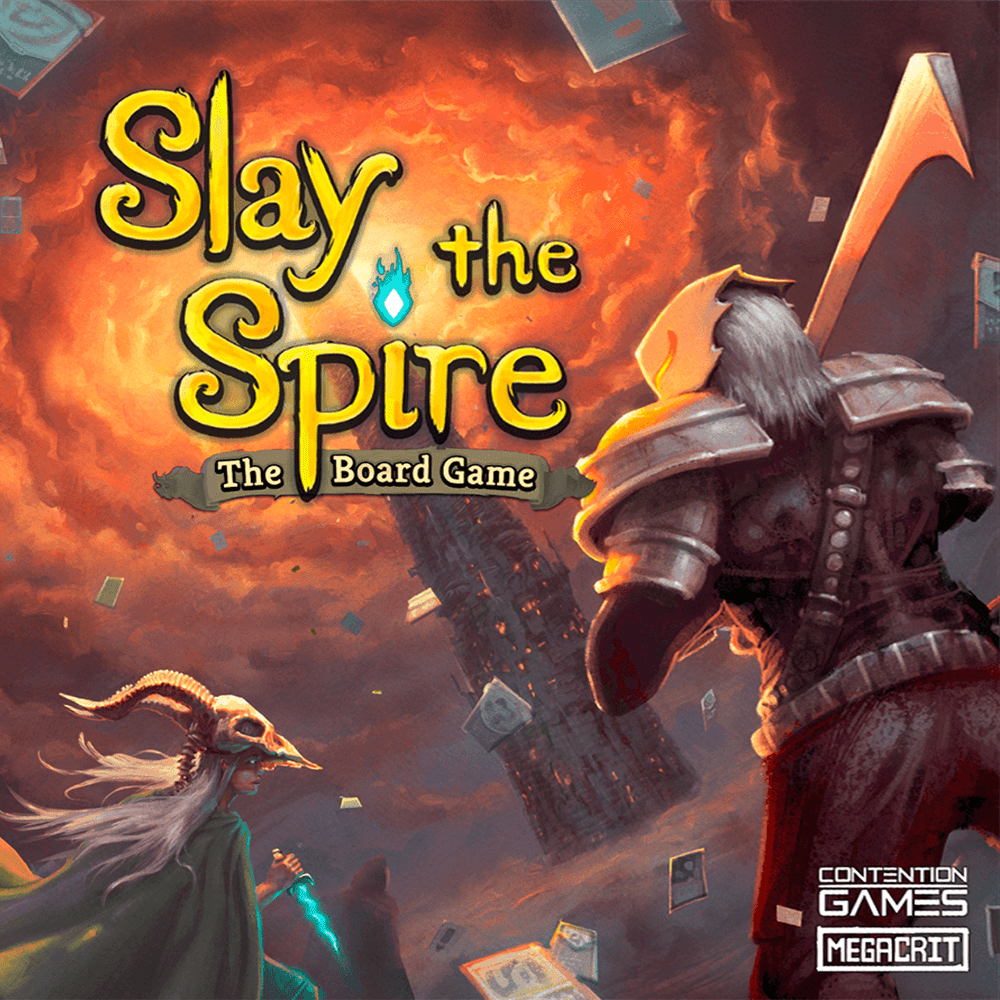
Slay the Spire: The Board Game
2024
A cooperative rogue-like deck-building adventure where 1–4 players craft unique decks, face bizarre creatures, and attempt to conquer the Spire.
150
minutes
1 - 4
player(s)
12+
Medium

About this board game
Slay the Spire: The Board Game is a cooperative deck-building, dungeon-crawling adventure for 1–4 players, with games lasting around 150 minutes. Work together to craft unique decks, overcome bizarre creatures, discover powerful relics, and become strong enough to slay the Spire.
Each player begins with a character featuring unique abilities and a simple deck of cards. During the adventure, players can improve their decks by adding and removing cards, shaping their strategy as they progress. Relics of immense power offer another way to strengthen the party on its climb.
The game follows a rogue-like structure: defeat is part of the experience. When a player’s HP reaches 0, that player is dead and the party loses the game. Start again from the beginning, apply the lessons learned, and try a new approach on the next attempt.
The adventure is divided into Acts, giving the group flexibility in how it plays. At the end of an Act, players can choose to continue, stop and end the adventure, or save their progress and return another time.
- Cooperative play: Face the challenges of the Spire together.
- Deck building: Add and remove cards to develop each character’s deck.
- Rogue-like progression: Learn from defeat and begin again.
- Flexible adventure length: Stop at the end of any Act or continue onward.
If the players defeat the final Boss, they win. Which Boss counts as final depends on how many Acts the group chooses to play, making each Slay the Spire adventure adjustable to the table’s plans.
/pic7182955.jpg)
Slay the Spire: The Board Game
Board Game Rules
Slay the Spire is a cooperative rogue-like deckbuilding adventure. Craft a unique deck, encounter bizarre creatures, discover relics of immense power, and finally become strong enough to defeat the boss at the end of the Act!
- Slay the Spire is a Deckbuilder. That means each player starts with a simple deck of cards that they can improve by adding and removing cards during the game.
- Slay the Spire is also a rogue-like. That means that when you die (and you will die!), start over from the beginning. Take the lessons you learned and try again!
Playtime
The game is divided into Acts. Each Act takes about 60–90 minutes. Plan for some extra time your first game. At the end of an Act you can continue, stop and end the adventure there, or save and continue another time!
Your First Game
Ironclad and Silent are easier characters to learn, with Defect being harder and Watcher hardest. Keep this in mind when choosing a character!
- Victory: If players defeat the final Boss, they win the game! Which Boss you consider to be final depends on how many Acts you want to play. You can stop playing at the end of any Act!
- Death: When a player’s HP is reduced to 0, they are dead and the party loses the game.
Get the Free Companion App!
With searchable rulebook, soundtrack, card library, achievement tracking, and more! (Not required to play the game.)
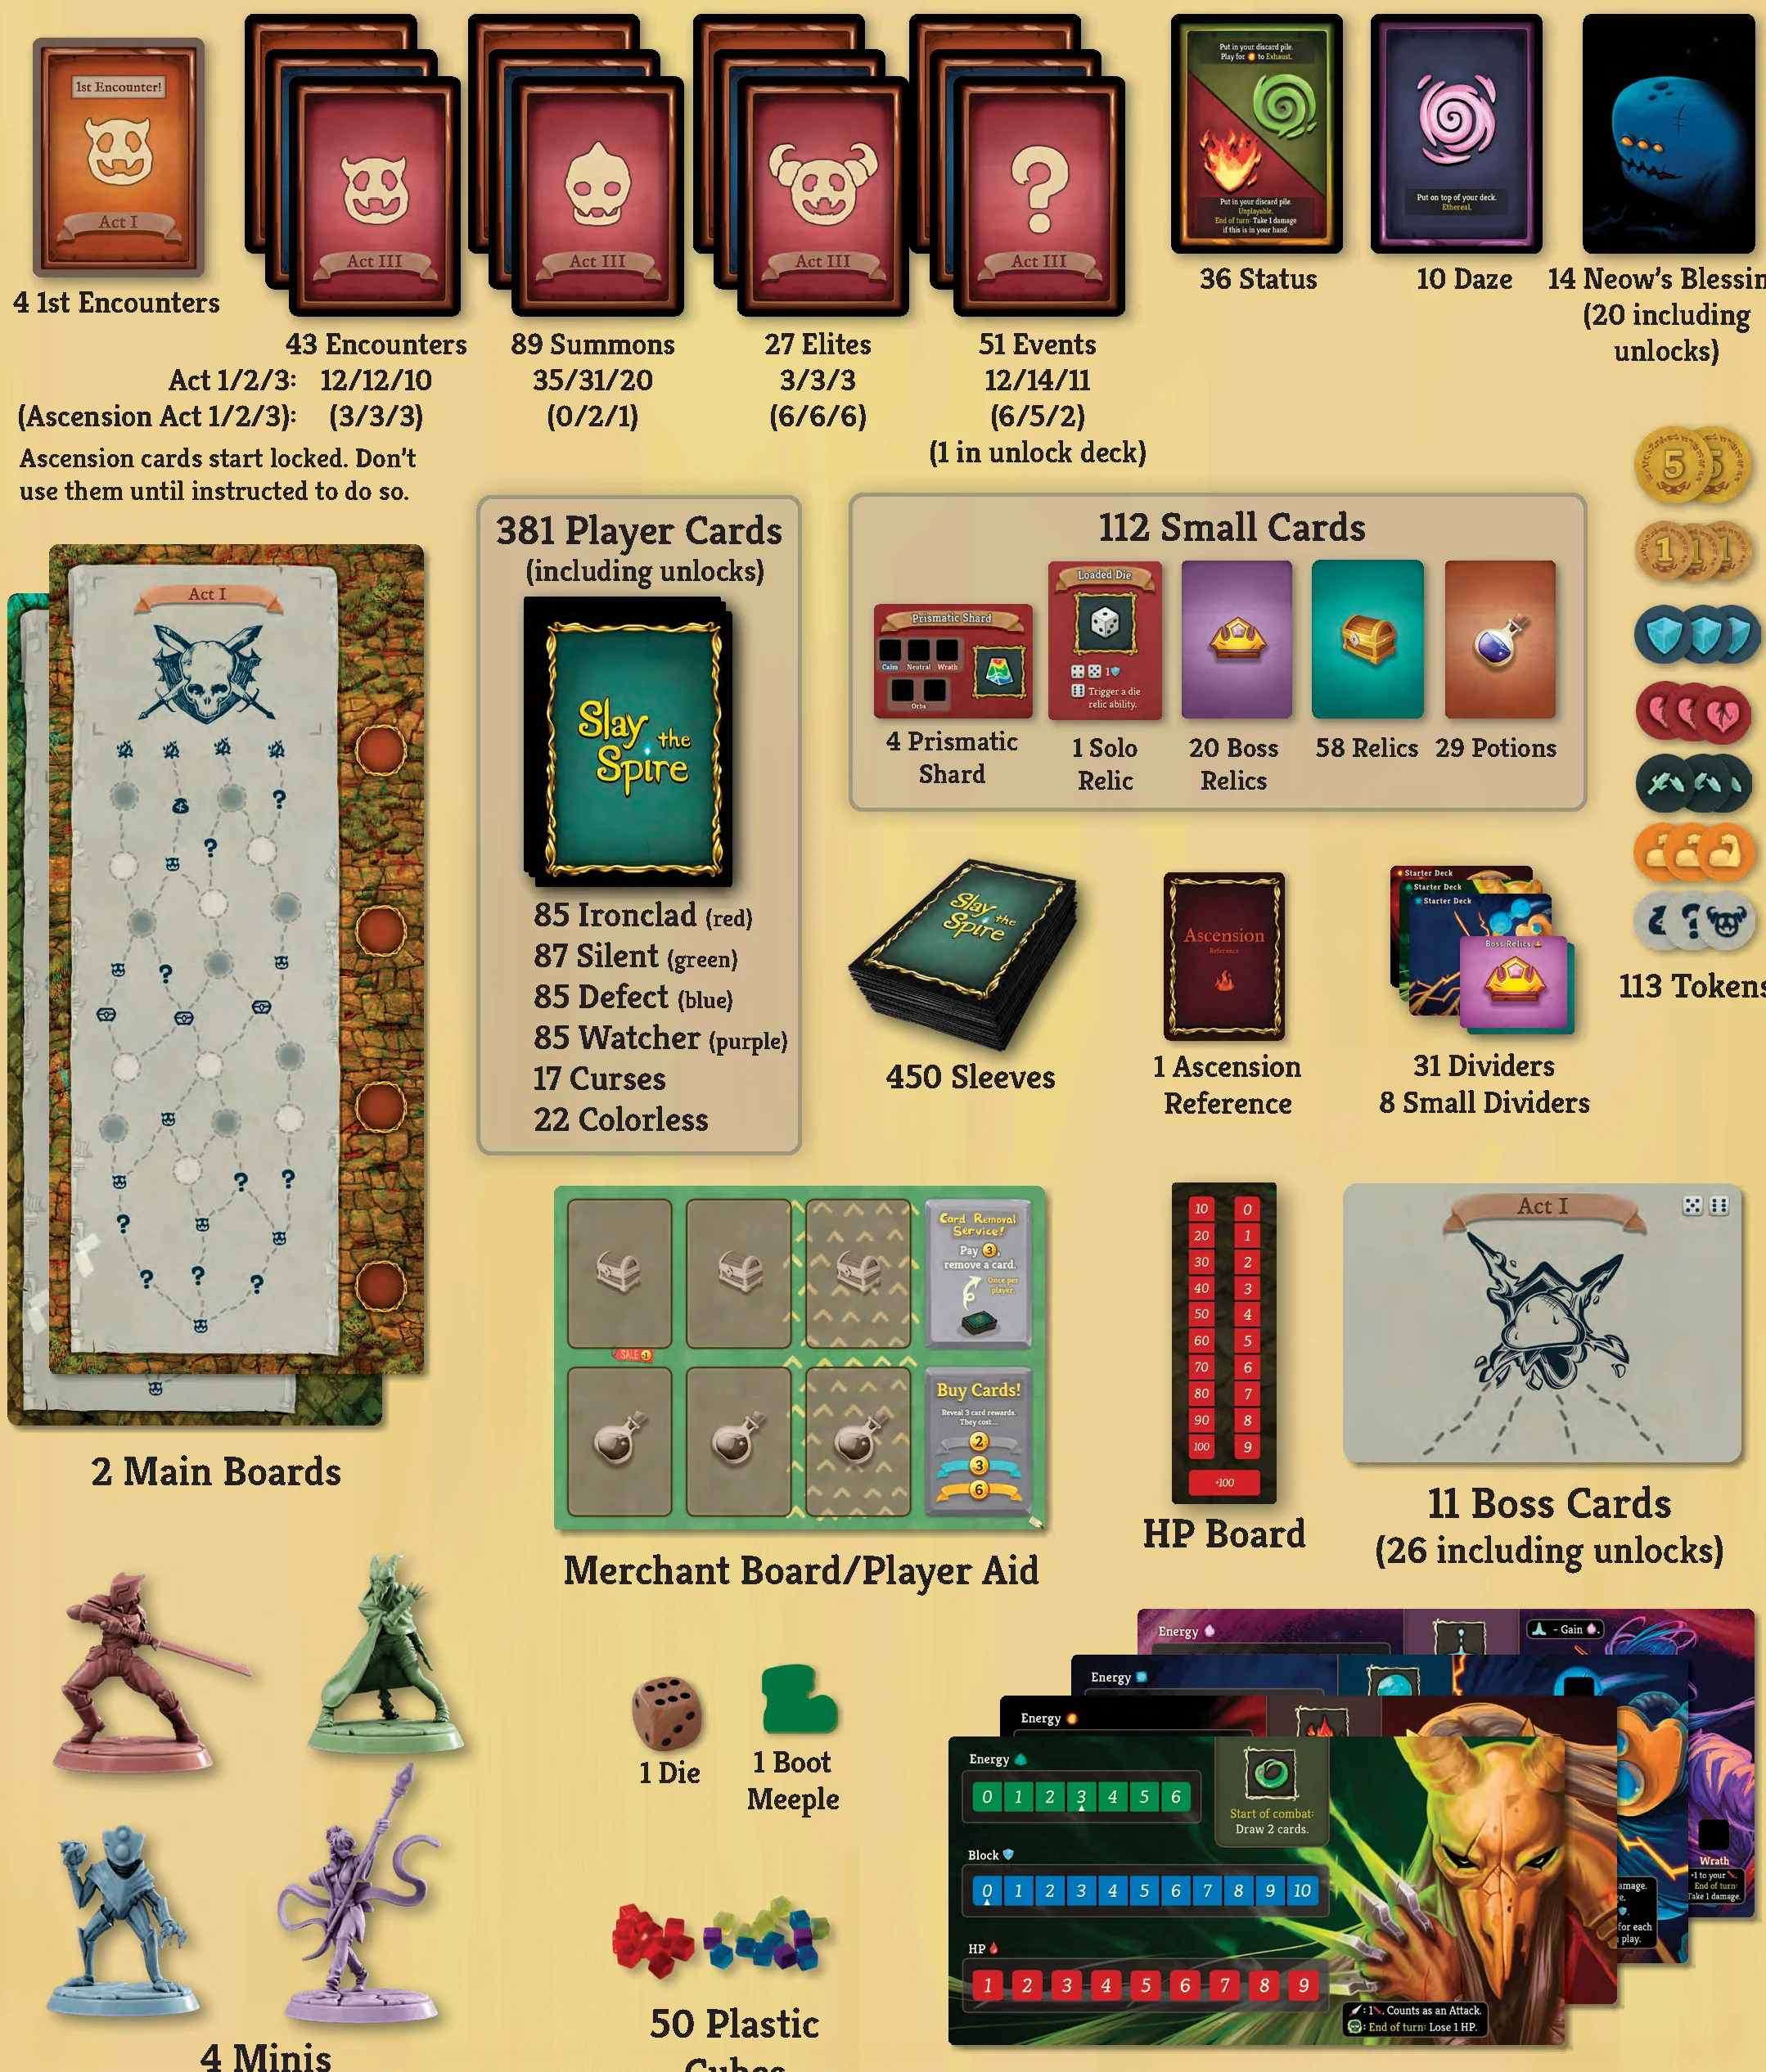
- 381 Player Cards (including unlocks):
- 85 Ironclad (red)
- 87 Silent (green)
- 85 Defect (blue)
- 85 Watcher (purple)
- 17 Curses
- 22 Colorless
- Encounter & Monster Cards:
- 4 1st Encounters
- 43 Encounters (Act 1/2/3: 12/12/10, Ascension Act 1/2/3: 3/3/3)
- 89 Summons (35/31/20, Ascension: 0/2/1)
- 27 Elites (3/3/3, Ascension: 6/6/6)
- 51 Events (12/14/11, Ascension: 6/5/2, 1 in unlock deck)
- 11 Boss Cards (26 including unlocks)
- Other Cards:
- 36 Status
- 10 Daze
- 14 Neow’s Blessing (20 including unlocks)
- 1 Ascension Reference
- 31 Dividers
- 8 Small Dividers
- 112 Small Cards:
- 4 Prismatic Shard
- 1 Solo Relic
- 20 Boss Relics
- 58 Relics
- 29 Potions
- Boards & Figures:
- 2 Main Boards
- 1 Merchant Board / Player Aid
- 1 HP Board
- 4 Player Boards
- 4 Minis
- 1 Die
- 1 Boot Meeple
- 50 Plastic Cubes
- 113 Tokens
- 450 Sleeves
Note: Ascension cards start locked. Don’t use them until instructed to do so.
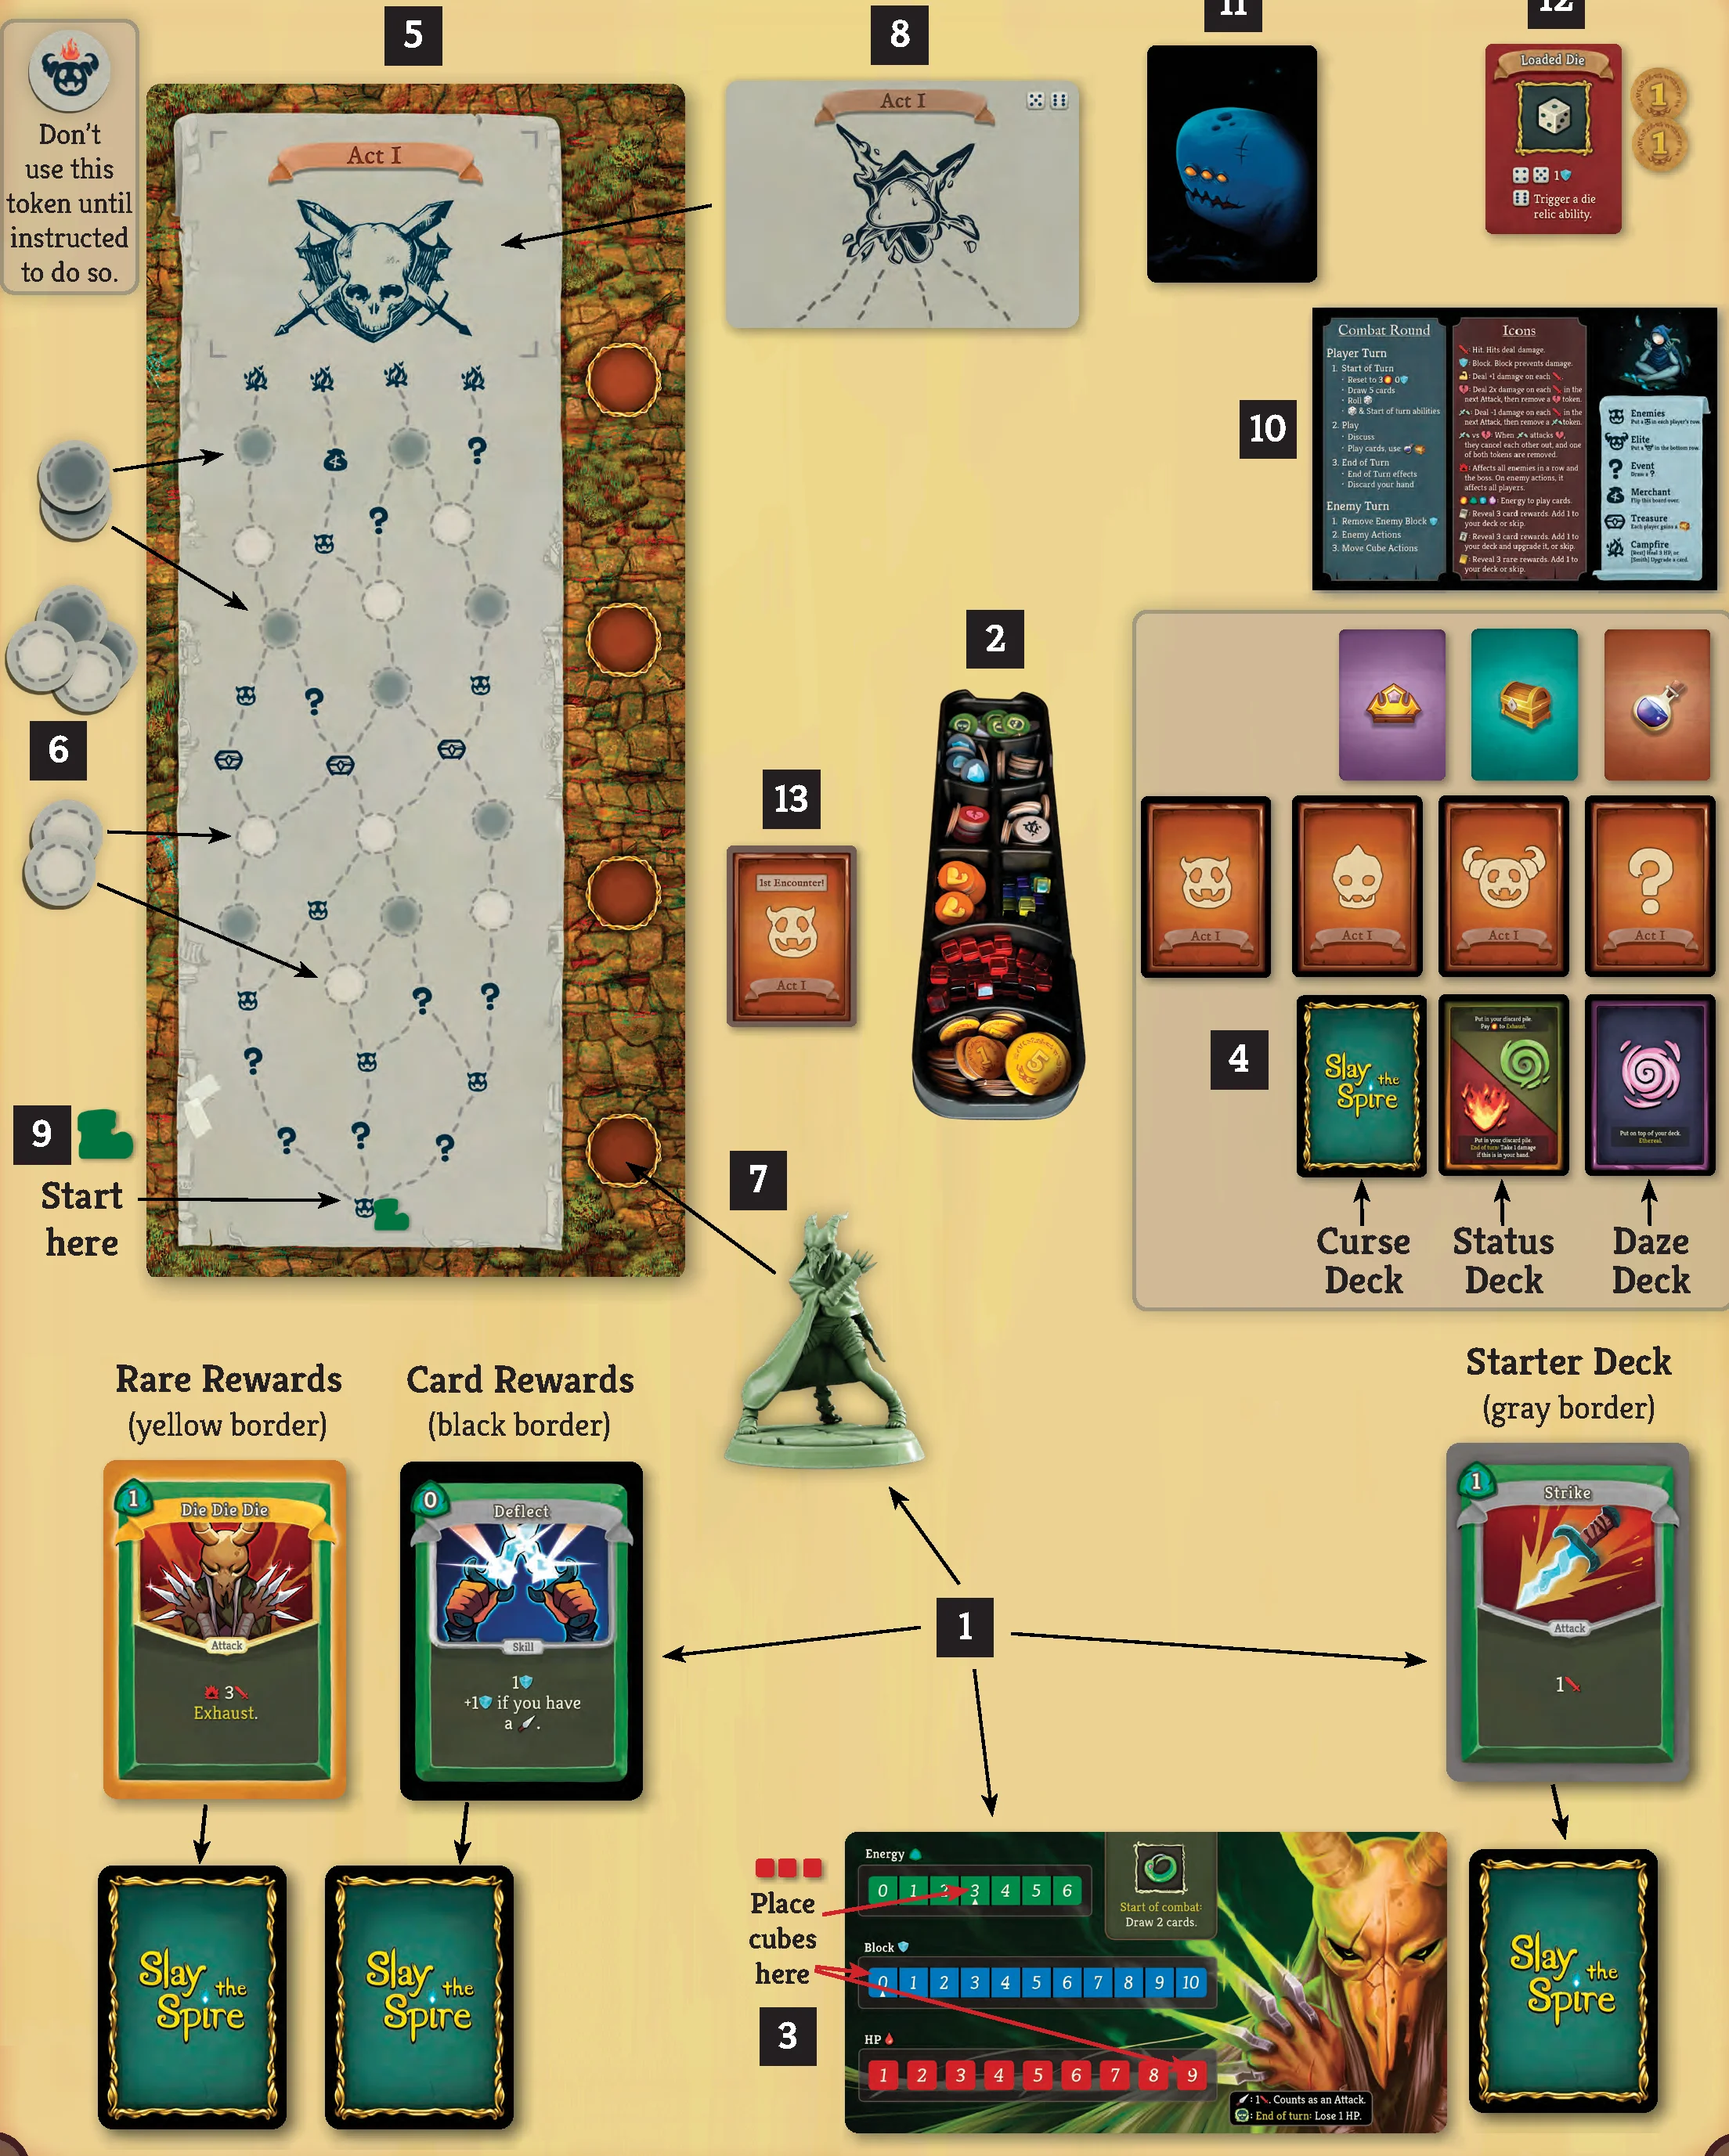
- Pick a Character: Each player chooses a character and takes the corresponding player board, mini, starter deck, card rewards deck, and rare rewards deck. Shuffle the decks.
- Token Tray: Take out the token tray.
- Player Board: Put a cube on your character’s Energy track at 3, on their Block track at 0, and on their HP track at the highest printed number.
- Get Decks Ready: Take out the following decks. Shuffle each deck except Summons, Daze, and Status (Slimed/Wound), then place them in separate piles. Shuffle and keep the “1st Encounter!” cards separate from the Encounter deck:
- Encounter Act I “1st Encounter!”
- Encounter Act I
- Elite Act I
- Summon Act I (Don’t shuffle!)
- Event Act I
- Relic
- Potion
- Boss Relic
- Daze Deck
- Status Deck (Slimed / Wound)
- Curse Deck
- The Board: Take out the Act I board. Randomly choose an Act I map.
- Map Tokens: Shuffle the map tokens face down. Randomly place dark map tokens on dark spaces, and light map tokens on light spaces. Then flip the tokens face up.
- Character Figure: Place your character figure on the board in the lowest open space.
- Reveal the Boss: Randomly choose an Act I Boss. You can roll the die and use the Boss with the matching die result on the back of the card. Place that Boss face down on the map on top of the Boss icon.
- The Boot: Place the boot meeple at the bottom of the map next to the bottom encounter.
- Player Aid / Merchant Board: Keep the Player Aid board handy as a quick rules reference. When you encounter a Merchant, flip the board over and set up the Merchant side.
- Neow’s Blessing: Shuffle the Neow’s Blessing deck (three-eyed whale). Each player draws one Neow’s Blessing card. Gain the reward in red, then choose one of the 3 rewards in blue. When players are done, put all Neow’s Blessing cards away.
- Solo: If you’re playing solo, also gain 2 Gold and the “Loaded Die” solo relic.
- 1st Encounter: Setup the 1st Encounter. Then start combat.
Setup for Acts II & III
- Act Decks: Replace the Encounter, Elite, Event, and Summon decks with decks for the next Act. Shuffle all of those decks except Summons. Note: Only Act I has a “1st Encounter” deck.
- Board Setup: Repeat steps 5 through 9 with the board and Boss from the next Act.
- Heal: All players heal to their maximum HP at the start of Act II and later Acts.
- Shuffle: Shuffle your card rewards deck. Include any cards you skipped. (Don’t shuffle rares.)
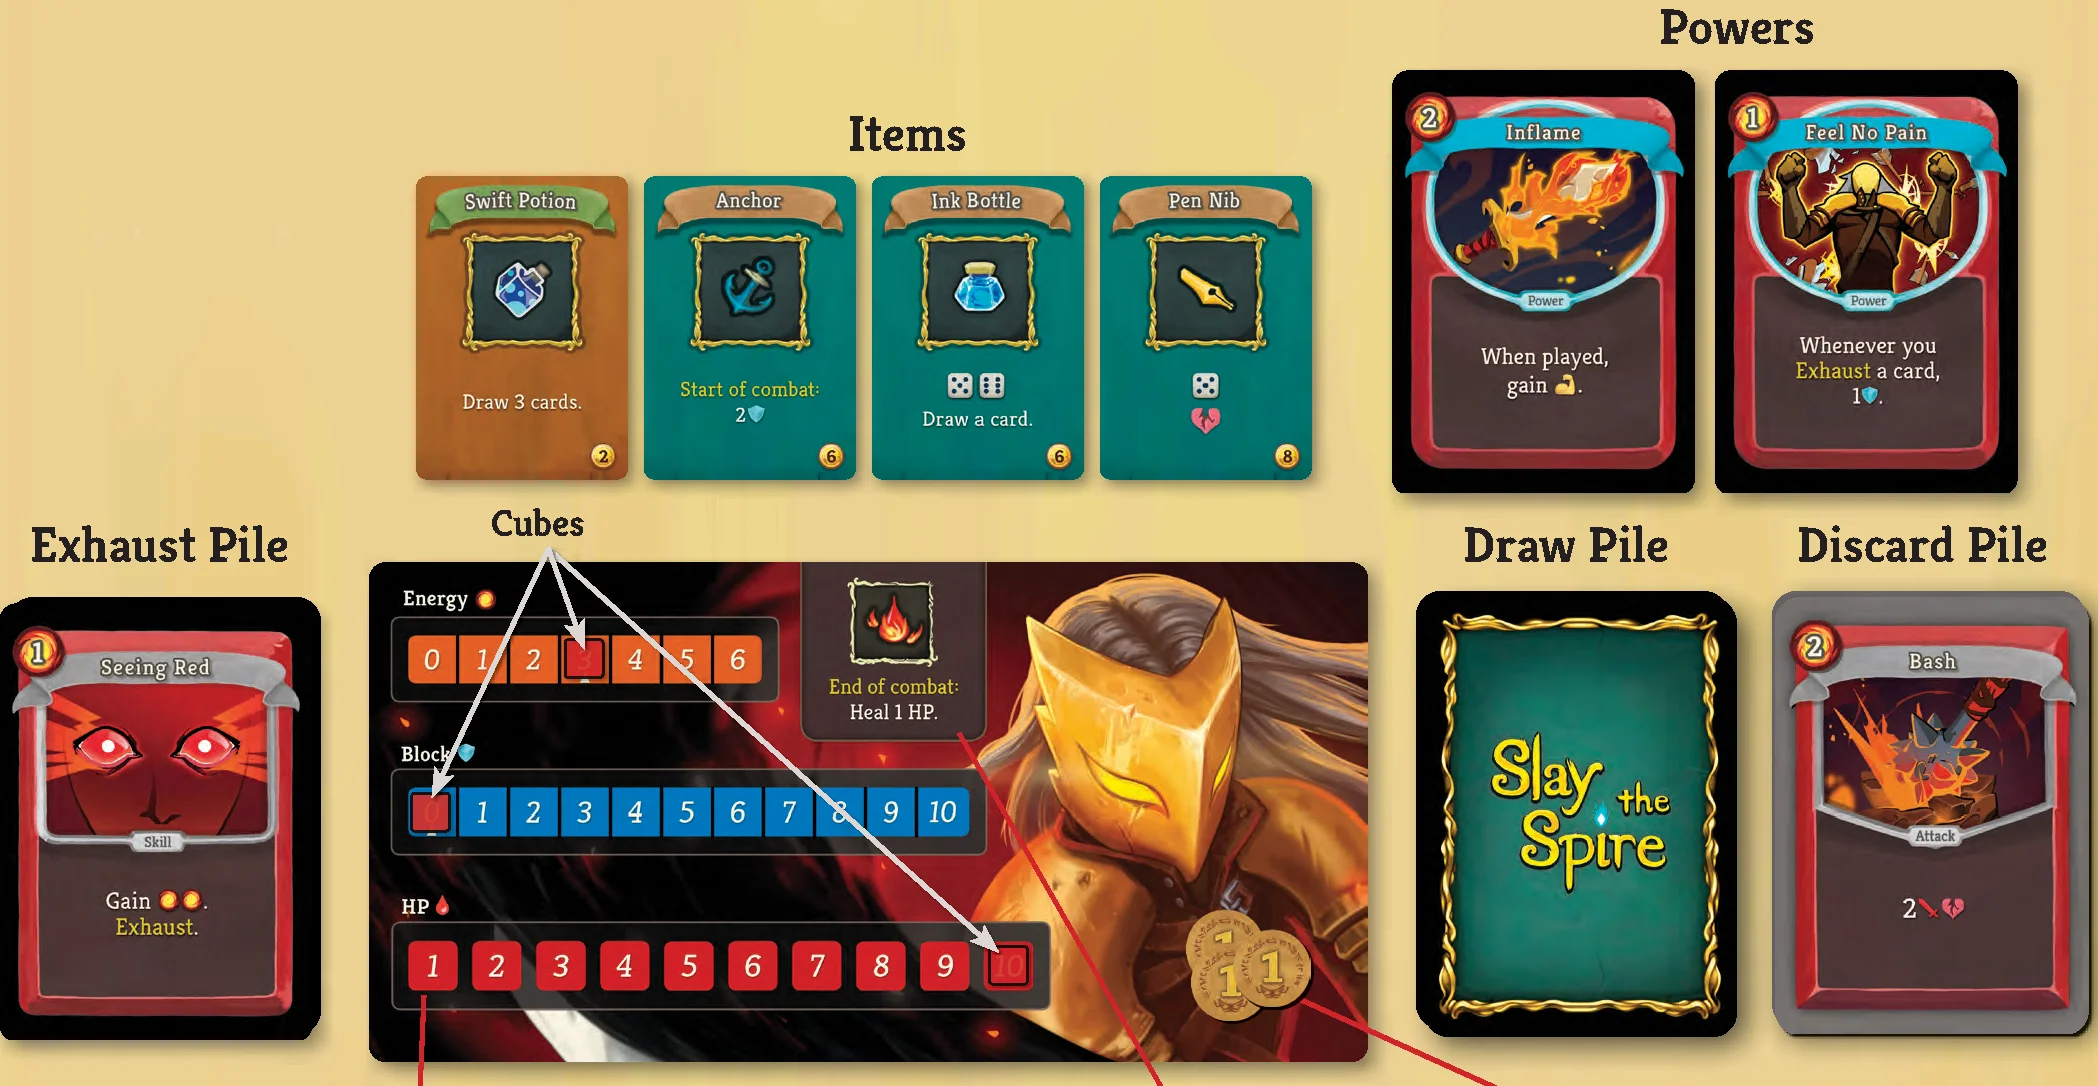
Below is a suggestion for how to organize your play area. Do whatever works for you!
- Draw Pile: Shuffle your deck before combat begins to create your draw pile.
- Discard Pile: After you play a card, it goes to your discard pile.
- Exhaust Pile: When you Exhaust a card, place it in the exhaust pile. You can’t use it again this combat.
- Item Area: Items are small cards. Keep items you gain in front of you.
- Power Area: When you play a Power, it stays in play until the end of combat. Keep Powers in front of you. At the end of combat, they return to your deck.
Hit Points (HP)
When your character takes damage or loses HP, your HP goes down. When you heal, your HP goes up. Keep a red cube on your HP to track it. Your HP starts at the highest number on your player board. Damage can be prevented with Block.
Starting Ability
Each character has a unique starting ability on their player board.
Tokens
Keep tokens for your character on your player board. Keep track of your gold and any buffs/debuffs this way. You may prefer to keep Vulnerable tokens near your character mini.
Card Types
- Attack: Attacks deal damage to enemies.
- Skill: Skills block damage and have other useful abilities.
- Power: Powers give you abilities that last the entire combat. Powers stay on the table in front of the player.
- Curse: Curses are bad cards that can get added to your deck. Curses can’t be Transformed. When you gain a Curse, add the top Curse card to your deck.
- Status & Daze: Powerful enemies can weaken your deck by adding Status (Slimed / Wound) and Daze cards to it. Remove these from your deck at the end of each combat.
Energy
Energy is used to play cards. You can have a maximum of 6 Energy at once. Each character has their own Energy icon, although they all mean the same thing. You can gain Energy from sources with icons that don’t match your character. You’ll usually see a generic Energy icon used on items and in the rules.
X Cost Cards: You can spend any amount of Energy when playing an X cost card, including 0. It has an effect based on how much Energy you spend. The text will tell you the effect for spending X Energy.
Banner & Rarity
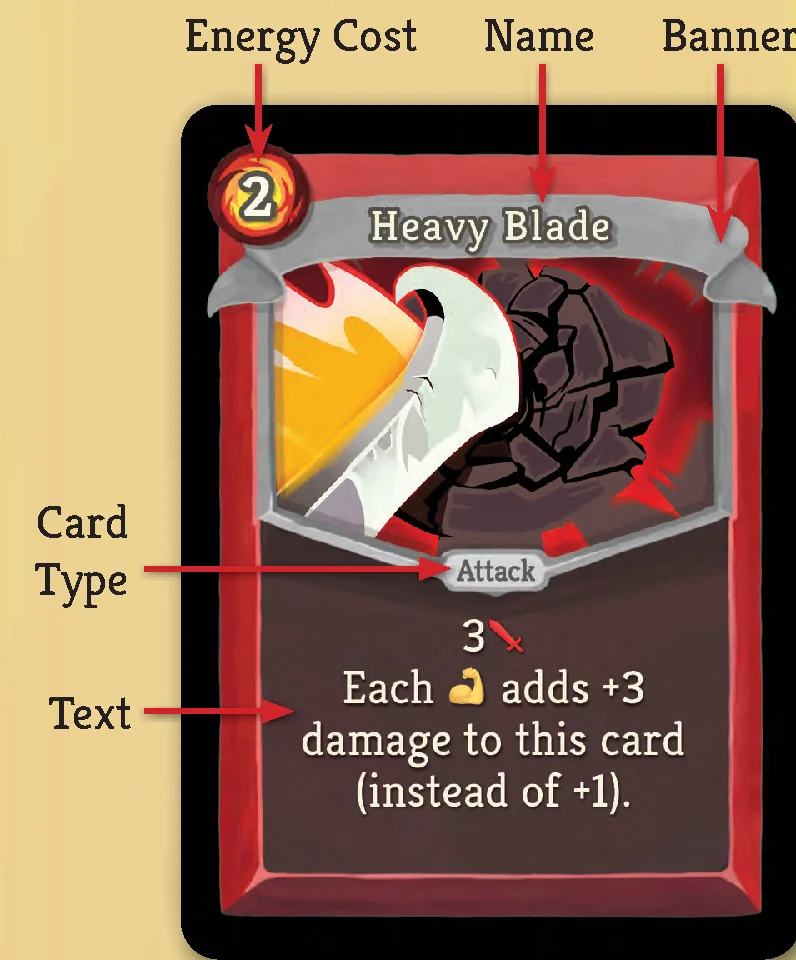
Cards have different rarities, which you can tell by the color of the banner behind their name:
- Starter deck cards: Gray banners and gray borders (4 or 5 starter Strikes and starter Defends).
- Common cards: Gray banners (2 copies of each).
- Uncommon cards: Blue banners.
- Rare cards: Yellow banners.

Items
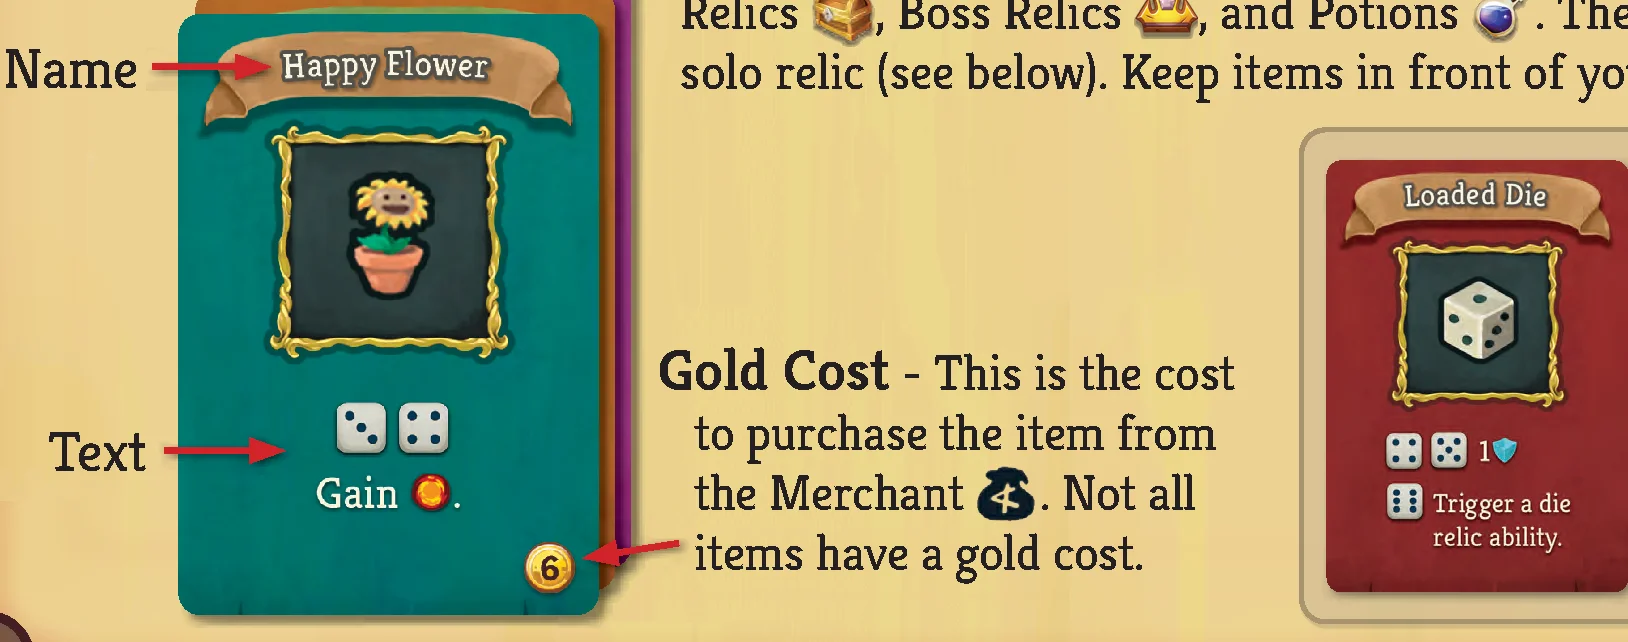
Items are small cards that you’ll collect on your adventure. There are Relics, Boss Relics, and Potions. There’s also the Loaded Die solo relic. Keep items in front of you.
- Gold Cost: This is the cost to purchase the item from the Merchant. Not all items have a gold cost.
- Loaded Die: When playing solo, start with the Loaded Die. On a die result of 1 or 2, it can trigger its own ability, or a die relic ability on another relic.
There are several types of rewards below… but first, some general rules about rewards!
- Pick Order: Gain rewards in any order you want!
- Skip: You may skip gaining any reward below. You may also skip revealing or drawing from any rewards deck.
- Full Knowledge: After revealing cards or items, you can look at what the other rewards are from that combat before making any final decisions on what to choose or skip. You can check upgrades. If you’re ever unsure if you’ll get to see another combat reward from your current room before finalizing a choice, the answer is yes.
- Trading: Potions can be given to other players outside of combat. Nothing else can be traded.
Reward Types
- Card Reward: Reveal the top 3 cards of your card rewards deck and lay them out in front of you. You may add one revealed card to your deck or skip adding a card. Return any unselected cards to the bottom of your card rewards deck.
- Golden Ticket: Whenever you reveal a Golden Ticket, reveal the top card of your rare rewards deck and add that to your choices. Unpicked rare cards return to the bottom of your rare rewards deck. Put the Golden Ticket on the bottom of your card rewards deck.
- Upgraded Card Reward: This is just like a “card reward” above, but the card you pick is immediately upgraded. You can always look at what an upgrade does before choosing.
- Rare Reward: Reveal 3 cards from your rare rewards deck and lay them out in front of you. You may add one to your deck or skip. Return any unselected cards to the bottom of your rare rewards deck.
- Potion: Draw a card from the potion deck. You may gain that potion or skip it. Keep it face up in front of you until used. You can’t have more than 3 potions. Potions are all single-use items. When a potion is used, discarded, or skipped, put it on the bottom of the potion deck. If you gain a potion but you’re at the limit, you must either: skip the potion, pass the potion to a player who is below their potion limit, or discard or use a potion then gain the new potion. Gambler’s Brew, Entropic Brew, Blood Potion, and Fairy in a Bottle can be used outside of combat if applicable.
- Relic: Draw a card from the relic deck. You may gain that relic or skip it. Keep your relics face up in front of you. When relics are discarded or skipped, put them on the bottom of the relic deck.
- Boss Relic: Reveal 1 Boss relic per player + 1. Reveal 3 instead if playing solo. Each player may gain a relic or skip. Keep your Boss relics face up in front of you. When Boss relics are discarded or skipped, return them to the bottom of the Boss relic deck.
- Gold: Gain gold tokens equal to the value. Gold can be spent at the Merchant or certain Events. You can use your gold to pay for any amount of another player’s purchase at a Merchant or Event.
Remove, Upgrade, Transform
Below are 3 types of rewards that can change your deck:
- Remove: Remove a card from your deck. Keep it in a removed pile away from your deck.
- Upgrade: Unsleeve a card in your deck and flip it to the upgraded side (has green text). You can check what a card’s upgrade is at any time by unsleeving it or checking the Upgrade Reference.
- Transform: Remove a card from your deck that isn’t a Curse. Keep it in a removed pile away from your deck. Add the top card of your card rewards to your deck (it should be random). If it’s a Golden Ticket, add the top card of your rare rewards to your deck instead, then put the Golden Ticket on the bottom of your card rewards.
You start at the encounter on the bottom of the map. When you’re done with a room, move the meeple up the map along one of the paths to the next room. Rules for each type of room:
- Encounter:
- 1st Encounter!: If this is the first encounter, place a “1st Encounter!” card in each player’s row. After combat, set aside the 1st Encounter cards (they’re no longer needed).
- Other Encounters: Draw one encounter card per player.
- Elite: Draw a card from the Elite deck.
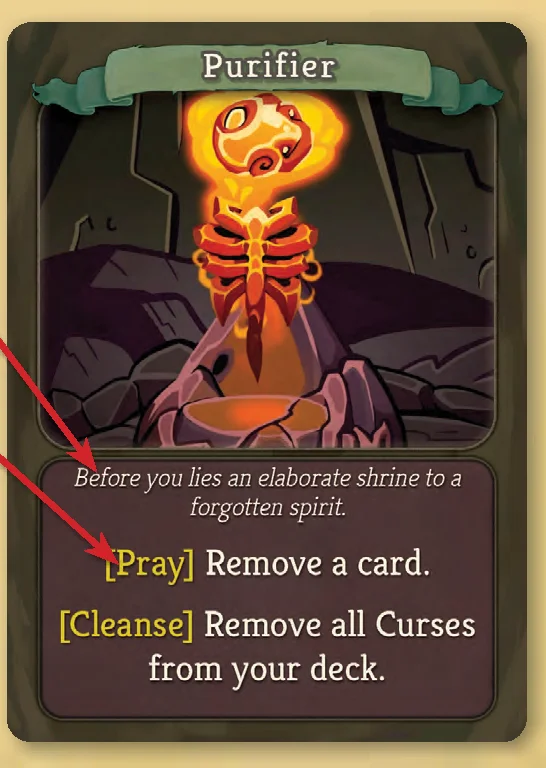
- Event: Draw a card from the Event deck. If there is text in [yellow brackets], each player must choose one of those options. Each player makes their own choice and acts once in any order. Some Events work differently, as described in their text. To choose a “Pay” or “Give” option, you must first have what it is asking you to pay or give. When all players are done, put the Event on the bottom of the Event deck.
- Campfire: Each player chooses one of two actions:
- Rest: Heal 3 HP.
- Smith: Upgrade a card.
- Treasure: Each player gains a relic.
- Merchant: Place 3 relics and 3 potions on the merchant board in the indicated slots. Each player reveals the top 3 cards of their card rewards deck. You can use your gold to pay for any amount of another player’s purchase at a Merchant or Event. Players can:
- Buy Items: Buy relics or potions for the gold cost on the bottom right of the item. The relic in the top left is on sale for 1 less gold.
- Buy Cards: Buy cards you revealed for 2, 3, or 6 gold based on their rarity (Common: 2, Uncommon: 3, Rare: 6).
- Card Remove: Pay 3 gold to remove a card from your deck. Each player can only do this once per Merchant.
When you’re done, return any unpurchased cards to the bottom of the deck they came from in any order.
- Boss: When you reach the Boss, start combat against the Boss card at the top of the map. If the Boss is defeated, you beat the Act! After gaining rewards, you can save and continue later, proceed to the next Act, or end the game here.
- Rows: Each player has a row. Enemies are placed in rows, except for Bosses.
- Summons: Some enemies will summon more enemies. If you see a green bar and summon icon, search for that enemy in the Summons deck and put them into play at the start of combat. Some enemy actions or special abilities can also summon.
- Random Summons: When multiple Summons have the same name, select them randomly. You can do this by picking one without reading its abilities or shuffling Summons with the same name in a small face down pile and drawing one. “Gremlins” have a Gremlin icon on the back to help you select them randomly.
- Encounter Setup: Place one enemy in each player’s row. If there are Summons, they are placed in the row of the enemy that summoned them to the right.
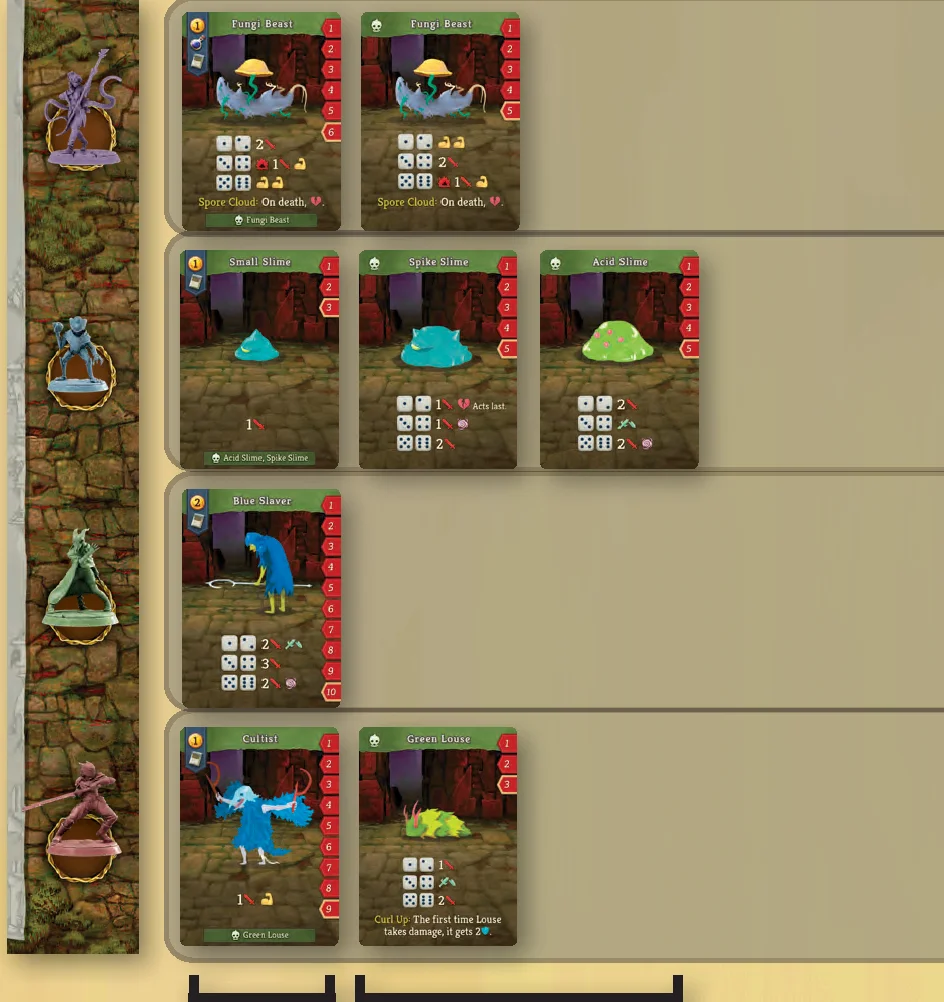
Enemy Cards Anatomy
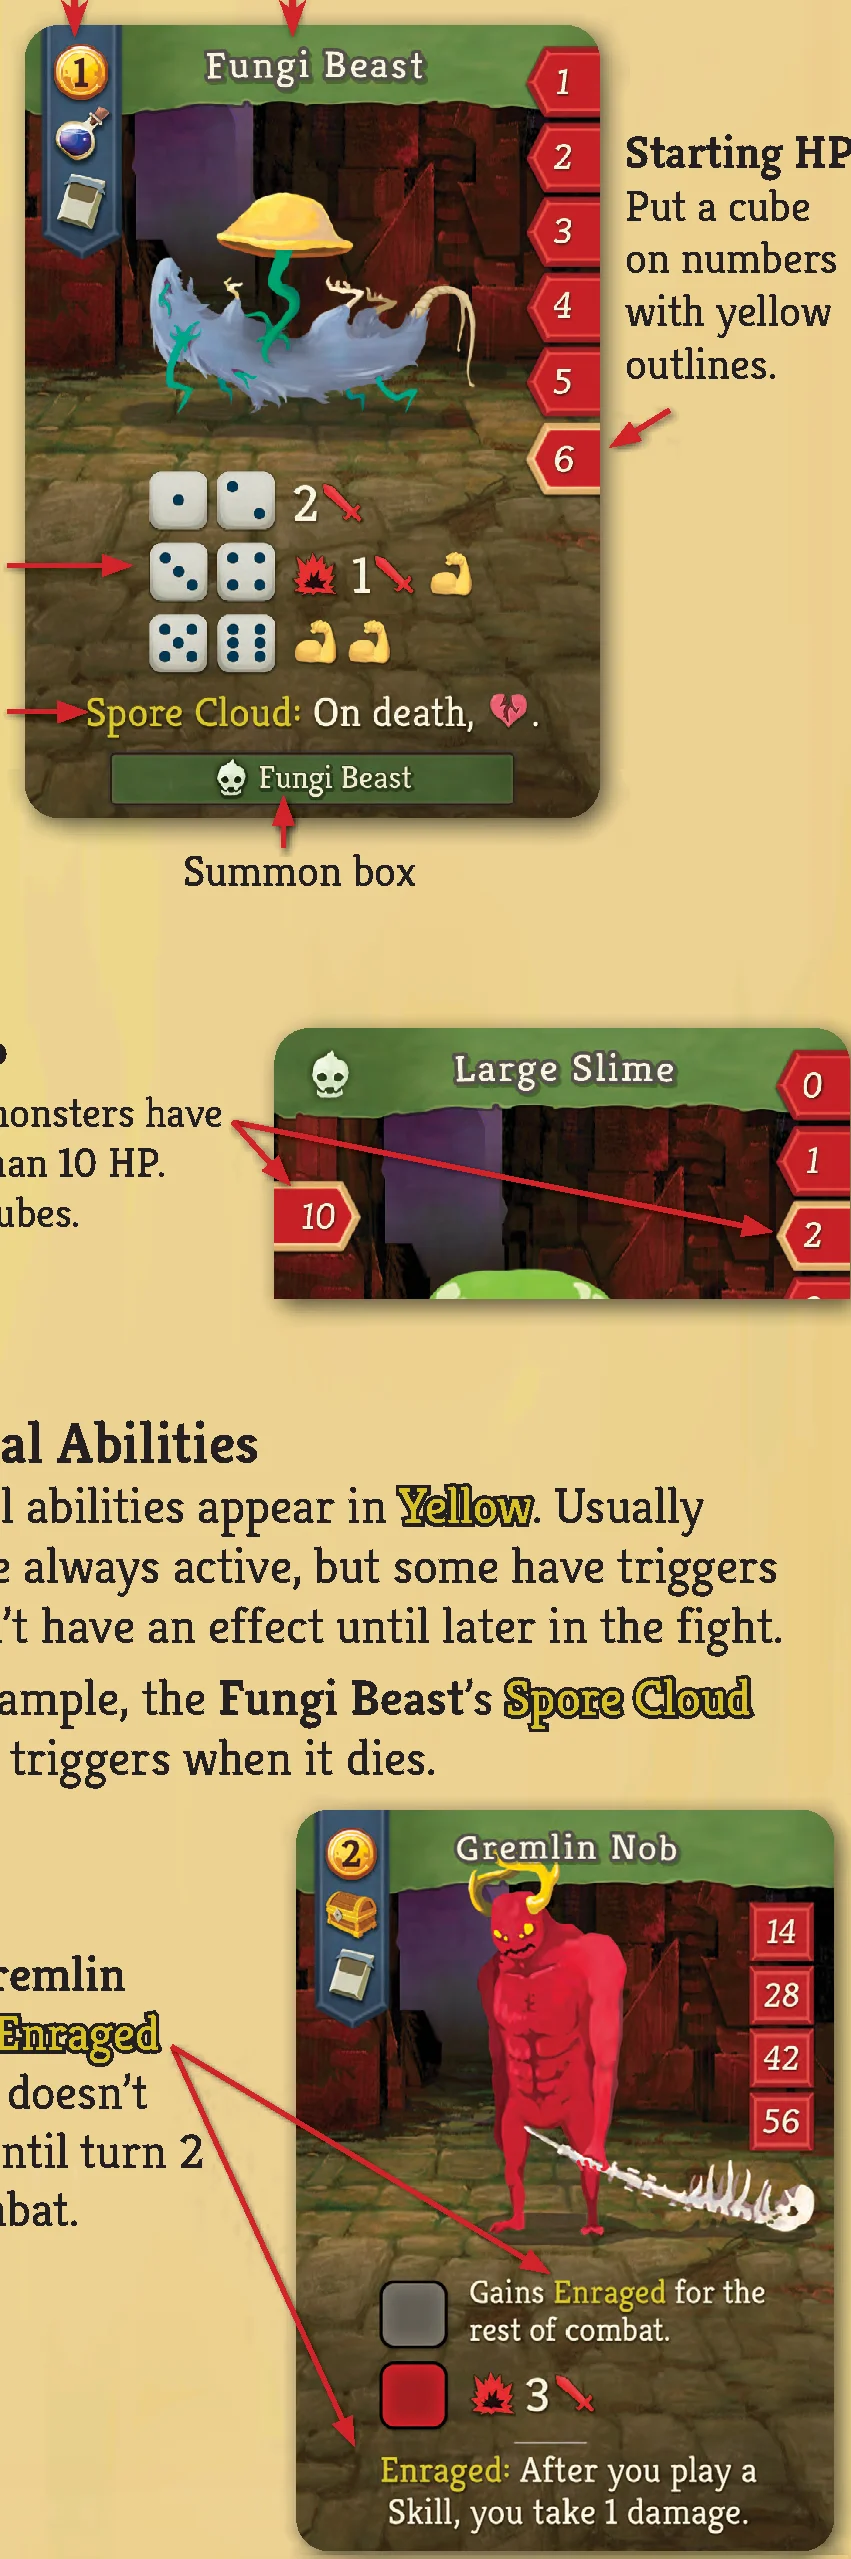
- Starting HP: Put a cube on numbers with yellow outlines. For monsters with more than 10 HP, use 2 cubes.
- Special Abilities: Special abilities appear in Yellow. Usually they’re always active, but some have triggers or don’t have an effect until later in the fight (for example, the Fungi Beast’s Spore Cloud triggers on death; Gremlin Nob’s Enraged doesn’t start until turn 2).
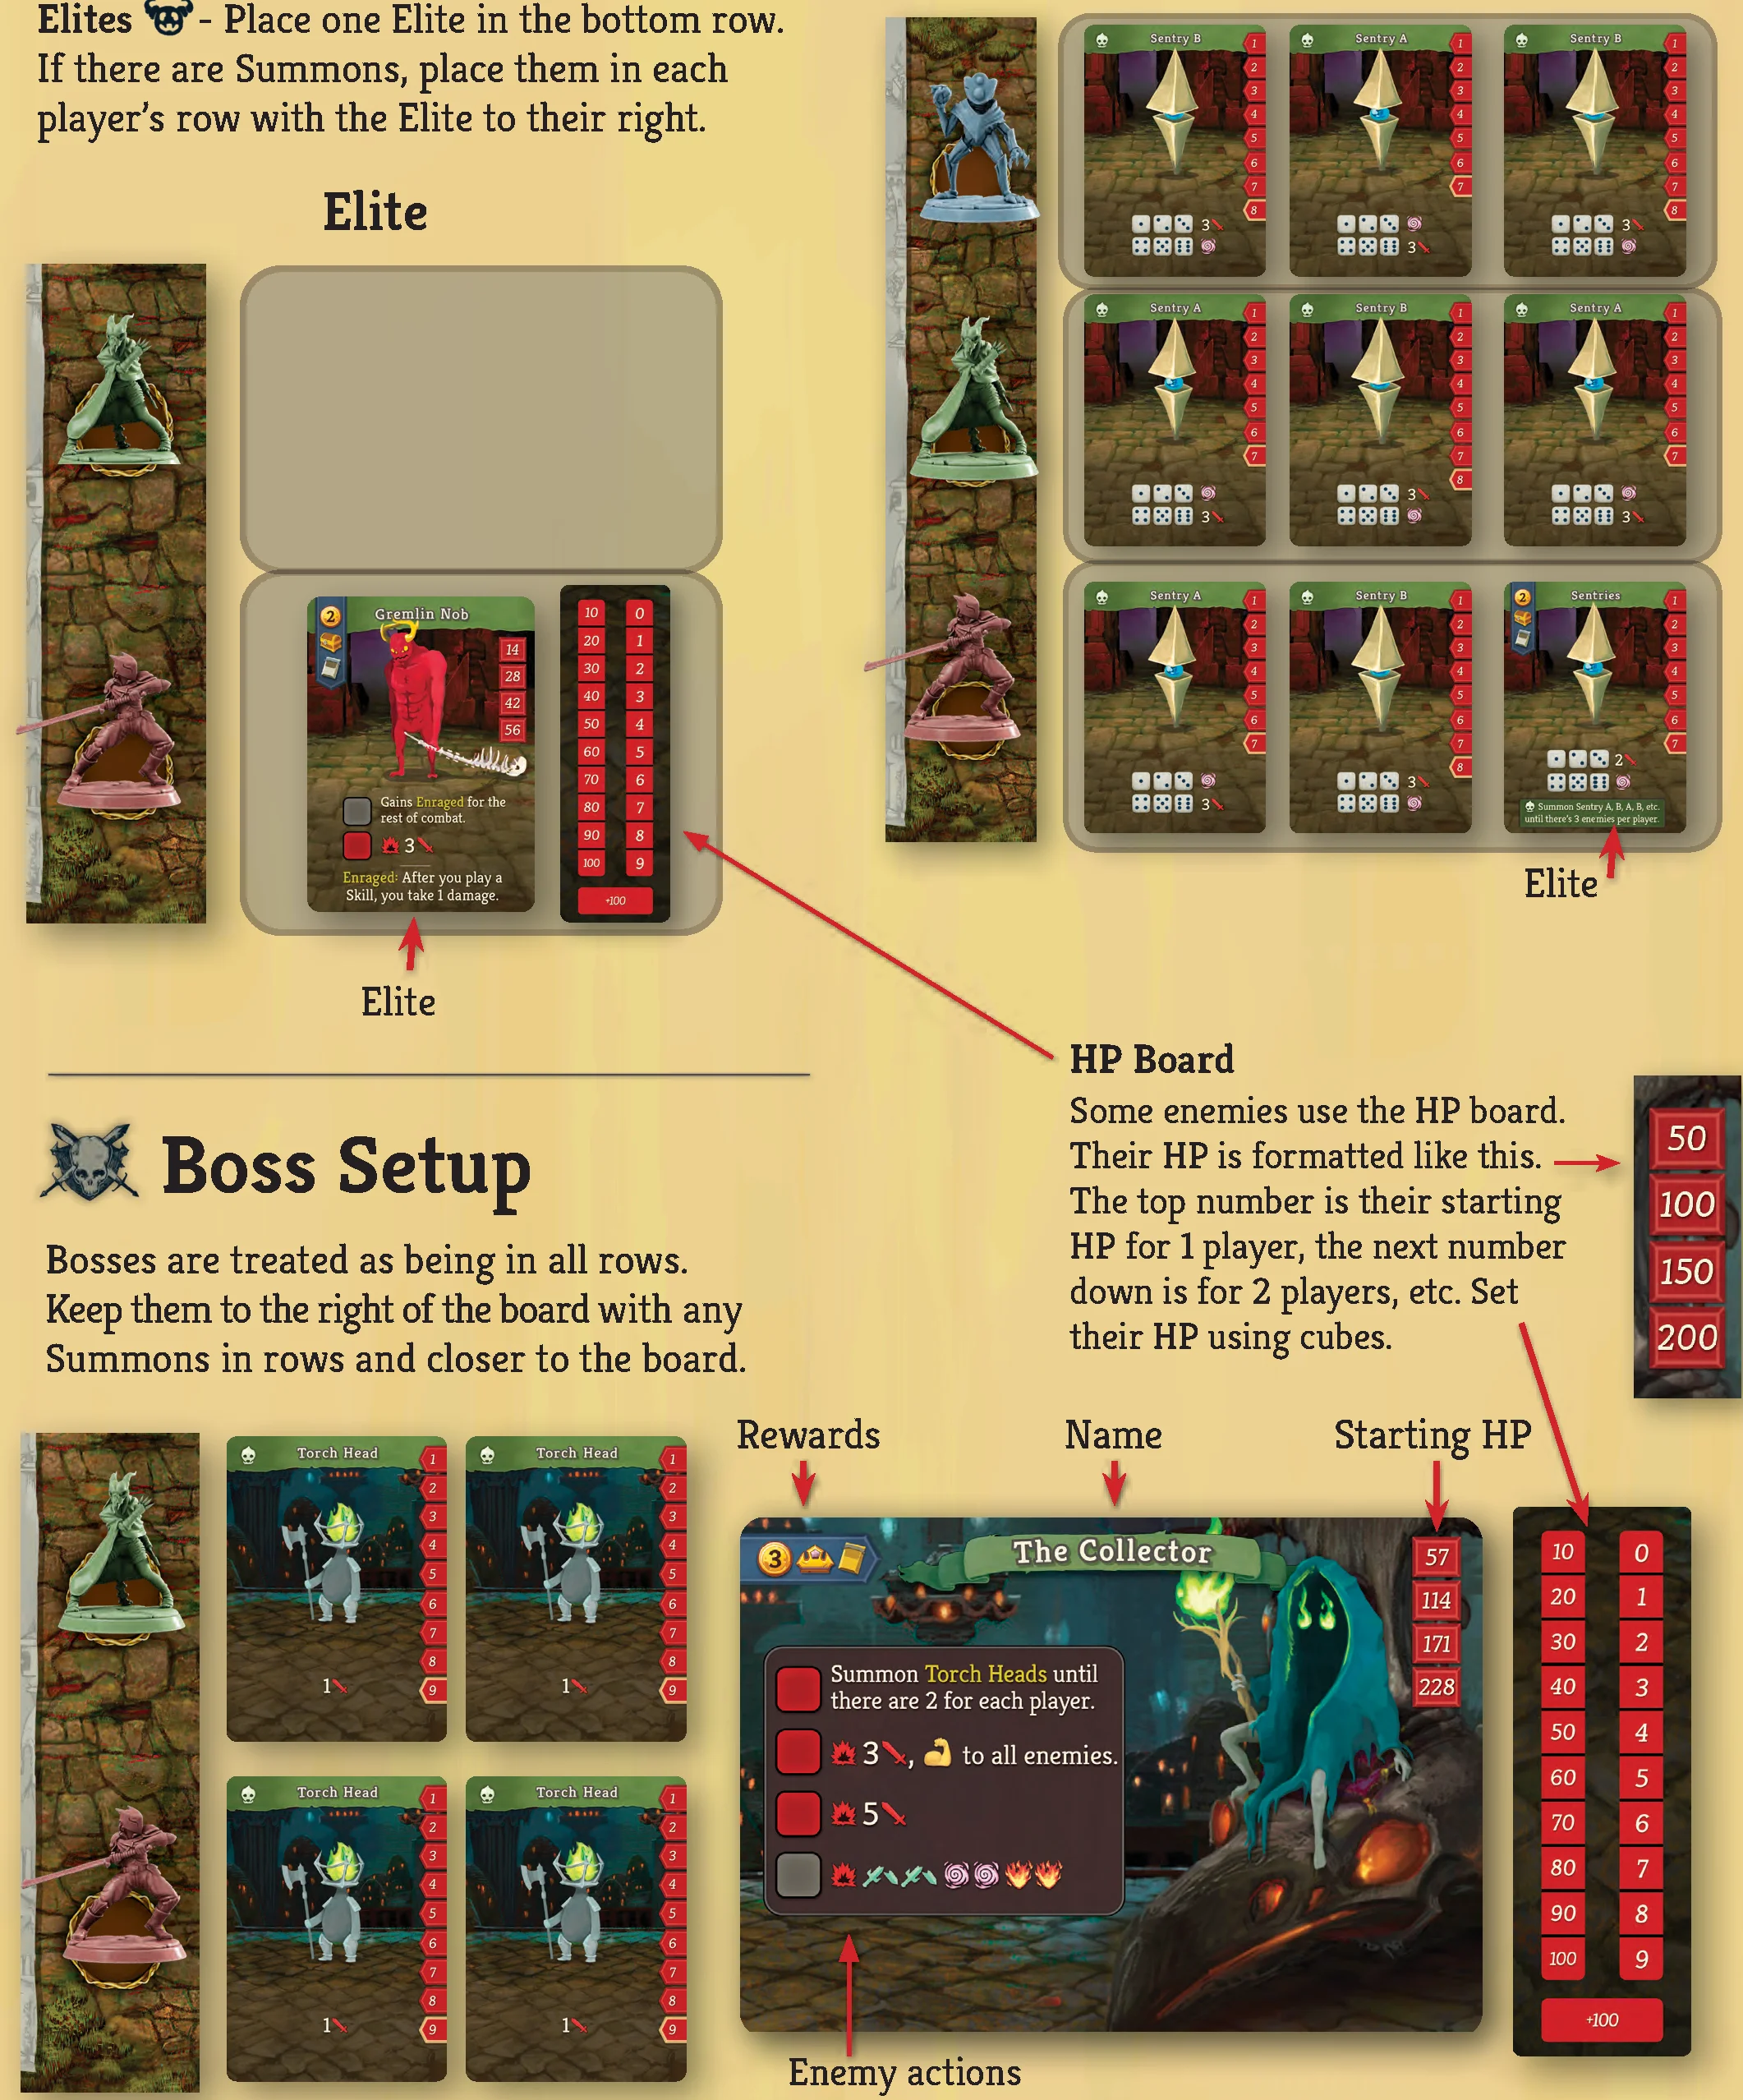
Elite Setup
Place one Elite in the bottom row. If there are Summons, place them in each player’s row with the Elite to their right.
Boss Setup
Bosses are treated as being in all rows. Keep them to the right of the board with any Summons in rows and closer to the board.
HP Board
Some enemies use the HP board. The top number is their starting HP for 1 player, the next number down is for 2 players, etc. Set their HP using cubes.
Combat rounds consist of a Player Turn followed by an Enemy Turn. Rounds repeat until combat ends.
Shuffle your deck before combat starts. There’s one shared Player Turn that’s broken into three phases taken simultaneously by all players: Start of Turn, Play, and End of Turn.
1. Start of Turn
- Reset: Set Energy to 3 and Block to 0.
- Draw: Draw 5 cards. There is no maximum hand size.
- Empty Draw Pile: When your draw pile is empty and you need to draw, shuffle your discard pile to form the new draw pile. If a card was just played that drew cards, set it aside while shuffling, then add it to the new discard pile.
- Roll: Roll the die. If any abilities can change the die result, they must be used now before resolving other abilities. The die result dictates monster actions and triggers die relic abilities. One die result determines all die effects for the round! Do not roll again until next round.
- Start of Turn Abilities: Trigger in any order players choose:
- Start of turn: Abilities that specify “Start of turn” or “Start of round”.
- Start of combat: Abilities triggering only on turn 1 of combat.
- Die relic abilities: Abilities triggering on the rolled die face.
2. Play
Players can play cards, use potions, and activate abilities in any order they choose.
- Discuss: Players can discuss strategy, such as which enemies to attack and who needs help. Coordinate Weak or Vulnerable effects and share status questions without looking at each other’s hands.
- To play a card:
- Pay: Pay the Energy cost in the upper left of the card.
- Choose: Make decisions and designate targets. You can target any enemy. Area of Effect symbols affect all enemies in one row and always affect the Boss.
- Being Played: While resolving, the card is neither in hand nor in discard.
- Resolve: Execute the printed effects from top to bottom. Triggered abilities take effect only after fully resolving the card’s text.
- Cleanup: Place the card into your discard pile. Powers stay face up in play. Exhausted cards go to your exhaust pile (Status/Daze exhaust to their supply decks).
3. End of Turn
- End of turn abilities: Abilities with an “End of turn” effect trigger in any order chosen by players. (“End of turn” refers solely to the end of the Player Turn).
- Discard: Discard all remaining cards in hand in any order.
The Enemy Turn is broken into three phases:
- Remove Enemy Block: Enemies lose all leftover Block tokens.
- Enemy Actions: Starting with the highest row, enemies act left to right taking one action each. Then proceed down row by row. Bosses always act last. Enemies marked “acts last” act after all other enemies.
- Move Cube Actions: If an enemy uses Cube Actions, slide their cube down the track. Then repeat the combat round.
Enemy Action Types
Enemies target the player in their row. Actions with an AoE symbol target all players. Patterns include:
- Single Action: The enemy takes the listed action every turn.
- Die Action: The enemy takes the action corresponding to the rolled die result.
- Cube Action: At combat start, put a cube in the top slot. The enemy executes the action next to the cube. In the Move Cube Actions phase, slide the cube down. Upon reaching the bottom, loop back to the topmost red cube slot. Gray cube actions are never repeated.
The Dead
When enemies hit 0 HP, they are defeated and lose tokens; flip them over until combat ends. When any player dies, the game immediately ends in defeat.
Combat ends immediately when all monsters are dead or leave combat (unless an enemy on-death ability summons another monster):
- End of Combat Abilities: Trigger abilities stating “End of combat”.
- Rewards: Collect rewards shown in the upper left of the enemy’s card. In standard encounters, gain rewards from the enemy in your final row. In Boss and Elite fights, all players gain rewards.
- Reset Your Deck: Return Powers, discard pile, and exhaust pile to your deck. Return Status and Daze cards to their respective decks.
- Reset Player Board: Reset Block and Energy tracks. Lose all tokens (Strength, Weak, Vulnerable, Block) except Gold. Defect removes all Orbs; Watcher enters Neutral Stance.
- Clear Enemies: Put encounters and elites on the bottom of their decks. Return summons to the Summons deck.
- Switch Rows: Players may freely swap rows before the next combat room.
Player Effect Examples
- 1 Hit: Deal 1 damage to any enemy.
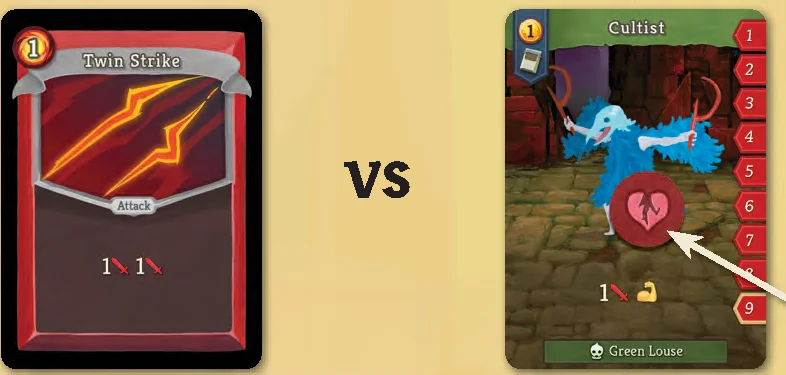
- 1 Hit / 1 Hit: Deal 1 damage to any enemy. Deal 1 damage to the same enemy.
- 2 Hit + Vulnerable: Deal 2 damage to an enemy. Give that enemy a Vulnerable token.
- 3 Hit AoE: Deal 3 damage to all enemies in a row (and the Boss, if present).
- Weak AoE: Put a Weak token on all enemies in a row (and the Boss, if present).
Enemy Action Examples
Note: When an enemy gains Strength or Block, it always goes on the enemy, never on you.
- 2 Hit + 1 Block: Deal 2 damage to the player in this row. This enemy gains 1 Block token.
- 1 Hit + Strength: Deal 1 damage to the player in this row. This enemy gains a Strength token.
- 2 Hit + Frail/Weak: Deal 2 damage to the player in this row. Give that player a token.
- 2 Hit / 2 Hit AoE + Weak: Deal 2 damage to all players twice. Give all players a Weak token.
- Daze: The player in this row puts a Daze card on top of their deck.
- Status AoE: All players put Status cards in their discard pile.
Multi-hits
Attacks or enemy actions featuring multiple hits against a target count as a multi-hit:
- All hits on a multi-hit target the same enemy (unless stated otherwise).
- All hits are affected equally by damage bonuses (such as Strength).
- All hits are affected equally by Vulnerable or Weak. Remove one Vulnerable/Weak token only after the entire multi-hit is resolved. With Weak, each individual hit has its damage reduced by 1.
Targeting for Players
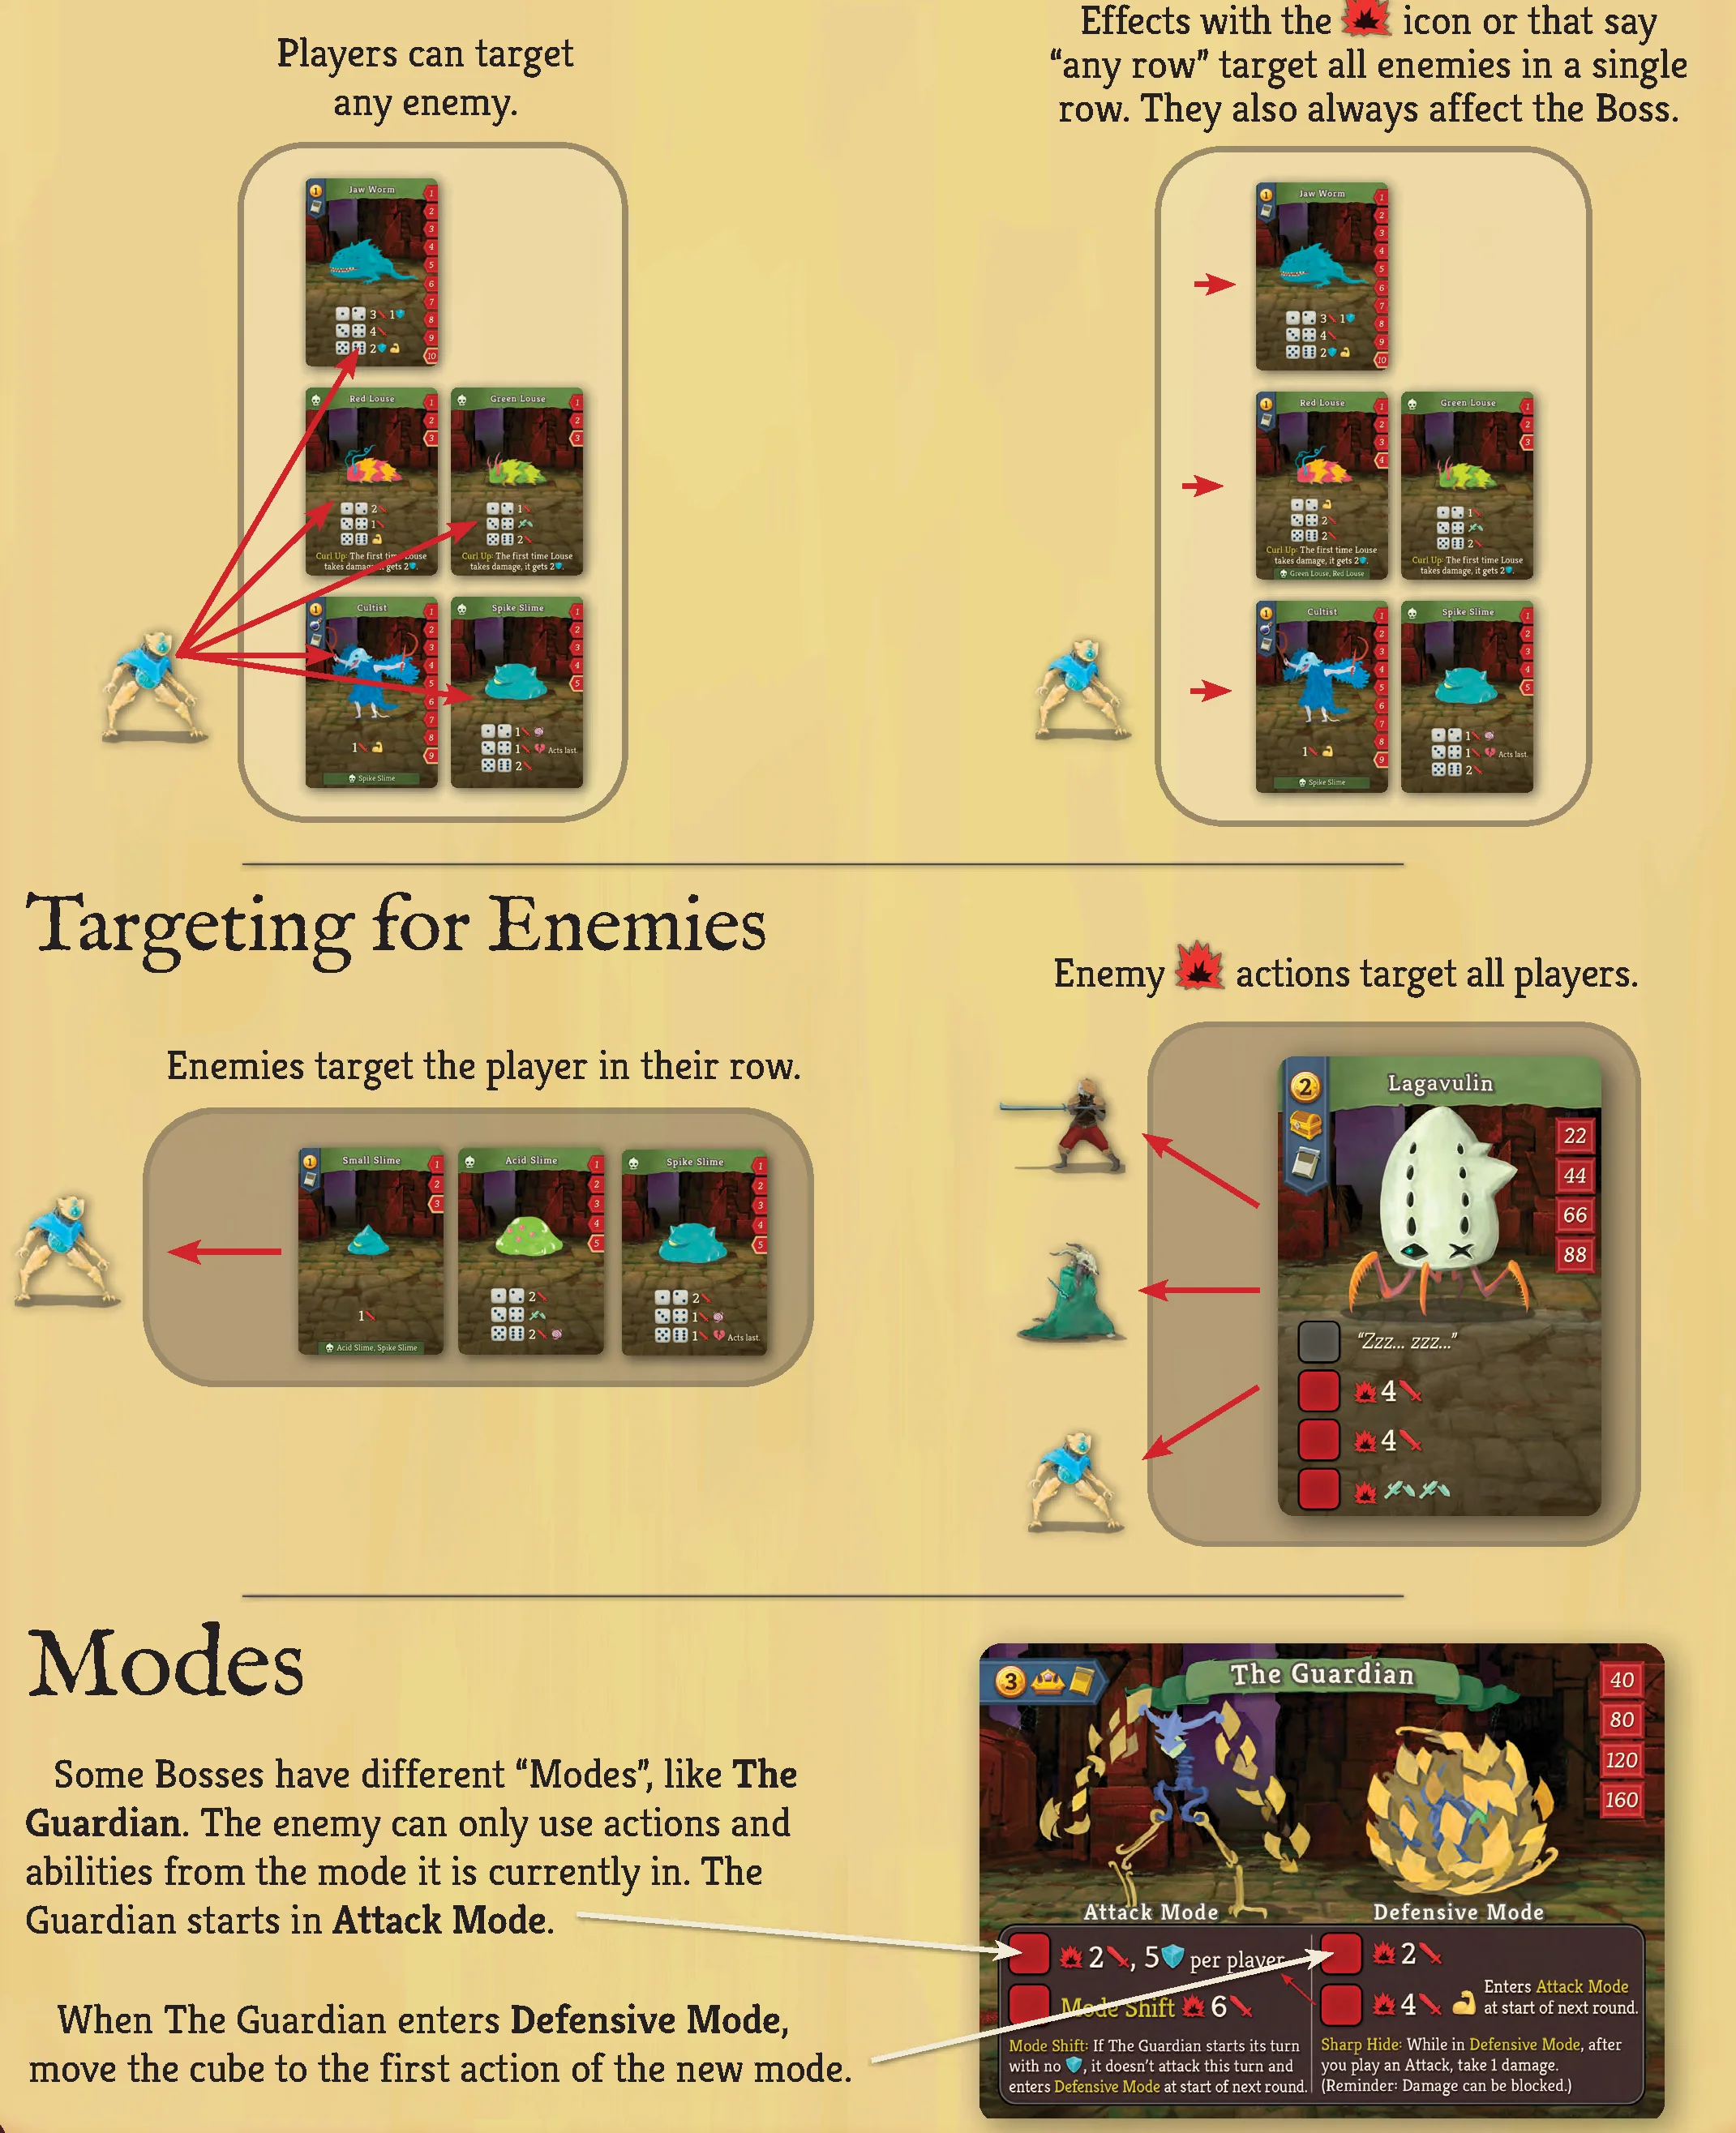
- Players can target any enemy on the board with single-target attacks.
- Effects featuring the AoE icon or stating “any row” affect all enemies in a single chosen row, and always include the Boss.
Targeting for Enemies
- Enemies target the player in their respective row.
- Enemy actions with an AoE symbol target all players.
Modes
Certain Bosses (such as The Guardian) possess distinct Modes. The Boss only uses actions and abilities matching its current active mode. For example, The Guardian begins in Attack Mode; upon triggering Defensive Mode, move the action cube to the first action of the defensive track.
The Ironclad
The remaining soldier of the Ironclads. Sold his soul to harness demonic energies.
- Strength (max 8): The Ironclad has many ways to gain Strength. A player can have a maximum of 8 Strength. You deal +1 damage on each hit for each Strength token you have.
- Exhaust: The Ironclad has many ways to Exhaust cards and powerful synergies with Exhausted cards.
- Extra HP: The Ironclad starts with more HP than any other character.
The Defect
Combat automaton which became self-aware. Ancient technology allows manipulation of Orbs.
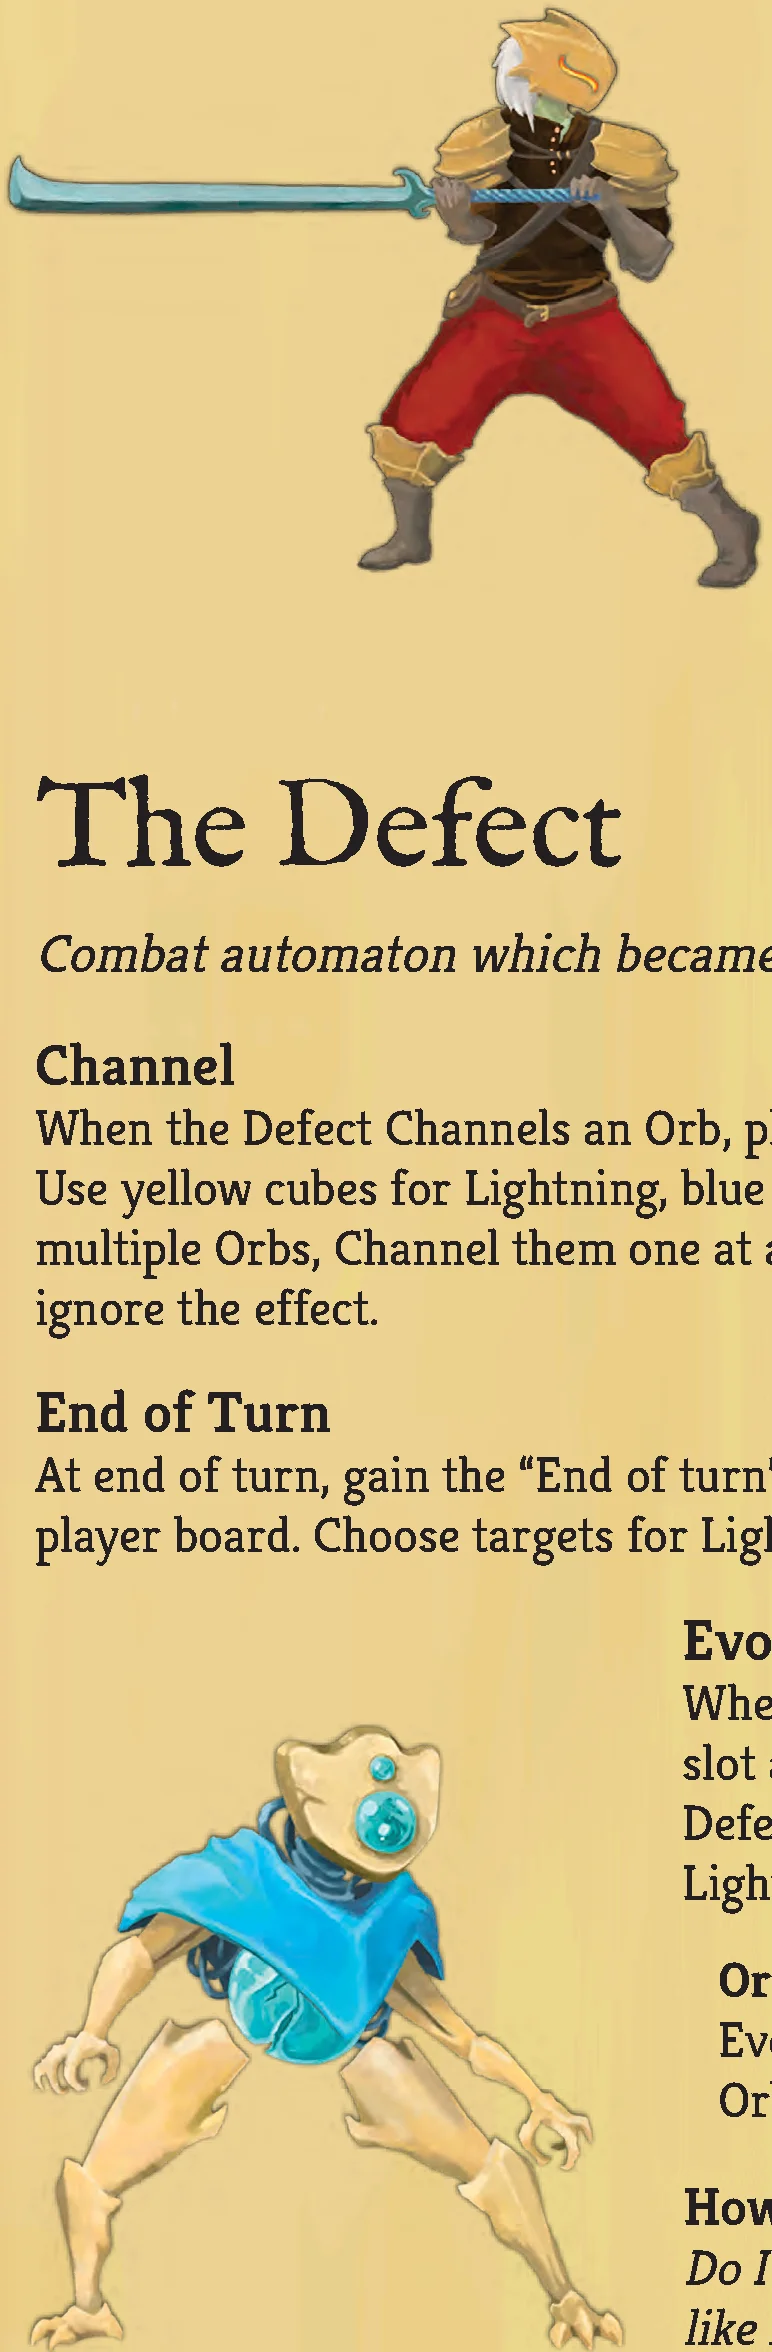
- Channel: When the Defect Channels an Orb, place an Orb cube of that type in an open Orb slot on the player board (Yellow = Lightning, Blue = Frost, Purple = Dark). Channel one at a time. If you run out of cubes, ignore further channeling.
- End of Turn: Trigger passive end-of-turn effects for each Lightning and Frost Orb. Each Lightning Orb may target a different enemy.
- Evoke: Remove an Orb of your choice and apply its Evoke effect as printed on the board. (With Dual Cast, evoke that Orb twice).
- Orb slots are full: If all slots are full when channeling, choose any Orb to Evoke immediately, then place the new Orb in the freed slot.
- Difference from the video game: Orbs do not rotate in a fixed queue. You can channel into any empty slot and evoke any Orb freely; all slots are equal.
The Silent
A deadly huntress from the foglands. Eradicates foes with daggers and poisons.
- Poison (max 30): Place Poison tokens on targets. At end of turn, poisoned enemies lose 1 HP per token. Losing HP ignores Block entirely. Tokens stay on enemies until they die. The party cannot exceed 30 Poison tokens in play collectively.
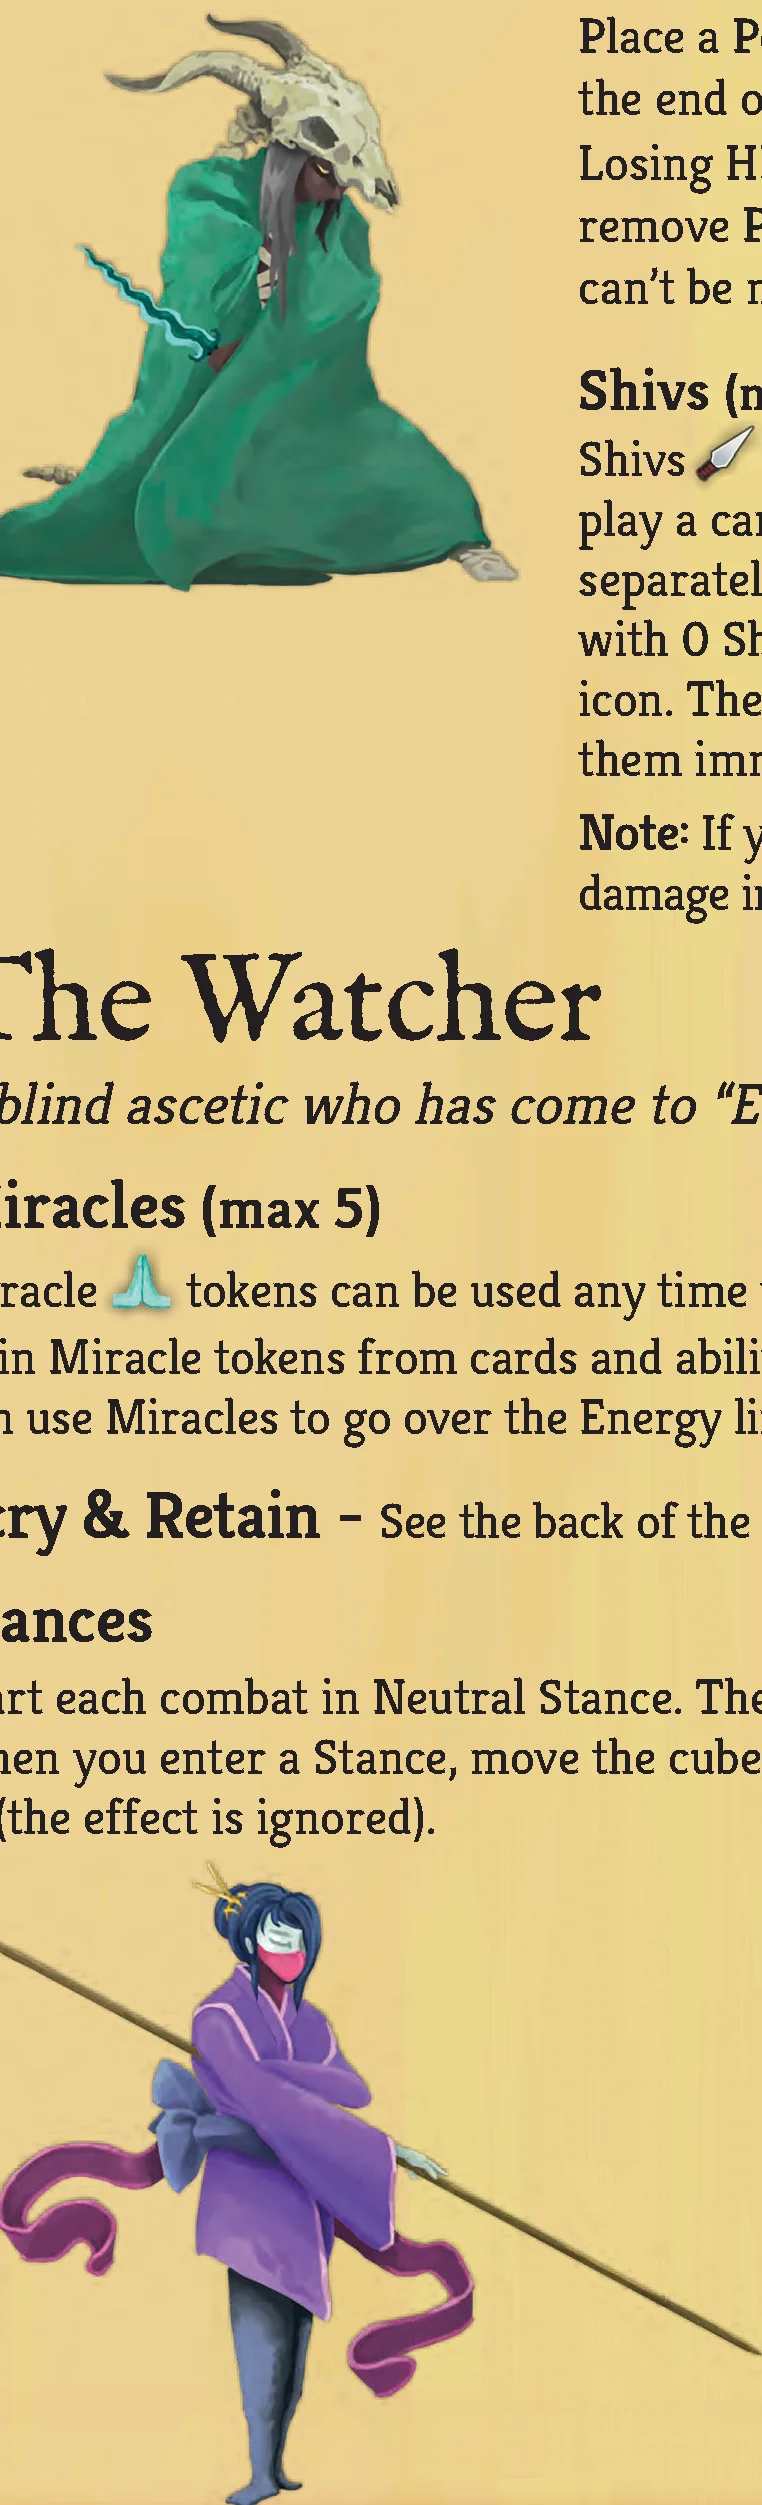
- Shivs (max 5): Shiv tokens can be spent anytime you could play a card to deal 1 hit. Treated as independent attacks boosted by Strength, Vulnerable, and Weak. Unspent Shivs persist between turns until combat ends. If out of tokens when gaining a Shiv, deal 1 hit immediately or skip. Shivs do not count as cards.
The Watcher
A blind ascetic who has come to “Evaluate” the Spire. Master of the divine Stances.
- Stances: Start each combat in Neutral Stance. Move the marker when changing Stances. You cannot re-enter a Stance you are already in:
- Neutral: No abilities.
- Calm: When leaving Calm, gain 2 Energy.
- Wrath: Deal +1 damage on all hits (+1 effective Strength). If you end your turn in Wrath, take 1 damage (can be blocked).
- Miracles (max 5): Miracle tokens can be discarded anytime for 1 Energy. Maximum of 5. Can exceed the 6 Energy cap if spent immediately to play a card.
- Scry & Retain: Manipulate draw decks and retain cards across rounds.
- Hand Size: There is no maximum hand size limit.
- Block vs HP Loss: Block cannot prevent “Lose X HP” effects. Block only stops damage from attacks and hit effects.
- Running Out of Tokens: If tokens run out, you cannot gain or apply more; extra applications are ignored (except Shivs, which can be dealt immediately).
- Card Memory: Cards lose memory once they leave your hand (retained status, cost reductions reset), unless a card specifies an ongoing self-cost alteration while in the discard pile (like Streamline).
- Starter Strike vs “Containing Strike”: “Starter Strike” is strictly the original card from your starter deck; “containing Strike” applies to any card with “Strike” in its title.
- Transforming Colorless Cards: The replacement card is drawn from your own character’s reward deck.
- Status Removal: Weak, Vulnerable, and Poison tokens do not reset at round end; they follow their own individual countdown or removal triggers.
- Summon Retention: Summons do not flee when the summoner dies; they must all be defeated to clear combat.
Specific Card Interactions
- Buffer & Multi-hits: HP loss from each individual hit of a multi-hit triggers and consumes a Buffer charge separately.
- Forced Play Effects: If Distilled Chaos or Mayhem attempts to play an unplayable card (e.g. Clash when invalid), discard the card without effect.
- Corpse Explosion: Playing multiple Corpse Explosions on one enemy does not stack; the on-death effect resolves only once.
- Dark Embrace & Ethereal: Drawing cards when Ethereal cards exhaust at turn end ignores their end-of-turn and ethereal triggers that turn; do not discard them during that turn’s discard phase.
- Consume & Dark Orbs: Consume boosts Dark Orb damage by 2 (1 base effect + 1 from being a Power). Dark Orb’s intrinsic scaling per Power in play is independent of Consume/Amplify.
- Once Per Room Items at Events: Items like Gambling Chip, The Abacus, and Toolbox can be used at Events when relevant.
- X Costs via Havoc/Mayhem: Playing an X cost card via forced play spends X=0 and exhausts it.
- Snecko Override: Snecko cost overrides any other cost modification.
- Tantrum + Rushdown: Tantrum resolves fully, returning to the draw pile, before Rushdown triggers to draw it immediately.
- Wrist Blade & 0-Cost Copies: Wrist Blade buffs copies only if the original card was also played for 0 Energy.
- Act IV Elite: You may switch into an empty combat row during Act IV Elite encounters.
Cards from Other Characters
- Tokens: Other characters’ tokens operate identically, sharing the pool.
- Transform: Transforming off-class or colorless cards awards a card from your own class reward deck.
- Golden Tickets: Revealing a Golden Ticket in another character’s rewards pulls from that character’s rare deck.
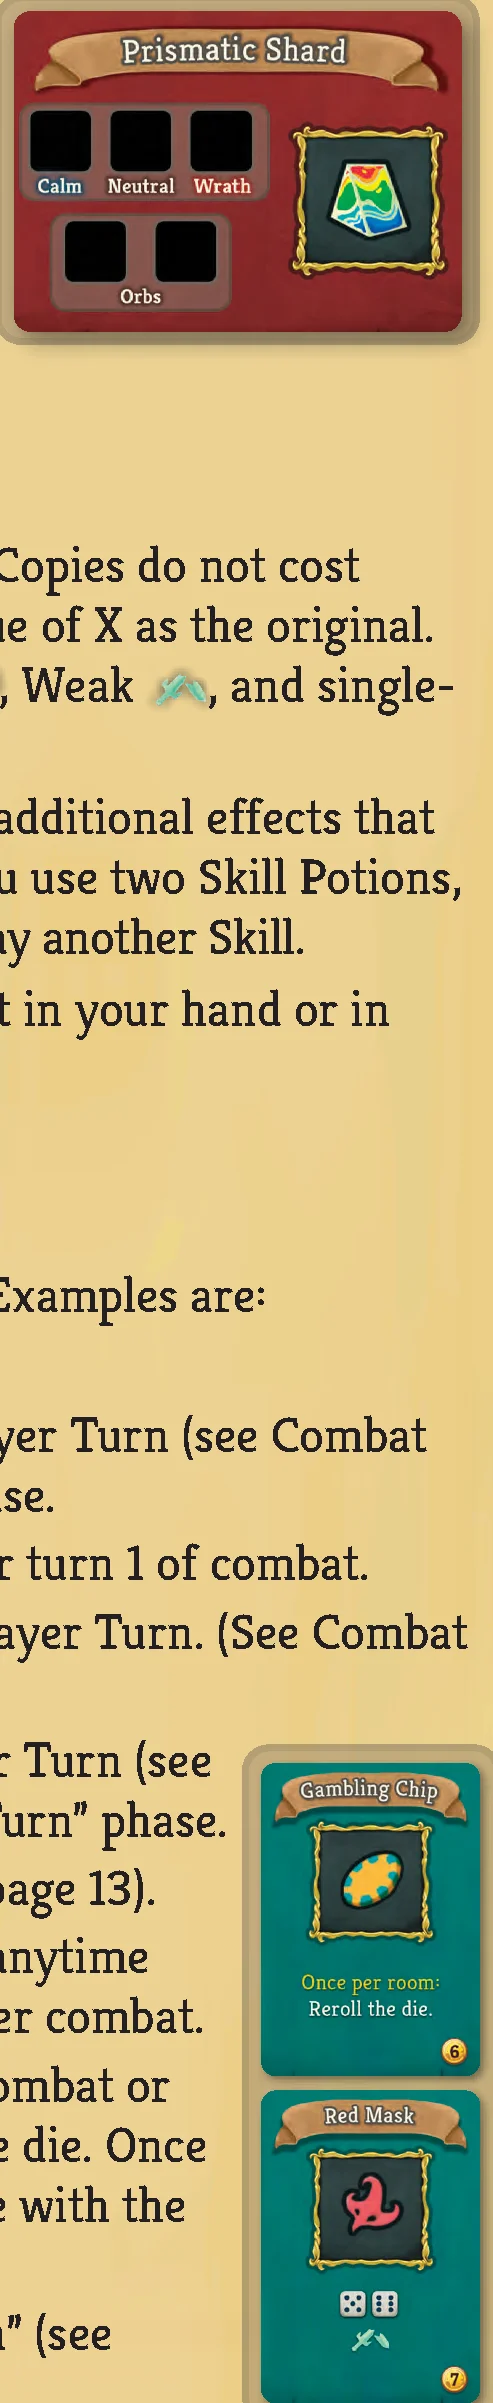
- Stances and Orbs: Gaining access to Stances or Orbs grants the Prismatic Shard relic. Start in Neutral Stance; Defect gains no additional orb slots, and Watcher cannot use Shard stances.
Playing Copies
When a card is played multiple times, each copy is treated as an independent card costing 0 Energy (inheriting X value if applicable). Copies choose individual targets and apply Vulnerable/Weak bonuses separately. Copies cannot be duplicated.
A card cannot be modified by more than one duplication effect simultaneously; excess duplicate triggers queue for the next valid card. Copies resolve before the original card enters the discard pile.
- On death: Triggers the moment the enemy dies.
- Start of turn: Triggers at the start of Player Turn (Enemy Turn has no start-of-turn phase).
- Start of combat: Triggers strictly on turn 1 of combat.
- Start of next round: Resolves during the Start of Turn phase of the next round.
- End of turn: Triggers at the end of the Player Turn.
- End of combat: Resolves immediately upon combat victory.
- Once per combat: Flip face down after use; reset face up post-combat.
- Once per room: Usable once per room/event; reset when room concludes.
- Die relic abilities: Triggers on specific matching die rolls at the start of turn.
Whenever you finish a game, each player checks 1 box per Boss defeated, plus 1 extra box. You must check boxes for your character until complete, then proceed to Colorless or Act IV boxes. When all boxes beside a lock are marked, add the corresponding numbered cards to the game decks.
- Colorless Cards: Unlocked cards form a colorless reward deck. Reveal 3 at the merchant. Add unlocked Events and Neow blessings.
- Act IV: Unlocks access to Act IV upon beating Act III if all 3 keys are collected.
Beat Act II (Act III solo) to unlock Ascension 1. Each higher tier requires beating Act II (Act III solo) with all cumulative modifiers active:
- Harder Elites: Replace Elites with Ascension 1 Elites.
- Lose 1 Max HP: Place a black cube capping your top HP track slot.
- Harder Events: Add Ascension 3 cards to event decks.
- Potion Limit is 2: Max potion capacity reduced to 2.
- Start Cursed: Add Ascender’s Bane to your starter deck.
- Heal 4 HP after Boss: Heal 4 HP instead of full HP entering new Acts.
- Harder Encounters: Swap standard encounters and summons with Ascension 7 versions.
- Card Removes Cost 4: Merchant removal fee increases to 4 gold.
- Start Damaged: Lose 1 HP at start of game (post Max HP reduction).
- Harder Bosses: Use the Ascension 10 Boss deck.
- Harder Act IV: Fight Ascension 11 Corrupt Heart and Elites.
- Harder Elites: Upgrade Acts I–III Elites to Ascension 12 versions.
- Double Act 3 Boss: Defeating Act III Boss triggers a second random Act III Boss immediately.
Achievements Checklist
- Jaxxed: Hit the Strength limit (8).
- Catalyst: Hit the Poison limit (30).
- Ninja: Play 7 Shivs in one turn.
- Powerful: Have 7 Powers in play at once.
- Barricaded: Hit the Block limit (20).
- You are Nothing: Defeat a Boss on turn 1.
- All for One: Beat Act III with 4 players.
- Perfect: Beat a Boss with all players at full HP.
- Minimalist: Beat Act III with a 5 card deck or smaller.
- The Transient: Kill The Transient before it kills itself.
- Common Sense: Beat Act III with a deck containing no uncommons or rares.
- Collector: Beat Act III with 12 relics and Boss relics combined per player.
- Ruby / Emerald / Sapphire / Amethyst: Beat Act III with Ironclad / Silent / Defect / Watcher.
- My Lucky Day: Beat Act III with a Daily Climb.
- Infinity: Create an infinite card combo.
- Who Needs Relics?: Beat Act III with no relics or Boss relics.
Daily Climb & Custom Run
Roll the die twice to select one positive and one negative modifier for all players:
Positive Modifiers (Roll 1–6)
- All Star: Start with 5 random colorless cards.
- Shiny: Start with 5 random rare cards.
- Heirloom: Start with a random Boss relic.
- Transformed: All card rewards become Transform a card.
- Vintage: Normal encounters drop relics instead of card rewards.
- Prismatic Shard: Start with Prismatic Shard; card rewards draft from any character pool.
Negative Modifiers (Roll 1–6)
- Terminal: Lose 1 HP at the end of combat.
- Insanity: Transform a random deck card at the end of each combat.
- Uncertain Future: Map tokens remain hidden face-down until entered.
- Cursed: Start with 2 random Curses.
- Deadly Events: Lose 2 HP after each Event room.
- Night Terrors: Resting at campfires is disabled.
To access Act IV, obtain all 3 keys before finishing Act III. All players heal at the start of Act IV:
- Ruby Key: All players simultaneously forgo campfire actions (no Rest or Smith).
- Sapphire Key: All players simultaneously skip gaining a relic in a Treasure or Elite room (may inspect the relic before deciding to discard it).
- Emerald Key: Defeat a Burning Elite. Players shuffle a Wound/Status into their deck prior to combat. Replace an Encounter token with the Burning Elite token before setup.
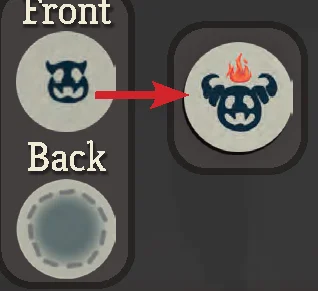
To begin a game in Act II, III, or IV (or catch up joining players), execute row-by-row sequentially down the chart:
- Neow Bonus: Gain 1 bonus.
- Starting Gold: Gain 6 (Act II), 7 (Act III), or 10 (Act IV) gold.
- Card Rewards: Draft 3 (Act II), 4 (Act III), or 5 (Act IV) card rewards.
- Transform: Perform 1 card transformation.
- Roll the Die: Roll 1 time (Act II), 2 times (Act III), or 6 times (Act IV) on the Die Reward Table:
- 1: Gain a Relic
- 2: Transform a card
- 3: Gain 1 Potion & 1 Gold
- 4: Gain 1 Potion & 2 Gold
- 5: Upgrade a card
- 6: Remove a card
- Potions & Relics: Receive assigned potions (1 for Acts II & III) and relics (2 for Act II, 4 for Act III, 6 for Act IV).
- Rare Rewards & Boss Relics: Draft rare cards and Boss relics (1 Boss relic for Act II, 2 for Acts III & IV).
- Removes & Upgrades: Apply free card removals (1 in Act III, 2 in Act IV) and upgrades (2 in Act II, 4 in Act III, 6 in Act IV).
- Merchant: Visit one communal Merchant as the final step.
Golden Rule: Whenever a card’s text contradicts the rules, the card text takes precedence.
Optional Rules
- The Last Stand: When a player dies during a Boss fight, surviving players continue. Enemies in the deceased player’s row redirect attacks to the nearest active row below (or above if none below). Victory clears the Act, but dead players cannot advance to the next Act.
- Sequential Turns: Instead of simultaneous turns, play sequentially starting from Lane 1 clockwise. The die is rolled only on the first player’s turn; personal triggers, resets, and draws occur on each player’s individual turn.
- Choose Your Relic: When earning an Elite or Treasure relic in multiplayer, reveal relics equal to player count; each player chooses one.
- Area of Effect (AoE): For players, affects all enemies in a chosen row plus the Boss. For enemies, targets every player (unless gaining Block or Strength).
- ALL Enemies: Targets all enemies in every row, including the Boss.
- Block (Max 20): Prevents damage on a 1-to-1 basis. Player block clears at player turn start; enemy block clears at enemy turn start. Does not prevent direct HP loss.
- Daze: Placed on top of draw pile; exhausts when played/drawn.
- Energy (Max 6): Resource pool to pay card costs.
- Ethereal: If remaining in hand at end of turn, the card is exhausted.
- Exhaust: Removed from combat deck to exhaust pile until combat ends.
- Hit: Attacks dealing damage; boosted by Strength and Vulnerable, reduced by Weak. Direct damage effects are not hits.
- Retain: Retained cards are not discarded at end of turn and retain memory until played.
- Scry X: Look at top X cards of draw pile; discard any number, returning remainder in original order.
- Status (Slimed / Wound): Added to discard pile; cost 1 to play/exhaust. Uses top or bottom effect matching enemy icon.
- Strength (Max 8): Adds +1 damage to every individual hit per token.
- Unplayable: Cannot be played from hand; ignored if forced to play.
- Vulnerable (Max 3): Doubles incoming damage from all hits in an attack, then sheds 1 token. Strength adds before doubling.
- Weak (Max 3): Reduces damage of each hit dealt by 1, then sheds 1 token after the attack.
- Weak vs Vulnerable: When a Weak attacker hits a Vulnerable target, both effects cancel out (damage is normal); remove 1 Weak from attacker and 1 Vulnerable from defender.
Game Overview
Slay the Spire is a cooperative rogue-like deckbuilding adventure. Craft a unique deck, encounter bizarre creatures, discover relics of immense power, and finally become strong enough to defeat the boss at the end of the Act!
- Slay the Spire is a Deckbuilder. That means each player starts with a simple deck of cards that they can improve by adding and removing cards during the game.
- Slay the Spire is also a rogue-like. That means that when you die (and you will die!), start over from the beginning. Take the lessons you learned and try again!
Playtime
The game is divided into Acts. Each Act takes about 60–90 minutes. Plan for some extra time your first game. At the end of an Act you can continue, stop and end the adventure there, or save and continue another time!
Your First Game
Ironclad and Silent are easier characters to learn, with Defect being harder and Watcher hardest. Keep this in mind when choosing a character!
Winning & Losing
- Victory: If players defeat the final Boss, they win the game! Which Boss you consider to be final depends on how many Acts you want to play. You can stop playing at the end of any Act!
- Death: When a player’s HP is reduced to 0, they are dead and the party loses the game.
Get the Free Companion App!
With searchable rulebook, soundtrack, card library, achievement tracking, and more! (Not required to play the game.)
Components
- 381 Player Cards (including unlocks):
- 85 Ironclad (red)
- 87 Silent (green)
- 85 Defect (blue)
- 85 Watcher (purple)
- 17 Curses
- 22 Colorless
- Encounter & Monster Cards:
- 4 1st Encounters
- 43 Encounters (Act 1/2/3: 12/12/10, Ascension Act 1/2/3: 3/3/3)
- 89 Summons (35/31/20, Ascension: 0/2/1)
- 27 Elites (3/3/3, Ascension: 6/6/6)
- 51 Events (12/14/11, Ascension: 6/5/2, 1 in unlock deck)
- 11 Boss Cards (26 including unlocks)
- Other Cards:
- 36 Status
- 10 Daze
- 14 Neow’s Blessing (20 including unlocks)
- 1 Ascension Reference
- 31 Dividers
- 8 Small Dividers
- 112 Small Cards:
- 4 Prismatic Shard
- 1 Solo Relic
- 20 Boss Relics
- 58 Relics
- 29 Potions
- Boards & Figures:
- 2 Main Boards
- 1 Merchant Board / Player Aid
- 1 HP Board
- 4 Player Boards
- 4 Minis
- 1 Die
- 1 Boot Meeple
- 50 Plastic Cubes
- 113 Tokens
- 450 Sleeves
Note: Ascension cards start locked. Don’t use them until instructed to do so.
Setup
- Pick a Character: Each player chooses a character and takes the corresponding player board, mini, starter deck, card rewards deck, and rare rewards deck. Shuffle the decks.
- Token Tray: Take out the token tray.
- Player Board: Put a cube on your character’s Energy track at 3, on their Block track at 0, and on their HP track at the highest printed number.
- Get Decks Ready: Take out the following decks. Shuffle each deck except Summons, Daze, and Status (Slimed/Wound), then place them in separate piles. Shuffle and keep the “1st Encounter!” cards separate from the Encounter deck:
- Encounter Act I “1st Encounter!”
- Encounter Act I
- Elite Act I
- Summon Act I (Don’t shuffle!)
- Event Act I
- Relic
- Potion
- Boss Relic
- Daze Deck
- Status Deck (Slimed / Wound)
- Curse Deck
- The Board: Take out the Act I board. Randomly choose an Act I map.
- Map Tokens: Shuffle the map tokens face down. Randomly place dark map tokens on dark spaces, and light map tokens on light spaces. Then flip the tokens face up.
- Character Figure: Place your character figure on the board in the lowest open space.
- Reveal the Boss: Randomly choose an Act I Boss. You can roll the die and use the Boss with the matching die result on the back of the card. Place that Boss face down on the map on top of the Boss icon.
- The Boot: Place the boot meeple at the bottom of the map next to the bottom encounter.
- Player Aid / Merchant Board: Keep the Player Aid board handy as a quick rules reference. When you encounter a Merchant, flip the board over and set up the Merchant side.
- Neow’s Blessing: Shuffle the Neow’s Blessing deck (three-eyed whale). Each player draws one Neow’s Blessing card. Gain the reward in red, then choose one of the 3 rewards in blue. When players are done, put all Neow’s Blessing cards away.
- Solo: If you’re playing solo, also gain 2 Gold and the “Loaded Die” solo relic.
- 1st Encounter: Setup the 1st Encounter. Then start combat.
Setup for Acts II & III
- Act Decks: Replace the Encounter, Elite, Event, and Summon decks with decks for the next Act. Shuffle all of those decks except Summons. Note: Only Act I has a “1st Encounter” deck.
- Board Setup: Repeat steps 5 through 9 with the board and Boss from the next Act.
- Heal: All players heal to their maximum HP at the start of Act II and later Acts.
- Shuffle: Shuffle your card rewards deck. Include any cards you skipped. (Don’t shuffle rares.)
Your Play Area
Below is a suggestion for how to organize your play area. Do whatever works for you!
- Draw Pile: Shuffle your deck before combat begins to create your draw pile.
- Discard Pile: After you play a card, it goes to your discard pile.
- Exhaust Pile: When you Exhaust a card, place it in the exhaust pile. You can’t use it again this combat.
- Item Area: Items are small cards. Keep items you gain in front of you.
- Power Area: When you play a Power, it stays in play until the end of combat. Keep Powers in front of you. At the end of combat, they return to your deck.
Hit Points (HP)
When your character takes damage or loses HP, your HP goes down. When you heal, your HP goes up. Keep a red cube on your HP to track it. Your HP starts at the highest number on your player board. Damage can be prevented with Block.
Starting Ability
Each character has a unique starting ability on their player board.
Tokens
Keep tokens for your character on your player board. Keep track of your gold and any buffs/debuffs this way. You may prefer to keep Vulnerable tokens near your character mini.
Your Deck
Card Types
- Attack: Attacks deal damage to enemies.
- Skill: Skills block damage and have other useful abilities.
- Power: Powers give you abilities that last the entire combat. Powers stay on the table in front of the player.
- Curse: Curses are bad cards that can get added to your deck. Curses can’t be Transformed. When you gain a Curse, add the top Curse card to your deck.
- Status & Daze: Powerful enemies can weaken your deck by adding Status (Slimed / Wound) and Daze cards to it. Remove these from your deck at the end of each combat.
Energy
Energy is used to play cards. You can have a maximum of 6 Energy at once. Each character has their own Energy icon, although they all mean the same thing. You can gain Energy from sources with icons that don’t match your character. You’ll usually see a generic Energy icon used on items and in the rules.
X Cost Cards: You can spend any amount of Energy when playing an X cost card, including 0. It has an effect based on how much Energy you spend. The text will tell you the effect for spending X Energy.
Banner & Rarity
Cards have different rarities, which you can tell by the color of the banner behind their name:
- Starter deck cards: Gray banners and gray borders (4 or 5 starter Strikes and starter Defends).
- Common cards: Gray banners (2 copies of each).
- Uncommon cards: Blue banners.
- Rare cards: Yellow banners.
Items
Items are small cards that you’ll collect on your adventure. There are Relics, Boss Relics, and Potions. There’s also the Loaded Die solo relic. Keep items in front of you.
- Gold Cost: This is the cost to purchase the item from the Merchant. Not all items have a gold cost.
- Loaded Die: When playing solo, start with the Loaded Die. On a die result of 1 or 2, it can trigger its own ability, or a die relic ability on another relic.
Rewards
There are several types of rewards below… but first, some general rules about rewards!
- Pick Order: Gain rewards in any order you want!
- Skip: You may skip gaining any reward below. You may also skip revealing or drawing from any rewards deck.
- Full Knowledge: After revealing cards or items, you can look at what the other rewards are from that combat before making any final decisions on what to choose or skip. You can check upgrades. If you’re ever unsure if you’ll get to see another combat reward from your current room before finalizing a choice, the answer is yes.
- Trading: Potions can be given to other players outside of combat. Nothing else can be traded.
Reward Types
- Card Reward: Reveal the top 3 cards of your card rewards deck and lay them out in front of you. You may add one revealed card to your deck or skip adding a card. Return any unselected cards to the bottom of your card rewards deck.
- Golden Ticket: Whenever you reveal a Golden Ticket, reveal the top card of your rare rewards deck and add that to your choices. Unpicked rare cards return to the bottom of your rare rewards deck. Put the Golden Ticket on the bottom of your card rewards deck.
- Upgraded Card Reward: This is just like a “card reward” above, but the card you pick is immediately upgraded. You can always look at what an upgrade does before choosing.
- Rare Reward: Reveal 3 cards from your rare rewards deck and lay them out in front of you. You may add one to your deck or skip. Return any unselected cards to the bottom of your rare rewards deck.
- Potion: Draw a card from the potion deck. You may gain that potion or skip it. Keep it face up in front of you until used. You can’t have more than 3 potions. Potions are all single-use items. When a potion is used, discarded, or skipped, put it on the bottom of the potion deck. If you gain a potion but you’re at the limit, you must either: skip the potion, pass the potion to a player who is below their potion limit, or discard or use a potion then gain the new potion. Gambler’s Brew, Entropic Brew, Blood Potion, and Fairy in a Bottle can be used outside of combat if applicable.
- Relic: Draw a card from the relic deck. You may gain that relic or skip it. Keep your relics face up in front of you. When relics are discarded or skipped, put them on the bottom of the relic deck.
- Boss Relic: Reveal 1 Boss relic per player + 1. Reveal 3 instead if playing solo. Each player may gain a relic or skip. Keep your Boss relics face up in front of you. When Boss relics are discarded or skipped, return them to the bottom of the Boss relic deck.
- Gold: Gain gold tokens equal to the value. Gold can be spent at the Merchant or certain Events. You can use your gold to pay for any amount of another player’s purchase at a Merchant or Event.
Remove, Upgrade, Transform
Below are 3 types of rewards that can change your deck:
- Remove: Remove a card from your deck. Keep it in a removed pile away from your deck.
- Upgrade: Unsleeve a card in your deck and flip it to the upgraded side (has green text). You can check what a card’s upgrade is at any time by unsleeving it or checking the Upgrade Reference.
- Transform: Remove a card from your deck that isn’t a Curse. Keep it in a removed pile away from your deck. Add the top card of your card rewards to your deck (it should be random). If it’s a Golden Ticket, add the top card of your rare rewards to your deck instead, then put the Golden Ticket on the bottom of your card rewards.
The Map
You start at the encounter on the bottom of the map. When you’re done with a room, move the meeple up the map along one of the paths to the next room. Rules for each type of room:
- Encounter:
- 1st Encounter!: If this is the first encounter, place a “1st Encounter!” card in each player’s row. After combat, set aside the 1st Encounter cards (they’re no longer needed).
- Other Encounters: Draw one encounter card per player.
- Elite: Draw a card from the Elite deck.
- Event: Draw a card from the Event deck. If there is text in [yellow brackets], each player must choose one of those options. Each player makes their own choice and acts once in any order. Some Events work differently, as described in their text. To choose a “Pay” or “Give” option, you must first have what it is asking you to pay or give. When all players are done, put the Event on the bottom of the Event deck.
- Campfire: Each player chooses one of two actions:
- Rest: Heal 3 HP.
- Smith: Upgrade a card.
- Treasure: Each player gains a relic.
- Merchant: Place 3 relics and 3 potions on the merchant board in the indicated slots. Each player reveals the top 3 cards of their card rewards deck. You can use your gold to pay for any amount of another player’s purchase at a Merchant or Event. Players can:
- Buy Items: Buy relics or potions for the gold cost on the bottom right of the item. The relic in the top left is on sale for 1 less gold.
- Buy Cards: Buy cards you revealed for 2, 3, or 6 gold based on their rarity (Common: 2, Uncommon: 3, Rare: 6).
- Card Remove: Pay 3 gold to remove a card from your deck. Each player can only do this once per Merchant.
When you’re done, return any unpurchased cards to the bottom of the deck they came from in any order.
- Boss: When you reach the Boss, start combat against the Boss card at the top of the map. If the Boss is defeated, you beat the Act! After gaining rewards, you can save and continue later, proceed to the next Act, or end the game here.
Combat Setup
- Rows: Each player has a row. Enemies are placed in rows, except for Bosses.
- Summons: Some enemies will summon more enemies. If you see a green bar and summon icon, search for that enemy in the Summons deck and put them into play at the start of combat. Some enemy actions or special abilities can also summon.
- Random Summons: When multiple Summons have the same name, select them randomly. You can do this by picking one without reading its abilities or shuffling Summons with the same name in a small face down pile and drawing one. “Gremlins” have a Gremlin icon on the back to help you select them randomly.
- Encounter Setup: Place one enemy in each player’s row. If there are Summons, they are placed in the row of the enemy that summoned them to the right.
Enemy Cards Anatomy
- Starting HP: Put a cube on numbers with yellow outlines. For monsters with more than 10 HP, use 2 cubes.
- Special Abilities: Special abilities appear in Yellow. Usually they’re always active, but some have triggers or don’t have an effect until later in the fight (for example, the Fungi Beast’s Spore Cloud triggers on death; Gremlin Nob’s Enraged doesn’t start until turn 2).
Elite & Boss Setup
Elite Setup
Place one Elite in the bottom row. If there are Summons, place them in each player’s row with the Elite to their right.
Boss Setup
Bosses are treated as being in all rows. Keep them to the right of the board with any Summons in rows and closer to the board.
HP Board
Some enemies use the HP board. The top number is their starting HP for 1 player, the next number down is for 2 players, etc. Set their HP using cubes.
Combat Round - Player Turn
Combat rounds consist of a Player Turn followed by an Enemy Turn. Rounds repeat until combat ends.
Shuffle your deck before combat starts. There’s one shared Player Turn that’s broken into three phases taken simultaneously by all players: Start of Turn, Play, and End of Turn.
1. Start of Turn
- Reset: Set Energy to 3 and Block to 0.
- Draw: Draw 5 cards. There is no maximum hand size.
- Empty Draw Pile: When your draw pile is empty and you need to draw, shuffle your discard pile to form the new draw pile. If a card was just played that drew cards, set it aside while shuffling, then add it to the new discard pile.
- Roll: Roll the die. If any abilities can change the die result, they must be used now before resolving other abilities. The die result dictates monster actions and triggers die relic abilities. One die result determines all die effects for the round! Do not roll again until next round.
- Start of Turn Abilities: Trigger in any order players choose:
- Start of turn: Abilities that specify “Start of turn” or “Start of round”.
- Start of combat: Abilities triggering only on turn 1 of combat.
- Die relic abilities: Abilities triggering on the rolled die face.
2. Play
Players can play cards, use potions, and activate abilities in any order they choose.
- Discuss: Players can discuss strategy, such as which enemies to attack and who needs help. Coordinate Weak or Vulnerable effects and share status questions without looking at each other’s hands.
- To play a card:
- Pay: Pay the Energy cost in the upper left of the card.
- Choose: Make decisions and designate targets. You can target any enemy. Area of Effect symbols affect all enemies in one row and always affect the Boss.
- Being Played: While resolving, the card is neither in hand nor in discard.
- Resolve: Execute the printed effects from top to bottom. Triggered abilities take effect only after fully resolving the card’s text.
- Cleanup: Place the card into your discard pile. Powers stay face up in play. Exhausted cards go to your exhaust pile (Status/Daze exhaust to their supply decks).
3. End of Turn
- End of turn abilities: Abilities with an “End of turn” effect trigger in any order chosen by players. (“End of turn” refers solely to the end of the Player Turn).
- Discard: Discard all remaining cards in hand in any order.
Combat Round - Enemy Turn
The Enemy Turn is broken into three phases:
- Remove Enemy Block: Enemies lose all leftover Block tokens.
- Enemy Actions: Starting with the highest row, enemies act left to right taking one action each. Then proceed down row by row. Bosses always act last. Enemies marked “acts last” act after all other enemies.
- Move Cube Actions: If an enemy uses Cube Actions, slide their cube down the track. Then repeat the combat round.
Enemy Action Types
Enemies target the player in their row. Actions with an AoE symbol target all players. Patterns include:
- Single Action: The enemy takes the listed action every turn.
- Die Action: The enemy takes the action corresponding to the rolled die result.
- Cube Action: At combat start, put a cube in the top slot. The enemy executes the action next to the cube. In the Move Cube Actions phase, slide the cube down. Upon reaching the bottom, loop back to the topmost red cube slot. Gray cube actions are never repeated.
The Dead
When enemies hit 0 HP, they are defeated and lose tokens; flip them over until combat ends. When any player dies, the game immediately ends in defeat.
End of Combat
Combat ends immediately when all monsters are dead or leave combat (unless an enemy on-death ability summons another monster):
- End of Combat Abilities: Trigger abilities stating “End of combat”.
- Rewards: Collect rewards shown in the upper left of the enemy’s card. In standard encounters, gain rewards from the enemy in your final row. In Boss and Elite fights, all players gain rewards.
- Reset Your Deck: Return Powers, discard pile, and exhaust pile to your deck. Return Status and Daze cards to their respective decks.
- Reset Player Board: Reset Block and Energy tracks. Lose all tokens (Strength, Weak, Vulnerable, Block) except Gold. Defect removes all Orbs; Watcher enters Neutral Stance.
- Clear Enemies: Put encounters and elites on the bottom of their decks. Return summons to the Summons deck.
- Switch Rows: Players may freely swap rows before the next combat room.
Actions & Effects
Player Effect Examples
- 1 Hit: Deal 1 damage to any enemy.
- 1 Hit / 1 Hit: Deal 1 damage to any enemy. Deal 1 damage to the same enemy.
- 2 Hit + Vulnerable: Deal 2 damage to an enemy. Give that enemy a Vulnerable token.
- 3 Hit AoE: Deal 3 damage to all enemies in a row (and the Boss, if present).
- Weak AoE: Put a Weak token on all enemies in a row (and the Boss, if present).
Enemy Action Examples
Note: When an enemy gains Strength or Block, it always goes on the enemy, never on you.
- 2 Hit + 1 Block: Deal 2 damage to the player in this row. This enemy gains 1 Block token.
- 1 Hit + Strength: Deal 1 damage to the player in this row. This enemy gains a Strength token.
- 2 Hit + Frail/Weak: Deal 2 damage to the player in this row. Give that player a token.
- 2 Hit / 2 Hit AoE + Weak: Deal 2 damage to all players twice. Give all players a Weak token.
- Daze: The player in this row puts a Daze card on top of their deck.
- Status AoE: All players put Status cards in their discard pile.
Multi-hits
Attacks or enemy actions featuring multiple hits against a target count as a multi-hit:
- All hits on a multi-hit target the same enemy (unless stated otherwise).
- All hits are affected equally by damage bonuses (such as Strength).
- All hits are affected equally by Vulnerable or Weak. Remove one Vulnerable/Weak token only after the entire multi-hit is resolved. With Weak, each individual hit has its damage reduced by 1.
Targeting & Modes
Targeting for Players
- Players can target any enemy on the board with single-target attacks.
- Effects featuring the AoE icon or stating “any row” affect all enemies in a single chosen row, and always include the Boss.
Targeting for Enemies
- Enemies target the player in their respective row.
- Enemy actions with an AoE symbol target all players.
Modes
Certain Bosses (such as The Guardian) possess distinct Modes. The Boss only uses actions and abilities matching its current active mode. For example, The Guardian begins in Attack Mode; upon triggering Defensive Mode, move the action cube to the first action of the defensive track.
Characters
The Ironclad
The remaining soldier of the Ironclads. Sold his soul to harness demonic energies.
- Strength (max 8): The Ironclad has many ways to gain Strength. A player can have a maximum of 8 Strength. You deal +1 damage on each hit for each Strength token you have.
- Exhaust: The Ironclad has many ways to Exhaust cards and powerful synergies with Exhausted cards.
- Extra HP: The Ironclad starts with more HP than any other character.
The Defect
Combat automaton which became self-aware. Ancient technology allows manipulation of Orbs.
- Channel: When the Defect Channels an Orb, place an Orb cube of that type in an open Orb slot on the player board (Yellow = Lightning, Blue = Frost, Purple = Dark). Channel one at a time. If you run out of cubes, ignore further channeling.
- End of Turn: Trigger passive end-of-turn effects for each Lightning and Frost Orb. Each Lightning Orb may target a different enemy.
- Evoke: Remove an Orb of your choice and apply its Evoke effect as printed on the board. (With Dual Cast, evoke that Orb twice).
- Orb slots are full: If all slots are full when channeling, choose any Orb to Evoke immediately, then place the new Orb in the freed slot.
- Difference from the video game: Orbs do not rotate in a fixed queue. You can channel into any empty slot and evoke any Orb freely; all slots are equal.
The Silent
A deadly huntress from the foglands. Eradicates foes with daggers and poisons.
- Poison (max 30): Place Poison tokens on targets. At end of turn, poisoned enemies lose 1 HP per token. Losing HP ignores Block entirely. Tokens stay on enemies until they die. The party cannot exceed 30 Poison tokens in play collectively.
- Shivs (max 5): Shiv tokens can be spent anytime you could play a card to deal 1 hit. Treated as independent attacks boosted by Strength, Vulnerable, and Weak. Unspent Shivs persist between turns until combat ends. If out of tokens when gaining a Shiv, deal 1 hit immediately or skip. Shivs do not count as cards.
The Watcher
A blind ascetic who has come to “Evaluate” the Spire. Master of the divine Stances.
- Stances: Start each combat in Neutral Stance. Move the marker when changing Stances. You cannot re-enter a Stance you are already in:
- Neutral: No abilities.
- Calm: When leaving Calm, gain 2 Energy.
- Wrath: Deal +1 damage on all hits (+1 effective Strength). If you end your turn in Wrath, take 1 damage (can be blocked).
- Miracles (max 5): Miracle tokens can be discarded anytime for 1 Energy. Maximum of 5. Can exceed the 6 Energy cap if spent immediately to play a card.
- Scry & Retain: Manipulate draw decks and retain cards across rounds.
FAQs & Random Rules
- Hand Size: There is no maximum hand size limit.
- Block vs HP Loss: Block cannot prevent “Lose X HP” effects. Block only stops damage from attacks and hit effects.
- Running Out of Tokens: If tokens run out, you cannot gain or apply more; extra applications are ignored (except Shivs, which can be dealt immediately).
- Card Memory: Cards lose memory once they leave your hand (retained status, cost reductions reset), unless a card specifies an ongoing self-cost alteration while in the discard pile (like Streamline).
- Starter Strike vs “Containing Strike”: “Starter Strike” is strictly the original card from your starter deck; “containing Strike” applies to any card with “Strike” in its title.
- Transforming Colorless Cards: The replacement card is drawn from your own character’s reward deck.
- Status Removal: Weak, Vulnerable, and Poison tokens do not reset at round end; they follow their own individual countdown or removal triggers.
- Summon Retention: Summons do not flee when the summoner dies; they must all be defeated to clear combat.
Specific Card Interactions
- Buffer & Multi-hits: HP loss from each individual hit of a multi-hit triggers and consumes a Buffer charge separately.
- Forced Play Effects: If Distilled Chaos or Mayhem attempts to play an unplayable card (e.g. Clash when invalid), discard the card without effect.
- Corpse Explosion: Playing multiple Corpse Explosions on one enemy does not stack; the on-death effect resolves only once.
- Dark Embrace & Ethereal: Drawing cards when Ethereal cards exhaust at turn end ignores their end-of-turn and ethereal triggers that turn; do not discard them during that turn’s discard phase.
- Consume & Dark Orbs: Consume boosts Dark Orb damage by 2 (1 base effect + 1 from being a Power). Dark Orb’s intrinsic scaling per Power in play is independent of Consume/Amplify.
- Once Per Room Items at Events: Items like Gambling Chip, The Abacus, and Toolbox can be used at Events when relevant.
- X Costs via Havoc/Mayhem: Playing an X cost card via forced play spends X=0 and exhausts it.
- Snecko Override: Snecko cost overrides any other cost modification.
- Tantrum + Rushdown: Tantrum resolves fully, returning to the draw pile, before Rushdown triggers to draw it immediately.
- Wrist Blade & 0-Cost Copies: Wrist Blade buffs copies only if the original card was also played for 0 Energy.
- Act IV Elite: You may switch into an empty combat row during Act IV Elite encounters.
Cards from Other Characters & Playing Copies
Cards from Other Characters
- Tokens: Other characters’ tokens operate identically, sharing the pool.
- Transform: Transforming off-class or colorless cards awards a card from your own class reward deck.
- Golden Tickets: Revealing a Golden Ticket in another character’s rewards pulls from that character’s rare deck.
- Stances and Orbs: Gaining access to Stances or Orbs grants the Prismatic Shard relic. Start in Neutral Stance; Defect gains no additional orb slots, and Watcher cannot use Shard stances.
Playing Copies
When a card is played multiple times, each copy is treated as an independent card costing 0 Energy (inheriting X value if applicable). Copies choose individual targets and apply Vulnerable/Weak bonuses separately. Copies cannot be duplicated.
A card cannot be modified by more than one duplication effect simultaneously; excess duplicate triggers queue for the next valid card. Copies resolve before the original card enters the discard pile.
Triggered Abilities
- On death: Triggers the moment the enemy dies.
- Start of turn: Triggers at the start of Player Turn (Enemy Turn has no start-of-turn phase).
- Start of combat: Triggers strictly on turn 1 of combat.
- Start of next round: Resolves during the Start of Turn phase of the next round.
- End of turn: Triggers at the end of the Player Turn.
- End of combat: Resolves immediately upon combat victory.
- Once per combat: Flip face down after use; reset face up post-combat.
- Once per room: Usable once per room/event; reset when room concludes.
- Die relic abilities: Triggers on specific matching die rolls at the start of turn.
Unlocks
Whenever you finish a game, each player checks 1 box per Boss defeated, plus 1 extra box. You must check boxes for your character until complete, then proceed to Colorless or Act IV boxes. When all boxes beside a lock are marked, add the corresponding numbered cards to the game decks.
- Colorless Cards: Unlocked cards form a colorless reward deck. Reveal 3 at the merchant. Add unlocked Events and Neow blessings.
- Act IV: Unlocks access to Act IV upon beating Act III if all 3 keys are collected.
Ascension Modifiers
Beat Act II (Act III solo) to unlock Ascension 1. Each higher tier requires beating Act II (Act III solo) with all cumulative modifiers active:
- Harder Elites: Replace Elites with Ascension 1 Elites.
- Lose 1 Max HP: Place a black cube capping your top HP track slot.
- Harder Events: Add Ascension 3 cards to event decks.
- Potion Limit is 2: Max potion capacity reduced to 2.
- Start Cursed: Add Ascender’s Bane to your starter deck.
- Heal 4 HP after Boss: Heal 4 HP instead of full HP entering new Acts.
- Harder Encounters: Swap standard encounters and summons with Ascension 7 versions.
- Card Removes Cost 4: Merchant removal fee increases to 4 gold.
- Start Damaged: Lose 1 HP at start of game (post Max HP reduction).
- Harder Bosses: Use the Ascension 10 Boss deck.
- Harder Act IV: Fight Ascension 11 Corrupt Heart and Elites.
- Harder Elites: Upgrade Acts I–III Elites to Ascension 12 versions.
- Double Act 3 Boss: Defeating Act III Boss triggers a second random Act III Boss immediately.
Achievements & Daily Climb
Achievements Checklist
- Jaxxed: Hit the Strength limit (8).
- Catalyst: Hit the Poison limit (30).
- Ninja: Play 7 Shivs in one turn.
- Powerful: Have 7 Powers in play at once.
- Barricaded: Hit the Block limit (20).
- You are Nothing: Defeat a Boss on turn 1.
- All for One: Beat Act III with 4 players.
- Perfect: Beat a Boss with all players at full HP.
- Minimalist: Beat Act III with a 5 card deck or smaller.
- The Transient: Kill The Transient before it kills itself.
- Common Sense: Beat Act III with a deck containing no uncommons or rares.
- Collector: Beat Act III with 12 relics and Boss relics combined per player.
- Ruby / Emerald / Sapphire / Amethyst: Beat Act III with Ironclad / Silent / Defect / Watcher.
- My Lucky Day: Beat Act III with a Daily Climb.
- Infinity: Create an infinite card combo.
- Who Needs Relics?: Beat Act III with no relics or Boss relics.
Daily Climb & Custom Run
Roll the die twice to select one positive and one negative modifier for all players:
Positive Modifiers (Roll 1–6)
- All Star: Start with 5 random colorless cards.
- Shiny: Start with 5 random rare cards.
- Heirloom: Start with a random Boss relic.
- Transformed: All card rewards become Transform a card.
- Vintage: Normal encounters drop relics instead of card rewards.
- Prismatic Shard: Start with Prismatic Shard; card rewards draft from any character pool.
Negative Modifiers (Roll 1–6)
- Terminal: Lose 1 HP at the end of combat.
- Insanity: Transform a random deck card at the end of each combat.
- Uncertain Future: Map tokens remain hidden face-down until entered.
- Cursed: Start with 2 random Curses.
- Deadly Events: Lose 2 HP after each Event room.
- Night Terrors: Resting at campfires is disabled.
Act IV
To access Act IV, obtain all 3 keys before finishing Act III. All players heal at the start of Act IV:
- Ruby Key: All players simultaneously forgo campfire actions (no Rest or Smith).
- Sapphire Key: All players simultaneously skip gaining a relic in a Treasure or Elite room (may inspect the relic before deciding to discard it).
- Emerald Key: Defeat a Burning Elite. Players shuffle a Wound/Status into their deck prior to combat. Replace an Encounter token with the Burning Elite token before setup.
Quick Start Rules
To begin a game in Act II, III, or IV (or catch up joining players), execute row-by-row sequentially down the chart:
- Neow Bonus: Gain 1 bonus.
- Starting Gold: Gain 6 (Act II), 7 (Act III), or 10 (Act IV) gold.
- Card Rewards: Draft 3 (Act II), 4 (Act III), or 5 (Act IV) card rewards.
- Transform: Perform 1 card transformation.
- Roll the Die: Roll 1 time (Act II), 2 times (Act III), or 6 times (Act IV) on the Die Reward Table:
- 1: Gain a Relic
- 2: Transform a card
- 3: Gain 1 Potion & 1 Gold
- 4: Gain 1 Potion & 2 Gold
- 5: Upgrade a card
- 6: Remove a card
- Potions & Relics: Receive assigned potions (1 for Acts II & III) and relics (2 for Act II, 4 for Act III, 6 for Act IV).
- Rare Rewards & Boss Relics: Draft rare cards and Boss relics (1 Boss relic for Act II, 2 for Acts III & IV).
- Removes & Upgrades: Apply free card removals (1 in Act III, 2 in Act IV) and upgrades (2 in Act II, 4 in Act III, 6 in Act IV).
- Merchant: Visit one communal Merchant as the final step.
Golden Rule & Optional Rules
Golden Rule: Whenever a card’s text contradicts the rules, the card text takes precedence.
Optional Rules
- The Last Stand: When a player dies during a Boss fight, surviving players continue. Enemies in the deceased player’s row redirect attacks to the nearest active row below (or above if none below). Victory clears the Act, but dead players cannot advance to the next Act.
- Sequential Turns: Instead of simultaneous turns, play sequentially starting from Lane 1 clockwise. The die is rolled only on the first player’s turn; personal triggers, resets, and draws occur on each player’s individual turn.
- Choose Your Relic: When earning an Elite or Treasure relic in multiplayer, reveal relics equal to player count; each player chooses one.
Abilities & Keywords
- Area of Effect (AoE): For players, affects all enemies in a chosen row plus the Boss. For enemies, targets every player (unless gaining Block or Strength).
- ALL Enemies: Targets all enemies in every row, including the Boss.
- Block (Max 20): Prevents damage on a 1-to-1 basis. Player block clears at player turn start; enemy block clears at enemy turn start. Does not prevent direct HP loss.
- Daze: Placed on top of draw pile; exhausts when played/drawn.
- Energy (Max 6): Resource pool to pay card costs.
- Ethereal: If remaining in hand at end of turn, the card is exhausted.
- Exhaust: Removed from combat deck to exhaust pile until combat ends.
- Hit: Attacks dealing damage; boosted by Strength and Vulnerable, reduced by Weak. Direct damage effects are not hits.
- Retain: Retained cards are not discarded at end of turn and retain memory until played.
- Scry X: Look at top X cards of draw pile; discard any number, returning remainder in original order.
- Status (Slimed / Wound): Added to discard pile; cost 1 to play/exhaust. Uses top or bottom effect matching enemy icon.
- Strength (Max 8): Adds +1 damage to every individual hit per token.
- Unplayable: Cannot be played from hand; ignored if forced to play.
- Vulnerable (Max 3): Doubles incoming damage from all hits in an attack, then sheds 1 token. Strength adds before doubling.
- Weak (Max 3): Reduces damage of each hit dealt by 1, then sheds 1 token after the attack.
- Weak vs Vulnerable: When a Weak attacker hits a Vulnerable target, both effects cancel out (damage is normal); remove 1 Weak from attacker and 1 Vulnerable from defender.
