
Vinhos: Deluxe Edition
2016
Develop vineyards, hire oenologists, trade at fairs, and turn quality Portuguese wines into profit or victory points.
180
minutes
1 - 4
player(s)
12+
Medium Heavy


About this board game
Vinhos: Deluxe Edition is a trading and economic game for 1–4 players that follows six years of winemaking in Portugal, with games lasting about 180 minutes. Players develop vineyards, produce quality wines, and compete to become the most successful winemaker.
Each player manages the business of wine making, cultivating vines and choosing the best varieties for their vineyards. Hiring skilled oenologists, taking part in trade fairs, and deciding when to exchange wine for money or victory points are all part of the challenge.
The Deluxe Edition includes the complete content and improved rules of the original Vinhos, along with a new simplified version. Its double-sided board supports both game versions, while double-sided player boards can also be used on either side. A new solo mode is designed for the new game version.
- A ninth wine region and a new estate
- The Farmer, a new character
- A streamlined Fair with new mechanisms
- 18 action tiles replacing the manager’s actions
- 22 multiplier tiles for final scoring
- New art by Ian O’Toole
The revised edition also removes the bank action and the zero initial Vintage tile, optimizes exportation for two players, and simplifies several rules. Players can now buy, hire, sell, or export one or two things during every action, while the limit on experts has been removed and one action has been replaced with another vineyard action.
With its six harvests, evolving vineyards, trade fairs, and focus on wine quality and profit, Vinhos: Deluxe Edition offers a substantial Portuguese winemaking experience in both its full and simplified forms.
/pic7182955.jpg)
Vinhos: Deluxe Edition
Board Game Rules
Vinhos Deluxe Edition – Special Vintage 2016
Game Design: Vital Lacerda
Players: 2–4 | Duration: 90–180 mins | Ages: 12+
Introduction
In Vinhos (a Portuguese word, pronounced vin-yos, which means “Wines”) you play the role of a wine producer in Portugal, trying to make a name for yourself. You must demonstrate your business acumen by promoting your label, and establishing the best reputation at home and abroad. Competition is fierce: Only the best labels can survive the test of time!
Over a period of 6 years, you will expand your business by establishing estates (local branches of your company) in the different regions of Portugal, buying vineyards and building wineries there. You can hire skilled enologists and capable farmers to help you increase the quality of your wine.
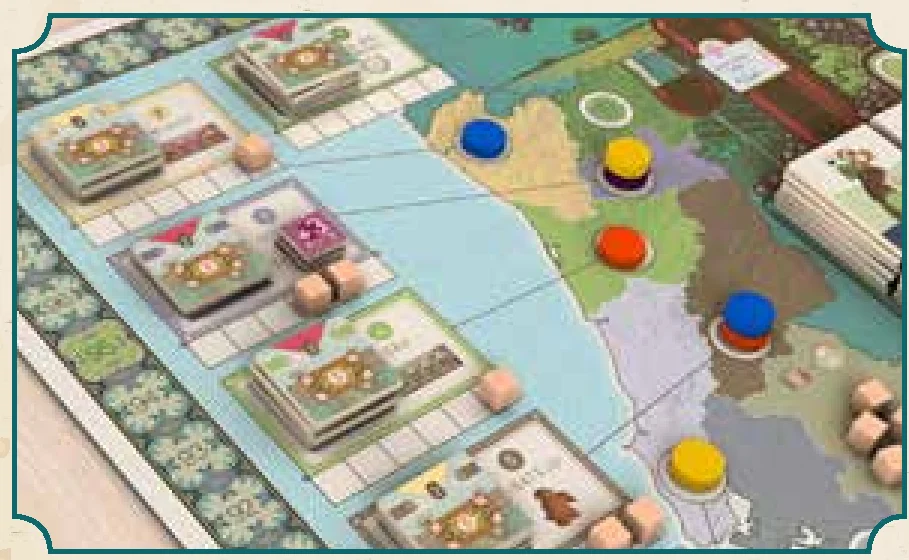
Each year begins with a weather forecast for the growing season, and ends with Wine production. Optimal climatic conditions can provide exceptional vintages, from which you can produce high-quality wines; while cloudy weather and heavy rain usually have devastating effects: The only way to produce palatable wines from such a yield is by expanding your estates or putting enologists, farmers, or even wine experts to work. With time, your wine will mature and become more valuable, but only if you have built a cellar in which it can age.
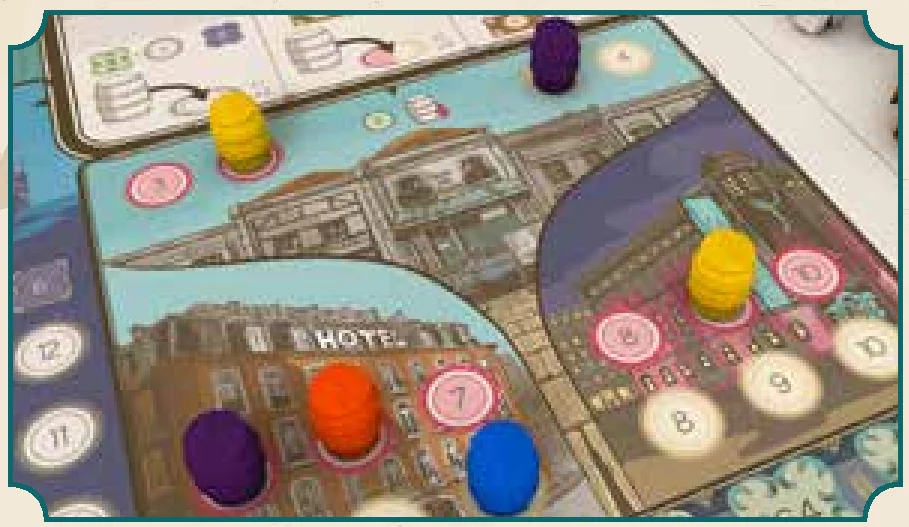
Profit margins for wine producers can be tenuous, but you can increase your liquid cash by selling your wines to local Portuguese establishments, such as the Casa de Fados, the Hotel, or the Enoteca. These sales make it much easier to expand your estates and pay your employees’ salaries. But it takes more than money to earn prestige. In order to make a name for yourself on the international market, you must meet the requirements of various countries by exporting high-quality wines.
Using this Manual
What to expect
This gamebox allows you to play two different versions of Vinhos: the Special Vintage 2016 and the 2010 Reserve.
- The 2010 Reserve is nearly the same as the first edition of the game, but with slight rules tweaks for better balance.
- The Special Vintage 2016 is a less complex version of the 2010 Reserve, with (hopefully) the same depth: It has new rules and adds some new concepts and tiles to the 2010 Reserve, replacing some of the more intricate portions of it.
The vast majority of the rules are the same for both games; so, to highlight the differences, and make it easy to play one when you are accustomed to the other, we give you some visual cues:
Whenever you see a rule in blue, it only applies to the Special Vintage 2016.
The Wine Tasting Fair & Magnates
Every few years, the Wine Tasting Fair provides an opportunity for global press for the best Wine makers. Being chosen as the best Wine is essential to your company’s prestige, and can make all the difference in your long-term success!
Three influential Wine industry magnates scrutinize the Wines presented at the fair. Each would like to offer you some special privileges, but only if your Wine meets their expectations.
It is up to you to decide the best time to announce which Wine will represent you at the fair. An early press release will allow you to start calling in favors from an interested magnate immediately, but waiting until the last moment could grant your Wine that extra maturity, and allow you to better know which features will be most appreciated by the judges.
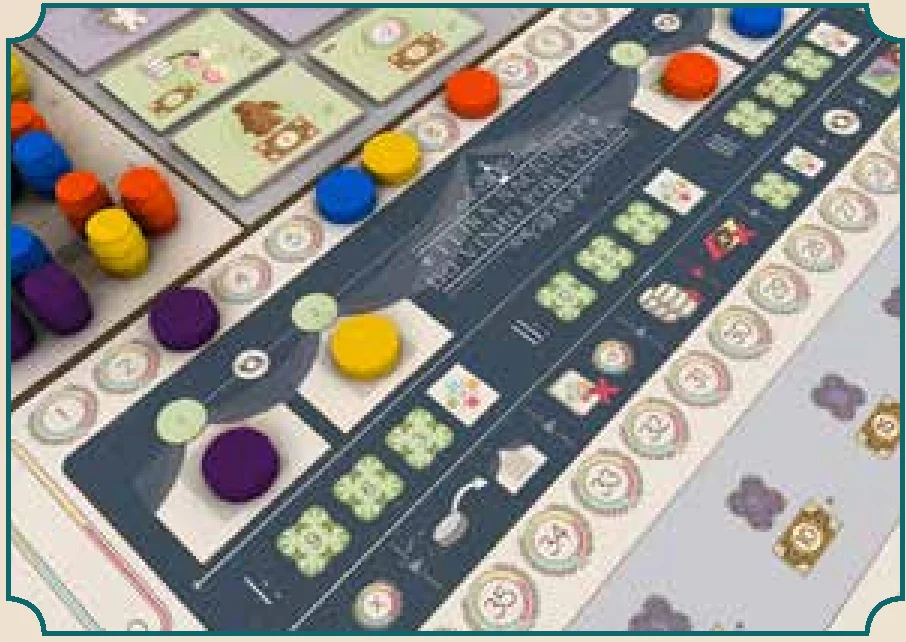
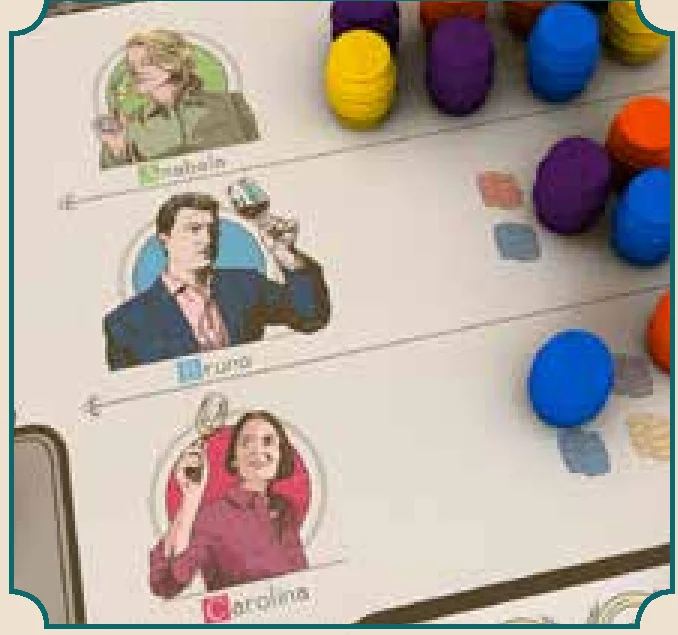
Objective of the Game
The winner is the player with the most Victory Points at the end of the game. You are producing Wines to gain the most prestige, which is represented in the game as Victory Points (VP).
Gameplay – Year Overview
The game lasts 6 rounds, and each round represents 1 year. The Year/Taxation marker indicates the passing of years and of different steps within each year.
Each year comprises the following phases:
- Start of Year: Each year begins with the weather forecast for the current year. Discard last year’s Vintage tile, and flip the new top tile face-up.
- Actions: Each player will perform 2 Actions from the 9 options available. You can buy Vineyards, build Wineries, hire Enologists and Farmers, build Cellars, sell or export Wines that you have produced, hire Wine Experts, Pass and/or announce which Wine you intend to present at the following Fair. You can also take advantage of the benefits offered by the 3 Magnates and Wine Experts.
- Maintenance: Each player must take at least one Barrel from one of the Sales slots, if she has any there.
- Production: Every year, Wines will move 1 slot to the right to indicate their aging. Then, each player will receive 1 Wine tile for each Estate on her Player Board that has at least 1 Vineyard, and places it in the leftmost slot of the corresponding Warehouse or Cellar.
The color of Wine depends on the color of Vineyard that produced it, while its Production Value depends on the number of Vineyards, Wineries, Enologists, and Farmers in the Estate, as well as the weather conditions of the current year.
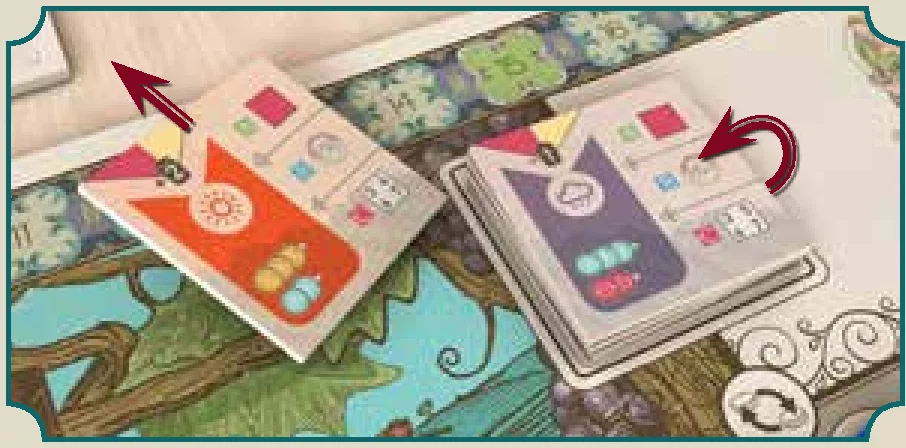
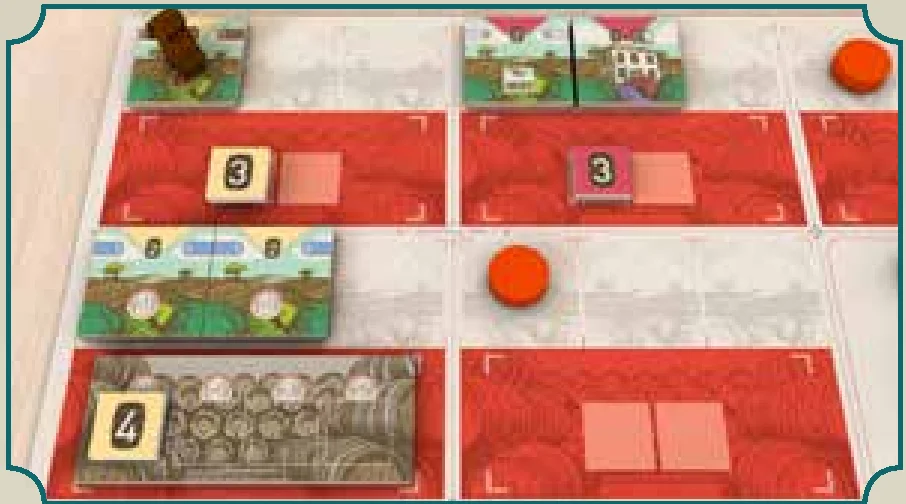
EXAMPLE: Weather: The new year has begun. The top Vintage tile is discarded and a new one is flipped.
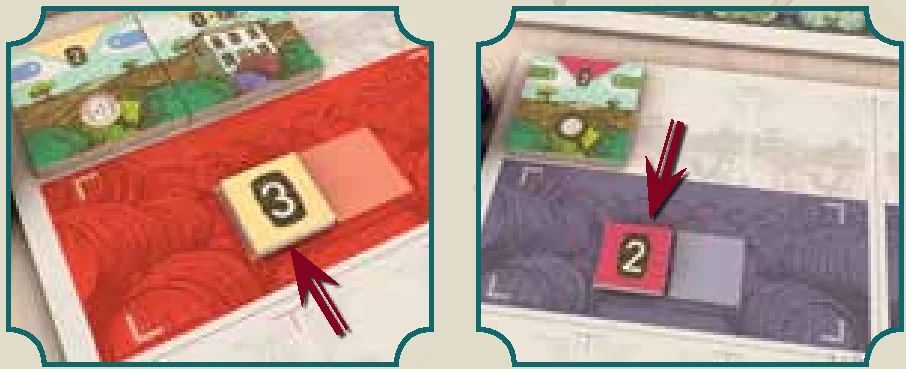
EXAMPLE: Production phase: Orange has produced 1 White Wine with a value of 3. She places the tile in the leftmost slot of the corresponding warehouse.
Purple has produced 1 Red Wine with a value of 2. She places the tile in the leftmost slot of the corresponding cellar.
Wine Tasting Fair (only 3rd, 5th, and 6th year): At the end of the 3rd, 5th, and 6th year, a Wine Tasting Fair is held. Each player must present 1 Wine, and only 1 Wine, at each Fair. If you have not yet presented a Wine when the Fair starts, you will do so at the fair. You can play Wine Expert tiles to gain Fair Points. The higher the value of the wine you present, the higher the number of Fair Points you earn.
Phase 1: Start of Year
At the beginning of each year except the 1st (which skips this phase), prepare for the year as follows:
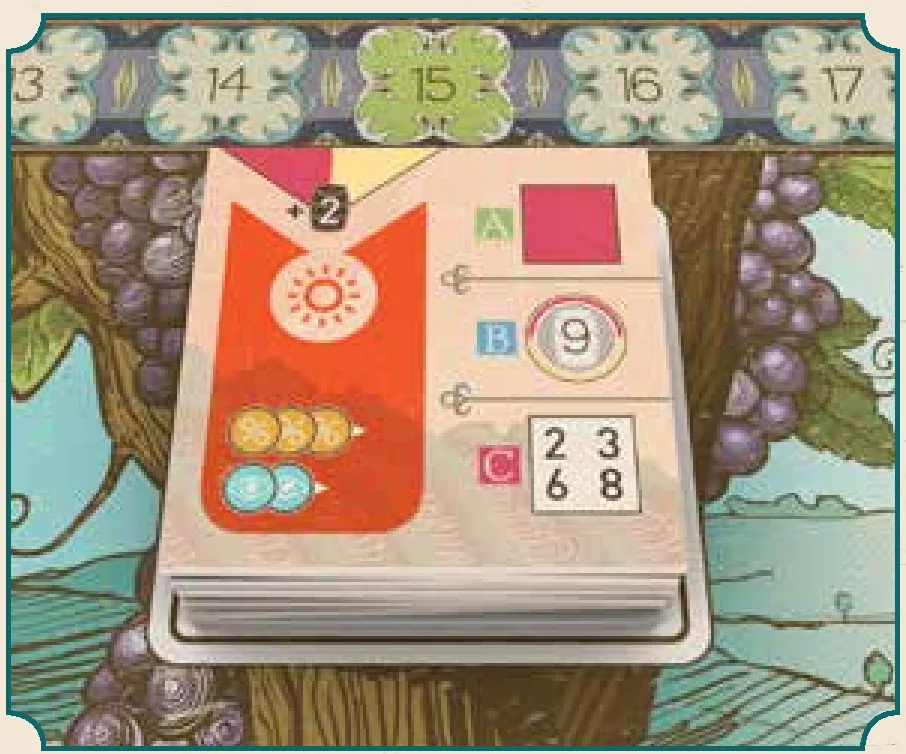
- Discard the Vintage tile used in the previous year and reveal a new Vintage tile for the current year by flipping the top Vintage tile face-up. The number (from +2 to -2) in the upper-left corner of the Vintage tile indicates the weather conditions for the current year. Weather conditions will influence the Wine production at the end of the year.
- Before the start of the 4th and 6th year, each player flips all of her face-down Wine Expert tiles and Magnate Action tiles face-up again. (Look for this symbol on the gameboard:
 ).
).
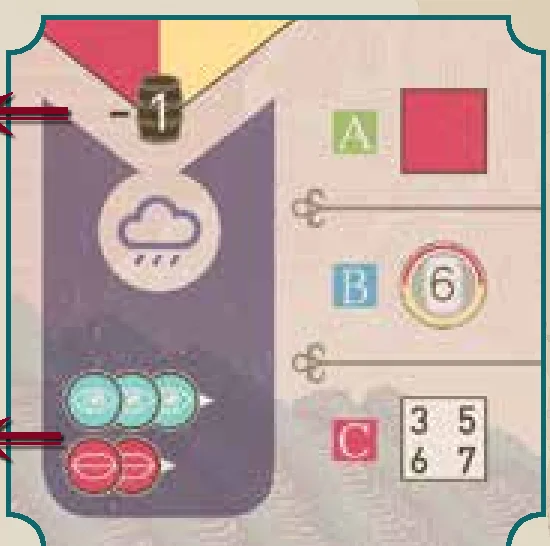
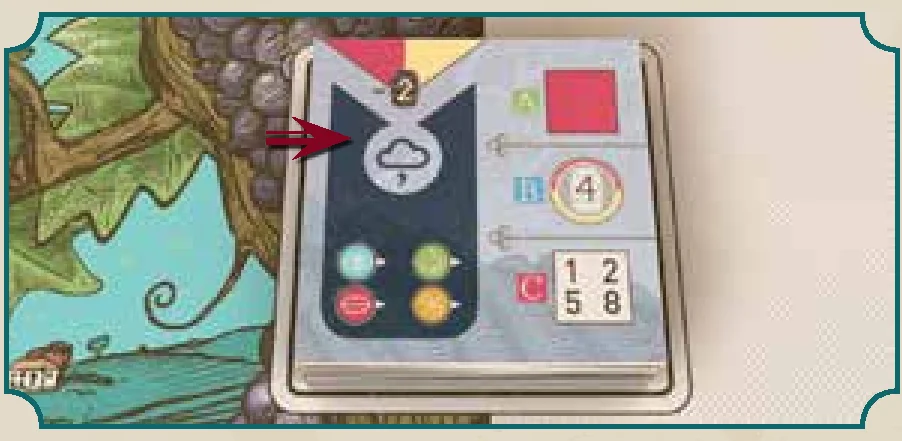
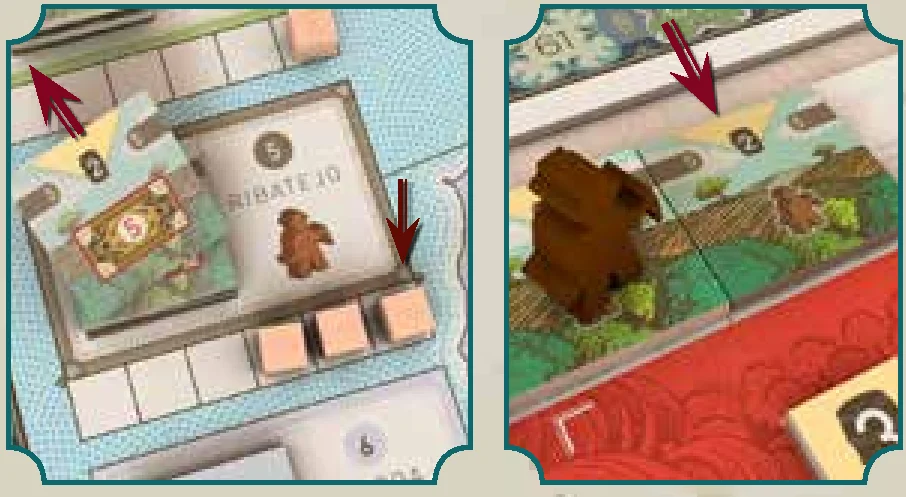
EXAMPLE: Weather conditions: 4th year: The Vintage tile foretells a bad year (the quality of each wine produced will be reduced by 2).
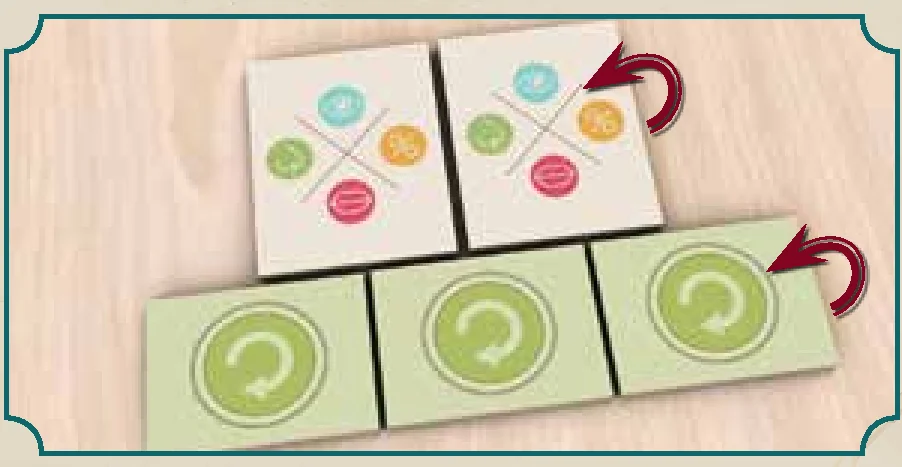
EXAMPLE: Start of the 4th and 6th year: Yellow has 2 Wine Expert tiles and 3 Magnate Action tiles face-down in front of him. He flips all of them face-up.
Phase 3: Maintenance
The supply of your lovely wine has run out, and now the customers demand more!
 Place the Year/Taxation Marker on the appropriate space (B – Barrel) of the current year, to indicate that the Maintenance Phase is starting.
Each player must take one of her barrels from the Sales Area, if she has any there. Return it to your supply on your player board.
Actions Phase
Each player, in Player Order, will perform 1 action. Next, any changes in Player Order go into effect. Then each player, in the new Player Order, will perform a 2nd action, and then any changes in Player Order go into effect.
1st Action
 Place the Year/Taxation Marker on space “1” of the current year to indicate that everyone is taking their 1st action.
Play proceeds according to the order shown in the “Player Order” area. On your turn, you must move your Action Marker to another space on the “Quadrel” and take the action related to that space.
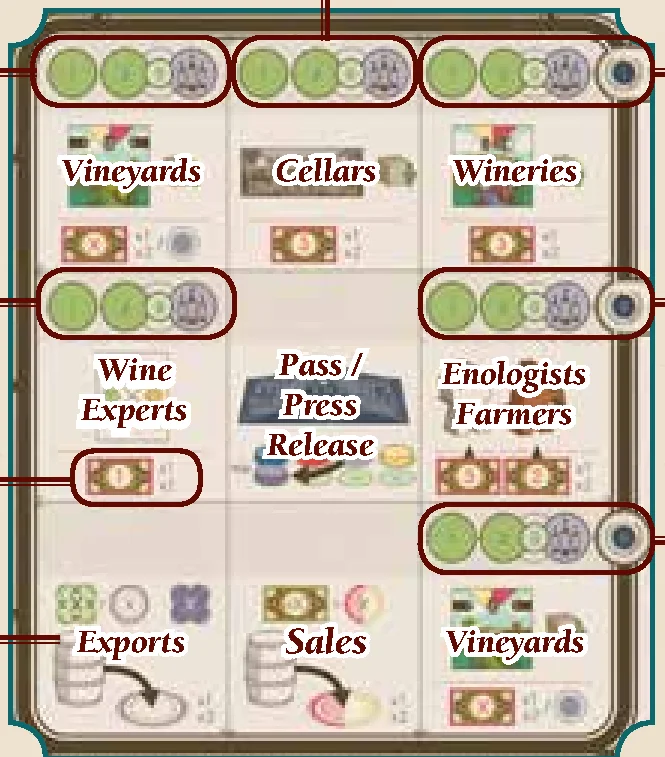
Movement Rules
- If you are unwilling or unable to take any actions, you must move your Action Marker to the Pass / Press Release space and pass.
- If you move your Action Marker to an adjacent space (orthogonally or diagonally), the movement is free of charge.
- If you move your Action Marker to a non-adjacent space, you must pay 1 Bago to the common supply.
- You must pay 1 Bago to each player whose Action Marker was already present in the space to which you moved.
- You must pay 1 Bago to the common supply if the Year/Taxation Marker was present in the space to which you moved.
Note: You cannot stay in the same space; you must move to a new space. If you cannot pay the movement costs, and pay for and perform the action, you cannot move to the space.
Exceptions:
- You never have to pay to move to the Pass / Press Release space, even if other Players’ Action Markers are there.
- If your Action Marker is already on the Pass / Press Release space, and you have no way to take any other Action, then you can stay on the Pass / Press Release space, without moving the Action Marker.
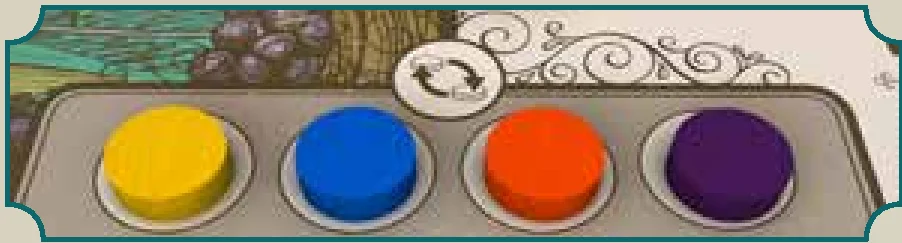
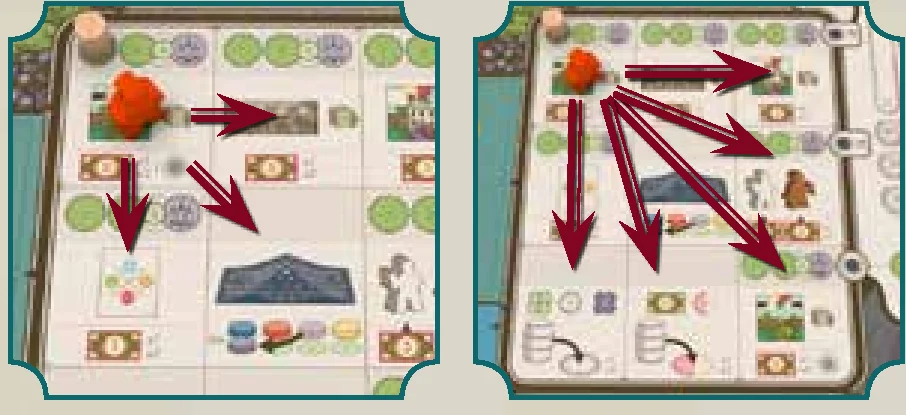
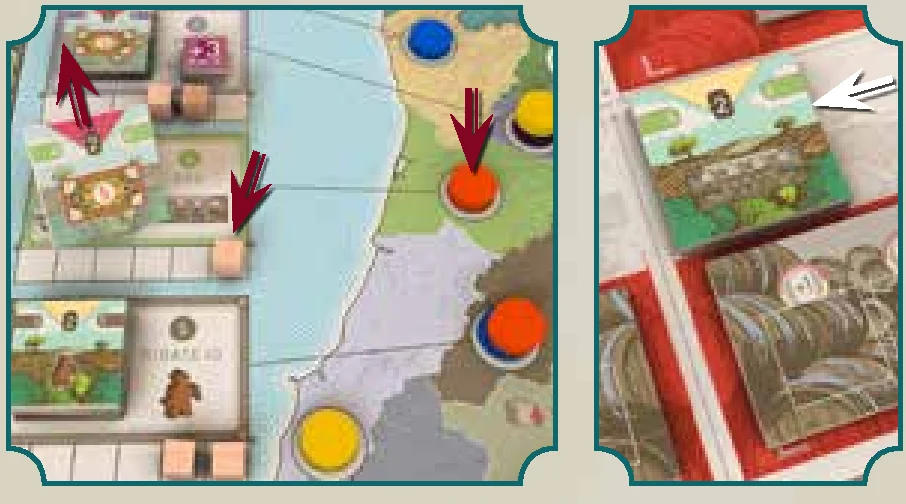
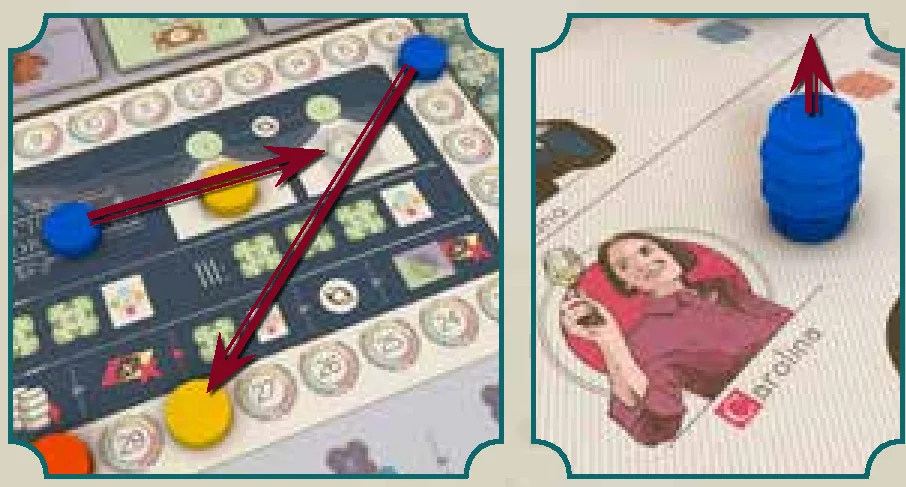
EXAMPLE: Movement: Orange can move her Action Marker free of charge to one of the spaces indicated by the arrows on the left picture. If she moves to any other space, she has to pay 1 Bago to the common supply.
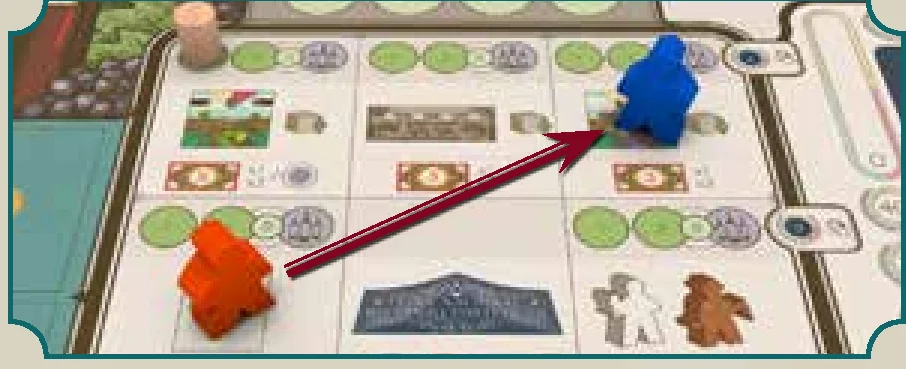
EXAMPLE 2: Movement: Orange must pay 1 Bago to Blue and another 1 Bago to the common supply because her movement was not adjacent to her last position.
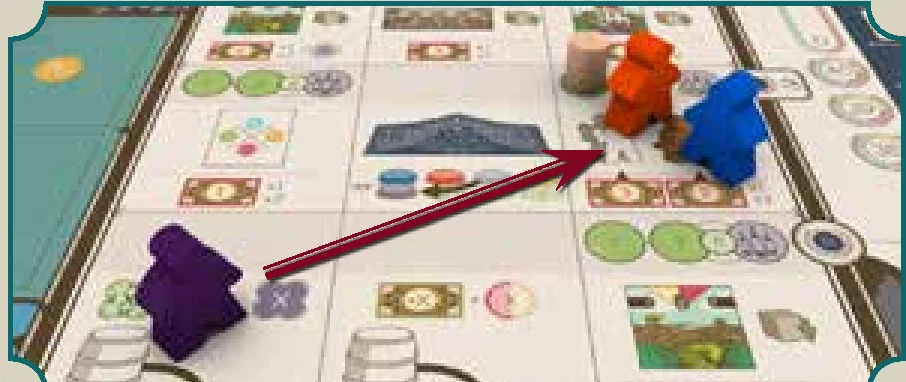
EXAMPLE 3: Movement: Purple must pay 1 Bago to Blue, 1 Bago to Orange, and 2 Bagos to the common supply because the Year/Taxation Marker is present in the chosen space, and because her movement was not adjacent to her last position.
Order of Play
Once all players have taken their first action, if any player chose the Pass / Press Release action, the turn order will have to be adjusted:
If any Player Order Marker is in the bottom row of the “Player Order” area, move it to the same Slot in the top row, shifting other Player Order Markers still in the top row to the right or left, as necessary, to make room for it.

2nd Action
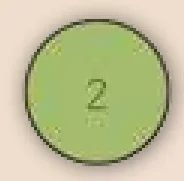 Once the turn order has been adjusted, place the Year/Taxation Marker in space “2” of the current year to indicate that everyone is taking their 2nd action.
Play proceeds according to the new order shown in the “Player Order” area. Again, on your turn, you must move your Action Marker to another space and take the action related to that space, just as you did for the 1st action.
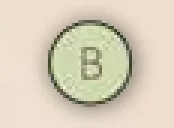 Once all Players have taken their second action, place the Year/Taxation Marker in the “B” space of the current year to indicate that it is the Maintenance phase.
Once again, after all players have taken their action, if any player chose the Pass / Press Release action, adjust the turn order as described in Order of Play above.
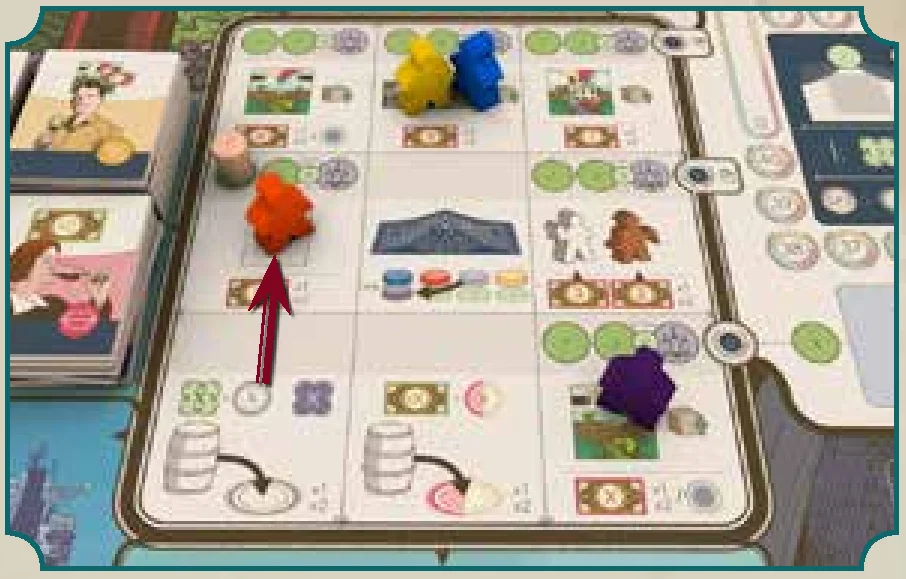
Example: Turn Order
4th year, Actions Phase, 1st Action: Place the Year/Taxation Marker in space “1” of the 4th Year. Order of play is: Orange, Yellow, Blue, and Purple.
- Orange (first Player) moves her Action Marker from the Export space to the Wine Experts space. Because the destination space is adjacent to the departure space, the move itself is free; however, the Year/Taxation Marker is in her destination space, so she has to pay 1 Bago to the common supply. She then takes the Wine Expert Action. (Movement costs 1 Bago).
- Yellow moves his Action Marker from the Cellars space to the Pass / Press Release space. He moves his Player Order Marker to the bottom row, and chooses the first space. He passes and does not take any action. (Movement costs nothing).
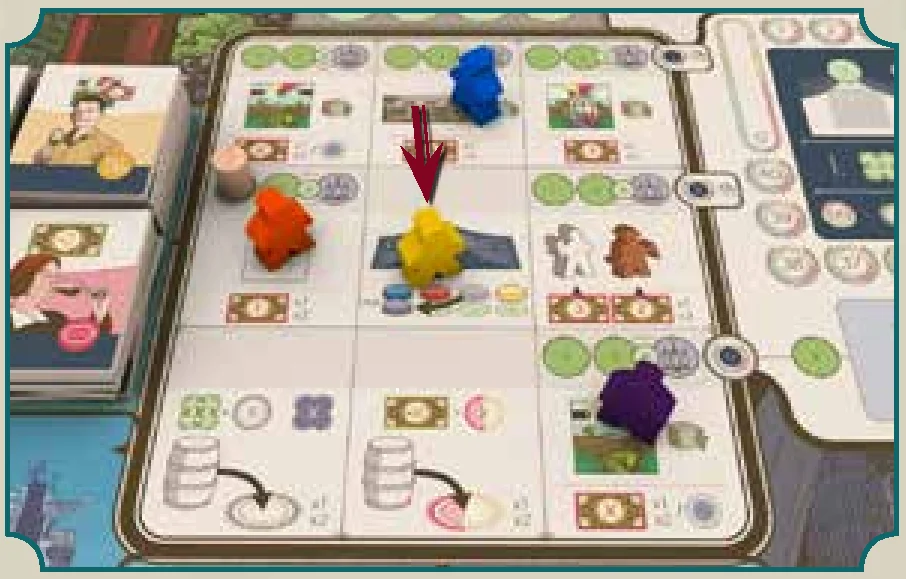
- Blue also moves his Action Marker from the Cellars space to Pass / Press Release space. He moves his Player Order Marker to the bottom row, and chooses the last space. He doesn’t pay anything to Yellow, because the Pass / Press Release space is always free of charge. He takes the Press Release Action. (Movement costs nothing).
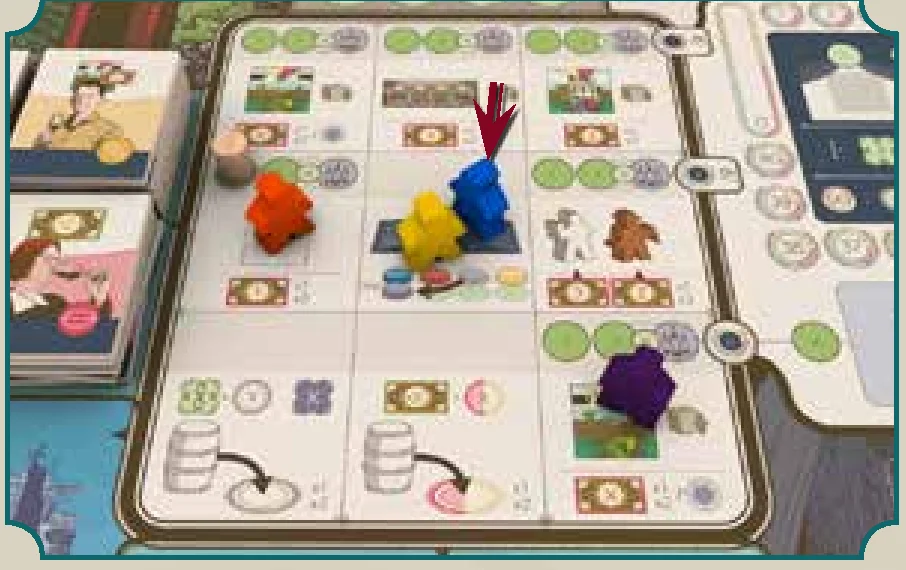
- Purple moves her Action Marker from the lower-right Vineyards space to the Wine Experts space. The destination space is not adjacent to the departure space. Both the Year/Taxation Marker and Orange Marker are in her destination space. So, Purple must pay 2 Bagos to the common supply for the non-adjacent move and the Year/Taxation Marker being there, and 1 Bago to Orange. She takes the Wine Expert Action. (Movement costs 3 Bagos: 2 Bagos to the common supply and 1 to Orange).
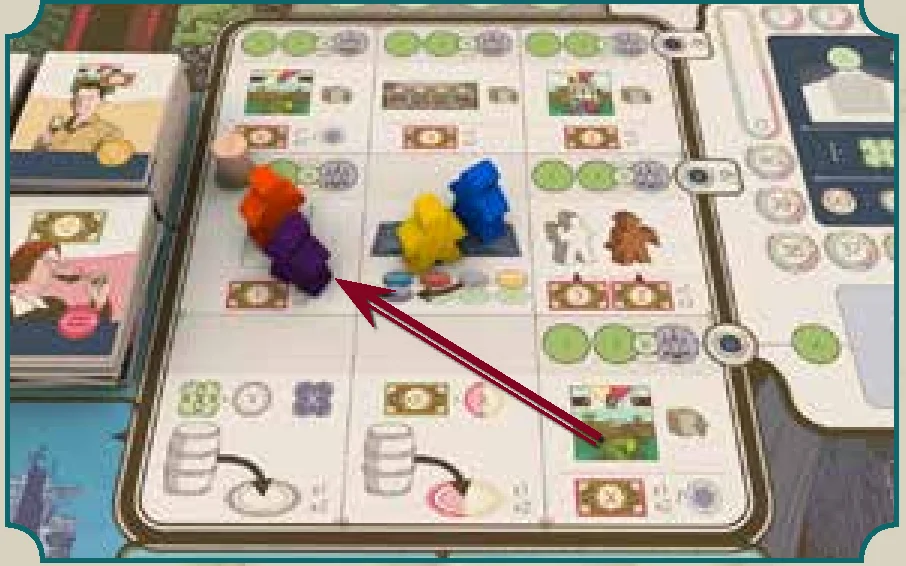
Now that everyone has taken their first action, the Year/Taxation Marker is placed in space “2” of the 4th Year and the Player Order Markers are moved to the top row.
For the 2nd Action, the Player Order is as follows: Yellow, Orange, Purple, Blue.
Available Actions
- Vineyards (p. 6)
- Wineries (p. 6)
- Enologists/Farmers (p. 7)
- Cellars (p. 9)
- Sales (p. 10)
- Export (p. 10)
- Wine Experts (p. 11)
- Pass / Press Release (p. 12)
Vineyards Action
An estate without any vineyards will not produce any wine — not good if you want to be a wine producer! Each vineyard adds 2 points to the quality of the Wine produced.
When you take this action, you must purchase 1 Vineyard per region from 1 or 2 regions of Portugal.
For each Vineyard you purchase, you must:
- Take the topmost Vineyard tile from the region’s deck,
- Pay the price shown on its cost side,
- Place it, region-side-up, on your Player Board in 1 empty Estate Slot of your choice.
Only 1 tile (Vineyard or Winery) can occupy any single Estate Slot. In each Estate on your Player Board, Vineyards must be from the same region and of the same color (White or Red). There are 2 White Wine Vineyards and 2 Red Wine Vineyards for each region, so an Estate can never have more than 2 Vineyards.
If it is the first Vineyard in the Estate, you must place that Estate’s Region Marker (you just moved it from the first Estate Slot in order to place the Vineyard tile there) on the gameboard in the appropriate Region Space on the map. The Region Markers make it easy for all players to see which players have Estates in the region.
If it is the second Vineyard in the Estate, you do not place a Region Marker. Your Player Board has 5 Estates (each one with 3 Estate Slots), so the map will have a maximum of 5 of your Region Markers on it.
4. If possible, place 1 Region Renown Cube (to be taken from the common supply) in 1 empty Cube Space of the appropriate Region inset. Skip this step if there are no Region Renown Cubes left in the supply, or if there are no empty Cube Spaces in the Region inset.
Important note: A single Vineyard Action never allows you to buy 2 Vineyards from the same region.
Any number of Players may have an Estate (and therefore a Region Marker) in the same region. Also, you can have more than 1 Estate (and therefore more than 1 Region Marker) in the same region. The different characteristics of the regions are described on page 12 of the Reference Book.
EXAMPLE: Vineyards Action: Orange already has Vineyard tiles in 3 Estates: 1 White in Ribatejo, 1 Red in Lisboa, and 2 White in Algarve. She decides to buy 2 Vineyards, and proceeds as follows:
- She buys 1 Dão Red and starts a fourth Estate. She pays 4 Bagos, and places the Dão tile in her 4th Estate. She places that Estate’s Region Marker on the region’s space on the map, and moves 1 Region Renown Cube to the Region’s inset.
- She buys 1 Ribatejo White to expand her Ribatejo Estate. She Pays 4 Bagos, and places a Renown Cube in the Ribatejo inset, and the Vineyard in her Estate. Because it is her second Vineyard in the Estate, she does not place another Region Marker (she already placed this Estate’s Region Marker earlier).
- She cannot expand her Lisboa Red Estate because the Vineyard on top of Lisboa’s deck is White. She cannot expand her Algarve White Estate because she already has both of Algarve’s White Vineyards.
Wineries Action
Wineries are necessary to house enologists, and a Winery also adds 1 to the quality of Wine produced.
When you take this action, you must build 1 or 2 Wineries.
For each Winery you build, you must:
- Take 1 Winery tile from the gameboard,
- Pay 3 Bagos,
- Place it in an empty Estate Slot of your choice on your Player Board. Only 1 tile (Vineyard or Winery) can occupy any single Estate Slot. Because you will want to have at least one Vineyard in each Estate, each Estate can have a maximum of 2 Wineries.
If possible, place 1 Region Renown Cube (to be taken from the common supply) in 1 empty Cube Space of the appropriate Region inset. If the Estate already has a Vineyard, place the Renown Cube on an empty Cube Space in that Region’s inset; otherwise, place the cube on the Winery itself until the Estate becomes affiliated with a region. At that point, move the cube from the Winery to an empty space in the Region’s inset.
Note: Place the Winery Red-side-up for a Red Wine estate; White-side-up for a White Wine estate. If your estate has a Winery before it has any Vineyards, the color of the Winery doesn’t matter, and can be changed to match the Vineyard you eventually buy for that estate.
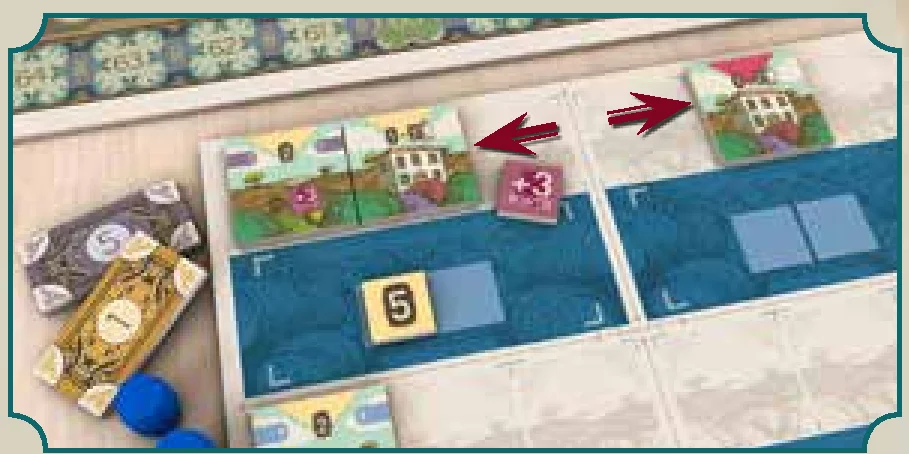
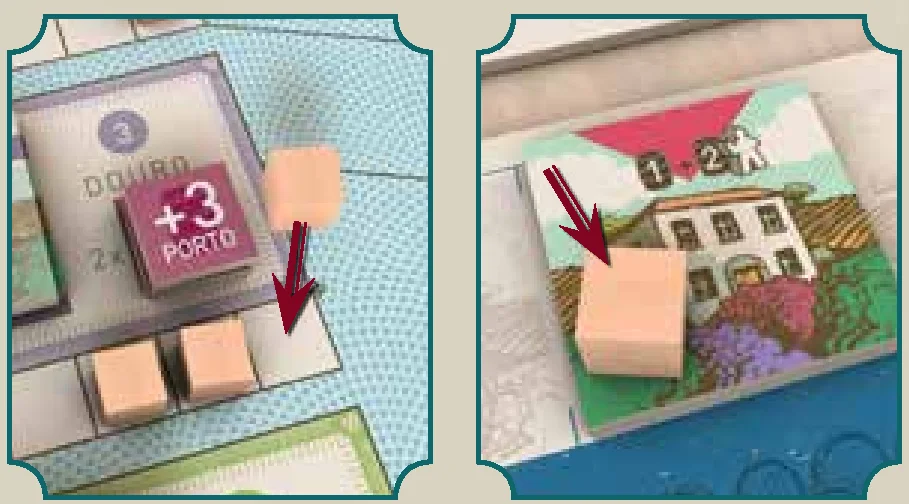
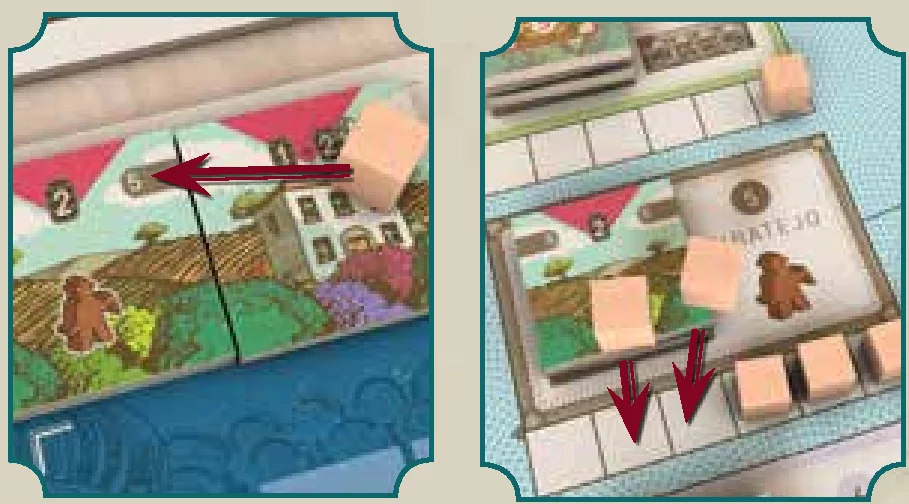
EXAMPLE: Wineries Action: Blue buys 2 Wineries. He places one to expand his Douro Estate, and the other one in an Estate without Vineyards. He Pays 6 Bagos and places 1 Region Renown Cube in the Douro Region inset and 1 Cube on the Winery of the Estate without Vineyards. In a following year, he buys a Ribatejo Vineyard and places it in the Estate that had only a Winery. He takes the Region Renown Cube from the Winery and places it in the Ribatejo Region inset.
Enologists/Farmers Action
Enologists work in wineries, and Farmer work on vineyards. An Enologist adds 2 to the quality of wine produced. A Farmer adds 1 to the quality of wine produced.
When you take this action, you must hire 1 or 2 Enologists/Farmers (any combination).
For each Enologist you hire, you must:
- Take 1 Enologist from the gameboard,
- Pay 3 Bagos,
- Place it on your Player Board on an empty Winery of your choice. Each Winery can only host 1 Enologist. (You cannot hire an Enologist if you do not have any unoccupied Wineries).
For each Farmer you hire, you must:
- Take 1 Farmer from the gameboard,
- Pay 2 Bagos,
- Place it on your Player Board on an empty Vineyard of your choice. Each Vineyard can only host 1 Farmer. (You cannot hire a Farmer if you do not have any unoccupied Vineyards).
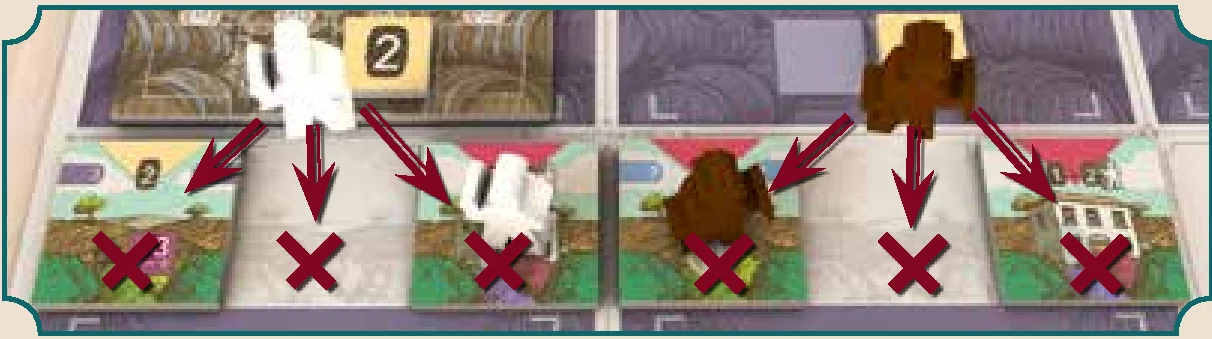
EXAMPLE: Enologists/Farmers Action: Purple has only 1 empty Winery and 1 empty Vineyard, so she can hire only 1 Enologist and 1 Farmer. She Pays 5 Bagos and places the Enologist on the empty Winery and the Farmer in the empty Vineyard.
Cellars Action
Cellars allow Wines to age longer, increasing the Wine Value for Sales, Export, and the Fair. The older Wine, more valuable it is.
When you take this action, you must build 1 or 2 Cellars.
For each Cellar you build, you must:
- Take 1 Cellar tile from the gameboard,
- Pay 3 Bagos,
- Place it on your Player Board to cover a Warehouse of your choice. Only 1 Cellar can cover any single Warehouse. Transfer all of the Wine tiles from the Warehouse to the Cellar, respecting their aging. Therefore, a Wine in the leftmost slot of the Warehouse moves to the leftmost slot of the Cellar; a Wine in the second Warehouse slot moves to the second slot of the Cellar.
- If possible, place 1 Region Renown Cube (to be taken from the common supply) in 1 empty Cube Space of the appropriate Region inset. If the Estate already has a Vineyard, place the Renown Cube on an empty Cube Space in that Region’s inset; otherwise, place the cube on the Cellar itself until the Estate becomes affiliated with a region. At that point, move the cube from the Cellar to an empty space in the Region’s inset.
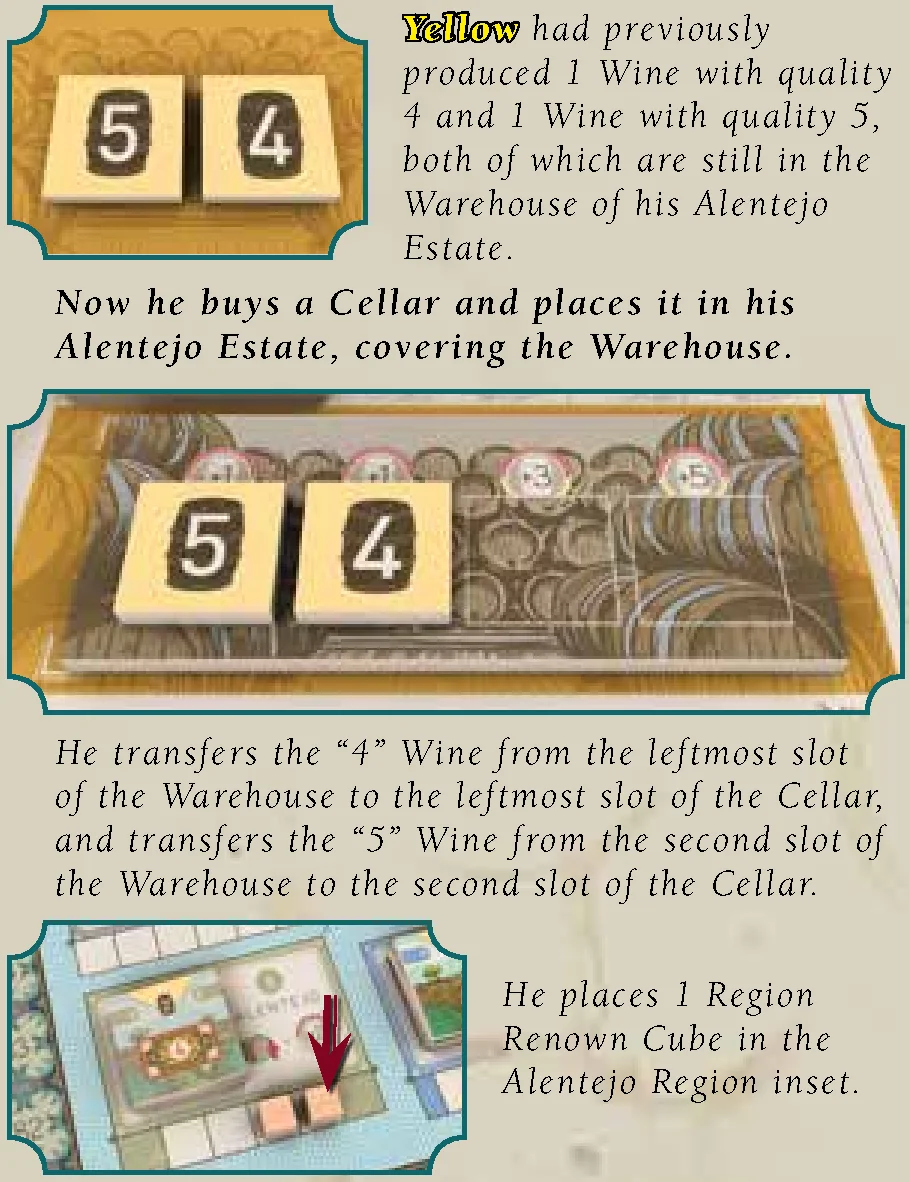
EXAMPLE: Cellars Action: Yellow had previously produced 1 Wine with quality 4 and 1 Wine with quality 5, both of which are still in the Warehouse of his Alentejo Estate. Now he buys a Cellar and places it in his Alentejo Estate, covering the Warehouse. He transfers the “4” Wine from the leftmost slot of the Warehouse to the leftmost slot of the Cellar, and transfers the “5” Wine from the second slot of the Warehouse to the second slot of the Cellar. He places 1 Region Renown Cube in the Alentejo Region inset.
Wine Mechanics
In order to better understand the rest of the actions, you need to know how Wine is made and aged, how its Wine Quality is calculated at the time of production, and how its Wine Value is determined when it is sold, exported, or presented at the Fair.
Aging and Wine Production Overview
 At the end of each Year (during the Production Phase), move each Wine in each of your Warehouses and Cellars 1 slot to the right to indicate that it has aged for 1 year.
If a Wine moves out of the rightmost slot of its Warehouse/Cellar, it can age no further. The Wine is lost and must be discarded.
After that, Wine production for the current year will start.
For each Estate on your Player Board that has at least 1 Vineyard (if an Estate has no Vineyard, it does not produce Wine) you must:
- Calculate the Wine Quality (see below),
- Take 1 Wine tile of the appropriate value (from the common supply),
- Place it in the leftmost slot of that Estate’s Warehouse/Cellar, with the “Red Wine” or “White Wine” side face-up, depending on the color of the Vineyard(s) that produced it.
Wine Quality
 Wine Quality is represented by an icon of a barrel with a number inside. Anything that affects the Wine Quality will depict this icon.
Wine Quality depends on several factors:
- The number of Vineyards in the Estate, and therefore the quantity of high-quality grapes produced;
- The work of Farmers who can select the best grapes;
- The presence of Wineries, which store the grapes in optimal conditions;
- The Enologists in Wineries, who oversee and optimize the process of turning grapes into Wine;
- Whether you are making Porto Wine (in Douro, see Reference Book p.12);
- The weather conditions of the current year (shown on the Vintage tile).
Wine Quality is calculated as follows:
- + 2 points for each Vineyard in the Estate,
- + 1 point for each Farmer in the Estate,
- + 1 point for each Winery in the Estate,
- + 2 points for each Enologist in the Estate,
- + 3 points if you are making Porto Wine (in Douro, see Reference Book p.12),
- ± Weather conditions Value (+2 to −2), shown at the top of the current Vintage tile.
Before production, you can move Enologists and Farmers to whichever of your Estates you like, but each Winery can only host 1 Enologist and each Vineyard can only host 1 Farmer.
Note: If you produce a Wine with “0” Quality, you didn’t harvest enough high-quality grapes to make any Wine; do not take a Wine tile (notice that there are no “0” Wine tiles).

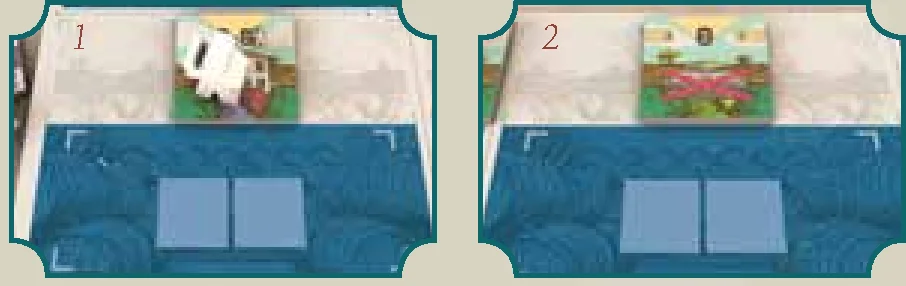
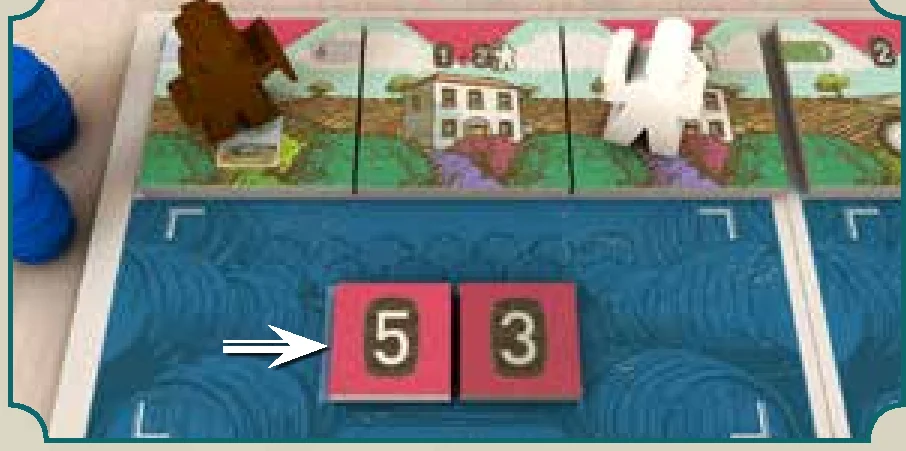
EXAMPLE: Aging and Wine Production: The Vintage tile is −2.
- In the leftmost slot of Blue’s Lisboa Warehouse, there is a wine produced at the end of the previous year. He moves it 1 slot to the right because it has aged 1 year.
- He does not take a Wine tile for his Estate that has no Vineyards: It’s not possible to produce Wine without grapes from a Vineyard.
- He does not take a Wine tile for his Minho Estate: Wine Quality in Minho is 0 (+2 for Vineyard, −2 for Vintage tile). Due to the bad weather, there were not enough good grapes to make Wine.
- He takes a “5” Wine tile for his Lisboa Estate. The Wine Quality is 5 (+2 for Vineyard, +1 for Farmer, +2 for 2 Wineries, +2 for Enologist, −2 for Vintage tile). His Lisboa Estate produces Red Wine, because of its Red Vineyard, so he places a “5” Wine tile Red-side-up in the leftmost slot in the Warehouse of his Lisboa Estate.
Wine Value
 Wine Value is represented by an icon of a circle with a barrel inside. Anything that affects the Wine Value will depict this icon.
When Wine is Sold, Exported, or Presented at the Fair, you must determine its Wine Value, which is based on the Wine Quality, the Renown of its Region of origin, and its time aging in a Cellar.
Wine Value is calculated as follows:
- + Wine Quality (the value on the Wine tile),
- + 1, 3, or 5 points for aging in a Cellar,
- + (optional) 1 or 2 points for the Renown of its Region of origin: If you choose to rely on the Renown of its Region, remove 1 or 2 Region Renown Cubes from the inset of the Region of the Wine’s origin, and add 1 point for each removed cube (+2 if the Wine is from Alentejo, region 8). If you choose not to use the Region’s Renown to increase the Wine Value, do not remove any cubes.
- + 1 if the Wine is from Algarve (region 9).
Return removed Region Renown Cubes to the common supply.
Note: A Region’s Renown Cubes can be used by any player that has an Estate in the Region (has a Region Marker there), regardless of whose actions generated the Renown in the first place.
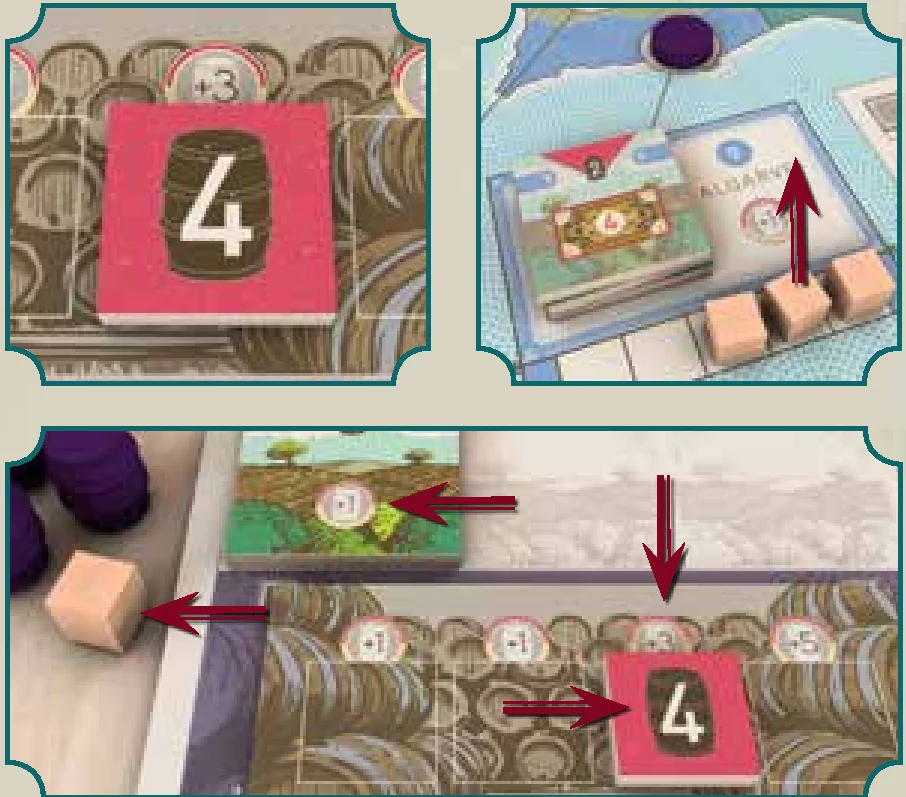
EXAMPLE: Wine Value: Purple has 1 Wine (Wine Quality of 4) in the 3rd slot of the Cellar in her Algarve Estate. The Algarve Region has 3 Region Renown Cubes. She decides to use one of them. She puts the Region Renown Cube back in the common supply. As a result, the Wine Value is 9: + 4 for its Quality, + 3 for aging in a Cellar, + 1 for the removed Region Renown Cube, + 1 for being an Algarve Wine.
Phase 4: Production (End of Year)
Production is the most crucial phase of the game, it’s the wine-maker’s ultimate goal, and the moment everyone has been waiting for!
 Place the Year/Taxation Marker on the appropriate space of the current year, to indicate that Production Phase is starting. Then, perform the following steps:
- Age Wine: Move each Wine tile on your Player Board (in Warehouses and Cellars) 1 slot to the right. Any Wine tile that cannot be moved to the right any further in its Warehouse/Cellar is lost, and must be discarded.
- Redistribute employees (optional): Reassign your Enologists and Farmers to different estates. Remember, each Winery can host 1 Enologist, and each Vineyard can host 1 Farmer.
- Produce Wine: For each of your Estates that has a Vineyard, do the following:
- Calculate the Wine Quality the estate produces this year (+2 per Vineyard, +1 per Farmer, +1 per Winery, +2 per Enologist, +3 if you are producing Porto, ± weather Value).
- If the Wine Quality is greater than 0, take a Wine tile matching the Wine Quality, and place it in the leftmost slot of the Warehouse/Cellar, with the appropriate side face-up: either “Red Wine” or “White Wine”.
If this is the 1st, 2nd, or 4th year, the year ends.
If this is the 3rd, 5th, or 6th year, there will be a Fair Phase, and then the year ends.
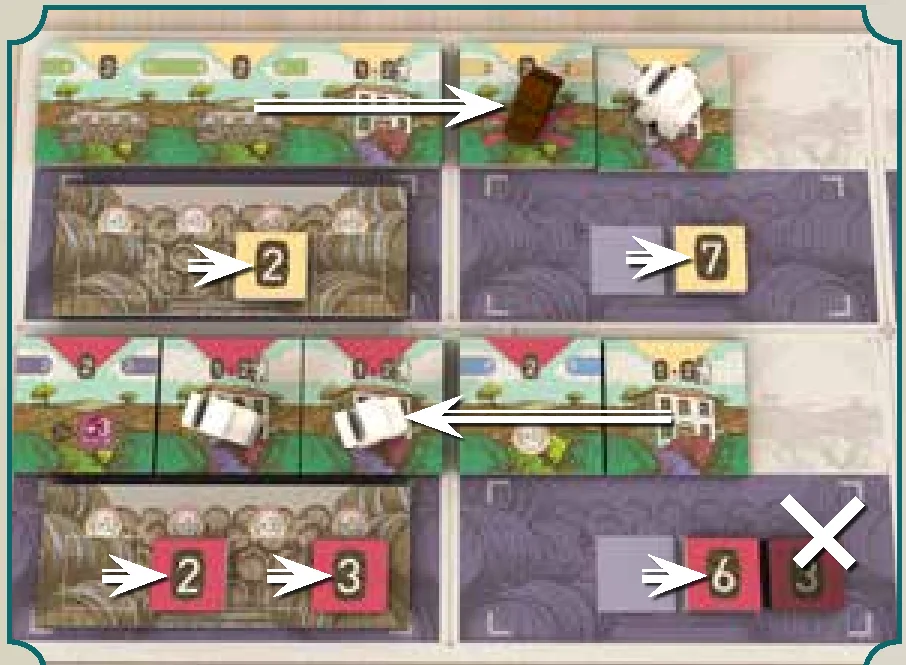
EXAMPLE: Production: Purple moves all the Wine tiles on her Player Board 1 slot to the right. Her Quality 3 Red was already in the rightmost slot of her Algarve estate, so she must discard it. She chooses to move an Enologist from the Winery in her Algarve Estate to the empty Winery in her Douro Estate, and one farmer from a Vineyard in Dão to her Vineyard in Minho. Then, for each estate, she calculates the Wine Quality produced, and places the appropriate Wine tile in the leftmost slot.
Sales Action
Without Sales you will have no profits to invest in your business. Casa de Fados, the Hotel, and the Enoteca are all eager to buy your wine.
When you take this action, you must sell 1 or 2 Wines from your Warehouses and Cellars, to 1 or more of the 3 available local Establishments.
For each Wine you sell, you must:
- Place 1 barrel from your supply in an empty Sales Slot of your choice in the Sales Area. Only 1 barrel can occupy any single Sales Slot. The Wine Value must be at least as high as the requested value indicated in the Sales Slot. Red Wines can be sold only in “Red Wine” Sales Slots; White Wines only in “White Wine” Sales Slots. Once placed, the barrel cannot be moved, unless you use a Wine Expert that permits you to do so.
- Remove 1 or 2 Region Renown Cubes (see Wine Value), if and only if you need them to increase the Wine Value in order to reach the requested value indicated in the chosen Sales Slot. (Note: You cannot remove Region Renown Cubes if you do not need to use them.)
- Discard the Wine tile.
- Receive the value of the Sales Slot in Bagos.
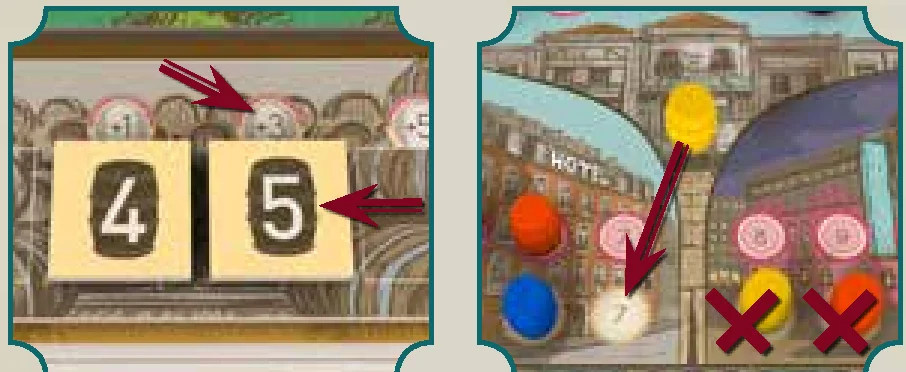
EXAMPLE: Sales Action: Yellow decides to sell the White Wine (Wine Quality 5) that is in the 3rd slot of the Cellar in his Dão Estate. Dão has 1 Renown Cube. Therefore, the Wine Value is 8: + 5 Wine Quality, + 3 for time aging in a Cellar. If he takes the Renown cube from Dão, he would increase the Wine Value to 9, but unfortunately both the White slots with value of 8 and 9 were already occupied with barrels. Because taking the Renown cube from Dão would be useless, he is not allowed to take it. He decides to place his barrel in the Hotel, in the White 7 Slot. He receives 7 Bagos.
Export Action
Export your Wine to the different countries and markets to get prestige. Exports provide immediate points and points at the end of the game.
When you take this action, you must export 1 or 2 Wines from your Warehouses and Cellars, to any number of the foreign markets (each column represents a different country).
For each Wine you export, you must:
- Place 1 barrel from your supply in an empty Export Slot of your choice in the Export Area. Only 1 barrel can occupy any single Export Slot. The Wine Value must be at least as high as the requested value, indicated in the Export Slot. Once placed, the barrels can neither be taken back nor moved, unless you use a Wine Expert that permits you to do so.
- Remove 1 or 2 Region Renown Cubes (see Wine Value), if and only if you need them to increase the Wine Value in order to reach the requested value indicated in the chosen Export Slot. (Note: You cannot remove Region Renown Cubes if you do not need to use them.)
- Discard the Wine tile.
You immediately earn as many VP as shown in the Export Slot where you placed the barrel (regardless of the Wine Value).
Note: At the end of the game, each country will reward the player who exported the most barrels to it with the VP as listed at the top of the column. In case of a tie, the points will be divided (rounded down) between the tied players.
Note: In a 2-player game, only the Export slots inside the 2-player frame are available.
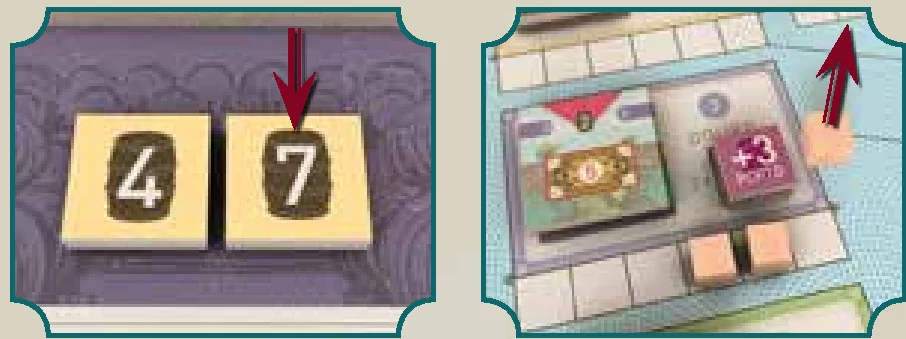
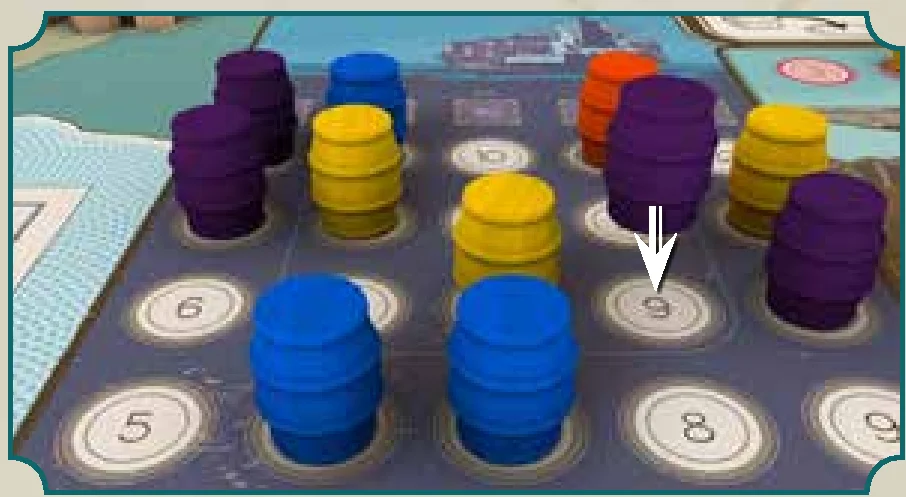
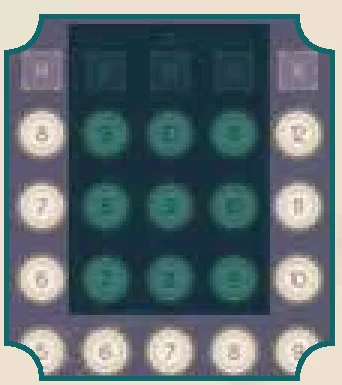
EXAMPLE: Export Action: Purple exports the Wine (Wine Quality 7) from the second slot of the Warehouse of her Douro Estate. If she wants to place the barrel in the “8” or “9” Export Slot, she will need to use 1 or 2 Region Renown Cubes, respectively, removing them from the Douro Region inset. If instead she would like to place it in the “6” or “7” Export Slot, she doesn’t need to use any Region Renown cubes, so she cannot opt to remove some, just to spite her opponents. She chooses to place the barrel in the “9” Export Slot in the 4th country, and immediately receives 9 VP.
Wine Experts Action
Experts in the Wine industry will help you to improve your business and will guide you on your journey into the world of Wine.
When you take this action, you must hire 1 or 2 Wine Experts.
For each Wine Expert you hire, you must:
- Choose a deck and take the top Wine Expert tile,
- Pay 1 Bago,
- Place the Wine Expert tile in front of you, face-up.
After you hire the first Expert, then you can decide whether to hire a second one (from the same deck or another). There is no limit to how many Wine Experts you can have. A discarded Wine Expert always goes face-up to the bottom of its deck.
Note: Each tile represents a Wine Expert, who specializes in a specific Wine feature (Taste, Aroma, Appearance, Alcohol Content).
During the Fair Phase, you will be able to use a certain number of face-up Wine Experts to promote your Wine and earn you Fair Points. Wine Experts may be able to help your Wine perform better at the fair, depending on the characteristics depicted on the Vintage tile for the year.
Wine Expert Abilities
In addition to being able to help promote your Wine at the fair, each Wine Expert also has a special ability.
During your turn, you may flip 1 Wine Expert tile face-down to use the special ability depicted on the front.
Note: You can only use 1 Wine Expert tile per turn.
See page 9 of the Reference Book for detailed descriptions of the Wine Experts’ special abilities, which also tells you when each special ability can be played.
Note: If you flip a Wine Expert tile face-down to use its special ability, it will not be available at the next Fair to help your Wine perform better; however, after the 1st and 2nd Fairs, it will flip face-up once again, allowing you to use its ability or send it to the next Fair.
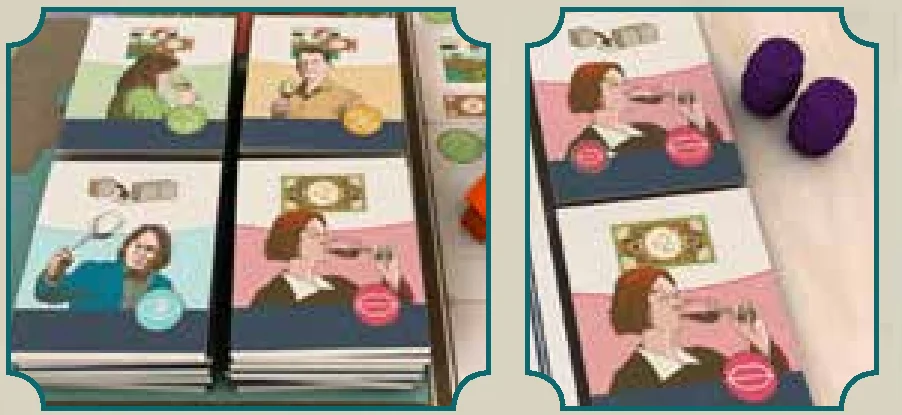
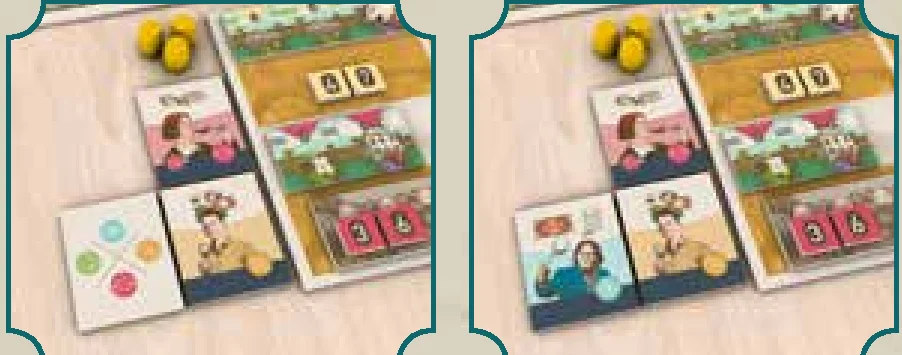
EXAMPLE: Wine Experts Action: Purple purchases the Wine Expert tile from the top of the “Taste” deck. She pays 1 Bago, and places the tile face-up in front of her. Now she decides to buy a second tile from the same deck. As before, she pays 1 Bago, and places the topmost “Taste” Expert face-up in front of her.
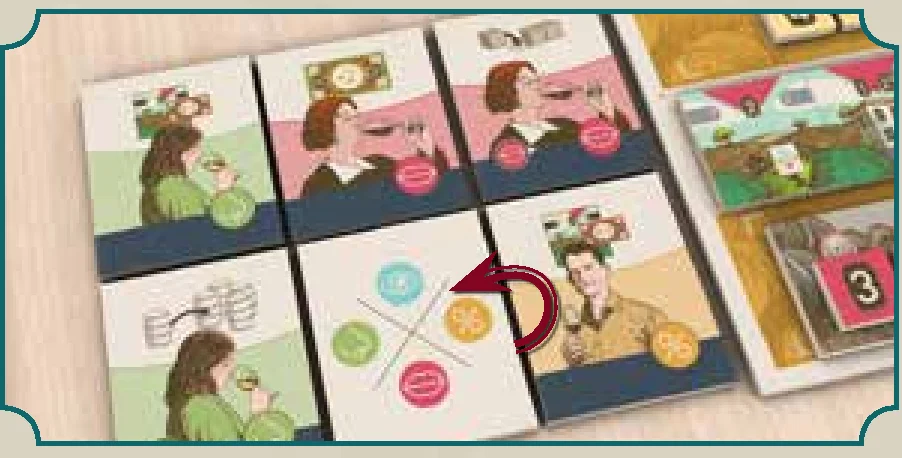
EXAMPLE: Wine Expert use:
- 2nd Year (Actions Phase): Yellow has 6 face-up Wine Expert tiles in front of him. He is currently performing the Export Action, and one of his Wine Experts has an applicable ability he wishes to use. He flips that Wine Expert tile face-down to use the special ability.
- 3rd Year (Fair Phase): Although he cannot make use of the face-down Wine Expert tile, he can use the other 5 that are face-up. He plays 3 of his face-up Wine Expert tiles. After the Fair, he must discard the 3 he played at the Fair. Now he has 1 face-down and 2 face-up Wine Expert tiles.
- 4th Year (before the first action): He flips all of his face-down Wine Experts (there’s only 1) face-up.
Pass / Press Release Action
With this action you are positioning yourself and preparing your Wine for the biggest competition in the world. Here you will prove that you are managing the best Wine business of all.
Remember: Moving to this space is always free.
When you place your Action Marker on the Pass / Press Release space, you must first move your Player Order Marker from the top row of the “Player Order” Area to the bottom row, and place it in an empty Player Order Slot of your choice (only 1 Player Order Marker may occupy each Order Slot).
After that, you either:
- Pass (do nothing), OR
- Do a Press Release (enter a Wine into the upcoming Wine Tasting Fair) — You can take this action only once per Fair: Once you have done a Press Release for the upcoming fair, on further visits to this action space you must Pass.
Note: If you have not taken this action before the Fair, you will have a chance to do a last-minute Press Release to enter a Wine in the Fair (as a free action), because every respectable Wine producer must participate in the Fair. So, you are not required to take the Press Release action during the Actions phase.
“Why would I spend a precious action to do a Press Release early?” you ask. Entering your Wine in the fair early lets you choose the best Fair Booth before someone else claims it. Also, the sooner you impress the Magnates, the earlier you have access to crucial barrels! Furthermore, timing your Press Release just right lets you send the Wine Experts best suited for the current Vintage.
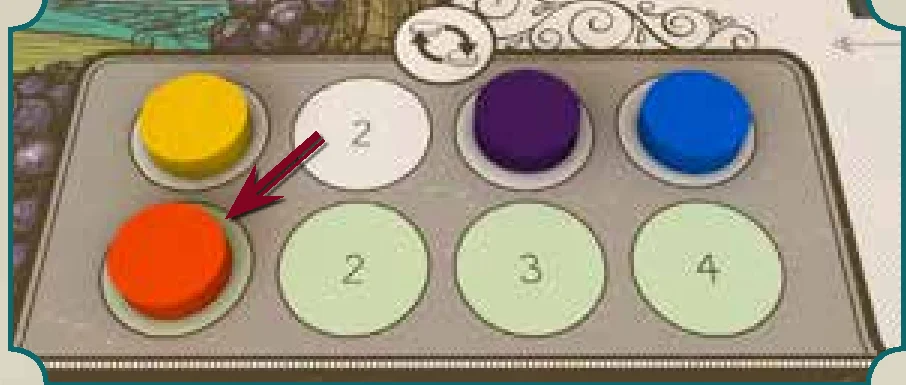
Steps for a Press Release
In order to do a Press Release, you must perform the following seven steps:
- Declare which Wine (just one), among those on your Player Board, you will enter in the Fair.
- (optional) Remove 1 or 2 Region Renown Cubes (see Wine Value) from the Wine’s region of origin in order to increase the Wine Value.
- Earn Fair Points: You earn Fair Points equal to the Wine Value. Advance your Fair Scoring Marker accordingly.
- Choose an empty Fair Booth, and move your color disc onto it.
- Wine Experts: For each wine feature depicted on the Vintage tile, you may discard 1 face-up Expert, whose expertise matches the wine feature, in order to earn Fair Points equal to the number of symbols depicted on the Vintage tile for that Wine Feature. If the Wine Expert tile also has a symbol with an arrow on it, earn one additional Fair Point. Put discarded Wine Expert tiles face-up on the bottom of their respective stacks.
Each Fair Booth depicts 1 bonus. When you select a Fair Booth, you earn the depicted bonus:
- No bonus, but you get to be the first player to choose Magnate Action/Multiplier tiles.
- Immediately take the topmost Wine Expert tile from the stack of your choice.
- Immediately get 3 Bagos from the common supply.
- Immediately advance 3 Fair Points.
The positions of the discs in the fair booths will also determine the Player Order for taking Action/Multiplier tiles and for the next turn after the Fair.
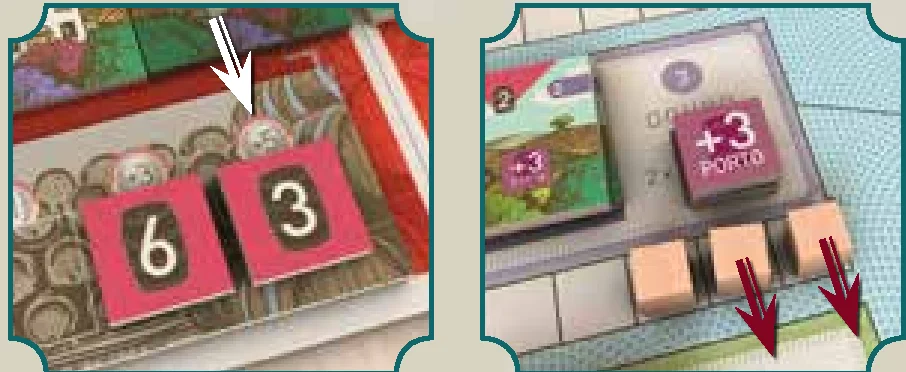

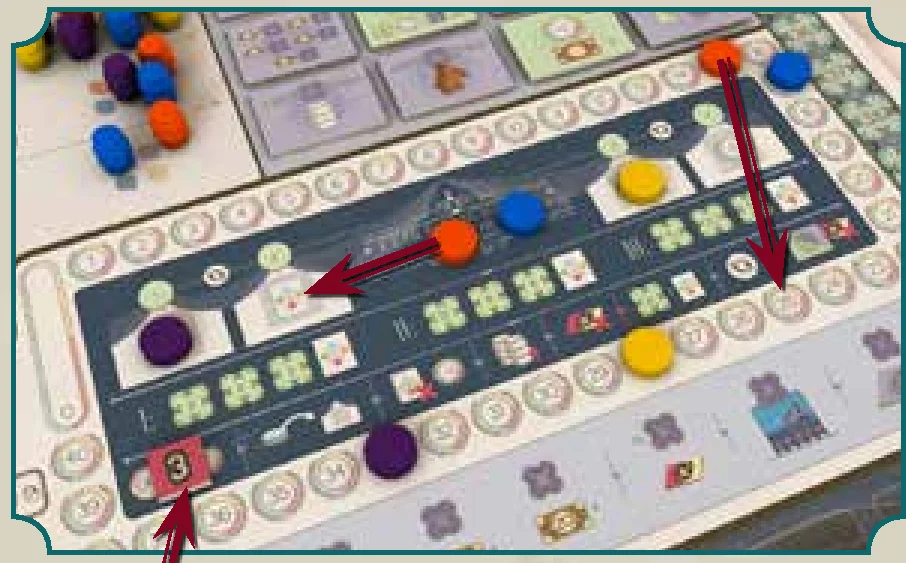
Note: Once placed, the disc can neither be moved nor taken back until the end of the upcoming Fair.
Note: Fair Points do not reset to zero after the Fair! They accumulate from Fair to Fair, your reputation building up over time.
- Take barrels (optional): Take 1 or 2 of your barrels from the Magnates Area into your supply, following the steps below:
For each Magnate (Anabela, Bruno, and Carolina) you must:- Determine whether the Wine you entered meets the Magnate’s current expectation, as indicated on the current Vintage tile: Anabela’s request is indicated beside the letter A; Bruno’s, beside the letter B; and Carolina’s, beside the letter C.
- Anabela is always interested in Wines of a certain Color;
- Bruno is always interested in Wines with a minimum Wine Value;
- Carolina is always interested in Wines from certain Regions of Origin.
- If your Wine meets the Magnate’s current expectation, decide if you want to take 1 of your barrels from that Magnate’s space.
Note: A single Press Release allows you to take up to 2 barrels (1 from each of 2 different Magnates’ spaces), so, even if the Wine satisfies all 3 Magnates, you can still only take a maximum of 2 barrels (from 2 different Magnate spaces of your choice).
- Determine whether the Wine you entered meets the Magnate’s current expectation, as indicated on the current Vintage tile: Anabela’s request is indicated beside the letter A; Bruno’s, beside the letter B; and Carolina’s, beside the letter C.
- Discard the Wine tile.
Remember: Once you have done a Press Release for the upcoming fair, on further visits to this Action space, you change the turn order and then you must Pass.
Note: Because you must present precisely 1 Wine at each Fair, and there are 3 Fairs during the game, you will only have 3 opportunities to take barrels from the Magnates Area.

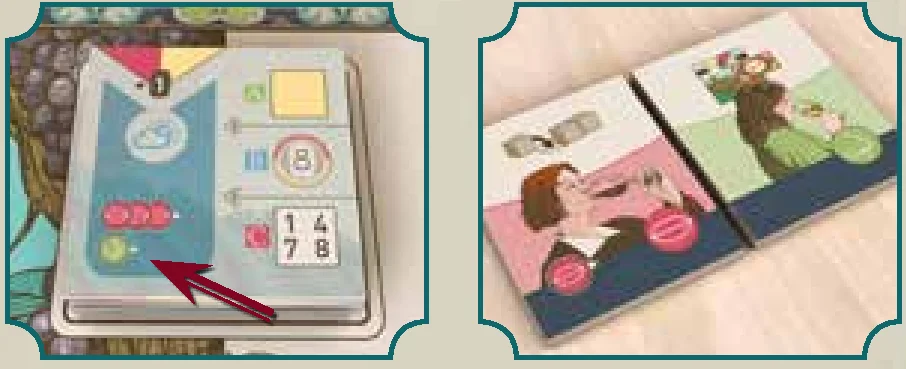
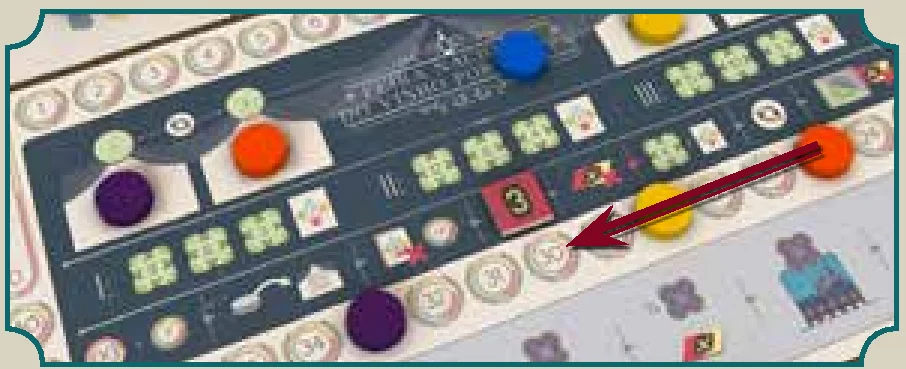
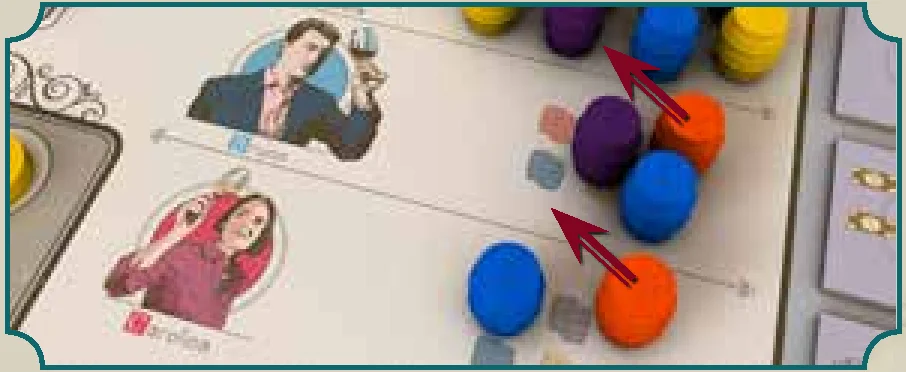
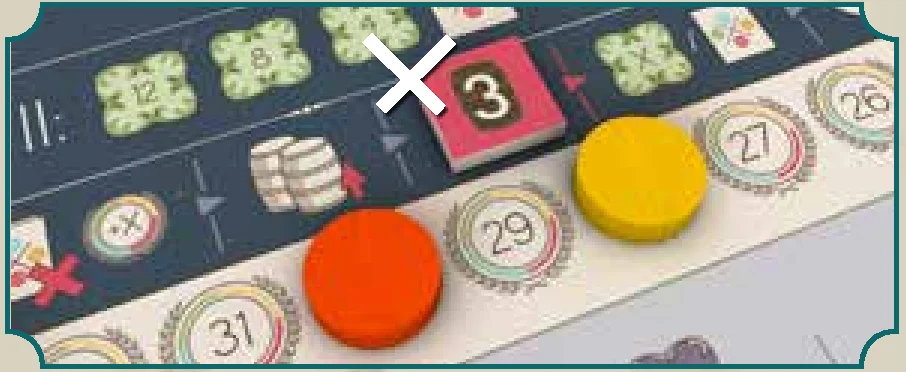
EXAMPLE: Pass / Press Release:
- 4th Year, Phase 1 (Actions Phase): Orange moves her Action Marker to the Pass / Press Release space. She moves her Order Marker to the bottom row of the Player Order Area and chooses the first Player Order Slot.
- She announces that the Wine she is presenting for the upcoming Fair (the 2nd Fair, end of Year 5) is her Red Wine (Wine Quality 3) that is in the 4th slot of her Douro cellar.
- She chooses to use 2 Region Renown Cubes, removes them from the Douro Region inset, and returns them to the common supply. This increases the Wine Value to 10 (+ 3 Quality, + 5 cellar aging, + 2 Renown Cubes). She receives 10 Fair Points and moves her Fair Scoring Marker accordingly (from 15 to 25).
- She moves her disc to the Expert Fair Booth and takes one Expert in Taste (red feature) from the top of the deck.
- The current Vintage tile depicts 3 symbols for Taste (red) and 1 symbol for Aroma (green). She discards the Wine Expert specialized in Taste she just took (which also has an arrow: +4 Fair Points), and an Expert specialized in Aroma (+1 Fair Point). Total: +5 Fair Points.
- Magnates’ expectations: Anabela wants White Wine; Bruno wants Wine value ≥ 8; Carolina wants region 1, 4, 7, or 8. Orange’s Red Douro Wine (Value 10) meets Bruno’s and Carolina’s expectations. She takes 1 barrel from Bruno’s space and 1 barrel from Carolina’s space.
- She discards the Wine tile.
Wine Tasting Fair (only 3rd, 5th, and 6th Year)
 Place the Year/Taxation Marker on the Fair space of the current year, to indicate that Fair Phase is starting.
Any player that hasn’t yet placed their disc in the Fair Area (using the Pass / Press Release action), must do so now, in Player Order, respecting the same rules described on page 12 in the Pass / Press Release Action.
If you have not entered a Wine into the fair, and you somehow have no Wine now, you shamefully will not participate in the fair. This is not good for business!
Now, the Fair starts:

a. Determine the ranking according to the number of Fair Points each player has accumulated over the course of the game.
The first 3 players in the ranking immediately gain VP according to their current position in the Fair Scoring Track per the table below; the 4th player takes a Wine Expert (WE) from any stack of her choice:

Note: 4th place gains no VP but does get a Wine Expert.
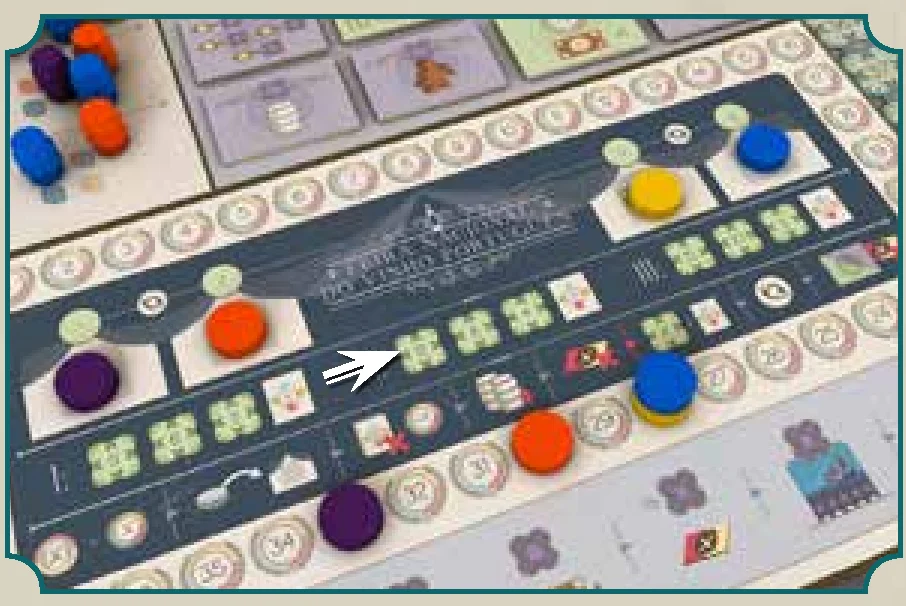
EXAMPLE: Wine Tasting Fair: 5th Year, Fair Phase. Blue is the only one who has not made a press release for this fair. He presents his Quality-5 White Wine from his Terras do Sado Estate, but there are no region renown cubes to boost its value, so its Wine Value is 5. He places one of his discs in the 4th Fair Booth. He receives 3 Fair Points for the Bonus in that space. He also discards 2 wine experts increasing the Fair Points by +3. This earns him 11 Fair Points. The wine meets Carolina’s expectations, so he takes 1 of his barrels from the Carolina space. The 2nd Fair starts.
In case of a tie, the total amount of VP given by the tied positions will be split (rounded down) by players who tied. If tied for last position in a 4-player game, each of those players, in turn order, gets a Wine Expert.
Important: In a 2-player game, use the 1st and 3rd place scorings.
Note: The Fair Points you earn will never reset to zero during the game. The VP you earn at each of the three fairs is determined by your ranking on the Fair Scoring Track, which records your total cumulative Fair Points over the course of the game.
- Adjust the order of play: The new player order matches the left-to-right order of the players’ discs in the fair booths. This order of play will be kept for the first action of the following year.
- Move your Disc from the Fair booth onto the fair logo.
- Buy Magnate Action/Multiplier tiles: In the new Player Order, players take turns either discarding any 1 Wine tile from their player board to take a Magnate Action/Multiplier tile, or passing to take no more this Fair. To be clear: Once you pass, you cannot come back in to buy more. Once everyone has passed, move on to the next step.
- Magnate Action tiles: When you buy a Magnate Action tile you place it face-up next to your player board.
- Magnate Multiplier tiles: To buy a Multiplier tile you must have a barrel available. Place the tile face-up next your player board and place a barrel from your supply on it. Once placed, the barrel cannot be moved, unless you use a Wine Expert that permits you to do so; however, note that a Multiplier tile with no barrel on it at the end of the game will not score any VP.
Note: You are not allowed to have more than 1 identical Action/Multiplier tile (with the same icon).
- Refill the display: Discard the unpurchased Magnate Action/Multiplier tiles remaining on the board and refill the display from the Magnate deck next to the board. Make sure that the Action tiles, which should be on top of the deck, get placed first.
Magnate Action Tile Use
During your turn in the Actions Phase (before moving your Action Marker, or before or after performing the Action, but not during the Action itself), you can flip one (and only one) of your face-up Magnate Action tiles to take the Action. Face-down Action tiles will be only flipped face up after the 1st and 2nd fairs, just like the Expert tiles.
For details on Magnate Action/Multiplier tiles, see page 5 of the Reference Book.
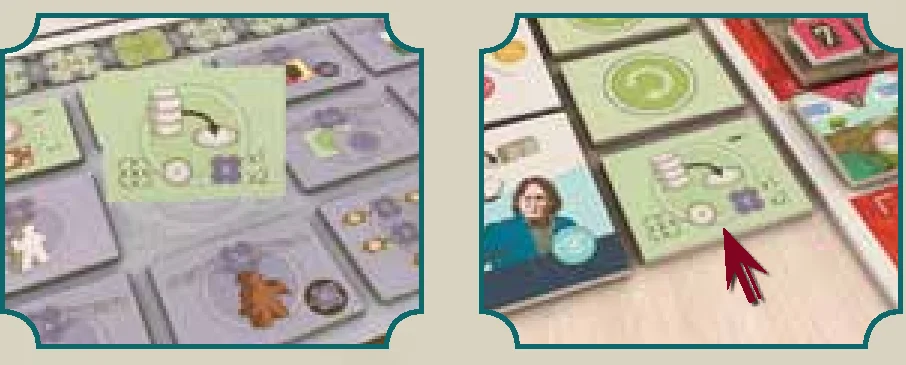
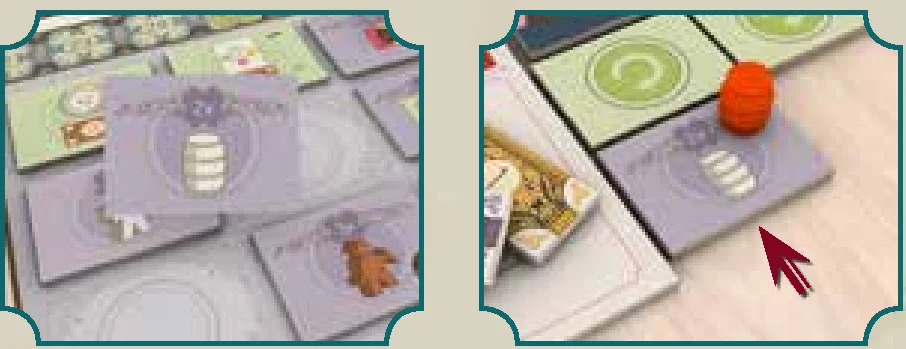
EXAMPLE: Fair results:
- Purple has 33 Fair Points, Orange has 30 and both Blue and Yellow have 28 Fair Points. Purple is in 1st, Orange is in 2nd, Blue and Yellow are in last position. It is the 2nd Fair, so Purple gains 12 VP, Orange gains 8 VP, Blue and Yellow gain 2 VP each (4+0)÷2.
- Orange and Yellow each take 1 Wine Expert tile for being last place in the Fair in a 4-player game.
- Purple is in the leftmost booth, so she will be the first player. She discards a Wine tile from her player board, then takes the Export action tile, and places it in front of her face-up.
- Orange, being in the second booth, goes next; she buys a Multiplier tile that gives 2 points per cellar at game end, places it next to her board, and places a barrel on it.
- The round continues until nobody has any more wines to discard, or they pass.
- Remaining tiles are discarded and refilled; fair discs move to the center logo; the 6th year starts following player order: Purple, Orange, Yellow, Blue.
EXAMPLE: Magnate Action tile use: Blue chooses to perform the Cellars Action. But before doing so, he plays an Export Action tile that allows him to export 1 or 2 barrels. Then he performs the Cellars action and buys 2 Cellars for 6 Bagos.
End of Game and Final Scoring
 After the 3rd Fair (i.e. at the end of 6th Year), move the round marker to the circle to the right of the Fair icon. Then, starting with the current first player and following the order of play shown in the “Player Order” area, each player takes one more action. (You are allowed to use one of your face-up Wine Experts’ abilities and one of your Magnate Action tiles, as usual.) The game then ends, and players move to the final scoring.
Note: The Wine Expert tiles and Magnate Action tiles do not flip over after the 3rd fair. Notice the lack of Flip tile icon after the fair.
Scoring Categories
You receive VP for:
- Money you have (see table below);
- Half of the quality of each of your wines (rounded down);
- Majorities in columns of the Export Area. Ties split the points, rounded down (see p. 10);
- End-game Multiplier tiles (only the ones with Barrels on them) (see Reference Book p. 5).

The winner is the player with most VP. Tie goes to the player with more barrels in the Export Area. Further tie goes to the player with more money.
EXAMPLE: Final Scoring
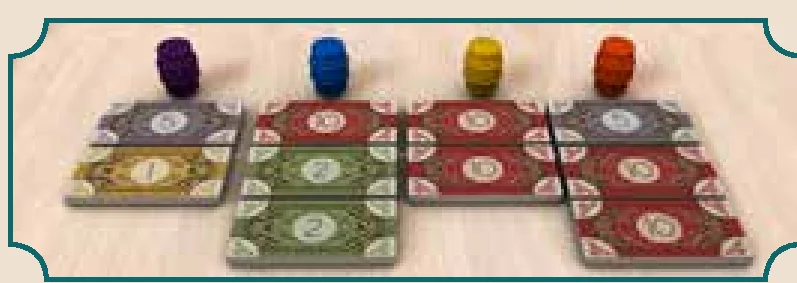
Scoring Money
- Purple receives 3 VP for having 6 Bagos.
- Blue receives 7 VP for having 14 Bagos.
- Yellow receives 18 VP for having 20 Bagos.
- Orange receives 18 VP for having 25 Bagos.
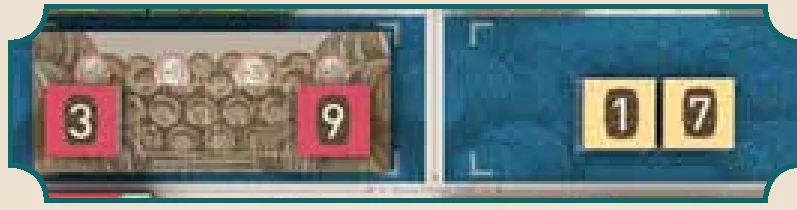
Scoring Wines
- Blue receives 1 VP for the quality-3 red wine and 4 VP for quality-9 red wine in her Cellar.
- Then she receives 0 VP for the quality-1 white wine and 3 VP for the quality-7 white wine in a Warehouse.
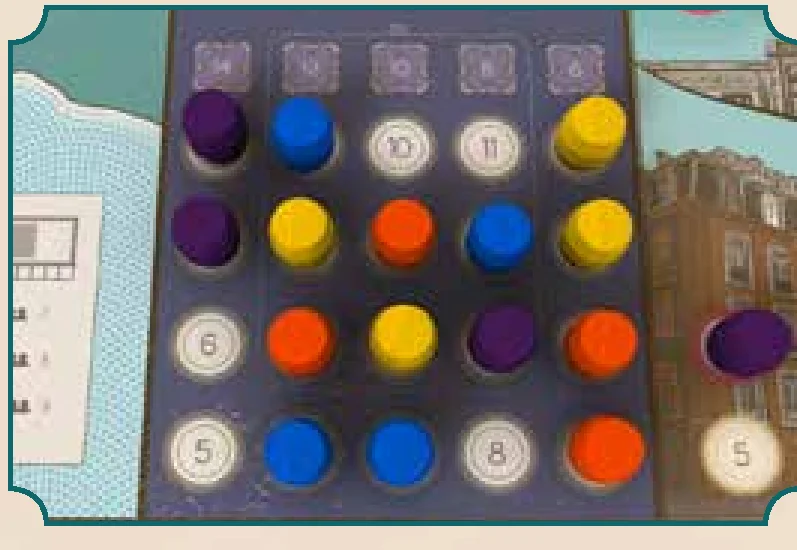
Scoring Exports
- Purple receives 14 VP for the 1st column.
- Blue receives 12 VP for the 2nd column.
- Blue, Yellow and Orange receive 3 VP each for the 3rd column.
- Blue and Purple receive 4 VP each for the 4th column.
- Yellow and Orange receive 3 VP each for the 5th column.
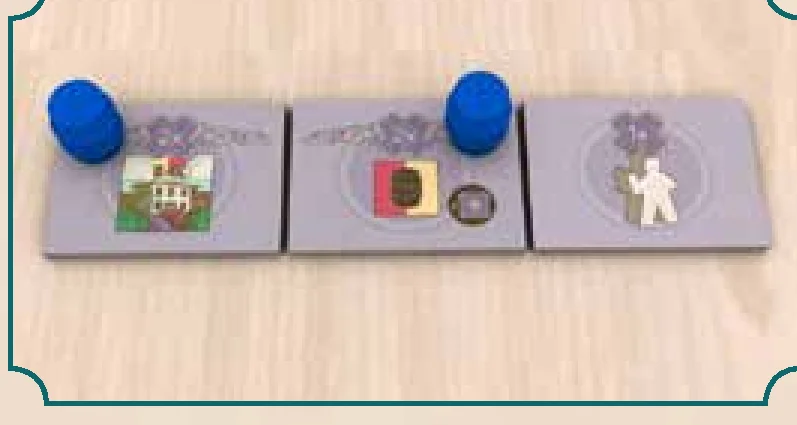
Scoring Multiplier Tiles
Blue has 3 Multiplier tiles:
- One tile is a 2X Wineries tile. He has 5 Wineries on his player board, so he receives 10 VP.
- The other tile is a 2X Wines tile. He has 10 Wine tiles. Normally he would get 20 VP, but because this multiplier has a maximum of 16 VP, he only gets 16 VP.
- The 3rd tile does not have a Barrel on it (because he had used a Wine Expert to move the locked barrel) so, he cannot score that Multiplier tile.
For details on Multiplier bonuses, see page 5 of the Reference Book.
Credits
- Game Design: Vital Lacerda
- Illustrations: Ian O’Toole
- Graphic Design & 3D Illustrations: Ian O’Toole
- Rulebook & 3D Illustrations: Vital Lacerda
- English Rules Editing: Nathan Morse
- Official Rules Video: Gaming Rules!
- Proofreading: Ori Avtalion
- Project Manager: Rick Soued
© 2016 Eagle-Gryphon Games, 801 Commerce Drive, building #5. Leitchfield, KY 42754. All Rights Reserved. www.eagle-gryphon.com
Introduction & Overview
Vinhos Deluxe Edition – Special Vintage 2016
Game Design: Vital Lacerda
Players: 2–4 | Duration: 90–180 mins | Ages: 12+
Introduction
In Vinhos (a Portuguese word, pronounced vin-yos, which means “Wines”) you play the role of a wine producer in Portugal, trying to make a name for yourself. You must demonstrate your business acumen by promoting your label, and establishing the best reputation at home and abroad. Competition is fierce: Only the best labels can survive the test of time!
Over a period of 6 years, you will expand your business by establishing estates (local branches of your company) in the different regions of Portugal, buying vineyards and building wineries there. You can hire skilled enologists and capable farmers to help you increase the quality of your wine.
Each year begins with a weather forecast for the growing season, and ends with Wine production. Optimal climatic conditions can provide exceptional vintages, from which you can produce high-quality wines; while cloudy weather and heavy rain usually have devastating effects: The only way to produce palatable wines from such a yield is by expanding your estates or putting enologists, farmers, or even wine experts to work. With time, your wine will mature and become more valuable, but only if you have built a cellar in which it can age.
Profit margins for wine producers can be tenuous, but you can increase your liquid cash by selling your wines to local Portuguese establishments, such as the Casa de Fados, the Hotel, or the Enoteca. These sales make it much easier to expand your estates and pay your employees’ salaries. But it takes more than money to earn prestige. In order to make a name for yourself on the international market, you must meet the requirements of various countries by exporting high-quality wines.
Using this Manual
What to expect
This gamebox allows you to play two different versions of Vinhos: the Special Vintage 2016 and the 2010 Reserve.
- The 2010 Reserve is nearly the same as the first edition of the game, but with slight rules tweaks for better balance.
- The Special Vintage 2016 is a less complex version of the 2010 Reserve, with (hopefully) the same depth: It has new rules and adds some new concepts and tiles to the 2010 Reserve, replacing some of the more intricate portions of it.
The vast majority of the rules are the same for both games; so, to highlight the differences, and make it easy to play one when you are accustomed to the other, we give you some visual cues:
Whenever you see a rule in blue, it only applies to the Special Vintage 2016.
The Wine Tasting Fair & Magnates
Every few years, the Wine Tasting Fair provides an opportunity for global press for the best Wine makers. Being chosen as the best Wine is essential to your company’s prestige, and can make all the difference in your long-term success!
Three influential Wine industry magnates scrutinize the Wines presented at the fair. Each would like to offer you some special privileges, but only if your Wine meets their expectations.
It is up to you to decide the best time to announce which Wine will represent you at the fair. An early press release will allow you to start calling in favors from an interested magnate immediately, but waiting until the last moment could grant your Wine that extra maturity, and allow you to better know which features will be most appreciated by the judges.
Objective of the Game
The winner is the player with the most Victory Points at the end of the game. You are producing Wines to gain the most prestige, which is represented in the game as Victory Points (VP).
Year Structure & Sequence of Play
Gameplay – Year Overview
The game lasts 6 rounds, and each round represents 1 year. The Year/Taxation marker indicates the passing of years and of different steps within each year.
Each year comprises the following phases:
- Start of Year: Each year begins with the weather forecast for the current year. Discard last year’s Vintage tile, and flip the new top tile face-up.
- Actions: Each player will perform 2 Actions from the 9 options available. You can buy Vineyards, build Wineries, hire Enologists and Farmers, build Cellars, sell or export Wines that you have produced, hire Wine Experts, Pass and/or announce which Wine you intend to present at the following Fair. You can also take advantage of the benefits offered by the 3 Magnates and Wine Experts.
- Maintenance: Each player must take at least one Barrel from one of the Sales slots, if she has any there.
- Production: Every year, Wines will move 1 slot to the right to indicate their aging. Then, each player will receive 1 Wine tile for each Estate on her Player Board that has at least 1 Vineyard, and places it in the leftmost slot of the corresponding Warehouse or Cellar.
The color of Wine depends on the color of Vineyard that produced it, while its Production Value depends on the number of Vineyards, Wineries, Enologists, and Farmers in the Estate, as well as the weather conditions of the current year.
EXAMPLE: Weather: The new year has begun. The top Vintage tile is discarded and a new one is flipped.
EXAMPLE: Production phase: Orange has produced 1 White Wine with a value of 3. She places the tile in the leftmost slot of the corresponding warehouse.
Purple has produced 1 Red Wine with a value of 2. She places the tile in the leftmost slot of the corresponding cellar.
Wine Tasting Fair (only 3rd, 5th, and 6th year): At the end of the 3rd, 5th, and 6th year, a Wine Tasting Fair is held. Each player must present 1 Wine, and only 1 Wine, at each Fair. If you have not yet presented a Wine when the Fair starts, you will do so at the fair. You can play Wine Expert tiles to gain Fair Points. The higher the value of the wine you present, the higher the number of Fair Points you earn.
Phase 1: Start of Year
At the beginning of each year except the 1st (which skips this phase), prepare for the year as follows:
- Discard the Vintage tile used in the previous year and reveal a new Vintage tile for the current year by flipping the top Vintage tile face-up. The number (from +2 to -2) in the upper-left corner of the Vintage tile indicates the weather conditions for the current year. Weather conditions will influence the Wine production at the end of the year.
- Before the start of the 4th and 6th year, each player flips all of her face-down Wine Expert tiles and Magnate Action tiles face-up again. (Look for this symbol on the gameboard: ).
EXAMPLE: Weather conditions: 4th year: The Vintage tile foretells a bad year (the quality of each wine produced will be reduced by 2).
EXAMPLE: Start of the 4th and 6th year: Yellow has 2 Wine Expert tiles and 3 Magnate Action tiles face-down in front of him. He flips all of them face-up.
Phase 3: Maintenance
The supply of your lovely wine has run out, and now the customers demand more!
Place the Year/Taxation Marker on the appropriate space (B – Barrel) of the current year, to indicate that the Maintenance Phase is starting.
Each player must take one of her barrels from the Sales Area, if she has any there. Return it to your supply on your player board.
Action Selection & The Quadrel
Actions Phase
Each player, in Player Order, will perform 1 action. Next, any changes in Player Order go into effect. Then each player, in the new Player Order, will perform a 2nd action, and then any changes in Player Order go into effect.
1st Action
Place the Year/Taxation Marker on space “1” of the current year to indicate that everyone is taking their 1st action.
Play proceeds according to the order shown in the “Player Order” area. On your turn, you must move your Action Marker to another space on the “Quadrel” and take the action related to that space.
Movement Rules
- If you are unwilling or unable to take any actions, you must move your Action Marker to the Pass / Press Release space and pass.
- If you move your Action Marker to an adjacent space (orthogonally or diagonally), the movement is free of charge.
- If you move your Action Marker to a non-adjacent space, you must pay 1 Bago to the common supply.
- You must pay 1 Bago to each player whose Action Marker was already present in the space to which you moved.
- You must pay 1 Bago to the common supply if the Year/Taxation Marker was present in the space to which you moved.
Note: You cannot stay in the same space; you must move to a new space. If you cannot pay the movement costs, and pay for and perform the action, you cannot move to the space.
Exceptions:
- You never have to pay to move to the Pass / Press Release space, even if other Players’ Action Markers are there.
- If your Action Marker is already on the Pass / Press Release space, and you have no way to take any other Action, then you can stay on the Pass / Press Release space, without moving the Action Marker.
EXAMPLE: Movement: Orange can move her Action Marker free of charge to one of the spaces indicated by the arrows on the left picture. If she moves to any other space, she has to pay 1 Bago to the common supply.
EXAMPLE 2: Movement: Orange must pay 1 Bago to Blue and another 1 Bago to the common supply because her movement was not adjacent to her last position.
EXAMPLE 3: Movement: Purple must pay 1 Bago to Blue, 1 Bago to Orange, and 2 Bagos to the common supply because the Year/Taxation Marker is present in the chosen space, and because her movement was not adjacent to her last position.
Order of Play
Once all players have taken their first action, if any player chose the Pass / Press Release action, the turn order will have to be adjusted:
If any Player Order Marker is in the bottom row of the “Player Order” area, move it to the same Slot in the top row, shifting other Player Order Markers still in the top row to the right or left, as necessary, to make room for it.
2nd Action
Once the turn order has been adjusted, place the Year/Taxation Marker in space “2” of the current year to indicate that everyone is taking their 2nd action.
Play proceeds according to the new order shown in the “Player Order” area. Again, on your turn, you must move your Action Marker to another space and take the action related to that space, just as you did for the 1st action.
Once all Players have taken their second action, place the Year/Taxation Marker in the “B” space of the current year to indicate that it is the Maintenance phase.
Once again, after all players have taken their action, if any player chose the Pass / Press Release action, adjust the turn order as described in Order of Play above.
Example: Turn Order
4th year, Actions Phase, 1st Action: Place the Year/Taxation Marker in space “1” of the 4th Year. Order of play is: Orange, Yellow, Blue, and Purple.
- Orange (first Player) moves her Action Marker from the Export space to the Wine Experts space. Because the destination space is adjacent to the departure space, the move itself is free; however, the Year/Taxation Marker is in her destination space, so she has to pay 1 Bago to the common supply. She then takes the Wine Expert Action. (Movement costs 1 Bago).
- Yellow moves his Action Marker from the Cellars space to the Pass / Press Release space. He moves his Player Order Marker to the bottom row, and chooses the first space. He passes and does not take any action. (Movement costs nothing).
- Blue also moves his Action Marker from the Cellars space to Pass / Press Release space. He moves his Player Order Marker to the bottom row, and chooses the last space. He doesn’t pay anything to Yellow, because the Pass / Press Release space is always free of charge. He takes the Press Release Action. (Movement costs nothing).
- Purple moves her Action Marker from the lower-right Vineyards space to the Wine Experts space. The destination space is not adjacent to the departure space. Both the Year/Taxation Marker and Orange Marker are in her destination space. So, Purple must pay 2 Bagos to the common supply for the non-adjacent move and the Year/Taxation Marker being there, and 1 Bago to Orange. She takes the Wine Expert Action. (Movement costs 3 Bagos: 2 Bagos to the common supply and 1 to Orange).
Now that everyone has taken their first action, the Year/Taxation Marker is placed in space “2” of the 4th Year and the Player Order Markers are moved to the top row.
For the 2nd Action, the Player Order is as follows: Yellow, Orange, Purple, Blue.
Estate Actions: Vineyards, Wineries, Employees & Cellars
Available Actions
- Vineyards (p. 6)
- Wineries (p. 6)
- Enologists/Farmers (p. 7)
- Cellars (p. 9)
- Sales (p. 10)
- Export (p. 10)
- Wine Experts (p. 11)
- Pass / Press Release (p. 12)
Vineyards Action
An estate without any vineyards will not produce any wine — not good if you want to be a wine producer! Each vineyard adds 2 points to the quality of the Wine produced.
When you take this action, you must purchase 1 Vineyard per region from 1 or 2 regions of Portugal.
For each Vineyard you purchase, you must:
- Take the topmost Vineyard tile from the region’s deck,
- Pay the price shown on its cost side,
- Place it, region-side-up, on your Player Board in 1 empty Estate Slot of your choice.
Only 1 tile (Vineyard or Winery) can occupy any single Estate Slot. In each Estate on your Player Board, Vineyards must be from the same region and of the same color (White or Red). There are 2 White Wine Vineyards and 2 Red Wine Vineyards for each region, so an Estate can never have more than 2 Vineyards.
If it is the first Vineyard in the Estate, you must place that Estate’s Region Marker (you just moved it from the first Estate Slot in order to place the Vineyard tile there) on the gameboard in the appropriate Region Space on the map. The Region Markers make it easy for all players to see which players have Estates in the region.
If it is the second Vineyard in the Estate, you do not place a Region Marker. Your Player Board has 5 Estates (each one with 3 Estate Slots), so the map will have a maximum of 5 of your Region Markers on it.
4. If possible, place 1 Region Renown Cube (to be taken from the common supply) in 1 empty Cube Space of the appropriate Region inset. Skip this step if there are no Region Renown Cubes left in the supply, or if there are no empty Cube Spaces in the Region inset.
Important note: A single Vineyard Action never allows you to buy 2 Vineyards from the same region.
Any number of Players may have an Estate (and therefore a Region Marker) in the same region. Also, you can have more than 1 Estate (and therefore more than 1 Region Marker) in the same region. The different characteristics of the regions are described on page 12 of the Reference Book.
EXAMPLE: Vineyards Action: Orange already has Vineyard tiles in 3 Estates: 1 White in Ribatejo, 1 Red in Lisboa, and 2 White in Algarve. She decides to buy 2 Vineyards, and proceeds as follows:
- She buys 1 Dão Red and starts a fourth Estate. She pays 4 Bagos, and places the Dão tile in her 4th Estate. She places that Estate’s Region Marker on the region’s space on the map, and moves 1 Region Renown Cube to the Region’s inset.
- She buys 1 Ribatejo White to expand her Ribatejo Estate. She Pays 4 Bagos, and places a Renown Cube in the Ribatejo inset, and the Vineyard in her Estate. Because it is her second Vineyard in the Estate, she does not place another Region Marker (she already placed this Estate’s Region Marker earlier).
- She cannot expand her Lisboa Red Estate because the Vineyard on top of Lisboa’s deck is White. She cannot expand her Algarve White Estate because she already has both of Algarve’s White Vineyards.
Wineries Action
Wineries are necessary to house enologists, and a Winery also adds 1 to the quality of Wine produced.
When you take this action, you must build 1 or 2 Wineries.
For each Winery you build, you must:
- Take 1 Winery tile from the gameboard,
- Pay 3 Bagos,
- Place it in an empty Estate Slot of your choice on your Player Board. Only 1 tile (Vineyard or Winery) can occupy any single Estate Slot. Because you will want to have at least one Vineyard in each Estate, each Estate can have a maximum of 2 Wineries.
If possible, place 1 Region Renown Cube (to be taken from the common supply) in 1 empty Cube Space of the appropriate Region inset. If the Estate already has a Vineyard, place the Renown Cube on an empty Cube Space in that Region’s inset; otherwise, place the cube on the Winery itself until the Estate becomes affiliated with a region. At that point, move the cube from the Winery to an empty space in the Region’s inset.
Note: Place the Winery Red-side-up for a Red Wine estate; White-side-up for a White Wine estate. If your estate has a Winery before it has any Vineyards, the color of the Winery doesn’t matter, and can be changed to match the Vineyard you eventually buy for that estate.
EXAMPLE: Wineries Action: Blue buys 2 Wineries. He places one to expand his Douro Estate, and the other one in an Estate without Vineyards. He Pays 6 Bagos and places 1 Region Renown Cube in the Douro Region inset and 1 Cube on the Winery of the Estate without Vineyards. In a following year, he buys a Ribatejo Vineyard and places it in the Estate that had only a Winery. He takes the Region Renown Cube from the Winery and places it in the Ribatejo Region inset.
Enologists/Farmers Action
Enologists work in wineries, and Farmer work on vineyards. An Enologist adds 2 to the quality of wine produced. A Farmer adds 1 to the quality of wine produced.
When you take this action, you must hire 1 or 2 Enologists/Farmers (any combination).
For each Enologist you hire, you must:
- Take 1 Enologist from the gameboard,
- Pay 3 Bagos,
- Place it on your Player Board on an empty Winery of your choice. Each Winery can only host 1 Enologist. (You cannot hire an Enologist if you do not have any unoccupied Wineries).
For each Farmer you hire, you must:
- Take 1 Farmer from the gameboard,
- Pay 2 Bagos,
- Place it on your Player Board on an empty Vineyard of your choice. Each Vineyard can only host 1 Farmer. (You cannot hire a Farmer if you do not have any unoccupied Vineyards).
EXAMPLE: Enologists/Farmers Action: Purple has only 1 empty Winery and 1 empty Vineyard, so she can hire only 1 Enologist and 1 Farmer. She Pays 5 Bagos and places the Enologist on the empty Winery and the Farmer in the empty Vineyard.
Cellars Action
Cellars allow Wines to age longer, increasing the Wine Value for Sales, Export, and the Fair. The older Wine, more valuable it is.
When you take this action, you must build 1 or 2 Cellars.
For each Cellar you build, you must:
- Take 1 Cellar tile from the gameboard,
- Pay 3 Bagos,
- Place it on your Player Board to cover a Warehouse of your choice. Only 1 Cellar can cover any single Warehouse. Transfer all of the Wine tiles from the Warehouse to the Cellar, respecting their aging. Therefore, a Wine in the leftmost slot of the Warehouse moves to the leftmost slot of the Cellar; a Wine in the second Warehouse slot moves to the second slot of the Cellar.
- If possible, place 1 Region Renown Cube (to be taken from the common supply) in 1 empty Cube Space of the appropriate Region inset. If the Estate already has a Vineyard, place the Renown Cube on an empty Cube Space in that Region’s inset; otherwise, place the cube on the Cellar itself until the Estate becomes affiliated with a region. At that point, move the cube from the Cellar to an empty space in the Region’s inset.
EXAMPLE: Cellars Action: Yellow had previously produced 1 Wine with quality 4 and 1 Wine with quality 5, both of which are still in the Warehouse of his Alentejo Estate. Now he buys a Cellar and places it in his Alentejo Estate, covering the Warehouse. He transfers the “4” Wine from the leftmost slot of the Warehouse to the leftmost slot of the Cellar, and transfers the “5” Wine from the second slot of the Warehouse to the second slot of the Cellar. He places 1 Region Renown Cube in the Alentejo Region inset.
Wine Mechanics & Production Phase
Wine Mechanics
In order to better understand the rest of the actions, you need to know how Wine is made and aged, how its Wine Quality is calculated at the time of production, and how its Wine Value is determined when it is sold, exported, or presented at the Fair.
Aging and Wine Production Overview
At the end of each Year (during the Production Phase), move each Wine in each of your Warehouses and Cellars 1 slot to the right to indicate that it has aged for 1 year.
If a Wine moves out of the rightmost slot of its Warehouse/Cellar, it can age no further. The Wine is lost and must be discarded.
After that, Wine production for the current year will start.
For each Estate on your Player Board that has at least 1 Vineyard (if an Estate has no Vineyard, it does not produce Wine) you must:
- Calculate the Wine Quality (see below),
- Take 1 Wine tile of the appropriate value (from the common supply),
- Place it in the leftmost slot of that Estate’s Warehouse/Cellar, with the “Red Wine” or “White Wine” side face-up, depending on the color of the Vineyard(s) that produced it.
Wine Quality
Wine Quality is represented by an icon of a barrel with a number inside. Anything that affects the Wine Quality will depict this icon.
Wine Quality depends on several factors:
- The number of Vineyards in the Estate, and therefore the quantity of high-quality grapes produced;
- The work of Farmers who can select the best grapes;
- The presence of Wineries, which store the grapes in optimal conditions;
- The Enologists in Wineries, who oversee and optimize the process of turning grapes into Wine;
- Whether you are making Porto Wine (in Douro, see Reference Book p.12);
- The weather conditions of the current year (shown on the Vintage tile).
Wine Quality is calculated as follows:
- + 2 points for each Vineyard in the Estate,
- + 1 point for each Farmer in the Estate,
- + 1 point for each Winery in the Estate,
- + 2 points for each Enologist in the Estate,
- + 3 points if you are making Porto Wine (in Douro, see Reference Book p.12),
- ± Weather conditions Value (+2 to −2), shown at the top of the current Vintage tile.
Before production, you can move Enologists and Farmers to whichever of your Estates you like, but each Winery can only host 1 Enologist and each Vineyard can only host 1 Farmer.
Note: If you produce a Wine with “0” Quality, you didn’t harvest enough high-quality grapes to make any Wine; do not take a Wine tile (notice that there are no “0” Wine tiles).
EXAMPLE: Aging and Wine Production: The Vintage tile is −2.
- In the leftmost slot of Blue’s Lisboa Warehouse, there is a wine produced at the end of the previous year. He moves it 1 slot to the right because it has aged 1 year.
- He does not take a Wine tile for his Estate that has no Vineyards: It’s not possible to produce Wine without grapes from a Vineyard.
- He does not take a Wine tile for his Minho Estate: Wine Quality in Minho is 0 (+2 for Vineyard, −2 for Vintage tile). Due to the bad weather, there were not enough good grapes to make Wine.
- He takes a “5” Wine tile for his Lisboa Estate. The Wine Quality is 5 (+2 for Vineyard, +1 for Farmer, +2 for 2 Wineries, +2 for Enologist, −2 for Vintage tile). His Lisboa Estate produces Red Wine, because of its Red Vineyard, so he places a “5” Wine tile Red-side-up in the leftmost slot in the Warehouse of his Lisboa Estate.
Wine Value
Wine Value is represented by an icon of a circle with a barrel inside. Anything that affects the Wine Value will depict this icon.
When Wine is Sold, Exported, or Presented at the Fair, you must determine its Wine Value, which is based on the Wine Quality, the Renown of its Region of origin, and its time aging in a Cellar.
Wine Value is calculated as follows:
- + Wine Quality (the value on the Wine tile),
- + 1, 3, or 5 points for aging in a Cellar,
- + (optional) 1 or 2 points for the Renown of its Region of origin: If you choose to rely on the Renown of its Region, remove 1 or 2 Region Renown Cubes from the inset of the Region of the Wine’s origin, and add 1 point for each removed cube (+2 if the Wine is from Alentejo, region 8). If you choose not to use the Region’s Renown to increase the Wine Value, do not remove any cubes.
- + 1 if the Wine is from Algarve (region 9).
Return removed Region Renown Cubes to the common supply.
Note: A Region’s Renown Cubes can be used by any player that has an Estate in the Region (has a Region Marker there), regardless of whose actions generated the Renown in the first place.
EXAMPLE: Wine Value: Purple has 1 Wine (Wine Quality of 4) in the 3rd slot of the Cellar in her Algarve Estate. The Algarve Region has 3 Region Renown Cubes. She decides to use one of them. She puts the Region Renown Cube back in the common supply. As a result, the Wine Value is 9: + 4 for its Quality, + 3 for aging in a Cellar, + 1 for the removed Region Renown Cube, + 1 for being an Algarve Wine.
Phase 4: Production (End of Year)
Production is the most crucial phase of the game, it’s the wine-maker’s ultimate goal, and the moment everyone has been waiting for!
Place the Year/Taxation Marker on the appropriate space of the current year, to indicate that Production Phase is starting. Then, perform the following steps:
- Age Wine: Move each Wine tile on your Player Board (in Warehouses and Cellars) 1 slot to the right. Any Wine tile that cannot be moved to the right any further in its Warehouse/Cellar is lost, and must be discarded.
- Redistribute employees (optional): Reassign your Enologists and Farmers to different estates. Remember, each Winery can host 1 Enologist, and each Vineyard can host 1 Farmer.
- Produce Wine: For each of your Estates that has a Vineyard, do the following:
- Calculate the Wine Quality the estate produces this year (+2 per Vineyard, +1 per Farmer, +1 per Winery, +2 per Enologist, +3 if you are producing Porto, ± weather Value).
- If the Wine Quality is greater than 0, take a Wine tile matching the Wine Quality, and place it in the leftmost slot of the Warehouse/Cellar, with the appropriate side face-up: either “Red Wine” or “White Wine”.
If this is the 1st, 2nd, or 4th year, the year ends.
If this is the 3rd, 5th, or 6th year, there will be a Fair Phase, and then the year ends.
EXAMPLE: Production: Purple moves all the Wine tiles on her Player Board 1 slot to the right. Her Quality 3 Red was already in the rightmost slot of her Algarve estate, so she must discard it. She chooses to move an Enologist from the Winery in her Algarve Estate to the empty Winery in her Douro Estate, and one farmer from a Vineyard in Dão to her Vineyard in Minho. Then, for each estate, she calculates the Wine Quality produced, and places the appropriate Wine tile in the leftmost slot.
Commerce: Sales & Export Actions
Sales Action
Without Sales you will have no profits to invest in your business. Casa de Fados, the Hotel, and the Enoteca are all eager to buy your wine.
When you take this action, you must sell 1 or 2 Wines from your Warehouses and Cellars, to 1 or more of the 3 available local Establishments.
For each Wine you sell, you must:
- Place 1 barrel from your supply in an empty Sales Slot of your choice in the Sales Area. Only 1 barrel can occupy any single Sales Slot. The Wine Value must be at least as high as the requested value indicated in the Sales Slot. Red Wines can be sold only in “Red Wine” Sales Slots; White Wines only in “White Wine” Sales Slots. Once placed, the barrel cannot be moved, unless you use a Wine Expert that permits you to do so.
- Remove 1 or 2 Region Renown Cubes (see Wine Value), if and only if you need them to increase the Wine Value in order to reach the requested value indicated in the chosen Sales Slot. (Note: You cannot remove Region Renown Cubes if you do not need to use them.)
- Discard the Wine tile.
- Receive the value of the Sales Slot in Bagos.
EXAMPLE: Sales Action: Yellow decides to sell the White Wine (Wine Quality 5) that is in the 3rd slot of the Cellar in his Dão Estate. Dão has 1 Renown Cube. Therefore, the Wine Value is 8: + 5 Wine Quality, + 3 for time aging in a Cellar. If he takes the Renown cube from Dão, he would increase the Wine Value to 9, but unfortunately both the White slots with value of 8 and 9 were already occupied with barrels. Because taking the Renown cube from Dão would be useless, he is not allowed to take it. He decides to place his barrel in the Hotel, in the White 7 Slot. He receives 7 Bagos.
Export Action
Export your Wine to the different countries and markets to get prestige. Exports provide immediate points and points at the end of the game.
When you take this action, you must export 1 or 2 Wines from your Warehouses and Cellars, to any number of the foreign markets (each column represents a different country).
For each Wine you export, you must:
- Place 1 barrel from your supply in an empty Export Slot of your choice in the Export Area. Only 1 barrel can occupy any single Export Slot. The Wine Value must be at least as high as the requested value, indicated in the Export Slot. Once placed, the barrels can neither be taken back nor moved, unless you use a Wine Expert that permits you to do so.
- Remove 1 or 2 Region Renown Cubes (see Wine Value), if and only if you need them to increase the Wine Value in order to reach the requested value indicated in the chosen Export Slot. (Note: You cannot remove Region Renown Cubes if you do not need to use them.)
- Discard the Wine tile.
You immediately earn as many VP as shown in the Export Slot where you placed the barrel (regardless of the Wine Value).
Note: At the end of the game, each country will reward the player who exported the most barrels to it with the VP as listed at the top of the column. In case of a tie, the points will be divided (rounded down) between the tied players.
Note: In a 2-player game, only the Export slots inside the 2-player frame are available.
EXAMPLE: Export Action: Purple exports the Wine (Wine Quality 7) from the second slot of the Warehouse of her Douro Estate. If she wants to place the barrel in the “8” or “9” Export Slot, she will need to use 1 or 2 Region Renown Cubes, respectively, removing them from the Douro Region inset. If instead she would like to place it in the “6” or “7” Export Slot, she doesn’t need to use any Region Renown cubes, so she cannot opt to remove some, just to spite her opponents. She chooses to place the barrel in the “9” Export Slot in the 4th country, and immediately receives 9 VP.
Wine Experts & Press Release
Wine Experts Action
Experts in the Wine industry will help you to improve your business and will guide you on your journey into the world of Wine.
When you take this action, you must hire 1 or 2 Wine Experts.
For each Wine Expert you hire, you must:
- Choose a deck and take the top Wine Expert tile,
- Pay 1 Bago,
- Place the Wine Expert tile in front of you, face-up.
After you hire the first Expert, then you can decide whether to hire a second one (from the same deck or another). There is no limit to how many Wine Experts you can have. A discarded Wine Expert always goes face-up to the bottom of its deck.
Note: Each tile represents a Wine Expert, who specializes in a specific Wine feature (Taste, Aroma, Appearance, Alcohol Content).
During the Fair Phase, you will be able to use a certain number of face-up Wine Experts to promote your Wine and earn you Fair Points. Wine Experts may be able to help your Wine perform better at the fair, depending on the characteristics depicted on the Vintage tile for the year.
Wine Expert Abilities
In addition to being able to help promote your Wine at the fair, each Wine Expert also has a special ability.
During your turn, you may flip 1 Wine Expert tile face-down to use the special ability depicted on the front.
Note: You can only use 1 Wine Expert tile per turn.
See page 9 of the Reference Book for detailed descriptions of the Wine Experts’ special abilities, which also tells you when each special ability can be played.
Note: If you flip a Wine Expert tile face-down to use its special ability, it will not be available at the next Fair to help your Wine perform better; however, after the 1st and 2nd Fairs, it will flip face-up once again, allowing you to use its ability or send it to the next Fair.
EXAMPLE: Wine Experts Action: Purple purchases the Wine Expert tile from the top of the “Taste” deck. She pays 1 Bago, and places the tile face-up in front of her. Now she decides to buy a second tile from the same deck. As before, she pays 1 Bago, and places the topmost “Taste” Expert face-up in front of her.
EXAMPLE: Wine Expert use:
- 2nd Year (Actions Phase): Yellow has 6 face-up Wine Expert tiles in front of him. He is currently performing the Export Action, and one of his Wine Experts has an applicable ability he wishes to use. He flips that Wine Expert tile face-down to use the special ability.
- 3rd Year (Fair Phase): Although he cannot make use of the face-down Wine Expert tile, he can use the other 5 that are face-up. He plays 3 of his face-up Wine Expert tiles. After the Fair, he must discard the 3 he played at the Fair. Now he has 1 face-down and 2 face-up Wine Expert tiles.
- 4th Year (before the first action): He flips all of his face-down Wine Experts (there’s only 1) face-up.
Pass / Press Release Action
With this action you are positioning yourself and preparing your Wine for the biggest competition in the world. Here you will prove that you are managing the best Wine business of all.
Remember: Moving to this space is always free.
When you place your Action Marker on the Pass / Press Release space, you must first move your Player Order Marker from the top row of the “Player Order” Area to the bottom row, and place it in an empty Player Order Slot of your choice (only 1 Player Order Marker may occupy each Order Slot).
After that, you either:
- Pass (do nothing), OR
- Do a Press Release (enter a Wine into the upcoming Wine Tasting Fair) — You can take this action only once per Fair: Once you have done a Press Release for the upcoming fair, on further visits to this action space you must Pass.
Note: If you have not taken this action before the Fair, you will have a chance to do a last-minute Press Release to enter a Wine in the Fair (as a free action), because every respectable Wine producer must participate in the Fair. So, you are not required to take the Press Release action during the Actions phase.
“Why would I spend a precious action to do a Press Release early?” you ask. Entering your Wine in the fair early lets you choose the best Fair Booth before someone else claims it. Also, the sooner you impress the Magnates, the earlier you have access to crucial barrels! Furthermore, timing your Press Release just right lets you send the Wine Experts best suited for the current Vintage.
Steps for a Press Release
In order to do a Press Release, you must perform the following seven steps:
- Declare which Wine (just one), among those on your Player Board, you will enter in the Fair.
- (optional) Remove 1 or 2 Region Renown Cubes (see Wine Value) from the Wine’s region of origin in order to increase the Wine Value.
- Earn Fair Points: You earn Fair Points equal to the Wine Value. Advance your Fair Scoring Marker accordingly.
- Choose an empty Fair Booth, and move your color disc onto it.
- Wine Experts: For each wine feature depicted on the Vintage tile, you may discard 1 face-up Expert, whose expertise matches the wine feature, in order to earn Fair Points equal to the number of symbols depicted on the Vintage tile for that Wine Feature. If the Wine Expert tile also has a symbol with an arrow on it, earn one additional Fair Point. Put discarded Wine Expert tiles face-up on the bottom of their respective stacks.
Each Fair Booth depicts 1 bonus. When you select a Fair Booth, you earn the depicted bonus:
- No bonus, but you get to be the first player to choose Magnate Action/Multiplier tiles.
- Immediately take the topmost Wine Expert tile from the stack of your choice.
- Immediately get 3 Bagos from the common supply.
- Immediately advance 3 Fair Points.
The positions of the discs in the fair booths will also determine the Player Order for taking Action/Multiplier tiles and for the next turn after the Fair.
Note: Once placed, the disc can neither be moved nor taken back until the end of the upcoming Fair.
Note: Fair Points do not reset to zero after the Fair! They accumulate from Fair to Fair, your reputation building up over time.
- Take barrels (optional): Take 1 or 2 of your barrels from the Magnates Area into your supply, following the steps below:
For each Magnate (Anabela, Bruno, and Carolina) you must:- Determine whether the Wine you entered meets the Magnate’s current expectation, as indicated on the current Vintage tile: Anabela’s request is indicated beside the letter A; Bruno’s, beside the letter B; and Carolina’s, beside the letter C.
- Anabela is always interested in Wines of a certain Color;
- Bruno is always interested in Wines with a minimum Wine Value;
- Carolina is always interested in Wines from certain Regions of Origin.
- If your Wine meets the Magnate’s current expectation, decide if you want to take 1 of your barrels from that Magnate’s space.
Note: A single Press Release allows you to take up to 2 barrels (1 from each of 2 different Magnates’ spaces), so, even if the Wine satisfies all 3 Magnates, you can still only take a maximum of 2 barrels (from 2 different Magnate spaces of your choice).
- Determine whether the Wine you entered meets the Magnate’s current expectation, as indicated on the current Vintage tile: Anabela’s request is indicated beside the letter A; Bruno’s, beside the letter B; and Carolina’s, beside the letter C.
- Discard the Wine tile.
Remember: Once you have done a Press Release for the upcoming fair, on further visits to this Action space, you change the turn order and then you must Pass.
Note: Because you must present precisely 1 Wine at each Fair, and there are 3 Fairs during the game, you will only have 3 opportunities to take barrels from the Magnates Area.
EXAMPLE: Pass / Press Release:
- 4th Year, Phase 1 (Actions Phase): Orange moves her Action Marker to the Pass / Press Release space. She moves her Order Marker to the bottom row of the Player Order Area and chooses the first Player Order Slot.
- She announces that the Wine she is presenting for the upcoming Fair (the 2nd Fair, end of Year 5) is her Red Wine (Wine Quality 3) that is in the 4th slot of her Douro cellar.
- She chooses to use 2 Region Renown Cubes, removes them from the Douro Region inset, and returns them to the common supply. This increases the Wine Value to 10 (+ 3 Quality, + 5 cellar aging, + 2 Renown Cubes). She receives 10 Fair Points and moves her Fair Scoring Marker accordingly (from 15 to 25).
- She moves her disc to the Expert Fair Booth and takes one Expert in Taste (red feature) from the top of the deck.
- The current Vintage tile depicts 3 symbols for Taste (red) and 1 symbol for Aroma (green). She discards the Wine Expert specialized in Taste she just took (which also has an arrow: +4 Fair Points), and an Expert specialized in Aroma (+1 Fair Point). Total: +5 Fair Points.
- Magnates’ expectations: Anabela wants White Wine; Bruno wants Wine value ≥ 8; Carolina wants region 1, 4, 7, or 8. Orange’s Red Douro Wine (Value 10) meets Bruno’s and Carolina’s expectations. She takes 1 barrel from Bruno’s space and 1 barrel from Carolina’s space.
- She discards the Wine tile.
The Wine Tasting Fair
Wine Tasting Fair (only 3rd, 5th, and 6th Year)
Place the Year/Taxation Marker on the Fair space of the current year, to indicate that Fair Phase is starting.
Any player that hasn’t yet placed their disc in the Fair Area (using the Pass / Press Release action), must do so now, in Player Order, respecting the same rules described on page 12 in the Pass / Press Release Action.
If you have not entered a Wine into the fair, and you somehow have no Wine now, you shamefully will not participate in the fair. This is not good for business!
Now, the Fair starts:
a. Determine the ranking according to the number of Fair Points each player has accumulated over the course of the game.
The first 3 players in the ranking immediately gain VP according to their current position in the Fair Scoring Track per the table below; the 4th player takes a Wine Expert (WE) from any stack of her choice:
Note: 4th place gains no VP but does get a Wine Expert.
EXAMPLE: Wine Tasting Fair: 5th Year, Fair Phase. Blue is the only one who has not made a press release for this fair. He presents his Quality-5 White Wine from his Terras do Sado Estate, but there are no region renown cubes to boost its value, so its Wine Value is 5. He places one of his discs in the 4th Fair Booth. He receives 3 Fair Points for the Bonus in that space. He also discards 2 wine experts increasing the Fair Points by +3. This earns him 11 Fair Points. The wine meets Carolina’s expectations, so he takes 1 of his barrels from the Carolina space. The 2nd Fair starts.
In case of a tie, the total amount of VP given by the tied positions will be split (rounded down) by players who tied. If tied for last position in a 4-player game, each of those players, in turn order, gets a Wine Expert.
Important: In a 2-player game, use the 1st and 3rd place scorings.
Note: The Fair Points you earn will never reset to zero during the game. The VP you earn at each of the three fairs is determined by your ranking on the Fair Scoring Track, which records your total cumulative Fair Points over the course of the game.
- Adjust the order of play: The new player order matches the left-to-right order of the players’ discs in the fair booths. This order of play will be kept for the first action of the following year.
- Move your Disc from the Fair booth onto the fair logo.
- Buy Magnate Action/Multiplier tiles: In the new Player Order, players take turns either discarding any 1 Wine tile from their player board to take a Magnate Action/Multiplier tile, or passing to take no more this Fair. To be clear: Once you pass, you cannot come back in to buy more. Once everyone has passed, move on to the next step.
- Magnate Action tiles: When you buy a Magnate Action tile you place it face-up next to your player board.
- Magnate Multiplier tiles: To buy a Multiplier tile you must have a barrel available. Place the tile face-up next your player board and place a barrel from your supply on it. Once placed, the barrel cannot be moved, unless you use a Wine Expert that permits you to do so; however, note that a Multiplier tile with no barrel on it at the end of the game will not score any VP.
Note: You are not allowed to have more than 1 identical Action/Multiplier tile (with the same icon).
- Refill the display: Discard the unpurchased Magnate Action/Multiplier tiles remaining on the board and refill the display from the Magnate deck next to the board. Make sure that the Action tiles, which should be on top of the deck, get placed first.
Magnate Action Tile Use
During your turn in the Actions Phase (before moving your Action Marker, or before or after performing the Action, but not during the Action itself), you can flip one (and only one) of your face-up Magnate Action tiles to take the Action. Face-down Action tiles will be only flipped face up after the 1st and 2nd fairs, just like the Expert tiles.
For details on Magnate Action/Multiplier tiles, see page 5 of the Reference Book.
EXAMPLE: Fair results:
- Purple has 33 Fair Points, Orange has 30 and both Blue and Yellow have 28 Fair Points. Purple is in 1st, Orange is in 2nd, Blue and Yellow are in last position. It is the 2nd Fair, so Purple gains 12 VP, Orange gains 8 VP, Blue and Yellow gain 2 VP each (4+0)÷2.
- Orange and Yellow each take 1 Wine Expert tile for being last place in the Fair in a 4-player game.
- Purple is in the leftmost booth, so she will be the first player. She discards a Wine tile from her player board, then takes the Export action tile, and places it in front of her face-up.
- Orange, being in the second booth, goes next; she buys a Multiplier tile that gives 2 points per cellar at game end, places it next to her board, and places a barrel on it.
- The round continues until nobody has any more wines to discard, or they pass.
- Remaining tiles are discarded and refilled; fair discs move to the center logo; the 6th year starts following player order: Purple, Orange, Yellow, Blue.
EXAMPLE: Magnate Action tile use: Blue chooses to perform the Cellars Action. But before doing so, he plays an Export Action tile that allows him to export 1 or 2 barrels. Then he performs the Cellars action and buys 2 Cellars for 6 Bagos.
End of Game, Final Scoring & Credits
End of Game and Final Scoring
After the 3rd Fair (i.e. at the end of 6th Year), move the round marker to the circle to the right of the Fair icon. Then, starting with the current first player and following the order of play shown in the “Player Order” area, each player takes one more action. (You are allowed to use one of your face-up Wine Experts’ abilities and one of your Magnate Action tiles, as usual.) The game then ends, and players move to the final scoring.
Note: The Wine Expert tiles and Magnate Action tiles do not flip over after the 3rd fair. Notice the lack of Flip tile icon after the fair.
Scoring Categories
You receive VP for:
- Money you have (see table below);
- Half of the quality of each of your wines (rounded down);
- Majorities in columns of the Export Area. Ties split the points, rounded down (see p. 10);
- End-game Multiplier tiles (only the ones with Barrels on them) (see Reference Book p. 5).
The winner is the player with most VP. Tie goes to the player with more barrels in the Export Area. Further tie goes to the player with more money.
EXAMPLE: Final Scoring
Scoring Money
- Purple receives 3 VP for having 6 Bagos.
- Blue receives 7 VP for having 14 Bagos.
- Yellow receives 18 VP for having 20 Bagos.
- Orange receives 18 VP for having 25 Bagos.
Scoring Wines
- Blue receives 1 VP for the quality-3 red wine and 4 VP for quality-9 red wine in her Cellar.
- Then she receives 0 VP for the quality-1 white wine and 3 VP for the quality-7 white wine in a Warehouse.
Scoring Exports
- Purple receives 14 VP for the 1st column.
- Blue receives 12 VP for the 2nd column.
- Blue, Yellow and Orange receive 3 VP each for the 3rd column.
- Blue and Purple receive 4 VP each for the 4th column.
- Yellow and Orange receive 3 VP each for the 5th column.
Scoring Multiplier Tiles
Blue has 3 Multiplier tiles:
- One tile is a 2X Wineries tile. He has 5 Wineries on his player board, so he receives 10 VP.
- The other tile is a 2X Wines tile. He has 10 Wine tiles. Normally he would get 20 VP, but because this multiplier has a maximum of 16 VP, he only gets 16 VP.
- The 3rd tile does not have a Barrel on it (because he had used a Wine Expert to move the locked barrel) so, he cannot score that Multiplier tile.
For details on Multiplier bonuses, see page 5 of the Reference Book.
Credits
- Game Design: Vital Lacerda
- Illustrations: Ian O’Toole
- Graphic Design & 3D Illustrations: Ian O’Toole
- Rulebook & 3D Illustrations: Vital Lacerda
- English Rules Editing: Nathan Morse
- Official Rules Video: Gaming Rules!
- Proofreading: Ori Avtalion
- Project Manager: Rick Soued
© 2016 Eagle-Gryphon Games, 801 Commerce Drive, building #5. Leitchfield, KY 42754. All Rights Reserved. www.eagle-gryphon.com
Board game expansions
Vinhos Deluxe Edition: Expansion Bundle
2020
A comprehensive collection of Vinhos Deluxe stretch-goal expansions and components.
135
minutes
Medium Heavy
View game
Vinhos Deluxe Edition: Tasting Room Expansion Pack
2016
A focused set of bottles, meeples, wineries, and a Hire action tile.
135
minutes
Medium Heavy
View game
Vinhos Deluxe Edition: Islands Expansion Pack
2016
Expand Vinhos Deluxe Edition with two island-themed component sets.
135
minutes
Medium Heavy
View game
Vinhos Deluxe Edition: Connoisseur Expansion Pack
2016
Expand your Vinhos Deluxe Edition collection with five tile types.
135
minutes
Heavy

View game
Vinhos Deluxe Edition: Experts Expansion Pack
2016
Expand the Vinhos experience with a diverse collection of expert tiles.
135
minutes
Heavy
View game
