Harmonies
2024
Build connected landscapes, match animal habitats, and score wisely in this 1–4 player terrain-placement game.
45
minutes
1 - 4
player(s)
10+
Medium


About this board game
Harmonies is a landscape-building board game for 1–4 players, with games lasting about 45 minutes. Place colored terrain tokens on your personal board, create habitats, and settle animals to build the highest-scoring landscape.
On each turn, choose a set of three terrain tokens from the central area and place them on your board. You may also choose an Animal card from the five displayed and place an Animal cube on a completed pattern that matches one of your cards. With a four-card limit, every choice helps shape your developing landscape.
- Build landscapes from terrain types such as mountains, fields, and forests.
- Complete patterns required by Animal cards and place their cubes on your board.
- Use terrain placement and habitat arrangements to pursue more points.
- Optionally add Nature’s Spirit cards for an additional layer of effects.
Terrain placement has a direct impact on scoring. Mountains score according to their height—a single mountain scores 1 point, while a stack of three scores 7—but a mountain scores zero unless it is adjacent to at least one other mountain. Animal cards are scored at the end of the game according to the highest number not covered by a cube.
When all the cubes on an Animal card have been placed, set that card aside and draw a new one. The game ends when the bag can no longer refill the central area or at least one player has two or fewer empty spaces on their board; play continues until everyone has had an equal turn that round.
For richer gameplay, Harmonies also includes optional Nature’s Spirit cards. Each player chooses one of two during setup, and a completed spirit card may provide an ongoing effect while still counting toward the four-card hand limit. The player with the most points wins.
/pic7182955.jpg)
Harmonies
Board Game Rules
Harmonies
Game Rules
Game Designer: Johan Benvenuto
From the Game Designer: Thanks to the Libellud team for their outstanding work, especially Anouk, Valentin and Matthis, who saw the potential in this game. To Maëva, let me congratulate you again for your superb illustrations! The game would not be what it is without you. Thanks also to CAL members (an association of game designers from Lyon) for their recommendations during the tests. Don’t change a thing!
2024 Credits: Game Designer: Johan Benvenuto • Artwork: Maëva Da Silva • Project Manager: Anouk Girard-Dagnas • Development: Matthis Gaciarz, Valentin Gaudicheau, Oleksandr Nevskiy • Art Director: Maëva Da Silva • Layout and Functional Design: Thomas Dutertre • Graphic Design: Simon Hay • Production Manager: Stéphane Robert
The team is thankful to Mathieu, Marion, Quentin, Camille, Alexandra, Delphine, Lucas, Joéva, Maximilien, Paul, Dorine, Ophélie, Laurent, Clément, and all the others who helped develop this game.
Goal of the Game
In Harmonies, build Landscapes by placing colored tokens and create Habitats for your Animals. To earn the most points and win the game, incorporate the Habitats in your Landscapes wisely and have as many Animals as you can settle there.
Contents
- 1 Pouch
- 1 Central board
- 4 Personal boards
- 4 Reminder cards
- 120 Tokens:
- 23 gray tokens
- 23 blue tokens
- 21 brown tokens
- 19 green tokens
- 19 yellow tokens
- 15 red tokens
- 66 Animal cubes
- 4 Nature’s Spirit cubes
- 32 Animal cards
- 10 Nature’s Spirit cards
- 1 Scoresheet pad
- 1 Rulebook
Game Setup
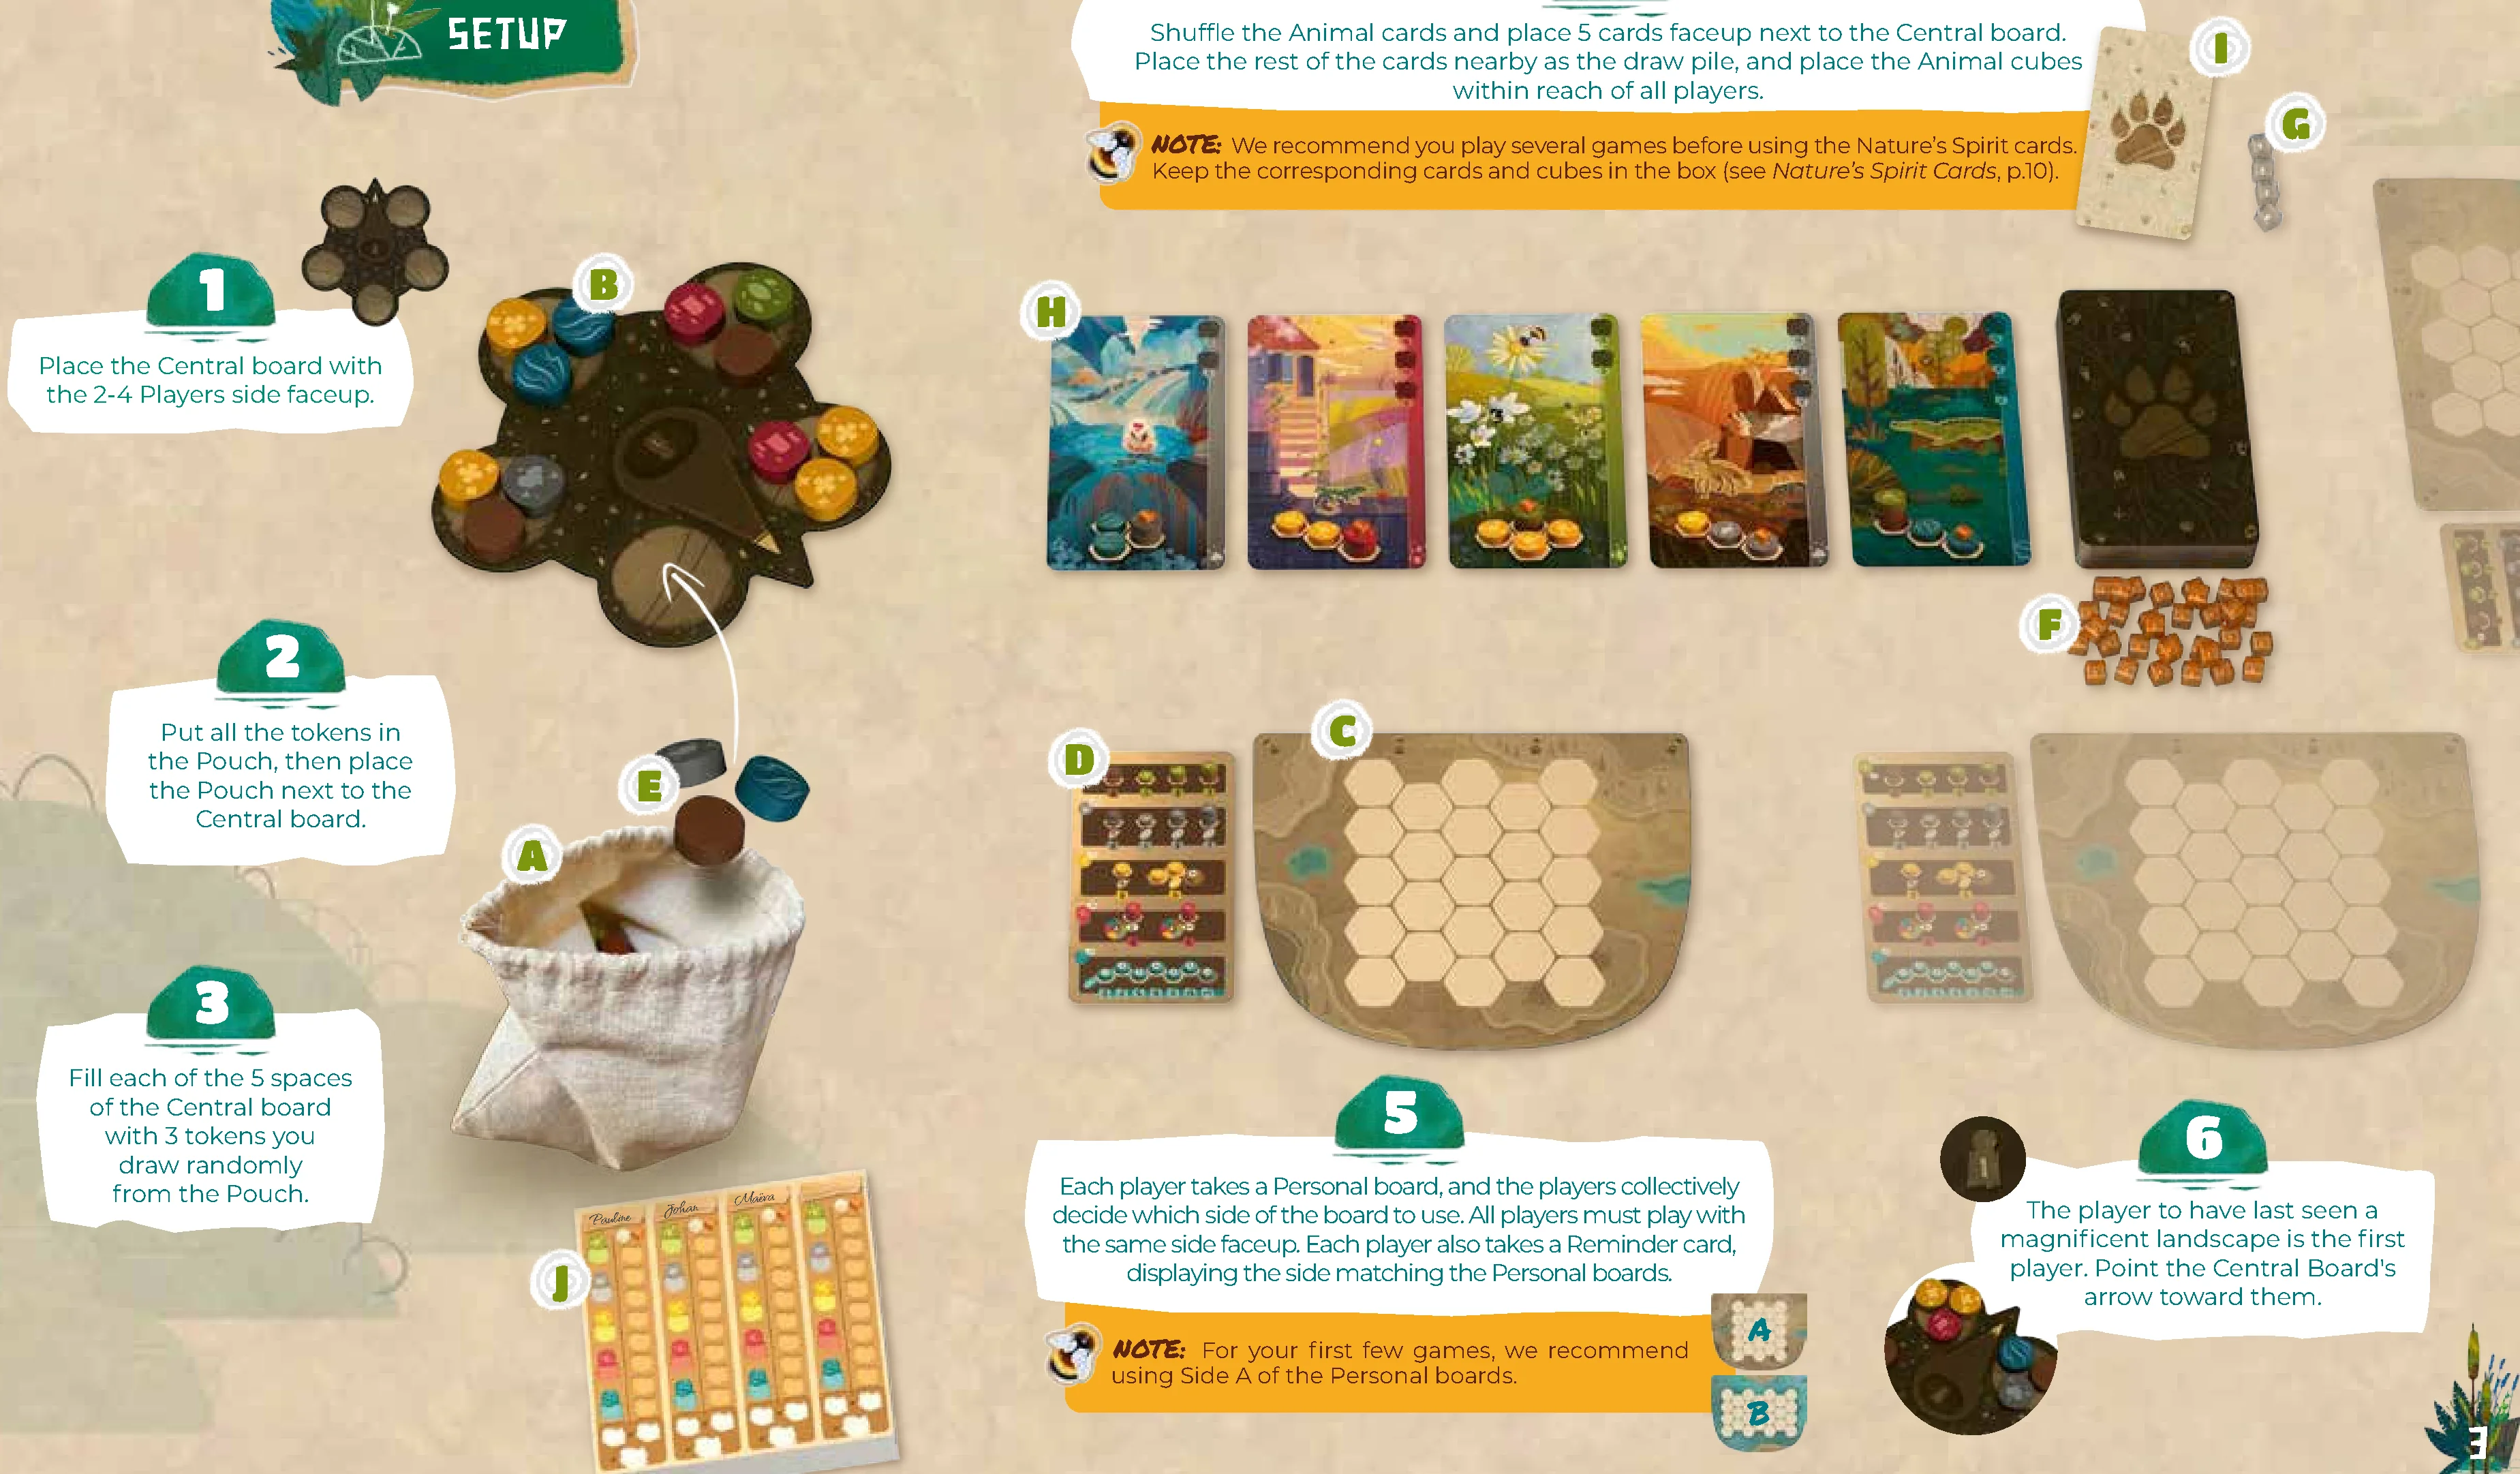
- Place the Central board with the 2-4 Players side faceup.
- Put all the tokens in the Pouch, then place the Pouch next to the Central board.
- Fill each of the 5 spaces of the Central board with 3 tokens drawn randomly from the Pouch.
- Shuffle the Animal cards and place 5 cards faceup next to the Central board. Place the rest of the cards nearby as the draw pile, and place the Animal cubes within reach of all players.
- Each player takes a Personal board, and the players collectively decide which side of the board to use. All players must play with the same side faceup. Each player also takes a Reminder card, displaying the side matching the Personal boards.
- The player to have last seen a magnificent landscape is the first player. Point the Central Board’s arrow toward them.
NOTE: We recommend you play several games before using the Nature’s Spirit cards. Keep the corresponding cards and cubes in the box (see Nature’s Spirit Cards, p. 10).
NOTE: For your first few games, we recommend using Side A of the Personal boards.
Game Turn
Starting with the first player and proceeding clockwise, each player takes a turn by performing the following actions in the order of their choosing:
Mandatory Action:
- Take and place tokens
Optional Actions:
- Take 1 Animal card
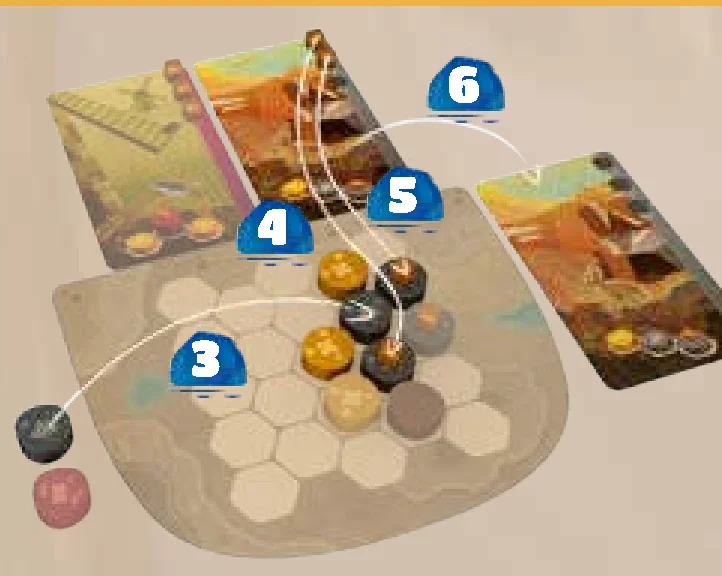
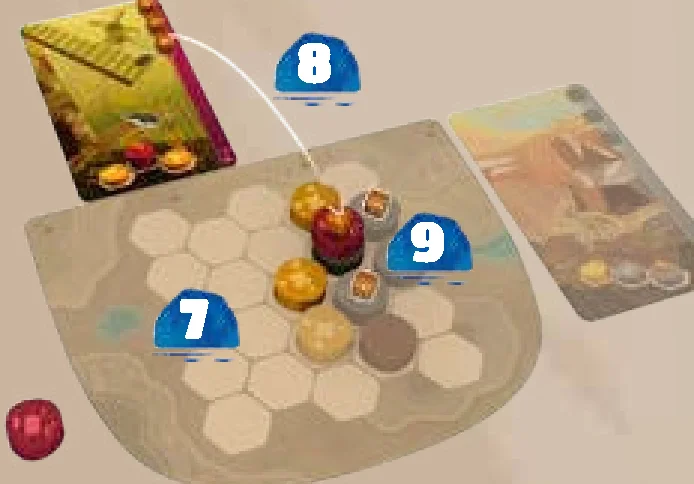
- Place 1 Animal cube
At the end of your turn, draw 3 tokens from the Pouch and refill the Central board. Refill the row of Animal cards if needed, so that there are 5 faceup cards.
Take and Place Tokens
With this action you will place the various features that will form your Landscape.
You must perform this action exactly once during your turn.
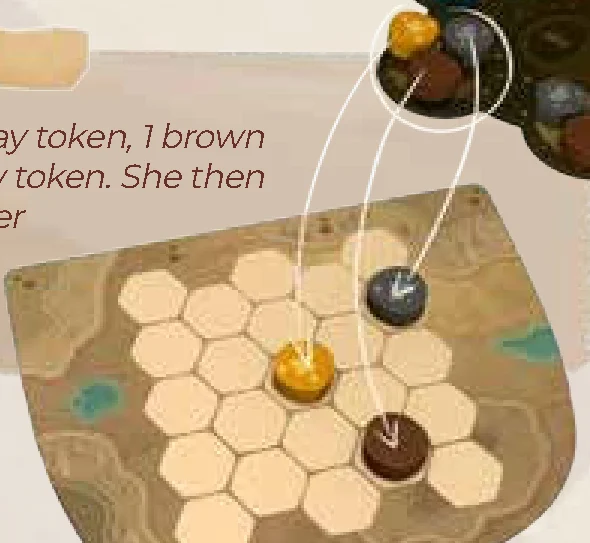
- Take 3 tokens from any one of the Central board spaces.
- You must place these 3 tokens on your Personal board however you see fit, following the rules below. After placing a token, you may perform optional actions before placing the next token.
How to Place a Token
- It can always be placed on an empty space.
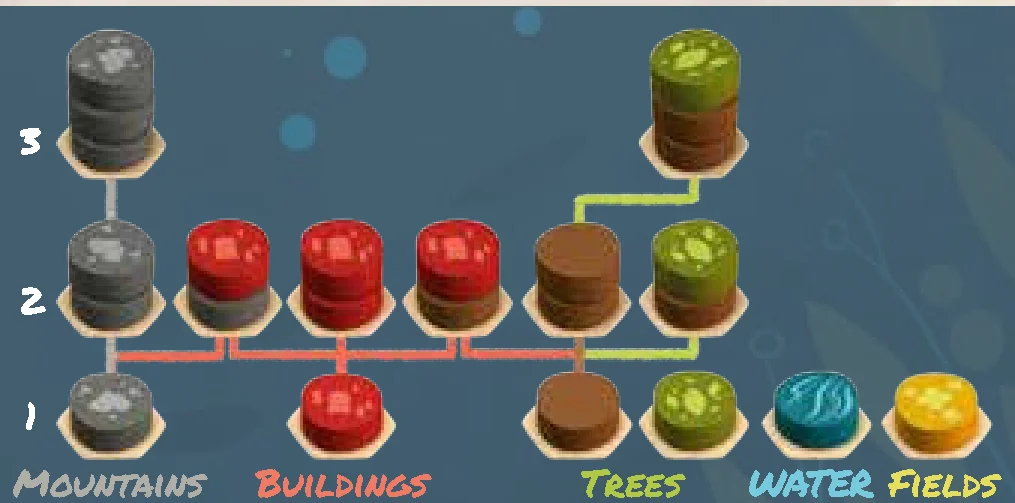
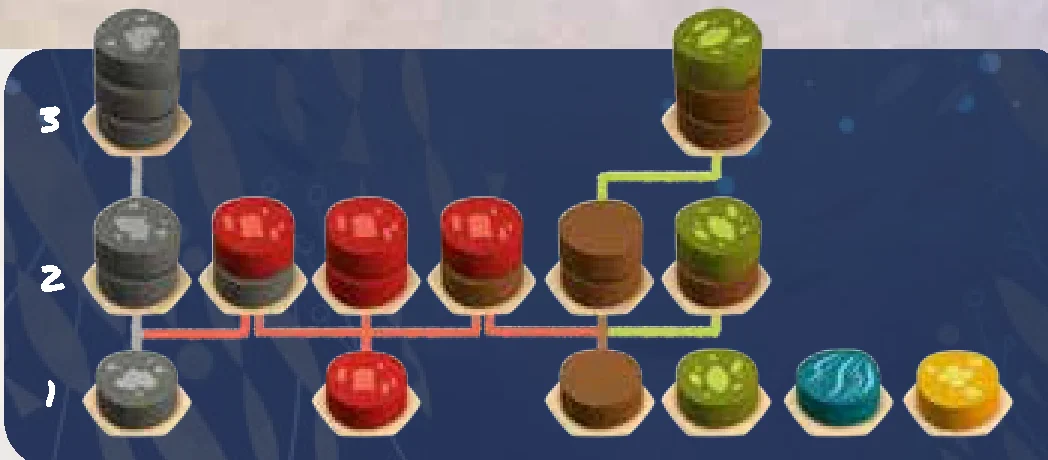
- It can be placed on top of 1 or 2 previously placed tokens to create Trees, Buildings, or Mountains (as shown in the illustration). No other stacking is allowed.
- It cannot be placed underneath previously placed tokens.
- It cannot be placed on a space occupied by an Animal cube (see Place 1 Animal Cube, p. 6).
Take 1 Animal Card
Animals are represented by Animal cards. Each Animal card indicates the Habitat pattern you must form within your Landscape to be able to place your Animal.
This action is optional. You can perform it anytime during your turn, but only once per turn.
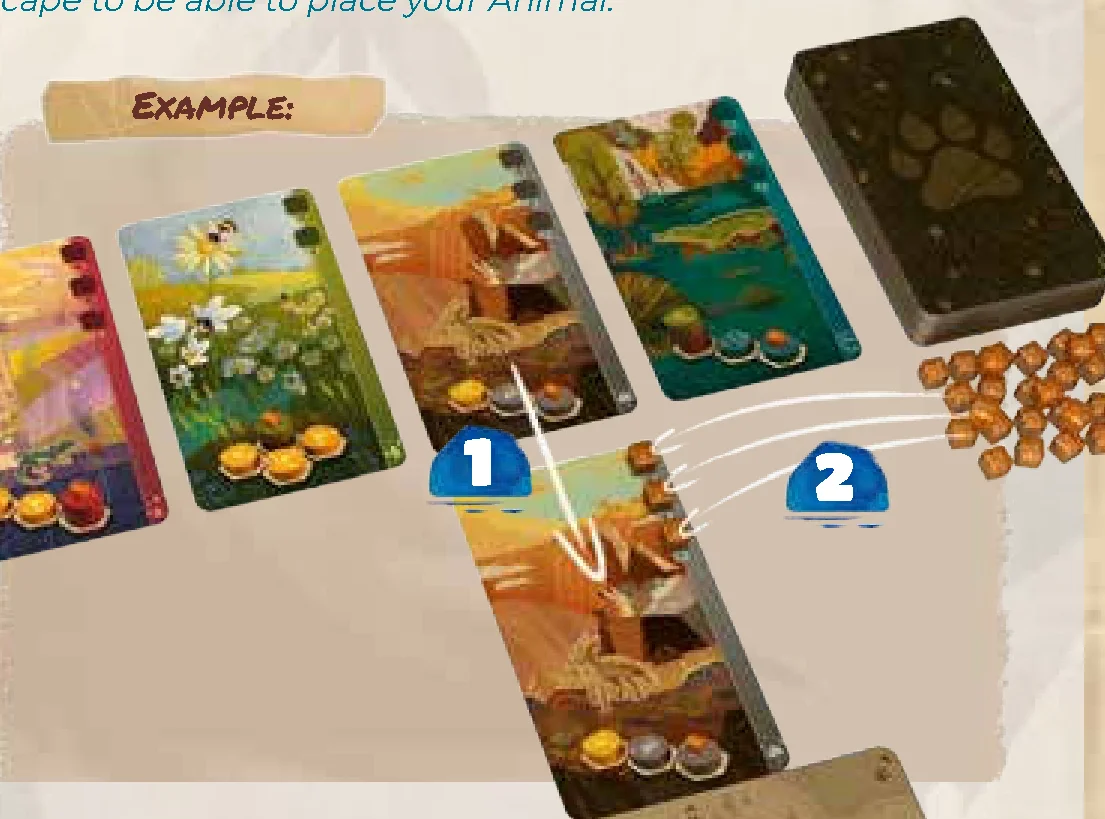
- Choose 1 Animal card from among the 5 faceup cards in the center of the table. Place that card above your Personal board. You may have up to 4 cards simultaneously above your Personal board.
- Take as many Animal cubes from the reserve as there are spaces to be filled on your Animal card, and place 1 cube on each of these spaces.
These Animals can now be placed onto your Landscape (see Place 1 Animal Cube, p. 6).
NOTE: For your first games, we recommend that you avoid having multiple Animal cards above your Personal board whose cubes are placed on the same color. The colored stripe on the side of the card is a reminder of that color, so try to choose Animals whose stripes are different colors.
Animal Card Description
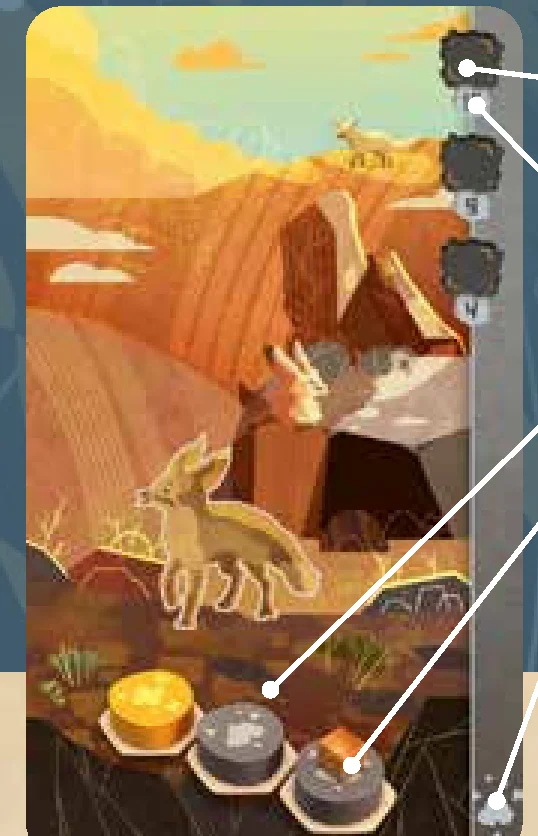
- Animal cubes space: Place the Animal cubes here until you can move them onto your Personal board.
- Points: Indicated beside each cube slot.
- Habitat pattern: The pattern your tokens must form on your Personal board to create the Habitat.
- Animal cube target space: The space on which the Animal cube must be placed within the Habitat.
- Colored stripe: A reminder of the token color on which the Animal cube must be placed.
Place 1 Animal Cube
The Animals can settle in your Landscape once you have recreated their required Habitats.
This action is optional. You may perform it multiple times on your turn, at any time.
Placement Requirements:
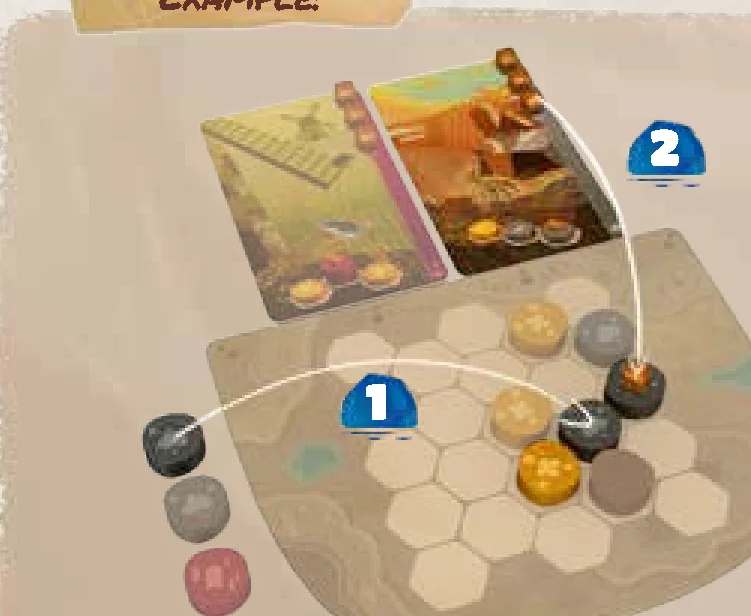
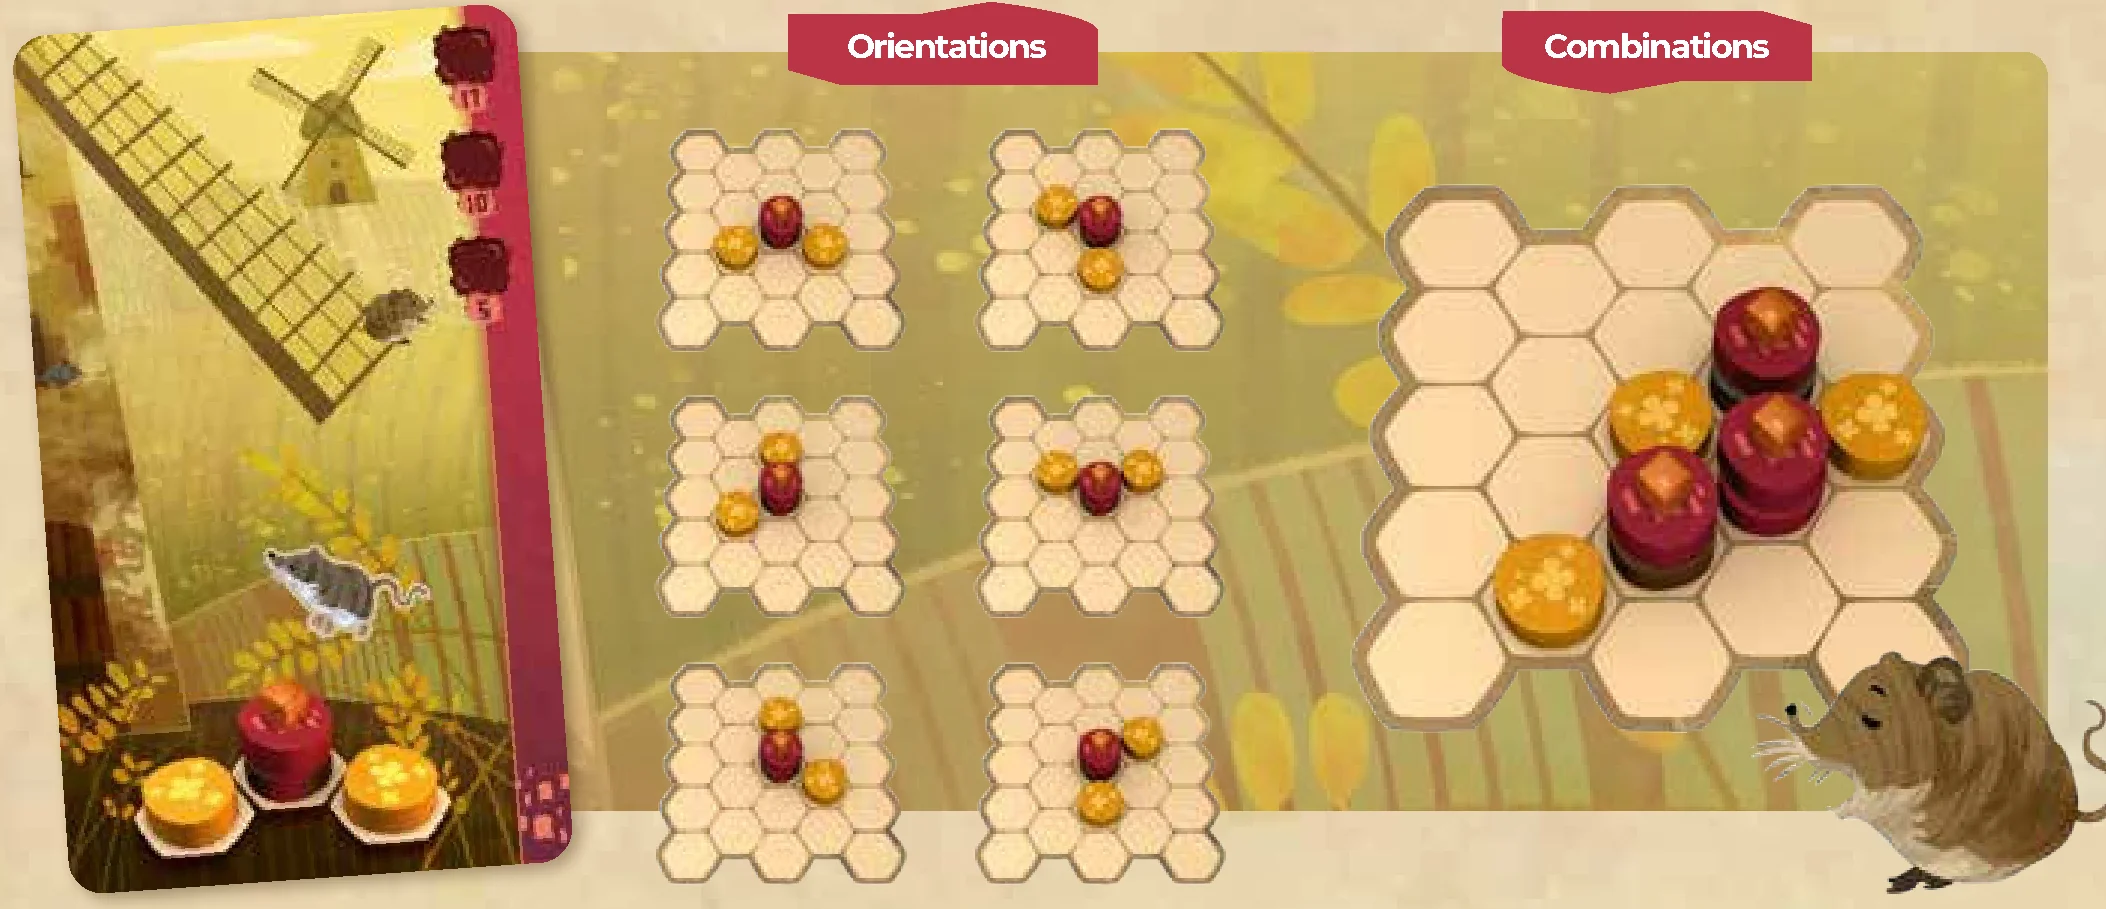
- The Habitat pattern must be created exactly on your Personal board as depicted on the card. However, it can be oriented in any direction (see Orientations p. 7).
- The height of the Trees and Mountains must exactly match what is shown on the card.
- The token on which the Animal cube is to be placed within the Habitat must be unoccupied.
- Buildings can be of any type (i.e., the bottom token can be either red, brown, or gray).
If these requirements are fulfilled, take the bottom-most cube from the Animal card and place it on the corresponding token within the Habitat on your Personal board.
Once the final cube on an Animal card has been placed, put that card next to your Personal board. It is considered complete and no longer counts against your 4-card limit.
At the end of the game, each Animal card earns you victory points (see Tallying Points, pp. 8-9).
NOTE: A single token can be used as part of multiple Habitats.
NOTE: The placement of an Animal cube is final, even if the pattern initially forming the Habitat is no longer on your Personal board. This can happen, for example, if a red token is placed on a gray token.
End of Game
The game ends in one of two ways:
- The Pouch is empty when you need to refill the Central board.
- At the end of your turn, there are 2 or fewer unoccupied spaces on your Personal board.
If necessary, end the current round so that all players have played an equal number of turns. At the end of the game, tally the points for the Landscapes you created and the Animals you placed (see Tallying Points, pp. 8-9).
The player with the most points wins the game!
In case of a tie, the player who has placed the most Animal cubes wins. In the event of another tie, players share the victory.
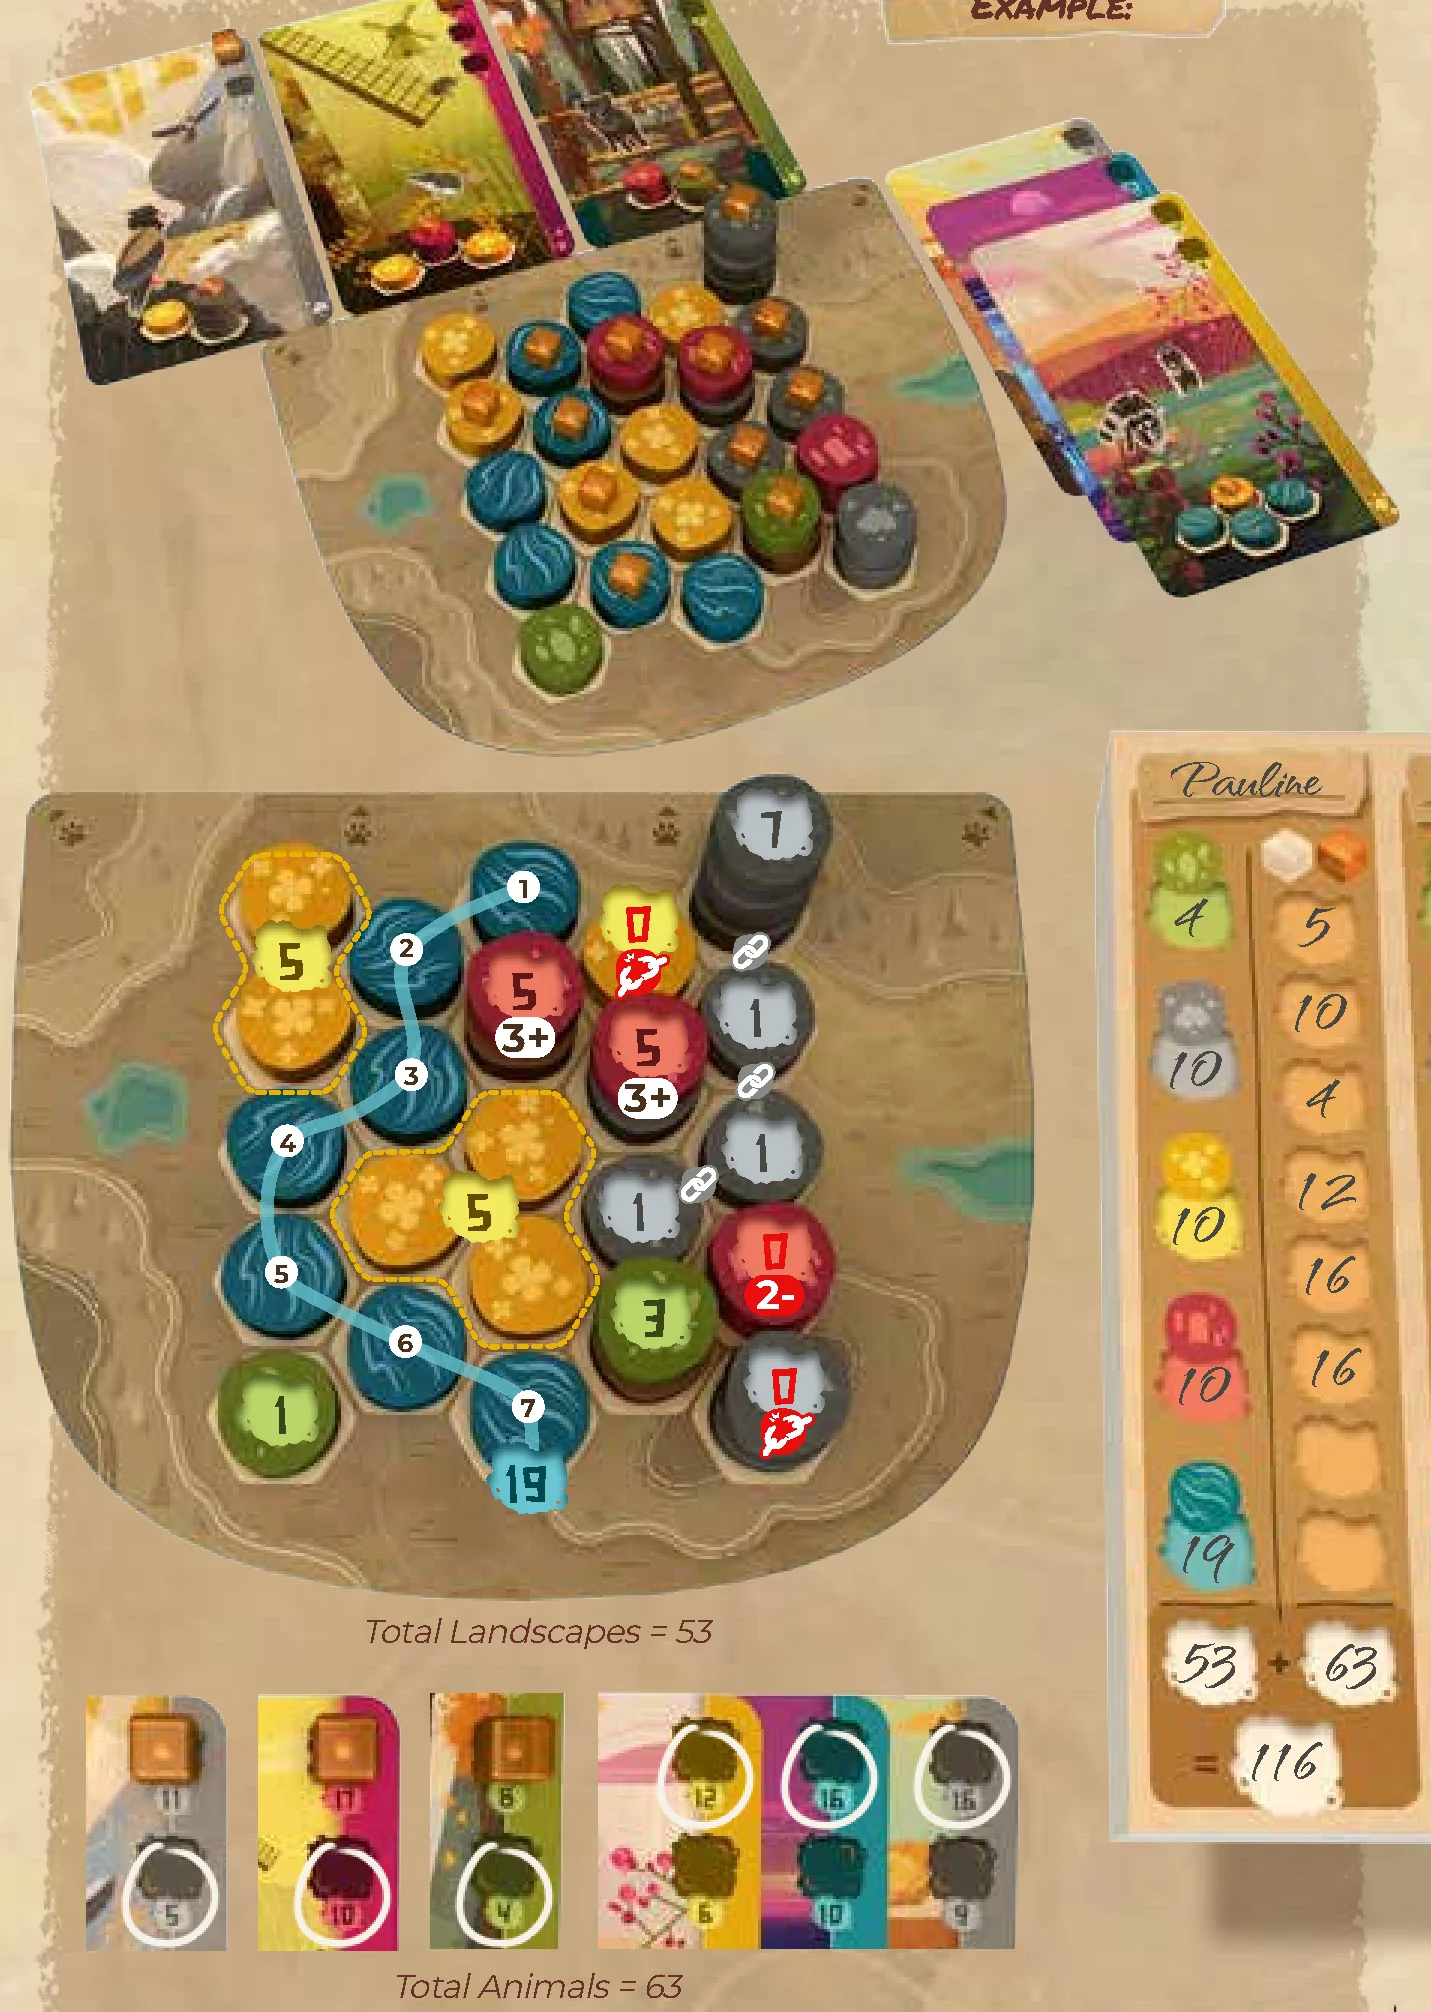
Tallying Points
Trees
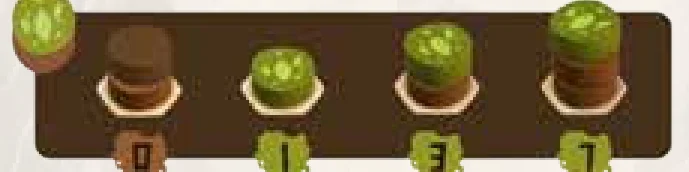
A Tree is formed by 1 green token, placed on top of 0, 1, or 2 brown tokens to create Trees of size 1, 2, or 3. The height of each Tree determines the number of points you score:
- Height 1 (1 green token): 1 point
- Height 2 (1 green on 1 brown): 3 points
- Height 3 (1 green on 2 brown): 7 points
Mountains
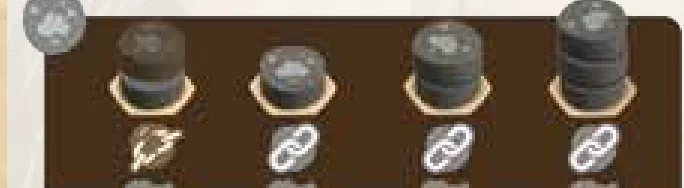
A Mountain is a stack made of 1, 2, or 3 gray tokens. The height of each Mountain determines the number of points you score. However, a Mountain is worth 0 points if it is not adjacent to another Mountain:
- Height 1: 1 point
- Height 2: 2 points
- Height 3: 3 points
Fields
A Field is formed by at least 2 yellow tokens in a contiguous group.
You score 5 points for each Field formed by 2 or more contiguous yellow tokens. To maximize your scoring, you should create small groups separated from each other. For example, if your Field is formed by 4 or more contiguous tokens, it only counts as a single Field and is only worth 5 points.

Buildings
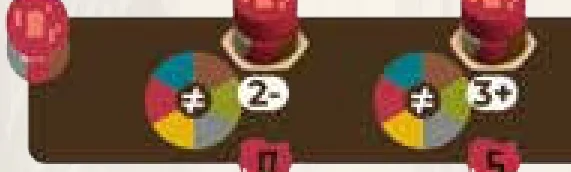
A Building is made of 1 red token, placed on top of 1 brown, gray, or red token (height 2 or more). You score 5 points for each Building, but only if surrounded by at least 3 tokens of different colors (out of the 6 available, including red). Only consider the top token on each adjacent space.
If this criteria is not met, a Building is worth 0 points.
Water – Side A: The River
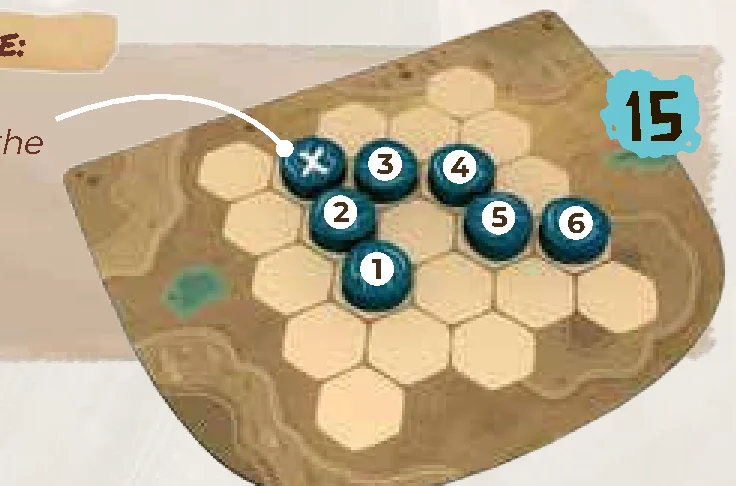
A River is a string of consecutive blue tokens. The length of the River determines the number of points you earn. Count the number of tokens from one end of the river to the other by the shortest path (ends included):
- 1 token: 0 points
- 2 tokens: 2 points
- 3 tokens: 5 points
- 4 tokens: 8 points
- 5 tokens: 11 points
- 6 tokens: 15 points
- Beyond 6 tokens: +4 points for each token beyond the 6th.
You only score your best river.
Water – Side B: The Islands
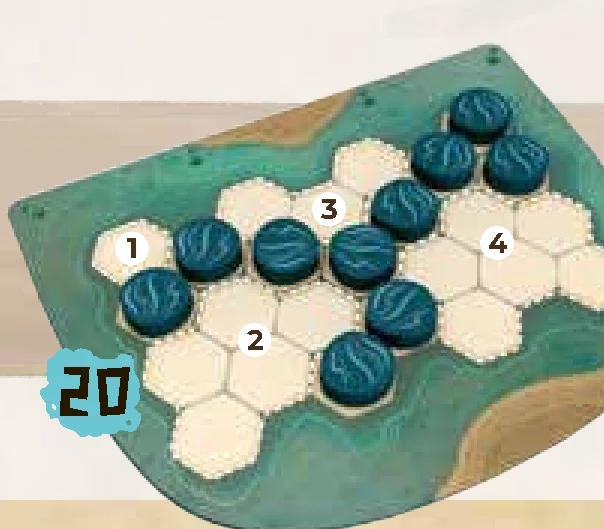
If using Side B of the Personal board, the blue tokens are scored differently. Each space or group of spaces separated from each other by blue tokens forms an Island.
You score 5 points for each island.
NOTE: You always have at least 1 island, even if you don’t create any separation using blue tokens.
Animal Cards
For each Animal card, whether completed or not, you score the number of points indicated in the topmost space without an Animal cube.
A card with all cubes still on it is worth 0 points. There is no penalty for not removing all cubes from an Animal card, other than it being worth fewer points.
Nature’s Spirit Cards
After you have played several games, you can use Nature’s Spirit cards to enjoy a richer game experience!
Set up
Shuffle the Nature’s Spirit cards and deal 2 to each player, facedown. On your first turn, you look at these 2 cards, then choose 1 and place it faceup above your Personal board, returning the other to the box. Then place a Nature’s Spirit cube on the chosen card. Nature’s Spirit cubes follow the same placement rules as the Animal cubes.
Game turn
Your Nature’s Spirit card counts towards your 4-card limit until it is completed by placing its Nature’s Spirit cube on your Personal board.
End of game
Nature’s Spirit cards are treated just like Animal cards: you will score points if you place the Nature’s Spirit cube on your Personal board, and you are not penalized if you don’t. However, the points scored by a Nature’s Spirit card are not tallied until the end of the game, and are based on the Landscapes you created.
Refer to the rule indicated on the card to determine its value in points. Some of these Nature’s Spirits cards will reward you for Landscape combinations you might not have looked for otherwise!
NOTE: Points from a Nature’s Spirit card are scored just like Animal cards, and are in addition to all other points scored elsewhere.
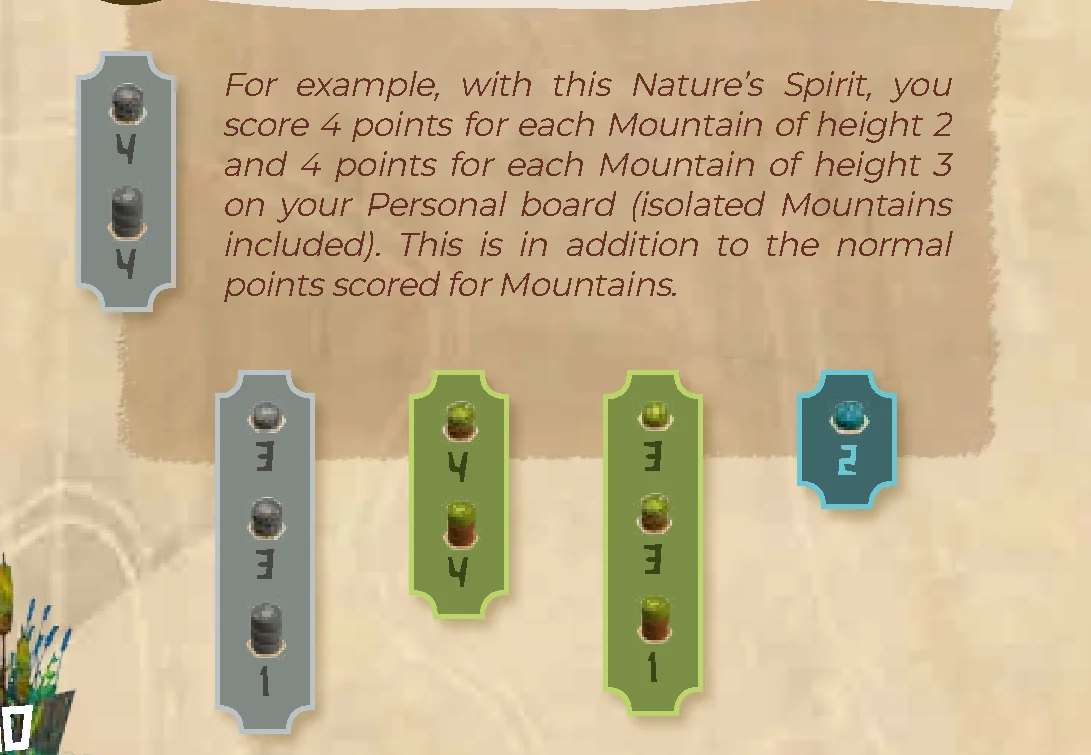
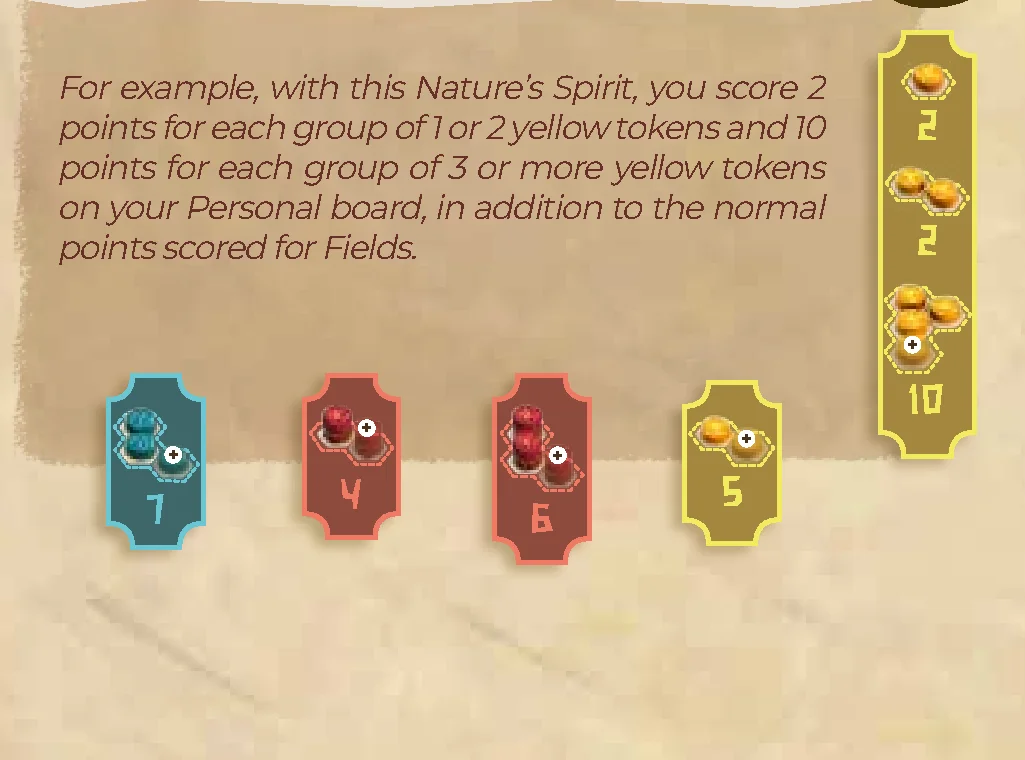
Some Nature’s Spirit cards earn you points based on:
- The number of Landscapes on your Personal board.
- The groups of connected Landscapes on your Personal board. An isolated Landscape is considered a group of size 1.
Solo Mode
You can play solo to discover the game, practice, or simply try to beat your highest score! To play alone, the following changes are necessary:
Setup
Place the Central board with the Solo side faceup, which only has 3 spaces. Place only 3 Animal cards faceup near the Central board.
Game Turn
At the end of each turn:
- Return the remaining 6 tokens to the box (they are discarded and are not returned to the Pouch), then refill each of the 3 spaces with 3 tokens.
- If you did not take an Animal card on this turn, you may discard 1 Animal card from the center of the table and replace it with the top card from the draw pile.
All other rules remain unchanged.
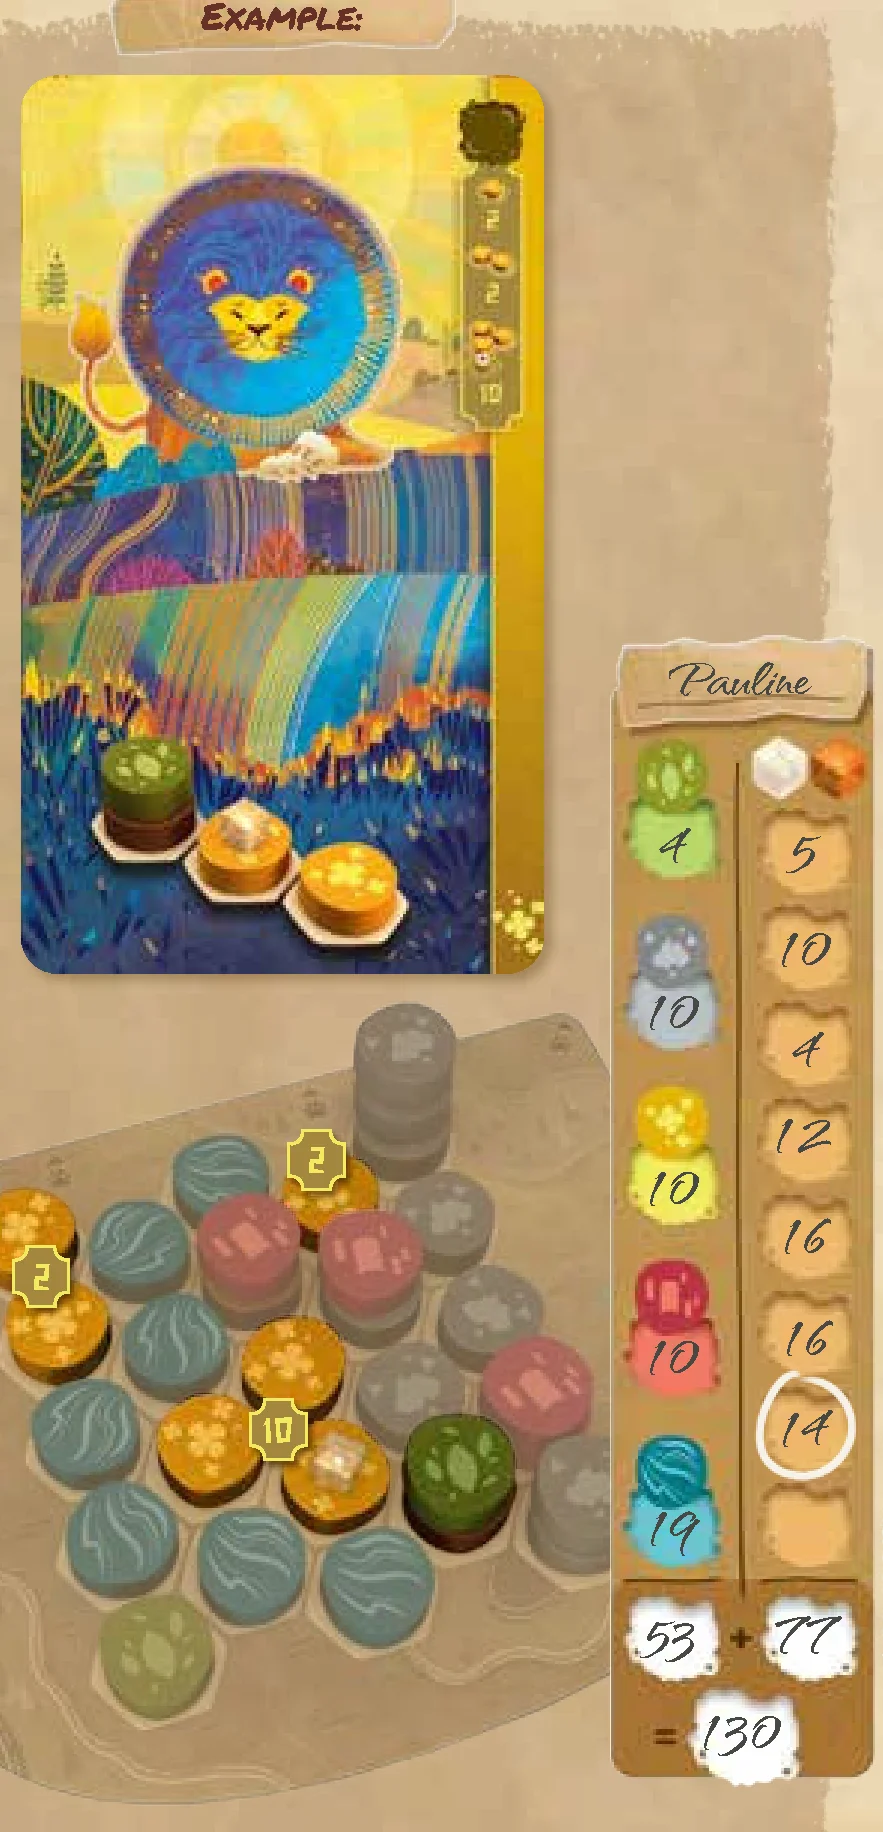
When playing solo mode, your goal is to earn as many suns  as possible, representing your level of success during the game. The number of obtained depends primarily on your score, but is also influenced by the side of the Personal board used, as well as the Nature’s Spirit you chose at the start of the game. Try to beat your high score in each configuration.
Score Chart
- 40 pts: 1
- 70 pts: 2
- 90 pts: 3
- 110 pts: 4
- 130 pts: 5
- 140 pts: 6
- 150 pts: 7
- 160 pts: 8
Modifiers
- Board Face: Side A = +1 | Side B = 0
- Nature’s Spirit: None = +2 | Level 1 = +1 | Level 2 = 0
Player Aid
Game Turn
Actions are performed in any order. Optional actions may be performed between the placement of 2 tokens.
Mandatory Action:
Take and place tokens (Once per turn)
- Can be placed on an empty space.
- Never underneath previously placed token(s).
- Never underneath or on top of an Animal cube.
- Can be stacked only if you comply with the stacking rules.
Optional Actions:
Take 1 Animal card (Once per turn)
- Immediately take enough cubes to cover each spot on the right side of the card.
- May have a maximum of 4 cards above your Personal board at any time.
- Recommendation: Avoid having several cards above your Personal board of the same color at the same time.
Place 1 Animal cube (Unlimited)
- Habitat pattern may be in any orientation.
- Must comply with the Tree and Mountain height requirements shown in the pattern.
- No more than 1 cube per space.
- A token may be part of several (identical or different) Habitats.
- Each cube placement is final, even if the Habitat used for its placement is no longer on your Personal board.
End of Game Turn:
- Refill the Central board.
- Refill the row of Animal cards so there are 5 cards faceup, if needed.
End of Game
Triggered when:
- There are no tokens left in the Pouch to refill the Central board.
- At least one player has 2 or fewer empty spaces on their Personal board.
Play until all players have had an equal number of turns.
Introduction & Components
Harmonies
Game Rules
Game Designer: Johan Benvenuto
From the Game Designer: Thanks to the Libellud team for their outstanding work, especially Anouk, Valentin and Matthis, who saw the potential in this game. To Maëva, let me congratulate you again for your superb illustrations! The game would not be what it is without you. Thanks also to CAL members (an association of game designers from Lyon) for their recommendations during the tests. Don’t change a thing!
2024 Credits: Game Designer: Johan Benvenuto • Artwork: Maëva Da Silva • Project Manager: Anouk Girard-Dagnas • Development: Matthis Gaciarz, Valentin Gaudicheau, Oleksandr Nevskiy • Art Director: Maëva Da Silva • Layout and Functional Design: Thomas Dutertre • Graphic Design: Simon Hay • Production Manager: Stéphane Robert
The team is thankful to Mathieu, Marion, Quentin, Camille, Alexandra, Delphine, Lucas, Joéva, Maximilien, Paul, Dorine, Ophélie, Laurent, Clément, and all the others who helped develop this game.
Goal of the Game
In Harmonies, build Landscapes by placing colored tokens and create Habitats for your Animals. To earn the most points and win the game, incorporate the Habitats in your Landscapes wisely and have as many Animals as you can settle there.
Contents
- 1 Pouch
- 1 Central board
- 4 Personal boards
- 4 Reminder cards
- 120 Tokens:
- 23 gray tokens
- 23 blue tokens
- 21 brown tokens
- 19 green tokens
- 19 yellow tokens
- 15 red tokens
- 66 Animal cubes
- 4 Nature’s Spirit cubes
- 32 Animal cards
- 10 Nature’s Spirit cards
- 1 Scoresheet pad
- 1 Rulebook
Setup
Game Setup
- Place the Central board with the 2-4 Players side faceup.
- Put all the tokens in the Pouch, then place the Pouch next to the Central board.
- Fill each of the 5 spaces of the Central board with 3 tokens drawn randomly from the Pouch.
- Shuffle the Animal cards and place 5 cards faceup next to the Central board. Place the rest of the cards nearby as the draw pile, and place the Animal cubes within reach of all players.
- Each player takes a Personal board, and the players collectively decide which side of the board to use. All players must play with the same side faceup. Each player also takes a Reminder card, displaying the side matching the Personal boards.
- The player to have last seen a magnificent landscape is the first player. Point the Central Board’s arrow toward them.
NOTE: We recommend you play several games before using the Nature’s Spirit cards. Keep the corresponding cards and cubes in the box (see Nature’s Spirit Cards, p. 10).
NOTE: For your first few games, we recommend using Side A of the Personal boards.
How to Play
Game Turn
Starting with the first player and proceeding clockwise, each player takes a turn by performing the following actions in the order of their choosing:
Mandatory Action:
- Take and place tokens
Optional Actions:
- Take 1 Animal card
- Place 1 Animal cube
At the end of your turn, draw 3 tokens from the Pouch and refill the Central board. Refill the row of Animal cards if needed, so that there are 5 faceup cards.
Take and Place Tokens
With this action you will place the various features that will form your Landscape.
You must perform this action exactly once during your turn.
- Take 3 tokens from any one of the Central board spaces.
- You must place these 3 tokens on your Personal board however you see fit, following the rules below. After placing a token, you may perform optional actions before placing the next token.
How to Place a Token
- It can always be placed on an empty space.
- It can be placed on top of 1 or 2 previously placed tokens to create Trees, Buildings, or Mountains (as shown in the illustration). No other stacking is allowed.
- It cannot be placed underneath previously placed tokens.
- It cannot be placed on a space occupied by an Animal cube (see Place 1 Animal Cube, p. 6).
Take 1 Animal Card
Animals are represented by Animal cards. Each Animal card indicates the Habitat pattern you must form within your Landscape to be able to place your Animal.
This action is optional. You can perform it anytime during your turn, but only once per turn.
- Choose 1 Animal card from among the 5 faceup cards in the center of the table. Place that card above your Personal board. You may have up to 4 cards simultaneously above your Personal board.
- Take as many Animal cubes from the reserve as there are spaces to be filled on your Animal card, and place 1 cube on each of these spaces.
These Animals can now be placed onto your Landscape (see Place 1 Animal Cube, p. 6).
NOTE: For your first games, we recommend that you avoid having multiple Animal cards above your Personal board whose cubes are placed on the same color. The colored stripe on the side of the card is a reminder of that color, so try to choose Animals whose stripes are different colors.
Animal Card Description
- Animal cubes space: Place the Animal cubes here until you can move them onto your Personal board.
- Points: Indicated beside each cube slot.
- Habitat pattern: The pattern your tokens must form on your Personal board to create the Habitat.
- Animal cube target space: The space on which the Animal cube must be placed within the Habitat.
- Colored stripe: A reminder of the token color on which the Animal cube must be placed.
Place 1 Animal Cube
The Animals can settle in your Landscape once you have recreated their required Habitats.
This action is optional. You may perform it multiple times on your turn, at any time.
Placement Requirements:
- The Habitat pattern must be created exactly on your Personal board as depicted on the card. However, it can be oriented in any direction (see Orientations p. 7).
- The height of the Trees and Mountains must exactly match what is shown on the card.
- The token on which the Animal cube is to be placed within the Habitat must be unoccupied.
- Buildings can be of any type (i.e., the bottom token can be either red, brown, or gray).
If these requirements are fulfilled, take the bottom-most cube from the Animal card and place it on the corresponding token within the Habitat on your Personal board.
Once the final cube on an Animal card has been placed, put that card next to your Personal board. It is considered complete and no longer counts against your 4-card limit.
At the end of the game, each Animal card earns you victory points (see Tallying Points, pp. 8-9).
NOTE: A single token can be used as part of multiple Habitats.
NOTE: The placement of an Animal cube is final, even if the pattern initially forming the Habitat is no longer on your Personal board. This can happen, for example, if a red token is placed on a gray token.
End of Game
End of Game
The game ends in one of two ways:
- The Pouch is empty when you need to refill the Central board.
- At the end of your turn, there are 2 or fewer unoccupied spaces on your Personal board.
If necessary, end the current round so that all players have played an equal number of turns. At the end of the game, tally the points for the Landscapes you created and the Animals you placed (see Tallying Points, pp. 8-9).
The player with the most points wins the game!
In case of a tie, the player who has placed the most Animal cubes wins. In the event of another tie, players share the victory.
Scoring
Tallying Points
Trees
A Tree is formed by 1 green token, placed on top of 0, 1, or 2 brown tokens to create Trees of size 1, 2, or 3. The height of each Tree determines the number of points you score:
- Height 1 (1 green token): 1 point
- Height 2 (1 green on 1 brown): 3 points
- Height 3 (1 green on 2 brown): 7 points
Mountains
A Mountain is a stack made of 1, 2, or 3 gray tokens. The height of each Mountain determines the number of points you score. However, a Mountain is worth 0 points if it is not adjacent to another Mountain:
- Height 1: 1 point
- Height 2: 2 points
- Height 3: 3 points
Fields
A Field is formed by at least 2 yellow tokens in a contiguous group.
You score 5 points for each Field formed by 2 or more contiguous yellow tokens. To maximize your scoring, you should create small groups separated from each other. For example, if your Field is formed by 4 or more contiguous tokens, it only counts as a single Field and is only worth 5 points.
Buildings
A Building is made of 1 red token, placed on top of 1 brown, gray, or red token (height 2 or more). You score 5 points for each Building, but only if surrounded by at least 3 tokens of different colors (out of the 6 available, including red). Only consider the top token on each adjacent space.
If this criteria is not met, a Building is worth 0 points.
Water – Side A: The River
A River is a string of consecutive blue tokens. The length of the River determines the number of points you earn. Count the number of tokens from one end of the river to the other by the shortest path (ends included):
- 1 token: 0 points
- 2 tokens: 2 points
- 3 tokens: 5 points
- 4 tokens: 8 points
- 5 tokens: 11 points
- 6 tokens: 15 points
- Beyond 6 tokens: +4 points for each token beyond the 6th.
You only score your best river.
Water – Side B: The Islands
If using Side B of the Personal board, the blue tokens are scored differently. Each space or group of spaces separated from each other by blue tokens forms an Island.
You score 5 points for each island.
NOTE: You always have at least 1 island, even if you don’t create any separation using blue tokens.
Animal Cards
For each Animal card, whether completed or not, you score the number of points indicated in the topmost space without an Animal cube.
A card with all cubes still on it is worth 0 points. There is no penalty for not removing all cubes from an Animal card, other than it being worth fewer points.
Nature's Spirit Cards
Nature’s Spirit Cards
After you have played several games, you can use Nature’s Spirit cards to enjoy a richer game experience!
Set up
Shuffle the Nature’s Spirit cards and deal 2 to each player, facedown. On your first turn, you look at these 2 cards, then choose 1 and place it faceup above your Personal board, returning the other to the box. Then place a Nature’s Spirit cube on the chosen card. Nature’s Spirit cubes follow the same placement rules as the Animal cubes.
Game turn
Your Nature’s Spirit card counts towards your 4-card limit until it is completed by placing its Nature’s Spirit cube on your Personal board.
End of game
Nature’s Spirit cards are treated just like Animal cards: you will score points if you place the Nature’s Spirit cube on your Personal board, and you are not penalized if you don’t. However, the points scored by a Nature’s Spirit card are not tallied until the end of the game, and are based on the Landscapes you created.
Refer to the rule indicated on the card to determine its value in points. Some of these Nature’s Spirits cards will reward you for Landscape combinations you might not have looked for otherwise!
NOTE: Points from a Nature’s Spirit card are scored just like Animal cards, and are in addition to all other points scored elsewhere.
Some Nature’s Spirit cards earn you points based on:
- The number of Landscapes on your Personal board.
- The groups of connected Landscapes on your Personal board. An isolated Landscape is considered a group of size 1.
Solo Mode
Solo Mode
You can play solo to discover the game, practice, or simply try to beat your highest score! To play alone, the following changes are necessary:
Setup
Place the Central board with the Solo side faceup, which only has 3 spaces. Place only 3 Animal cards faceup near the Central board.
Game Turn
At the end of each turn:
- Return the remaining 6 tokens to the box (they are discarded and are not returned to the Pouch), then refill each of the 3 spaces with 3 tokens.
- If you did not take an Animal card on this turn, you may discard 1 Animal card from the center of the table and replace it with the top card from the draw pile.
All other rules remain unchanged.
When playing solo mode, your goal is to earn as many suns as possible, representing your level of success during the game. The number of obtained depends primarily on your score, but is also influenced by the side of the Personal board used, as well as the Nature’s Spirit you chose at the start of the game. Try to beat your high score in each configuration.
Score Chart
- 40 pts: 1
- 70 pts: 2
- 90 pts: 3
- 110 pts: 4
- 130 pts: 5
- 140 pts: 6
- 150 pts: 7
- 160 pts: 8
Modifiers
- Board Face: Side A = +1 | Side B = 0
- Nature’s Spirit: None = +2 | Level 1 = +1 | Level 2 = 0
Player Aid & Summary
Player Aid
Game Turn
Actions are performed in any order. Optional actions may be performed between the placement of 2 tokens.
Mandatory Action:
Take and place tokens (Once per turn)
- Can be placed on an empty space.
- Never underneath previously placed token(s).
- Never underneath or on top of an Animal cube.
- Can be stacked only if you comply with the stacking rules.
Optional Actions:
Take 1 Animal card (Once per turn)
- Immediately take enough cubes to cover each spot on the right side of the card.
- May have a maximum of 4 cards above your Personal board at any time.
- Recommendation: Avoid having several cards above your Personal board of the same color at the same time.
Place 1 Animal cube (Unlimited)
- Habitat pattern may be in any orientation.
- Must comply with the Tree and Mountain height requirements shown in the pattern.
- No more than 1 cube per space.
- A token may be part of several (identical or different) Habitats.
- Each cube placement is final, even if the Habitat used for its placement is no longer on your Personal board.
End of Game Turn:
- Refill the Central board.
- Refill the row of Animal cards so there are 5 cards faceup, if needed.
End of Game
Triggered when:
- There are no tokens left in the Pouch to refill the Central board.
- At least one player has 2 or fewer empty spaces on their Personal board.
Play until all players have had an equal number of turns.