Lisboa
2017
Guide Lisbon’s reconstruction through influence, commerce, construction, and royal favor in a strategic game where the most wigs claim victory.
120
minutes
1 - 4
player(s)
12+
Heavy

About this board game
Lisboa is a board game for 1–4 players about rebuilding Lisbon after the devastating earthquake, tsunami, and fires of 1755, with a playing time of approximately 120 minutes. Players take the roles of members of the nobility, using their influence to help create a new city while pursuing the most important prize of the era: wigs.
The game is played on a real map of downtown Lisbon. Working with the architects, players help construct the city anew; with the Marquis of Pombal, they develop commerce; and with the King, they open the city’s buildings. The type of business permitted on each street has already been determined, adding structure to the reconstruction and business development.
Each round, every player takes one turn and may place a card on their display or replace one already there. Players also schedule hearings to gain character favors connected to commerce, construction, and openings. Iconic buildings score stores, while stores provide income, linking the growth of the city to each player’s progress.
- Manage influence, construction licenses, store permits, church power, workers, and money.
- Use hearings to obtain valuable character favors.
- Help develop commerce and open buildings across the reconstructed city.
- Adapt to a royal treasure whose wealth is controlled by player actions.
The royal treasure drives the economy, and its changing wealth means every game of Lisboa offers a different experience. Workers have a cost that depends on the prestige of the players, making resource management an important part of the reconstruction.
After a fixed number of rounds, the player with the most wigs wins. Lisboa combines historical setting, card play, city rebuilding, commerce, and carefully managed influence into a distinctive strategy game set during Lisbon’s remarkable recovery.
Thematics
Mechanics
Designer
Illustrator
/pic7182955.jpg)

Board Game Rules for
Lisboa
LISBOA
A game by Vital Lacerda
1–4 Players / 30 min per player / Ages 14+
Historical Background
On November 1st, 1755, on All Saints’ Day, Lisboa suffered an earthquake of an estimated magnitude of 8.5–9.0, followed by a tsunami, and 3 days of fires. The city was almost completely destroyed.
The Marquis of Pombal, Sebastião José de Carvalho e Melo, was the prime minister at the time, and the king put him in charge of the reconstruction of Lisboa.
The king and the prime minister immediately launched efforts to rebuild the city. On December 4th, 1755, little more than a month after the catastrophe, the chief engineer of the realm, Manuel da Maia, presented his plans to rebuild Lisboa. Maia presented five options, including abandoning Lisboa altogether, rebuilding with recycled ruins, widening the streets, and even building a completely new city. The chosen plan boldly proposed razing the entire Baixa quarter and “laying out new streets without restraint”. Eugénio dos Santos and Carlos Mardel were the architects in charge of the rebuilding.
In less than a year, the city was cleared of debris. Because the king wanted to have a new and perfectly ordered city, he commissioned the construction of big squares, straight, large avenues, and widened streets, with related types of businesses as if each street had its own motto: A Baixa de Lisboa.
A game of Lisboa is set over a span of 22 years. You play the roles of influential nobles who survived the earthquake, tsunami, and fires, and who will help in the reconstruction and economic development of the new city to receive graces from the king and the marquis. You will work with the architects to build Lisboa anew in order to gain Influence, and the most important thing of all: Wigs.
Game Art, the Portuguese Azulejo, and the Wigs
All the art Ian O’Toole created for Lisboa is based on murals of glazed Portuguese tiles, as the art form had evolved by the 17th Century. Even today, you can find these murals not only in many palaces, churches, and Noble houses, but also in middle-class homes. Mass production of these tiles began in the 18th Century, partly due to increased demand in Portugal, but also from large orders that started coming in from the Portuguese colony, Brazil. After the earthquake, they became trendy, and often depicted historical situations, framed by decorative patterns — all of this done predominantly in blue and white. The Portuguese name for these tiles is Azulejos Portugueses.
A more ubiquitous trendy commodity from that time was the wig. The following excerpt explains why wigs were chosen as the “victory points” in this game:
“With wigs being the universal male consumer product of the 1700s, and everyone from shopkeeper to king wearing one, men were spoiled for choice. While a shop boy might only be able to afford one wig, and thus had to choose wisely and for durability, those of the one percent of the population, the Nobleman and the wealthy citizens, could afford to own dozens of wigs…”
— From ‘The Wig Business was Big Business in 18th Century’ by Lucinda Brant
Components
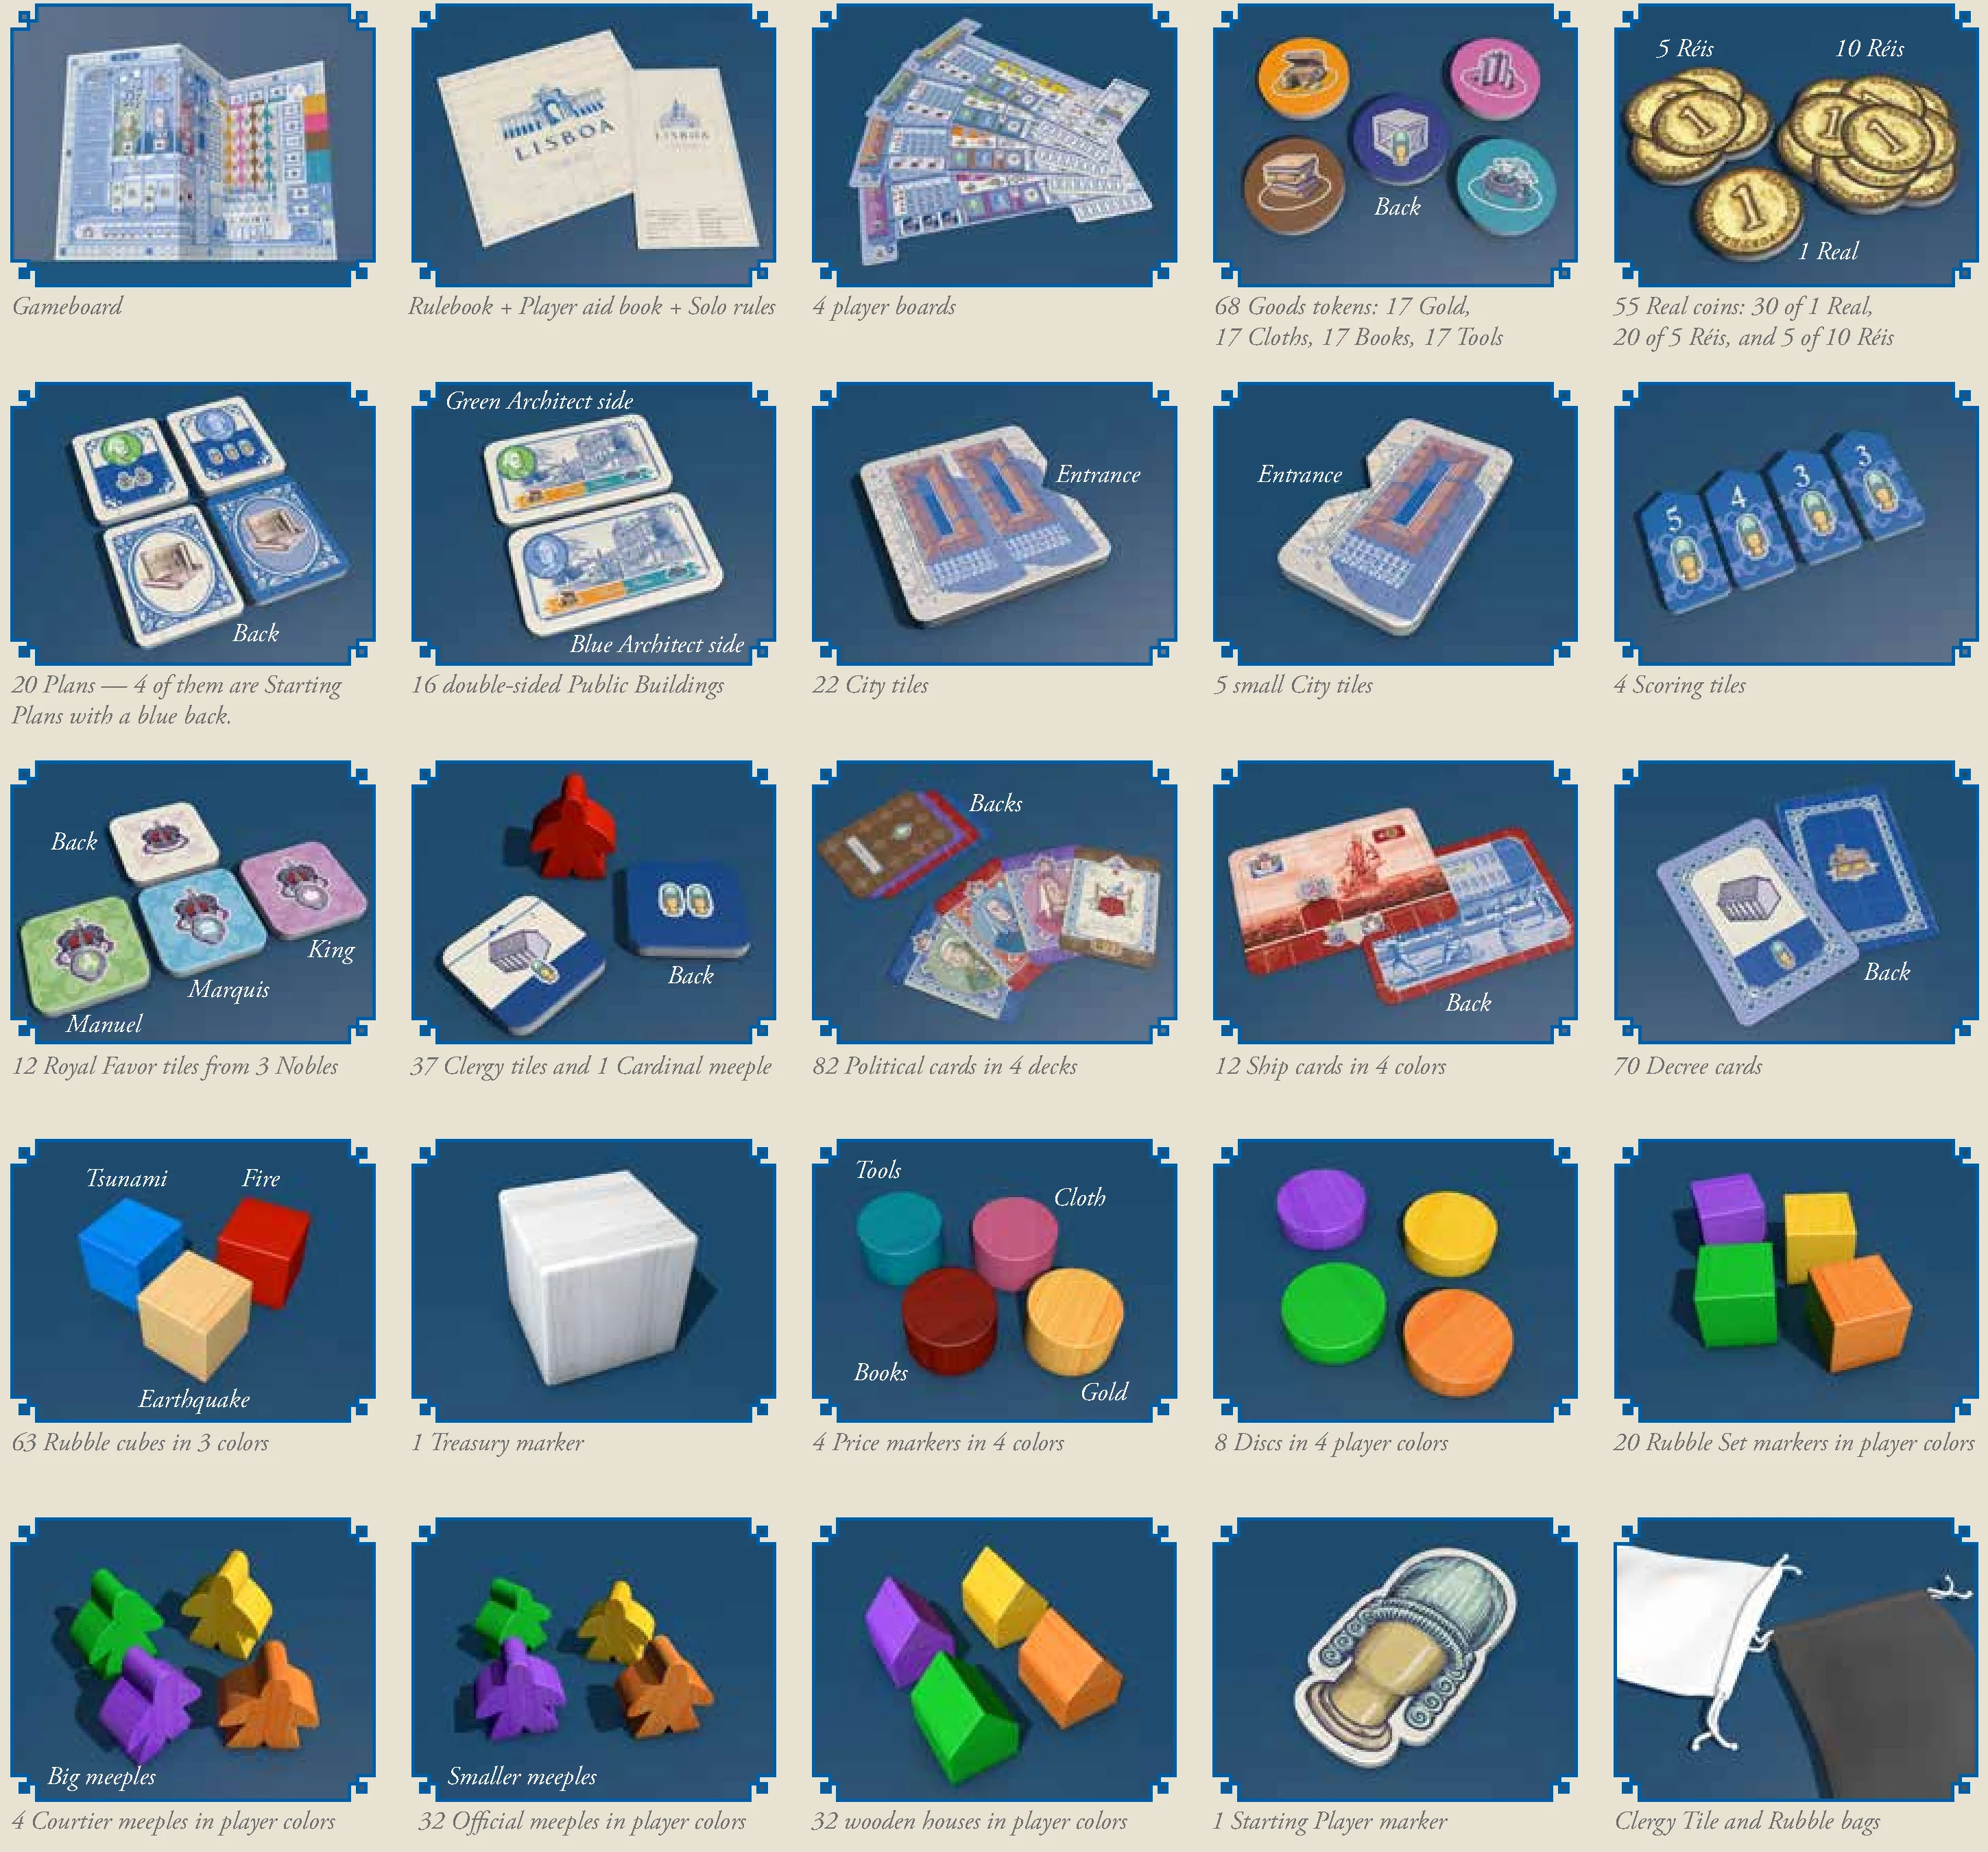
- 1 Gameboard
- 1 Rulebook + 1 Player Aid book + Solo rules
- 4 Player boards
- 68 Goods tokens: 17 Gold, 17 Cloths, 17 Books, 17 Tools
- 55 Real coins: 30 of 1 Real, 20 of 5 Réis, and 5 of 10 Réis
- 20 Plans (4 of them are Starting Plans with a blue back)
- 16 double-sided Public Buildings (Green Architect side / Blue Architect side)
- 22 City tiles (large)
- 5 small City tiles
- 4 Scoring tiles
- 12 Royal Favor tiles from 3 Nobles (Manuel, Marquis, King)
- 37 Clergy tiles and 1 Cardinal meeple
- 82 Political cards in 4 decks
- 12 Ship cards in 4 colors
- 70 Decree cards
- 63 Rubble cubes in 3 colors (Earthquake – brown, Fire – red, Tsunami – blue)
- 1 Treasury marker
- 4 Price markers in 4 colors
- 8 Discs in 4 player colors
- 20 Rubble Set markers in player colors
- 4 Courtier meeples in player colors (Big meeples)
- 32 Official meeples in player colors (Smaller meeples)
- 32 wooden houses in player colors
- 1 Starting Player marker
- 2 Cloth bags: Clergy Tile bag and Rubble bag
Credits & Acknowledgments
Game Design: Vital Lacerda
Illustrations: Ian O’Toole
Head of development: Paul Incao
Lead developers: Julián Pombo and Nils Urdahl
Graphic Design & 3D Illustrations: Ian O’Toole
Rulebook & 3D Illustrations: Vital Lacerda
English Rules Editing: Nathan Morse
Official Rules Video: Paul Grogan, Gaming Rules!
Proofreading: Ori Avtalion, Paul Grogan
Project Managers: Rick Soued & Alex Soued
Acknowledgments
Many thanks to all players who playtested Lisboa for the last 4 years and sent so many suggestions.
Main playtesters: Emanuel Diniz, Nuno Fonseca, Rafael Pires, Thomas Brygmann.
The Author wishes to warmly thank for playtesting and suggestions: Alexandre Bezerra, André Almeida, Brandon Kempf, Brian Frahm, Brian Tri, Carlos Paiva, Carolina Valença, Catarina Sarmento, Celine Gaudin, César Mendes, Clayton Ross, Chris Arnold, Chris Weiss, Cristina Antunes, Christophe Gaudin, Christopher Incao, David da Silva, Dave Moss, Derek Davis, Duarte Conceição, Eduardo Mendieta, Eisen Montalvo, Elsa Romão, Gary Perrin, Gonçalo Moura, Hugo Cabrita, Hugo Elias, Ian O’Toole, Jake Blomquist, Jason Grantz, João Monteiro, João Madeira, Jorge Blázquez, Jorge Deinos, Jorge Graça, Joze Reverente, Lars Helmersson, Luís Cóias, Luís Severino, Ori Avtalion, Patrick Morrison, Paulo Renato, Paulo Terça, Pedro Almeida, Pedro Branco, Pedro Freitas, Pedro Sampaio, Pedro Sequeira, Pete King, Piero Cabral, Mal King, Malte Frieg, Manny Rodriguez, Matthew Dennison, Matthew James Goodwin, Mitch Chiappalone, Nicola Bocchetta, Nikolas Co, Nicholas Hjelmberg, Rafael Duarte, Rafael Maia, Rafael Theunis, Ralph Anderson, Réjean Ducharme, Ricardo Almeida, Ricardo Gama, Ricardo Moita, Rob Arntz, Roel Vaneerdeweg, Rodrigo Levin, Ruben Rodrigues, Sandra Sarmento, Sandrina Fernandes, Sara Rodrigues, Sébastien Charbonneau, Shay Rickman, Sofia Passinhas, Stephen Roberts, Steve Raab, Tiago Ribeiro, The Dice Men Cometh (Mark, Garth & Leon), Vasco Almeida, Vitor Pires, Warren Adams.
A very special thanks to Julián Pombo and Nils Urdahl for the infinite playtesting hours on Tabletopia, incredible ideas, great development and friendship. To Ian O’Toole for the amazing art and graphic ideas, to Nathan Morse, for all the support, ideas, and many working hours on the rulebook, Ori for his eagle eye on catching issues in the rules, all of the BGG community for their suggestions and support, and finally to Paul Incao, who keeps following me on this adventure, with many great ideas, and for being available at every hour for developing. To Alex, Rick Soued, and the entire EGG team for believing in this game. Without all of these people this game would not have been possible.
All my love to my beautiful daughters Catarina and Inês and to my muse and greatest friend, my wife Sandra, for their patience, support, inspiration, and many hours of discussion on this game.
Initial Preparation
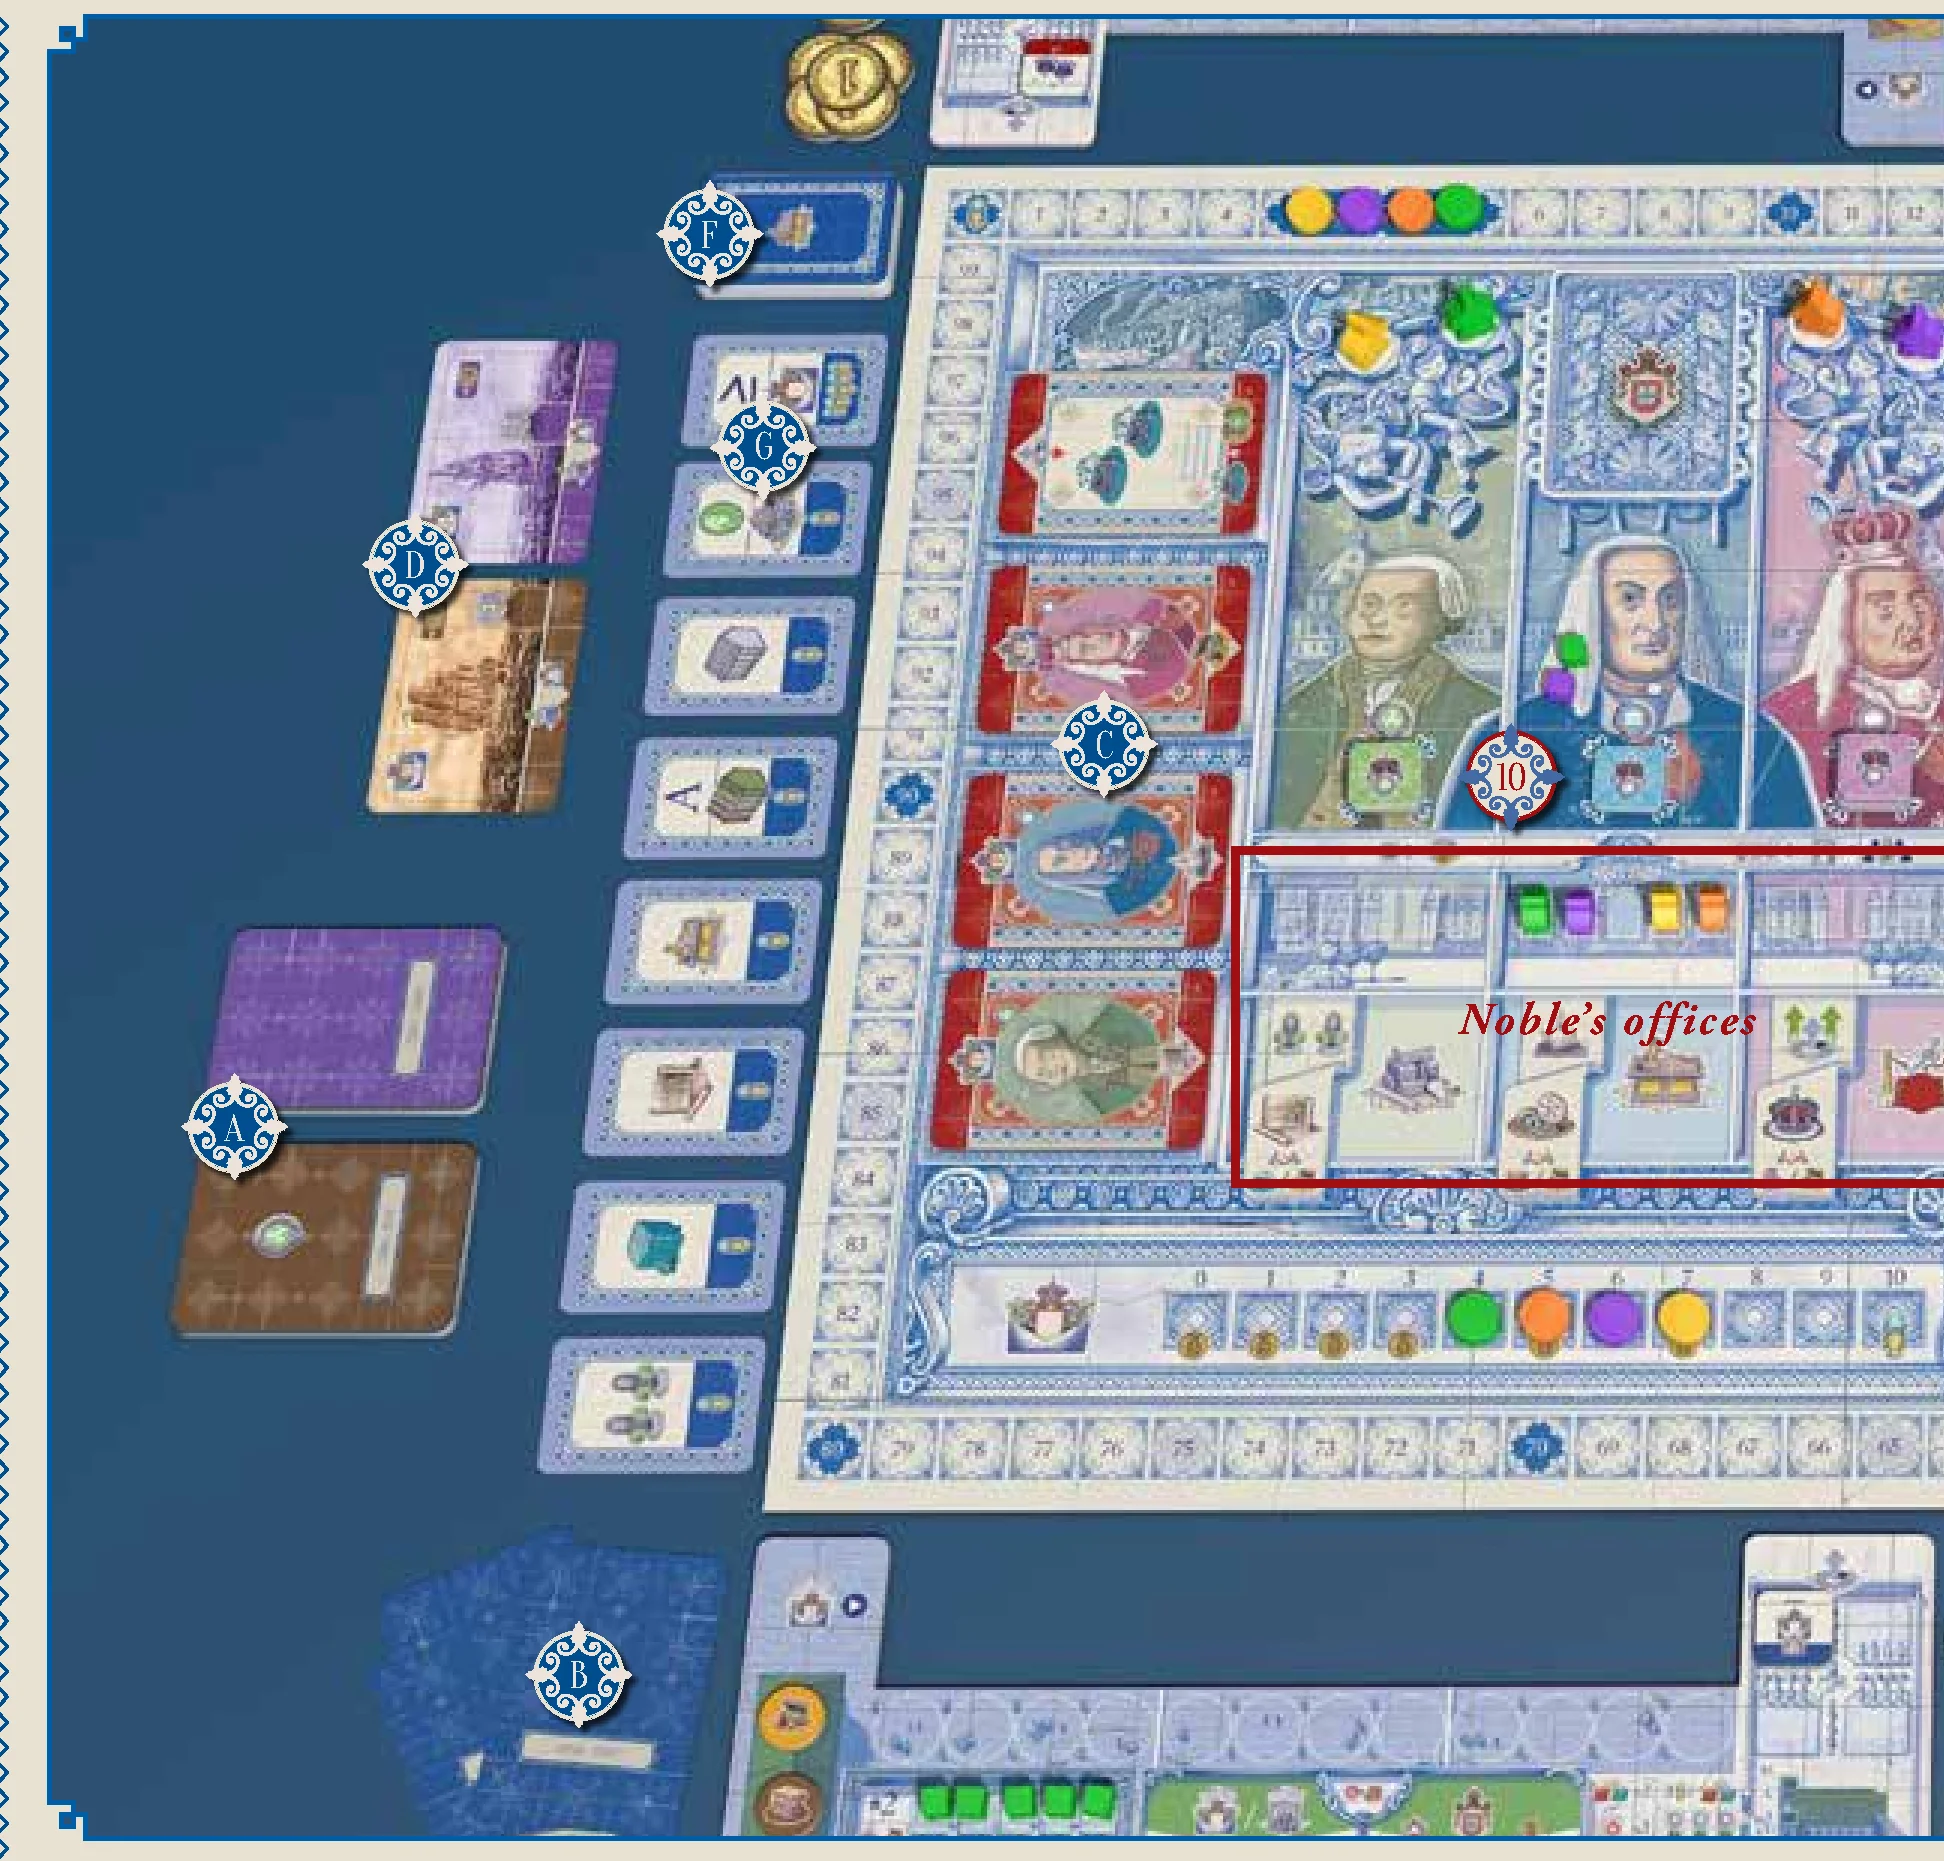
Put 1 Royal Favor tile of each character, per player, in the Rubble bag. Put all of the Clergy tiles in the Clergy Tile bag.
Player Board Setup
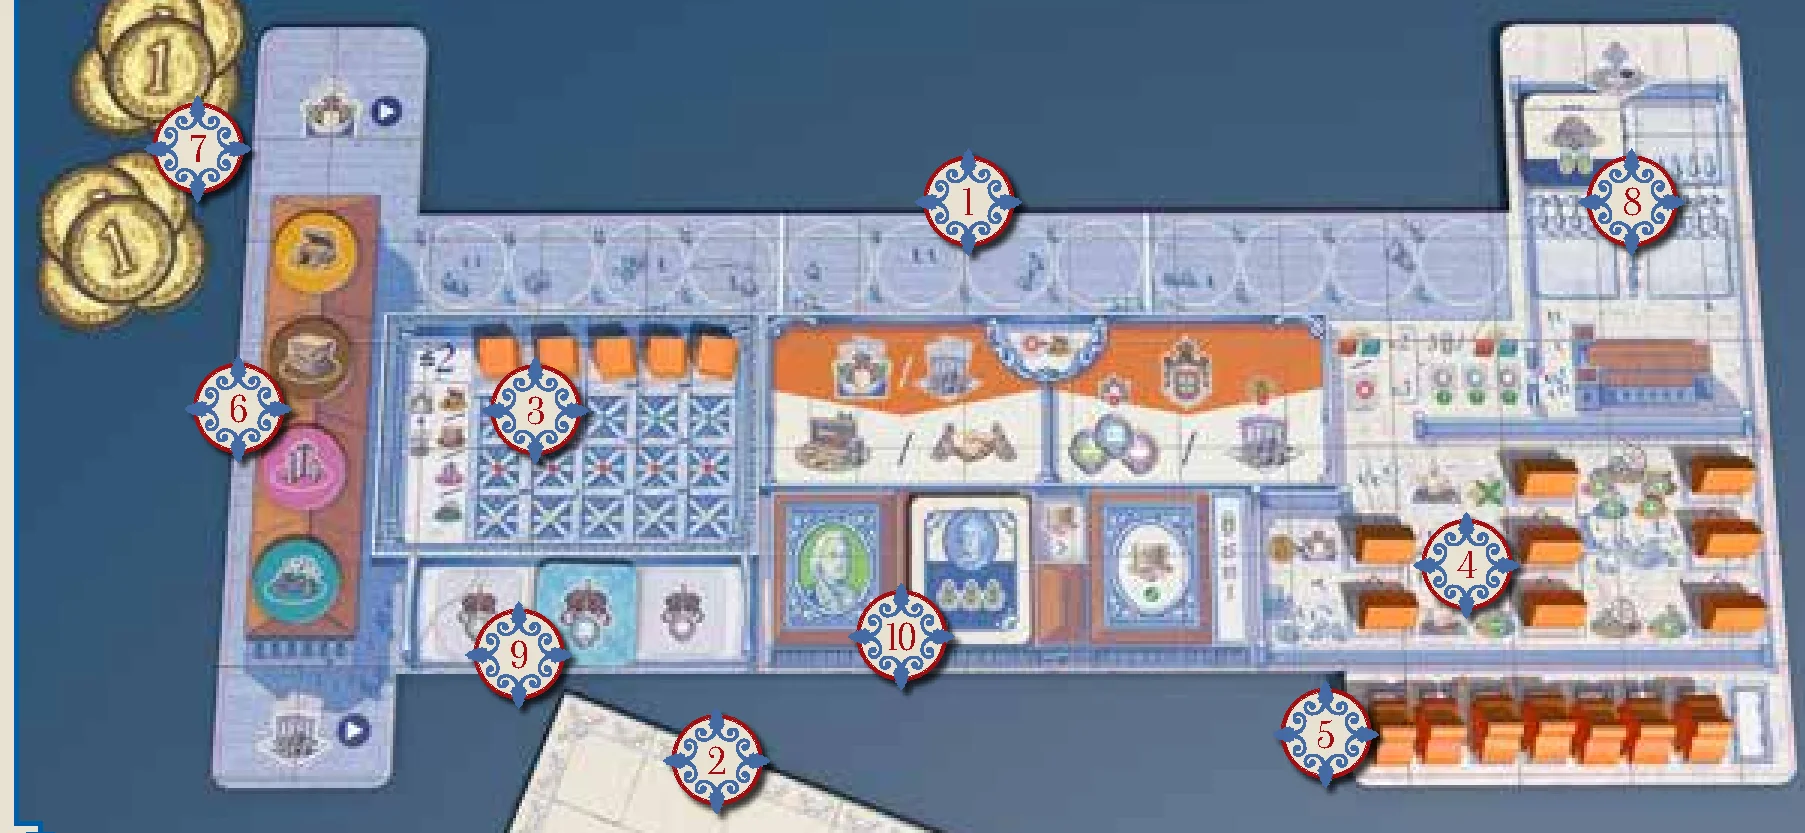
Each player chooses a color and takes the following:
- 1 player board.
- 1 Player Aid book.
- 5 Rubble Set markers (cubes).
- 8 wooden houses.
- 8 Officials (meeples).
- 1 Good tile of each type (gold, books, cloth, tools).
- 10 réis [HRA-ees] (singular form is “real” [hree-ALL] — e.g. 1 real, 2 réis).
- 2 Clergy tiles drawn at random from the Clergy Tile bag. Look at them and keep one; return the other to the bag.
- 1 random Royal Favor tile drawn from the Rubble bag.
- 1 random Starting Plan (the ones with the dark blue backs). Return the remaining Starting Plans to the box.
(Each of the components above has a proper place, face-up on your player board.)
Gameboard Setup
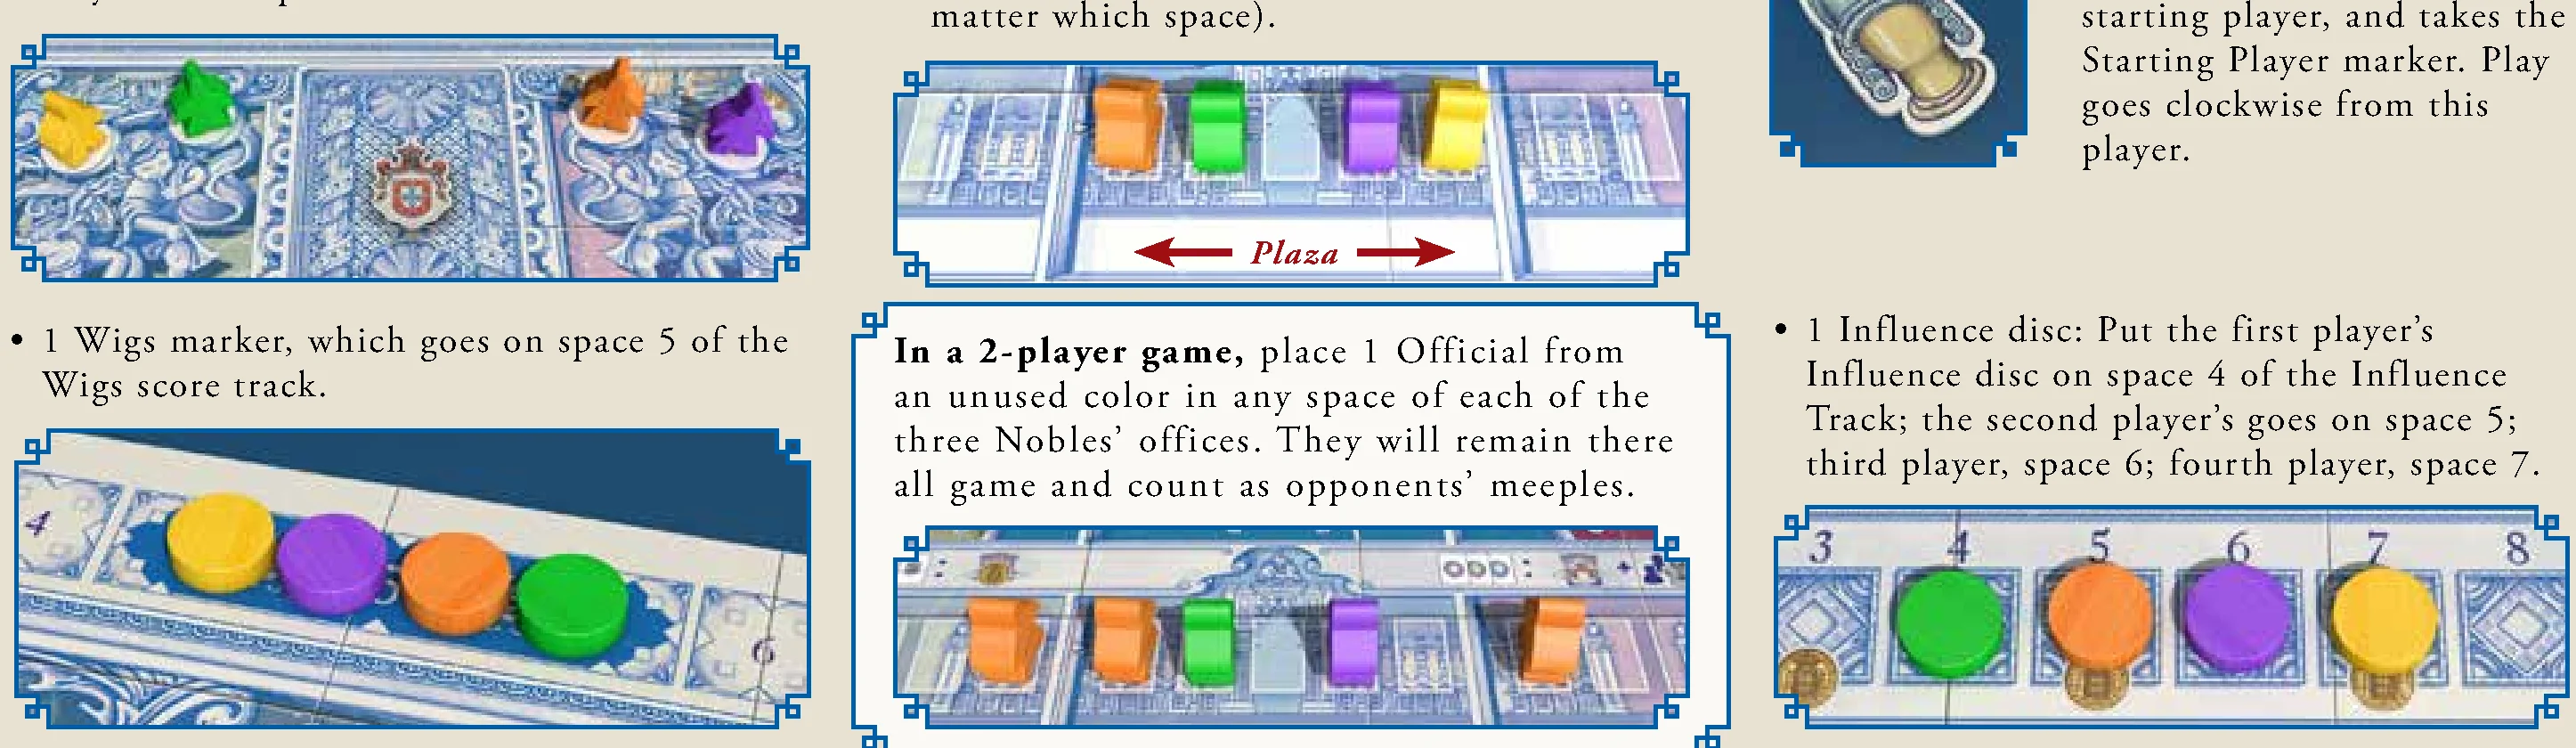
- Courtier meeple: 1 Courtier meeple per player goes in one of the Royal Court spaces.
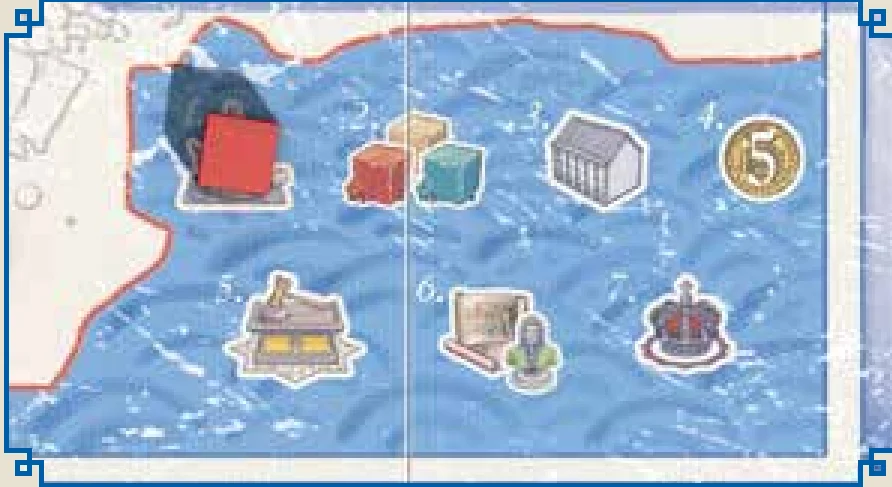
- Wigs marker: Place on space 5 of the Wigs score track.
- Starting Player: The player who visited Lisboa most recently is the starting player, and takes the Starting Player marker. Play goes clockwise from this player.
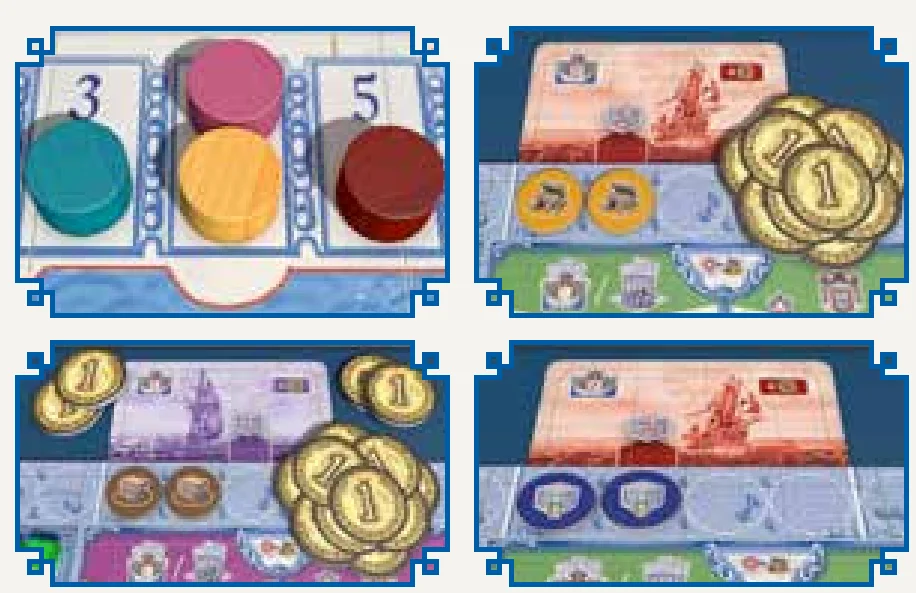
- Influence disc: Put the first player’s Influence disc on space 4 of the Influence Track; the second player’s goes on space 5; third player, space 6; fourth player, space 7.
- Noble’s Office: Place 1 of your Officials in the office of the Marquis, the middle character (does not matter which space).
- In a 2-player game: Place 1 Official from an unused color in any space of each of the three Nobles’ offices. They will remain there all game and count as opponents’ meeples.
Public Buildings
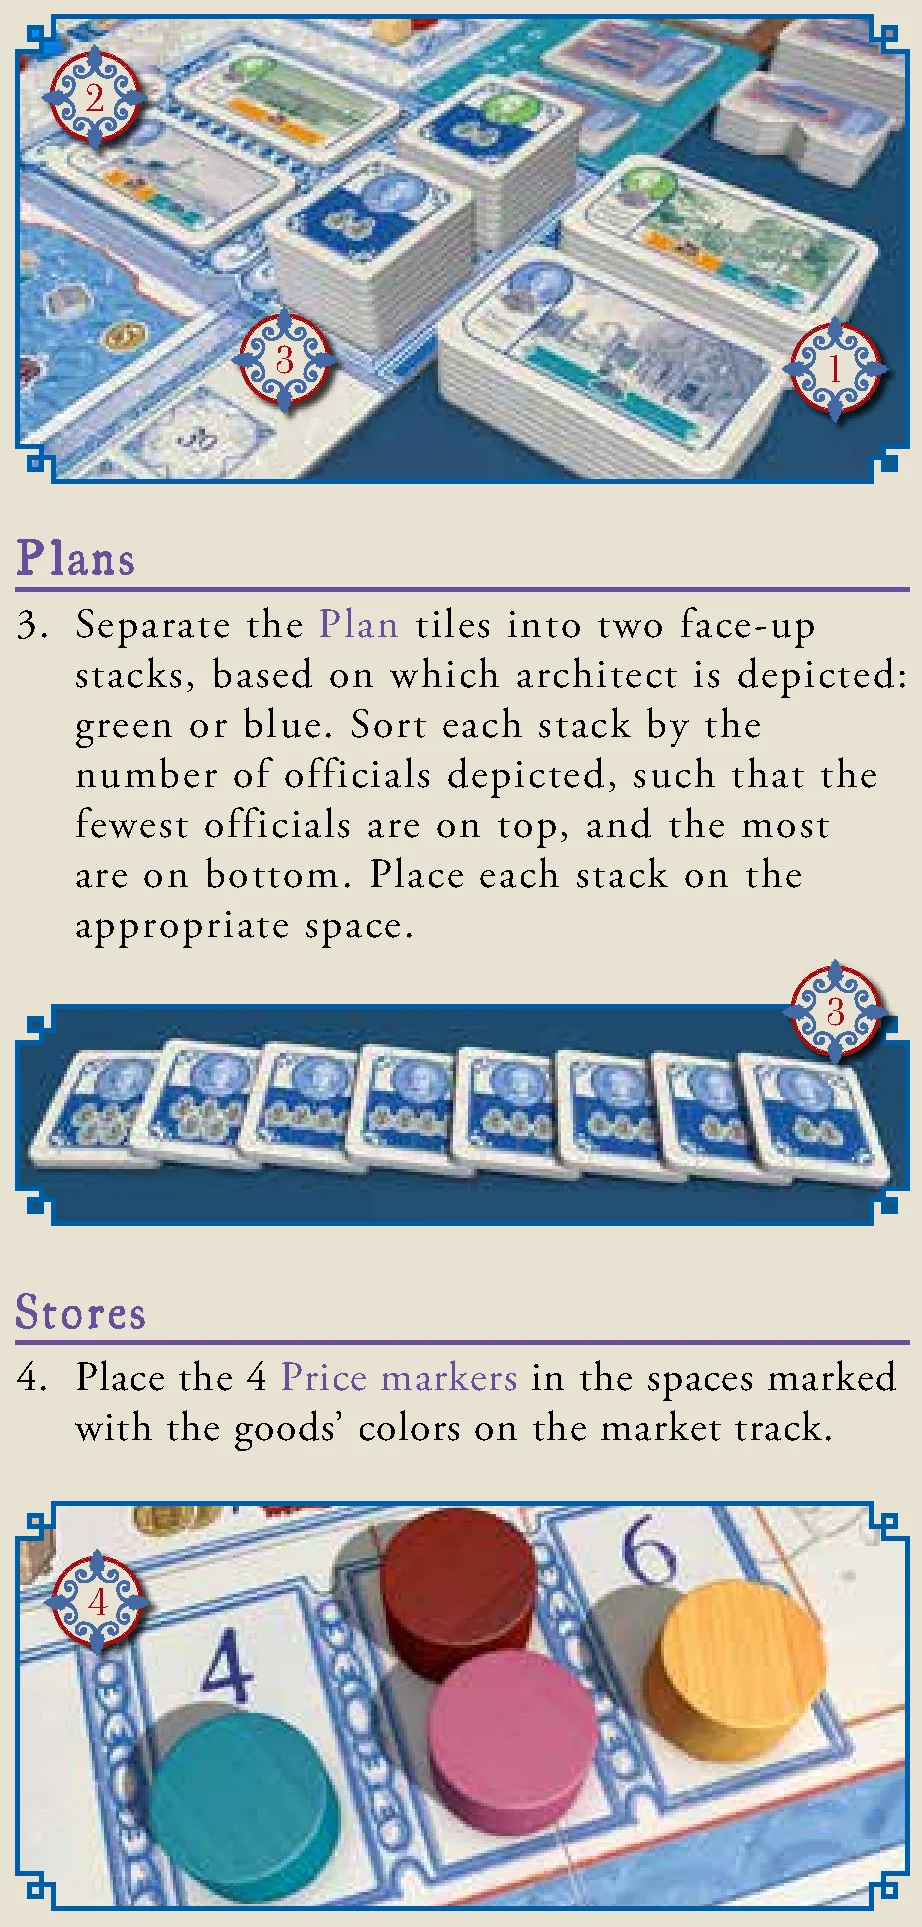
- The Public Buildings are blue on one side, green on the other. Flip all 16 Public Buildings blue-side-up, then shuffle them. Split the stack into two stacks of 8, and flip one stack green-side-up. Place each stack just off the board beside the plan space of the same-color architect.
- Move the top tile of each architect’s Public Building stack into the architect’s plan space. This way, players can always see both the current and the next Public Building available.
Plans
- Separate the Plan tiles into two face-up stacks, based on which architect is depicted: green or blue. Sort each stack by the number of officials depicted, such that the fewest officials are on top, and the most are on bottom. Place each stack on the appropriate space.
Stores
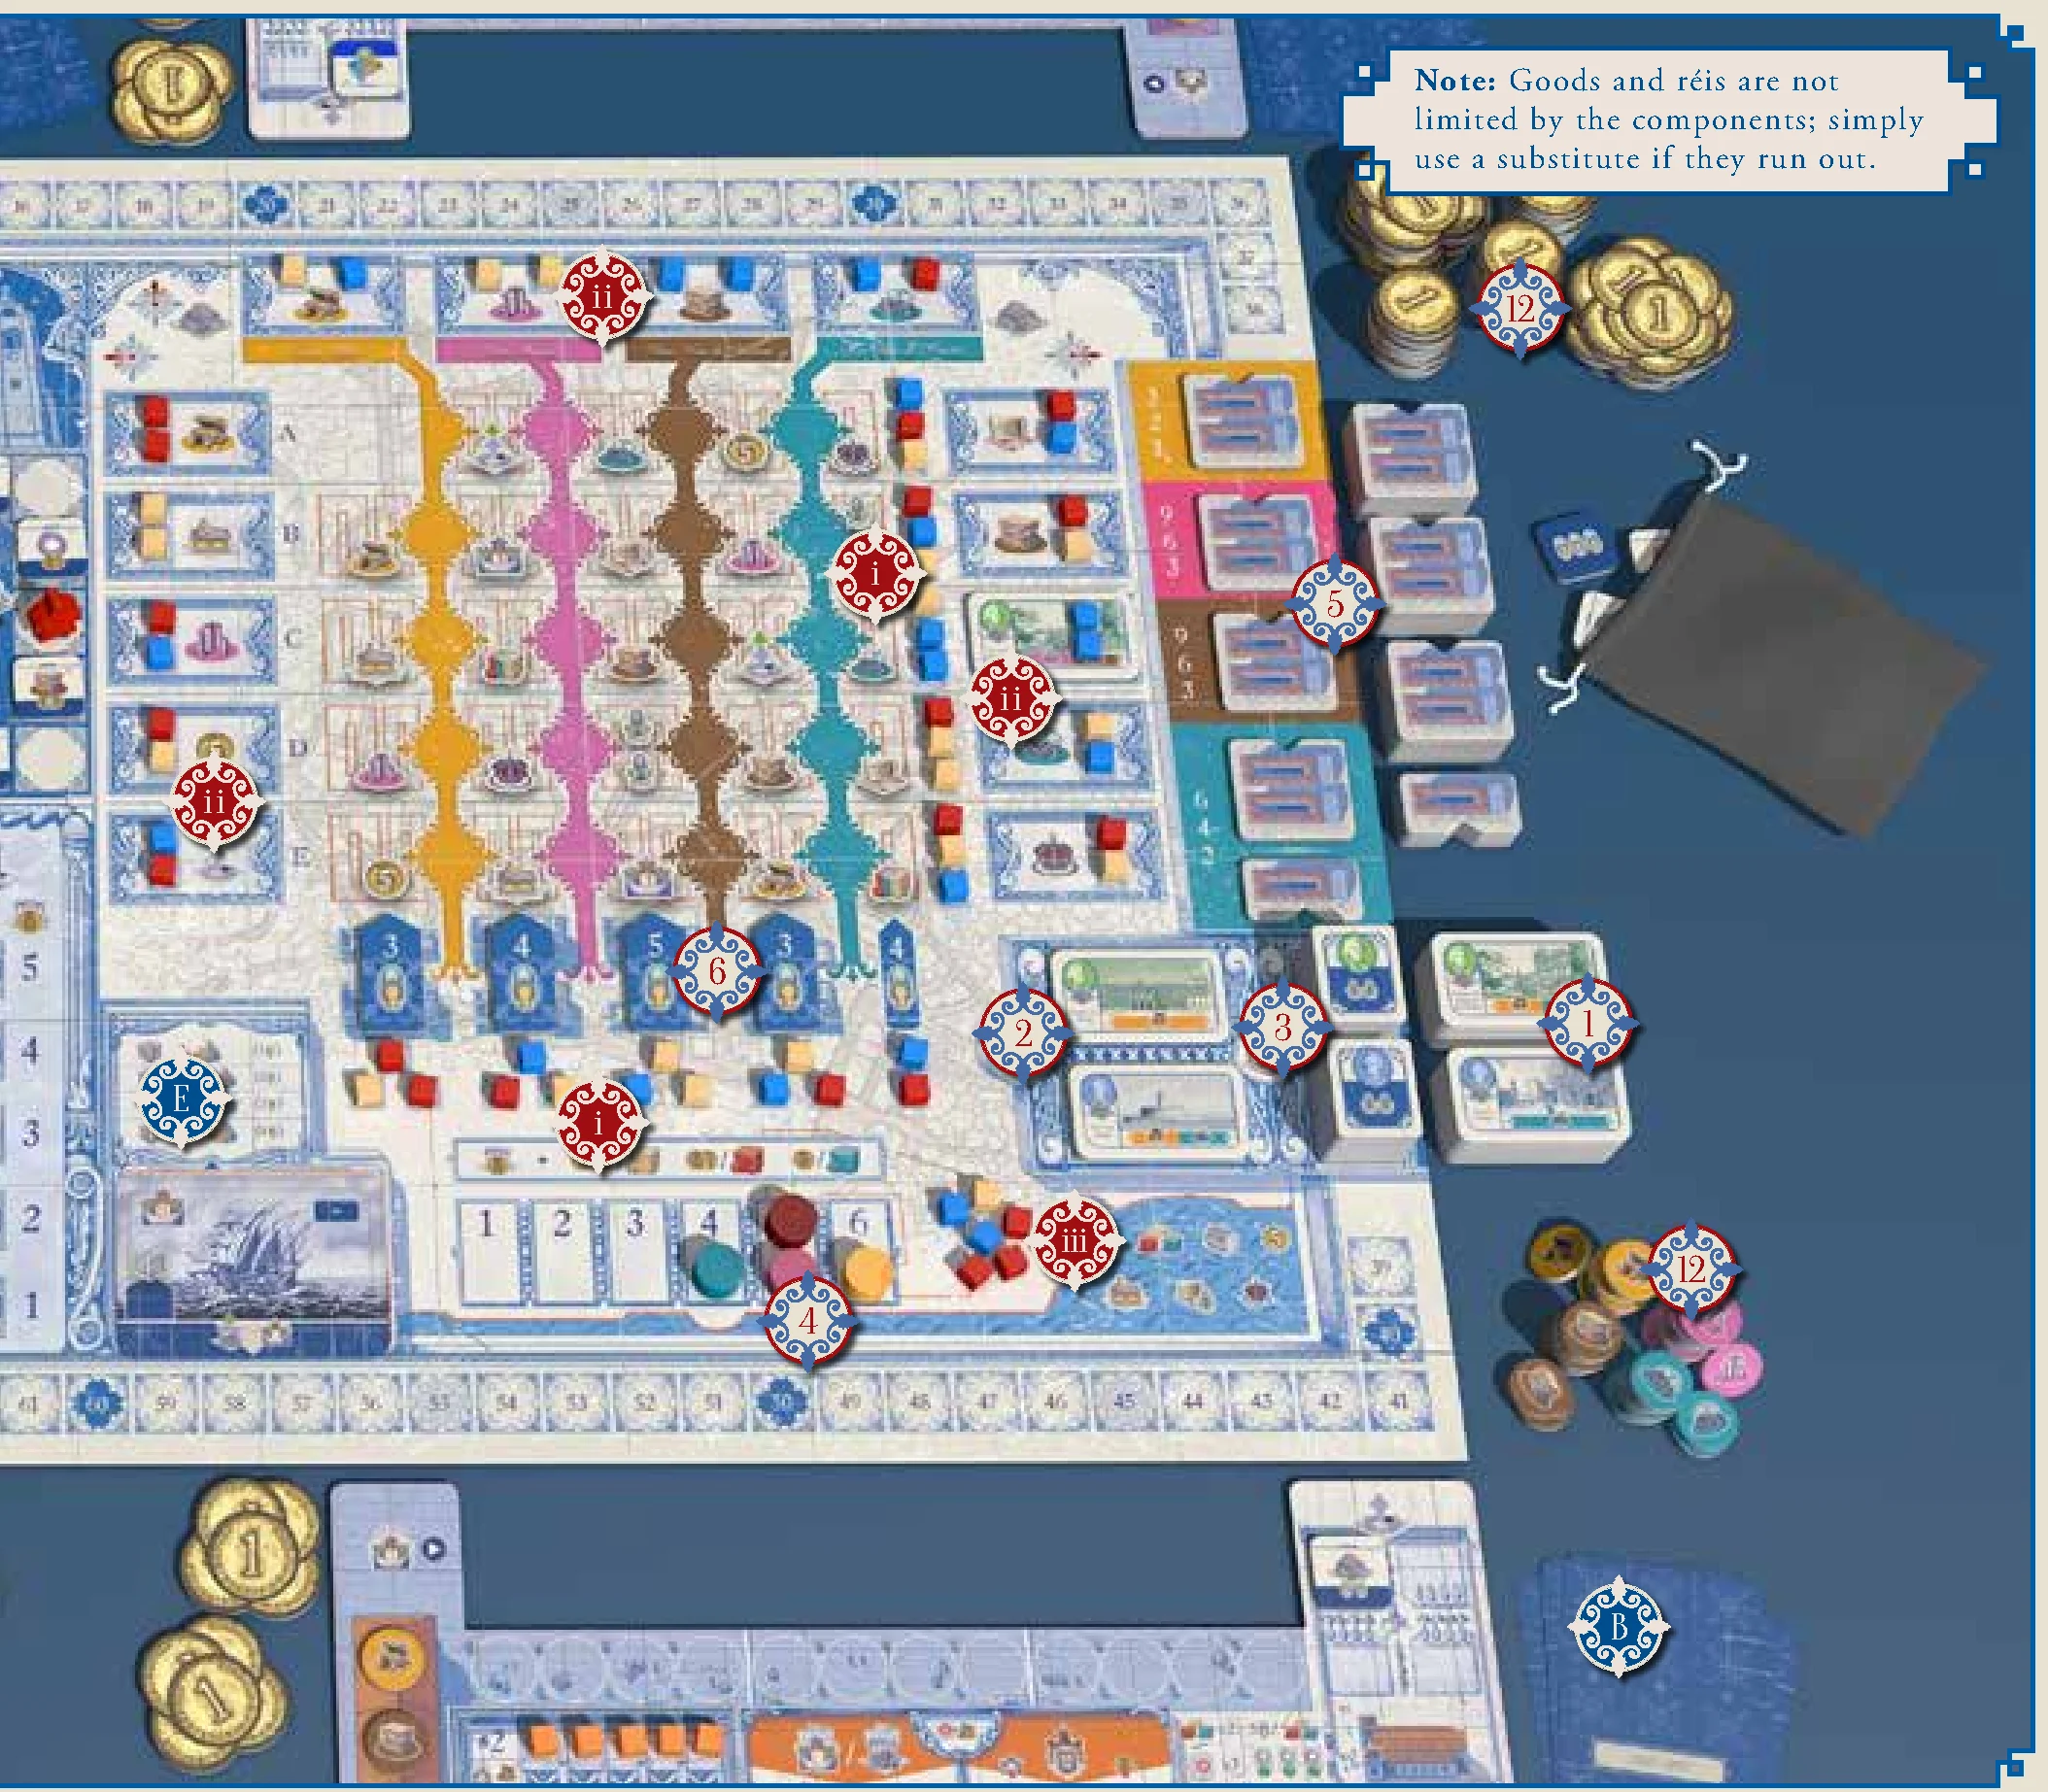
- Place the 4 Price markers in the spaces marked with the goods’ colors on the market track.
- Place one City tile on each space (yellow, pink, brown, blue, small blue) on the board to form the City Building display. Leave the remaining tiles in stacks near the display.
- Shuffle the 4 Scoring tiles depicting wigs, and place a random one in each space at the bottom of the downtown map.
- In a 2-player game, cover row E with the 2-player overlay.
Church
- Draw 6 Clergy tiles from the Clergy Tile bag, and place them face-up (wigs-side-down) on the dark spaces of the Church track.
- Place the Cardinal meeple on the space of the Church track with the Influence symbol (envelope).
Other Supplies
- Dump the remaining Royal Favor tiles from the Rubble bag, and stack the tiles for each character on the space on that character’s portrait.
- Place the big Treasury marker cube on space 3 of the Treasury track.
- Place all the goods and all money next to the gameboard to form the general supply and the Royal Treasury.
Card Setup
- Separate the Political cards into decks by color. Shuffle each deck and set them aside for now.
- Deal 5 cards to each player from the blue deck (1755–1757) and return the remaining cards to the box. (Experienced players may draft starting hands: keep 2, pass 3 left; keep 1, pass 2 left; keep 1, pass last left.)
- Distribute all cards from the red deck (1758–1762) face-down in the Event display, separated by type (card back) on their respective spaces; this will make 4 different decks of 5 unique cards each. Then flip the top card of each deck face-up.
- Ship cards: There are 3 copies of each Ship card. With 4 players, include 3 of each; with 3 players, include 2 of each; with 2 players, include 1 of each. Return remaining copies to the box.
- Stack the blue Ship cards atop the red Ship cards and place the stack face-up in the shipyard. Set the others aside for now.
- Shuffle the Decree deck and place it face-down next to the gameboard.
- Lay out the top 8 cards of the Decree deck to form a face-up display next to the gameboard. In a 2-player game, immediately return and replace any Decree cards showing the 2-player restriction symbol.
Note: Goods and réis are not limited by the components; simply use a substitute if they run out.
Simulate the Earthquake
The brown cubes represent destruction by the earthquake, the red cubes represent destruction from the 3 days of fires, and the blue cubes represent the destruction from the tsunami. Place all Rubble cubes in the Rubble bag.
- Place a random Rubble cube from the bag in each space at the bottom of the columns of the Downtown map, and at the right end of the rows (in a 2-player game, skip row E).
- Place 2 random Rubble cubes in each Public Building Site around the three edges of Downtown (in a 2-player game, skip row E); these represent neighboring sites.
- Place 6 random Rubble cubes in the Rubble pile next to the Rubble values (in a 2-player game, return the remaining Rubble cubes to the box).
Game Concept
You will be working with the King, D. José I, with Manuel da Maia, the royal builder, and the Marquis de Pombal, the prime minister, to reconstruct a new Lisboa, and develop its economy. You need to build stores downtown to produce goods, and will earn wigs once appropriate Public Buildings are opened to drive traffic to your stores. In order to open Public Buildings, you will need Plans from one of the two architects, and enough state officials to staff the building. You will need Influence to convince the nobles to help you complete these tasks via Noble actions, but you could also trade with them, offering goods in exchange for State actions. You can also meet with the Cardinal to acquire Clergy tiles, which give you permanent powers. Last, but by no means the least, you can persuade the Marquis to make decrees that favor you, granting you more wigs at the end of the game.
Gameplay Overview
A game of Lisboa is divided into 2 time periods, each of which spans a variable number of rounds.
On your turn, you will play one of the five Political cards in your hand to perform one of the four available actions or to get 1 gold; then you will take a new card into your hand from the Political card display. Finally, the turn passes to the player on your left.
When a player manages to complete 2 sets (brown, red, blue) of rubble, or 3 decks of Political cards are exhausted (whichever comes first), the first time period ends at the end of that player’s turn.
After the change of period is resolved, the game continues until the end of the game is triggered by a player having 4 complete sets of rubble, or by 3 decks of Political cards being exhausted again. At the end of the round in which that happens, players will take one more turn and then the final scoring occurs.
The player with the most wigs wins the game.
Political Cards
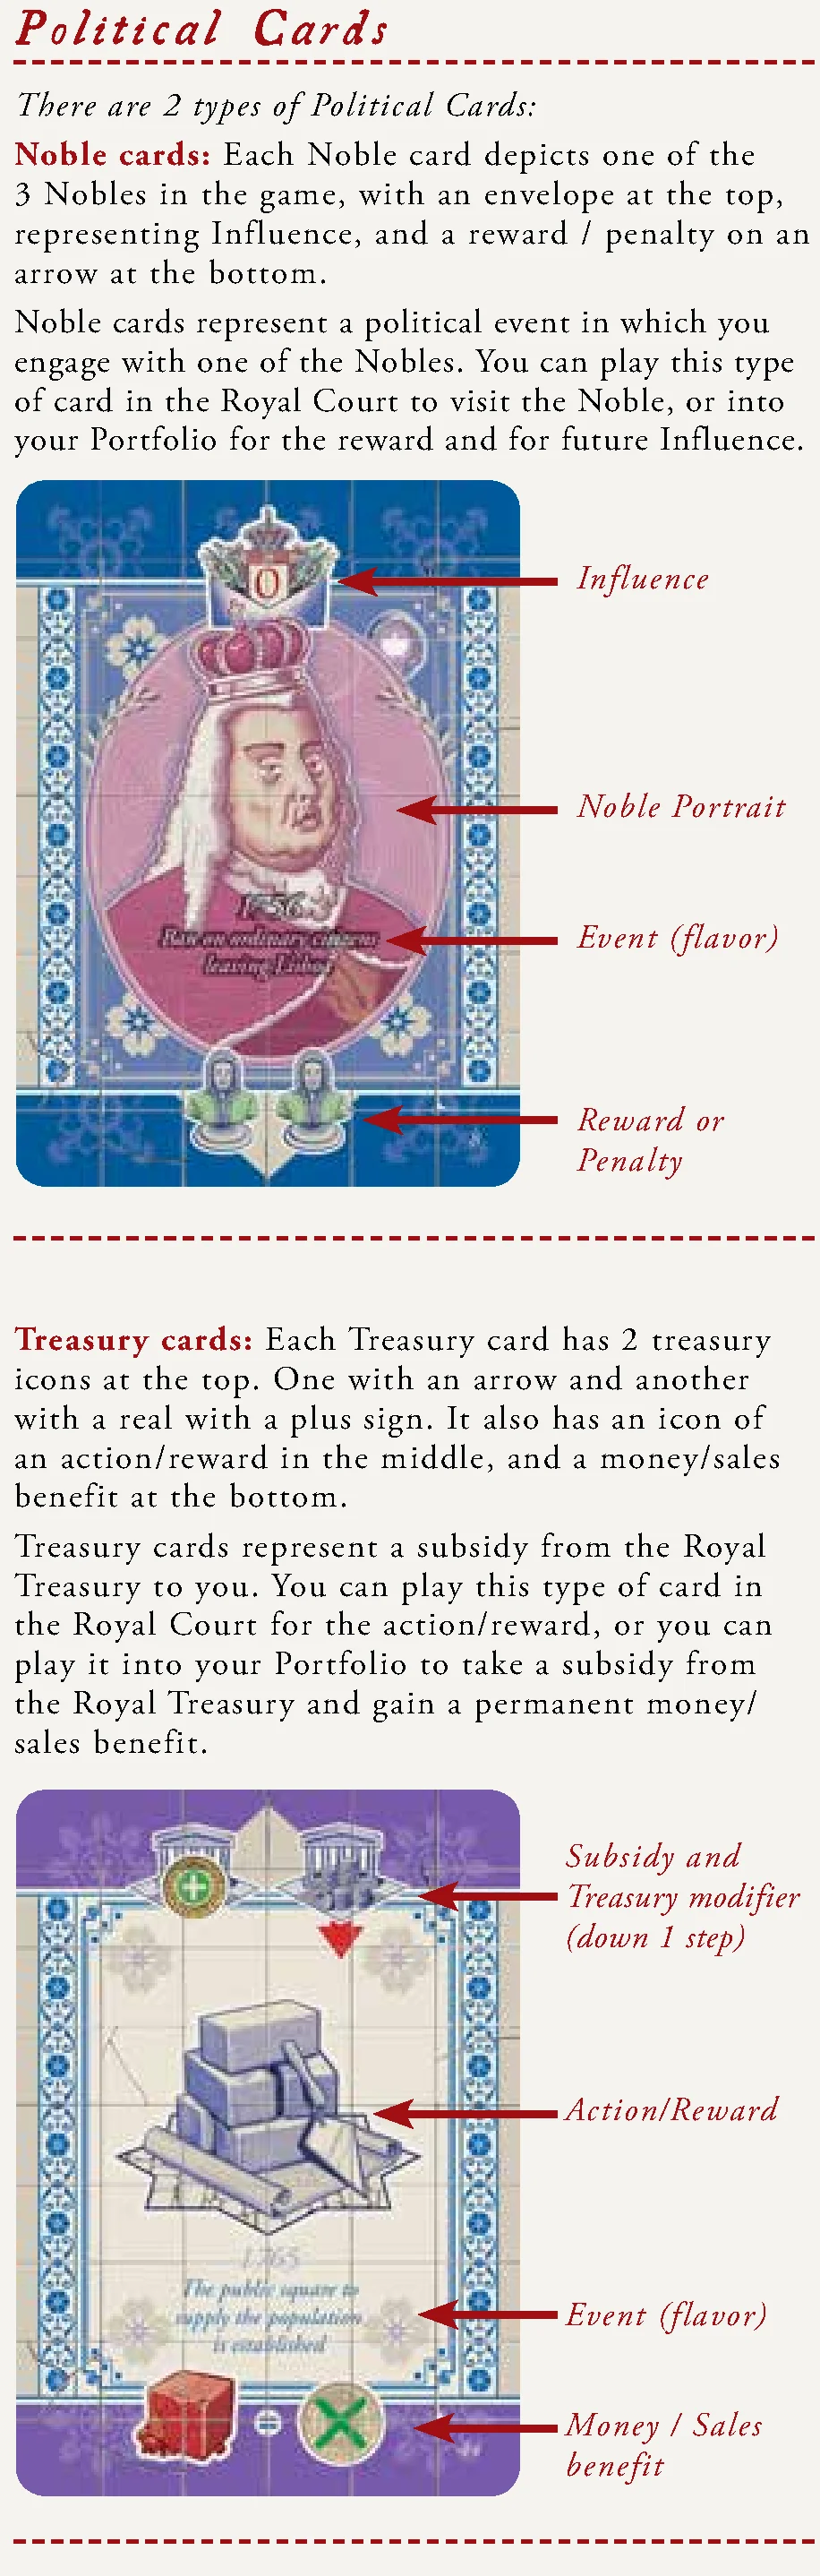
There are 2 types of Political Cards:
- Noble cards: Each Noble card depicts one of the 3 Nobles in the game, with an envelope at the top, representing Influence, and a reward / penalty on an arrow at the bottom. Noble cards represent a political event in which you engage with one of the Nobles. You can play this type of card in the Royal Court to visit the Noble, or into your Portfolio for the reward and for future Influence.
- Treasury cards: Each Treasury card has 2 treasury icons at the top (one with an arrow and another with a real with a plus sign), an action/reward icon in the middle, and a money/sales benefit at the bottom. Treasury cards represent a subsidy from the Royal Treasury. You can play this type of card in the Royal Court for the action/reward, or into your Portfolio to take a subsidy from the Royal Treasury and gain a permanent money/sales benefit.
Turn Sequence
On your turn, you will follow this sequence:
- Dock Your Ships
- Either Get 1 Gold OR Take an Action
- Take a Political Card
- End of Turn upkeep
Step 1: Dock Your Ships
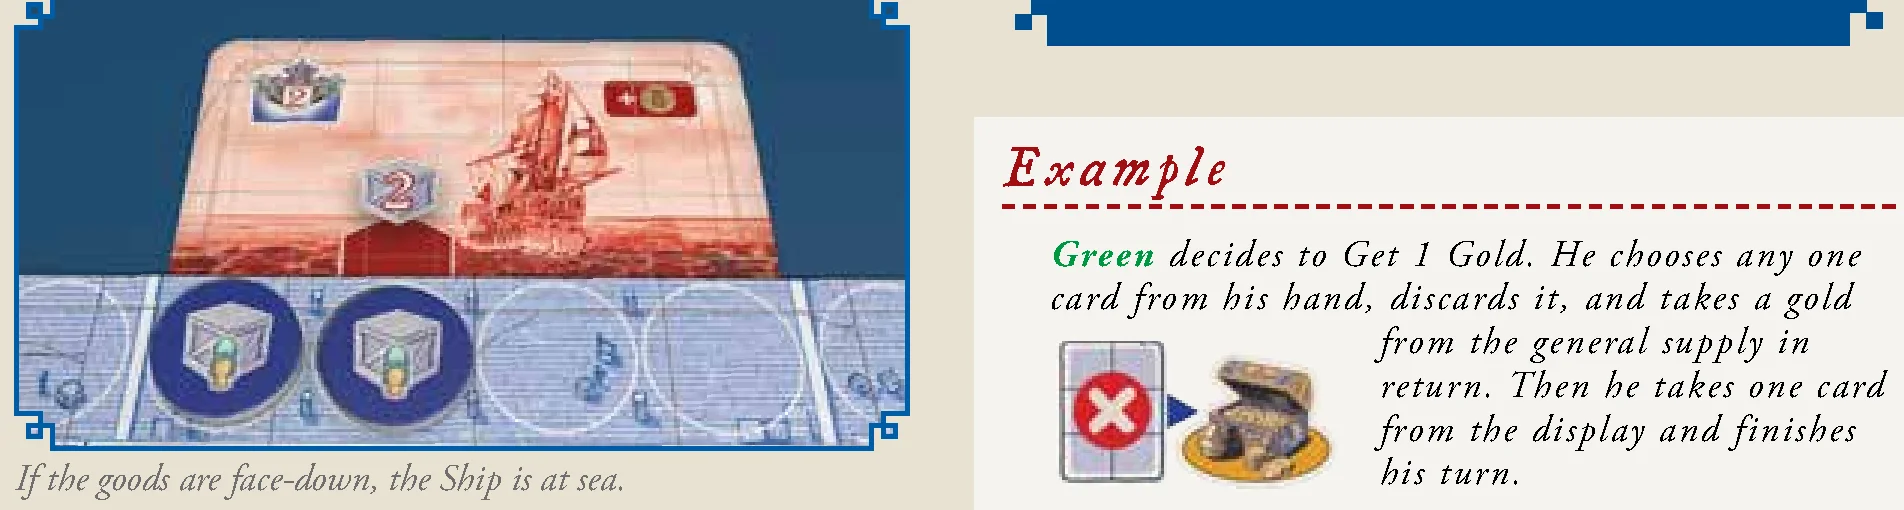
If you have any Ships in your Portfolio that are “at sea” (i.e. the cargo hold is full, and thus the goods in the cargo hold are flipped face-down so they are all packed up in crates), return the goods from the cargo hold to the general supply. Your Ships at sea have returned from their voyage!
Step 2 Option A: Get 1 Gold
As an act of desperation, you can Get 1 Gold instead of taking an action, by performing the following steps:
- Discard a Political card from your hand (it is removed from the game).
- Take 1 gold from the general supply.
Your Portfolio Structure
Adding Political cards to your Portfolio grows your Business and through it, the power and Influence you have on the Crown.
Your player board has 3 wide “slots” for cards at the top (docks), and 3 narrow slots at the bottom (your office). These 6 slots are called your Portfolio and each slot can hold only 1 card at a time.
- Top slots (docks): Reserved for Nobles and Ships, both of which give you cumulative Influence.
- Bottom slots (your office): For Treasury cards, which give you money discounts or sales benefits.
In the beginning of the game, you can only have 2 cards in your Portfolio; both could be in the top slots, both in the bottom slots, or one in each.
Playing a Card into Your Portfolio
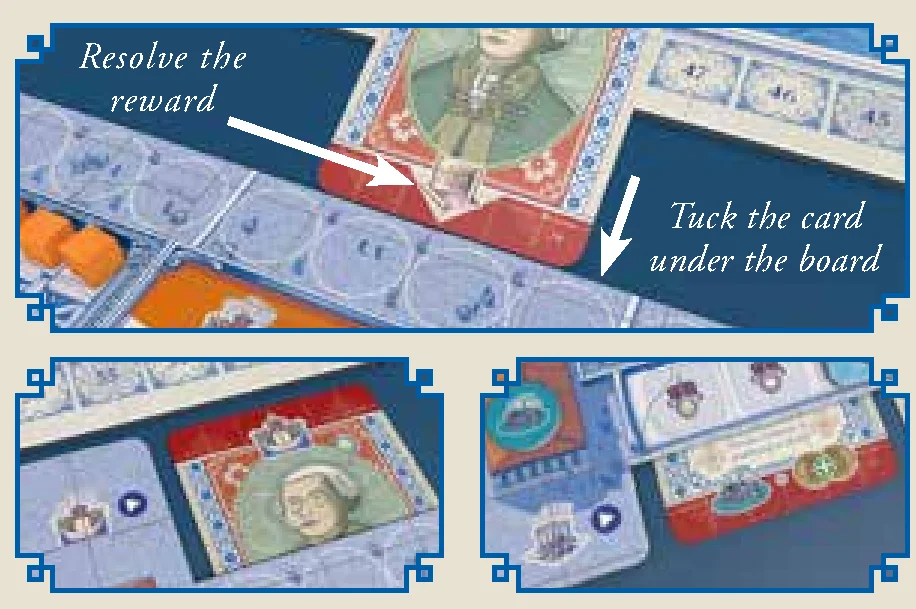
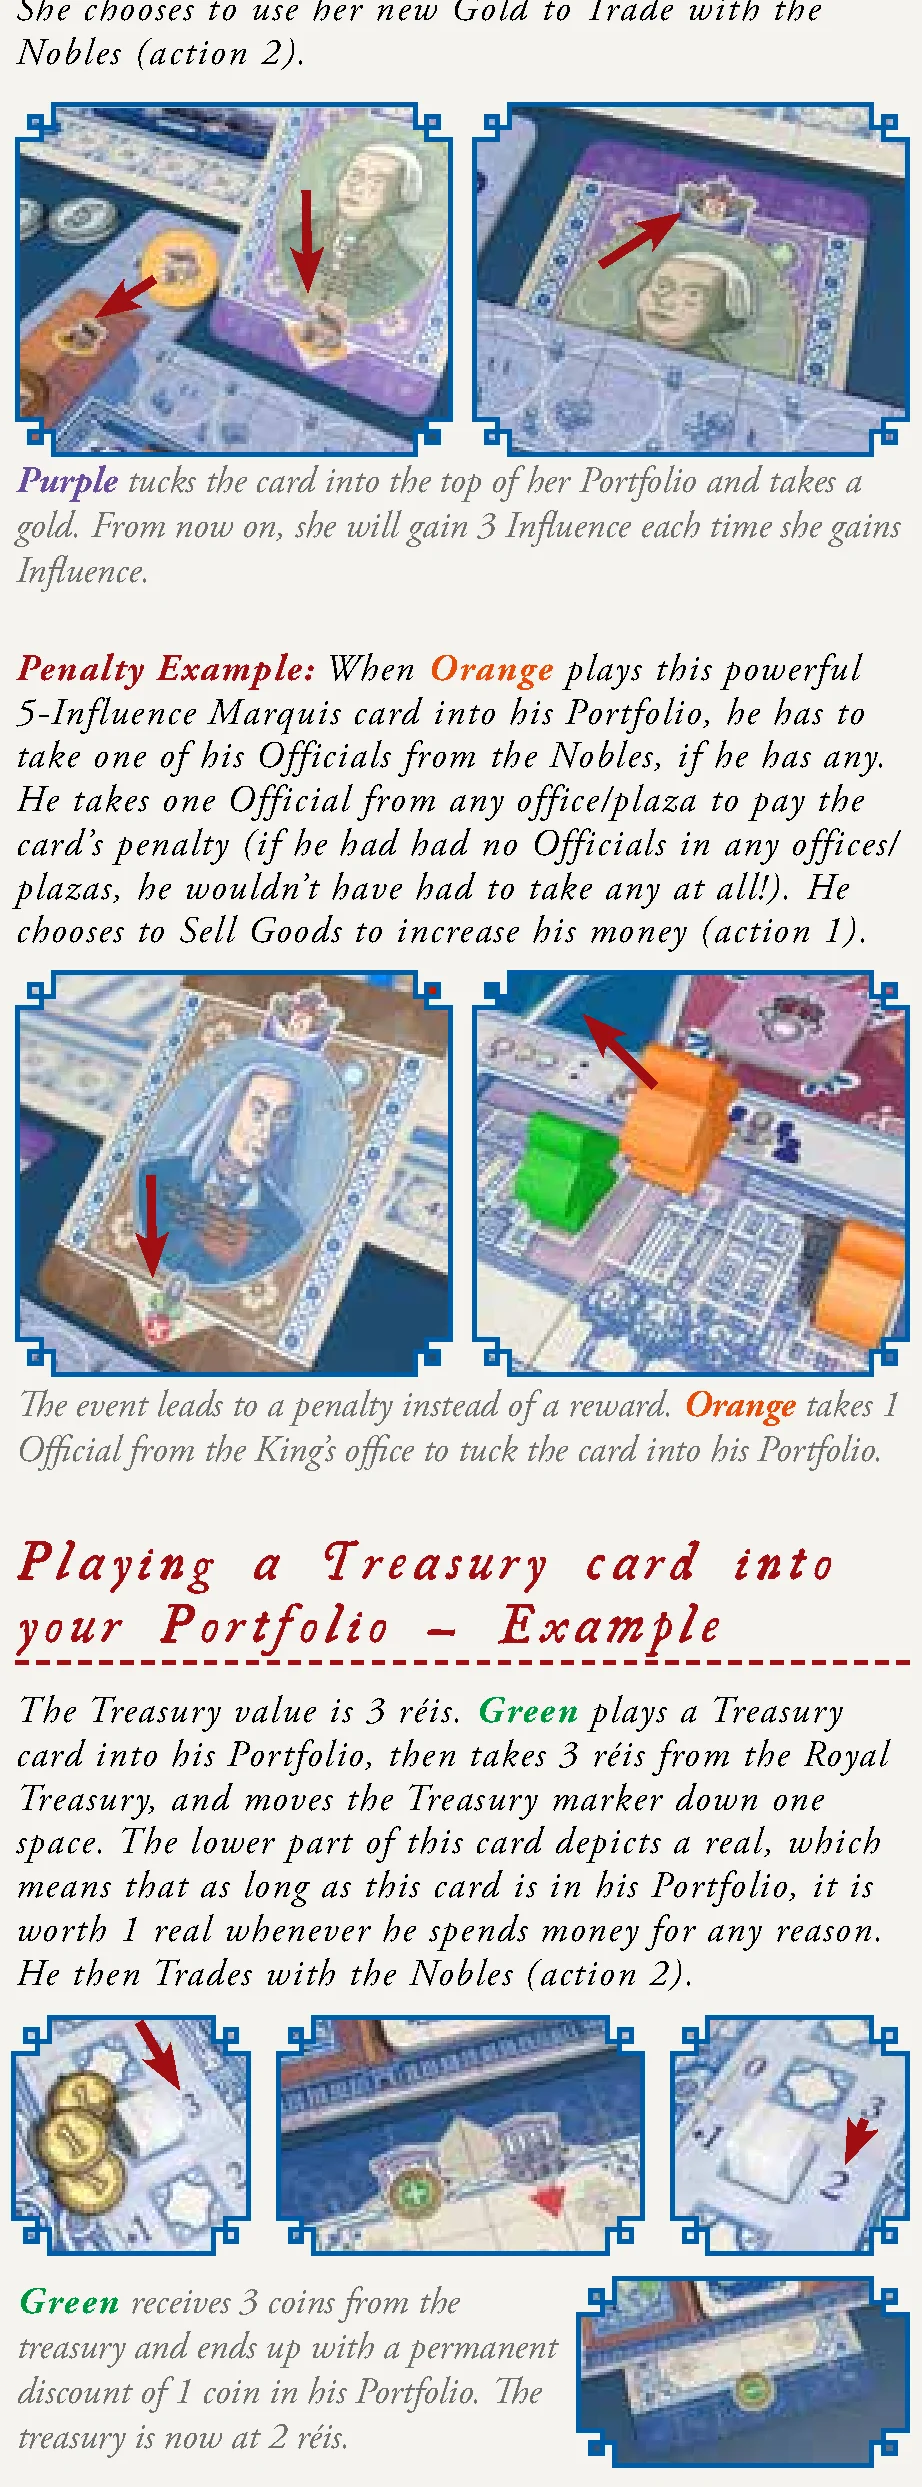
When you add a card to your Portfolio, you tuck the arrow end of the card under your player board. Any benefit or penalty depicted on the portion of the card that goes under your board must be resolved before it is hidden.
Note: The gray arrow, with icon(s) on it, at the top or bottom of the cards shows you which end of the card you will tuck under your player board when you add it to your Portfolio.
Portfolio and Warehouse Capacities
- Warehouse Capacity: Your Warehouse can hold 2 goods of each kind. Each Rubble set you collect lets it hold 1 more good of each kind. (Excess goods are returned to the general stock.)
- Portfolio Capacity: Your Portfolio can have 2 cards + 1 card for each Rubble set you have collected.
- Over Capacity: If you want to play a card to your Portfolio when it is already at capacity, you must first discard a card from your Portfolio. If you discard a Ship to make room for a Noble, discard the goods on the dock beneath the Ship.
- Rubble Limit: If you don’t have a free space on your board to place a Rubble cube you take, just discard the cube. You can never have more than 5 Rubble cubes of one kind.
Rubble Sets for Reconstruction (Gaiola Pombalina)
Downtown buildings were built over the wrecks of the old destroyed buildings. Rubble was one of the most important construction materials in the rebuilding of Lisboa. Masonry walls with an embedded braced timber structure, known as the “Gaiola Pombalina”, were filled with rubble to make the new buildings durable and anti-seismic, while retaining the flame resistance of brick. To reflect this, collecting sets of rubble will increase your warehouse space and the size of your Portfolio, and also helps set the pace of the game.
By proportionate use of rubble from each of the three disasters, you can build new buildings from a wooden frame embedded in masonry, which is resistant to earthquake, fire, and tsunami. Building stores or opening Public Buildings will reward you with rubble cubes.
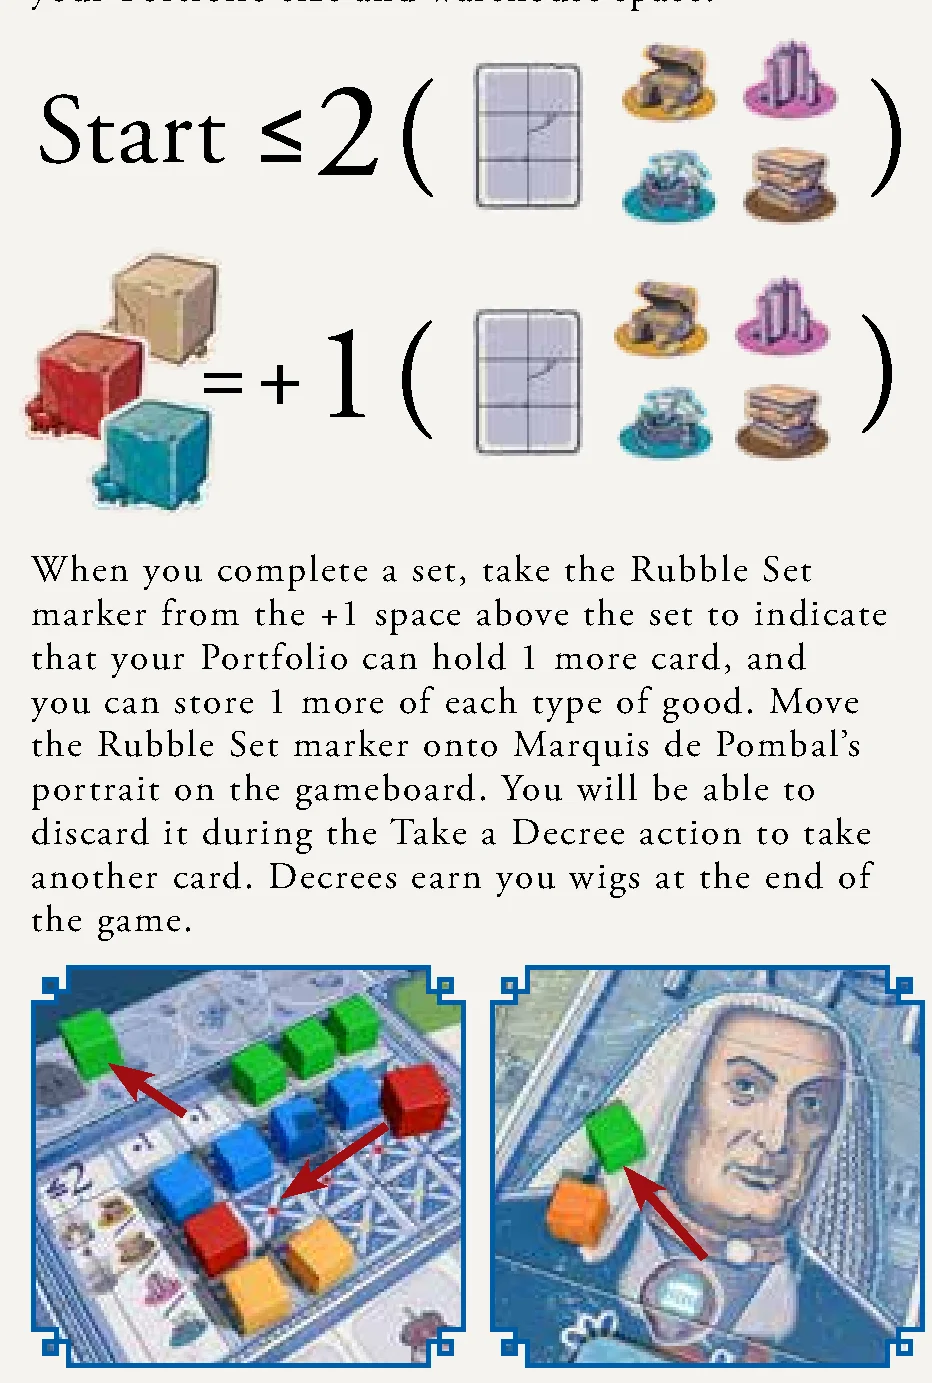
Each set of 1 earthquake rubble, 1 fire rubble, and 1 tsunami rubble you complete immediately increases your Portfolio size and warehouse space:
- Take the Rubble Set marker from the +1 space above the set to indicate that your Portfolio can hold 1 more card, and you can store 1 more of each type of good.
- Move the Rubble Set marker onto Marquis de Pombal’s portrait on the gameboard. You will be able to discard it during the Take a Decree action to take another card.
Designer’s Tip: After you play a card to your Portfolio, you must either Sell Goods or Trade with the Nobles, both of which require at least one good. Make sure that after getting the reward at the bottom of the card, you will have at least one good, or you cannot play the card into your Portfolio.
Playing Cards into Your Portfolio
Playing a Noble Card into Your Portfolio
Noble cards must be played in the top slots of your Portfolio. Perform the following steps:
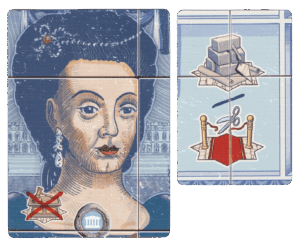
- Receive the reward / pay the penalty depicted at the bottom of the card. If the icon has a red ‘X’ over it, it is a penalty, and you must pay the depicted item instead of receiving it. If you cannot pay the penalty, you can still play the card. Cards with penalties provide you more Influence than the other cards from the same deck.
- Select an empty slot at the top of your player board, or discard a card from one of the slots, then tuck the card under your player board, such that the reward/penalty icon on the bottom portion of the card is covered.
- Then you must perform either a Sell Goods action (Action 1) or a Trade with the Nobles action (Action 2).
Playing a Treasury Card into Your Portfolio
Treasury cards must be played in the bottom slots of your Portfolio. Perform the following steps:
- Immediately receive réis from the Royal Treasury equal to the Treasury value (indicated to the right of the Treasury marker).
- Move the Treasury marker down 1 space, because you have taken money from the Royal Treasury. The marker cannot go beyond the confines of its track.
- Select an empty slot at the bottom of your player board, or discard a card from one of the slots, then tuck the card under your player board, such that the treasury icons are covered.
- Then you must perform either a Sell Goods action (Action 1) or a Trade with the Nobles action (Action 2).
Treasury cards provide a permanent money/sales benefit at the bottom of the card, active while in your Portfolio and cumulative with other Treasury cards.
Influence Rules
One needs Influence in order to be accepted into the higher circles of the Crown. Influence is required to take some very important actions, and has great impact on many steps of the game.
Important Rules:
- Your Influence cannot exceed 10; any excess beyond that goes to waste.
- Each time you increase your Influence, if your Influence marker ends up on the Wig icon (space 10), you gain 1 wig — even if your Influence was already 10 before gaining Influence.
- Your Influence cannot go below 0; there is no penalty for having 0 Influence.
Gaining Influence
When you gain Influence, you always earn the total Influence depicted at the tops of the Noble and Ship cards in your Portfolio (cards in the top row). Indicate this by moving your Influence marker rightward on the Influence track.
Ways of Gaining Influence:
- When you Build a Ship (Action 2 / Build Ship).
- When Church Scoring occurs.
- As a reward on a card, building space, or clergy tile.
Spending Influence
There are only 2 ways of spending Influence in the game:
- Visiting a Noble (or Following a Visit).
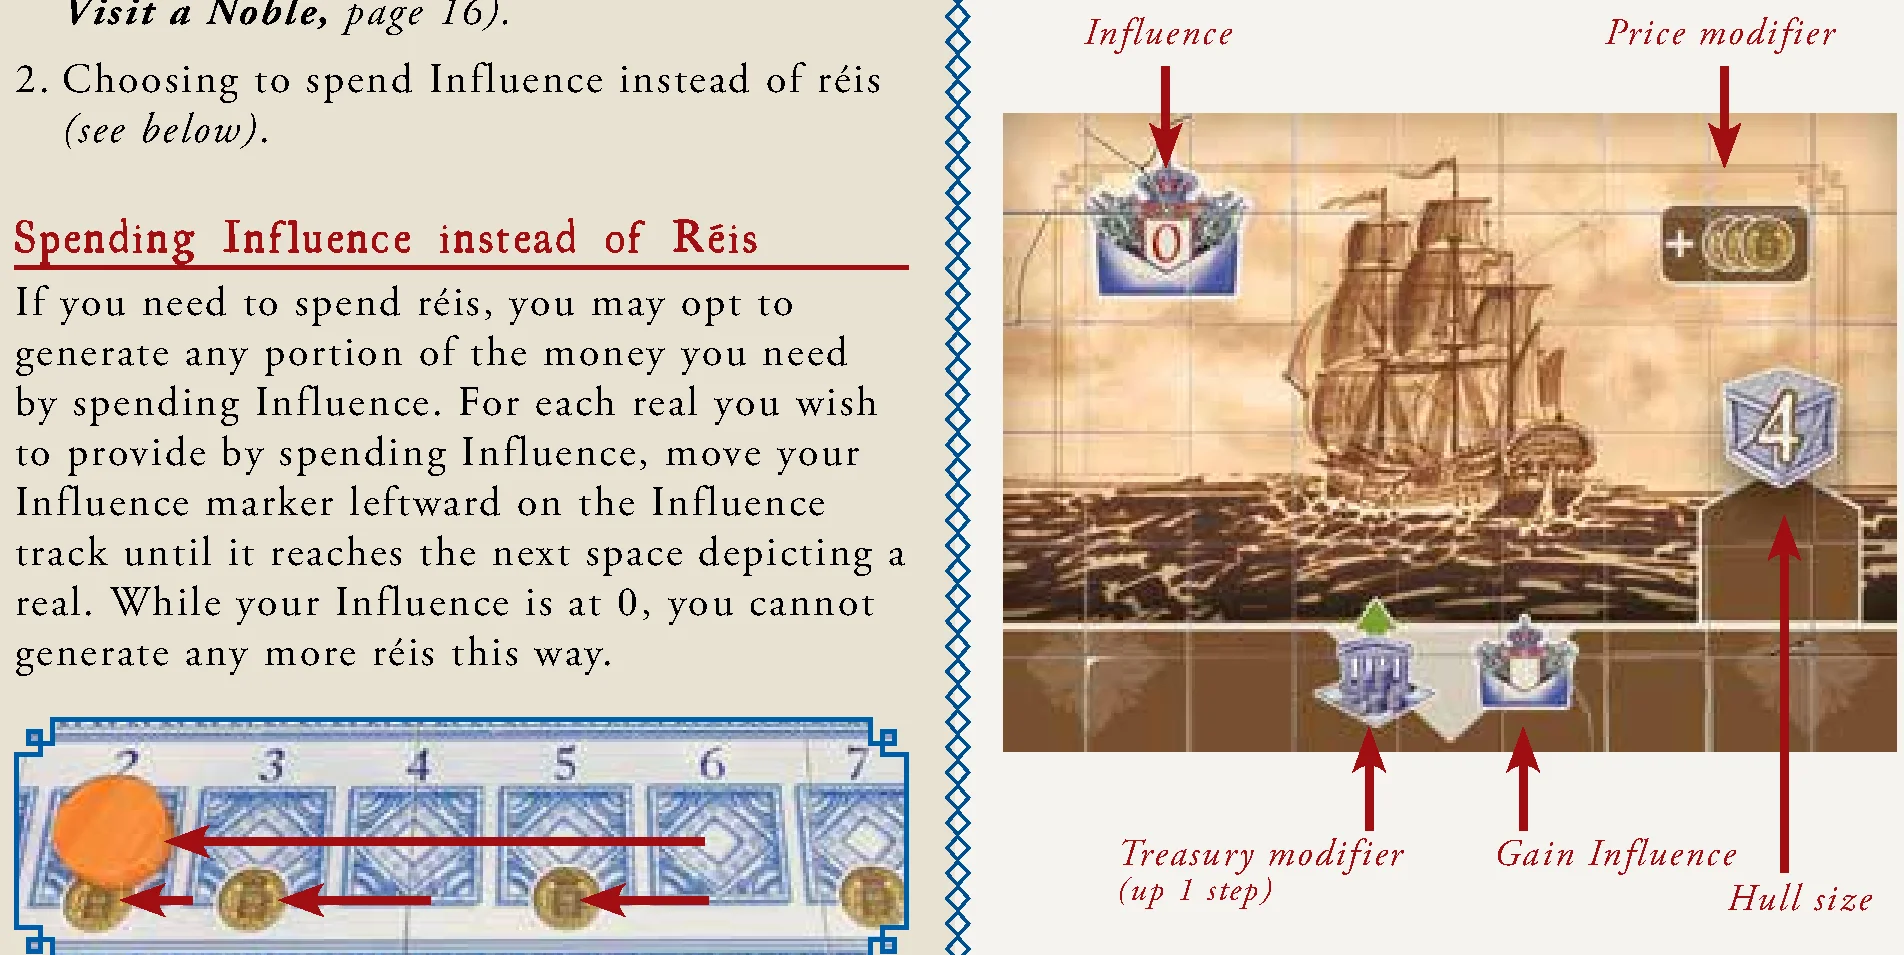
- Spending Influence instead of Réis: For each real you wish to provide by spending Influence, move your Influence marker leftward on the Influence track until it reaches the next space depicting a real. While your Influence is at 0, you cannot generate any more réis this way.
Playing to Your Portfolio (Actions 1 & 2)
You play a card into your Portfolio in order to take Action 1 (Sell Goods) or Action 2 (Trade with the Nobles).
Action 1: Sell Goods
When you take the Sell Goods action, you can sell one or more goods. Perform the following steps for each good you sell:
- Choose a docked Ship: A Ship card in any player’s Portfolio that still has space for goods.
- Move a Good token (Gold, Books, Cloth, or Tools) from your warehouses onto an empty dock space below the Ship.
- Receive money from the Royal Treasury equal to the Good’s current market price, plus any modifier depicted on the Ship card.
You can sell any number of goods to any Ships (up to capacity). Goods sold to a Ship remain face-up on the dock below the Ship until the Ship is full and sails away.
Setting Sail:
If the number of goods on the dock spaces below the Ship is equal to the Ship’s hull size, the Ship immediately “sets sail”, and the Ship’s owner does the following:
- Flip the goods tokens on the dock spaces below the Ship card face-down to show them packed up in crates.
- Earn 1 wig per newly packed crate, as indicated on the crates.
Remember: Your Ships that are out to sea will return to dock with empty cargo holds at the beginning of your turn (Dock Your Ships step).
Action 2: Trade with Nobles
When you take the Trade with Nobles action, you trade 1 or 2 goods. Perform the following steps for each good you trade:
- Select one of the six State actions that is not currently covered with a good.
- Identify which Noble performs this State action, then take 1 of the type of good this Noble seeks from your warehouses, and cover the action:
- Manuel da Maia (the Builder): accepts tools or gold.
- Marquis de Pombal (the Minister): accepts books or gold.
- Rei D. José I (the King): accepts cloth or gold.
- Perform the State action.
Note: You cannot take the same State action twice in a single turn: Covering the first action with a good prevents it from being selected for the second action.
State Actions: Manuel da Maia (The Builder)
Recruit State Officials
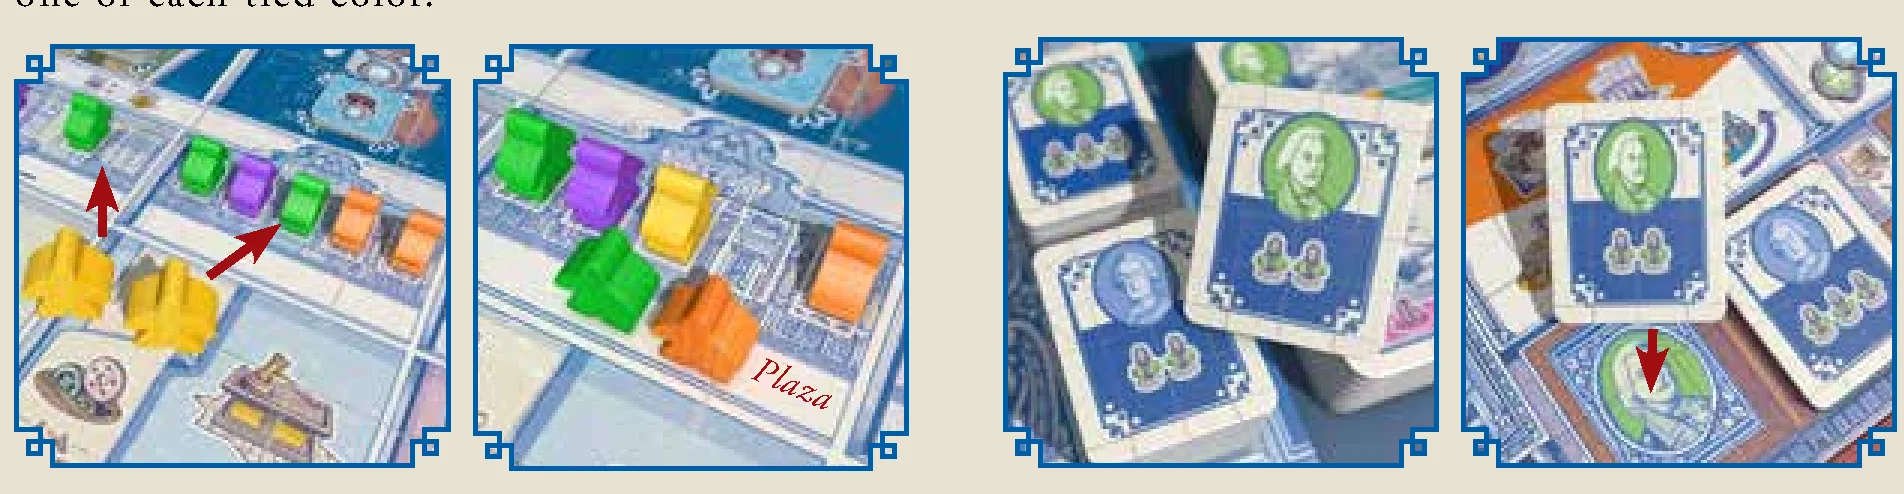
Move up to 2 State Officials of your color from your player board to 2 different Nobles’ offices. If an office has no free space for your Official, determine which color has the most State Official meeples in that office, and move one of those to the plaza below the office. In a tie, move one of each tied color.
Acquire a Plan
Take the top Plan from either architect’s stack (green or blue) and place it on the proper space on your player board, architect-side-up. You can have any number of Plans from both architects.
State Actions: Marquis de Pombal (The Minister)
Build a Ship
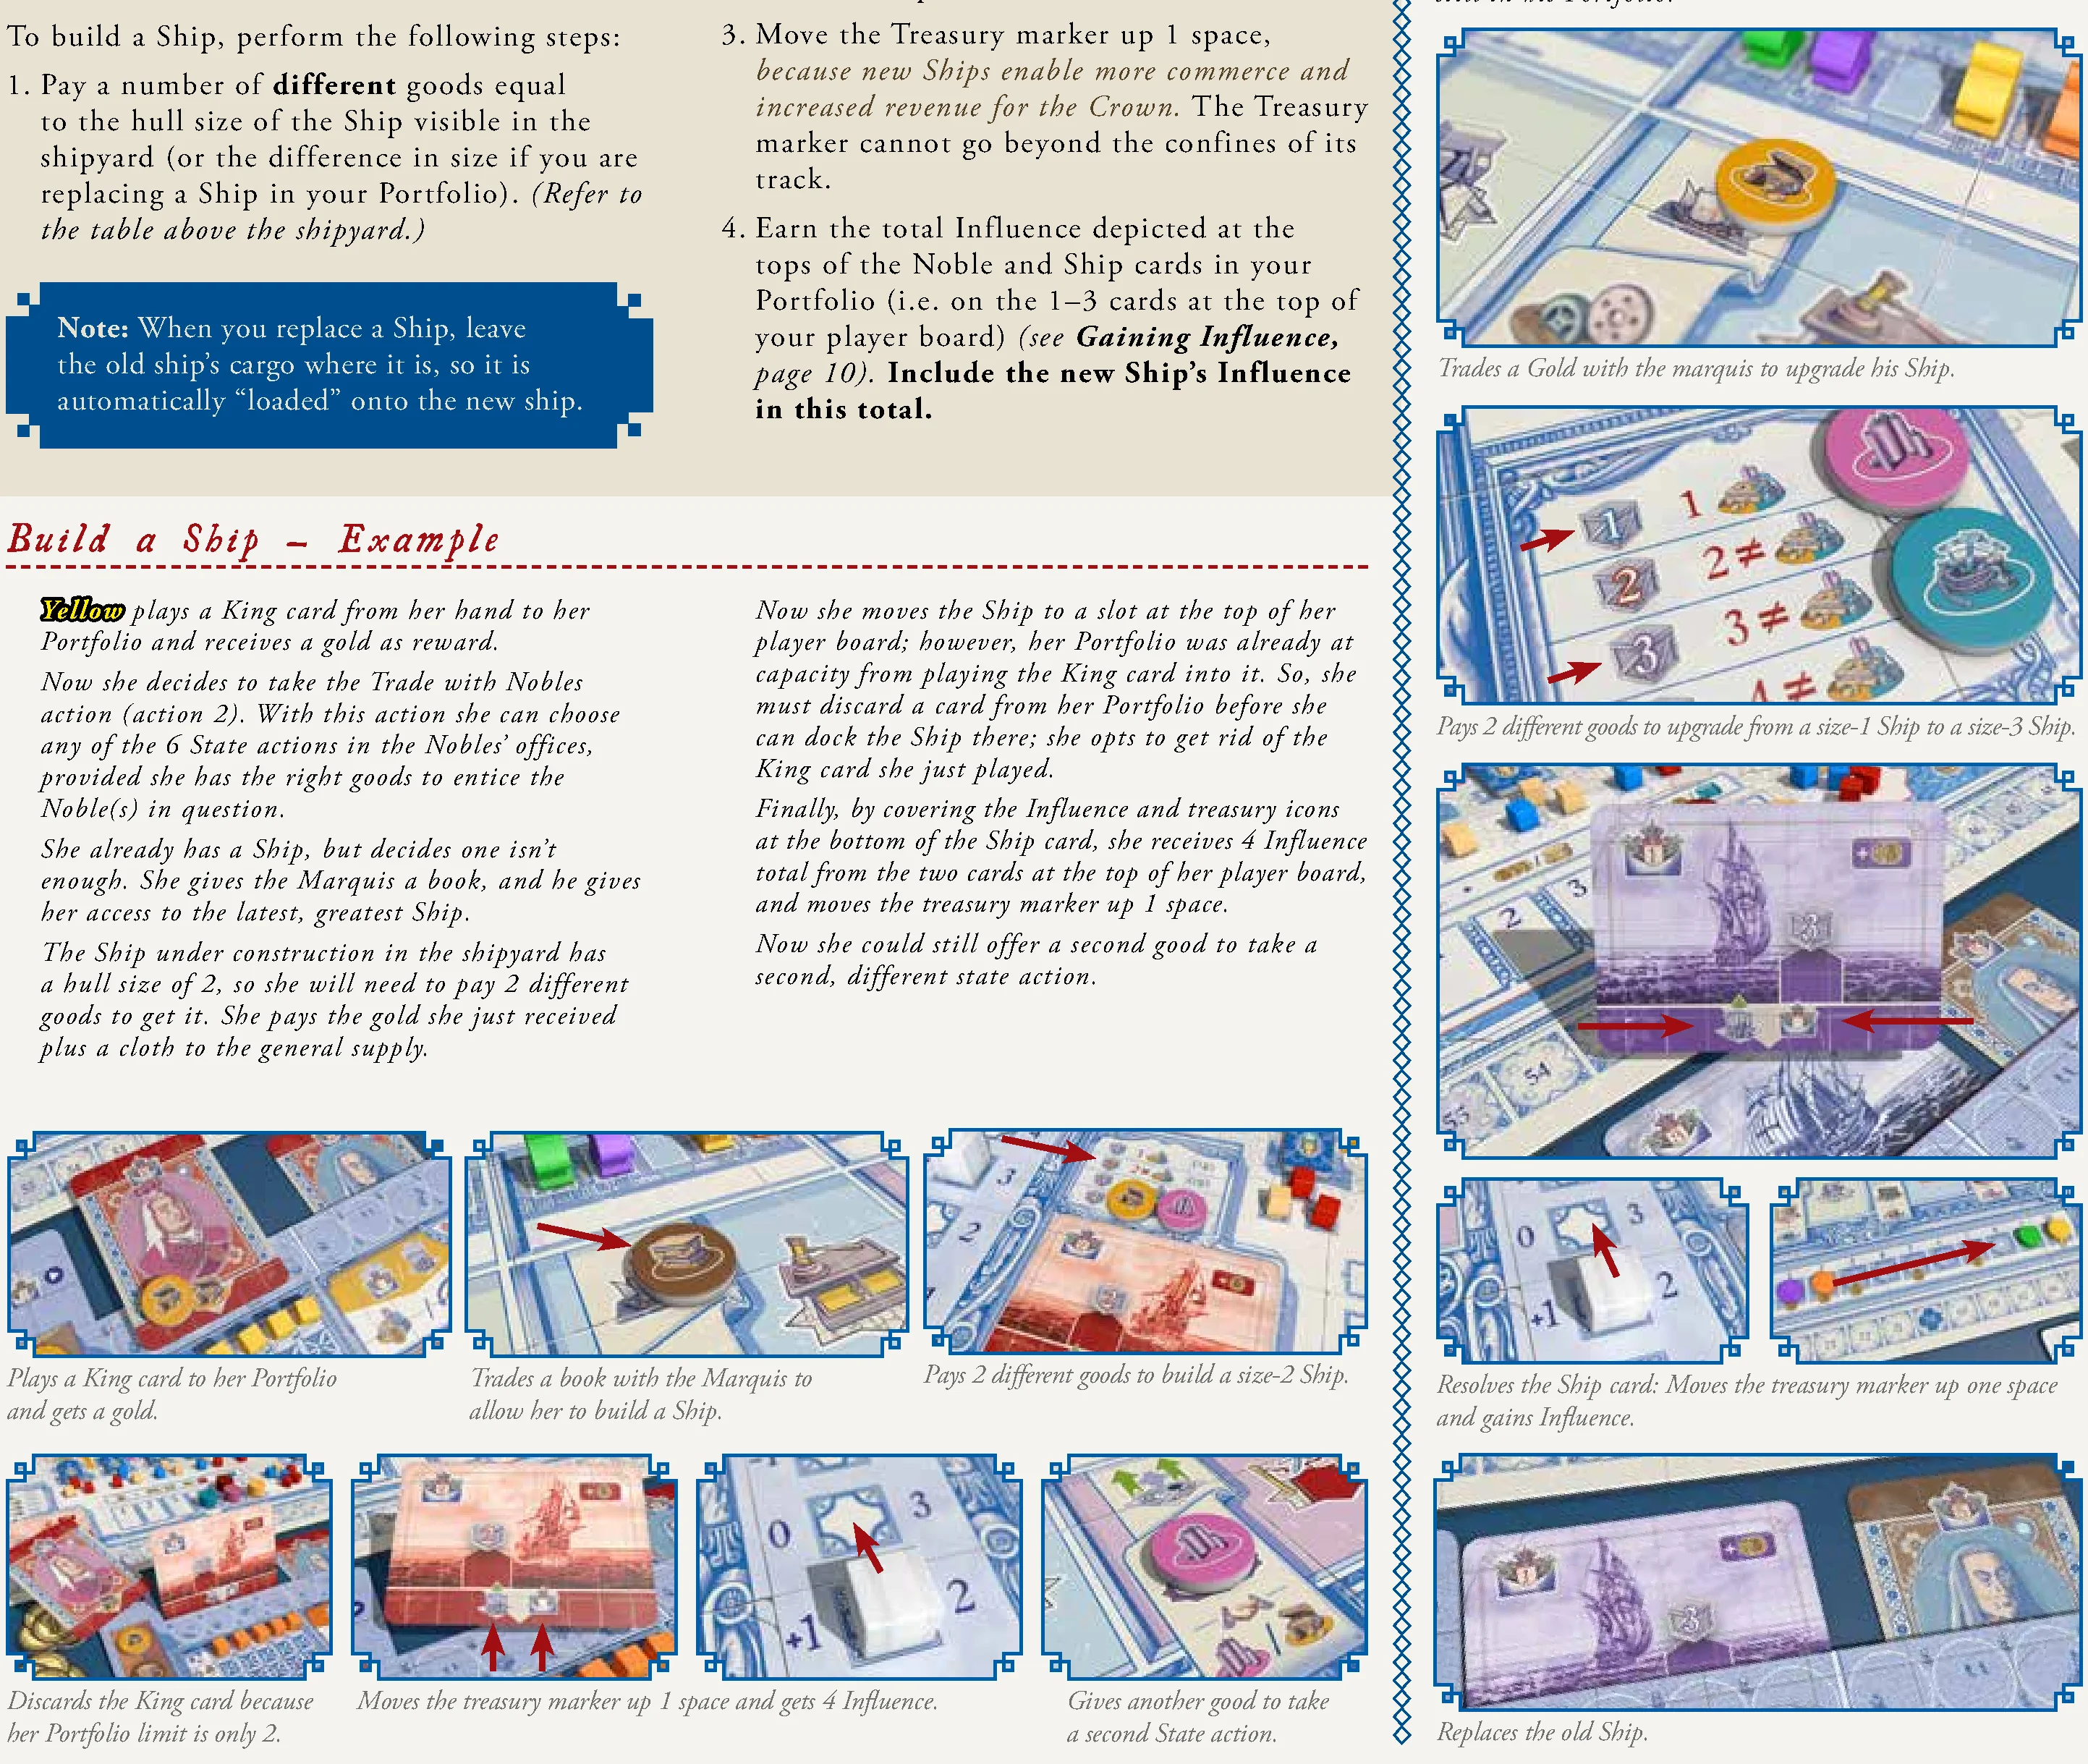
- Pay different goods: Pay a number of different goods equal to the hull size of the Ship visible in the shipyard (or the difference in size if replacing a Ship in your Portfolio). (Note: When you replace a Ship, leave the old ship’s cargo where it is; it is automatically loaded onto the new ship.)
- Place in Portfolio: Select an empty slot at the top of your player board (or discard a card from one of the slots), then tuck the new card under your board, covering the Treasury and Influence icons at the bottom.
- Adjust Treasury: Move the Treasury marker up 1 space.
- Earn Influence: Earn the total Influence depicted at the tops of the Noble and Ship cards in your Portfolio (including the new Ship).
Produce Goods
- From each store you own, take 1 good of its business type (the street it is facing) from the general supply. If you receive more goods than you can store, return the excess to the supply.
- Each type of good produced drops 1 real in price. Adjust its market price marker accordingly.
Note: The price drops for each type of good produced, not for each good produced. If your warehouse was full before producing so you received 0 goods of that type, that type is considered not produced, so its price does not drop. Prices never increase.
State Actions: Rei D. José I (The King)
Meet the Cardinal
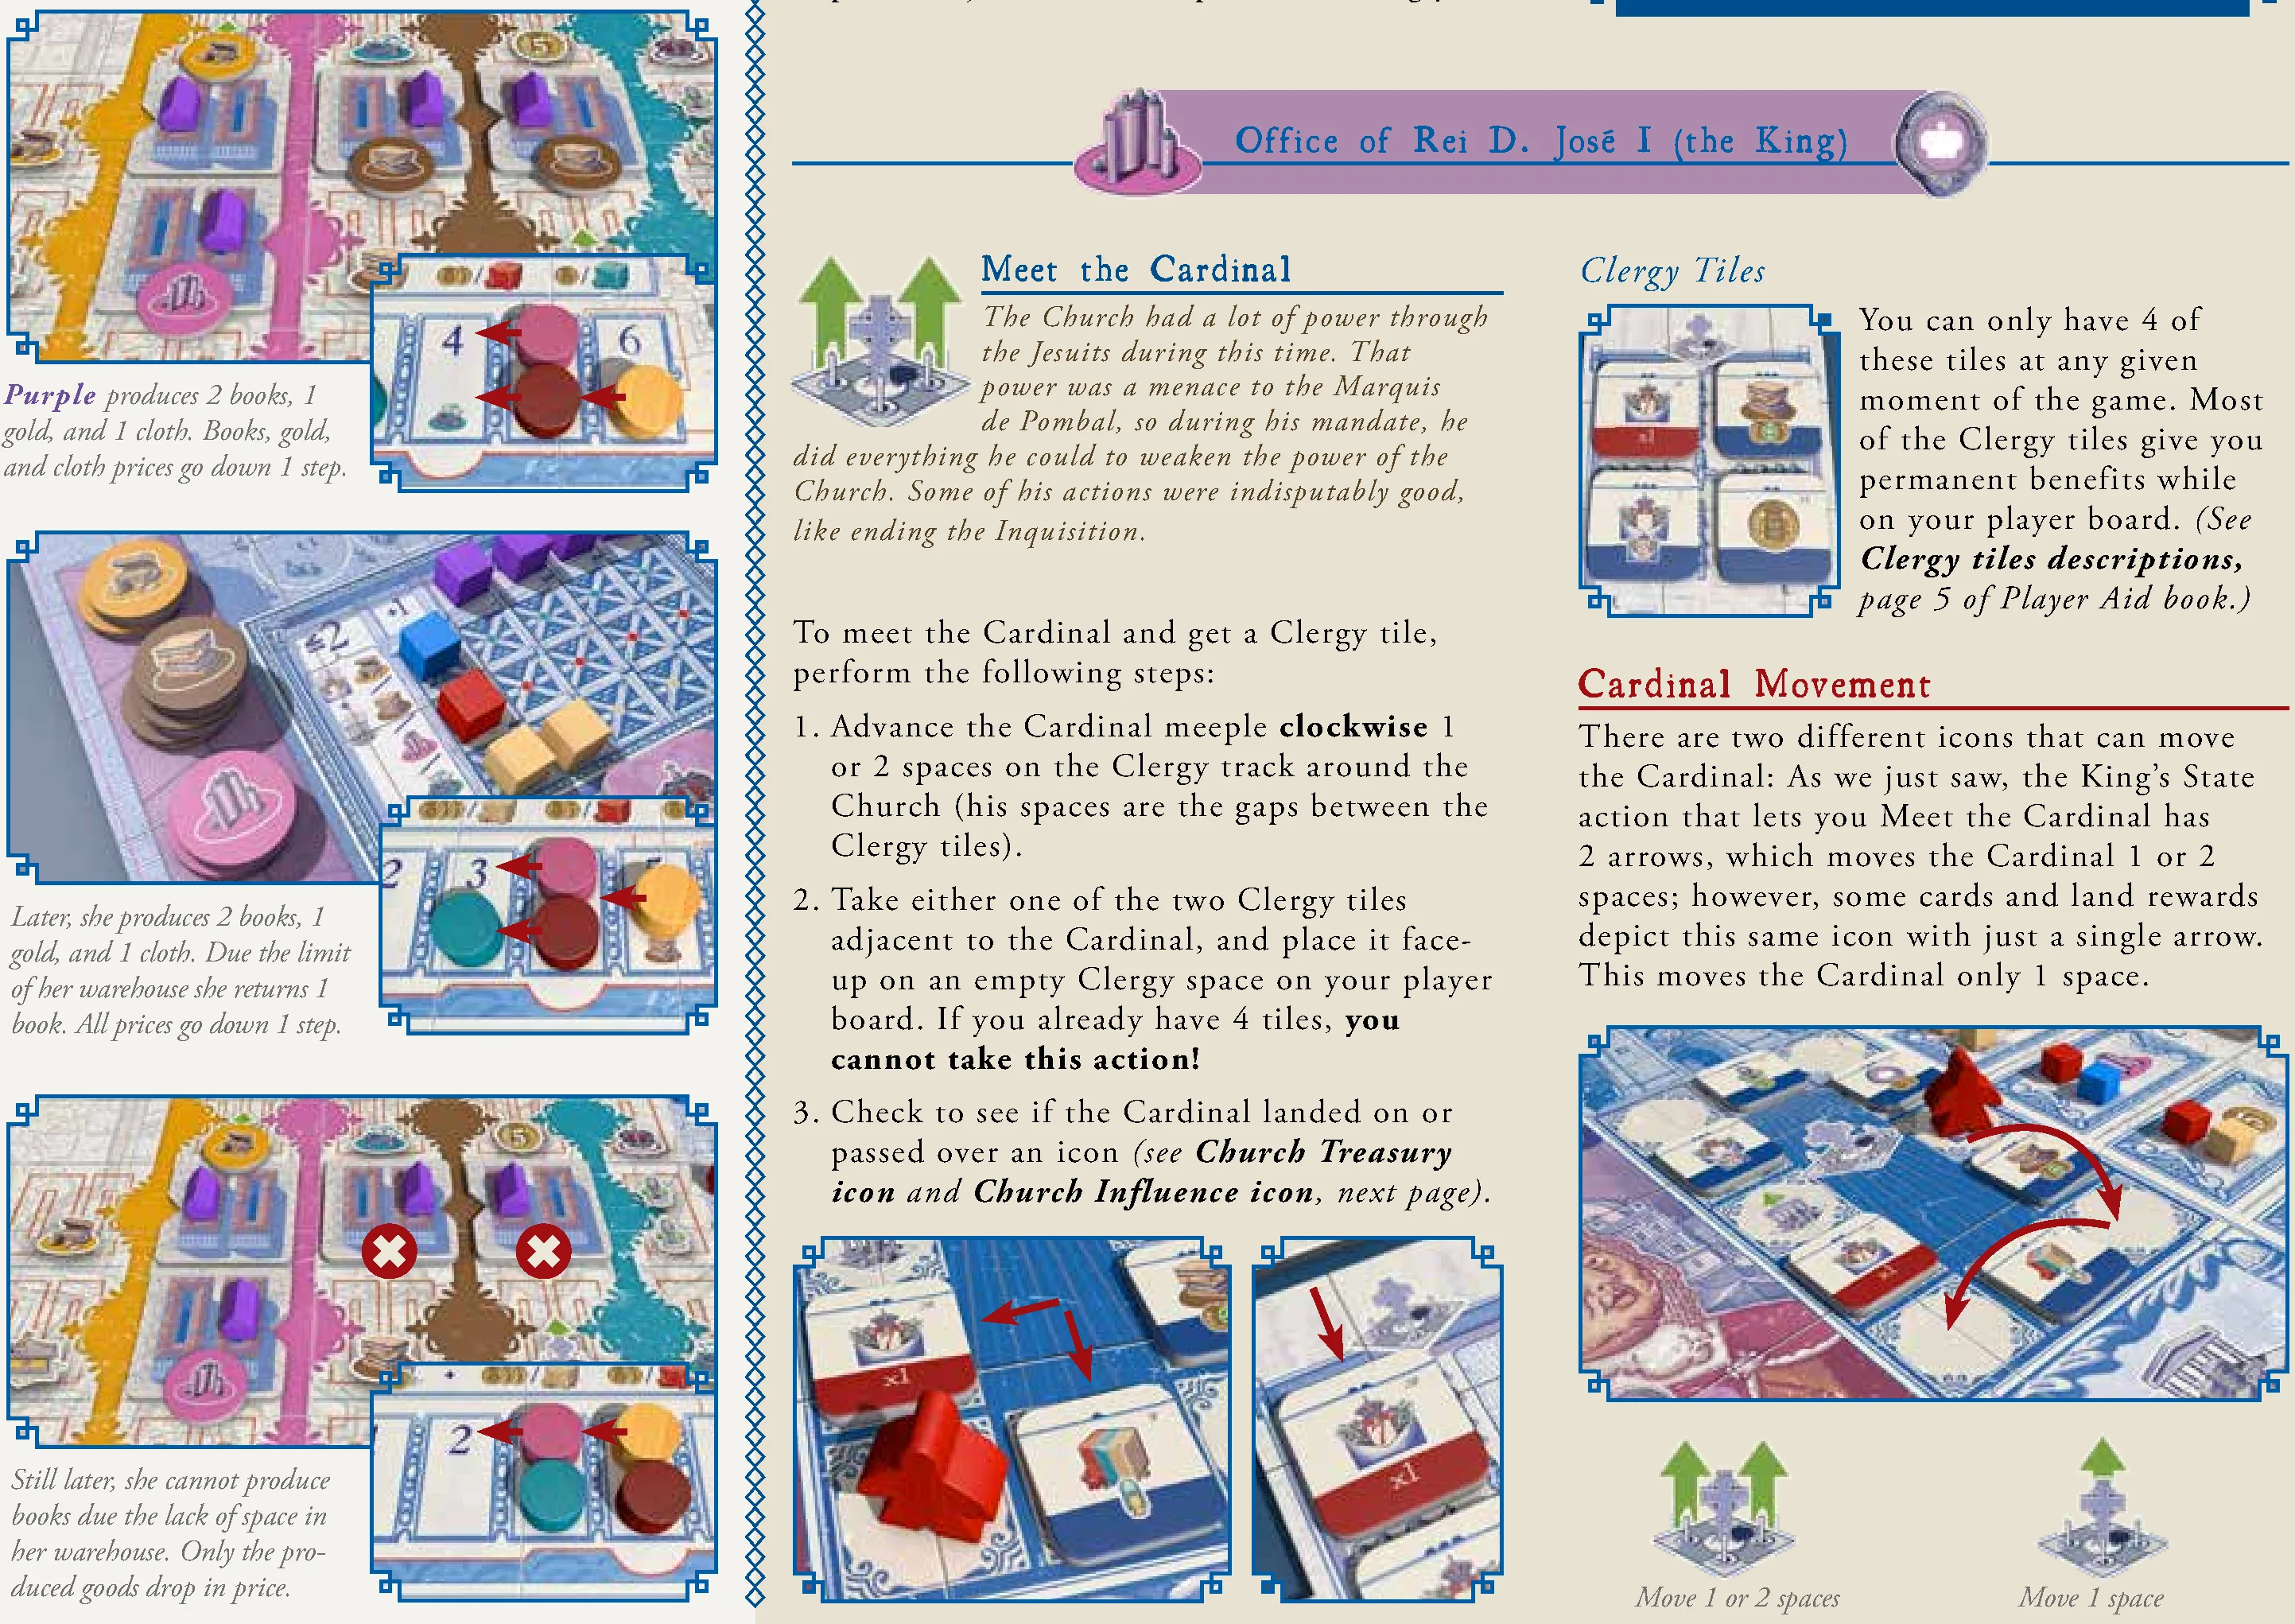
- Advance the Cardinal meeple clockwise 1 or 2 spaces on the Clergy track around the Church (his spaces are the gaps between the Clergy tiles).
- Take either one of the two Clergy tiles adjacent to the Cardinal, and place it face-up on an empty Clergy space on your player board. (Maximum 4 Clergy tiles; if you already have 4, you cannot take this action!)
- Check if the Cardinal landed on or passed over an icon (Treasury icon or Influence icon).
Cardinal Movement icons: King’s action has 2 arrows (moves 1 or 2 spaces). Single-arrow icons on cards or land rewards move the Cardinal only 1 space.
Church Track Icons and Church Scoring
- Church Treasury Icon: If the Cardinal landed on or passed over the Treasury icon, move the Treasury marker up 1 space.
- Church Influence Icon: If the Cardinal landed on or passed over the Influence icon, Church Scoring occurs at the end of the active player’s turn. (Lay the Cardinal down as a reminder; stand him up after scoring.)
Church Scoring Procedure
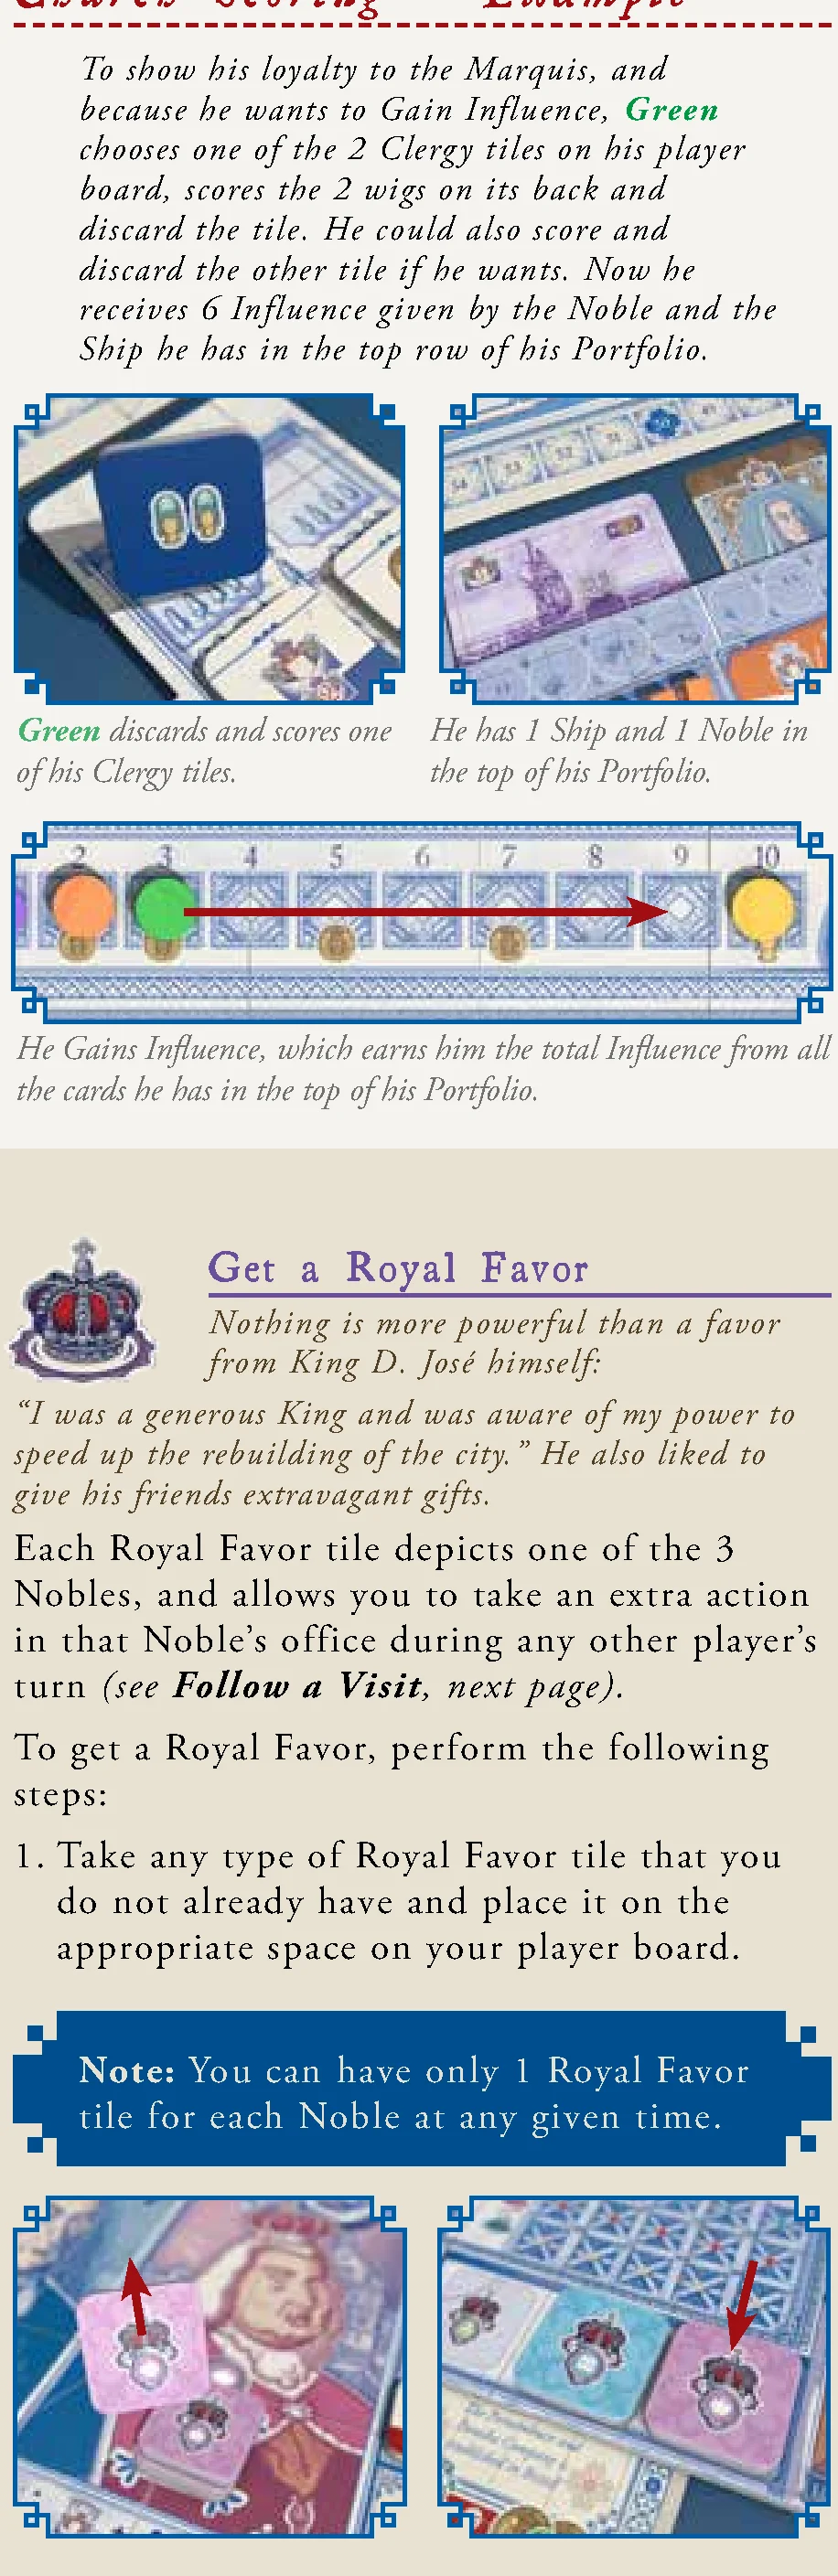
Each player, starting with the player who moved the Cardinal, and going clockwise, decides whether to gain Influence:
- Discard 1 or more of your Clergy tiles.
- Earn the wigs depicted on their backs.
- Gain Influence (total from the top row of your Portfolio).
Note: If you have no Clergy tiles, you cannot participate in Church Scoring, and do not earn Influence.
Get a Royal Favor
Take any type of Royal Favor tile (Manuel, Marquis, or King) that you do not already have and place it on the appropriate space on your player board. (You can have only 1 Royal Favor tile for each Noble at any given time.)
Playing to the Royal Court (Actions 3 & 4)
Play a card from your hand into the Royal Court in order to take Action 3 (Visit a Noble) or Action 4 (Sponsor an Event).
Action 3: Visit a Noble
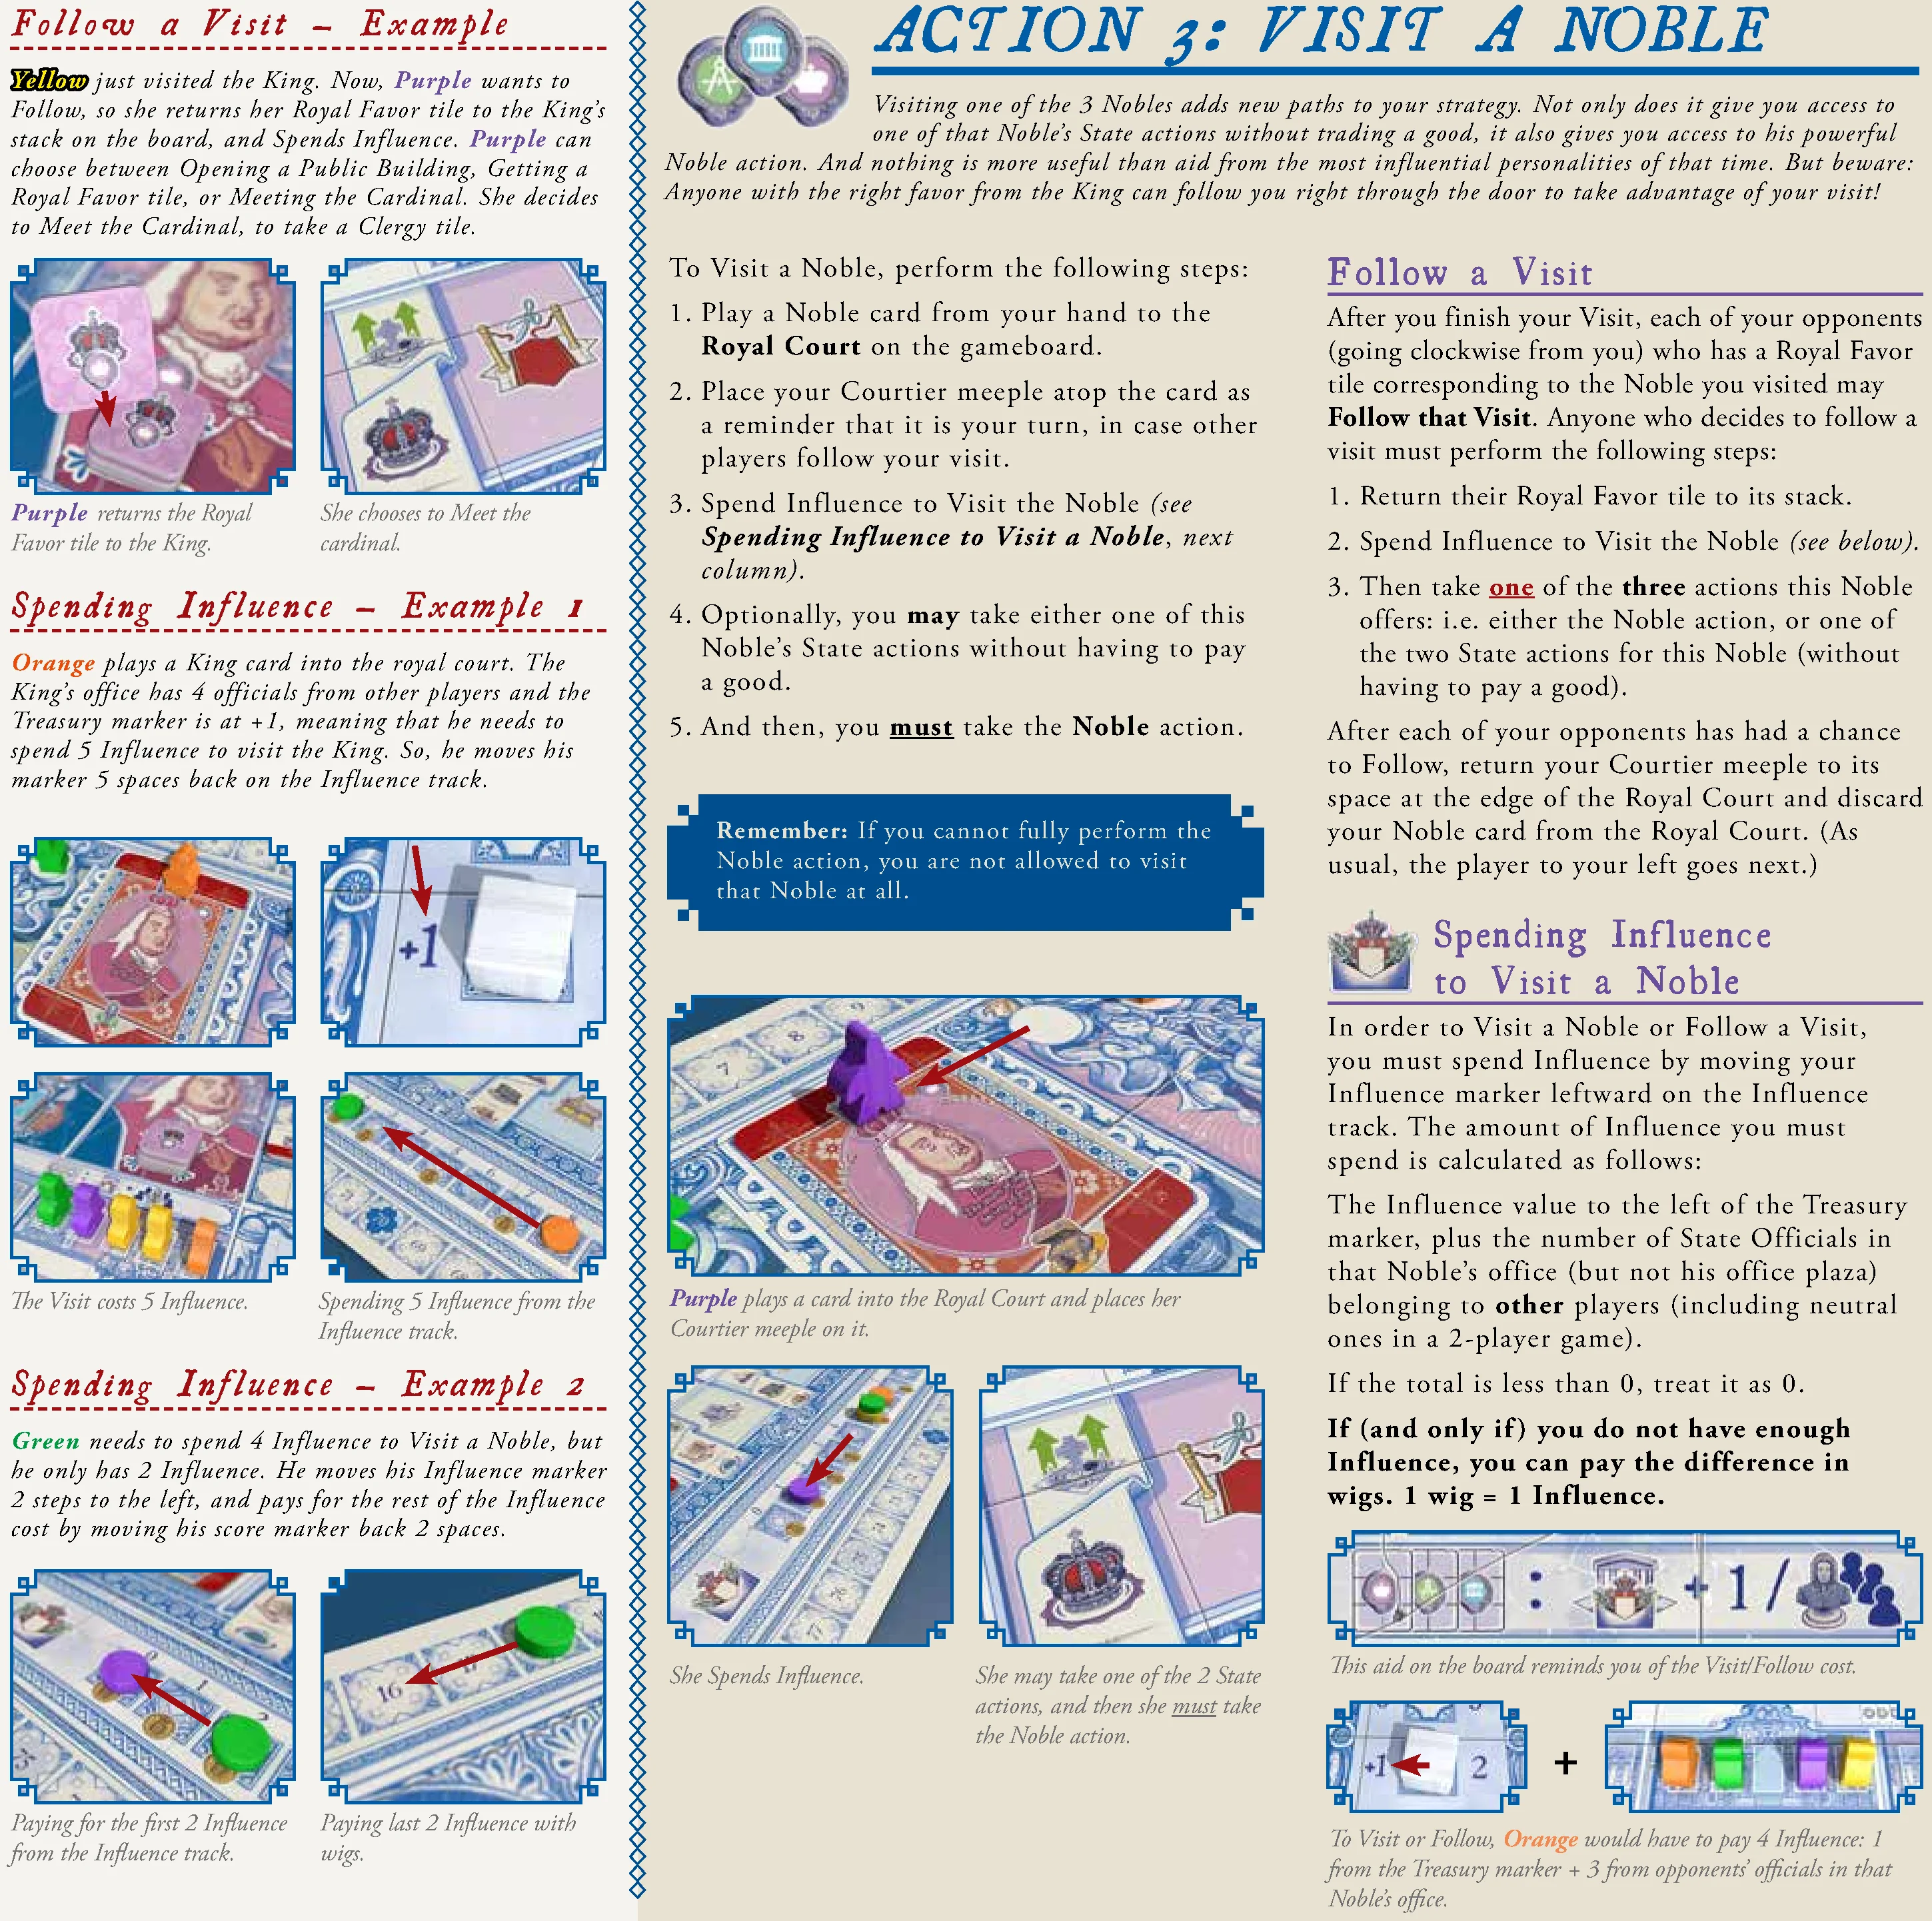
To Visit a Noble, perform the following steps:
- Play a Noble card from your hand to the Royal Court on the gameboard.
- Place your Courtier meeple atop the card as a reminder that it is your turn.
- Spend Influence to Visit the Noble.
- Optionally, take one State action: You may take either one of this Noble’s State actions without paying a good.
- Take the Noble action: You must take the Noble action. (Remember: If you cannot fully perform the Noble action, you are not allowed to visit that Noble at all.)
Follow a Visit
After you finish your Visit, each of your opponents (going clockwise) who has a Royal Favor tile corresponding to the visited Noble may Follow that Visit:
- Return their Royal Favor tile to its stack.
- Spend Influence to Visit the Noble.
- Take one of the three actions this Noble offers: either the Noble action, or one of the two State actions (without paying a good).
After each opponent has had a chance to Follow, return your Courtier meeple to the edge of the Royal Court and discard the Noble card.
Spending Influence to Visit a Noble
The amount of Influence you must spend to Visit or Follow is:
Influence cost = (Influence value to the left of the Treasury marker) + (Number of State Officials in that Noble’s office belonging to other players)
- Do not count officials in the plaza. In a 2-player game, neutral officials count as opponents’ officials.
- If the total is less than 0, treat it as 0.
- If (and only if) you do not have enough Influence, you can pay the difference in wigs: 1 wig = 1 Influence.
The Noble Actions
Manuel da Maia (The Builder): Build a Store
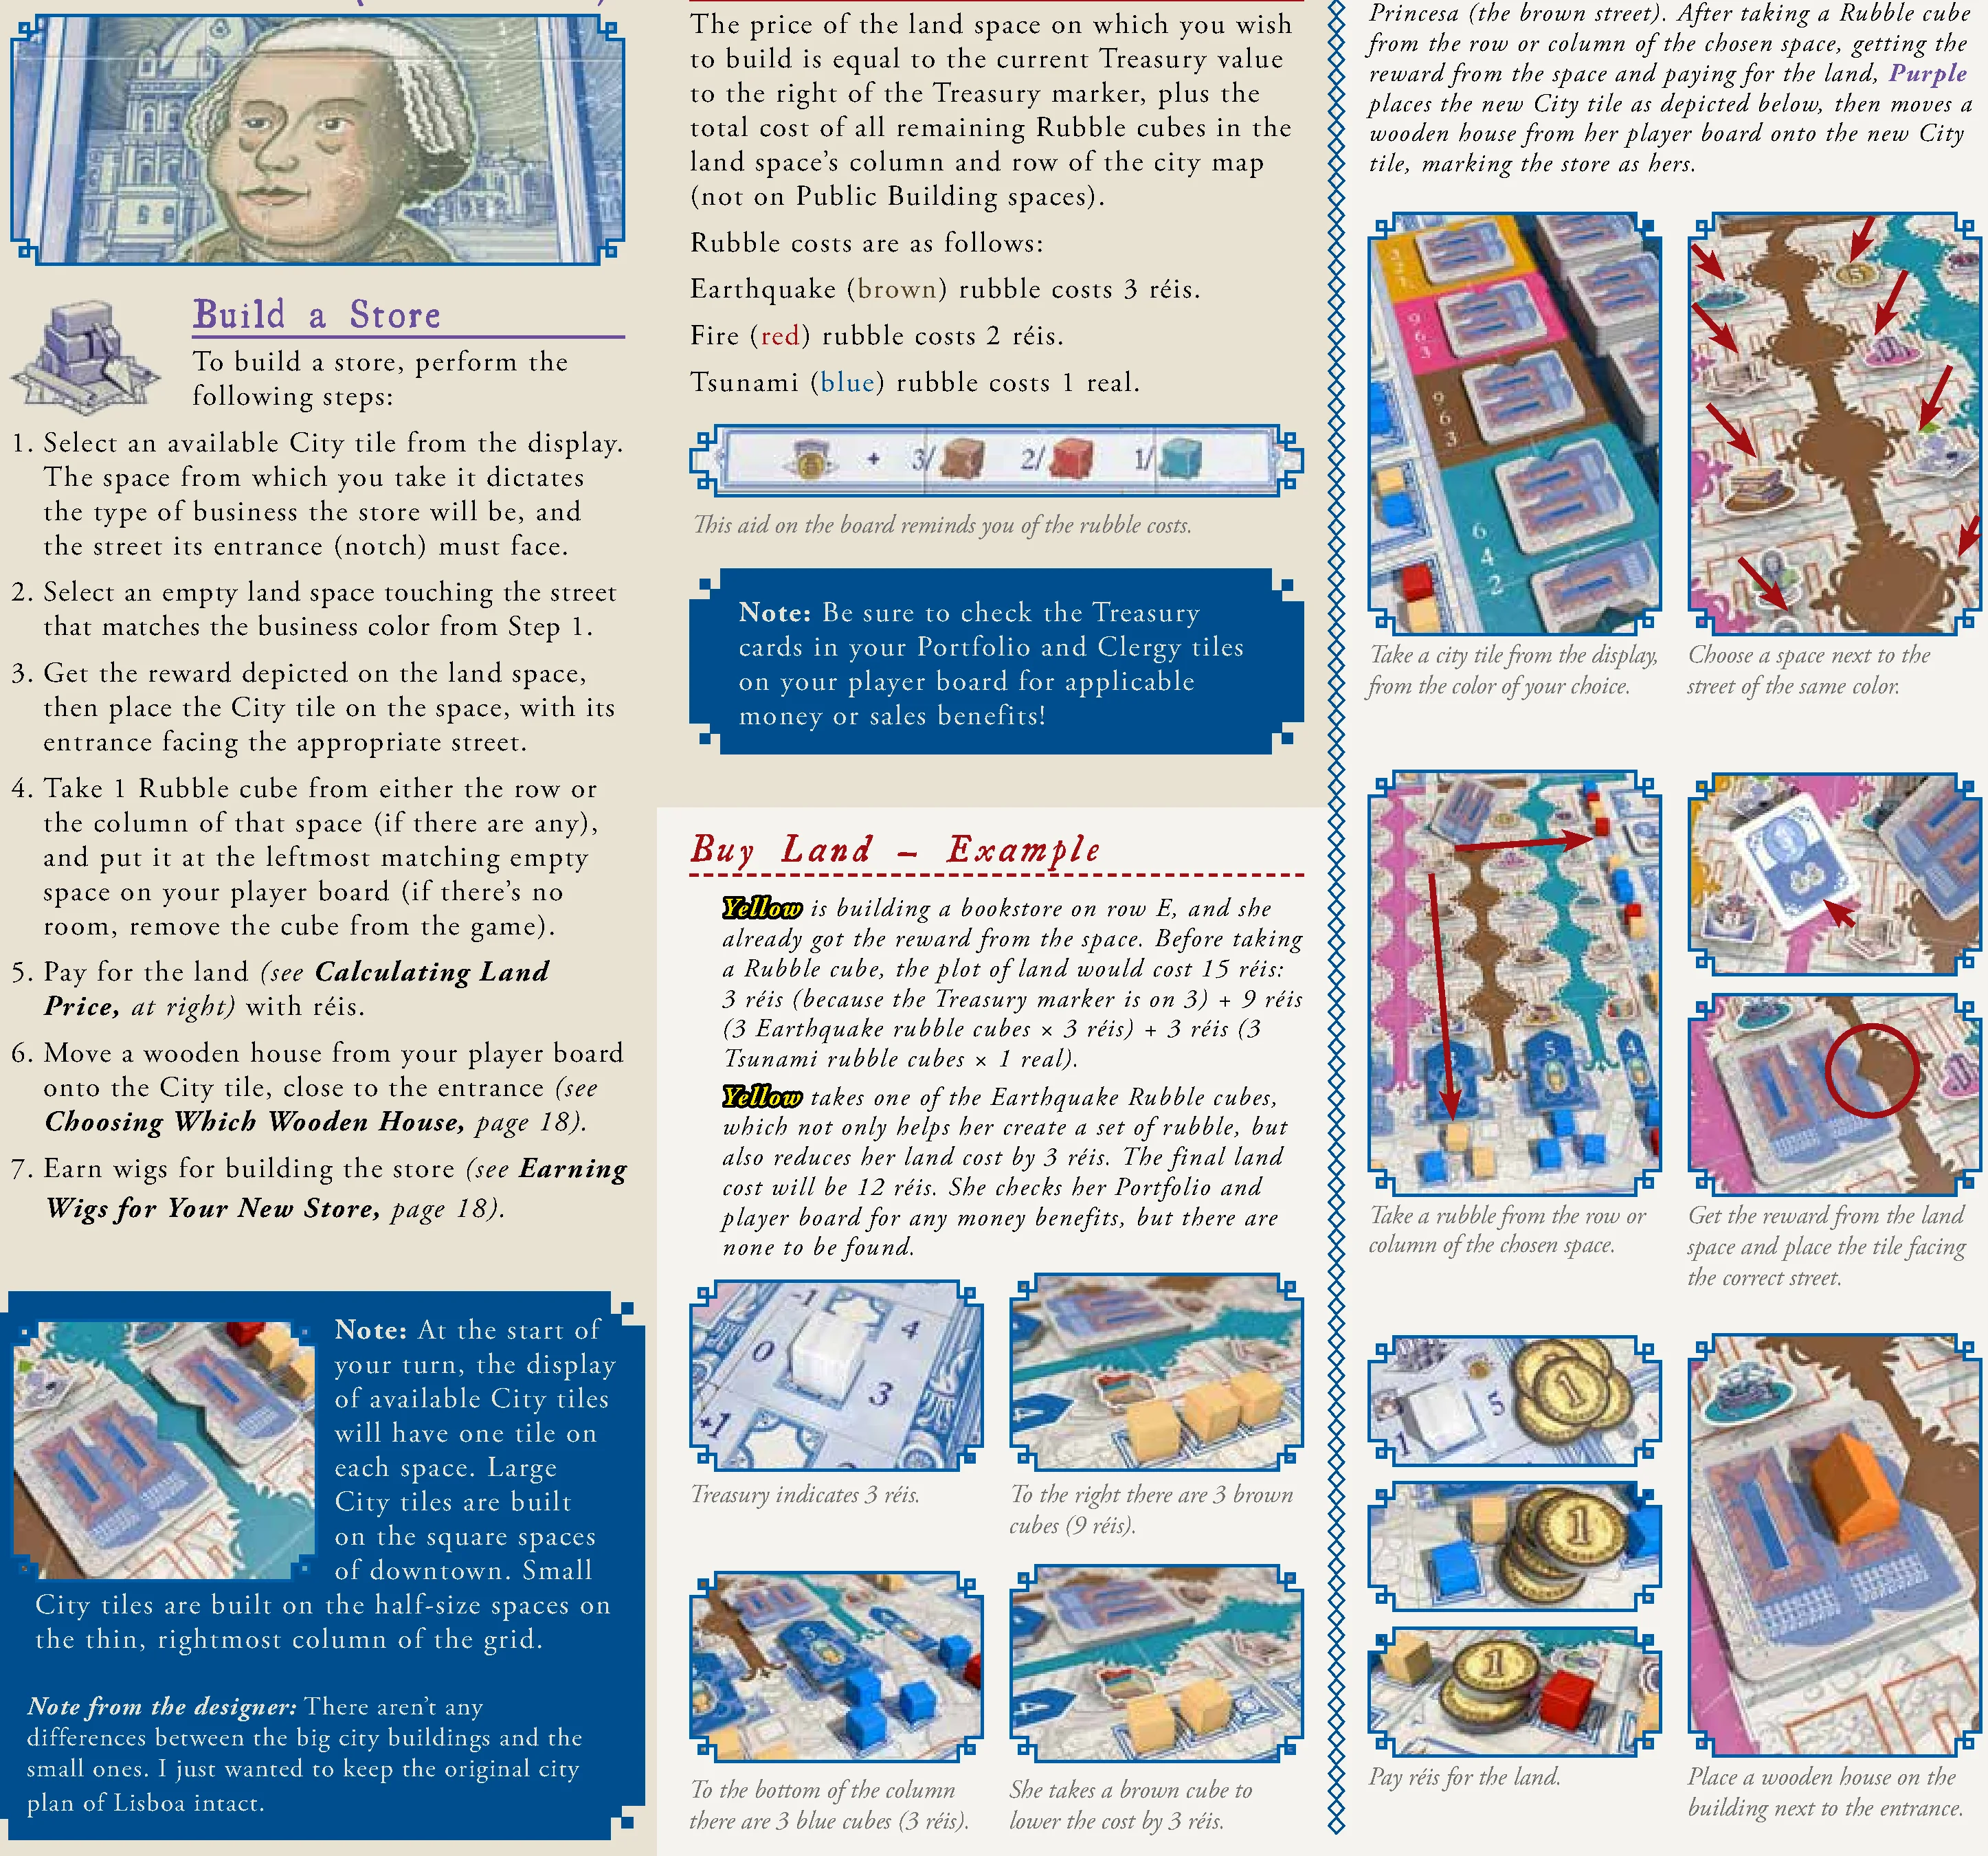
- Select an available City tile from the display. The space indicates the type of business and the street its entrance (notch) must face.
- Select an empty land space touching the street that matches the business color.
- Get the reward depicted on the land space, then place the City tile on the space with its entrance facing the matching street.
- Take 1 Rubble cube from either the row or column of that space (if available), and place it on the leftmost matching empty space on your player board.
- Pay for the land with réis.
- Place a wooden house from your player board onto the City tile, near the entrance.
- Earn wigs for building the store.
Calculating Land Price
Land Price = (Treasury value to right of Treasury marker) + (Total cost of all remaining Rubble cubes in that column and row)
- Earthquake (brown) rubble costs 3 réis.
- Fire (red) rubble costs 2 réis.
- Tsunami (blue) rubble costs 1 real.
(Rubble cubes on Public Building spaces are not counted.)
Choosing Which Wooden House to Build
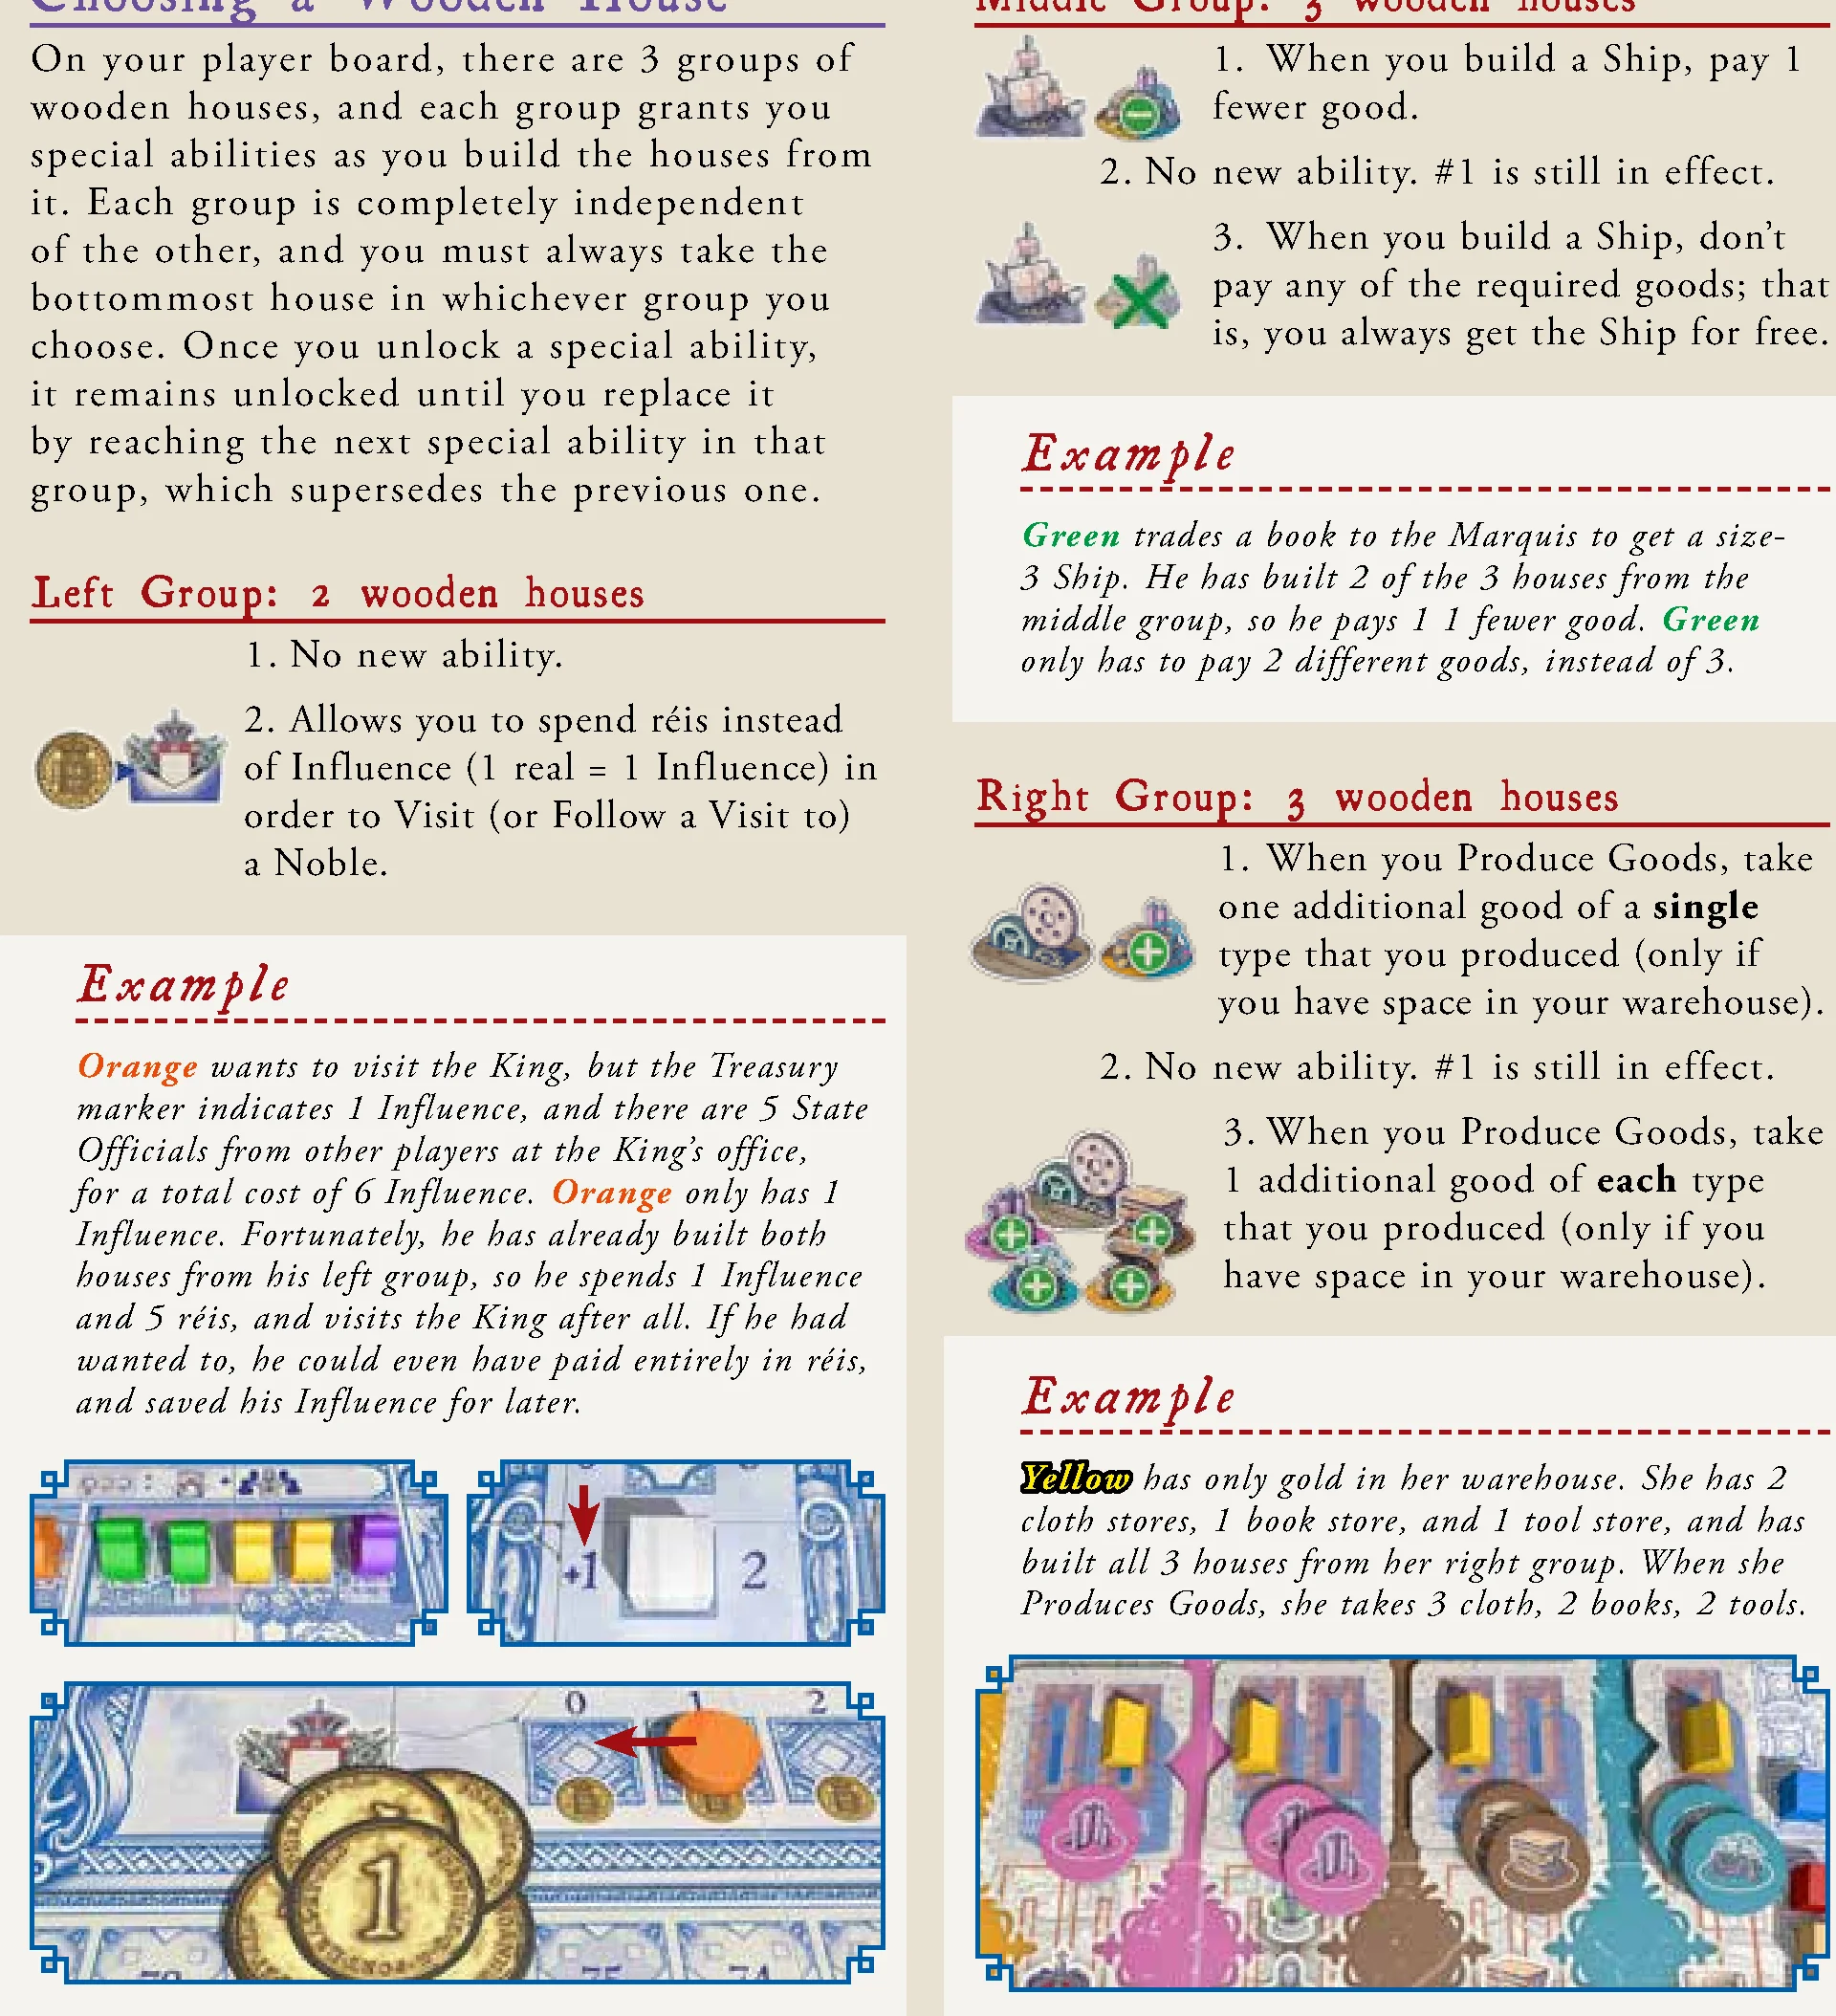
There are 3 groups of wooden houses on your player board. Always take the bottommost house in whichever group you choose. Unlocked abilities remain until superseded by the next ability in that group.
Left Group (2 wooden houses):
- No new ability.
- Allows you to spend réis instead of Influence (1 real = 1 Influence) to Visit or Follow a Visit to a Noble.
Middle Group (3 wooden houses):
- When you build a Ship, pay 1 fewer good.
- No new ability (#1 remains in effect).
- When you build a Ship, don’t pay any goods (free Ship).
Right Group (3 wooden houses):
- When you Produce Goods, take 1 additional good of a single type produced (if warehouse space permits).
- No new ability (#1 remains in effect).
- When you Produce Goods, take 1 additional good of each type produced (if warehouse space permits).
Earning Wigs for Your New Store
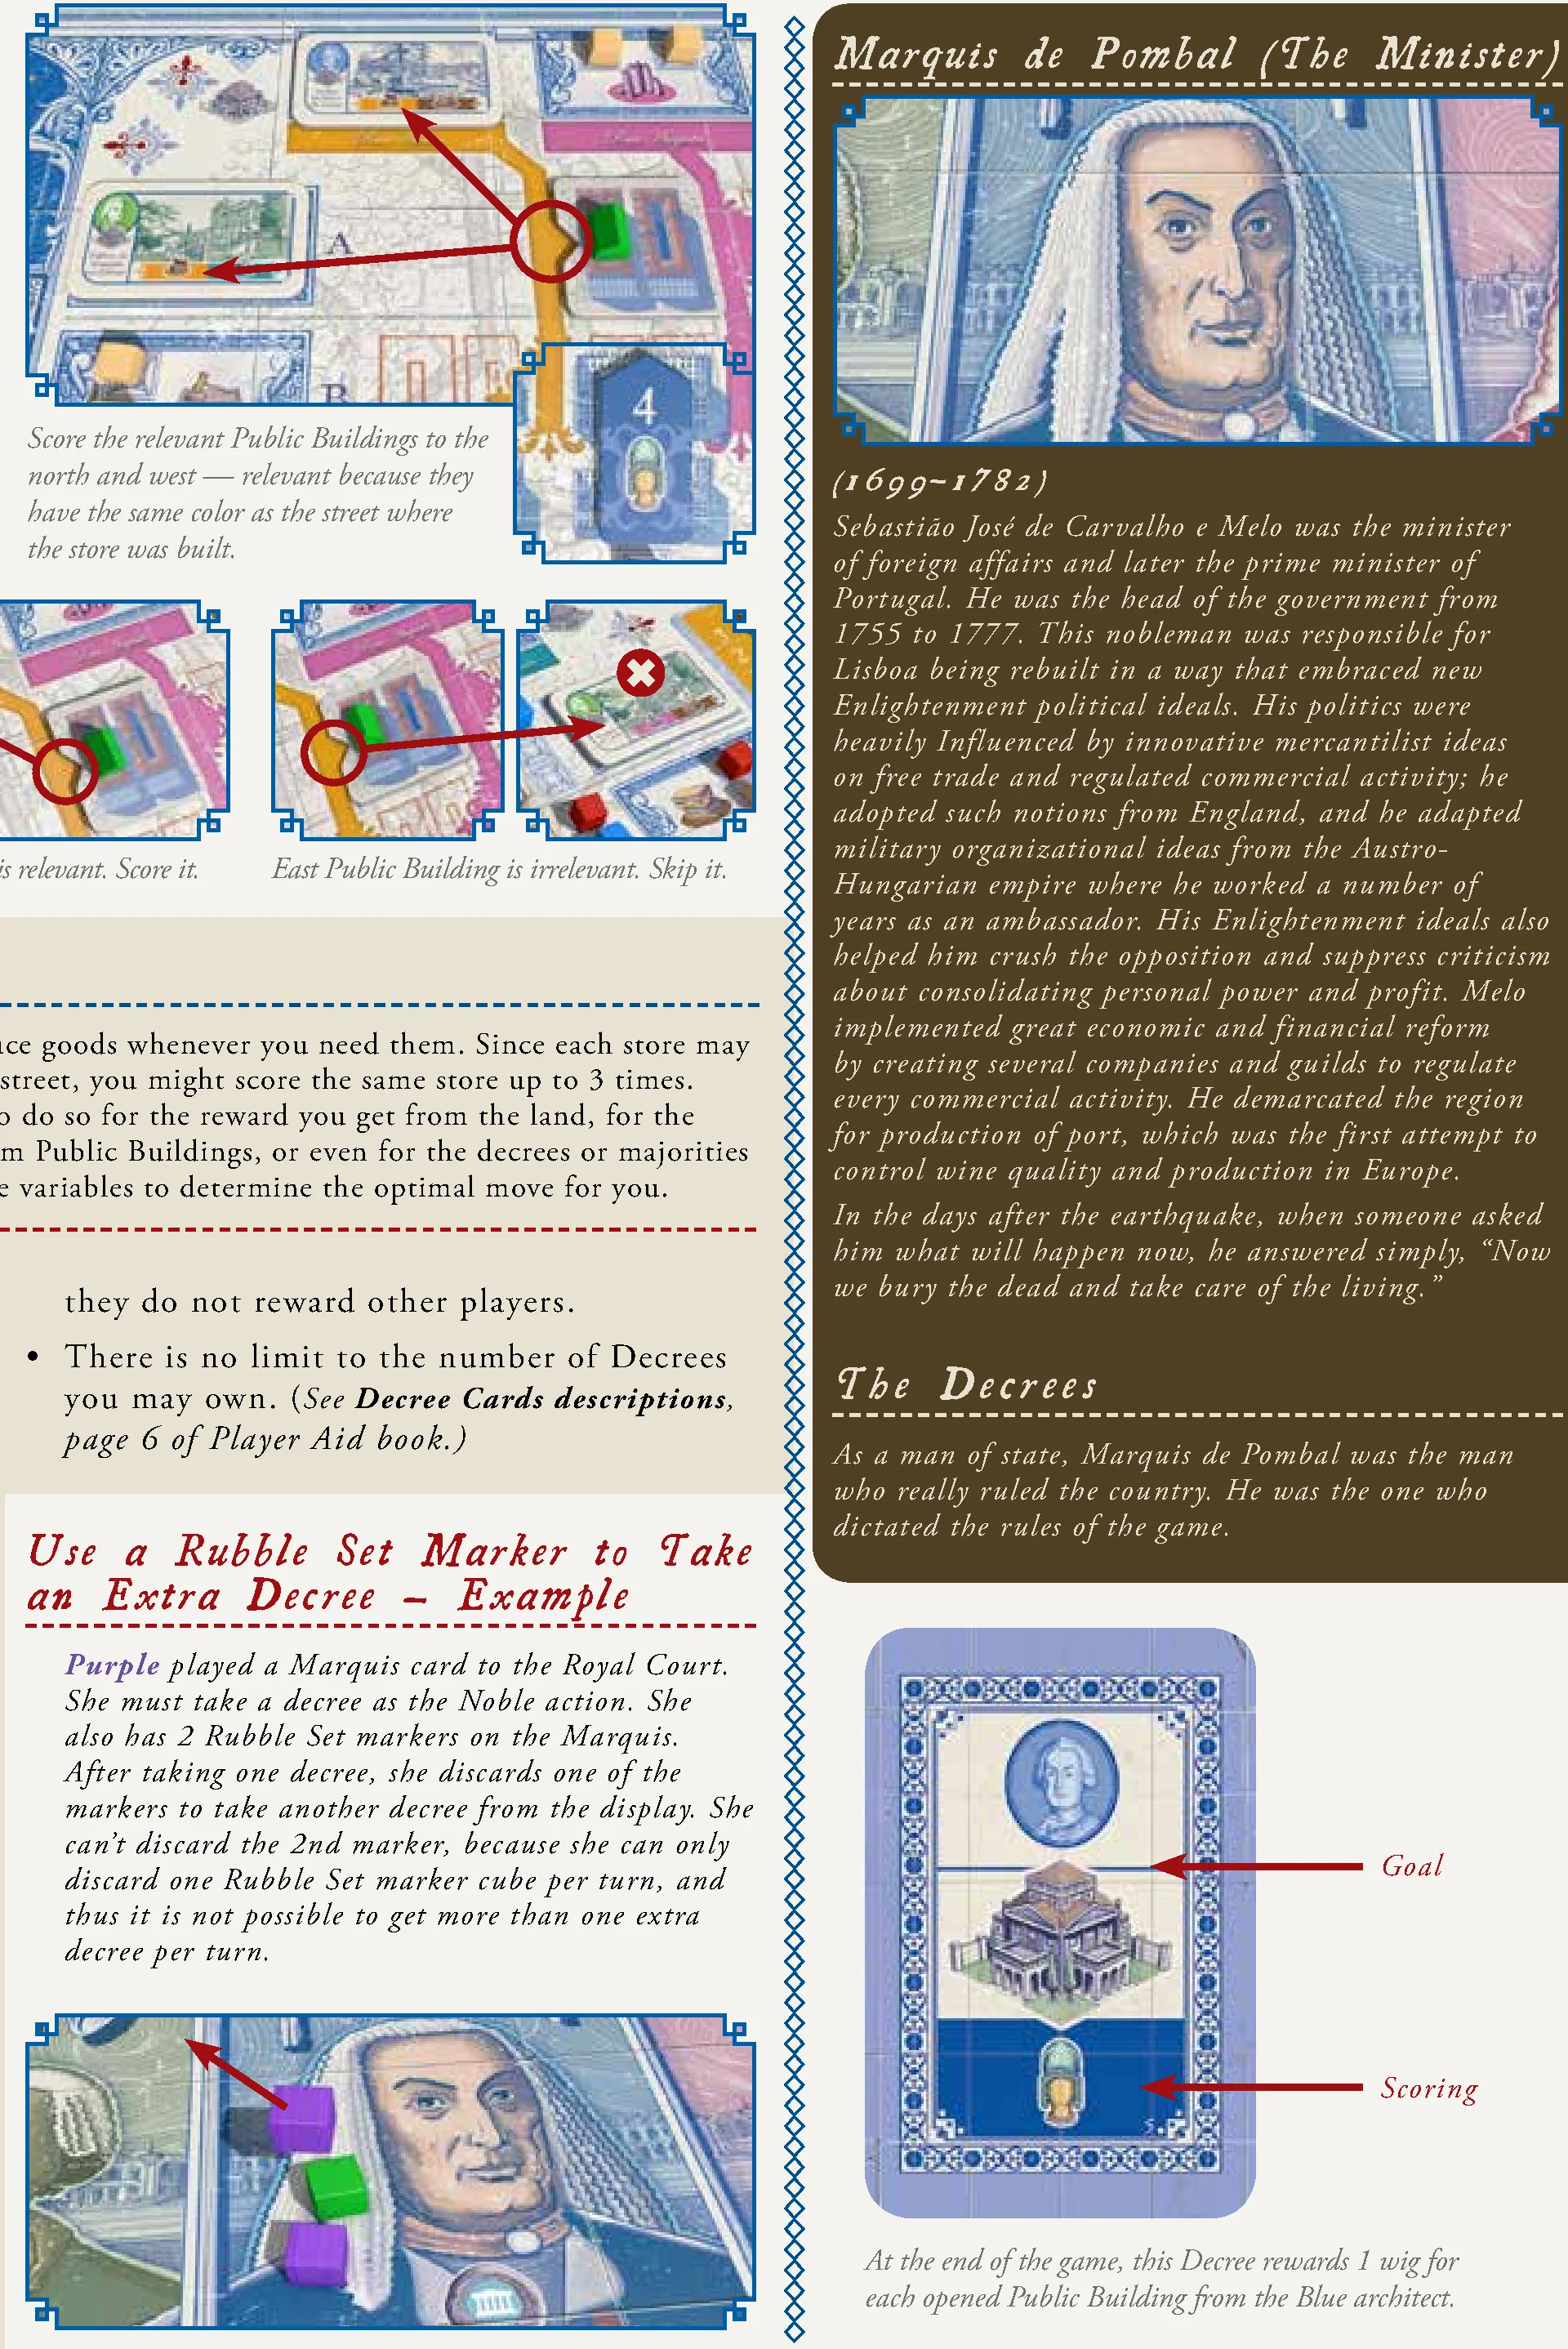
Relevant Public Buildings are those matching the store’s business color and situated either in the same row or on the same street that the store faces (maximum 3: north, west, east).
Wigs Earned = (Number on the Scoring tile at the bottom of the store’s column) × (Number of relevant Public Buildings)
Marquis de Pombal (The Minister): Take a Decree
Select one of the Decree cards from the display and place it face-up next to your player board. Decrees earn wigs at end of game if criteria are met.
- If you have a Rubble Set marker on the Marquis portrait, you may discard it to take an extra decree. (Max 1 Rubble Set marker discarded per turn.)
- Decree cards are always face-up and visible. Only you score your Decrees. No limit to the number of Decrees you may own.
Rei D. José I (The King): Open a Public Building
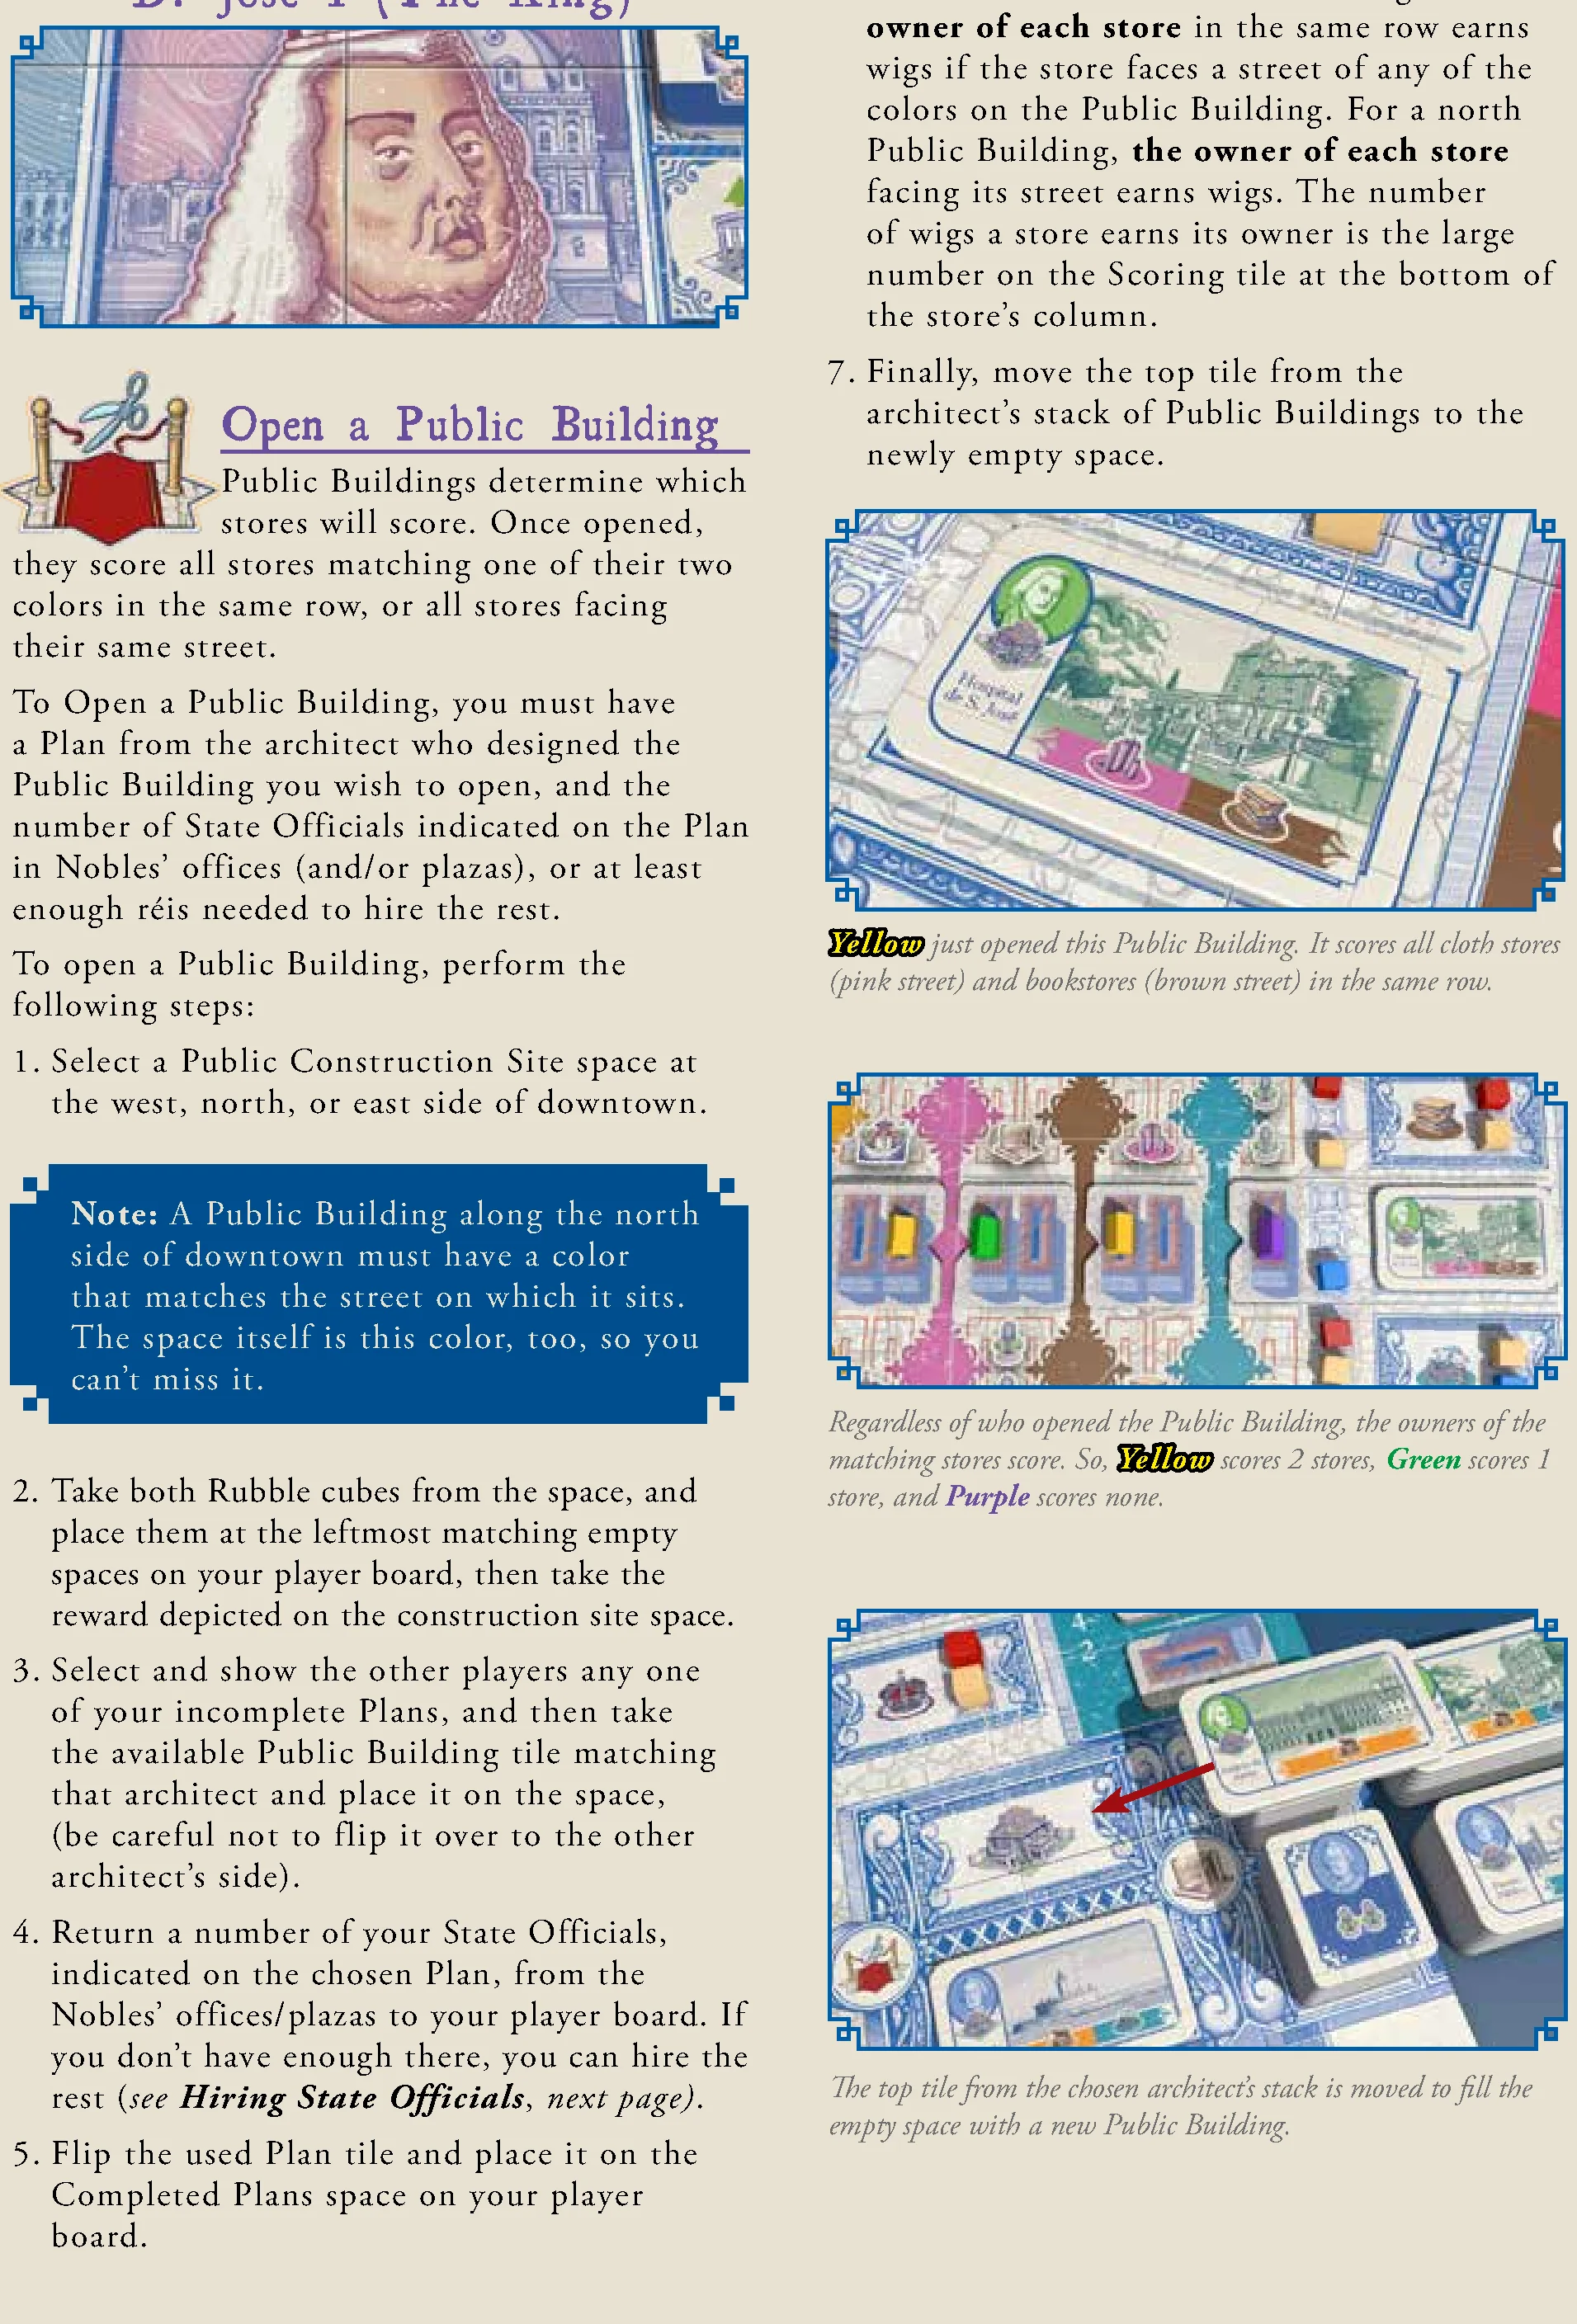
To Open a Public Building, you must have a Plan matching the architect of the available Public Building, and enough State Officials in Nobles’ offices/plazas (or réis to hire them).
- Select a Public Construction Site at the west, north, or east side of downtown. (North side must match the street color.)
- Take both Rubble cubes from the space onto your player board, then take the reward depicted on the space.
- Select and reveal an incomplete Plan matching the architect, and place the available Public Building tile on the space.
- Return State Officials: Return the number of State Officials indicated on the Plan from Nobles’ offices/plazas to your board. If short, hire the rest.
- Flip the used Plan to its Completed Plans space.
- Score Stores:
- East / West Public Building: Every store in the same row earns wigs if it faces a street matching either color of the Public Building.
- North Public Building: Every store facing its street earns wigs.
- Wigs earned per matching store = the large number on the Scoring tile at the bottom of that store’s column (regardless of who opened the building).
- Refill: Move the top tile from that architect’s stack into the empty space.
Hiring State Officials
If (and only if) you do not have enough State Officials available among the Nobles’ offices and plazas, you may hire the rest. The price for each new hire equals the current Treasury value (to the right of the Treasury marker).
Action 4: Sponsor an Event
To Sponsor an Event depicted on a Treasury card in your hand:
- Play the Treasury card from your hand to the Royal Court.
- Pay réis equal to the current Treasury value.
- Perform the action / receive the reward depicted in the center of the Treasury card. (Discard the card at end of turn.)
Take a Political Card
To finish your turn, take any face-up Political card from the Political card display. This brings your hand back up to 5 cards.
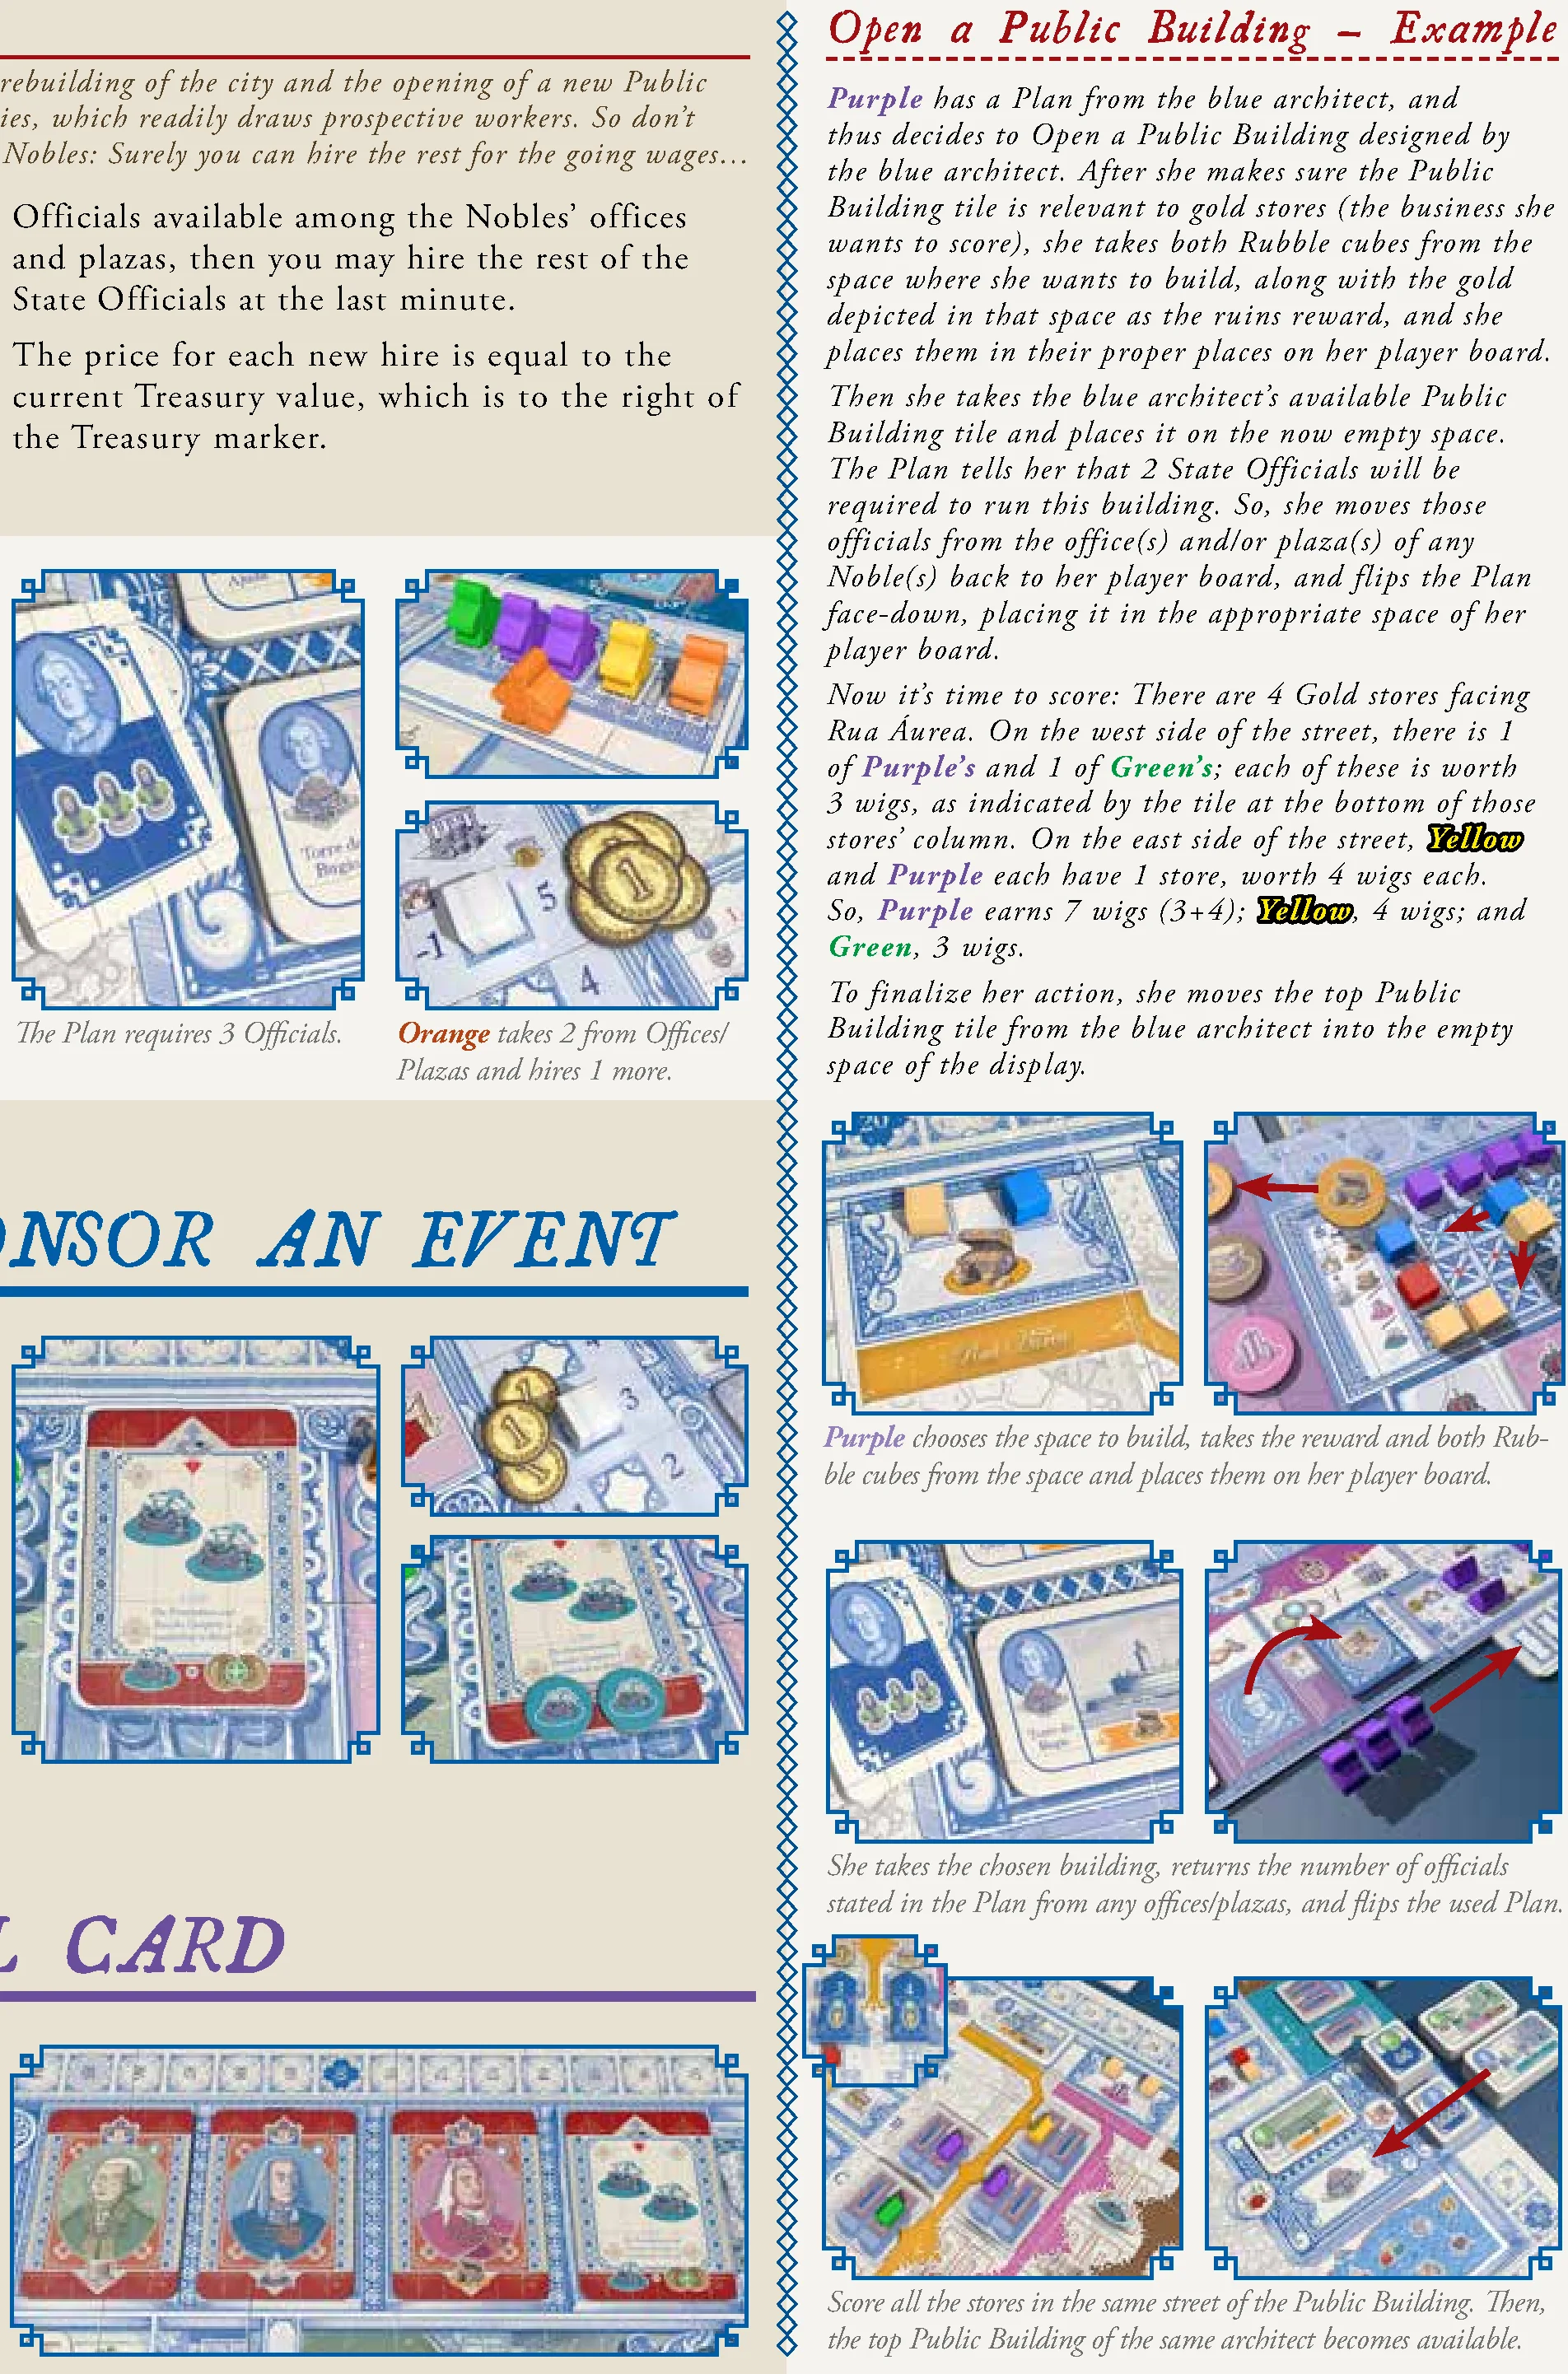
Decks from left to right: Manuel da Maia, Marquis de Pombal, King D. José I, and Treasury deck.
End of Turn Upkeep
- Reveal a New Political Card: Flip the top card of the deck face-up to replace the card taken.
- Refill City Tile Display: Refill any empty spaces.
- Refill Church Track: Refill empty Clergy tile spaces from the bag.
- Refill Decrees Display: Refill up to 8 cards from the deck.
- Remove Goods from State Actions: Return traded goods on State action banners to the supply.
End of Period Transition
As soon as anyone completes their 2nd set of rubble OR 3 Political card decks in the display are empty, finish the current turn, discard all remaining cards in the display, then perform the following steps:
- Rubble Scoring: Each player receives 3 wigs for each completed rubble set on their board.
- Shipyard Refill: Discard remaining Ship cards. Replace with purple size-3 and brown size-4 Ship cards (purple size-3 on top).
- Discard Cards for Rewards: In clockwise order starting with the player who triggered the end of the period, each player may discard any number of cards from hand. Each player earns the reward at the bottom of one of each type of Noble card discarded (penalties are ignored; Treasury cards provide no reward).
- Draw New Hands: Each player draws up to a 5-card hand from the purple Political card deck (1763–1768). Return remaining cards to the box.
- Prepare Period 2 Deck: Prepare the brown Political card deck (1769–1777) in the display spaces (4 decks of 5 unique cards each, top card face-up).
If needed, refill Church track and Decrees display. Continue play from the next player in turn order.
End of the Game
As soon as anyone completes 4 sets of Rubble OR once again 3 Political card decks in the display are empty, finish the current round so all players have taken the same number of turns. Then, play one final round before endgame scoring.
Endgame Scoring
To your total wigs on the score track, add the following:
- Ships: Wigs equal to the sum of the hull sizes of the Ships in your Portfolio.
- Rubble Sets: 3 Wigs for each completed set of Rubble cubes.
- Stores Majority: Wigs for having more stores of each type than opponents:
Stores The most 2nd-most 3rd-most Gold 3 wigs 2 wigs 1 wig Tool 6 wigs 3 wigs 1 wig Book 9 wigs 6 wigs 3 wigs Cloth 9 wigs 6 wigs 3 wigs (In a 2-player game, count only ‘The most’ and ‘3rd-most’. If you have 0 stores of a type, you earn 0 wigs. Ties: add tied places and divide points rounded down.)
- Money & Influence: Cash out Influence for réis (using your Influence track value), then earn 1 Wig for each 5 réis (rounded down).
- Decrees: Wigs from all fulfilled Decree cards.
- State Officials in Public Buildings: Count total Officials depicted on completed Plans:
Game The most 2nd-most 3rd-most 3–4 players 15 wigs 10 wigs 5 wigs 2 players 15 wigs 5 wigs — (Must have at least 1 completed Plan. Ties: add tied places and divide points rounded down.)
- Royal Favors: 2 wigs for each Royal Favor tile remaining on your board.
Tiebreakers
- Most sets of rubble.
- Most stores.
- Most completed Plans.
- Most money.
If still tied, tied players share the victory!
Introduction & Components
LISBOA
A game by Vital Lacerda
1–4 Players / 30 min per player / Ages 14+
Historical Background
On November 1st, 1755, on All Saints’ Day, Lisboa suffered an earthquake of an estimated magnitude of 8.5–9.0, followed by a tsunami, and 3 days of fires. The city was almost completely destroyed.
The Marquis of Pombal, Sebastião José de Carvalho e Melo, was the prime minister at the time, and the king put him in charge of the reconstruction of Lisboa.
The king and the prime minister immediately launched efforts to rebuild the city. On December 4th, 1755, little more than a month after the catastrophe, the chief engineer of the realm, Manuel da Maia, presented his plans to rebuild Lisboa. Maia presented five options, including abandoning Lisboa altogether, rebuilding with recycled ruins, widening the streets, and even building a completely new city. The chosen plan boldly proposed razing the entire Baixa quarter and “laying out new streets without restraint”. Eugénio dos Santos and Carlos Mardel were the architects in charge of the rebuilding.
In less than a year, the city was cleared of debris. Because the king wanted to have a new and perfectly ordered city, he commissioned the construction of big squares, straight, large avenues, and widened streets, with related types of businesses as if each street had its own motto: A Baixa de Lisboa.
A game of Lisboa is set over a span of 22 years. You play the roles of influential nobles who survived the earthquake, tsunami, and fires, and who will help in the reconstruction and economic development of the new city to receive graces from the king and the marquis. You will work with the architects to build Lisboa anew in order to gain Influence, and the most important thing of all: Wigs.
Game Art, the Portuguese Azulejo, and the Wigs
All the art Ian O’Toole created for Lisboa is based on murals of glazed Portuguese tiles, as the art form had evolved by the 17th Century. Even today, you can find these murals not only in many palaces, churches, and Noble houses, but also in middle-class homes. Mass production of these tiles began in the 18th Century, partly due to increased demand in Portugal, but also from large orders that started coming in from the Portuguese colony, Brazil. After the earthquake, they became trendy, and often depicted historical situations, framed by decorative patterns — all of this done predominantly in blue and white. The Portuguese name for these tiles is Azulejos Portugueses.
A more ubiquitous trendy commodity from that time was the wig. The following excerpt explains why wigs were chosen as the “victory points” in this game:
“With wigs being the universal male consumer product of the 1700s, and everyone from shopkeeper to king wearing one, men were spoiled for choice. While a shop boy might only be able to afford one wig, and thus had to choose wisely and for durability, those of the one percent of the population, the Nobleman and the wealthy citizens, could afford to own dozens of wigs…”
— From ‘The Wig Business was Big Business in 18th Century’ by Lucinda Brant
Components
- 1 Gameboard
- 1 Rulebook + 1 Player Aid book + Solo rules
- 4 Player boards
- 68 Goods tokens: 17 Gold, 17 Cloths, 17 Books, 17 Tools
- 55 Real coins: 30 of 1 Real, 20 of 5 Réis, and 5 of 10 Réis
- 20 Plans (4 of them are Starting Plans with a blue back)
- 16 double-sided Public Buildings (Green Architect side / Blue Architect side)
- 22 City tiles (large)
- 5 small City tiles
- 4 Scoring tiles
- 12 Royal Favor tiles from 3 Nobles (Manuel, Marquis, King)
- 37 Clergy tiles and 1 Cardinal meeple
- 82 Political cards in 4 decks
- 12 Ship cards in 4 colors
- 70 Decree cards
- 63 Rubble cubes in 3 colors (Earthquake – brown, Fire – red, Tsunami – blue)
- 1 Treasury marker
- 4 Price markers in 4 colors
- 8 Discs in 4 player colors
- 20 Rubble Set markers in player colors
- 4 Courtier meeples in player colors (Big meeples)
- 32 Official meeples in player colors (Smaller meeples)
- 32 wooden houses in player colors
- 1 Starting Player marker
- 2 Cloth bags: Clergy Tile bag and Rubble bag
Credits & Acknowledgments
Game Design: Vital Lacerda
Illustrations: Ian O’Toole
Head of development: Paul Incao
Lead developers: Julián Pombo and Nils Urdahl
Graphic Design & 3D Illustrations: Ian O’Toole
Rulebook & 3D Illustrations: Vital Lacerda
English Rules Editing: Nathan Morse
Official Rules Video: Paul Grogan, Gaming Rules!
Proofreading: Ori Avtalion, Paul Grogan
Project Managers: Rick Soued & Alex Soued
Acknowledgments
Many thanks to all players who playtested Lisboa for the last 4 years and sent so many suggestions.
Main playtesters: Emanuel Diniz, Nuno Fonseca, Rafael Pires, Thomas Brygmann.
The Author wishes to warmly thank for playtesting and suggestions: Alexandre Bezerra, André Almeida, Brandon Kempf, Brian Frahm, Brian Tri, Carlos Paiva, Carolina Valença, Catarina Sarmento, Celine Gaudin, César Mendes, Clayton Ross, Chris Arnold, Chris Weiss, Cristina Antunes, Christophe Gaudin, Christopher Incao, David da Silva, Dave Moss, Derek Davis, Duarte Conceição, Eduardo Mendieta, Eisen Montalvo, Elsa Romão, Gary Perrin, Gonçalo Moura, Hugo Cabrita, Hugo Elias, Ian O’Toole, Jake Blomquist, Jason Grantz, João Monteiro, João Madeira, Jorge Blázquez, Jorge Deinos, Jorge Graça, Joze Reverente, Lars Helmersson, Luís Cóias, Luís Severino, Ori Avtalion, Patrick Morrison, Paulo Renato, Paulo Terça, Pedro Almeida, Pedro Branco, Pedro Freitas, Pedro Sampaio, Pedro Sequeira, Pete King, Piero Cabral, Mal King, Malte Frieg, Manny Rodriguez, Matthew Dennison, Matthew James Goodwin, Mitch Chiappalone, Nicola Bocchetta, Nikolas Co, Nicholas Hjelmberg, Rafael Duarte, Rafael Maia, Rafael Theunis, Ralph Anderson, Réjean Ducharme, Ricardo Almeida, Ricardo Gama, Ricardo Moita, Rob Arntz, Roel Vaneerdeweg, Rodrigo Levin, Ruben Rodrigues, Sandra Sarmento, Sandrina Fernandes, Sara Rodrigues, Sébastien Charbonneau, Shay Rickman, Sofia Passinhas, Stephen Roberts, Steve Raab, Tiago Ribeiro, The Dice Men Cometh (Mark, Garth & Leon), Vasco Almeida, Vitor Pires, Warren Adams.
A very special thanks to Julián Pombo and Nils Urdahl for the infinite playtesting hours on Tabletopia, incredible ideas, great development and friendship. To Ian O’Toole for the amazing art and graphic ideas, to Nathan Morse, for all the support, ideas, and many working hours on the rulebook, Ori for his eagle eye on catching issues in the rules, all of the BGG community for their suggestions and support, and finally to Paul Incao, who keeps following me on this adventure, with many great ideas, and for being available at every hour for developing. To Alex, Rick Soued, and the entire EGG team for believing in this game. Without all of these people this game would not have been possible.
All my love to my beautiful daughters Catarina and Inês and to my muse and greatest friend, my wife Sandra, for their patience, support, inspiration, and many hours of discussion on this game.
Setup
Initial Preparation
Put 1 Royal Favor tile of each character, per player, in the Rubble bag. Put all of the Clergy tiles in the Clergy Tile bag.
Player Board Setup
Each player chooses a color and takes the following:
- 1 player board.
- 1 Player Aid book.
- 5 Rubble Set markers (cubes).
- 8 wooden houses.
- 8 Officials (meeples).
- 1 Good tile of each type (gold, books, cloth, tools).
- 10 réis [HRA-ees] (singular form is “real” [hree-ALL] — e.g. 1 real, 2 réis).
- 2 Clergy tiles drawn at random from the Clergy Tile bag. Look at them and keep one; return the other to the bag.
- 1 random Royal Favor tile drawn from the Rubble bag.
- 1 random Starting Plan (the ones with the dark blue backs). Return the remaining Starting Plans to the box.
(Each of the components above has a proper place, face-up on your player board.)
Gameboard Setup
- Courtier meeple: 1 Courtier meeple per player goes in one of the Royal Court spaces.
- Wigs marker: Place on space 5 of the Wigs score track.
- Starting Player: The player who visited Lisboa most recently is the starting player, and takes the Starting Player marker. Play goes clockwise from this player.
- Influence disc: Put the first player’s Influence disc on space 4 of the Influence Track; the second player’s goes on space 5; third player, space 6; fourth player, space 7.
- Noble’s Office: Place 1 of your Officials in the office of the Marquis, the middle character (does not matter which space).
- In a 2-player game: Place 1 Official from an unused color in any space of each of the three Nobles’ offices. They will remain there all game and count as opponents’ meeples.
Public Buildings
- The Public Buildings are blue on one side, green on the other. Flip all 16 Public Buildings blue-side-up, then shuffle them. Split the stack into two stacks of 8, and flip one stack green-side-up. Place each stack just off the board beside the plan space of the same-color architect.
- Move the top tile of each architect’s Public Building stack into the architect’s plan space. This way, players can always see both the current and the next Public Building available.
Plans
- Separate the Plan tiles into two face-up stacks, based on which architect is depicted: green or blue. Sort each stack by the number of officials depicted, such that the fewest officials are on top, and the most are on bottom. Place each stack on the appropriate space.
Stores
- Place the 4 Price markers in the spaces marked with the goods’ colors on the market track.
- Place one City tile on each space (yellow, pink, brown, blue, small blue) on the board to form the City Building display. Leave the remaining tiles in stacks near the display.
- Shuffle the 4 Scoring tiles depicting wigs, and place a random one in each space at the bottom of the downtown map.
- In a 2-player game, cover row E with the 2-player overlay.
Church
- Draw 6 Clergy tiles from the Clergy Tile bag, and place them face-up (wigs-side-down) on the dark spaces of the Church track.
- Place the Cardinal meeple on the space of the Church track with the Influence symbol (envelope).
Other Supplies
- Dump the remaining Royal Favor tiles from the Rubble bag, and stack the tiles for each character on the space on that character’s portrait.
- Place the big Treasury marker cube on space 3 of the Treasury track.
- Place all the goods and all money next to the gameboard to form the general supply and the Royal Treasury.
Card Setup
- Separate the Political cards into decks by color. Shuffle each deck and set them aside for now.
- Deal 5 cards to each player from the blue deck (1755–1757) and return the remaining cards to the box. (Experienced players may draft starting hands: keep 2, pass 3 left; keep 1, pass 2 left; keep 1, pass last left.)
- Distribute all cards from the red deck (1758–1762) face-down in the Event display, separated by type (card back) on their respective spaces; this will make 4 different decks of 5 unique cards each. Then flip the top card of each deck face-up.
- Ship cards: There are 3 copies of each Ship card. With 4 players, include 3 of each; with 3 players, include 2 of each; with 2 players, include 1 of each. Return remaining copies to the box.
- Stack the blue Ship cards atop the red Ship cards and place the stack face-up in the shipyard. Set the others aside for now.
- Shuffle the Decree deck and place it face-down next to the gameboard.
- Lay out the top 8 cards of the Decree deck to form a face-up display next to the gameboard. In a 2-player game, immediately return and replace any Decree cards showing the 2-player restriction symbol.
Note: Goods and réis are not limited by the components; simply use a substitute if they run out.
Simulate the Earthquake
The brown cubes represent destruction by the earthquake, the red cubes represent destruction from the 3 days of fires, and the blue cubes represent the destruction from the tsunami. Place all Rubble cubes in the Rubble bag.
- Place a random Rubble cube from the bag in each space at the bottom of the columns of the Downtown map, and at the right end of the rows (in a 2-player game, skip row E).
- Place 2 random Rubble cubes in each Public Building Site around the three edges of Downtown (in a 2-player game, skip row E); these represent neighboring sites.
- Place 6 random Rubble cubes in the Rubble pile next to the Rubble values (in a 2-player game, return the remaining Rubble cubes to the box).
Game Concepts & Turn Overview
Game Concept
You will be working with the King, D. José I, with Manuel da Maia, the royal builder, and the Marquis de Pombal, the prime minister, to reconstruct a new Lisboa, and develop its economy. You need to build stores downtown to produce goods, and will earn wigs once appropriate Public Buildings are opened to drive traffic to your stores. In order to open Public Buildings, you will need Plans from one of the two architects, and enough state officials to staff the building. You will need Influence to convince the nobles to help you complete these tasks via Noble actions, but you could also trade with them, offering goods in exchange for State actions. You can also meet with the Cardinal to acquire Clergy tiles, which give you permanent powers. Last, but by no means the least, you can persuade the Marquis to make decrees that favor you, granting you more wigs at the end of the game.
Gameplay Overview
A game of Lisboa is divided into 2 time periods, each of which spans a variable number of rounds.
On your turn, you will play one of the five Political cards in your hand to perform one of the four available actions or to get 1 gold; then you will take a new card into your hand from the Political card display. Finally, the turn passes to the player on your left.
When a player manages to complete 2 sets (brown, red, blue) of rubble, or 3 decks of Political cards are exhausted (whichever comes first), the first time period ends at the end of that player’s turn.
After the change of period is resolved, the game continues until the end of the game is triggered by a player having 4 complete sets of rubble, or by 3 decks of Political cards being exhausted again. At the end of the round in which that happens, players will take one more turn and then the final scoring occurs.
The player with the most wigs wins the game.
Political Cards
There are 2 types of Political Cards:
- Noble cards: Each Noble card depicts one of the 3 Nobles in the game, with an envelope at the top, representing Influence, and a reward / penalty on an arrow at the bottom. Noble cards represent a political event in which you engage with one of the Nobles. You can play this type of card in the Royal Court to visit the Noble, or into your Portfolio for the reward and for future Influence.
- Treasury cards: Each Treasury card has 2 treasury icons at the top (one with an arrow and another with a real with a plus sign), an action/reward icon in the middle, and a money/sales benefit at the bottom. Treasury cards represent a subsidy from the Royal Treasury. You can play this type of card in the Royal Court for the action/reward, or into your Portfolio to take a subsidy from the Royal Treasury and gain a permanent money/sales benefit.
Turn Sequence
On your turn, you will follow this sequence:
- Dock Your Ships
- Either Get 1 Gold OR Take an Action
- Take a Political Card
- End of Turn upkeep
Step 1: Dock Your Ships
If you have any Ships in your Portfolio that are “at sea” (i.e. the cargo hold is full, and thus the goods in the cargo hold are flipped face-down so they are all packed up in crates), return the goods from the cargo hold to the general supply. Your Ships at sea have returned from their voyage!
Step 2 Option A: Get 1 Gold
As an act of desperation, you can Get 1 Gold instead of taking an action, by performing the following steps:
- Discard a Political card from your hand (it is removed from the game).
- Take 1 gold from the general supply.
The Portfolio & Rubble Sets
Your Portfolio Structure
Adding Political cards to your Portfolio grows your Business and through it, the power and Influence you have on the Crown.
Your player board has 3 wide “slots” for cards at the top (docks), and 3 narrow slots at the bottom (your office). These 6 slots are called your Portfolio and each slot can hold only 1 card at a time.
- Top slots (docks): Reserved for Nobles and Ships, both of which give you cumulative Influence.
- Bottom slots (your office): For Treasury cards, which give you money discounts or sales benefits.
In the beginning of the game, you can only have 2 cards in your Portfolio; both could be in the top slots, both in the bottom slots, or one in each.
Playing a Card into Your Portfolio
When you add a card to your Portfolio, you tuck the arrow end of the card under your player board. Any benefit or penalty depicted on the portion of the card that goes under your board must be resolved before it is hidden.
Note: The gray arrow, with icon(s) on it, at the top or bottom of the cards shows you which end of the card you will tuck under your player board when you add it to your Portfolio.
Portfolio and Warehouse Capacities
- Warehouse Capacity: Your Warehouse can hold 2 goods of each kind. Each Rubble set you collect lets it hold 1 more good of each kind. (Excess goods are returned to the general stock.)
- Portfolio Capacity: Your Portfolio can have 2 cards + 1 card for each Rubble set you have collected.
- Over Capacity: If you want to play a card to your Portfolio when it is already at capacity, you must first discard a card from your Portfolio. If you discard a Ship to make room for a Noble, discard the goods on the dock beneath the Ship.
- Rubble Limit: If you don’t have a free space on your board to place a Rubble cube you take, just discard the cube. You can never have more than 5 Rubble cubes of one kind.
Rubble Sets for Reconstruction (Gaiola Pombalina)
Downtown buildings were built over the wrecks of the old destroyed buildings. Rubble was one of the most important construction materials in the rebuilding of Lisboa. Masonry walls with an embedded braced timber structure, known as the “Gaiola Pombalina”, were filled with rubble to make the new buildings durable and anti-seismic, while retaining the flame resistance of brick. To reflect this, collecting sets of rubble will increase your warehouse space and the size of your Portfolio, and also helps set the pace of the game.
By proportionate use of rubble from each of the three disasters, you can build new buildings from a wooden frame embedded in masonry, which is resistant to earthquake, fire, and tsunami. Building stores or opening Public Buildings will reward you with rubble cubes.
Each set of 1 earthquake rubble, 1 fire rubble, and 1 tsunami rubble you complete immediately increases your Portfolio size and warehouse space:
- Take the Rubble Set marker from the +1 space above the set to indicate that your Portfolio can hold 1 more card, and you can store 1 more of each type of good.
- Move the Rubble Set marker onto Marquis de Pombal’s portrait on the gameboard. You will be able to discard it during the Take a Decree action to take another card.
Designer’s Tip: After you play a card to your Portfolio, you must either Sell Goods or Trade with the Nobles, both of which require at least one good. Make sure that after getting the reward at the bottom of the card, you will have at least one good, or you cannot play the card into your Portfolio.
Playing Cards into Your Portfolio
Playing a Noble Card into Your Portfolio
Noble cards must be played in the top slots of your Portfolio. Perform the following steps:
- Receive the reward / pay the penalty depicted at the bottom of the card. If the icon has a red ‘X’ over it, it is a penalty, and you must pay the depicted item instead of receiving it. If you cannot pay the penalty, you can still play the card. Cards with penalties provide you more Influence than the other cards from the same deck.
- Select an empty slot at the top of your player board, or discard a card from one of the slots, then tuck the card under your player board, such that the reward/penalty icon on the bottom portion of the card is covered.
- Then you must perform either a Sell Goods action (Action 1) or a Trade with the Nobles action (Action 2).
Playing a Treasury Card into Your Portfolio
Treasury cards must be played in the bottom slots of your Portfolio. Perform the following steps:
- Immediately receive réis from the Royal Treasury equal to the Treasury value (indicated to the right of the Treasury marker).
- Move the Treasury marker down 1 space, because you have taken money from the Royal Treasury. The marker cannot go beyond the confines of its track.
- Select an empty slot at the bottom of your player board, or discard a card from one of the slots, then tuck the card under your player board, such that the treasury icons are covered.
- Then you must perform either a Sell Goods action (Action 1) or a Trade with the Nobles action (Action 2).
Treasury cards provide a permanent money/sales benefit at the bottom of the card, active while in your Portfolio and cumulative with other Treasury cards.
Influence
Influence Rules
One needs Influence in order to be accepted into the higher circles of the Crown. Influence is required to take some very important actions, and has great impact on many steps of the game.
Important Rules:
- Your Influence cannot exceed 10; any excess beyond that goes to waste.
- Each time you increase your Influence, if your Influence marker ends up on the Wig icon (space 10), you gain 1 wig — even if your Influence was already 10 before gaining Influence.
- Your Influence cannot go below 0; there is no penalty for having 0 Influence.
Gaining Influence
When you gain Influence, you always earn the total Influence depicted at the tops of the Noble and Ship cards in your Portfolio (cards in the top row). Indicate this by moving your Influence marker rightward on the Influence track.
Ways of Gaining Influence:
- When you Build a Ship (Action 2 / Build Ship).
- When Church Scoring occurs.
- As a reward on a card, building space, or clergy tile.
Spending Influence
There are only 2 ways of spending Influence in the game:
- Visiting a Noble (or Following a Visit).
- Spending Influence instead of Réis: For each real you wish to provide by spending Influence, move your Influence marker leftward on the Influence track until it reaches the next space depicting a real. While your Influence is at 0, you cannot generate any more réis this way.
Actions: Playing to Your Portfolio
Playing to Your Portfolio (Actions 1 & 2)
You play a card into your Portfolio in order to take Action 1 (Sell Goods) or Action 2 (Trade with the Nobles).
Action 1: Sell Goods
When you take the Sell Goods action, you can sell one or more goods. Perform the following steps for each good you sell:
- Choose a docked Ship: A Ship card in any player’s Portfolio that still has space for goods.
- Move a Good token (Gold, Books, Cloth, or Tools) from your warehouses onto an empty dock space below the Ship.
- Receive money from the Royal Treasury equal to the Good’s current market price, plus any modifier depicted on the Ship card.
You can sell any number of goods to any Ships (up to capacity). Goods sold to a Ship remain face-up on the dock below the Ship until the Ship is full and sails away.
Setting Sail:
If the number of goods on the dock spaces below the Ship is equal to the Ship’s hull size, the Ship immediately “sets sail”, and the Ship’s owner does the following:
- Flip the goods tokens on the dock spaces below the Ship card face-down to show them packed up in crates.
- Earn 1 wig per newly packed crate, as indicated on the crates.
Remember: Your Ships that are out to sea will return to dock with empty cargo holds at the beginning of your turn (Dock Your Ships step).
Action 2: Trade with Nobles
When you take the Trade with Nobles action, you trade 1 or 2 goods. Perform the following steps for each good you trade:
- Select one of the six State actions that is not currently covered with a good.
- Identify which Noble performs this State action, then take 1 of the type of good this Noble seeks from your warehouses, and cover the action:
- Manuel da Maia (the Builder): accepts tools or gold.
- Marquis de Pombal (the Minister): accepts books or gold.
- Rei D. José I (the King): accepts cloth or gold.
- Perform the State action.
Note: You cannot take the same State action twice in a single turn: Covering the first action with a good prevents it from being selected for the second action.
State Actions: Manuel da Maia (The Builder)
Recruit State Officials
Move up to 2 State Officials of your color from your player board to 2 different Nobles’ offices. If an office has no free space for your Official, determine which color has the most State Official meeples in that office, and move one of those to the plaza below the office. In a tie, move one of each tied color.
Acquire a Plan
Take the top Plan from either architect’s stack (green or blue) and place it on the proper space on your player board, architect-side-up. You can have any number of Plans from both architects.
State Actions: Marquis de Pombal (The Minister)
Build a Ship
- Pay different goods: Pay a number of different goods equal to the hull size of the Ship visible in the shipyard (or the difference in size if replacing a Ship in your Portfolio). (Note: When you replace a Ship, leave the old ship’s cargo where it is; it is automatically loaded onto the new ship.)
- Place in Portfolio: Select an empty slot at the top of your player board (or discard a card from one of the slots), then tuck the new card under your board, covering the Treasury and Influence icons at the bottom.
- Adjust Treasury: Move the Treasury marker up 1 space.
- Earn Influence: Earn the total Influence depicted at the tops of the Noble and Ship cards in your Portfolio (including the new Ship).
Produce Goods
- From each store you own, take 1 good of its business type (the street it is facing) from the general supply. If you receive more goods than you can store, return the excess to the supply.
- Each type of good produced drops 1 real in price. Adjust its market price marker accordingly.
Note: The price drops for each type of good produced, not for each good produced. If your warehouse was full before producing so you received 0 goods of that type, that type is considered not produced, so its price does not drop. Prices never increase.
State Actions: Rei D. José I (The King)
Meet the Cardinal
- Advance the Cardinal meeple clockwise 1 or 2 spaces on the Clergy track around the Church (his spaces are the gaps between the Clergy tiles).
- Take either one of the two Clergy tiles adjacent to the Cardinal, and place it face-up on an empty Clergy space on your player board. (Maximum 4 Clergy tiles; if you already have 4, you cannot take this action!)
- Check if the Cardinal landed on or passed over an icon (Treasury icon or Influence icon).
Cardinal Movement icons: King’s action has 2 arrows (moves 1 or 2 spaces). Single-arrow icons on cards or land rewards move the Cardinal only 1 space.
Church Track Icons and Church Scoring
- Church Treasury Icon: If the Cardinal landed on or passed over the Treasury icon, move the Treasury marker up 1 space.
- Church Influence Icon: If the Cardinal landed on or passed over the Influence icon, Church Scoring occurs at the end of the active player’s turn. (Lay the Cardinal down as a reminder; stand him up after scoring.)
Church Scoring Procedure
Each player, starting with the player who moved the Cardinal, and going clockwise, decides whether to gain Influence:
- Discard 1 or more of your Clergy tiles.
- Earn the wigs depicted on their backs.
- Gain Influence (total from the top row of your Portfolio).
Note: If you have no Clergy tiles, you cannot participate in Church Scoring, and do not earn Influence.
Get a Royal Favor
Take any type of Royal Favor tile (Manuel, Marquis, or King) that you do not already have and place it on the appropriate space on your player board. (You can have only 1 Royal Favor tile for each Noble at any given time.)
Actions: Playing to the Royal Court
Playing to the Royal Court (Actions 3 & 4)
Play a card from your hand into the Royal Court in order to take Action 3 (Visit a Noble) or Action 4 (Sponsor an Event).
Action 3: Visit a Noble
To Visit a Noble, perform the following steps:
- Play a Noble card from your hand to the Royal Court on the gameboard.
- Place your Courtier meeple atop the card as a reminder that it is your turn.
- Spend Influence to Visit the Noble.
- Optionally, take one State action: You may take either one of this Noble’s State actions without paying a good.
- Take the Noble action: You must take the Noble action. (Remember: If you cannot fully perform the Noble action, you are not allowed to visit that Noble at all.)
Follow a Visit
After you finish your Visit, each of your opponents (going clockwise) who has a Royal Favor tile corresponding to the visited Noble may Follow that Visit:
- Return their Royal Favor tile to its stack.
- Spend Influence to Visit the Noble.
- Take one of the three actions this Noble offers: either the Noble action, or one of the two State actions (without paying a good).
After each opponent has had a chance to Follow, return your Courtier meeple to the edge of the Royal Court and discard the Noble card.
Spending Influence to Visit a Noble
The amount of Influence you must spend to Visit or Follow is:
Influence cost = (Influence value to the left of the Treasury marker) + (Number of State Officials in that Noble’s office belonging to other players)
- Do not count officials in the plaza. In a 2-player game, neutral officials count as opponents’ officials.
- If the total is less than 0, treat it as 0.
- If (and only if) you do not have enough Influence, you can pay the difference in wigs: 1 wig = 1 Influence.
The Noble Actions
Manuel da Maia (The Builder): Build a Store
- Select an available City tile from the display. The space indicates the type of business and the street its entrance (notch) must face.
- Select an empty land space touching the street that matches the business color.
- Get the reward depicted on the land space, then place the City tile on the space with its entrance facing the matching street.
- Take 1 Rubble cube from either the row or column of that space (if available), and place it on the leftmost matching empty space on your player board.
- Pay for the land with réis.
- Place a wooden house from your player board onto the City tile, near the entrance.
- Earn wigs for building the store.
Calculating Land Price
Land Price = (Treasury value to right of Treasury marker) + (Total cost of all remaining Rubble cubes in that column and row)
- Earthquake (brown) rubble costs 3 réis.
- Fire (red) rubble costs 2 réis.
- Tsunami (blue) rubble costs 1 real.
(Rubble cubes on Public Building spaces are not counted.)
Choosing Which Wooden House to Build
There are 3 groups of wooden houses on your player board. Always take the bottommost house in whichever group you choose. Unlocked abilities remain until superseded by the next ability in that group.
Left Group (2 wooden houses):
- No new ability.
- Allows you to spend réis instead of Influence (1 real = 1 Influence) to Visit or Follow a Visit to a Noble.
Middle Group (3 wooden houses):
- When you build a Ship, pay 1 fewer good.
- No new ability (#1 remains in effect).
- When you build a Ship, don’t pay any goods (free Ship).
Right Group (3 wooden houses):
- When you Produce Goods, take 1 additional good of a single type produced (if warehouse space permits).
- No new ability (#1 remains in effect).
- When you Produce Goods, take 1 additional good of each type produced (if warehouse space permits).
Earning Wigs for Your New Store
Relevant Public Buildings are those matching the store’s business color and situated either in the same row or on the same street that the store faces (maximum 3: north, west, east).
Wigs Earned = (Number on the Scoring tile at the bottom of the store’s column) × (Number of relevant Public Buildings)
Marquis de Pombal (The Minister): Take a Decree
Select one of the Decree cards from the display and place it face-up next to your player board. Decrees earn wigs at end of game if criteria are met.
- If you have a Rubble Set marker on the Marquis portrait, you may discard it to take an extra decree. (Max 1 Rubble Set marker discarded per turn.)
- Decree cards are always face-up and visible. Only you score your Decrees. No limit to the number of Decrees you may own.
Rei D. José I (The King): Open a Public Building
To Open a Public Building, you must have a Plan matching the architect of the available Public Building, and enough State Officials in Nobles’ offices/plazas (or réis to hire them).
- Select a Public Construction Site at the west, north, or east side of downtown. (North side must match the street color.)
- Take both Rubble cubes from the space onto your player board, then take the reward depicted on the space.
- Select and reveal an incomplete Plan matching the architect, and place the available Public Building tile on the space.
- Return State Officials: Return the number of State Officials indicated on the Plan from Nobles’ offices/plazas to your board. If short, hire the rest.
- Flip the used Plan to its Completed Plans space.
- Score Stores:
- East / West Public Building: Every store in the same row earns wigs if it faces a street matching either color of the Public Building.
- North Public Building: Every store facing its street earns wigs.
- Wigs earned per matching store = the large number on the Scoring tile at the bottom of that store’s column (regardless of who opened the building).
- Refill: Move the top tile from that architect’s stack into the empty space.
Hiring State Officials
If (and only if) you do not have enough State Officials available among the Nobles’ offices and plazas, you may hire the rest. The price for each new hire equals the current Treasury value (to the right of the Treasury marker).
Action 4: Sponsor an Event
To Sponsor an Event depicted on a Treasury card in your hand:
- Play the Treasury card from your hand to the Royal Court.
- Pay réis equal to the current Treasury value.
- Perform the action / receive the reward depicted in the center of the Treasury card. (Discard the card at end of turn.)
End of Turn & Period Transition
Take a Political Card
To finish your turn, take any face-up Political card from the Political card display. This brings your hand back up to 5 cards.
Decks from left to right: Manuel da Maia, Marquis de Pombal, King D. José I, and Treasury deck.
End of Turn Upkeep
- Reveal a New Political Card: Flip the top card of the deck face-up to replace the card taken.
- Refill City Tile Display: Refill any empty spaces.
- Refill Church Track: Refill empty Clergy tile spaces from the bag.
- Refill Decrees Display: Refill up to 8 cards from the deck.
- Remove Goods from State Actions: Return traded goods on State action banners to the supply.
End of Period Transition
As soon as anyone completes their 2nd set of rubble OR 3 Political card decks in the display are empty, finish the current turn, discard all remaining cards in the display, then perform the following steps:
- Rubble Scoring: Each player receives 3 wigs for each completed rubble set on their board.
- Shipyard Refill: Discard remaining Ship cards. Replace with purple size-3 and brown size-4 Ship cards (purple size-3 on top).
- Discard Cards for Rewards: In clockwise order starting with the player who triggered the end of the period, each player may discard any number of cards from hand. Each player earns the reward at the bottom of one of each type of Noble card discarded (penalties are ignored; Treasury cards provide no reward).
- Draw New Hands: Each player draws up to a 5-card hand from the purple Political card deck (1763–1768). Return remaining cards to the box.
- Prepare Period 2 Deck: Prepare the brown Political card deck (1769–1777) in the display spaces (4 decks of 5 unique cards each, top card face-up).
If needed, refill Church track and Decrees display. Continue play from the next player in turn order.
End of Game & Final Scoring
End of the Game
As soon as anyone completes 4 sets of Rubble OR once again 3 Political card decks in the display are empty, finish the current round so all players have taken the same number of turns. Then, play one final round before endgame scoring.
Endgame Scoring
To your total wigs on the score track, add the following:
- Ships: Wigs equal to the sum of the hull sizes of the Ships in your Portfolio.
- Rubble Sets: 3 Wigs for each completed set of Rubble cubes.
- Stores Majority: Wigs for having more stores of each type than opponents:
Stores The most 2nd-most 3rd-most Gold 3 wigs 2 wigs 1 wig Tool 6 wigs 3 wigs 1 wig Book 9 wigs 6 wigs 3 wigs Cloth 9 wigs 6 wigs 3 wigs (In a 2-player game, count only ‘The most’ and ‘3rd-most’. If you have 0 stores of a type, you earn 0 wigs. Ties: add tied places and divide points rounded down.)
- Money & Influence: Cash out Influence for réis (using your Influence track value), then earn 1 Wig for each 5 réis (rounded down).
- Decrees: Wigs from all fulfilled Decree cards.
- State Officials in Public Buildings: Count total Officials depicted on completed Plans:
Game The most 2nd-most 3rd-most 3–4 players 15 wigs 10 wigs 5 wigs 2 players 15 wigs 5 wigs — (Must have at least 1 completed Plan. Ties: add tied places and divide points rounded down.)
- Royal Favors: 2 wigs for each Royal Favor tile remaining on your board.
Tiebreakers
- Most sets of rubble.
- Most stores.
- Most completed Plans.
- Most money.
If still tied, tied players share the victory!