
Reavers of Midgard
2019
Lead a Viking crew, recruit elite Reavers, and build your engine through worker placement, set collection, and dice combat.
120
minutes
2 - 4
player(s)
14+
Medium


About this board game
Reavers of Midgard is a single worker placement game for 2–4 players, with games lasting about 120 minutes. Set in the Champions of Midgard universe, it combines set collection, dice combat, and engine building with a Viking campaign for glory.
In Champions of Midgard, the goal was to become Jarl by defending a humble port town from trolls, draugr, and epic monsters. Now the battle moves beyond those shores. In Reavers of Midgard, players take their crews on the offensive, raiding nearby villages for riches, sacking well-fortified castles, and confronting both humans and monsters on the open seas.
Your ship needs a rowdy crew of Vikings and enough food to keep them happy throughout the voyage. You must also recruit elite warriors known as the Reavers, powerful additions that can shape how your crew develops and performs in battle.
- Make a Reaver your ship’s leader to gain a one-time bonus and make your warriors more versatile in combat.
- Use Reavers to rally additional warriors, filling your ship with the fighters best suited to different situations.
- Put Reavers to work specializing your crew, earning a bonus whenever that crew sails into battle.
Across six rounds, worker placement helps guide your preparations and actions while set collection, combat dice, and an evolving engine support your quest for glory. Every part of your expedition, from recruiting warriors to gathering food and choosing your battles, contributes to the final score.
Reavers of Midgard expands the Champions of Midgard setting with an offensive Viking adventure focused on raids, naval battles, crew development, and the pursuit of glory. Whoever earns the most glory after six rounds wins.
Designer
Illustrator
/pic7182955.jpg)

Board Game Rules for
Reavers of Midgard
Game Description
In Reavers of Midgard, you are the master of your own longship with a small but loyal crew by your side. You set out to gain glory and become the most renowned reaver in all of Midgard. Recruit vikings to man your longship. Cast bones in order to glimpse your destiny. Slay giant sea monsters and battle against the draugr. Pillage castles and small villages, and force territories to pay tribute to you lest you decide to conquer their lands. In the end, will skalds tell the tale of your adventures? Or will your rivals surpass you and have their stories spun in the Halls of Valhalla?
2-4 Players • 60-120 Minutes
Objective
The goal of the game is to have the most Glory at the end of 6 rounds.
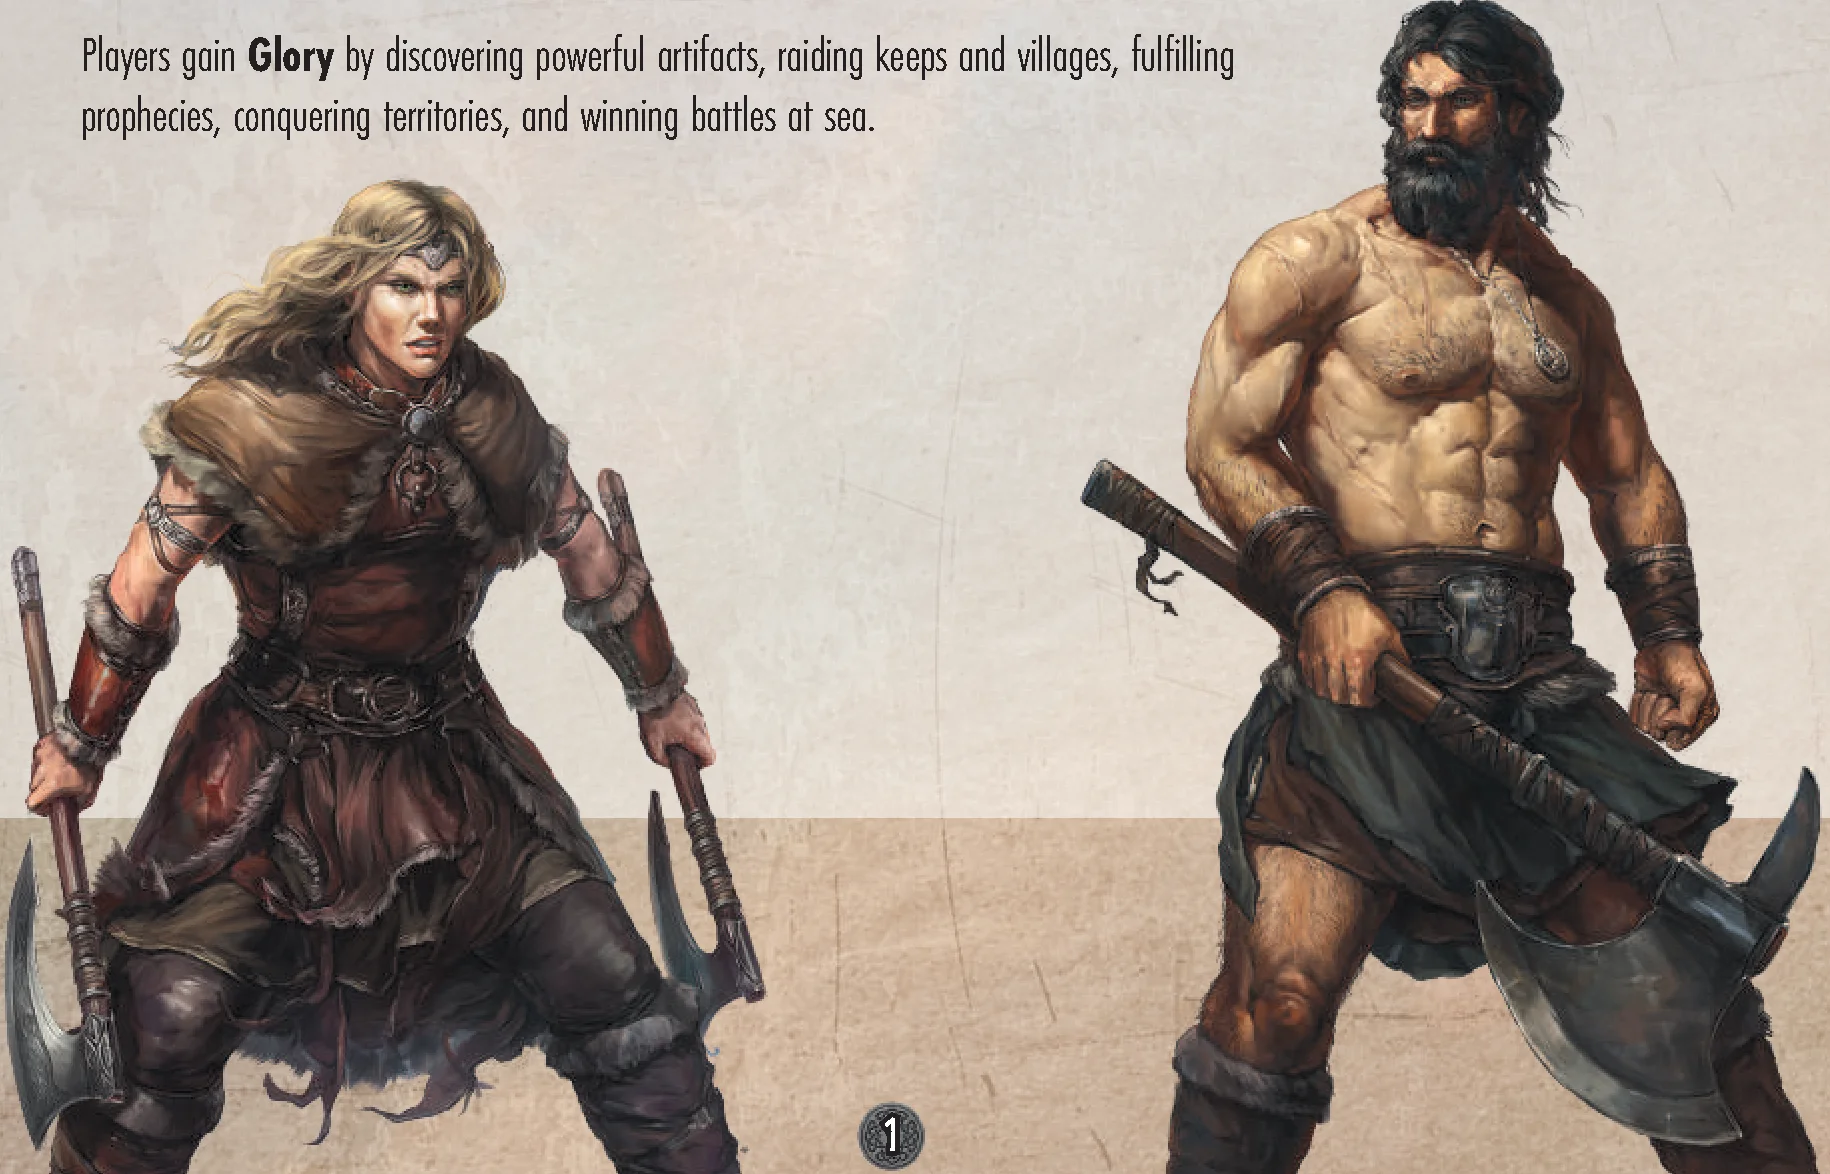
Players gain Glory by discovering powerful artifacts, raiding keeps and villages, fulfilling prophecies, conquering territories, and winning battles at sea.
Components List
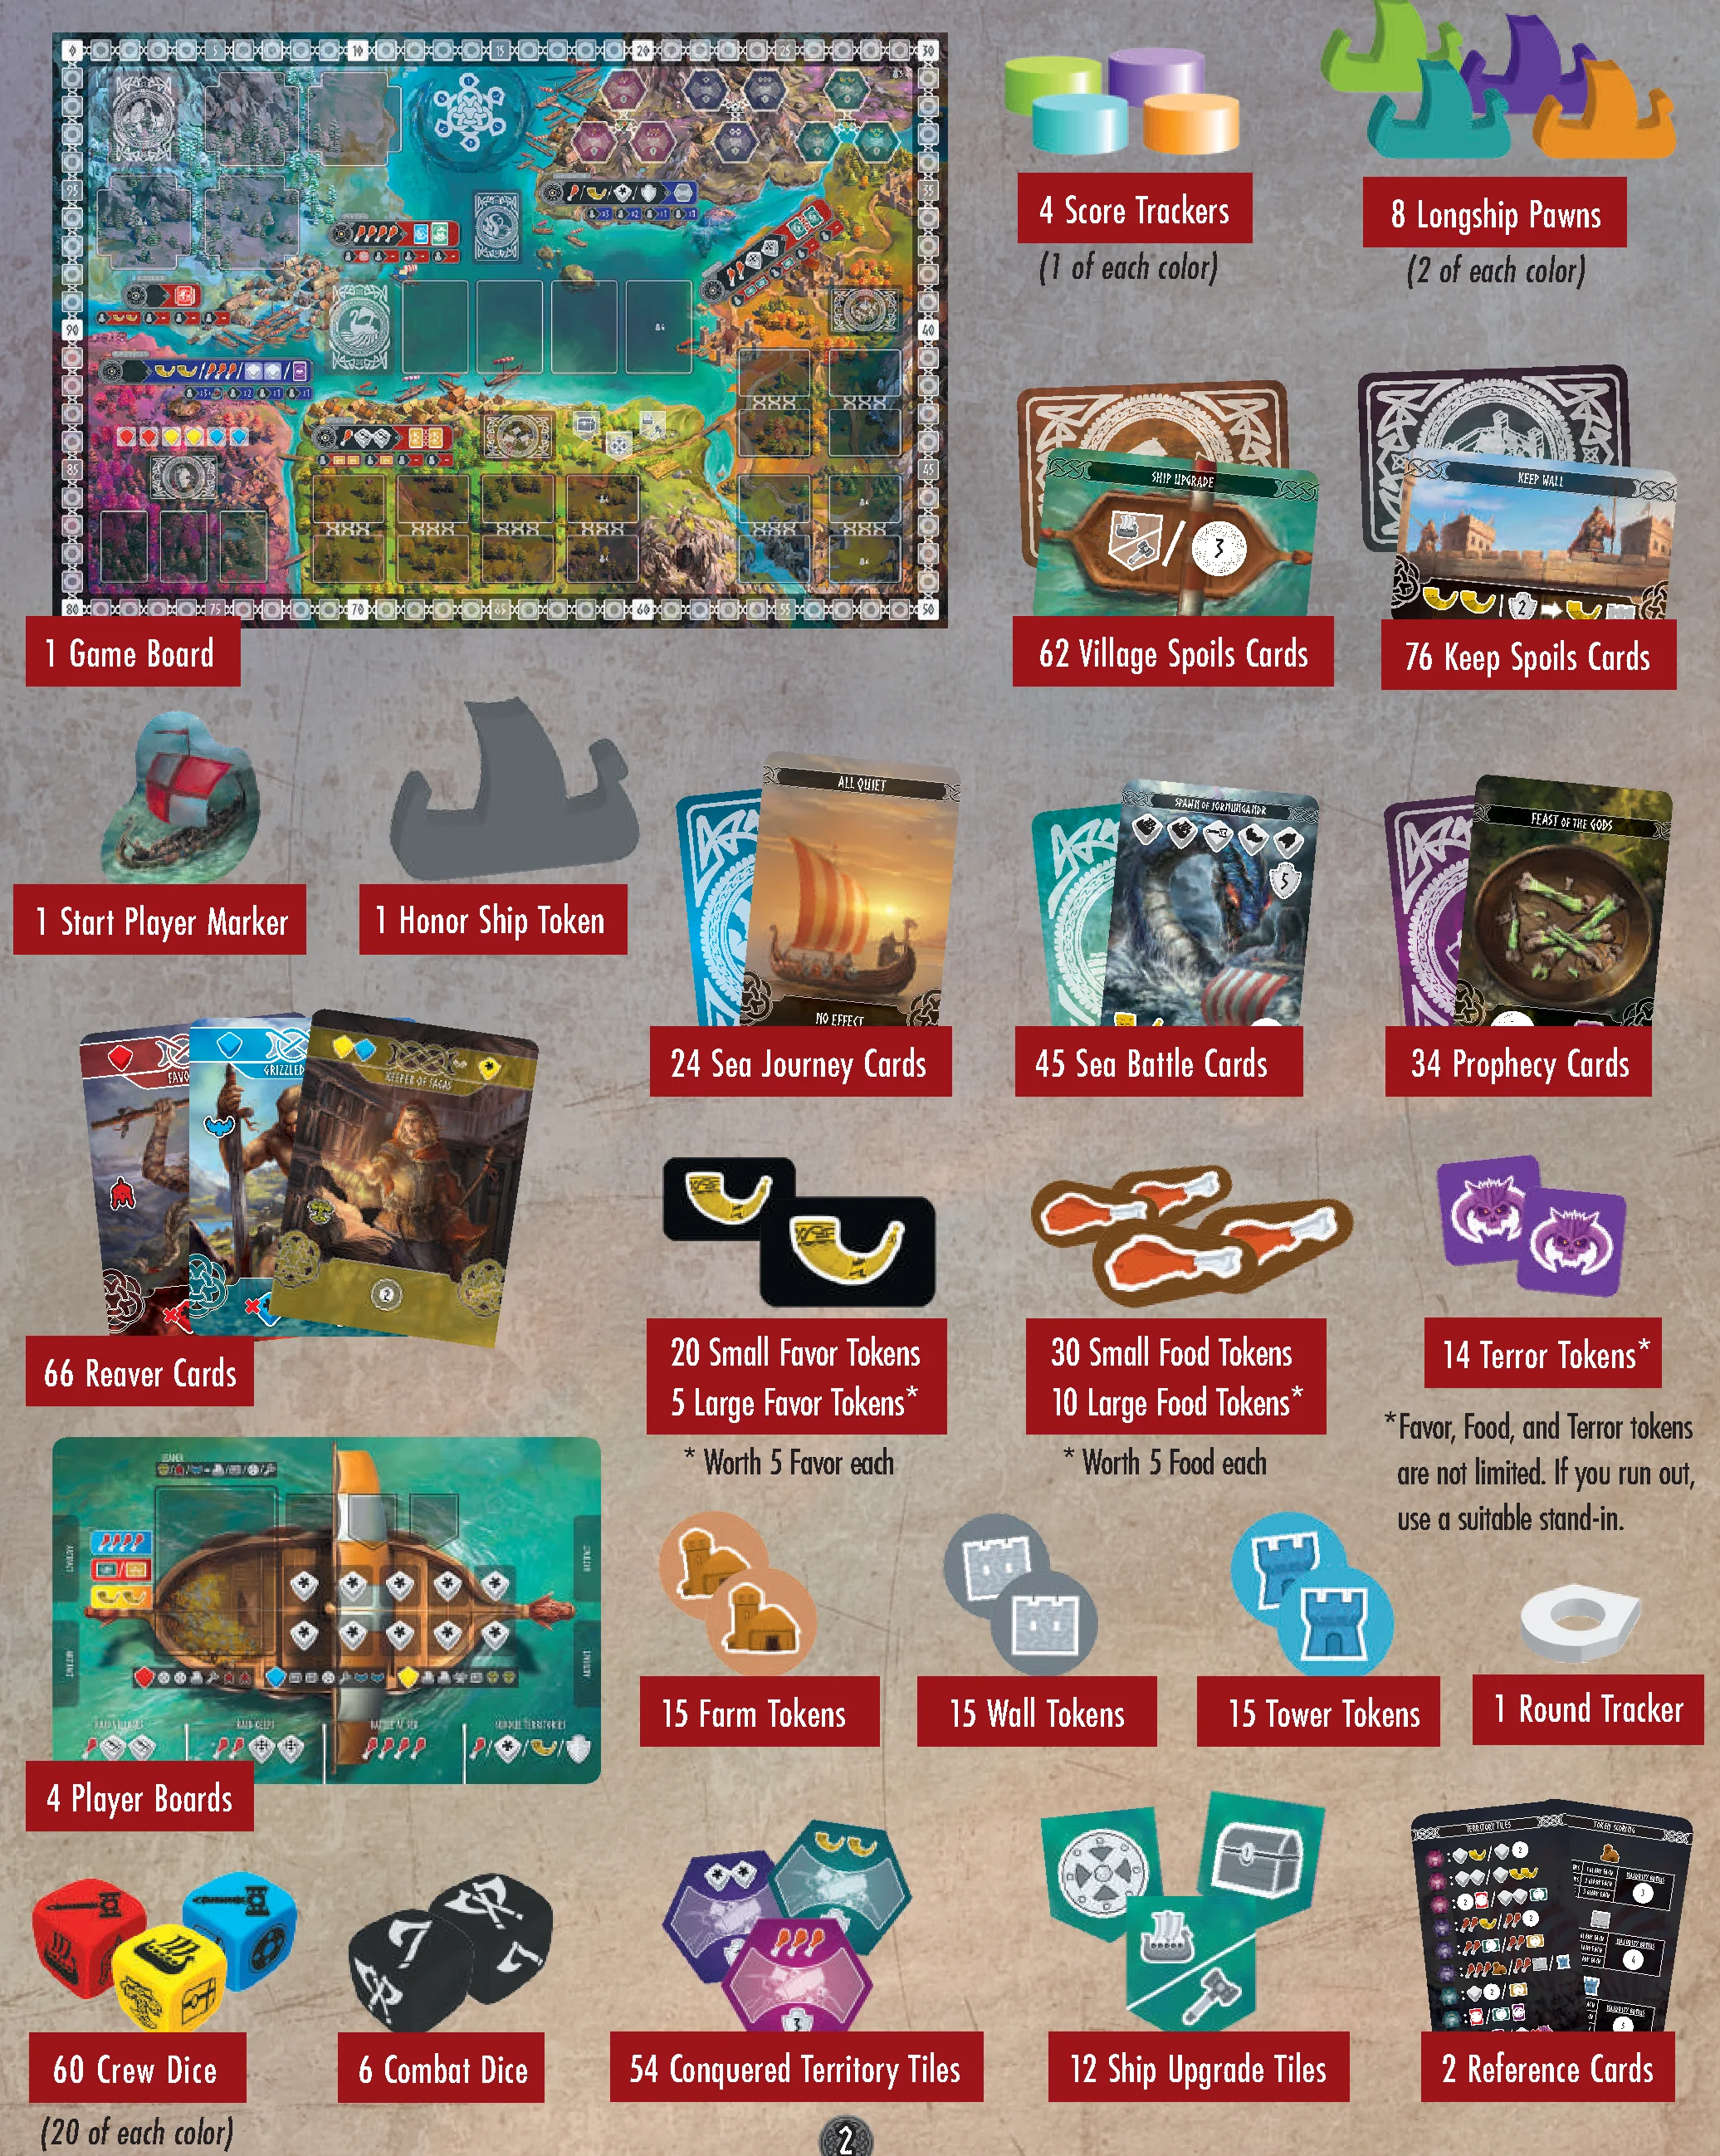
- 1 Game Board
- 4 Score Trackers (1 of each color)
- 8 Longship Pawns (2 of each color)
- 1 Start Player Marker
- 1 Honor Ship Token
- 62 Village Spoils Cards
- 76 Keep Spoils Cards
- 24 Sea Journey Cards
- 45 Sea Battle Cards
- 34 Prophecy Cards
- 66 Reaver Cards
- 20 Small Favor Tokens, 5 Large Favor Tokens (Worth 5 Favor each)*
- 30 Small Food Tokens, 10 Large Food Tokens (Worth 5 Food each)*
- 14 Terror Tokens*
- 15 Farm Tokens
- 15 Wall Tokens
- 15 Tower Tokens
- 1 Round Tracker
- 4 Player Boards
- 54 Conquered Territory Tiles
- 12 Ship Upgrade Tiles
- 2 Reference Cards
- 60 Crew Dice (20 of each color)
- 6 Combat Dice
*Favor, Food, and Terror tokens are not limited. If you run out, use a suitable stand-in.
Game Setup
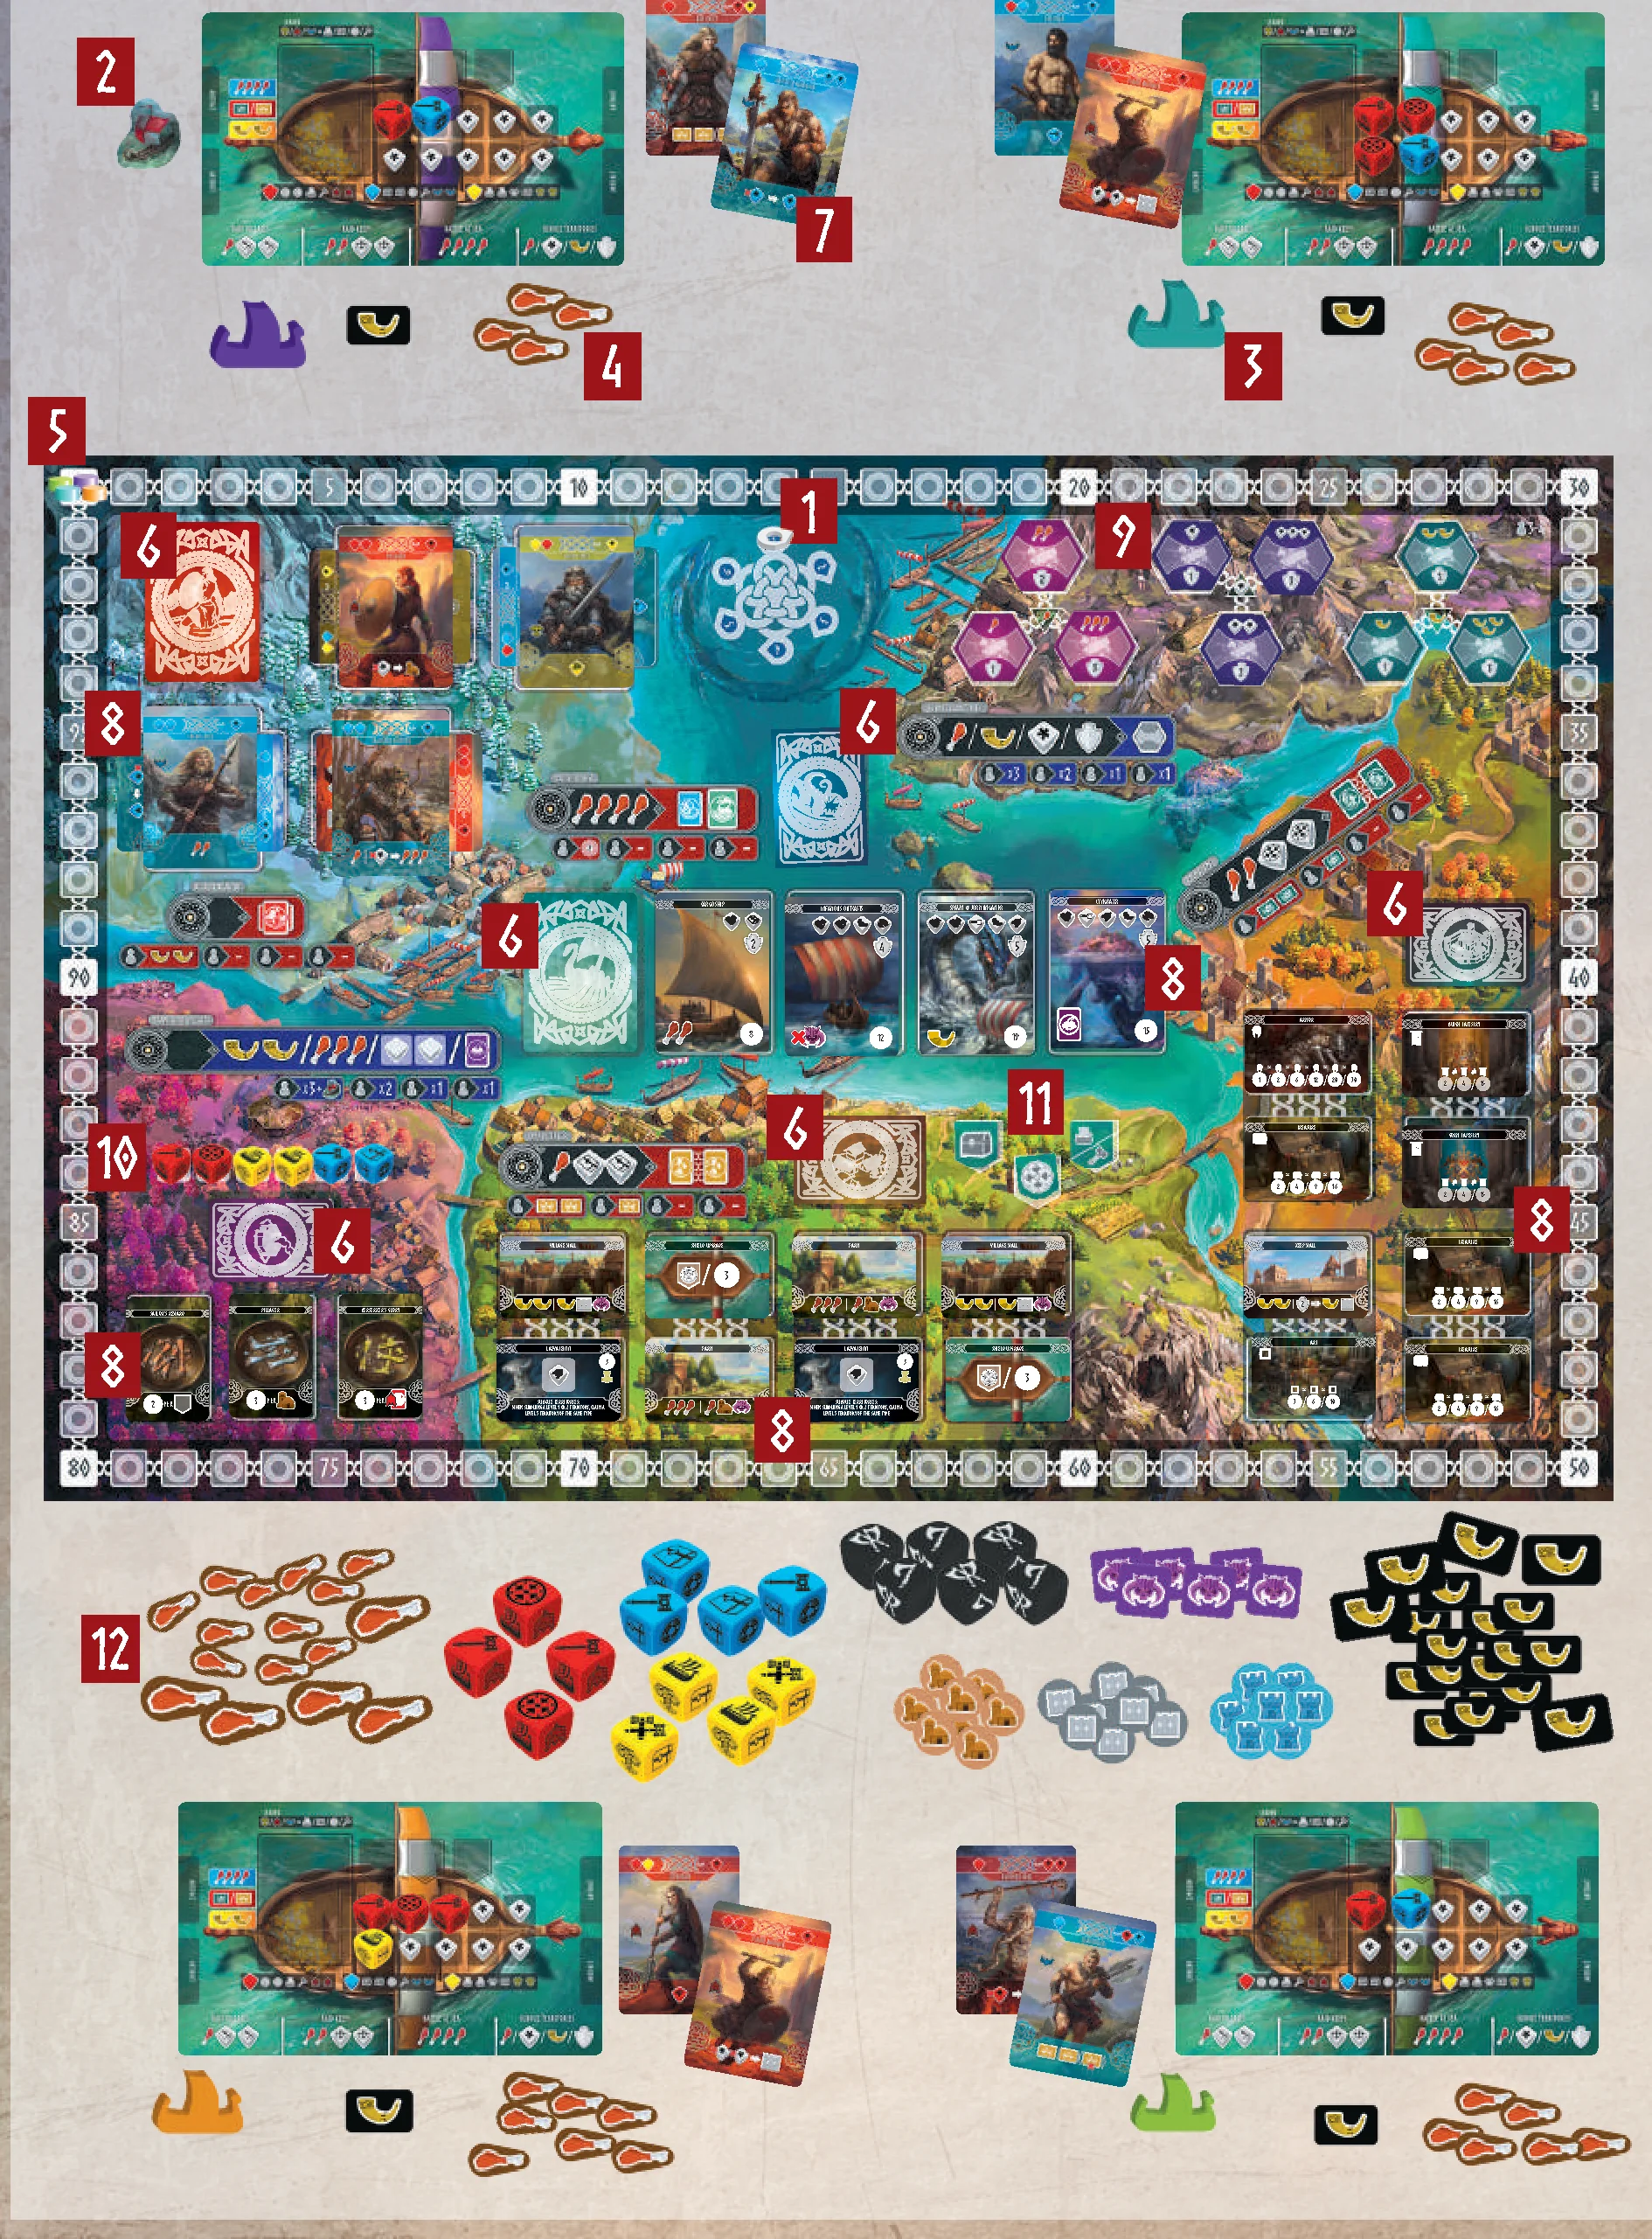
- Set the Game Board in the middle of the playing area, and place the Round Tracker on the space labeled 1. (The displayed board is for 3-4 players. Use the reverse side for a 2-player game.)
- Give the Start Player marker to whomever most recently won glory in battle. (Alternatively, select a start player at random.) In a three-player game, also give the first player the Honor Ship token. The Honor Ship token functions as an extra Longship pawn for the player controlling it.
- Give each player:
- 1 Player Board
- 1 Longship pawn and 1 score tracker (In a two-player game, give each player 2 Longship pawns)
- 1 Favor token
- In clockwise order:
- The Start Player takes 4 Food tokens
- The second player takes 5 Food
- The third player takes 6 Food
- The fourth player takes 7 Food
- Each player places their score tracker at the 0 marker on the Glory track.
- Separate the Sea Journey, Sea Battle, Village Spoils, Keep Spoils, Reaver, and Prophecy cards. Shuffle each deck separately then place them on their corresponding spaces on the Game Board.
- Each player takes 2 Reaver cards from the deck. Players roll the dice indicated on the top left of each of these Reaver cards and place them on their Player Board. Then each player decides whether to Rally, Specialize, or Promote them according to the Recruit Reavers rules on page 7. (Read that section fully before beginning your first game.)
- At each Action Location, fill the spaces with cards according to the number of players (see page 5).
- Sort the Territory tiles by type and shuffle them. Then, place them on their corresponding spaces.
- Roll 2 of each color Crew dice, and place them in their corresponding spaces within the Trade with Villages Action Location.
- Place the Ship Upgrade tokens at the Raid Villages Action Location on their corresponding spaces.
- Place the Dice, Food, Favor, Terror, Wall, Farm, and Tower tokens in a supply accessible to all players.
Action Locations Setup
During initial Game Setup, and during each cleanup phase, set up each of the Action Locations as described below:
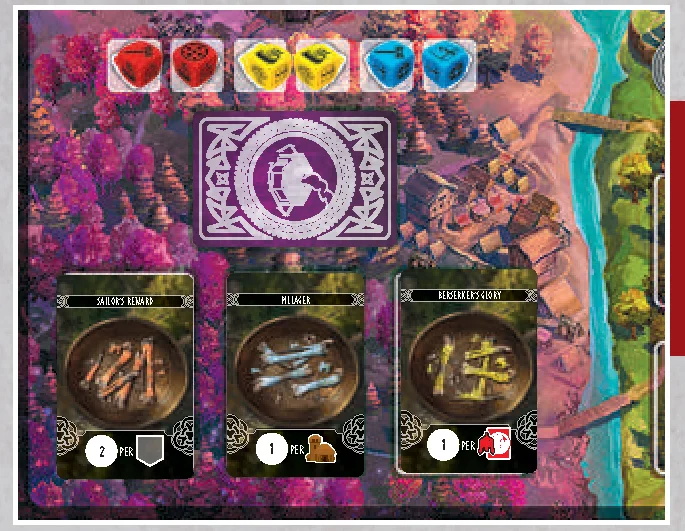
Trading with Villages: Place a Prophecy card face up in each of the card spaces. Then, roll and place two of each color Crew dice in the designated dice spaces.
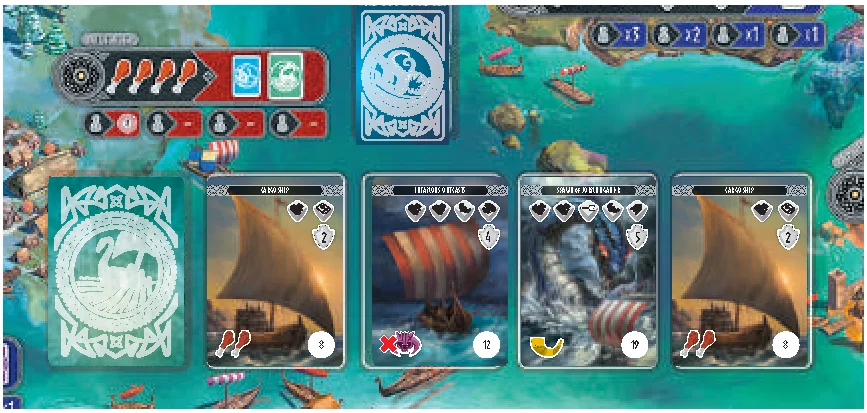
Sea Battle: Place Sea Battle cards face up in each of the card spaces according to the number of players.
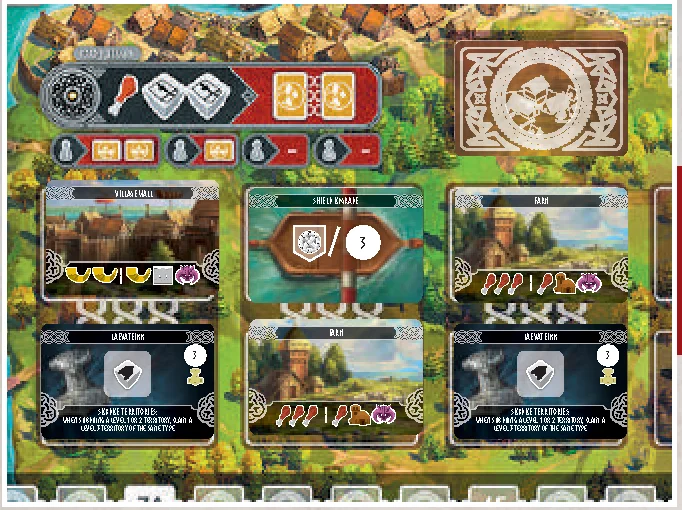
Raid Villages: Place Village Spoils cards face up in each of the card spaces according to the number of players.
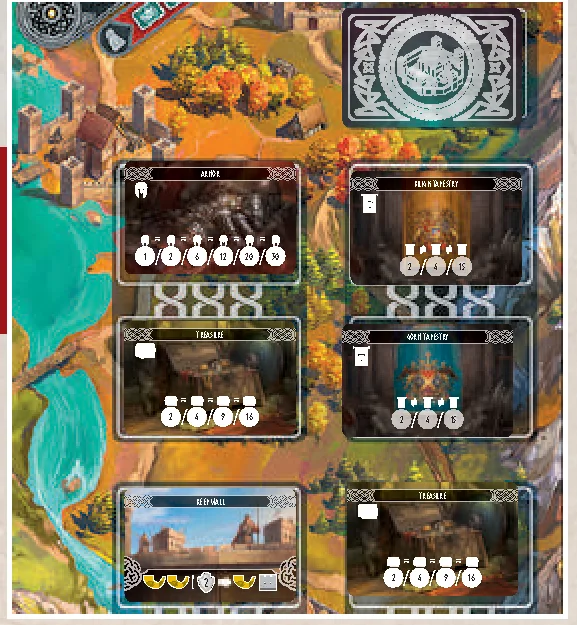
Raid Keeps: Place Keep Spoils cards face up in each of the card spaces according to the number of players.
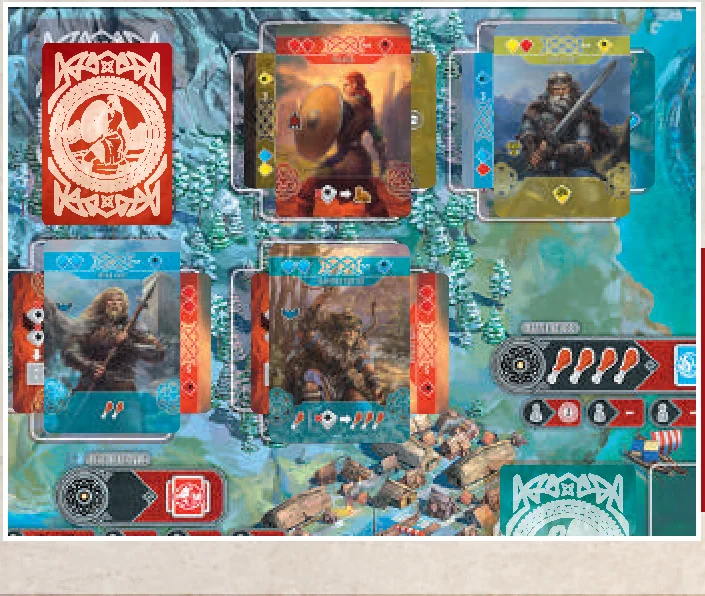
Recruit Reavers: Place Reaver cards face up in each of the card spaces according to the number of players. Each space is designed to hold one card vertically and one card horizontally so that all of the relevant information is visible.
Game Structure
Reavers of Midgard is played over six rounds during which you sail your longship to various locations throughout the land. You will lead your viking warriors as you lay siege to powerful castles and raid unsuspecting villages. The seas are full of danger. You will encounter other raiders, draugr, and maybe even a spawn of Jormungandr. Your crew will grow stronger as you outfit your ship with upgrades and powerful artifacts. Though the players will take turns choosing locations to raid, each will partake in the spoils.
Once the 6th round has ended, players will total their score in Glory. The player with the most Glory wins!
Playing a Round
Whoever has the Start Player marker places their Longship pawn on an Action Location. Then, each player immediately activates the effects on any Reaver cards they have specialized in that action (see Recruit Reavers on page 7).
After activating the effects of Reavers, each player may activate the effect of the Action Location selected. The player who selected the Action Location gets a powerful bonus. The other players get lesser bonuses. Most Action Locations have a cost to activate. Any player taking the action must pay the cost. Instead of paying the cost and taking the action a player may opt to Rest. After each player has resolved the effect of a selected Action Location, the next player clockwise places their Longship pawn on a different Action Location, repeating this process. The round ends once four Action Locations have been activated. (This means that in a 2-player game, each player will place two Longship pawns, alternately choosing Action Locations. In a 3-player game, each player will place a Longship pawn, one at a time, in clockwise order. Then, the player with the Honor Ship pawn places it to select an additional Action Location.) At the end of a round, players refresh all the Action Locations by discarding any remaining cards and refilling the empty spaces as shown on page 5.
Note: Players should place discarded cards face up on the bottom of their respective decks. If a deck runs out, the discarded cards should be shuffled to create a new deck. Note: Each Action Location may only be selected once per Round.

Turn Sequence
- A player places their Longship pawn on an Action Location.
- Each player activates the effects of Reaver cards in the corresponding Specialize slot from top to bottom (see Recruit Reavers on page 7).
- Beginning with the active player and continuing clockwise, each player must pay associated costs if they wish to execute the action. Alternatively, they may Rest (see Rest on page 7).
Players should activate their Reaver cards simultaneously. If any timing conflicts arise, resolve them in player order, beginning with the active player.
Note: The abilities of specialized Reaver cards are activated before a player decides whether to activate the Action Location or Rest.
Action Selection
There are two different kinds of Action Locations, indicated by the color of their banner:
- RED locations provide an effect and also an additional bonus depending on player order.
- BLUE locations provide an effect that may be repeated a certain number of times depending on player order.
In either case, the cost for the location is indicated in the BLACK section on the left side of the Action Location graphic. Players must discard the indicated resources to the general supply if they wish to activate the Action Location. (Alternatively, they may Rest.)
The effects of each Action Location are described in detail below.
Note: The bonuses that players receive are based on their proximity to the active player, not on the order of activation. Meaning if the player 1 seat clockwise from the active player chooses to not to pay the cost and participate in the effect of the Action Location, the next player to pay the cost does not get the second player bonus.
Additionally, the bonuses described below apply to the 3- and 4-player game. In a 2-player game, the second player receives the same bonus the fourth player would receive in a larger game. This is indicated graphically on the 2-player side of the game board.
Important Terms
- Rest: Whenever a player cannot (or chooses not to) pay the cost to activate an Action Location, they must Rest. When a player Rests, they may take either 2 Food from the supply or 1 Crew die from the supply in a color of their choice and place it on their Player Board on a side of their choice.
- Active Player: The player who is selecting an Action location. The “second,” “third,” and “fourth” players in Action Location descriptions are counted clockwise from the active player.
- Glory Pile: Sometimes you will be instructed to discard a card to your Glory pile. This is a personal discard pile that will be relevant for end-game scoring. When you discard cards to your Glory pile, simply keep them face-down near your Player Board. Cards discarded from your Player Board go to your Glory pile. Any other cards discarded should be placed face up on the bottom of their respective decks unless noted otherwise.
Recruit Reavers
This Action Location has no cost.
All activating players gain 2 Reaver cards. Beginning with the active player and proceeding clockwise, each participant chooses a face-up stack of cards from the board or 2 random cards from the Reavers deck. The player who selects this locations gain 2 Favor. The other players receive no bonus.
For each Reaver card you take, also take the dice depicted in the top left corner of the card from the supply. Roll these dice and place them in free dice spaces on your player board. If you do not have space for any more dice, you may discard excess dice from your Player Board or discard some or all of the newly-rolled dice.
After collecting your dice, you must decide to use each Reaver card in one of the following three ways:
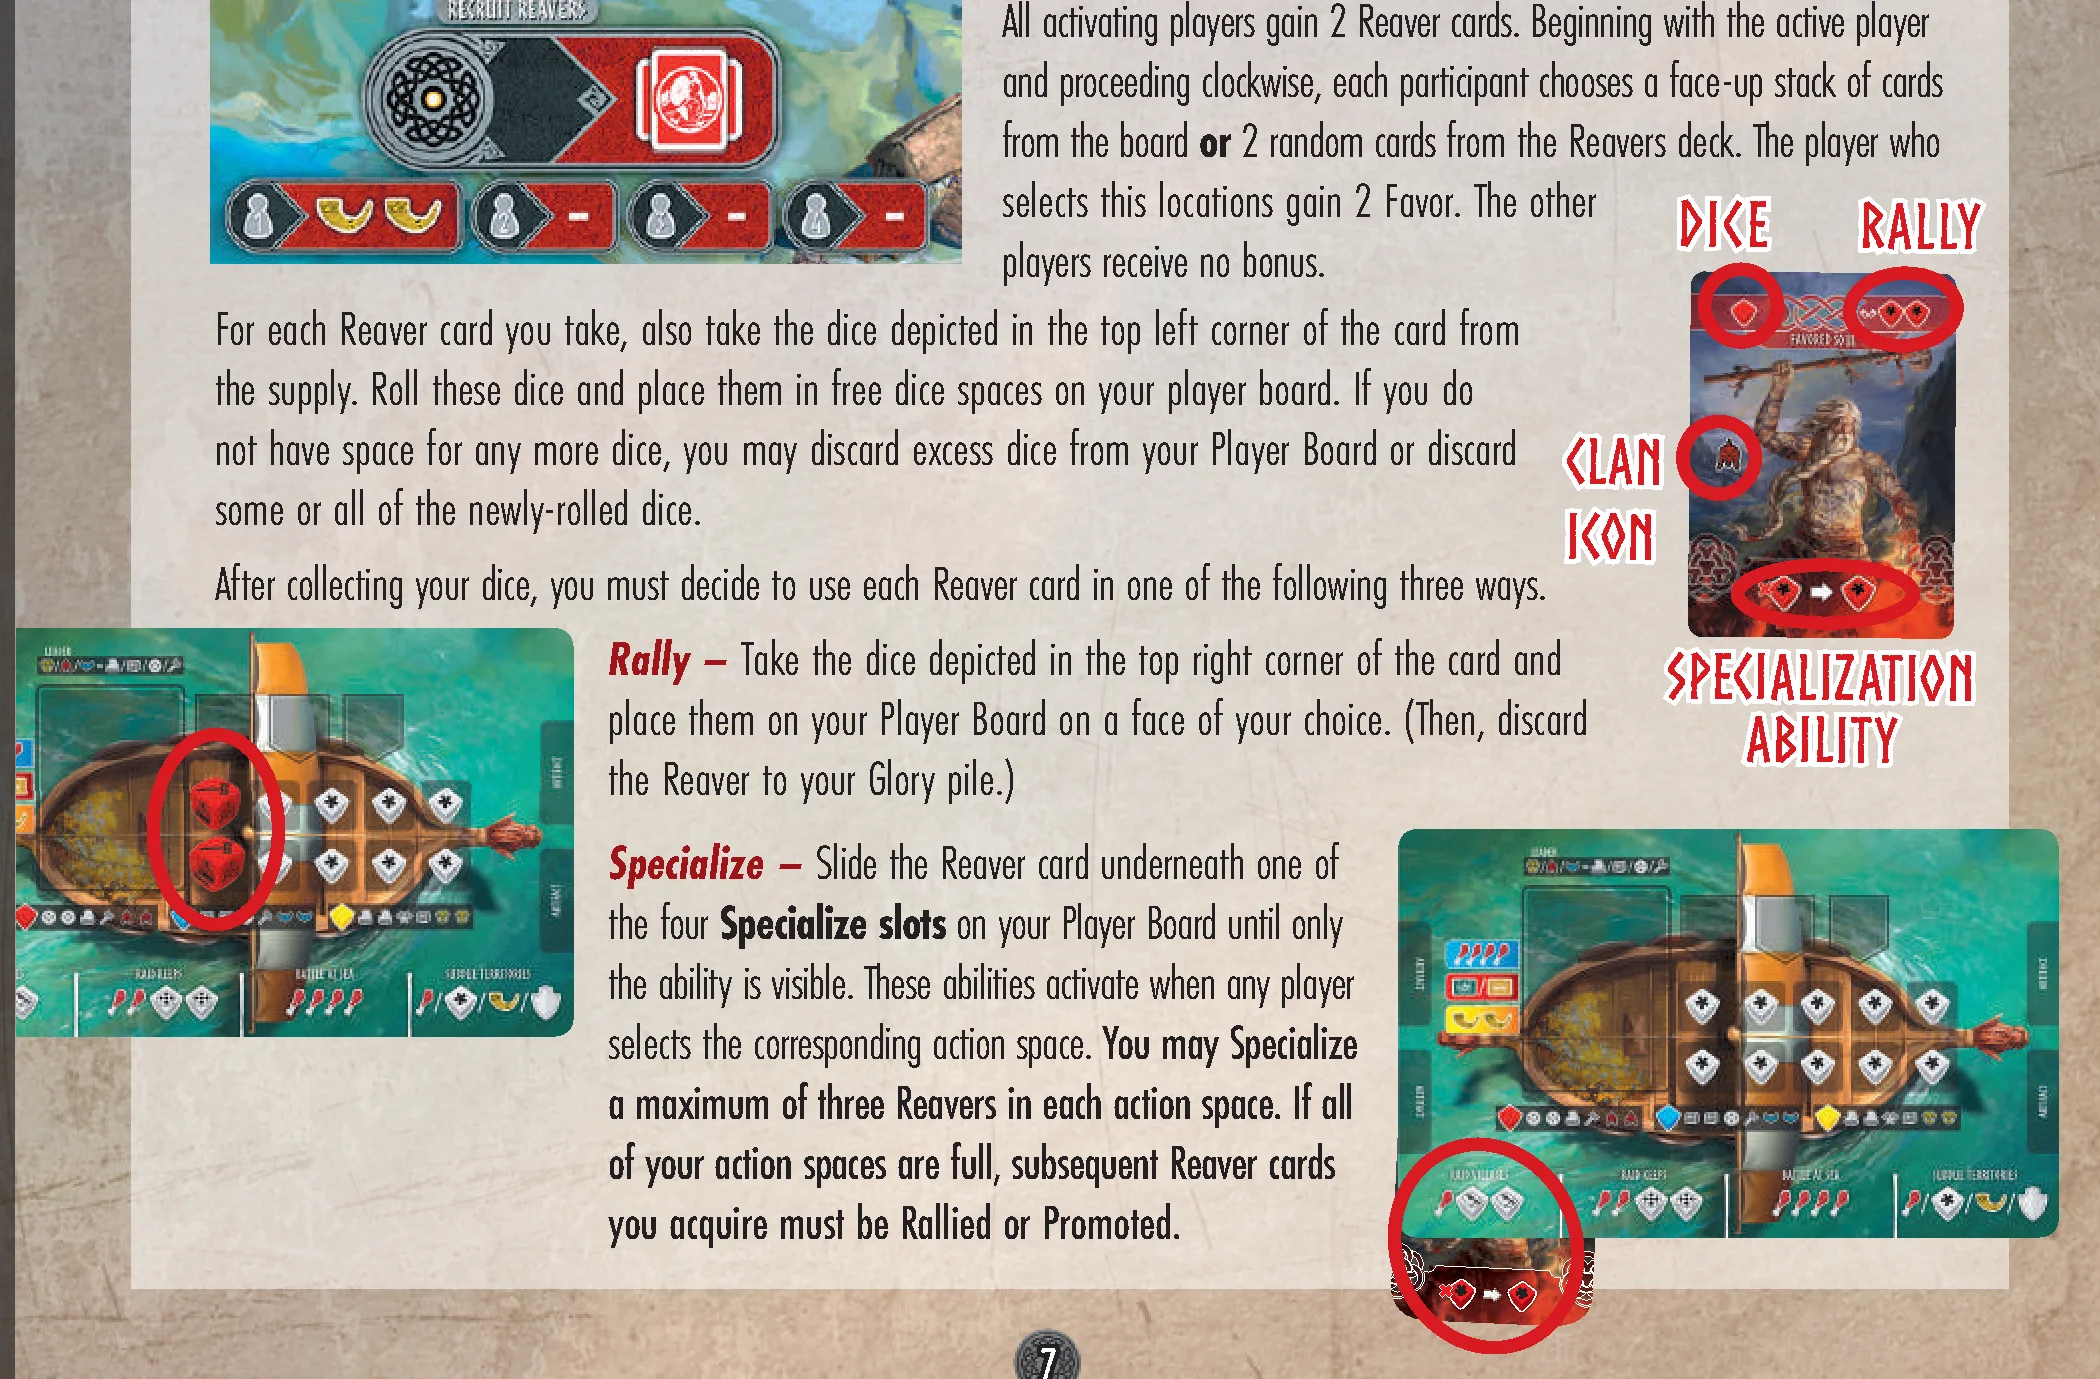
- Rally: Take the dice depicted in the top right corner of the card and place them on your Player Board on a face of your choice. (Then, discard the Reaver to your Glory pile.)
- Specialize: Slide the Reaver card underneath one of the four Specialize slots on your Player Board until only the ability is visible. These abilities activate when any player selects the corresponding action space. You may Specialize a maximum of three Reavers in each action space. If all of your action spaces are full, subsequent Reaver cards you acquire must be Rallied or Promoted.
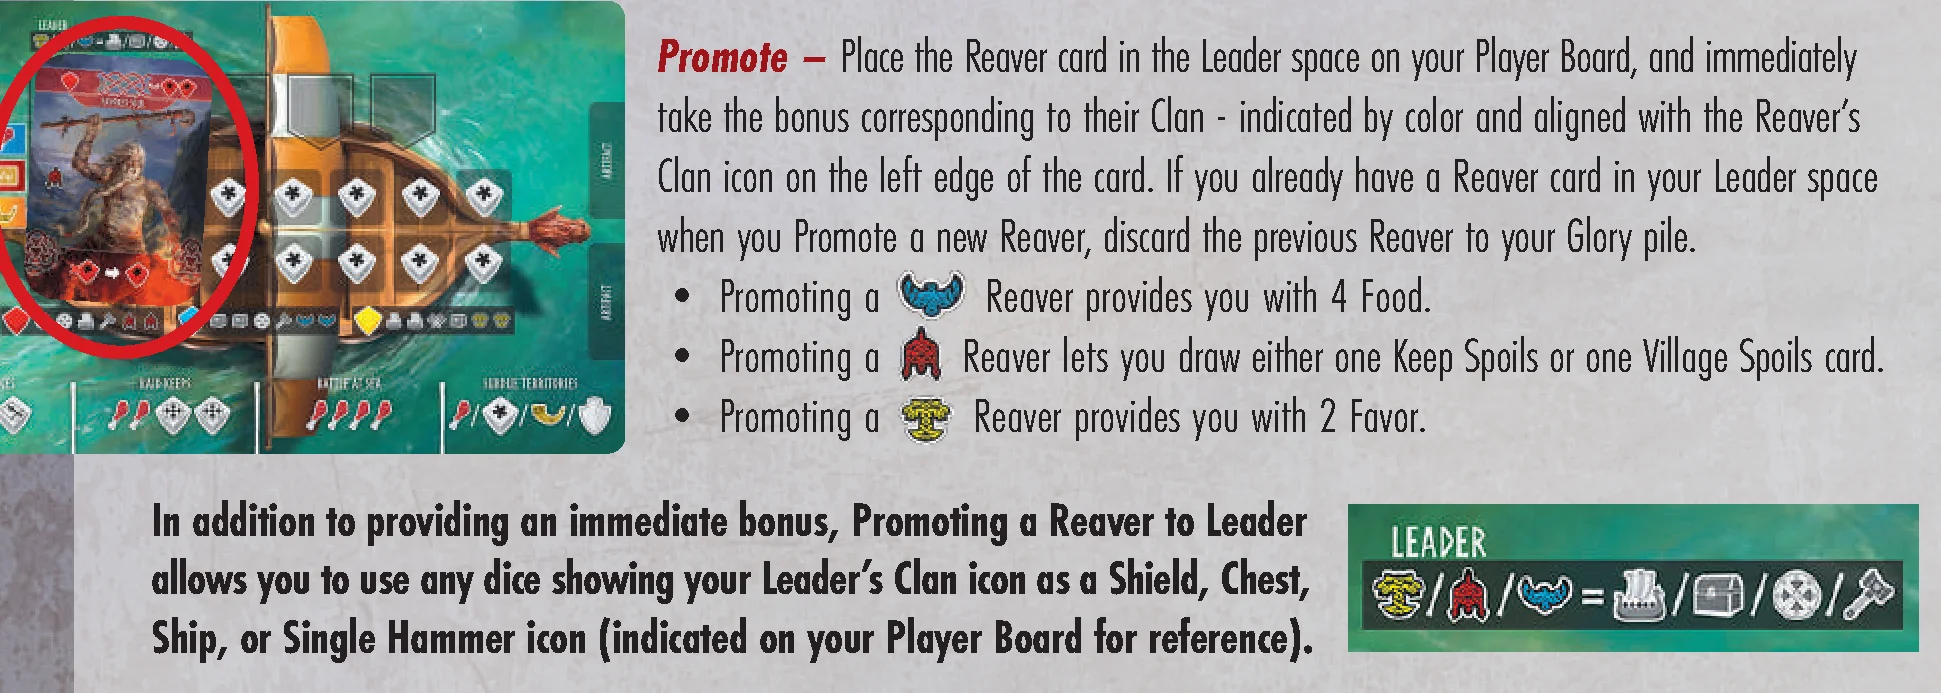
- Promote: Place the Reaver card in the Leader space on your Player Board, and immediately take the bonus corresponding to their Clan – indicated by color and aligned with the Reaver’s Clan icon on the left edge of the card. If you already have a Reaver card in your Leader space when you Promote a new Reaver, discard the previous Reaver to your Glory pile.
- Promoting a
 Reaver provides you with 4 Food.
 - Promoting a
 Reaver lets you draw either one Keep Spoils or one Village Spoils card.
 - Promoting a
 Reaver provides you with 2 Favor.
- Promoting a
In addition to providing an immediate bonus, Promoting a Reaver to Leader allows you to use any dice showing your Leader’s Clan icon as a Shield, Chest, Ship, or Single Hammer icon (indicated on your Player Board for reference).
Trade with Villages
This Action Location has no cost.
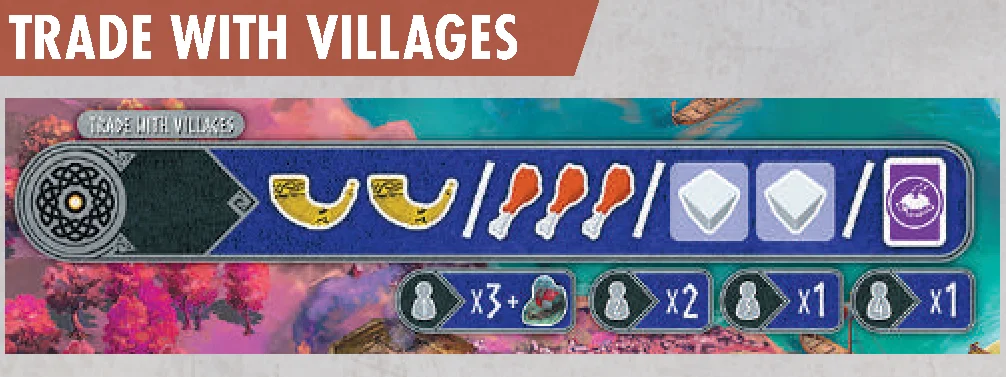
The active player takes the Start Player marker. Beginning with the active player and proceeding clockwise, each participant chooses from the available rewards a declining number of times.
The active player chooses 3 rewards. The second player chooses 2 rewards. The third and fourth players choose 1 reward.
The available rewards are as follows:
- 2 Favor
- 3 Food
- Any two dice available in dice slots at this Action Location. These dice are not rolled and are kept on the same face as when selected. (If all of the dice from this Location have been taken, you may not choose this reward.)
- A face-up Prophecy card (or a random Prophecy card from the deck)
Note: You may choose the same reward multiple times.
Note: If the player with the Start Player marker selects this Action Location, they must pass the Start Player marker to the next player clockwise.
Battle at Sea
This Action Location costs 4 Food to activate.
All activating players attempt to win a Sea Battle. Beginning with the active player and proceeding clockwise, each participant reveals and resolves a Sea Journey card and then chooses a Sea Battle card to encounter (either one of the face-up cards or a random card from the top of the deck). The active player gains 2 Glory upon selecting this location. Other players receive no bonus.
Journey
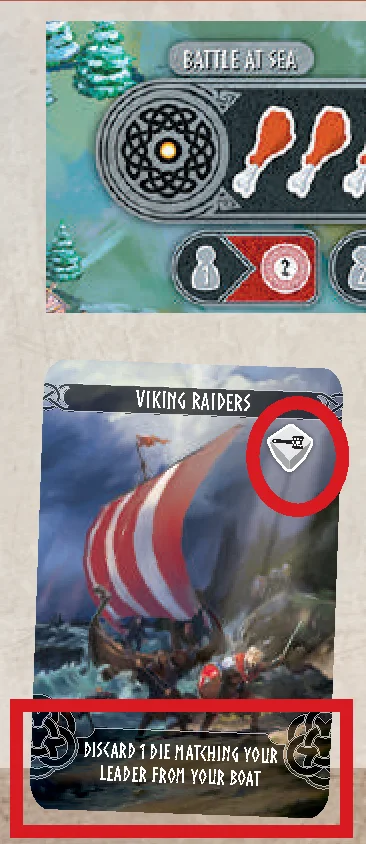
Reveal the top card of the Sea Journey deck. Most of these cards give players the choice of paying the cost depicted in the top right corner or suffering the effect in the text box at the bottom. Some of the cards have no effect.
Battle
Sea Battle cards may be resolved in two different ways. Sea Battle cards show a Defense value (in the Shield) and a combination of dice shown at the top of the card. To defeat the Sea Battle, you may discard the specified combination of Crew dice from your Player Board or you may attempt to defeat the Sea Battle in combat (see below).
If you win the Sea Battle using either of the above methods, gain the rewards depicted at the bottom of the card then add it to your Glory Pile.
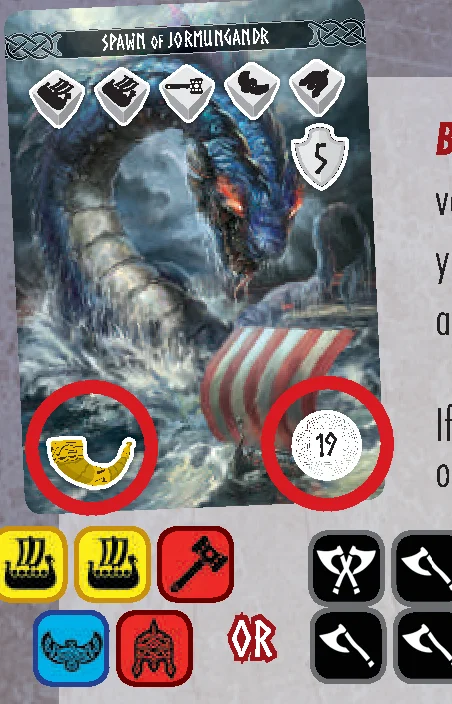
Combat
To participate in combat, discard any number of Crew dice showing a single or double Hammer face. For each Hammer discarded, roll a Combat die. Combat dice will show 0-2 successes (depicted as  ). Roll at least as many successes as the number shown in the target card’s Defense value to defeat the enemy.
After any combat roll, you may spend 1 Favor to reroll any number of Combat dice. You may continue discarding Favor to repeat this effect as many times as you wish.
Raid Villages
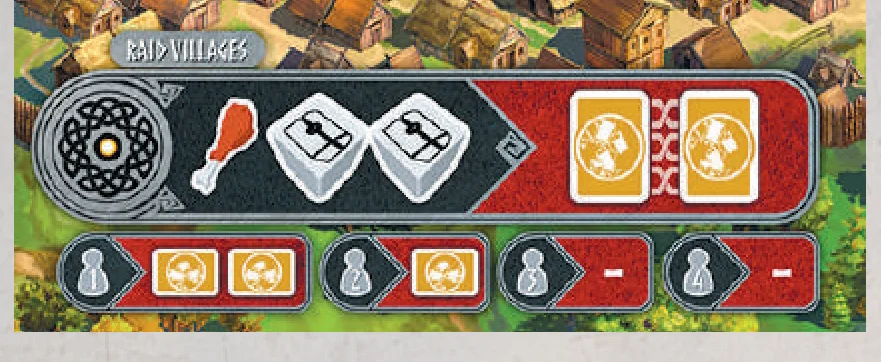
This Action Location costs 1 Food and 2 dice on their Treasure Chest face to activate.
All Activating players gain 2 Village Spoils cards. Beginning with the active player and proceeding clockwise, each participant chooses a face-up linked group of cards from the board or 2 random cards from the Village Spoils deck.
The player who selects this location gains 2 additional random cards from the Village Spoils deck. The second player gains 1 additional random card from the deck. The third and fourth players receive no bonus.
Any time you take multiple cards in Reavers of Midgard, you resolve them one at a time and in any order that you choose.
Village Spoils Card Types
The Village Spoils deck has several different types of cards:
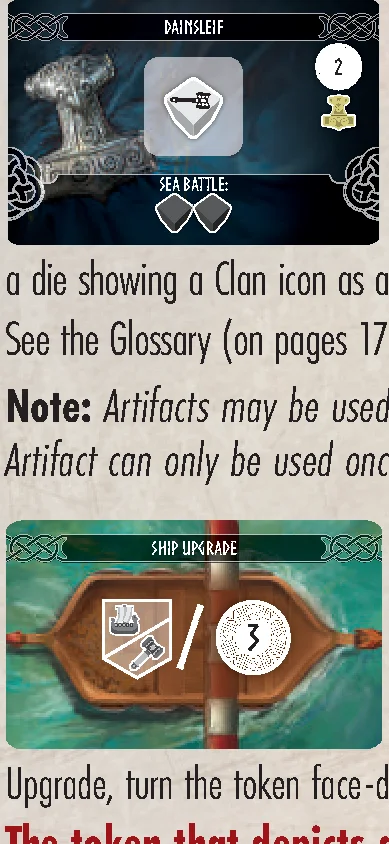
- Ship Upgrades: Ship Upgrade cards give you a choice of taking the depicted Ship Upgrade token and placing it on a free Ship Upgrade space on your Player Board or taking 3 Glory immediately. After either choice, the card is discarded. Ship Upgrade tokens show an icon that normally appears on Crew dice and may be activated once per turn as though you were spending a Crew die with that icon. When activating a Ship Upgrade, turn the token face-down on your player board. All face down Ship Upgrade tokens are flipped face up during the cleanup phase. The token that depicts a Ship and a Hammer may be used as either, but not both.
- Artifacts: Artifact cards are placed face up in one of the four indicated spaces on your player board. If all four spaces are already filled, you may discard either an already-owned Artifact or a newly-acquired one to your Glory pile. Artifacts provide a space for storing additional dice and have effects that can be activated by discarding the die stored on them. You may only store the die indicated and may not store a die showing a Clan icon as a wild. Artifacts may be activated during the activation of specific Action Locations as indicated on the card. See the Glossary (on pages 17-18) for details.
Note: Artifacts may be used when an Action Location is selected, even if the artifact’s owner chooses to rest. Furthermore, each Artifact can only be used once per Action Location activation.
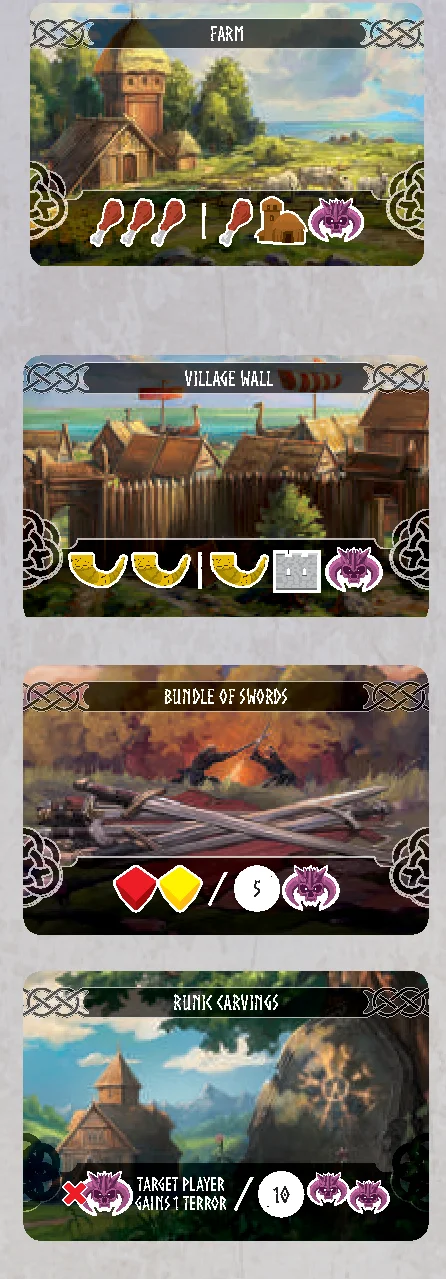
- Farm: Farm cards give you 3 Food immediately. Additionally, you may choose to Pillage the Farm. If you choose to Pillage, gain 1 additional Food, 1 Farm token, and 1 Terror token from the supply. After choosing whether or not to Pillage, discard the Farm card.
- Village Wall: Village Wall cards give you 2 Favor immediately. Additionally, you may choose to Pillage the Wall. If you choose to Pillage a Village Wall, gain 1 additional Favor, 1 Wall token, and 1 Terror token from the supply. After choosing whether or not to Pillage, discard the Village Wall card.
Note: Farm, Wall, and Tower tokens grant you Glory at the end of the game. Terror tokens cost you Glory at the end of the game. See End Game Scoring (page 13).
- Bundle of Swords / Bows and Arrows / Axes and Spears: These cards represent craftspeople in the village and offer players an immediate choice. You may either take the 2 dice depicted on the left (signifying trading with the craftspeople) or take the Glory and Terror token depicted on the right (signifying pillaging their stall). After making your choice, discard this card.
- Runic Carvings: These cards represent craftspeople in the village and offer players an immediate choice. You may either discard 1 Terror token and force another player to gain 1 (signifying trading for runes that you utilize well) or take the Glory and Terror tokens depicted on the right (signifying pillaging their stall). After making your choice, discard this card.
Pillage: Pillaging is an optional action that you may take for an additional effect. When cards show a | icon, you automatically receive the reward to the left of the |. You only take the reward to the right of the | if you choose to pillage.
Raid Keeps
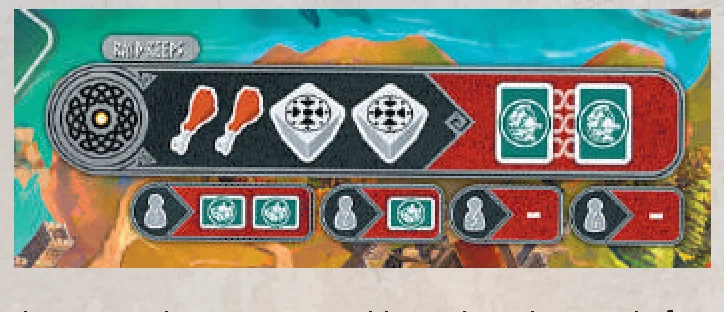
This Action Location costs 2 Food and 2 dice on their Shield face to activate.
All activating players gain 2 Keep Spoils cards. Beginning with the active player and proceeding clockwise, each participant chooses a face up linked group of cards from the board or 2 random cards from the deck.
The active player gains 2 additional random cards from the Keep Spoils deck. The second player gains 1 additional random card from the deck. The third and fourth players receive no bonus.
Keep Spoils Card Types
The Keep Spoils deck has several different types of cards:
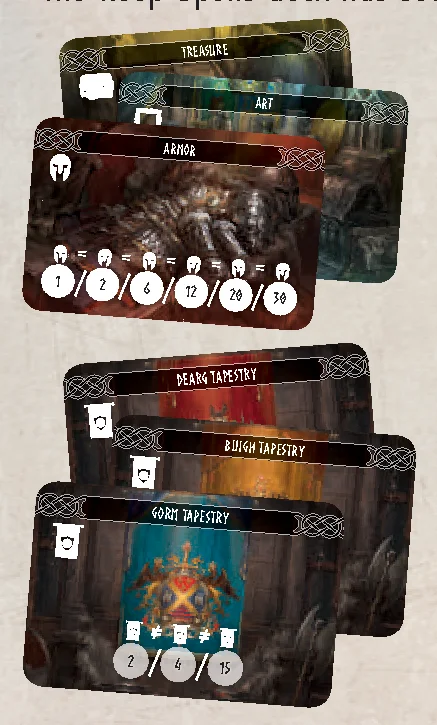
- Treasure / Art / Armor: These cards are all scored as sets at the end of the game. The more of a particular type you have, the more Glory you will gain. The graphic on the bottom of each card shows you how to score based on the number of that particular card you possess. If you possess more cards than are indicated on the bottom of the card, create more than one set and score each set individually. When you gain one of these cards, add it to your Glory pile.
- Tapestry: Tapestries are collected in sets that contain one of each type of Tapestry. If you have all 3 different types, you will gain 15 Glory. Tapestries that are not part of a complete set score 2 Glory each. When you gain one of these cards, add it to your Glory pile.
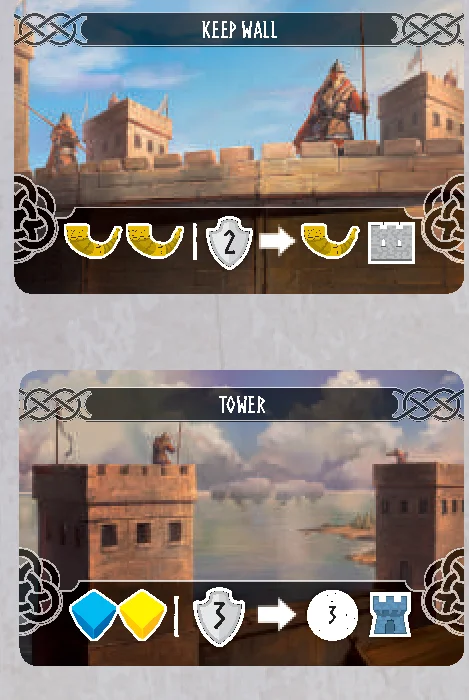
- Tower: Tower cards give you 2 dice immediately. Optionally, you may also choose to Pillage the Tower. If you choose to Pillage a Tower, you must succeed in a combat against it (see Combat page 9). Towers have a Defense Value of 3. If you succeed in the combat, you have successfully Pillaged the Tower and gain 3 Glory and 1 Tower token from the supply. After resolving the Tower card, discard it.
- Keep Wall: Keep Wall cards give you 2 Favor immediately. Optionally, you may also choose to Pillage the Wall. If you choose to Pillage a Keep Wall, you must succeed in a combat against it (see Combat page 9). Keep Walls have a Defense Value of 2. If you succeed in the combat, you have successfully Pillaged the Wall and gain 1 additional Favor and 1 Wall token from the supply. After resolving the Keep Wall card, discard it.
Note: Farm, Wall, and Tower tokens grant you Glory at the end of the game. Terror tokens cost you Glory at the end of the game. See End Game Scoring (page 13).
Subdue Territories
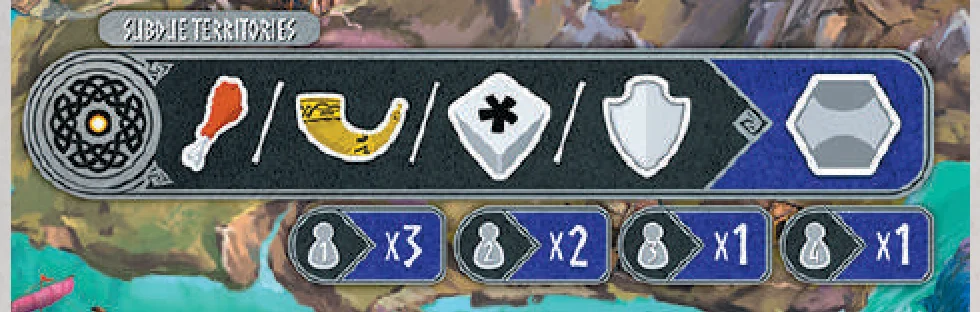
This Action Location has a variable cost to activate.
Beginning with the active player and proceeding clockwise, each participant may attempt to Subdue territories a declining number of times:
- The active player may attempt to Subdue 3 territories.
- The second player may attempt to Subdue 2 territories.
- The third and fourth players may attempt to Subdue 1 territory.
Methods to Subdue
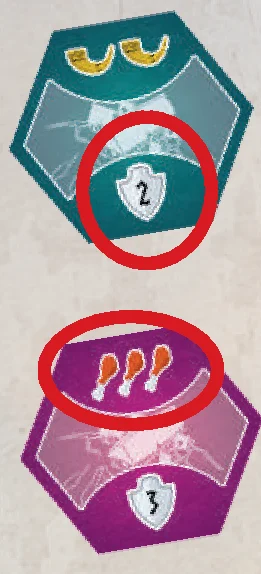
- Subdue by Force: First, select the territory you wish to Subdue. Then, attempt to defeat the territory in combat (see Combat page 9), using the Defense Value indicated on that Territory tile. The higher the Territory’s Defense Value, the greater the potential reward for Subduing it (see page 19). If you succeed in combat, claim the territory tile, and place it in your play area. If you fail in combat, do not claim the territory tile. This Failure still counts as one of your allowed attempts at subduing a territory.
- Peacefully Subdue: First, select the territory you wish to Subdue. Then, discard the resources indicated on the top of that territory tile. The more resources you spend, the greater the potential reward for Subduing the Territory. After spending the required resources, claim the territory tile and place it in your play area.
After completing all of your attempts to Subdue territories, flip over all the territory tiles you Subdued this turn and claim the rewards indicated.
Territory tiles are divided by resource type and by level:
- Red tiles are Food Territories
- Blue tiles are Favor Territories
- Purple tiles are Dice Territories
The level is equal to the Defense value on each tile, either 1, 2, or 3.
During the Cleanup Phase, players score 1 Glory for each territory tile they have Subdued so far.
Round Cleanup
At the end of each round of the game, players complete the following steps to prepare for the next round:
- If you are on Round 6, proceed to final scoring. Otherwise, move the Round marker 1 space clockwise.
In a 3-player game, the player with the Honor Ship token passes it clockwise to the next player. - Each player gains 1 Glory for each territory tile in their play area.
- Clear any dice from the Trade with Villages Location and replace them.
- Discard any remaining face-up cards from the game board and refill from the corresponding decks.
Final Scoring
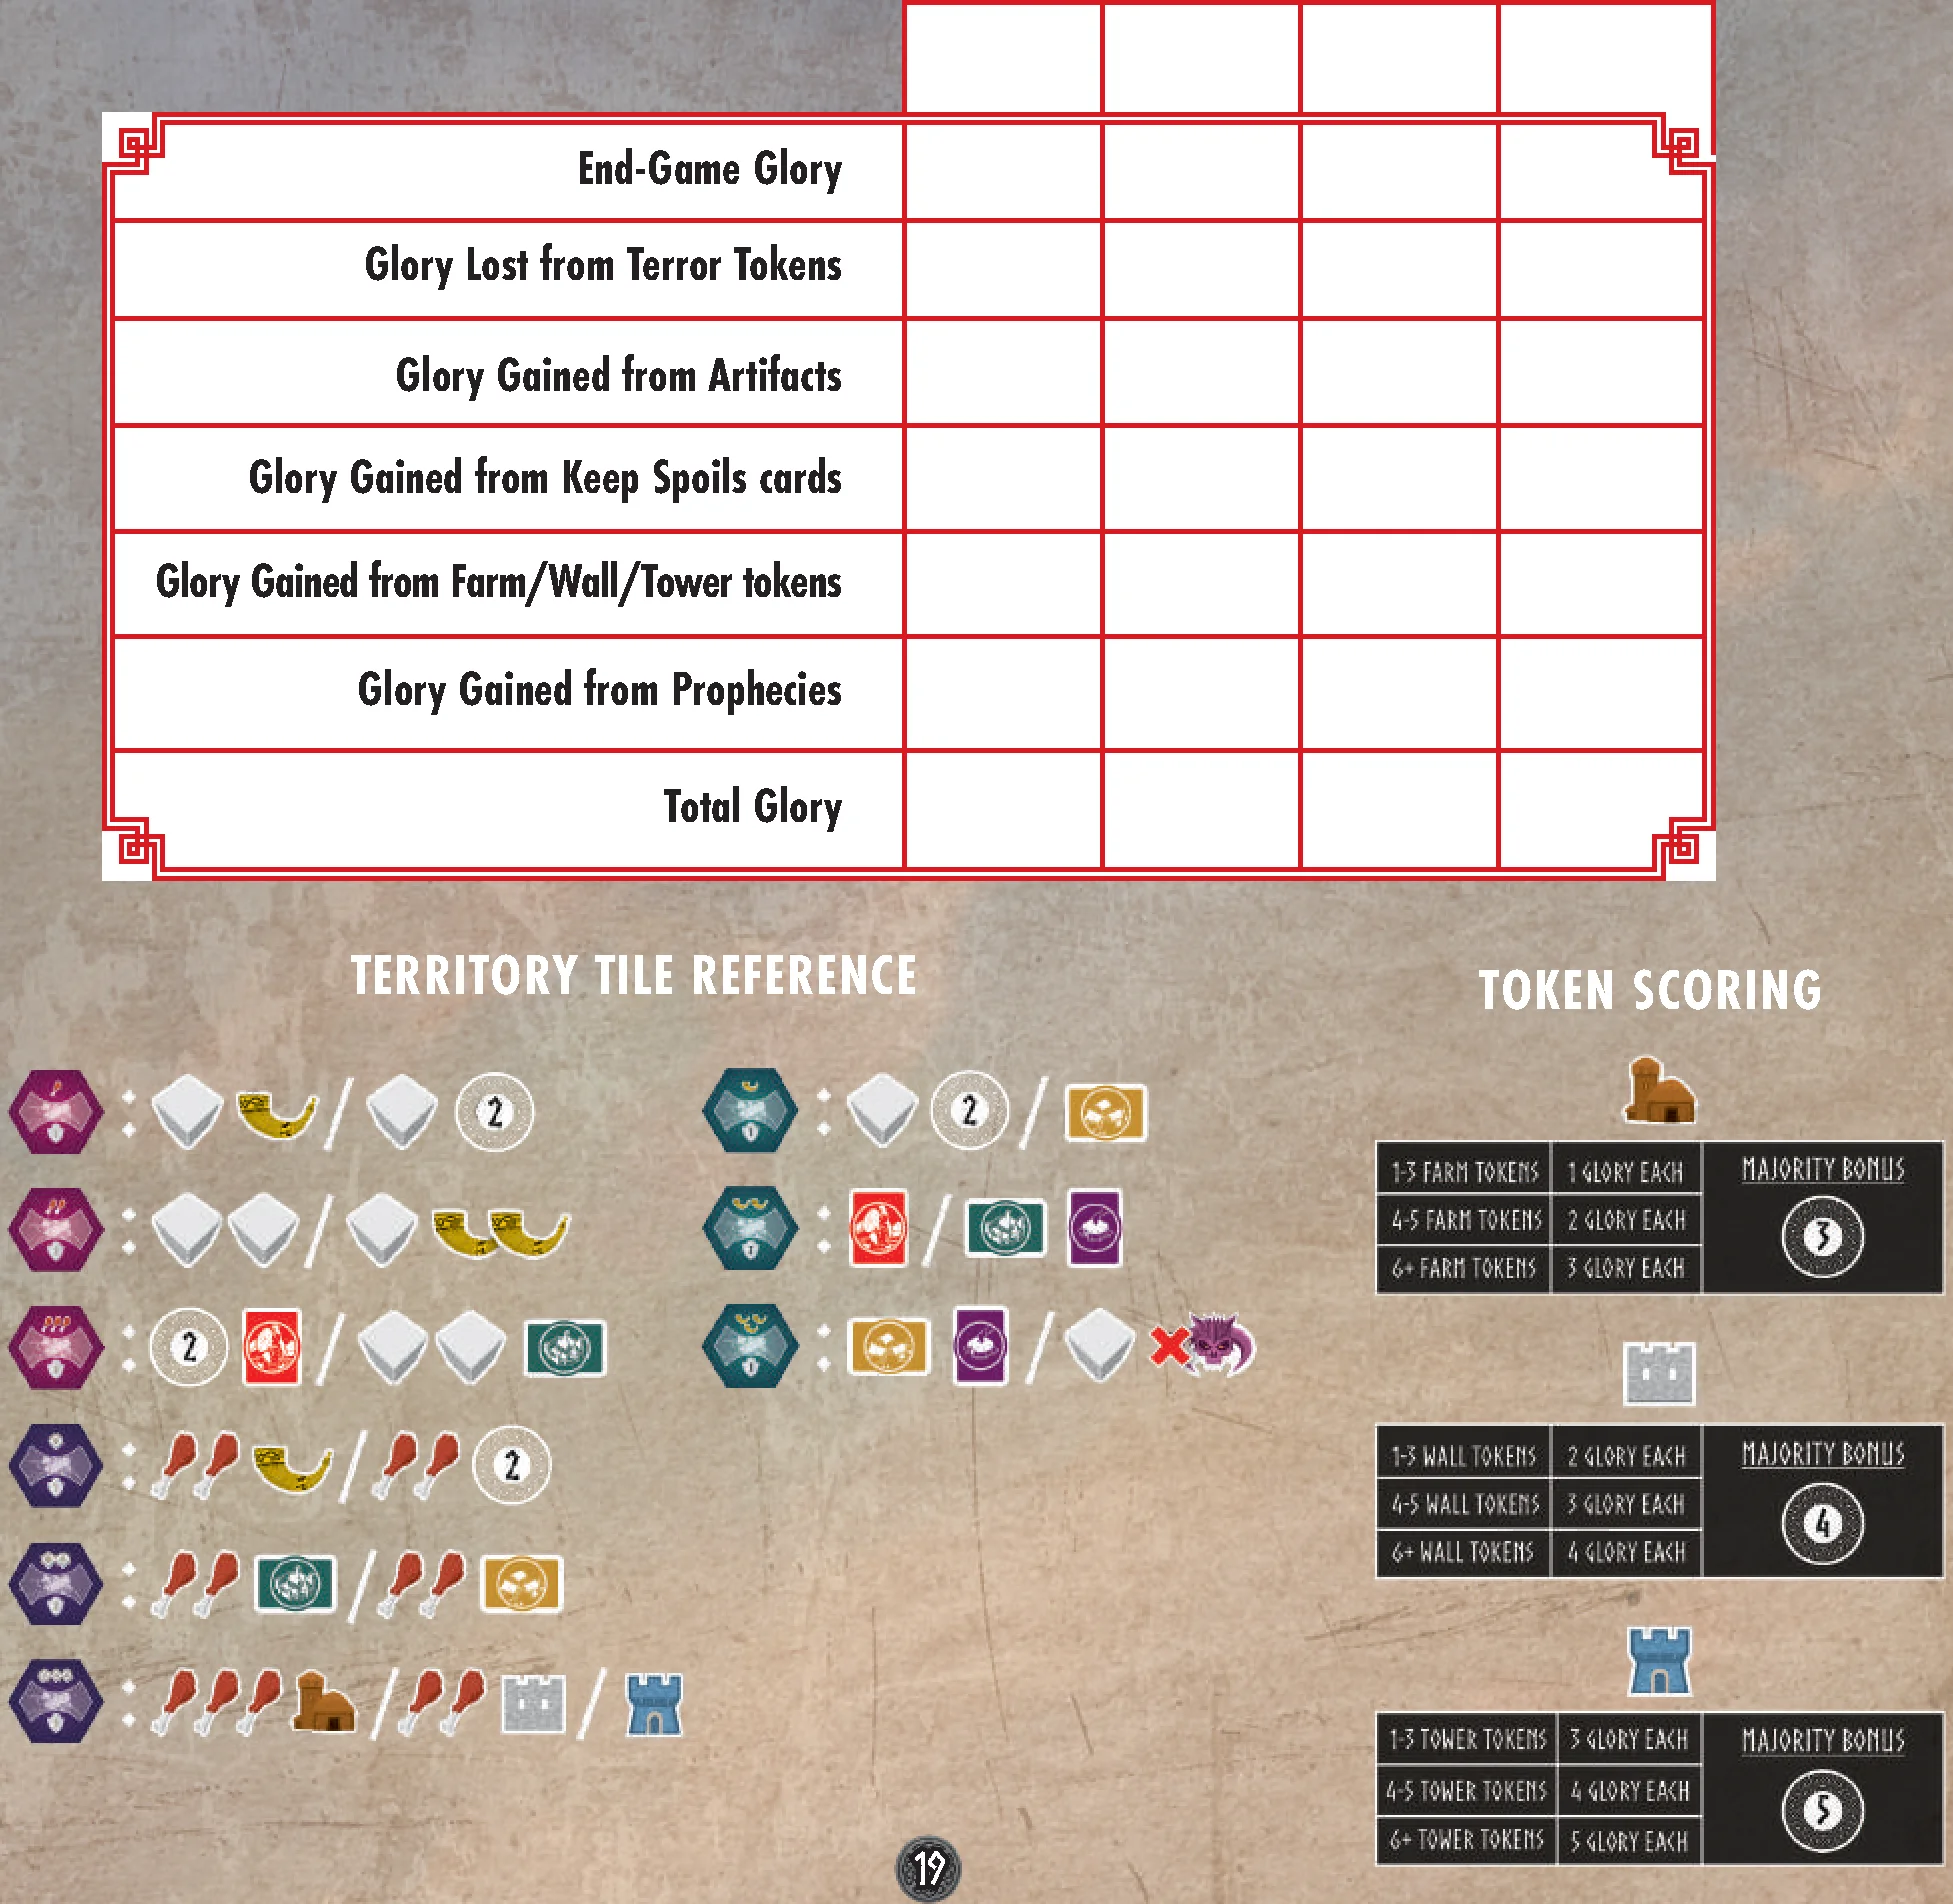
On the back of the rulebook, you will find a scoring chart that you can copy to make your own scoring easier. (You may also download scoring charts from www.greyfoxgames.com)
At the end of the game, each player should take all of the cards from their Player Board and Glory pile and separate them by type. Score each group of cards in the following manner:
- Terror tokens: Lose Glory according to how many Terror tokens you have:
- 1 Terror token: -1 Glory
- 2 Terror tokens: -3 Glory
- 3 Terror tokens: -6 Glory
- 4 Terror tokens: -10 Glory
- 5 Terror tokens: -15 Glory
- 6 Terror tokens: -21 Glory
- Any further Terror tokens cause the players to lose 6 additional Glory each.
- Artifacts: Gain the amount of Glory listed on each card.
- Keep Spoils cards: Sort the cards based on their sets and gain Glory according to the size of each set.
- Farm / Wall / Tower tokens: Score each token separately according to the following chart. If multiple players tie with the most tokens of a type, all tied players gain the full amount of Glory.
- Farm tokens:
- 1 – 3 tokens: 1 Glory each
- 4 – 5 tokens: 2 Glory each
- 6+ tokens: 3 Glory each
- Majority Bonus: The player with the most Farm tokens gains 3 additional Glory.
- Wall tokens:
- 1 – 3 tokens: 2 Glory each
- 4 – 5 tokens: 3 Glory each
- 6+ tokens: 4 Glory each
- Majority Bonus: The player with the most Wall tokens gains 4 additional Glory.
- Tower tokens:
- 1 – 3 tokens: 3 Glory each
- 4 – 5 tokens: 4 Glory each
- 6+ tokens: 5 Glory each
- Majority Bonus: The player with the most Tower tokens gains 5 additional Glory.
- Farm tokens:
- Prophecies: Gain Glory as indicated by each Prophecy card in your play area. See Glossary (pages 16-17).
- The player with the most Glory becomes the most respected Reaver in all of Midgard and is the winner of the game. In case of a tie, the player with the most Favor tokens wins. If players are still tied, they share the victory.
Scoring Example 1 (Orange Player)
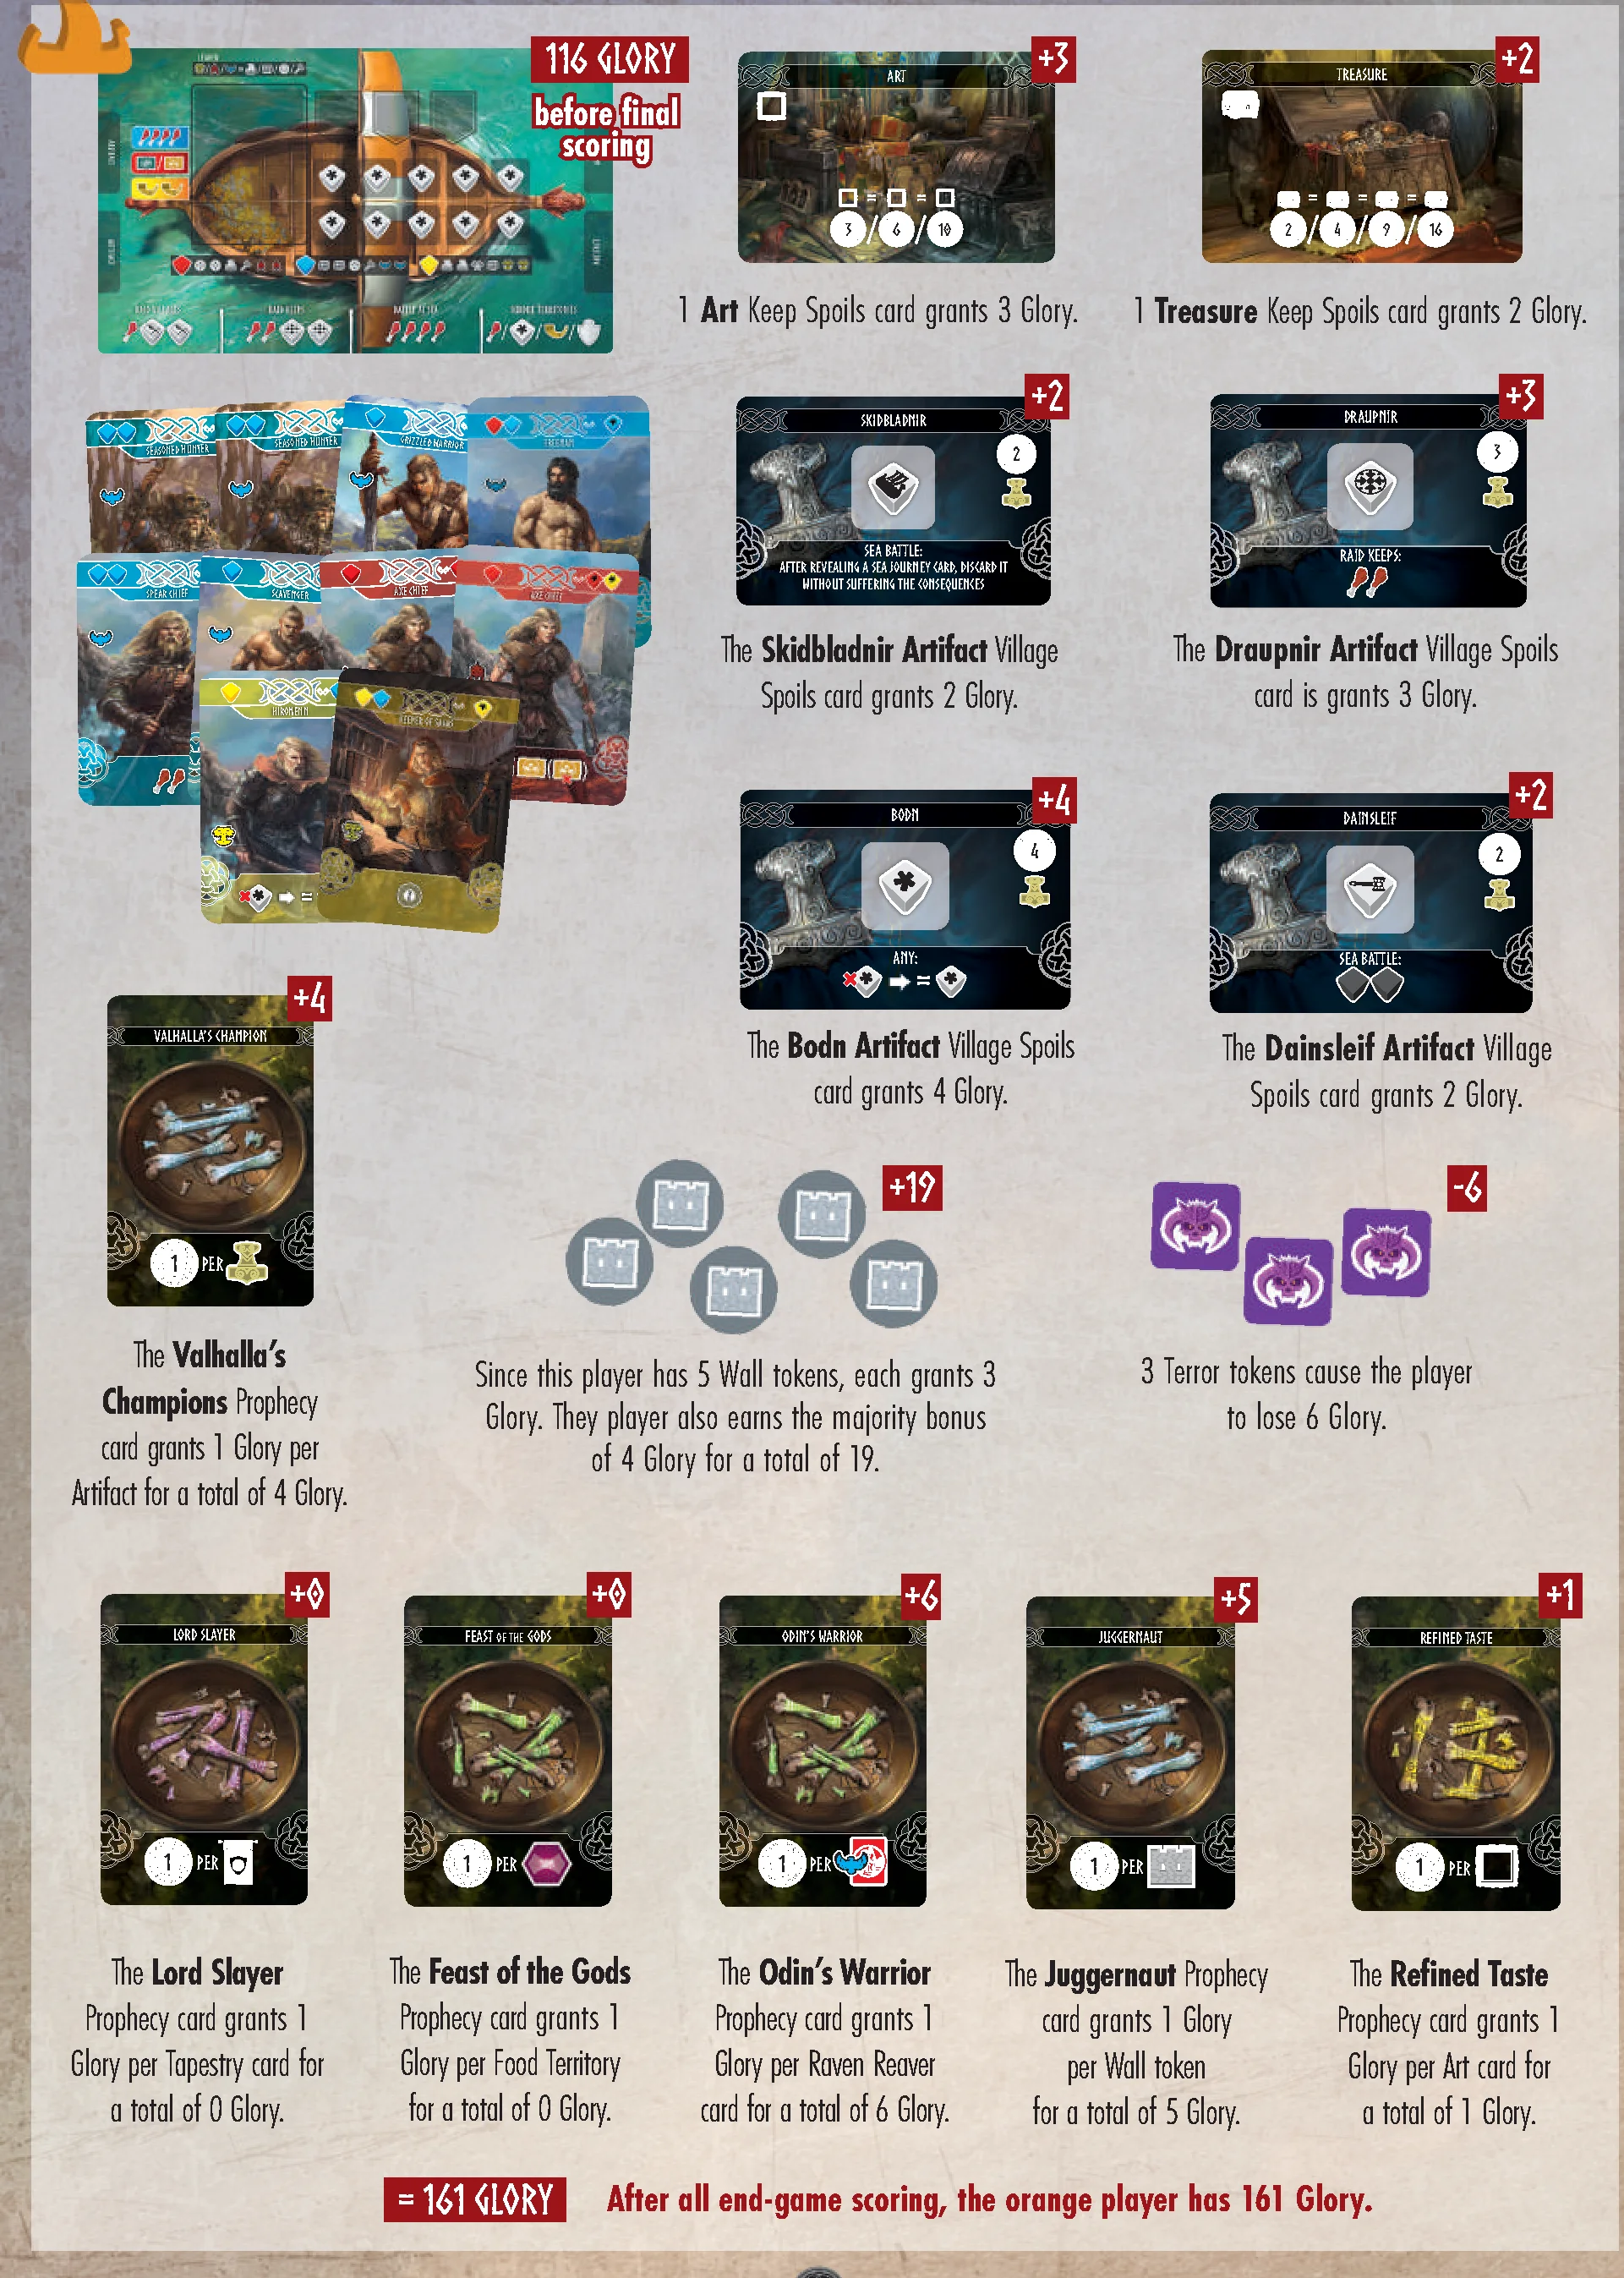
116 Glory before final scoring.
- 1 Art Keep Spoils card grants 3 Glory.
- 1 Treasure Keep Spoils card grants 2 Glory.
- The Skidbladnir Artifact Village Spoils card grants 2 Glory.
- The Draupnir Artifact Village Spoils card grants 3 Glory.
- The Bodn Artifact Village Spoils card grants 4 Glory.
- The Dainsleif Artifact Village Spoils card grants 2 Glory.
- Since this player has 5 Wall tokens, each grants 3 Glory (15). They player also earns the majority bonus of 4 Glory for a total of 19 Glory.
- 3 Terror tokens cause the player to lose 6 Glory (-6).
- The Valhalla’s Champions Prophecy card grants 1 Glory per Artifact for a total of 4 Glory.
- The Lord Slayer Prophecy card grants 1 Glory per Tapestry card for a total of 0 Glory.
- The Feast of the Gods Prophecy card grants 1 Glory per Food Territory for a total of 0 Glory.
- The Odin’s Warrior Prophecy card grants 1 Glory per Raven Reaver card for a total of 6 Glory.
- The Juggernaut Prophecy card grants 1 Glory per Wall token for a total of 5 Glory.
- The Refined Taste Prophecy card grants 1 Glory per Art card for a total of 1 Glory.
Total: = 161 Glory. After all end-game scoring, the orange player has 161 Glory.
Scoring Example 2 (Teal Player)
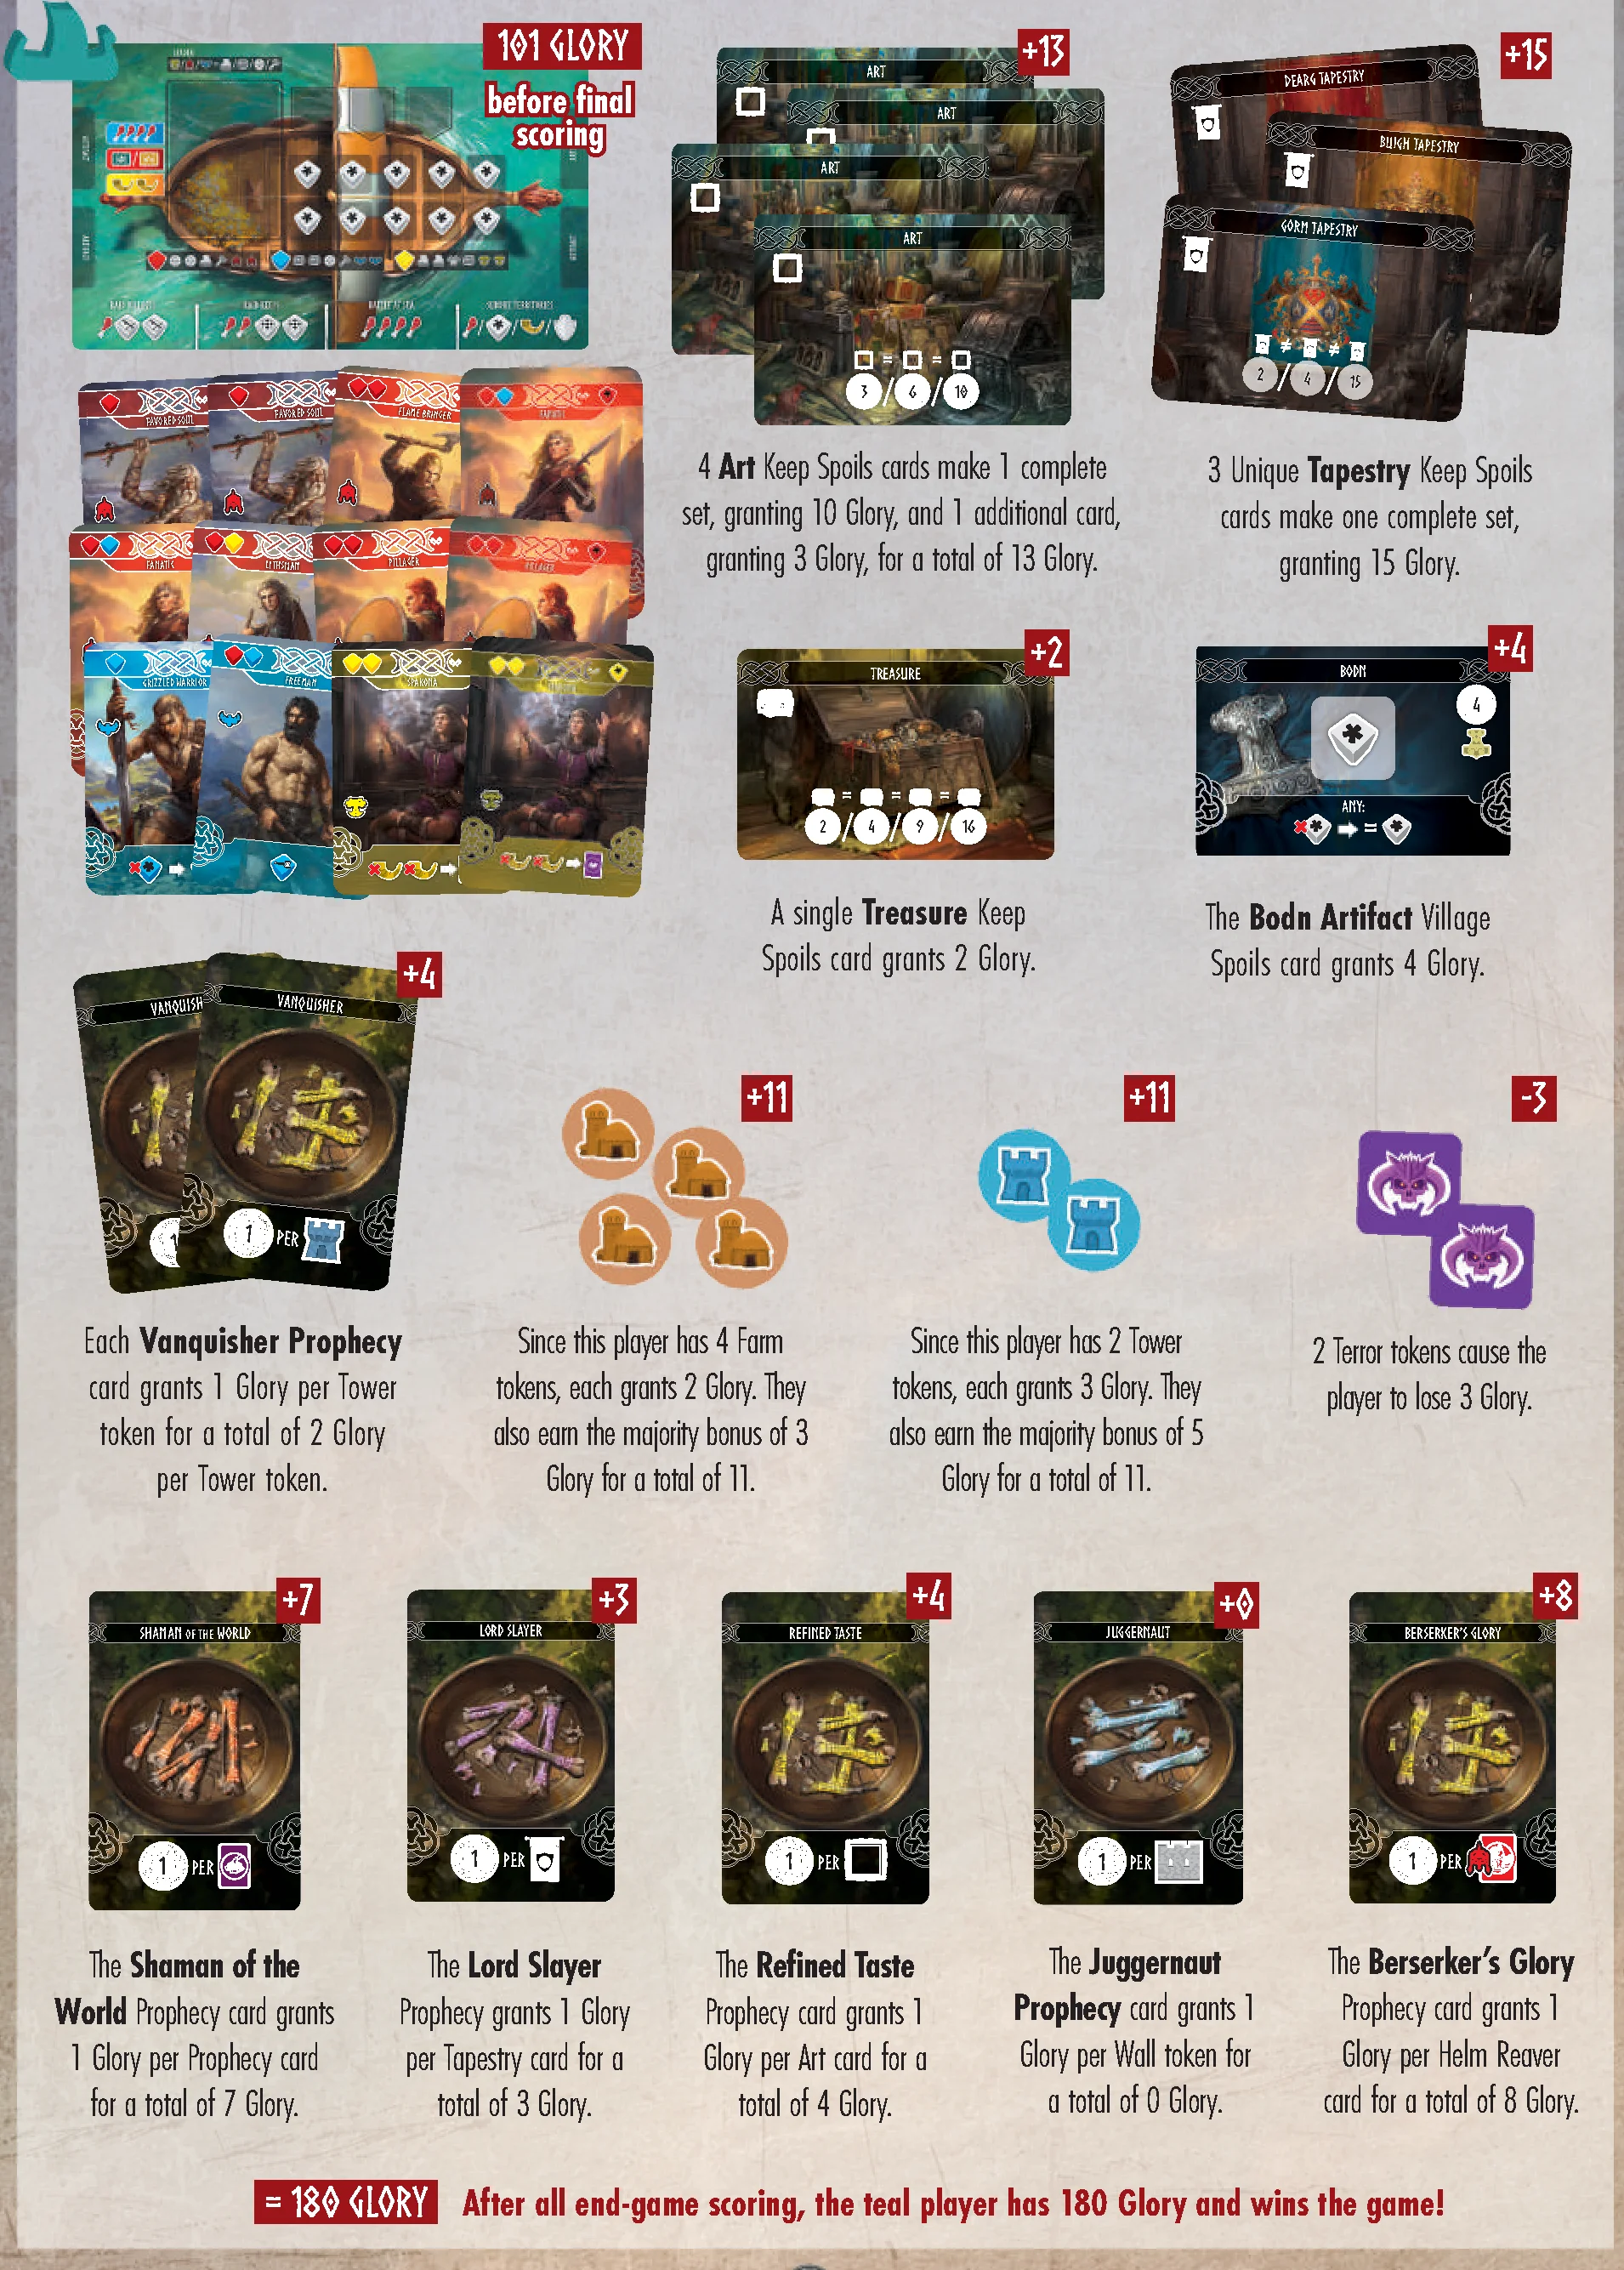
101 Glory before final scoring.
- 4 Art Keep Spoils cards make 1 complete set, granting 10 Glory, and 1 additional card, granting 3 Glory, for a total of 13 Glory.
- 3 Unique Tapestry Keep Spoils cards make one complete set, granting 15 Glory.
- A single Treasure Keep Spoils card grants 2 Glory.
- The Bodn Artifact Village Spoils card grants 4 Glory.
- Since this player has 4 Farm tokens, each grants 2 Glory (8). They also earn the majority bonus of 3 Glory for a total of 11 Glory.
- Since this player has 2 Tower tokens, each grants 3 Glory (6). They also earn the majority bonus of 5 Glory for a total of 11 Glory.
- 2 Terror tokens cause the player to lose 3 Glory (-3).
- Each Vanquisher Prophecy card grants 1 Glory per Tower token for a total of 2 Glory per Tower token (+4 Glory).
- The Shaman of the World Prophecy card grants 1 Glory per Prophecy card for a total of 7 Glory.
- The Lord Slayer Prophecy grants 1 Glory per Tapestry card for a total of 3 Glory.
- The Refined Taste Prophecy card grants 1 Glory per Art card for a total of 4 Glory.
- The Juggernaut Prophecy card grants 1 Glory per Wall token for a total of 0 Glory.
- The Berserker’s Glory Prophecy card grants 1 Glory per Helm Reaver card for a total of 8 Glory.
Total: = 180 Glory. After all end-game scoring, the teal player has 180 Glory and wins the game!
Icons
 – Any color die
 – The depicted color of die
 – The depicted color of die on a side of your choice
 – Any color die on a side of your choice
 – Any color die with the indicated side
 – Food token
 – Favor token
 – Terror token
 – Wall token
 – Tower token
 – Farm token
 – Glory
 – Keep Spoils card
 – Reaver card
 – Prophecy card
 – Village Spoils card
 – Defense Value
 – Discard the indicated token, dice, or card
 – Spend the item on the left to gain the item on the right
- – You resolve the action on the left, and may optionally resolve the action on the right
 – You resolve the action depicted on the left, then resolve the action on the right
 – You may resolve the action on the left OR the action on the right
 – The items on the left and right must be the same
 – The items on the left and right must not be the same
Reavers
Helm Reavers
- Axe Chief: Draw 2 Village Spoils cards and keep 1.
- Fanatic: Draw 2 Keep Spoils cards and keep 1.
- Favored Soul: Discard a red die to gain a red die on any side.
- Flame Bringer: Discard 2 dice to gain a Wall token.
- Lithsman: Gain 1 red die on its Helm side.
- Pillager: Discard 1 die to gain a Farm token.
Raven Reavers
- Grizzled Warrior: Discard a blue die to gain a blue die on any side.
- Huskarl: Gain 1 blue die on its Raven side.
- Freeman: Gain 1 blue die on its Hammer side.
- Scavenger: Draw 2 Village Spoils cards and keep 1.
- Seasoned Hunter: Gain 1 Food. You may discard 1 die to gain 3 additional Food.
- Spear Chief: Gain 2 Food.
Tree Reavers
- Hiromenn: Discard any die to gain the same color die on any side.
- Keeper of Sagas: Gain 2 Glory.
- Revered Seer: Discard 1 Favor to gain 2 Glory.
- Scout: Discard a yellow die to gain a yellow die on any side.
- Spakona: Discard 2 Favor to draw 1 Prophecy card.
- Sword Chief: Gain 1 yellow die on its Tree side.
Sea Battles
- Cargo Ship: Gain 2 Food and 8 Glory.
- Draugr Raiders: Discard 1 Terror token and gain 9 Glory.
- Infamous Outcasts: Discard 1 Terror token and gain 12 Glory.
- Knarr: Gain a Keep Spoils card and 11 Glory.
- Longship: Draw a Reaver card and gain 13 Glory.
- Lyngbakr: Draw a Prophecy card and gain 15 Glory.
- Spawn of Jormungandr: Gain 1 Favor and 19 Glory.
- Wherry: Gain 2 Food and 10 Glory.
Sea Journey Effects
- All Quiet: No Effect.
- Draugr Ambush: Discard a Shield die, or lose 1 Artifact card or Ship Upgrade tile.
- Kraken!!!: If you spend a Ship and Hammer die to defeat the Kraken, gain 3 Glory. Otherwise, discard 2 Food and 1 die.
- Rough Seas: Discard a Ship die, or discard your Leader.
- Spoiled Food: Discard a Chest die, or lose 2 Food.
- Starvation: Discard 1 Reaver card, or lose 2 Food.
- Viking Raiders: Discard a Hammer die, or lose 1 die matching the color of your Leader from your Player Board.
Prophecies
- Berserker’s Glory: Gain 1 Glory for every Helm Reaver card in your Glory pile.
- Champion of the Sea: Gain 1 Glory for every Sea Battle card in your Glory pile.
- Feast of the Gods: Gain 1 Glory for every Food Territory in your Glory pile.
- Juggernaut: Gain 1 Glory for every Wall token in your Glory pile.
- Lord Slayer: Gain 1 Glory for every Tapestry card in your Glory pile.
- Odin’s Prophet: Gain 1 Glory for every Favor Territory in your Glory pile.
- Odin’s Warrior: Gain 1 Glory for every Raven Reaver card in your Glory pile.
- Pillager: Gain 1 Glory for every Farm token in your Glory pile.
- Proud Conquerors: Gain 1 Glory for every Dice Territory in your Glory pile.
- Refined Taste: Gain 1 Glory for every Art card in your Glory pile.
- Sailor’s Reward: Gain 2 Glory for every Ship Upgrade tile on your Player Board.
- Seidr’s Chosen: Gain 1 Glory for every Tree Reaver card in your Glory pile.
- Shaman of the World: Gain 1 Glory for every Prophecy card in your Glory Pile (including this one).
- Stolen Armor: Gain 1 Glory for every Armor card in your Glory pile.
- Treasure Hunter: Gain 1 Glory for every Treasure card in your Glory pile.
- Valhalla’s Champion: Gain 1 Glory for every Artifact card in your Glory pile.
- Vanquisher: Gain 1 Glory for every Tower token in your Glory pile.
Keep Spoils
- Armor: 1 Armor card grants you 1 Glory, 2 Armor cards grant you 2 Glory, 3 Armor cards grant you 6 Glory, 4 Armor cards grant you 12 Glory, 5 Armor cards grant you 20 Glory, and 6 Armor cards grant you 30 Glory at the end of the game.
- Art: 1 Art card grants you 3 Glory, 2 Art cards grant you 6 Glory, and 3 Art cards grant you 10 Glory at the end of the game.
- Keep Wall: Gain 2 Favor. Then, you may attempt to win a combat against a Defense Value of 2 to gain 1 Favor and 1 Wall token.
- Tapestries: 1 Tapestry card grants you 2 Points, 2 different Tapestry cards grant you 4 Glory, and 3 different Tapestry cards grant you 15 Glory at the end of the game.
- Treasure: 1 Treasure card grants you 2 Glory, 2 Treasure cards grant you 4 Glory, 3 Treasure cards grant you 9 Glory, and 4 Treasure cards grant you 16 Glory at the end of the game.
- Tower: Gain and roll a blue and yellow die. Then, you may attempt to win a combat against a Defense Value of 3 to gain 3 Glory and 1 Tower token.
- Tower: Gain and roll a red and yellow die. Then, you may attempt to win a combat against a Defense Value of 3 to gain 3 Glory and 1 Tower token.
- Tower: Gain and roll a red and blue die. Then, you may attempt to win a combat against a Defense Value of 3 to gain 3 Glory and 1 Tower token.
Village Spoils
- Andvarinaut: During the Raid Keeps Action, discard a Shield die to draw 1 Keep Spoils card.
- Axes and Spears: Gain and roll a blue and red die, or gain 5 Glory and 1 Terror token.
- Bodn: During any Action, discard a die of your choice to discard any die then gain the same color die on any side.
- Bows and Arrows: Gain and roll a blue and yellow die, or gain 5 Glory and 1 Terror token.
- Bundle of Swords: Gain and roll a red and yellow die, or gain 5 Glory and 1 Terror token.
- Brisingamen: During the Trade with Villages Action, discard a Tree die to draw a Prophecy card and then discard one from your play area.
- Dainsleif: During the Battle at Sea Action, discard a Hammer die to gain 2 Combat dice.
- Draupnir: During the Raid Keeps Action, discard a Shield die to gain 2 Food.
- Eldrihmnir: During the Raid Villages Action, discard a Raven die to gain 3 Food.
- Farm: Gain 3 Food. Then you may Pillage the Farm to gain 1 Food, 1 Terror token, and 1 Farm token.
- Fragment of Mjölnir: During the Subdue Territories Action, discard a Helm die to gain 1 combat die.
- Frigg’s Chalice: During the Raid Villages Action, discard a Chest die to discard 1 Terror token.
- Harp of the Ljósálfar: During any Action, discard a Tree die to gain 2 Favor.
- Hringhorni: During the Trade with Villages Action, discard a Ship die to gain and roll 2 dice of your choice.
- Járnglófar: During the Recruit Reavers Action, discard a Raven die to resolve the Leader ability (clan bonus) of 1 Reaver you acquired this turn.
- Laevateinn: During the Subdue Territories Action, discard a Helm die when Subduing a level 1 or 2 Territory to instead claim a level 3 Territory of the same type.
- Runic Carvings: Either discard 1 Terror and chose another player to gain 1 Terror, or gain 10 Glory and 2 Terror.
- Sacred Ash Stave: During the Recruit Reavers Action, discard a Chest die to resolve the Specialization ability of 1 Reaver you acquired this turn.
- Ship Upgrade: Take the associated tile and place it on your Player Board, or gain 3 Glory.
- Skidbladnir: During the Battle at Sea Action, discard a Ship die to discard a revealed Sea Journey card without suffering the consequences.
- Village Wall: Gain 2 Favor. Then you may Pillage the Wall to gain 1 Favor, 1 Terror, and 1 Wall token.
Credits
Game Design: J.B. Howell
Lead Development: Joshua Lobkowicz
Additional Development: Matthew Kunz & Shane Myerscough
Art: Yaroslav Radeckyi
Graphic Design: Christian Strain
Additional Art & Graphics: Tyler Myatt
Rulebook Layout: Sarah Lafser
Rulebook Editing: Allison Ditmore, Matthew Kunz, Manuela Fendt, Dawn Lobkowicz, Joshua Lobkowicz, Joseph Reissmann, & Owen Reissmann
Playtesting
Playtesting: Karyss Vedder, Tim Pike, Robby Clark, Peter Vedder, Mark Sellmeyer, Chris Ploesser, Kreg Smith, Jay McNamara, Eric Farthing, Scott Ward, Kevin Nance, Jake Politte, Matt Roberts, Allison Ditmore, Tom Hite, Allyssa Ohlman, Cory Goff, Alex Goldsmith, Mike Mihealsick, Aaron Holland, JR Honeycutt, Pedro P. Mendoza, Nick Vollentine, Joseph Rose, Camden, Clutter, John Hex Carter, Ryan Paul, Jeff Howell, Darth Knapik, Steve Hines, Djemil Daniel, Matt Williamson, Julie Williamson, Ben Kushner, Robbi Ramirez, Mark Mistretta, Shana Boss-Hill, Rob Yates, Brian Kline, Lloyd Kochinka, Andrew Russell Birkett, Laura Gifford, Don Riddle, Jenn Tatti, K. Novak, Brandon Vieira, Michael Posada & Kathleen Mercury
Overview & Objective
Game Description
In Reavers of Midgard, you are the master of your own longship with a small but loyal crew by your side. You set out to gain glory and become the most renowned reaver in all of Midgard. Recruit vikings to man your longship. Cast bones in order to glimpse your destiny. Slay giant sea monsters and battle against the draugr. Pillage castles and small villages, and force territories to pay tribute to you lest you decide to conquer their lands. In the end, will skalds tell the tale of your adventures? Or will your rivals surpass you and have their stories spun in the Halls of Valhalla?
2-4 Players • 60-120 Minutes
Objective
The goal of the game is to have the most Glory at the end of 6 rounds.
Players gain Glory by discovering powerful artifacts, raiding keeps and villages, fulfilling prophecies, conquering territories, and winning battles at sea.
Components
Components List
- 1 Game Board
- 4 Score Trackers (1 of each color)
- 8 Longship Pawns (2 of each color)
- 1 Start Player Marker
- 1 Honor Ship Token
- 62 Village Spoils Cards
- 76 Keep Spoils Cards
- 24 Sea Journey Cards
- 45 Sea Battle Cards
- 34 Prophecy Cards
- 66 Reaver Cards
- 20 Small Favor Tokens, 5 Large Favor Tokens (Worth 5 Favor each)*
- 30 Small Food Tokens, 10 Large Food Tokens (Worth 5 Food each)*
- 14 Terror Tokens*
- 15 Farm Tokens
- 15 Wall Tokens
- 15 Tower Tokens
- 1 Round Tracker
- 4 Player Boards
- 54 Conquered Territory Tiles
- 12 Ship Upgrade Tiles
- 2 Reference Cards
- 60 Crew Dice (20 of each color)
- 6 Combat Dice
*Favor, Food, and Terror tokens are not limited. If you run out, use a suitable stand-in.
Setup
Game Setup
- Set the Game Board in the middle of the playing area, and place the Round Tracker on the space labeled 1. (The displayed board is for 3-4 players. Use the reverse side for a 2-player game.)
- Give the Start Player marker to whomever most recently won glory in battle. (Alternatively, select a start player at random.) In a three-player game, also give the first player the Honor Ship token. The Honor Ship token functions as an extra Longship pawn for the player controlling it.
- Give each player:
- 1 Player Board
- 1 Longship pawn and 1 score tracker (In a two-player game, give each player 2 Longship pawns)
- 1 Favor token
- In clockwise order:
- The Start Player takes 4 Food tokens
- The second player takes 5 Food
- The third player takes 6 Food
- The fourth player takes 7 Food
- Each player places their score tracker at the 0 marker on the Glory track.
- Separate the Sea Journey, Sea Battle, Village Spoils, Keep Spoils, Reaver, and Prophecy cards. Shuffle each deck separately then place them on their corresponding spaces on the Game Board.
- Each player takes 2 Reaver cards from the deck. Players roll the dice indicated on the top left of each of these Reaver cards and place them on their Player Board. Then each player decides whether to Rally, Specialize, or Promote them according to the Recruit Reavers rules on page 7. (Read that section fully before beginning your first game.)
- At each Action Location, fill the spaces with cards according to the number of players (see page 5).
- Sort the Territory tiles by type and shuffle them. Then, place them on their corresponding spaces.
- Roll 2 of each color Crew dice, and place them in their corresponding spaces within the Trade with Villages Action Location.
- Place the Ship Upgrade tokens at the Raid Villages Action Location on their corresponding spaces.
- Place the Dice, Food, Favor, Terror, Wall, Farm, and Tower tokens in a supply accessible to all players.
Action Locations Setup
During initial Game Setup, and during each cleanup phase, set up each of the Action Locations as described below:
Trading with Villages: Place a Prophecy card face up in each of the card spaces. Then, roll and place two of each color Crew dice in the designated dice spaces.
Sea Battle: Place Sea Battle cards face up in each of the card spaces according to the number of players.
Raid Villages: Place Village Spoils cards face up in each of the card spaces according to the number of players.
Raid Keeps: Place Keep Spoils cards face up in each of the card spaces according to the number of players.
Recruit Reavers: Place Reaver cards face up in each of the card spaces according to the number of players. Each space is designed to hold one card vertically and one card horizontally so that all of the relevant information is visible.
How to Play
Game Structure
Reavers of Midgard is played over six rounds during which you sail your longship to various locations throughout the land. You will lead your viking warriors as you lay siege to powerful castles and raid unsuspecting villages. The seas are full of danger. You will encounter other raiders, draugr, and maybe even a spawn of Jormungandr. Your crew will grow stronger as you outfit your ship with upgrades and powerful artifacts. Though the players will take turns choosing locations to raid, each will partake in the spoils.
Once the 6th round has ended, players will total their score in Glory. The player with the most Glory wins!
Playing a Round
Whoever has the Start Player marker places their Longship pawn on an Action Location. Then, each player immediately activates the effects on any Reaver cards they have specialized in that action (see Recruit Reavers on page 7).
After activating the effects of Reavers, each player may activate the effect of the Action Location selected. The player who selected the Action Location gets a powerful bonus. The other players get lesser bonuses. Most Action Locations have a cost to activate. Any player taking the action must pay the cost. Instead of paying the cost and taking the action a player may opt to Rest. After each player has resolved the effect of a selected Action Location, the next player clockwise places their Longship pawn on a different Action Location, repeating this process. The round ends once four Action Locations have been activated. (This means that in a 2-player game, each player will place two Longship pawns, alternately choosing Action Locations. In a 3-player game, each player will place a Longship pawn, one at a time, in clockwise order. Then, the player with the Honor Ship pawn places it to select an additional Action Location.) At the end of a round, players refresh all the Action Locations by discarding any remaining cards and refilling the empty spaces as shown on page 5.
Note: Players should place discarded cards face up on the bottom of their respective decks. If a deck runs out, the discarded cards should be shuffled to create a new deck. Note: Each Action Location may only be selected once per Round.
Turn Sequence
- A player places their Longship pawn on an Action Location.
- Each player activates the effects of Reaver cards in the corresponding Specialize slot from top to bottom (see Recruit Reavers on page 7).
- Beginning with the active player and continuing clockwise, each player must pay associated costs if they wish to execute the action. Alternatively, they may Rest (see Rest on page 7).
Players should activate their Reaver cards simultaneously. If any timing conflicts arise, resolve them in player order, beginning with the active player.
Note: The abilities of specialized Reaver cards are activated before a player decides whether to activate the Action Location or Rest.
Action Selection
There are two different kinds of Action Locations, indicated by the color of their banner:
- RED locations provide an effect and also an additional bonus depending on player order.
- BLUE locations provide an effect that may be repeated a certain number of times depending on player order.
In either case, the cost for the location is indicated in the BLACK section on the left side of the Action Location graphic. Players must discard the indicated resources to the general supply if they wish to activate the Action Location. (Alternatively, they may Rest.)
The effects of each Action Location are described in detail below.
Note: The bonuses that players receive are based on their proximity to the active player, not on the order of activation. Meaning if the player 1 seat clockwise from the active player chooses to not to pay the cost and participate in the effect of the Action Location, the next player to pay the cost does not get the second player bonus.
Additionally, the bonuses described below apply to the 3- and 4-player game. In a 2-player game, the second player receives the same bonus the fourth player would receive in a larger game. This is indicated graphically on the 2-player side of the game board.
Important Terms
- Rest: Whenever a player cannot (or chooses not to) pay the cost to activate an Action Location, they must Rest. When a player Rests, they may take either 2 Food from the supply or 1 Crew die from the supply in a color of their choice and place it on their Player Board on a side of their choice.
- Active Player: The player who is selecting an Action location. The “second,” “third,” and “fourth” players in Action Location descriptions are counted clockwise from the active player.
- Glory Pile: Sometimes you will be instructed to discard a card to your Glory pile. This is a personal discard pile that will be relevant for end-game scoring. When you discard cards to your Glory pile, simply keep them face-down near your Player Board. Cards discarded from your Player Board go to your Glory pile. Any other cards discarded should be placed face up on the bottom of their respective decks unless noted otherwise.
Action: Recruit Reavers
Recruit Reavers
This Action Location has no cost.
All activating players gain 2 Reaver cards. Beginning with the active player and proceeding clockwise, each participant chooses a face-up stack of cards from the board or 2 random cards from the Reavers deck. The player who selects this locations gain 2 Favor. The other players receive no bonus.
For each Reaver card you take, also take the dice depicted in the top left corner of the card from the supply. Roll these dice and place them in free dice spaces on your player board. If you do not have space for any more dice, you may discard excess dice from your Player Board or discard some or all of the newly-rolled dice.
After collecting your dice, you must decide to use each Reaver card in one of the following three ways:
- Rally: Take the dice depicted in the top right corner of the card and place them on your Player Board on a face of your choice. (Then, discard the Reaver to your Glory pile.)
- Specialize: Slide the Reaver card underneath one of the four Specialize slots on your Player Board until only the ability is visible. These abilities activate when any player selects the corresponding action space. You may Specialize a maximum of three Reavers in each action space. If all of your action spaces are full, subsequent Reaver cards you acquire must be Rallied or Promoted.
- Promote: Place the Reaver card in the Leader space on your Player Board, and immediately take the bonus corresponding to their Clan – indicated by color and aligned with the Reaver’s Clan icon on the left edge of the card. If you already have a Reaver card in your Leader space when you Promote a new Reaver, discard the previous Reaver to your Glory pile.
- Promoting a Reaver provides you with 4 Food.
- Promoting a Reaver lets you draw either one Keep Spoils or one Village Spoils card.
- Promoting a Reaver provides you with 2 Favor.
- Promoting a
In addition to providing an immediate bonus, Promoting a Reaver to Leader allows you to use any dice showing your Leader’s Clan icon as a Shield, Chest, Ship, or Single Hammer icon (indicated on your Player Board for reference).
Action: Trade with Villages
Trade with Villages
This Action Location has no cost.
The active player takes the Start Player marker. Beginning with the active player and proceeding clockwise, each participant chooses from the available rewards a declining number of times.
The active player chooses 3 rewards. The second player chooses 2 rewards. The third and fourth players choose 1 reward.
The available rewards are as follows:
- 2 Favor
- 3 Food
- Any two dice available in dice slots at this Action Location. These dice are not rolled and are kept on the same face as when selected. (If all of the dice from this Location have been taken, you may not choose this reward.)
- A face-up Prophecy card (or a random Prophecy card from the deck)
Note: You may choose the same reward multiple times.
Note: If the player with the Start Player marker selects this Action Location, they must pass the Start Player marker to the next player clockwise.
Action: Battle at Sea
Battle at Sea
This Action Location costs 4 Food to activate.
All activating players attempt to win a Sea Battle. Beginning with the active player and proceeding clockwise, each participant reveals and resolves a Sea Journey card and then chooses a Sea Battle card to encounter (either one of the face-up cards or a random card from the top of the deck). The active player gains 2 Glory upon selecting this location. Other players receive no bonus.
Journey
Reveal the top card of the Sea Journey deck. Most of these cards give players the choice of paying the cost depicted in the top right corner or suffering the effect in the text box at the bottom. Some of the cards have no effect.
Battle
Sea Battle cards may be resolved in two different ways. Sea Battle cards show a Defense value (in the Shield) and a combination of dice shown at the top of the card. To defeat the Sea Battle, you may discard the specified combination of Crew dice from your Player Board or you may attempt to defeat the Sea Battle in combat (see below).
If you win the Sea Battle using either of the above methods, gain the rewards depicted at the bottom of the card then add it to your Glory Pile.
Combat
To participate in combat, discard any number of Crew dice showing a single or double Hammer face. For each Hammer discarded, roll a Combat die. Combat dice will show 0-2 successes (depicted as ). Roll at least as many successes as the number shown in the target card’s Defense value to defeat the enemy.
After any combat roll, you may spend 1 Favor to reroll any number of Combat dice. You may continue discarding Favor to repeat this effect as many times as you wish.
Action: Raid Villages
Raid Villages
This Action Location costs 1 Food and 2 dice on their Treasure Chest face to activate.
All Activating players gain 2 Village Spoils cards. Beginning with the active player and proceeding clockwise, each participant chooses a face-up linked group of cards from the board or 2 random cards from the Village Spoils deck.
The player who selects this location gains 2 additional random cards from the Village Spoils deck. The second player gains 1 additional random card from the deck. The third and fourth players receive no bonus.
Any time you take multiple cards in Reavers of Midgard, you resolve them one at a time and in any order that you choose.
Village Spoils Card Types
The Village Spoils deck has several different types of cards:
- Ship Upgrades: Ship Upgrade cards give you a choice of taking the depicted Ship Upgrade token and placing it on a free Ship Upgrade space on your Player Board or taking 3 Glory immediately. After either choice, the card is discarded. Ship Upgrade tokens show an icon that normally appears on Crew dice and may be activated once per turn as though you were spending a Crew die with that icon. When activating a Ship Upgrade, turn the token face-down on your player board. All face down Ship Upgrade tokens are flipped face up during the cleanup phase. The token that depicts a Ship and a Hammer may be used as either, but not both.
- Artifacts: Artifact cards are placed face up in one of the four indicated spaces on your player board. If all four spaces are already filled, you may discard either an already-owned Artifact or a newly-acquired one to your Glory pile. Artifacts provide a space for storing additional dice and have effects that can be activated by discarding the die stored on them. You may only store the die indicated and may not store a die showing a Clan icon as a wild. Artifacts may be activated during the activation of specific Action Locations as indicated on the card. See the Glossary (on pages 17-18) for details.
Note: Artifacts may be used when an Action Location is selected, even if the artifact’s owner chooses to rest. Furthermore, each Artifact can only be used once per Action Location activation.
- Farm: Farm cards give you 3 Food immediately. Additionally, you may choose to Pillage the Farm. If you choose to Pillage, gain 1 additional Food, 1 Farm token, and 1 Terror token from the supply. After choosing whether or not to Pillage, discard the Farm card.
- Village Wall: Village Wall cards give you 2 Favor immediately. Additionally, you may choose to Pillage the Wall. If you choose to Pillage a Village Wall, gain 1 additional Favor, 1 Wall token, and 1 Terror token from the supply. After choosing whether or not to Pillage, discard the Village Wall card.
Note: Farm, Wall, and Tower tokens grant you Glory at the end of the game. Terror tokens cost you Glory at the end of the game. See End Game Scoring (page 13).
- Bundle of Swords / Bows and Arrows / Axes and Spears: These cards represent craftspeople in the village and offer players an immediate choice. You may either take the 2 dice depicted on the left (signifying trading with the craftspeople) or take the Glory and Terror token depicted on the right (signifying pillaging their stall). After making your choice, discard this card.
- Runic Carvings: These cards represent craftspeople in the village and offer players an immediate choice. You may either discard 1 Terror token and force another player to gain 1 (signifying trading for runes that you utilize well) or take the Glory and Terror tokens depicted on the right (signifying pillaging their stall). After making your choice, discard this card.
Pillage: Pillaging is an optional action that you may take for an additional effect. When cards show a | icon, you automatically receive the reward to the left of the |. You only take the reward to the right of the | if you choose to pillage.
Action: Raid Keeps
Raid Keeps
This Action Location costs 2 Food and 2 dice on their Shield face to activate.
All activating players gain 2 Keep Spoils cards. Beginning with the active player and proceeding clockwise, each participant chooses a face up linked group of cards from the board or 2 random cards from the deck.
The active player gains 2 additional random cards from the Keep Spoils deck. The second player gains 1 additional random card from the deck. The third and fourth players receive no bonus.
Keep Spoils Card Types
The Keep Spoils deck has several different types of cards:
- Treasure / Art / Armor: These cards are all scored as sets at the end of the game. The more of a particular type you have, the more Glory you will gain. The graphic on the bottom of each card shows you how to score based on the number of that particular card you possess. If you possess more cards than are indicated on the bottom of the card, create more than one set and score each set individually. When you gain one of these cards, add it to your Glory pile.
- Tapestry: Tapestries are collected in sets that contain one of each type of Tapestry. If you have all 3 different types, you will gain 15 Glory. Tapestries that are not part of a complete set score 2 Glory each. When you gain one of these cards, add it to your Glory pile.
- Tower: Tower cards give you 2 dice immediately. Optionally, you may also choose to Pillage the Tower. If you choose to Pillage a Tower, you must succeed in a combat against it (see Combat page 9). Towers have a Defense Value of 3. If you succeed in the combat, you have successfully Pillaged the Tower and gain 3 Glory and 1 Tower token from the supply. After resolving the Tower card, discard it.
- Keep Wall: Keep Wall cards give you 2 Favor immediately. Optionally, you may also choose to Pillage the Wall. If you choose to Pillage a Keep Wall, you must succeed in a combat against it (see Combat page 9). Keep Walls have a Defense Value of 2. If you succeed in the combat, you have successfully Pillaged the Wall and gain 1 additional Favor and 1 Wall token from the supply. After resolving the Keep Wall card, discard it.
Note: Farm, Wall, and Tower tokens grant you Glory at the end of the game. Terror tokens cost you Glory at the end of the game. See End Game Scoring (page 13).
Action: Subdue Territories
Subdue Territories
This Action Location has a variable cost to activate.
Beginning with the active player and proceeding clockwise, each participant may attempt to Subdue territories a declining number of times:
- The active player may attempt to Subdue 3 territories.
- The second player may attempt to Subdue 2 territories.
- The third and fourth players may attempt to Subdue 1 territory.
Methods to Subdue
- Subdue by Force: First, select the territory you wish to Subdue. Then, attempt to defeat the territory in combat (see Combat page 9), using the Defense Value indicated on that Territory tile. The higher the Territory’s Defense Value, the greater the potential reward for Subduing it (see page 19). If you succeed in combat, claim the territory tile, and place it in your play area. If you fail in combat, do not claim the territory tile. This Failure still counts as one of your allowed attempts at subduing a territory.
- Peacefully Subdue: First, select the territory you wish to Subdue. Then, discard the resources indicated on the top of that territory tile. The more resources you spend, the greater the potential reward for Subduing the Territory. After spending the required resources, claim the territory tile and place it in your play area.
After completing all of your attempts to Subdue territories, flip over all the territory tiles you Subdued this turn and claim the rewards indicated.
Territory tiles are divided by resource type and by level:
- Red tiles are Food Territories
- Blue tiles are Favor Territories
- Purple tiles are Dice Territories
The level is equal to the Defense value on each tile, either 1, 2, or 3.
During the Cleanup Phase, players score 1 Glory for each territory tile they have Subdued so far.
Cleanup Phase
Round Cleanup
At the end of each round of the game, players complete the following steps to prepare for the next round:
- If you are on Round 6, proceed to final scoring. Otherwise, move the Round marker 1 space clockwise.
In a 3-player game, the player with the Honor Ship token passes it clockwise to the next player. - Each player gains 1 Glory for each territory tile in their play area.
- Clear any dice from the Trade with Villages Location and replace them.
- Discard any remaining face-up cards from the game board and refill from the corresponding decks.
Final Scoring & Examples
Final Scoring
On the back of the rulebook, you will find a scoring chart that you can copy to make your own scoring easier. (You may also download scoring charts from www.greyfoxgames.com)
At the end of the game, each player should take all of the cards from their Player Board and Glory pile and separate them by type. Score each group of cards in the following manner:
- Terror tokens: Lose Glory according to how many Terror tokens you have:
- 1 Terror token: -1 Glory
- 2 Terror tokens: -3 Glory
- 3 Terror tokens: -6 Glory
- 4 Terror tokens: -10 Glory
- 5 Terror tokens: -15 Glory
- 6 Terror tokens: -21 Glory
- Any further Terror tokens cause the players to lose 6 additional Glory each.
- Artifacts: Gain the amount of Glory listed on each card.
- Keep Spoils cards: Sort the cards based on their sets and gain Glory according to the size of each set.
- Farm / Wall / Tower tokens: Score each token separately according to the following chart. If multiple players tie with the most tokens of a type, all tied players gain the full amount of Glory.
- Farm tokens:
- 1 – 3 tokens: 1 Glory each
- 4 – 5 tokens: 2 Glory each
- 6+ tokens: 3 Glory each
- Majority Bonus: The player with the most Farm tokens gains 3 additional Glory.
- Wall tokens:
- 1 – 3 tokens: 2 Glory each
- 4 – 5 tokens: 3 Glory each
- 6+ tokens: 4 Glory each
- Majority Bonus: The player with the most Wall tokens gains 4 additional Glory.
- Tower tokens:
- 1 – 3 tokens: 3 Glory each
- 4 – 5 tokens: 4 Glory each
- 6+ tokens: 5 Glory each
- Majority Bonus: The player with the most Tower tokens gains 5 additional Glory.
- Farm tokens:
- Prophecies: Gain Glory as indicated by each Prophecy card in your play area. See Glossary (pages 16-17).
- The player with the most Glory becomes the most respected Reaver in all of Midgard and is the winner of the game. In case of a tie, the player with the most Favor tokens wins. If players are still tied, they share the victory.
Scoring Example 1 (Orange Player)
116 Glory before final scoring.
- 1 Art Keep Spoils card grants 3 Glory.
- 1 Treasure Keep Spoils card grants 2 Glory.
- The Skidbladnir Artifact Village Spoils card grants 2 Glory.
- The Draupnir Artifact Village Spoils card grants 3 Glory.
- The Bodn Artifact Village Spoils card grants 4 Glory.
- The Dainsleif Artifact Village Spoils card grants 2 Glory.
- Since this player has 5 Wall tokens, each grants 3 Glory (15). They player also earns the majority bonus of 4 Glory for a total of 19 Glory.
- 3 Terror tokens cause the player to lose 6 Glory (-6).
- The Valhalla’s Champions Prophecy card grants 1 Glory per Artifact for a total of 4 Glory.
- The Lord Slayer Prophecy card grants 1 Glory per Tapestry card for a total of 0 Glory.
- The Feast of the Gods Prophecy card grants 1 Glory per Food Territory for a total of 0 Glory.
- The Odin’s Warrior Prophecy card grants 1 Glory per Raven Reaver card for a total of 6 Glory.
- The Juggernaut Prophecy card grants 1 Glory per Wall token for a total of 5 Glory.
- The Refined Taste Prophecy card grants 1 Glory per Art card for a total of 1 Glory.
Total: = 161 Glory. After all end-game scoring, the orange player has 161 Glory.
Scoring Example 2 (Teal Player)
101 Glory before final scoring.
- 4 Art Keep Spoils cards make 1 complete set, granting 10 Glory, and 1 additional card, granting 3 Glory, for a total of 13 Glory.
- 3 Unique Tapestry Keep Spoils cards make one complete set, granting 15 Glory.
- A single Treasure Keep Spoils card grants 2 Glory.
- The Bodn Artifact Village Spoils card grants 4 Glory.
- Since this player has 4 Farm tokens, each grants 2 Glory (8). They also earn the majority bonus of 3 Glory for a total of 11 Glory.
- Since this player has 2 Tower tokens, each grants 3 Glory (6). They also earn the majority bonus of 5 Glory for a total of 11 Glory.
- 2 Terror tokens cause the player to lose 3 Glory (-3).
- Each Vanquisher Prophecy card grants 1 Glory per Tower token for a total of 2 Glory per Tower token (+4 Glory).
- The Shaman of the World Prophecy card grants 1 Glory per Prophecy card for a total of 7 Glory.
- The Lord Slayer Prophecy grants 1 Glory per Tapestry card for a total of 3 Glory.
- The Refined Taste Prophecy card grants 1 Glory per Art card for a total of 4 Glory.
- The Juggernaut Prophecy card grants 1 Glory per Wall token for a total of 0 Glory.
- The Berserker’s Glory Prophecy card grants 1 Glory per Helm Reaver card for a total of 8 Glory.
Total: = 180 Glory. After all end-game scoring, the teal player has 180 Glory and wins the game!
Glossary & Icons Reference
Icons
- – Any color die
- – The depicted color of die
- – The depicted color of die on a side of your choice
- – Any color die on a side of your choice
- – Any color die with the indicated side
- – Food token
- – Favor token
- – Terror token
- – Wall token
- – Tower token
- – Farm token
- – Glory
- – Keep Spoils card
- – Reaver card
- – Prophecy card
- – Village Spoils card
- – Defense Value
- – Discard the indicated token, dice, or card
- – Spend the item on the left to gain the item on the right
- – You resolve the action on the left, and may optionally resolve the action on the right
- – You resolve the action depicted on the left, then resolve the action on the right
- – You may resolve the action on the left OR the action on the right
- – The items on the left and right must be the same
- – The items on the left and right must not be the same
Reavers
Helm Reavers
- Axe Chief: Draw 2 Village Spoils cards and keep 1.
- Fanatic: Draw 2 Keep Spoils cards and keep 1.
- Favored Soul: Discard a red die to gain a red die on any side.
- Flame Bringer: Discard 2 dice to gain a Wall token.
- Lithsman: Gain 1 red die on its Helm side.
- Pillager: Discard 1 die to gain a Farm token.
Raven Reavers
- Grizzled Warrior: Discard a blue die to gain a blue die on any side.
- Huskarl: Gain 1 blue die on its Raven side.
- Freeman: Gain 1 blue die on its Hammer side.
- Scavenger: Draw 2 Village Spoils cards and keep 1.
- Seasoned Hunter: Gain 1 Food. You may discard 1 die to gain 3 additional Food.
- Spear Chief: Gain 2 Food.
Tree Reavers
- Hiromenn: Discard any die to gain the same color die on any side.
- Keeper of Sagas: Gain 2 Glory.
- Revered Seer: Discard 1 Favor to gain 2 Glory.
- Scout: Discard a yellow die to gain a yellow die on any side.
- Spakona: Discard 2 Favor to draw 1 Prophecy card.
- Sword Chief: Gain 1 yellow die on its Tree side.
Sea Battles
- Cargo Ship: Gain 2 Food and 8 Glory.
- Draugr Raiders: Discard 1 Terror token and gain 9 Glory.
- Infamous Outcasts: Discard 1 Terror token and gain 12 Glory.
- Knarr: Gain a Keep Spoils card and 11 Glory.
- Longship: Draw a Reaver card and gain 13 Glory.
- Lyngbakr: Draw a Prophecy card and gain 15 Glory.
- Spawn of Jormungandr: Gain 1 Favor and 19 Glory.
- Wherry: Gain 2 Food and 10 Glory.
Sea Journey Effects
- All Quiet: No Effect.
- Draugr Ambush: Discard a Shield die, or lose 1 Artifact card or Ship Upgrade tile.
- Kraken!!!: If you spend a Ship and Hammer die to defeat the Kraken, gain 3 Glory. Otherwise, discard 2 Food and 1 die.
- Rough Seas: Discard a Ship die, or discard your Leader.
- Spoiled Food: Discard a Chest die, or lose 2 Food.
- Starvation: Discard 1 Reaver card, or lose 2 Food.
- Viking Raiders: Discard a Hammer die, or lose 1 die matching the color of your Leader from your Player Board.
Prophecies
- Berserker’s Glory: Gain 1 Glory for every Helm Reaver card in your Glory pile.
- Champion of the Sea: Gain 1 Glory for every Sea Battle card in your Glory pile.
- Feast of the Gods: Gain 1 Glory for every Food Territory in your Glory pile.
- Juggernaut: Gain 1 Glory for every Wall token in your Glory pile.
- Lord Slayer: Gain 1 Glory for every Tapestry card in your Glory pile.
- Odin’s Prophet: Gain 1 Glory for every Favor Territory in your Glory pile.
- Odin’s Warrior: Gain 1 Glory for every Raven Reaver card in your Glory pile.
- Pillager: Gain 1 Glory for every Farm token in your Glory pile.
- Proud Conquerors: Gain 1 Glory for every Dice Territory in your Glory pile.
- Refined Taste: Gain 1 Glory for every Art card in your Glory pile.
- Sailor’s Reward: Gain 2 Glory for every Ship Upgrade tile on your Player Board.
- Seidr’s Chosen: Gain 1 Glory for every Tree Reaver card in your Glory pile.
- Shaman of the World: Gain 1 Glory for every Prophecy card in your Glory Pile (including this one).
- Stolen Armor: Gain 1 Glory for every Armor card in your Glory pile.
- Treasure Hunter: Gain 1 Glory for every Treasure card in your Glory pile.
- Valhalla’s Champion: Gain 1 Glory for every Artifact card in your Glory pile.
- Vanquisher: Gain 1 Glory for every Tower token in your Glory pile.
Keep Spoils
- Armor: 1 Armor card grants you 1 Glory, 2 Armor cards grant you 2 Glory, 3 Armor cards grant you 6 Glory, 4 Armor cards grant you 12 Glory, 5 Armor cards grant you 20 Glory, and 6 Armor cards grant you 30 Glory at the end of the game.
- Art: 1 Art card grants you 3 Glory, 2 Art cards grant you 6 Glory, and 3 Art cards grant you 10 Glory at the end of the game.
- Keep Wall: Gain 2 Favor. Then, you may attempt to win a combat against a Defense Value of 2 to gain 1 Favor and 1 Wall token.
- Tapestries: 1 Tapestry card grants you 2 Points, 2 different Tapestry cards grant you 4 Glory, and 3 different Tapestry cards grant you 15 Glory at the end of the game.
- Treasure: 1 Treasure card grants you 2 Glory, 2 Treasure cards grant you 4 Glory, 3 Treasure cards grant you 9 Glory, and 4 Treasure cards grant you 16 Glory at the end of the game.
- Tower: Gain and roll a blue and yellow die. Then, you may attempt to win a combat against a Defense Value of 3 to gain 3 Glory and 1 Tower token.
- Tower: Gain and roll a red and yellow die. Then, you may attempt to win a combat against a Defense Value of 3 to gain 3 Glory and 1 Tower token.
- Tower: Gain and roll a red and blue die. Then, you may attempt to win a combat against a Defense Value of 3 to gain 3 Glory and 1 Tower token.
Village Spoils
- Andvarinaut: During the Raid Keeps Action, discard a Shield die to draw 1 Keep Spoils card.
- Axes and Spears: Gain and roll a blue and red die, or gain 5 Glory and 1 Terror token.
- Bodn: During any Action, discard a die of your choice to discard any die then gain the same color die on any side.
- Bows and Arrows: Gain and roll a blue and yellow die, or gain 5 Glory and 1 Terror token.
- Bundle of Swords: Gain and roll a red and yellow die, or gain 5 Glory and 1 Terror token.
- Brisingamen: During the Trade with Villages Action, discard a Tree die to draw a Prophecy card and then discard one from your play area.
- Dainsleif: During the Battle at Sea Action, discard a Hammer die to gain 2 Combat dice.
- Draupnir: During the Raid Keeps Action, discard a Shield die to gain 2 Food.
- Eldrihmnir: During the Raid Villages Action, discard a Raven die to gain 3 Food.
- Farm: Gain 3 Food. Then you may Pillage the Farm to gain 1 Food, 1 Terror token, and 1 Farm token.
- Fragment of Mjölnir: During the Subdue Territories Action, discard a Helm die to gain 1 combat die.
- Frigg’s Chalice: During the Raid Villages Action, discard a Chest die to discard 1 Terror token.
- Harp of the Ljósálfar: During any Action, discard a Tree die to gain 2 Favor.
- Hringhorni: During the Trade with Villages Action, discard a Ship die to gain and roll 2 dice of your choice.
- Járnglófar: During the Recruit Reavers Action, discard a Raven die to resolve the Leader ability (clan bonus) of 1 Reaver you acquired this turn.
- Laevateinn: During the Subdue Territories Action, discard a Helm die when Subduing a level 1 or 2 Territory to instead claim a level 3 Territory of the same type.
- Runic Carvings: Either discard 1 Terror and chose another player to gain 1 Terror, or gain 10 Glory and 2 Terror.
- Sacred Ash Stave: During the Recruit Reavers Action, discard a Chest die to resolve the Specialization ability of 1 Reaver you acquired this turn.
- Ship Upgrade: Take the associated tile and place it on your Player Board, or gain 3 Glory.
- Skidbladnir: During the Battle at Sea Action, discard a Ship die to discard a revealed Sea Journey card without suffering the consequences.
- Village Wall: Gain 2 Favor. Then you may Pillage the Wall to gain 1 Favor, 1 Terror, and 1 Wall token.
Credits
Credits
Game Design: J.B. Howell
Lead Development: Joshua Lobkowicz
Additional Development: Matthew Kunz & Shane Myerscough
Art: Yaroslav Radeckyi
Graphic Design: Christian Strain
Additional Art & Graphics: Tyler Myatt
Rulebook Layout: Sarah Lafser
Rulebook Editing: Allison Ditmore, Matthew Kunz, Manuela Fendt, Dawn Lobkowicz, Joshua Lobkowicz, Joseph Reissmann, & Owen Reissmann
Playtesting
Playtesting: Karyss Vedder, Tim Pike, Robby Clark, Peter Vedder, Mark Sellmeyer, Chris Ploesser, Kreg Smith, Jay McNamara, Eric Farthing, Scott Ward, Kevin Nance, Jake Politte, Matt Roberts, Allison Ditmore, Tom Hite, Allyssa Ohlman, Cory Goff, Alex Goldsmith, Mike Mihealsick, Aaron Holland, JR Honeycutt, Pedro P. Mendoza, Nick Vollentine, Joseph Rose, Camden, Clutter, John Hex Carter, Ryan Paul, Jeff Howell, Darth Knapik, Steve Hines, Djemil Daniel, Matt Williamson, Julie Williamson, Ben Kushner, Robbi Ramirez, Mark Mistretta, Shana Boss-Hill, Rob Yates, Brian Kline, Lloyd Kochinka, Andrew Russell Birkett, Laura Gifford, Don Riddle, Jenn Tatti, K. Novak, Brandon Vieira, Michael Posada & Kathleen Mercury
