
Space Base
2018
Command a growing fleet, build your engine, and pursue explosive gains or steady income in this strategic dice game for 2–5 players.
60
minutes
2 - 5
player(s)
14+
Medium

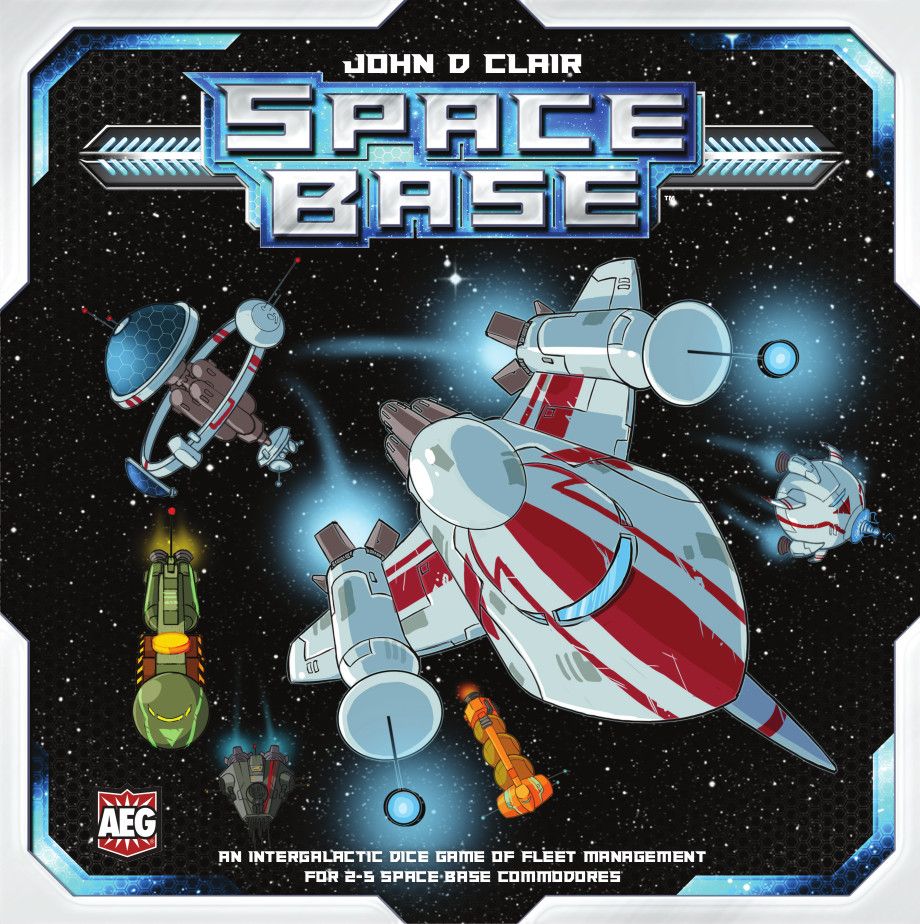
About this board game
Space Base is a strategic dice game for 2–5 players that plays in about 60 minutes. Each player takes the role of a Commodore commanding a small fleet, developing a space base through ship cards, dice rolls, and carefully planned engine-building choices.
Ships begin docked at stations before being deployed to sectors as new vessels are commissioned. Your fleet can take several directions: cargo vessels support trade and commerce, mining vessels create recurring base income, and carriers spread your influence. Establishing new colonies can bring even more influence, helping you progress toward promotion to Admiral.
- Dice-driven rewards: The active player rolls, while everyone receives benefits through the game’s “I roll, everyone gets stuff” mechanism.
- Strategic engine building: Buy ship cards and add them to your player board, where both their abilities and the order in which you acquire them shape your developing engine.
- Multiple paths to success: Pursue long odds and explosive gains, low-luck steady income, powerful end-game combinations, or a flexible mix of approaches.
The cards you purchase do more than provide immediate abilities. Their placement and timing create interesting implications for how your engine develops, offering a distinctive take on tableau-based construction and rewarding thoughtful decisions throughout the game.
Quick to learn and quick to play, Space Base can be taught during the first round or two while still offering meaningful strategic choices. Its blend of dice-chucking luck and challenging planning makes each fleet’s development feel different as players compete to build influence and rise through the ranks.
Designer
Illustrator
/pic7182955.jpg)

Board Game Rules for
Space Base
Overview
For 2–5 Spacebase Commodores | Ages 14 and Up | By John D. Clair
In Space Base players assume the role of a Commodore in command of a small fleet of ships. Ships begin docked at their stations and are then deployed to sectors as new ships are commissioned under your command. Use cargo vessels to engage in trade and commerce, mining vessels to build recurring base income, and carriers to spread your influence. Establish new colonies in a sector to gain even more influence.
Gain enough influence and you just might be promoted to Admiral!
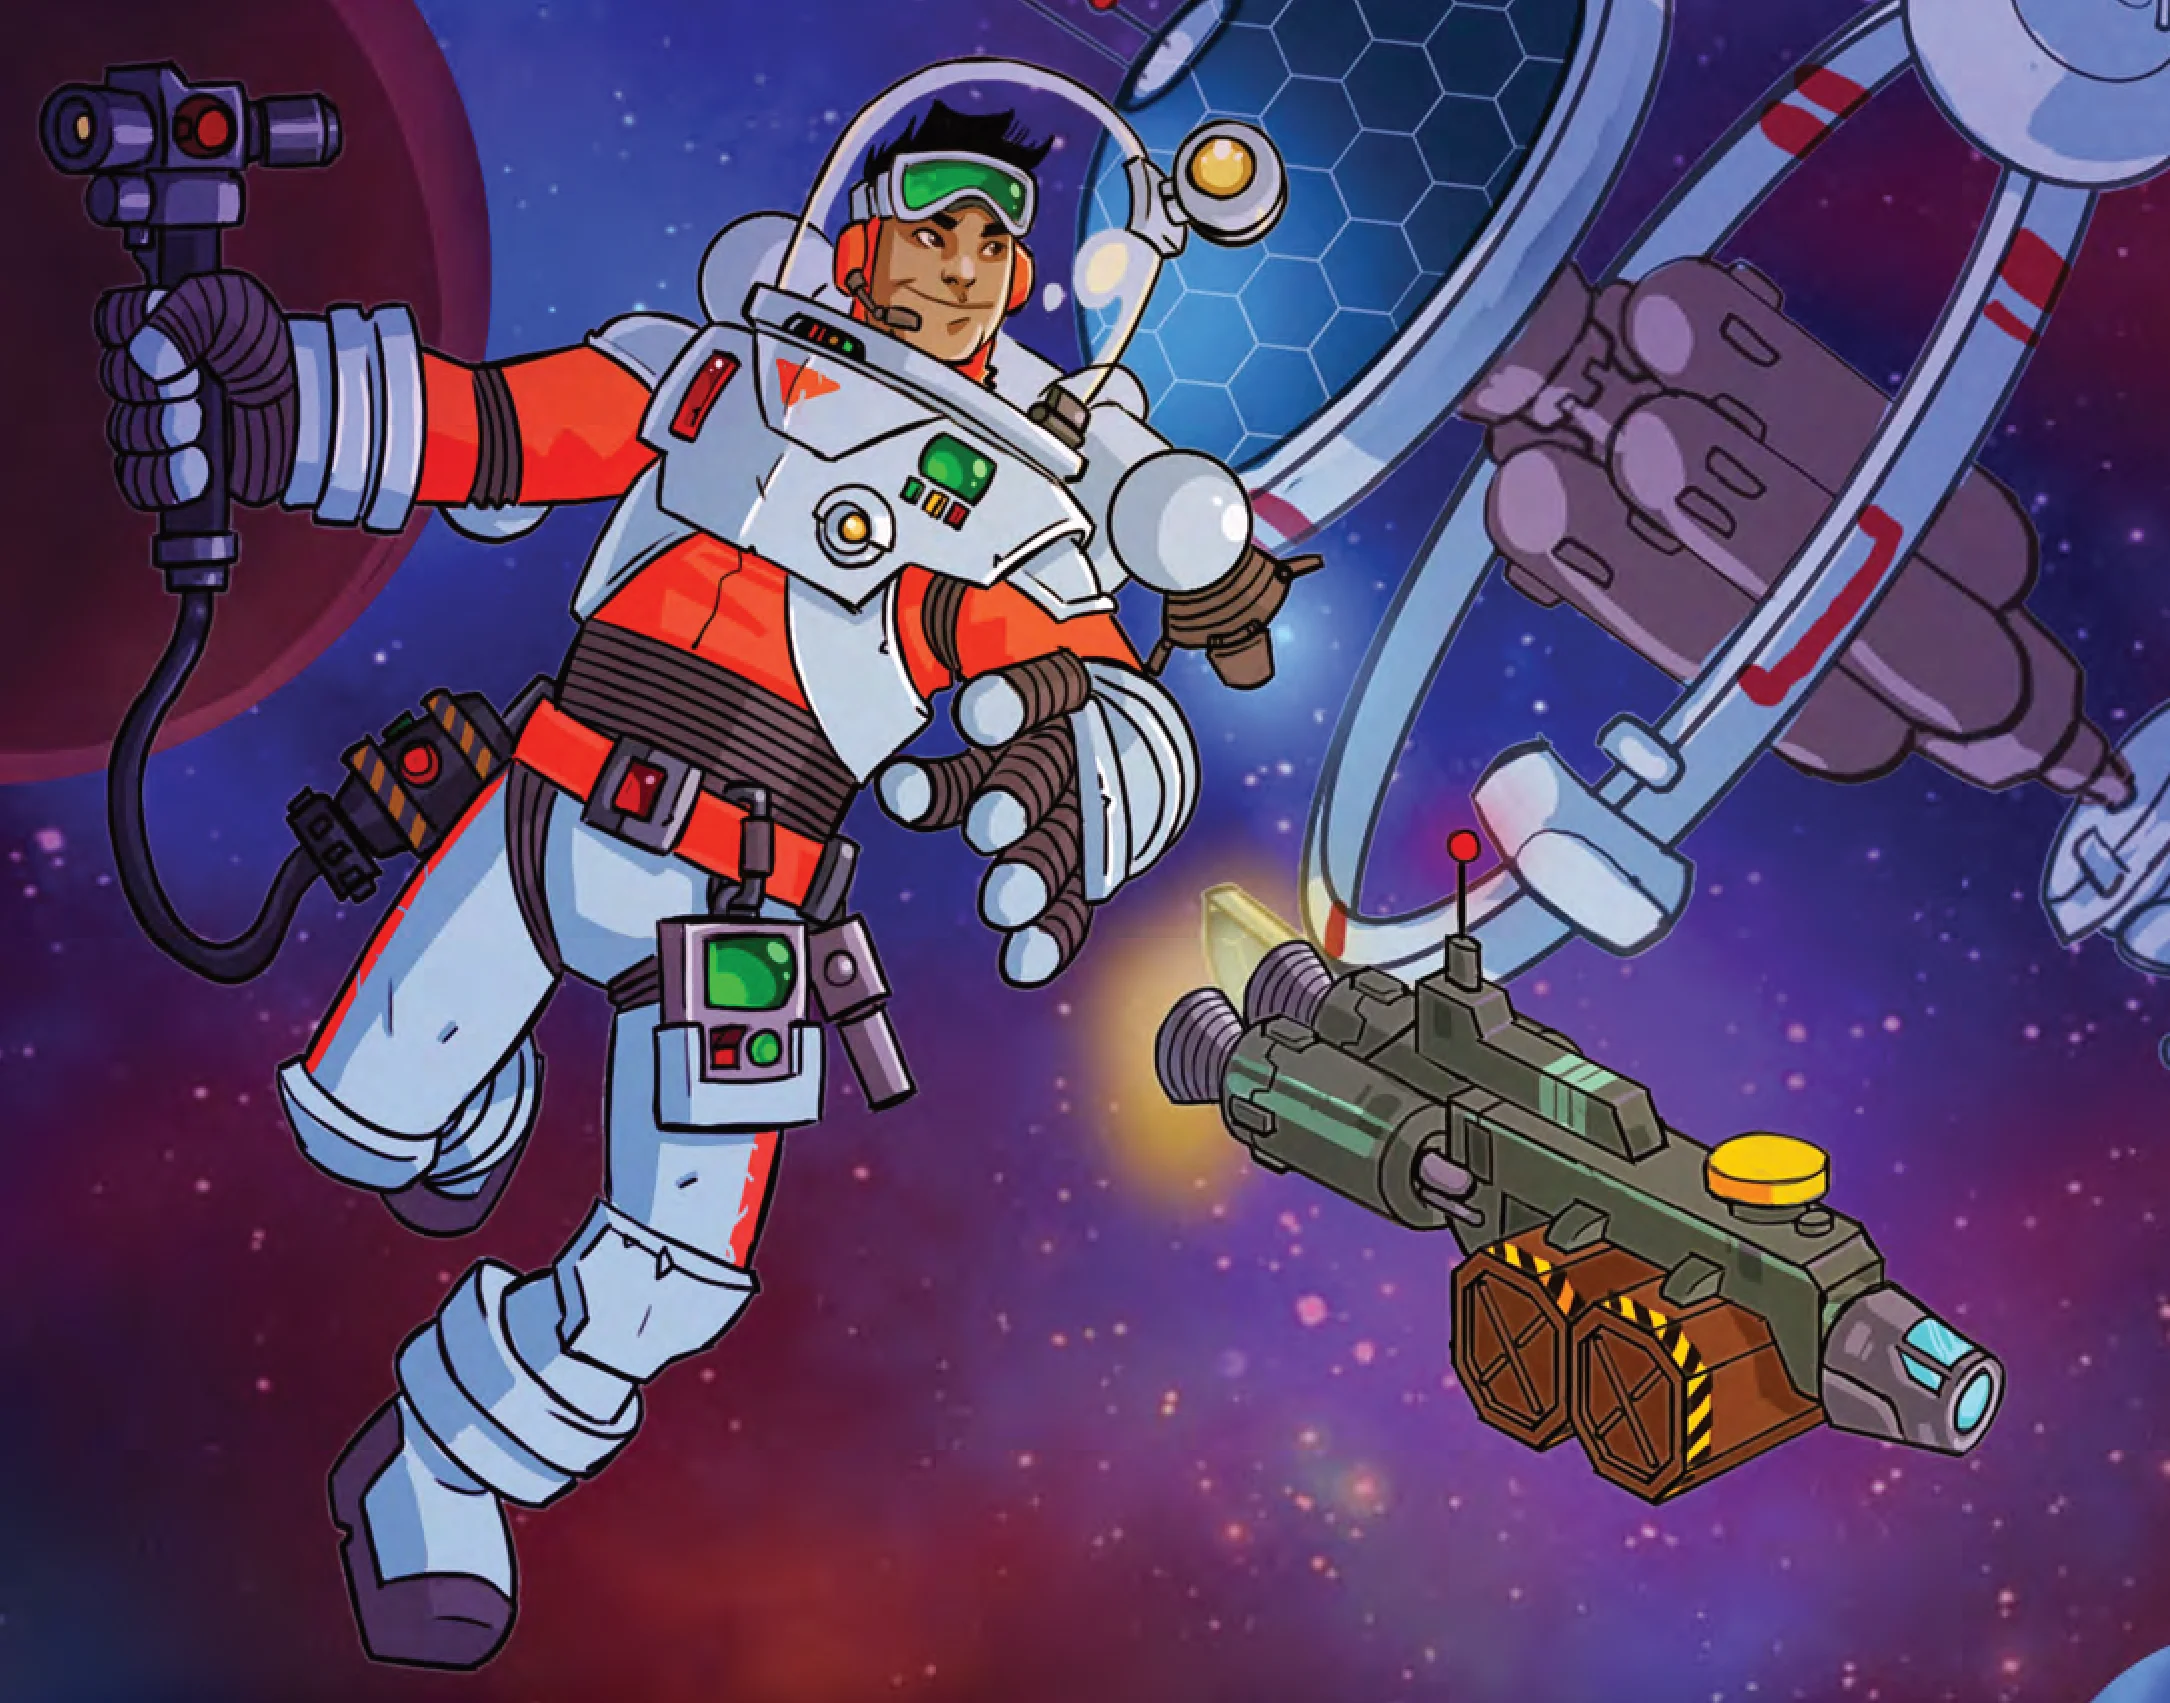
Commodore Sean Chen floats in the void, protected only by his space suit. Today he is overseeing the flight crew and signal officers of the “Knight Class Cargo Vessel, U.E.S. Scobee” as it pulls away from port. It has five long years ahead of it in sector seven, engaging in trade with the natives and colonies. Replacing the Scobee in base is the new “Bradbury Class Carrier, U.E.S. Allen.” The recently assigned Allen will lend support and influence to the bases and sectors to which it is designated, and these newer C retrofit models can even hold a moderate amount of cargo.
Chen smiles to himself, “Influence.” Influence over one’s sectors is how a Space Base commodore becomes an admiral.
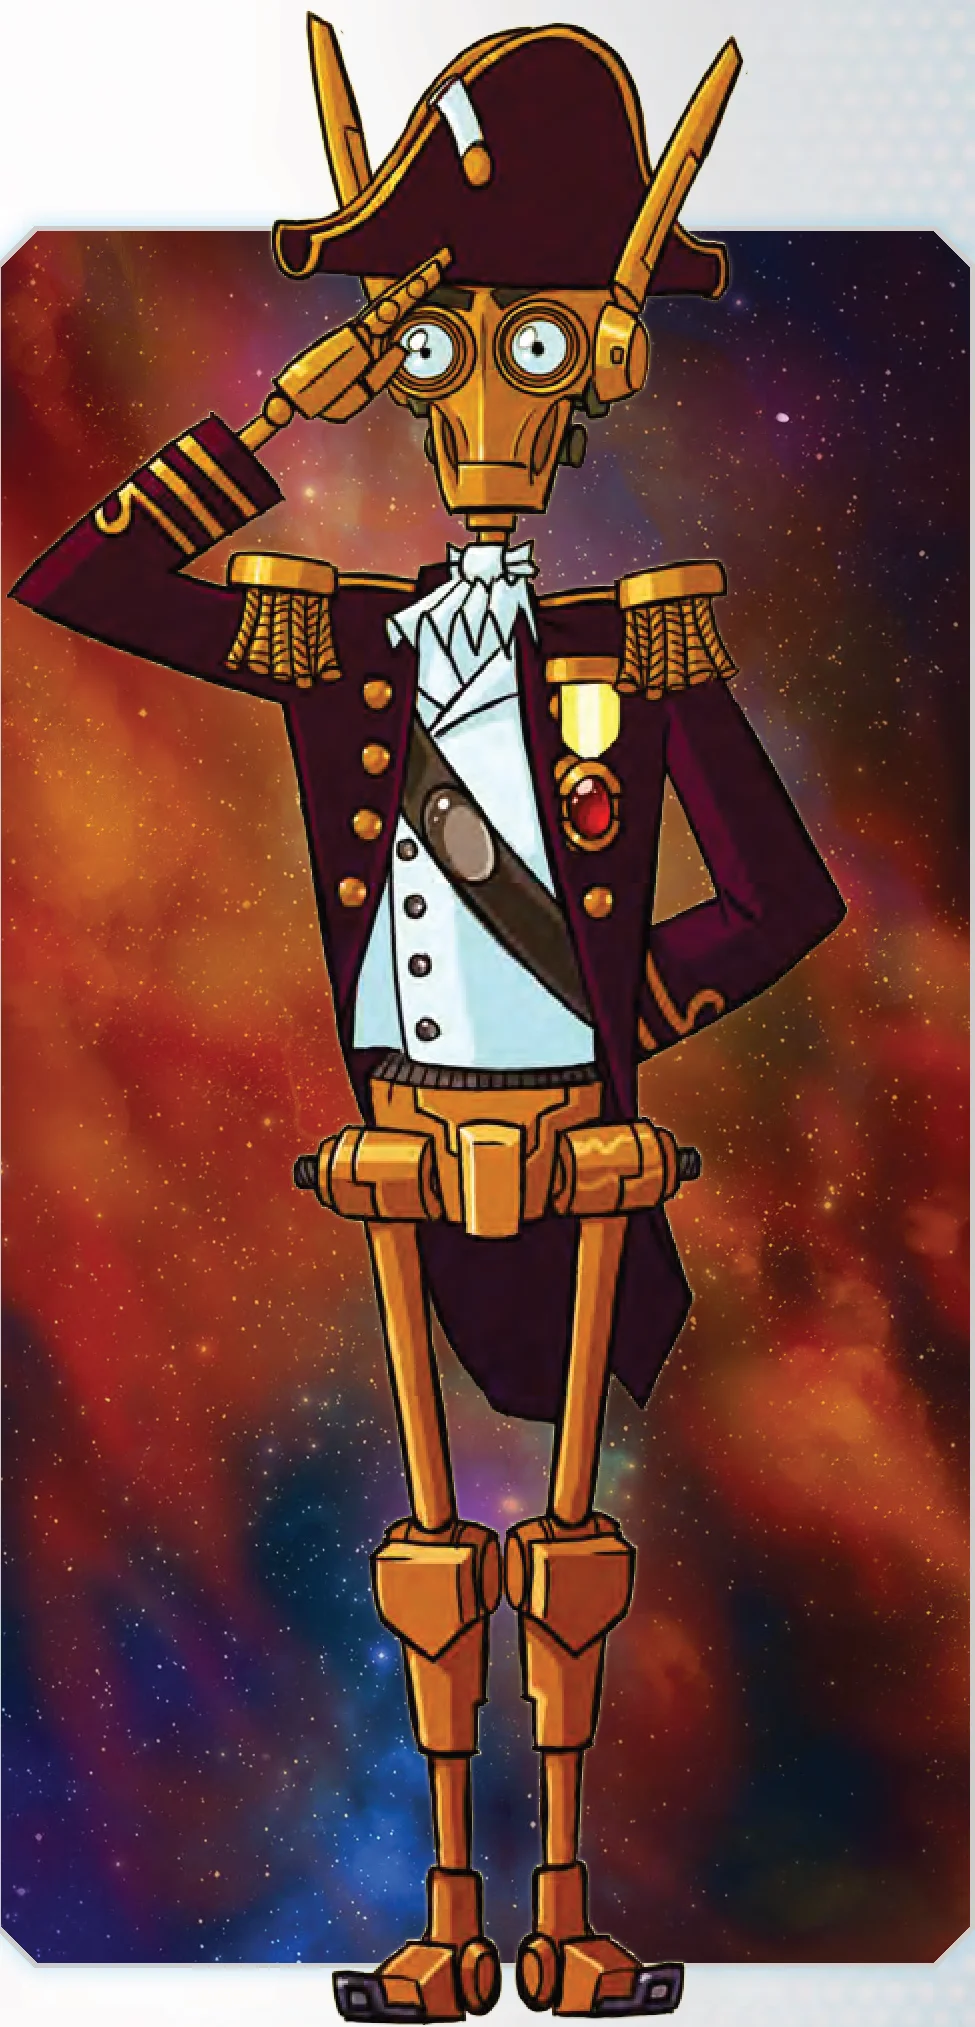
His brow furrows momentarily. There is only one promotion available and Commodore Liz Valor, a capable, sassy and dynamic officer rising through the ranks, has her eyes on the position. And there is also the newly-promoted Z-bot: Z-4045 was built for promotion, and even has the hat to go with it!
As he turns to watch the Allen move through the silence of space towards its docking stand, he knows that he has his work cut out today — just like every other day.
Game Play Overview
Space Base is a race to 40 victory points.
On your turn you will roll 2 six-sided dice. All players will then claim rewards from their cards, either for each individual die or for the sum of the dice. For example, if you roll a 5 and a 6, you could claim rewards for the 5 sector and the 6 sector cards on your board, or you could claim the reward of only the 11 sector card on your board.
Importantly though, if it is not your turn, instead of gaining rewards for cards on your board, you will gain rewards for the “deployed” cards above your board.
After rewards are gained, the active player may buy a new card to place on their board, causing the card currently in that sector to be deployed above their board.
As new cards are bought and deployed your base will get better and better at a faster rate. Don’t forget to score points because in the end points are what matters!
Goal
When any player reaches 40 victory points, you will finish the current round so all players have the same number of turns, at which point the player with the most victory points wins.
Components
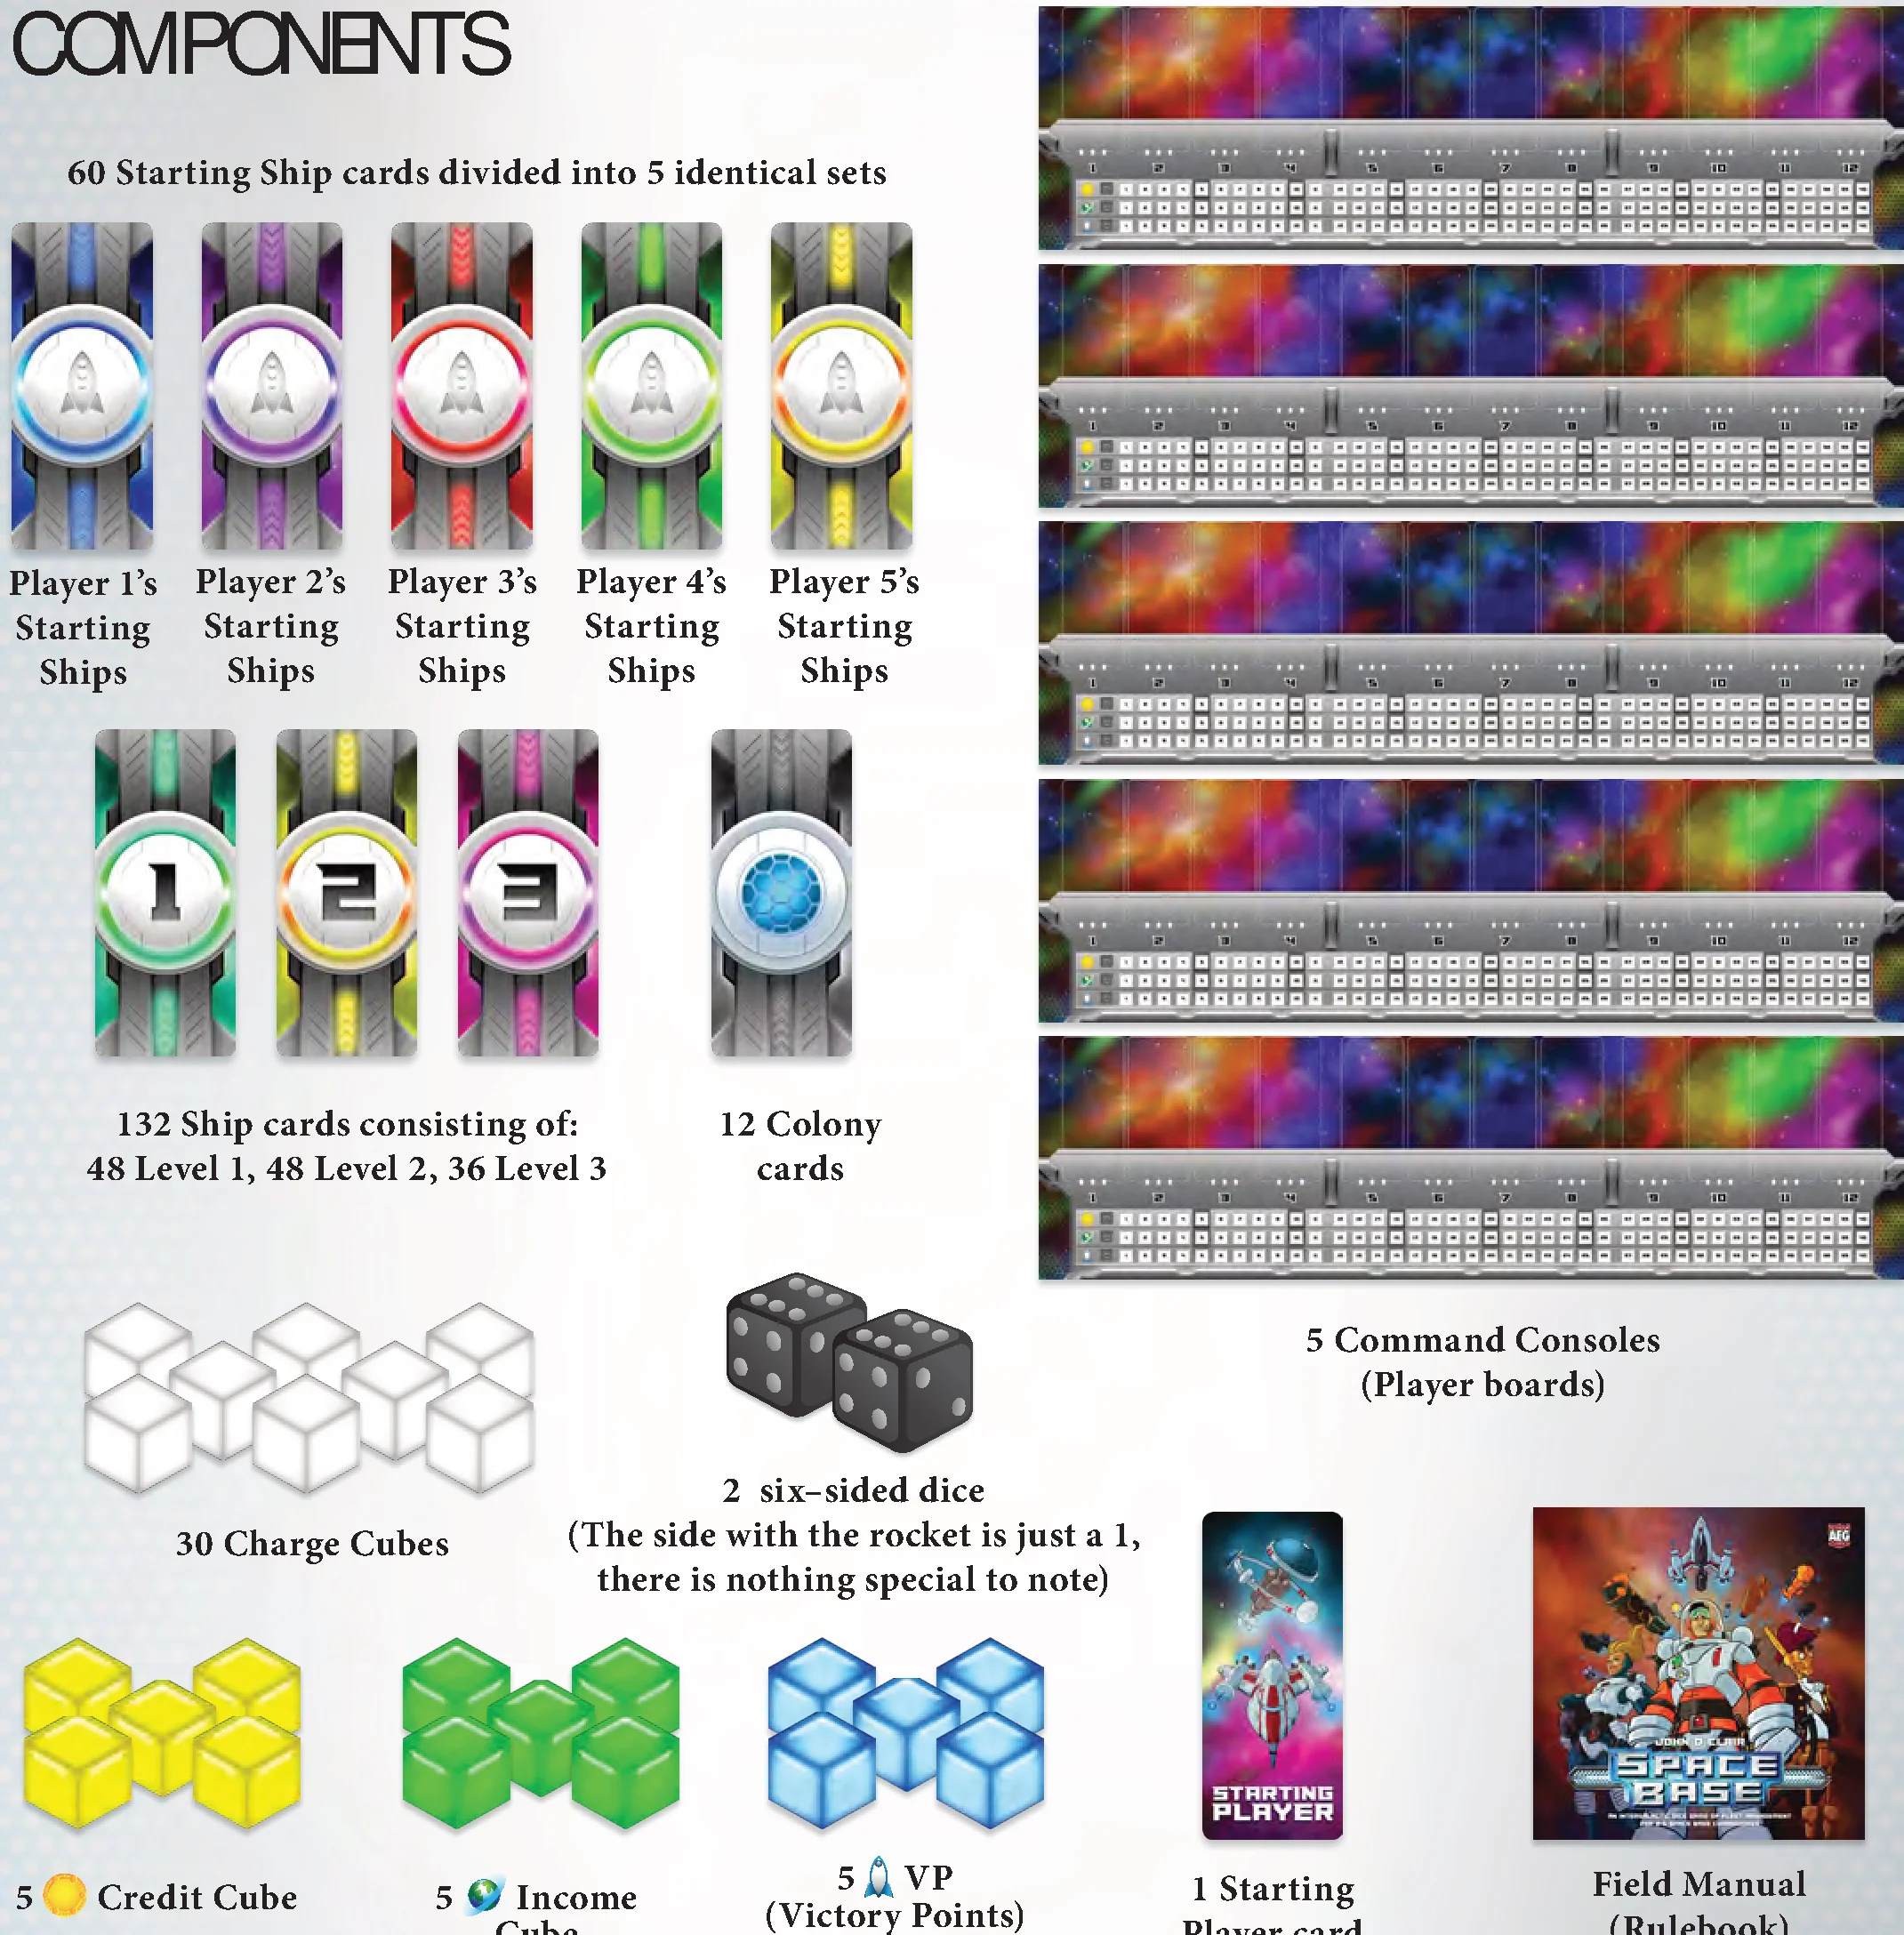
- 5 Command Consoles (Player boards)
- 60 Starting Ship cards divided into 5 identical sets (Player 1 to 5)
- 132 Ship cards consisting of:
- 48 Level 1
- 48 Level 2
- 36 Level 3
- 12 Colony cards
- 30 Charge Cubes
- 2 six-sided dice (The side with the rocket is just a 1, there is nothing special to note)
- 5 Credit Cubes (yellow)
- 5 Income Cubes (green)
- 5 VP Cubes (Victory Points, blue)
- 1 Starting Player card
- Field Manual (Rulebook)
Core Concepts
The following are key concepts that you need to understand to play Space Base. These will be covered in further detail later in the rulebook.
Simultaneous Rewards
After a player rolls the dice on their turn, everyone—the active player and all passive players—independently decide how to allocate the rolled dice, then gain rewards from their player cards.
Deploying Ships
When you buy a new ship, place it in the sector on your board that the card indicates. The card already in that sector gets “deployed,” which means turned upside-down and tucked under the top of your board in the same sector with its deployed effect visible.
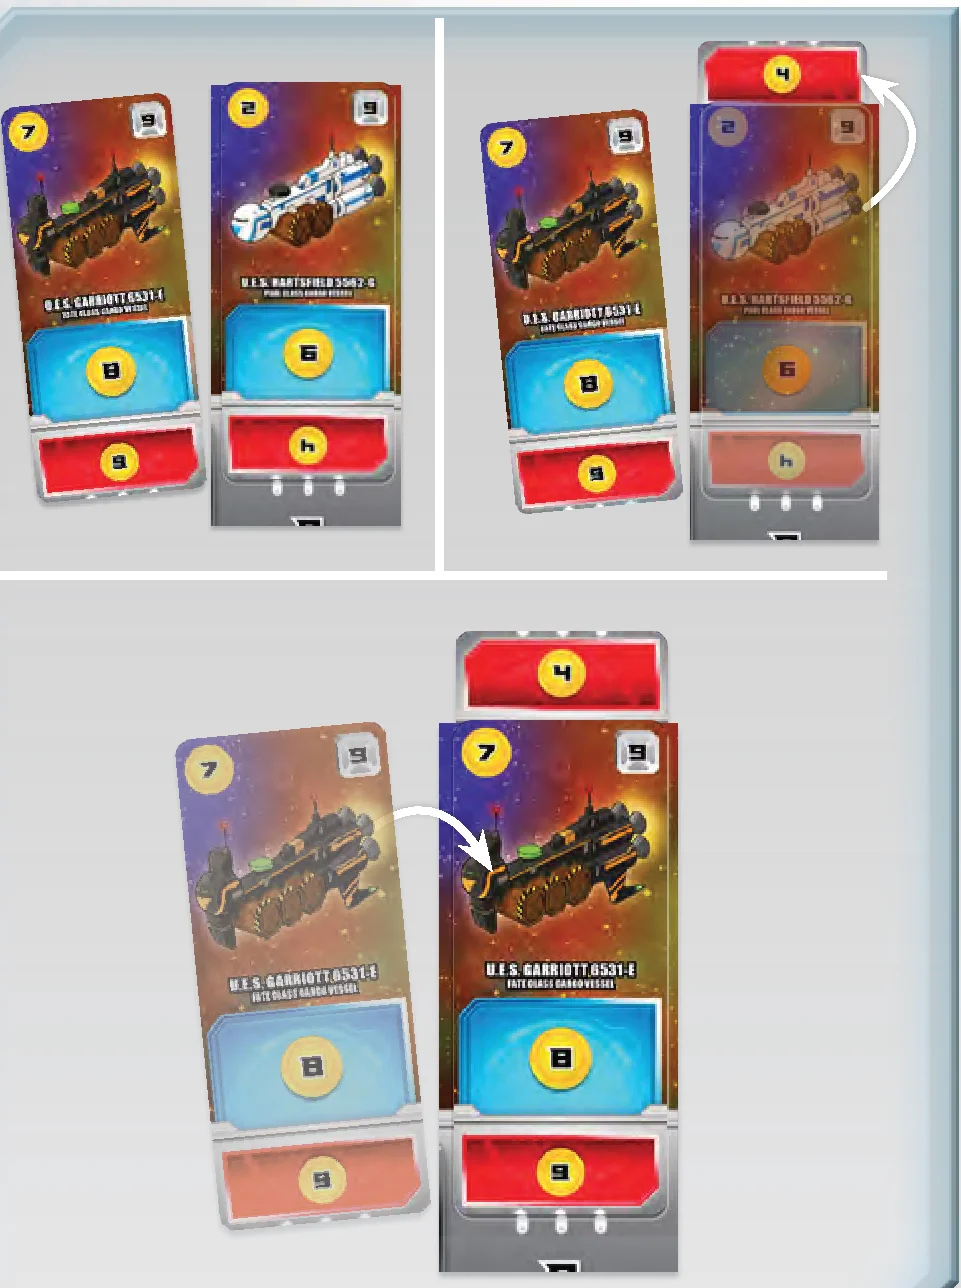
Deployed Ships Stack
During the game you might buy multiple cards for the same sector, thus deploying multiple cards there. In this case, these deployed effects stack and should all be visible. When you allocate dice in that sector as a passive player—on another player’s turn—gain rewards for ALL your deployed cards in that sector, if able.
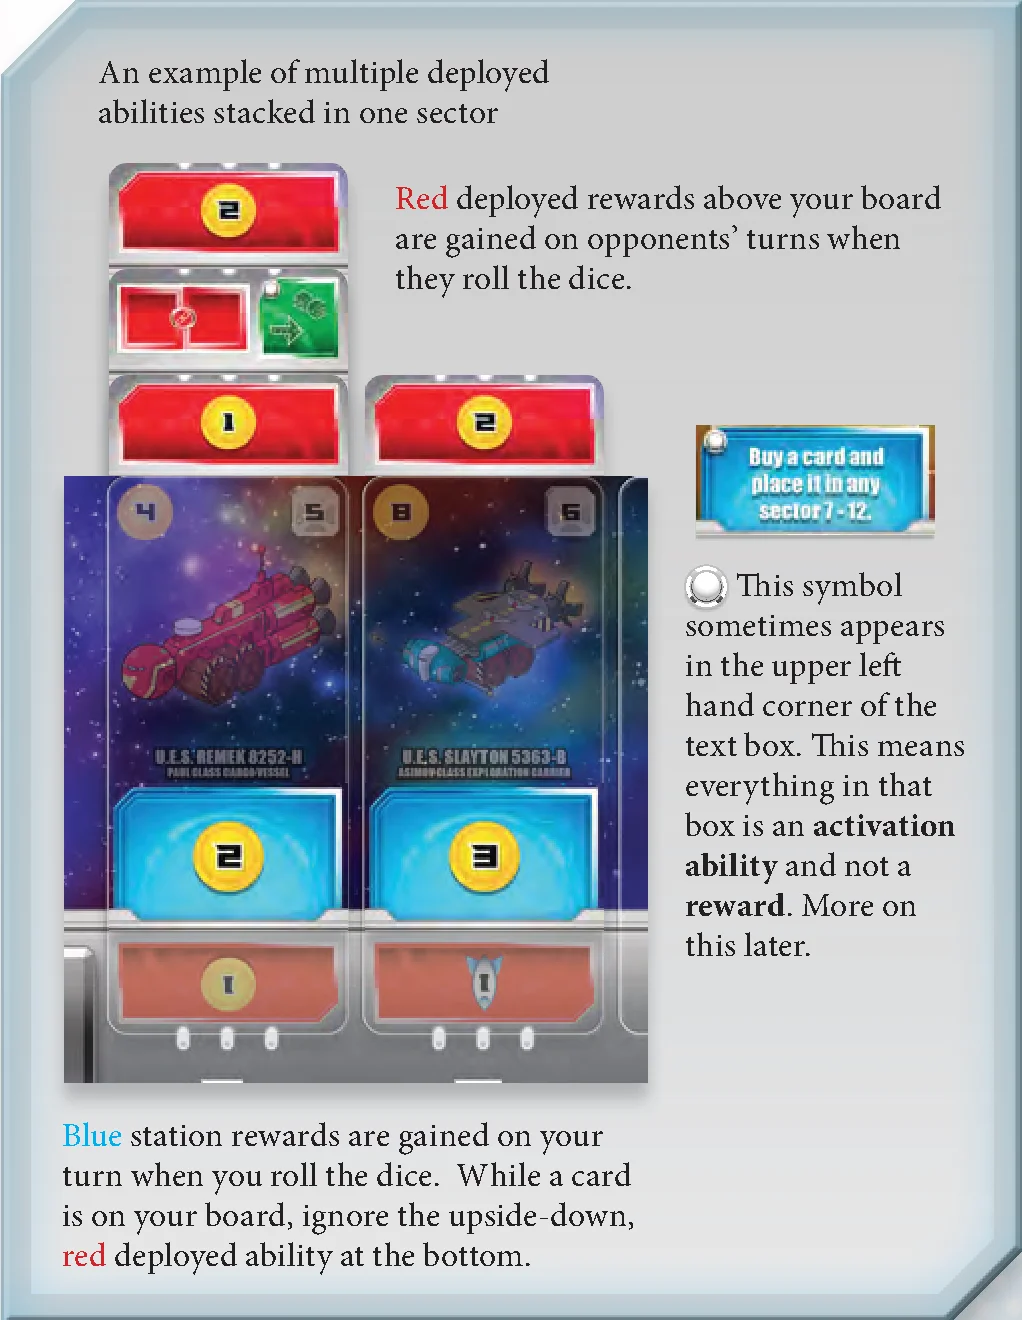
Station vs. Deployed Rewards
As a general rule, cards on your board—called “station” cards—offer rewards during your turn, and cards deployed above your board offer rewards during opponents’ turns.
We’ve already defined “active” and “passive” a few times on this page:
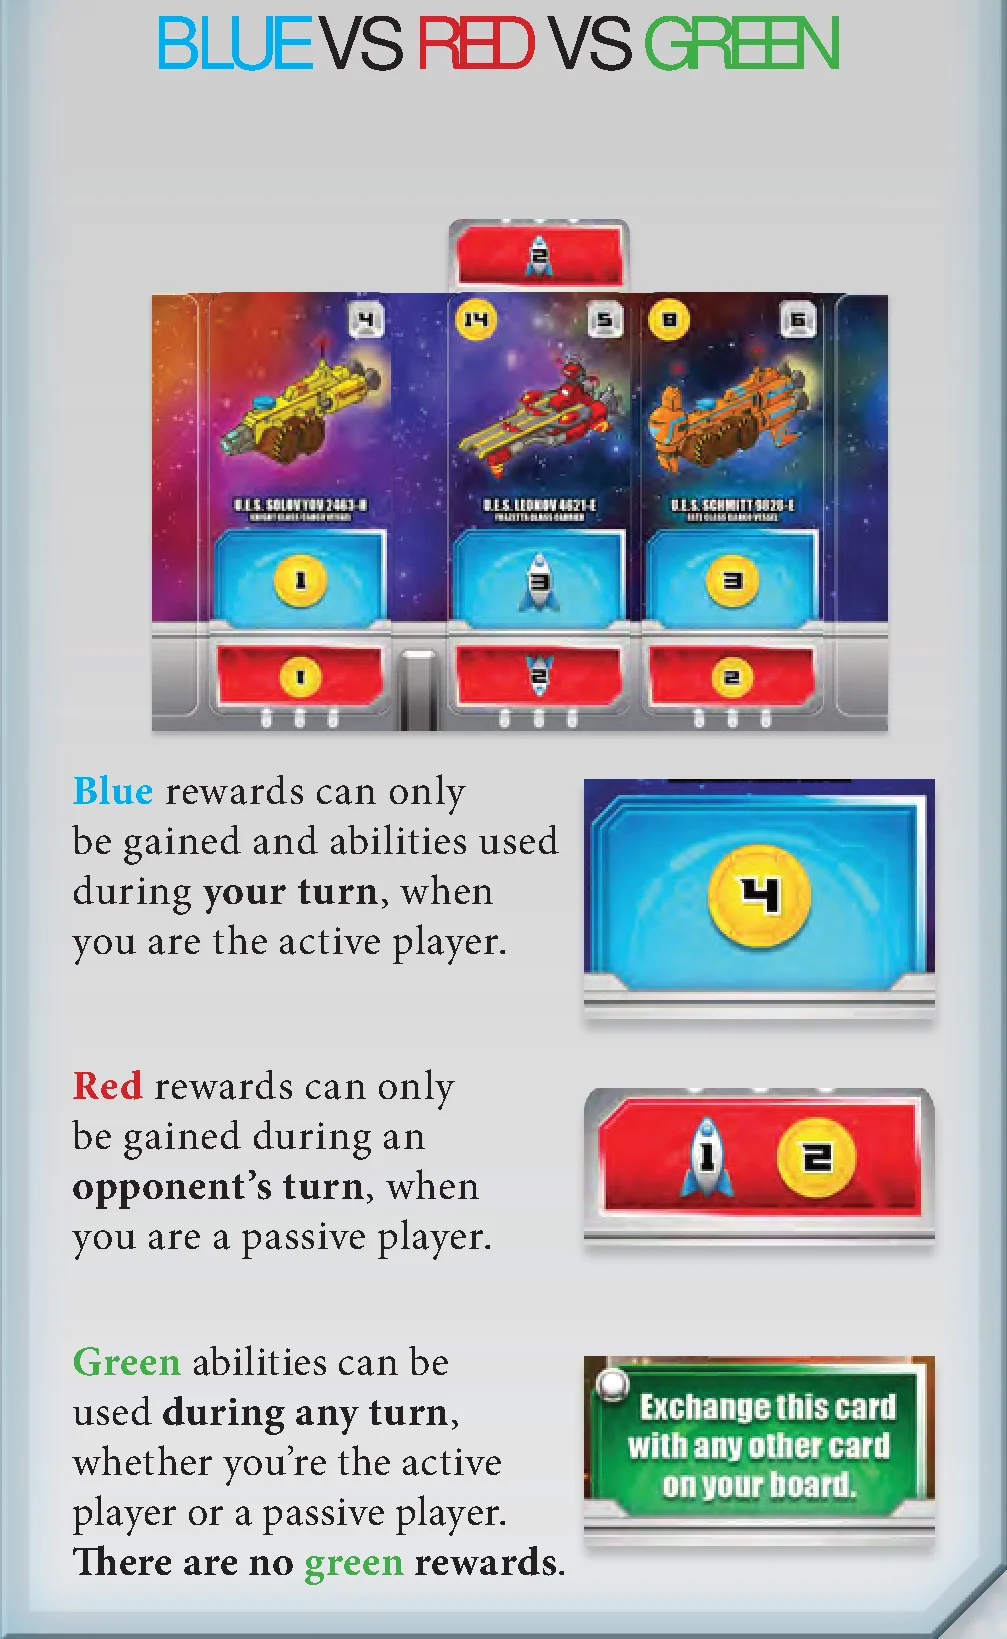
- Blue rewards can only be gained during your turn.
- Red rewards can only be gained during opponents’ turns.
The  symbol sometimes appears in the upper left hand corner of the text box. This means everything in that box is an activation ability and not a reward. More on this later.
Card Anatomy
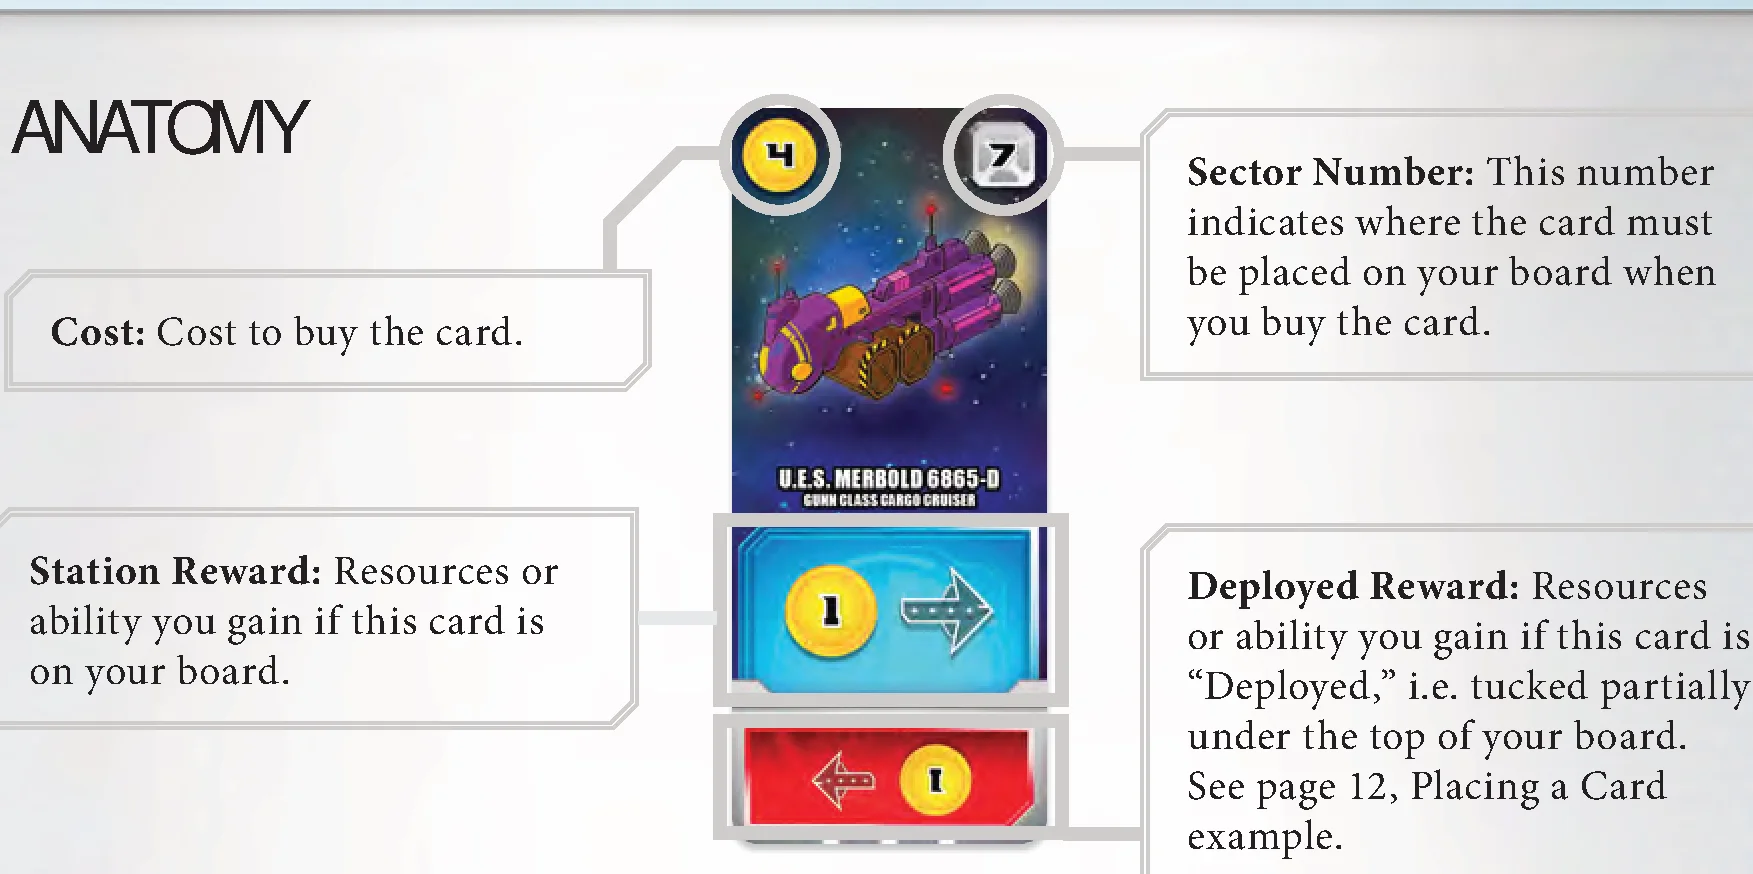
- Cost: Cost to buy the card.
- Sector Number: This number indicates where the card must be placed on your board when you buy the card.
- Station Reward: Resources or ability you gain if this card is on your board.
- Deployed Reward: Resources or ability you gain if this card is “Deployed,” i.e. tucked partially under the top of your board.
Anatomy of the Command Console
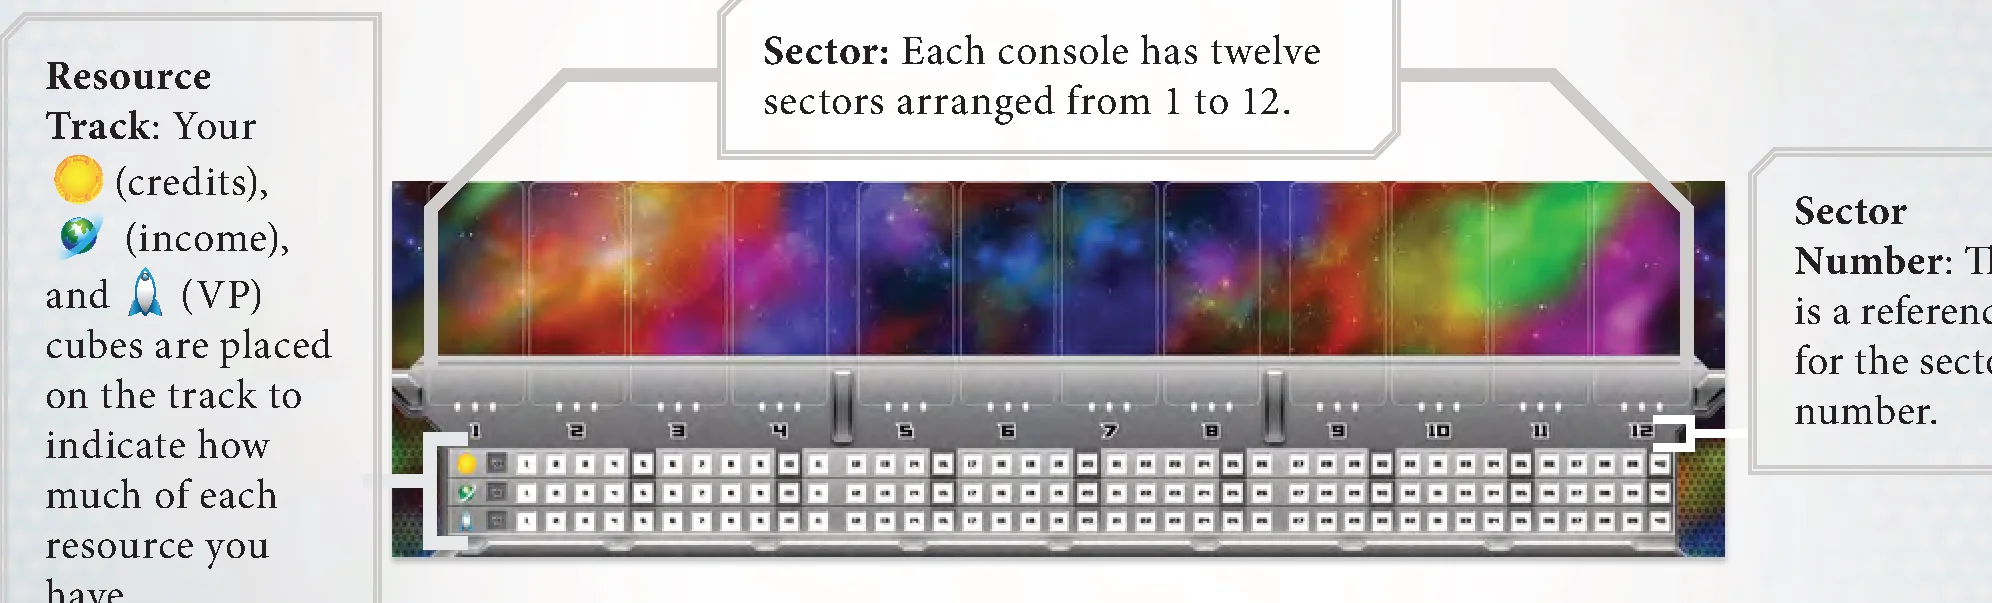
- Sector: Each console has twelve sectors arranged from 1 to 12.
- Sector Number: This is a reference for the sector number.
- Resource Track: Your
 (credits),
  (income), and
  (VP) cubes are placed on the track to indicate how much of each resource you have.
Gaining Resources
When you gain resources, move the appropriate cube up the track a number of spaces equal to the amount you gained.
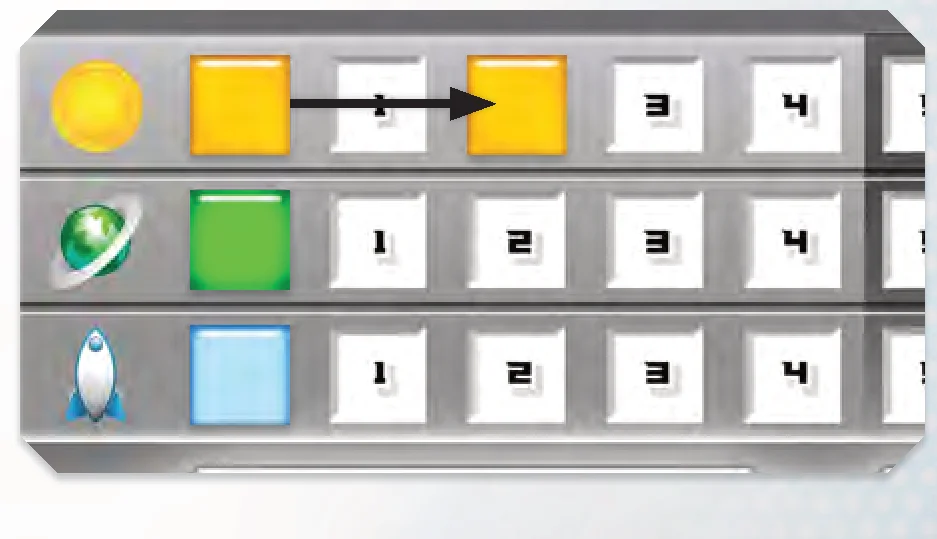
For example, if you gained 2 (credits) you would advance your (credits) cube up two spaces.
There is no limit to the number of (credits), (income), or (VP) you can have. If you ever find yourself with more than 40 , , or , place a charge cube on the 40 spot of the respective resource and simply start counting again at the 0 space, adding +40 to the total.
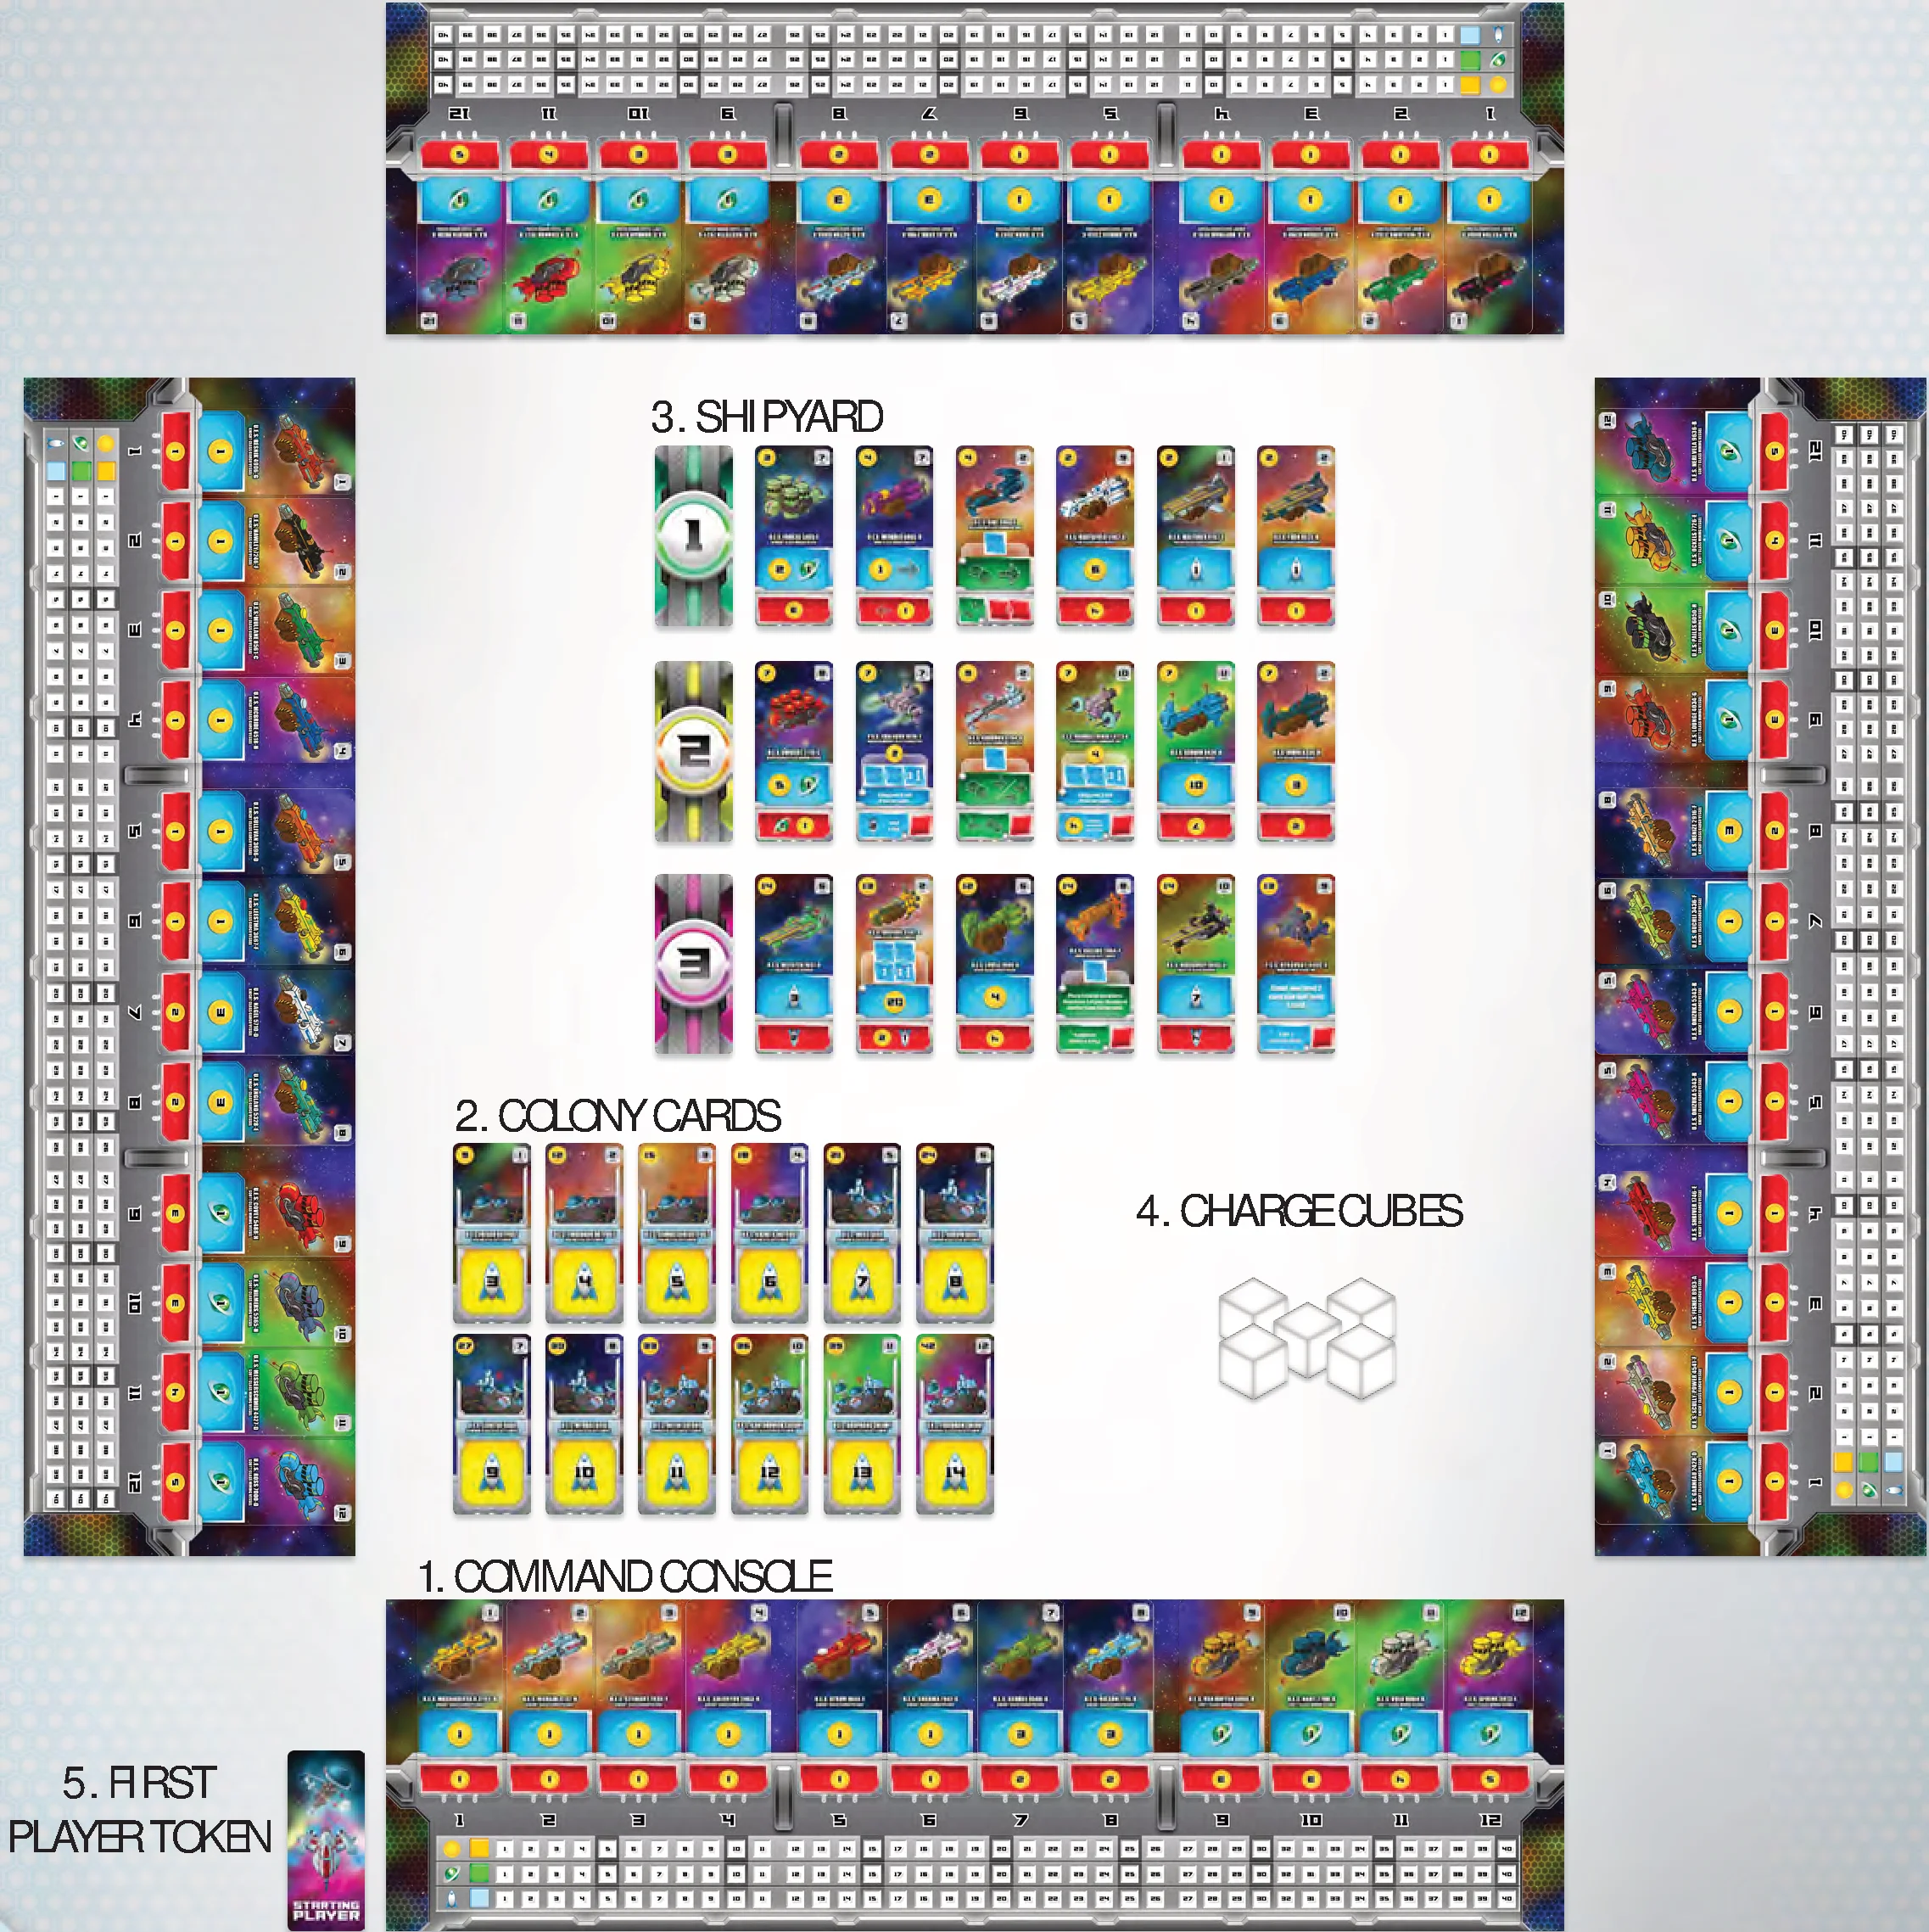
1. Command Consoles
Each player takes the following:
- 1 command console
- 1 set of 12 starting ships (cards belonging to a specific set are denoted by their card back)
- 1 cube for each track: 1 , 1 , and 1
Each player should place their console in front of them:
- They place the and cubes on the 0 (zero) space, and the cube on the 5 space.
- Each player then places each of their starting ships faceup in the sectors as indicated in the sector number in the upper right-hand corner of the card. Each sector on your board should have 1 card in it.
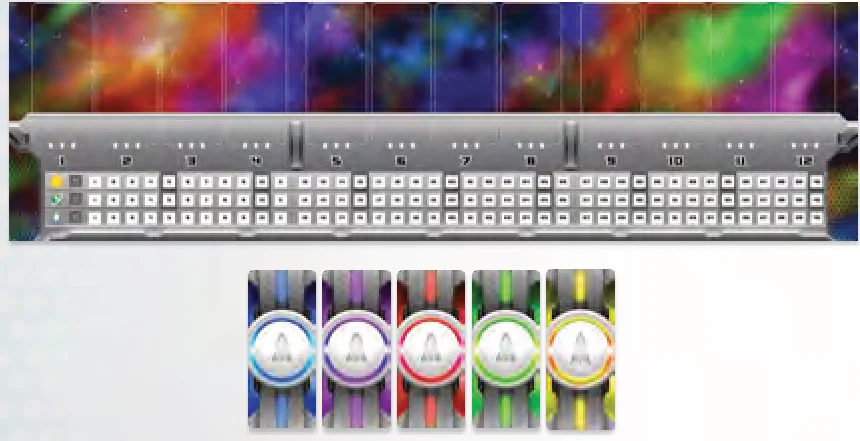
2. Colony Cards
Take the 12 colony cards and place them faceup in ascending sector order.

3. The Shipyard
The shipyard is a set of 18 fleet cards available to buy during the game. Separate the ship cards into three decks based on their card-backs, then shuffle each deck separately and place them face-down on the table. Draw the top six cards from each deck and lay them face-up on the table to create the shipyard.

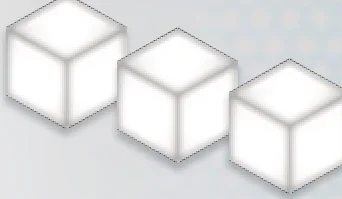
4. Charge Cubes
Place the charges in a pool available to all players.
5. Determine Starting Player
Make sure each player’s start at 5. Then each player should do the following:
- Draw one random card from the level 1 deck.
- Lose equal to the card’s cost, shown in the top left corner.
- Place the card in its respective sector on your board according to the number listed in the upper right corner of the card. Take the card currently in that sector, turn it upside down and “deploy” it in the same sector (see “Deploying Ships” on page 7).
The player who drew the card with the highest sector number is the starting player and takes the starting player card. If two or more players tie for the highest sector number, each tied player rolls the dice and the player with the highest dice total is the starting player.
Finally, each player gains additional resources according to their turn order position:
- The starting player does not gain any resources.
- The 2nd player gains 1 .
- The 3rd player (if any) gains 2 .
- The 4th player (if any) gains 1 .
- The 5th player (if any) gains 1 .
Players are now ready to play the game beginning with the starting player’s turn!
Turn Structure
The starting player takes the first turn of the game. When a player finishes their turn, the next player clockwise around the table takes a turn. Players continue taking turns until the end of the game.
When a player is taking a turn, they are considered the active player; everyone else is considered a passive player on that turn. Turns are fairly simple in Space Base. Generally:
- The active player rolls the dice.
- Based on the roll and the cards on players’ boards, ALL players will gain zero or more various rewards.
- The active player buys a card (or chooses not to).
- If the active player bought a card, they reset their to their .
- The active player’s turn ends, and play passes clockwise.
Turn Phases in Detail
What follows are more detailed and formal phases of a turn to help clarify when abilities can be used.
1. Abilities May Be Triggered
(Remember “rewards” and “abilities are different things”). All players may optionally trigger abilities as desired.
- The active player may trigger abilities with blue or green ability boxes.
- The passive players may only trigger abilities with red or green ability boxes.
- You may NOT trigger certain abilities, like those with the 2 dice icon.
2. Roll
The active player rolls both dice. Some abilities like “re-roll” or “set dice” may be used now and only now.
3. Allocate Dice
Each player chooses to claim the dice separately or as a sum. Each player’s choice is independent. For example, if the active player chooses to take the sum of the dice, it has no impact on the other players’ ability to choose the individual dice or the sum of both. Any player that chooses the sum may now trigger abilities that show the green 2 dice and arrow icon.
4. Gain Rewards
Each player now gets the rewards on their cards for the sector(s) the dice hit. Each sector that you allocate dice to allows you to gain rewards from cards in that sector.
- The active player gains the blue rewards for cards on their board.
- The passive player(s) gain the red rewards for deployed cards. Passive players with multiple deployed cards in one sector gain all the rewards in that sector when allocating dice there.
Note: If doubles are rolled and you take the dice separately, you gain the rewards for that sector twice.
5. Abilities May Be Triggered
Same as before, players may now trigger abilities if possible and desired.
6. Buy a Card
The active player may buy any one card they can afford from the 18 available ship cards in the Shipyard, or buy a Colony card. The active player may choose to buy no cards if they want to save their .
- You may not buy a card that costs more than the number of you have.
- If you buy a card you must spend all of your (set your yellow cube to 0) even if that means you spend more than the price of the card.
- When you buy a card, place it in the appropriate sector on your board as indicated on the card (the top-right grey number). The card that was in that sector on your board becomes deployed in that same sector above your board.
7. Charge Abilities May Be Triggered
Same as before, players may now trigger charge abilities if possible and desired.
8. Refill Shipyard
If any cards were taken from the shipyard, replace them with the top card of their respective deck. Each level should have a selection of six cards at the end of your turn.
9. Income
If the active player’s cube is lower than their cube, they move their cube up to be equal with their cube. This is all does, but it can be quite handy. Passive players do nothing in this step.
End of Turn!
The next player in clockwise order begins their turn.
Turn Examples
Active Player Example 1: Allocating Dice / Gaining Rewards
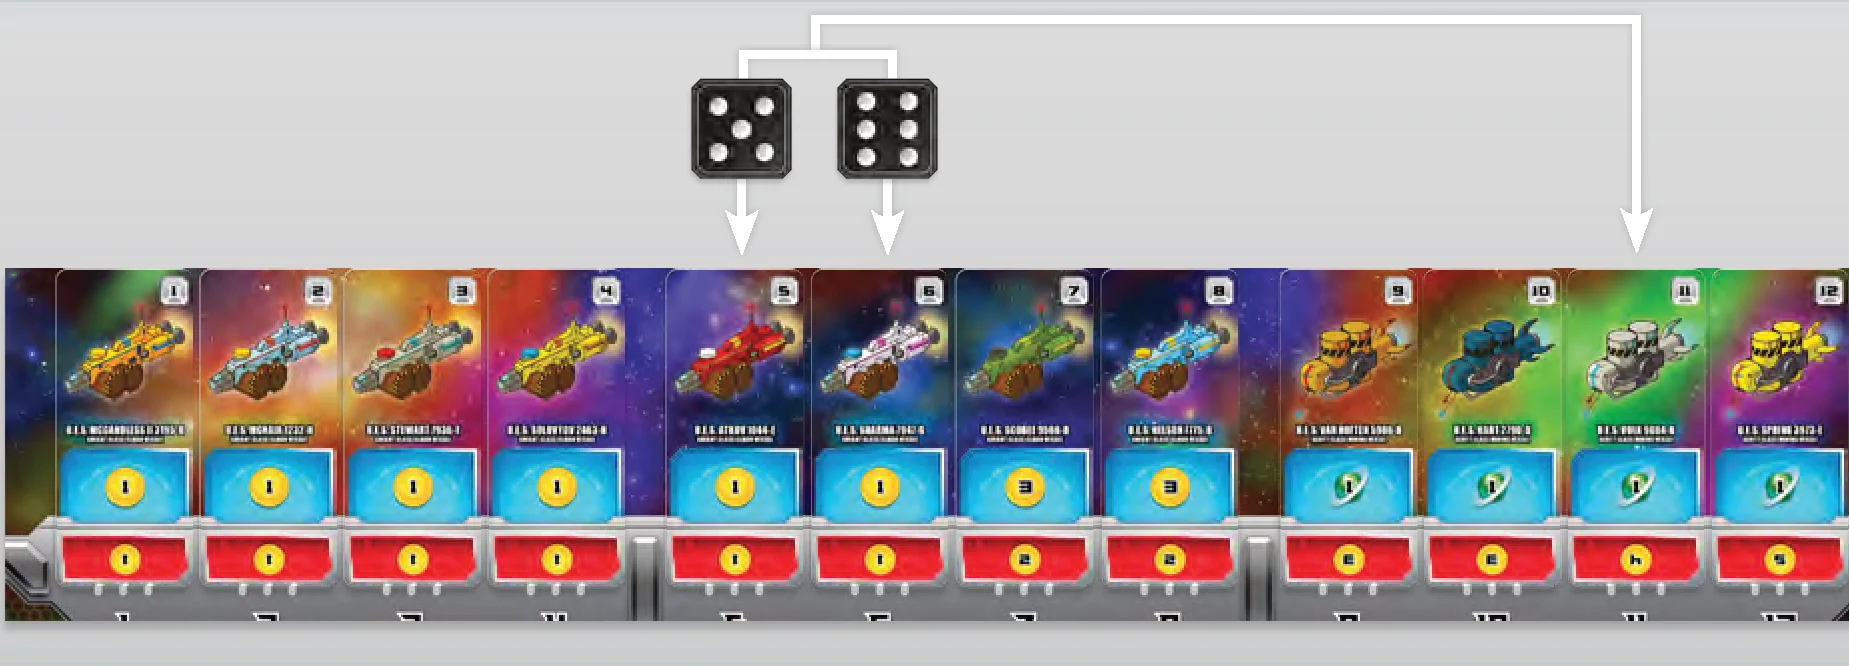
If you are the active player and you rolled a 5 and a 6, you could choose to take the sector 11 reward—gaining a , advancing your cube 1 space—or both the sector 5 and sector 6 rewards, gaining 2 , and moving your cube 2 spaces.
Active Player Example 2: Allocating Dice / Gaining Rewards
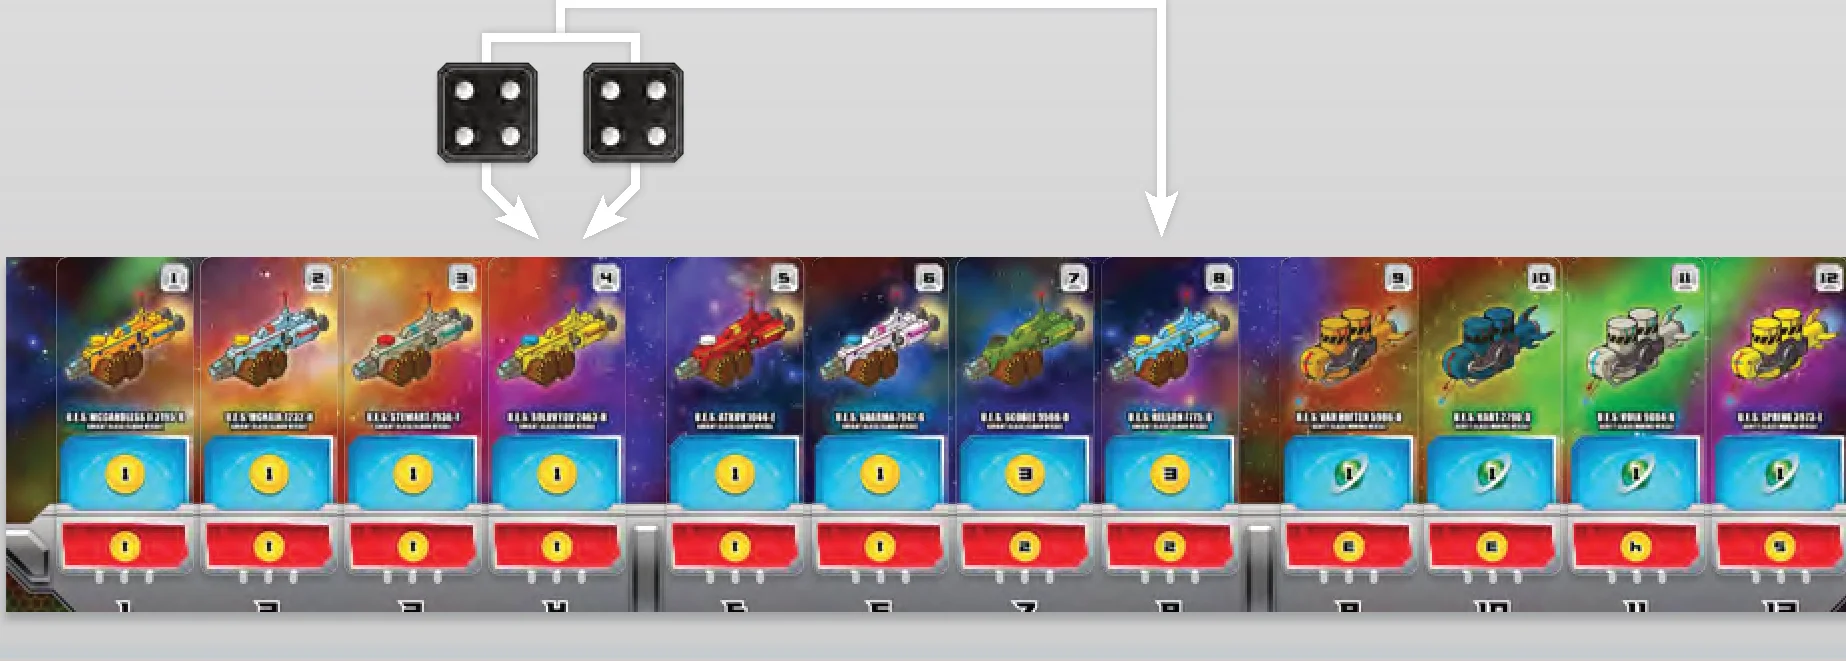
If you are the active player and you rolled a 4 and a 4, you could choose to take the sector 4 reward twice, or the sector 8 reward. In this example, sector 8 is the obvious choice, since it would give you 3 instead of the 2 you would gain for using sector 4 twice.
Passive Player Example: Allocating Dice / Gaining Rewards
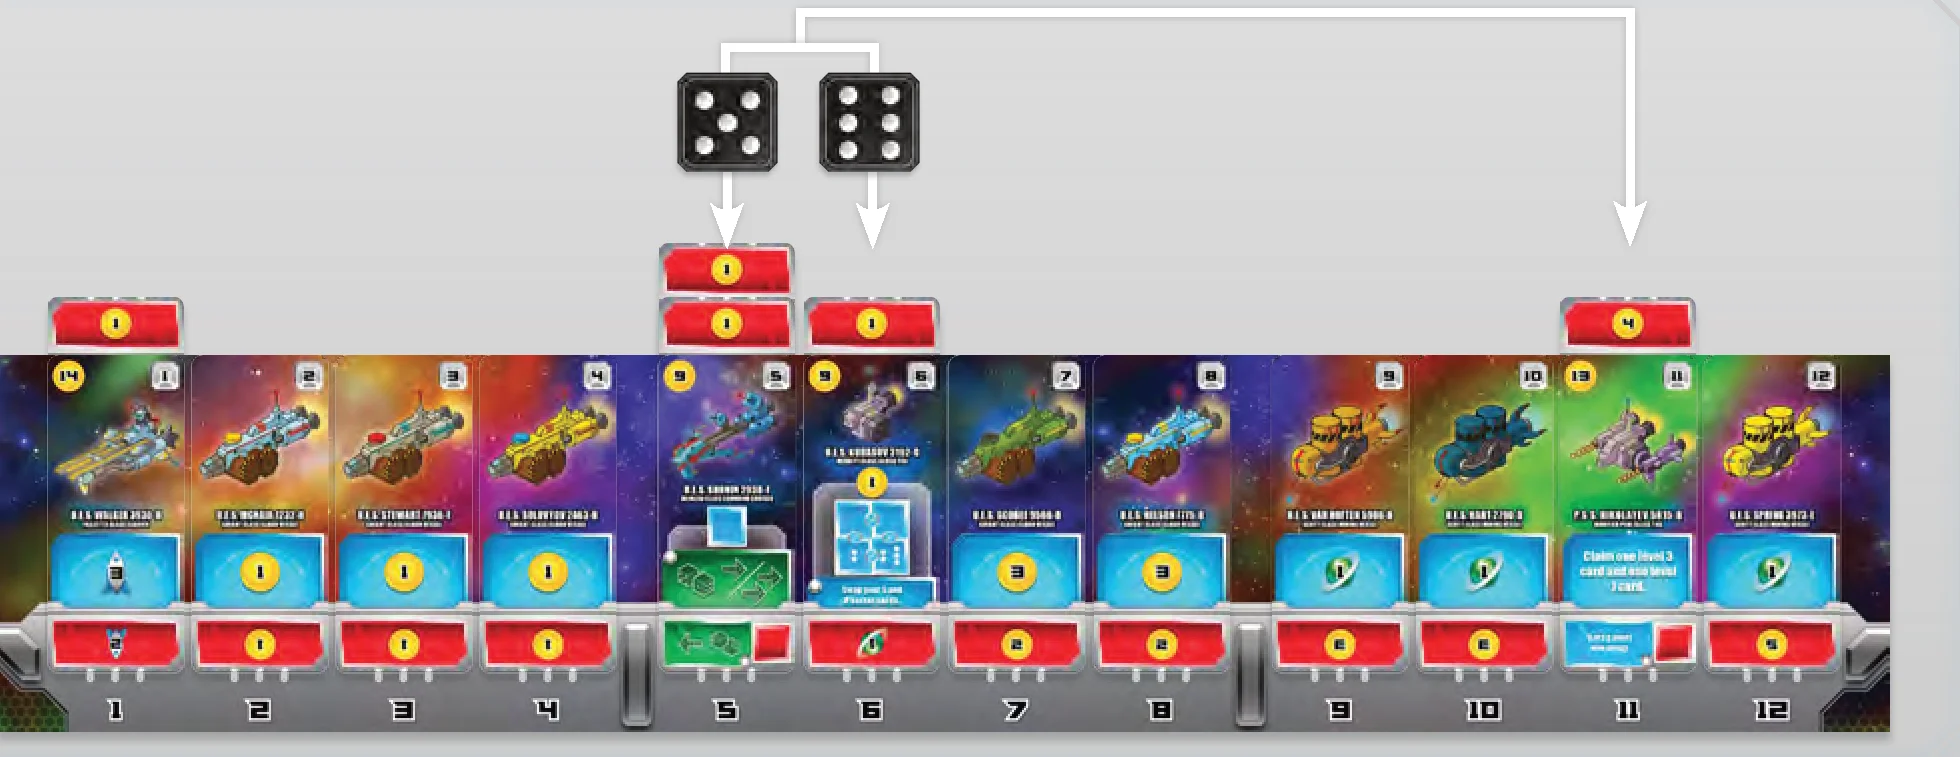
If you are a passive player and the active player rolled a 5 and a 6, you may choose to take the sector 11 reward (for 4 ) or both the sector 5 and 6 rewards for a total of 3 —2 from 5 and 1 from 6. In this case, sector 11 is clearly the better choice.
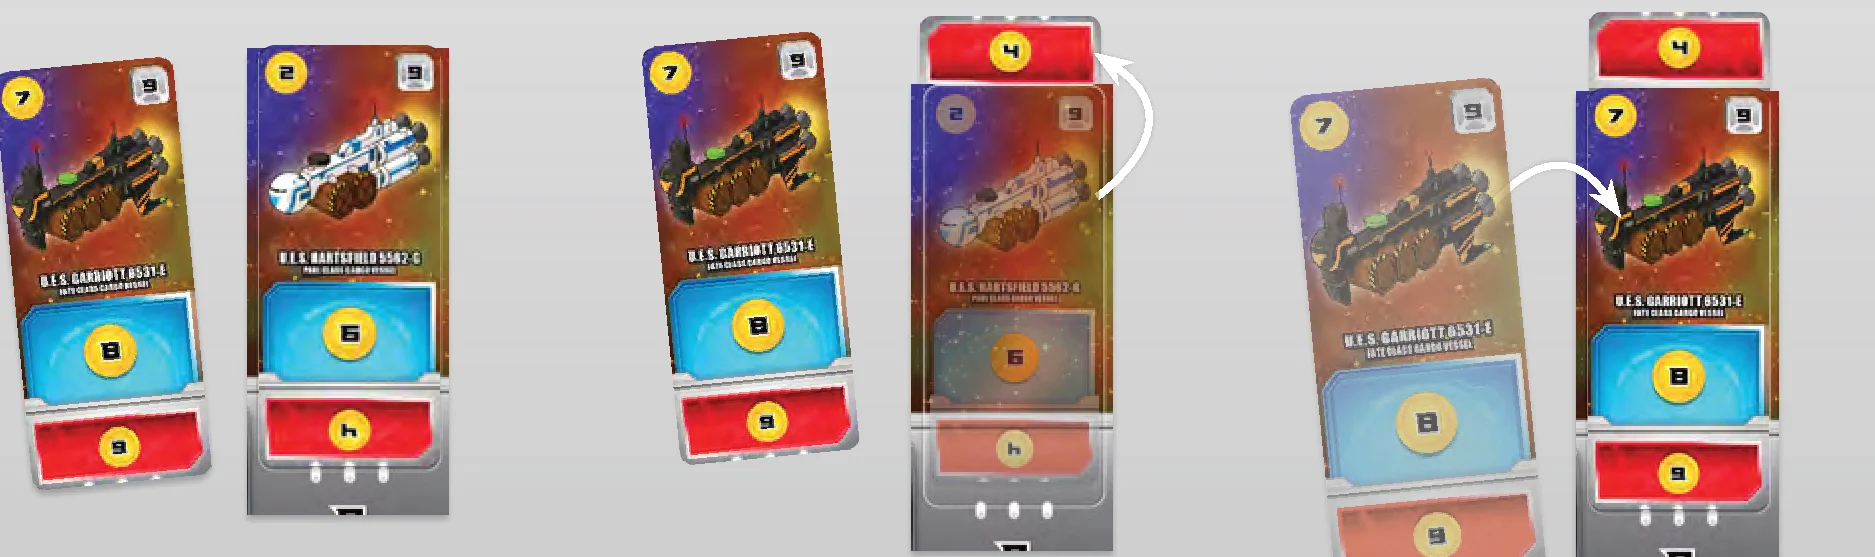
Example: Buying and Placing a Card
- The ship you bought has a sector number of 9.
- The ship currently on your console in sector 9 is deployed under your board so its deployed reward is visible.
- The bought ship is then placed in sector 9 on your console.
Purchasing Colony Cards
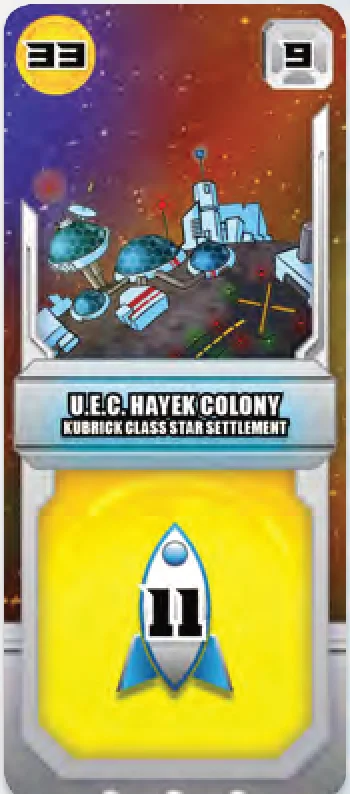
When you purchase a colony card, you have established a new colony in that sector. It is no longer under your control, although you remain in command of your ships deployed deep in that sector.
The sole purpose of colony cards is to score immediate . However, once bought these cards will clog up your board and potentially slow your progress.
All twelve colony cards are available to buy at the start of the game. Unlike cards in the shipyard, when a colony card is bought it does not get replaced. When you buy a colony card, follow all of the usual rules: place it on your console in the sector indicated by the number in the top right of the card, then deploy the card already in that sector. After placing the colony card, immediately gain the indicated on the card. (Tip: place your purchased colony cards face-down on your board as an extra reminder that they have no further effect.)
Colony Card Restrictions
Once a colony card is placed, it CANNOT be replaced; meaning you may no longer buy cards that would be placed in that sector on your board. Moreover, colony cards have no reward when dice are allocated to them on your turn. (You still gain rewards on other players’ rolls from deployed cards in that sector, however.) Colony cards may never be deployed, even with a card effect.
Important! Understanding Rewards vs Abilities
This is the hardest thing for new players to grasp. If you get confused with how an ability card works, first check the “Card Clarifications” section toward the end of the rules and if it still doesn’t make sense, come back here and make sure this concept makes sense: A “Reward” and an “Ability” are different things.
Rewards:
Rewards are gained based on the dice roll. ALL ship cards give you rewards. The result of each die roll will tell you which cards you can gain rewards from. Rewards are commonly , , , or a  (charge cube). The (charge cube) is the odd one here and mostly where people get confused.
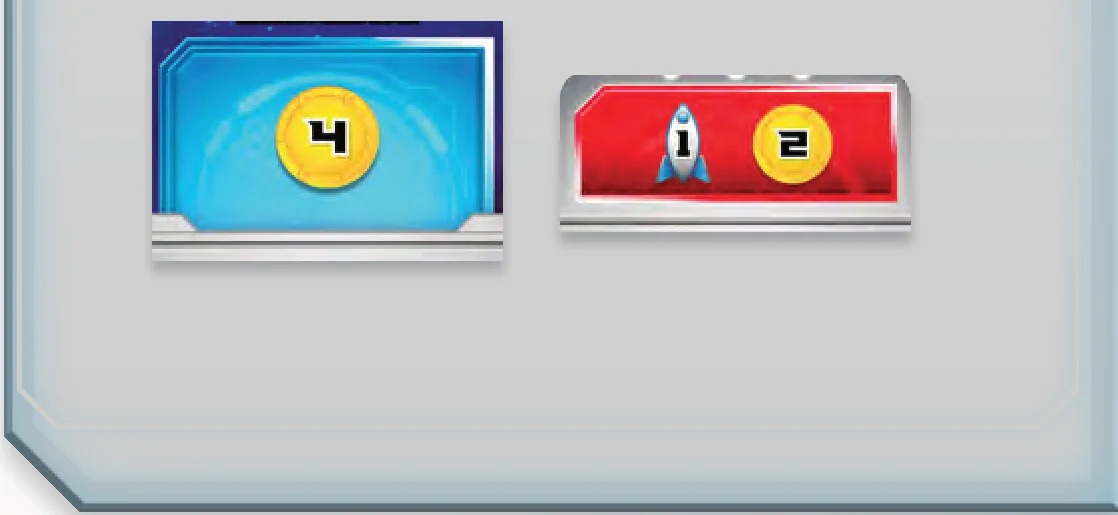
- Cards that give the reward of a will show one or more blue squares if the card is “stationed” on your board, or red squares if the card is “deployed” above your board.
- When you gain the reward for one of these cards, all you do is place 1 on one of these squares; that counts as the “reward” this card gives you for the dice roll.
- If all the squares already have , then you get no reward from this card.
Abilities:
Abilities are distinguished by their linkage to one or more  or
or  and the presence of the ability icon in the top left of the ability box.
- Using an ability requires you to remove a certain number of from that card. This means you cannot use an ability until you’ve placed enough on the card.
- Moreover, once you use an ability you will have to get the back on the card before you can use it again.
- IMPORTANT: To use an ability you do NOT need to roll any specific die result. The timing of when you can use an ability is specific to that ability and has nothing to do with what the roll was.

In summary, (charge cubes) are placed as the reward for dice rolls on cards that have abilities. Once an ability is fully charged you can use it as desired, independent of the dice roll, by removing the from the card.
Timing Restrictions of Abilities:
Abilities have timing restrictions, and you can check the “Ability Cards in Detail” section for more on each ability.
- Green Abilities can be used on any player’s turn.
- Blue Abilities can only be used on your own turn.
- Red Abilities can only be used on opponents’ turns.
Note that the color of the charge square does not have to match the color of the ability.
Unlike rewards, an ability being deployed or not-deployed has no impact on when or on whose turn you are able to use it. Only the color of the ability determines on whose turn you can use it.
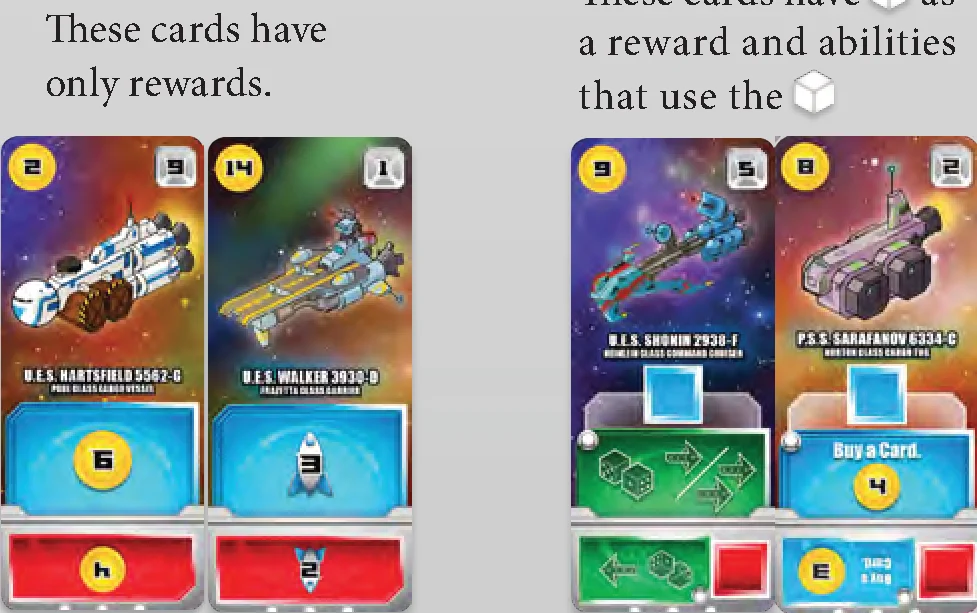
Regular Rewards Cards – In Detail
Below are some of the reward types available in Space Base.
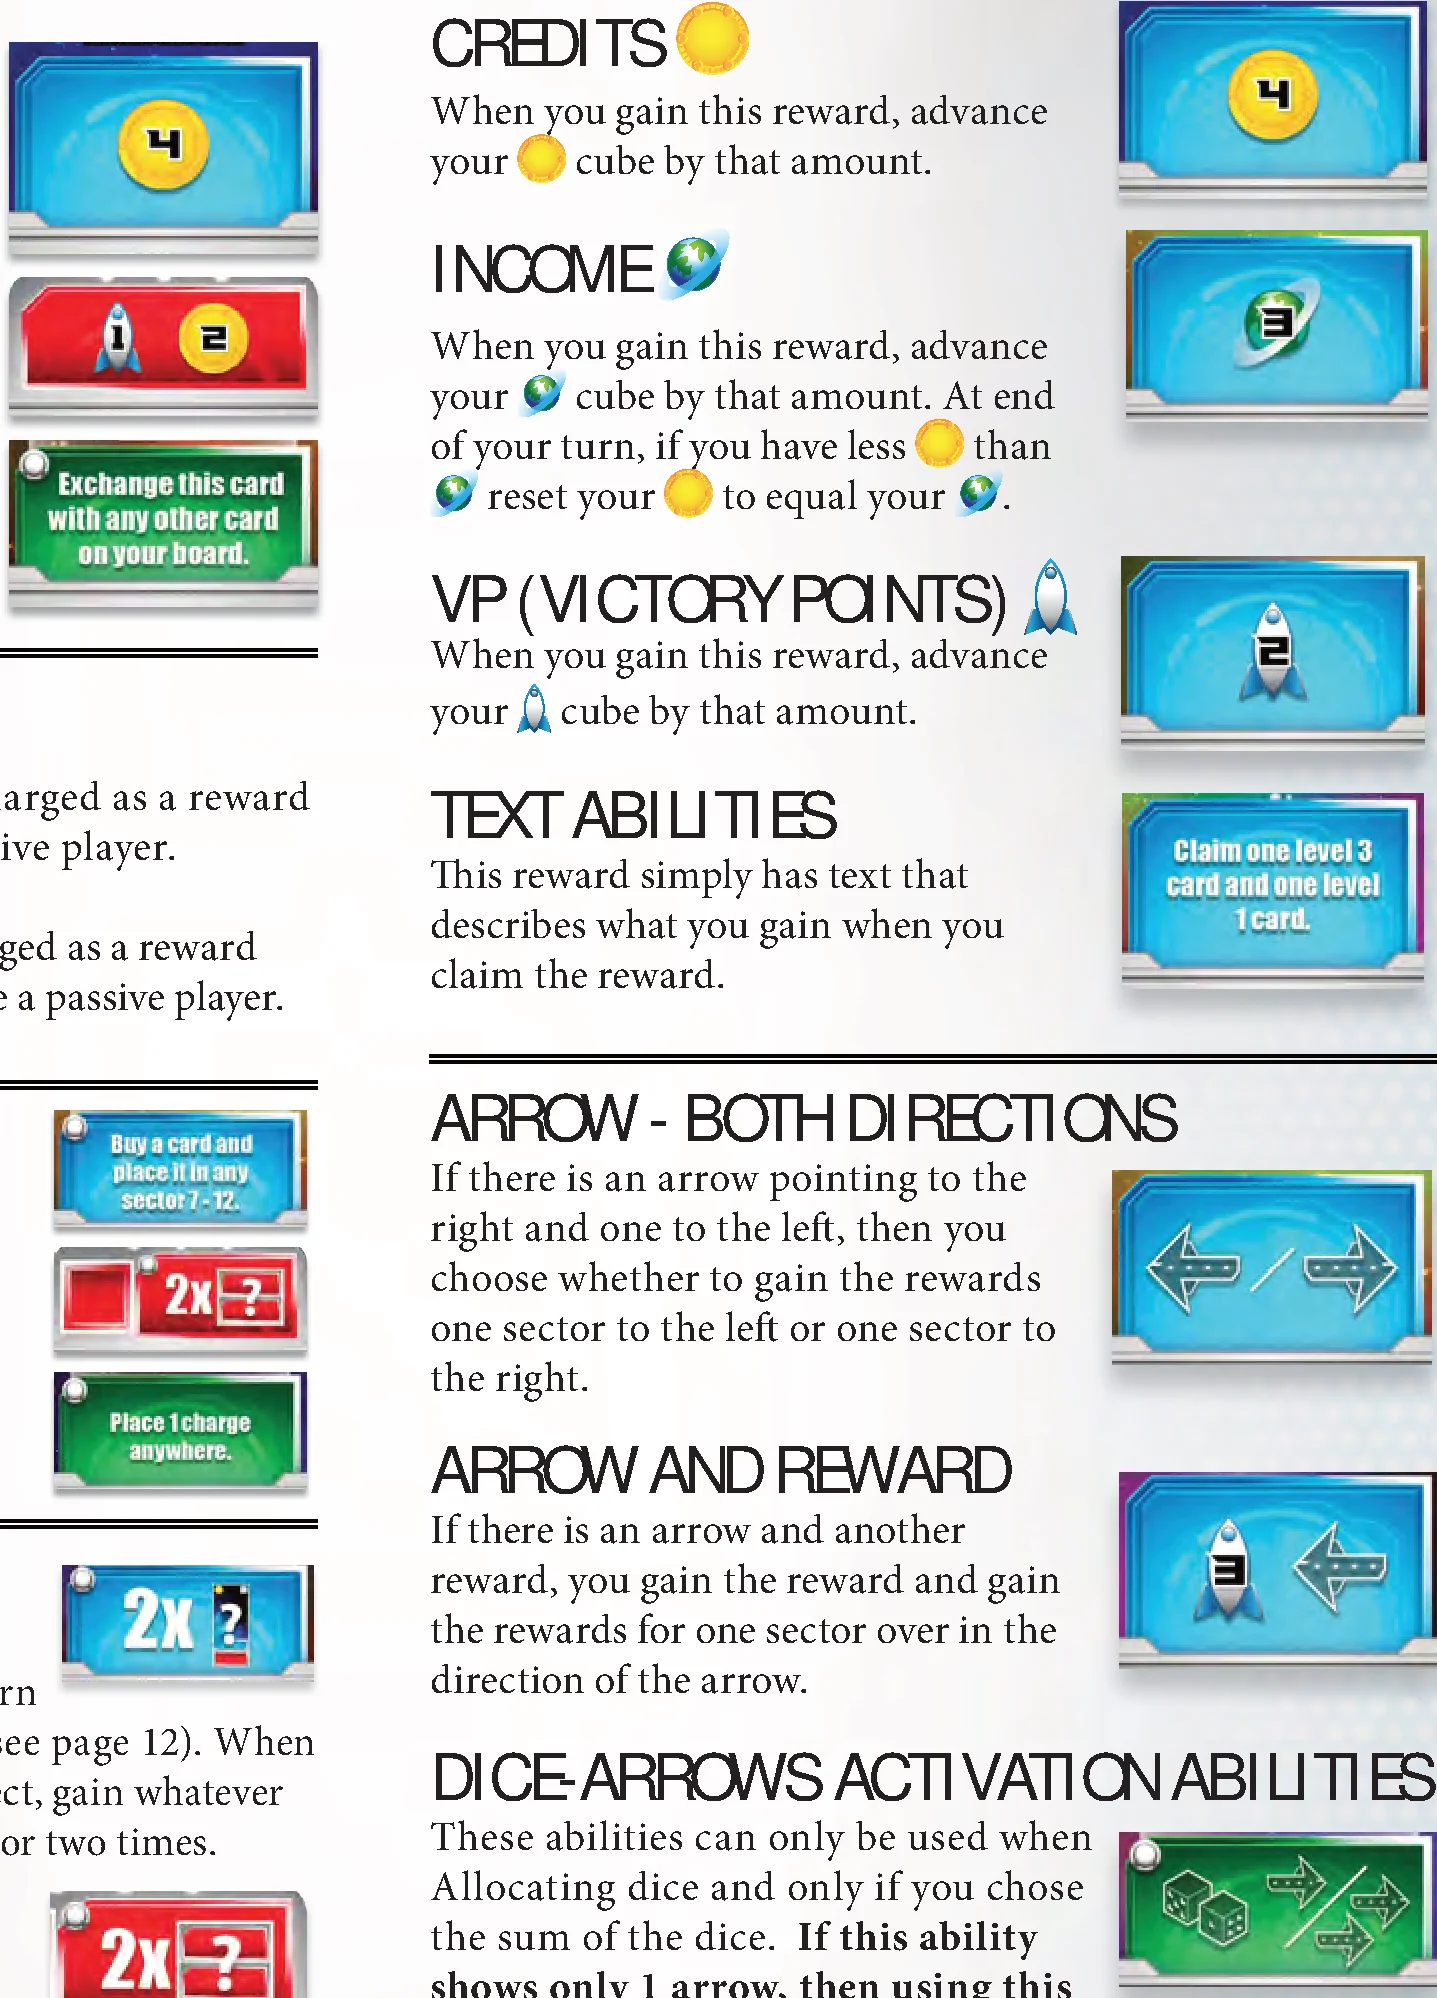
Credits
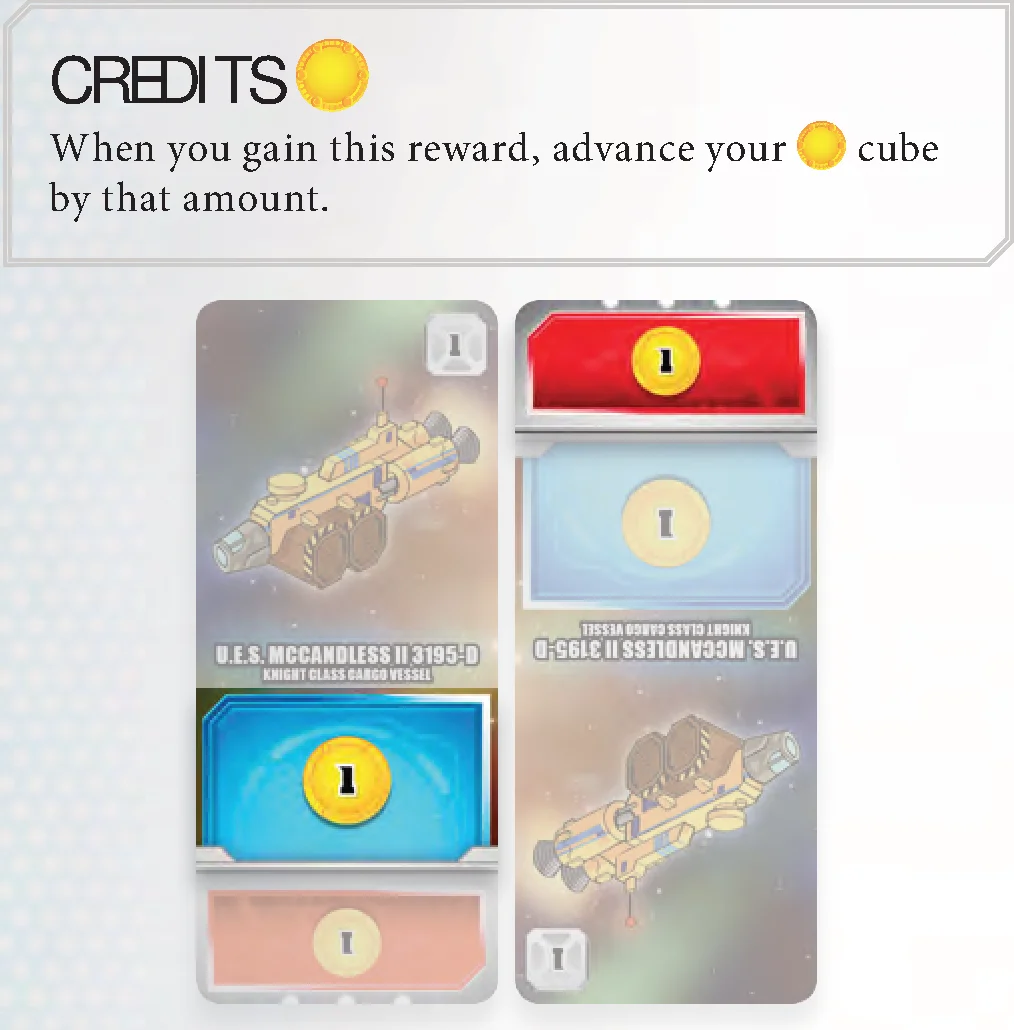
When you gain this reward, advance your cube by that amount.
VP
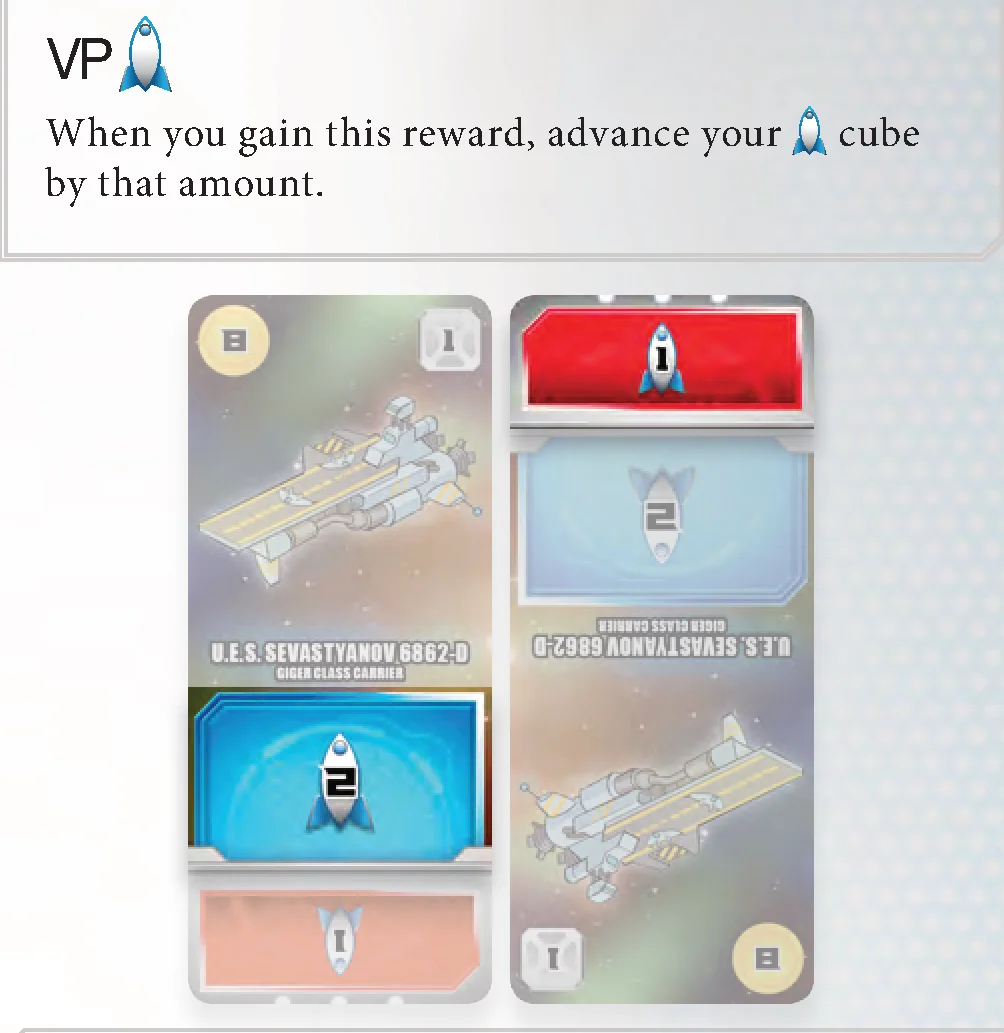
When you gain this reward, advance your cube by that amount.
Income
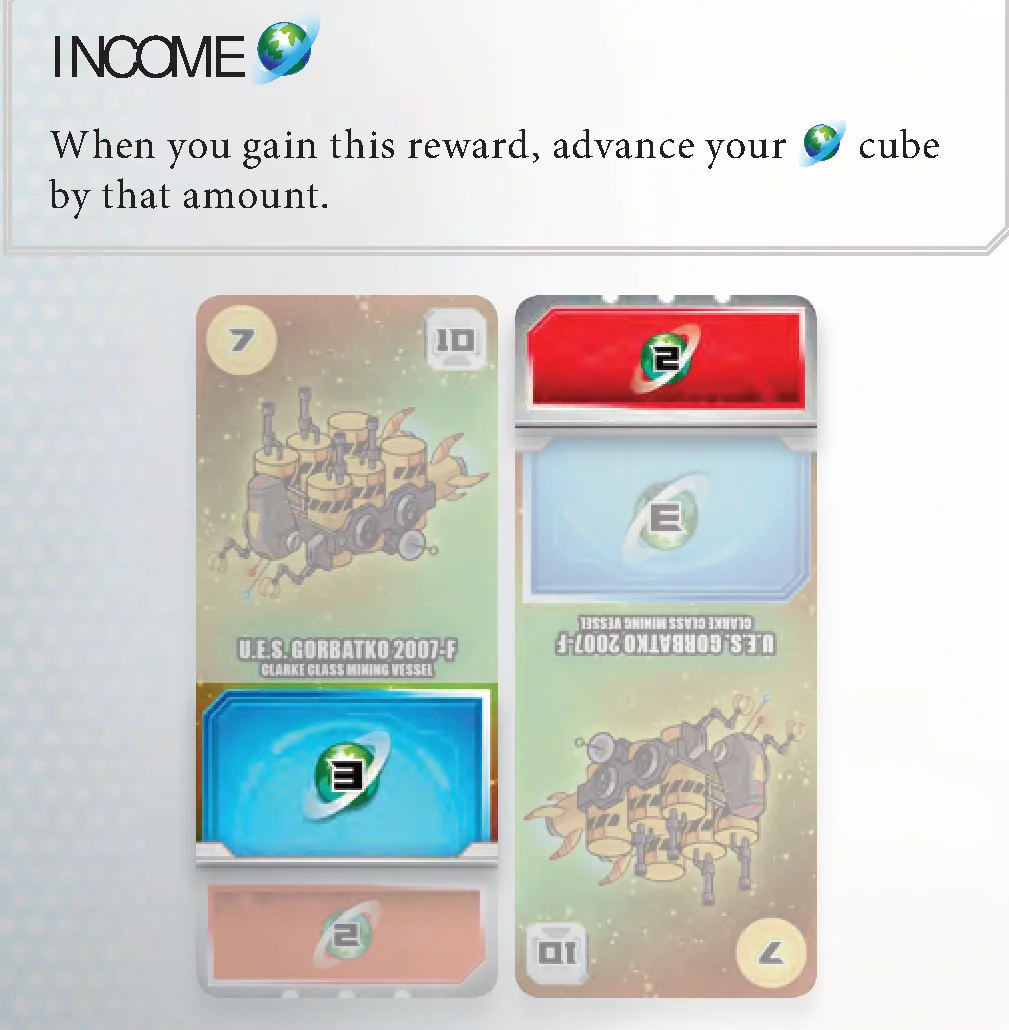
When you gain this reward, advance your cube by that amount.
Text Rewards
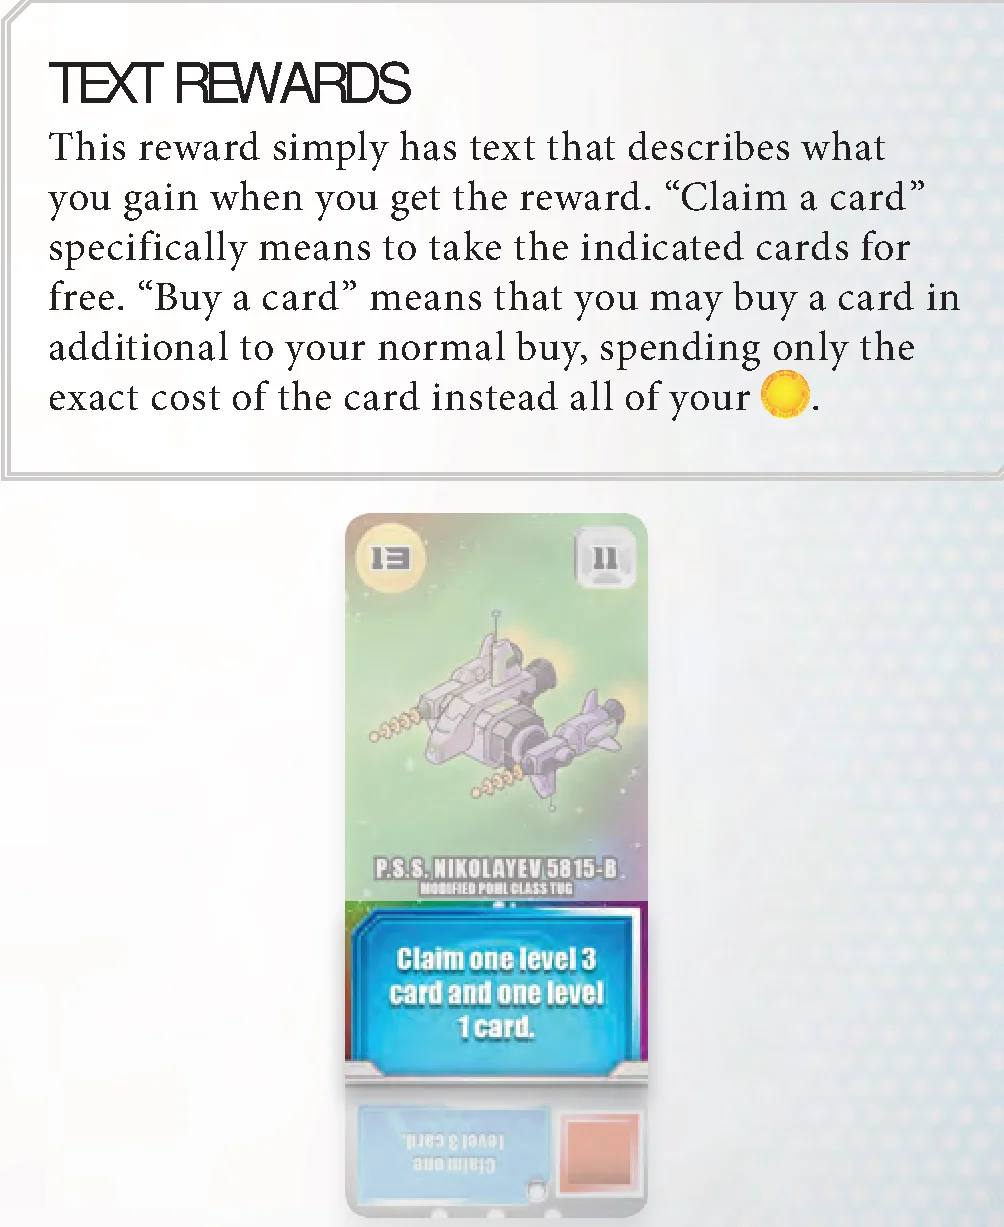
This reward simply has text that describes what you gain when you get the reward.
- “Claim a card” specifically means to take the indicated cards for free.
- “Buy a card” means that you may buy a card in addition to your normal buy, spending only the exact cost of the card instead all of your .
Arrow Rewards
Both Directions
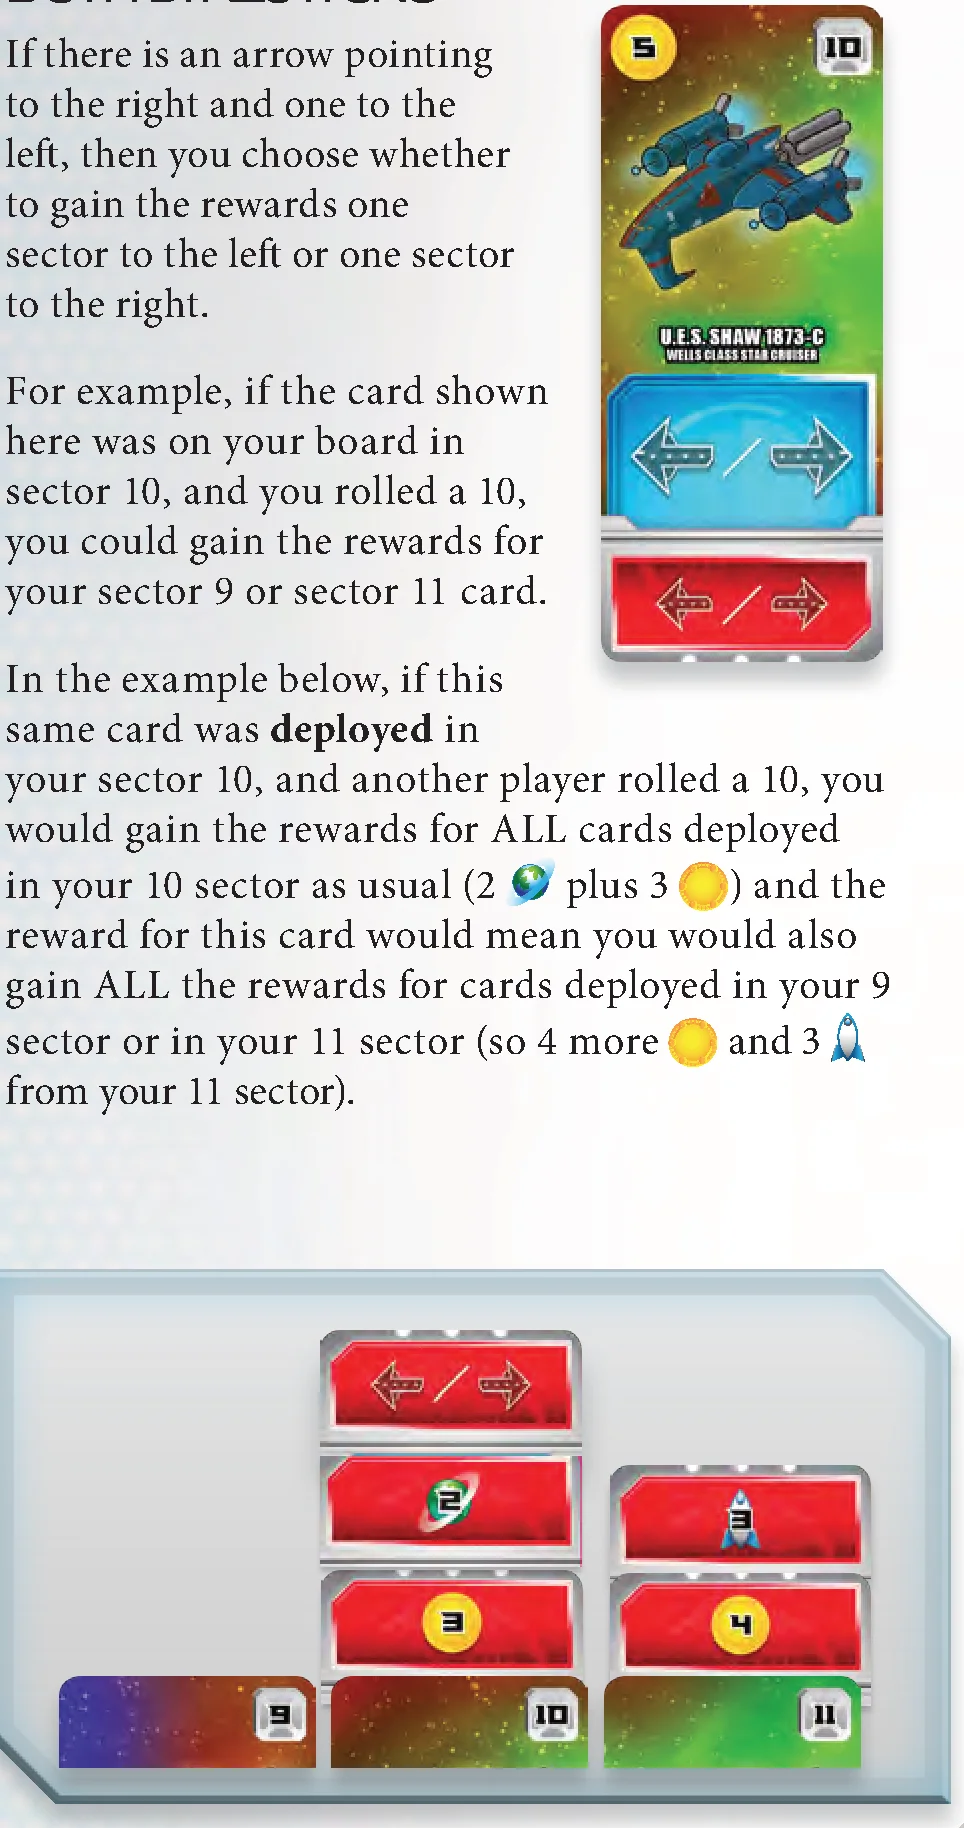
If there is an arrow pointing to the right and one to the left, then you choose whether to gain the rewards one sector to the left or one sector to the right.
For example, if the card shown here was on your board in sector 10, and you rolled a 10, you could gain the rewards for your sector 9 or sector 11 card.
In the example above, if this same card was deployed in your sector 10, and another player rolled a 10, you would gain the rewards for ALL cards deployed in your 10 sector as usual (2 plus 3 ) and the reward for this card would mean you would also gain ALL the rewards for cards deployed in your 9 sector or in your 11 sector (so 4 more and 3 from your 11 sector).
Arrow and Another Reward
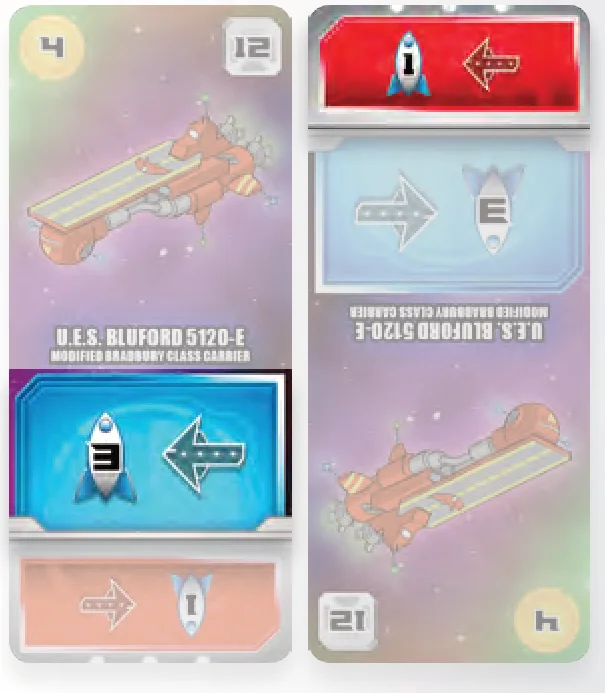
If there is an arrow and another reward, the arrow works the same in this case, but you only can get the rewards for the sector in the direction of arrow. However, you also get the thing shown in addition to the arrow.
For example, if the card above was on your board in your 12 sector and you rolled a 12, you would gain 3 and whatever reward you get for your 11 sector. If the card was deployed on your 12 sector, you would get all of your other red rewards in that sector, 1 and the arrow would give you all of the red rewards in the 11 sector as well.
A Note on Infinite Loops — You Can’t!
Multiple arrows next to each other can chain together. However, you can’t create infinite loops:
- If you use the sum of the dice, each reward may only be claimed once.
- If you use the individual dice, each reward may be claimed no more than twice; once for one die, and once for the other die.
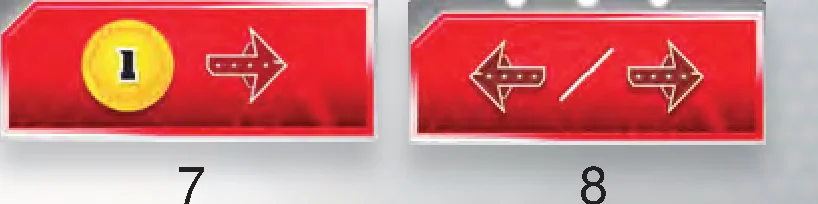
For example, in the case below, if you rolled a 7 you would gain 1 and then also gain your 8 sector rewards. Your 8 sector reward lets you gain your 7 or 9 sector reward, however, since you’ve already gained your 7 sector reward for this roll you can’t gain it again, so you would want to gain your 9 sector rewards.
Ability Cards in Detail
We talked about this topic previously in the “Understanding Rewards vs Abilities” section, and we will be repeating some of that here.
These cards have one or more colored squares on them and an ability box that describes an ability that card can do once it is fully charged. These ability boxes have an ability icon () in the upper left hand corner. Remember, things in ability boxes are not “rewards” and you do not get them when you roll the dice.
When you allocate dice such that you gain the reward of an ability card, all you do is place 1 (charge cube) on the card in one of the squares. Nothing else happens.
- Blue squares appear on the station section of cards, and likewise, can only be charged as a reward during your own turn.
- Red squares appear on the deployed section of cards and can only be charged as a reward during an opponent’s turn, when you are a passive player.
Once the required are placed on the card, they may be removed to use the ability as desired, independent of the result of the dice.
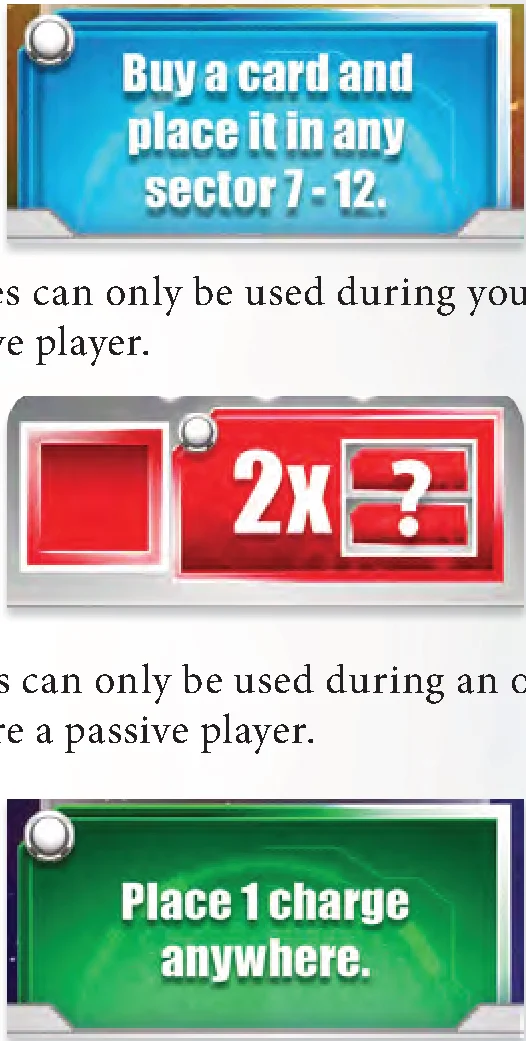
- Blue abilities can only be used during your turn, when you are the active player.
- Red abilities can only be used during an opponent’s turn, when you are a passive player.
- Green abilities can be used during any turn, whether you’re an active or passive player.
Remember, regardless of when the ability can be used, are still gained as rewards based on allocating dice, and the rules for when you gain rewards for dice rolls apply as normal.
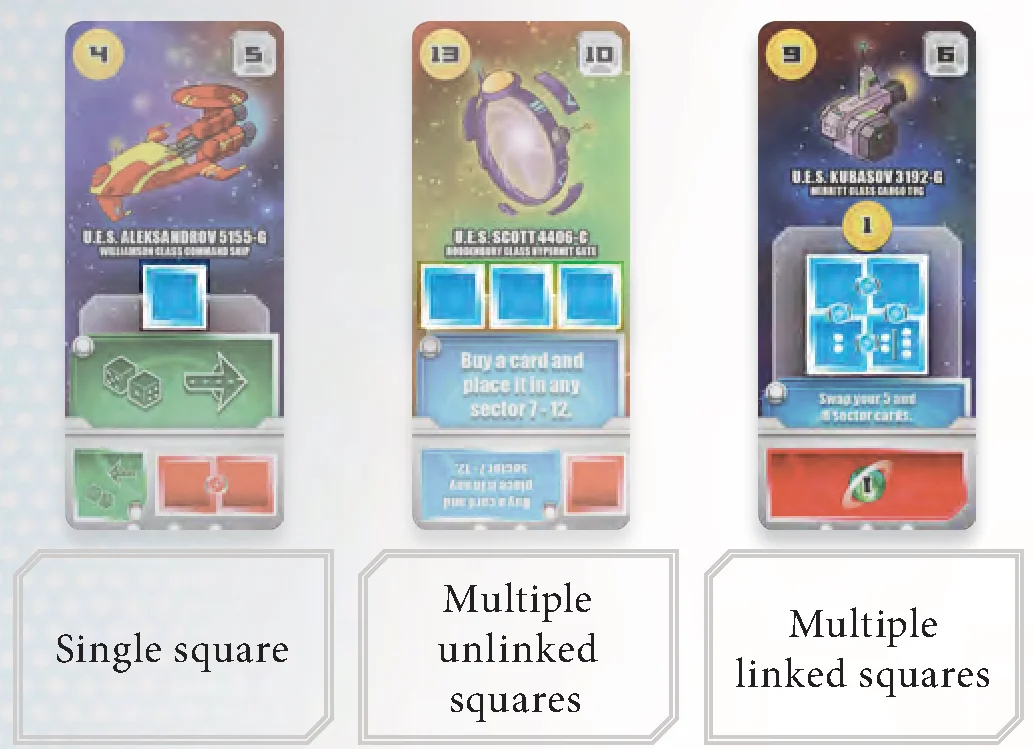
Square Configurations
- Some abilities require just one in order to use them, and will show a single colored square.
- Some ability cards may hold multiple , but only need 1 to use the ability. These colored squares do not have connectors linking them. In these cases you may have multiple on a card, but you only need to spend 1 to use the ability.
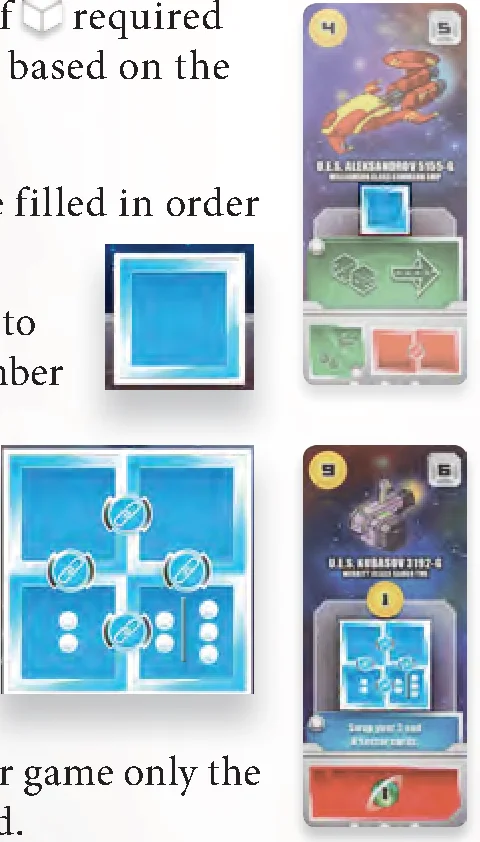
- Other abilities require multiple to use, and will show a number of squares linked together.
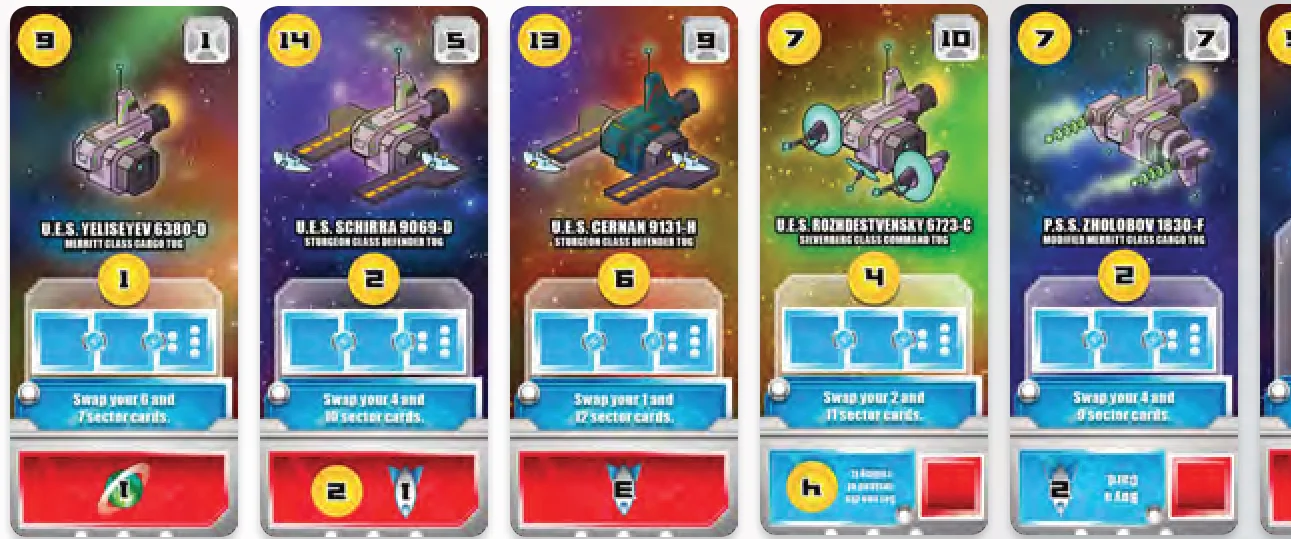
Abilities that have multiple linked squares cannot be used until all of the required squares are filled with . When you activate the ability, you spend all the . The number of required for many of these abilities vary based on the number of players:
- An empty square needs to be filled in order to use the ability.
- A square with pips in it needs to be filled if and only if the number of players is equal to the number of pips shown. For example, in a two player game all four squares would need a ; whereas in a three player game, three of these squares would need a and in a 4 or 5 player game only the top two would need to be filled.
Rewards and Charges!
Some cards give you both a regular reward and a . When gaining rewards for these cards you gain both the (or other rewards) indicated under the name of the card, and you get to place a as normal.
Timing
As long as an ability can be used after gaining rewards for the dice roll, you may use that ability the same turn it becomes fully charged.
Also note, almost always players can simply allocate dice, gain rewards, and execute abilities simultaneously in order to minimize downtime. If it becomes important to resolve things in order, the active player should allocate dice and resolve all rewards and activations first, followed by the next player(s) in clockwise order.
Deploying Cards with Charges
If you have a card on your board with one or more and it gets deployed (due to buying a new card in that sector for example), any on the card may be transferred to the deployed effect on the same card, if possible.
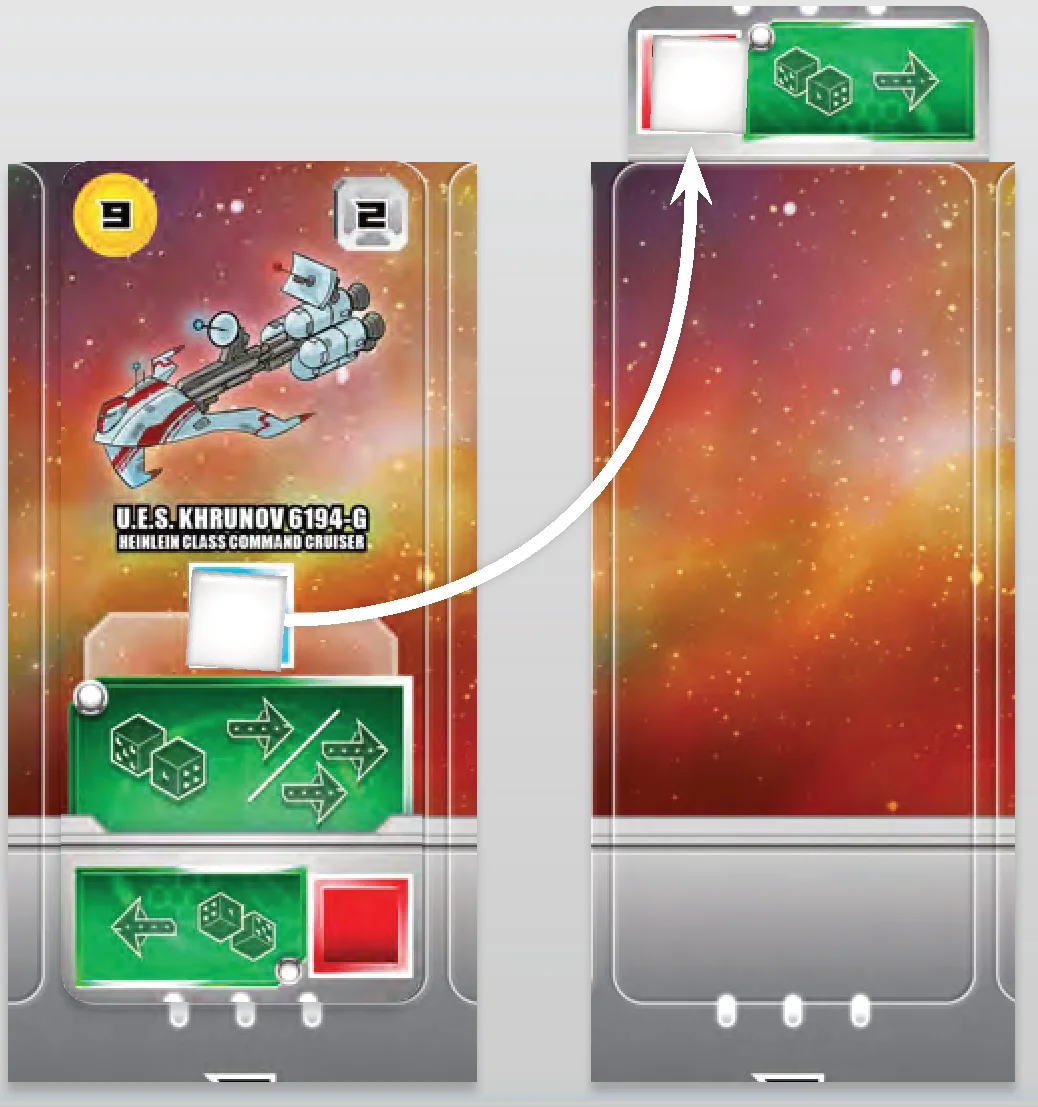
Example: Your U.E.S Khrunov is being deployed and has one (charge cube) on its station ability. After the card is deployed you may move that to its deploy ability.
Dice+Arrow(s)
This ability shows 2 dice to remind you it can only be used if you allocated the roll to the sum, and a right pointing arrow to tell you that you will be changing which sector you get rewards for.
These abilities can only be used during phase 3 (“allocate dice”) of the turn and only if you chose to allocate the sum of the dice. It may be used on either your turn or your opponent’s turn because it is a green ability.
To use this ability, you must use the sum of the dice.
- If this ability shows only 1
 then using this ability means the sector you gain rewards from this turn is shifted one sector to the right. For example, if a 9 is rolled and you use this ability, you would gain rewards for your 10 sector instead of your 9 sector.
 - If the ability shows both a and
 then using this ability means the sector you gain rewards from this turn is shifted 1 or 2 sectors to the right (your choice).
 - You may combine these types of effects on a single roll to shift your reward sector many spaces along your board.
Like all other abilities, this ability may be used regardless of what sector it is placed in, regardless of what sector(s) are rolled on the dice, and regardless of it being deployed or not deployed. Moreover, the ability is green, so it can be used on any player’s turn.
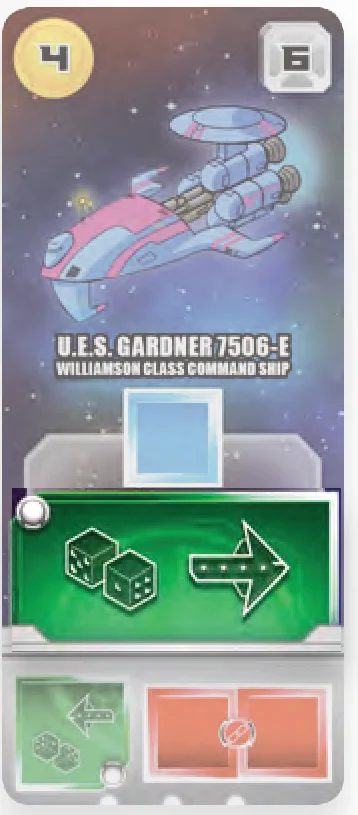
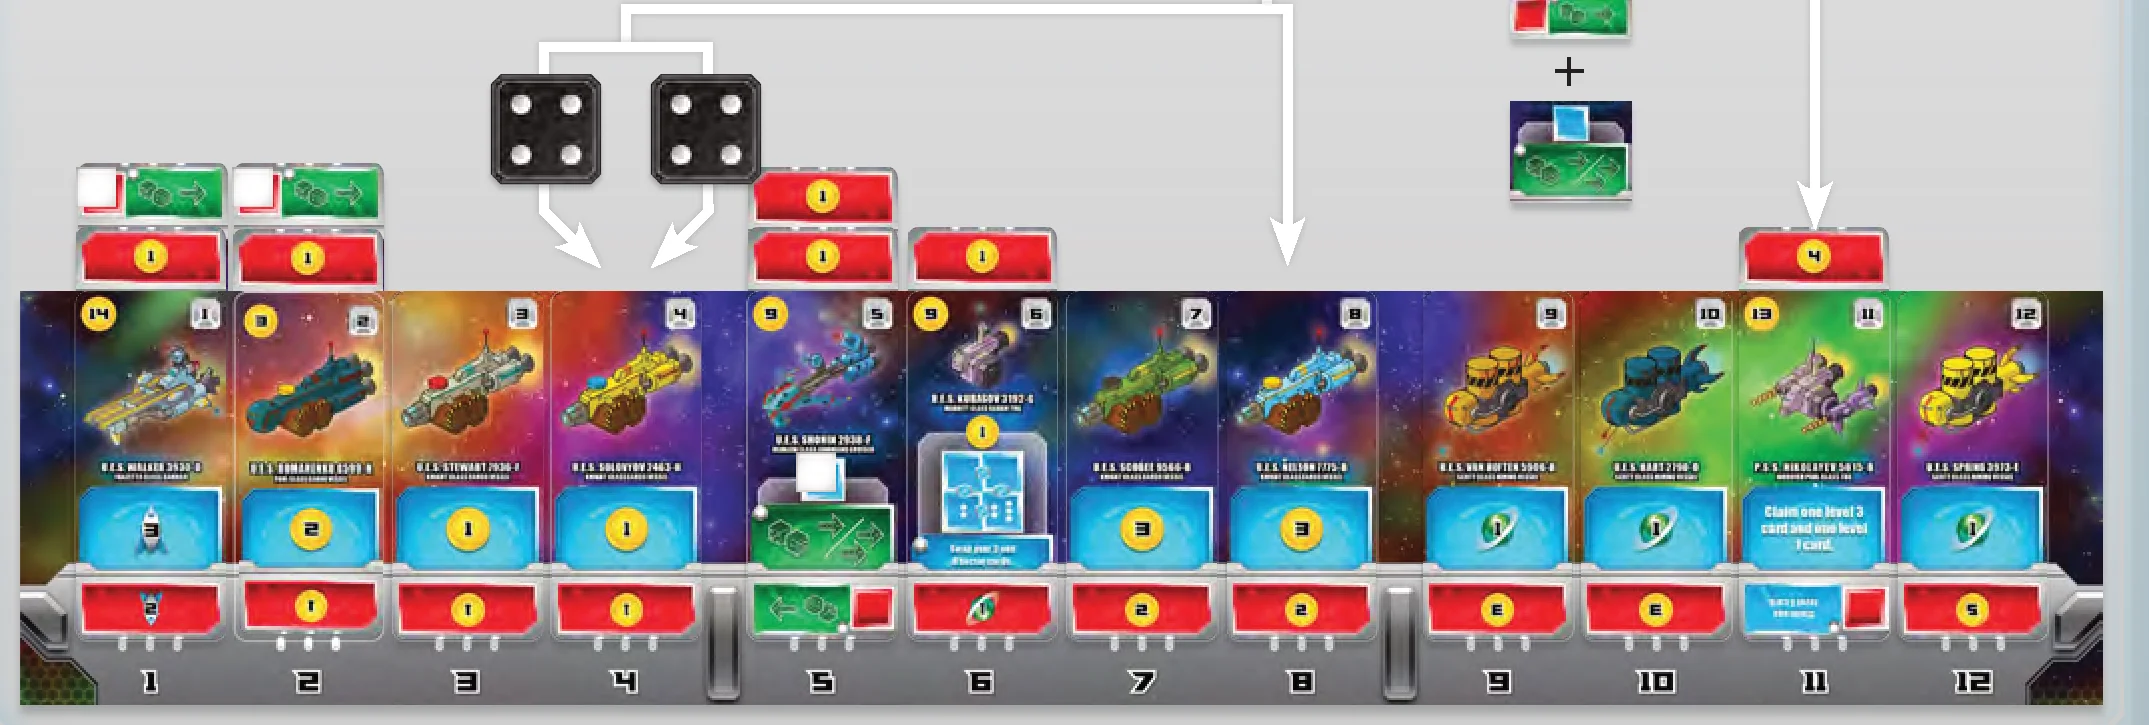
Example: Your opponent rolled double 4. You have 2 single arrow effects charged and 1 double arrow effect charged. You could take the dice individually and gain nothing twice for your 4 sector. Bad idea. Allocating the sum gets you nothing once for your 8 sector. Also a bad idea. However, if you take the sum but also spend 1 off either of your single-arrow abilities and 1 off your double-arrow ability you would shift the sector you gain rewards from this turn 3 sectors to the right and gain the 4 from your 11 sector instead of the nothing you get from your 8 sector.
Buy a Card / Claim a Card
These abilities can be used only during phase 1, 5 or 7 of your own turn.
Buy a Card
When you use the “Buy a Card” ability, it acts similar to a normal buy except you only spend the exact cost of the card you buy instead of all your . Moreover, you may still make your normal buy on your turn.
If the buy ability also gives you money, you gain the money before you buy the card. You are not required to buy a card when using this ability.
Claim a Card
When you claim a card, simply choose a ship card of the appropriate level from the shipyard and add it your console without paying for it. This is not a “buy” and you may still make your normal buy. You are not required to claim all the cards indicated.
Swap Sectors
These abilities can be used only during phase 1, 5 or 7 of your own turn.
An ability that says you may swap cards in sectors means you take ALL the cards in those two sectors and swap them. This includes the station card and all the deployed cards in each of those sectors.
A couple of notes:
- Any cards you buy during future turns are still placed according to their sector number as normal.
- Many of these abilities have a reward listed above their charge squares. These are rewards and are earned when you gain rewards for that card in addition to placing a on the card.
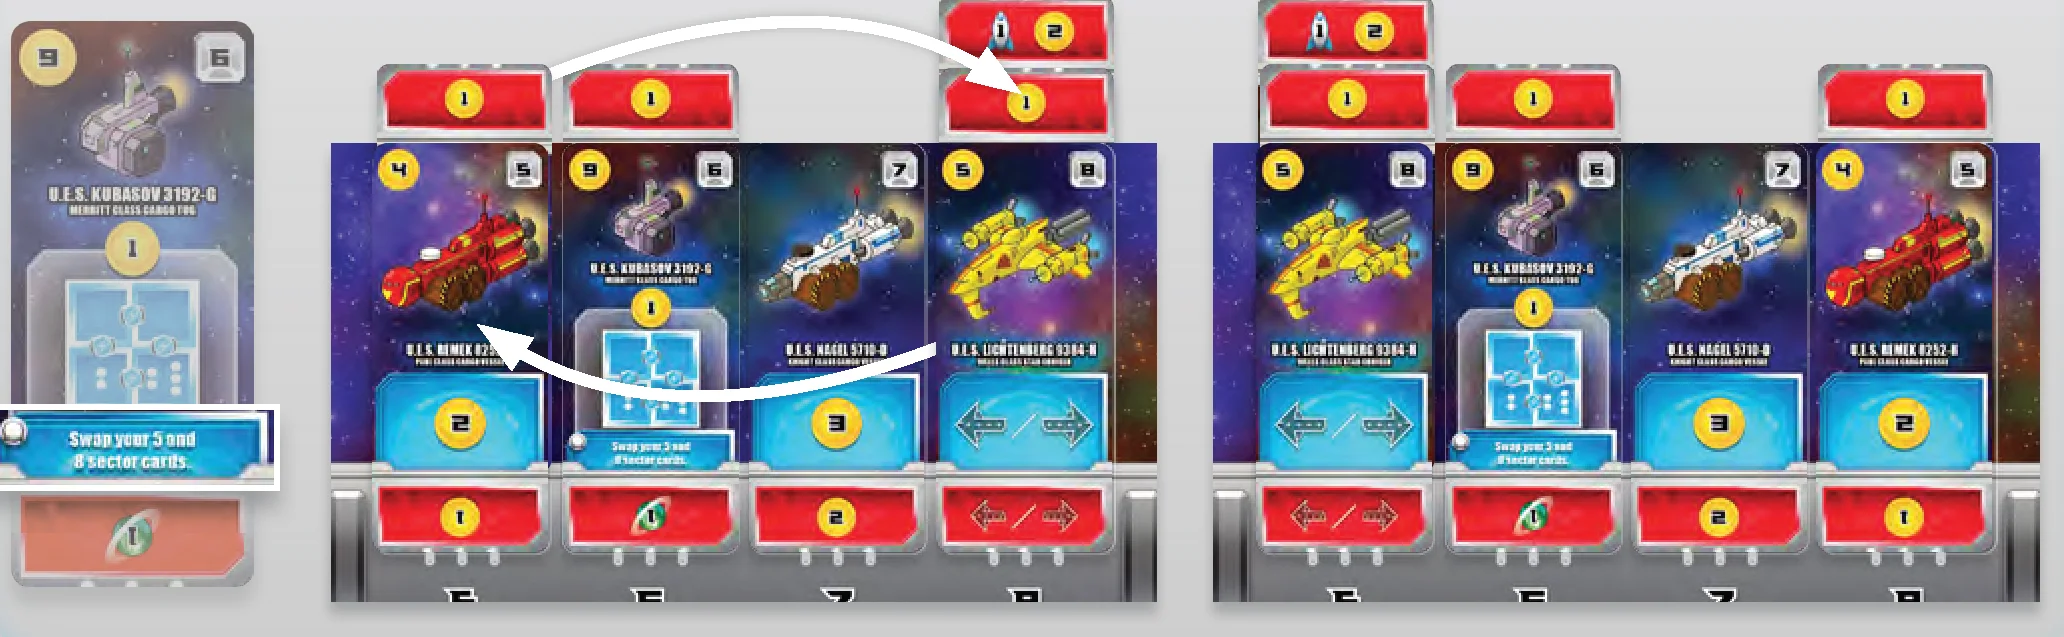
Reroll Dice
These abilities can be used only during phase 2 (“roll”) of your own turn. Rerolling one or both dice affects all players. When a player is considering using this ability, they should warn the other players, so they do not gain rewards using the wrong dice results.
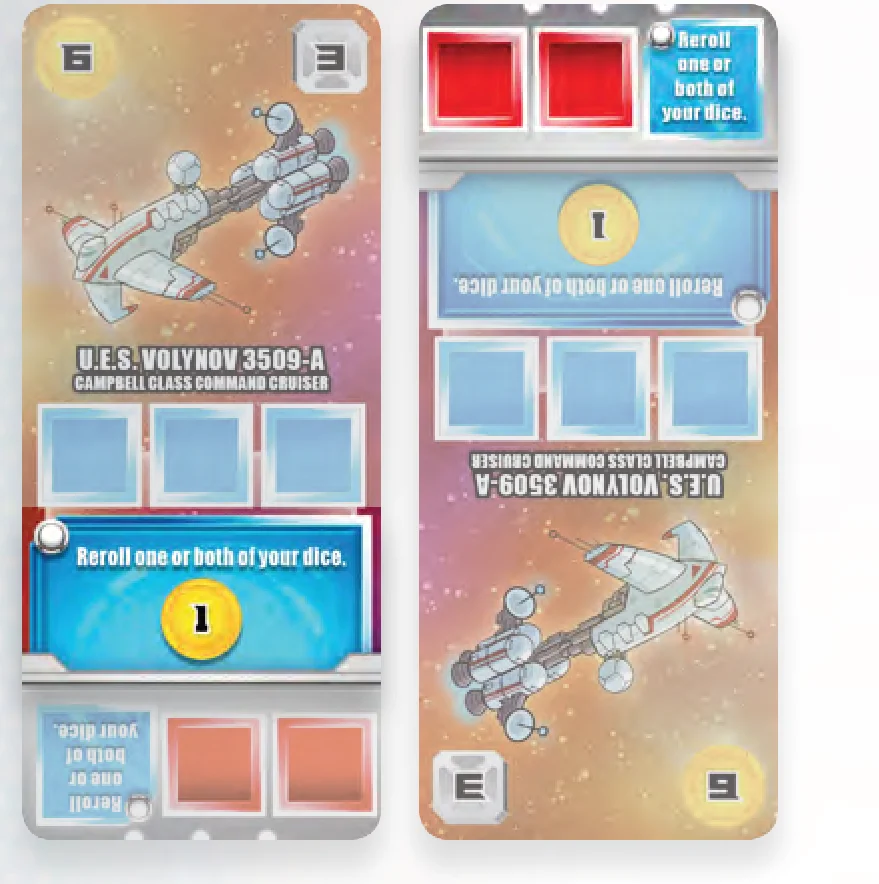
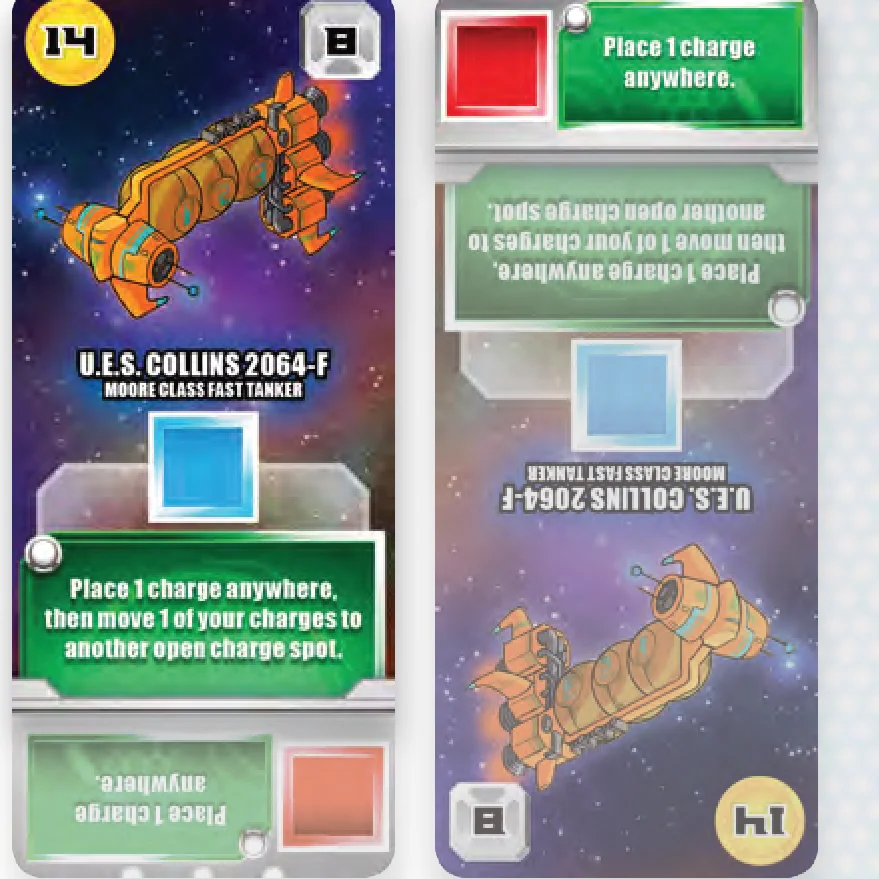
Place One Charge Anywhere
These abilities can be used during phase 1, 5 or 7 of any player’s turn. You may place one on an empty charge square on any of your cards.
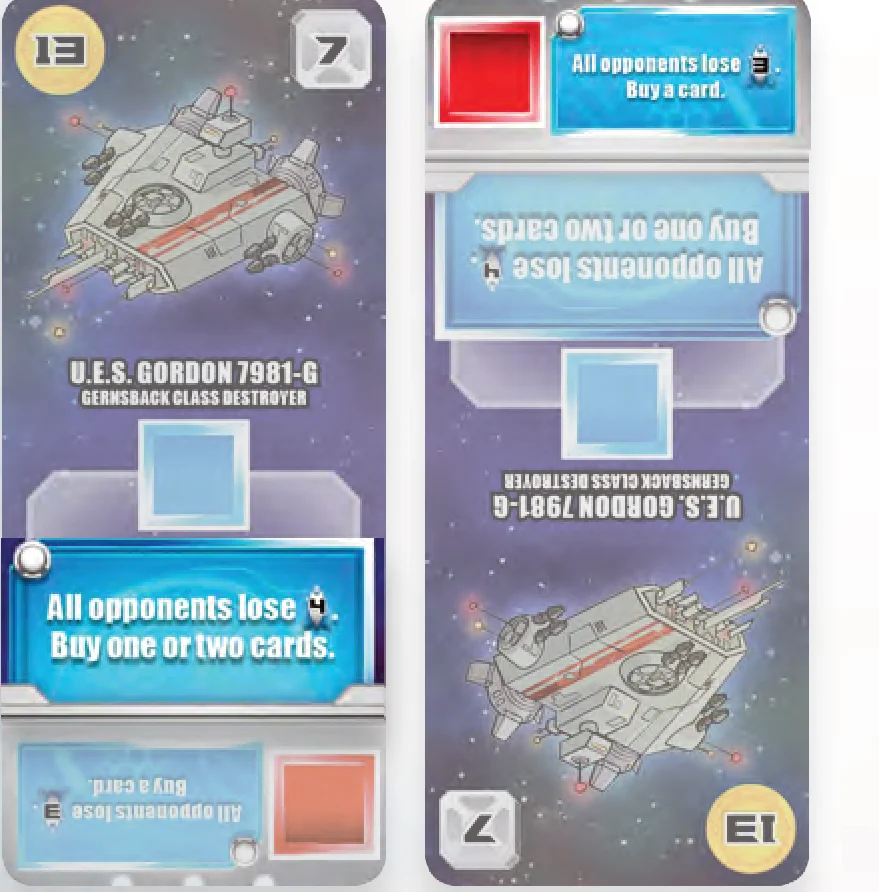
All Players Lose 4 VP
These abilities can be used only during phase 1, 5 or 7 of your own turn. Other players lose 4 . A player can never drop below 0 .
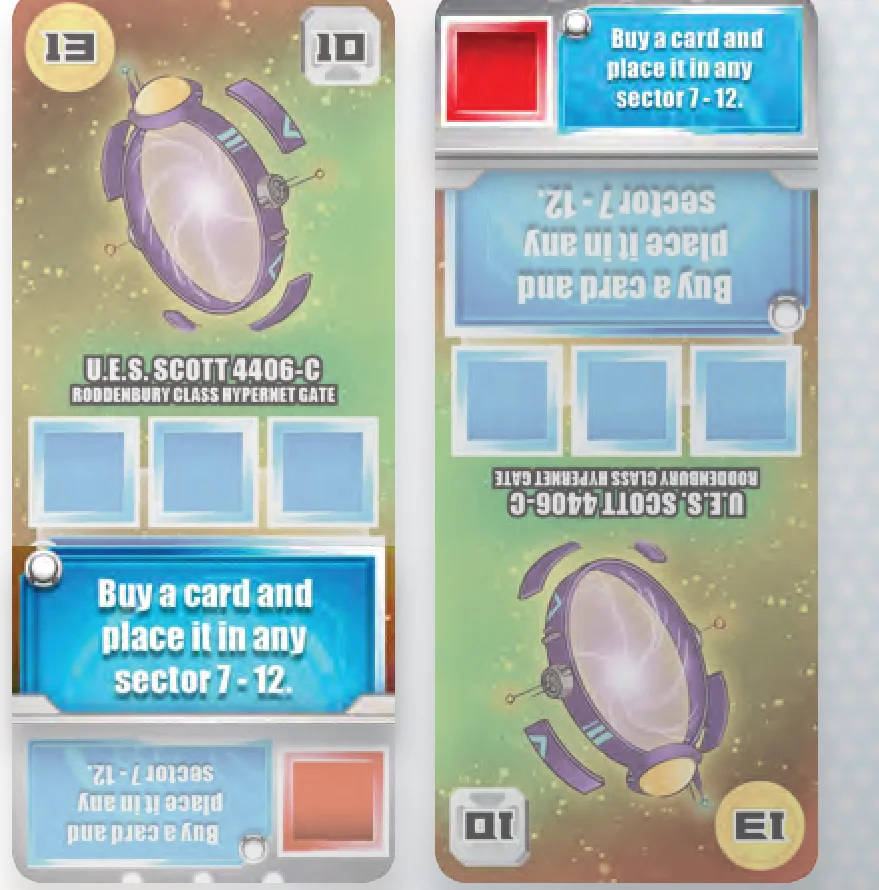
Place a Card on Any 7–12 Sector
These abilities can be used only during phase 1, 5 or 7 of your own turn. This allows you to put cards on sectors they may not normally be placed on, such as putting a card for sector 12 on sector 7.
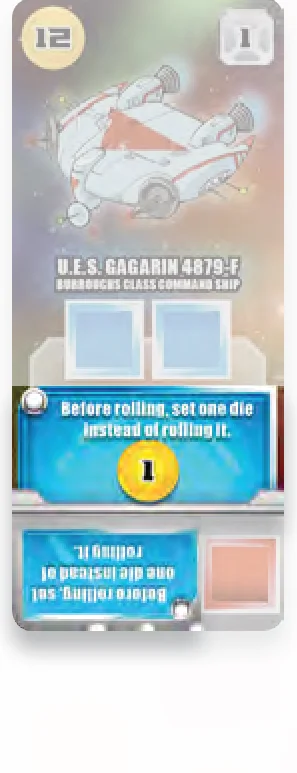
Set Dice
These abilities can be used only during phase 2 (“roll”) of your own turn. This must be used before you roll the dice. Instead of rolling a die, you choose which result to place it on.
For example, instead of rolling a die you may place it so the ‘6’ result is used. Further, if you had a on both of the blue charge squares, you would be able to spend 1 to set 1 die and roll the other, or spend both to set both dice to any numbers you want.
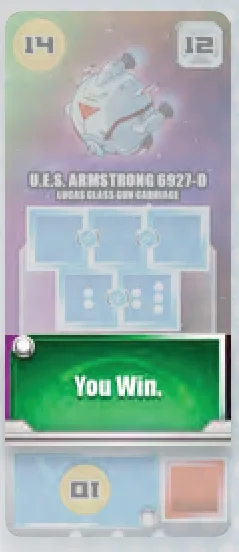
You Win!
This ability can be used during phase 1, 5 or 7 of any player’s turn. Yup, you read that correctly. When you use this ability, points are irrelevant; the game ends immediately and you win! Do not finish the round. If another player has more than 40 you win anyway.
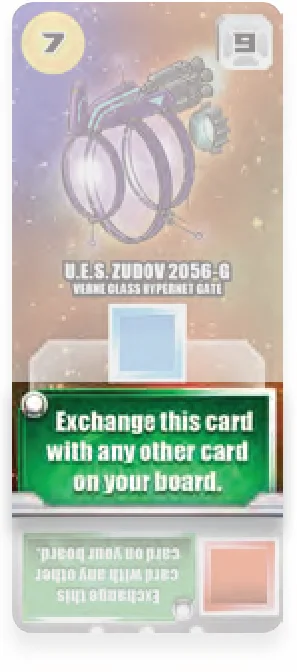
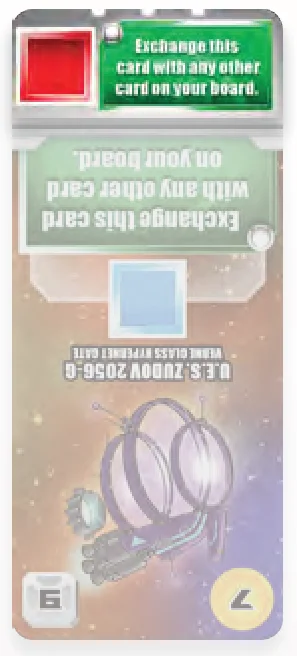
Exchange This Card with Any Other Card on Your Board
This ability can be used during phase 1, 5 or 7 of any player’s turn. When you use this ability, exchange this card’s position with any station card on your board.
- For example, if this card was on your board in sector 9, you could swap it with your 7 sector card on your board, in which case that card would now be in your 9 sector and this card would be in your 7 sector.
- As another example, if this card were deployed in your 9 sector, and you used the ability, you could swap it with your 4 sector station card on your board. In this case that card would now be deployed in your 9 sector and this card would be on your board in your 4 sector.
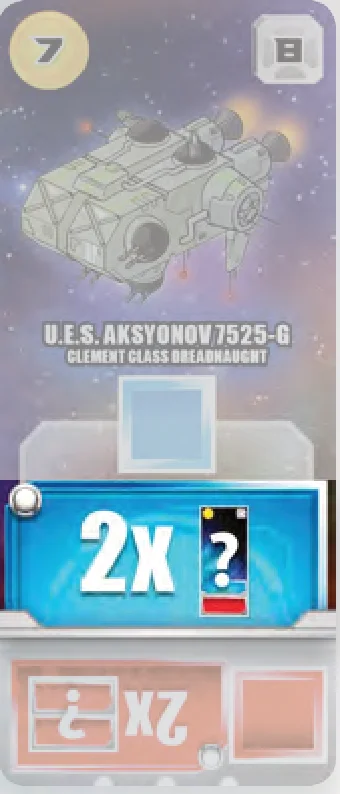
2X – Station (Active)
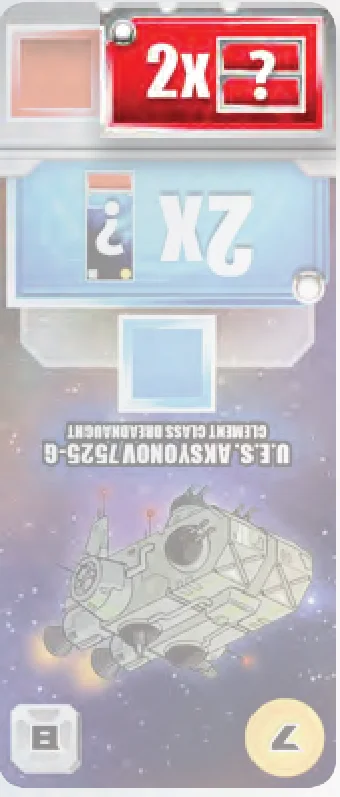
This ability can be used only during phase 4 (“gain rewards”) of your own turn before gaining the rewards for the roll. When you activate this ability and resolve its effect, gain whatever blue rewards you get this turn for one sector two times. Note, this ability cannot be used to charge itself.
Example to the right: If a 2 and 3 were rolled on your turn and you activated this ability, then after claiming your from your 2 and 3 sectors you could choose to take the reward from either your 2 or 3 sector a second time. If you took the sum for a 5, this ability would let you gain your 5 sector reward twice.
2X – Deploy (Passive)
This ability can be used only during phase 4 (“gain rewards”) of an opponent’s turn before gaining rewards from the roll. When you activate this ability and resolve its effect, gain whatever red rewards you get this turn for one sector two times. Note, this ability cannot be used to charge itself.
Example to the right: If a 5 and 6 were rolled on your opponent’s turn and you allocated the dice individually, you could use this ability to gain the rewards for sector 5 twice, thus placing a and gaining the 3 from sector 5 twice (for a total of 6 and 2 being placed), but you would not gain the 2 from the 6 sector a second time.
Credit (or Income or VP) Generating Abilities
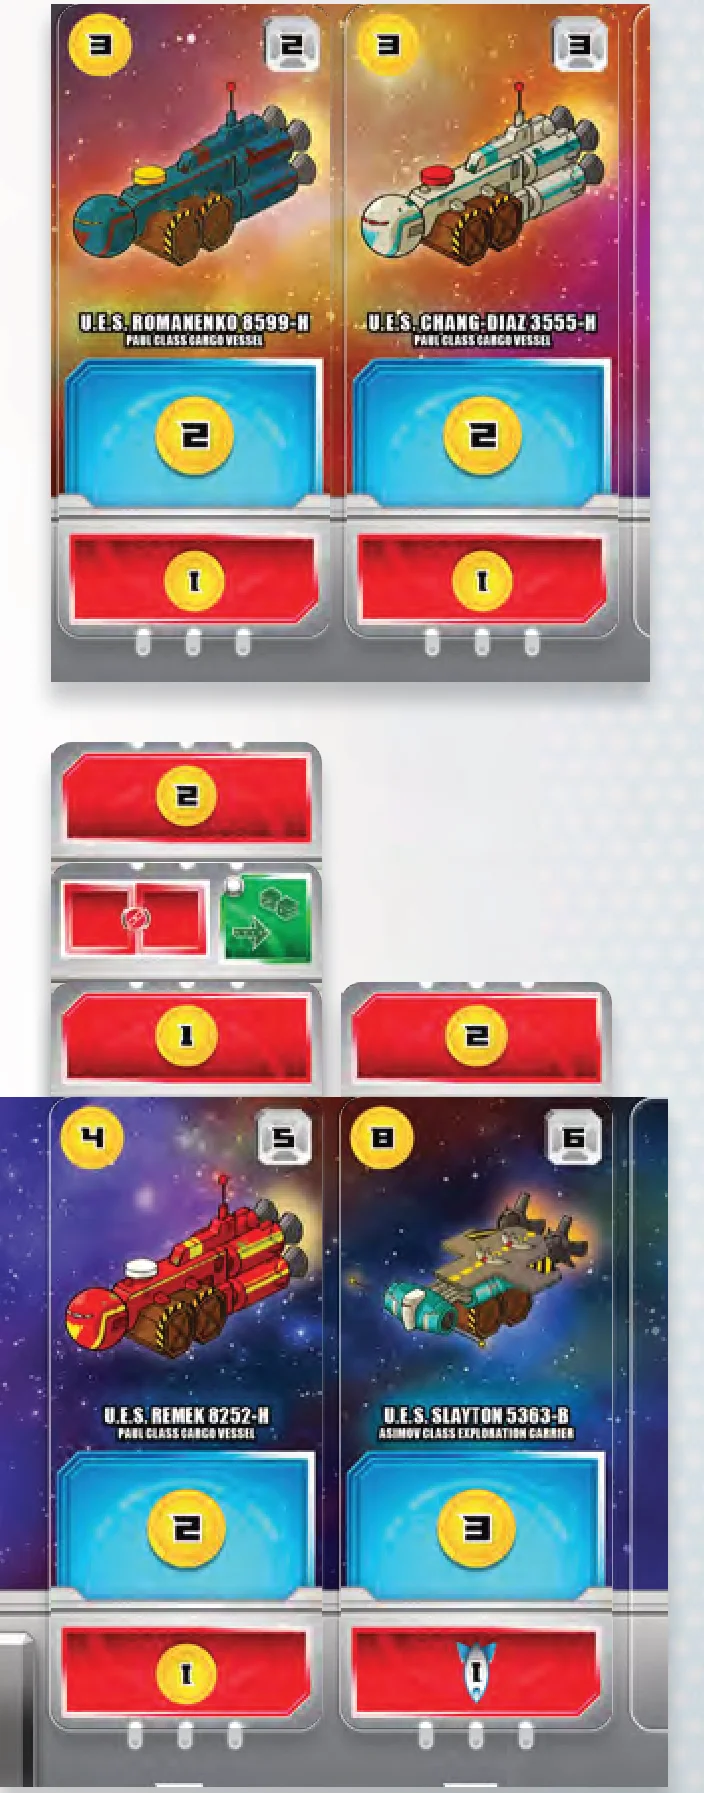
This ability can be used only during phases 1, 5, and 7. When you activate this ability and resolve its effect, gain the , (or , or ) listed in the ability box.
End of the Game
When any player reaches at least 40 , it triggers the end of the game, even if this happens on another player’s turn. Finish playing the current round so that each player gets an equal number of turns, then the game ends. This means the player sitting to the right of the starting player will take the last turn of the game.
The player with the most total is the winner. If two or more players are tied, play one more full round (each player takes one more turn), after which the player with the most is the winner—even if that player is not one of the original tied players. If still tied, continue playing extra rounds until a winner is determined.
Reminder: While your resource track only goes to 40 spaces, there is no limit to the number of (or or ) you can gain; place a charge cube on the 40 position of the respective tracker and simply start counting again at the 0 space, adding +40 to the total.
Light-Speed Variant
NOT RECOMMENDED FOR YOUR FIRST GAME!
This is an optional variant for those who want to essentially skip through the first few turns of the game and get into the middle of the game faster. Playing with this variant will reduce the average length of the game.
NOTE: These are not the “standard” rules, but rather a variant.
Before the game:
- Instead of giving each player 5 , each player begins the game with 15 and 1 .
- Then, instead of having each player draw a random level 1 card and deducting the cost from their starting credits, have each player draw four level 1 cards and two level 2 cards.
- Players may spend their credits to buy as many of these cards as they wish to buy and can afford with their 15 . Any unspent are kept to start the game. Any unbought cards are placed at the bottom of their respective decks.
- The player who kept the most money goes first. In the case of a tie, the player with the highest sector card goes first, and if still tied roll to see who goes first.
Starting bonuses for 2nd, 3rd, 4th player, etc. are the same as a standard game of Space Base:
- The starting player does not gain any resources.
- The 2nd player gains 1 .
- The 3rd player (if any) gains 2 .
- The 4th player (if any) gains 1 .
- The 5th player (if any) gains 1 .
Strategy Tip – Dice Roll Probability
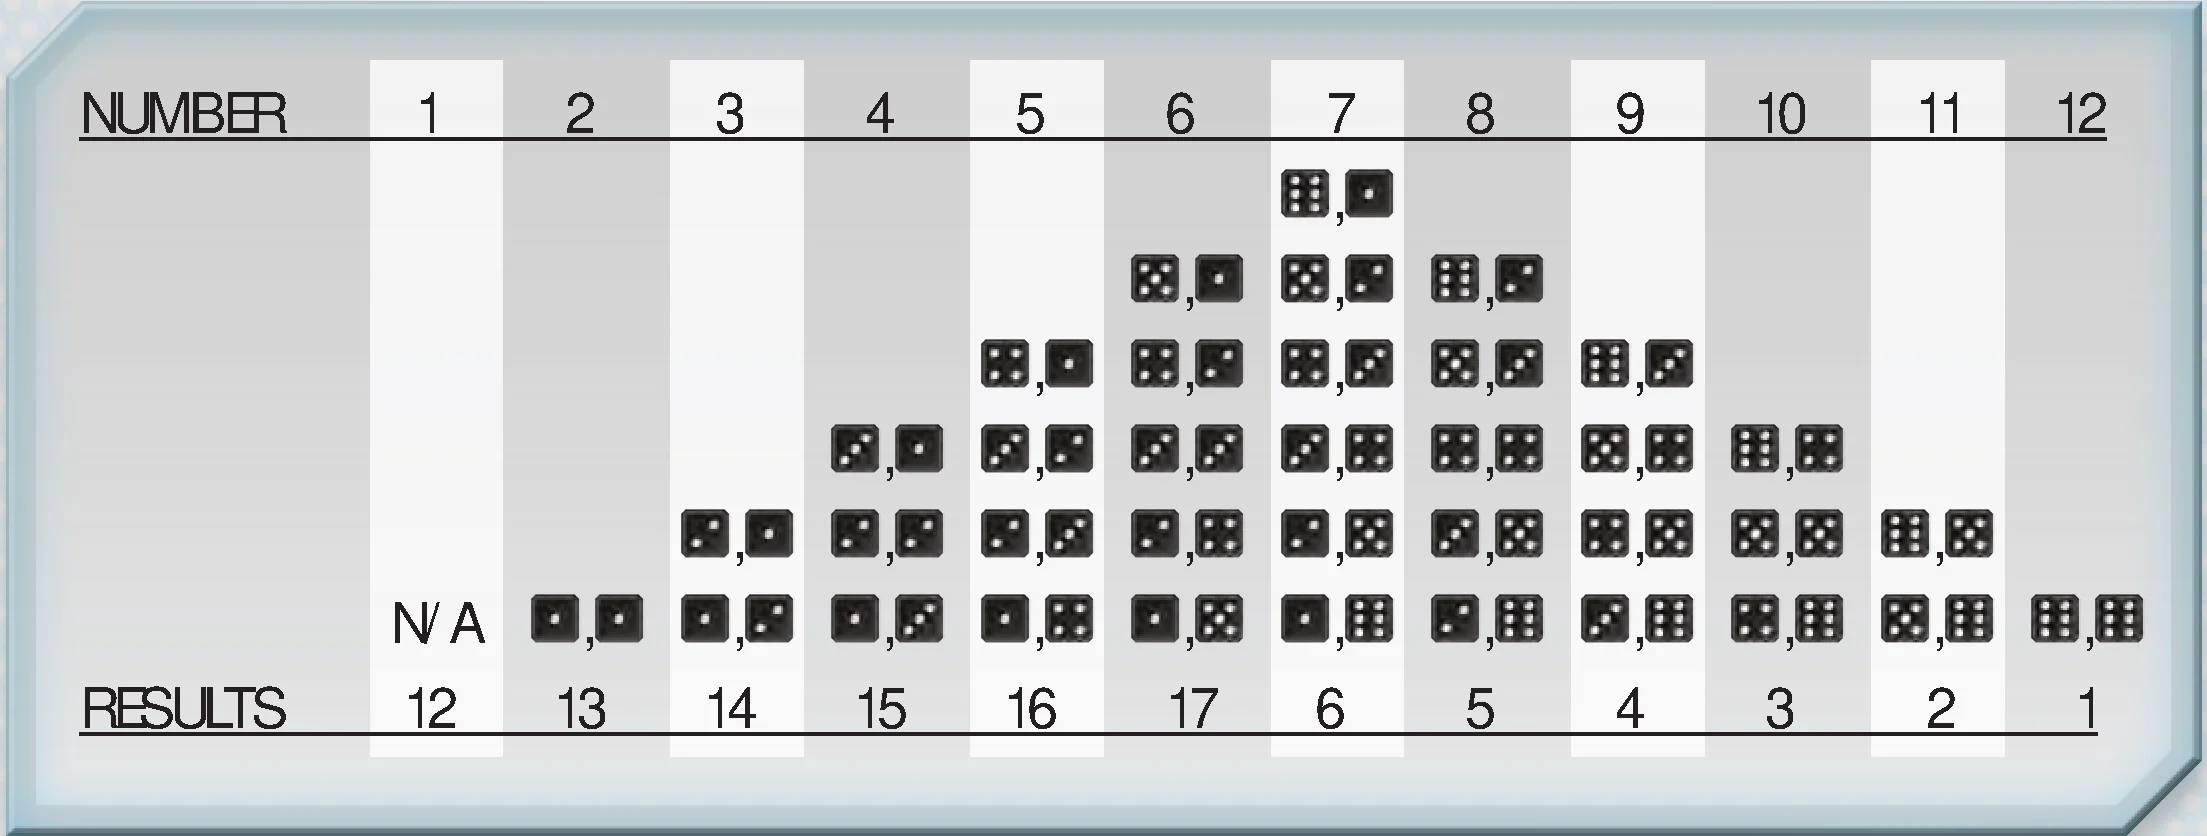
Because players may choose to take the dice separately or as a sum, probabilities of results do not make for a normal distribution. As most experienced gamers know, when two six–sided dice are rolled, one of possible 36 results occurs (shown in the graph below). The result with the most ways to be rolled is 7, which can be rolled 6 different ways out of the 36 possible results. However, it pays to note that in Space Base the dice can be allocated individually, so lower numbers, 1–6, will actually be the most common. Each number between 1 and 6 appears 12 times. Further, since the numbers 2 to 6 can be made with the sum of the dice as well, their results become even more frequent.
The numbers in order of possible frequency are: 6 (17 results), 5 (16 results), 4 (15 results), 3 (14 results), 2 (13 results), 1 (12 results), 7 (6 results), 8 (5 results), 9 (4 results), 10 (3 results), 11 (2 results), and finally 12 (1 result). Thus, naturally, the cards with a sector of 7 or higher have more powerful rewards, where the more frequently occurring sector cards have weaker rewards.
U.E.S. Gordon 7981-G (Gernsback Class Destroyer)
The U.E.S. Gordon has been a workhorse for the U.E.S. since the days of the Slassas wars. Initially designed as an escort destroyer, it’s from an early part of the war when destroyers and not carriers brought military might to a sector through sheer fire power. The Gordon was one of the first ships equipped with ultra-core laser technology and carried out many of the initial tests. The Gordon was also fitted with a Devastator-class propulsion system, which makes it capable of chasing down blockade runners and turning them to dust.
Gernsback destroyers were once some of the most numerous ships in the fleet, protecting U.E.S. interests across the stars, but as modern carriers came into service, order 6D6 was issued which decommissioned and sent most of the other Gernbacks for scuttling. The Gordon happened to be deployed at that time and secured its sector single handedly. Due to its long service to the U.E.S., the Terran High Chancellor pardoned the Gordon from order 6D6. Today the Gordon is among a few remaining Gernbacks in service to the U.E.S.
U.E.S. Scott 4406-C (Roddenbury Class Hypernet Gate)
Recent discoveries and advancements in faster than light travel have resulted in hypernet technology. Dimensional portals that reroute physical space through wormholes at the end of a black hole are opened to preset hypernet buoys, allowing giant capital ships to cross immense distances in the blink of an eye.
The hypernet travel was shelved after initial experiments resulted in entire crews emerging from the hypernet completely ravenous, murderous, and insane. However, once the oxygen and food supplies were altered, experimental crews of specially engineered humans, whose DNA was crossed with that of elephant DNA, emerged from the hypernet reporting feelings of euphoria and stimulated senses. Now, unmodified ship crews can travel the hypernet with only a modified diet and supplement intakes.
Once the technology was put into production, the U.E.S. Zudov was commissioned. After a long series of 7 retrofits, the technology was allowed to advance and the U.E.S. Scott was commissioned. Now on its third retrofit (as indicated by the “-C” after its numeric designation) the Scott is put into service moving newly assigned ships into action at a rapid pace.
U.E.S. Thornton 8524-G (Wells Class Star Cruiser)
The old Wells Class Star Cruisers were intended to be rapid deployment command and control vessels. In peace time, they have been used as shuttles for dignitaries and to investigate localized phenomenon.
The Thornton, manned by a rookie crew, was sent to investigate the emergence of a tear in space just beyond Neptune. Gravitational impulses skewed the orbits of three of Neptune’s moons, and swallowed a science station based in the area.
After two weeks of gathering data on the anomaly, the space station reappeared and the tear in space disappeared. The crew of the Thornton docked with the station to investigate. What they found aboard the ship set the boarding crewmen, including the captain of the Thornton, into paranoid delusions that ended with those crewmen self-destructing the space station. The skeletal crew of three aboard the Thornton made a harrowing last minute escape from the blast radius of the station as it became star dust. Only one transmitted image from the boarding crew made it to the Thornton’s databases: flesh-covered walls on which crewmen had become fused with the walls of the space station.
This incident led to the creation of the U.E.S. Department of Dimensional Investigations (the D.D.I. for short).
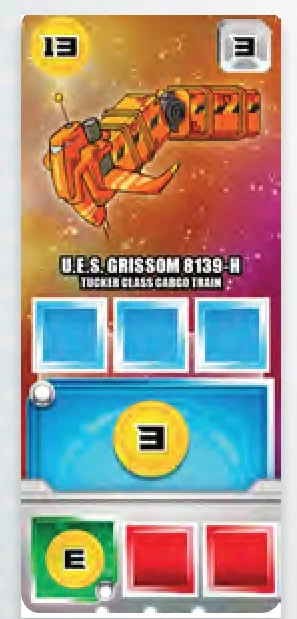
U.E.S. Grissom 8139-H (Tucker Class Cargo Train)
Originally, three Tucker Class Cargo Trains were operated by the U.E.S.—the Grissom is the only one that remains. When the U.E.S. made first contact and formed trading alliances with the Ziilen Empire, the Tuckers were conceived as long range trade vessels designed to haul immense loads over long distances. Each would carry the load of 20 standard cargo ships, though at a slower speed. All three Tucker Cargo Trains were destroyed when remaining Slassas resistance fighters began waging a guerrilla war against the U.S. following the destruction of their home world and the end of standard armed conflict with the U.E.S. The remnants of the three cargo trains were salvaged and the Grissom, following a restoration and retrofit, was returned to service, though carrying much smaller loads than she used to.
U.E.S. Grechko 1421-A (Asimov Class Exploration Carrier)
One of the first duties of the Grechko was to ferry fighter squadrons back and forth to the front lines of the Slassas conflicts, along with general supplies. Upon returning to the front lines, the Grechko took a shortcut through the Harrison wormhole that was well-known to the U.E.S. However, when the Grechko went through, two ships emerged on the other side: the U.E.S. Grechko 1421-A and the U.E.S. Grechko 1421-!! Based on the records of the surviving vessel, the captains of the Grechko both assumed that the other ship was a ruse by Slassas forces. Fighters on board were immediately scrambled and turbo-torpedoes were fired. The ensuing combat was hectic and chaotic as both vessels—and all fighters—communicated on the same channels with the same callsigns, wingmen often losing track of each other. Eventually one ship emerged victorious and returned to base—with a few duplicate fighter pilots and fighter registration numbers. These pilots were put in the custody of the U.E.S.D.D.I.
U.E.S. Armstrong 6927-D (Lucas Class Gun Carriage)
On a moon-sized planet in a far off sector lived a desert race of sentient, cold-blooded reptilians, referred to in official U.E.S. records as the Slassas. These humanoids clashed with U.E.S. services during the U.E.S.’s first expedition into the stars. Their ships were stronger and more heavily armored than those of the U.E.S. and threatened human exploration of space. The U.E.S. countered by putting escort carriers and heavily armored destroyers into service. An arms race followed.
A decade into the Slassas arms race the U.E.S. stole technology from a neighboring race of humanoids not involved with the Slassas or the U.E.S. This stolen technology, while requiring large amounts of power, allowed for ultra-core lasers, powerful enough to destroy capital ships and space stations in one volley. This technology was advanced by U.E.S. scientists and technicians to its ultimate pinnacle.
The Lucas Class Gun Carriage was designed to carry the ultra-core laser and power station into Slassas territory. On Terran Date 1.11.A2505 the Armstrong Lucas Gun Carriage laid waste to the Slassas fleets, nearly single-handedly. On Terran Date 3.11.A2507, following its 4th retrofit, the Armstrong, escorted by numerous carriers and dreadnoughts, flew deep into Slassas space and took aim at their planet—laying waste to the Slassas homeworld and surrounding bases.
One other Lucas Class Gun Carriage was in the beginning stages of production, but its construction was halted when remaining Slassas forces signed the treaty of 6.11.A2507, 3 days after the Armstrong ended their production capabilities.
U.E.S. Scobee 9566-B (Knight Class Cargo Vessel)
Mining and colonization are the goals of the United Earth Services, but trade is what keeps its ships sailing. The Knight Class Cargo Vessels of the U.E.S. are the backbone of a fleet’s finances. Knight class vessels were pressed into service 5 years before their expected service date when the Mmaal attacks on remote U.E.S. Space Bases took place.
In planning for a counter invasion, ships like the Scobee were fitted with special drop pods that replaced their cargo pods, allowing these unarmed cargo ships to deliver troops and armor to the planet’s surface. The Scobee was among the last of these military cargo retrofits, having taken part in the final counter invasion of the Mmaal Empire on 22.2.A2576 which ended the conflict, by dropping over 1 million U.E.S. Human-Canine hybrids and accompanying armor divisions on the Mmaal homeworld, taking their capital.
As time passed, the Mmaal Empire became a regular trading partner and eventually a strong ally of the U.E.S., partnering with them in the exploration and the peacekeeping among the stars. The Scobee and her sister ships made that possible.
U.E.S. Aksyonov 7525-G (Clement Class Dreadnaught)
The Clement Class Dreadnaughts are self-sufficient multifunctional battleships sent into remote, exploratory regions to seek out new civilizations and new life and to go where the U.E.S. has never gone before. These beasts of far space hold a small contingent of space fighters and a deployable mining vessel within their bellies. Further, they sport massive firepower, with giant hull-mounted Yarie cannons.
The Aksyonov was forced to return to home port early from its five year mission when an infestation of a rapidly breeding rodent of alien origin, called Friddles, was found on the ship. Friddles are rabbit-sized, star-shaped furry animals of an almost mammal descent. When in heat, Friddles emit a hormone which is sleep-inducing in unaltered human. When the infestation grew to a catastrophic size and the Friddles went into heat, this caused the Aksyonov to abort its exploratory mission and to return home under the manning of the unaffected genetically altered crew, where it was purged of the infestation.
Quick Reference
Rewards and Activations
- Blue rewards and abilities: can only be gained during your turn, when you are the active player.
- Red rewards and abilities: can only be gained during an opponent’s turn, when you are a passive player.
- Green abilities: can be used during any turn, whether you’re the active player or a passive player.
Charge Rewards
- Blue colored squares: can only be charged as a reward during your turn, when you are the active player.
- Red colored squares: can only be charged as a reward during an opponent’s turn, when you are a passive player.
Activation Cards –
These cards have one or more colored squares on them with an activation ability that describes the ability. Their effects have an activation icon in the upper left hand corner.
Credits
When you gain this reward, advance your cube by that amount.
Income
When you gain this reward, advance your cube by that amount. At end of your turn, if you have less than reset your to equal your .
VP (Victory Points)
When you gain this reward, advance your cube by that amount.
Text Abilities
This reward simply has text that describes what you gain when you claim the reward.
Arrow – Both Directions
If there is an arrow pointing to the right and one to the left, then you choose whether to gain the rewards one sector to the left or one sector to the right.
Arrow and Reward
If there is an arrow and another reward, you gain the reward and gain the rewards for one sector over in the direction of the arrow.
Dice-Arrows Activation Abilities
These abilities can only be used when Allocating dice and only if you chose the sum of the dice.
- If this ability shows only 1 arrow, then using this ability means that you gain the rewards one sector to the right of the sector to which you allocated the dice.
- If the ability shows both 1 arrow and 2 arrows, then you may choose to shift the sector you receive rewards from 1 or 2 sectors to the right.
2X – Station (Active)
This ability can be used only during phase 4 (“gain rewards”) of your own turn before gaining the rewards for the roll. When you activate this ability and resolve its effect, gain whatever blue rewards you get this turn for one sector two times.
2X – Deploy (Passive)
This ability can be used only during phase 4 (“gain rewards”) of an opponent’s turn before gaining rewards from the roll. When you activate this ability and resolve its effect, gain whatever red rewards you get this turn for one sector two times.
Space Base Card List by Level, Class, Then Name
Starting Ships
- U.E.S. Acton 8806-A (Knight Class Cargo Vessel)
- U.E.S. Al Saud 2196-A (Knight Class Cargo Vessel)
- U.E.S. Atkov 1044-E (Knight Class Cargo Vessel)
- U.E.S. Bartoe 5606-F (Knight Class Cargo Vessel)
- U.E.S. Baudry 1084-B (Knight Class Cargo Vessel)
- U.E.S. Bridges 7036-B (Knight Class Cargo Vessel)
- U.E.S. Buchli 3436-F (Knight Class Cargo Vessel)
- U.E.S. Creighton 1884-B (Knight Class Cargo Vessel)
- U.E.S. England 5328-E (Knight Class Cargo Vessel)
- U.E.S. Fisher 8993-A (Knight Class Cargo Vessel)
- U.E.S. Garn 2592-B (Knight Class Cargo Vessel)
- U.E.S. Garneau 2428-D (Knight Class Cargo Vessel)
- U.E.S. Gregory 3117-E (Knight Class Cargo Vessel)
- U.E.S. Griggs 2355-C (Knight Class Cargo Vessel)
- U.E.S. Hawley 7246-F (Knight Class Cargo Vessel)
- U.E.S. Henize 2916-F (Knight Class Cargo Vessel)
- U.E.S. Hoffman 1915-G (Knight Class Cargo Vessel)
- U.E.S. Leestma 3667-F (Knight Class Cargo Vessel)
- U.E.S. Lind 6653-B (Knight Class Cargo Vessel)
- U.E.S. Lucid 6422-F (Knight Class Cargo Vessel)
- U.E.S. McBride 4518-H (Knight Class Cargo Vessel)
- U.E.S. McCandless II 3195-D (Knight Class Cargo Vessel)
- U.E.S. McNair 1232-H (Knight Class Cargo Vessel)
- U.E.S. Mullane 8561-C (Knight Class Cargo Vessel)
- U.E.S. Nagel 5710-D (Knight Class Cargo Vessel)
- U.E.S. Nelson 7775-B (Knight Class Cargo Vessel)
- U.E.S. Onizuka 5343-B (Knight Class Cargo Vessel)
- U.E.S. Payton 8404-A (Knight Class Cargo Vessel)
- U.E.S. Resnik 4906-G (Knight Class Cargo Vessel)
- U.E.S. Scobee 9566-B (Knight Class Cargo Vessel)
- U.E.S. Scully-Power 4541-F (Knight Class Cargo Vessel)
- U.E.S. Seddon 8290-G (Knight Class Cargo Vessel)
- U.E.S. Sharma 7947-G (Knight Class Cargo Vessel)
- U.E.S. Shriver 1746-E (Knight Class Cargo Vessel)
- U.E.S. Solovyov 2463-H (Knight Class Cargo Vessel)
- U.E.S. Stewart 7936-F (Knight Class Cargo Vessel)
- U.E.S. Sullivan 3696-D (Knight Class Cargo Vessel)
- U.E.S. van den Berg 2091-C (Knight Class Cargo Vessel)
- U.E.S. Wang 1171-B (Knight Class Cargo Vessel)
- U.E.S. Williams 3753-E (Knight Class Cargo Vessel)
- U.E.S. Bolden 9030-A (Scott Class Mining Vessel)
- U.E.S. Cleave 2349-G (Scott Class Mining Vessel)
- U.E.S. Coats 2150-C (Scott Class Mining Vessel)
- U.E.S. Covey 5488-H (Scott Class Mining Vessel)
- U.E.S. Dunbar 8761-G (Scott Class Mining Vessel)
- U.E.S. Furrer 4563-G (Scott Class Mining Vessel)
- U.E.S. Grabe 2173-C (Scott Class Mining Vessel)
- U.E.S. Hart 2790-D (Scott Class Mining Vessel)
- U.E.S. Hilmers 5365-H (Scott Class Mining Vessel)
- U.E.S. Lounge 4034-G (Scott Class Mining Vessel)
- U.E.S. Messerschmid 4427-D (Scott Class Mining Vessel)
- U.E.S. Neri Vela 9636-B (Scott Class Mining Vessel)
- U.E.S. O’Connor 1927-D (Scott Class Mining Vessel)
- U.E.S. Ockels 7726-E (Scott Class Mining Vessel)
- U.E.S. Pailes 6050-H (Scott Class Mining Vessel)
- U.E.S. Ross 7000-D (Scott Class Mining Vessel)
- U.E.S. Spring 3973-E (Scott Class Mining Vessel)
- U.E.S. van Hoften 5906-B (Scott Class Mining Vessel)
- U.E.S. Vasyutin 7921-G (Scott Class Mining Vessel)
- U.E.S. Volk 9084-B (Scott Class Mining Vessel)
Level 1 Ships
- U.E.S. Bobko 6010-E (Bradbury Class Carrier)
- U.E.S. Hauck 5084-D (Bradbury Class Carrier)
- U.E.S. Musgrave 5650-E (Bradbury Class Carrier)
- U.E.S. Peterson 5325-H (Bradbury Class Carrier)
- U.E.S. Merbold 6865-D (Gunn Class Cargo Cruiser)
- U.E.S. Farkas 3405-F (Herbert Class Mining Vessel)
- U.E.S. Hermaszewski 5586-E (Herbert Class Mining Vessel)
- U.E.S. Ivanov 8387-E (Herbert Class Mining Vessel)
- U.E.S. Jähn 8920-C (Herbert Class Mining Vessel)
- U.E.S. Lyakhov 4181-D (Herbert Class Mining Vessel)
- U.E.S. Popov 3919-A (Herbert Class Mining Vessel)
- U.E.S. Bluford 5120-E (Modified Bradbury Class Carrier)
- U.E.S. Brergovoy 9890-C (Paul Class Cargo Vessel)
- U.E.S. Chang-Diaz 3555-H (Paul Class Cargo Vessel)
- U.E.S. Chrétien 3182-C (Paul Class Cargo Vessel)
- U.E.S. Crippen 7733-C (Paul Class Cargo Vessel)
- U.E.S. Dzhanibekov 1999-G (Paul Class Cargo Vessel)
- U.E.S. Engle 1913-A (Paul Class Cargo Vessel)
- U.E.S. Fullerton 2005-A (Paul Class Cargo Vessel)
- U.E.S. Gürragchaa 3972-D (Paul Class Cargo Vessel)
- U.E.S. Hartsfield 5562-G (Paul Class Cargo Vessel)
- U.E.S. Ivanchenkov 2754-H (Paul Class Cargo Vessel)
- U.E.S. Overmyer 3792-A (Paul Class Cargo Vessel)
- U.E.S. Prunariu 7750-G (Paul Class Cargo Vessel)
- U.E.S. Remek 8252-H (Paul Class Cargo Vessel)
- U.E.S. Romanenko 8599-H (Paul Class Cargo Vessel)
- U.E.S. Ryumin 4713-C (Paul Class Cargo Vessel)
- U.E.S. Savitskaya 6659-G (Paul Class Cargo Vessel)
- U.E.S. Serebrov 1243-G (Paul Class Cargo Vessel)
- U.E.S. Truly 9239-H (Paul Class Cargo Vessel)
- U.E.S. Allen 4004-C (Tolkien Class Cargo Carrier)
- U.E.S. Kizim 1379-H (Tolkien Class Cargo Carrier)
- U.E.S. Lenoir 7021-B (Tolkien Class Cargo Carrier)
- U.E.S. Malyshev 9767-E (Tolkien Class Cargo Carrier)
- U.E.S. Savinykh 8526-G (Tolkien Class Cargo Carrier)
- U.E.S. Strekalov 7422-E (Tolkien Class Cargo Carrier)
- U.E.S. Tamayo-Mendez 4759-G (Tolkien Class Cargo Carrier)
- U.E.S. Tuân 8623-B (Tolkien Class Cargo Carrier)
- U.E.S. Lichtenberg 9384-H (Wells Class Star Cruiser)
- U.E.S. Parker 8635-F (Wells Class Star Cruiser)
- U.E.S. Shaw 1873-C (Wells Class Star Cruiser)
- U.E.S. Thornton 8524-G (Wells Class Star Cruiser)
- U.E.S. Aleksandrov 5155-G (Williamson Class Command Ship)
- U.E.S. Brandenstein 3161-C (Williamson Class Command Ship)
- U.E.S. Fabian 4787-B (Williamson Class Command Ship)
- U.E.S. Gardner 7506-E (Williamson Class Command Ship)
- U.E.S. Ride 3066-E (Williamson Class Command Ship)
- U.E.S. Thagard 4684-B (Williamson Class Command Ship)
Level 2 Ships
- U.E.S. Brand 5208-D (Asimov Class Exploration Carrier)
- U.E.S. Glazkov 3371-B (Asimov Class Exploration Carrier)
- U.E.S. Grechko 1421-A (Asimov Class Exploration Carrier)
- U.E.S. Slayton 5363-B (Asimov Class Exploration Carrier)
- U.E.S. Volynov 3509-A (Campbell Class Command Cruiser)
- U.E.S. Gorbatko 2007-F (Clarke Class Mining Vessel)
- U.E.S. Aksyonov 7525-G (Clement Class Dreadnaught)
- U.E.S. Duke 6222-C (Fate Class Cargo Vessel)
- U.E.S. Evans 7316-E (Fate Class Cargo Vessel)
- U.E.S. Garriott 6531-E (Fate Class Cargo Vessel)
- U.E.S. Irwin 8339-H (Fate Class Cargo Vessel)
- U.E.S. Kerwin 8426-A (Fate Class Cargo Vessel)
- U.E.S. Lazarev 4784-B (Fate Class Cargo Vessel)
- U.E.S. Lousma 6040-C (Fate Class Cargo Vessel)
- U.E.S. Makarov 6674-G (Fate Class Cargo Vessel)
- U.E.S. Mattingly 4618-C (Fate Class Cargo Vessel)
- U.E.S. Schmitt 9828-E (Fate Class Cargo Vessel)
- U.E.S. Weitz 3134-C (Fate Class Cargo Vessel)
- U.E.S. Worden 8663-H (Fate Class Cargo Vessel)
- U.E.S. Artyukhin 7727-D (Giger Class Carrier)
- U.E.S. Carr 7510-H (Giger Class Carrier)
- U.E.S. Dobrovolsky 5643-E (Giger Class Carrier)
- U.E.S. Gibson 4003-B (Giger Class Carrier)
- U.E.S. Klimuk 6800-G (Giger Class Carrier)
- U.E.S. Lebedev 5128-B (Giger Class Carrier)
- U.E.S. Mitchell 6176-D (Giger Class Carrier)
- U.E.S. Patsayev 6859-H (Giger Class Carrier)
- U.E.S. Pogue 5353-G (Giger Class Carrier)
- U.E.S. Roosa 1689-A (Giger Class Carrier)
- U.E.S. Rukavishnikov 3402-C (Giger Class Carrier)
- U.E.S. Sevastyanov 6862-D (Giger Class Carrier)
- U.E.S. Bean 1925-D (Harryhausen Class Mining Vessel)
- U.E.S. Filipchenko 9745-C (Harryhausen Class Mining Vessel)
- U.E.S. Haise 3712-D (Harryhausen Class Mining Vessel)
- U.E.S. Schweickart 5209-E (Harryhausen Class Mining Vessel)
- U.E.S. Swigert 2715-C (Harryhausen Class Mining Vessel)
- U.E.S. Volkov 9103-G (Harryhausen Class Mining Vessel)
- U.E.S. Demin 5091-F (Heinlein Class Command Cruiser)
- U.E.S. Gubarev 1743-B (Heinlein Class Command Cruiser)
- U.E.S. Khrunov 6194-G (Heinlein Class Command Cruiser)
- U.E.S. Shonin 2938-F (Heinlein Class Command Cruiser)
- U.E.S. Kubasov 3192-G (Merritt Class Cargo Tug)
- U.E.S. Yeliseyev 6380-D (Merritt Class Cargo Tug)
- P.S.S. Zholobov 1830-F (Modified Merritt Class Cargo Tug)
- P.S.S. Sarafanov 6334-C (Norton Class Cargo Tug)
- U.E.S. Kovalyonok 8127-H (Roddenbury Class Hypernet Gate)
- U.E.S. Rozhdestvensky 6723-C (Silverberg Class Command Tug)
- U.E.S. Zudov 2056-G (Verne Class Hypernet Gate)
Level 3 Ships
- U.E.S. Borman 3060-D (Bowie Class Cargo Vessel)
- U.E.S. Carpenter 2967-E (Bowie Class Cargo Vessel)
- U.E.S. Conrad 5602-E (Bowie Class Cargo Vessel)
- U.E.S. Lovell 1948-A (Bowie Class Cargo Vessel)
- U.E.S. McDivitt 2121-A (Bowie Class Cargo Vessel)
- U.E.S. Stafford 4286-G (Bowie Class Cargo Vessel)
- U.E.S. White 4448-C (Bowie Class Cargo Vessel)
- U.E.S. Young 6740-G (Bowie Class Cargo Vessel)
- U.E.S. Gagarin 4879-F (Burroughs Class Command Ship)
- U.E.S. Titov 9072-F (Burroughs Class Command Ship)
- U.E.S. Cooper 6412-D (Clarke Class Mining Vessel)
- U.E.S. Aldrin 4775-F (Frazetta Class Carrier)
- U.E.S. Anders 4253-F (Frazetta Class Carrier)
- U.E.S. Belyayev 1657-D (Frazetta Class Carrier)
- U.E.S. Beregovoy 8603-A (Frazetta Class Carrier)
- U.E.S. Cunningham 9172-H (Frazetta Class Carrier)
- U.E.S. Eisele 7639-F (Frazetta Class Carrier)
- U.E.S. Feoktistov 1804-D (Frazetta Class Carrier)
- U.E.S. Komarov 9388-G (Frazetta Class Carrier)
- U.E.S. Leonov 4621-E (Frazetta Class Carrier)
- U.E.S. Shatalov 3516-B (Frazetta Class Carrier)
- U.E.S. Walker 3930-D (Frazetta Class Carrier)
- U.E.S. Yegorov 1205-H (Frazetta Class Carrier)
- U.E.S. Gordon 7981-G (Gernsback Class Destroyer)
- U.E.S. Shepard 3592-G (Gunn Class Cargo Carrier)
- U.E.S. Armstrong 6927-D (Lucas Class Gun Carriage)
- P.S.S. Bykovsky 4498-A (Modified Pohl Class Tug)
- P.S.S. Nikolayev 5815-B (Modified Pohl Class Tug)
- P.S.S. Popovich 8867-G (Modified Pohl Class Tug)
- P.S.S. Tereshkova 5875-A (Modified Pohl Class Tug)
- U.E.S. Collins 2064-F (Moore Class Fast Tanker)
- U.E.S. Scott 4406-C (Roddenbury Class Hypernet Gate)
- U.E.S. Glenn 1817-C (Russel Class Tanker)
- U.E.S. Cernan 9131-H (Sturgeon Class Defender Tug)
- U.E.S. Schirra 9069-D (Sturgeon Class Defender Tug)
- U.E.S. Grissom 8139-H (Tucker Class Cargo Train)
Colony Cards
- U.E.C. Arrow Base (Cameron Class Star Settlement)
- U.E.C. Hicks Base (Cameron Class Star Settlement)
- U.E.C. Leontief Base (Cameron Class Star Settlement)
- U.E.C. Myrdal Base (Cameron Class Star Settlement)
- U.E.C. Friedman Colony (Kubrick Class Star Settlement)
- U.E.C. Hayek Colony (Kubrick Class Star Settlement)
- U.E.C. Kantorovich Colony (Kubrick Class Star Settlement)
- U.E.C. Koopmans Colony (Kubrick Class Star Settlement)
- U.E.C. Frisch Outpost (Serling Star Settlement)
- U.E.C. Kuznets Outpost (Serling Star Settlement)
- U.E.C. Samuelson Outpost (Serling Star Settlement)
- U.E.C. Tinbergen Outpost (Serling Star Settlement)
Credits
Designer: John D. Clair
Publisher: John Zinser
Project Lead: Erik-Jason Yaple
Development: John Goodenough
World Development: Erik-Jason Yaple
Production: David Lepore
Lead Artist: Chris Walton
Graphic Design: Kris Aubin
Art Director: Erik-Jason Yaple
Head of Quality Assurance: Kaz Nyborg-Andersen
Rulebook Writer: John D. Clair, John Goodenough, and Erik-Jason Yaple
Rulebook Editor: Mark Harbison
Proofing: David Lepore, Nicolas Bongiu, Mark Harbison, Mark Wootton
Playtesting
Alex Daar, Alix Greene, Andrew Narzynski, Ben Lesel, Bryan Reese, Carole Smith, Chris Buckley, Chris Buskirk, Clay Conditt, Csilla Clair, Daniel Lepore, Daniel Silvera, David Lebedoff, David Lepore, Devin Dai, Dwight Stone, Ehren Evans, Eric Elder, Eric Martinez, Erik-Jason Yaple, Eva Balogh, Hershey Harris, Jewel Woo, John Borders, John Goodenough, John Sanderson, John Zinser, Jon Espinoza, Katalin Balogh, Kaz Nyborg-Andersen, Kevin Raymond Will, Laramie Sasseville, Mara Kenyon, Mark Harbison, Mark Wootton, Michael Darling, Michael Kutan, Mindy Riley, Nicolas Bongiu, Nye Green, Richard Tatge, Ryan Dancey, Sam Nazarian, Samuel Lepore, Sean Growley, Terry Hughes, Thorin Tatge, Todd Rowland, Tricia Victor, Will Pell, Yan Yan
© 2018 Alderac Entertainment Group. Space Base, and all related marks are ™ and © Alderac Entertainment Group, Inc. 555 N El Camino Real #A393 San Clemente, CA 92672 USA. All rights reserved. Printed in China.
Overview & Components
Overview
For 2–5 Spacebase Commodores | Ages 14 and Up | By John D. Clair
In Space Base players assume the role of a Commodore in command of a small fleet of ships. Ships begin docked at their stations and are then deployed to sectors as new ships are commissioned under your command. Use cargo vessels to engage in trade and commerce, mining vessels to build recurring base income, and carriers to spread your influence. Establish new colonies in a sector to gain even more influence.
Gain enough influence and you just might be promoted to Admiral!
Commodore Sean Chen floats in the void, protected only by his space suit. Today he is overseeing the flight crew and signal officers of the “Knight Class Cargo Vessel, U.E.S. Scobee” as it pulls away from port. It has five long years ahead of it in sector seven, engaging in trade with the natives and colonies. Replacing the Scobee in base is the new “Bradbury Class Carrier, U.E.S. Allen.” The recently assigned Allen will lend support and influence to the bases and sectors to which it is designated, and these newer C retrofit models can even hold a moderate amount of cargo.
Chen smiles to himself, “Influence.” Influence over one’s sectors is how a Space Base commodore becomes an admiral.
His brow furrows momentarily. There is only one promotion available and Commodore Liz Valor, a capable, sassy and dynamic officer rising through the ranks, has her eyes on the position. And there is also the newly-promoted Z-bot: Z-4045 was built for promotion, and even has the hat to go with it!
As he turns to watch the Allen move through the silence of space towards its docking stand, he knows that he has his work cut out today — just like every other day.
Game Play Overview
Space Base is a race to 40 victory points.
On your turn you will roll 2 six-sided dice. All players will then claim rewards from their cards, either for each individual die or for the sum of the dice. For example, if you roll a 5 and a 6, you could claim rewards for the 5 sector and the 6 sector cards on your board, or you could claim the reward of only the 11 sector card on your board.
Importantly though, if it is not your turn, instead of gaining rewards for cards on your board, you will gain rewards for the “deployed” cards above your board.
After rewards are gained, the active player may buy a new card to place on their board, causing the card currently in that sector to be deployed above their board.
As new cards are bought and deployed your base will get better and better at a faster rate. Don’t forget to score points because in the end points are what matters!
Goal
When any player reaches 40 victory points, you will finish the current round so all players have the same number of turns, at which point the player with the most victory points wins.
Components
- 5 Command Consoles (Player boards)
- 60 Starting Ship cards divided into 5 identical sets (Player 1 to 5)
- 132 Ship cards consisting of:
- 48 Level 1
- 48 Level 2
- 36 Level 3
- 12 Colony cards
- 30 Charge Cubes
- 2 six-sided dice (The side with the rocket is just a 1, there is nothing special to note)
- 5 Credit Cubes (yellow)
- 5 Income Cubes (green)
- 5 VP Cubes (Victory Points, blue)
- 1 Starting Player card
- Field Manual (Rulebook)
Game Concepts & Anatomy
Core Concepts
The following are key concepts that you need to understand to play Space Base. These will be covered in further detail later in the rulebook.
Simultaneous Rewards
After a player rolls the dice on their turn, everyone—the active player and all passive players—independently decide how to allocate the rolled dice, then gain rewards from their player cards.
Deploying Ships
When you buy a new ship, place it in the sector on your board that the card indicates. The card already in that sector gets “deployed,” which means turned upside-down and tucked under the top of your board in the same sector with its deployed effect visible.
Deployed Ships Stack
During the game you might buy multiple cards for the same sector, thus deploying multiple cards there. In this case, these deployed effects stack and should all be visible. When you allocate dice in that sector as a passive player—on another player’s turn—gain rewards for ALL your deployed cards in that sector, if able.
Station vs. Deployed Rewards
As a general rule, cards on your board—called “station” cards—offer rewards during your turn, and cards deployed above your board offer rewards during opponents’ turns.
We’ve already defined “active” and “passive” a few times on this page:
- Blue rewards can only be gained during your turn.
- Red rewards can only be gained during opponents’ turns.
The symbol sometimes appears in the upper left hand corner of the text box. This means everything in that box is an activation ability and not a reward. More on this later.
Card Anatomy
- Cost: Cost to buy the card.
- Sector Number: This number indicates where the card must be placed on your board when you buy the card.
- Station Reward: Resources or ability you gain if this card is on your board.
- Deployed Reward: Resources or ability you gain if this card is “Deployed,” i.e. tucked partially under the top of your board.
Anatomy of the Command Console
- Sector: Each console has twelve sectors arranged from 1 to 12.
- Sector Number: This is a reference for the sector number.
- Resource Track: Your (credits), (income), and (VP) cubes are placed on the track to indicate how much of each resource you have.
Gaining Resources
When you gain resources, move the appropriate cube up the track a number of spaces equal to the amount you gained.
For example, if you gained 2 (credits) you would advance your (credits) cube up two spaces.
There is no limit to the number of (credits), (income), or (VP) you can have. If you ever find yourself with more than 40 , , or , place a charge cube on the 40 spot of the respective resource and simply start counting again at the 0 space, adding +40 to the total.
Setup
1. Command Consoles
Each player takes the following:
- 1 command console
- 1 set of 12 starting ships (cards belonging to a specific set are denoted by their card back)
- 1 cube for each track: 1 , 1 , and 1
Each player should place their console in front of them:
- They place the and cubes on the 0 (zero) space, and the cube on the 5 space.
- Each player then places each of their starting ships faceup in the sectors as indicated in the sector number in the upper right-hand corner of the card. Each sector on your board should have 1 card in it.
2. Colony Cards
Take the 12 colony cards and place them faceup in ascending sector order.
3. The Shipyard
The shipyard is a set of 18 fleet cards available to buy during the game. Separate the ship cards into three decks based on their card-backs, then shuffle each deck separately and place them face-down on the table. Draw the top six cards from each deck and lay them face-up on the table to create the shipyard.
4. Charge Cubes
Place the charges in a pool available to all players.
5. Determine Starting Player
Make sure each player’s start at 5. Then each player should do the following:
- Draw one random card from the level 1 deck.
- Lose equal to the card’s cost, shown in the top left corner.
- Place the card in its respective sector on your board according to the number listed in the upper right corner of the card. Take the card currently in that sector, turn it upside down and “deploy” it in the same sector (see “Deploying Ships” on page 7).
The player who drew the card with the highest sector number is the starting player and takes the starting player card. If two or more players tie for the highest sector number, each tied player rolls the dice and the player with the highest dice total is the starting player.
Finally, each player gains additional resources according to their turn order position:
- The starting player does not gain any resources.
- The 2nd player gains 1 .
- The 3rd player (if any) gains 2 .
- The 4th player (if any) gains 1 .
- The 5th player (if any) gains 1 .
Players are now ready to play the game beginning with the starting player’s turn!
How to Play
Turn Structure
The starting player takes the first turn of the game. When a player finishes their turn, the next player clockwise around the table takes a turn. Players continue taking turns until the end of the game.
When a player is taking a turn, they are considered the active player; everyone else is considered a passive player on that turn. Turns are fairly simple in Space Base. Generally:
- The active player rolls the dice.
- Based on the roll and the cards on players’ boards, ALL players will gain zero or more various rewards.
- The active player buys a card (or chooses not to).
- If the active player bought a card, they reset their to their .
- The active player’s turn ends, and play passes clockwise.
Turn Phases in Detail
What follows are more detailed and formal phases of a turn to help clarify when abilities can be used.
1. Abilities May Be Triggered
(Remember “rewards” and “abilities are different things”). All players may optionally trigger abilities as desired.
- The active player may trigger abilities with blue or green ability boxes.
- The passive players may only trigger abilities with red or green ability boxes.
- You may NOT trigger certain abilities, like those with the 2 dice icon.
2. Roll
The active player rolls both dice. Some abilities like “re-roll” or “set dice” may be used now and only now.
3. Allocate Dice
Each player chooses to claim the dice separately or as a sum. Each player’s choice is independent. For example, if the active player chooses to take the sum of the dice, it has no impact on the other players’ ability to choose the individual dice or the sum of both. Any player that chooses the sum may now trigger abilities that show the green 2 dice and arrow icon.
4. Gain Rewards
Each player now gets the rewards on their cards for the sector(s) the dice hit. Each sector that you allocate dice to allows you to gain rewards from cards in that sector.
- The active player gains the blue rewards for cards on their board.
- The passive player(s) gain the red rewards for deployed cards. Passive players with multiple deployed cards in one sector gain all the rewards in that sector when allocating dice there.
Note: If doubles are rolled and you take the dice separately, you gain the rewards for that sector twice.
5. Abilities May Be Triggered
Same as before, players may now trigger abilities if possible and desired.
6. Buy a Card
The active player may buy any one card they can afford from the 18 available ship cards in the Shipyard, or buy a Colony card. The active player may choose to buy no cards if they want to save their .
- You may not buy a card that costs more than the number of you have.
- If you buy a card you must spend all of your (set your yellow cube to 0) even if that means you spend more than the price of the card.
- When you buy a card, place it in the appropriate sector on your board as indicated on the card (the top-right grey number). The card that was in that sector on your board becomes deployed in that same sector above your board.
7. Charge Abilities May Be Triggered
Same as before, players may now trigger charge abilities if possible and desired.
8. Refill Shipyard
If any cards were taken from the shipyard, replace them with the top card of their respective deck. Each level should have a selection of six cards at the end of your turn.
9. Income
If the active player’s cube is lower than their cube, they move their cube up to be equal with their cube. This is all does, but it can be quite handy. Passive players do nothing in this step.
End of Turn!
The next player in clockwise order begins their turn.
Turn Examples
Active Player Example 1: Allocating Dice / Gaining Rewards
If you are the active player and you rolled a 5 and a 6, you could choose to take the sector 11 reward—gaining a , advancing your cube 1 space—or both the sector 5 and sector 6 rewards, gaining 2 , and moving your cube 2 spaces.
Active Player Example 2: Allocating Dice / Gaining Rewards
If you are the active player and you rolled a 4 and a 4, you could choose to take the sector 4 reward twice, or the sector 8 reward. In this example, sector 8 is the obvious choice, since it would give you 3 instead of the 2 you would gain for using sector 4 twice.
Passive Player Example: Allocating Dice / Gaining Rewards
If you are a passive player and the active player rolled a 5 and a 6, you may choose to take the sector 11 reward (for 4 ) or both the sector 5 and 6 rewards for a total of 3 —2 from 5 and 1 from 6. In this case, sector 11 is clearly the better choice.
Example: Buying and Placing a Card
- The ship you bought has a sector number of 9.
- The ship currently on your console in sector 9 is deployed under your board so its deployed reward is visible.
- The bought ship is then placed in sector 9 on your console.
Colony Cards
Purchasing Colony Cards
When you purchase a colony card, you have established a new colony in that sector. It is no longer under your control, although you remain in command of your ships deployed deep in that sector.
The sole purpose of colony cards is to score immediate . However, once bought these cards will clog up your board and potentially slow your progress.
All twelve colony cards are available to buy at the start of the game. Unlike cards in the shipyard, when a colony card is bought it does not get replaced. When you buy a colony card, follow all of the usual rules: place it on your console in the sector indicated by the number in the top right of the card, then deploy the card already in that sector. After placing the colony card, immediately gain the indicated on the card. (Tip: place your purchased colony cards face-down on your board as an extra reminder that they have no further effect.)
Colony Card Restrictions
Once a colony card is placed, it CANNOT be replaced; meaning you may no longer buy cards that would be placed in that sector on your board. Moreover, colony cards have no reward when dice are allocated to them on your turn. (You still gain rewards on other players’ rolls from deployed cards in that sector, however.) Colony cards may never be deployed, even with a card effect.
Rewards & Abilities Rules
Important! Understanding Rewards vs Abilities
This is the hardest thing for new players to grasp. If you get confused with how an ability card works, first check the “Card Clarifications” section toward the end of the rules and if it still doesn’t make sense, come back here and make sure this concept makes sense: A “Reward” and an “Ability” are different things.
Rewards:
Rewards are gained based on the dice roll. ALL ship cards give you rewards. The result of each die roll will tell you which cards you can gain rewards from. Rewards are commonly , , , or a (charge cube). The (charge cube) is the odd one here and mostly where people get confused.
- Cards that give the reward of a will show one or more blue squares if the card is “stationed” on your board, or red squares if the card is “deployed” above your board.
- When you gain the reward for one of these cards, all you do is place 1 on one of these squares; that counts as the “reward” this card gives you for the dice roll.
- If all the squares already have , then you get no reward from this card.
Abilities:
Abilities are distinguished by their linkage to one or more or and the presence of the ability icon in the top left of the ability box.
- Using an ability requires you to remove a certain number of from that card. This means you cannot use an ability until you’ve placed enough on the card.
- Moreover, once you use an ability you will have to get the back on the card before you can use it again.
- IMPORTANT: To use an ability you do NOT need to roll any specific die result. The timing of when you can use an ability is specific to that ability and has nothing to do with what the roll was.
In summary, (charge cubes) are placed as the reward for dice rolls on cards that have abilities. Once an ability is fully charged you can use it as desired, independent of the dice roll, by removing the from the card.
Timing Restrictions of Abilities:
Abilities have timing restrictions, and you can check the “Ability Cards in Detail” section for more on each ability.
- Green Abilities can be used on any player’s turn.
- Blue Abilities can only be used on your own turn.
- Red Abilities can only be used on opponents’ turns.
Note that the color of the charge square does not have to match the color of the ability.
Unlike rewards, an ability being deployed or not-deployed has no impact on when or on whose turn you are able to use it. Only the color of the ability determines on whose turn you can use it.
Regular Rewards Cards – In Detail
Below are some of the reward types available in Space Base.
Credits
When you gain this reward, advance your cube by that amount.
VP
When you gain this reward, advance your cube by that amount.
Income
When you gain this reward, advance your cube by that amount.
Text Rewards
This reward simply has text that describes what you gain when you get the reward.
- “Claim a card” specifically means to take the indicated cards for free.
- “Buy a card” means that you may buy a card in addition to your normal buy, spending only the exact cost of the card instead all of your .
Arrow Rewards
Both Directions
If there is an arrow pointing to the right and one to the left, then you choose whether to gain the rewards one sector to the left or one sector to the right.
For example, if the card shown here was on your board in sector 10, and you rolled a 10, you could gain the rewards for your sector 9 or sector 11 card.
In the example above, if this same card was deployed in your sector 10, and another player rolled a 10, you would gain the rewards for ALL cards deployed in your 10 sector as usual (2 plus 3 ) and the reward for this card would mean you would also gain ALL the rewards for cards deployed in your 9 sector or in your 11 sector (so 4 more and 3 from your 11 sector).
Arrow and Another Reward
If there is an arrow and another reward, the arrow works the same in this case, but you only can get the rewards for the sector in the direction of arrow. However, you also get the thing shown in addition to the arrow.
For example, if the card above was on your board in your 12 sector and you rolled a 12, you would gain 3 and whatever reward you get for your 11 sector. If the card was deployed on your 12 sector, you would get all of your other red rewards in that sector, 1 and the arrow would give you all of the red rewards in the 11 sector as well.
A Note on Infinite Loops — You Can’t!
Multiple arrows next to each other can chain together. However, you can’t create infinite loops:
- If you use the sum of the dice, each reward may only be claimed once.
- If you use the individual dice, each reward may be claimed no more than twice; once for one die, and once for the other die.
For example, in the case below, if you rolled a 7 you would gain 1 and then also gain your 8 sector rewards. Your 8 sector reward lets you gain your 7 or 9 sector reward, however, since you’ve already gained your 7 sector reward for this roll you can’t gain it again, so you would want to gain your 9 sector rewards.
Ability Cards in Detail
We talked about this topic previously in the “Understanding Rewards vs Abilities” section, and we will be repeating some of that here.
These cards have one or more colored squares on them and an ability box that describes an ability that card can do once it is fully charged. These ability boxes have an ability icon () in the upper left hand corner. Remember, things in ability boxes are not “rewards” and you do not get them when you roll the dice.
When you allocate dice such that you gain the reward of an ability card, all you do is place 1 (charge cube) on the card in one of the squares. Nothing else happens.
- Blue squares appear on the station section of cards, and likewise, can only be charged as a reward during your own turn.
- Red squares appear on the deployed section of cards and can only be charged as a reward during an opponent’s turn, when you are a passive player.
Once the required are placed on the card, they may be removed to use the ability as desired, independent of the result of the dice.
- Blue abilities can only be used during your turn, when you are the active player.
- Red abilities can only be used during an opponent’s turn, when you are a passive player.
- Green abilities can be used during any turn, whether you’re an active or passive player.
Remember, regardless of when the ability can be used, are still gained as rewards based on allocating dice, and the rules for when you gain rewards for dice rolls apply as normal.
Square Configurations
- Some abilities require just one in order to use them, and will show a single colored square.
- Some ability cards may hold multiple , but only need 1 to use the ability. These colored squares do not have connectors linking them. In these cases you may have multiple on a card, but you only need to spend 1 to use the ability.
- Other abilities require multiple to use, and will show a number of squares linked together.
Abilities that have multiple linked squares cannot be used until all of the required squares are filled with . When you activate the ability, you spend all the . The number of required for many of these abilities vary based on the number of players:
- An empty square needs to be filled in order to use the ability.
- A square with pips in it needs to be filled if and only if the number of players is equal to the number of pips shown. For example, in a two player game all four squares would need a ; whereas in a three player game, three of these squares would need a and in a 4 or 5 player game only the top two would need to be filled.
Rewards and Charges!
Some cards give you both a regular reward and a . When gaining rewards for these cards you gain both the (or other rewards) indicated under the name of the card, and you get to place a as normal.
Timing
As long as an ability can be used after gaining rewards for the dice roll, you may use that ability the same turn it becomes fully charged.
Also note, almost always players can simply allocate dice, gain rewards, and execute abilities simultaneously in order to minimize downtime. If it becomes important to resolve things in order, the active player should allocate dice and resolve all rewards and activations first, followed by the next player(s) in clockwise order.
Deploying Cards with Charges
If you have a card on your board with one or more and it gets deployed (due to buying a new card in that sector for example), any on the card may be transferred to the deployed effect on the same card, if possible.
Example: Your U.E.S Khrunov is being deployed and has one (charge cube) on its station ability. After the card is deployed you may move that to its deploy ability.
Ability Clarifications
Dice+Arrow(s)
This ability shows 2 dice to remind you it can only be used if you allocated the roll to the sum, and a right pointing arrow to tell you that you will be changing which sector you get rewards for.
These abilities can only be used during phase 3 (“allocate dice”) of the turn and only if you chose to allocate the sum of the dice. It may be used on either your turn or your opponent’s turn because it is a green ability.
To use this ability, you must use the sum of the dice.
- If this ability shows only 1 then using this ability means the sector you gain rewards from this turn is shifted one sector to the right. For example, if a 9 is rolled and you use this ability, you would gain rewards for your 10 sector instead of your 9 sector.
- If the ability shows both a and then using this ability means the sector you gain rewards from this turn is shifted 1 or 2 sectors to the right (your choice).
- You may combine these types of effects on a single roll to shift your reward sector many spaces along your board.
Like all other abilities, this ability may be used regardless of what sector it is placed in, regardless of what sector(s) are rolled on the dice, and regardless of it being deployed or not deployed. Moreover, the ability is green, so it can be used on any player’s turn.
Example: Your opponent rolled double 4. You have 2 single arrow effects charged and 1 double arrow effect charged. You could take the dice individually and gain nothing twice for your 4 sector. Bad idea. Allocating the sum gets you nothing once for your 8 sector. Also a bad idea. However, if you take the sum but also spend 1 off either of your single-arrow abilities and 1 off your double-arrow ability you would shift the sector you gain rewards from this turn 3 sectors to the right and gain the 4 from your 11 sector instead of the nothing you get from your 8 sector.
Buy a Card / Claim a Card
These abilities can be used only during phase 1, 5 or 7 of your own turn.
Buy a Card
When you use the “Buy a Card” ability, it acts similar to a normal buy except you only spend the exact cost of the card you buy instead of all your . Moreover, you may still make your normal buy on your turn.
If the buy ability also gives you money, you gain the money before you buy the card. You are not required to buy a card when using this ability.
Claim a Card
When you claim a card, simply choose a ship card of the appropriate level from the shipyard and add it your console without paying for it. This is not a “buy” and you may still make your normal buy. You are not required to claim all the cards indicated.
Swap Sectors
These abilities can be used only during phase 1, 5 or 7 of your own turn.
An ability that says you may swap cards in sectors means you take ALL the cards in those two sectors and swap them. This includes the station card and all the deployed cards in each of those sectors.
A couple of notes:
- Any cards you buy during future turns are still placed according to their sector number as normal.
- Many of these abilities have a reward listed above their charge squares. These are rewards and are earned when you gain rewards for that card in addition to placing a on the card.
Reroll Dice
These abilities can be used only during phase 2 (“roll”) of your own turn. Rerolling one or both dice affects all players. When a player is considering using this ability, they should warn the other players, so they do not gain rewards using the wrong dice results.
Place One Charge Anywhere
These abilities can be used during phase 1, 5 or 7 of any player’s turn. You may place one on an empty charge square on any of your cards.
All Players Lose 4 VP
These abilities can be used only during phase 1, 5 or 7 of your own turn. Other players lose 4 . A player can never drop below 0 .
Place a Card on Any 7–12 Sector
These abilities can be used only during phase 1, 5 or 7 of your own turn. This allows you to put cards on sectors they may not normally be placed on, such as putting a card for sector 12 on sector 7.
Set Dice
These abilities can be used only during phase 2 (“roll”) of your own turn. This must be used before you roll the dice. Instead of rolling a die, you choose which result to place it on.
For example, instead of rolling a die you may place it so the ‘6’ result is used. Further, if you had a on both of the blue charge squares, you would be able to spend 1 to set 1 die and roll the other, or spend both to set both dice to any numbers you want.
You Win!
This ability can be used during phase 1, 5 or 7 of any player’s turn. Yup, you read that correctly. When you use this ability, points are irrelevant; the game ends immediately and you win! Do not finish the round. If another player has more than 40 you win anyway.
Exchange This Card with Any Other Card on Your Board
This ability can be used during phase 1, 5 or 7 of any player’s turn. When you use this ability, exchange this card’s position with any station card on your board.
- For example, if this card was on your board in sector 9, you could swap it with your 7 sector card on your board, in which case that card would now be in your 9 sector and this card would be in your 7 sector.
- As another example, if this card were deployed in your 9 sector, and you used the ability, you could swap it with your 4 sector station card on your board. In this case that card would now be deployed in your 9 sector and this card would be on your board in your 4 sector.
2X – Station (Active)
This ability can be used only during phase 4 (“gain rewards”) of your own turn before gaining the rewards for the roll. When you activate this ability and resolve its effect, gain whatever blue rewards you get this turn for one sector two times. Note, this ability cannot be used to charge itself.
Example to the right: If a 2 and 3 were rolled on your turn and you activated this ability, then after claiming your from your 2 and 3 sectors you could choose to take the reward from either your 2 or 3 sector a second time. If you took the sum for a 5, this ability would let you gain your 5 sector reward twice.
2X – Deploy (Passive)
This ability can be used only during phase 4 (“gain rewards”) of an opponent’s turn before gaining rewards from the roll. When you activate this ability and resolve its effect, gain whatever red rewards you get this turn for one sector two times. Note, this ability cannot be used to charge itself.
Example to the right: If a 5 and 6 were rolled on your opponent’s turn and you allocated the dice individually, you could use this ability to gain the rewards for sector 5 twice, thus placing a and gaining the 3 from sector 5 twice (for a total of 6 and 2 being placed), but you would not gain the 2 from the 6 sector a second time.
Credit (or Income or VP) Generating Abilities
This ability can be used only during phases 1, 5, and 7. When you activate this ability and resolve its effect, gain the , (or , or ) listed in the ability box.
End of Game & Scoring
End of the Game
When any player reaches at least 40 , it triggers the end of the game, even if this happens on another player’s turn. Finish playing the current round so that each player gets an equal number of turns, then the game ends. This means the player sitting to the right of the starting player will take the last turn of the game.
The player with the most total is the winner. If two or more players are tied, play one more full round (each player takes one more turn), after which the player with the most is the winner—even if that player is not one of the original tied players. If still tied, continue playing extra rounds until a winner is determined.
Reminder: While your resource track only goes to 40 spaces, there is no limit to the number of (or or ) you can gain; place a charge cube on the 40 position of the respective tracker and simply start counting again at the 0 space, adding +40 to the total.
Variants & Strategy
Light-Speed Variant
NOT RECOMMENDED FOR YOUR FIRST GAME!
This is an optional variant for those who want to essentially skip through the first few turns of the game and get into the middle of the game faster. Playing with this variant will reduce the average length of the game.
NOTE: These are not the “standard” rules, but rather a variant.
Before the game:
- Instead of giving each player 5 , each player begins the game with 15 and 1 .
- Then, instead of having each player draw a random level 1 card and deducting the cost from their starting credits, have each player draw four level 1 cards and two level 2 cards.
- Players may spend their credits to buy as many of these cards as they wish to buy and can afford with their 15 . Any unspent are kept to start the game. Any unbought cards are placed at the bottom of their respective decks.
- The player who kept the most money goes first. In the case of a tie, the player with the highest sector card goes first, and if still tied roll to see who goes first.
Starting bonuses for 2nd, 3rd, 4th player, etc. are the same as a standard game of Space Base:
- The starting player does not gain any resources.
- The 2nd player gains 1 .
- The 3rd player (if any) gains 2 .
- The 4th player (if any) gains 1 .
- The 5th player (if any) gains 1 .
Strategy Tip – Dice Roll Probability
Because players may choose to take the dice separately or as a sum, probabilities of results do not make for a normal distribution. As most experienced gamers know, when two six–sided dice are rolled, one of possible 36 results occurs (shown in the graph below). The result with the most ways to be rolled is 7, which can be rolled 6 different ways out of the 36 possible results. However, it pays to note that in Space Base the dice can be allocated individually, so lower numbers, 1–6, will actually be the most common. Each number between 1 and 6 appears 12 times. Further, since the numbers 2 to 6 can be made with the sum of the dice as well, their results become even more frequent.
The numbers in order of possible frequency are: 6 (17 results), 5 (16 results), 4 (15 results), 3 (14 results), 2 (13 results), 1 (12 results), 7 (6 results), 8 (5 results), 9 (4 results), 10 (3 results), 11 (2 results), and finally 12 (1 result). Thus, naturally, the cards with a sector of 7 or higher have more powerful rewards, where the more frequently occurring sector cards have weaker rewards.
Ship Lore
U.E.S. Gordon 7981-G (Gernsback Class Destroyer)
The U.E.S. Gordon has been a workhorse for the U.E.S. since the days of the Slassas wars. Initially designed as an escort destroyer, it’s from an early part of the war when destroyers and not carriers brought military might to a sector through sheer fire power. The Gordon was one of the first ships equipped with ultra-core laser technology and carried out many of the initial tests. The Gordon was also fitted with a Devastator-class propulsion system, which makes it capable of chasing down blockade runners and turning them to dust.
Gernsback destroyers were once some of the most numerous ships in the fleet, protecting U.E.S. interests across the stars, but as modern carriers came into service, order 6D6 was issued which decommissioned and sent most of the other Gernbacks for scuttling. The Gordon happened to be deployed at that time and secured its sector single handedly. Due to its long service to the U.E.S., the Terran High Chancellor pardoned the Gordon from order 6D6. Today the Gordon is among a few remaining Gernbacks in service to the U.E.S.
U.E.S. Scott 4406-C (Roddenbury Class Hypernet Gate)
Recent discoveries and advancements in faster than light travel have resulted in hypernet technology. Dimensional portals that reroute physical space through wormholes at the end of a black hole are opened to preset hypernet buoys, allowing giant capital ships to cross immense distances in the blink of an eye.
The hypernet travel was shelved after initial experiments resulted in entire crews emerging from the hypernet completely ravenous, murderous, and insane. However, once the oxygen and food supplies were altered, experimental crews of specially engineered humans, whose DNA was crossed with that of elephant DNA, emerged from the hypernet reporting feelings of euphoria and stimulated senses. Now, unmodified ship crews can travel the hypernet with only a modified diet and supplement intakes.
Once the technology was put into production, the U.E.S. Zudov was commissioned. After a long series of 7 retrofits, the technology was allowed to advance and the U.E.S. Scott was commissioned. Now on its third retrofit (as indicated by the “-C” after its numeric designation) the Scott is put into service moving newly assigned ships into action at a rapid pace.
U.E.S. Thornton 8524-G (Wells Class Star Cruiser)
The old Wells Class Star Cruisers were intended to be rapid deployment command and control vessels. In peace time, they have been used as shuttles for dignitaries and to investigate localized phenomenon.
The Thornton, manned by a rookie crew, was sent to investigate the emergence of a tear in space just beyond Neptune. Gravitational impulses skewed the orbits of three of Neptune’s moons, and swallowed a science station based in the area.
After two weeks of gathering data on the anomaly, the space station reappeared and the tear in space disappeared. The crew of the Thornton docked with the station to investigate. What they found aboard the ship set the boarding crewmen, including the captain of the Thornton, into paranoid delusions that ended with those crewmen self-destructing the space station. The skeletal crew of three aboard the Thornton made a harrowing last minute escape from the blast radius of the station as it became star dust. Only one transmitted image from the boarding crew made it to the Thornton’s databases: flesh-covered walls on which crewmen had become fused with the walls of the space station.
This incident led to the creation of the U.E.S. Department of Dimensional Investigations (the D.D.I. for short).
U.E.S. Grissom 8139-H (Tucker Class Cargo Train)
Originally, three Tucker Class Cargo Trains were operated by the U.E.S.—the Grissom is the only one that remains. When the U.E.S. made first contact and formed trading alliances with the Ziilen Empire, the Tuckers were conceived as long range trade vessels designed to haul immense loads over long distances. Each would carry the load of 20 standard cargo ships, though at a slower speed. All three Tucker Cargo Trains were destroyed when remaining Slassas resistance fighters began waging a guerrilla war against the U.S. following the destruction of their home world and the end of standard armed conflict with the U.E.S. The remnants of the three cargo trains were salvaged and the Grissom, following a restoration and retrofit, was returned to service, though carrying much smaller loads than she used to.
U.E.S. Grechko 1421-A (Asimov Class Exploration Carrier)
One of the first duties of the Grechko was to ferry fighter squadrons back and forth to the front lines of the Slassas conflicts, along with general supplies. Upon returning to the front lines, the Grechko took a shortcut through the Harrison wormhole that was well-known to the U.E.S. However, when the Grechko went through, two ships emerged on the other side: the U.E.S. Grechko 1421-A and the U.E.S. Grechko 1421-!! Based on the records of the surviving vessel, the captains of the Grechko both assumed that the other ship was a ruse by Slassas forces. Fighters on board were immediately scrambled and turbo-torpedoes were fired. The ensuing combat was hectic and chaotic as both vessels—and all fighters—communicated on the same channels with the same callsigns, wingmen often losing track of each other. Eventually one ship emerged victorious and returned to base—with a few duplicate fighter pilots and fighter registration numbers. These pilots were put in the custody of the U.E.S.D.D.I.
U.E.S. Armstrong 6927-D (Lucas Class Gun Carriage)
On a moon-sized planet in a far off sector lived a desert race of sentient, cold-blooded reptilians, referred to in official U.E.S. records as the Slassas. These humanoids clashed with U.E.S. services during the U.E.S.’s first expedition into the stars. Their ships were stronger and more heavily armored than those of the U.E.S. and threatened human exploration of space. The U.E.S. countered by putting escort carriers and heavily armored destroyers into service. An arms race followed.
A decade into the Slassas arms race the U.E.S. stole technology from a neighboring race of humanoids not involved with the Slassas or the U.E.S. This stolen technology, while requiring large amounts of power, allowed for ultra-core lasers, powerful enough to destroy capital ships and space stations in one volley. This technology was advanced by U.E.S. scientists and technicians to its ultimate pinnacle.
The Lucas Class Gun Carriage was designed to carry the ultra-core laser and power station into Slassas territory. On Terran Date 1.11.A2505 the Armstrong Lucas Gun Carriage laid waste to the Slassas fleets, nearly single-handedly. On Terran Date 3.11.A2507, following its 4th retrofit, the Armstrong, escorted by numerous carriers and dreadnoughts, flew deep into Slassas space and took aim at their planet—laying waste to the Slassas homeworld and surrounding bases.
One other Lucas Class Gun Carriage was in the beginning stages of production, but its construction was halted when remaining Slassas forces signed the treaty of 6.11.A2507, 3 days after the Armstrong ended their production capabilities.
U.E.S. Scobee 9566-B (Knight Class Cargo Vessel)
Mining and colonization are the goals of the United Earth Services, but trade is what keeps its ships sailing. The Knight Class Cargo Vessels of the U.E.S. are the backbone of a fleet’s finances. Knight class vessels were pressed into service 5 years before their expected service date when the Mmaal attacks on remote U.E.S. Space Bases took place.
In planning for a counter invasion, ships like the Scobee were fitted with special drop pods that replaced their cargo pods, allowing these unarmed cargo ships to deliver troops and armor to the planet’s surface. The Scobee was among the last of these military cargo retrofits, having taken part in the final counter invasion of the Mmaal Empire on 22.2.A2576 which ended the conflict, by dropping over 1 million U.E.S. Human-Canine hybrids and accompanying armor divisions on the Mmaal homeworld, taking their capital.
As time passed, the Mmaal Empire became a regular trading partner and eventually a strong ally of the U.E.S., partnering with them in the exploration and the peacekeeping among the stars. The Scobee and her sister ships made that possible.
U.E.S. Aksyonov 7525-G (Clement Class Dreadnaught)
The Clement Class Dreadnaughts are self-sufficient multifunctional battleships sent into remote, exploratory regions to seek out new civilizations and new life and to go where the U.E.S. has never gone before. These beasts of far space hold a small contingent of space fighters and a deployable mining vessel within their bellies. Further, they sport massive firepower, with giant hull-mounted Yarie cannons.
The Aksyonov was forced to return to home port early from its five year mission when an infestation of a rapidly breeding rodent of alien origin, called Friddles, was found on the ship. Friddles are rabbit-sized, star-shaped furry animals of an almost mammal descent. When in heat, Friddles emit a hormone which is sleep-inducing in unaltered human. When the infestation grew to a catastrophic size and the Friddles went into heat, this caused the Aksyonov to abort its exploratory mission and to return home under the manning of the unaffected genetically altered crew, where it was purged of the infestation.
Card List & Quick Reference
Quick Reference
Rewards and Activations
- Blue rewards and abilities: can only be gained during your turn, when you are the active player.
- Red rewards and abilities: can only be gained during an opponent’s turn, when you are a passive player.
- Green abilities: can be used during any turn, whether you’re the active player or a passive player.
Charge Rewards
- Blue colored squares: can only be charged as a reward during your turn, when you are the active player.
- Red colored squares: can only be charged as a reward during an opponent’s turn, when you are a passive player.
Activation Cards –
These cards have one or more colored squares on them with an activation ability that describes the ability. Their effects have an activation icon in the upper left hand corner.
Credits
When you gain this reward, advance your cube by that amount.
Income
When you gain this reward, advance your cube by that amount. At end of your turn, if you have less than reset your to equal your .
VP (Victory Points)
When you gain this reward, advance your cube by that amount.
Text Abilities
This reward simply has text that describes what you gain when you claim the reward.
Arrow – Both Directions
If there is an arrow pointing to the right and one to the left, then you choose whether to gain the rewards one sector to the left or one sector to the right.
Arrow and Reward
If there is an arrow and another reward, you gain the reward and gain the rewards for one sector over in the direction of the arrow.
Dice-Arrows Activation Abilities
These abilities can only be used when Allocating dice and only if you chose the sum of the dice.
- If this ability shows only 1 arrow, then using this ability means that you gain the rewards one sector to the right of the sector to which you allocated the dice.
- If the ability shows both 1 arrow and 2 arrows, then you may choose to shift the sector you receive rewards from 1 or 2 sectors to the right.
2X – Station (Active)
This ability can be used only during phase 4 (“gain rewards”) of your own turn before gaining the rewards for the roll. When you activate this ability and resolve its effect, gain whatever blue rewards you get this turn for one sector two times.
2X – Deploy (Passive)
This ability can be used only during phase 4 (“gain rewards”) of an opponent’s turn before gaining rewards from the roll. When you activate this ability and resolve its effect, gain whatever red rewards you get this turn for one sector two times.
Space Base Card List by Level, Class, Then Name
Starting Ships
- U.E.S. Acton 8806-A (Knight Class Cargo Vessel)
- U.E.S. Al Saud 2196-A (Knight Class Cargo Vessel)
- U.E.S. Atkov 1044-E (Knight Class Cargo Vessel)
- U.E.S. Bartoe 5606-F (Knight Class Cargo Vessel)
- U.E.S. Baudry 1084-B (Knight Class Cargo Vessel)
- U.E.S. Bridges 7036-B (Knight Class Cargo Vessel)
- U.E.S. Buchli 3436-F (Knight Class Cargo Vessel)
- U.E.S. Creighton 1884-B (Knight Class Cargo Vessel)
- U.E.S. England 5328-E (Knight Class Cargo Vessel)
- U.E.S. Fisher 8993-A (Knight Class Cargo Vessel)
- U.E.S. Garn 2592-B (Knight Class Cargo Vessel)
- U.E.S. Garneau 2428-D (Knight Class Cargo Vessel)
- U.E.S. Gregory 3117-E (Knight Class Cargo Vessel)
- U.E.S. Griggs 2355-C (Knight Class Cargo Vessel)
- U.E.S. Hawley 7246-F (Knight Class Cargo Vessel)
- U.E.S. Henize 2916-F (Knight Class Cargo Vessel)
- U.E.S. Hoffman 1915-G (Knight Class Cargo Vessel)
- U.E.S. Leestma 3667-F (Knight Class Cargo Vessel)
- U.E.S. Lind 6653-B (Knight Class Cargo Vessel)
- U.E.S. Lucid 6422-F (Knight Class Cargo Vessel)
- U.E.S. McBride 4518-H (Knight Class Cargo Vessel)
- U.E.S. McCandless II 3195-D (Knight Class Cargo Vessel)
- U.E.S. McNair 1232-H (Knight Class Cargo Vessel)
- U.E.S. Mullane 8561-C (Knight Class Cargo Vessel)
- U.E.S. Nagel 5710-D (Knight Class Cargo Vessel)
- U.E.S. Nelson 7775-B (Knight Class Cargo Vessel)
- U.E.S. Onizuka 5343-B (Knight Class Cargo Vessel)
- U.E.S. Payton 8404-A (Knight Class Cargo Vessel)
- U.E.S. Resnik 4906-G (Knight Class Cargo Vessel)
- U.E.S. Scobee 9566-B (Knight Class Cargo Vessel)
- U.E.S. Scully-Power 4541-F (Knight Class Cargo Vessel)
- U.E.S. Seddon 8290-G (Knight Class Cargo Vessel)
- U.E.S. Sharma 7947-G (Knight Class Cargo Vessel)
- U.E.S. Shriver 1746-E (Knight Class Cargo Vessel)
- U.E.S. Solovyov 2463-H (Knight Class Cargo Vessel)
- U.E.S. Stewart 7936-F (Knight Class Cargo Vessel)
- U.E.S. Sullivan 3696-D (Knight Class Cargo Vessel)
- U.E.S. van den Berg 2091-C (Knight Class Cargo Vessel)
- U.E.S. Wang 1171-B (Knight Class Cargo Vessel)
- U.E.S. Williams 3753-E (Knight Class Cargo Vessel)
- U.E.S. Bolden 9030-A (Scott Class Mining Vessel)
- U.E.S. Cleave 2349-G (Scott Class Mining Vessel)
- U.E.S. Coats 2150-C (Scott Class Mining Vessel)
- U.E.S. Covey 5488-H (Scott Class Mining Vessel)
- U.E.S. Dunbar 8761-G (Scott Class Mining Vessel)
- U.E.S. Furrer 4563-G (Scott Class Mining Vessel)
- U.E.S. Grabe 2173-C (Scott Class Mining Vessel)
- U.E.S. Hart 2790-D (Scott Class Mining Vessel)
- U.E.S. Hilmers 5365-H (Scott Class Mining Vessel)
- U.E.S. Lounge 4034-G (Scott Class Mining Vessel)
- U.E.S. Messerschmid 4427-D (Scott Class Mining Vessel)
- U.E.S. Neri Vela 9636-B (Scott Class Mining Vessel)
- U.E.S. O’Connor 1927-D (Scott Class Mining Vessel)
- U.E.S. Ockels 7726-E (Scott Class Mining Vessel)
- U.E.S. Pailes 6050-H (Scott Class Mining Vessel)
- U.E.S. Ross 7000-D (Scott Class Mining Vessel)
- U.E.S. Spring 3973-E (Scott Class Mining Vessel)
- U.E.S. van Hoften 5906-B (Scott Class Mining Vessel)
- U.E.S. Vasyutin 7921-G (Scott Class Mining Vessel)
- U.E.S. Volk 9084-B (Scott Class Mining Vessel)
Level 1 Ships
- U.E.S. Bobko 6010-E (Bradbury Class Carrier)
- U.E.S. Hauck 5084-D (Bradbury Class Carrier)
- U.E.S. Musgrave 5650-E (Bradbury Class Carrier)
- U.E.S. Peterson 5325-H (Bradbury Class Carrier)
- U.E.S. Merbold 6865-D (Gunn Class Cargo Cruiser)
- U.E.S. Farkas 3405-F (Herbert Class Mining Vessel)
- U.E.S. Hermaszewski 5586-E (Herbert Class Mining Vessel)
- U.E.S. Ivanov 8387-E (Herbert Class Mining Vessel)
- U.E.S. Jähn 8920-C (Herbert Class Mining Vessel)
- U.E.S. Lyakhov 4181-D (Herbert Class Mining Vessel)
- U.E.S. Popov 3919-A (Herbert Class Mining Vessel)
- U.E.S. Bluford 5120-E (Modified Bradbury Class Carrier)
- U.E.S. Brergovoy 9890-C (Paul Class Cargo Vessel)
- U.E.S. Chang-Diaz 3555-H (Paul Class Cargo Vessel)
- U.E.S. Chrétien 3182-C (Paul Class Cargo Vessel)
- U.E.S. Crippen 7733-C (Paul Class Cargo Vessel)
- U.E.S. Dzhanibekov 1999-G (Paul Class Cargo Vessel)
- U.E.S. Engle 1913-A (Paul Class Cargo Vessel)
- U.E.S. Fullerton 2005-A (Paul Class Cargo Vessel)
- U.E.S. Gürragchaa 3972-D (Paul Class Cargo Vessel)
- U.E.S. Hartsfield 5562-G (Paul Class Cargo Vessel)
- U.E.S. Ivanchenkov 2754-H (Paul Class Cargo Vessel)
- U.E.S. Overmyer 3792-A (Paul Class Cargo Vessel)
- U.E.S. Prunariu 7750-G (Paul Class Cargo Vessel)
- U.E.S. Remek 8252-H (Paul Class Cargo Vessel)
- U.E.S. Romanenko 8599-H (Paul Class Cargo Vessel)
- U.E.S. Ryumin 4713-C (Paul Class Cargo Vessel)
- U.E.S. Savitskaya 6659-G (Paul Class Cargo Vessel)
- U.E.S. Serebrov 1243-G (Paul Class Cargo Vessel)
- U.E.S. Truly 9239-H (Paul Class Cargo Vessel)
- U.E.S. Allen 4004-C (Tolkien Class Cargo Carrier)
- U.E.S. Kizim 1379-H (Tolkien Class Cargo Carrier)
- U.E.S. Lenoir 7021-B (Tolkien Class Cargo Carrier)
- U.E.S. Malyshev 9767-E (Tolkien Class Cargo Carrier)
- U.E.S. Savinykh 8526-G (Tolkien Class Cargo Carrier)
- U.E.S. Strekalov 7422-E (Tolkien Class Cargo Carrier)
- U.E.S. Tamayo-Mendez 4759-G (Tolkien Class Cargo Carrier)
- U.E.S. Tuân 8623-B (Tolkien Class Cargo Carrier)
- U.E.S. Lichtenberg 9384-H (Wells Class Star Cruiser)
- U.E.S. Parker 8635-F (Wells Class Star Cruiser)
- U.E.S. Shaw 1873-C (Wells Class Star Cruiser)
- U.E.S. Thornton 8524-G (Wells Class Star Cruiser)
- U.E.S. Aleksandrov 5155-G (Williamson Class Command Ship)
- U.E.S. Brandenstein 3161-C (Williamson Class Command Ship)
- U.E.S. Fabian 4787-B (Williamson Class Command Ship)
- U.E.S. Gardner 7506-E (Williamson Class Command Ship)
- U.E.S. Ride 3066-E (Williamson Class Command Ship)
- U.E.S. Thagard 4684-B (Williamson Class Command Ship)
Level 2 Ships
- U.E.S. Brand 5208-D (Asimov Class Exploration Carrier)
- U.E.S. Glazkov 3371-B (Asimov Class Exploration Carrier)
- U.E.S. Grechko 1421-A (Asimov Class Exploration Carrier)
- U.E.S. Slayton 5363-B (Asimov Class Exploration Carrier)
- U.E.S. Volynov 3509-A (Campbell Class Command Cruiser)
- U.E.S. Gorbatko 2007-F (Clarke Class Mining Vessel)
- U.E.S. Aksyonov 7525-G (Clement Class Dreadnaught)
- U.E.S. Duke 6222-C (Fate Class Cargo Vessel)
- U.E.S. Evans 7316-E (Fate Class Cargo Vessel)
- U.E.S. Garriott 6531-E (Fate Class Cargo Vessel)
- U.E.S. Irwin 8339-H (Fate Class Cargo Vessel)
- U.E.S. Kerwin 8426-A (Fate Class Cargo Vessel)
- U.E.S. Lazarev 4784-B (Fate Class Cargo Vessel)
- U.E.S. Lousma 6040-C (Fate Class Cargo Vessel)
- U.E.S. Makarov 6674-G (Fate Class Cargo Vessel)
- U.E.S. Mattingly 4618-C (Fate Class Cargo Vessel)
- U.E.S. Schmitt 9828-E (Fate Class Cargo Vessel)
- U.E.S. Weitz 3134-C (Fate Class Cargo Vessel)
- U.E.S. Worden 8663-H (Fate Class Cargo Vessel)
- U.E.S. Artyukhin 7727-D (Giger Class Carrier)
- U.E.S. Carr 7510-H (Giger Class Carrier)
- U.E.S. Dobrovolsky 5643-E (Giger Class Carrier)
- U.E.S. Gibson 4003-B (Giger Class Carrier)
- U.E.S. Klimuk 6800-G (Giger Class Carrier)
- U.E.S. Lebedev 5128-B (Giger Class Carrier)
- U.E.S. Mitchell 6176-D (Giger Class Carrier)
- U.E.S. Patsayev 6859-H (Giger Class Carrier)
- U.E.S. Pogue 5353-G (Giger Class Carrier)
- U.E.S. Roosa 1689-A (Giger Class Carrier)
- U.E.S. Rukavishnikov 3402-C (Giger Class Carrier)
- U.E.S. Sevastyanov 6862-D (Giger Class Carrier)
- U.E.S. Bean 1925-D (Harryhausen Class Mining Vessel)
- U.E.S. Filipchenko 9745-C (Harryhausen Class Mining Vessel)
- U.E.S. Haise 3712-D (Harryhausen Class Mining Vessel)
- U.E.S. Schweickart 5209-E (Harryhausen Class Mining Vessel)
- U.E.S. Swigert 2715-C (Harryhausen Class Mining Vessel)
- U.E.S. Volkov 9103-G (Harryhausen Class Mining Vessel)
- U.E.S. Demin 5091-F (Heinlein Class Command Cruiser)
- U.E.S. Gubarev 1743-B (Heinlein Class Command Cruiser)
- U.E.S. Khrunov 6194-G (Heinlein Class Command Cruiser)
- U.E.S. Shonin 2938-F (Heinlein Class Command Cruiser)
- U.E.S. Kubasov 3192-G (Merritt Class Cargo Tug)
- U.E.S. Yeliseyev 6380-D (Merritt Class Cargo Tug)
- P.S.S. Zholobov 1830-F (Modified Merritt Class Cargo Tug)
- P.S.S. Sarafanov 6334-C (Norton Class Cargo Tug)
- U.E.S. Kovalyonok 8127-H (Roddenbury Class Hypernet Gate)
- U.E.S. Rozhdestvensky 6723-C (Silverberg Class Command Tug)
- U.E.S. Zudov 2056-G (Verne Class Hypernet Gate)
Level 3 Ships
- U.E.S. Borman 3060-D (Bowie Class Cargo Vessel)
- U.E.S. Carpenter 2967-E (Bowie Class Cargo Vessel)
- U.E.S. Conrad 5602-E (Bowie Class Cargo Vessel)
- U.E.S. Lovell 1948-A (Bowie Class Cargo Vessel)
- U.E.S. McDivitt 2121-A (Bowie Class Cargo Vessel)
- U.E.S. Stafford 4286-G (Bowie Class Cargo Vessel)
- U.E.S. White 4448-C (Bowie Class Cargo Vessel)
- U.E.S. Young 6740-G (Bowie Class Cargo Vessel)
- U.E.S. Gagarin 4879-F (Burroughs Class Command Ship)
- U.E.S. Titov 9072-F (Burroughs Class Command Ship)
- U.E.S. Cooper 6412-D (Clarke Class Mining Vessel)
- U.E.S. Aldrin 4775-F (Frazetta Class Carrier)
- U.E.S. Anders 4253-F (Frazetta Class Carrier)
- U.E.S. Belyayev 1657-D (Frazetta Class Carrier)
- U.E.S. Beregovoy 8603-A (Frazetta Class Carrier)
- U.E.S. Cunningham 9172-H (Frazetta Class Carrier)
- U.E.S. Eisele 7639-F (Frazetta Class Carrier)
- U.E.S. Feoktistov 1804-D (Frazetta Class Carrier)
- U.E.S. Komarov 9388-G (Frazetta Class Carrier)
- U.E.S. Leonov 4621-E (Frazetta Class Carrier)
- U.E.S. Shatalov 3516-B (Frazetta Class Carrier)
- U.E.S. Walker 3930-D (Frazetta Class Carrier)
- U.E.S. Yegorov 1205-H (Frazetta Class Carrier)
- U.E.S. Gordon 7981-G (Gernsback Class Destroyer)
- U.E.S. Shepard 3592-G (Gunn Class Cargo Carrier)
- U.E.S. Armstrong 6927-D (Lucas Class Gun Carriage)
- P.S.S. Bykovsky 4498-A (Modified Pohl Class Tug)
- P.S.S. Nikolayev 5815-B (Modified Pohl Class Tug)
- P.S.S. Popovich 8867-G (Modified Pohl Class Tug)
- P.S.S. Tereshkova 5875-A (Modified Pohl Class Tug)
- U.E.S. Collins 2064-F (Moore Class Fast Tanker)
- U.E.S. Scott 4406-C (Roddenbury Class Hypernet Gate)
- U.E.S. Glenn 1817-C (Russel Class Tanker)
- U.E.S. Cernan 9131-H (Sturgeon Class Defender Tug)
- U.E.S. Schirra 9069-D (Sturgeon Class Defender Tug)
- U.E.S. Grissom 8139-H (Tucker Class Cargo Train)
Colony Cards
- U.E.C. Arrow Base (Cameron Class Star Settlement)
- U.E.C. Hicks Base (Cameron Class Star Settlement)
- U.E.C. Leontief Base (Cameron Class Star Settlement)
- U.E.C. Myrdal Base (Cameron Class Star Settlement)
- U.E.C. Friedman Colony (Kubrick Class Star Settlement)
- U.E.C. Hayek Colony (Kubrick Class Star Settlement)
- U.E.C. Kantorovich Colony (Kubrick Class Star Settlement)
- U.E.C. Koopmans Colony (Kubrick Class Star Settlement)
- U.E.C. Frisch Outpost (Serling Star Settlement)
- U.E.C. Kuznets Outpost (Serling Star Settlement)
- U.E.C. Samuelson Outpost (Serling Star Settlement)
- U.E.C. Tinbergen Outpost (Serling Star Settlement)
Credits & Playtesting
Credits
Designer: John D. Clair
Publisher: John Zinser
Project Lead: Erik-Jason Yaple
Development: John Goodenough
World Development: Erik-Jason Yaple
Production: David Lepore
Lead Artist: Chris Walton
Graphic Design: Kris Aubin
Art Director: Erik-Jason Yaple
Head of Quality Assurance: Kaz Nyborg-Andersen
Rulebook Writer: John D. Clair, John Goodenough, and Erik-Jason Yaple
Rulebook Editor: Mark Harbison
Proofing: David Lepore, Nicolas Bongiu, Mark Harbison, Mark Wootton
Playtesting
Alex Daar, Alix Greene, Andrew Narzynski, Ben Lesel, Bryan Reese, Carole Smith, Chris Buckley, Chris Buskirk, Clay Conditt, Csilla Clair, Daniel Lepore, Daniel Silvera, David Lebedoff, David Lepore, Devin Dai, Dwight Stone, Ehren Evans, Eric Elder, Eric Martinez, Erik-Jason Yaple, Eva Balogh, Hershey Harris, Jewel Woo, John Borders, John Goodenough, John Sanderson, John Zinser, Jon Espinoza, Katalin Balogh, Kaz Nyborg-Andersen, Kevin Raymond Will, Laramie Sasseville, Mara Kenyon, Mark Harbison, Mark Wootton, Michael Darling, Michael Kutan, Mindy Riley, Nicolas Bongiu, Nye Green, Richard Tatge, Ryan Dancey, Sam Nazarian, Samuel Lepore, Sean Growley, Terry Hughes, Thorin Tatge, Todd Rowland, Tricia Victor, Will Pell, Yan Yan
© 2018 Alderac Entertainment Group. Space Base, and all related marks are ™ and © Alderac Entertainment Group, Inc. 555 N El Camino Real #A393 San Clemente, CA 92672 USA. All rights reserved. Printed in China.
Expansions for
Space Base
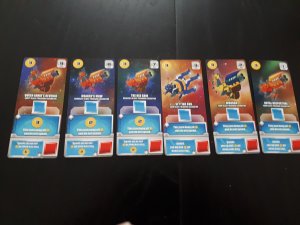
Space Base: Dead Reckoning Promo Cards
2022
Six treasure excavator ships that let you keep every unspent coin this turn
60
minutes
Medium
View expansion
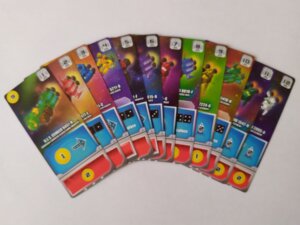
Space Base: Dreadnaught Promo Pack
2019
A 12-card promo pack from 2019 Kickstarter campaigns
60
minutes
Medium
View expansion
Space Base: Biodome
2021
Hypernet craft and lasting colony powers for your Space Base games
60
minutes
Medium
View expansion
Space Base: The Mysteries of Terra Proxima
2022
Explore Terra Proxima and expand your fleet through a linked spacefaring story.
60
minutes
Medium
View expansion
Space Base: Genesis
2024
Expand your fleet with alien technology, new card variety, and victory paths.
60
minutes
Medium
View expansion
Space Base: The Emergence of Shy Pluto
2019
Deploy your ships in a story-driven galactic adventure.
75
minutes
Medium
View expansion
