
Too Many Bones
2017
Build your skills with dice, face tactical battles, and make risky choices on an 8–12 battle quest to defeat a notorious kingpin.
120
minutes
1 - 4
player(s)
12+
Medium Heavy

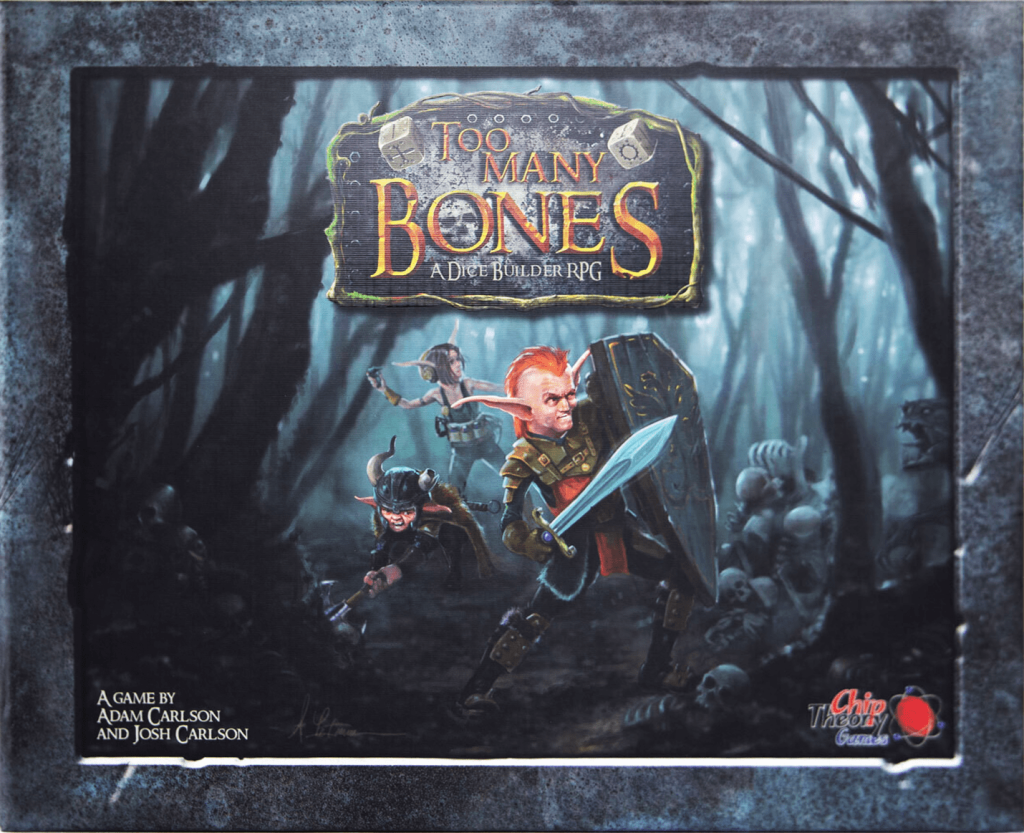
About this board game
Too Many Bones is a 1–4 player cooperative or solo dice-builder RPG with a 120-minute play time, released in 2017. Set in a fantasy world, it sends you north to root out growing enemy forces and defeat the infamous baddie responsible.
Take on the role of a new race and prepare for a campaign of 8–12 battles before reaching the final destination. Each battle is its own mini challenge, requiring strategy as you decide how to use your abilities and respond to the enemies in front of you.
- Choose from 4–7 classes.
- Use more than 100 unique skill dice.
- Play cooperatively with up to four players or take on the adventure alone.
- Face one of several possible kingpins in the final confrontation.
Dice are woven into every aspect of the adventure, including battles and storyline decisions. Encounters can force you to weigh risk and reward, consider the odds, and apply logic before choosing your path.
Your party must also decide when to rest, when to explore, and which fights to pursue. Encounter cards add plot twists and comic relief while setting the stage for the next battle, keeping each journey distinct.
With its combination of character classes, skill dice, tactical encounters, and meaningful choices, Too Many Bones turns dice-rolling into the foundation of a strategic fantasy adventure.
Mechanics
Designers
Illustrator
Useful links
/pic7182955.jpg) View board game on
View board game onBoard Game Geek
Board Game Rules for
Too Many Bones
A Note From Josh & Adam
Too Many Bones (TMB) has been a humbling endeavor for us both. Never before have we experienced this level of support and encouragement throughout the game-making process. Our backer community support has been second to none and has fueled us to make this game stand out in every way possible. Everyone involved has given more effort than we were ever expecting. We want to personally thank our artist, Anthony LeTourneau; our writer, James Boutilier; our jack of all trades and social media man, Josh Wielgus; and an orc horde of others who donated their time and talents to proof and playtest this unique take on dice strategy. We hope the amount of care and attention to detail invested into this game is apparent. It remains our goal to steadily improve the quality standard for board gaming. We think this game sets the bar high. Enjoy!
Disembarkment Notice
In Too Many Bones, you are playing as an unusual race of adventurers headed into a land overrun by all sorts of hostile creatures. Your race has lived hidden in the Deepwood for centuries, and only recently, your kin have been forced to emerge to the south and take shelter within the walls of Obendar.
Due to your reclusive lifestyle, many in town are encountering your race for the very first time. Some locals believe you to be an elf, due to your distinct facial features; others would say a goblin, from your size and build. Others still would insist your high technological aptitude proves you a gnome! Only those most intimate with the Deepwood know your true kind and kin as Gearlocs – big-eared, thin-bodied creatures with conflicting loves of nature and machine and an insatiable thirst for adventure!
The elder Gearlocs know all too well that this growing danger to the north is the work of The Ebon, a melting pot of lawless creatures ruled by tyrants who hold a firm grasp on all the northern regions of Daelore. Because each of these regions has little to no communication with the next, the elders believe that a smaller party will be most effective at infiltrating and eliminating the threat. They have selected your party of adventurers and tasked them with venturing northward to silence the Ebon one tyrant at a time.
This was never to be your task alone! Others were sequestered! But the Obendar militia is thin in ranks, and any sellswords worth hiring have already been swayed by the promise of plundering rights if they aid the enemy. But no matter! For you are Gearlocs, and being the resourceful and fearless race that you are, your party has happily accepted this challenge! You will be among the first to travel north in many decades, and your adventure begins today!
You may notice YouTube icons in various places throughout this rulebook. Wherever this icon appears, it means we have created a video explaining that subject. To view it, visit our YouTube channel at youtube.com/chiptheorygames and search that word or phrase. Happy viewing!
We consider this rulebook a living document and may continue to add and update as necessary with new expansions and content. Latest versions will be posted at toomanybones.com/rules
Units Explained
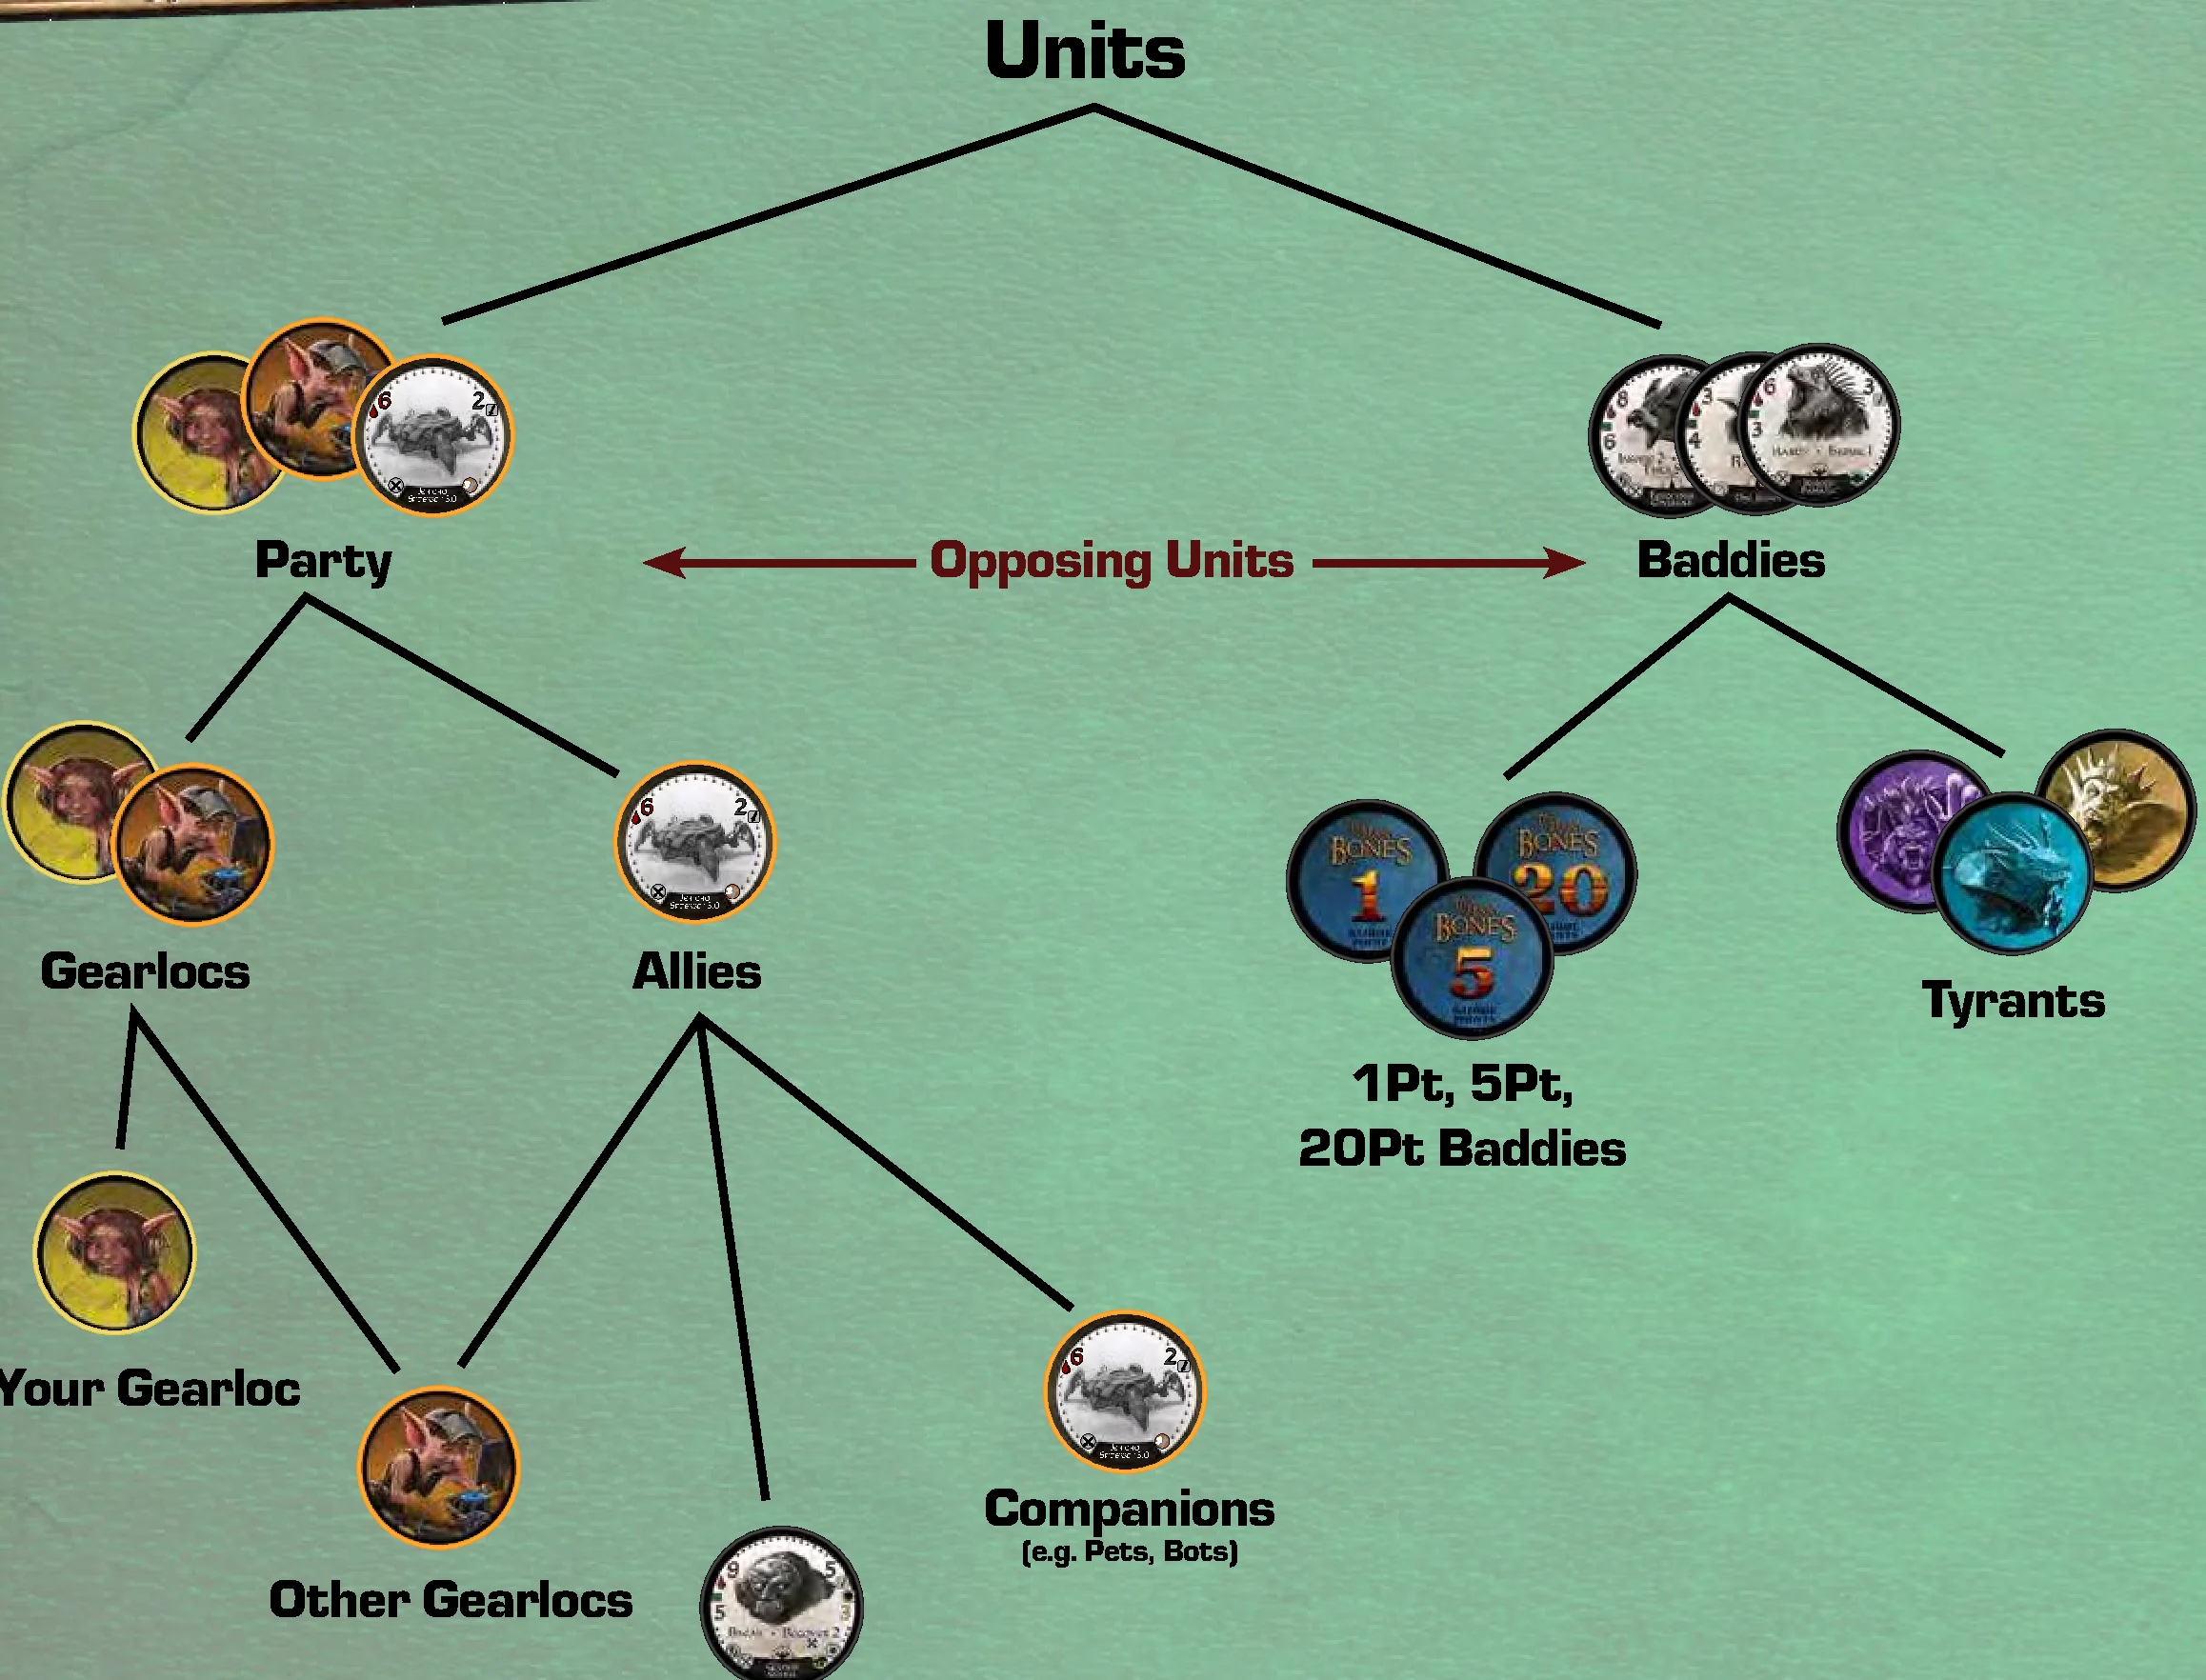
In TMB, a unit refers to any playable chip in the game (does not include Lane Markers, Day Counter, or Health Chips). All units fall under two categories: Party and Baddies. These two categories, in relation to one another, are referred to as Opposing Units.
- Baddies: Included in the Baddies category are all 1Pt, 5Pt, and 20Pt Baddies, as well as all Tyrants.
- Party: The Party falls under two categories: Gearlocs and Allies.
- The Gearlocs category contains all Gearlocs: yours and all of the other players’.
- The Allies category also includes all other Gearlocs, as well as Temporary Allies and Companions.
In the example above, if you are playing as Boomer, she would be Your Gearloc. All text referring to Your Gearloc or Gearlocs would be referring to her. Tink (available as an add-on character) would be another member of your Party, as well as a Gearloc. The Golden Golem would be an Ally, but only when the card “Between a Rock and a Hard Place” allows you to take control of it. Tink’s Bots would be both Companions and Allies.
Box Contents
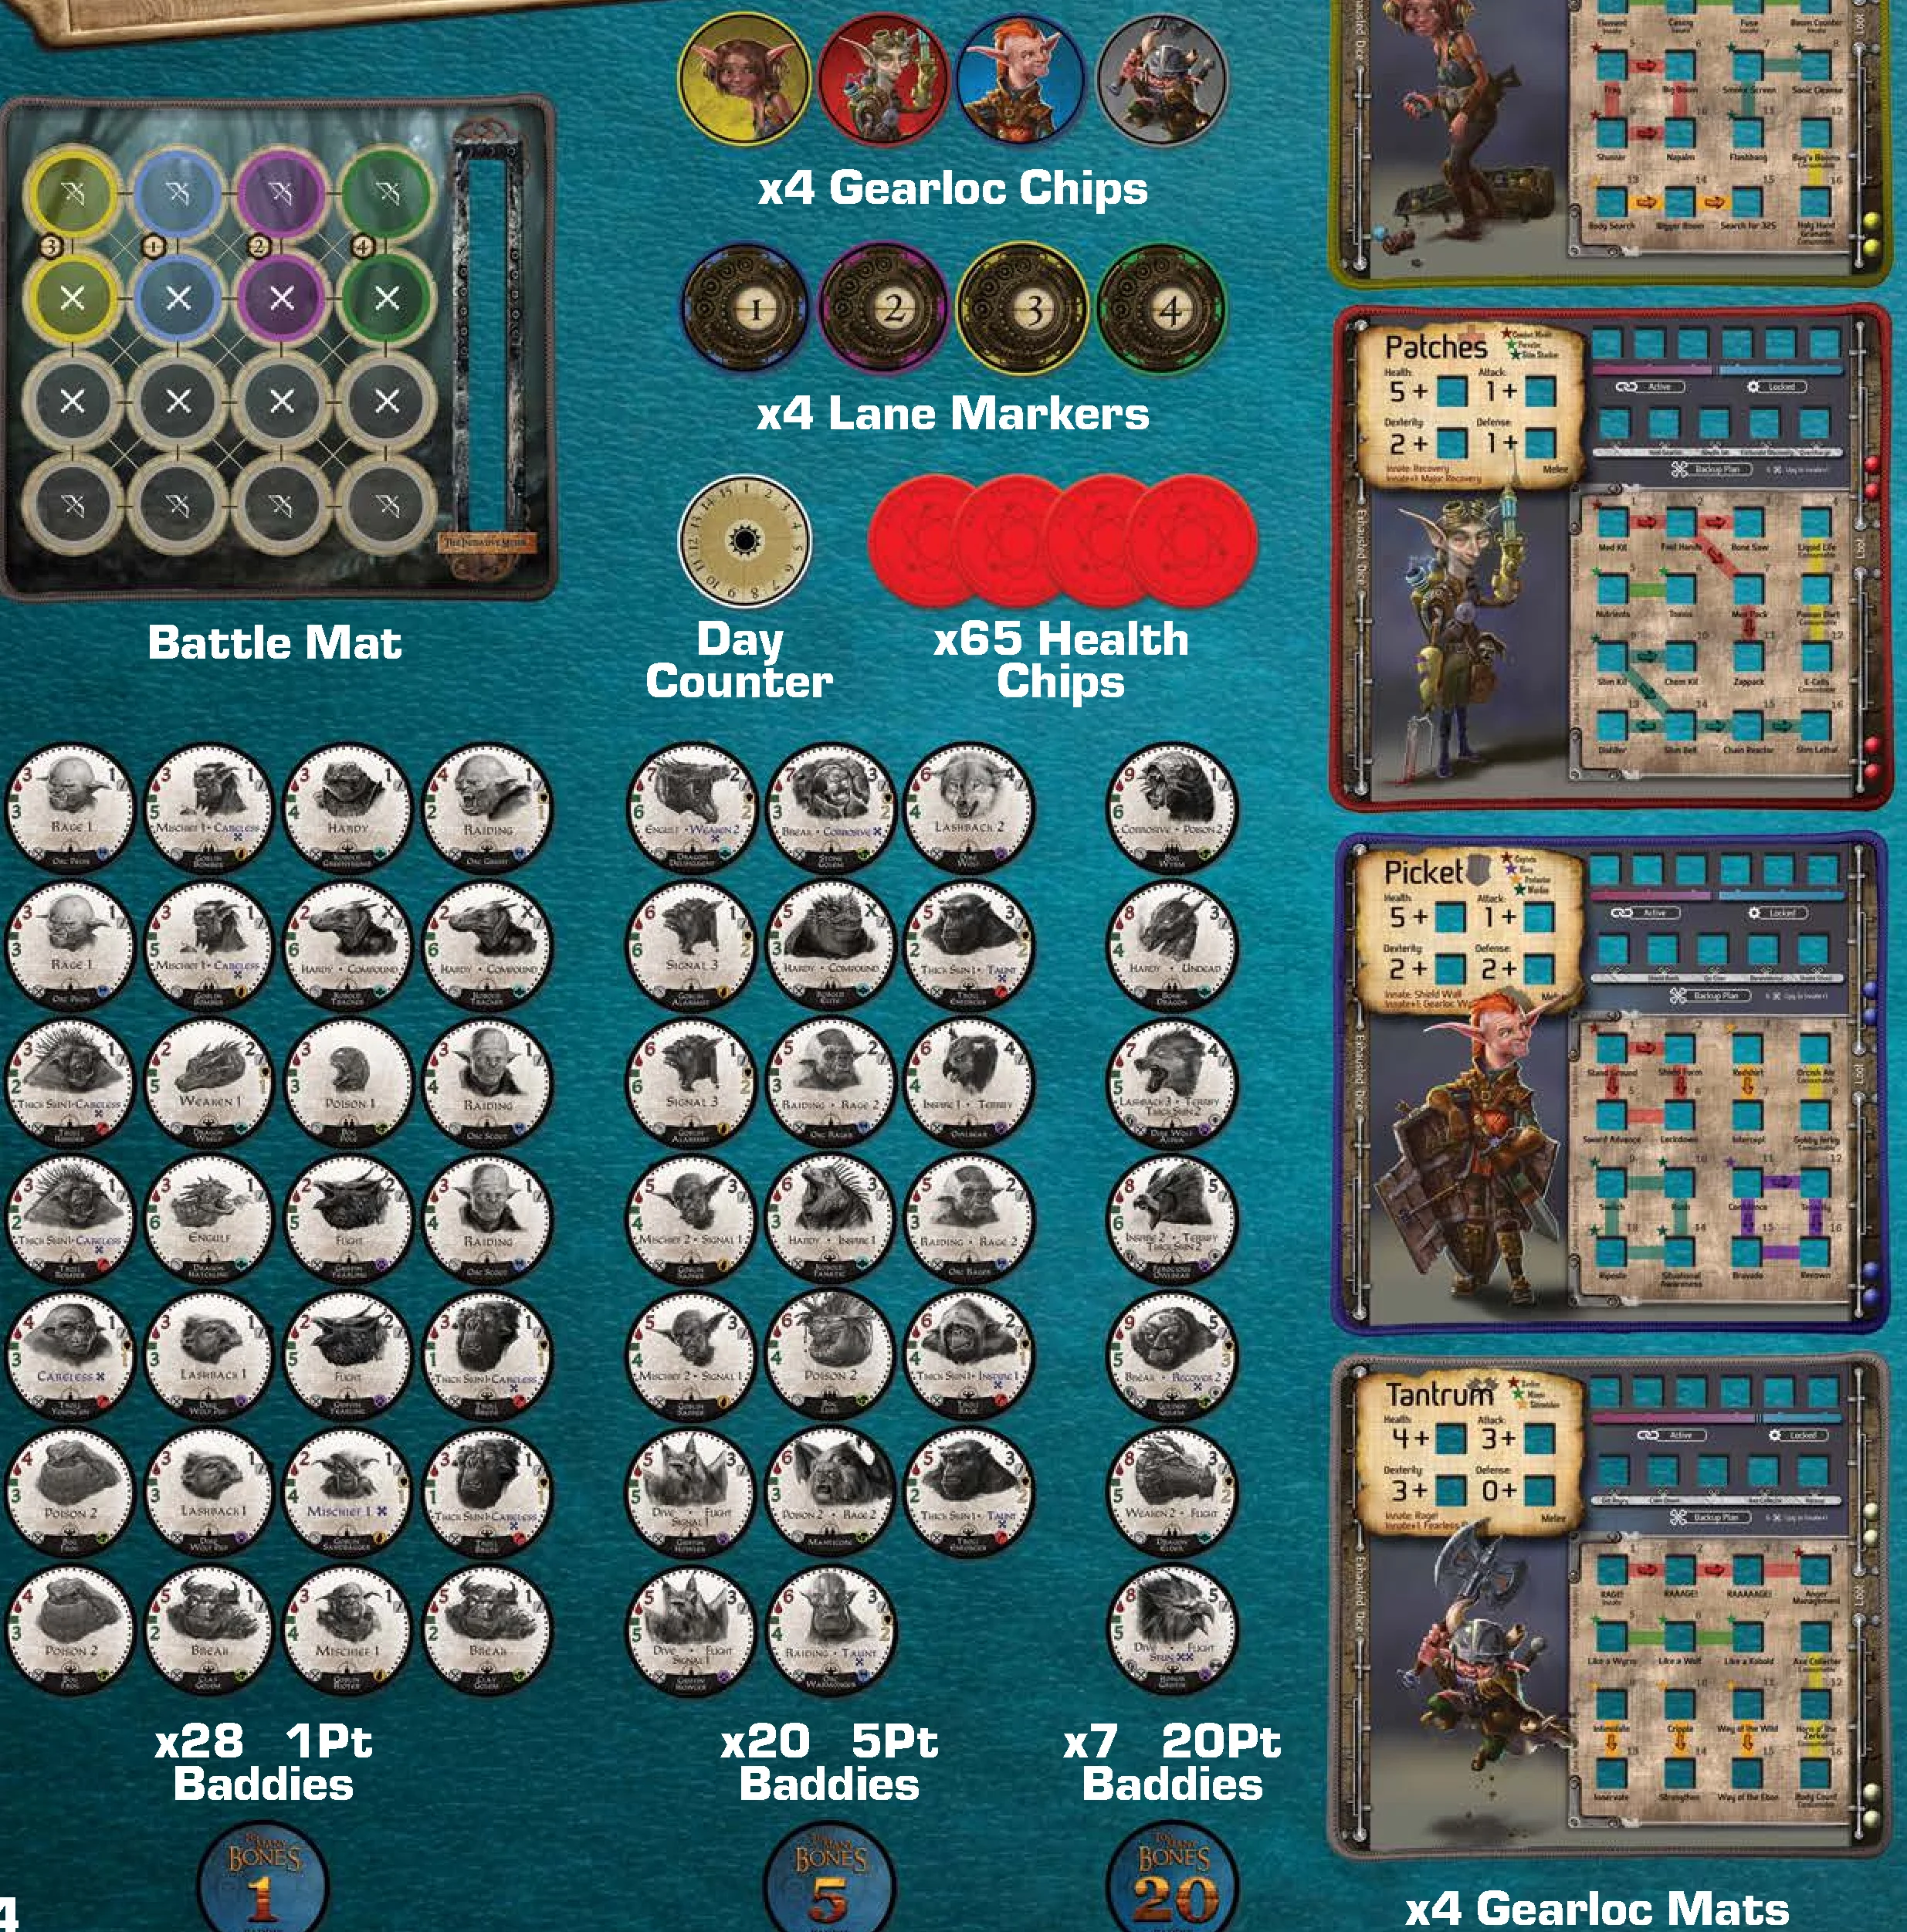
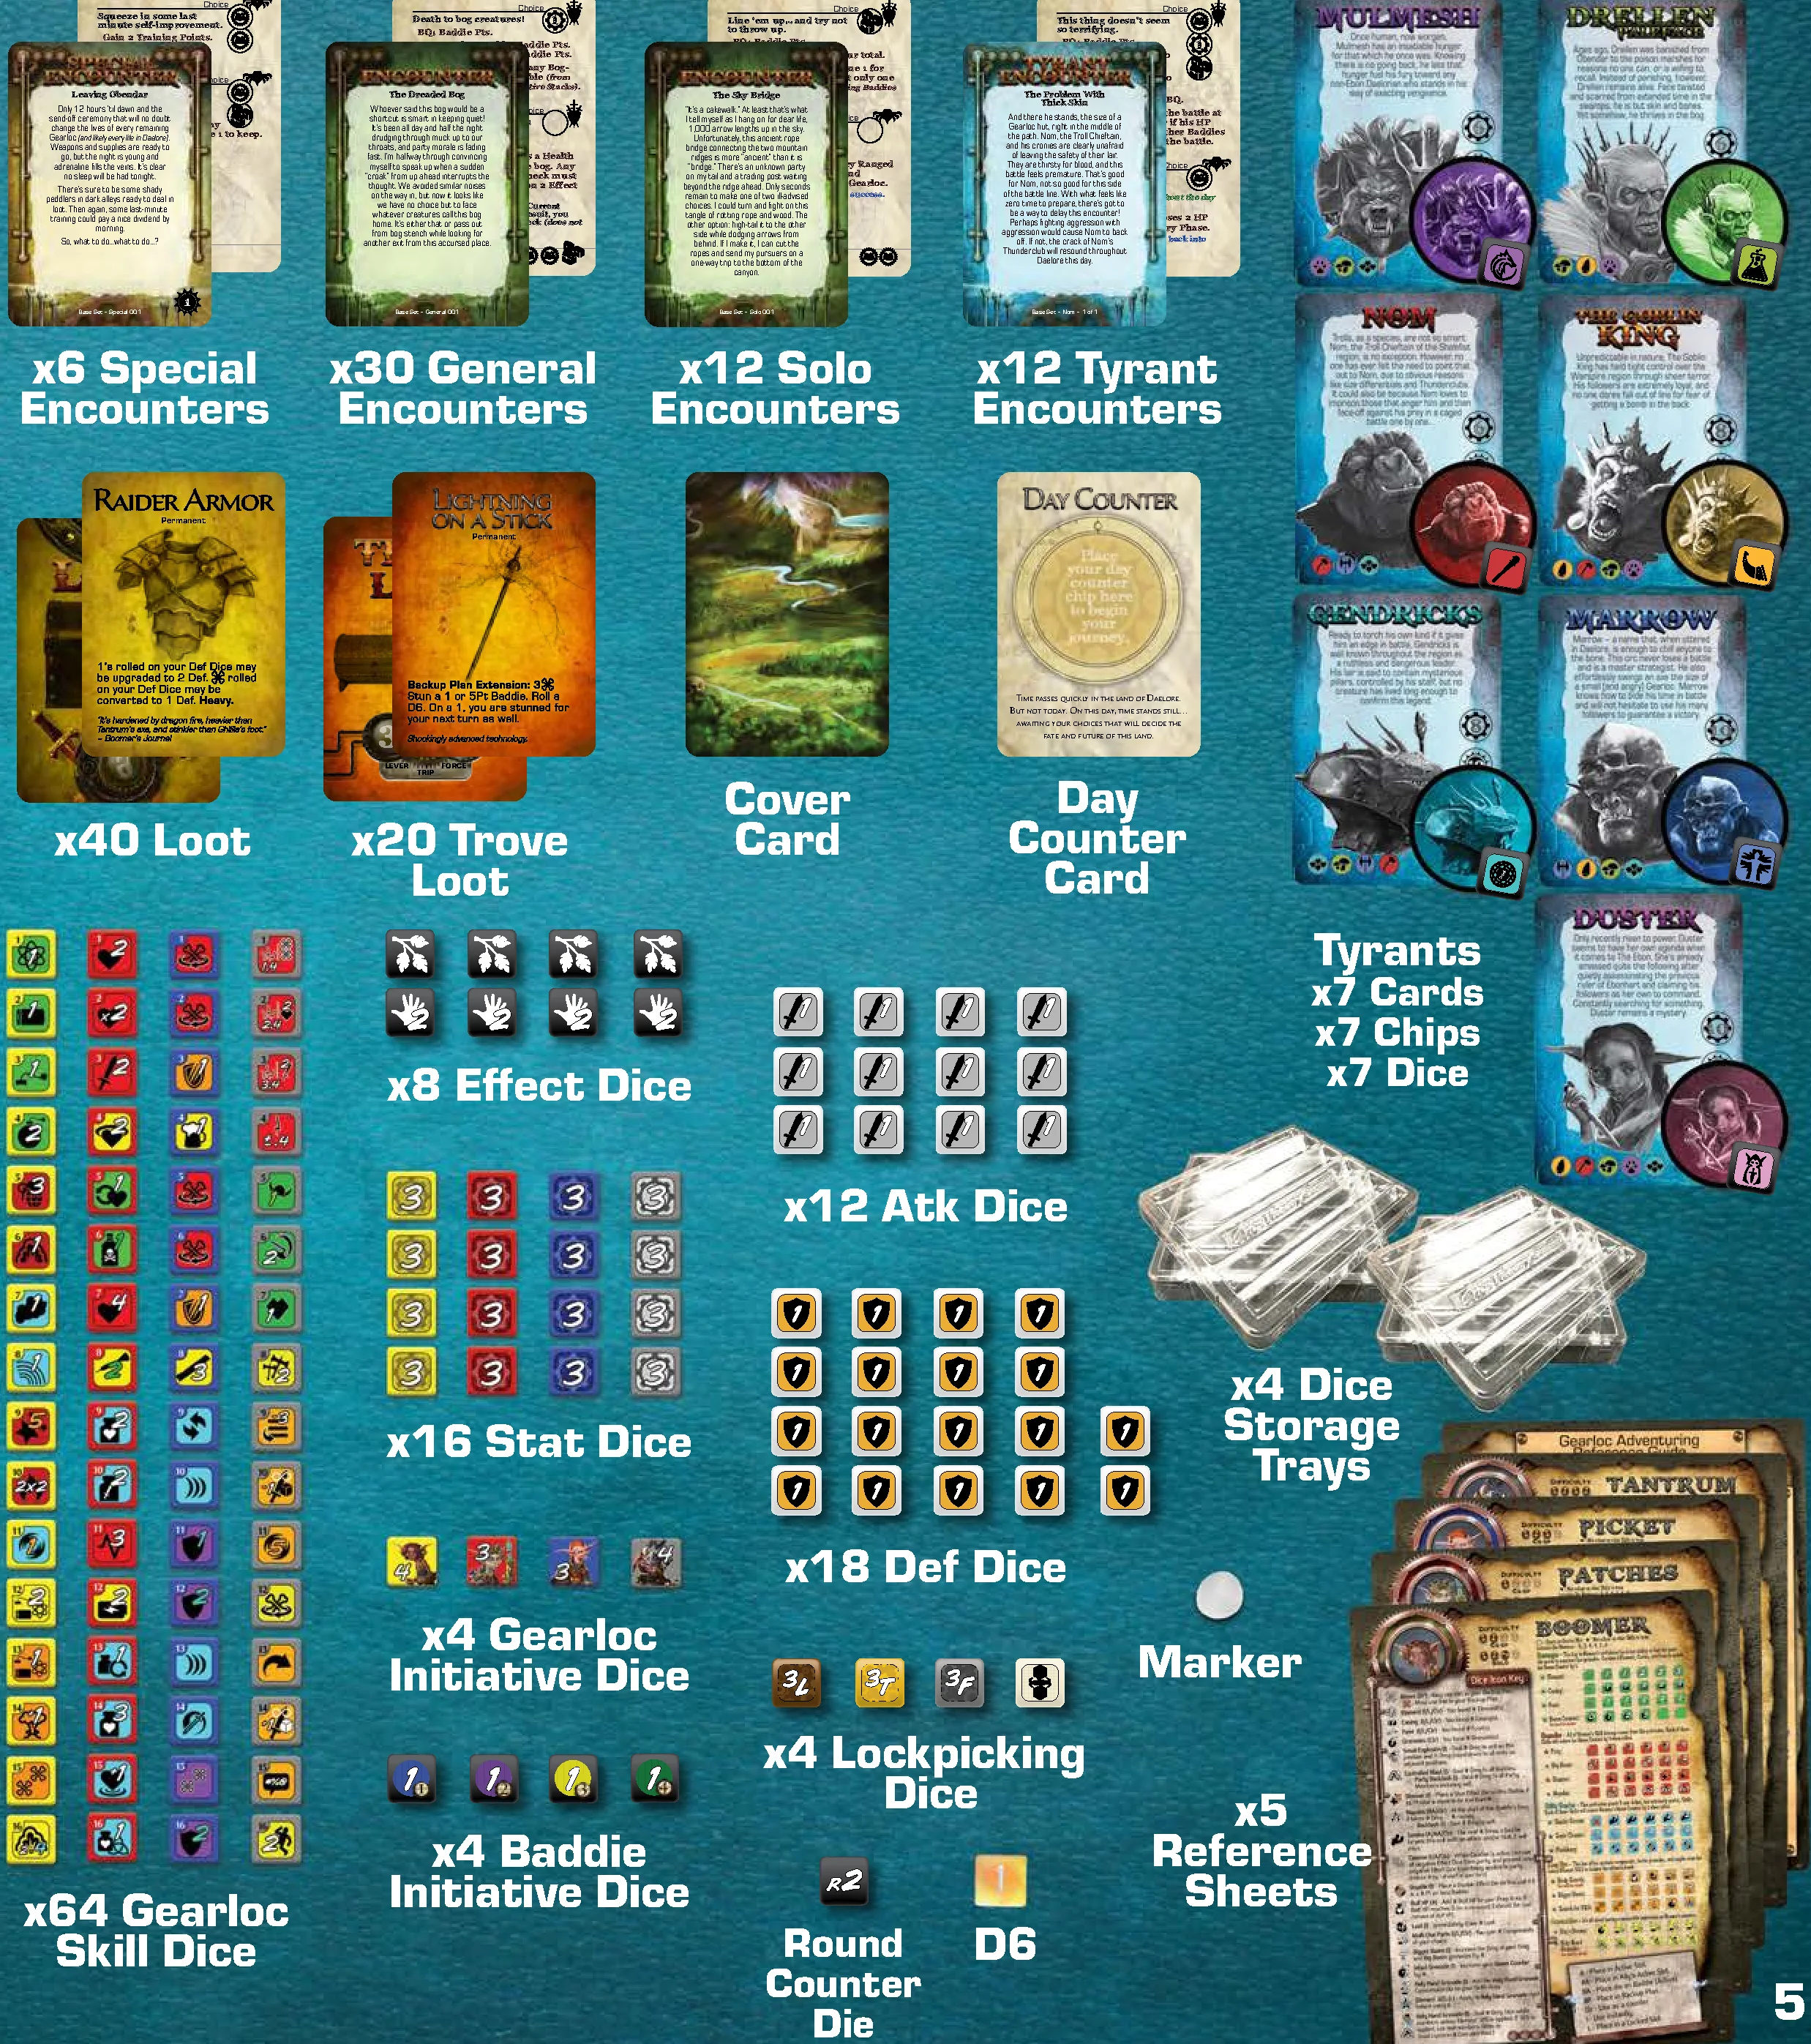
- 1 Battle Mat
- 4 Gearloc Mats (Boomer, Patches, Picket, Tantrum)
- 4 Gearloc Chips
- 4 Lane Markers
- 65 Health Chips
- 1 Day Counter
- 28 1Pt Baddies
- 20 5Pt Baddies
- 7 20Pt Baddies
- 6 Special Encounters
- 30 General Encounters
- 12 Solo Encounters
- 12 Tyrant Encounters
- 1 Cover Card
- 1 Day Counter Card
- 40 Loot Cards
- 20 Trove Loot Cards
- 7 Tyrants (Cards, Chips, Dice)
- 8 Effect Dice
- 12 Atk Dice
- 18 Def Dice
- 16 Stat Dice
- 4 Gearloc Initiative Dice
- 4 Baddie Initiative Dice
- 64 Gearloc Skill Dice
- 4 Lockpicking Dice
- 1 Round Counter Die
- 1 D6 Die
- 1 Marker
- 4 Dice Storage Trays
- 5 Reference Sheets
Game Objective
Your task is easy…according to the Gearloc Council. Reach and defeat the selected Tyrant within its day allotment to win.
Game Set-Up
Let’s start by setting up for your Adventure. Place the Battle Mat in the center of your play area.
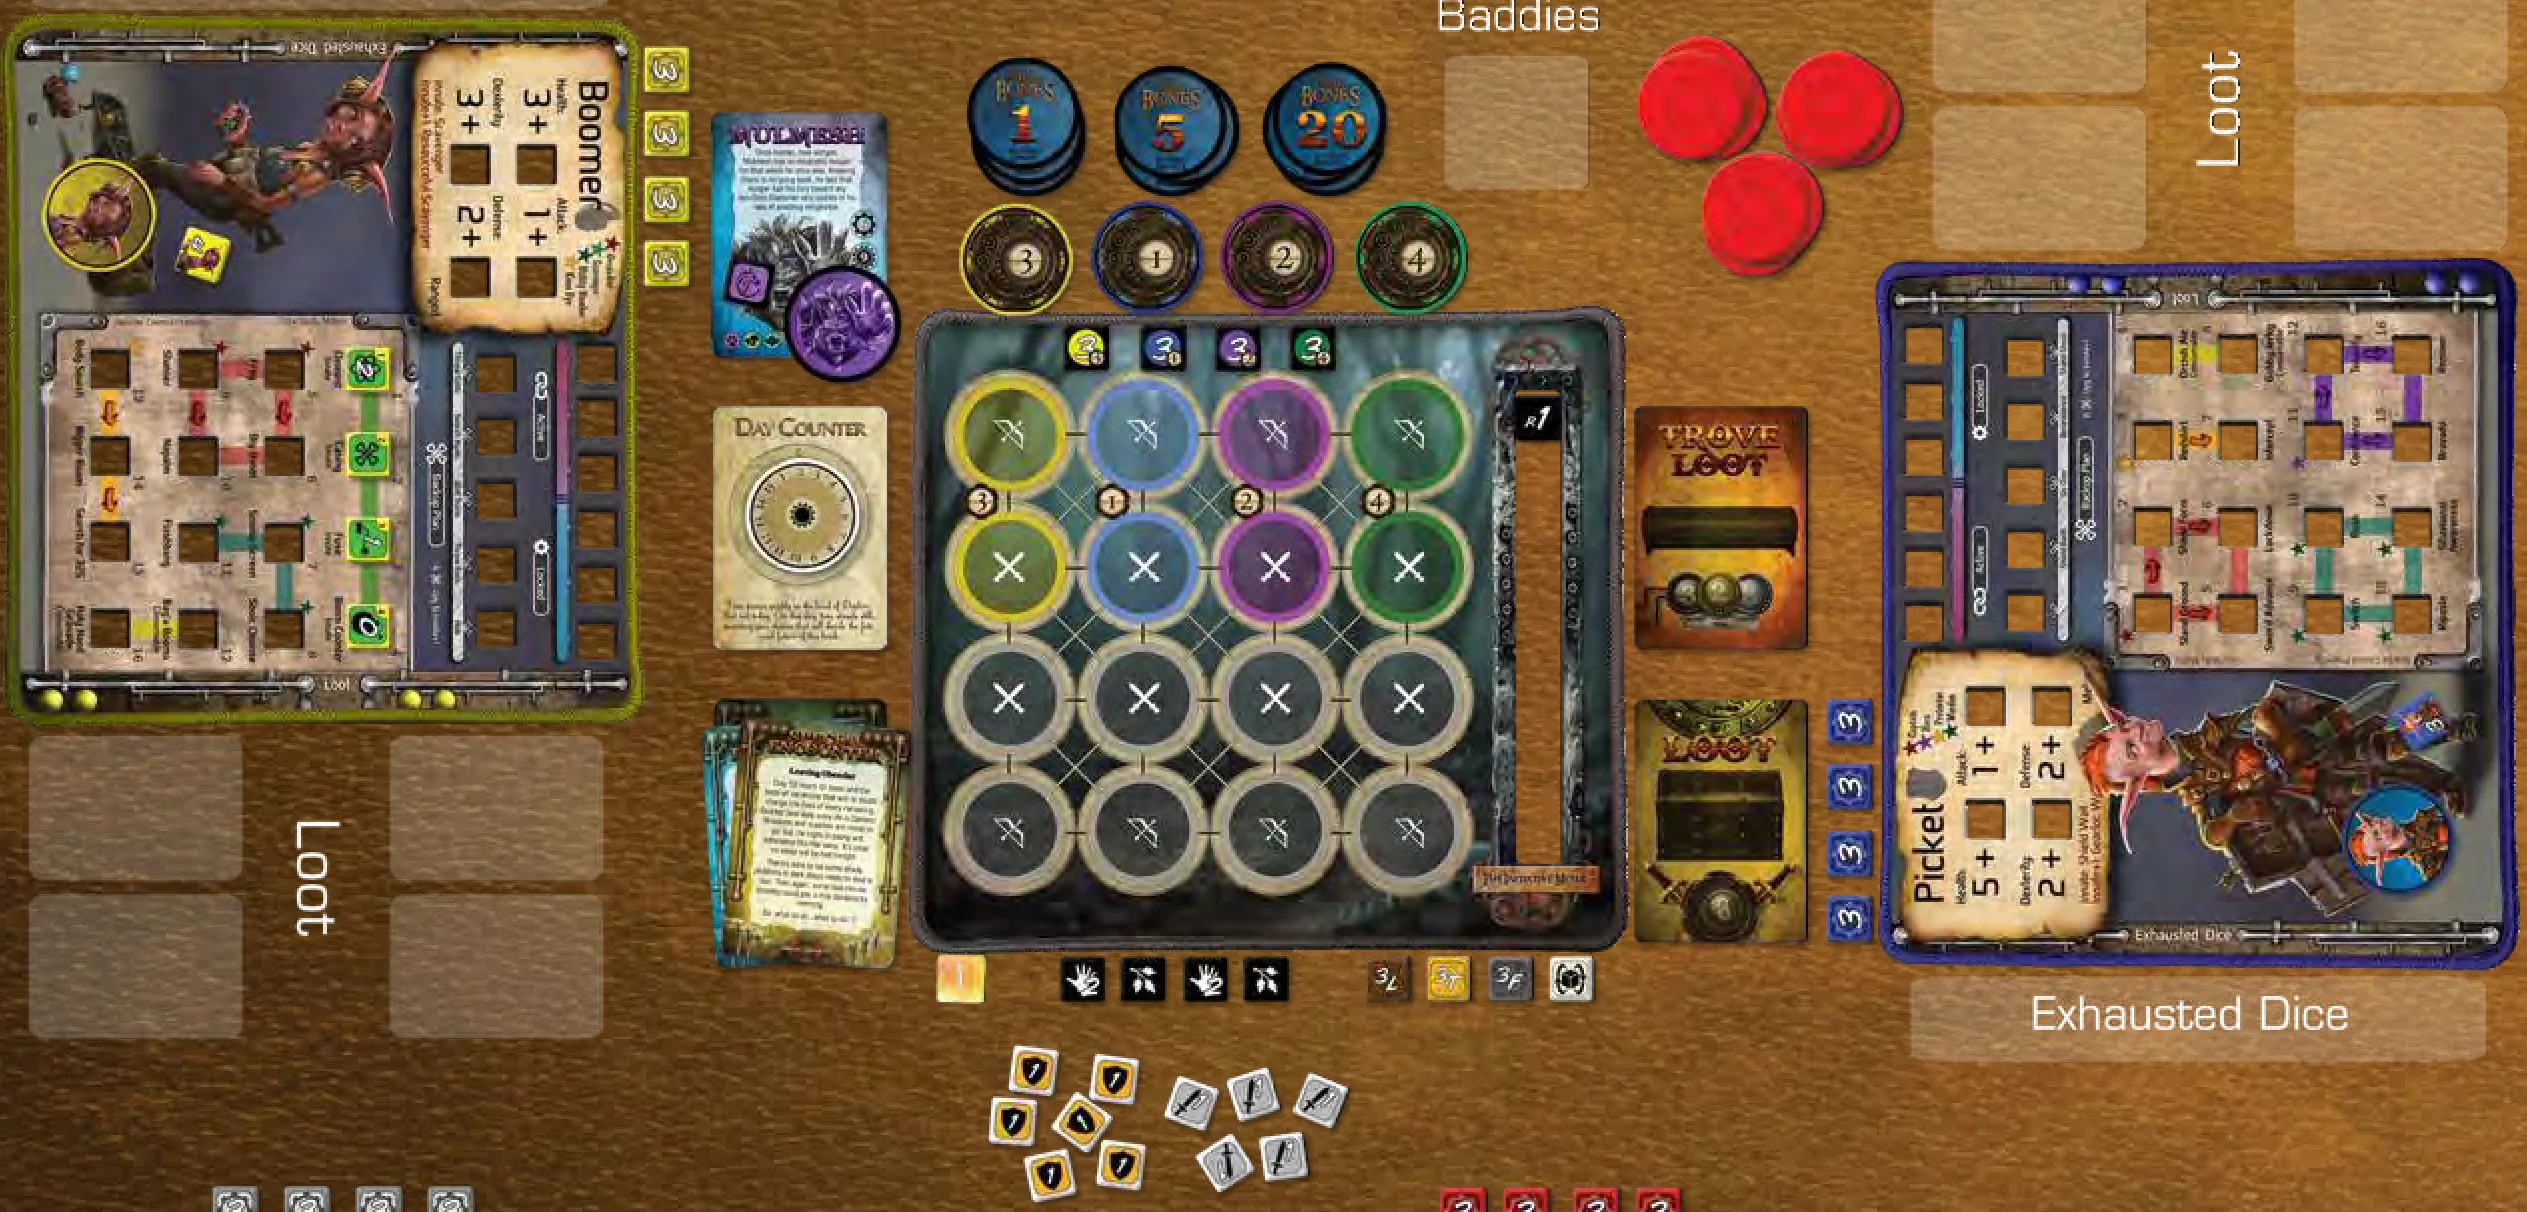
Tyrant and Day Counter
- Select a Tyrant or draw one at random (you may look at both sides and familiarize yourself with its Skills and Tyrant Die effects). Games can range from 1-4 hours depending on how many days are provided to reach the Tyrant and the number of Gearlocs in the party.
- Place the Tyrant’s Card, Chip, and Die to the left of the Battle Mat.
- Place the Day Counter Card and Chip (set to 1) directly below your Tyrant Card.
Encounters
- Find any Tyrant Encounters associated with chosen Tyrant (1-3 blue cards, labeled with the Tyrant name at the bottom of the card) and set those aside. Place other Tyrant Cards in the game box.
- Shuffle the General Encounter Deck (green and labeled “General” at the bottom), or Solo Encounter Deck (green and labeled “Solo” at the bottom) if playing with only one Gearloc. Draw Encounter Cards equal to the # of Days (
 ) shown on your Tyrant Card minus 3 cards. Shuffle these together with the Tyrant Encounter Card(s) you set aside to form an Encounter Deck, and place to the left (story side up) of the Battle Mat as shown.
 - Place unused General and Solo Encounter Cards in the game box. In the rare instance you run out of Encounters, you may replenish your Encounter Deck from the game box.
- Finally, find Special Encounters 001-003 (labeled
 ,
,  , and
, and  ) and place them, in order, on top of your newly created Encounter Deck. Place other Special Encounters in the game box (keep these accessible, as you may need them later on). Add Cover Card on top of Encounter Deck if you’d like to make Encounters even more of a surprise.
Loot & Trove Loot
Shuffle all Loot and Trove Loot cards separately and place both decks (chest side up) to the right of the Battle Mat. Take the 4 Lockpicking Dice and place them nearby.
Baddies
Using the Baddie Type icons, Troll ( ), Orc (
 ), Scales (
 ), Goblin (
 ), Bog (
 ) and Beast (
 ) shown on your Tyrant Card, find all Baddies of these types. Flip them face down, shuffle, and create separate 1Pt, 5Pt, and 20Pt Baddie “Active Stacks.” Place these stacks above the Battle Mat. Place other Baddie Chips in your game box (on occasion, you may need to access these Baddies for a specific Encounter). If you ever run out of Baddies in an Active Stack, reshuffle defeated #Pt Baddies to replenish that Active Stack.
Gearlocs
- Each player chooses a Gearloc and places their selected Gearloc Mat, Gearloc Chip (with # of Starting Health Chips underneath it), Initiative (Ini) Die, and Stat Dice as shown. Adjust mat placement to your liking based on party size. Place Gearloc Reference Sheet nearby.
- Find your Gearloc’s 16 Skill Dice and place them in a Storage Tray near your Gearloc Mat (feel free to use tray covers for storing Atk and Def Dice near each Gearloc as well).
- Using your Gearloc Reference Sheet (front right column), look for any Skills with a circle (
 ) next to their name. Your Gearloc starts the game with these Skills (find the Skill names on your Gearloc Mat and then place the Skill Dice with corresponding numbers into those slots on your mat).
 - Collectively choose a Party Leader, who is responsible for making tie-breaking decisions.
Other Components
- Below the Battle Mat, make pools of Atk Dice, Def Dice, and Effect Dice. Set the D6 in this area as well.
- Place the 4 Lane Marker Chips above the Battle Mat as shown. Do the same for the 4 Baddie Ini Dice and Health Chip stacks as shown.
- Lastly, place the Round Counter Die at the top of the Initiative (Ini) Meter on the Battle Mat, set to R1.
- Make sure the Gearloc Adventuring Reference Guide (GARG) is close by.
- You are ready for your Adventure!
Gameplay Overview
While the main objective of Too Many Bones (TMB) is to take down the selected Tyrant, you must first earn enough Progress Points (Pts) to do so. It’s also imperative that you strengthen your Gearlocs, honing their Stats and Skills with Training Points (Pts) in preparation for that final battle.
Both Progress Pts and Training Pts can be earned through daily Encounters. These situations will provide your party with choices that can result in peaceful outcomes or battles. Let’s start by discussing how and when all of this happens.
Game Phases
Each day of your Adventure will take you through 4 game phases. Once completed, a new day begins and you will repeat these phases.
- New Day Phase: Rotate Day Counter 1 day (skip this for Day 1).
- Encounter Phase:
- Draw an Encounter and read it to the party; if your Party has earned enough Progress Pts, you may instead challenge Tyrant.
- Pick a choice (if applicable) and attempt to successfully complete it.
- If successful, go to the Reward Phase.
- If unsuccessful, skip the Reward Phase and go directly to the Recovery Phase.
- Reward Phase:
- Gain all rewards specific to your Choice. Also gain any general Encounter rewards.
- If rewards include Loot or Trove Loot, draw them now.
- If rewards include Training Pt(s), use them now.
- If rewards include Progress Pt(s), place card (with Progress Pts showing) under Tyrant Card.
- Recovery Phase:
- Trade Loot and Trove Loot within your Party. Any loot! Any amount! To anyone…or leave it behind (discard whatever you like)!
- Make a Lockpicking Attempt. This can be on your Trove Loot or someone else’s.
- Individual Options (each Gearloc may choose 1):
- Rest and Recover: Heal to full HP.
- Search for Better Loot: Discard 1 Loot or Trove Loot. Roll 6 Atk Dice. For each
 you roll, reveal a Loot card – you may keep 1. If no is rolled, discard still happens.
 - Scout the Area: Roll a D6. On 1-3: Reveal a 1Pt Baddie; 4-5: Reveal up to a 5Pt Baddie; 6: Reveal up to a 20Pt Baddie. Reveal the first face down chip on the stack. Once revealed, you may leave that Baddie face up in the same position in the stack, or cycle it to the bottom of the stack (returning it face down). *There is no limit to the # of Baddies you can reveal per stack.
This completes your day! Start over at: New Day Phase.
Encounters
Encounters are daily situations your party must overcome as it makes its way toward the Tyrant. Each day, your party will start by drawing an Encounter Card and reading it aloud. The front of the card presents a situation your party “encounters.” The back lists your choices and the effects those choices will have on the Encounter (you may read the entire card and discuss before deciding).
Your party must choose one of the options offered. These choices will result in a peaceful outcome ( ) or a battle (
 ). Either way, you must successfully complete the Encounter to earn its rewards (usually Progress Pts, Loot, and/or Training Pts).
A peaceful Encounter choice is automatically successful unless otherwise noted. A battle Encounter choice is successful if at least one Gearloc remains on the Battle Mat after all Baddies are defeated. Once an Encounter is successful, the party moves into the Reward Phase.
If an Encounter is unsuccessful (peaceful or battle), your party does not gain any rewards. Discard the Encounter and move into the Recovery Phase.
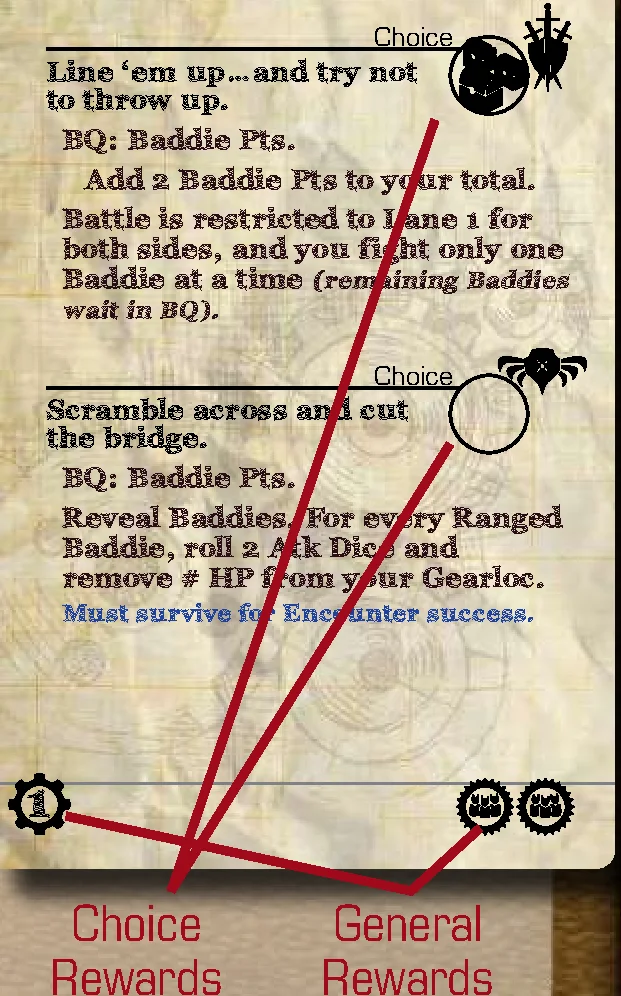
Encounter Types
There are 3 types of Encounters in TMB:
- Special Encounters: Added to the Encounter Deck only when instructed in set-up or by another Encounter.
- Tyrant Encounters: Added to the Encounter Deck based on which Tyrant you are facing (explained on page 7).
- Regular Encounters: Come in 2 sets: General and Solo Encounters (indicated on the front at the bottom of each card). Use Solo when adventuring with 1 Gearloc only. Use General for 2 or more Gearlocs.
Encounter Card Icons
- Battle: This Choice will result in a battle. *Must succeed to gain rewards and Progress.
- Peaceful: This Choice does not result in battle. *May still have requirements for success.
 Progress Points: Gain # Progress Points for completing this Encounter.
 Loot (Individual): Each Gearloc draws 1 Loot.
 Loot (Party): Draw # Loot. *Party decides how to distribute.
 Training Point: Each Gearloc gains 1 Training Point.
 Trove Loot (Individual): Each Gearloc draws 1 Trove Loot.
 Trove Loot (Party): Draw # Trove Loot. *Party decides how to distribute.
Encounter Text Colors
- Yellow / Gold: Choice Text
- White: Choice Result Text
- Grey italic: Flavor Text
- Yellow / Blue highlights: Special Instructions
Rewards & Progress Points
Upon successfully completing an Encounter, check the card in 3 places for any rewards your party has earned. First, check to the right of your Choice Text for any rewards specific to your Choice. Next, look in the bottom left (Progress Pts) and right (Training Pts, Loot, and Trove Loot) corners for any general Encounter rewards. Collect these rewards now. Then, move to your Recovery Phase.
Progress Pts represent the party’s advancement toward the Tyrant. Stack all successfully completed Encounters, with their showing, in a neat row to easily reference how many Pts your party currently has. Once you earn enough Progress Pts to equal or exceed the shown on your Tyrant, you may choose to face the Tyrant instead of drawing an Encounter during your next Encounter Phase.
Recovery
During your Recovery Phase, you may trade (give and/or receive) Loot and Trove Loot, make a Lockpicking Attempt (Lockpicking described on page 21 and on the Gearloc Adventuring Reference Guide (GARG)), and choose one individual option (described on page 8).
Once your Recovery Phase is complete, your day ends, and you start over at the New Day Phase.
IMPORTANT: Before we get into these Phases further, it’s imperative that you have a solid understanding of your Gearloc and how your Gearloc Mat interacts with everything else. Please select a Gearloc Mat and place it in front of you for easy reference during this next section. Also, find your corresponding Gearloc Reference Sheet and keep it close, as we will be referencing it as well.
Gearloc Mat Overview
Your Gearloc Mat represents everything that makes your Gearloc unique and effective in battle. It can be built differently every Adventure!
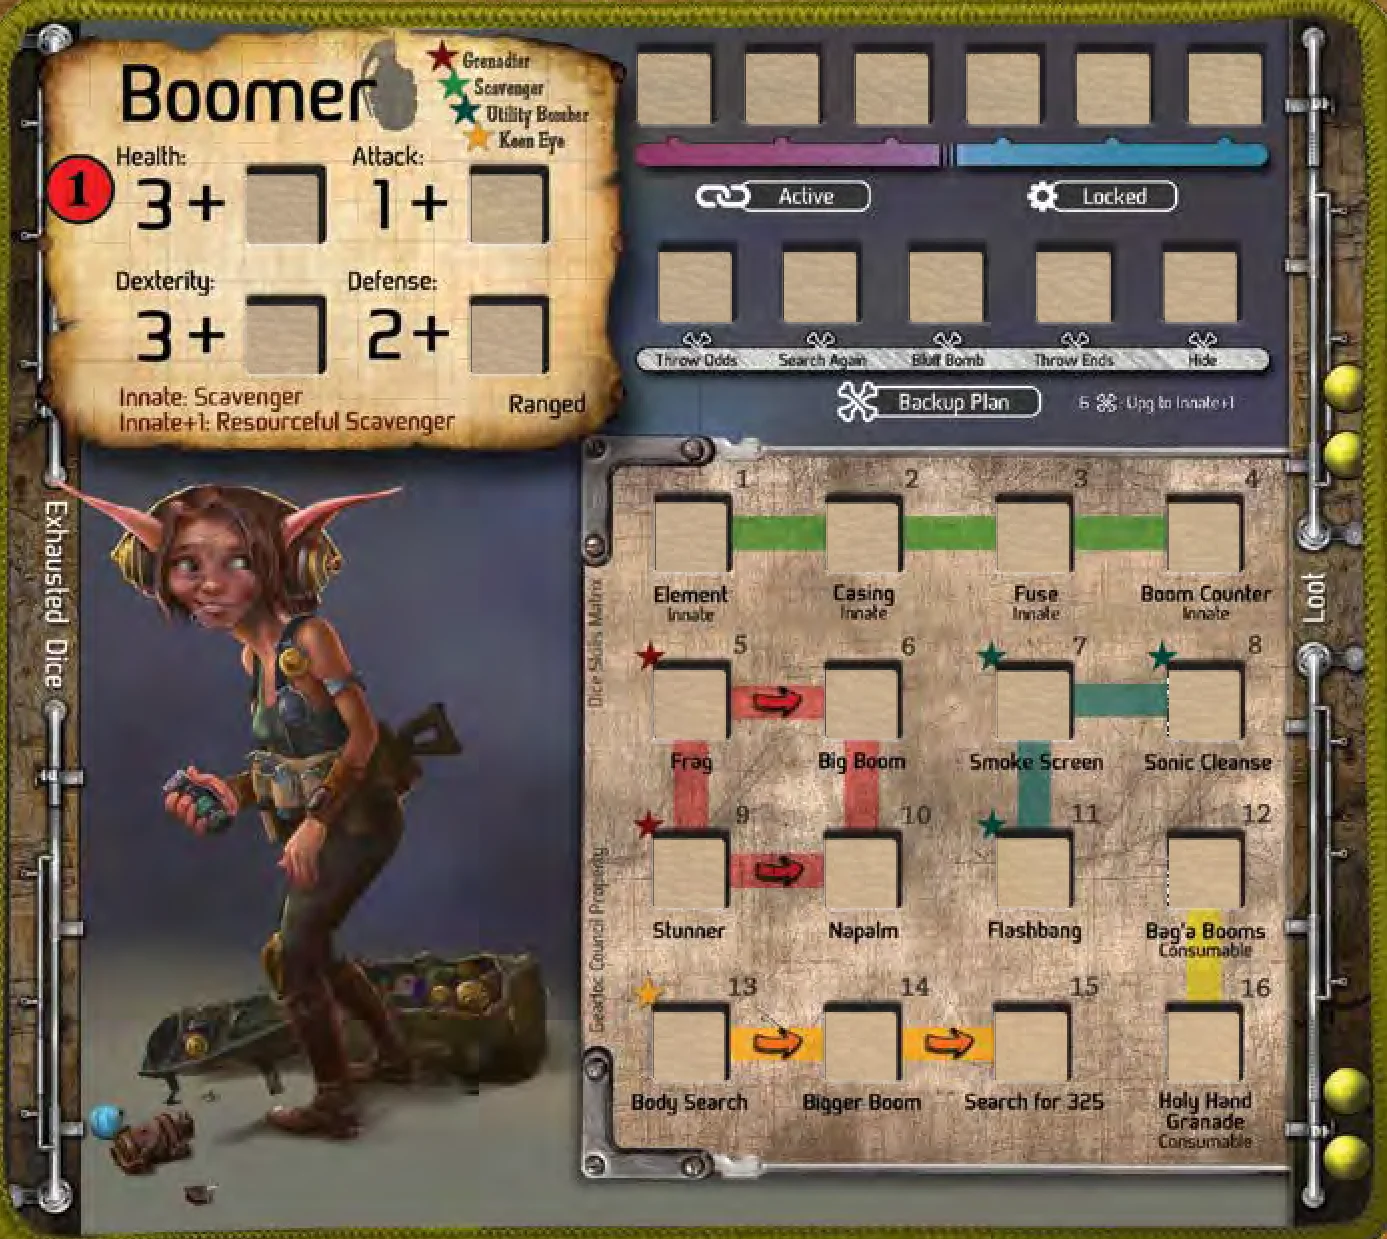
1. Stat Area
- Each Gearloc has 4 Stats: Health (HP), Dexterity (Dex), Attack (Atk), and Defense (Def).
- Each has a Starting Stat (printed number on the mat) which can be increased by placing a Stat Die in the corresponding Stat Dice slot during the game. The Starting Stat plus the value of the Stat Die equals the current max Stat of your Gearloc.
- You increase these Stats using Training Pts () from completing Encounters.
- A Training Pt gives you 1 Training Attempt for any Stat (or Skill).
- If a Training Attempt is successful, place (or increase by 1) a Stat Die in the slot next to the Starting Stat to reflect the new modified number (Stat Dice cannot go higher than 6).
- Stat Dice from Training remain throughout the Adventure.
Health (HP)
- Your HP is the # of Health Chips your Gearloc currently has stacked under its Gearloc Chip.
- HP cannot exceed its max Stat (excess healing is lost). *Buff HP is separate from your HP and is therefore handled differently (see page 22).
- Losing your last HP means you are Knocked Out (KO’d; See page 20 for details).
- An HP Training Attempt will always succeed. After Training in HP, add 1 HP to your Gearloc (in addition to increasing the HP Stat Die).
Dexterity (Dex)
- Your Dex is the max # of dice you may roll each turn (any combination of Atk, Def & Skill Dice).
- Dex can also be spent to move your Gearloc on the Battle Mat (costs 1 Dex per available position). Each Dex spent this way subtracts from the Dex available to roll dice this turn.
- A Dex Training Attempt will always succeed.
Attack (Atk)
- An Attack is the act of rolling Atk Dice (
 ) to Dmg the target. Rolling Skills is not considered to be an “Attack” even if the Skills deal Dmg.
 - Your Atk Stat is the # of Atk Dice you have available to roll each turn (not Exhausted when used).
- Each Atk Die costs 1 Dex to roll in battle.
- A target for your attack must be declared prior to rolling (one target only).
- Each
 rolled is # Dmg that may be applied to target.
 - If any Dmg is done to your target through the use of Atk dice, it is considered a “Hit.”
- Each rolled may be used in your Backup Plan (does not reduce # of Atk Dice available to you in future turns).
- An Atk Training Attempt requires you to roll your current Atk Stat (Starting Stat + Stat Die). If no are rolled, you are successful. If unsuccessful, there is no Atk Stat increase, but you may spend this Pt elsewhere.
Defense (Def)
- Your Def Stat is the # of Def Dice (
 ) you have available to roll each turn (not Exhausted when used).
 - Each Def Die costs 1 Dex to roll in battle.
- Each
 rolled may be placed in an Active slot (must use actual rolls – cannot combine results from 2 dice into 1).
 - The total # of in your Active slots is the # Dmg you prevent. Decrease by this amount (e.g. Boomer has a Def 2 Die and a Def 1 Die in her Active slots. A Baddie deals 1 Dmg to her. She can either remove the Def 1 Die, or reduce the Def 2 Die to 1). Def Dice must be used for all incoming Dmg first before removing HP, except True Dmg which is applied directly to HP.
- The total Def Dice currently in Active slots will reduce available Def Dice for rolling this turn (e.g. Boomer has a Def Stat of 2. She rolls both Def Dice on her turn and gets a 1 and a 2 result. She chooses to place both dice in her Active slots. Later in the round, a Baddie attacks her for 1 Dmg, so she chooses to remove the 1 Def from her Active slot. It’s now her turn again, but because she still has a Def Die in her Active slot, she can only roll 1 Def Die this turn).
- Each rolled may be used in your Backup Plan (does not reduce # of Def Dice available to you in future turns).
- A Def Training Attempt requires you to roll your current Def Stat (Starting Stat + Stat Die). Any rolled are rolled once more. If no are rolled after the second roll (or first), you are successful. If unsuccessful, there is no Def Stat increase, but you may spend this Training Pt elsewhere.
Training Points (Pts) Rules
A Party Training Pt () is earned through the successful completion of Encounters. When a is earned, each Gearloc gains a Training Pt that can be used toward a Training Attempt of one of their Skills or Stats. Training HP, Dex, or a Skill will always succeed. However, training in Atk or Def requires a successful attempt in order to increase this stat. A failed attempt means you will be forced to train in something else with that Training Pt. The training process is covered in the Gearloc Mat section (page 10-12) and on the GARG.
Innate & Innate +1
- Each Gearloc starts with a unique talent (Innate) and can use it throughout their Adventure. Use your Gearloc Reference Sheet to learn more about what it can do.
- Your Gearloc’s Innate can be upgraded by using 6 on your Backup Plan. Once upgraded, this also lasts the entire Adventure, and its effects are explained on your Gearloc Reference Sheet.
- Play with the non-star side of your Gearloc chip face up until you upgrade to Innate +1, then flip it!
Attack Form (Ranged / Melee / Melee-Ranged)
- This determines how your Gearloc can target and attack:
- Melee Gearlocs: Can only target adjacent units.
- Ranged Gearlocs: Can target any unit.
- Melee-Ranged Gearlocs: Have their own instructions for targeting and attacking. See their Gearloc Reference Sheet for details.
- Your form also determines your Gearloc’s Battle Mat starting position options in battle (discussed on page 17).
2. Exhausted Dice Area
- When Skill Dice are used, they must be Exhausted (unless otherwise noted).
- Exhausted Dice are stored to the left of the Gearloc Mat for the remainder of the current battle and are no longer available to you. All Exhausted dice are unexhausted after battle.
- Baddie Skills may force you to Exhaust Atk or Def Dice. Each die Exhausted in this way reduces your Atk or Def Stat by 1 for the battle (e.g., Break, Corrosive).
3. Prep Area
The picture of your Gearloc also serves as a staging area for certain components throughout the game:
- This is where your Gearloc Chip with its current HP sits when not in battle.
- If your Gearloc receives Buff HP, it is placed here.
- Some Gearlocs even use this area for staging certain Skills before they are used in battle.
4. Skills Area
Skill Dice
- Begin your Adventure with all Skill Dice in your Storage Tray (out of play), except for any Skills your Gearloc starts with. These have circled bullets on your Gearloc Reference Sheet ().
- Skills are learned through Training Pts. When you train/unlock a Skill, locate the numbered die in your Storage Tray that matches the Skill you’re training and place it on your mat in its correct slot.
- The side showing on Skill Dice in your Skills Area doesn’t matter (Counters are often the exception).
- Skills are usable only once per battle (unless otherwise noted). Rolling these dice, however, does not mean you must use them. You can choose not to use them if an undesired face is rolled (there are some exceptions, like Boomer’s Grenades). Exhaust each Skill Die after use.
- Once trained/unlocked, Skill Dice are usable throughout the Adventure.
- Applying Skill Dice that deal Dmg to Baddies is not considered attacking them.
- Each Skill Die side has an icon that can be matched to your Gearloc’s Reference Sheet to find out how this icon functions. It also shows where this die may be placed once it’s rolled (i.e. Active [A], Locked [L]).
- A Skill Training Attempt will always succeed.
Professions
- A profession is a related set of Skills unique to your Gearloc. Professions are listed in the top right corner of the Stat Area, and their corresponding Skills are linked by colored lines in the Skills Area.
- Starred (
 ) Skills (visible next to certain slots in your Skills Area) are always available for training.
 - Some Skills will have arrows pointing to them and do not have a . These Skills must be learned in order, starting with a Skill and following the arrows (if 2 arrows point to a Skill, only 1 is needed to unlock it).
- You do not need to unlock all the Skills in a Profession before starting another Profession.
Consumables
- Consumable Dice are special Skills that cannot be gained using Training Pts and are instead acquired through Loot or certain Backup Plans. *Some Gearlocs even start with certain Consumable Counter Dice on their mats.
- When you acquire a Consumable Die, take it from your Storage Tray and place it in your Skills Area (unless otherwise instructed).
- Once a Consumable is used, it is placed back in your Storage Tray and must be re-acquired to be used again. Consumables that act as Counters are the exception to this rule, and remain in your Skills Area throughout your Adventure.
- If a Consumable is to be exhausted or removed from an Active or Locked Slot, place it back in your Storage Tray.
5. Backup Plan (BP)
BP Skills
- Only 1 BP Skill may be used per turn.
- The cost of using a BP Skill varies from 1-6 as shown on Gearloc Mat and Reference Sheet.
- Remove # to use a BP Skill that costs #. from Atk and Def Dice are simply removed, but Skill Dice used in this way must be Exhausted.
Managing Bones
- Any rolled by your Gearloc during battle may be placed in your BP. This includes rolled outside of your turn (unless otherwise noted).
- Up to 5 total may be stored within the BP from turn to turn.
- Line up from left to right in the order they are earned.
- Use from left to right. Shift unused all the way left.
- will remain in your BP until used. They must be removed at the end of battle or if KO’d.
Multi-Bones Dice
- These take up multiple slots on the BP (skip slots to show this).
- If the BP Skill uses up only part of a Multi-Bones Die, the entire die is used and any unspent are lost.
Upgrading to Innate +1
- It takes the use of 6 to upgrade to a Gearloc’s Innate +1 (treat 6th as if it is slotted into your BP).
- Flip over Gearloc Chip (to stars side) for the rest of the Adventure to indicate this upgrade!
6. Active Slots
- Place rolled Def Dice and Active (A) Skill Dice effects here. Ally Active (AA) Skill Dice effects are also placed in this area (by other Party Members). Specific Active and Ally Active Skill Dice effects are explained on the Gearloc Reference Sheets.
- Active Dice remain here until used and must be removed at the end of battle or if Gearloc is KO’d.
- Skill Dice in these slots must be Exhausted when used (unless otherwise stated).
7. Locked Slots
- Place rolled Locked (L) Skill Dice effects here.
- Locked Dice remain here from battle to battle until used. These dice must be removed if Gearloc is KO’d (unless playing in Adventurer mode – see page 23 for details).
- Skill Dice in these slots must be Exhausted when used (unless otherwise stated).
NOTE: To free up space, a player may remove dice from Active or Locked slots at any time during their turn or at the End of Battle. Certain Skills may also cause you to remove dice from these slots. Skill dice are always Exhausted when removed, while Def Dice are simply returned to the supply.
8. Loot Area
- When a Gearloc gains Loot or Trove Loot, they can store it to the right of their Gearloc Mat.
- Each Gearloc can hold up to 4 Loot/Trove Loot (when out of spots, choose 4 spots worth of loot and discard remaining cards).
- Locked Trove Loot always only takes up 1 spot.
- Loot/Trove Loot is fully explained on page 21.
Baddies Overview
IMPORTANT: Now that you have a grasp on the intricacies of your Gearloc, we can introduce you to the opposition! Baddies (and eventually the Tyrant) are what you will be battling all the way to the end of your Adventure. For this next section, find a 1Pt, 5Pt, and 20Pt Baddie, and grab a Tyrant Chip while you are at it. Keep these close for reference and comparison. Also, find your Gearloc Adventuring Reference Guide (GARG) and flip it to the back where the Baddie Skills are listed. You are all set! Let’s dig in!
Baddies represent the opposition you will face during your Adventure. Each Baddie comes with its own chip and stats.
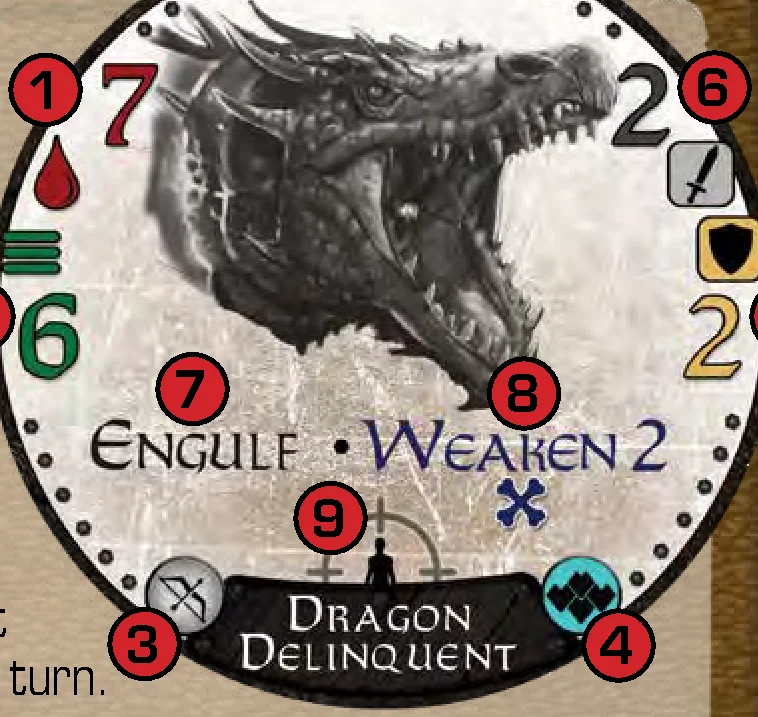
Baddie Chip Anatomy
- HP: This is the max # of Health Chips a Baddie can have. Place # HP beneath a Baddie when it enters the Battle Mat.
- Initiative (Ini): This determines the Baddies’ starting spot on the Ini Meter. A Baddie Ini Die is used to indicate this.
- Attack Form:
- Melee Baddies (
 ): Can only target adjacent (not diagonal) opposing units. If none exist, they cannot attack or roll skills requiring a target this turn.
 - Ranged Baddies (
 ): Can target any opposing unit, regardless of mat position.
- Melee Baddies (
- Creature Type:
- Trolls ()
- Orcs ()
- Scales ()
- Goblins ()
- Bogs ()
- Beasts ()
- Trolls (
- Defense: This is the # of Def Dice this Baddie rolls on its turn (minus any already active Def Dice). Rolled is applied to top of Baddie chip (making the die active). A Baddie does not need a target in range to roll its Def Dice.
- Attack: This represents the # of Atk Dice this Baddie rolls against its target on its turn. Total rolled is # Dmg dealt to target. If Baddie has multiple targets, these dice are rolled separately for each.
- Skills: These Skills (in black) are always in effect. Refer to the GARG for a list of Baddie Skills and how they work. If Baddie has multiple targets, targeting Skills will trigger against each.
- Baddie Backup Plan (BP) Skills: BP Skills (in blue with icon) trigger if a Baddie rolls at least the # of shown on the Baddie chip from all its Atk and Def Dice rolls combined this turn. Rolled do not carry over to the next turn. If a triggered BP Skill requires a target and the Baddie has multiple targets, party may choose. BP Skills can only be triggered once per turn and are listed on the GARG. BP Skills trigger after resolving rolled Def and Atk, even if the Skill text indicates different timing.
- Target(s): Melee Baddies always pursue the closest opposing unit (route with fewest positions). If there is a tie, it will then use its
 to determine which unit it targets and pursues. A Baddie’s target () is either the weakest (
 , lowest HP) or the strongest (
 , highest HP) opposing unit. Party chooses on ties of strength. Ranged Baddies only target their . Some Baddies will target multiple units (shown by # of figures within the icon) but will not attack the same target more than once per turn. Roll Atk Dice for each target separately.
 - Extra Baddies: A Baddie with
 or
or  adds one or two 5Pt Baddies to the top of the BQ immediately when it enters the Battle Mat.
 - Diagonal Movement: Only Baddies with
 can move diagonally.
Baddie Points (Pts)
There are 4 types of Baddies: Tyrants, 1Pt, 5Pt, and 20Pt Baddies. They are identified by their image or # Pts on the back of the Baddie chip.
Tyrants
Reaching and defeating the Tyrant is your main objective in Too Many Bones.
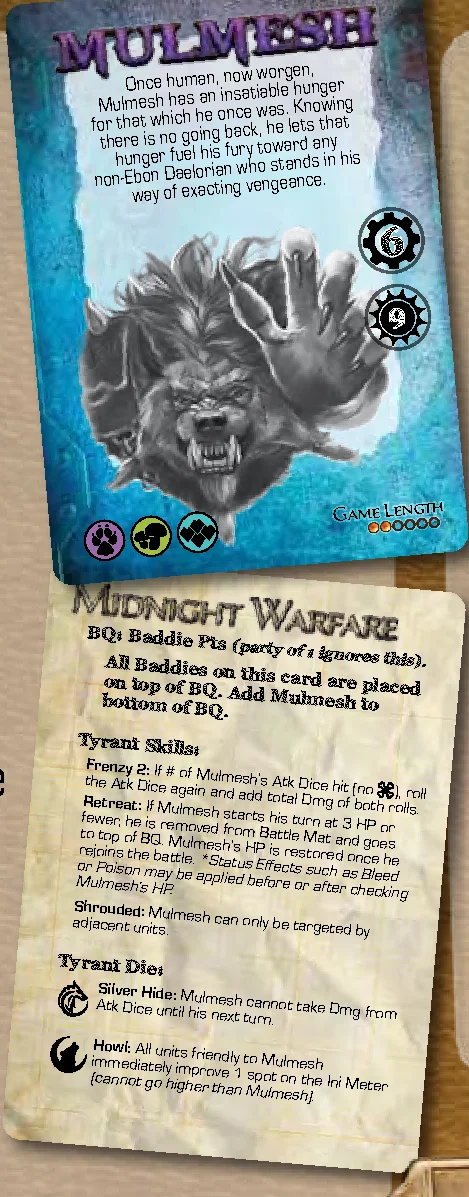
Tyrant Card
A Tyrant Card front gives information about that Tyrant and shows the Creature Types you are to use for this Adventure. It also lists the Progress Pts needed in order to challenge the Tyrant. While you are not required to challenge the Tyrant the day after earning the required , you must defeat the Tyrant before the maximum number of Days for the Adventure is exceeded in order to win.
The Tyrant Card acts as your Encounter Card for the day. The back of the Tyrant Card instructs you on how to set up the Battle Mat for the Tyrant battle and explains each Skill the Tyrant has, including its Tyrant Die. You only need to defeat the Tyrant Baddie to win this battle.
A failed Tyrant battle is handled the same as an unsuccessful Encounter battle and can be tried again if you have enough days for another try.
Tyrant Chip
Each Tyrant has a chip that is used as a Baddie chip in the final battle.
Tyrant Die
Each Tyrant with  on its chip has a unique Tyrant Die that is rolled once per Tyrant turn. Roll this along with its Atk and Def Dice.
Tyrant Encounters
Each Tyrant has Tyrant Encounter Cards specific to them. Tyrant Encounter Cards for the Tyrant you are pursuing are shuffled into your Encounter Deck before your Adventure begins.
The Battle Mat
The Battle Mat…a place of risky moves and ruthless combat. This is where all the action happens and a place you will want to get very familiar with!
IMPORTANT: Congratulations! You are now ready for the battle sections! With your new understanding of the Baddies and their stats, we can now introduce you to where these battles will be taking place! For these next sections, find your Battle Mat and stack a few Baddies next to it. Then, add the Round Counter Die to the Ini Meter area. Also have your Gearloc (chip and die) nearby, as these are used on the Battle Mat as well. While this section is being discussed, feel free to use your components to mimic what is being described.
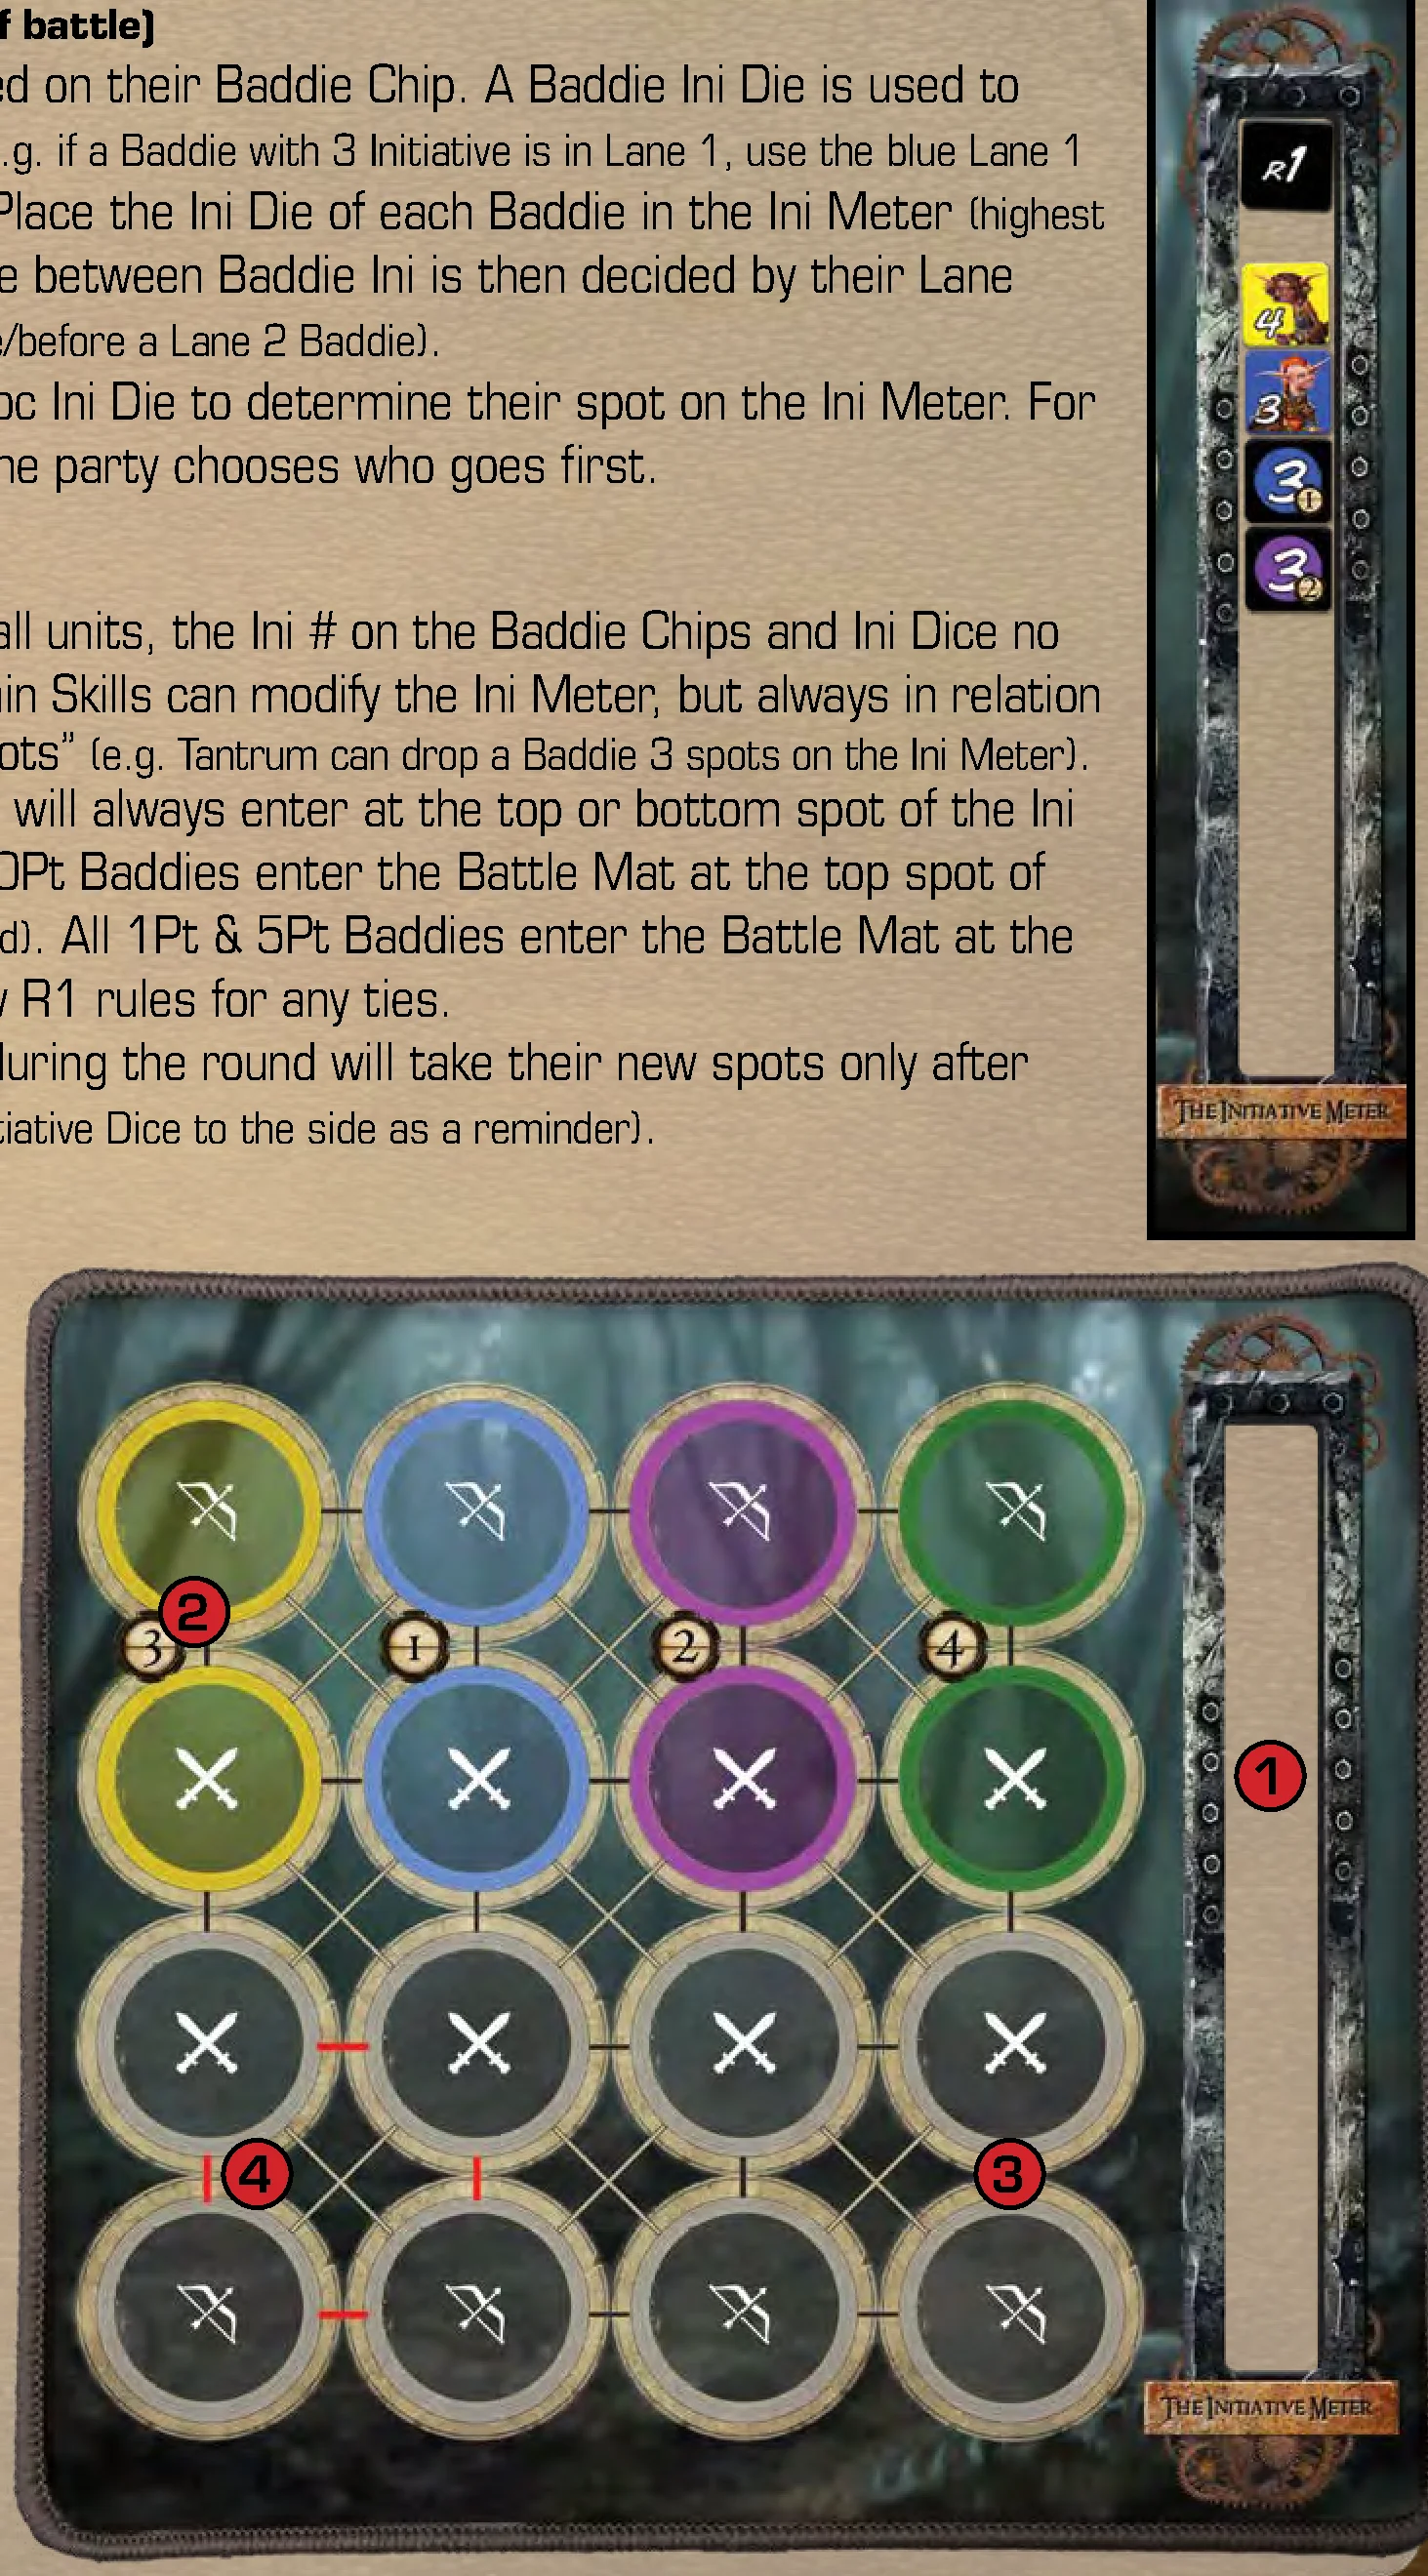
1. Initiative Meter (Ini Meter)
In battle, a single turn from each unit completes 1 full round. The Ini Meter tracks the current round and whose turn it is. It also gives you a visual forecast of who will be taking their turn next and in what order. Ini is built downward on the meter from highest (going first) to lowest (going last).
- The Round Counter Die goes on the top of the Ini Meter, starting with R1 (Round 1).
- Increase this die to R2, R3, etc. at the start of each new battle round.
- After R5, the
 (Fatigue) rounds occur until the battle is completed. At the start of each round, all units on the Battle Mat lose 1 HP (this is not counted as any specific type of Dmg and cannot be blocked or defended against in any way).
Ini Dice Placement (setting up for R1 of battle)
- Baddies have their Ini (
 ) indicated on their Baddie Chip. A Baddie Ini Die is used to represent this # on the Ini Meter (e.g. if a Baddie with 3 Initiative is in Lane 1, use the blue Lane 1 Ini Die, and set it to 3 on the Ini Meter). Place the Ini Die of each Baddie in the Ini Meter (highest on top, then in descending order). Any tie between Baddie Ini is then decided by their Lane priority (a Lane 1 Baddie would go above/before a Lane 2 Baddie).
 - Each player rolls their unique Gearloc Ini Die to determine their spot on the Ini Meter. For any Ini tie that involves a Gearloc, the party chooses who goes first.
Ini Dice During Battle (R2 and beyond)
- After initial Ini placement is set for all units, the Ini # on the Baddie Chips and Ini Dice no longer matters. During battle, certain Skills can modify the Ini Meter, but always in relation to other units’ current Ini Meter “spots” (e.g. Tantrum can drop a Baddie 3 spots on the Ini Meter).
- Units that enter the battle after R1 will always enter at the top or bottom spot of the Ini Meter. All Gearlocs, Tyrants, and 20Pt Baddies enter the Battle Mat at the top spot of the Ini Meter (again, Ini # is disregarded). All 1Pt & 5Pt Baddies enter the Battle Mat at the bottom spot of the Ini Meter. Follow R1 rules for any ties.
- Units with their Ini spots modified during the round will take their new spots only after End of Round (feel free to shift their Initiative Dice to the side as a reminder).
2. Baddie Starting Positions
Use the colored positions for Baddies. Melee Baddies start on  positions; Ranged Baddies start on
  positions. The first Baddie to enter the Battle Mat goes in Lane 1 (
 ). The second Baddie, Lane 2, etc. As Baddies move, they may change Lanes; therefore, place a Lane Marker Chip (matching its starting Lane color) under each Baddie when it enters battle.
3. Gearloc Starting Positions
Use the grey positions for Gearlocs. Melee Gearlocs start on  positions; Ranged Gearlocs start on
  positions; Melee-Ranged Gearlocs may start on either. Gearlocs may start on any lane and may even double up on a single lane.
4. Adjacent Movement
When moving, units can only move to orthogonally adjacent positions. Baddies with () can move diagonally. As a rule, units may not occupy the same position or pass through other units.
Battle Set-Up
Most of the Encounters in TMB will result in a battle () of some sort. Sometimes, the Baddies you face are specifically defined on your Encounter Card, but more often, the Encounter will include “BQ: Baddie Pts” as part of the battle set-up.
Battle Queue (BQ)
Every battle must start with the creation of a BQ that contains the Baddies you will be facing for the fight. To build the BQ, you must refer to your Encounter Card and then assemble a stack of Baddie chips using your Active Stacks. Except for scouted Baddies (which are face up), the BQ should always be assembled face down so the Baddies are unknown before the battle begins. Also, when creating the BQ, greater Pt Baddies should always be placed higher on the stack than lesser Pt Baddies. *If the BQ calls for a specific Baddie or type, search your Baddie Active Stacks first (shuffling them afterwards), then Defeated Stacks, then out of play Baddies.
Baddie Points (Baddie Pts)
“BQ: Baddie Pts” is a short way of saying you need to create your initial Battle Queue by calculating your Baddie Pts:
- Step 1: Calculate Current Day x Number of Gearlocs in Party (e.g. Day 4 x 3 Gearlocs would be 12 Baddie Pts).
- Step 2: Draw Baddies to equal Baddie Pts using highest Pt Baddies when possible (e.g. 12 Baddie Pts means two 5Pt Baddies and two 1Pt Baddies).
- Step 3: Stack ‘Em (e.g. two 1Pt and two 5Pt Baddies would be stacked top down: 5, 5, 1, 1).
Easy! Don’t forget to factor in any other Encounter requirements or Skill modifications that could affect this number. Sometimes this can affect your Baddie Pts total BEFORE you draw your Baddies (i.e. going from 18Pts to 20Pts has a HUGE effect on which Baddies will be fought). Other times, Baddies are added to your BQ AFTER it’s been created. All of this is determined and explained on your Encounter card, so read it carefully! Unless otherwise stated, Baddies added to the BQ are added in their appropriate position in the stack (i.e. an added 20Pt Baddie goes on top, an added 1Pt Baddie goes to the bottom).
Battle Set-Up Sequence
Now that you understand BQ basics, let’s go through the battle set-up from start to finish:
- Trigger “Before Battle” effects and Skills such as Tantrum’s Innate – Rage.
- Use Encounter Card instructions to build your BQ.
- Place top Baddie from BQ in its appropriate lane and Battle Mat position (also its HP, Lane Marker, and Ini Die). Continue placing Baddies until there are 4 on the mat or the BQ is empty. *See page 17 for more on Baddie placement and Ini.
- Roll party’s Ini Dice. Add them to Ini Meter.
- Place Party Members onto Battle Mat in appropriate positions (with existing HP).
- Make sure your Round Counter Die is set at R1.
- Trigger “Start of Battle” effects and Skills such as Picket’s Innate – Shield Wall.
You are ready to battle! Each unit will now take its turn, starting with the top Ini spot!
BQ In Battle
During battle, you may still have Baddies in your BQ (due to having more than 4 Baddies to start or from Skills like Signal, which calls more Baddies to the BQ). These Baddies will not join the battle until there are fewer than 4 Baddies on the Battle Mat. If that is the case, after End of Round, the Baddie(s) from the top of the BQ will join and assume the first available Lane Marker(s) and Ini Dice (see page 17, “Ini Dice During Battle”).
Place the Baddie in the lane that matches its Lane Marker and on the position matching its Attack Form. If that position is occupied, the Baddie will instead take the first available Baddie position that matches its Attack Form (starting with Lane 1 and working up). Then, it will try lanes of the other Attack Form (again, starting with lane 1).
Gearloc Turn
Gearloc Movement and Targeting
- Melee Gearlocs: May use # Dex to move # adjacent positions and target 1 adjacent Baddie each turn.
- Ranged Gearlocs: May use # Dex to move # adjacent positions and may target 1 Baddie anywhere on the Battle Mat each turn. No “line of sight” is needed.
- Melee-Ranged Gearlocs: May use # Dex to move # adjacent positions and target 1 adjacent Baddie each turn. Use the Gearloc Reference Sheets to learn how some of these hybrid Gearlocs may target non-adjacent Baddies on the Battle Mat.
*Some Gearloc Skills may allow for selecting non-target Baddies, Battle Mat positions, or even multiple Baddies!
Gearloc’s Turn Sequence
*Loot: Unless otherwise specified, use loot anytime during your turn (even before triggering Effects).
- Start of Turn: Be sure to trigger any Effect Dice on top of your Gearloc Chip.
- Move Gearloc: You may use # Dex to move # adjacent (not diagonal) available positions.
- Determine Target: Select a target for your Atk Dice, Skill dice, and/or BP as needed.
- Select and Roll Dice: Your remaining Dex represents how many dice you may roll. The dice you may choose from are determined by your current Atk Stat, Def Stat, and available Skill dice (e.g. If Atk Stat is 2, Def Stat is 1, and there are 3 available/rollable Skills, 6 dice can be chosen from to roll. If Dex is 3 and no movement was made this turn, only 3 of those 6 dice are available options). All selected dice must be rolled simultaneously.
- Resolve the Roll: *See next section.
- Baddies React: Sometimes Baddies have Skills that trigger after they are attacked.
- End of Turn
Resolving the Roll
Note: As a Gearloc, you do not need to use the result of any dice you roll unless the Profession or rolled icon rules state otherwise. For instance, if you roll Atk Dice successfully and then realize you are attacking a Dire Wolf with Lashback and don’t want to hit it yet, you do not need to use your result. Or, if you roll a Med Pack (Patches) Skill Die and the result is a 1 HP heal instead of 3 HP, you can choose not to heal and place that Skill Die back in its slot in your Skills Area (Dex is still counted for the roll).
After your dice are rolled, feel free to do any of the following, in no particular order:
- Resolve Target Dmg and Effects: Apply Dmg and any other Dmg results or effects from your Skills to your target.
- Resolve Non-Target Dmg and Effects: Some Skills may apply to non-target units. Others may be Instant Skills that do not apply to other units at all. Go ahead and use these Skills as desired.
- Allocate Active, Locked and Backup Plan Dice: Place any rolled you want to use into open Active slots. You may also place any applicable Skills into your Active (or a Gearloc’s Ally Active) & Locked slots. Also, you may place in Backup Plan slots as desired.
- Use your Backup Plan: You may use your BP only once per turn. Remove # to use BP Skill that costs #.
Baddie Turn
Baddie Skills
All Baddie Skills are unique and trigger at very specific times throughout the battle depending on the Skill. Be sure to review all Skills of Baddies as they enter the Battle Mat so you know when they apply. For Baddie Skills that require a target, that target must be within attack range in order to apply that Skill (i.e. Poison, Corrosive, etc).
Baddie Movement and Targeting
- Ranged Baddies: Do not move and can target any opposing unit on the Battle Mat.
- Melee Baddies: May move up to 2 adjacent available positions per turn. They will always target and move toward the closest opposing unit (route with fewest available positions). If there is a tie for “closest,” use its (discussed on page 15) to determine which unit it pursues. If still a tie, party chooses the target. A Baddie will always take the shortest possible route toward an available position adjacent to its target. If there are multiple possible shortest routes, party chooses which it will take. If there are no routes to any targets, the Baddie will not move. A Baddie does not move if it is already adjacent to an opposing unit.
Baddie’s Turn Sequence
- Start of Turn: Effects Trigger. Resolve applicable Effect Dice sitting on the Baddie Chip (i.e. Bleed, Poison, Disable, etc).
- Determine Target(s).
- Move: Move Baddie if and not adjacent to an opposing unit (see Movement and Targeting above).
- Skills: Any Skill for this Baddie that does not list a specific time it happens, should be resolved now, if possible.
- Roll Dice: Roll all of Baddie’s inactive Def Dice and also roll its Atk Dice (only if target is within attack range). *If Baddie can target multiple units (
 ) and they are in attack range, roll its Atk Dice for each.
 - Resolve the Roll: In order – place rolled on Baddie, apply total rolled to target, and resolve any triggered Skills. Tyrants will then resolve their Tyrant Die (If applicable).
- Gearlocs React: Don’t forget to trigger Gearloc Skills if they apply!
- End of Turn
KO’s and Wipes
Getting Knocked Out
Getting “KO’d” during battle is going to happen to you. It’s not unusual, especially if you get a nasty roll! Do not be discouraged by this! KO’s are an inevitable part of being a fearless Gearloc!
If you are KO’d (lose your last Health chip), your Gearloc chip and Ini Die come off the Battle Mat immediately and are placed in your Gearloc Prep Area. All slotted Active, Locked, and Backup Plan dice are removed (Skills are Exhausted) from your mat. Loot stays with you but is not usable while you are KO’d. *Certain Gearlocs have Skills that can Revive KO’d Gearlocs. These Skills are specifically defined on those Gearlocs’ Reference Sheets.
Full Party “Wipe”
If your entire party runs into bad luck and all Gearlocs are KO’d, the battle immediately ends, but the Adventure continues! Skip the Reward Phase and move directly to the Recovery Phase for that day. Unless you have loot that grants HP, each Gearloc will likely have to choose “Rest and Recover” as their individual choice option during this phase.
Reviving a Gearloc
Any Gearloc that has been KO’d may be Revived with a Skill. When a Gearloc is Revived, set its HP to # shown on Skill, and it re-joins the battle after the end of the current round. Remember, any time a Gearloc enters the Battle Mat after R1, it will assume a Starting Gearloc Position and be placed at the top spot of the Ini Meter.
Battle Results
Successful Battle
Remove all dice from each Gearloc’s Active Slots and BP. Dice in Locked Slots may remain. Place all Exhausted Skill dice back into their Skill Slots. Remove any remaining Buff HP from Prep Area. Place all Party Members with their remaining HP, back on their own Gearloc Prep Area and move to the Reward Phase. *Game Phases are discussed in detail on pages 8 and 9.
Unsuccessful Battle
Remove all dice from each Gearloc’s Active Slots, Locked Slots, and Backup Plan. Place all Exhausted Skill dice back into their Skill Slots. Remove any remaining Buff HP from Prep Area. Place KO’d Party Members on their Gearloc Prep Area (if not there already). Place any undefeated Baddies face down on the bottom of their appropriate Active Stack and move directly into the Recovery Phase.
Loot / Trove Loot
In order to have a chance at taking down a Tyrant, your party will need to find some Loot and, if lucky, some Trove Loot along the way. Here are a few details about both:
- There are two kinds of loot: Loot and Trove Loot.
- You are limited to 4 loot per Gearloc at any time (when exceeded, choose 4 to keep and discard the remaining).
- Turn a loot card with multiple uses to show it has been used (start with highest #).
- After fully using loot card, discard it.
- Unless stated otherwise, outside of battle, loot can be used or discarded at any time.
- During battle, if not specified otherwise, loot must be used on your turn.
- Trove Loot should remain “chest” side up until fully opened through successful Lockpicking Attempts (this counts as a loot).
- Heavy: Counts as 3 loot.
- Permanent: Do not discard when used.
- Backup Plan Extensions: Grant additional BP Skills that you may use for. Using this counts as using your BP for this turn.
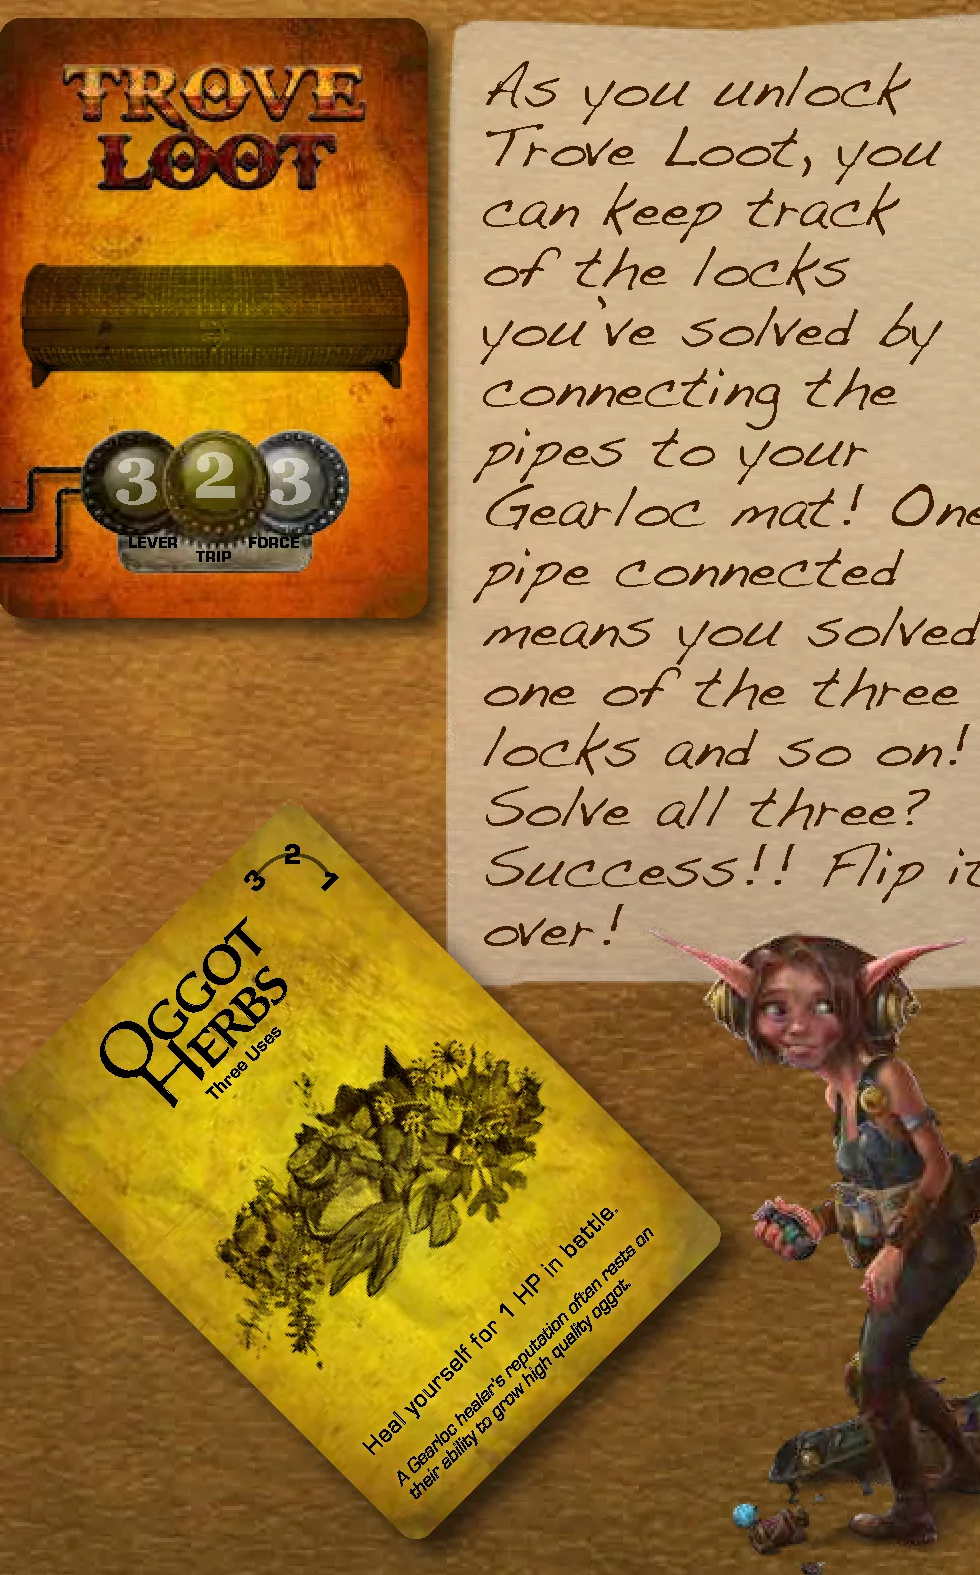
Lockpicking
The need for Lockpicking can come from a random Encounter or any Trove Loot you manage to get your hands on. There are 4 Lockpicking Dice used in this process consisting of 1 Intuition Die and 3 Action Dice. You can learn more about how these work on the GARG.
Each Gearloc will have an opportunity to make one Lockpicking Attempt per day on any discovered Trove Loot during the Recovery Phase. If you manage to solve only the 1st or 2nd lock during an attempt, those locks remain solved, giving you a head start on your next attempt. Also, your Lockpicking Attempt can be used on someone else’s Trove Loot instead of your own if you see that as more beneficial.
As you unlock Trove Loot, you can keep track of the locks you’ve solved by connecting the pipes to your Gearloc mat! One pipe connected means you solved one of the three locks and so on! Solve all three? Success!! Flip it over!
Difficulty Modes
Invading The Ebon is no easy task. In fact, some Gearlocs may struggle finding success even on Day 2 of their Adventure! Don’t be disheartened! TMB was designed to be quite challenging. When we suggest that first-time adventurers should ask the guards for help (on day 2), we mean it! We also understand that it can take some time to fully grasp the intricacies of TMB and each Gearloc. Therefore, we have developed 3 play modes to help you get your feet wet. We suggest that you start your Adventure in the first mode until you find yourself being challenged to a degree that is comfortable for you, and then adjust accordingly.
*TMB is a game that requires you to learn and adapt. Oftentimes this learning comes through brutal battles and party KO’s. If this is not your style of play or hampers your enjoyment of the game, hang out at the Adventurer level as long as you like, or feel free to modify it further! Bottom line, make sure you are enjoying the Adventure!
Adventurer
Use this mode when just starting out and learning the game.
- Add 2 to your Gearloc’s HP Stat before starting Day 1.
- Gain 1 Training Pt before starting Day 1.
- If KO’d during your Adventure, dice in your Locked Slots may remain.
Heroic Adventurer
Use this mode when you have a basic understanding of the game.
- Add 1 to your Gearloc’s HP Stat before starting Day 1.
- Gain 1 Training Pt before starting Day 1.
Legendary Adventurer
Use this mode when you are ready for a true challenge!
- The ultimate test of strategy and survivability.
- No Training Pts or HP boosts to start – Yikes!
- Too Many Bones, hardcore.
Miscellaneous Rules
Buff HP
Add # HP to a Gearloc’s Prep Area. When taking Dmg, remove from this Buff HP first, before removing HP from the unit. Def Dice take effect before removing Buff HP. Buff HP is not counted towards Baddie targeting choice (strongest/weakest) or removed with True Dmg. You can have multiple Buff HP active at a time.
D6 Die (orange marbled die with numbers)
Use this specific die for any situation requiring the use of a D6.
Damage Types
- Damage (Dmg): Amount of HP to remove from target. This can be mitigated by Def Dice, Thick Skin, Hardy, etc.
- True Dmg: Amount of HP to remove from target regardless of Def in play. Only in cases where skills directly affect True Dmg can this number be modified (e.g. Picket – Ale, Tantrum – Hardy).
Dangerous Darts (choice on some Encounters)
Each player and opponent starts with 10 HP. Using only Atk Dice, Def Dice, or Status Effect Dice (the Poison, Weaken, Stun Effect Dice), players must choose 3 dice but no more than 2 of any kind. You will roll the same dice each turn. Non-Gearloc opponents always choose 2 Atk Dice and 1 Status Effect Die.
Once dice are chosen, the game begins with your opponent rolling their 3 dice (Gearlocs always go second). Take turns rolling available dice. Apply rolled Def Dice to self. Deal Dmg and apply rolled Status Effect Dice to opponent (Poison, Weaken (player’s choice), Stun).
are used for the Dangerous Darts Backup Plan (must be used the same turn they are rolled – no storing up!). Only Gearlocs may use this!
- – Remove an applied die from self or opponent (Effect or Def).
 – Stun opponent until the start of your next turn.
 – Instant Knockout – You win!
Remove all your opponent’s HP to win!
Day Counter (chip and card)
At the start of each day, rotate this chip by 1. This happens regardless of whether your previous Encounter was successful or not. You must challenge and defeat the Tyrant before the Day Counter exceeds the Tyrant’s .
Effect Dice
There are two different Effect Dice covering many different Effects that can be found in TMB. These dice are used to help remember when a specific Effect is in use or applied to a unit on the Battle Mat. Place this die on the Baddie or Gearloc Chip to show the Effect is Active. There can be at most 1 of each Effect on any unit. If a second of the same effect would be applied, the new Effect replaces the current one. Some text may refer to “negative effects.” Those considered negative are: Poison, Weaken, Stun, Disable, and Terrify.
STOP & READ!!!
You are through the hardest part! It’s now time to learn the rest by jumping into a game of Too Many Bones! For this example, you get the pleasure of playing myself and Picket as we walk you through a real battle! Find our 2 Gearloc Mats and go through the Game Set-up on pages 6 and 7. We are off to take down Drellen, so use him as the Tyrant during set-up! This will be a live battle (meaning we want you to follow along in real time with your game mats as we go through it)! See you shortly!
Live Battle
Well, hello again! Do you have the play area set up and ready to go? Normally, before you choose a Gearloc, you would want to read over their Gearloc Reference Sheet to better understand how that Gearloc plays – we are all so different! For now, you’ll just have to trust me that I’m the best choice. Ha! But enough about me; let’s get started!
You may want to select someone in your party to serve as a “Party Leader” to help make those tough decisions that the group cannot decide on. In this example, I shall nominate myself as the most apt leader!
Hopefully you have chosen Drellen as your Tyrant (since that’s who we are headed to take down)! Let’s check to see if you have your Encounter Deck set up correctly! You should have Special Encounters 001-003, then a total of 8 shuffled Encounters, which should include Drellen’s Tyrant Encounter. Yes? Awesome!
On this Adventure, we will be facing Bog-Type (), Goblin-Type (), and Beast-Type () Baddies. We should have those Baddie Types shuffled and set as your Active Baddie Stacks, and the Day Counter set at 1. Since we are playing on Adventurer difficulty, we each get to place a Stat Die set to 2 in our HP slot. We also each get 1 Training Pt () to spend. I am going to increase my HP Stat again. You can never be too healthy! Boomer wants to train her Atk Stat. Since her current Atk Stat is 1, she rolls an Atk Die. She gets no , so her attempt is a success!
Day 1
Time to kick off this adventure. Picket draws the top Special Encounter: “Leaving Obendar.” After reading the card, the party chooses to “Shake down a shady peddler!” This is a peaceful encounter with no extra requirements for success. This means they can move right to the Reward Phase. Picket and Boomer each draw 2 cards from the Loot pile. Picket chooses the Infused Incense, and Boomer chooses the Stone Hammer, discarding the others.
Each Gearloc also gains a Training Pt. Picket chooses to train in Dex. Training in Dex always succeeds, so he places a Stat Die, set at 1, in his Dex slot. Boomer already starts the Adventure with the Element, Casing, Fuse, and Boom Counter Skills (see her Innate), but she has no specific grenades yet. She decides she wants the option to throw a grenade in her first battle if she can. Boomer trains in Frag Grenade and places the Frag Skill Die (#5) on her mat in the Frag Skill slot. The party also gains a Progress Pt. They place this card, with the point showing, under the Tyrant Card to track their progress. Only 5 more Progress Pts (within 9 days) are needed to reach Drellen!
Whew, Day 1 is almost done! Nice work! All we have left is the Recovery Phase! No need for Picket and I to trade loot, and there’s nothing to Lockpick; therefore, we are just down to our individual options. Since we are both at full HP and we like our loot, I think we will both opt to ‘Scout the area’!…(45 minutes pass)…Hah! I beat Picket back! With my roll of 3, I scouted a 1Pt Bog Frog, and Picket’s dud roll of a 1 uncovered a 1Pt Bog Pole. I like our chances with these two; no need to avoid them! Time to nap and then get outta here! Rotate that Day Counter to Day 2!
Day 2
After drawing and reading their second Special Encounter, “Hardly out of the Gate,” the party decides to go with the first choice: “Hail the guards for help.” This choice will result in a battle, and there are some beneficial conditions that go along with their choice.
Note: A battle’s difficulty greatly depends on the party size and Baddies you face! Certain days and Baddie combinations can result in a very tough battle! During battle, your Gearloc(s) may be Knocked Out (KO’d) from losing all HP. If there are no surviving Gearlocs at the end of battle (all Gearlocs KO’d), there will be no Progress or Rewards for that day, and the Encounter Card is discarded. You will begin the next day (increase Day Counter by 1) by drawing a new Encounter card. Don’t give up! Losing a battle (or failing a peaceful Encounter) is part of the Adventure!
Yes! We are headed into a battle! Every battle is shaped by your party size, total days you’ve been adventuring, and any modifications in your Encounter. Since their are no specific Battle Queue (BQ) rules on this card, we are going to need to build our BQ by calculating our Baddie Pts. Do you remember how to do that? Current Day x Number of Gearlocs in Party. Simple! For us it’s Day 2, it’s just Picket and I, and there are no other mods, so that’s 2 x 2 = 4. Yeah, I just did that in my head. I’m gifted.
Thanks for that, Boomer. *sigh* Now that we know our Baddie Pt total is 4, we need to set up our BQ! We must draw Baddies starting with the largest Pt stack possible. If our total was 6, we would draw a 5Pt Baddie and a 1Pt Baddie to total 6. With 4, however, we will be drawing 4 1Pt Baddies. Remember, the BQ is set up with the highest Pt Baddies on top, in descending order, to the lowest Pt Baddies on the bottom. For us, they are all equal so it will be the Bog Frog, then the Bog Pole, and then 2 Baddies we have yet to see.
Let’s see who else we are up against! Normally this part is random, but for this example, prepare your BQ with the following Baddies: Goblin Sandbagger on the bottom, then a Clay Golem, next the Bog Pole, and finish the BQ stack with that big ol’ Bog Frog on top! Before listening to anything else Picket has to say, see if you can place these Baddies on the Battle Mat correctly (including Health, Lane Markers, and Baddie Initiative Dice).
No really, STOP reading and try to set up your Battle Mat. Picket will still have something to say when you return…I promise.
Boomer, lighten up! I want to make sure they understand! Remember, up to 4 Baddies can battle at one time. The first Baddie from the top of the BQ will take a Lane 1 Baddie Melee or Range position depending on its Attack Form. The second Baddie will go in Lane 2 and so on. When placing these Baddies on the Battle Mat, first place their HP stack, then the Lane Marker that corresponds to the Lane they are in, and then the Baddie chip itself. Also, set the Baddie’s Initiative using the Baddie Initiative Die that matches the Lane it’s in.
Ok, ok! Since you’re STILL TALKING, I’ll add this: If there are more than 4 Baddies in the fight, the rest of the Baddies remain face down in the BQ and off to the side of the Battle Mat. If one of the 4 current Baddies is defeated, the next Baddie in the BQ will come out once the current round ends. Remember, when bringing this Baddie into battle, use the first available Lane Marker and Baddie Ini Die. Now, Picket! No more talking! And you with your hands on this rulebook! Try setting up the Battle Mat and let’s see how you did on the next page.
Battling 4+ Baddies Reminder
During battle, if a Baddie cannot enter the Battle Mat because its position is occupied, it will instead take the first available Baddie position (starting with Lane 1-4) that matches its Attack Form. Then, it will try the opposite Attack Form.
Baddie Initiative Reminder
During battle set-up, for each Baddie that enters the Battle Mat, set the corresponding Baddie Ini Die to reflect the Baddie’s Initiative , and place it on the Ini Meter. Initiative tie-breakers with Baddies and Gearlocs are decided by the party. If a unit joins the fight after Round 1, it will ignore this starting Ini number and instead be placed at the top or bottom spot of the Ini Meter. 1Pt and 5Pt Baddies start at the bottom spot, 20Pt and Tyrant Baddies start at the top spot.
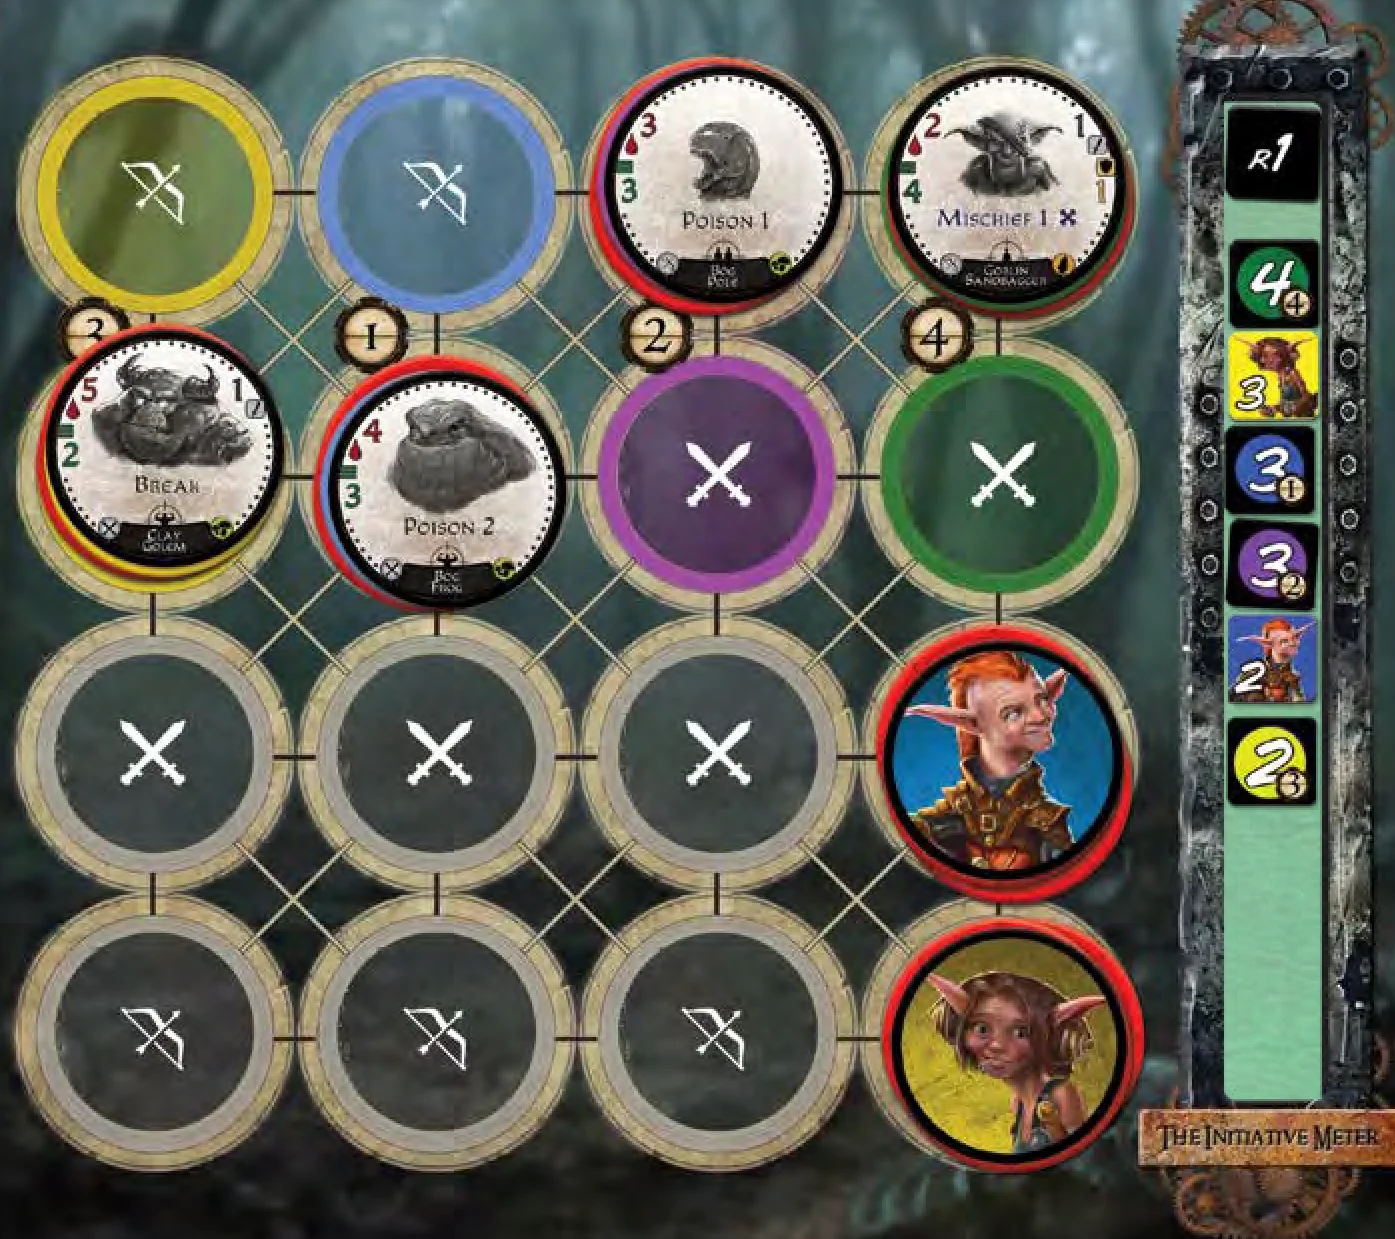
How did you do? Adjust if you need to! Next, it’s time for Picket and I to join! As you can see from the image, Picket has chosen Lane 4. I am going to play it safe and set up right behind him! We had some unlucky Initiative rolls…I blame our Party Leader. Go ahead and set our chips and Initiative Dice to match the image!
Gearloc Placement and Initiative Reminder
Gearlocs are always placed onto the Battle Mat after the Baddies. All Gearlocs roll their Initiative Dice and place them into the Ini Meter, along with the Baddies, in descending order. Then, each Gearloc is placed, along with their current HP stack, onto a Gearloc position that matches its Attack Form.
Great job! One more thing before we get this battle started! Picket has an Innate Skill that allows him to open with Shield Wall before battle begins! Let’s see how he does!
Picket rolls his 2 Dice and lands only 1 and a ; he locks the Def in one of his Active Slots. Shield Wall does not allow the to be used, so it is placed back into the dice pool.
Rotten oggots! I usually roll better than that. Ah well, we have help because as Round 1 begins, our Encounter choice condition kicks in! Each Baddie is dealt 1 True Dmg from the Obendar wall guards. Go ahead and remove 1 HP from each Baddie. Now the battle can begin. It looks like the Goblin Sandbagger is first!
This Baddie has Ranged Attack Form, so it does not move and it targets Boomer. The Goblin Sandbagger rolls 1 Die and 1 Die. The Atk Die rolls a and the Def Die rolls a 1 . The triggers Mischief 1 (defined on the Gearloc Adventuring Reference Guide) which forces Boomer to remove a die from her Active slot. She does not have one, so this does nothing. Also, since the goblin did not roll any Dmg, it does not hurt Boomer. Place the 1 it rolled on the goblin Baddie chip. The goblin’s turn is now over.
Baddie Movement and Targeting Reminder
Melee Baddies may move up to 2 adjacent positions per turn. They will always move toward and attack the closest (route with fewest positions) opposing unit. If there is a tie for “closest”, use its to determine which it pursues. If a Melee Baddie is already adjacent to an opposing unit, it will not move. Ranged Baddies do not move and can target any opposing unit on the Battle Mat, using its to decide which unit(s) to target.
It’s my turn next! Yee-hoo! I’m not going to move, which allows me to use all 3 Dex for dice rolling! It looks like I have 7 dice options to choose from: an Element, Casing, Fuse, 2 Dice, and 2 Dice. In order to use my Frag, I need to get my Boom Counter to 1 by finding 1 of each Component! I think I’ll target the Bog Pole and will roll 1 Die, 1 Die, and my Element Die. Here we go!
Boomer rolls 2 Elements, 1 , and 1 (with her Def Die). She chooses to apply the Dmg from the Atk Die to the Bog Pole. With the , Boomer also decides to use her Backup Plan: Throw Odds, which allows her to do an additional 1 Dmg to her target. This means the Bog Pole is defeated. Remove Bog Pole, along with its Lane Marker and Baddie Ini Die, from the Battle Mat and place it in the Defeated Baddies area. Finally, Boomer places her 2 Elements result in one of her Locked slots. She now has 1 of the 3 needed Components toward making a grenade.
Picket! Did you see that? I KNOW you saw that! Nailed that pole right in the kisser with the bolt I was going to use for Frag shrapnel! If you were half as accurate with your sword…hehe…I’ll stop there because we are in the middle of a battle! FOCUS! One Baddie down! But no celebrating yet, that Bog Frog is next!
The Bog Frog moves 2 positions towards its closest target (Picket is 3 positions away, and Boomer is 4). Go ahead and move it to either position adjacent to Picket. The Bog Frog does not have any dice to roll, but it does have a Skill that triggers each turn. In this case, place a Poison Effect Die, set at 2, on Picket’s chip.
Next up is Picket (it would have been the Bog Pole, but it was defeated before it could have a turn). At the start of Picket’s turn, he immediately takes 2 True Dmg (ignoring his Def) from Poison (remove 2 HP from Picket) and decreases the Poison Effect Die to 1. Since Picket still has a Die in his Active slot, it is not available to roll. Picket chooses to use his Loot: Infused Incense. This adds 2 additional Atk Dice to his roll for no Dex cost. He chooses the Bog Frog as his target since it is already adjacent to him and rolls 3 Dice and 1 Die.
Picket’s roll results in a total of 2 , 1 , and 1 . He places the in his Backup Plan, places the Def Die in his Active slot, and applies 2 Dmg to the Bog Frog (remove 2 HP from it).
Don’t fret, Boomer, I’ve got this! This battle is practically over already! That frog will soon take another guard arrow so it will be decimated before its next turn. I, of course, am still very healthy, and my awareness of this battle and its remaining dangers is unmatched! Just one more Baddie this round and it’s only a…ugh…ouch…a Clay Golem…as I suspected!
The Clay Golem pursues the closest opposing unit. When moving the Clay Golem, there are possibly 2 positions you could move it to (depending on how you moved the Bog Frog). Move the Clay Golem toward Picket.
Note: With the round over, if there was a Baddie still in the BQ, it would enter the Battle Mat at this time using the Lane 2 Marker and Ini Die.
Increase the Round Counter to R2, and remove 1 HP from all Baddies (for the Encounter condition).
OK! With the first round under your belt, it’s time for you to play out the rest of the rounds in this battle! See how well you can navigate the remaining Baddie and Gearloc turns. Better read up on what the Clay Golem’s Skill “Break” does. It can be nasty! Thankfully, both yours truly and Picket will take our turns first! Good luck!
Getting Technical – FAQ
This game has a lot of details! Sometimes saying things in just a little different way makes all of the difference. We’ve searched the forums and our direct e-mails for some of the more common questions (and answers) people have submitted. Some of the answers come directly from other TMB owners who did an excellent job of clarifying things in a way that seemed to resonate with people (thanks everyone).
- Atk and Def Dice in Backup Plan: Do Atk and Def Dice in my Backup Plan count against my Attack and Defense Stat? (asked by Tony B)
No, Atk and Def Dice in your Backup Plan do NOT count against your Atk and Def Stat. - Backup Plan Extensions: How does a Backup Plan Extension work (found on certain Trove Loot)? (asked by Sara J)
A Backup Plan Extension is an item that gives you more Backup Plan options. Just like your Gearloc’s current Backup Plan Skills, there is a cost involved when using this new Backup Plan Extension. That cost is listed on the card. - Baddie Movement/Targeting: What happens if a Melee Baddie targets a Gearloc that is completely surrounded? (asked by Justin S)
This should never happen. Melee Baddies will not target an opposing unit it doesn’t have a route to. Meaning, if the closest opposing unit does not have an open adjacent position, then the Baddie will target the closest opposing unit that does have an open adjacent position. - Poison: How does Poison work if I’m hit with it multiple times? (answered by Soka S)
Poison is not cumulative. Rather, the counter will always be set to the more recent Poison Effect value being applied. For example: If you have a Poison 2 Effect Die on you, and a Baddie with Poison 1 targets you with that Skill, your Poison Effect Die should be set to 1. The same is true in reverse – Poison 1 can be bumped to Poison 2 if that’s what came second. As a general rule, a unit can have only 1 of each Effect on it at a time. - Search for Loot: Can a partially “used” Loot (one with multiple charges) be chosen to Search for better loot? (asked by Jamie S)
Yes, as long as the Loot or Trove Loot takes up a spot in your Loot Area, it can be used to “Search for Better Loot.” - Skill Timing: What is the timing of different Skills that happen at the beginning of a Baddies turn? Example: A Baddie has one HP left. It has Recover (#1) and is Poisoned (#1). (answered by Shannon M)
Anything that happens at the same time (i.e. beginning of the turn effects) happen in the order of the player’s choosing. So you can choose for the poison to hit before the recover does!
We (CTG) will add that the “player’s choice” ruling in such situations is very intentional and meant to be part of the strategy for taking down your opposition. Mulmesh is a great example of a Tyrant where this rule can greatly effect the battle’s outcome depending on what Effects are in play at just the right time. - Targeting: Can I choose a target to roll my Atk Dice and a different target for my Skill Die and a different target for my damaging Backup Plan? (answered by Tyler R)
No, if a Skill, Backup Plan, or Attack has the word “Target” in the description, then it must be used on the same target. You only get one target per turn, which is declared before you choose which dice are rolled. That being said, if a Skill or Backup Plan does not use the term target (such as Boomer’s Frag Skill), then that Skill / Backup Plan does not need to be used on the same Baddie as your target. - Atk and Def Dice Pool: What is a dice pool? What if all Def Dice are in use?
Your party shares the same general Atk and Def Dice (white) that are used by the Baddies. Once in a great while, the Def Dice pool may run out (from dice on Baddies, Gearlocs, or in Backup Plans). If a party member runs out of Def Dice to roll, others should exchange Def Dice in their Backup Plans for Atk Dice to accommodate. - Attacking: What does it mean to “Attack” (for Baddies and Gearlocs).
Attacking is the act of rolling Atk Dice (white) on a target. Rolling Skills is not considered an “Attack” even if Skills do Dmg. - Baddie Active Stacks: I had to search for a Baddie in my Active Stacks, what happens now?
Some Encounters require you to face a specific Baddie or type, once found, shuffle your Active Stacks (except for any scouted Baddies) and place your scouted Baddies back on top of the stacks. - Break and Corrosive: How do they work exactly? Is it different for an individual or group?
The Skill “Break” forces you to Exhaust an Atk die that removes HP from this unit. The act of Exhausting this die reduces your Atk Stat by 1 for this battle. The actual Atk die that is Exhausted is there to remind you of this. Corrosive triggers when this Baddie attacks. At that point, all Def Dice that remain (after applying Dmg) in a target’s Active slots must be Exhausted. - Encounter Deck is Visible: I can see the color and title of our next Encounter, is that ok?
Yes. Most Encounters will still be a surprise. If you want total surprise, you can cover the deck. - What happens if a Baddie is removed from the Battle Mat for any reason?
Baddies can be removed from a battle and put back in the BQ for various reasons (Ghillie’s “Lure Away” for example). When this happens, any effects are removed from Baddie, Baddie health is recovered, Initiative die is removed and reset according to Initiative Dice During Battle Rules (page 17) and Baddie is placed back on the Battle Mat under normal Baddie BQ – In Battle rules (page 18). - KO’d Gearlocs: When I am KO’d, can I do anything at all?
When KO’d, you’ve been knocked out and cannot contribute to the battle any longer unless you are Revived (a unique Gearloc Skill your party may or may not have access to). Usually, when a player is KO’d, they become the person that rolls for and moves the Baddies. This helps move the battle along. Or, it’s time to get yourself some popcorn. - Will a Melee Baddie with multiple targets position itself so it is adjacent to as many opposing units as possible?
No. It will follow normal movement rules for Melee Baddies. If it is adjacent to multiple opposing units after moving, it will target both, but will not take this into consideration when moving. - Multi-target Target Selection: If a Baddie has multiple targets (
 ) or (
 ), who will it target first?
This Baddie will target the weakest, then the next weakest. On ties, party can choose. - Rolling Atk Dice: As a melee unit, can I roll Atk Dice (for a chance to roll Bones) even if I’m not adjacent to a Baddie?
No. Gearlocs, like Baddies, must have a target within attack range in order to attack (roll their attack dice). - Untargetable Units: Can Untargetable units still be damaged?
Yes. Untargetable units cannot be targeted but they can still take damage in other ways.
Further FAQs can be found on our website here: toomanybones.com/rules
BoardGameGeek is also a great place to ask your rules questions!
Epilogue
Significant progress toward better things can rarely be achieved without creating new evils that require new remedies. So the cycle of progress goes. New ideas, blind to the past, fuel a perpetual evolution until what remains is only a faded remnant of what was.
Daelore knows this pattern well. Its lands and its history have been wounded by the technological pursuits of its inhabitants. Is repair possible? That answer is not yet written. Maybe it will be soon.
What be you, adventurer? An /evil, or a /remedy?
Credits
- A Game By: Adam Carlson, Josh Carlson
- Artist: Anthony LeTourneau
- Writer: James Boutilier
- Graphic Design: Josh Carlson
- Dice Art: T. Eshelman, Project Khopesh, and Lorc
- Publisher: Chip Theory Games
Liberation Logbook Download: goo.gl/cW5Oq6
Password: wearegearlocs
Think we could explain something better in our rules? We are open to suggestions! toomanybones.com/rules
ChipTheoryGames.com
Introduction & Overview
A Note From Josh & Adam
Too Many Bones (TMB) has been a humbling endeavor for us both. Never before have we experienced this level of support and encouragement throughout the game-making process. Our backer community support has been second to none and has fueled us to make this game stand out in every way possible. Everyone involved has given more effort than we were ever expecting. We want to personally thank our artist, Anthony LeTourneau; our writer, James Boutilier; our jack of all trades and social media man, Josh Wielgus; and an orc horde of others who donated their time and talents to proof and playtest this unique take on dice strategy. We hope the amount of care and attention to detail invested into this game is apparent. It remains our goal to steadily improve the quality standard for board gaming. We think this game sets the bar high. Enjoy!
Disembarkment Notice
In Too Many Bones, you are playing as an unusual race of adventurers headed into a land overrun by all sorts of hostile creatures. Your race has lived hidden in the Deepwood for centuries, and only recently, your kin have been forced to emerge to the south and take shelter within the walls of Obendar.
Due to your reclusive lifestyle, many in town are encountering your race for the very first time. Some locals believe you to be an elf, due to your distinct facial features; others would say a goblin, from your size and build. Others still would insist your high technological aptitude proves you a gnome! Only those most intimate with the Deepwood know your true kind and kin as Gearlocs – big-eared, thin-bodied creatures with conflicting loves of nature and machine and an insatiable thirst for adventure!
The elder Gearlocs know all too well that this growing danger to the north is the work of The Ebon, a melting pot of lawless creatures ruled by tyrants who hold a firm grasp on all the northern regions of Daelore. Because each of these regions has little to no communication with the next, the elders believe that a smaller party will be most effective at infiltrating and eliminating the threat. They have selected your party of adventurers and tasked them with venturing northward to silence the Ebon one tyrant at a time.
This was never to be your task alone! Others were sequestered! But the Obendar militia is thin in ranks, and any sellswords worth hiring have already been swayed by the promise of plundering rights if they aid the enemy. But no matter! For you are Gearlocs, and being the resourceful and fearless race that you are, your party has happily accepted this challenge! You will be among the first to travel north in many decades, and your adventure begins today!
You may notice YouTube icons in various places throughout this rulebook. Wherever this icon appears, it means we have created a video explaining that subject. To view it, visit our YouTube channel at youtube.com/chiptheorygames and search that word or phrase. Happy viewing!
We consider this rulebook a living document and may continue to add and update as necessary with new expansions and content. Latest versions will be posted at toomanybones.com/rules
Units Explained
In TMB, a unit refers to any playable chip in the game (does not include Lane Markers, Day Counter, or Health Chips). All units fall under two categories: Party and Baddies. These two categories, in relation to one another, are referred to as Opposing Units.
- Baddies: Included in the Baddies category are all 1Pt, 5Pt, and 20Pt Baddies, as well as all Tyrants.
- Party: The Party falls under two categories: Gearlocs and Allies.
- The Gearlocs category contains all Gearlocs: yours and all of the other players’.
- The Allies category also includes all other Gearlocs, as well as Temporary Allies and Companions.
In the example above, if you are playing as Boomer, she would be Your Gearloc. All text referring to Your Gearloc or Gearlocs would be referring to her. Tink (available as an add-on character) would be another member of your Party, as well as a Gearloc. The Golden Golem would be an Ally, but only when the card “Between a Rock and a Hard Place” allows you to take control of it. Tink’s Bots would be both Companions and Allies.
Box Contents
- 1 Battle Mat
- 4 Gearloc Mats (Boomer, Patches, Picket, Tantrum)
- 4 Gearloc Chips
- 4 Lane Markers
- 65 Health Chips
- 1 Day Counter
- 28 1Pt Baddies
- 20 5Pt Baddies
- 7 20Pt Baddies
- 6 Special Encounters
- 30 General Encounters
- 12 Solo Encounters
- 12 Tyrant Encounters
- 1 Cover Card
- 1 Day Counter Card
- 40 Loot Cards
- 20 Trove Loot Cards
- 7 Tyrants (Cards, Chips, Dice)
- 8 Effect Dice
- 12 Atk Dice
- 18 Def Dice
- 16 Stat Dice
- 4 Gearloc Initiative Dice
- 4 Baddie Initiative Dice
- 64 Gearloc Skill Dice
- 4 Lockpicking Dice
- 1 Round Counter Die
- 1 D6 Die
- 1 Marker
- 4 Dice Storage Trays
- 5 Reference Sheets
Setup & Objective
Game Objective
Your task is easy…according to the Gearloc Council. Reach and defeat the selected Tyrant within its day allotment to win.
Game Set-Up
Let’s start by setting up for your Adventure. Place the Battle Mat in the center of your play area.
Tyrant and Day Counter
- Select a Tyrant or draw one at random (you may look at both sides and familiarize yourself with its Skills and Tyrant Die effects). Games can range from 1-4 hours depending on how many days are provided to reach the Tyrant and the number of Gearlocs in the party.
- Place the Tyrant’s Card, Chip, and Die to the left of the Battle Mat.
- Place the Day Counter Card and Chip (set to 1) directly below your Tyrant Card.
Encounters
- Find any Tyrant Encounters associated with chosen Tyrant (1-3 blue cards, labeled with the Tyrant name at the bottom of the card) and set those aside. Place other Tyrant Cards in the game box.
- Shuffle the General Encounter Deck (green and labeled “General” at the bottom), or Solo Encounter Deck (green and labeled “Solo” at the bottom) if playing with only one Gearloc. Draw Encounter Cards equal to the # of Days () shown on your Tyrant Card minus 3 cards. Shuffle these together with the Tyrant Encounter Card(s) you set aside to form an Encounter Deck, and place to the left (story side up) of the Battle Mat as shown.
- Place unused General and Solo Encounter Cards in the game box. In the rare instance you run out of Encounters, you may replenish your Encounter Deck from the game box.
- Finally, find Special Encounters 001-003 (labeled , , and ) and place them, in order, on top of your newly created Encounter Deck. Place other Special Encounters in the game box (keep these accessible, as you may need them later on). Add Cover Card on top of Encounter Deck if you’d like to make Encounters even more of a surprise.
Loot & Trove Loot
Shuffle all Loot and Trove Loot cards separately and place both decks (chest side up) to the right of the Battle Mat. Take the 4 Lockpicking Dice and place them nearby.
Baddies
Using the Baddie Type icons, Troll (), Orc (), Scales (), Goblin (), Bog () and Beast () shown on your Tyrant Card, find all Baddies of these types. Flip them face down, shuffle, and create separate 1Pt, 5Pt, and 20Pt Baddie “Active Stacks.” Place these stacks above the Battle Mat. Place other Baddie Chips in your game box (on occasion, you may need to access these Baddies for a specific Encounter). If you ever run out of Baddies in an Active Stack, reshuffle defeated #Pt Baddies to replenish that Active Stack.
Gearlocs
- Each player chooses a Gearloc and places their selected Gearloc Mat, Gearloc Chip (with # of Starting Health Chips underneath it), Initiative (Ini) Die, and Stat Dice as shown. Adjust mat placement to your liking based on party size. Place Gearloc Reference Sheet nearby.
- Find your Gearloc’s 16 Skill Dice and place them in a Storage Tray near your Gearloc Mat (feel free to use tray covers for storing Atk and Def Dice near each Gearloc as well).
- Using your Gearloc Reference Sheet (front right column), look for any Skills with a circle () next to their name. Your Gearloc starts the game with these Skills (find the Skill names on your Gearloc Mat and then place the Skill Dice with corresponding numbers into those slots on your mat).
- Collectively choose a Party Leader, who is responsible for making tie-breaking decisions.
Other Components
- Below the Battle Mat, make pools of Atk Dice, Def Dice, and Effect Dice. Set the D6 in this area as well.
- Place the 4 Lane Marker Chips above the Battle Mat as shown. Do the same for the 4 Baddie Ini Dice and Health Chip stacks as shown.
- Lastly, place the Round Counter Die at the top of the Initiative (Ini) Meter on the Battle Mat, set to R1.
- Make sure the Gearloc Adventuring Reference Guide (GARG) is close by.
- You are ready for your Adventure!
Daily Adventure Structure
Gameplay Overview
While the main objective of Too Many Bones (TMB) is to take down the selected Tyrant, you must first earn enough Progress Points (Pts) to do so. It’s also imperative that you strengthen your Gearlocs, honing their Stats and Skills with Training Points (Pts) in preparation for that final battle.
Both Progress Pts and Training Pts can be earned through daily Encounters. These situations will provide your party with choices that can result in peaceful outcomes or battles. Let’s start by discussing how and when all of this happens.
Game Phases
Each day of your Adventure will take you through 4 game phases. Once completed, a new day begins and you will repeat these phases.
- New Day Phase: Rotate Day Counter 1 day (skip this for Day 1).
- Encounter Phase:
- Draw an Encounter and read it to the party; if your Party has earned enough Progress Pts, you may instead challenge Tyrant.
- Pick a choice (if applicable) and attempt to successfully complete it.
- If successful, go to the Reward Phase.
- If unsuccessful, skip the Reward Phase and go directly to the Recovery Phase.
- Reward Phase:
- Gain all rewards specific to your Choice. Also gain any general Encounter rewards.
- If rewards include Loot or Trove Loot, draw them now.
- If rewards include Training Pt(s), use them now.
- If rewards include Progress Pt(s), place card (with Progress Pts showing) under Tyrant Card.
- Recovery Phase:
- Trade Loot and Trove Loot within your Party. Any loot! Any amount! To anyone…or leave it behind (discard whatever you like)!
- Make a Lockpicking Attempt. This can be on your Trove Loot or someone else’s.
- Individual Options (each Gearloc may choose 1):
- Rest and Recover: Heal to full HP.
- Search for Better Loot: Discard 1 Loot or Trove Loot. Roll 6 Atk Dice. For each you roll, reveal a Loot card – you may keep 1. If no is rolled, discard still happens.
- Scout the Area: Roll a D6. On 1-3: Reveal a 1Pt Baddie; 4-5: Reveal up to a 5Pt Baddie; 6: Reveal up to a 20Pt Baddie. Reveal the first face down chip on the stack. Once revealed, you may leave that Baddie face up in the same position in the stack, or cycle it to the bottom of the stack (returning it face down). *There is no limit to the # of Baddies you can reveal per stack.
This completes your day! Start over at: New Day Phase.
Encounters
Encounters are daily situations your party must overcome as it makes its way toward the Tyrant. Each day, your party will start by drawing an Encounter Card and reading it aloud. The front of the card presents a situation your party “encounters.” The back lists your choices and the effects those choices will have on the Encounter (you may read the entire card and discuss before deciding).
Your party must choose one of the options offered. These choices will result in a peaceful outcome () or a battle (). Either way, you must successfully complete the Encounter to earn its rewards (usually Progress Pts, Loot, and/or Training Pts).
A peaceful Encounter choice is automatically successful unless otherwise noted. A battle Encounter choice is successful if at least one Gearloc remains on the Battle Mat after all Baddies are defeated. Once an Encounter is successful, the party moves into the Reward Phase.
If an Encounter is unsuccessful (peaceful or battle), your party does not gain any rewards. Discard the Encounter and move into the Recovery Phase.
Encounter Types
There are 3 types of Encounters in TMB:
- Special Encounters: Added to the Encounter Deck only when instructed in set-up or by another Encounter.
- Tyrant Encounters: Added to the Encounter Deck based on which Tyrant you are facing (explained on page 7).
- Regular Encounters: Come in 2 sets: General and Solo Encounters (indicated on the front at the bottom of each card). Use Solo when adventuring with 1 Gearloc only. Use General for 2 or more Gearlocs.
Encounter Card Icons
- Battle: This Choice will result in a battle. *Must succeed to gain rewards and Progress.
- Peaceful: This Choice does not result in battle. *May still have requirements for success.
- Progress Points: Gain # Progress Points for completing this Encounter.
- Loot (Individual): Each Gearloc draws 1 Loot.
- Loot (Party): Draw # Loot. *Party decides how to distribute.
- Training Point: Each Gearloc gains 1 Training Point.
- Trove Loot (Individual): Each Gearloc draws 1 Trove Loot.
- Trove Loot (Party): Draw # Trove Loot. *Party decides how to distribute.
Encounter Text Colors
- Yellow / Gold: Choice Text
- White: Choice Result Text
- Grey italic: Flavor Text
- Yellow / Blue highlights: Special Instructions
Rewards & Progress Points
Upon successfully completing an Encounter, check the card in 3 places for any rewards your party has earned. First, check to the right of your Choice Text for any rewards specific to your Choice. Next, look in the bottom left (Progress Pts) and right (Training Pts, Loot, and Trove Loot) corners for any general Encounter rewards. Collect these rewards now. Then, move to your Recovery Phase.
Progress Pts represent the party’s advancement toward the Tyrant. Stack all successfully completed Encounters, with their showing, in a neat row to easily reference how many Pts your party currently has. Once you earn enough Progress Pts to equal or exceed the shown on your Tyrant, you may choose to face the Tyrant instead of drawing an Encounter during your next Encounter Phase.
Recovery
During your Recovery Phase, you may trade (give and/or receive) Loot and Trove Loot, make a Lockpicking Attempt (Lockpicking described on page 21 and on the Gearloc Adventuring Reference Guide (GARG)), and choose one individual option (described on page 8).
Once your Recovery Phase is complete, your day ends, and you start over at the New Day Phase.
IMPORTANT: Before we get into these Phases further, it’s imperative that you have a solid understanding of your Gearloc and how your Gearloc Mat interacts with everything else. Please select a Gearloc Mat and place it in front of you for easy reference during this next section. Also, find your corresponding Gearloc Reference Sheet and keep it close, as we will be referencing it as well.
Gearlocs: Stats, Skills & Mat Anatomy
Gearloc Mat Overview
Your Gearloc Mat represents everything that makes your Gearloc unique and effective in battle. It can be built differently every Adventure!
1. Stat Area
- Each Gearloc has 4 Stats: Health (HP), Dexterity (Dex), Attack (Atk), and Defense (Def).
- Each has a Starting Stat (printed number on the mat) which can be increased by placing a Stat Die in the corresponding Stat Dice slot during the game. The Starting Stat plus the value of the Stat Die equals the current max Stat of your Gearloc.
- You increase these Stats using Training Pts () from completing Encounters.
- A Training Pt gives you 1 Training Attempt for any Stat (or Skill).
- If a Training Attempt is successful, place (or increase by 1) a Stat Die in the slot next to the Starting Stat to reflect the new modified number (Stat Dice cannot go higher than 6).
- Stat Dice from Training remain throughout the Adventure.
Health (HP)
- Your HP is the # of Health Chips your Gearloc currently has stacked under its Gearloc Chip.
- HP cannot exceed its max Stat (excess healing is lost). *Buff HP is separate from your HP and is therefore handled differently (see page 22).
- Losing your last HP means you are Knocked Out (KO’d; See page 20 for details).
- An HP Training Attempt will always succeed. After Training in HP, add 1 HP to your Gearloc (in addition to increasing the HP Stat Die).
Dexterity (Dex)
- Your Dex is the max # of dice you may roll each turn (any combination of Atk, Def & Skill Dice).
- Dex can also be spent to move your Gearloc on the Battle Mat (costs 1 Dex per available position). Each Dex spent this way subtracts from the Dex available to roll dice this turn.
- A Dex Training Attempt will always succeed.
Attack (Atk)
- An Attack is the act of rolling Atk Dice () to Dmg the target. Rolling Skills is not considered to be an “Attack” even if the Skills deal Dmg.
- Your Atk Stat is the # of Atk Dice you have available to roll each turn (not Exhausted when used).
- Each Atk Die costs 1 Dex to roll in battle.
- A target for your attack must be declared prior to rolling (one target only).
- Each rolled is # Dmg that may be applied to target.
- If any Dmg is done to your target through the use of Atk dice, it is considered a “Hit.”
- Each rolled may be used in your Backup Plan (does not reduce # of Atk Dice available to you in future turns).
- An Atk Training Attempt requires you to roll your current Atk Stat (Starting Stat + Stat Die). If no are rolled, you are successful. If unsuccessful, there is no Atk Stat increase, but you may spend this Pt elsewhere.
Defense (Def)
- Your Def Stat is the # of Def Dice () you have available to roll each turn (not Exhausted when used).
- Each Def Die costs 1 Dex to roll in battle.
- Each rolled may be placed in an Active slot (must use actual rolls – cannot combine results from 2 dice into 1).
- The total # of in your Active slots is the # Dmg you prevent. Decrease by this amount (e.g. Boomer has a Def 2 Die and a Def 1 Die in her Active slots. A Baddie deals 1 Dmg to her. She can either remove the Def 1 Die, or reduce the Def 2 Die to 1). Def Dice must be used for all incoming Dmg first before removing HP, except True Dmg which is applied directly to HP.
- The total Def Dice currently in Active slots will reduce available Def Dice for rolling this turn (e.g. Boomer has a Def Stat of 2. She rolls both Def Dice on her turn and gets a 1 and a 2 result. She chooses to place both dice in her Active slots. Later in the round, a Baddie attacks her for 1 Dmg, so she chooses to remove the 1 Def from her Active slot. It’s now her turn again, but because she still has a Def Die in her Active slot, she can only roll 1 Def Die this turn).
- Each rolled may be used in your Backup Plan (does not reduce # of Def Dice available to you in future turns).
- A Def Training Attempt requires you to roll your current Def Stat (Starting Stat + Stat Die). Any rolled are rolled once more. If no are rolled after the second roll (or first), you are successful. If unsuccessful, there is no Def Stat increase, but you may spend this Training Pt elsewhere.
Training Points (Pts) Rules
A Party Training Pt () is earned through the successful completion of Encounters. When a is earned, each Gearloc gains a Training Pt that can be used toward a Training Attempt of one of their Skills or Stats. Training HP, Dex, or a Skill will always succeed. However, training in Atk or Def requires a successful attempt in order to increase this stat. A failed attempt means you will be forced to train in something else with that Training Pt. The training process is covered in the Gearloc Mat section (page 10-12) and on the GARG.
Innate & Innate +1
- Each Gearloc starts with a unique talent (Innate) and can use it throughout their Adventure. Use your Gearloc Reference Sheet to learn more about what it can do.
- Your Gearloc’s Innate can be upgraded by using 6 on your Backup Plan. Once upgraded, this also lasts the entire Adventure, and its effects are explained on your Gearloc Reference Sheet.
- Play with the non-star side of your Gearloc chip face up until you upgrade to Innate +1, then flip it!
Attack Form (Ranged / Melee / Melee-Ranged)
- This determines how your Gearloc can target and attack:
- Melee Gearlocs: Can only target adjacent units.
- Ranged Gearlocs: Can target any unit.
- Melee-Ranged Gearlocs: Have their own instructions for targeting and attacking. See their Gearloc Reference Sheet for details.
- Your form also determines your Gearloc’s Battle Mat starting position options in battle (discussed on page 17).
2. Exhausted Dice Area
- When Skill Dice are used, they must be Exhausted (unless otherwise noted).
- Exhausted Dice are stored to the left of the Gearloc Mat for the remainder of the current battle and are no longer available to you. All Exhausted dice are unexhausted after battle.
- Baddie Skills may force you to Exhaust Atk or Def Dice. Each die Exhausted in this way reduces your Atk or Def Stat by 1 for the battle (e.g., Break, Corrosive).
3. Prep Area
The picture of your Gearloc also serves as a staging area for certain components throughout the game:
- This is where your Gearloc Chip with its current HP sits when not in battle.
- If your Gearloc receives Buff HP, it is placed here.
- Some Gearlocs even use this area for staging certain Skills before they are used in battle.
4. Skills Area
Skill Dice
- Begin your Adventure with all Skill Dice in your Storage Tray (out of play), except for any Skills your Gearloc starts with. These have circled bullets on your Gearloc Reference Sheet ().
- Skills are learned through Training Pts. When you train/unlock a Skill, locate the numbered die in your Storage Tray that matches the Skill you’re training and place it on your mat in its correct slot.
- The side showing on Skill Dice in your Skills Area doesn’t matter (Counters are often the exception).
- Skills are usable only once per battle (unless otherwise noted). Rolling these dice, however, does not mean you must use them. You can choose not to use them if an undesired face is rolled (there are some exceptions, like Boomer’s Grenades). Exhaust each Skill Die after use.
- Once trained/unlocked, Skill Dice are usable throughout the Adventure.
- Applying Skill Dice that deal Dmg to Baddies is not considered attacking them.
- Each Skill Die side has an icon that can be matched to your Gearloc’s Reference Sheet to find out how this icon functions. It also shows where this die may be placed once it’s rolled (i.e. Active [A], Locked [L]).
- A Skill Training Attempt will always succeed.
Professions
- A profession is a related set of Skills unique to your Gearloc. Professions are listed in the top right corner of the Stat Area, and their corresponding Skills are linked by colored lines in the Skills Area.
- Starred () Skills (visible next to certain slots in your Skills Area) are always available for training.
- Some Skills will have arrows pointing to them and do not have a . These Skills must be learned in order, starting with a Skill and following the arrows (if 2 arrows point to a Skill, only 1 is needed to unlock it).
- You do not need to unlock all the Skills in a Profession before starting another Profession.
Consumables
- Consumable Dice are special Skills that cannot be gained using Training Pts and are instead acquired through Loot or certain Backup Plans. *Some Gearlocs even start with certain Consumable Counter Dice on their mats.
- When you acquire a Consumable Die, take it from your Storage Tray and place it in your Skills Area (unless otherwise instructed).
- Once a Consumable is used, it is placed back in your Storage Tray and must be re-acquired to be used again. Consumables that act as Counters are the exception to this rule, and remain in your Skills Area throughout your Adventure.
- If a Consumable is to be exhausted or removed from an Active or Locked Slot, place it back in your Storage Tray.
5. Backup Plan (BP)
BP Skills
- Only 1 BP Skill may be used per turn.
- The cost of using a BP Skill varies from 1-6 as shown on Gearloc Mat and Reference Sheet.
- Remove # to use a BP Skill that costs #. from Atk and Def Dice are simply removed, but Skill Dice used in this way must be Exhausted.
Managing Bones
- Any rolled by your Gearloc during battle may be placed in your BP. This includes rolled outside of your turn (unless otherwise noted).
- Up to 5 total may be stored within the BP from turn to turn.
- Line up from left to right in the order they are earned.
- Use from left to right. Shift unused all the way left.
- will remain in your BP until used. They must be removed at the end of battle or if KO’d.
Multi-Bones Dice
- These take up multiple slots on the BP (skip slots to show this).
- If the BP Skill uses up only part of a Multi-Bones Die, the entire die is used and any unspent are lost.
Upgrading to Innate +1
- It takes the use of 6 to upgrade to a Gearloc’s Innate +1 (treat 6th as if it is slotted into your BP).
- Flip over Gearloc Chip (to stars side) for the rest of the Adventure to indicate this upgrade!
6. Active Slots
- Place rolled Def Dice and Active (A) Skill Dice effects here. Ally Active (AA) Skill Dice effects are also placed in this area (by other Party Members). Specific Active and Ally Active Skill Dice effects are explained on the Gearloc Reference Sheets.
- Active Dice remain here until used and must be removed at the end of battle or if Gearloc is KO’d.
- Skill Dice in these slots must be Exhausted when used (unless otherwise stated).
7. Locked Slots
- Place rolled Locked (L) Skill Dice effects here.
- Locked Dice remain here from battle to battle until used. These dice must be removed if Gearloc is KO’d (unless playing in Adventurer mode – see page 23 for details).
- Skill Dice in these slots must be Exhausted when used (unless otherwise stated).
NOTE: To free up space, a player may remove dice from Active or Locked slots at any time during their turn or at the End of Battle. Certain Skills may also cause you to remove dice from these slots. Skill dice are always Exhausted when removed, while Def Dice are simply returned to the supply.
8. Loot Area
- When a Gearloc gains Loot or Trove Loot, they can store it to the right of their Gearloc Mat.
- Each Gearloc can hold up to 4 Loot/Trove Loot (when out of spots, choose 4 spots worth of loot and discard remaining cards).
- Locked Trove Loot always only takes up 1 spot.
- Loot/Trove Loot is fully explained on page 21.
The Opposition: Baddies & Tyrants
Baddies Overview
IMPORTANT: Now that you have a grasp on the intricacies of your Gearloc, we can introduce you to the opposition! Baddies (and eventually the Tyrant) are what you will be battling all the way to the end of your Adventure. For this next section, find a 1Pt, 5Pt, and 20Pt Baddie, and grab a Tyrant Chip while you are at it. Keep these close for reference and comparison. Also, find your Gearloc Adventuring Reference Guide (GARG) and flip it to the back where the Baddie Skills are listed. You are all set! Let’s dig in!
Baddies represent the opposition you will face during your Adventure. Each Baddie comes with its own chip and stats.
Baddie Chip Anatomy
- HP: This is the max # of Health Chips a Baddie can have. Place # HP beneath a Baddie when it enters the Battle Mat.
- Initiative (Ini): This determines the Baddies’ starting spot on the Ini Meter. A Baddie Ini Die is used to indicate this.
- Attack Form:
- Melee Baddies (): Can only target adjacent (not diagonal) opposing units. If none exist, they cannot attack or roll skills requiring a target this turn.
- Ranged Baddies (): Can target any opposing unit, regardless of mat position.
- Melee Baddies (
- Creature Type:
- Trolls ()
- Orcs ()
- Scales ()
- Goblins ()
- Bogs ()
- Beasts ()
- Trolls (
- Defense: This is the # of Def Dice this Baddie rolls on its turn (minus any already active Def Dice). Rolled is applied to top of Baddie chip (making the die active). A Baddie does not need a target in range to roll its Def Dice.
- Attack: This represents the # of Atk Dice this Baddie rolls against its target on its turn. Total rolled is # Dmg dealt to target. If Baddie has multiple targets, these dice are rolled separately for each.
- Skills: These Skills (in black) are always in effect. Refer to the GARG for a list of Baddie Skills and how they work. If Baddie has multiple targets, targeting Skills will trigger against each.
- Baddie Backup Plan (BP) Skills: BP Skills (in blue with icon) trigger if a Baddie rolls at least the # of shown on the Baddie chip from all its Atk and Def Dice rolls combined this turn. Rolled do not carry over to the next turn. If a triggered BP Skill requires a target and the Baddie has multiple targets, party may choose. BP Skills can only be triggered once per turn and are listed on the GARG. BP Skills trigger after resolving rolled Def and Atk, even if the Skill text indicates different timing.
- Target(s): Melee Baddies always pursue the closest opposing unit (route with fewest positions). If there is a tie, it will then use its to determine which unit it targets and pursues. A Baddie’s target () is either the weakest (, lowest HP) or the strongest (, highest HP) opposing unit. Party chooses on ties of strength. Ranged Baddies only target their . Some Baddies will target multiple units (shown by # of figures within the icon) but will not attack the same target more than once per turn. Roll Atk Dice for each target separately.
- Extra Baddies: A Baddie with or adds one or two 5Pt Baddies to the top of the BQ immediately when it enters the Battle Mat.
- Diagonal Movement: Only Baddies with can move diagonally.
Baddie Points (Pts)
There are 4 types of Baddies: Tyrants, 1Pt, 5Pt, and 20Pt Baddies. They are identified by their image or # Pts on the back of the Baddie chip.
Tyrants
Reaching and defeating the Tyrant is your main objective in Too Many Bones.
Tyrant Card
A Tyrant Card front gives information about that Tyrant and shows the Creature Types you are to use for this Adventure. It also lists the Progress Pts needed in order to challenge the Tyrant. While you are not required to challenge the Tyrant the day after earning the required , you must defeat the Tyrant before the maximum number of Days for the Adventure is exceeded in order to win.
The Tyrant Card acts as your Encounter Card for the day. The back of the Tyrant Card instructs you on how to set up the Battle Mat for the Tyrant battle and explains each Skill the Tyrant has, including its Tyrant Die. You only need to defeat the Tyrant Baddie to win this battle.
A failed Tyrant battle is handled the same as an unsuccessful Encounter battle and can be tried again if you have enough days for another try.
Tyrant Chip
Each Tyrant has a chip that is used as a Baddie chip in the final battle.
Tyrant Die
Each Tyrant with on its chip has a unique Tyrant Die that is rolled once per Tyrant turn. Roll this along with its Atk and Def Dice.
Tyrant Encounters
Each Tyrant has Tyrant Encounter Cards specific to them. Tyrant Encounter Cards for the Tyrant you are pursuing are shuffled into your Encounter Deck before your Adventure begins.
Combat: Battle Mat & Battle Queue Setup
The Battle Mat
The Battle Mat…a place of risky moves and ruthless combat. This is where all the action happens and a place you will want to get very familiar with!
IMPORTANT: Congratulations! You are now ready for the battle sections! With your new understanding of the Baddies and their stats, we can now introduce you to where these battles will be taking place! For these next sections, find your Battle Mat and stack a few Baddies next to it. Then, add the Round Counter Die to the Ini Meter area. Also have your Gearloc (chip and die) nearby, as these are used on the Battle Mat as well. While this section is being discussed, feel free to use your components to mimic what is being described.
1. Initiative Meter (Ini Meter)
In battle, a single turn from each unit completes 1 full round. The Ini Meter tracks the current round and whose turn it is. It also gives you a visual forecast of who will be taking their turn next and in what order. Ini is built downward on the meter from highest (going first) to lowest (going last).
- The Round Counter Die goes on the top of the Ini Meter, starting with R1 (Round 1).
- Increase this die to R2, R3, etc. at the start of each new battle round.
- After R5, the (Fatigue) rounds occur until the battle is completed. At the start of each round, all units on the Battle Mat lose 1 HP (this is not counted as any specific type of Dmg and cannot be blocked or defended against in any way).
Ini Dice Placement (setting up for R1 of battle)
- Baddies have their Ini () indicated on their Baddie Chip. A Baddie Ini Die is used to represent this # on the Ini Meter (e.g. if a Baddie with 3 Initiative is in Lane 1, use the blue Lane 1 Ini Die, and set it to 3 on the Ini Meter). Place the Ini Die of each Baddie in the Ini Meter (highest on top, then in descending order). Any tie between Baddie Ini is then decided by their Lane priority (a Lane 1 Baddie would go above/before a Lane 2 Baddie).
- Each player rolls their unique Gearloc Ini Die to determine their spot on the Ini Meter. For any Ini tie that involves a Gearloc, the party chooses who goes first.
Ini Dice During Battle (R2 and beyond)
- After initial Ini placement is set for all units, the Ini # on the Baddie Chips and Ini Dice no longer matters. During battle, certain Skills can modify the Ini Meter, but always in relation to other units’ current Ini Meter “spots” (e.g. Tantrum can drop a Baddie 3 spots on the Ini Meter).
- Units that enter the battle after R1 will always enter at the top or bottom spot of the Ini Meter. All Gearlocs, Tyrants, and 20Pt Baddies enter the Battle Mat at the top spot of the Ini Meter (again, Ini # is disregarded). All 1Pt & 5Pt Baddies enter the Battle Mat at the bottom spot of the Ini Meter. Follow R1 rules for any ties.
- Units with their Ini spots modified during the round will take their new spots only after End of Round (feel free to shift their Initiative Dice to the side as a reminder).
2. Baddie Starting Positions
Use the colored positions for Baddies. Melee Baddies start on positions; Ranged Baddies start on positions. The first Baddie to enter the Battle Mat goes in Lane 1 (). The second Baddie, Lane 2, etc. As Baddies move, they may change Lanes; therefore, place a Lane Marker Chip (matching its starting Lane color) under each Baddie when it enters battle.
3. Gearloc Starting Positions
Use the grey positions for Gearlocs. Melee Gearlocs start on positions; Ranged Gearlocs start on positions; Melee-Ranged Gearlocs may start on either. Gearlocs may start on any lane and may even double up on a single lane.
4. Adjacent Movement
When moving, units can only move to orthogonally adjacent positions. Baddies with () can move diagonally. As a rule, units may not occupy the same position or pass through other units.
Battle Set-Up
Most of the Encounters in TMB will result in a battle () of some sort. Sometimes, the Baddies you face are specifically defined on your Encounter Card, but more often, the Encounter will include “BQ: Baddie Pts” as part of the battle set-up.
Battle Queue (BQ)
Every battle must start with the creation of a BQ that contains the Baddies you will be facing for the fight. To build the BQ, you must refer to your Encounter Card and then assemble a stack of Baddie chips using your Active Stacks. Except for scouted Baddies (which are face up), the BQ should always be assembled face down so the Baddies are unknown before the battle begins. Also, when creating the BQ, greater Pt Baddies should always be placed higher on the stack than lesser Pt Baddies. *If the BQ calls for a specific Baddie or type, search your Baddie Active Stacks first (shuffling them afterwards), then Defeated Stacks, then out of play Baddies.
Baddie Points (Baddie Pts)
“BQ: Baddie Pts” is a short way of saying you need to create your initial Battle Queue by calculating your Baddie Pts:
- Step 1: Calculate Current Day x Number of Gearlocs in Party (e.g. Day 4 x 3 Gearlocs would be 12 Baddie Pts).
- Step 2: Draw Baddies to equal Baddie Pts using highest Pt Baddies when possible (e.g. 12 Baddie Pts means two 5Pt Baddies and two 1Pt Baddies).
- Step 3: Stack ‘Em (e.g. two 1Pt and two 5Pt Baddies would be stacked top down: 5, 5, 1, 1).
Easy! Don’t forget to factor in any other Encounter requirements or Skill modifications that could affect this number. Sometimes this can affect your Baddie Pts total BEFORE you draw your Baddies (i.e. going from 18Pts to 20Pts has a HUGE effect on which Baddies will be fought). Other times, Baddies are added to your BQ AFTER it’s been created. All of this is determined and explained on your Encounter card, so read it carefully! Unless otherwise stated, Baddies added to the BQ are added in their appropriate position in the stack (i.e. an added 20Pt Baddie goes on top, an added 1Pt Baddie goes to the bottom).
Battle Set-Up Sequence
Now that you understand BQ basics, let’s go through the battle set-up from start to finish:
- Trigger “Before Battle” effects and Skills such as Tantrum’s Innate – Rage.
- Use Encounter Card instructions to build your BQ.
- Place top Baddie from BQ in its appropriate lane and Battle Mat position (also its HP, Lane Marker, and Ini Die). Continue placing Baddies until there are 4 on the mat or the BQ is empty. *See page 17 for more on Baddie placement and Ini.
- Roll party’s Ini Dice. Add them to Ini Meter.
- Place Party Members onto Battle Mat in appropriate positions (with existing HP).
- Make sure your Round Counter Die is set at R1.
- Trigger “Start of Battle” effects and Skills such as Picket’s Innate – Shield Wall.
You are ready to battle! Each unit will now take its turn, starting with the top Ini spot!
BQ In Battle
During battle, you may still have Baddies in your BQ (due to having more than 4 Baddies to start or from Skills like Signal, which calls more Baddies to the BQ). These Baddies will not join the battle until there are fewer than 4 Baddies on the Battle Mat. If that is the case, after End of Round, the Baddie(s) from the top of the BQ will join and assume the first available Lane Marker(s) and Ini Dice (see page 17, “Ini Dice During Battle”).
Place the Baddie in the lane that matches its Lane Marker and on the position matching its Attack Form. If that position is occupied, the Baddie will instead take the first available Baddie position that matches its Attack Form (starting with Lane 1 and working up). Then, it will try lanes of the other Attack Form (again, starting with lane 1).
Combat: Turn Order & Actions
Gearloc Turn
Gearloc Movement and Targeting
- Melee Gearlocs: May use # Dex to move # adjacent positions and target 1 adjacent Baddie each turn.
- Ranged Gearlocs: May use # Dex to move # adjacent positions and may target 1 Baddie anywhere on the Battle Mat each turn. No “line of sight” is needed.
- Melee-Ranged Gearlocs: May use # Dex to move # adjacent positions and target 1 adjacent Baddie each turn. Use the Gearloc Reference Sheets to learn how some of these hybrid Gearlocs may target non-adjacent Baddies on the Battle Mat.
*Some Gearloc Skills may allow for selecting non-target Baddies, Battle Mat positions, or even multiple Baddies!
Gearloc’s Turn Sequence
*Loot: Unless otherwise specified, use loot anytime during your turn (even before triggering Effects).
- Start of Turn: Be sure to trigger any Effect Dice on top of your Gearloc Chip.
- Move Gearloc: You may use # Dex to move # adjacent (not diagonal) available positions.
- Determine Target: Select a target for your Atk Dice, Skill dice, and/or BP as needed.
- Select and Roll Dice: Your remaining Dex represents how many dice you may roll. The dice you may choose from are determined by your current Atk Stat, Def Stat, and available Skill dice (e.g. If Atk Stat is 2, Def Stat is 1, and there are 3 available/rollable Skills, 6 dice can be chosen from to roll. If Dex is 3 and no movement was made this turn, only 3 of those 6 dice are available options). All selected dice must be rolled simultaneously.
- Resolve the Roll: *See next section.
- Baddies React: Sometimes Baddies have Skills that trigger after they are attacked.
- End of Turn
Resolving the Roll
Note: As a Gearloc, you do not need to use the result of any dice you roll unless the Profession or rolled icon rules state otherwise. For instance, if you roll Atk Dice successfully and then realize you are attacking a Dire Wolf with Lashback and don’t want to hit it yet, you do not need to use your result. Or, if you roll a Med Pack (Patches) Skill Die and the result is a 1 HP heal instead of 3 HP, you can choose not to heal and place that Skill Die back in its slot in your Skills Area (Dex is still counted for the roll).
After your dice are rolled, feel free to do any of the following, in no particular order:
- Resolve Target Dmg and Effects: Apply Dmg and any other Dmg results or effects from your Skills to your target.
- Resolve Non-Target Dmg and Effects: Some Skills may apply to non-target units. Others may be Instant Skills that do not apply to other units at all. Go ahead and use these Skills as desired.
- Allocate Active, Locked and Backup Plan Dice: Place any rolled you want to use into open Active slots. You may also place any applicable Skills into your Active (or a Gearloc’s Ally Active) & Locked slots. Also, you may place in Backup Plan slots as desired.
- Use your Backup Plan: You may use your BP only once per turn. Remove # to use BP Skill that costs #.
Baddie Turn
Baddie Skills
All Baddie Skills are unique and trigger at very specific times throughout the battle depending on the Skill. Be sure to review all Skills of Baddies as they enter the Battle Mat so you know when they apply. For Baddie Skills that require a target, that target must be within attack range in order to apply that Skill (i.e. Poison, Corrosive, etc).
Baddie Movement and Targeting
- Ranged Baddies: Do not move and can target any opposing unit on the Battle Mat.
- Melee Baddies: May move up to 2 adjacent available positions per turn. They will always target and move toward the closest opposing unit (route with fewest available positions). If there is a tie for “closest,” use its (discussed on page 15) to determine which unit it pursues. If still a tie, party chooses the target. A Baddie will always take the shortest possible route toward an available position adjacent to its target. If there are multiple possible shortest routes, party chooses which it will take. If there are no routes to any targets, the Baddie will not move. A Baddie does not move if it is already adjacent to an opposing unit.
Baddie’s Turn Sequence
- Start of Turn: Effects Trigger. Resolve applicable Effect Dice sitting on the Baddie Chip (i.e. Bleed, Poison, Disable, etc).
- Determine Target(s).
- Move: Move Baddie if and not adjacent to an opposing unit (see Movement and Targeting above).
- Skills: Any Skill for this Baddie that does not list a specific time it happens, should be resolved now, if possible.
- Roll Dice: Roll all of Baddie’s inactive Def Dice and also roll its Atk Dice (only if target is within attack range). *If Baddie can target multiple units () and they are in attack range, roll its Atk Dice for each.
- Resolve the Roll: In order – place rolled on Baddie, apply total rolled to target, and resolve any triggered Skills. Tyrants will then resolve their Tyrant Die (If applicable).
- Gearlocs React: Don’t forget to trigger Gearloc Skills if they apply!
- End of Turn
End of Battle, Knockouts & Wipes
KO’s and Wipes
Getting Knocked Out
Getting “KO’d” during battle is going to happen to you. It’s not unusual, especially if you get a nasty roll! Do not be discouraged by this! KO’s are an inevitable part of being a fearless Gearloc!
If you are KO’d (lose your last Health chip), your Gearloc chip and Ini Die come off the Battle Mat immediately and are placed in your Gearloc Prep Area. All slotted Active, Locked, and Backup Plan dice are removed (Skills are Exhausted) from your mat. Loot stays with you but is not usable while you are KO’d. *Certain Gearlocs have Skills that can Revive KO’d Gearlocs. These Skills are specifically defined on those Gearlocs’ Reference Sheets.
Full Party “Wipe”
If your entire party runs into bad luck and all Gearlocs are KO’d, the battle immediately ends, but the Adventure continues! Skip the Reward Phase and move directly to the Recovery Phase for that day. Unless you have loot that grants HP, each Gearloc will likely have to choose “Rest and Recover” as their individual choice option during this phase.
Reviving a Gearloc
Any Gearloc that has been KO’d may be Revived with a Skill. When a Gearloc is Revived, set its HP to # shown on Skill, and it re-joins the battle after the end of the current round. Remember, any time a Gearloc enters the Battle Mat after R1, it will assume a Starting Gearloc Position and be placed at the top spot of the Ini Meter.
Battle Results
Successful Battle
Remove all dice from each Gearloc’s Active Slots and BP. Dice in Locked Slots may remain. Place all Exhausted Skill dice back into their Skill Slots. Remove any remaining Buff HP from Prep Area. Place all Party Members with their remaining HP, back on their own Gearloc Prep Area and move to the Reward Phase. *Game Phases are discussed in detail on pages 8 and 9.
Unsuccessful Battle
Remove all dice from each Gearloc’s Active Slots, Locked Slots, and Backup Plan. Place all Exhausted Skill dice back into their Skill Slots. Remove any remaining Buff HP from Prep Area. Place KO’d Party Members on their Gearloc Prep Area (if not there already). Place any undefeated Baddies face down on the bottom of their appropriate Active Stack and move directly into the Recovery Phase.
Loot, Trove Loot & Lockpicking
Loot / Trove Loot
In order to have a chance at taking down a Tyrant, your party will need to find some Loot and, if lucky, some Trove Loot along the way. Here are a few details about both:
- There are two kinds of loot: Loot and Trove Loot.
- You are limited to 4 loot per Gearloc at any time (when exceeded, choose 4 to keep and discard the remaining).
- Turn a loot card with multiple uses to show it has been used (start with highest #).
- After fully using loot card, discard it.
- Unless stated otherwise, outside of battle, loot can be used or discarded at any time.
- During battle, if not specified otherwise, loot must be used on your turn.
- Trove Loot should remain “chest” side up until fully opened through successful Lockpicking Attempts (this counts as a loot).
- Heavy: Counts as 3 loot.
- Permanent: Do not discard when used.
- Backup Plan Extensions: Grant additional BP Skills that you may use for. Using this counts as using your BP for this turn.
Lockpicking
The need for Lockpicking can come from a random Encounter or any Trove Loot you manage to get your hands on. There are 4 Lockpicking Dice used in this process consisting of 1 Intuition Die and 3 Action Dice. You can learn more about how these work on the GARG.
Each Gearloc will have an opportunity to make one Lockpicking Attempt per day on any discovered Trove Loot during the Recovery Phase. If you manage to solve only the 1st or 2nd lock during an attempt, those locks remain solved, giving you a head start on your next attempt. Also, your Lockpicking Attempt can be used on someone else’s Trove Loot instead of your own if you see that as more beneficial.
As you unlock Trove Loot, you can keep track of the locks you’ve solved by connecting the pipes to your Gearloc mat! One pipe connected means you solved one of the three locks and so on! Solve all three? Success!! Flip it over!
Game Modes & Miscellaneous Rules
Difficulty Modes
Invading The Ebon is no easy task. In fact, some Gearlocs may struggle finding success even on Day 2 of their Adventure! Don’t be disheartened! TMB was designed to be quite challenging. When we suggest that first-time adventurers should ask the guards for help (on day 2), we mean it! We also understand that it can take some time to fully grasp the intricacies of TMB and each Gearloc. Therefore, we have developed 3 play modes to help you get your feet wet. We suggest that you start your Adventure in the first mode until you find yourself being challenged to a degree that is comfortable for you, and then adjust accordingly.
*TMB is a game that requires you to learn and adapt. Oftentimes this learning comes through brutal battles and party KO’s. If this is not your style of play or hampers your enjoyment of the game, hang out at the Adventurer level as long as you like, or feel free to modify it further! Bottom line, make sure you are enjoying the Adventure!
Adventurer
Use this mode when just starting out and learning the game.
- Add 2 to your Gearloc’s HP Stat before starting Day 1.
- Gain 1 Training Pt before starting Day 1.
- If KO’d during your Adventure, dice in your Locked Slots may remain.
Heroic Adventurer
Use this mode when you have a basic understanding of the game.
- Add 1 to your Gearloc’s HP Stat before starting Day 1.
- Gain 1 Training Pt before starting Day 1.
Legendary Adventurer
Use this mode when you are ready for a true challenge!
- The ultimate test of strategy and survivability.
- No Training Pts or HP boosts to start – Yikes!
- Too Many Bones, hardcore.
Miscellaneous Rules
Buff HP
Add # HP to a Gearloc’s Prep Area. When taking Dmg, remove from this Buff HP first, before removing HP from the unit. Def Dice take effect before removing Buff HP. Buff HP is not counted towards Baddie targeting choice (strongest/weakest) or removed with True Dmg. You can have multiple Buff HP active at a time.
D6 Die (orange marbled die with numbers)
Use this specific die for any situation requiring the use of a D6.
Damage Types
- Damage (Dmg): Amount of HP to remove from target. This can be mitigated by Def Dice, Thick Skin, Hardy, etc.
- True Dmg: Amount of HP to remove from target regardless of Def in play. Only in cases where skills directly affect True Dmg can this number be modified (e.g. Picket – Ale, Tantrum – Hardy).
Dangerous Darts (choice on some Encounters)
Each player and opponent starts with 10 HP. Using only Atk Dice, Def Dice, or Status Effect Dice (the Poison, Weaken, Stun Effect Dice), players must choose 3 dice but no more than 2 of any kind. You will roll the same dice each turn. Non-Gearloc opponents always choose 2 Atk Dice and 1 Status Effect Die.
Once dice are chosen, the game begins with your opponent rolling their 3 dice (Gearlocs always go second). Take turns rolling available dice. Apply rolled Def Dice to self. Deal Dmg and apply rolled Status Effect Dice to opponent (Poison, Weaken (player’s choice), Stun).
are used for the Dangerous Darts Backup Plan (must be used the same turn they are rolled – no storing up!). Only Gearlocs may use this!
- – Remove an applied die from self or opponent (Effect or Def).
- – Stun opponent until the start of your next turn.
- – Instant Knockout – You win!
Remove all your opponent’s HP to win!
Day Counter (chip and card)
At the start of each day, rotate this chip by 1. This happens regardless of whether your previous Encounter was successful or not. You must challenge and defeat the Tyrant before the Day Counter exceeds the Tyrant’s .
Effect Dice
There are two different Effect Dice covering many different Effects that can be found in TMB. These dice are used to help remember when a specific Effect is in use or applied to a unit on the Battle Mat. Place this die on the Baddie or Gearloc Chip to show the Effect is Active. There can be at most 1 of each Effect on any unit. If a second of the same effect would be applied, the new Effect replaces the current one. Some text may refer to “negative effects.” Those considered negative are: Poison, Weaken, Stun, Disable, and Terrify.
Live Battle Walkthrough
STOP & READ!!!
You are through the hardest part! It’s now time to learn the rest by jumping into a game of Too Many Bones! For this example, you get the pleasure of playing myself and Picket as we walk you through a real battle! Find our 2 Gearloc Mats and go through the Game Set-up on pages 6 and 7. We are off to take down Drellen, so use him as the Tyrant during set-up! This will be a live battle (meaning we want you to follow along in real time with your game mats as we go through it)! See you shortly!
Live Battle
Well, hello again! Do you have the play area set up and ready to go? Normally, before you choose a Gearloc, you would want to read over their Gearloc Reference Sheet to better understand how that Gearloc plays – we are all so different! For now, you’ll just have to trust me that I’m the best choice. Ha! But enough about me; let’s get started!
You may want to select someone in your party to serve as a “Party Leader” to help make those tough decisions that the group cannot decide on. In this example, I shall nominate myself as the most apt leader!
Hopefully you have chosen Drellen as your Tyrant (since that’s who we are headed to take down)! Let’s check to see if you have your Encounter Deck set up correctly! You should have Special Encounters 001-003, then a total of 8 shuffled Encounters, which should include Drellen’s Tyrant Encounter. Yes? Awesome!
On this Adventure, we will be facing Bog-Type (), Goblin-Type (), and Beast-Type () Baddies. We should have those Baddie Types shuffled and set as your Active Baddie Stacks, and the Day Counter set at 1. Since we are playing on Adventurer difficulty, we each get to place a Stat Die set to 2 in our HP slot. We also each get 1 Training Pt () to spend. I am going to increase my HP Stat again. You can never be too healthy! Boomer wants to train her Atk Stat. Since her current Atk Stat is 1, she rolls an Atk Die. She gets no , so her attempt is a success!
Day 1
Time to kick off this adventure. Picket draws the top Special Encounter: “Leaving Obendar.” After reading the card, the party chooses to “Shake down a shady peddler!” This is a peaceful encounter with no extra requirements for success. This means they can move right to the Reward Phase. Picket and Boomer each draw 2 cards from the Loot pile. Picket chooses the Infused Incense, and Boomer chooses the Stone Hammer, discarding the others.
Each Gearloc also gains a Training Pt. Picket chooses to train in Dex. Training in Dex always succeeds, so he places a Stat Die, set at 1, in his Dex slot. Boomer already starts the Adventure with the Element, Casing, Fuse, and Boom Counter Skills (see her Innate), but she has no specific grenades yet. She decides she wants the option to throw a grenade in her first battle if she can. Boomer trains in Frag Grenade and places the Frag Skill Die (#5) on her mat in the Frag Skill slot. The party also gains a Progress Pt. They place this card, with the point showing, under the Tyrant Card to track their progress. Only 5 more Progress Pts (within 9 days) are needed to reach Drellen!
Whew, Day 1 is almost done! Nice work! All we have left is the Recovery Phase! No need for Picket and I to trade loot, and there’s nothing to Lockpick; therefore, we are just down to our individual options. Since we are both at full HP and we like our loot, I think we will both opt to ‘Scout the area’!…(45 minutes pass)…Hah! I beat Picket back! With my roll of 3, I scouted a 1Pt Bog Frog, and Picket’s dud roll of a 1 uncovered a 1Pt Bog Pole. I like our chances with these two; no need to avoid them! Time to nap and then get outta here! Rotate that Day Counter to Day 2!
Day 2
After drawing and reading their second Special Encounter, “Hardly out of the Gate,” the party decides to go with the first choice: “Hail the guards for help.” This choice will result in a battle, and there are some beneficial conditions that go along with their choice.
Note: A battle’s difficulty greatly depends on the party size and Baddies you face! Certain days and Baddie combinations can result in a very tough battle! During battle, your Gearloc(s) may be Knocked Out (KO’d) from losing all HP. If there are no surviving Gearlocs at the end of battle (all Gearlocs KO’d), there will be no Progress or Rewards for that day, and the Encounter Card is discarded. You will begin the next day (increase Day Counter by 1) by drawing a new Encounter card. Don’t give up! Losing a battle (or failing a peaceful Encounter) is part of the Adventure!
Yes! We are headed into a battle! Every battle is shaped by your party size, total days you’ve been adventuring, and any modifications in your Encounter. Since their are no specific Battle Queue (BQ) rules on this card, we are going to need to build our BQ by calculating our Baddie Pts. Do you remember how to do that? Current Day x Number of Gearlocs in Party. Simple! For us it’s Day 2, it’s just Picket and I, and there are no other mods, so that’s 2 x 2 = 4. Yeah, I just did that in my head. I’m gifted.
Thanks for that, Boomer. *sigh* Now that we know our Baddie Pt total is 4, we need to set up our BQ! We must draw Baddies starting with the largest Pt stack possible. If our total was 6, we would draw a 5Pt Baddie and a 1Pt Baddie to total 6. With 4, however, we will be drawing 4 1Pt Baddies. Remember, the BQ is set up with the highest Pt Baddies on top, in descending order, to the lowest Pt Baddies on the bottom. For us, they are all equal so it will be the Bog Frog, then the Bog Pole, and then 2 Baddies we have yet to see.
Let’s see who else we are up against! Normally this part is random, but for this example, prepare your BQ with the following Baddies: Goblin Sandbagger on the bottom, then a Clay Golem, next the Bog Pole, and finish the BQ stack with that big ol’ Bog Frog on top! Before listening to anything else Picket has to say, see if you can place these Baddies on the Battle Mat correctly (including Health, Lane Markers, and Baddie Initiative Dice).
No really, STOP reading and try to set up your Battle Mat. Picket will still have something to say when you return…I promise.
Boomer, lighten up! I want to make sure they understand! Remember, up to 4 Baddies can battle at one time. The first Baddie from the top of the BQ will take a Lane 1 Baddie Melee or Range position depending on its Attack Form. The second Baddie will go in Lane 2 and so on. When placing these Baddies on the Battle Mat, first place their HP stack, then the Lane Marker that corresponds to the Lane they are in, and then the Baddie chip itself. Also, set the Baddie’s Initiative using the Baddie Initiative Die that matches the Lane it’s in.
Ok, ok! Since you’re STILL TALKING, I’ll add this: If there are more than 4 Baddies in the fight, the rest of the Baddies remain face down in the BQ and off to the side of the Battle Mat. If one of the 4 current Baddies is defeated, the next Baddie in the BQ will come out once the current round ends. Remember, when bringing this Baddie into battle, use the first available Lane Marker and Baddie Ini Die. Now, Picket! No more talking! And you with your hands on this rulebook! Try setting up the Battle Mat and let’s see how you did on the next page.
Battling 4+ Baddies Reminder
During battle, if a Baddie cannot enter the Battle Mat because its position is occupied, it will instead take the first available Baddie position (starting with Lane 1-4) that matches its Attack Form. Then, it will try the opposite Attack Form.
Baddie Initiative Reminder
During battle set-up, for each Baddie that enters the Battle Mat, set the corresponding Baddie Ini Die to reflect the Baddie’s Initiative , and place it on the Ini Meter. Initiative tie-breakers with Baddies and Gearlocs are decided by the party. If a unit joins the fight after Round 1, it will ignore this starting Ini number and instead be placed at the top or bottom spot of the Ini Meter. 1Pt and 5Pt Baddies start at the bottom spot, 20Pt and Tyrant Baddies start at the top spot.
How did you do? Adjust if you need to! Next, it’s time for Picket and I to join! As you can see from the image, Picket has chosen Lane 4. I am going to play it safe and set up right behind him! We had some unlucky Initiative rolls…I blame our Party Leader. Go ahead and set our chips and Initiative Dice to match the image!
Gearloc Placement and Initiative Reminder
Gearlocs are always placed onto the Battle Mat after the Baddies. All Gearlocs roll their Initiative Dice and place them into the Ini Meter, along with the Baddies, in descending order. Then, each Gearloc is placed, along with their current HP stack, onto a Gearloc position that matches its Attack Form.
Great job! One more thing before we get this battle started! Picket has an Innate Skill that allows him to open with Shield Wall before battle begins! Let’s see how he does!
Picket rolls his 2 Dice and lands only 1 and a ; he locks the Def in one of his Active Slots. Shield Wall does not allow the to be used, so it is placed back into the dice pool.
Rotten oggots! I usually roll better than that. Ah well, we have help because as Round 1 begins, our Encounter choice condition kicks in! Each Baddie is dealt 1 True Dmg from the Obendar wall guards. Go ahead and remove 1 HP from each Baddie. Now the battle can begin. It looks like the Goblin Sandbagger is first!
This Baddie has Ranged Attack Form, so it does not move and it targets Boomer. The Goblin Sandbagger rolls 1 Die and 1 Die. The Atk Die rolls a and the Def Die rolls a 1 . The triggers Mischief 1 (defined on the Gearloc Adventuring Reference Guide) which forces Boomer to remove a die from her Active slot. She does not have one, so this does nothing. Also, since the goblin did not roll any Dmg, it does not hurt Boomer. Place the 1 it rolled on the goblin Baddie chip. The goblin’s turn is now over.
Baddie Movement and Targeting Reminder
Melee Baddies may move up to 2 adjacent positions per turn. They will always move toward and attack the closest (route with fewest positions) opposing unit. If there is a tie for “closest”, use its to determine which it pursues. If a Melee Baddie is already adjacent to an opposing unit, it will not move. Ranged Baddies do not move and can target any opposing unit on the Battle Mat, using its to decide which unit(s) to target.
It’s my turn next! Yee-hoo! I’m not going to move, which allows me to use all 3 Dex for dice rolling! It looks like I have 7 dice options to choose from: an Element, Casing, Fuse, 2 Dice, and 2 Dice. In order to use my Frag, I need to get my Boom Counter to 1 by finding 1 of each Component! I think I’ll target the Bog Pole and will roll 1 Die, 1 Die, and my Element Die. Here we go!
Boomer rolls 2 Elements, 1 , and 1 (with her Def Die). She chooses to apply the Dmg from the Atk Die to the Bog Pole. With the , Boomer also decides to use her Backup Plan: Throw Odds, which allows her to do an additional 1 Dmg to her target. This means the Bog Pole is defeated. Remove Bog Pole, along with its Lane Marker and Baddie Ini Die, from the Battle Mat and place it in the Defeated Baddies area. Finally, Boomer places her 2 Elements result in one of her Locked slots. She now has 1 of the 3 needed Components toward making a grenade.
Picket! Did you see that? I KNOW you saw that! Nailed that pole right in the kisser with the bolt I was going to use for Frag shrapnel! If you were half as accurate with your sword…hehe…I’ll stop there because we are in the middle of a battle! FOCUS! One Baddie down! But no celebrating yet, that Bog Frog is next!
The Bog Frog moves 2 positions towards its closest target (Picket is 3 positions away, and Boomer is 4). Go ahead and move it to either position adjacent to Picket. The Bog Frog does not have any dice to roll, but it does have a Skill that triggers each turn. In this case, place a Poison Effect Die, set at 2, on Picket’s chip.
Next up is Picket (it would have been the Bog Pole, but it was defeated before it could have a turn). At the start of Picket’s turn, he immediately takes 2 True Dmg (ignoring his Def) from Poison (remove 2 HP from Picket) and decreases the Poison Effect Die to 1. Since Picket still has a Die in his Active slot, it is not available to roll. Picket chooses to use his Loot: Infused Incense. This adds 2 additional Atk Dice to his roll for no Dex cost. He chooses the Bog Frog as his target since it is already adjacent to him and rolls 3 Dice and 1 Die.
Picket’s roll results in a total of 2 , 1 , and 1 . He places the in his Backup Plan, places the Def Die in his Active slot, and applies 2 Dmg to the Bog Frog (remove 2 HP from it).
Don’t fret, Boomer, I’ve got this! This battle is practically over already! That frog will soon take another guard arrow so it will be decimated before its next turn. I, of course, am still very healthy, and my awareness of this battle and its remaining dangers is unmatched! Just one more Baddie this round and it’s only a…ugh…ouch…a Clay Golem…as I suspected!
The Clay Golem pursues the closest opposing unit. When moving the Clay Golem, there are possibly 2 positions you could move it to (depending on how you moved the Bog Frog). Move the Clay Golem toward Picket.
Note: With the round over, if there was a Baddie still in the BQ, it would enter the Battle Mat at this time using the Lane 2 Marker and Ini Die.
Increase the Round Counter to R2, and remove 1 HP from all Baddies (for the Encounter condition).
OK! With the first round under your belt, it’s time for you to play out the rest of the rounds in this battle! See how well you can navigate the remaining Baddie and Gearloc turns. Better read up on what the Clay Golem’s Skill “Break” does. It can be nasty! Thankfully, both yours truly and Picket will take our turns first! Good luck!
Rules Clarifications & FAQ
Getting Technical – FAQ
This game has a lot of details! Sometimes saying things in just a little different way makes all of the difference. We’ve searched the forums and our direct e-mails for some of the more common questions (and answers) people have submitted. Some of the answers come directly from other TMB owners who did an excellent job of clarifying things in a way that seemed to resonate with people (thanks everyone).
- Atk and Def Dice in Backup Plan: Do Atk and Def Dice in my Backup Plan count against my Attack and Defense Stat? (asked by Tony B)
No, Atk and Def Dice in your Backup Plan do NOT count against your Atk and Def Stat. - Backup Plan Extensions: How does a Backup Plan Extension work (found on certain Trove Loot)? (asked by Sara J)
A Backup Plan Extension is an item that gives you more Backup Plan options. Just like your Gearloc’s current Backup Plan Skills, there is a cost involved when using this new Backup Plan Extension. That cost is listed on the card. - Baddie Movement/Targeting: What happens if a Melee Baddie targets a Gearloc that is completely surrounded? (asked by Justin S)
This should never happen. Melee Baddies will not target an opposing unit it doesn’t have a route to. Meaning, if the closest opposing unit does not have an open adjacent position, then the Baddie will target the closest opposing unit that does have an open adjacent position. - Poison: How does Poison work if I’m hit with it multiple times? (answered by Soka S)
Poison is not cumulative. Rather, the counter will always be set to the more recent Poison Effect value being applied. For example: If you have a Poison 2 Effect Die on you, and a Baddie with Poison 1 targets you with that Skill, your Poison Effect Die should be set to 1. The same is true in reverse – Poison 1 can be bumped to Poison 2 if that’s what came second. As a general rule, a unit can have only 1 of each Effect on it at a time. - Search for Loot: Can a partially “used” Loot (one with multiple charges) be chosen to Search for better loot? (asked by Jamie S)
Yes, as long as the Loot or Trove Loot takes up a spot in your Loot Area, it can be used to “Search for Better Loot.” - Skill Timing: What is the timing of different Skills that happen at the beginning of a Baddies turn? Example: A Baddie has one HP left. It has Recover (#1) and is Poisoned (#1). (answered by Shannon M)
Anything that happens at the same time (i.e. beginning of the turn effects) happen in the order of the player’s choosing. So you can choose for the poison to hit before the recover does!
We (CTG) will add that the “player’s choice” ruling in such situations is very intentional and meant to be part of the strategy for taking down your opposition. Mulmesh is a great example of a Tyrant where this rule can greatly effect the battle’s outcome depending on what Effects are in play at just the right time. - Targeting: Can I choose a target to roll my Atk Dice and a different target for my Skill Die and a different target for my damaging Backup Plan? (answered by Tyler R)
No, if a Skill, Backup Plan, or Attack has the word “Target” in the description, then it must be used on the same target. You only get one target per turn, which is declared before you choose which dice are rolled. That being said, if a Skill or Backup Plan does not use the term target (such as Boomer’s Frag Skill), then that Skill / Backup Plan does not need to be used on the same Baddie as your target. - Atk and Def Dice Pool: What is a dice pool? What if all Def Dice are in use?
Your party shares the same general Atk and Def Dice (white) that are used by the Baddies. Once in a great while, the Def Dice pool may run out (from dice on Baddies, Gearlocs, or in Backup Plans). If a party member runs out of Def Dice to roll, others should exchange Def Dice in their Backup Plans for Atk Dice to accommodate. - Attacking: What does it mean to “Attack” (for Baddies and Gearlocs).
Attacking is the act of rolling Atk Dice (white) on a target. Rolling Skills is not considered an “Attack” even if Skills do Dmg. - Baddie Active Stacks: I had to search for a Baddie in my Active Stacks, what happens now?
Some Encounters require you to face a specific Baddie or type, once found, shuffle your Active Stacks (except for any scouted Baddies) and place your scouted Baddies back on top of the stacks. - Break and Corrosive: How do they work exactly? Is it different for an individual or group?
The Skill “Break” forces you to Exhaust an Atk die that removes HP from this unit. The act of Exhausting this die reduces your Atk Stat by 1 for this battle. The actual Atk die that is Exhausted is there to remind you of this. Corrosive triggers when this Baddie attacks. At that point, all Def Dice that remain (after applying Dmg) in a target’s Active slots must be Exhausted. - Encounter Deck is Visible: I can see the color and title of our next Encounter, is that ok?
Yes. Most Encounters will still be a surprise. If you want total surprise, you can cover the deck. - What happens if a Baddie is removed from the Battle Mat for any reason?
Baddies can be removed from a battle and put back in the BQ for various reasons (Ghillie’s “Lure Away” for example). When this happens, any effects are removed from Baddie, Baddie health is recovered, Initiative die is removed and reset according to Initiative Dice During Battle Rules (page 17) and Baddie is placed back on the Battle Mat under normal Baddie BQ – In Battle rules (page 18). - KO’d Gearlocs: When I am KO’d, can I do anything at all?
When KO’d, you’ve been knocked out and cannot contribute to the battle any longer unless you are Revived (a unique Gearloc Skill your party may or may not have access to). Usually, when a player is KO’d, they become the person that rolls for and moves the Baddies. This helps move the battle along. Or, it’s time to get yourself some popcorn. - Will a Melee Baddie with multiple targets position itself so it is adjacent to as many opposing units as possible?
No. It will follow normal movement rules for Melee Baddies. If it is adjacent to multiple opposing units after moving, it will target both, but will not take this into consideration when moving. - Multi-target Target Selection: If a Baddie has multiple targets () or (), who will it target first?
This Baddie will target the weakest, then the next weakest. On ties, party can choose. - Rolling Atk Dice: As a melee unit, can I roll Atk Dice (for a chance to roll Bones) even if I’m not adjacent to a Baddie?
No. Gearlocs, like Baddies, must have a target within attack range in order to attack (roll their attack dice). - Untargetable Units: Can Untargetable units still be damaged?
Yes. Untargetable units cannot be targeted but they can still take damage in other ways.
Further FAQs can be found on our website here: toomanybones.com/rules
BoardGameGeek is also a great place to ask your rules questions!
Epilogue & Credits
Epilogue
Significant progress toward better things can rarely be achieved without creating new evils that require new remedies. So the cycle of progress goes. New ideas, blind to the past, fuel a perpetual evolution until what remains is only a faded remnant of what was.
Daelore knows this pattern well. Its lands and its history have been wounded by the technological pursuits of its inhabitants. Is repair possible? That answer is not yet written. Maybe it will be soon.
What be you, adventurer? An /evil, or a /remedy?
Credits
- A Game By: Adam Carlson, Josh Carlson
- Artist: Anthony LeTourneau
- Writer: James Boutilier
- Graphic Design: Josh Carlson
- Dice Art: T. Eshelman, Project Khopesh, and Lorc
- Publisher: Chip Theory Games
Liberation Logbook Download: goo.gl/cW5Oq6
Password: wearegearlocs
Think we could explain something better in our rules? We are open to suggestions! toomanybones.com/rules
ChipTheoryGames.com
Expansions for
Too Many Bones
Too Many Bones: Ace in the Troll Card Pack
2020
A five-card promo pack featuring the Ace in the Troll encounter.
120
minutes
Medium Heavy
View expansion
Too Many Bones: Drakkenbright Duo
2018
A 2018 promo chip with a focused stat line and In-Depth Analysis.
120
minutes
View expansion
Too Many Bones: Chinese Edition Baddies
2019
Three Chinese-release Baddies bring poison, flight, engulf, and more.
180
minutes
View expansion
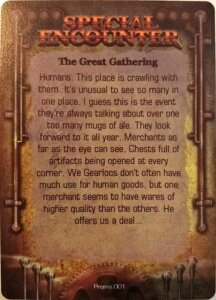
Too Many Bones: The Great Gathering Promo Card
2017
A Special Encounter promo card for the Too Many Bones encounter deck.
120
minutes
Medium Heavy
View expansion
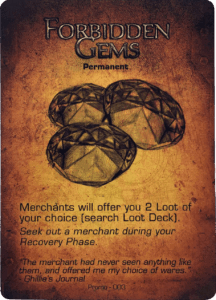
Too Many Bones: Forbidden Gems Promo Card
2017
Trade forbidden gems for two Loot cards of your choice.
120
minutes
Medium Heavy
View expansion
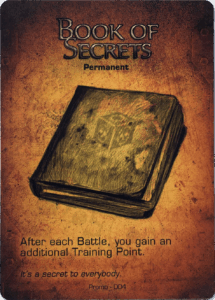
Too Many Bones: Book of Secrets Promo Card
2017
A permanent Trove Loot card that grants an extra Training Point after every Battle.
120
minutes
Medium Heavy
View expansion
Too Many Bones: Age of Tyranny
2018
Expand your original game with content for all 7 Tyrants.
90
minutes
Heavy

View expansion
Too Many Bones: 40 Days in Daelore
2018
Add 40 encounters and 15 unique Baddies to your Too Many Bones adventures.
120
minutes
Heavy
View expansion
