Bitoku
2021
Guide yōkai, kodamas, pilgrims, and lost souls toward transcendence in a richly layered forest strategy game.
120
minutes
1 - 4
player(s)
12+
Medium Heavy


About this board game
Bitoku is a hand-management and engine-building board game for 1–4 players, with a playing time of approximately 120 minutes. Each player takes the role of a Bitoku spirit of the forest, seeking transcendence and aiming to become the next great spirit of the forest.
Players develop their options by managing yōkai cards in hand and placing them in the right locations at the right times. These cards provide abilities, while additional yōkai can be earned during the game to expand each player’s deck, increase flexibility, and help pursue a higher score.
Three yōkai guardians, represented by dice, can be sent to the large regions of the forest on the main board. Their placement opens access to new possibilities, including structures built in specific forest areas and soul crystals that generate resources when certain actions are performed.
- Manage a hand of yōkai cards and build your deck.
- Send yōkai guardians into the forest to unlock options.
- Build structures and use soul crystals to develop your engine.
- Help mitamas, lost souls seeking redemption, with chinkon fireflies.
- Manage pilgrims in your personal domain as they undertake journeys of contemplation and reflection.
The personal domain adds another layer of strategy, where pilgrims share the experiences and learning they gain along the spirit path with their Bitoku. With a wide range of actions and multiple paths to victory, every decision contributes to the journey toward elevation.
In Bitoku, careful card placement, forest development, resource generation, and the guidance of followers come together in a richly layered quest for transcendence.
Thematics
Mechanics
Designer
Illustrator
/pic7182955.jpg)

Board Game Rules for
Bitoku
Bitoku is a game that brings a hefty volume of rules, as you can see while holding it on your hands right now. For this reason, we recommend that you watch the video tutorial that you can find at www.devir.com to complement what you will learn here.
This rulebook will expose the information in the most optimal way, by teaching the round and turn structure first, and then the details of the game board and the player board. Bear in mind that with such a complex game, it is likely that you will come across concepts early in the text that aren’t explained in detail until a few pages later.
You should familiarize yourself with the game components and read all of the rules before sitting your friends around a table to play. You may find it helpful to set up the board in advance as if you were playing the game. Then play a few turns on your own, without any opponents, so you can see how the components move around the board and how to resolve actions in the different areas. In a short time, you will master the game and you will have no trouble finding answers to any questions in the rules.
Then, when you invite your friends and explain to them how the game works, do so by handing over the player aids for them to follow along with your explanation. They are sure to appreciate you being a good host by having prepared the game beforehand!
Long ago, in the time of our ancestors, during an epoch that mankind has since forgotten, a Great Spirit inhabited a forest. Its mere presence imbued everything with life, abundance, and peace. After its given time, the Great Spirit would go away, never to return. A Bitoku spirit, worthy to take its place, would then arise to preserve the harmony of the forest.
This primordial forest, millennia old, stretches from the Earthquake Plains to the foothills of the Akaishi Mountains. The mountains are home to the source of the sacred river Kurirakugan, whose mighty flow traverses the forest before shooting out over the cliffs of Sea’s Claw.
The Forest has no other name. Indeed, all forests are called such after this one. It is one of the Five Hearts of the World, and it is said that in its deepest, densest regions, the trees and vegetation are so thick that Lost Souls who wander there are able to at last find peace and transcend to the beyond—or become lost forever and cease to exist as the last memory of them is forgotten.
There has never been nor will ever be a place like it. Magical and spiritual beings inhabit it, remembered today only in legend and children’s tales…
The time has come for the Great Spirit to move on, and one of the Bitoku must be chosen as its successor. As one of those spirits, can you prove that you alone are worthy of this incredible honor?
The Goal of the Game
The game is played over four rounds, each representing one year left for the Great Spirit. Each round is divided into four phases named for the seasons. At the end of the Winter Phase in the fourth round, the game ends and the Ascension occurs.
Each phase, you will carry out actions to earn Virtue Points (from now on called “VP”). As you earn VP, you will advance along the Spirit Path, which runs around the outside of the board. During the Ascension, you can earn additional VP by completing certain goals. The spirit who advances the furthest along that path will be the winner—and become the new Great Spirit!
1 Game Board & Player Elements
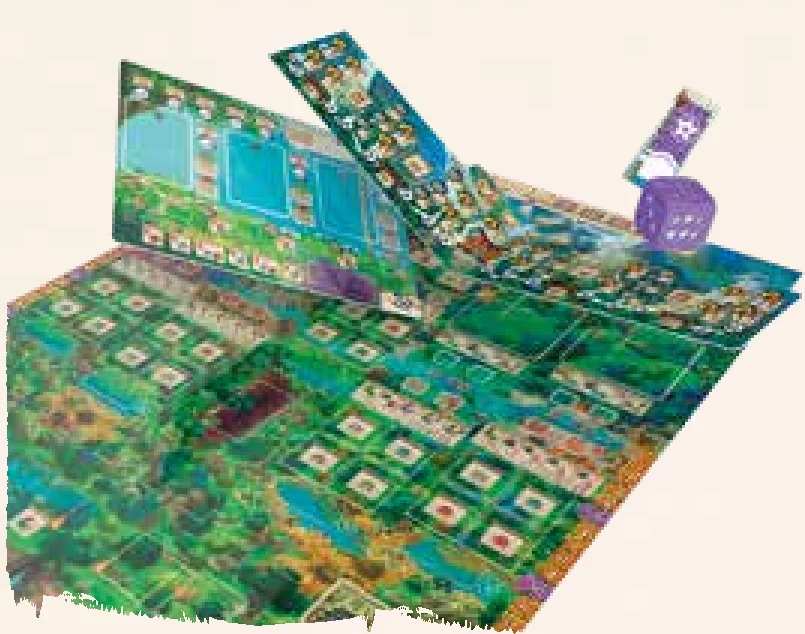
- 1 Game board
- 14 Die-cut pieces (to complete the board)
- 4 Player boards (1 per player) / Tengu board (solo mode)
- 4 Flags / “+100 VP” (1 per player)
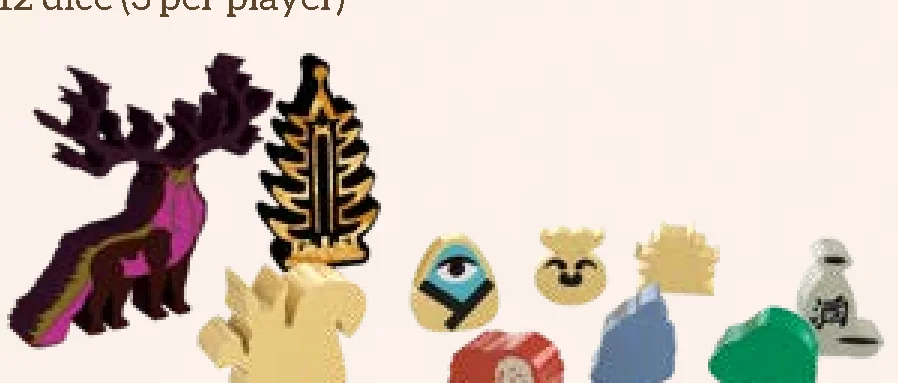
- 12 Dice (3 per player)
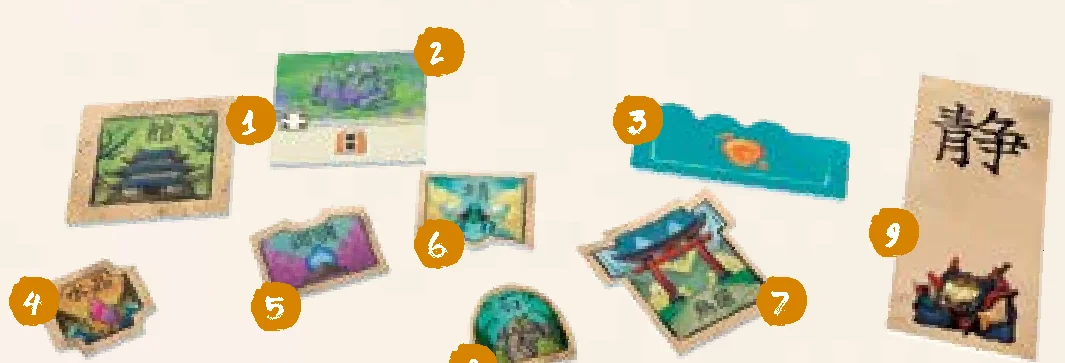
152 Tiles
- 24 Building tiles (6 temples, 6 onsen, 6 farms, 6 ryokan)
- 6 Ancient Building tiles
- 5 Lake Treasure tiles
- 32 Crystal tiles
- 24 Mitama Spirit tiles (5 ara, 5 nigi, 5 saki, 5 khushi, and 4 shinigami)
- 32 Dragonfly tiles
- 16 Gate tiles (8 of type A and 8 of type B)
- 13 Iwakura Rock tiles
- 1 Tengu Attitude tile (solo mode)
172 Counters
- 1 Great Spirit counter (to indicate the round)
- 1 Pagoda counter (to indicate the phase)
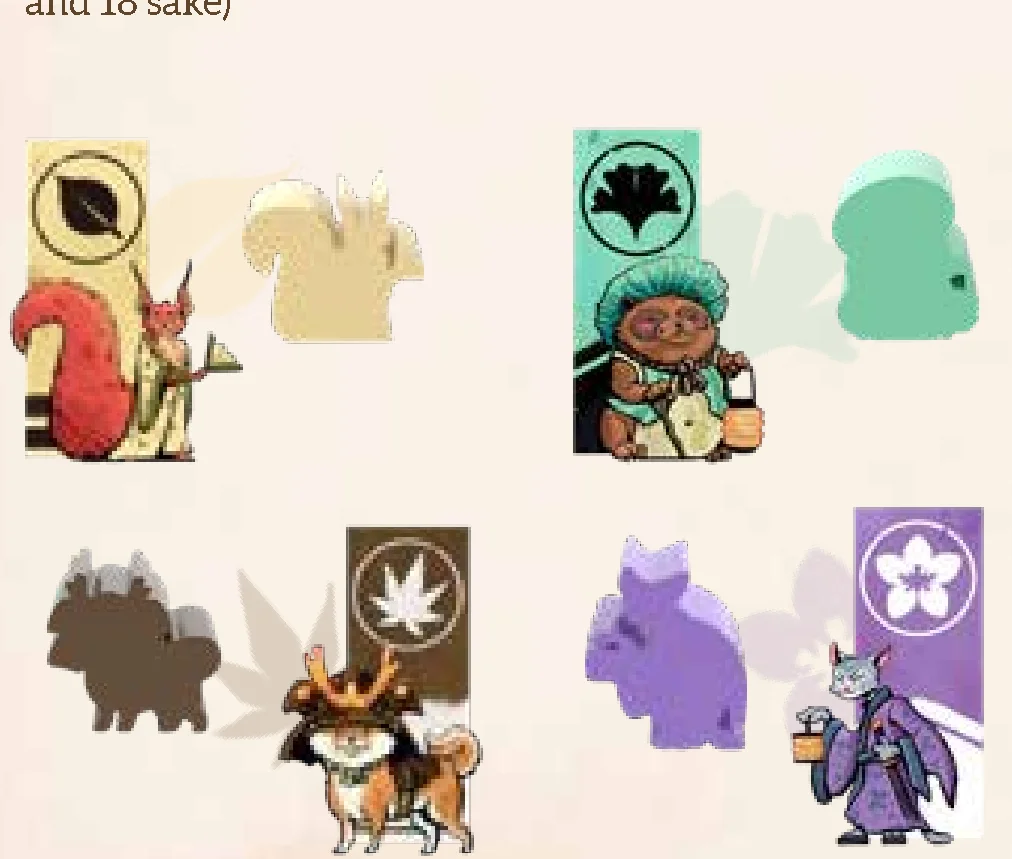
- 12 Player counters (3 per player: for turn order, VP, and their Bitoku Path)
- 44 Pilgrim counters (11 per player)
- 20 Kodama counters (5 per player)
- 24 Construction counters (6 per player)
- 72 Resource counters (18 wood, 18 stone, 18 jade, and 18 sake)
111 Cards
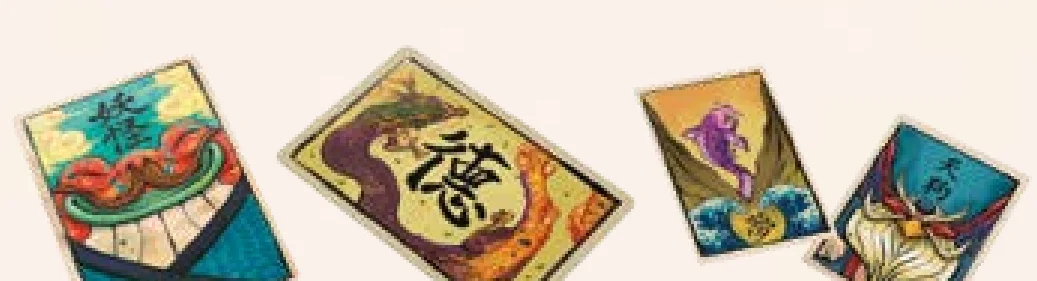
- 29 Yōkai cards (5 Kappa, 5 Imomushi, 5 Nezumi, 5 Kitsune, 5 Shin Ookami, and 4 Yama-Uba)
- 20 Starting Yōkai cards (1 of each type per player)
- 24 Bitoku cards (5 Makoto, 5 Chuugi, 4 Yu, 4 Jin, 3 Rei, 2 Gi, and 1 Meijo)
- 28 Vision cards
- 10 Tengu Action cards (solo mode)
Other Components
- 58 Amulets (+1, +2, +3)
- 32 3x Resources tiles
- 12 Hikaru markers
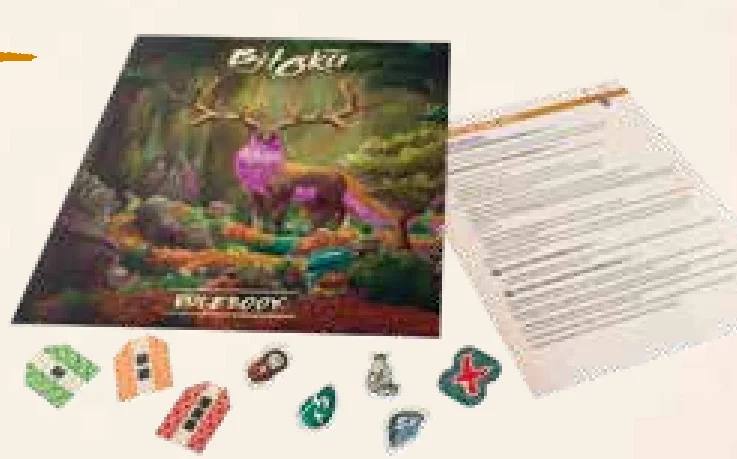
- 1 Rulebook
- 4 Player aids
The path of the Great Spirit is coming to its end. The final step taken by this enigmatic being will mark the beginning of the path for the one who will be its successor. The imprint of its wisdom shall forever be upon the stones, glades, and green of the Forest. Those who are called to take its place have spent centuries, living through many reincarnations, just to prepare for this challenge. The wisest of the Bitoku are now ready. Which of them shall become the new Great Spirit of the Forest?
Setting Up the Board
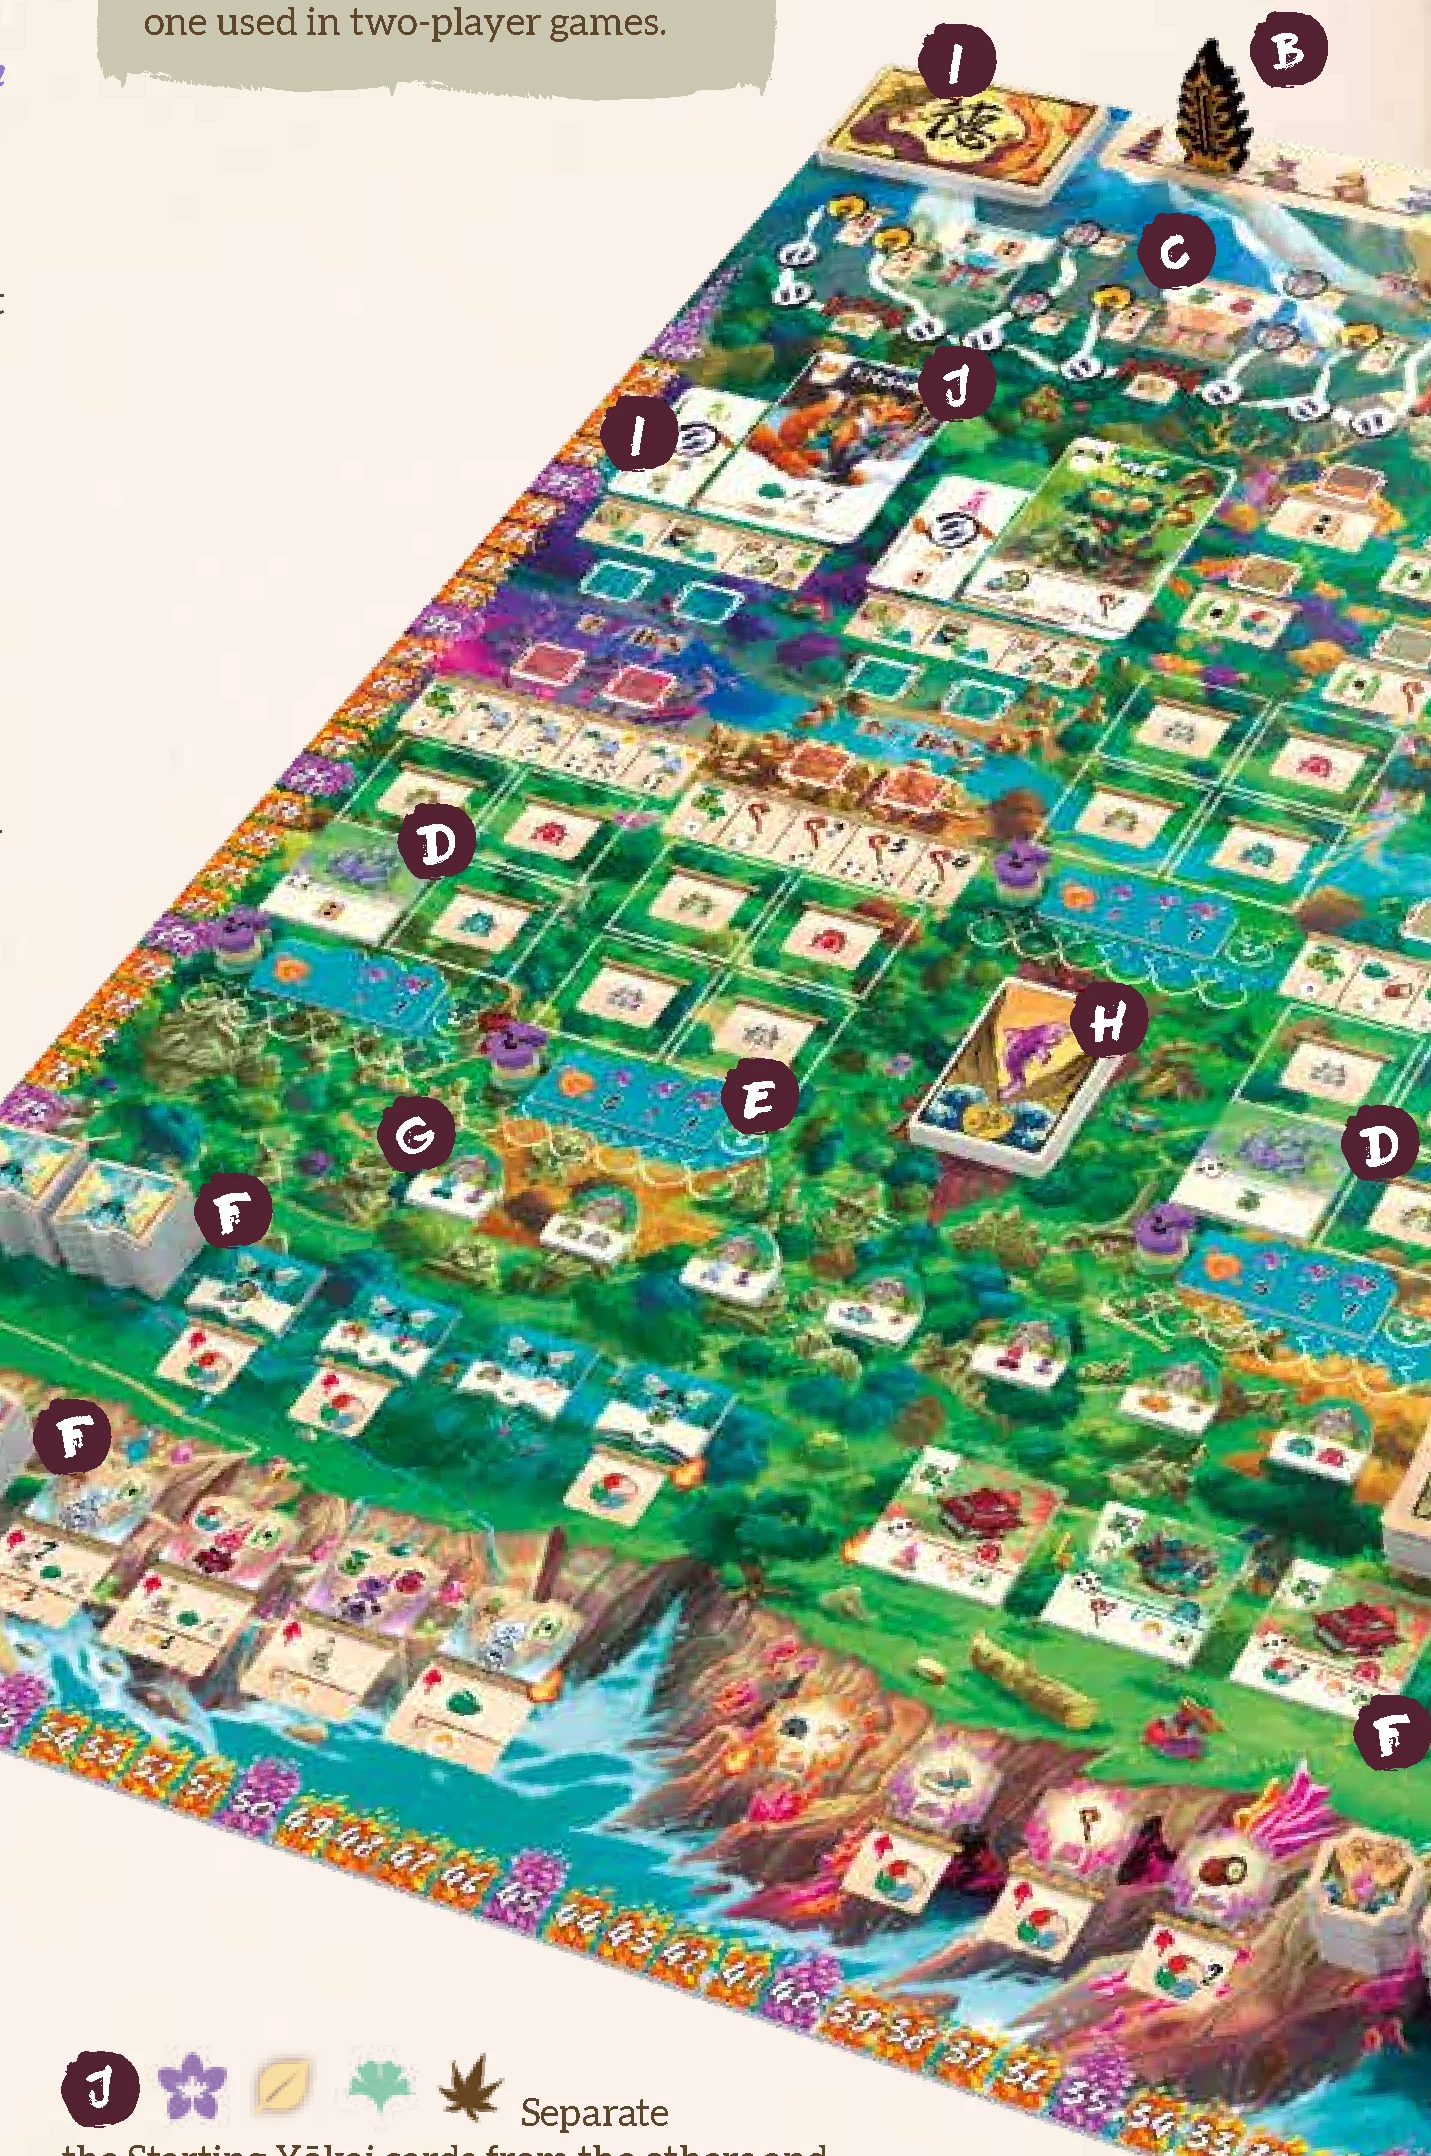
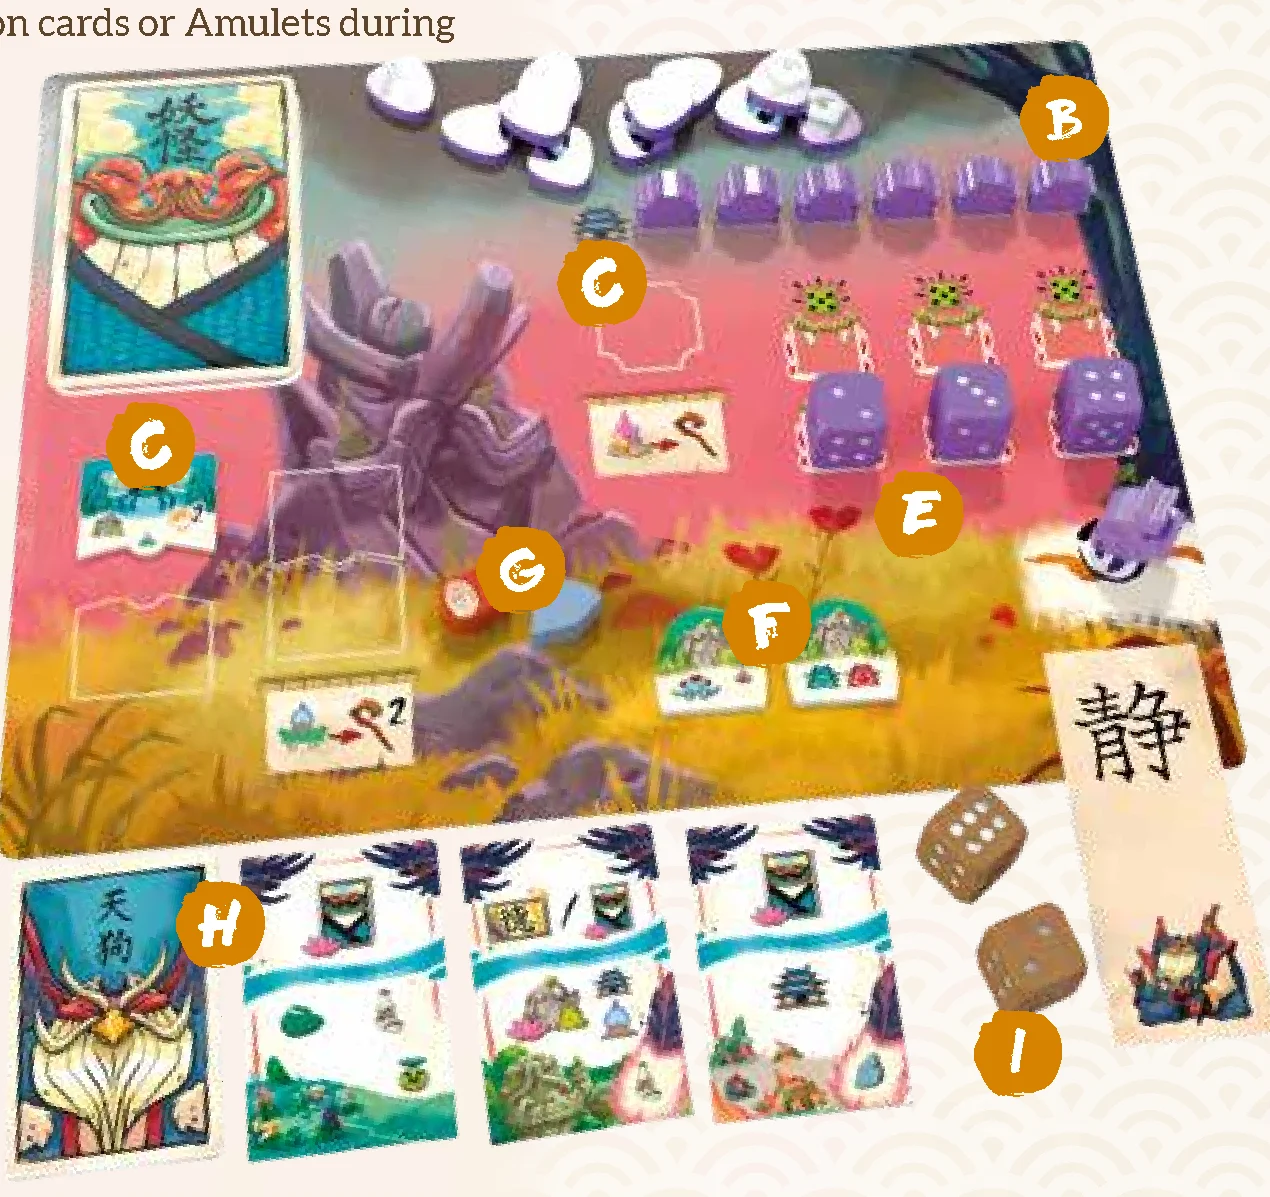
- A. Place the game board in the middle of the table. The side without any gaps is ready for solitaire and two-player games. If three or four of you are playing, add the die-cut pieces in the corresponding spaces as shown in the gaps (the four-player setup always has more spaces on the tiles).
- B. Place the counters: Place the Great Spirit counter on the first space of the Round Track and the Pagoda counter on the first space of the Phase Track (Spring).
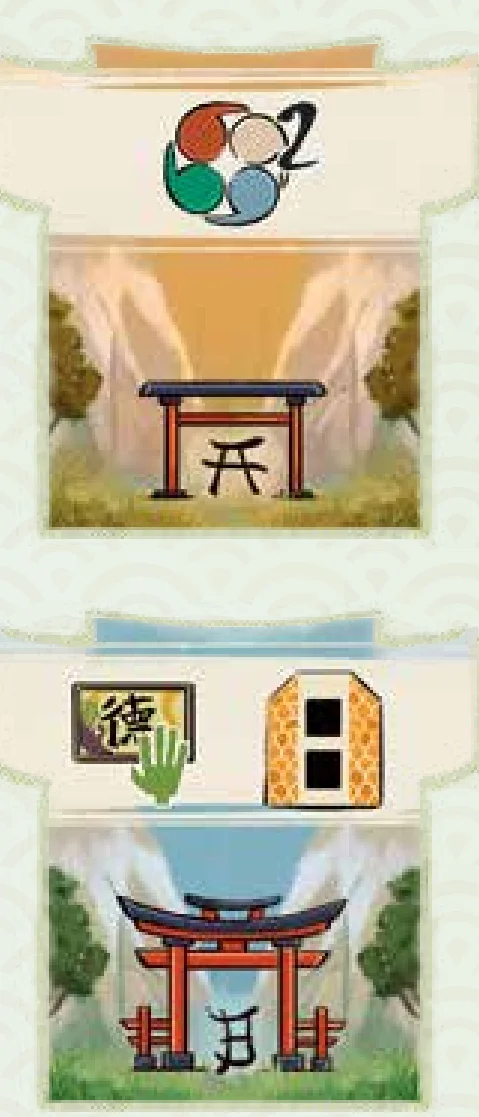
- C. Torii Gate tiles: Divide the Torii Gate tiles marked “A” and “B.” Mix each group separately. Place a random “A” tile on each Torii Gate space marked “A” and a random “B” tile on each space marked “B”, with their rewards side facing up. Put any remaining Torii Gate tiles back in the box.
- D. Ancient Buildings: For a solitaire or a two-player game, mix the Ancient Building tiles and randomly place one on each of the lower leftmost spaces of the four inhabited areas indicated on the board. In three-player games, place only two of these tiles on the lower leftmost spaces of the Lands of Yomi and the Glade of Jade. You don’t need Ancient Buildings in four-player games. Return any leftover tiles to the box.
- E. Forest Treasure tiles & neutral Kodama: Shuffle the Forest Treasure tiles and randomly place one in each of the five Forest regions. For a two-player game, also place a Kodama counter of a neutral color on the fourth space of each region’s Kodama Track.
- F. Tiles supply stacks: Shuffle the Building tiles, Crystal tiles, Mitama Spirit tiles, and Dragonfly tiles separately and place them in stacks with roughly the same number of tiles face down in the matching spaces. Then, turn over enough tiles of each type (from either of the stacks) to fill all of the spaces next to that stack.
- G. Iwakura Rock tiles: Mix the Iwakura Rock tiles and, without looking at them, give one to each player. Then place one face up in each space of the Rock Garden. Put the remaining tiles back in the box.
- H. Vision cards: Shuffle the Vision cards and place them face down on their space on the board.
- I. Bitoku cards: Shuffle the Bitoku cards and place them in their space on the board with space for a discard pile. Turn over and place one Bitoku card in each space of the Hills area of the board.
- J. Yōkai cards: Separate the Starting Yōkai cards from the others and set them aside. Shuffle the remaining Yōkai cards and create a face-down deck in their space on the board with space for a discard pile. Turn over and place one Yōkai card in each space of the Hills area of the board (partially covering the Bitoku cards).
- K. Common supply: Create a common supply for the Resource counters (jade, sake, stone, and wood), the x3 Resource tiles, the Hikaru tiles and the Amulets.
Player Setup
Each player chooses a color and takes the following:
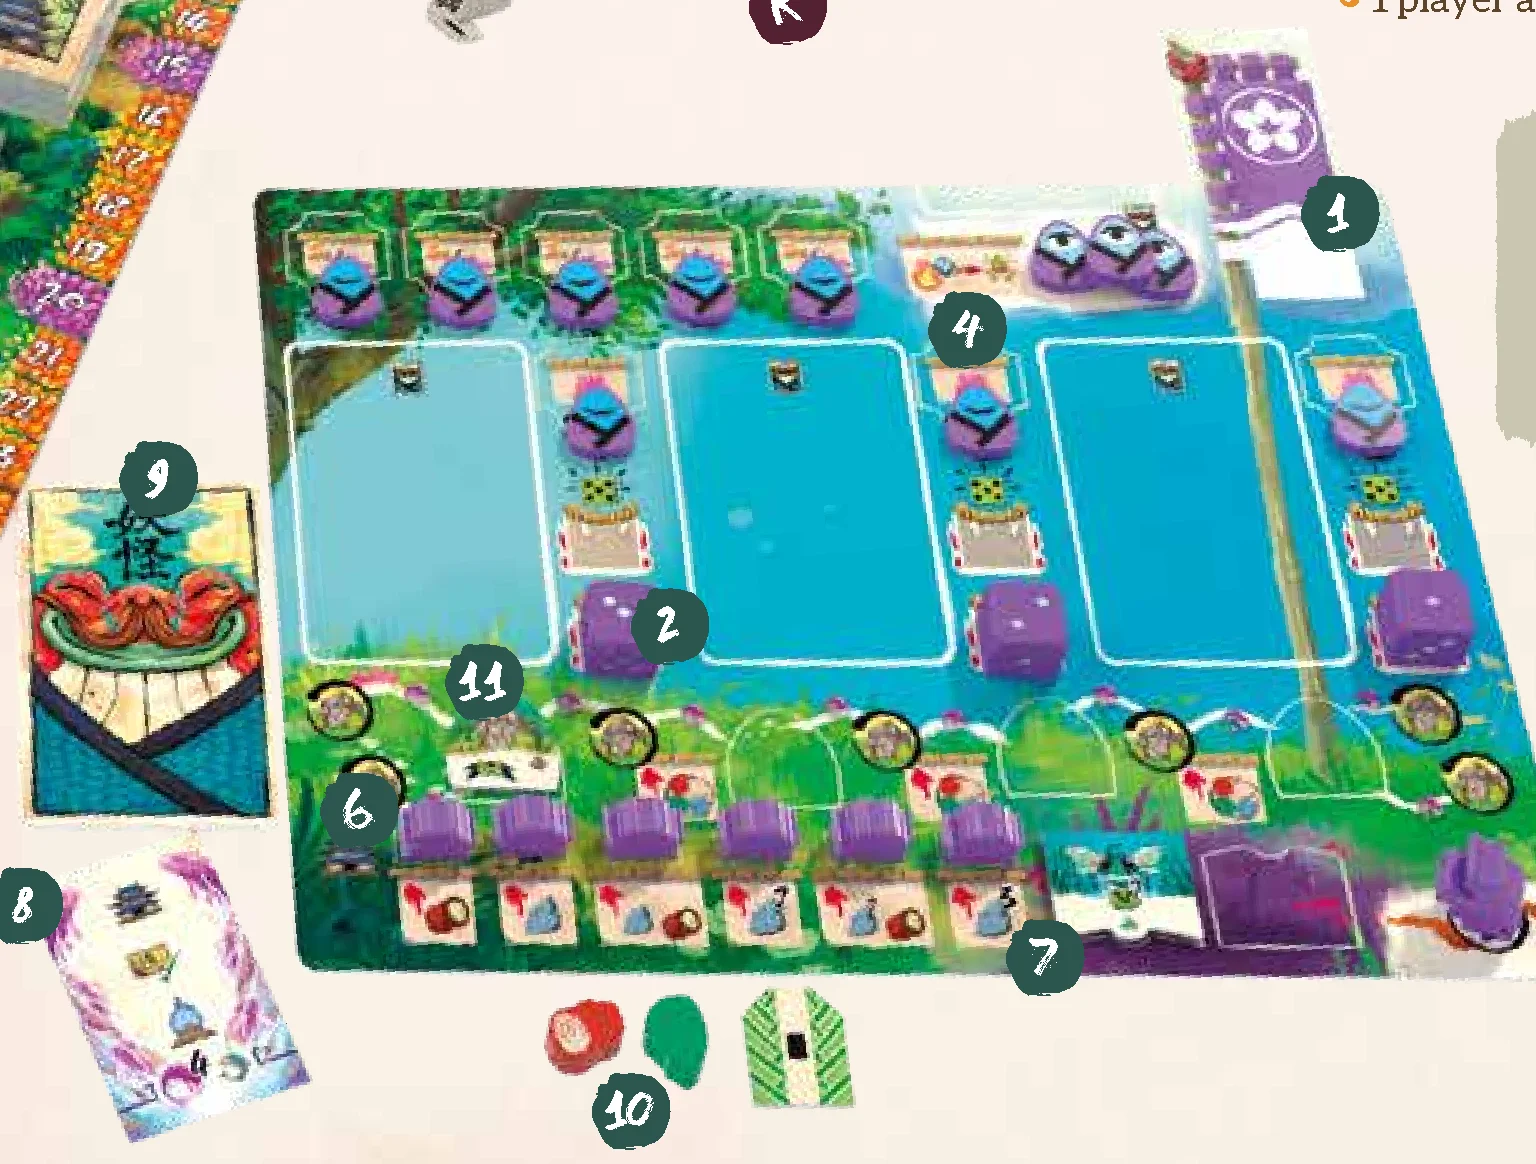
- A player board and a flag of your color: place it in front of you.
- 3 dice: place them on the red spaces on your player board, with these values showing from left to right: 3, 2, and 1.
- 5 Kodama counters of your color: place 1 on the first space of each Kodama Track in the Forest area of the game board.
- 11 Pilgrim counters of your color: Place 3 of them with their awakened side facing up in the upper right area of your player board and the rest with their sleeping side facing up on the 8 spaces in the Crystal areas so they cover the Virtue Points (VP) symbols.
- 3 Player counters of your color: Place 1 on the Bitoku Path on your player board, 1 on the river space at the beginning of the Ascension Track (VP) on the board, and 1 on the Turn Order Track. Mix the tokens of all players on the Turn Order Track and place them on the track in random order.
- 6 Building counters: place them on the spaces in the Building area of your player board, covering the VP symbols.
- 1 random Dragonfly from any face down stack: place it face up in the matching area of your player board.
- 1 random Vision card from the deck: place it face up next to your player board.
- The set of 5 Starting Yōkai cards of your color. Shuffle your Yōkai cards together and place them face down next to your player board. Return any unused Starting Yōkai cards to the box.
- 1 wood, 1 jade, and 1 “+1” Amulet: place them next to your player board.
- Place the Iwakura Rock you received in the leftmost space on your player board.
- 1 player aid with the Game order and Icon summaries.
Note: Except for the face down cards and tiles and the Yōkai cards in the players’ hands, all game elements (counters, tiles, Vision cards, etc.) are public knowledge and available to all players.
Icons and Symbols
Bitoku uses a variety of icons and symbols to help you through the game and communicate valuable information. It may seem like a lot at first, but you will quickly learn to identify them. You can find them all in the player aid that briefly explains each symbol, as well as reference pages where they are explained in more detail.
- A black number to the right of any icon indicates the number of times you can take an action. If there is no number, you only take that action once. (e.g., Receive 2 VP; Obtain 1 Dragonfly).
- A red hand means that you must pay that Resource, returning it to the common reserve, in order to obtain a tile or perform an action.
- A yellow hand next to an icon indicates that we can take that action paying a lower number of Resources (of any type), by the amount indicated. (e.g., Gate allowing you to purchase a Mitama Spirit tile by paying 2 Resources less than the price shown).
- If a Virtue Points icon is orange, it means that you earn those VP immediately as soon as you take that action.
- If the icon is purple, you do not earn those VP until the end of the game.
- A gray VP indicates a loss in VP.
- When you see a slash “/” between two icons, you can decide which one of those to take (e.g., receive two jades, two sakes, or one jade and one sake; construct a Building with a discount of one Resource, or obtain a Crystal with a discount of one Resource).
Resources
Resources are used to pay various costs during the game, and can be acquired from tiles, cards, and other sources. There are four types of Resources in the game: Jade, Sake, Wood, and Stone.
When you receive Resources, place them next to your player board. At any time, you may return 3 Resources of the same type to the supply and take a x3 Resources tile for that Resource type in exchange (or vice versa).
Limit of Components: There is no limit to the number of Resource tokens or Amulets available during the game at any given moment. If you run out of any of these components and need more, just use any kind of temporary substitute, like coins.
Amulets
These mystical tokens are used by Guardians to enhance their powers. When you obtain them, take them from the common pool and place them next to your player board. Any time you move a die to the game board, you may spend any number of Amulets to increase the value showing on that die (+1, +2, or +3 as marked on each Amulet). Amulets cannot be broken down into other Amulets of smaller denominations: you can’t change a +3 Amulet for three +1 Amulets.
Movement Points (MP)
You can earn Movement Points (MP) as the effects of some cards and tiles. MP must always be spent immediately when gained: they cannot be saved for later and are lost if not used. Each MP may be spent to carry out one of the following actions. You may spend MP to take different actions or repeat the same action more than once, but you must fully resolve each action before spending the next MP.
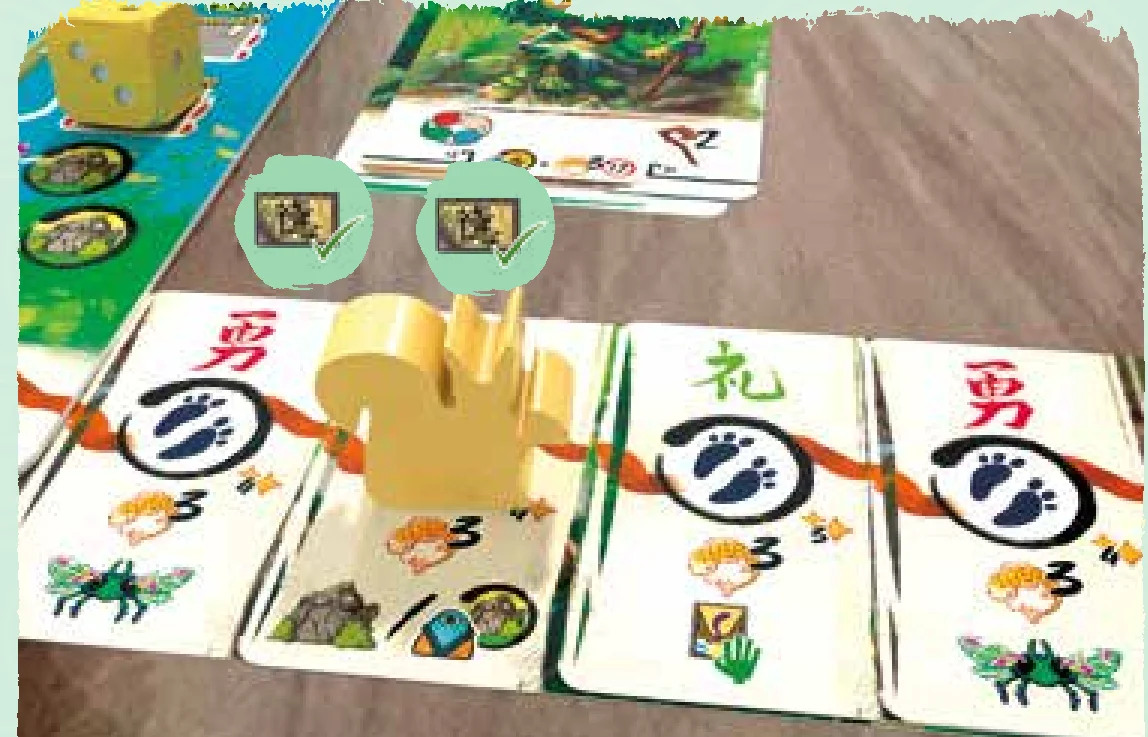
- Move Your Spirit Along Your Bitoku Path: If you have at least one Bitoku card on your Bitoku Path beyond the space occupied by your Player counter, you may spend 1 MP to move your counter to the space on the next card in your path. It is complete now and you take the action shown.
- Start a New Pilgrimage on the Paths of Wisdom: If you have a Pilgrim available in your player board, you may place it on the starting space (next to the starting Gate) on any of the Paths of Wisdom that you wish to follow.
- Move a Pilgrim Forward on a Path of Wisdom: If you already have a Pilgrim on a Path of Wisdom, you may move it forward one space by paying 1 MP.
Yōkai Cards and Dice
The duties of a Bitoku who aspires to become the Great Spirit of the Forest would be laborious and arduous if they had to do it all alone. Fortunately, the Yōkai—Guardians who watch over and protect the Forest—are there to help. Their presence in the game is represented in the form of cards and dice. Using these is fundamental to the strategy of the game, and you must use them well if you hope to become the next Great Spirit.
During each round, you will use 3 cards and 3 dice.
Yōkai Cards
Yōkai cards are played onto your player board to allow you to perform various tasks and receive rewards. You begin the game with a basic deck of 5 Starting Yōkai cards, but you can gain more powerful cards during the game. In addition, they can give you VP at the end of the round in which they are played.
- Obtain a Yōkai card from the common deck: Take the top two cards, choose one and keep it in your hand. Then place the other face down back at the bottom of the deck.
- Obtain the Yōkai card from the Hikaru Hill: Take the Yōkai card from the Hikaru Hill you just moved your dice to. Place it in your hand.
- Draw a Yōkai card from your deck: Put it in your hand. Any time you draw Yōkai cards, always take them from the top of your own deck. Your deck is kept face down next to your player board and you may not look at those cards at any time. The cards in your hand should be kept secret from the other players.
When you discard Yōkai cards, place them in a face up discard pile next to your deck. You may examine the cards in your discard pile at any time, but under no circumstances can you draw cards from here.
If you need to draw a card and there are no cards left in your deck, shuffle your discard pile and create a new face-down deck, then draw the cards you need.
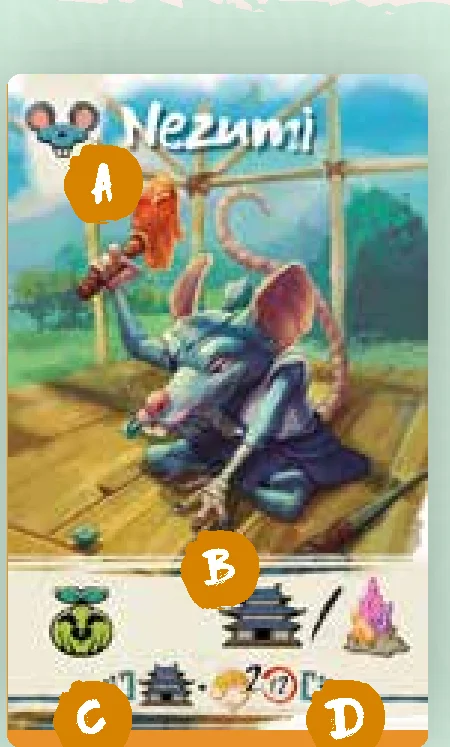
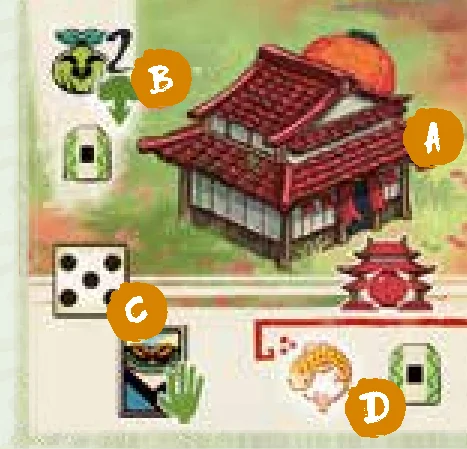
Each Yōkai card shows:
- A: Their type
- B: The action they offer when played
- C: The VP they can grant you during the optional Spirit’s Virtues step during the Winter Phase
- D: A red circle indicating that you can obtain a maximum of 12 points by playing the Spirit’s Virtues (see player aid). Also, the starting Yōkai cards show a symbol under the type icon matching the color of the player’s pieces.
Example: The card in the illustration is a Nezumi type; its action allows you to advance one of your Kodamas one space forward and either construct a Building or obtain a Crystal. If you choose to remove it during the Winter Phase, you will receive 2 VP for each building that you have constructed (Max. 12).
Dice
Dice begin each round on the red spaces of your player board. The value on the die determines how powerful that Yōkai is: the higher the value on the die, the more powerful the action will be when you use that die. Also, as only Yōkai can cross the sacred River, only dice can be used to gain the Favor of the Forest by moving over the river to the Hills.
Before you can use a die, you must unlock it, moving it to the green space. There are three ways to unlock a die:
- Play a Yōkai card in the space next to the locked die.
- Use an action that allows you to unlock a die.
- Discard a Pilgrim: You may use a locked die from your Personal Board if you discard a Pilgrim counter you have available. If you do, you must use that die immediately. The Pilgrim is removed from the game.
The Player Boards
Over their centuries-long lives, each spirit that aspires to become the Great Spirit of the Forest will establish their own personal dominion over a part of the Forest. Within this safe haven of tranquility, they can reflect and grow in self-awareness.
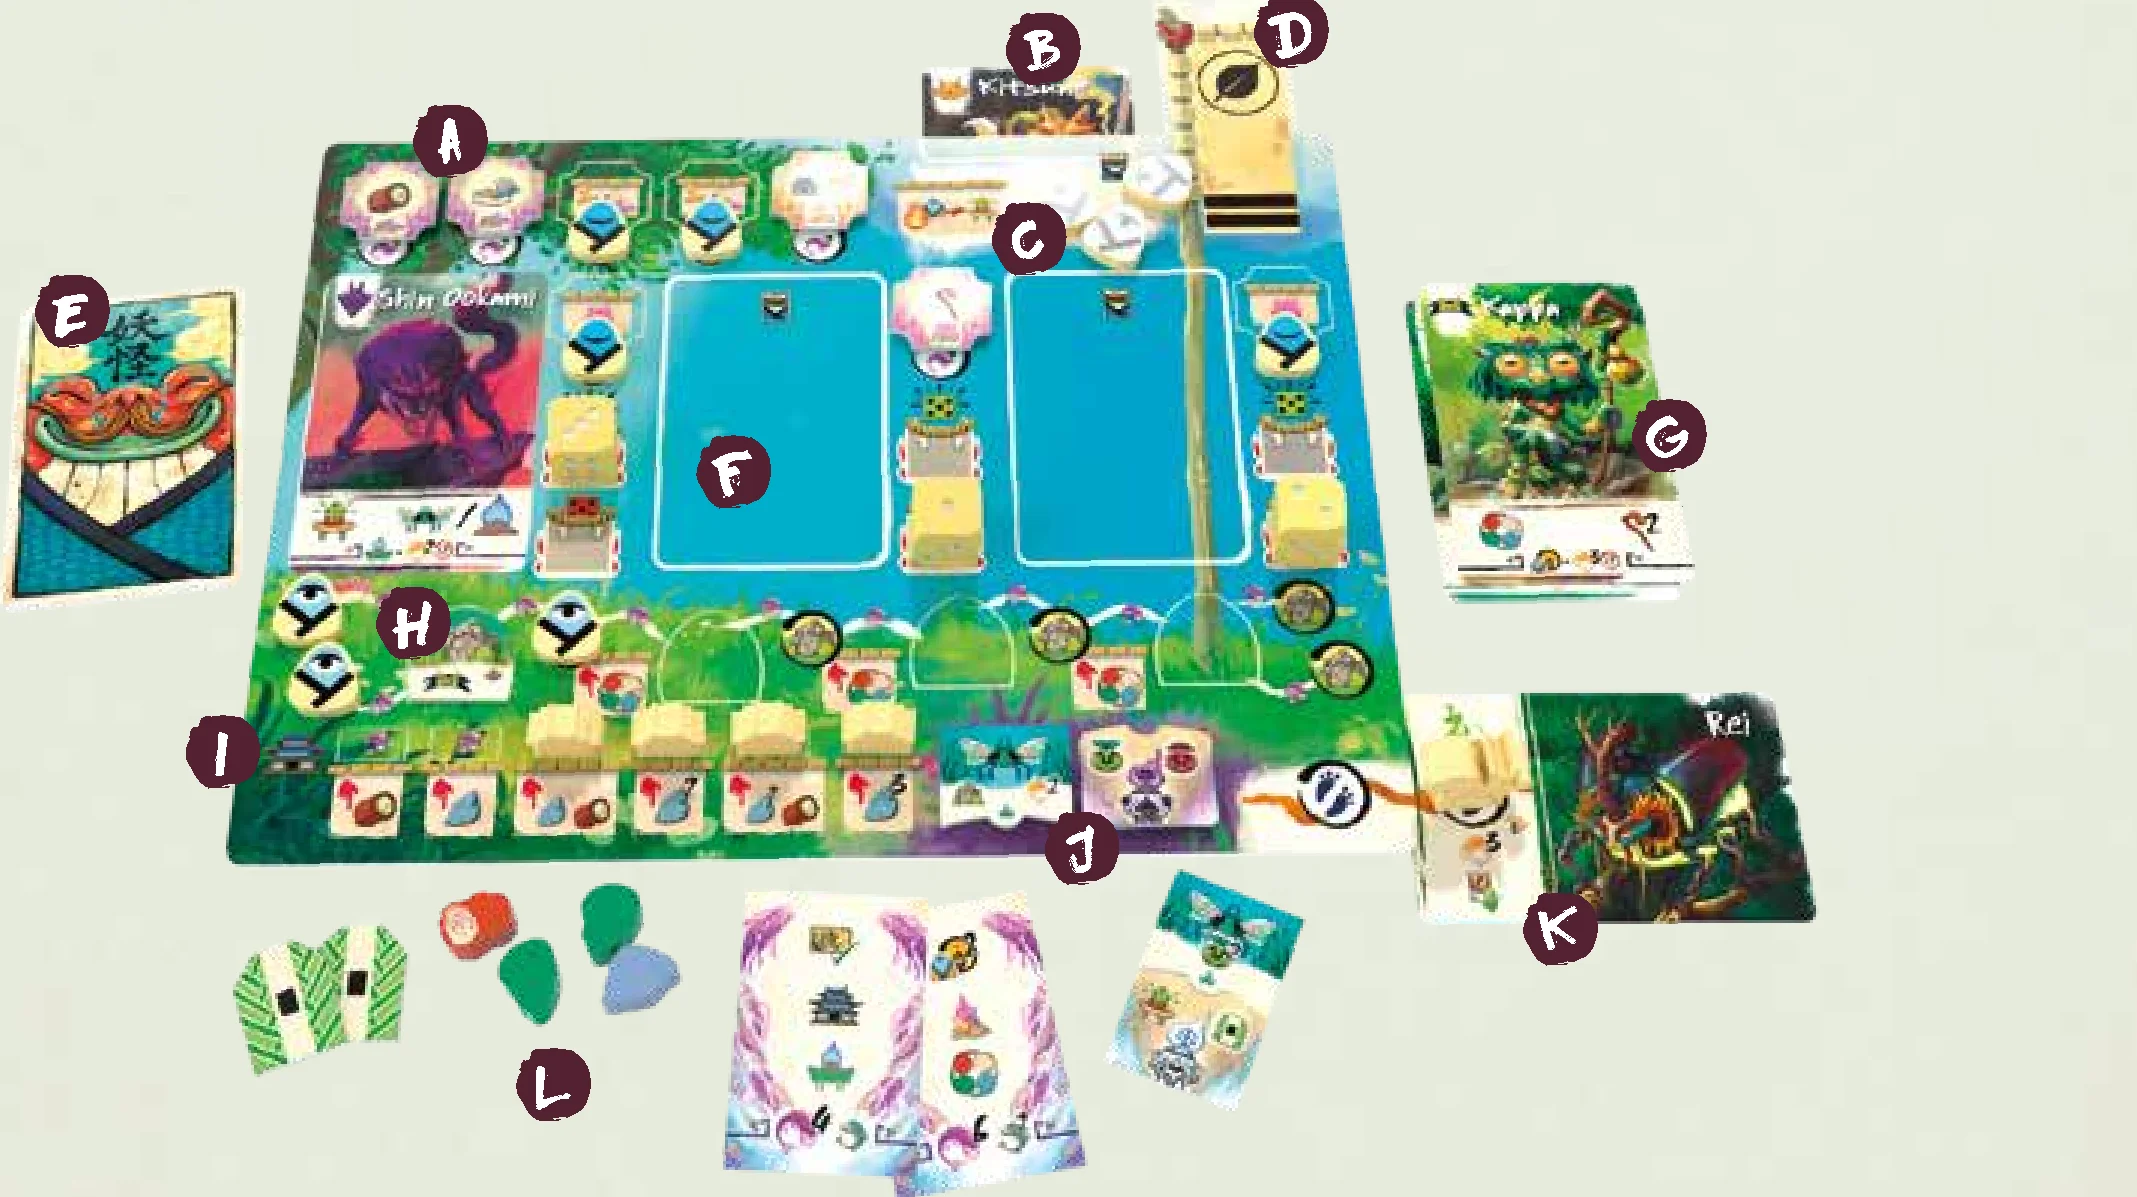
You will use your player board to place Yōkai cards and organize other elements you gather during the game. Your player board is divided into the following zones:
- A: Pink and yellow Crystals spaces. Each Crystal gives another Pilgrim and reveals end-game VP.
- B: Virtue of the Spirit slot for discarded cards.
- C: Available Pilgrims pool.
- D: Flag space.
- E: Yōkai deck.
- F: Yōkai card spaces, holding locked/unlocked dice and crystal slots.
- G: Yōkai discard pile.
- H: Iwakura Rock Path.
- I: Building Counters track.
- J: Resting Place of uncombined Mitama Spirit and Dragonfly tiles.
- K: Bitoku Path cards.
- L: Next to board area: combined Mitama & Dragonflies, Vision cards, Resources, and Amulets.
The spirits of the Forest are united in harmony and symbiosis. In all they do, they aid one another, without conflict. Hatred is unknown here, and lush greenery grows everywhere, for the Bitoku oversee everything and together they take care of the Forest. The Great Spirit is the foremost of these, and all can rejoice in the plenitude of its efforts.
Bitoku is played over four rounds, each divided into four phases inspired by the seasons of the year:
- Spring: The Awakening of the Forest. The players prepare their Yōkai cards and gather the fruits of their earlier labors.
- Summer: The Call of the Guardians. The players call upon their Yōkai and perform actions in the various areas on the board.
- Autumn: The Reverence. Based on their actions in the Summer, the players determine the new turn order.
- Winter: The Repose of the Forest. The players recover their pieces and prepare the board for the next round.
At the end of the last round, the Ascension will begin, when the final VP are awarded and the new Great Spirit will be chosen.
Spring: The Awakening of the Forest
The cold winter’s snow turns to crystal-clear streams, flooding the woods with fresh and green. The Forest erupts in a festival of life and exuberance as the animals awaken from their hibernation and the spirits resume their activities, taking care of the Forest. Spring is the time when life flourishes, and the Yōkai gather to assist the Bitoku.
During this phase, the players receive their Yōkai for the round and collect income. All players may act simultaneously during this phase, performing these two steps:
- A. Summon the Yōkai: Each player draws cards from their Yōkai deck until they have 4 cards in their hand. It is possible for players to start this phase already with 4 or more cards in hand from previous rounds; in that case, they should not draw more cards from their deck. Then, they must choose which of those cards to discard, finally keeping a total of 3 in hand.
- B. Reap the Fruits: Each player now collects the rewards indicated on the Dream Crystals (purple) on their player boards. You may collect these rewards in any order you choose (see player aid).
As soon as all players have completed both steps, the Summer Phase can begin—move the Pagoda counter to the next space on the Phase Track.
Summer: The Call of the Guardians
As spirits gain wisdom and become more powerful, they also grow proportionally larger. Some even grow to the size of oak trees and acquire masterful abilities. These are known as Yōkai Guardians. Summer is the season of hard work. This is the time that those who hope to become the Great Spirit call upon these Guardians for aid.
During this phase, the players will take individual turns. The order of turns is determined from left to right by the location of the Player counters on the Turn Order Track.
When it is your turn, you must choose one of these four basic actions (detailed in the following section):
- A. Play a Yōkai card from your hand.
- B. Use an unlocked die on your player board.
- C. Cross the River.
- D. Pass.
Once you have completed your actions, it is the next player’s turn. Players continue taking turns in this way until all players have chosen to pass. Then the Autumn Phase can begin—move the Pagoda counter to the next space on the Phase Track.
Autumn: The Reverence
The Great Spirit of the Forest is a generous being, for with every step that it takes, life springs forth from its footprints. The Great Spirit of the Forest is a strict being, for every thing that lives must die when its time has come. The Great Spirit of the Forest is a fair being, for the decay of the expired feeds the fruit from whence new life is born.
Autumn is the season for reflection. At this time, the aspiring spirits present themselves humbly before the Great Spirit to review their deeds. Players take the following step simultaneously:
Take One Step Forward: The new turn order is decided at this point. The player whose die is on the highest position in the Home of the Great Spirit places their Player counter in the first position on the Turn Order Track, pushing the rest of the counters on the track to the right to make room. Then the player in the second highest position places their counter in the second position on the Turn Order Track, and so on.
If you have more than one die in the Home of the Great Spirit, only the one in the higher position is counted. If there are no dice in the Home of the Great Spirit, the turn order remains unchanged.
Once this step is resolved, the Autumn Phase ends and the Winter Phase can begin—move the Pagoda counter to the next space on the Phase Track.
Winter: The Repose of the Forest
Snow and ice overtake the Forest. The Great Spirit contemplates how the flakes light upon the branches of the evergreens and the way the ice slows the heartbeat of the ponds. Silence settles in as the Forest begins to rest. Winter is the season where the Forest recovers its strength for the coming cycle, and is the time for aspiring spirits to prepare themselves for their next challenges.
All players must follow these five steps in order:
- A. Guardians Return Home: Take your dice back from the game board and return them to the red spaces on your player board on the order of your choice. All dice keep their current values.
- B. The Spirit’s Virtue: If you have a total of at least 5 Yōkai cards (between your deck, your player board, your hand, and your discard pile), you may choose to permanently remove one from the game to earn VP. This step is optional.
Using the new turn order, each player may remove 1 of the 3 Yōkai cards on their player board and score the VP shown at the bottom of the card. If you do so, place the card face up so it is visible under your player board (next to the flag), leaving its type visible. You will no longer be able to use that card for the rest of the game. At the end of the game, this card still counts when you score your Iwakura Rocks.
Cards discarded this way will award VP by counting the number of copies of each item shown currently under your control, multiplied by the value of the VP icon, always up to a maximum of 12 points. (e.g., receive 2 VP for every Building that you have constructed, up to a maximum of 12 VP).
- C. The Yōkai Say Farewell: Take all of the remaining Yōkai cards on your player board and put them in your discard pile. Keep any Yōkai cards in your hand for the next round.
- D. The Great Spirit Takes a Step: Advance the Great Spirit counter one space forward on the Round Track. If the Great Spirit reaches the Ascension space, skip the next step and proceed directly to the Ascension Phase.
- E. Snow in the Forest: Prepare the game components for the next round:
- Remove all Bitoku and Yōkai cards from the game board and discard them. If either deck has no cards left, reshuffle the matching discard pile and create a new deck at this time.
- Return the « Hikaru » tiles from the Hills to the common supply.
- Draw a Bitoku card and then a Yōkai card for each space in the Hills.
- Remove the Mitama Spirits, Dragonfly, Building, and Crystal tiles that are in the last space (furthest away from the stack) of each of their areas on the game board from the game. Push the remaining tiles on these paths forward until they fill all of the spaces at the end of their paths. Then, turn over enough tiles to fill in all of the spaces on each path. Remember: The Iwakura Rocks are never refilled.
- Move the Pagoda counter back to the Spring space on the Phase Track.
Actions in the Game
There are three main ways to gain actions during the game:
- Basic actions: Your options during your turn in the Summer Phase: play a Yōkai card, use an unlocked die, cross the river, or pass.
- Forest and Building Actions: Granted by the regions of the Forest when you place a die there. Forest Actions are different for each region. The Building Action available depends on which Buildings are available in the region you place your die on.
- Board/Tile/Card triggers: Some spaces on the game board, some tiles, and some Yōkai cards also allow you to take the action shown. These actions must be resolved at the moment the space, tile, or card is activated. This may trigger additional actions, possibly causing a chain of actions, one after another.
A. Play a Yōkai Card from Your Hand
The Yōkai cards represent the guardian spirits of the Forest. They are divided into five types, each specialized in a different kind of effect. When you choose this option, you will play one Yōkai card from your hand, placing it on an empty card space on your player board Yōkai area. Then, follow these three steps:
- Unlock the die next to the Yōkai card you just played, moving it from the closed red space (to the right of your card) to the green open one, if needed.
- Activate the Yōkai card by carrying out the action shown on the card. This step is optional.
- Harmonize the Crystal, if you have one connected to that card space, by carrying out the action shown on the tile. You may do this before or after you activate the Yōkai card. This step is optional.
Things to Consider When Playing a Yōkai Card:
- You may not play a Yōkai card on a space that is already occupied by another card.
- You may play a Yōkai card even if the die in that space has already been unlocked or even played on the board.
- If all three of your card spaces are full, you must choose a different option on your turn.
- You may not move a Yōkai card to another space after you have played it.
- Each card space can only have one Crystal connected to it for the entire game.
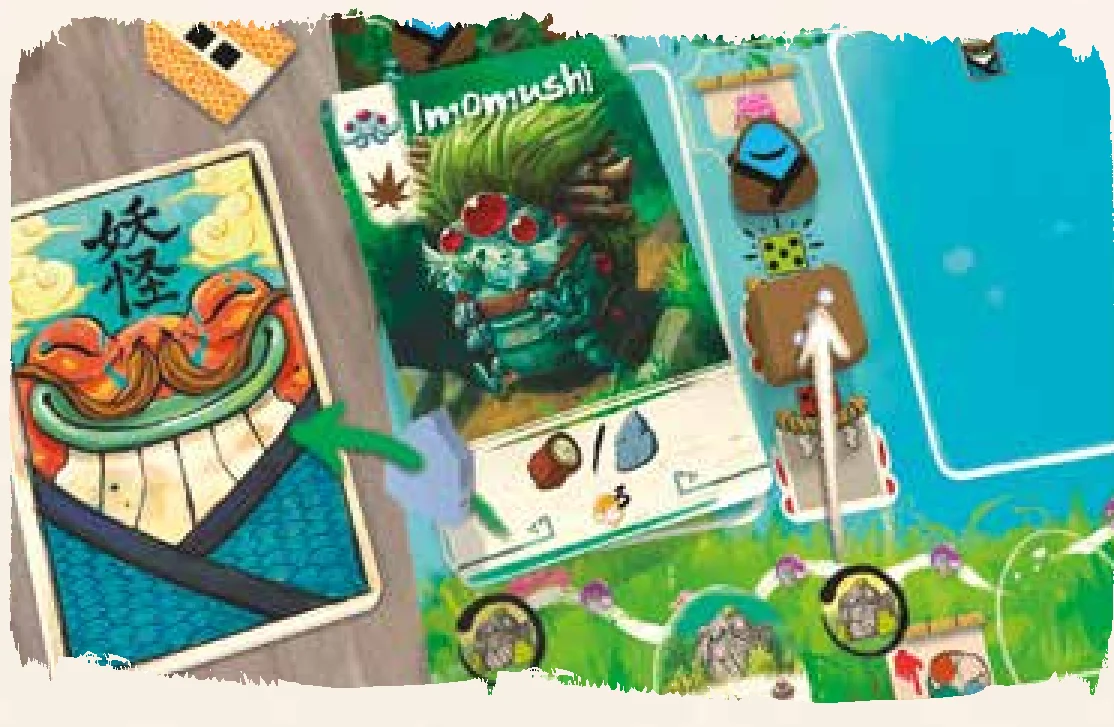
B. Use an Unlocked Die on Your Player Board
The most powerful Yōkai are the Guardians, represented in the game by dice. When you use one of your unlocked dice, you will always place it in the Forest area of the game board. The Forest is divided into five regions. Each region has a number of spaces where dice can be placed. You can only place a die in a space that is not already occupied by another die.
When you place a die in the game board, follow these steps:
- Reinforce the Guardian: Before you place a die (and only at this time), you may increase the value shown on the die by discarding any number of Amulets you have to the supply. Each Amulet you spend in this way increases the value of the die by 1, 2 or 3, depending on the value of the Amulet. The value of a die can never be increased above 6 (any additional points are lost). This step is optional.
- Visit the Forest: Move the die to any empty space on the Forest area of the game board. You may have more than one die in the same region (over multiple turns), as long as there are still empty spaces available.
- Perform Forest and Building Actions: You may now use the Forest Action and/or one of the Building Actions that are available in the region where you placed the die. You may perform these actions in any order you choose. This step is optional.
Forest Actions
You may only use a Forest Action if the die you placed has an equal or higher value than all other dice already in that region. Note that any dice that have crossed the river over to the Hills are no longer counted as being in the Forest region.
Building Actions
If there are any Buildings in the inhabited area attached to that Forest region at the moment in which you place the die, you may perform the action shown on one of those Buildings. Unlike Forest Actions, you may use a Building’s action regardless of the values of other dice in that Forest region. But, your die value must still be higher than or equal to the value shown on the Building you want to use.
Property Bonus: If you perform a Building Action on a Building that was constructed by another player (that is, one marked with another player’s Building counter), the Building’s owner receives the Property Bonus on the tile. This is in addition to the effect that you are using and comes from the common supply (you don’t pay them the bonus yourself). There are three types of Property Bonuses:
- The owner earns 1 VP.
- The owner earns 1 VP or a +1 Amulet (owner’s choice).
- The owner earns 1 VP and a +1 Amulet.
You do not receive a Property Bonus if you use your own Building.
Things to Consider When Playing Dice in the Forest:
- You may not perform more than one Forest Action per die placement.
- You may not perform more than one Building Action per die placement.
- You may not perform a Building Action from a Building you just built this turn.
- You may not place a die from your personal board onto any space in the Hills over the other side of the River.
- You may use a locked die by permanently discarding a Pilgrim available on your player board.
- You may perform the Building Action before the Forest Action or vice versa, but either way you must complete the first action before beginning the second one.
- Both types of actions are optional: You may place a die without taking either type of action.
One Quick Tip to Make Bitoku More Difficult
After your first few games, you can increase Bitoku’s difficulty simply by adjusting the Forest action rules: You may only use a Forest Action if the die you placed has a higher value than all other dice already in that region. If any of those dice is showing a value of 6, you have to spend an Amulet at this moment in order to “virtually” increase your value over 6 for this Forest action only (do not change the top face of the die). Note that any dice that have crossed the river over to the Hills are no longer counted as being in the Forest region.
C. Cross the River
If you have one or more dice in the Forest area of the game board, you may choose this option. If you do, follow these steps:
- Move Your Die Across the River: Choose one of your dice in the Forest and move it to an empty space in the matching Hikaru Hills area on the other side of the river. In two-player games, the spaces on the other side of the River can reach both Hikaru Hills on each side of the board (as divided by the Home of the Great Spirit).
- Perform an Act of Contrition: Only the humble can cross the sacred Kurirakugan River, so you must reduce the value of your die by 1 point. If the die has a value of 6, however, you must reduce its value by 3 points instead. Note: You cannot cross the river with a die that has a value of 1 because it cannot pay for the Act of Contrition.
- Obtain a Favor of the Forest: Gain one of the available benefits shown in the space you moved your die to. You can only move your die to an empty space, but you can choose any available Favor. Each Favor can only be gained once per round in each area, so players will cover them with Hikaru markers after claiming one of them to indicate that one is not available until the following round. In two-player games you will be able to access the Favors of the two Hills connected to the space where you place your die when crossing the river.
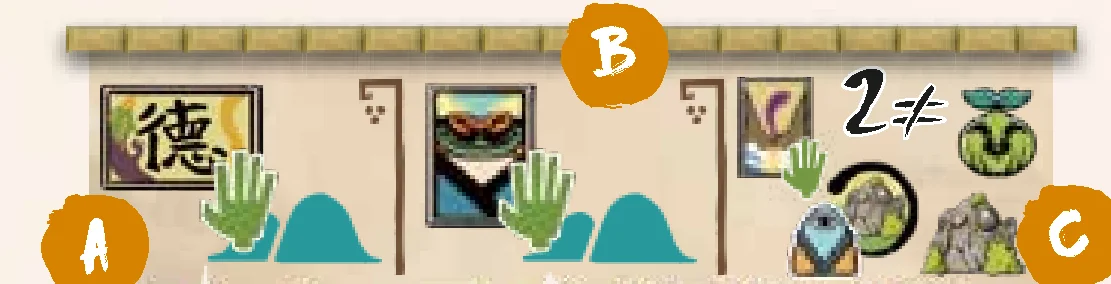
These are the three Favors available in each area:
- A: Take the Bitoku card from this space. Place it face up below your player board to begin or extend your Bitoku Path.
- B: Take the Yōkai card from this space. Add it to your hand. You may play this card during a later turn.
- C: Choose two different of these four options:
- Draw 1 Vision card from the deck.
- Take 1 Iwakura Rock from the board and add it to your Rock Path.
- Place 1 available Pilgrim on your player board adjacent to one Iwakura Rock.
- Move one of your Kodamas on any Kodama Track forward 1 space.
Once a die has crossed the river, it remains there until the Winter Phase and cannot be moved again that round.
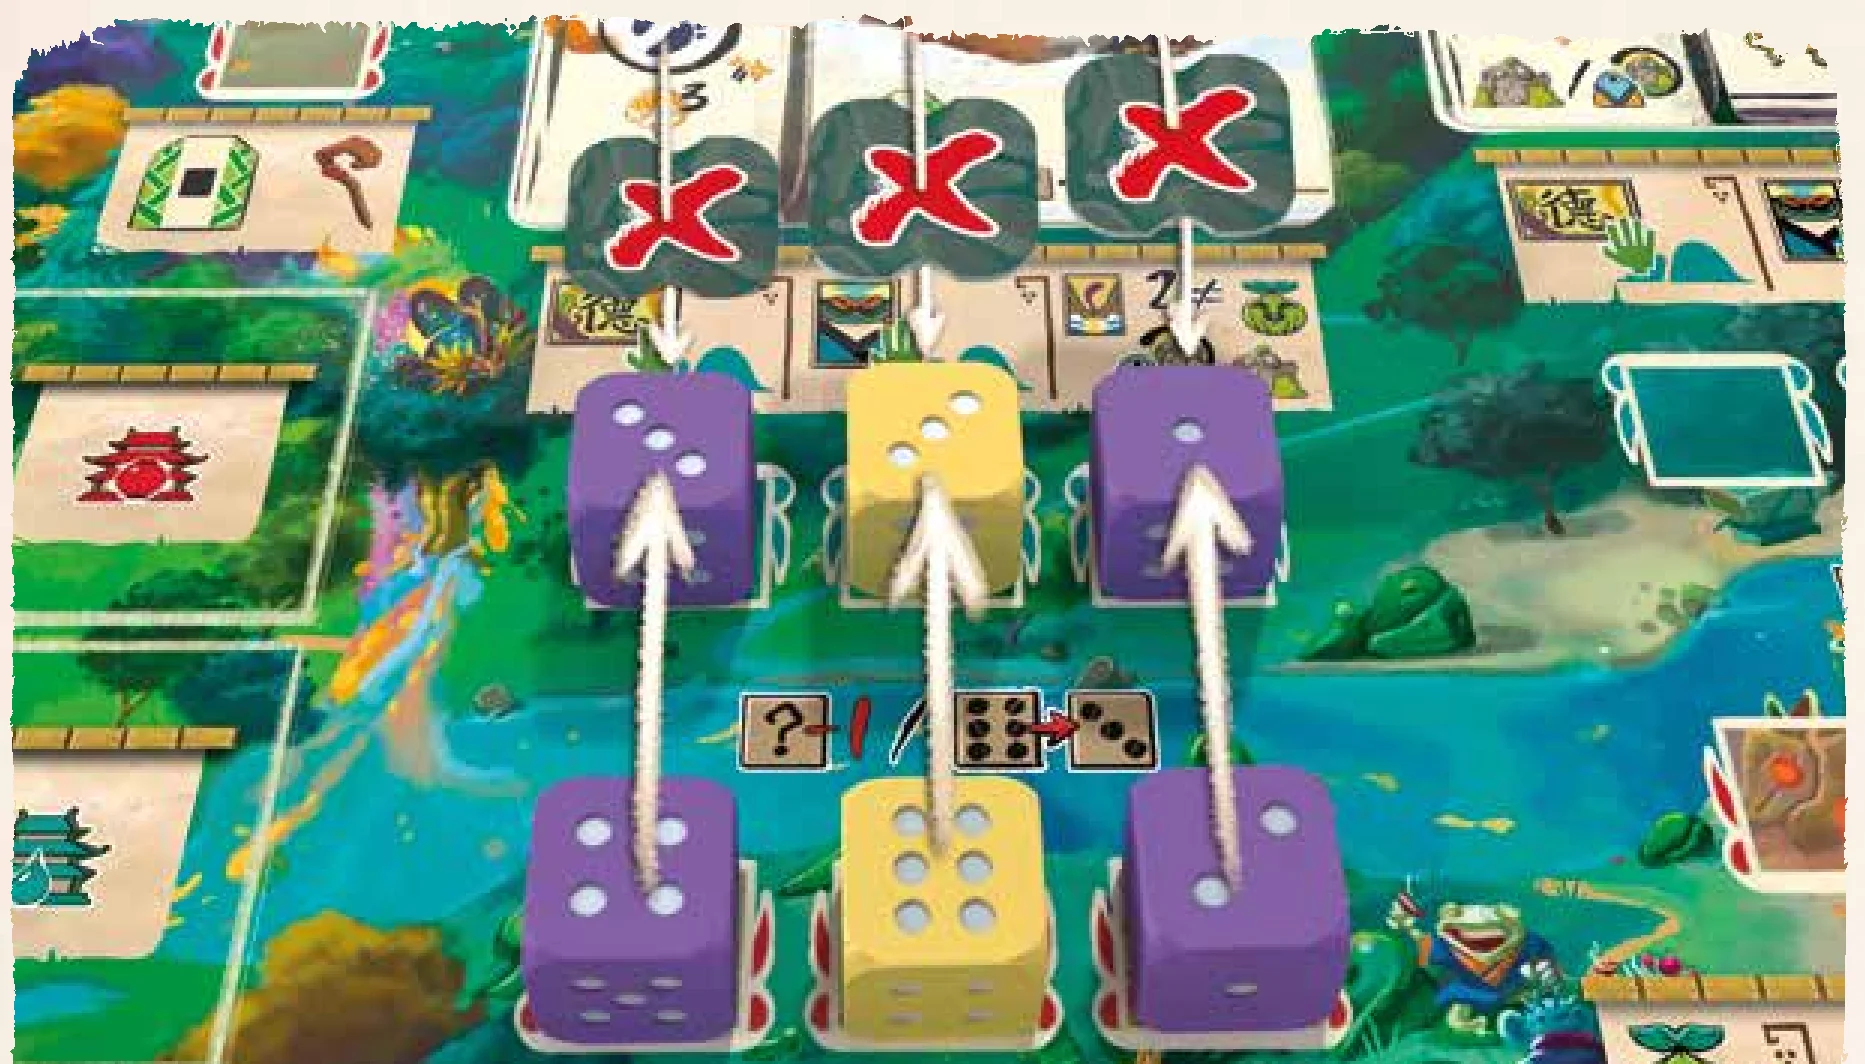
Things to Consider When Crossing the River:
- You can only place your die in an empty space after crossing the river.
- The value on your die does not affect which Favors you may take here.
- After you cross, the space in the Forest that your die left behind is now empty and available for another die to use.
- A die at the Home of the Great Spirit cannot cross the river.
- Taking the Favor of the Forest is optional: You may cross the river and choose a reward but decide not to take it, and simply cover that option with a Hikaru marker without any further effects.
D. Pass
After having played your three Yōkai cards on your personal board and moved your three dice over to Forest spaces, if you cannot or do not wish to cross the River, you may pass when it is your turn. Once you pass, you are “out” for the rest of the phase and you may not take any more actions.
Once all players have passed, the Summer Phase ends and the Autumn Phase can begin—move the Pagoda counter to the next space on the Phase Track.
In this section of the rulebook we will give you details of the different areas of the board and their game play.
The main game board is divided into a number of areas, each of which has a different function during the game:
- A: Phase Track
- B: Round Track
- C: Spirit Path
- D: Paths of Wisdom
- E: The Forest, divided into five regions: 1. The Lands of Yomi, 2. The Stairs of Knowledge, 3. The Home of the Great Spirit, 4. The Glade of Jade, 5. The Forges
- F: The Sacred Kurirakugan River
- G: The Hikaru Hills
- H: The Inhabited Areas
- I: The Rock Garden
- J: The Crystal Caves
- K: The Rift of Visions
- L: The Twisted Trail of the Mitamas
- M: Kodamas and the Treasures of the Lake
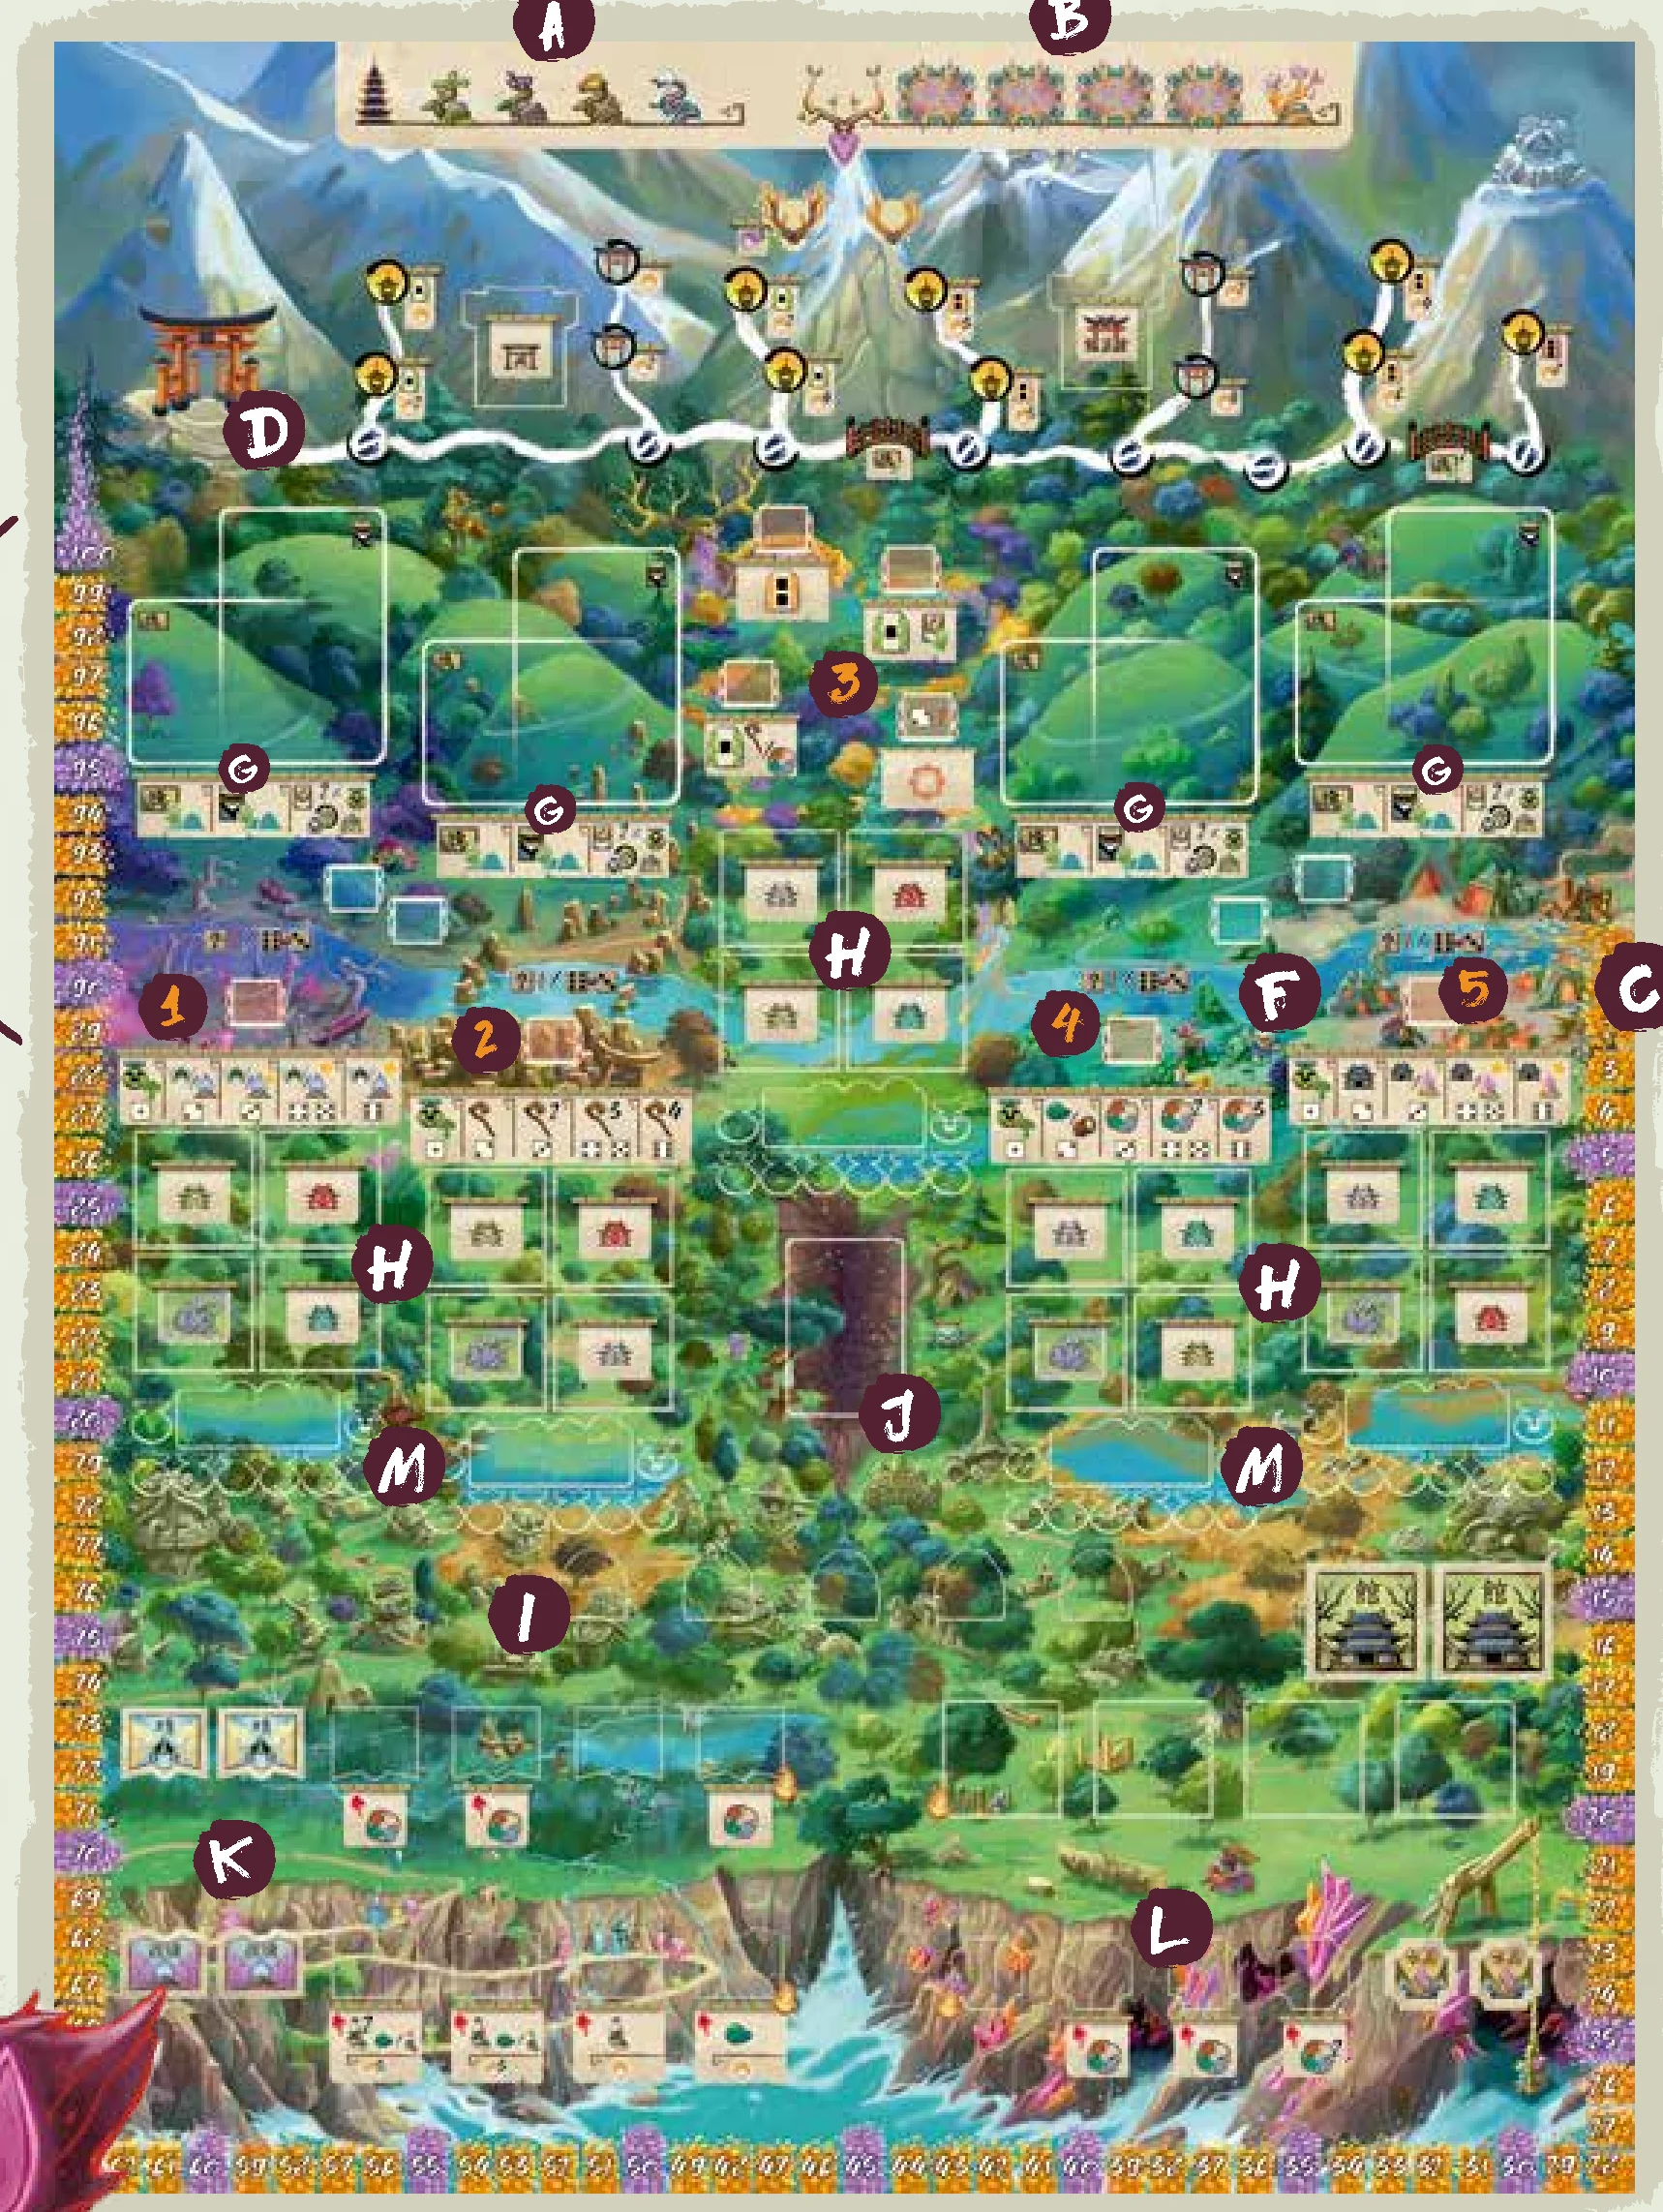
Tracks: Phase, Round & Spirit Path
- A. The Phase Track: The Pagoda counter is used on this track to remind the players which phase they are currently playing. At the end of each phase, move the counter to the next space.
- B. The Round Track: The Great Spirit counter is used on this track to indicate which round of the game is being played. After the Winter Phase each round, move the Great Spirit counter forward one space towards Ascension. The last space in this track indicates that it is time for the Ascension Phase.
- C. The Spirit Path: This path is used by the players to keep track of their Virtue Points (VP) during the game and the Ascension. Remember to move your Player counter each time you gain VP. If your counter moves past the “100” space, flip your flag to its “+100 VP” side as a reminder.
D. The Paths of Wisdom
The journey towards Ascension brings spirits and pilgrims new levels of consciousness and self-awareness. This part of the game board shows the paths that Pilgrims can follow as they seek enlightenment. In order to move a Pilgrim on a path, you must spend Movement Points (MP). In this section of the board you can take the following actions:
- Start a New Pilgrimage on the Paths of Wisdom: If you have a Pilgrim available on your player board, you may place it on the starting space (next to the starting Gate) on any of the Paths of Wisdom that you wish to follow. Depending on the number of players, this Gate will be the starting point for one or two paths. You may start as many pilgrimages as you like, as long as you have Pilgrims available. You can acquire more Pilgrims by earning Crystals. Optional: If you already occupy a Gate space with one of your Pilgrims, you may start a new pilgrimage on the path space connected to that Gate instead of the starting Gate if you wish, saving yourself part of the journey. However, you always have the option of placing the new Pilgrim at the starting Gate if you prefer.
- Move a Pilgrim Forward on a Path of Wisdom: If you already have a Pilgrim on a Path of Wisdom pilgrimage space, you may move it forward one space by paying 1 MP onto the next pilgrimage space. Each path is one way only, and must be followed in the direction shown. Pilgrims can never move backward on a path. Several Pilgrims may occupy the same space only if the circle on that space is open at the top.
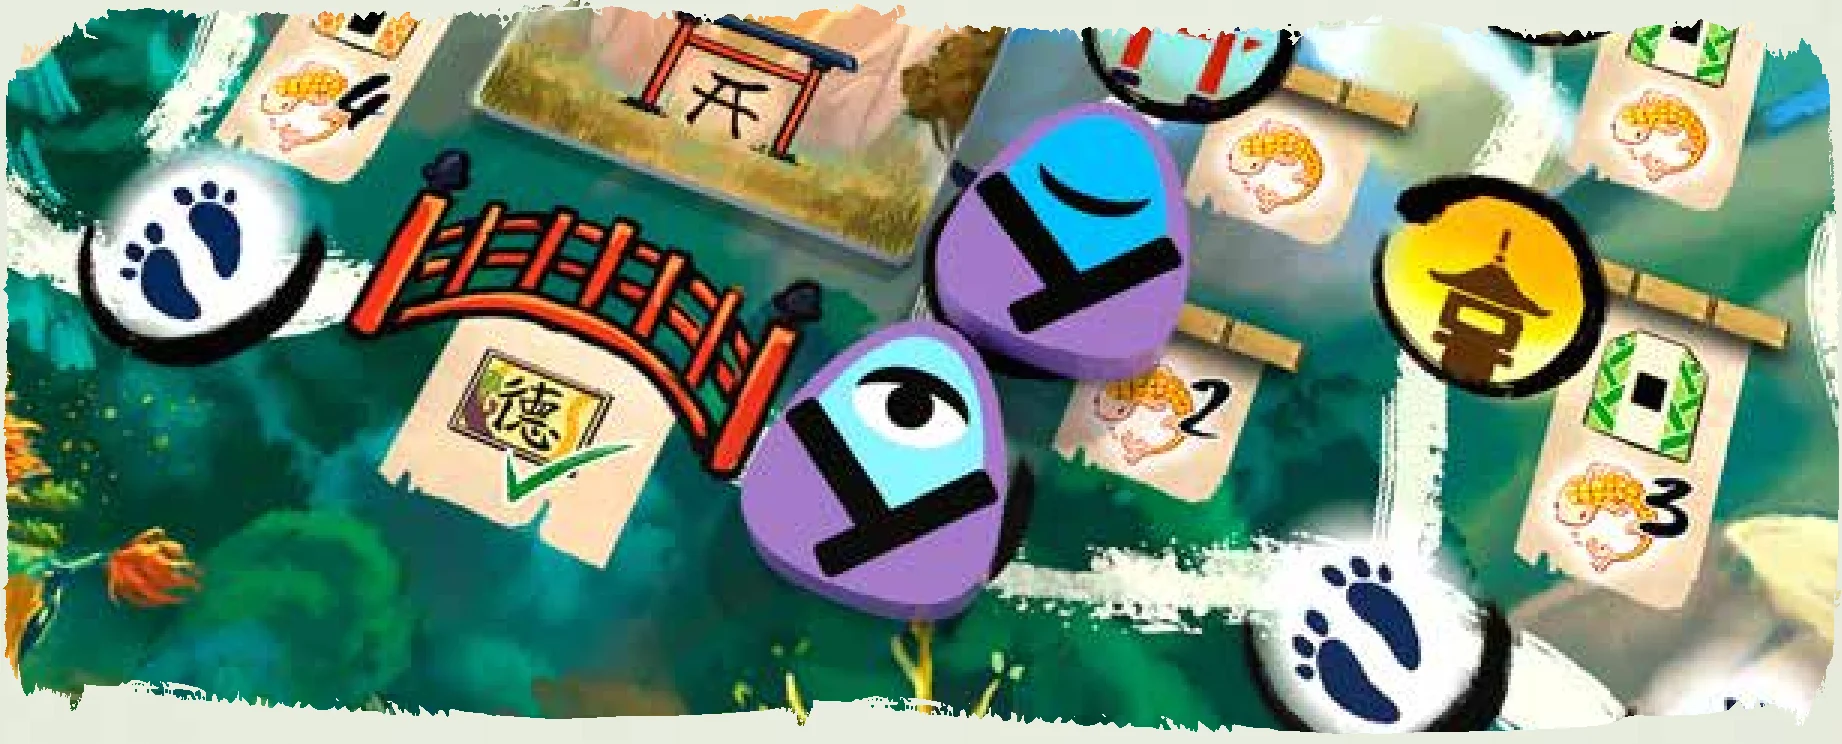
Along the path, your Pilgrim will encounter forks heading towards Illumination spaces or a Gate. When you reach a fork, you may choose which direction to move. The spaces along these side paths can hold only one Pilgrim at a time, as indicated by the closed circle on those spaces. Also, Pilgrims may not occupy different spaces on the same fork.
- Illumination Spaces: These spaces award VP and Amulets when a Pilgrim is placed onto them. A Pilgrim on an Illumination Space is placed there with its sleeping side up, and cannot move any further and remains in that space for the rest of the game: They have reached their personal goal.
- Torii Gate Spaces (A and B): The same rules as the Illumination Spaces apply here. In addition, you immediately take the action shown on the tile marking that Gate. From now on, if you decide to start a new pilgrimage, you may begin from the space adjacent to this Gate.
- Bridge Spaces: The spaces with bridges represent spiritual obstacles that a Pilgrim may encounter during their journey. In order to cross a bridge, it is not enough to simply pay 1 MP. You must also have advanced far enough along your personal Bitoku Path. For the first bridge, you must have advanced your Player counter onto at least the first card of your Bitoku Path. For the second, you must have reached at least the second card on your path.
E. The Forest Regions
The Forest is like a gigantic baobab that is centuries old: difficult to get your arms around. Its dominions spread to the four points of the compass, and within its shade are an infinite number of hidden corners, each with its own personality and home to every kind of creature, from the simplest beasts to perfectly structured societies. These mythical places, full of life and mystery, hold the resources that spirits need to complete their journey to Ascension. Each region is also the location of one of the Hikaru Hills, where Yōkai and Bitoku spirits gather. The source of all this life is the sacred Kurirakugan River.
During the Summer Phase, you can place your dice in this area of the game board. Each region of the Forest offers different Forest Actions and is connected to both one of the Hills and one of the Inhabited Areas. There is also a separate Kodama Track in each region, where players can compete for the Treasures of the Lake.
1. The Lands of Yomi
Many Mitama spirits become lost in the darkness of the Forest. Fortunately, the Yomi can help guide them and purify their souls before they are forever forgotten. They achieve this with the help of the Chinkon Dragonflies.
This region is connected to the Twisted Trail of the Mitamas. When you place a die here, you may choose from the following Forest Actions (only if your die has a value equal to or higher than all other dice already in this region):
- Space 1 (Die value 1+): Move your Kodama in this region forward 1 space.
- Space 2 (Die value 2+): Pay the indicated cost and obtain 1 Mitama Spirit tile or 1 Dragonfly tile.
- Space 3 (Die value 3+): Pay the indicated cost and obtain 1 Mitama Spirit tile (with a discount of 1 resource) or 1 Dragonfly.
- Space 4 (Die value 4+): Pay the indicated cost with a discount of any 1 resource and obtain 1 Mitama Spirit tile or 1 Dragonfly tile.
- Space 5 (Die value 6): Pay the indicated costs and obtain 1 Mitama Spirit tile and 1 Dragonfly tile, with a discount of 1 resource on the purchase of one of these tiles.
2. The Stairs of Knowledge
A long walk awaits all pilgrims in search of the truth of all things. Fortunately, refuge can be found in the Torii Gates, where they can enjoy a regenerative rest.
This region is connected to the Paths of Wisdom. When you place a die here, you may choose from the following Forest Actions (only if your die has a value equal to or higher than all other dice already in this region):
- Space 1 (Die value 1+): Move your Kodama in this region forward 1 space.
- Space 2 (Die value 2+): Gain 1 Movement Point.
- Space 3 (Die value 3+): Gain 2 Movement Points.
- Space 4 (Die value 4+): Gain 3 Movement Points.
- Space 5 (Die value 6): Gain 4 Movement Points.
3. The Home of the Great Spirit
This is the refuge of the one who is everything in the Forest, whose time is coming to an end. The spirit who reaches the highest virtue will soon make their home here.
The Turn Order Track at the top of this region shows the order that the players will take turns during the Summer Phase. This order is determined during the Autumn Phase, based on the positions of the players’ dice in this region.
There are several spaces here for dice, each of which offers a different Forest Action. Any dice can be placed on these spaces, regardless of the values shown on those dice (the Great Spirit is equally generous to all the beings of the Forest):
- Space 1: Gain 1 +2 Amulet.
- Space 2: Gain 1 +1 Amulet and draw 1 Vision card (following the process described on page 16).
- Space 3: Gain 1 +1 Amulet and any 1 Resource of your choice. (Available only in games with 3 or 4 players.)
- Space 4: Gain 1 +1 Amulet and 1 MP. (Available only in games with 3 or 4 players.)
- Space 5: Gain 1 +1 Amulet and your choice of 1 MP or any 1 Resource. (Available only in games with 2 players.)
- Space 6: This space is the only exception to the rule that a die of any value can be placed in the Home of the Great Spirit: you can only place a die with value 2 or higher here. When you place a die on this space, you must immediately reduce its value by 1 point. Then you may choose any other player’s die that is on any Forest space, and then perform the Forest Action for the region that die is located in, using the value on that die. You do not get to perform any Building Action, and you cannot choose a die that has crossed the river. (Available only in games with 2 players.)
4. The Glade of Jade
In this region, spirits from all over the Forest gather to exchange every imaginable kind of precious stone and, of course, the drink of the gods: sake.
This region offers a way to gain Resources. When you place a die here, you may choose from the following Forest Actions (only if your die has a value equal to or higher than all other dice already in this region):
- Space 1 (Die value 1+): Move your Kodama in this region forward 1 space.
- Space 2 (Die value 2+): Take 1 wood or 1 jade.
- Space 3 (Die value 3+): Take 1 of any Resource of your choice (wood, jade, sake, or stone).
- Space 4 (Die value 4+): Take any 2 Resources of your choice (wood, jade, sake, or stone in any combination).
- Space 5 (Die value 6): Take any 3 Resources of your choice (wood, jade, sake, or stone in any combination).
5. The Forges
Scarlet fire emanates from the depths of the Earth. The artisans of Spider Town mine soul crystals from deep below the surface, using them to craft magnificent objects and erect structures of immeasurable power.
This region offers a way to gain Crystals and construct Buildings. When you place a die here, you may choose from the following Forest Actions (only if your die has a value equal to or higher than all other dice already in this region):
- Space 1 (Die value 1+): Move your Kodama in this region forward 1 space.
- Space 2 (Die value 2+): Construct 1 Building in an empty space of that Building’s type in any Inhabited Area of the Forest.
- Space 3 (Die value 3+): Obtain 1 Crystal or construct 1 Building in an empty space of that Building’s type in any Inhabited Area of the Forest.
- Space 4 (Die value 4+): Pay the indicated cost with a discount of 1 resource in order to either obtain 1 Crystal or construct 1 Building in an empty space of that Building’s type in any Inhabited Area of the Forest.
- Space 5 (Die value 6): Pay the indicated cost with a discount of 1 resource in order to obtain 1 Crystal and construct 1 Building in an empty space of that Building’s type in any Inhabited Area of the Forest. The discount only applies either to the construction of the Building or to the Crystal, not both.
F. The River & G. The Hills
The water flows along the path of the Sacred Kurirakugan River, giving life as it passes. Those who wet their feet in the river must pay a small toll to continue their path to transcendence, for only the humble may cross. Any who enter the water and follow the flow to where the river meets the sea will float forever in the underwater halls of the Rashaar.
The river marks the border between the regions of the Forest. Only the Home of the Great Spirit does not touch its banks. If you have a die in any region of the Forest except the Home of the Great Spirit, you may move that die across the river during your turn over to the corresponding Hikaru Hill.
These luminous places are remnants of peace, often roamed by all sorts of spirits.
Each of the regions of the Forest (except the Home of the Great Spirit) is connected to one of the Hikaru Hills. These spaces can award you Yōkai or Bitoku cards or other options. When you move a die across the river, you may place it in any empty space of the area connected to the region that die just left.
H. The Inhabited Areas & Constructing Buildings
This is the friendliest part of the Forest, where both spirits and mundane beings pass through and share experiences. Just as there is always a Great Spirit of the Forest, so are there always spirits charged with the care of these areas, providing a roof, repast, and recreation for the pilgrims in need of a rest along their path as well as a home for the mischievous, fun-loving Kodamas. One can often find warm, welcoming buildings here, including ryokan (inns), farms, temples, and onsen (baths). Any spirit that aspires to become the next Great Spirit would do well to provide for the well-being of these pilgrims, providing them with welcome and shelter.
Each region of the Forest is linked to one of the Inhabited Areas. This part of the game board has spaces with face-down piles of Building tiles, and a reserve of face-up Buildings. When you construct a Building, you may choose any of the face-up Buildings to put up.
Depending on the number of players, there may be some Ancient Buildings on the board at the beginning of the game. These work the same way that normal Buildings do, except that they have no owner so no one receives any Property Bonus from them.
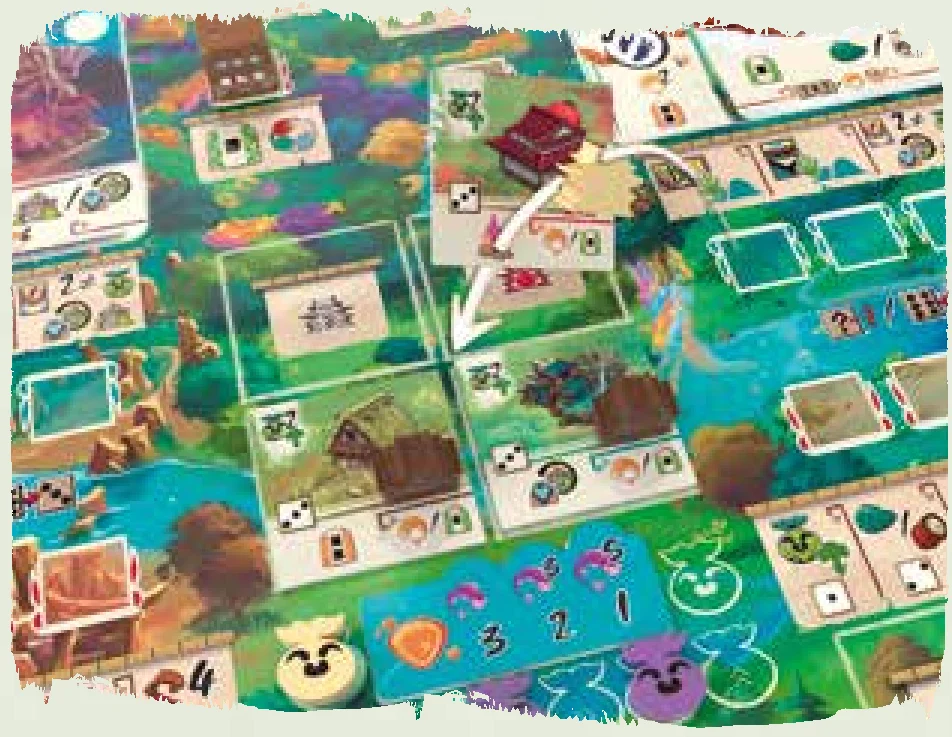
You may construct a maximum of 6 Buildings over the course of the game. The Building counters on your player board indicate how many Buildings you can still construct and the cost you must pay in order to construct each. When you construct a Building, follow these five steps:
- Pay the cost under the leftmost building counter on your player board. Construction requires a combination of wood and/or stone, which you must pay to the supply. Take the Building counter from your player board. You will receive the VP shown in the now-empty space at the end of the game.
- Choose a Building tile from those available on the Inhabited Areas of the game board. Do not refill any empty spaces here yet (that will occur in the next Winter Phase).
- Add the Building to any empty space that matches the type of Building you have chosen to construct (each space can be occupied only by the type of Building shown in that space).
- Move your Kodama in the region where you placed the Building tile forward a number of spaces equal to the Kodama Bonus granted by that Building, and receive a +1 Amulet if indicated.
- Place the Building counter that you took from your player board in Step 1 on the Building tile you just constructed to show that you own it.
Kodamas and the Treasures of the Lake
Kodamas are kindly but mischievous spirits who live in the smallest ponds and streams of the Forest. They are the most innocent and affable beings, and their limitless curiosity leads them to find well-hidden treasures wherever they may be within the Forest. The Kodamas eagerly identify with those Bitoku that exhibit virtues that match their own, and offer these treasures to them as gifts. Those who aspire to become the Great Spirit often make a game of this, supporting their loyal Kodamas to make certain that they receive the greatest treasures from each region of the Forest.
Each region has its own Kodama Track. Some actions you take will allow you to move your Kodamas forward or even move your opponents’ Kodamas backward:
- Move Kodamas forward: Move 1 Kodama forward 2 spaces, or 2 Kodamas 1 space each in any region or regions of the forest.
- Move opponents’ Kodamas back: Move 1 Kodama back 2 spaces, or 2 Kodamas 1 space each in any region or regions of the forest.
- If the action is marked with a green arrow, you may only move Kodamas in the same region as the effect that granted you the action.
- Any number of Kodamas may occupy the same space except for the last space on each track: Only 1 Kodama at a time may occupy each of these spaces.
During Ascension, players will earn VP based on the positions of their Kodamas on the Treasures of the Forest tracks.
Special Rule for 2-Player Games: If you are playing Bitoku with two players, you will place a “dummy” Kodama of a neutral color on the fourth space of each Kodama Track. This token never moves from this space, not even with the “move Kodama backwards” action. These tokens are counted when determining the final ranking on each track for VP purposes.
I. The Rock Garden
The Iwakura Rocks are the most ancient spirits. Through the passage of time, they have taken on solid forms. While they are neither inert nor immobile, their existence moves at a speed very different from those around them. Their indifferent eyes have seen empires rise, grow, and then disappear in the time it takes for them to exhale a simple sigh. The spirits of the Forest know of the wisdom concealed in these rocks, and pilgrims who have learned to listen to their advice dedicate their lives to transmitting the knowledge of the Iwakura to their fellow travelers.
Iwakura Rocks can be an important source of VP during Ascension. Each of them grants VP based on the symbols on the tile. But, Iwakura Rocks do not grant points themselves: you must place a Pilgrim by their side in order to earn those VP.
At the beginning of the game, a number of Iwakura Rock tiles are placed on the game board. These are the only Iwakura Rocks that will be available for the entire game, as they are never replenished.
There are two actions that relate to the Iwakura Rocks:
- Obtain Iwakura Rock: If you have at least one clear space in the Iwakura Rock area of your player board, you can choose 1 Iwakura Rock from the Rock Garden. Place it on your player board in the empty space furthest to the left on your Rock Path.
- Place a pilgrim on an Iwakura Rock space: Take one of your available Pilgrims and place them on any empty space on your Rock Path that is next to at least one Iwakura Rock (you cannot perform this action if you have no Iwakura Rocks next to empty spaces). If the space you place the Pilgrim on shows a cost, you must pay those Resources when you place a Pilgrim there. Place this Pilgrim with its sleeping side face up, as this will be the end of his journey and he may not be moved again during the game.
J. The Rift of Visions & Vision Cards
In the deepest heart of the Forest, there is a terrible rift that threatens to split the world in two. It is said that those who are able to stare into this abyss and remain with their soul at peace can see the future and learn what is to come.
This part of the game board holds the Vision cards. Visions offer a way to gain additional VP during Ascension by completing the requirements shown on the card.
Each Vision card shows a specific list of requirements that you must fulfill in order to earn the VP shown on the card. You must complete all of the requirements on the card in order to earn the points, or lose VP for each Vision card that wasn’t fully fulfilled at the end of the game.
Obtaining Vision Cards
When you take an action that awards you a Vision card, follow these steps:
- A. Draw 2 Vision cards from the deck.
- B. Choose if you want to keep one of the Vision cards or not:
- If you choose to keep a Vision card, take 1 card and place it face up next to your player board. Take the other card and place it face down at the bottom of the Vision card deck.
- If you do not wish to keep either of the Vision cards, return both of them to the bottom of the Vision card deck and take any 1 Resource of your choice from the supply instead.
Scoring Vision Cards
In order to earn the VP listed on a Vision card, you must complete all of the tasks shown on that card before Ascension begins. Players will lose 1 or 2 VP at the end of the game as indicated on each uncompleted Vision card.
Each item in the game can only be used to fulfill the requirements of one Vision card. So, if you have multiple Vision cards that require the same item, you must have a separate copy of that item for each Vision card you want to complete. If you do not have enough, you may choose which Visions to complete.
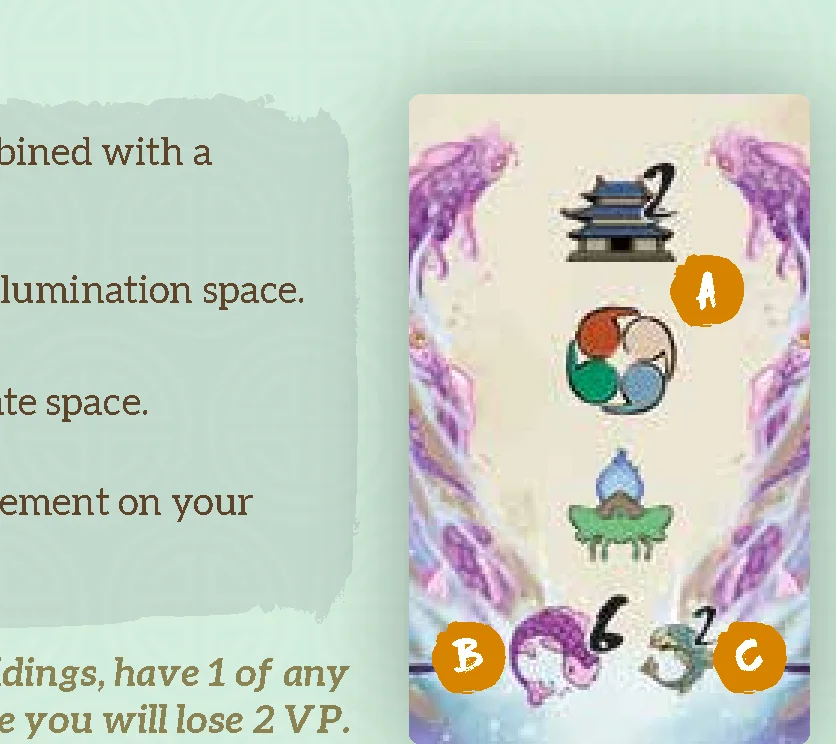
Each Vision card shows the following information:
- A: The Requirements you must fulfill to complete that Vision.
- B: The Virtue Points you will earn during Ascension if you complete that Vision.
- C: The number of VP you will lose in case it is not completed.
The requirements for a Vision card can include any of the following:
- Have a Resource of any type.
- Have a constructed Building.
- Have a Crystal of any color.
- Have a Mitama Spirit tile (combined with a Dragonfly or not. In case of being combined, the dragonfly will still apply for the following requirement).
- Have a Dragonfly combined with a Mitama Spirit.
- Have a Pilgrim on an Illumination space.
- Have a Pilgrim on a Gate space.
- Have made an advancement on your Bitoku Path.
K. The Twisted Trail of the Mitamas
The most remote corner of the Forest overlooks the Cliffs of Sea’s Claw. Here lies a trail that can be followed only by the Mitama Spirits—suffering souls who no longer understand the place they occupy in the order of all things. The Mitamas restlessly walk this trail, hoping to encounter a Chinkon Dragonfly to guide them along their way. Those who do not find the right Dragonfly are destined to sink into the Sea, and into eternal irrelevance as the forgotten trophies of the Rashaar.
This part of the board shows the Mitama Spirits and Dragonfly tiles that are available. There are two actions that allow you to interact with these tiles: Obtain a Mitama Spirit, or Obtain a Dragonfly.
Obtain a Mitama Spirit
Obtain the Mitama Spirit tile of your choice from those available on the game board after paying the cost shown (an amount of sake and/or jade). You also immediately receive the reward shown above that tile’s space (in VP). Do not refill any empty spaces at this time (they will be refilled during the Winter Phase).
Take the action shown on the Mitama Spirit tile you have chosen and place it on your player board. If you have a Dragonfly available, you may immediately attach it to the Mitama.
These are the actions that you might take when obtaining a Mitama Spirit:
- Ara: Take 1 Resource of your choice or a +1 Amulet from the supply.
- Nigi: Unlock 1 locked die on your player board and take a +1 Amulet from the supply.
- Saki: Gain 1 Movement Point or take a +1 Amulet from the supply.
- Kushi: Advance any of your Kodamas 1 space on their track or take a +1 Amulet from the supply.
- Shinigami: There are 4 Shinigami tiles in the game, each offering a different action:
- Take 1 Resource of any type
- Gain 1 MP
- Advance any of your Kodamas 1 space and move one of the other player’s 1 space backwards
- Gain a “+1” Amulet or unlock one die.
During Ascension, you can use Shinigami as “wild” spirits when scoring your Iwakura Rocks.
Obtain a Dragonfly
Obtain the Dragonfly of your choice from those available on the game board, by paying or receiving the resources indicated below it. You do not receive the Dragonfly’s action until it is combined with a Mitama Spirit. Do not refill any empty spaces at this time (they will be refilled during the Winter Phase).
Place your Dragonfly tile on your player board. If you have a Mitama Spirit available, you may immediately attach it to the Dragonfly.
Combining a Mitama Spirit with a Dragonfly
When you obtain a Mitama Spirit tile or a Dragonfly tile (and only at that moment), you may combine them with the opposite (a Mitama Spirit to a Dragonfly tile) if you have one available on your player board. Place the two tiles together and move them off of your player board, then take the action shown on the Dragonfly tile.
Combined Mitama Spirits and Dragonflies are taken into account at several points during the game, but cannot be combined with other Mitama Spirits or Dragonflies.
Note: You take the action shown on your Mitama spirit tiles as soon as you acquire them, but you can’t take the action on your Dragonfly tiles until you attach them to a Mitama.
L. The Crystal Caves
A boulder breaks, opening the way into cold caves at the most distant reaches of the Forest. Echoes of a promising future emerge from within the caverns, glowing with the reflections of Soul Crystals. If a spirit can harmonize the right Crystals, their path to Ascension shall indubitably be more peaceful and rewarding.
You can find the Crystals in this part of the game board. As you obtain Crystals, you will place them on the matching spaces of your player board. Crystals will open new actions for you to take. In addition, this is the only way to gain new Pilgrims.
Obtaining a Crystal: This action allows you to take 1 Crystal from the Crystal Caves by paying the cost indicated on the game board (0, 1, or 2 Resources of any type). Do not refill any empty spaces at this time (they will be refilled during the Winter Phase). You can only take a Crystal if it matches the specific type shown in an empty space on your player board.
When you obtain a Crystal, you may place it in any corresponding empty Crystal space of your player board. When you do so, move the Pilgrim in that space with its awakened side up to the top part of your player board to use later. You will also receive any VP shown in that space at the end of the game. If you don’t have any available spaces to place Crystals of a certain type, you cannot obtain them.
Types of Crystals
There are three kinds of Crystals: Dream (purple), Memory (yellow), and Ingenuity (pink). Each type occupies different spaces on your player board.
- Dream Crystal (purple): You receive the reward shown during the Reap the Fruits Step 2 during Spring and Ascension.
- Memory Crystal (yellow): You receive 1 or 2 VP each time you take the action shown on the tile.
- Ingenuity Crystal (pink): During the Summer Phase, when you play a Yōkai card on the matching space, you take the action shown on the Crystal. You may take your bonus either immediately before or immediately after resolving that Yōkai card.
Bitoku Cards
Bitoku are powerful spirits on their own path to Ascension. But even the strongest of them require the advice and wisdom of other spirits.
- Obtain a Bitoku card from the common deck: Take the top two cards, choose one and keep it on your Bitoku Path. Then place the other face down back on the bottom of the deck.
- Obtain the Bitoku card from the Hikaru Hill: Take the card from the Hikaru Hill you just moved your die to. Place it on your Bitoku Path.
Each Bitoku card shows a type (A), a space for a Player counter (B), a VP award and any other actions available when the Player counter moves onto that card (C), and a rarity number indicating the number of copies of that type available in the deck (D).
Bitoku cards are used to create the Bitoku Path on your player board. Each time you gain a Bitoku card, you must add it to your path.
If you have at least 1 Bitoku card beyond the space occupied by your Player counter, you may spend 1 Movement Point (MP) to move your counter to the next space. When you do this you complete that Bitoku card and immediately gain the VP and any other action shown on that card. Also, you will need to have at least one or two completed Bitoku cards in order to cross the bridges in the Paths of Wisdom.
At the beginning of the game, you have no Bitoku cards on your path, so you may not move your Player counter forward until you gain at least one card.
Much time passed before the Great Spirit of the Forest was able to complete its journey into peace. Finding a replacement was no simple matter, for reaching the required state of balance and wisdom is a challenge for even the most enlightened of beings. The oldest of trees, for whom the passing of centuries is like a single breath, if they are very lucky may live to see as many as three Great Spirits in their entire lifespan.
As soon as the Winter Phase of the last round is complete, the players add up their final score to determine who will be the next Great Spirit of the Forest. If they prefer, the players can take turns calculating their personal score, or carry out each step of the Ascension together.
Add up your points by moving your marker on the VP path. If your score passes 100 VP, flip your flag to its “+100” VP side to show your accomplishment.
Here are the different items to score:
- A. Reap the Fruits: Each player collects the rewards indicated on the Dream Crystals (purple) on their player boards. You may collect these rewards in any order you choose.
- B. First Among Many: The player who is first on the Turn Order Track receives 3 VP.
- C. The Bitoku Bow Before You: Each player who has Bitoku cards receives VPs based on the number of different types of Bitoku cards they have in their Bitoku Path, as shown on the chart below (duplicate Bitokus don’t score anything at this point). You receive points regardless of how far you have progressed on your Bitoku Path.
- 1 type: 1 VP
- 2 types: 2 VP
- 3 types: 4 VP
- 4 types: 7 VP
- 5 types: 11 VP
- 6 types: 16 VP
- 7 types: 22 VP
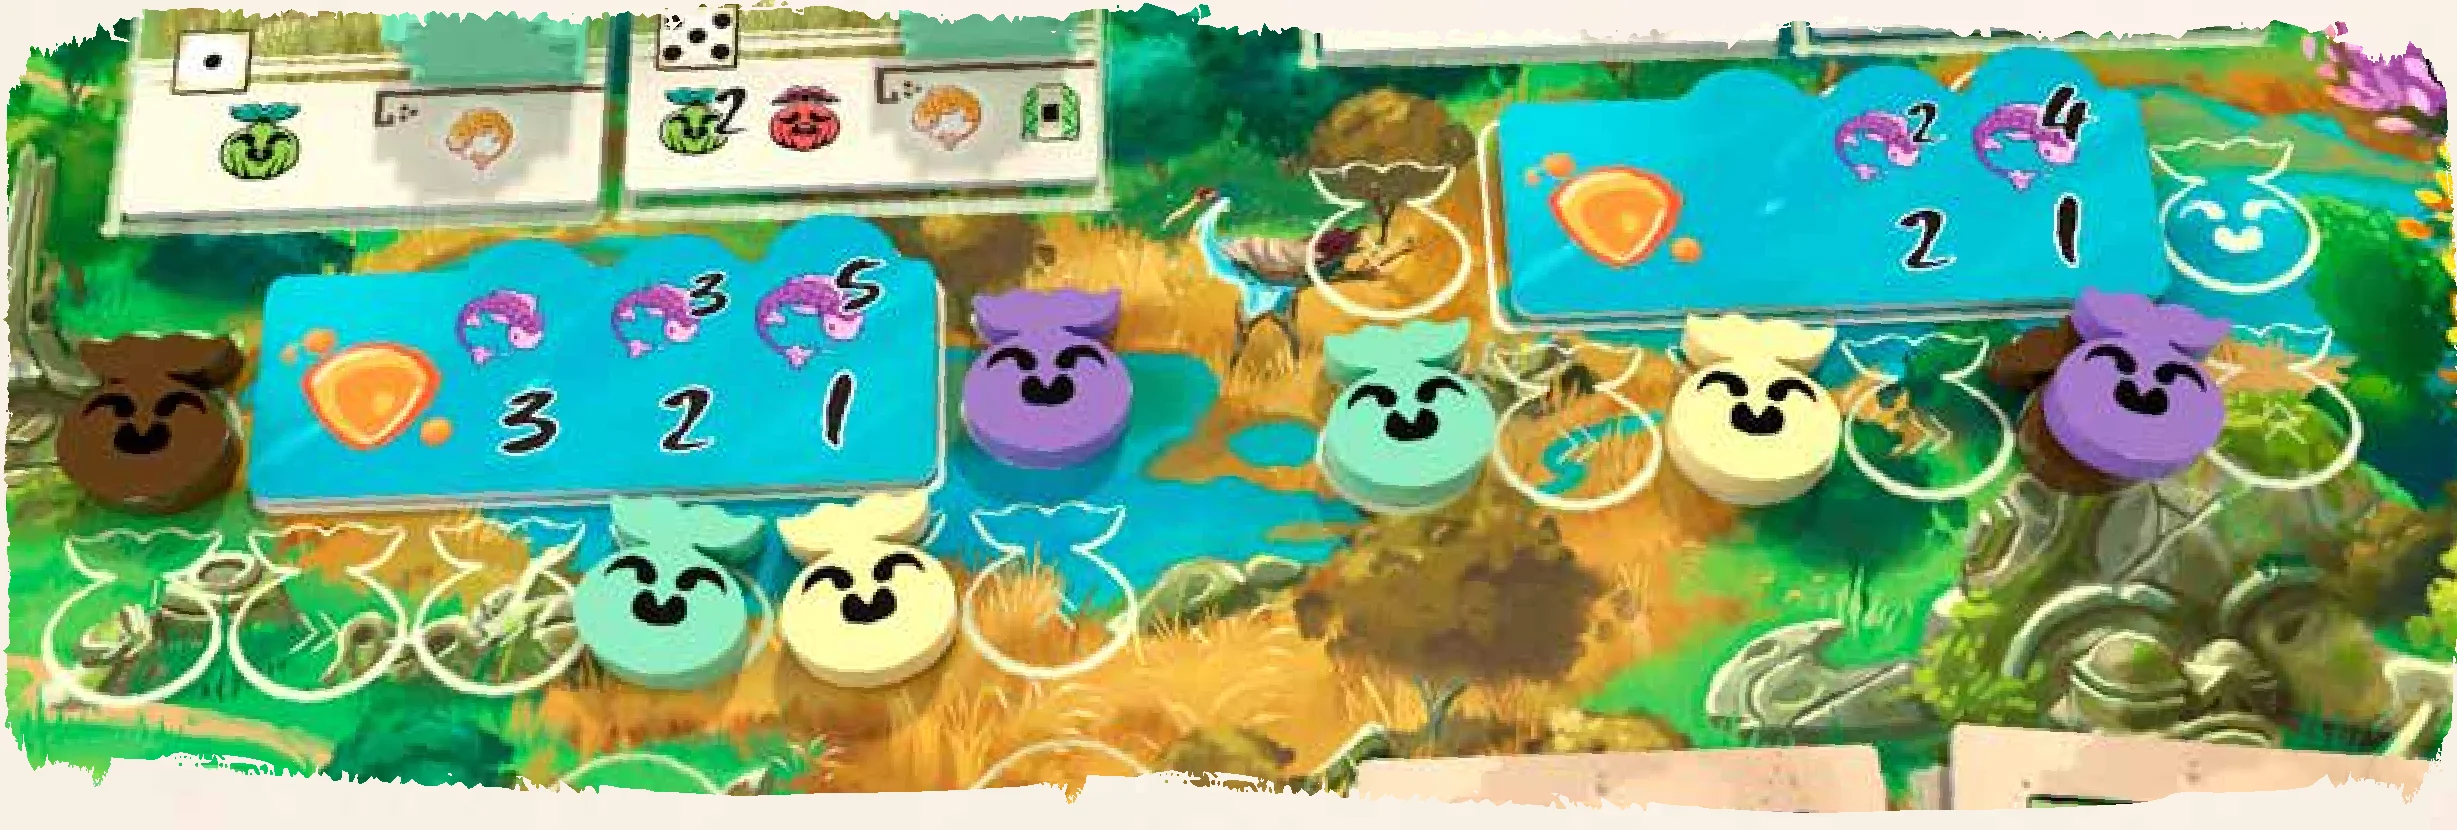
- D. Treasures of the Lake: The VP for each region of the Forest are awarded next. The player whose Kodama is furthest along the track earns the highest VP award for that region. The second Kodama earns the middle reward, and the third Kodama earns the smallest reward. If there is a tie, add the rewards of the tied positions and divide the total VP among the tied players (rounded down). Remember: The final space on the track can be occupied by only a single Kodama.
- E. Iwakura Rocks Resonate: Each player earns the VP indicated by the Iwakura Rocks on their player board. Each Pilgrim you have sitting next to a Rock awards you 1 VP for each item you have that matches the requirements shown on that tile. If an item appears on two different Rocks, you may count it both times. The items shown on the Rocks can be found on Yōkai cards, Buildings, or Mitama Spirits:
- 1. Yōkais: Each Yōkai card with the matching symbol, whether it is in your deck, discard pile, hand, or player board (or under it), including any Starting Yōkai cards, awards VP. Yama-uba cards act as “wild” cards: You may choose which unique type of Yōkai you want to assign to each of these cards at this time.
- 2. Mitama Spirits: Each Mitama tile with the matching symbol that you have on your player board awards VP, whether you have combined them with a Firefly or not. Shinigami Mitama Spirits act as “wild” cards: You may choose which type of Mitama you want to assign to each of these tiles at this time.
- 3. Buildings: Each Building with the matching symbol that you own (has your Building counter on it) awards VP.
- F. Guardians Pay Homage: Each player now adds up the current value of all three of their dice, plus the number of Resources they still hold, then they divide this total by 4 (rounding down) and earns the result in VP.
- G. Visions Revealed: Each player earns the VP shown on each of the Visions that they were able to complete, and loses 1 or 2 VP for each uncompleted Vision as indicated. Remember: You can only use each game element to fulfill the requirements of one Vision.
- H. Fate Accomplished: Players add up the number of end of game Virtue Points (purple) shown on their player boards, in their Building and Crystal areas.
The player who has the most VP becomes the new Great Spirit of the Forest and wins the game! If there is a tie, the one who completed the most Visions is the winner. If they are still tied, the winner is the one furthest ahead on the Turn Order Track.
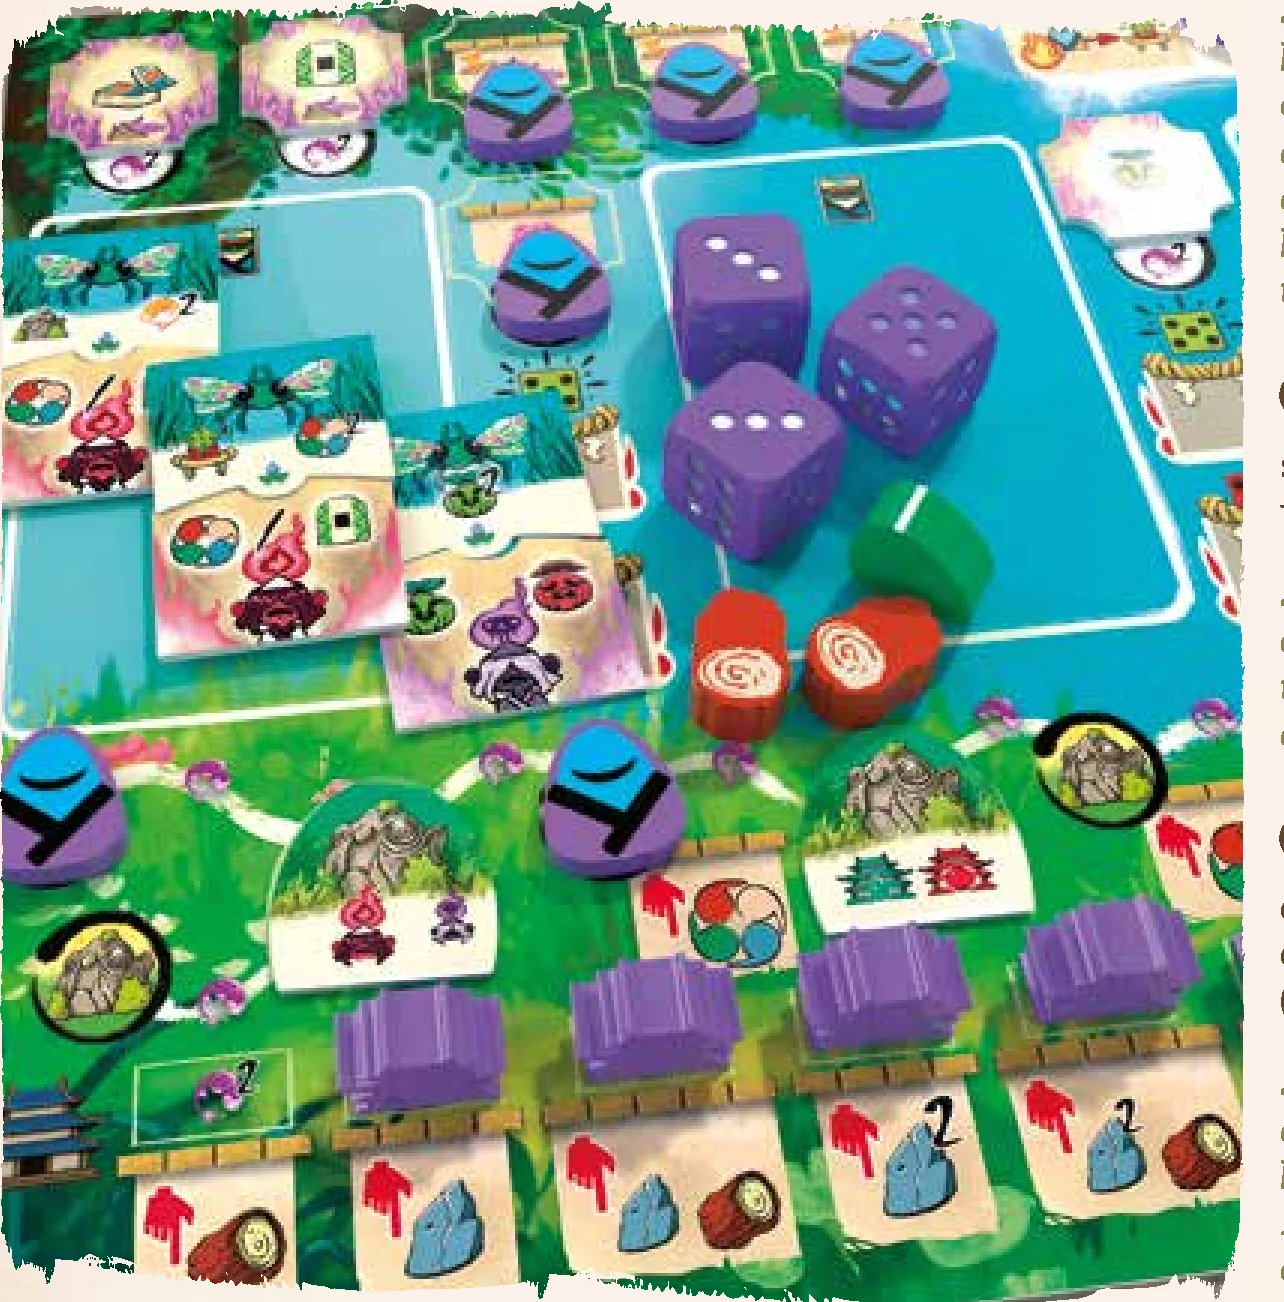
The Forest is being overrun by a horde of Tengu. These mischievous demons will try to trick you away from the path to Ascension, so you must prove yourself even more virtuous by rising above them!
These rules provide you a way to play Bitoku by yourself. All of the regular rules still apply, unless explicitly changed by these rules. In these rules, “you” always refers to the lone human player, while “the Tengu” or “it” always refers to your automated opponent.
Setting Up the Solo Game
- A. Board setup: Set up a two-player game as described in the regular rules. Ignore the G step regarding the Tengu: he doesn’t receive any Iwakura Rocks at this point (you receive yours as normal).
- B. Solo board: Select a color for the Tengu. Flip its player board to the Solitaire side. Keep the Tengu Activation Cycle chart (TAC) at hand.
- C. Components: Place the Tengu’s Building counters on the indicated spaces. Place all of its Pilgrims in the top part of the board. Set all of its Starting Yōkai cards face down in a pile on its board. Take 1 random Dragonfly token and place it on the indicated space. The Tengu does not receive any Vision cards or Amulets during setup or at any time during the game.
- D. Counters: Place the Tengu’s Kodamas and Player counters as you would for a normal player. The Tengu’s Player counter is always first on the Turn Order Track at the beginning of the first round.
- E. Dice: Place the Tengu’s dice on the red spaces with the values 2, 3, and 4 (in that order from left to right).
- F. Iwakura Rocks: Randomly select 1 Iwakura Rock from the Rock Garden and place it on the Tengu’s board (do not refill the empty space). Then, select a second random tile from the remaining stack with these restrictions:
- If the first tile shows rewards for Yōkai cards, the second must show rewards for either Buildings or Mitama Spirits.
- If the first tile shows rewards for Buildings or Mitama Spirits, the second must show Yōkai cards.
Place the second Iwakura Rock on the Tengu’s board. Return remaining rocks to the box.
- G. Resources: The Tengu starts with 1 wood Resource and 1 other Resource based on its Iwakura Rocks: 1 stone if one of its Iwakura Rocks shows Buildings, or 1 sake if one shows Mitamas.
- H. Tengu cards: Shuffle all 10 Tengu Action cards and create a face-down deck. Turn over the top 3 cards and place them in a row to the right of the deck.
- I. Will of the Tengu: Take 2 dice of an unused player color and set them near the Tengu cards (the Will of the Tengu dice). Place the Tengu Attitude tile in the bottom-right slot with the inactive side up.
Tengu Terminology
- Available Action: An action is “available” if there is no die on that space (yours or the Tengu’s).
- Rarest Bitoku: The Bitoku card currently in the Hills with the lowest rarity number that the Tengu has not yet collected. In case of a tie, it prefers the one further to the left.
- Choose Randomly: If between two equal options, roll one Will of the Tengu die (1-3 vs 4-6). If choosing objects from the board (Mitamas, Dragonflies, Buildings, Crystals): 1-2 cheapest/innermost; 3-4 second; 5 third; 6 fourth/outermost. Cycle outward if empty.
- Favorite: An object matching either of the Tengu’s 2 Iwakura Rocks. “Favorite Mitama or Building” on action cards means Lands of Yomi if it has a Mitama rock, or Forges if it has a Building rock.
- Tengu Attitude Tile: Has two sides: active and inactive.
- Most Competitive Kodama: The Kodama that is behind yours on its track, which would take the fewest moves to tie with you. Ties: highest 1st place VP, then further left.
- Crossing / Contested Crossing: A die is at a Crossing if in a Forest space with an available space across the river in the matching Hill. Contested if both you and the Tengu have a die at Crossings connected to the same Hill.
- Die Values: Tengu dice values never change. When unlocking/placing, use the lowest value die first. When crossing the river, use the highest value die.
Changes to Gameplay
- Spring: The Tengu never draws Yōkai cards. During Reap the Fruits, Tengu gains (and immediately spends) 1 MP for each Crystal on its board on top of normal rewards.
- Summer: Players alternate turns. On Tengu’s turn: roll both Will of the Tengu dice; select card (lowest die 1-2: right card; 3-4: middle card; 5-6: left card); resolve TAC; discard active card, slide cards right, draw new card leftmost.
- Autumn: Determine new turn order as normal.
- Winter: Tengu never interacts with Yōkai cards. Before advancing Great Spirit, remove 1 random Iwakura Rock from the Rock Garden.
Resolving Tengu Actions
- The Lands of Yomi: If card shows Dragonfly, takes random Dragonfly. If Mitama, takes cheapest favorite Mitama (or random if none match) and gains VP under space. Combines with Dragonfly immediately if available (ignoring Dragonfly effect and gaining 2 MP instead).
- Stairs of Knowledge: Tengu gains 3 MP.
- Spending Movement Points: Resolves in order: 1. Advance Bitoku Path (scores VP printed, ignores actions). 2. Move Pilgrim on Path of Wisdom (to highest Illumination space for 2x VP; or to unvisited Gate for 2x VP and resolves top card of deck; or forward 1 space ignoring bridges). 3. Place new Pilgrim on furthest available Gate to the right.
- Glade of Jade: Takes 2 Resources shown on card (or 2 Associated Resources) and advances its most competitive Kodama 1 space.
- The Forges: Takes random Crystal if card shows Crystal. If Building, constructs favorite Building (innermost) in legal location with most competitive Kodama, places Building counter, advances Kodama 1 space.
- Building Actions: Tengu never uses them. If you use Tengu’s building, it gains 1 VP.
- The Hills: Yōkai cards are added to its score pile; Bitoku cards are added to its Bitoku path.
The Ascension (Solo Scoring)
- Tengu scores: visible VP on Building spaces emptied; 3 VP for each matching Yōkai/Building/Mitama per Iwakura Rock; 3 VP per Starting Yōkai and 6 VP per advanced Yōkai; 1 VP per Resource; 2 VP per Crystal; Bitoku set collection as human; Kodama tracks (wins ties against you); 3 VP if 1st in turn order. Tengu scores 0 for dice and has no Visions.
Adjusting Difficulty
To make it easier: no starting Dragonfly; no starting Yōkai cards; no starting Resources; Kodama only advances if you are ahead; no MP from Soul Crystals in Spring.
To make it harder: starts with Pilgrim on first space of Path of Wisdom; advance all Kodamas 1 space at setup; starts with 2 Dragonflies; scores +3 VP per region where Kodama is ahead of yours.
The Tengu Activation Cycle (TAC)
| Step | Condition | Actions |
|---|---|---|
| A | The Tengu is at a Contested Crossing where a Yōkai or Bitoku showing on the top half of the Active Tengu card is available. | Cross the river with the corresponding die and take the Yōkai or Bitoku card as shown. (If both cards match, choose randomly.) |
| B | 1. The location shown on the bottom of the Active Tengu card is available. 2. The Tengu has no unlocked dice but has at least one locked die. 3. The Tengu Attitude tile is inactive. 4. The Active Tengu card is in the leftmost position in the card row. |
Flip the Tengu Attitude tile to the active side. Unlock 1 die and immediately place it on the location shown. Advance the Tengu’s Kodama in that region one space and perform the corresponding action. |
| C | 1. The location shown on the bottom of the Active Tengu card is available. 2. The Tengu has at least one unlocked die. |
Place an unlocked die on the location shown. Advance the Tengu’s Kodama in that region one space and perform the corresponding action. |
| D | 1. The Tengu has at least one locked die. 2. The Tengu has the Associated Resource or the card shows no Associated resource. |
Unlock 1 die and spend the Associated Resource. Then perform the action for the location shown on the bottom of the Active Tengu card without placing a die there. |
| E | The Tengu is at a Contested Crossing with only one space available in the corresponding Hill area. | Cross the river with the corresponding die and take the first available option below: Its favorite Yōkai card; The rarest available Bitoku of a type it doesn’t already have; A random Yōkai card. |
| F | 1. The Tengu has not yet placed a die in the Home of the Great Spirit. 2. The Tengu has at least one unlocked die. |
Place an unlocked die on the second-highest space in the Home of the Great Spirit (if your die is already in that space, place it on the third highest space instead). Advance the Tengu’s Kodama in that region one space. Then the Tengu scores 3 VP plus an additional 2 VP for each of your dice showing values of 5 or 6 currently in any of the locations below the river. |
| G | The Tengu has at least one locked die. | Unlock 1 die and take the Associated Resource. |
| H | The Tengu is at a Crossing where a Yōkai or Bitoku card showing on the top half of the Active Tengu card is available. | Cross the river with the corresponding die and take the Yōkai or Bitoku card shown. (If both cards match, choose randomly.) |
| I | 1. The location shown on the bottom of the Active Tengu card is not available. 2. The Tengu has at least one unlocked die. |
Find the location (excluding the Home of the Great Spirit) with the most competitive Kodama and place an unlocked die there. Advance the Tengu’s Kodama in that region one space and perform the corresponding action. |
| J | 1. The Tengu Attitude tile is active. 2. The Tengu has no locked or unlocked dice available. |
Flip the Tengu Attitude tile to the inactive side and take the Associated Resource. |
| K | The Tengu is at a Crossing. | Cross the river with the corresponding die and take the first available option below: Its favorite Yōkai card; The rarest available Bitoku of a type it doesn’t already have; A random Yōkai card. |
| L | None of the above. | The Tengu passes. |
Cultural References
Bitoku is a Japanese word that refers to different types of virtues, especially those of the Bushido. Bitoku is also a game set in a fictional universe. It is a sequel of sorts to another game published by Devir: Silk, as they share the same universe. Actually we should say that it is a prequel, as the action in Bitoku takes place in a time thousands of years before Silk, in which the human race is barely present. You don’t have to play Silk to enjoy Bitoku, or vice versa. Feel free to explore them both but know that they are very different in terms of gameplay.
This universe has been inspired mainly by manga, anime, and all sorts of japanese pop culture, which also derived from its folklore and traditions. Many of the creatures mentioned in the game come from Asian myths, many of them we just made them up. Bitoku does not claim to be a faithful rendition of any of these cultural instances, but we have tried to approach them with the utmost respect. We are trying to put together a fictional universe for all of us to visit and inspire great games.
Credits
- Game designed by: Germán P. Millán
- Illustrated by: Edu Valls
- Solitaire mode rules by: Dávid Turczi
- Additional solo game development: Xavi Bordes
- Proofreading: Marià Pitarque
- Graphic design: Bascu, BG FX, Meeple Foundry
- Wooden and cardboard components: BG FX
- English Language Translation: Andrew Campbell
- English Language Revision: William Niebling
- Development, production, and editing: David Esbrí
- Game testers: Juan Ruiz de la Fuente, Juan Milla, Aida Hernández, Lorena Santaella, Jorge Cheno, Aaron Vallecillos, Mikel Zorrilla, Gonzalo Bedia, Pablo Cazorla, Julián Mena, María Algar, Israel Reyes, Samuel J, Pascual Peláez, Gastón Avendaño, Jorge Barboso, Sergio Pangua, and Jose Raúl Megías.
Game designer notes: This game would have not been possible to imagine without the influence of master Hayao Miyazaki, who has taken my imagination to wonderful worlds on so many occasions. I’d like to thank my family and friends for their never ending support and care. To so many gamers who, even without participating in the playtest, still played a part in the development of Bitoku. To Dávid Turczi and his development team for the solitaire game and their contributions to the betterment of this game. To David Esbrí for making this board game possible. And specially to my sister Sandra.
Introduction & Goal of the Game
Bitoku is a game that brings a hefty volume of rules, as you can see while holding it on your hands right now. For this reason, we recommend that you watch the video tutorial that you can find at www.devir.com to complement what you will learn here.
This rulebook will expose the information in the most optimal way, by teaching the round and turn structure first, and then the details of the game board and the player board. Bear in mind that with such a complex game, it is likely that you will come across concepts early in the text that aren’t explained in detail until a few pages later.
You should familiarize yourself with the game components and read all of the rules before sitting your friends around a table to play. You may find it helpful to set up the board in advance as if you were playing the game. Then play a few turns on your own, without any opponents, so you can see how the components move around the board and how to resolve actions in the different areas. In a short time, you will master the game and you will have no trouble finding answers to any questions in the rules.
Then, when you invite your friends and explain to them how the game works, do so by handing over the player aids for them to follow along with your explanation. They are sure to appreciate you being a good host by having prepared the game beforehand!
Long ago, in the time of our ancestors, during an epoch that mankind has since forgotten, a Great Spirit inhabited a forest. Its mere presence imbued everything with life, abundance, and peace. After its given time, the Great Spirit would go away, never to return. A Bitoku spirit, worthy to take its place, would then arise to preserve the harmony of the forest.
This primordial forest, millennia old, stretches from the Earthquake Plains to the foothills of the Akaishi Mountains. The mountains are home to the source of the sacred river Kurirakugan, whose mighty flow traverses the forest before shooting out over the cliffs of Sea’s Claw.
The Forest has no other name. Indeed, all forests are called such after this one. It is one of the Five Hearts of the World, and it is said that in its deepest, densest regions, the trees and vegetation are so thick that Lost Souls who wander there are able to at last find peace and transcend to the beyond—or become lost forever and cease to exist as the last memory of them is forgotten.
There has never been nor will ever be a place like it. Magical and spiritual beings inhabit it, remembered today only in legend and children’s tales…
The time has come for the Great Spirit to move on, and one of the Bitoku must be chosen as its successor. As one of those spirits, can you prove that you alone are worthy of this incredible honor?
The Goal of the Game
The game is played over four rounds, each representing one year left for the Great Spirit. Each round is divided into four phases named for the seasons. At the end of the Winter Phase in the fourth round, the game ends and the Ascension occurs.
Each phase, you will carry out actions to earn Virtue Points (from now on called “VP”). As you earn VP, you will advance along the Spirit Path, which runs around the outside of the board. During the Ascension, you can earn additional VP by completing certain goals. The spirit who advances the furthest along that path will be the winner—and become the new Great Spirit!
Components
1 Game Board & Player Elements
- 1 Game board
- 14 Die-cut pieces (to complete the board)
- 4 Player boards (1 per player) / Tengu board (solo mode)
- 4 Flags / “+100 VP” (1 per player)
- 12 Dice (3 per player)
152 Tiles
- 24 Building tiles (6 temples, 6 onsen, 6 farms, 6 ryokan)
- 6 Ancient Building tiles
- 5 Lake Treasure tiles
- 32 Crystal tiles
- 24 Mitama Spirit tiles (5 ara, 5 nigi, 5 saki, 5 khushi, and 4 shinigami)
- 32 Dragonfly tiles
- 16 Gate tiles (8 of type A and 8 of type B)
- 13 Iwakura Rock tiles
- 1 Tengu Attitude tile (solo mode)
172 Counters
- 1 Great Spirit counter (to indicate the round)
- 1 Pagoda counter (to indicate the phase)
- 12 Player counters (3 per player: for turn order, VP, and their Bitoku Path)
- 44 Pilgrim counters (11 per player)
- 20 Kodama counters (5 per player)
- 24 Construction counters (6 per player)
- 72 Resource counters (18 wood, 18 stone, 18 jade, and 18 sake)
111 Cards
- 29 Yōkai cards (5 Kappa, 5 Imomushi, 5 Nezumi, 5 Kitsune, 5 Shin Ookami, and 4 Yama-Uba)
- 20 Starting Yōkai cards (1 of each type per player)
- 24 Bitoku cards (5 Makoto, 5 Chuugi, 4 Yu, 4 Jin, 3 Rei, 2 Gi, and 1 Meijo)
- 28 Vision cards
- 10 Tengu Action cards (solo mode)
Other Components
- 58 Amulets (+1, +2, +3)
- 32 3x Resources tiles
- 12 Hikaru markers
- 1 Rulebook
- 4 Player aids
Setup
The path of the Great Spirit is coming to its end. The final step taken by this enigmatic being will mark the beginning of the path for the one who will be its successor. The imprint of its wisdom shall forever be upon the stones, glades, and green of the Forest. Those who are called to take its place have spent centuries, living through many reincarnations, just to prepare for this challenge. The wisest of the Bitoku are now ready. Which of them shall become the new Great Spirit of the Forest?
Setting Up the Board
- A. Place the game board in the middle of the table. The side without any gaps is ready for solitaire and two-player games. If three or four of you are playing, add the die-cut pieces in the corresponding spaces as shown in the gaps (the four-player setup always has more spaces on the tiles).
- B. Place the counters: Place the Great Spirit counter on the first space of the Round Track and the Pagoda counter on the first space of the Phase Track (Spring).
- C. Torii Gate tiles: Divide the Torii Gate tiles marked “A” and “B.” Mix each group separately. Place a random “A” tile on each Torii Gate space marked “A” and a random “B” tile on each space marked “B”, with their rewards side facing up. Put any remaining Torii Gate tiles back in the box.
- D. Ancient Buildings: For a solitaire or a two-player game, mix the Ancient Building tiles and randomly place one on each of the lower leftmost spaces of the four inhabited areas indicated on the board. In three-player games, place only two of these tiles on the lower leftmost spaces of the Lands of Yomi and the Glade of Jade. You don’t need Ancient Buildings in four-player games. Return any leftover tiles to the box.
- E. Forest Treasure tiles & neutral Kodama: Shuffle the Forest Treasure tiles and randomly place one in each of the five Forest regions. For a two-player game, also place a Kodama counter of a neutral color on the fourth space of each region’s Kodama Track.
- F. Tiles supply stacks: Shuffle the Building tiles, Crystal tiles, Mitama Spirit tiles, and Dragonfly tiles separately and place them in stacks with roughly the same number of tiles face down in the matching spaces. Then, turn over enough tiles of each type (from either of the stacks) to fill all of the spaces next to that stack.
- G. Iwakura Rock tiles: Mix the Iwakura Rock tiles and, without looking at them, give one to each player. Then place one face up in each space of the Rock Garden. Put the remaining tiles back in the box.
- H. Vision cards: Shuffle the Vision cards and place them face down on their space on the board.
- I. Bitoku cards: Shuffle the Bitoku cards and place them in their space on the board with space for a discard pile. Turn over and place one Bitoku card in each space of the Hills area of the board.
- J. Yōkai cards: Separate the Starting Yōkai cards from the others and set them aside. Shuffle the remaining Yōkai cards and create a face-down deck in their space on the board with space for a discard pile. Turn over and place one Yōkai card in each space of the Hills area of the board (partially covering the Bitoku cards).
- K. Common supply: Create a common supply for the Resource counters (jade, sake, stone, and wood), the x3 Resource tiles, the Hikaru tiles and the Amulets.
Player Setup
Each player chooses a color and takes the following:
- A player board and a flag of your color: place it in front of you.
- 3 dice: place them on the red spaces on your player board, with these values showing from left to right: 3, 2, and 1.
- 5 Kodama counters of your color: place 1 on the first space of each Kodama Track in the Forest area of the game board.
- 11 Pilgrim counters of your color: Place 3 of them with their awakened side facing up in the upper right area of your player board and the rest with their sleeping side facing up on the 8 spaces in the Crystal areas so they cover the Virtue Points (VP) symbols.
- 3 Player counters of your color: Place 1 on the Bitoku Path on your player board, 1 on the river space at the beginning of the Ascension Track (VP) on the board, and 1 on the Turn Order Track. Mix the tokens of all players on the Turn Order Track and place them on the track in random order.
- 6 Building counters: place them on the spaces in the Building area of your player board, covering the VP symbols.
- 1 random Dragonfly from any face down stack: place it face up in the matching area of your player board.
- 1 random Vision card from the deck: place it face up next to your player board.
- The set of 5 Starting Yōkai cards of your color. Shuffle your Yōkai cards together and place them face down next to your player board. Return any unused Starting Yōkai cards to the box.
- 1 wood, 1 jade, and 1 “+1” Amulet: place them next to your player board.
- Place the Iwakura Rock you received in the leftmost space on your player board.
- 1 player aid with the Game order and Icon summaries.
Note: Except for the face down cards and tiles and the Yōkai cards in the players’ hands, all game elements (counters, tiles, Vision cards, etc.) are public knowledge and available to all players.
Core Concepts & General Rules
Icons and Symbols
Bitoku uses a variety of icons and symbols to help you through the game and communicate valuable information. It may seem like a lot at first, but you will quickly learn to identify them. You can find them all in the player aid that briefly explains each symbol, as well as reference pages where they are explained in more detail.
- A black number to the right of any icon indicates the number of times you can take an action. If there is no number, you only take that action once. (e.g., Receive 2 VP; Obtain 1 Dragonfly).
- A red hand means that you must pay that Resource, returning it to the common reserve, in order to obtain a tile or perform an action.
- A yellow hand next to an icon indicates that we can take that action paying a lower number of Resources (of any type), by the amount indicated. (e.g., Gate allowing you to purchase a Mitama Spirit tile by paying 2 Resources less than the price shown).
- If a Virtue Points icon is orange, it means that you earn those VP immediately as soon as you take that action.
- If the icon is purple, you do not earn those VP until the end of the game.
- A gray VP indicates a loss in VP.
- When you see a slash “/” between two icons, you can decide which one of those to take (e.g., receive two jades, two sakes, or one jade and one sake; construct a Building with a discount of one Resource, or obtain a Crystal with a discount of one Resource).
Resources
Resources are used to pay various costs during the game, and can be acquired from tiles, cards, and other sources. There are four types of Resources in the game: Jade, Sake, Wood, and Stone.
When you receive Resources, place them next to your player board. At any time, you may return 3 Resources of the same type to the supply and take a x3 Resources tile for that Resource type in exchange (or vice versa).
Limit of Components: There is no limit to the number of Resource tokens or Amulets available during the game at any given moment. If you run out of any of these components and need more, just use any kind of temporary substitute, like coins.
Amulets
These mystical tokens are used by Guardians to enhance their powers. When you obtain them, take them from the common pool and place them next to your player board. Any time you move a die to the game board, you may spend any number of Amulets to increase the value showing on that die (+1, +2, or +3 as marked on each Amulet). Amulets cannot be broken down into other Amulets of smaller denominations: you can’t change a +3 Amulet for three +1 Amulets.
Movement Points (MP)
You can earn Movement Points (MP) as the effects of some cards and tiles. MP must always be spent immediately when gained: they cannot be saved for later and are lost if not used. Each MP may be spent to carry out one of the following actions. You may spend MP to take different actions or repeat the same action more than once, but you must fully resolve each action before spending the next MP.
- Move Your Spirit Along Your Bitoku Path: If you have at least one Bitoku card on your Bitoku Path beyond the space occupied by your Player counter, you may spend 1 MP to move your counter to the space on the next card in your path. It is complete now and you take the action shown.
- Start a New Pilgrimage on the Paths of Wisdom: If you have a Pilgrim available in your player board, you may place it on the starting space (next to the starting Gate) on any of the Paths of Wisdom that you wish to follow.
- Move a Pilgrim Forward on a Path of Wisdom: If you already have a Pilgrim on a Path of Wisdom, you may move it forward one space by paying 1 MP.
Yōkai Cards and Dice
The duties of a Bitoku who aspires to become the Great Spirit of the Forest would be laborious and arduous if they had to do it all alone. Fortunately, the Yōkai—Guardians who watch over and protect the Forest—are there to help. Their presence in the game is represented in the form of cards and dice. Using these is fundamental to the strategy of the game, and you must use them well if you hope to become the next Great Spirit.
During each round, you will use 3 cards and 3 dice.
Yōkai Cards
Yōkai cards are played onto your player board to allow you to perform various tasks and receive rewards. You begin the game with a basic deck of 5 Starting Yōkai cards, but you can gain more powerful cards during the game. In addition, they can give you VP at the end of the round in which they are played.
- Obtain a Yōkai card from the common deck: Take the top two cards, choose one and keep it in your hand. Then place the other face down back at the bottom of the deck.
- Obtain the Yōkai card from the Hikaru Hill: Take the Yōkai card from the Hikaru Hill you just moved your dice to. Place it in your hand.
- Draw a Yōkai card from your deck: Put it in your hand. Any time you draw Yōkai cards, always take them from the top of your own deck. Your deck is kept face down next to your player board and you may not look at those cards at any time. The cards in your hand should be kept secret from the other players.
When you discard Yōkai cards, place them in a face up discard pile next to your deck. You may examine the cards in your discard pile at any time, but under no circumstances can you draw cards from here.
If you need to draw a card and there are no cards left in your deck, shuffle your discard pile and create a new face-down deck, then draw the cards you need.
Each Yōkai card shows:
- A: Their type
- B: The action they offer when played
- C: The VP they can grant you during the optional Spirit’s Virtues step during the Winter Phase
- D: A red circle indicating that you can obtain a maximum of 12 points by playing the Spirit’s Virtues (see player aid). Also, the starting Yōkai cards show a symbol under the type icon matching the color of the player’s pieces.
Example: The card in the illustration is a Nezumi type; its action allows you to advance one of your Kodamas one space forward and either construct a Building or obtain a Crystal. If you choose to remove it during the Winter Phase, you will receive 2 VP for each building that you have constructed (Max. 12).
Dice
Dice begin each round on the red spaces of your player board. The value on the die determines how powerful that Yōkai is: the higher the value on the die, the more powerful the action will be when you use that die. Also, as only Yōkai can cross the sacred River, only dice can be used to gain the Favor of the Forest by moving over the river to the Hills.
Before you can use a die, you must unlock it, moving it to the green space. There are three ways to unlock a die:
- Play a Yōkai card in the space next to the locked die.
- Use an action that allows you to unlock a die.
- Discard a Pilgrim: You may use a locked die from your Personal Board if you discard a Pilgrim counter you have available. If you do, you must use that die immediately. The Pilgrim is removed from the game.
The Player Boards
Over their centuries-long lives, each spirit that aspires to become the Great Spirit of the Forest will establish their own personal dominion over a part of the Forest. Within this safe haven of tranquility, they can reflect and grow in self-awareness.
You will use your player board to place Yōkai cards and organize other elements you gather during the game. Your player board is divided into the following zones:
- A: Pink and yellow Crystals spaces. Each Crystal gives another Pilgrim and reveals end-game VP.
- B: Virtue of the Spirit slot for discarded cards.
- C: Available Pilgrims pool.
- D: Flag space.
- E: Yōkai deck.
- F: Yōkai card spaces, holding locked/unlocked dice and crystal slots.
- G: Yōkai discard pile.
- H: Iwakura Rock Path.
- I: Building Counters track.
- J: Resting Place of uncombined Mitama Spirit and Dragonfly tiles.
- K: Bitoku Path cards.
- L: Next to board area: combined Mitama & Dragonflies, Vision cards, Resources, and Amulets.
The Path of the Great Spirit: Round Structure
The spirits of the Forest are united in harmony and symbiosis. In all they do, they aid one another, without conflict. Hatred is unknown here, and lush greenery grows everywhere, for the Bitoku oversee everything and together they take care of the Forest. The Great Spirit is the foremost of these, and all can rejoice in the plenitude of its efforts.
Bitoku is played over four rounds, each divided into four phases inspired by the seasons of the year:
- Spring: The Awakening of the Forest. The players prepare their Yōkai cards and gather the fruits of their earlier labors.
- Summer: The Call of the Guardians. The players call upon their Yōkai and perform actions in the various areas on the board.
- Autumn: The Reverence. Based on their actions in the Summer, the players determine the new turn order.
- Winter: The Repose of the Forest. The players recover their pieces and prepare the board for the next round.
At the end of the last round, the Ascension will begin, when the final VP are awarded and the new Great Spirit will be chosen.
Spring: The Awakening of the Forest
The cold winter’s snow turns to crystal-clear streams, flooding the woods with fresh and green. The Forest erupts in a festival of life and exuberance as the animals awaken from their hibernation and the spirits resume their activities, taking care of the Forest. Spring is the time when life flourishes, and the Yōkai gather to assist the Bitoku.
During this phase, the players receive their Yōkai for the round and collect income. All players may act simultaneously during this phase, performing these two steps:
- A. Summon the Yōkai: Each player draws cards from their Yōkai deck until they have 4 cards in their hand. It is possible for players to start this phase already with 4 or more cards in hand from previous rounds; in that case, they should not draw more cards from their deck. Then, they must choose which of those cards to discard, finally keeping a total of 3 in hand.
- B. Reap the Fruits: Each player now collects the rewards indicated on the Dream Crystals (purple) on their player boards. You may collect these rewards in any order you choose (see player aid).
As soon as all players have completed both steps, the Summer Phase can begin—move the Pagoda counter to the next space on the Phase Track.
Summer: The Call of the Guardians
As spirits gain wisdom and become more powerful, they also grow proportionally larger. Some even grow to the size of oak trees and acquire masterful abilities. These are known as Yōkai Guardians. Summer is the season of hard work. This is the time that those who hope to become the Great Spirit call upon these Guardians for aid.
During this phase, the players will take individual turns. The order of turns is determined from left to right by the location of the Player counters on the Turn Order Track.
When it is your turn, you must choose one of these four basic actions (detailed in the following section):
- A. Play a Yōkai card from your hand.
- B. Use an unlocked die on your player board.
- C. Cross the River.
- D. Pass.
Once you have completed your actions, it is the next player’s turn. Players continue taking turns in this way until all players have chosen to pass. Then the Autumn Phase can begin—move the Pagoda counter to the next space on the Phase Track.
Autumn: The Reverence
The Great Spirit of the Forest is a generous being, for with every step that it takes, life springs forth from its footprints. The Great Spirit of the Forest is a strict being, for every thing that lives must die when its time has come. The Great Spirit of the Forest is a fair being, for the decay of the expired feeds the fruit from whence new life is born.
Autumn is the season for reflection. At this time, the aspiring spirits present themselves humbly before the Great Spirit to review their deeds. Players take the following step simultaneously:
Take One Step Forward: The new turn order is decided at this point. The player whose die is on the highest position in the Home of the Great Spirit places their Player counter in the first position on the Turn Order Track, pushing the rest of the counters on the track to the right to make room. Then the player in the second highest position places their counter in the second position on the Turn Order Track, and so on.
If you have more than one die in the Home of the Great Spirit, only the one in the higher position is counted. If there are no dice in the Home of the Great Spirit, the turn order remains unchanged.
Once this step is resolved, the Autumn Phase ends and the Winter Phase can begin—move the Pagoda counter to the next space on the Phase Track.
Winter: The Repose of the Forest
Snow and ice overtake the Forest. The Great Spirit contemplates how the flakes light upon the branches of the evergreens and the way the ice slows the heartbeat of the ponds. Silence settles in as the Forest begins to rest. Winter is the season where the Forest recovers its strength for the coming cycle, and is the time for aspiring spirits to prepare themselves for their next challenges.
All players must follow these five steps in order:
- A. Guardians Return Home: Take your dice back from the game board and return them to the red spaces on your player board on the order of your choice. All dice keep their current values.
- B. The Spirit’s Virtue: If you have a total of at least 5 Yōkai cards (between your deck, your player board, your hand, and your discard pile), you may choose to permanently remove one from the game to earn VP. This step is optional.
Using the new turn order, each player may remove 1 of the 3 Yōkai cards on their player board and score the VP shown at the bottom of the card. If you do so, place the card face up so it is visible under your player board (next to the flag), leaving its type visible. You will no longer be able to use that card for the rest of the game. At the end of the game, this card still counts when you score your Iwakura Rocks.
Cards discarded this way will award VP by counting the number of copies of each item shown currently under your control, multiplied by the value of the VP icon, always up to a maximum of 12 points. (e.g., receive 2 VP for every Building that you have constructed, up to a maximum of 12 VP).
- C. The Yōkai Say Farewell: Take all of the remaining Yōkai cards on your player board and put them in your discard pile. Keep any Yōkai cards in your hand for the next round.
- D. The Great Spirit Takes a Step: Advance the Great Spirit counter one space forward on the Round Track. If the Great Spirit reaches the Ascension space, skip the next step and proceed directly to the Ascension Phase.
- E. Snow in the Forest: Prepare the game components for the next round:
- Remove all Bitoku and Yōkai cards from the game board and discard them. If either deck has no cards left, reshuffle the matching discard pile and create a new deck at this time.
- Return the « Hikaru » tiles from the Hills to the common supply.
- Draw a Bitoku card and then a Yōkai card for each space in the Hills.
- Remove the Mitama Spirits, Dragonfly, Building, and Crystal tiles that are in the last space (furthest away from the stack) of each of their areas on the game board from the game. Push the remaining tiles on these paths forward until they fill all of the spaces at the end of their paths. Then, turn over enough tiles to fill in all of the spaces on each path. Remember: The Iwakura Rocks are never refilled.
- Move the Pagoda counter back to the Spring space on the Phase Track.
Summer Actions
Actions in the Game
There are three main ways to gain actions during the game:
- Basic actions: Your options during your turn in the Summer Phase: play a Yōkai card, use an unlocked die, cross the river, or pass.
- Forest and Building Actions: Granted by the regions of the Forest when you place a die there. Forest Actions are different for each region. The Building Action available depends on which Buildings are available in the region you place your die on.
- Board/Tile/Card triggers: Some spaces on the game board, some tiles, and some Yōkai cards also allow you to take the action shown. These actions must be resolved at the moment the space, tile, or card is activated. This may trigger additional actions, possibly causing a chain of actions, one after another.
A. Play a Yōkai Card from Your Hand
The Yōkai cards represent the guardian spirits of the Forest. They are divided into five types, each specialized in a different kind of effect. When you choose this option, you will play one Yōkai card from your hand, placing it on an empty card space on your player board Yōkai area. Then, follow these three steps:
- Unlock the die next to the Yōkai card you just played, moving it from the closed red space (to the right of your card) to the green open one, if needed.
- Activate the Yōkai card by carrying out the action shown on the card. This step is optional.
- Harmonize the Crystal, if you have one connected to that card space, by carrying out the action shown on the tile. You may do this before or after you activate the Yōkai card. This step is optional.
Things to Consider When Playing a Yōkai Card:
- You may not play a Yōkai card on a space that is already occupied by another card.
- You may play a Yōkai card even if the die in that space has already been unlocked or even played on the board.
- If all three of your card spaces are full, you must choose a different option on your turn.
- You may not move a Yōkai card to another space after you have played it.
- Each card space can only have one Crystal connected to it for the entire game.
B. Use an Unlocked Die on Your Player Board
The most powerful Yōkai are the Guardians, represented in the game by dice. When you use one of your unlocked dice, you will always place it in the Forest area of the game board. The Forest is divided into five regions. Each region has a number of spaces where dice can be placed. You can only place a die in a space that is not already occupied by another die.
When you place a die in the game board, follow these steps:
- Reinforce the Guardian: Before you place a die (and only at this time), you may increase the value shown on the die by discarding any number of Amulets you have to the supply. Each Amulet you spend in this way increases the value of the die by 1, 2 or 3, depending on the value of the Amulet. The value of a die can never be increased above 6 (any additional points are lost). This step is optional.
- Visit the Forest: Move the die to any empty space on the Forest area of the game board. You may have more than one die in the same region (over multiple turns), as long as there are still empty spaces available.
- Perform Forest and Building Actions: You may now use the Forest Action and/or one of the Building Actions that are available in the region where you placed the die. You may perform these actions in any order you choose. This step is optional.
Forest Actions
You may only use a Forest Action if the die you placed has an equal or higher value than all other dice already in that region. Note that any dice that have crossed the river over to the Hills are no longer counted as being in the Forest region.
Building Actions
If there are any Buildings in the inhabited area attached to that Forest region at the moment in which you place the die, you may perform the action shown on one of those Buildings. Unlike Forest Actions, you may use a Building’s action regardless of the values of other dice in that Forest region. But, your die value must still be higher than or equal to the value shown on the Building you want to use.
Property Bonus: If you perform a Building Action on a Building that was constructed by another player (that is, one marked with another player’s Building counter), the Building’s owner receives the Property Bonus on the tile. This is in addition to the effect that you are using and comes from the common supply (you don’t pay them the bonus yourself). There are three types of Property Bonuses:
- The owner earns 1 VP.
- The owner earns 1 VP or a +1 Amulet (owner’s choice).
- The owner earns 1 VP and a +1 Amulet.
You do not receive a Property Bonus if you use your own Building.
Things to Consider When Playing Dice in the Forest:
- You may not perform more than one Forest Action per die placement.
- You may not perform more than one Building Action per die placement.
- You may not perform a Building Action from a Building you just built this turn.
- You may not place a die from your personal board onto any space in the Hills over the other side of the River.
- You may use a locked die by permanently discarding a Pilgrim available on your player board.
- You may perform the Building Action before the Forest Action or vice versa, but either way you must complete the first action before beginning the second one.
- Both types of actions are optional: You may place a die without taking either type of action.
One Quick Tip to Make Bitoku More Difficult
After your first few games, you can increase Bitoku’s difficulty simply by adjusting the Forest action rules: You may only use a Forest Action if the die you placed has a higher value than all other dice already in that region. If any of those dice is showing a value of 6, you have to spend an Amulet at this moment in order to “virtually” increase your value over 6 for this Forest action only (do not change the top face of the die). Note that any dice that have crossed the river over to the Hills are no longer counted as being in the Forest region.
C. Cross the River
If you have one or more dice in the Forest area of the game board, you may choose this option. If you do, follow these steps:
- Move Your Die Across the River: Choose one of your dice in the Forest and move it to an empty space in the matching Hikaru Hills area on the other side of the river. In two-player games, the spaces on the other side of the River can reach both Hikaru Hills on each side of the board (as divided by the Home of the Great Spirit).
- Perform an Act of Contrition: Only the humble can cross the sacred Kurirakugan River, so you must reduce the value of your die by 1 point. If the die has a value of 6, however, you must reduce its value by 3 points instead. Note: You cannot cross the river with a die that has a value of 1 because it cannot pay for the Act of Contrition.
- Obtain a Favor of the Forest: Gain one of the available benefits shown in the space you moved your die to. You can only move your die to an empty space, but you can choose any available Favor. Each Favor can only be gained once per round in each area, so players will cover them with Hikaru markers after claiming one of them to indicate that one is not available until the following round. In two-player games you will be able to access the Favors of the two Hills connected to the space where you place your die when crossing the river.
These are the three Favors available in each area:
- A: Take the Bitoku card from this space. Place it face up below your player board to begin or extend your Bitoku Path.
- B: Take the Yōkai card from this space. Add it to your hand. You may play this card during a later turn.
- C: Choose two different of these four options:
- Draw 1 Vision card from the deck.
- Take 1 Iwakura Rock from the board and add it to your Rock Path.
- Place 1 available Pilgrim on your player board adjacent to one Iwakura Rock.
- Move one of your Kodamas on any Kodama Track forward 1 space.
Once a die has crossed the river, it remains there until the Winter Phase and cannot be moved again that round.
Things to Consider When Crossing the River:
- You can only place your die in an empty space after crossing the river.
- The value on your die does not affect which Favors you may take here.
- After you cross, the space in the Forest that your die left behind is now empty and available for another die to use.
- A die at the Home of the Great Spirit cannot cross the river.
- Taking the Favor of the Forest is optional: You may cross the river and choose a reward but decide not to take it, and simply cover that option with a Hikaru marker without any further effects.
D. Pass
After having played your three Yōkai cards on your personal board and moved your three dice over to Forest spaces, if you cannot or do not wish to cross the River, you may pass when it is your turn. Once you pass, you are “out” for the rest of the phase and you may not take any more actions.
Once all players have passed, the Summer Phase ends and the Autumn Phase can begin—move the Pagoda counter to the next space on the Phase Track.
Board Areas & Game Elements
In this section of the rulebook we will give you details of the different areas of the board and their game play.
The main game board is divided into a number of areas, each of which has a different function during the game:
- A: Phase Track
- B: Round Track
- C: Spirit Path
- D: Paths of Wisdom
- E: The Forest, divided into five regions: 1. The Lands of Yomi, 2. The Stairs of Knowledge, 3. The Home of the Great Spirit, 4. The Glade of Jade, 5. The Forges
- F: The Sacred Kurirakugan River
- G: The Hikaru Hills
- H: The Inhabited Areas
- I: The Rock Garden
- J: The Crystal Caves
- K: The Rift of Visions
- L: The Twisted Trail of the Mitamas
- M: Kodamas and the Treasures of the Lake
Tracks: Phase, Round & Spirit Path
- A. The Phase Track: The Pagoda counter is used on this track to remind the players which phase they are currently playing. At the end of each phase, move the counter to the next space.
- B. The Round Track: The Great Spirit counter is used on this track to indicate which round of the game is being played. After the Winter Phase each round, move the Great Spirit counter forward one space towards Ascension. The last space in this track indicates that it is time for the Ascension Phase.
- C. The Spirit Path: This path is used by the players to keep track of their Virtue Points (VP) during the game and the Ascension. Remember to move your Player counter each time you gain VP. If your counter moves past the “100” space, flip your flag to its “+100 VP” side as a reminder.
D. The Paths of Wisdom
The journey towards Ascension brings spirits and pilgrims new levels of consciousness and self-awareness. This part of the game board shows the paths that Pilgrims can follow as they seek enlightenment. In order to move a Pilgrim on a path, you must spend Movement Points (MP). In this section of the board you can take the following actions:
- Start a New Pilgrimage on the Paths of Wisdom: If you have a Pilgrim available on your player board, you may place it on the starting space (next to the starting Gate) on any of the Paths of Wisdom that you wish to follow. Depending on the number of players, this Gate will be the starting point for one or two paths. You may start as many pilgrimages as you like, as long as you have Pilgrims available. You can acquire more Pilgrims by earning Crystals. Optional: If you already occupy a Gate space with one of your Pilgrims, you may start a new pilgrimage on the path space connected to that Gate instead of the starting Gate if you wish, saving yourself part of the journey. However, you always have the option of placing the new Pilgrim at the starting Gate if you prefer.
- Move a Pilgrim Forward on a Path of Wisdom: If you already have a Pilgrim on a Path of Wisdom pilgrimage space, you may move it forward one space by paying 1 MP onto the next pilgrimage space. Each path is one way only, and must be followed in the direction shown. Pilgrims can never move backward on a path. Several Pilgrims may occupy the same space only if the circle on that space is open at the top.
Along the path, your Pilgrim will encounter forks heading towards Illumination spaces or a Gate. When you reach a fork, you may choose which direction to move. The spaces along these side paths can hold only one Pilgrim at a time, as indicated by the closed circle on those spaces. Also, Pilgrims may not occupy different spaces on the same fork.
- Illumination Spaces: These spaces award VP and Amulets when a Pilgrim is placed onto them. A Pilgrim on an Illumination Space is placed there with its sleeping side up, and cannot move any further and remains in that space for the rest of the game: They have reached their personal goal.
- Torii Gate Spaces (A and B): The same rules as the Illumination Spaces apply here. In addition, you immediately take the action shown on the tile marking that Gate. From now on, if you decide to start a new pilgrimage, you may begin from the space adjacent to this Gate.
- Bridge Spaces: The spaces with bridges represent spiritual obstacles that a Pilgrim may encounter during their journey. In order to cross a bridge, it is not enough to simply pay 1 MP. You must also have advanced far enough along your personal Bitoku Path. For the first bridge, you must have advanced your Player counter onto at least the first card of your Bitoku Path. For the second, you must have reached at least the second card on your path.
E. The Forest Regions
The Forest is like a gigantic baobab that is centuries old: difficult to get your arms around. Its dominions spread to the four points of the compass, and within its shade are an infinite number of hidden corners, each with its own personality and home to every kind of creature, from the simplest beasts to perfectly structured societies. These mythical places, full of life and mystery, hold the resources that spirits need to complete their journey to Ascension. Each region is also the location of one of the Hikaru Hills, where Yōkai and Bitoku spirits gather. The source of all this life is the sacred Kurirakugan River.
During the Summer Phase, you can place your dice in this area of the game board. Each region of the Forest offers different Forest Actions and is connected to both one of the Hills and one of the Inhabited Areas. There is also a separate Kodama Track in each region, where players can compete for the Treasures of the Lake.
1. The Lands of Yomi
Many Mitama spirits become lost in the darkness of the Forest. Fortunately, the Yomi can help guide them and purify their souls before they are forever forgotten. They achieve this with the help of the Chinkon Dragonflies.
This region is connected to the Twisted Trail of the Mitamas. When you place a die here, you may choose from the following Forest Actions (only if your die has a value equal to or higher than all other dice already in this region):
- Space 1 (Die value 1+): Move your Kodama in this region forward 1 space.
- Space 2 (Die value 2+): Pay the indicated cost and obtain 1 Mitama Spirit tile or 1 Dragonfly tile.
- Space 3 (Die value 3+): Pay the indicated cost and obtain 1 Mitama Spirit tile (with a discount of 1 resource) or 1 Dragonfly.
- Space 4 (Die value 4+): Pay the indicated cost with a discount of any 1 resource and obtain 1 Mitama Spirit tile or 1 Dragonfly tile.
- Space 5 (Die value 6): Pay the indicated costs and obtain 1 Mitama Spirit tile and 1 Dragonfly tile, with a discount of 1 resource on the purchase of one of these tiles.
2. The Stairs of Knowledge
A long walk awaits all pilgrims in search of the truth of all things. Fortunately, refuge can be found in the Torii Gates, where they can enjoy a regenerative rest.
This region is connected to the Paths of Wisdom. When you place a die here, you may choose from the following Forest Actions (only if your die has a value equal to or higher than all other dice already in this region):
- Space 1 (Die value 1+): Move your Kodama in this region forward 1 space.
- Space 2 (Die value 2+): Gain 1 Movement Point.
- Space 3 (Die value 3+): Gain 2 Movement Points.
- Space 4 (Die value 4+): Gain 3 Movement Points.
- Space 5 (Die value 6): Gain 4 Movement Points.
3. The Home of the Great Spirit
This is the refuge of the one who is everything in the Forest, whose time is coming to an end. The spirit who reaches the highest virtue will soon make their home here.
The Turn Order Track at the top of this region shows the order that the players will take turns during the Summer Phase. This order is determined during the Autumn Phase, based on the positions of the players’ dice in this region.
There are several spaces here for dice, each of which offers a different Forest Action. Any dice can be placed on these spaces, regardless of the values shown on those dice (the Great Spirit is equally generous to all the beings of the Forest):
- Space 1: Gain 1 +2 Amulet.
- Space 2: Gain 1 +1 Amulet and draw 1 Vision card (following the process described on page 16).
- Space 3: Gain 1 +1 Amulet and any 1 Resource of your choice. (Available only in games with 3 or 4 players.)
- Space 4: Gain 1 +1 Amulet and 1 MP. (Available only in games with 3 or 4 players.)
- Space 5: Gain 1 +1 Amulet and your choice of 1 MP or any 1 Resource. (Available only in games with 2 players.)
- Space 6: This space is the only exception to the rule that a die of any value can be placed in the Home of the Great Spirit: you can only place a die with value 2 or higher here. When you place a die on this space, you must immediately reduce its value by 1 point. Then you may choose any other player’s die that is on any Forest space, and then perform the Forest Action for the region that die is located in, using the value on that die. You do not get to perform any Building Action, and you cannot choose a die that has crossed the river. (Available only in games with 2 players.)
4. The Glade of Jade
In this region, spirits from all over the Forest gather to exchange every imaginable kind of precious stone and, of course, the drink of the gods: sake.
This region offers a way to gain Resources. When you place a die here, you may choose from the following Forest Actions (only if your die has a value equal to or higher than all other dice already in this region):
- Space 1 (Die value 1+): Move your Kodama in this region forward 1 space.
- Space 2 (Die value 2+): Take 1 wood or 1 jade.
- Space 3 (Die value 3+): Take 1 of any Resource of your choice (wood, jade, sake, or stone).
- Space 4 (Die value 4+): Take any 2 Resources of your choice (wood, jade, sake, or stone in any combination).
- Space 5 (Die value 6): Take any 3 Resources of your choice (wood, jade, sake, or stone in any combination).
5. The Forges
Scarlet fire emanates from the depths of the Earth. The artisans of Spider Town mine soul crystals from deep below the surface, using them to craft magnificent objects and erect structures of immeasurable power.
This region offers a way to gain Crystals and construct Buildings. When you place a die here, you may choose from the following Forest Actions (only if your die has a value equal to or higher than all other dice already in this region):
- Space 1 (Die value 1+): Move your Kodama in this region forward 1 space.
- Space 2 (Die value 2+): Construct 1 Building in an empty space of that Building’s type in any Inhabited Area of the Forest.
- Space 3 (Die value 3+): Obtain 1 Crystal or construct 1 Building in an empty space of that Building’s type in any Inhabited Area of the Forest.
- Space 4 (Die value 4+): Pay the indicated cost with a discount of 1 resource in order to either obtain 1 Crystal or construct 1 Building in an empty space of that Building’s type in any Inhabited Area of the Forest.
- Space 5 (Die value 6): Pay the indicated cost with a discount of 1 resource in order to obtain 1 Crystal and construct 1 Building in an empty space of that Building’s type in any Inhabited Area of the Forest. The discount only applies either to the construction of the Building or to the Crystal, not both.
F. The River & G. The Hills
The water flows along the path of the Sacred Kurirakugan River, giving life as it passes. Those who wet their feet in the river must pay a small toll to continue their path to transcendence, for only the humble may cross. Any who enter the water and follow the flow to where the river meets the sea will float forever in the underwater halls of the Rashaar.
The river marks the border between the regions of the Forest. Only the Home of the Great Spirit does not touch its banks. If you have a die in any region of the Forest except the Home of the Great Spirit, you may move that die across the river during your turn over to the corresponding Hikaru Hill.
These luminous places are remnants of peace, often roamed by all sorts of spirits.
Each of the regions of the Forest (except the Home of the Great Spirit) is connected to one of the Hikaru Hills. These spaces can award you Yōkai or Bitoku cards or other options. When you move a die across the river, you may place it in any empty space of the area connected to the region that die just left.
H. The Inhabited Areas & Constructing Buildings
This is the friendliest part of the Forest, where both spirits and mundane beings pass through and share experiences. Just as there is always a Great Spirit of the Forest, so are there always spirits charged with the care of these areas, providing a roof, repast, and recreation for the pilgrims in need of a rest along their path as well as a home for the mischievous, fun-loving Kodamas. One can often find warm, welcoming buildings here, including ryokan (inns), farms, temples, and onsen (baths). Any spirit that aspires to become the next Great Spirit would do well to provide for the well-being of these pilgrims, providing them with welcome and shelter.
Each region of the Forest is linked to one of the Inhabited Areas. This part of the game board has spaces with face-down piles of Building tiles, and a reserve of face-up Buildings. When you construct a Building, you may choose any of the face-up Buildings to put up.
Depending on the number of players, there may be some Ancient Buildings on the board at the beginning of the game. These work the same way that normal Buildings do, except that they have no owner so no one receives any Property Bonus from them.
You may construct a maximum of 6 Buildings over the course of the game. The Building counters on your player board indicate how many Buildings you can still construct and the cost you must pay in order to construct each. When you construct a Building, follow these five steps:
- Pay the cost under the leftmost building counter on your player board. Construction requires a combination of wood and/or stone, which you must pay to the supply. Take the Building counter from your player board. You will receive the VP shown in the now-empty space at the end of the game.
- Choose a Building tile from those available on the Inhabited Areas of the game board. Do not refill any empty spaces here yet (that will occur in the next Winter Phase).
- Add the Building to any empty space that matches the type of Building you have chosen to construct (each space can be occupied only by the type of Building shown in that space).
- Move your Kodama in the region where you placed the Building tile forward a number of spaces equal to the Kodama Bonus granted by that Building, and receive a +1 Amulet if indicated.
- Place the Building counter that you took from your player board in Step 1 on the Building tile you just constructed to show that you own it.
Kodamas and the Treasures of the Lake
Kodamas are kindly but mischievous spirits who live in the smallest ponds and streams of the Forest. They are the most innocent and affable beings, and their limitless curiosity leads them to find well-hidden treasures wherever they may be within the Forest. The Kodamas eagerly identify with those Bitoku that exhibit virtues that match their own, and offer these treasures to them as gifts. Those who aspire to become the Great Spirit often make a game of this, supporting their loyal Kodamas to make certain that they receive the greatest treasures from each region of the Forest.
Each region has its own Kodama Track. Some actions you take will allow you to move your Kodamas forward or even move your opponents’ Kodamas backward:
- Move Kodamas forward: Move 1 Kodama forward 2 spaces, or 2 Kodamas 1 space each in any region or regions of the forest.
- Move opponents’ Kodamas back: Move 1 Kodama back 2 spaces, or 2 Kodamas 1 space each in any region or regions of the forest.
- If the action is marked with a green arrow, you may only move Kodamas in the same region as the effect that granted you the action.
- Any number of Kodamas may occupy the same space except for the last space on each track: Only 1 Kodama at a time may occupy each of these spaces.
During Ascension, players will earn VP based on the positions of their Kodamas on the Treasures of the Forest tracks.
Special Rule for 2-Player Games: If you are playing Bitoku with two players, you will place a “dummy” Kodama of a neutral color on the fourth space of each Kodama Track. This token never moves from this space, not even with the “move Kodama backwards” action. These tokens are counted when determining the final ranking on each track for VP purposes.
I. The Rock Garden
The Iwakura Rocks are the most ancient spirits. Through the passage of time, they have taken on solid forms. While they are neither inert nor immobile, their existence moves at a speed very different from those around them. Their indifferent eyes have seen empires rise, grow, and then disappear in the time it takes for them to exhale a simple sigh. The spirits of the Forest know of the wisdom concealed in these rocks, and pilgrims who have learned to listen to their advice dedicate their lives to transmitting the knowledge of the Iwakura to their fellow travelers.
Iwakura Rocks can be an important source of VP during Ascension. Each of them grants VP based on the symbols on the tile. But, Iwakura Rocks do not grant points themselves: you must place a Pilgrim by their side in order to earn those VP.
At the beginning of the game, a number of Iwakura Rock tiles are placed on the game board. These are the only Iwakura Rocks that will be available for the entire game, as they are never replenished.
There are two actions that relate to the Iwakura Rocks:
- Obtain Iwakura Rock: If you have at least one clear space in the Iwakura Rock area of your player board, you can choose 1 Iwakura Rock from the Rock Garden. Place it on your player board in the empty space furthest to the left on your Rock Path.
- Place a pilgrim on an Iwakura Rock space: Take one of your available Pilgrims and place them on any empty space on your Rock Path that is next to at least one Iwakura Rock (you cannot perform this action if you have no Iwakura Rocks next to empty spaces). If the space you place the Pilgrim on shows a cost, you must pay those Resources when you place a Pilgrim there. Place this Pilgrim with its sleeping side face up, as this will be the end of his journey and he may not be moved again during the game.
J. The Rift of Visions & Vision Cards
In the deepest heart of the Forest, there is a terrible rift that threatens to split the world in two. It is said that those who are able to stare into this abyss and remain with their soul at peace can see the future and learn what is to come.
This part of the game board holds the Vision cards. Visions offer a way to gain additional VP during Ascension by completing the requirements shown on the card.
Each Vision card shows a specific list of requirements that you must fulfill in order to earn the VP shown on the card. You must complete all of the requirements on the card in order to earn the points, or lose VP for each Vision card that wasn’t fully fulfilled at the end of the game.
Obtaining Vision Cards
When you take an action that awards you a Vision card, follow these steps:
- A. Draw 2 Vision cards from the deck.
- B. Choose if you want to keep one of the Vision cards or not:
- If you choose to keep a Vision card, take 1 card and place it face up next to your player board. Take the other card and place it face down at the bottom of the Vision card deck.
- If you do not wish to keep either of the Vision cards, return both of them to the bottom of the Vision card deck and take any 1 Resource of your choice from the supply instead.
Scoring Vision Cards
In order to earn the VP listed on a Vision card, you must complete all of the tasks shown on that card before Ascension begins. Players will lose 1 or 2 VP at the end of the game as indicated on each uncompleted Vision card.
Each item in the game can only be used to fulfill the requirements of one Vision card. So, if you have multiple Vision cards that require the same item, you must have a separate copy of that item for each Vision card you want to complete. If you do not have enough, you may choose which Visions to complete.
Each Vision card shows the following information:
- A: The Requirements you must fulfill to complete that Vision.
- B: The Virtue Points you will earn during Ascension if you complete that Vision.
- C: The number of VP you will lose in case it is not completed.
The requirements for a Vision card can include any of the following:
- Have a Resource of any type.
- Have a constructed Building.
- Have a Crystal of any color.
- Have a Mitama Spirit tile (combined with a Dragonfly or not. In case of being combined, the dragonfly will still apply for the following requirement).
- Have a Dragonfly combined with a Mitama Spirit.
- Have a Pilgrim on an Illumination space.
- Have a Pilgrim on a Gate space.
- Have made an advancement on your Bitoku Path.
K. The Twisted Trail of the Mitamas
The most remote corner of the Forest overlooks the Cliffs of Sea’s Claw. Here lies a trail that can be followed only by the Mitama Spirits—suffering souls who no longer understand the place they occupy in the order of all things. The Mitamas restlessly walk this trail, hoping to encounter a Chinkon Dragonfly to guide them along their way. Those who do not find the right Dragonfly are destined to sink into the Sea, and into eternal irrelevance as the forgotten trophies of the Rashaar.
This part of the board shows the Mitama Spirits and Dragonfly tiles that are available. There are two actions that allow you to interact with these tiles: Obtain a Mitama Spirit, or Obtain a Dragonfly.
Obtain a Mitama Spirit
Obtain the Mitama Spirit tile of your choice from those available on the game board after paying the cost shown (an amount of sake and/or jade). You also immediately receive the reward shown above that tile’s space (in VP). Do not refill any empty spaces at this time (they will be refilled during the Winter Phase).
Take the action shown on the Mitama Spirit tile you have chosen and place it on your player board. If you have a Dragonfly available, you may immediately attach it to the Mitama.
These are the actions that you might take when obtaining a Mitama Spirit:
- Ara: Take 1 Resource of your choice or a +1 Amulet from the supply.
- Nigi: Unlock 1 locked die on your player board and take a +1 Amulet from the supply.
- Saki: Gain 1 Movement Point or take a +1 Amulet from the supply.
- Kushi: Advance any of your Kodamas 1 space on their track or take a +1 Amulet from the supply.
- Shinigami: There are 4 Shinigami tiles in the game, each offering a different action:
- Take 1 Resource of any type
- Gain 1 MP
- Advance any of your Kodamas 1 space and move one of the other player’s 1 space backwards
- Gain a “+1” Amulet or unlock one die.
During Ascension, you can use Shinigami as “wild” spirits when scoring your Iwakura Rocks.
Obtain a Dragonfly
Obtain the Dragonfly of your choice from those available on the game board, by paying or receiving the resources indicated below it. You do not receive the Dragonfly’s action until it is combined with a Mitama Spirit. Do not refill any empty spaces at this time (they will be refilled during the Winter Phase).
Place your Dragonfly tile on your player board. If you have a Mitama Spirit available, you may immediately attach it to the Dragonfly.
Combining a Mitama Spirit with a Dragonfly
When you obtain a Mitama Spirit tile or a Dragonfly tile (and only at that moment), you may combine them with the opposite (a Mitama Spirit to a Dragonfly tile) if you have one available on your player board. Place the two tiles together and move them off of your player board, then take the action shown on the Dragonfly tile.
Combined Mitama Spirits and Dragonflies are taken into account at several points during the game, but cannot be combined with other Mitama Spirits or Dragonflies.
Note: You take the action shown on your Mitama spirit tiles as soon as you acquire them, but you can’t take the action on your Dragonfly tiles until you attach them to a Mitama.
L. The Crystal Caves
A boulder breaks, opening the way into cold caves at the most distant reaches of the Forest. Echoes of a promising future emerge from within the caverns, glowing with the reflections of Soul Crystals. If a spirit can harmonize the right Crystals, their path to Ascension shall indubitably be more peaceful and rewarding.
You can find the Crystals in this part of the game board. As you obtain Crystals, you will place them on the matching spaces of your player board. Crystals will open new actions for you to take. In addition, this is the only way to gain new Pilgrims.
Obtaining a Crystal: This action allows you to take 1 Crystal from the Crystal Caves by paying the cost indicated on the game board (0, 1, or 2 Resources of any type). Do not refill any empty spaces at this time (they will be refilled during the Winter Phase). You can only take a Crystal if it matches the specific type shown in an empty space on your player board.
When you obtain a Crystal, you may place it in any corresponding empty Crystal space of your player board. When you do so, move the Pilgrim in that space with its awakened side up to the top part of your player board to use later. You will also receive any VP shown in that space at the end of the game. If you don’t have any available spaces to place Crystals of a certain type, you cannot obtain them.
Types of Crystals
There are three kinds of Crystals: Dream (purple), Memory (yellow), and Ingenuity (pink). Each type occupies different spaces on your player board.
- Dream Crystal (purple): You receive the reward shown during the Reap the Fruits Step 2 during Spring and Ascension.
- Memory Crystal (yellow): You receive 1 or 2 VP each time you take the action shown on the tile.
- Ingenuity Crystal (pink): During the Summer Phase, when you play a Yōkai card on the matching space, you take the action shown on the Crystal. You may take your bonus either immediately before or immediately after resolving that Yōkai card.
Bitoku Cards
Bitoku are powerful spirits on their own path to Ascension. But even the strongest of them require the advice and wisdom of other spirits.
- Obtain a Bitoku card from the common deck: Take the top two cards, choose one and keep it on your Bitoku Path. Then place the other face down back on the bottom of the deck.
- Obtain the Bitoku card from the Hikaru Hill: Take the card from the Hikaru Hill you just moved your die to. Place it on your Bitoku Path.
Each Bitoku card shows a type (A), a space for a Player counter (B), a VP award and any other actions available when the Player counter moves onto that card (C), and a rarity number indicating the number of copies of that type available in the deck (D).
Bitoku cards are used to create the Bitoku Path on your player board. Each time you gain a Bitoku card, you must add it to your path.
If you have at least 1 Bitoku card beyond the space occupied by your Player counter, you may spend 1 Movement Point (MP) to move your counter to the next space. When you do this you complete that Bitoku card and immediately gain the VP and any other action shown on that card. Also, you will need to have at least one or two completed Bitoku cards in order to cross the bridges in the Paths of Wisdom.
At the beginning of the game, you have no Bitoku cards on your path, so you may not move your Player counter forward until you gain at least one card.
The Ascension: Final Scoring and End of Game
Much time passed before the Great Spirit of the Forest was able to complete its journey into peace. Finding a replacement was no simple matter, for reaching the required state of balance and wisdom is a challenge for even the most enlightened of beings. The oldest of trees, for whom the passing of centuries is like a single breath, if they are very lucky may live to see as many as three Great Spirits in their entire lifespan.
As soon as the Winter Phase of the last round is complete, the players add up their final score to determine who will be the next Great Spirit of the Forest. If they prefer, the players can take turns calculating their personal score, or carry out each step of the Ascension together.
Add up your points by moving your marker on the VP path. If your score passes 100 VP, flip your flag to its “+100” VP side to show your accomplishment.
Here are the different items to score:
- A. Reap the Fruits: Each player collects the rewards indicated on the Dream Crystals (purple) on their player boards. You may collect these rewards in any order you choose.
- B. First Among Many: The player who is first on the Turn Order Track receives 3 VP.
- C. The Bitoku Bow Before You: Each player who has Bitoku cards receives VPs based on the number of different types of Bitoku cards they have in their Bitoku Path, as shown on the chart below (duplicate Bitokus don’t score anything at this point). You receive points regardless of how far you have progressed on your Bitoku Path.
- 1 type: 1 VP
- 2 types: 2 VP
- 3 types: 4 VP
- 4 types: 7 VP
- 5 types: 11 VP
- 6 types: 16 VP
- 7 types: 22 VP
- D. Treasures of the Lake: The VP for each region of the Forest are awarded next. The player whose Kodama is furthest along the track earns the highest VP award for that region. The second Kodama earns the middle reward, and the third Kodama earns the smallest reward. If there is a tie, add the rewards of the tied positions and divide the total VP among the tied players (rounded down). Remember: The final space on the track can be occupied by only a single Kodama.
- E. Iwakura Rocks Resonate: Each player earns the VP indicated by the Iwakura Rocks on their player board. Each Pilgrim you have sitting next to a Rock awards you 1 VP for each item you have that matches the requirements shown on that tile. If an item appears on two different Rocks, you may count it both times. The items shown on the Rocks can be found on Yōkai cards, Buildings, or Mitama Spirits:
- 1. Yōkais: Each Yōkai card with the matching symbol, whether it is in your deck, discard pile, hand, or player board (or under it), including any Starting Yōkai cards, awards VP. Yama-uba cards act as “wild” cards: You may choose which unique type of Yōkai you want to assign to each of these cards at this time.
- 2. Mitama Spirits: Each Mitama tile with the matching symbol that you have on your player board awards VP, whether you have combined them with a Firefly or not. Shinigami Mitama Spirits act as “wild” cards: You may choose which type of Mitama you want to assign to each of these tiles at this time.
- 3. Buildings: Each Building with the matching symbol that you own (has your Building counter on it) awards VP.
- F. Guardians Pay Homage: Each player now adds up the current value of all three of their dice, plus the number of Resources they still hold, then they divide this total by 4 (rounding down) and earns the result in VP.
- G. Visions Revealed: Each player earns the VP shown on each of the Visions that they were able to complete, and loses 1 or 2 VP for each uncompleted Vision as indicated. Remember: You can only use each game element to fulfill the requirements of one Vision.
- H. Fate Accomplished: Players add up the number of end of game Virtue Points (purple) shown on their player boards, in their Building and Crystal areas.
The player who has the most VP becomes the new Great Spirit of the Forest and wins the game! If there is a tie, the one who completed the most Visions is the winner. If they are still tied, the winner is the one furthest ahead on the Turn Order Track.
Rise of the Tengu: Solo Rules
The Forest is being overrun by a horde of Tengu. These mischievous demons will try to trick you away from the path to Ascension, so you must prove yourself even more virtuous by rising above them!
These rules provide you a way to play Bitoku by yourself. All of the regular rules still apply, unless explicitly changed by these rules. In these rules, “you” always refers to the lone human player, while “the Tengu” or “it” always refers to your automated opponent.
Setting Up the Solo Game
- A. Board setup: Set up a two-player game as described in the regular rules. Ignore the G step regarding the Tengu: he doesn’t receive any Iwakura Rocks at this point (you receive yours as normal).
- B. Solo board: Select a color for the Tengu. Flip its player board to the Solitaire side. Keep the Tengu Activation Cycle chart (TAC) at hand.
- C. Components: Place the Tengu’s Building counters on the indicated spaces. Place all of its Pilgrims in the top part of the board. Set all of its Starting Yōkai cards face down in a pile on its board. Take 1 random Dragonfly token and place it on the indicated space. The Tengu does not receive any Vision cards or Amulets during setup or at any time during the game.
- D. Counters: Place the Tengu’s Kodamas and Player counters as you would for a normal player. The Tengu’s Player counter is always first on the Turn Order Track at the beginning of the first round.
- E. Dice: Place the Tengu’s dice on the red spaces with the values 2, 3, and 4 (in that order from left to right).
- F. Iwakura Rocks: Randomly select 1 Iwakura Rock from the Rock Garden and place it on the Tengu’s board (do not refill the empty space). Then, select a second random tile from the remaining stack with these restrictions:
- If the first tile shows rewards for Yōkai cards, the second must show rewards for either Buildings or Mitama Spirits.
- If the first tile shows rewards for Buildings or Mitama Spirits, the second must show Yōkai cards.
Place the second Iwakura Rock on the Tengu’s board. Return remaining rocks to the box.
- G. Resources: The Tengu starts with 1 wood Resource and 1 other Resource based on its Iwakura Rocks: 1 stone if one of its Iwakura Rocks shows Buildings, or 1 sake if one shows Mitamas.
- H. Tengu cards: Shuffle all 10 Tengu Action cards and create a face-down deck. Turn over the top 3 cards and place them in a row to the right of the deck.
- I. Will of the Tengu: Take 2 dice of an unused player color and set them near the Tengu cards (the Will of the Tengu dice). Place the Tengu Attitude tile in the bottom-right slot with the inactive side up.
Tengu Terminology
- Available Action: An action is “available” if there is no die on that space (yours or the Tengu’s).
- Rarest Bitoku: The Bitoku card currently in the Hills with the lowest rarity number that the Tengu has not yet collected. In case of a tie, it prefers the one further to the left.
- Choose Randomly: If between two equal options, roll one Will of the Tengu die (1-3 vs 4-6). If choosing objects from the board (Mitamas, Dragonflies, Buildings, Crystals): 1-2 cheapest/innermost; 3-4 second; 5 third; 6 fourth/outermost. Cycle outward if empty.
- Favorite: An object matching either of the Tengu’s 2 Iwakura Rocks. “Favorite Mitama or Building” on action cards means Lands of Yomi if it has a Mitama rock, or Forges if it has a Building rock.
- Tengu Attitude Tile: Has two sides: active and inactive.
- Most Competitive Kodama: The Kodama that is behind yours on its track, which would take the fewest moves to tie with you. Ties: highest 1st place VP, then further left.
- Crossing / Contested Crossing: A die is at a Crossing if in a Forest space with an available space across the river in the matching Hill. Contested if both you and the Tengu have a die at Crossings connected to the same Hill.
- Die Values: Tengu dice values never change. When unlocking/placing, use the lowest value die first. When crossing the river, use the highest value die.
Changes to Gameplay
- Spring: The Tengu never draws Yōkai cards. During Reap the Fruits, Tengu gains (and immediately spends) 1 MP for each Crystal on its board on top of normal rewards.
- Summer: Players alternate turns. On Tengu’s turn: roll both Will of the Tengu dice; select card (lowest die 1-2: right card; 3-4: middle card; 5-6: left card); resolve TAC; discard active card, slide cards right, draw new card leftmost.
- Autumn: Determine new turn order as normal.
- Winter: Tengu never interacts with Yōkai cards. Before advancing Great Spirit, remove 1 random Iwakura Rock from the Rock Garden.
Resolving Tengu Actions
- The Lands of Yomi: If card shows Dragonfly, takes random Dragonfly. If Mitama, takes cheapest favorite Mitama (or random if none match) and gains VP under space. Combines with Dragonfly immediately if available (ignoring Dragonfly effect and gaining 2 MP instead).
- Stairs of Knowledge: Tengu gains 3 MP.
- Spending Movement Points: Resolves in order: 1. Advance Bitoku Path (scores VP printed, ignores actions). 2. Move Pilgrim on Path of Wisdom (to highest Illumination space for 2x VP; or to unvisited Gate for 2x VP and resolves top card of deck; or forward 1 space ignoring bridges). 3. Place new Pilgrim on furthest available Gate to the right.
- Glade of Jade: Takes 2 Resources shown on card (or 2 Associated Resources) and advances its most competitive Kodama 1 space.
- The Forges: Takes random Crystal if card shows Crystal. If Building, constructs favorite Building (innermost) in legal location with most competitive Kodama, places Building counter, advances Kodama 1 space.
- Building Actions: Tengu never uses them. If you use Tengu’s building, it gains 1 VP.
- The Hills: Yōkai cards are added to its score pile; Bitoku cards are added to its Bitoku path.
The Ascension (Solo Scoring)
- Tengu scores: visible VP on Building spaces emptied; 3 VP for each matching Yōkai/Building/Mitama per Iwakura Rock; 3 VP per Starting Yōkai and 6 VP per advanced Yōkai; 1 VP per Resource; 2 VP per Crystal; Bitoku set collection as human; Kodama tracks (wins ties against you); 3 VP if 1st in turn order. Tengu scores 0 for dice and has no Visions.
Adjusting Difficulty
To make it easier: no starting Dragonfly; no starting Yōkai cards; no starting Resources; Kodama only advances if you are ahead; no MP from Soul Crystals in Spring.
To make it harder: starts with Pilgrim on first space of Path of Wisdom; advance all Kodamas 1 space at setup; starts with 2 Dragonflies; scores +3 VP per region where Kodama is ahead of yours.
The Tengu Activation Cycle (TAC)
| Step | Condition | Actions |
|---|---|---|
| A | The Tengu is at a Contested Crossing where a Yōkai or Bitoku showing on the top half of the Active Tengu card is available. | Cross the river with the corresponding die and take the Yōkai or Bitoku card as shown. (If both cards match, choose randomly.) |
| B | 1. The location shown on the bottom of the Active Tengu card is available. 2. The Tengu has no unlocked dice but has at least one locked die. 3. The Tengu Attitude tile is inactive. 4. The Active Tengu card is in the leftmost position in the card row. |
Flip the Tengu Attitude tile to the active side. Unlock 1 die and immediately place it on the location shown. Advance the Tengu’s Kodama in that region one space and perform the corresponding action. |
| C | 1. The location shown on the bottom of the Active Tengu card is available. 2. The Tengu has at least one unlocked die. |
Place an unlocked die on the location shown. Advance the Tengu’s Kodama in that region one space and perform the corresponding action. |
| D | 1. The Tengu has at least one locked die. 2. The Tengu has the Associated Resource or the card shows no Associated resource. |
Unlock 1 die and spend the Associated Resource. Then perform the action for the location shown on the bottom of the Active Tengu card without placing a die there. |
| E | The Tengu is at a Contested Crossing with only one space available in the corresponding Hill area. | Cross the river with the corresponding die and take the first available option below: Its favorite Yōkai card; The rarest available Bitoku of a type it doesn’t already have; A random Yōkai card. |
| F | 1. The Tengu has not yet placed a die in the Home of the Great Spirit. 2. The Tengu has at least one unlocked die. |
Place an unlocked die on the second-highest space in the Home of the Great Spirit (if your die is already in that space, place it on the third highest space instead). Advance the Tengu’s Kodama in that region one space. Then the Tengu scores 3 VP plus an additional 2 VP for each of your dice showing values of 5 or 6 currently in any of the locations below the river. |
| G | The Tengu has at least one locked die. | Unlock 1 die and take the Associated Resource. |
| H | The Tengu is at a Crossing where a Yōkai or Bitoku card showing on the top half of the Active Tengu card is available. | Cross the river with the corresponding die and take the Yōkai or Bitoku card shown. (If both cards match, choose randomly.) |
| I | 1. The location shown on the bottom of the Active Tengu card is not available. 2. The Tengu has at least one unlocked die. |
Find the location (excluding the Home of the Great Spirit) with the most competitive Kodama and place an unlocked die there. Advance the Tengu’s Kodama in that region one space and perform the corresponding action. |
| J | 1. The Tengu Attitude tile is active. 2. The Tengu has no locked or unlocked dice available. |
Flip the Tengu Attitude tile to the inactive side and take the Associated Resource. |
| K | The Tengu is at a Crossing. | Cross the river with the corresponding die and take the first available option below: Its favorite Yōkai card; The rarest available Bitoku of a type it doesn’t already have; A random Yōkai card. |
| L | None of the above. | The Tengu passes. |
Cultural References & Credits
Cultural References
Bitoku is a Japanese word that refers to different types of virtues, especially those of the Bushido. Bitoku is also a game set in a fictional universe. It is a sequel of sorts to another game published by Devir: Silk, as they share the same universe. Actually we should say that it is a prequel, as the action in Bitoku takes place in a time thousands of years before Silk, in which the human race is barely present. You don’t have to play Silk to enjoy Bitoku, or vice versa. Feel free to explore them both but know that they are very different in terms of gameplay.
This universe has been inspired mainly by manga, anime, and all sorts of japanese pop culture, which also derived from its folklore and traditions. Many of the creatures mentioned in the game come from Asian myths, many of them we just made them up. Bitoku does not claim to be a faithful rendition of any of these cultural instances, but we have tried to approach them with the utmost respect. We are trying to put together a fictional universe for all of us to visit and inspire great games.
Credits
- Game designed by: Germán P. Millán
- Illustrated by: Edu Valls
- Solitaire mode rules by: Dávid Turczi
- Additional solo game development: Xavi Bordes
- Proofreading: Marià Pitarque
- Graphic design: Bascu, BG FX, Meeple Foundry
- Wooden and cardboard components: BG FX
- English Language Translation: Andrew Campbell
- English Language Revision: William Niebling
- Development, production, and editing: David Esbrí
- Game testers: Juan Ruiz de la Fuente, Juan Milla, Aida Hernández, Lorena Santaella, Jorge Cheno, Aaron Vallecillos, Mikel Zorrilla, Gonzalo Bedia, Pablo Cazorla, Julián Mena, María Algar, Israel Reyes, Samuel J, Pascual Peláez, Gastón Avendaño, Jorge Barboso, Sergio Pangua, and Jose Raúl Megías.
Game designer notes: This game would have not been possible to imagine without the influence of master Hayao Miyazaki, who has taken my imagination to wonderful worlds on so many occasions. I’d like to thank my family and friends for their never ending support and care. To so many gamers who, even without participating in the playtest, still played a part in the development of Bitoku. To Dávid Turczi and his development team for the solitaire game and their contributions to the betterment of this game. To David Esbrí for making this board game possible. And specially to my sister Sandra.