
Golem
2021
Create golems, craft artifacts, collect books, and guide your students in a tense engine-building game inspired by the legend of Prague.
120
minutes
1 - 4
player(s)
14+
Heavy

About this board game
Golem is an engine-building board game for 1–4 players, with games lasting approximately 120 minutes. Inspired by the 16th-century legend of the Golem of Prague, it casts players as rabbis who create powerful clay creatures, develop artifacts, and pursue ancient knowledge.
Each game lasts four rounds, and every round follows seven phases, from refreshing the synagogue and moving golems to taking actions, gaining income, and controlling your creatures. A 3D synagogue shuffles colored marbles into five action lines, creating a changing selection of opportunities.
- Work: Spend Knowledge to activate a golem in Prague and gain bonuses.
- Golem: Obtain clay to create new golems and improve your personal-board developments.
- Artifact: Gain coins, buy gold, and build artifacts with permanent bonuses.
- Spells: Gain Knowledge, perform spells, and score through book collection.
- Mirror: Perform an action of your choice by paying 1 coin.
When you select a marble, its line determines the strength of the action, while its color advances a student through one of Prague’s districts. Students are essential for keeping your golems under control. If a creature becomes too powerful, it can destroy everything it encounters, forcing you to destroy and bury it; Knowledge can also help control a golem that has outpaced its student.
Marble colors also influence the favors you receive from powerful Prague characters. At the end of the fourth round, players score active and buried golems, artifacts, books, personal-board developments, and collected goal cards. In Golem, planning your engine means balancing growth, control, and the dangerous power of your creations.
/pic7182955.jpg)
Board Game Rules for
Golem
Prologue
It is Prague, 1584. In the dark attic of the Synagogue, Rabbi Loew walks nervously. Piles of books on a desk, gold melting in the cauldron, and a mass of clay shaped into human form. “Now the last step,” exclaims the Rabbi, “because only with a true word will you come to life!” As the word “Truth” is engraved on the clay giant’s forehead and the word “God” is put into its mouth, a great silence descends upon the room. The eyes open, illuminated by a sinister light, and stare at the Rabbi’s gaze, waiting for its first order.
The legend of the Golem is one of the most fascinating stories in the world and has its roots in the Jewish tradition. In Golem, this story inspires a strategic and complex game in which players take on the role of scholars focused on recreating the famous clay automas.
Use your knowledge (represented by the first letter of the Hebrew alphabet “Aleph”) to study traditional books, collect gold and melt it down to create powerful artifacts, bring tireless Golems to life and send them to the city to do important jobs. You will need to maintain control of your Golems by using your students and spending the knowledge you have gained. You can also choose to kill your Golems to avoid paying for their maintenance.
Components
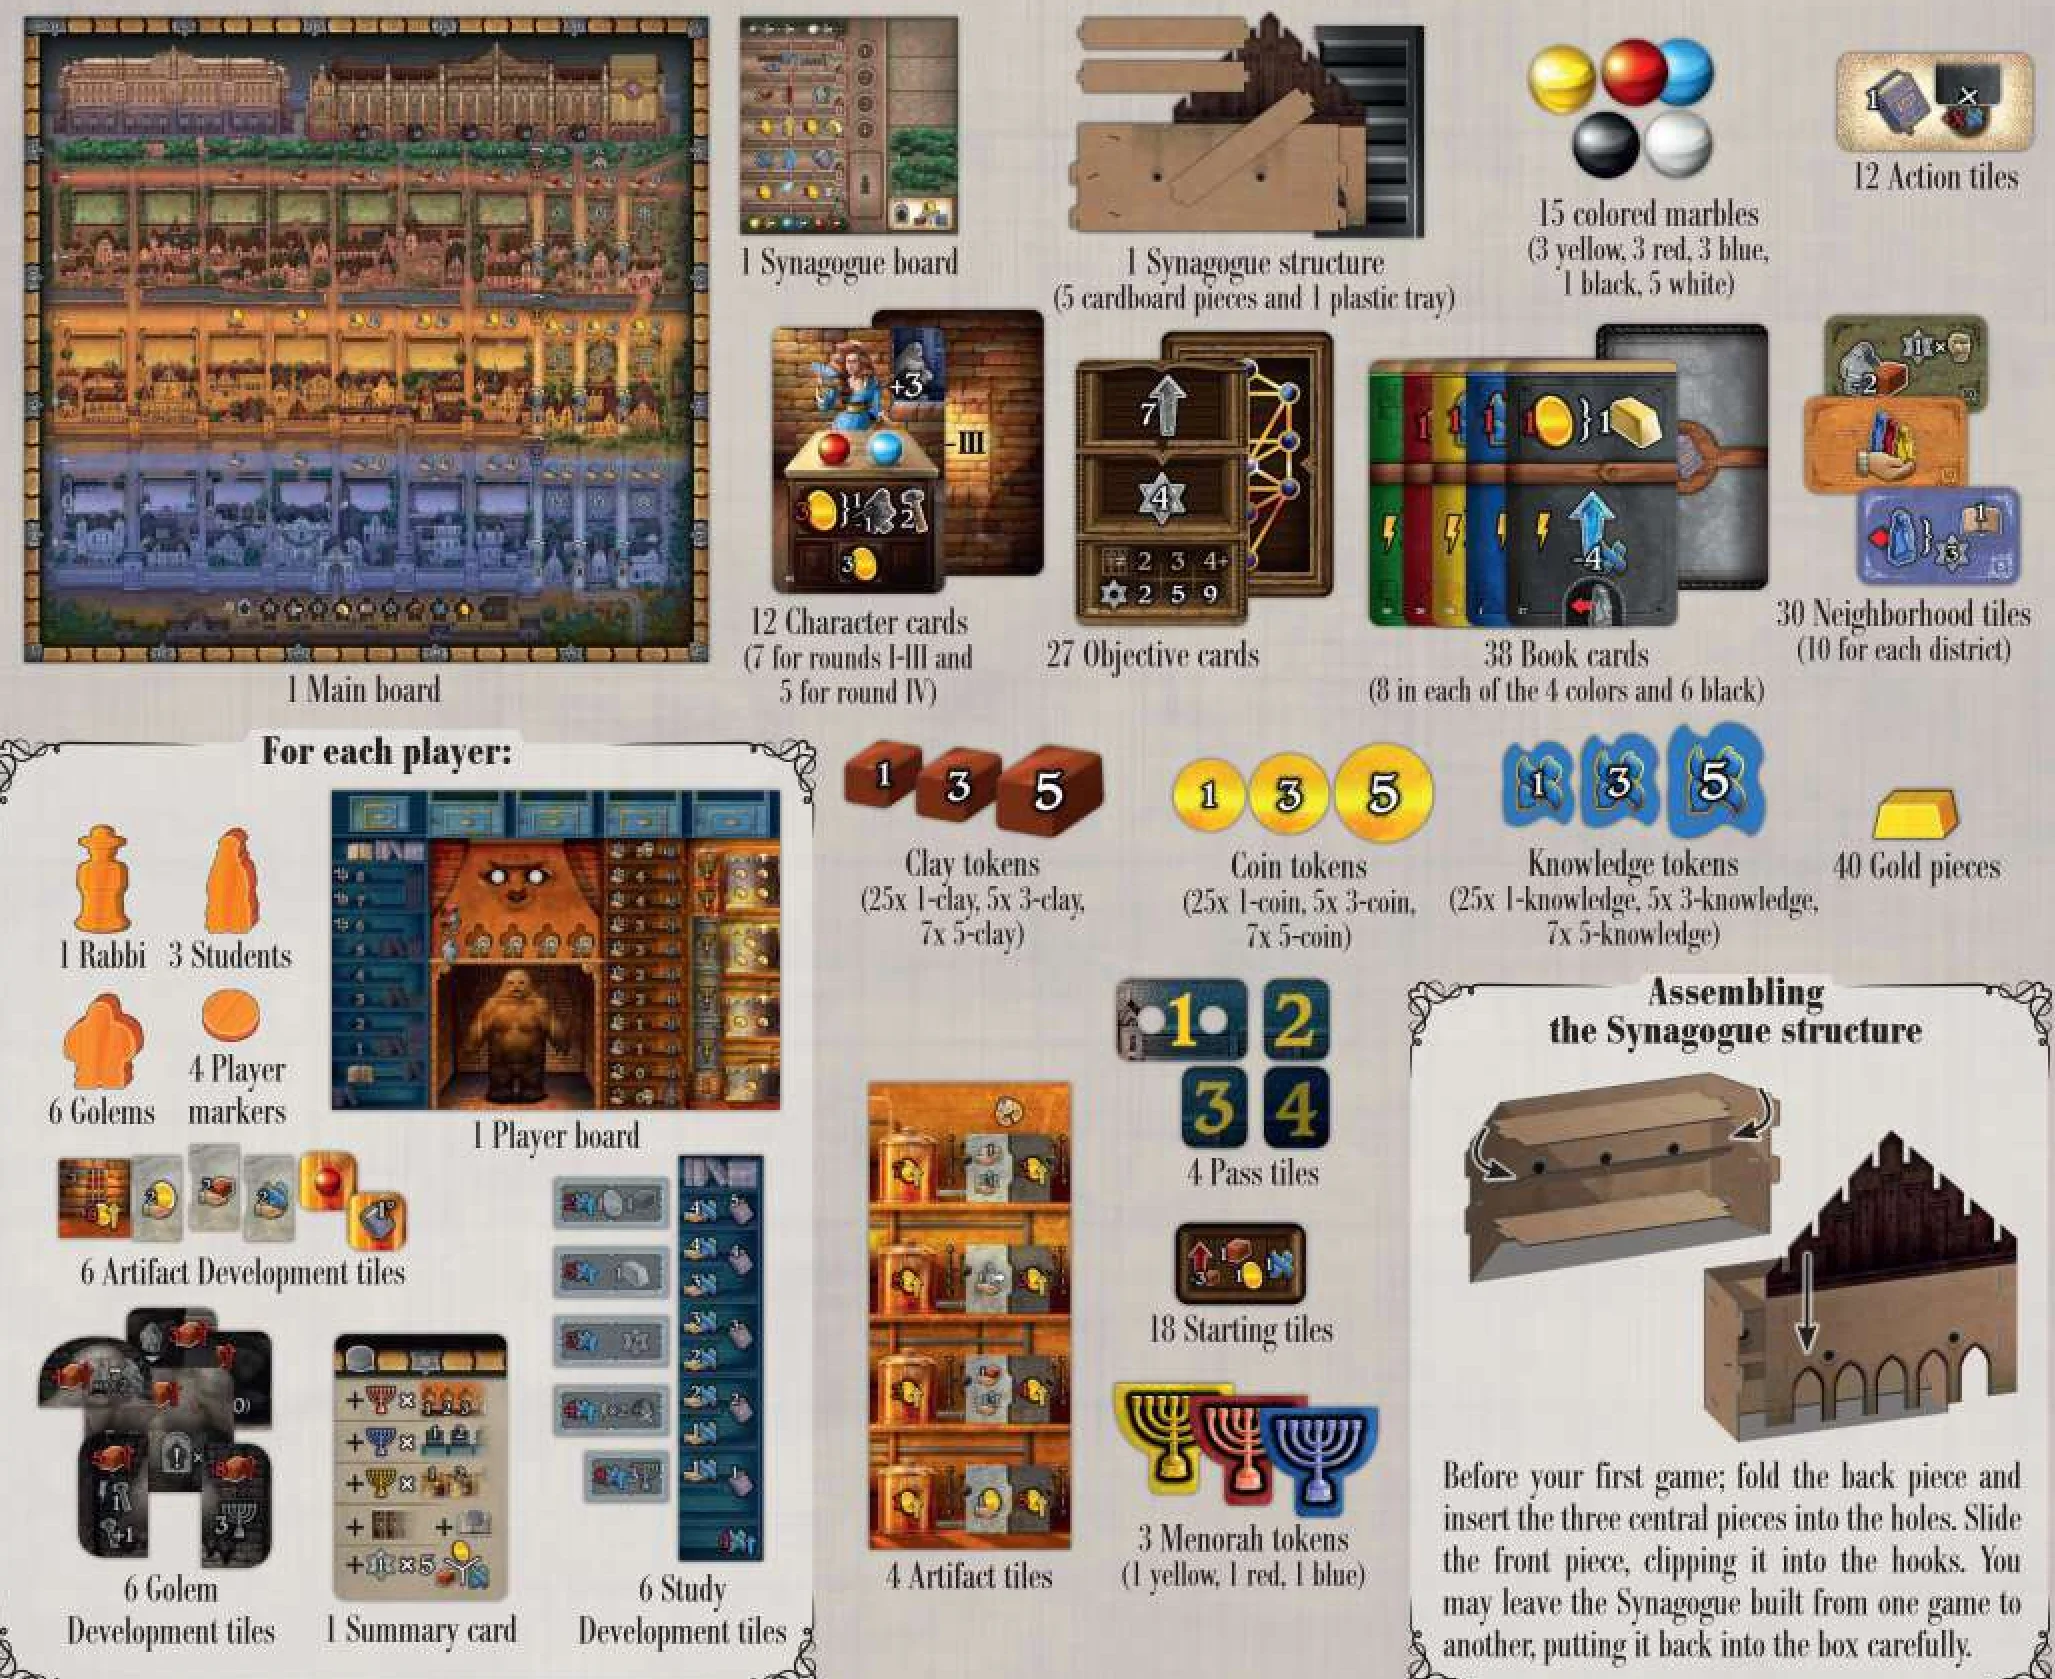
- 1 Main board
- 1 Synagogue board
- 1 Synagogue structure (5 cardboard pieces and 1 plastic tray)
- 15 colored marbles:
- 3 yellow
- 3 red
- 3 blue
- 1 black
- 5 white
- 12 Action tiles
- 12 Character cards (7 for rounds I–III and 5 for round IV)
- 27 Objective cards
- 38 Book cards (8 in each of the 4 colors and 6 black)
- 30 Neighborhood tiles (10 for each district)
- 40 Gold pieces
- Clay tokens: 25× 1-clay, 5× 3-clay, 7× 5-clay
- Coin tokens: 25× 1-coin, 5× 3-coin, 7× 5-coin
- Knowledge tokens: 25× 1-knowledge, 5× 3-knowledge, 7× 5-knowledge
- 4 Pass tiles
- 18 Starting tiles
- 3 Menorah tokens (1 yellow, 1 red, 1 blue)
- For each player:
- 1 Rabbi
- 3 Students
- 4 Player markers
- 6 Golems
- 1 Player board
- 6 Artifact Development tiles
- 6 Golem Development tiles
- 6 Study Development tiles
- 4 Artifact tiles
- 1 Summary card
Assembling the Synagogue structure
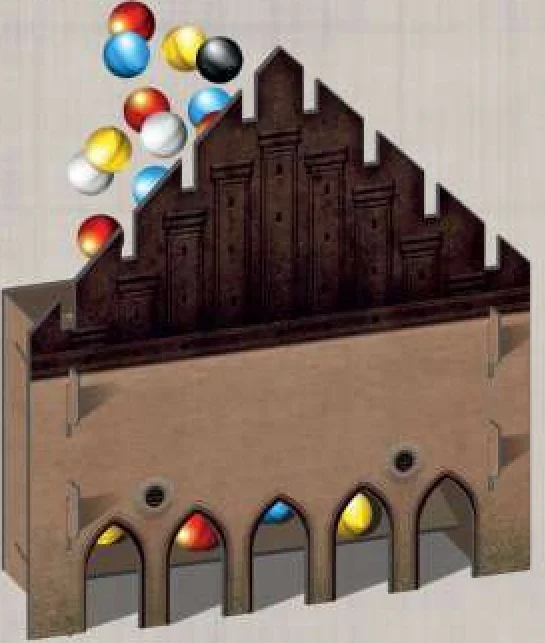
Before your first game: fold the back piece and insert the three central pieces into the holes. Slide the front piece, clipping it into the hooks. You may leave the Synagogue built from one game to another, putting it back into the box carefully.
Game Setup
Golem is a complex game that has a lot of variable setup options. There is an introductory setup to help you learn the game; this setup is shown in special boxes, which replace the corresponding setup phase. Once you are familiar with the rules, you will be ready to set up the standard game (without referring to the introductory boxes).
- Place the main board in the center of the play area.
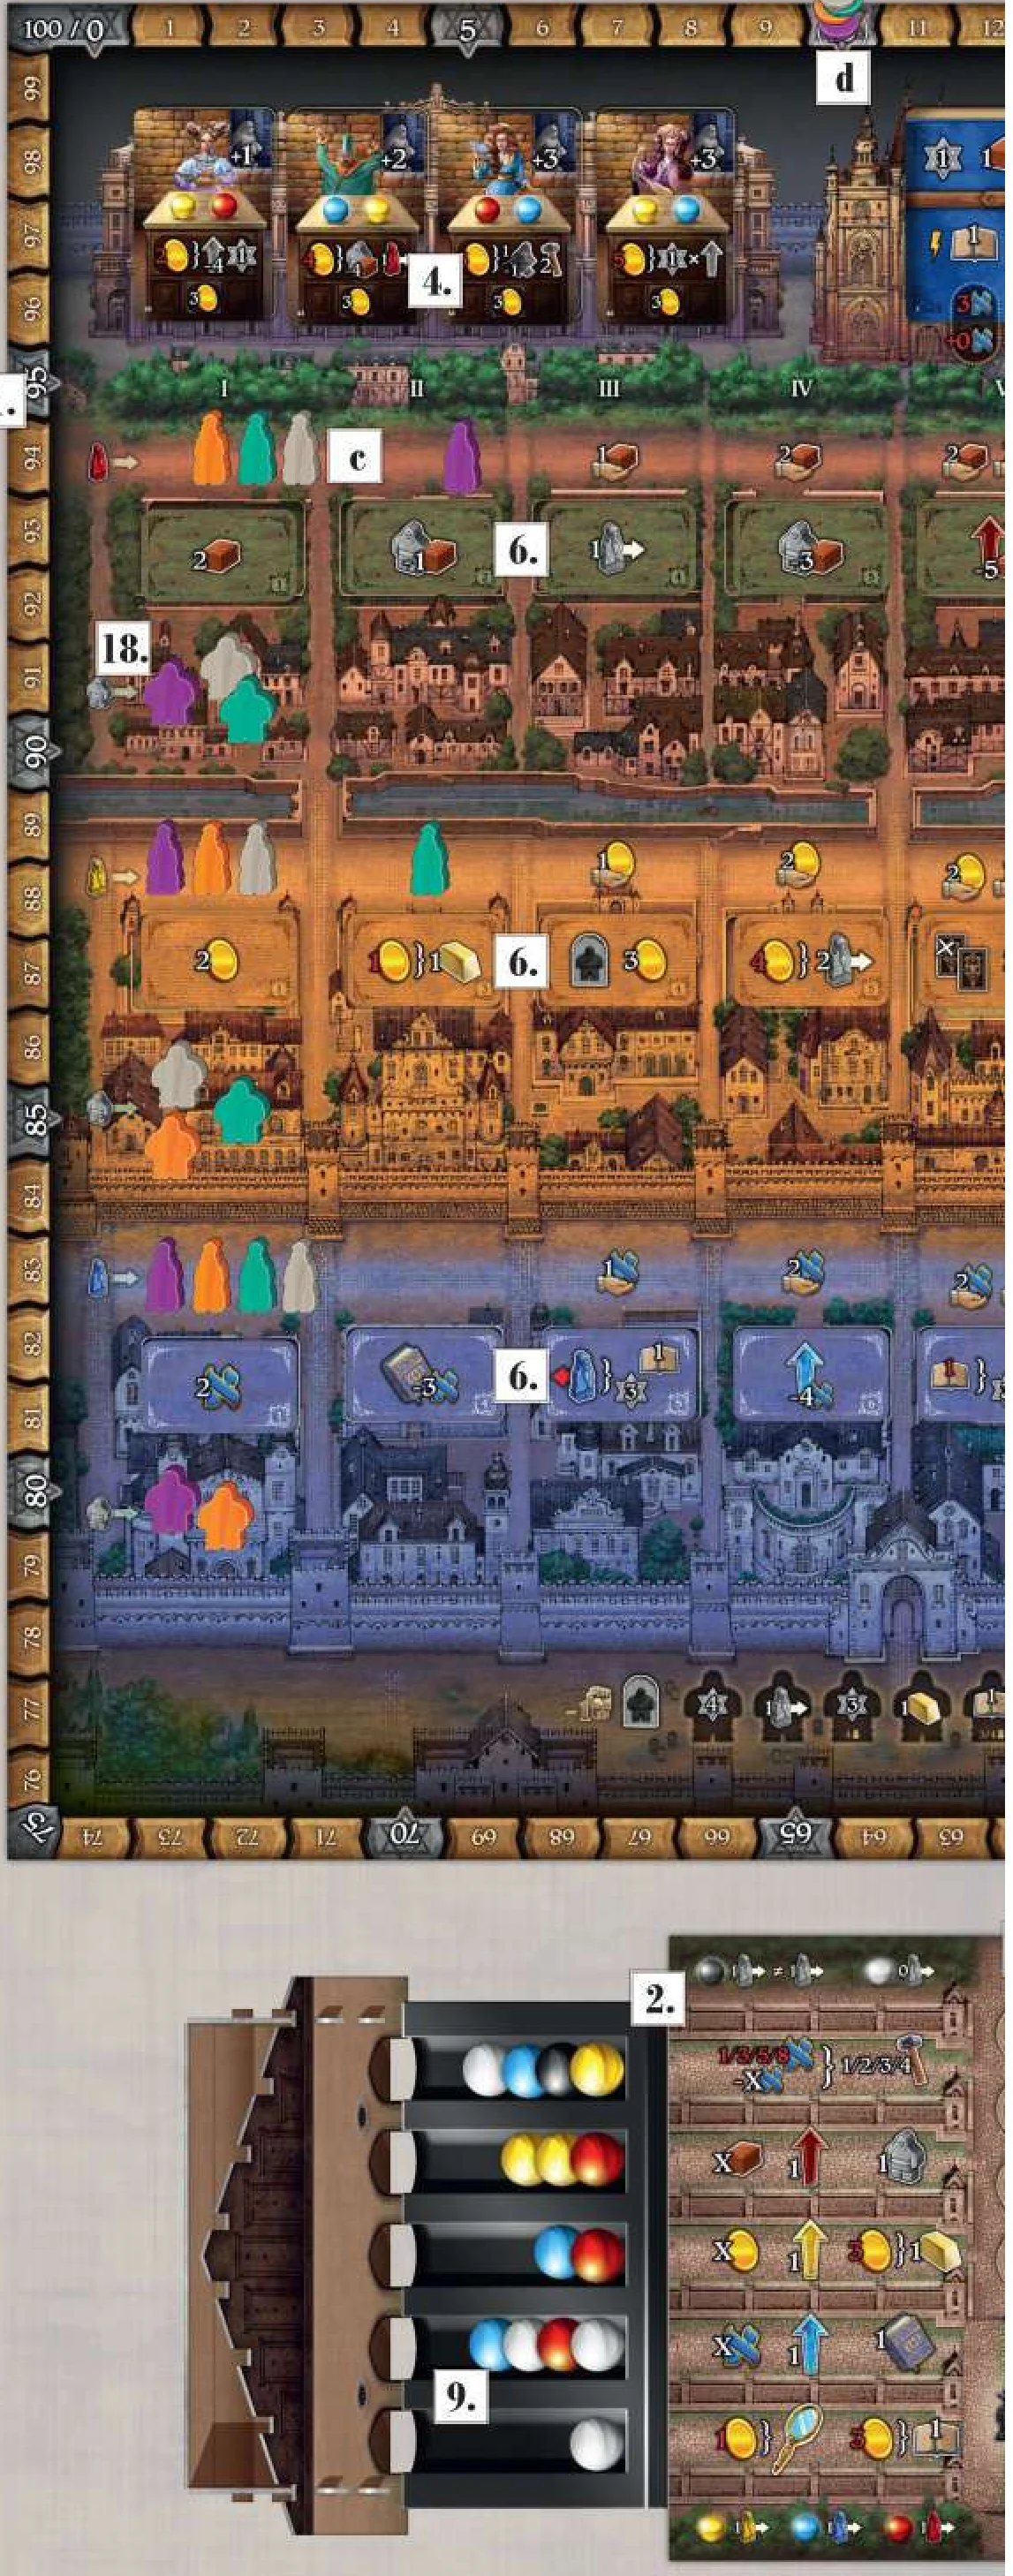
- Place the Synagogue board and structure next to the main board, within reach of all players. The tray of the Synagogue structure must line up with the actions on the Synagogue board as shown.
- Place the Pass tiles next to the Synagogue board.
Introductory 4
Find the Character cards 39, 43, 41, and 46 and place them from left to right into the Palace, face up.
- Character cards: Separate the Character cards into 2 decks, using the round number icons on the backside, to create a I-III and a IV deck. Shuffle each deck separately. Deal 1 Character card from the IV deck into the rightmost space of the Palace, face up. Deal 3 Character cards from the I-III deck into the other 3 spaces, face up.
- Book cards: Shuffle the Book cards to form a face-down deck and place the deck on the Library. Deal 5 cards, face up onto the display next to the deck.
Introductory 6
Separate the Neighborhood tiles by color. Find the following Neighbourhood tiles and place them left to right in each district:
- Red District: 1 2 4 5 7 8 9
- Yellow District: 1 3 4 5 6 7 10
- Blue District: 1 4 5 6 7 8 9
- Neighborhood tiles: Separate the Neighborhood tiles by color and shuffle each stack separately. Deal out 7 tiles of each type onto the Neighbourhood spaces in the matching district. Arrange the tiles into ascending numerical order, from left to right.
- Action tiles: Shuffle the Action tiles and place them in a face-down pile on the Synagogue board. Deal a number of Action tiles face up into the action spaces, from top to bottom, equal to the number of players, plus one. These will be the Action tiles for the first round. The bottom most action space of the Synagogue board shows an action which is always available; this space must never be covered by a tile.
- Objective cards: Shuffle the Objective cards to form a face-down deck and place it near the main board.
- Marbles: Gather the marbles (depending on the number of players as shown below) and place them into the Synagogue structure. Put all the marbles in at the same time to ensure they are distributed properly.
| Player count | White | Black | Red | Blue | Yellow |
|---|---|---|---|---|---|
| 1–2 | 3 | 1 | 2 | 2 | 2 |
| 3 | 5 | 1 | 2 | 2 | 2 |
| 4 | 4 | 1 | 3 | 3 | 3 |
- Menorah tokens: Place the matching colored Menorah tokens on each district, between spaces VII and VIII.
- Resources supply: Place the resources (Clay, Coin, and Knowledge tokens and Gold pieces), separated by type, next to the main board to form the general supply.
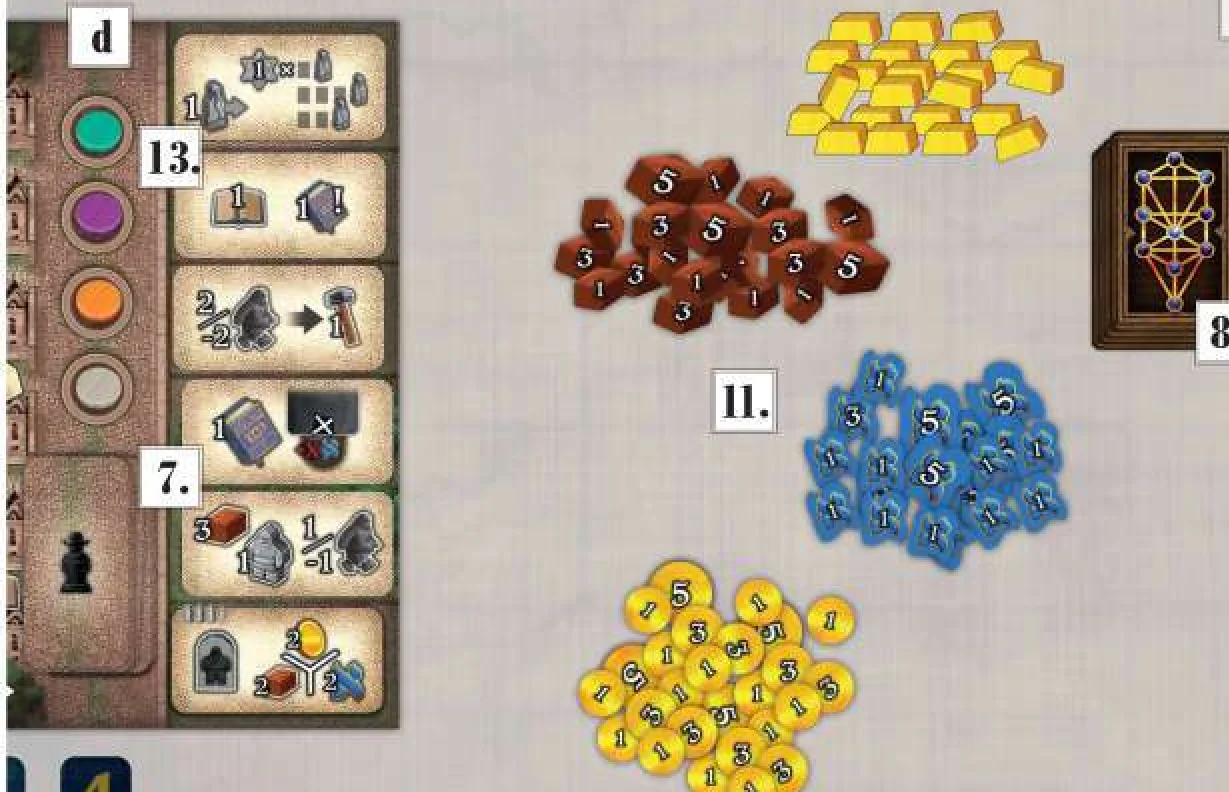
- Player board and components: Give each player a Player board and all the components of their chosen color.
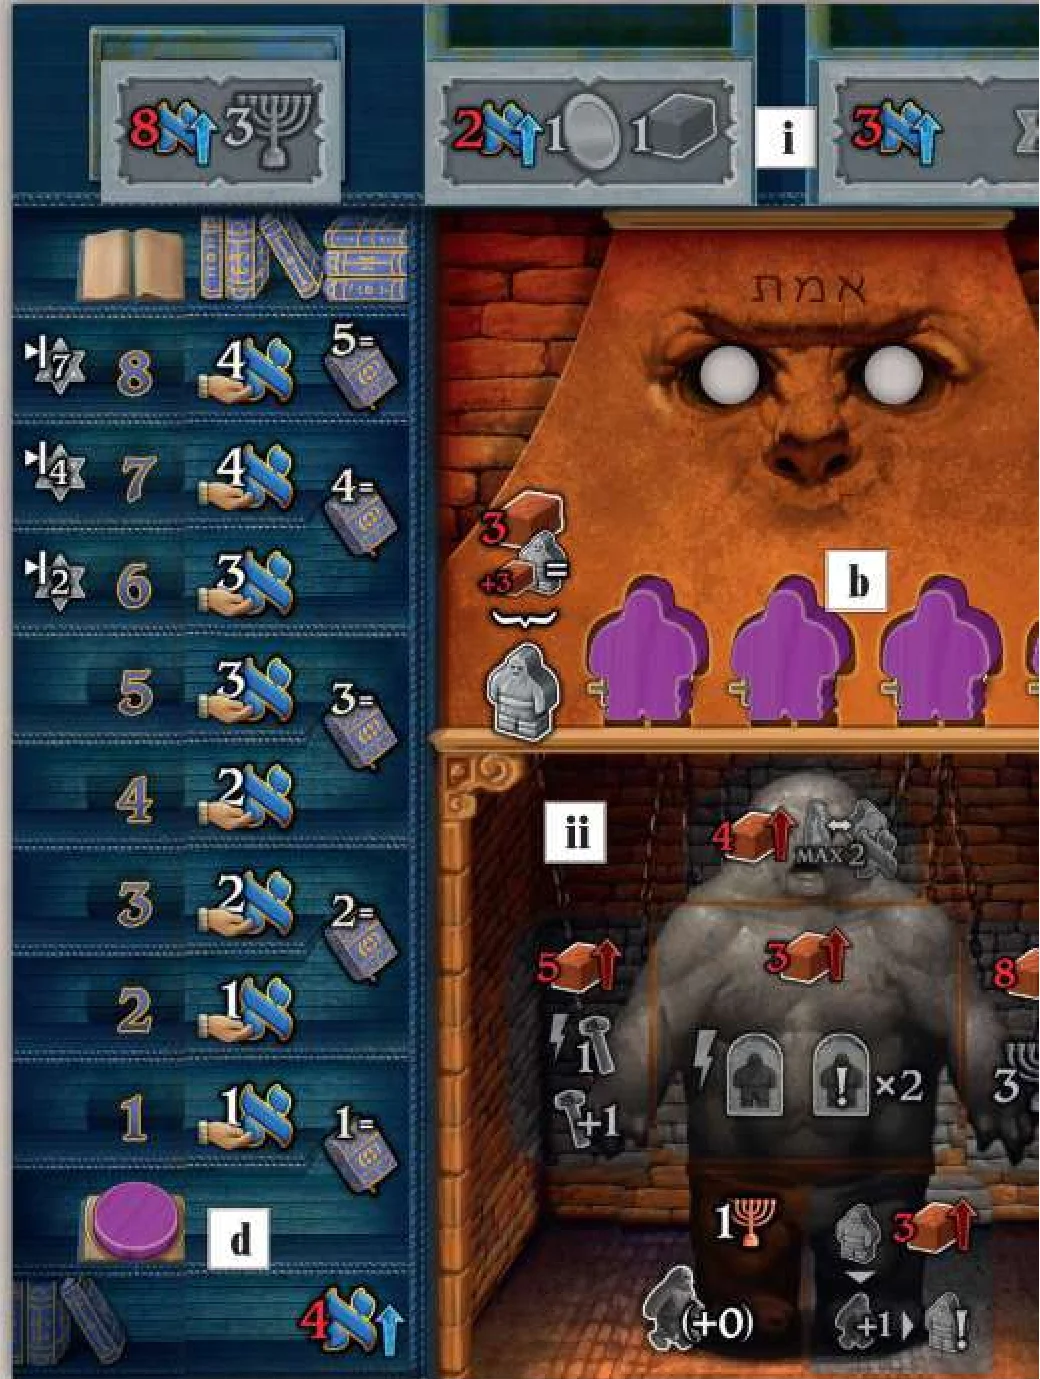
- Place all your Development tiles onto your board in the marked spaces:
- Study Developments: 5 of the Study Developments are placed across the top of your board. Place each tile on its matching space, grey side up. The final Study Development forms part of your Study track and is placed so that the cost icon is showing face up.
- Golem Developments: Placed over the Golem image at the bottom of your board, grey side up.
- Artifact Developments: Placed on the right of your board. Place the two small gold tiles at the top, followed by the 3 grey tiles, with the larger tile at the bottom, with the cost icon face up.
- Place 4 Golems onto your board in the marked spaces, set aside the remaining 2; these will start on the main board, see below.
- Place a Student in the first space of each of the 3 streets on the main board.
- Player markers: Place a Player marker on space 0 of your Study track (blue), a Player marker on the 3rd space of your Golem Track (red), a Player marker on space 10 on the VP track on the main board, and a Player marker on the Turn Order track on the Synagogue board.
- Place your Rabbi and Summary card next to your Player board.
- Place all your Development tiles onto your board in the marked spaces:
- Turn order: Randomly determine the turn order; arrange your Player markers from top to bottom in this order on the Turn Order track.
- Deal 4 Starting tiles to each player.
- Objective cards draft: Deal 4 Objective cards to each player. Draft these cards, selecting one card and passing the remainder to your left, until each player has selected 4 cards. From the final 4 cards, choose 3 to keep and discard 1, returning it to the bottom of the deck.
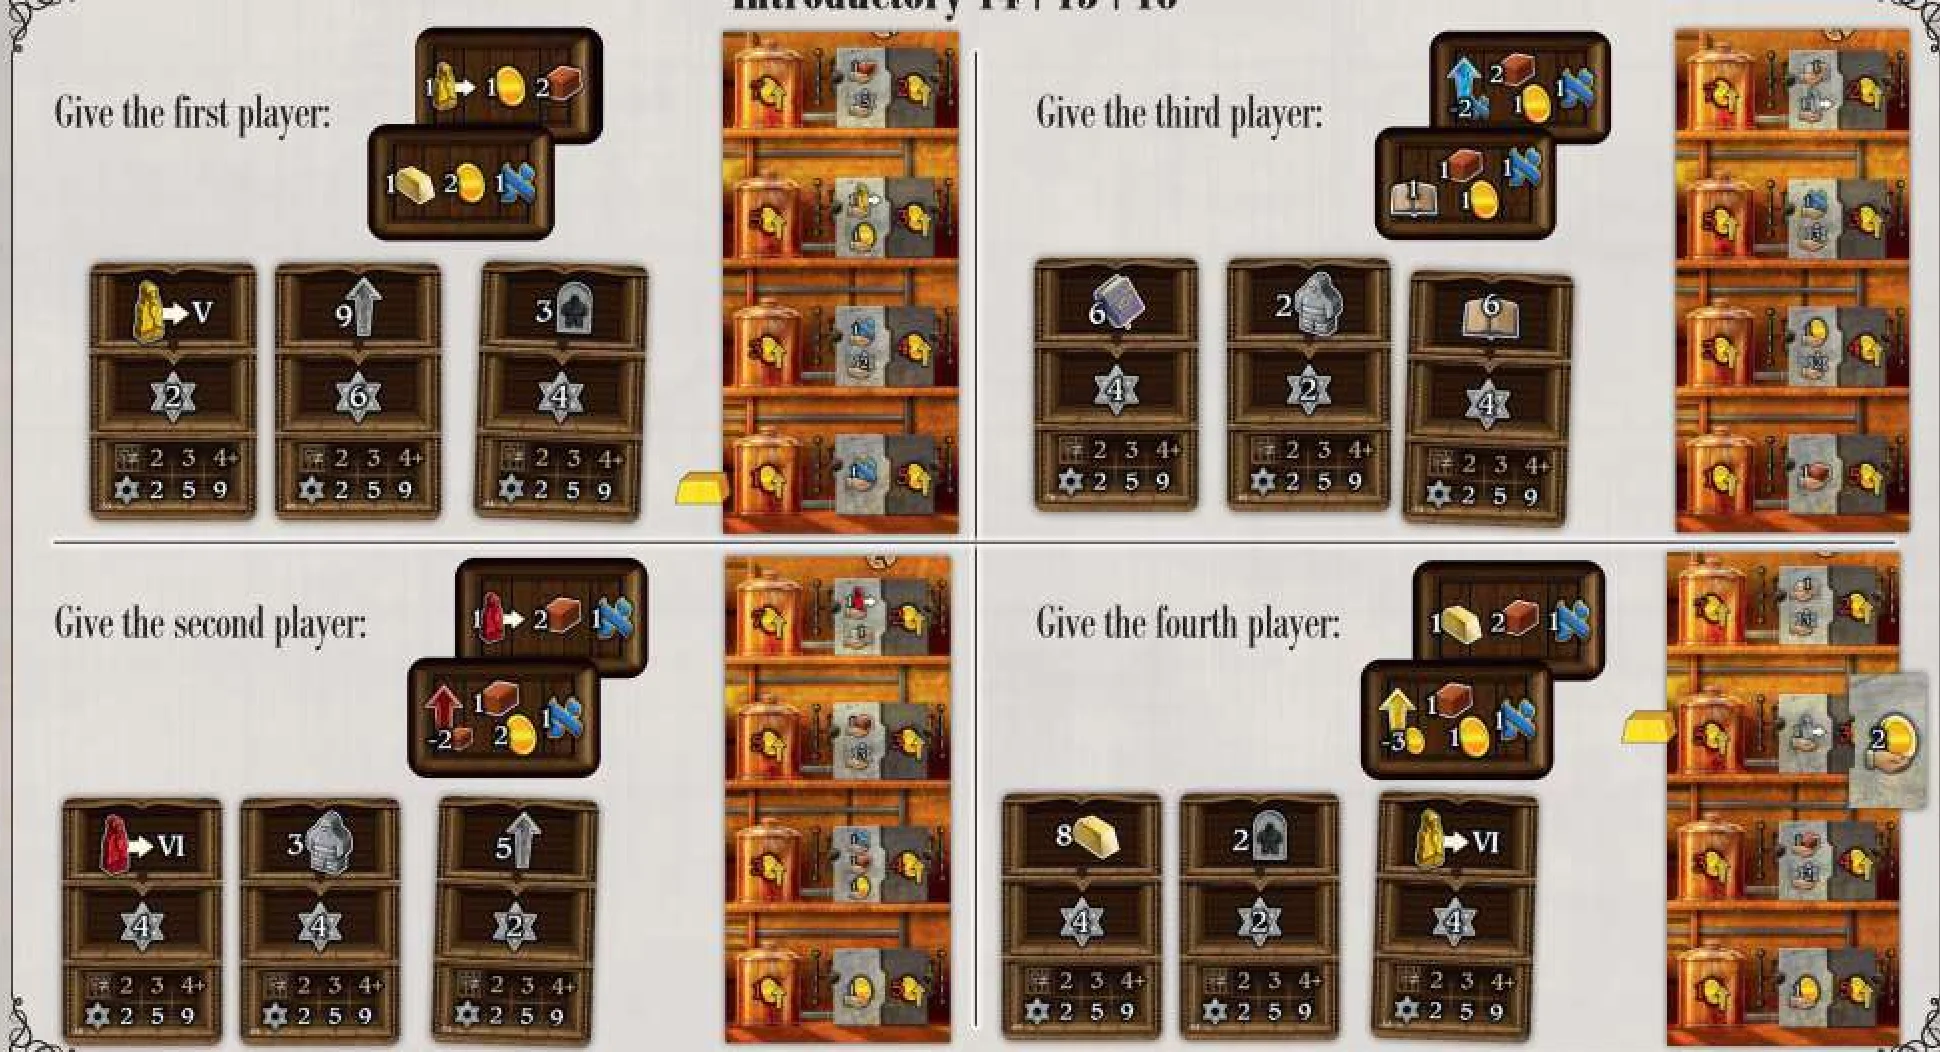
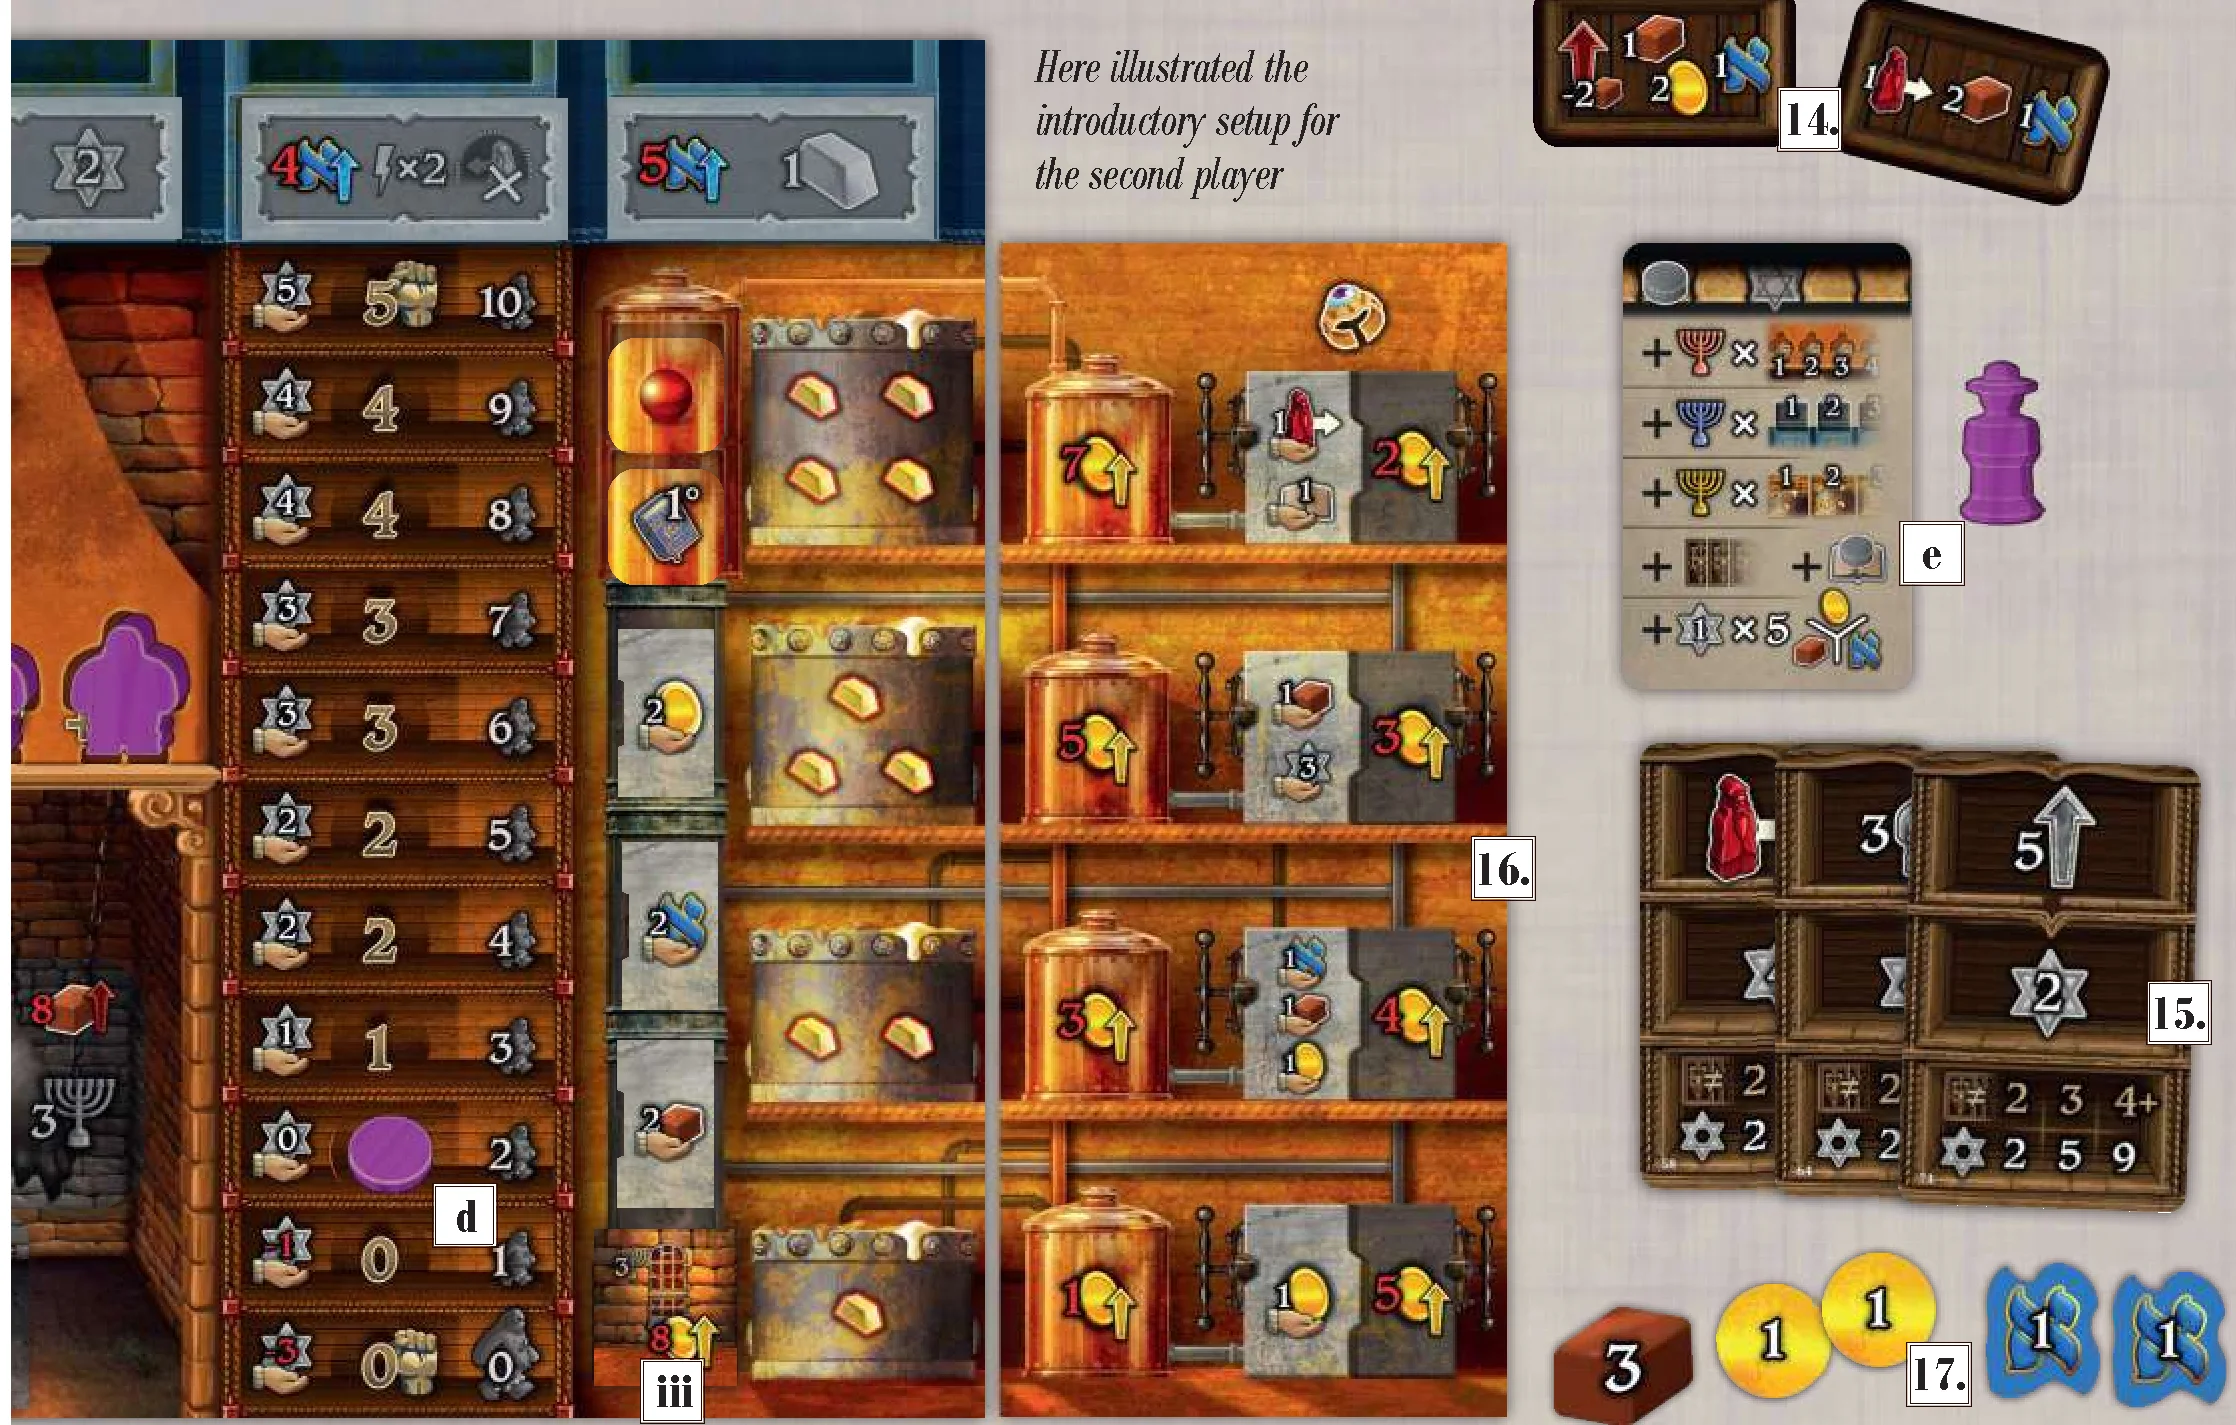
Introductory 14 | 15 | 16
- First player: Starting tiles 1 & 2; Objective cards 8, 9, 3; Artifact tiles with starting side up.
- Second player: Starting tiles 3 & 4; Objective cards 11, 3, 5; Artifact tiles.
- Third player: Starting tiles 5 & 6; Objective cards 6, 2, 7; Artifact tiles.
- Fourth player: Starting tiles 7 & 8; Objective cards 8, 2, 10; Artifact tiles.
- Artifact tiles: Take a number of Artifact tiles equal to the number of players and place them on the table with a random side face up. In reverse turn order, choose an Artifact tile and place it on the right of your player board without changing the side.
Introductory 17
Each player takes the resources or benefits shown on both of their Starting tiles.
- First player (green): takes 3 Coins, 2 Clay, 1 Knowledge, moves their Student in the yellow district forwards 1 step and places 1 Gold on their 1-Gold Artifact, completing it and taking 1 more Knowledge.
- Second player (purple): takes 3 Clay, 2 Coins, 2 Knowledge, upgrades the left leg Golem Development and moves their Student in the red district forward 1 step.
- Third player (orange): takes 3 Clay, 2 Coins, 2 Knowledge, moves their marker up 1 step on the Study track and upgrades the left most column Study Development.
- Fourth player (grey): takes 3 Clay, 1 Coin, 2 Knowledge, places the 2-Coin income Artifact Development and 1 Gold on their 3-Gold Artifact.
- Choose two of the four Starting tiles and take all of the resources and benefits shown. Return all the Starting tiles to the box.
Introductory 18
- First player (green): places a Golem in the first block of the red and yellow districts.
- Second player (purple): places a Golem in the first block of the red and blue districts.
- Third player (orange): places a Golem in the first block of the yellow and blue districts.
- Fourth player (grey): places a Golem in the first block of the red and yellow districts.
- Starting Golems: In turn order, each player places their 2 Golems onto the leftmost blocks in any 2 districts of their choice. You can’t place your Golems in the same district.
Main Board Areas
The main board represents the city of Prague, divided into several areas:
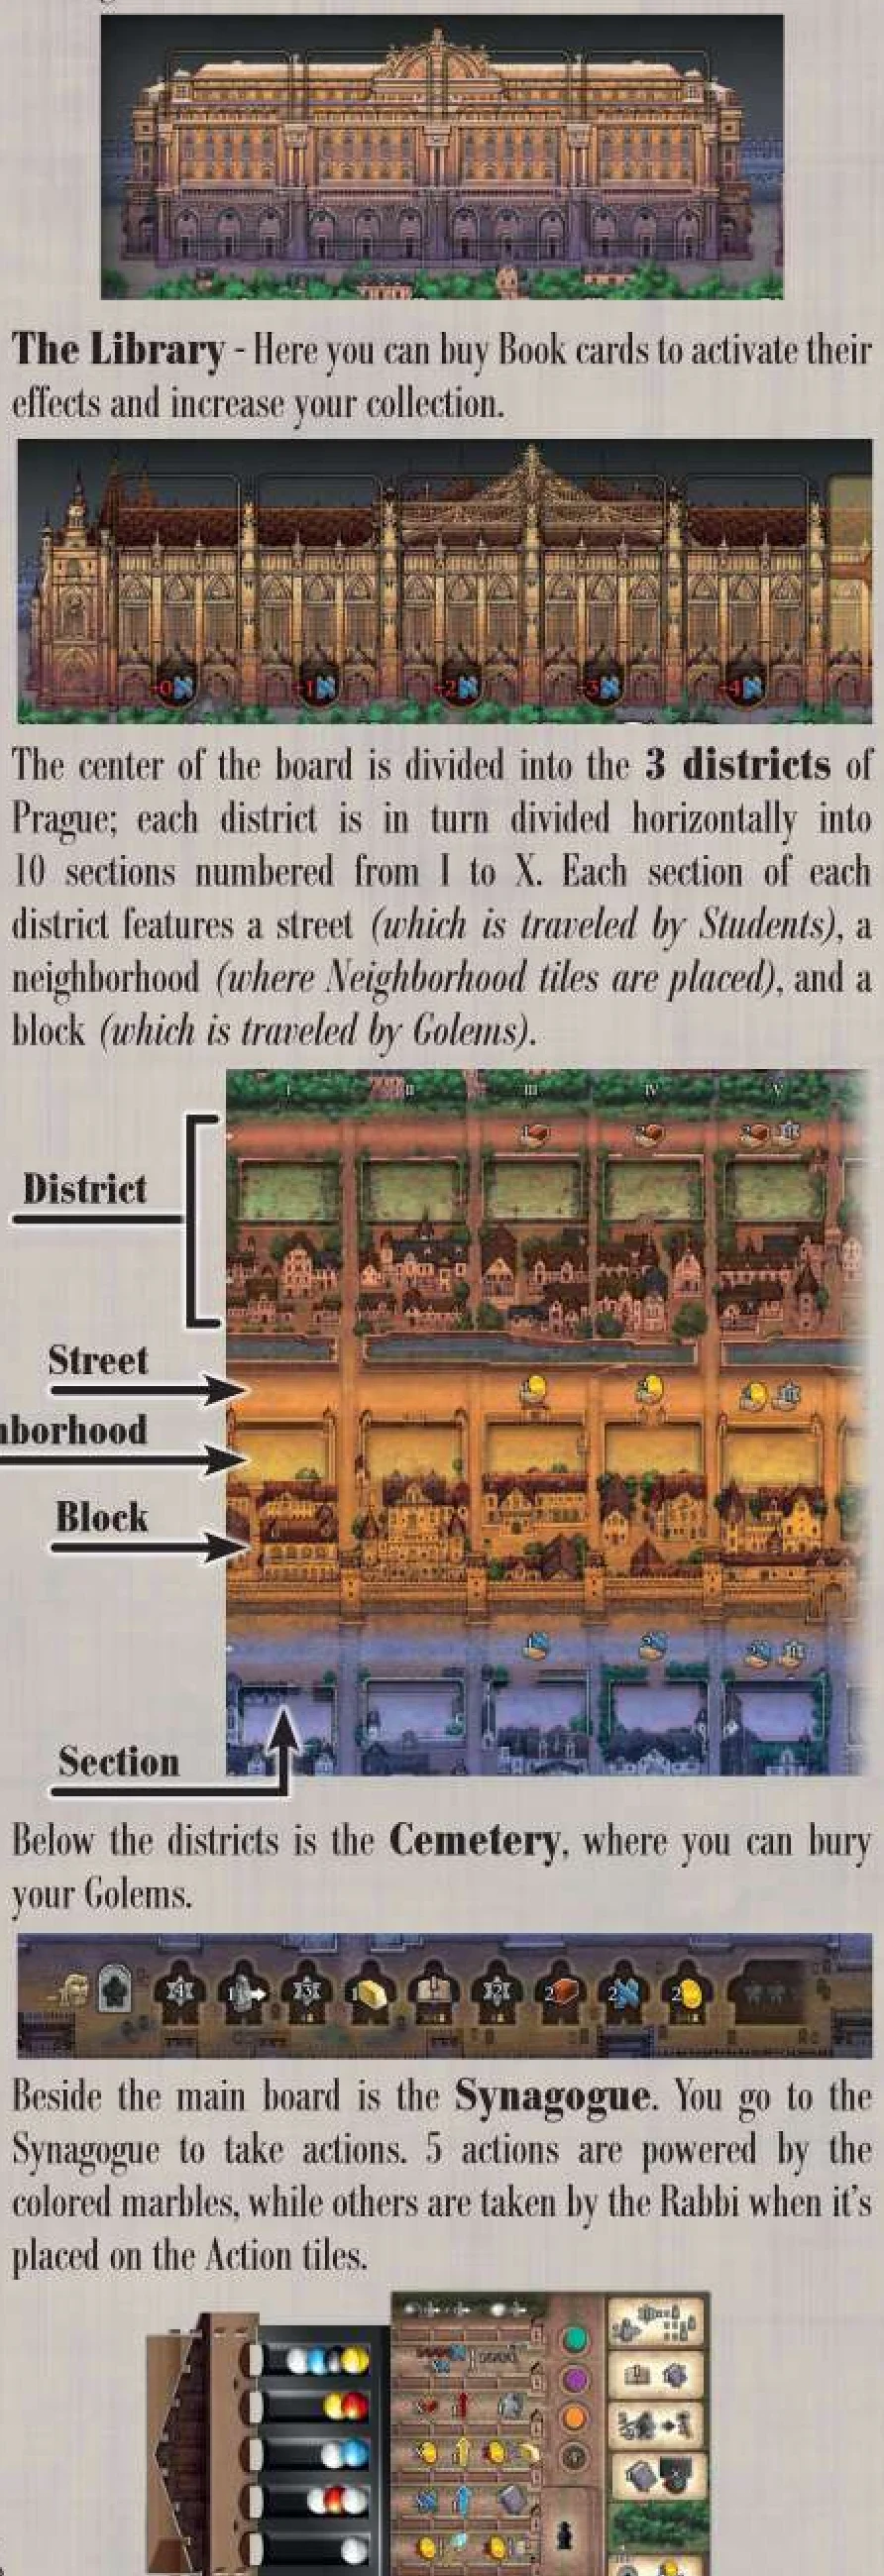
- The Palace: There are 4 Characters placed here; the first face up card from the left is the active Character for each round of the game.
- The Library: Here you can buy Book cards to activate their effects and increase your collection.
- The 3 districts of Prague: The center of the board is divided into 3 districts. Each district is in turn divided horizontally into 10 sections numbered from I to X. Each section of each district features:
- a street (which is traveled by Students),
- a neighborhood (where Neighborhood tiles are placed), and
- a block (which is traveled by Golems).
- The Cemetery: Below the districts is the Cemetery, where you can bury your Golems.
- The Synagogue: Beside the main board is the Synagogue. You go to the Synagogue to take actions: 5 actions are powered by the colored marbles, while others are taken by the Rabbi when it’s placed on the Action tiles.
Player Boards
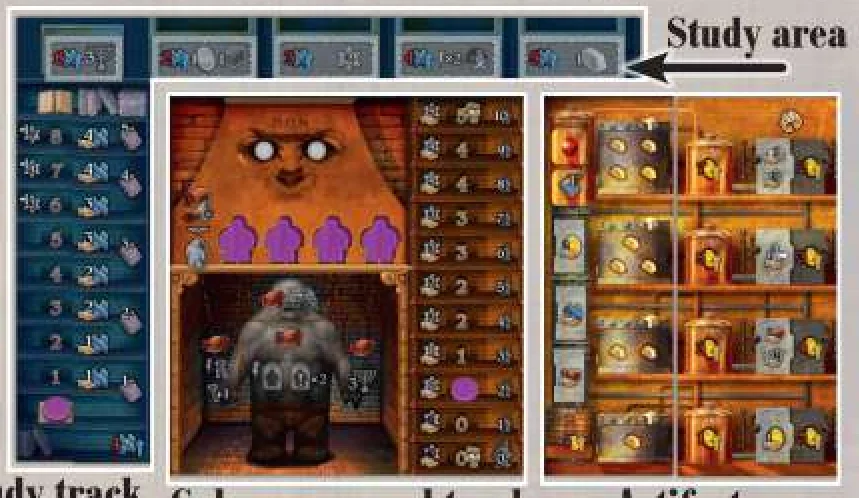
Each player has their own player board which represents their studio. Your player board is divided into 3 colored areas, each linked to a particular field of research:
- The blue area represents bibliographic research.
- The red area represents the study and creation of Golems.
- The yellow area represents the creation of powerful artifacts.
In each area Development tiles represent particular abilities that you can activate and allow you to collect Menorah symbols which are fundamental for the final scoring. You have 2 tracks: the Study track and the Golem track. Your books are stored in columns above your board and your unique artifacts are found on the tile to the right.
During the game you will build Golems that move through the city’s blocks performing actions, study ancient books to gain their bonuses, and buy gold to create powerful artifacts. Throughout the game you will try to collect Menorahs to multiply your end game score. After 4 rounds, the player who has accumulated the most Victory Points (VP) will be declared the winner.
Earning Victory Points
There are several ways to earn Victory Points (VP) during the game (for each VP you earn, move your marker on the VP track 1 step forward):
- Making the Golems work in specific neighborhoods
- Performing specific actions with the Rabbi
- Buying specific Book cards
- Completing specific Artifacts
- Paying specific Characters
- Through the income of your Students and on your Player board
- Burying your Golems in specific spaces
At the end of the game, players will earn additional VP for:
- Multiplying the number of Golems created by the number of red Menorahs accumulated
- Multiplying the number of Artifacts completed by the number of yellow Menorahs accumulated
- Multiplying the number of columns of Books by the number of blue Menorahs accumulated
- Reaching the last spaces of the Study track
- Meeting the demands of your Objective cards
- Leftover resources
Round Structure
Each game is divided into 4 rounds, in each of which there is an active Character card in the Palace. Each round is divided into 7 phases, to be played in order:
- Refresh
- Golem Movement
- Actions
- Turn Order
- Influence Characters
- Income and Development
- Golem Control
Phase 1: Refresh
Skip this phase in the first round. Complete the following steps:
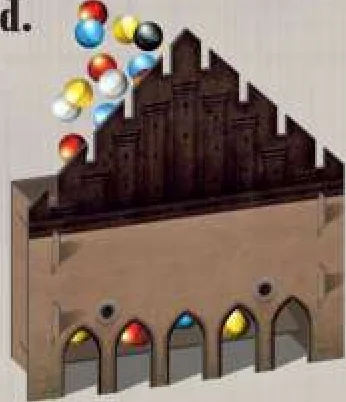
- Gather all of the marbles and place them back into the Synagogue structure. Put all the marbles in at the same time to ensure they are distributed properly.
- Discard the Action tiles used in the previous round, placing them to one side. Deal a number of new Action tiles onto the Synagogue board equal to the number of players plus one. If the Action tiles run out, shuffle all of the used tiles to form a new face-down pile and continue to deal tiles as needed.
- Remove the leftmost Book card from the Library and put it back at the end of the deck. Shift all the remaining cards to the left and deal a new card, face up, into the rightmost space.
Phase 2: Golem Movement
In turn order, starting with the player on the top space of the turn order track, proceeding downwards, each player must move their Golems forward.
Sum up the Golem steps gained from your Golem Track level and the steps indicated on the active Character card for the current round (i.e. the first face up card from the left).
You may distribute these steps however you wish between all your Golems, you must use all the steps.
If a Golem was lying down, stand it up whenever it moves. Standing a Golem up is not considered to be a movement but a result of movement taking place.
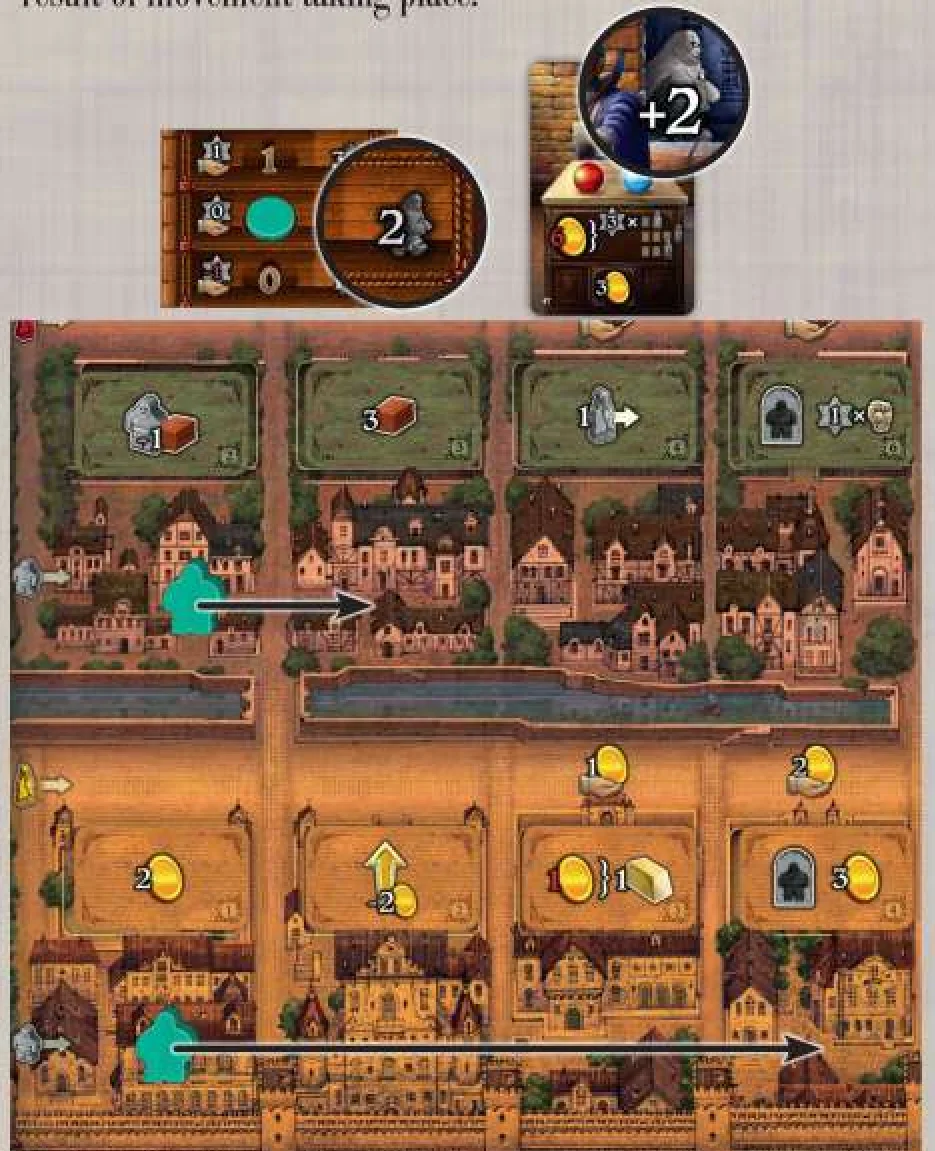
Example: David’s (green) Golem track shows 2 steps and the Character card adds another 2. He chooses to move 1 Golem 1 space forward and another 3 spaces forwards.
Reaching Sections VIII, IX, and X
If a Golem reaches the last sections of a block (VIII, IX, and X), you must pay a cost of either VP or Knowledge to advance onto each of these sections (as indicated on the board).
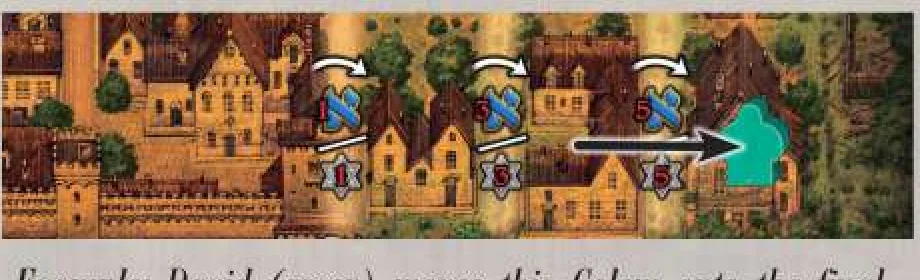
Example: David (green) moves this Golem onto the final space of the yellow District. He may choose to pay either 5 Knowledge or 5 VP.
If one of your Golems reaches section X (or one of your Golems is already on section X from a previous turn) and you are required to move your Golems, you must first distribute the steps between the Golems that are not in the final section.
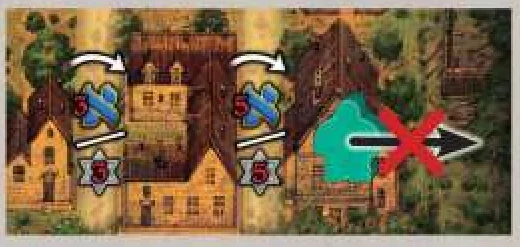
If all your Golems have reached section X and you have any movement remaining, for each movement that you cannot use, you lose 5 VP up to a maximum of 5 VP per Golem.
Action Selection
In turn order, each player takes an action, until all players have taken 3 actions.
You may take an action in one of two ways:
- Selecting a marble from the Synagogue to perform a Marble action
- Placing your Rabbi on an Action tile to perform a Rabbi action
Each round you must take 2 Marble actions and 1 Rabbi action. You may decide the order of your actions in any combination. You may also pass.
Select Marble Action
Each line of marbles is connected to one of the actions listed below. The number of marbles in each line, at the moment you select one, represents the value of that action.
Complete the following steps in order:
- Select any one marble from the Synagogue and place it on your board (inside one eye).
- Student movement:
- If you select a yellow/red/blue marble, move your Student in the matching district 1 step forwards.
- If you select a white marble, don’t move any Students.
- If you select a black marble, move two different Students of your choice, 1 step each.
- Perform the corresponding action at the current value. The current value is equal to the number of marbles present before you selected.
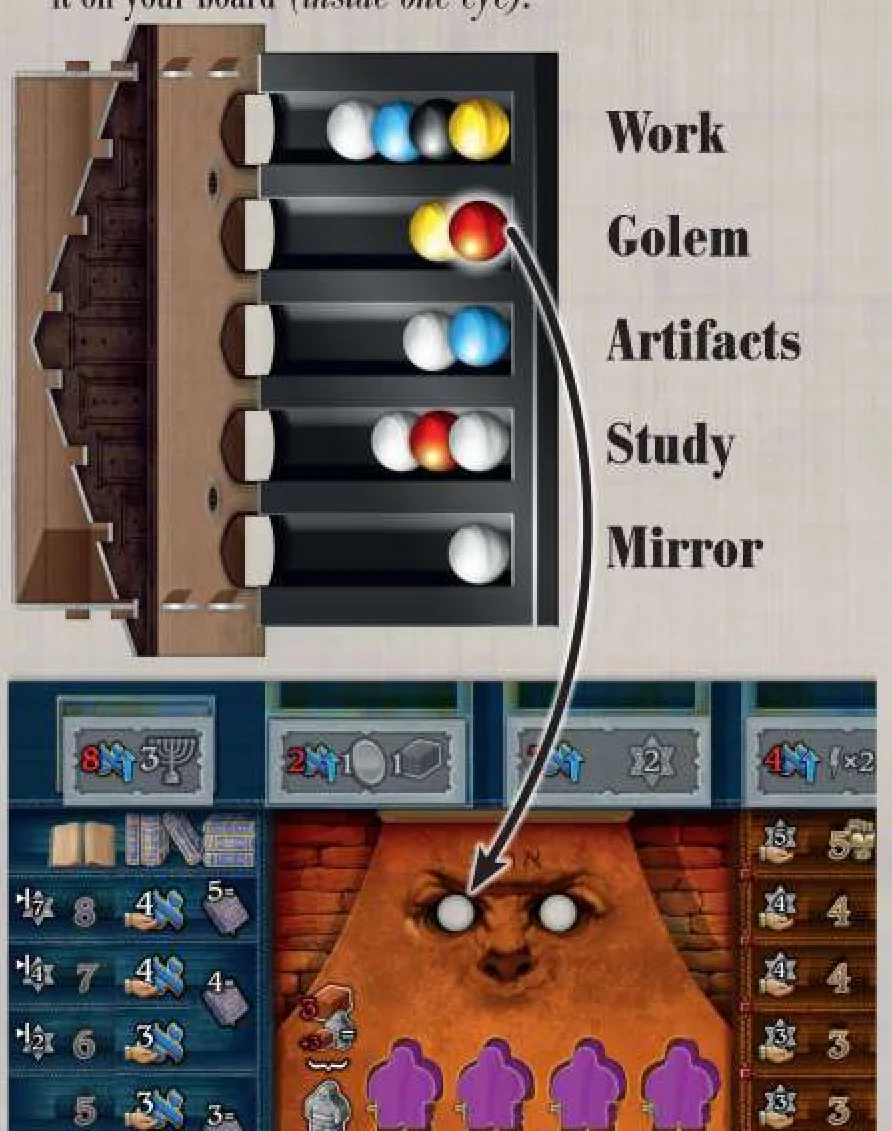

Example: If you take a marble from this line, the corresponding Golem action will have a value of 2.
Students
Your Students have 2 primary uses:
- The position of each Student in the Income phase may earn you a range of resources or VP;
- The relative position of your Students to your Golems determines how much Knowledge you need to spend to control them.
In addition, if any of your Students are the first to reach the VIII space of a street, you take the Menorah token from the district and place it next to your player board for end game scoring.
Note: The icons of the game refer to the color of the district, not to the color of the piece.
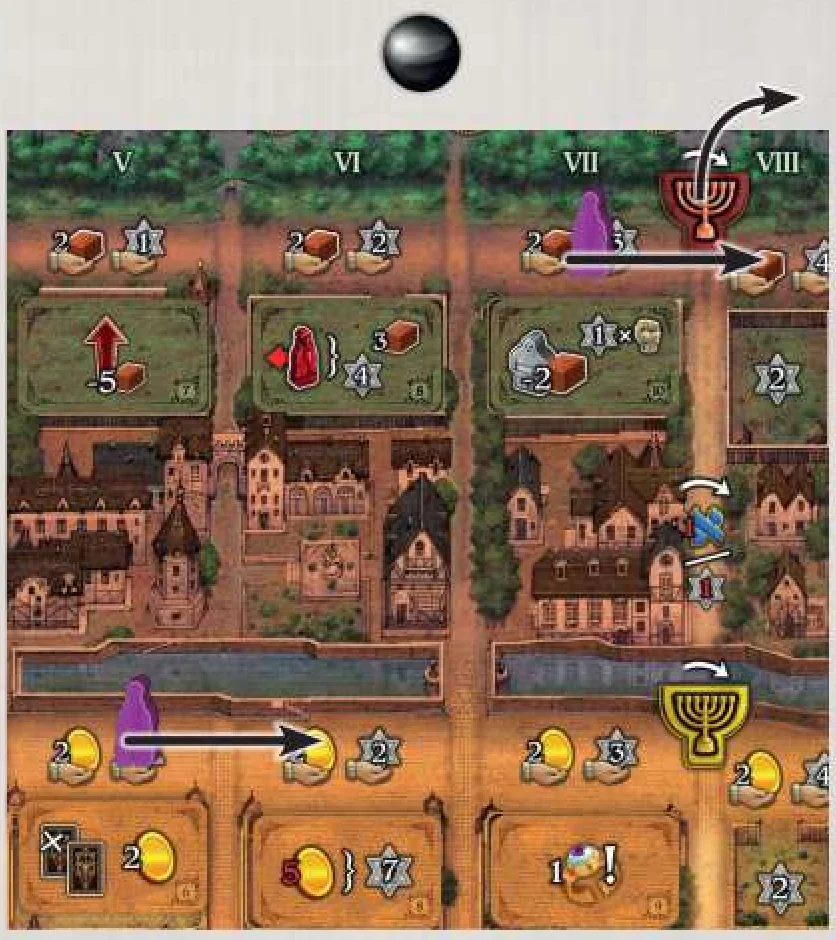
Example: Sara (purple) selects the black marble and therefore moves 2 Students forward. In the red district the Student moves to space VIII so Sara claims the red Menorah.
The Marble Actions
Work Action
You may activate up to 4 of your Golems already on the board. The Golems must be standing.
Pay 1 / 3 / 5 / 8 Knowledge to activate 1 / 2 / 3 / 4 Golems. You receive a discount equal to the action value.
When you activate a Golem, lay it down and activate the effect of the adjacent Neighborhood tile.
You may decide the order in which you activate your Golems. Complete the effects of each Neighborhood tile before activating the next one.
Note: You can’t activate a Golem you’ve just created during the Work action.
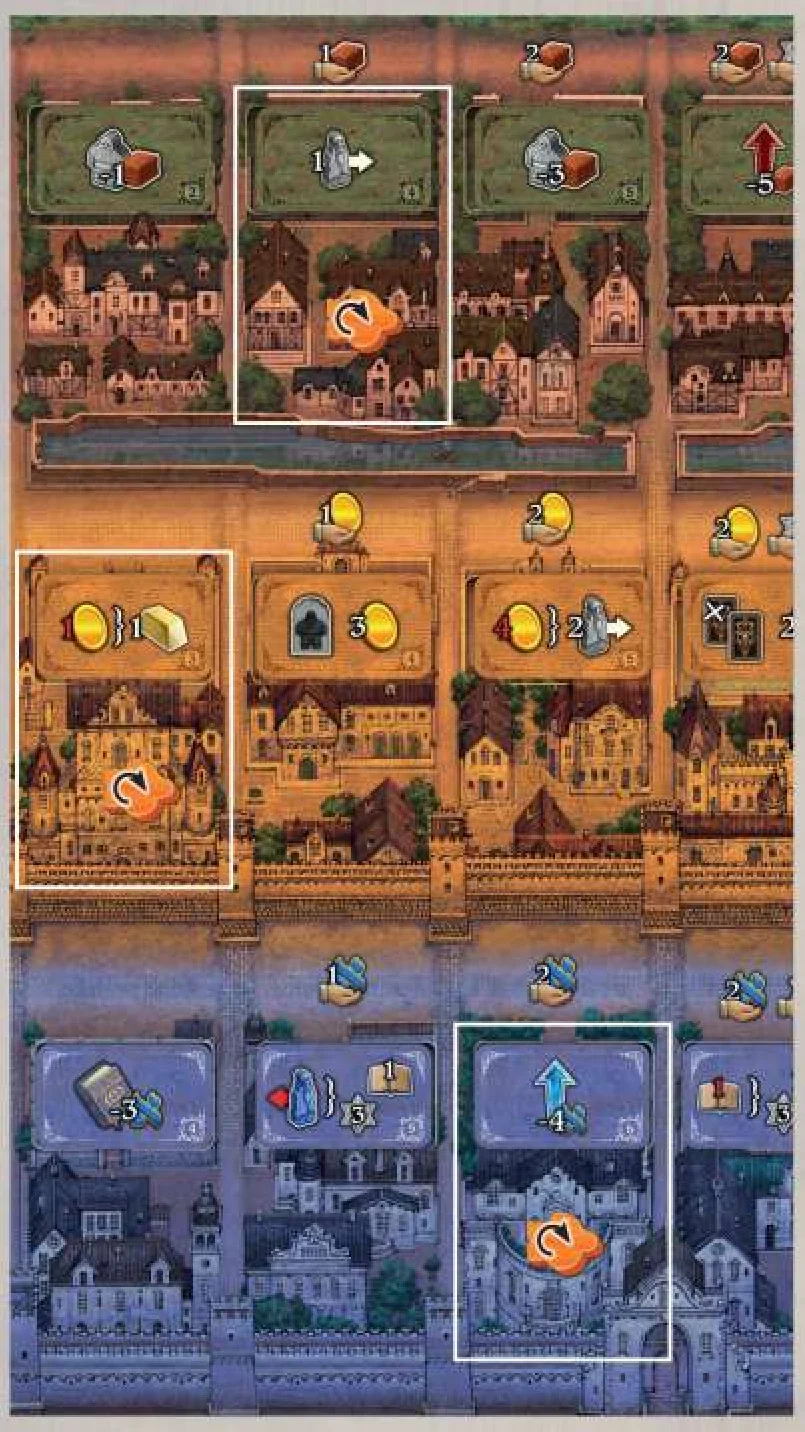
Example: Simon (orange) has a Work action with value 3. He chooses to activate 3 Golems, paying 2 Knowledge (5 with a discount of 3). He takes the actions shown on all 3 Neighborhood tiles and lays those Golems down, in any order.
Golem Action
- Take a number of Clay equal to the action value.
- You may spend Clay to upgrade one of your Golem Developments on your board. Each Development has a different cost, shown on the tile.
- You may spend 3 Clay to create one Golem. When you create a Golem, place it on the first space of a district. If you already have other Golems in the same district, you must pay 3 additional Clay for each Golem already present. Move your marker up 2 steps on your Golem track as shown on the space revealed by creating the Golem.
You may decide the order of any upgrade and create actions taken.
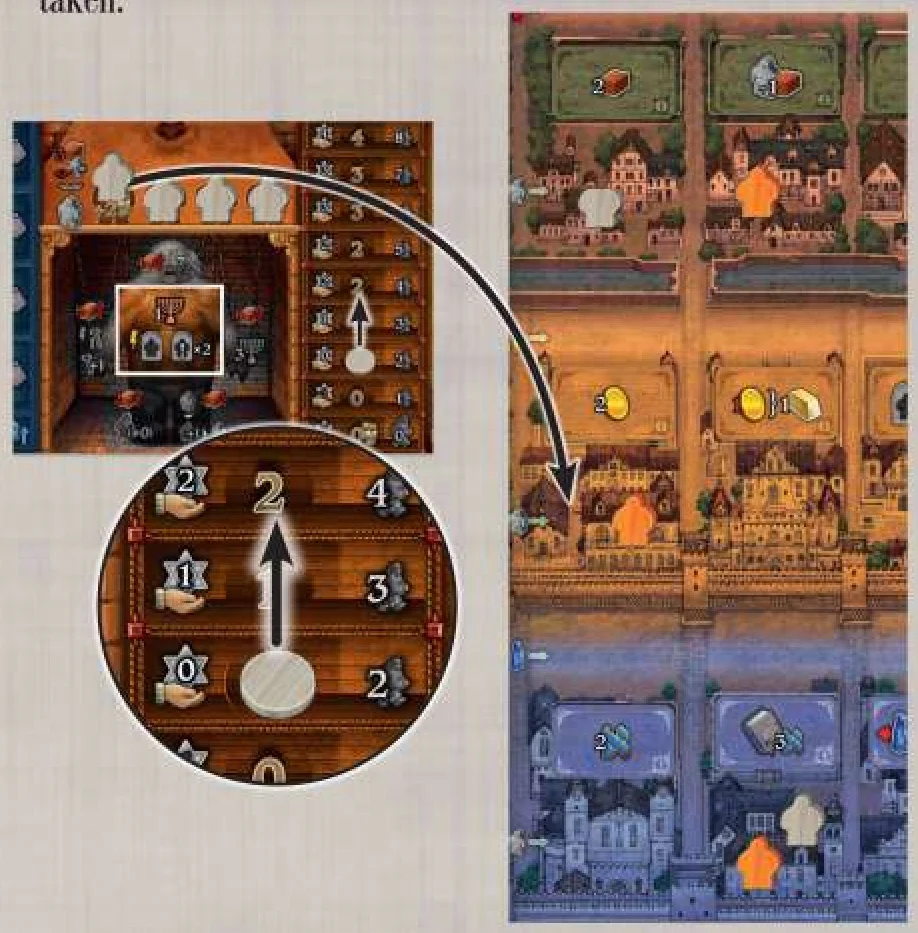
Example: Julia (grey) has a Golem action with value 4. She takes 4 Clay. She pays 3 Clay to upgrade the torso Golem Development and then another 3 Clay to place a Golem in the Yellow district. Had she placed the Golem in either of the other district she would need to pay 6 Clay instead. She moves her marker 2 steps up her Golem track.
Killing a Golem
During the game, you may take an action that allows you to kill one of your Golems. This not only gets you an instant bonus but may also save you Knowledge in the Golem Control phase.
When you kill a Golem, move it from a neighborhood to any unoccupied cemetery space. Immediately move your marker 1 step down on your Golem track and receive the bonus indicated on your chosen cemetery space. Certain spaces may not be available depending on your player count. The rightmost cemetery space is considered unlimited but gives no bonus.
Artifacts & Artifacts Action
Over the course of the game you may complete up to 4 Artifacts. The right hand side of your player board shows 4 cauldrons in which you must place the Gold pieces you collect. When each of the icons in a cauldron are covered with a Gold piece, you have completed that Artifact. You immediately receive all the benefits shown on the matching section of your Artifact tile. You will receive these benefits again during each Income phase.
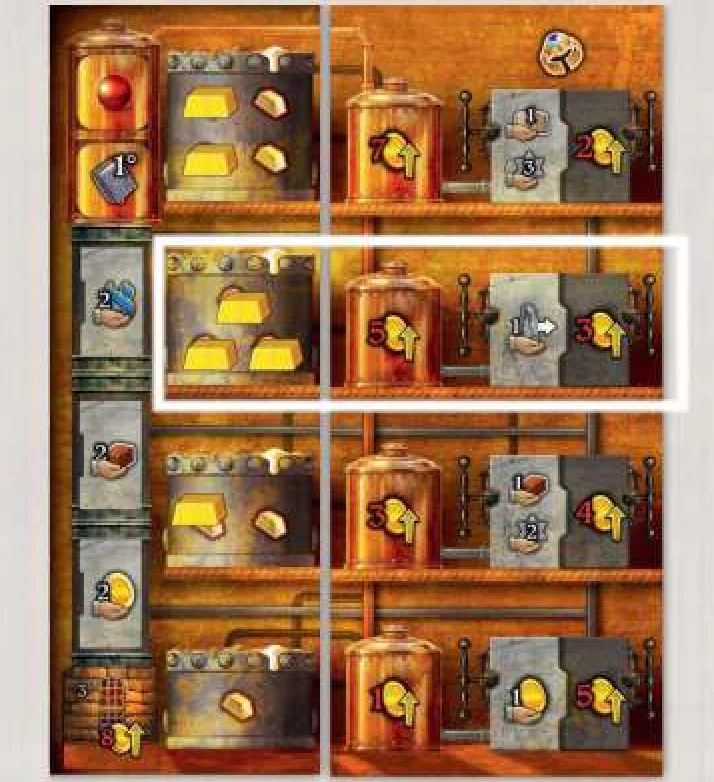
Your Artifacts may be upgraded using the Artifacts marble action or other game effects. When you upgrade an Artifact, take one of the Artifact Development tiles from your player board and place it on the corresponding space on your Artifact tile. Only the lowest Development tile shows a cost; when you upgrade this Development pay 8 Coins and flip the tile to show 3 yellow Menorahs. The remaining Development tiles are double-sided; you may choose which side to have face up when you upgrade them. They cost Coins based on which space you choose to place them; pay the number of Coins shown on the space. Whenever you upgrade one of these, you will reveal a yellow Menorah shown below.
The two gold-colored Development tiles are used to activate an Artifact based on the shown condition, as well as in the Income phase. The three grey Development tiles are used to increase the Artifact’s effect. When that Artifact is activated, you will now earn the additional benefit shown.
Performing the Artifacts Action
- Take a number of Coins equal to the action value.
- You may spend Coins to upgrade one of your Artifact Developments on your board. Each Development has a different cost, shown on the space you place it on.
- You may spend 3 Coins to buy one Gold piece. Place it on a Gold space on your board.
You may decide the order of any upgrade and buy actions taken.
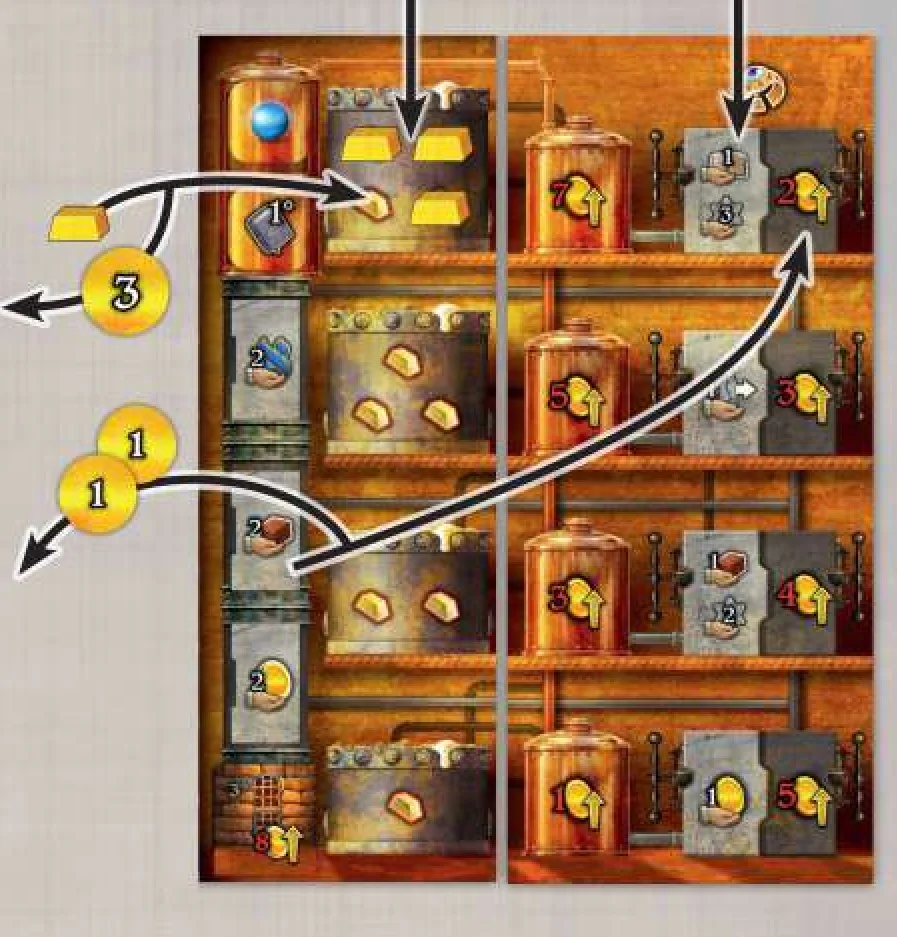
Example: Julia has an Artifact action with value 2. She takes 2 Coins. She pays 2 Coins to upgrade the Development on the top row of the Artifacts and 3 Coins to buy a Gold piece and place it on the same Artifact. The Artifact is now complete: she immediately receives 1 step on the Study track, 3 VP and 2 Clay.
Books & Study Action
Each Book card shows an immediate bonus on the lower half, an active bonus on the upper half, and a cost at the bottom. Each card is also one of 5 colors: red, blue, green, yellow, or black. The colored Book cards cost Knowledge and the black Book cards are paid for by moving a Student of your choice 1 step back. When you buy a Book you must tuck the card into one of the columns above your player board.
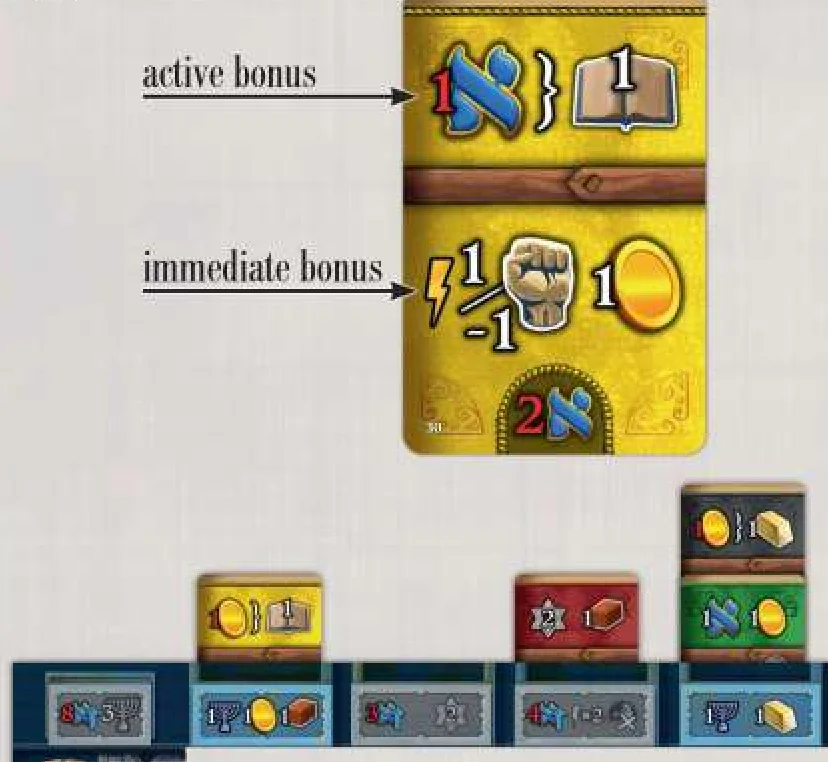
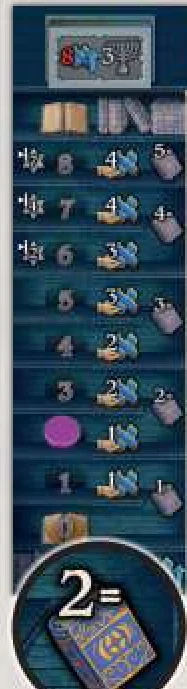
Each column may only contain cards of the same color and no two columns may contain cards of the same color. You are limited to the number of cards you can have in each column (max 5) by the icon corresponding to the position of the marker in your Study track. Black Books may count as a Book of any one color. When you place a Book in a column you receive the immediate bonus first, then you receive all the active bonuses in that column, from bottom to top. Start with the bonus from the Development tile, if it’s active, then the active bonus from other Book cards, then the active bonus of the Book just placed.
You may only buy a Book if you can legally tuck it into at least one of your columns.
Performing the Study Action
- Take a number of Knowledge equal to the action value.
- You may spend Knowledge to upgrade one of your Study Developments on your board. Each Development has a different cost, shown on the tile.
- You may spend Knowledge to buy one Book card from the main board. The cost of the Book card is the sum of the cost depicted at the bottom of the card and the cost shown on the board below the card’s position.
Move all the remaining cards to the left and deal a new card from the deck into the rightmost position.
You may decide the order of any upgrade and buy actions taken.
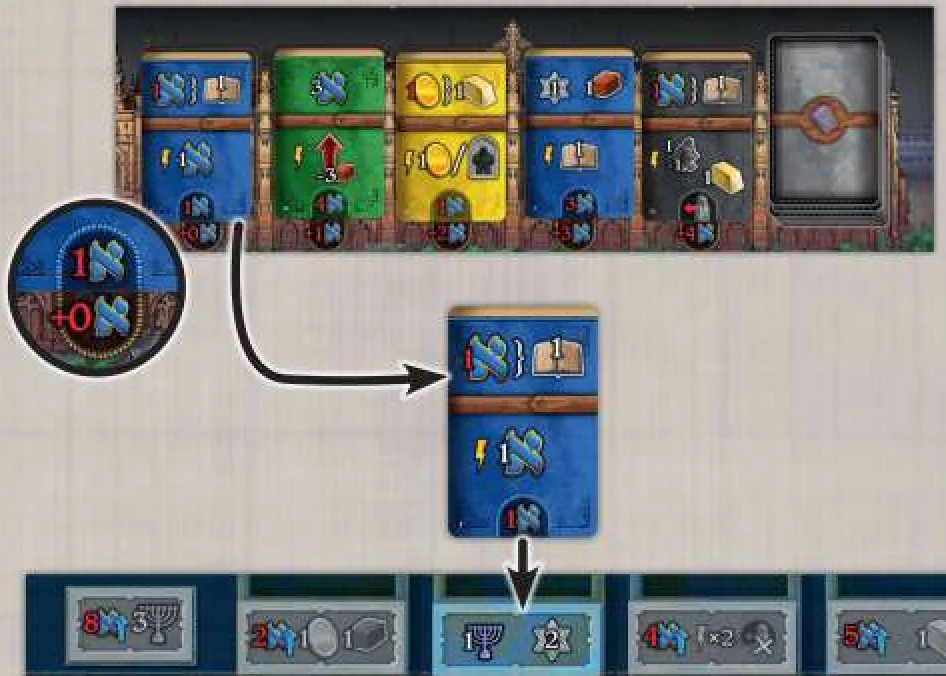
Example: Sara has a Study action with a value of 2. She takes 2 Knowledge. She chooses to upgrade the 2nd column, spending 3 Knowledge. She chooses to buy the leftmost Book card, paying 1 Knowledge and she places it in the 2nd column. She gains 1 Knowledge, then she gains 2 VP and spends 1 Knowledge to move up the Study track.
Mirror Action
Pay 1 Coin to perform any of the other marble actions with the value of this Mirror action.
You may also pay 3 Coins to move your marker up the Study track by one space.
Rabbi Action
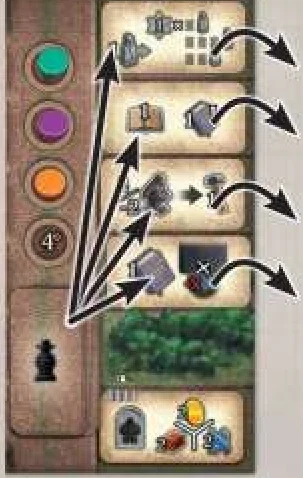
Each round you must place your Rabbi on 1 Action tile to carry out the action shown on the tile. Each tile may only have one Rabbi placed on it, except for the lowest space (which is permanently printed on the board), which may hold any number of Rabbis.
The order of your Rabbis on the tiles will also determine turn order for the next round, from top to bottom. If more than one player places their Rabbi on the lowest action space, they place their Rabbi to the right of any already placed there.
The Action tiles will change each round.
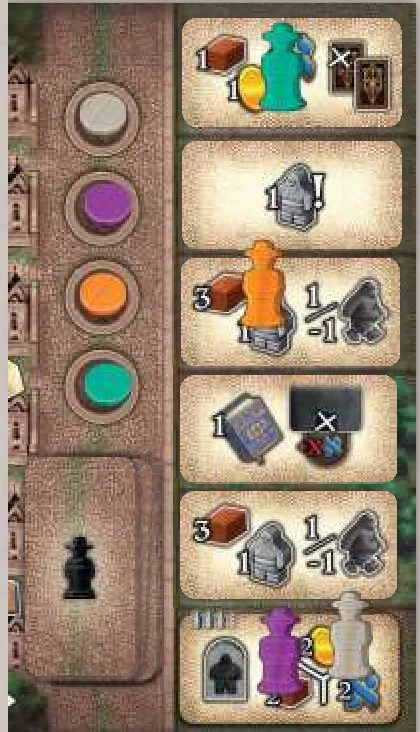
Example: David (green) has placed his Rabbi on the top-most Action tile. Simon (orange) has placed his Rabbi on the third Action tile. Sara (purple) and Julia (grey) both placed their Rabbi on the last Action, but Julia has placed it after Sara.
Passing
When it’s your turn, you may choose to pass instead of performing an action. Players usually decide to pass when they need to perform an action that has no marbles on it.
- Take the lowest numbered Pass tile available.
- After all other players have performed their 3 actions or have passed, the Passing phase begins. In this phase, players who passed must perform their remaining actions.
- If you have the number 1 Pass tile, remove 1 marble of your choice from the marbles remaining in the Synagogue and place it on the Pass tile.
- The player in charge of putting the marbles back into the Synagogue will be either one of the players who did not pass, or the player with the highest Pass tile, in case all players passed.
- Players will play as many turns as they need to complete all their remaining actions following the Pass tile order.
- Players may pass a second time when it’s their turn.
- Should any player pass for the second time, it will be necessary to start another (and final) Passing phase. The player with the number 1 Pass tile will remove another marble and the remaining marbles must be put back into the Synagogue.
- At the end of the Passing phase, put all the Pass tiles back near the Synagogue board.

Example: Sara and David choose to pass during the round, while both of them have a remaining marble action to be performed each. Once all other players have taken their actions, the Passing phase begins. Sara chooses to remove 1 white marble, placing it on the ‘1’ tile. Julia collects all the remaining marbles and puts them back into the Synagogue. Sara doesn’t like the new marble composition and decides to pass again. On the contrary, David plays his turn selecting a marble to perform his remaining action. At this point, the second and final Passing phase begins; Sara removes a red marble, Julia collects all the remaining marbles and puts them back into the Synagogue once again. Sara must now take her last action.
Phase 4: Turn Order
Reset the Turn Order track. Arrange the Player markers in the same order as the Rabbi pieces on the Action tiles, from top to bottom. If multiple Rabbis are placed on the lowest permanent action, the player markers are placed following the Rabbi order from left to right. After setting the turn order each player collects their Rabbi and returns it to their player area.
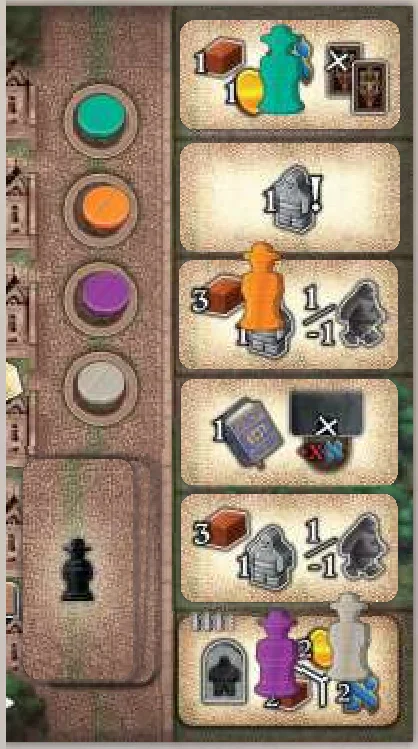
Example: The Actions phase ends in this situation. David (green) becomes first, Simon (orange) becomes second, Sara (purple) becomes third and Julia (grey) becomes fourth.
Phase 5: Influence Characters
In turn order, each player checks the Character card for the current round; it will be the leftmost face-up card. Each Character card shows a combination of 2 colored marbles. If during the current round, you have selected the same combination of marbles, you will be able to influence the Character. Note that the white marble counts as any color and the order of marbles on the card doesn’t matter.
If you influence the Character, you must either:
- pay Coins to take the specific bonus, or
- take 3 Coins.
Once all players have done this, flip the Character card face down.
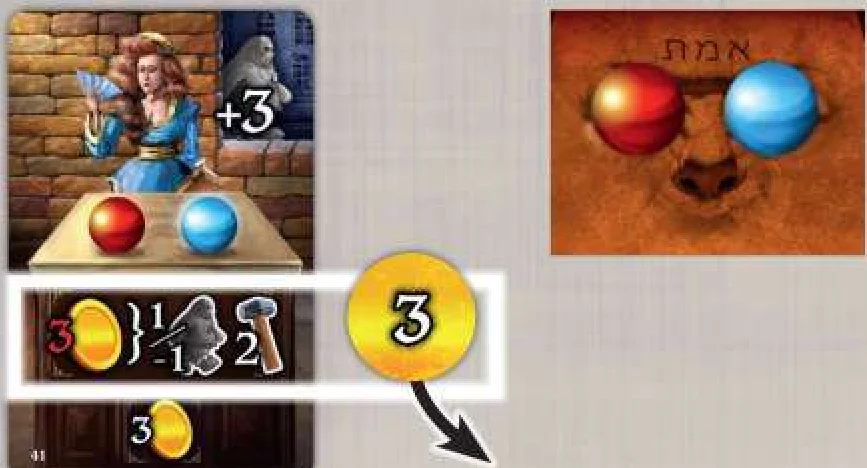
Example: Sara selected a red and a blue marble during the Actions phase. The Character card for the current round shows the same combination, so Sara can influence it. She decides to pay 3 Coins to take the bonus.
Phase 6: Income and Development
The  icon indicates any income you receive. This may be VP, steps with your Students, steps on the Study track, or resources.
You receive all the income from:
- the position of your Students on each of the 3 streets
- the completed Artifacts on your board
- the position of your marker on your Study track
- the position of your marker on your Golem track
Example: With the situation illustrated above, Sara (purple) would receive 4 Coins, 6 VP, 1 step up the Study track, and 2 Knowledge (for the new position on the Study track).
You may choose the order in which you collect your income.
After all players have collected their income, you may pay to upgrade one Development of your choice, paying the normal cost as explained under the marble actions.
Phase 7: Golem Control
You must now pay Knowledge to control your Golems.
For each Golem you must pay 1 Knowledge for each section the Golem is ahead of the Student in the same district. You count the section the Golem is in but not the section the Student is in.
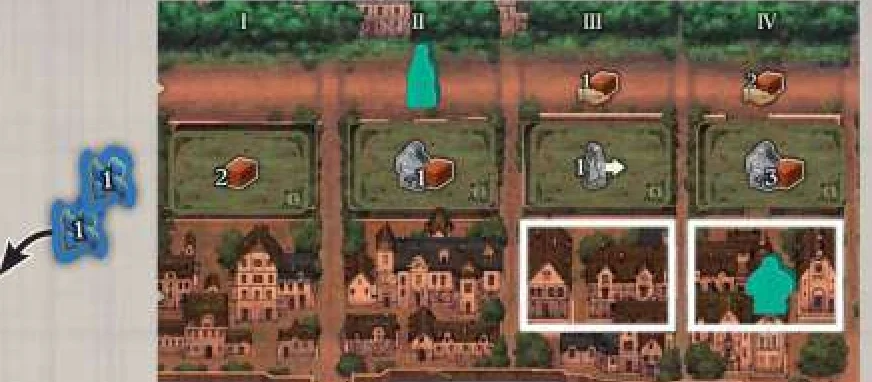
Example: David (green) must pay 2 Knowledge to control the illustrated Golem, which is 2 sections ahead the green Student in the same district.
If you do not have enough Knowledge to control all of your Golems, spend all the Knowledge you have and lose 5 VP for each Golem that you cannot afford to fully control.
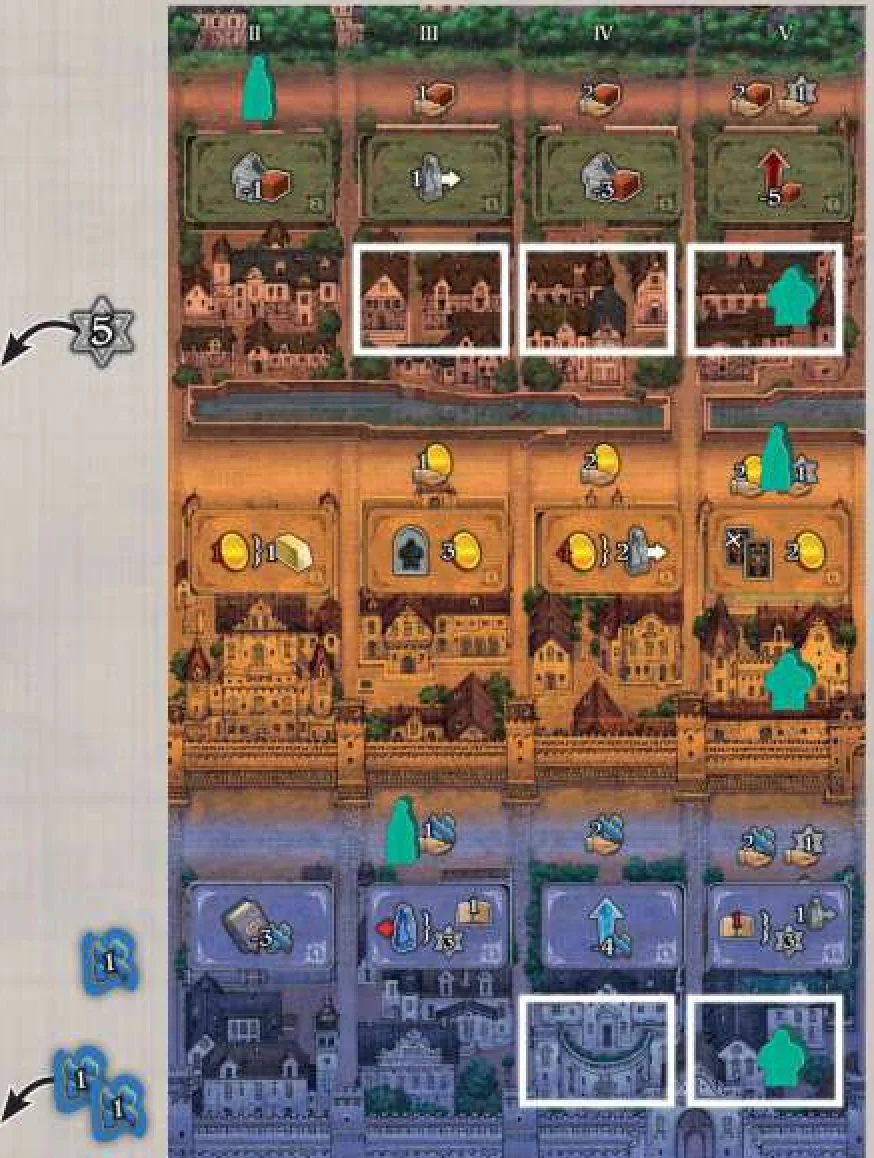
Example: David (green) must pay 5 Knowledge to control his Golems. He has only 3 Knowledge, that he pays to control the Golem in the blue district. Then, he must discard the remaining Knowledge, which is not enough to control the Golem in the red district, and lose 5 VP. The Golem in the yellow district is controlled for free.
If you have just completed the fourth round, proceed to Final Scoring. If not, start a new round with the Refresh phase.
End of the Game
The game ends after the Golem Control phase of round 4. Each player scores VP as follows:
- Red Menorahs: Multiply the number of Golems you have built (the starting 2 Golems are not counted) by the number of red Menorahs you have (these are found on your Development tiles and the Menorah tokens).
- Yellow Menorahs: Multiply the number of Artifacts you have completed by the number of yellow Menorahs you have (these are found on your Development tiles and the Menorah tokens).
- Blue Menorahs: Multiply the number of columns of Book cards (with at least 1 Book) you have above your player board by the number of blue Menorahs you have (these are found on your Development tiles and the Menorah tokens).
- Study Track: As shown on the upper 3 spaces of the Study Track.
- Objective cards: VP from your completed Objective cards.
- Resources: 1 VP for every 5 resources of any type.
The player with the most Victory Points is declared the winner. If there is a tie, the tied player whose Rabbi is placed in the uppermost space wins.
Objective cards
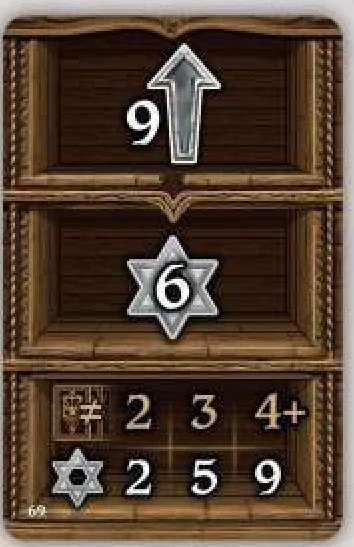
Each Objective card is split into 3 parts:
- Top part: Shows what you need to do to complete the Objective. There are various types and may relate to the final position of one of your students, a number of Golems, Books, Gold, or Developments you have, or your position on a track.
- Middle part: If you meet this criteria you score the VP shown in the middle part of the card.
- Bottom part: Shows a reminder of the additional VP you will earn for each different type of Objective you have completed:
- Completing 2 different types of Objective: 2 VP
- Completing 3 different types: 5 VP
- Completing 4 or more different types: 9 VP
Two Objectives are considered to be of the same type if they show the same icon (even if with a different number) on the top part.
End Game Scoring Example
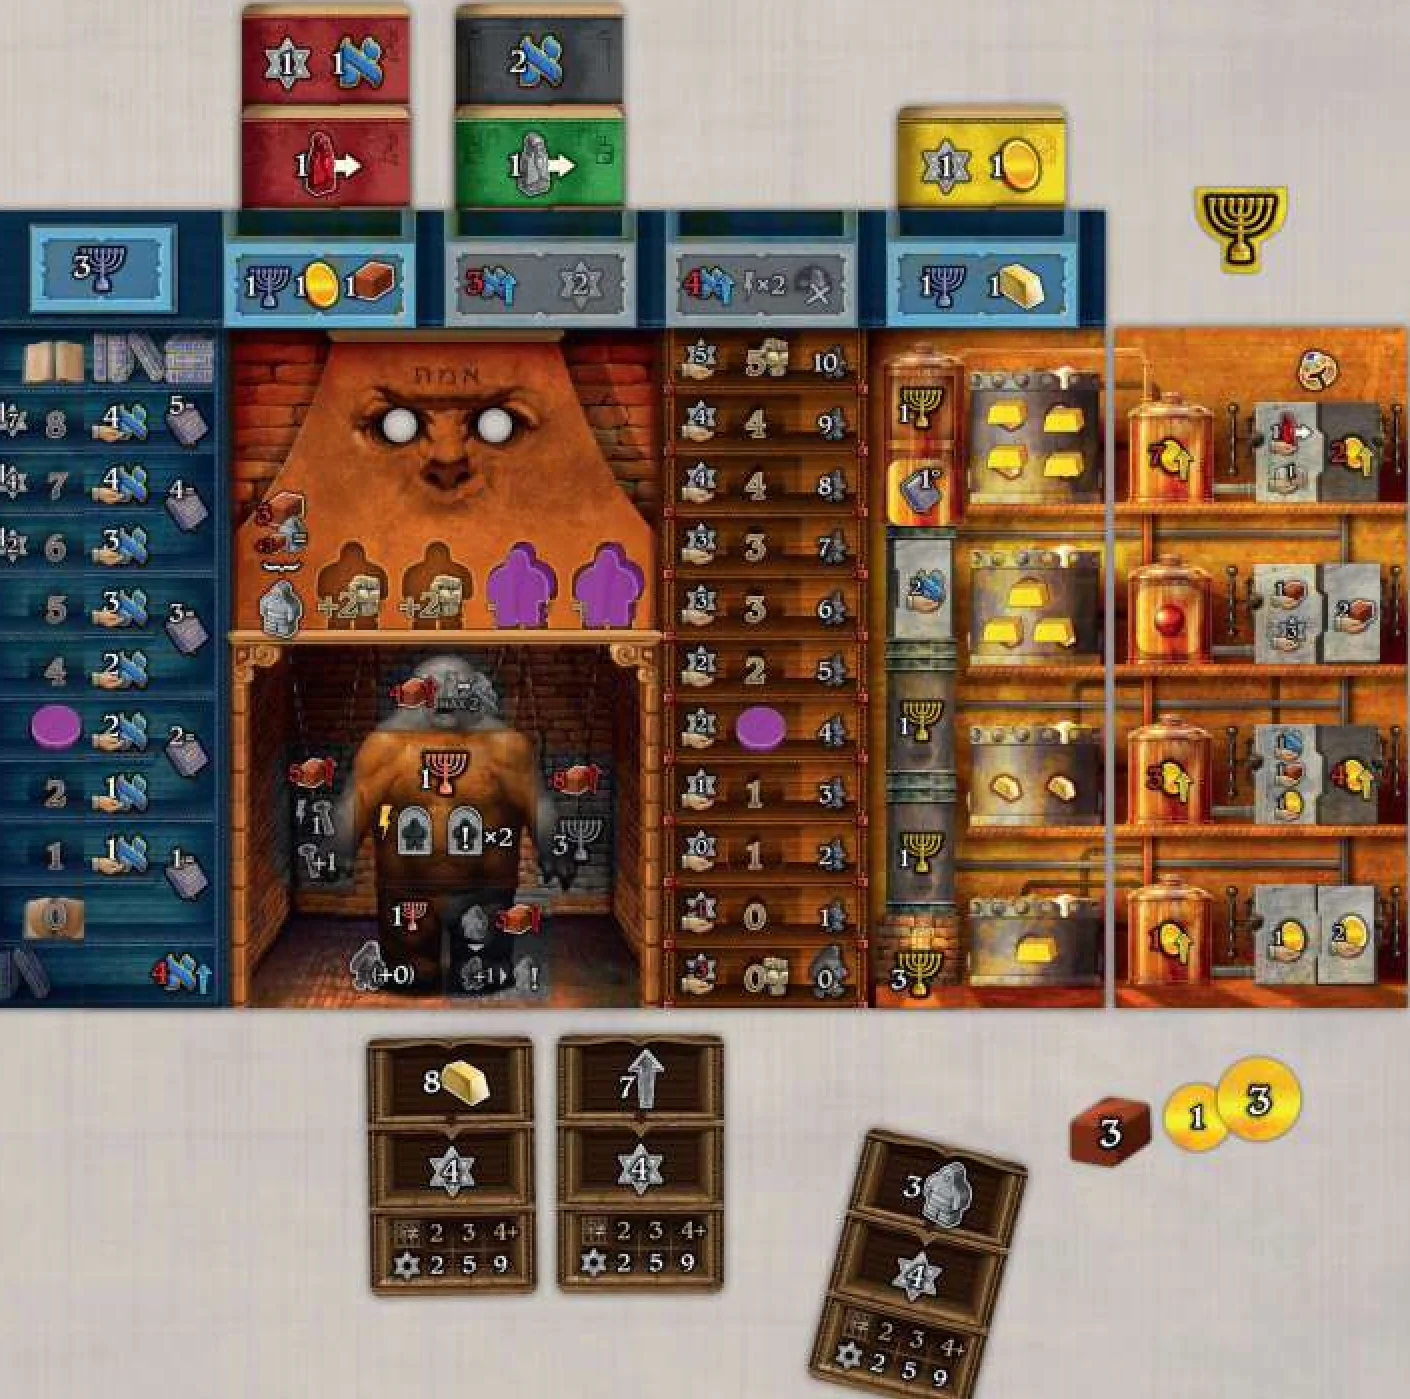
With this final situation, Sara will score:
- 4 VP for the Golem area (2 Golems built × 2 red Menorahs)
- 21 VP for the Artifact area (3 completed Artifacts × 7 yellow Menorahs)
- 15 VP for the Study area (3 columns with Books × 5 blue Menorahs)
- no VP from the Study track
- 1 VP for resources left
- 4 VP for the Objective card requiring 8 gold pieces, 4 VP for the card requiring 7 Developments, no VP for the card requiring 3 Golems
- 2 VP for completing two different types of Objective cards
All the bonuses in the game are optional: when you activate one, you can decide to take it partially or not take it at all. The only mandatory effects in the game are the Golem movements in Phase 2 and the Golem track movements when creating or killing a Golem.
Action Tiles
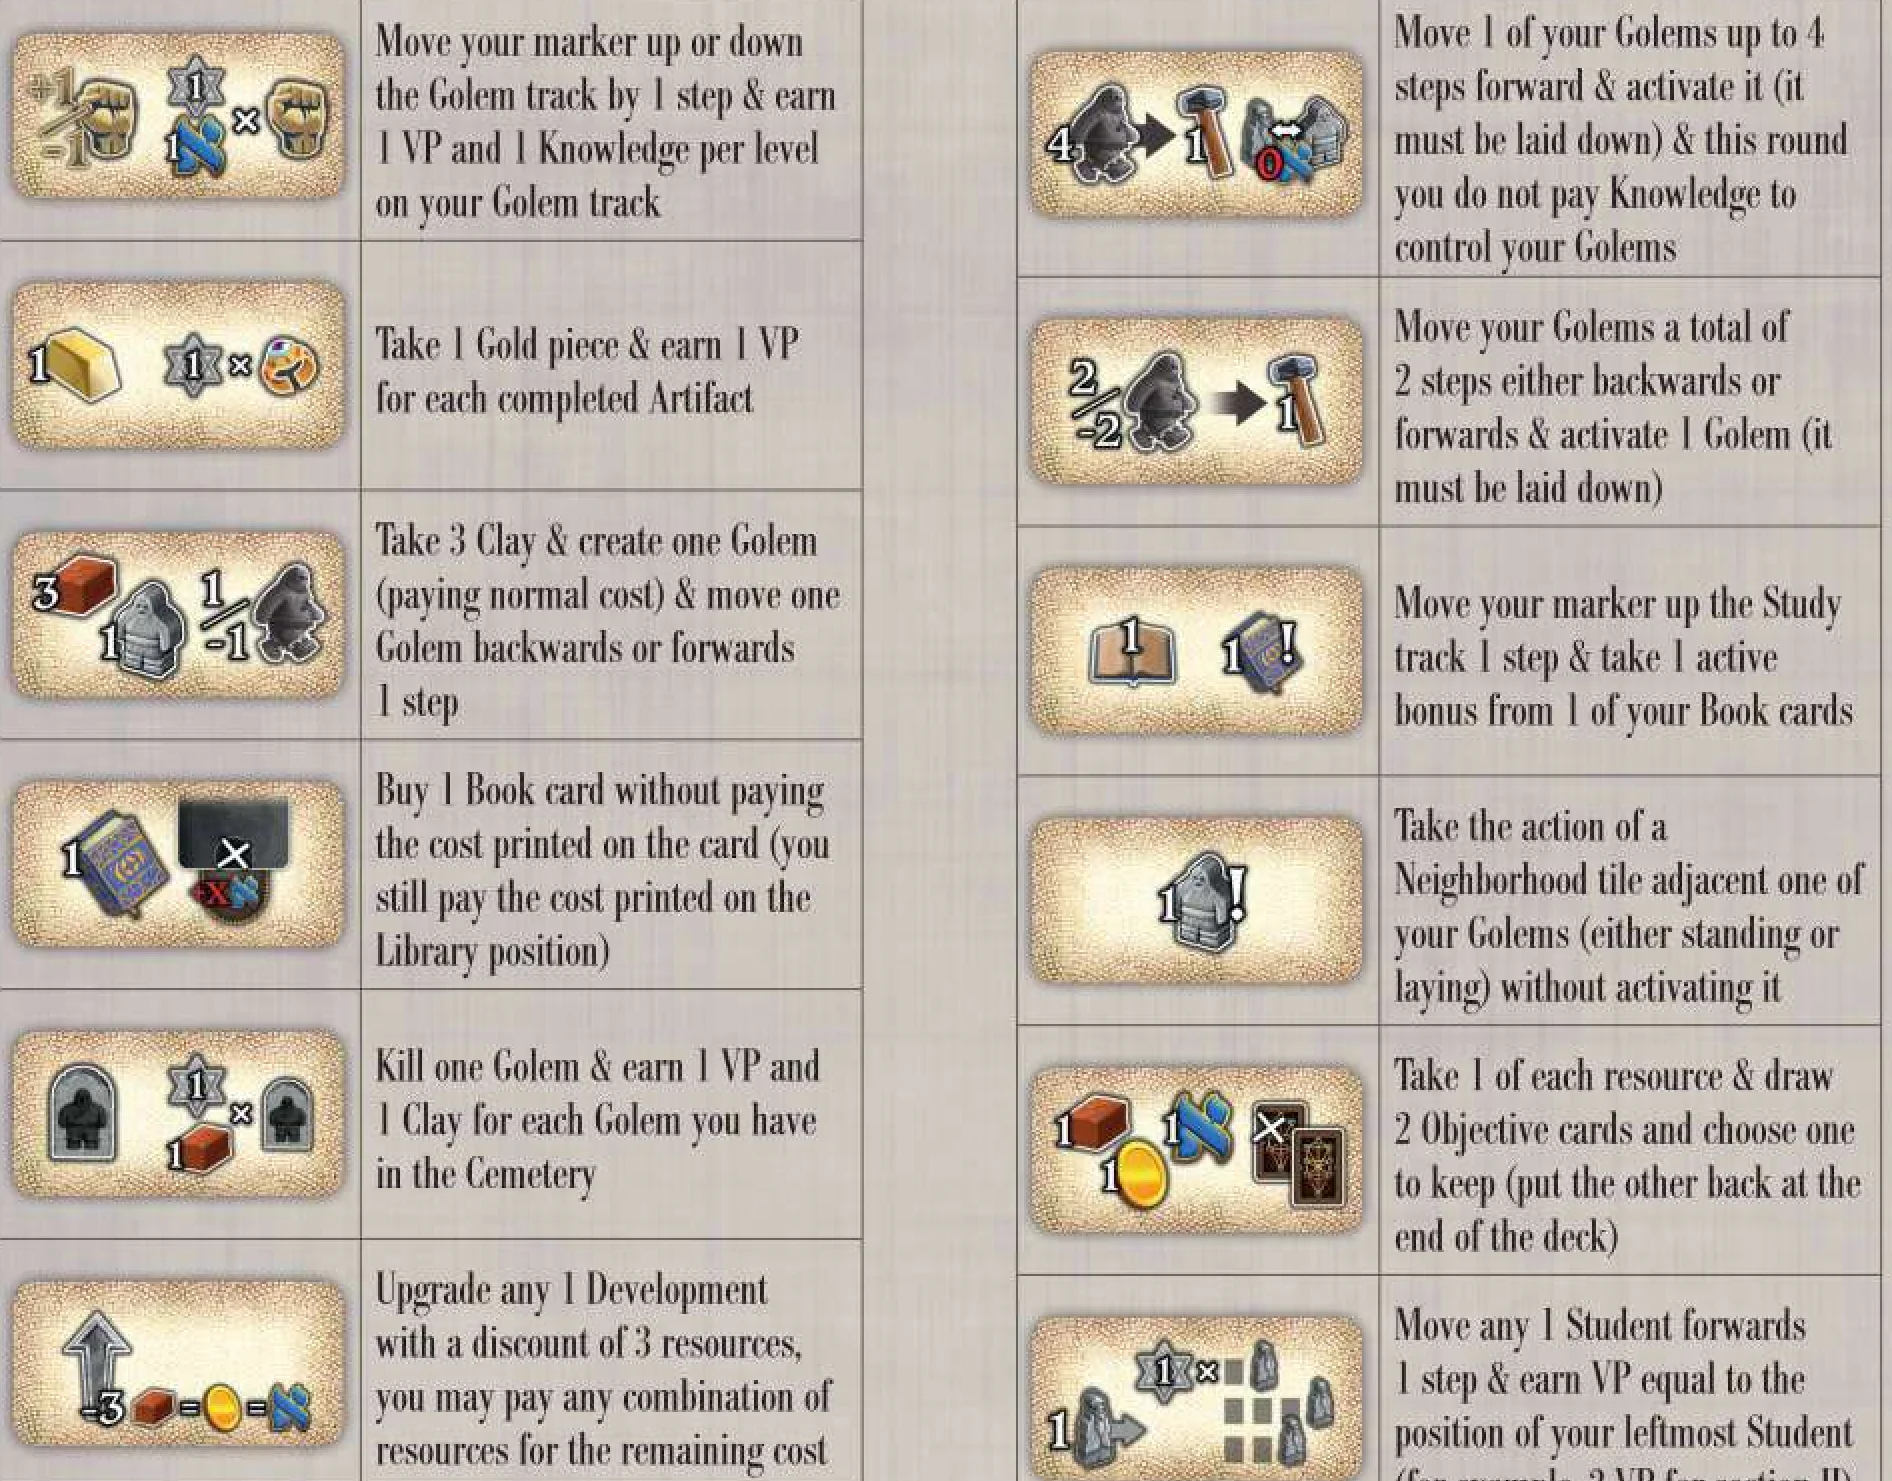
- Move your marker up or down the Golem track by 1 step & earn 1 VP and 1 Knowledge per level on your Golem track.
- Take 1 Gold piece & earn 1 VP for each completed Artifact.
- Take 3 Clay & create one Golem (paying normal cost) & move one Golem backwards or forwards 1 step.
- Buy 1 Book card without paying the cost printed on the card (you still pay the cost printed on the Library position).
- Kill one Golem & earn 1 VP and 1 Clay for each Golem you have in the Cemetery.
- Upgrade any 1 Development with a discount of 3 resources; you may pay any combination of resources for the remaining cost.
- Move 1 of your Golems up to 4 steps forward & activate it (it must be laid down) & this round you do not pay Knowledge to control your Golems.
- Move your Golems a total of 2 steps either backwards or forwards & activate 1 Golem (it must be laid down).
- Move your marker up the Study track 1 step & take 1 active bonus from 1 of your Book cards.
- Take the action of a Neighborhood tile adjacent one of your Golems (either standing or laying) without activating it.
- Take 1 of each resource & draw 2 Objective cards and choose one to keep (put the other back at the end of the deck).
- Move any 1 Student forwards 1 step & earn VP equal to the position of your leftmost Student (for example, 2 VP for section II).
Neighbourhood Tiles
Red District Neighbourhood Tiles
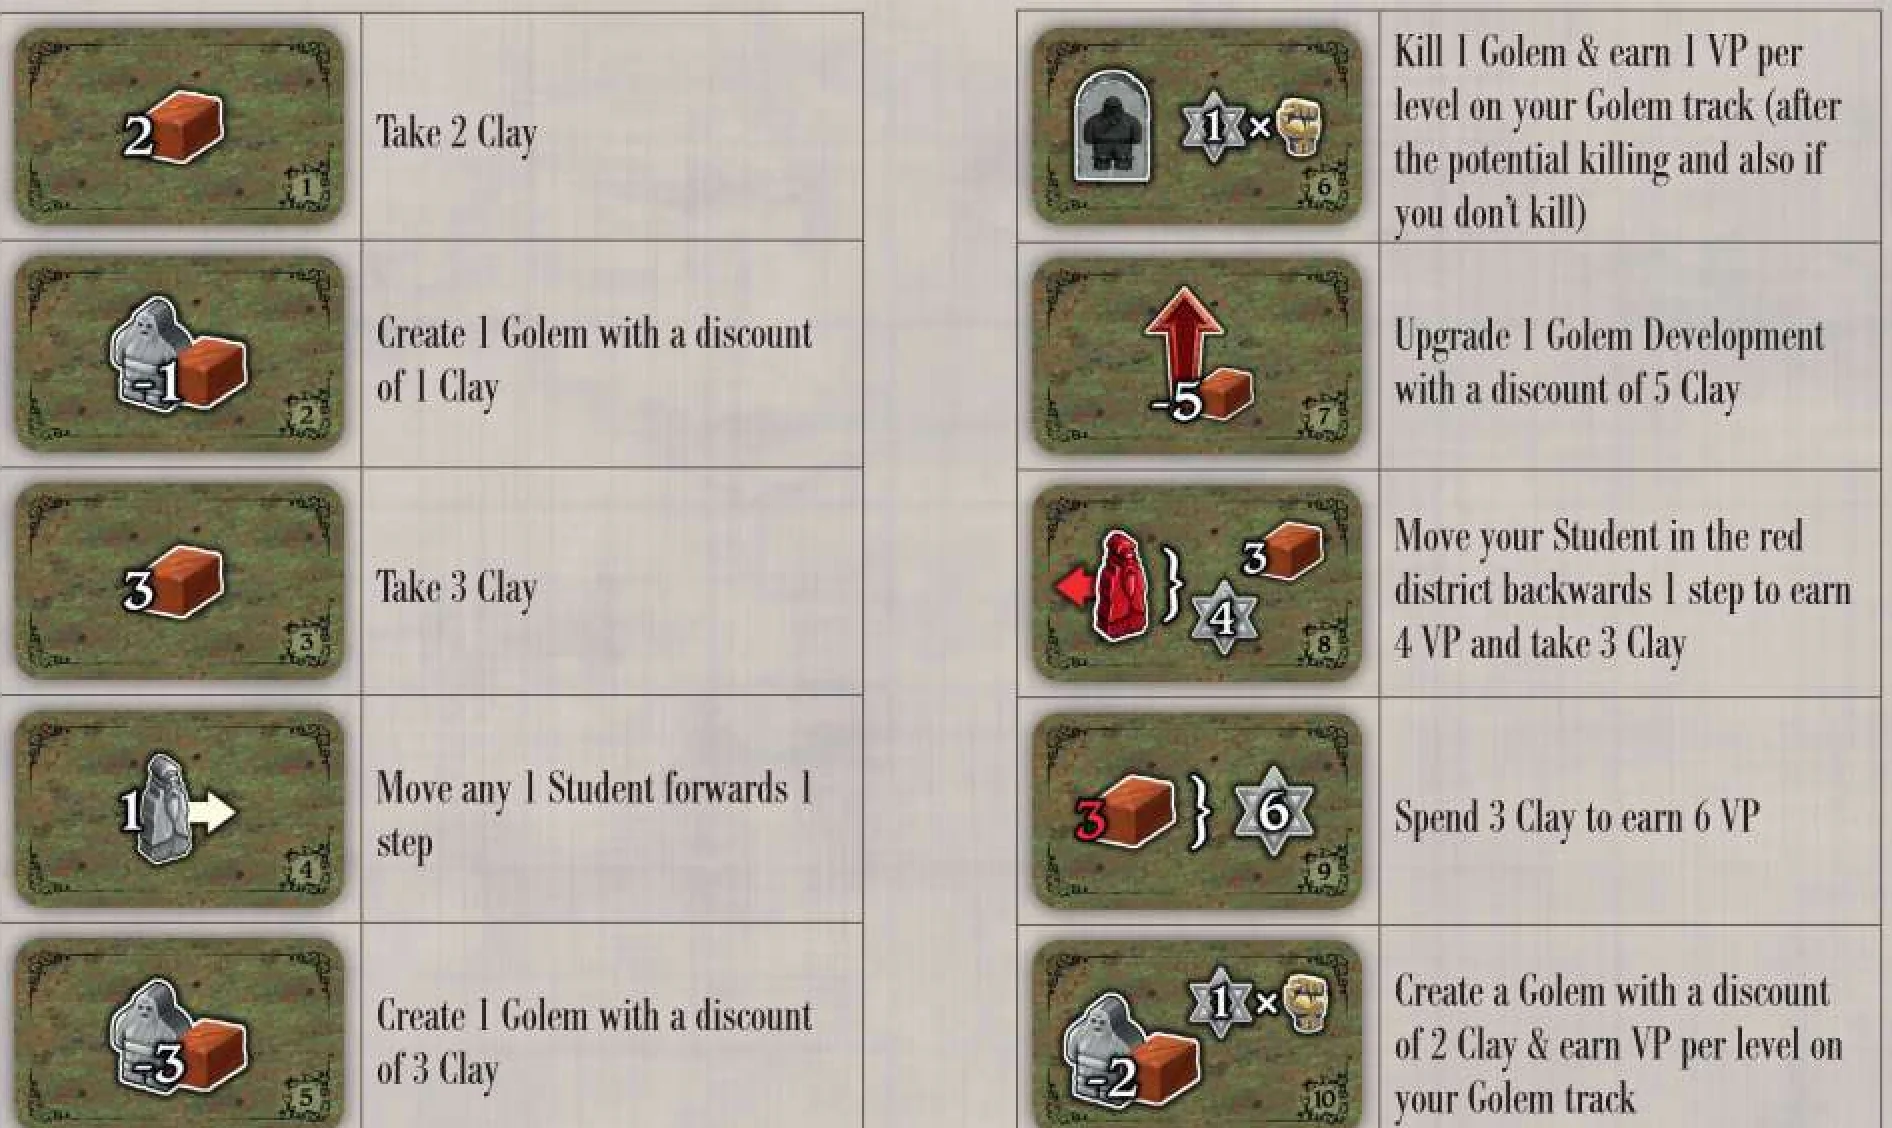
- Take 2 Clay.
- Create 1 Golem with a discount of 1 Clay.
- Take 3 Clay.
- Move any 1 Student forwards 1 step.
- Create 1 Golem with a discount of 3 Clay.
- Kill 1 Golem & earn 1 VP per level on your Golem track (after the potential killing and also if you don’t kill).
- Upgrade 1 Golem Development with a discount of 5 Clay.
- Move your Student in the red district backwards 1 step to earn 4 VP and take 3 Clay.
- Spend 3 Clay to earn 6 VP.
- Create a Golem with a discount of 2 Clay & earn VP per level on your Golem track.
Yellow District Neighbourhood Tiles
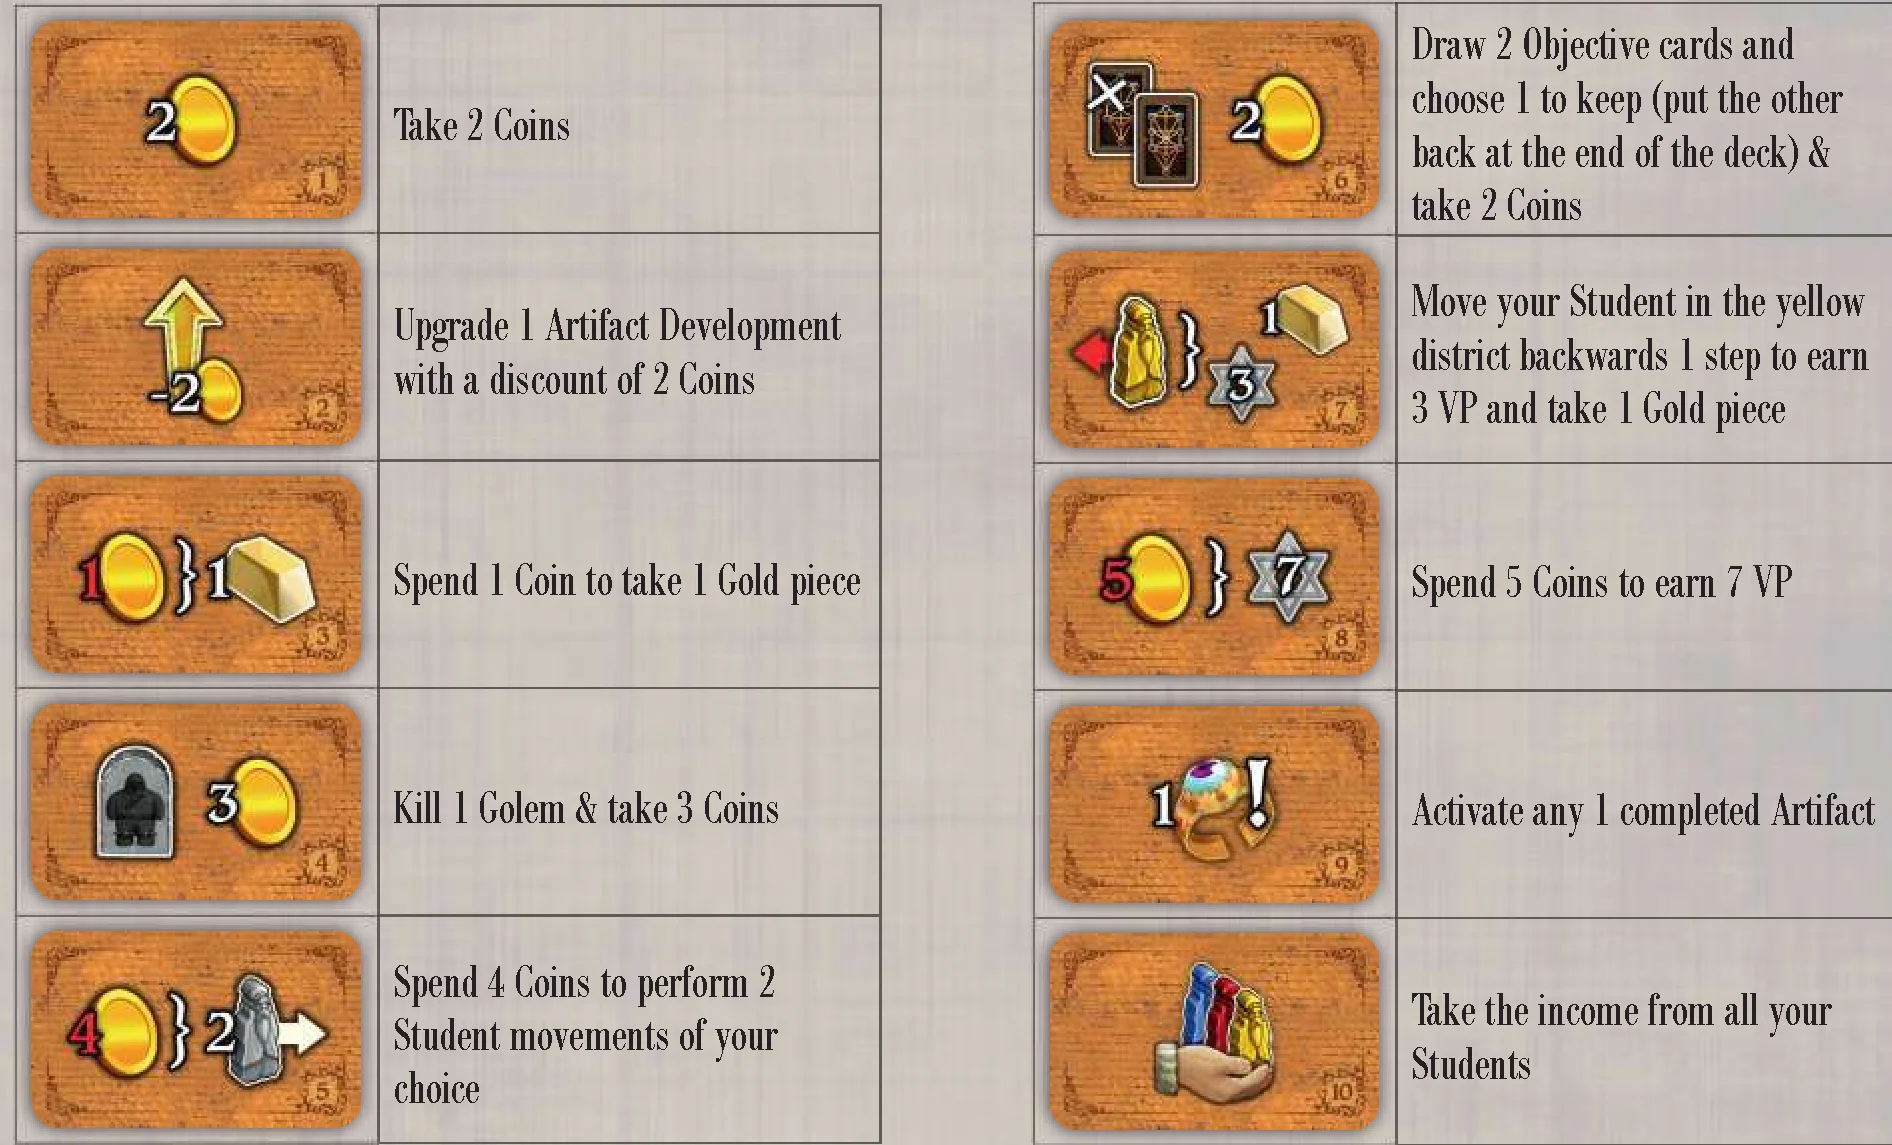
- Take 2 Coins.
- Upgrade 1 Artifact Development with a discount of 2 Coins.
- Spend 1 Coin to take 1 Gold piece.
- Kill 1 Golem & take 3 Coins.
- Spend 4 Coins to perform 2 Student movements of your choice.
- Draw 2 Objective cards and choose 1 to keep (put the other back at the end of the deck) & take 2 Coins.
- Move your Student in the yellow district backwards 1 step to earn 3 VP and take 1 Gold piece.
- Spend 5 Coins to earn 7 VP.
- Activate any 1 completed Artifact.
- Take the income from all your Students.
Blue District Neighbourhood Tiles
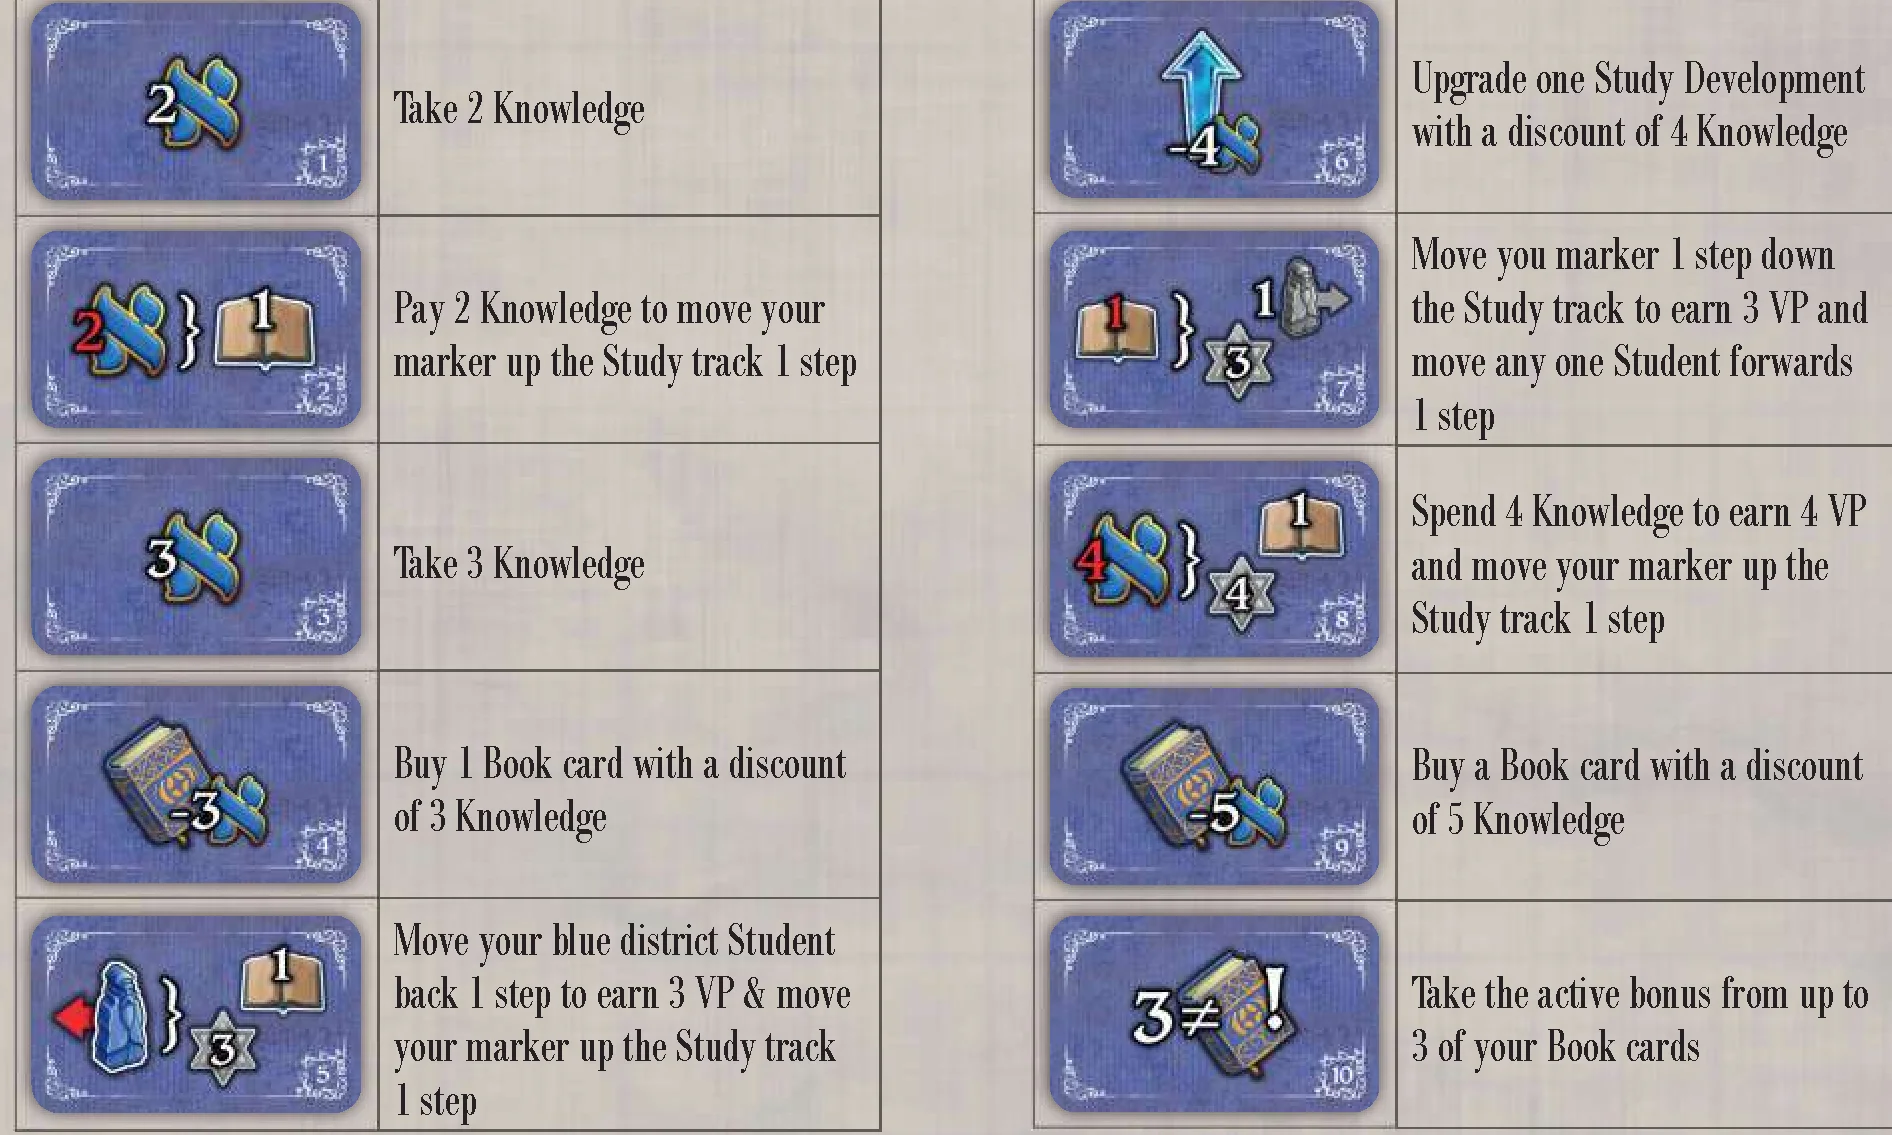
- Take 2 Knowledge.
- Pay 2 Knowledge to move your marker up the Study track 1 step.
- Take 3 Knowledge.
- Buy 1 Book card with a discount of 3 Knowledge.
- Move your blue district Student back 1 step to earn 3 VP & move your marker up the Study track 1 step.
- Upgrade one Study Development with a discount of 4 Knowledge.
- Move your marker 1 step down the Study track to earn 3 VP and move any one Student forwards 1 step.
- Spend 4 Knowledge to earn 4 VP and move your marker up the Study track 1 step.
- Buy a Book card with a discount of 5 Knowledge.
- Take the active bonus from up to 3 of your Book cards.
Characters Cards
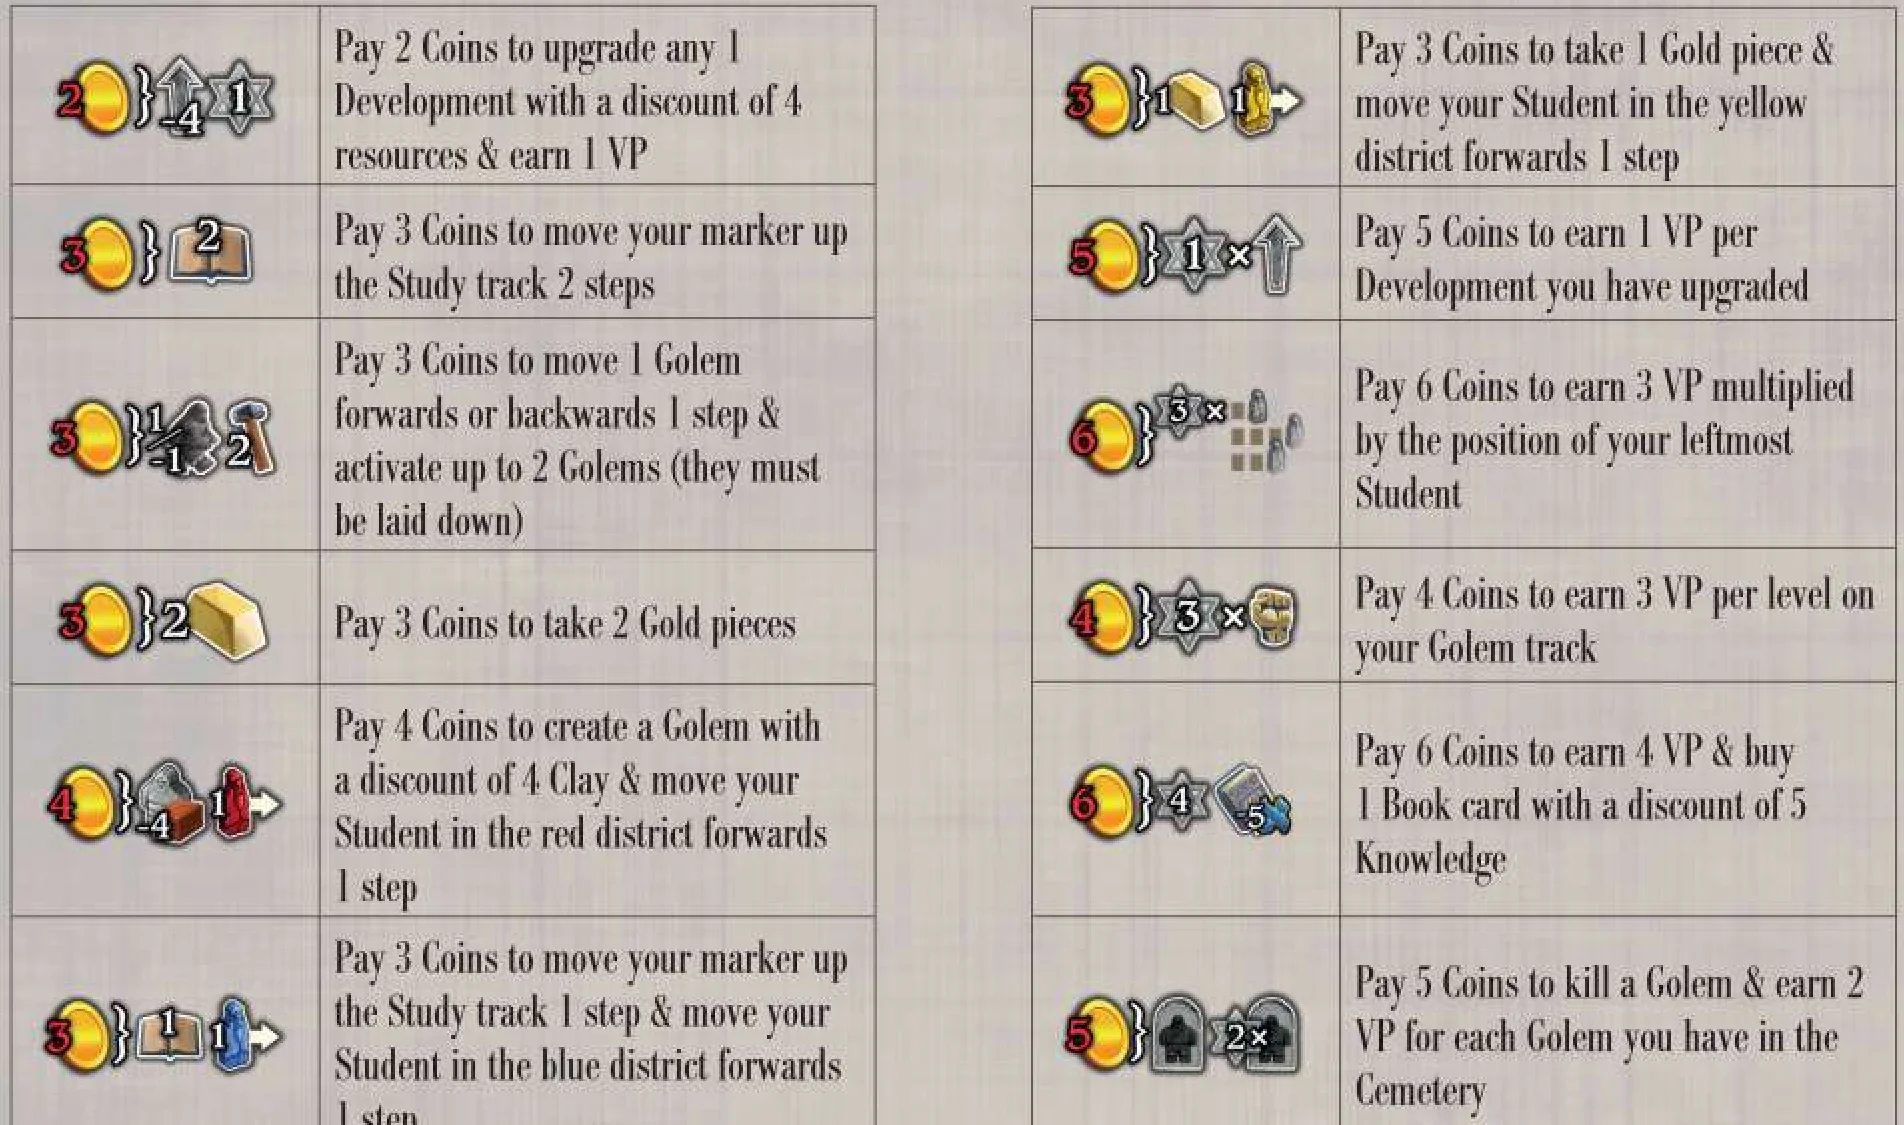
- Pay 2 Coins to upgrade any 1 Development with a discount of 4 resources & earn 1 VP.
- Pay 3 Coins to move your marker up the Study track 2 steps.
- Pay 3 Coins to move 1 Golem forwards or backwards 1 step & activate up to 2 Golems (they must be laid down).
- Pay 3 Coins to take 2 Gold pieces.
- Pay 4 Coins to create a Golem with a discount of 4 Clay & move your Student in the red district forwards 1 step.
- Pay 3 Coins to move your marker up the Study track 1 step & move your Student in the blue district forwards 1 step.
- Pay 3 Coins to take 1 Gold piece & move your Student in the yellow district forwards 1 step.
- Pay 5 Coins to earn 1 VP per Development you have upgraded.
- Pay 6 Coins to earn 3 VP multiplied by the position of your leftmost Student.
- Pay 4 Coins to earn 3 VP per level on your Golem track.
- Pay 6 Coins to earn 4 VP & buy 1 Book card with a discount of 5 Knowledge.
- Pay 5 Coins to kill a Golem & earn 2 VP for each Golem you have in the Cemetery.
Book Cards Iconography
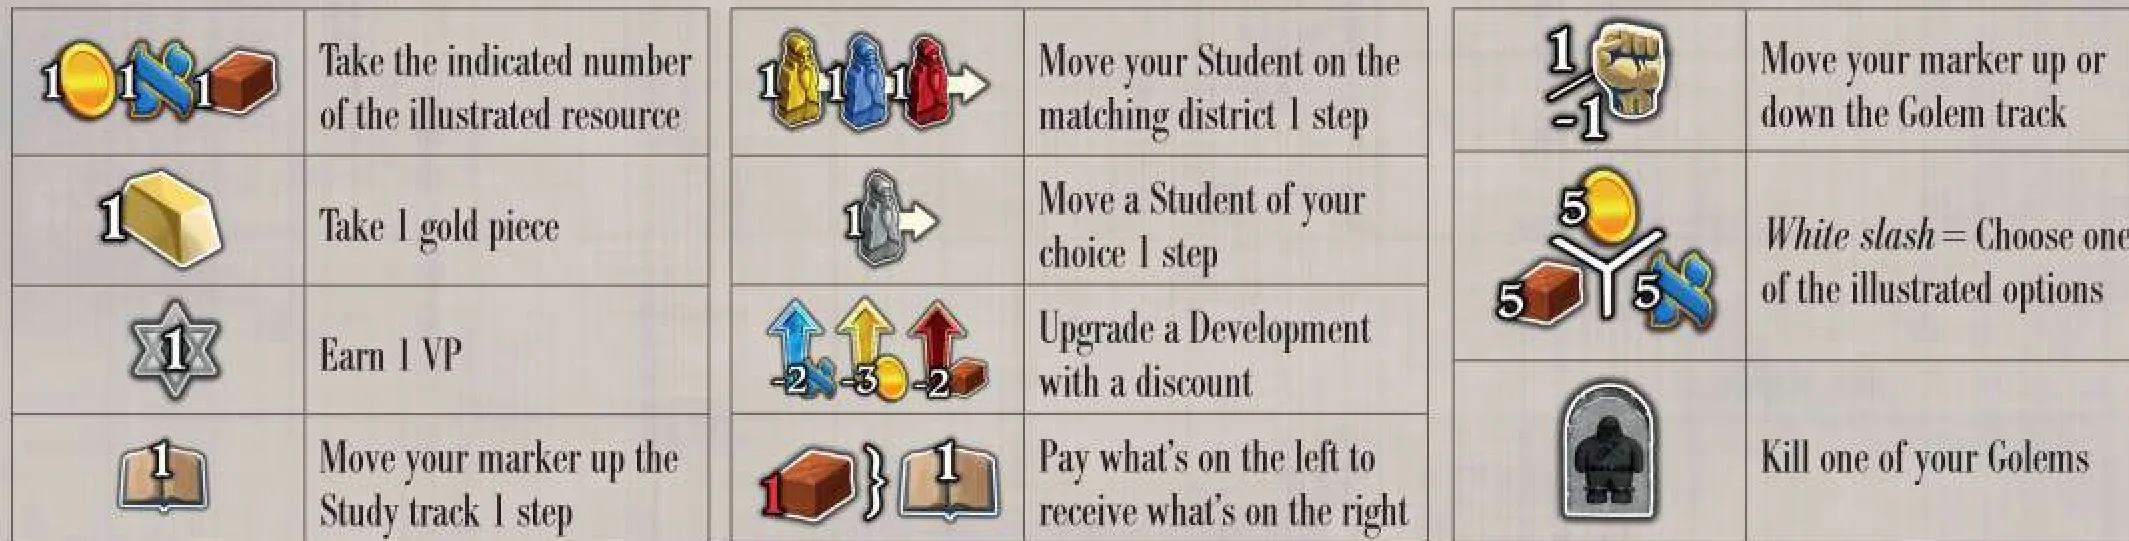
 Take the indicated number of the illustrated resource.
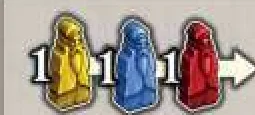 Move your Student on the matching district 1 step.
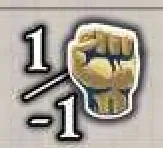 Move your marker up or down the Golem track.
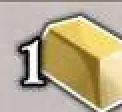 Take 1 Gold piece.
 Move a Student of your choice 1 step.
 White slash = Choose one of the illustrated options.
 Earn 1 VP.
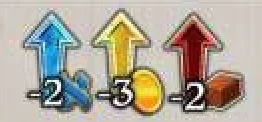 Upgrade a Development with a discount.
 Kill one of your Golems.
 Move your marker up the Study track 1 step.
 Pay what’s on the left to receive what’s on the right.
Objective Cards
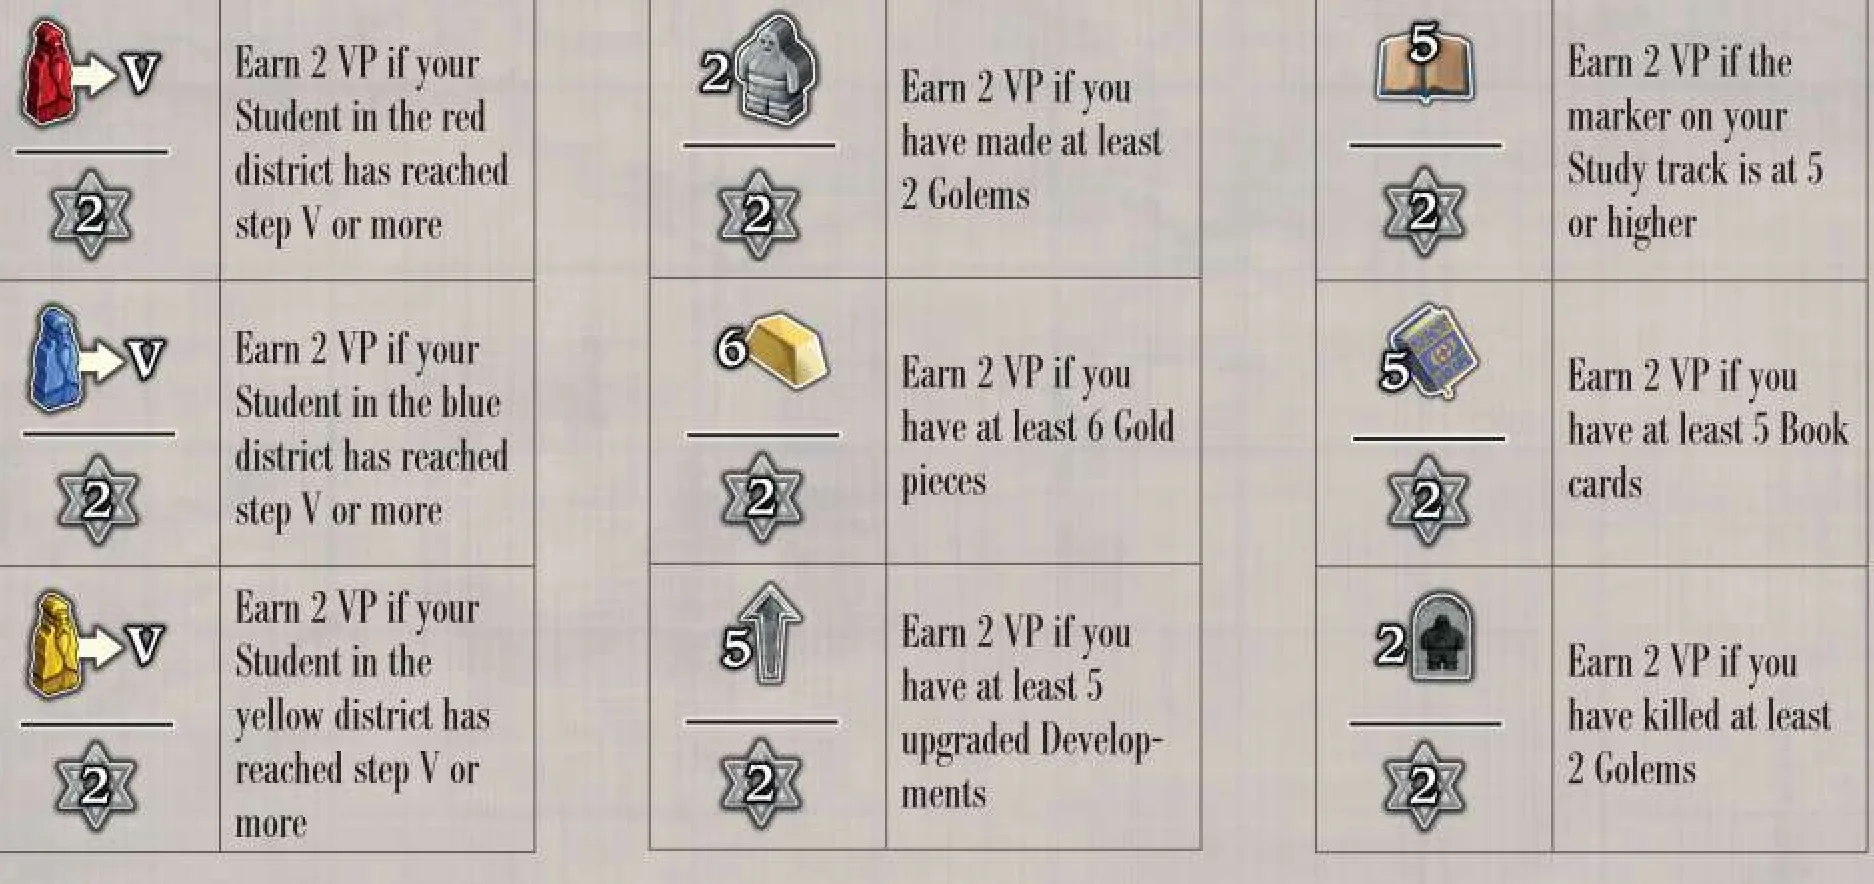
- Earn 2 VP if your Student in the red district has reached step V or more.
- Earn 2 VP if you have at least 2 Golems.
- Earn 2 VP if the marker on your Study track is at 5 or higher.
- Earn 2 VP if your Student in the blue district has reached step V or more.
- Earn 2 VP if you have at least 6 Gold pieces.
- Earn 2 VP if you have at least 5 Book cards.
- Earn 2 VP if your Student in the yellow district has reached step V or more.
- Earn 2 VP if you have at least 5 upgraded Developments.
- Earn 2 VP if you have killed at least 2 Golems.
Development Tiles
Study Development Tiles
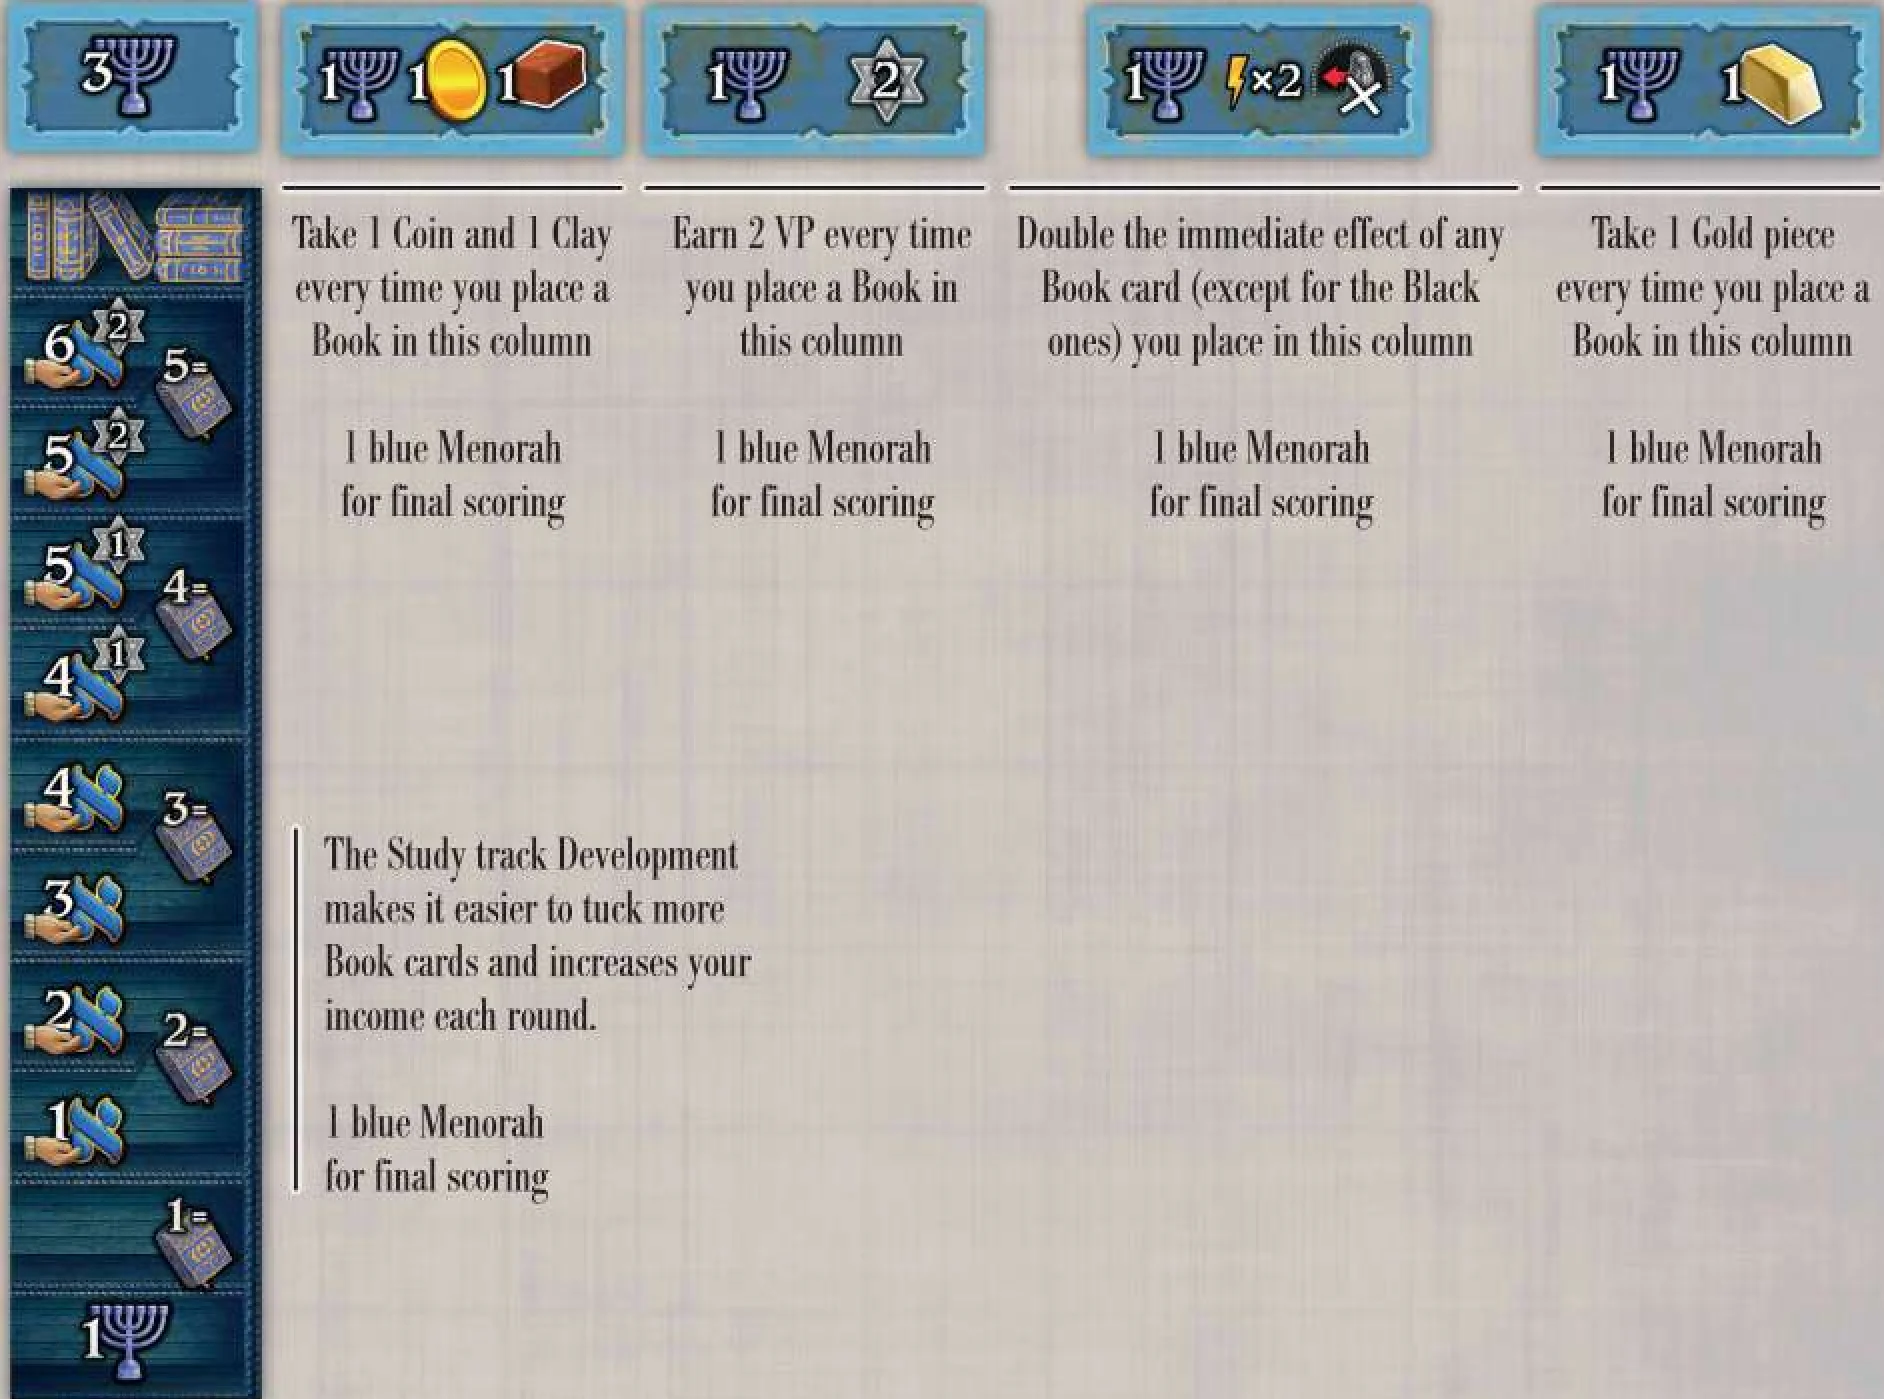
- 3 blue Menorahs for final scoring: Found on the track.
- Column 1: Take 1 Coin and 1 Clay every time you place a Book in this column. (1 blue Menorah for final scoring)
- Column 2: Earn 2 VP every time you place a Book in this column. (1 blue Menorah for final scoring)
- Column 3: Double the immediate effect of any Book card (except for the Black ones) you place in this column. (1 blue Menorah for final scoring)
- Column 4: Take 1 Gold piece every time you place a Book in this column. (1 blue Menorah for final scoring)
- Study Track Development: The Study track Development makes it easier to tuck more Book cards and increases your income each round. (1 blue Menorah for final scoring)
Golem Development Tiles
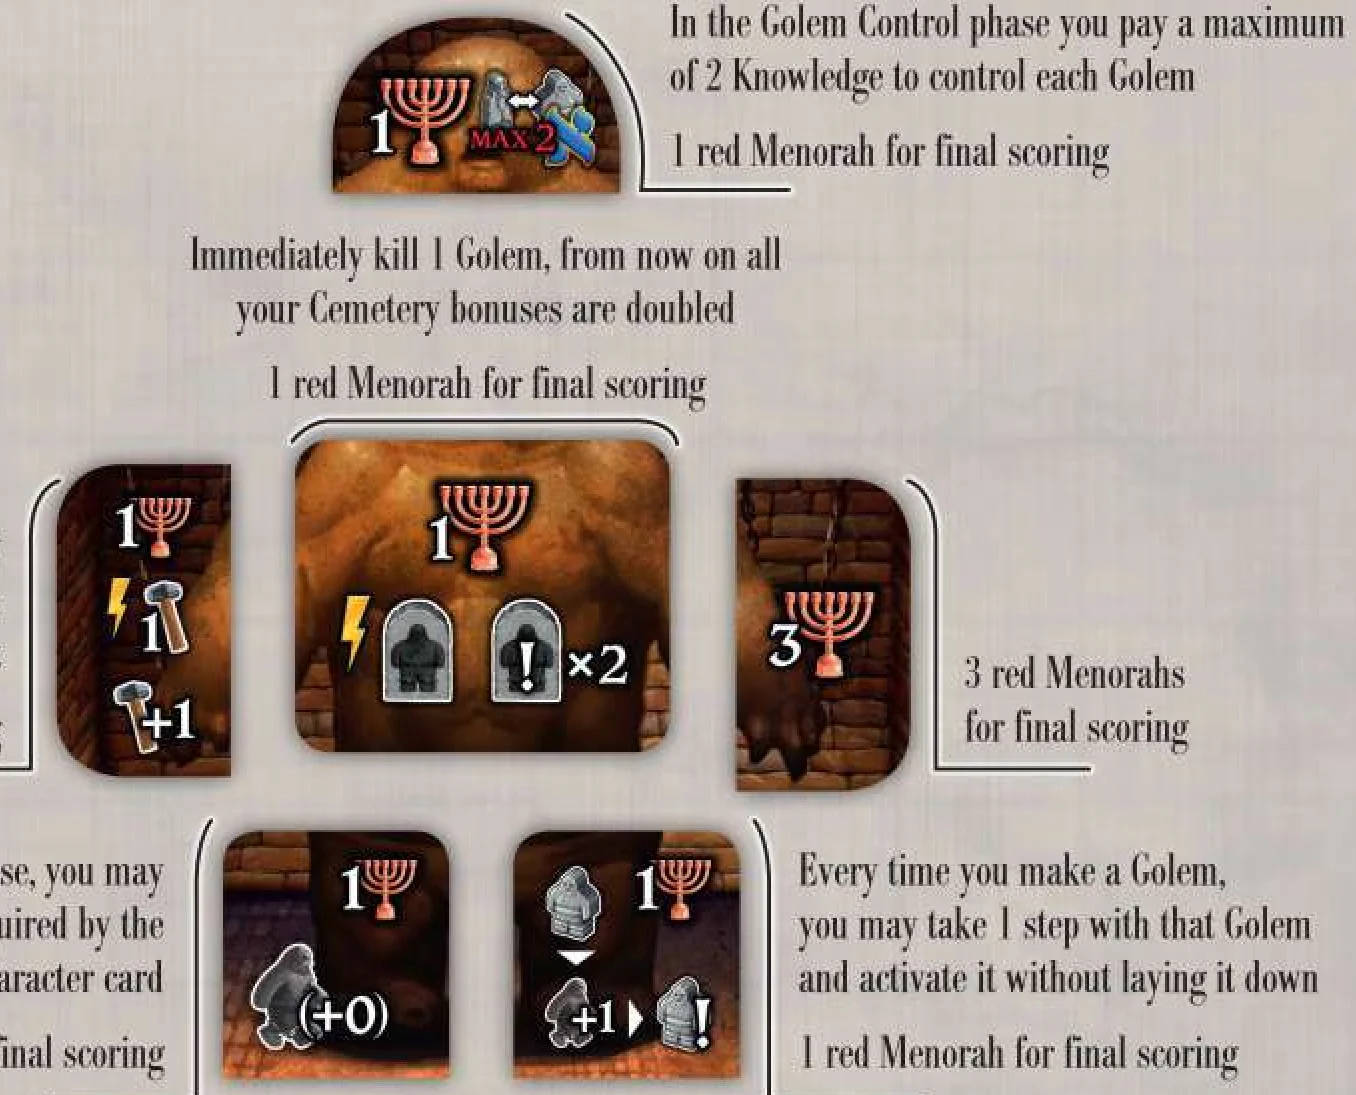
- Head: In the Golem Control phase you pay a maximum of 2 Knowledge to control each Golem. (1 red Menorah for final scoring)
- Torso: Immediately kill 1 Golem; from now on all your Cemetery bonuses are doubled. (1 red Menorah for final scoring)
- Right Arm: Immediately activate 1 Golem and every time you perform the Work action, you activate 1 additional Golem for no cost. (1 red Menorah for final scoring)
- Left Arm: 3 red Menorahs for final scoring.
- Right Leg: In the Golem Movement phase, you may ignore the extra steps required by the current round’s Character card. (1 red Menorah for final scoring)
- Left Leg: Every time you make a Golem, you may take 1 step with that Golem and activate it without laying it down. (1 red Menorah for final scoring)
Artifact Development Tiles
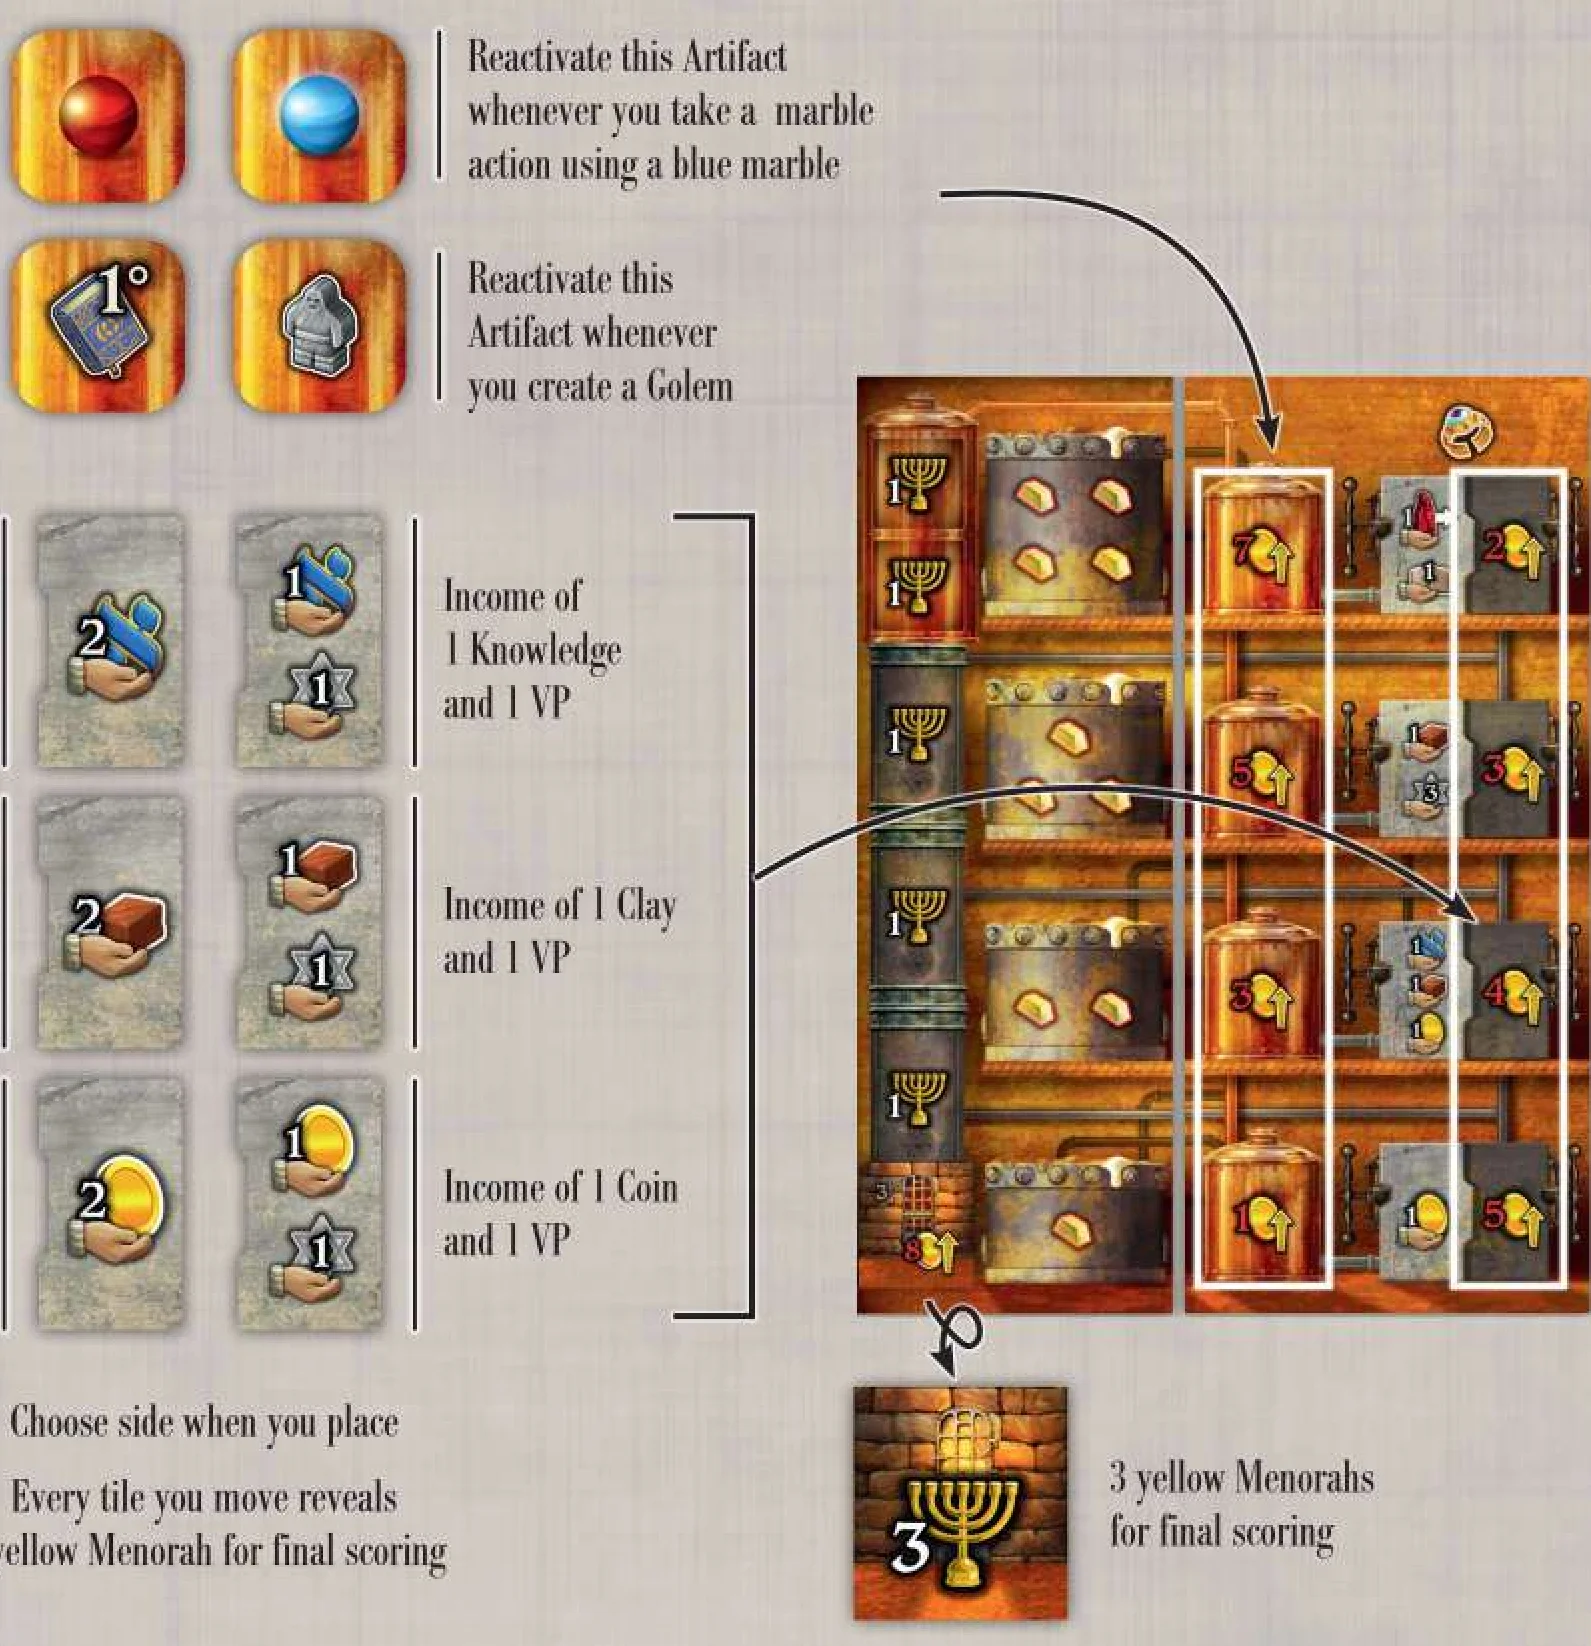
- Top row (Gold tiles):
- Reactivate this Artifact whenever you take a marble action using a red marble. / Reactivate this Artifact whenever you place the first Book card in a column.
- Reactivate this Artifact whenever you take a marble action using a blue marble. / Reactivate this Artifact whenever you create a Golem.
- Middle rows (Grey tiles): Choose side when you place:
- Income of 2 Knowledge OR Income of 1 Knowledge and 1 VP.
- Income of 2 Clay OR Income of 1 Clay and 1 VP.
- Income of 2 Coins OR Income of 1 Coin and 1 VP.
- Every tile you move reveals 1 yellow Menorah for final scoring.
- Bottom tile: 3 yellow Menorahs for final scoring.
The designers wish to thank all the testers who supported the long development of this project with their comments, ideas, advice and passion. In particular, they thank Samantha Milani, Antonio Tinto, Stefano Luperto, Sabrina Volpini, Davide Malvestuto, Francesca Giusti, Gaetano Cellizza, Luca Ercolini, Nestore Mangone, Ilaria Negri, Alessandro Negri, Enrico Risioluto, Franco Mari, Luigi Pccheschi (Shaka), Michele Morosini, Marco Piola Caselli, Ennio Pantani, Domenico Stellato, Fabrizio Neri, Matteo Le Foche, Ido Traini, Daniel Marinangeli, Simone Fini, Giacomo Censi, Claudio Ciccalè, Paolo Toffanello, Nadia Curi, Simone Scalabroni, Paolo Prioretti, Michele Rozzi, Daniele Tascini, Julie Carpinelli and Simone Colombo.
Special thanks to Tommaso Battista, Marco Pranzo, and Gabriele Ausiello who followed Golem with patience, skills, and friendship from its first, unsteady steps through Prague’s streets.
Last, immense gratitude goes to Mauro Gibertoni for his suggestions on the Automa, a subject in which he is a master.
The editor wishes to thank Klemens Franz for his endless efforts in refining this game’s overall look, while making it more functional.
Golem is inspired by a Jewish legend and, despite referring to some Jewish elements, it isn’t meant to represent this tradition we all respect deeply. Special thanks go to David Piazza from the Rabbinato Centrale di Milano, expert in Jewish history and culture, who supervised all the decisions regarding icons, names, and setting and gave his blessing to this project.
- Game Designers: Virginio Gigli, Flaminia Brasini, and Simone Luciani
- Illustrations: Ausonia and Roberto Grasso
- Rules: David Digby
- Graphics, layout, and rules typesetting: atelier198
- Editor: Giuliano Acquati
- Publisher: Cranio Creations Srl, Via Ettore Romagnoli 1, 20146 Milano – Italy
Introduction & Components
Prologue
It is Prague, 1584. In the dark attic of the Synagogue, Rabbi Loew walks nervously. Piles of books on a desk, gold melting in the cauldron, and a mass of clay shaped into human form. “Now the last step,” exclaims the Rabbi, “because only with a true word will you come to life!” As the word “Truth” is engraved on the clay giant’s forehead and the word “God” is put into its mouth, a great silence descends upon the room. The eyes open, illuminated by a sinister light, and stare at the Rabbi’s gaze, waiting for its first order.
The legend of the Golem is one of the most fascinating stories in the world and has its roots in the Jewish tradition. In Golem, this story inspires a strategic and complex game in which players take on the role of scholars focused on recreating the famous clay automas.
Use your knowledge (represented by the first letter of the Hebrew alphabet “Aleph”) to study traditional books, collect gold and melt it down to create powerful artifacts, bring tireless Golems to life and send them to the city to do important jobs. You will need to maintain control of your Golems by using your students and spending the knowledge you have gained. You can also choose to kill your Golems to avoid paying for their maintenance.
Components
- 1 Main board
- 1 Synagogue board
- 1 Synagogue structure (5 cardboard pieces and 1 plastic tray)
- 15 colored marbles:
- 3 yellow
- 3 red
- 3 blue
- 1 black
- 5 white
- 12 Action tiles
- 12 Character cards (7 for rounds I–III and 5 for round IV)
- 27 Objective cards
- 38 Book cards (8 in each of the 4 colors and 6 black)
- 30 Neighborhood tiles (10 for each district)
- 40 Gold pieces
- Clay tokens: 25× 1-clay, 5× 3-clay, 7× 5-clay
- Coin tokens: 25× 1-coin, 5× 3-coin, 7× 5-coin
- Knowledge tokens: 25× 1-knowledge, 5× 3-knowledge, 7× 5-knowledge
- 4 Pass tiles
- 18 Starting tiles
- 3 Menorah tokens (1 yellow, 1 red, 1 blue)
- For each player:
- 1 Rabbi
- 3 Students
- 4 Player markers
- 6 Golems
- 1 Player board
- 6 Artifact Development tiles
- 6 Golem Development tiles
- 6 Study Development tiles
- 4 Artifact tiles
- 1 Summary card
Assembling the Synagogue structure
Before your first game: fold the back piece and insert the three central pieces into the holes. Slide the front piece, clipping it into the hooks. You may leave the Synagogue built from one game to another, putting it back into the box carefully.
Setup
Game Setup
Golem is a complex game that has a lot of variable setup options. There is an introductory setup to help you learn the game; this setup is shown in special boxes, which replace the corresponding setup phase. Once you are familiar with the rules, you will be ready to set up the standard game (without referring to the introductory boxes).
- Place the main board in the center of the play area.
- Place the Synagogue board and structure next to the main board, within reach of all players. The tray of the Synagogue structure must line up with the actions on the Synagogue board as shown.
- Place the Pass tiles next to the Synagogue board.
Introductory 4
Find the Character cards 39, 43, 41, and 46 and place them from left to right into the Palace, face up.
- Character cards: Separate the Character cards into 2 decks, using the round number icons on the backside, to create a I-III and a IV deck. Shuffle each deck separately. Deal 1 Character card from the IV deck into the rightmost space of the Palace, face up. Deal 3 Character cards from the I-III deck into the other 3 spaces, face up.
- Book cards: Shuffle the Book cards to form a face-down deck and place the deck on the Library. Deal 5 cards, face up onto the display next to the deck.
Introductory 6
Separate the Neighborhood tiles by color. Find the following Neighbourhood tiles and place them left to right in each district:
- Red District: 1 2 4 5 7 8 9
- Yellow District: 1 3 4 5 6 7 10
- Blue District: 1 4 5 6 7 8 9
- Neighborhood tiles: Separate the Neighborhood tiles by color and shuffle each stack separately. Deal out 7 tiles of each type onto the Neighbourhood spaces in the matching district. Arrange the tiles into ascending numerical order, from left to right.
- Action tiles: Shuffle the Action tiles and place them in a face-down pile on the Synagogue board. Deal a number of Action tiles face up into the action spaces, from top to bottom, equal to the number of players, plus one. These will be the Action tiles for the first round. The bottom most action space of the Synagogue board shows an action which is always available; this space must never be covered by a tile.
- Objective cards: Shuffle the Objective cards to form a face-down deck and place it near the main board.
- Marbles: Gather the marbles (depending on the number of players as shown below) and place them into the Synagogue structure. Put all the marbles in at the same time to ensure they are distributed properly.
| Player count | White | Black | Red | Blue | Yellow |
|---|---|---|---|---|---|
| 1–2 | 3 | 1 | 2 | 2 | 2 |
| 3 | 5 | 1 | 2 | 2 | 2 |
| 4 | 4 | 1 | 3 | 3 | 3 |
- Menorah tokens: Place the matching colored Menorah tokens on each district, between spaces VII and VIII.
- Resources supply: Place the resources (Clay, Coin, and Knowledge tokens and Gold pieces), separated by type, next to the main board to form the general supply.
- Player board and components: Give each player a Player board and all the components of their chosen color.
- Place all your Development tiles onto your board in the marked spaces:
- Study Developments: 5 of the Study Developments are placed across the top of your board. Place each tile on its matching space, grey side up. The final Study Development forms part of your Study track and is placed so that the cost icon is showing face up.
- Golem Developments: Placed over the Golem image at the bottom of your board, grey side up.
- Artifact Developments: Placed on the right of your board. Place the two small gold tiles at the top, followed by the 3 grey tiles, with the larger tile at the bottom, with the cost icon face up.
- Place 4 Golems onto your board in the marked spaces, set aside the remaining 2; these will start on the main board, see below.
- Place a Student in the first space of each of the 3 streets on the main board.
- Player markers: Place a Player marker on space 0 of your Study track (blue), a Player marker on the 3rd space of your Golem Track (red), a Player marker on space 10 on the VP track on the main board, and a Player marker on the Turn Order track on the Synagogue board.
- Place your Rabbi and Summary card next to your Player board.
- Place all your Development tiles onto your board in the marked spaces:
- Turn order: Randomly determine the turn order; arrange your Player markers from top to bottom in this order on the Turn Order track.
- Deal 4 Starting tiles to each player.
- Objective cards draft: Deal 4 Objective cards to each player. Draft these cards, selecting one card and passing the remainder to your left, until each player has selected 4 cards. From the final 4 cards, choose 3 to keep and discard 1, returning it to the bottom of the deck.
Introductory 14 | 15 | 16
- First player: Starting tiles 1 & 2; Objective cards 8, 9, 3; Artifact tiles with starting side up.
- Second player: Starting tiles 3 & 4; Objective cards 11, 3, 5; Artifact tiles.
- Third player: Starting tiles 5 & 6; Objective cards 6, 2, 7; Artifact tiles.
- Fourth player: Starting tiles 7 & 8; Objective cards 8, 2, 10; Artifact tiles.
- Artifact tiles: Take a number of Artifact tiles equal to the number of players and place them on the table with a random side face up. In reverse turn order, choose an Artifact tile and place it on the right of your player board without changing the side.
Introductory 17
Each player takes the resources or benefits shown on both of their Starting tiles.
- First player (green): takes 3 Coins, 2 Clay, 1 Knowledge, moves their Student in the yellow district forwards 1 step and places 1 Gold on their 1-Gold Artifact, completing it and taking 1 more Knowledge.
- Second player (purple): takes 3 Clay, 2 Coins, 2 Knowledge, upgrades the left leg Golem Development and moves their Student in the red district forward 1 step.
- Third player (orange): takes 3 Clay, 2 Coins, 2 Knowledge, moves their marker up 1 step on the Study track and upgrades the left most column Study Development.
- Fourth player (grey): takes 3 Clay, 1 Coin, 2 Knowledge, places the 2-Coin income Artifact Development and 1 Gold on their 3-Gold Artifact.
- Choose two of the four Starting tiles and take all of the resources and benefits shown. Return all the Starting tiles to the box.
Introductory 18
- First player (green): places a Golem in the first block of the red and yellow districts.
- Second player (purple): places a Golem in the first block of the red and blue districts.
- Third player (orange): places a Golem in the first block of the yellow and blue districts.
- Fourth player (grey): places a Golem in the first block of the red and yellow districts.
- Starting Golems: In turn order, each player places their 2 Golems onto the leftmost blocks in any 2 districts of their choice. You can’t place your Golems in the same district.
Game Overview
Main Board Areas
The main board represents the city of Prague, divided into several areas:
- The Palace: There are 4 Characters placed here; the first face up card from the left is the active Character for each round of the game.
- The Library: Here you can buy Book cards to activate their effects and increase your collection.
- The 3 districts of Prague: The center of the board is divided into 3 districts. Each district is in turn divided horizontally into 10 sections numbered from I to X. Each section of each district features:
- a street (which is traveled by Students),
- a neighborhood (where Neighborhood tiles are placed), and
- a block (which is traveled by Golems).
- The Cemetery: Below the districts is the Cemetery, where you can bury your Golems.
- The Synagogue: Beside the main board is the Synagogue. You go to the Synagogue to take actions: 5 actions are powered by the colored marbles, while others are taken by the Rabbi when it’s placed on the Action tiles.
Player Boards
Each player has their own player board which represents their studio. Your player board is divided into 3 colored areas, each linked to a particular field of research:
- The blue area represents bibliographic research.
- The red area represents the study and creation of Golems.
- The yellow area represents the creation of powerful artifacts.
In each area Development tiles represent particular abilities that you can activate and allow you to collect Menorah symbols which are fundamental for the final scoring. You have 2 tracks: the Study track and the Golem track. Your books are stored in columns above your board and your unique artifacts are found on the tile to the right.
During the game you will build Golems that move through the city’s blocks performing actions, study ancient books to gain their bonuses, and buy gold to create powerful artifacts. Throughout the game you will try to collect Menorahs to multiply your end game score. After 4 rounds, the player who has accumulated the most Victory Points (VP) will be declared the winner.
Earning Victory Points
There are several ways to earn Victory Points (VP) during the game (for each VP you earn, move your marker on the VP track 1 step forward):
- Making the Golems work in specific neighborhoods
- Performing specific actions with the Rabbi
- Buying specific Book cards
- Completing specific Artifacts
- Paying specific Characters
- Through the income of your Students and on your Player board
- Burying your Golems in specific spaces
At the end of the game, players will earn additional VP for:
- Multiplying the number of Golems created by the number of red Menorahs accumulated
- Multiplying the number of Artifacts completed by the number of yellow Menorahs accumulated
- Multiplying the number of columns of Books by the number of blue Menorahs accumulated
- Reaching the last spaces of the Study track
- Meeting the demands of your Objective cards
- Leftover resources
Rounds & Movement (Phases 1–2)
Round Structure
Each game is divided into 4 rounds, in each of which there is an active Character card in the Palace. Each round is divided into 7 phases, to be played in order:
- Refresh
- Golem Movement
- Actions
- Turn Order
- Influence Characters
- Income and Development
- Golem Control
Phase 1: Refresh
Skip this phase in the first round. Complete the following steps:
- Gather all of the marbles and place them back into the Synagogue structure. Put all the marbles in at the same time to ensure they are distributed properly.
- Discard the Action tiles used in the previous round, placing them to one side. Deal a number of new Action tiles onto the Synagogue board equal to the number of players plus one. If the Action tiles run out, shuffle all of the used tiles to form a new face-down pile and continue to deal tiles as needed.
- Remove the leftmost Book card from the Library and put it back at the end of the deck. Shift all the remaining cards to the left and deal a new card, face up, into the rightmost space.
Phase 2: Golem Movement
In turn order, starting with the player on the top space of the turn order track, proceeding downwards, each player must move their Golems forward.
Sum up the Golem steps gained from your Golem Track level and the steps indicated on the active Character card for the current round (i.e. the first face up card from the left).
You may distribute these steps however you wish between all your Golems, you must use all the steps.
If a Golem was lying down, stand it up whenever it moves. Standing a Golem up is not considered to be a movement but a result of movement taking place.
Example: David’s (green) Golem track shows 2 steps and the Character card adds another 2. He chooses to move 1 Golem 1 space forward and another 3 spaces forwards.
Reaching Sections VIII, IX, and X
If a Golem reaches the last sections of a block (VIII, IX, and X), you must pay a cost of either VP or Knowledge to advance onto each of these sections (as indicated on the board).
Example: David (green) moves this Golem onto the final space of the yellow District. He may choose to pay either 5 Knowledge or 5 VP.
If one of your Golems reaches section X (or one of your Golems is already on section X from a previous turn) and you are required to move your Golems, you must first distribute the steps between the Golems that are not in the final section.
If all your Golems have reached section X and you have any movement remaining, for each movement that you cannot use, you lose 5 VP up to a maximum of 5 VP per Golem.
Phase 3: Actions
Action Selection
In turn order, each player takes an action, until all players have taken 3 actions.
You may take an action in one of two ways:
- Selecting a marble from the Synagogue to perform a Marble action
- Placing your Rabbi on an Action tile to perform a Rabbi action
Each round you must take 2 Marble actions and 1 Rabbi action. You may decide the order of your actions in any combination. You may also pass.
Select Marble Action
Each line of marbles is connected to one of the actions listed below. The number of marbles in each line, at the moment you select one, represents the value of that action.
Complete the following steps in order:
- Select any one marble from the Synagogue and place it on your board (inside one eye).
- Student movement:
- If you select a yellow/red/blue marble, move your Student in the matching district 1 step forwards.
- If you select a white marble, don’t move any Students.
- If you select a black marble, move two different Students of your choice, 1 step each.
- Perform the corresponding action at the current value. The current value is equal to the number of marbles present before you selected.
Example: If you take a marble from this line, the corresponding Golem action will have a value of 2.
Students
Your Students have 2 primary uses:
- The position of each Student in the Income phase may earn you a range of resources or VP;
- The relative position of your Students to your Golems determines how much Knowledge you need to spend to control them.
In addition, if any of your Students are the first to reach the VIII space of a street, you take the Menorah token from the district and place it next to your player board for end game scoring.
Note: The icons of the game refer to the color of the district, not to the color of the piece.
Example: Sara (purple) selects the black marble and therefore moves 2 Students forward. In the red district the Student moves to space VIII so Sara claims the red Menorah.
The Marble Actions
Work Action
You may activate up to 4 of your Golems already on the board. The Golems must be standing.
Pay 1 / 3 / 5 / 8 Knowledge to activate 1 / 2 / 3 / 4 Golems. You receive a discount equal to the action value.
When you activate a Golem, lay it down and activate the effect of the adjacent Neighborhood tile.
You may decide the order in which you activate your Golems. Complete the effects of each Neighborhood tile before activating the next one.
Note: You can’t activate a Golem you’ve just created during the Work action.
Example: Simon (orange) has a Work action with value 3. He chooses to activate 3 Golems, paying 2 Knowledge (5 with a discount of 3). He takes the actions shown on all 3 Neighborhood tiles and lays those Golems down, in any order.
Golem Action
- Take a number of Clay equal to the action value.
- You may spend Clay to upgrade one of your Golem Developments on your board. Each Development has a different cost, shown on the tile.
- You may spend 3 Clay to create one Golem. When you create a Golem, place it on the first space of a district. If you already have other Golems in the same district, you must pay 3 additional Clay for each Golem already present. Move your marker up 2 steps on your Golem track as shown on the space revealed by creating the Golem.
You may decide the order of any upgrade and create actions taken.
Example: Julia (grey) has a Golem action with value 4. She takes 4 Clay. She pays 3 Clay to upgrade the torso Golem Development and then another 3 Clay to place a Golem in the Yellow district. Had she placed the Golem in either of the other district she would need to pay 6 Clay instead. She moves her marker 2 steps up her Golem track.
Killing a Golem
During the game, you may take an action that allows you to kill one of your Golems. This not only gets you an instant bonus but may also save you Knowledge in the Golem Control phase.
When you kill a Golem, move it from a neighborhood to any unoccupied cemetery space. Immediately move your marker 1 step down on your Golem track and receive the bonus indicated on your chosen cemetery space. Certain spaces may not be available depending on your player count. The rightmost cemetery space is considered unlimited but gives no bonus.
Artifacts & Artifacts Action
Over the course of the game you may complete up to 4 Artifacts. The right hand side of your player board shows 4 cauldrons in which you must place the Gold pieces you collect. When each of the icons in a cauldron are covered with a Gold piece, you have completed that Artifact. You immediately receive all the benefits shown on the matching section of your Artifact tile. You will receive these benefits again during each Income phase.
Your Artifacts may be upgraded using the Artifacts marble action or other game effects. When you upgrade an Artifact, take one of the Artifact Development tiles from your player board and place it on the corresponding space on your Artifact tile. Only the lowest Development tile shows a cost; when you upgrade this Development pay 8 Coins and flip the tile to show 3 yellow Menorahs. The remaining Development tiles are double-sided; you may choose which side to have face up when you upgrade them. They cost Coins based on which space you choose to place them; pay the number of Coins shown on the space. Whenever you upgrade one of these, you will reveal a yellow Menorah shown below.
The two gold-colored Development tiles are used to activate an Artifact based on the shown condition, as well as in the Income phase. The three grey Development tiles are used to increase the Artifact’s effect. When that Artifact is activated, you will now earn the additional benefit shown.
Performing the Artifacts Action
- Take a number of Coins equal to the action value.
- You may spend Coins to upgrade one of your Artifact Developments on your board. Each Development has a different cost, shown on the space you place it on.
- You may spend 3 Coins to buy one Gold piece. Place it on a Gold space on your board.
You may decide the order of any upgrade and buy actions taken.
Example: Julia has an Artifact action with value 2. She takes 2 Coins. She pays 2 Coins to upgrade the Development on the top row of the Artifacts and 3 Coins to buy a Gold piece and place it on the same Artifact. The Artifact is now complete: she immediately receives 1 step on the Study track, 3 VP and 2 Clay.
Books & Study Action
Each Book card shows an immediate bonus on the lower half, an active bonus on the upper half, and a cost at the bottom. Each card is also one of 5 colors: red, blue, green, yellow, or black. The colored Book cards cost Knowledge and the black Book cards are paid for by moving a Student of your choice 1 step back. When you buy a Book you must tuck the card into one of the columns above your player board.
Each column may only contain cards of the same color and no two columns may contain cards of the same color. You are limited to the number of cards you can have in each column (max 5) by the icon corresponding to the position of the marker in your Study track. Black Books may count as a Book of any one color. When you place a Book in a column you receive the immediate bonus first, then you receive all the active bonuses in that column, from bottom to top. Start with the bonus from the Development tile, if it’s active, then the active bonus from other Book cards, then the active bonus of the Book just placed.
You may only buy a Book if you can legally tuck it into at least one of your columns.
Performing the Study Action
- Take a number of Knowledge equal to the action value.
- You may spend Knowledge to upgrade one of your Study Developments on your board. Each Development has a different cost, shown on the tile.
- You may spend Knowledge to buy one Book card from the main board. The cost of the Book card is the sum of the cost depicted at the bottom of the card and the cost shown on the board below the card’s position.
Move all the remaining cards to the left and deal a new card from the deck into the rightmost position.
You may decide the order of any upgrade and buy actions taken.
Example: Sara has a Study action with a value of 2. She takes 2 Knowledge. She chooses to upgrade the 2nd column, spending 3 Knowledge. She chooses to buy the leftmost Book card, paying 1 Knowledge and she places it in the 2nd column. She gains 1 Knowledge, then she gains 2 VP and spends 1 Knowledge to move up the Study track.
Mirror Action
Pay 1 Coin to perform any of the other marble actions with the value of this Mirror action.
You may also pay 3 Coins to move your marker up the Study track by one space.
Rabbi Action
Each round you must place your Rabbi on 1 Action tile to carry out the action shown on the tile. Each tile may only have one Rabbi placed on it, except for the lowest space (which is permanently printed on the board), which may hold any number of Rabbis.
The order of your Rabbis on the tiles will also determine turn order for the next round, from top to bottom. If more than one player places their Rabbi on the lowest action space, they place their Rabbi to the right of any already placed there.
The Action tiles will change each round.
Example: David (green) has placed his Rabbi on the top-most Action tile. Simon (orange) has placed his Rabbi on the third Action tile. Sara (purple) and Julia (grey) both placed their Rabbi on the last Action, but Julia has placed it after Sara.
Passing
When it’s your turn, you may choose to pass instead of performing an action. Players usually decide to pass when they need to perform an action that has no marbles on it.
- Take the lowest numbered Pass tile available.
- After all other players have performed their 3 actions or have passed, the Passing phase begins. In this phase, players who passed must perform their remaining actions.
- If you have the number 1 Pass tile, remove 1 marble of your choice from the marbles remaining in the Synagogue and place it on the Pass tile.
- The player in charge of putting the marbles back into the Synagogue will be either one of the players who did not pass, or the player with the highest Pass tile, in case all players passed.
- Players will play as many turns as they need to complete all their remaining actions following the Pass tile order.
- Players may pass a second time when it’s their turn.
- Should any player pass for the second time, it will be necessary to start another (and final) Passing phase. The player with the number 1 Pass tile will remove another marble and the remaining marbles must be put back into the Synagogue.
- At the end of the Passing phase, put all the Pass tiles back near the Synagogue board.
Example: Sara and David choose to pass during the round, while both of them have a remaining marble action to be performed each. Once all other players have taken their actions, the Passing phase begins. Sara chooses to remove 1 white marble, placing it on the ‘1’ tile. Julia collects all the remaining marbles and puts them back into the Synagogue. Sara doesn’t like the new marble composition and decides to pass again. On the contrary, David plays his turn selecting a marble to perform his remaining action. At this point, the second and final Passing phase begins; Sara removes a red marble, Julia collects all the remaining marbles and puts them back into the Synagogue once again. Sara must now take her last action.
End of Round Phases (Phases 4–7)
Phase 4: Turn Order
Reset the Turn Order track. Arrange the Player markers in the same order as the Rabbi pieces on the Action tiles, from top to bottom. If multiple Rabbis are placed on the lowest permanent action, the player markers are placed following the Rabbi order from left to right. After setting the turn order each player collects their Rabbi and returns it to their player area.
Example: The Actions phase ends in this situation. David (green) becomes first, Simon (orange) becomes second, Sara (purple) becomes third and Julia (grey) becomes fourth.
Phase 5: Influence Characters
In turn order, each player checks the Character card for the current round; it will be the leftmost face-up card. Each Character card shows a combination of 2 colored marbles. If during the current round, you have selected the same combination of marbles, you will be able to influence the Character. Note that the white marble counts as any color and the order of marbles on the card doesn’t matter.
If you influence the Character, you must either:
- pay Coins to take the specific bonus, or
- take 3 Coins.
Once all players have done this, flip the Character card face down.
Example: Sara selected a red and a blue marble during the Actions phase. The Character card for the current round shows the same combination, so Sara can influence it. She decides to pay 3 Coins to take the bonus.
Phase 6: Income and Development
The icon indicates any income you receive. This may be VP, steps with your Students, steps on the Study track, or resources.
You receive all the income from:
- the position of your Students on each of the 3 streets
- the completed Artifacts on your board
- the position of your marker on your Study track
- the position of your marker on your Golem track
Example: With the situation illustrated above, Sara (purple) would receive 4 Coins, 6 VP, 1 step up the Study track, and 2 Knowledge (for the new position on the Study track).
You may choose the order in which you collect your income.
After all players have collected their income, you may pay to upgrade one Development of your choice, paying the normal cost as explained under the marble actions.
Phase 7: Golem Control
You must now pay Knowledge to control your Golems.
For each Golem you must pay 1 Knowledge for each section the Golem is ahead of the Student in the same district. You count the section the Golem is in but not the section the Student is in.
Example: David (green) must pay 2 Knowledge to control the illustrated Golem, which is 2 sections ahead the green Student in the same district.
If you do not have enough Knowledge to control all of your Golems, spend all the Knowledge you have and lose 5 VP for each Golem that you cannot afford to fully control.
Example: David (green) must pay 5 Knowledge to control his Golems. He has only 3 Knowledge, that he pays to control the Golem in the blue district. Then, he must discard the remaining Knowledge, which is not enough to control the Golem in the red district, and lose 5 VP. The Golem in the yellow district is controlled for free.
If you have just completed the fourth round, proceed to Final Scoring. If not, start a new round with the Refresh phase.
End of Game & Final Scoring
End of the Game
The game ends after the Golem Control phase of round 4. Each player scores VP as follows:
- Red Menorahs: Multiply the number of Golems you have built (the starting 2 Golems are not counted) by the number of red Menorahs you have (these are found on your Development tiles and the Menorah tokens).
- Yellow Menorahs: Multiply the number of Artifacts you have completed by the number of yellow Menorahs you have (these are found on your Development tiles and the Menorah tokens).
- Blue Menorahs: Multiply the number of columns of Book cards (with at least 1 Book) you have above your player board by the number of blue Menorahs you have (these are found on your Development tiles and the Menorah tokens).
- Study Track: As shown on the upper 3 spaces of the Study Track.
- Objective cards: VP from your completed Objective cards.
- Resources: 1 VP for every 5 resources of any type.
The player with the most Victory Points is declared the winner. If there is a tie, the tied player whose Rabbi is placed in the uppermost space wins.
Objective cards
Each Objective card is split into 3 parts:
- Top part: Shows what you need to do to complete the Objective. There are various types and may relate to the final position of one of your students, a number of Golems, Books, Gold, or Developments you have, or your position on a track.
- Middle part: If you meet this criteria you score the VP shown in the middle part of the card.
- Bottom part: Shows a reminder of the additional VP you will earn for each different type of Objective you have completed:
- Completing 2 different types of Objective: 2 VP
- Completing 3 different types: 5 VP
- Completing 4 or more different types: 9 VP
Two Objectives are considered to be of the same type if they show the same icon (even if with a different number) on the top part.
End Game Scoring Example
With this final situation, Sara will score:
- 4 VP for the Golem area (2 Golems built × 2 red Menorahs)
- 21 VP for the Artifact area (3 completed Artifacts × 7 yellow Menorahs)
- 15 VP for the Study area (3 columns with Books × 5 blue Menorahs)
- no VP from the Study track
- 1 VP for resources left
- 4 VP for the Objective card requiring 8 gold pieces, 4 VP for the card requiring 7 Developments, no VP for the card requiring 3 Golems
- 2 VP for completing two different types of Objective cards
Appendix: Reference & Iconography
All the bonuses in the game are optional: when you activate one, you can decide to take it partially or not take it at all. The only mandatory effects in the game are the Golem movements in Phase 2 and the Golem track movements when creating or killing a Golem.
Action Tiles
- Move your marker up or down the Golem track by 1 step & earn 1 VP and 1 Knowledge per level on your Golem track.
- Take 1 Gold piece & earn 1 VP for each completed Artifact.
- Take 3 Clay & create one Golem (paying normal cost) & move one Golem backwards or forwards 1 step.
- Buy 1 Book card without paying the cost printed on the card (you still pay the cost printed on the Library position).
- Kill one Golem & earn 1 VP and 1 Clay for each Golem you have in the Cemetery.
- Upgrade any 1 Development with a discount of 3 resources; you may pay any combination of resources for the remaining cost.
- Move 1 of your Golems up to 4 steps forward & activate it (it must be laid down) & this round you do not pay Knowledge to control your Golems.
- Move your Golems a total of 2 steps either backwards or forwards & activate 1 Golem (it must be laid down).
- Move your marker up the Study track 1 step & take 1 active bonus from 1 of your Book cards.
- Take the action of a Neighborhood tile adjacent one of your Golems (either standing or laying) without activating it.
- Take 1 of each resource & draw 2 Objective cards and choose one to keep (put the other back at the end of the deck).
- Move any 1 Student forwards 1 step & earn VP equal to the position of your leftmost Student (for example, 2 VP for section II).
Neighbourhood Tiles
Red District Neighbourhood Tiles
- Take 2 Clay.
- Create 1 Golem with a discount of 1 Clay.
- Take 3 Clay.
- Move any 1 Student forwards 1 step.
- Create 1 Golem with a discount of 3 Clay.
- Kill 1 Golem & earn 1 VP per level on your Golem track (after the potential killing and also if you don’t kill).
- Upgrade 1 Golem Development with a discount of 5 Clay.
- Move your Student in the red district backwards 1 step to earn 4 VP and take 3 Clay.
- Spend 3 Clay to earn 6 VP.
- Create a Golem with a discount of 2 Clay & earn VP per level on your Golem track.
Yellow District Neighbourhood Tiles
- Take 2 Coins.
- Upgrade 1 Artifact Development with a discount of 2 Coins.
- Spend 1 Coin to take 1 Gold piece.
- Kill 1 Golem & take 3 Coins.
- Spend 4 Coins to perform 2 Student movements of your choice.
- Draw 2 Objective cards and choose 1 to keep (put the other back at the end of the deck) & take 2 Coins.
- Move your Student in the yellow district backwards 1 step to earn 3 VP and take 1 Gold piece.
- Spend 5 Coins to earn 7 VP.
- Activate any 1 completed Artifact.
- Take the income from all your Students.
Blue District Neighbourhood Tiles
- Take 2 Knowledge.
- Pay 2 Knowledge to move your marker up the Study track 1 step.
- Take 3 Knowledge.
- Buy 1 Book card with a discount of 3 Knowledge.
- Move your blue district Student back 1 step to earn 3 VP & move your marker up the Study track 1 step.
- Upgrade one Study Development with a discount of 4 Knowledge.
- Move your marker 1 step down the Study track to earn 3 VP and move any one Student forwards 1 step.
- Spend 4 Knowledge to earn 4 VP and move your marker up the Study track 1 step.
- Buy a Book card with a discount of 5 Knowledge.
- Take the active bonus from up to 3 of your Book cards.
Characters Cards
- Pay 2 Coins to upgrade any 1 Development with a discount of 4 resources & earn 1 VP.
- Pay 3 Coins to move your marker up the Study track 2 steps.
- Pay 3 Coins to move 1 Golem forwards or backwards 1 step & activate up to 2 Golems (they must be laid down).
- Pay 3 Coins to take 2 Gold pieces.
- Pay 4 Coins to create a Golem with a discount of 4 Clay & move your Student in the red district forwards 1 step.
- Pay 3 Coins to move your marker up the Study track 1 step & move your Student in the blue district forwards 1 step.
- Pay 3 Coins to take 1 Gold piece & move your Student in the yellow district forwards 1 step.
- Pay 5 Coins to earn 1 VP per Development you have upgraded.
- Pay 6 Coins to earn 3 VP multiplied by the position of your leftmost Student.
- Pay 4 Coins to earn 3 VP per level on your Golem track.
- Pay 6 Coins to earn 4 VP & buy 1 Book card with a discount of 5 Knowledge.
- Pay 5 Coins to kill a Golem & earn 2 VP for each Golem you have in the Cemetery.
Book Cards Iconography
- Take the indicated number of the illustrated resource.
- Move your Student on the matching district 1 step.
- Move your marker up or down the Golem track.
- Take 1 Gold piece.
- Move a Student of your choice 1 step.
- White slash = Choose one of the illustrated options.
- Earn 1 VP.
- Upgrade a Development with a discount.
- Kill one of your Golems.
- Move your marker up the Study track 1 step.
- Pay what’s on the left to receive what’s on the right.
Objective Cards
- Earn 2 VP if your Student in the red district has reached step V or more.
- Earn 2 VP if you have at least 2 Golems.
- Earn 2 VP if the marker on your Study track is at 5 or higher.
- Earn 2 VP if your Student in the blue district has reached step V or more.
- Earn 2 VP if you have at least 6 Gold pieces.
- Earn 2 VP if you have at least 5 Book cards.
- Earn 2 VP if your Student in the yellow district has reached step V or more.
- Earn 2 VP if you have at least 5 upgraded Developments.
- Earn 2 VP if you have killed at least 2 Golems.
Development Tiles
Study Development Tiles
- 3 blue Menorahs for final scoring: Found on the track.
- Column 1: Take 1 Coin and 1 Clay every time you place a Book in this column. (1 blue Menorah for final scoring)
- Column 2: Earn 2 VP every time you place a Book in this column. (1 blue Menorah for final scoring)
- Column 3: Double the immediate effect of any Book card (except for the Black ones) you place in this column. (1 blue Menorah for final scoring)
- Column 4: Take 1 Gold piece every time you place a Book in this column. (1 blue Menorah for final scoring)
- Study Track Development: The Study track Development makes it easier to tuck more Book cards and increases your income each round. (1 blue Menorah for final scoring)
Golem Development Tiles
- Head: In the Golem Control phase you pay a maximum of 2 Knowledge to control each Golem. (1 red Menorah for final scoring)
- Torso: Immediately kill 1 Golem; from now on all your Cemetery bonuses are doubled. (1 red Menorah for final scoring)
- Right Arm: Immediately activate 1 Golem and every time you perform the Work action, you activate 1 additional Golem for no cost. (1 red Menorah for final scoring)
- Left Arm: 3 red Menorahs for final scoring.
- Right Leg: In the Golem Movement phase, you may ignore the extra steps required by the current round’s Character card. (1 red Menorah for final scoring)
- Left Leg: Every time you make a Golem, you may take 1 step with that Golem and activate it without laying it down. (1 red Menorah for final scoring)
Artifact Development Tiles
- Top row (Gold tiles):
- Reactivate this Artifact whenever you take a marble action using a red marble. / Reactivate this Artifact whenever you place the first Book card in a column.
- Reactivate this Artifact whenever you take a marble action using a blue marble. / Reactivate this Artifact whenever you create a Golem.
- Middle rows (Grey tiles): Choose side when you place:
- Income of 2 Knowledge OR Income of 1 Knowledge and 1 VP.
- Income of 2 Clay OR Income of 1 Clay and 1 VP.
- Income of 2 Coins OR Income of 1 Coin and 1 VP.
- Every tile you move reveals 1 yellow Menorah for final scoring.
- Bottom tile: 3 yellow Menorahs for final scoring.
Credits
The designers wish to thank all the testers who supported the long development of this project with their comments, ideas, advice and passion. In particular, they thank Samantha Milani, Antonio Tinto, Stefano Luperto, Sabrina Volpini, Davide Malvestuto, Francesca Giusti, Gaetano Cellizza, Luca Ercolini, Nestore Mangone, Ilaria Negri, Alessandro Negri, Enrico Risioluto, Franco Mari, Luigi Pccheschi (Shaka), Michele Morosini, Marco Piola Caselli, Ennio Pantani, Domenico Stellato, Fabrizio Neri, Matteo Le Foche, Ido Traini, Daniel Marinangeli, Simone Fini, Giacomo Censi, Claudio Ciccalè, Paolo Toffanello, Nadia Curi, Simone Scalabroni, Paolo Prioretti, Michele Rozzi, Daniele Tascini, Julie Carpinelli and Simone Colombo.
Special thanks to Tommaso Battista, Marco Pranzo, and Gabriele Ausiello who followed Golem with patience, skills, and friendship from its first, unsteady steps through Prague’s streets.
Last, immense gratitude goes to Mauro Gibertoni for his suggestions on the Automa, a subject in which he is a master.
The editor wishes to thank Klemens Franz for his endless efforts in refining this game’s overall look, while making it more functional.
Golem is inspired by a Jewish legend and, despite referring to some Jewish elements, it isn’t meant to represent this tradition we all respect deeply. Special thanks go to David Piazza from the Rabbinato Centrale di Milano, expert in Jewish history and culture, who supervised all the decisions regarding icons, names, and setting and gave his blessing to this project.
- Game Designers: Virginio Gigli, Flaminia Brasini, and Simone Luciani
- Illustrations: Ausonia and Roberto Grasso
- Rules: David Digby
- Graphics, layout, and rules typesetting: atelier198
- Editor: Giuliano Acquati
- Publisher: Cranio Creations Srl, Via Ettore Romagnoli 1, 20146 Milano – Italy
