Tiny Epic Quest
2017
Lead three elf heroes through quests, artifacts, spells, and risky night rolls before goblins overrun the realm.
60
minutes
1 - 4
player(s)
14+
Medium


About this board game
Tiny Epic Quest is a sandbox adventure for 1–4 players that takes about 60 minutes, sending bands of three elf heroes across a realm threatened by invading goblins.
A vile portal has opened from the goblin kingdom, bringing fire and destruction to peaceful groves and villages. Players must choose between two paths to end the crisis: close the portal or slay every goblin in the realm.
Each round unfolds across two distinct phases. During the day, heroes travel throughout the world to pursue their goals and prepare for the dangers ahead. They may visit villages to acquire quests, monuments to learn powerful spells, mushroom groves to seek guidance, and perilous locations in search of artifacts.
- Quests: Complete objectives while exploring the endangered realm.
- Artifacts: Gain unique abilities that can improve movement, combat, spell learning, or the mitigation of harmful dice rolls.
- Movement: Travel by foot, horse, raft, boat, or gryphon, with each method offering different and limited possibilities.
- Night challenges: Roll dice, test your luck, and decide when to press on or save your progress and rest.
Positioning matters, because the way heroes travel can determine whether they reach the places needed to fulfill quests or prepare for the night. During the night phase, players face the consequences of their quests and decisions, weighing the chance of further progress against the risk of continuing.
The game ends when the portal is closed or all goblins have been eradicated. Victory points come from slaying goblins, learning spells, and completing quests, and the player with the most points claims victory. In Tiny Epic Quest, every journey combines exploration, tough choices, and the pressure of a world ending quickly.
/pic7182955.jpg)
Board Game Rules for
Tiny Epic Quest
Prologue
A world at peace has been torn apart by the opening of chasms across the land. Goblins spew forth from the underworld, pouring into the sacred mushroom grottos and destroying eons of ancient knowledge and magic. To end this, you must venture forth on an epic quest!
There are many ways to help save the Mushroom Realm: defeating nasty Goblins, learning ancient Spells, raiding dangerous Temples, acquiring powerful Items, and completing treacherous Quests. Along the way, you’ll need to rely on planning and wit, but be careful not to push your luck too far!
Objective and Overview
The objective is to have the most Victory Points at the end of five rounds. Victory Points are earned from completing Quests, defeating Goblins, learning Spells, and acquiring Legendary Items.
Each round is broken into two phases: Day and Night.
- During the Day, players use different methods of movement to send their heroes around the land completing Quests, visiting helpful Mushroom Grottos, and positioning themselves to explore Temples, learn Spells at Obelisks, and attack Goblins as they emerge from their Portals.
- During the Night, players press their luck looking to resolve what they set up during the Day. To do this, players will take turns rolling Adventure Dice, sharing the results, and hoping for good fortune. But if they don’t know when to Rest, they risk losing their progress for the round.
After five rounds, the game is over and Victory Points are totaled. The player with the most is crowned the winner!
Components
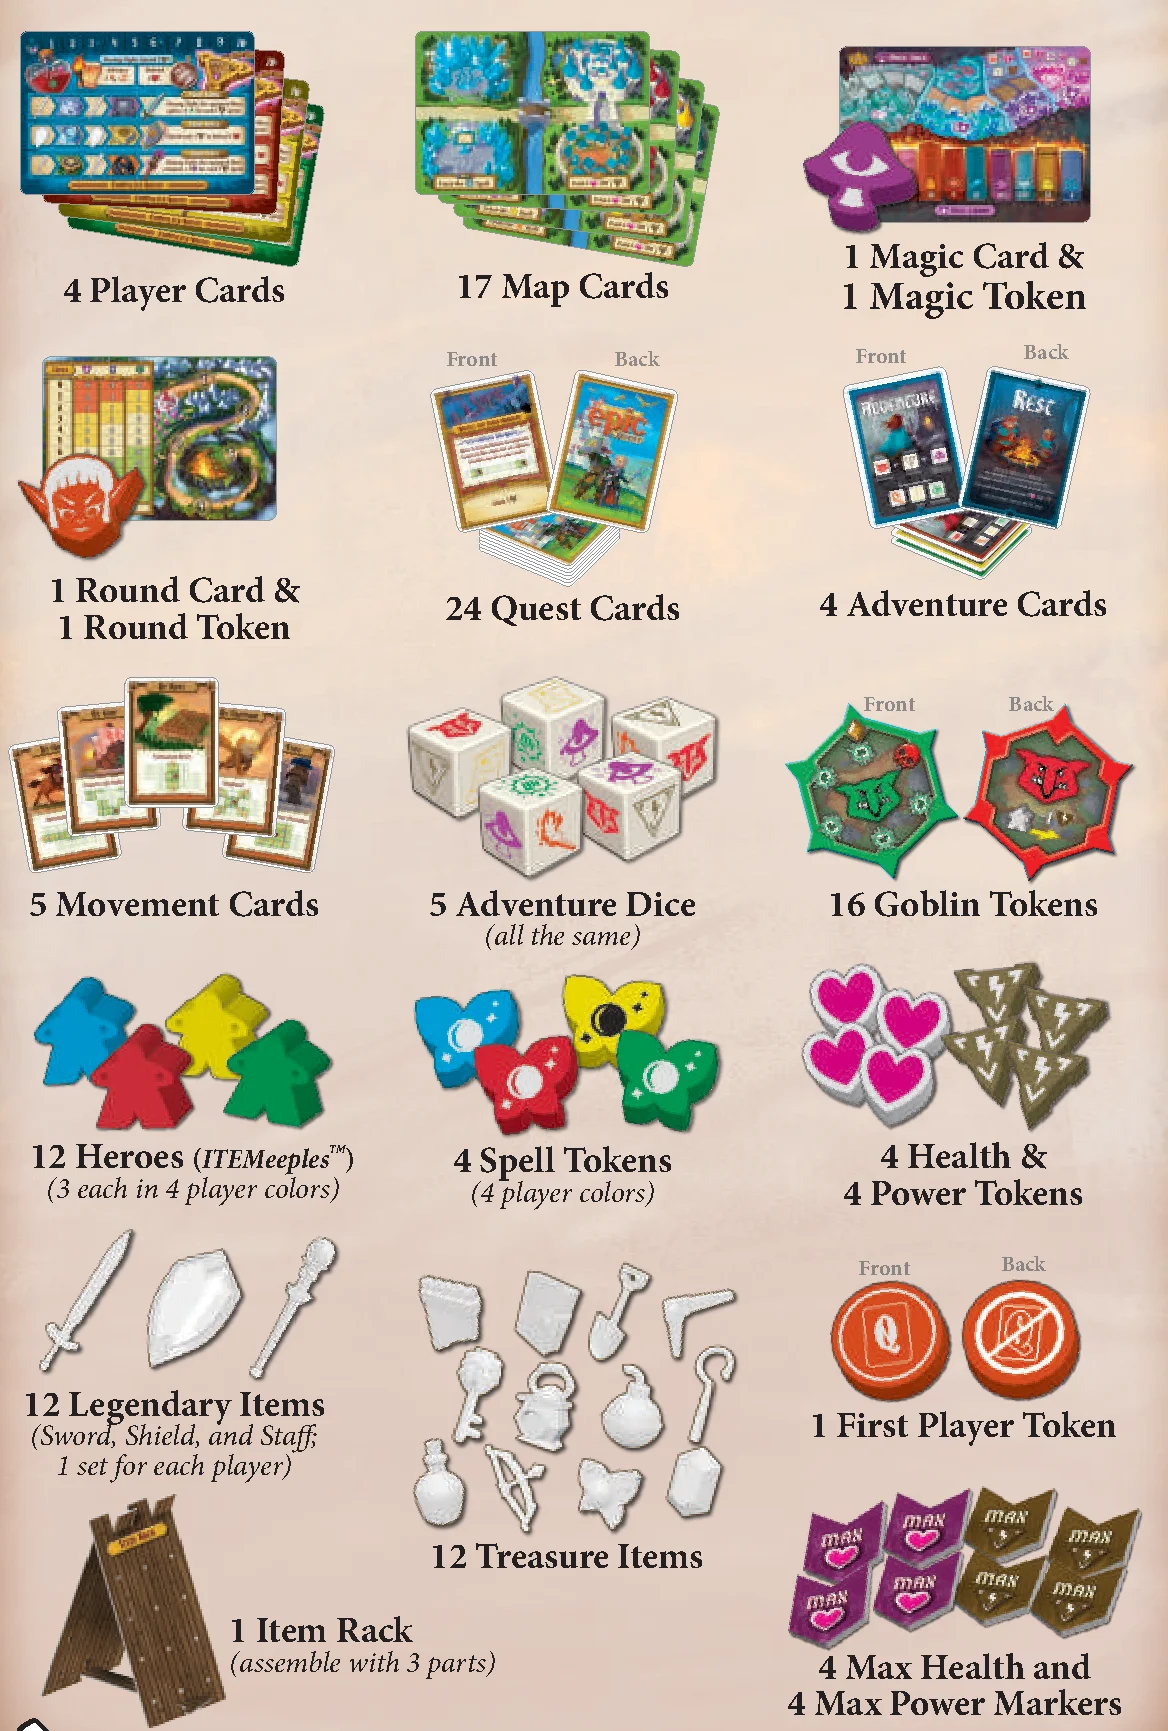
- 4 Player Cards
- 17 Map Cards
- 1 Magic Card & 1 Magic Token
- 1 Round Card & 1 Round Token
- 24 Quest Cards
- 4 Adventure Cards
- 5 Movement Cards
- 5 Adventure Dice (all the same)
- 16 Goblin Tokens
- 12 Heroes (ITEMeeples™) (3 each in 4 player colors)
- 4 Spell Tokens (4 player colors)
- 4 Health & 4 Power Tokens
- 12 Legendary Items (Sword, Shield, and Staff; 1 set for each player)
- 12 Treasure Items
- 1 First Player Token
- 1 Item Rack (assemble with 3 parts)
- 4 Max Health and 4 Max Power Markers
Game Setup (for 2-4 Players)
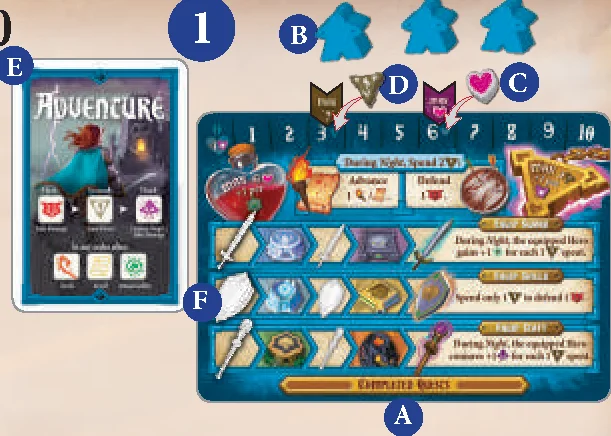
- Give each player:
- A. 1 Player Card (their selected color, or randomly).
- B. 3 Heroes in their Player Card’s color.
- C. 1 Health Token and 1 Max Health Marker, both placed on the number 6 at the top of the Player Card.
- D. 1 Power Token and 1 Max Power Marker, both placed on the number 3 at the top of the Player Card.
- E. 1 Adventure Card, with the "Adventure" side face up.
- F. 1 Set of Legendary Items (Sword, Shield, and Staff), placed on the first (left) space of their corresponding tracks on the Player Card.
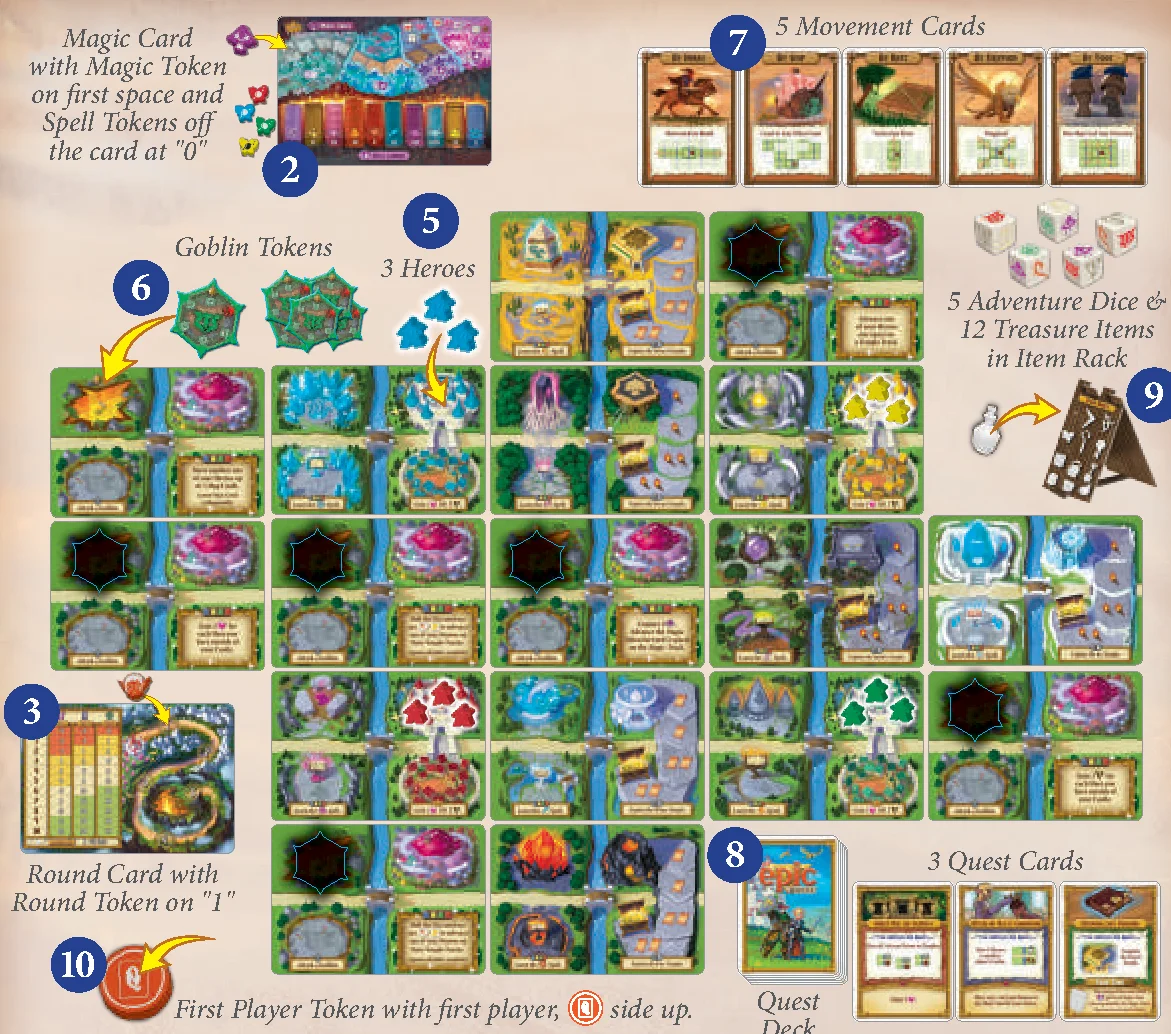
- Place the Magic Card, "2-4 player" side face up, on the table:
- A. Place the players’ Spell Tokens (matching their player colors) off to the left of this card near the Spell Library (denoted as books on the Magic Card), designating a spell level of "0".
- B. Place the Magic Token onto the marked first space of the Magic Track.
- Place the Round Card on the table, and on the right side of the card, place the Round Token on the number 1, designating the first of five rounds.
- Create the Land Map (follow the instructions on next page).
- Place the 3 Heroes of each player on the Map Card with the Castle matching the color of their Player Cards.
- Place Goblin Tokens, passive (green) side face up, on each of the 7 Goblin Portals on the Land Map, matching the diamond on the token with the diamond on the Map Card. Place the unused Goblin Tokens in a stack where all players can reach them.
- Place the 5 Movement Cards, face up, in a row within reach of the players.
- Shuffle the Quest Cards and place them into a deck, face down. Deal 3 face up Quest Cards in a row so all players can easily see and reach them. There should always be at least 1 Movement Quest and 1 Treasure Quest face up in the row. If there is not, discard the last card in the row and draw a new one until this requirement is met.
- Place the Item Rack, along with the 12 Treasure Items in it, and the 5 Adventure Dice within reach of the players.
- Give the First Player Token to the player who has most recently done a scavenger hunt, or as a group determine who gets the token. This player goes first. The token should be placed with the
 face up at the start of the game.
Creating the Land Map
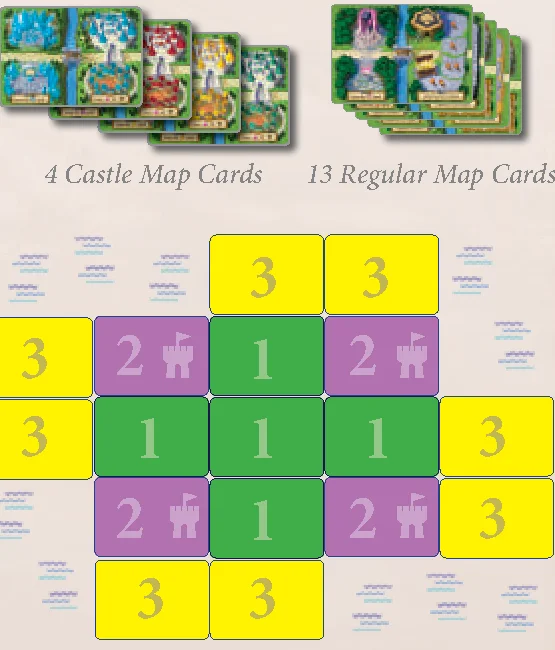
Separate the Map Cards into 2 decks: 4 Castle Map Cards (with Castles) and 13 Regular Map Cards. Using the Bright side of each Map Card, lay out the Land Map as follows:
- Shuffle the Regular Map Cards, then deal 5 into a "cross."
- Randomly place all 4 Castle Map Cards in the corners of the "cross."
- Deal 8 Regular Map Cards, 2 to each side of the center cards. These Cards, along with the Castle Map Cards, will serve as the Coast of the Land Map.
Day Phase Overview
The Day Phase consists of 4 turns, regardless of the number of players, and starts with the player who holds the First Player Token, then proceeds clockwise around the table. This means that only 4 of the 5 Movement Cards will be used during a single round.
On your turn:
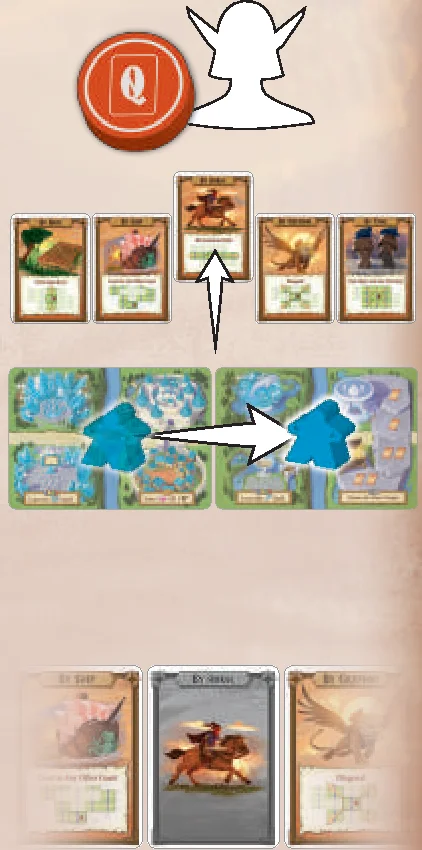
- Select a Movement Card and slide it up so that it stands higher in the row, then choose from A or B:
- A. Move 1 of your Heroes onto a Region of a new Map Card using the travel method depicted on the Movement Card.
- B. Remain Idle and not move.
- Going clockwise, each other player must either use the selected Movement Card or choose to remain Idle instead.
- After all players have moved or remained Idle, flip the selected Movement Card face down and place it back into the row to show it is no longer available this round. The next player selects a new Movement Card and the procedure is repeated until 4 Movement Cards have been played.
This completes the Day Phase.
Hero Movement
There are five types of Movement Cards in the game, each describing a unique travel method. The travel method for the turn is the same whether you selected the card yourself or you are following the player who selected the card.
When a Hero moves, they must always move to a different Map Card. A Hero cannot be moved to a Region on the same Map Card. When moving across any number Map Cards, your Hero is considered to be moving through each Map Card between the start and finish locations.
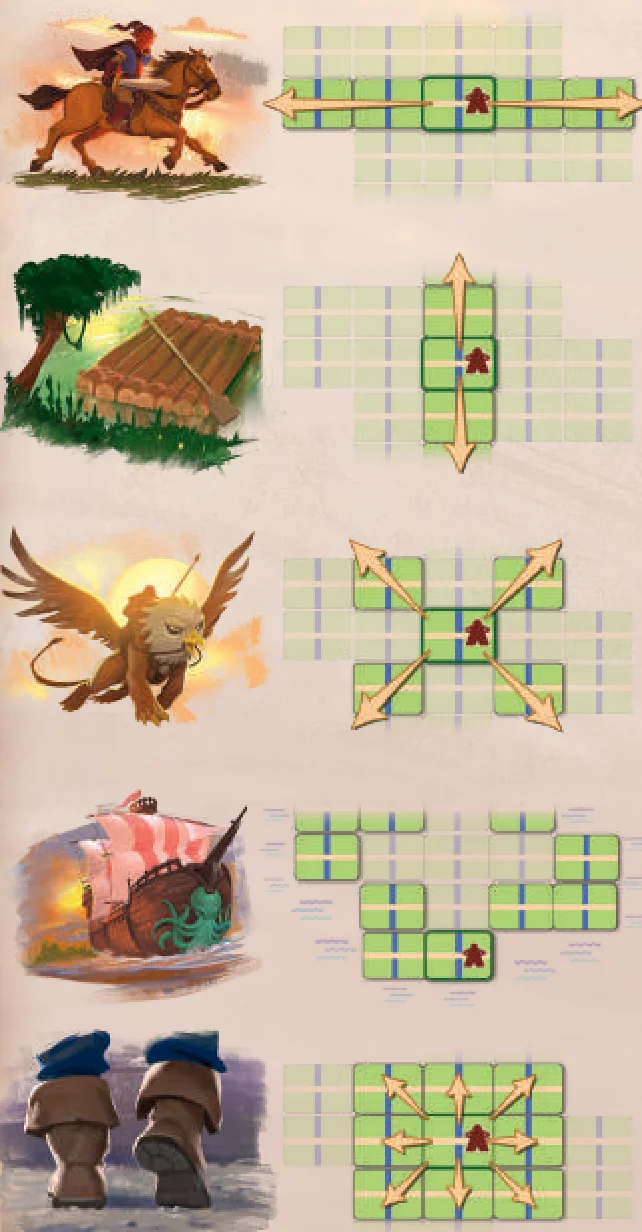
The 5 Movement Cards and their respective travel methods are:
- By Horse: Move 1 Hero horizontally to any different Map Card along the "road".
- By Raft: Move 1 Hero vertically to any different Map Card along the "river".
- By Gryphon: Move 1 Hero diagonally to any different Map Card along the diagonal path.
- By Ship: Move 1 Hero on the Coast (perimeter of the Land Map) to any different Map Card on the Coast. Map Cards passed along the Coast are considered to have been "moved through."
- By Foot: Move 1 Hero in any direction to any adjacent Map Card.
Moving Past Goblins
Goblin Tokens have two sides: Passive Goblins (green) and Aggressive Goblins (red).
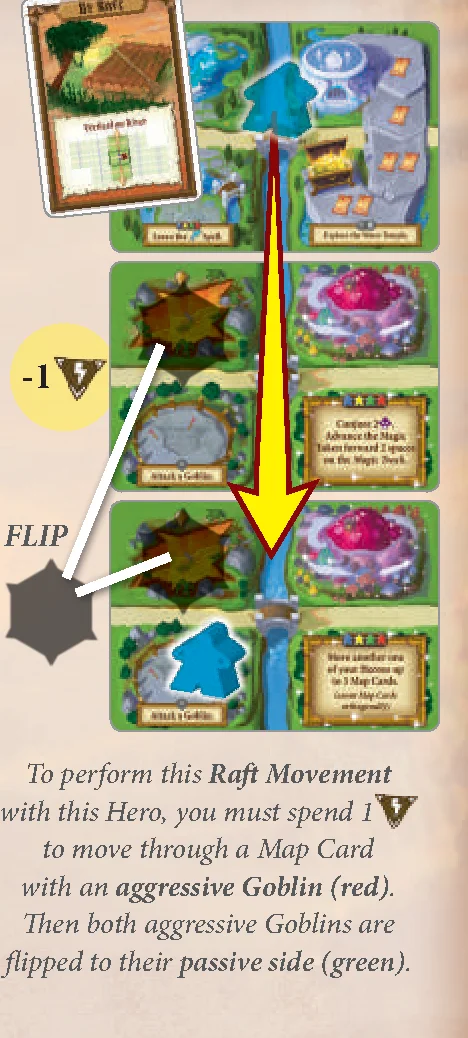
When moving through a Map Card (not your start or destination) with an aggressive Goblin (red) at its Portal, you must spend 1 Power (move the  Token down 1 number) for EACH such Map Card that your Hero moves through. Then flip that Goblin Token to its passive side (green) with the diamond on the Goblin Token aligning with diamond on the Map Card.
- If you end your movement at a Portal with an aggressive Goblin (red), flip it to its passive side (green) without spending .
- If you do not have the to move past an aggressive Goblin (red), you may not make that movement.
Idling — Choosing to Not Move
You may choose to Idle instead of taking the selected movement. In doing so, you do not move a Hero, and play passes to the next player. In addition, if you have at least 1 Hero in any player’s Castle you may gain 1 Health ( ) OR 1 Power () up to your Maximum Threshold. You only gain this benefit once each time you Idle, and not for each Hero at your or separate Castles.
Regions on the Map Cards
Each Map Card has two Regions: a Left and a Right Region (the top and bottom of each side are considered to be the same Region). When you move your Hero to a Map Card, you must choose on which Region of Map Card your Hero is going to be placed, either on the Left or Right. Some Regions have actions that may be taken when you move there. A Hero who starts on a Region like this must move off the Map Card and back onto it during a subsequent movement in order to take that Region’s action again. The different Regions are:
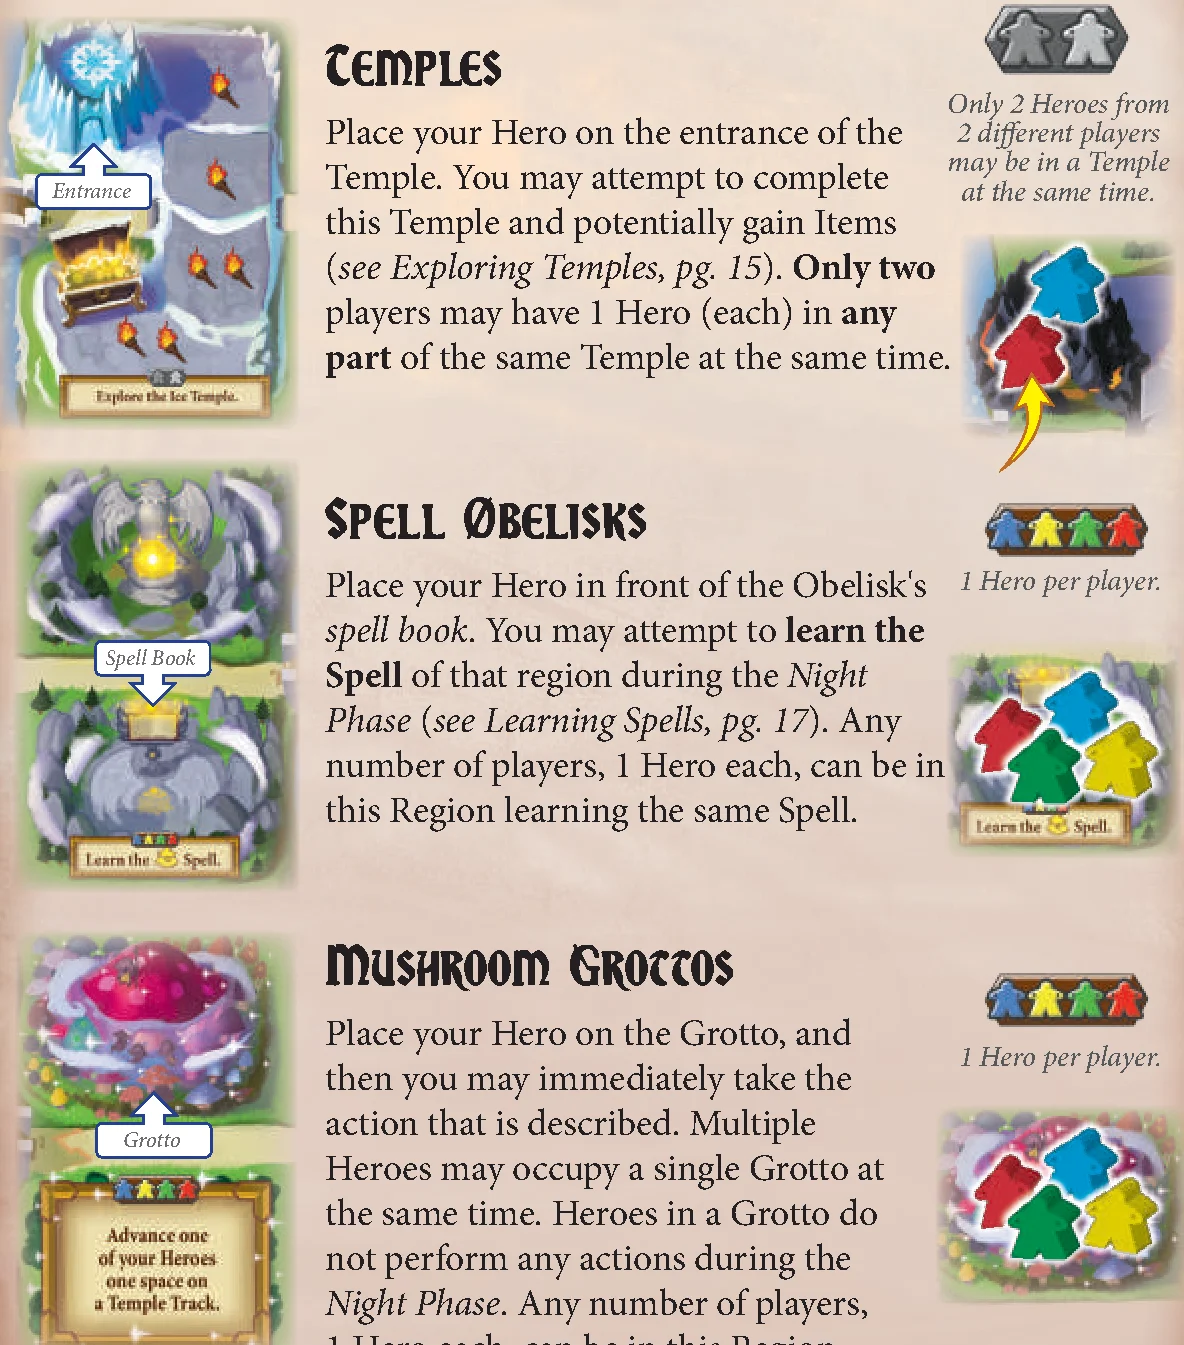
- Temples: Place your Hero on the entrance of the Temple. You may attempt to complete this Temple and potentially gain Items. Only two players may have 1 Hero (each) in any part of the same Temple at the same time.
- Spell Obelisks: Place your Hero in front of the Obelisk’s spell book. You may attempt to learn the Spell of that region during the Night Phase. Any number of players, 1 Hero each, can be in this Region learning the same Spell.
- Mushroom Grottos: Place your Hero on the Grotto, and then you may immediately take the action that is described. Multiple Heroes may occupy a single Grotto at the same time. Heroes in a Grotto do not perform any actions during the Night Phase. Any number of players, 1 Hero each, can be in this Region.
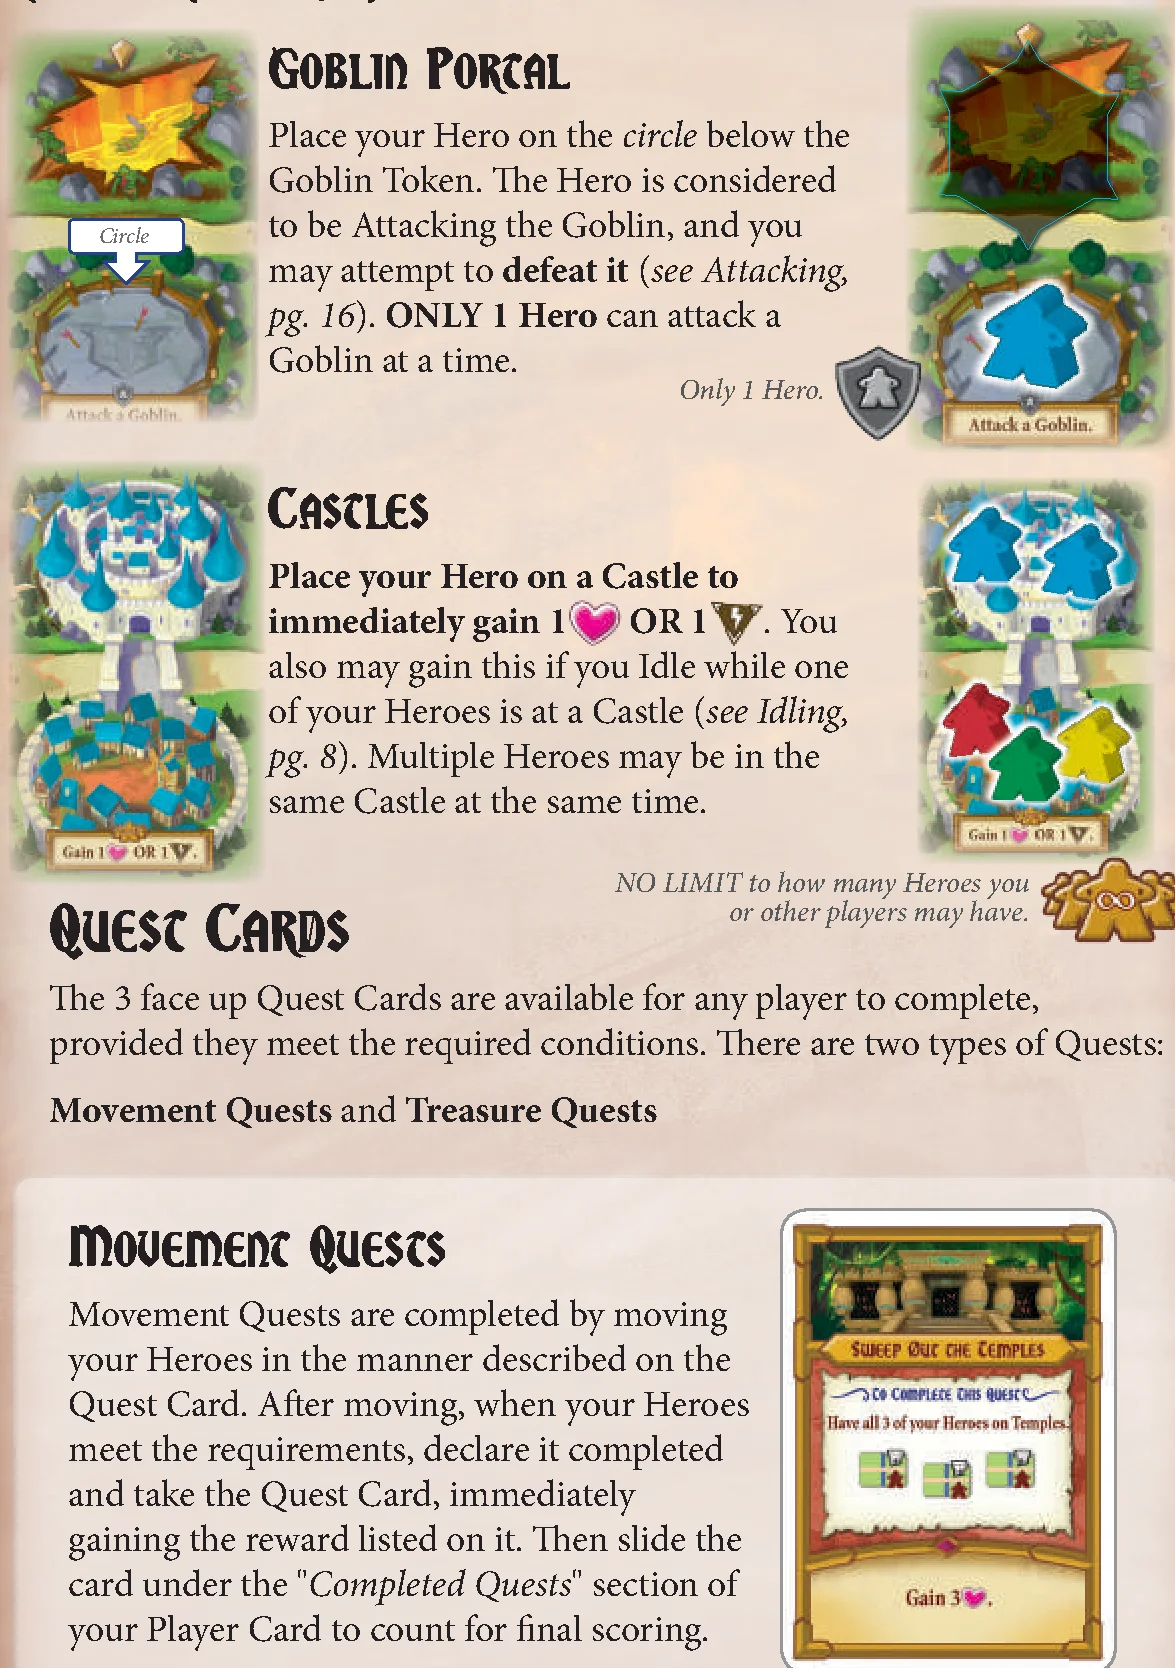
- Goblin Portal: Place your Hero on the circle below the Goblin Token. The Hero is considered to be Attacking the Goblin, and you may attempt to defeat it. ONLY 1 Hero can attack a Goblin at a time.
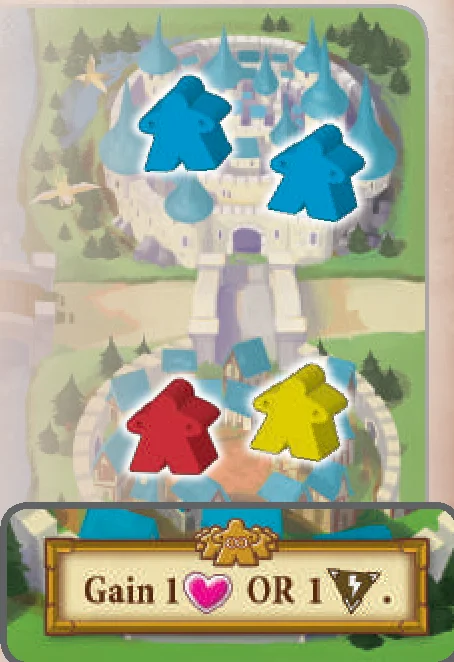
- Castles: Place your Hero on a Castle to immediately gain 1 OR 1 . You also may gain this if you Idle while one of your Heroes is at a Castle. Multiple Heroes may be in the same Castle at the same time. NO LIMIT to how many Heroes you or other players may have.
Quest Cards
The 3 face up Quest Cards are available for any player to complete, provided they meet the required conditions. There are two types of Quests: Movement Quests and Treasure Quests.
Movement Quests
Movement Quests are completed by moving your Heroes in the manner described on the Quest Card. After moving, when your Heroes meet the requirements, declare it completed and take the Quest Card, immediately gaining the reward listed on it. Then slide the card under the "Completed Quests" section of your Player Card to count for final scoring.
Treasure Quests
To complete a Treasure Quest, you must complete the Temple listed on the Quest Card. You can complete a Treasure Quest during either the Day or Night Phase.
- To complete a Treasure Quest during the Day Phase, your Hero must be the first Hero to reach the last space on the Temple Track.
- To complete a Treasure Quest during the Night Phase, you must be the first player to Rest, with a Hero on the last space on the Temple Track.
In either case, when you complete a Quest Card, you resolve it immediately by gaining the Treasure Item, taking the Quest Card and sliding it underneath your Player Card under "Completed Quests," and returning your Hero to your Castle.
Equipping Heroes
When you gain an Item, you must immediately equip it to any of your Heroes that has an available "hand" for it. Then gain the completed Treasure Quest Card, if applicable. Each Hero can hold up to two Items. The Hero who carries the Item gains its benefit as described on the Quest Card. You MAY rearrange Items amongst YOUR Heroes on YOUR Castle freely. If you gain an Item but none of your Heroes has an open "hand", keep the Item near your Player Card. You may exchange it freely with your Heroes on your Castle.
The Quest Card Row
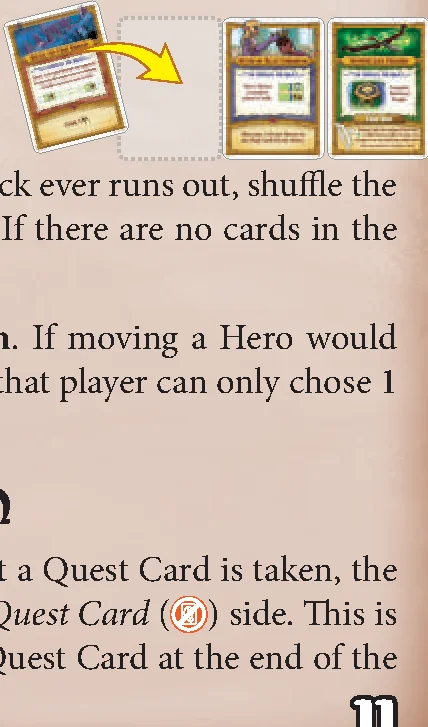
Whenever a Quest Card is taken from the row, immediately slide the rest of the Quest Cards to the right and replace the leftmost spot with a new Quest Card from the top of the Quest deck. If the deck ever runs out, shuffle the discard pile into a new deck and continue playing. If there are no cards in the discard pile, the game continues without Quests.
Note: You may only complete one Quest per turn. If moving a Hero would result in a player completing more than one Quest, that player can only choose 1 Quest Card to take.
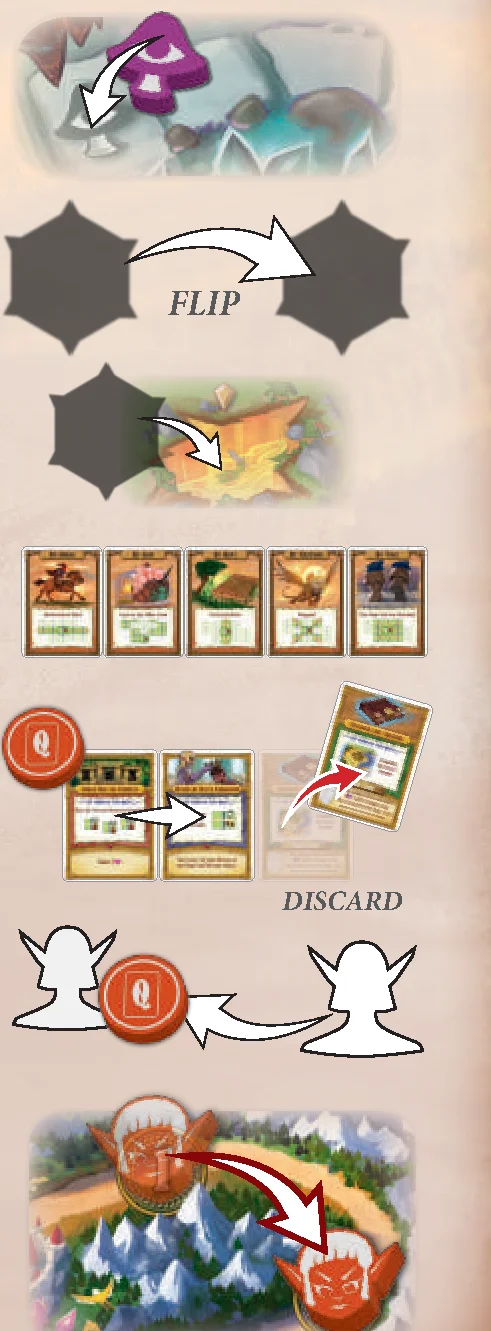
Flip the First Player Token
The first time during the Day Phase that a Quest Card is taken, the First Player Token flips over to the no Quest Card ( ) side. This is to remind the players not to discard a Quest Card at the end of the round.
Day Phase Completion
After 4 turns have been taken, and 4 Movement Cards have been flipped, the Day Phase is over and the Night Phase begins.
Night Phase Overview
During this phase, players will take turns rolling the 5 Adventure Dice in an effort to complete three different types of Adventures:
- Exploring for Items at Temples
- Attacking Goblins at Portals
- Learning Spells at Obelisks
Each player should start the phase with their Adventure Card with the "Adventure" side face up. A player is considered to be Adventuring until they have Rested. The player with the First Player Token takes the 5 Adventure Dice and starts the Night Phase.
The flow of Adventuring is as follows:
- Choose to Adventure or Rest: The player with the dice must first choose to Adventure or Rest:
- A. If a player chooses to Rest, they flip their Adventure Card over to the "Rest" side and pass the dice clockwise to the next Adventuring player.
- B. If a player chooses to Adventure (leaving their card "Adventure" side up), they follow steps 2–4 below.
- Roll Dice: The player with the dice rolls them where all players can see them. The die actions are resolved in the following order:
- First: Take Damage (
 )
) - Second: Gain Power (
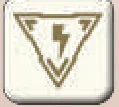 )
) - Third: Conjure Magic / Take Damage (
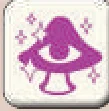 )
)
- First: Take Damage (
- Resolve Adventures: All Adventuring players may simultaneously use these symbols toward resolving their own Adventures:
- Torch (
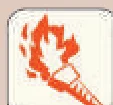 ) and Scroll (
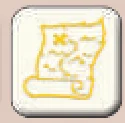 ) (for Exploring a Temple)
 - Attack Goblin (
 )
)
- Torch (
- Pass Dice: The dice are passed clockwise to the next Adventuring player who starts by choosing to Adventure or Rest. Once all players have chosen to Rest, or are Exhausted, move onto Resolution.
Adventure Dice Actions
Take Damage
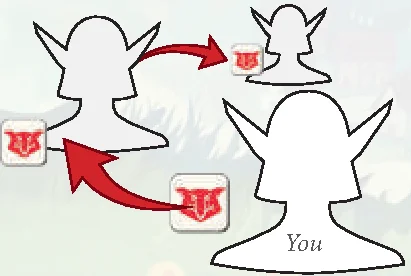
Count up each rolled. This represents the total damage dealt to the Adventuring players, and it is equally distributed clockwise starting with the player who rolled the dice and going to each Adventuring player. Going clockwise, each player loses 1 Health (-1 ) for each damage taken until all the damage is dealt.
For instance, if you roll 3 , you take 1 , the next Adventuring player takes 1 , and the Adventuring player after that takes 1 . In the case that there are only 2 players still Adventuring, you would receive the third, taking 2 total.
Magic Level Damage
The magic level ( ) of the Magic Track may change the amount of total damage done by a . Damage is still distributed 1 symbol at a time.
Defending Damage
You may defend a that would deal damage by spending 2 . This action must happen immediately when each is taken.
Becoming Exhausted
If your Health Token ever reaches 0 , you become Exhausted. Flip your Adventure Card to the Rest side and immediately return ALL of your Heroes to your Castle. Set your Health Token to 6 and your Power Token to 3 for the next round (regardless of your Max Health or Max Power) and lose 1 Spell Level (-1 ) in the Spell Library (reduce Max Power Token if needed). You cannot resolve any more dice actions this round.
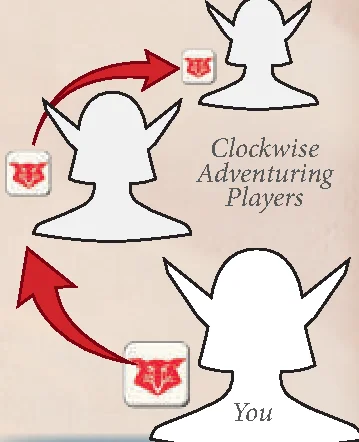
Gain Power
Each equals 1 (or 0 depending on the Magic Level) Power () gained by the Adventuring players. Just as taking damage is distributed clockwise 1 die at a time, so is gaining Power. The first is gained by the player who rolled the dice and then additional rolled are gained clockwise by the next Adventuring players.
Conjure Magic or Take Damage
For each rolled, advance the Magic Token forward 1 space on the Magic Track. This designates the Magic Level, which determines how many Spells a player can learn.
If the Magic Token is on the last space on the Magic Track (Level 3 ), then each additional rolled represents 1 damage dealt to the players. Damage is dealt first to the player who rolled the dice and then clockwise to the other Adventuring players. Also, higher Magic Levels alter the damage dealt by and Power given by .
The Magic Levels are:
- Level 0 (0 ): Players cannot learn a Spell; all dice are resolved normally.
- Level 1 (1 ): Players can learn a Spell 1 Level higher than their current Spell Level (represented by books); all dice are resolved normally.
- Level 2 (2 ): Players can learn a Spell up to 2 Levels higher than their current Spell Level; ‘s deal -2 in damage and ‘s do not give power.
- Level 3 (3 ): Players can learn a Spell up to 3 Levels higher than their current Spell Level; ‘s deal -3 in damage, ‘s do not give power, and now ‘s no longer conjure magic and instead deal -1 in damage.
Torches and Scrolls
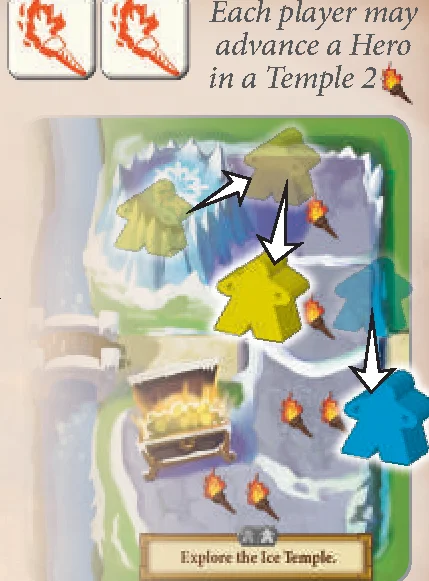
All Adventuring players can use and to advance their Heroes who are currently exploring Temples to the next space on their Temple Tracks. A space marked with or requires 2 / 2 to advance a Hero on to it. Each die symbol may only be used by one of your Heroes, so if you have multiple Heroes exploring Temples, they may not share a single die symbol.
Forge Ahead
During the Night Phase only, any player who is still Adventuring, and who has a Hero exploring a Temple, may at any time advance that Hero by 1 or 1 by spending 2 . This can be paired with any or rolled, but does not have to be. This can be done as many times as the player can afford, and is listed on your Player Card as a reminder.
Adventure Dice Symbols Reference
Resolve First:
- Take Damage*: Lose 1 , and -2 or -3 at higher Magic Levels.
Second:
- Gain Power*: Gain 1 OR 0 at higher Magic Levels.
Third:
- Conjure Magic: Advance the Magic Token 1 space forward on the Magic Track.
OR if Magic Level is 3:
Take Damage*: Lose 1.
In any Order After:
- Advance in Temple: Each player may advance their Heroes on Temple Tracks requiring / .
- Attack Goblin: Each player may deal 1 damage to a Goblin one of their Heroes is currently attacking.
* If multiples of these symbols are rolled, take 1 die effect and pass any additional die effects to subsequent clockwise Adventuring players (one at a time).
Exploring Temples
Temples hold Legendary Items and Treasure Items that your Heroes can use to gain abilities. You start exploring Temples during the Day Phase by moving your Hero onto the Temple’s entrance.
You may advance your Hero on the Temple Track (4 total spaces) by using and rolled during the Night Phase, or with the help of certain Mushroom Grottos. If the next space on the Track shows 2 symbols, they must be rolled at the same time and both assigned to the same Hero. You can also Forge Ahead in addition to the dice rolled, and may advance multiple Heroes, and advance multiple spaces on the same Temple Track, if enough symbols were rolled or Forged.
- If a player’s Hero reaches the last space on a Temple Track during the Day Phase (through use of a Grotto), that player has completed that Temple and they immediately return their Hero to their Castle and gain 1 OR 1 . Then, that player can take the Item and Quest Card they achieved, advance a Legendary Item on its track on their Player Card, or both, if applicable.
- If a player’s Hero reaches the last space on a Temple Track during the Night Phase, the completion of the Temple is resolved only when that player Rests. If a player becomes Exhausted before they Rest, the Temple is not completed. Their Hero returns to their Castle, losing their progress in the Temple, even if they were on the last space.
Legendary Items
There are 3 Legendary Items that are not acquired through completing Treasure Quests. These Items require you to complete two Temples separately in order (as presented on your Player Card), and when each Temple is completed, the Item advances forward on its track. Completing both Temples at the same time does not advance the Item twice. The first Temple must be completed first, then the Item advances. After completing the second Temple needed, you gain the Legendary Item, and may now equip it to a Hero of your choice.

Legendary Item Clarifications
- The Sword: Used to help attack Goblins during the Night Phase. For the Hero with the Sword, you can spend 1 , any number of times, to deal 1 damage () to a Goblin. This can be used in conjunction with symbols rolled or independently. This action may be taken even when you’re not the player with the dice. However, the Hero must be at a Goblin Portal to use it. Note: if also equipped with a Bow and attacking from one Map Card away, the Sword ability does not apply.
- The Shield: Used to help defend against taking damage during the Night Phase. It does not matter which Hero is equipped with the Shield. When you receive 1 , instead of spending 2 to defend, you only spend 1 . Note: if is spent to defend 1 , it negates all the damage that would otherwise deal (-1 to -3 damage).
- The Staff: Used when you Rest during the Night Phase to help you learn Spells. For the Hero with the Staff, you can spend 1 , any number of times, to learn the Spell that Hero is on as if the Magic Token was advanced that number of additional spaces on the Magic Track. Do not physically advance the token. For instance, if the Magic Token is on the fifth space, you can spend 3 to act as if it were on the eighth space when you Rest. This allows you to learn Spells that are a higher level than the current progress of the Magic Track.
Attacking Goblins
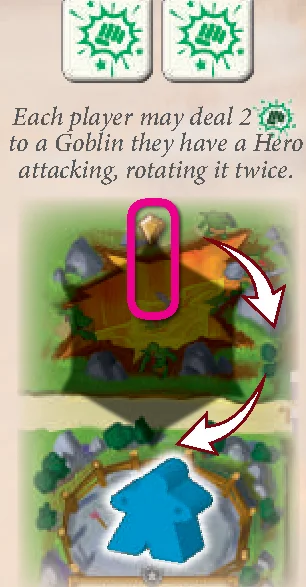
All players may use each rolled to damage a Goblin that one of their Heroes is attacking. To defeat the Goblin, you must rotate the Goblin Token 5 times clockwise. You rotate the Goblin Token once for each rolled . Each may only be used by one of your Heroes, so if you have multiple Heroes attacking Goblins, they may not share a single .
As you continue to damage the Goblin Token, rotate until the diamond on the Map Card points to the skull. Then the Goblin is defeated! Collect the Goblin Token immediately and keep it next to your Player Card to later count for final scoring. For each Goblin Token collected, your maximum Health threshold is increased by 1.
If you Rest or are Exhausted before you can defeat a Goblin you are attacking, your Hero must leave the Portal and return to your Castle. Damage dealt to the Goblin is not saved. Goblins restore to "full health" if not defeated in a single round.
Learning Spells
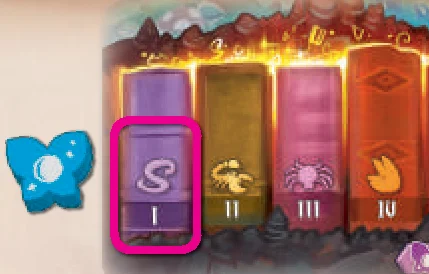
To learn a Spell means to increase your Spell Level (). Your Spell Level contributes to your Victory Points at the end of the game. Also for each Spell Level you have, your maximum Power threshold is increased by 1. Players start the game with a Spell Level of "0" (off the Magic Card). Your Spell Level is tracked using your Spell Token on the Spell Library (books) located at the bottom of the Magic Card.
To learn a Spell, you must choose to Rest during the Night Phase and two conditions must be met:
- You must have a Hero on the Obelisk whose symbol matches the Spell (book) you wish to learn (advance your Spell Token to).
- The Magic Level, as designated by the progress of the Magic Token on the Magic Track, must be high enough for you to learn the number of spell levels you need to reach that Spell.
For example, if your Spell Level is currently "0" (your Spell Token is off the card), and you wish to learn the first Spell, the Magic Level must be Level 1 range or higher, and you MUST have a Hero at that Obelisk to advance your Spell Token forward 1 Level when you Rest.
As another example, if you’re currently at Spell Level "0", you can try learning Spells that are 2 or 3 Levels higher. To do this, you must have a Hero at one of those Obelisks and the Magic Level must be Level 2 or Level 3.
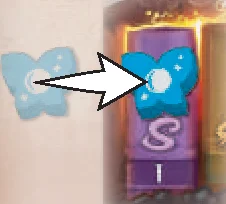
If the two conditions above have been met, then when you Rest, you learn the Spell. Advance your Spell Token to your new book on the Spell Library (this is your new Spell Level), even if this skips books you haven’t learned, and move your Max Power Marker on your Player Card to your new maximum Power threshold. If you become Exhausted, your Hero must leave the Obelisk, and you do not learn that Spell.
Health and Power Maximum Thresholds
Keep track of your maximum Health and maximum Power by marking your thresholds at the top of your Player Card with the Max Health and Max Power Markers respectively. Your Health and Power thresholds are as follows:
- : 6 + the number of Goblin Tokens you have collected
- : 3 + your current Spell Level ()
- Neither may exceed the limit of 10.
Resting
When you Rest, either by choice or by becoming Exhausted, you flip your Adventure Card over to its "Rest" side. If you were just passed the dice, pass them again clockwise. You can no longer Adventure or take part in rolling. You now must resolve your Heroes depending on the Regions in which they are located.
Return your Heroes to your Castle:
- All of your Heroes on Portals, Obelisks, or on the last space of a Temple Track MUST return to your Castle. If you chose to Rest (not became Exhausted): any Hero on the last space of a Temple Track completes that Temple, and any Hero on an Obelisk learns that Spell if the Magic Level allows.
- Heroes on Castles, Grottos, or on a space of a Temple Track, other than the last space, MUST remain for the next Day Phase. Unless you became Exhausted, then all your Heroes return to your Castle.
- For each Hero returned, gain 1 OR 1 . If you became Exhausted, set your Health Token to 6 and your Power Token to 3 instead.
Night Phase Completion & Resolution
When all players have Rested, by choice or from Exhaustion, move to Resolution.
First, all players should have already resolved their Heroes when they Rested. This includes collecting defeated Goblin Tokens, learning Spells, and completing Temples. Next, players perform the following to set up for the next round:
- Move the Magic Token back to the first space on the Magic Track. The progress of the Magic Token resets at the end of every round.
- Flip any passive Goblin Tokens (green) on Portals to their aggressive sides (red).
- Fill any empty Portals (without a Goblin Token) with a new passive Goblin Token (green) from the supply.
- Flip all Movement Cards to their active sides.
- If the First Player Token is showing the side, then the rightmost Quest Card is discarded to a discard pile. Shift the remaining Quest Cards to the right, and deal a new Quest Card face up to the left. There should be 3 Quest Cards face up to begin the next round.
- Pass the First Player Token to the next player clockwise with the side face up.
- Advance the Round Token to the next number on the Round Card.
Game End
The game’s end is triggered at the completion of the Night Phase of round 5.
Final Scoring
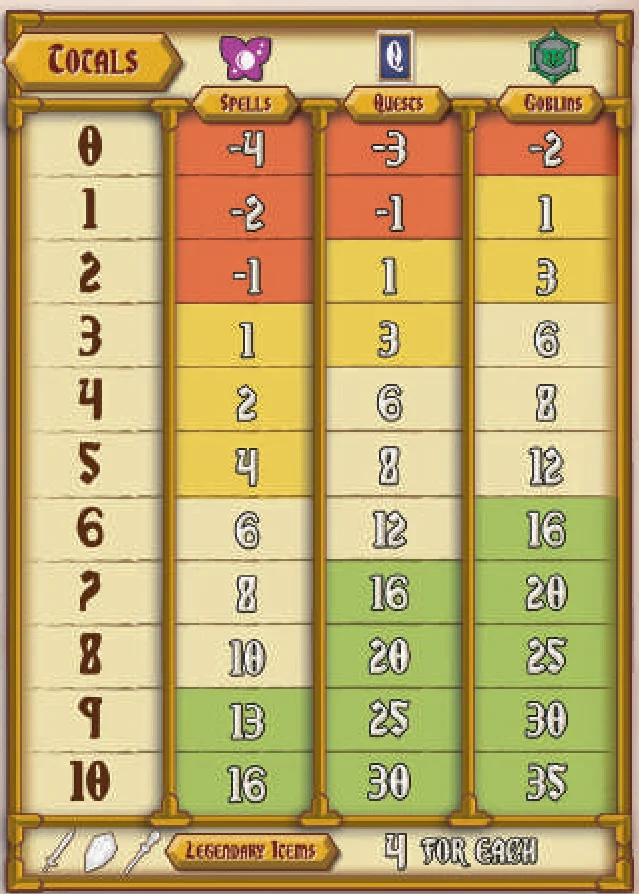
When the game ends, players add their Victory Points. Players score Victory Points from four different sources:
- Total Quests Completed
- Total Goblins Defeated (Tokens)
- Total Spells Learned (Spell Level)
- Legendary Items found (4 Victory Points each)
The player with the most Victory Points wins the game! In the event of a tie, check these tie breaking conditions in this order:
- Most Quests Completed
- Most Goblins Defeated
- Highest Spell Level
- Most Items, including Treasure and Legendary Items.
If a tie remains, tied players share the victory!
GloomFall Game Variant
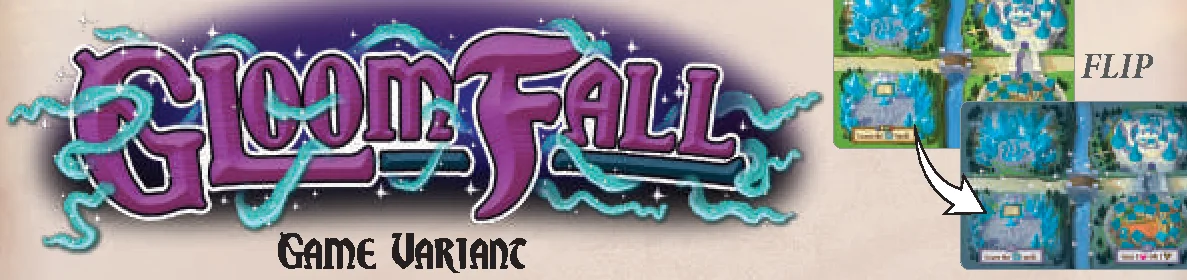
Just when you thought the impending struggles of the Mushroom Realm couldn’t get any darker, a gloomy haze appears, covering the world in a fog and making your experience more difficult. The GloomFall Variant adds additional challenges to gameplay.
Game Setup: Use the Gloom side for each Map Card while creating the Land Map.
Gameplay: There are slight differences to the Regions on Map Cards:
- Goblin Portals: When new Goblins Tokens appear at Portals, they are placed aggressive side (red) up.
- Temples: The second space on Temple Tracks has a double icon.
- Mushroom Grottos: New abilities that add more chance and actions.
Solo Variant Rules — “The Legend of the Chosen One”
The Legend of the Chosen One tells of one noble hero, guided by destiny, who alone can thwart the minions of evil and bring peace to this land. That hero is you! The fate of our kingdom rests on your shoulders….
Game Setup
The game is set up the same as a multiplayer game. However, flip the Magic Card to the “1 player” side. Also, the First Player Token is not needed and should be left in the box.
Choose a Difficulty Level
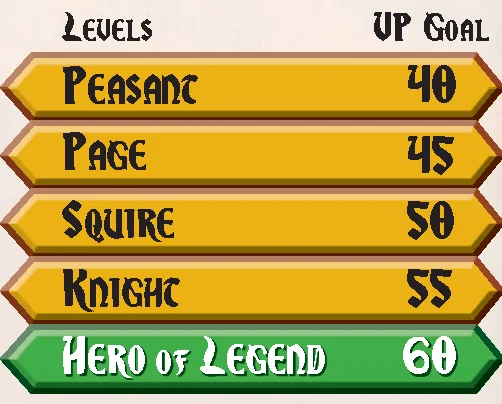
Prior to starting your game, you should select one of 5 difficulty levels to take on. For each challenge, you will have 5 rounds to reach that Victory Point Goal, else the realm will crumble to ruin!
Day Phase — Solo Movement Drafting
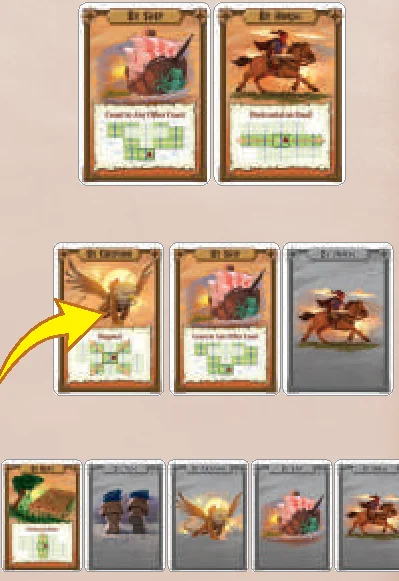
At the beginning of the Day Phase, shuffle the 5 Movement Cards and then randomly deal 2 face up. Choose one of the Movement Cards. You may use that movement to move a Hero or you may choose to Idle, just as you would in the multiplayer game. That Movement Card is then flipped and cannot be used again this round.
Then, randomly deal another Movement Card face up, giving you two movement options again. Select one, move, and then deal another card as before. This drafting and choosing continues until you have completed and flipped 4 Movement Cards. Then move to the Night Phase.
Night Phase — Adventuring
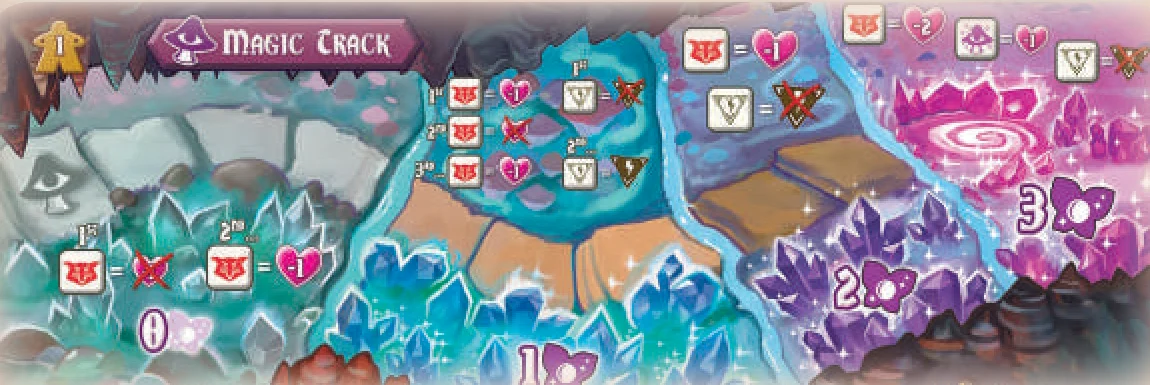
As you Adventure, you are always the player with the dice. The Magic Track and how it affects dice actions for each Magic Level are different in the Solo Variant:
- Level 0 (0 ): The first is ignored. The second and all other ‘s deal -1 in damage.
- Level 1 (1 ): The first deals -1 in damage. The second is ignored. The third and all other ‘s deal -1 in damage. The first is ignored. The second and all other ‘s give power.
- Level 2 (2 ): All ‘s deal -1 in damage. All ‘s do not give power.
- Level 3 (3 ): All ‘s deal -2 in damage. All ‘s do not give power, and all ‘s now deal -1 in damage.
Night Phase — Resolution
The rightmost Quest Card is always discarded and other cards are shifted to the right, regardless of whether the player has completed one or not.
When flipping over Goblins Tokens to the aggressive side (red), only 3 Goblins will turn aggressive at the end of each Night Phase. The player chooses which 3 turn aggressive.
End of Game
If you reach the Victory Point Goal you decided on by the time the five rounds have ended, you are victorious! If you fail to reach your Victory Point Goal, the Mushroom Realm crumbles to ruin and you lose.
Credits
- Designer: Scott Almes
- Game Developer: Michael Coe
- Illustrator: Miguel Coimbra
- Graphic Designer: Benjamin Shulman
- Editor: Richard A. Edwards
- Logo Design: Adam P. McIver
Honorary Producers
Stephen B. Eckman, Robert Corbett, Gregg Almes, Jonathan Wilkerson, Mike Paul, Colin McRavey, Jason Neufeld, Robert Slack, Jung-Hun Lim, and MendoZen
Introduction & Components
Prologue
A world at peace has been torn apart by the opening of chasms across the land. Goblins spew forth from the underworld, pouring into the sacred mushroom grottos and destroying eons of ancient knowledge and magic. To end this, you must venture forth on an epic quest!
There are many ways to help save the Mushroom Realm: defeating nasty Goblins, learning ancient Spells, raiding dangerous Temples, acquiring powerful Items, and completing treacherous Quests. Along the way, you’ll need to rely on planning and wit, but be careful not to push your luck too far!
Objective and Overview
The objective is to have the most Victory Points at the end of five rounds. Victory Points are earned from completing Quests, defeating Goblins, learning Spells, and acquiring Legendary Items.
Each round is broken into two phases: Day and Night.
- During the Day, players use different methods of movement to send their heroes around the land completing Quests, visiting helpful Mushroom Grottos, and positioning themselves to explore Temples, learn Spells at Obelisks, and attack Goblins as they emerge from their Portals.
- During the Night, players press their luck looking to resolve what they set up during the Day. To do this, players will take turns rolling Adventure Dice, sharing the results, and hoping for good fortune. But if they don’t know when to Rest, they risk losing their progress for the round.
After five rounds, the game is over and Victory Points are totaled. The player with the most is crowned the winner!
Components
- 4 Player Cards
- 17 Map Cards
- 1 Magic Card & 1 Magic Token
- 1 Round Card & 1 Round Token
- 24 Quest Cards
- 4 Adventure Cards
- 5 Movement Cards
- 5 Adventure Dice (all the same)
- 16 Goblin Tokens
- 12 Heroes (ITEMeeples™) (3 each in 4 player colors)
- 4 Spell Tokens (4 player colors)
- 4 Health & 4 Power Tokens
- 12 Legendary Items (Sword, Shield, and Staff; 1 set for each player)
- 12 Treasure Items
- 1 First Player Token
- 1 Item Rack (assemble with 3 parts)
- 4 Max Health and 4 Max Power Markers
Setup
Game Setup (for 2-4 Players)
- Give each player:
- A. 1 Player Card (their selected color, or randomly).
- B. 3 Heroes in their Player Card’s color.
- C. 1 Health Token and 1 Max Health Marker, both placed on the number 6 at the top of the Player Card.
- D. 1 Power Token and 1 Max Power Marker, both placed on the number 3 at the top of the Player Card.
- E. 1 Adventure Card, with the "Adventure" side face up.
- F. 1 Set of Legendary Items (Sword, Shield, and Staff), placed on the first (left) space of their corresponding tracks on the Player Card.
- Place the Magic Card, "2-4 player" side face up, on the table:
- A. Place the players’ Spell Tokens (matching their player colors) off to the left of this card near the Spell Library (denoted as books on the Magic Card), designating a spell level of "0".
- B. Place the Magic Token onto the marked first space of the Magic Track.
- Place the Round Card on the table, and on the right side of the card, place the Round Token on the number 1, designating the first of five rounds.
- Create the Land Map (follow the instructions on next page).
- Place the 3 Heroes of each player on the Map Card with the Castle matching the color of their Player Cards.
- Place Goblin Tokens, passive (green) side face up, on each of the 7 Goblin Portals on the Land Map, matching the diamond on the token with the diamond on the Map Card. Place the unused Goblin Tokens in a stack where all players can reach them.
- Place the 5 Movement Cards, face up, in a row within reach of the players.
- Shuffle the Quest Cards and place them into a deck, face down. Deal 3 face up Quest Cards in a row so all players can easily see and reach them. There should always be at least 1 Movement Quest and 1 Treasure Quest face up in the row. If there is not, discard the last card in the row and draw a new one until this requirement is met.
- Place the Item Rack, along with the 12 Treasure Items in it, and the 5 Adventure Dice within reach of the players.
- Give the First Player Token to the player who has most recently done a scavenger hunt, or as a group determine who gets the token. This player goes first. The token should be placed with the face up at the start of the game.
Creating the Land Map
Separate the Map Cards into 2 decks: 4 Castle Map Cards (with Castles) and 13 Regular Map Cards. Using the Bright side of each Map Card, lay out the Land Map as follows:
- Shuffle the Regular Map Cards, then deal 5 into a "cross."
- Randomly place all 4 Castle Map Cards in the corners of the "cross."
- Deal 8 Regular Map Cards, 2 to each side of the center cards. These Cards, along with the Castle Map Cards, will serve as the Coast of the Land Map.
Day Phase — Movement & Quests
Day Phase Overview
The Day Phase consists of 4 turns, regardless of the number of players, and starts with the player who holds the First Player Token, then proceeds clockwise around the table. This means that only 4 of the 5 Movement Cards will be used during a single round.
On your turn:
- Select a Movement Card and slide it up so that it stands higher in the row, then choose from A or B:
- A. Move 1 of your Heroes onto a Region of a new Map Card using the travel method depicted on the Movement Card.
- B. Remain Idle and not move.
- Going clockwise, each other player must either use the selected Movement Card or choose to remain Idle instead.
- After all players have moved or remained Idle, flip the selected Movement Card face down and place it back into the row to show it is no longer available this round. The next player selects a new Movement Card and the procedure is repeated until 4 Movement Cards have been played.
This completes the Day Phase.
Hero Movement
There are five types of Movement Cards in the game, each describing a unique travel method. The travel method for the turn is the same whether you selected the card yourself or you are following the player who selected the card.
When a Hero moves, they must always move to a different Map Card. A Hero cannot be moved to a Region on the same Map Card. When moving across any number Map Cards, your Hero is considered to be moving through each Map Card between the start and finish locations.
The 5 Movement Cards and their respective travel methods are:
- By Horse: Move 1 Hero horizontally to any different Map Card along the "road".
- By Raft: Move 1 Hero vertically to any different Map Card along the "river".
- By Gryphon: Move 1 Hero diagonally to any different Map Card along the diagonal path.
- By Ship: Move 1 Hero on the Coast (perimeter of the Land Map) to any different Map Card on the Coast. Map Cards passed along the Coast are considered to have been "moved through."
- By Foot: Move 1 Hero in any direction to any adjacent Map Card.
Moving Past Goblins
Goblin Tokens have two sides: Passive Goblins (green) and Aggressive Goblins (red).
When moving through a Map Card (not your start or destination) with an aggressive Goblin (red) at its Portal, you must spend 1 Power (move the Token down 1 number) for EACH such Map Card that your Hero moves through. Then flip that Goblin Token to its passive side (green) with the diamond on the Goblin Token aligning with diamond on the Map Card.
- If you end your movement at a Portal with an aggressive Goblin (red), flip it to its passive side (green) without spending .
- If you do not have the to move past an aggressive Goblin (red), you may not make that movement.
Idling — Choosing to Not Move
You may choose to Idle instead of taking the selected movement. In doing so, you do not move a Hero, and play passes to the next player. In addition, if you have at least 1 Hero in any player’s Castle you may gain 1 Health () OR 1 Power () up to your Maximum Threshold. You only gain this benefit once each time you Idle, and not for each Hero at your or separate Castles.
Regions on the Map Cards
Each Map Card has two Regions: a Left and a Right Region (the top and bottom of each side are considered to be the same Region). When you move your Hero to a Map Card, you must choose on which Region of Map Card your Hero is going to be placed, either on the Left or Right. Some Regions have actions that may be taken when you move there. A Hero who starts on a Region like this must move off the Map Card and back onto it during a subsequent movement in order to take that Region’s action again. The different Regions are:
- Temples: Place your Hero on the entrance of the Temple. You may attempt to complete this Temple and potentially gain Items. Only two players may have 1 Hero (each) in any part of the same Temple at the same time.
- Spell Obelisks: Place your Hero in front of the Obelisk’s spell book. You may attempt to learn the Spell of that region during the Night Phase. Any number of players, 1 Hero each, can be in this Region learning the same Spell.
- Mushroom Grottos: Place your Hero on the Grotto, and then you may immediately take the action that is described. Multiple Heroes may occupy a single Grotto at the same time. Heroes in a Grotto do not perform any actions during the Night Phase. Any number of players, 1 Hero each, can be in this Region.
- Goblin Portal: Place your Hero on the circle below the Goblin Token. The Hero is considered to be Attacking the Goblin, and you may attempt to defeat it. ONLY 1 Hero can attack a Goblin at a time.
- Castles: Place your Hero on a Castle to immediately gain 1 OR 1 . You also may gain this if you Idle while one of your Heroes is at a Castle. Multiple Heroes may be in the same Castle at the same time. NO LIMIT to how many Heroes you or other players may have.
Quest Cards
The 3 face up Quest Cards are available for any player to complete, provided they meet the required conditions. There are two types of Quests: Movement Quests and Treasure Quests.
Movement Quests
Movement Quests are completed by moving your Heroes in the manner described on the Quest Card. After moving, when your Heroes meet the requirements, declare it completed and take the Quest Card, immediately gaining the reward listed on it. Then slide the card under the "Completed Quests" section of your Player Card to count for final scoring.
Treasure Quests
To complete a Treasure Quest, you must complete the Temple listed on the Quest Card. You can complete a Treasure Quest during either the Day or Night Phase.
- To complete a Treasure Quest during the Day Phase, your Hero must be the first Hero to reach the last space on the Temple Track.
- To complete a Treasure Quest during the Night Phase, you must be the first player to Rest, with a Hero on the last space on the Temple Track.
In either case, when you complete a Quest Card, you resolve it immediately by gaining the Treasure Item, taking the Quest Card and sliding it underneath your Player Card under "Completed Quests," and returning your Hero to your Castle.
Equipping Heroes
When you gain an Item, you must immediately equip it to any of your Heroes that has an available "hand" for it. Then gain the completed Treasure Quest Card, if applicable. Each Hero can hold up to two Items. The Hero who carries the Item gains its benefit as described on the Quest Card. You MAY rearrange Items amongst YOUR Heroes on YOUR Castle freely. If you gain an Item but none of your Heroes has an open "hand", keep the Item near your Player Card. You may exchange it freely with your Heroes on your Castle.
The Quest Card Row
Whenever a Quest Card is taken from the row, immediately slide the rest of the Quest Cards to the right and replace the leftmost spot with a new Quest Card from the top of the Quest deck. If the deck ever runs out, shuffle the discard pile into a new deck and continue playing. If there are no cards in the discard pile, the game continues without Quests.
Note: You may only complete one Quest per turn. If moving a Hero would result in a player completing more than one Quest, that player can only choose 1 Quest Card to take.
Flip the First Player Token
The first time during the Day Phase that a Quest Card is taken, the First Player Token flips over to the no Quest Card () side. This is to remind the players not to discard a Quest Card at the end of the round.
Day Phase Completion
After 4 turns have been taken, and 4 Movement Cards have been flipped, the Day Phase is over and the Night Phase begins.
Night Phase — Adventure & Resolution
Night Phase Overview
During this phase, players will take turns rolling the 5 Adventure Dice in an effort to complete three different types of Adventures:
- Exploring for Items at Temples
- Attacking Goblins at Portals
- Learning Spells at Obelisks
Each player should start the phase with their Adventure Card with the "Adventure" side face up. A player is considered to be Adventuring until they have Rested. The player with the First Player Token takes the 5 Adventure Dice and starts the Night Phase.
The flow of Adventuring is as follows:
- Choose to Adventure or Rest: The player with the dice must first choose to Adventure or Rest:
- A. If a player chooses to Rest, they flip their Adventure Card over to the "Rest" side and pass the dice clockwise to the next Adventuring player.
- B. If a player chooses to Adventure (leaving their card "Adventure" side up), they follow steps 2–4 below.
- Roll Dice: The player with the dice rolls them where all players can see them. The die actions are resolved in the following order:
- First: Take Damage ()
- Second: Gain Power ()
- Third: Conjure Magic / Take Damage ()
- First: Take Damage (
- Resolve Adventures: All Adventuring players may simultaneously use these symbols toward resolving their own Adventures:
- Torch () and Scroll () (for Exploring a Temple)
- Attack Goblin ()
- Torch (
- Pass Dice: The dice are passed clockwise to the next Adventuring player who starts by choosing to Adventure or Rest. Once all players have chosen to Rest, or are Exhausted, move onto Resolution.
Adventure Dice Actions
Take Damage
Count up each rolled. This represents the total damage dealt to the Adventuring players, and it is equally distributed clockwise starting with the player who rolled the dice and going to each Adventuring player. Going clockwise, each player loses 1 Health (-1 ) for each damage taken until all the damage is dealt.
For instance, if you roll 3 , you take 1 , the next Adventuring player takes 1 , and the Adventuring player after that takes 1 . In the case that there are only 2 players still Adventuring, you would receive the third, taking 2 total.
Magic Level Damage
The magic level () of the Magic Track may change the amount of total damage done by a . Damage is still distributed 1 symbol at a time.
Defending Damage
You may defend a that would deal damage by spending 2 . This action must happen immediately when each is taken.
Becoming Exhausted
If your Health Token ever reaches 0 , you become Exhausted. Flip your Adventure Card to the Rest side and immediately return ALL of your Heroes to your Castle. Set your Health Token to 6 and your Power Token to 3 for the next round (regardless of your Max Health or Max Power) and lose 1 Spell Level (-1 ) in the Spell Library (reduce Max Power Token if needed). You cannot resolve any more dice actions this round.
Gain Power
Each equals 1 (or 0 depending on the Magic Level) Power () gained by the Adventuring players. Just as taking damage is distributed clockwise 1 die at a time, so is gaining Power. The first is gained by the player who rolled the dice and then additional rolled are gained clockwise by the next Adventuring players.
Conjure Magic or Take Damage
For each rolled, advance the Magic Token forward 1 space on the Magic Track. This designates the Magic Level, which determines how many Spells a player can learn.
If the Magic Token is on the last space on the Magic Track (Level 3 ), then each additional rolled represents 1 damage dealt to the players. Damage is dealt first to the player who rolled the dice and then clockwise to the other Adventuring players. Also, higher Magic Levels alter the damage dealt by and Power given by .
The Magic Levels are:
- Level 0 (0 ): Players cannot learn a Spell; all dice are resolved normally.
- Level 1 (1 ): Players can learn a Spell 1 Level higher than their current Spell Level (represented by books); all dice are resolved normally.
- Level 2 (2 ): Players can learn a Spell up to 2 Levels higher than their current Spell Level; ‘s deal -2 in damage and ‘s do not give power.
- Level 3 (3 ): Players can learn a Spell up to 3 Levels higher than their current Spell Level; ‘s deal -3 in damage, ‘s do not give power, and now ‘s no longer conjure magic and instead deal -1 in damage.
Torches and Scrolls
All Adventuring players can use and to advance their Heroes who are currently exploring Temples to the next space on their Temple Tracks. A space marked with or requires 2 / 2 to advance a Hero on to it. Each die symbol may only be used by one of your Heroes, so if you have multiple Heroes exploring Temples, they may not share a single die symbol.
Forge Ahead
During the Night Phase only, any player who is still Adventuring, and who has a Hero exploring a Temple, may at any time advance that Hero by 1 or 1 by spending 2 . This can be paired with any or rolled, but does not have to be. This can be done as many times as the player can afford, and is listed on your Player Card as a reminder.
Adventure Dice Symbols Reference
Resolve First:
- Take Damage*: Lose 1 , and -2 or -3 at higher Magic Levels.
Second:
- Gain Power*: Gain 1 OR 0 at higher Magic Levels.
Third:
- Conjure Magic: Advance the Magic Token 1 space forward on the Magic Track.
OR if Magic Level is 3:
Take Damage*: Lose 1.
In any Order After:
- Advance in Temple: Each player may advance their Heroes on Temple Tracks requiring / .
- Attack Goblin: Each player may deal 1 damage to a Goblin one of their Heroes is currently attacking.
* If multiples of these symbols are rolled, take 1 die effect and pass any additional die effects to subsequent clockwise Adventuring players (one at a time).
Exploring Temples
Temples hold Legendary Items and Treasure Items that your Heroes can use to gain abilities. You start exploring Temples during the Day Phase by moving your Hero onto the Temple’s entrance.
You may advance your Hero on the Temple Track (4 total spaces) by using and rolled during the Night Phase, or with the help of certain Mushroom Grottos. If the next space on the Track shows 2 symbols, they must be rolled at the same time and both assigned to the same Hero. You can also Forge Ahead in addition to the dice rolled, and may advance multiple Heroes, and advance multiple spaces on the same Temple Track, if enough symbols were rolled or Forged.
- If a player’s Hero reaches the last space on a Temple Track during the Day Phase (through use of a Grotto), that player has completed that Temple and they immediately return their Hero to their Castle and gain 1 OR 1 . Then, that player can take the Item and Quest Card they achieved, advance a Legendary Item on its track on their Player Card, or both, if applicable.
- If a player’s Hero reaches the last space on a Temple Track during the Night Phase, the completion of the Temple is resolved only when that player Rests. If a player becomes Exhausted before they Rest, the Temple is not completed. Their Hero returns to their Castle, losing their progress in the Temple, even if they were on the last space.
Legendary Items
There are 3 Legendary Items that are not acquired through completing Treasure Quests. These Items require you to complete two Temples separately in order (as presented on your Player Card), and when each Temple is completed, the Item advances forward on its track. Completing both Temples at the same time does not advance the Item twice. The first Temple must be completed first, then the Item advances. After completing the second Temple needed, you gain the Legendary Item, and may now equip it to a Hero of your choice.
Legendary Item Clarifications
- The Sword: Used to help attack Goblins during the Night Phase. For the Hero with the Sword, you can spend 1 , any number of times, to deal 1 damage () to a Goblin. This can be used in conjunction with symbols rolled or independently. This action may be taken even when you’re not the player with the dice. However, the Hero must be at a Goblin Portal to use it. Note: if also equipped with a Bow and attacking from one Map Card away, the Sword ability does not apply.
- The Shield: Used to help defend against taking damage during the Night Phase. It does not matter which Hero is equipped with the Shield. When you receive 1 , instead of spending 2 to defend, you only spend 1 . Note: if is spent to defend 1 , it negates all the damage that would otherwise deal (-1 to -3 damage).
- The Staff: Used when you Rest during the Night Phase to help you learn Spells. For the Hero with the Staff, you can spend 1 , any number of times, to learn the Spell that Hero is on as if the Magic Token was advanced that number of additional spaces on the Magic Track. Do not physically advance the token. For instance, if the Magic Token is on the fifth space, you can spend 3 to act as if it were on the eighth space when you Rest. This allows you to learn Spells that are a higher level than the current progress of the Magic Track.
Attacking Goblins
All players may use each rolled to damage a Goblin that one of their Heroes is attacking. To defeat the Goblin, you must rotate the Goblin Token 5 times clockwise. You rotate the Goblin Token once for each rolled . Each may only be used by one of your Heroes, so if you have multiple Heroes attacking Goblins, they may not share a single .
As you continue to damage the Goblin Token, rotate until the diamond on the Map Card points to the skull. Then the Goblin is defeated! Collect the Goblin Token immediately and keep it next to your Player Card to later count for final scoring. For each Goblin Token collected, your maximum Health threshold is increased by 1.
If you Rest or are Exhausted before you can defeat a Goblin you are attacking, your Hero must leave the Portal and return to your Castle. Damage dealt to the Goblin is not saved. Goblins restore to "full health" if not defeated in a single round.
Learning Spells
To learn a Spell means to increase your Spell Level (). Your Spell Level contributes to your Victory Points at the end of the game. Also for each Spell Level you have, your maximum Power threshold is increased by 1. Players start the game with a Spell Level of "0" (off the Magic Card). Your Spell Level is tracked using your Spell Token on the Spell Library (books) located at the bottom of the Magic Card.
To learn a Spell, you must choose to Rest during the Night Phase and two conditions must be met:
- You must have a Hero on the Obelisk whose symbol matches the Spell (book) you wish to learn (advance your Spell Token to).
- The Magic Level, as designated by the progress of the Magic Token on the Magic Track, must be high enough for you to learn the number of spell levels you need to reach that Spell.
For example, if your Spell Level is currently "0" (your Spell Token is off the card), and you wish to learn the first Spell, the Magic Level must be Level 1 range or higher, and you MUST have a Hero at that Obelisk to advance your Spell Token forward 1 Level when you Rest.
As another example, if you’re currently at Spell Level "0", you can try learning Spells that are 2 or 3 Levels higher. To do this, you must have a Hero at one of those Obelisks and the Magic Level must be Level 2 or Level 3.
If the two conditions above have been met, then when you Rest, you learn the Spell. Advance your Spell Token to your new book on the Spell Library (this is your new Spell Level), even if this skips books you haven’t learned, and move your Max Power Marker on your Player Card to your new maximum Power threshold. If you become Exhausted, your Hero must leave the Obelisk, and you do not learn that Spell.
Health and Power Maximum Thresholds
Keep track of your maximum Health and maximum Power by marking your thresholds at the top of your Player Card with the Max Health and Max Power Markers respectively. Your Health and Power thresholds are as follows:
- : 6 + the number of Goblin Tokens you have collected
- : 3 + your current Spell Level ()
- Neither may exceed the limit of 10.
Resting
When you Rest, either by choice or by becoming Exhausted, you flip your Adventure Card over to its "Rest" side. If you were just passed the dice, pass them again clockwise. You can no longer Adventure or take part in rolling. You now must resolve your Heroes depending on the Regions in which they are located.
Return your Heroes to your Castle:
- All of your Heroes on Portals, Obelisks, or on the last space of a Temple Track MUST return to your Castle. If you chose to Rest (not became Exhausted): any Hero on the last space of a Temple Track completes that Temple, and any Hero on an Obelisk learns that Spell if the Magic Level allows.
- Heroes on Castles, Grottos, or on a space of a Temple Track, other than the last space, MUST remain for the next Day Phase. Unless you became Exhausted, then all your Heroes return to your Castle.
- For each Hero returned, gain 1 OR 1 . If you became Exhausted, set your Health Token to 6 and your Power Token to 3 instead.
Night Phase Completion & Resolution
When all players have Rested, by choice or from Exhaustion, move to Resolution.
First, all players should have already resolved their Heroes when they Rested. This includes collecting defeated Goblin Tokens, learning Spells, and completing Temples. Next, players perform the following to set up for the next round:
- Move the Magic Token back to the first space on the Magic Track. The progress of the Magic Token resets at the end of every round.
- Flip any passive Goblin Tokens (green) on Portals to their aggressive sides (red).
- Fill any empty Portals (without a Goblin Token) with a new passive Goblin Token (green) from the supply.
- Flip all Movement Cards to their active sides.
- If the First Player Token is showing the side, then the rightmost Quest Card is discarded to a discard pile. Shift the remaining Quest Cards to the right, and deal a new Quest Card face up to the left. There should be 3 Quest Cards face up to begin the next round.
- Pass the First Player Token to the next player clockwise with the side face up.
- Advance the Round Token to the next number on the Round Card.
End of Game & Scoring
Game End
The game’s end is triggered at the completion of the Night Phase of round 5.
Final Scoring
When the game ends, players add their Victory Points. Players score Victory Points from four different sources:
- Total Quests Completed
- Total Goblins Defeated (Tokens)
- Total Spells Learned (Spell Level)
- Legendary Items found (4 Victory Points each)
The player with the most Victory Points wins the game! In the event of a tie, check these tie breaking conditions in this order:
- Most Quests Completed
- Most Goblins Defeated
- Highest Spell Level
- Most Items, including Treasure and Legendary Items.
If a tie remains, tied players share the victory!
Variants
GloomFall Game Variant
Just when you thought the impending struggles of the Mushroom Realm couldn’t get any darker, a gloomy haze appears, covering the world in a fog and making your experience more difficult. The GloomFall Variant adds additional challenges to gameplay.
Game Setup: Use the Gloom side for each Map Card while creating the Land Map.
Gameplay: There are slight differences to the Regions on Map Cards:
- Goblin Portals: When new Goblins Tokens appear at Portals, they are placed aggressive side (red) up.
- Temples: The second space on Temple Tracks has a double icon.
- Mushroom Grottos: New abilities that add more chance and actions.
Solo Variant Rules — “The Legend of the Chosen One”
The Legend of the Chosen One tells of one noble hero, guided by destiny, who alone can thwart the minions of evil and bring peace to this land. That hero is you! The fate of our kingdom rests on your shoulders….
Game Setup
The game is set up the same as a multiplayer game. However, flip the Magic Card to the “1 player” side. Also, the First Player Token is not needed and should be left in the box.
Choose a Difficulty Level
Prior to starting your game, you should select one of 5 difficulty levels to take on. For each challenge, you will have 5 rounds to reach that Victory Point Goal, else the realm will crumble to ruin!
Day Phase — Solo Movement Drafting
At the beginning of the Day Phase, shuffle the 5 Movement Cards and then randomly deal 2 face up. Choose one of the Movement Cards. You may use that movement to move a Hero or you may choose to Idle, just as you would in the multiplayer game. That Movement Card is then flipped and cannot be used again this round.
Then, randomly deal another Movement Card face up, giving you two movement options again. Select one, move, and then deal another card as before. This drafting and choosing continues until you have completed and flipped 4 Movement Cards. Then move to the Night Phase.
Night Phase — Adventuring
As you Adventure, you are always the player with the dice. The Magic Track and how it affects dice actions for each Magic Level are different in the Solo Variant:
- Level 0 (0 ): The first is ignored. The second and all other ‘s deal -1 in damage.
- Level 1 (1 ): The first deals -1 in damage. The second is ignored. The third and all other ‘s deal -1 in damage. The first is ignored. The second and all other ‘s give power.
- Level 2 (2 ): All ‘s deal -1 in damage. All ‘s do not give power.
- Level 3 (3 ): All ‘s deal -2 in damage. All ‘s do not give power, and all ‘s now deal -1 in damage.
Night Phase — Resolution
The rightmost Quest Card is always discarded and other cards are shifted to the right, regardless of whether the player has completed one or not.
When flipping over Goblins Tokens to the aggressive side (red), only 3 Goblins will turn aggressive at the end of each Night Phase. The player chooses which 3 turn aggressive.
End of Game
If you reach the Victory Point Goal you decided on by the time the five rounds have ended, you are victorious! If you fail to reach your Victory Point Goal, the Mushroom Realm crumbles to ruin and you lose.
Credits
Credits
- Designer: Scott Almes
- Game Developer: Michael Coe
- Illustrator: Miguel Coimbra
- Graphic Designer: Benjamin Shulman
- Editor: Richard A. Edwards
- Logo Design: Adam P. McIver
Honorary Producers
Stephen B. Eckman, Robert Corbett, Gregg Almes, Jonathan Wilkerson, Mike Paul, Colin McRavey, Jason Neufeld, Robert Slack, Jung-Hun Lim, and MendoZen