Azul
2017
Choose colored tiles from shared suppliers, build elegant palace patterns, and outscore opponents while avoiding wasted supplies.
45
minutes
2 - 4
player(s)
8+
Medium Light


About this board game
Azul is a tile-laying game for 2–4 players with a 45-minute play time, released in 2017. Players take on the role of tile-laying artists challenged to embellish the walls of the Royal Palace of Evora.
The game draws on the history of azulejos, ceramic tiles originally made in white and blue. Portuguese king Manuel I was captivated by the Moorish decorative tiles at the Alhambra palace in Southern Spain and ordered his own palace to be decorated with similar wall tiles.
During play, players draft colored tiles from suppliers and place them on their individual player boards. The goal is to arrange these tiles as they decorate the palace walls, with scoring taking place later in each round.
- Draft colored tiles from the available suppliers.
- Place tiles on your player board to create palace decorations.
- Score extra points for specific patterns and completed sets.
- Manage supplies carefully, because wasted tiles harm your score.
Every placement contributes to the evolving decoration of your board, while completed sets and particular patterns provide opportunities for additional points. At the same time, unused or wasted supplies can reduce your score, making careful tile selection important.
Azul combines a clear drafting system with the visual appeal of building a tiled palace wall. When the game ends, the player with the most points wins.
Mechanics
Designer
Illustrators
/pic7182955.jpg)

Board Game Rules for
Azul
Introduced by the Moors, azulejos (originally white and blue ceramic tiles) were fully embraced by the Portuguese, when their king Manuel I, on a visit to the Alhambra palace in Southern Spain, was mesmerized by the stunning beauty of the Moorish decorative tiles. The king, awestruck by the interior beauty of the Alhambra, immediately ordered that his own palace in Portugal be decorated with similar wall tiles. Azul brings you, a tile laying artist, to embellish the walls of the Royal Palace of Evora.
A GAME BY MICHAEL KIESLING
Object of the Game
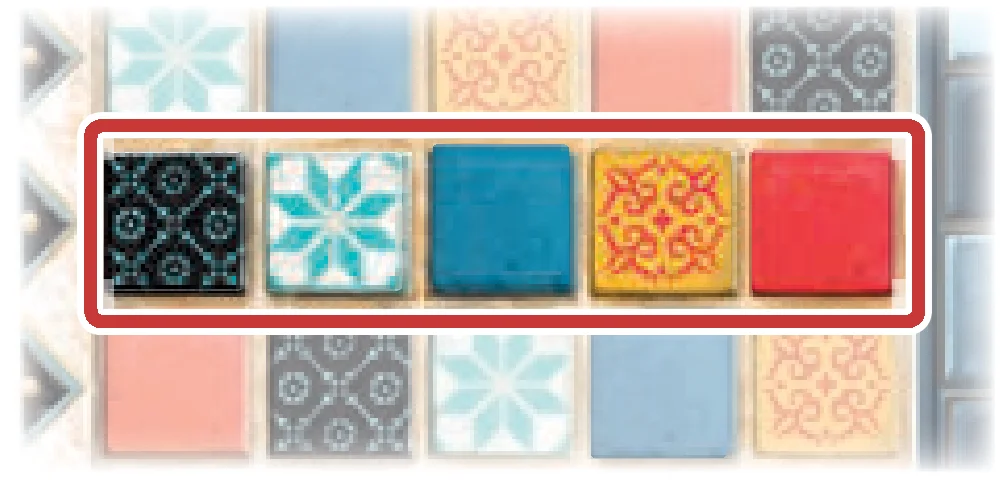
To be the player with the most points at the end of the game. The game ends after the round in which at least one player has completed a horizontal line of 5 consecutive tiles on her wall.
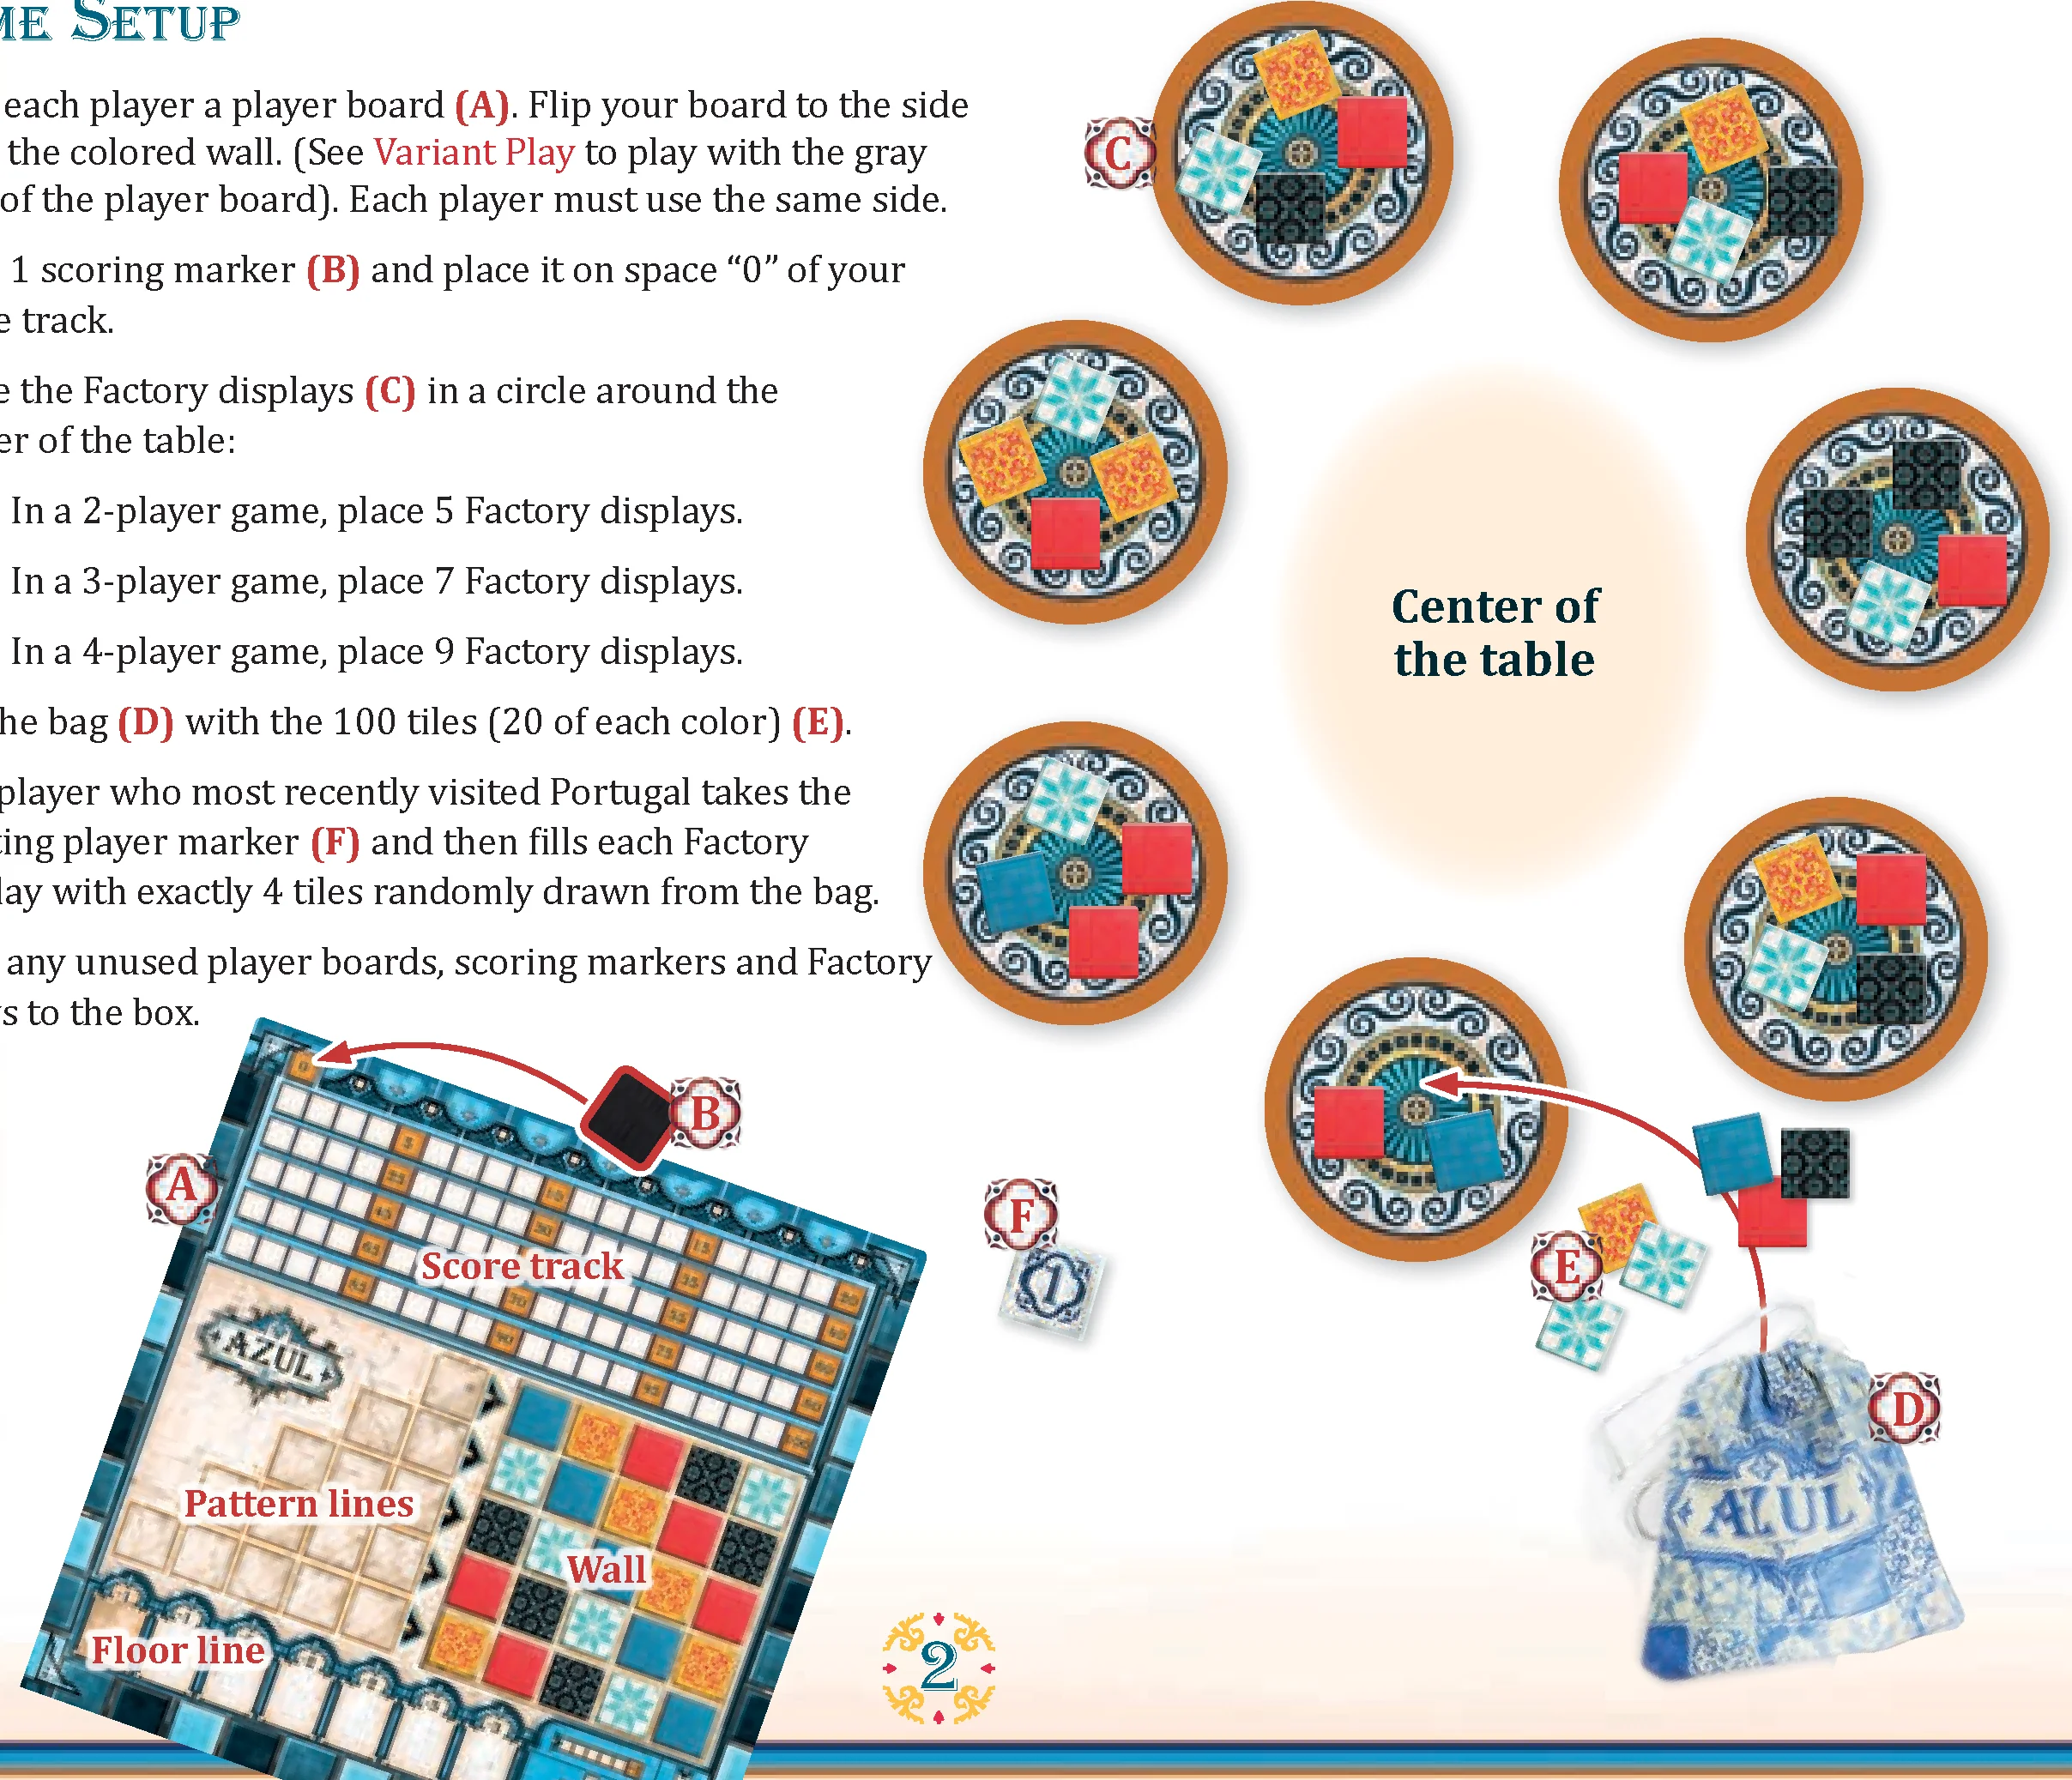
- Give each player a player board (A). Flip your board to the side with the colored wall. (See Variant Play to play with the gray side of the player board). Each player must use the same side.
- Take 1 scoring marker (B) and place it on space “0” of your score track.
- Place the Factory displays (C) in a circle around the center of the table:
- In a 2-player game, place 5 Factory displays.
- In a 3-player game, place 7 Factory displays.
- In a 4-player game, place 9 Factory displays.
- Fill the bag (D) with the 100 tiles (20 of each color) (E).
- The player who most recently visited Portugal takes the starting player marker (F) and then fills each Factory display with exactly 4 tiles randomly drawn from the bag.
Return any unused player boards, scoring markers and Factory displays to the box.
The game is played over multiple rounds, each of which is composed of three phases:
- A. Factory offer
- B. Wall-tiling
- C. Preparing the next round
Phase 1: Factory Offer
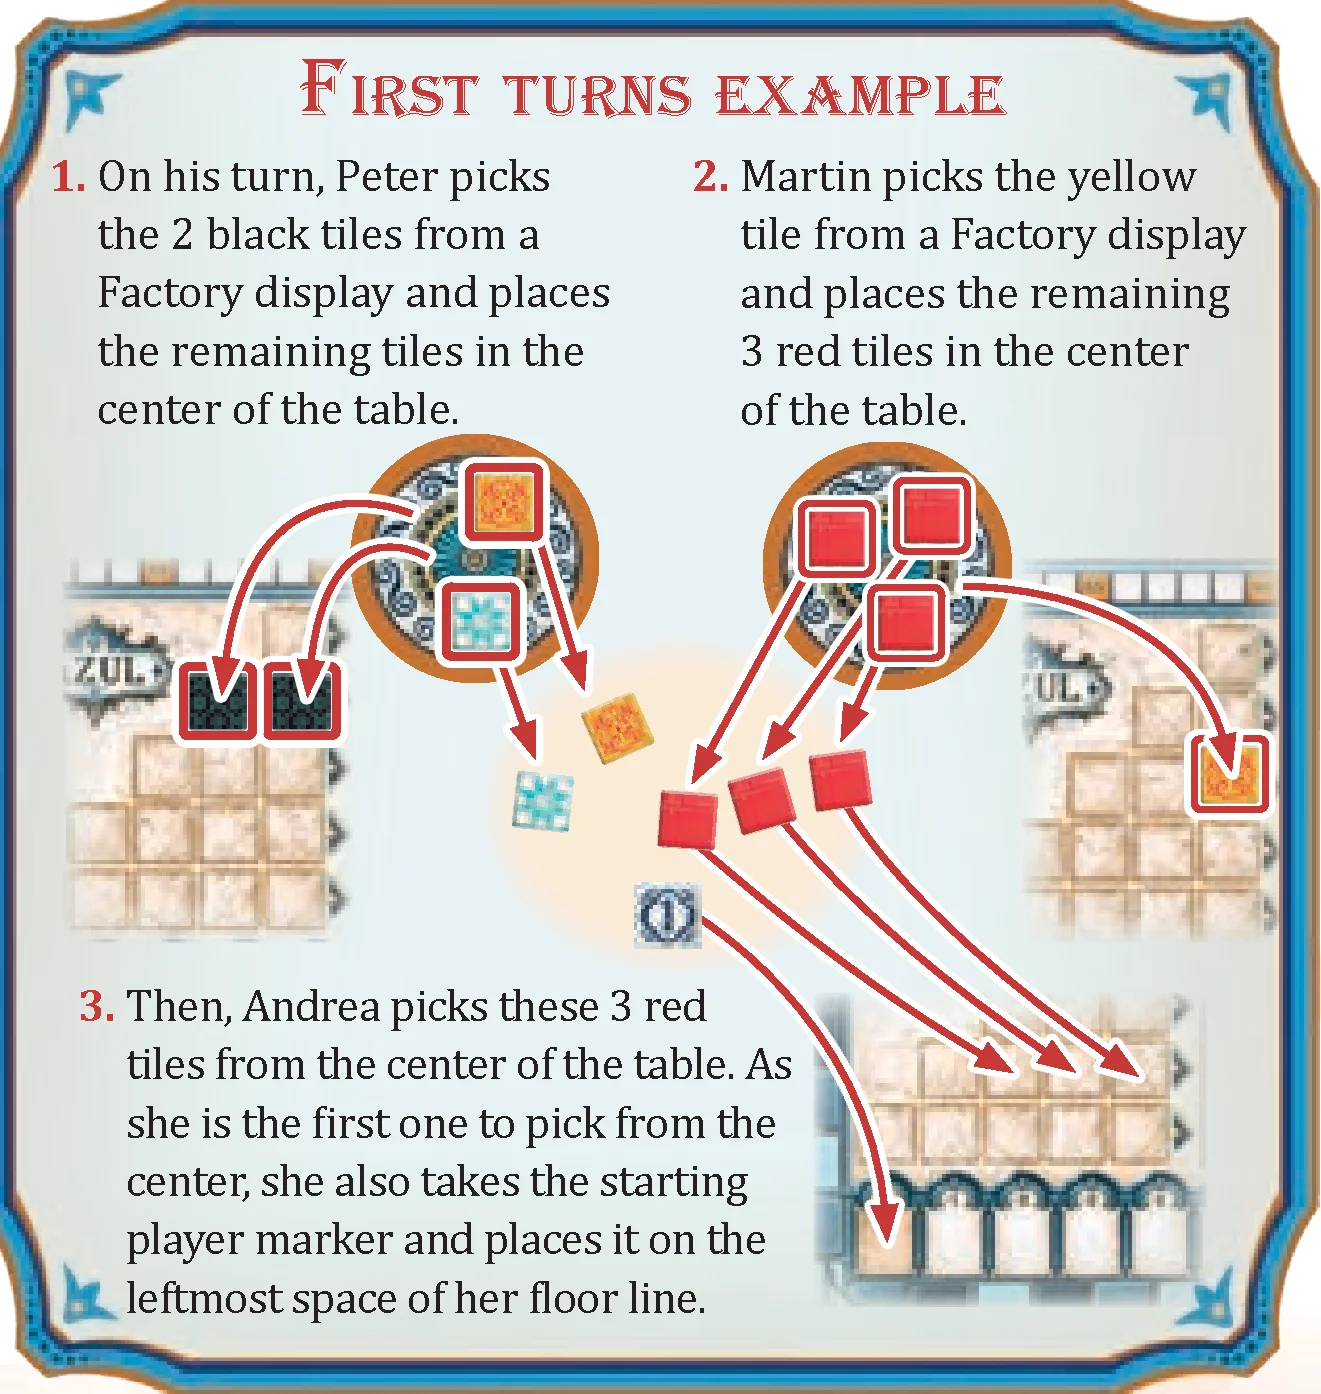
The starting player places the starting player marker in the center of the table and then takes the first turn. Play then continues clockwise.
On your turn, you must pick tiles in one of the following ways:
EITHER
- a) Pick all tiles of the same color from any one Factory display and then move the remaining tiles from this Factory display to the center of the table.
OR
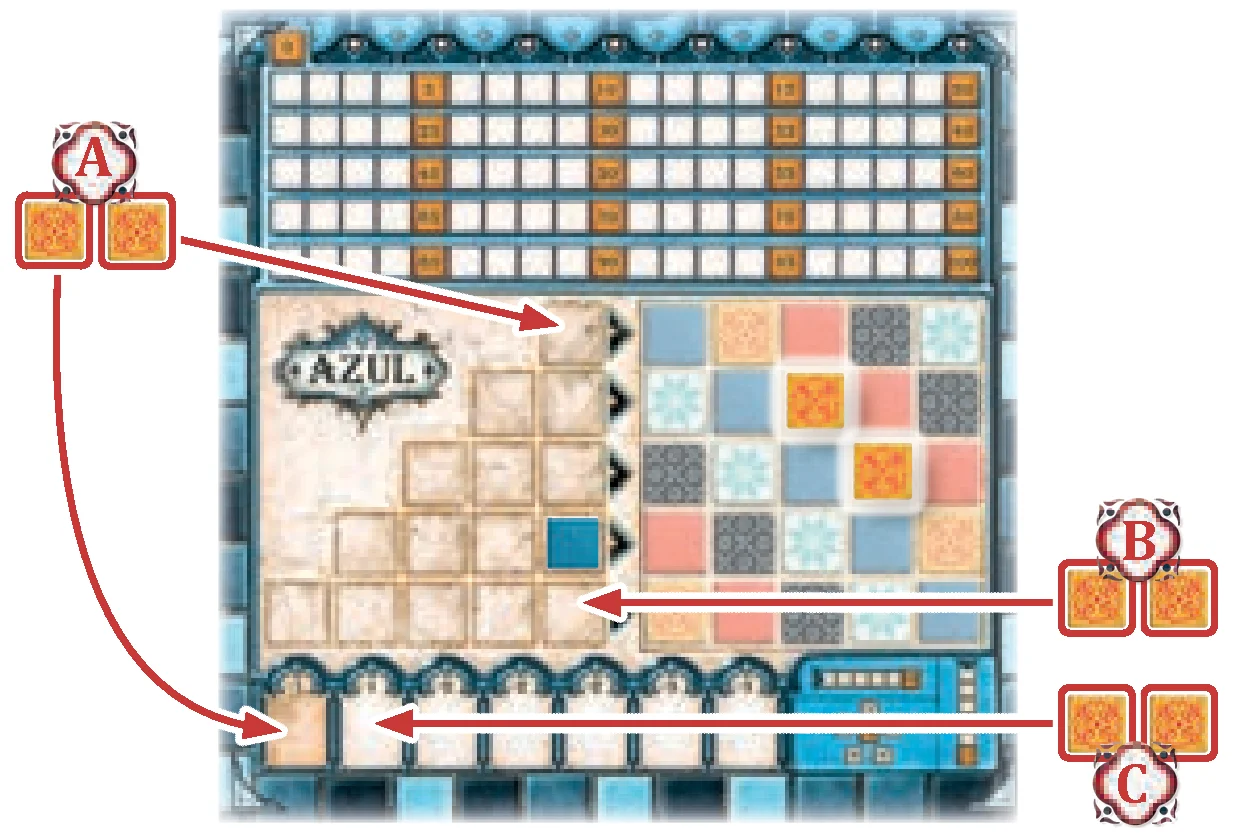
- b) Pick all tiles of the same color from the center of the table. If you are the first player in this round to pick tiles from the center of the table, also take the starting player marker and place it onto the leftmost free space of your floor line.
Placing Tiles on Pattern Lines
Then, add the tiles you picked to one of the 5 pattern lines on your player board (the first line has 1 space to hold 1 tile, the fifth line has 5).
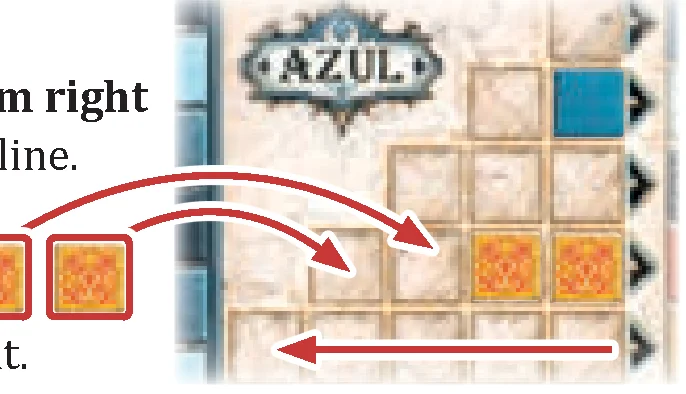
- Place the tiles, one by one, from right to left in your chosen pattern line.
- If the pattern line already holds tiles, you may only add tiles of the same color to it.
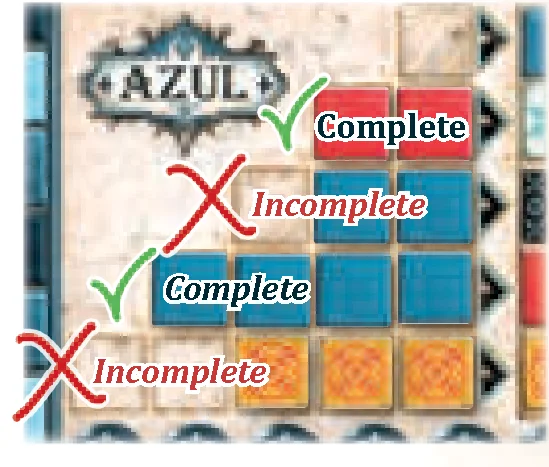
- Once all spaces of a pattern line are filled, that line is considered complete. If you have picked up more tiles than you can place in your chosen pattern line, you must place the excess tiles in the floor line (see Floor line).
Your goal in this phase is to complete as many of your pattern lines as you can, because during the following Wall-tiling phase, you will only be able to move tiles from complete pattern lines to their corresponding lines on your wall to score points.
- In all later rounds, you must also comply with the following rule: You are not allowed to place tiles of a certain color in a pattern line whose corresponding line of your wall already holds a tile of that color.
Floor Line
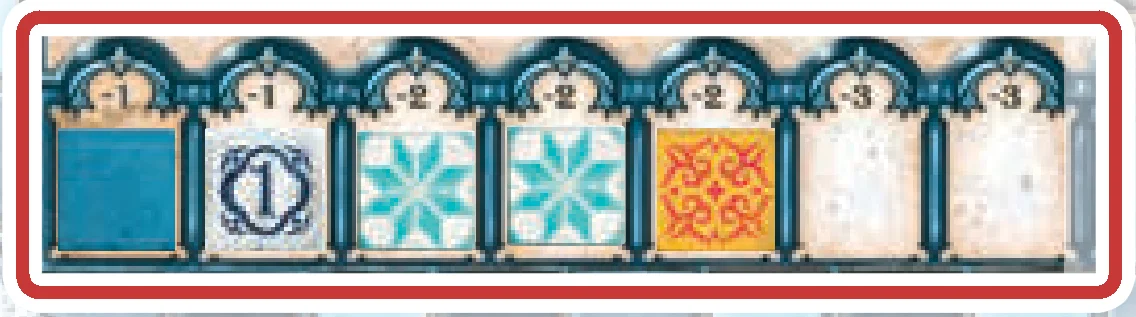
Any tiles you have picked that you cannot or do not want to place according to the rules, you must place in your floor line, filling its spaces from left to right. These tiles are considered as having fallen on the floor and give minus points in the Wall-tiling phase. If all spaces of your floor line are occupied, return any further fallen tiles to the lid of the game box to store them for now.
This phase ends when the center of the table AND all Factory displays contain no more tiles.
Then, continue with the Wall-tiling phase.
Phase 2: Wall-tiling
This phase can be carried out by all players simultaneously, as they move tiles from their complete pattern lines over to their walls.
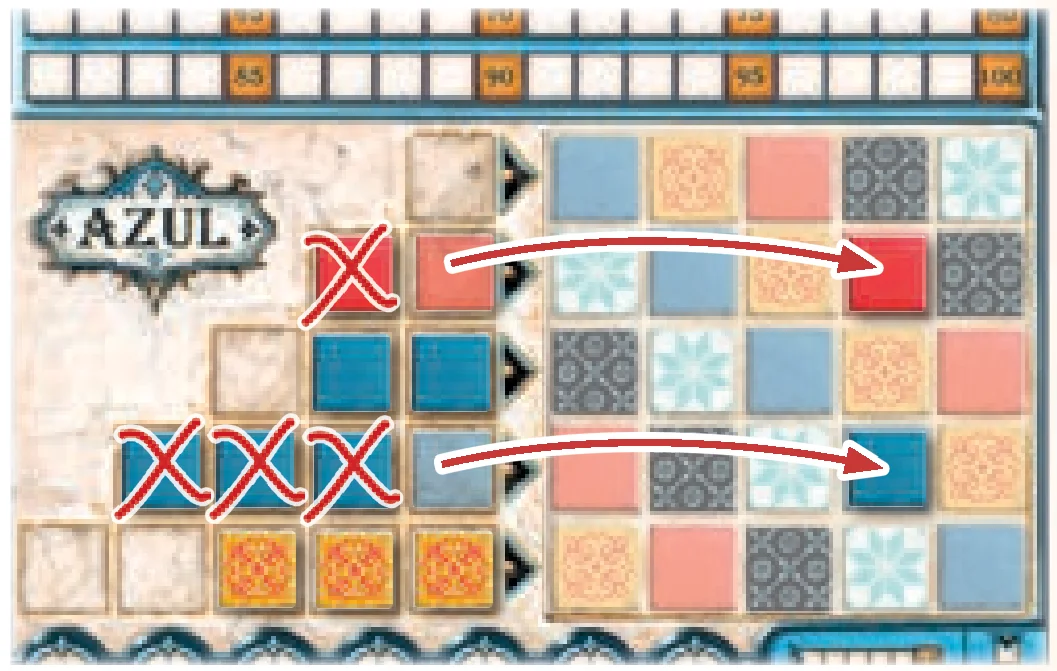
- A) Go through your pattern lines from top to bottom. Move the rightmost tile of each complete line to the space of the same color in the corresponding line of your wall. Each time you move a tile, score points immediately (see Scoring).
- B) Then, remove all tiles from any pattern lines that now have no tile in the rightmost space. Place them into the lid of the game box to store them for now.
Once that is done, any remaining tiles on the pattern lines stay on your player board for the next round.
Scoring
Each tile you move over to your wall is always placed on the space matching its color and immediately scores as follows:
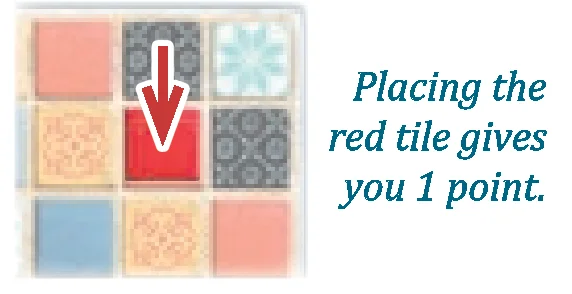
- If there are no tiles directly adjacent (vertically or horizontally) to the newly placed tile, gain 1 point on the score track.
- If there are any tiles adjacent, however, do the following:
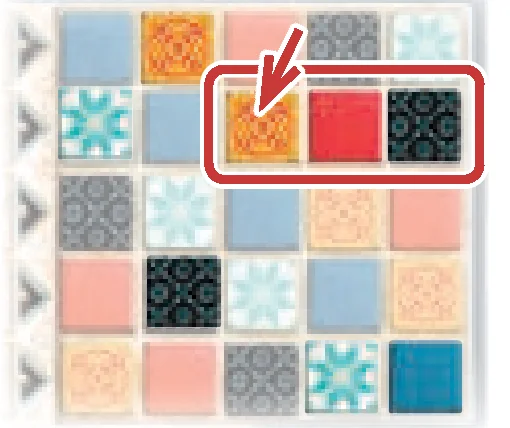
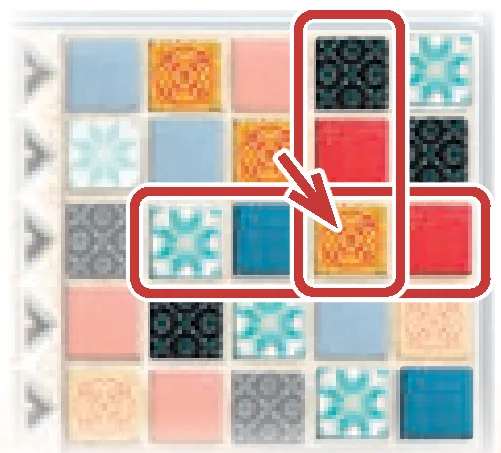
- First check if there are 1 or more tiles horizontally linked to the newly placed tile. If so, count all these linked tiles (including the newly placed one) and gain that many points.
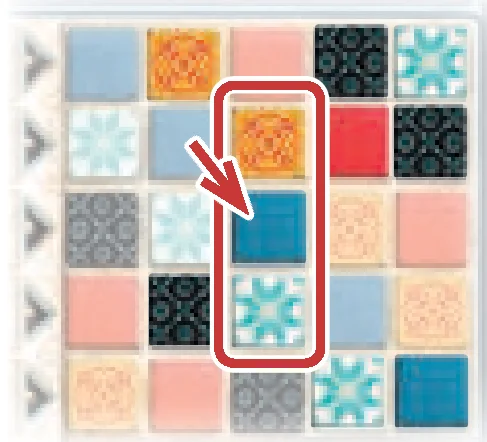
- Then check if there are 1 or more tiles vertically linked to the newly placed tile. If so, count all these linked tiles (including the newly placed tile) and gain that many points.
Floor Line Deductions
Finally, at the end of the Wall-tiling phase, check if you have any tiles in your floor line. For each tile in your floor line, you lose the number of points indicated directly above it. Adjust your scoring marker on your score track accordingly (however, you can never drop below 0 points).
Afterwards, remove all tiles in your floor line and place them into the lid of the game box. Note: If you have the starting player marker in your floor line, it counts as a normal tile there. But instead of placing it in the lid, place it in front of you.

Phase 3: Preparing the Next Round
If nobody has completed a horizontal line of 5 consecutive tiles on her wall yet (see End of the game), prepare the next round. The player with the starting player marker refills each of the Factory displays with 4 tiles from the bag as in the setup. If the bag is empty, refill it with all the tiles that you have placed in the lid of the game box and then continue filling the remaining Factory displays. Then, start the new round.
In the rare case that you run out of tiles again while there are none left in the lid, start the new round as usual even though not all Factory displays are properly filled.
The game ends right after the Wall-tiling phase in which at least one player has completed at least one horizontal line of 5 consecutive tiles on her wall.
Final Scoring
Once the game has ended, score additional points if you have achieved the following goals:
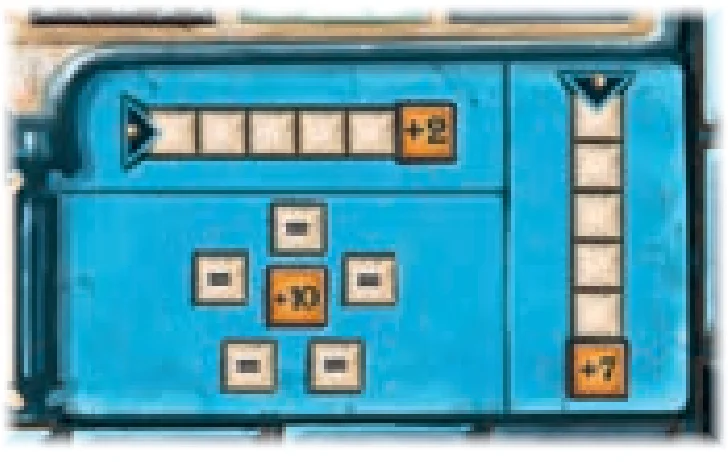
- Gain 2 points for each complete horizontal line of 5 consecutive tiles on your wall.
- Gain 7 points for each complete vertical line of 5 consecutive tiles on your wall.
- Gain 10 points for each color of which you have placed all 5 tiles on your wall.
The player with the most points on her score track wins the game. In the case of a tie, the tied player with more complete horizontal lines wins the game. If that does not break the tie, the victory is shared.
For a slightly different game, use the gray side of the player boards. Rules are exactly the same as in the normal game, except that when you move a tile from a pattern line to the wall, you may place it on any space of its corresponding wall line. However, as the game progresses, in each of the 5 vertical lines of your wall, no color may appear more than once. Also keep in mind that in each horizontal line, no color may appear more than once either.
Special case: In the wall-tiling phase, it may happen that you are not able to move the rightmost tile of a certain pattern line over to the wall because there is no valid space left for it. In this case, you must immediately place all tiles of that pattern line in your floor line (see Floor line).
- Game Design: Michael Kiesling
- Producer: Sophie Gravel
- Development: Viktor Kobilke & Philippe Schmit
- Art Direction: Philippe Guérin
- Illustrations: Chris Quilliams
- Graphic Design: Philippe Guérin, Karla Ron & Marie-Eve Joly
- Communications: Mike Young
- Foreign Affairs: Andrea Ahlers & Katja Wienicke
- Editing: Sophie Gravel, Viktor Kobilke
- Marketing: Martin Bouchard
- Development by: Next Move Games
© 2018 Plan B Games Inc.
No part of this product may be reproduced without specific permission.
19 rue de la Coopérative, Rigaud, QC. J0P 1P0, Canada.
[email protected]
www.nextmovegames.com
Retain this information for your records.
Made in China.
Introduction & Object of the Game
Introduced by the Moors, azulejos (originally white and blue ceramic tiles) were fully embraced by the Portuguese, when their king Manuel I, on a visit to the Alhambra palace in Southern Spain, was mesmerized by the stunning beauty of the Moorish decorative tiles. The king, awestruck by the interior beauty of the Alhambra, immediately ordered that his own palace in Portugal be decorated with similar wall tiles. Azul brings you, a tile laying artist, to embellish the walls of the Royal Palace of Evora.
A GAME BY MICHAEL KIESLING
Object of the Game
To be the player with the most points at the end of the game. The game ends after the round in which at least one player has completed a horizontal line of 5 consecutive tiles on her wall.
Game Setup
- Give each player a player board (A). Flip your board to the side with the colored wall. (See Variant Play to play with the gray side of the player board). Each player must use the same side.
- Take 1 scoring marker (B) and place it on space “0” of your score track.
- Place the Factory displays (C) in a circle around the center of the table:
- In a 2-player game, place 5 Factory displays.
- In a 3-player game, place 7 Factory displays.
- In a 4-player game, place 9 Factory displays.
- Fill the bag (D) with the 100 tiles (20 of each color) (E).
- The player who most recently visited Portugal takes the starting player marker (F) and then fills each Factory display with exactly 4 tiles randomly drawn from the bag.
Return any unused player boards, scoring markers and Factory displays to the box.
How to Play
The game is played over multiple rounds, each of which is composed of three phases:
- A. Factory offer
- B. Wall-tiling
- C. Preparing the next round
Phase 1: Factory Offer
The starting player places the starting player marker in the center of the table and then takes the first turn. Play then continues clockwise.
On your turn, you must pick tiles in one of the following ways:
EITHER
- a) Pick all tiles of the same color from any one Factory display and then move the remaining tiles from this Factory display to the center of the table.
OR
- b) Pick all tiles of the same color from the center of the table. If you are the first player in this round to pick tiles from the center of the table, also take the starting player marker and place it onto the leftmost free space of your floor line.
Placing Tiles on Pattern Lines
Then, add the tiles you picked to one of the 5 pattern lines on your player board (the first line has 1 space to hold 1 tile, the fifth line has 5).
- Place the tiles, one by one, from right to left in your chosen pattern line.
- If the pattern line already holds tiles, you may only add tiles of the same color to it.
- Once all spaces of a pattern line are filled, that line is considered complete. If you have picked up more tiles than you can place in your chosen pattern line, you must place the excess tiles in the floor line (see Floor line).
Your goal in this phase is to complete as many of your pattern lines as you can, because during the following Wall-tiling phase, you will only be able to move tiles from complete pattern lines to their corresponding lines on your wall to score points.
- In all later rounds, you must also comply with the following rule: You are not allowed to place tiles of a certain color in a pattern line whose corresponding line of your wall already holds a tile of that color.
Floor Line
Any tiles you have picked that you cannot or do not want to place according to the rules, you must place in your floor line, filling its spaces from left to right. These tiles are considered as having fallen on the floor and give minus points in the Wall-tiling phase. If all spaces of your floor line are occupied, return any further fallen tiles to the lid of the game box to store them for now.
This phase ends when the center of the table AND all Factory displays contain no more tiles.
Then, continue with the Wall-tiling phase.
Phase 2: Wall-tiling
This phase can be carried out by all players simultaneously, as they move tiles from their complete pattern lines over to their walls.
- A) Go through your pattern lines from top to bottom. Move the rightmost tile of each complete line to the space of the same color in the corresponding line of your wall. Each time you move a tile, score points immediately (see Scoring).
- B) Then, remove all tiles from any pattern lines that now have no tile in the rightmost space. Place them into the lid of the game box to store them for now.
Once that is done, any remaining tiles on the pattern lines stay on your player board for the next round.
Scoring
Each tile you move over to your wall is always placed on the space matching its color and immediately scores as follows:
- If there are no tiles directly adjacent (vertically or horizontally) to the newly placed tile, gain 1 point on the score track.
- If there are any tiles adjacent, however, do the following:
- First check if there are 1 or more tiles horizontally linked to the newly placed tile. If so, count all these linked tiles (including the newly placed one) and gain that many points.
- Then check if there are 1 or more tiles vertically linked to the newly placed tile. If so, count all these linked tiles (including the newly placed tile) and gain that many points.
Floor Line Deductions
Finally, at the end of the Wall-tiling phase, check if you have any tiles in your floor line. For each tile in your floor line, you lose the number of points indicated directly above it. Adjust your scoring marker on your score track accordingly (however, you can never drop below 0 points).
Afterwards, remove all tiles in your floor line and place them into the lid of the game box. Note: If you have the starting player marker in your floor line, it counts as a normal tile there. But instead of placing it in the lid, place it in front of you.
Phase 3: Preparing the Next Round
If nobody has completed a horizontal line of 5 consecutive tiles on her wall yet (see End of the game), prepare the next round. The player with the starting player marker refills each of the Factory displays with 4 tiles from the bag as in the setup. If the bag is empty, refill it with all the tiles that you have placed in the lid of the game box and then continue filling the remaining Factory displays. Then, start the new round.
In the rare case that you run out of tiles again while there are none left in the lid, start the new round as usual even though not all Factory displays are properly filled.
End of the Game & Final Scoring
The game ends right after the Wall-tiling phase in which at least one player has completed at least one horizontal line of 5 consecutive tiles on her wall.
Final Scoring
Once the game has ended, score additional points if you have achieved the following goals:
- Gain 2 points for each complete horizontal line of 5 consecutive tiles on your wall.
- Gain 7 points for each complete vertical line of 5 consecutive tiles on your wall.
- Gain 10 points for each color of which you have placed all 5 tiles on your wall.
The player with the most points on her score track wins the game. In the case of a tie, the tied player with more complete horizontal lines wins the game. If that does not break the tie, the victory is shared.
Variant Play
For a slightly different game, use the gray side of the player boards. Rules are exactly the same as in the normal game, except that when you move a tile from a pattern line to the wall, you may place it on any space of its corresponding wall line. However, as the game progresses, in each of the 5 vertical lines of your wall, no color may appear more than once. Also keep in mind that in each horizontal line, no color may appear more than once either.
Special case: In the wall-tiling phase, it may happen that you are not able to move the rightmost tile of a certain pattern line over to the wall because there is no valid space left for it. In this case, you must immediately place all tiles of that pattern line in your floor line (see Floor line).
Credits
- Game Design: Michael Kiesling
- Producer: Sophie Gravel
- Development: Viktor Kobilke & Philippe Schmit
- Art Direction: Philippe Guérin
- Illustrations: Chris Quilliams
- Graphic Design: Philippe Guérin, Karla Ron & Marie-Eve Joly
- Communications: Mike Young
- Foreign Affairs: Andrea Ahlers & Katja Wienicke
- Editing: Sophie Gravel, Viktor Kobilke
- Marketing: Martin Bouchard
- Development by: Next Move Games
© 2018 Plan B Games Inc.
No part of this product may be reproduced without specific permission.
19 rue de la Coopérative, Rigaud, QC. J0P 1P0, Canada.
[email protected]
www.nextmovegames.com
Retain this information for your records.
Made in China.