Beyond the Sun
2020
Guide technological progress, develop your economy, colonize systems, and pursue achievements in a competitive space civilization game.
120
minutes
2 - 4
player(s)
14+
Medium Heavy

About this board game
Beyond the Sun is a space civilization game for 2–4 players, with an approximate play time of 120 minutes. Players collectively guide humanity’s technological progress at the dawn of the Spacefaring Era while competing to become the leading faction in economic development, science, and galactic influence.
The game unfolds over a variable number of rounds. Play continues until the players collectively claim a set number of game-end achievements, and the faction with the most victory points wins. Points come from researching technologies, improving the economy, controlling and colonizing systems, and completing achievements and events.
Each turn begins when a player moves their action pawn to an empty action space and performs that action. They then enter the production phase, choosing to produce ore, grow their population, or trade one of these resources for the other. Finally, they may claim up to one achievement if they meet its requirements.
Research is at the heart of Beyond the Sun. Technologies are arranged across four levels and belong to one of four types: scientific, economic, military, or commercial. Higher-level technologies must match one of the types that lead into them, allowing players to create their own technology tree during each game.
- Increase military strength
- Jump to different habitable exoplanetary systems
- Colonize those systems
- Boost resource production
- Develop android technology that enables growth without population
With its shared direction of technological progress and individual race for victory points, Beyond the Sun combines collective development with direct competition across science, economy, expansion, and achievements.
Mechanics
Designer
Illustrator
/pic7182955.jpg)

Board Game Rules for
Beyond the Sun
The Story
The First Thermonuclear War was not kind to the Earth. Over the last two centuries, civil unrest and climate change continued to ravage every region of the globe. Crop yields were plunging, resources were depleting, and poverty and crime were rampant. Humanity was facing extinction.
The solution seemed clear: abandon Earth and find a new home among the stars. Faced with the prospect of annihilation, the remaining factions on Earth came together. On New Year’s Eve 2240, the Treaty of Scientific Exchange was signed at the old site of the Lincoln Memorial in Washington, D.C. The world’s resources were poured into spacefaring research, and all discoveries were shared on a globally distributed network. For the first time in history, humanity acted as one.
In only six short years, the first hyper-spacecraft was built by the engineers of the Nishida-Østergaard Corporation under the leadership of Dr. Edmund Saito, and the technology was shared with the rest of the world. Humanity had finally entered the Spacefaring Era.
Soon after this keystone discovery, other factions also researched primitive terraforming techniques, radiation-resistant crops, asteroid mining, and other key components for human survival outside the solar system. Countless exoplanet expeditions were initiated every month. Now that a solution has been found, ambition for power and control stirred in each faction once again…
The Goal of the Game
Beyond the Sun is a space civilization game where players collectively decide the technological progress of humankind at the dawn of the Spacefaring Era, while competing against each other to be the leading faction in economic development, science, and galactic influence.
The game is played over a variable number of rounds until a number of game-end achievements are collectively claimed by the players. The winner is the faction with the most Victory Points  , which are obtained by researching technologies, improving their economy, controlling and colonizing systems, and through various achievements and events throughout the game.
Components
General Components
Technology board
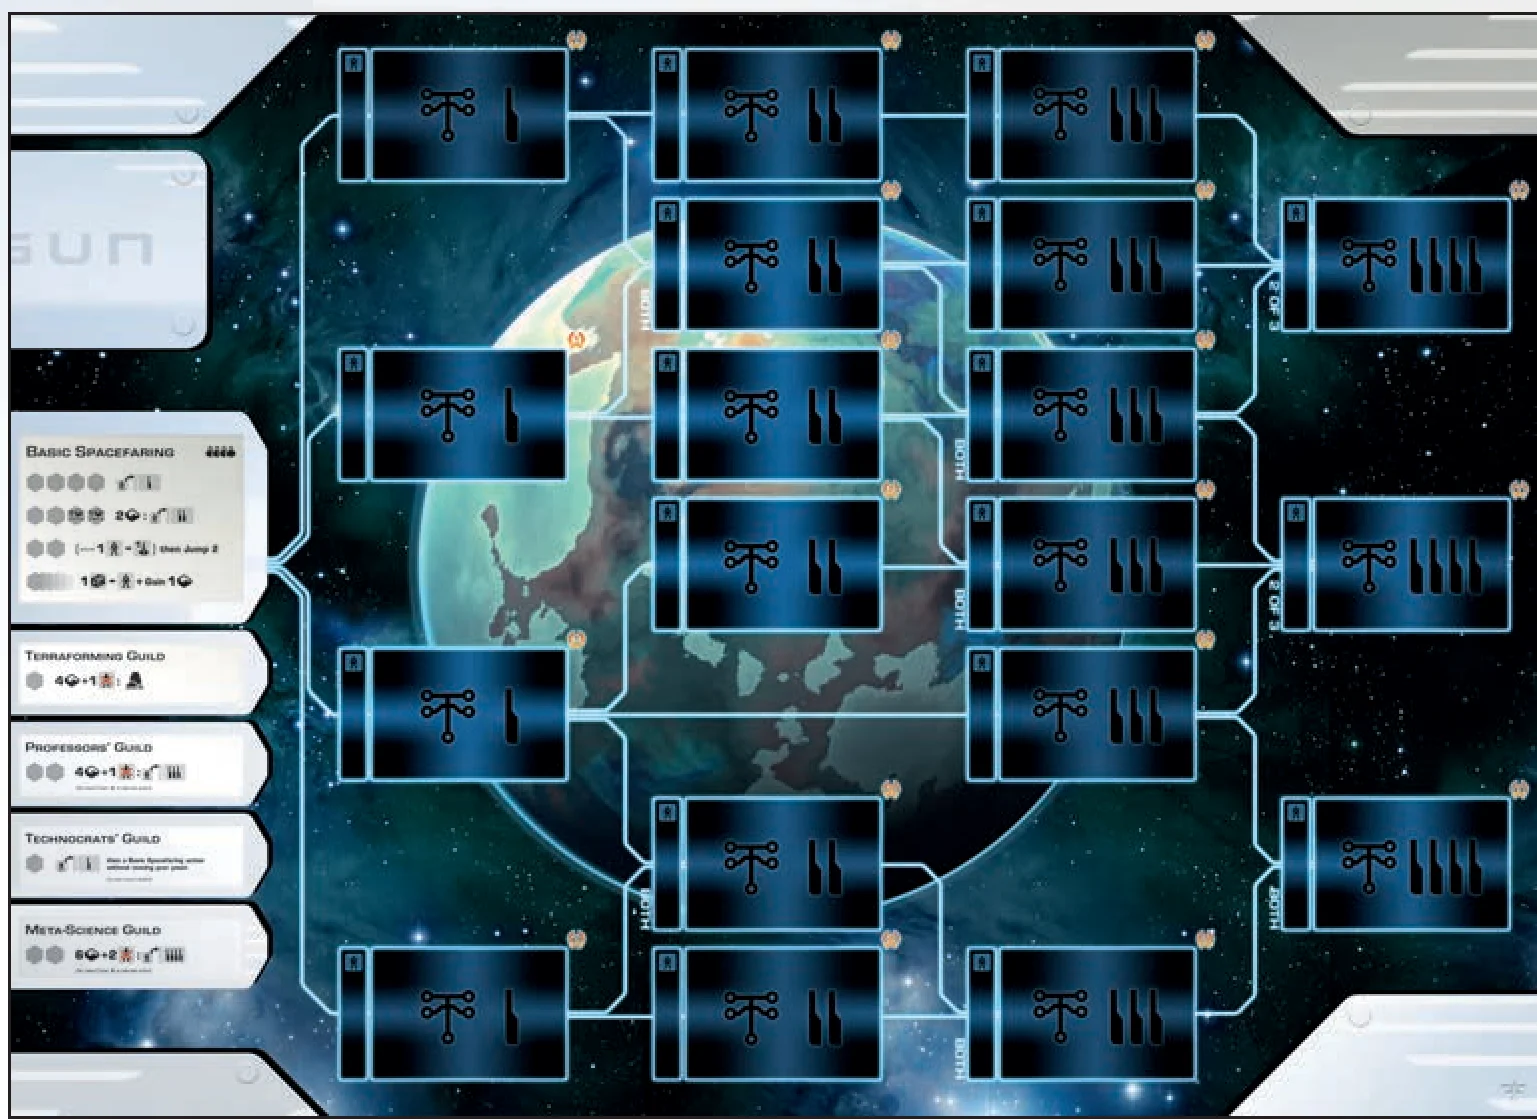
This is the central board of the game, where players place their workers to take Actions each turn. It represents a Technology tree of four levels, starting with the Basic Spacefaring Technology box on the left, and ending with the Level IIII Technologies on the far right. Players must work their way up the Technology tree by researching lower-level Technologies first.
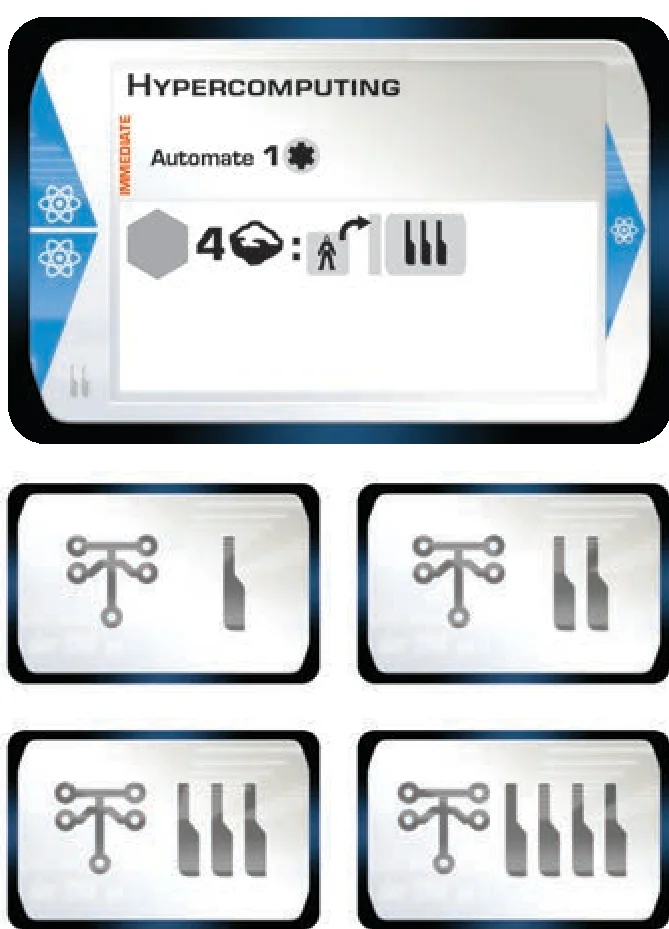
46 Technology cards
Technology cards represent possible scientific advances players can discover during the course of the game. They contain new and increasingly powerful Actions and/or grant immediate bonuses to the Faction researching them. Each new Technology is chosen by the first Faction that researches it, after which it becomes available for others to research. The configuration of the Technology tree will be different every game, requiring a new strategy each time. The progression of the Technology tree is guided by 4 Technology types:
- Scientific

- Economic

- Military

- Commercial

At the beginning of the game, only Level I and II technologies can be researched. In order to reach higher levels, players need to find Actions that enable advanced research or unlock research Guilds via Events.
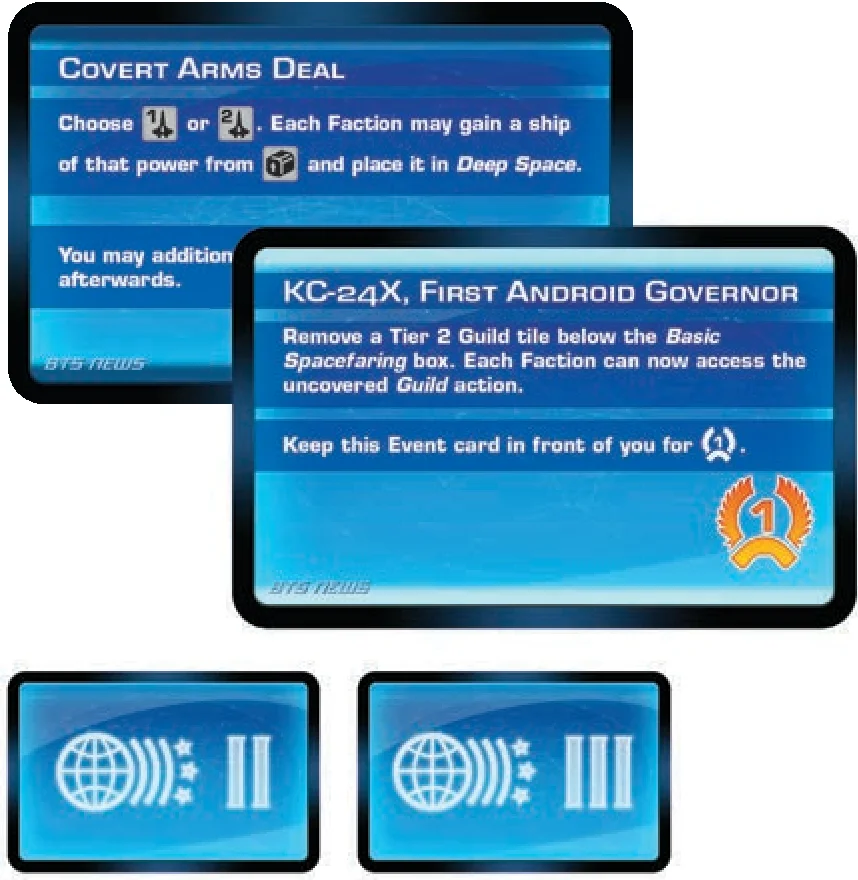
20 Event cards: 10 each of Level II and III
The future course of human civilization is punctuated by events that affect every Faction. These are represented by Event cards that cover the empty Technology slots at the beginning of the game. When a new Technology is first discovered, the Event card is revealed, and its effects are applied. Events may change the game in unexpected ways. Some may also provide additional Victory Points at the end of the game.
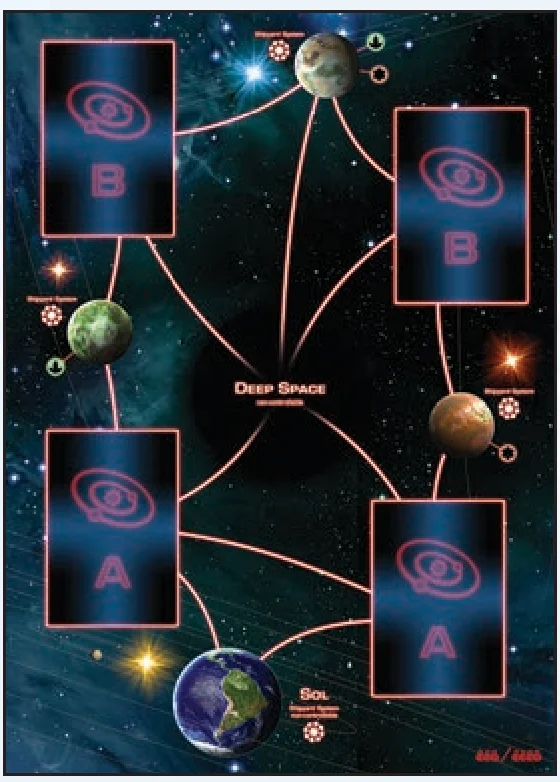
2-sided Exploration board
This board represents a simplified navigational map of the Milky Way galaxy, containing the solar system (Sol), habitable systems  that can be colonized, shipyard systems
  where Spaceships can be built, and Deep Space. Each location is connected to neighboring ones with line segments representing hyperspace jump routes. Each line segment requires one “Jump” (movement point) for a Spaceship to travel across it.
Except for Sol and Deep Space, locations can be controlled by a Faction — marked with an Outpost disc corresponding to the System specialty  or
or  on the location — providing a production improvement for the Faction that controls it.
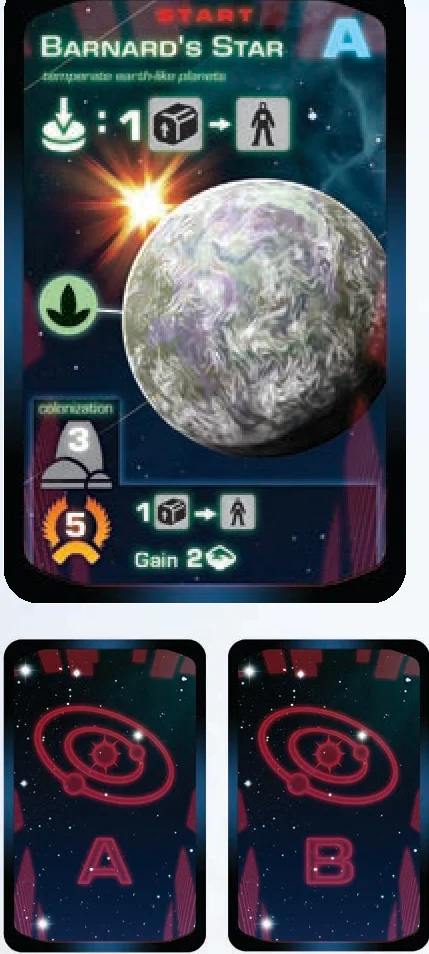
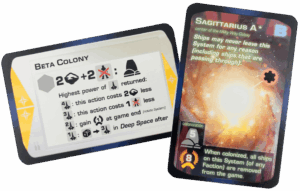
24 System cards: 12 each of type A and B
System cards describe habitable exoplanetary Systems that can be colonized to gain Victory Points, as well as unique bonuses. Each System has a number denoting the minimum military power to colonize it. The two Systems closer to Sol are filled with cards drawn from System Deck A. They have lower military power requirements and are worth fewer Victory Points. The cards from System Deck B are used for the spaces that are farther away from Sol (marked with the matching letter “B”). These Systems are stronger but provide better rewards.
Once colonized, the System card is taken from the Exploration board and placed in front of the Faction as their permanent territory. Due to the powerful Victory Point boost and special effects they provide, choosing the right Systems to colonize can be crucial in ensuring a Faction’s success.
In Beyond the Sun, all System cards are named according to real star systems observable from Earth!
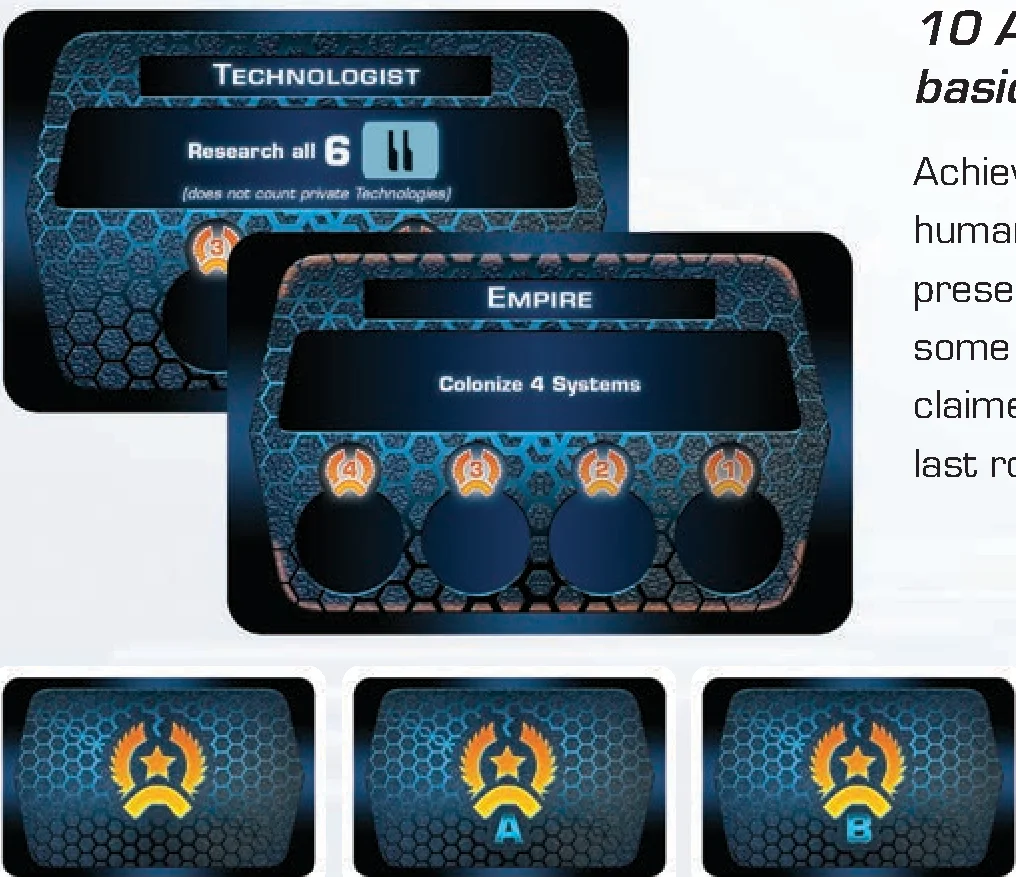
10 Achievement cards: 4 each of type A and B, plus 2 basic Achievements
Achievements are civilization milestones that mark the progress of humanity. Two basic and two randomly drawn Achievement cards are present in every game. They provide additional Victory Point boosts, and some Achievement cards have a limited number of slots that can be claimed. When a certain number of Achievement discs are placed, the last round of the game is triggered.

Starting player marker
The Starting player marker is used to track who started the game to ensure equal turns. It does not change hands during the game.
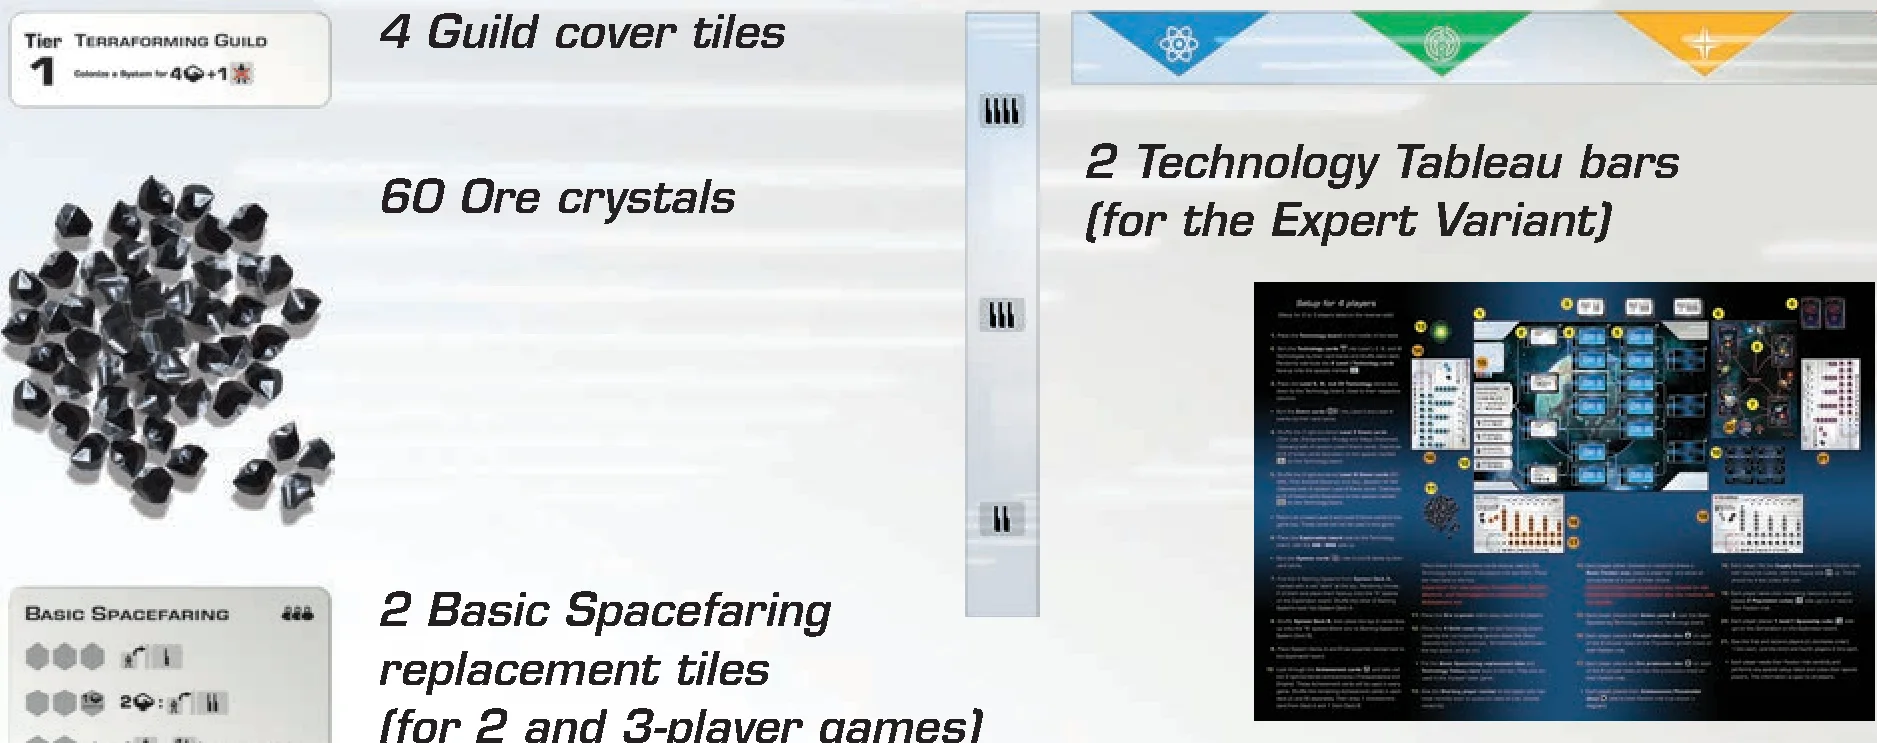
Additional Game Components
- 4 Guild cover tiles
- 60 Ore crystals
- 2 Basic Spacefaring replacement tiles (for 2 and 3-player games)
- 2 Technology Tableau bars (for the Expert Variant)
- Setup sheet
Components for Each of the 4 Factions
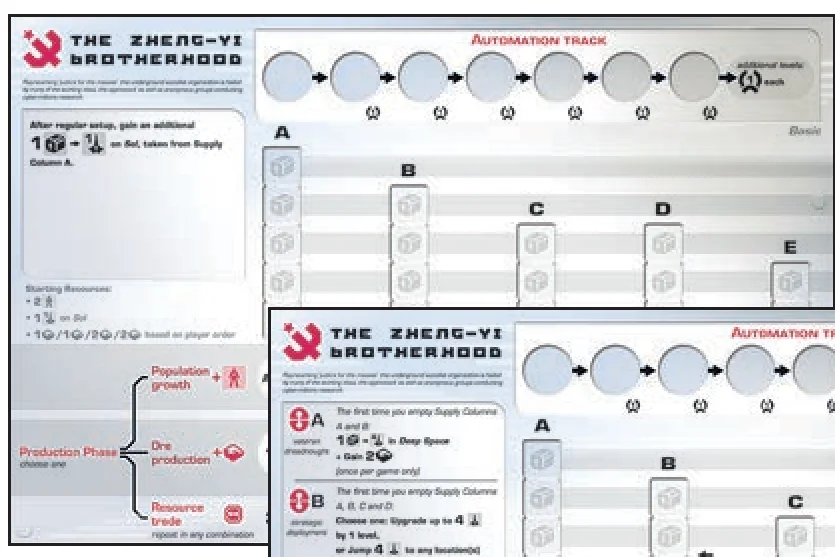
2 Faction mats (Basic and Advanced)
Each player has a Faction mat to manage and track their economy. There are two main resource types in this game:
- Population
 , representing the Factions’ workforce
 - Ore
 , representing currency
The main area of the Faction mat contains Supply Columns and production tracks for both resources, as well as the trade ratios between them. At the top is the Automation track, which represents technological advances of the Faction’s production. There are 2 sets of Faction mats:
- The Basic set has the same production tracks for every Faction and contains only minor setup differences.
- The Advanced set contains varied production tracks and special powers that can be gained during the game.
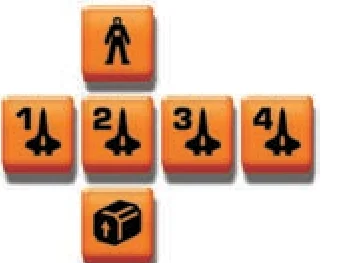
20 6-sided resource cubes
The resource cubes are used for multiple purposes and have six different sides: Population  , Supply
  , and Spaceships of level
  ,
,  ,
,  , and
, and  .
.

24 wooden discs
(8 Food production, 8 Ore production, 8 Achievement/placeholder)
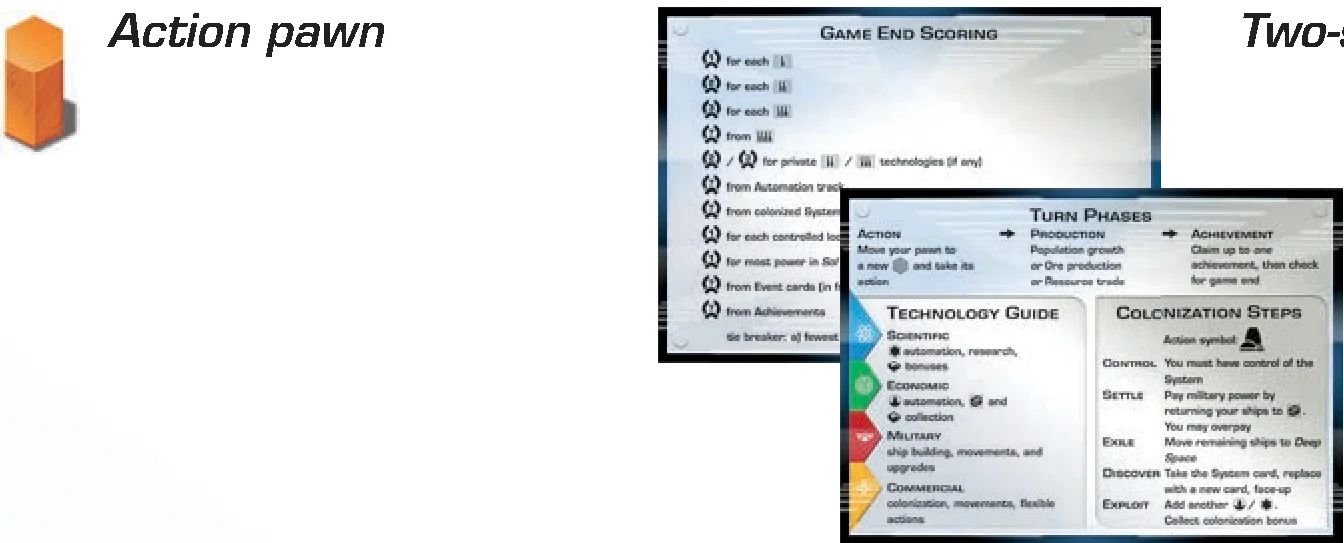
Additional Player Pieces
- Action pawn
- Two-sided player aid
Setup for 4 Players
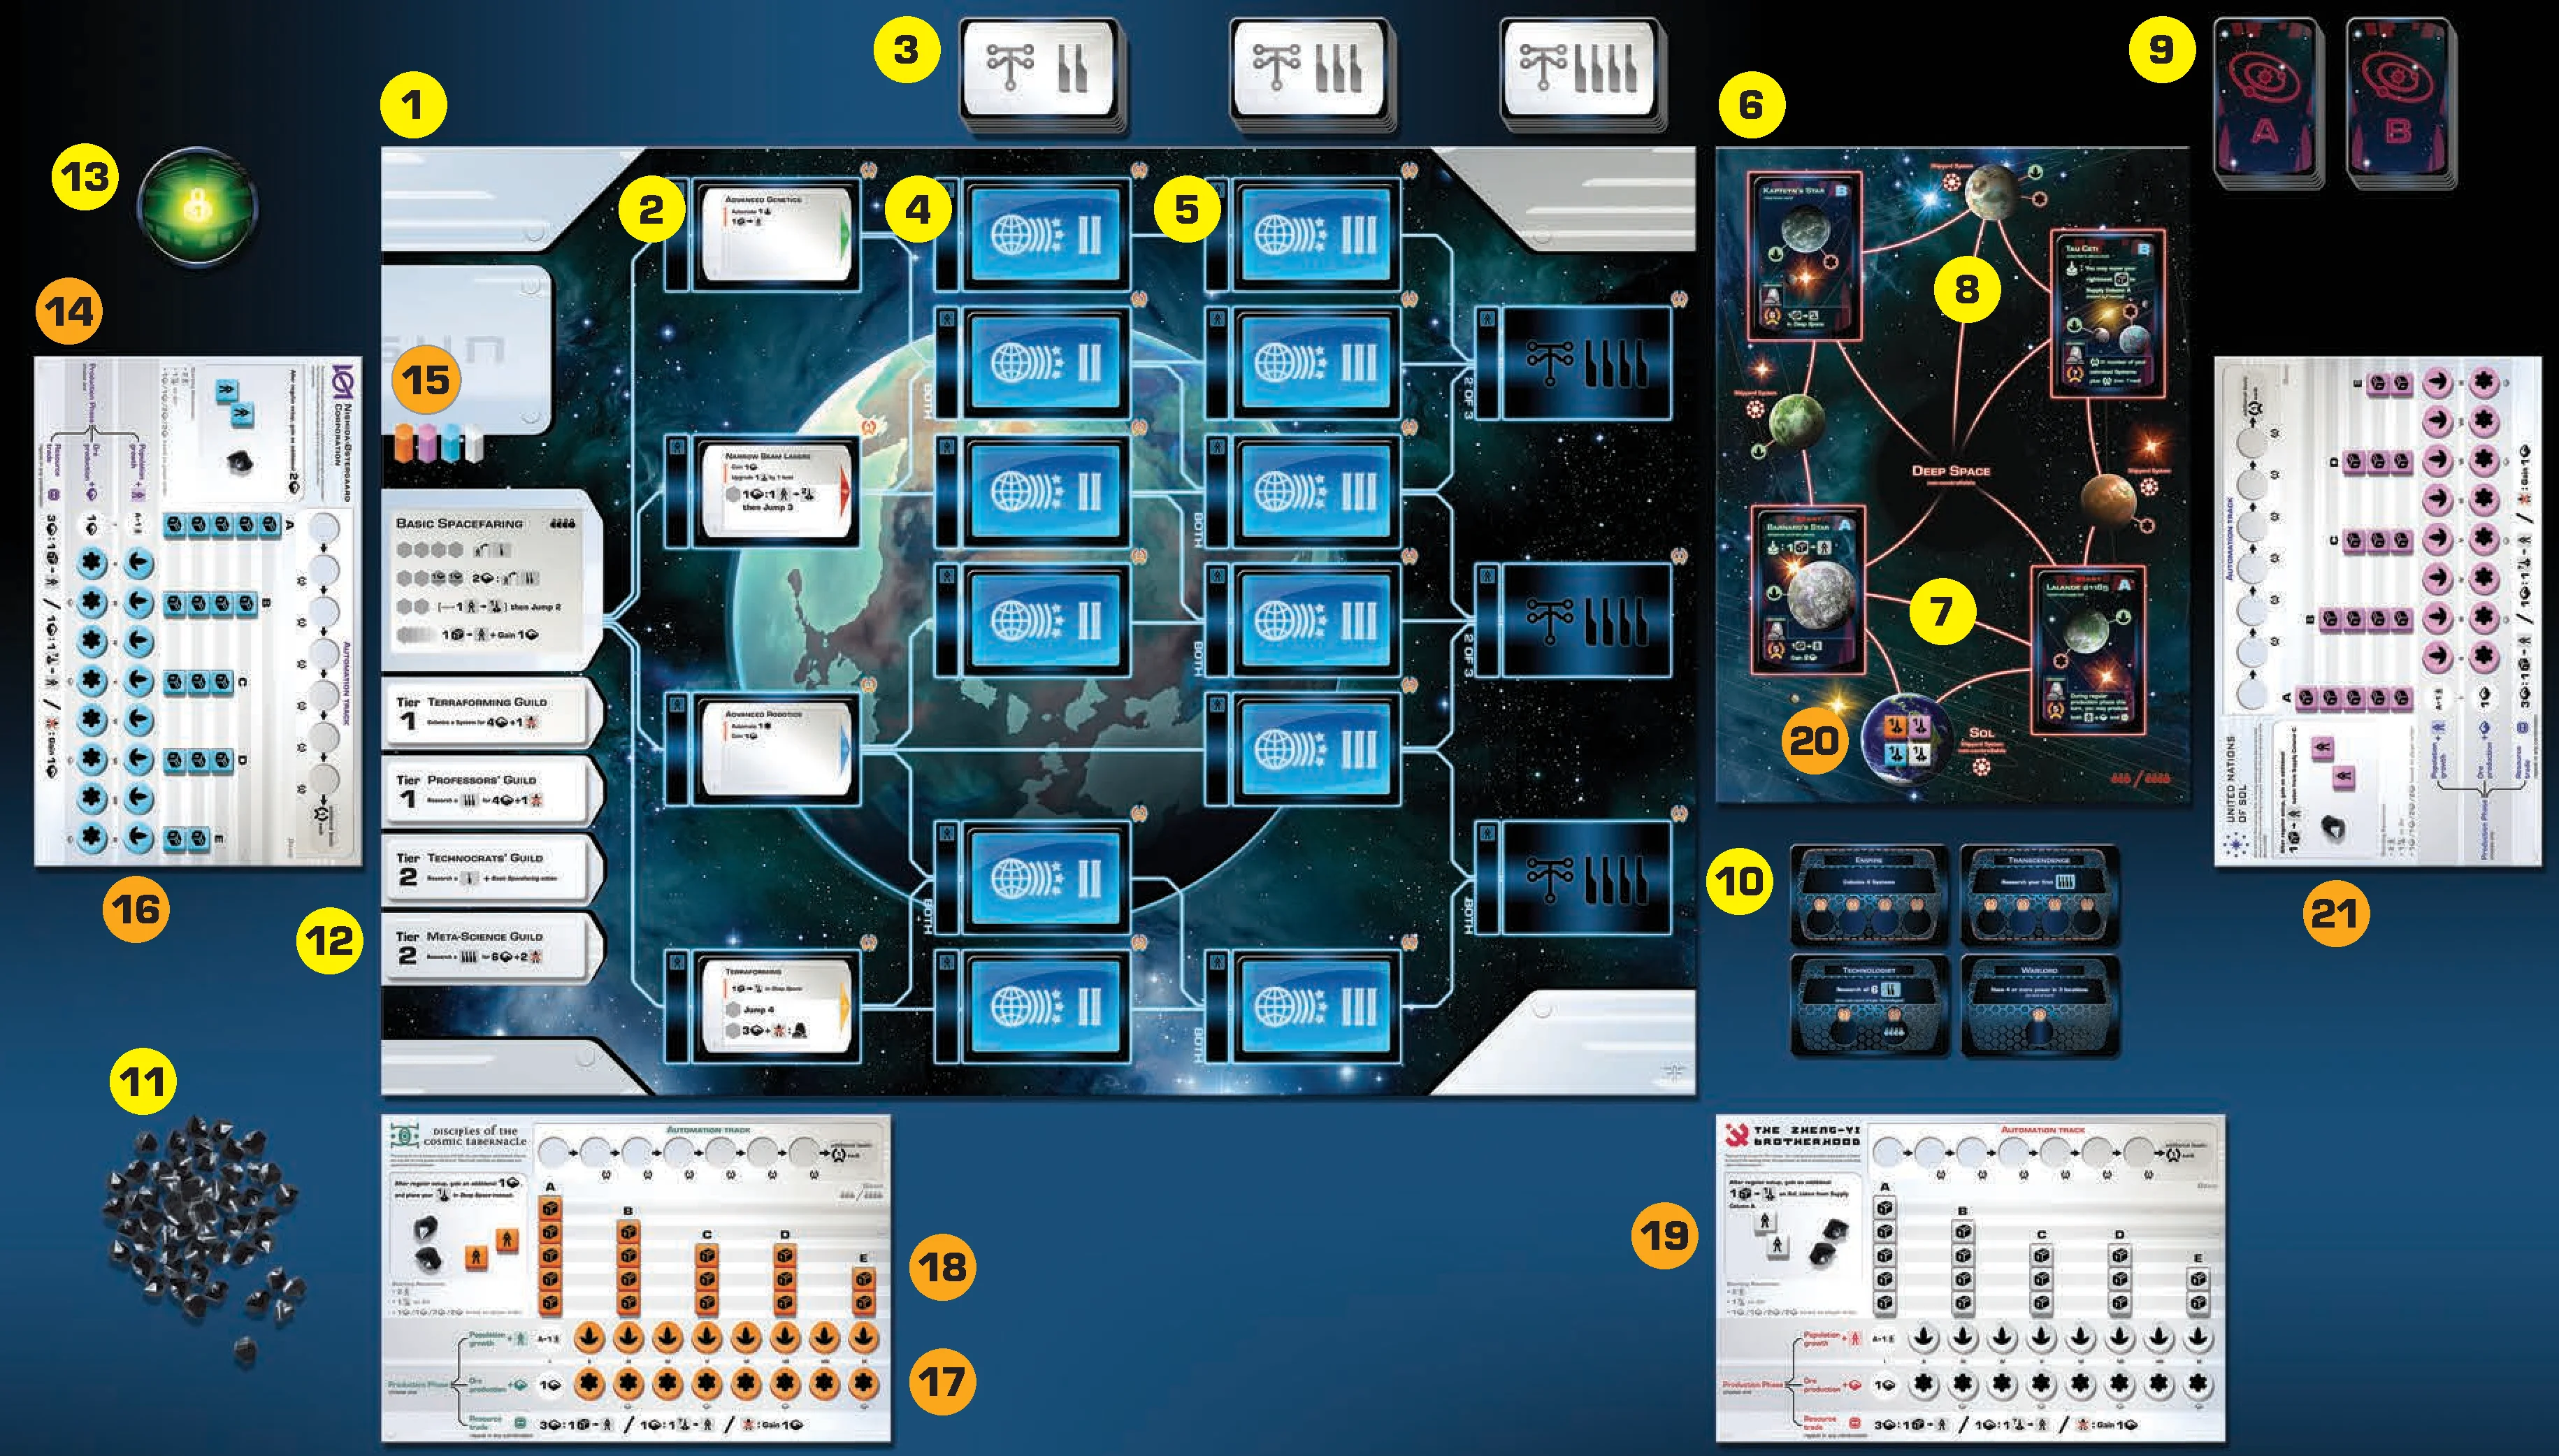
- Place the Technology board in the middle of the table.
- Sort the Technology cards into Level I, II, III, and IIII Technologies by their card backs and shuffle each deck. Randomly distribute the 4 Level I Technology cards face-up onto the spaces marked I.
- Place the Level II, III, and IIII Technology decks face-down by the Technology board, close to their respective columns.
- Sort the Event cards into Level II and Level III events by their card backs. Shuffle the 2 light-bordered Level II Event cards (Tyler Lee, Entrepreneur Prodigy and Maya Chaturvedi, Visionary) with 4 random Level II Event cards. Distribute all 6 of these cards face-down on the spaces marked II on the Technology board.
- Shuffle the 2 light-bordered Level III Event cards (KC-24X, First Android Governor and Onu, Speaker for the Colonies) with 4 random Level III Event cards. Distribute all 6 of these cards face-down on the spaces marked III on the Technology board. Return all unused Level II and Level III Event cards to the game box. These cards will not be used in this game.
- Place the Exploration board next to the Technology board, with the 3/4-player side up.
- Sort the System cards into A and B decks by their card backs. Find the 4 Starting Systems from System Deck A, marked with a red “start” at the top. Randomly choose 2 of them and place them face-up onto the “A” spaces on the Exploration board. Shuffle the other 2 Starting Systems back into System Deck A.
- Shuffle System Deck B, then place the top 2 cards face-up onto the “B” spaces (there are no Starting Systems in System Deck B).
- Place System Decks A and B (as separate decks) next to the Exploration board.
- Look through the Achievement cards and take out the 2 light-bordered Achievements (Transcendence and Empire). These Achievement cards will be used in every game. Shuffle the remaining Achievement cards in each deck (A and B) separately. Then draw 1 Achievement card from Deck A and 1 from Deck B. Place these 4 Achievement cards face-up next to the Technology board, where all players can see them. Place the rest back in the box.
Important! For new players, Transcendence, Empire, Warlord, and Technologist are recommended as the Achievement set. - Place the Ore crystals within easy reach of all players.
- Place the 4 Guild cover tiles on the Technology board, covering the corresponding spaces below the Basic Spacefaring box (for example, Terraforming Guild covers the top space, and so on). Put the Basic Spacefaring replacement tiles and Technology Tableau bars back in the box. They are not used in the 4-player basic game.
- Give the Starting player marker to the player who has most recently been to space (in case of a tie, choose randomly).
- Each player either chooses or randomly draws a Basic Faction mat, takes a player aid, and takes all components of a color of their choice.
Important! Experienced players may choose to use Advanced Faction mats instead. See the reverse side for details. - Each player places their Action pawn near the Basic Spacefaring Technology box on the Technology board.
- Each player places a Food production disc on each of the 8 circular slots on the Population growth track on their Faction mat.
- Each player places an Ore production disc on each of the 8 circular slots on the Ore production track on their Faction mat. Each player places their Achievement/Placeholder discs next to their Faction mat (not shown in diagram).
- Each player fills the Supply Columns on their Faction mat with resource cubes, with the Supply side up. There should be a few cubes left over.
- Each player takes their remaining resource cubes and places 2 Population cubes (side up) on or next to their Faction mat.
- Each player places 1 level-1 Spaceship cube (level 1 side up) on the Sol location on the Exploration board.
- Give the first and second players (in clockwise order) 1 Ore each, and the third and fourth players 2 Ore each.
Each player reads their Faction mat carefully and performs any special setup listed and notes their special powers. This information is open to all players.
Setup for 2 to 3 Players
Changes for 3 players
- Cover the Basic Spacefaring Technology box with the replacement tile for 3 players.
- The first and second player each begin the game with 1 Ore; and the third player 2 Ore.
- The second slot on Achievement Card A is not available.
- Only 3 Achievement discs are needed to trigger the last round of the game.
Changes for 2 players
- Cover the Basic Spacefaring Technology box with the replacement tile for 2 players.
- Both players begin the game with 1 Ore.
- The 2-player side of the Exploration board is used and only one Starting System from Deck A is revealed.
- The Disciples of the Cosmic Tabernacle Faction mats are returned to the box and cannot be chosen.
- The second slot on Achievement Card A is not available.
- Only 3 Achievement discs are needed to trigger the last round of the game.
Turn Overview
In Beyond the Sun, players take turns, going clockwise, until the game end condition is triggered. After that, all Victory Points are tallied, and the winner is determined.
A player’s turn consists of three phases:
- Action phase — Move the Action pawn to a new Action space, and take its corresponding Action
- Production phase — Choose either Population growth, Ore production, or Resource trade
- Achievement phase — Claim up to one Achievement
After these phases have been completed, the turn passes to the left.
1. Action Phase
To take an Action, the player moves their Action pawn  and places it on an Action space
  on the Technology board. They then take the Action printed to the right of that Action space.
- The chosen Action space cannot be occupied by any other Faction’s Action pawn.
- The Action pawn must move and cannot stay on the same space it is currently on. However, it is allowed to move to another open Action space on the same Technology card (if there are multiple Action spaces on a Technology card), or even to repeat the same Action (if there is more than one space for the same Action). This rule also applies to spaces in the Basic Spacefaring Technology box (with the exception of the last Action space, which can be repeated as many times as the player wishes).
- The player must have already researched the Technology the Action space is on. This is indicated by the presence of the Faction’s Population cube to the left of the Technology card. (Action spaces printed directly on the Technology board do not require research).
- A player may not take an Action that they are unable to perform or pay the cost for.
- Two of the Action spaces in the Basic Spacefaring Technology box require paying an additional Ore for the Action.
- At the beginning of the game, the Action pawns are placed off the board and do not block any spaces.
Action spaces are usually found on Technology cards and in the Basic Spacefaring Technology box printed on the Technology board.
An Action always has the format:
[cost :] effect
Most of the costs and effects of an Action are represented using icons, while more unique effects are explained in sentences. The Glossary of Effects beginning on page 13 provides further explanation of different types of symbols and effects.
- Players should always check whether they have researched the Technology before taking one of its actions!
- Players are allowed to repeat the same Action if there is a second, open Action space for it.
- The cost, if any, must be paid in full before an effect takes place.
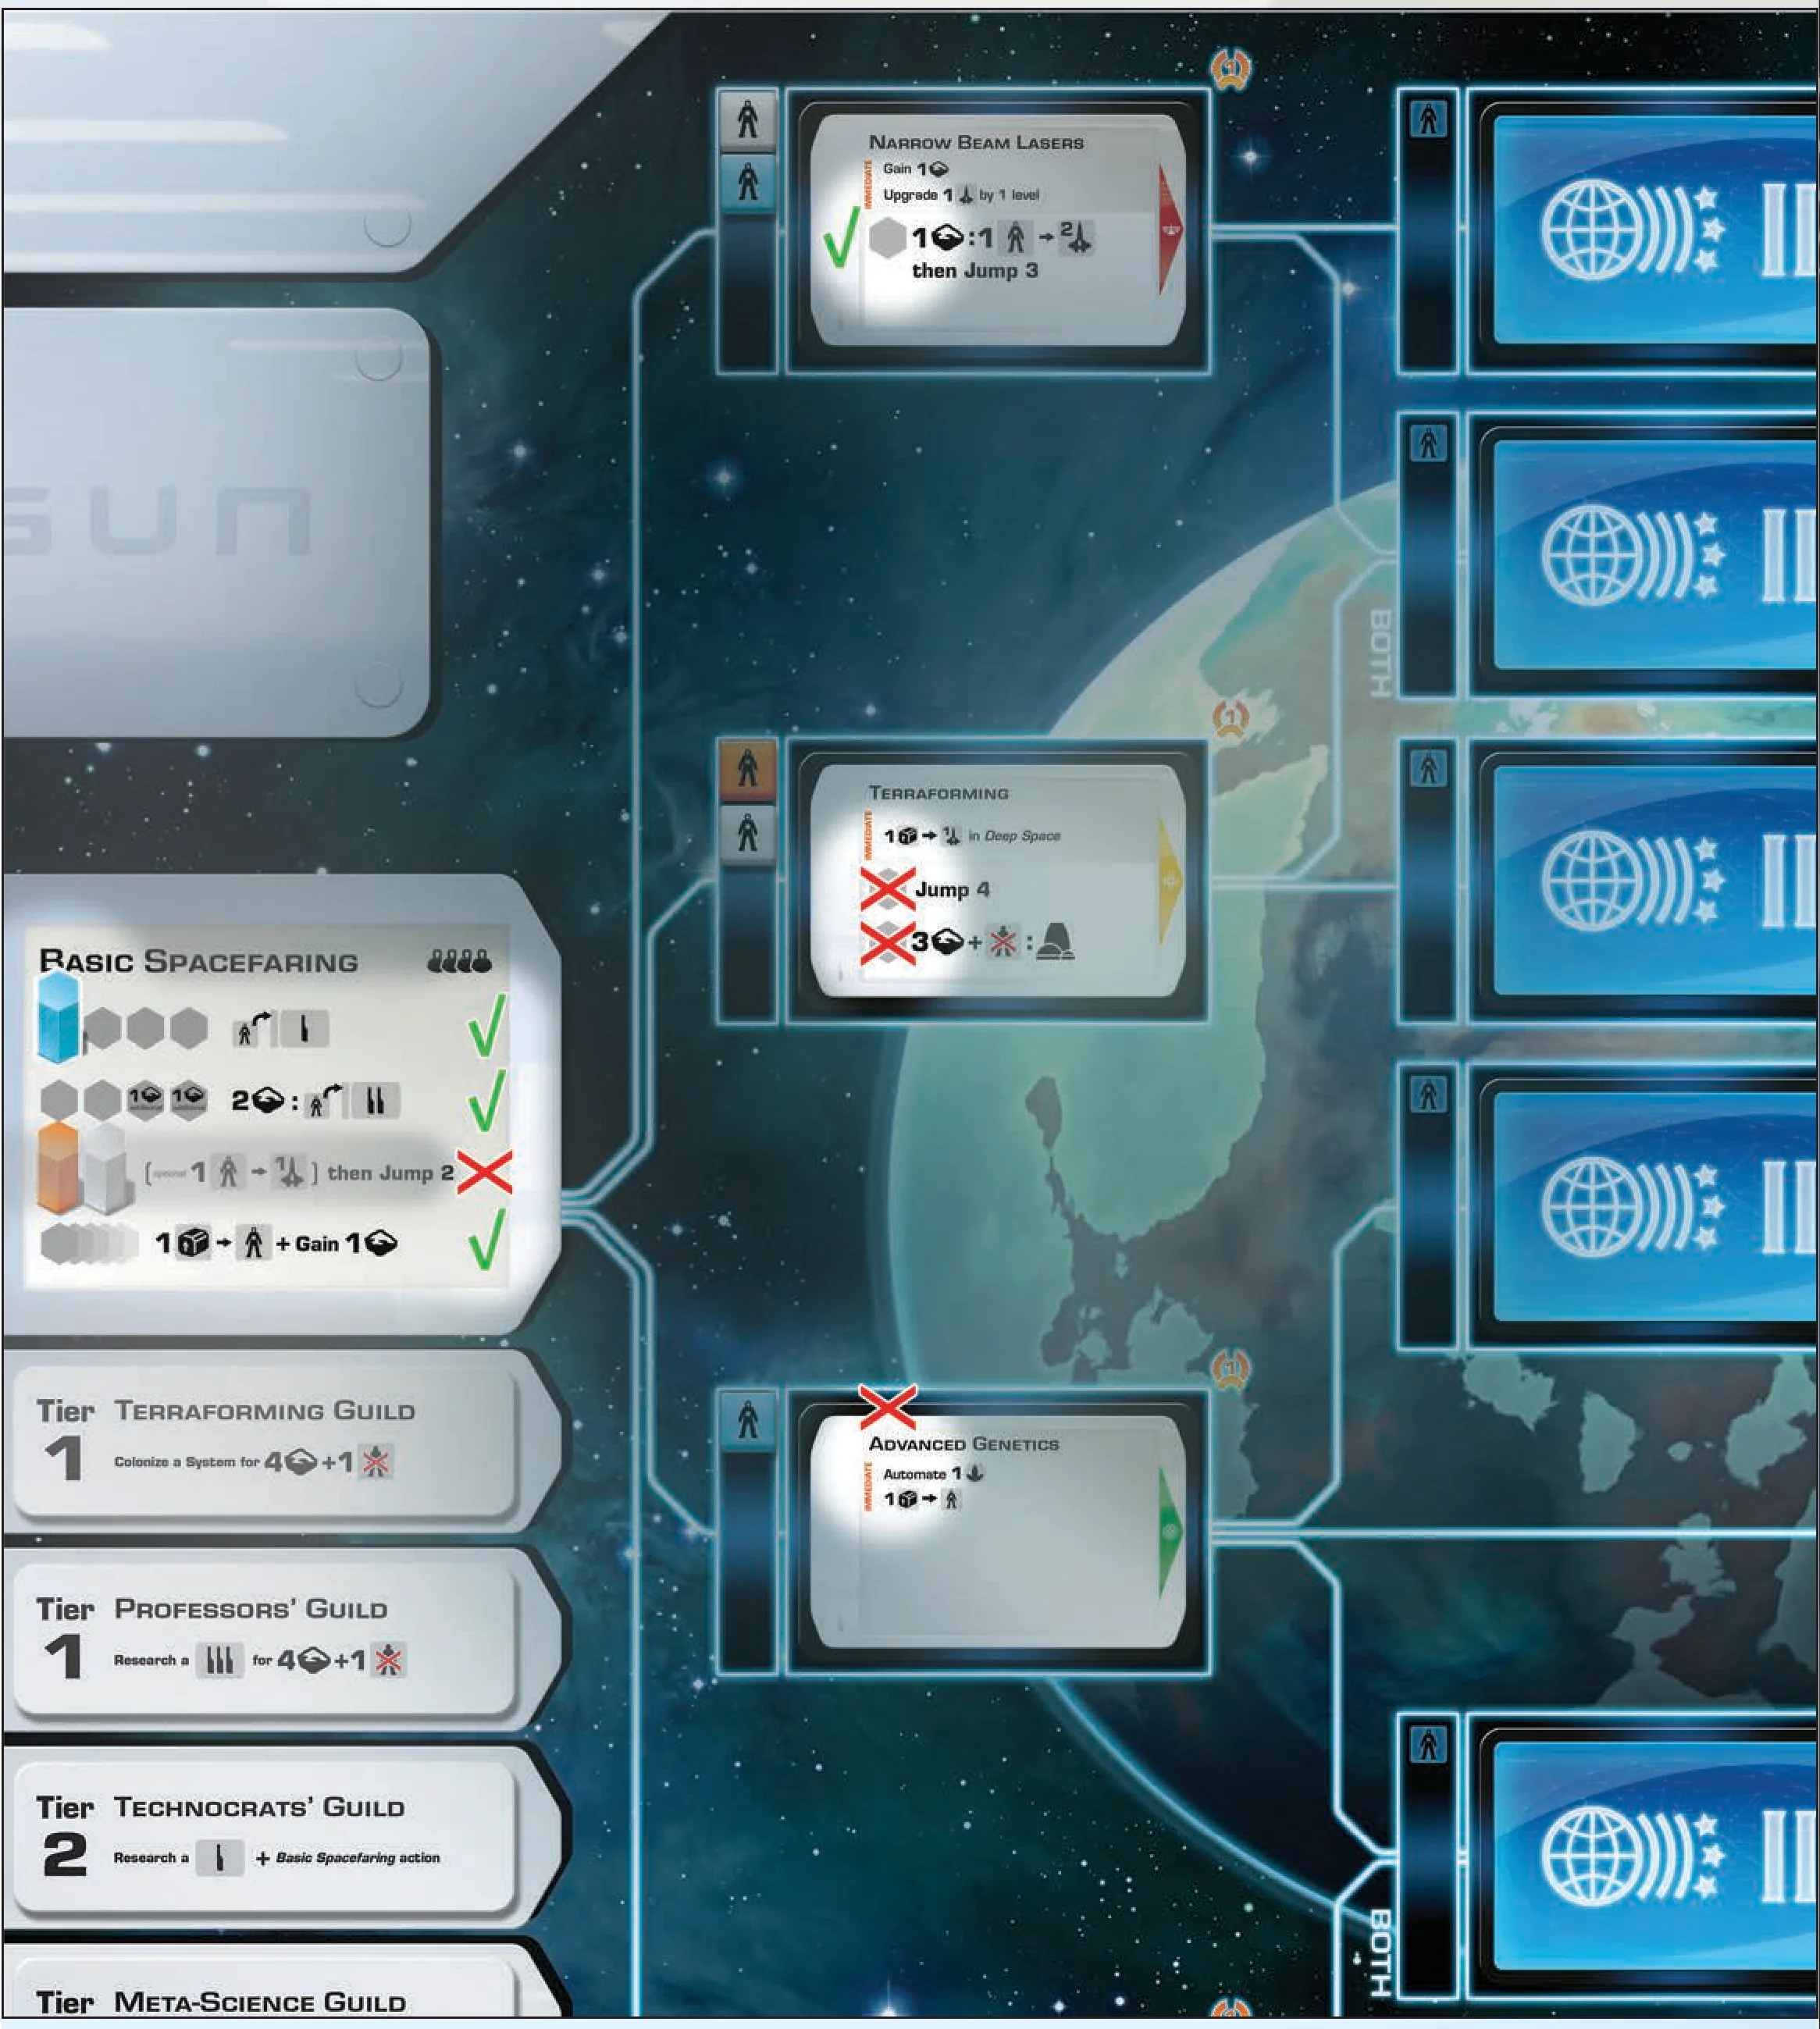
Action Phase Example
It is now Annie’s  turn. Her Action pawn is currently on one of the Action spaces for “Research a Level I Technology”. She must move her pawn. She is allowed to move it to any unoccupied space on the Basic Spacefaring box (including researching a Level I Technology again), or the open space on the Narrow Beam Lasers Technology card.
She cannot take the “Build a Spaceship then Jump 2” Action (third Basic Spacefaring Action) because both spaces are occupied by other players. She cannot take any actions on the Terraforming Technology card because she has not researched that Technology (no blue cube to the left of that Technology card). She cannot choose to use the Advanced Genetics Technology card because it has no Action spaces — it is a Technology that provides an immediate benefit, but no additional actions.
2. Production Phase
During the production phase, the player must choose one of the following options:
- Population growth
- Ore production
- Trade resources
This is not an Action and does not require the use of the Action pawn.
Population growth +:
- The player examines the Population growth track on their Faction mat.
- They look at the
 symbols that are not covered by Food production discs , including the leftmost circle.
 - For each symbol that is showing, take one Supply cube from the corresponding lettered Supply Column above it (position within the column doesn’t matter), flip it to the Population side , and place it on the Faction mat.
The mechanisms used to remove Food (and Ore) production discs are explained later in the rules.
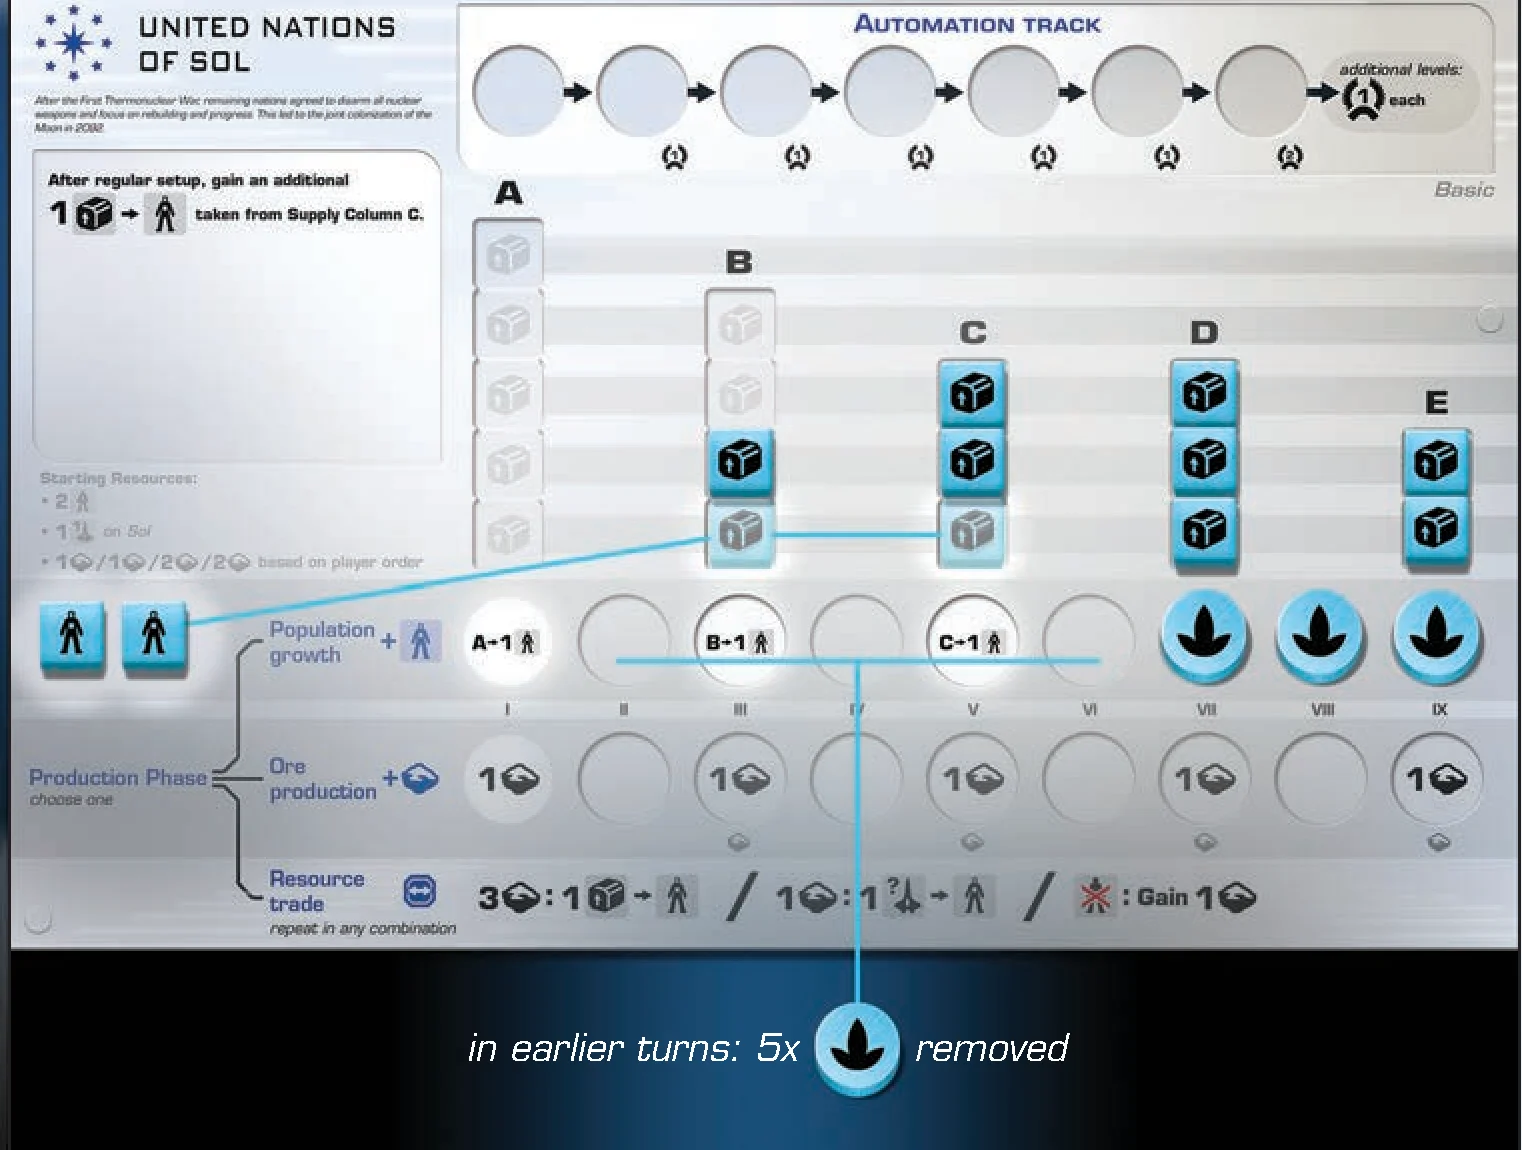
A total of 5 Food production discs were previously removed from Brian’s Faction mat, so 3 symbols (A, B, C) are visible. If Brian chooses Population growth, he takes 1 cube from Column B and 1 cube from Column C and flips them to the side. Column A is out of cubes, so it does not produce any Population.
Take one and only one Supply cube from the column matching the letter on the symbol. If there are no more cubes in a Supply Column, that column cannot produce Population.
Ore production +:
- The player examines the Ore production track on their Faction mat.
- They look at the
 symbols that are not covered by Ore production discs , including the leftmost circle.
 - They gain Ore from the supply equal to the number of that is showing. This Ore is placed on the Faction mat.
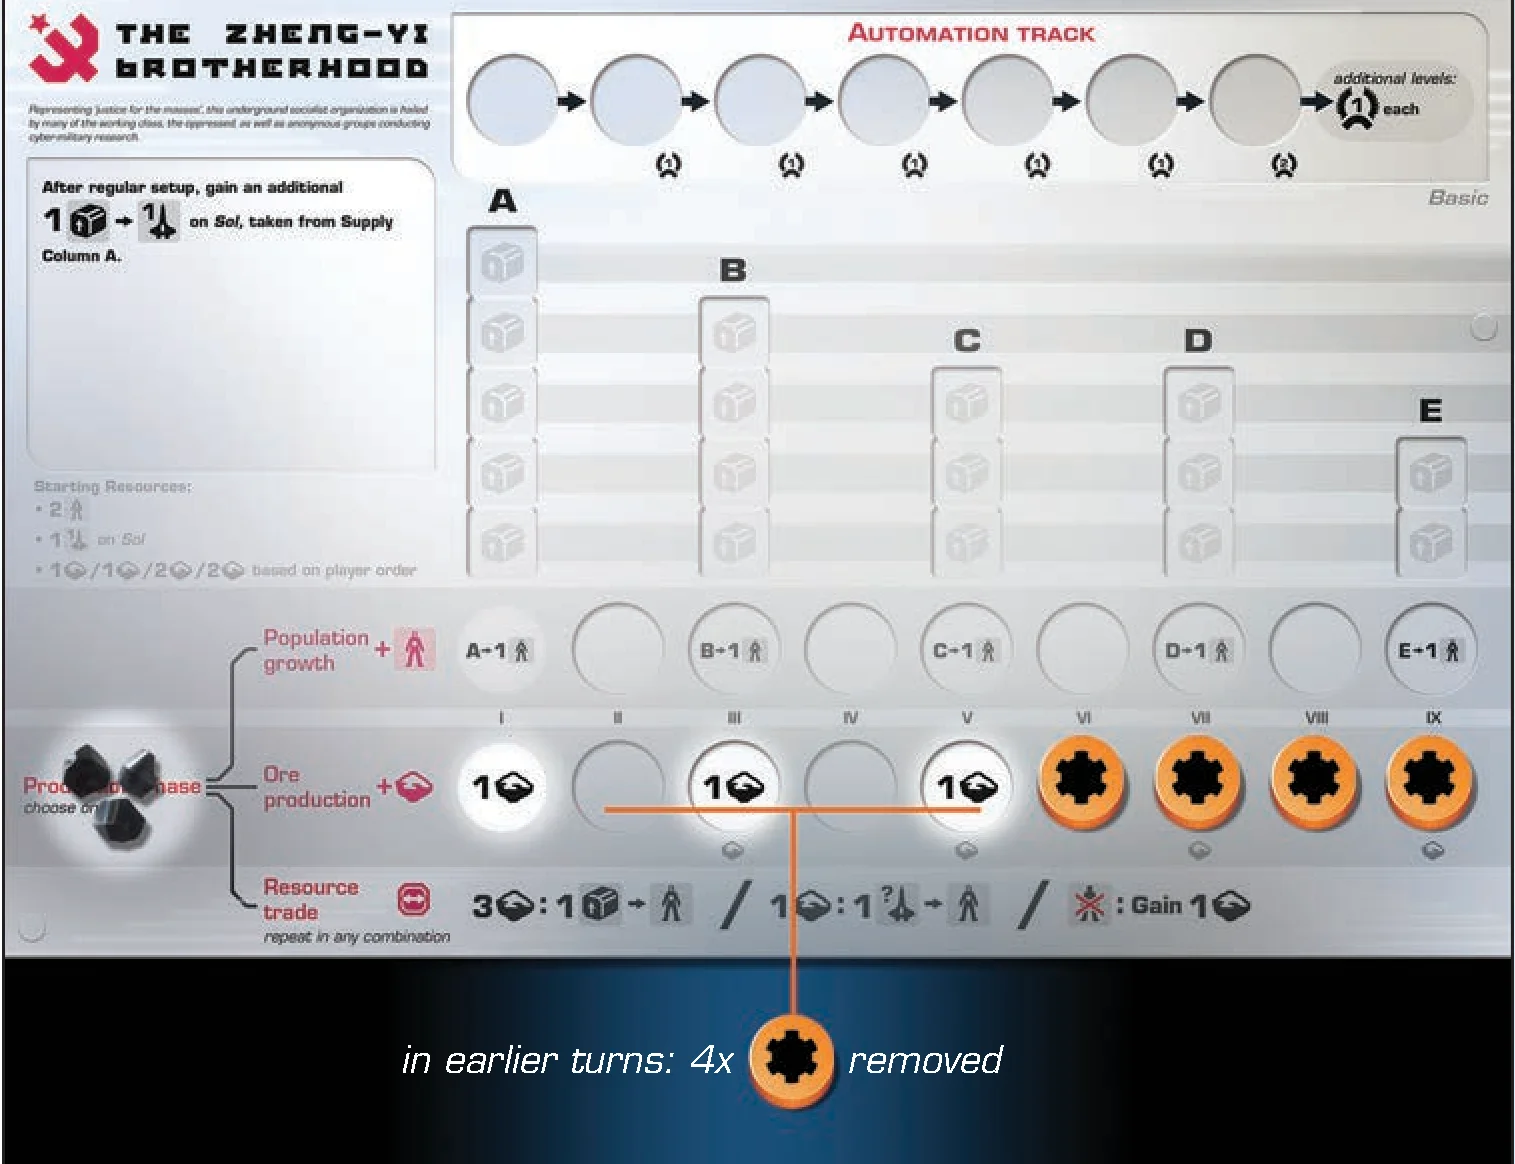
A total of 4 Ore production discs were previously taken off Cindy’s Faction mat, so 3 are visible. If Cindy chooses to produce Ore, she will receive 3 Ore from the supply.
Resource trade  :
:
- This option allows the player to exchange resources but does not generate any new ones. It is useful when a player has many resources of one type and insufficient production capability of another type.
- Players may make as many trades as they wish and in any combination:
- Ore to Population: The player pays 3 Ore, then takes a Supply cube from the leftmost Supply Column that has Supply cubes, and flips it to the Population side . The number of Food production discs on the Faction mat does not apply in this situation.
- Decommission a Spaceship: The player pays 1 Ore, then takes 1 of their Spaceships from anywhere, and turns it into a Population cube.
- Population to Ore: The player returns a Population to the rightmost Supply Column with at least one empty space for a cube ( side up) and gains 1 Ore.
- Ore to Population: The player pays 3 Ore, then takes a Supply cube
- If a player’s Supply cubes run out (very rare), that player may not trade for any more Population.
- A player can only choose one option (Population growth, Ore production, or Resource trade) during each production phase on a given turn, not all of them. This choice can be critical to prepare the right resources for the next turn.
- When producing Population or Ore, the quantities must be gained in full if possible. A player cannot voluntarily choose to take fewer resources than the production would provide.
- Since Trade ignores Food production discs, it is a way for players to get new Population even when some Supply Columns are depleted.
- If all of the players agree, the next player in turn order can start their turn while the current player decides what to produce.
3. Achievement Phase
Achievements provide Victory Points at the end of the game and can be claimed during the last phase of each player’s turn. Only one Achievement can be claimed per turn, no matter how many conditions have been satisfied.
- To claim an Achievement, the player announces the condition that they have satisfied, then places an Achievement disc
 on an open slot on the corresponding Achievement card, filling from left to right (higher to lower Victory Points).
 - Each Achievement slot can only be occupied by a single disc. When an Achievement card is full, that Achievement can no longer be claimed.
- Each Achievement can only be claimed by each Faction once. For example, if a player has colonized 8 Systems, they cannot claim the Empire Achievement again.
- Once an Achievement is claimed, the disc stays there for the rest of the game, even if the condition stops being satisfied.
- Players must claim an Achievement if they qualify to do so. They may not voluntarily skip this phase to delay the end of the game.
- The players’ supply of Achievement discs is not limited (use substitute markers if necessary).
- Achievements can only be claimed by the player who is currently taking their turn, even if the condition is met by another player.
Basic Actions Overview
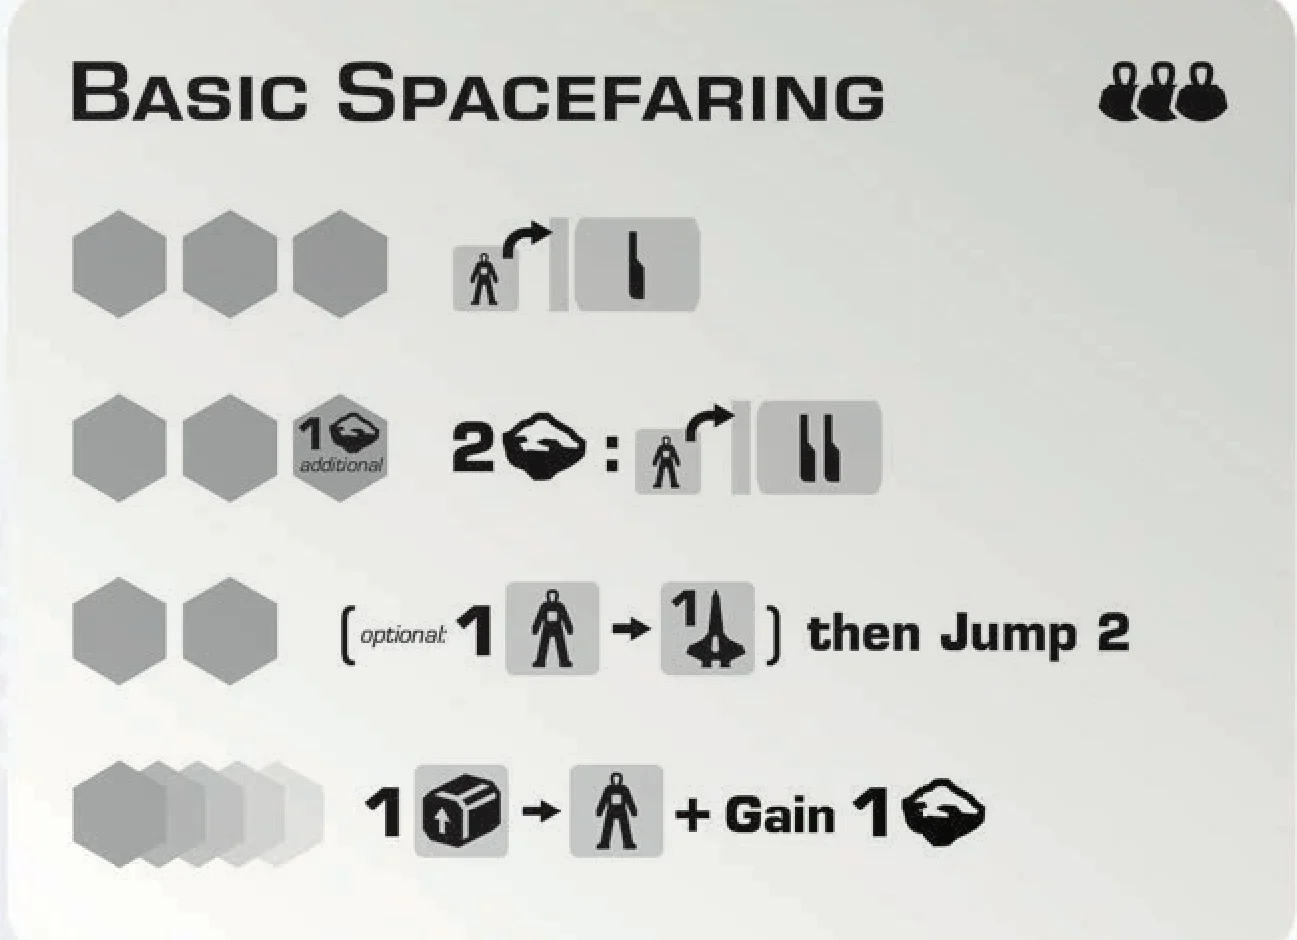
In Beyond the Sun, icons are used to describe Action costs and their effects, as well as other bonuses that may be gained during the game. As starting examples (especially if players are playing the game for the first time), the following table introduces the actions in the Basic Spacefaring Technology box, explained in plain sentences in the Description column, then broken down into individual component effects in the Referenced Effects column.
A complete glossary of all referenced effects is listed from the next page onward.
| Basic Spacefaring Action | Description | Referenced Effects |
|---|---|---|
 |
Use 1 Population cube to research a Level I Technology. |
|
2 :   |
Pay 2 Ore to use 1 Population cube to research an undiscovered or existing Level II Technology for which the player is eligible. |
|
(optional: 1  ) then Jump 2 ) then Jump 2 |
The player may optionally transform 1 Population cube to a level 1 Spaceship and place it on Sol or any Shipyard System that the player controls. Then the player may perform up to 2 Jumps. |
|
| 1 + Gain 1 |
Create 1 Population cube from the leftmost Supply cube available, ignoring Food production discs, and then gain 1 Ore. |
|
Research a Technology



Research plays an essential role in advancing a Faction’s power and economy. As the Technology tree unfolds, Factions steer the course of human civilization and unlock increasingly powerful actions and effects.
Researching a Technology involves the following steps:
- Choose Technology slot
- Place Population cube
- Trigger Event (undiscovered Level II or III Technologies only)
- Choose Technology card (undiscovered Technologies only)
- Gain immediate bonus
1. Choose Technology slot
There are 4 levels of Technologies, laid out in 4 columns on the Technology board, going from left to right. The symbol ( I / II / III / IIII ) in the icon specifies which Technology level the player is researching.
The researching player can choose any Technology slot on that level that satisfies the following conditions:
- they have not already researched the Technology
- they have the prerequisites for the Technology
To determine if the prerequisite Technologies have been researched for a given slot, the player must have already researched all the technologies connected directly to the left of it via the blue line(s).
Level I Technologies do not have prerequisites, since every Faction starts the game with the Basic Spacefaring Technology.
Higher-level Technologies require 1 or 2 prerequisites. Some Level IIII Technologies only require 2 out of 3 prerequisites.
If the symbol contains an eye  , the player can only pick an already discovered (face-up) Technology.
2. Place Population cube
The player places their required Population cube onto the rectangular space to the left of the Technology slot. Other players’ cubes do not block this placement. Factions are allowed to research the same Technologies.
These Population cubes represent part of the Faction’s workforce dedicated to science and technology. These cubes will never be returned to the Faction mat, so as a Faction’s technology advances throughout the game, they will need more Food production to keep up with the demand.
3. Trigger Event (undiscovered Level II or III Technologies only)
If this is an undiscovered Level II or III Technology slot, the player reveals the Event card covering the slot, reads the Event, and resolves it according to the instructions. The Event card is then discarded unless specified otherwise.
4. Choose Technology card (undiscovered Technologies only)
If this is an undiscovered Technology, the researching player has the opportunity to choose a new Technology card from the deck to place on the board, unlocking new actions and abilities:
- Determine Technology type: The player examines the type/color of each prerequisite Technology one level to the left, which is indicated with a small triangle on the right side of the prerequisite card. If there is only 1 prerequisite (or both prerequisites are of the same type), that will be the type of the newly discovered Technology. If there is more than 1 prerequisite type, the player chooses which of those 2 types the new Technology will be before the next step.
- Reveal Technology cards: The player reveals cards from the Technology deck of the appropriate level until 2 Technology cards matching the chosen type/color are revealed, using the large triangle on the left side of the card to find a match. If the large triangle is split into 2 types/colors, the card represents a hybrid Technology that matches either type. Cards that do not match are placed to the side for now.
- Choose Technology card: The player chooses 1 of the matching cards and places it on the chosen Technology slot. The card that was not chosen and unmatching Technology cards are placed face-down on the bottom of the same Technology deck in random order. The deck is not shuffled.
The 4 types of Technologies have different characteristics, summarized below. A hybrid Technology generally contains characteristics of both of its types.
- Scientific — Ore production automation, research actions, and Ore bonuses
- Economic — Food production automation, Population collection, and Ore collection
- Military — Shipbuilding, movements, and upgrades
- Commercial — Colonization actions, ship movements, and flexible actions
5. Gain immediate bonus
If there is a box labeled “IMMEDIATE” on the Technology card, the player receives a one-time bonus described in the box immediately after researching the Technology. This bonus is not limited to the first player to discover the Technology. If other Factions research the same Technology later in the game, they will also get the bonus. Any other effects that are shown outside this box are not executed — they are either new Action space(s) or a permanent power for the players who have researched the Technology.
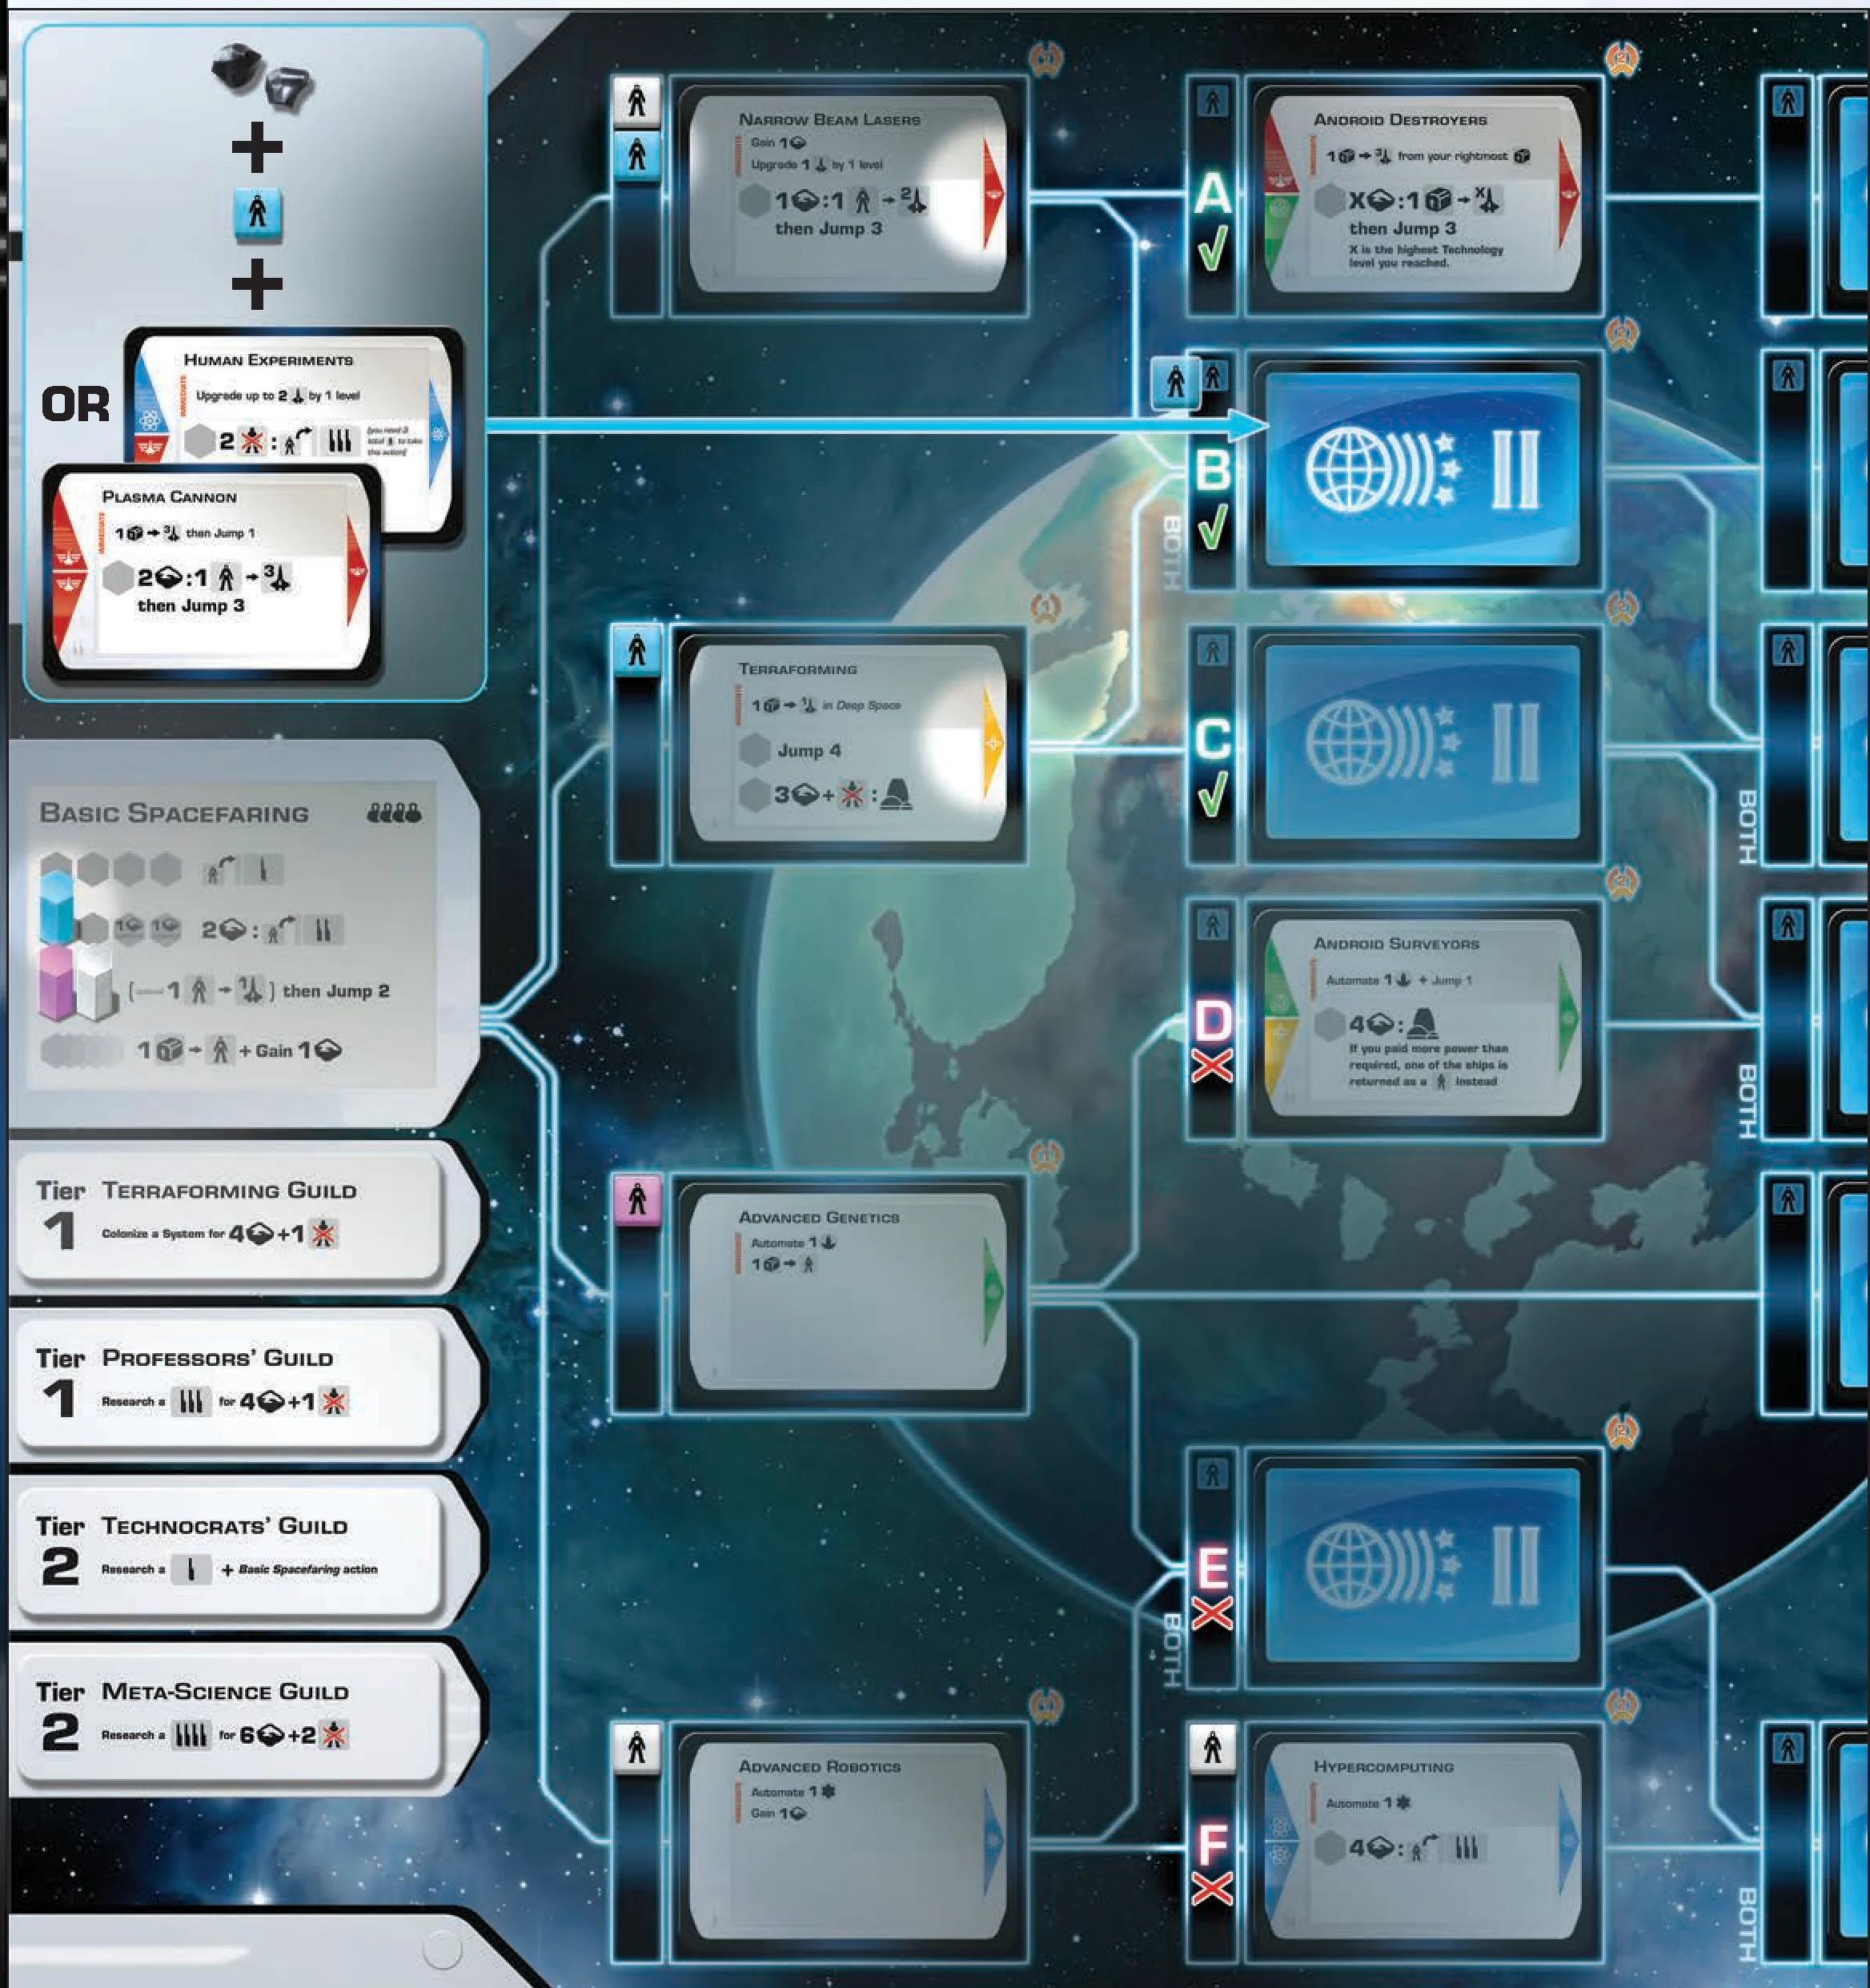
Research Example
Derek  takes the “Research a Level II Technology” Action listed in the Basic Spacefaring Technology box. He is allowed to research the Technology at slot A, B, or C (he has the prerequisites, Narrow Beam Lasers and/or Terraforming), but not slot D, E, or F (he does not have the prerequisites, Advanced Genetics and/or Advanced Robotics). He chooses slot B and will discover a new Technology there. He pays 2 Ore, places a Population cube on the space to the left of slot B, and resolves the Event card there.
Since there are 2 prerequisites connected to slot B, he can decide to search for either a Military or Commercial Technology. He chooses Military, so he reveals cards from the Level II Technology deck until he finds 2 Military Level II Technology cards: Human Experiments and Plasma Cannon. He chooses the Plasma Cannon Technology card, places it on slot B, and receives the IMMEDIATE bonus on the card. The new Action space on the Plasma Cannon Technology card will be available to him starting on his next turn; no other player can use it until they also research the Plasma Cannon Technology.
Automate Food or Ore Production
Automate 1
Automate 1
Automating production is one way to increase Ore and Population growth for a Faction.
To automate Food production or Ore production , the player takes the leftmost production disc from the corresponding production track on the Faction mat and places it on the Automation track above, starting from the left. If there are no more production discs of that type, the player must place a disc (as a placeholder; it is not an Achievement). If all 7 Automation levels are filled, the player places additional discs to the right of the Automation track.
Some automation levels provide additional Victory Points at the end of the game, as indicated on the Automation track. Each level beyond 7 provides 1 Victory Point.
Do not confuse this effect with placing production discs on System cards (as outposts/colonies) when controlling or colonizing a System (see Hyperspace Jump and Colonize a System). Unlike Outpost discs on System cards, discs on the Automation track can never be removed.
Build a Spaceship
To amass a fleet for exploration and colonization of the galaxy, Factions build spaceships using the massive Modular Orbital Shipyards engineered during the Second Space Race of the mid-2100s.
To build a Spaceship, the player takes the required resource cube and rotates it to the side with the Spaceship symbol  of the indicated ship level (1 to 4). New Spaceships can be built either on Sol or on any Shipyard System that the player controls (control is determined by the presence of the player’s Outpost disc on that location). All locations where ships can be built are marked with a icon on the Exploration board. If multiple ships are built, they can be placed on separate locations.
In the rare occurrence that a new Spaceship appears on a location the player does not already control (from certain card bonuses), System control may change, and effects may trigger (see Hyperspace Jump).
Upgrade a Spaceship
Upgrade 1  by X level(s)
Upgrade up to X by X level(s)
To upgrade a Spaceship, the player simply rotates the selected Spaceship cube to the new level. A Spaceship cannot exceed level 4. Players may only upgrade their own Spaceships.
Glossary of Resource & Effect Rules
Gain/Pay Ore
X : effect
Gain X
Pay X to an opponent
Many actions in the game cost Ore to execute, and some allow players to gain Ore from the supply.
- If an Action or effect requires Ore in its cost, the full amount must be paid to the supply (or to the target opponent) before executing the effect.
- If an effect allows the player to gain Ore, the player takes the full amount from the supply and puts the Ore crystals on their Faction mat. The supply of Ore crystals is not limited (use substitute markers if necessary).
Use a Population Cube
1 effect, effect
A Faction’s active workforce is crucial in researching new Technologies and constructing Spaceships. Careful balancing of food production and population utilization is necessary to ensure sustainable growth of a Faction’s economy.
To use Population cubes , the player must have the required number of Population cubes on their Faction mat. Most effects only require 1 Population cube. Using a Population cube involves moving it to the board and possibly rotating the cube to a different side (e.g., moving it to a Technology slot or turning it into a Spaceship).
Use a Supply Cube Directly
1 effect
The invention of advanced AI and android technologies allow Factions to increase their operational efficiency with minimal human involvement. This leads to the introduction of autonomous ships and proto-sentient workers, but also raises ethical issues regarding how machines and androids should be treated in society.
The player takes the indicated number of Supply cubes from the Supply Columns of their Faction mat, starting from left to right. The player must take all cubes from a column before they start taking from the next column. The number of Food production discs on the Faction mat does not matter for this effect. If there are no more Supply cubes left in the Supply area, Population cubes may be used instead, but it is not required.
This effect allows players to take cubes directly from their Supply area regardless of the Population growth track. It can be very useful when a player is struggling to keep up with food demand.
Returning/Overworking Population
1  effect
To return Population as a cost of an effect, the player must have the required number of Population cubes on their Faction mat. Returning a Population cube means flipping it to the Supply side and placing it back on the rightmost Supply Column with at least one empty space for a cube. The player must fill a column completely before placing it in the next. If all columns are filled, the player continues placing cubes on Supply Column A, even though there are no spaces left there.
Some effects require Population cubes both as a cost and in the effect itself. For example: 2 : requires a total of 3 Population cubes.
Unless otherwise specified, players will always take Supply cubes from left to right and return them to empty slots from right to left.
Optional Effects
(optional: Effect)
Effect (optional)
You may…
Jump X
Throughout the game, unless specified otherwise, all costs and effects are mandatory and all quantities must be paid or gained in full. There are, however, a few exceptions to this rule:
- Any effects that are specified “optional”, “if possible”, “you may”, or has “up to” rules text
- Movement points in a Jump effect
- Upgrading Spaceships when there are not enough to upgrade (or if all of them are already at level 4)
- When a player runs out of Supply cubes, and an effect converts Supply cubes to something else, the player may instead use Population cubes for some or all of the missing quantities or just pass on that effect.
Hyperspace Jump
Jump X
Hyperdrive technology was the keystone discovery that enabled humans to go beyond Sol to explore the galaxy. Due to its unstable nature and high energy cost, the distance and fleet size of each jump is limited.
A hyperspace jump effect involves the following steps:
- Move
- Check System control and build outposts
- Check System bonuses
1. Move
The number indicated in the Jump effect is the number of movement points that the player may spend on ships:
- One movement point allows one Spaceship cube to move one line segment connecting two locations on the Exploration board.
- Movement points can be allocated in any way among available ships (i.e., multiple movement points can be spent on one ship or multiple ships can split the points).
- All movements are considered simultaneous — only resolve the next steps after movement is done.
- Players are not required to use all movement points, but they cannot be saved for later.
2. Check System control and build outposts
Locations on the Exploration board with / symbols attached are Systems that can be controlled during the game. The Faction with the most powerful fleet in a System builds an outpost there and benefits from the improved production. System cards and Shipyard Systems on the board are controllable, while Sol and Deep Space are not controllable.
System control is updated whenever there is any change on the Exploration board, even when it is out of turn. However, control is not checked in the middle of a movement.
To determine control of a System:
- If the System currently has no ships, the Faction that moves one or more ships there and leaves at least one ship on the System gains control of the System.
- Otherwise, a Faction needs to have a strictly higher military power than the current controlling Faction to take control. The power of a Faction’s fleet at a location is equal to the sum of all their Spaceships’ levels there (not the number of Spaceship cubes). Outposts do not add any power to the Faction that owns them.
- If some or all of the controlling Faction’s Spaceships leave a System and another Faction now has the strictly highest power there, that Faction takes control.
- If some or all of the controlling Faction’s Spaceships leave a System and multiple remaining Factions tie for the highest power, the Faction that is leaving loses control of the System. That Faction returns the Outpost disc to their Faction mat, and no other Faction takes control.
- If all of the controlling Faction’s Spaceships leave a System and no other ships are there, the Faction retains control of the System.
When a player gains control of a System, they must immediately build an outpost on it by taking the leftmost production disc from the production track corresponding to the System’s specialty ( / ) and placing it on the location. If a System has multiple specialties, the player chooses which disc to place there. If the player has no more production discs of a matching type, they must place a disc on the System as a placeholder. This is not considered an Achievement.
When a player loses control of a System, they return their Outpost disc to the rightmost empty slot on the corresponding production track. The new controlling Faction (if applicable) then places one of their discs in its spot. If one Faction takes control of a multi-specialty System from another, the player who controls the new Faction does not have to choose the same type of outpost.
An outpost serves as an indicator of which Faction controls a System, which is required for shipbuilding and colonization .
3. Check System bonuses
Some Systems provide additional effects when Factions visit them.
- Gain control
 — When a player gains control of (i.e., places an disc on) a System with a gain control effect, they gain this bonus immediately. It does not matter whether it was previously empty or occupied. This bonus can also be triggered on another Faction’s turn (for example, if ships move away). However, the bonus is not applied again when the System is colonized.
 - Other effects — There are occasionally other special rules related to a System. These rules are explained on the card.
If a player gains control of multiple Systems at the same time, they may apply their bonuses in any order they wish.
At the end of the game, each Outpost disc on the Exploration Board is worth 1 Victory Point.
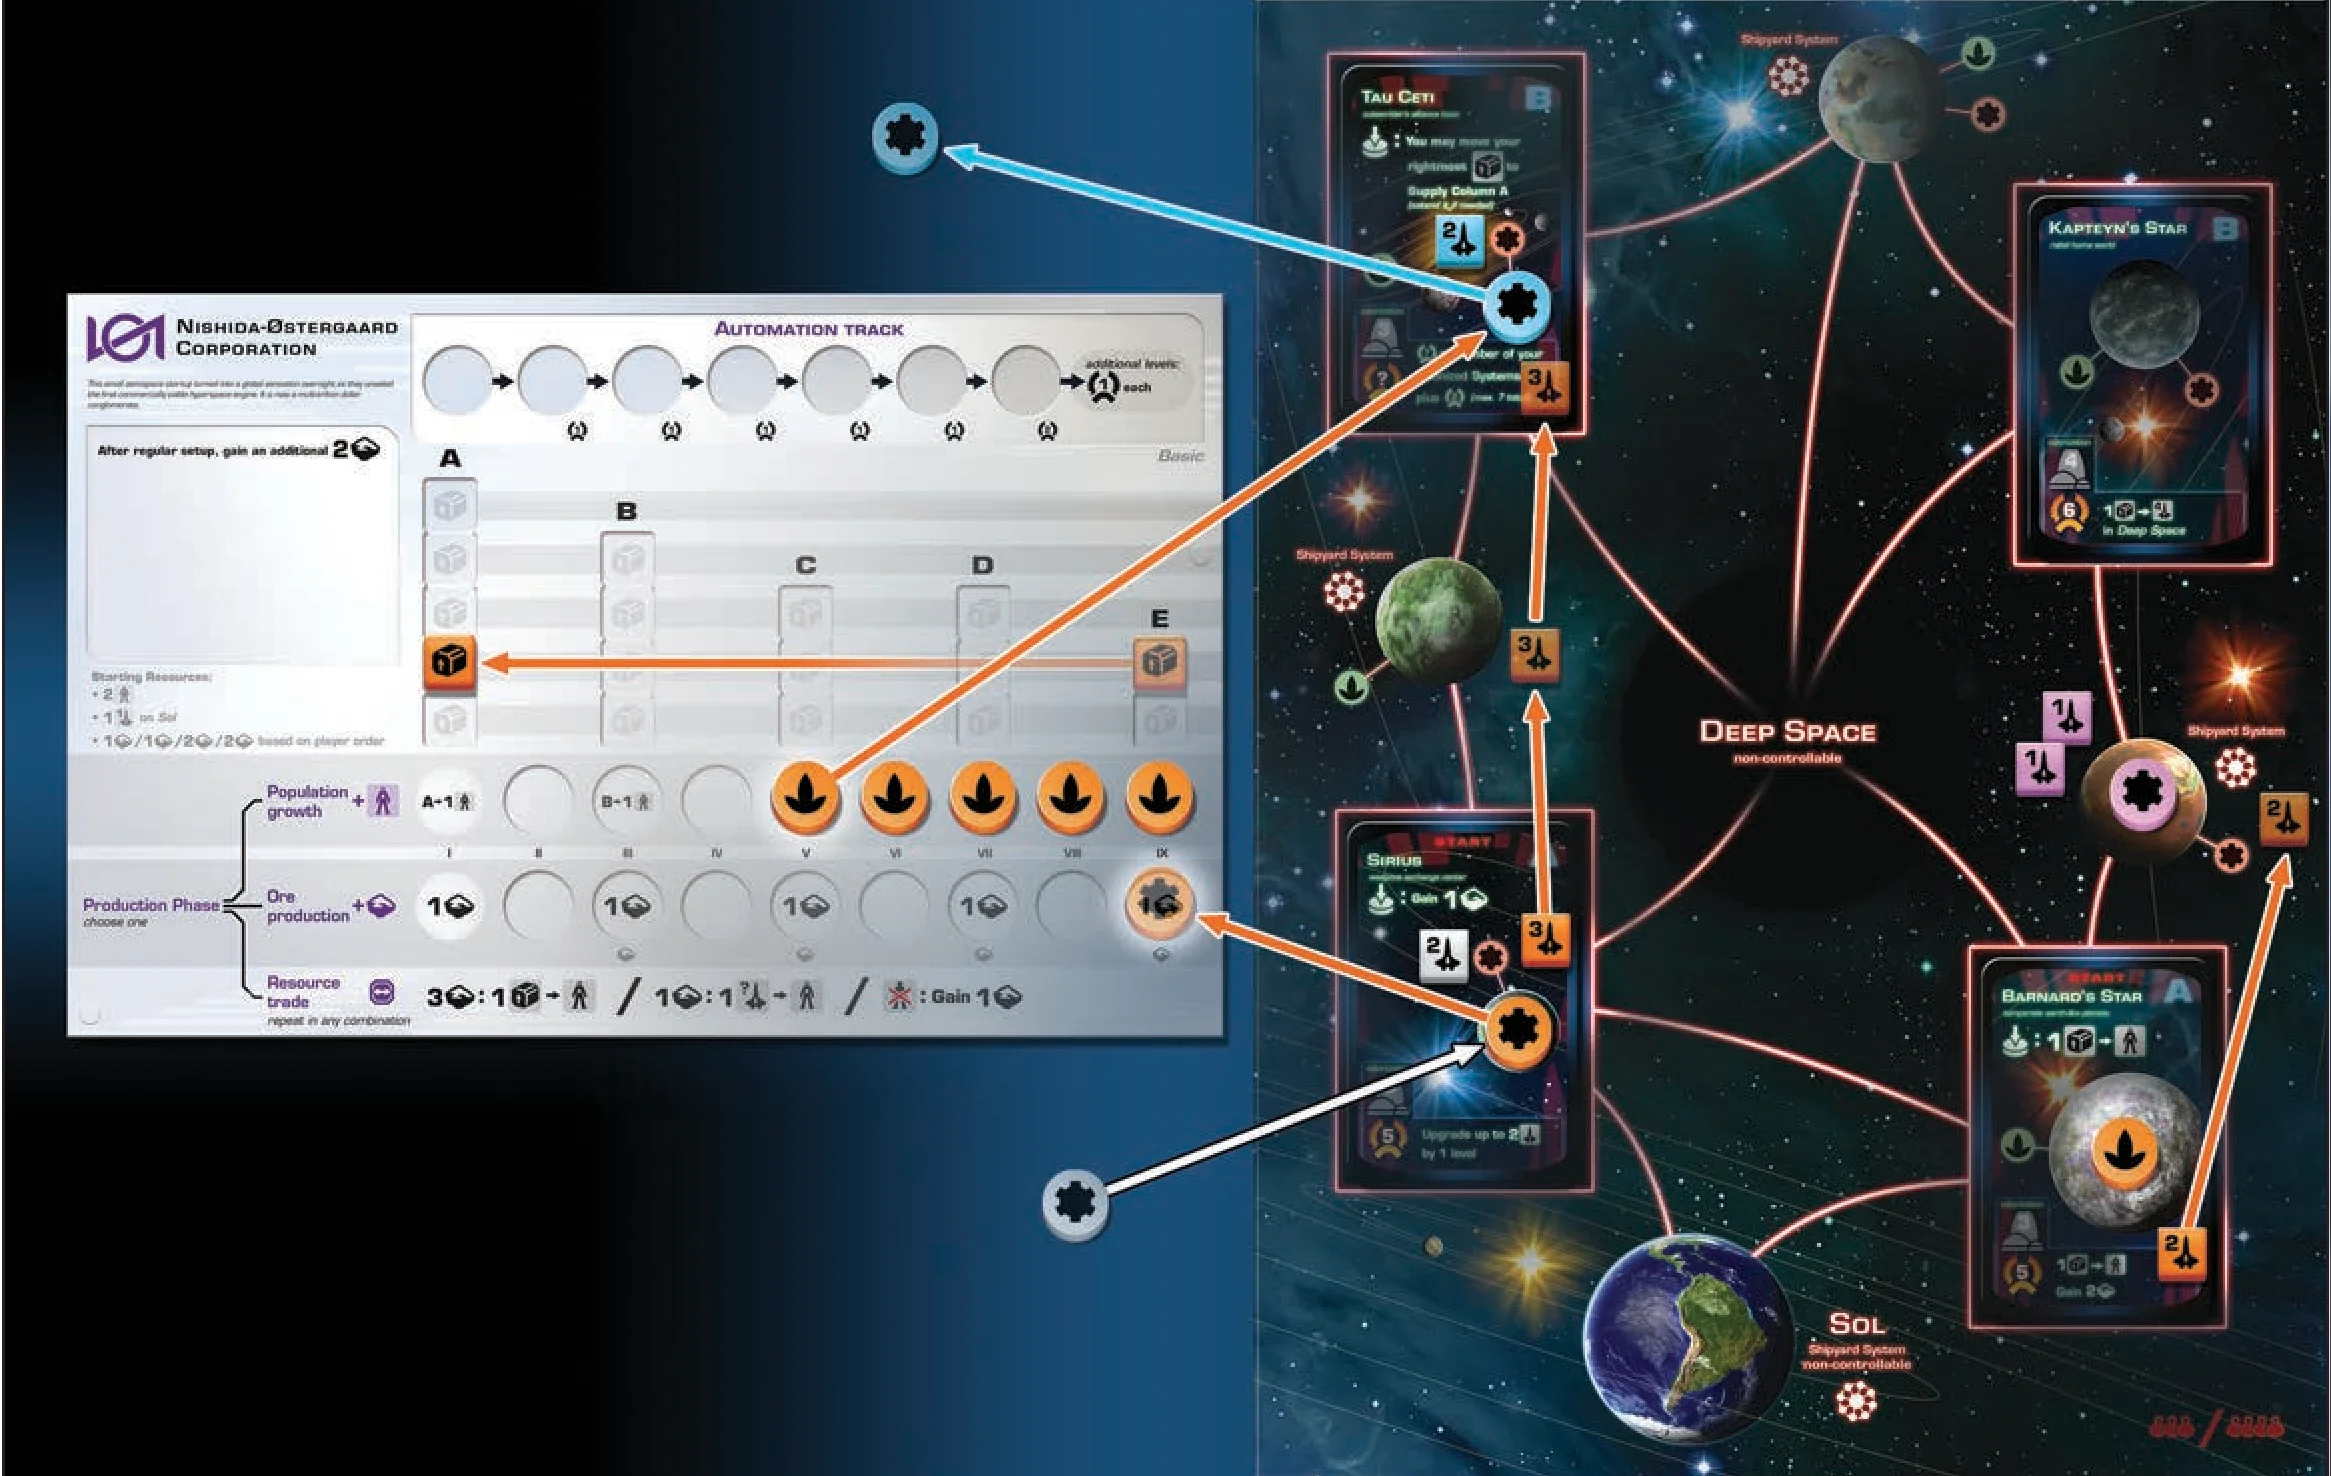
Hyperspace Jump Example
Ellen  is executing a “Jump 4” effect. She moves a level 2 Spaceship from Barnard’s Star to the Shipyard System on the right (1 movement point), and a level 3 Spaceship from Sirius to Tau Ceti (2 movement points). She chooses not to use the last movement point.
Control does not change on the Shipyard System (military power tied with ), but she now gains control of Tau Ceti ( vs ). It is a System with multiple specialties, so she chooses and places a Food production disc from her Faction mat onto the Tau Ceti card and returns the existing disc to Frank , who places it in the rightmost empty space of the Ore production track on his mat. Ellen receives the Gain control bonus on Tau Ceti (moving 1 Supply cube to Supply Column A).
At Sirius, Ellen lost control to Geoff  , so she places her Ore production disc back to the rightmost space on her Ore production track. Geoff then places one of his production discs on Sirius and receives the Gain control bonus there (gaining 1 Ore).
Ellen keeps her Outpost disc on Barnard’s Star since no other players have ships on it.
Colonize a System
(Colonize)
With sufficient resources and military power, a System under a Faction’s control can be colonized to become that Faction’s permanent territory. This allows the Faction to further improve its production and receive unique benefits the System offers.
Only System cards (with a symbol) are colonizable. Shipyard Systems, Sol, and Deep Space cannot be colonized.
A colonization effect involves multiple steps. These steps are also listed on each player aid:
- Determine eligibility
- Settle Spaceships of required power or more
- Exile other Spaceships to Deep Space
- Take System card and discover new System
- Place additional production disc
- Gain colonization bonus
1. Determine eligibility
Colonization requires a strong military presence in order to establish a stable and sustainable community, as well as to ensure the safety of the settlers.
Unless otherwise specified, to be eligible to colonize a System, a player must have:
- control of the System (an Outpost disc on the System card)
- the minimum required military power on that System. The power requirement is printed inside the symbol on the System card. The power of opponents’ ships at that System does not matter for colonization.
2. Settle Spaceships of required power or more
The player must return a number of Spaceships in the System that add up to the required military power or more. They become settlers on the new colony and will be returned to the Faction mat. The player is allowed to return more power than required, either by choice or because no combination of Spaceships on the System is exactly equal to the required power. However, they do not get any “change” for the difference.
Place the selected Spaceships, side up, back on the empty slots in the Supply Columns of the Faction mat, starting from right to left. If all slots are filled, continue placing cubes on Supply Column A, even though there are no spaces left there.
An often overlooked benefit of colonization is that it refills Supply Columns, allowing more Population to be produced and used again without having to improve Food production. The returned Spaceships are not sacrificed or destroyed — they are merely starting a community in the new world!
3. Exile other Spaceships to Deep Space
Once a System is colonized by a Faction, the remaining Spaceships must leave and continue to explore the rest of the galaxy. The player moves all remaining Spaceships in that System (including their own ships) to the Deep Space location.
4. Take System card and discover new System
The player takes the System card, along with the Outpost disc on it, and places it next to their Faction mat. They then draw the top System card from the corresponding System Deck and refill the empty slot with that card. The player should read the new card out loud to the other players, so they know what bonuses the new System has to offer. In the rare case where one of the System Decks runs out, draw from the other deck instead. If no System cards remain in either deck, leave the slot empty.
5. Place additional production disc
The outpost flourishes into a colony, providing additional production boosts for the governing Faction.
The player places another production disc matching the System’s specialty on the System card, ending with a stack of 2 production discs. If the System has multiple specialties, the player may choose one. This new disc does not have to be the same type as the original outpost. If the player has no more production discs of a matching type, place a disc as a placeholder. This is not considered an Achievement.
6. Gain colonization bonus
The player gains the bonus described at the bottom of the System card immediately. Bonus effects must be executed in full unless specified otherwise.
Since a new System card was already drawn in the previous step, a colonization bonus that involves a Jump effect may allow Spaceships to immediately enter (and likely control) the newly drawn System.
At the end of the game, each colonized System is worth Victory Points equal to the value indicated at the bottom of the card.
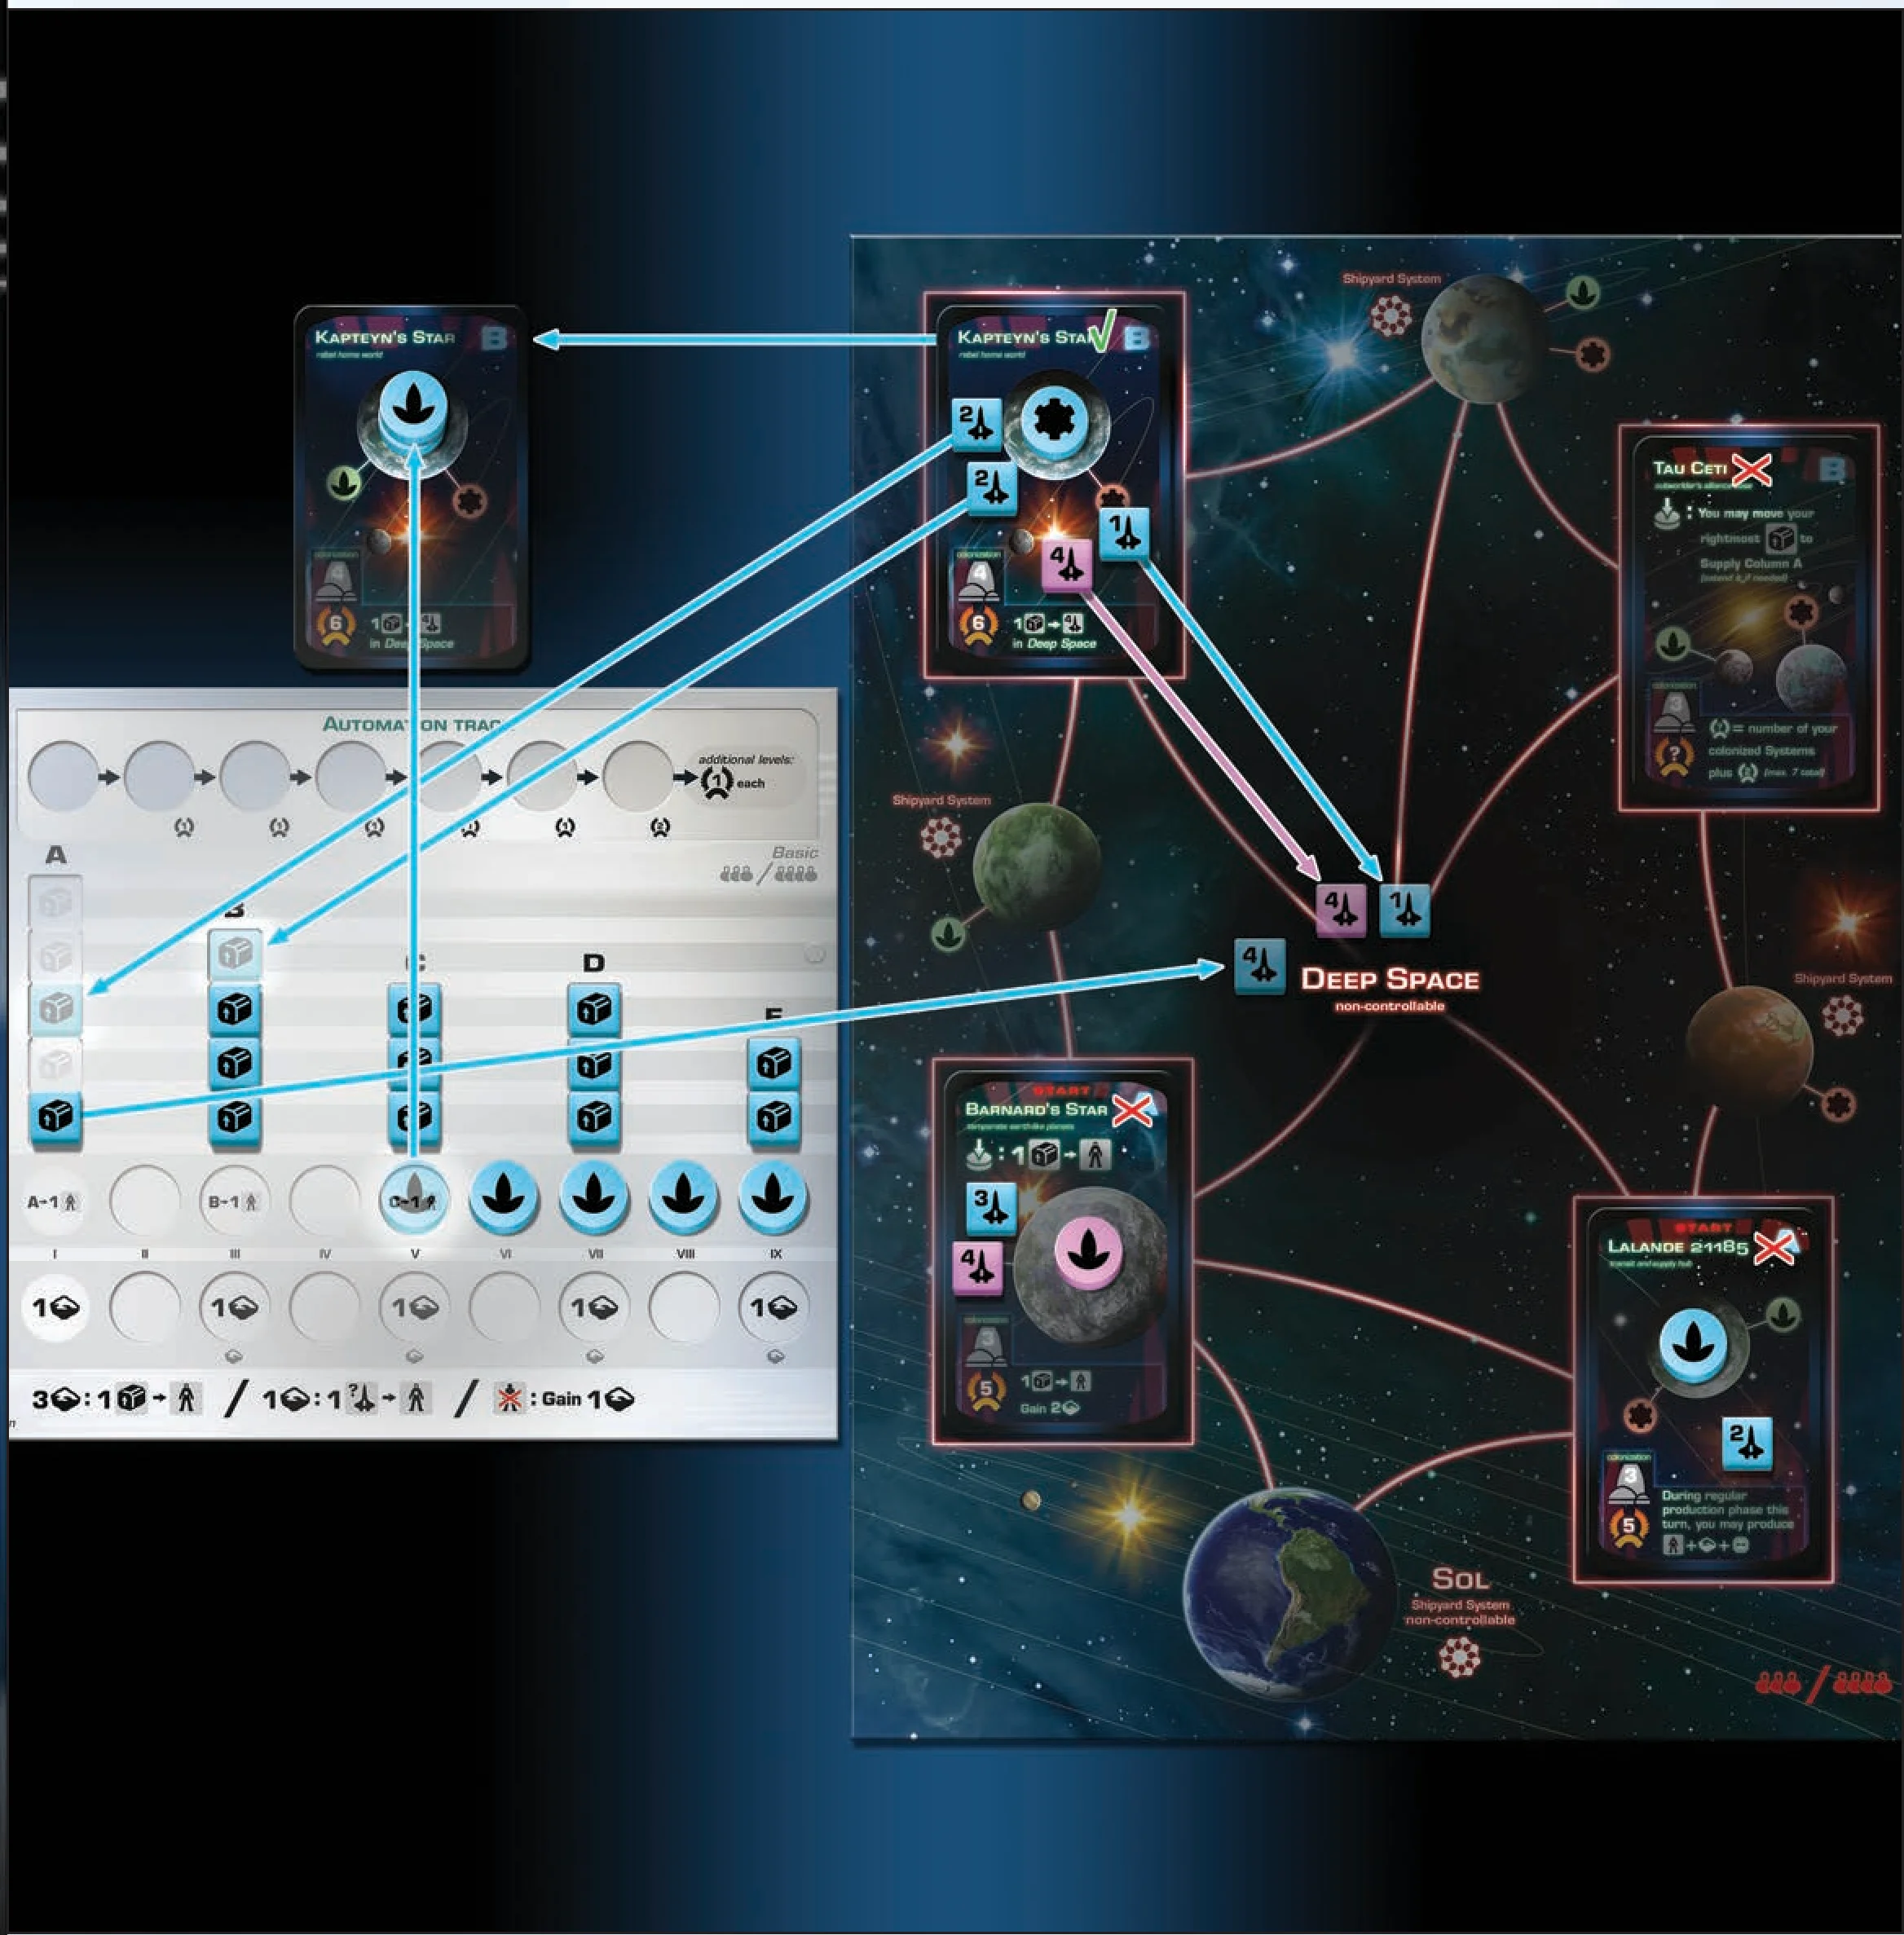
Colonization Example
Heidi is taking a “Colonize a System” Action. Despite having a military presence, she is not allowed to colonize Barnard’s Star (because she does not control it) or Lalande 21185 (because she does not have enough military power). Her only choice is Kapteyn’s Star.
Kapteyn’s Star requires 4 power to colonize. She takes 2 level-2 Spaceships there, flips them to the side, and returns them to her Faction mat’s Supply Columns. She places 1 cube on the last empty slot on Supply Column B and 1 cube on an empty slot on Supply Column A. The remaining 2 Spaceships ( and ) are moved to Deep Space.
She takes the Kapteyn’s Star card along with the existing outpost and places it next to her Faction mat. She refills the empty slot with another card from System Deck B and reads it to all players. Kapteyn’s Star is a System with multiple specialties, so she chooses and places an additional Food production disc on it, making a stack of 2 discs.
Finally, she gains Kapteyn’s Star‘s colonization bonus of placing a Spaceship in Deep Space from her supply.
Triggering the End of the Game
In Beyond the Sun, there is not a set number of rounds to finish the game. Instead, the last round is triggered when 4 total Achievement discs have been placed on Achievement cards. It does not matter which Achievement cards they are on or which colors the Achievement discs are.
Once 4 Achievements are claimed, finish the current round (ending with the player to the right of the starting player), then play one full, final round of the game. Achievements can still be claimed after the game end is triggered, resulting in more than 4 total discs on Achievement cards. After the final round, players calculate their scores, and the winner is the player with the most Victory Points.
Players should pay special attention when Achievements are starting to be claimed, as the last round can be triggered rather quickly afterward. However, since only one Achievement can be claimed per turn, a player cannot “rush” the end by claiming multiple Achievements at once. On the other hand, a player also cannot “delay” the end by not claiming an Achievement when they can. If a given Achievement condition is fulfilled, a player must claim the Achievement; however, if they fulfill multiple Achievements at once, they can choose which one to claim.
The active player may claim only one Achievement each turn!
On average, there are about 15 rounds in a game, including the final round. However, this can vary based on players’ decisions and how the Technology tree unfolds.
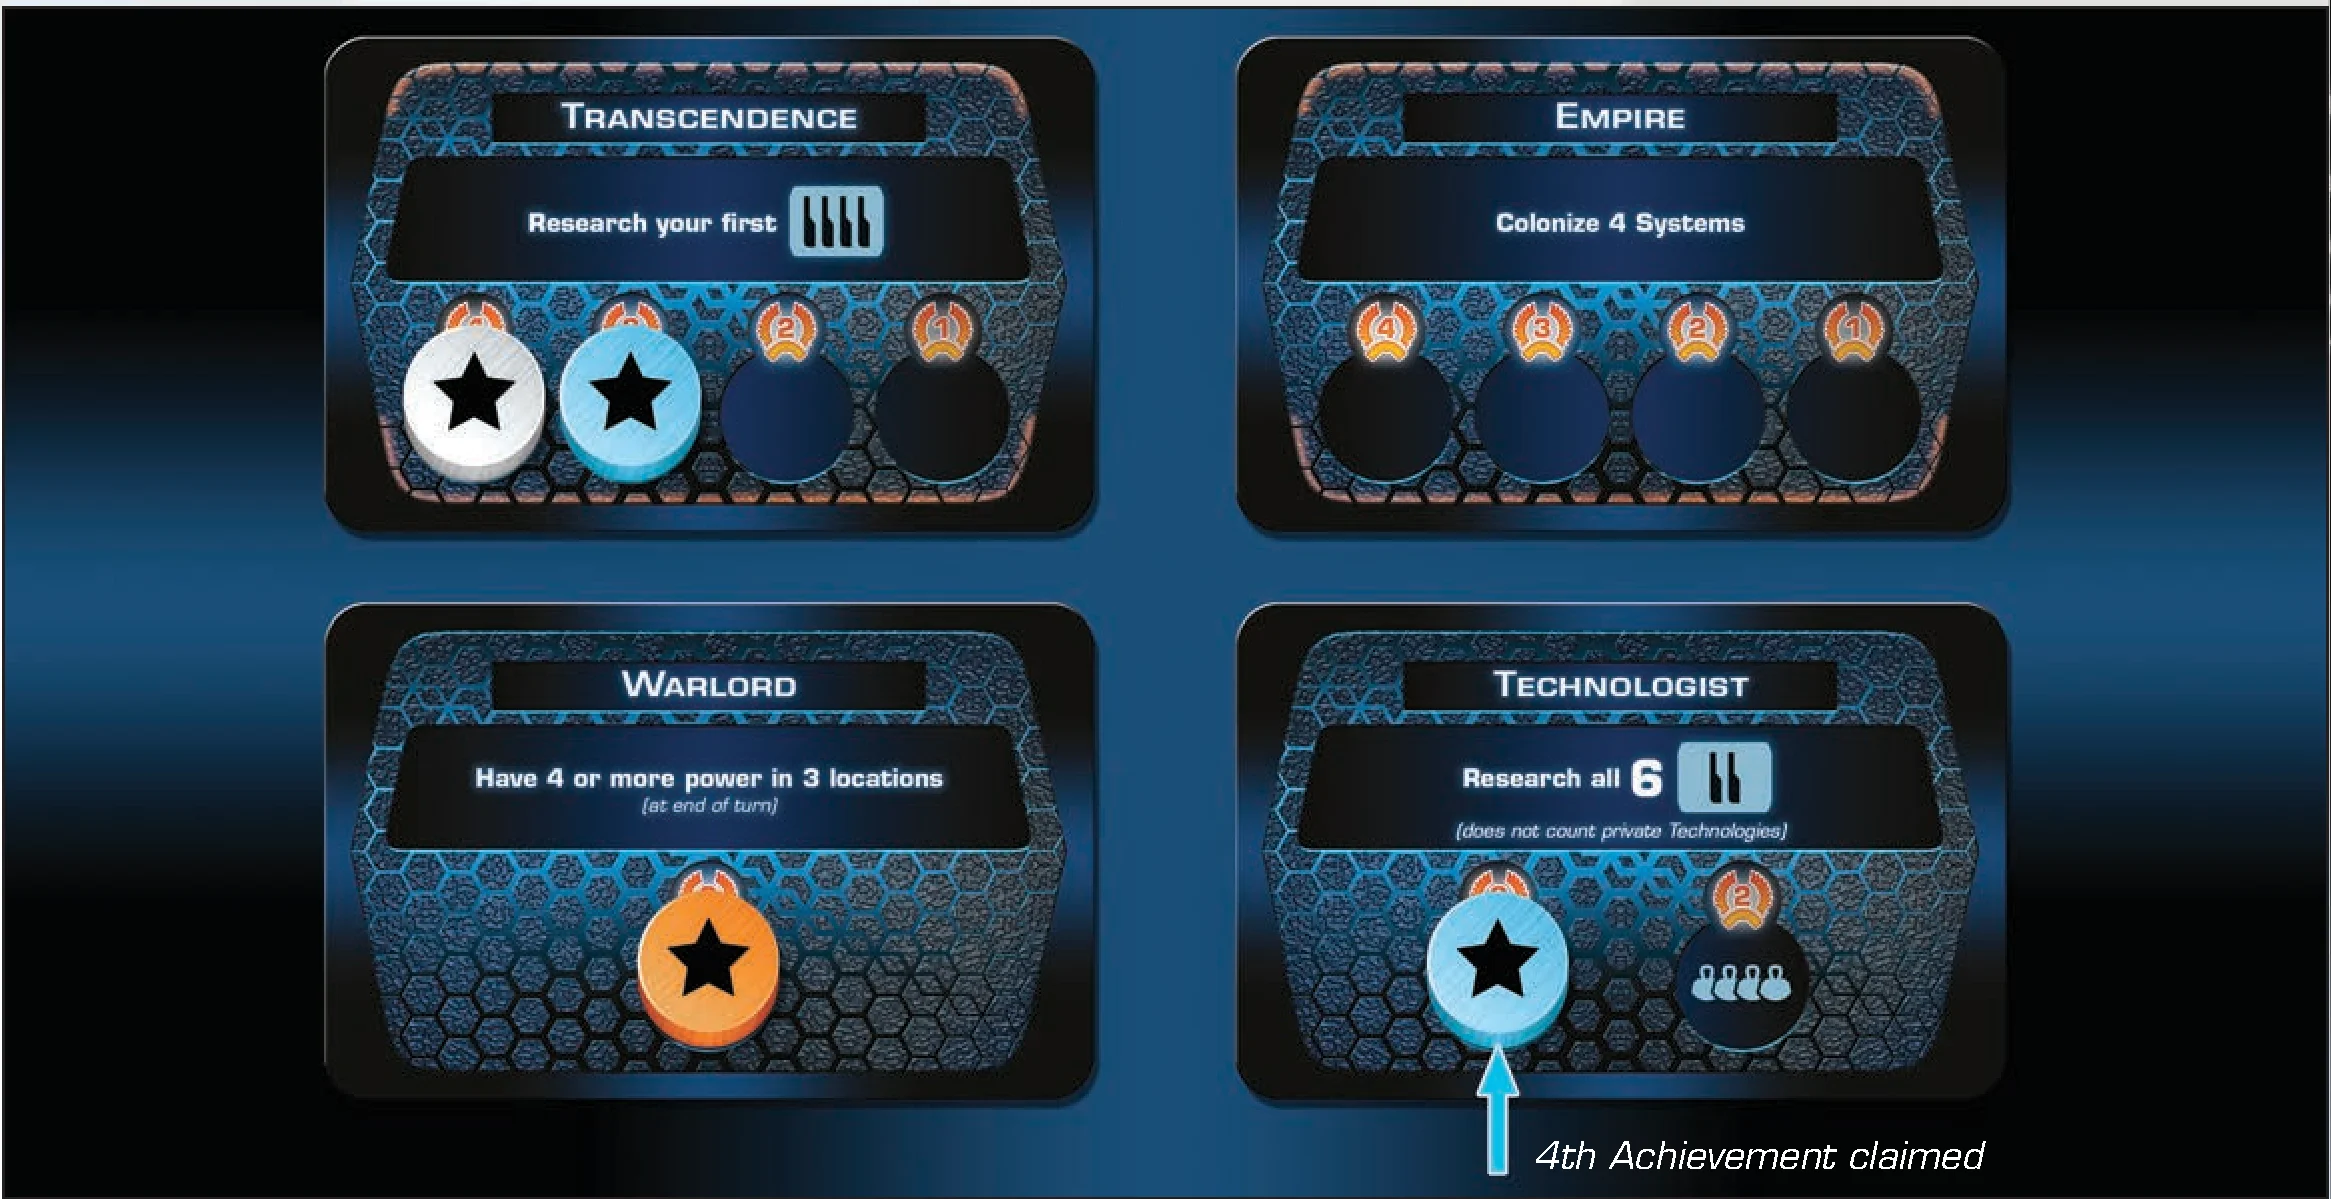
Annie , Brian , Cindy , and Derek are playing a game of Beyond the Sun, and Annie was the starting Faction. Cindy (3rd player) managed to claim the 4th Achievement, which triggered the end of the game. To ensure equal turns, Derek (4th player) gets to take his turn after Cindy, then everyone (including Derek) gets exactly one more turn. Players are still allowed to claim an Achievement on their final turn, even though 4 Achievement discs are already on the board.
If Derek was the one who triggered the end of the game, the final round would begin immediately after Derek’s turn. All players (including Derek) will get exactly one more turn.
Scoring
Follow the steps below to score each Faction’s Victory Points. This is also printed on the back of the player aid.
- Each Faction scores 1 for each of their Level I Technologies
- Each Faction scores 2 for each of their Level II Technologies
- Each Faction scores 3 for each of their Level III Technologies
- “Private Technologies” (from card bonuses) are worth 2 or 3 based on their level (Level II or III, respectively).
- Each Faction scores specified on their Level IIII Technologies
- Each Faction scores specified on their Automation track (add all showing, up to the level reached). After level 7, each additional level is 1 each.
- Each Faction scores for each of their colonized Systems, as indicated at the bottom of the System card.
- Each Faction scores 1 for each of their uncolonized Outpost discs (on System cards or Shipyard Systems).
- Each non-controllable location (Sol and Deep Space) scores 1 for the Faction(s) with the highest military power (tied players get the same ).
- Each Faction scores for each Event card that provides . They are usually found near the Achievement cards, or they can be attached to certain locations or Factions.
- Each Faction scores for each of their Achievements.
The Faction with the most Victory Points is the winner. In case of a tie, the tied Faction with the fewest remaining Food and Ore production discs on their Faction mat (in other words, the highest combined production level) wins. The second tiebreaker is the highest number of remaining Population cubes , and the third tiebreaker is the highest number of remaining Ore crystals. If there is still a tie, multiple Factions will jointly rule the galaxy.
Advanced Faction Mats
Once players are familiar with the mechanisms of the game, all players can agree to use the Advanced Faction mats to enable unique Faction powers. The use of either Basic or Advanced Faction mats must be determined before setup, and all of the players must use the same set.
- Setup changes: After the Technology board, Exploration board, and Achievement cards are set up, each player selects a Faction board in reverse player order, then finish the rest of the Faction setup as usual.
- The Advanced Faction mats have powers that are unique to each Faction:
- Two unique “Innovations” that can be reached during the game:
- The activation conditions for these Innovations are described below the Faction name, and also indicated with a
 icon on the Faction mat itself.
 - Some Innovations are activated just once when achieved, while others are in effect while a certain minimum production level is available. If the production level goes below this minimum, the ability is lost until production reaches the required level again.
- The activation conditions for these Innovations are described below the Faction name, and also indicated with a
- The configuration of Supply Columns and Ore production tracks are also different for every Faction.
- Two unique “Innovations” that can be reached during the game:
Expert Variant: Technology Tableau
For experienced players who prefer more strategic gameplay, Beyond the Sun can be played with a tableau of Technology cards instead of drawing 2 from the top of the deck. The changes are as follows:
Setup changes
- Reserve a 3-row-by-4-column “grid” of Technology card tableau on the play area, by placing the included cardboard bar showing the 4 Technology types on top, and the bar showing Level II / III / IIII to the left.
- Across the Level II row, under each column, reveal cards from the Level II Technology deck until there is a Technology card that matches the column’s type/color on the left triangle of the card. Cards with 2 types count as a match for either type. Place the discarded cards on the bottom, then move on to the next column.
- Do not reveal any Technology cards for Level III and IIII yet.
- Shuffle and place the Level II, III, and IIII Technology decks to the left of the tableau, next to their respective rows.
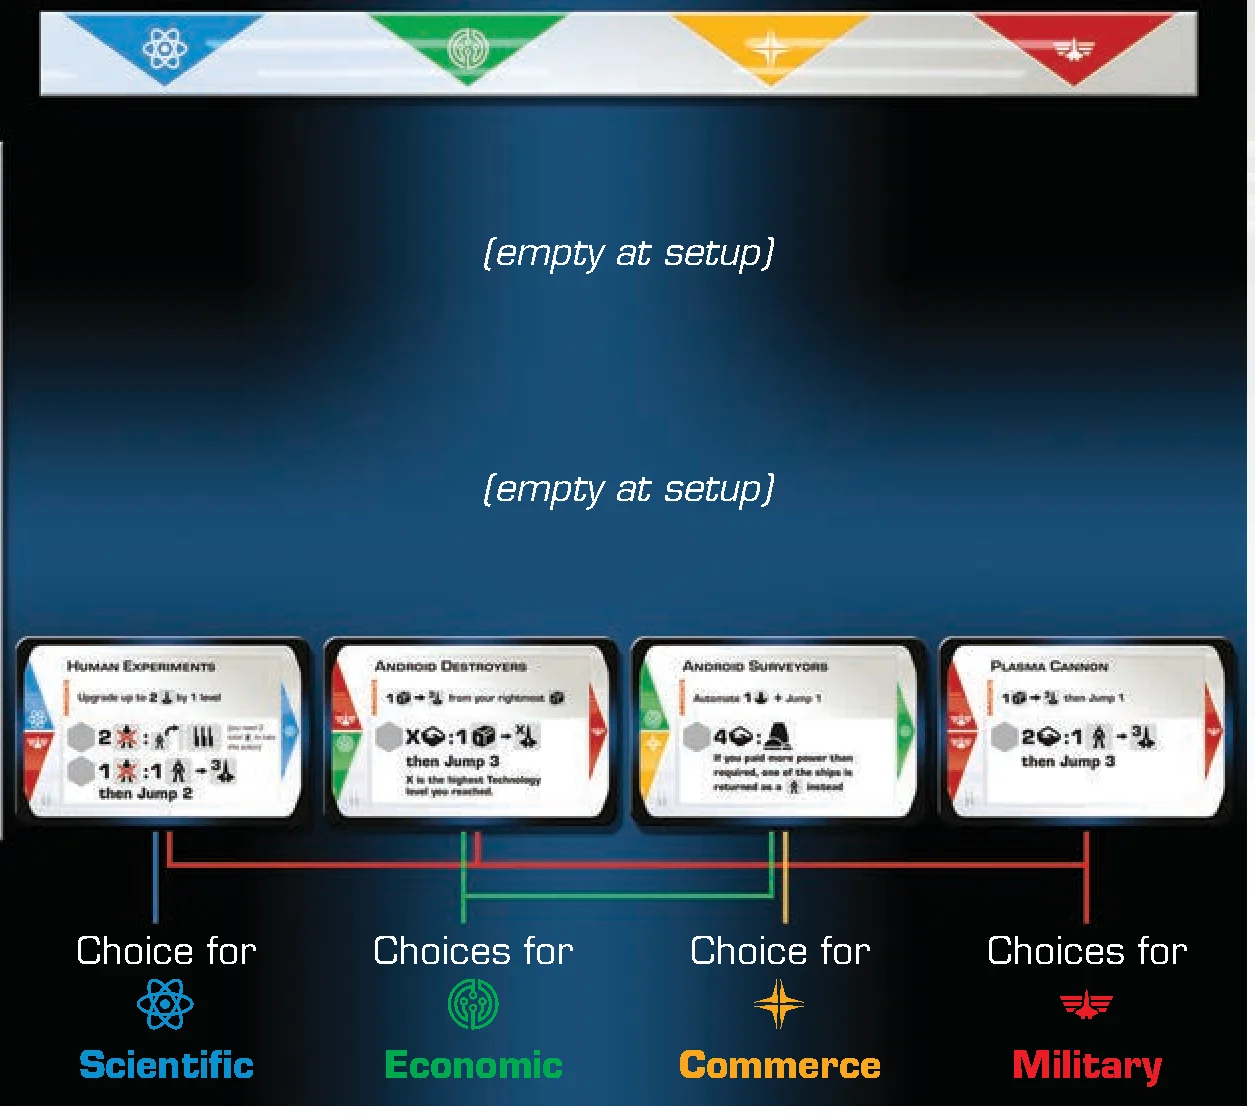
Gameplay changes
- When discovering a new Technology, players may select 1 of the 4 revealed cards of the corresponding Level row, or draw a random one from the deck:
- The type requirement is the same. For example, from a military/red prerequisite, the player can pick any card from the row that has military/red on the left triangle. When there are 2 prerequisites of different types, either type can be chosen. The 4-column setup ensures there is at least one card of each type (but it is possible that some types only have one choice!).
- At the end of each turn, refill any empty slots by revealing cards from the corresponding deck until a card matching the type/color of the column is found. In the rare case where there are no more cards of a matching type, draw a random one.
- If a player does not like the face-up choices, they may instead draw from the top of the deck until a card of the matching type is found. They must use that card as the new Technology. Place the discarded cards on the bottom of the deck as usual.
- As soon as an Action space that allows research of Level III Technologies is unlocked, set up the Level III row using the same method as the setup section above. The same applies to the first Action space that allows research of Level IIII Technologies.
- When all spaces on the Technology board for a particular Technology Level have been filled, clear that level’s row from this tableau and shuffle the deck. The decks may still be needed for other effects later.
Rule and Card Clarifications
- A player may not deliberately take an Action that causes no change in the game state when the Action is complete.
- For example, a player may not take a “Jump 4” Action and not perform any Jumps, but they may take a “Gain 2 Ore + Jump 2” Action to take 2 Ore and not perform any Jumps.
- Modular Fleet (tech II) — since all 3 shipbuilding effects are optional, players are allowed to take this Action just to Jump 3.
- Quantum Data Exchange (tech III), Technocrats’ Guild — the chosen Action can be occupied by another player.
- Ministry of Colonies (tech IIII) — in the extremely rare case that System Deck A runs out, draw the rest of the cards from Deck B.
- Lalande 21185 (system A) — the colonization bonus must be carried out in order: produce Food, produce Ore, then Trade.
- Ross 154 (system B) — to use its power, the player moves the existing Action pawn aside and occupies the Action slot normally.
- Museum of Retired Spacecraft (event III) — ships on this card are out of the game and cannot be moved, upgraded, or targeted.
- Dyson Sphere, Mk. I (event III) — the attached System card is not a location and cannot be reached or targeted. To execute this Action, the player takes the System card and places it next to their Faction mat, similar to regular colonization. The player collects any colonization bonuses described on the card but does not place any production discs. The Event card is then discarded, and the Action pawn is placed near the Basic Spacefaring box to be moved again next turn.
- Specialization (achievement B) — this counts the printed System specialty icons, not the discs placed. Shipyard Systems also count toward this total.
- “Upgrade then Jump” (e.g., Supply Outpost (tech II), Hyperdrive Boosters (tech III), etc.) — resolve any System control changes after upgrade, then resolve again after Jumps.
- Taking Supply cubes from other columns (e.g., United Nations (basic), Android Rights Movement (tech III), etc.) — the next time cubes are returned to the supply for any reason, the rightmost spaces must still be filled first.
- “Private Technology” (Procyon (system A), WISE 0855-0714 (system B))
- No Population cube is needed for this research. Simply put the Technology card near the Faction mat.
- The researching player gets the immediate research bonus, and only they can use its Action(s).
- Make sure to score Victory Points for them at the end of the game.
- They are considered out of the game and cannot be researched, copied, or targeted by other Factions.
- If a player runs out of production discs and is using discs as a placeholder (e.g., when automating/controlling/colonizing), and if an actual production disc becomes available later (e.g., losing control of a System), the player does not get to replace the placeholder with it. Note that the supply of discs is not limited (use substitute markers if necessary).
- If a resource cube is returned to a player’s supply and there are no empty slots left in any Supply Columns, place it above Supply Column A to extend that column.
- If a disc that is used as a placeholder is returned to the player for any reason, return it next to the player’s Faction mat and it can be reused again.
- When researching a Level IIII Technology that requires “2 out of 3” prerequisites, the researching player may only choose a Technology type from prerequisites that they have researched.
- Technology Tableau Expert Variant:
- Mass Enlightenment (event III) — this card does not trigger the revealing of the Level IIII row.
- Spacetime Anomaly Studies (tech II) — this card will trigger the revealing of the Level III row.
- Planetary-scale Research (tech III) — reveal new rows as needed.
Strategy and General Tips
- Due to the variability of the Technology tree, players should adapt their strategy to what Technologies come out in the game. The game can favor a research-heavy strategy, a colonization-heavy strategy, or a mixture of both.
- When selecting a new Technology, make sure it serves both short-term needs (via immediate bonuses) and long-term goals (via new actions).
- Colonizing a System seems like a daunting task, as it involves movement, taking control, and returning Spaceships, but it can be a crucial part of a winning strategy and should not be ignored.
- If competition for control of Systems seems vicious, it often helps to focus on research during that time. When opponents start thinning out their military due to colonization, it is time to take control of Systems cheaply.
- Population cubes can get “locked up” by Technologies or having a fleet that is too big. To free up Population cubes, either increase Food production, colonize Systems to get cubes back, or take actions that use Supply cubes directly.
Special Thanks
Benjamin Jones, Sam Backwell, Jan Horjus, Yue Shing, Jared Rubinstein, Jared Miller, Jason Kovacs, Phil Amylon, Peter Harvey, Ankit Shah, Seth Meyer, Nathaniel Speer, Chris Rollins, Mike Erickson, Brian Gow, Carol Carveth, Jeff Grove, Jam Murphy, Elise Spencer, Adam Eastwood, Zoltan Perko, Janet Guo, Colin Goldberg, Eric J. Francis, Joey Chan, Kin Cheung, Christopher Rivera, Chris Bryant, Kevin Monahan, Ken Hill, Robin Hill, Mike Zehnal, Lyle Rhodebeck, Peter “The Red Menace” Stein, Scott Tepper, Tom Lehmann, Ray Pfieffer, Scott Russell, Tadd Colver, Roy Colver, Franz Vohwinkel, Game Makers Guild Boston, Boston Festival of Indie Games

Dennis K. Chan
is a game designer living in Boston. Originally from Hong Kong, he moved to the United States to attend Wesleyan University, where he graduated with a degree in Physics. When not designing games, he is a software engineer who enjoys biking, cooking, playing board games, and rocking out on the pipe organ.
Game Design: Dennis K. Chan
Artwork: Franz Vohwinkel
Production Management and Development: Ken Hill
© 2020 Rio Grande Games, All Rights Reserved
Rio Grande Games, PO Box 1033, Placitas, NM 87043, USA
[email protected] • www.riograndegames.com
Introduction & Components
The Story
The First Thermonuclear War was not kind to the Earth. Over the last two centuries, civil unrest and climate change continued to ravage every region of the globe. Crop yields were plunging, resources were depleting, and poverty and crime were rampant. Humanity was facing extinction.
The solution seemed clear: abandon Earth and find a new home among the stars. Faced with the prospect of annihilation, the remaining factions on Earth came together. On New Year’s Eve 2240, the Treaty of Scientific Exchange was signed at the old site of the Lincoln Memorial in Washington, D.C. The world’s resources were poured into spacefaring research, and all discoveries were shared on a globally distributed network. For the first time in history, humanity acted as one.
In only six short years, the first hyper-spacecraft was built by the engineers of the Nishida-Østergaard Corporation under the leadership of Dr. Edmund Saito, and the technology was shared with the rest of the world. Humanity had finally entered the Spacefaring Era.
Soon after this keystone discovery, other factions also researched primitive terraforming techniques, radiation-resistant crops, asteroid mining, and other key components for human survival outside the solar system. Countless exoplanet expeditions were initiated every month. Now that a solution has been found, ambition for power and control stirred in each faction once again…
The Goal of the Game
Beyond the Sun is a space civilization game where players collectively decide the technological progress of humankind at the dawn of the Spacefaring Era, while competing against each other to be the leading faction in economic development, science, and galactic influence.
The game is played over a variable number of rounds until a number of game-end achievements are collectively claimed by the players. The winner is the faction with the most Victory Points , which are obtained by researching technologies, improving their economy, controlling and colonizing systems, and through various achievements and events throughout the game.
Components
General Components
Technology board
This is the central board of the game, where players place their workers to take Actions each turn. It represents a Technology tree of four levels, starting with the Basic Spacefaring Technology box on the left, and ending with the Level IIII Technologies on the far right. Players must work their way up the Technology tree by researching lower-level Technologies first.
46 Technology cards
Technology cards represent possible scientific advances players can discover during the course of the game. They contain new and increasingly powerful Actions and/or grant immediate bonuses to the Faction researching them. Each new Technology is chosen by the first Faction that researches it, after which it becomes available for others to research. The configuration of the Technology tree will be different every game, requiring a new strategy each time. The progression of the Technology tree is guided by 4 Technology types:
- Scientific
- Economic
- Military
- Commercial
At the beginning of the game, only Level I and II technologies can be researched. In order to reach higher levels, players need to find Actions that enable advanced research or unlock research Guilds via Events.
20 Event cards: 10 each of Level II and III
The future course of human civilization is punctuated by events that affect every Faction. These are represented by Event cards that cover the empty Technology slots at the beginning of the game. When a new Technology is first discovered, the Event card is revealed, and its effects are applied. Events may change the game in unexpected ways. Some may also provide additional Victory Points at the end of the game.
2-sided Exploration board
This board represents a simplified navigational map of the Milky Way galaxy, containing the solar system (Sol), habitable systems that can be colonized, shipyard systems where Spaceships can be built, and Deep Space. Each location is connected to neighboring ones with line segments representing hyperspace jump routes. Each line segment requires one “Jump” (movement point) for a Spaceship to travel across it.
Except for Sol and Deep Space, locations can be controlled by a Faction — marked with an Outpost disc corresponding to the System specialty or on the location — providing a production improvement for the Faction that controls it.
24 System cards: 12 each of type A and B
System cards describe habitable exoplanetary Systems that can be colonized to gain Victory Points, as well as unique bonuses. Each System has a number denoting the minimum military power to colonize it. The two Systems closer to Sol are filled with cards drawn from System Deck A. They have lower military power requirements and are worth fewer Victory Points. The cards from System Deck B are used for the spaces that are farther away from Sol (marked with the matching letter “B”). These Systems are stronger but provide better rewards.
Once colonized, the System card is taken from the Exploration board and placed in front of the Faction as their permanent territory. Due to the powerful Victory Point boost and special effects they provide, choosing the right Systems to colonize can be crucial in ensuring a Faction’s success.
In Beyond the Sun, all System cards are named according to real star systems observable from Earth!
10 Achievement cards: 4 each of type A and B, plus 2 basic Achievements
Achievements are civilization milestones that mark the progress of humanity. Two basic and two randomly drawn Achievement cards are present in every game. They provide additional Victory Point boosts, and some Achievement cards have a limited number of slots that can be claimed. When a certain number of Achievement discs are placed, the last round of the game is triggered.
Starting player marker
The Starting player marker is used to track who started the game to ensure equal turns. It does not change hands during the game.
Additional Game Components
- 4 Guild cover tiles
- 60 Ore crystals
- 2 Basic Spacefaring replacement tiles (for 2 and 3-player games)
- 2 Technology Tableau bars (for the Expert Variant)
- Setup sheet
Components for Each of the 4 Factions
2 Faction mats (Basic and Advanced)
Each player has a Faction mat to manage and track their economy. There are two main resource types in this game:
- Population , representing the Factions’ workforce
- Ore , representing currency
The main area of the Faction mat contains Supply Columns and production tracks for both resources, as well as the trade ratios between them. At the top is the Automation track, which represents technological advances of the Faction’s production. There are 2 sets of Faction mats:
- The Basic set has the same production tracks for every Faction and contains only minor setup differences.
- The Advanced set contains varied production tracks and special powers that can be gained during the game.
20 6-sided resource cubes
The resource cubes are used for multiple purposes and have six different sides: Population , Supply , and Spaceships of level , , , and .
24 wooden discs
(8 Food production, 8 Ore production, 8 Achievement/placeholder)
Additional Player Pieces
- Action pawn
- Two-sided player aid
Setup
Setup for 4 Players
- Place the Technology board in the middle of the table.
- Sort the Technology cards into Level I, II, III, and IIII Technologies by their card backs and shuffle each deck. Randomly distribute the 4 Level I Technology cards face-up onto the spaces marked I.
- Place the Level II, III, and IIII Technology decks face-down by the Technology board, close to their respective columns.
- Sort the Event cards into Level II and Level III events by their card backs. Shuffle the 2 light-bordered Level II Event cards (Tyler Lee, Entrepreneur Prodigy and Maya Chaturvedi, Visionary) with 4 random Level II Event cards. Distribute all 6 of these cards face-down on the spaces marked II on the Technology board.
- Shuffle the 2 light-bordered Level III Event cards (KC-24X, First Android Governor and Onu, Speaker for the Colonies) with 4 random Level III Event cards. Distribute all 6 of these cards face-down on the spaces marked III on the Technology board. Return all unused Level II and Level III Event cards to the game box. These cards will not be used in this game.
- Place the Exploration board next to the Technology board, with the 3/4-player side up.
- Sort the System cards into A and B decks by their card backs. Find the 4 Starting Systems from System Deck A, marked with a red “start” at the top. Randomly choose 2 of them and place them face-up onto the “A” spaces on the Exploration board. Shuffle the other 2 Starting Systems back into System Deck A.
- Shuffle System Deck B, then place the top 2 cards face-up onto the “B” spaces (there are no Starting Systems in System Deck B).
- Place System Decks A and B (as separate decks) next to the Exploration board.
- Look through the Achievement cards and take out the 2 light-bordered Achievements (Transcendence and Empire). These Achievement cards will be used in every game. Shuffle the remaining Achievement cards in each deck (A and B) separately. Then draw 1 Achievement card from Deck A and 1 from Deck B. Place these 4 Achievement cards face-up next to the Technology board, where all players can see them. Place the rest back in the box.
Important! For new players, Transcendence, Empire, Warlord, and Technologist are recommended as the Achievement set. - Place the Ore crystals within easy reach of all players.
- Place the 4 Guild cover tiles on the Technology board, covering the corresponding spaces below the Basic Spacefaring box (for example, Terraforming Guild covers the top space, and so on). Put the Basic Spacefaring replacement tiles and Technology Tableau bars back in the box. They are not used in the 4-player basic game.
- Give the Starting player marker to the player who has most recently been to space (in case of a tie, choose randomly).
- Each player either chooses or randomly draws a Basic Faction mat, takes a player aid, and takes all components of a color of their choice.
Important! Experienced players may choose to use Advanced Faction mats instead. See the reverse side for details. - Each player places their Action pawn near the Basic Spacefaring Technology box on the Technology board.
- Each player places a Food production disc on each of the 8 circular slots on the Population growth track on their Faction mat.
- Each player places an Ore production disc on each of the 8 circular slots on the Ore production track on their Faction mat. Each player places their Achievement/Placeholder discs next to their Faction mat (not shown in diagram).
- Each player fills the Supply Columns on their Faction mat with resource cubes, with the Supply side up. There should be a few cubes left over.
- Each player takes their remaining resource cubes and places 2 Population cubes (side up) on or next to their Faction mat.
- Each player places 1 level-1 Spaceship cube (level 1 side up) on the Sol location on the Exploration board.
- Give the first and second players (in clockwise order) 1 Ore each, and the third and fourth players 2 Ore each.
Each player reads their Faction mat carefully and performs any special setup listed and notes their special powers. This information is open to all players.
Setup for 2 to 3 Players
Changes for 3 players
- Cover the Basic Spacefaring Technology box with the replacement tile for 3 players.
- The first and second player each begin the game with 1 Ore; and the third player 2 Ore.
- The second slot on Achievement Card A is not available.
- Only 3 Achievement discs are needed to trigger the last round of the game.
Changes for 2 players
- Cover the Basic Spacefaring Technology box with the replacement tile for 2 players.
- Both players begin the game with 1 Ore.
- The 2-player side of the Exploration board is used and only one Starting System from Deck A is revealed.
- The Disciples of the Cosmic Tabernacle Faction mats are returned to the box and cannot be chosen.
- The second slot on Achievement Card A is not available.
- Only 3 Achievement discs are needed to trigger the last round of the game.
Turn Overview & Core Phases
Turn Overview
In Beyond the Sun, players take turns, going clockwise, until the game end condition is triggered. After that, all Victory Points are tallied, and the winner is determined.
A player’s turn consists of three phases:
- Action phase — Move the Action pawn to a new Action space, and take its corresponding Action
- Production phase — Choose either Population growth, Ore production, or Resource trade
- Achievement phase — Claim up to one Achievement
After these phases have been completed, the turn passes to the left.
1. Action Phase
To take an Action, the player moves their Action pawn and places it on an Action space on the Technology board. They then take the Action printed to the right of that Action space.
- The chosen Action space cannot be occupied by any other Faction’s Action pawn.
- The Action pawn must move and cannot stay on the same space it is currently on. However, it is allowed to move to another open Action space on the same Technology card (if there are multiple Action spaces on a Technology card), or even to repeat the same Action (if there is more than one space for the same Action). This rule also applies to spaces in the Basic Spacefaring Technology box (with the exception of the last Action space, which can be repeated as many times as the player wishes).
- The player must have already researched the Technology the Action space is on. This is indicated by the presence of the Faction’s Population cube to the left of the Technology card. (Action spaces printed directly on the Technology board do not require research).
- A player may not take an Action that they are unable to perform or pay the cost for.
- Two of the Action spaces in the Basic Spacefaring Technology box require paying an additional Ore for the Action.
- At the beginning of the game, the Action pawns are placed off the board and do not block any spaces.
Action spaces are usually found on Technology cards and in the Basic Spacefaring Technology box printed on the Technology board.
An Action always has the format:
[cost :] effect
Most of the costs and effects of an Action are represented using icons, while more unique effects are explained in sentences. The Glossary of Effects beginning on page 13 provides further explanation of different types of symbols and effects.
- Players should always check whether they have researched the Technology before taking one of its actions!
- Players are allowed to repeat the same Action if there is a second, open Action space for it.
- The cost, if any, must be paid in full before an effect takes place.
Action Phase Example
It is now Annie’s turn. Her Action pawn is currently on one of the Action spaces for “Research a Level I Technology”. She must move her pawn. She is allowed to move it to any unoccupied space on the Basic Spacefaring box (including researching a Level I Technology again), or the open space on the Narrow Beam Lasers Technology card.
She cannot take the “Build a Spaceship then Jump 2” Action (third Basic Spacefaring Action) because both spaces are occupied by other players. She cannot take any actions on the Terraforming Technology card because she has not researched that Technology (no blue cube to the left of that Technology card). She cannot choose to use the Advanced Genetics Technology card because it has no Action spaces — it is a Technology that provides an immediate benefit, but no additional actions.
2. Production Phase
During the production phase, the player must choose one of the following options:
- Population growth
- Ore production
- Trade resources
This is not an Action and does not require the use of the Action pawn.
Population growth +:
- The player examines the Population growth track on their Faction mat.
- They look at the symbols that are not covered by Food production discs , including the leftmost circle.
- For each symbol that is showing, take one Supply cube from the corresponding lettered Supply Column above it (position within the column doesn’t matter), flip it to the Population side , and place it on the Faction mat.
The mechanisms used to remove Food (and Ore) production discs are explained later in the rules.
A total of 5 Food production discs were previously removed from Brian’s Faction mat, so 3 symbols (A, B, C) are visible. If Brian chooses Population growth, he takes 1 cube from Column B and 1 cube from Column C and flips them to the side. Column A is out of cubes, so it does not produce any Population.
Take one and only one Supply cube from the column matching the letter on the symbol. If there are no more cubes in a Supply Column, that column cannot produce Population.
Ore production +:
- The player examines the Ore production track on their Faction mat.
- They look at the symbols that are not covered by Ore production discs , including the leftmost circle.
- They gain Ore from the supply equal to the number of that is showing. This Ore is placed on the Faction mat.
A total of 4 Ore production discs were previously taken off Cindy’s Faction mat, so 3 are visible. If Cindy chooses to produce Ore, she will receive 3 Ore from the supply.
Resource trade :
- This option allows the player to exchange resources but does not generate any new ones. It is useful when a player has many resources of one type and insufficient production capability of another type.
- Players may make as many trades as they wish and in any combination:
- Ore to Population: The player pays 3 Ore, then takes a Supply cube from the leftmost Supply Column that has Supply cubes, and flips it to the Population side . The number of Food production discs on the Faction mat does not apply in this situation.
- Decommission a Spaceship: The player pays 1 Ore, then takes 1 of their Spaceships from anywhere, and turns it into a Population cube.
- Population to Ore: The player returns a Population to the rightmost Supply Column with at least one empty space for a cube ( side up) and gains 1 Ore.
- Ore to Population: The player pays 3 Ore, then takes a Supply cube
- If a player’s Supply cubes run out (very rare), that player may not trade for any more Population.
- A player can only choose one option (Population growth, Ore production, or Resource trade) during each production phase on a given turn, not all of them. This choice can be critical to prepare the right resources for the next turn.
- When producing Population or Ore, the quantities must be gained in full if possible. A player cannot voluntarily choose to take fewer resources than the production would provide.
- Since Trade ignores Food production discs, it is a way for players to get new Population even when some Supply Columns are depleted.
- If all of the players agree, the next player in turn order can start their turn while the current player decides what to produce.
3. Achievement Phase
Achievements provide Victory Points at the end of the game and can be claimed during the last phase of each player’s turn. Only one Achievement can be claimed per turn, no matter how many conditions have been satisfied.
- To claim an Achievement, the player announces the condition that they have satisfied, then places an Achievement disc on an open slot on the corresponding Achievement card, filling from left to right (higher to lower Victory Points).
- Each Achievement slot can only be occupied by a single disc. When an Achievement card is full, that Achievement can no longer be claimed.
- Each Achievement can only be claimed by each Faction once. For example, if a player has colonized 8 Systems, they cannot claim the Empire Achievement again.
- Once an Achievement is claimed, the disc stays there for the rest of the game, even if the condition stops being satisfied.
- Players must claim an Achievement if they qualify to do so. They may not voluntarily skip this phase to delay the end of the game.
- The players’ supply of Achievement discs is not limited (use substitute markers if necessary).
- Achievements can only be claimed by the player who is currently taking their turn, even if the condition is met by another player.
Actions & Research
Basic Actions Overview
In Beyond the Sun, icons are used to describe Action costs and their effects, as well as other bonuses that may be gained during the game. As starting examples (especially if players are playing the game for the first time), the following table introduces the actions in the Basic Spacefaring Technology box, explained in plain sentences in the Description column, then broken down into individual component effects in the Referenced Effects column.
A complete glossary of all referenced effects is listed from the next page onward.
| Basic Spacefaring Action | Description | Referenced Effects |
|---|---|---|
| |
Use 1 Population cube to research a Level I Technology. |
|
| 2 : |
Pay 2 Ore to use 1 Population cube to research an undiscovered or existing Level II Technology for which the player is eligible. |
|
| (optional: 1 ) then Jump 2 |
The player may optionally transform 1 Population cube to a level 1 Spaceship and place it on Sol or any Shipyard System that the player controls. Then the player may perform up to 2 Jumps. |
|
| 1 + Gain 1 |
Create 1 Population cube from the leftmost Supply cube available, ignoring Food production discs, and then gain 1 Ore. |
|
Research a Technology
Research plays an essential role in advancing a Faction’s power and economy. As the Technology tree unfolds, Factions steer the course of human civilization and unlock increasingly powerful actions and effects.
Researching a Technology involves the following steps:
- Choose Technology slot
- Place Population cube
- Trigger Event (undiscovered Level II or III Technologies only)
- Choose Technology card (undiscovered Technologies only)
- Gain immediate bonus
1. Choose Technology slot
There are 4 levels of Technologies, laid out in 4 columns on the Technology board, going from left to right. The symbol ( I / II / III / IIII ) in the icon specifies which Technology level the player is researching.
The researching player can choose any Technology slot on that level that satisfies the following conditions:
- they have not already researched the Technology
- they have the prerequisites for the Technology
To determine if the prerequisite Technologies have been researched for a given slot, the player must have already researched all the technologies connected directly to the left of it via the blue line(s).
Level I Technologies do not have prerequisites, since every Faction starts the game with the Basic Spacefaring Technology.
Higher-level Technologies require 1 or 2 prerequisites. Some Level IIII Technologies only require 2 out of 3 prerequisites.
If the symbol contains an eye , the player can only pick an already discovered (face-up) Technology.
2. Place Population cube
The player places their required Population cube onto the rectangular space to the left of the Technology slot. Other players’ cubes do not block this placement. Factions are allowed to research the same Technologies.
These Population cubes represent part of the Faction’s workforce dedicated to science and technology. These cubes will never be returned to the Faction mat, so as a Faction’s technology advances throughout the game, they will need more Food production to keep up with the demand.
3. Trigger Event (undiscovered Level II or III Technologies only)
If this is an undiscovered Level II or III Technology slot, the player reveals the Event card covering the slot, reads the Event, and resolves it according to the instructions. The Event card is then discarded unless specified otherwise.
4. Choose Technology card (undiscovered Technologies only)
If this is an undiscovered Technology, the researching player has the opportunity to choose a new Technology card from the deck to place on the board, unlocking new actions and abilities:
- Determine Technology type: The player examines the type/color of each prerequisite Technology one level to the left, which is indicated with a small triangle on the right side of the prerequisite card. If there is only 1 prerequisite (or both prerequisites are of the same type), that will be the type of the newly discovered Technology. If there is more than 1 prerequisite type, the player chooses which of those 2 types the new Technology will be before the next step.
- Reveal Technology cards: The player reveals cards from the Technology deck of the appropriate level until 2 Technology cards matching the chosen type/color are revealed, using the large triangle on the left side of the card to find a match. If the large triangle is split into 2 types/colors, the card represents a hybrid Technology that matches either type. Cards that do not match are placed to the side for now.
- Choose Technology card: The player chooses 1 of the matching cards and places it on the chosen Technology slot. The card that was not chosen and unmatching Technology cards are placed face-down on the bottom of the same Technology deck in random order. The deck is not shuffled.
The 4 types of Technologies have different characteristics, summarized below. A hybrid Technology generally contains characteristics of both of its types.
- Scientific — Ore production automation, research actions, and Ore bonuses
- Economic — Food production automation, Population collection, and Ore collection
- Military — Shipbuilding, movements, and upgrades
- Commercial — Colonization actions, ship movements, and flexible actions
5. Gain immediate bonus
If there is a box labeled “IMMEDIATE” on the Technology card, the player receives a one-time bonus described in the box immediately after researching the Technology. This bonus is not limited to the first player to discover the Technology. If other Factions research the same Technology later in the game, they will also get the bonus. Any other effects that are shown outside this box are not executed — they are either new Action space(s) or a permanent power for the players who have researched the Technology.
Research Example
Derek takes the “Research a Level II Technology” Action listed in the Basic Spacefaring Technology box. He is allowed to research the Technology at slot A, B, or C (he has the prerequisites, Narrow Beam Lasers and/or Terraforming), but not slot D, E, or F (he does not have the prerequisites, Advanced Genetics and/or Advanced Robotics). He chooses slot B and will discover a new Technology there. He pays 2 Ore, places a Population cube on the space to the left of slot B, and resolves the Event card there.
Since there are 2 prerequisites connected to slot B, he can decide to search for either a Military or Commercial Technology. He chooses Military, so he reveals cards from the Level II Technology deck until he finds 2 Military Level II Technology cards: Human Experiments and Plasma Cannon. He chooses the Plasma Cannon Technology card, places it on slot B, and receives the IMMEDIATE bonus on the card. The new Action space on the Plasma Cannon Technology card will be available to him starting on his next turn; no other player can use it until they also research the Plasma Cannon Technology.
Automate Food or Ore Production
Automate 1
Automate 1
Automating production is one way to increase Ore and Population growth for a Faction.
To automate Food production or Ore production , the player takes the leftmost production disc from the corresponding production track on the Faction mat and places it on the Automation track above, starting from the left. If there are no more production discs of that type, the player must place a disc (as a placeholder; it is not an Achievement). If all 7 Automation levels are filled, the player places additional discs to the right of the Automation track.
Some automation levels provide additional Victory Points at the end of the game, as indicated on the Automation track. Each level beyond 7 provides 1 Victory Point.
Do not confuse this effect with placing production discs on System cards (as outposts/colonies) when controlling or colonizing a System (see Hyperspace Jump and Colonize a System). Unlike Outpost discs on System cards, discs on the Automation track can never be removed.
Build a Spaceship
To amass a fleet for exploration and colonization of the galaxy, Factions build spaceships using the massive Modular Orbital Shipyards engineered during the Second Space Race of the mid-2100s.
To build a Spaceship, the player takes the required resource cube and rotates it to the side with the Spaceship symbol of the indicated ship level (1 to 4). New Spaceships can be built either on Sol or on any Shipyard System that the player controls (control is determined by the presence of the player’s Outpost disc on that location). All locations where ships can be built are marked with a icon on the Exploration board. If multiple ships are built, they can be placed on separate locations.
In the rare occurrence that a new Spaceship appears on a location the player does not already control (from certain card bonuses), System control may change, and effects may trigger (see Hyperspace Jump).
Upgrade a Spaceship
Upgrade 1 by X level(s)
Upgrade up to X by X level(s)
To upgrade a Spaceship, the player simply rotates the selected Spaceship cube to the new level. A Spaceship cannot exceed level 4. Players may only upgrade their own Spaceships.
Glossary of Resource & Effect Rules
Gain/Pay Ore
X : effect
Gain X
Pay X to an opponent
Many actions in the game cost Ore to execute, and some allow players to gain Ore from the supply.
- If an Action or effect requires Ore in its cost, the full amount must be paid to the supply (or to the target opponent) before executing the effect.
- If an effect allows the player to gain Ore, the player takes the full amount from the supply and puts the Ore crystals on their Faction mat. The supply of Ore crystals is not limited (use substitute markers if necessary).
Use a Population Cube
1 effect, effect
A Faction’s active workforce is crucial in researching new Technologies and constructing Spaceships. Careful balancing of food production and population utilization is necessary to ensure sustainable growth of a Faction’s economy.
To use Population cubes , the player must have the required number of Population cubes on their Faction mat. Most effects only require 1 Population cube. Using a Population cube involves moving it to the board and possibly rotating the cube to a different side (e.g., moving it to a Technology slot or turning it into a Spaceship).
Use a Supply Cube Directly
1 effect
The invention of advanced AI and android technologies allow Factions to increase their operational efficiency with minimal human involvement. This leads to the introduction of autonomous ships and proto-sentient workers, but also raises ethical issues regarding how machines and androids should be treated in society.
The player takes the indicated number of Supply cubes from the Supply Columns of their Faction mat, starting from left to right. The player must take all cubes from a column before they start taking from the next column. The number of Food production discs on the Faction mat does not matter for this effect. If there are no more Supply cubes left in the Supply area, Population cubes may be used instead, but it is not required.
This effect allows players to take cubes directly from their Supply area regardless of the Population growth track. It can be very useful when a player is struggling to keep up with food demand.
Returning/Overworking Population
1 effect
To return Population as a cost of an effect, the player must have the required number of Population cubes on their Faction mat. Returning a Population cube means flipping it to the Supply side and placing it back on the rightmost Supply Column with at least one empty space for a cube. The player must fill a column completely before placing it in the next. If all columns are filled, the player continues placing cubes on Supply Column A, even though there are no spaces left there.
Some effects require Population cubes both as a cost and in the effect itself. For example: 2 : requires a total of 3 Population cubes.
Unless otherwise specified, players will always take Supply cubes from left to right and return them to empty slots from right to left.
Optional Effects
(optional: Effect)
Effect (optional)
You may…
Jump X
Throughout the game, unless specified otherwise, all costs and effects are mandatory and all quantities must be paid or gained in full. There are, however, a few exceptions to this rule:
- Any effects that are specified “optional”, “if possible”, “you may”, or has “up to” rules text
- Movement points in a Jump effect
- Upgrading Spaceships when there are not enough to upgrade (or if all of them are already at level 4)
- When a player runs out of Supply cubes, and an effect converts Supply cubes to something else, the player may instead use Population cubes for some or all of the missing quantities or just pass on that effect.
Exploration & Colonization
Hyperspace Jump
Jump X
Hyperdrive technology was the keystone discovery that enabled humans to go beyond Sol to explore the galaxy. Due to its unstable nature and high energy cost, the distance and fleet size of each jump is limited.
A hyperspace jump effect involves the following steps:
- Move
- Check System control and build outposts
- Check System bonuses
1. Move
The number indicated in the Jump effect is the number of movement points that the player may spend on ships:
- One movement point allows one Spaceship cube to move one line segment connecting two locations on the Exploration board.
- Movement points can be allocated in any way among available ships (i.e., multiple movement points can be spent on one ship or multiple ships can split the points).
- All movements are considered simultaneous — only resolve the next steps after movement is done.
- Players are not required to use all movement points, but they cannot be saved for later.
2. Check System control and build outposts
Locations on the Exploration board with / symbols attached are Systems that can be controlled during the game. The Faction with the most powerful fleet in a System builds an outpost there and benefits from the improved production. System cards and Shipyard Systems on the board are controllable, while Sol and Deep Space are not controllable.
System control is updated whenever there is any change on the Exploration board, even when it is out of turn. However, control is not checked in the middle of a movement.
To determine control of a System:
- If the System currently has no ships, the Faction that moves one or more ships there and leaves at least one ship on the System gains control of the System.
- Otherwise, a Faction needs to have a strictly higher military power than the current controlling Faction to take control. The power of a Faction’s fleet at a location is equal to the sum of all their Spaceships’ levels there (not the number of Spaceship cubes). Outposts do not add any power to the Faction that owns them.
- If some or all of the controlling Faction’s Spaceships leave a System and another Faction now has the strictly highest power there, that Faction takes control.
- If some or all of the controlling Faction’s Spaceships leave a System and multiple remaining Factions tie for the highest power, the Faction that is leaving loses control of the System. That Faction returns the Outpost disc to their Faction mat, and no other Faction takes control.
- If all of the controlling Faction’s Spaceships leave a System and no other ships are there, the Faction retains control of the System.
When a player gains control of a System, they must immediately build an outpost on it by taking the leftmost production disc from the production track corresponding to the System’s specialty ( / ) and placing it on the location. If a System has multiple specialties, the player chooses which disc to place there. If the player has no more production discs of a matching type, they must place a disc on the System as a placeholder. This is not considered an Achievement.
When a player loses control of a System, they return their Outpost disc to the rightmost empty slot on the corresponding production track. The new controlling Faction (if applicable) then places one of their discs in its spot. If one Faction takes control of a multi-specialty System from another, the player who controls the new Faction does not have to choose the same type of outpost.
An outpost serves as an indicator of which Faction controls a System, which is required for shipbuilding and colonization .
3. Check System bonuses
Some Systems provide additional effects when Factions visit them.
- Gain control — When a player gains control of (i.e., places an disc on) a System with a gain control effect, they gain this bonus immediately. It does not matter whether it was previously empty or occupied. This bonus can also be triggered on another Faction’s turn (for example, if ships move away). However, the bonus is not applied again when the System is colonized.
- Other effects — There are occasionally other special rules related to a System. These rules are explained on the card.
If a player gains control of multiple Systems at the same time, they may apply their bonuses in any order they wish.
At the end of the game, each Outpost disc on the Exploration Board is worth 1 Victory Point.
Hyperspace Jump Example
Ellen is executing a “Jump 4” effect. She moves a level 2 Spaceship from Barnard’s Star to the Shipyard System on the right (1 movement point), and a level 3 Spaceship from Sirius to Tau Ceti (2 movement points). She chooses not to use the last movement point.
Control does not change on the Shipyard System (military power tied with ), but she now gains control of Tau Ceti ( vs ). It is a System with multiple specialties, so she chooses and places a Food production disc from her Faction mat onto the Tau Ceti card and returns the existing disc to Frank , who places it in the rightmost empty space of the Ore production track on his mat. Ellen receives the Gain control bonus on Tau Ceti (moving 1 Supply cube to Supply Column A).
At Sirius, Ellen lost control to Geoff , so she places her Ore production disc back to the rightmost space on her Ore production track. Geoff then places one of his production discs on Sirius and receives the Gain control bonus there (gaining 1 Ore).
Ellen keeps her Outpost disc on Barnard’s Star since no other players have ships on it.
Colonize a System
(Colonize)
With sufficient resources and military power, a System under a Faction’s control can be colonized to become that Faction’s permanent territory. This allows the Faction to further improve its production and receive unique benefits the System offers.
Only System cards (with a symbol) are colonizable. Shipyard Systems, Sol, and Deep Space cannot be colonized.
A colonization effect involves multiple steps. These steps are also listed on each player aid:
- Determine eligibility
- Settle Spaceships of required power or more
- Exile other Spaceships to Deep Space
- Take System card and discover new System
- Place additional production disc
- Gain colonization bonus
1. Determine eligibility
Colonization requires a strong military presence in order to establish a stable and sustainable community, as well as to ensure the safety of the settlers.
Unless otherwise specified, to be eligible to colonize a System, a player must have:
- control of the System (an Outpost disc on the System card)
- the minimum required military power on that System. The power requirement is printed inside the symbol on the System card. The power of opponents’ ships at that System does not matter for colonization.
2. Settle Spaceships of required power or more
The player must return a number of Spaceships in the System that add up to the required military power or more. They become settlers on the new colony and will be returned to the Faction mat. The player is allowed to return more power than required, either by choice or because no combination of Spaceships on the System is exactly equal to the required power. However, they do not get any “change” for the difference.
Place the selected Spaceships, side up, back on the empty slots in the Supply Columns of the Faction mat, starting from right to left. If all slots are filled, continue placing cubes on Supply Column A, even though there are no spaces left there.
An often overlooked benefit of colonization is that it refills Supply Columns, allowing more Population to be produced and used again without having to improve Food production. The returned Spaceships are not sacrificed or destroyed — they are merely starting a community in the new world!
3. Exile other Spaceships to Deep Space
Once a System is colonized by a Faction, the remaining Spaceships must leave and continue to explore the rest of the galaxy. The player moves all remaining Spaceships in that System (including their own ships) to the Deep Space location.
4. Take System card and discover new System
The player takes the System card, along with the Outpost disc on it, and places it next to their Faction mat. They then draw the top System card from the corresponding System Deck and refill the empty slot with that card. The player should read the new card out loud to the other players, so they know what bonuses the new System has to offer. In the rare case where one of the System Decks runs out, draw from the other deck instead. If no System cards remain in either deck, leave the slot empty.
5. Place additional production disc
The outpost flourishes into a colony, providing additional production boosts for the governing Faction.
The player places another production disc matching the System’s specialty on the System card, ending with a stack of 2 production discs. If the System has multiple specialties, the player may choose one. This new disc does not have to be the same type as the original outpost. If the player has no more production discs of a matching type, place a disc as a placeholder. This is not considered an Achievement.
6. Gain colonization bonus
The player gains the bonus described at the bottom of the System card immediately. Bonus effects must be executed in full unless specified otherwise.
Since a new System card was already drawn in the previous step, a colonization bonus that involves a Jump effect may allow Spaceships to immediately enter (and likely control) the newly drawn System.
At the end of the game, each colonized System is worth Victory Points equal to the value indicated at the bottom of the card.
Colonization Example
Heidi is taking a “Colonize a System” Action. Despite having a military presence, she is not allowed to colonize Barnard’s Star (because she does not control it) or Lalande 21185 (because she does not have enough military power). Her only choice is Kapteyn’s Star.
Kapteyn’s Star requires 4 power to colonize. She takes 2 level-2 Spaceships there, flips them to the side, and returns them to her Faction mat’s Supply Columns. She places 1 cube on the last empty slot on Supply Column B and 1 cube on an empty slot on Supply Column A. The remaining 2 Spaceships ( and ) are moved to Deep Space.
She takes the Kapteyn’s Star card along with the existing outpost and places it next to her Faction mat. She refills the empty slot with another card from System Deck B and reads it to all players. Kapteyn’s Star is a System with multiple specialties, so she chooses and places an additional Food production disc on it, making a stack of 2 discs.
Finally, she gains Kapteyn’s Star‘s colonization bonus of placing a Spaceship in Deep Space from her supply.
Game End & Scoring
Triggering the End of the Game
In Beyond the Sun, there is not a set number of rounds to finish the game. Instead, the last round is triggered when 4 total Achievement discs have been placed on Achievement cards. It does not matter which Achievement cards they are on or which colors the Achievement discs are.
Once 4 Achievements are claimed, finish the current round (ending with the player to the right of the starting player), then play one full, final round of the game. Achievements can still be claimed after the game end is triggered, resulting in more than 4 total discs on Achievement cards. After the final round, players calculate their scores, and the winner is the player with the most Victory Points.
Players should pay special attention when Achievements are starting to be claimed, as the last round can be triggered rather quickly afterward. However, since only one Achievement can be claimed per turn, a player cannot “rush” the end by claiming multiple Achievements at once. On the other hand, a player also cannot “delay” the end by not claiming an Achievement when they can. If a given Achievement condition is fulfilled, a player must claim the Achievement; however, if they fulfill multiple Achievements at once, they can choose which one to claim.
The active player may claim only one Achievement each turn!
On average, there are about 15 rounds in a game, including the final round. However, this can vary based on players’ decisions and how the Technology tree unfolds.
Annie , Brian , Cindy , and Derek are playing a game of Beyond the Sun, and Annie was the starting Faction. Cindy (3rd player) managed to claim the 4th Achievement, which triggered the end of the game. To ensure equal turns, Derek (4th player) gets to take his turn after Cindy, then everyone (including Derek) gets exactly one more turn. Players are still allowed to claim an Achievement on their final turn, even though 4 Achievement discs are already on the board.
If Derek was the one who triggered the end of the game, the final round would begin immediately after Derek’s turn. All players (including Derek) will get exactly one more turn.
Scoring
Follow the steps below to score each Faction’s Victory Points. This is also printed on the back of the player aid.
- Each Faction scores 1 for each of their Level I Technologies
- Each Faction scores 2 for each of their Level II Technologies
- Each Faction scores 3 for each of their Level III Technologies
- “Private Technologies” (from card bonuses) are worth 2 or 3 based on their level (Level II or III, respectively).
- Each Faction scores specified on their Level IIII Technologies
- Each Faction scores specified on their Automation track (add all showing, up to the level reached). After level 7, each additional level is 1 each.
- Each Faction scores for each of their colonized Systems, as indicated at the bottom of the System card.
- Each Faction scores 1 for each of their uncolonized Outpost discs (on System cards or Shipyard Systems).
- Each non-controllable location (Sol and Deep Space) scores 1 for the Faction(s) with the highest military power (tied players get the same ).
- Each Faction scores for each Event card that provides . They are usually found near the Achievement cards, or they can be attached to certain locations or Factions.
- Each Faction scores for each of their Achievements.
The Faction with the most Victory Points is the winner. In case of a tie, the tied Faction with the fewest remaining Food and Ore production discs on their Faction mat (in other words, the highest combined production level) wins. The second tiebreaker is the highest number of remaining Population cubes , and the third tiebreaker is the highest number of remaining Ore crystals. If there is still a tie, multiple Factions will jointly rule the galaxy.
Variants
Advanced Faction Mats
Once players are familiar with the mechanisms of the game, all players can agree to use the Advanced Faction mats to enable unique Faction powers. The use of either Basic or Advanced Faction mats must be determined before setup, and all of the players must use the same set.
- Setup changes: After the Technology board, Exploration board, and Achievement cards are set up, each player selects a Faction board in reverse player order, then finish the rest of the Faction setup as usual.
- The Advanced Faction mats have powers that are unique to each Faction:
- Two unique “Innovations” that can be reached during the game:
- The activation conditions for these Innovations are described below the Faction name, and also indicated with a icon on the Faction mat itself.
- Some Innovations are activated just once when achieved, while others are in effect while a certain minimum production level is available. If the production level goes below this minimum, the ability is lost until production reaches the required level again.
- The activation conditions for these Innovations are described below the Faction name, and also indicated with a
- The configuration of Supply Columns and Ore production tracks are also different for every Faction.
- Two unique “Innovations” that can be reached during the game:
Expert Variant: Technology Tableau
For experienced players who prefer more strategic gameplay, Beyond the Sun can be played with a tableau of Technology cards instead of drawing 2 from the top of the deck. The changes are as follows:
Setup changes
- Reserve a 3-row-by-4-column “grid” of Technology card tableau on the play area, by placing the included cardboard bar showing the 4 Technology types on top, and the bar showing Level II / III / IIII to the left.
- Across the Level II row, under each column, reveal cards from the Level II Technology deck until there is a Technology card that matches the column’s type/color on the left triangle of the card. Cards with 2 types count as a match for either type. Place the discarded cards on the bottom, then move on to the next column.
- Do not reveal any Technology cards for Level III and IIII yet.
- Shuffle and place the Level II, III, and IIII Technology decks to the left of the tableau, next to their respective rows.
Gameplay changes
- When discovering a new Technology, players may select 1 of the 4 revealed cards of the corresponding Level row, or draw a random one from the deck:
- The type requirement is the same. For example, from a military/red prerequisite, the player can pick any card from the row that has military/red on the left triangle. When there are 2 prerequisites of different types, either type can be chosen. The 4-column setup ensures there is at least one card of each type (but it is possible that some types only have one choice!).
- At the end of each turn, refill any empty slots by revealing cards from the corresponding deck until a card matching the type/color of the column is found. In the rare case where there are no more cards of a matching type, draw a random one.
- If a player does not like the face-up choices, they may instead draw from the top of the deck until a card of the matching type is found. They must use that card as the new Technology. Place the discarded cards on the bottom of the deck as usual.
- As soon as an Action space that allows research of Level III Technologies is unlocked, set up the Level III row using the same method as the setup section above. The same applies to the first Action space that allows research of Level IIII Technologies.
- When all spaces on the Technology board for a particular Technology Level have been filled, clear that level’s row from this tableau and shuffle the deck. The decks may still be needed for other effects later.
Clarifications, Strategy & Credits
Rule and Card Clarifications
- A player may not deliberately take an Action that causes no change in the game state when the Action is complete.
- For example, a player may not take a “Jump 4” Action and not perform any Jumps, but they may take a “Gain 2 Ore + Jump 2” Action to take 2 Ore and not perform any Jumps.
- Modular Fleet (tech II) — since all 3 shipbuilding effects are optional, players are allowed to take this Action just to Jump 3.
- Quantum Data Exchange (tech III), Technocrats’ Guild — the chosen Action can be occupied by another player.
- Ministry of Colonies (tech IIII) — in the extremely rare case that System Deck A runs out, draw the rest of the cards from Deck B.
- Lalande 21185 (system A) — the colonization bonus must be carried out in order: produce Food, produce Ore, then Trade.
- Ross 154 (system B) — to use its power, the player moves the existing Action pawn aside and occupies the Action slot normally.
- Museum of Retired Spacecraft (event III) — ships on this card are out of the game and cannot be moved, upgraded, or targeted.
- Dyson Sphere, Mk. I (event III) — the attached System card is not a location and cannot be reached or targeted. To execute this Action, the player takes the System card and places it next to their Faction mat, similar to regular colonization. The player collects any colonization bonuses described on the card but does not place any production discs. The Event card is then discarded, and the Action pawn is placed near the Basic Spacefaring box to be moved again next turn.
- Specialization (achievement B) — this counts the printed System specialty icons, not the discs placed. Shipyard Systems also count toward this total.
- “Upgrade then Jump” (e.g., Supply Outpost (tech II), Hyperdrive Boosters (tech III), etc.) — resolve any System control changes after upgrade, then resolve again after Jumps.
- Taking Supply cubes from other columns (e.g., United Nations (basic), Android Rights Movement (tech III), etc.) — the next time cubes are returned to the supply for any reason, the rightmost spaces must still be filled first.
- “Private Technology” (Procyon (system A), WISE 0855-0714 (system B))
- No Population cube is needed for this research. Simply put the Technology card near the Faction mat.
- The researching player gets the immediate research bonus, and only they can use its Action(s).
- Make sure to score Victory Points for them at the end of the game.
- They are considered out of the game and cannot be researched, copied, or targeted by other Factions.
- If a player runs out of production discs and is using discs as a placeholder (e.g., when automating/controlling/colonizing), and if an actual production disc becomes available later (e.g., losing control of a System), the player does not get to replace the placeholder with it. Note that the supply of discs is not limited (use substitute markers if necessary).
- If a resource cube is returned to a player’s supply and there are no empty slots left in any Supply Columns, place it above Supply Column A to extend that column.
- If a disc that is used as a placeholder is returned to the player for any reason, return it next to the player’s Faction mat and it can be reused again.
- When researching a Level IIII Technology that requires “2 out of 3” prerequisites, the researching player may only choose a Technology type from prerequisites that they have researched.
- Technology Tableau Expert Variant:
- Mass Enlightenment (event III) — this card does not trigger the revealing of the Level IIII row.
- Spacetime Anomaly Studies (tech II) — this card will trigger the revealing of the Level III row.
- Planetary-scale Research (tech III) — reveal new rows as needed.
Strategy and General Tips
- Due to the variability of the Technology tree, players should adapt their strategy to what Technologies come out in the game. The game can favor a research-heavy strategy, a colonization-heavy strategy, or a mixture of both.
- When selecting a new Technology, make sure it serves both short-term needs (via immediate bonuses) and long-term goals (via new actions).
- Colonizing a System seems like a daunting task, as it involves movement, taking control, and returning Spaceships, but it can be a crucial part of a winning strategy and should not be ignored.
- If competition for control of Systems seems vicious, it often helps to focus on research during that time. When opponents start thinning out their military due to colonization, it is time to take control of Systems cheaply.
- Population cubes can get “locked up” by Technologies or having a fleet that is too big. To free up Population cubes, either increase Food production, colonize Systems to get cubes back, or take actions that use Supply cubes directly.
Special Thanks
Benjamin Jones, Sam Backwell, Jan Horjus, Yue Shing, Jared Rubinstein, Jared Miller, Jason Kovacs, Phil Amylon, Peter Harvey, Ankit Shah, Seth Meyer, Nathaniel Speer, Chris Rollins, Mike Erickson, Brian Gow, Carol Carveth, Jeff Grove, Jam Murphy, Elise Spencer, Adam Eastwood, Zoltan Perko, Janet Guo, Colin Goldberg, Eric J. Francis, Joey Chan, Kin Cheung, Christopher Rivera, Chris Bryant, Kevin Monahan, Ken Hill, Robin Hill, Mike Zehnal, Lyle Rhodebeck, Peter “The Red Menace” Stein, Scott Tepper, Tom Lehmann, Ray Pfieffer, Scott Russell, Tadd Colver, Roy Colver, Franz Vohwinkel, Game Makers Guild Boston, Boston Festival of Indie Games
Dennis K. Chan
is a game designer living in Boston. Originally from Hong Kong, he moved to the United States to attend Wesleyan University, where he graduated with a degree in Physics. When not designing games, he is a software engineer who enjoys biking, cooking, playing board games, and rocking out on the pipe organ.
Game Design: Dennis K. Chan
Artwork: Franz Vohwinkel
Production Management and Development: Ken Hill
© 2020 Rio Grande Games, All Rights Reserved
Rio Grande Games, PO Box 1033, Placitas, NM 87043, USA
[email protected] • www.riograndegames.com