
Aeon’s End
2016
Harness breach energy, master your deck, and unite as breach mages to defend Gravehold from The Nameless and their hordes.
60
minutes
1 - 4
player(s)
14+
Medium

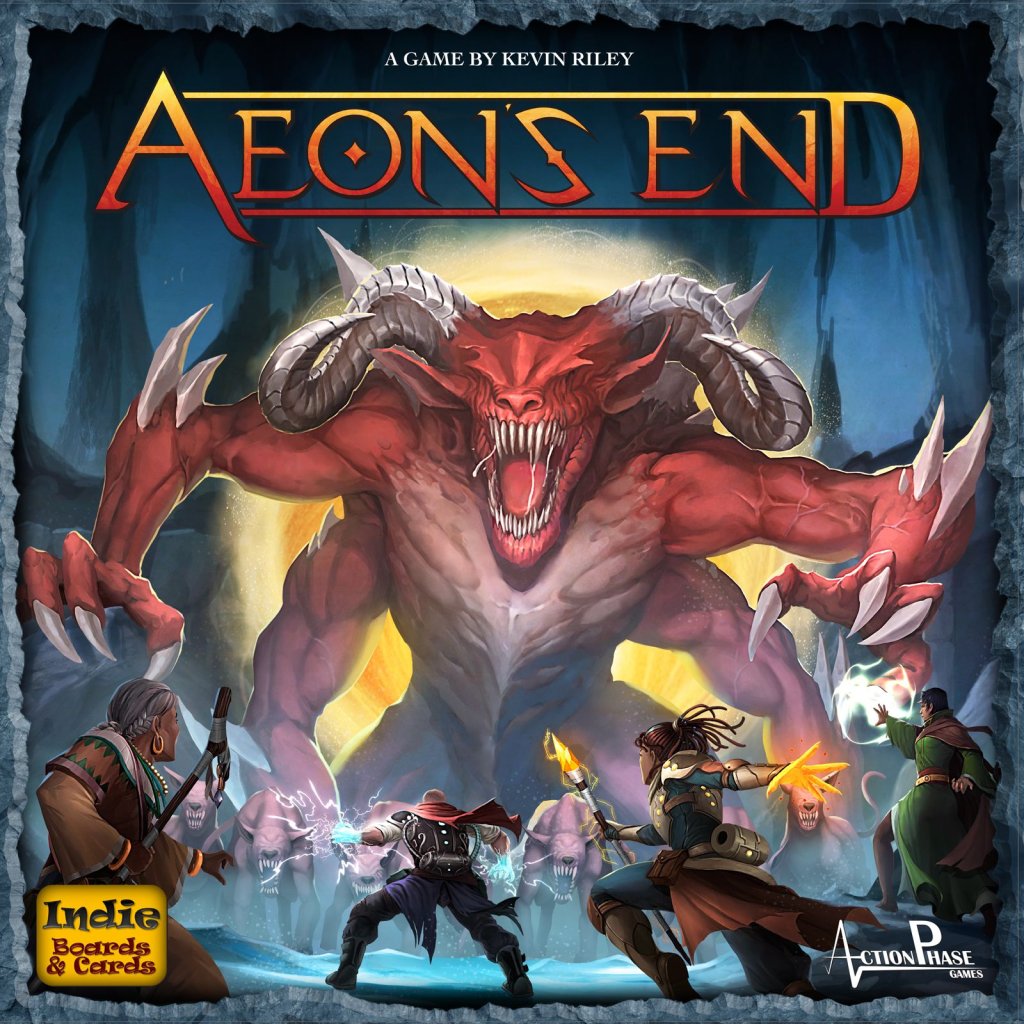
About this board game
Aeon’s End is a cooperative deckbuilding game for 1–4 players, with sessions lasting about 60 minutes. Players take the roles of breach mages defending the underground city of Gravehold from The Nameless and their hordes.
Long ago, an invasion drove the survivors into Gravehold, a forgotten underground refuge. Now, the energy of the breaches used by hostile beings to attack can be repurposed through various gems, transforming malign power into beneficial spells and weapons.
Working together, players must protect Gravehold using unique abilities, powerful spells, and collective planning. Every decision matters as the last line of defense struggles against an overwhelming threat.
- Cooperative play: Unite your efforts to defend Gravehold.
- Deckbuilding: Develop your available cards while managing your deck carefully.
- Variable turn order: A system that simulates the chaos of an ongoing attack.
- Breach energy: Use gems to transform hostile energies into useful spells and weapons.
Aeon’s End explores the deckbuilding genre through mechanisms that demand foresight rather than routine play. Its deck management rules make every discarded card part of a larger plan, encouraging careful consideration throughout the battle.
With its combination of unique abilities, spells, gems, and an unpredictable turn order, Aeon’s End creates a tense cooperative challenge. The fate of Gravehold rests on how effectively the breach mages can combine their strengths and use their collective wits.
/pic7182955.jpg)
Board Game Rules for
Aeon’s End
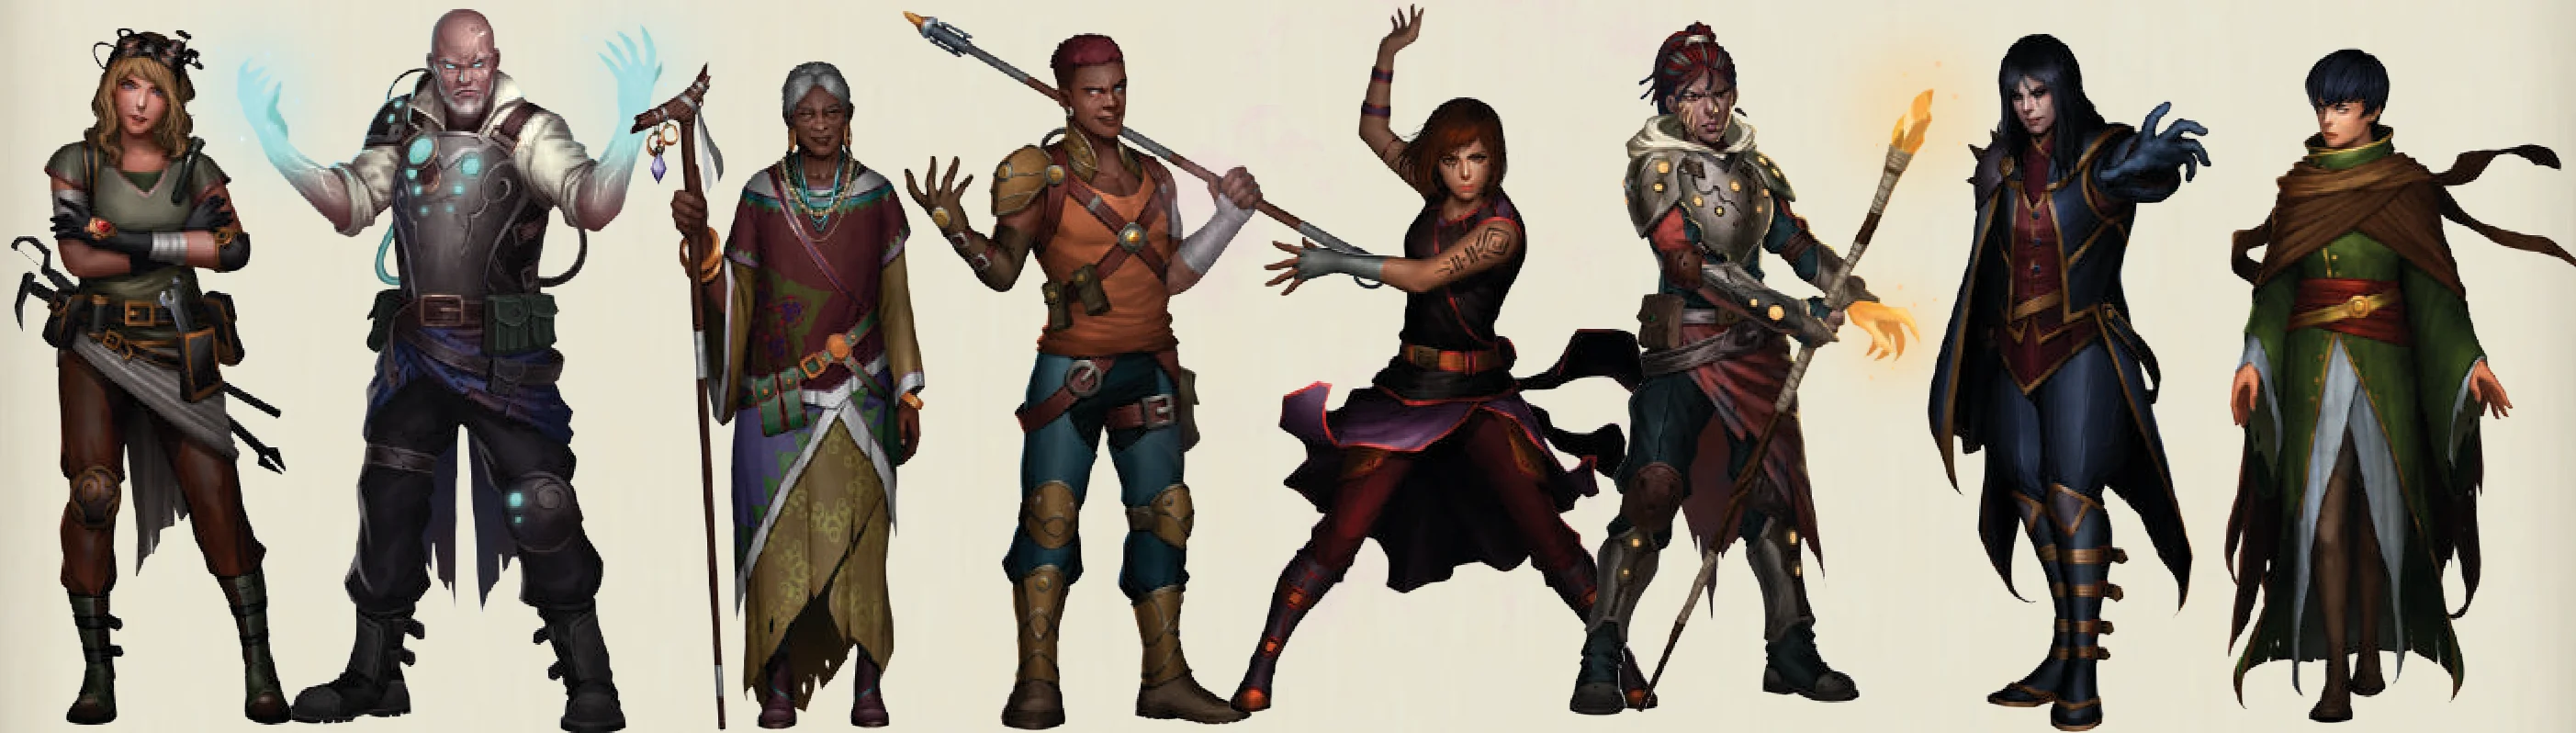
This isn’t the end of the world. That already happened. This is what’s left. Us, Gravehold, and The Nameless – creatures seeking to snatch what little we have left from our grasp. The breath in our lungs. The weak light in our eyes. For generations we have taken refuge in an ancient and haunted place, one whose first purpose was forgotten for a thousand ages, until our exodus once again filled its empty halls and hovels with our shadows. Here in the darkness, we seek a way back to the light.
It has taken the breach mages an aeon to hone their dark craft, but they are ready, they are lethal. The breaches, the very conduits through which The Nameless travel, have become our weapon. The breach mages wield this power with undeniable ambition: to survive, to take back The World That Was, to protect our home.
Nerva, Gravehold survivor
OBJECT OF THE GAME
Aeon’s End is a cooperative deck building game where your deck is never shuffled. Your goal is to defeat the nemesis before your home, Gravehold, is overrun or the players are exhausted.
Each round, the players and the nemesis will take turns in a random order. During a player’s turn, they will be able to cast spells, acquire additional gems, relics and spells from the supply, manipulate their spell casting breaches and use their unique abilities. All four of the different nemeses included in the game are unique in the actions taken during their turns, and will require a different strategy to defeat.
CONTENTS
The following section introduces the game components and the game terms used with those components. Please take some time to become familiar with this section before reading the rules.
- 30 life tokens with value 1 & 10 life tokens with value 5: used to track the life of the players and minions.
- 21 charge tokens: used to fuel players’ abilities.
- 10 power tokens: used on certain nemesis cards to track the number of turns until a power resolves.
- 15 Fury/husk tokens: used when playing against Rageborne or Carapace Queen.
- 2 life dials: used to track the life of Gravehold and the nemesis.
- 4 player number tokens: placed on player mats and used in conjunction with the turn order cards to determine play order.
- Player cards – gems, spells, and relics: used by the players to enhance their decks.
- 87 gem cards
- 86 spell cards
- 30 relic cards
- 27 randomizer cards: used to determine which player cards are available.
- 4 player aid cards: used for quick reference of the phases of a turn.
- 8 player mats: used for tracking the important information of each player.
- 16 breaches: used by the players to cast their spells.
- 9 turn order cards: used to determine the order of play during the game.
- 4 nemesis mats: used to display the specific rules for each nemesis.
- 75 nemesis cards: used by the nemesis against the players and Gravehold.
PLAYER MATS
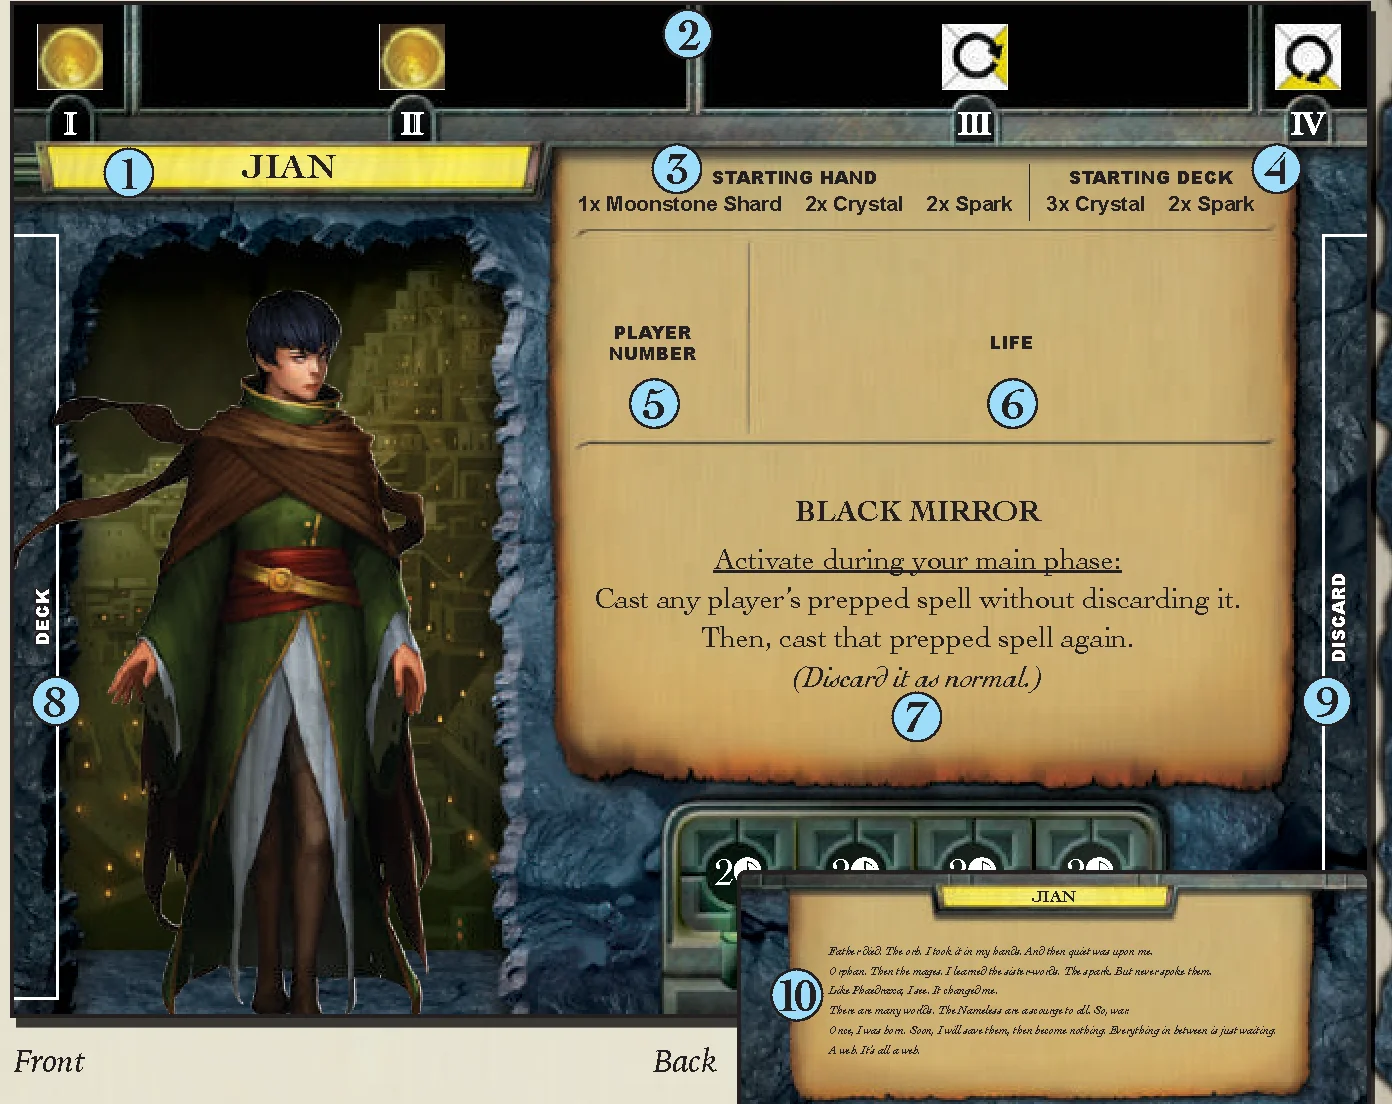
- Breach Mage Name
- Breach Setup: The initial configuration of your breaches. Not all players have the same amount of available breaches.
- Starting Hand: The five cards which you will have in your hand at the start of the game.
- Starting Deck: The five cards, and the order in which they are placed in your starting deck. Place the leftmost cards at the top of your starting deck.
- Player Number: Place your player number token here. Player number is used in conjunction with the turn order deck to determine turn order.
- Life: Place your life tokens here.
- Ability: Each breach mage has a unique ability. The player mat explains when that ability can be activated and what it does. Abilities can only be activated when you have a charge token on all of the spaces shown below the ability. Once an ability is activated, all of the charge tokens are removed.
- Deck: Place your deck facedown here.
- Discard: Place your discard pile faceup here.
- Breach Mage Story: Has no effect on play. Provides further lore into the world of Aeon’s End.
BREACHES
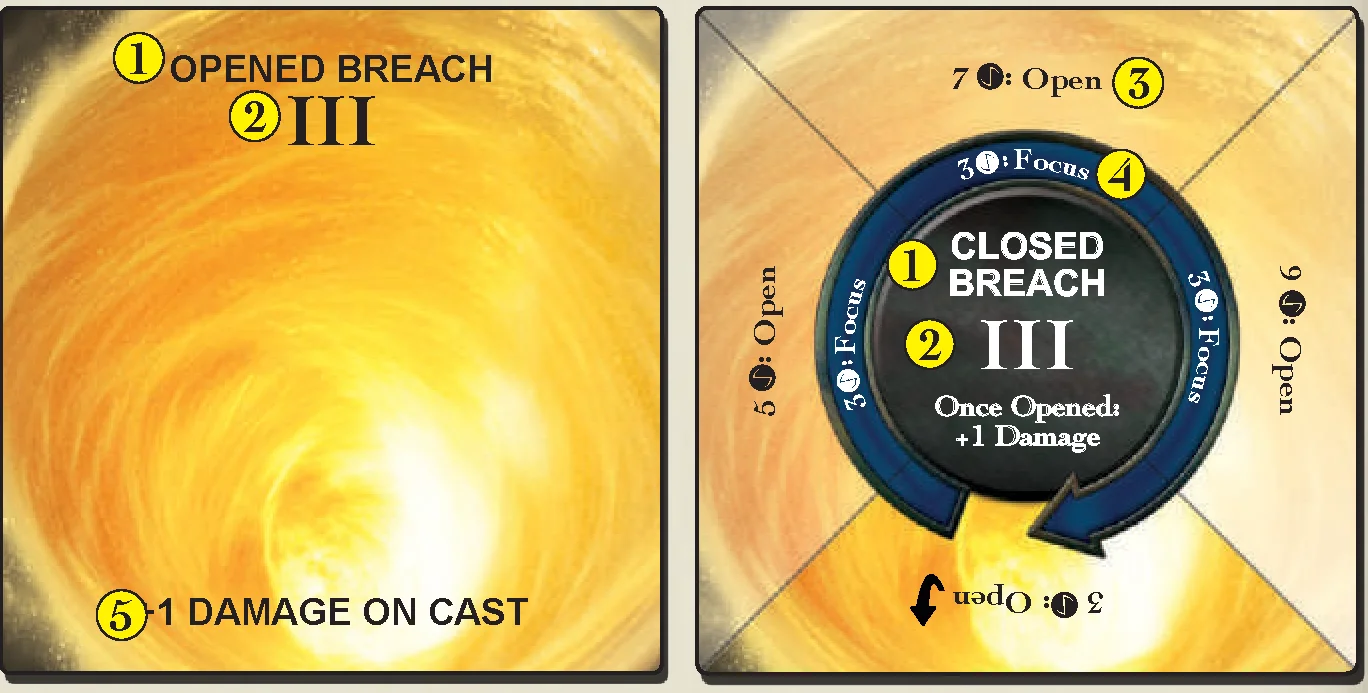
Breaches are double-sided cards used to prep and cast spells. A single spell may be prepped by placing a spell card from hand to an opened breach during a player’s turn. On a subsequent turn, a player’s prepped spells may be cast by discarding the spell card.
- Open/Closed: One side of the card is used to indicate that the breach is open, the other indicates a closed breach.
- Breach Number: Used primarily during setup to indicate where each breach placed next to the player mat.
- Open Cost: The cost, in aether (
 ), to open the breach. When a breach is opened, flip it to the opened side. Once a breach is opened, it remains opened for the rest of the game.
 - Focus Cost: The cost, in aether (), to focus the breach. When a breach is focused, rotate the breach card 90° clockwise. The only time that spells can be prepped to a closed breach is during the player’s turn in which that breach was focused.
- Opened Effect: Some breaches have effects that occur whenever a spell is cast from that breach while it is opened.
You may open or focus breaches in any order. For example, you may focus Breach III before Breach II, or open Breach IV before opening breach II or III.
Adjacency
Some spells may refer to adjacent breaches. Breaches are always adjacent to the one or two directly next to them physically.
For example, I is adjacent to II. II is adjacent to I and III.
PLAYER CARDS
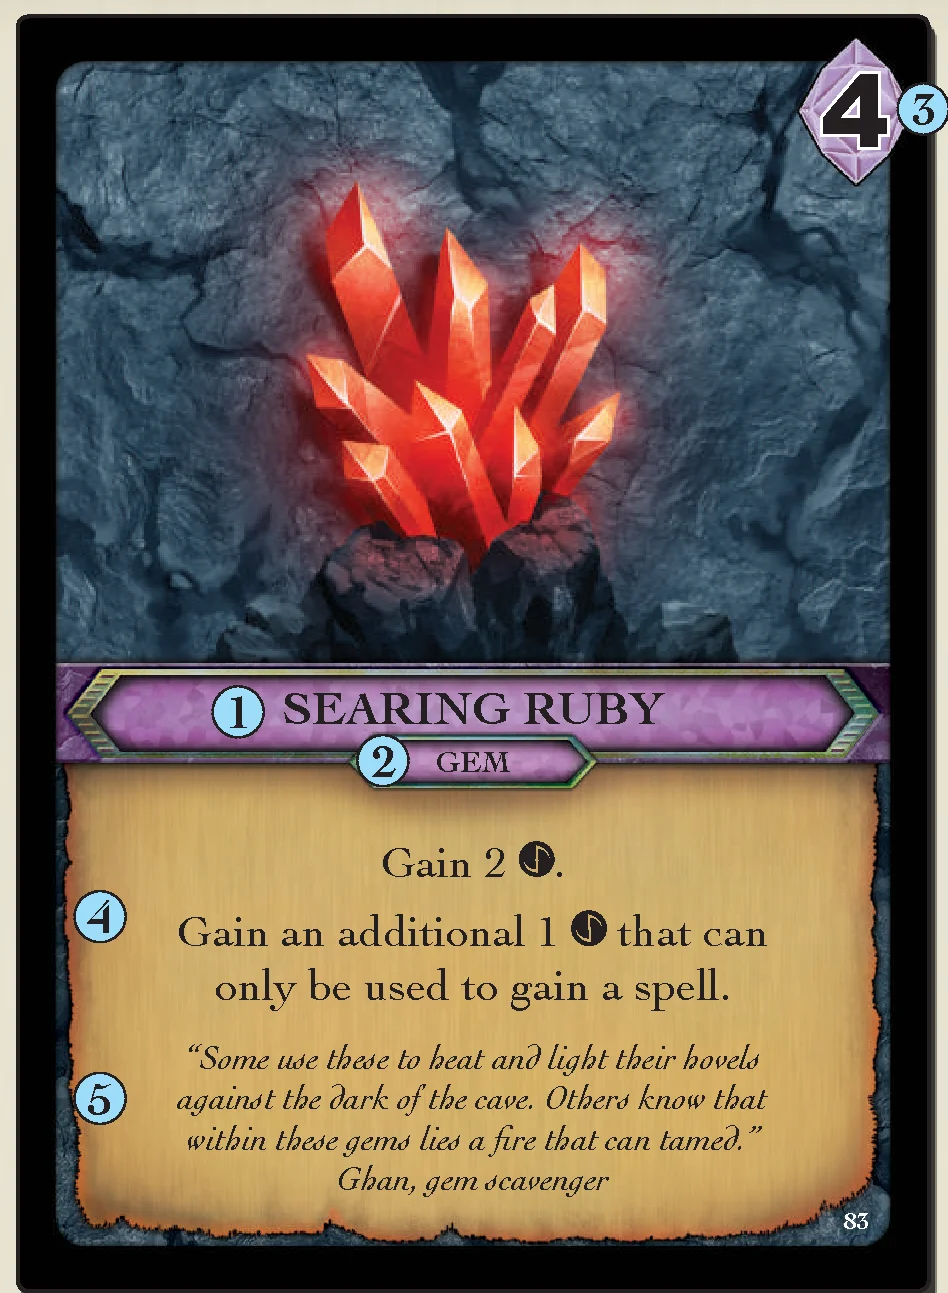
Player cards are the various cards the players can use to build their decks in order to defeat the nemesis. Each player starts with a unique hand and deck of cards. Players will acquire more cards for their deck by spending aether () to gain them from the supply piles.
- Card Name
- Type: There are three types of player cards: gems, relics, and spells.
- Gems are played to give you aether (), the main currency of the game. Aether can be spent to gain more cards, gain charges for breach mage abilities, and focus breaches. (Breaches are the conduits through which spells are cast.)
- Spells are the main way of dealing damage to the nemesis and his minions. Spells must be prepped to a breach (that is, the spell card must be placed on a breach card next to your player mat) before you can cast them.
- Relics have a variety of useful instantaneous effects.
- Gems are played to give you aether (
- Cost: The amount of aether () you must spend to gain this card.
- Effect: The effect you resolve when you play the card. Gems and relics have effects that are resolved immediately. Spells need to be prepped to a breach before they can be Cast. If any card contradicts this rulebook, follow the card’s effect.
- Flavor Text: Has no effect on play. Provides further lore into the world of Aeon’s End.
RANDOMIZER CARDS
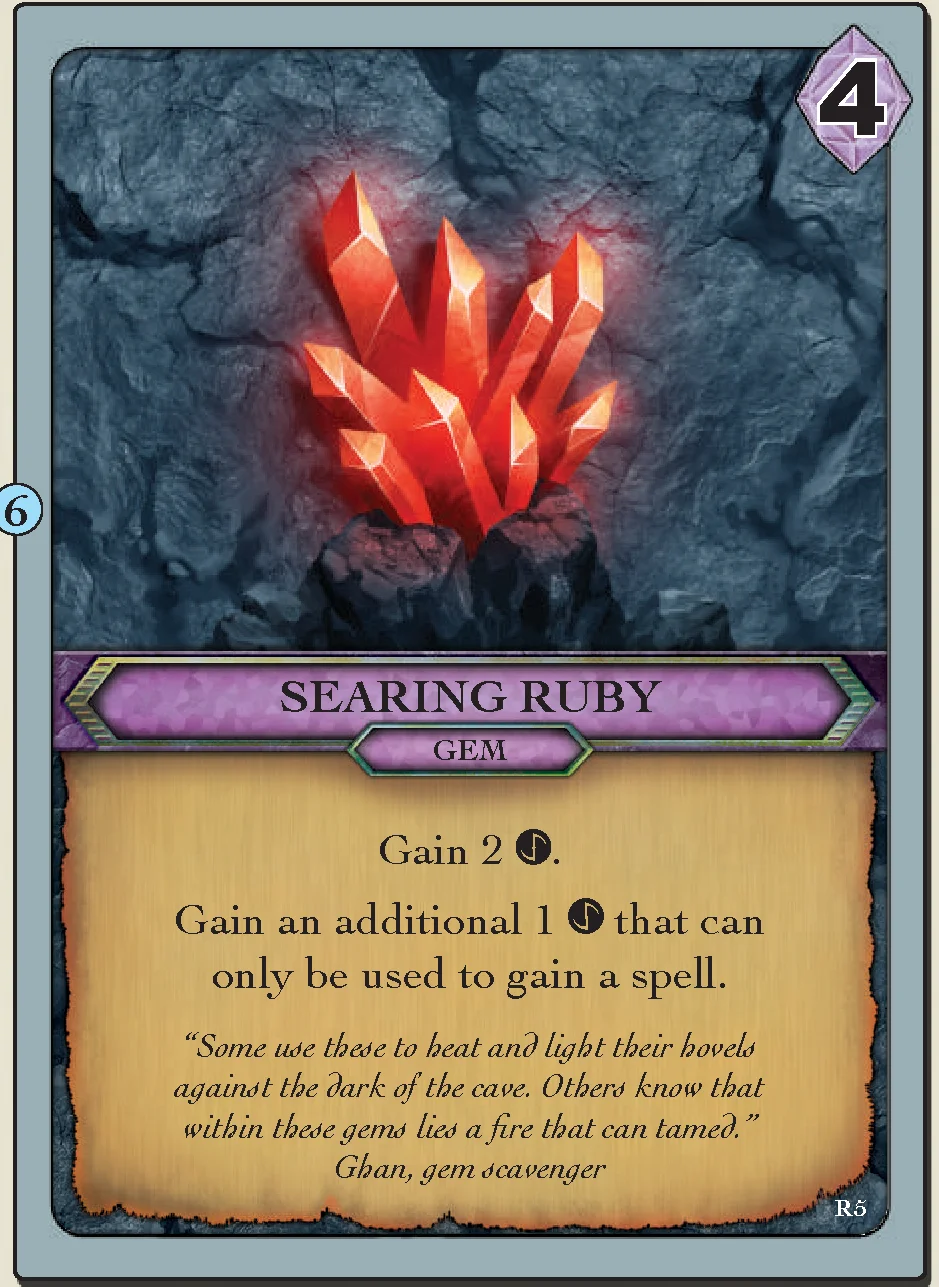
- For each player card there is one additional copy that has a grey border. The grey-bordered cards are used during setup to randomly pick which gems, spells, and relics will be in the supply. These cards are not played with during the game.
See Setup on page 10 for more information.
NEMESIS MAT
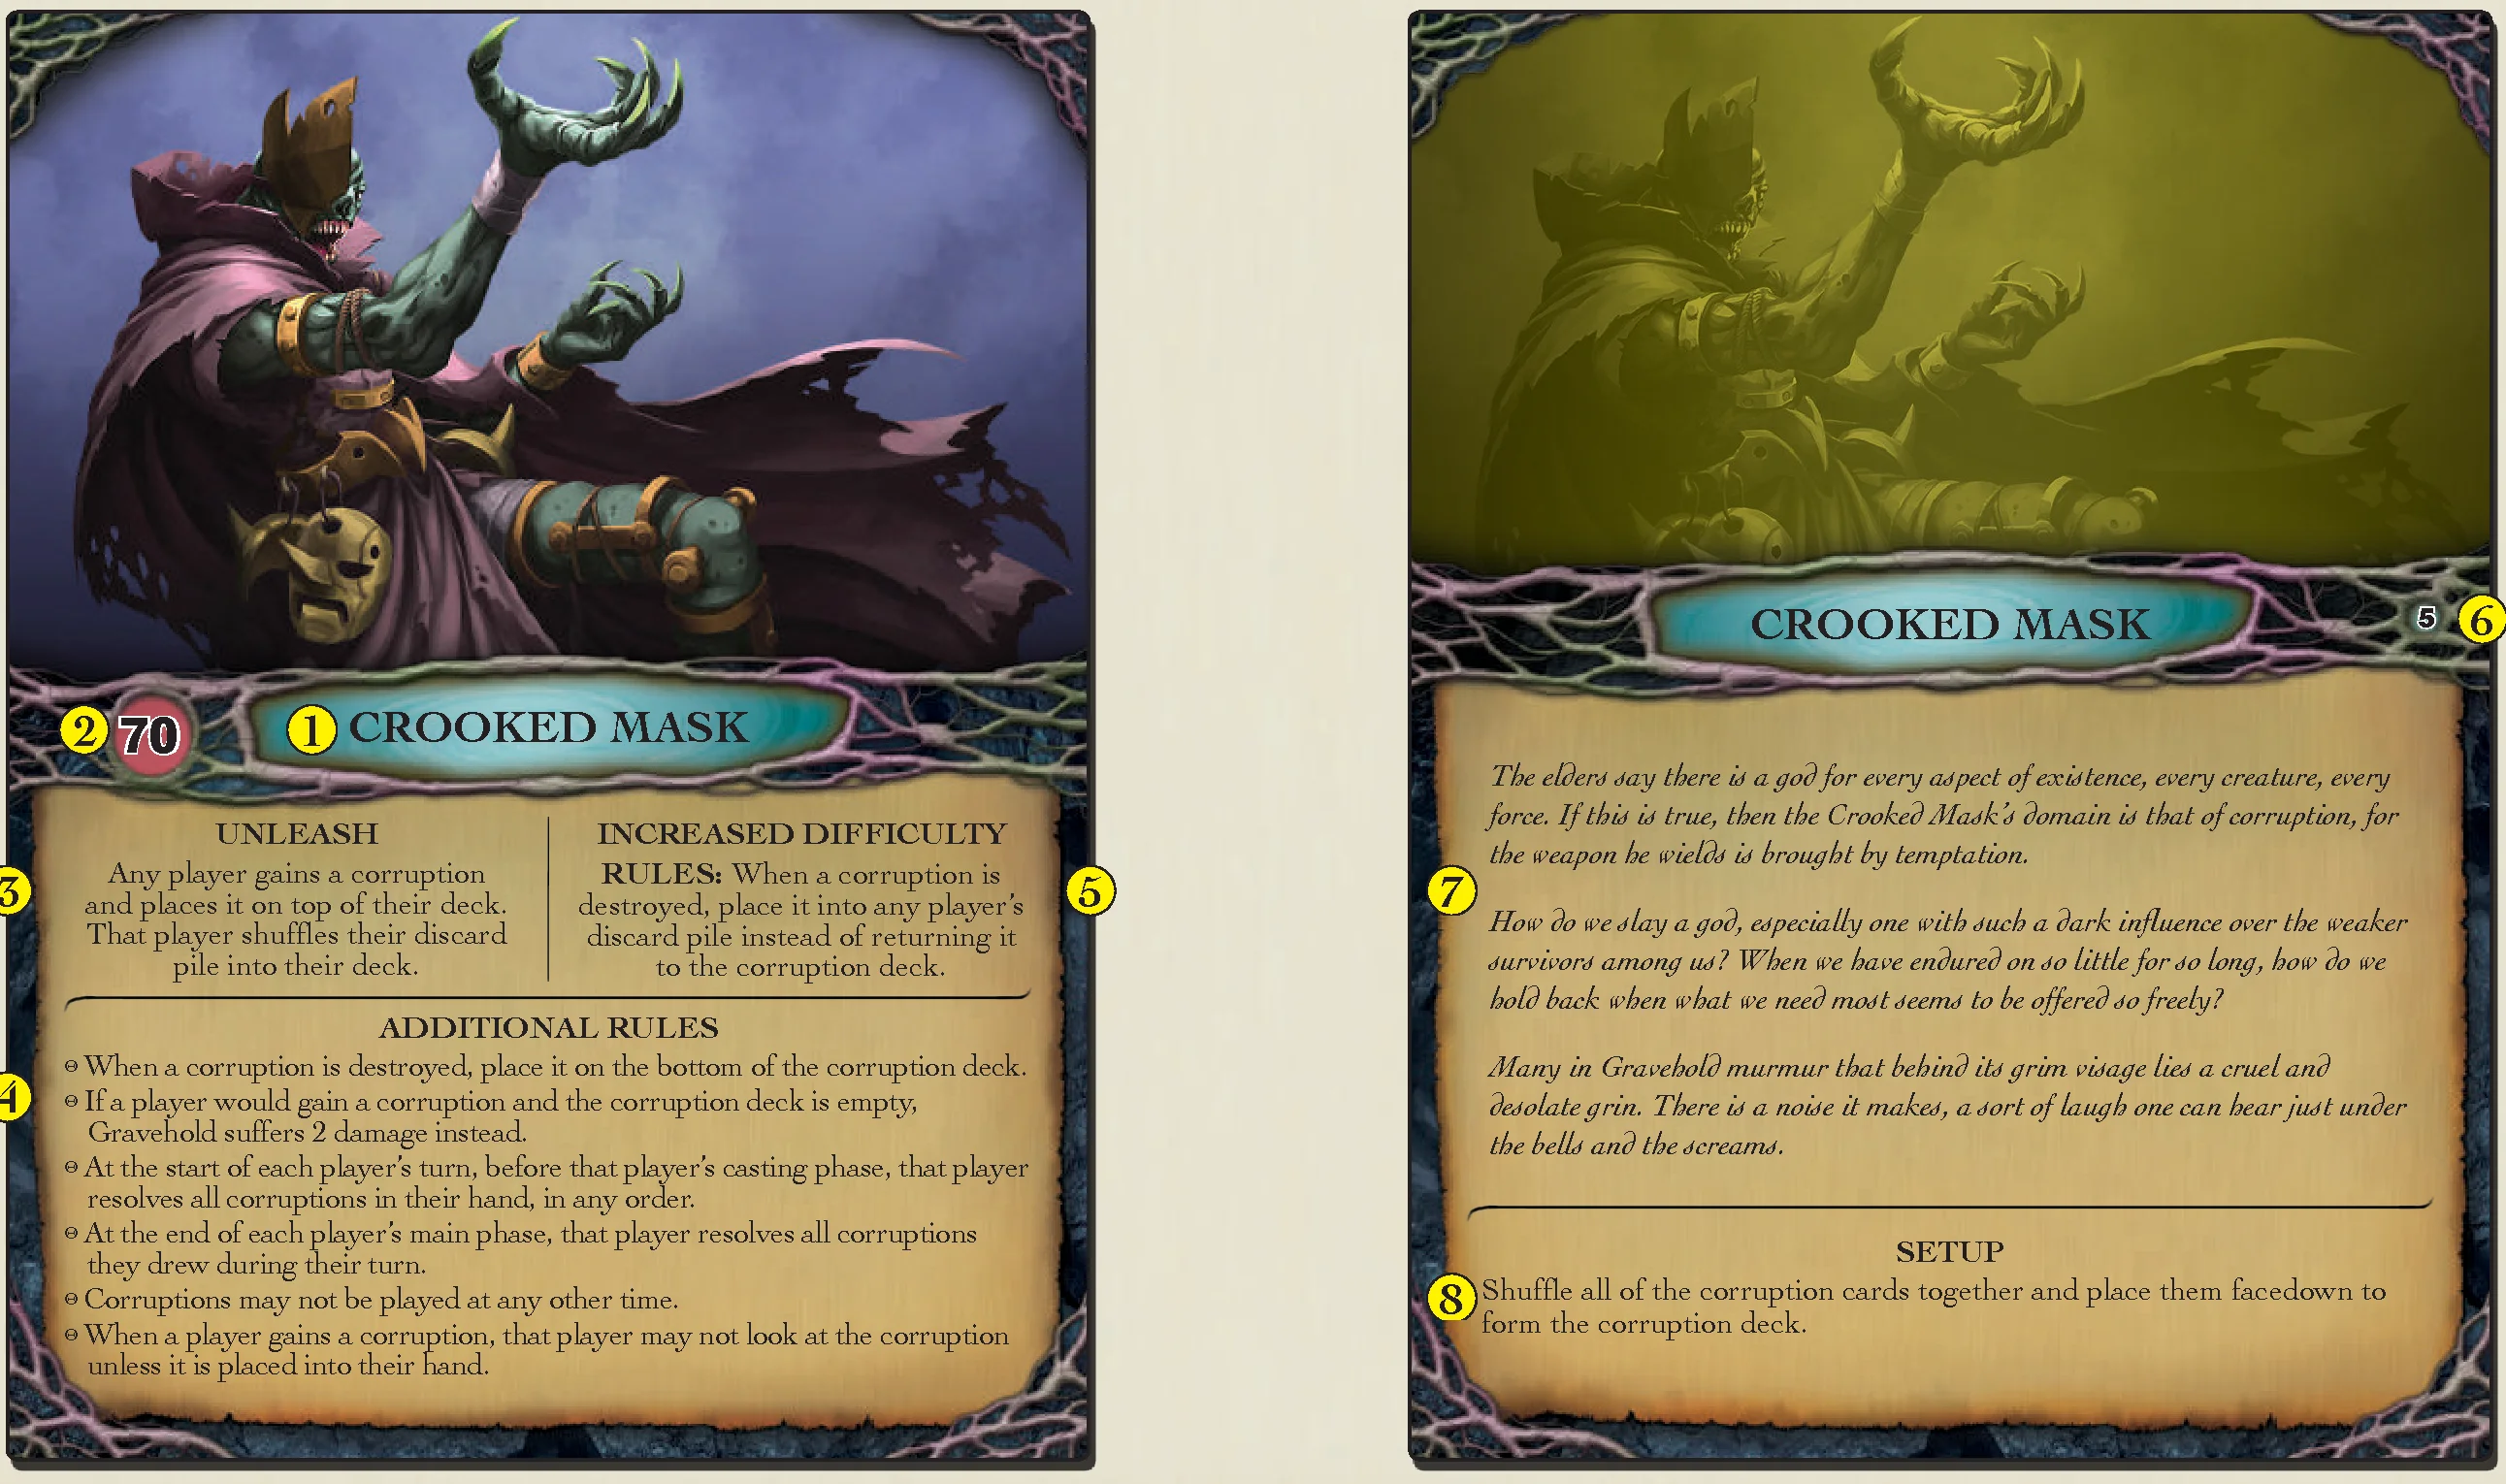
- Nemesis Name
- Life: Starting life of the nemesis. The nemesis’s life is tracked on its life dial. If the life of the nemesis reaches zero, the players win.
- Unleash Effect: The effect that occurs when the Unleash keyword resolves. Each nemesis has a unique Unleash ability.
- Additional Rules: Any additional rules that pertain only to this nemesis.
- Increased Difficulty: An optional rule which can be used to adjust difficulty.
See page 19 for further difficulty modifications. - Difficulty Level: How difficult this nemesis is compared to the other nemeses. The difficulty level ranges from 1 (easiest) to 10 (most challenging).
- Nemesis Story: Has no effect on play. Provides further lore into the world of Aeon’s End.
- Setup: Additional information required during setup for this nemesis.
NEMESIS CARDS
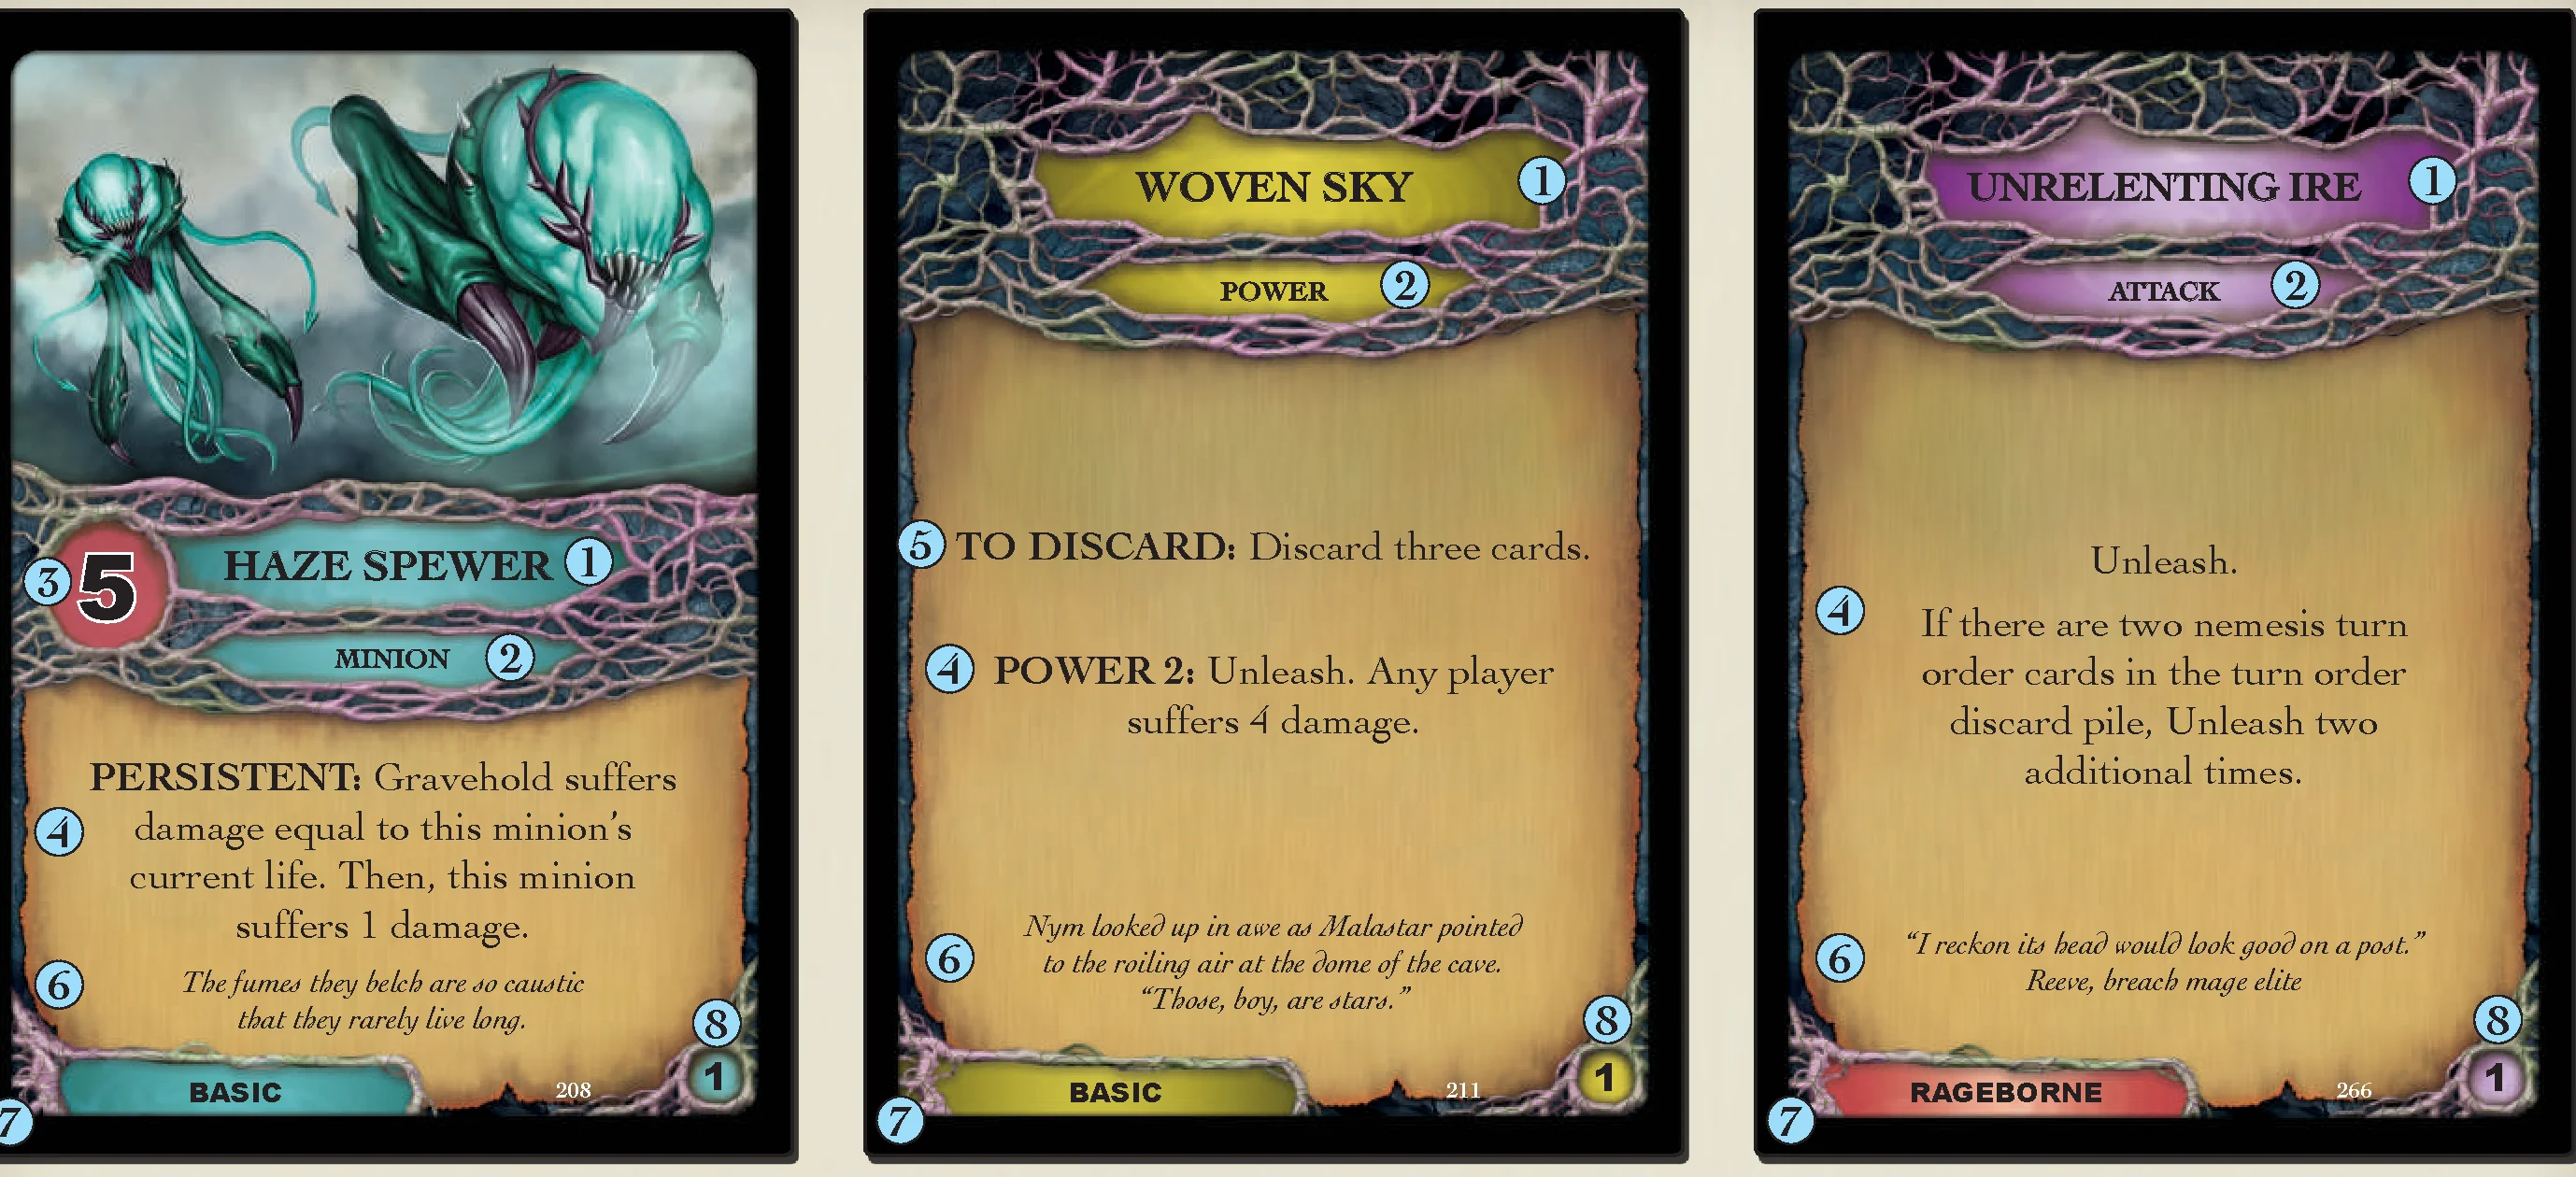
Nemesis cards are the attacks, minions, and powers the nemesis uses against the players and Gravehold. The nemesis deck is constructed at the beginning of each game from a mixture of basic nemesis cards that can be used in any nemesis deck, and a number of unique cards that are only used with that particular nemesis. You may encounter the same nemesis many times, but it will never attack you in exactly the same way twice.
- Card Name
- Type: There are three types of nemesis cards: attacks, minions, and powers.
- Attacks are resolved immediately and are then discarded.
- Minions: Minions enter play with life tokens and stay in play until defeated. They have persistent effects which are resolved during the nemesis’s main phase. If the life of a minion reaches zero, it is immediately discarded.
- Powers: All power cards have “POWER X:” on them. When a power card enters play, place X power tokens on it. Unless discarded, power cards stay in play for X nemesis turns before resolving. During the nemesis main phase, remove one power token from every power card in play. When a power card has no tokens left, resolve its effect and then discard it.
- Life: Minion cards have life which can be depleted by dealing it damage. If the life of a minion reaches zero, it is immediately placed in the nemesis discard pile.
- Effect: The effect to resolve for this nemesis card.
- TO DISCARD effect: Some power cards have a “TO DISCARD:” effect. During any player’s main phase, that player may fully resolve the effect listed to discard that power card. If a power card is discarded this way, its effect will not be resolved.
- Flavor Text: Has no effect on play. Provides further lore into the world of Aeon’s End.
- Nemesis: The nemesis to which the card belongs. Cards that say “Basic” may be used with any nemesis.
- Tier: There are three tiers of nemesis cards. Tier 1 cards are less dangerous than Tier 2 cards, which are less dangerous than Tier 3 cards. Some unique nemesis cards are marked as Tier 0. These cards are covered in the additional rules section of the nemesis to which they belong.
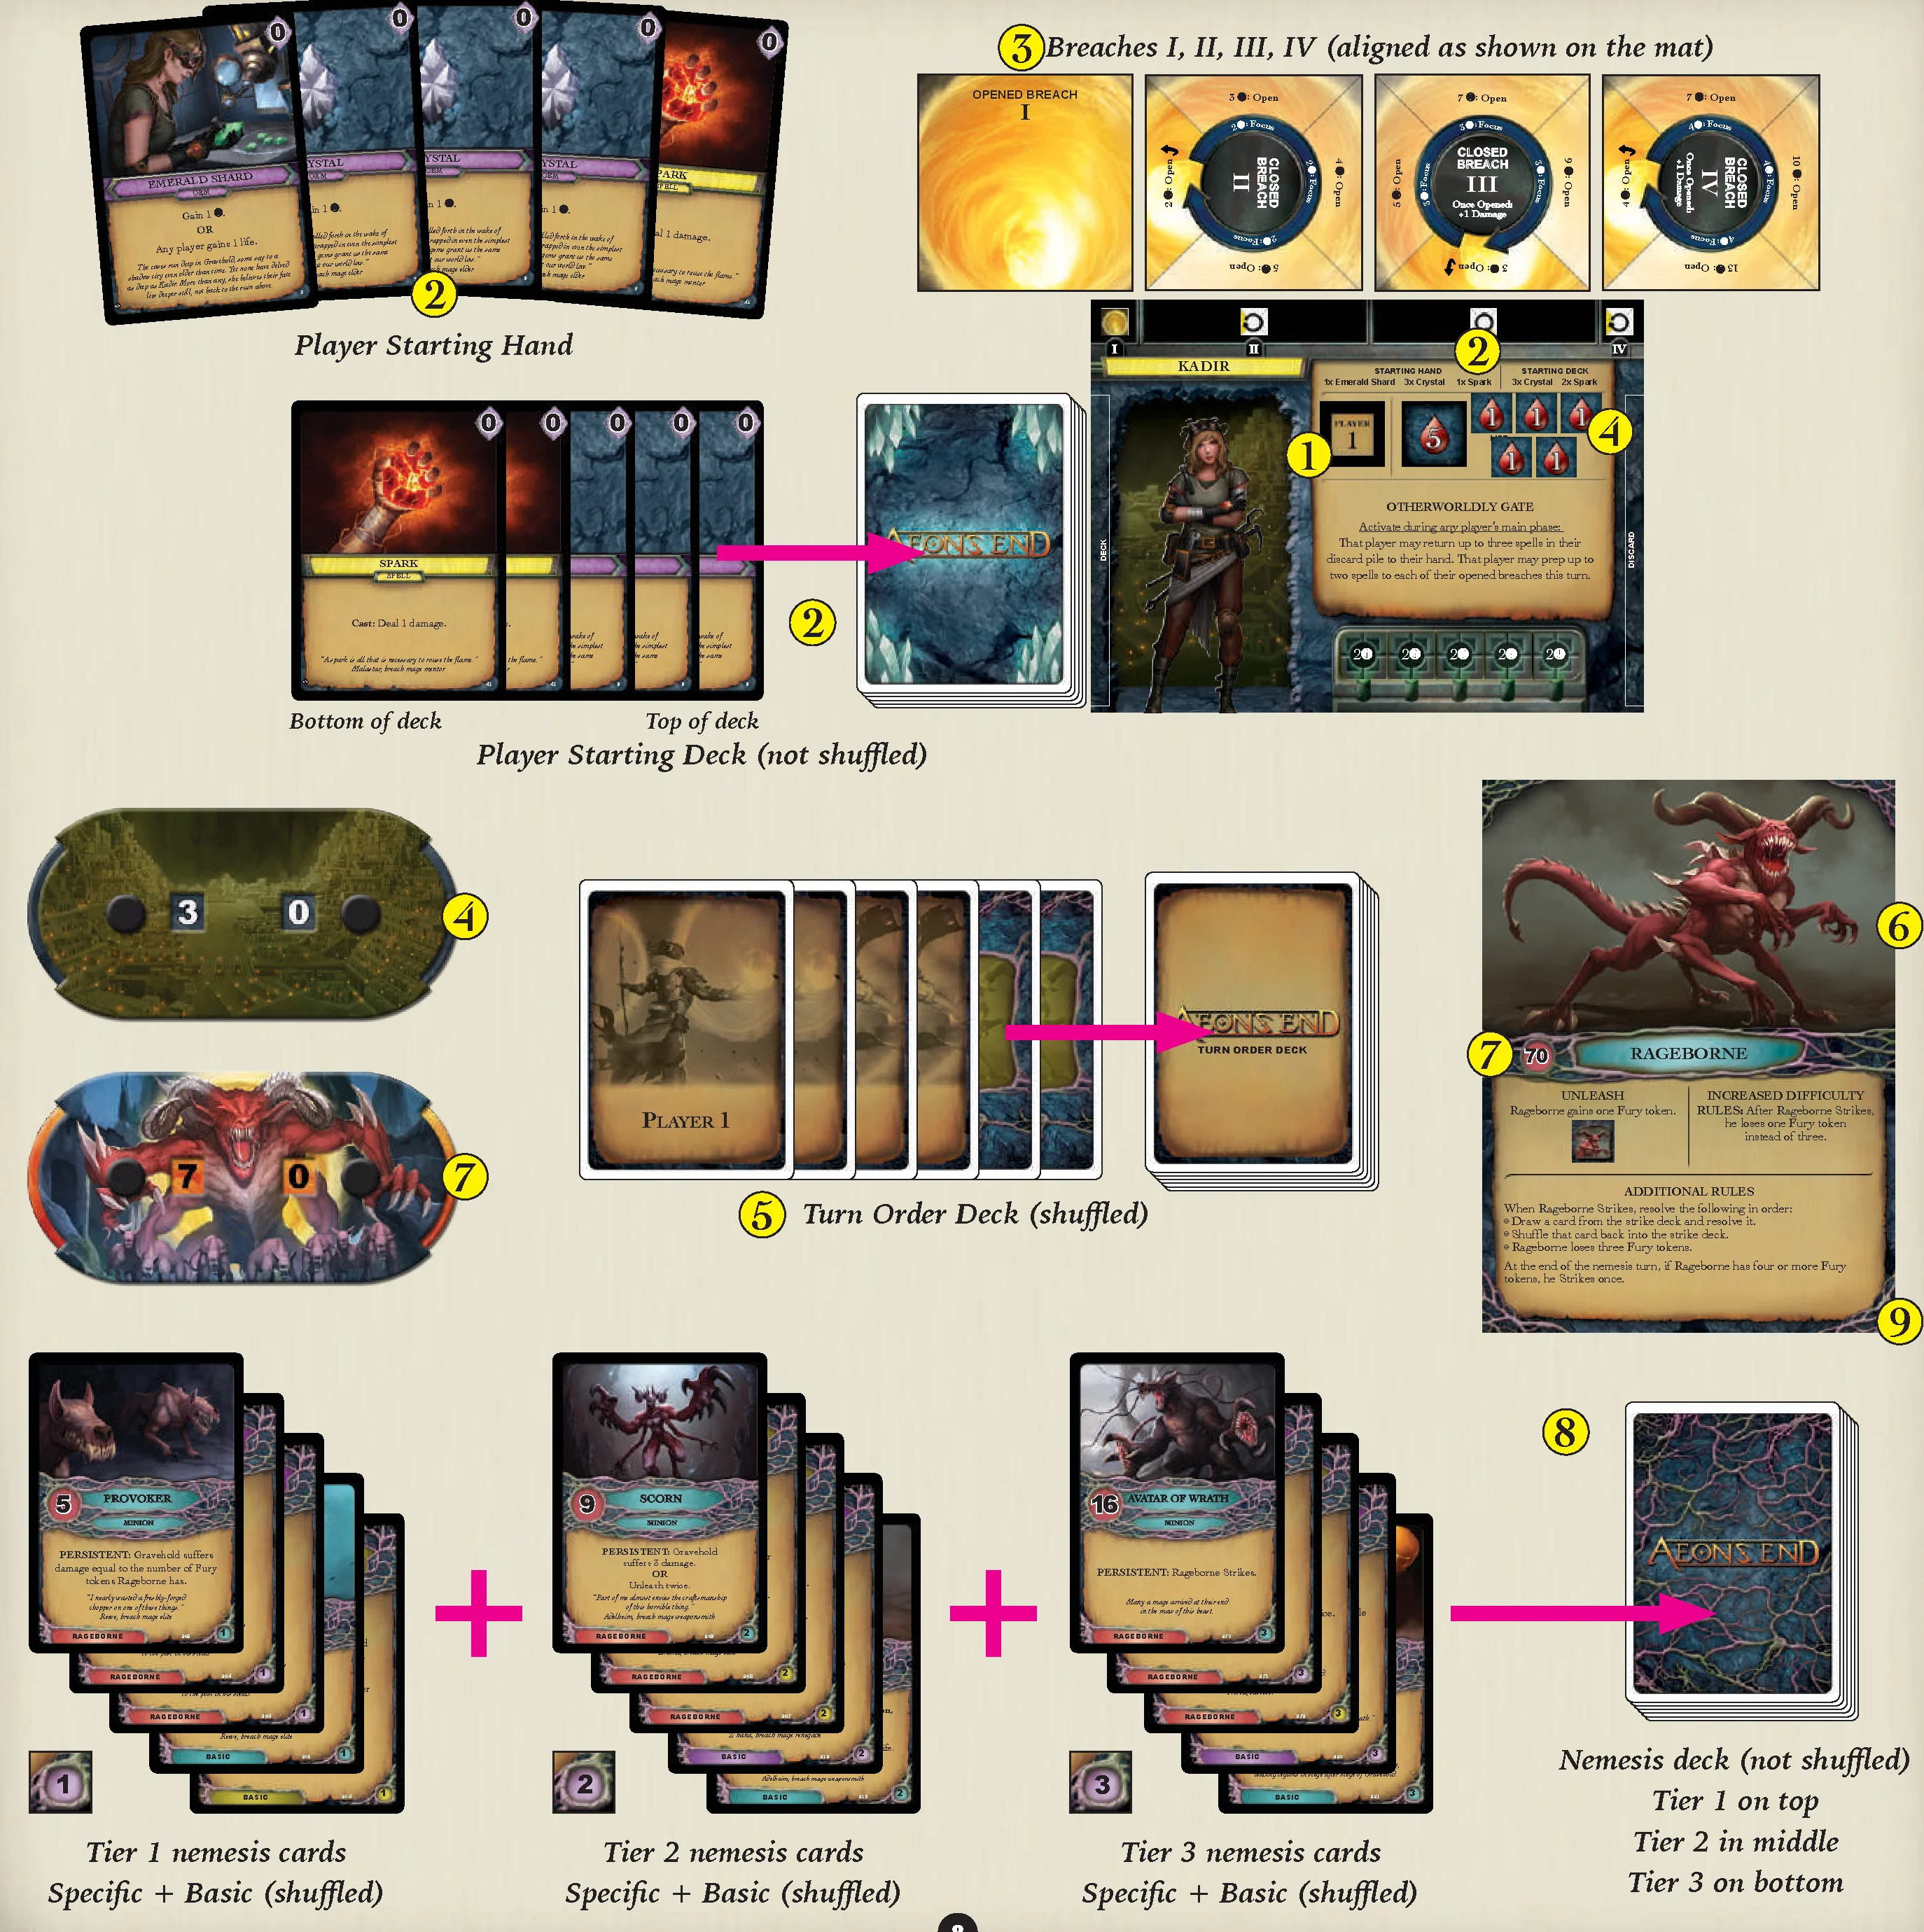
PLAYER SETUP
- Each player chooses a player mat and a player number token.
- Each player builds their starting hand and deck as shown on their player mat. The cards should be in the order shown with the leftmost card(s) being the top card(s) of their deck and the rightmost card(s) being the bottom card(s) of their deck.
- Each player receives one of each type of breach shown on their mat (I–IV as listed). Players arrange their breaches as indicated on their player mat.
- Each player starts the game with 10 life. Set the Gravehold life dial to 30. The players and Gravehold can never have more than their starting life.
Starter Cards
To differentiate the starter cards from the cards used in the market, the cards used to form your initial hand and deck are denoted with a  in the lower left corner.
PLAYER SETUP EXAMPLE
Abby and Bob are playing a game of Aeon’s End. (1) Abby is the first player and has chosen to play with Kadir. She sets the Kadir player mat in front of her on the table. She places the Player 1 token on the corresponding section of her mat.
(2) She checks her player mat to see that Kadir starts the game with one Emerald Shard, three Crystals, and one Spark in her hand. She also notices that Kadir starts with three Crystals and two Sparks in her starting deck. Abby locates those cards and places her starting hand in front of her, and her starting deck to the left of her play mat, with the Sparks on the bottom of her deck because those are listed second on the player mat.
(3) Abby grabs one of each type of breach, which are labeled I-IV. She places them above her mat and orients them so that they match what is shown at the top of her mat. The I breach is open. The II and IV breaches have the yellow section to the left. The III breach has the yellow section on the bottom.
TURN ORDER DECK SETUP
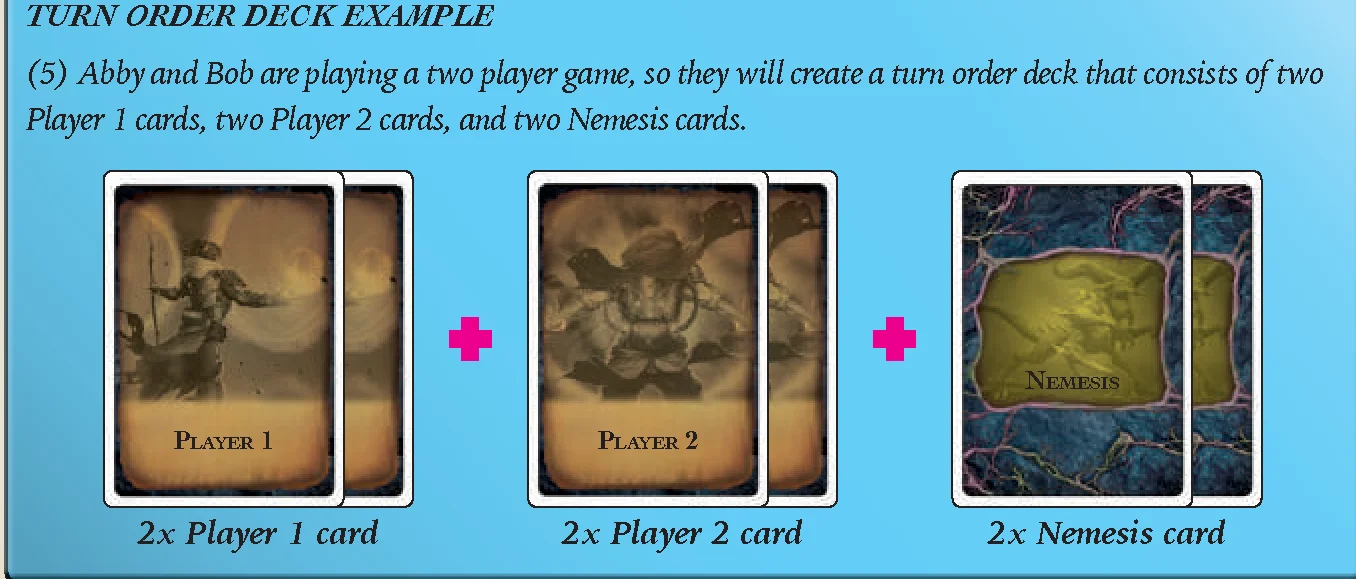
- The turn order deck is always composed of four player turn order cards and two nemesis turn order cards. The player turn order cards correspond to the player number tokens.
- For two players: place two turn order cards for each player in the deck.
- For three players: place one turn order card for each player plus the wild turn order card in the deck. When the wild turn order card is drawn, the players decide which one of them will take that turn. The wild turn order card is a player turn order card.
- For four players: place one turn order card in the deck for each player.
- Regardless of the player count: add two nemesis turn order cards to the deck and shuffle it.
When the turn order deck is empty and a new turn order card must be drawn or revealed, shuffle all of the turn order cards together and place them facedown to make the turn order deck again.
NEMESIS SETUP
- Choose a nemesis to play against, and set its nemesis mat near the players. Carefully read all of the additional rules for the chosen nemesis.
- Set the nemesis life dial equal to the number shown on the nemesis mat. The nemesis can never have more than its starting life.
- The nemesis deck:
The nemesis deck is comprised of between 20 and 31 cards as determined by player count. The nemesis deck has three tiers which increase in difficulty as the game progresses and will consist of both nemesis specific and basic nemesis cards. Tiers are indicated by a 1, 2 or 3 in the bottom right of the nemesis cards. Each nemesis has nine nemesis specific cards with the name of the nemesis written at the bottom left.
To build the nemesis deck:- Locate the nine nemesis specific cards used for this game, and separate them into three piles of three cards according to the card’s tier.
- Use the chart below to add basic nemesis cards to each pile based on the number of players in the game:
BASIC NEMESIS CARDS ADDED 1 Player 2 Player 3 Player 4 Player Tier 1 1 3 5 8 Tier 2 3 5 6 7 Tier 3 7 7 7 7 - Shuffle each pile of cards separately.
- Place the tier 3 cards on bottom facedown, the tier 2 cards facedown on top of the tier 3 cards, and the tier 1 cards facedown on top of the tier 2 cards. Combined, these tiers form the nemesis deck.
- Do not shuffle the nemesis deck once it has been created.
- After creating the nemesis deck, follow all Setup instructions written on the back of the nemesis mat.
Tier 0
Depending on which nemesis you’re playing against, there may be other cards used besides the nemesis deck. These cards are marked as tier 0. Refer to the nemesis mat for specific setup instructions.
NEMESIS SETUP EXAMPLE: REFER TO PAGE 8 DIAGRAM
(6) Abby and Bob have chosen to play against Rageborne. Bob finds the Rageborne mat and sets it on the table. He reads all of the additional rules regarding Rageborne.
(7) He checks the mat to see that Rageborne starts the game with 70 life. He grabs the nemesis life dial and sets it to 70.
(8) Bob finds the fifteen nemesis cards with Rageborne written at the bottom. He consults the chart to see what basic cards he will need for a two-player game. He finds three random tier 1 basic nemesis cards, five random tier 2 basic nemesis cards, and seven random tier 3 basic nemesis cards.
Then he sorts the Rageborne nemesis cards into tiers. First he shuffles the three tier 3 Rageborne cards into the seven tier 3 basic cards and places them facedown to start the deck. Next, he shuffles the three tier 2 Rageborne nemesis cards in with the five tier 2 basic cards and places those on top of the tier 3 cards. Finally, he shuffles the three tier 1 Rageborne cards into the three tier 1 basic cards and places those on top of the tier 2 cards. At this point, Bob will no longer shuffle the nemesis deck. He sets it beside the nemesis mat.
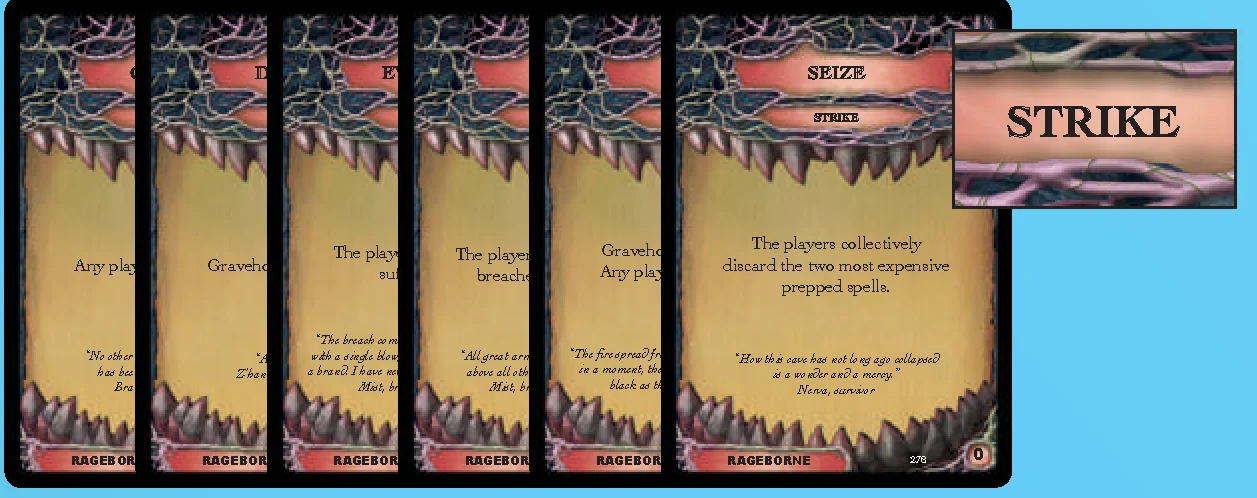
(9) Bob notices that there are six tier 0 Rageborne cards left over. With the nemesis deck now created, Bob checks the Rageborne mat for further setup instructions. The mat says, “Shuffle all of the strike cards together and place them facedown to form the strike deck. Rageborne gains 1 Fury token.”
Bob takes the six Rageborne cards he had left over after creating the nemesis deck; noting that the card type states “Strike” instead of the regular Power or Attack. He shuffles them and places them facedown next to the nemesis deck.
Bob also grabs all of the Fury tokens from the box and places one of them on the Rageborne mat to denote that Rageborne has gained one Fury token.
SUPPLY SETUP
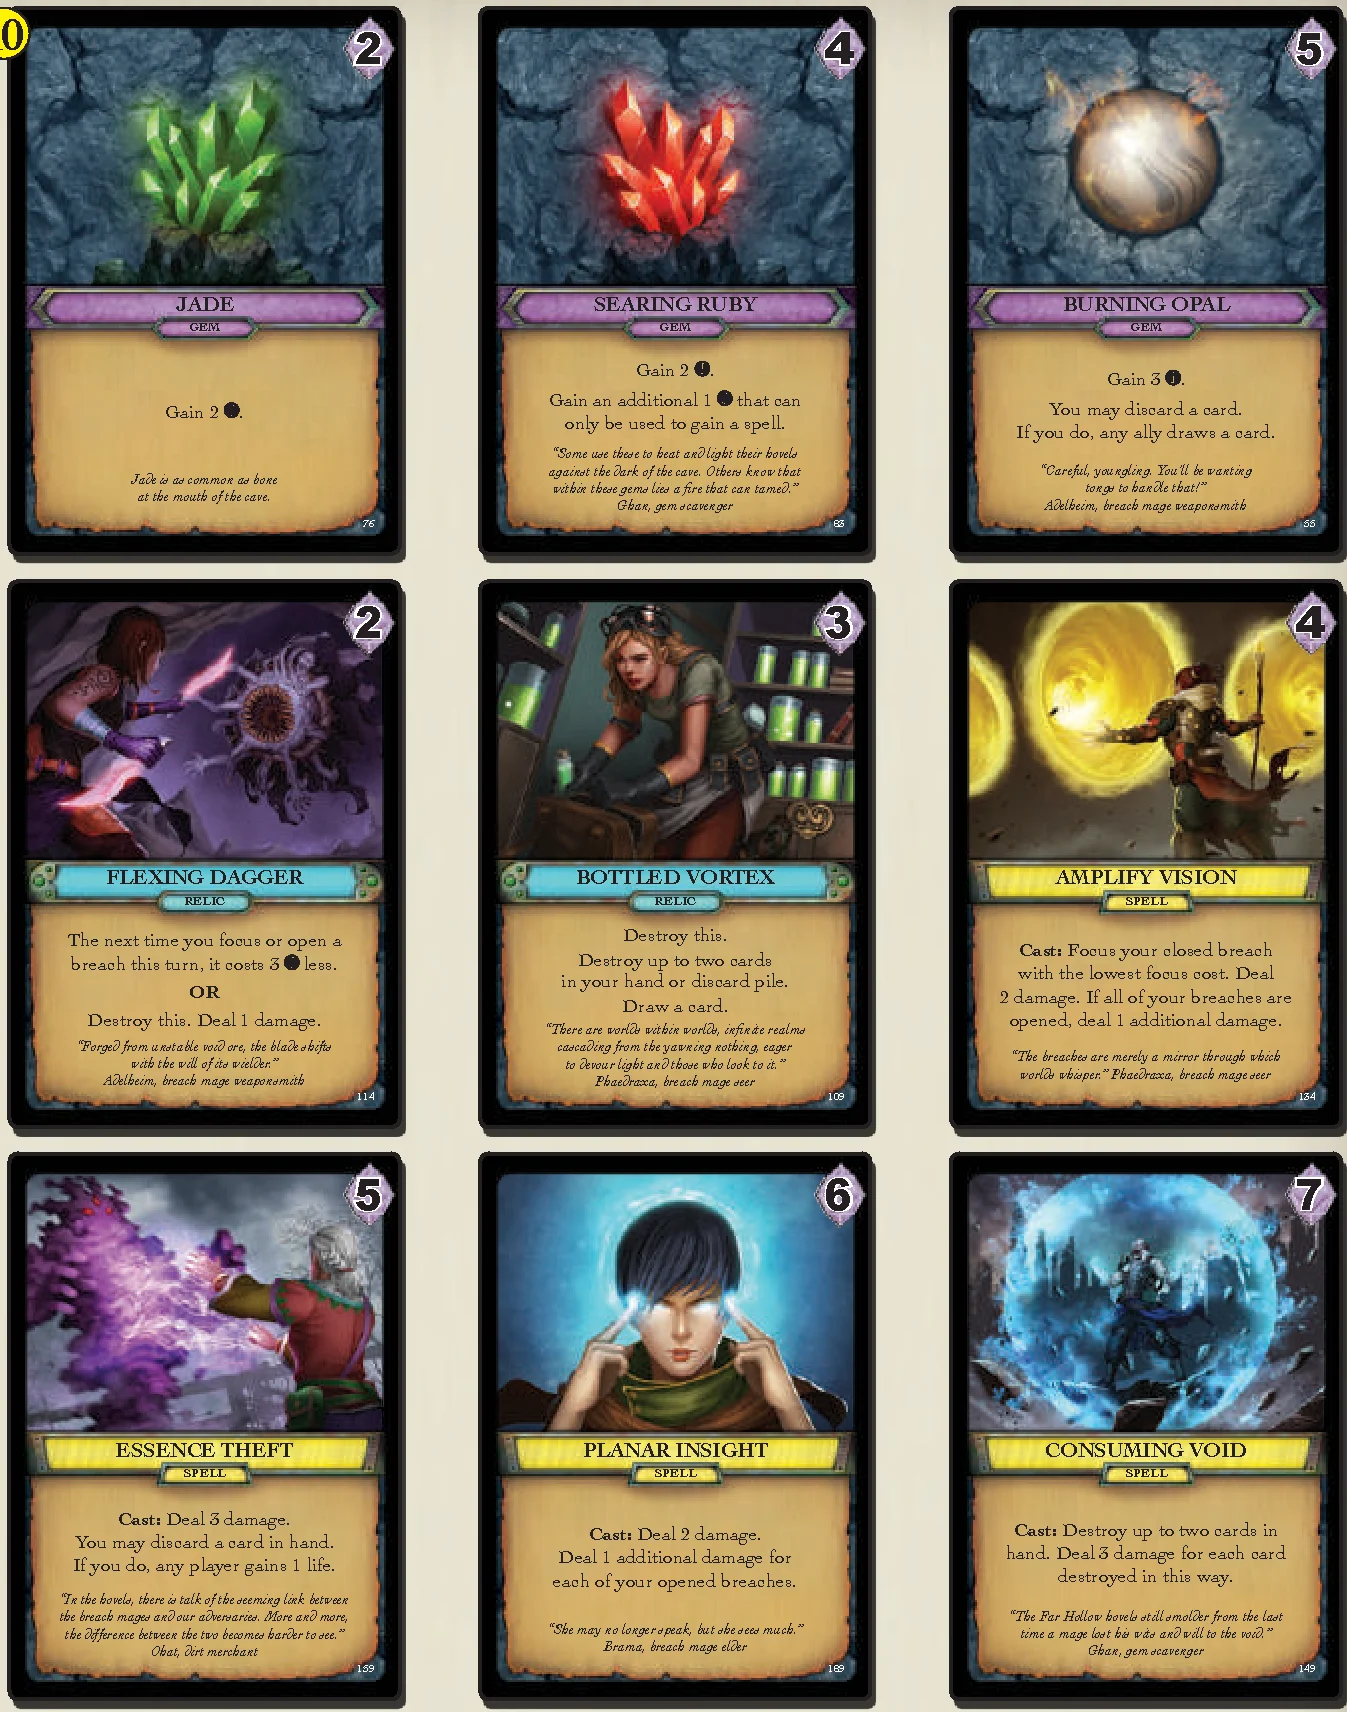
- The supply piles are the player cards that can be gained during the game. The supply is composed of nine supply piles. Each pile contains several copies of the same card. The players can determine these piles randomly, using the randomizer cards, or choose the cards they wish to use.
Empty Supply Piles
If a supply pile runs out, it is considered empty. Do not replace it.
GUIDELINES FOR MAKING THE SUPPLY
Choose 3 gems, 2 relics, and 4 spells. Place each card of the same name in its own separate pile, in the middle of the table.
- Gems are the primary source of gaining aether (). Spending aether () is how you gain new cards, focus and open breaches, and gain charges.
- There are seven gem cards in each gem supply pile.
- Relics have a wide variety of effects and are resolved as soon as they are played.
- There are five relic cards in each relic supply pile.
- Spells are the primary source of damage to the nemesis and its minions. They must be prepped to a breach on one turn in order to be cast on a later turn.
- There are five spell cards in each spell supply pile.
SUGGESTED STARTING SUPPLIES
Below are some suggested starting supplies for learning the game.
Suggested Supply: “Deck Destruction” (shown above)
- Gems: Jade, Searing Ruby, Burning Opal
- Relics: Flexing Dagger, Bottled Vortex
- Spells: Amplify Vision, Essence Theft, Planar Insight, Consuming Void
Suggested Supply: “Free Charges!”
- Gems: Jade, V’riswood Amber, Diamond Cluster
- Relics: Unstable Prism, Mage’s Talisman
- Spells: Spectral Echo, Ignite, Feral Lightning, Wildfire Whip
SUPPLY SETUP EXAMPLE
(10) Abby and Bob choose to use the suggested starting supply, Deck Destruction, because they like the ability to make their decks more efficient through cards like Bottled Vortex and Consuming Void.
TURN ORDER
Aeon’s End has a variable turn order which is determined by the turn order deck. At the start of the game and after each player or nemesis turn ends, draw a card from the turn order deck to determine who takes the next turn. Place that card on the top of the turn order discard pile.
If you need to draw or reveal a card from the turn order deck and that deck is empty, shuffle the discarded turn order cards together facedown to replenish the turn order deck.
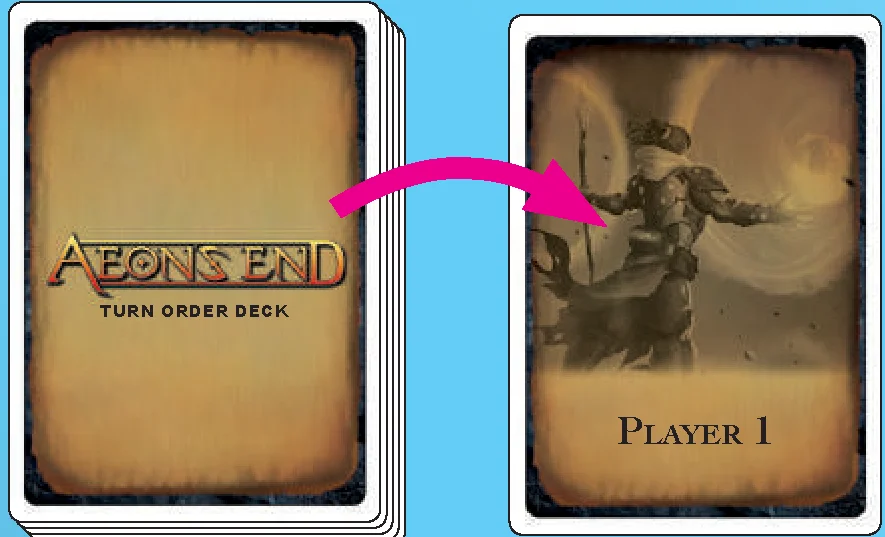
TURN ORDER EXAMPLE
Now that Abby and Bob have the game set up, they start the game by drawing the top card of the turn order deck. The Player 1 turn order card is drawn, so Abby will take the first turn.
On Abby’s turn, she will play through the following phases in order: casting phase, main phase, and draw phase.
During the casting phase, she will be able to cast spells that she prepped on a previous turn. Since it is the first turn of the game, Abby will skip this phase and move straight to the main phase.
PLAYER TURN OVERVIEW
- Casting Phase
- You may Cast any of your prepped spells in opened breaches.
- You must Cast any of your prepped spells in closed breaches.
- Place cast spells on the top of your discard pile as they are cast.
- Main Phase
You may resolve the following actions in any order and as many times as you want:- Play a gem or relic card
- Gain a card
- Gain a charge
- Focus a breach
- Open a breach
- Prep a spell to a breach
- Resolve a “While prepped” effect
- Resolve a “TO DISCARD:” effect
- Draw Phase
- Place all the gems and relics that you have played this turn on the top of your discard pile in any order you choose.
- Draw cards from the top of your deck until you have five cards in hand.
If at any time a player’s life is reduced to zero, that player is exhausted. Read the exhausted section on page 18 for details.
NEMESIS TURN OVERVIEW
- Main phase:
From oldest to newest, resolve the effects of each minion and power card the nemesis has in play. - Draw phase:
Draw a card from the nemesis deck.- If it is an attack card, resolve its effect immediately.
- If it is a minion card or power card, place it into play with the appropriate number of life or power tokens. Resolve any effects following “IMMEDIATELY:” on the card. The rest of its effects will not be resolved this turn.
If at any time a player’s life is reduced to zero, that player is exhausted. Read the exhausted section on page 18 for details.
PLAYER TURN: 1 – CASTING PHASE
Cast prepped spells:
- Any spells that are prepped in an opened breach may be Cast during this phase.
- Every spell prepped in a closed breach (that is, a spell that was prepped to a focused breach in the previous turn) must be Cast now.
- You choose the order in which you Cast your spells.
When a spell is Cast:
- Discard it to the top of your discard pile immediately, then resolve the effect after the word ‘Cast:’ on the card.
- That spell can only deal damage to a single minion or the nemesis unless otherwise specified.
- Some breaches have a “+1 damage when Cast” effect while they are opened. Any spell Cast from an open breach with this effect deals 1 additional damage, even if that spell’s effect would normally not deal damage.
When you deal damage:
- To a minion: remove life tokens from that minion card equal to the damage you dealt. If a minion has no life tokens remaining, it is immediately discarded.
- To the nemesis: reduce its life total on the dial by the amount of damage you dealt. If the nemesis has zero life remaining, the players immediately win.
There are some effects in Aeon’s End that will allow you to cast another player’s prepped spells. When casting a spell other than your own, you are the “you” referred to on the spell card. You make all decisions pertaining to that spell.
For example: You play a Garnet Shard to cast your ally’s prepped Dark Fire. You must discard up to two cards from your hand (Dark Fire’s effect) to your discard pile. You also choose either the nemesis or a minion to suffer Dark Fire’s damage. The cast Dark Fire spell card is placed on the top of your ally’s discard pile.
CASTING PHASE EXAMPLE
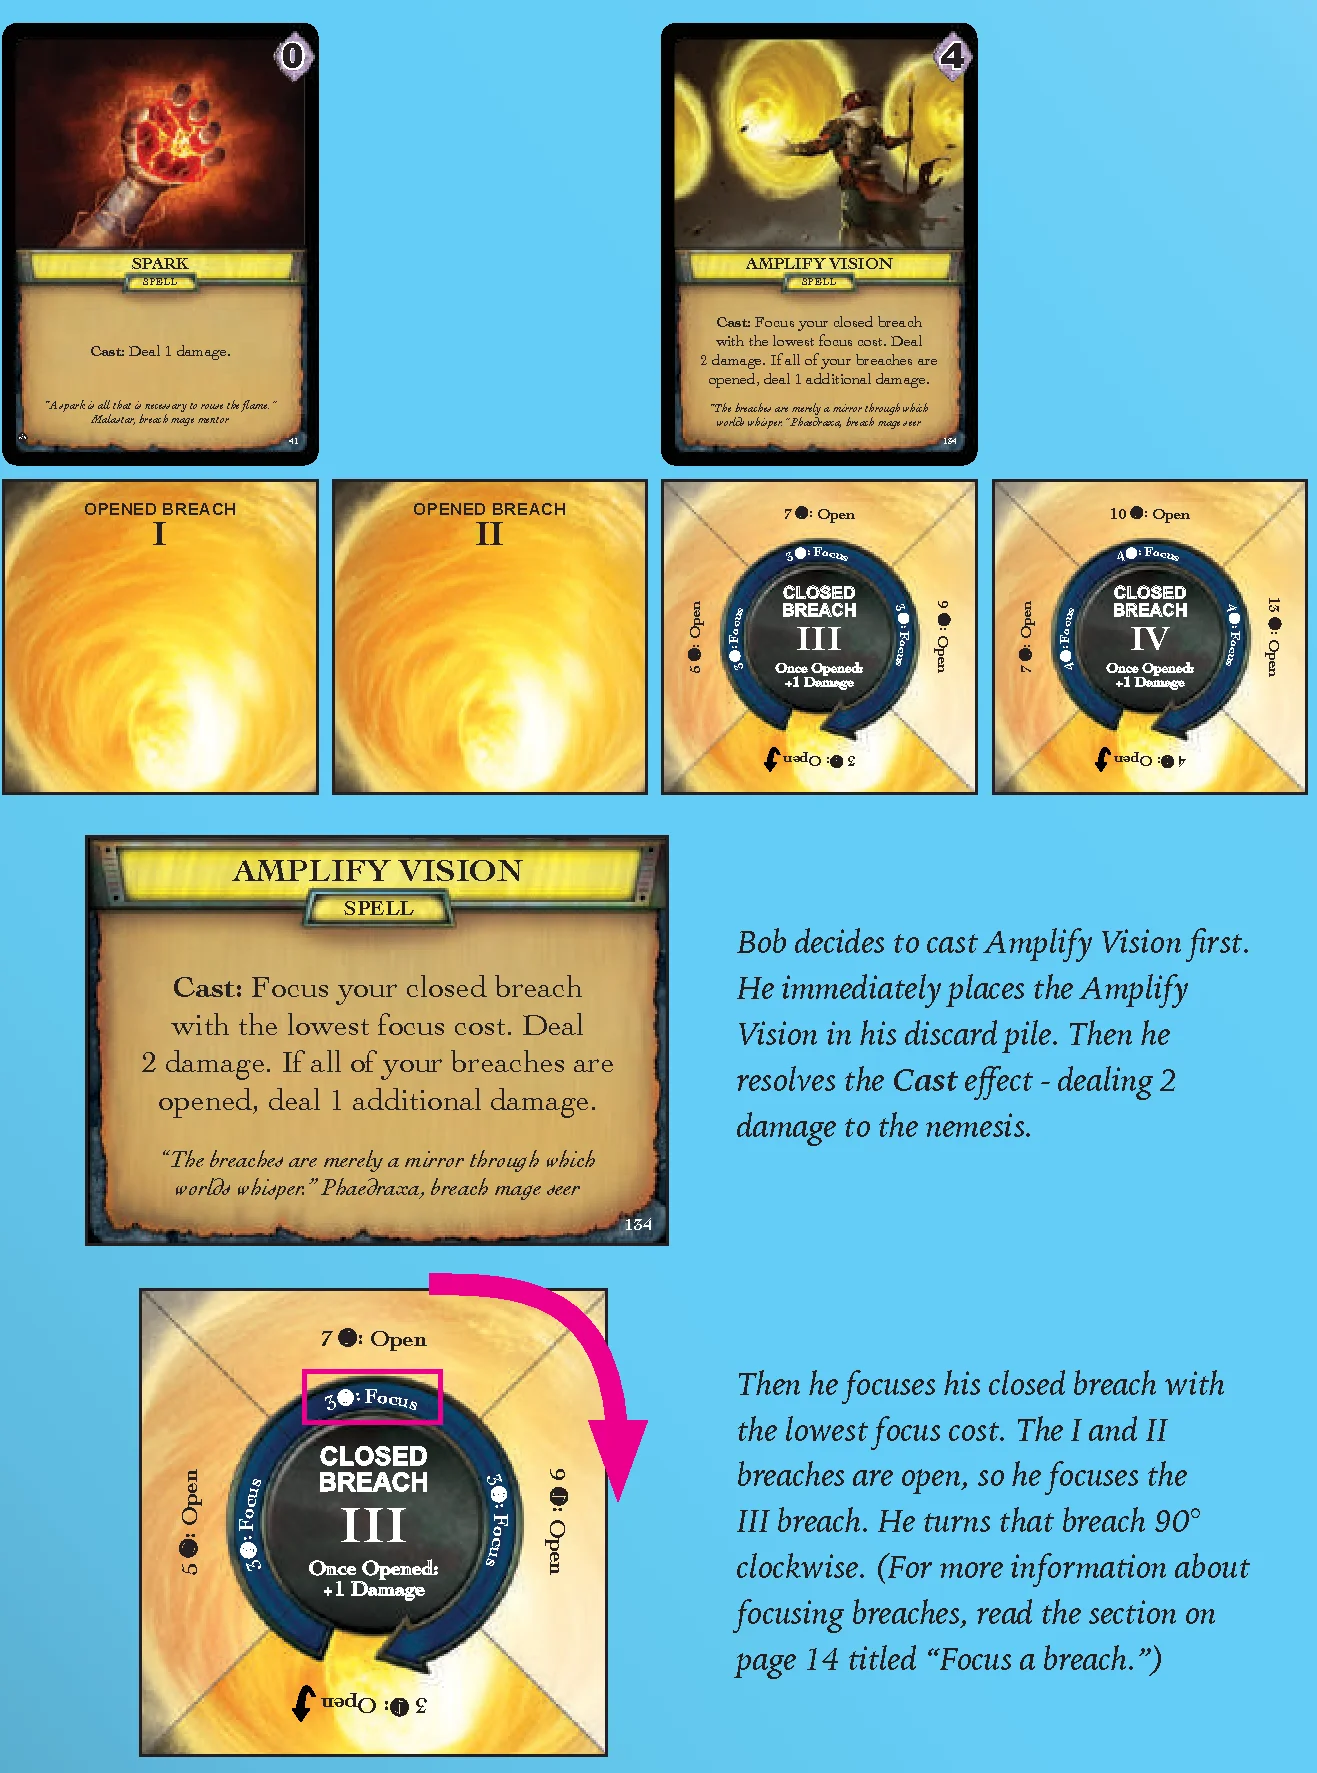
For this example, we have skipped ahead a few turns in the game to a point where Bob has gained a few spells. He starts the turn with a Spark and an Amplify Vision prepped as shown below. His Spark spell is prepped on breach I, which is opened, so he has the option of casting it now or waiting to cast it later. Amplify Vision is prepped on a closed breach III. Since that breach is closed, Amplify Vision must be cast this turn.
Bob decides to cast Amplify Vision first. He immediately places the Amplify Vision in his discard pile. Then he resolves the Cast effect – dealing 2 damage to the nemesis.
Then he focuses his closed breach with the lowest focus cost. The I and II breaches are open, so he focuses the III breach. He turns that breach 90° clockwise. (For more information about focusing breaches, read the section on page 14 titled “Focus a breach.”)
Finally, Bob decides not to cast the Spark prepped on an open breach. He wants to save this spell for a future turn and be ready if a minion shows up.
PLAYER TURN: 2 – MAIN PHASE
The following eight actions can be done in any order, any number of times during a player’s main phase.
For example, you could play a gem, gain a card, prep a spell, play another gem card, and gain another card.
Actions 1–3: Resources and Cards
- Play a gem or relic card:
- When you play a card, you must execute all of the text on that card, if possible.
- If there is an “OR,” you choose exactly one of the options listed. If you can only complete one of the two options, you must choose that option.
- You may gain aether () even if you choose not to spend it.
- Any aether () gained on a turn that is not spent is lost. Aether does not accumulate over turns, nor can it be given to other players.
- At the end of your turn, any gem or relic cards you played are placed on top of your discard pile in any order.
- Gain a card:
- You may gain a card from the supply by spending aether () you have gained this turn equal to the the cost shown in the upper right-hand corner of the card.
- When you gain a card, it is immediately placed on top of your discard pile.
- You may gain a card from the supply by spending aether (
- Gain a charge:
- You may pay 2 aether () to gain a charge.
- When you gain a charge, place a charge token on your player mat beneath the ability description.
- You may not pay aether () to gain charges for your allies.
- You may not have more charges than your ability requires. The maximum charges are denoted by the number of spaces available on the player mat: 4, 5, or 6.
- You may pay 2 aether (
Discard Order
Cards gained are immediately placed in your discard pile.
Any gem or relic cards that you play are placed in your play area. At the end of your turn, during the draw phase, played gem and relic cards will be placed in your discard pile in any order you choose.
MAIN PHASE: GAIN AND SPEND AETHER EXAMPLE
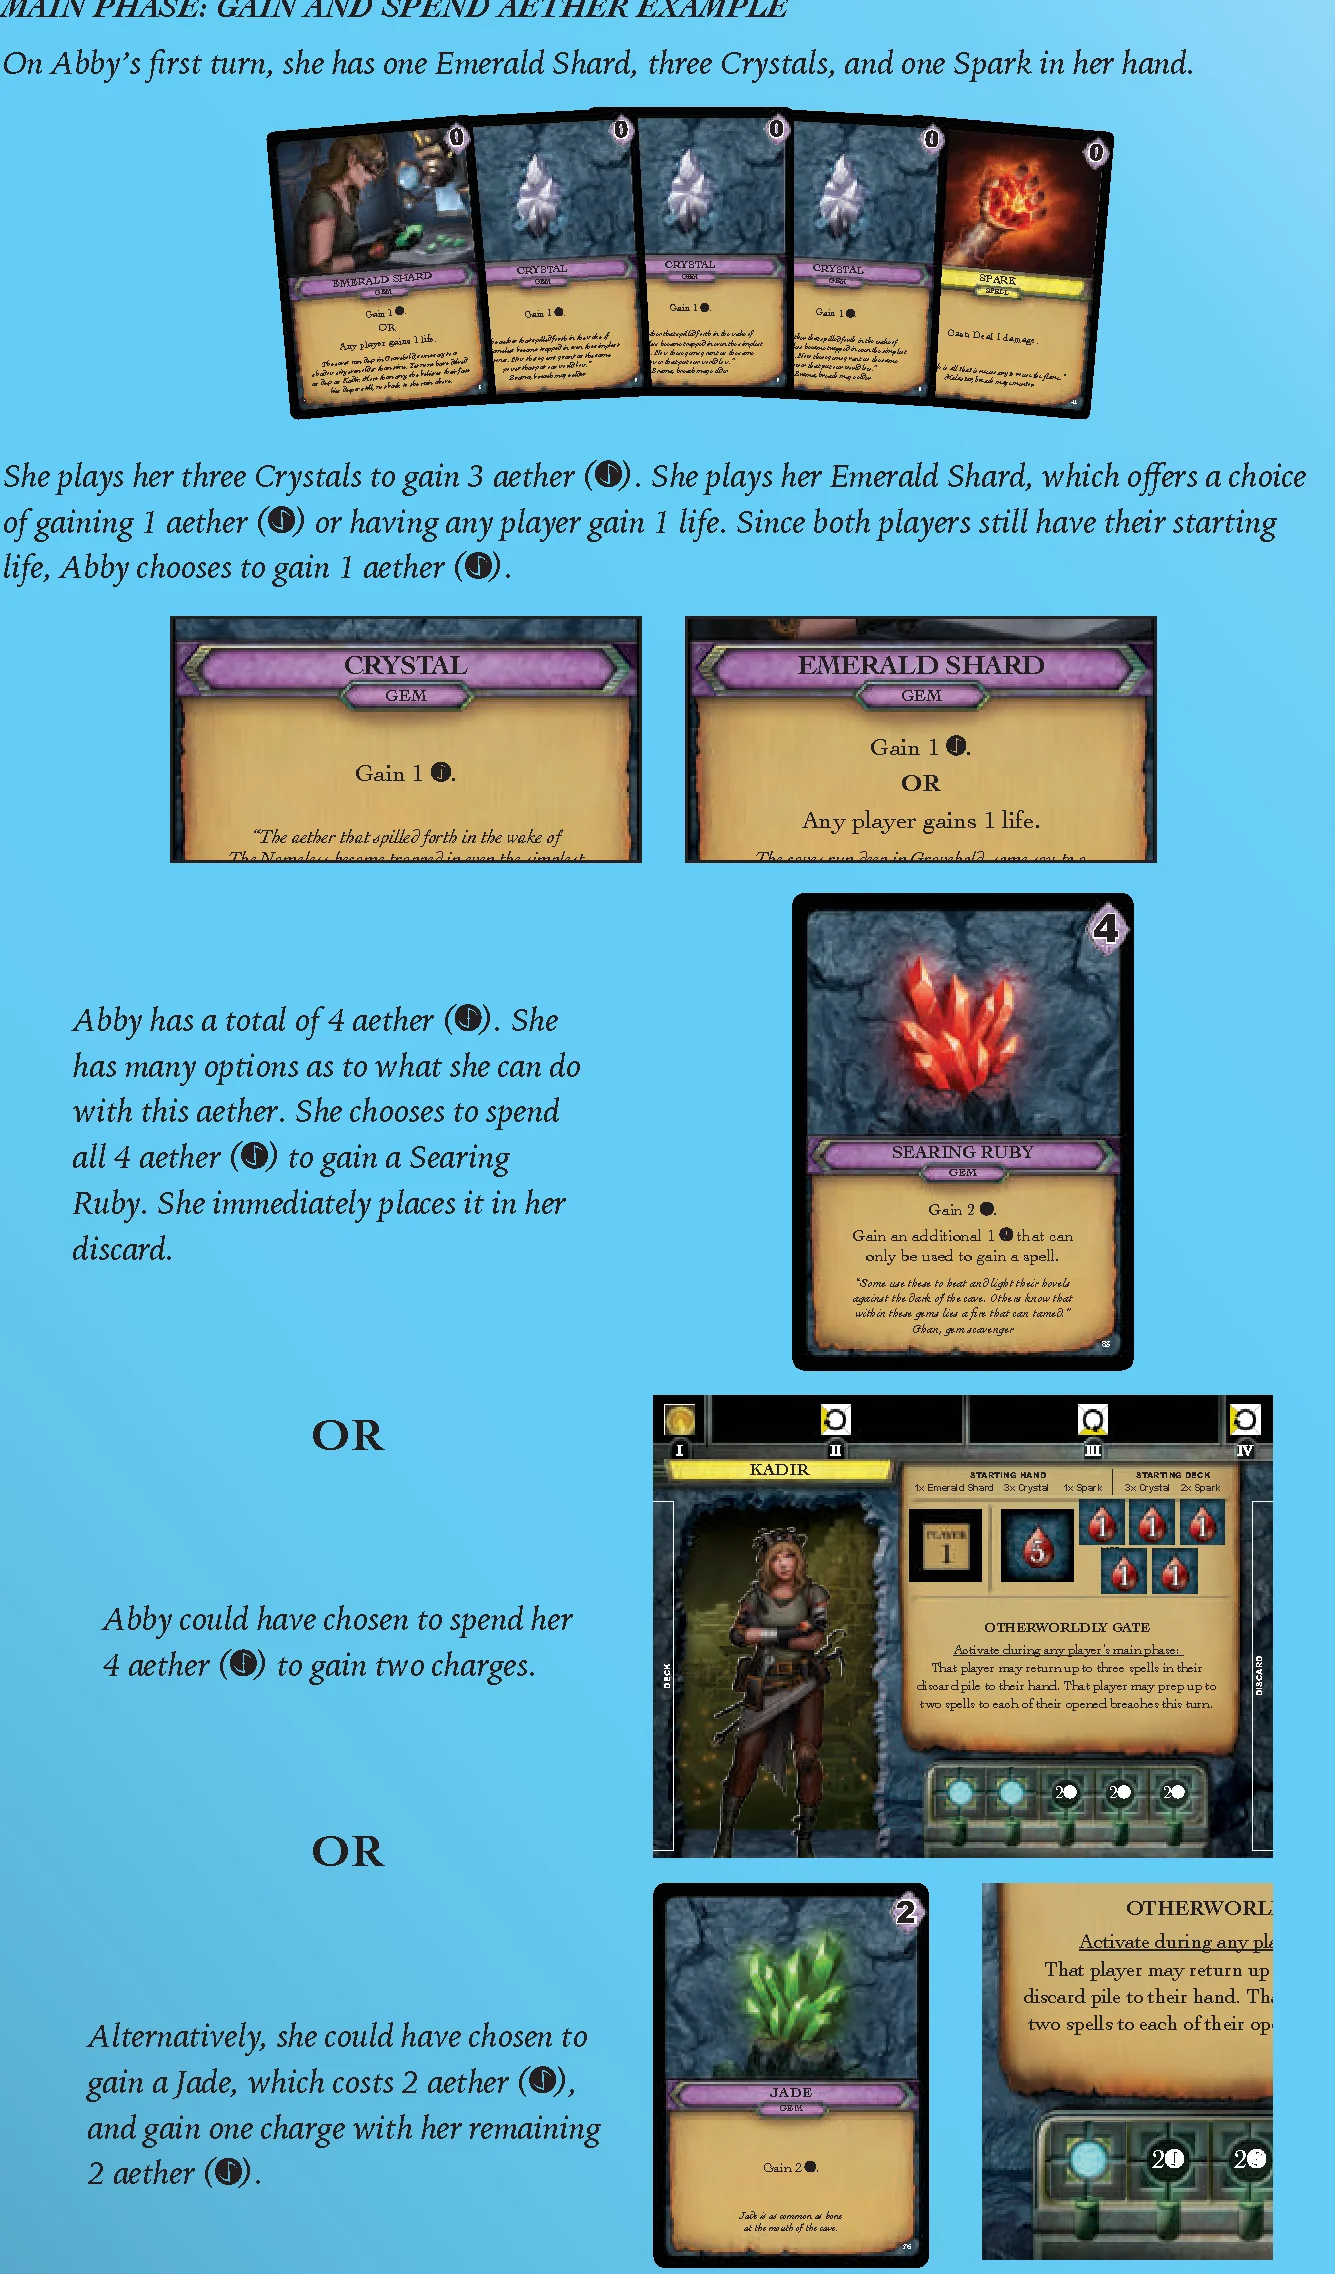
On Abby’s first turn, she has one Emerald Shard, three Crystals, and one Spark in her hand.
She plays her three Crystals to gain 3 aether (). She plays her Emerald Shard, which offers a choice of gaining 1 aether () or having any player gain 1 life. Since both players still have their starting life, Abby chooses to gain 1 aether ().
Abby has a total of 4 aether (). She has many options as to what she can do with this aether. She chooses to spend all 4 aether () to gain a Searing Ruby. She immediately places it in her discard.
OR: Abby could have chosen to spend her 4 aether () to gain two charges.
OR: Alternatively, she could have chosen to gain a Jade, which costs 2 aether (), and gain one charge with her remaining 2 aether ().
Actions 4–8: Breaches, Spells, and Effects
- Focus a breach:
- You can focus a closed breach by paying the focus cost shown near the center of that breach card.
- When you focus a breach, rotate the breach card 90° clockwise. You may prep a spell to the focused breach this turn.
- Breaches may be focused any number of times per turn. Any number of breaches may be focused per turn. You may focus a breach without prepping a spell to it.
- A breach that has been rotated so that the yellow quadrant is at the top has a focus cost equal to its stated open cost and can be opened by an effect that would otherwise focus this breach.
- Open a breach:
- You can open a closed breach by paying the open cost currently indicated on the top of that breach card. The open cost decreases each time you focus the breach.
- When you open a breach, flip the breach to the opened side. Opened breaches stay opened for the rest of the game. A spell can be prepped to a breach on the turn that breach is opened and any subsequent turn.
- Prep a spell to a breach:
- To prep a spell, play a spell card onto an opened breach or a closed breach that has been focused this turn. Only one spell may be prepped to a breach at a time. You cannot prep a spell to a breach that already has a prepped spell.
- Prepped spells can be Cast during the casting phase of that player’s next turn.
- Resolve a “While prepped” effect:
- You can use the effect of any of your prepped spells that have a “While prepped” effect that is specific to the main phase. Such effects may be used on the turn that the spell is prepped or any subsequent turn if the spell is still prepped.
- Some “While prepped” effects do not occur during the main phase.
- Each “While prepped” effect may be used once per turn.
- Resolve a “TO DISCARD:” effect:
- Some nemesis power cards have a “TO DISCARD:” effect. During your main phase, you may fully resolve the effect listed to discard that power card. If a power card is discarded this way, its effect is not resolved.
FOCUS OR OPEN A BREACH EXAMPLE
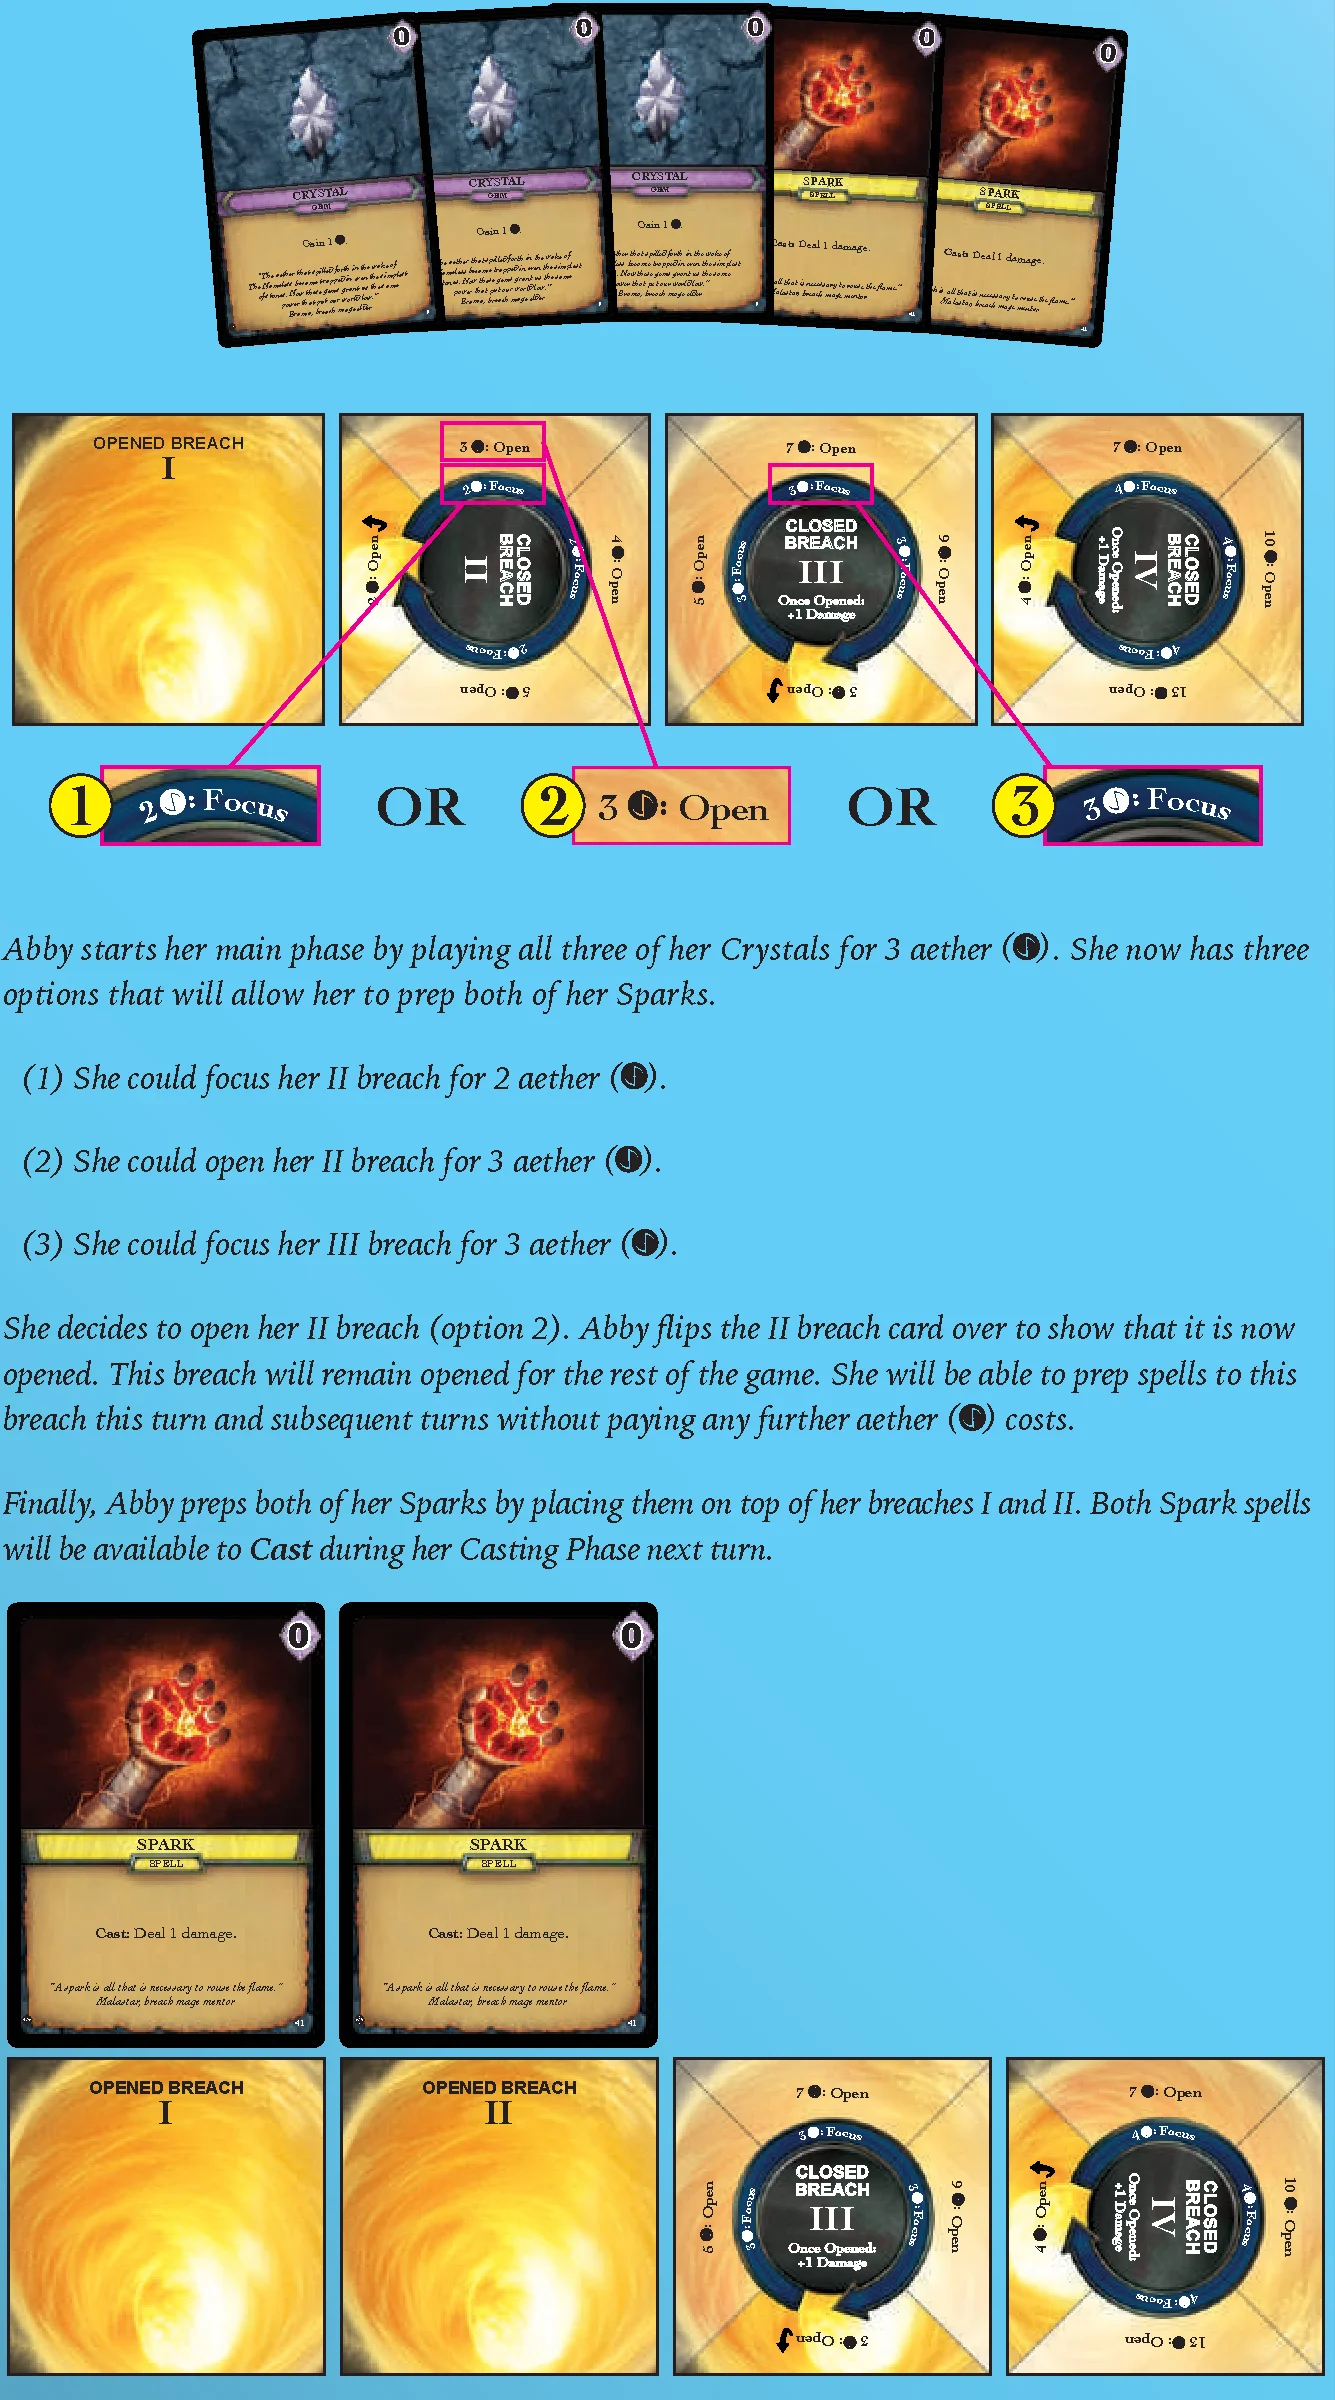
For this example, we’ll jump ahead to Abby’s second turn. She has three Crystals and two Sparks in her hand. It is her main phase. She has only one open breach, so she will need to either open or focus another breach if she wishes to prep both of her Sparks.
Abby starts her main phase by playing all three of her Crystals for 3 aether (). She now has three options that will allow her to prep both of her Sparks.
- She could focus her II breach for 2 aether ().
- She could open her II breach for 3 aether ().
- She could focus her III breach for 3 aether ().
She decides to open her II breach (option 2). Abby flips the II breach card over to show that it is now opened. This breach will remain opened for the rest of the game. She will be able to prep spells to this breach this turn and subsequent turns without paying any further aether () costs.
Finally, Abby preps both of her Sparks by placing them on top of her breaches I and II. Both Spark spells will be available to Cast during her Casting Phase next turn.
PLAYER TURN: 3 – DRAW PHASE
Once you have finished your main phase, place all of the gem and relic cards you played this turn on top of your discard pile in any order.
Then, keeping all unplayed cards in hand, draw cards from the top of your deck until you have five cards in hand.
If at any time there are not enough cards in your deck to draw or reveal a card, draw/reveal as many as you can then flip over your discard pile to form a new deck and draw/reveal. At no point in the game do you shuffle your deck.
Notes:
- You may not choose to discard cards during your turn. Unlike other deck builders, you do not discard your hand at the end of each turn.
- You may look through your discard pile at any time, although you may not rearrange it.
- You may not look through your deck.
- There is no maximum hand size.
No Deck Shuffling
Unlike many other deckbuilding games, you do not shuffle your discard pile when your deck is empty. Simply flip your discard pile over to form your deck.
DRAW PHASE EXAMPLE
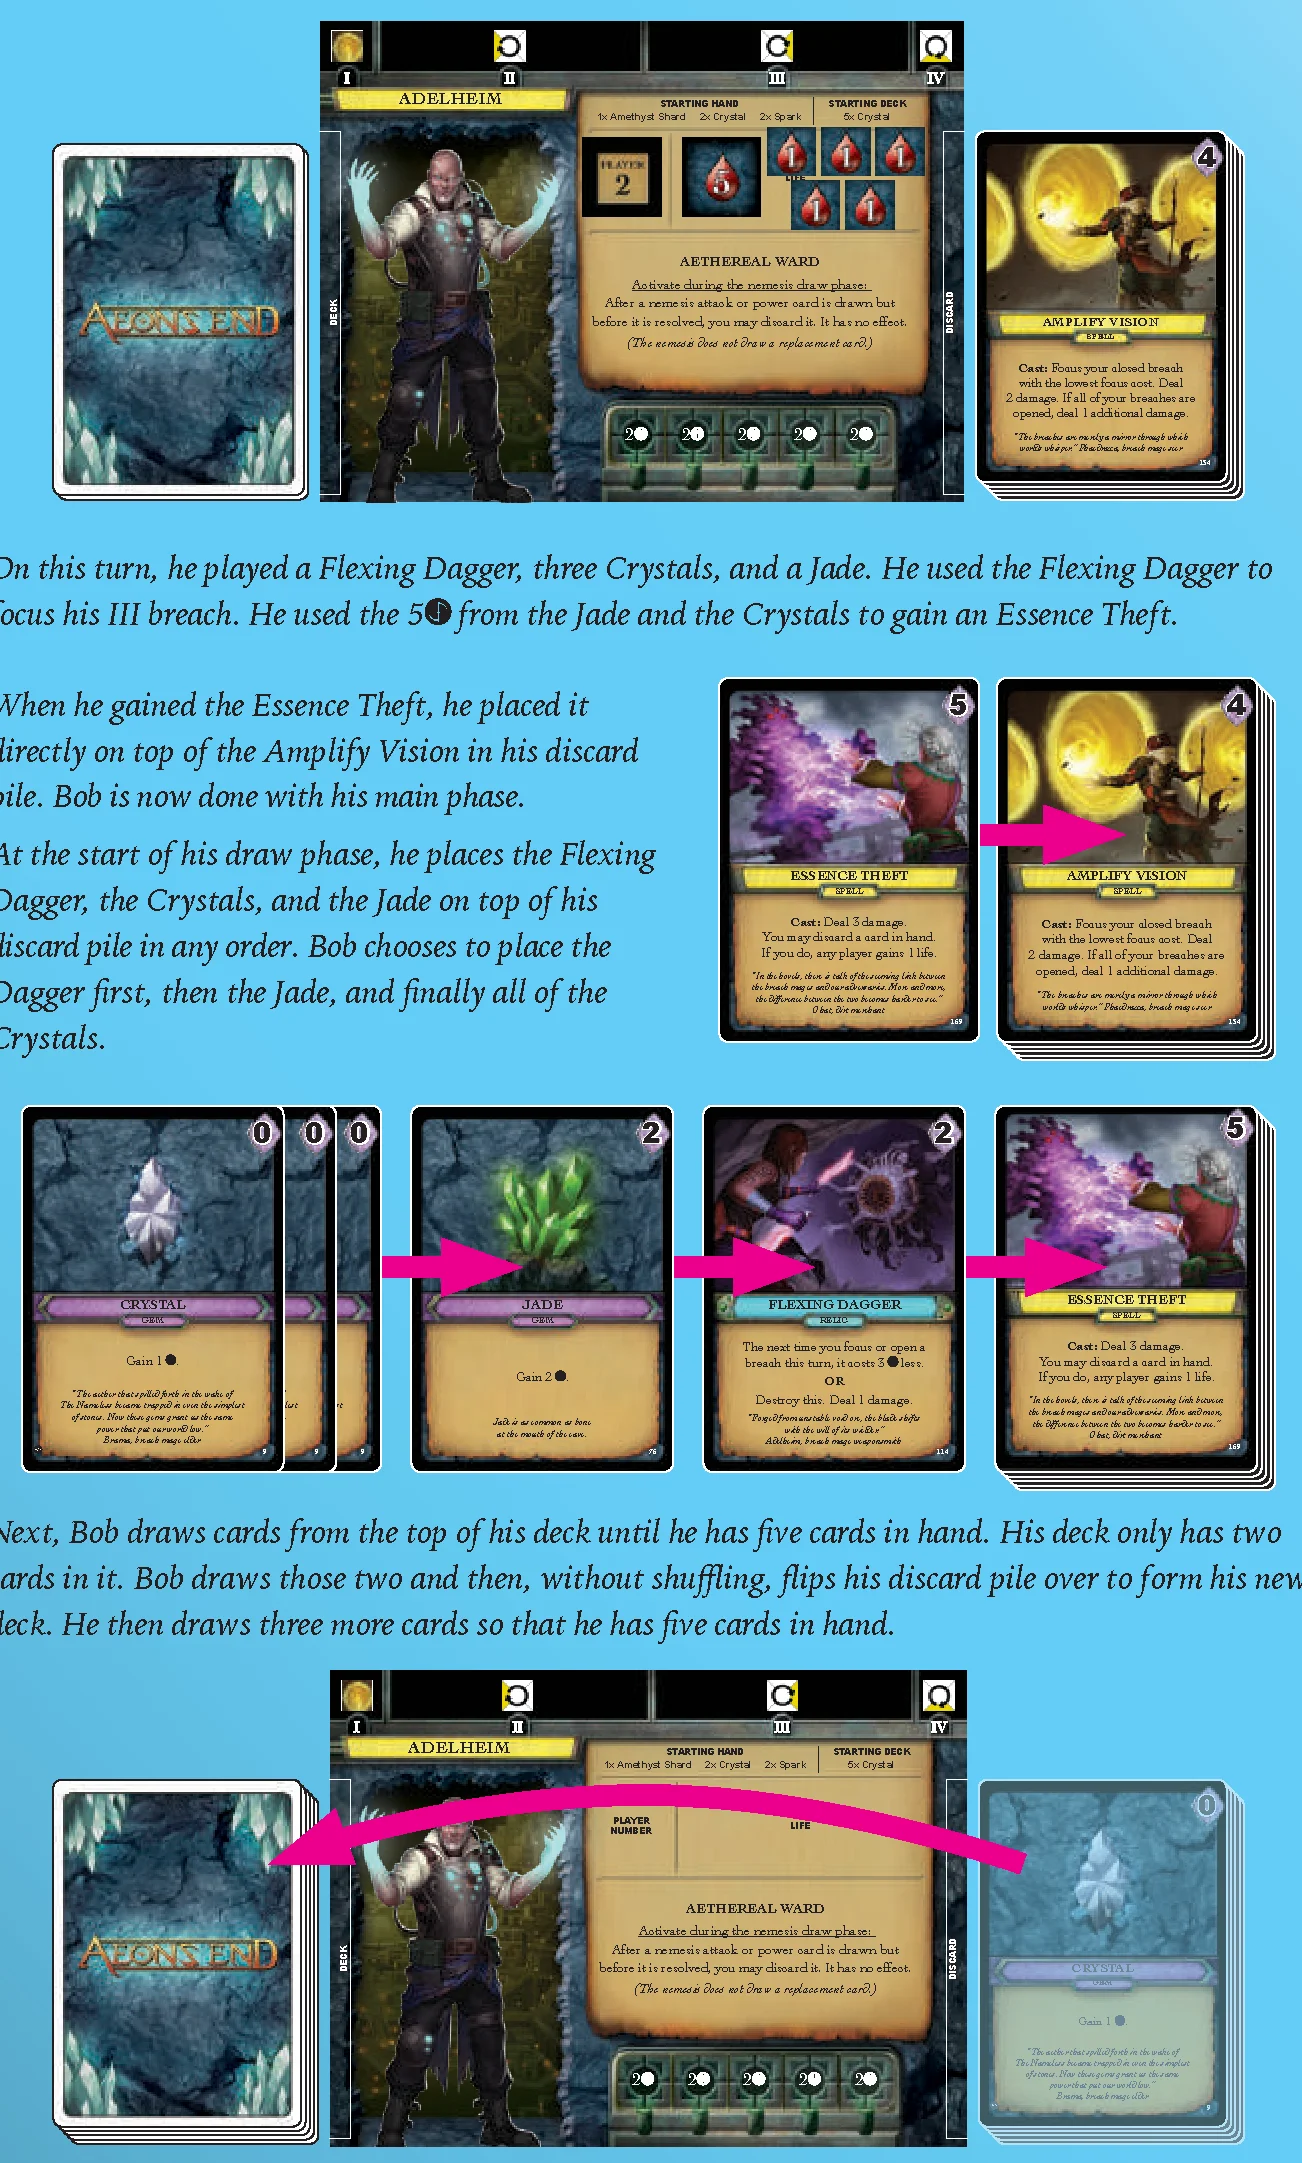
It is the end of one of Bob’s turns. During his casting phase, he Cast an Amplify Vision, which was immediately placed on top of his discard pile.
On this turn, he played a Flexing Dagger, three Crystals, and a Jade. He used the Flexing Dagger to focus his III breach. He used the 5 from the Jade and the Crystals to gain an Essence Theft.
When he gained the Essence Theft, he placed it directly on top of the Amplify Vision in his discard pile. Bob is now done with his main phase.
At the start of his draw phase, he places the Flexing Dagger, the Crystals, and the Jade on top of his discard pile in any order. Bob chooses to place the Dagger first, then the Jade, and finally all of the Crystals.
Next, Bob draws cards from the top of his deck until he has five cards in hand. His deck only has two cards in it. Bob draws those two and then, without shuffling, flips his discard pile over to form his new deck. He then draws three more cards so that he has five cards in hand.
NEMESIS TURN: 1 – MAIN PHASE
Starting with the minion card or power card that has been in play the longest, the players will resolve the effects of each minion card and power card in play.
- PERSISTENT effects are resolved now.
- Each power card in play will lose 1 power token. After removing a token, if a power card has no tokens on it, resolve the effect that is shown after “POWER X:” and discard it from play.
NEMESIS MAIN PHASE EXAMPLE
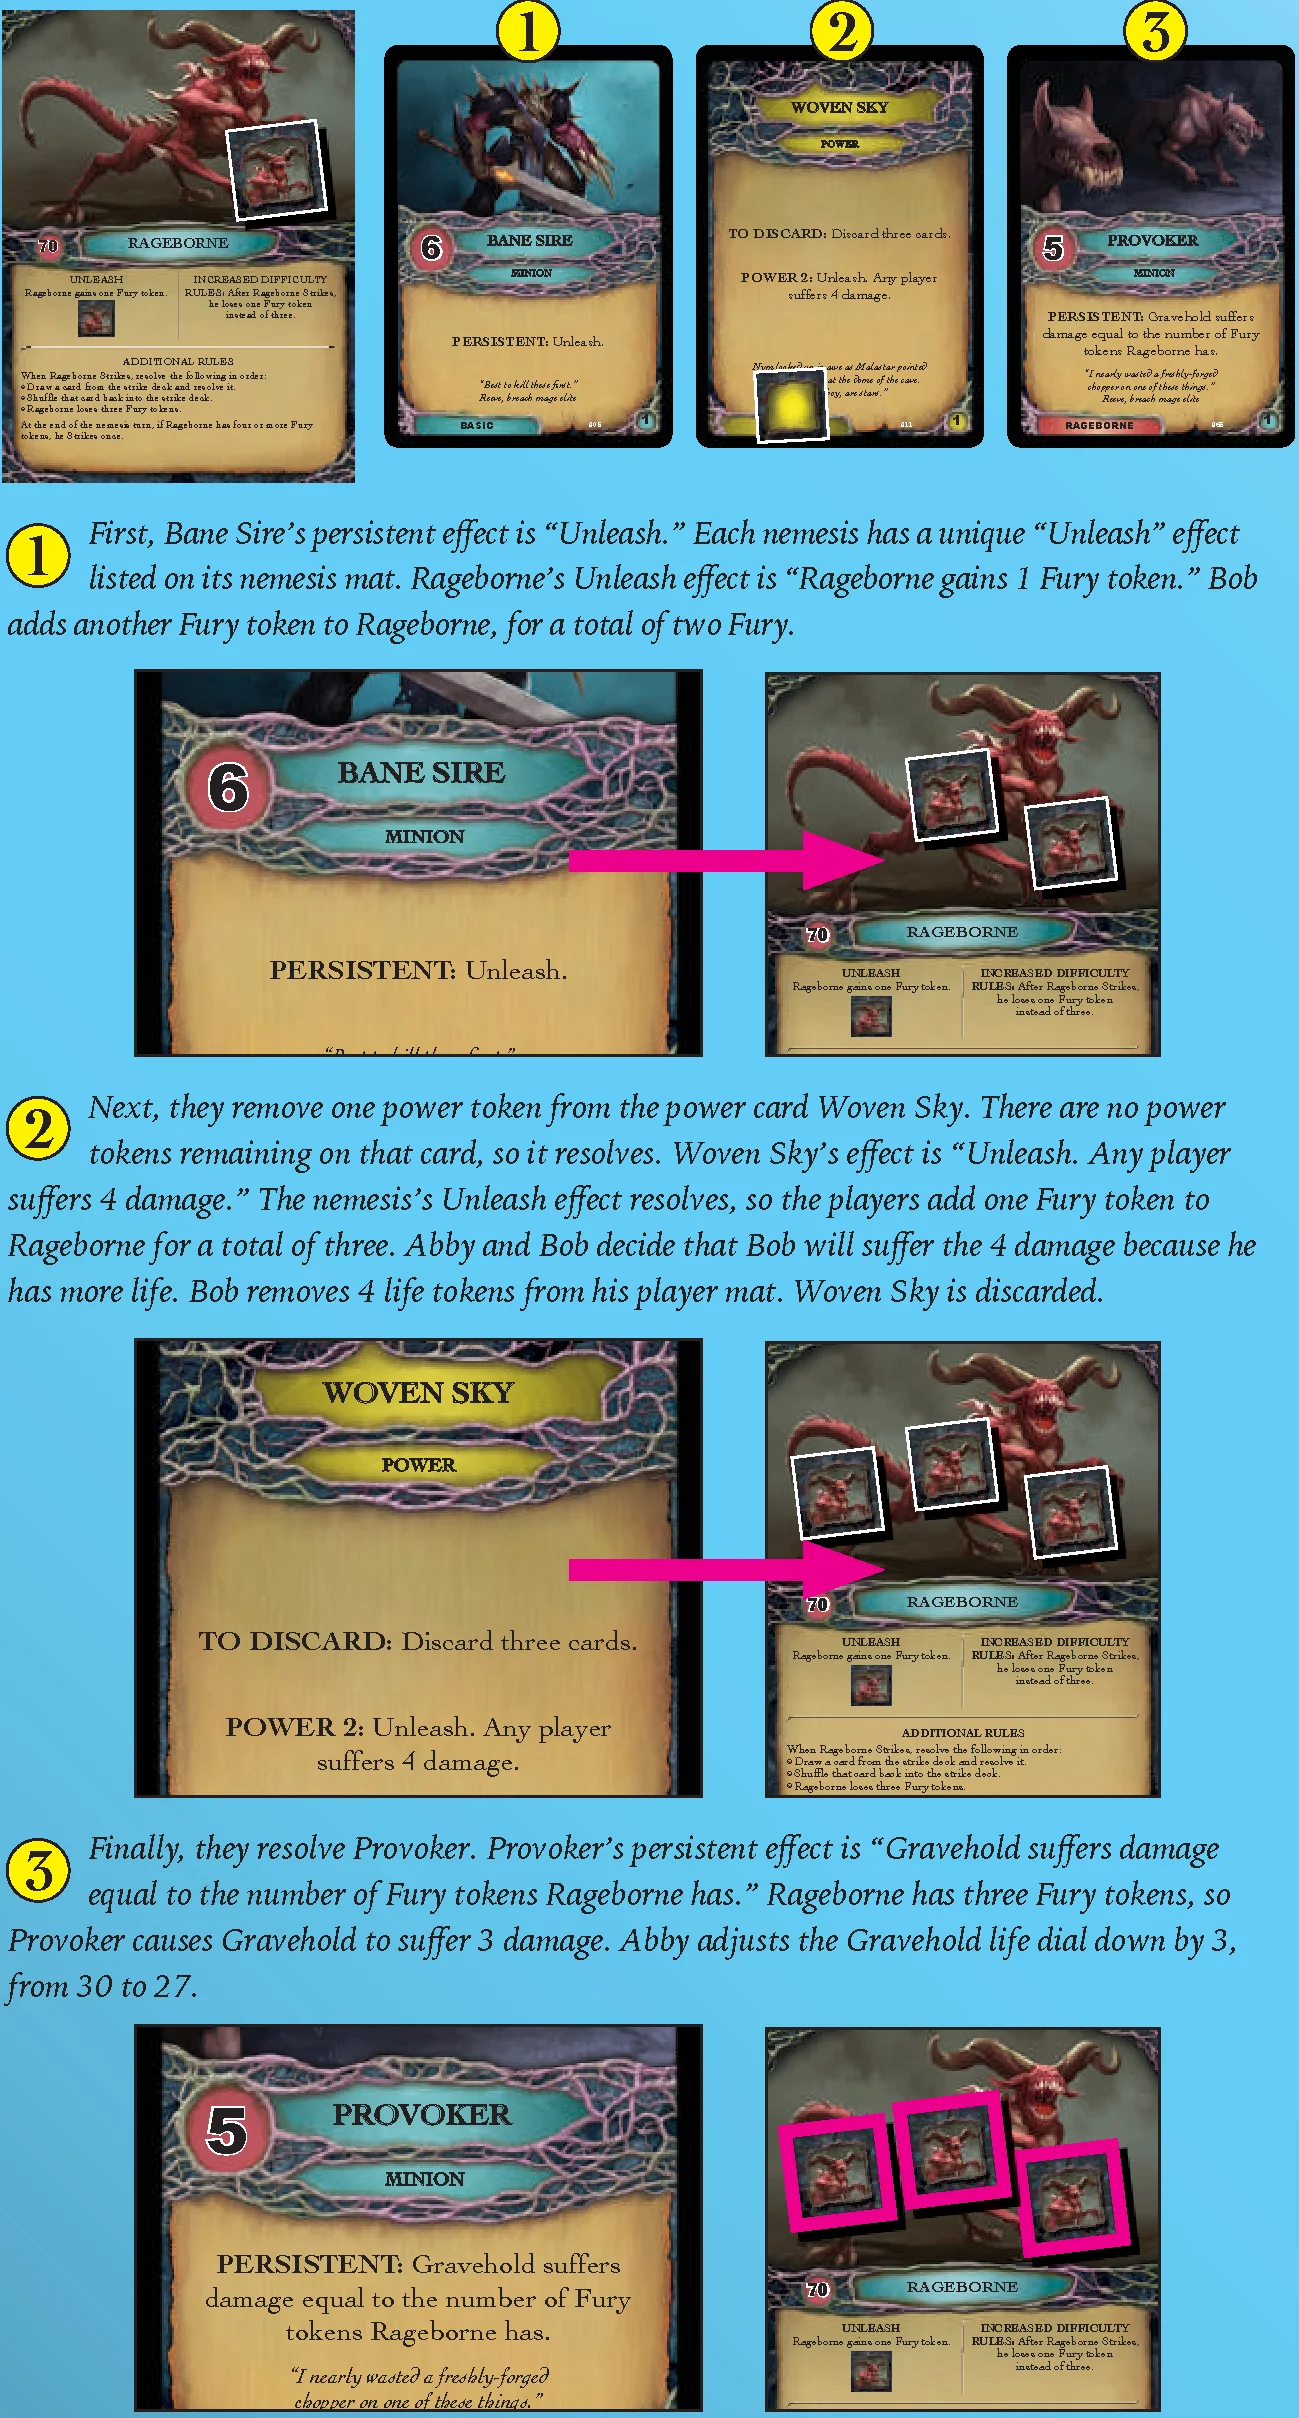
For this example, we’ll fast forward a few rounds into the game. The nemesis turn order card has been drawn. Rageborne starts his turn with one Fury token. He has Bane Sire, Woven Sky with one power counter, and Provoker in play. Those cards came into play in that order, so Abby and Bob will resolve them in that order.
- First, Bane Sire’s persistent effect is “Unleash.” Each nemesis has a unique “Unleash” effect listed on its nemesis mat. Rageborne’s Unleash effect is “Rageborne gains 1 Fury token.” Bob adds another Fury token to Rageborne, for a total of two Fury.
- Next, they remove one power token from the power card Woven Sky. There are no power tokens remaining on that card, so it resolves. Woven Sky’s effect is “Unleash. Any player suffers 4 damage.” The nemesis’s Unleash effect resolves, so the players add one Fury token to Rageborne for a total of three. Abby and Bob decide that Bob will suffer the 4 damage because he has more life. Bob removes 4 life tokens from his player mat. Woven Sky is discarded.
- Finally, they resolve Provoker. Provoker’s persistent effect is “Gravehold suffers damage equal to the number of Fury tokens Rageborne has.” Rageborne has three Fury tokens, so Provoker causes Gravehold to suffer 3 damage. Abby adjusts the Gravehold life dial down by 3, from 30 to 27.
NEMESIS TURN: 2 – DRAW PHASE
Draw a nemesis card:
- If the nemesis deck is empty and the nemesis would draw a card, instead Unleash three times.
If the drawn card type is:
- Attack card: Resolve the card’s effect immediately in the order that it appears on the card. Then, place the card in the nemesis’s discard pile.
- Minion card: Execute any effect that follows the word “IMMEDIATELY:”. Then place the minion card into play with the number of life tokens indicated on the card.
- Power card: Execute any effect that follows the word “IMMEDIATELY:” Then place the power card into play with a number of power tokens as indicated on the card.
When resolving card effects:
- When resolving an effect that cannot be fully completed, resolve as much as possible. If you are given an option between two effects, you must choose an option you can fully resolve.
- Persistent and power effects only occur during the nemesis’s main phase. These effects are ignored for newly placed minion and power cards until the nemesis’ next turn.
Ambiguity
Nemesis cards may have ambiguous situations where it’s not clear what or who should be affected. In these cases the players make that determination.
For example, if you are resolving a nemesis card that makes the player with the lowest life suffer damage and two players are tied for having the lowest life, the players decide who suffers the damage.
Another card may have the player with the most charges suffer damage when no players have any charges. In this case also, the players choose who will suffer the damage.
NEMESIS DRAW PHASE EXAMPLES
After fully resolving the nemesis main phase, Abby and Bob proceed to the nemesis draw phase. During this phase, they will draw a card from the nemesis deck and resolve it. Here are examples of the three types of nemesis cards, along with how they would be resolved.
ATTACK CARD EXAMPLE
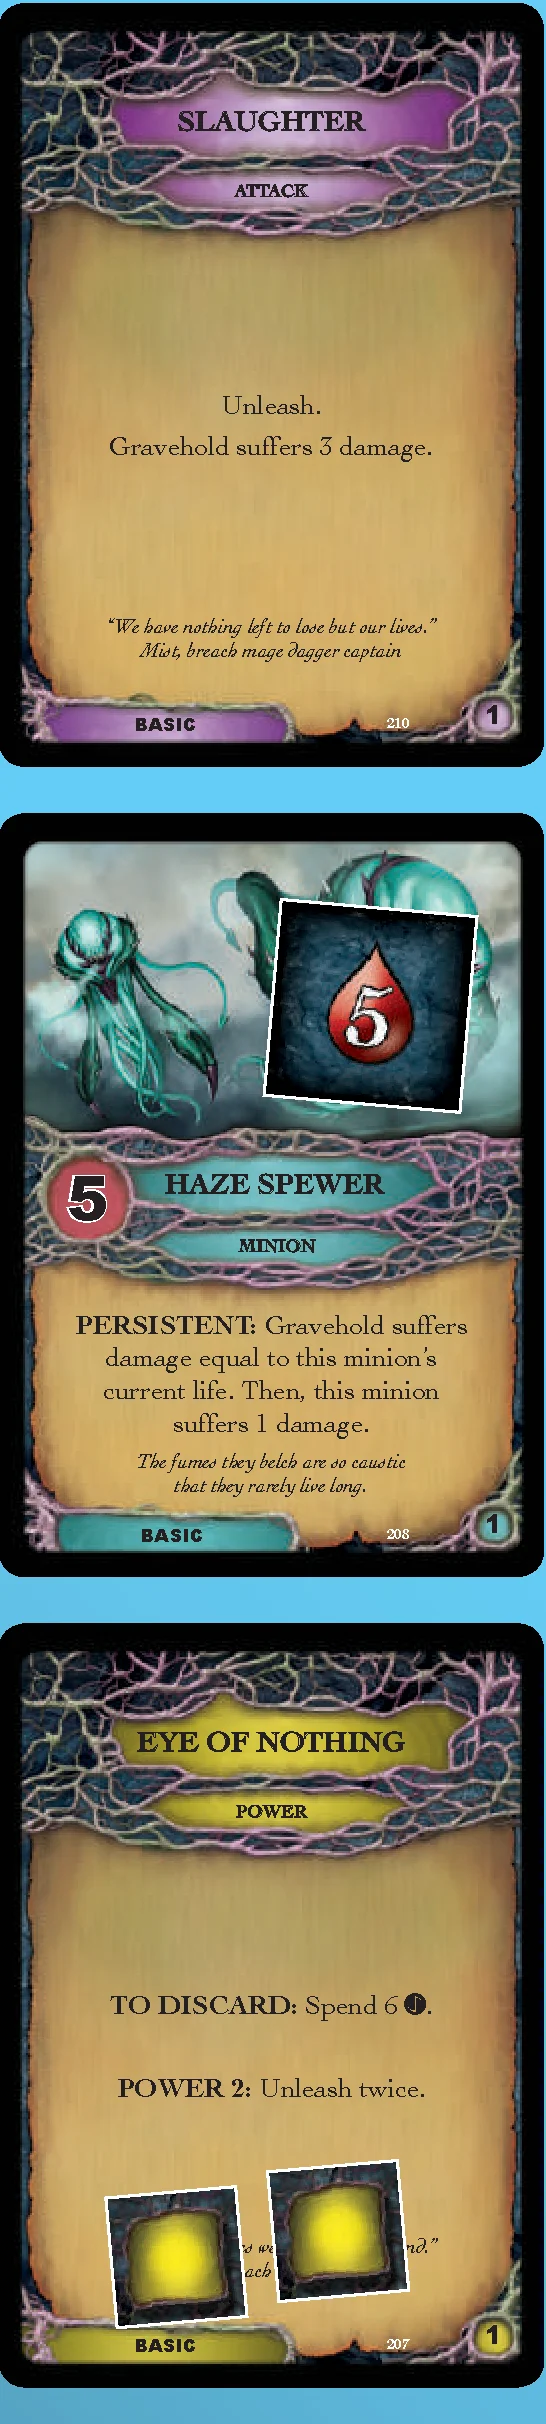
In this example, Abby and Bob draw Slaughter, an attack card, from Rageborne’s nemesis deck.
Attack cards resolve immediately. Slaughter’s effect is “Unleash. Gravehold suffers 3 damage.”
Rageborne’s Unleash effect is “Rageborne gains 1 Fury token.” Abby adds a Fury token to Rageborne.
Then, Bob adjusts Gravehold’s life counter down 3 life from 27 to 24.
Finally, Slaughter is discarded to the nemesis discard pile.
MINION CARD EXAMPLE
In this example, Abby and Bob draw Haze Spewer, a minion card, from Rageborne’s nemesis deck.
Haze Spewer is a minion with no immediate effect, so it is placed into play. It has 5 life, so Abby and Bob place a 5 life token on it.
They also read Haze Spewer’s persistent effect so they know what will happen during the next nemesis main phase. This effect doesn’t resolve this turn because persistent effects are only resolved during the nemesis main phase, which has already passed.
POWER CARD EXAMPLE
In this example, Abby and Bob draw Eye of Nothing, a power card, from Rageborne’s nemesis deck.
Since Eye of Nothing is a power card, it is placed directly into play. It has a power of 2. Therefore, Abby and Bob place two power tokens on it. It has no immediate effect, so there is nothing else that Abby and Bob have to resolve this turn.
They read the card’s effect so they know what it will do when it resolves. Power tokens are removed and powers resolve during the nemesis main phase – neither of these actions will happen this turn as the nemesis main phase has already passed.
Eye of Nothing has a “TO DISCARD:” effect. Any player may resolve the effect listed here during their main phase to discard that power card.
EXHAUSTED
If a player’s life is reduced to zero, that player is exhausted. Resolve the following effects in order:
- Resolve the nemesis’s Unleash effect twice.
- The exhausted player destroys one of their breaches, discarding any spell prepped in that breach.
Destroyed breaches can be returned to the box – there is no way to regain a destroyed breach. The remaining breaches stay in their current positions. - The exhausted player discards all of their charge tokens.
The exhausted player continues to participate in the game as usual with the following exceptions:
- Exhausted players cannot gain life.
- When a card deals damage to the player with the lowest life, it always deals that damage to the non-exhausted player with the lowest current life.
- When an exhausted player suffers damage, instead deal twice that amount of damage to Gravehold. This includes excess damage when a player initially becomes exhausted.
If all players become exhausted, the game ends immediately and the players lose.
EXHAUSTED EXAMPLE
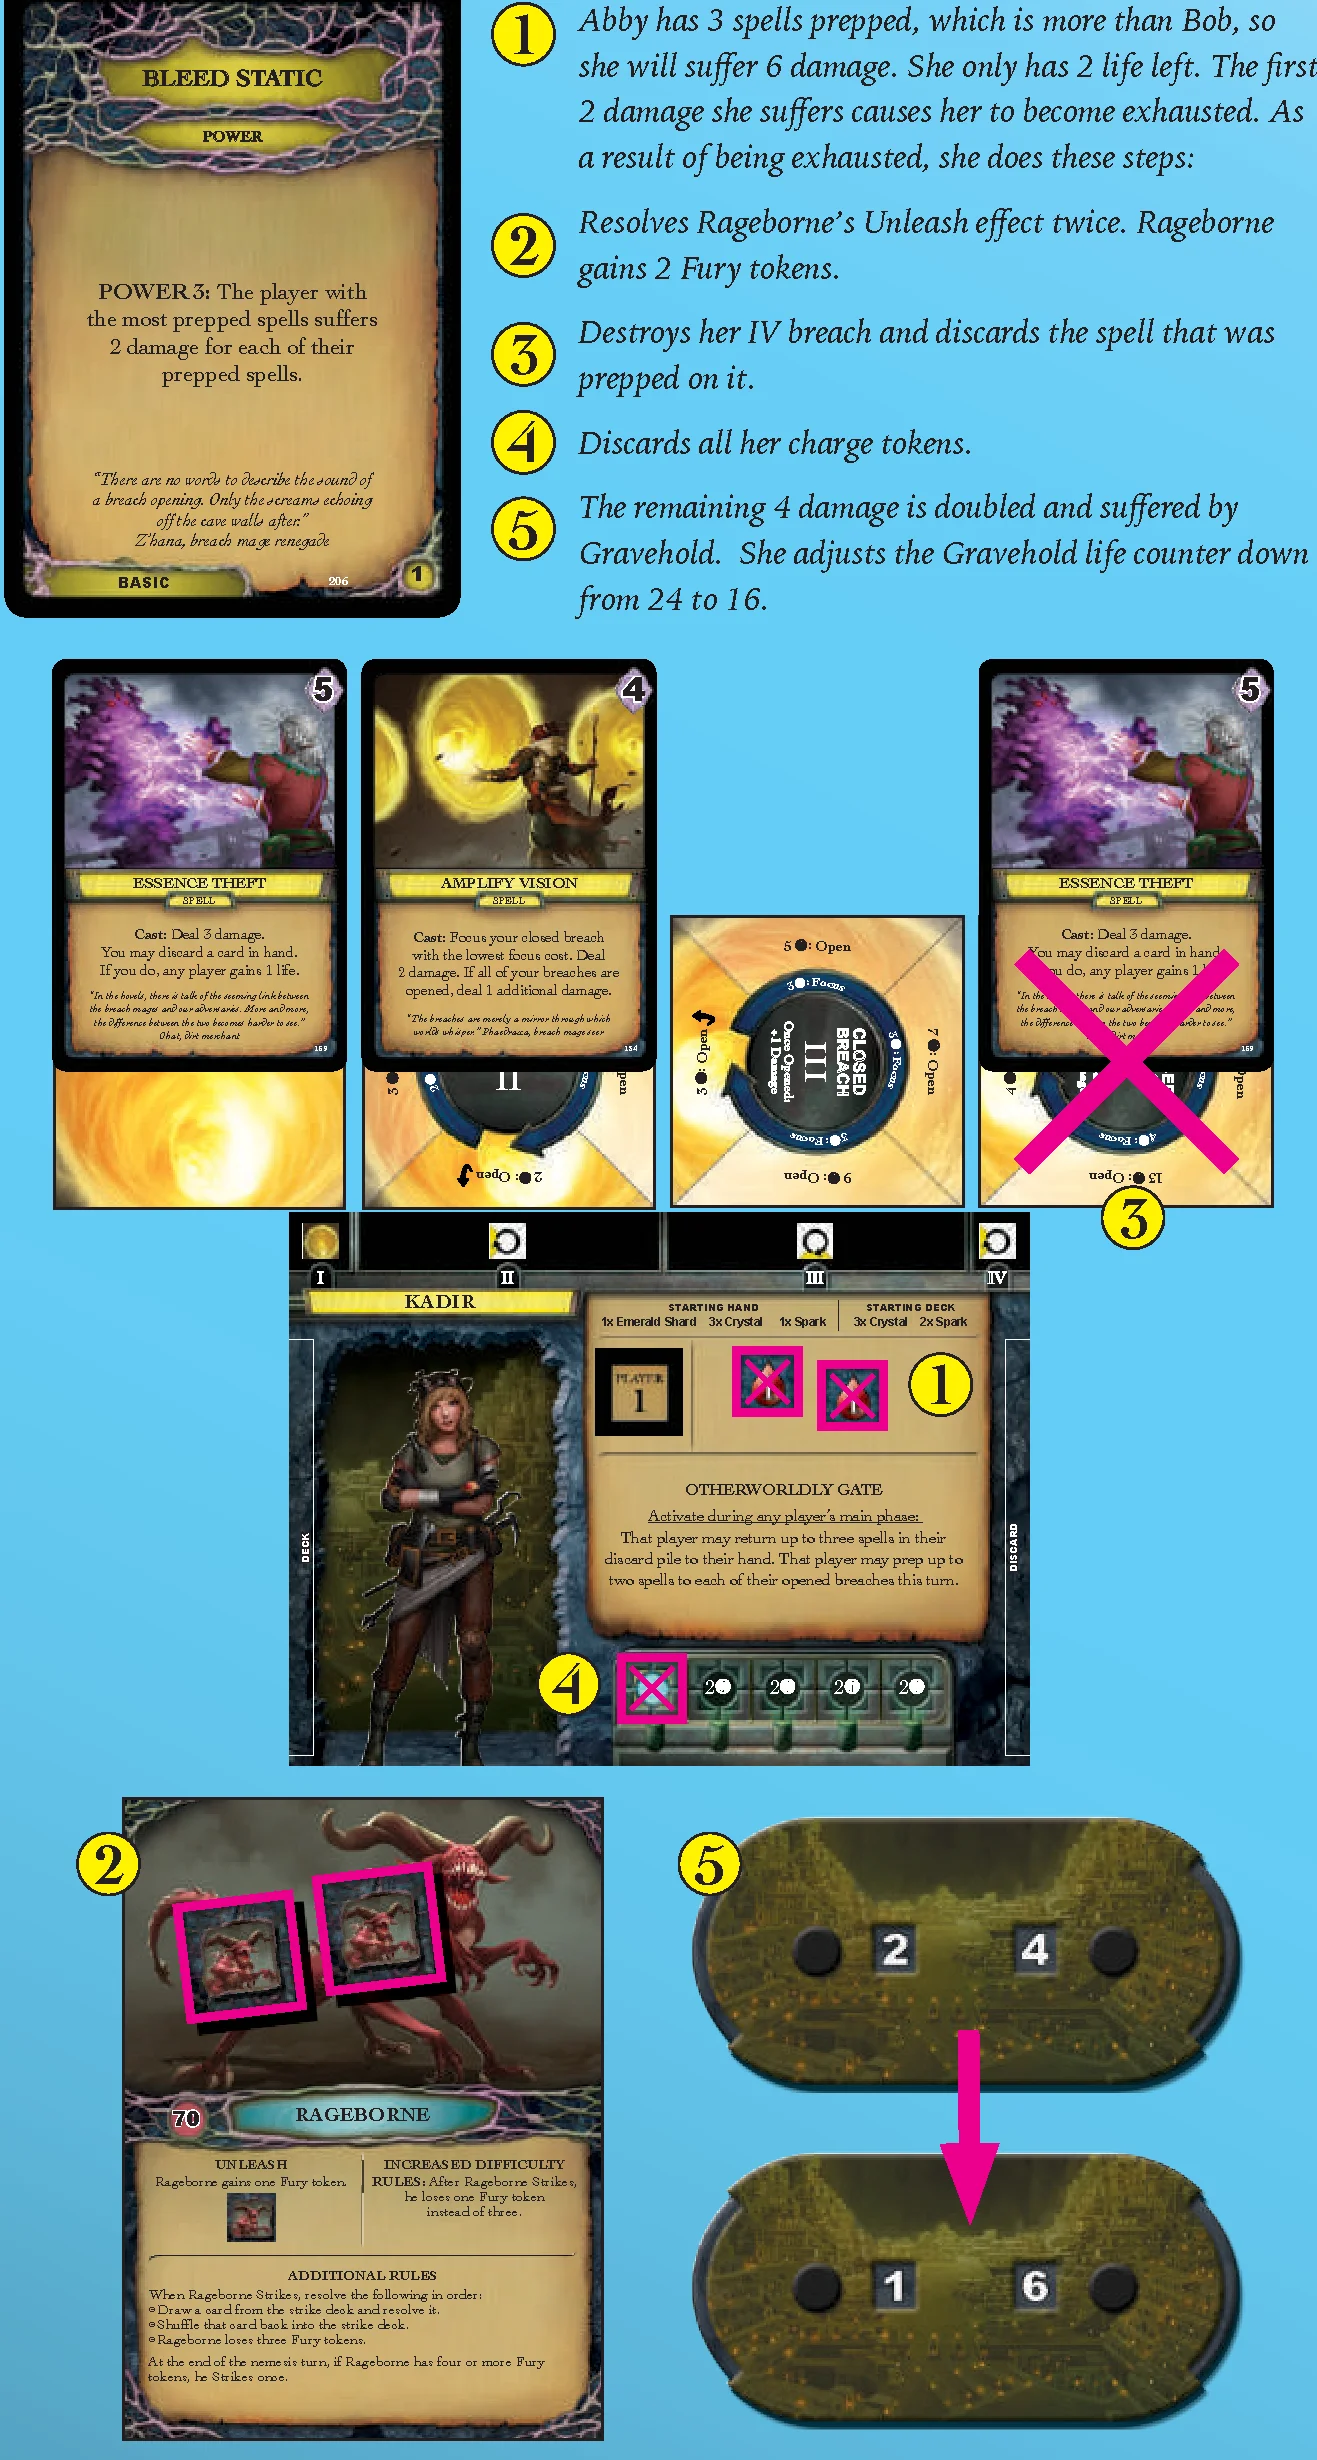
Later in the game during the Nemesis Main Phase, Bleed Static’s effect (The player with the most prepped spells suffers 2 damage for each of their prepped spells.) is resolved.
Abby has 3 spells prepped, which is more than Bob, so she will suffer 6 damage. She only has 2 life left. The first 2 damage she suffers causes her to become exhausted. As a result of being exhausted, she does these steps:
- Resolves Rageborne’s Unleash effect twice. Rageborne gains 2 Fury tokens.
- Destroys her IV breach and discards the spell that was prepped on it.
- Discards all her charge tokens.
- The remaining 4 damage is doubled and suffered by Gravehold. She adjusts the Gravehold life counter down from 24 to 16.
GAME END
In all situations, when an end game condition is met, gameplay ends immediately without further resolution of effects.
The players are victorious if any of the following conditions are true:
- The nemesis has no cards in its deck and no minions or powers in play.
- The nemesis has 0 life.
The players lose if any of the following conditions are true:
- All the players are exhausted (have 0 life).
- Gravehold has 0 life.
In addition, a nemesis may have a specific victory condition listed on the nemesis mat that causes the players to lose immediately.
VARIABLE DIFFICULTY
Aeon’s End has adjustable difficulty. Play the nemesis mat as written to play in normal mode. To adjust the difficulty, follow the rules below:
BEGINNER
- Each player starts the game with 12 life (2 more).
- Gravehold starts with 35 life (5 more).
- The nemesis starts with 10 less life.
EXPERT
- Use the Increased Difficulty rules shown on the nemesis mat. These rules may affect Setup, Unleash, or Additional Rules section of that nemesis.
EXTINCTION
- Use the Increased Difficulty rules.
- Also, each player starts the game with 8 life (2 less).
- Gravehold starts with 25 life (5 less).
- The nemesis starts with 10 more life.
SOLO PLAY
You can play solo as multiple separate mages where you control all of those mages. If you choose to play like this, just follow the rules as normal for the player count related to the number of mages you chose to play.
To play a true solo experience:
- Consult the chart for constructing the nemesis deck (pg. 7).
- Create the turn order deck to contain 3 player turn order cards and 2 nemesis turn order cards. When any of the player turn order cards are drawn, the solo player takes a turn.
- In solo play, you are your own ally. For example, if a card gives a charge to an ally, you instead gain that charge yourself. Otherwise, play the game as normal.
GAME TERMS
- Ally: An ally is any player other than you.
- Destroy: Cards which are destroyed are permanently removed from the game and are not used or interacted with in any way once they are destroyed.
- ‘OR’ effects: When a card gives two options separated by an “OR”, you may choose either option, unless you cannot fully resolve one of them. In that case, you must choose the effect that you can fully resolve.
- ‘To Discard’: Some nemesis power cards have “TO DISCARD:” effects on them. During a player’s main phase, that player may resolve the text following “TO DISCARD:” to discard that power card from play. If a player does discard a power card this way, that card has no effect.
- Unleash: Some nemesis cards will say “Unleash.” Each nemesis has a unique effect that is resolved when this happens. This effect is listed on each nemesis mat.
CREDITS
Game Design: Kevin Riley
Game Development: Nick Little, Travis R. Chance, and Jenny Iglesias
Art: Gong Studios
Art Direction and Graphic Design: Scott Hartman
Editor: Denise Patterson-Monroe
Business Head: Brian Wyrick
Manufactured by: Strom Manufacturing, Inc.
Playtesters: Brian “Big Mac” McCarthy, Benjamin Adelman, David Andrews, Cameron Boozarjomehri, Raymond Carley, David Colmenares, Stelios Despotakis, Cas Gray, Yizhu Gu, Muneeb Hai, Matt Hin, Ann Iglesias, Yang Jiao, Elad Karni, Mike Leider, Austin Matthews, Guru Prashanth, Addison Sadewater, Markham Shofner, CJ Smith, Christian Tjandraatmadja, Jay Walker, Wenting Yu, Ian Zang, Jerry Buhle, Trish Buhle, Brian Busha, Dingyan Zheng, Brick Busha, Shu-Chu, Chun Yin Fung, Patrick Jost, Max Gibiansky, Mattijs Reinen, Matthew Simpson, Tony Truong, Teddy Brewer, Curtis Redus, Matt Hin, Tricia Victor, Federico “Kentervin” Luison, Neelam Balasubramanian, Cody Heim, Eric Mullen, Ian Swift, Rebecca Streitz, Matt Hogg, Solomon Stein, Cory Dawson, Kristen Armellino, and Addison Sadewater.
Special Thanks to: Our collective special loves, who put up with much and ask for little in return: Kristen, Jennifer C., Violet, Jennifer W., and Denice. We also want to thank Richard Ham, Sen-Foong Lim, Lance Myxter, Brent Poyis, Cas Gray, Misha Lavrov, and Todd Sanders.. As well as The Game Preserve and Game Time for providing us a place to call home.
Huge thanks to all the awesome supporters that backed this fun project! You guys made it possible!
© 2016 Lone Oak Games. Oakland, CA 94610. All rights reserved.
Introduction & Overview
This isn’t the end of the world. That already happened. This is what’s left. Us, Gravehold, and The Nameless – creatures seeking to snatch what little we have left from our grasp. The breath in our lungs. The weak light in our eyes. For generations we have taken refuge in an ancient and haunted place, one whose first purpose was forgotten for a thousand ages, until our exodus once again filled its empty halls and hovels with our shadows. Here in the darkness, we seek a way back to the light.
It has taken the breach mages an aeon to hone their dark craft, but they are ready, they are lethal. The breaches, the very conduits through which The Nameless travel, have become our weapon. The breach mages wield this power with undeniable ambition: to survive, to take back The World That Was, to protect our home.
Nerva, Gravehold survivor
OBJECT OF THE GAME
Aeon’s End is a cooperative deck building game where your deck is never shuffled. Your goal is to defeat the nemesis before your home, Gravehold, is overrun or the players are exhausted.
Each round, the players and the nemesis will take turns in a random order. During a player’s turn, they will be able to cast spells, acquire additional gems, relics and spells from the supply, manipulate their spell casting breaches and use their unique abilities. All four of the different nemeses included in the game are unique in the actions taken during their turns, and will require a different strategy to defeat.
CONTENTS
The following section introduces the game components and the game terms used with those components. Please take some time to become familiar with this section before reading the rules.
- 30 life tokens with value 1 & 10 life tokens with value 5: used to track the life of the players and minions.
- 21 charge tokens: used to fuel players’ abilities.
- 10 power tokens: used on certain nemesis cards to track the number of turns until a power resolves.
- 15 Fury/husk tokens: used when playing against Rageborne or Carapace Queen.
- 2 life dials: used to track the life of Gravehold and the nemesis.
- 4 player number tokens: placed on player mats and used in conjunction with the turn order cards to determine play order.
- Player cards – gems, spells, and relics: used by the players to enhance their decks.
- 87 gem cards
- 86 spell cards
- 30 relic cards
- 27 randomizer cards: used to determine which player cards are available.
- 4 player aid cards: used for quick reference of the phases of a turn.
- 8 player mats: used for tracking the important information of each player.
- 16 breaches: used by the players to cast their spells.
- 9 turn order cards: used to determine the order of play during the game.
- 4 nemesis mats: used to display the specific rules for each nemesis.
- 75 nemesis cards: used by the nemesis against the players and Gravehold.
Component Anatomy
PLAYER MATS
- Breach Mage Name
- Breach Setup: The initial configuration of your breaches. Not all players have the same amount of available breaches.
- Starting Hand: The five cards which you will have in your hand at the start of the game.
- Starting Deck: The five cards, and the order in which they are placed in your starting deck. Place the leftmost cards at the top of your starting deck.
- Player Number: Place your player number token here. Player number is used in conjunction with the turn order deck to determine turn order.
- Life: Place your life tokens here.
- Ability: Each breach mage has a unique ability. The player mat explains when that ability can be activated and what it does. Abilities can only be activated when you have a charge token on all of the spaces shown below the ability. Once an ability is activated, all of the charge tokens are removed.
- Deck: Place your deck facedown here.
- Discard: Place your discard pile faceup here.
- Breach Mage Story: Has no effect on play. Provides further lore into the world of Aeon’s End.
BREACHES
Breaches are double-sided cards used to prep and cast spells. A single spell may be prepped by placing a spell card from hand to an opened breach during a player’s turn. On a subsequent turn, a player’s prepped spells may be cast by discarding the spell card.
- Open/Closed: One side of the card is used to indicate that the breach is open, the other indicates a closed breach.
- Breach Number: Used primarily during setup to indicate where each breach placed next to the player mat.
- Open Cost: The cost, in aether (), to open the breach. When a breach is opened, flip it to the opened side. Once a breach is opened, it remains opened for the rest of the game.
- Focus Cost: The cost, in aether (), to focus the breach. When a breach is focused, rotate the breach card 90° clockwise. The only time that spells can be prepped to a closed breach is during the player’s turn in which that breach was focused.
- Opened Effect: Some breaches have effects that occur whenever a spell is cast from that breach while it is opened.
You may open or focus breaches in any order. For example, you may focus Breach III before Breach II, or open Breach IV before opening breach II or III.
Adjacency
Some spells may refer to adjacent breaches. Breaches are always adjacent to the one or two directly next to them physically.
For example, I is adjacent to II. II is adjacent to I and III.
PLAYER CARDS
Player cards are the various cards the players can use to build their decks in order to defeat the nemesis. Each player starts with a unique hand and deck of cards. Players will acquire more cards for their deck by spending aether () to gain them from the supply piles.
- Card Name
- Type: There are three types of player cards: gems, relics, and spells.
- Gems are played to give you aether (), the main currency of the game. Aether can be spent to gain more cards, gain charges for breach mage abilities, and focus breaches. (Breaches are the conduits through which spells are cast.)
- Spells are the main way of dealing damage to the nemesis and his minions. Spells must be prepped to a breach (that is, the spell card must be placed on a breach card next to your player mat) before you can cast them.
- Relics have a variety of useful instantaneous effects.
- Gems are played to give you aether (
- Cost: The amount of aether () you must spend to gain this card.
- Effect: The effect you resolve when you play the card. Gems and relics have effects that are resolved immediately. Spells need to be prepped to a breach before they can be Cast. If any card contradicts this rulebook, follow the card’s effect.
- Flavor Text: Has no effect on play. Provides further lore into the world of Aeon’s End.
RANDOMIZER CARDS
- For each player card there is one additional copy that has a grey border. The grey-bordered cards are used during setup to randomly pick which gems, spells, and relics will be in the supply. These cards are not played with during the game.
See Setup on page 10 for more information.
NEMESIS MAT
- Nemesis Name
- Life: Starting life of the nemesis. The nemesis’s life is tracked on its life dial. If the life of the nemesis reaches zero, the players win.
- Unleash Effect: The effect that occurs when the Unleash keyword resolves. Each nemesis has a unique Unleash ability.
- Additional Rules: Any additional rules that pertain only to this nemesis.
- Increased Difficulty: An optional rule which can be used to adjust difficulty.
See page 19 for further difficulty modifications. - Difficulty Level: How difficult this nemesis is compared to the other nemeses. The difficulty level ranges from 1 (easiest) to 10 (most challenging).
- Nemesis Story: Has no effect on play. Provides further lore into the world of Aeon’s End.
- Setup: Additional information required during setup for this nemesis.
NEMESIS CARDS
Nemesis cards are the attacks, minions, and powers the nemesis uses against the players and Gravehold. The nemesis deck is constructed at the beginning of each game from a mixture of basic nemesis cards that can be used in any nemesis deck, and a number of unique cards that are only used with that particular nemesis. You may encounter the same nemesis many times, but it will never attack you in exactly the same way twice.
- Card Name
- Type: There are three types of nemesis cards: attacks, minions, and powers.
- Attacks are resolved immediately and are then discarded.
- Minions: Minions enter play with life tokens and stay in play until defeated. They have persistent effects which are resolved during the nemesis’s main phase. If the life of a minion reaches zero, it is immediately discarded.
- Powers: All power cards have “POWER X:” on them. When a power card enters play, place X power tokens on it. Unless discarded, power cards stay in play for X nemesis turns before resolving. During the nemesis main phase, remove one power token from every power card in play. When a power card has no tokens left, resolve its effect and then discard it.
- Life: Minion cards have life which can be depleted by dealing it damage. If the life of a minion reaches zero, it is immediately placed in the nemesis discard pile.
- Effect: The effect to resolve for this nemesis card.
- TO DISCARD effect: Some power cards have a “TO DISCARD:” effect. During any player’s main phase, that player may fully resolve the effect listed to discard that power card. If a power card is discarded this way, its effect will not be resolved.
- Flavor Text: Has no effect on play. Provides further lore into the world of Aeon’s End.
- Nemesis: The nemesis to which the card belongs. Cards that say “Basic” may be used with any nemesis.
- Tier: There are three tiers of nemesis cards. Tier 1 cards are less dangerous than Tier 2 cards, which are less dangerous than Tier 3 cards. Some unique nemesis cards are marked as Tier 0. These cards are covered in the additional rules section of the nemesis to which they belong.
Setup
PLAYER SETUP
- Each player chooses a player mat and a player number token.
- Each player builds their starting hand and deck as shown on their player mat. The cards should be in the order shown with the leftmost card(s) being the top card(s) of their deck and the rightmost card(s) being the bottom card(s) of their deck.
- Each player receives one of each type of breach shown on their mat (I–IV as listed). Players arrange their breaches as indicated on their player mat.
- Each player starts the game with 10 life. Set the Gravehold life dial to 30. The players and Gravehold can never have more than their starting life.
Starter Cards
To differentiate the starter cards from the cards used in the market, the cards used to form your initial hand and deck are denoted with a in the lower left corner.
PLAYER SETUP EXAMPLE
Abby and Bob are playing a game of Aeon’s End. (1) Abby is the first player and has chosen to play with Kadir. She sets the Kadir player mat in front of her on the table. She places the Player 1 token on the corresponding section of her mat.
(2) She checks her player mat to see that Kadir starts the game with one Emerald Shard, three Crystals, and one Spark in her hand. She also notices that Kadir starts with three Crystals and two Sparks in her starting deck. Abby locates those cards and places her starting hand in front of her, and her starting deck to the left of her play mat, with the Sparks on the bottom of her deck because those are listed second on the player mat.
(3) Abby grabs one of each type of breach, which are labeled I-IV. She places them above her mat and orients them so that they match what is shown at the top of her mat. The I breach is open. The II and IV breaches have the yellow section to the left. The III breach has the yellow section on the bottom.
TURN ORDER DECK SETUP
- The turn order deck is always composed of four player turn order cards and two nemesis turn order cards. The player turn order cards correspond to the player number tokens.
- For two players: place two turn order cards for each player in the deck.
- For three players: place one turn order card for each player plus the wild turn order card in the deck. When the wild turn order card is drawn, the players decide which one of them will take that turn. The wild turn order card is a player turn order card.
- For four players: place one turn order card in the deck for each player.
- Regardless of the player count: add two nemesis turn order cards to the deck and shuffle it.
When the turn order deck is empty and a new turn order card must be drawn or revealed, shuffle all of the turn order cards together and place them facedown to make the turn order deck again.
NEMESIS SETUP
- Choose a nemesis to play against, and set its nemesis mat near the players. Carefully read all of the additional rules for the chosen nemesis.
- Set the nemesis life dial equal to the number shown on the nemesis mat. The nemesis can never have more than its starting life.
- The nemesis deck:
The nemesis deck is comprised of between 20 and 31 cards as determined by player count. The nemesis deck has three tiers which increase in difficulty as the game progresses and will consist of both nemesis specific and basic nemesis cards. Tiers are indicated by a 1, 2 or 3 in the bottom right of the nemesis cards. Each nemesis has nine nemesis specific cards with the name of the nemesis written at the bottom left.
To build the nemesis deck:- Locate the nine nemesis specific cards used for this game, and separate them into three piles of three cards according to the card’s tier.
- Use the chart below to add basic nemesis cards to each pile based on the number of players in the game:
BASIC NEMESIS CARDS ADDED 1 Player 2 Player 3 Player 4 Player Tier 1 1 3 5 8 Tier 2 3 5 6 7 Tier 3 7 7 7 7 - Shuffle each pile of cards separately.
- Place the tier 3 cards on bottom facedown, the tier 2 cards facedown on top of the tier 3 cards, and the tier 1 cards facedown on top of the tier 2 cards. Combined, these tiers form the nemesis deck.
- Do not shuffle the nemesis deck once it has been created.
- After creating the nemesis deck, follow all Setup instructions written on the back of the nemesis mat.
Tier 0
Depending on which nemesis you’re playing against, there may be other cards used besides the nemesis deck. These cards are marked as tier 0. Refer to the nemesis mat for specific setup instructions.
NEMESIS SETUP EXAMPLE: REFER TO PAGE 8 DIAGRAM
(6) Abby and Bob have chosen to play against Rageborne. Bob finds the Rageborne mat and sets it on the table. He reads all of the additional rules regarding Rageborne.
(7) He checks the mat to see that Rageborne starts the game with 70 life. He grabs the nemesis life dial and sets it to 70.
(8) Bob finds the fifteen nemesis cards with Rageborne written at the bottom. He consults the chart to see what basic cards he will need for a two-player game. He finds three random tier 1 basic nemesis cards, five random tier 2 basic nemesis cards, and seven random tier 3 basic nemesis cards.
Then he sorts the Rageborne nemesis cards into tiers. First he shuffles the three tier 3 Rageborne cards into the seven tier 3 basic cards and places them facedown to start the deck. Next, he shuffles the three tier 2 Rageborne nemesis cards in with the five tier 2 basic cards and places those on top of the tier 3 cards. Finally, he shuffles the three tier 1 Rageborne cards into the three tier 1 basic cards and places those on top of the tier 2 cards. At this point, Bob will no longer shuffle the nemesis deck. He sets it beside the nemesis mat.
(9) Bob notices that there are six tier 0 Rageborne cards left over. With the nemesis deck now created, Bob checks the Rageborne mat for further setup instructions. The mat says, “Shuffle all of the strike cards together and place them facedown to form the strike deck. Rageborne gains 1 Fury token.”
Bob takes the six Rageborne cards he had left over after creating the nemesis deck; noting that the card type states “Strike” instead of the regular Power or Attack. He shuffles them and places them facedown next to the nemesis deck.
Bob also grabs all of the Fury tokens from the box and places one of them on the Rageborne mat to denote that Rageborne has gained one Fury token.
SUPPLY SETUP
- The supply piles are the player cards that can be gained during the game. The supply is composed of nine supply piles. Each pile contains several copies of the same card. The players can determine these piles randomly, using the randomizer cards, or choose the cards they wish to use.
Empty Supply Piles
If a supply pile runs out, it is considered empty. Do not replace it.
GUIDELINES FOR MAKING THE SUPPLY
Choose 3 gems, 2 relics, and 4 spells. Place each card of the same name in its own separate pile, in the middle of the table.
- Gems are the primary source of gaining aether (). Spending aether () is how you gain new cards, focus and open breaches, and gain charges.
- There are seven gem cards in each gem supply pile.
- Relics have a wide variety of effects and are resolved as soon as they are played.
- There are five relic cards in each relic supply pile.
- Spells are the primary source of damage to the nemesis and its minions. They must be prepped to a breach on one turn in order to be cast on a later turn.
- There are five spell cards in each spell supply pile.
SUGGESTED STARTING SUPPLIES
Below are some suggested starting supplies for learning the game.
Suggested Supply: “Deck Destruction” (shown above)
- Gems: Jade, Searing Ruby, Burning Opal
- Relics: Flexing Dagger, Bottled Vortex
- Spells: Amplify Vision, Essence Theft, Planar Insight, Consuming Void
Suggested Supply: “Free Charges!”
- Gems: Jade, V’riswood Amber, Diamond Cluster
- Relics: Unstable Prism, Mage’s Talisman
- Spells: Spectral Echo, Ignite, Feral Lightning, Wildfire Whip
SUPPLY SETUP EXAMPLE
(10) Abby and Bob choose to use the suggested starting supply, Deck Destruction, because they like the ability to make their decks more efficient through cards like Bottled Vortex and Consuming Void.
How to Play & Turn Order
TURN ORDER
Aeon’s End has a variable turn order which is determined by the turn order deck. At the start of the game and after each player or nemesis turn ends, draw a card from the turn order deck to determine who takes the next turn. Place that card on the top of the turn order discard pile.
If you need to draw or reveal a card from the turn order deck and that deck is empty, shuffle the discarded turn order cards together facedown to replenish the turn order deck.
TURN ORDER EXAMPLE
Now that Abby and Bob have the game set up, they start the game by drawing the top card of the turn order deck. The Player 1 turn order card is drawn, so Abby will take the first turn.
On Abby’s turn, she will play through the following phases in order: casting phase, main phase, and draw phase.
During the casting phase, she will be able to cast spells that she prepped on a previous turn. Since it is the first turn of the game, Abby will skip this phase and move straight to the main phase.
PLAYER TURN OVERVIEW
- Casting Phase
- You may Cast any of your prepped spells in opened breaches.
- You must Cast any of your prepped spells in closed breaches.
- Place cast spells on the top of your discard pile as they are cast.
- Main Phase
You may resolve the following actions in any order and as many times as you want:- Play a gem or relic card
- Gain a card
- Gain a charge
- Focus a breach
- Open a breach
- Prep a spell to a breach
- Resolve a “While prepped” effect
- Resolve a “TO DISCARD:” effect
- Draw Phase
- Place all the gems and relics that you have played this turn on the top of your discard pile in any order you choose.
- Draw cards from the top of your deck until you have five cards in hand.
If at any time a player’s life is reduced to zero, that player is exhausted. Read the exhausted section on page 18 for details.
NEMESIS TURN OVERVIEW
- Main phase:
From oldest to newest, resolve the effects of each minion and power card the nemesis has in play. - Draw phase:
Draw a card from the nemesis deck.- If it is an attack card, resolve its effect immediately.
- If it is a minion card or power card, place it into play with the appropriate number of life or power tokens. Resolve any effects following “IMMEDIATELY:” on the card. The rest of its effects will not be resolved this turn.
If at any time a player’s life is reduced to zero, that player is exhausted. Read the exhausted section on page 18 for details.
Player Turn in Detail
PLAYER TURN: 1 – CASTING PHASE
Cast prepped spells:
- Any spells that are prepped in an opened breach may be Cast during this phase.
- Every spell prepped in a closed breach (that is, a spell that was prepped to a focused breach in the previous turn) must be Cast now.
- You choose the order in which you Cast your spells.
When a spell is Cast:
- Discard it to the top of your discard pile immediately, then resolve the effect after the word ‘Cast:’ on the card.
- That spell can only deal damage to a single minion or the nemesis unless otherwise specified.
- Some breaches have a “+1 damage when Cast” effect while they are opened. Any spell Cast from an open breach with this effect deals 1 additional damage, even if that spell’s effect would normally not deal damage.
When you deal damage:
- To a minion: remove life tokens from that minion card equal to the damage you dealt. If a minion has no life tokens remaining, it is immediately discarded.
- To the nemesis: reduce its life total on the dial by the amount of damage you dealt. If the nemesis has zero life remaining, the players immediately win.
There are some effects in Aeon’s End that will allow you to cast another player’s prepped spells. When casting a spell other than your own, you are the “you” referred to on the spell card. You make all decisions pertaining to that spell.
For example: You play a Garnet Shard to cast your ally’s prepped Dark Fire. You must discard up to two cards from your hand (Dark Fire’s effect) to your discard pile. You also choose either the nemesis or a minion to suffer Dark Fire’s damage. The cast Dark Fire spell card is placed on the top of your ally’s discard pile.
CASTING PHASE EXAMPLE
For this example, we have skipped ahead a few turns in the game to a point where Bob has gained a few spells. He starts the turn with a Spark and an Amplify Vision prepped as shown below. His Spark spell is prepped on breach I, which is opened, so he has the option of casting it now or waiting to cast it later. Amplify Vision is prepped on a closed breach III. Since that breach is closed, Amplify Vision must be cast this turn.
Bob decides to cast Amplify Vision first. He immediately places the Amplify Vision in his discard pile. Then he resolves the Cast effect – dealing 2 damage to the nemesis.
Then he focuses his closed breach with the lowest focus cost. The I and II breaches are open, so he focuses the III breach. He turns that breach 90° clockwise. (For more information about focusing breaches, read the section on page 14 titled “Focus a breach.”)
Finally, Bob decides not to cast the Spark prepped on an open breach. He wants to save this spell for a future turn and be ready if a minion shows up.
PLAYER TURN: 2 – MAIN PHASE
The following eight actions can be done in any order, any number of times during a player’s main phase.
For example, you could play a gem, gain a card, prep a spell, play another gem card, and gain another card.
Actions 1–3: Resources and Cards
- Play a gem or relic card:
- When you play a card, you must execute all of the text on that card, if possible.
- If there is an “OR,” you choose exactly one of the options listed. If you can only complete one of the two options, you must choose that option.
- You may gain aether () even if you choose not to spend it.
- Any aether () gained on a turn that is not spent is lost. Aether does not accumulate over turns, nor can it be given to other players.
- At the end of your turn, any gem or relic cards you played are placed on top of your discard pile in any order.
- Gain a card:
- You may gain a card from the supply by spending aether () you have gained this turn equal to the the cost shown in the upper right-hand corner of the card.
- When you gain a card, it is immediately placed on top of your discard pile.
- You may gain a card from the supply by spending aether (
- Gain a charge:
- You may pay 2 aether () to gain a charge.
- When you gain a charge, place a charge token on your player mat beneath the ability description.
- You may not pay aether () to gain charges for your allies.
- You may not have more charges than your ability requires. The maximum charges are denoted by the number of spaces available on the player mat: 4, 5, or 6.
- You may pay 2 aether (
Discard Order
Cards gained are immediately placed in your discard pile.
Any gem or relic cards that you play are placed in your play area. At the end of your turn, during the draw phase, played gem and relic cards will be placed in your discard pile in any order you choose.
MAIN PHASE: GAIN AND SPEND AETHER EXAMPLE
On Abby’s first turn, she has one Emerald Shard, three Crystals, and one Spark in her hand.
She plays her three Crystals to gain 3 aether (). She plays her Emerald Shard, which offers a choice of gaining 1 aether () or having any player gain 1 life. Since both players still have their starting life, Abby chooses to gain 1 aether ().
Abby has a total of 4 aether (). She has many options as to what she can do with this aether. She chooses to spend all 4 aether () to gain a Searing Ruby. She immediately places it in her discard.
OR: Abby could have chosen to spend her 4 aether () to gain two charges.
OR: Alternatively, she could have chosen to gain a Jade, which costs 2 aether (), and gain one charge with her remaining 2 aether ().
Actions 4–8: Breaches, Spells, and Effects
- Focus a breach:
- You can focus a closed breach by paying the focus cost shown near the center of that breach card.
- When you focus a breach, rotate the breach card 90° clockwise. You may prep a spell to the focused breach this turn.
- Breaches may be focused any number of times per turn. Any number of breaches may be focused per turn. You may focus a breach without prepping a spell to it.
- A breach that has been rotated so that the yellow quadrant is at the top has a focus cost equal to its stated open cost and can be opened by an effect that would otherwise focus this breach.
- Open a breach:
- You can open a closed breach by paying the open cost currently indicated on the top of that breach card. The open cost decreases each time you focus the breach.
- When you open a breach, flip the breach to the opened side. Opened breaches stay opened for the rest of the game. A spell can be prepped to a breach on the turn that breach is opened and any subsequent turn.
- Prep a spell to a breach:
- To prep a spell, play a spell card onto an opened breach or a closed breach that has been focused this turn. Only one spell may be prepped to a breach at a time. You cannot prep a spell to a breach that already has a prepped spell.
- Prepped spells can be Cast during the casting phase of that player’s next turn.
- Resolve a “While prepped” effect:
- You can use the effect of any of your prepped spells that have a “While prepped” effect that is specific to the main phase. Such effects may be used on the turn that the spell is prepped or any subsequent turn if the spell is still prepped.
- Some “While prepped” effects do not occur during the main phase.
- Each “While prepped” effect may be used once per turn.
- Resolve a “TO DISCARD:” effect:
- Some nemesis power cards have a “TO DISCARD:” effect. During your main phase, you may fully resolve the effect listed to discard that power card. If a power card is discarded this way, its effect is not resolved.
FOCUS OR OPEN A BREACH EXAMPLE
For this example, we’ll jump ahead to Abby’s second turn. She has three Crystals and two Sparks in her hand. It is her main phase. She has only one open breach, so she will need to either open or focus another breach if she wishes to prep both of her Sparks.
Abby starts her main phase by playing all three of her Crystals for 3 aether (). She now has three options that will allow her to prep both of her Sparks.
- She could focus her II breach for 2 aether ().
- She could open her II breach for 3 aether ().
- She could focus her III breach for 3 aether ().
She decides to open her II breach (option 2). Abby flips the II breach card over to show that it is now opened. This breach will remain opened for the rest of the game. She will be able to prep spells to this breach this turn and subsequent turns without paying any further aether () costs.
Finally, Abby preps both of her Sparks by placing them on top of her breaches I and II. Both Spark spells will be available to Cast during her Casting Phase next turn.
PLAYER TURN: 3 – DRAW PHASE
Once you have finished your main phase, place all of the gem and relic cards you played this turn on top of your discard pile in any order.
Then, keeping all unplayed cards in hand, draw cards from the top of your deck until you have five cards in hand.
If at any time there are not enough cards in your deck to draw or reveal a card, draw/reveal as many as you can then flip over your discard pile to form a new deck and draw/reveal. At no point in the game do you shuffle your deck.
Notes:
- You may not choose to discard cards during your turn. Unlike other deck builders, you do not discard your hand at the end of each turn.
- You may look through your discard pile at any time, although you may not rearrange it.
- You may not look through your deck.
- There is no maximum hand size.
No Deck Shuffling
Unlike many other deckbuilding games, you do not shuffle your discard pile when your deck is empty. Simply flip your discard pile over to form your deck.
DRAW PHASE EXAMPLE
It is the end of one of Bob’s turns. During his casting phase, he Cast an Amplify Vision, which was immediately placed on top of his discard pile.
On this turn, he played a Flexing Dagger, three Crystals, and a Jade. He used the Flexing Dagger to focus his III breach. He used the 5 from the Jade and the Crystals to gain an Essence Theft.
When he gained the Essence Theft, he placed it directly on top of the Amplify Vision in his discard pile. Bob is now done with his main phase.
At the start of his draw phase, he places the Flexing Dagger, the Crystals, and the Jade on top of his discard pile in any order. Bob chooses to place the Dagger first, then the Jade, and finally all of the Crystals.
Next, Bob draws cards from the top of his deck until he has five cards in hand. His deck only has two cards in it. Bob draws those two and then, without shuffling, flips his discard pile over to form his new deck. He then draws three more cards so that he has five cards in hand.
Nemesis Turn in Detail
NEMESIS TURN: 1 – MAIN PHASE
Starting with the minion card or power card that has been in play the longest, the players will resolve the effects of each minion card and power card in play.
- PERSISTENT effects are resolved now.
- Each power card in play will lose 1 power token. After removing a token, if a power card has no tokens on it, resolve the effect that is shown after “POWER X:” and discard it from play.
NEMESIS MAIN PHASE EXAMPLE
For this example, we’ll fast forward a few rounds into the game. The nemesis turn order card has been drawn. Rageborne starts his turn with one Fury token. He has Bane Sire, Woven Sky with one power counter, and Provoker in play. Those cards came into play in that order, so Abby and Bob will resolve them in that order.
- First, Bane Sire’s persistent effect is “Unleash.” Each nemesis has a unique “Unleash” effect listed on its nemesis mat. Rageborne’s Unleash effect is “Rageborne gains 1 Fury token.” Bob adds another Fury token to Rageborne, for a total of two Fury.
- Next, they remove one power token from the power card Woven Sky. There are no power tokens remaining on that card, so it resolves. Woven Sky’s effect is “Unleash. Any player suffers 4 damage.” The nemesis’s Unleash effect resolves, so the players add one Fury token to Rageborne for a total of three. Abby and Bob decide that Bob will suffer the 4 damage because he has more life. Bob removes 4 life tokens from his player mat. Woven Sky is discarded.
- Finally, they resolve Provoker. Provoker’s persistent effect is “Gravehold suffers damage equal to the number of Fury tokens Rageborne has.” Rageborne has three Fury tokens, so Provoker causes Gravehold to suffer 3 damage. Abby adjusts the Gravehold life dial down by 3, from 30 to 27.
NEMESIS TURN: 2 – DRAW PHASE
Draw a nemesis card:
- If the nemesis deck is empty and the nemesis would draw a card, instead Unleash three times.
If the drawn card type is:
- Attack card: Resolve the card’s effect immediately in the order that it appears on the card. Then, place the card in the nemesis’s discard pile.
- Minion card: Execute any effect that follows the word “IMMEDIATELY:”. Then place the minion card into play with the number of life tokens indicated on the card.
- Power card: Execute any effect that follows the word “IMMEDIATELY:” Then place the power card into play with a number of power tokens as indicated on the card.
When resolving card effects:
- When resolving an effect that cannot be fully completed, resolve as much as possible. If you are given an option between two effects, you must choose an option you can fully resolve.
- Persistent and power effects only occur during the nemesis’s main phase. These effects are ignored for newly placed minion and power cards until the nemesis’ next turn.
Ambiguity
Nemesis cards may have ambiguous situations where it’s not clear what or who should be affected. In these cases the players make that determination.
For example, if you are resolving a nemesis card that makes the player with the lowest life suffer damage and two players are tied for having the lowest life, the players decide who suffers the damage.
Another card may have the player with the most charges suffer damage when no players have any charges. In this case also, the players choose who will suffer the damage.
NEMESIS DRAW PHASE EXAMPLES
After fully resolving the nemesis main phase, Abby and Bob proceed to the nemesis draw phase. During this phase, they will draw a card from the nemesis deck and resolve it. Here are examples of the three types of nemesis cards, along with how they would be resolved.
ATTACK CARD EXAMPLE
In this example, Abby and Bob draw Slaughter, an attack card, from Rageborne’s nemesis deck.
Attack cards resolve immediately. Slaughter’s effect is “Unleash. Gravehold suffers 3 damage.”
Rageborne’s Unleash effect is “Rageborne gains 1 Fury token.” Abby adds a Fury token to Rageborne.
Then, Bob adjusts Gravehold’s life counter down 3 life from 27 to 24.
Finally, Slaughter is discarded to the nemesis discard pile.
MINION CARD EXAMPLE
In this example, Abby and Bob draw Haze Spewer, a minion card, from Rageborne’s nemesis deck.
Haze Spewer is a minion with no immediate effect, so it is placed into play. It has 5 life, so Abby and Bob place a 5 life token on it.
They also read Haze Spewer’s persistent effect so they know what will happen during the next nemesis main phase. This effect doesn’t resolve this turn because persistent effects are only resolved during the nemesis main phase, which has already passed.
POWER CARD EXAMPLE
In this example, Abby and Bob draw Eye of Nothing, a power card, from Rageborne’s nemesis deck.
Since Eye of Nothing is a power card, it is placed directly into play. It has a power of 2. Therefore, Abby and Bob place two power tokens on it. It has no immediate effect, so there is nothing else that Abby and Bob have to resolve this turn.
They read the card’s effect so they know what it will do when it resolves. Power tokens are removed and powers resolve during the nemesis main phase – neither of these actions will happen this turn as the nemesis main phase has already passed.
Eye of Nothing has a “TO DISCARD:” effect. Any player may resolve the effect listed here during their main phase to discard that power card.
Player Exhaustion & Game End
EXHAUSTED
If a player’s life is reduced to zero, that player is exhausted. Resolve the following effects in order:
- Resolve the nemesis’s Unleash effect twice.
- The exhausted player destroys one of their breaches, discarding any spell prepped in that breach.
Destroyed breaches can be returned to the box – there is no way to regain a destroyed breach. The remaining breaches stay in their current positions. - The exhausted player discards all of their charge tokens.
The exhausted player continues to participate in the game as usual with the following exceptions:
- Exhausted players cannot gain life.
- When a card deals damage to the player with the lowest life, it always deals that damage to the non-exhausted player with the lowest current life.
- When an exhausted player suffers damage, instead deal twice that amount of damage to Gravehold. This includes excess damage when a player initially becomes exhausted.
If all players become exhausted, the game ends immediately and the players lose.
EXHAUSTED EXAMPLE
Later in the game during the Nemesis Main Phase, Bleed Static’s effect (The player with the most prepped spells suffers 2 damage for each of their prepped spells.) is resolved.
Abby has 3 spells prepped, which is more than Bob, so she will suffer 6 damage. She only has 2 life left. The first 2 damage she suffers causes her to become exhausted. As a result of being exhausted, she does these steps:
- Resolves Rageborne’s Unleash effect twice. Rageborne gains 2 Fury tokens.
- Destroys her IV breach and discards the spell that was prepped on it.
- Discards all her charge tokens.
- The remaining 4 damage is doubled and suffered by Gravehold. She adjusts the Gravehold life counter down from 24 to 16.
GAME END
In all situations, when an end game condition is met, gameplay ends immediately without further resolution of effects.
The players are victorious if any of the following conditions are true:
- The nemesis has no cards in its deck and no minions or powers in play.
- The nemesis has 0 life.
The players lose if any of the following conditions are true:
- All the players are exhausted (have 0 life).
- Gravehold has 0 life.
In addition, a nemesis may have a specific victory condition listed on the nemesis mat that causes the players to lose immediately.
Variants & Solo Play
VARIABLE DIFFICULTY
Aeon’s End has adjustable difficulty. Play the nemesis mat as written to play in normal mode. To adjust the difficulty, follow the rules below:
BEGINNER
- Each player starts the game with 12 life (2 more).
- Gravehold starts with 35 life (5 more).
- The nemesis starts with 10 less life.
EXPERT
- Use the Increased Difficulty rules shown on the nemesis mat. These rules may affect Setup, Unleash, or Additional Rules section of that nemesis.
EXTINCTION
- Use the Increased Difficulty rules.
- Also, each player starts the game with 8 life (2 less).
- Gravehold starts with 25 life (5 less).
- The nemesis starts with 10 more life.
SOLO PLAY
You can play solo as multiple separate mages where you control all of those mages. If you choose to play like this, just follow the rules as normal for the player count related to the number of mages you chose to play.
To play a true solo experience:
- Consult the chart for constructing the nemesis deck (pg. 7).
- Create the turn order deck to contain 3 player turn order cards and 2 nemesis turn order cards. When any of the player turn order cards are drawn, the solo player takes a turn.
- In solo play, you are your own ally. For example, if a card gives a charge to an ally, you instead gain that charge yourself. Otherwise, play the game as normal.
Game Terms & Glossary
GAME TERMS
- Ally: An ally is any player other than you.
- Destroy: Cards which are destroyed are permanently removed from the game and are not used or interacted with in any way once they are destroyed.
- ‘OR’ effects: When a card gives two options separated by an “OR”, you may choose either option, unless you cannot fully resolve one of them. In that case, you must choose the effect that you can fully resolve.
- ‘To Discard’: Some nemesis power cards have “TO DISCARD:” effects on them. During a player’s main phase, that player may resolve the text following “TO DISCARD:” to discard that power card from play. If a player does discard a power card this way, that card has no effect.
- Unleash: Some nemesis cards will say “Unleash.” Each nemesis has a unique effect that is resolved when this happens. This effect is listed on each nemesis mat.
Credits
CREDITS
Game Design: Kevin Riley
Game Development: Nick Little, Travis R. Chance, and Jenny Iglesias
Art: Gong Studios
Art Direction and Graphic Design: Scott Hartman
Editor: Denise Patterson-Monroe
Business Head: Brian Wyrick
Manufactured by: Strom Manufacturing, Inc.
Playtesters: Brian “Big Mac” McCarthy, Benjamin Adelman, David Andrews, Cameron Boozarjomehri, Raymond Carley, David Colmenares, Stelios Despotakis, Cas Gray, Yizhu Gu, Muneeb Hai, Matt Hin, Ann Iglesias, Yang Jiao, Elad Karni, Mike Leider, Austin Matthews, Guru Prashanth, Addison Sadewater, Markham Shofner, CJ Smith, Christian Tjandraatmadja, Jay Walker, Wenting Yu, Ian Zang, Jerry Buhle, Trish Buhle, Brian Busha, Dingyan Zheng, Brick Busha, Shu-Chu, Chun Yin Fung, Patrick Jost, Max Gibiansky, Mattijs Reinen, Matthew Simpson, Tony Truong, Teddy Brewer, Curtis Redus, Matt Hin, Tricia Victor, Federico “Kentervin” Luison, Neelam Balasubramanian, Cody Heim, Eric Mullen, Ian Swift, Rebecca Streitz, Matt Hogg, Solomon Stein, Cory Dawson, Kristen Armellino, and Addison Sadewater.
Special Thanks to: Our collective special loves, who put up with much and ask for little in return: Kristen, Jennifer C., Violet, Jennifer W., and Denice. We also want to thank Richard Ham, Sen-Foong Lim, Lance Myxter, Brent Poyis, Cas Gray, Misha Lavrov, and Todd Sanders.. As well as The Game Preserve and Game Time for providing us a place to call home.
Huge thanks to all the awesome supporters that backed this fun project! You guys made it possible!
© 2016 Lone Oak Games. Oakland, CA 94610. All rights reserved.
