
Ark Nova
2021
Design a modern zoo, accommodate animals, and pursue conservation through powerful cards and five evolving actions.
150
minutes
1 - 4
player(s)
14+
Medium Heavy


About this board game
Ark Nova is a board game for 1–4 players that takes about 150 minutes, in which you plan and design a modern, scientifically managed zoo. Your goal is to create the most successful zoological establishment by building enclosures, accommodating animals, and supporting conservation projects around the world.
Each player manages a personal set of five action cards. The power of each action depends on the slot currently occupied by its card, so the position of your cards shapes what you can accomplish during play.
- Cards: Gain new zoo cards, including animals, sponsors, and conservation projects.
- Build: Construct standard or special enclosures, kiosks, and pavilions.
- Animals: Accommodate animals in your zoo.
- Association: Send association workers to carry out different tasks.
- Sponsors: Play a sponsor card in your zoo or raise money.
A total of 255 cards featuring animals, specialists, special enclosures, and conservation projects form the heart of the game. Each card has a special ability, giving you tools to develop your zoo and shape its growing collection of features.
As your establishment develops, use the cards and actions available to increase its appeal and scientific reputation. Supporting conservation projects is also central to your progress, helping you collect conservation points while contributing to projects all over the world.
Released in 2021, Ark Nova combines zoo construction, animal accommodation, card management, and conservation projects in one substantial experience. Specialists and unique buildings provide further ways to advance your scientifically managed zoo as you work toward becoming the most successful zoological establishment.
Mechanics
Designer
Illustrators
/pic7182955.jpg)

Board Game Rules for
Ark Nova
Cards
- 212 Zoo cards:
- 128 Animal cards
- 64 Sponsor cards
- 20 Conservation Project cards
- 11 Final Scoring cards
- 12 Base Conservation Project cards
- 20 double-sided Action cards (5 per set)
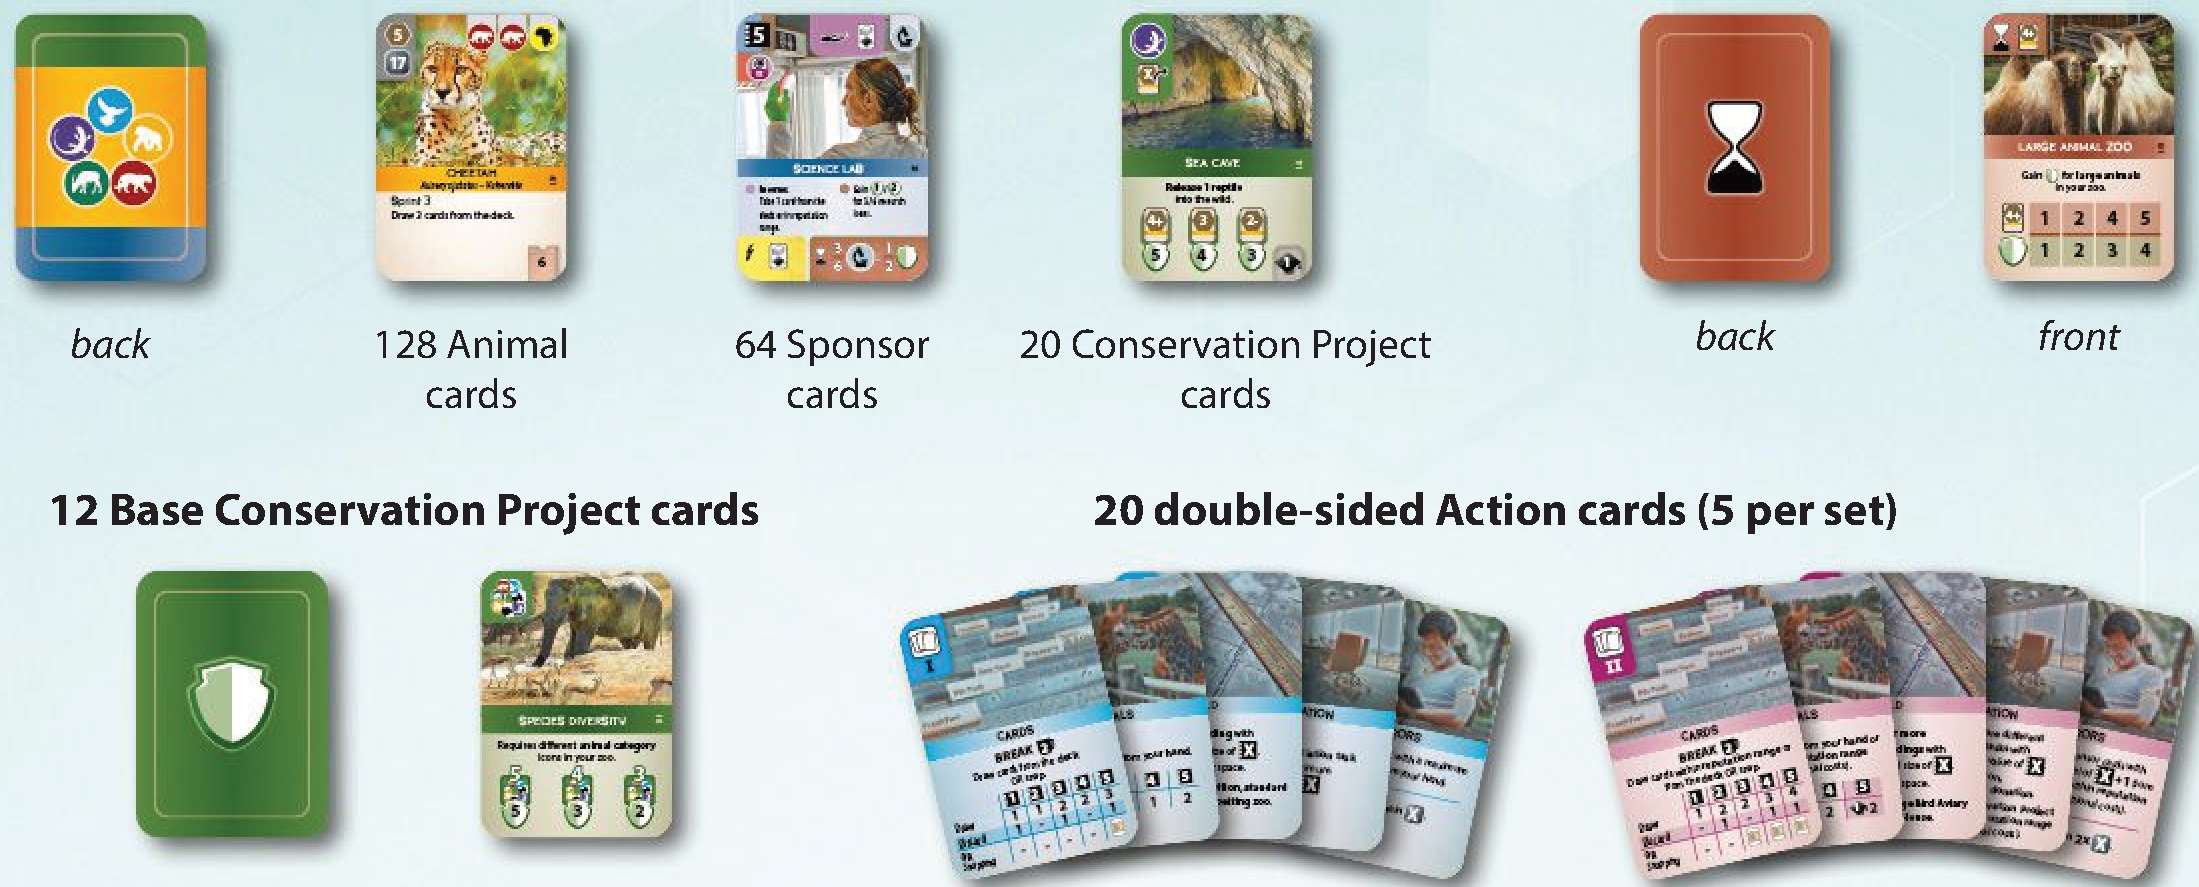
Boards & Mats
- 1 game board (the reverse side shows a different orientation of the card spaces; use the side that suits you better)
- 1 Association board
- 8 player mats (zoo maps):
- 4x map A: map for first-time players with starting advantage (easy)
- 4x map 0: map with more bonus spaces (intermediate)
- 8x maps (1–8) on the reverse side of maps A and maps 0 to allow for customized setup (advanced)
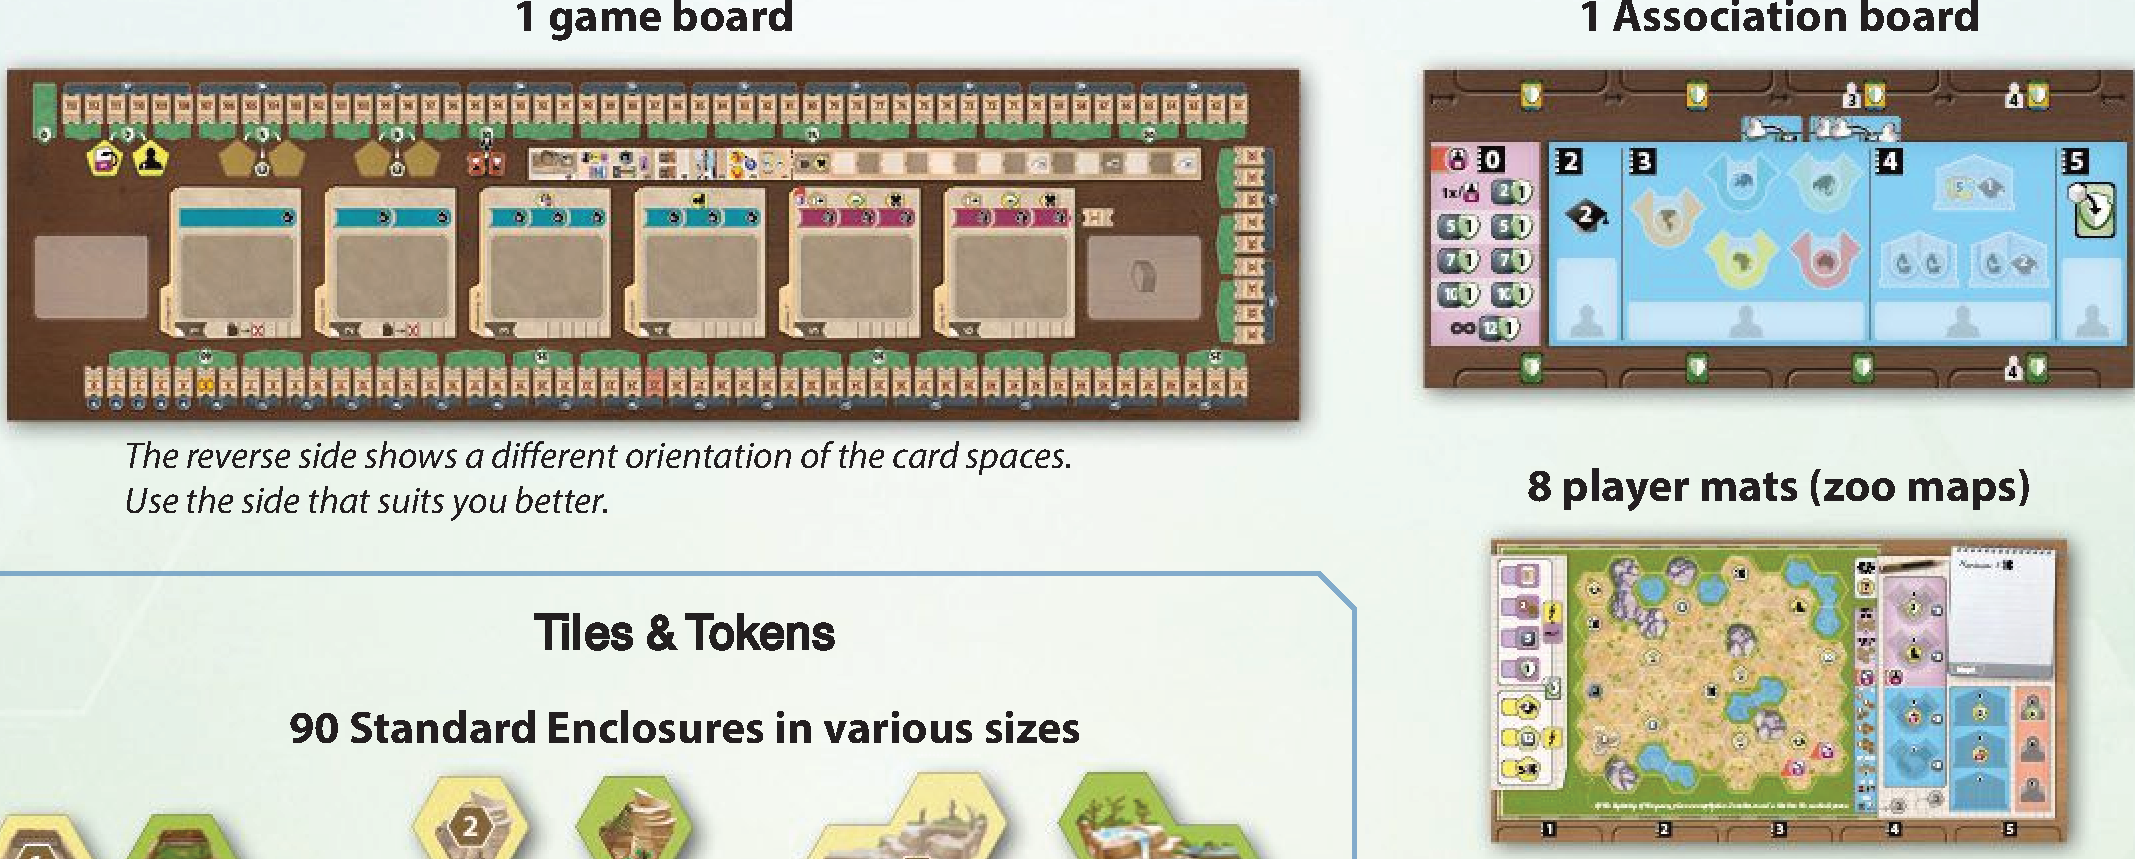
Tiles & Tokens
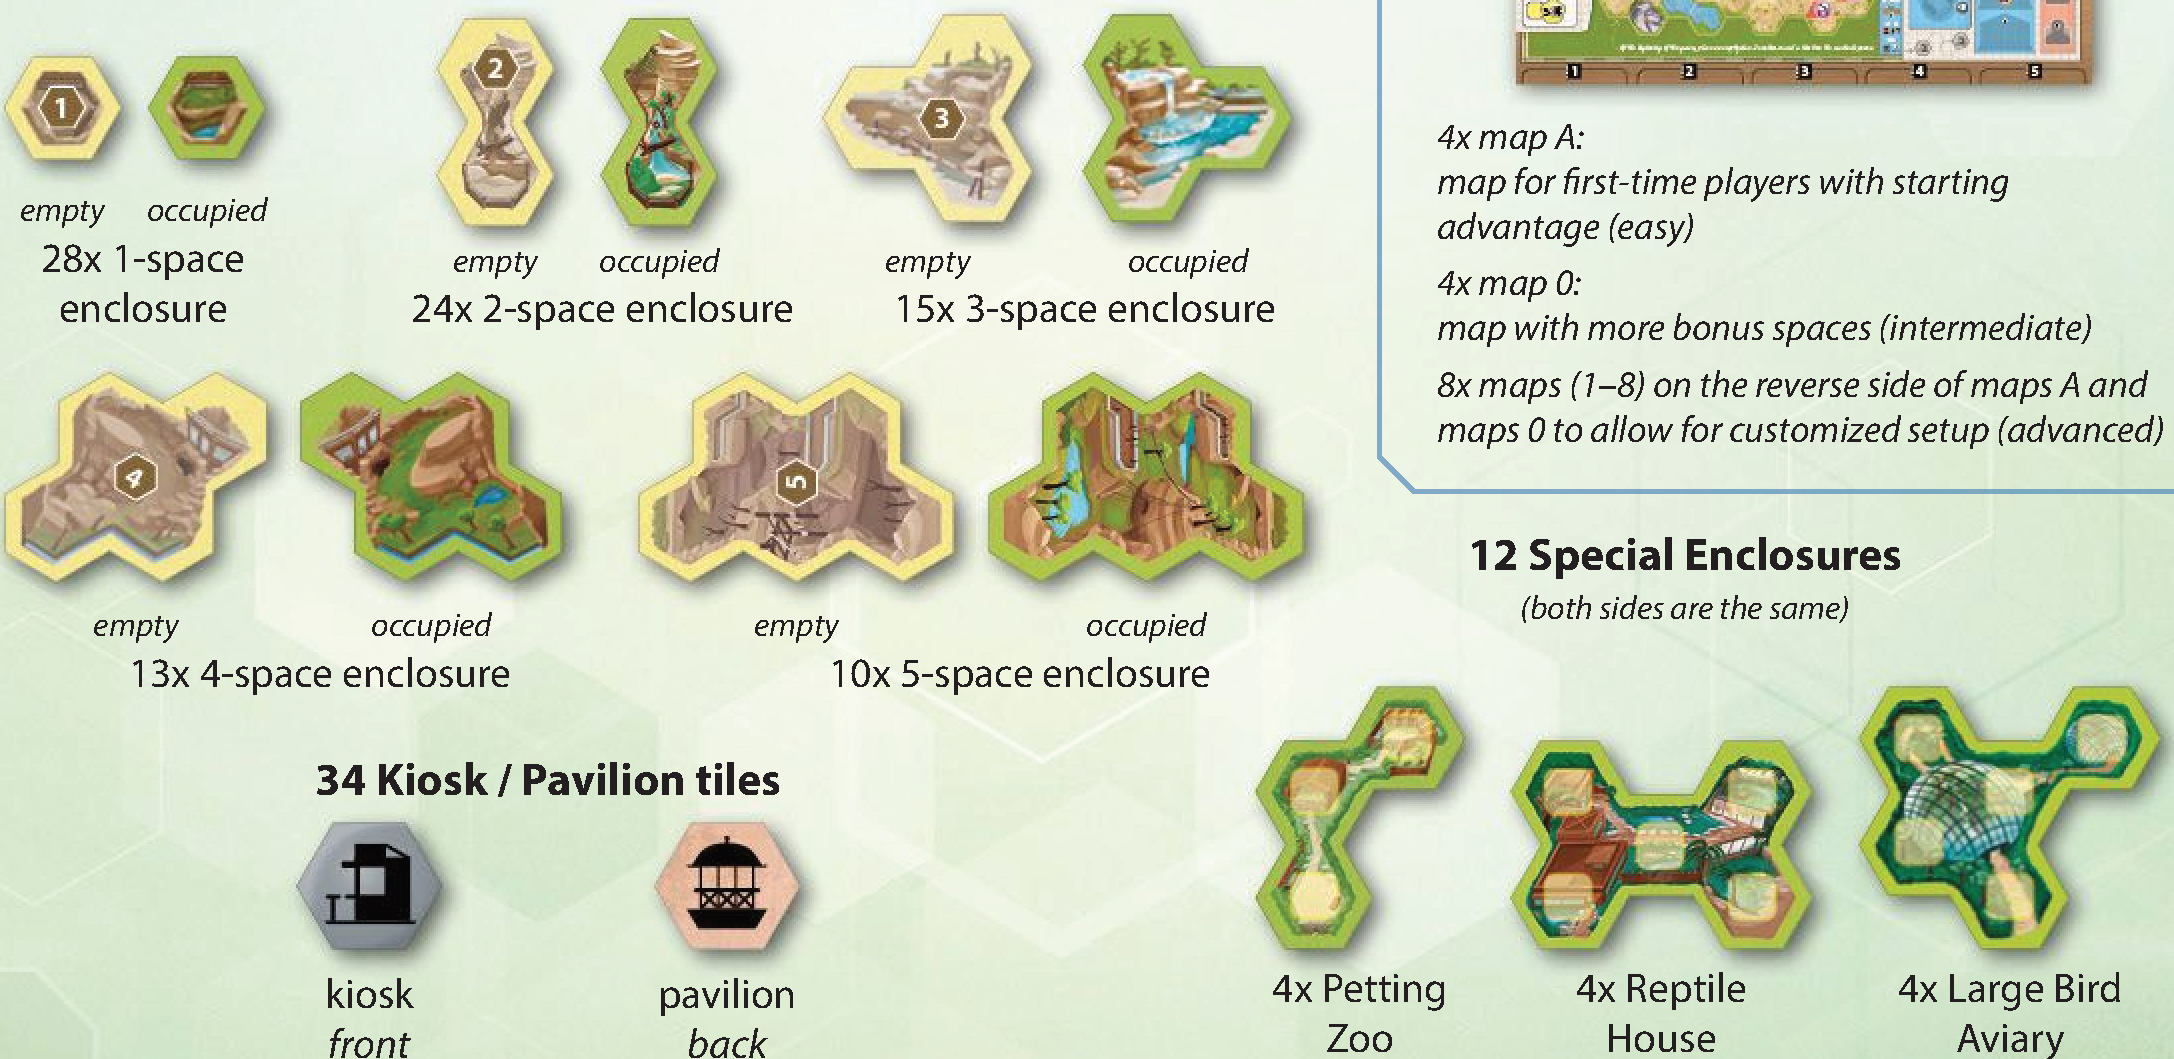
- 90 Standard Enclosures in various sizes (empty / occupied):
- 28x 1-space enclosure
- 24x 2-space enclosure
- 15x 3-space enclosure
- 13x 4-space enclosure
- 10x 5-space enclosure
- 12 Special Enclosures (both sides are the same):
- 4x Petting Zoo
- 4x Reptile House
- 4x Large Bird Aviary
- 34 Kiosk / Pavilion tiles (kiosk front / pavilion back)
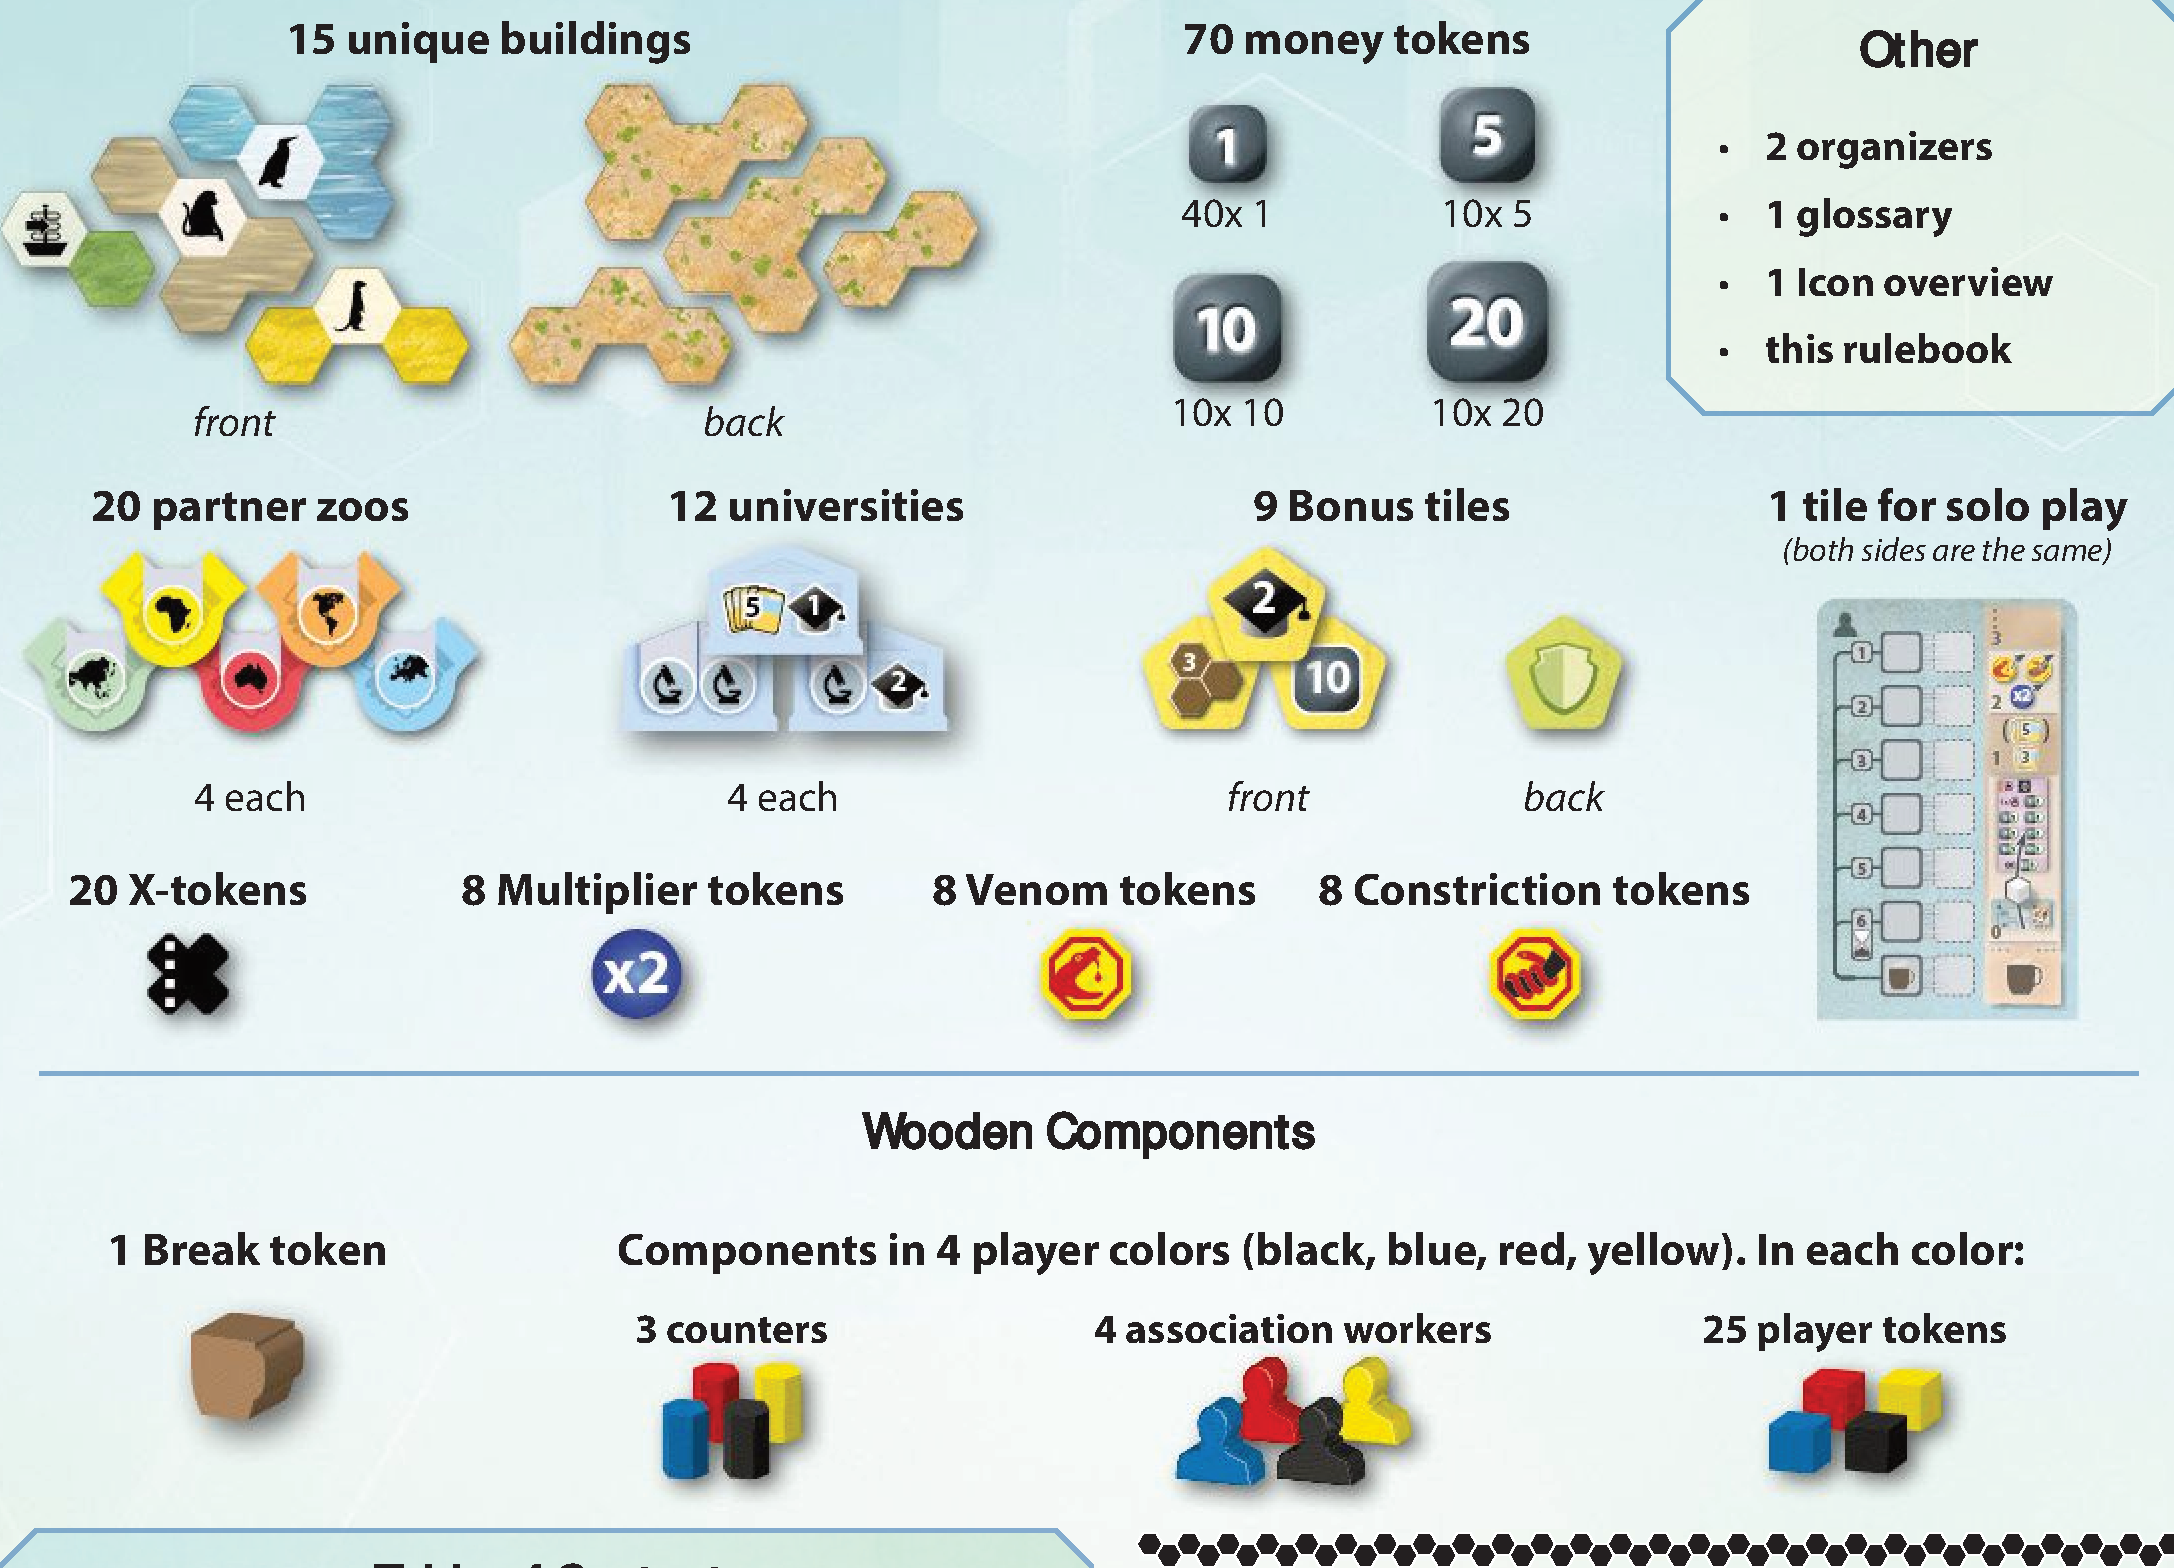
Additional Tiles, Tokens & Wooden Pieces
- 15 unique buildings
- 70 money tokens: 40x 1, 10x 5, 10x 10, 10x 20
- 20 partner zoos (4 each)
- 12 universities (4 each)
- 9 Bonus tiles
- 1 tile for solo play (both sides are the same)
- 20 X-tokens
- 8 Multiplier tokens
- 8 Venom tokens
- 8 Constriction tokens
Wooden Components
- 1 Break token
- Components in 4 player colors (black, blue, red, yellow). In each color:
- 3 counters
- 4 association workers
- 25 player tokens
Other
- 2 organizers
- 1 glossary
- 1 Icon overview
- this rulebook
Cards
- 212 Zoo cards: 128 Animals, 64 Sponsors, 20 Conservation Projects
- 11 Final Scoring cards
- 12 Base Conservation Project cards
- 20 Action cards: 4 sets of 5 double-sided
Boards & Mats
- 1 Game board (double-sided layout)
- 1 Association board
- 8 Player mats: 4x Map A (beginner), 4x Map 0 (intermediate), reverse: Maps 1–8 (advanced)
Tiles & Tokens
- 90 Standard Enclosures: 28x 1-space, 24x 2-space, 15x 3-space, 13x 4-space, 10x 5-space (empty/occupied)
- 12 Special Enclosures: 4 Petting Zoos, 4 Reptile Houses, 4 Large Bird Aviaries
- 34 Kiosks / Pavilions (double-sided)
Additional Tiles, Tokens & Wooden Pieces
- 15 Unique buildings
- 70 Money tokens: 40x 1, 10x 5, 10x 10, 10x 20
- 20 Partner zoos (4 each of 5 types)
- 12 Universities (4 each of 3 types)
- Status tokens: 9 Bonus, 1 Solo, 20 X-tokens, 8 Multiplier, 8 Venom, 8 Constriction
Wooden Components
- 1 Break token
- Per player color (black, blue, red, yellow): 3 counters, 4 association workers, 25 tokens
Introduction & Goal of the Game
In Ark Nova you plan and build a modern, scientifically managed zoo. You build enclosures according to the animals’ way of life and support conservation projects to ensure the preservation of animal species.
Gathering diverse animals increases the attractiveness of your zoo, advancing you on the Appeal track and generating higher revenues. Likewise, careful stewardship of the animals allows you to support conservation projects, such as breeding programs, that lead to your advancement on the Conservation track and corresponding bonuses. These two tracks progress in opposite directions – if your counters meet, the game ends. Whoever achieves the best combination of appeal and conservation has built the most successful zoo and wins the game.
Association work in different zoo associations allows you to partner with zoos and universities around the world. Together, with specialists and sponsors, they will help you manage the various tasks needed to achieve your goals.
Both the designer and the publisher have made every effort to be realistic in the implementation of this game. In rare cases, however, concessions have been made for the sake of the game mechanics. For example, the koala has the subclass bear, which is often used colloquially, but does not correspond to reality. The same applies to the enclosure requirements.
Goal of the Game
- Tracks: Progress on the Appeal track (revenue) and Conservation track (bonuses) in opposite directions.
- Game End: Triggered when a player’s Appeal and Conservation markers meet.
- Victory: Player with the best combination of Appeal and Conservation points wins.
Global Setup
- Game Board & Break Track: Place the game board in the center of the table. Take the Break token and place it on the start space of the Break track that corresponds to your player count. If there are three players, place the Break token on the space marked 3.
- Bonus Tiles: Shuffle the 9 Bonus tiles and place a random Bonus tile face up on each on each of the 4 blank yellow Bonus spaces on the board. Do not place any tiles on the two yellow spaces with icons. Return the remaining 5 tiles to the box. They are not used in the game.
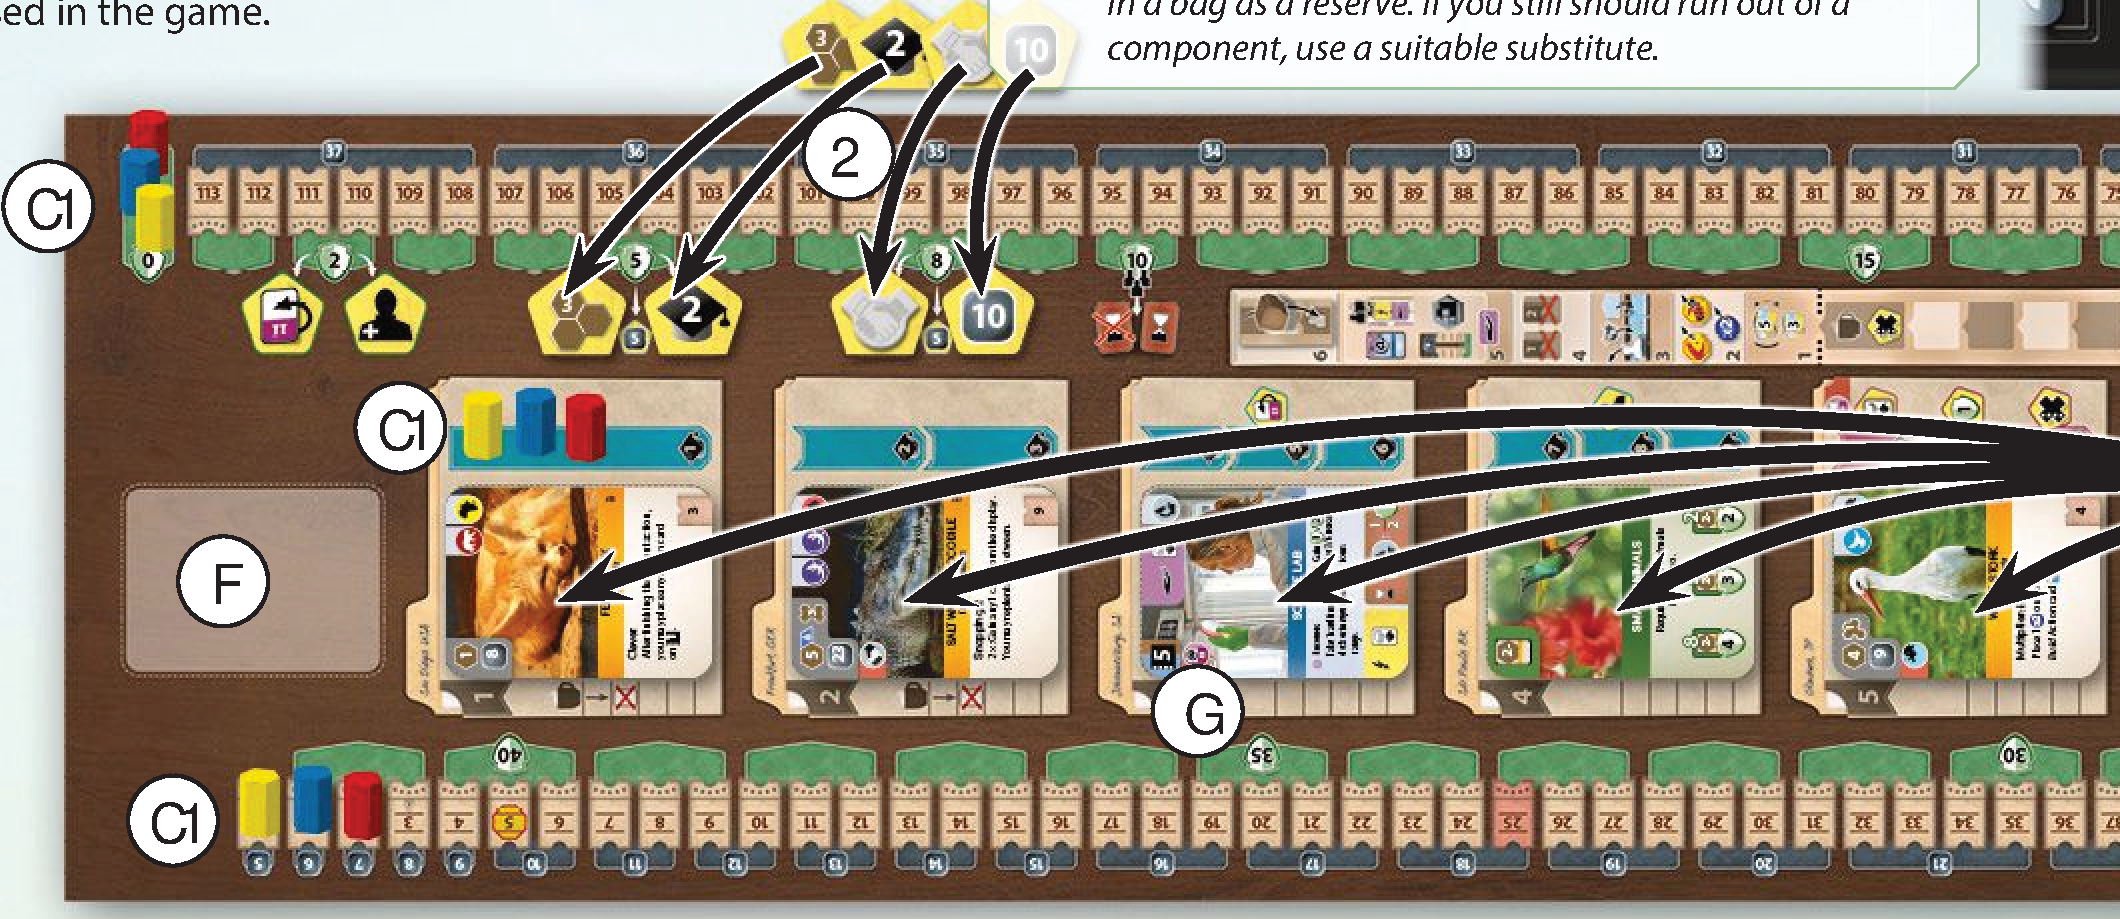
- Zoo Cards Deck & Display: Shuffle the Zoo cards to create a face-down deck on the game board on the space marked with the deck icon. Deal 6 face-down cards from the deck to the spaces provided on the game board (you will turn them face-up at the end of setup). This is the display.
- Organizers / Supply: Place the 2 organizers next to the game board as the general supply. We recommend filling one of the organizers with the enclosures as shown. Fill the other organizer with the remaining tiles and tokens. Components are abound. Thus, pack a few standard enclosures and kiosks / pavilions in a bag as a reserve. If you still should run out of a component, use a suitable substitute.
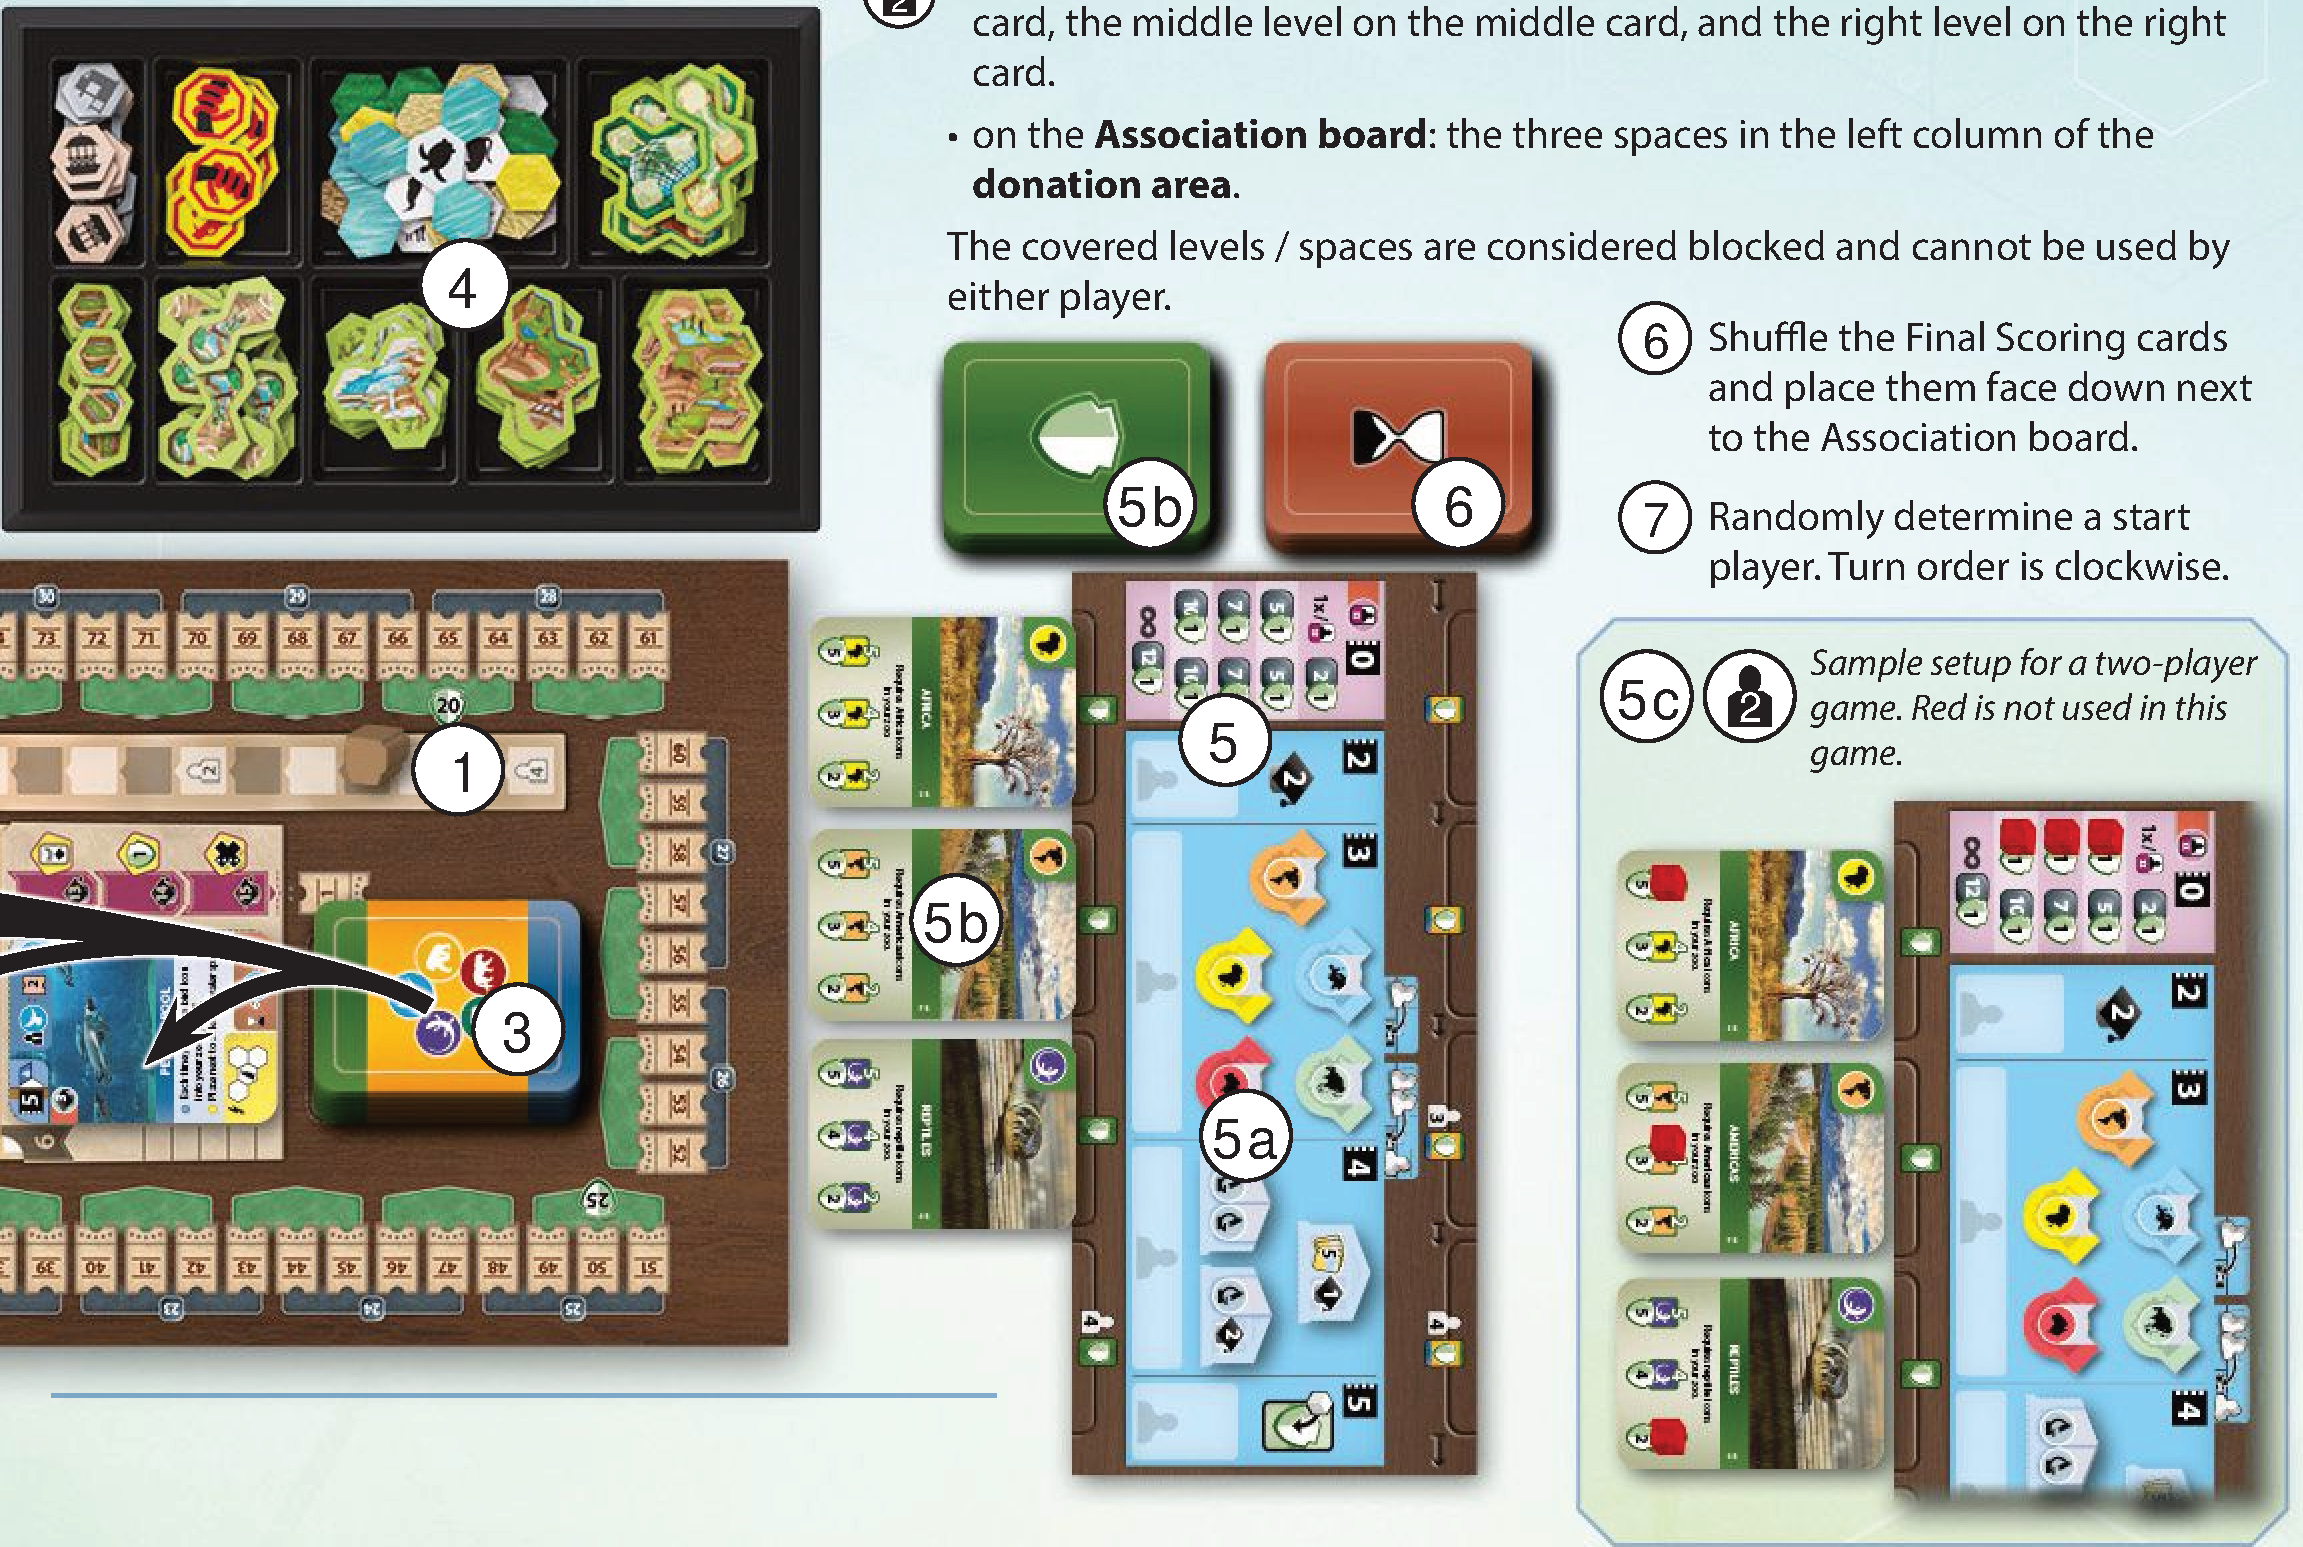
- Association Board: Place the Association board next to the game board, leaving enough room for one row of cards above and one row of cards below the board.
- 5a: Place 1 partner zoo of each continent and 1 university of each kind on the spaces provided on the Association board.
- 5b: Shuffle the Base Conservation Project cards and place them face-down as a deck next to the Association board. In a 4-player game, place the 4 topmost cards face up below the board, otherwise the 3 topmost.
- 5c: In a 2-player game: Take 6 player tokens of any unused color and cover:
- On the face-up Base Conservation Project cards: the left level on the left card, the middle level on the middle card, and the right level on the right card.
- On the Association board: the three spaces in the left column of the donation area.
The covered levels / spaces are considered blocked and cannot be used by either player.
- Final Scoring Cards: Shuffle the Final Scoring cards and place them face down next to the Association board.
- Start Player: Randomly determine a start player. Turn order is clockwise.
Personal Setup
For your personal setup, each of you takes the following steps:
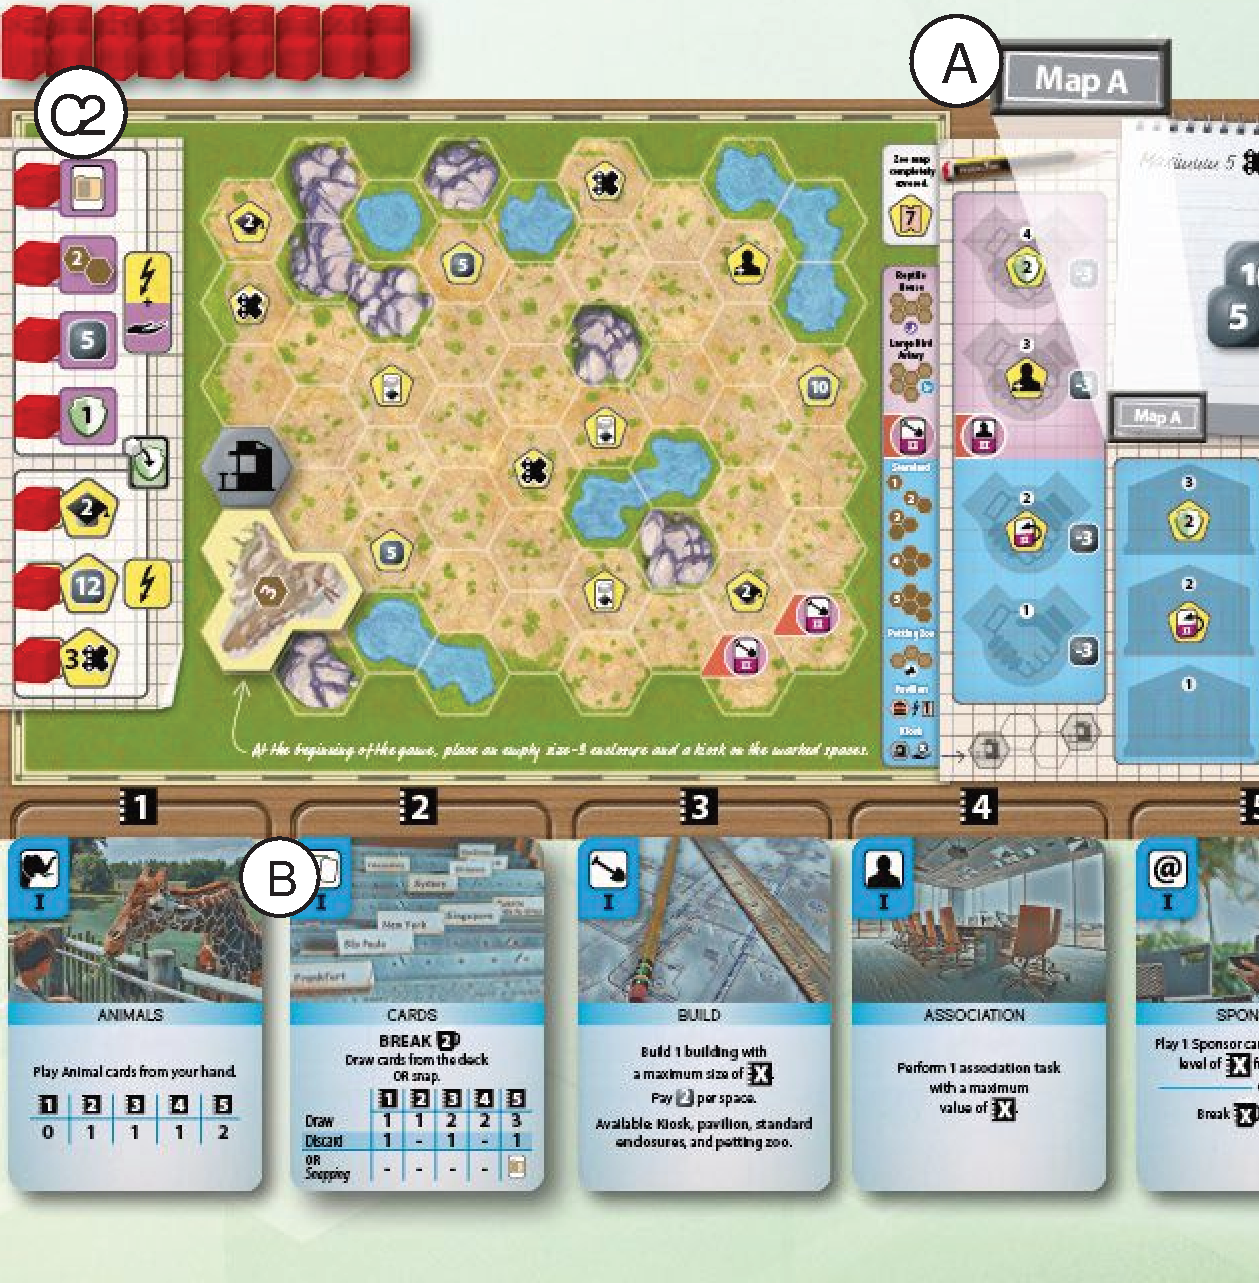
- Zoo Map: Take a random Map A zoo map, and place it with that side up in front of you. Return the remaining zoo maps to the box. They are not used in this game.
- 4 of the 8 zoo maps have Map A on one side. All 4 copies of Map A are identical and recommended for your first game. It allows an easy entry and offers generous rewards.
- The other 4 zoo maps have Map 0 on one side (identical set of 4). This map is suitable for beginners after the first game.
- On the other side of all zoo maps you will find Maps 1–8 (advanced maps). These are all different and give an individual special ability. When playing with these, take 2 random zoo maps and choose 1, or lay out player count + 1 advanced maps and choose 1 each in reverse order of play.
- Handicap rule: If playing with beginners, you can give them a small starting advantage with Map 0 and a larger starting advantage with Map A.
- Action Cards: Take one set of Action cards each (Build, Cards, Animals, Association, and Sponsors). Place one card with side I up under each of the five card slots on your zoo map: the Animals card under slot 1 (furthest left), and the remaining cards randomly distributed under the other 4 slots.
- Player Color Components: Choose a color and take all components of this color:
- C1: Place the counters for appeal, conservation, and reputation on the first spaces of their tracks on the game board. Place counters on the Appeal track according to turn order:
- Start player: space 0
- Second player: space 1
- Third player: space 2
- Fourth player: space 3
- C2: Take 7 of the player tokens in your color and place them on the designated spaces at the left edge of your zoo map. Keep the remaining player tokens next to your zoo map for later use.
- C3: Take the 4 association workers: place 1 on the notepad of your zoo map (active worker), and the remaining 3 lying down on the designated spaces below the notepad.
- C1: Place the counters for appeal, conservation, and reputation on the first spaces of their tracks on the game board. Place counters on the Appeal track according to turn order:
- Starting Money: Take 25 money from the supply and put it on the notepad of your zoo map.
- Final Scoring Cards: Draw 2 Final Scoring cards and place them next to your zoo map. You may look at them at any time, but keep them hidden from other players.
- Starting Hand: Draw 8 Zoo cards. Choose 4 of them to keep as hand cards and discard the remaining 4 cards to a face-up discard pile on the discard space on the board. Keep your hand cards hidden.
- Recommendation: Choose 1–2 Sponsor cards and 2–3 Animal cards. Avoid cards with difficult conditions early on, and try to match icons with the Base Conservation Projects on display.
- Reveal Display: After all players have chosen their hand cards, reveal the 6 cards on the display.
Global Setup
- Break Track: Place Break token on matching player-count space (space 3 for 3 players).
- Bonus Tiles: Shuffle 9 tiles; place 4 face-up on the 4 blank yellow spaces. Box remaining 5.
- Zoo Deck & Display: Shuffle Zoo cards to form a face-down deck. Deal 6 face-down cards to the display spaces.
- Supply: Place the 2 organizers with standard enclosures, tiles, and tokens within reach.
- Association Board: Place 1 partner zoo per continent and 1 university of each type on marked spaces.
- Shuffle Base Conservation Projects; reveal 4 cards below the board (4 players) or 3 cards (2–3 players).
- 2-player game: Block with unused tokens: 3 left donation spaces; the left, middle, and right levels across the 3 revealed Conservation cards.
- Final Scoring Cards: Shuffle and place face down near the Association board.
- First Player: Choose randomly; play proceeds clockwise.
Personal Setup
- Zoo Map: Choose a map (Map A recommended for first game).
- Action Cards: Place 5 Action cards side I up: Animals under slot 1, remaining 4 randomly under slots 2–5.
- Player Components:
- Place Conservation and Reputation counters on space 1 of their tracks.
- Place Appeal counters by turn order: 1st player on 0, 2nd on 1, 3rd on 2, 4th on 3.
- Place 7 player tokens on the left edge spaces of zoo map; keep rest nearby.
- Place 1 association worker on notepad (active), remaining 3 lying down below it.
- Starting Money: Take 25 money onto notepad.
- Final Scoring: Deal 2 cards per player (kept hidden).
- Starting Hand: Deal 8 Zoo cards; keep 4, discard 4 face up.
- Reveal Display: Flip the 6 display cards face-up once all players have kept their hand.
Gameplay Overview
Ark Nova does not play in formal rounds; instead, players simply take turns (in clockwise order) taking one turn at a time until the end of the game is triggered. In addition, there are so-called breaks in between, when the game is put on hold for an administration phase. During these breaks you will discard cards down to your hand limit, recall workers, and gain income, among other things.
You always perform one action during your turn, which may trigger additional effects and bonuses. You perform these actions with the 5 Action cards displayed below your zoo map. You can expand your zoo, play Zoo cards, and draw new Zoo cards. The position of the Action card determines how much you can do with that action.
Your Zoo Map
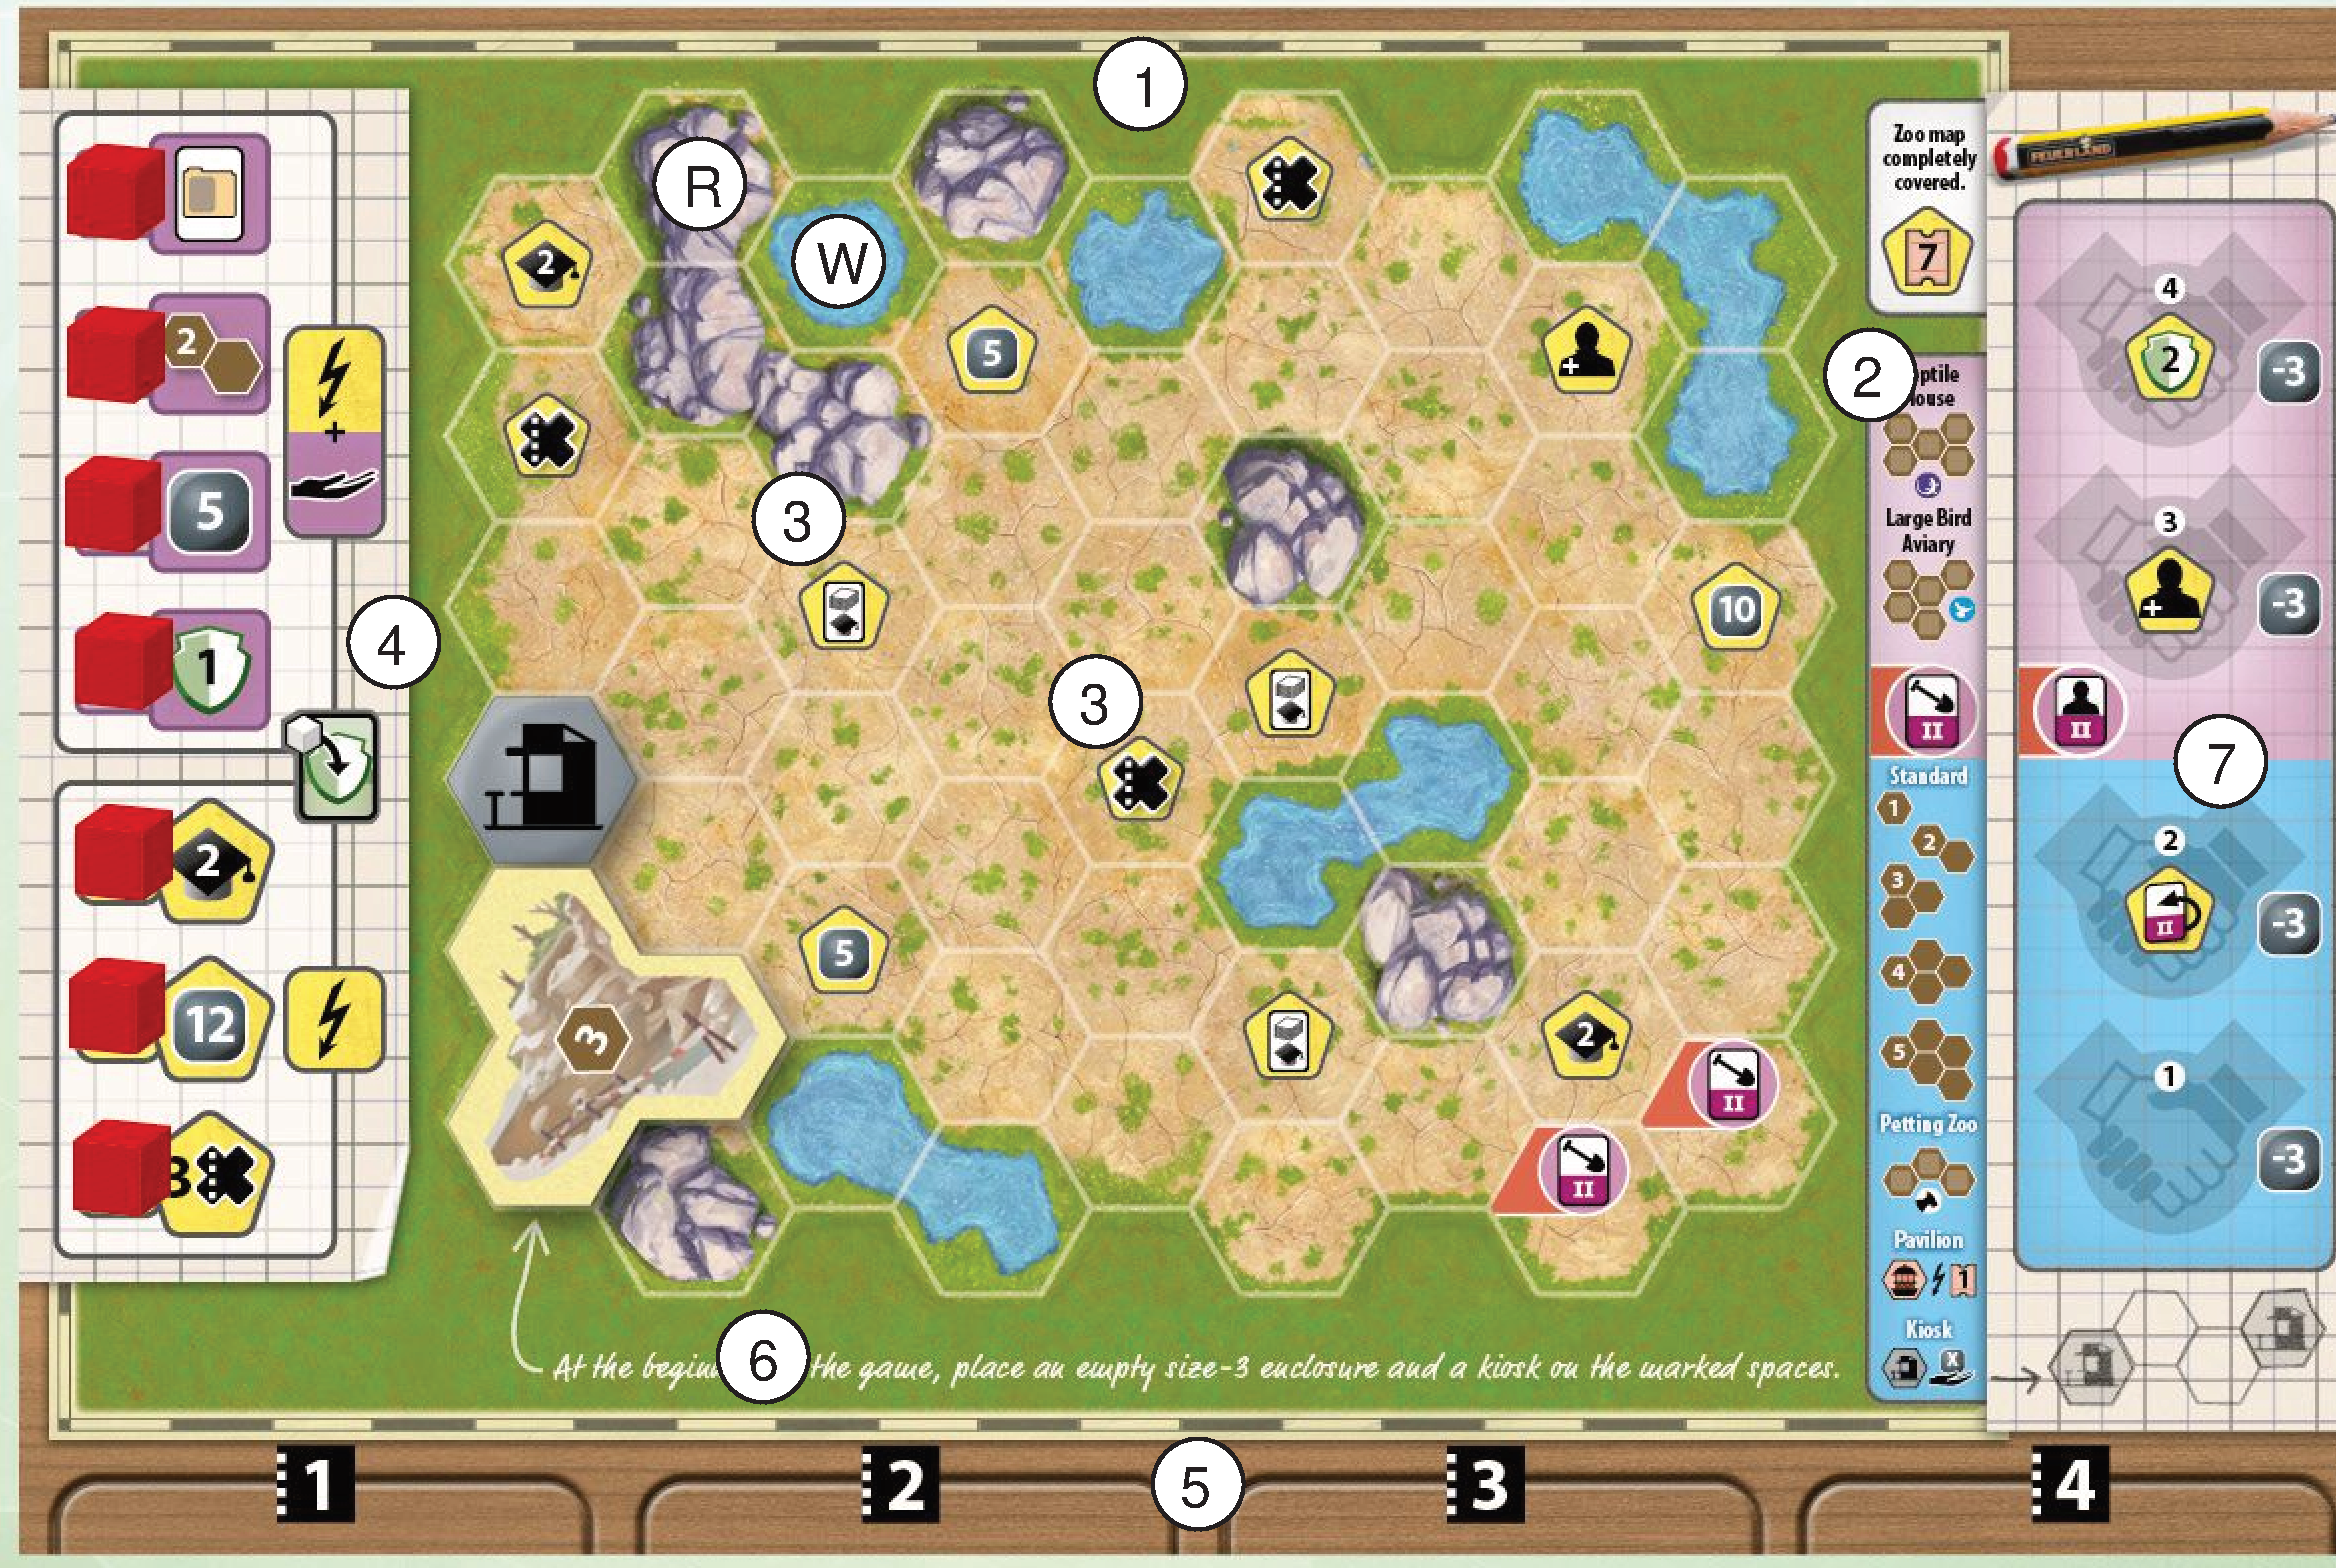
- Your Zoo (1): Established in the large area in the middle of your zoo map. This is where you place buildings such as enclosures (standard or special enclosures), kiosks, pavilions, or unique buildings.
- Enclosure Overview (2): Shows their sizes and shapes.
- Placement Restrictions: You are not allowed to build on rock (R) and water (W) spaces, but some animals need an enclosure next to a rock or water space. All other spaces are building spaces (a space built on is covered). You are not allowed to build on spaces with the upgraded icon until you have upgraded your Build action card.
- Placement Bonuses (3): Some spaces show a placement bonus icon. You receive the indicated bonus immediately when you cover it.
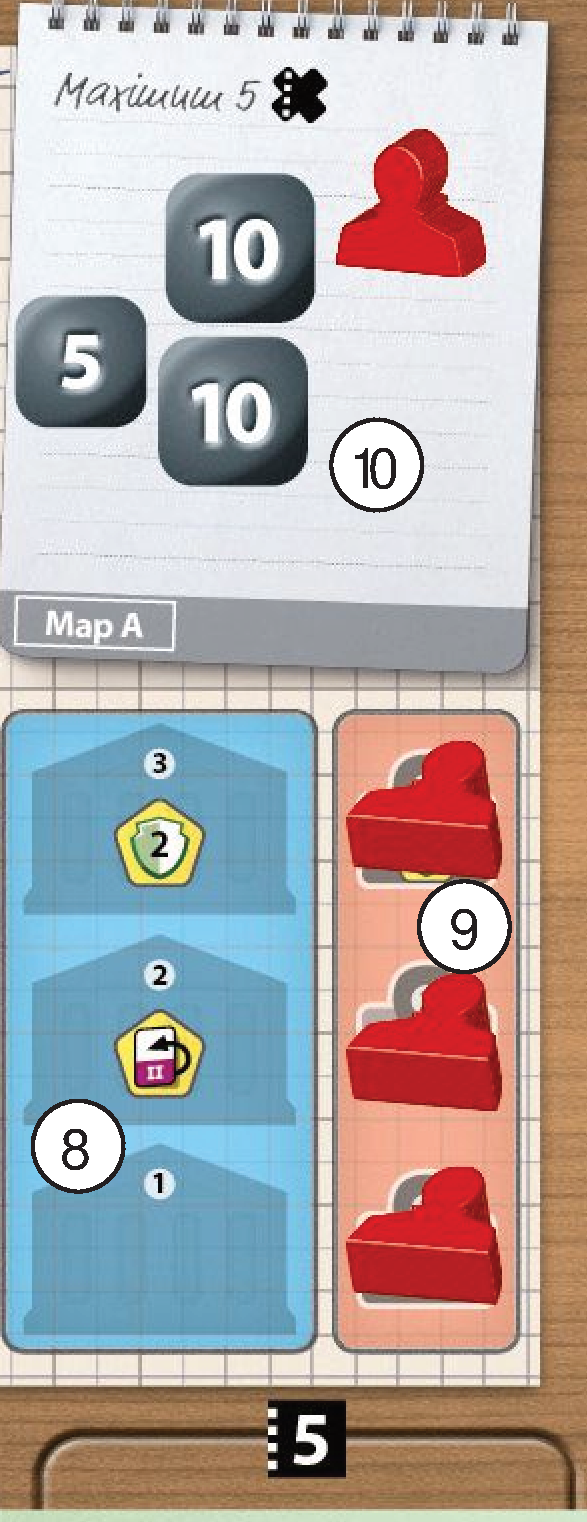
- Conservation Project Bonus Spaces (4): The left edge of your zoo map holds 7 player tokens at the start. Whenever you support a conservation project, take one token and place it on the Conservation Project card. This always gains you an immediate bonus and sometimes again in each break.
- Action Card Slots (5): The bottom of your zoo map holds your Action cards. The number above each slot shows the strength of the Action card in that slot.
- Special Ability (6): Advanced zoo maps feature a unique special ability. Map A has the same ability for all players: at the beginning of the game, place a 3-space enclosure on the indicated spaces, with the empty side (showing 3) face up.
Zoo Map Tracks & Supply
- Partner Zoos (7) & Universities (8): The right side of your zoo map has spaces for 5 partner zoos and 3 universities. You can only establish partnerships with a maximum of 4 partner zoos. Whenever you establish a new partnership, place the tile on the lowest empty space of the appropriate column:
- To get a third partner zoo, you must first upgrade your Association action card.
- If there is a bonus depicted on the space where you place the tile, receive it immediately.
- A partner zoo reduces the cost to accommodate an animal from that continent by 3 money per continent icon on the Animal card.
- A university grants the bonuses and icons shown on it.
- Association Workers Supply (9): Placed at the start of the game. Workers are taken from bottom to top whenever you hire an association worker, moving them to the active notepad area. Certain maps reward conservation points for hiring your last worker.
- Notepad (10): All available association workers, money, and X-tokens are kept here.
Zoo Cards
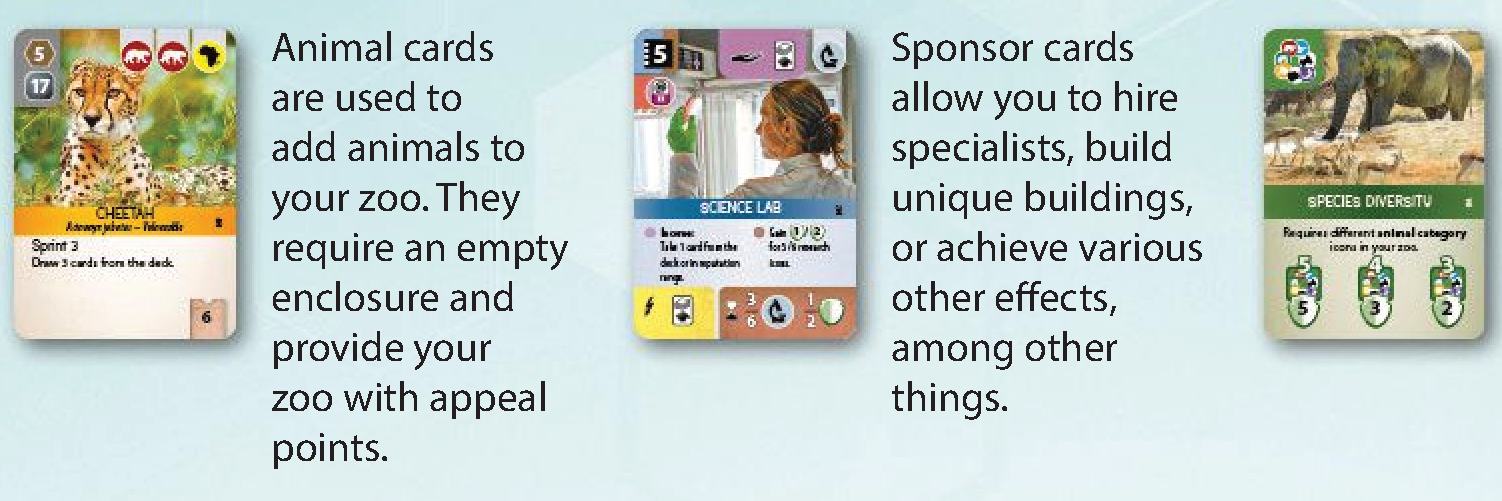
The 3 different types of Zoo cards are:
- Animal cards: Used to add animals to your zoo. They require an empty enclosure and provide your zoo with appeal points.
- Sponsor cards: Allow you to hire specialists, build unique buildings, or achieve various other effects.
- Conservation Project cards: Support conservation projects to collect conservation points (specializing in animal species, continents, or reintroducing animals into the wild). Includes both Zoo cards and Base Conservation Project cards.
The Break Track
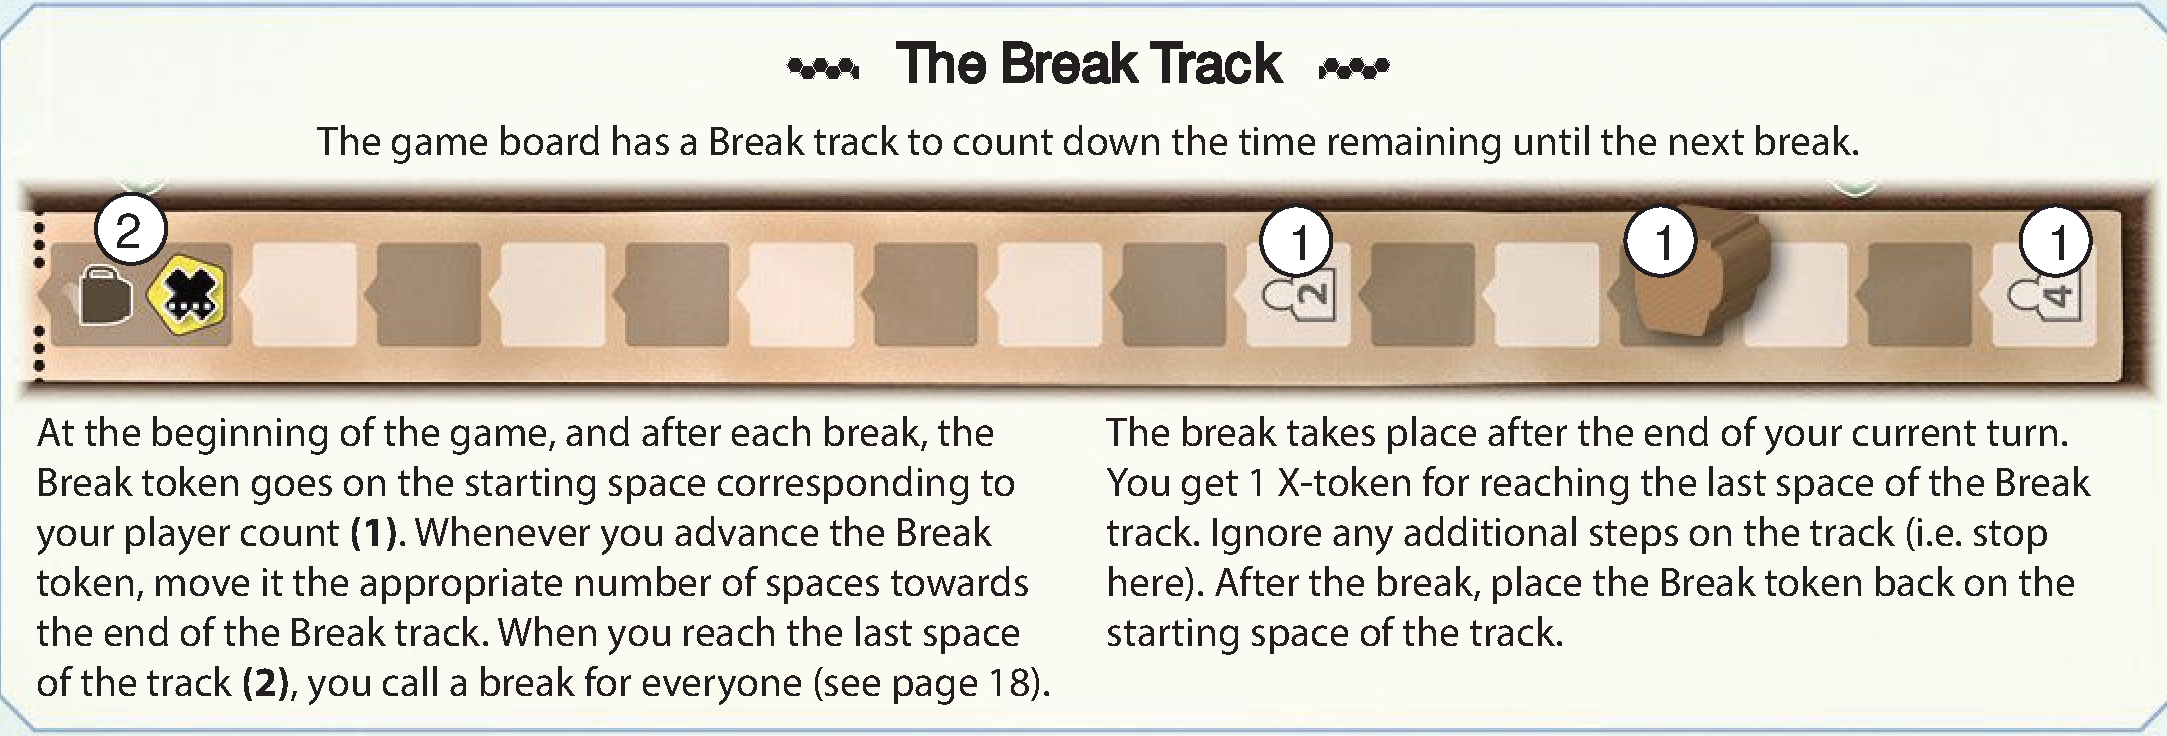
The game board has a Break track to count down the time remaining until the next break:
- At the start of the game and after each break, the Break token is placed on the start space corresponding to player count (1).
- Whenever you advance the Break token, move it towards the end.
- When it reaches the last space (2), you call a break for everyone. The break occurs after your current turn ends.
- You get 1 X-token for reaching the last space of the Break track. Ignore any excess steps. After the break, place the Break token back on its starting space.
Gameplay Overview
- Turn Structure: Clockwise; choose and resolve 1 of your 5 Action cards (slot position 1–5 determines action strength).
- Breaks: Triggered administration phase (discard to hand limit, recall workers, gain income).
Your Zoo Map
- Placement Restrictions: Rock (R) and water (W) spaces cannot be built on. Spaces with upgrade icons require an upgraded Build card.
- Placement Bonuses: Gained immediately when the space is covered.
- Conservation Bonus Spaces: 7 player tokens on the left. Moving a token to a Conservation Project card unlocks immediate and/or break bonuses.
- Special Ability: Map A grants a free size-3 empty enclosure at setup; advanced maps grant unique abilities.
Zoo Map Tracks & Supply
- Partner Zoos: Max 4. 3rd+ requires an upgraded Association card. Place bottom-to-top; gain space bonus immediately. Each discounts matching continent animals by 3 money.
- Universities: Max 3. Place bottom-to-top; gain space bonus immediately. Grants icons and research bonuses.
- Workers & Notepad: Hire workers bottom-to-top into the active notepad. Notepad holds available workers, money, and X-tokens.
Zoo Cards
- Animal: Requires an empty enclosure meeting size/terrain prerequisites; awards Appeal.
- Sponsor: Grants specialists, unique buildings, or ongoing/end-game abilities.
- Conservation Project: Fulfilled to earn Conservation Points (by species, continent, or animal release).
The Break Track
- Token begins on the player-count space and moves forward when advanced.
- Reaching the final space awards 1 X-token to the active player (excess steps ignored) and triggers a break at the end of their turn.
- Reset the token to its player-count space after the break.
A Turn / The 5 Action Cards
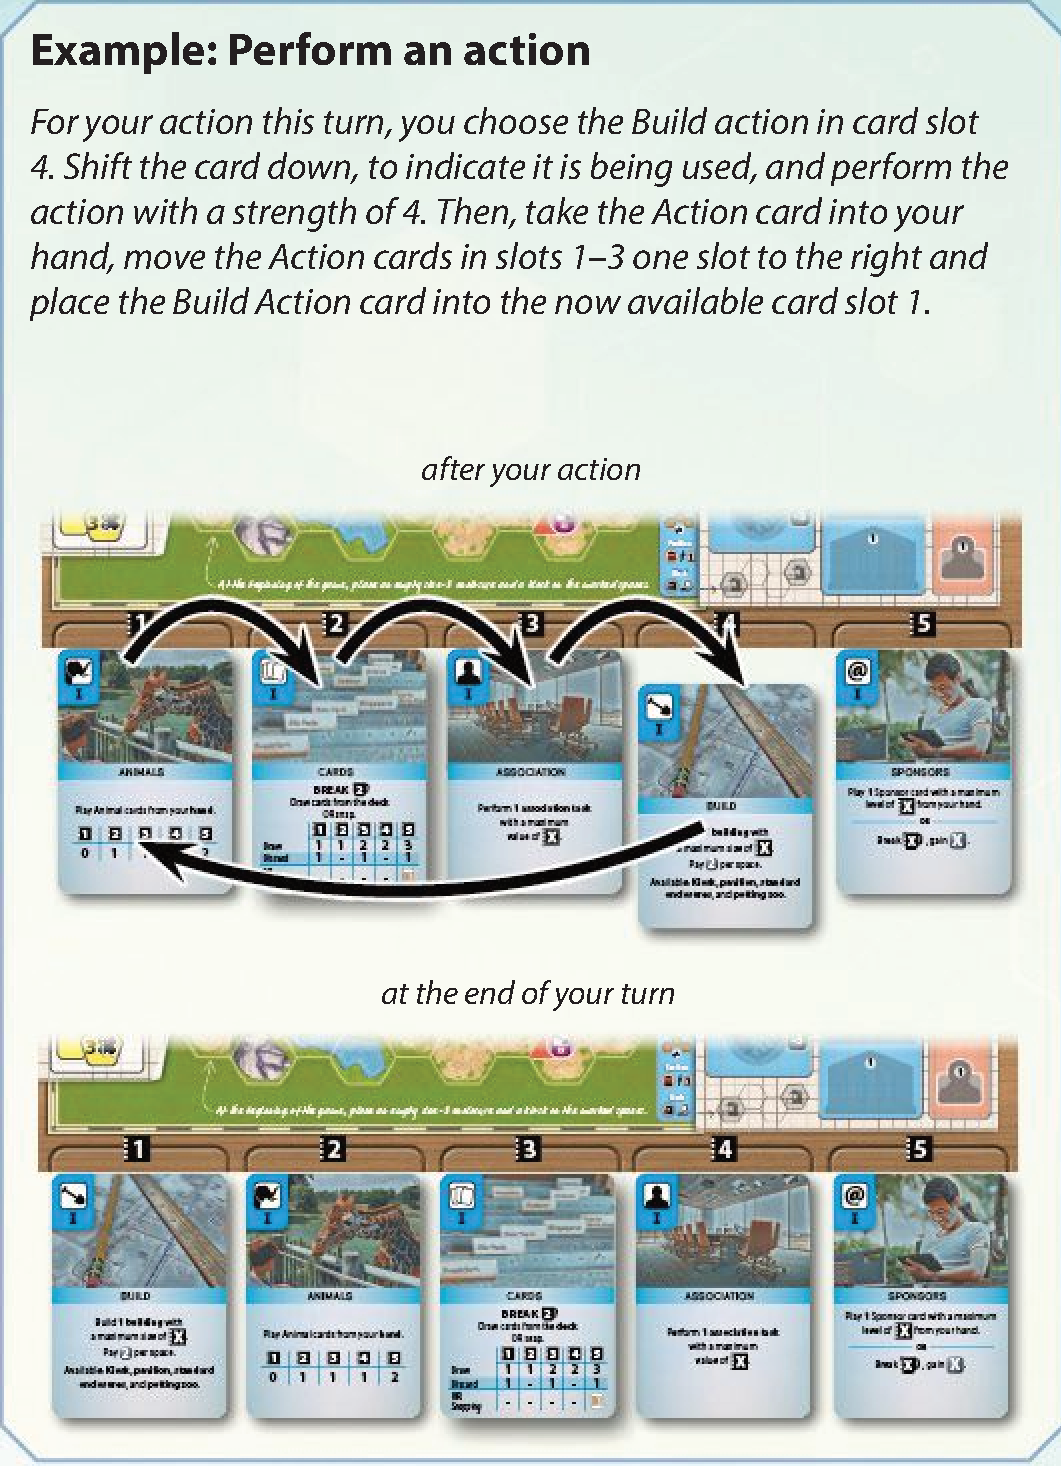
Your Action cards are located below your zoo map, assigned to slots numbered 1 (far left) to 5 (far right). The slot number indicates the strength (X) with which you perform the action.
On your turn:
- Choose one of your Action cards.
- Shift it lower than the others in the row.
- Perform the action with a strength equal to its current slot (X).
- After completing the action, remove the card, shift all Action cards that were to its left one slot to the right, and place the chosen Action card into slot 1.
Modifying Strength with X-tokens
- For each X-token spent, increase the strength of the action by 1. Return spent tokens to the general supply.
- You can spend as many X-tokens as you like, but some actions do not benefit from strength beyond 5.
- You can never have more than 5 X-tokens.
- Strength is set before performing the action (tokens gained during the action cannot boost that same action).
Zoo cards with “after finishing” effects are executed only after completely finishing the action, including moving the Action cards.
Action Card Upgrades
All Action cards start on side I. When you gain a card upgrade, flip any one Action card from side I to side II. It stays in its current slot and is used in its improved version thereafter.
- There are exactly 4 ways to upgrade an Action card during the game: on the Conservation track, on the Reputation track, and when gaining your second partner zoo or second partner university (one allows an alternative choice). You can never upgrade all 5 cards!
- You may never “do nothing” with your action (e.g., play 0 Animal cards or build 0 buildings).
X-TOKEN Action
If you cannot or do not want to perform any of the 5 actions, choose any Action card, move it to slot 1, shift others right, and take 1 X-token (max 5 tokens held). Slot value and upgrades do not affect this action.
A Turn / Action Cards
- Turn sequence:
- Choose an Action card.
- Execute action at strength X (slot 1–5 + spent X-tokens).
- Move card to slot 1; shift all cards previously to its left 1 slot right.
- Cannot choose an action to do nothing.
- “After finishing” effects trigger after card movement is complete.
X-Tokens
- Spend 1 X-token to gain +1 strength (must declare before resolving action).
- Maximum 5 X-tokens held at any time.
Card Upgrades
- Flip chosen card to side II in its current slot.
- Maximum 4 upgrades per game (Conservation track, Reputation track, 2nd partner zoo, 2nd partner university). You can never upgrade all 5 cards.
X-Token Action
Alternative to normal action: move any Action card to slot 1, shift cards to its left 1 slot right, and gain 1 X-token. Slot value and upgrades are ignored.
CARDS Action
Side I: Advance the Break token 2 spaces. Then draw cards from the deck OR snap.
- Drawing from the deck: Compare strength X with the card table. Draw up to the indicated number of cards (max 3). Discard a card if indicated (can be a freshly drawn card or one already held).
- Snapping: At strength 5 or higher, instead of drawing from the deck, take exactly 1 card of your choice from the display into your hand regardless of reputation. Replenish display at end of turn.
- Advancing the Break: Advance the Break token 2 spaces first (do not gain money).
- Hand Limit: You can hold any number of cards during your turn, but during a break you must discard down to your limit (3, or 5 with the appropriate university).
Side II: Advance the Break token 2 spaces. Then draw cards from the deck or within reputation range OR snap.
- Drawing within reputation range: Draw from the display (up to your Reputation counter) and/or from the deck in any combination/order. Display is not replenished until the turn is complete.
- Snapping: Can snap starting at strength 3 or higher.
- Allows your reputation to progress beyond 9 on the Reputation track.
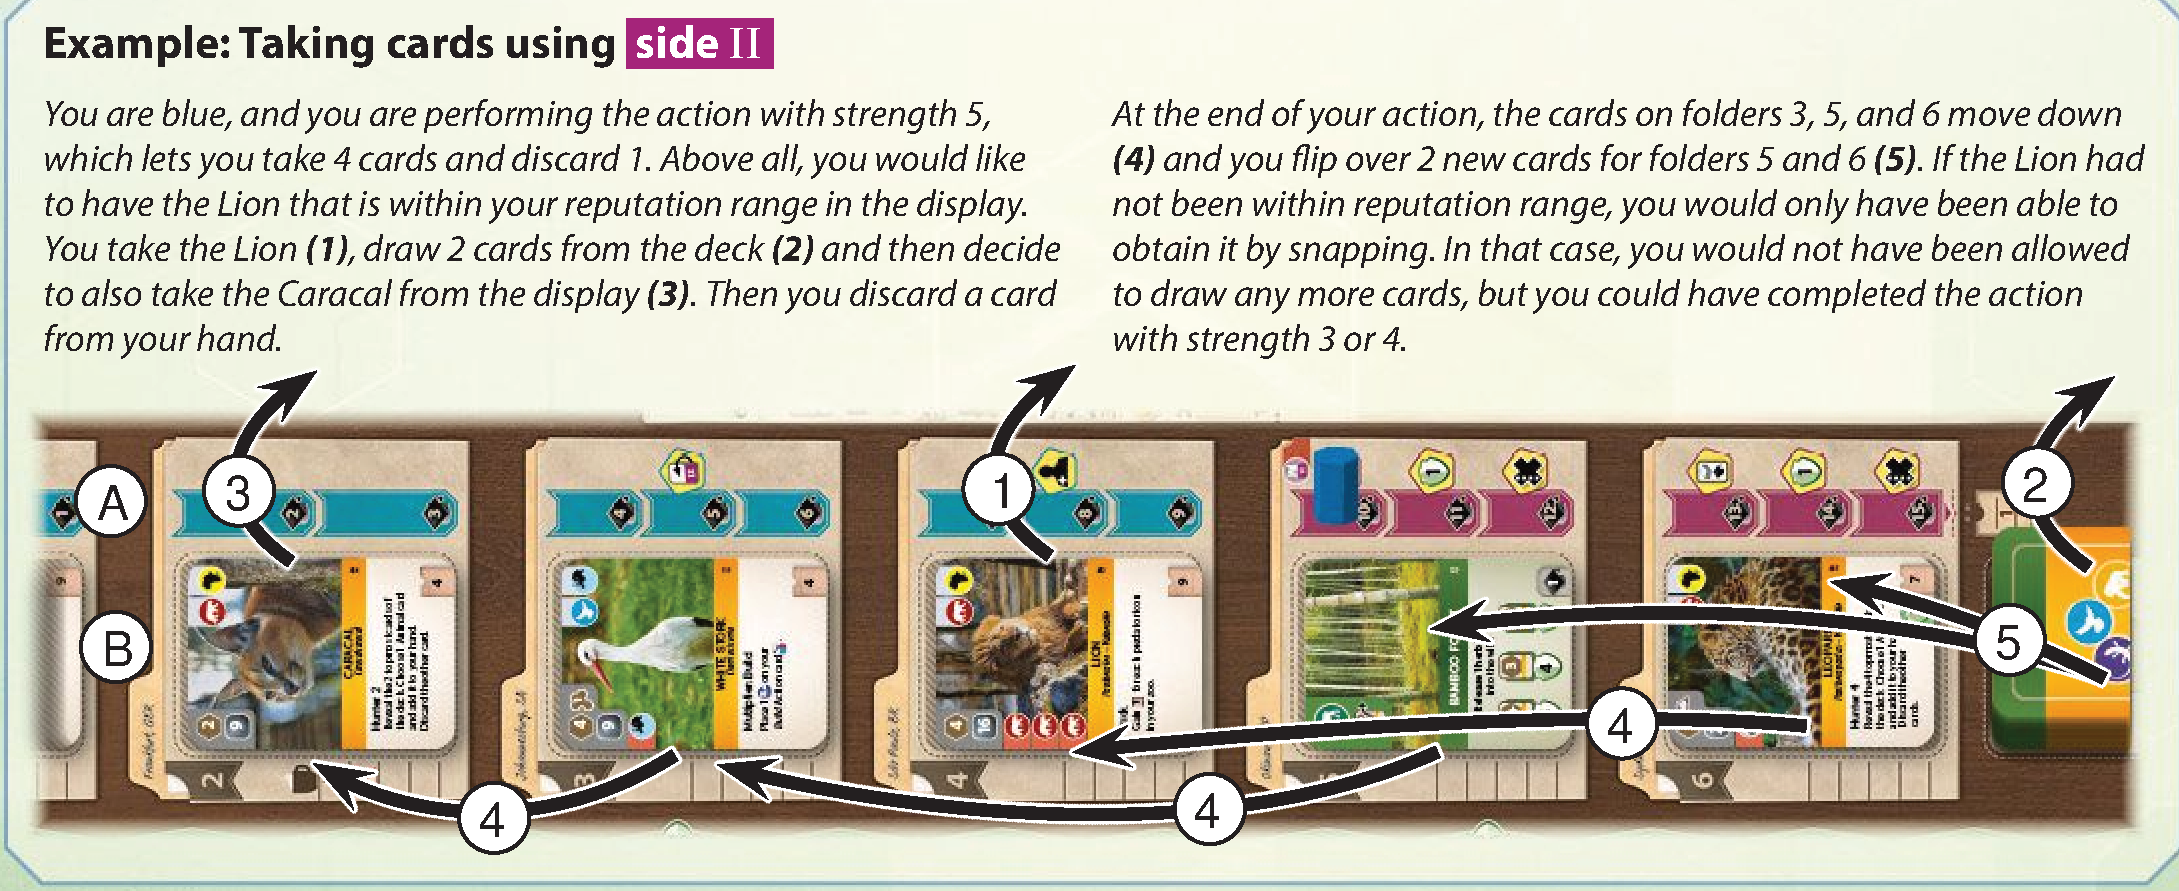
The Reputation Track and the Display
- Reputation Range: The card on the same folder number as your Reputation counter, plus all cards on lower-numbered folders, are within your reputation range.
- Progressing Past 9: You must upgrade Cards to side II to increase reputation to 10 or more.
- Bonuses: Bonuses printed next to reputation spaces are gained once immediately upon reaching them. At space 15 (max), any further reputation steps award 1 appeal each.
- Replenishing the Display: Only done after completing your full turn. Slide remaining cards from higher folders down to lower folders (preserving order), then refill empty high-numbered spaces from the deck. The discard pile is face-up next to the display; players may not browse through it.
CARDS Action
Always advance Break 2 spaces first. Hand limit: 3 cards (5 with university), checked only during Break.
Side I
- Draw: Draw from deck up to card table limit (max 3); discard if indicated (drawn or held card).
- OR Snap (Strength 5+): Take exactly 1 card from display regardless of reputation.
Side II
- Draw: Draw from deck and/or display within reputation range in any combination.
- OR Snap (Strength 3+): Take exactly 1 card from display regardless of reputation.
- Allows reputation to advance past 9.
The Reputation Track and the Display
- Reputation Range: Cards in folders with numbers less than or equal to your Reputation marker.
- Track Limit: Requires Cards Side II to reach 10+. At max space (15), each further step grants 1 appeal. One-time bonuses are claimed immediately upon reaching.
- Replenishing Display: Done at end of turn only. Slide remaining cards to lowest-numbered empty folders; fill remaining spaces from deck. Discard pile is face-up; browsing forbidden.
BUILD Action
Side I: Build exactly 1 building of your choice with a maximum size of X on your zoo map. Pay 2 money per space. Available: Kiosk, pavilion, standard enclosure, and Petting Zoo.
- Building Costs: Pay twice the size of the building (cost = size x 2 money) before placing it.
- Placement Rules:
- Must be adjacent to an existing building (sharing at least 1 edge). The very first building in your zoo must touch at least 1 border space of the map.
- May only be built on empty building spaces. Cannot overlap other buildings, extend beyond the map edge, or cover water or rock spaces.
- Cannot build on spaces with the upgrade icon until Build is upgraded to side II.
- Kiosks: Must always be placed at least 3 spaces away from every other kiosk (at least 2 empty/other spaces between kiosks). Grants income during breaks.
- Pavilion: Size 1; immediately increases zoo appeal by 1.
- Standard Enclosure: Placed empty side up (yellow border with size X).
- Petting Zoo: Size 3 special enclosure; maximum 1 per zoo. Both sides are identical.
- Placement Bonuses: Gained immediately when covering a bonus icon.
Side II: Build as many different buildings as you like with a maximum total size of X on your zoo map. Newly available: Large Bird Aviary and Reptile House.
- May build multiple buildings in one action, provided they are all different (cannot build 2 identical buildings in the same action). Total size cannot exceed X.
- Build and pay for each building one after another. Placement bonuses are gained immediately and can help pay for subsequent buildings in the same action.
- Unlocks Large Bird Aviary and Reptile House (both size 5; limit 1 of each per zoo). When built, you may immediately move eligible animals from standard enclosures into them (flipping vacated standard enclosures to empty).
- Allows building on upgrade-icon spaces. If you completely cover every space on your zoo map (except water and rocks), immediately gain 7 appeal.
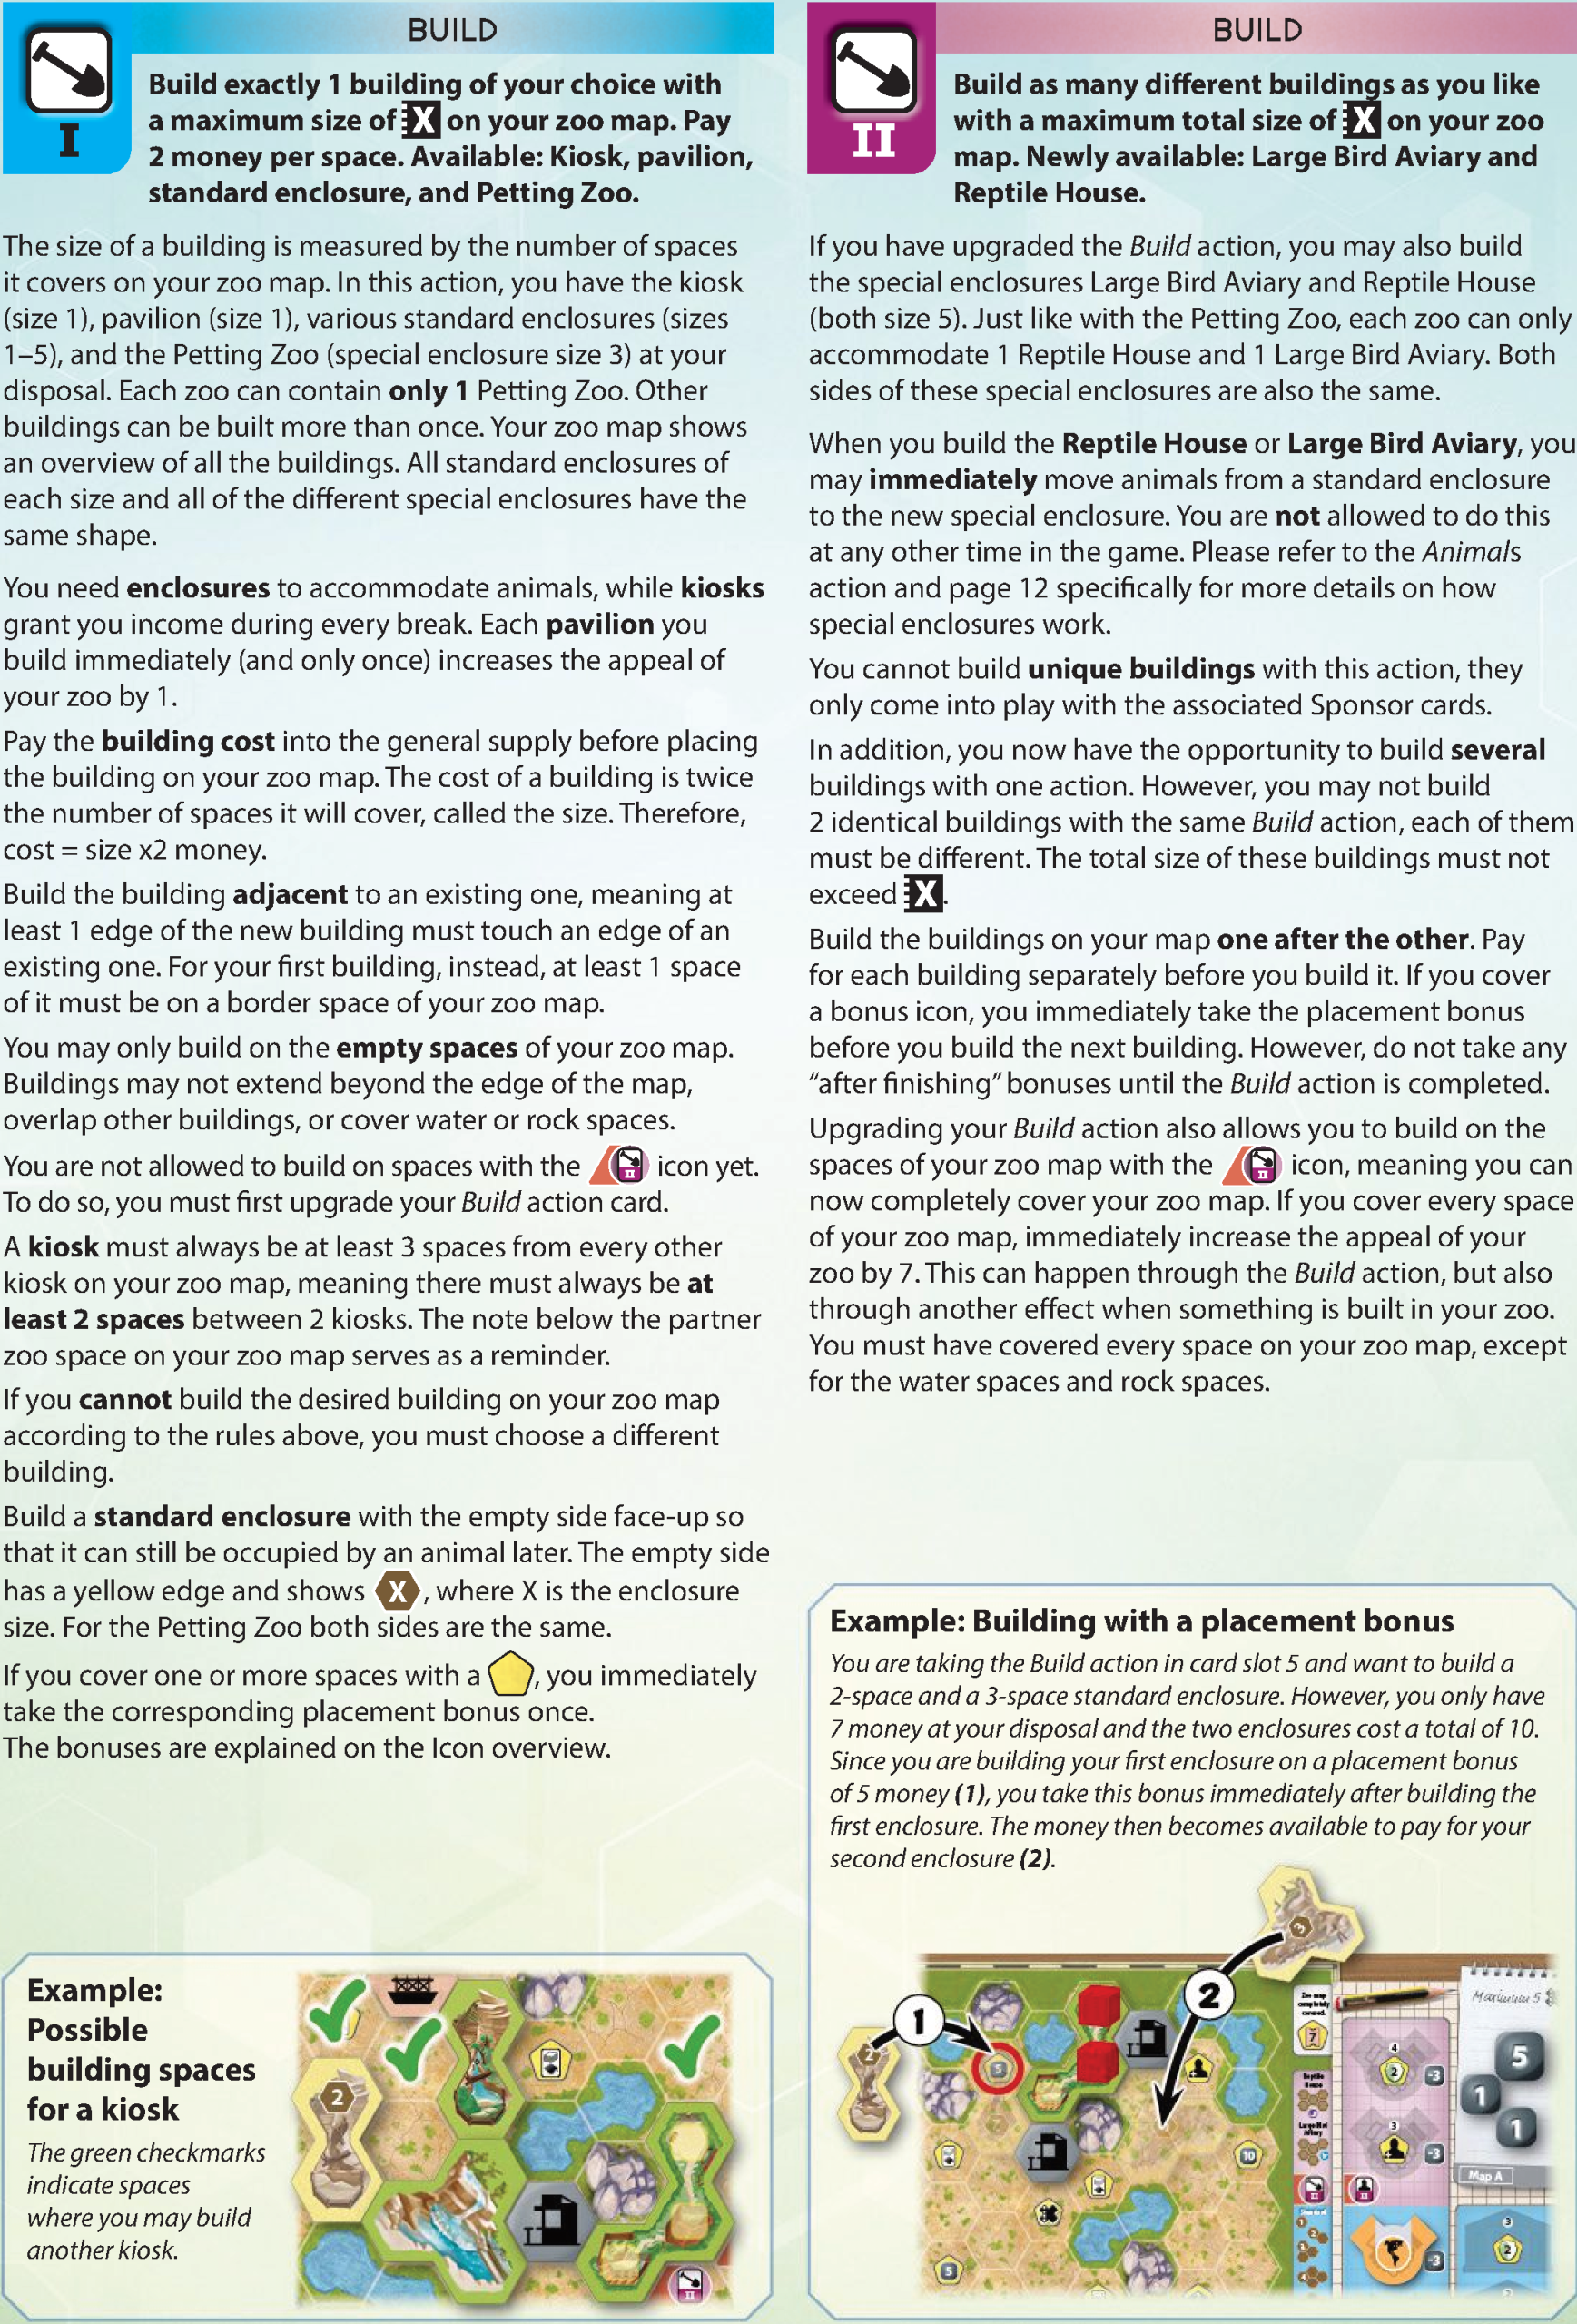
BUILD Action
- Cost: 2 money per space.
- Placement: Must be adjacent to an existing building (first building must touch map border). Only on empty spaces; never on rock, water, or overlapping.
- Bonuses: Immediate when covered. Spaces with upgrade icons require Side II.
Side I
- Build 1 building of max size X.
- Kiosk: ≥3 spaces away from any other kiosk. Provides break income.
- Pavilion: Size 1; immediately grants +1 Appeal.
- Standard Enclosure: Placed empty side up.
- Petting Zoo: Size 3; limit 1 per zoo.
Side II
- Build multiple different buildings up to total size X. Pay and place sequentially (bonuses can fund later placements in the same turn).
- May build on upgrade-icon spaces.
- Large Bird Aviary & Reptile House: Size 5; limit 1 of each per zoo. May immediately move eligible animals into them from standard enclosures (flip vacated enclosures to empty).
- Map Completion: Gain +7 Appeal if all valid map spaces are filled.
ANIMALS Action
Side I: Play Animal cards from your hand up to the limit allowed by action strength X.
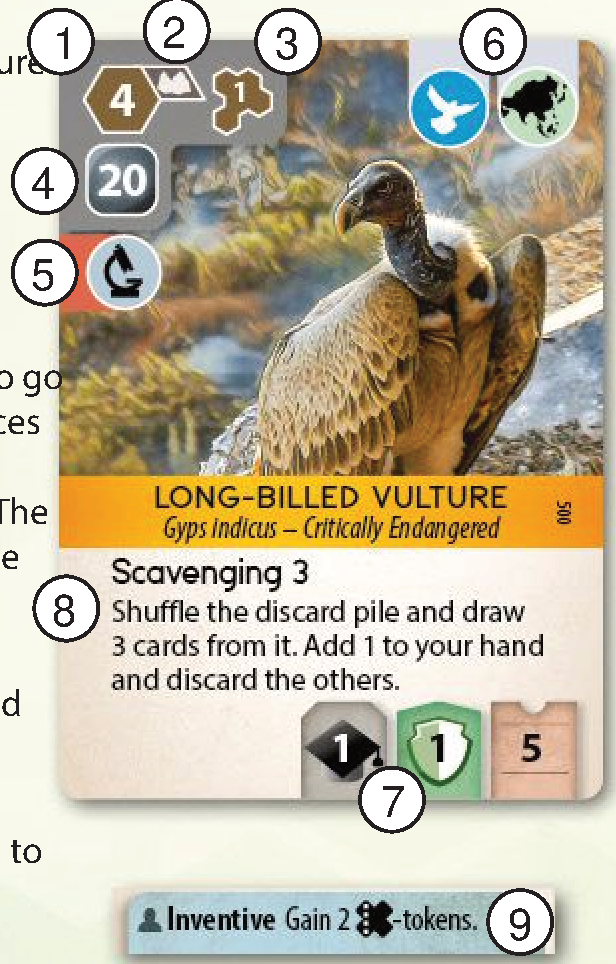
For each animal played, execute the following steps in sequence:
- Check conditions: Fulfill all conditions shown on the left side of the Animal card (e.g., partner zoos, animal category icons, continent icons).
- Pay cost: Pay the money cost in the upper-left corner into the general supply. Reduced by 3 money per matching continent icon if you have the corresponding partner zoo.
- Fill empty enclosure: Accommodate the animal into an eligible empty enclosure:
- Petting Zoo animals can only go into the Petting Zoo.
- Standard animals require an empty standard enclosure of at least the required size, adjacent to required rock/water spaces if depicted. Flip the enclosure to its occupied side.
- Reptiles and birds with special enclosure icons may either enter a standard enclosure or the Reptile House / Large Bird Aviary (by placing the required number of player tokens onto it).
- Place Animal card: Place the card next to your zoo map overlapping existing cards.
- Execute effects: Advance Appeal on the track as shown on the card, plus any reputation or conservation points indicated. Execute instant abilities immediately. Effects marked “after finishing” are executed only after all played animals and the card shift to slot 1 are resolved.
If playing 2 animals, complete steps 1–5 for the first animal before beginning the second animal.
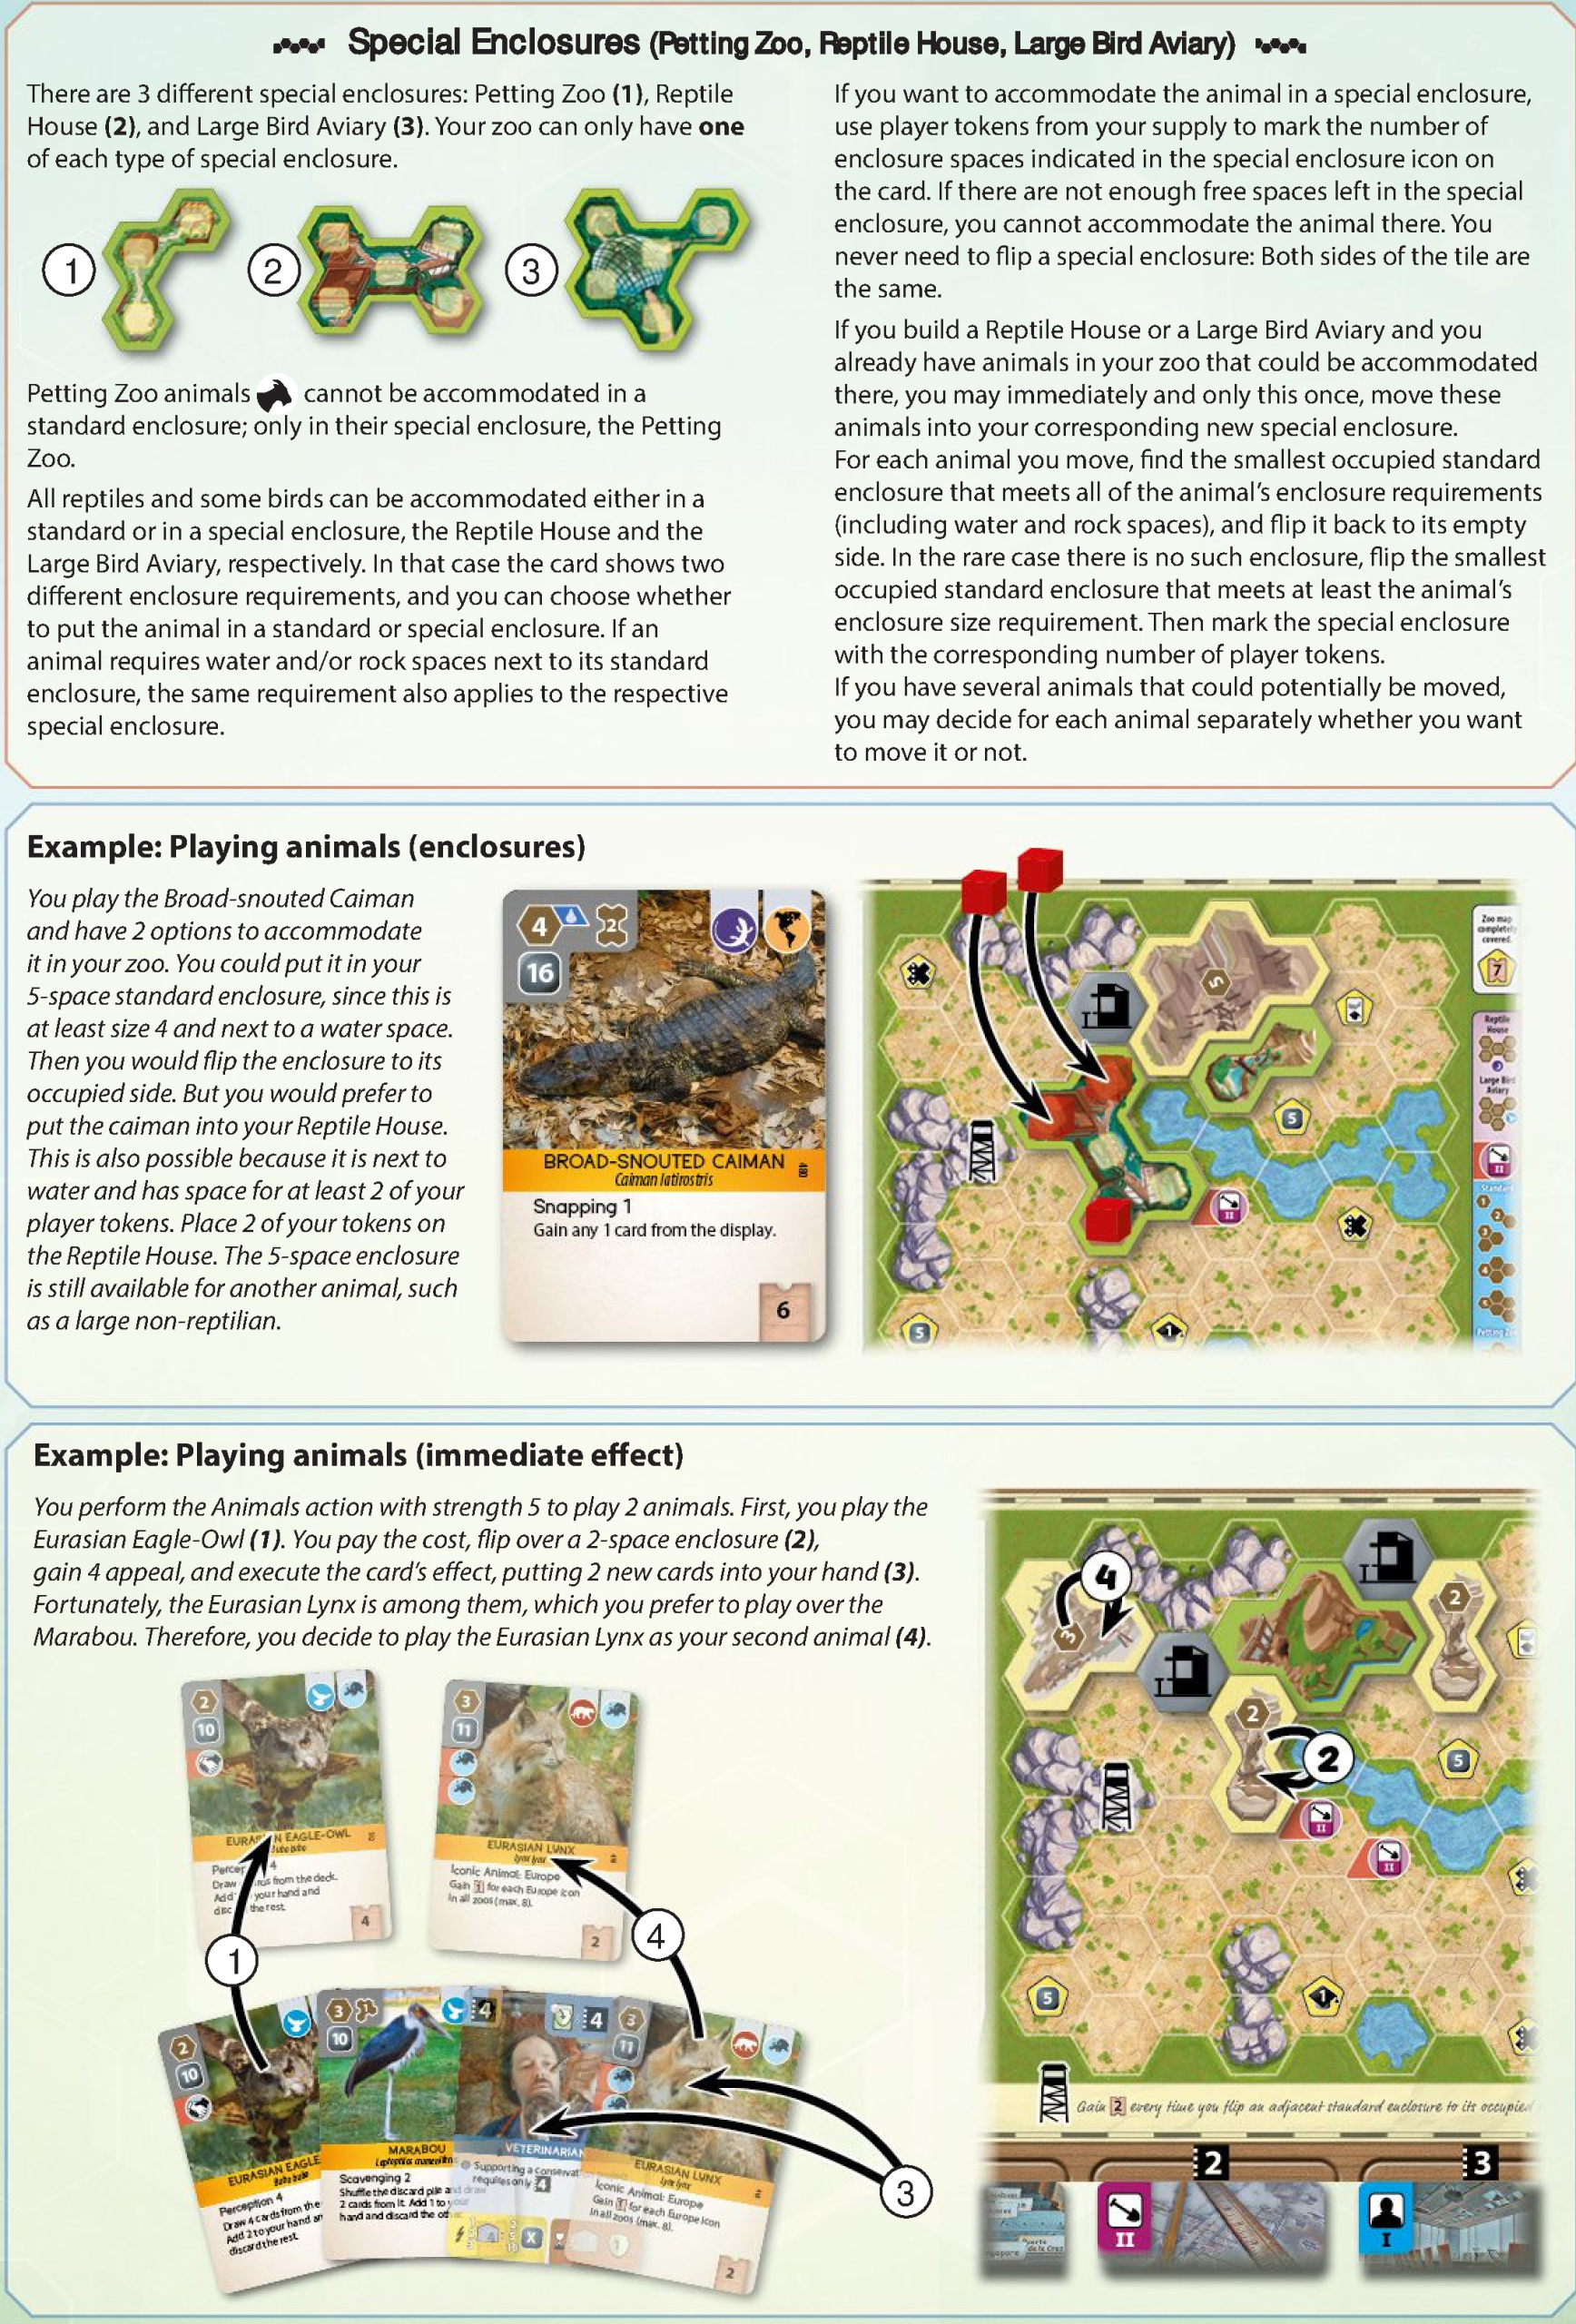
Special Enclosures (Petting Zoo, Reptile House, Large Bird Aviary)
- Limits: Each zoo can contain at most one of each special enclosure.
- Tokens: Place player tokens on the special enclosure to mark spaces used. Both sides of special enclosures are identical. Rock and water requirements still apply to the special enclosure tile.
- Moving Animals: When you build a Reptile House or Large Bird Aviary, you may immediately move matching animals from standard enclosures into it, flipping the smallest matching occupied enclosure back to its empty side and placing tokens on the special enclosure.
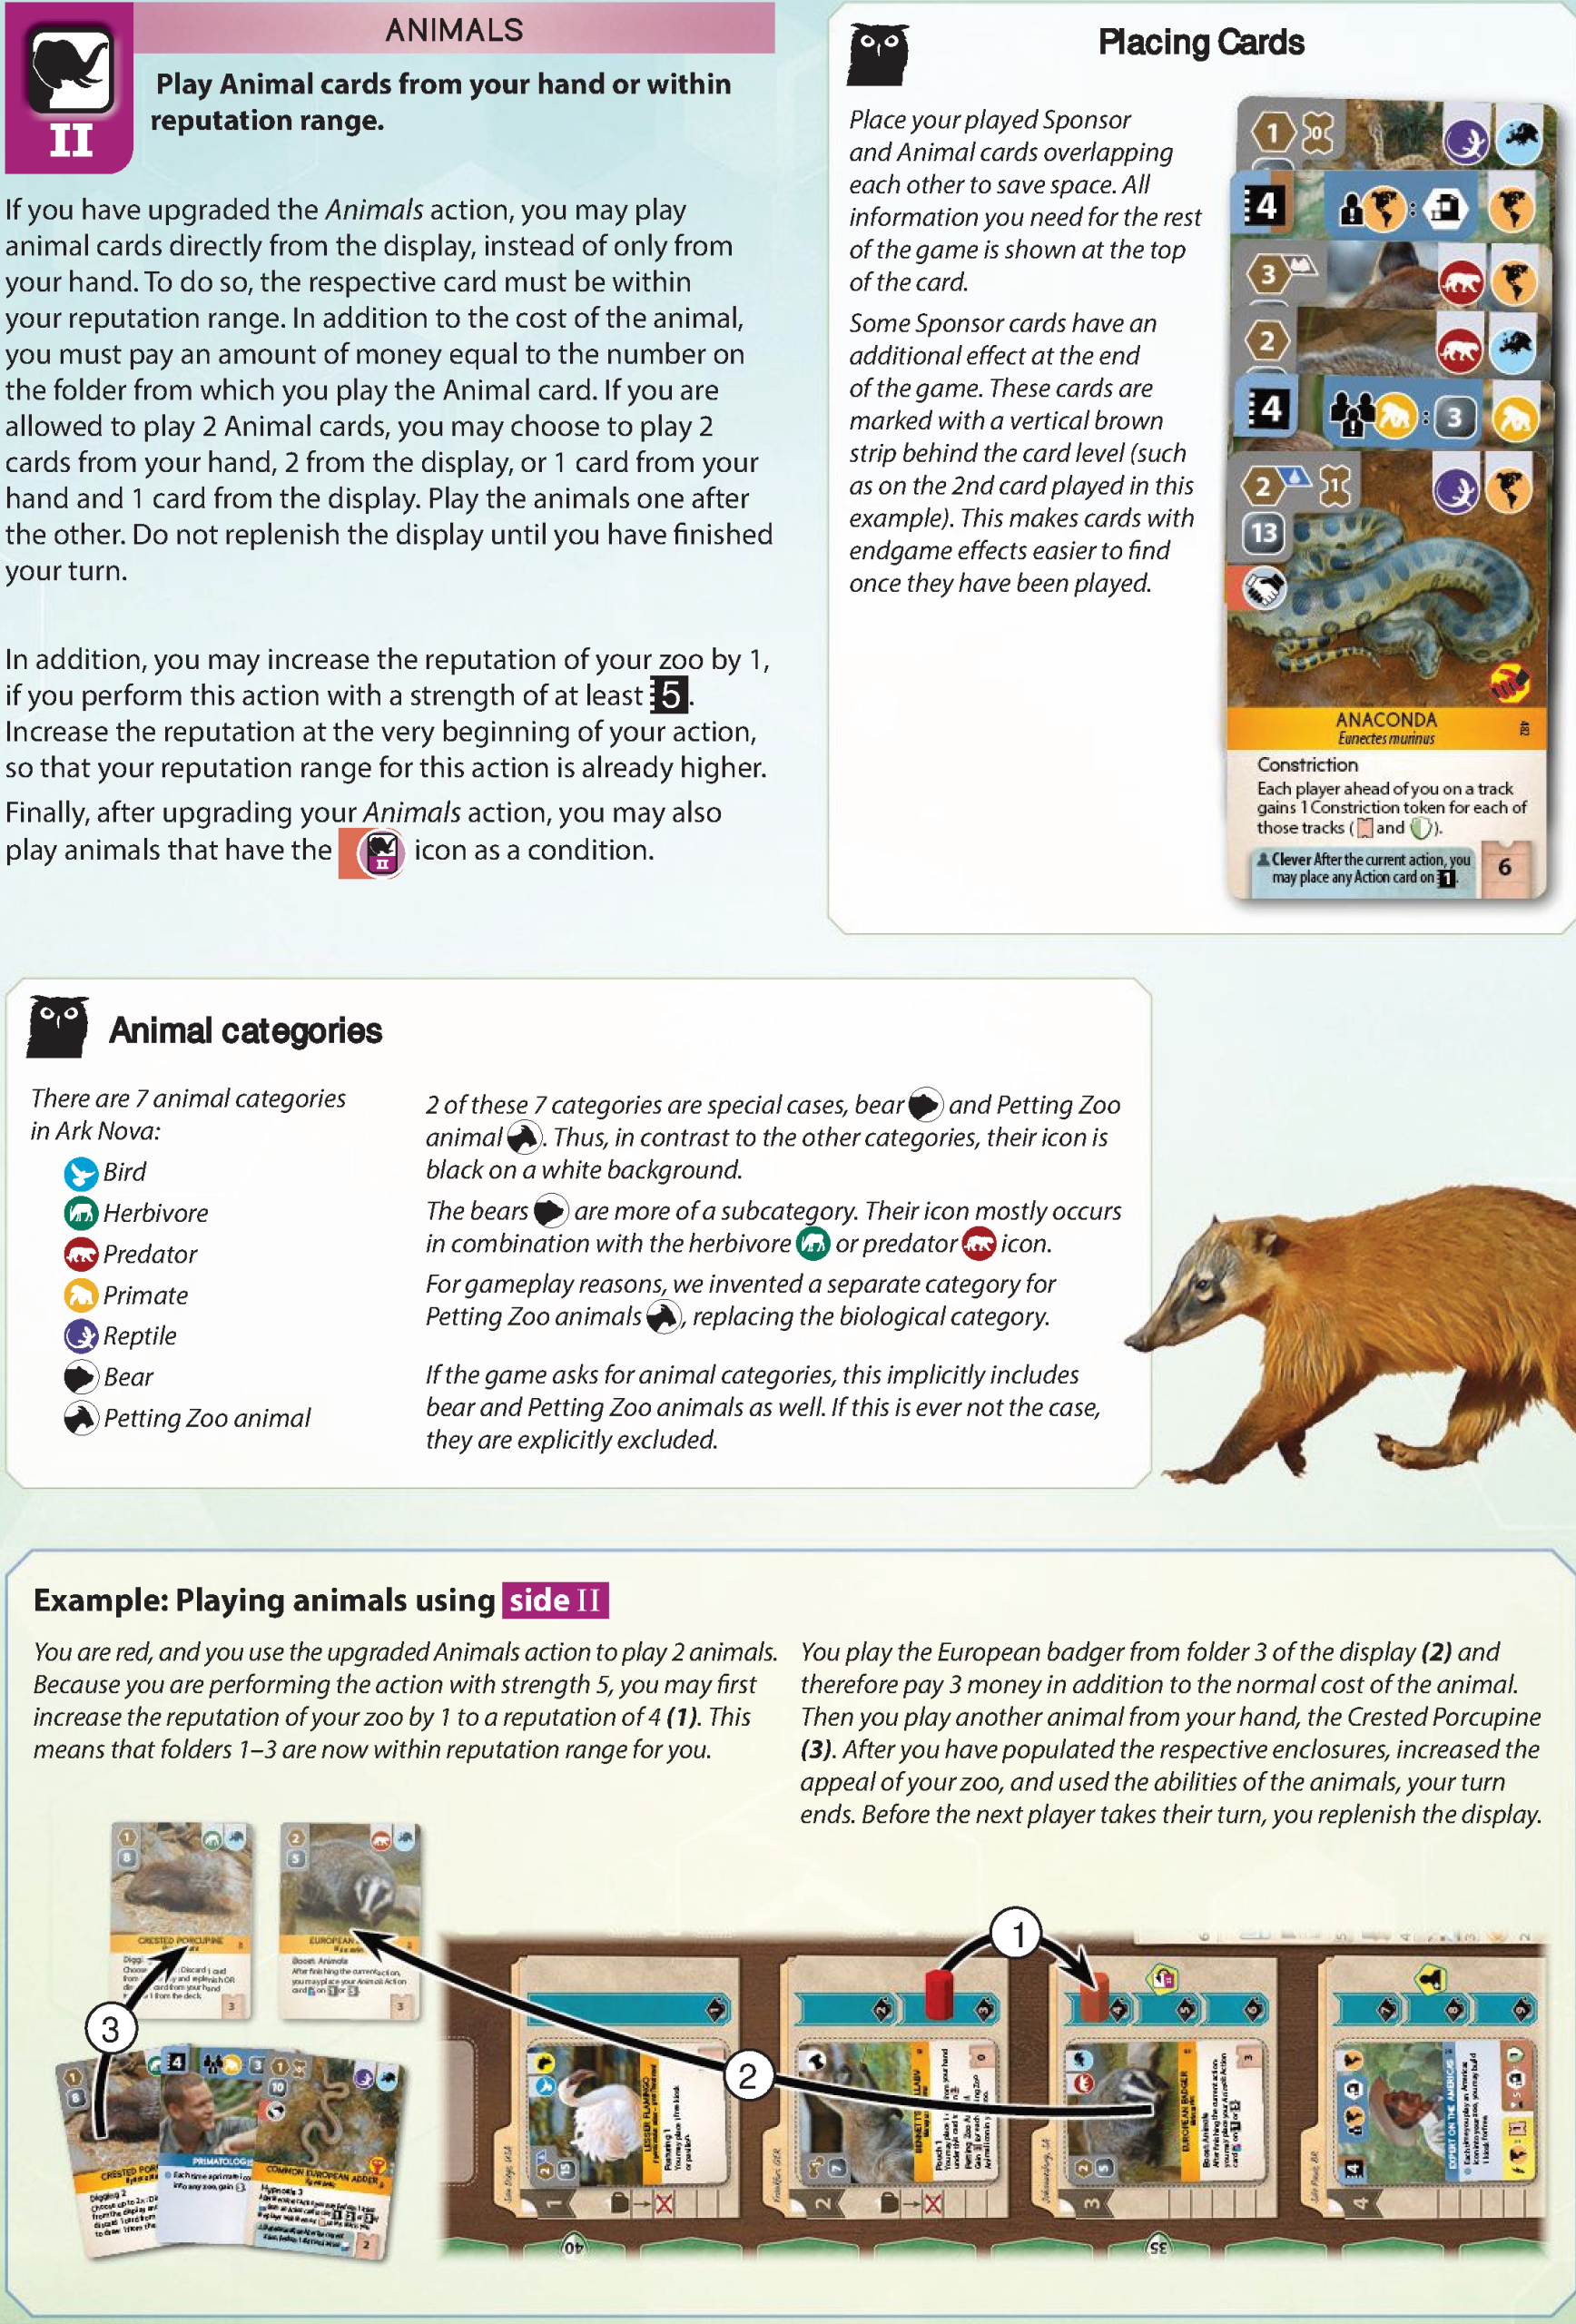
Animals Action (Side II) & Card Placement
Side II: Play Animal cards from your hand or within reputation range.
- May play animals directly from the display within your reputation range by paying extra money equal to the folder number.
- If performed at strength 5, you may first increase your reputation by 1 at the start of the action.
- Allows playing animals with the upgrade condition icon.
Animal Categories
There are 7 animal categories: Bird, Herbivore, Predator, Primate, Reptile, Bear, and Petting Zoo animal. (Bear and Petting Zoo animal have black icons on white backgrounds as special categories/subcategories).
Placing Cards
Tuck played cards overlapping each other so only the top icon bar remains visible. Sponsor cards with end-game scoring have a vertical brown stripe behind the card level.
ANIMALS Action
Play Animal cards up to strength limit. Fully resolve each card in sequence before playing the next:
- Conditions: Fulfill all left-edge requirements.
- Cost: Pay money cost (-3 per matching continent icon on partner zoos).
- Enclosure:
- Standard: Flip an empty enclosure of ≥ required size (must satisfy rock/water adjacencies).
- Petting Zoo: Petting Zoo only.
- Reptiles/Birds: Standard enclosure OR place player tokens into Reptile House / Aviary.
- Place Card: Tuck overlapping existing cards so top icon bar remains visible.
- Effects: Advance tracks and execute instant abilities. “After finishing” effects trigger after all played cards and the action card reset resolve.
Special Enclosures
- Limit 1 of each per zoo (Petting Zoo, Reptile House, Large Bird Aviary).
- Mark capacity with player tokens. Rock/water terrain requirements still apply to the tile.
- When built: May immediately move matching animals from standard enclosures into them; flip the smallest emptied enclosure back to its empty side.
Animals Action (Side II)
- Play cards from hand or from display within reputation range (pay card cost + slot number fee).
- At strength 5: May take +1 Reputation before playing cards.
- Allows playing cards with the upgrade requirement icon.
Animal Categories
7 categories: Bird, Herbivore, Predator, Primate, Reptile, Bear, and Petting Zoo animal.
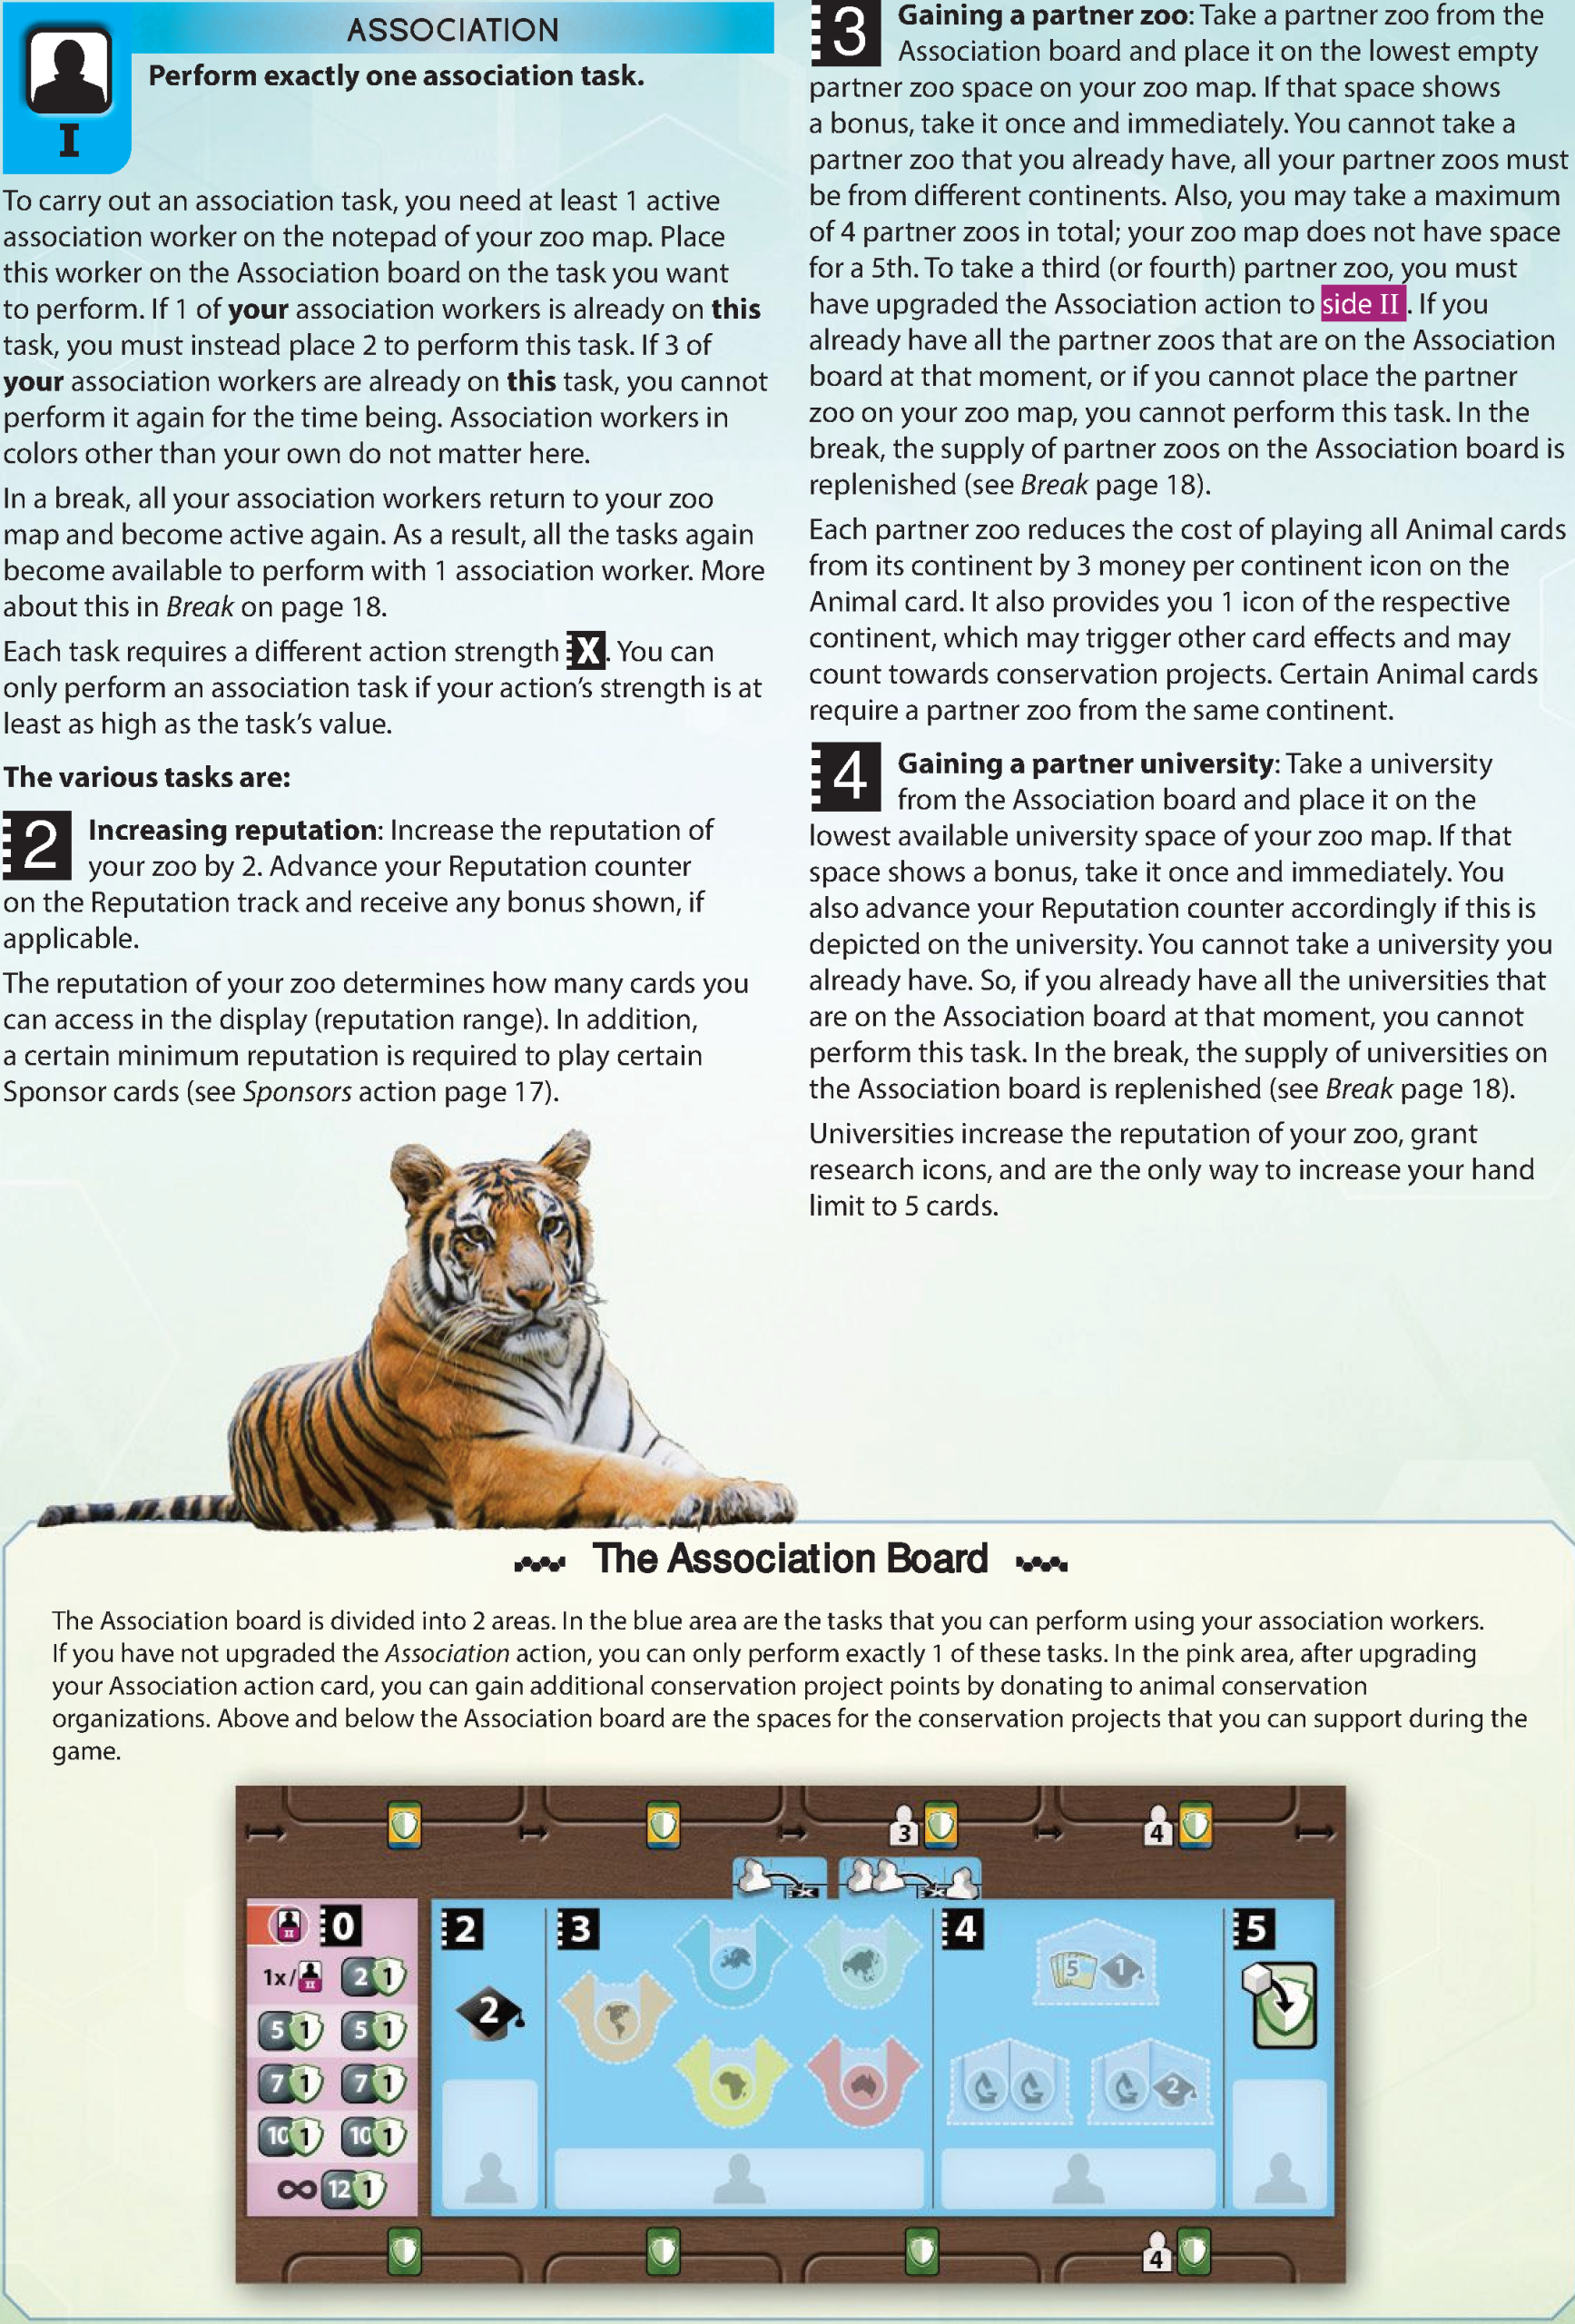
ASSOCIATION Action
Side I: Perform exactly one association task. Requires placing an active association worker on the task on the Association board. If 1 worker of yours is already there, you must place 2 workers. If 3 are there, you cannot perform it again until workers are recalled in a break.
Tasks available based on action strength:
- Strength 2 – Increasing reputation: Advance Reputation counter by 2 on the Reputation track.
- Strength 3 – Gaining a partner zoo: Take 1 available partner zoo from the board and place it on the lowest empty space on your zoo map. Maximum 4 partner zoos total (upgrade Association to side II to take a 3rd or 4th). Cannot take duplicate continents.
- Strength 4 – Gaining a partner university: Take 1 available university and place it on your zoo map. Cannot take duplicates. Increases reputation, grants research icons, or increases hand limit to 5.
- Strength 5 – Conservation project work: Support an active project or play a new Conservation Project card from your hand into the leftmost slot above the board (sliding others right; discard if exceeding limit: 2, 3, or 4 based on player count). Place 1 player token from the left of your zoo map onto the fulfilled condition to score points and unlock the token space bonus.
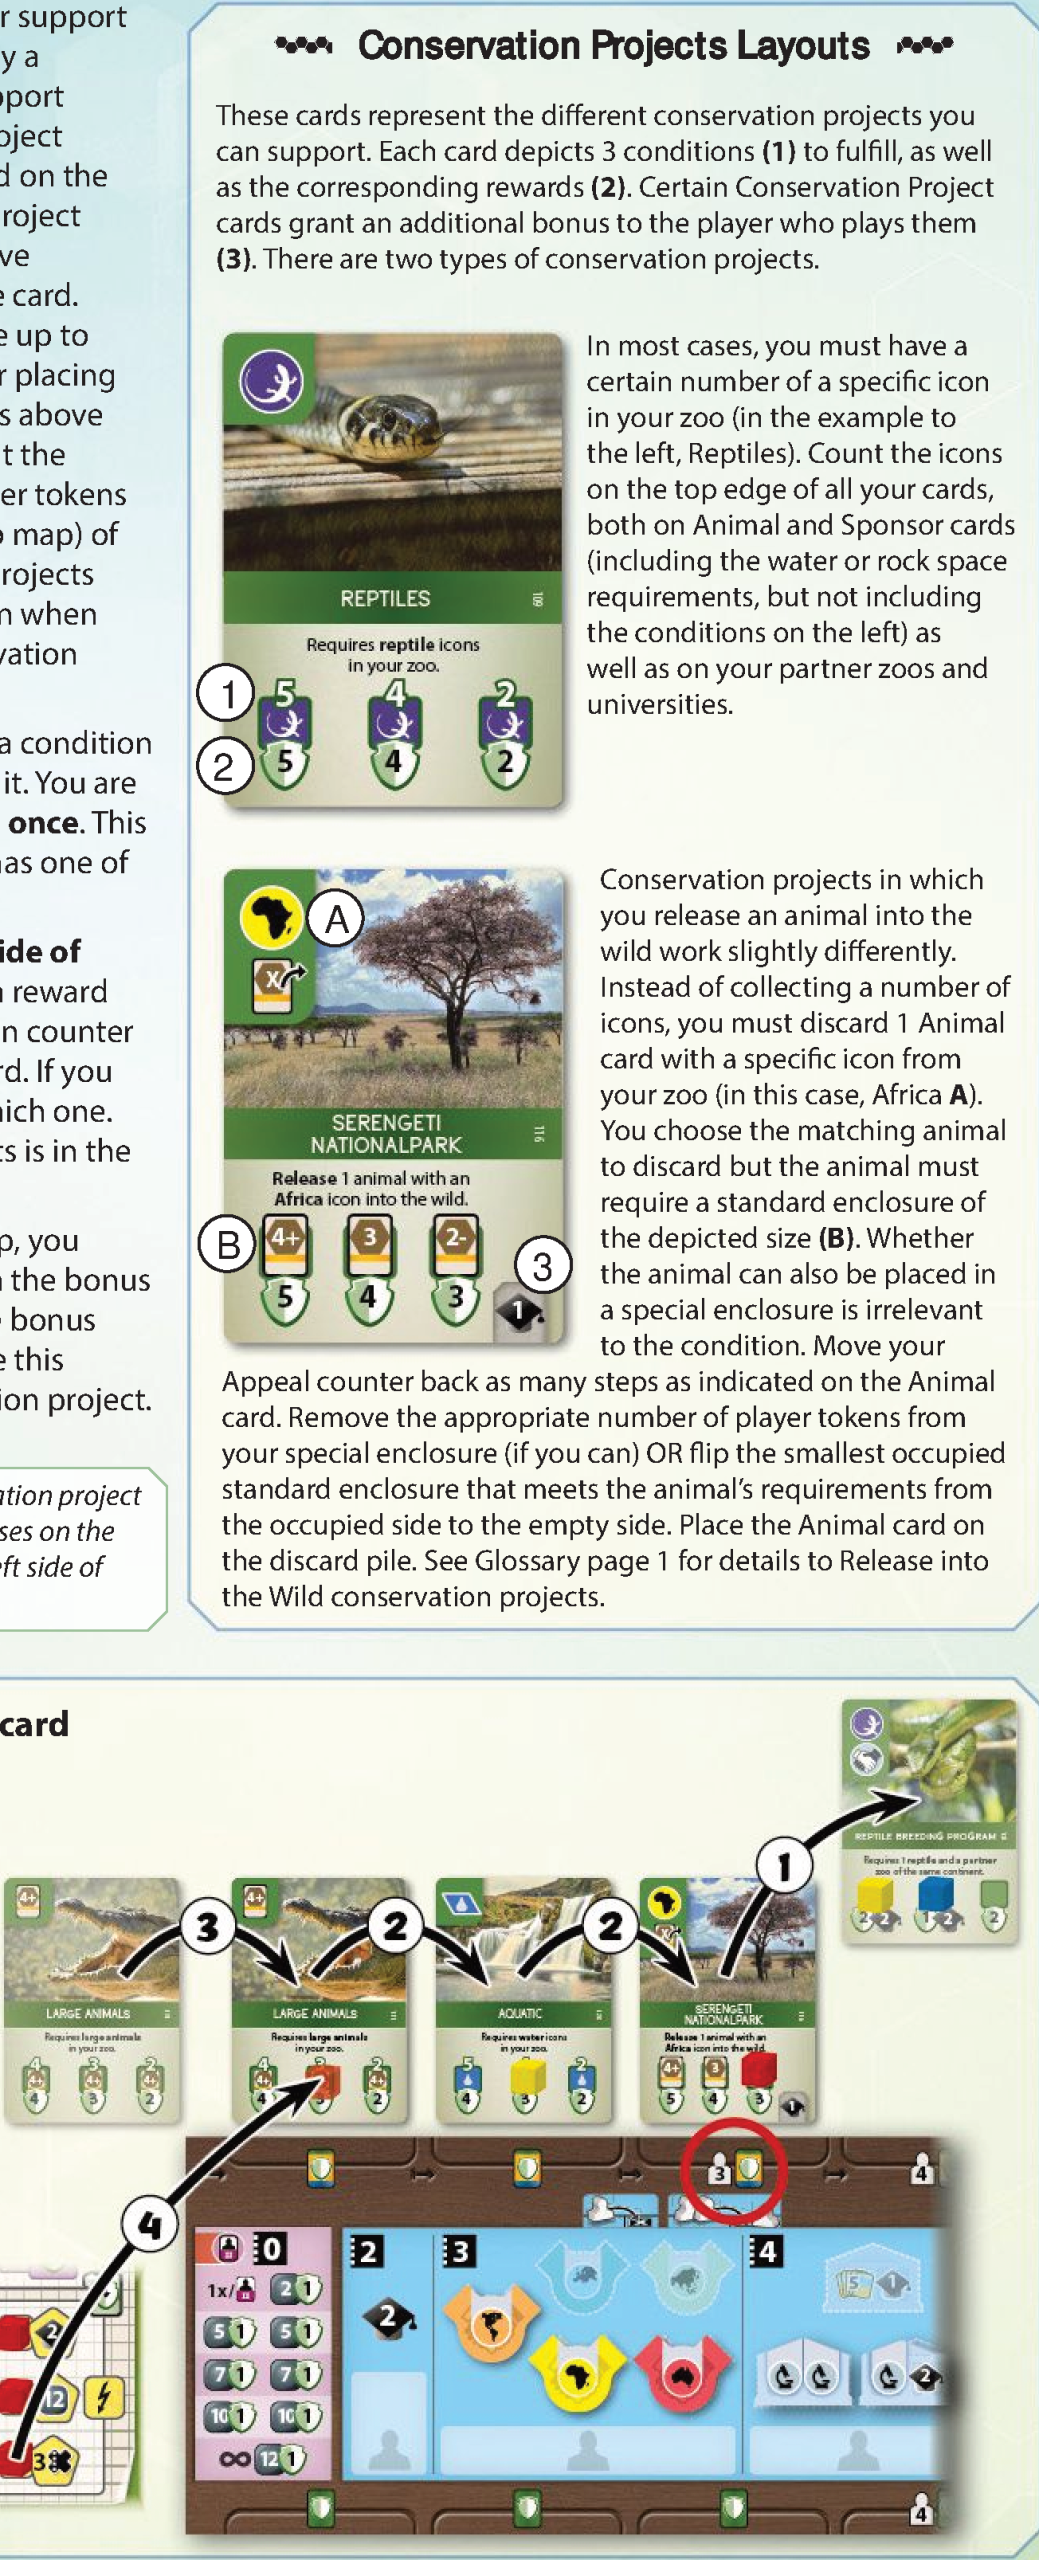
Conservation Projects Layouts & Types
- Icon Requirements: Count matching icons on played cards, partner zoos, and universities.
- Release into the Wild: Discard a matching Animal card from your zoo that occupies a standard enclosure of the required size. Move Appeal back by the animal’s value, empty its enclosure, and score conservation points.
Association Action (Side II) & Donations
Side II: Perform one or more different association tasks. You may make one donation.
- Can perform multiple different tasks in a single action, spending required workers for each, provided the sum of task strengths does not exceed action strength X.
- Can play Conservation Project cards directly from display within reputation range (paying folder cost).
- Donations: May make 1 donation per action by paying the lowest visible cost in the donation area (2, 5, 7, 10, or 12 money) and covering it with a player token to gain 1 conservation point. Once all spaces are covered, each subsequent donation costs 12 money without placing a token.
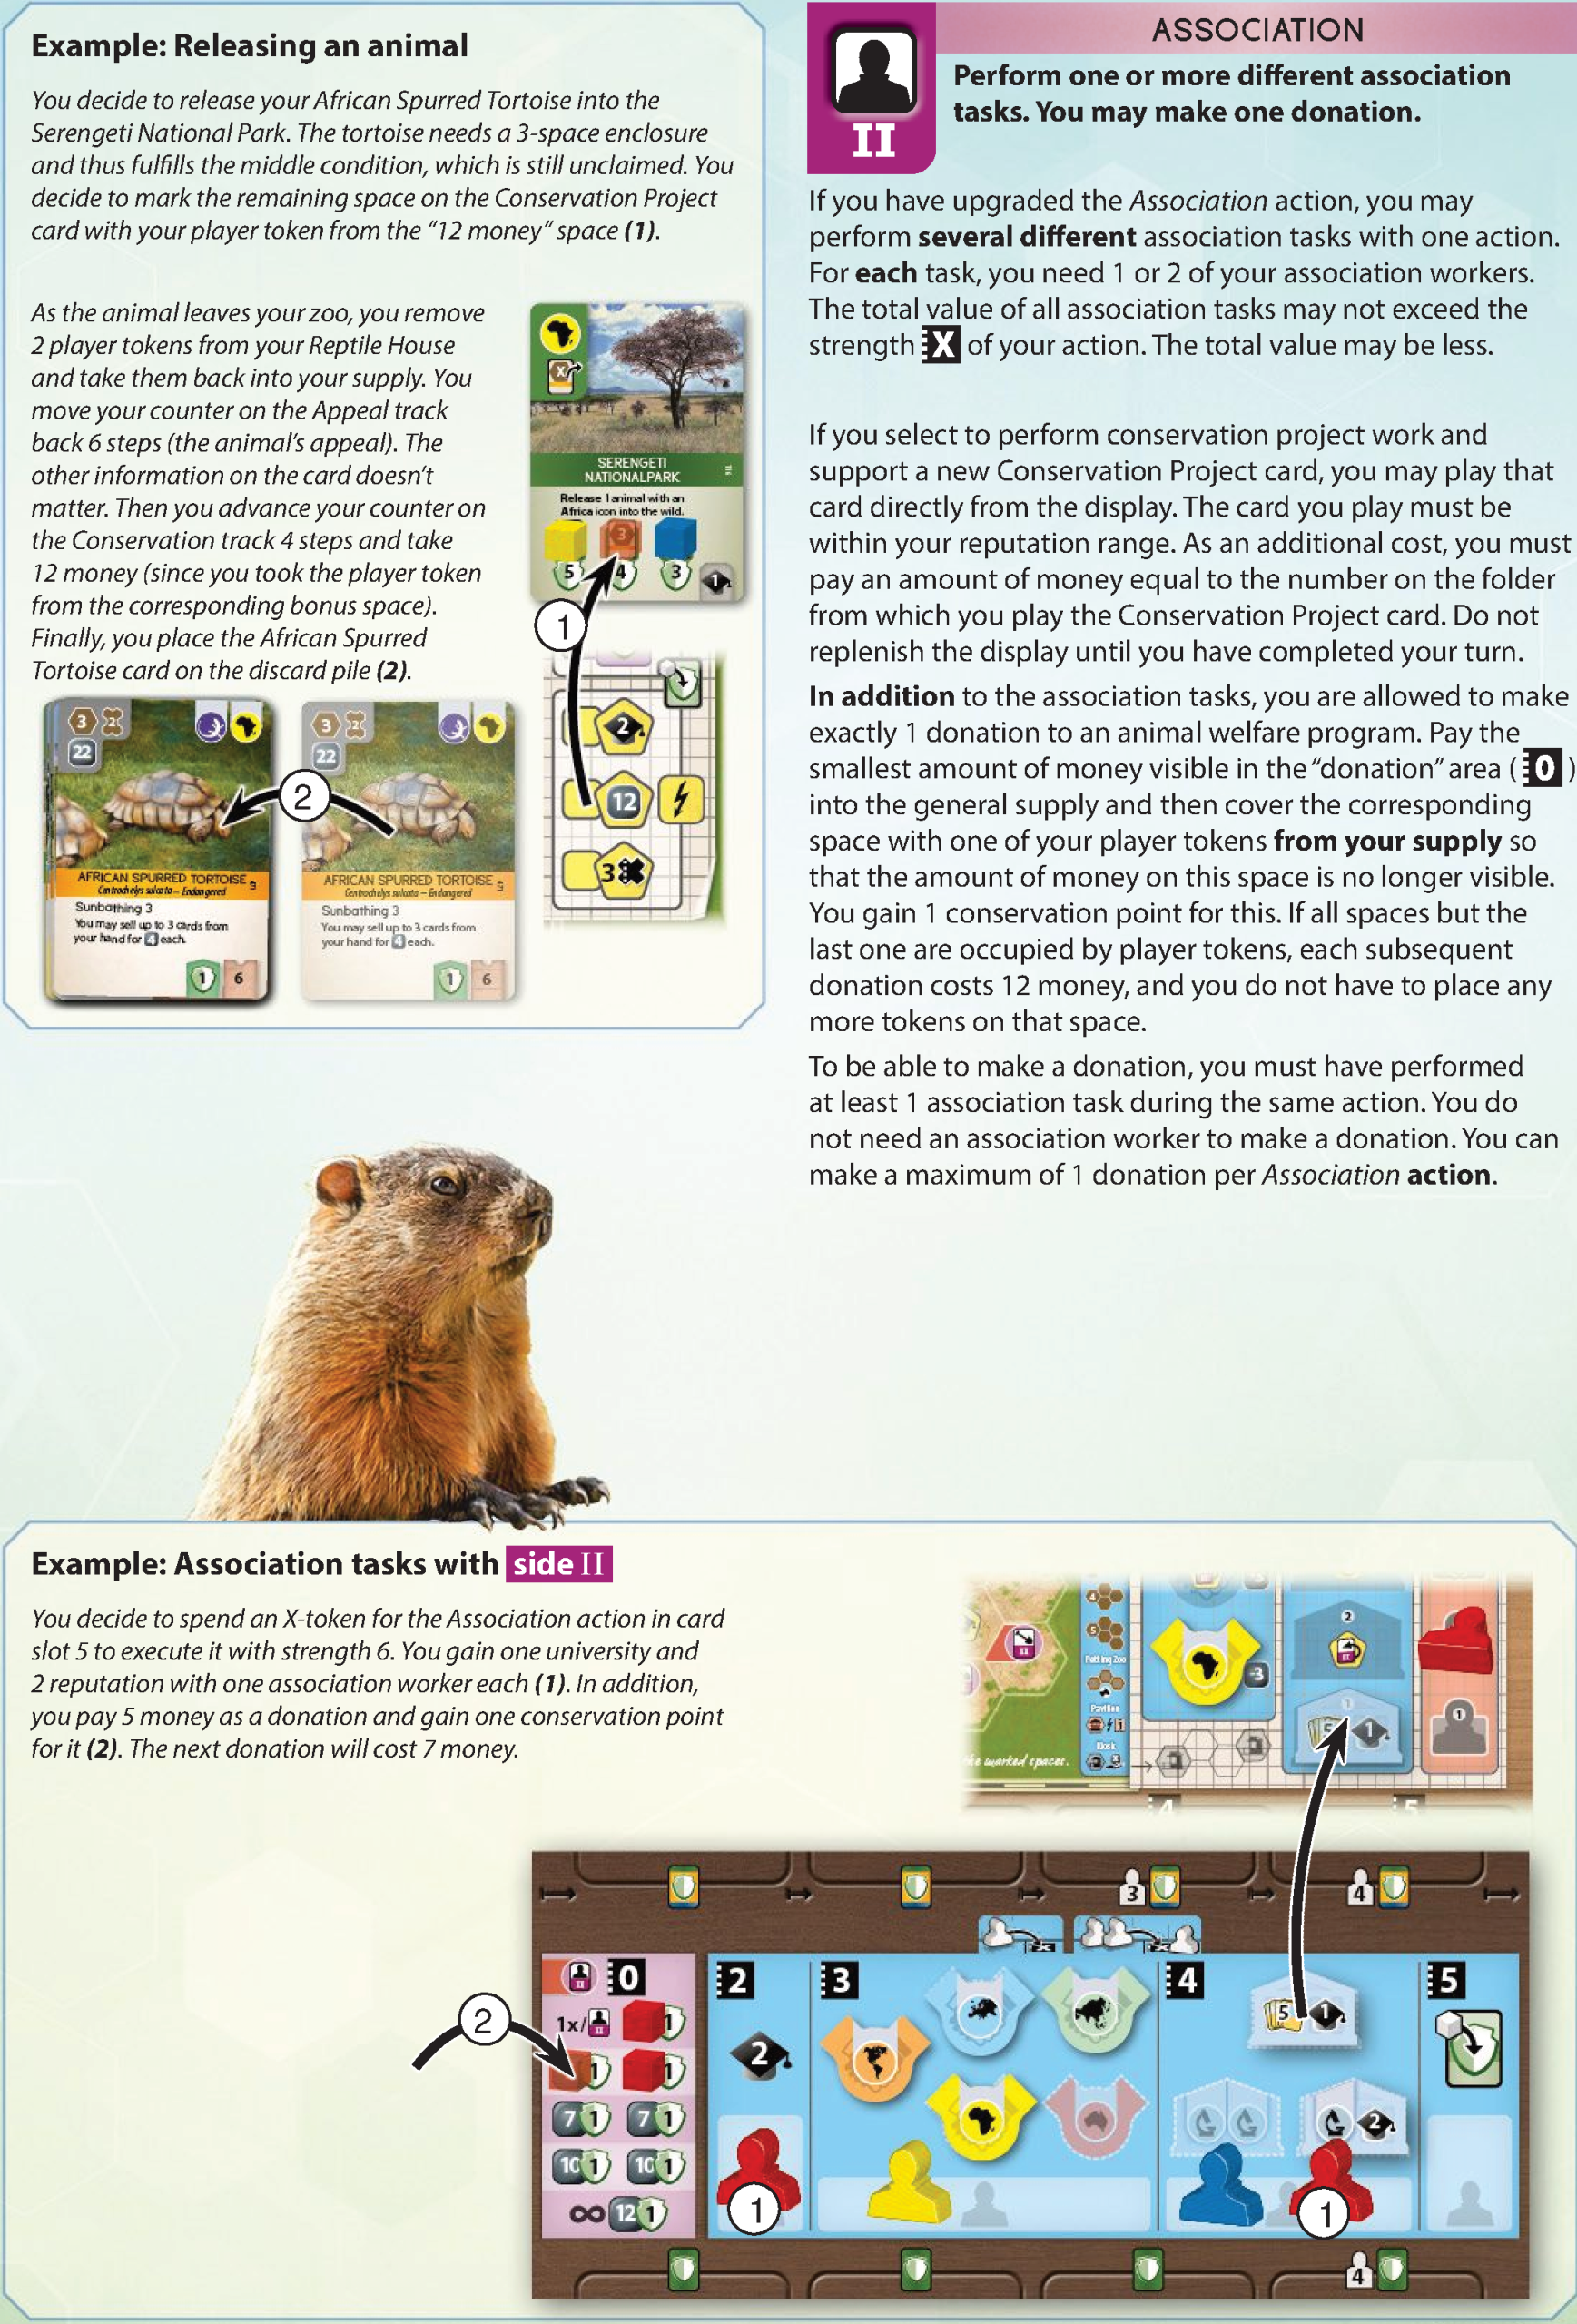
ASSOCIATION Action (Side I)
Perform 1 task. Requires 1 worker (2 workers if you already have 1 there; maximum 2 placements per break).
- Strength 2: +2 Reputation.
- Strength 3: Take 1 partner zoo (no duplicate continents; max 2 zoos on Side I).
- Strength 4: Take 1 university (no duplicates; grants reputation, research icons, or hand size 5).
- Strength 5: Support active project or play 1 from hand. Place player token from map to score and unlock bonus.
Conservation Projects
- Icon Requirements: Count matching icons on cards, partner zoos, and universities.
- Release into the Wild: Discard matching animal from required standard enclosure. Deduct its Appeal, empty the enclosure, and gain conservation points.
Association Action (Side II) & Donations
- Perform multiple different tasks in one action if sum of task strengths ≤ action strength (spend workers per task).
- Unlocks 3rd and 4th partner zoo slots.
- Play Conservation Project cards directly from display within reputation range.
- Donations: Max 1 per action. Pay lowest visible cost (2, 5, 7, 10, 12) and cover with token for +1 Conservation point. When full, costs 12 (no token placed).
SPONSORS Action
Side I: Play exactly 1 Sponsor card OR advance the Break token and take money.
- Play 1 Sponsor card from hand with level <= strength X and fulfill conditions.
- Alternative: Advance Break token X spaces and take X money (even if the Break track ends early).
Side II: Play one or more Sponsor cards OR advance the Break token and take money.
- Play multiple Sponsor cards (strength X + 1 >= sum of levels). Can play from hand or display within reputation range (paying folder cost).
- Alternative: Advance Break token X spaces and take 2X money.
- Allows playing Sponsor cards with the upgrade requirement icon.
Sponsor Card Layout
- Level in upper-left corner; building requirements next to level.
- Conditions on left side; icon benefits in upper-right corner.
- Recurring effects at top (blue background, or purple for break income); instant effects in bottom-left (yellow); final scoring effects in bottom-right (brown).
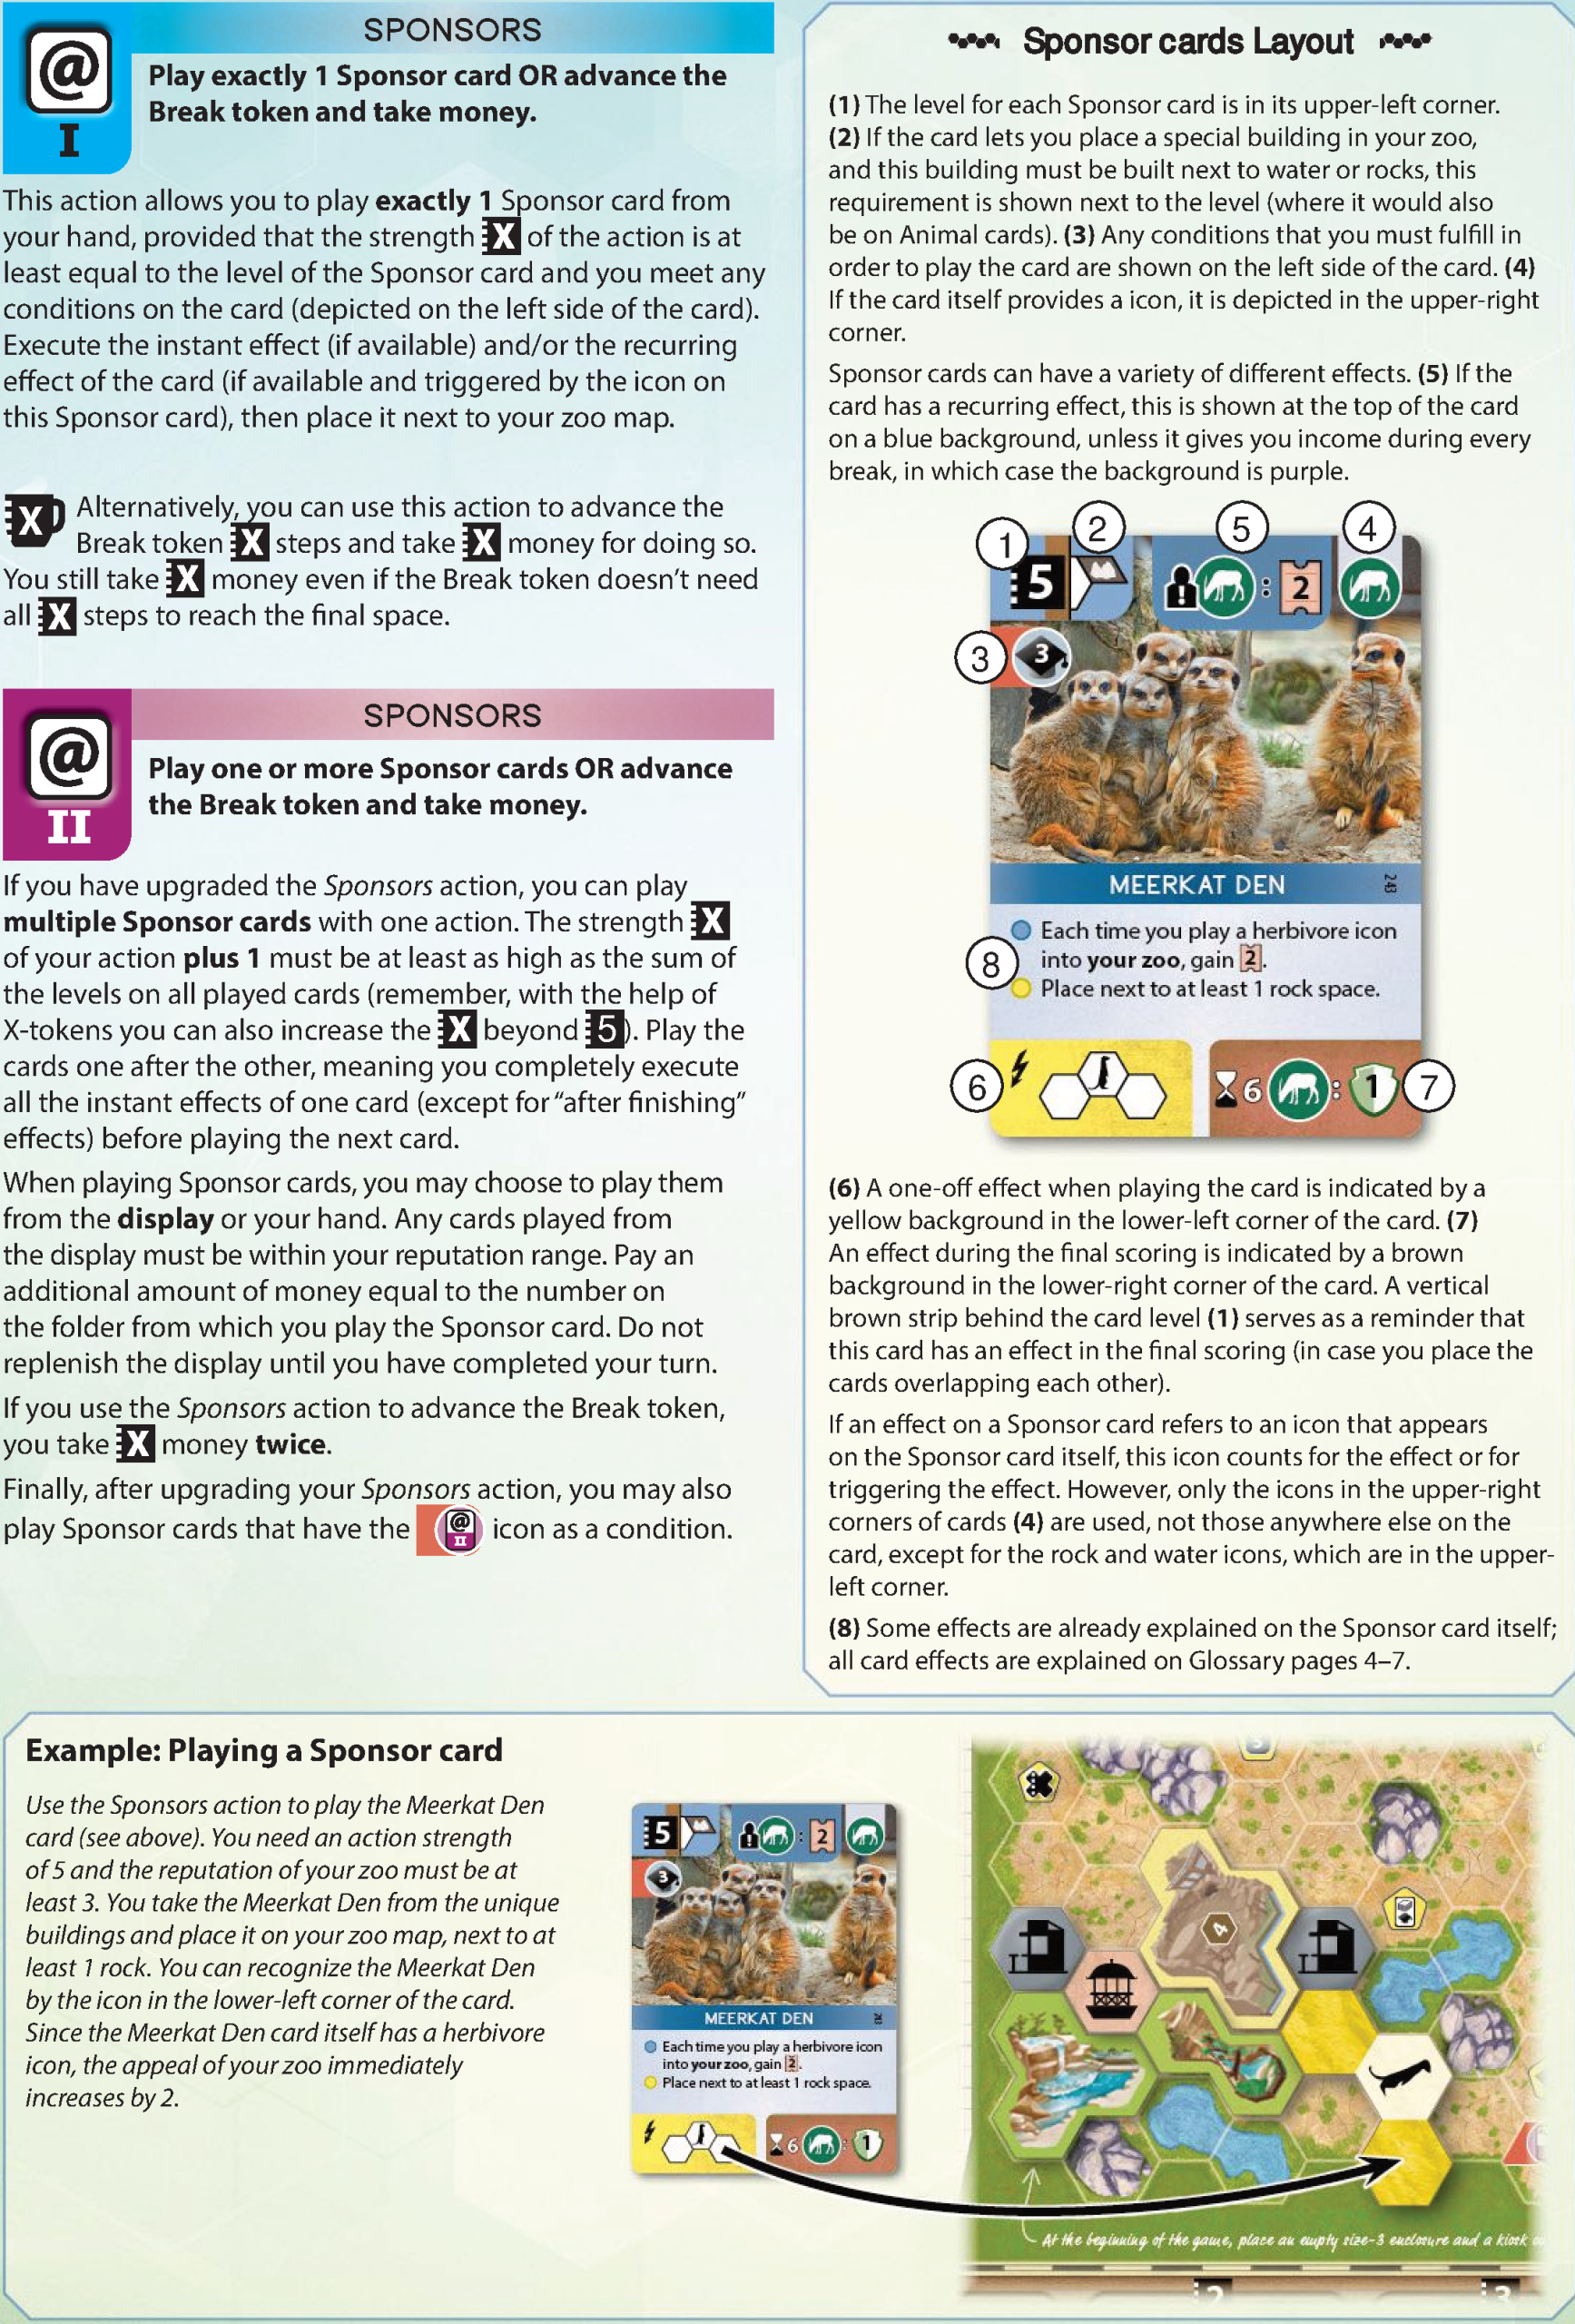
SPONSORS Action
Side I
- Play 1 card: From hand, level ≤ X. Fulfill conditions.
- Alternative: Advance Break X, gain X money.
Side II
- Play cards: Play 1+ cards from hand or display (pay folder fee). Total levels ≤ X + 1. Allows upgrade-required cards.
- Alternative: Advance Break X, gain 2X money.
Sponsor Card Layout
- Upper-left: Level and building requirements.
- Left edge: Conditions.
- Upper-right: Icon benefits.
- Top: Recurring effects (blue) / Break income (purple).
- Bottom-left: Instant effects (yellow).
- Bottom-right: Final scoring (brown).
Appeal and Conservation Points
Special milestone spaces on the Conservation track:
- 2 conservation points: Upgrade one Action card OR activate an additional association worker.
- 5 & 8 conservation points: Take 5 money OR take one of the available Bonus tokens next to the space.
- 10 conservation points: The first time any player reaches/exceeds 10 conservation points, all players discard one of their 2 Final Scoring cards face down.
Break
Triggered when the Break token reaches the last space of the Break track. After the active player finishes their turn, execute in order:
- Hand card limit: Discard down to limit (normally 3 cards, or 5 with university).
- Tokens on Action cards: Discard Multiplier, Venom, and Constriction tokens from Action cards.
- Association board: Return all association workers to notepads. Replenish partner zoos and universities to 1 of each available.
- Replenish display: Discard cards in folders 1 and 2, slide remaining cards down, refill empty folders from deck.
- Take income:
- Collect money from Appeal track position.
- Collect kiosk income: 1 money per adjacent unique building, special enclosure, occupied standard enclosure, and pavilion.
- Collect income from Sponsor cards and unlocked zoo map bonus spaces (purple icon).
- Break track: Reset the Break token to the starting space for player count.
Appeal and Conservation Points
- 2 CP: Upgrade 1 Action card OR activate 1 association worker.
- 5 & 8 CP: Gain 5 money OR 1 available Bonus token.
- 10 CP (first player only): All players discard 1 of their 2 Final Scoring cards.
Break
Triggered when track ends; resolve after current turn in order:
- Hand limit: Discard to 3 (5 with university).
- Tokens: Remove Multiplier, Venom, and Constriction tokens from Action cards.
- Association board: Return all workers. Replenish partner zoos and universities to 1 each.
- Display: Discard slots 1 and 2, slide remaining cards down, refill.
- Income:
- Appeal track payout.
- Kiosks: 1 money per adjacent unique building, special enclosure, occupied standard enclosure, or pavilion.
- Sponsor cards and unlocked map spaces (purple icons).
- Reset: Return Break token to player-count starting space.
1. Game End
Triggered when a player’s Conservation counter and Appeal counter meet in the same scoring area or pass each other.
- If triggered at the end of a player’s turn: all other players take one final turn.
- If triggered during a break: all players take one final turn.
2. Score Cards
Reveal and score Final Scoring cards and end-game Sponsor cards. (If no player reached 10 conservation points during the game, discard 1 Final Scoring card now before scoring). Maximum 4 conservation points from a single Final Scoring card.
3. Determine Victory Points
- Find the scoring area where your Conservation counter is located.
- Identify the lowest appeal number in that scoring area: this is your Target Number.
- Subtract the Target Number from your current Appeal counter value:
Victory Points = Appeal - Target Number. - The player with the highest positive Victory Point total wins!
- Tie-breaker: Most Conservation Projects supported (most player tokens removed from the left side of the zoo map). If still tied, share the victory.
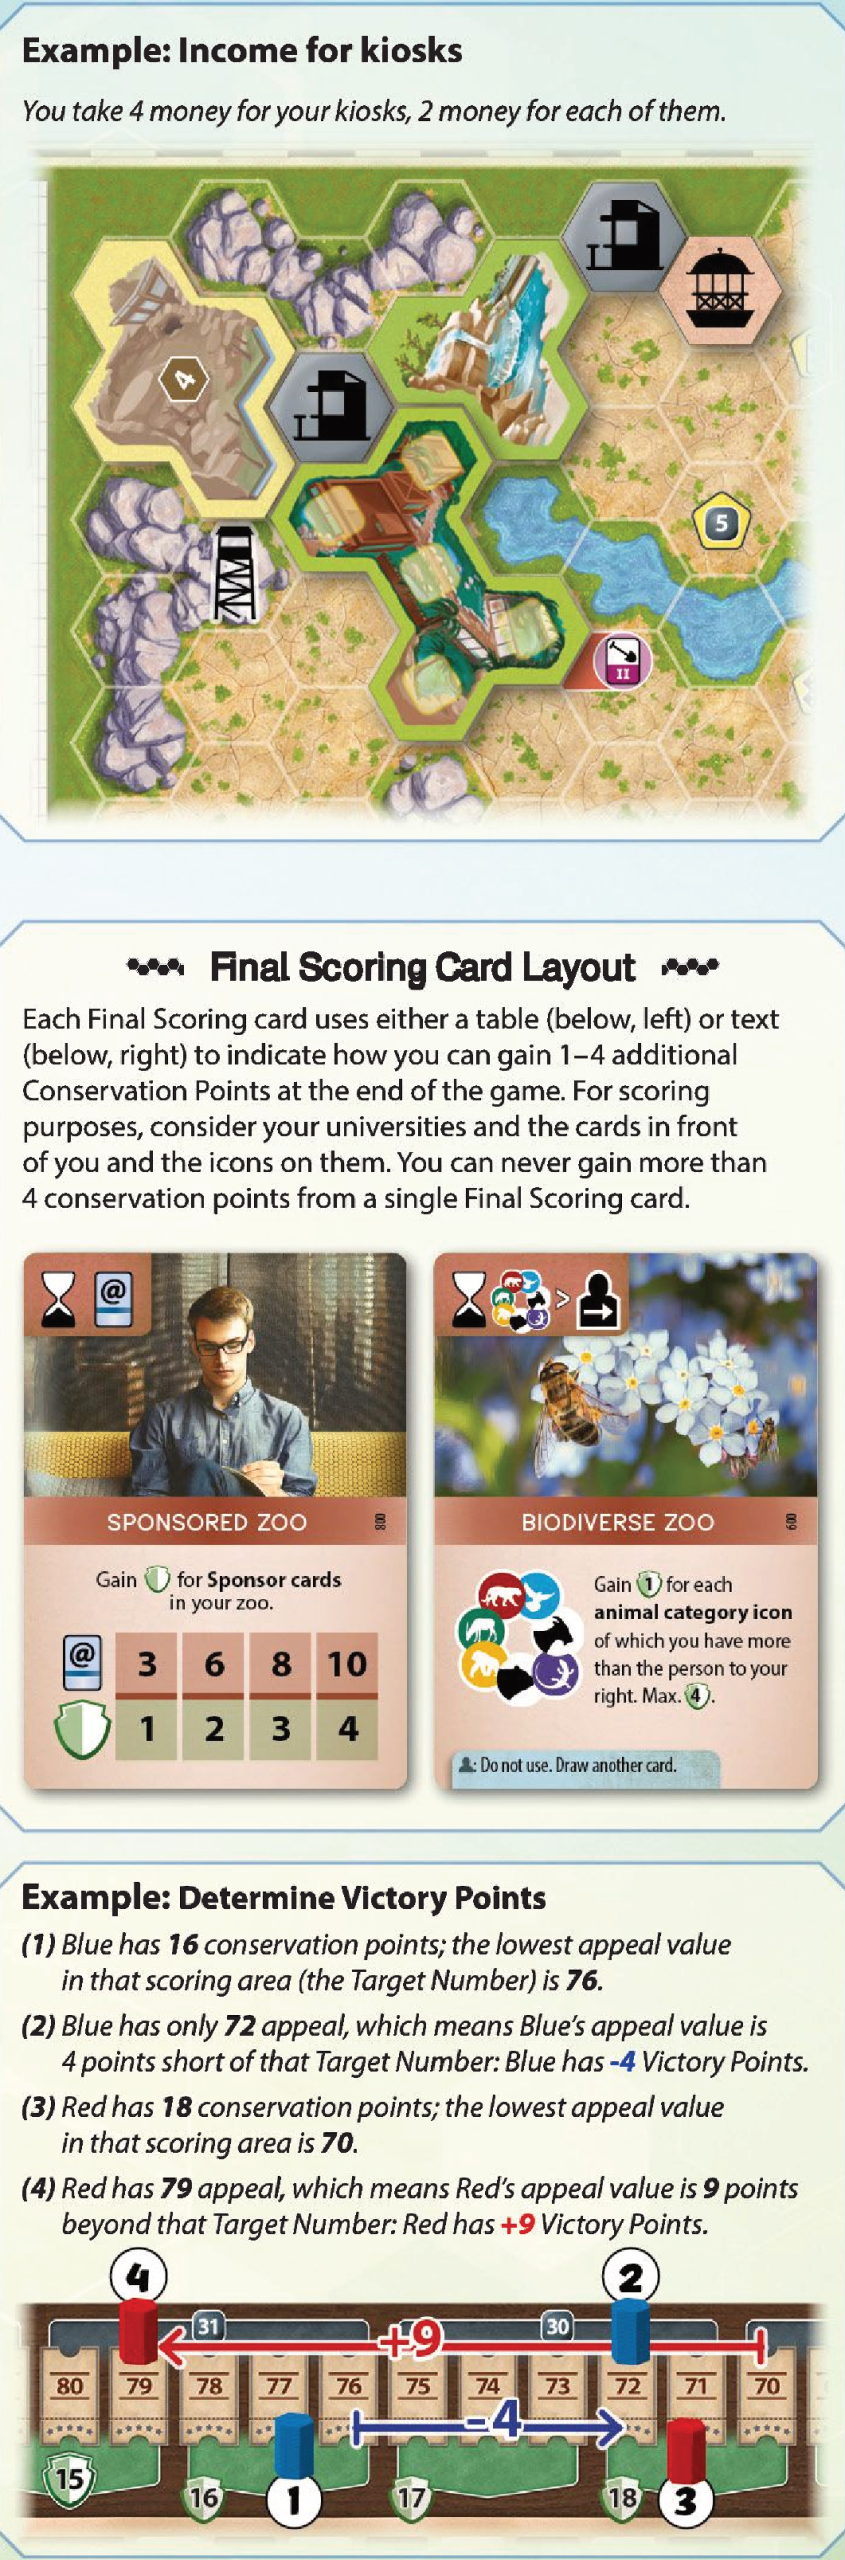
1. Game End
Trigger: A player’s Conservation and Appeal counters meet or cross.
- Triggered on a turn: All other players take 1 final turn.
- Triggered during a break: All players take 1 final turn.
2. Score Cards
- Score Final Scoring cards (max 4 Conservation points per card) and end-game Sponsor cards.
- If no player reached 10 Conservation points: Discard 1 Final Scoring card before scoring.
3. Determine Victory Points
- Calculation:
Victory Points = Appeal − Target Number(Target Number = lowest appeal value in your Conservation counter’s area). - Highest VP wins.
- Tie-breaker: Most Conservation Projects supported (tokens off left side of board); then shared victory.
Solo Game Rules
Rules adjustments for solo play:
Setup
- Lay out 3 basic Conservation Project cards (no neutral tokens covering slots).
- Do not use the Break token; place 7 player tokens of an unused color in the left column of the solo tile.
- Start with 20 appeal (for beginner difficulty; 10 appeal for intermediate, 0 appeal for advanced challenge).
Turn / Cards
- Interactive card effects are replaced by the solo effect shown in the blue bottom bar.
- Maximum 2 Conservation Project cards above the Association board.
- Effects advancing the Break track do not move any token, but you still gain any associated money. No X-token for triggering breaks.
Gameplay & Breaks
- At the end of each turn, move the topmost token from the left column of the solo tile to the right column.
- When the 7th token moves to the right, a break occurs immediately: place the topmost token onto the lowest open donation space on the Association board, move the remaining tokens back to the left column (one row will now be empty), and execute break steps 1–5.
- The game ends after 6 rounds (when only 2 tokens remain on the solo tile and the bottom one is shifted). Win by scoring 0 or more Victory Points!
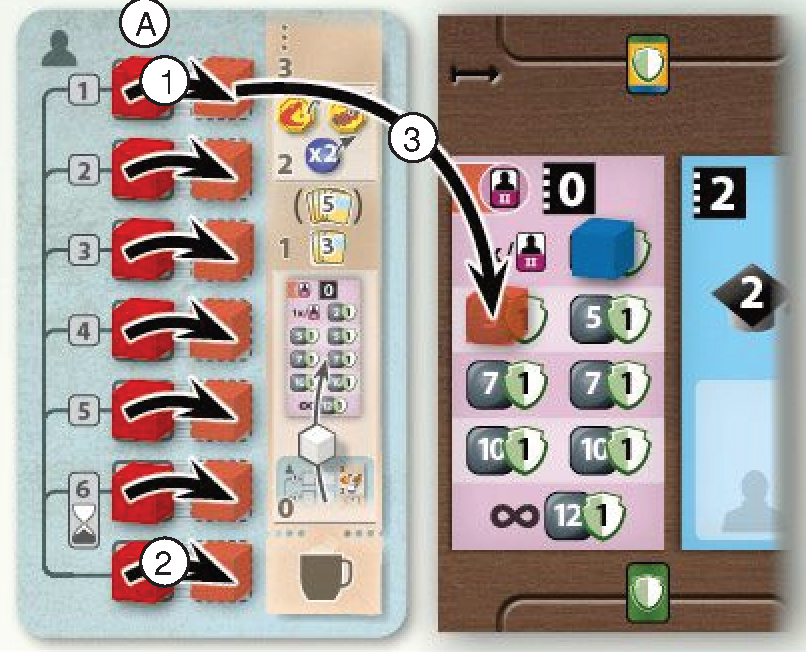
Solo Game Rules
Setup
- Display 3 basic Conservation Project cards (no neutral tokens covering slots).
- Place 7 unused player tokens in the left column of the solo tile (do not use the Break token).
- Starting Appeal: 20 (beginner), 10 (intermediate), or 0 (advanced).
Turn / Cards
- Resolve solo effects (blue bottom bar) instead of interactive card effects.
- Maximum 2 Conservation Projects above the Association board.
- Break track advances: gain any depicted money, but do not advance any token; no X-tokens awarded.
Gameplay & Breaks
- End of turn: Move the topmost token from the left column to the right column of the solo tile.
- Break: Triggers immediately when the 7th token shifts right.
- Place the topmost token onto the lowest open donation space on the Association board.
- Move all remaining tokens back to the left column (one row permanently empty).
- Resolve standard break steps 1–5.
- Game End: The game ends after 6 rounds (shifting the 2nd token in the final round). Win by scoring ≥ 0 VP.
Components
Cards
- 212 Zoo cards:
- 128 Animal cards
- 64 Sponsor cards
- 20 Conservation Project cards
- 11 Final Scoring cards
- 12 Base Conservation Project cards
- 20 double-sided Action cards (5 per set)
Boards & Mats
- 1 game board (the reverse side shows a different orientation of the card spaces; use the side that suits you better)
- 1 Association board
- 8 player mats (zoo maps):
- 4x map A: map for first-time players with starting advantage (easy)
- 4x map 0: map with more bonus spaces (intermediate)
- 8x maps (1–8) on the reverse side of maps A and maps 0 to allow for customized setup (advanced)
Tiles & Tokens
- 90 Standard Enclosures in various sizes (empty / occupied):
- 28x 1-space enclosure
- 24x 2-space enclosure
- 15x 3-space enclosure
- 13x 4-space enclosure
- 10x 5-space enclosure
- 12 Special Enclosures (both sides are the same):
- 4x Petting Zoo
- 4x Reptile House
- 4x Large Bird Aviary
- 34 Kiosk / Pavilion tiles (kiosk front / pavilion back)
Additional Tiles, Tokens & Wooden Pieces
- 15 unique buildings
- 70 money tokens: 40x 1, 10x 5, 10x 10, 10x 20
- 20 partner zoos (4 each)
- 12 universities (4 each)
- 9 Bonus tiles
- 1 tile for solo play (both sides are the same)
- 20 X-tokens
- 8 Multiplier tokens
- 8 Venom tokens
- 8 Constriction tokens
Wooden Components
- 1 Break token
- Components in 4 player colors (black, blue, red, yellow). In each color:
- 3 counters
- 4 association workers
- 25 player tokens
Other
- 2 organizers
- 1 glossary
- 1 Icon overview
- this rulebook
Cards
- 212 Zoo cards: 128 Animals, 64 Sponsors, 20 Conservation Projects
- 11 Final Scoring cards
- 12 Base Conservation Project cards
- 20 Action cards: 4 sets of 5 double-sided
Boards & Mats
- 1 Game board (double-sided layout)
- 1 Association board
- 8 Player mats: 4x Map A (beginner), 4x Map 0 (intermediate), reverse: Maps 1–8 (advanced)
Tiles & Tokens
- 90 Standard Enclosures: 28x 1-space, 24x 2-space, 15x 3-space, 13x 4-space, 10x 5-space (empty/occupied)
- 12 Special Enclosures: 4 Petting Zoos, 4 Reptile Houses, 4 Large Bird Aviaries
- 34 Kiosks / Pavilions (double-sided)
Additional Tiles, Tokens & Wooden Pieces
- 15 Unique buildings
- 70 Money tokens: 40x 1, 10x 5, 10x 10, 10x 20
- 20 Partner zoos (4 each of 5 types)
- 12 Universities (4 each of 3 types)
- Status tokens: 9 Bonus, 1 Solo, 20 X-tokens, 8 Multiplier, 8 Venom, 8 Constriction
Wooden Components
- 1 Break token
- Per player color (black, blue, red, yellow): 3 counters, 4 association workers, 25 tokens
Overview & Goal of the Game
Introduction & Goal of the Game
In Ark Nova you plan and build a modern, scientifically managed zoo. You build enclosures according to the animals’ way of life and support conservation projects to ensure the preservation of animal species.
Gathering diverse animals increases the attractiveness of your zoo, advancing you on the Appeal track and generating higher revenues. Likewise, careful stewardship of the animals allows you to support conservation projects, such as breeding programs, that lead to your advancement on the Conservation track and corresponding bonuses. These two tracks progress in opposite directions – if your counters meet, the game ends. Whoever achieves the best combination of appeal and conservation has built the most successful zoo and wins the game.
Association work in different zoo associations allows you to partner with zoos and universities around the world. Together, with specialists and sponsors, they will help you manage the various tasks needed to achieve your goals.
Both the designer and the publisher have made every effort to be realistic in the implementation of this game. In rare cases, however, concessions have been made for the sake of the game mechanics. For example, the koala has the subclass bear, which is often used colloquially, but does not correspond to reality. The same applies to the enclosure requirements.
Goal of the Game
- Tracks: Progress on the Appeal track (revenue) and Conservation track (bonuses) in opposite directions.
- Game End: Triggered when a player’s Appeal and Conservation markers meet.
- Victory: Player with the best combination of Appeal and Conservation points wins.
Setup
Global Setup
- Game Board & Break Track: Place the game board in the center of the table. Take the Break token and place it on the start space of the Break track that corresponds to your player count. If there are three players, place the Break token on the space marked 3.
- Bonus Tiles: Shuffle the 9 Bonus tiles and place a random Bonus tile face up on each on each of the 4 blank yellow Bonus spaces on the board. Do not place any tiles on the two yellow spaces with icons. Return the remaining 5 tiles to the box. They are not used in the game.
- Zoo Cards Deck & Display: Shuffle the Zoo cards to create a face-down deck on the game board on the space marked with the deck icon. Deal 6 face-down cards from the deck to the spaces provided on the game board (you will turn them face-up at the end of setup). This is the display.
- Organizers / Supply: Place the 2 organizers next to the game board as the general supply. We recommend filling one of the organizers with the enclosures as shown. Fill the other organizer with the remaining tiles and tokens. Components are abound. Thus, pack a few standard enclosures and kiosks / pavilions in a bag as a reserve. If you still should run out of a component, use a suitable substitute.
- Association Board: Place the Association board next to the game board, leaving enough room for one row of cards above and one row of cards below the board.
- 5a: Place 1 partner zoo of each continent and 1 university of each kind on the spaces provided on the Association board.
- 5b: Shuffle the Base Conservation Project cards and place them face-down as a deck next to the Association board. In a 4-player game, place the 4 topmost cards face up below the board, otherwise the 3 topmost.
- 5c: In a 2-player game: Take 6 player tokens of any unused color and cover:
- On the face-up Base Conservation Project cards: the left level on the left card, the middle level on the middle card, and the right level on the right card.
- On the Association board: the three spaces in the left column of the donation area.
The covered levels / spaces are considered blocked and cannot be used by either player.
- Final Scoring Cards: Shuffle the Final Scoring cards and place them face down next to the Association board.
- Start Player: Randomly determine a start player. Turn order is clockwise.
Personal Setup
For your personal setup, each of you takes the following steps:
- Zoo Map: Take a random Map A zoo map, and place it with that side up in front of you. Return the remaining zoo maps to the box. They are not used in this game.
- 4 of the 8 zoo maps have Map A on one side. All 4 copies of Map A are identical and recommended for your first game. It allows an easy entry and offers generous rewards.
- The other 4 zoo maps have Map 0 on one side (identical set of 4). This map is suitable for beginners after the first game.
- On the other side of all zoo maps you will find Maps 1–8 (advanced maps). These are all different and give an individual special ability. When playing with these, take 2 random zoo maps and choose 1, or lay out player count + 1 advanced maps and choose 1 each in reverse order of play.
- Handicap rule: If playing with beginners, you can give them a small starting advantage with Map 0 and a larger starting advantage with Map A.
- Action Cards: Take one set of Action cards each (Build, Cards, Animals, Association, and Sponsors). Place one card with side I up under each of the five card slots on your zoo map: the Animals card under slot 1 (furthest left), and the remaining cards randomly distributed under the other 4 slots.
- Player Color Components: Choose a color and take all components of this color:
- C1: Place the counters for appeal, conservation, and reputation on the first spaces of their tracks on the game board. Place counters on the Appeal track according to turn order:
- Start player: space 0
- Second player: space 1
- Third player: space 2
- Fourth player: space 3
- C2: Take 7 of the player tokens in your color and place them on the designated spaces at the left edge of your zoo map. Keep the remaining player tokens next to your zoo map for later use.
- C3: Take the 4 association workers: place 1 on the notepad of your zoo map (active worker), and the remaining 3 lying down on the designated spaces below the notepad.
- C1: Place the counters for appeal, conservation, and reputation on the first spaces of their tracks on the game board. Place counters on the Appeal track according to turn order:
- Starting Money: Take 25 money from the supply and put it on the notepad of your zoo map.
- Final Scoring Cards: Draw 2 Final Scoring cards and place them next to your zoo map. You may look at them at any time, but keep them hidden from other players.
- Starting Hand: Draw 8 Zoo cards. Choose 4 of them to keep as hand cards and discard the remaining 4 cards to a face-up discard pile on the discard space on the board. Keep your hand cards hidden.
- Recommendation: Choose 1–2 Sponsor cards and 2–3 Animal cards. Avoid cards with difficult conditions early on, and try to match icons with the Base Conservation Projects on display.
- Reveal Display: After all players have chosen their hand cards, reveal the 6 cards on the display.
Global Setup
- Break Track: Place Break token on matching player-count space (space 3 for 3 players).
- Bonus Tiles: Shuffle 9 tiles; place 4 face-up on the 4 blank yellow spaces. Box remaining 5.
- Zoo Deck & Display: Shuffle Zoo cards to form a face-down deck. Deal 6 face-down cards to the display spaces.
- Supply: Place the 2 organizers with standard enclosures, tiles, and tokens within reach.
- Association Board: Place 1 partner zoo per continent and 1 university of each type on marked spaces.
- Shuffle Base Conservation Projects; reveal 4 cards below the board (4 players) or 3 cards (2–3 players).
- 2-player game: Block with unused tokens: 3 left donation spaces; the left, middle, and right levels across the 3 revealed Conservation cards.
- Final Scoring Cards: Shuffle and place face down near the Association board.
- First Player: Choose randomly; play proceeds clockwise.
Personal Setup
- Zoo Map: Choose a map (Map A recommended for first game).
- Action Cards: Place 5 Action cards side I up: Animals under slot 1, remaining 4 randomly under slots 2–5.
- Player Components:
- Place Conservation and Reputation counters on space 1 of their tracks.
- Place Appeal counters by turn order: 1st player on 0, 2nd on 1, 3rd on 2, 4th on 3.
- Place 7 player tokens on the left edge spaces of zoo map; keep rest nearby.
- Place 1 association worker on notepad (active), remaining 3 lying down below it.
- Starting Money: Take 25 money onto notepad.
- Final Scoring: Deal 2 cards per player (kept hidden).
- Starting Hand: Deal 8 Zoo cards; keep 4, discard 4 face up.
- Reveal Display: Flip the 6 display cards face-up once all players have kept their hand.
Core Concepts & Components Overview
Gameplay Overview
Ark Nova does not play in formal rounds; instead, players simply take turns (in clockwise order) taking one turn at a time until the end of the game is triggered. In addition, there are so-called breaks in between, when the game is put on hold for an administration phase. During these breaks you will discard cards down to your hand limit, recall workers, and gain income, among other things.
You always perform one action during your turn, which may trigger additional effects and bonuses. You perform these actions with the 5 Action cards displayed below your zoo map. You can expand your zoo, play Zoo cards, and draw new Zoo cards. The position of the Action card determines how much you can do with that action.
Your Zoo Map
- Your Zoo (1): Established in the large area in the middle of your zoo map. This is where you place buildings such as enclosures (standard or special enclosures), kiosks, pavilions, or unique buildings.
- Enclosure Overview (2): Shows their sizes and shapes.
- Placement Restrictions: You are not allowed to build on rock (R) and water (W) spaces, but some animals need an enclosure next to a rock or water space. All other spaces are building spaces (a space built on is covered). You are not allowed to build on spaces with the upgraded icon until you have upgraded your Build action card.
- Placement Bonuses (3): Some spaces show a placement bonus icon. You receive the indicated bonus immediately when you cover it.
- Conservation Project Bonus Spaces (4): The left edge of your zoo map holds 7 player tokens at the start. Whenever you support a conservation project, take one token and place it on the Conservation Project card. This always gains you an immediate bonus and sometimes again in each break.
- Action Card Slots (5): The bottom of your zoo map holds your Action cards. The number above each slot shows the strength of the Action card in that slot.
- Special Ability (6): Advanced zoo maps feature a unique special ability. Map A has the same ability for all players: at the beginning of the game, place a 3-space enclosure on the indicated spaces, with the empty side (showing 3) face up.
Zoo Map Tracks & Supply
- Partner Zoos (7) & Universities (8): The right side of your zoo map has spaces for 5 partner zoos and 3 universities. You can only establish partnerships with a maximum of 4 partner zoos. Whenever you establish a new partnership, place the tile on the lowest empty space of the appropriate column:
- To get a third partner zoo, you must first upgrade your Association action card.
- If there is a bonus depicted on the space where you place the tile, receive it immediately.
- A partner zoo reduces the cost to accommodate an animal from that continent by 3 money per continent icon on the Animal card.
- A university grants the bonuses and icons shown on it.
- Association Workers Supply (9): Placed at the start of the game. Workers are taken from bottom to top whenever you hire an association worker, moving them to the active notepad area. Certain maps reward conservation points for hiring your last worker.
- Notepad (10): All available association workers, money, and X-tokens are kept here.
Zoo Cards
The 3 different types of Zoo cards are:
- Animal cards: Used to add animals to your zoo. They require an empty enclosure and provide your zoo with appeal points.
- Sponsor cards: Allow you to hire specialists, build unique buildings, or achieve various other effects.
- Conservation Project cards: Support conservation projects to collect conservation points (specializing in animal species, continents, or reintroducing animals into the wild). Includes both Zoo cards and Base Conservation Project cards.
The Break Track
The game board has a Break track to count down the time remaining until the next break:
- At the start of the game and after each break, the Break token is placed on the start space corresponding to player count (1).
- Whenever you advance the Break token, move it towards the end.
- When it reaches the last space (2), you call a break for everyone. The break occurs after your current turn ends.
- You get 1 X-token for reaching the last space of the Break track. Ignore any excess steps. After the break, place the Break token back on its starting space.
Gameplay Overview
- Turn Structure: Clockwise; choose and resolve 1 of your 5 Action cards (slot position 1–5 determines action strength).
- Breaks: Triggered administration phase (discard to hand limit, recall workers, gain income).
Your Zoo Map
- Placement Restrictions: Rock (R) and water (W) spaces cannot be built on. Spaces with upgrade icons require an upgraded Build card.
- Placement Bonuses: Gained immediately when the space is covered.
- Conservation Bonus Spaces: 7 player tokens on the left. Moving a token to a Conservation Project card unlocks immediate and/or break bonuses.
- Special Ability: Map A grants a free size-3 empty enclosure at setup; advanced maps grant unique abilities.
Zoo Map Tracks & Supply
- Partner Zoos: Max 4. 3rd+ requires an upgraded Association card. Place bottom-to-top; gain space bonus immediately. Each discounts matching continent animals by 3 money.
- Universities: Max 3. Place bottom-to-top; gain space bonus immediately. Grants icons and research bonuses.
- Workers & Notepad: Hire workers bottom-to-top into the active notepad. Notepad holds available workers, money, and X-tokens.
Zoo Cards
- Animal: Requires an empty enclosure meeting size/terrain prerequisites; awards Appeal.
- Sponsor: Grants specialists, unique buildings, or ongoing/end-game abilities.
- Conservation Project: Fulfilled to earn Conservation Points (by species, continent, or animal release).
The Break Track
- Token begins on the player-count space and moves forward when advanced.
- Reaching the final space awards 1 X-token to the active player (excess steps ignored) and triggers a break at the end of their turn.
- Reset the token to its player-count space after the break.
Turn Flow & Action Card Mechanics
A Turn / The 5 Action Cards
Your Action cards are located below your zoo map, assigned to slots numbered 1 (far left) to 5 (far right). The slot number indicates the strength (X) with which you perform the action.
On your turn:
- Choose one of your Action cards.
- Shift it lower than the others in the row.
- Perform the action with a strength equal to its current slot (X).
- After completing the action, remove the card, shift all Action cards that were to its left one slot to the right, and place the chosen Action card into slot 1.
Modifying Strength with X-tokens
- For each X-token spent, increase the strength of the action by 1. Return spent tokens to the general supply.
- You can spend as many X-tokens as you like, but some actions do not benefit from strength beyond 5.
- You can never have more than 5 X-tokens.
- Strength is set before performing the action (tokens gained during the action cannot boost that same action).
Zoo cards with “after finishing” effects are executed only after completely finishing the action, including moving the Action cards.
Action Card Upgrades
All Action cards start on side I. When you gain a card upgrade, flip any one Action card from side I to side II. It stays in its current slot and is used in its improved version thereafter.
- There are exactly 4 ways to upgrade an Action card during the game: on the Conservation track, on the Reputation track, and when gaining your second partner zoo or second partner university (one allows an alternative choice). You can never upgrade all 5 cards!
- You may never “do nothing” with your action (e.g., play 0 Animal cards or build 0 buildings).
X-TOKEN Action
If you cannot or do not want to perform any of the 5 actions, choose any Action card, move it to slot 1, shift others right, and take 1 X-token (max 5 tokens held). Slot value and upgrades do not affect this action.
A Turn / Action Cards
- Turn sequence:
- Choose an Action card.
- Execute action at strength X (slot 1–5 + spent X-tokens).
- Move card to slot 1; shift all cards previously to its left 1 slot right.
- Cannot choose an action to do nothing.
- “After finishing” effects trigger after card movement is complete.
X-Tokens
- Spend 1 X-token to gain +1 strength (must declare before resolving action).
- Maximum 5 X-tokens held at any time.
Card Upgrades
- Flip chosen card to side II in its current slot.
- Maximum 4 upgrades per game (Conservation track, Reputation track, 2nd partner zoo, 2nd partner university). You can never upgrade all 5 cards.
X-Token Action
Alternative to normal action: move any Action card to slot 1, shift cards to its left 1 slot right, and gain 1 X-token. Slot value and upgrades are ignored.
Action: Cards
CARDS Action
Side I: Advance the Break token 2 spaces. Then draw cards from the deck OR snap.
- Drawing from the deck: Compare strength X with the card table. Draw up to the indicated number of cards (max 3). Discard a card if indicated (can be a freshly drawn card or one already held).
- Snapping: At strength 5 or higher, instead of drawing from the deck, take exactly 1 card of your choice from the display into your hand regardless of reputation. Replenish display at end of turn.
- Advancing the Break: Advance the Break token 2 spaces first (do not gain money).
- Hand Limit: You can hold any number of cards during your turn, but during a break you must discard down to your limit (3, or 5 with the appropriate university).
Side II: Advance the Break token 2 spaces. Then draw cards from the deck or within reputation range OR snap.
- Drawing within reputation range: Draw from the display (up to your Reputation counter) and/or from the deck in any combination/order. Display is not replenished until the turn is complete.
- Snapping: Can snap starting at strength 3 or higher.
- Allows your reputation to progress beyond 9 on the Reputation track.
The Reputation Track and the Display
- Reputation Range: The card on the same folder number as your Reputation counter, plus all cards on lower-numbered folders, are within your reputation range.
- Progressing Past 9: You must upgrade Cards to side II to increase reputation to 10 or more.
- Bonuses: Bonuses printed next to reputation spaces are gained once immediately upon reaching them. At space 15 (max), any further reputation steps award 1 appeal each.
- Replenishing the Display: Only done after completing your full turn. Slide remaining cards from higher folders down to lower folders (preserving order), then refill empty high-numbered spaces from the deck. The discard pile is face-up next to the display; players may not browse through it.
CARDS Action
Always advance Break 2 spaces first. Hand limit: 3 cards (5 with university), checked only during Break.
Side I
- Draw: Draw from deck up to card table limit (max 3); discard if indicated (drawn or held card).
- OR Snap (Strength 5+): Take exactly 1 card from display regardless of reputation.
Side II
- Draw: Draw from deck and/or display within reputation range in any combination.
- OR Snap (Strength 3+): Take exactly 1 card from display regardless of reputation.
- Allows reputation to advance past 9.
The Reputation Track and the Display
- Reputation Range: Cards in folders with numbers less than or equal to your Reputation marker.
- Track Limit: Requires Cards Side II to reach 10+. At max space (15), each further step grants 1 appeal. One-time bonuses are claimed immediately upon reaching.
- Replenishing Display: Done at end of turn only. Slide remaining cards to lowest-numbered empty folders; fill remaining spaces from deck. Discard pile is face-up; browsing forbidden.
Action: Build
BUILD Action
Side I: Build exactly 1 building of your choice with a maximum size of X on your zoo map. Pay 2 money per space. Available: Kiosk, pavilion, standard enclosure, and Petting Zoo.
- Building Costs: Pay twice the size of the building (cost = size x 2 money) before placing it.
- Placement Rules:
- Must be adjacent to an existing building (sharing at least 1 edge). The very first building in your zoo must touch at least 1 border space of the map.
- May only be built on empty building spaces. Cannot overlap other buildings, extend beyond the map edge, or cover water or rock spaces.
- Cannot build on spaces with the upgrade icon until Build is upgraded to side II.
- Kiosks: Must always be placed at least 3 spaces away from every other kiosk (at least 2 empty/other spaces between kiosks). Grants income during breaks.
- Pavilion: Size 1; immediately increases zoo appeal by 1.
- Standard Enclosure: Placed empty side up (yellow border with size X).
- Petting Zoo: Size 3 special enclosure; maximum 1 per zoo. Both sides are identical.
- Placement Bonuses: Gained immediately when covering a bonus icon.
Side II: Build as many different buildings as you like with a maximum total size of X on your zoo map. Newly available: Large Bird Aviary and Reptile House.
- May build multiple buildings in one action, provided they are all different (cannot build 2 identical buildings in the same action). Total size cannot exceed X.
- Build and pay for each building one after another. Placement bonuses are gained immediately and can help pay for subsequent buildings in the same action.
- Unlocks Large Bird Aviary and Reptile House (both size 5; limit 1 of each per zoo). When built, you may immediately move eligible animals from standard enclosures into them (flipping vacated standard enclosures to empty).
- Allows building on upgrade-icon spaces. If you completely cover every space on your zoo map (except water and rocks), immediately gain 7 appeal.
BUILD Action
- Cost: 2 money per space.
- Placement: Must be adjacent to an existing building (first building must touch map border). Only on empty spaces; never on rock, water, or overlapping.
- Bonuses: Immediate when covered. Spaces with upgrade icons require Side II.
Side I
- Build 1 building of max size X.
- Kiosk: ≥3 spaces away from any other kiosk. Provides break income.
- Pavilion: Size 1; immediately grants +1 Appeal.
- Standard Enclosure: Placed empty side up.
- Petting Zoo: Size 3; limit 1 per zoo.
Side II
- Build multiple different buildings up to total size X. Pay and place sequentially (bonuses can fund later placements in the same turn).
- May build on upgrade-icon spaces.
- Large Bird Aviary & Reptile House: Size 5; limit 1 of each per zoo. May immediately move eligible animals into them from standard enclosures (flip vacated enclosures to empty).
- Map Completion: Gain +7 Appeal if all valid map spaces are filled.
Action: Animals
ANIMALS Action
Side I: Play Animal cards from your hand up to the limit allowed by action strength X.
For each animal played, execute the following steps in sequence:
- Check conditions: Fulfill all conditions shown on the left side of the Animal card (e.g., partner zoos, animal category icons, continent icons).
- Pay cost: Pay the money cost in the upper-left corner into the general supply. Reduced by 3 money per matching continent icon if you have the corresponding partner zoo.
- Fill empty enclosure: Accommodate the animal into an eligible empty enclosure:
- Petting Zoo animals can only go into the Petting Zoo.
- Standard animals require an empty standard enclosure of at least the required size, adjacent to required rock/water spaces if depicted. Flip the enclosure to its occupied side.
- Reptiles and birds with special enclosure icons may either enter a standard enclosure or the Reptile House / Large Bird Aviary (by placing the required number of player tokens onto it).
- Place Animal card: Place the card next to your zoo map overlapping existing cards.
- Execute effects: Advance Appeal on the track as shown on the card, plus any reputation or conservation points indicated. Execute instant abilities immediately. Effects marked “after finishing” are executed only after all played animals and the card shift to slot 1 are resolved.
If playing 2 animals, complete steps 1–5 for the first animal before beginning the second animal.
Special Enclosures (Petting Zoo, Reptile House, Large Bird Aviary)
- Limits: Each zoo can contain at most one of each special enclosure.
- Tokens: Place player tokens on the special enclosure to mark spaces used. Both sides of special enclosures are identical. Rock and water requirements still apply to the special enclosure tile.
- Moving Animals: When you build a Reptile House or Large Bird Aviary, you may immediately move matching animals from standard enclosures into it, flipping the smallest matching occupied enclosure back to its empty side and placing tokens on the special enclosure.
Animals Action (Side II) & Card Placement
Side II: Play Animal cards from your hand or within reputation range.
- May play animals directly from the display within your reputation range by paying extra money equal to the folder number.
- If performed at strength 5, you may first increase your reputation by 1 at the start of the action.
- Allows playing animals with the upgrade condition icon.
Animal Categories
There are 7 animal categories: Bird, Herbivore, Predator, Primate, Reptile, Bear, and Petting Zoo animal. (Bear and Petting Zoo animal have black icons on white backgrounds as special categories/subcategories).
Placing Cards
Tuck played cards overlapping each other so only the top icon bar remains visible. Sponsor cards with end-game scoring have a vertical brown stripe behind the card level.
ANIMALS Action
Play Animal cards up to strength limit. Fully resolve each card in sequence before playing the next:
- Conditions: Fulfill all left-edge requirements.
- Cost: Pay money cost (-3 per matching continent icon on partner zoos).
- Enclosure:
- Standard: Flip an empty enclosure of ≥ required size (must satisfy rock/water adjacencies).
- Petting Zoo: Petting Zoo only.
- Reptiles/Birds: Standard enclosure OR place player tokens into Reptile House / Aviary.
- Place Card: Tuck overlapping existing cards so top icon bar remains visible.
- Effects: Advance tracks and execute instant abilities. “After finishing” effects trigger after all played cards and the action card reset resolve.
Special Enclosures
- Limit 1 of each per zoo (Petting Zoo, Reptile House, Large Bird Aviary).
- Mark capacity with player tokens. Rock/water terrain requirements still apply to the tile.
- When built: May immediately move matching animals from standard enclosures into them; flip the smallest emptied enclosure back to its empty side.
Animals Action (Side II)
- Play cards from hand or from display within reputation range (pay card cost + slot number fee).
- At strength 5: May take +1 Reputation before playing cards.
- Allows playing cards with the upgrade requirement icon.
Animal Categories
7 categories: Bird, Herbivore, Predator, Primate, Reptile, Bear, and Petting Zoo animal.
Action: Association
ASSOCIATION Action
Side I: Perform exactly one association task. Requires placing an active association worker on the task on the Association board. If 1 worker of yours is already there, you must place 2 workers. If 3 are there, you cannot perform it again until workers are recalled in a break.
Tasks available based on action strength:
- Strength 2 – Increasing reputation: Advance Reputation counter by 2 on the Reputation track.
- Strength 3 – Gaining a partner zoo: Take 1 available partner zoo from the board and place it on the lowest empty space on your zoo map. Maximum 4 partner zoos total (upgrade Association to side II to take a 3rd or 4th). Cannot take duplicate continents.
- Strength 4 – Gaining a partner university: Take 1 available university and place it on your zoo map. Cannot take duplicates. Increases reputation, grants research icons, or increases hand limit to 5.
- Strength 5 – Conservation project work: Support an active project or play a new Conservation Project card from your hand into the leftmost slot above the board (sliding others right; discard if exceeding limit: 2, 3, or 4 based on player count). Place 1 player token from the left of your zoo map onto the fulfilled condition to score points and unlock the token space bonus.
Conservation Projects Layouts & Types
- Icon Requirements: Count matching icons on played cards, partner zoos, and universities.
- Release into the Wild: Discard a matching Animal card from your zoo that occupies a standard enclosure of the required size. Move Appeal back by the animal’s value, empty its enclosure, and score conservation points.
Association Action (Side II) & Donations
Side II: Perform one or more different association tasks. You may make one donation.
- Can perform multiple different tasks in a single action, spending required workers for each, provided the sum of task strengths does not exceed action strength X.
- Can play Conservation Project cards directly from display within reputation range (paying folder cost).
- Donations: May make 1 donation per action by paying the lowest visible cost in the donation area (2, 5, 7, 10, or 12 money) and covering it with a player token to gain 1 conservation point. Once all spaces are covered, each subsequent donation costs 12 money without placing a token.
ASSOCIATION Action (Side I)
Perform 1 task. Requires 1 worker (2 workers if you already have 1 there; maximum 2 placements per break).
- Strength 2: +2 Reputation.
- Strength 3: Take 1 partner zoo (no duplicate continents; max 2 zoos on Side I).
- Strength 4: Take 1 university (no duplicates; grants reputation, research icons, or hand size 5).
- Strength 5: Support active project or play 1 from hand. Place player token from map to score and unlock bonus.
Conservation Projects
- Icon Requirements: Count matching icons on cards, partner zoos, and universities.
- Release into the Wild: Discard matching animal from required standard enclosure. Deduct its Appeal, empty the enclosure, and gain conservation points.
Association Action (Side II) & Donations
- Perform multiple different tasks in one action if sum of task strengths ≤ action strength (spend workers per task).
- Unlocks 3rd and 4th partner zoo slots.
- Play Conservation Project cards directly from display within reputation range.
- Donations: Max 1 per action. Pay lowest visible cost (2, 5, 7, 10, 12) and cover with token for +1 Conservation point. When full, costs 12 (no token placed).
Action: Sponsors
SPONSORS Action
Side I: Play exactly 1 Sponsor card OR advance the Break token and take money.
- Play 1 Sponsor card from hand with level <= strength X and fulfill conditions.
- Alternative: Advance Break token X spaces and take X money (even if the Break track ends early).
Side II: Play one or more Sponsor cards OR advance the Break token and take money.
- Play multiple Sponsor cards (strength X + 1 >= sum of levels). Can play from hand or display within reputation range (paying folder cost).
- Alternative: Advance Break token X spaces and take 2X money.
- Allows playing Sponsor cards with the upgrade requirement icon.
Sponsor Card Layout
- Level in upper-left corner; building requirements next to level.
- Conditions on left side; icon benefits in upper-right corner.
- Recurring effects at top (blue background, or purple for break income); instant effects in bottom-left (yellow); final scoring effects in bottom-right (brown).
SPONSORS Action
Side I
- Play 1 card: From hand, level ≤ X. Fulfill conditions.
- Alternative: Advance Break X, gain X money.
Side II
- Play cards: Play 1+ cards from hand or display (pay folder fee). Total levels ≤ X + 1. Allows upgrade-required cards.
- Alternative: Advance Break X, gain 2X money.
Sponsor Card Layout
- Upper-left: Level and building requirements.
- Left edge: Conditions.
- Upper-right: Icon benefits.
- Top: Recurring effects (blue) / Break income (purple).
- Bottom-left: Instant effects (yellow).
- Bottom-right: Final scoring (brown).
Breaks & Track Milestones
Appeal and Conservation Points
Special milestone spaces on the Conservation track:
- 2 conservation points: Upgrade one Action card OR activate an additional association worker.
- 5 & 8 conservation points: Take 5 money OR take one of the available Bonus tokens next to the space.
- 10 conservation points: The first time any player reaches/exceeds 10 conservation points, all players discard one of their 2 Final Scoring cards face down.
Break
Triggered when the Break token reaches the last space of the Break track. After the active player finishes their turn, execute in order:
- Hand card limit: Discard down to limit (normally 3 cards, or 5 with university).
- Tokens on Action cards: Discard Multiplier, Venom, and Constriction tokens from Action cards.
- Association board: Return all association workers to notepads. Replenish partner zoos and universities to 1 of each available.
- Replenish display: Discard cards in folders 1 and 2, slide remaining cards down, refill empty folders from deck.
- Take income:
- Collect money from Appeal track position.
- Collect kiosk income: 1 money per adjacent unique building, special enclosure, occupied standard enclosure, and pavilion.
- Collect income from Sponsor cards and unlocked zoo map bonus spaces (purple icon).
- Break track: Reset the Break token to the starting space for player count.
Appeal and Conservation Points
- 2 CP: Upgrade 1 Action card OR activate 1 association worker.
- 5 & 8 CP: Gain 5 money OR 1 available Bonus token.
- 10 CP (first player only): All players discard 1 of their 2 Final Scoring cards.
Break
Triggered when track ends; resolve after current turn in order:
- Hand limit: Discard to 3 (5 with university).
- Tokens: Remove Multiplier, Venom, and Constriction tokens from Action cards.
- Association board: Return all workers. Replenish partner zoos and universities to 1 each.
- Display: Discard slots 1 and 2, slide remaining cards down, refill.
- Income:
- Appeal track payout.
- Kiosks: 1 money per adjacent unique building, special enclosure, occupied standard enclosure, or pavilion.
- Sponsor cards and unlocked map spaces (purple icons).
- Reset: Return Break token to player-count starting space.
End of Game & Final Scoring
1. Game End
Triggered when a player’s Conservation counter and Appeal counter meet in the same scoring area or pass each other.
- If triggered at the end of a player’s turn: all other players take one final turn.
- If triggered during a break: all players take one final turn.
2. Score Cards
Reveal and score Final Scoring cards and end-game Sponsor cards. (If no player reached 10 conservation points during the game, discard 1 Final Scoring card now before scoring). Maximum 4 conservation points from a single Final Scoring card.
3. Determine Victory Points
- Find the scoring area where your Conservation counter is located.
- Identify the lowest appeal number in that scoring area: this is your Target Number.
- Subtract the Target Number from your current Appeal counter value:
Victory Points = Appeal - Target Number. - The player with the highest positive Victory Point total wins!
- Tie-breaker: Most Conservation Projects supported (most player tokens removed from the left side of the zoo map). If still tied, share the victory.
1. Game End
Trigger: A player’s Conservation and Appeal counters meet or cross.
- Triggered on a turn: All other players take 1 final turn.
- Triggered during a break: All players take 1 final turn.
2. Score Cards
- Score Final Scoring cards (max 4 Conservation points per card) and end-game Sponsor cards.
- If no player reached 10 Conservation points: Discard 1 Final Scoring card before scoring.
3. Determine Victory Points
- Calculation:
Victory Points = Appeal − Target Number(Target Number = lowest appeal value in your Conservation counter’s area). - Highest VP wins.
- Tie-breaker: Most Conservation Projects supported (tokens off left side of board); then shared victory.
Solo Rules
Solo Game Rules
Rules adjustments for solo play:
Setup
- Lay out 3 basic Conservation Project cards (no neutral tokens covering slots).
- Do not use the Break token; place 7 player tokens of an unused color in the left column of the solo tile.
- Start with 20 appeal (for beginner difficulty; 10 appeal for intermediate, 0 appeal for advanced challenge).
Turn / Cards
- Interactive card effects are replaced by the solo effect shown in the blue bottom bar.
- Maximum 2 Conservation Project cards above the Association board.
- Effects advancing the Break track do not move any token, but you still gain any associated money. No X-token for triggering breaks.
Gameplay & Breaks
- At the end of each turn, move the topmost token from the left column of the solo tile to the right column.
- When the 7th token moves to the right, a break occurs immediately: place the topmost token onto the lowest open donation space on the Association board, move the remaining tokens back to the left column (one row will now be empty), and execute break steps 1–5.
- The game ends after 6 rounds (when only 2 tokens remain on the solo tile and the bottom one is shifted). Win by scoring 0 or more Victory Points!
Solo Game Rules
Setup
- Display 3 basic Conservation Project cards (no neutral tokens covering slots).
- Place 7 unused player tokens in the left column of the solo tile (do not use the Break token).
- Starting Appeal: 20 (beginner), 10 (intermediate), or 0 (advanced).
Turn / Cards
- Resolve solo effects (blue bottom bar) instead of interactive card effects.
- Maximum 2 Conservation Projects above the Association board.
- Break track advances: gain any depicted money, but do not advance any token; no X-tokens awarded.
Gameplay & Breaks
- End of turn: Move the topmost token from the left column to the right column of the solo tile.
- Break: Triggers immediately when the 7th token shifts right.
- Place the topmost token onto the lowest open donation space on the Association board.
- Move all remaining tokens back to the left column (one row permanently empty).
- Resolve standard break steps 1–5.
- Game End: The game ends after 6 rounds (shifting the 2nd token in the final round). Win by scoring ≥ 0 VP.
Rules explaination videos
Expansions for
Ark Nova
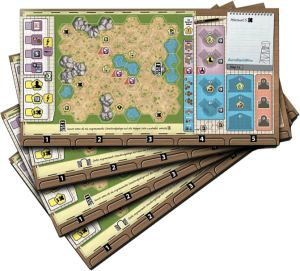
Ark Nova: Board Game Arena Maps
2026
Eight Board Game Arena map variants with changed tile-playing areas
View expansion
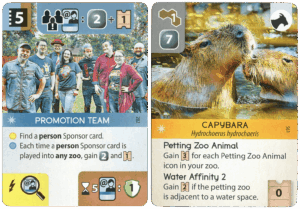
Ark Nova: Promotion Team & Capybara Promo Cards
2024
Two promo cards bring a capybara and a Sponsor-focused scoring opportunity.
View expansion

Ark Nova: Zoo Map Pack 2
2024
Five new zoo designs, including a shared Tournament layout and four unique boards.
150
minutes
Medium Heavy
View expansion

Ark Nova: Marine Worlds
2023
Expand your zoo with sea animals, reef synergies, and new strategic choices.
150
minutes
Medium Heavy
View expansion
Ark Nova: Zoo Map Pack 1
2022
Two new zoo maps expand your Ark Nova options.
150
minutes
Medium Heavy
View expansion
