
Heroes of Land, Air & Sea
2018
Develop a humble kingdom into a mighty force through exploration, resource management, worker placement, and strategic warfare.
180
minutes
1 - 4
player(s)
14+
Medium Heavy


About this board game
Heroes of Land, Air & Sea is a strategic 4X-style board game for 1–4 players, with games lasting around 180 minutes. Set in a world of warring kingdoms, it puts players in command of iconic factions including orcs, humans, dwarves, and elves.
Each kingdom begins modestly, with a town hall, a handful of peons, and a lone warrior. From there, players explore surrounding lands, expand their territory, develop their workforce, gather vital resources, and build a formidable army. Careful decision-making and resource management are essential as every player shapes the growth of their kingdom.
- Develop your forces: Peons can evolve into warriors, warriors can rise as heroes, and town halls can become majestic castles.
- Command land, air, and sea: Unlock water vessels, air vessels, and mythical creatures to move units across the game board and position armies for attack.
- Balance competing priorities: Assign peons to construct buildings, or use them for exploration, expansion, exploitation, and extermination.
- Outwit your opponents: Secretly select tactics cards for battles, with available options determined by the units involved.
Warfare in Heroes of Land & Sea uses a carefully designed cost-and-reward system, making each conflict a test of strategic judgment. Players must weigh the risks of battle against the rewards of conquest while competing to establish the strongest kingdom.
With beautifully crafted miniatures, evolving armies, two distinct economic systems, and multiple paths to development, Heroes of Land & Sea delivers an immersive contest of expansion and warfare. Success depends on finding the right balance between building your kingdom and using its people to pursue victory.
/pic7182955.jpg)
Board Game Rules for
Heroes of Land, Air & Sea
Welcome to Aughmoore…
In the beginning, the primal energies of the races fueled the inner spark of Aughmoore. In return, it provided a plentiful bounty that, for a time, even satisfied the blood-crazed Orcs. With prosperity came complacency, and the aura of a once vigorous struggle for survival weakened. As it waned, Aughmoore was able to provide less and less.
After centuries of feeding her sprawling children, she became fallow. Crops no longer leaped from the tilled mounds of fertile soil, veins of ore hardened to the pickaxe, and the very spark of magic and life began to retreat into the dark crevices of the earth. Aughmoore was cast into shadow and sickness.
As anxiety peaked, the races began to turn away from one another. Scarcity strained the delicate bonds of trade, marketplaces became hives of petty theft, Resources were harvested to desolation, and territorial disputes escalated.
During this harrowing time, it was Laelithar, the Human paladin, who first grew distrustful and turned his back on the other races, preferring to help and shelter only his own kind. Under the flickering glow of the Great Hall’s sconces, he announced the Isolation Concordat, though as he spoke, those old allies whom he renounced were executing their vile plots against him.
Spindly shadows descended from the rafters. Cold steel gleamed in stained-glass painted moonlight throughout the hall as assassins cut through the crowd toward the paranoid leader.
The Elves had grown tired of the arrogant humans—of all races. Their scheming was accompanied by small coups across Aughmoore. As more assassination plots and economic betrayals were revealed, it became clear that each of the races had been preparing for complete independence for quite some time. The world had declared war on itself.
The Orcs, secretly disciplining a league of armed forces, cut weapon tradelines immediately, arming only themselves with their legendary steel. Their armies began marching in every cardinal direction with standing orders to eviscerate those who now lacked the advantage of their superior metallurgy.
The Elves created pacts in the darkened alleys of the enemy cities they had infiltrated, trading bottles of fine wine and ancient mystical relics for information on their next target.
The Humans rallied their masses, conducting public prayer and calling the earth to flourish and provide for the brave men and women. Under their holy sky, Humanity met their enemies not with trickery but with iron force and sheer hubris.
The Dwarves sought the majestic wisdom of the timeless mountains, and mined their valuable ore, hastily constructing enormous stone fortresses to exile all those not of the Heaven-Blood.
As the races continued to turn their backs on one another, the seeds of disquiet spread like disease in their hearts. Their hatred, their feuds, the unwavering raw energies of their dedication and passion reignited Aughmoore’s inner flame. Fueled by their fury, Aughmoore returned bounty and prosperity to its inhabitants. The plague of barrenness had ceased, but the allure of power and revenge ensued.
Today, terror and destruction are the norm. Fizzling spell slinging has turned to hailing comets and shattering earthquakes, brief skirmishes to violent massacres, and trade to extortion and subterfuge. Armies of all colors and creeds now march, sail, and fly over the scarred surface of the world. No stone will remain unturned, no enemy left alive, no element unplundered, and no territory unclaimed.
The future of Aughmoore will be forever altered by the events to come. The only question that remains is: who will be left in the past?
Game Overview
Heroes of Land, Air & Sea is a 4X-style board game that tells the epic tale of Aughmoore’s many conflicts: Orcs vs. Humans, Dwarves vs. Elves, battling kingdoms, and the heroic individuals who turn the tides of war.
Players control one of these four Factions, competing to expand their small kingdom of a single Warrior and two Serfs into new territory. From there, players must explore the territory around them, expand their work force, fortify their army, and build up their Capital City — all through careful action selection, exploitation, war, and Resource management.
As players reach milestones through building, recruiting, or war, they gain access to many advantages and Victory Points. Achieving one of four “X-Objectives” will end the game: eXplore, eXpand, eXploit, or eXterminate.
Finding this balance in exploration, kingdom growth, territory exploitation, and war is crucial. After one of the X-Objectives have been met, the game is over and players total their Victory Points, crowning one of them as the most supreme Faction of Aughmoore!
Game Objective
Every round, players are exploring, building their Capital City, casting Spells, and Battling to gain Victory Points ( ). After one player achieves any one of the 4 “X-Objectives,” then players finish the current round as normal and play one additional full round which will be the final round. These “X-Objectives” are:
- eXplore: All Land Exploration Tokens in the game have been revealed.
- eXpand: All of a player’s Serfs and Warriors are in play.
- eXploit: All 3 of a player’s Towers are in play.
- eXterminate: A player has destroyed another player’s Capital City.
Once the end of the game has been triggered, it cannot be undone, even if the end game conditions are no longer met. After the final round ends, the game is over. Players total their Victory Points, from Buildings, Towers, certain Units, Scribed Spells, occupied Regions, and any other end game bonuses. The player with the most Victory Points is crowned the supreme Faction of Aughmoore.
Game Components
Faction Components:
- 4 Capital City Boards (1 per Faction)
- 80 Miniatures (20 per Faction)
- 12 Hero Cards (3 per Faction)
- 32 Constructs (One-Time Assembly Required):
- 12 Capital Cities (3 stackable levels per player)
- 12 Towers (3 per Faction)
- 4 Sea Vessels (1 per Faction)
- 4 Air Vessels (with 4 plastic stands, 1 per player)
- 12 Faction Tokens (3 per Faction)
Other Components:
- 1 Game Board (Map)
- 28 Tactic Cards (7 Cards for each player)
- 60 Spell Cards
- 8 Solo Enemy Cards
- 94 Exploration Tokens (70 Land, 24 Sea)
- 15 Resource Tokens (5 Ore, 5 Mana, 5 Food)
- 1 First Player Token
- 1 Quick Reference Sheet
Assembling Constructs
Before setting up your first game, punch out all of the Construct pieces and assemble them. You may refer to the Construct Assembly Guide for detailed assembly instructions. Constructs are made to be assembled once and never disassembled.
Component Overview
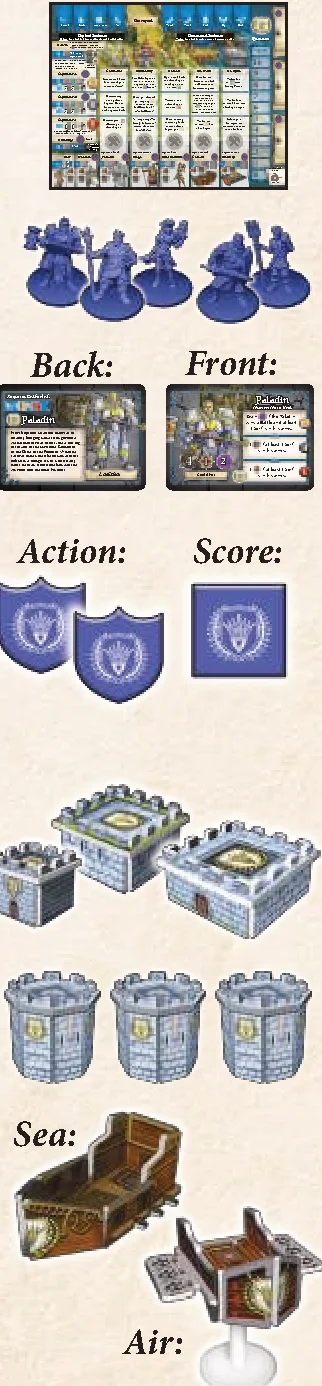
Faction Components: A Faction consists of a Capital City Board, a supply of Units, Hero Cards, several types of Constructs, and several Tokens:
- Capital City Board: Placed directly in front of each player. It contains the information needed for gameplay, an Action Bar, and an area to track a player’s Resources.
- Units: 20 Miniatures for each Faction kept in a supply. These consist of 3 Heroes, 5 Warriors, and 12 Serfs.
- Hero Cards: Each Hero has a corresponding Hero Card that lists their special abilities.
- Faction Tokens: Two kinds–1 Score Token (square) for tracking Victory Points, and 2 Action Tokens (shield) for marking a chosen action during Action Selection.
- Constructs:
- Capital City Levels: 3 stackable structural Constructs that represent a Faction’s Capital City location and level. The Capital City is considered a “Structure.”
- Towers: 3 structural Constructs that can be built by a Faction on a Land Region. Towers are considered “Structures,” NOT Units.
- Sea Vessel: A movable vessel Construct that can carry Units into Sea Regions. A Sea Vessel is considered a “Unit.”
- Air Vessel: A movable vessel Construct that can carry Units over Land or Sea Regions. An Air Vessel is considered a “Unit.”
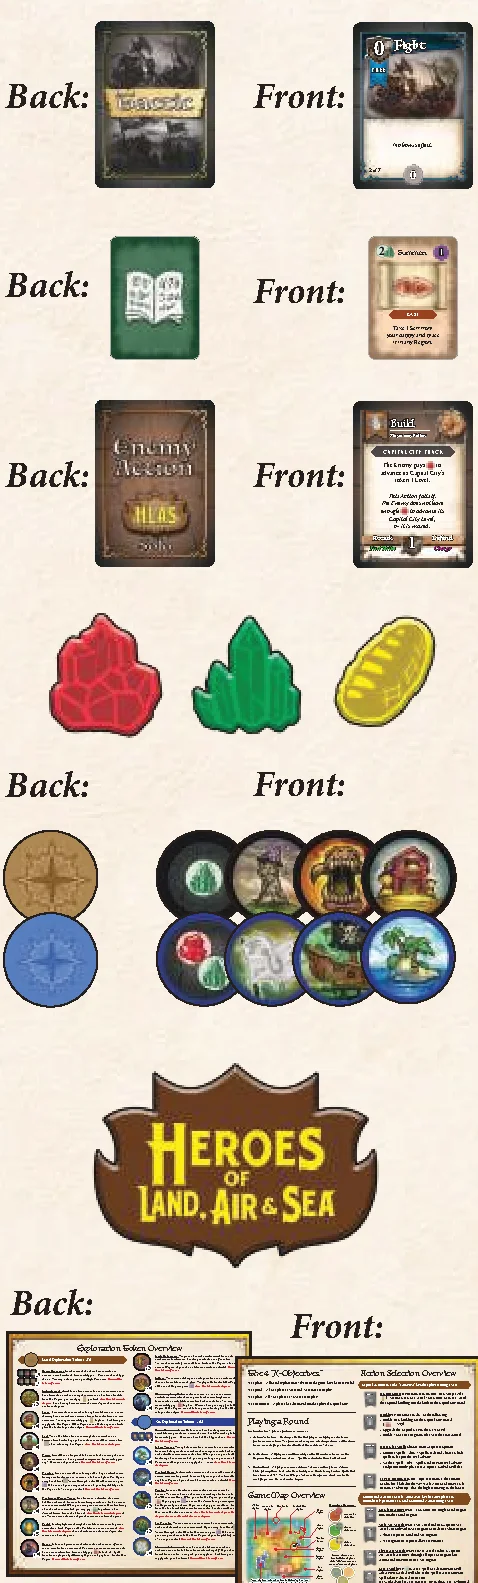
Other Components:
- Tactic Cards: Each player has a hand of 7 Tactic Cards (marked “X of 7”) to be used during Battle.
- Spell Cards: Gained each round, and by taking the Research Action. Spells can be used by Casting them.
- Solo Action Cards: Used in the Solo Play Variant to dictate the actions of the Solo Enemy.
- Resource Tokens: Used to track Ore, Mana, and Food amounts on each player’s Resource Track.
- Exploration Tokens: Placed face-down onto unexplored Land and Sea Regions on the map (except Capital City Regions) and then flipped and resolved when Units first enter a Region containing one. There are 2 kinds of Exploration Tokens: Land and Sea.
- First Player Token: A Token that is given to the first player each round to perform the first action, and will pass to the next player at the end of the round.
- Quick Reference Sheet: A quick reference of gameplay and the effects of Exploration Tokens.
Game Board
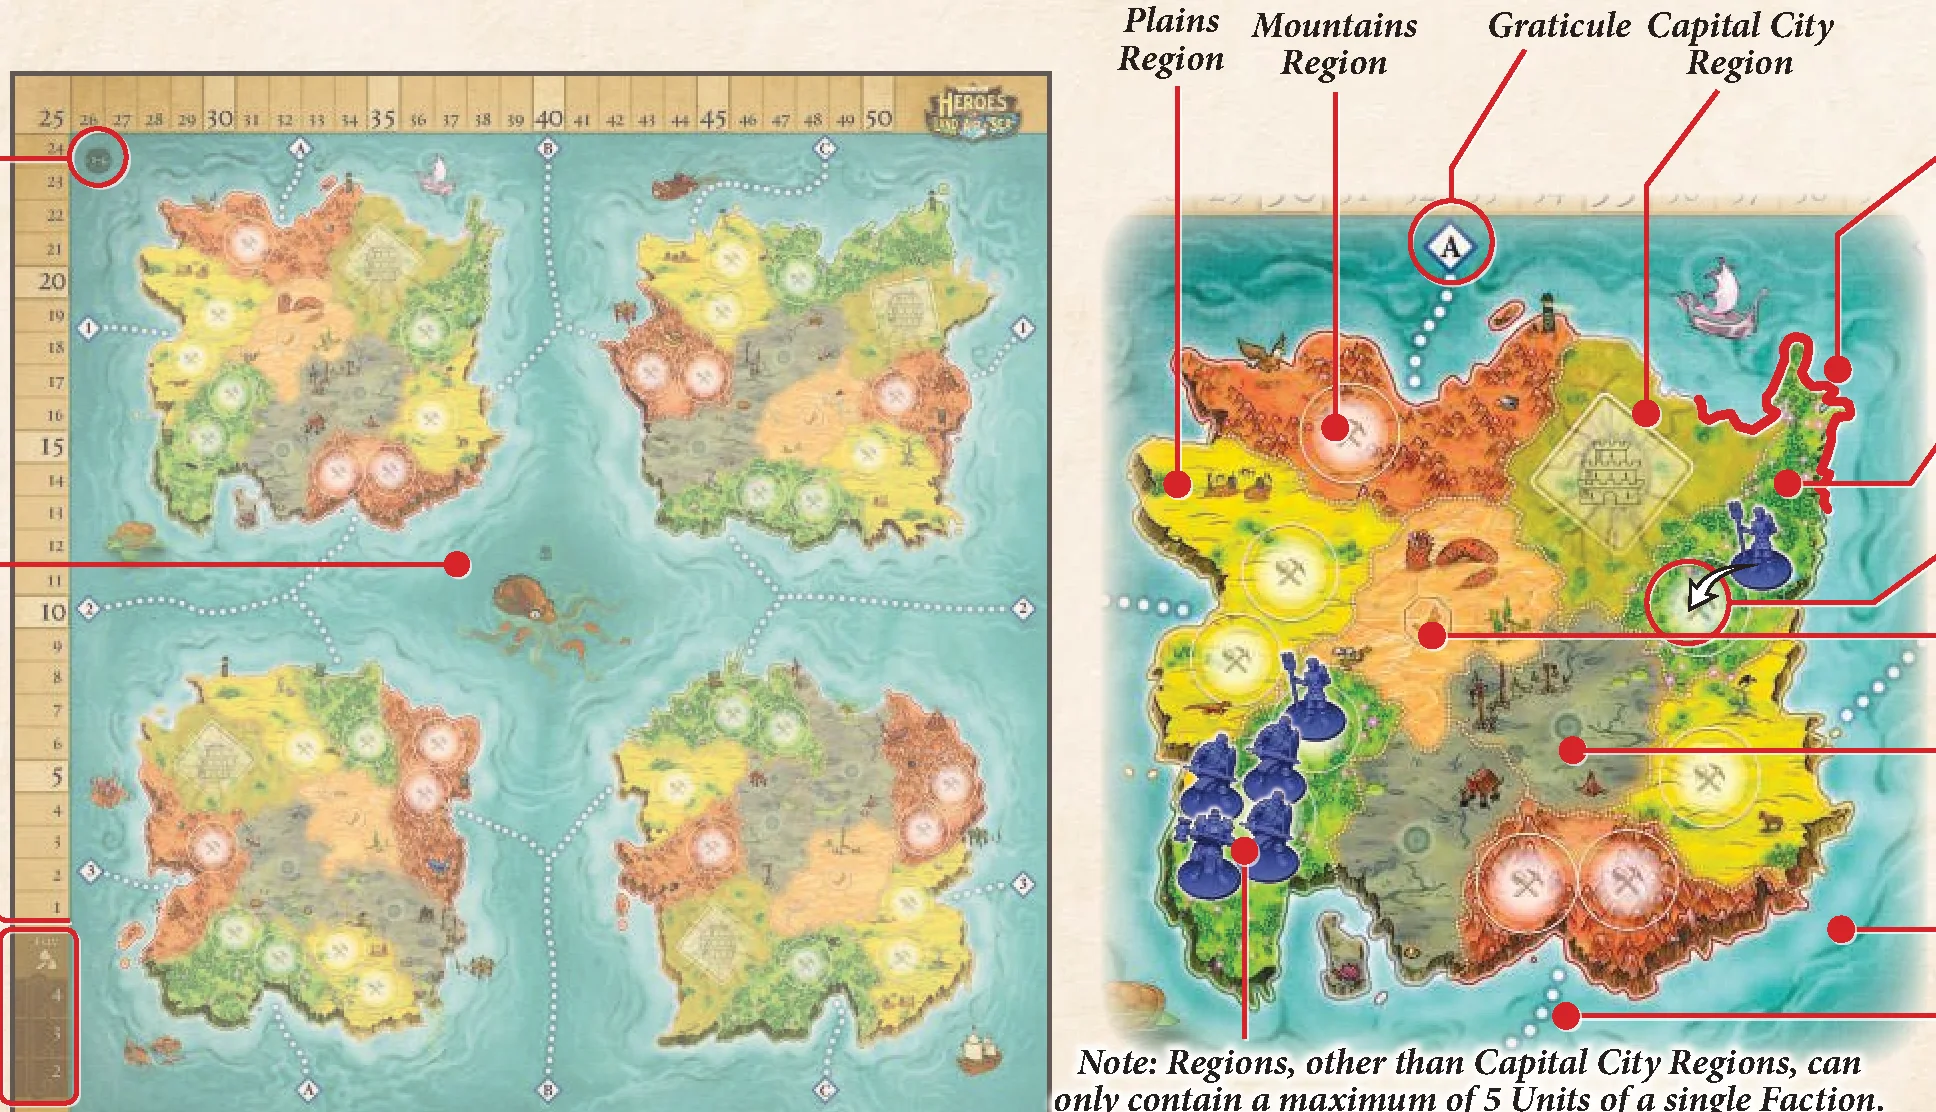
Placed in the center of the play area. Choose a side based on your number of players (Note: Playing with more than 4 players requires the Order & Chaos Expansion). It consists of the following:
- Continents: Clusters of 10 adjacent Land Regions.
- Sea Regions: 13 total Sea Regions.
- Shores: Connect Land to Sea Regions where Sea Vessels may dock.
- Ferry Routes: Separate Sea Regions and connect continents so Land Units may cross.
- Graticules: Numbers/letters that mark a continuation of a Ferry Route.
- Player Count: Marks how many players should be playing when using this side of the board.
- Score Track: Marks the current Victory Points of each Faction and is used for end game scoring as well.
- Tax Track: Resources offered when taking the Tax Action.
- Note: Regions, other than Capital City Regions, can only contain a maximum of 5 Units of a single Faction. Capital City Regions do not have a Unit maximum.
Capital City Board Overview
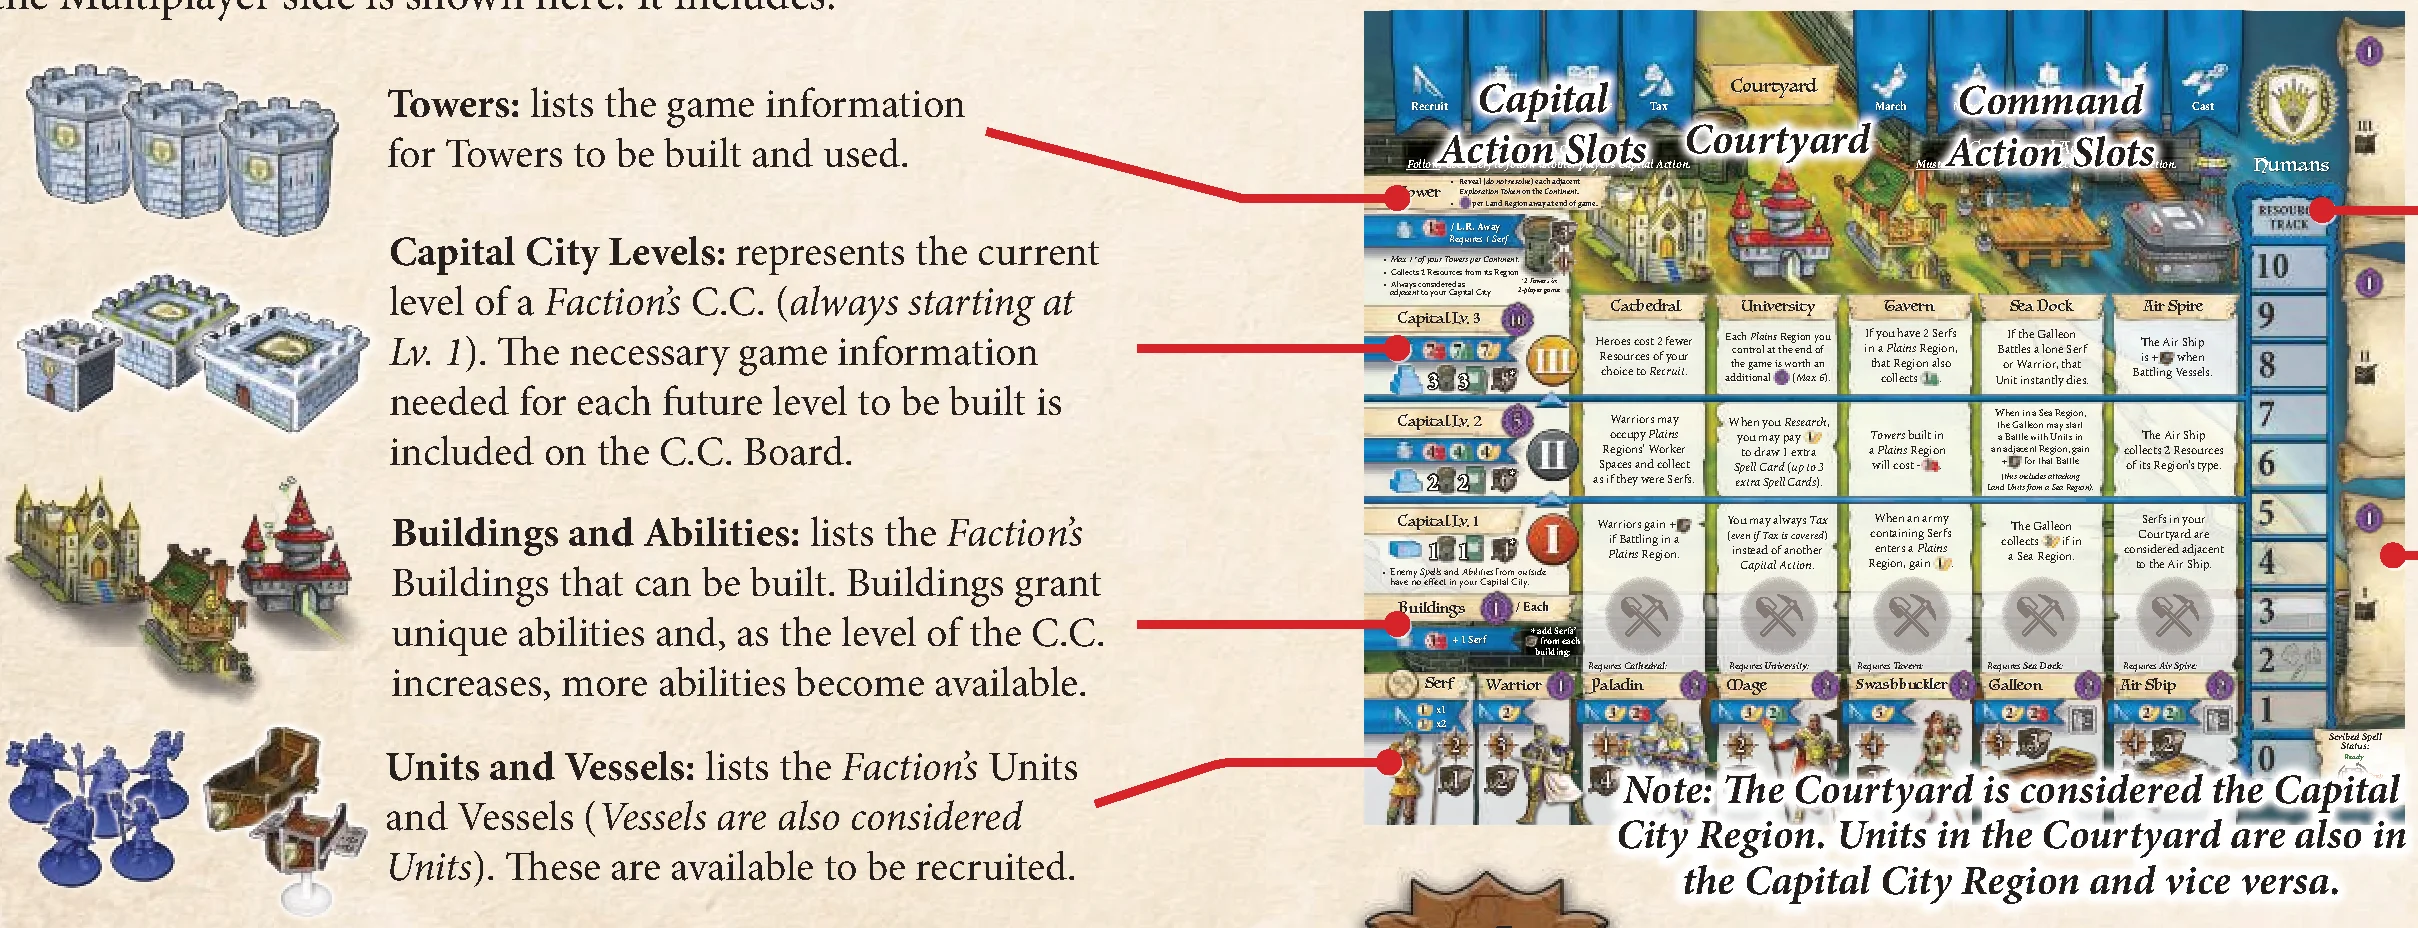
Each Capital City Board represents the Capital City of a Faction. The board has 2 sides: a Multiplayer side and a Solo Enemy side. It includes:
- Towers: lists the game information for Towers to be built and used.
- Capital City Levels: represents the current level of a Faction’s C.C. (always starting at Lv. 1). The necessary game information needed for each future level to be built is included on the C.C. Board.
- Buildings and Abilities: lists the Faction’s Buildings that can be built. Buildings grant unique abilities and, as the level of the C.C. increases, more abilities become available.
- Units and Vessels: lists the Faction’s Units and Vessels (Vessels are also considered Units). These are available to be recruited.
- Courtyard & Action Bar: At the top of the C.C. Board is the Courtyard and an Action Bar that includes 9 Action Slots split into 2 types of actions: Capital Actions and Command Actions. These represent the game actions that a player may perform using Action Tokens and Serfs (from the Courtyard).
Note: The Courtyard is considered the Capital City Region. Units in the Courtyard are also in the Capital City Region and vice versa.
- Resource Track: The numbered spaces on the track represent the amount of each Resource a player has, marked by Resource Tokens. No one Resource type can ever exceed “10.”
- Scribed Spells: Slots for Spell Cards to be “permanently scribed” during a Research Action and which may be Cast without discarding.
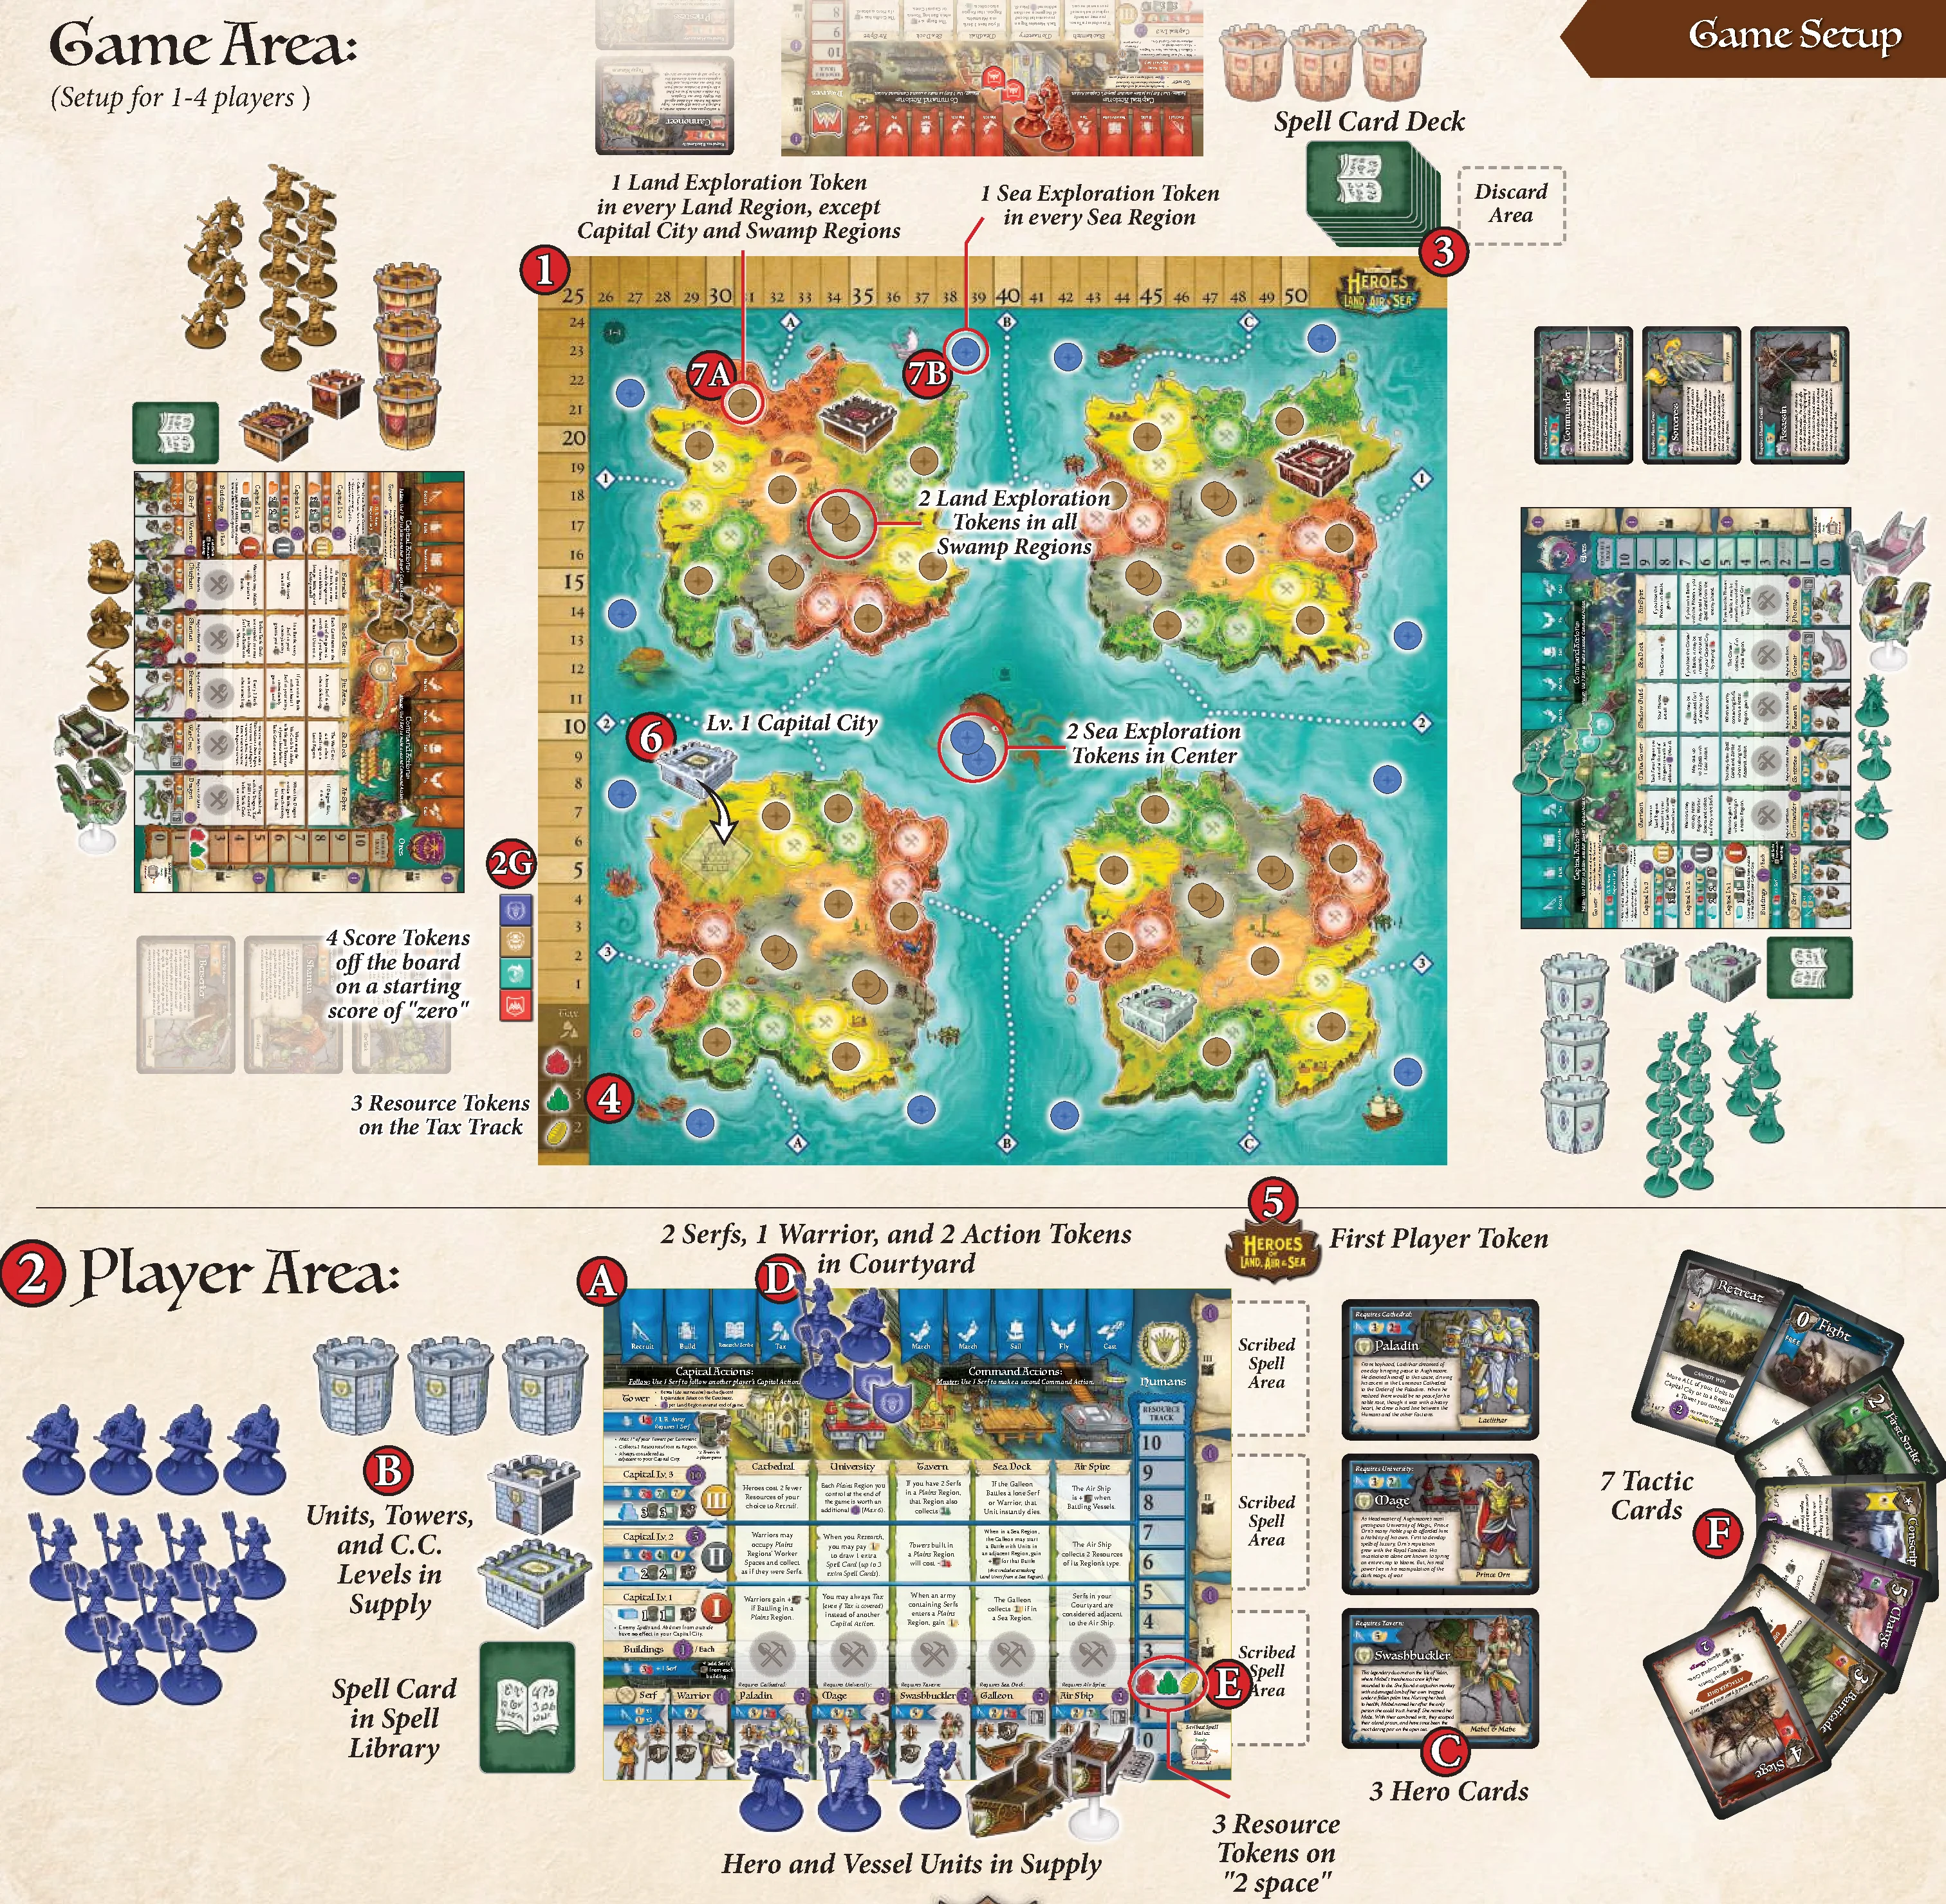
Game Setup
- Place the Game Board in the center of the table. For a 1-4 player game, use the side of the board with the “1-4” in the upper-left corner. The reverse side of the board with the “5-6” requires the Order & Chaos Expansion.
- Each player selects a Faction and collects its Faction Components:
- Place the Capital City (C.C.) Board in each player’s area.
- Collect the 20 Units and 8 Constructs (3 C.C. Levels, 3 Towers, and 2 Vessels):
- Place the Units and Vessels below the C.C. Board under, or near, their corresponding slots. This is considered a player’s “supply.”
- Place the Towers and C.C. Levels to the left of the board near their corresponding slots.
- From the supply, place 2 Serfs and 1 Warrior into the Courtyard at the top of the C.C. Board.
- Place the 3 Hero Cards near the right side of the C.C. Board. Leave enough room to place future Spell Cards in the 3 slots designated for Scribed Spells.
- Place the 2 Action Tokens into the Courtyard at the top of the C.C. Board.
- Place 3 Resource Tokens (1 Ore, 1 Mana, and 1 Food) onto the “2” space of the Resource Track (note the Watermark images of the Resource types).
- Collect a complete set of 7 Tactic Cards (each listed “X of 7”).
- Place the Score Token off the board next to (but not on) the “1″ space on the Score Track, designating a starting score of “zero.”
- Shuffle the Spell Cards and place the deck face-down near the top of the Game Board. Also designate an area for a face-down Discard Pile nearby. Then, deal 1 Spell Card to each player to be placed in their “hand,” also referred to as a player’s “Spell Library.” Always keep cards in your Spell Library secret from other players.
- Take 3 Resource Tokens (1 Ore, 1 Mana, 1 Food), which have not yet been used, and while cupped in a player’s hand, drop tokens out one at a time. The first token to fall, is placed on the “4″ space of the Tax Track (bottom left of the Game Board), the second on the “3,” and the final on the “2.” This determines the starting Tax Track values.
- Give the youngest player the First Player Token, or choose who starts the game using any other method. You can also download our Heroes of Land, Air & Sea mobile app which provides a randomizer for selecting the starting player.
- Players next decide on which Continents to place their Capital Cities. Starting with the player to the right of the first player (with the First Player Token) and going counterclockwise, players place their Lv. 1 C.C. Construct in a Capital City Region on a Continent adjacent to another player’s Continent, except for the first player to choose, who may choose any Continent to start on.
Note: there is only 1 C.C. Region per Continent and therefore each player will have their own Continent to start. Once all players have chosen where their C.C. will go, the game is ready to begin.
- Shuffle the Exploration Tokens face-down, and then place them face-down onto Regions on the Map:
- Land Regions, except for where a player’s Capital City is present, receive 1 (brown) Land Exploration Token, except for Swamp Regions, which receive 2 Land Exploration Tokens.
- Sea Regions receives 1 (blue) Sea Exploration Token, except for the center Sea Region (with the image of the Octopus, and if playing with the expansion, the second center Sea Region with the image of a Sea Serpent), which receives 2 Sea Exploration Tokens.
- Any unused Exploration Tokens are returned to the box without being revealed.
Note: In 1-2 player games, 1 of the 4 continents, chosen by the player(s), will not be used and is not accessible by players. No Exploration Tokens should be placed on this continent. Regardless of player count, all Sea Regions are accessible and should receive Exploration Tokens.
In 1-2 player games, use 3 Continents. In 3-4 player games, use all 4 Continents. In 5-6 player games (using the Order & Chaos Expansion), use all 6 Continents.
Playing a Round
Each round has 3 Phases, performed in order:
- Action Selection: Starting with the first player (with the First Player Token), and then going clockwise in turn, each player selects and performs one action. The player places one of their Action Tokens onto an open Action Slot at the top of their Capital City Board. Once an action is selected, the player cannot perform that action again for the rest of the round unless granted by a Spell or ability. This process of selecting an action will be done twice, so each player will use both of their Action Tokens.
- Collection: Once all players have completed the Action Selection Phase, they simultaneously collect Resources based on Regions they control and also draw 1 Spell Card into to their Spell Library. A player can only have 1 Spell Card in their Spell Library per level of their C.C.
- Round End: After the Collection Phase, all players remove Action Tokens and Serfs from the Action Bar, placing them back into their Courtyards. Rotate 90° any Scribed Spells that have been cast. The First Player Token then rotates clockwise to the next player, and the next round begins.
Phase 1 — Action Selection
On their turn, players place an Action Token on 1 unused action on the Action Bar. There are 2 categories of Actions:
- Capital Actions: Actions that can be “Followed” by other players using Serfs.
- Command Actions: Actions that, when selected, allow the player to “Muster,” using a Serf to immediately perform a second Command Action.
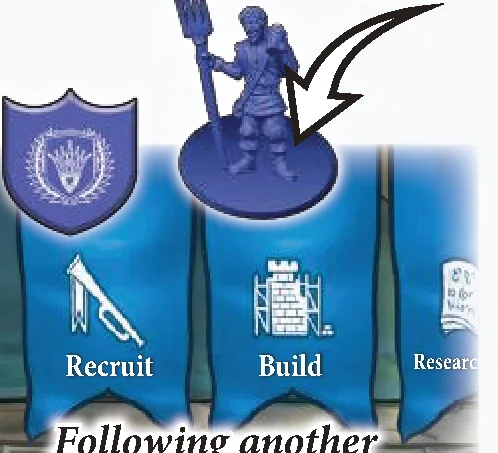
Following a Capital Action
When a player selects a Capital Action, other players may choose to “Follow” the same action. To Follow, the player must have that Action Slot open and have an available Serf in their Courtyard. Move a Serf from the Courtyard and place it in that Action Slot. That player may perform the selected action, even though it is not their turn. Only Capital Actions, not Command Actions, may be followed.
Serfs in the Action Bar cannot be used for any other Actions this round, cannot be targeted or sacrificed in Battle and cannot be the target of any Spells, but they do offer their Strength value if the Capital City is attacked.
Serfs must remain in their Action Slots until the end of the round. This fills that Action Slot for the remainder of the round and that action may not be taken again, neither by following with another Serf nor by taking a traditional action with a Faction Token.
Note: To keep the game moving smoothly, it is important for any players that are following to do so simultaneously. In the rare event that a conflict arises, resolve the actions in player order, starting with the active player.
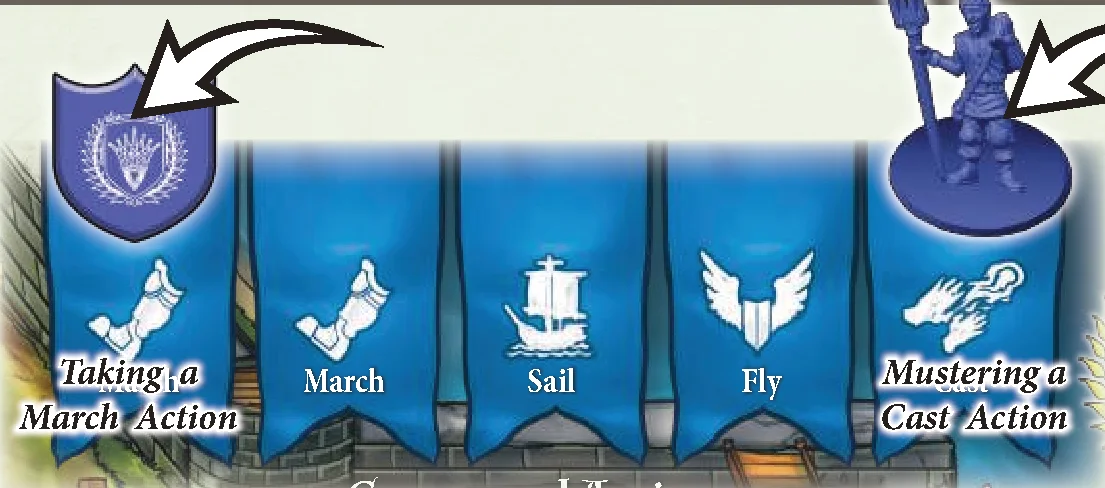
Mustering a Command Action
After a player selects a Command Action and resolves it, they may immediately “Muster” a second Command Action by placing 1 Serf from their Courtyard into an open Action Slot. Only Command Actions may be Mustered. Fully resolve each action in the order they are taken. For example, you could March, then Muster and cast a Spell. Or even March twice (with the same or different armies) using a Muster to use both March Actions.
Capital Actions Overview
The 4 Action Slots on the left side of the Action Bar are as follows:
Recruit Units
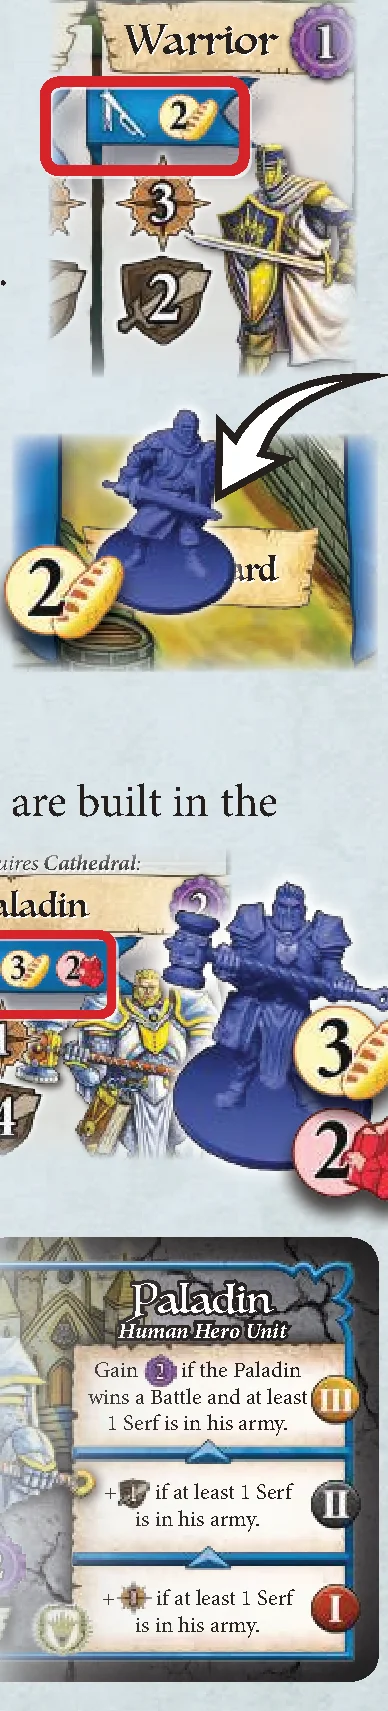
Pay Resources to recruit 1 new Unit. The cost to recruit is listed in the banner next to the Unit at the bottom of the C.C. Board. For example, a Warrior costs 2 Food to recruit.
After paying the cost, the Unit is placed in the Courtyard. Only 1 Unit can be recruited with this Action each time it is taken. The exception is with Serfs: 3 Food may be spent to recruit 2 Serfs. Each Warrior in play is worth at the end of the game.
Recruiting Heroes and Vessels:
Players can recruit Heroes and Vessels if certain Buildings are built in the Capital City. For example, to recruit the Paladin, the Cathedral must be built, and only then can 3 Food and 2 Ore be paid to recruit him, adding him to the Courtyard. Each Hero in play is worth at the end of the game.
Heroes’ Abilities:
Each Hero comes with 3 unique abilities, as noted on their Hero Card. Each ability is aligned with I, II, and III, which are unlocked by upgrading your current Capital City Level.
Note: In the event that abilities conflict with the game’s rules, the abilities always take precedence.
Placing Vessels on the Map:
When Recruited or Built, Vessels are placed on the Map, not into the Courtyard:
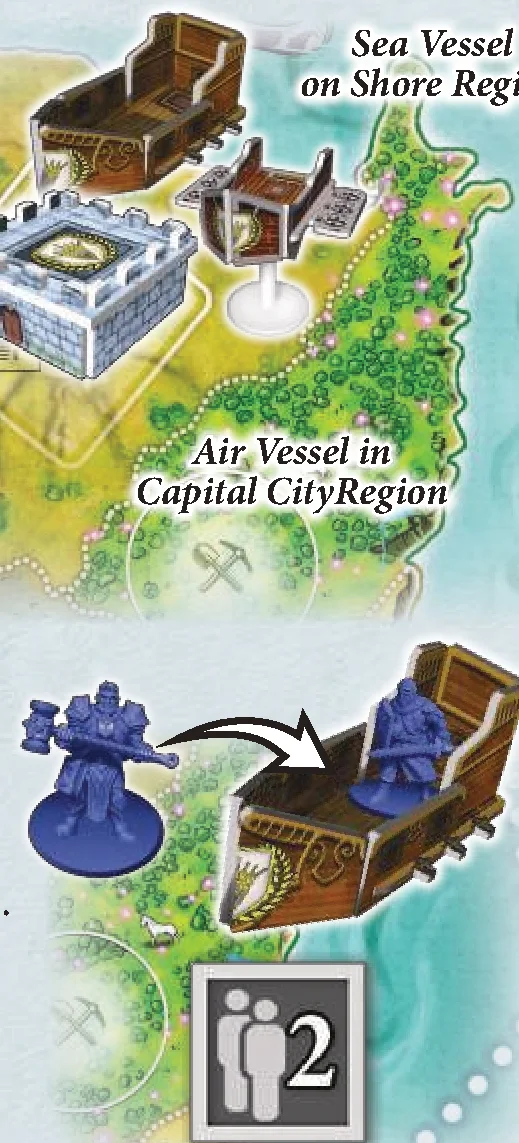
- Sea Vessels must start docked on the Shore of your Capital City Region, which is the border between the Land Region and its adjacent Sea Region. Note: docked Sea Vessels are considered to be in the Land Region NOT the Sea Region.
- Air Vessels start fully in the Capital City Region.
Boarding Vessels:
Units may be exchanged freely between the Vessel and the Land Region it occupies or whose Shore it is docked with (in the case of Sea Vessels). That includes boarding from the Courtyard into the Vessel if it is in the Capital City Region. Each Vessel has a maximum capacity of 2 Units, as listed on the C.C. Board. Vessels cannot be boarded while moving.
Build
Pay Resources to do 1 of the following:
- Build a Vessel in the C.C. Region (required Building needed). Building a Vessel is the same as Recruiting a Vessel, except a Build Action is used.
- Build a new Building on the C.C. Board.
- Upgrade the Capital City to the Next Level.
- Build a Tower.
Build a New Building:
Pay 3 Ore and then move a Serf from the Courtyard, placing it onto the Worker Space underneath the Building. This indicates that it is built, and now the player has access to its abilities listed above as well as the Hero or Vessel, pictured below, now being available to recruit (or build in the case of Vessels) during a future action.
For example, paying 3 Ore and using a Serf to build the Sea Dock will allow a player to recruit a Sea Vessel in the future, as well as unlock the Sea Dock’s abilities.
Each Building unlocks new abilities as the Capital upgrades. The Serf used to build the Building MUST stay on this Worker Space for the remainder of the game and cannot be used in any other action, nor can it be destroyed or sacrificed. Each completed Building is worth at the end of the game and each Serf occupying a building Worker Space still offers its  when defending a Battle in your Capital City Region.
Upgrade the Capital City to the Next Level:
Pay the Resources listed in the next level’s banner on the C.C. Board. To signify the new level, stack the next smaller C.C. Construct from the supply on top of the existing C.C. Construct.
For example, with a Capital City Lv. I, a player pays 4 Ore, 4 Mana, and 4 Food to upgrade their C.C. to Lv. II, then placing the second C.C. Construct on top of their Capital on the board.
Upgraded Capitals unlock new abilities with Buildings and Heroes as listed on the C.C. Board and Hero Cards. It also increases the C.C.’s Strength (), the numbers of Towers and Spell Cards a player can have and Scribe, and the the Capital City is worth at endgame.
Build a Tower:
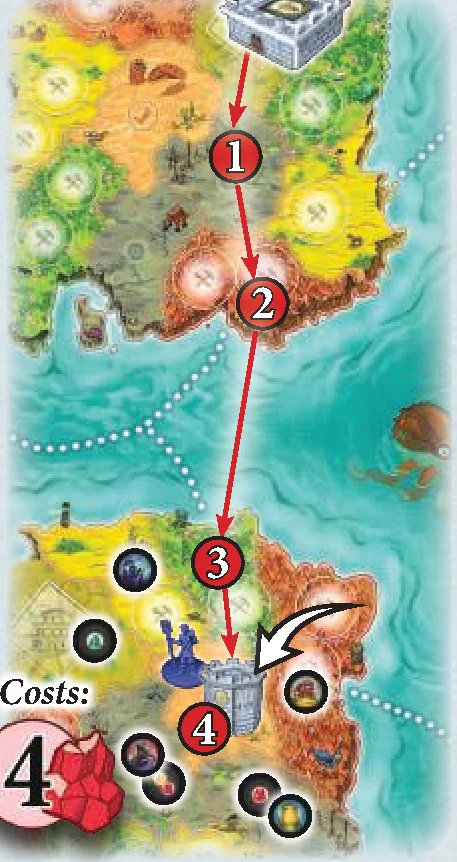
A player may build a Tower in a Land Region where they have a Serf present. The cost of building a Tower is 1 Ore for EACH Land Region away from the Capital City the target Region is. This distance should be the minimum number of Land Regions it would take a Unit to March there.
When a Tower is built, reveal, but do not resolve, all the face-down Land Exploration Tokens in the Land Regions adjacent to the Tower that are on the same Continent as the Tower. The tokens are resolved when another Unit enters those Regions.
Unlike when building a Building, the Serf is not required to stay in that Region; they are treated as a normal Unit.
Example: A player has a Serf in a Mountains Region and is building a Tower. They count the Land Regions away from their C.C. and it comes to 4 Regions (Ferry Routes make Land Regions adjacent). The player pays 4 Ore and places a Tower into this Region. Then reveals the face-down Exploration Tokens in all adjacent Land Regions on the same Continent.
A player with a Lv. 1 Capital City may only build 1 Tower. As the C.C. is upgraded, more Towers may be built, 1 additional Tower per Level. Players are also limited to building only 1 of their own Towers on 1 continent (in 2-player games, a player may have 2 Towers on 1 Continent). Multiple Factions’ Towers may occupy the same continent. A Tower may never be built in a Capital City Region with a Capital City Construct. Towers have a Natural Strength of and may not move (unless an ability allows it). They are each worth per Land Region away from that player’s C.C. at the end of the game.
Research or Scribe Spells
Researching allows players to build an arsenal of powerful Mana Spells. Select the Research Action to choose from 2 separate options:
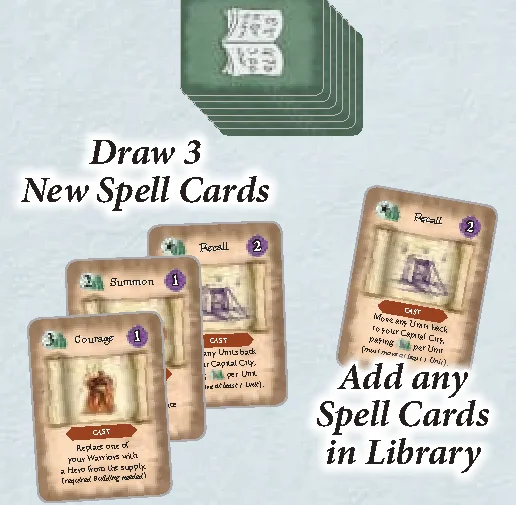
- Conjure Spells: Draw 3 Spell Cards from the Spell Deck. Then choose which cards to keep in the player’s Spell Library (a hand of Spell Cards) and which to discard. Note that there is a Spell Library Hand Limit based on the player’s C.C. Level. When finished Researching, discard Spells (from those you drew and/or from those already in your Spell Library) until the number of Spells in your Spell Library is equal to your current Hand Limit.
For example, a player with a Lv. 1 C.C. and 1 card in their Spell Library takes the Research Action. They draw 3 Spell Cards and compare them with the Spell Card they already have in their library. They choose to replace that card with one of the new Spell Cards drawn, discarding the other 3 face-down to the discard pile.
- Scribe a Spell: Take 1 Spell Card in your Spell Library and permanently place it face-up in a Scribed Spell Slot on the right side of the C.C. Board. Scribed Spells cannot be discarded at any time. Players may have only as many scribed Spells as the level of their Capital City. A Lv. 2 C.C. allows a player to have 2 total Scribed Spells. Players may only Scribe Spell Cards labeled “CAST.” They may never Scribe Spell Cards labeled “COMBAT” or “INTERRUPT.” Each Scribed Spell is worth at the end of the game.
For example, a player with a Lv. 1 C.C. and 1 Spell Card in their Spell Library takes a Research Action. They scribe their Spell Card, placing it into the Lv. 1 Scribed Spell Slot.
The cards you choose are kept in your Spell Library or Scribed Spell Slots to be Cast in later actions. Scribed Spell Cards are NOT discarded when they are Cast, nor can a player willingly discard one. When the Spell Deck runs out, shuffle the discard pile and form a new deck.
Spell Card Types
There are 3 types of Spell Cards which are labeled on the card:
- CAST: Require you to select the Command Action: Cast to use. These Spell Cards are the only Spells that may be Scribed.
- COMBAT: May only be Cast during a Battle. Cannot be Scribed. Combat spells may not be copied with a Copy Spell card by a player not involved in the current Battle.
- INTERRUPT: May be used immediately after an enemy player has Cast a Spell. Cannot be Scribed.
Tax for Resources
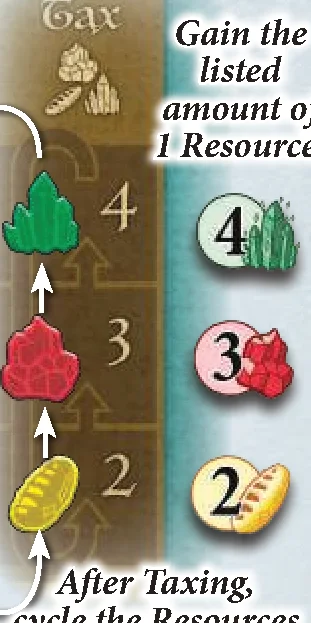
Select the Tax Action to gain one type of Resource, the amount of which is labeled in the Tax Track located in the bottom left of the Game Board.
The player chooses one of the 3 Resources and immediately gains the amount listed on the slot that the Resource’s Token is in. The slots are labeled “4,” “3,” and “2.”
For example, a player takes a Tax Action to gain 4 Mana, since the Mana Token is in the “4 slot.”
After Taxing is complete (including Followed Actions), the Resource Tokens advance; the token in “slot 2” moves to “3,” the “3” to the “4,” and the “4” then cycles back to the beginning “2” slot.
Command Actions Overview
The 5 Action Slots on the right side of the C.C. Board are as follows:
March a Unit or an Army
Move 1 to 5 Units from a single Land Region, called an “army,” into another Land Region. An army can consist of any number or combination of Units, from a single Serf to multiple Serfs, Warriors, and Heroes. Regions have a limit of 5 Units per Faction after Marching, but not when an army is moving through a Region.
The number of Regions a Unit may move in a March is called its Speed ( ) and is listed next to its picture on the C.C. Board. The army can only move as many Regions as allowed by the lowest-Speed Unit.
For example, an army containing 2 Warriors with and a Paladin with may only move 1 Region because of the Paladin’s low Speed.
Note: There are 2 March Action Slots, so this Action may be performed twice. It can even be performed twice during the same round by Mustering, even by the same army.
Marching into Battle:
Armies must stop a March when they enter a Region with an opponent’s Units, Vessels, Tower or Capital City. This ends a March Action, and it immediately results in a Battle between the two players.
Towers are Adjacent to the Capital:
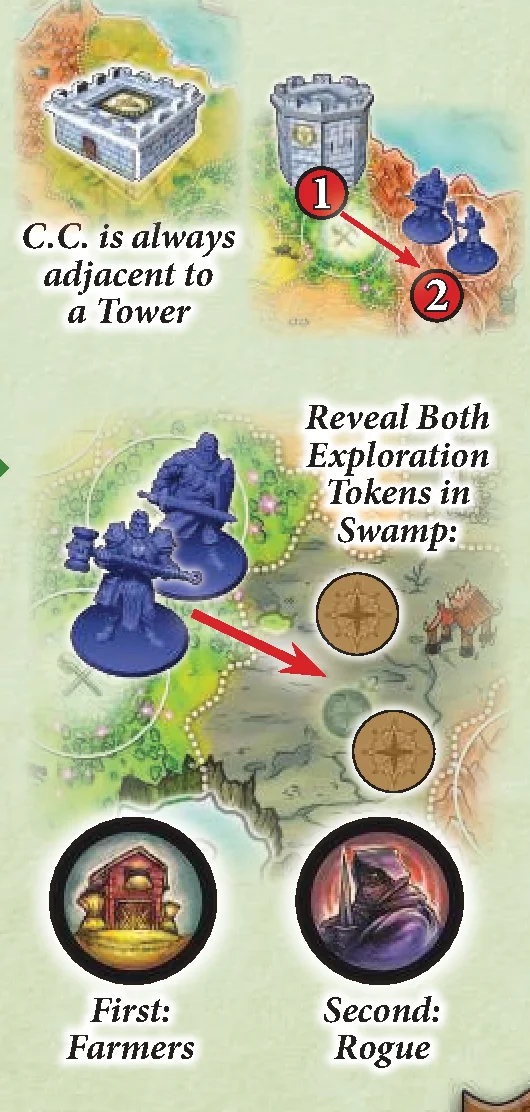
Each player’s C.C. Region, and their Units in the Courtyard, are always considered to be adjacent to all Regions with the player’s Towers. Note: Towers are not adjacent to other Towers.
Exploring Land Regions:
If the army ENDS its March in a Land Region that has a face-down Exploration Token, it is immediately revealed and then resolved (see the Reference Sheet for outcomes). In a Swamp Region, 2 Exploration Tokens are revealed and resolved one at a time. Do not reveal the second token until the first is resolving. Armies may March through “unexplored” Regions without revealing their Exploration Tokens.
Ending a March in a Desert:
Units cannot pass through a Desert Region in a single March Action, even if they have sufficient Speed to do so. They must end their March upon entering and may move out with a subsequent March Action.
Ferry Routes and Graticules:
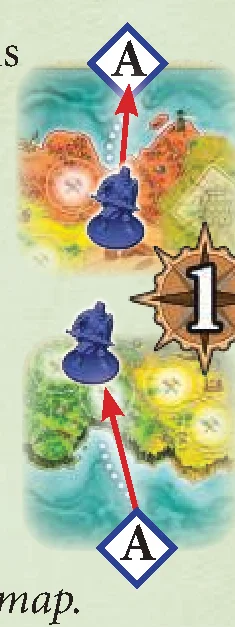
Continents are connected by Ferry Routes, which link Land Regions together and separate Sea Regions. Two Regions connected by a Ferry Route are considered adjacent, and this is the only way for Land Units to travel across Sea Regions without a Vessel.
Graticules are the letters or numbers marked on the outside of the map that have matching pairs directly opposite from each other. Attached to Ferry Routes, these are considered connected and “wrap-around” to the opposite side of the map.
For example, this army uses to March north using the “A” Ferry Route into the southern continent’s Region on the opposite side of the map.
Sail a Sea Vessel
Using its Speed, the Sea Vessel may only sail into Shore and Sea Regions. Shore Regions are any Land Regions that border the Sea:
- Docked Sea Vessels must use to first sail from Shore to Sea. A docked Sea Vessel may move into any Sea Region adjacent to that shore. Sea Vessels cannot move from one shore to another without first moving into a Sea Region.
- Use to sail to adjacent Sea Regions separated by Ferry Routes.
- Use to sail from a Sea Region to dock onto a Shore.
- Sea Regions on directly opposite sides of the board, between 2 Ferry Routes with at least 1 matching Graticule, are considered adjacent.
When a vessel is “docked” on a Shore, the Vessel is placed halfway between both the Land and Sea Region. Land Units on the Shore may freely board and exit the docked Vessel, however a Sea Vessel may not march with an army. Sea Vessels do not require Units aboard to sail.
Exploring Sea Regions:
If the Sail ENDS in a Sea Region that has a face-down Exploration Token, it is immediately revealed and then resolved. In the Central Sea Region, 2 Exploration Tokens are revealed and resolved one at a time. Do not reveal the second token until the first is resolving. Sea Vessels may Sail through “unexplored” Sea Regions without revealing their Exploration Tokens.
Ending a Sail in the Central Sea Regions:
Like armies Marching through a Desert Region, Sea Vessels cannot Sail through the Central Sea Region in a single Sail Action. They must end their Sail upon entering and may move out with a subsequent Sail Action.
Fly an Air Vessel
Using its Speed, an Air Vessel:
- May Fly through adjacent Land Regions, as if it were marching (including between Towers and the Capital City).
- May not use Ferry Routes.
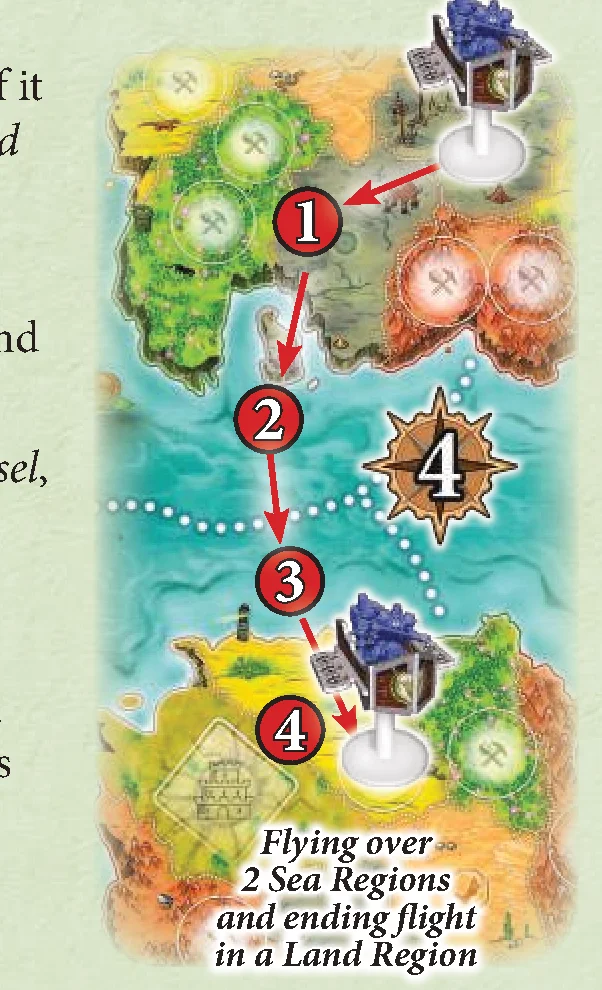
- May Fly through Sea Regions, but may not end flight in a Sea Region.
- May Fly into a Sea Region to Battle a Sea Vessel, but if it survives it has only to return to a friendly or unoccupied Land Region. If it cannot do this, the Air Vessel is destroyed.
- May pass through unexplored Land Regions, and also may end its flight to explore Regions with Land Exploration Tokens. However, if there are no Units aboard the vessel and the token’s outcome requires the player to lose a “Unit,” the player must lose the Air Vessel.
- May not explore Sea Regions.
- MUST stop in a Region with enemy Units or Structures to Battle.
- May Fly through a Desert Region WITHOUT stopping.
Like the Sea Vessel, the Air Vessel may carry passenger Units which can freely board and exit the vessel if sharing the same Region but not in the middle of a Fly Action. Air Vessels do not require Units aboard it to fly.
Note: Air Vessels may not move using a March Action.
Flying Through the Central Sea:
The Central Sea Region counts as 2 Regions when flying, so it requires to fly an Air Vessel through it.
Cast a Spell
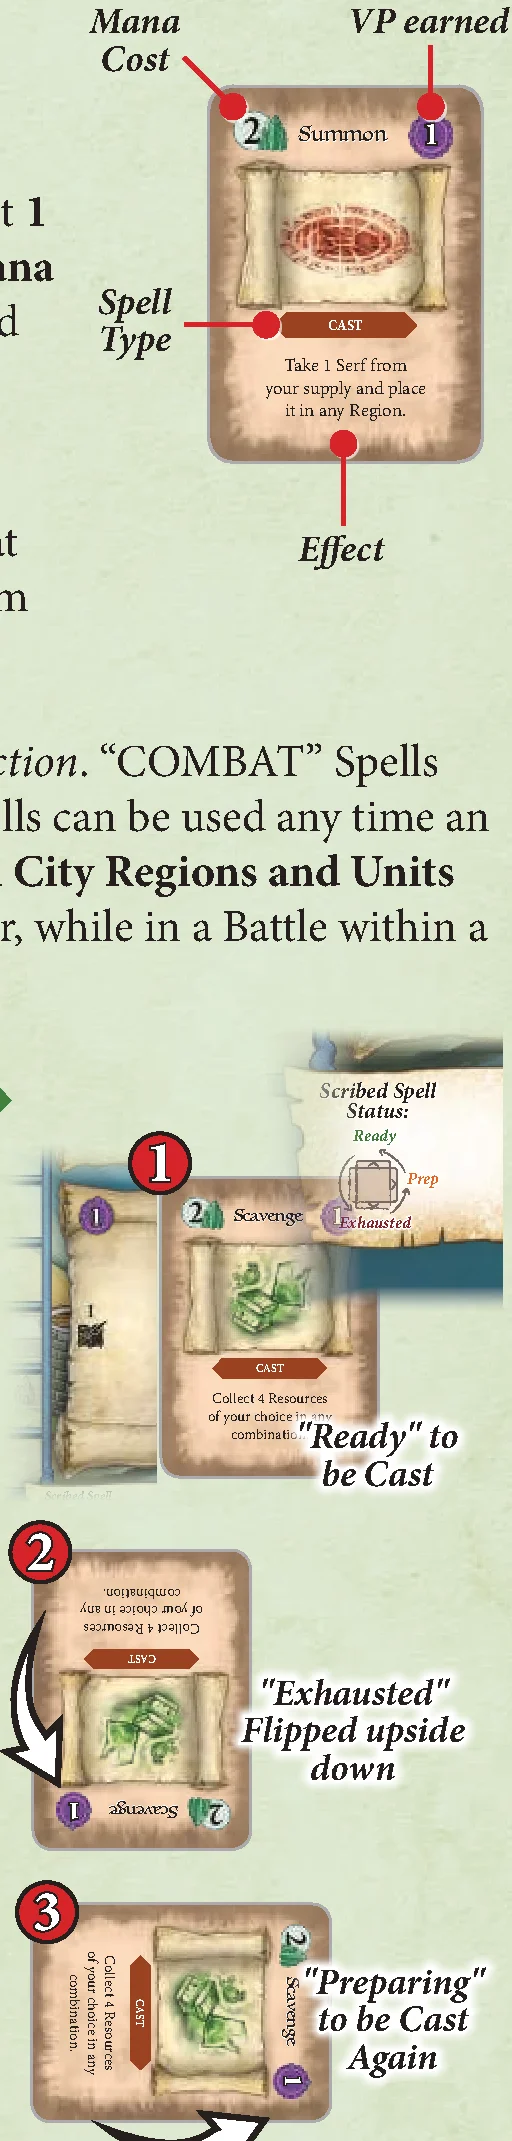
Reveal 1 Spell Card from your Spell Library (hand of Spell Cards) OR select 1 Scribed Spell. Then pay the cost of Mana ( ) listed in the upper left corner, and perform the action listed on the card.
Casting immediately gains the Victory Points () listed in the upper right of the card for the player that cast the Spell (advance Score Token). A card Cast from your Spell Library is discarded.
Only Spells labeled “CAST” may be used in a Cast Action. “COMBAT” Spells may only be used in Battles, and “INTERRUPT” Spells can be used any time an enemy casts a Spell. Unless stated otherwise, Capital City Regions and Units inside cannot be affected by enemy Spells. However, while in a Battle within a Capital City Region, Combat Spells may be used.
Casting Scribed Spells:
A Spell in a Scribed Spell Slot may be used instead of one from the Library, and only when it is pointing upward in the “Ready” position (1).
After casting, rotate the Scribed Spell Card upside down (top pointing down) to designate it as “Exhausted” (2).
During the Round End Phase, all Scribed Spell Cards that are not “Ready” rotate once 90° counter-clockwise. “Preparing” Spell Cards (3) will rotate so that the top is facing up (these Spells are now “Ready” to be Cast again during the following round). Then “Exhausted” Spell Cards will rotate so that the top is facing to the right. These Spells are now “Preparing” and will be unavailable to Cast during the following round. They will rotate again to “Ready” during the next Round End Phase.
Battling
When an army or Vessel moves into a Region with enemy Units or Structures, its movement ends and a Battle occurs. One player’s army will be victorious and allowed to remain in the Region, but the other army must leave and possibly lose Units. The player who initiates the Battle, called the attacker, immediately gains (advance the Score Token).
Note: a player who uses an ability to move enemy Units into a Region with their own Units is still initiating the Battle and considered the attacker.
Total Each Army’s Strength:
Both players total the Strength () of all the Units, Vessels, and Structures in the Battle:
- Natural Strength: The value as listed beside the Unit’s picture on the Capital City Board, or its card, before bonuses are considered. For example, a Paladin has a Natural Strength of .
- Ability Bonuses: Next add in all ability bonuses of Heroes, Vessels, and Structures that increase Strength. Defenders apply their abilities first, then the attacker. For example, the Paladin’s ability “+ if at least 1 Serf is in his army” makes the Paladin since his army has Serfs.
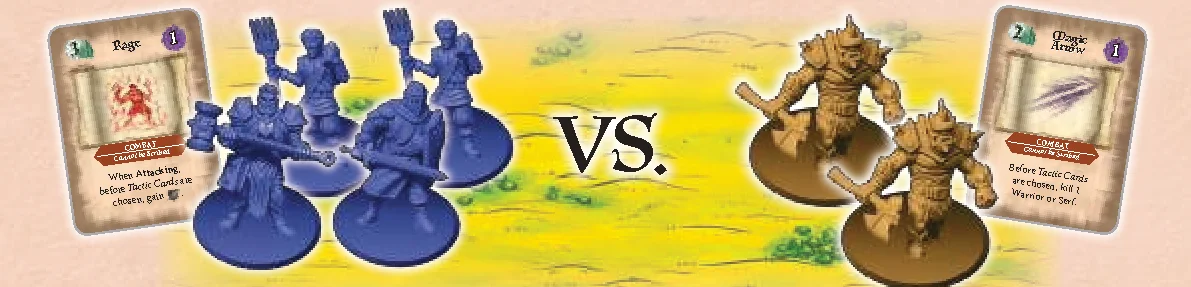
- Combat Spells: Cast 1 Combat Spell to add to an army, decrease from an enemy army, or destroy enemy Units. The defending player always casts a Combat Spell first. Once defender does so or announces that they are not casting, the attacking player may then cast a Combat Spell. The defender may not cast a Combat Spell after the attacker has, however Interrupt Spells may still be cast. For example, the attacking player casts Rage which says “Before Tactic Cards are chosen, gain .”
Example Battle Breakdown:
The attacking Human army is in the Plains Region:
- has a Natural Strength of : 1 Paladin, 1 Warrior, and 2 Serfs.
- + from bonuses from the Paladin’s ability and the Cathedral’s ability (“Warriors are + if Battling in the Plains Region”).
- + from casting the Combat Spell “Rage.”
- The total Strength of the Human army is now: 13
The defending Orc army:
- has a Natural Strength of : 2 Warriors.
- + in bonuses from the Blood Tent’s ability (“Every Serf in your enemy’s army grants +”) and the Barracks’ ability (“Your Warriors are + “).
- The Orc player casts “Magic Arrow” (“Destroy 1 Warrior or Serf”) instantly destroying the Human Warrior.
- The total Strength of the Orc army is now: 8.
- Since the Human army loses its Warrior to Magic Arrow, its total is now: 10.
Select a Tactic Card to Play:
After totaling the Strength of their armies, both players gather their hand of 7 Tactic Cards, and each secretly selects one card to play which adds a bonus to their army’s Strength. In the event that one or both players have no Units or Structures remaining in the Region due to spells or abilities, the Battle ends and no Tactic Cards are played. The amount of added is listed in the upper left of the card, as well as any bonus or effects listed below if against a specific card chosen by the enemy.
Note: The Conscripts Tactic Card may change the composition of the Armies, which may change the ability bonuses of the Heroes, Vessels, and Structures. Win or lose, each player must pay the cost of the Tactic Card, and each player gains the listed on the Tactic Card they played. If both players played Conscripts, the defender resolves it first, then the attacker.
When players select a Tactic Card, they must factor in these two rules:
- The player MUST be able to afford the cost of the Tactic Card, as noted on the upper left of the card, and MUST Spend the appropriate Resources AND/OR Sacrifice Units.
- Some Tactic Cards may only be played by an attacking or defending player, and some may not be played if there are only Serfs in the army and no Structures.
Note: If a player cannot pay the cost and meet the requirements then their card is ignored and considered a 0. A player may NOT choose to not pay the cost of their selected Tactic Card and ignore it if they can afford to pay the cost, in Resources and/or in Units. If a Tactic Card or other ability cancels your Tactic Card, you do not have to pay the resource cost, nor do you gain its VP (positive or negative).
Example Tactic Resolution:
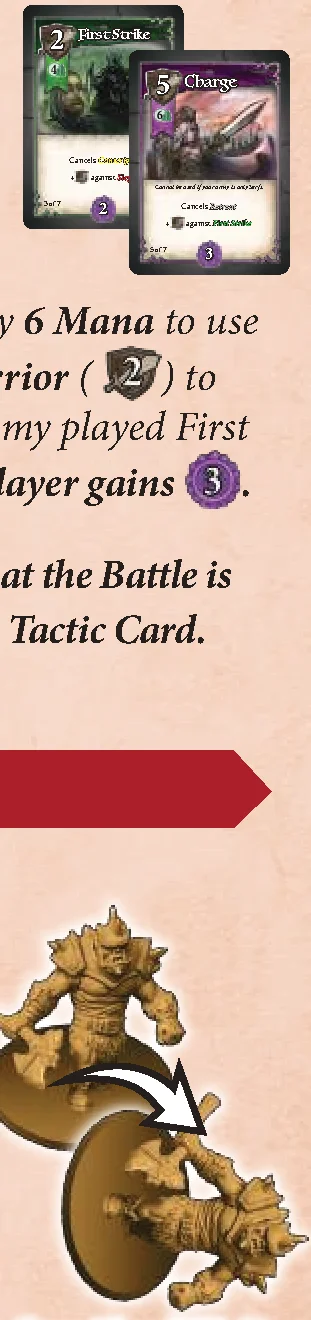
- The Human army with 10 reveals the First Strike Tactic and pays 4 Mana to use it, so their final total is 12 and the player gains .
- The Orc army with 8 reveals the Charge Tactic Card and must pay 6 Mana to use it even though they only have 4 Mana. They intend to sacrifice 1 Warrior () to pay the difference. Since the enemy played First Strike, the Orcs receive a +2 bonus, and their final total is 15 and the player gains .
With the higher strength (15 vs. 12), the Orc army is victorious, but now that the Battle is resolved the Orc army must lose a Warrior to finish paying the cost of their Tactic Card.
Sacrificing Units in Battle:
Players may choose to sacrifice one or more Units (not including Vessels) to help pay for the cost of a Tactic Card (even if they have enough resources to pay for the Tactic Card without sacrificing). The Natural Strength of the Unit sacrificed can go toward paying the cost of the Tactic Card. The Strength values of Sacrificed Units are still counted toward the army’s total Strength. Lay Units on their sides to signify that they are being sacrificed. After the Battle resolution begins but before Damage is assigned, Sacrificed Units are removed from play, considered destroyed in battle, and returned to their owner’s supply. Only Units (except for Vessels) may be sacrificed. Neither Vessels nor Structures may be sacrificed.
Resolving the Battle:
The army with the highest value wins, with ties going to the defender:
- The winning army remains in the Region and loses no Units, except for Sacrificed Units (if any) to pay for their Tactic Card.
- The losing army:
- takes “Damage” and must lose Units and/or Structures whose Natural Strength totals at least half of the losing army’s Natural Strength (rounded up). Natural Strength of the loser’s army is calculated AFTER removing any Sacrificed Units. Damage is deducted from each Unit, Vessel, or Tower’s own Natural Strength, and the losing player may choose which Units are lost. Any Tower MUST be lost first since it may not remain in the Region with enemy Units and may not be moved to your Capital City.
- Damage must be assigned completely to one Tower, Unit, or Vessel before the rest of the damage is assigned to remaining Units or Vessels.
- If a Structure, Unit, or Vessel takes any damage at all, even 1, it is destroyed. Destroyed Units are returned to the supply.
- Any remaining Units must be returned to that player’s Capital City or a Region containing a Tower they control.
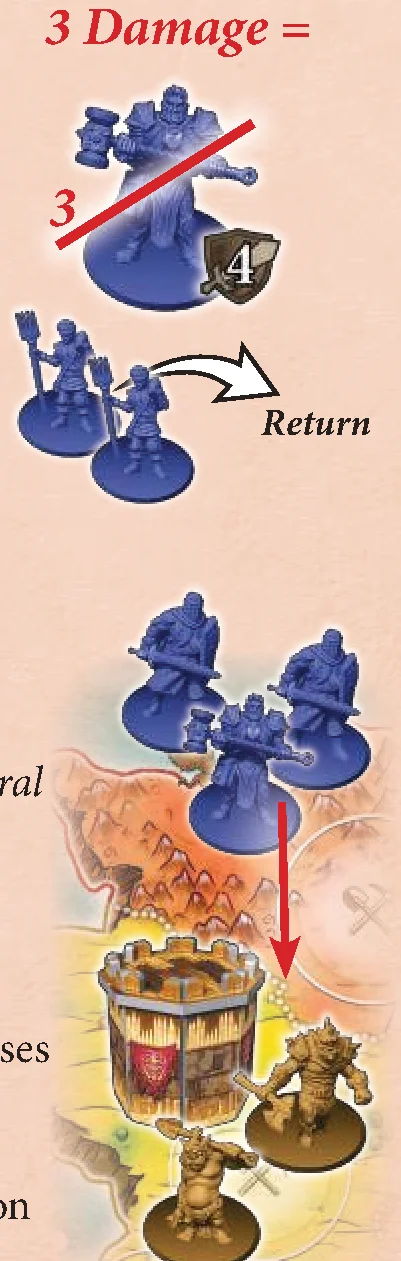
Example Damage Assignment: The losing Human army suffers damage equal to half its Natural Strength of 6 (1 Paladin and 2 Serfs), so it takes 3 Damage. The Human player decides to lose the Paladin, because his 4 Natural Strength more than covers the 3 Damage dealt. The Paladin is returned to the player’s supply and can be recruited again on a future Recruit Action. The remaining 2 Serfs must be returned to their Capital City or a Region in which that player controls a Tower.
Special Combat Situations
Battling with Towers:
Armies may Battle in Regions with Towers, which have a Natural Strength of (counts toward your army’s Natural Strength for purposes of Battle and determining Damage). Towers are also considered adjacent to the Capital City’s Courtyard, so a defending player may use the Conscripts Tactic to move Units from their Courtyard into the Battle. If the defending player loses the Battle, the Tower MUST take damage first before all other Units or Vessels in the army. Towers are then “destroyed” and returned to the supply. A destroyed Tower may be built again on a future Build Action.
Battling with Vessels:
Vessels Battle from either air or sea. They may Battle without passengers aboard, but if carrying passengers be sure to add both the of the Vessel and any Units aboard together. Sea Vessels Battle Land Units in the Land Region whose Shore it docks on.
Battling a Capital City:
To achieve the “eXterminate Objective,” players may Battle an enemy’s Capital City. To total the Capital City’s Natural Strength:
- Add listed for the Capital City’s current Level only.
- Add from any Units in the Courtyard and Action Bar along with their bonuses.
- Add of any Vessels in or docked on the Shore of the Capital City Region.
- Add of any Serfs in any completed Buildings’ Worker Spaces.
- Towers are considered adjacent to the Capital City so any armies in Regions with your Towers may be moved into the Battle using the Conscripts Tactic Card.
- Note: Your Capital City can hold any number of Units and is not subject to the normal limit of 5 Units per Faction.
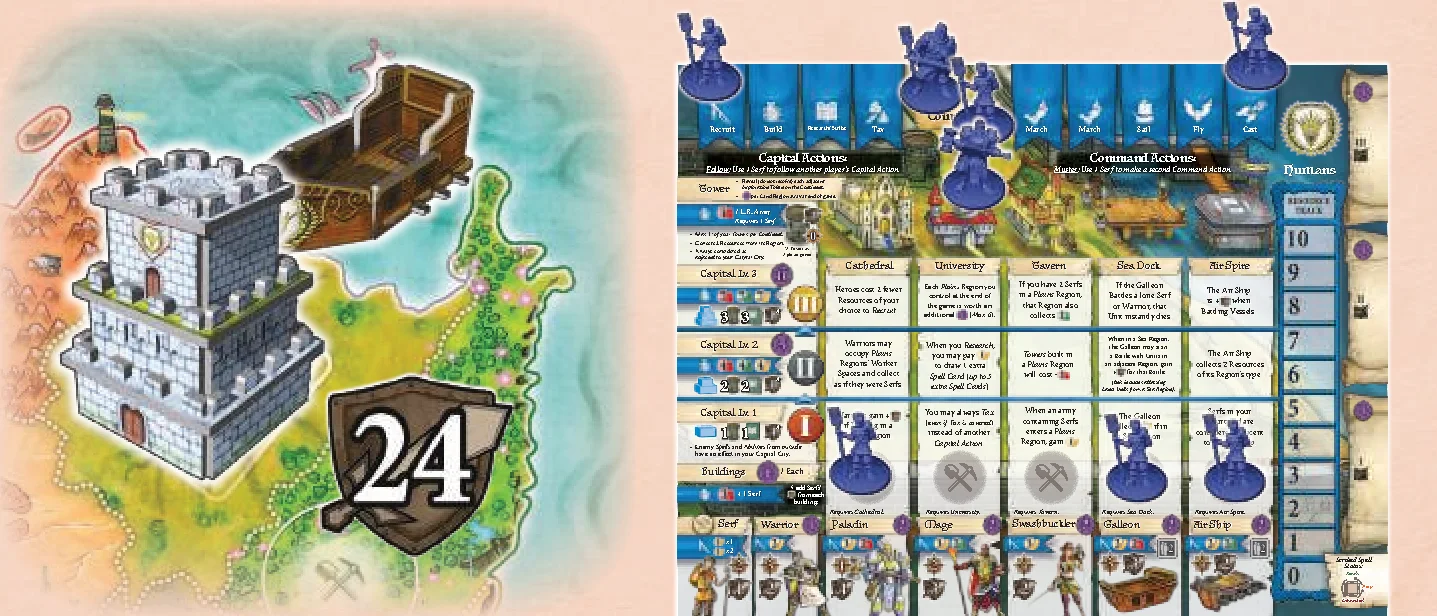
Example: This Capital City is Lv. 3, so it naturally has 8. There are 3 Serfs, 1 Warrior, and a Paladin (has a bonus ability) in the Courtyard and Action Bar, so together with bonuses they have 10. A Sea Vessel docked on the Shore Region has 3. The 3 Serfs on Buildings’ Worker Spaces together have 3. Therefore added together, the total Strength of the Capital City before Tactic Cards are chosen is 24.
If a player’s Capital City is destroyed, that player is immediately eliminated from the game. They do not participate in end game scoring and their total score is 0. Remove all their Units, Vessels, and Structures from the Game Board.
The player who destroys the Capital City gains in addition to points from starting the Battle, their Tactic Card, and Combat Spell (if any).
Note: Abilities and Spells performed by enemy players cannot affect the Capital City from OUTSIDE, but during a Battle INSIDE the Capital City Region, abilities can take effect. For example, an enemy player cannot cast “Earthquake” and cause another player to lose Units from their Capital City. But, if they were in a Battle with the Capital City, they could cast “Fireball,” causing a loss of Units there. Spells and Abilities, even during a Battle in the Capital City, cannot remove Serfs from the Action Bar or Building Spaces, nor can those Units be Sacrificed to pay for Tactic Cards.
Phase 2 — Collection
After all players have performed two actions, completing the Action Selection Phase, then players simultaneously:
- Collect Resources: Gain Resources from controlled Regions. A Region is controlled by the player having at least 1 Unit or Structure there. Certain “Resource Regions” yield a single type of Resource:
- Mountains yield Ore
- Forests yield Mana
- Plains yield Food
- Swamp, Desert, and Capital City Regions yield NO Resources and are not Resource Regions.
Each controlled Resource Region yields 1 Resource of its kind. In addition, Resource Regions also contain “Worker Spaces” where 1 Serf may be placed to collect 1 additional Resource from that Region. If a Tower is in a Resource Region, it collects 2 additional Resources.
Example collection:
- 2 Ore (1 controlled Mountains, with 1 Working Serf)
- 4 Mana (2 controlled Forests, one with 2 Working Serfs and one with 1 Warrior)
- 6 Food (2 controlled Plains, one with 1 Working Serf and one with 1 Working Serf and a Tower)
- Draw a Spell Card: Each player draws 1 Spell Card from the Spell Deck and adds it to their Spell Library. Then if any player has more Spell Cards than allowed by their Spell Library Hand Limit (equal to their Capital City Level), they choose a Spell Card to discard face-down. Remember that Scribed Spells do not count against your Spell Library Hand Limit.
Phase 3 — Round End
After Collection, all players return Serfs and the Action Tokens in their Action Bar back to their Capital City’s Courtyard. Rotate any Scribed Spells:
- “Preparing” (sideways) 90° counter-clockwise to “Ready.”
- “Exhausted” (upside down) 90° counter-clockwise to “Preparing.”
Then pass the First Player Marker to the next clockwise player, and then start the next round.
End Game
The end of the game is triggered if any of the four “X-Objectives” is achieved. Once one is achieved during a game round, finish the current round and then play one additional full round, which will be the final (in a 1-2 player game, if a player triggers the end through eXterminate, the game immediately ends). The end of the game cannot be “un-triggered,” even if conditions for the X-Objective are no longer met. After the final round, players total up their final Victory Points. The X-Objectives are as follows:
- eXplore: All Land Exploration Tokens in the game have been revealed.
- eXpand: All of a player’s Serfs and Warriors are in play.
- eXploit: All 3 of a player’s Towers are in play.
- eXterminate: A player has destroyed another player’s Capital City.
Final Scoring
Players total their final scores. In addition to their current scores from casting Spells, Battling, and certain Exploration Tokens, players now advance their Score Tokens:
- for each recruited Unit and Vessel in the game (not in the supply) as listed on the Capital City Board.
- for each completed Building.
- for each built Tower ( per Land Region away from the C.C.).
- for the final Capital Level as listed on the C.C. Board (no if at Lv. 1).
- for each Scribed Spell.
- for each Land and Sea Region you control at the end of the game (not including your Capital City or Shores). A Region is controlled if a Unit or Structure is present in that Region.
- Bonus from Buildings abilities as listed on the C.C. Board.
- Bonus from certain Exploration Tokens in controlled Regions.
In the event of a tie, the tied player with the highest total resources wins the game (based on the sum of all 3 resource types). If the game is still tied, enjoy the shared victory.
Read Winning Faction Lore
After determining a winner, the winning player reads their Faction’s Victory Lore aloud.
Solo Play Variant
In this variant, you go head-to-head with an A.I.-controlled Faction, called the Enemy. The Enemy controls 3 armies, each led by one of its powerful Heroes. These Heroes each have powerful abilities, and will offer you a serious challenge!
Components and Setup Changes
- 8 Solo Action Cards
- After you have selected your Faction:
- Randomly select the Faction for the Solo Enemy.
- Gather that Faction’s components as if it were a normal game. Flip the Enemy’s C.C. Board to the Solo Enemy side. The Enemy does not need Hero Cards, as the Enemy Hero abilities are listed on the Solo C.C. Board.
- Place the 3 Hero Units into the Enemy’s Courtyard. DO NOT place 2 Serfs or 1 Warrior into the Courtyard.
- Place all 3 Resource Tokens onto the “3” space of the Resource Track.
- Place 1 Action Token on the “Start” space of Capital City Track. The other Action Token is removed from the game.
- Shuffle the Solo Action Cards into a deck and place it face-down next to the Enemy C.C. Board.
- The Enemy DOES NOT require Spell Cards. Do not deal cards to it.
- All other Faction components are set up in the supply as normal. After you have placed your own Capital City, choose the Enemy’s Capital City Region on an adjacent Continent.
Gameplay Overview
The game is played in a series of rounds as normal until one of the “X-Objectives” is achieved, triggering the end of the game.
Each game round, the Action Selection Phase goes as follows:
- The Enemy draws a Solo Action Card, and performs that action with its first Hero (1).
- You perform your first action (the Enemy cannot Follow).
- The Enemy draws a card and performs that action with its second Hero (2).
- You take your second action (the Enemy cannot Follow).
- The Enemy draws a card and performs that action with its third Hero (3).
In this manner, you will perform 2 actions as normal, and the Enemy will perform 3. After all these actions are taken, the Collection Phase occurs, where Resources are collected as normal, and after Resolution, a new round begins.
Action Selection Phase – Enemy Draws Cards
Draw the topmost Solo Enemy Card and assign it to the leftmost Hero Slot at the bottom of the Capital City Board. That action will be performed by that Hero. The Enemy does not have a normal Action Bar like you do, so the Solo Enemy Cards and the Hero’s card slots act as the Enemy’s actions.
If the Enemy is able to perform the listed action by meeting its requirements, they MUST do so. However, if they cannot because of insufficient Resources or lacking a necessary requirement, it is considered a “Failed Action.” Instead that Hero performs a Move Action.
If ever there is a single Solo Enemy Card in the deck, instead of drawing it take that card and ALL cards in the discard pile (not cards in Hero Slots) and shuffle them together. Place them face-down to form a refreshed Solo Enemy deck.
Collection Phase – Discard Cards
After the Enemy has drawn 3 cards and performed (or failed) 3 actions, it is time for the Collection Phase. The Enemy collects Resources just like a normal player. Then discard all 3 cards from the Hero Slots into a face-up discard pile nearby.
Solo Action Cards – The Actions
Listed at the top of the Solo Action Card is the type of action and whether or not you may Follow it. Also listed are the specifics and requirements for the action, and what constitutes a Failed Action. Note that abilities from the Heroes or from the Capital City may alter the normal rules of these actions.
Recruit:
The Enemy pays Resources to recruit 1 Unit. Units are recruited in priority order, meaning if they can not be recruited then move to the next Unit in order:
- Air Vessel >
- Sea Vessel >
- Warrior >
- Serf*
*Serfs can only be recruited 1 at a time, not 2.
New Units are placed in the Region of the Hero who performed the action, and will now be part of that Hero’s army. If a Unit cannot fit in that Region due to the 5 Unit Limit a Region has, then it is placed in the Capital City. If the Hero is in the Courtyard, place new Units there.
This action will fail if the Enemy does not have the required Resources available to recruit any Unit OR if no Units are available in the supply.
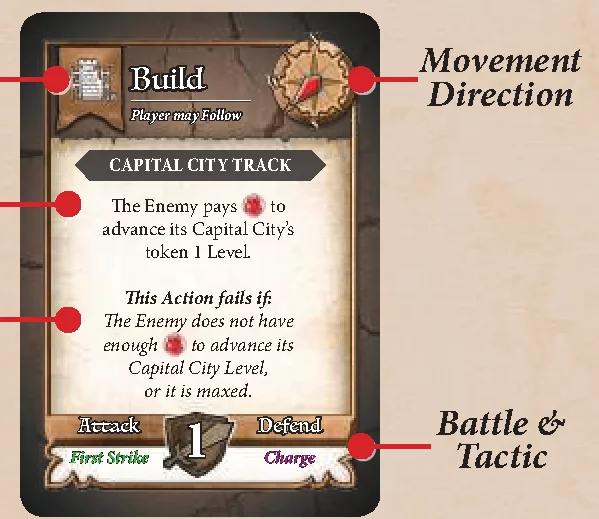
Build:
There are 2 different “Build” Solo Action Cards:
- Capital City Track: The Enemy upgrades its entire Capital City by advancing an Action Token on a 6-space track, which marks its Capital City Level. The Enemy MUST pay the Ore amount listed on the next open space. If it reaches the end of the track, it triggers the end of the game. Increasing the Capital City Level grants more strength, VP, Constructs, and special abilities. This action will fail if the Enemy does not have the required Resources available.
- Towers and Vessels: The Enemy pays Resources to build 1 feature. Units/Towers are built in priority order: Tower > Air Vessel > Sea Vessel.
- Towers are placed in the Region of the Hero who took the action. Just like a normal player, the Enemy may not build more Towers than its Capital City Level allows, and a Serf is required to be in the Region to build a Tower. When the Enemy’s Tower reveals all adjacent Exploration Tokens, those tokens are collected and placed on the designated space on the Enemy’s Faction Board.
- Vessels are placed in the Region of the Hero who took the action. In the case of a Sea Vessel, the Hero must be on a Shore Region. If it’s not on a Shore Region, the Sea Vessel will be built in the Capital City instead. The Enemy will try to fit as many Units in the Vessel as possible, prioritizing Heroes first, then Warriors, then Serfs. If the Hero is already in a Vessel, the new Vessel is placed in the Capital City.
This action will fail if the Enemy does not have the required Resources available.
Research:
Unlike you, the Enemy does not need to collect Spell Cards. It has 3 Spells already at its disposal, 1 for each Hero. It will actually cast a Spell instead of taking a normal Research Action. The Enemy will gain the Victory Points shown and the Spell will take effect.
Spells cast by the Enemy can still be interrupted by player Spells. If a Spell is copied and turned against the Enemy, the player may make choices for the Enemy. Such as which Unit or Resources the Enemy loses.
This action will fail if the Enemy does not have the required Resources available to cast a Spell. If a Spell is useless, the Spell is still cast and the Enemy gains the Victory Points.
Note: When a Research Action is taken, the player can follow it as if it was a normal Research Action.
Tax:
Immediately collect the listed amount of Resources in every slot on the Tax Track, and then after the player follows, if they do, cycle the Resource Tokens like normal. This action cannot fail, and this Hero will then move afterward.
Attack:
All Units in this Hero’s Region move up to 2 regions to Battle the player. The Enemy can move in any direction and that the compass is ignored except for breaking a tie between two eligible targets of equal strength. However, they will only attack if the Natural Strength of the player’s army is less than or equal to the Natural Strength of the Enemy Hero’s army. If there are multiple player armies within range, the Enemy will attack the weakest.
Ties for choosing the weakest army are broken by referring to the movement compass, and going clockwise, then choosing the first army it can reach. The Enemy also gains for starting a Battle.
This action will fail if there are no player armies within 2 Regions of the Hero, or the armies are stronger than it.
Battling with a Solo Enemy
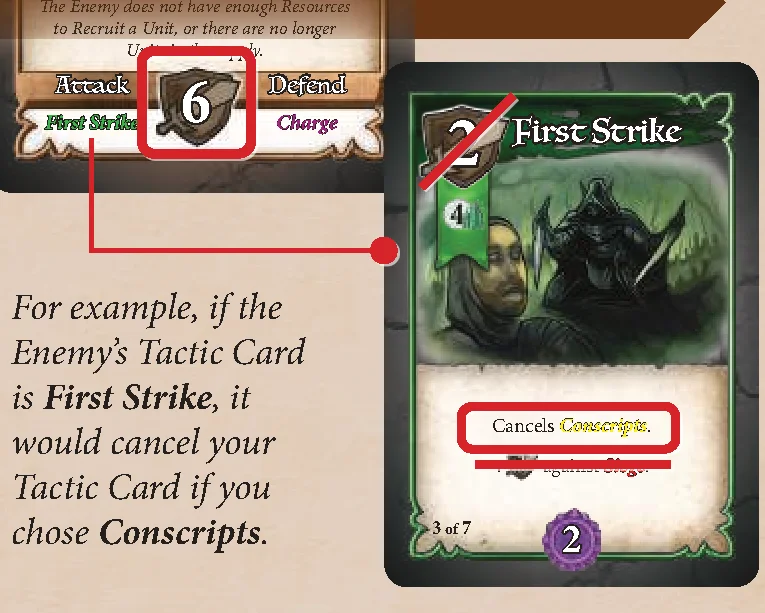
When Battling, you first choose your Tactic Card. Then, draw and reveal 1 Solo Action Card, noting the Strength value listed at the bottom.
This value is added to the Enemy army’s total Strength. In addition, a Tactic Card is listed, which is different depending on whether the Enemy is attacking or defending. This Tactic Card DOES NOT add additional Strength to the Enemy’s army nor does it grant VP (only the Solo Action Card does), but it may change the result of your Tactic Card.
Note: If your Tactic Card cancels the Enemy’s Tactic then the Solo Action Card’s added Strength is cancelled as well.
If the Enemy loses a Battle, they lose Units like a normal player, but weak to strong: Serfs > Warriors > Air Vessel > Sea Vessel > Hero.
Any surviving Units return to the Capital City Courtyard. In the event that a Hero is destroyed, it immediately respawns in the Courtyard.
Moving a Hero if an Action Fails
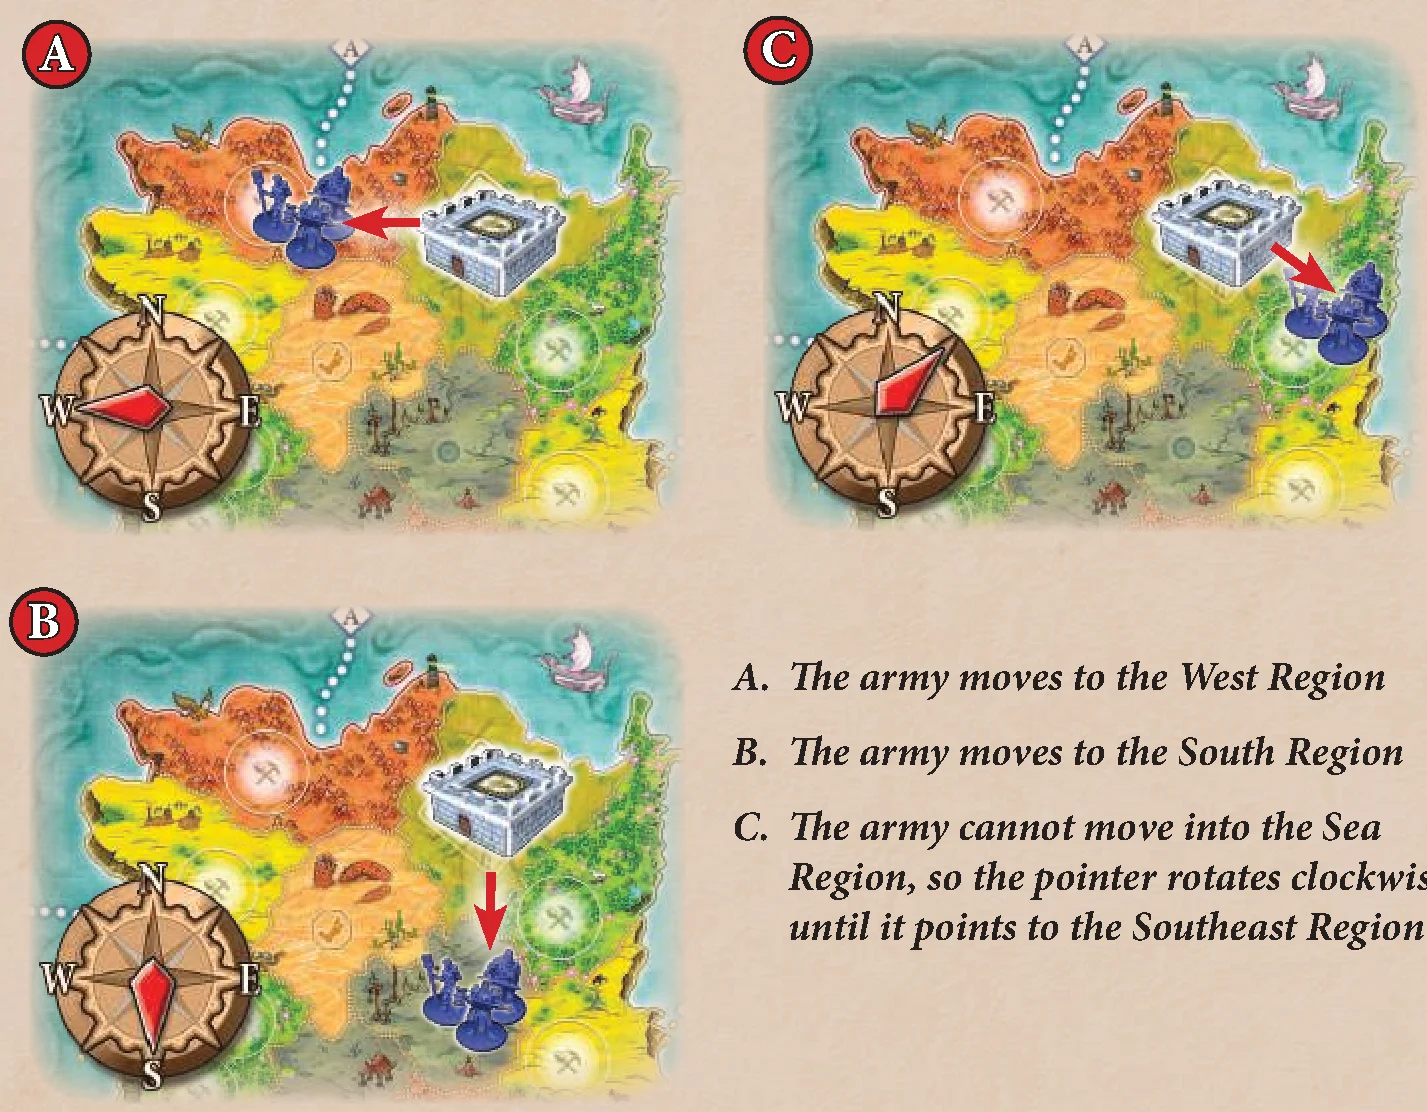
If the Enemy’s chosen action fails, then that Hero and its army will move. The Hero and all Units in its Region will move in the direction based on the compass on the Action Card (orient the compass to match the one in the top-left corner of the Game Board).
The Hero’s army moves in the designated direction, if it can. If it cannot, it will circle clockwise until it finds a Region that it can move into. When using the arrow, reference the center of the region and draw the line from there. If in doubt, go clockwise.
When the Hero moves:
- Its army always moves .
- The golden rule for deciding movement is that if the Unit cannot move properly in the direction of the arrow shown, continue moving the direction clockwise until it points to a Region it can move into.
- If moving from a Capital City, it will take all available Units in the Courtyard without exceeding 5 Units. It will take as many available Warriors as possible, however the army MUST have at least 1 Serf if possible.
- If an empty Vessel is present in the Hero’s region, the Hero boards that Vessel and then moves, taking 1 other Unit aboard if one is available (prioritizing Warriors over Serfs).
- It CANNOT move back into its Capital City or into a Region with another of its Heroes (only 1 Enemy Faction Hero per Region).
- If the army moves into a Region that you control, it results in a Battle.
Moving on Ferry Routes:
If the movement arrow is in the same direction as a Ferry Route, then the Enemy army will move along the Ferry Route. If the Ferry Route has multiple branches, the Enemy army will take the one that does not use a Graticule, a letter or number that wraps around the Map.
Moving Aboard Vessels:
Heroes aboard Air and Sea Vessels move differently:
- The Vessel always moves .
- A Vessel and its occupants move alone and not as part of a Land army. Any Units left behind remain in their Region.
- The Vessel may still collect Exploration Tokens when passing through Regions.
Enemy Air Vessels:
- Will not move using Ferry Routes or Graticules.
- Can move through the center Sea Region, counting it as one Region, but MAY NOT stop there.
- If their second movement would end in a Sea Region, they do not move there and instead move into the next “clockwise” Land Region.
- End movement immediately if entering a Region you control, which results in a Battle.
Enemy Sea Vessels:
- Can use Graticules and wrap around the Map if they continue in the card’s compass direction.
- Can Dock and Undock from Shores without using movement.
- Stop in a Sea Region with your Sea Vessel and then Battle.
- After a second movement, will Dock at the Shore Regions pointed to by the compass on the Card.
- If ending movement in a Sea Region adjacent to Land Region(s) that you control, the Enemy Sea Vessel will Dock on the Shore with the lowest Natural Strength army and then Battle, even if not in the direction of the card and even if the player’s army has a higher Natural Strength than the Enemy’s army.
- A General Note on Sea Vessel Movement: Since the map is organic in nature, some movement paths may be difficult to determine. When in doubt, the movement path may bend clockwise to determine the direction.
Moving and Gaining Resources:
The Enemy Hero collects 1 Resource of a Resource Region’s type when it enters that Region. If moving results in a Battle, it must be resolved first (and the Enemy must win) before gaining the Resource. For the “Attack” Action Card and Air Vessels, the Hero potentially could gain 2 Resources.
Collecting Exploration Tokens:
If the Hero passes through or ends movement in a Region with Exploration Tokens, the tokens are immediately taken and placed in a pile on the labeled section on the Enemy C.C. Board. The outcome listed on the Tokens do not matter. The Enemy gains immediately for each Token collected.
Following a Solo Action Card
You may Follow a successful Solo Action as if it were a normal action (except for Attack). HOWEVER, if the Enemy’s Action has failed, it may not be Followed. The Enemy does not Follow your actions.
Solo Game End
The game’s end is triggered when either you or the Enemy has achieved one of the 4 “X-Objectives,” or if the Enemy has reached the end of their Capital City Track. The current round is then completed, and then one more round is played (if a Capital City is destroyed then the game is automatically over). Victory Points are then totalled as normal, but note that the Enemy Heroes do not grant points.
Team Play Variant
In this epic variant, players gather in groups of 2 (or 3 with the Order & Chaos Expansion) in a war of alliances! Their powerful Factions have banded together in a campaign against their mortal enemies.
Components and Setup
Setup as you would for a normal game. Even as teams, players have their own Faction.
Player Seat Positions
The Team Play Variant must be played as a 2 vs. 2 game (with two teams of 2), or with the Order & Chaos Expansion as a 2 vs. 2 vs. 2 game (with three teams of 2) or as a 3 vs. 3 game (with two teams of 3). Players should decide their alliances before starting the game. These alliances will be permanent and cannot be broken. Members of the same alliance should not sit next to each other, and their seats should be alternated.
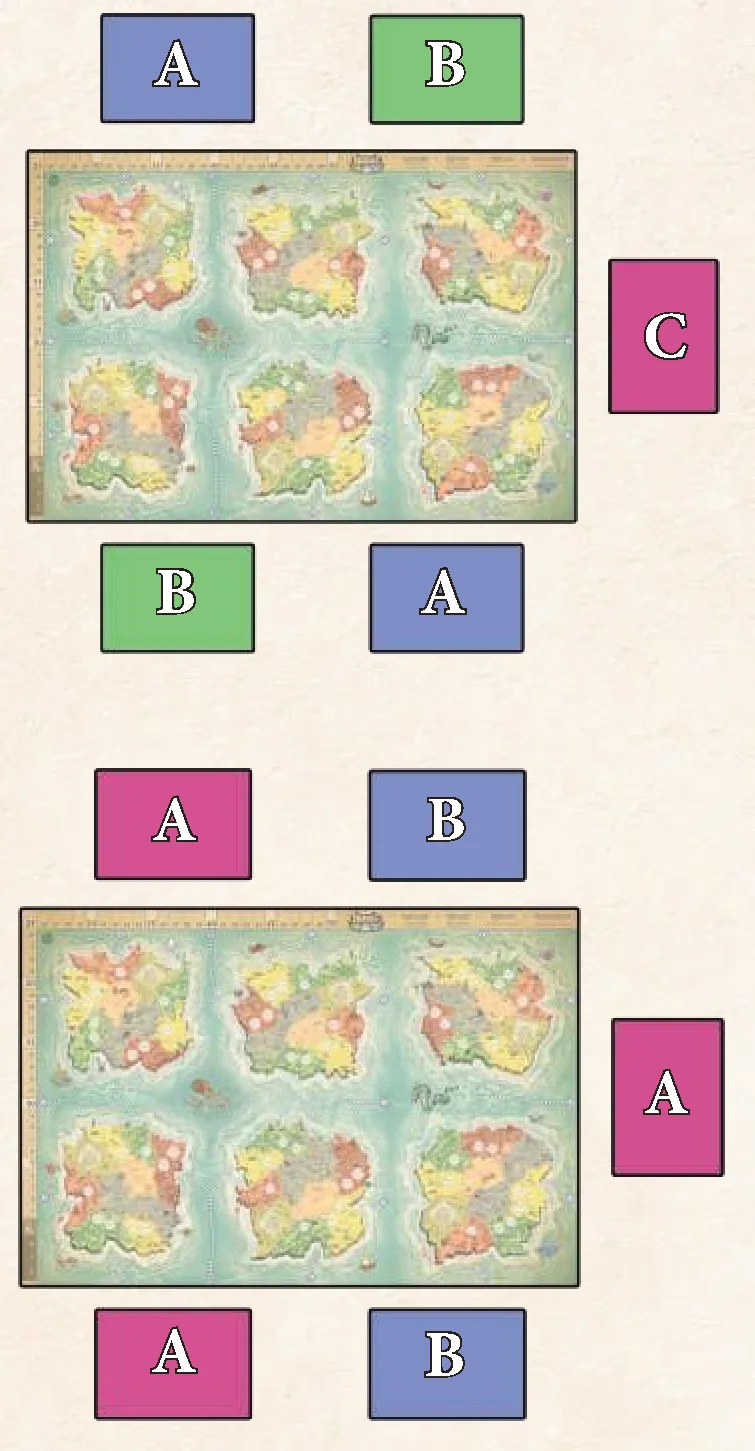
Gameplay Changes
- Players cannot attack their allies, and can peacefully share Units in the same Region. The allies can only have a collective total of 5 Units in a single Region. When this happens, both players will gain a Resource from that Region. However, Towers will only benefit the Faction that built it, and any Serf occupying a worker space only gains an additional Resource for the Faction it belongs to.
- When a Tax Action is taken, you may also give Resources from your supply, in any combination and at any time during the Tax Action, to an ally of your choice before or after you gain Resources.
- Ally Units in the same Region can move together, even if they belong to a teammate. When moving, a player can take any friendly Units in that Region with them, with their ally player’s permission.
- If attacking with mixed Units, the active player chooses the Tactic Card and must pay for it. If defending in a Regions with mixed Units, the players in the team choose who will lead the Battle and select and pay for the Tactic Card.
End Game Scoring
When the end of the game is triggered, each team will combine the Victory Points of all team players. Regions are only counted once per team, so if a Region is shared then it only counts for one of the players. The team with the highest total wins.
Faction Lore
Humans
All that is known for certain is that Humans, the youngest race, first sailed to Aughmoore from far away. The specifics of their homeland have been lost to time, but there are those who maintain that they are not native to this world. Pointing to the design of their water and aircraft, the few that have preserved the old ways claim the extraordinary vessels once traveled amongst the stars. Regardless of its exact origin, Human civilization has shown an unprecedented explosion in economic and cultural growth in its new home.
The originally nomadic Humans discovered an affinity for the open plains, and their territories now delineate the far-reaching meadows of Aughmoore. Families sit by firelight for hours contemplating the unobscured night sky as their children share their dreams of one day becoming a Paladin, a Human conduit of light and righteousness. Perhaps the spiritual connection they feel with the boundless heavens is indeed evidence that they once traversed the interstellar beyond.
This history has become tiresome, though, to the many Humans who now bathe in the luxuries of Mana. Goblets overflow in taverns with deep red wines artfully crafted from the finest combinations of sorcery and horticulture. Crops are as much conjured as they are cultivated, and the bounty is often lush and plenty enough to invoke impressions of an agricultural empire in even the smallest settlements’ fields. Before the smoke rising from sacked villages clouded Aughmoore’s skies, Human farmers ate like kings, and their royalty feasted like the Gods themselves.
War has fallen on Aughmoore, and the life of the king has been claimed by the murderous Elven Shadow Guild. With no named heir to the throne, preparation for impending battle now falls to the people. As mysticism is retrofitted for war, citizens of the Human alliance have reclaimed the old ways, harvesting their yield by sweat and stamina. Keepers of archaic naval tradition and members of the religious order alike have been called upon to defend the development of mankind. They strengthen their bodies and minds, ready to meet the contentious races that threaten their distinguished evolution with justice and swift, irrevocable retribution.
If you win with the Humans, read aloud:
Glory and gluttony return for Aughmoore’s youngest race! Laelithar knew he was wise to withdraw his aid from the other races before the wars began. Now with control over all the farms and fields in the land, Humanity alone eats and drinks bountifully, ignoring the famished moans of those that remain of the other races, dying outside the Humans’ high walls.
Orcs
After her failed first attempt to preside over Aughmoore, the bloody divinity Oghtaa schemed again to lay claim to the land. Opening the ancient Battle wounds beset by Norellia, the goddess of the mystic elves, Oghtaa bled from the heavens, coating the world in a thick crimson rain for a single day and night. The Blood Rain soaked deep in the earth, penetrating the very center of the world. From gore-sodden brimstone rose the repugnant Orcs.
It is the self-proclaimed right of the Orcs to rule over every last scrap of land touched by their mother’s precious lifeblood. The Orcs look with disdain upon the pitiful beings resting comfortably along their once undisputed borders. Is it possible that they have forgotten the savage weight with which Orcish steel carves through muscle and sinew? They will be made to remember.
The Orcs march forth, driven by honor and glory through the rigors of battle. No worthy foe, neither foreign nor domestic, goes unchallenged. It is said that Orcs do not cry when they are born, but instead herald their arrival with a blood-curdling shriek, which deepens with every vanquished rival. Perhaps it was the thunderous roar of the battle-hardened Orcish warmongers that first commanded the attention of the Dragons. The two races, long separate, have found in each other a burning seed of violence.
Now in alliance, Orcish footsteps fall to the beat of dragon wings, forging a symphony that inspires greater terror than the very calamity of Hell’s open maw. Those that do not flee will crumble under the indomitable force of the Orc army, exterminated as is the fate of all decrepit pests. For those that do flee, few shadows and crevices remain in which to hide from the reign of the Orcs’ thirsting blades. Soon, there will be no opponent nor territory in all of Aughmoore that does not lie under the heavy boot of the blood-bred Orcs.
If you win with the Orcs, read aloud:
After many hard-fought Battles, the Orcs have shown no mercy to the inferior races and now they alone reign over Aughmoore. Bloody mud covers the once tranquil plains and rancid steam rises from their steel weapon refineries. Still, the Orcs hunger for war and look toward the sky, with treachery in their hearts, at their own Dragon allies.
Dwarves
The bloody divinity Oghtaa had coveted the land of Aughmoore once before creating the Orcs. Immediately following the creation of the elves by the fair Norellia, Oghtaa grew jealous. In haste, she drew ores from celestial bodies across the heavens to craft her mighty warriors. When she began to lower her creations to the land, Norellia took notice. Appalled at the selfish motivations of her counterpart, Norellia lashed out in a furious barrage of blades for twenty-two moons. The attack disrupted the spell that cradled the Dwarves in their slow descent, and they began to fall.
As the Dwarves tumbled toward the surface, unbridled by their defeated creator, they felt, for the first time, alone. A tremendous number perished in the Great Fall. Those that survived turned to stern stoicism, which offered the only escape from profound sorrow and loneliness in the early years. This temperament, so characteristic of the lords of stone, ingrained itself permanently in their demeanor.
Despair ultimately turned to introspection, and the Dwarves found divinity in themselves. The celestial ores inhabiting their veins had braced them in impact, and became the focus of their spirituality. They spurned Oghtaa, and by doing so, severed her bond to Aughmoore. The Dwarves then looked to the mountains, and found them to inspire a steadfastness that so captures the resolve of The Fallen. Atop the highest peaks, the Dwarves found peace.
After a great era of tranquil isolation, the squabbling races grew tired of destroying each other and sought a new challenge in the Dwarves. Their armies broke upon the stonework fortifications like waves, searching for any flaw in the exceptional craftsmanship. They found none. Their threats to overtake the sacred temples and towers of the stone ones proved to be empty. There is a secret, however. The Dwarves are quite outnumbered. It is for this reason that they fight with such stalwart courage, making a single defender feel like a thousand, and showing all of Aughmoore that their heavenly blood is not to be boiled.
If you win with the Dwarves, read aloud:
Repelling their foes with sheer might, the Dwarves rid Aughmoore of all but a few of the enemy races. But with the others gone, the Dwarves become deeply aware of their small numbers and the great loneliness of before returns. Now they build a great tower reaching back toward the creator they rejected, but Oghtaa does not easily forgive.
Elves
Aughmoore had existed for some time before catching the eye of the universe’s greater forces. It was the fair Norellia, an entity of pure energy, who first examined this world. As she approached, she discovered a mighty echo ringing from the forests. She curiously ventured deeper and deeper into the dark woods until the sound was almost deafening. In a clearing, bathed in a pool of dancing rays that penetrated the high canopy, stood two impressive stags. One was made of incandescent light, the other of shadowy darkness, their antlers locked in an endless competition.
Norellia wept at the sight of the beautiful forces, doomed to destroy each other over the course of eternity. In a moment of compassion, she sacrificed a fraction of her own power to fuse them. As the creatures became one, their figures turned upright and their antlers narrowed to the familiar pointed ears of the mystical Elves.
Born of both light and darkness, the Elves are creatures of disciplined study and wild frivolity. A piece of Norellia remains in them, and their spirits are now intertwined with the fluid resonance of Aughmoore’s mystical forces. Even apprentice sorcerers are capable of incanting advanced spells with little exertion, and strange phenomena are often thought to be amplifications of the wicked tongues of Elves hidden away in wispy towers.
Still preserved in the Elven spirit is the instinct to hunt, to stalk, to move through the night as but an obscure shade and pounce upon unwitting prey. Many great beasts have been tracked and slaughtered to sustain the encampments that weave through the treetops, but these abilities are equally fitted for war.
As the younger races turned to the forests for sap and lumber to construct their superfluous edifices, the Elves trained to protect their birthplace. In their studies, they discovered a great and terrible power, the ability to persuade the flow of Mana from their enemies to their own forces. Through subtlety, might, and elite magical prowess, the Elves have shown that those who threaten their thicketed homelands place themselves in imminent danger.
If you win with the Elves, read aloud:
A burst of searing light from the rarest and most powerful Elven spell has brought victory for the superior race. Now the High Elven Order must convene to decide how to rebuild Aughmoore. Some Elders believe their Mana should be used to restore the old ways of cooperation among the races but others wish to seek out their creator, Norellia, and wage celestial war against her nemesis, Oghtaa. The debate may last generations.
Credits
- Game Design: Scott Almes
- Illustration: Adam P. McIver, Ian Rosenthaler
- Product and Game Development: Michael Coe
- Graphic and Construct Design: Benjamin Shulman
- Miniatures Design: Chad Hoverter
- Lore Writing: Jacob M. Burton, Dylan D. Phillips, Michael Coe
- Editing: Richard A. Edwards, Dylan D. Phillips
- Playtesters: Nathan Hatfield, Beth Almes, Dan Lamoureaux, Hannah Hiller, Alyssa & Joe Lombardo, Ray & Jess Kovacs, Charlie Bink, Jason Washburn, Roger Hicks, Randal Lloyd, Andrew Spindler, Ian Stedman
- Special Thanks: The Almes Family, Brittany Coe, Richard Ham, Elizabeth Kimbell, Jonathan Cox, Roy Cannaday, Donald Dennis, Wesley Tomlin, Marty Connell, Jeremy Salinas, Jonathan H. Liu, Dan Yarrington, Jeremiah Isley, Adam Clark
Glossary of Terms
- Action Bar: Row of 9 Action Slots along the top of the C.C. Board. Players place Action Tokens on these slots to perform these Actions OR place Serfs to Follow or Muster an Action:
- Capital Actions: 4 Action Slots (Recruit, Build, Research, and Tax) selected by a player on their turn and can be Followed by other players using a Serf from their Courtyard.
- Command Actions: 5 Action Slots (March, March, Sail, Fly, and Cast) selected by a player on their turn, who may also choose to Muster to take a second Command Action, marking it with a Serf from their Courtyard.
- Army: 1-5 Units from one Faction sharing a Region. An army can March only as many Regions as allowed by its Unit with the lowest Speed. Regions have a limit of 5 Units per Faction, except when an army is moving through a Region. Note: Vessels may NOT move with an army as part of a March Action.
- Battle: When one Faction’s army enters a Region occupied by an enemy’s army, a Battle will occur. Total each army’s Strength, cast any Combat Spells, and then each player reveals 1 Tactic Card. Each player MUST pay the listed cost on the Tactic Card in Resources or by Sacrificing Units from their army. After the final Strength is totalled, the army with the most Strength is the winner (in a tie, the defending army wins). The losing army must leave that Region and will take Damage.
- Courtyard: Area on C.C. Board where unused Action Tokens and Units inside the Capital Region may be placed. Units in the Courtyard are considered to be in that Faction’s C.C. Region and vice versa.
- Damage: After losing a Battle, the losing player must assign Damage equal to half their army’s Natural Strength (not including Sacrificed Units) to Units in that army (rounded up). Each Unit may be assigned Damage up to its individual Natural Strength, and if a Unit is assigned even 1 Damage, it is destroyed and returned to the player’s supply. Any surviving Units from the losing army are returned to the Courtyard or a Region with a friendly Tower.
- Ferry Route: Dotted lines on the map which connect Land Regions on different Continents and also act as the borders separating adjacent Sea Regions. Land Regions connected by a Ferry Route are considered adjacent so Units may move from one Land Region to another along a Ferry Route without a Vessel. Some Ferry Routes connect to Graticules, and Units may move along those Ferry Routes to Land Regions on the opposite side of the board which are connected to Ferry Routes with a matching Graticule.
- Graticule: Letters or numbers along the outside edge of the map that mark where a Ferry Route “wraps around” and continues. Land Regions attached to Ferry Routes with matching Graticules are considered adjacent. Sea Regions on opposite sides of the board between two Ferry Routes with matching Graticules are also considered adjacent.
- Hero: Each Faction has three Hero Units in the supply which may be recruited during a Recruit Action by paying the required Resources as listed in the banner next to the Hero Unit at the bottom of the C.C. Board. A Hero can only be recruited if the required Building has been built. Each Hero’s Strength and Speed are noted on the C.C. Board and has a corresponding card which lists three abilities marked I, II, and III. These abilities correspond to the Faction’s current C.C. Level and the higher-level abilities can be unlocked by upgrading to a higher C.C. Level.
- Region Control: A Faction has control of a Region if they have at least one Unit or Structure in that Region. During the Collection Phase, Resource Regions a Faction controls produce. During Final Scoring, each player receives 1VP for each Region they Control, not including their Capital City Region.
- Resources: Three types: Ore (
 ), Food (
 ), Mana (). Players collect these from Regions they control and spend them to Recruit Units, Build Structures, Cast Spells, and pay for the cost of Tactic Cards in Battles.
 - Resource Region: Land Regions which produce Resources during the Collection Phase. Mountains produce Ore, Plains produce Food, and Forests produce Mana. Other Regions produce nothing and are not considered Resource Regions.
- Scribe: During a Research Action, a player may choose a “CAST” Spell from their Spell Library to Scribe by placing it face-up in one of the three slots to the right side of the C.C. Board. A player may only have one Scribed Spell per Capital City Level, and once a Spell is Scribed, it may never be discarded. Scribed Spells can be Cast using a Cast Action and are not discarded but are rotated upside-down to indicate they are Exhausted. During the Round End, players will rotate all of their Preparing and Exhausted Spells 90° counter-clockwise.
- Shore: Border shared between a Land Region and an adjacent Sea Region. A Sea Vessel may dock on a Shore by placing it halfway on the Land Region and halfway on the Sea Region. Vessels docked on a Shore are considered in the Land Region.
- Speed (): Number of Regions a Unit may move using a March Action (or a Sail or Fly action in the case of Vessels). If an army of more than one Unit Marches together, it may only move as many Regions as allowed by its lowest-speed Unit. Units in a Vessel will move with the Vessel at the speed of the Vessel. A Unit’s Speed can be found beside the Unit’s image on the C.C. Board.
- Strength (): Both the attack value and the health amount that a Unit or Structure has during a Battle. This can be modified with bonus abilities. The Natural Strength of a Unit is the “unmodified” value listed on the Capital City Board.
- Units and Structures: Heroes, Warriors, Serfs, and Vessels are all considered Units. Towers and Capital City Constructs are considered Structures.
- Vessel: Two types: Air and Sea. Each Vessel requires a specific Building to be built before the Vessel can be Recruited or Built by paying the Resource cost listed in the banner beside the Vessel on the C.C. Board. Each Vessel can carry 2 Units; Vessels cannot carry other Vessels. Units in the same Region with a stationary Vessel may freely board it, moving into or out of that Vessel.
Introduction & Overview
Welcome to Aughmoore…
In the beginning, the primal energies of the races fueled the inner spark of Aughmoore. In return, it provided a plentiful bounty that, for a time, even satisfied the blood-crazed Orcs. With prosperity came complacency, and the aura of a once vigorous struggle for survival weakened. As it waned, Aughmoore was able to provide less and less.
After centuries of feeding her sprawling children, she became fallow. Crops no longer leaped from the tilled mounds of fertile soil, veins of ore hardened to the pickaxe, and the very spark of magic and life began to retreat into the dark crevices of the earth. Aughmoore was cast into shadow and sickness.
As anxiety peaked, the races began to turn away from one another. Scarcity strained the delicate bonds of trade, marketplaces became hives of petty theft, Resources were harvested to desolation, and territorial disputes escalated.
During this harrowing time, it was Laelithar, the Human paladin, who first grew distrustful and turned his back on the other races, preferring to help and shelter only his own kind. Under the flickering glow of the Great Hall’s sconces, he announced the Isolation Concordat, though as he spoke, those old allies whom he renounced were executing their vile plots against him.
Spindly shadows descended from the rafters. Cold steel gleamed in stained-glass painted moonlight throughout the hall as assassins cut through the crowd toward the paranoid leader.
The Elves had grown tired of the arrogant humans—of all races. Their scheming was accompanied by small coups across Aughmoore. As more assassination plots and economic betrayals were revealed, it became clear that each of the races had been preparing for complete independence for quite some time. The world had declared war on itself.
The Orcs, secretly disciplining a league of armed forces, cut weapon tradelines immediately, arming only themselves with their legendary steel. Their armies began marching in every cardinal direction with standing orders to eviscerate those who now lacked the advantage of their superior metallurgy.
The Elves created pacts in the darkened alleys of the enemy cities they had infiltrated, trading bottles of fine wine and ancient mystical relics for information on their next target.
The Humans rallied their masses, conducting public prayer and calling the earth to flourish and provide for the brave men and women. Under their holy sky, Humanity met their enemies not with trickery but with iron force and sheer hubris.
The Dwarves sought the majestic wisdom of the timeless mountains, and mined their valuable ore, hastily constructing enormous stone fortresses to exile all those not of the Heaven-Blood.
As the races continued to turn their backs on one another, the seeds of disquiet spread like disease in their hearts. Their hatred, their feuds, the unwavering raw energies of their dedication and passion reignited Aughmoore’s inner flame. Fueled by their fury, Aughmoore returned bounty and prosperity to its inhabitants. The plague of barrenness had ceased, but the allure of power and revenge ensued.
Today, terror and destruction are the norm. Fizzling spell slinging has turned to hailing comets and shattering earthquakes, brief skirmishes to violent massacres, and trade to extortion and subterfuge. Armies of all colors and creeds now march, sail, and fly over the scarred surface of the world. No stone will remain unturned, no enemy left alive, no element unplundered, and no territory unclaimed.
The future of Aughmoore will be forever altered by the events to come. The only question that remains is: who will be left in the past?
Game Overview
Heroes of Land, Air & Sea is a 4X-style board game that tells the epic tale of Aughmoore’s many conflicts: Orcs vs. Humans, Dwarves vs. Elves, battling kingdoms, and the heroic individuals who turn the tides of war.
Players control one of these four Factions, competing to expand their small kingdom of a single Warrior and two Serfs into new territory. From there, players must explore the territory around them, expand their work force, fortify their army, and build up their Capital City — all through careful action selection, exploitation, war, and Resource management.
As players reach milestones through building, recruiting, or war, they gain access to many advantages and Victory Points. Achieving one of four “X-Objectives” will end the game: eXplore, eXpand, eXploit, or eXterminate.
Finding this balance in exploration, kingdom growth, territory exploitation, and war is crucial. After one of the X-Objectives have been met, the game is over and players total their Victory Points, crowning one of them as the most supreme Faction of Aughmoore!
Game Objective
Every round, players are exploring, building their Capital City, casting Spells, and Battling to gain Victory Points (). After one player achieves any one of the 4 “X-Objectives,” then players finish the current round as normal and play one additional full round which will be the final round. These “X-Objectives” are:
- eXplore: All Land Exploration Tokens in the game have been revealed.
- eXpand: All of a player’s Serfs and Warriors are in play.
- eXploit: All 3 of a player’s Towers are in play.
- eXterminate: A player has destroyed another player’s Capital City.
Once the end of the game has been triggered, it cannot be undone, even if the end game conditions are no longer met. After the final round ends, the game is over. Players total their Victory Points, from Buildings, Towers, certain Units, Scribed Spells, occupied Regions, and any other end game bonuses. The player with the most Victory Points is crowned the supreme Faction of Aughmoore.
Components
Game Components
Faction Components:
- 4 Capital City Boards (1 per Faction)
- 80 Miniatures (20 per Faction)
- 12 Hero Cards (3 per Faction)
- 32 Constructs (One-Time Assembly Required):
- 12 Capital Cities (3 stackable levels per player)
- 12 Towers (3 per Faction)
- 4 Sea Vessels (1 per Faction)
- 4 Air Vessels (with 4 plastic stands, 1 per player)
- 12 Faction Tokens (3 per Faction)
Other Components:
- 1 Game Board (Map)
- 28 Tactic Cards (7 Cards for each player)
- 60 Spell Cards
- 8 Solo Enemy Cards
- 94 Exploration Tokens (70 Land, 24 Sea)
- 15 Resource Tokens (5 Ore, 5 Mana, 5 Food)
- 1 First Player Token
- 1 Quick Reference Sheet
Assembling Constructs
Before setting up your first game, punch out all of the Construct pieces and assemble them. You may refer to the Construct Assembly Guide for detailed assembly instructions. Constructs are made to be assembled once and never disassembled.
Component Overview
Faction Components: A Faction consists of a Capital City Board, a supply of Units, Hero Cards, several types of Constructs, and several Tokens:
- Capital City Board: Placed directly in front of each player. It contains the information needed for gameplay, an Action Bar, and an area to track a player’s Resources.
- Units: 20 Miniatures for each Faction kept in a supply. These consist of 3 Heroes, 5 Warriors, and 12 Serfs.
- Hero Cards: Each Hero has a corresponding Hero Card that lists their special abilities.
- Faction Tokens: Two kinds–1 Score Token (square) for tracking Victory Points, and 2 Action Tokens (shield) for marking a chosen action during Action Selection.
- Constructs:
- Capital City Levels: 3 stackable structural Constructs that represent a Faction’s Capital City location and level. The Capital City is considered a “Structure.”
- Towers: 3 structural Constructs that can be built by a Faction on a Land Region. Towers are considered “Structures,” NOT Units.
- Sea Vessel: A movable vessel Construct that can carry Units into Sea Regions. A Sea Vessel is considered a “Unit.”
- Air Vessel: A movable vessel Construct that can carry Units over Land or Sea Regions. An Air Vessel is considered a “Unit.”
Other Components:
- Tactic Cards: Each player has a hand of 7 Tactic Cards (marked “X of 7”) to be used during Battle.
- Spell Cards: Gained each round, and by taking the Research Action. Spells can be used by Casting them.
- Solo Action Cards: Used in the Solo Play Variant to dictate the actions of the Solo Enemy.
- Resource Tokens: Used to track Ore, Mana, and Food amounts on each player’s Resource Track.
- Exploration Tokens: Placed face-down onto unexplored Land and Sea Regions on the map (except Capital City Regions) and then flipped and resolved when Units first enter a Region containing one. There are 2 kinds of Exploration Tokens: Land and Sea.
- First Player Token: A Token that is given to the first player each round to perform the first action, and will pass to the next player at the end of the round.
- Quick Reference Sheet: A quick reference of gameplay and the effects of Exploration Tokens.
Game Board
Placed in the center of the play area. Choose a side based on your number of players (Note: Playing with more than 4 players requires the Order & Chaos Expansion). It consists of the following:
- Continents: Clusters of 10 adjacent Land Regions.
- Sea Regions: 13 total Sea Regions.
- Shores: Connect Land to Sea Regions where Sea Vessels may dock.
- Ferry Routes: Separate Sea Regions and connect continents so Land Units may cross.
- Graticules: Numbers/letters that mark a continuation of a Ferry Route.
- Player Count: Marks how many players should be playing when using this side of the board.
- Score Track: Marks the current Victory Points of each Faction and is used for end game scoring as well.
- Tax Track: Resources offered when taking the Tax Action.
- Note: Regions, other than Capital City Regions, can only contain a maximum of 5 Units of a single Faction. Capital City Regions do not have a Unit maximum.
Capital City Board Overview
Each Capital City Board represents the Capital City of a Faction. The board has 2 sides: a Multiplayer side and a Solo Enemy side. It includes:
- Towers: lists the game information for Towers to be built and used.
- Capital City Levels: represents the current level of a Faction’s C.C. (always starting at Lv. 1). The necessary game information needed for each future level to be built is included on the C.C. Board.
- Buildings and Abilities: lists the Faction’s Buildings that can be built. Buildings grant unique abilities and, as the level of the C.C. increases, more abilities become available.
- Units and Vessels: lists the Faction’s Units and Vessels (Vessels are also considered Units). These are available to be recruited.
- Courtyard & Action Bar: At the top of the C.C. Board is the Courtyard and an Action Bar that includes 9 Action Slots split into 2 types of actions: Capital Actions and Command Actions. These represent the game actions that a player may perform using Action Tokens and Serfs (from the Courtyard).
Note: The Courtyard is considered the Capital City Region. Units in the Courtyard are also in the Capital City Region and vice versa.
- Resource Track: The numbered spaces on the track represent the amount of each Resource a player has, marked by Resource Tokens. No one Resource type can ever exceed “10.”
- Scribed Spells: Slots for Spell Cards to be “permanently scribed” during a Research Action and which may be Cast without discarding.
Setup
Game Setup
- Place the Game Board in the center of the table. For a 1-4 player game, use the side of the board with the “1-4” in the upper-left corner. The reverse side of the board with the “5-6” requires the Order & Chaos Expansion.
- Each player selects a Faction and collects its Faction Components:
- Place the Capital City (C.C.) Board in each player’s area.
- Collect the 20 Units and 8 Constructs (3 C.C. Levels, 3 Towers, and 2 Vessels):
- Place the Units and Vessels below the C.C. Board under, or near, their corresponding slots. This is considered a player’s “supply.”
- Place the Towers and C.C. Levels to the left of the board near their corresponding slots.
- From the supply, place 2 Serfs and 1 Warrior into the Courtyard at the top of the C.C. Board.
- Place the 3 Hero Cards near the right side of the C.C. Board. Leave enough room to place future Spell Cards in the 3 slots designated for Scribed Spells.
- Place the 2 Action Tokens into the Courtyard at the top of the C.C. Board.
- Place 3 Resource Tokens (1 Ore, 1 Mana, and 1 Food) onto the “2” space of the Resource Track (note the Watermark images of the Resource types).
- Collect a complete set of 7 Tactic Cards (each listed “X of 7”).
- Place the Score Token off the board next to (but not on) the “1″ space on the Score Track, designating a starting score of “zero.”
- Shuffle the Spell Cards and place the deck face-down near the top of the Game Board. Also designate an area for a face-down Discard Pile nearby. Then, deal 1 Spell Card to each player to be placed in their “hand,” also referred to as a player’s “Spell Library.” Always keep cards in your Spell Library secret from other players.
- Take 3 Resource Tokens (1 Ore, 1 Mana, 1 Food), which have not yet been used, and while cupped in a player’s hand, drop tokens out one at a time. The first token to fall, is placed on the “4″ space of the Tax Track (bottom left of the Game Board), the second on the “3,” and the final on the “2.” This determines the starting Tax Track values.
- Give the youngest player the First Player Token, or choose who starts the game using any other method. You can also download our Heroes of Land, Air & Sea mobile app which provides a randomizer for selecting the starting player.
- Players next decide on which Continents to place their Capital Cities. Starting with the player to the right of the first player (with the First Player Token) and going counterclockwise, players place their Lv. 1 C.C. Construct in a Capital City Region on a Continent adjacent to another player’s Continent, except for the first player to choose, who may choose any Continent to start on.
Note: there is only 1 C.C. Region per Continent and therefore each player will have their own Continent to start. Once all players have chosen where their C.C. will go, the game is ready to begin.
- Shuffle the Exploration Tokens face-down, and then place them face-down onto Regions on the Map:
- Land Regions, except for where a player’s Capital City is present, receive 1 (brown) Land Exploration Token, except for Swamp Regions, which receive 2 Land Exploration Tokens.
- Sea Regions receives 1 (blue) Sea Exploration Token, except for the center Sea Region (with the image of the Octopus, and if playing with the expansion, the second center Sea Region with the image of a Sea Serpent), which receives 2 Sea Exploration Tokens.
- Any unused Exploration Tokens are returned to the box without being revealed.
Note: In 1-2 player games, 1 of the 4 continents, chosen by the player(s), will not be used and is not accessible by players. No Exploration Tokens should be placed on this continent. Regardless of player count, all Sea Regions are accessible and should receive Exploration Tokens.
In 1-2 player games, use 3 Continents. In 3-4 player games, use all 4 Continents. In 5-6 player games (using the Order & Chaos Expansion), use all 6 Continents.
How to Play: Round Structure
Playing a Round
Each round has 3 Phases, performed in order:
- Action Selection: Starting with the first player (with the First Player Token), and then going clockwise in turn, each player selects and performs one action. The player places one of their Action Tokens onto an open Action Slot at the top of their Capital City Board. Once an action is selected, the player cannot perform that action again for the rest of the round unless granted by a Spell or ability. This process of selecting an action will be done twice, so each player will use both of their Action Tokens.
- Collection: Once all players have completed the Action Selection Phase, they simultaneously collect Resources based on Regions they control and also draw 1 Spell Card into to their Spell Library. A player can only have 1 Spell Card in their Spell Library per level of their C.C.
- Round End: After the Collection Phase, all players remove Action Tokens and Serfs from the Action Bar, placing them back into their Courtyards. Rotate 90° any Scribed Spells that have been cast. The First Player Token then rotates clockwise to the next player, and the next round begins.
Phase 1 — Action Selection
On their turn, players place an Action Token on 1 unused action on the Action Bar. There are 2 categories of Actions:
- Capital Actions: Actions that can be “Followed” by other players using Serfs.
- Command Actions: Actions that, when selected, allow the player to “Muster,” using a Serf to immediately perform a second Command Action.
Following a Capital Action
When a player selects a Capital Action, other players may choose to “Follow” the same action. To Follow, the player must have that Action Slot open and have an available Serf in their Courtyard. Move a Serf from the Courtyard and place it in that Action Slot. That player may perform the selected action, even though it is not their turn. Only Capital Actions, not Command Actions, may be followed.
Serfs in the Action Bar cannot be used for any other Actions this round, cannot be targeted or sacrificed in Battle and cannot be the target of any Spells, but they do offer their Strength value if the Capital City is attacked.
Serfs must remain in their Action Slots until the end of the round. This fills that Action Slot for the remainder of the round and that action may not be taken again, neither by following with another Serf nor by taking a traditional action with a Faction Token.
Note: To keep the game moving smoothly, it is important for any players that are following to do so simultaneously. In the rare event that a conflict arises, resolve the actions in player order, starting with the active player.
Mustering a Command Action
After a player selects a Command Action and resolves it, they may immediately “Muster” a second Command Action by placing 1 Serf from their Courtyard into an open Action Slot. Only Command Actions may be Mustered. Fully resolve each action in the order they are taken. For example, you could March, then Muster and cast a Spell. Or even March twice (with the same or different armies) using a Muster to use both March Actions.
Capital Actions
Capital Actions Overview
The 4 Action Slots on the left side of the Action Bar are as follows:
Recruit Units
Pay Resources to recruit 1 new Unit. The cost to recruit is listed in the banner next to the Unit at the bottom of the C.C. Board. For example, a Warrior costs 2 Food to recruit.
After paying the cost, the Unit is placed in the Courtyard. Only 1 Unit can be recruited with this Action each time it is taken. The exception is with Serfs: 3 Food may be spent to recruit 2 Serfs. Each Warrior in play is worth at the end of the game.
Recruiting Heroes and Vessels:
Players can recruit Heroes and Vessels if certain Buildings are built in the Capital City. For example, to recruit the Paladin, the Cathedral must be built, and only then can 3 Food and 2 Ore be paid to recruit him, adding him to the Courtyard. Each Hero in play is worth at the end of the game.
Heroes’ Abilities:
Each Hero comes with 3 unique abilities, as noted on their Hero Card. Each ability is aligned with I, II, and III, which are unlocked by upgrading your current Capital City Level.
Note: In the event that abilities conflict with the game’s rules, the abilities always take precedence.
Placing Vessels on the Map:
When Recruited or Built, Vessels are placed on the Map, not into the Courtyard:
- Sea Vessels must start docked on the Shore of your Capital City Region, which is the border between the Land Region and its adjacent Sea Region. Note: docked Sea Vessels are considered to be in the Land Region NOT the Sea Region.
- Air Vessels start fully in the Capital City Region.
Boarding Vessels:
Units may be exchanged freely between the Vessel and the Land Region it occupies or whose Shore it is docked with (in the case of Sea Vessels). That includes boarding from the Courtyard into the Vessel if it is in the Capital City Region. Each Vessel has a maximum capacity of 2 Units, as listed on the C.C. Board. Vessels cannot be boarded while moving.
Build
Pay Resources to do 1 of the following:
- Build a Vessel in the C.C. Region (required Building needed). Building a Vessel is the same as Recruiting a Vessel, except a Build Action is used.
- Build a new Building on the C.C. Board.
- Upgrade the Capital City to the Next Level.
- Build a Tower.
Build a New Building:
Pay 3 Ore and then move a Serf from the Courtyard, placing it onto the Worker Space underneath the Building. This indicates that it is built, and now the player has access to its abilities listed above as well as the Hero or Vessel, pictured below, now being available to recruit (or build in the case of Vessels) during a future action.
For example, paying 3 Ore and using a Serf to build the Sea Dock will allow a player to recruit a Sea Vessel in the future, as well as unlock the Sea Dock’s abilities.
Each Building unlocks new abilities as the Capital upgrades. The Serf used to build the Building MUST stay on this Worker Space for the remainder of the game and cannot be used in any other action, nor can it be destroyed or sacrificed. Each completed Building is worth at the end of the game and each Serf occupying a building Worker Space still offers its when defending a Battle in your Capital City Region.
Upgrade the Capital City to the Next Level:
Pay the Resources listed in the next level’s banner on the C.C. Board. To signify the new level, stack the next smaller C.C. Construct from the supply on top of the existing C.C. Construct.
For example, with a Capital City Lv. I, a player pays 4 Ore, 4 Mana, and 4 Food to upgrade their C.C. to Lv. II, then placing the second C.C. Construct on top of their Capital on the board.
Upgraded Capitals unlock new abilities with Buildings and Heroes as listed on the C.C. Board and Hero Cards. It also increases the C.C.’s Strength (), the numbers of Towers and Spell Cards a player can have and Scribe, and the the Capital City is worth at endgame.
Build a Tower:
A player may build a Tower in a Land Region where they have a Serf present. The cost of building a Tower is 1 Ore for EACH Land Region away from the Capital City the target Region is. This distance should be the minimum number of Land Regions it would take a Unit to March there.
When a Tower is built, reveal, but do not resolve, all the face-down Land Exploration Tokens in the Land Regions adjacent to the Tower that are on the same Continent as the Tower. The tokens are resolved when another Unit enters those Regions.
Unlike when building a Building, the Serf is not required to stay in that Region; they are treated as a normal Unit.
Example: A player has a Serf in a Mountains Region and is building a Tower. They count the Land Regions away from their C.C. and it comes to 4 Regions (Ferry Routes make Land Regions adjacent). The player pays 4 Ore and places a Tower into this Region. Then reveals the face-down Exploration Tokens in all adjacent Land Regions on the same Continent.
A player with a Lv. 1 Capital City may only build 1 Tower. As the C.C. is upgraded, more Towers may be built, 1 additional Tower per Level. Players are also limited to building only 1 of their own Towers on 1 continent (in 2-player games, a player may have 2 Towers on 1 Continent). Multiple Factions’ Towers may occupy the same continent. A Tower may never be built in a Capital City Region with a Capital City Construct. Towers have a Natural Strength of and may not move (unless an ability allows it). They are each worth per Land Region away from that player’s C.C. at the end of the game.
Research or Scribe Spells
Researching allows players to build an arsenal of powerful Mana Spells. Select the Research Action to choose from 2 separate options:
- Conjure Spells: Draw 3 Spell Cards from the Spell Deck. Then choose which cards to keep in the player’s Spell Library (a hand of Spell Cards) and which to discard. Note that there is a Spell Library Hand Limit based on the player’s C.C. Level. When finished Researching, discard Spells (from those you drew and/or from those already in your Spell Library) until the number of Spells in your Spell Library is equal to your current Hand Limit.
For example, a player with a Lv. 1 C.C. and 1 card in their Spell Library takes the Research Action. They draw 3 Spell Cards and compare them with the Spell Card they already have in their library. They choose to replace that card with one of the new Spell Cards drawn, discarding the other 3 face-down to the discard pile.
- Scribe a Spell: Take 1 Spell Card in your Spell Library and permanently place it face-up in a Scribed Spell Slot on the right side of the C.C. Board. Scribed Spells cannot be discarded at any time. Players may have only as many scribed Spells as the level of their Capital City. A Lv. 2 C.C. allows a player to have 2 total Scribed Spells. Players may only Scribe Spell Cards labeled “CAST.” They may never Scribe Spell Cards labeled “COMBAT” or “INTERRUPT.” Each Scribed Spell is worth at the end of the game.
For example, a player with a Lv. 1 C.C. and 1 Spell Card in their Spell Library takes a Research Action. They scribe their Spell Card, placing it into the Lv. 1 Scribed Spell Slot.
The cards you choose are kept in your Spell Library or Scribed Spell Slots to be Cast in later actions. Scribed Spell Cards are NOT discarded when they are Cast, nor can a player willingly discard one. When the Spell Deck runs out, shuffle the discard pile and form a new deck.
Spell Card Types
There are 3 types of Spell Cards which are labeled on the card:
- CAST: Require you to select the Command Action: Cast to use. These Spell Cards are the only Spells that may be Scribed.
- COMBAT: May only be Cast during a Battle. Cannot be Scribed. Combat spells may not be copied with a Copy Spell card by a player not involved in the current Battle.
- INTERRUPT: May be used immediately after an enemy player has Cast a Spell. Cannot be Scribed.
Tax for Resources
Select the Tax Action to gain one type of Resource, the amount of which is labeled in the Tax Track located in the bottom left of the Game Board.
The player chooses one of the 3 Resources and immediately gains the amount listed on the slot that the Resource’s Token is in. The slots are labeled “4,” “3,” and “2.”
For example, a player takes a Tax Action to gain 4 Mana, since the Mana Token is in the “4 slot.”
After Taxing is complete (including Followed Actions), the Resource Tokens advance; the token in “slot 2” moves to “3,” the “3” to the “4,” and the “4” then cycles back to the beginning “2” slot.
Command Actions
Command Actions Overview
The 5 Action Slots on the right side of the C.C. Board are as follows:
March a Unit or an Army
Move 1 to 5 Units from a single Land Region, called an “army,” into another Land Region. An army can consist of any number or combination of Units, from a single Serf to multiple Serfs, Warriors, and Heroes. Regions have a limit of 5 Units per Faction after Marching, but not when an army is moving through a Region.
The number of Regions a Unit may move in a March is called its Speed () and is listed next to its picture on the C.C. Board. The army can only move as many Regions as allowed by the lowest-Speed Unit.
For example, an army containing 2 Warriors with and a Paladin with may only move 1 Region because of the Paladin’s low Speed.
Note: There are 2 March Action Slots, so this Action may be performed twice. It can even be performed twice during the same round by Mustering, even by the same army.
Marching into Battle:
Armies must stop a March when they enter a Region with an opponent’s Units, Vessels, Tower or Capital City. This ends a March Action, and it immediately results in a Battle between the two players.
Towers are Adjacent to the Capital:
Each player’s C.C. Region, and their Units in the Courtyard, are always considered to be adjacent to all Regions with the player’s Towers. Note: Towers are not adjacent to other Towers.
Exploring Land Regions:
If the army ENDS its March in a Land Region that has a face-down Exploration Token, it is immediately revealed and then resolved (see the Reference Sheet for outcomes). In a Swamp Region, 2 Exploration Tokens are revealed and resolved one at a time. Do not reveal the second token until the first is resolving. Armies may March through “unexplored” Regions without revealing their Exploration Tokens.
Ending a March in a Desert:
Units cannot pass through a Desert Region in a single March Action, even if they have sufficient Speed to do so. They must end their March upon entering and may move out with a subsequent March Action.
Ferry Routes and Graticules:
Continents are connected by Ferry Routes, which link Land Regions together and separate Sea Regions. Two Regions connected by a Ferry Route are considered adjacent, and this is the only way for Land Units to travel across Sea Regions without a Vessel.
Graticules are the letters or numbers marked on the outside of the map that have matching pairs directly opposite from each other. Attached to Ferry Routes, these are considered connected and “wrap-around” to the opposite side of the map.
For example, this army uses to March north using the “A” Ferry Route into the southern continent’s Region on the opposite side of the map.
Sail a Sea Vessel
Using its Speed, the Sea Vessel may only sail into Shore and Sea Regions. Shore Regions are any Land Regions that border the Sea:
- Docked Sea Vessels must use to first sail from Shore to Sea. A docked Sea Vessel may move into any Sea Region adjacent to that shore. Sea Vessels cannot move from one shore to another without first moving into a Sea Region.
- Use to sail to adjacent Sea Regions separated by Ferry Routes.
- Use to sail from a Sea Region to dock onto a Shore.
- Sea Regions on directly opposite sides of the board, between 2 Ferry Routes with at least 1 matching Graticule, are considered adjacent.
When a vessel is “docked” on a Shore, the Vessel is placed halfway between both the Land and Sea Region. Land Units on the Shore may freely board and exit the docked Vessel, however a Sea Vessel may not march with an army. Sea Vessels do not require Units aboard to sail.
Exploring Sea Regions:
If the Sail ENDS in a Sea Region that has a face-down Exploration Token, it is immediately revealed and then resolved. In the Central Sea Region, 2 Exploration Tokens are revealed and resolved one at a time. Do not reveal the second token until the first is resolving. Sea Vessels may Sail through “unexplored” Sea Regions without revealing their Exploration Tokens.
Ending a Sail in the Central Sea Regions:
Like armies Marching through a Desert Region, Sea Vessels cannot Sail through the Central Sea Region in a single Sail Action. They must end their Sail upon entering and may move out with a subsequent Sail Action.
Fly an Air Vessel
Using its Speed, an Air Vessel:
- May Fly through adjacent Land Regions, as if it were marching (including between Towers and the Capital City).
- May not use Ferry Routes.
- May Fly through Sea Regions, but may not end flight in a Sea Region.
- May Fly into a Sea Region to Battle a Sea Vessel, but if it survives it has only to return to a friendly or unoccupied Land Region. If it cannot do this, the Air Vessel is destroyed.
- May pass through unexplored Land Regions, and also may end its flight to explore Regions with Land Exploration Tokens. However, if there are no Units aboard the vessel and the token’s outcome requires the player to lose a “Unit,” the player must lose the Air Vessel.
- May not explore Sea Regions.
- MUST stop in a Region with enemy Units or Structures to Battle.
- May Fly through a Desert Region WITHOUT stopping.
Like the Sea Vessel, the Air Vessel may carry passenger Units which can freely board and exit the vessel if sharing the same Region but not in the middle of a Fly Action. Air Vessels do not require Units aboard it to fly.
Note: Air Vessels may not move using a March Action.
Flying Through the Central Sea:
The Central Sea Region counts as 2 Regions when flying, so it requires to fly an Air Vessel through it.
Cast a Spell
Reveal 1 Spell Card from your Spell Library (hand of Spell Cards) OR select 1 Scribed Spell. Then pay the cost of Mana () listed in the upper left corner, and perform the action listed on the card.
Casting immediately gains the Victory Points () listed in the upper right of the card for the player that cast the Spell (advance Score Token). A card Cast from your Spell Library is discarded.
Only Spells labeled “CAST” may be used in a Cast Action. “COMBAT” Spells may only be used in Battles, and “INTERRUPT” Spells can be used any time an enemy casts a Spell. Unless stated otherwise, Capital City Regions and Units inside cannot be affected by enemy Spells. However, while in a Battle within a Capital City Region, Combat Spells may be used.
Casting Scribed Spells:
A Spell in a Scribed Spell Slot may be used instead of one from the Library, and only when it is pointing upward in the “Ready” position (1).
After casting, rotate the Scribed Spell Card upside down (top pointing down) to designate it as “Exhausted” (2).
During the Round End Phase, all Scribed Spell Cards that are not “Ready” rotate once 90° counter-clockwise. “Preparing” Spell Cards (3) will rotate so that the top is facing up (these Spells are now “Ready” to be Cast again during the following round). Then “Exhausted” Spell Cards will rotate so that the top is facing to the right. These Spells are now “Preparing” and will be unavailable to Cast during the following round. They will rotate again to “Ready” during the next Round End Phase.
Combat & Battling
Battling
When an army or Vessel moves into a Region with enemy Units or Structures, its movement ends and a Battle occurs. One player’s army will be victorious and allowed to remain in the Region, but the other army must leave and possibly lose Units. The player who initiates the Battle, called the attacker, immediately gains (advance the Score Token).
Note: a player who uses an ability to move enemy Units into a Region with their own Units is still initiating the Battle and considered the attacker.
Total Each Army’s Strength:
Both players total the Strength () of all the Units, Vessels, and Structures in the Battle:
- Natural Strength: The value as listed beside the Unit’s picture on the Capital City Board, or its card, before bonuses are considered. For example, a Paladin has a Natural Strength of .
- Ability Bonuses: Next add in all ability bonuses of Heroes, Vessels, and Structures that increase Strength. Defenders apply their abilities first, then the attacker. For example, the Paladin’s ability “+ if at least 1 Serf is in his army” makes the Paladin since his army has Serfs.
- Combat Spells: Cast 1 Combat Spell to add to an army, decrease from an enemy army, or destroy enemy Units. The defending player always casts a Combat Spell first. Once defender does so or announces that they are not casting, the attacking player may then cast a Combat Spell. The defender may not cast a Combat Spell after the attacker has, however Interrupt Spells may still be cast. For example, the attacking player casts Rage which says “Before Tactic Cards are chosen, gain .”
Example Battle Breakdown:
The attacking Human army is in the Plains Region:
- has a Natural Strength of : 1 Paladin, 1 Warrior, and 2 Serfs.
- + from bonuses from the Paladin’s ability and the Cathedral’s ability (“Warriors are + if Battling in the Plains Region”).
- + from casting the Combat Spell “Rage.”
- The total Strength of the Human army is now: 13
The defending Orc army:
- has a Natural Strength of : 2 Warriors.
- + in bonuses from the Blood Tent’s ability (“Every Serf in your enemy’s army grants +”) and the Barracks’ ability (“Your Warriors are + “).
- The Orc player casts “Magic Arrow” (“Destroy 1 Warrior or Serf”) instantly destroying the Human Warrior.
- The total Strength of the Orc army is now: 8.
- Since the Human army loses its Warrior to Magic Arrow, its total is now: 10.
Select a Tactic Card to Play:
After totaling the Strength of their armies, both players gather their hand of 7 Tactic Cards, and each secretly selects one card to play which adds a bonus to their army’s Strength. In the event that one or both players have no Units or Structures remaining in the Region due to spells or abilities, the Battle ends and no Tactic Cards are played. The amount of added is listed in the upper left of the card, as well as any bonus or effects listed below if against a specific card chosen by the enemy.
Note: The Conscripts Tactic Card may change the composition of the Armies, which may change the ability bonuses of the Heroes, Vessels, and Structures. Win or lose, each player must pay the cost of the Tactic Card, and each player gains the listed on the Tactic Card they played. If both players played Conscripts, the defender resolves it first, then the attacker.
When players select a Tactic Card, they must factor in these two rules:
- The player MUST be able to afford the cost of the Tactic Card, as noted on the upper left of the card, and MUST Spend the appropriate Resources AND/OR Sacrifice Units.
- Some Tactic Cards may only be played by an attacking or defending player, and some may not be played if there are only Serfs in the army and no Structures.
Note: If a player cannot pay the cost and meet the requirements then their card is ignored and considered a 0. A player may NOT choose to not pay the cost of their selected Tactic Card and ignore it if they can afford to pay the cost, in Resources and/or in Units. If a Tactic Card or other ability cancels your Tactic Card, you do not have to pay the resource cost, nor do you gain its VP (positive or negative).
Example Tactic Resolution:
- The Human army with 10 reveals the First Strike Tactic and pays 4 Mana to use it, so their final total is 12 and the player gains .
- The Orc army with 8 reveals the Charge Tactic Card and must pay 6 Mana to use it even though they only have 4 Mana. They intend to sacrifice 1 Warrior () to pay the difference. Since the enemy played First Strike, the Orcs receive a +2 bonus, and their final total is 15 and the player gains .
With the higher strength (15 vs. 12), the Orc army is victorious, but now that the Battle is resolved the Orc army must lose a Warrior to finish paying the cost of their Tactic Card.
Sacrificing Units in Battle:
Players may choose to sacrifice one or more Units (not including Vessels) to help pay for the cost of a Tactic Card (even if they have enough resources to pay for the Tactic Card without sacrificing). The Natural Strength of the Unit sacrificed can go toward paying the cost of the Tactic Card. The Strength values of Sacrificed Units are still counted toward the army’s total Strength. Lay Units on their sides to signify that they are being sacrificed. After the Battle resolution begins but before Damage is assigned, Sacrificed Units are removed from play, considered destroyed in battle, and returned to their owner’s supply. Only Units (except for Vessels) may be sacrificed. Neither Vessels nor Structures may be sacrificed.
Resolving the Battle:
The army with the highest value wins, with ties going to the defender:
- The winning army remains in the Region and loses no Units, except for Sacrificed Units (if any) to pay for their Tactic Card.
- The losing army:
- takes “Damage” and must lose Units and/or Structures whose Natural Strength totals at least half of the losing army’s Natural Strength (rounded up). Natural Strength of the loser’s army is calculated AFTER removing any Sacrificed Units. Damage is deducted from each Unit, Vessel, or Tower’s own Natural Strength, and the losing player may choose which Units are lost. Any Tower MUST be lost first since it may not remain in the Region with enemy Units and may not be moved to your Capital City.
- Damage must be assigned completely to one Tower, Unit, or Vessel before the rest of the damage is assigned to remaining Units or Vessels.
- If a Structure, Unit, or Vessel takes any damage at all, even 1, it is destroyed. Destroyed Units are returned to the supply.
- Any remaining Units must be returned to that player’s Capital City or a Region containing a Tower they control.
Example Damage Assignment: The losing Human army suffers damage equal to half its Natural Strength of 6 (1 Paladin and 2 Serfs), so it takes 3 Damage. The Human player decides to lose the Paladin, because his 4 Natural Strength more than covers the 3 Damage dealt. The Paladin is returned to the player’s supply and can be recruited again on a future Recruit Action. The remaining 2 Serfs must be returned to their Capital City or a Region in which that player controls a Tower.
Special Combat Situations
Battling with Towers:
Armies may Battle in Regions with Towers, which have a Natural Strength of (counts toward your army’s Natural Strength for purposes of Battle and determining Damage). Towers are also considered adjacent to the Capital City’s Courtyard, so a defending player may use the Conscripts Tactic to move Units from their Courtyard into the Battle. If the defending player loses the Battle, the Tower MUST take damage first before all other Units or Vessels in the army. Towers are then “destroyed” and returned to the supply. A destroyed Tower may be built again on a future Build Action.
Battling with Vessels:
Vessels Battle from either air or sea. They may Battle without passengers aboard, but if carrying passengers be sure to add both the of the Vessel and any Units aboard together. Sea Vessels Battle Land Units in the Land Region whose Shore it docks on.
Battling a Capital City:
To achieve the “eXterminate Objective,” players may Battle an enemy’s Capital City. To total the Capital City’s Natural Strength:
- Add listed for the Capital City’s current Level only.
- Add from any Units in the Courtyard and Action Bar along with their bonuses.
- Add of any Vessels in or docked on the Shore of the Capital City Region.
- Add of any Serfs in any completed Buildings’ Worker Spaces.
- Towers are considered adjacent to the Capital City so any armies in Regions with your Towers may be moved into the Battle using the Conscripts Tactic Card.
- Note: Your Capital City can hold any number of Units and is not subject to the normal limit of 5 Units per Faction.
Example: This Capital City is Lv. 3, so it naturally has 8. There are 3 Serfs, 1 Warrior, and a Paladin (has a bonus ability) in the Courtyard and Action Bar, so together with bonuses they have 10. A Sea Vessel docked on the Shore Region has 3. The 3 Serfs on Buildings’ Worker Spaces together have 3. Therefore added together, the total Strength of the Capital City before Tactic Cards are chosen is 24.
If a player’s Capital City is destroyed, that player is immediately eliminated from the game. They do not participate in end game scoring and their total score is 0. Remove all their Units, Vessels, and Structures from the Game Board.
The player who destroys the Capital City gains in addition to points from starting the Battle, their Tactic Card, and Combat Spell (if any).
Note: Abilities and Spells performed by enemy players cannot affect the Capital City from OUTSIDE, but during a Battle INSIDE the Capital City Region, abilities can take effect. For example, an enemy player cannot cast “Earthquake” and cause another player to lose Units from their Capital City. But, if they were in a Battle with the Capital City, they could cast “Fireball,” causing a loss of Units there. Spells and Abilities, even during a Battle in the Capital City, cannot remove Serfs from the Action Bar or Building Spaces, nor can those Units be Sacrificed to pay for Tactic Cards.
Collection & Round End
Phase 2 — Collection
After all players have performed two actions, completing the Action Selection Phase, then players simultaneously:
- Collect Resources: Gain Resources from controlled Regions. A Region is controlled by the player having at least 1 Unit or Structure there. Certain “Resource Regions” yield a single type of Resource:
- Mountains yield Ore
- Forests yield Mana
- Plains yield Food
- Swamp, Desert, and Capital City Regions yield NO Resources and are not Resource Regions.
Each controlled Resource Region yields 1 Resource of its kind. In addition, Resource Regions also contain “Worker Spaces” where 1 Serf may be placed to collect 1 additional Resource from that Region. If a Tower is in a Resource Region, it collects 2 additional Resources.
Example collection:
- 2 Ore (1 controlled Mountains, with 1 Working Serf)
- 4 Mana (2 controlled Forests, one with 2 Working Serfs and one with 1 Warrior)
- 6 Food (2 controlled Plains, one with 1 Working Serf and one with 1 Working Serf and a Tower)
- Draw a Spell Card: Each player draws 1 Spell Card from the Spell Deck and adds it to their Spell Library. Then if any player has more Spell Cards than allowed by their Spell Library Hand Limit (equal to their Capital City Level), they choose a Spell Card to discard face-down. Remember that Scribed Spells do not count against your Spell Library Hand Limit.
Phase 3 — Round End
After Collection, all players return Serfs and the Action Tokens in their Action Bar back to their Capital City’s Courtyard. Rotate any Scribed Spells:
- “Preparing” (sideways) 90° counter-clockwise to “Ready.”
- “Exhausted” (upside down) 90° counter-clockwise to “Preparing.”
Then pass the First Player Marker to the next clockwise player, and then start the next round.
End of Game & Final Scoring
End Game
The end of the game is triggered if any of the four “X-Objectives” is achieved. Once one is achieved during a game round, finish the current round and then play one additional full round, which will be the final (in a 1-2 player game, if a player triggers the end through eXterminate, the game immediately ends). The end of the game cannot be “un-triggered,” even if conditions for the X-Objective are no longer met. After the final round, players total up their final Victory Points. The X-Objectives are as follows:
- eXplore: All Land Exploration Tokens in the game have been revealed.
- eXpand: All of a player’s Serfs and Warriors are in play.
- eXploit: All 3 of a player’s Towers are in play.
- eXterminate: A player has destroyed another player’s Capital City.
Final Scoring
Players total their final scores. In addition to their current scores from casting Spells, Battling, and certain Exploration Tokens, players now advance their Score Tokens:
- for each recruited Unit and Vessel in the game (not in the supply) as listed on the Capital City Board.
- for each completed Building.
- for each built Tower ( per Land Region away from the C.C.).
- for the final Capital Level as listed on the C.C. Board (no if at Lv. 1).
- for each Scribed Spell.
- for each Land and Sea Region you control at the end of the game (not including your Capital City or Shores). A Region is controlled if a Unit or Structure is present in that Region.
- Bonus from Buildings abilities as listed on the C.C. Board.
- Bonus from certain Exploration Tokens in controlled Regions.
In the event of a tie, the tied player with the highest total resources wins the game (based on the sum of all 3 resource types). If the game is still tied, enjoy the shared victory.
Read Winning Faction Lore
After determining a winner, the winning player reads their Faction’s Victory Lore aloud.
Game Variants
Solo Play Variant
In this variant, you go head-to-head with an A.I.-controlled Faction, called the Enemy. The Enemy controls 3 armies, each led by one of its powerful Heroes. These Heroes each have powerful abilities, and will offer you a serious challenge!
Components and Setup Changes
- 8 Solo Action Cards
- After you have selected your Faction:
- Randomly select the Faction for the Solo Enemy.
- Gather that Faction’s components as if it were a normal game. Flip the Enemy’s C.C. Board to the Solo Enemy side. The Enemy does not need Hero Cards, as the Enemy Hero abilities are listed on the Solo C.C. Board.
- Place the 3 Hero Units into the Enemy’s Courtyard. DO NOT place 2 Serfs or 1 Warrior into the Courtyard.
- Place all 3 Resource Tokens onto the “3” space of the Resource Track.
- Place 1 Action Token on the “Start” space of Capital City Track. The other Action Token is removed from the game.
- Shuffle the Solo Action Cards into a deck and place it face-down next to the Enemy C.C. Board.
- The Enemy DOES NOT require Spell Cards. Do not deal cards to it.
- All other Faction components are set up in the supply as normal. After you have placed your own Capital City, choose the Enemy’s Capital City Region on an adjacent Continent.
Gameplay Overview
The game is played in a series of rounds as normal until one of the “X-Objectives” is achieved, triggering the end of the game.
Each game round, the Action Selection Phase goes as follows:
- The Enemy draws a Solo Action Card, and performs that action with its first Hero (1).
- You perform your first action (the Enemy cannot Follow).
- The Enemy draws a card and performs that action with its second Hero (2).
- You take your second action (the Enemy cannot Follow).
- The Enemy draws a card and performs that action with its third Hero (3).
In this manner, you will perform 2 actions as normal, and the Enemy will perform 3. After all these actions are taken, the Collection Phase occurs, where Resources are collected as normal, and after Resolution, a new round begins.
Action Selection Phase – Enemy Draws Cards
Draw the topmost Solo Enemy Card and assign it to the leftmost Hero Slot at the bottom of the Capital City Board. That action will be performed by that Hero. The Enemy does not have a normal Action Bar like you do, so the Solo Enemy Cards and the Hero’s card slots act as the Enemy’s actions.
If the Enemy is able to perform the listed action by meeting its requirements, they MUST do so. However, if they cannot because of insufficient Resources or lacking a necessary requirement, it is considered a “Failed Action.” Instead that Hero performs a Move Action.
If ever there is a single Solo Enemy Card in the deck, instead of drawing it take that card and ALL cards in the discard pile (not cards in Hero Slots) and shuffle them together. Place them face-down to form a refreshed Solo Enemy deck.
Collection Phase – Discard Cards
After the Enemy has drawn 3 cards and performed (or failed) 3 actions, it is time for the Collection Phase. The Enemy collects Resources just like a normal player. Then discard all 3 cards from the Hero Slots into a face-up discard pile nearby.
Solo Action Cards – The Actions
Listed at the top of the Solo Action Card is the type of action and whether or not you may Follow it. Also listed are the specifics and requirements for the action, and what constitutes a Failed Action. Note that abilities from the Heroes or from the Capital City may alter the normal rules of these actions.
Recruit:
The Enemy pays Resources to recruit 1 Unit. Units are recruited in priority order, meaning if they can not be recruited then move to the next Unit in order:
- Air Vessel >
- Sea Vessel >
- Warrior >
- Serf*
*Serfs can only be recruited 1 at a time, not 2.
New Units are placed in the Region of the Hero who performed the action, and will now be part of that Hero’s army. If a Unit cannot fit in that Region due to the 5 Unit Limit a Region has, then it is placed in the Capital City. If the Hero is in the Courtyard, place new Units there.
This action will fail if the Enemy does not have the required Resources available to recruit any Unit OR if no Units are available in the supply.
Build:
There are 2 different “Build” Solo Action Cards:
- Capital City Track: The Enemy upgrades its entire Capital City by advancing an Action Token on a 6-space track, which marks its Capital City Level. The Enemy MUST pay the Ore amount listed on the next open space. If it reaches the end of the track, it triggers the end of the game. Increasing the Capital City Level grants more strength, VP, Constructs, and special abilities. This action will fail if the Enemy does not have the required Resources available.
- Towers and Vessels: The Enemy pays Resources to build 1 feature. Units/Towers are built in priority order: Tower > Air Vessel > Sea Vessel.
- Towers are placed in the Region of the Hero who took the action. Just like a normal player, the Enemy may not build more Towers than its Capital City Level allows, and a Serf is required to be in the Region to build a Tower. When the Enemy’s Tower reveals all adjacent Exploration Tokens, those tokens are collected and placed on the designated space on the Enemy’s Faction Board.
- Vessels are placed in the Region of the Hero who took the action. In the case of a Sea Vessel, the Hero must be on a Shore Region. If it’s not on a Shore Region, the Sea Vessel will be built in the Capital City instead. The Enemy will try to fit as many Units in the Vessel as possible, prioritizing Heroes first, then Warriors, then Serfs. If the Hero is already in a Vessel, the new Vessel is placed in the Capital City.
This action will fail if the Enemy does not have the required Resources available.
Research:
Unlike you, the Enemy does not need to collect Spell Cards. It has 3 Spells already at its disposal, 1 for each Hero. It will actually cast a Spell instead of taking a normal Research Action. The Enemy will gain the Victory Points shown and the Spell will take effect.
Spells cast by the Enemy can still be interrupted by player Spells. If a Spell is copied and turned against the Enemy, the player may make choices for the Enemy. Such as which Unit or Resources the Enemy loses.
This action will fail if the Enemy does not have the required Resources available to cast a Spell. If a Spell is useless, the Spell is still cast and the Enemy gains the Victory Points.
Note: When a Research Action is taken, the player can follow it as if it was a normal Research Action.
Tax:
Immediately collect the listed amount of Resources in every slot on the Tax Track, and then after the player follows, if they do, cycle the Resource Tokens like normal. This action cannot fail, and this Hero will then move afterward.
Attack:
All Units in this Hero’s Region move up to 2 regions to Battle the player. The Enemy can move in any direction and that the compass is ignored except for breaking a tie between two eligible targets of equal strength. However, they will only attack if the Natural Strength of the player’s army is less than or equal to the Natural Strength of the Enemy Hero’s army. If there are multiple player armies within range, the Enemy will attack the weakest.
Ties for choosing the weakest army are broken by referring to the movement compass, and going clockwise, then choosing the first army it can reach. The Enemy also gains for starting a Battle.
This action will fail if there are no player armies within 2 Regions of the Hero, or the armies are stronger than it.
Battling with a Solo Enemy
When Battling, you first choose your Tactic Card. Then, draw and reveal 1 Solo Action Card, noting the Strength value listed at the bottom.
This value is added to the Enemy army’s total Strength. In addition, a Tactic Card is listed, which is different depending on whether the Enemy is attacking or defending. This Tactic Card DOES NOT add additional Strength to the Enemy’s army nor does it grant VP (only the Solo Action Card does), but it may change the result of your Tactic Card.
Note: If your Tactic Card cancels the Enemy’s Tactic then the Solo Action Card’s added Strength is cancelled as well.
If the Enemy loses a Battle, they lose Units like a normal player, but weak to strong: Serfs > Warriors > Air Vessel > Sea Vessel > Hero.
Any surviving Units return to the Capital City Courtyard. In the event that a Hero is destroyed, it immediately respawns in the Courtyard.
Moving a Hero if an Action Fails
If the Enemy’s chosen action fails, then that Hero and its army will move. The Hero and all Units in its Region will move in the direction based on the compass on the Action Card (orient the compass to match the one in the top-left corner of the Game Board).
The Hero’s army moves in the designated direction, if it can. If it cannot, it will circle clockwise until it finds a Region that it can move into. When using the arrow, reference the center of the region and draw the line from there. If in doubt, go clockwise.
When the Hero moves:
- Its army always moves .
- The golden rule for deciding movement is that if the Unit cannot move properly in the direction of the arrow shown, continue moving the direction clockwise until it points to a Region it can move into.
- If moving from a Capital City, it will take all available Units in the Courtyard without exceeding 5 Units. It will take as many available Warriors as possible, however the army MUST have at least 1 Serf if possible.
- If an empty Vessel is present in the Hero’s region, the Hero boards that Vessel and then moves, taking 1 other Unit aboard if one is available (prioritizing Warriors over Serfs).
- It CANNOT move back into its Capital City or into a Region with another of its Heroes (only 1 Enemy Faction Hero per Region).
- If the army moves into a Region that you control, it results in a Battle.
Moving on Ferry Routes:
If the movement arrow is in the same direction as a Ferry Route, then the Enemy army will move along the Ferry Route. If the Ferry Route has multiple branches, the Enemy army will take the one that does not use a Graticule, a letter or number that wraps around the Map.
Moving Aboard Vessels:
Heroes aboard Air and Sea Vessels move differently:
- The Vessel always moves .
- A Vessel and its occupants move alone and not as part of a Land army. Any Units left behind remain in their Region.
- The Vessel may still collect Exploration Tokens when passing through Regions.
Enemy Air Vessels:
- Will not move using Ferry Routes or Graticules.
- Can move through the center Sea Region, counting it as one Region, but MAY NOT stop there.
- If their second movement would end in a Sea Region, they do not move there and instead move into the next “clockwise” Land Region.
- End movement immediately if entering a Region you control, which results in a Battle.
Enemy Sea Vessels:
- Can use Graticules and wrap around the Map if they continue in the card’s compass direction.
- Can Dock and Undock from Shores without using movement.
- Stop in a Sea Region with your Sea Vessel and then Battle.
- After a second movement, will Dock at the Shore Regions pointed to by the compass on the Card.
- If ending movement in a Sea Region adjacent to Land Region(s) that you control, the Enemy Sea Vessel will Dock on the Shore with the lowest Natural Strength army and then Battle, even if not in the direction of the card and even if the player’s army has a higher Natural Strength than the Enemy’s army.
- A General Note on Sea Vessel Movement: Since the map is organic in nature, some movement paths may be difficult to determine. When in doubt, the movement path may bend clockwise to determine the direction.
Moving and Gaining Resources:
The Enemy Hero collects 1 Resource of a Resource Region’s type when it enters that Region. If moving results in a Battle, it must be resolved first (and the Enemy must win) before gaining the Resource. For the “Attack” Action Card and Air Vessels, the Hero potentially could gain 2 Resources.
Collecting Exploration Tokens:
If the Hero passes through or ends movement in a Region with Exploration Tokens, the tokens are immediately taken and placed in a pile on the labeled section on the Enemy C.C. Board. The outcome listed on the Tokens do not matter. The Enemy gains immediately for each Token collected.
Following a Solo Action Card
You may Follow a successful Solo Action as if it were a normal action (except for Attack). HOWEVER, if the Enemy’s Action has failed, it may not be Followed. The Enemy does not Follow your actions.
Solo Game End
The game’s end is triggered when either you or the Enemy has achieved one of the 4 “X-Objectives,” or if the Enemy has reached the end of their Capital City Track. The current round is then completed, and then one more round is played (if a Capital City is destroyed then the game is automatically over). Victory Points are then totalled as normal, but note that the Enemy Heroes do not grant points.
Team Play Variant
In this epic variant, players gather in groups of 2 (or 3 with the Order & Chaos Expansion) in a war of alliances! Their powerful Factions have banded together in a campaign against their mortal enemies.
Components and Setup
Setup as you would for a normal game. Even as teams, players have their own Faction.
Player Seat Positions
The Team Play Variant must be played as a 2 vs. 2 game (with two teams of 2), or with the Order & Chaos Expansion as a 2 vs. 2 vs. 2 game (with three teams of 2) or as a 3 vs. 3 game (with two teams of 3). Players should decide their alliances before starting the game. These alliances will be permanent and cannot be broken. Members of the same alliance should not sit next to each other, and their seats should be alternated.
Gameplay Changes
- Players cannot attack their allies, and can peacefully share Units in the same Region. The allies can only have a collective total of 5 Units in a single Region. When this happens, both players will gain a Resource from that Region. However, Towers will only benefit the Faction that built it, and any Serf occupying a worker space only gains an additional Resource for the Faction it belongs to.
- When a Tax Action is taken, you may also give Resources from your supply, in any combination and at any time during the Tax Action, to an ally of your choice before or after you gain Resources.
- Ally Units in the same Region can move together, even if they belong to a teammate. When moving, a player can take any friendly Units in that Region with them, with their ally player’s permission.
- If attacking with mixed Units, the active player chooses the Tactic Card and must pay for it. If defending in a Regions with mixed Units, the players in the team choose who will lead the Battle and select and pay for the Tactic Card.
End Game Scoring
When the end of the game is triggered, each team will combine the Victory Points of all team players. Regions are only counted once per team, so if a Region is shared then it only counts for one of the players. The team with the highest total wins.
Faction Lore & Credits
Faction Lore
Humans
All that is known for certain is that Humans, the youngest race, first sailed to Aughmoore from far away. The specifics of their homeland have been lost to time, but there are those who maintain that they are not native to this world. Pointing to the design of their water and aircraft, the few that have preserved the old ways claim the extraordinary vessels once traveled amongst the stars. Regardless of its exact origin, Human civilization has shown an unprecedented explosion in economic and cultural growth in its new home.
The originally nomadic Humans discovered an affinity for the open plains, and their territories now delineate the far-reaching meadows of Aughmoore. Families sit by firelight for hours contemplating the unobscured night sky as their children share their dreams of one day becoming a Paladin, a Human conduit of light and righteousness. Perhaps the spiritual connection they feel with the boundless heavens is indeed evidence that they once traversed the interstellar beyond.
This history has become tiresome, though, to the many Humans who now bathe in the luxuries of Mana. Goblets overflow in taverns with deep red wines artfully crafted from the finest combinations of sorcery and horticulture. Crops are as much conjured as they are cultivated, and the bounty is often lush and plenty enough to invoke impressions of an agricultural empire in even the smallest settlements’ fields. Before the smoke rising from sacked villages clouded Aughmoore’s skies, Human farmers ate like kings, and their royalty feasted like the Gods themselves.
War has fallen on Aughmoore, and the life of the king has been claimed by the murderous Elven Shadow Guild. With no named heir to the throne, preparation for impending battle now falls to the people. As mysticism is retrofitted for war, citizens of the Human alliance have reclaimed the old ways, harvesting their yield by sweat and stamina. Keepers of archaic naval tradition and members of the religious order alike have been called upon to defend the development of mankind. They strengthen their bodies and minds, ready to meet the contentious races that threaten their distinguished evolution with justice and swift, irrevocable retribution.
If you win with the Humans, read aloud:
Glory and gluttony return for Aughmoore’s youngest race! Laelithar knew he was wise to withdraw his aid from the other races before the wars began. Now with control over all the farms and fields in the land, Humanity alone eats and drinks bountifully, ignoring the famished moans of those that remain of the other races, dying outside the Humans’ high walls.
Orcs
After her failed first attempt to preside over Aughmoore, the bloody divinity Oghtaa schemed again to lay claim to the land. Opening the ancient Battle wounds beset by Norellia, the goddess of the mystic elves, Oghtaa bled from the heavens, coating the world in a thick crimson rain for a single day and night. The Blood Rain soaked deep in the earth, penetrating the very center of the world. From gore-sodden brimstone rose the repugnant Orcs.
It is the self-proclaimed right of the Orcs to rule over every last scrap of land touched by their mother’s precious lifeblood. The Orcs look with disdain upon the pitiful beings resting comfortably along their once undisputed borders. Is it possible that they have forgotten the savage weight with which Orcish steel carves through muscle and sinew? They will be made to remember.
The Orcs march forth, driven by honor and glory through the rigors of battle. No worthy foe, neither foreign nor domestic, goes unchallenged. It is said that Orcs do not cry when they are born, but instead herald their arrival with a blood-curdling shriek, which deepens with every vanquished rival. Perhaps it was the thunderous roar of the battle-hardened Orcish warmongers that first commanded the attention of the Dragons. The two races, long separate, have found in each other a burning seed of violence.
Now in alliance, Orcish footsteps fall to the beat of dragon wings, forging a symphony that inspires greater terror than the very calamity of Hell’s open maw. Those that do not flee will crumble under the indomitable force of the Orc army, exterminated as is the fate of all decrepit pests. For those that do flee, few shadows and crevices remain in which to hide from the reign of the Orcs’ thirsting blades. Soon, there will be no opponent nor territory in all of Aughmoore that does not lie under the heavy boot of the blood-bred Orcs.
If you win with the Orcs, read aloud:
After many hard-fought Battles, the Orcs have shown no mercy to the inferior races and now they alone reign over Aughmoore. Bloody mud covers the once tranquil plains and rancid steam rises from their steel weapon refineries. Still, the Orcs hunger for war and look toward the sky, with treachery in their hearts, at their own Dragon allies.
Dwarves
The bloody divinity Oghtaa had coveted the land of Aughmoore once before creating the Orcs. Immediately following the creation of the elves by the fair Norellia, Oghtaa grew jealous. In haste, she drew ores from celestial bodies across the heavens to craft her mighty warriors. When she began to lower her creations to the land, Norellia took notice. Appalled at the selfish motivations of her counterpart, Norellia lashed out in a furious barrage of blades for twenty-two moons. The attack disrupted the spell that cradled the Dwarves in their slow descent, and they began to fall.
As the Dwarves tumbled toward the surface, unbridled by their defeated creator, they felt, for the first time, alone. A tremendous number perished in the Great Fall. Those that survived turned to stern stoicism, which offered the only escape from profound sorrow and loneliness in the early years. This temperament, so characteristic of the lords of stone, ingrained itself permanently in their demeanor.
Despair ultimately turned to introspection, and the Dwarves found divinity in themselves. The celestial ores inhabiting their veins had braced them in impact, and became the focus of their spirituality. They spurned Oghtaa, and by doing so, severed her bond to Aughmoore. The Dwarves then looked to the mountains, and found them to inspire a steadfastness that so captures the resolve of The Fallen. Atop the highest peaks, the Dwarves found peace.
After a great era of tranquil isolation, the squabbling races grew tired of destroying each other and sought a new challenge in the Dwarves. Their armies broke upon the stonework fortifications like waves, searching for any flaw in the exceptional craftsmanship. They found none. Their threats to overtake the sacred temples and towers of the stone ones proved to be empty. There is a secret, however. The Dwarves are quite outnumbered. It is for this reason that they fight with such stalwart courage, making a single defender feel like a thousand, and showing all of Aughmoore that their heavenly blood is not to be boiled.
If you win with the Dwarves, read aloud:
Repelling their foes with sheer might, the Dwarves rid Aughmoore of all but a few of the enemy races. But with the others gone, the Dwarves become deeply aware of their small numbers and the great loneliness of before returns. Now they build a great tower reaching back toward the creator they rejected, but Oghtaa does not easily forgive.
Elves
Aughmoore had existed for some time before catching the eye of the universe’s greater forces. It was the fair Norellia, an entity of pure energy, who first examined this world. As she approached, she discovered a mighty echo ringing from the forests. She curiously ventured deeper and deeper into the dark woods until the sound was almost deafening. In a clearing, bathed in a pool of dancing rays that penetrated the high canopy, stood two impressive stags. One was made of incandescent light, the other of shadowy darkness, their antlers locked in an endless competition.
Norellia wept at the sight of the beautiful forces, doomed to destroy each other over the course of eternity. In a moment of compassion, she sacrificed a fraction of her own power to fuse them. As the creatures became one, their figures turned upright and their antlers narrowed to the familiar pointed ears of the mystical Elves.
Born of both light and darkness, the Elves are creatures of disciplined study and wild frivolity. A piece of Norellia remains in them, and their spirits are now intertwined with the fluid resonance of Aughmoore’s mystical forces. Even apprentice sorcerers are capable of incanting advanced spells with little exertion, and strange phenomena are often thought to be amplifications of the wicked tongues of Elves hidden away in wispy towers.
Still preserved in the Elven spirit is the instinct to hunt, to stalk, to move through the night as but an obscure shade and pounce upon unwitting prey. Many great beasts have been tracked and slaughtered to sustain the encampments that weave through the treetops, but these abilities are equally fitted for war.
As the younger races turned to the forests for sap and lumber to construct their superfluous edifices, the Elves trained to protect their birthplace. In their studies, they discovered a great and terrible power, the ability to persuade the flow of Mana from their enemies to their own forces. Through subtlety, might, and elite magical prowess, the Elves have shown that those who threaten their thicketed homelands place themselves in imminent danger.
If you win with the Elves, read aloud:
A burst of searing light from the rarest and most powerful Elven spell has brought victory for the superior race. Now the High Elven Order must convene to decide how to rebuild Aughmoore. Some Elders believe their Mana should be used to restore the old ways of cooperation among the races but others wish to seek out their creator, Norellia, and wage celestial war against her nemesis, Oghtaa. The debate may last generations.
Credits
- Game Design: Scott Almes
- Illustration: Adam P. McIver, Ian Rosenthaler
- Product and Game Development: Michael Coe
- Graphic and Construct Design: Benjamin Shulman
- Miniatures Design: Chad Hoverter
- Lore Writing: Jacob M. Burton, Dylan D. Phillips, Michael Coe
- Editing: Richard A. Edwards, Dylan D. Phillips
- Playtesters: Nathan Hatfield, Beth Almes, Dan Lamoureaux, Hannah Hiller, Alyssa & Joe Lombardo, Ray & Jess Kovacs, Charlie Bink, Jason Washburn, Roger Hicks, Randal Lloyd, Andrew Spindler, Ian Stedman
- Special Thanks: The Almes Family, Brittany Coe, Richard Ham, Elizabeth Kimbell, Jonathan Cox, Roy Cannaday, Donald Dennis, Wesley Tomlin, Marty Connell, Jeremy Salinas, Jonathan H. Liu, Dan Yarrington, Jeremiah Isley, Adam Clark
Glossary
Glossary of Terms
- Action Bar: Row of 9 Action Slots along the top of the C.C. Board. Players place Action Tokens on these slots to perform these Actions OR place Serfs to Follow or Muster an Action:
- Capital Actions: 4 Action Slots (Recruit, Build, Research, and Tax) selected by a player on their turn and can be Followed by other players using a Serf from their Courtyard.
- Command Actions: 5 Action Slots (March, March, Sail, Fly, and Cast) selected by a player on their turn, who may also choose to Muster to take a second Command Action, marking it with a Serf from their Courtyard.
- Army: 1-5 Units from one Faction sharing a Region. An army can March only as many Regions as allowed by its Unit with the lowest Speed. Regions have a limit of 5 Units per Faction, except when an army is moving through a Region. Note: Vessels may NOT move with an army as part of a March Action.
- Battle: When one Faction’s army enters a Region occupied by an enemy’s army, a Battle will occur. Total each army’s Strength, cast any Combat Spells, and then each player reveals 1 Tactic Card. Each player MUST pay the listed cost on the Tactic Card in Resources or by Sacrificing Units from their army. After the final Strength is totalled, the army with the most Strength is the winner (in a tie, the defending army wins). The losing army must leave that Region and will take Damage.
- Courtyard: Area on C.C. Board where unused Action Tokens and Units inside the Capital Region may be placed. Units in the Courtyard are considered to be in that Faction’s C.C. Region and vice versa.
- Damage: After losing a Battle, the losing player must assign Damage equal to half their army’s Natural Strength (not including Sacrificed Units) to Units in that army (rounded up). Each Unit may be assigned Damage up to its individual Natural Strength, and if a Unit is assigned even 1 Damage, it is destroyed and returned to the player’s supply. Any surviving Units from the losing army are returned to the Courtyard or a Region with a friendly Tower.
- Ferry Route: Dotted lines on the map which connect Land Regions on different Continents and also act as the borders separating adjacent Sea Regions. Land Regions connected by a Ferry Route are considered adjacent so Units may move from one Land Region to another along a Ferry Route without a Vessel. Some Ferry Routes connect to Graticules, and Units may move along those Ferry Routes to Land Regions on the opposite side of the board which are connected to Ferry Routes with a matching Graticule.
- Graticule: Letters or numbers along the outside edge of the map that mark where a Ferry Route “wraps around” and continues. Land Regions attached to Ferry Routes with matching Graticules are considered adjacent. Sea Regions on opposite sides of the board between two Ferry Routes with matching Graticules are also considered adjacent.
- Hero: Each Faction has three Hero Units in the supply which may be recruited during a Recruit Action by paying the required Resources as listed in the banner next to the Hero Unit at the bottom of the C.C. Board. A Hero can only be recruited if the required Building has been built. Each Hero’s Strength and Speed are noted on the C.C. Board and has a corresponding card which lists three abilities marked I, II, and III. These abilities correspond to the Faction’s current C.C. Level and the higher-level abilities can be unlocked by upgrading to a higher C.C. Level.
- Region Control: A Faction has control of a Region if they have at least one Unit or Structure in that Region. During the Collection Phase, Resource Regions a Faction controls produce. During Final Scoring, each player receives 1VP for each Region they Control, not including their Capital City Region.
- Resources: Three types: Ore (), Food (), Mana (). Players collect these from Regions they control and spend them to Recruit Units, Build Structures, Cast Spells, and pay for the cost of Tactic Cards in Battles.
- Resource Region: Land Regions which produce Resources during the Collection Phase. Mountains produce Ore, Plains produce Food, and Forests produce Mana. Other Regions produce nothing and are not considered Resource Regions.
- Scribe: During a Research Action, a player may choose a “CAST” Spell from their Spell Library to Scribe by placing it face-up in one of the three slots to the right side of the C.C. Board. A player may only have one Scribed Spell per Capital City Level, and once a Spell is Scribed, it may never be discarded. Scribed Spells can be Cast using a Cast Action and are not discarded but are rotated upside-down to indicate they are Exhausted. During the Round End, players will rotate all of their Preparing and Exhausted Spells 90° counter-clockwise.
- Shore: Border shared between a Land Region and an adjacent Sea Region. A Sea Vessel may dock on a Shore by placing it halfway on the Land Region and halfway on the Sea Region. Vessels docked on a Shore are considered in the Land Region.
- Speed (): Number of Regions a Unit may move using a March Action (or a Sail or Fly action in the case of Vessels). If an army of more than one Unit Marches together, it may only move as many Regions as allowed by its lowest-speed Unit. Units in a Vessel will move with the Vessel at the speed of the Vessel. A Unit’s Speed can be found beside the Unit’s image on the C.C. Board.
- Strength (): Both the attack value and the health amount that a Unit or Structure has during a Battle. This can be modified with bonus abilities. The Natural Strength of a Unit is the “unmodified” value listed on the Capital City Board.
- Units and Structures: Heroes, Warriors, Serfs, and Vessels are all considered Units. Towers and Capital City Constructs are considered Structures.
- Vessel: Two types: Air and Sea. Each Vessel requires a specific Building to be built before the Vessel can be Recruited or Built by paying the Resource cost listed in the banner beside the Vessel on the C.C. Board. Each Vessel can carry 2 Units; Vessels cannot carry other Vessels. Units in the same Region with a stationary Vessel may freely board it, moving into or out of that Vessel.
Expansions for
Heroes of Land, Air & Sea
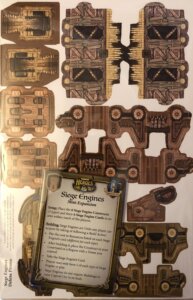
Heroes of Land, Air & Sea: Siege Engines Mini-Expansion
2018
Add six siege engines and their cards to your Heroes of Land, Air & Sea collection.
180
minutes
Medium Heavy
View expansion
Heroes of Land, Air & Sea: Mercenaries Expansion Pack #3
2018
Four distinctive mercenary miniatures and their cards for expanded adventures
180
minutes
Medium Heavy
View expansion
Heroes of Land, Air & Sea: Nomads Mini-Expansion
2018
Add troll nomads, a mercenary card, and six spells to your collection.
180
minutes
Medium Heavy
View expansion
Heroes of Land, Air & Sea: Mercenaries Expansion Pack #2
2018
Add two distinctive mercenaries to your Heroes of Land, Air & Sea collection.
180
minutes
Medium Heavy
View expansion
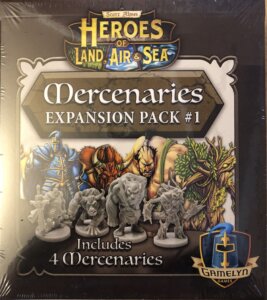
Heroes of Land, Air & Sea: Mercenaries Expansion Pack #1
2018
Four mercenary miniatures and cards from the 2017 Kickstarter campaign
180
minutes
Medium Heavy
View expansion
Heroes of Land, Air & Sea: Pestilence
2019
Expand the world with new factions, continents, spells, and support for seven players.
180
minutes
Medium Heavy
View expansion
Heroes of Land, Air & Sea: Order and Chaos
2018
Expand the battle with two more players and four new factions.
180
minutes
Medium Heavy
View expansion
