
Maximum Apocalypse
2018
Work together as unique survivors to explore a changing wasteland, battle monsters, gather resources, and escape before starvation or defeat.
90
minutes
1 - 6
player(s)
13+
Medium

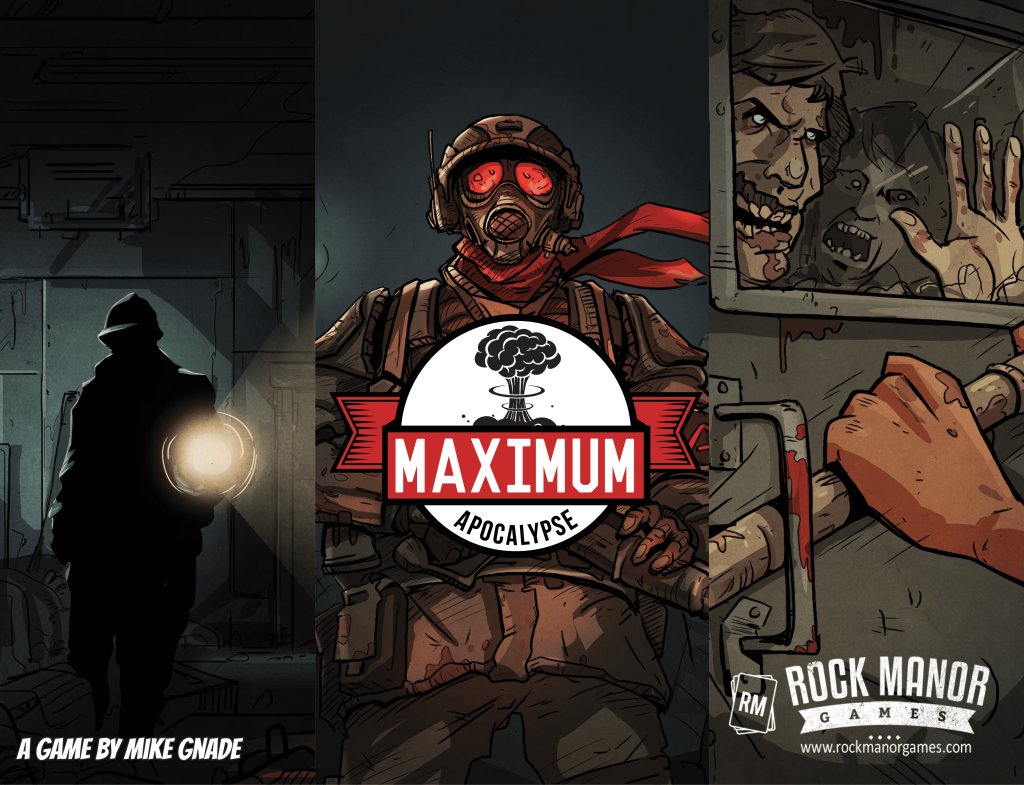
About this board game
Maximum Apocalypse is a cooperative roguelike adventure game for 1–6 players, with sessions lasting around 90 minutes. Civilization has already fallen, and each player takes the role of a survivor trying to endure a hostile, ever-changing landscape.
Every game features a randomly generated map, so exploration unfolds differently each time you play. On a turn, a player can use up to four actions to move through the map, play cards, equip weapons, scavenge for resources, draw cards, or battle the monsters threatening the group.
Each survivor class brings distinct strengths to the team, making cooperation and planning essential. The Fireman is deadly at close range with his ax, while the stealthy Hunter excels at scouting the map and avoiding traps.
- Cooperative play for 1–6 players
- Randomly generated maps for changing scenarios
- Unique survivor classes with different strengths
- Exploration, scavenging, card play, equipment, and monster battles
- Starvation and roaming monsters create constant pressure
As roaming monsters gather, the survivors must balance exploration with the need to find food and other resources. If the group is overwhelmed by monsters or a survivor dies of starvation, everyone loses.
To win, the survivors must find enough gas and bring it back to their van so they can escape together. With its shifting map, distinct survivor roles, and urgent shared objective, Maximum Apocalypse challenges players to adapt their strategy and rely on one another to live through each scenario.
Mechanics
Designer
Illustrator
/pic7182955.jpg)

Board Game Rules for
Maximum Apocalypse
Introduction
Maximum Apocalypse is a cooperative game where each player plays as a post-apocalypse survivor with actions and gear in the form of cards. Players explore the landscape and react to threats from roaming monsters while trying to fend off starvation and scavenge for the resources needed to complete their mission and escape. Ultimately, Players will work together and successfully complete their objective and escape or perish in the wasteland of the apocalypse.
IMPORTANT NOTE:
If the text of a card directly conflicts with the rules in this book, the card text takes precedence.
Objective
Each mission provides a different scenario and objective for the survivors. Most missions require you to complete the objective and return to the Van with an adequate amount of fuel to escape the area with your lives.
Contents
- 1 Scavenge Board
- 7 Character Cards
- 6 Standees
- 6 Plastic Stands
- 180 Survivor Cards
- 100 Monster Cards
- 8 Boss Cards
- 13 Mission Cards
- 80 Scavenge Cards
- 6 Reference Cards
- 38 Map Tiles
- 12 Card Dividers
- 2 Main Dice (16mm)
- 6 Hunger Dice (12mm)
- 30 Ammo Tokens
- 12 Fuel Tokens
 30 Monster Tokens
 57 Hit Point Tokens
 20 Poison Tokens
 3 Objective Tokens
Game Setup Steps
- Each player selects a survivor, putting that Survivor’s character card, standee and deck into their play area.
- Players may select the mission they would like to play or pick one randomly. Be sure to read the mission for additional setup instructions.
- Take the monster cards that relate to your apocalypse and shuffle them together to form the Monster deck.
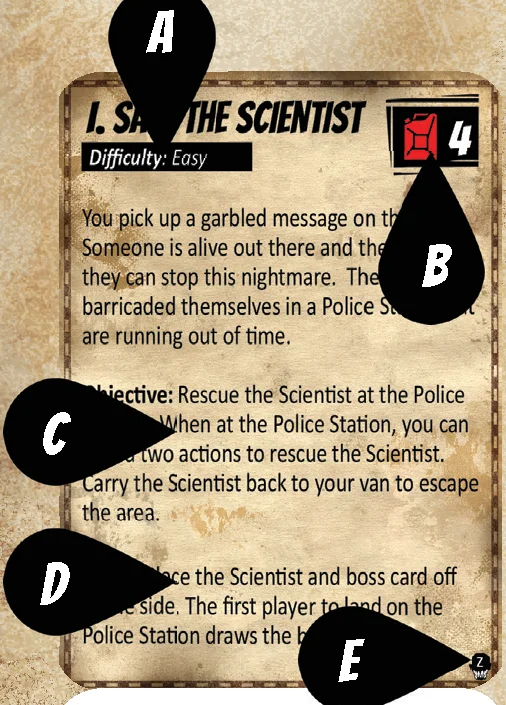
Mission Cards
- A. Title and Difficulty
- B. Fuel Requirement: If a mission has this fuel icon, you must collect the specified fuel to complete your objective. Unless otherwise specified, this symbol indicates that you must return to the Van with the specified fuel to win.
- C. Mission Objective and additional setup instructions.
- D. Boss Setup: Randomly select a boss from the monster set. Boss cards are treated like any other monster card but occasionally are kept out of the deck and triggered at certain moments in the mission as described here.
- E. Intended Monster Set.
- F. Map Tiles to use for this mission.
- G. Scavenge Deck composition.
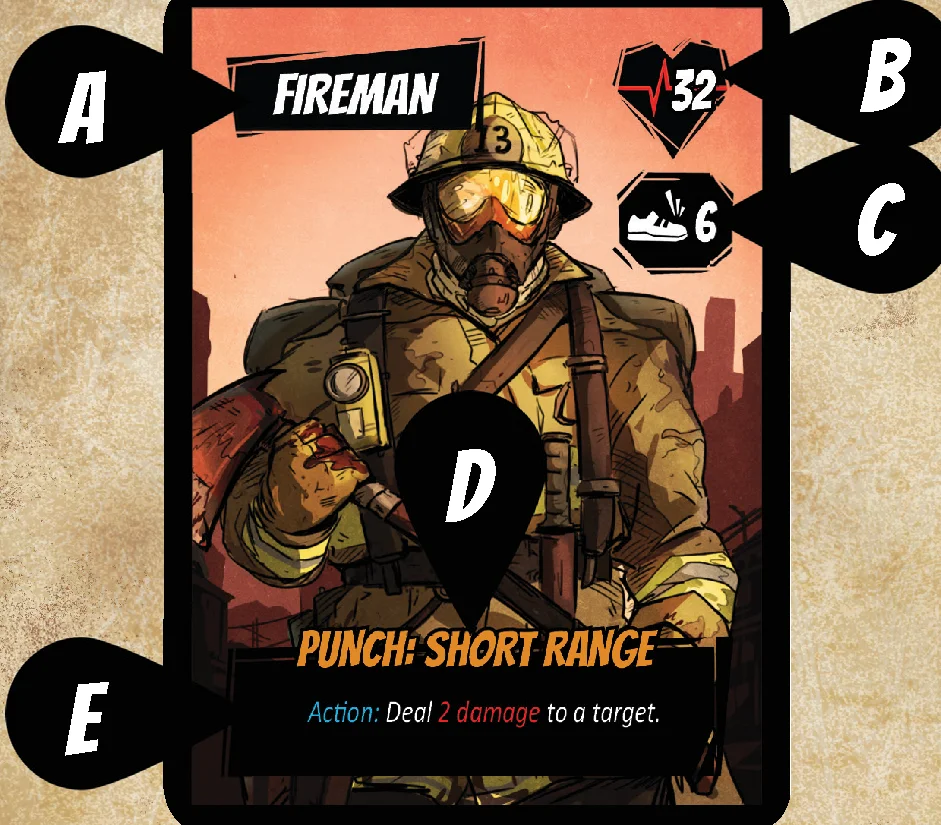
Character Cards
- A. Character Name
- B. Starting Health
- C. Stealth Stat
- D. Name of Action : Range
- E. Innate Action
- Build the three different Scavenge decks (Blue, Green, Red) based on the mission instructions. Shuffle these decks.
- Build the Map: Set aside the starting map tile (“the Van”) and make a deck of the map tiles included in the mission. Shuffle the tiles and then take turns around the table placing these tiles face down to create a grid that will represent the board. You can make a simple grid or build your own unique map. After the final map tile is placed, drive the “Van” tile to connect anywhere on the outer edges of the board. All players start at this location (unless otherwise specified in the mission).
- Draw Starting Hand: After the map is built, each player should draw 4 cards from their Survivor deck to make up their starting hand. There is a 10 card hand limit.
Each player may take a single mulligan at this time, if desired, by setting aside up to 4 of the cards just drawn, drawing an equivalent number of cards, and shuffling the set-aside cards back into his or her deck. - Set Hunger: Each player should also take one of the included hunger dice and place this die on their character card. Set each die to 1 to indicate the starting hunger level for each player.
- Draw Starting Monster: Each player should draw a monster card and place it in front of their character (your van is noisy).
Monster cards stay in front of you (even if you move) until they are destroyed or drawn away via another card like the Fireman’s Flare.
Players can attack monster cards in front of other players as long as they are in range. - Determine Turn Order: After assessing the situation, pick a player to go first and then proceed clockwise.
To keep track of damage, ammo, etc, use the included tokens. Alternatively, you can use dice, pen and paper, or any other tracking method you might prefer.
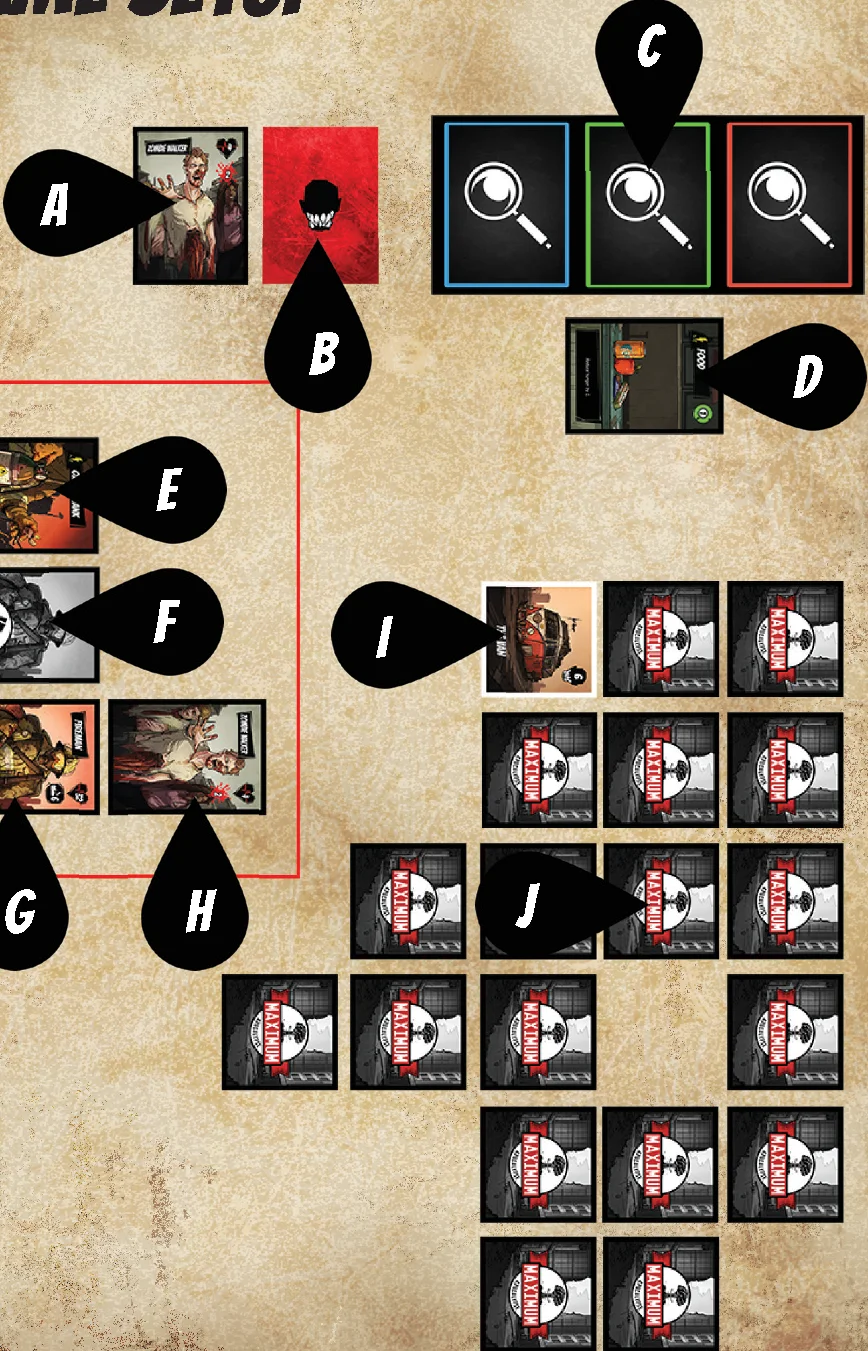
Game Setup Diagram Reference
- A. Monster Discard
- B. Monster Deck: Shuffle and place the monster deck within the reach of all players. If the monster deck is empty, reshuffle it.
- C. Scavenge Decks: Shuffle and place the scavenge decks within the reach of all players. If the scavenge decks are empty, do not reshuffle them.
Player Area:
- D. Scavenge Discard Pile
- E. Survivor Discard Pile
- F. Survivor Deck
- G. Character Card
- H. Starting Monster
Board:
- I. Starting Location
- J. Map: Place all players on the Van to start unless stated otherwise in the mission setup.
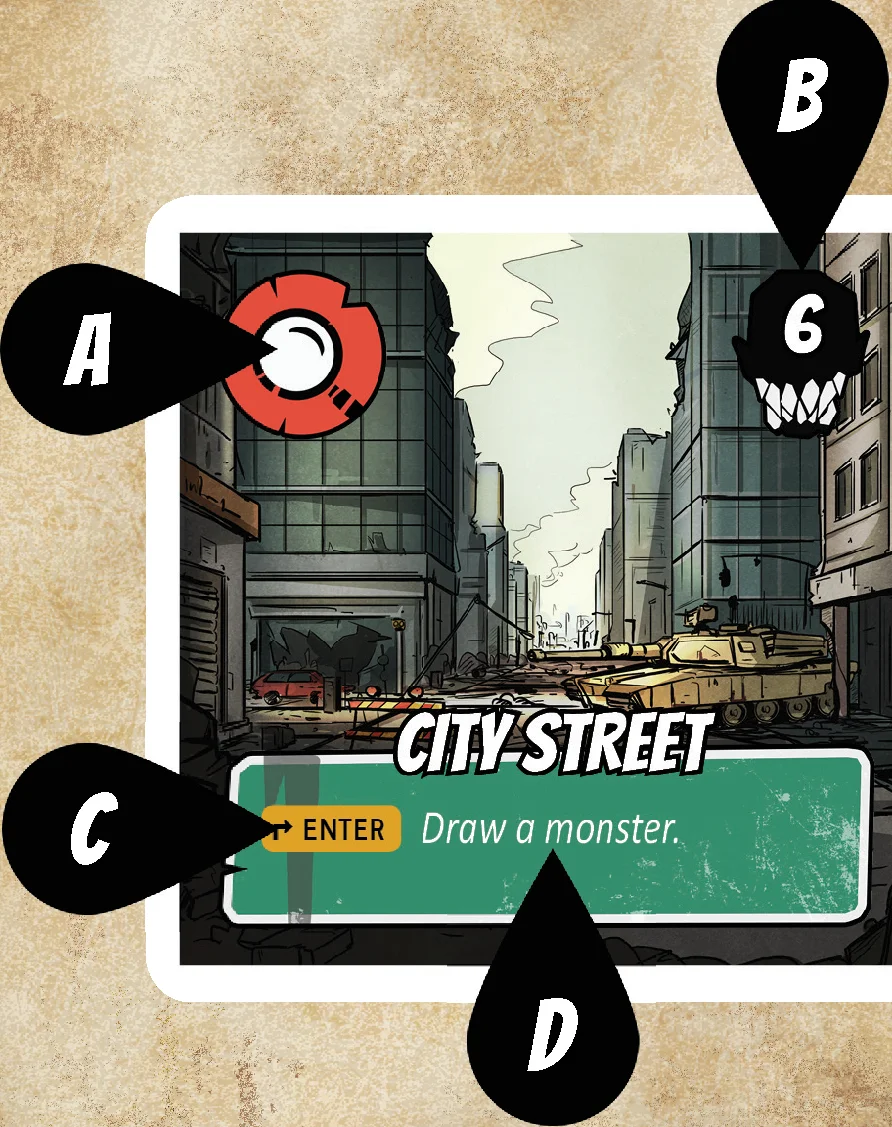
Map Tiles
- A. Scavenge Icon: This icon indicates which Scavenge decks (Red, Blue, Green) you can draw from when performing the Scavenge Action on this tile.
Important: If there is no symbol in the upper left, you cannot scavenge on the tile. - B. Monster Spawn: When this number is rolled, monsters appear on this tile (see turn sequence for more information).
- C. Trigger: This is the condition which triggers the tile effect. In this example, you would trigger the event every time that you enter this tile.
- D. Tile Effect: Nearly every location has some kind of effect. Some effects trigger when the tile is revealed, others are triggered when a player lands on the space.
Movement
Players can move to any adjacent map tile but cannot move diagonally. Attempting to move onto a tile costs 1 action. When you try to move onto a tile, reveal it and follow the text, if applicable.
For example, you reveal and enter a Bandit Camp tile, triggering its effect. You must decide whether to take damage or discard an equipped gear card.
If you enter a tile with monster tokens and do not have any monsters in front of you, you must pass a stealth test to sneak by them. If you want to purposely draw monsters to your character, you can skip this test and remove the token(s) and draw a monster card for each token on the space.
Stealth Test
Roll the two main dice. If your combined roll is less than or equal to your survivor’s stealth stat, then you are successful. Each monster token on the tile reduces your Stealth by 1.
If your roll is higher than your stealth, remove all the monster tokens on the tile and draw a monster card for each token removed.
If the monster deck ever runs out, reshuffle the discard pile and form a new deck.
Turn Reference
- Spawn Monsters
- Draw a Card
- Take 4 Actions:
- Move 1 Space
- Draw a Card
- Play a Card
- Take a Card Action
- Scavenge
Free Actions (once per turn):
- Discard two cards to draw a card
- Trade scavenge cards with another player
- Fuel up the Van
- Increase Hunger
- Take Damage; End Turn
Detailed Turn Sequence
- Spawn Monsters: Roll the two main dice. Place a monster token on any face up map tile where the Monster Spawn number matches the combined roll. The maximum is 3 monster tokens per tile; do not place any new tokens on tiles that already have 3 tokens. If a player is currently occupying a tile, that player must draw a monster card and place it in front of them instead of placing a monster token. Note that all players occupying a matching tile must draw a monster.
- Draw a Card from your Survivor Deck: If your deck is empty and you cannot draw a card, you are eliminated.
- Take Actions: Take 4 actions listed below, in any combination. You may take the same action more than once. You must take 4 actions:
- Move 1 space orthogonally
- Draw a card from your Survivor deck
- Play a card from your hand
- Perform an action from a card in play
- Scavenge: Draw a Scavenge card based on your current location (if able)
Free Actions:
- Once per turn as a free action, you may discard two of your Survivor cards to draw a new card from your Survivor Deck.
- Once per turn as a free action, you can trade scavenge cards with another player on the same space.
- You may play cards on an objective as a free action. For example, you may fuel up the van and store any fuel you are carrying.
- Increase your Hunger: Increase your hunger by 1 by rotating your hunger die to the appropriate side. If you’re already starving, increase your hunger damage level.
If your hunger level reaches 6, flip your character card over and take hunger damage. Hunger damage is irreducible and unavoidable. On subsequent turns, you will take more and more damage if you don’t eat. - End Turn: At the end of your turn, all of the monsters in front of you attack and deal damage, then play proceeds clockwise.
Starvation
When your hunger level reaches 6, you start suffering hunger damage. Flip over your character card and place the die at the top of the hunger track. You lose access to your innate ability when starving. Every turn that you would increase your hunger, instead progress it down this hunger track and suffer the corresponding damage. As soon as you eat something or reduce your hunger level below 6, flip your character card back over. If you starve again, flip your card once more and place the die at the top of the tracker.
Example Turn
I am playing as the Gunslinger and have a Zombie Walker in front of me and my starting gun equipped. My hunger is currently at 4, but I still have 4 ammo for my gun. My character is on a Gas Station (8) with the Fireman. I roll the dice to spawn monsters and roll a 6. I place a monster token on the revealed Police Station (6) and another token on the van. I draw a card and then proceed to take my 4 actions:
- 1st Action: I use my gun’s action and spend 1 ammo to deal 2 damage to the Zombie Walker. It has 2 health remaining.
- 2nd Action: I scavenge at the Gas Station and draw a card from the red deck; it is a fuel. I have to immediately equip the fuel as a free action or discard it based on the card’s text. I decide to equip it and have 2 storage slots remaining.
- Free Action: I take a food card from the Fireman since we are on the same space.
- 3rd Action: I move to an adjacent tile and reveal the tile. It is a City Street. Since the City Street has an Enter: Draw a Monster effect, I draw a monster card and get a Zombie Spitter.
- 4th Action: I spend another ammo to shoot the walker again. It is killed and placed in the monster discard pile.
I increase my hunger to 5. Then the Zombie Spitter in front of me attacks, dealing me 2 damage. The fireman on the adjacent space also takes 2 damage from the Spitter since the Spitter attacks everyone in midrange. My turn ends.
Playing Cards
There are two types of cards that you can play on your turn: Instant Actions and Gear. Both Scavenge cards and Survivor cards fall into either of these categories. Playing a card from your hand costs an action. Instant cards are played as an action; follow the card text and discard it.
Reloading weapons, eating food and healing players all cost an action. After playing a scavenge card, place it in the scavenge discard pile NOT your personal discard pile.
REMEMBER:
As a free action, you can give/take/trade scavenge cards with other players as long as you are on the same space. You cannot trade your survivor cards.
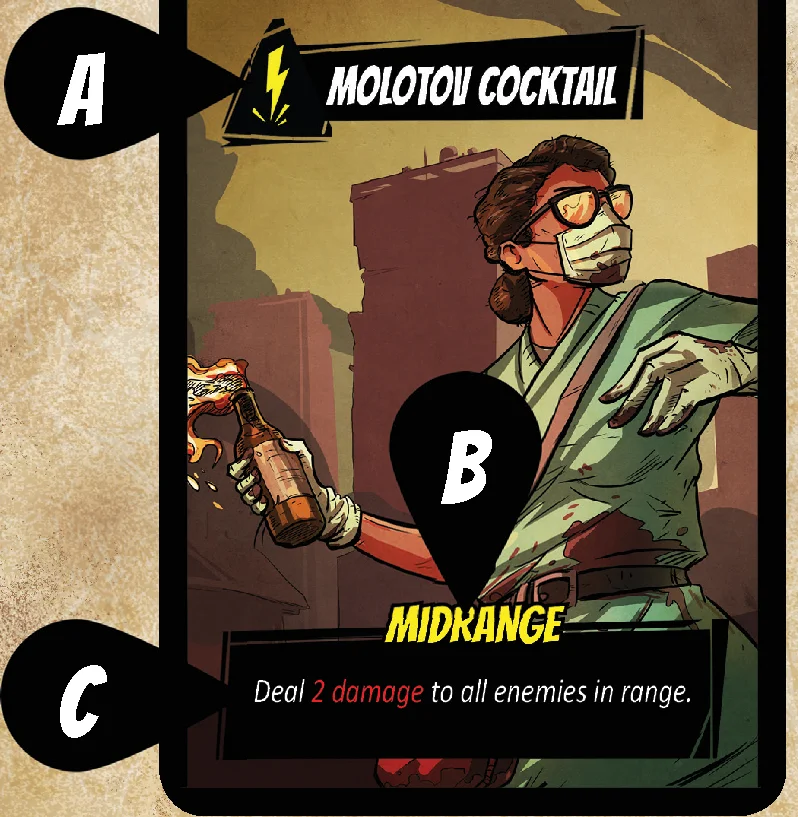
Instant Actions
- A. Instant symbol and Card Name
- B. Range (if applicable)
- C. Card Effect
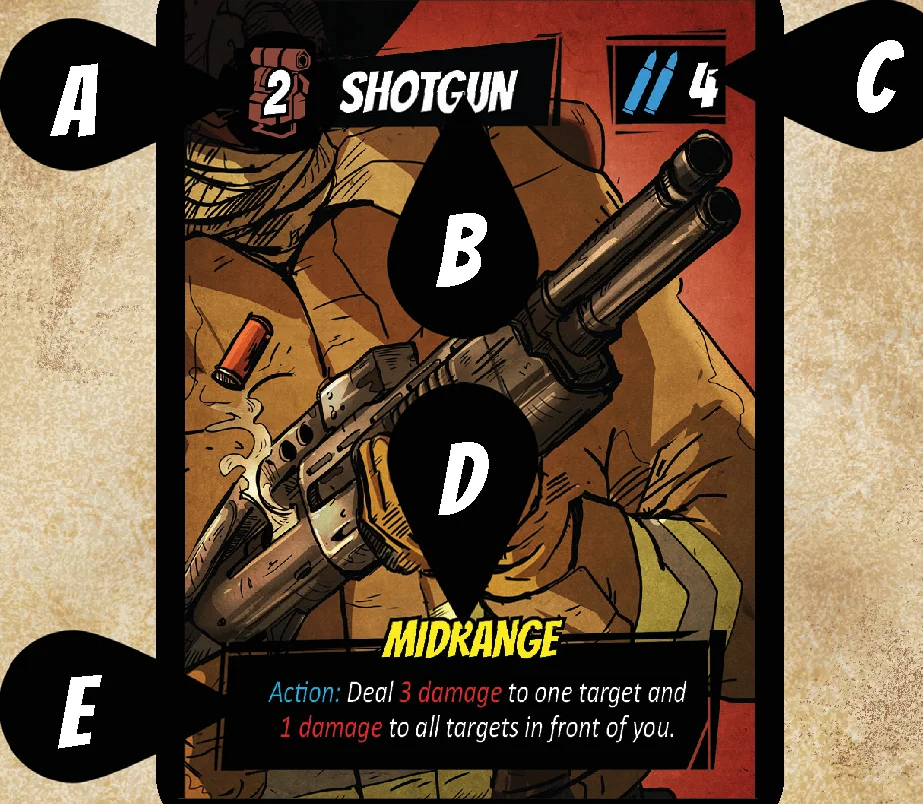
Gear Cards
- A. Gear symbol and Storage Cost
- B. Card Name
- C. Starting Ammo for card (if applicable)
 indicates that a card can only be reloaded by discarding a fuel rather than an ammo card
 - D. Range of Action
- E. Card Action or Effect
Gear cards are placed in front of your character and stay in play until they are destroyed. Gear typically gives a player access to a new action or passive ability. You can only have one copy of a Gear card equipped at a time (i.e. you can’t wear two Ranger Hats); Fuel is an exception. If the Gear has starting ammo, place that many ammo tokens on the card when it is equipped. Each time you use that card’s action, remove an ammo. If you run out of tokens, the action on the card is no longer available to you. Each piece of Gear has a storage cost and each character starts with a storage limit of 4. You cannot have Gear cards equipped that have a combined storage cost greater than your available limit. If your total Gear exceeds your storage limit, you must discard Gear cards of your choice until you are no longer exceeding your storage limit.
Range
 Short Range: These cards can target and affect the space that your character currently occupies.
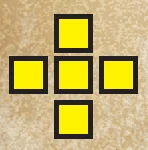 Midrange: These cards can target and affect the space that you occupy and adjacent orthogonal spaces.
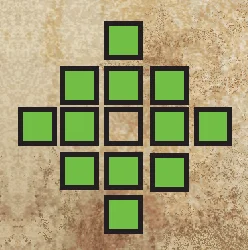 Long Range: Target 1-2 adjacent orthogonal spaces away from you but CANNOT target the space that you currently occupy.
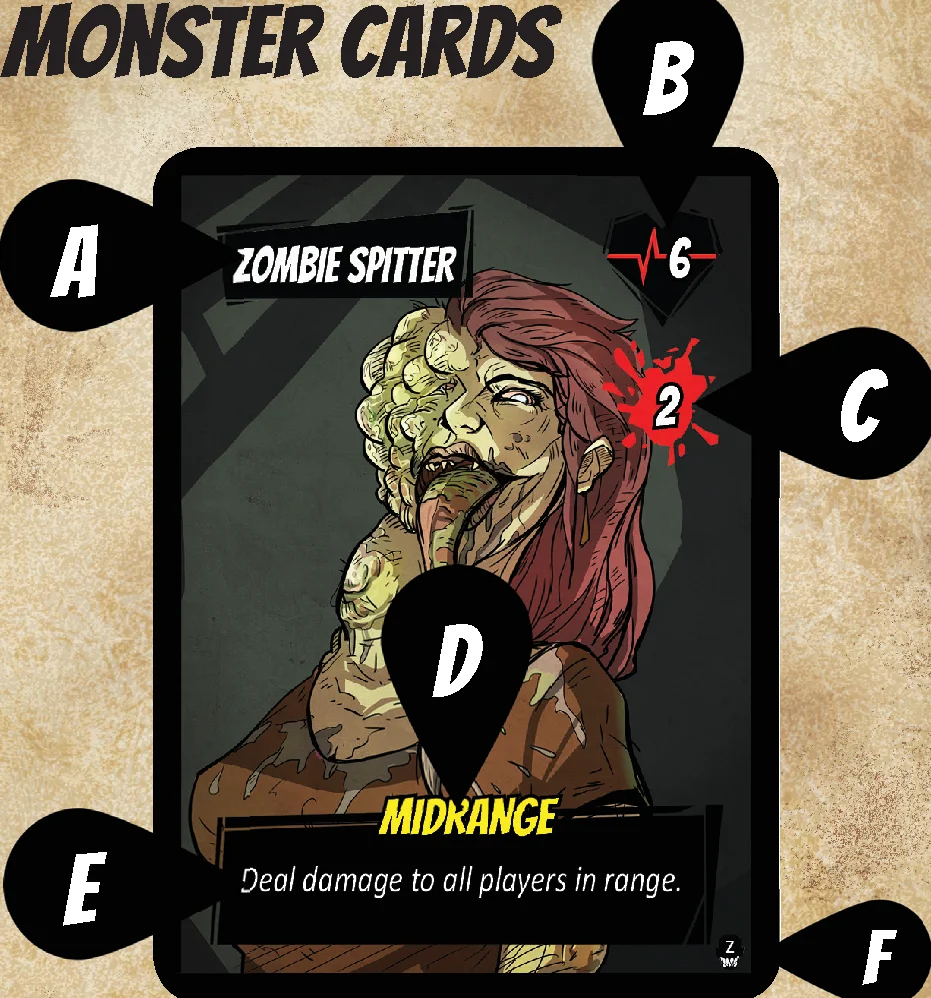
Monster Cards
- A. Monster Name
- B. Starting Health
- C. Attack Damage
- D. Range (Damages all players in range if listed)
- E. Effect
- F. Monster Set (Z: Zombie)
Winning the Game
Once you have completed your mission and collected the necessary fuel (as a team), and all players have returned to the van, your game is over and you win!
REMEMBER:
The win condition is triggered at the end of the final player’s turn (they still suffer damage as the final phase of their turn).
Player Elimination & Losing
If a survivor runs out of health or runs out of cards from their survivor deck, they die. All monsters in front of that character are discarded and replaced with monster tokens. Any scavenge cards that character may have been carrying are considered at the location that they died (you can place these cards on the tile to be picked up by other players).
If all players die or if you go to place a monster token and have run out of tokens, your team loses.
To make the game more difficult you can also play that when any player dies, the game is over.
Veteran + Dog Notes
When playing as the Veteran and the Dog, you can select which enemy is attacking which character but must evenly distribute enemies between the characters. For example, if you have two enemies in front of you – one will damage the veteran and the other the dog, but you can choose which one. If an enemy hits all players in range, it hits both the Veteran and the Dog.
The veteran has a storage limit of 4, and the dog has a limit of 0. If both characters are alive, use the lower stealth statistic. If one character dies, you can continue playing until the other character is eliminated.
Solitaire / Multi Class Variant
If you’re playing the game solo, we suggest that you select two different characters to play. Shuffle these two decks together and then draw 8 cards to start. Your max hand size is 20. You can play any card from your hand on either character. Otherwise, you should continue to play the game normally switching between each character’s turn and actions. This is a much easier and faster way to play as multiple characters.
Difficulty Variants
If you’re finding Maximum Apocalypse to lack challenge after a few plays, there are several things you can do to make the game more difficult:
- Add more ambush or empty handed cards to the scavenge decks
- Remove the 3 monster token cap on map tiles
- Have Players roll to set their starting hunger level
- Add more tiles to the map
Maximum Variant
If you’re up to the challenge, feel free to combine and mash-up monster decks and/or include extra tiles in your games. It makes things less predictable and more difficult. Can you survive the zombie apocalypse after a Nuke went off and aliens invaded?
Glossary
- Action: Take an action to trigger the text on this card.
- Attack: Trigger this effect every time the monster attacks.
- Burn: Discard the top card of your deck.
- Destroy: Trigger this effect when the monster is killed.
- Discard: Discard this card to trigger the game text on this card. Discarding does not count as an action.
- End: Trigger this effect when you end your turn here.
- Enter: Trigger this effect when you enter the space.
- Equip: When you equip this card, trigger this effect.
- Reveal: Trigger this effect only when the map tile is first flipped.
- Passive: This is a passive effect that stays active as long as the card is in play.
- Poison: Place a poison counter on your character card. At the end of every turn, take poison damage equal to the number of poison counters on your character. This is a status effect.
- Stop: End your movement for this turn or trigger the effect.
- Stun: The target does not deal damage until the start of your next turn.
- Test: Perform a Stealth Test.
Credits
Game Design and Development: Mike Gnade
Original Artwork: Gustav Rangmar
Graphic Design: Gustav Rangmar and Mike Gnade
Playtesters and Special Thanks: Matthew Cangialosi, Rosalie Bryant Gnade, Nicole Kline, Anthony Amato, Chris O’Neil and the entire Game Makers Guild of Philadelphia and Tabletop Co-op folks.
Alpha Playtesters: Stavros Tsiakalos, Paul Richter, Hermes, Patrick Wilhelmi, Martin Koch, Dan “Bacadiar” FitzSimons, Table for Two Show, R. Zachary Gebelein, M. Triemstra, Andrew Pavlis, Daniel P. Stevens, Joshua Burt, Julien Bertrand, James Stewart-Jones, Rae & Chris Yocum, Rob Gaulden, Sontana Intraweat, Sarah Walther, John J. Fitek, Bongo Machongo, Kevin Lee, Jason Hendricks, David Tipton Jr, Psychic Kitty, Zac “Rufus” Fleury, Rick F. Kwan, Tseebaka, Chester C., Hamoud A. Alkhaldi, Zak Richardson, Ziliang Wang, Benjamin Guinane, Leon “Tyrael” Jesmanowicz, Casey Bertels, the Mabie Family, Colton Kenney, Brandon Lindquist, Sanjana Ram and Philipp Luijckx, Raymond Taylor, Michelle Fursa, and Zane Hill
© 2017 Rock Manor Games. All rights reserved.
Survivor Card Back Icons made by Lorc, Available on http://game-icons.net.
Introduction & Components
Introduction
Maximum Apocalypse is a cooperative game where each player plays as a post-apocalypse survivor with actions and gear in the form of cards. Players explore the landscape and react to threats from roaming monsters while trying to fend off starvation and scavenge for the resources needed to complete their mission and escape. Ultimately, Players will work together and successfully complete their objective and escape or perish in the wasteland of the apocalypse.
IMPORTANT NOTE:
If the text of a card directly conflicts with the rules in this book, the card text takes precedence.
Objective
Each mission provides a different scenario and objective for the survivors. Most missions require you to complete the objective and return to the Van with an adequate amount of fuel to escape the area with your lives.
Contents
- 1 Scavenge Board
- 7 Character Cards
- 6 Standees
- 6 Plastic Stands
- 180 Survivor Cards
- 100 Monster Cards
- 8 Boss Cards
- 13 Mission Cards
- 80 Scavenge Cards
- 6 Reference Cards
- 38 Map Tiles
- 12 Card Dividers
- 2 Main Dice (16mm)
- 6 Hunger Dice (12mm)
- 30 Ammo Tokens
- 12 Fuel Tokens
- 30 Monster Tokens
- 57 Hit Point Tokens
- 20 Poison Tokens
- 3 Objective Tokens
Setup
Game Setup Steps
- Each player selects a survivor, putting that Survivor’s character card, standee and deck into their play area.
- Players may select the mission they would like to play or pick one randomly. Be sure to read the mission for additional setup instructions.
- Take the monster cards that relate to your apocalypse and shuffle them together to form the Monster deck.
Mission Cards
- A. Title and Difficulty
- B. Fuel Requirement: If a mission has this fuel icon, you must collect the specified fuel to complete your objective. Unless otherwise specified, this symbol indicates that you must return to the Van with the specified fuel to win.
- C. Mission Objective and additional setup instructions.
- D. Boss Setup: Randomly select a boss from the monster set. Boss cards are treated like any other monster card but occasionally are kept out of the deck and triggered at certain moments in the mission as described here.
- E. Intended Monster Set.
- F. Map Tiles to use for this mission.
- G. Scavenge Deck composition.
Character Cards
- A. Character Name
- B. Starting Health
- C. Stealth Stat
- D. Name of Action : Range
- E. Innate Action
- Build the three different Scavenge decks (Blue, Green, Red) based on the mission instructions. Shuffle these decks.
- Build the Map: Set aside the starting map tile (“the Van”) and make a deck of the map tiles included in the mission. Shuffle the tiles and then take turns around the table placing these tiles face down to create a grid that will represent the board. You can make a simple grid or build your own unique map. After the final map tile is placed, drive the “Van” tile to connect anywhere on the outer edges of the board. All players start at this location (unless otherwise specified in the mission).
- Draw Starting Hand: After the map is built, each player should draw 4 cards from their Survivor deck to make up their starting hand. There is a 10 card hand limit.
Each player may take a single mulligan at this time, if desired, by setting aside up to 4 of the cards just drawn, drawing an equivalent number of cards, and shuffling the set-aside cards back into his or her deck. - Set Hunger: Each player should also take one of the included hunger dice and place this die on their character card. Set each die to 1 to indicate the starting hunger level for each player.
- Draw Starting Monster: Each player should draw a monster card and place it in front of their character (your van is noisy).
Monster cards stay in front of you (even if you move) until they are destroyed or drawn away via another card like the Fireman’s Flare.
Players can attack monster cards in front of other players as long as they are in range. - Determine Turn Order: After assessing the situation, pick a player to go first and then proceed clockwise.
To keep track of damage, ammo, etc, use the included tokens. Alternatively, you can use dice, pen and paper, or any other tracking method you might prefer.
Game Setup Diagram Reference
- A. Monster Discard
- B. Monster Deck: Shuffle and place the monster deck within the reach of all players. If the monster deck is empty, reshuffle it.
- C. Scavenge Decks: Shuffle and place the scavenge decks within the reach of all players. If the scavenge decks are empty, do not reshuffle them.
Player Area:
- D. Scavenge Discard Pile
- E. Survivor Discard Pile
- F. Survivor Deck
- G. Character Card
- H. Starting Monster
Board:
- I. Starting Location
- J. Map: Place all players on the Van to start unless stated otherwise in the mission setup.
Map Tiles & Movement
Map Tiles
- A. Scavenge Icon: This icon indicates which Scavenge decks (Red, Blue, Green) you can draw from when performing the Scavenge Action on this tile.
Important: If there is no symbol in the upper left, you cannot scavenge on the tile. - B. Monster Spawn: When this number is rolled, monsters appear on this tile (see turn sequence for more information).
- C. Trigger: This is the condition which triggers the tile effect. In this example, you would trigger the event every time that you enter this tile.
- D. Tile Effect: Nearly every location has some kind of effect. Some effects trigger when the tile is revealed, others are triggered when a player lands on the space.
Movement
Players can move to any adjacent map tile but cannot move diagonally. Attempting to move onto a tile costs 1 action. When you try to move onto a tile, reveal it and follow the text, if applicable.
For example, you reveal and enter a Bandit Camp tile, triggering its effect. You must decide whether to take damage or discard an equipped gear card.
If you enter a tile with monster tokens and do not have any monsters in front of you, you must pass a stealth test to sneak by them. If you want to purposely draw monsters to your character, you can skip this test and remove the token(s) and draw a monster card for each token on the space.
Stealth Test
Roll the two main dice. If your combined roll is less than or equal to your survivor’s stealth stat, then you are successful. Each monster token on the tile reduces your Stealth by 1.
If your roll is higher than your stealth, remove all the monster tokens on the tile and draw a monster card for each token removed.
If the monster deck ever runs out, reshuffle the discard pile and form a new deck.
Turn Sequence & Starvation
Turn Reference
- Spawn Monsters
- Draw a Card
- Take 4 Actions:
- Move 1 Space
- Draw a Card
- Play a Card
- Take a Card Action
- Scavenge
Free Actions (once per turn):
- Discard two cards to draw a card
- Trade scavenge cards with another player
- Fuel up the Van
- Increase Hunger
- Take Damage; End Turn
Detailed Turn Sequence
- Spawn Monsters: Roll the two main dice. Place a monster token on any face up map tile where the Monster Spawn number matches the combined roll. The maximum is 3 monster tokens per tile; do not place any new tokens on tiles that already have 3 tokens. If a player is currently occupying a tile, that player must draw a monster card and place it in front of them instead of placing a monster token. Note that all players occupying a matching tile must draw a monster.
- Draw a Card from your Survivor Deck: If your deck is empty and you cannot draw a card, you are eliminated.
- Take Actions: Take 4 actions listed below, in any combination. You may take the same action more than once. You must take 4 actions:
- Move 1 space orthogonally
- Draw a card from your Survivor deck
- Play a card from your hand
- Perform an action from a card in play
- Scavenge: Draw a Scavenge card based on your current location (if able)
Free Actions:
- Once per turn as a free action, you may discard two of your Survivor cards to draw a new card from your Survivor Deck.
- Once per turn as a free action, you can trade scavenge cards with another player on the same space.
- You may play cards on an objective as a free action. For example, you may fuel up the van and store any fuel you are carrying.
- Increase your Hunger: Increase your hunger by 1 by rotating your hunger die to the appropriate side. If you’re already starving, increase your hunger damage level.
If your hunger level reaches 6, flip your character card over and take hunger damage. Hunger damage is irreducible and unavoidable. On subsequent turns, you will take more and more damage if you don’t eat. - End Turn: At the end of your turn, all of the monsters in front of you attack and deal damage, then play proceeds clockwise.
Starvation
When your hunger level reaches 6, you start suffering hunger damage. Flip over your character card and place the die at the top of the hunger track. You lose access to your innate ability when starving. Every turn that you would increase your hunger, instead progress it down this hunger track and suffer the corresponding damage. As soon as you eat something or reduce your hunger level below 6, flip your character card back over. If you starve again, flip your card once more and place the die at the top of the tracker.
Example Turn
I am playing as the Gunslinger and have a Zombie Walker in front of me and my starting gun equipped. My hunger is currently at 4, but I still have 4 ammo for my gun. My character is on a Gas Station (8) with the Fireman. I roll the dice to spawn monsters and roll a 6. I place a monster token on the revealed Police Station (6) and another token on the van. I draw a card and then proceed to take my 4 actions:
- 1st Action: I use my gun’s action and spend 1 ammo to deal 2 damage to the Zombie Walker. It has 2 health remaining.
- 2nd Action: I scavenge at the Gas Station and draw a card from the red deck; it is a fuel. I have to immediately equip the fuel as a free action or discard it based on the card’s text. I decide to equip it and have 2 storage slots remaining.
- Free Action: I take a food card from the Fireman since we are on the same space.
- 3rd Action: I move to an adjacent tile and reveal the tile. It is a City Street. Since the City Street has an Enter: Draw a Monster effect, I draw a monster card and get a Zombie Spitter.
- 4th Action: I spend another ammo to shoot the walker again. It is killed and placed in the monster discard pile.
I increase my hunger to 5. Then the Zombie Spitter in front of me attacks, dealing me 2 damage. The fireman on the adjacent space also takes 2 damage from the Spitter since the Spitter attacks everyone in midrange. My turn ends.
Cards, Gear & Combat
Playing Cards
There are two types of cards that you can play on your turn: Instant Actions and Gear. Both Scavenge cards and Survivor cards fall into either of these categories. Playing a card from your hand costs an action. Instant cards are played as an action; follow the card text and discard it.
Reloading weapons, eating food and healing players all cost an action. After playing a scavenge card, place it in the scavenge discard pile NOT your personal discard pile.
REMEMBER:
As a free action, you can give/take/trade scavenge cards with other players as long as you are on the same space. You cannot trade your survivor cards.
Instant Actions
- A. Instant symbol and Card Name
- B. Range (if applicable)
- C. Card Effect
Gear Cards
- A. Gear symbol and Storage Cost
- B. Card Name
- C. Starting Ammo for card (if applicable) indicates that a card can only be reloaded by discarding a fuel rather than an ammo card
- D. Range of Action
- E. Card Action or Effect
Gear cards are placed in front of your character and stay in play until they are destroyed. Gear typically gives a player access to a new action or passive ability. You can only have one copy of a Gear card equipped at a time (i.e. you can’t wear two Ranger Hats); Fuel is an exception. If the Gear has starting ammo, place that many ammo tokens on the card when it is equipped. Each time you use that card’s action, remove an ammo. If you run out of tokens, the action on the card is no longer available to you. Each piece of Gear has a storage cost and each character starts with a storage limit of 4. You cannot have Gear cards equipped that have a combined storage cost greater than your available limit. If your total Gear exceeds your storage limit, you must discard Gear cards of your choice until you are no longer exceeding your storage limit.
Range
- Short Range: These cards can target and affect the space that your character currently occupies.
- Midrange: These cards can target and affect the space that you occupy and adjacent orthogonal spaces.
- Long Range: Target 1-2 adjacent orthogonal spaces away from you but CANNOT target the space that you currently occupy.
Monster Cards
- A. Monster Name
- B. Starting Health
- C. Attack Damage
- D. Range (Damages all players in range if listed)
- E. Effect
- F. Monster Set (Z: Zombie)
End of Game
Winning the Game
Once you have completed your mission and collected the necessary fuel (as a team), and all players have returned to the van, your game is over and you win!
REMEMBER:
The win condition is triggered at the end of the final player’s turn (they still suffer damage as the final phase of their turn).
Player Elimination & Losing
If a survivor runs out of health or runs out of cards from their survivor deck, they die. All monsters in front of that character are discarded and replaced with monster tokens. Any scavenge cards that character may have been carrying are considered at the location that they died (you can place these cards on the tile to be picked up by other players).
If all players die or if you go to place a monster token and have run out of tokens, your team loses.
To make the game more difficult you can also play that when any player dies, the game is over.
Character Specifics & Game Variants
Veteran + Dog Notes
When playing as the Veteran and the Dog, you can select which enemy is attacking which character but must evenly distribute enemies between the characters. For example, if you have two enemies in front of you – one will damage the veteran and the other the dog, but you can choose which one. If an enemy hits all players in range, it hits both the Veteran and the Dog.
The veteran has a storage limit of 4, and the dog has a limit of 0. If both characters are alive, use the lower stealth statistic. If one character dies, you can continue playing until the other character is eliminated.
Solitaire / Multi Class Variant
If you’re playing the game solo, we suggest that you select two different characters to play. Shuffle these two decks together and then draw 8 cards to start. Your max hand size is 20. You can play any card from your hand on either character. Otherwise, you should continue to play the game normally switching between each character’s turn and actions. This is a much easier and faster way to play as multiple characters.
Difficulty Variants
If you’re finding Maximum Apocalypse to lack challenge after a few plays, there are several things you can do to make the game more difficult:
- Add more ambush or empty handed cards to the scavenge decks
- Remove the 3 monster token cap on map tiles
- Have Players roll to set their starting hunger level
- Add more tiles to the map
Maximum Variant
If you’re up to the challenge, feel free to combine and mash-up monster decks and/or include extra tiles in your games. It makes things less predictable and more difficult. Can you survive the zombie apocalypse after a Nuke went off and aliens invaded?
Glossary & Credits
Glossary
- Action: Take an action to trigger the text on this card.
- Attack: Trigger this effect every time the monster attacks.
- Burn: Discard the top card of your deck.
- Destroy: Trigger this effect when the monster is killed.
- Discard: Discard this card to trigger the game text on this card. Discarding does not count as an action.
- End: Trigger this effect when you end your turn here.
- Enter: Trigger this effect when you enter the space.
- Equip: When you equip this card, trigger this effect.
- Reveal: Trigger this effect only when the map tile is first flipped.
- Passive: This is a passive effect that stays active as long as the card is in play.
- Poison: Place a poison counter on your character card. At the end of every turn, take poison damage equal to the number of poison counters on your character. This is a status effect.
- Stop: End your movement for this turn or trigger the effect.
- Stun: The target does not deal damage until the start of your next turn.
- Test: Perform a Stealth Test.
Credits
Game Design and Development: Mike Gnade
Original Artwork: Gustav Rangmar
Graphic Design: Gustav Rangmar and Mike Gnade
Playtesters and Special Thanks: Matthew Cangialosi, Rosalie Bryant Gnade, Nicole Kline, Anthony Amato, Chris O’Neil and the entire Game Makers Guild of Philadelphia and Tabletop Co-op folks.
Alpha Playtesters: Stavros Tsiakalos, Paul Richter, Hermes, Patrick Wilhelmi, Martin Koch, Dan “Bacadiar” FitzSimons, Table for Two Show, R. Zachary Gebelein, M. Triemstra, Andrew Pavlis, Daniel P. Stevens, Joshua Burt, Julien Bertrand, James Stewart-Jones, Rae & Chris Yocum, Rob Gaulden, Sontana Intraweat, Sarah Walther, John J. Fitek, Bongo Machongo, Kevin Lee, Jason Hendricks, David Tipton Jr, Psychic Kitty, Zac “Rufus” Fleury, Rick F. Kwan, Tseebaka, Chester C., Hamoud A. Alkhaldi, Zak Richardson, Ziliang Wang, Benjamin Guinane, Leon “Tyrael” Jesmanowicz, Casey Bertels, the Mabie Family, Colton Kenney, Brandon Lindquist, Sanjana Ram and Philipp Luijckx, Raymond Taylor, Michelle Fursa, and Zane Hill
© 2017 Rock Manor Games. All rights reserved.
Survivor Card Back Icons made by Lorc, Available on http://game-icons.net.
