
Nexus Ops
2005
Command alien forces, win battles, complete Secret Missions, and race to the victory-point target in a futuristic corporate war.
90
minutes
2 - 4
player(s)
12+
Medium


About this board game
Nexus Ops is a science-fiction war game for 2–4 players that plays in about 90 minutes. Players command competing futuristic corporations battling for control of the moon’s valuable Rubium Ore.
Every game uses a hexagonal board that is set up differently, creating a new battlefield for each conflict. Players deploy units representing various alien races and fight for control of the grid, with combat featuring stats and rules similar to those found in the Axis & Allies series.
Winning battles earns victory points, but combat is only one route to success. Players can also complete Secret Missions, adding private objectives to the struggle for the moon’s resources. The first player to reach the required number of victory points wins the game.
- 2–4 players and an approximately 90-minute play time
- A modular hexagonal board with a different setup each game
- Alien units with varied statistics and combat roles
- Secret Missions and victory points as alternate paths to victory
- Energize cards that provide special powers during later play
Players who lose battles receive Energize cards, which grant special powers that can help them recover. These cards can also be obtained by controlling the Monolith, a raised structure positioned in the center of the grid.
With its shifting battlefield, alien armies, corporate rivalry, and frequent combat, Nexus Ops puts the focus on direct conflict and tactical opportunities. The Avalon Hill edition is also known for its distinctive glow miniatures, bringing extra visual character to this futuristic battle for Rubium Ore.
/pic7182955.jpg)
Board Game Rules for
Nexus Ops
Introduction
It’s 2315. Human society depends on an exotic energy source called rubium for all of its advanced technology. A small group of explorers have recently discovered an alien moon that is exceptionally rich in rubium. In desperate need of more funding for their research, they simultaneously sold the “exclusive” mineral rights to four competing corporations: Ares Inc., Black Helix Industries, The Galactic Syndicate, and Zyborg Technologies.
By the time the corporations discovered the ruse, the explorers had moved on, leaving the corporations to contend with the liquifungus forests, the magma pools, and the indigenous alien life forms.
Far out on the galactic frontier, away from oversight or public scrutiny, these four corporations now do fierce, bloody battle for control of the moon’s rubium. By taming and unleashing the rock striders, lava leapers, fungoids, crystallines, and the plasma-breathing rubium dragons, the corporations hope to eliminate their competitors and seize control of the precious rubium deposits for themselves.
Once they have harvested all of the rubium and secured the mysterious alien monolith on the moon’s surface…well, who knows what sinister agenda lurks at the heart of their corporate greed?
Game Overview
In Nexus Ops, two to four players control factions of corporate troops and indigenous life forms on an alien moon. Players deploy troops from their home bases as they explore the moon, mine resources, purchase troops, win battles, and fulfill missions to win the game.
The Classic Game
This edition of Nexus Ops contains many new optional rules in addition to the classic game. This rulebook is written assuming players are playing the classic game.
For the optional rules, see pages 9–11.
Object of the Game
The object of the game is to earn 12 or more victory points by completing secret missions and winning battles.
Component List
- 164 Plastic Figures, consisting of:
- 12 Rubium Dragons (3 per faction)
- 16 Lava Leapers (4 per faction)
- 24 Rock Striders (6 per faction)
- 32 Crystallines (8 per faction)
- 32 Fungoids (8 per faction)
- 48 Humans (12 per faction)
- 17 Terrain Tiles:
- 7 Single-hex Tiles
- 6 Double-hex Tiles
- 4 Triple-hex Tiles (home base)
- 96 Cardboard Tokens, consisting of:
- 24 Exploration Tokens
- 71 Rubium Tokens
- 1 First Player Marker
- 4 Reference Sheets (1 per faction)
- 32 Energize Cards
- 76 Small Cards, consisting of:
- 36 Secret Mission Cards
- 40 Battle Victory/King of the Hill Cards
- 6 Six-sided Dice (3 white, 3 black)
- This Rulebook
Component Overview
This section describes the game’s components.
Plastic Figures
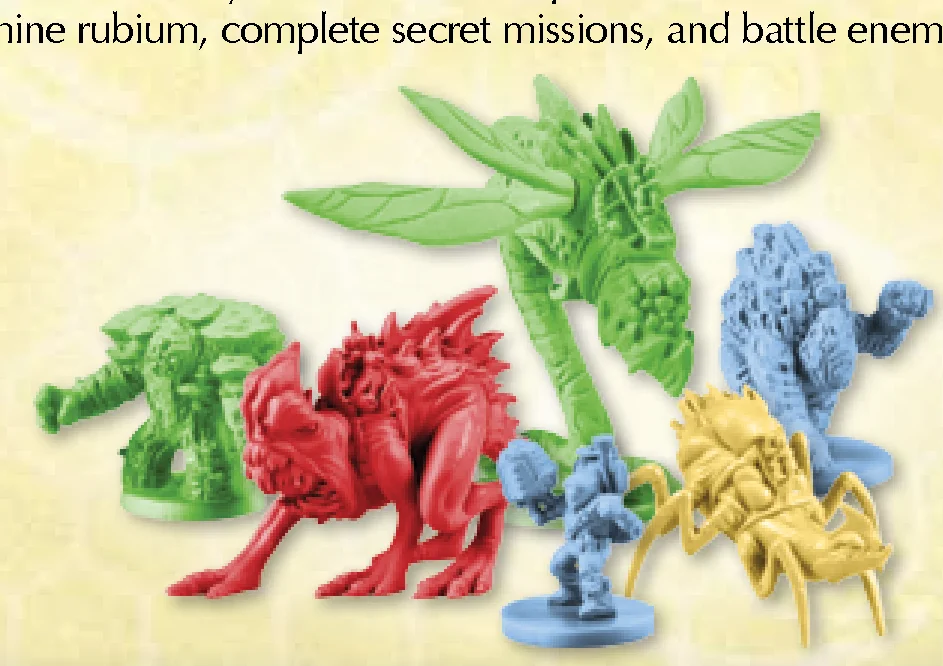
These figures represent the different units that players command. Players use units to explore the moon’s surface, mine rubium, complete secret missions, and battle enemy units.
Terrain Tiles
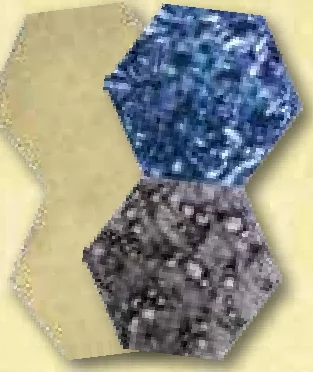
These large cardboard tiles are used during setup to create the game board. This allows for many different configurations and provides players with a unique battlefield for every game.
Exploration Tokens
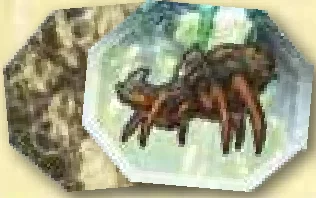
These tokens indicate the rewards that units discover after moving into an unexplored hex.
Rubium Tokens
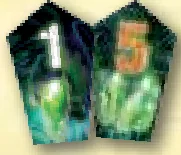
These tokens represent the game’s currency and come in denominations of one and five.
First Player Marker
This marker indicates which player takes the first turn.
Reference Sheets
These double-sided sheets provide players with a list of units, their stats, and their abilities. One side shows information for the classic game; the other side shows information for the “Alternate Units” optional rule.
Dice
These standard six-sided dice are used to determine hits in battle and other random game elements.
Terrain Types
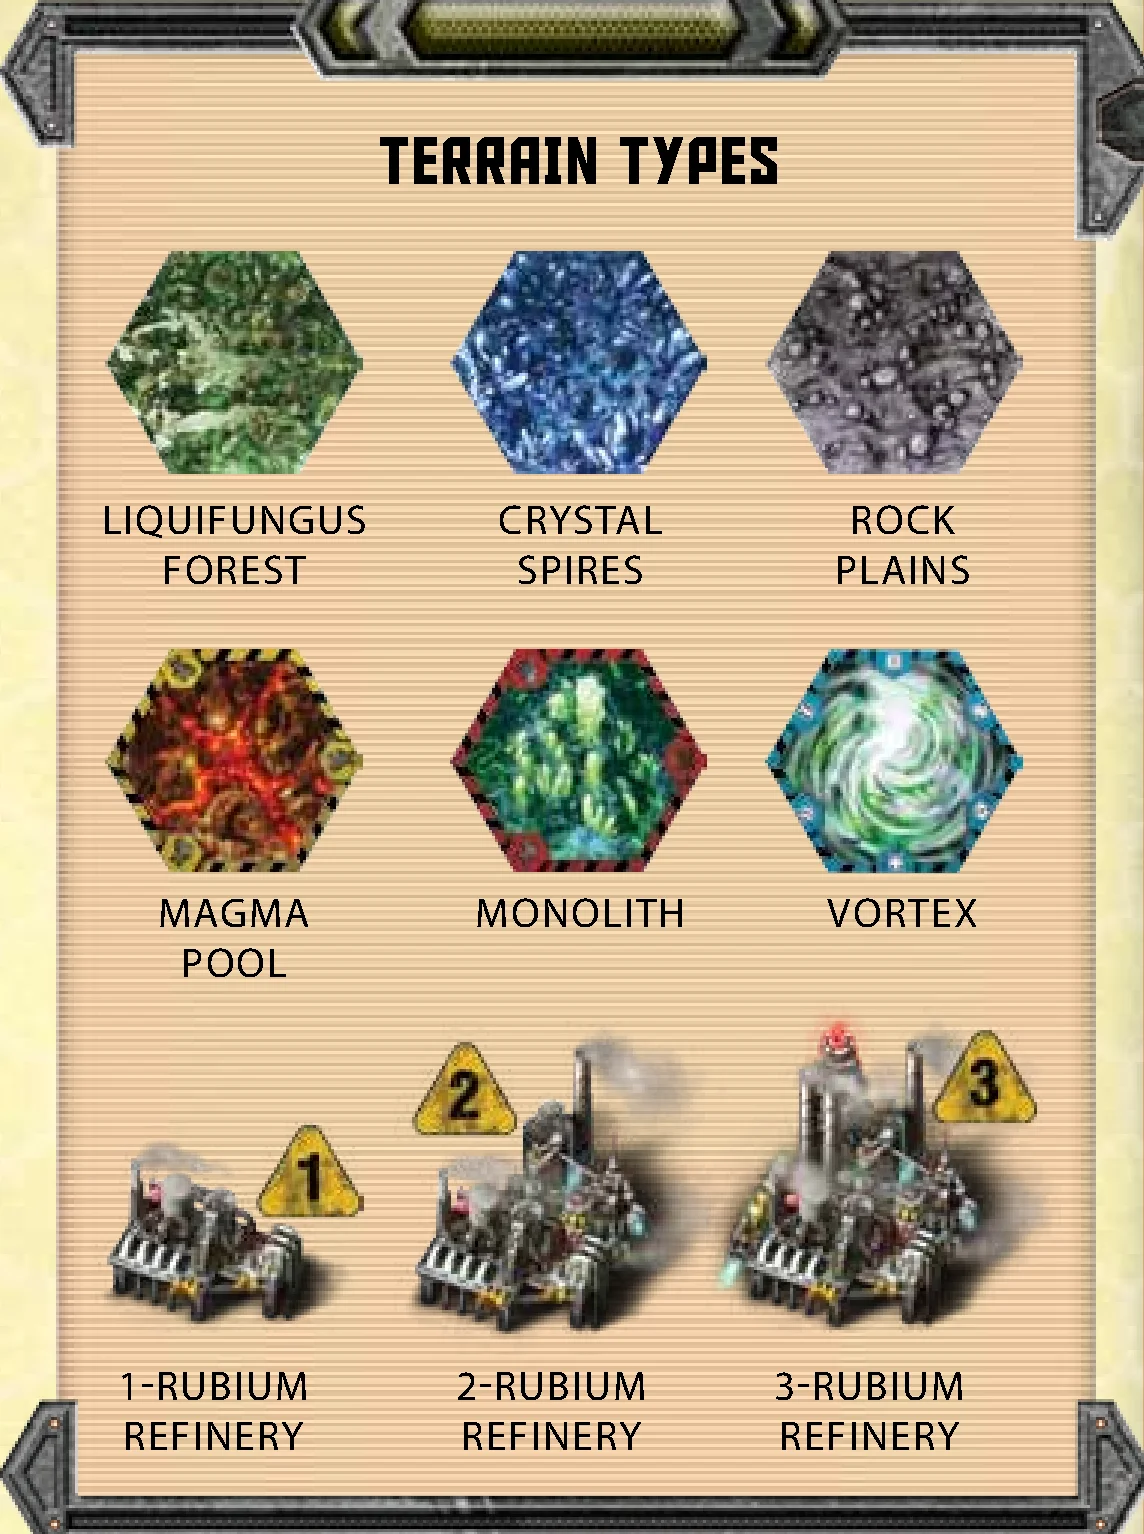
- Liquifungus Forest
- Crystal Spires
- Rock Plains
- Magma Pool
- Monolith
- Vortex
- 1-Rubium Refinery
- 2-Rubium Refinery
- 3-Rubium Refinery
Reference Sheet Breakdown
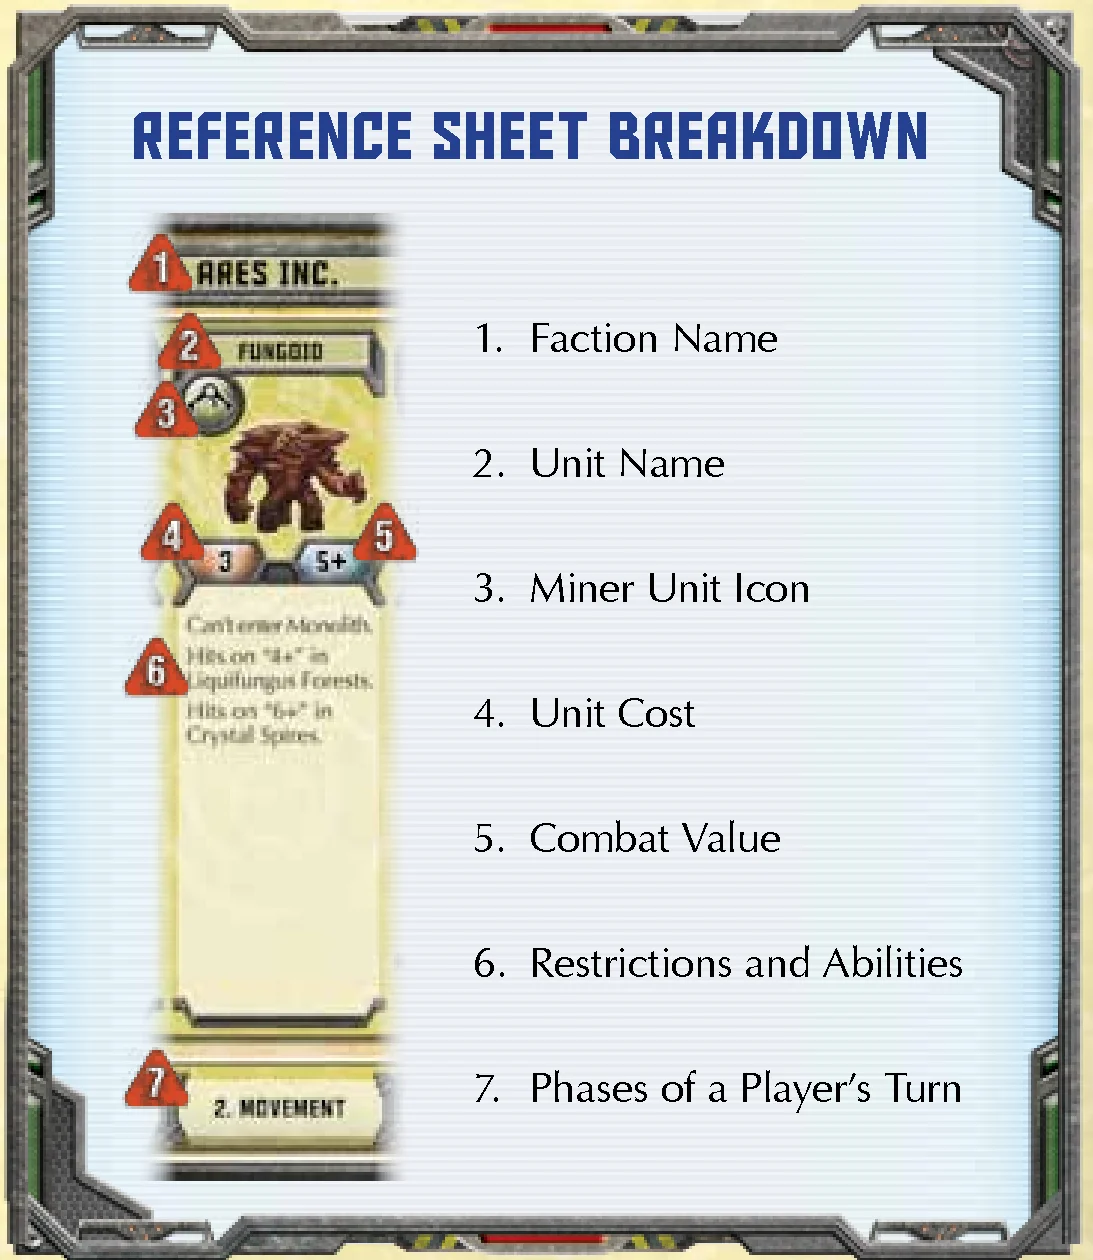
- Faction Name
- Unit Name
- Miner Unit Icon
- Unit Cost
- Combat Value
- Restrictions and Abilities
- Phases of a Player’s Turn
Setup Steps
Before playing, set up the game as follows:
- Determine First Player: Randomly determine who plays first and give this player the first player marker. That player keeps the first player marker for the duration of the game.
- Choose Factions: Starting with the first player, each player chooses a faction and takes the plastic unit pieces and reference sheet for that faction. Place the sheet with the red and black striped side faceup.
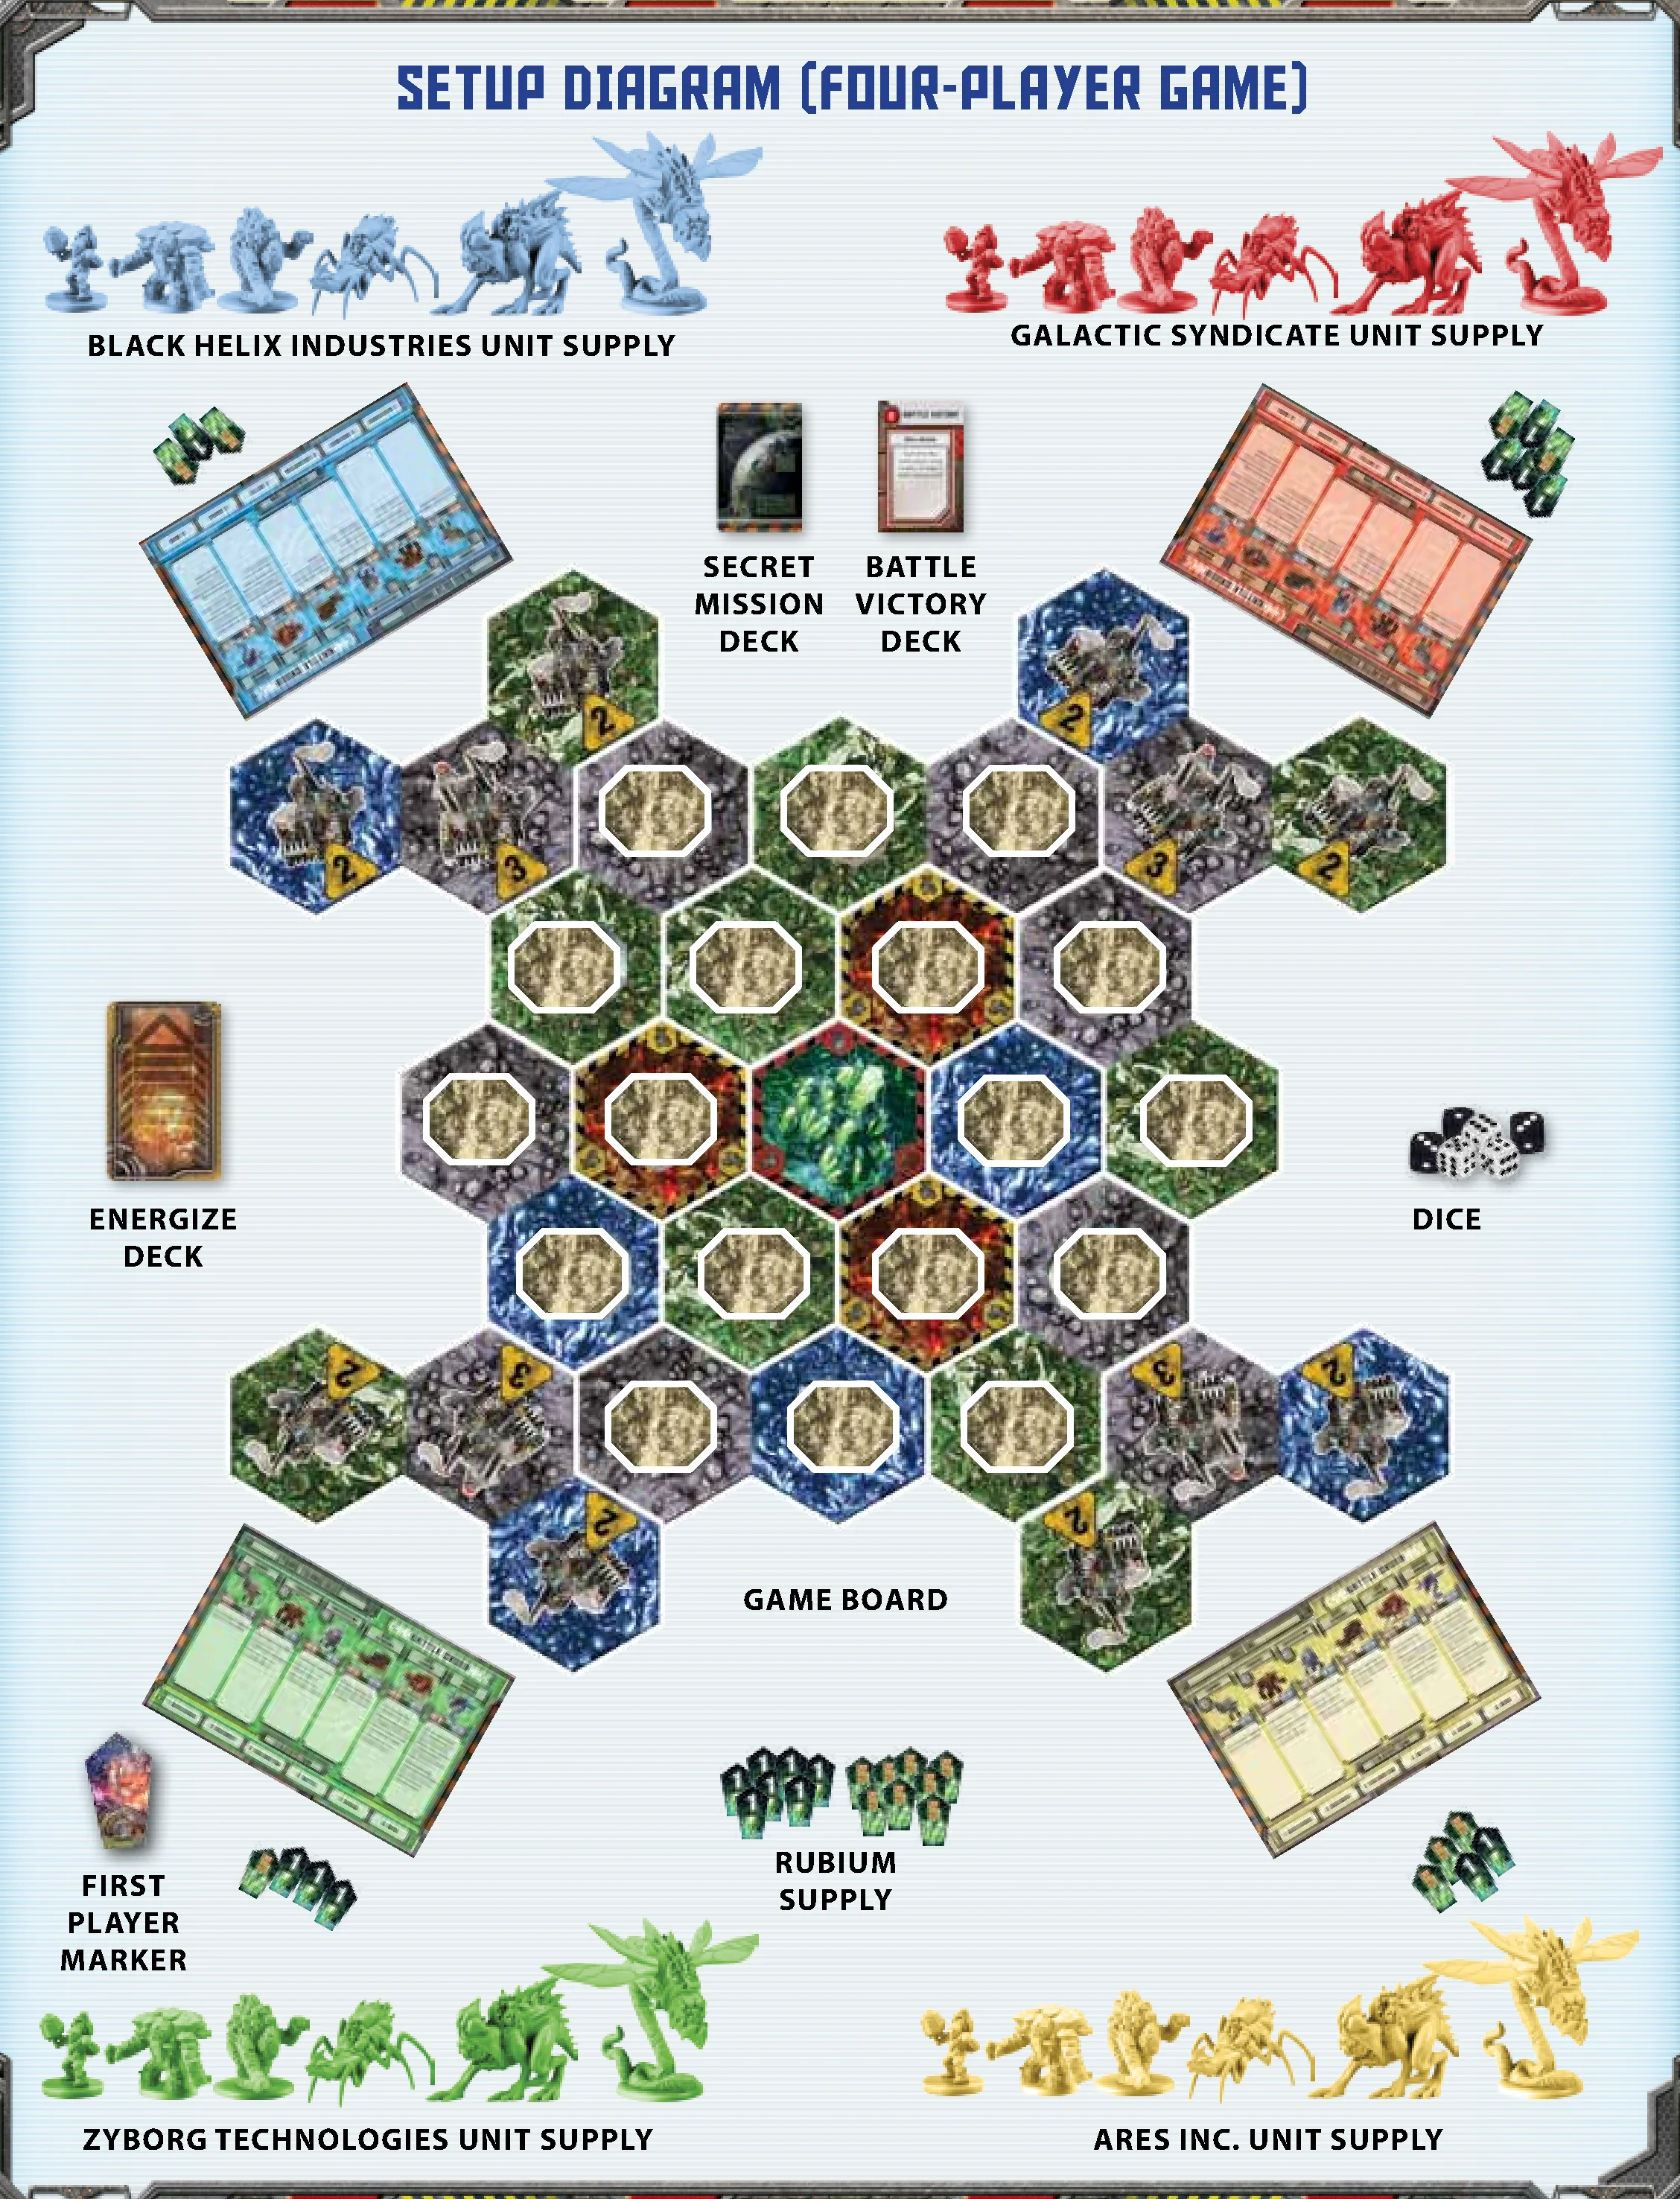
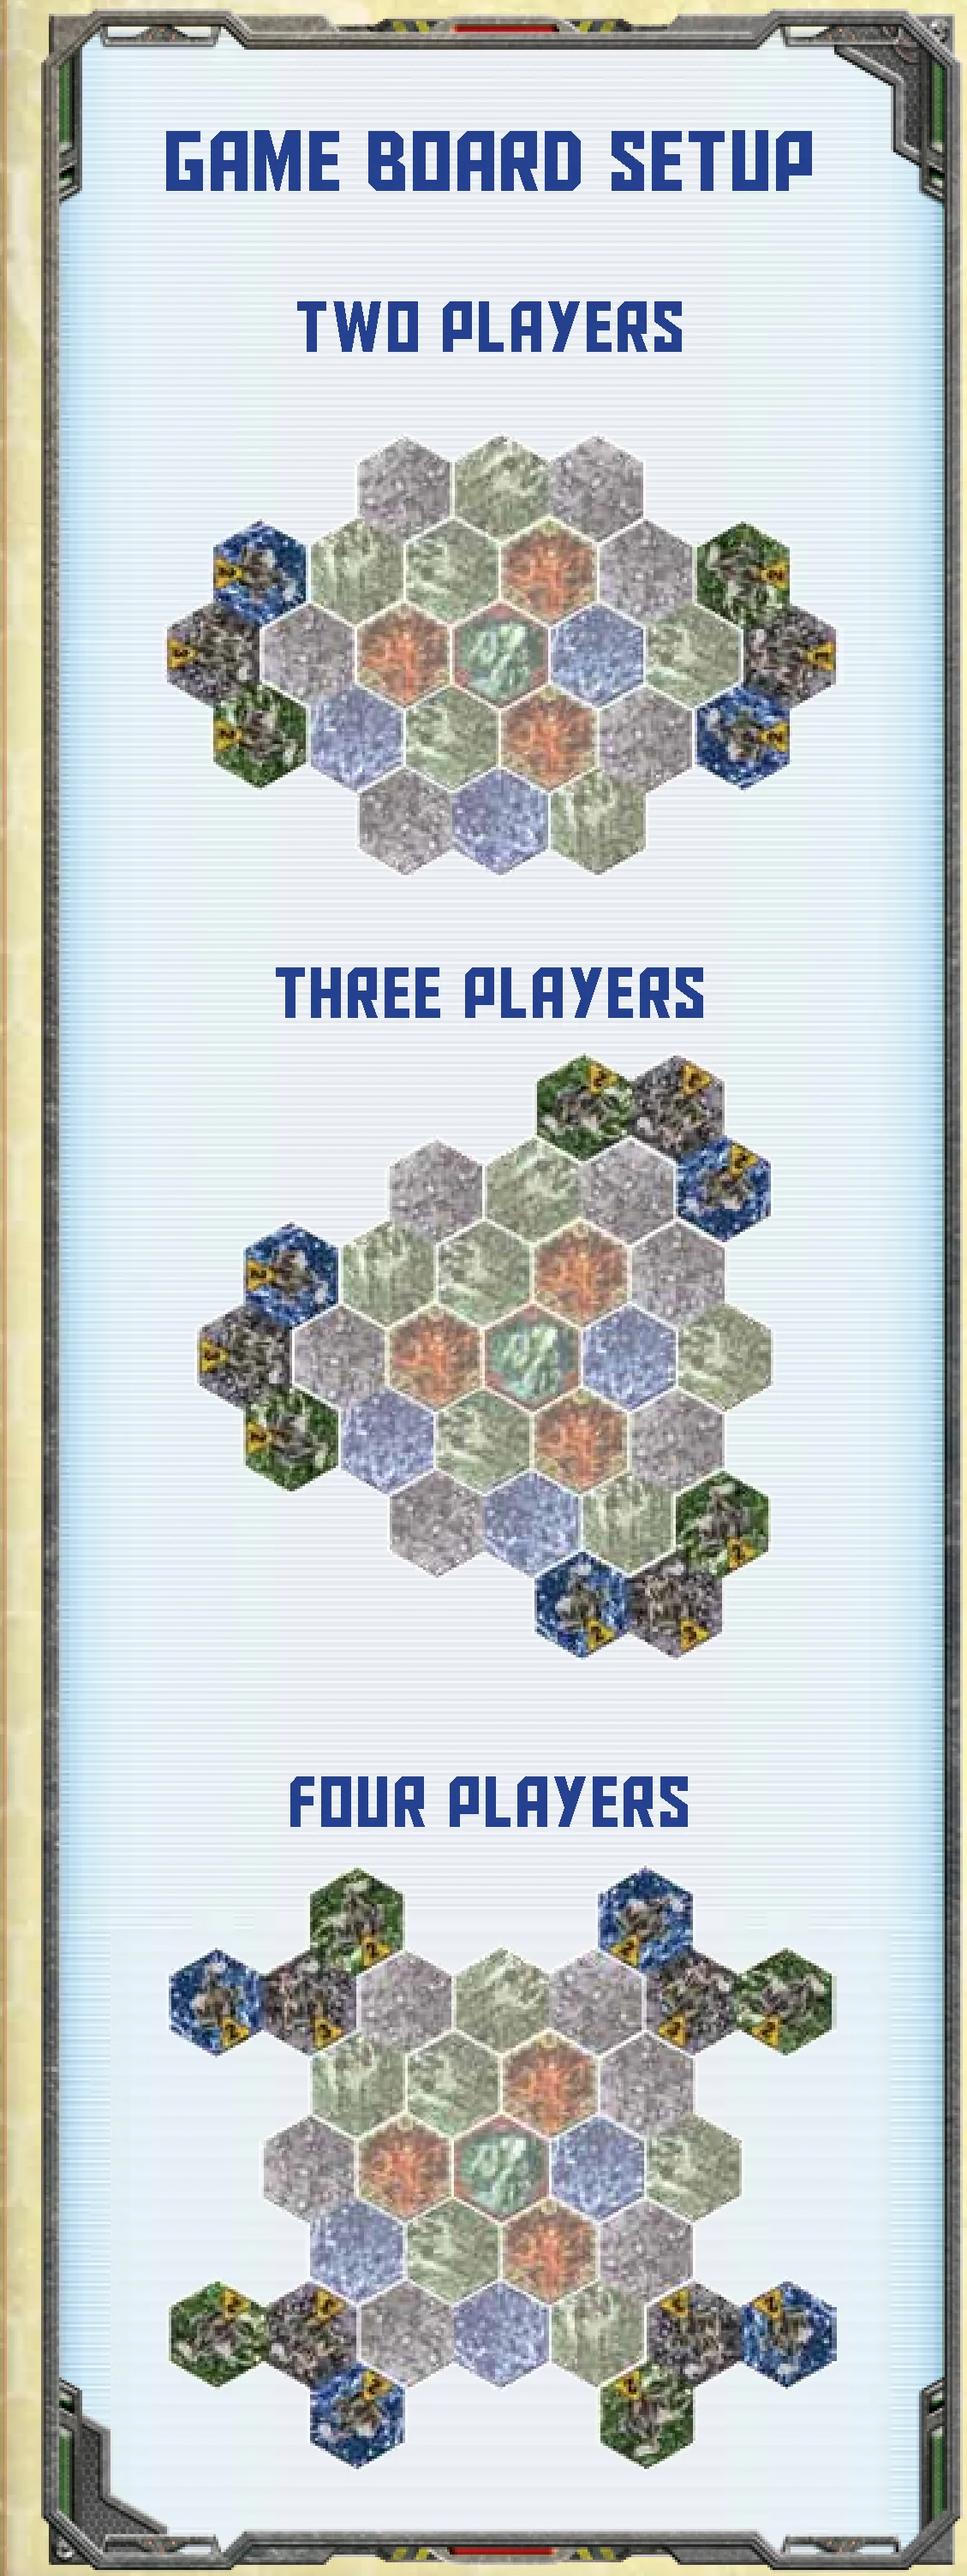
- Place the Terrain: Place the Monolith hex tile in the middle of the play area. Shuffle the six single-hex tiles facedown, then place them facedown in a circle around the Monolith. Shuffle the six double-hex tiles facedown, then place them facedown in a circle around the single-hex tiles (see diagram on page 12).
- Build Bases: Place a home base tile next to the board for each player, in the position indicated by the “Game Board Setup” diagram on page 12 (positions will vary depending on the number of players). Then flip all terrain tiles faceup.
- Prepare the Decks: Shuffle the Secret Mission cards to create a deck and place it facedown near the board. Shuffle the Energize cards to create a deck and place it facedown near the Secret Mission deck. Place all the Battle Victory cards faceup in a deck.
- Place Exploration Tokens: Unless using the “Extra Exploration Tokens” optional rule, return the exploration tokens with green borders to the game box. Shuffle the remaining exploration tokens facedown, then randomly place one token facedown on all hexes except home base hexes and the Monolith.
- Prepare Rubium Tokens and Dice: Place the rubium tokens in a pile next to the board to create a supply. Place the dice near the board.
- Receive Starting Rubium: Each player receives starting rubium tokens. The first player starts with 8 rubium, and each subsequent player in clockwise order receives 3 additional rubium (e.g., the second player receives 11 rubium, the third player receives 14 rubium, and the fourth player receives 17 rubium).
A Player’s Turn
Starting with the first player, each player takes a turn being the active player. During his turn, only the active player performs the following phases in order:
- Deployment Phase: He may purchase and place new units as well as play “Deployment Phase” Energize cards.
- Movement Phase: He may move each unit once.
- Exploration Phase: He reveals facedown exploration tokens in hexes where his units are present.
- Battle Phase: He conducts battle in each contested hex where his units are present.
- Mining Phase: He collects rubium from each controlled hex where his miner units are present. (Miner units include Humans, Fungoids, and Crystallines).
- Draw Phase: He draws one Secret Mission card. If he controls the Monolith, he also draws two Energize cards.
After completing the Draw phase, the player to his left becomes the new active player.
A Player’s Turn (Quick Reference)
- Deployment: Purchase new units and play Deployment Energize cards.
- Movement: Move each unit once.
- Exploration: Reveal facedown exploration tokens.
- Battle: Conduct battles and play Battle Energize cards.
- Mining: Collect rubium from refineries in each controlled hex where at least one of your units can operate refineries.
- Draw: Draw one Secret Mission card. If the active player controls the Monolith, he also draws two Energize cards.
General Rules & Information
Hidden and Open Information
- Each player’s hand of cards is hidden.
- Each player’s collected rubium, unit supply, Battle Victory cards, and fulfilled Secret Mission cards are open information and cannot be hidden.
Breaking the Rules
Some card and unit abilities override the general rules. In case of a conflict, follow the text on that card or the text on the reference sheet that explains the ability.
States of Hexes
- A hex is considered controlled if only one player has units in the hex.
- Alternatively, a hex is considered contested if more than one player has units in the hex.
- A hex is considered unoccupied if no player has units in the hex.
1. Deployment Phase
During the Deployment phase, the active player may purchase new units and play “Deployment Phase” Energize cards.
Each unit costs a certain amount of rubium, as shown on each player’s reference sheet. The active player may spend his rubium to purchase as many units as he would like, provided he has sufficient resources to purchase them. He returns spent rubium tokens to the supply.
When purchasing units, he takes the corresponding figures from his supply and places them on any of his home base hexes. The active player may always place these units on any of his home base hexes, even if another player’s units currently occupy that hex.
The number and type of units that the active player can purchase is limited by the number of figures available in his supply. It is possible to run out of a particular unit type. However, as units are destroyed during the game, they return to the player’s supply and may be purchased again later.
The Deployment phase is also the only time that the active player may play “Deployment Phase” Energize cards. To play an Energize card, the active player must state that he is playing it and follow the instructions on the card. After resolving the card text, he places it faceup in a discard pile next to the Energize deck.
2. Movement Phase
During the Movement phase, the active player may move each of his units once. Most units only move one hex, although some units have abilities that allow them to move more than one hex (see “Movement Example” below). When the active player moves one of his units into a hex that contains enemy units, it must immediately stop in that hex (unless its ability says otherwise). Some units cannot enter certain hexes, as noted on the reference sheet and indicated by the images in the hex’s border.
The active player cannot move his units from one contested hex to (or through) another enemy-controlled or contested hex. In other words, he cannot move a unit from one battle to a different battle. However, he may move a unit from a battle to one of his controlled hexes or an unoccupied hex.
Some units have special attacks that occur at the end of the Movement phase. These special attacks do not initiate a battle, so the active player does not take a Battle Victory card if one of these attacks is successful.
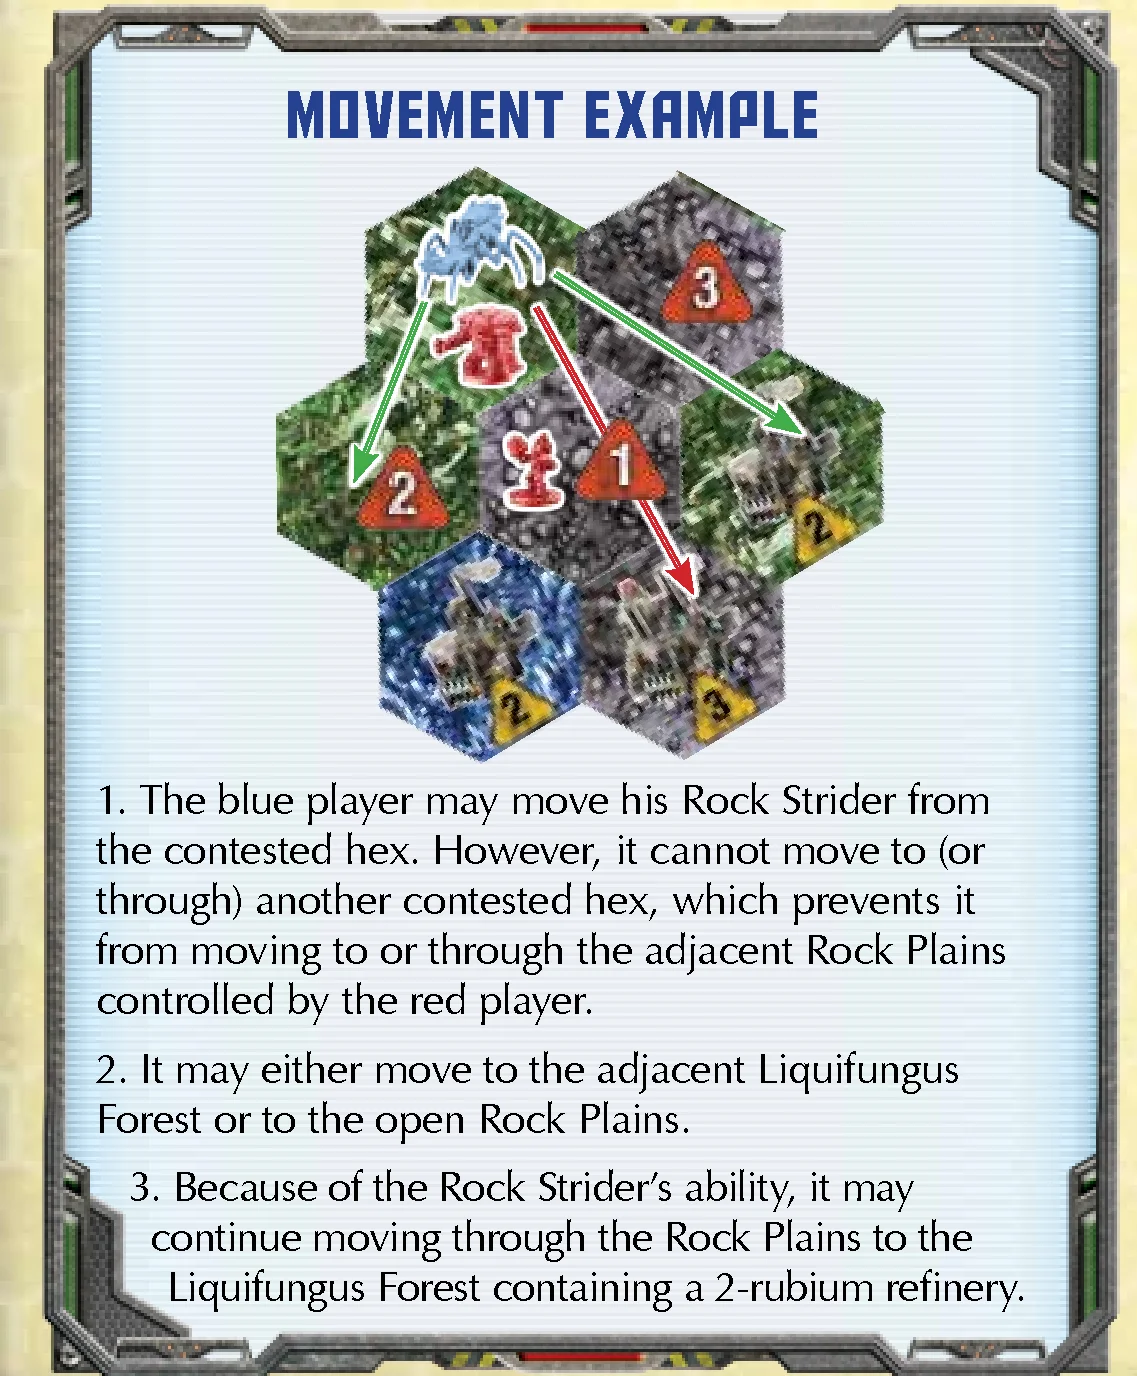
Movement Example
- The blue player may move his Rock Strider from the contested hex. However, it cannot move to (or through) another contested hex, which prevents it from moving to or through the adjacent Rock Plains controlled by the red player.
- It may either move to the adjacent Liquifungus Forest or to the open Rock Plains.
- Because of the Rock Strider’s ability, it may continue moving through the Rock Plains to the Liquifungus Forest containing a 2-rubium refinery.
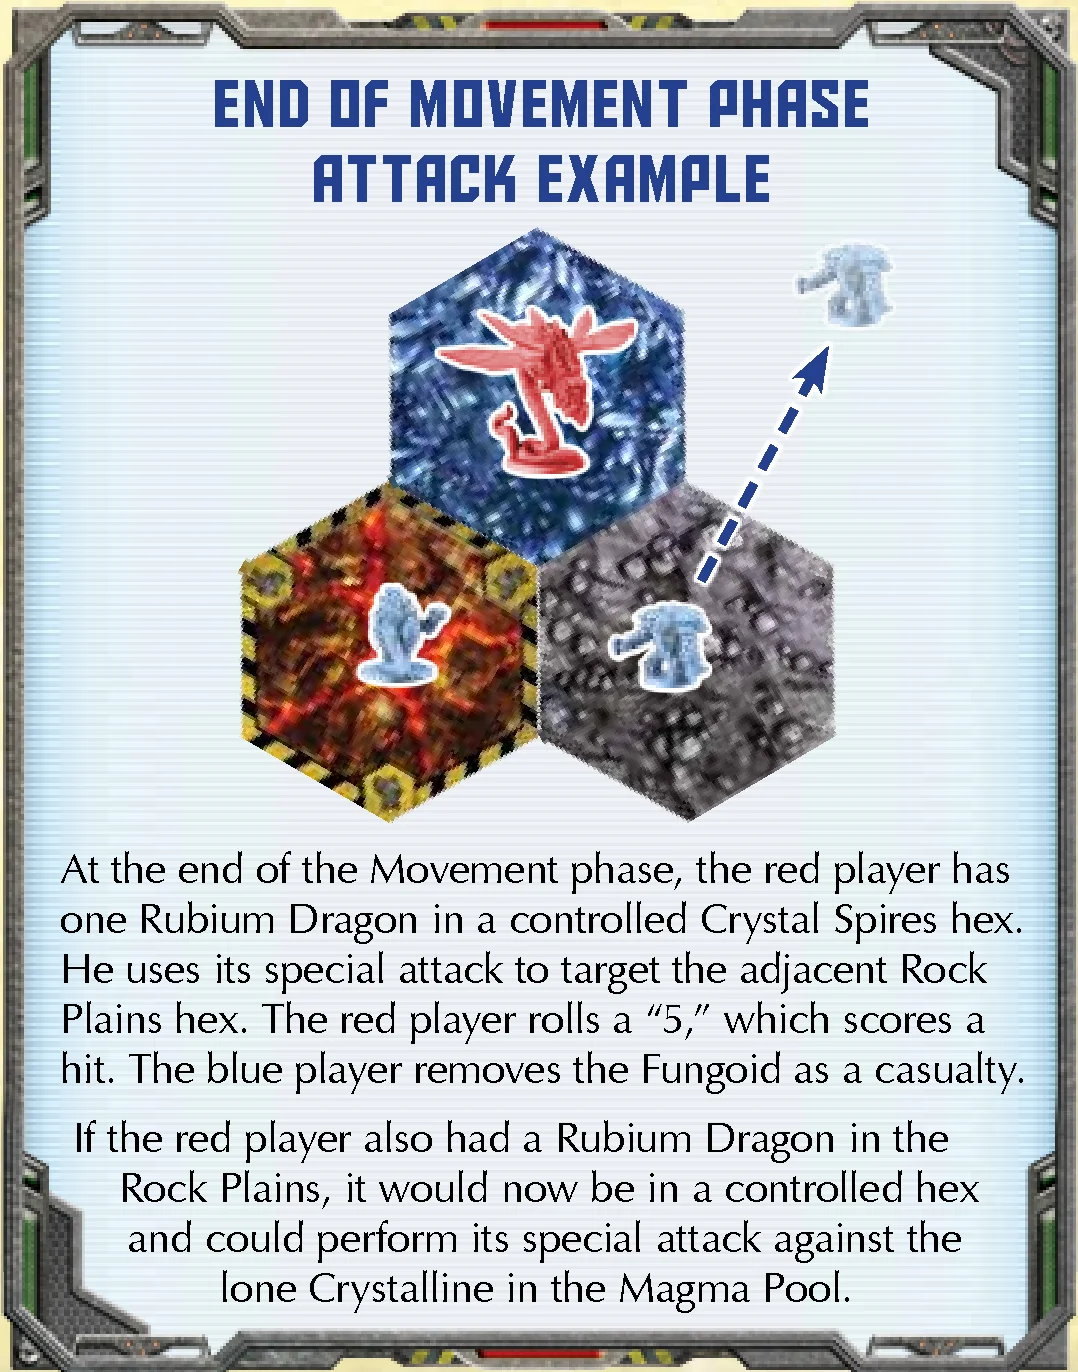
End of Movement Phase Attack Example
At the end of the Movement phase, the red player has one Rubium Dragon in a controlled Crystal Spires hex. He uses its special attack to target the adjacent Rock Plains hex. The red player rolls a “5,” which scores a hit. The blue player removes the Fungoid as a casualty.
If the red player also had a Rubium Dragon in the Rock Plains, it would now be in a controlled hex and could perform its special attack against the lone Crystalline in the Magma Pool.
3. Exploration Phase
During the Exploration phase, the active player reveals all facedown exploration tokens in hexes where his units are present. The active player may find the following rewards:
- If the token only shows a unit: he takes one unit of that type from his supply and places it in that hex. During his next turn, he can move the unit and use it in battle like his other units. After placing the unit, return this token to the game box.
- If the token only shows a refinery: he leaves the exploration token faceup on that hex to mark the location of the refinery.
- If the token shows both a unit and a refinery: he receives both rewards. He takes one unit of that type from his supply and places it in that hex. He also leaves the exploration token faceup on that hex to mark the location of the refinery.
Note: Each hex can be explored only once during each game.
4. Battle Phase
During the Battle phase, the active player conducts one battle in each contested hex where his units are present (see “Battle”). If his units are present in multiple contested hexes, he chooses the order in which each battle is resolved.
5. Mining Phase
During the Mining phase, the active player collects rubium from refineries in each controlled hex where at least one of his miner units is present. He takes rubium tokens from the supply equal to the refinery’s number and places them in his play area.
Note: Only units marked with the claw icon  on the reference sheet are considered miner units.
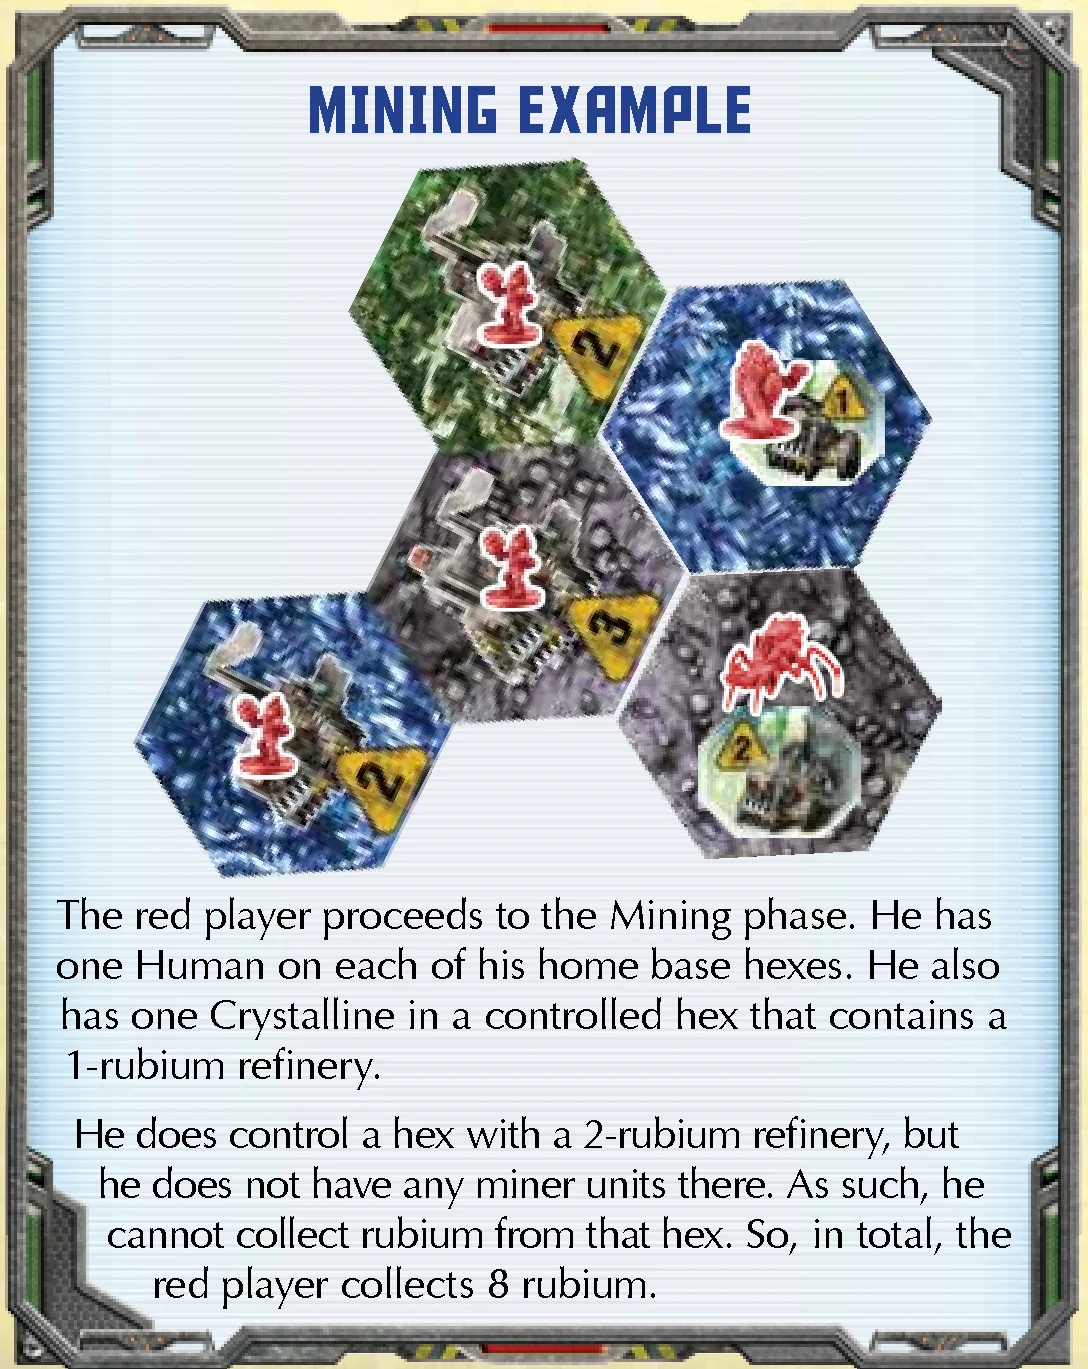
Mining Example
The red player proceeds to the Mining phase. He has one Human on each of his home base hexes. He also has one Crystalline in a controlled hex that contains a 1-rubium refinery.
He does control a hex with a 2-rubium refinery, but he does not have any miner units there. As such, he cannot collect rubium from that hex. So, in total, the red player collects 8 rubium.
6. Draw Phase
During the Draw phase, the active player draws one Secret Mission card and keeps it hidden in his hand. If he draws a Secret Mission: Objective card and meets its requirements, he can play it immediately.
If he controls the Monolith hex, he draws two Energize cards and keeps them hidden in his hand until he chooses to play them.
Battle Rules
This section explains how to conduct a battle.
Battle Order
Units attack in a specific order, known as the battle order. This order is indicated on the reference sheet and runs from right to left – with the most powerful units attacking first, and the least powerful attacking last. In other words, all Rubium Dragons attack first, then all surviving Lava Leapers attack, followed by all surviving Rock Striders, and so on.
Each unit rolls only one attack during battle. After each unit attacks in order, the battle is over – even if both the attacker and defender have units remaining in that contested hex.
When a unit type attacks, both the attacking player and the defending player simultaneously roll for each of their units of that type. The attacker rolls the black dice and the defender rolls the white dice. One hit is scored for each die result that is equal to or higher than the unit’s combat value.
For each hit scored, the opposing player must remove one casualty. He chooses one of his units in the contested hex and returns it to his supply. That unit does not participate in the rest of the battle. If the unit is removed from battle before it has a chance to attack, it no longer has the opportunity to attack.
The active player is always the attacker, and the other player involved in the battle is always the defender. In cases where more than one opponent has units in a hex, the active player chooses one of those opponents to be the defender. Only the attacker and the defender participate in the battle. If the attacker destroys all of the defender’s units, the attacker wins the battle (although the hex is still contested).
Order of Choosing
The attacker removes casualties first.
During the Battle phase, players are allowed to trigger unit abilities and/or play Energize cards in this order: attacker, defender, then other players in clockwise order from the defender’s left.
Each time a player either triggers a unit ability or plays an Energize card, fully resolve the ability. Then all players get an opportunity to trigger a unit ability or play an Energize card, following the same order outlined above. After all players pass, begin rolling attacks in battle order.
Results of Battle
- The attacker wins a battle if all of the defender’s units are destroyed. When the attacker wins a battle, he draws one Battle Victory card from the pile and places it faceup in his play area. He may also play one Secret Mission: Battle card from his hand if he fulfilled the conditions on the card during this battle.
- The defender loses a battle if all of his units in the contested hex are destroyed. When the defender loses a battle, he may draw one Energize card.
- If both players mutually destroy each other in the hex, then the attacker wins and the defender loses.
- If both the attacker and the defender have at least one unit remaining in the contested hex at the end of a combat round, neither player wins or loses the battle.
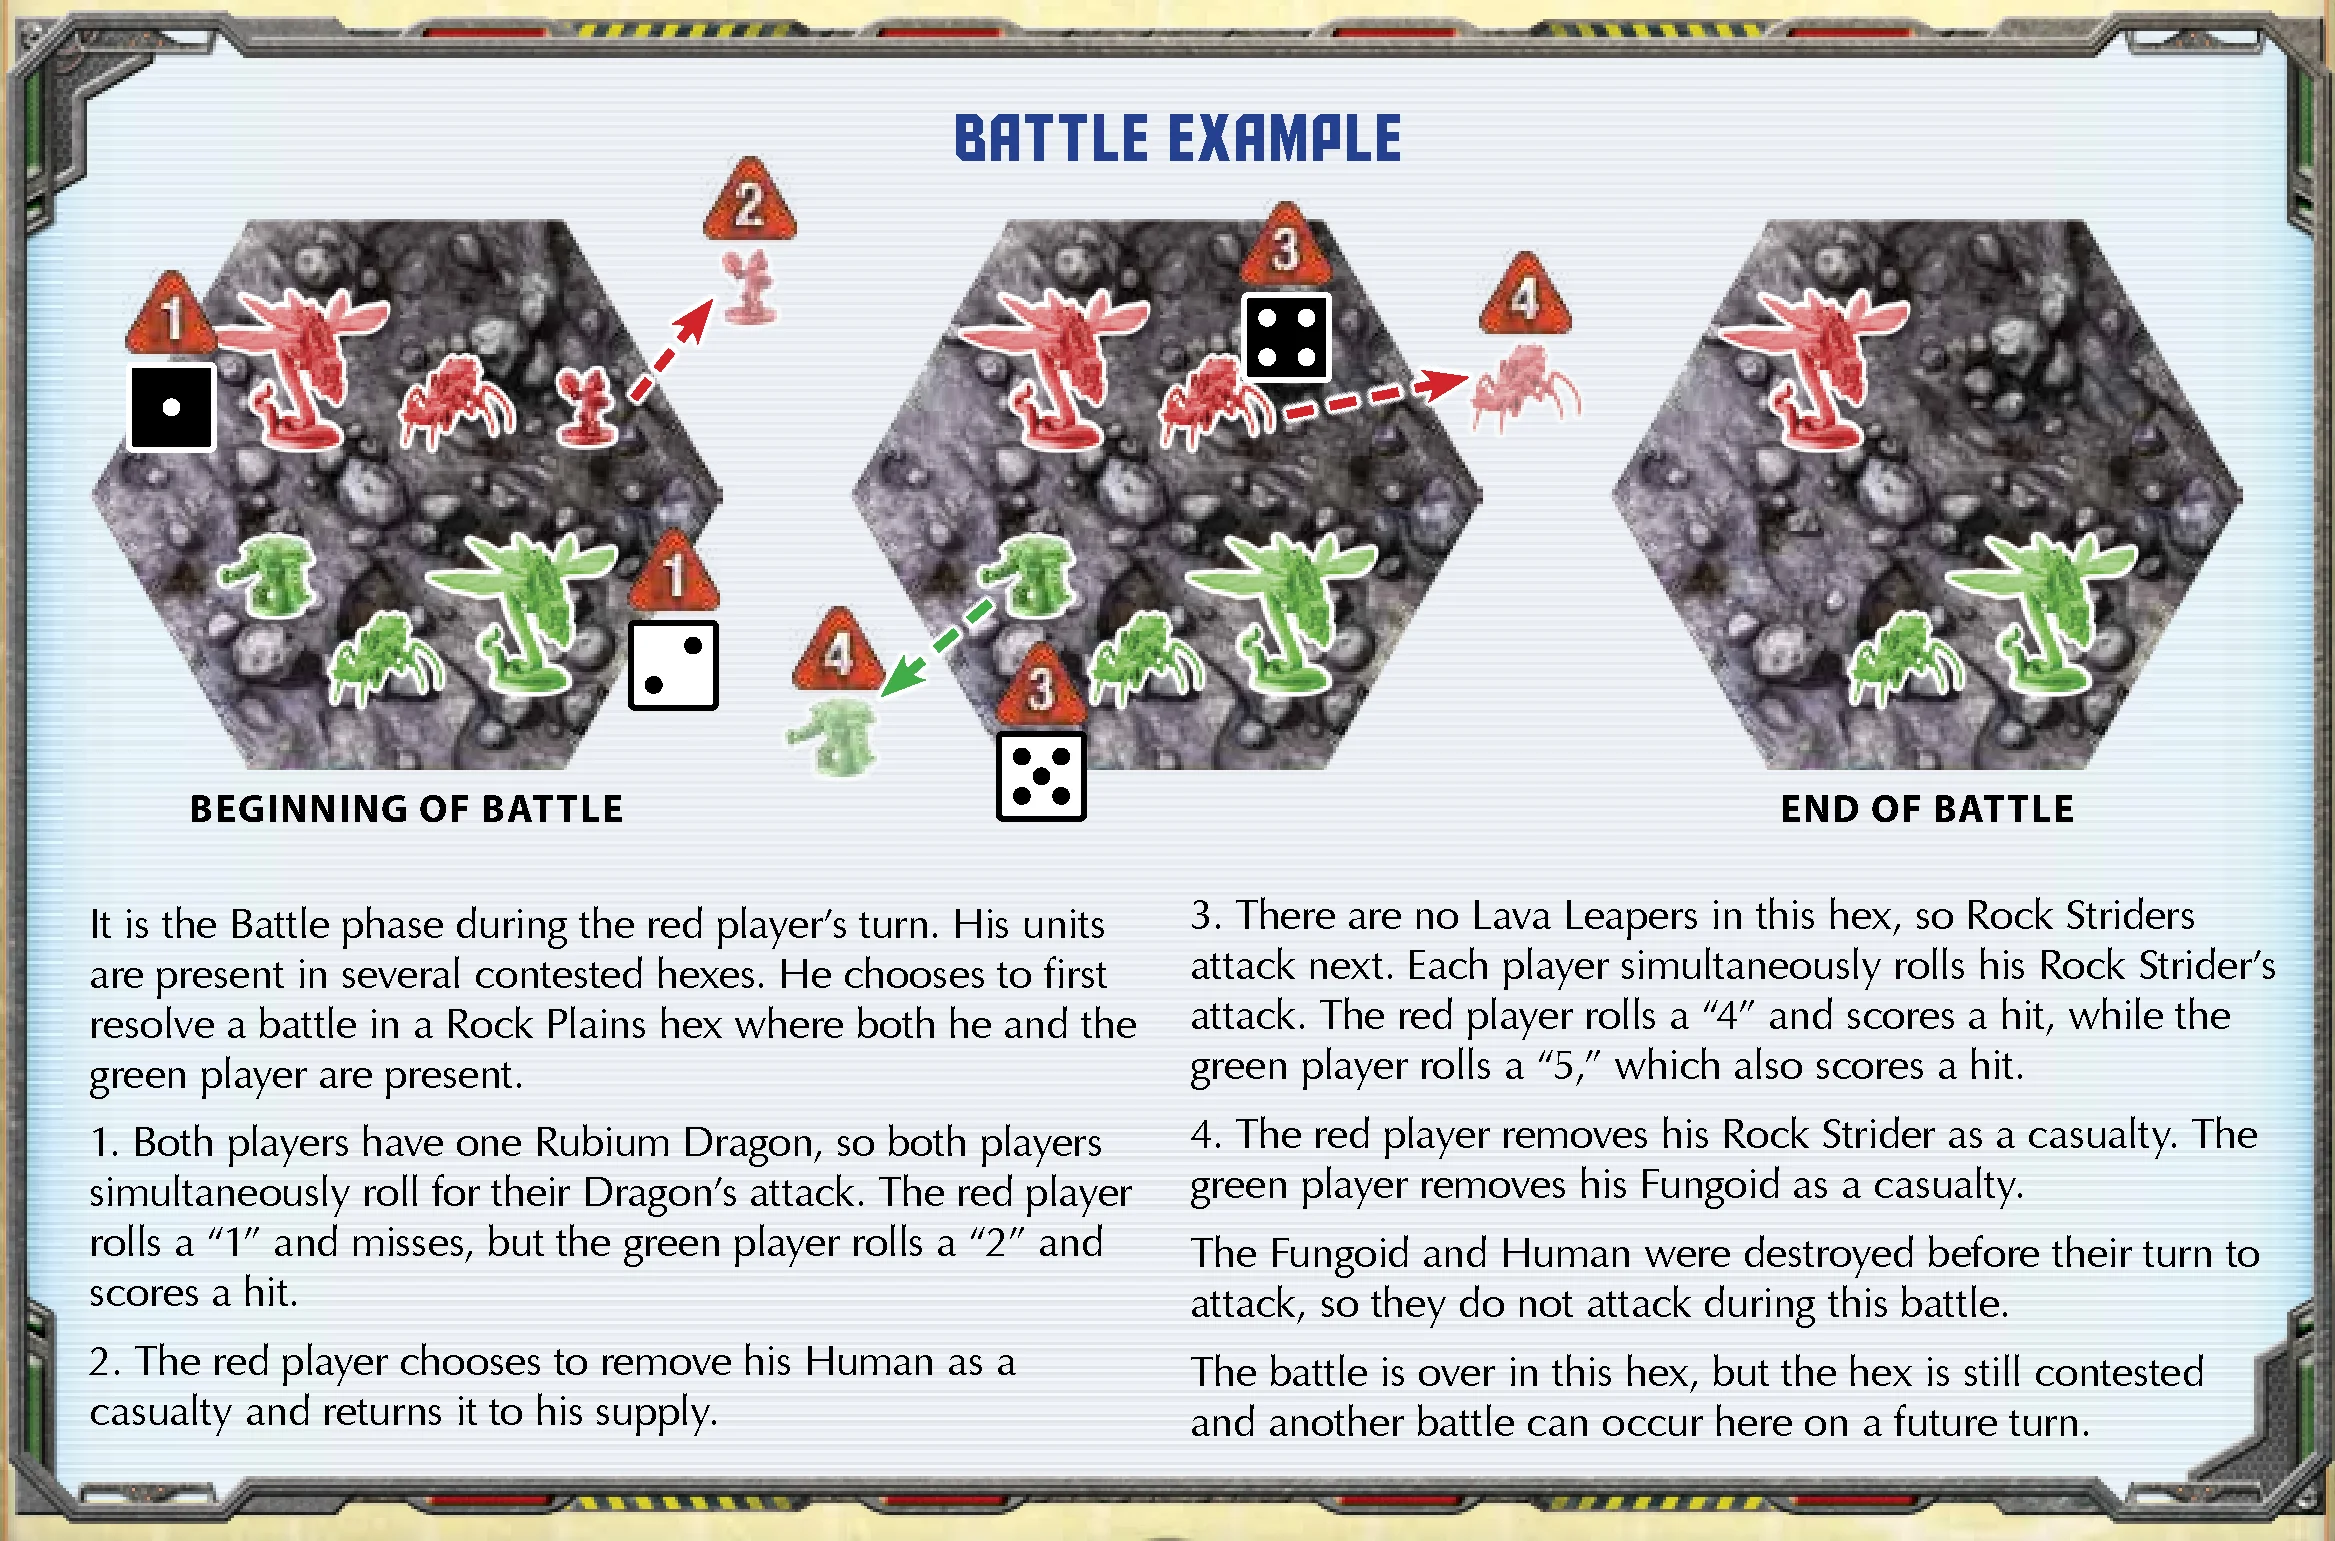
Battle Example
It is the Battle phase during the red player’s turn. His units are present in several contested hexes. He chooses to first resolve a battle in a Rock Plains hex where both he and the green player are present.
- Both players have one Rubium Dragon, so both players simultaneously roll for their Dragon’s attack. The red player rolls a “1” and misses, but the green player rolls a “2” and scores a hit.
- The red player chooses to remove his Human as a casualty and returns it to his supply.
- There are no Lava Leapers in this hex, so Rock Striders attack next. Each player simultaneously rolls his Rock Strider’s attack. The red player rolls a “4” and scores a hit, while the green player rolls a “5,” which also scores a hit.
- The red player removes his Rock Strider as a casualty. The green player removes his Fungoid as a casualty.
The Fungoid and Human were destroyed before their turn to attack, so they do not attack during this battle.
The battle is over in this hex, but the hex is still contested and another battle can occur here on a future turn.
Card Types
This section explains the different card types in Nexus Ops.
Victory Point Cards
There are two types of cards that award victory points: Battle Victory cards and Secret Mission cards. These cards display a number in the upper-left corner, which indicates how many victory points the card is worth. All faceup cards in a player’s play area count toward his victory point total.
Note: The active player is the only player who may play or receive victory point cards.
Battle Victory Cards
All Battle Victory cards are identical and provide the player one victory point. The backside of this card type is used with the “King of the Hill” optional rule.
After winning a battle during the Battle phase, the active player draws one Battle Victory card from the deck and places it faceup in his play area.
All Battle Victory cards are worth one victory point.
Secret Mission Cards
Secret Mission cards contain various objectives and, when fulfilled, provide the player between one and three victory points.
The active player draws one Secret Mission card during the Draw phase. When a player draws a Secret Mission card, he keeps it hidden in his hand until he fulfills the conditions on the card. Once fulfilled, he may play Secret Mission cards at different times during his turn:
- Secret Mission: Battle cards are played during the Battle phase after winning a battle and fulfilling the conditions on the card. The active player may only play one Secret Mission: Battle card per battle.
- Secret Mission: Objective cards are played during any phase immediately after fulfilling the conditions on the card. The active player may play any number of Secret Mission: Objective cards during his turn, provided that he fulfills the conditions of each card.
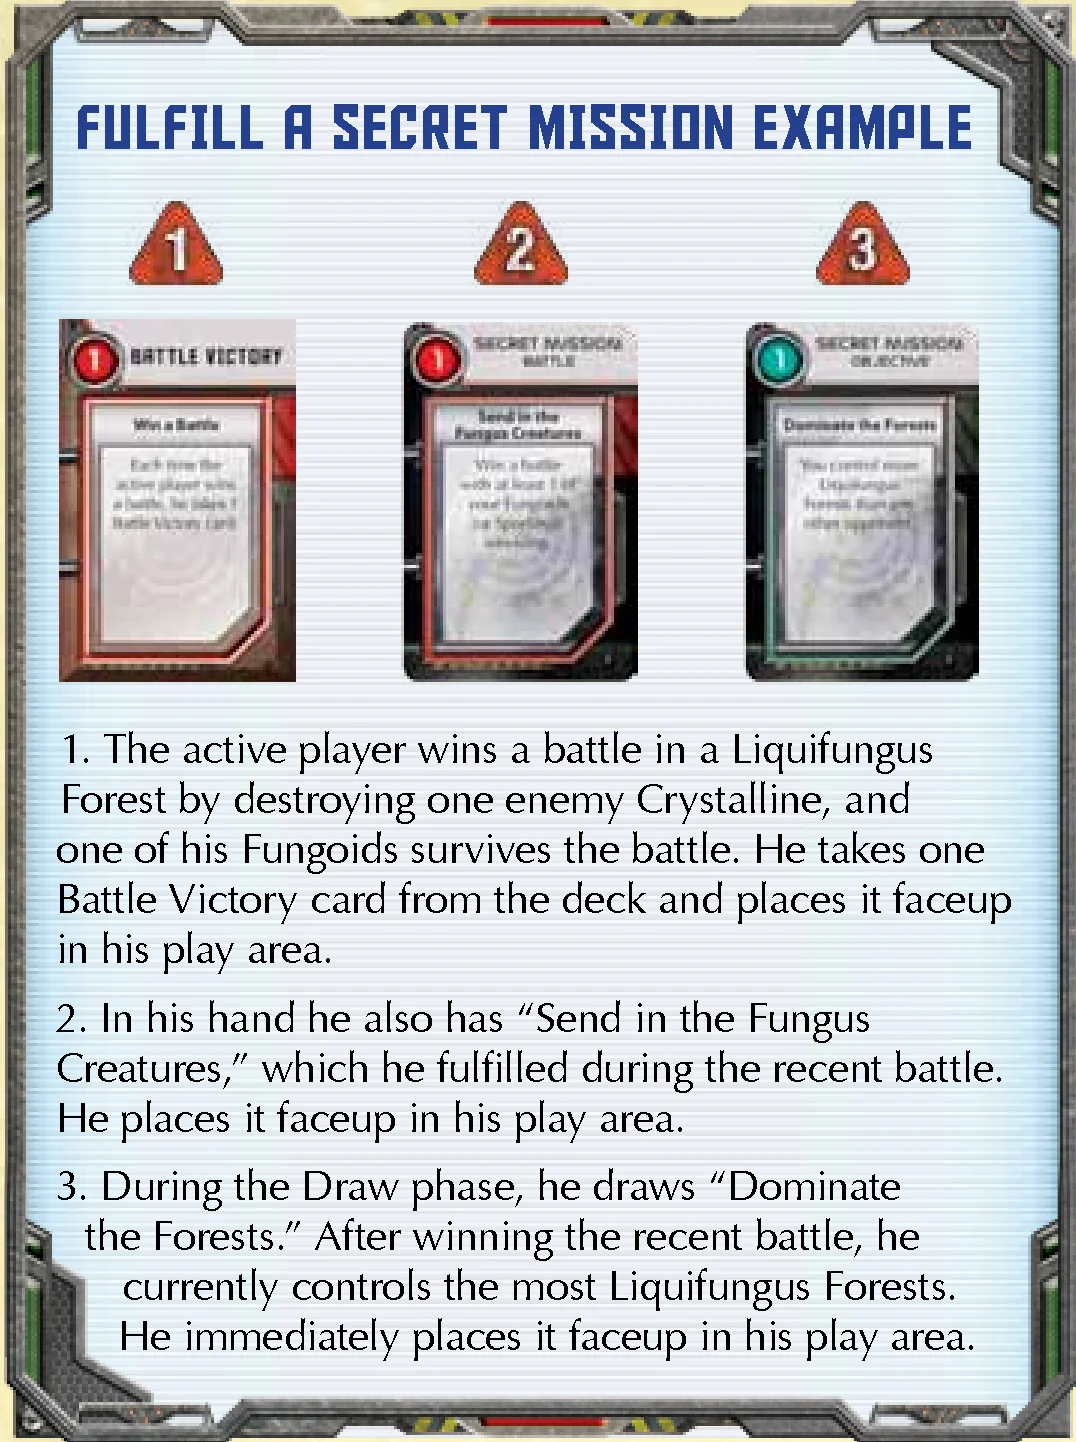
Fulfill a Secret Mission Example
- The active player wins a battle in a Liquifungus Forest by destroying one enemy Crystalline, and one of his Fungoids survives the battle. He takes one Battle Victory card from the deck and places it faceup in his play area.
- In his hand he also has “Send in the Fungus Creatures,” which he fulfilled during the recent battle. He places it faceup in his play area.
- During the Draw phase, he draws “Dominate the Forests.” After winning the recent battle, he currently controls the most Liquifungus Forests. He immediately places it faceup in his play area.
Energize Cards
Energize cards provide a temporary bonus, such as enhancing a unit’s abilities or gaining a tactical advantage in combat.
The defender draws one Energize card after losing a battle. If the active player controls the Monolith, he draws two Energize cards at the end of his turn. When a player draws an Energize card, he keeps it hidden in his hand until he chooses to play it.
The active player can only play “Deployment Phase” Energize cards during the Deployment phase of his turn. To play one, the player reads the card aloud to all players and follows the instructions on the card. When finished, he places the Energize card faceup in the discard pile.
“Battle Phase” Energize cards can only be played during the Battle phase and specifically when the card text indicates (e.g., “Play this card before rolling dice”). To play one, the player reads the card text aloud to all players and follows the instructions on the card.
During a battle, any player may play Energize battle cards – even players who are not involved in the battle. Be sure to follow the Order of Choosing.
Exchanging Cards for Rubium
The active player may discard Energize and Secret Mission cards from his hand any time during his turn to gain one rubium per discarded card. Discarded cards are placed faceup next to the appropriate deck.
Winning the Game
The game ends immediately if either of the following conditions occur:
- A player acquires 12 or more victory points. That player wins the game.
- A player is eliminated from the game. A player is eliminated if both of the following conditions are true:
- None of his units are on the board.
- He does not have enough rubium to purchase more units, even after exchanging cards for rubium.
The player with the highest number of victory points among the remaining players wins the game. In case of a tie, the tiebreaker order is:
- The tied player with the most controlled hexes wins.
- If there is still a tie, the tied player with the most units on the board wins.
- If there is still a tie, the tied player with the most rubium tokens wins the game.
- Finally, if there is still a tie, the game ends in a draw.
Optional Rules Overview
This section explains several optional rules that players may freely use to customize the game to their liking. Although not all of the optional rules can be used together, players can experience Nexus Ops in many different ways by using several optional rules during the same game (e.g., players can use the alternate units, intercepted transmissions, and the vortex). Before starting the game, players must all agree on which optional rules (if any) they wish to use.
Time Is of the Essence
The game ends immediately after a player acquires 10 or more victory points. That player wins the game. The game still ends if a player is eliminated, as described in “Winning the Game.”
In for the Long Haul
The game ends immediately after a player acquires 14 or more victory points. That player wins the game. The game still ends if a player is eliminated, as described in “Winning the Game.”
Executive Orders
During the Receive Starting Rubium step of setup, all players receive one Secret Mission card.
King of the Hill
If the active player controls the Monolith hex during the Draw phase, he may either draw two Energize cards or take one King of the Hill card (the backside of the Battle Victory card) and place it faceup in his play area. If he takes a King of the Hill card, all other players each draw one Energize card.
King of the Hill cards are worth 1 victory point each. Players still gain Battle Victory cards as normal.
Top Priority
Instead of drawing only one Secret Mission card during the Draw phase, the active player draws two Secret Mission cards, chooses one to keep in his hand, and returns the other card to the bottom of the Secret Mission deck.
Extra Exploration Tokens
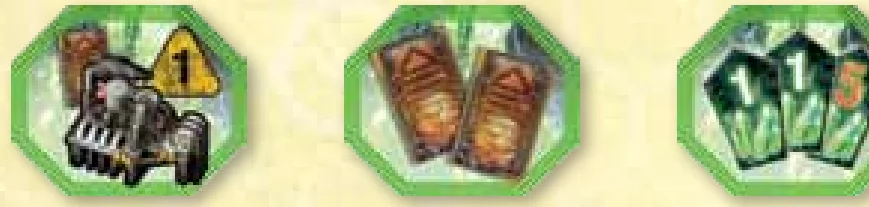
Included with this game are six extra exploration tokens, marked with green borders. These tokens are meant to increase the variety of rewards that players can find on the board. These bonus tokens can be used in the classic or variant game and in conjunction with any other optional rules.
During the “Place Exploration Tokens” step of setup, instead of returning the exploration tokens with green borders to the game box, players are free to exchange these bonus exploration tokens with any of the other exploration tokens. There can only ever be 18 exploration tokens on the board (12 on the Energy Dependence two-player board), so return all unused exploration tokens to the game box.
Note: For optimal game balance, it is recommended that the entire group of exploration tokens contain refineries that generate no fewer than a total of 16 rubium.
Intercepted Transmissions
After preparing the Secret Mission deck during setup, draw two more Secret Mission cards than the number of players in the game. (For example: in a two-player game, players draw four Secret Mission cards; in a three-player game, players draw five Secret Mission cards; in a four-player game, players draw six Secret Mission cards.) Reveal these cards by placing them faceup near the board where all players can see them. This row of cards is called the transmission line.
During the game, players do not draw Secret Mission cards into their hand. Instead, the active player may fulfill any card(s) in the transmission line. When the active player fulfills a card, he places it faceup in his play area. During the Draw phase, he replenishes the transmission line back to the original total.
The active player still takes one Battle Victory card after winning a battle, and he is limited to fulfilling only one Secret Mission: Battle card per battle.
Four-Player Team Rules
To play a four-player team game, set up the game for four players as shown in the diagram on page 12. Players separate into two teams of two players each. Teammates sit across from each other. Instead of playing to 12 individual victory points, the first team to reach a combined total of 20 victory points wins the game.
At the end of the Draw phase, the active player’s teammate may choose one card from his hand and pass that card facedown to the active player, who adds it to his hand. The passed card can either be an Energize card or a Secret Mission card.
If the active player moves any of his units into a hex that contains his teammate’s units, the hex is considered contested, but no battle occurs. Neither player collects rubium from a refinery in that hex. The active player can move units that are capable of moving more than one hex through hexes containing his teammate’s units as long as none of the opposing team’s units are present.
Teammates may discuss whatever they like, but all talk must be public. Also, aside from the card-passing rule explained above, a player may show his teammate some cards from his hand. If he does so, he must show it to all players.
If one player is eliminated, the game does not end. The remaining teammate continues playing and can still win the game for the team. The eliminated player’s victory points still count toward the team’s total victory points.
If two teammates are both eliminated, the game ends. The surviving team wins the game.
Vortex
During the Place Terrain step of setup, flip the Monolith hex to reveal the Vortex. Each edge of this hex is labeled with one face of a six-sided die. It does not matter how players orient this hex during setup, but once placed it must remain in that position for the duration of the game.
Each time before the first player takes his turn, he must follow these steps to resolve the Vortex’s effect:
- Roll one black die and one white die, and then refer to the numbers on the Vortex hex. The Vortex sucks in all units occupying the hex that borders the number shown on the black die. Then the storm blows these units into the hex that borders the number shown on the white die. Simply move the units to this new hex.
- Then roll one die and refer to the numbers on the Vortex hex. The Vortex projects massive amounts of energy toward the hex that borders the number shown on the die. All units occupying that hex are destroyed.
- Finally, for each controlled hex adjacent to the Vortex, the controlling player draws one Energize card.
Note: Skip these steps during his first turn of the game.
The blue border surrounding the Vortex hex indicates that no units can enter that hex. Cards affecting the Monolith do not affect the Vortex. During setup, return “Death From Above” and “Secure the Monolith” to the game box; they are not used.
Alternate Units
To play with alternate units, use the backside of the reference sheet labeled “Alternate Units.” Some clarifications to the alternate unit abilities are explained here:
- Clones: If players have difficulty remembering the purchasing limit, simply place newly purchased Clones on the refinery art. Then at the end of the turn, slide all Clones off the refinery art.
- Shardian: If a defender destroys his own Shardians and he has no other units in the contested hex, he loses the battle and the attacker wins the battle.
- Sporling: It is possible for Sporlings to move several times and participate in multiple battles during a single turn.
- Boulder Blitzer: If in a Rock Plains, Boulder Blitzers attack before all other units (instead of after Magma Divers).
- Magma Diver: When moving from a Magma Pool, Magma Divers “dive” down and may surface in any other Magma Pool as well as any hex adjacent to a Magma Pool.
- Monolith Wyrm: Each time the Monolith Wyrm scores a hit during its special attack, the owner must roll another die. This process continues until the Monolith Wyrm misses.
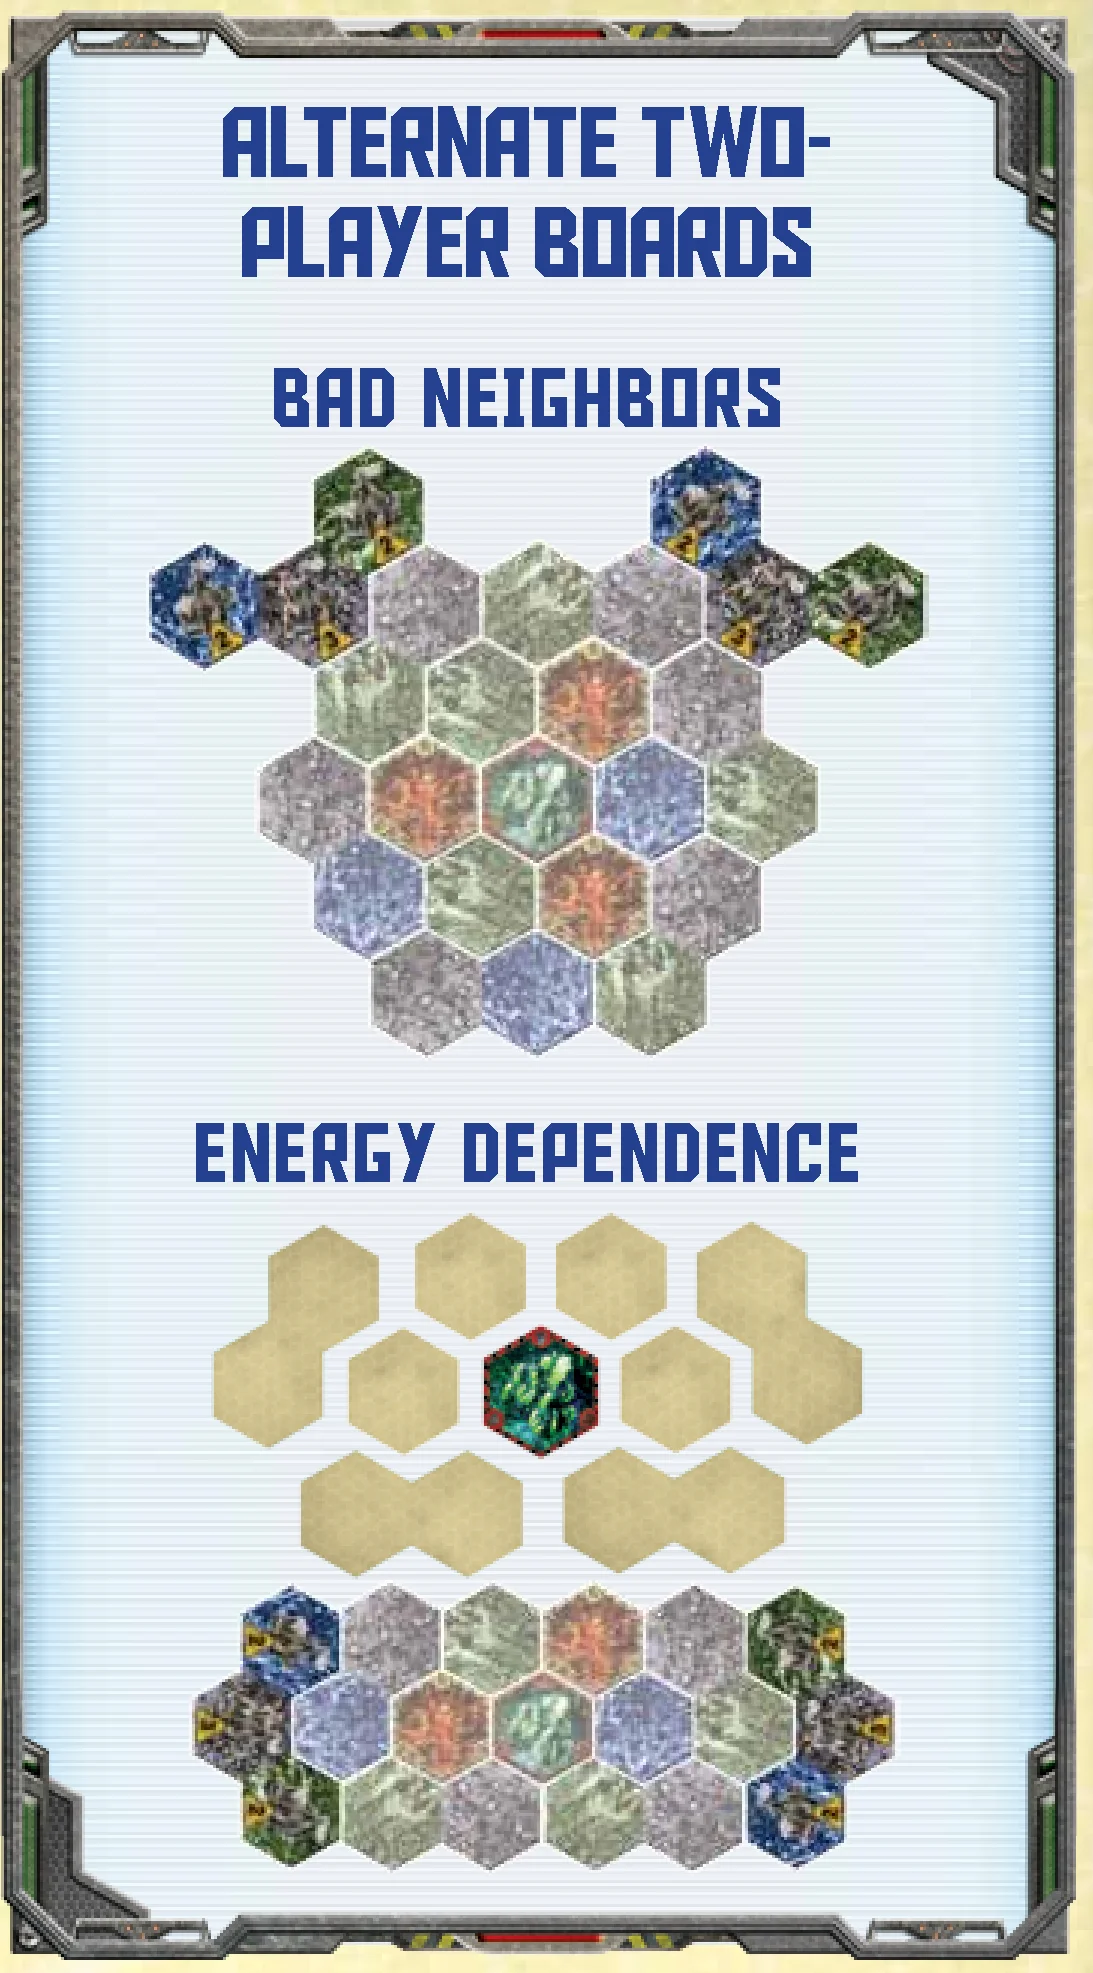
Alternate Two-Player Boards
This section describes how to set up and play with alternate two-player boards.
Energy Dependence
During the “Place the Terrain” step of setup, set aside the following terrain tiles:
- 3 Double-hex tiles with a Liquifungus Forest
- 1 Double-hex tile with a Crystal Spires
- 1 Single-hex Liquifungus Forest
- 1 Single-hex Crystal Spires
- 2 Single-hex Magma Pools
Return all other terrain tiles to the game box. Then shuffle the set aside terrain tiles and build the board according to the setup diagram on page 12.
During the “Place Exploration Tokens” step of setup, set aside the following 12 exploration tokens into two identical piles that contain:
- 2 Rock Strider tokens
- 1 Rubium Refinery (2) tokens
- 2 Rubium Refinery (1) + Crystalline tokens
- 1 Rubium Refinery (1) + Fungoid tokens
Return all remaining exploration tokens to the game box. Each player shuffles one pile facedown and then randomly places those tokens on his opponent’s side of the map.
All other rules remain unchanged.
Bad Neighbors
During setup, players place the terrain according to the standard two-player setup. However, during the “Build Bases” step, players must place their home base hexes much closer to each other than required in the standard two-player setup, as indicated in the setup diagram on page 12.
Introduction & Overview
Introduction
It’s 2315. Human society depends on an exotic energy source called rubium for all of its advanced technology. A small group of explorers have recently discovered an alien moon that is exceptionally rich in rubium. In desperate need of more funding for their research, they simultaneously sold the “exclusive” mineral rights to four competing corporations: Ares Inc., Black Helix Industries, The Galactic Syndicate, and Zyborg Technologies.
By the time the corporations discovered the ruse, the explorers had moved on, leaving the corporations to contend with the liquifungus forests, the magma pools, and the indigenous alien life forms.
Far out on the galactic frontier, away from oversight or public scrutiny, these four corporations now do fierce, bloody battle for control of the moon’s rubium. By taming and unleashing the rock striders, lava leapers, fungoids, crystallines, and the plasma-breathing rubium dragons, the corporations hope to eliminate their competitors and seize control of the precious rubium deposits for themselves.
Once they have harvested all of the rubium and secured the mysterious alien monolith on the moon’s surface…well, who knows what sinister agenda lurks at the heart of their corporate greed?
Game Overview
In Nexus Ops, two to four players control factions of corporate troops and indigenous life forms on an alien moon. Players deploy troops from their home bases as they explore the moon, mine resources, purchase troops, win battles, and fulfill missions to win the game.
The Classic Game
This edition of Nexus Ops contains many new optional rules in addition to the classic game. This rulebook is written assuming players are playing the classic game.
For the optional rules, see pages 9–11.
Object of the Game
The object of the game is to earn 12 or more victory points by completing secret missions and winning battles.
Components & Reference Guide
Component List
- 164 Plastic Figures, consisting of:
- 12 Rubium Dragons (3 per faction)
- 16 Lava Leapers (4 per faction)
- 24 Rock Striders (6 per faction)
- 32 Crystallines (8 per faction)
- 32 Fungoids (8 per faction)
- 48 Humans (12 per faction)
- 17 Terrain Tiles:
- 7 Single-hex Tiles
- 6 Double-hex Tiles
- 4 Triple-hex Tiles (home base)
- 96 Cardboard Tokens, consisting of:
- 24 Exploration Tokens
- 71 Rubium Tokens
- 1 First Player Marker
- 4 Reference Sheets (1 per faction)
- 32 Energize Cards
- 76 Small Cards, consisting of:
- 36 Secret Mission Cards
- 40 Battle Victory/King of the Hill Cards
- 6 Six-sided Dice (3 white, 3 black)
- This Rulebook
Component Overview
This section describes the game’s components.
Plastic Figures
These figures represent the different units that players command. Players use units to explore the moon’s surface, mine rubium, complete secret missions, and battle enemy units.
Terrain Tiles
These large cardboard tiles are used during setup to create the game board. This allows for many different configurations and provides players with a unique battlefield for every game.
Exploration Tokens
These tokens indicate the rewards that units discover after moving into an unexplored hex.
Rubium Tokens
These tokens represent the game’s currency and come in denominations of one and five.
First Player Marker
This marker indicates which player takes the first turn.
Reference Sheets
These double-sided sheets provide players with a list of units, their stats, and their abilities. One side shows information for the classic game; the other side shows information for the “Alternate Units” optional rule.
Dice
These standard six-sided dice are used to determine hits in battle and other random game elements.
Terrain Types
- Liquifungus Forest
- Crystal Spires
- Rock Plains
- Magma Pool
- Monolith
- Vortex
- 1-Rubium Refinery
- 2-Rubium Refinery
- 3-Rubium Refinery
Reference Sheet Breakdown
- Faction Name
- Unit Name
- Miner Unit Icon
- Unit Cost
- Combat Value
- Restrictions and Abilities
- Phases of a Player’s Turn
Setup
Setup Steps
Before playing, set up the game as follows:
- Determine First Player: Randomly determine who plays first and give this player the first player marker. That player keeps the first player marker for the duration of the game.
- Choose Factions: Starting with the first player, each player chooses a faction and takes the plastic unit pieces and reference sheet for that faction. Place the sheet with the red and black striped side faceup.
- Place the Terrain: Place the Monolith hex tile in the middle of the play area. Shuffle the six single-hex tiles facedown, then place them facedown in a circle around the Monolith. Shuffle the six double-hex tiles facedown, then place them facedown in a circle around the single-hex tiles (see diagram on page 12).
- Build Bases: Place a home base tile next to the board for each player, in the position indicated by the “Game Board Setup” diagram on page 12 (positions will vary depending on the number of players). Then flip all terrain tiles faceup.
- Prepare the Decks: Shuffle the Secret Mission cards to create a deck and place it facedown near the board. Shuffle the Energize cards to create a deck and place it facedown near the Secret Mission deck. Place all the Battle Victory cards faceup in a deck.
- Place Exploration Tokens: Unless using the “Extra Exploration Tokens” optional rule, return the exploration tokens with green borders to the game box. Shuffle the remaining exploration tokens facedown, then randomly place one token facedown on all hexes except home base hexes and the Monolith.
- Prepare Rubium Tokens and Dice: Place the rubium tokens in a pile next to the board to create a supply. Place the dice near the board.
- Receive Starting Rubium: Each player receives starting rubium tokens. The first player starts with 8 rubium, and each subsequent player in clockwise order receives 3 additional rubium (e.g., the second player receives 11 rubium, the third player receives 14 rubium, and the fourth player receives 17 rubium).
Turn Structure
A Player’s Turn
Starting with the first player, each player takes a turn being the active player. During his turn, only the active player performs the following phases in order:
- Deployment Phase: He may purchase and place new units as well as play “Deployment Phase” Energize cards.
- Movement Phase: He may move each unit once.
- Exploration Phase: He reveals facedown exploration tokens in hexes where his units are present.
- Battle Phase: He conducts battle in each contested hex where his units are present.
- Mining Phase: He collects rubium from each controlled hex where his miner units are present. (Miner units include Humans, Fungoids, and Crystallines).
- Draw Phase: He draws one Secret Mission card. If he controls the Monolith, he also draws two Energize cards.
After completing the Draw phase, the player to his left becomes the new active player.
A Player’s Turn (Quick Reference)
- Deployment: Purchase new units and play Deployment Energize cards.
- Movement: Move each unit once.
- Exploration: Reveal facedown exploration tokens.
- Battle: Conduct battles and play Battle Energize cards.
- Mining: Collect rubium from refineries in each controlled hex where at least one of your units can operate refineries.
- Draw: Draw one Secret Mission card. If the active player controls the Monolith, he also draws two Energize cards.
General Rules & Information
Hidden and Open Information
- Each player’s hand of cards is hidden.
- Each player’s collected rubium, unit supply, Battle Victory cards, and fulfilled Secret Mission cards are open information and cannot be hidden.
Breaking the Rules
Some card and unit abilities override the general rules. In case of a conflict, follow the text on that card or the text on the reference sheet that explains the ability.
States of Hexes
- A hex is considered controlled if only one player has units in the hex.
- Alternatively, a hex is considered contested if more than one player has units in the hex.
- A hex is considered unoccupied if no player has units in the hex.
Turn Phases
1. Deployment Phase
During the Deployment phase, the active player may purchase new units and play “Deployment Phase” Energize cards.
Each unit costs a certain amount of rubium, as shown on each player’s reference sheet. The active player may spend his rubium to purchase as many units as he would like, provided he has sufficient resources to purchase them. He returns spent rubium tokens to the supply.
When purchasing units, he takes the corresponding figures from his supply and places them on any of his home base hexes. The active player may always place these units on any of his home base hexes, even if another player’s units currently occupy that hex.
The number and type of units that the active player can purchase is limited by the number of figures available in his supply. It is possible to run out of a particular unit type. However, as units are destroyed during the game, they return to the player’s supply and may be purchased again later.
The Deployment phase is also the only time that the active player may play “Deployment Phase” Energize cards. To play an Energize card, the active player must state that he is playing it and follow the instructions on the card. After resolving the card text, he places it faceup in a discard pile next to the Energize deck.
2. Movement Phase
During the Movement phase, the active player may move each of his units once. Most units only move one hex, although some units have abilities that allow them to move more than one hex (see “Movement Example” below). When the active player moves one of his units into a hex that contains enemy units, it must immediately stop in that hex (unless its ability says otherwise). Some units cannot enter certain hexes, as noted on the reference sheet and indicated by the images in the hex’s border.
The active player cannot move his units from one contested hex to (or through) another enemy-controlled or contested hex. In other words, he cannot move a unit from one battle to a different battle. However, he may move a unit from a battle to one of his controlled hexes or an unoccupied hex.
Some units have special attacks that occur at the end of the Movement phase. These special attacks do not initiate a battle, so the active player does not take a Battle Victory card if one of these attacks is successful.
Movement Example
- The blue player may move his Rock Strider from the contested hex. However, it cannot move to (or through) another contested hex, which prevents it from moving to or through the adjacent Rock Plains controlled by the red player.
- It may either move to the adjacent Liquifungus Forest or to the open Rock Plains.
- Because of the Rock Strider’s ability, it may continue moving through the Rock Plains to the Liquifungus Forest containing a 2-rubium refinery.
End of Movement Phase Attack Example
At the end of the Movement phase, the red player has one Rubium Dragon in a controlled Crystal Spires hex. He uses its special attack to target the adjacent Rock Plains hex. The red player rolls a “5,” which scores a hit. The blue player removes the Fungoid as a casualty.
If the red player also had a Rubium Dragon in the Rock Plains, it would now be in a controlled hex and could perform its special attack against the lone Crystalline in the Magma Pool.
3. Exploration Phase
During the Exploration phase, the active player reveals all facedown exploration tokens in hexes where his units are present. The active player may find the following rewards:
- If the token only shows a unit: he takes one unit of that type from his supply and places it in that hex. During his next turn, he can move the unit and use it in battle like his other units. After placing the unit, return this token to the game box.
- If the token only shows a refinery: he leaves the exploration token faceup on that hex to mark the location of the refinery.
- If the token shows both a unit and a refinery: he receives both rewards. He takes one unit of that type from his supply and places it in that hex. He also leaves the exploration token faceup on that hex to mark the location of the refinery.
Note: Each hex can be explored only once during each game.
4. Battle Phase
During the Battle phase, the active player conducts one battle in each contested hex where his units are present (see “Battle”). If his units are present in multiple contested hexes, he chooses the order in which each battle is resolved.
5. Mining Phase
During the Mining phase, the active player collects rubium from refineries in each controlled hex where at least one of his miner units is present. He takes rubium tokens from the supply equal to the refinery’s number and places them in his play area.
Note: Only units marked with the claw icon on the reference sheet are considered miner units.
Mining Example
The red player proceeds to the Mining phase. He has one Human on each of his home base hexes. He also has one Crystalline in a controlled hex that contains a 1-rubium refinery.
He does control a hex with a 2-rubium refinery, but he does not have any miner units there. As such, he cannot collect rubium from that hex. So, in total, the red player collects 8 rubium.
6. Draw Phase
During the Draw phase, the active player draws one Secret Mission card and keeps it hidden in his hand. If he draws a Secret Mission: Objective card and meets its requirements, he can play it immediately.
If he controls the Monolith hex, he draws two Energize cards and keeps them hidden in his hand until he chooses to play them.
Combat & Battles
Battle Rules
This section explains how to conduct a battle.
Battle Order
Units attack in a specific order, known as the battle order. This order is indicated on the reference sheet and runs from right to left – with the most powerful units attacking first, and the least powerful attacking last. In other words, all Rubium Dragons attack first, then all surviving Lava Leapers attack, followed by all surviving Rock Striders, and so on.
Each unit rolls only one attack during battle. After each unit attacks in order, the battle is over – even if both the attacker and defender have units remaining in that contested hex.
When a unit type attacks, both the attacking player and the defending player simultaneously roll for each of their units of that type. The attacker rolls the black dice and the defender rolls the white dice. One hit is scored for each die result that is equal to or higher than the unit’s combat value.
For each hit scored, the opposing player must remove one casualty. He chooses one of his units in the contested hex and returns it to his supply. That unit does not participate in the rest of the battle. If the unit is removed from battle before it has a chance to attack, it no longer has the opportunity to attack.
The active player is always the attacker, and the other player involved in the battle is always the defender. In cases where more than one opponent has units in a hex, the active player chooses one of those opponents to be the defender. Only the attacker and the defender participate in the battle. If the attacker destroys all of the defender’s units, the attacker wins the battle (although the hex is still contested).
Order of Choosing
The attacker removes casualties first.
During the Battle phase, players are allowed to trigger unit abilities and/or play Energize cards in this order: attacker, defender, then other players in clockwise order from the defender’s left.
Each time a player either triggers a unit ability or plays an Energize card, fully resolve the ability. Then all players get an opportunity to trigger a unit ability or play an Energize card, following the same order outlined above. After all players pass, begin rolling attacks in battle order.
Results of Battle
- The attacker wins a battle if all of the defender’s units are destroyed. When the attacker wins a battle, he draws one Battle Victory card from the pile and places it faceup in his play area. He may also play one Secret Mission: Battle card from his hand if he fulfilled the conditions on the card during this battle.
- The defender loses a battle if all of his units in the contested hex are destroyed. When the defender loses a battle, he may draw one Energize card.
- If both players mutually destroy each other in the hex, then the attacker wins and the defender loses.
- If both the attacker and the defender have at least one unit remaining in the contested hex at the end of a combat round, neither player wins or loses the battle.
Battle Example
It is the Battle phase during the red player’s turn. His units are present in several contested hexes. He chooses to first resolve a battle in a Rock Plains hex where both he and the green player are present.
- Both players have one Rubium Dragon, so both players simultaneously roll for their Dragon’s attack. The red player rolls a “1” and misses, but the green player rolls a “2” and scores a hit.
- The red player chooses to remove his Human as a casualty and returns it to his supply.
- There are no Lava Leapers in this hex, so Rock Striders attack next. Each player simultaneously rolls his Rock Strider’s attack. The red player rolls a “4” and scores a hit, while the green player rolls a “5,” which also scores a hit.
- The red player removes his Rock Strider as a casualty. The green player removes his Fungoid as a casualty.
The Fungoid and Human were destroyed before their turn to attack, so they do not attack during this battle.
The battle is over in this hex, but the hex is still contested and another battle can occur here on a future turn.
Cards & Victory Points
Card Types
This section explains the different card types in Nexus Ops.
Victory Point Cards
There are two types of cards that award victory points: Battle Victory cards and Secret Mission cards. These cards display a number in the upper-left corner, which indicates how many victory points the card is worth. All faceup cards in a player’s play area count toward his victory point total.
Note: The active player is the only player who may play or receive victory point cards.
Battle Victory Cards
All Battle Victory cards are identical and provide the player one victory point. The backside of this card type is used with the “King of the Hill” optional rule.
After winning a battle during the Battle phase, the active player draws one Battle Victory card from the deck and places it faceup in his play area.
All Battle Victory cards are worth one victory point.
Secret Mission Cards
Secret Mission cards contain various objectives and, when fulfilled, provide the player between one and three victory points.
The active player draws one Secret Mission card during the Draw phase. When a player draws a Secret Mission card, he keeps it hidden in his hand until he fulfills the conditions on the card. Once fulfilled, he may play Secret Mission cards at different times during his turn:
- Secret Mission: Battle cards are played during the Battle phase after winning a battle and fulfilling the conditions on the card. The active player may only play one Secret Mission: Battle card per battle.
- Secret Mission: Objective cards are played during any phase immediately after fulfilling the conditions on the card. The active player may play any number of Secret Mission: Objective cards during his turn, provided that he fulfills the conditions of each card.
Fulfill a Secret Mission Example
- The active player wins a battle in a Liquifungus Forest by destroying one enemy Crystalline, and one of his Fungoids survives the battle. He takes one Battle Victory card from the deck and places it faceup in his play area.
- In his hand he also has “Send in the Fungus Creatures,” which he fulfilled during the recent battle. He places it faceup in his play area.
- During the Draw phase, he draws “Dominate the Forests.” After winning the recent battle, he currently controls the most Liquifungus Forests. He immediately places it faceup in his play area.
Energize Cards
Energize cards provide a temporary bonus, such as enhancing a unit’s abilities or gaining a tactical advantage in combat.
The defender draws one Energize card after losing a battle. If the active player controls the Monolith, he draws two Energize cards at the end of his turn. When a player draws an Energize card, he keeps it hidden in his hand until he chooses to play it.
The active player can only play “Deployment Phase” Energize cards during the Deployment phase of his turn. To play one, the player reads the card aloud to all players and follows the instructions on the card. When finished, he places the Energize card faceup in the discard pile.
“Battle Phase” Energize cards can only be played during the Battle phase and specifically when the card text indicates (e.g., “Play this card before rolling dice”). To play one, the player reads the card text aloud to all players and follows the instructions on the card.
During a battle, any player may play Energize battle cards – even players who are not involved in the battle. Be sure to follow the Order of Choosing.
Exchanging Cards for Rubium
The active player may discard Energize and Secret Mission cards from his hand any time during his turn to gain one rubium per discarded card. Discarded cards are placed faceup next to the appropriate deck.
End of Game
Winning the Game
The game ends immediately if either of the following conditions occur:
- A player acquires 12 or more victory points. That player wins the game.
- A player is eliminated from the game. A player is eliminated if both of the following conditions are true:
- None of his units are on the board.
- He does not have enough rubium to purchase more units, even after exchanging cards for rubium.
The player with the highest number of victory points among the remaining players wins the game. In case of a tie, the tiebreaker order is:
- The tied player with the most controlled hexes wins.
- If there is still a tie, the tied player with the most units on the board wins.
- If there is still a tie, the tied player with the most rubium tokens wins the game.
- Finally, if there is still a tie, the game ends in a draw.
Optional Rules & Variants
Optional Rules Overview
This section explains several optional rules that players may freely use to customize the game to their liking. Although not all of the optional rules can be used together, players can experience Nexus Ops in many different ways by using several optional rules during the same game (e.g., players can use the alternate units, intercepted transmissions, and the vortex). Before starting the game, players must all agree on which optional rules (if any) they wish to use.
Time Is of the Essence
The game ends immediately after a player acquires 10 or more victory points. That player wins the game. The game still ends if a player is eliminated, as described in “Winning the Game.”
In for the Long Haul
The game ends immediately after a player acquires 14 or more victory points. That player wins the game. The game still ends if a player is eliminated, as described in “Winning the Game.”
Executive Orders
During the Receive Starting Rubium step of setup, all players receive one Secret Mission card.
King of the Hill
If the active player controls the Monolith hex during the Draw phase, he may either draw two Energize cards or take one King of the Hill card (the backside of the Battle Victory card) and place it faceup in his play area. If he takes a King of the Hill card, all other players each draw one Energize card.
King of the Hill cards are worth 1 victory point each. Players still gain Battle Victory cards as normal.
Top Priority
Instead of drawing only one Secret Mission card during the Draw phase, the active player draws two Secret Mission cards, chooses one to keep in his hand, and returns the other card to the bottom of the Secret Mission deck.
Extra Exploration Tokens
Included with this game are six extra exploration tokens, marked with green borders. These tokens are meant to increase the variety of rewards that players can find on the board. These bonus tokens can be used in the classic or variant game and in conjunction with any other optional rules.
During the “Place Exploration Tokens” step of setup, instead of returning the exploration tokens with green borders to the game box, players are free to exchange these bonus exploration tokens with any of the other exploration tokens. There can only ever be 18 exploration tokens on the board (12 on the Energy Dependence two-player board), so return all unused exploration tokens to the game box.
Note: For optimal game balance, it is recommended that the entire group of exploration tokens contain refineries that generate no fewer than a total of 16 rubium.
Intercepted Transmissions
After preparing the Secret Mission deck during setup, draw two more Secret Mission cards than the number of players in the game. (For example: in a two-player game, players draw four Secret Mission cards; in a three-player game, players draw five Secret Mission cards; in a four-player game, players draw six Secret Mission cards.) Reveal these cards by placing them faceup near the board where all players can see them. This row of cards is called the transmission line.
During the game, players do not draw Secret Mission cards into their hand. Instead, the active player may fulfill any card(s) in the transmission line. When the active player fulfills a card, he places it faceup in his play area. During the Draw phase, he replenishes the transmission line back to the original total.
The active player still takes one Battle Victory card after winning a battle, and he is limited to fulfilling only one Secret Mission: Battle card per battle.
Four-Player Team Rules
To play a four-player team game, set up the game for four players as shown in the diagram on page 12. Players separate into two teams of two players each. Teammates sit across from each other. Instead of playing to 12 individual victory points, the first team to reach a combined total of 20 victory points wins the game.
At the end of the Draw phase, the active player’s teammate may choose one card from his hand and pass that card facedown to the active player, who adds it to his hand. The passed card can either be an Energize card or a Secret Mission card.
If the active player moves any of his units into a hex that contains his teammate’s units, the hex is considered contested, but no battle occurs. Neither player collects rubium from a refinery in that hex. The active player can move units that are capable of moving more than one hex through hexes containing his teammate’s units as long as none of the opposing team’s units are present.
Teammates may discuss whatever they like, but all talk must be public. Also, aside from the card-passing rule explained above, a player may show his teammate some cards from his hand. If he does so, he must show it to all players.
If one player is eliminated, the game does not end. The remaining teammate continues playing and can still win the game for the team. The eliminated player’s victory points still count toward the team’s total victory points.
If two teammates are both eliminated, the game ends. The surviving team wins the game.
Vortex
During the Place Terrain step of setup, flip the Monolith hex to reveal the Vortex. Each edge of this hex is labeled with one face of a six-sided die. It does not matter how players orient this hex during setup, but once placed it must remain in that position for the duration of the game.
Each time before the first player takes his turn, he must follow these steps to resolve the Vortex’s effect:
- Roll one black die and one white die, and then refer to the numbers on the Vortex hex. The Vortex sucks in all units occupying the hex that borders the number shown on the black die. Then the storm blows these units into the hex that borders the number shown on the white die. Simply move the units to this new hex.
- Then roll one die and refer to the numbers on the Vortex hex. The Vortex projects massive amounts of energy toward the hex that borders the number shown on the die. All units occupying that hex are destroyed.
- Finally, for each controlled hex adjacent to the Vortex, the controlling player draws one Energize card.
Note: Skip these steps during his first turn of the game.
The blue border surrounding the Vortex hex indicates that no units can enter that hex. Cards affecting the Monolith do not affect the Vortex. During setup, return “Death From Above” and “Secure the Monolith” to the game box; they are not used.
Alternate Units
To play with alternate units, use the backside of the reference sheet labeled “Alternate Units.” Some clarifications to the alternate unit abilities are explained here:
- Clones: If players have difficulty remembering the purchasing limit, simply place newly purchased Clones on the refinery art. Then at the end of the turn, slide all Clones off the refinery art.
- Shardian: If a defender destroys his own Shardians and he has no other units in the contested hex, he loses the battle and the attacker wins the battle.
- Sporling: It is possible for Sporlings to move several times and participate in multiple battles during a single turn.
- Boulder Blitzer: If in a Rock Plains, Boulder Blitzers attack before all other units (instead of after Magma Divers).
- Magma Diver: When moving from a Magma Pool, Magma Divers “dive” down and may surface in any other Magma Pool as well as any hex adjacent to a Magma Pool.
- Monolith Wyrm: Each time the Monolith Wyrm scores a hit during its special attack, the owner must roll another die. This process continues until the Monolith Wyrm misses.
Alternate Two-Player Boards
This section describes how to set up and play with alternate two-player boards.
Energy Dependence
During the “Place the Terrain” step of setup, set aside the following terrain tiles:
- 3 Double-hex tiles with a Liquifungus Forest
- 1 Double-hex tile with a Crystal Spires
- 1 Single-hex Liquifungus Forest
- 1 Single-hex Crystal Spires
- 2 Single-hex Magma Pools
Return all other terrain tiles to the game box. Then shuffle the set aside terrain tiles and build the board according to the setup diagram on page 12.
During the “Place Exploration Tokens” step of setup, set aside the following 12 exploration tokens into two identical piles that contain:
- 2 Rock Strider tokens
- 1 Rubium Refinery (2) tokens
- 2 Rubium Refinery (1) + Crystalline tokens
- 1 Rubium Refinery (1) + Fungoid tokens
Return all remaining exploration tokens to the game box. Each player shuffles one pile facedown and then randomly places those tokens on his opponent’s side of the map.
All other rules remain unchanged.
Bad Neighbors
During setup, players place the terrain according to the standard two-player setup. However, during the “Build Bases” step, players must place their home base hexes much closer to each other than required in the standard two-player setup, as indicated in the setup diagram on page 12.
