
Nucleum
2023
Build networks, power urban buildings, secure contracts, and unlock asymmetric technologies in a continuous heavy euro game set in 19th-century Saxony.
150
minutes
1 - 4
player(s)
14+
Heavy


About this board game
Nucleum is a heavy euro board game for 1–4 players, with play time of about 150 minutes, set in 19th-century Saxony during an industrial and technological boom powered by the invention of the Nucleum.
Players take the roles of industrialists competing to lead this new era of energy and prosperity. Factories demand more power, while Saxony needs additional Nucleums, imported Uranium from nearby Bohemia, and railways and power lines to connect energy with the country’s great cities.
Victory points come from developing your networks, building and powering urban buildings, securing contracts, and meeting milestones—randomized endgame goals that shape each game. Each player also has unique asymmetric technologies, providing special powers when they are unlocked.
- Develop networks across Saxony
- Build and power urban buildings
- Secure contracts and pursue randomized milestones
- Unlock unique asymmetric technologies
Gameplay is continuous, with players taking turns one after another rather than moving through rounds or phases. This creates a streamlined flow as industrial plans develop and the demands of the growing economy intensify.
Inspired by an alternate history in which Elsa von Frühlingsfeld’s Uranium-powered invention transformed Saxony, Nucleum combines industrial expansion, energy development, and technological progress in a challenging strategic setting. Compete to become the leading inventor, engineer, or industrialist at the Saxon court.
Mechanics
Designers
Illustrators
/pic7182955.jpg)

Board Game Rules for
Nucleum
NUCLEUM
AN ATOMIC STRATEGY GAME BY DÁVID TURCZI AND SIMONE LUCIANI
When Elsa von Frühlingfeld presented her invention to King Frederik Augustus II of Saxony, people thought it was trickery. She used the recently isolated element Uranium to heat up a jar of water and used the resulting steam to power an engine that kept the Uranium active via a process she called “atomization.” Her device, the Nucleum, ushered in a new era of energy and prosperity over the next decades. Saxony went from a minor regional power to the hub of European science and engineering. Now, a generation later, factories are still hungry for more power, demanding bigger and more Nucleums to be built, more Uranium imported from the nearby country of Bohemia, and railways and power lines built across the country to carry the tamed power of the atoms to Saxony’s great cities. Inventors, engineers, and industrialists flock to the Saxon court, vying to be the leader in this new industrial revolution.
LIVING RULES PLEDGE
We pledge to support every game well after its initial release. Despite rigorous play testing and multiple rounds of both internal and external proofreading and editing, occasionally the need for rules corrections or minor game play adjustments are discovered only several months or years after the game was manufactured. We promise to produce timely rules updates as necessary, along with expanded FAQ clarifications if needed, available for download from our website in digital PDF format.
Missing or damaged components:
Although we take a lot of care to make sure that your game is complete, manufacturing mistakes can still leave you with a missing or damaged component. If that happens, please contact us to receive replacements swiftly, and with our sincere apologies.
Customer support: https://boardanddice.com/customer-support/
COMPONENTS
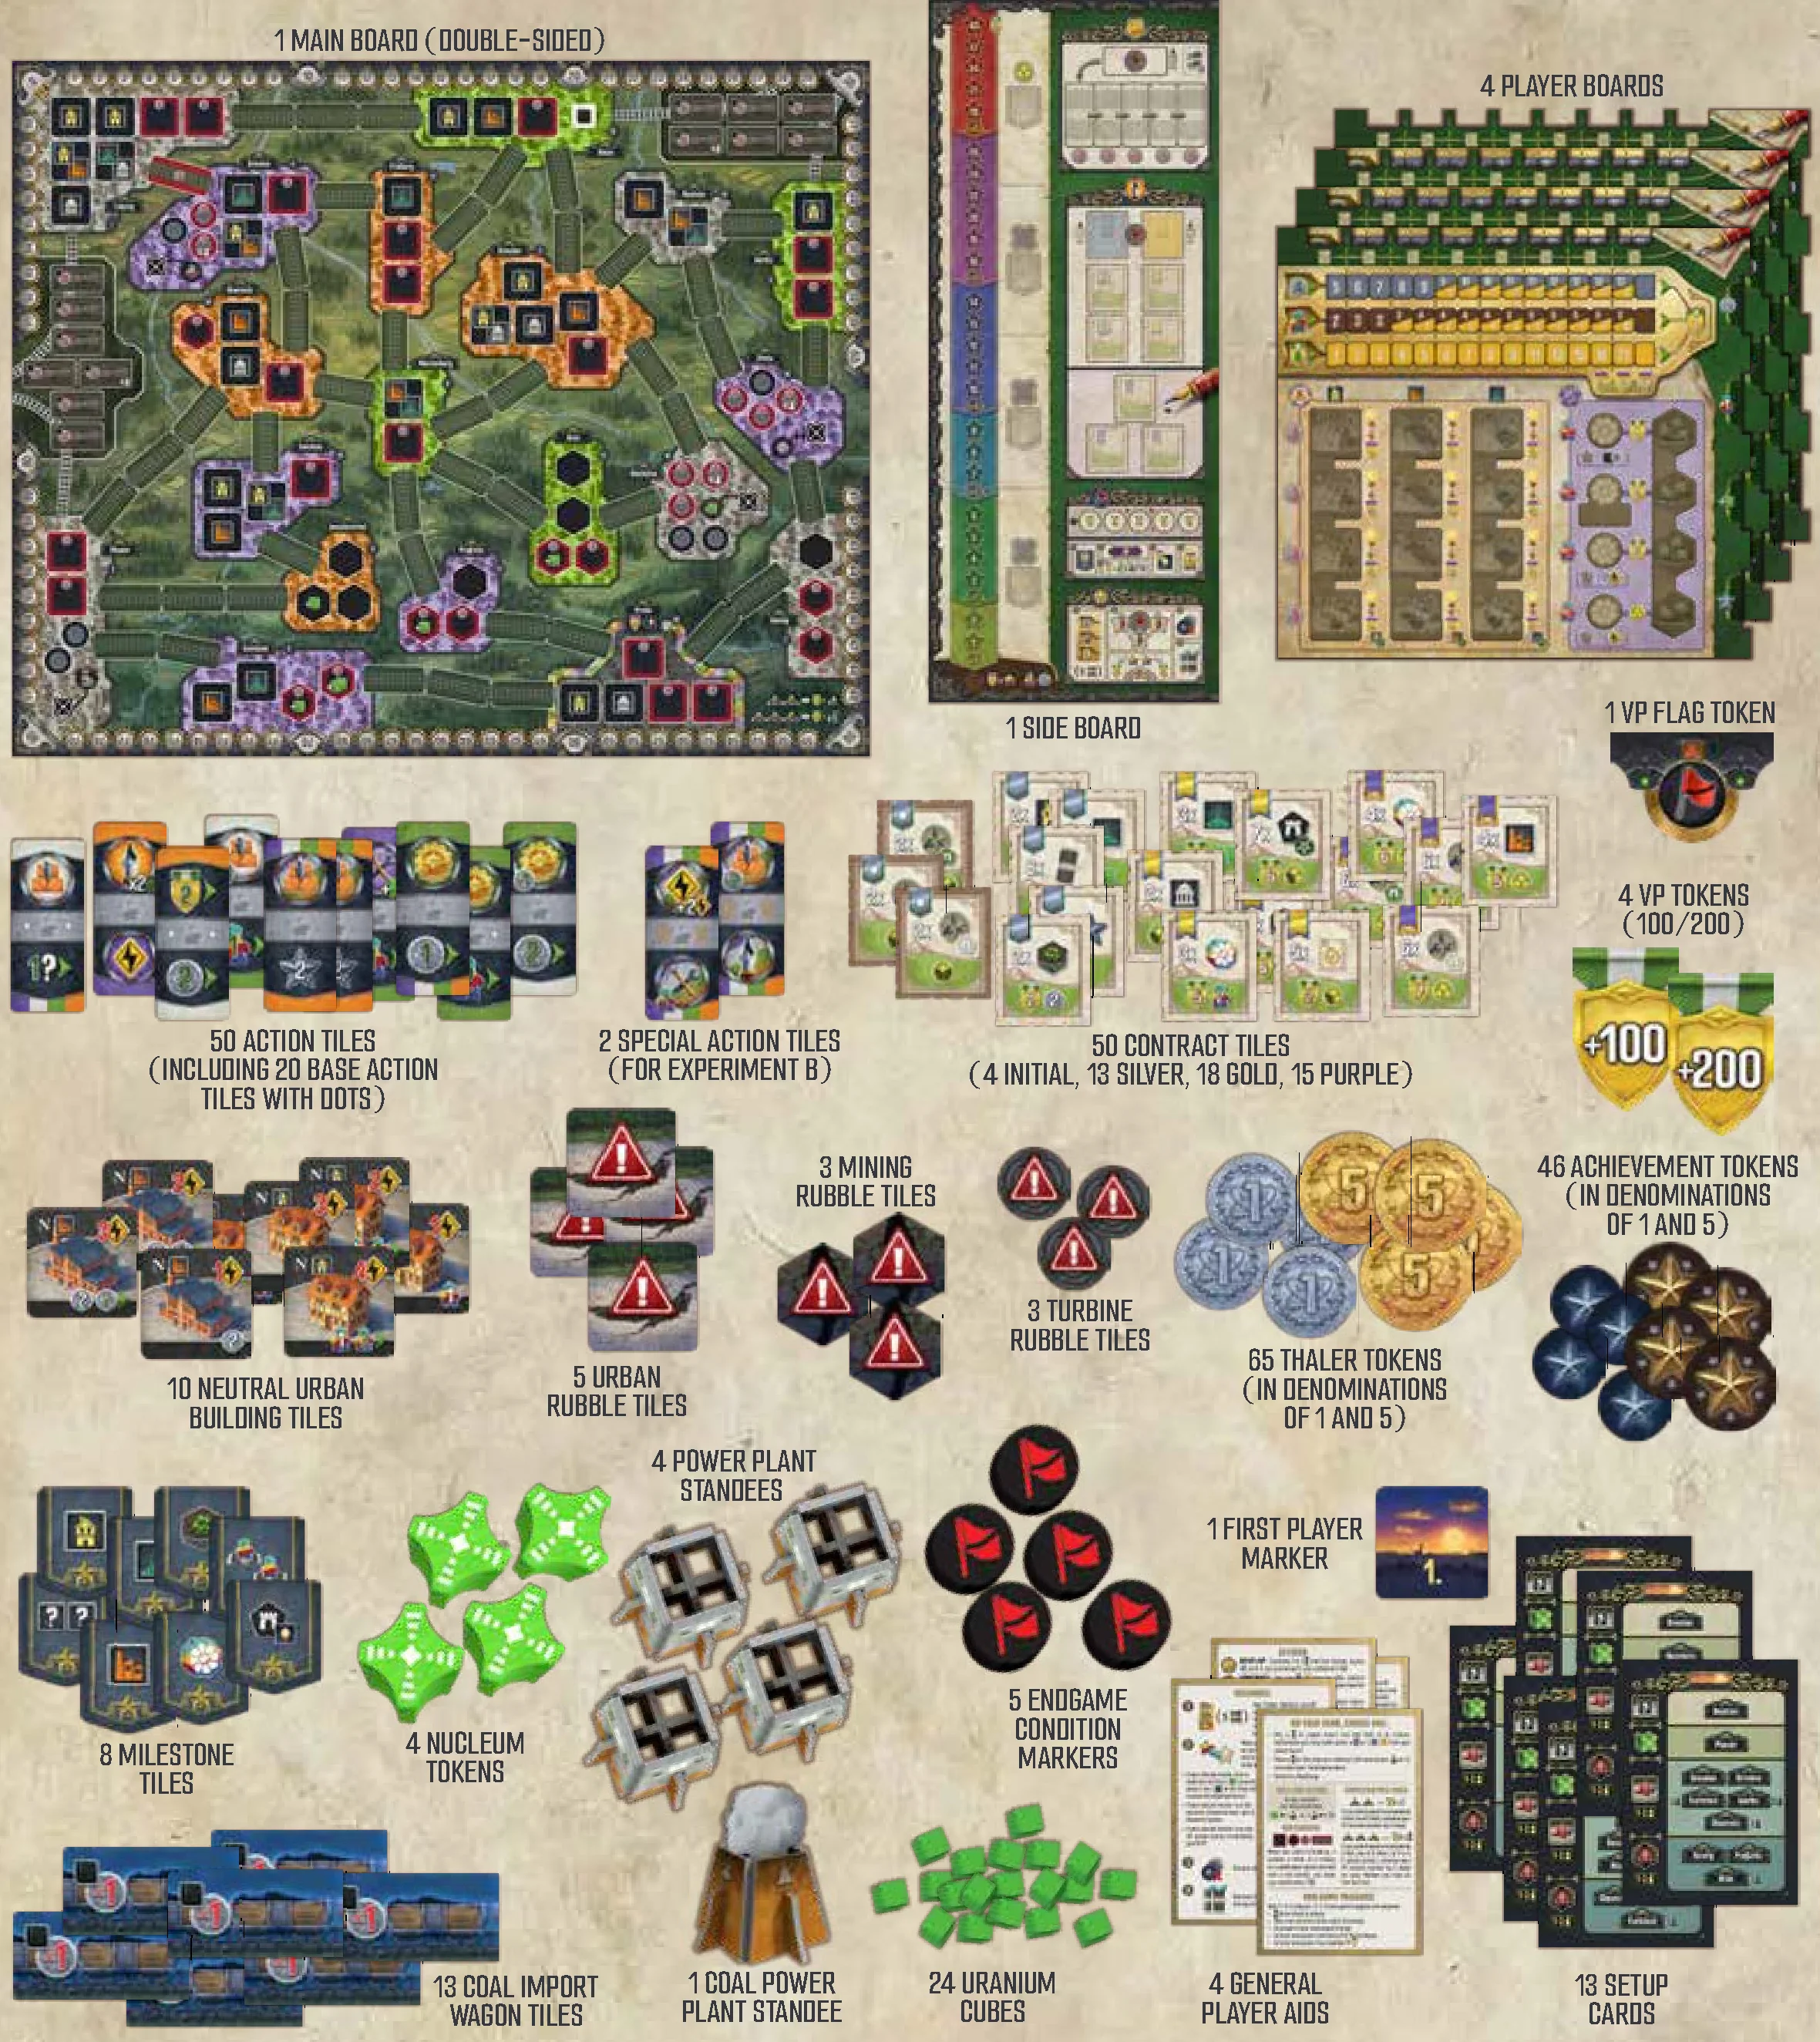
- 1 Main Board (double-sided)
- 1 Side Board
- 4 Player Boards
- 50 Action Tiles (including 20 base action tiles with dots)
- 2 Special Action Tiles (for Experiment B)
- 50 Contract Tiles (4 Initial, 13 Silver, 18 Gold, 15 Purple)
- 10 Neutral Urban Building Tiles
- 5 Urban Rubble Tiles
- 3 Mining Rubble Tiles
- 3 Turbine Rubble Tiles
- 65 Thaler Tokens (in denominations of 1 and 5)
- 46 Achievement Tokens (in denominations of 1 and 5)
- 4 VP Tokens (100/200)
- 1 VP Flag Token
- 8 Milestone Tiles
- 4 Nucleum Tokens
- 4 Power Plant Standees
- 1 Coal Power Plant Standee
- 5 Endgame Condition Markers
- 1 First Player Marker
- 13 Coal Import Wagon Tiles
- 24 Uranium Cubes
- 4 General Player Aids
- 13 Setup Cards
PER EXPERIMENT (×4)
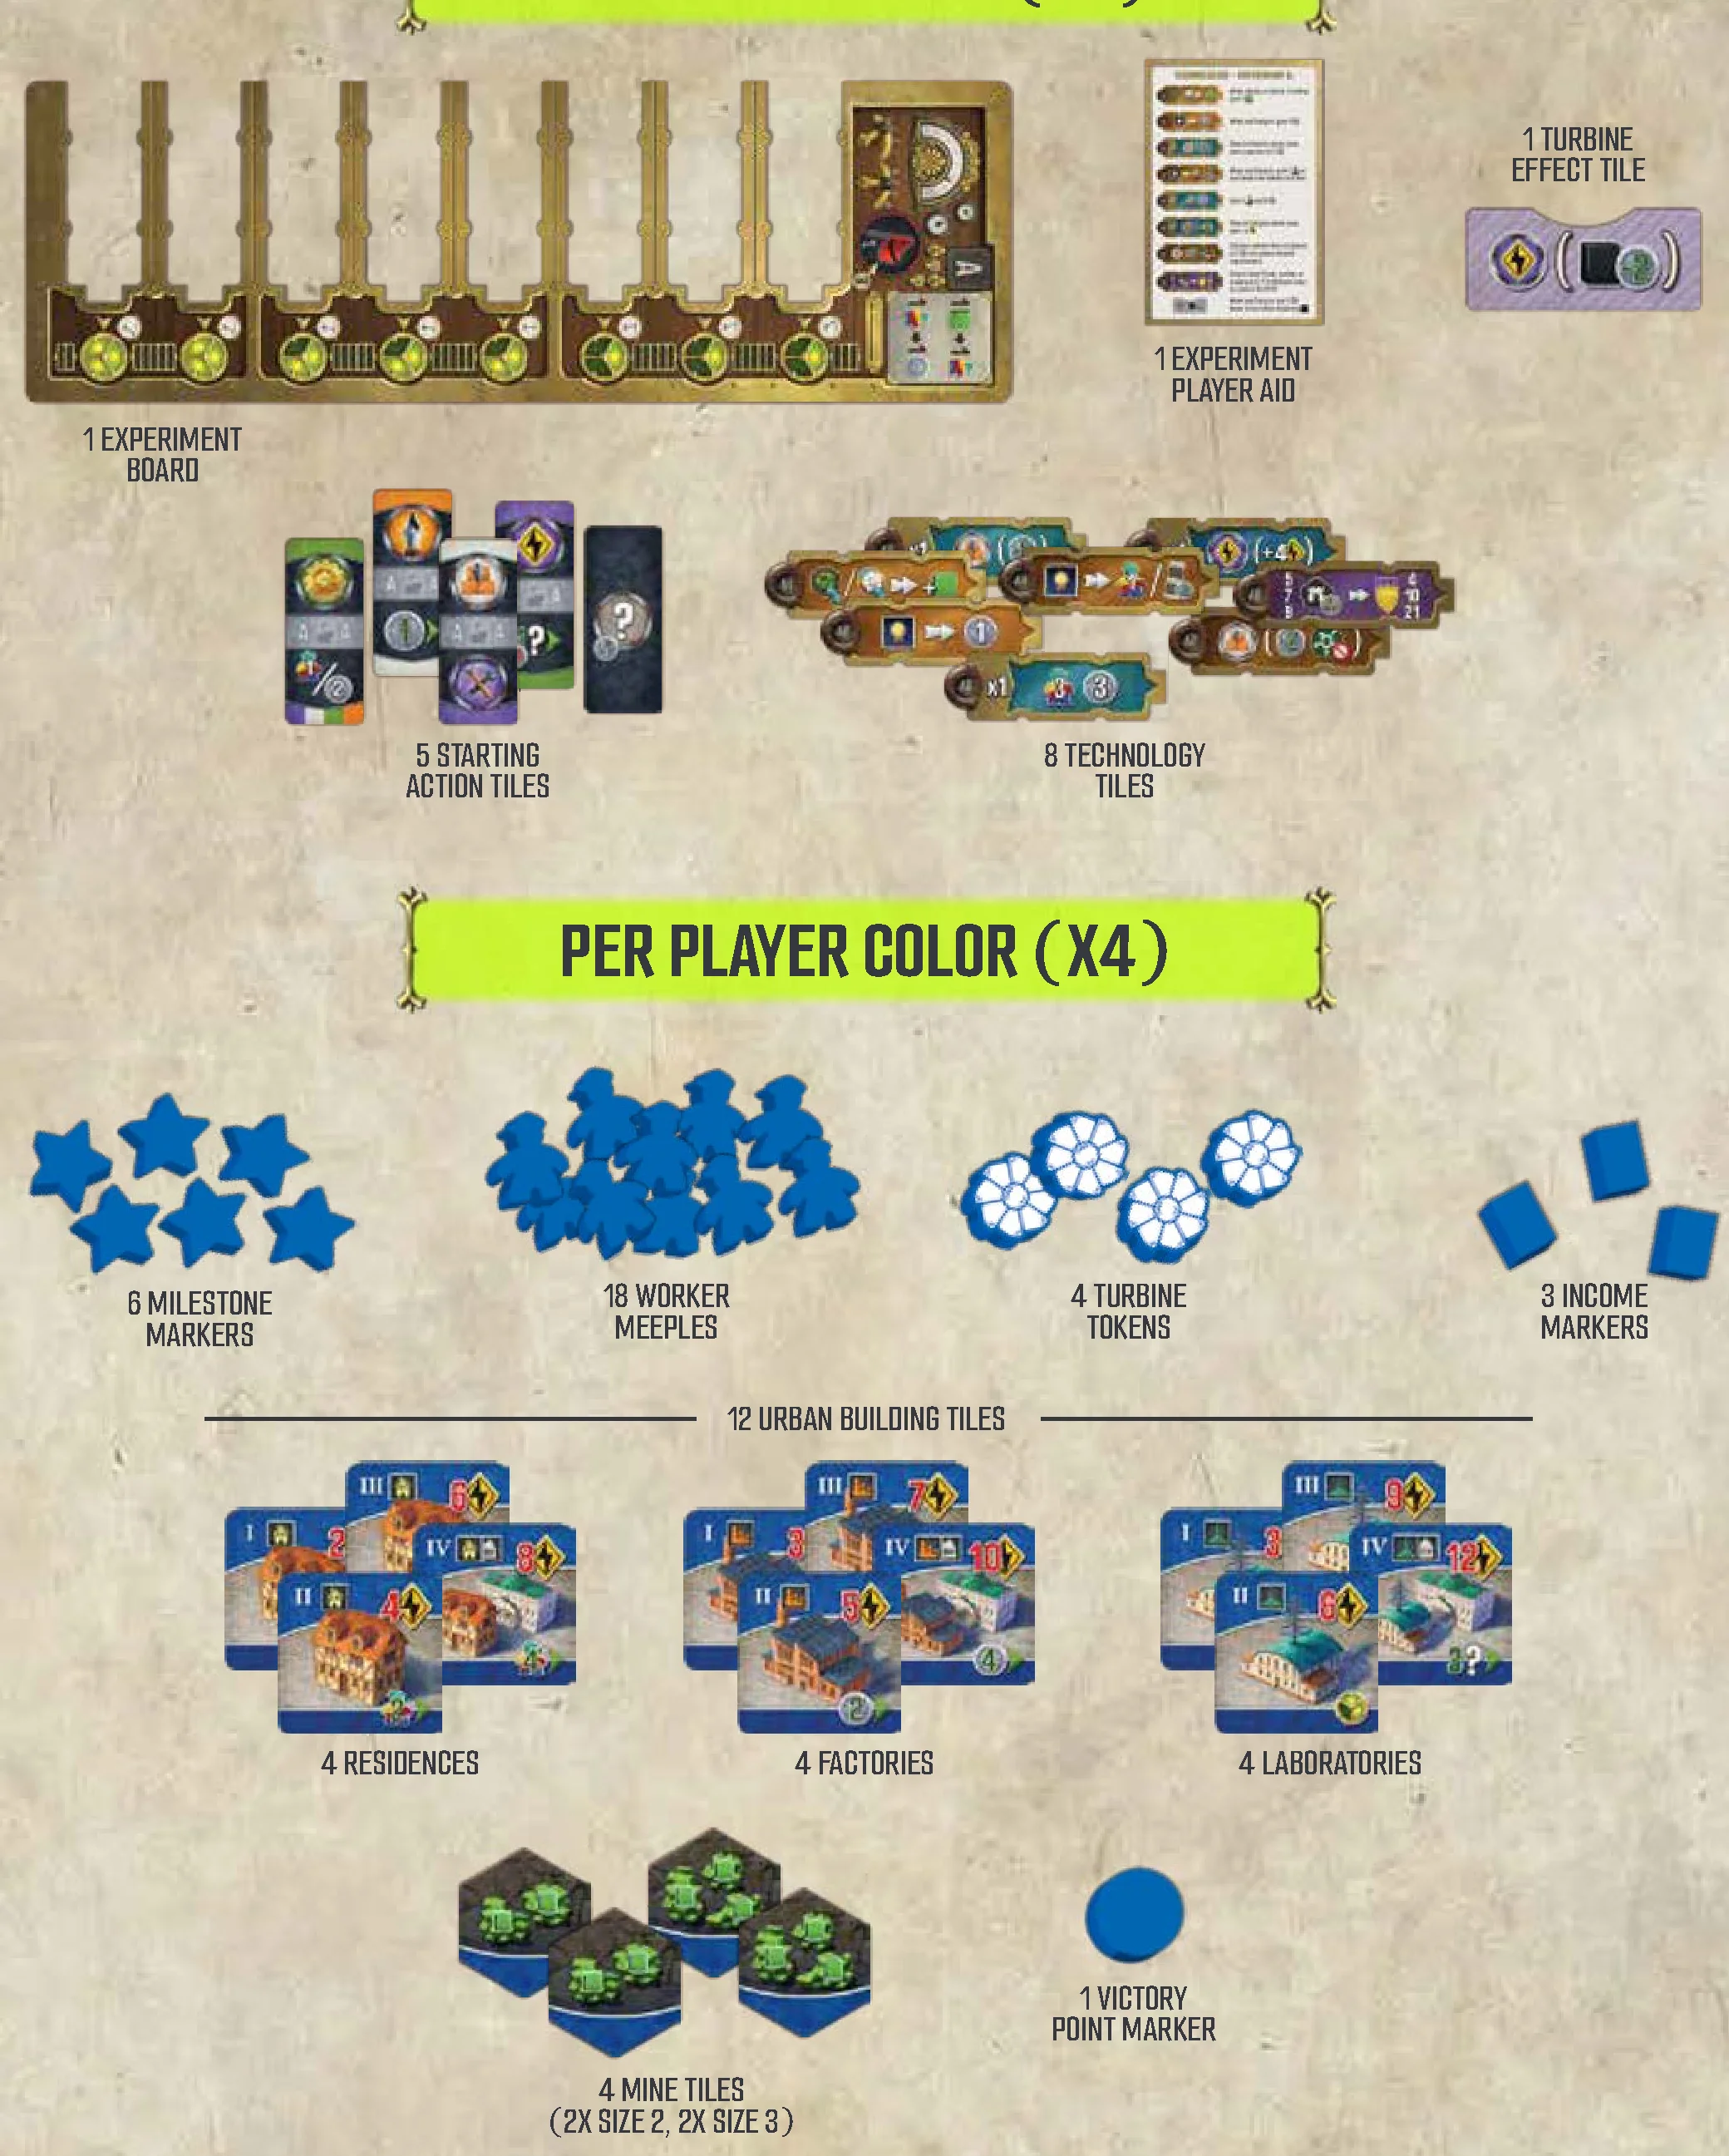
- 1 Experiment Board
- 1 Turbine Effect Tile
- 1 Experiment Player Aid
- 5 Starting Action Tiles
- 8 Technology Tiles
PER PLAYER COLOR (×4)
- 6 Milestone Markers
- 18 Worker Meeples
- 4 Turbine Tokens
- 3 Income Markers
- 12 Urban Building Tiles (4 Residences, 4 Factories, 4 Laboratories)
- 4 Mine Tiles (2× Size 2, 2× Size 3)
- 1 Victory Point Marker
Components Limitation: Uranium, Thaler, Achievement tokens, and Milestone markers are considered unlimited. If you run out, use any suitable alternative(s). All other components are strictly limited to what is provided in the game box.
Thaler and Achievement tokens have denominations of 1 and 5 – you may make change any time as necessary.
SETUP
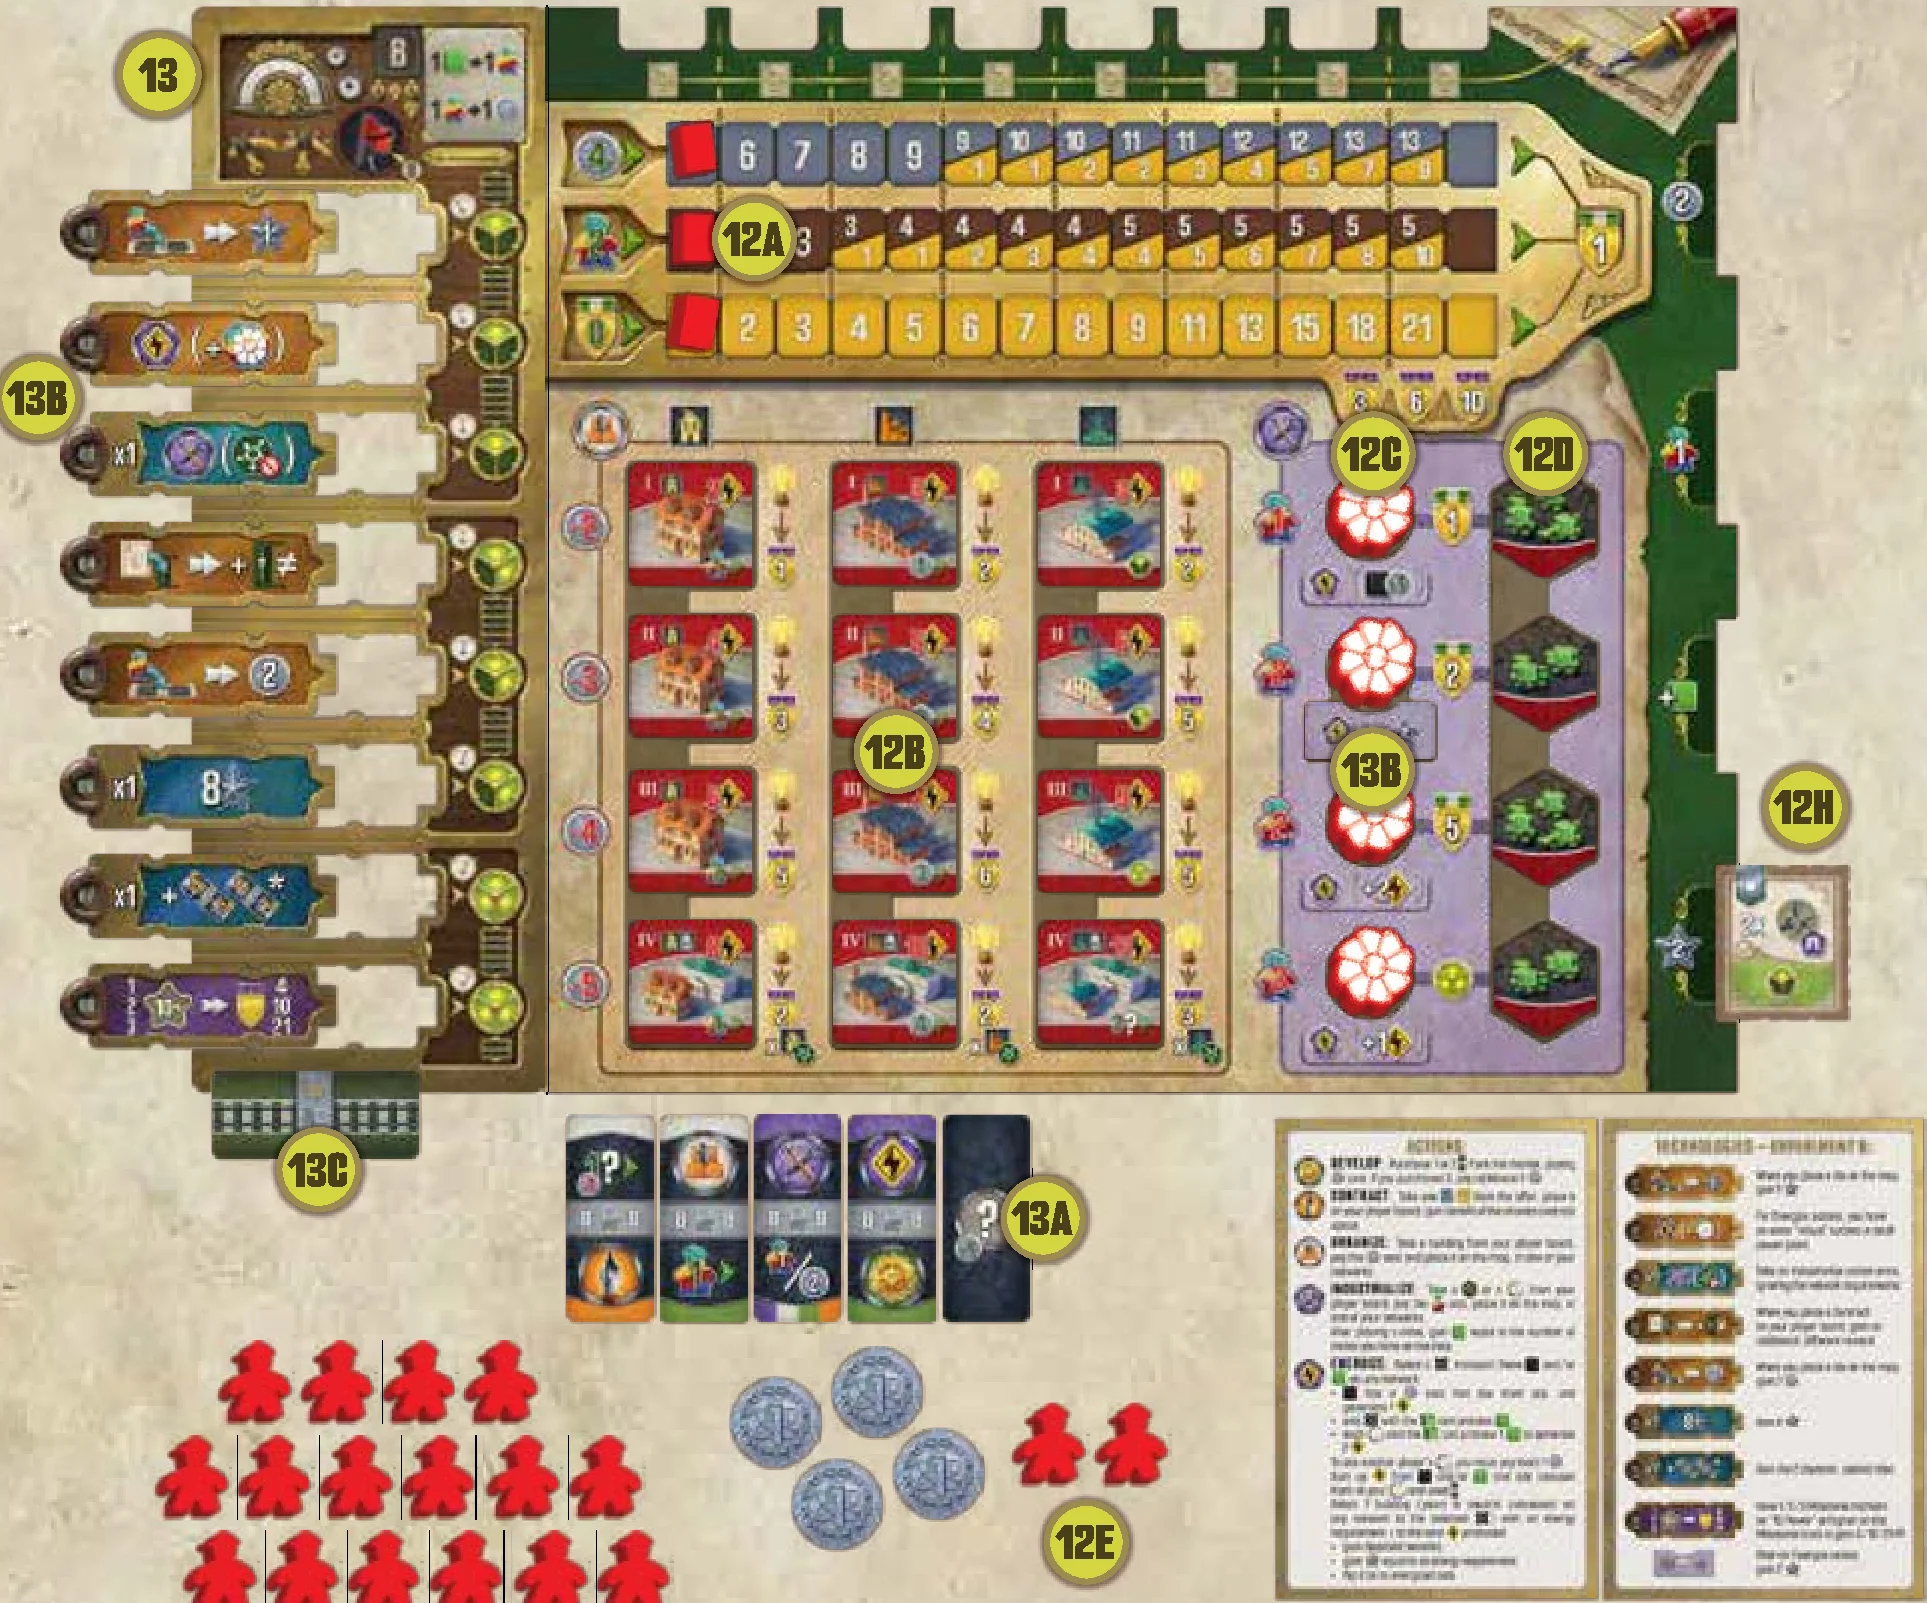
MAIN BOARD & SIDE BOARD SETUP
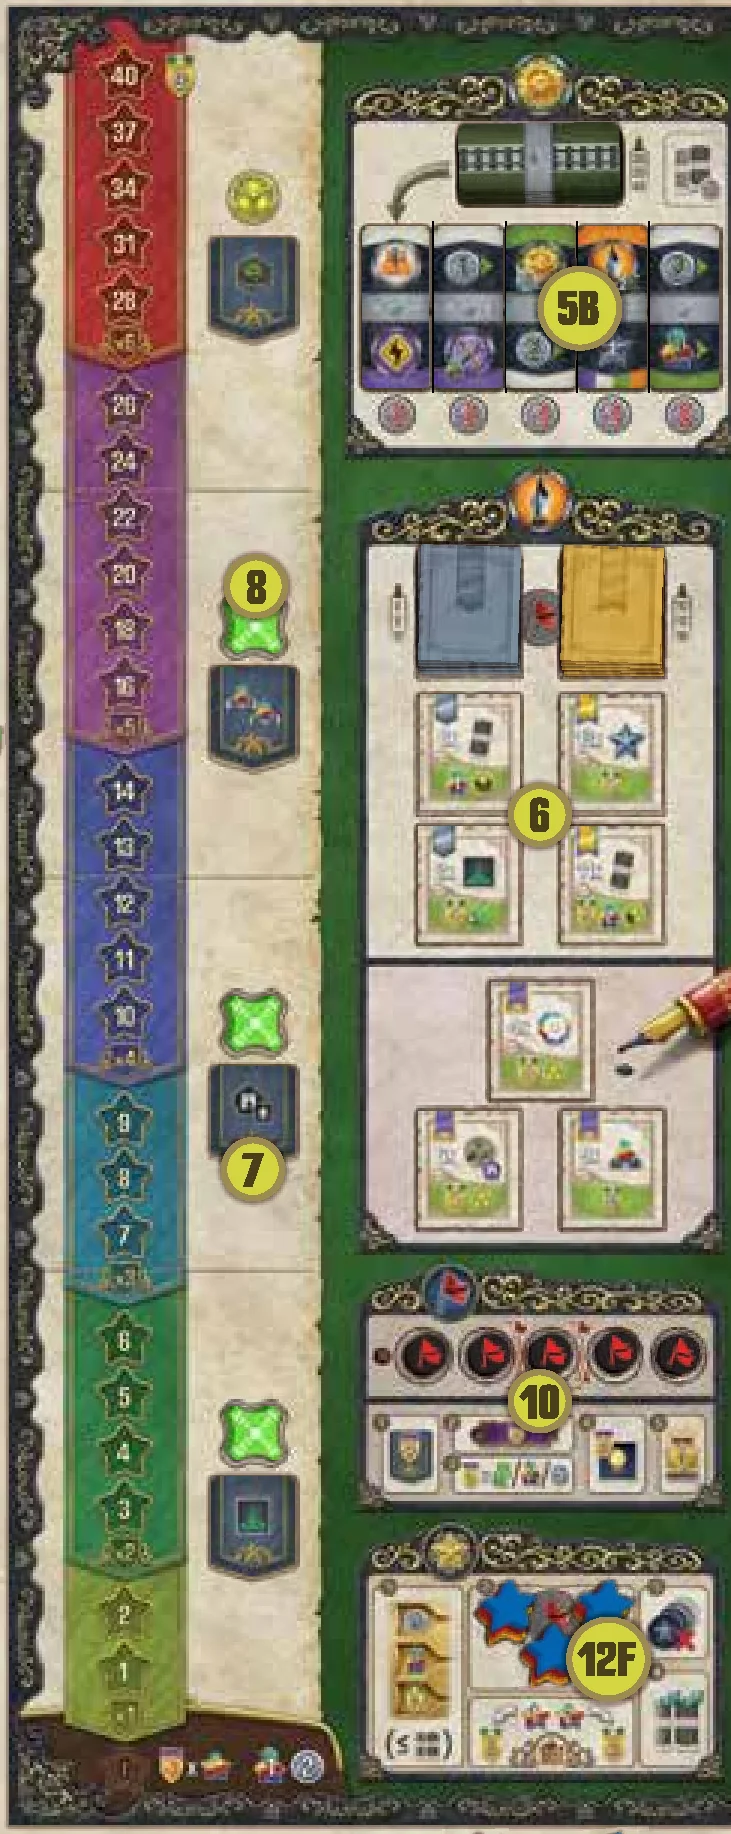
- Place the main board in the center of the table with the side matching the number of players facing up, and place the side board next to the main board.
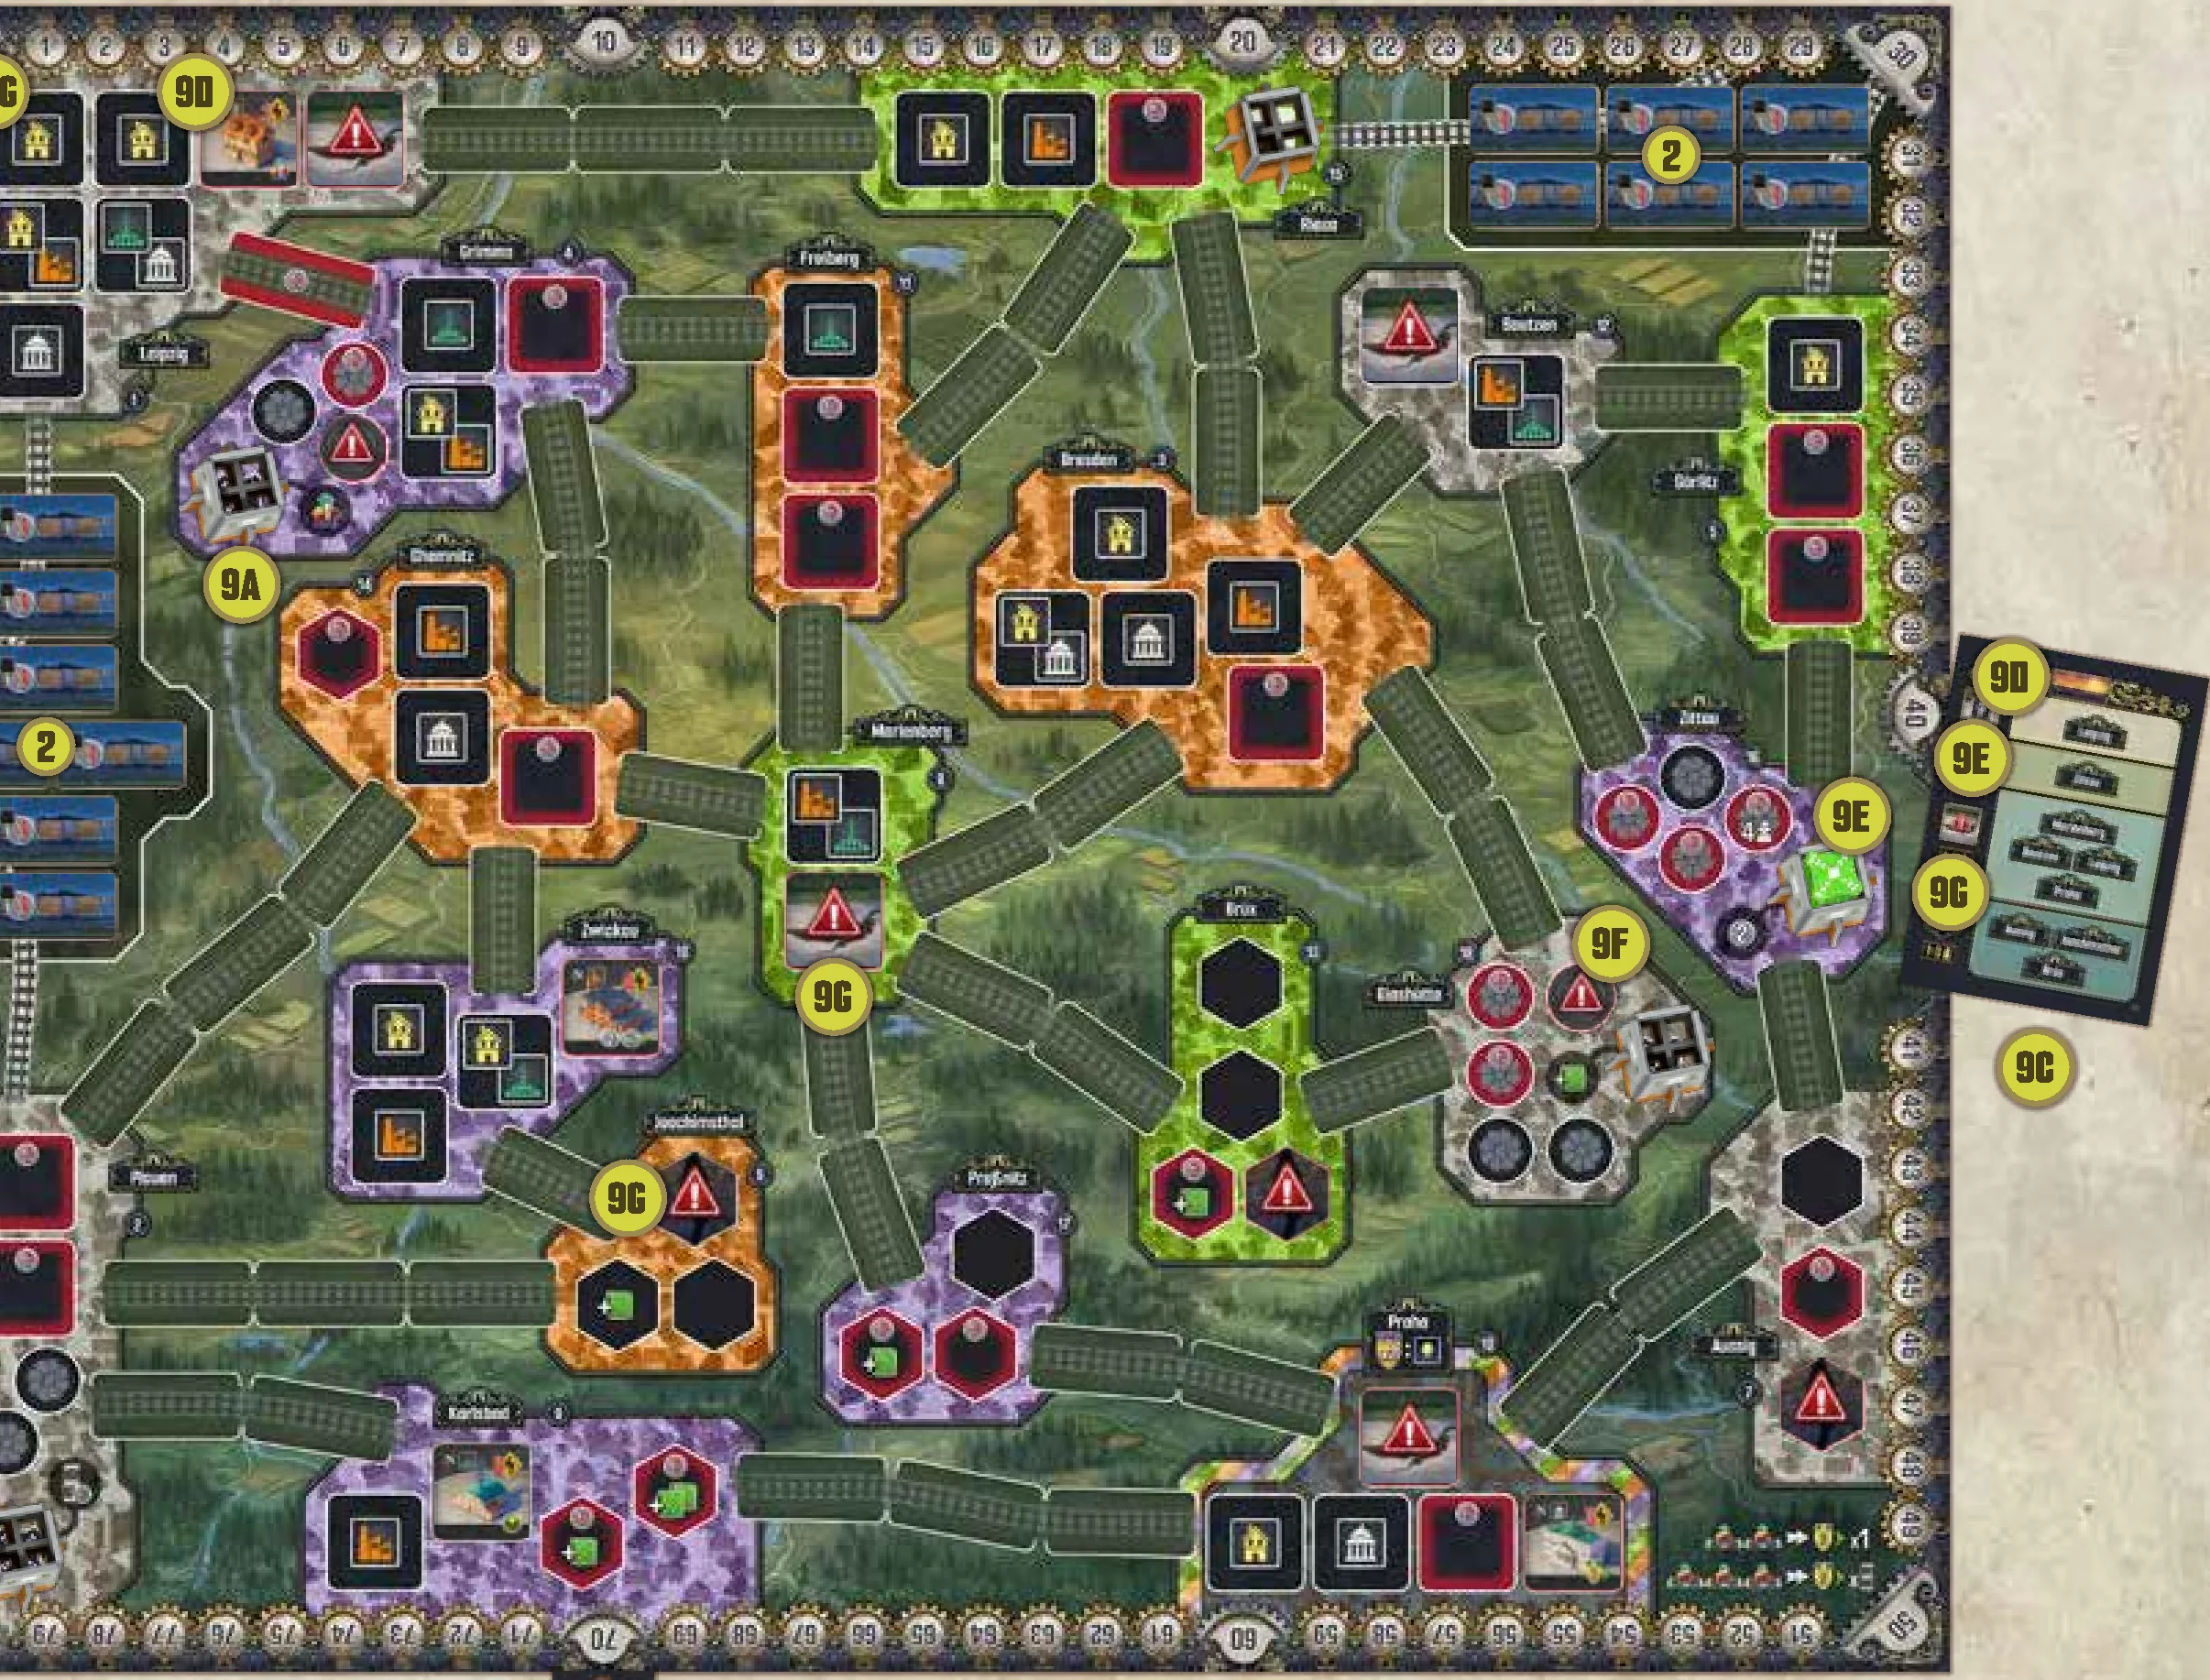
- Place the Coal Import Wagon tiles with the side showing “-1 Thaler” facing up on the indicated spots of the two coal production areas. Note: when playing with 3 players, leave one spot on each area empty. Return any excess Coal Import Wagon tiles to the game box.
- Place all the Thaler tokens, Uranium cubes, and Achievement tokens in a general supply next to the main board.
- Place VP Flag token under “70” spot on the VP Track.
- Separate the 20 Base Action tiles. Shuffle the remaining 30 tiles (taking care to not mix in the Starting or Special Action tiles), and add 10/15/25 of them (when playing with 2/3/4 players) to the 20 you put aside earlier. Shuffle this pile well, divide it into three piles, and place one of them in a face-down draw pile on the designated space at the top of the side board and put the other two face-down close to the side board.
- A. Return the unused Action tiles to the game box.
- B. Draw and reveal 5 Action tiles from the draw pile, and place them on the indicated market spaces on the side board.
- Separate the Contract tiles by type (Initial, Silver, Gold, and three types of Purple) based on their backs.
- A. Randomly give each player one Initial Contract.
- B. Shuffle the rest of the Contracts by type to create five stacks.
- C. For a 2-/3-/4-player game, place 6/9/12 randomly selected Silver Contracts in a face-down stack on the indicated space on the side board. Return all remaining Silver Contract tiles to the game box.
- D. For a 2-/3-/4-player game, place 10/12/16 randomly selected Gold Contracts in a face-down stack on the indicated space on the side board. Return all remaining Gold Contract tiles to the game box.
- E. Place one random Contract of each of the three Purple types face up on the matching space on the Contract market on the side board.
- F. Return all remaining Contract tiles (Initial and Purple) to the game box. They will not be used in this game.
- G. Draw two Silver and two Gold Contract tiles, and place them face up on the Contract market on the indicated spaces.
- Shuffle all the Milestone tiles, and randomly assign one face up to each of the four indicated spaces of the Milestone track. Return the remaining Milestone tiles to the box.
- Place three Nucleum tokens on the indicated spaces near the Milestone track.
- Perform the map setup:
- A. Place Coal Power Plant standee in Riesa on
 , and 4 other Power Plant Standees in all the Cities with .
 - B. Shuffle the 13 Setup cards.
- C. Reveal one card from the deck.
- D. Randomly select a Neutral Urban Building tile, and place it on an urban site of the city indicated in the first row of the card:
- If possible, place it on a red space.
- Otherwise, place it in a space with an icon matching the tile’s icon (choose a space with only one icon, if multiple options are available).
- If no such space exists, select another Neutral Urban Building tile.
- If a card indicates no Urban Building tile or in a 1- or 2-player game the city’s name has
 by it, skip placing a tile.
- E. Place the fourth Nucleum token on the power plant in the city indicated in the second row of the card.
- F. If playing with 3 players, place 3 Turbine Rubble tiles on Turbine spaces marked with the
 icon.
icon. - G. If playing with 3 or fewer players:
- Place Urban Rubble tiles on one urban site in each of the cities indicated in the third row of the card. If possible, place them on red spaces (otherwise, on a space with one icon), then select topmost/leftmost in the city if there are still multiple options. If a city is listed twice, place two Urban Rubble tiles.
- Place Mining Rubble tiles on one mining space in each of the cities indicated in the fourth row of the card. Place the Mining Rubble tile on the mining space with the smallest possible modifier (including no modifier). Break ties in favor of red spaces and then randomly if still tied. In a 1- or 2-player game, if a city’s name is followed by a , skip placing the Mining Rubble tile.
- Return any unused Rubble tiles to the box.
- H. Repeat steps C and D (draw a new card and place a Neutral Urban Building tile) three more times (so in total, a maximum of four Neutral Urban Building tiles will be placed). If the card drawn would require you to place a Neutral Urban Building tile in a city that has no empty space remaining, skip that placement.
- I. Return all unused Neutral Urban Building tiles and all the Setup cards to the box.
- A. Place Coal Power Plant standee in Riesa on
- Place the five Endgame Condition markers on the spaces in the endgame condition area on the side board.
- Randomly select the first player, and give them the First Player marker.
PLAYER BOARD & EXPERIMENT SETUP
- Each player takes: a player board (placing it in the middle of your player area), a player aid, VP token (100/200) and 4 Thaler from the supply. Choose a color, and take all the components in that specific color:
- A. 3 Income markers, placing one on the first space of each income track (so that the starting income of 4 Thaler, 2 Workers, and 0 VP is visible to their left).
- B. 12 Urban Building tiles, placing them on the spaces that match their level (Roman numeral) and type with the side showing their level face up.
- C. 4 Turbine tokens, placing them on the indicated spaces on your player board.
- D. 4 Mine tiles, placing them on the indicated spaces on your player board in the following order from top to bottom: Mine tile with 3 Uranium spaces, Mine tile with 2 Uranium spaces, Mine tile with 3 Uranium spaces, then Mine tile with 2 Uranium spaces.
- E. 18 Worker meeples. Place 2 of them in your personal supply and the remaining 16 meeples into a reserve. (For your first few games, we strongly recommend starting with 3 Worker meeples in your supply instead.)
- F. 6 Milestone markers. Place 3 of them on the three indicated Milestone spaces near the bottom of the side board and the other 3 into a reserve next to the side board. (The stacking order between players does not matter.)
- G. 1 Victory Point marker, placing it on the “0” space of the scoring track around the edge of the board.
- H. Place the Initial Contract you received earlier during the setup on the bottommost Contract space on your player board (without receiving the benefit).
- Starting with the last player and proceeding counterclockwise, each player selects one of the four Experiments. Take the Experiment board, all the technology tiles, the depicted Turbine Effect tile, all Starting Action tiles, and Experiment player aid belonging to that Experiment (all marked with the Experiment letter).
- A. Place your 5 Starting Action tiles face up next to your player board, creating your tile pool.
- B. Place your Turbine Effect tile in its dedicated space below the second Turbine token on your player board. Also, place your Technology tiles in ascending order in their spaces on the Experiment board, not fully slid.
- C. If any player chose Experiment B, give them the 2 Special Action tiles to stack face down below the Experiment Board. Otherwise, return these tiles to the box.
The game is ready to begin, with the first player taking their turn.
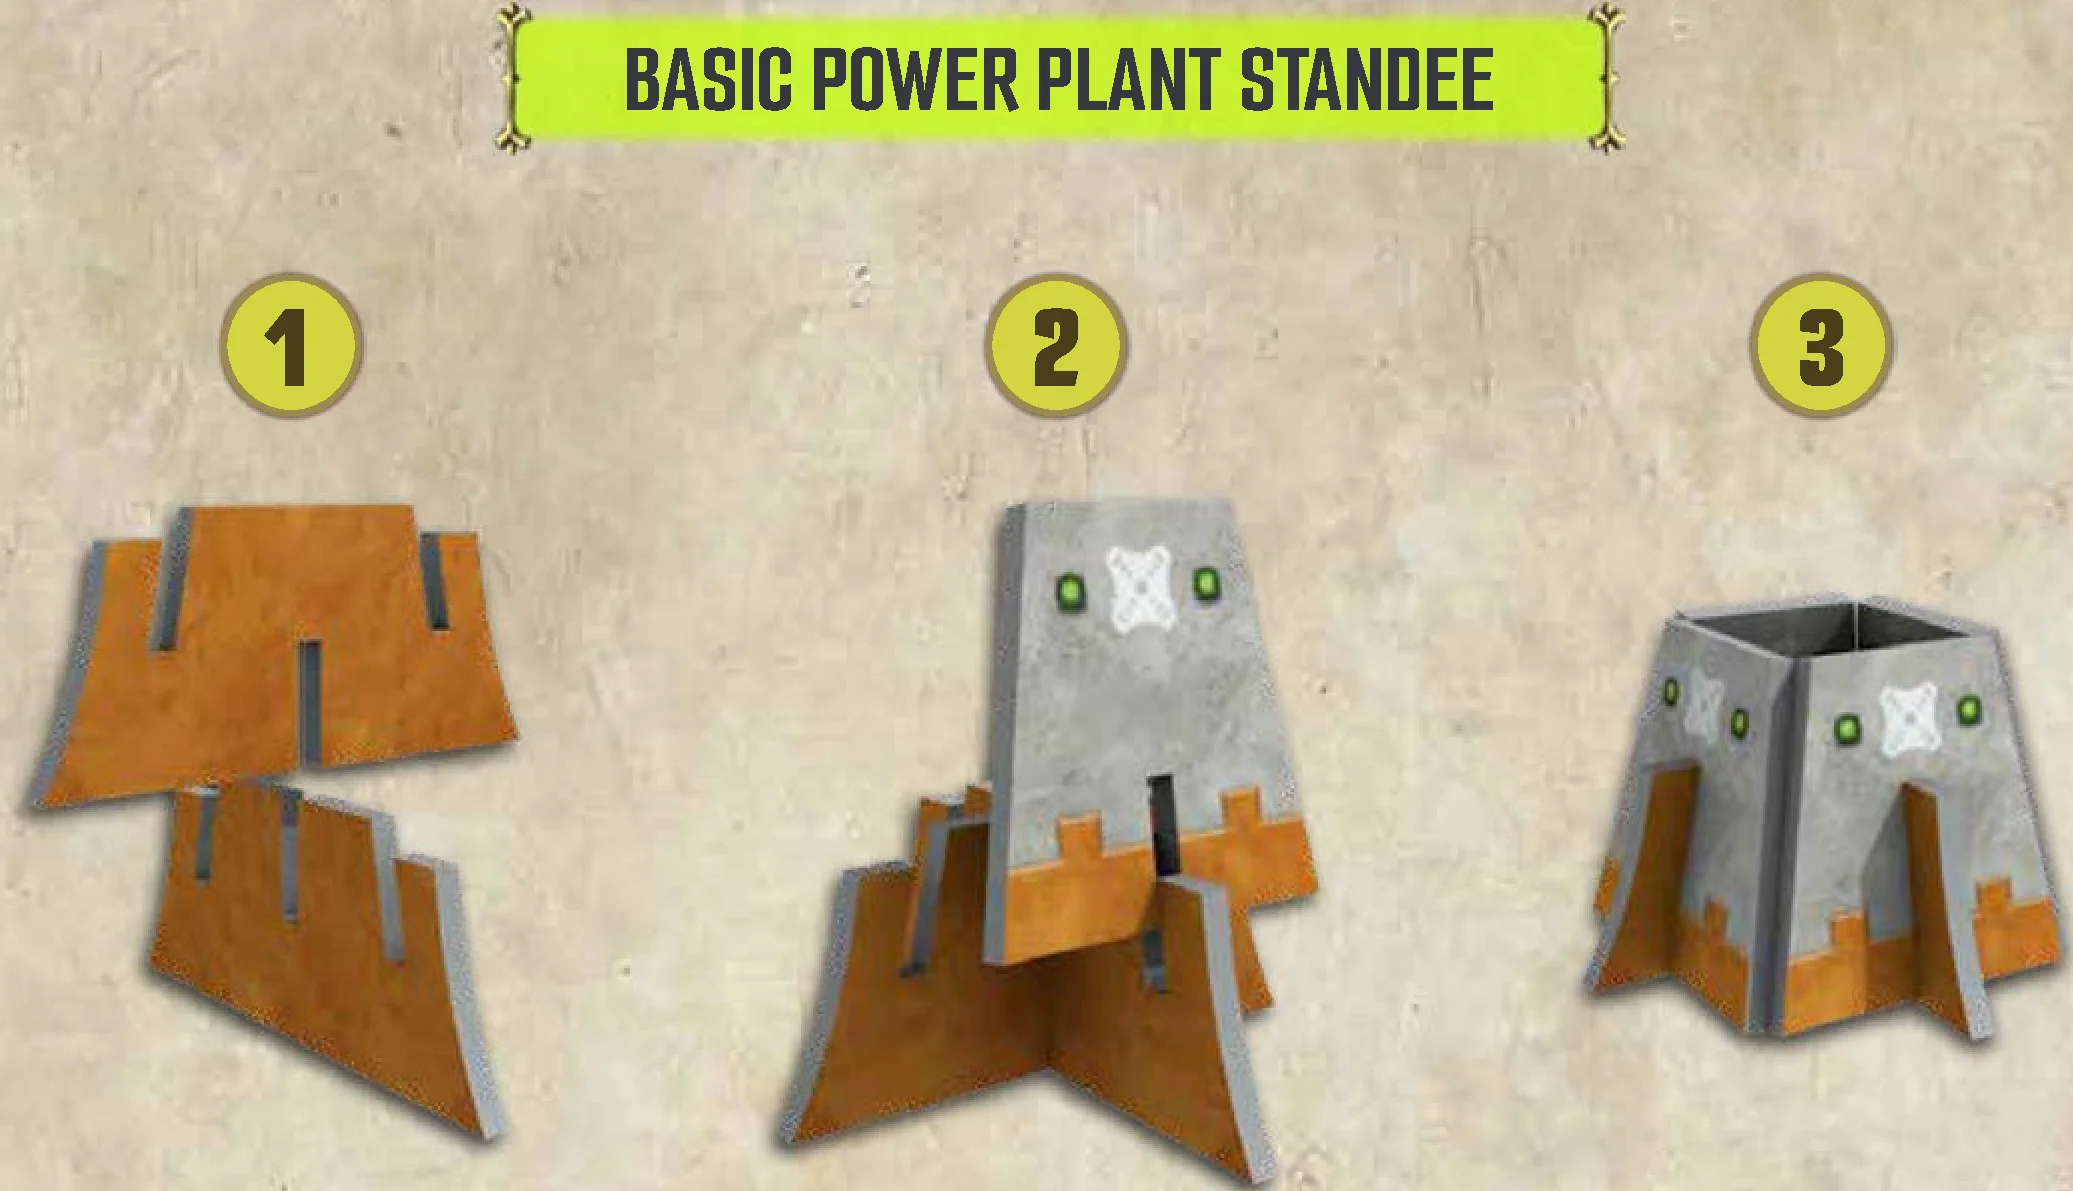
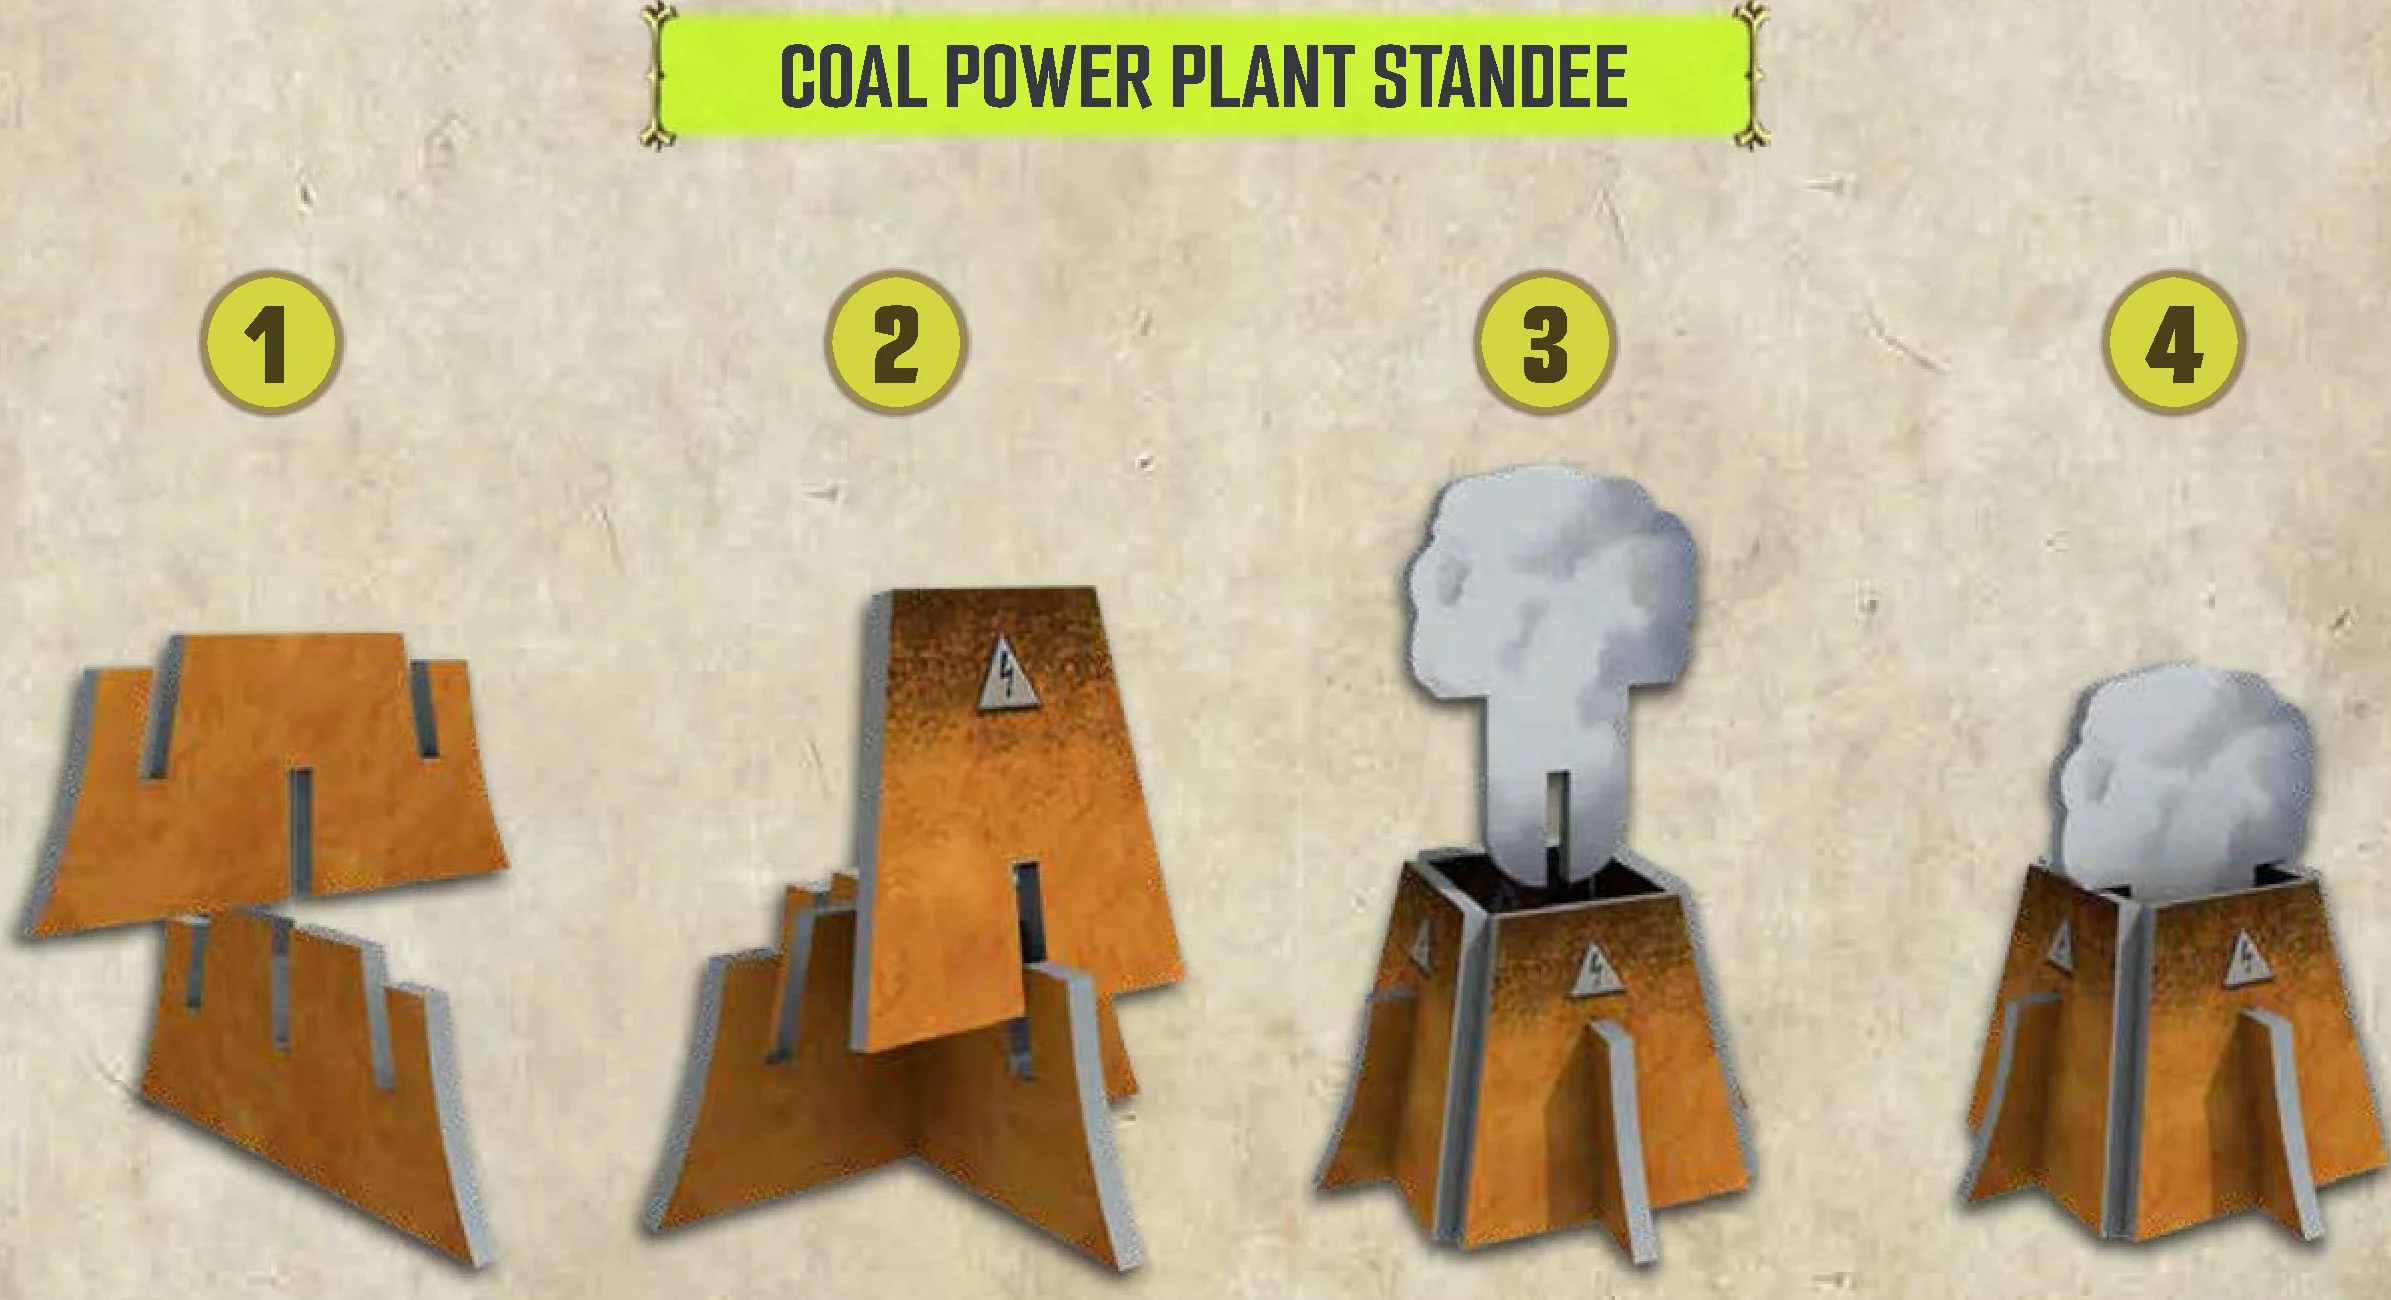
POWER PLANT STANDEE ASSEMBLY
GOAL OF THE GAME
You are an industrialist trying to succeed during the economic and technological boom of 19th-century Saxony, fueled by the invention and spread of the Nucleum (what—in another timeline—people of another century would call a nuclear reactor) and its immense power-generating capabilities. You will strive to earn victory points (VP) by building and powering Urban Buildings, securing Contracts, and meeting milestones dictated by King Frederik Augustus.
GAMEPLAY AND TURN STRUCTURE
Gameplay is continuous; players take turns one after another with no rounds or phases. On your turn, you must do one of the following:
- Play an Action tile from your pool to the leftmost free slot at the top of your player board. Then, resolve one or both actions shown on the played tile. You may not choose this option if there are no free spaces available at the top of your player board or if you have no tiles remaining in your pool. If you choose this option, you may complete one Contract (before or after either of your actions).
- Play an Action tile from your pool to an empty railway space on the main board—placing one of your available Workers on it—to become a Railway tile. Then, you and possibly other players may perform one or more actions, depending on the color matches made by your placement. You may not choose this option if you have no suitable tiles remaining in your pool or if you have no available Worker.
- Perform a Recharge, allowing you to gain income and retrieve all Action tiles from the top of your player board. This may trigger a King’s Day Scoring.
Starting with the first player and moving clockwise around the table, play continues in this fashion until two (or three in a 2-player game) of the five endgame conditions are triggered.
GAINING RESOURCES
Thaler and Achievement tokens are gained from and spent to the common supply.
Workers are gained and spent from your personal supply. You may always spend 1 Worker to gain 1 Thaler but not vice versa. If you ever must gain a Worker and no Workers remain in your reserve, you immediately gain 1 Thaler instead.
Uranium is typically gained when building a Mine. Whenever you gain Uranium, you must either place it on one of your Mines or spend it to gain 1 Worker. You may always spend 1 Uranium to gain 1 Worker but not vice versa.
TIP: EXCHANGING URANIUM FOR WORKERS CAN BE VERY USEFUL, BUT REMEMBER THAT YOU MOSTLY GAIN URANIUM WHEN BUILDING A MINE—AND YOU HAVE ONLY FOUR MINES.
Whenever you gain an income advancement of any kind (Thaler, Workers, Victory Points), move the corresponding Income marker the indicated number of spaces to the right on your player board. If the Income marker is already on the last space of its income track, receive 1 VP instead for each advancement you were unable to gain.
ELEMENTS OF THE MAP
The main board shows cities which have a color (green, white, orange, purple, and the multicolored Praha, which is a special case) and a name. In these cities, you will find:
- urban sites (black squares): where you place Buildings.
- mining sites (black hexagons): where you build Mines to store 2 or 3 Uranium. During setup, some mining spaces may be blocked, while some urban sites contain Neutral Buildings.
- turbine spaces (black circles) and power plants: Nearly all power plants (except Riesa) have a dedicated space for a Nucleum and up to five spaces dedicated to Turbines.
NOTE: Some urban sites, mining sites, and turbine spaces are red; these indicate a higher cost of construction, as explained under their respective actions.
LINKS, RAILWAYS, AND NETWORKS
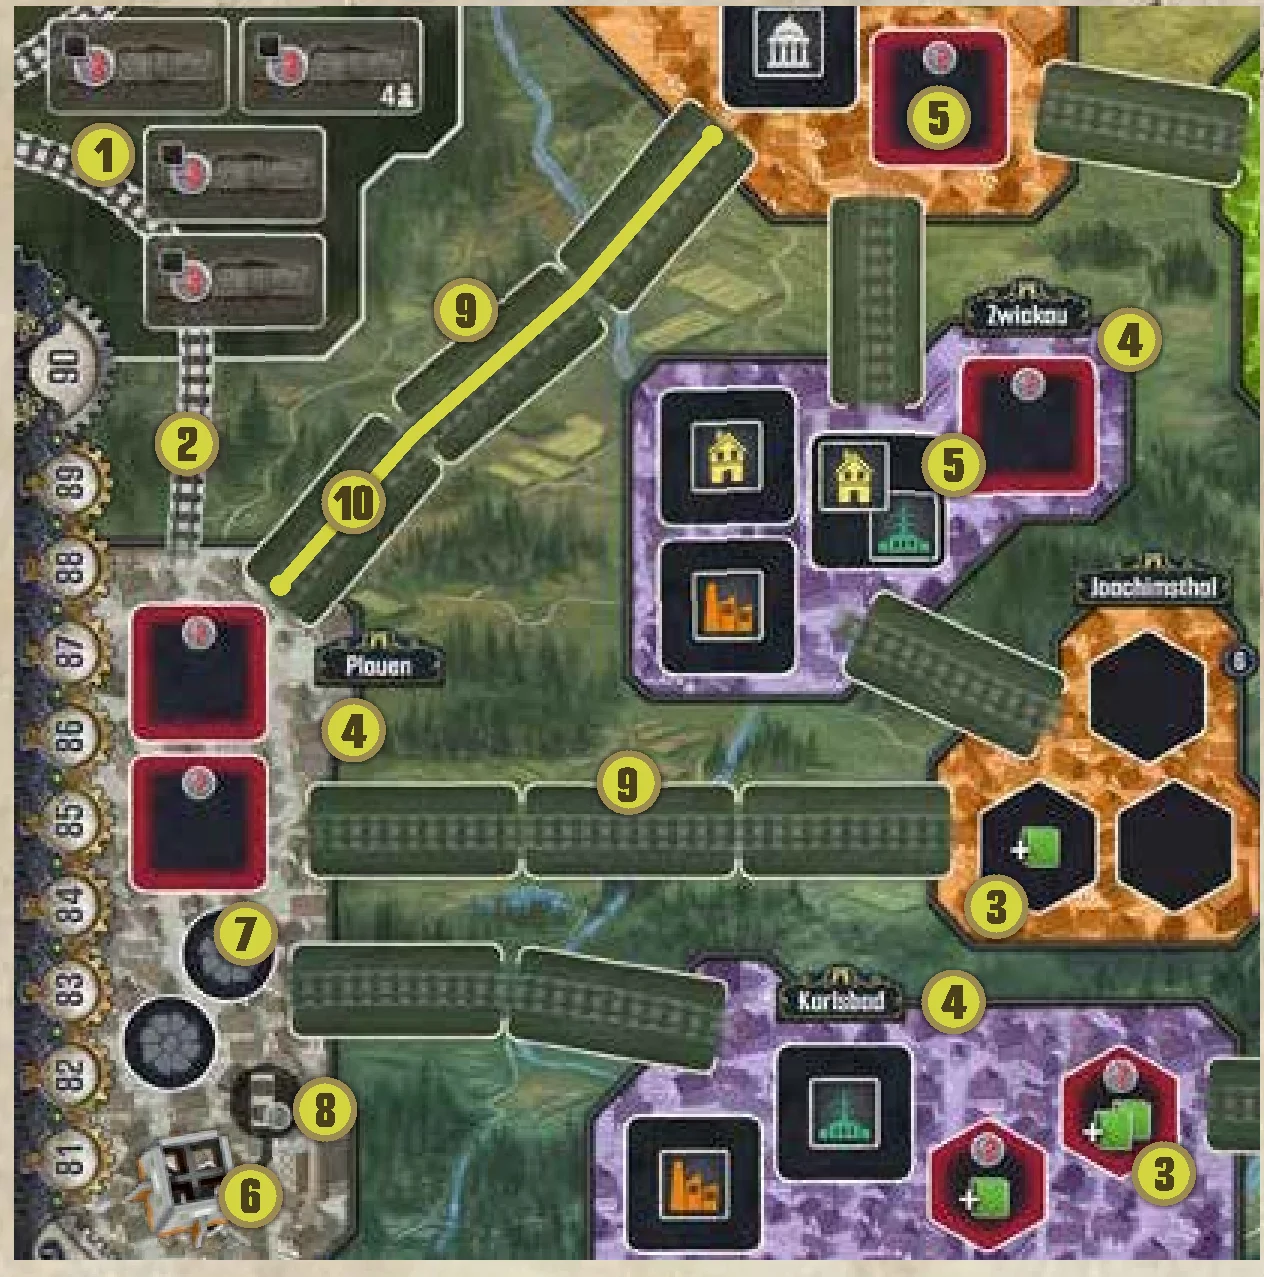
Between these cities, you will find links consisting of up to three connected empty railway spaces. During the game, you will place Action tiles on these spaces, creating railways that serve both as means of transporting Coal and Uranium and relaying electricity. A link becomes a completed rail line if it has no empty railway spaces. A completed rail line is owned (equally) by every player who owns at least one railway within it, as indicated by their Worker on top of the Action tile. Completing a rail line consisting of more than one railway space grants an inauguration reward to players who participated in its completion.
On the map, you create networks. A network is defined as a grouping of one or more cities connected with each other by completed rail lines. A city belongs to your network if either:
- it is adjacent to your railway, or
- is connected to a completed rail line with at least 1 railway you own, or
- contains your building.
The size of a particular network is the number of cities in that group (not the longest path between two cities in the group). Therefore, a single city with your Buildings, Mines or Turbines present but not connected to another network counts as a network of size 1, and a single railway (even if it’s not part of a completed rail line) that touches a city also forms a network of size 1. You may have one or more networks at any given time, and you may connect them later. Networks are relevant when constructing Buildings, Mines, or Turbines.
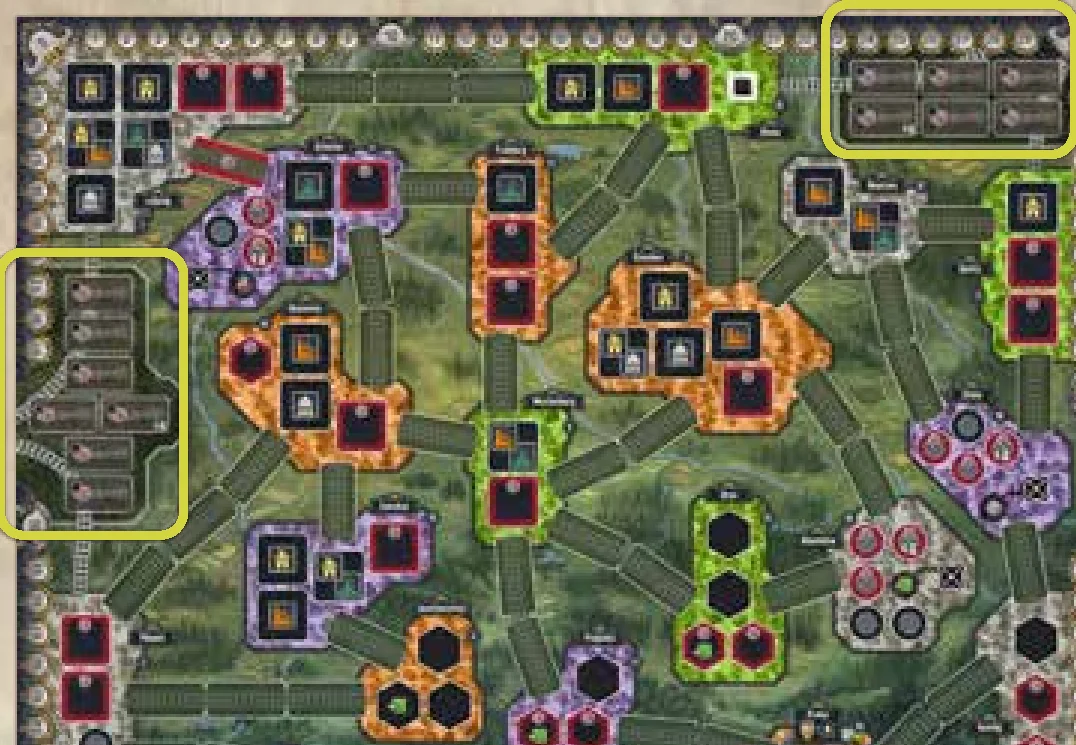
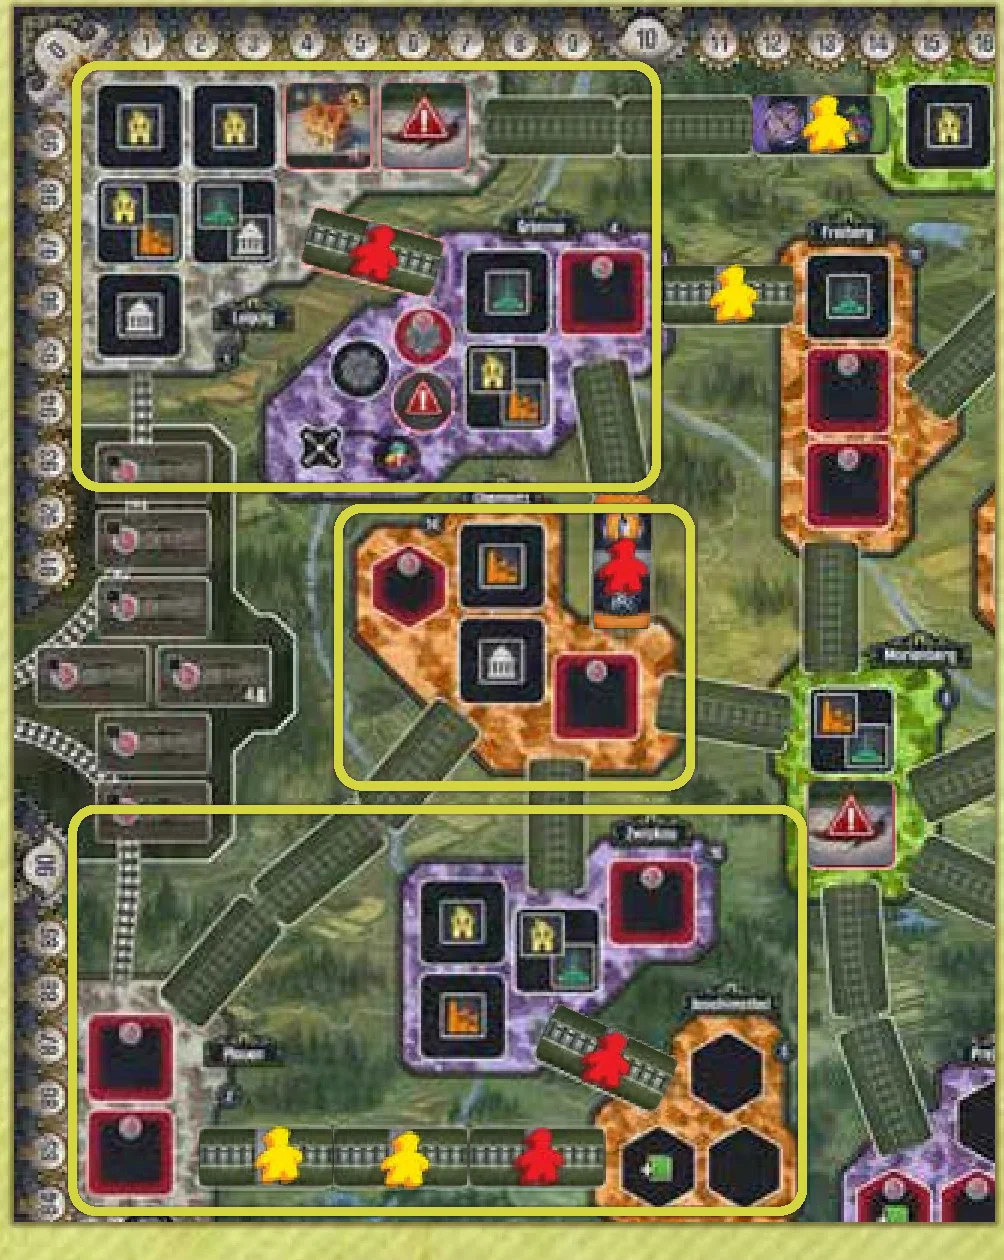
EXAMPLE: Red has three networks: one containing Leipzig and Grimma—but not Freiberg and Riesa (since those links only have Yellow’s Workers present) and not Chemnitz (since a gap separates Grimma from Chemnitz). Chemnitz forms a network of its own (because of the presence of the red Worker), despite not being linked to any other cities. The third network contains Zwickau, Joachimsthal, and Plauen, included via the completed rail line that both Yellow and Red own between the latter two. If any player places a tile between Chemnitz and Grimma and Red places a tile between Chemnitz and Zwickau, then Red would instead have a single network of six cities.
COAL PRODUCTION AREAS & TRANSPORTATION
There are two coal production areas: Ruhr to the west and Silesia on the northeastern side of the map. These represent coal-rich areas outside of the map. They are connected to some cities via long-distance rails. Players may import coal from the respective production areas into the connected cities (Plauen and Leipzig in the west, and Riesa and Görlitz in the east on the 3/4-player map and Dresden on the 1/2-player map). Long-distance rails cannot be used for any other purpose than importing coal. They are not owned by any player and therefore cannot connect or create networks.
Coal, Uranium, and electricity can be transported from one city to another using completed rail lines owned by any player. The ability to transport resources is relevant when power plants are activated.
PLAYING AN ACTION TILE
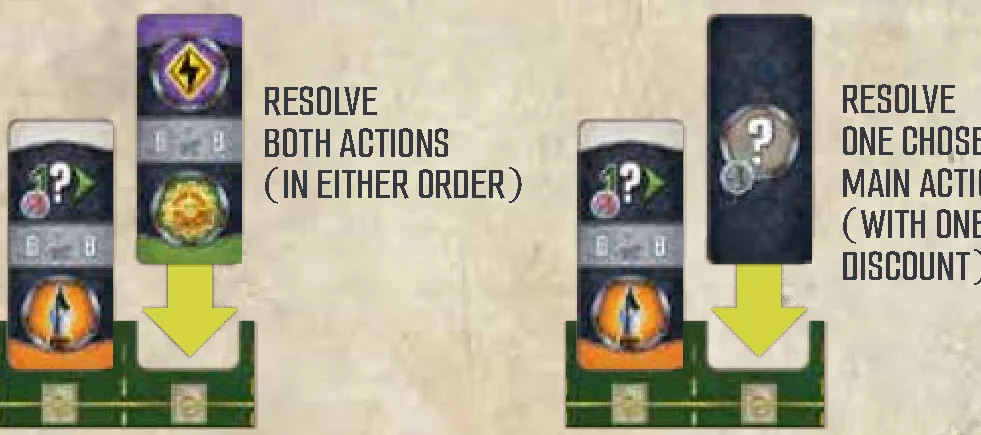
This option allows you to resolve actions and fulfill a Contract. When playing an Action tile, place it on the leftmost empty space at the top of your player board, then resolve both actions depicted on the tile, in any order. Any action can be skipped; nothing is mandatory.
When playing a Special Directive tile (your Starting Action tile with a black background and no railway tracks on the back), you may choose and perform exactly one of the 5 main actions (Urbanize/Industrialize/Develop/Contract/Energize) with a discount of 1 Thaler.
Before resolving an action, between the two actions, or after completing both actions, you may fulfill one Contract per turn. You can fulfill either any of the Contracts on the right side of your player board or one of the three Purple Contracts on the side board. Important: Purple Contracts do not get replaced!
To fulfill a Contract, you must first meet its requirements, then gain all of its benefits (VP, Technologies, etc.) and flip that Contract tile face down, placing it in your player area. When you fulfill a Contract from your player board, that Contract spot is freed, becoming available once again for a new Contract.
Action tiles placed at the top of your player board remain there until you perform a Recharge.
MAIN ACTIONS EXPLAINED
 URBANIZE
This action allows you to place Urban Buildings on the map. Take an Urban Building tile of your choice from your player board, paying the cost shown to the left of its row (from top to bottom, 2 Thaler for the first row, 3 Thaler for the second, etc.). Place it on an empty urban site within one of your networks.
- If you have no networks due to having no pieces on the board at the beginning of the game, you may build anywhere.
- Building at red urban sites costs an additional 2 Thaler.
- Regular (black) urban sites must show the icon of the Building type you are placing.
- Friendly placement restriction: If possible, you must place the Building in a single-type space in the chosen city. Red urban sites do not affect and are not affected by this rule.
- If the Action tile shows a discount icon
 / , reduce the total amount to be paid by 1 or 2 Thaler, as depicted.
 - The level-IV Building of each type is also a Government building
 . They can be placed into a black space showing either their column’s icon, or a Government icon.
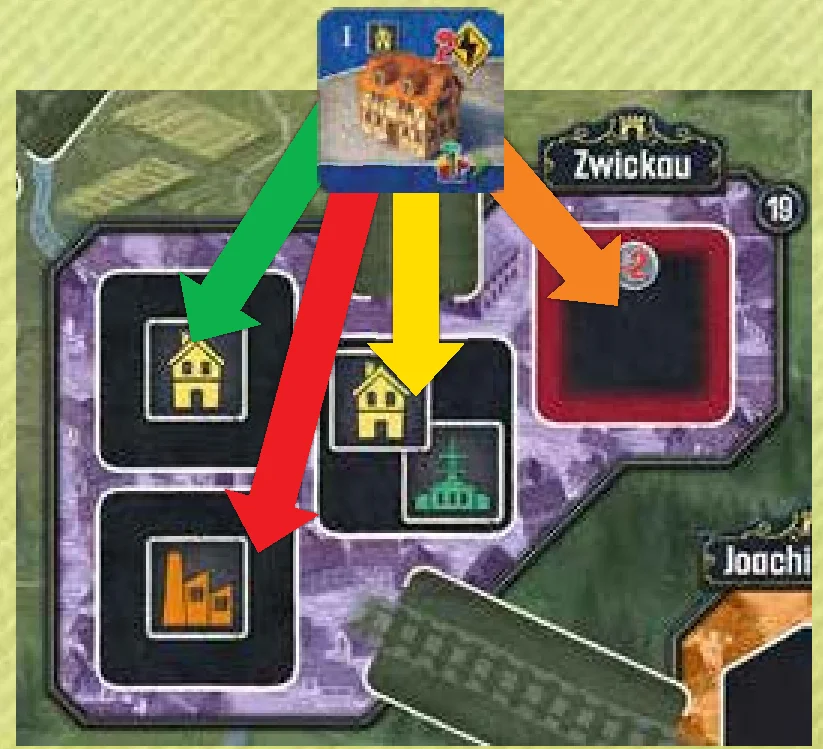
EXAMPLE: Blue wants to build a Residence in Zwickau, where there are 4 urban sites available. They cannot place it on the bottommost site (red arrow), because only factories can be placed there. They cannot place it on the middle site (yellow arrow) either, because of the friendly placement restriction. Therefore only the leftmost and rightmost sites are available to Blue, but since the rightmost site (orange arrow) is marked with a red border, Blue would have to pay 2 Thaler to place a Residence there. Finally, Blue places his Residence on the leftmost site (green arrow).
 INDUSTRIALIZE
This action allows you to place Mines and Turbines on the map. Take a Mine or a Turbine of your choice from your player board, paying the cost shown to the left of its row (from top to bottom, 1 Worker for the first row, 2 Workers for the second, etc.), and place it on a corresponding space within one of your networks.
- Turbines are placed onto turbine spaces in power plants. You may build a Turbine regardless of the presence of a Nucleum in that power plant. Placing a Turbine unlocks an ongoing special ability.
- Mines are placed onto mining sites. Once a Mine is placed, gain Uranium equal to the number of Mines you have on the board, including the one just placed. If the mining site covered shows
 , gain 1 additional Uranium. You can place gained Uranium in any of your Mines, but each Mine is limited to 2 or 3 Uranium.
 - If you have no networks at the beginning of the game, you may build anywhere.
- To place a Mine or Turbine in a red space, you must pay 2 Thaler. (The Special Directive discount can reduce this cost.)
- Each Turbine is paired with a Mine on your player board. Once you have built a connected Turbine-Mine pair, gain the reward depicted on the connecting line.
- If the Action tile shows an icon
 , pay 1 Worker fewer than the indicated cost.
 - If the Action tile shows , gain 1 Uranium (placed in any Mine, or gain 1 Worker if no Mine space is free). You must perform the action to gain this bonus.
TIP: YOU DO NOT HAVE TO BUILD TURBINES OR MINES IN A CERTAIN ORDER. SOME OF THE TURBINES PROVIDE FREE ELECTRICITY FOR ENERGIZING THE BUILDINGS. YOU CAN EVEN BUILD THE BOTTOMMOST TURBINE-MINE PAIR EARLY IN THE GAME TO GAIN ACCESS TO A LEVEL – 3 TECHNOLOGY.
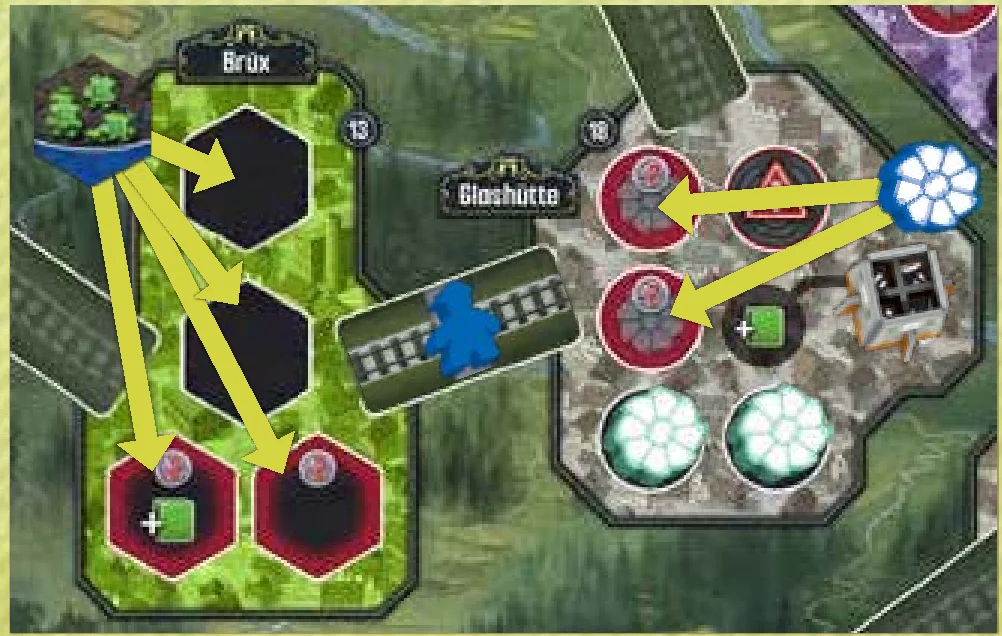
EXAMPLE: Blue has an Industrialize action and would like to place either a Mine or a Turbine. They can place their Mine in Brüx on either black site. They can also place it on a site with a red border and + 1 Uranium, but paying 2 Thaler for that. They can also place it on a site with only a red border paying 2 Thaler, but it wouldn’t benefit them at all. They may also decide to build a Turbine in Glashütte, but there are only red sites available, meaning that Blue would have to pay 2 Thaler to place their Turbine there.
 DEVELOP
This action allows you to gain additional Action tiles. Purchase one Action tile from the market, paying the Thaler amount (0 to 2) indicated below it. Then, you may pay an additional 2 Thaler to repeat this, paying the second tile’s cost as well. After purchasing 1 or 2 tiles, slide all remaining tiles to the right to close the gaps in the offer, and refill the offer from the draw pile. If the draw pile is empty, refill it with one of the piles you have placed outside the side board during setup. If the draw pile is empty and you cannot refill it, this triggers one of the endgame conditions.
If the Action tile you played this turn shows a discount icon / , reduce the total amount to be paid by 1 or 2 Thaler, as depicted.
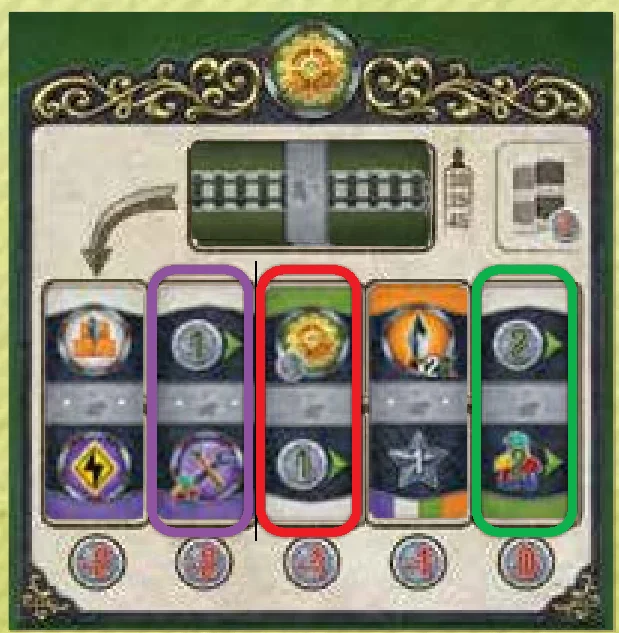
EXAMPLE: Teal has 4 Thaler and is performing a Develop action. They really want to buy the tile that allows them to industrialize with a discount of 1 Worker which costs 2 Thaler (Purple). Teal would also like to buy another tile, so they have to pay 2 Thaler to have that possibility. That leaves them with 0 Thaler, so the only tile available to them is the rightmost one (Green). Teal would prefer to buy the leftmost tile costing 1 Thaler (Red) and they could buy it if they used their Special Directive tile for that action or any other Action tile with a Develop action with a discount.
 CONTRACT
This action allows you to collect Contracts. Take one Silver or Gold Contract from the offer, and place it on any empty Contract space on the right side of your player board, then receive the corresponding reward shown on that Contract space. If the Action tile shows the  icon, receive the shown reward twice:
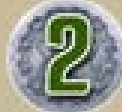 Gain 2 Thaler.
 Gain 1 Worker from your reserve.
 Add 1 Uranium to one of the Mines you own on the map.
 Gain 2 Achievement tokens.
If you do not have an empty Contract space, you may not resolve this action. You cannot remove or replace Contracts present on your player board, nor can you keep a Contract in your hand or player area.
After taking a Contract, draw a new Contract of the same color (Silver or Gold) from the respective draw pile to refill the empty space in the offer. If there are no more tiles of the required color, draw a tile of the other color instead. If there are no more tiles of either color remaining in the draw piles, leave the space empty. Drawing the last Contract from the last remaining pile triggers an endgame condition.
Purple Contracts cannot be taken with the Contract Action. You treat them as yours in terms of fulfilling them, but whoever is first takes the Contract from the side board, making it impossible for other players to fulfill it.
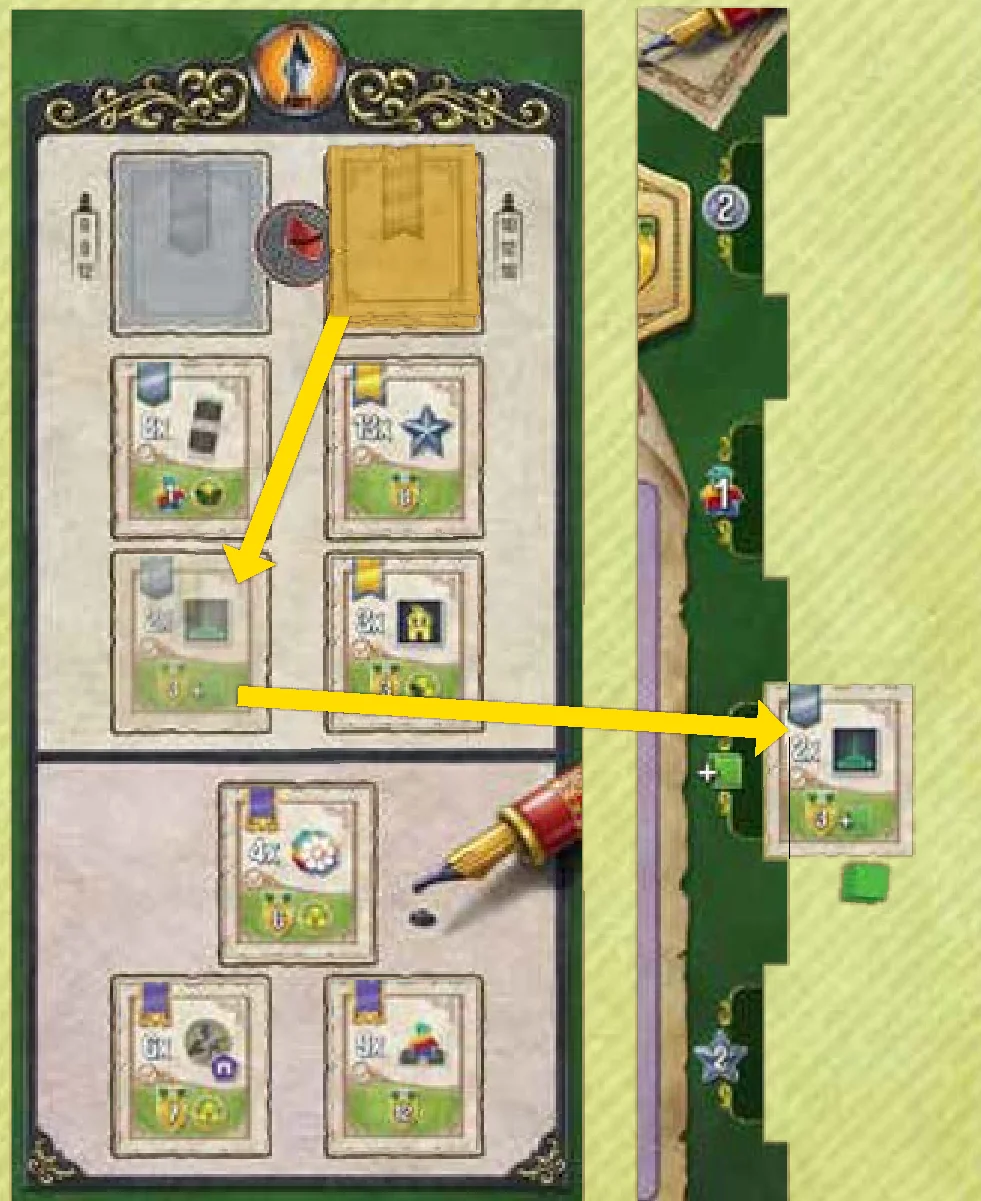
EXAMPLE: Yellow plays an Action tile that allows them to perform a Contract action. They can choose from 2 Silver and 2 Gold Contracts, because Purple Contracts cannot be taken this way. They decide to take the “Build 2 Laboratories” Contract. After that, Yellow has to place it on their player board. They choose the spot to place the Contract. Yellow immediately receives 1 Uranium to put in one of their Mines. Because the Silver Contract stack is empty, a Gold Contract is drawn in place of just one taken. Since Yellow has already built 2 Laboratories, they can now fulfill that Contract to gain 3 VP and 1 Uranium.
TIP: FULFILLING CERTAIN CONTRACTS IS ONE OF TWO MAIN WAYS TO GAIN TECHNOLOGIES.
GAINING TECHNOLOGIES
When you gain a Technology as a reward (usually via completing Contracts or energizing Laboratories), you must immediately unlock a single Technology or gain victory points equal to the level of the gained reward.
When unlocking a Technology, select one with a level equal to or lower than the level of the gained reward and slide its tile to the right into its slot on the Experiment board.
There are three types of Technologies:
- Immediate abilities [blue]: You must either resolve the entirety of this effect when you unlock it or forfeit it; the effect cannot be stored for later use. The effect is a one-time use and therefore those Technologies should be flipped after use.
- Ongoing abilities [brown]: Ongoing abilities have a trigger depicted on their left side and a benefit or an action modifier in parenthesis depicted on the right side. From the moment you gain this Technology, every time you meet the condition, you gain the benefit or apply the modifier to the triggering action.
- Ultimate goal [purple]: If unlocked, your 8th Technology provides victory points that are scored at the end of the game if you meet its condition.
Unlocking all 8 of your Technologies is one of the endgame conditions.
 ENERGIZE
This action allows you to power up Buildings, gaining you immediate benefits and VP at the end of the game. When you choose to Energize, perform the following steps:
- Select one power plant on the map (in Riesa, Zittau, Glashütte, Grimma, or Plauen).
- Transport coal and/or Uranium from any number of locations via completed rail lines to this power plant. You may use any completed rail lines—not just your own:
- A. For coal: import any amount from either/both coal import site(s) first, then transport it to the power plant.
- B. For Uranium: transport up to the allowed amount from your connected Mines to the power plant.
- Determine the amount of electricity produced.
- Select a connected Urban Building (yours or Neutral) that has a requirement equal to or less than the amount of electricity produced.
- Receive Achievement tokens equal to the requirement of the Building and any benefits printed on it.
- Flip the Building to its energized side.
In order to transport coal, it must first be imported. You can import coal only if the selected power plant is connected to one or both coal import areas via completed rail lines (you do not have to own any of these rail lines) and a long-distance rail. There is no limit to the amount of coal that you can import, and you can import coal from all connected coal import areas at the same time as long as they are connected to your selected power plant.
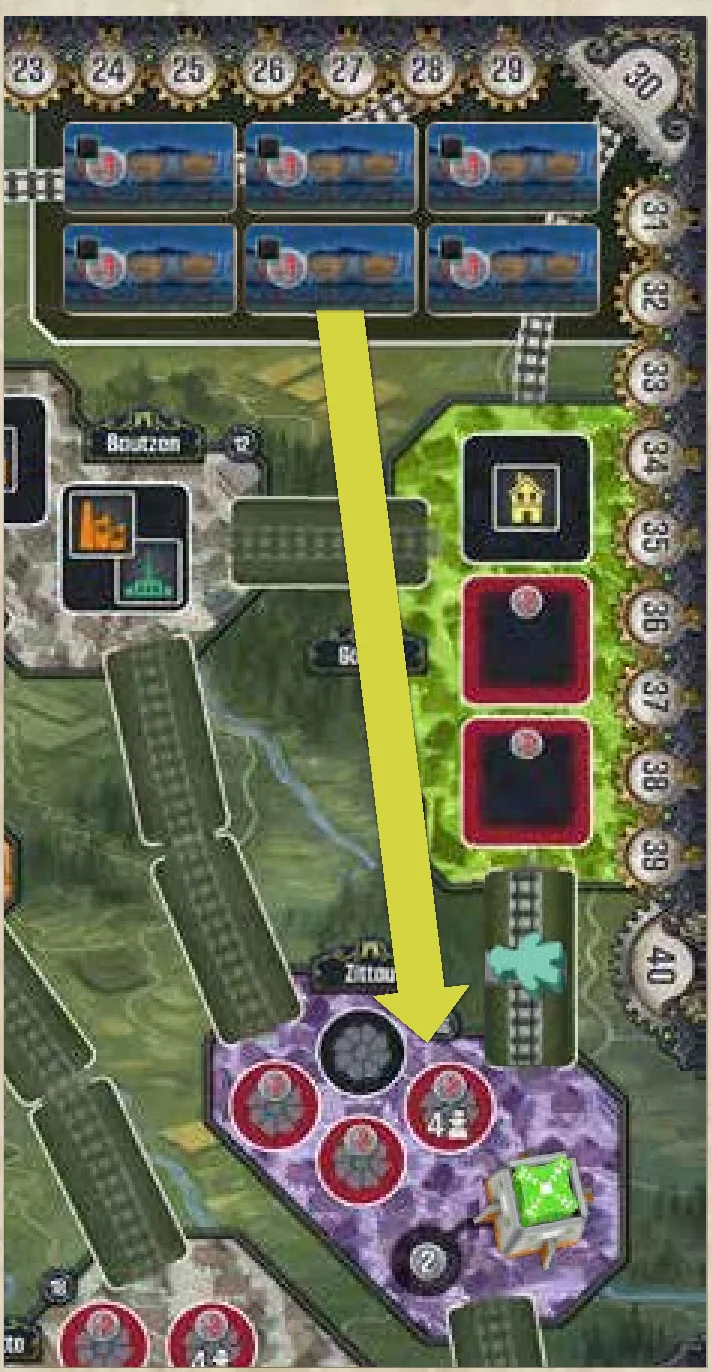
For each imported coal, pay the cost shown on a Coal Import Wagon in the selected coal import area, flipping the import tile to its -2 Thaler side or, if there are no more import tiles on their 1-Thaler side, removing it from the game to reveal the 3 Thaler cost printed on the board. The coal supply can never be depleted, but the price always increases toward the maximum of 3 Thaler as it is imported. If using your Special Directive tile’s and/or a Turbine effect’s discount , apply the reduction to the total amount spent on coal. Once imported, the coal is immediately available for use in the connected power plant.
In order to transport and use Uranium, the selected power plant must have a Nucleum and each of your chosen Mines must be connected to the selected power plant via completed rail lines (you do not have to own these rail lines). The amount of Uranium you can transport is dependent on the total number of Turbines (regardless of owner) present: you can transport 1 Uranium by default plus an additional 1 Uranium for each Turbine present. If the Turbine belongs to another player, you must pay that player 1 Thaler (or use the Special Directive discount). Transported Uranium is returned to the supply.
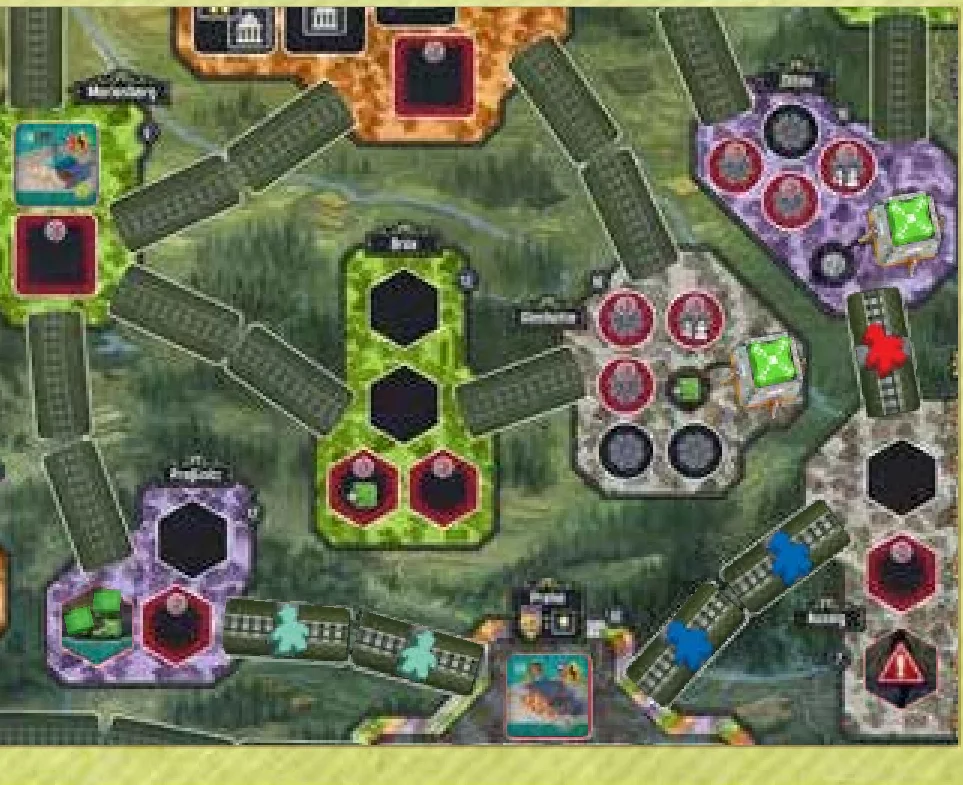
EXAMPLE: Teal can transport Uranium to a power plant in Zittau even though 2 of the rail lines they are using belong to other players. Teal can only transport 1 Uranium to Zittau, because they don’t have a Turbine there, but a power plant with Nucleum can process 1 Uranium by default.
After transporting any coal and/or Uranium, determine the total amount of electricity  produced:
- 1 electricity per 1 transported coal
- 2 electricity per 1 transported Uranium
- any additional electricity depicted on the used Action tile
- any electricity produced by your built Turbines
- any electricity provided by your active Technologies
Select exactly one Urban Building, either yours or Neutral (it does not have to be in your network), that is still unenergized and connected to the selected power plant via completed rail lines. The Building must have a requirement that is equal to or lower than the electricity produced. Then, receive:
- A. Achievement tokens equal to the electricity requirement of the Building (any excess electricity is lost).
- B. The printed benefits depicted on the front of the tile (Thaler, Workers, advancements on income tracks, gaining Technologies).
- C. Flip the tile to its energized side (showing a lit light bulb in the upper left corner).
NOTE: The VP depicted on the energized side of the tile are counted only at the end of the game, with energized Buildings in Praha scoring double.
TIP: THE MAP HAS NEUTRAL BUILDINGS PLACED DURING SETUP; ENERGIZING THEM CAN GIVE AN EARLY BOOST TO YOUR ECONOMY AND MAKE YOUR FIRST RECHARGE MORE EFFICIENT.
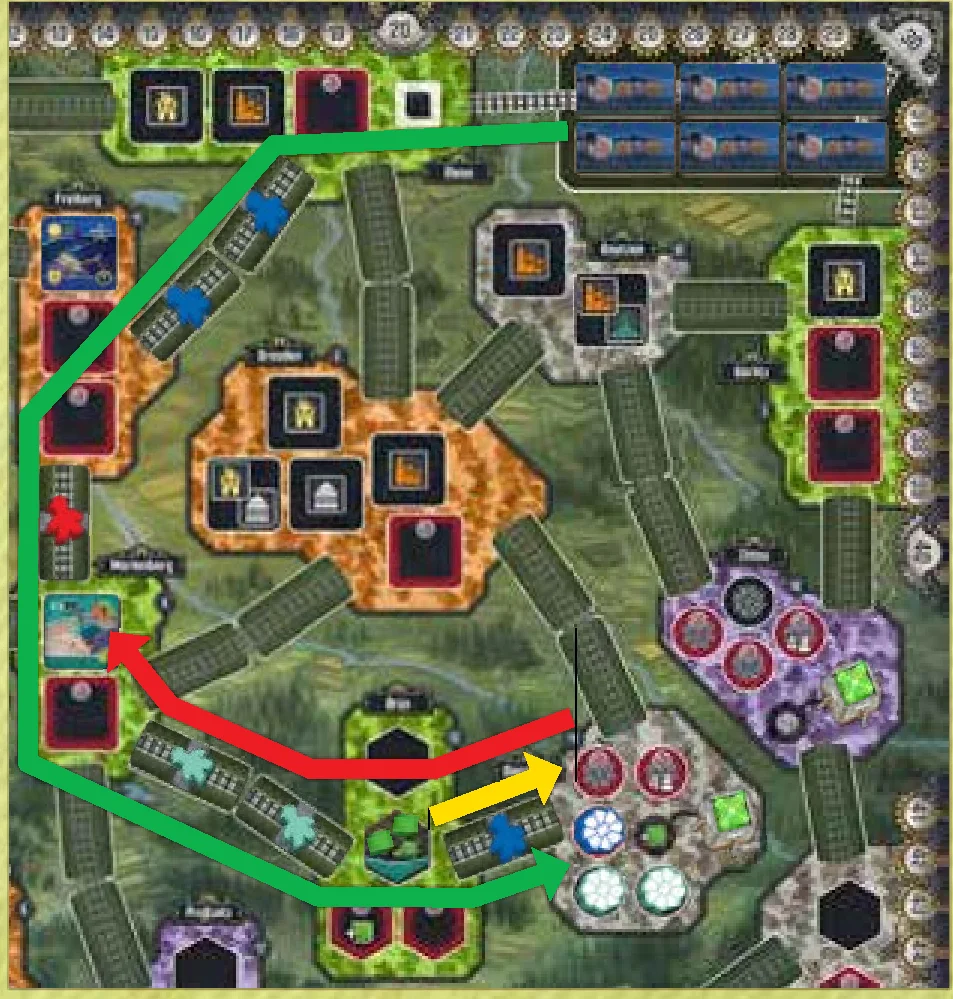
EXAMPLE: Teal performs an Energize action. They have a Laboratory in Marienberg that requires 9 electricity. Since Teal has already built their 3rd and 4th Turbines, they have 3 extra electricity. Teal decides that they will use a power plant in Glashütte. They transport 2 Uranium from their Mine in Brüx through Blue’s rail line (yellow arrow). Since there is a Nucleum in Glashütte, that power plant can process Uranium. Thanks to their 2 Turbines there, Teal can process transported Uranium to generate 4 electricity. They are now lacking 2 electricity. Fortunately, Glashütte is also connected via various rail lines and long distance rail near Riesa with a coal production area, so Teal can import 2 coal paying 2 Thaler and flipping 2 Coal Import Wagon tiles to generate remaining 2 electricity (green arrow). Now, all 9 electricity is being transported to Marienberg which allows Teal to energize the building (red arrow). They get 9 Achievement tokens, Level 3 Technology of their choice and they flip the building to its energized side.
SUBSIDIZE ACTIONS
Other small actions that can be found on the Action tiles, but cannot be done with Special Directive tile:
 Gain 2 Thaler OR 1 Worker.
 Advance Thaler income marker by 1.
 Advance Worker income marker by 1.
 Advance VP income marker by 1.
 Gain 1 Achievement token.
 Advance any income marker by 1.
 Pay 1 Thaler to advance any income marker by 1.
PLACING A RAILWAY TILE
Placing a railway consists of the following steps:
- Place an Action tile on a link, using a Worker to mark ownership.
- Resolve any action(s) with a color match.
- Check if the rail line has been completed. If it has:
- A. Gain the inauguration reward, if any; then,
- B. Flip the tile(s) face down.
When placing a tile as a railway, select any empty railway space on the map that is adjacent to a city and/or railway, place the tile on it face up oriented in any direction, and place one of your Workers on the tile.
NOTE: The tile does not need to be placed into your network. Placing a Railway tile is how you extend your network and/or create a new network.
If you do not have (or cannot obtain) a Worker before placing the railway, you may not choose this option. (Remember, you can always spend a Uranium in a pinch, to gain a Worker.)
You may never place your Special Directive tile as a railway.
To place a tile on a red railway space (between Leipzig and Grimma on the 3/4-player map and between Brüx and Praha on the 1/2-player map), you must first pay 2 Thaler. If you cannot pay, you may not place a tile there.
COLOR MATCHING
Then, check the tile you placed for color matches. Each tile shows two actions and has two colored edges. If the edge is multicolored, it is a wildcard. An action creates a color match if any of the following is true:
- it is adjacent to a city of the same color,
- it is a wildcard, and adjacent to any city,
- it is adjacent to Praha (which matches every color), or
- it is adjacent to another tile and both adjacent actions are of the same color or one or both of them is a wildcard. (In this case, the adjacent action on the other tile is also matched, even if it belongs to another player.)
Note that an action adjacent to an empty railway space never creates a color match.
TIP: BE MINDFUL OF THE ACTIONS ON YOUR TILES AND IN THE MARKET. IF YOU PLACE ON THE MAP A TILE WITH AN ACTION THAT YOU DO NOT HAVE ON ANY OTHER OF YOUR TILES, YOU MAY LATER HAVE A HARD TIME GETTING A NEW ONE FROM THE MARKET (IT MAY OR MAY NOT APPEAR), THUS SLOWING YOUR PROGRESS IN THE GAME.
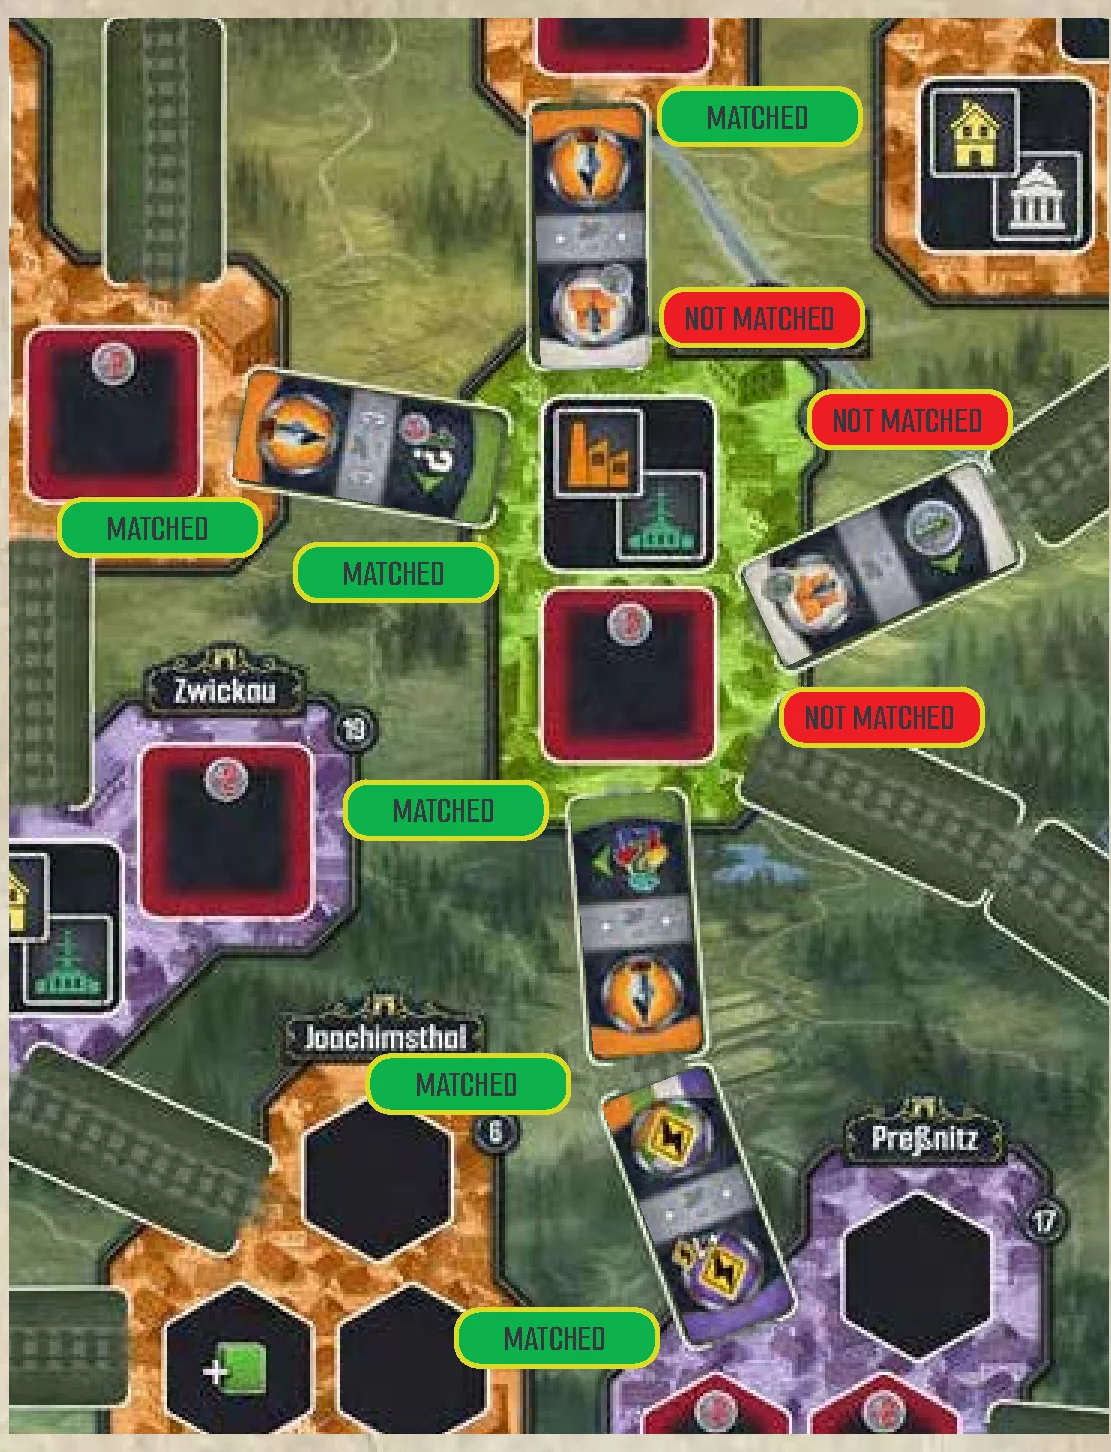
Resolve your matched actions first from the just placed tile (in any order), and then from the tiles that are matched. As a result of placing a tile, you will be able to resolve between 0 and 4 actions. Any action can be skipped; nothing is mandatory.
If other players gained matched actions this way, then they may resolve their actions after you have finished resolving all of yours. If they cannot resolve their actions at that time, the opportunity is lost; they may not resolve them later. If more than one other player gains matched actions, they resolve their matched actions in clockwise order starting from the active player.
NOTE: It is not required to match a placed tile. If you place a tile adjacent to another player’s tile without creating a match, you deny them the action they might have counted on at the cost of giving up an action yourself.
COMPLETING A RAIL LINE & INAUGURATION
Whenever a rail line of two or more railway spaces is completed as a result of a player placing the last tile, all players with one or more Workers on links making up that rail line receive the inauguration reward, resulting in an advancement on the VP income track.
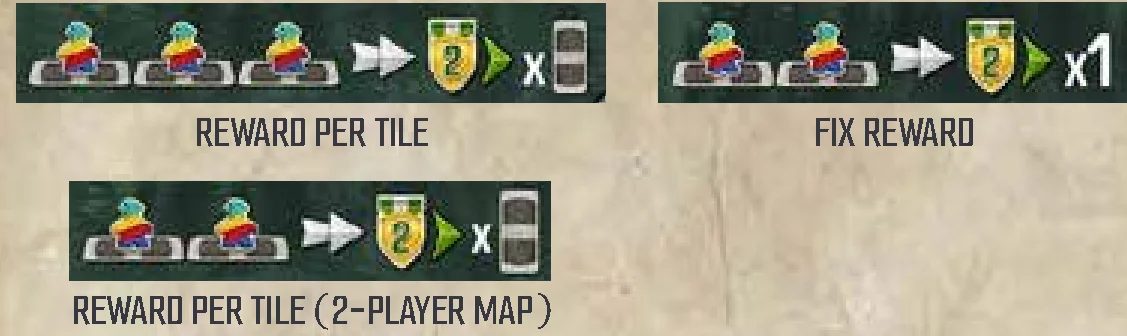
Some rail lines provide an income advancement for each of your Railway tiles within that link, while others provide the bonus once, even if you own multiple railways within the link.
Finally, after gaining any inauguration bonus, flip all railways within this link face down (to show the railway icon and the fact that that rail line is complete).
NOTE: While tiles are only flipped when a rail line is complete and after actions are resolved, the connection is immediate; thus, it is possible to grow your network (or start a new one) by placing a tile and then immediately using that network in one or more of the actions’ resolutions.
Action tiles placed on the map remain here for the entirety of the game.
RECHARGE
Recharging allows you to gain income, place a Milestone marker (potentially triggering King’s Day Scorings), and retrieve all the Action tiles from the top of your player board. When you choose to Recharge, you must perform, in order, each of the following steps:
- Gain Thaler, Workers, and VP from your income tracks.
- Place a Milestone marker on the Milestone track:
- A. Gain rewards, if any.
- B. If a Milestone space becomes empty, perform a King’s Day Scoring.
- Discard all Achievement tokens you have collected.
- Retrieve all the tiles from the top of your player board.
1. GAINING INCOME
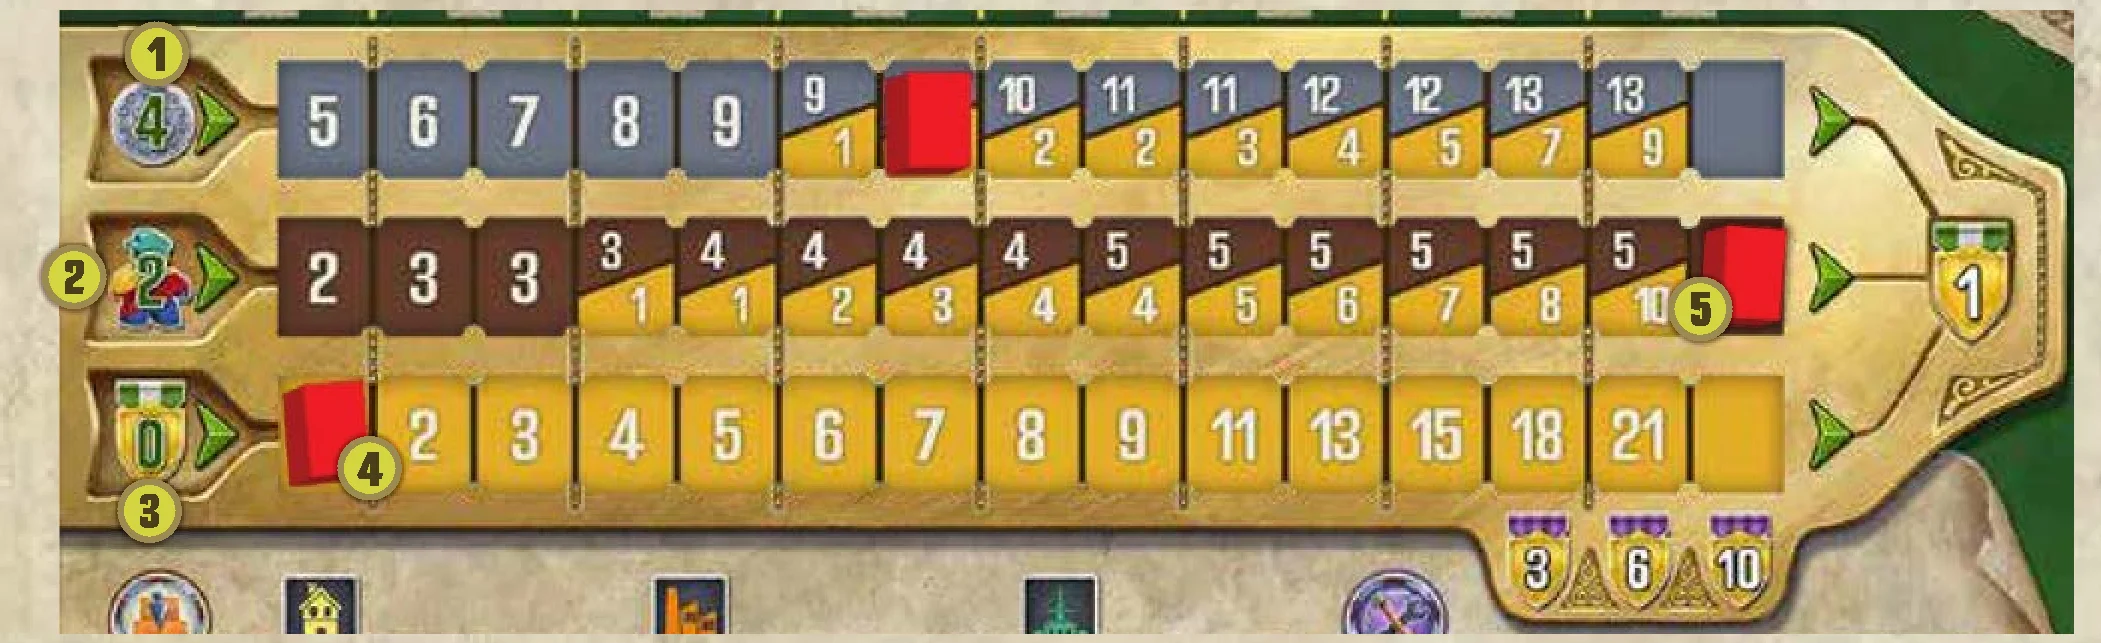
The income you gain (Thaler, Workers, and/or VP) is the highest value that is both to the left of the marker on the respective income track and underneath an Action tile. The income of the top two tracks (Thaler and Workers) will also include VP as you advance on them.
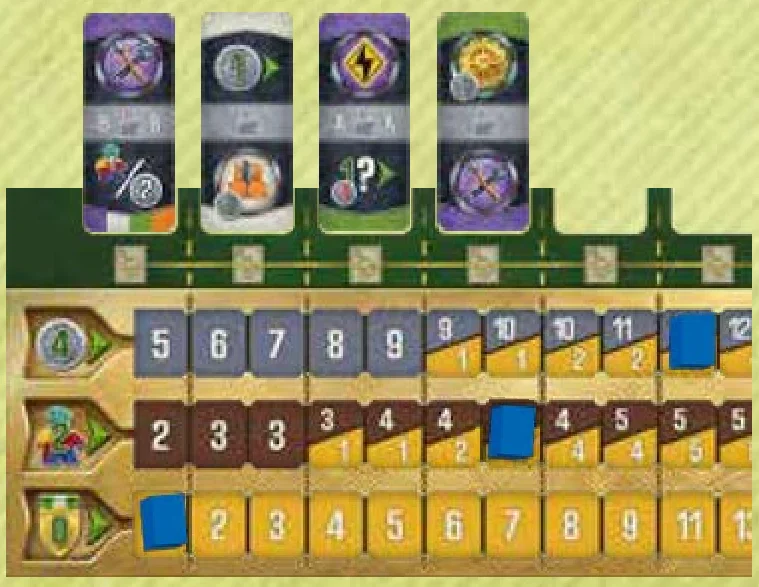
EXAMPLE: From top to bottom, Blue gains 10 Thaler and 1 VP (because of the action tile), 4 Workers and 2 VP, and 0 VP from their respective income tracks.
At the end of the game, you will score additional VP for reaching the last three spaces of each income track. These VP are shown below the income tracks and are not gained when gaining income.
TIP: WHILE YOU CAN GET A LOT FROM YOUR INCOME TRACKS DURING A RECHARGE, FOCUSING ON ONE OR TWO OF THEM INCREASES THE LIKELIHOOD OF GAINING EXTRA VP AT THE END OF THE GAME.
2. PLACING A MILESTONE MARKER
This allows you to place your Milestone markers onto Achievement spaces for Final Scoring and occasionally placing a new Nucleum on the map.
On the left side of the side board is the Milestone track, which consists of Achievement spaces that increase in value as you advance up the track. These Achievement spaces are grouped into six different tiers (1-2, 3-6, 7-9, 10-14, 16-26, and 28-40, depicted in different colors and showing different multipliers) on the left and four Milestone segments (1-6, 7-12, 13-22, 24-40) on the right. When placing one of your Milestone markers on the Milestone track, you can only have one marker in each tier, but multiple players can have their marker in the same tier, even on the same space.
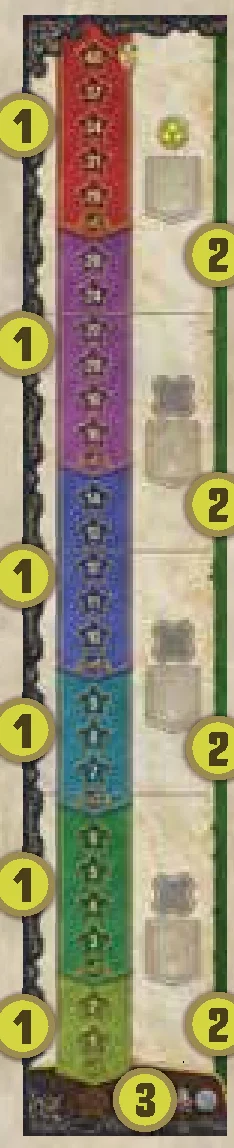
To place your Milestone marker on the milestone track, follow these steps:
- Determine the total value of Achievement tokens you have.
- Choose an Achievement space on the track with a value equal to or lower than the total value of Achievement tokens you have to place your marker on, remembering that you can only place 1 marker in each tier.
- A. If you already have Milestone markers in all tiers equal to or lower than the total value of Achievement tokens you have (or your total is zero), you must place your marker on the “0” Achievement space and gain the bailout bonus. You may willingly choose to place your marker on “0” as well.
- If you place your marker in a Milestone segment that still has a Nucleum present, place it on a power plant on the map and receive the depicted bonus
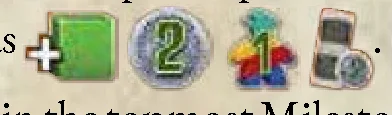 .
. - If you placed your marker in the topmost Milestone segment, gain a level 3 Technology.
- If you placed your Milestone marker on the topmost space (40 Achievement tokens), immediately gain 9 VP.
Your first three Milestone markers come from the Milestone spaces at the bottom of the side board, from left to right. Once you have used these three milestone markers, take additional ones from the three Milestone markers placed in reserve next to the side board during setup. Placed Milestone markers remain on the milestone track for the duration of the game.
The “0” Achievement space is not part of any tier or milestone segment. When you place a Milestone marker on this space, you receive a bailout bonus of 2 Thaler and 1 Worker. For each marker you have on the “0” Achievement space, you will lose 3 VP at the end of the game.
EXAMPLE: Teal recharges with 17 Achievement tokens. Even though they have enough tokens to place their Milestone marker in the “×5” and “×4” tiers, they already have one marker each in those tiers, so they cannot do that. Therefore Teal has to place their Milestone marker in one of the lower tiers. They decide to place it on the ‘9’ spot, so they will have ‘×3’ multiplier for the Milestone tile “Score for every city (including Praha) in which you have an energized Urban Building.” On top of that, since there is still a Nucleum in that segment, Teal gets to place it in a power plant of their choice, gaining the bonus.
3. PERFORMING A KING’S DAY SCORING
Whenever a Milestone space becomes empty (i.e., you are the last player to recharge the first, second, or third time), perform a King’s Day Scoring:
- The owner of the highest Milestone marker on the Milestone track scores 6 VP. If there is a tie, all tied players score the same amount.
- The owner of the second-highest Milestone marker on the Milestone track scores 2 VP. In a tie, all tied players score the same amount. Second place is scored even if there was a tie for the first place.
- It is possible for you to score for both first and second place (for a total of 8 VP). Milestone markers on the “0” Achievement space are not eligible for King’s Day Scoring.
Emptying the third (last) Milestone space is one of the endgame conditions.
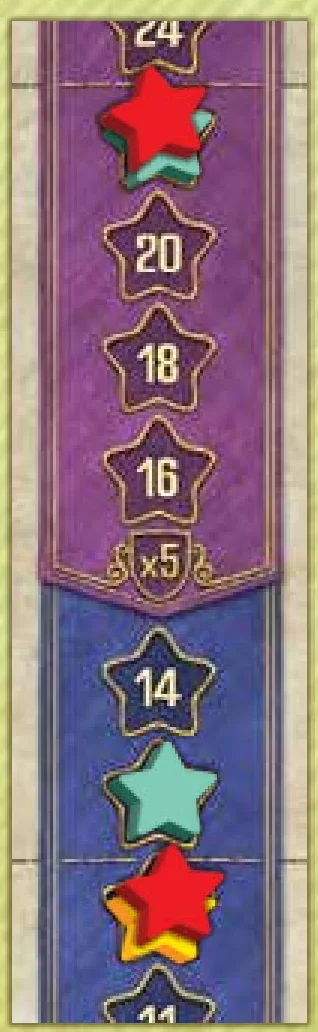
EXAMPLE: Red placed their second Milestone marker on ‘22’ spot which caused King’s Day Scoring to happen. Since both Teal and Red are tied for first place, they both gain 6 VP. Second highest Milestone marker also belongs to Teal which means that they receive another 2 VP. Therefore for this King’s Day Scoring Teal gains 8 VP, Red gains 6 VP and Yellow gains 0 VP.
4. DISCARDING ACHIEVEMENT TOKENS & RETRIEVING TILES
Discard all Achievement tokens you have collected, even if you placed your Milestone marker on a lower position than their total could have possibly allowed you to.
Retrieve all tiles from the top of your player board (not from the map), and return them face up to your tile pool. These Action tiles are now available for you to use again.
TIP: DO NOT BE AFRAID TO TAKE A RECHARGE WITH 0 ACHIEVEMENT TOKENS; AN EXTRA WORKER AND SOME MONEY CAN SERIOUSLY BOOST YOUR EARLY GAME.
ENDGAME CONDITIONS & END OF THE GAME
Endgame is triggered when two (three in a 2-player game) of the following five conditions are met:
- The Action tile draw piles are empty.
- Both the Silver and Gold Contract draw stacks are empty.
- All players have recharged at least 3 times (the Milestone spaces have no Milestone markers on them).
- At least one player has unlocked all of their 8 Technologies.
- At least one player has reached 70 VP.
NOTE: The last two conditions can only be met by one player—the first to do so.
As soon as an endgame condition is met, the player who met the condition first (usually the active player) moves the left-most Endgame Condition marker from the side board’s relevant area onto the condition’s dedicated space and scores 3 VP.
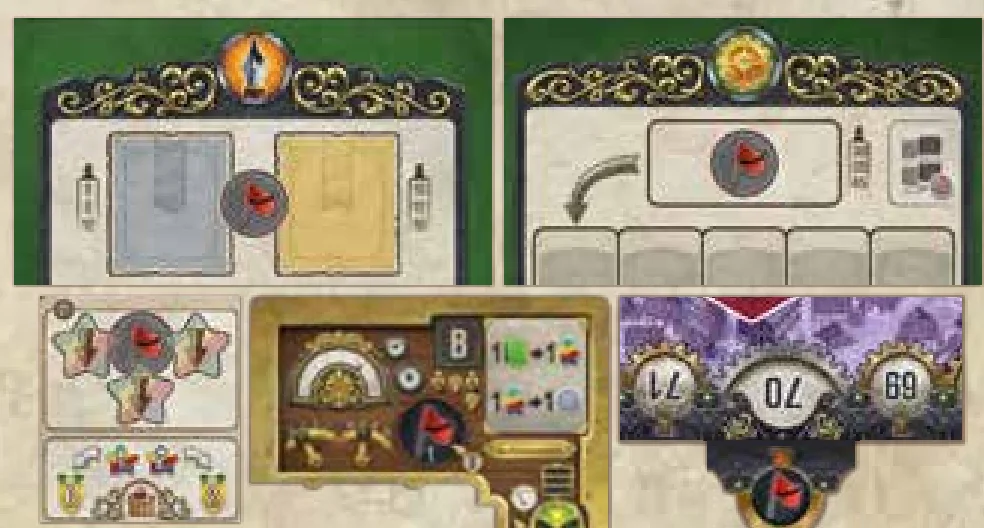
After the end of the game is triggered, continue taking turns until each player has taken an equal number of turns (until the last player in player order has finished their turn), then you each play one more turn. It is possible to trigger and score additional endgame conditions after the end of the game has been triggered—this has no effect on the end of the game.
Afterwards, proceed to Final Scoring.
FINAL SCORING
If a player has one or more Achievement tokens left at this stage, they may place a Milestone marker on the Milestone track as described under “Recharge” but without triggering any effects (King’s Day Scoring, Nucleum placement, gaining Technologies, etc.) nor gaining any income. The limit of 1 Milestone marker per player per tier still applies.
SCORING MILESTONES
For each of your Milestone markers on the Milestone track, score 1 VP for each time you meet the condition shown on its segment’s Milestone tile, multiplied by its tier’s multiplier. For each of your Milestone markers on the “0” Achievement space, lose 3 VP instead.
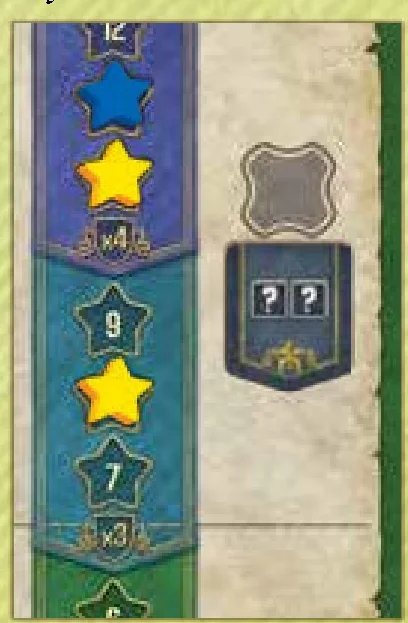
EXAMPLE: Blue scores 4 VP for every second Urban Building they have built, while Yellow scores 7 VP for every second Urban Building they have built.
SCORING YOUR ULTIMATE GOAL TECHNOLOGY
If you have unlocked your 8th Technology, score this goal. See the appendix for details.
SCORING YOUR LEFTOVER RESOURCES
Score 1 VP for every 2 Uranium in your Mines, 2 Workers in your personal supply, and 5 Thaler in your player area. Before scoring your leftover resources, you may still convert Uranium into Workers and Workers into Thaler.
ENERGIZED BUILDINGS
For each of your energized Buildings, score the depicted number of VP. Energized Buildings in Praha score double.
Most Buildings indicate a flat VP amount. Government Buildings , however, show a scoring condition indicating a Building type (Residence, Factory, or Laboratory); for each energized Government Building, score the indicated amount of points for all Buildings of the shown type — including itself, and those belonging to other players and regardless of whether they are energized or not — that are in the same network of yours as the Government Building in question.
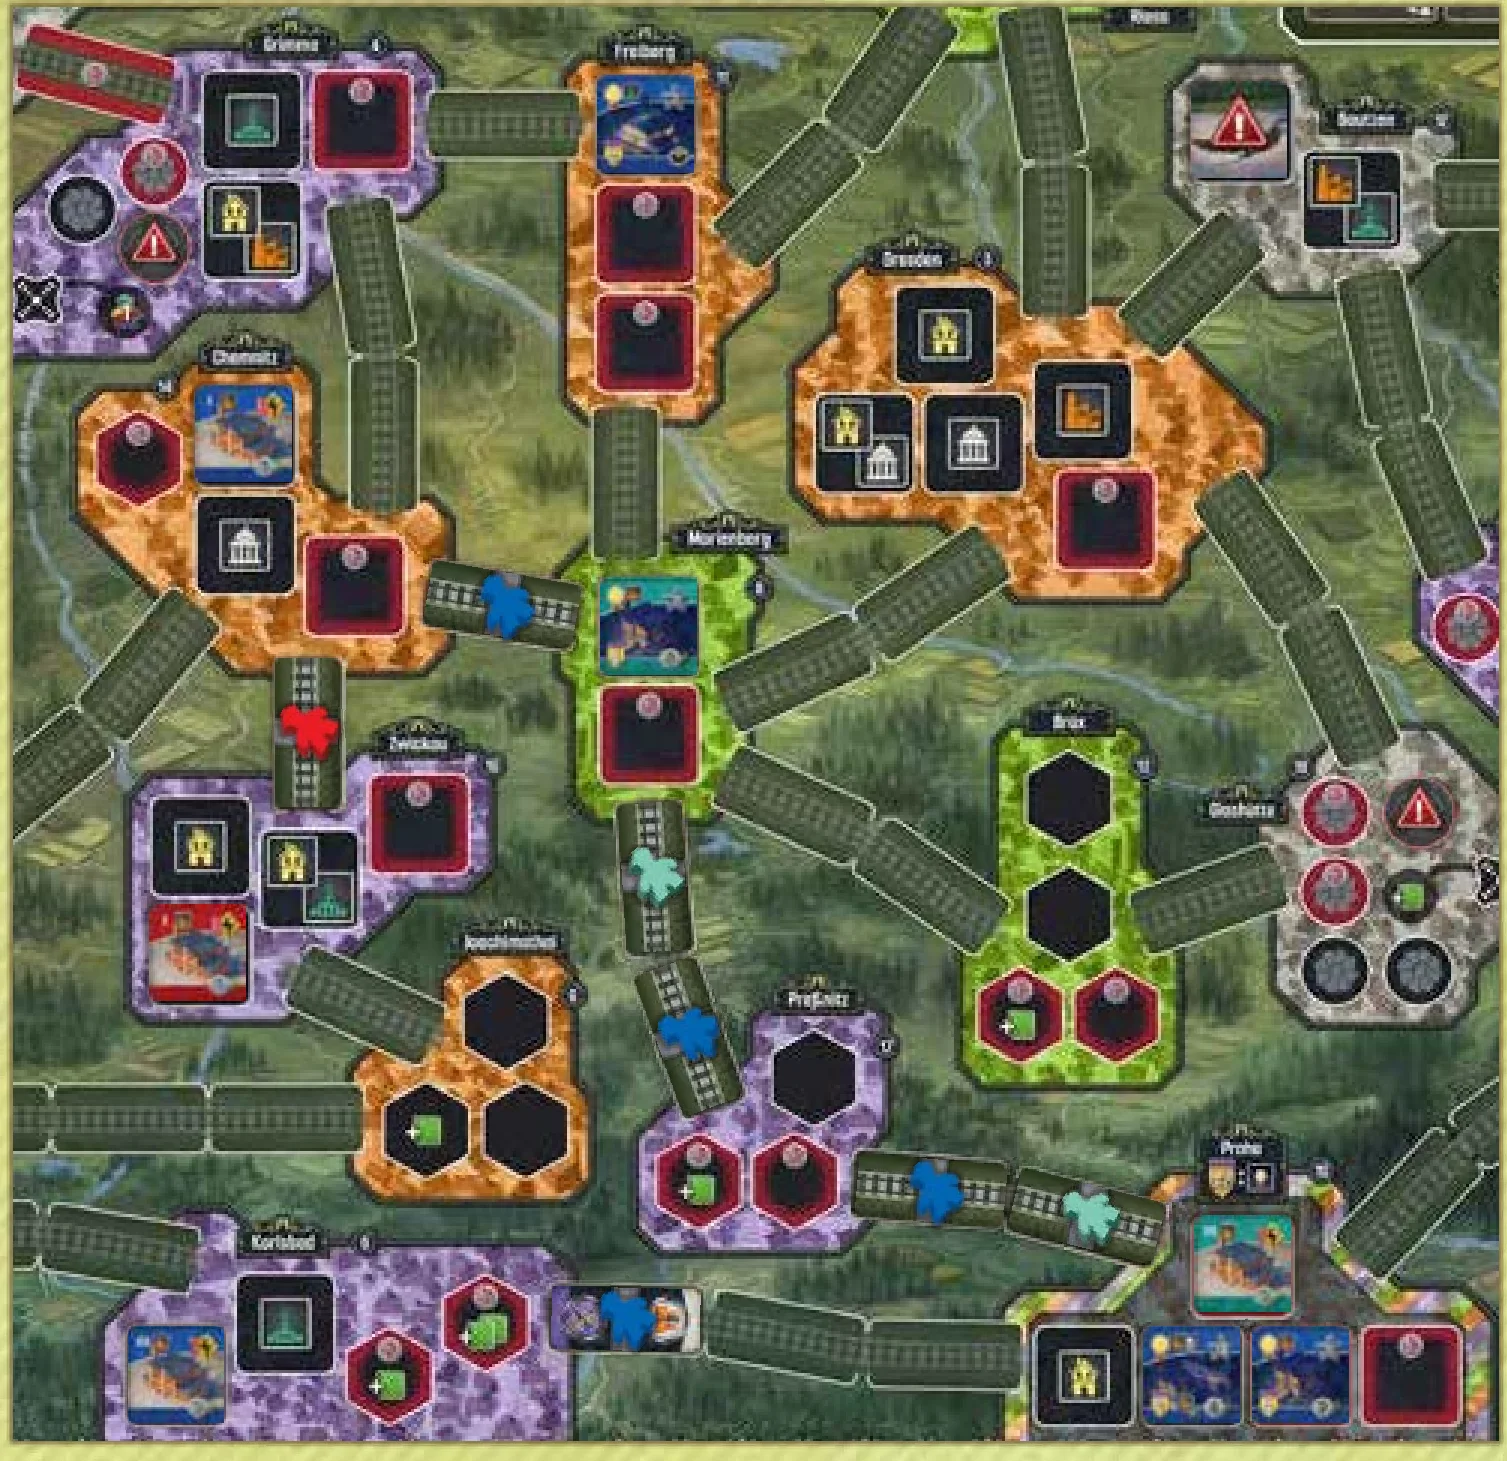
EXAMPLE: Blue scores 2 VP for their energized Laboratory in Freiberg, 8 VP for their energized Factory in Praha, and 20 VP for their energized Government Building (counting 5 Factories for 4 VP each). Note that Blue counts Teal’s tiles—including the unenergized ones—but it does not count Red’s because it is not accessible from Praha via completed rail lines that Blue owns. Blue does not score for their own unflipped Factory in Karlsbad either, because even though it is within one of their networks, it is not connected via a completed rail line to the Government Building in Praha.
SCORING INCOME TRACK BONUSES
Score 3/6/10 VP for each of your income tracks that has its income marker on one of the last three spaces (as indicated below them).
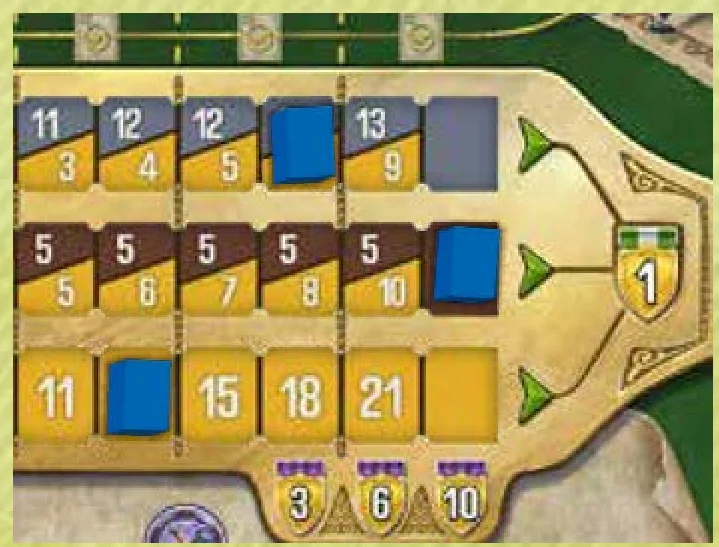
EXAMPLE: In this case, Blue scores 3 VP for their Thaler income track and 10 VP for their Worker income track, for a total of 13 VP.
The player with the most VP is the winner. If there is a tie, tied players share the victory.
CONTRACTS & MILESTONES APPENDIX
- Praha does not count as a city of any color for the purpose of fulfilling Contracts.
- Urban Buildings with 2 icons count for Contracts/Milestones requiring both, but they count only as 1 Urban Building for Contracts not specifying icons.
- These Contracts are all minimum requirements; if you have more, you still can fulfill the Contract.
INITIAL CONTRACTS
- (C01) Have a total of 2 Urban Buildings, Mines, and/or Turbines in green cities. → Gain 2 VP, 2 Thaler, and a Level 1 Technology.
- (C02) Have a total of 2 Urban Buildings, Mines, and/or Turbines in purple cities. → Gain a Level 1 Technology.
- (C03) Have a total of 2 Urban Buildings, Mines, and/or Turbines in white cities. → Gain a Level 1 Technology.
- (C04) Have a total of 2 Urban Buildings, Mines, and/or Turbines in orange cities. → Gain a Level 1 Technology.
SILVER CONTRACTS
- (C05) Have 2 Laboratory Urban Buildings on the map (energized or not). → Gain 3 VP and add a Uranium cube to one of your Mines (or gain a Worker).
- (C06) Have 8 Action tiles (available or on top of your player board), excluding Railway tiles. → Gain 1 Worker and a Level 1 Technology.
- (C07) Have 6 Achievement tokens. → Gain 4 VP.
- (C08) Have 5 Railway tiles. → Gain 2 VP and a Level 1 Technology.
- (C09) Have 2 Turbines on the map. → Gain 2 VP and 1 Worker.
- (C10) Have 2 energized Urban Buildings. → Gain 2 VP and 2 Thaler.
- (C11) Have 2 Residential Urban Buildings on the map (energized or not). → Gain a Level 1 Technology.
- (C12) Have 2 Factory Urban Buildings on the map (energized or not). → Gain 2 VP and a Level 1 Technology.
- (C13) Have an Urban Building (energized or not) in Praha. → Gain a Level 1 Technology.
- (C14) Have a network of 4 cities. → Gain 3 VP and a Level 1 Technology.
- (C15) Have a Government Urban Building on the map (energized or not). → Gain a Level 1 Technology, and 2 VP income steps.
- (C16) Have an Urban Building (energized or not) in 2 cities of different color, excluding Praha. → Gain 3 VP and 2 Thaler.
- (C17) Have 2 Mines on the map. → Gain 2 VP and 2 Thaler.
GOLD CONTRACTS
- (C18) Have a total of 5 Urban Buildings, Mines, and/or Turbines in orange cities. → Gain 6 VP and a Level 2 Technology.
- (C19) Have a total of 5 Urban Buildings, Mines, and/or Turbines in green cities. → Gain 6 VP, 2 Workers, and a Level 2 Technology.
- (C20) Have a total of 5 Urban Buildings, Mines, and/or Turbines in purple cities. → Gain 6 VP and a Level 2 Technology.
- (C21) Have a total of 5 Urban Buildings, Mines, and/or Turbines in white cities. → Gain 6 VP and a Level 2 Technology.
- (C22) Have at least one Urban Building (energized or not) in 3 cities of different color, excluding Praha. → Gain 6 VP.
- (C23) Have 4 energized Urban Buildings. → Gain 6 VP and 3 Thaler.
- (C24) Have an energized Urban Building in Praha. → Gain 4 Thaler and a Level 2 Technology.
- (C25) Have 7 Railway tiles. → Gain 6 VP and a Level 2 Technology.
- (C26) Have 11 Action tiles (available or on top of your player board), excluding Railway tiles. → Gain 5 VP, 2 Workers, and a Level 2 Technology.
- (C27) Have 13 Achievement tokens. → Gain 8 VP.
- (C28) Have 3 Residential Urban Buildings on the map (energized or not). → Gain 3 VP and a Level 2 Technology.
- (C29) Have 3 Factory Urban Buildings on the map (energized or not). → Gain 5 VP and a Level 2 Technology.
- (C30) Have 3 Laboratory Urban Buildings on the map (energized or not). → Gain 5 VP and add 2 Uranium cubes to your Mines on board (or gain 1 Worker instead of each).
- (C31) Have 2 Government Urban Buildings on the map (energized or not). → Gain a Level 2 Technology and 2 VP income steps.
- (C32) Have 3 Turbines on the map. → Gain 5 VP and 2 Workers.
- (C33) Have 3 Mines on the map. → Gain 6 VP and 4 Thaler.
- (C34) Have a network of 7 cities. → Gain 6 VP and a Level 2 Technology.
- (C35) Have 5 fulfilled Contracts. → Gain 2 VP and a Level 2 Technology.
PURPLE CONTRACTS
- (C36) Have 4 Turbines on the map. → Gain 6 VP and a Level 3 Technology.
- (C37) Have 17 Achievement tokens. → Gain 4 VP and a Level 3 Technology.
- (C38) Have 3 Government Urban Buildings on the map (energized or not). → Gain 6 VP and a Level 3 Technology.
- (C39) Have 4 Mines on the map. → Gain 6 VP and a Level 3 Technology.
- (C40) Have 8 Uranium cubes on the map. → Gain 6 VP and a Level 3 Technology.
- (C41) Have a total of 6 Urban Buildings, Mines, and/or Turbines in purple cities. → Gain 7 VP and a Level 3 Technology.
- (C42) Have a total of 6 Urban Buildings, Mines, and/or Turbines in orange cities. → Gain 7 VP and a Level 3 Technology.
- (C43) Have a total of 6 Urban Buildings, Mines, and/or Turbines in green cities. → Gain 10 VP and a Level 3 Technology.
- (C44) Have a total of 6 Urban Buildings, Mines, and/or Turbines in white cities. → Gain 7 VP and a Level 3 Technology.
- (C45) Have 4 Factory Urban Buildings on the map (energized or not). → Gain 5 VP and a Level 3 Technology.
- (C46) Have 4 Laboratory Urban Buildings on the map (energized or not). → Gain 7 VP and a Level 3 Technology.
- (C47) Have 4 Residential Urban Buildings on the map (energized or not). → Gain 6 VP and a Level 3 Technology.
- (C48) Have 6 energized Urban Buildings. → Gain 12 VP.
- (C49) Have 8 fulfilled Contracts. → Gain 12 VP.
- (C50) Have 9 Railway tiles. → Gain 12 VP.
MILESTONE TILES
- Score for every 2nd Urban Building tile (energized or not) you have on the map.
- Score for every Residential Urban Building (energized or not) you have on the map.
- Score for every Factory Urban Building (energized or not) you have on the map.
- Score for every Laboratory Urban Building (energized or not) you have on the map.
- Score for every Mine you have on the map.
- Score for every Turbine you have on the map.
- Score for every 2nd Railway tile you placed.
- Score for every city (including Praha) in which you have an energized Urban Building.
TECHNOLOGIES
| Level | Technology | Effect | Appears on |
|---|---|---|---|
| 1 | (A1) | After placing a Mine or a Turbine, gain 1 Uranium. | Experiment A |
| 1 | (A2, C1) | Whenever you energize an Urban Building, gain 1 Thaler. | Experiments A & C |
| 1 | (D2) | Whenever you gain a Contract, gain 1 Achievement token. | Experiment D |
| 1 | (A3, C3) | Immediately perform an Urbanize action, with an additional discount of 2 Thaler. | Experiments A & C |
| 1 | (B3, D3) | Immediately perform an Industrialize action, ignoring any network requirement (i.e. build a Turbine or a Mine anywhere, paying costs). | Experiments B & D |
| 1 | (B2, C2) | For Energize actions only, you have an extra “virtual” Turbine in each power plant. Therefore, in power plants with a Nucleum present, you can use one additional Uranium. | Experiments B & C |
| 1 | (B1, D1) | Whenever you place a Railway tile, gain 1 Achievement token. | Experiments B & D |
| 2 | (A6, C6) | Immediately perform an Energize action, producing an additional 4 electricity. | Experiments A & C |
| 2 | (A4, C4) | Whenever you Energize an Urban Building, either gain 1 Worker or take an Action tile from the offer with an additional discount of 2 Thaler. | Experiments A & C |
| 2 | (B5, D4) | Whenever you place a Railway tile, gain 2 Thaler. | Experiments B & D |
| 2 | (B4) | Whenever you gain a Contract, also receive the reward of one other Contract space (regardless if that additional Contract space is empty or occupied). If the Action tile used shows ×2, it does not double this second reward. | Experiment B |
| 2 | (A5) | Immediately gain 3 Workers and 3 Thaler. | Experiment A |
| 2 | (C5, D5) | Immediately take a tile from the offer with an additional discount of 2 Thaler, then you may perform a “Place a Railway” turn using that tile. | Experiments C & D |
| 2 | (B6, D6) | Immediately gain 8 Achievement tokens. | Experiments B & D |
| 3 | (A7) | Urbanize actions have a discount of 2 Thaler, and ignore any network requirement (i.e. you can build anywhere). | Experiment A |
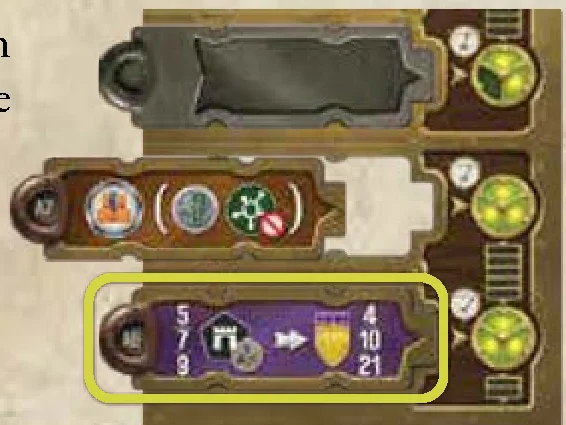
| 3 | (A8) | Have at least 1 Urban Building, Mine or Turbine in 5/7/9 different cities each to score 4/10/21 VP. | Experiment A |
| 3 | (B7) | Gain the 2 Special Action tiles. | Experiment B |
| 3 | (B8) | Have 1/2/3 markers on the “10 Achievement” space or higher on the Milestone track (i.e. in the red, purple, or blue tiers) to gain 4/10/21 VP. | Experiment B |
| 3 | (C7) | During Energize actions, you can transport coal, Uranium, and electricity ignoring network restrictions. Thus you can use any one power plant AND you can energize Buildings that are not connected to that power plant. That also means that you can use coal and your Uranium that are not connected to that power plant. | Experiment C |
| 3 | (C8) | Have 4/6/8 energized Urban Buildings to score 4/10/21 VP. | Experiment C |
| 3 | (D7) | Your Railway tiles are considered to be a wildcard on both sides (for all purposes, including when other players try to match with your tiles). On turns when you place a Railway tile you are allowed to fulfill a Contract (as if you were placing a tile on your player board). | Experiment D |
| 3 | (D8) | Have 6/8/10 Railway tiles to score 4/10/21 VP. | Experiment D |
TURBINE EFFECTS
Common Turbine Effects (on Player Board)
- Whenever you take an Energize action, pay one fewer Thaler in total when importing one or more Coal.
- When you take an Energize action, produce 2 additional electricity.
- Whenever you take an Energize action, produce 1 additional electricity.
Experiment Unique 2nd Turbines
- Experiment A’s 2nd Turbine: Whenever you take an Energize action, pay two fewer Thaler in total when importing one or more Coal. (This discount is additional to the discount from your topmost Turbine.)
- Experiment B’s 2nd Turbine: After you take an Energize action, gain 2 additional Achievement tokens.
- Experiment C’s 2nd Turbine: Each Uranium produces 3 electricity instead of 2.
- Experiment D’s 2nd Turbine: After you take an Energize action, gain 1 Worker.
ICON APPENDIX
 X Thaler Cost
 X Worker Cost
- X Thaler Discount
- X Worker Discount
 Receive X Thaler
 Receive X Workers
- Add Uranium to one of your Mines
- Advance Thaler income marker by X steps
- Advance Worker income marker by X steps
- Advance VP income marker by X steps
- Advance any income marker by X steps (you can split steps between different tracks)
 Get X Victory Points
 Get X Victory Points at the end of the game
 Get X Achievement tokens
 Level 1 Technology
 Level 2 Technology
 Level 3 Technology
 Action tile
 Railway tile
 Network
 Turbine
 Mine
Mine Residence
 Factory
 Laboratory
 Government Urban Building
 Any Urban Building
 Energized Building
 Built Mines, Turbines and Urban Buildings
 City
City Electricity Requirement
 Additional Electricity during Energize action
- Contract
 Fulfill a Contract
CREDITS
Game Design: Dávid Turczi & Simone Luciani
Solo Mode Design: Dávid Turczi
Game Development: Andrei Novac, Maciej Górkowski, Michał Cieślikowski, Kacper Frydrykiewicz
Solo Development: Gary Perrin, Chuck Case, David Digby, Mauro Gibertoni, Kacper Frydrykiewicz
Illustrations: Andreas Resch, Piotr Sokołowski
Graphic Design & DTP: Zbigniew Umgelter, Andreas Resch, Zuza Kołakowska, Paweł Niziołek
Rulebook: Dávid Turczi
Rulebook DTP: Paweł Niziołek, Zuza Kołakowska, Zbigniew Umgelter
Proofreading: Robert and Emanuela Pratt
Board&Dice would like to thank the following for their invaluable play testing, advice, and feedback: Frank de Jong, Jace Ravensburg, Tommaso Battista, Gabriele Ausielllo, Hendri Adriaens, Daniele Tascini, Noralie Lubbers, David Digby, Gary Perrin, Chuck Case, Violet Tieman, Mauro Gibertoni, Błażej Kubacki, Simone Colombo, Samantha Milani, Luke Reinsik, Daniele Radavero, Ido Traini, Claudio Ciccalè, Paolo Prioretti, Andrea Giuliani, Bijan Mehdinejad, Riccardo Fabris, Tamás Rábel, Iwona Jaworowska, Klaudyna Mikołajczyk, Przemysław Kapica, Łukasz Stadnik, Daniel “Gun3R” Sobolewski, Jakub Kisała, Paweł “Wppxis” Gajda, Dave Haenze, Anita Sokołowska, Aneta Bernaciak, Damian “Erefor” Adamczak, Yuriy Ivanov, Miłosz Murawski, Adam “Samson” Kamiński, Marta Szpaderska, Daniel Dubel, Hans Brunnström, Jesper Molin, Athina and Johan, Charles Adams, Jeff Gage, Steve Fladda, Jan Skornowicz, Ariel “Ardel” Kowalski, Michał Mazurek, Ania Oksanen, Maria Jóźwik, Paweł Jabłczyński, Patryk Olbert, Emil Pacholczyk, Jeremy Nordmoe, Krzysztof Kapelańczyk, Jakub Pańczyk, Wiktoria Matyja, Jarosław Pawełczyk, Małgosia Sztokfisz, Krzysztof Wójcikiewicz, Jan Mikołajczak, Joanna Szopińska, Konrad Nowicki, Jan Friderick Wahlin, Jacob Coon, Ed McKell.
Dávid would like to give special thanks to Noralie Lubbers, because she always has the exact idea he is looking for.
BOARD&DICE
CEO: Ireneusz Huszcza
Operations Manager: Aleksandra Menio
Head of Marketing: Aleksandra Skłodowska-Michalak
Head of Sales: Ireneusz Huszcza
Art Direction: Filip Głowacz
Head of Development: Kuba Polkowski
© 2023 Board&Dice. All rights reserved.
For more information about Nucleum please visit: www.boardanddice.com
Introduction & Components
NUCLEUM
AN ATOMIC STRATEGY GAME BY DÁVID TURCZI AND SIMONE LUCIANI
When Elsa von Frühlingfeld presented her invention to King Frederik Augustus II of Saxony, people thought it was trickery. She used the recently isolated element Uranium to heat up a jar of water and used the resulting steam to power an engine that kept the Uranium active via a process she called “atomization.” Her device, the Nucleum, ushered in a new era of energy and prosperity over the next decades. Saxony went from a minor regional power to the hub of European science and engineering. Now, a generation later, factories are still hungry for more power, demanding bigger and more Nucleums to be built, more Uranium imported from the nearby country of Bohemia, and railways and power lines built across the country to carry the tamed power of the atoms to Saxony’s great cities. Inventors, engineers, and industrialists flock to the Saxon court, vying to be the leader in this new industrial revolution.
LIVING RULES PLEDGE
We pledge to support every game well after its initial release. Despite rigorous play testing and multiple rounds of both internal and external proofreading and editing, occasionally the need for rules corrections or minor game play adjustments are discovered only several months or years after the game was manufactured. We promise to produce timely rules updates as necessary, along with expanded FAQ clarifications if needed, available for download from our website in digital PDF format.
Missing or damaged components:
Although we take a lot of care to make sure that your game is complete, manufacturing mistakes can still leave you with a missing or damaged component. If that happens, please contact us to receive replacements swiftly, and with our sincere apologies.
Customer support: https://boardanddice.com/customer-support/
COMPONENTS
- 1 Main Board (double-sided)
- 1 Side Board
- 4 Player Boards
- 50 Action Tiles (including 20 base action tiles with dots)
- 2 Special Action Tiles (for Experiment B)
- 50 Contract Tiles (4 Initial, 13 Silver, 18 Gold, 15 Purple)
- 10 Neutral Urban Building Tiles
- 5 Urban Rubble Tiles
- 3 Mining Rubble Tiles
- 3 Turbine Rubble Tiles
- 65 Thaler Tokens (in denominations of 1 and 5)
- 46 Achievement Tokens (in denominations of 1 and 5)
- 4 VP Tokens (100/200)
- 1 VP Flag Token
- 8 Milestone Tiles
- 4 Nucleum Tokens
- 4 Power Plant Standees
- 1 Coal Power Plant Standee
- 5 Endgame Condition Markers
- 1 First Player Marker
- 13 Coal Import Wagon Tiles
- 24 Uranium Cubes
- 4 General Player Aids
- 13 Setup Cards
PER EXPERIMENT (×4)
- 1 Experiment Board
- 1 Turbine Effect Tile
- 1 Experiment Player Aid
- 5 Starting Action Tiles
- 8 Technology Tiles
PER PLAYER COLOR (×4)
- 6 Milestone Markers
- 18 Worker Meeples
- 4 Turbine Tokens
- 3 Income Markers
- 12 Urban Building Tiles (4 Residences, 4 Factories, 4 Laboratories)
- 4 Mine Tiles (2× Size 2, 2× Size 3)
- 1 Victory Point Marker
Components Limitation: Uranium, Thaler, Achievement tokens, and Milestone markers are considered unlimited. If you run out, use any suitable alternative(s). All other components are strictly limited to what is provided in the game box.
Thaler and Achievement tokens have denominations of 1 and 5 – you may make change any time as necessary.
Setup
SETUP
MAIN BOARD & SIDE BOARD SETUP
- Place the main board in the center of the table with the side matching the number of players facing up, and place the side board next to the main board.
- Place the Coal Import Wagon tiles with the side showing “-1 Thaler” facing up on the indicated spots of the two coal production areas. Note: when playing with 3 players, leave one spot on each area empty. Return any excess Coal Import Wagon tiles to the game box.
- Place all the Thaler tokens, Uranium cubes, and Achievement tokens in a general supply next to the main board.
- Place VP Flag token under “70” spot on the VP Track.
- Separate the 20 Base Action tiles. Shuffle the remaining 30 tiles (taking care to not mix in the Starting or Special Action tiles), and add 10/15/25 of them (when playing with 2/3/4 players) to the 20 you put aside earlier. Shuffle this pile well, divide it into three piles, and place one of them in a face-down draw pile on the designated space at the top of the side board and put the other two face-down close to the side board.
- A. Return the unused Action tiles to the game box.
- B. Draw and reveal 5 Action tiles from the draw pile, and place them on the indicated market spaces on the side board.
- Separate the Contract tiles by type (Initial, Silver, Gold, and three types of Purple) based on their backs.
- A. Randomly give each player one Initial Contract.
- B. Shuffle the rest of the Contracts by type to create five stacks.
- C. For a 2-/3-/4-player game, place 6/9/12 randomly selected Silver Contracts in a face-down stack on the indicated space on the side board. Return all remaining Silver Contract tiles to the game box.
- D. For a 2-/3-/4-player game, place 10/12/16 randomly selected Gold Contracts in a face-down stack on the indicated space on the side board. Return all remaining Gold Contract tiles to the game box.
- E. Place one random Contract of each of the three Purple types face up on the matching space on the Contract market on the side board.
- F. Return all remaining Contract tiles (Initial and Purple) to the game box. They will not be used in this game.
- G. Draw two Silver and two Gold Contract tiles, and place them face up on the Contract market on the indicated spaces.
- Shuffle all the Milestone tiles, and randomly assign one face up to each of the four indicated spaces of the Milestone track. Return the remaining Milestone tiles to the box.
- Place three Nucleum tokens on the indicated spaces near the Milestone track.
- Perform the map setup:
- A. Place Coal Power Plant standee in Riesa on , and 4 other Power Plant Standees in all the Cities with .
- B. Shuffle the 13 Setup cards.
- C. Reveal one card from the deck.
- D. Randomly select a Neutral Urban Building tile, and place it on an urban site of the city indicated in the first row of the card:
- If possible, place it on a red space.
- Otherwise, place it in a space with an icon matching the tile’s icon (choose a space with only one icon, if multiple options are available).
- If no such space exists, select another Neutral Urban Building tile.
- If a card indicates no Urban Building tile or in a 1- or 2-player game the city’s name has by it, skip placing a tile.
- E. Place the fourth Nucleum token on the power plant in the city indicated in the second row of the card.
- F. If playing with 3 players, place 3 Turbine Rubble tiles on Turbine spaces marked with the icon.
- G. If playing with 3 or fewer players:
- Place Urban Rubble tiles on one urban site in each of the cities indicated in the third row of the card. If possible, place them on red spaces (otherwise, on a space with one icon), then select topmost/leftmost in the city if there are still multiple options. If a city is listed twice, place two Urban Rubble tiles.
- Place Mining Rubble tiles on one mining space in each of the cities indicated in the fourth row of the card. Place the Mining Rubble tile on the mining space with the smallest possible modifier (including no modifier). Break ties in favor of red spaces and then randomly if still tied. In a 1- or 2-player game, if a city’s name is followed by a , skip placing the Mining Rubble tile.
- Return any unused Rubble tiles to the box.
- H. Repeat steps C and D (draw a new card and place a Neutral Urban Building tile) three more times (so in total, a maximum of four Neutral Urban Building tiles will be placed). If the card drawn would require you to place a Neutral Urban Building tile in a city that has no empty space remaining, skip that placement.
- I. Return all unused Neutral Urban Building tiles and all the Setup cards to the box.
- A. Place Coal Power Plant standee in Riesa on
- Place the five Endgame Condition markers on the spaces in the endgame condition area on the side board.
- Randomly select the first player, and give them the First Player marker.
PLAYER BOARD & EXPERIMENT SETUP
- Each player takes: a player board (placing it in the middle of your player area), a player aid, VP token (100/200) and 4 Thaler from the supply. Choose a color, and take all the components in that specific color:
- A. 3 Income markers, placing one on the first space of each income track (so that the starting income of 4 Thaler, 2 Workers, and 0 VP is visible to their left).
- B. 12 Urban Building tiles, placing them on the spaces that match their level (Roman numeral) and type with the side showing their level face up.
- C. 4 Turbine tokens, placing them on the indicated spaces on your player board.
- D. 4 Mine tiles, placing them on the indicated spaces on your player board in the following order from top to bottom: Mine tile with 3 Uranium spaces, Mine tile with 2 Uranium spaces, Mine tile with 3 Uranium spaces, then Mine tile with 2 Uranium spaces.
- E. 18 Worker meeples. Place 2 of them in your personal supply and the remaining 16 meeples into a reserve. (For your first few games, we strongly recommend starting with 3 Worker meeples in your supply instead.)
- F. 6 Milestone markers. Place 3 of them on the three indicated Milestone spaces near the bottom of the side board and the other 3 into a reserve next to the side board. (The stacking order between players does not matter.)
- G. 1 Victory Point marker, placing it on the “0” space of the scoring track around the edge of the board.
- H. Place the Initial Contract you received earlier during the setup on the bottommost Contract space on your player board (without receiving the benefit).
- Starting with the last player and proceeding counterclockwise, each player selects one of the four Experiments. Take the Experiment board, all the technology tiles, the depicted Turbine Effect tile, all Starting Action tiles, and Experiment player aid belonging to that Experiment (all marked with the Experiment letter).
- A. Place your 5 Starting Action tiles face up next to your player board, creating your tile pool.
- B. Place your Turbine Effect tile in its dedicated space below the second Turbine token on your player board. Also, place your Technology tiles in ascending order in their spaces on the Experiment board, not fully slid.
- C. If any player chose Experiment B, give them the 2 Special Action tiles to stack face down below the Experiment Board. Otherwise, return these tiles to the box.
The game is ready to begin, with the first player taking their turn.
POWER PLANT STANDEE ASSEMBLY
Game Overview, Map & Networks
GOAL OF THE GAME
You are an industrialist trying to succeed during the economic and technological boom of 19th-century Saxony, fueled by the invention and spread of the Nucleum (what—in another timeline—people of another century would call a nuclear reactor) and its immense power-generating capabilities. You will strive to earn victory points (VP) by building and powering Urban Buildings, securing Contracts, and meeting milestones dictated by King Frederik Augustus.
GAMEPLAY AND TURN STRUCTURE
Gameplay is continuous; players take turns one after another with no rounds or phases. On your turn, you must do one of the following:
- Play an Action tile from your pool to the leftmost free slot at the top of your player board. Then, resolve one or both actions shown on the played tile. You may not choose this option if there are no free spaces available at the top of your player board or if you have no tiles remaining in your pool. If you choose this option, you may complete one Contract (before or after either of your actions).
- Play an Action tile from your pool to an empty railway space on the main board—placing one of your available Workers on it—to become a Railway tile. Then, you and possibly other players may perform one or more actions, depending on the color matches made by your placement. You may not choose this option if you have no suitable tiles remaining in your pool or if you have no available Worker.
- Perform a Recharge, allowing you to gain income and retrieve all Action tiles from the top of your player board. This may trigger a King’s Day Scoring.
Starting with the first player and moving clockwise around the table, play continues in this fashion until two (or three in a 2-player game) of the five endgame conditions are triggered.
GAINING RESOURCES
Thaler and Achievement tokens are gained from and spent to the common supply.
Workers are gained and spent from your personal supply. You may always spend 1 Worker to gain 1 Thaler but not vice versa. If you ever must gain a Worker and no Workers remain in your reserve, you immediately gain 1 Thaler instead.
Uranium is typically gained when building a Mine. Whenever you gain Uranium, you must either place it on one of your Mines or spend it to gain 1 Worker. You may always spend 1 Uranium to gain 1 Worker but not vice versa.
TIP: EXCHANGING URANIUM FOR WORKERS CAN BE VERY USEFUL, BUT REMEMBER THAT YOU MOSTLY GAIN URANIUM WHEN BUILDING A MINE—AND YOU HAVE ONLY FOUR MINES.
Whenever you gain an income advancement of any kind (Thaler, Workers, Victory Points), move the corresponding Income marker the indicated number of spaces to the right on your player board. If the Income marker is already on the last space of its income track, receive 1 VP instead for each advancement you were unable to gain.
ELEMENTS OF THE MAP
The main board shows cities which have a color (green, white, orange, purple, and the multicolored Praha, which is a special case) and a name. In these cities, you will find:
- urban sites (black squares): where you place Buildings.
- mining sites (black hexagons): where you build Mines to store 2 or 3 Uranium. During setup, some mining spaces may be blocked, while some urban sites contain Neutral Buildings.
- turbine spaces (black circles) and power plants: Nearly all power plants (except Riesa) have a dedicated space for a Nucleum and up to five spaces dedicated to Turbines.
NOTE: Some urban sites, mining sites, and turbine spaces are red; these indicate a higher cost of construction, as explained under their respective actions.
LINKS, RAILWAYS, AND NETWORKS
Between these cities, you will find links consisting of up to three connected empty railway spaces. During the game, you will place Action tiles on these spaces, creating railways that serve both as means of transporting Coal and Uranium and relaying electricity. A link becomes a completed rail line if it has no empty railway spaces. A completed rail line is owned (equally) by every player who owns at least one railway within it, as indicated by their Worker on top of the Action tile. Completing a rail line consisting of more than one railway space grants an inauguration reward to players who participated in its completion.
On the map, you create networks. A network is defined as a grouping of one or more cities connected with each other by completed rail lines. A city belongs to your network if either:
- it is adjacent to your railway, or
- is connected to a completed rail line with at least 1 railway you own, or
- contains your building.
The size of a particular network is the number of cities in that group (not the longest path between two cities in the group). Therefore, a single city with your Buildings, Mines or Turbines present but not connected to another network counts as a network of size 1, and a single railway (even if it’s not part of a completed rail line) that touches a city also forms a network of size 1. You may have one or more networks at any given time, and you may connect them later. Networks are relevant when constructing Buildings, Mines, or Turbines.
EXAMPLE: Red has three networks: one containing Leipzig and Grimma—but not Freiberg and Riesa (since those links only have Yellow’s Workers present) and not Chemnitz (since a gap separates Grimma from Chemnitz). Chemnitz forms a network of its own (because of the presence of the red Worker), despite not being linked to any other cities. The third network contains Zwickau, Joachimsthal, and Plauen, included via the completed rail line that both Yellow and Red own between the latter two. If any player places a tile between Chemnitz and Grimma and Red places a tile between Chemnitz and Zwickau, then Red would instead have a single network of six cities.
COAL PRODUCTION AREAS & TRANSPORTATION
There are two coal production areas: Ruhr to the west and Silesia on the northeastern side of the map. These represent coal-rich areas outside of the map. They are connected to some cities via long-distance rails. Players may import coal from the respective production areas into the connected cities (Plauen and Leipzig in the west, and Riesa and Görlitz in the east on the 3/4-player map and Dresden on the 1/2-player map). Long-distance rails cannot be used for any other purpose than importing coal. They are not owned by any player and therefore cannot connect or create networks.
Coal, Uranium, and electricity can be transported from one city to another using completed rail lines owned by any player. The ability to transport resources is relevant when power plants are activated.
Turn Option A: Playing an Action Tile & Actions
PLAYING AN ACTION TILE
This option allows you to resolve actions and fulfill a Contract. When playing an Action tile, place it on the leftmost empty space at the top of your player board, then resolve both actions depicted on the tile, in any order. Any action can be skipped; nothing is mandatory.
When playing a Special Directive tile (your Starting Action tile with a black background and no railway tracks on the back), you may choose and perform exactly one of the 5 main actions (Urbanize/Industrialize/Develop/Contract/Energize) with a discount of 1 Thaler.
Before resolving an action, between the two actions, or after completing both actions, you may fulfill one Contract per turn. You can fulfill either any of the Contracts on the right side of your player board or one of the three Purple Contracts on the side board. Important: Purple Contracts do not get replaced!
To fulfill a Contract, you must first meet its requirements, then gain all of its benefits (VP, Technologies, etc.) and flip that Contract tile face down, placing it in your player area. When you fulfill a Contract from your player board, that Contract spot is freed, becoming available once again for a new Contract.
Action tiles placed at the top of your player board remain there until you perform a Recharge.
MAIN ACTIONS EXPLAINED
URBANIZE
This action allows you to place Urban Buildings on the map. Take an Urban Building tile of your choice from your player board, paying the cost shown to the left of its row (from top to bottom, 2 Thaler for the first row, 3 Thaler for the second, etc.). Place it on an empty urban site within one of your networks.
- If you have no networks due to having no pieces on the board at the beginning of the game, you may build anywhere.
- Building at red urban sites costs an additional 2 Thaler.
- Regular (black) urban sites must show the icon of the Building type you are placing.
- Friendly placement restriction: If possible, you must place the Building in a single-type space in the chosen city. Red urban sites do not affect and are not affected by this rule.
- If the Action tile shows a discount icon / , reduce the total amount to be paid by 1 or 2 Thaler, as depicted.
- The level-IV Building of each type is also a Government building . They can be placed into a black space showing either their column’s icon, or a Government icon.
EXAMPLE: Blue wants to build a Residence in Zwickau, where there are 4 urban sites available. They cannot place it on the bottommost site (red arrow), because only factories can be placed there. They cannot place it on the middle site (yellow arrow) either, because of the friendly placement restriction. Therefore only the leftmost and rightmost sites are available to Blue, but since the rightmost site (orange arrow) is marked with a red border, Blue would have to pay 2 Thaler to place a Residence there. Finally, Blue places his Residence on the leftmost site (green arrow).
INDUSTRIALIZE
This action allows you to place Mines and Turbines on the map. Take a Mine or a Turbine of your choice from your player board, paying the cost shown to the left of its row (from top to bottom, 1 Worker for the first row, 2 Workers for the second, etc.), and place it on a corresponding space within one of your networks.
- Turbines are placed onto turbine spaces in power plants. You may build a Turbine regardless of the presence of a Nucleum in that power plant. Placing a Turbine unlocks an ongoing special ability.
- Mines are placed onto mining sites. Once a Mine is placed, gain Uranium equal to the number of Mines you have on the board, including the one just placed. If the mining site covered shows , gain 1 additional Uranium. You can place gained Uranium in any of your Mines, but each Mine is limited to 2 or 3 Uranium.
- If you have no networks at the beginning of the game, you may build anywhere.
- To place a Mine or Turbine in a red space, you must pay 2 Thaler. (The Special Directive discount can reduce this cost.)
- Each Turbine is paired with a Mine on your player board. Once you have built a connected Turbine-Mine pair, gain the reward depicted on the connecting line.
- If the Action tile shows an icon , pay 1 Worker fewer than the indicated cost.
- If the Action tile shows , gain 1 Uranium (placed in any Mine, or gain 1 Worker if no Mine space is free). You must perform the action to gain this bonus.
TIP: YOU DO NOT HAVE TO BUILD TURBINES OR MINES IN A CERTAIN ORDER. SOME OF THE TURBINES PROVIDE FREE ELECTRICITY FOR ENERGIZING THE BUILDINGS. YOU CAN EVEN BUILD THE BOTTOMMOST TURBINE-MINE PAIR EARLY IN THE GAME TO GAIN ACCESS TO A LEVEL – 3 TECHNOLOGY.
EXAMPLE: Blue has an Industrialize action and would like to place either a Mine or a Turbine. They can place their Mine in Brüx on either black site. They can also place it on a site with a red border and + 1 Uranium, but paying 2 Thaler for that. They can also place it on a site with only a red border paying 2 Thaler, but it wouldn’t benefit them at all. They may also decide to build a Turbine in Glashütte, but there are only red sites available, meaning that Blue would have to pay 2 Thaler to place their Turbine there.
DEVELOP
This action allows you to gain additional Action tiles. Purchase one Action tile from the market, paying the Thaler amount (0 to 2) indicated below it. Then, you may pay an additional 2 Thaler to repeat this, paying the second tile’s cost as well. After purchasing 1 or 2 tiles, slide all remaining tiles to the right to close the gaps in the offer, and refill the offer from the draw pile. If the draw pile is empty, refill it with one of the piles you have placed outside the side board during setup. If the draw pile is empty and you cannot refill it, this triggers one of the endgame conditions.
If the Action tile you played this turn shows a discount icon / , reduce the total amount to be paid by 1 or 2 Thaler, as depicted.
EXAMPLE: Teal has 4 Thaler and is performing a Develop action. They really want to buy the tile that allows them to industrialize with a discount of 1 Worker which costs 2 Thaler (Purple). Teal would also like to buy another tile, so they have to pay 2 Thaler to have that possibility. That leaves them with 0 Thaler, so the only tile available to them is the rightmost one (Green). Teal would prefer to buy the leftmost tile costing 1 Thaler (Red) and they could buy it if they used their Special Directive tile for that action or any other Action tile with a Develop action with a discount.
CONTRACT
This action allows you to collect Contracts. Take one Silver or Gold Contract from the offer, and place it on any empty Contract space on the right side of your player board, then receive the corresponding reward shown on that Contract space. If the Action tile shows the icon, receive the shown reward twice:
- Gain 2 Thaler.
- Gain 1 Worker from your reserve.
- Add 1 Uranium to one of the Mines you own on the map.
- Gain 2 Achievement tokens.
If you do not have an empty Contract space, you may not resolve this action. You cannot remove or replace Contracts present on your player board, nor can you keep a Contract in your hand or player area.
After taking a Contract, draw a new Contract of the same color (Silver or Gold) from the respective draw pile to refill the empty space in the offer. If there are no more tiles of the required color, draw a tile of the other color instead. If there are no more tiles of either color remaining in the draw piles, leave the space empty. Drawing the last Contract from the last remaining pile triggers an endgame condition.
Purple Contracts cannot be taken with the Contract Action. You treat them as yours in terms of fulfilling them, but whoever is first takes the Contract from the side board, making it impossible for other players to fulfill it.
EXAMPLE: Yellow plays an Action tile that allows them to perform a Contract action. They can choose from 2 Silver and 2 Gold Contracts, because Purple Contracts cannot be taken this way. They decide to take the “Build 2 Laboratories” Contract. After that, Yellow has to place it on their player board. They choose the spot to place the Contract. Yellow immediately receives 1 Uranium to put in one of their Mines. Because the Silver Contract stack is empty, a Gold Contract is drawn in place of just one taken. Since Yellow has already built 2 Laboratories, they can now fulfill that Contract to gain 3 VP and 1 Uranium.
TIP: FULFILLING CERTAIN CONTRACTS IS ONE OF TWO MAIN WAYS TO GAIN TECHNOLOGIES.
GAINING TECHNOLOGIES
When you gain a Technology as a reward (usually via completing Contracts or energizing Laboratories), you must immediately unlock a single Technology or gain victory points equal to the level of the gained reward.
When unlocking a Technology, select one with a level equal to or lower than the level of the gained reward and slide its tile to the right into its slot on the Experiment board.
There are three types of Technologies:
- Immediate abilities [blue]: You must either resolve the entirety of this effect when you unlock it or forfeit it; the effect cannot be stored for later use. The effect is a one-time use and therefore those Technologies should be flipped after use.
- Ongoing abilities [brown]: Ongoing abilities have a trigger depicted on their left side and a benefit or an action modifier in parenthesis depicted on the right side. From the moment you gain this Technology, every time you meet the condition, you gain the benefit or apply the modifier to the triggering action.
- Ultimate goal [purple]: If unlocked, your 8th Technology provides victory points that are scored at the end of the game if you meet its condition.
Unlocking all 8 of your Technologies is one of the endgame conditions.
ENERGIZE
This action allows you to power up Buildings, gaining you immediate benefits and VP at the end of the game. When you choose to Energize, perform the following steps:
- Select one power plant on the map (in Riesa, Zittau, Glashütte, Grimma, or Plauen).
- Transport coal and/or Uranium from any number of locations via completed rail lines to this power plant. You may use any completed rail lines—not just your own:
- A. For coal: import any amount from either/both coal import site(s) first, then transport it to the power plant.
- B. For Uranium: transport up to the allowed amount from your connected Mines to the power plant.
- Determine the amount of electricity produced.
- Select a connected Urban Building (yours or Neutral) that has a requirement equal to or less than the amount of electricity produced.
- Receive Achievement tokens equal to the requirement of the Building and any benefits printed on it.
- Flip the Building to its energized side.
In order to transport coal, it must first be imported. You can import coal only if the selected power plant is connected to one or both coal import areas via completed rail lines (you do not have to own any of these rail lines) and a long-distance rail. There is no limit to the amount of coal that you can import, and you can import coal from all connected coal import areas at the same time as long as they are connected to your selected power plant.
For each imported coal, pay the cost shown on a Coal Import Wagon in the selected coal import area, flipping the import tile to its -2 Thaler side or, if there are no more import tiles on their 1-Thaler side, removing it from the game to reveal the 3 Thaler cost printed on the board. The coal supply can never be depleted, but the price always increases toward the maximum of 3 Thaler as it is imported. If using your Special Directive tile’s and/or a Turbine effect’s discount , apply the reduction to the total amount spent on coal. Once imported, the coal is immediately available for use in the connected power plant.
In order to transport and use Uranium, the selected power plant must have a Nucleum and each of your chosen Mines must be connected to the selected power plant via completed rail lines (you do not have to own these rail lines). The amount of Uranium you can transport is dependent on the total number of Turbines (regardless of owner) present: you can transport 1 Uranium by default plus an additional 1 Uranium for each Turbine present. If the Turbine belongs to another player, you must pay that player 1 Thaler (or use the Special Directive discount). Transported Uranium is returned to the supply.
EXAMPLE: Teal can transport Uranium to a power plant in Zittau even though 2 of the rail lines they are using belong to other players. Teal can only transport 1 Uranium to Zittau, because they don’t have a Turbine there, but a power plant with Nucleum can process 1 Uranium by default.
After transporting any coal and/or Uranium, determine the total amount of electricity produced:
- 1 electricity per 1 transported coal
- 2 electricity per 1 transported Uranium
- any additional electricity depicted on the used Action tile
- any electricity produced by your built Turbines
- any electricity provided by your active Technologies
Select exactly one Urban Building, either yours or Neutral (it does not have to be in your network), that is still unenergized and connected to the selected power plant via completed rail lines. The Building must have a requirement that is equal to or lower than the electricity produced. Then, receive:
- A. Achievement tokens equal to the electricity requirement of the Building (any excess electricity is lost).
- B. The printed benefits depicted on the front of the tile (Thaler, Workers, advancements on income tracks, gaining Technologies).
- C. Flip the tile to its energized side (showing a lit light bulb in the upper left corner).
NOTE: The VP depicted on the energized side of the tile are counted only at the end of the game, with energized Buildings in Praha scoring double.
TIP: THE MAP HAS NEUTRAL BUILDINGS PLACED DURING SETUP; ENERGIZING THEM CAN GIVE AN EARLY BOOST TO YOUR ECONOMY AND MAKE YOUR FIRST RECHARGE MORE EFFICIENT.
EXAMPLE: Teal performs an Energize action. They have a Laboratory in Marienberg that requires 9 electricity. Since Teal has already built their 3rd and 4th Turbines, they have 3 extra electricity. Teal decides that they will use a power plant in Glashütte. They transport 2 Uranium from their Mine in Brüx through Blue’s rail line (yellow arrow). Since there is a Nucleum in Glashütte, that power plant can process Uranium. Thanks to their 2 Turbines there, Teal can process transported Uranium to generate 4 electricity. They are now lacking 2 electricity. Fortunately, Glashütte is also connected via various rail lines and long distance rail near Riesa with a coal production area, so Teal can import 2 coal paying 2 Thaler and flipping 2 Coal Import Wagon tiles to generate remaining 2 electricity (green arrow). Now, all 9 electricity is being transported to Marienberg which allows Teal to energize the building (red arrow). They get 9 Achievement tokens, Level 3 Technology of their choice and they flip the building to its energized side.
SUBSIDIZE ACTIONS
Other small actions that can be found on the Action tiles, but cannot be done with Special Directive tile:
- Gain 2 Thaler OR 1 Worker.
- Advance Thaler income marker by 1.
- Advance Worker income marker by 1.
- Advance VP income marker by 1.
- Gain 1 Achievement token.
- Advance any income marker by 1.
- Pay 1 Thaler to advance any income marker by 1.
Turn Option B: Placing a Railway Tile
PLACING A RAILWAY TILE
Placing a railway consists of the following steps:
- Place an Action tile on a link, using a Worker to mark ownership.
- Resolve any action(s) with a color match.
- Check if the rail line has been completed. If it has:
- A. Gain the inauguration reward, if any; then,
- B. Flip the tile(s) face down.
When placing a tile as a railway, select any empty railway space on the map that is adjacent to a city and/or railway, place the tile on it face up oriented in any direction, and place one of your Workers on the tile.
NOTE: The tile does not need to be placed into your network. Placing a Railway tile is how you extend your network and/or create a new network.
If you do not have (or cannot obtain) a Worker before placing the railway, you may not choose this option. (Remember, you can always spend a Uranium in a pinch, to gain a Worker.)
You may never place your Special Directive tile as a railway.
To place a tile on a red railway space (between Leipzig and Grimma on the 3/4-player map and between Brüx and Praha on the 1/2-player map), you must first pay 2 Thaler. If you cannot pay, you may not place a tile there.
COLOR MATCHING
Then, check the tile you placed for color matches. Each tile shows two actions and has two colored edges. If the edge is multicolored, it is a wildcard. An action creates a color match if any of the following is true:
- it is adjacent to a city of the same color,
- it is a wildcard, and adjacent to any city,
- it is adjacent to Praha (which matches every color), or
- it is adjacent to another tile and both adjacent actions are of the same color or one or both of them is a wildcard. (In this case, the adjacent action on the other tile is also matched, even if it belongs to another player.)
Note that an action adjacent to an empty railway space never creates a color match.
TIP: BE MINDFUL OF THE ACTIONS ON YOUR TILES AND IN THE MARKET. IF YOU PLACE ON THE MAP A TILE WITH AN ACTION THAT YOU DO NOT HAVE ON ANY OTHER OF YOUR TILES, YOU MAY LATER HAVE A HARD TIME GETTING A NEW ONE FROM THE MARKET (IT MAY OR MAY NOT APPEAR), THUS SLOWING YOUR PROGRESS IN THE GAME.
Resolve your matched actions first from the just placed tile (in any order), and then from the tiles that are matched. As a result of placing a tile, you will be able to resolve between 0 and 4 actions. Any action can be skipped; nothing is mandatory.
If other players gained matched actions this way, then they may resolve their actions after you have finished resolving all of yours. If they cannot resolve their actions at that time, the opportunity is lost; they may not resolve them later. If more than one other player gains matched actions, they resolve their matched actions in clockwise order starting from the active player.
NOTE: It is not required to match a placed tile. If you place a tile adjacent to another player’s tile without creating a match, you deny them the action they might have counted on at the cost of giving up an action yourself.
COMPLETING A RAIL LINE & INAUGURATION
Whenever a rail line of two or more railway spaces is completed as a result of a player placing the last tile, all players with one or more Workers on links making up that rail line receive the inauguration reward, resulting in an advancement on the VP income track.
Some rail lines provide an income advancement for each of your Railway tiles within that link, while others provide the bonus once, even if you own multiple railways within the link.
Finally, after gaining any inauguration bonus, flip all railways within this link face down (to show the railway icon and the fact that that rail line is complete).
NOTE: While tiles are only flipped when a rail line is complete and after actions are resolved, the connection is immediate; thus, it is possible to grow your network (or start a new one) by placing a tile and then immediately using that network in one or more of the actions’ resolutions.
Action tiles placed on the map remain here for the entirety of the game.
Turn Option C: Recharge & King's Day Scoring
RECHARGE
Recharging allows you to gain income, place a Milestone marker (potentially triggering King’s Day Scorings), and retrieve all the Action tiles from the top of your player board. When you choose to Recharge, you must perform, in order, each of the following steps:
- Gain Thaler, Workers, and VP from your income tracks.
- Place a Milestone marker on the Milestone track:
- A. Gain rewards, if any.
- B. If a Milestone space becomes empty, perform a King’s Day Scoring.
- Discard all Achievement tokens you have collected.
- Retrieve all the tiles from the top of your player board.
1. GAINING INCOME
The income you gain (Thaler, Workers, and/or VP) is the highest value that is both to the left of the marker on the respective income track and underneath an Action tile. The income of the top two tracks (Thaler and Workers) will also include VP as you advance on them.
EXAMPLE: From top to bottom, Blue gains 10 Thaler and 1 VP (because of the action tile), 4 Workers and 2 VP, and 0 VP from their respective income tracks.
At the end of the game, you will score additional VP for reaching the last three spaces of each income track. These VP are shown below the income tracks and are not gained when gaining income.
TIP: WHILE YOU CAN GET A LOT FROM YOUR INCOME TRACKS DURING A RECHARGE, FOCUSING ON ONE OR TWO OF THEM INCREASES THE LIKELIHOOD OF GAINING EXTRA VP AT THE END OF THE GAME.
2. PLACING A MILESTONE MARKER
This allows you to place your Milestone markers onto Achievement spaces for Final Scoring and occasionally placing a new Nucleum on the map.
On the left side of the side board is the Milestone track, which consists of Achievement spaces that increase in value as you advance up the track. These Achievement spaces are grouped into six different tiers (1-2, 3-6, 7-9, 10-14, 16-26, and 28-40, depicted in different colors and showing different multipliers) on the left and four Milestone segments (1-6, 7-12, 13-22, 24-40) on the right. When placing one of your Milestone markers on the Milestone track, you can only have one marker in each tier, but multiple players can have their marker in the same tier, even on the same space.
To place your Milestone marker on the milestone track, follow these steps:
- Determine the total value of Achievement tokens you have.
- Choose an Achievement space on the track with a value equal to or lower than the total value of Achievement tokens you have to place your marker on, remembering that you can only place 1 marker in each tier.
- A. If you already have Milestone markers in all tiers equal to or lower than the total value of Achievement tokens you have (or your total is zero), you must place your marker on the “0” Achievement space and gain the bailout bonus. You may willingly choose to place your marker on “0” as well.
- If you place your marker in a Milestone segment that still has a Nucleum present, place it on a power plant on the map and receive the depicted bonus .
- If you placed your marker in the topmost Milestone segment, gain a level 3 Technology.
- If you placed your Milestone marker on the topmost space (40 Achievement tokens), immediately gain 9 VP.
Your first three Milestone markers come from the Milestone spaces at the bottom of the side board, from left to right. Once you have used these three milestone markers, take additional ones from the three Milestone markers placed in reserve next to the side board during setup. Placed Milestone markers remain on the milestone track for the duration of the game.
The “0” Achievement space is not part of any tier or milestone segment. When you place a Milestone marker on this space, you receive a bailout bonus of 2 Thaler and 1 Worker. For each marker you have on the “0” Achievement space, you will lose 3 VP at the end of the game.
EXAMPLE: Teal recharges with 17 Achievement tokens. Even though they have enough tokens to place their Milestone marker in the “×5” and “×4” tiers, they already have one marker each in those tiers, so they cannot do that. Therefore Teal has to place their Milestone marker in one of the lower tiers. They decide to place it on the ‘9’ spot, so they will have ‘×3’ multiplier for the Milestone tile “Score for every city (including Praha) in which you have an energized Urban Building.” On top of that, since there is still a Nucleum in that segment, Teal gets to place it in a power plant of their choice, gaining the bonus.
3. PERFORMING A KING’S DAY SCORING
Whenever a Milestone space becomes empty (i.e., you are the last player to recharge the first, second, or third time), perform a King’s Day Scoring:
- The owner of the highest Milestone marker on the Milestone track scores 6 VP. If there is a tie, all tied players score the same amount.
- The owner of the second-highest Milestone marker on the Milestone track scores 2 VP. In a tie, all tied players score the same amount. Second place is scored even if there was a tie for the first place.
- It is possible for you to score for both first and second place (for a total of 8 VP). Milestone markers on the “0” Achievement space are not eligible for King’s Day Scoring.
Emptying the third (last) Milestone space is one of the endgame conditions.
EXAMPLE: Red placed their second Milestone marker on ‘22’ spot which caused King’s Day Scoring to happen. Since both Teal and Red are tied for first place, they both gain 6 VP. Second highest Milestone marker also belongs to Teal which means that they receive another 2 VP. Therefore for this King’s Day Scoring Teal gains 8 VP, Red gains 6 VP and Yellow gains 0 VP.
4. DISCARDING ACHIEVEMENT TOKENS & RETRIEVING TILES
Discard all Achievement tokens you have collected, even if you placed your Milestone marker on a lower position than their total could have possibly allowed you to.
Retrieve all tiles from the top of your player board (not from the map), and return them face up to your tile pool. These Action tiles are now available for you to use again.
TIP: DO NOT BE AFRAID TO TAKE A RECHARGE WITH 0 ACHIEVEMENT TOKENS; AN EXTRA WORKER AND SOME MONEY CAN SERIOUSLY BOOST YOUR EARLY GAME.
End of the Game & Final Scoring
ENDGAME CONDITIONS & END OF THE GAME
Endgame is triggered when two (three in a 2-player game) of the following five conditions are met:
- The Action tile draw piles are empty.
- Both the Silver and Gold Contract draw stacks are empty.
- All players have recharged at least 3 times (the Milestone spaces have no Milestone markers on them).
- At least one player has unlocked all of their 8 Technologies.
- At least one player has reached 70 VP.
NOTE: The last two conditions can only be met by one player—the first to do so.
As soon as an endgame condition is met, the player who met the condition first (usually the active player) moves the left-most Endgame Condition marker from the side board’s relevant area onto the condition’s dedicated space and scores 3 VP.
After the end of the game is triggered, continue taking turns until each player has taken an equal number of turns (until the last player in player order has finished their turn), then you each play one more turn. It is possible to trigger and score additional endgame conditions after the end of the game has been triggered—this has no effect on the end of the game.
Afterwards, proceed to Final Scoring.
FINAL SCORING
If a player has one or more Achievement tokens left at this stage, they may place a Milestone marker on the Milestone track as described under “Recharge” but without triggering any effects (King’s Day Scoring, Nucleum placement, gaining Technologies, etc.) nor gaining any income. The limit of 1 Milestone marker per player per tier still applies.
SCORING MILESTONES
For each of your Milestone markers on the Milestone track, score 1 VP for each time you meet the condition shown on its segment’s Milestone tile, multiplied by its tier’s multiplier. For each of your Milestone markers on the “0” Achievement space, lose 3 VP instead.
EXAMPLE: Blue scores 4 VP for every second Urban Building they have built, while Yellow scores 7 VP for every second Urban Building they have built.
SCORING YOUR ULTIMATE GOAL TECHNOLOGY
If you have unlocked your 8th Technology, score this goal. See the appendix for details.
SCORING YOUR LEFTOVER RESOURCES
Score 1 VP for every 2 Uranium in your Mines, 2 Workers in your personal supply, and 5 Thaler in your player area. Before scoring your leftover resources, you may still convert Uranium into Workers and Workers into Thaler.
ENERGIZED BUILDINGS
For each of your energized Buildings, score the depicted number of VP. Energized Buildings in Praha score double.
Most Buildings indicate a flat VP amount. Government Buildings , however, show a scoring condition indicating a Building type (Residence, Factory, or Laboratory); for each energized Government Building, score the indicated amount of points for all Buildings of the shown type — including itself, and those belonging to other players and regardless of whether they are energized or not — that are in the same network of yours as the Government Building in question.
EXAMPLE: Blue scores 2 VP for their energized Laboratory in Freiberg, 8 VP for their energized Factory in Praha, and 20 VP for their energized Government Building (counting 5 Factories for 4 VP each). Note that Blue counts Teal’s tiles—including the unenergized ones—but it does not count Red’s because it is not accessible from Praha via completed rail lines that Blue owns. Blue does not score for their own unflipped Factory in Karlsbad either, because even though it is within one of their networks, it is not connected via a completed rail line to the Government Building in Praha.
SCORING INCOME TRACK BONUSES
Score 3/6/10 VP for each of your income tracks that has its income marker on one of the last three spaces (as indicated below them).
EXAMPLE: In this case, Blue scores 3 VP for their Thaler income track and 10 VP for their Worker income track, for a total of 13 VP.
The player with the most VP is the winner. If there is a tie, tied players share the victory.
Appendix: Contracts, Milestones & Technologies
CONTRACTS & MILESTONES APPENDIX
- Praha does not count as a city of any color for the purpose of fulfilling Contracts.
- Urban Buildings with 2 icons count for Contracts/Milestones requiring both, but they count only as 1 Urban Building for Contracts not specifying icons.
- These Contracts are all minimum requirements; if you have more, you still can fulfill the Contract.
INITIAL CONTRACTS
- (C01) Have a total of 2 Urban Buildings, Mines, and/or Turbines in green cities. → Gain 2 VP, 2 Thaler, and a Level 1 Technology.
- (C02) Have a total of 2 Urban Buildings, Mines, and/or Turbines in purple cities. → Gain a Level 1 Technology.
- (C03) Have a total of 2 Urban Buildings, Mines, and/or Turbines in white cities. → Gain a Level 1 Technology.
- (C04) Have a total of 2 Urban Buildings, Mines, and/or Turbines in orange cities. → Gain a Level 1 Technology.
SILVER CONTRACTS
- (C05) Have 2 Laboratory Urban Buildings on the map (energized or not). → Gain 3 VP and add a Uranium cube to one of your Mines (or gain a Worker).
- (C06) Have 8 Action tiles (available or on top of your player board), excluding Railway tiles. → Gain 1 Worker and a Level 1 Technology.
- (C07) Have 6 Achievement tokens. → Gain 4 VP.
- (C08) Have 5 Railway tiles. → Gain 2 VP and a Level 1 Technology.
- (C09) Have 2 Turbines on the map. → Gain 2 VP and 1 Worker.
- (C10) Have 2 energized Urban Buildings. → Gain 2 VP and 2 Thaler.
- (C11) Have 2 Residential Urban Buildings on the map (energized or not). → Gain a Level 1 Technology.
- (C12) Have 2 Factory Urban Buildings on the map (energized or not). → Gain 2 VP and a Level 1 Technology.
- (C13) Have an Urban Building (energized or not) in Praha. → Gain a Level 1 Technology.
- (C14) Have a network of 4 cities. → Gain 3 VP and a Level 1 Technology.
- (C15) Have a Government Urban Building on the map (energized or not). → Gain a Level 1 Technology, and 2 VP income steps.
- (C16) Have an Urban Building (energized or not) in 2 cities of different color, excluding Praha. → Gain 3 VP and 2 Thaler.
- (C17) Have 2 Mines on the map. → Gain 2 VP and 2 Thaler.
GOLD CONTRACTS
- (C18) Have a total of 5 Urban Buildings, Mines, and/or Turbines in orange cities. → Gain 6 VP and a Level 2 Technology.
- (C19) Have a total of 5 Urban Buildings, Mines, and/or Turbines in green cities. → Gain 6 VP, 2 Workers, and a Level 2 Technology.
- (C20) Have a total of 5 Urban Buildings, Mines, and/or Turbines in purple cities. → Gain 6 VP and a Level 2 Technology.
- (C21) Have a total of 5 Urban Buildings, Mines, and/or Turbines in white cities. → Gain 6 VP and a Level 2 Technology.
- (C22) Have at least one Urban Building (energized or not) in 3 cities of different color, excluding Praha. → Gain 6 VP.
- (C23) Have 4 energized Urban Buildings. → Gain 6 VP and 3 Thaler.
- (C24) Have an energized Urban Building in Praha. → Gain 4 Thaler and a Level 2 Technology.
- (C25) Have 7 Railway tiles. → Gain 6 VP and a Level 2 Technology.
- (C26) Have 11 Action tiles (available or on top of your player board), excluding Railway tiles. → Gain 5 VP, 2 Workers, and a Level 2 Technology.
- (C27) Have 13 Achievement tokens. → Gain 8 VP.
- (C28) Have 3 Residential Urban Buildings on the map (energized or not). → Gain 3 VP and a Level 2 Technology.
- (C29) Have 3 Factory Urban Buildings on the map (energized or not). → Gain 5 VP and a Level 2 Technology.
- (C30) Have 3 Laboratory Urban Buildings on the map (energized or not). → Gain 5 VP and add 2 Uranium cubes to your Mines on board (or gain 1 Worker instead of each).
- (C31) Have 2 Government Urban Buildings on the map (energized or not). → Gain a Level 2 Technology and 2 VP income steps.
- (C32) Have 3 Turbines on the map. → Gain 5 VP and 2 Workers.
- (C33) Have 3 Mines on the map. → Gain 6 VP and 4 Thaler.
- (C34) Have a network of 7 cities. → Gain 6 VP and a Level 2 Technology.
- (C35) Have 5 fulfilled Contracts. → Gain 2 VP and a Level 2 Technology.
PURPLE CONTRACTS
- (C36) Have 4 Turbines on the map. → Gain 6 VP and a Level 3 Technology.
- (C37) Have 17 Achievement tokens. → Gain 4 VP and a Level 3 Technology.
- (C38) Have 3 Government Urban Buildings on the map (energized or not). → Gain 6 VP and a Level 3 Technology.
- (C39) Have 4 Mines on the map. → Gain 6 VP and a Level 3 Technology.
- (C40) Have 8 Uranium cubes on the map. → Gain 6 VP and a Level 3 Technology.
- (C41) Have a total of 6 Urban Buildings, Mines, and/or Turbines in purple cities. → Gain 7 VP and a Level 3 Technology.
- (C42) Have a total of 6 Urban Buildings, Mines, and/or Turbines in orange cities. → Gain 7 VP and a Level 3 Technology.
- (C43) Have a total of 6 Urban Buildings, Mines, and/or Turbines in green cities. → Gain 10 VP and a Level 3 Technology.
- (C44) Have a total of 6 Urban Buildings, Mines, and/or Turbines in white cities. → Gain 7 VP and a Level 3 Technology.
- (C45) Have 4 Factory Urban Buildings on the map (energized or not). → Gain 5 VP and a Level 3 Technology.
- (C46) Have 4 Laboratory Urban Buildings on the map (energized or not). → Gain 7 VP and a Level 3 Technology.
- (C47) Have 4 Residential Urban Buildings on the map (energized or not). → Gain 6 VP and a Level 3 Technology.
- (C48) Have 6 energized Urban Buildings. → Gain 12 VP.
- (C49) Have 8 fulfilled Contracts. → Gain 12 VP.
- (C50) Have 9 Railway tiles. → Gain 12 VP.
MILESTONE TILES
- Score for every 2nd Urban Building tile (energized or not) you have on the map.
- Score for every Residential Urban Building (energized or not) you have on the map.
- Score for every Factory Urban Building (energized or not) you have on the map.
- Score for every Laboratory Urban Building (energized or not) you have on the map.
- Score for every Mine you have on the map.
- Score for every Turbine you have on the map.
- Score for every 2nd Railway tile you placed.
- Score for every city (including Praha) in which you have an energized Urban Building.
TECHNOLOGIES
| Level | Technology | Effect | Appears on |
|---|---|---|---|
| 1 | (A1) | After placing a Mine or a Turbine, gain 1 Uranium. | Experiment A |
| 1 | (A2, C1) | Whenever you energize an Urban Building, gain 1 Thaler. | Experiments A & C |
| 1 | (D2) | Whenever you gain a Contract, gain 1 Achievement token. | Experiment D |
| 1 | (A3, C3) | Immediately perform an Urbanize action, with an additional discount of 2 Thaler. | Experiments A & C |
| 1 | (B3, D3) | Immediately perform an Industrialize action, ignoring any network requirement (i.e. build a Turbine or a Mine anywhere, paying costs). | Experiments B & D |
| 1 | (B2, C2) | For Energize actions only, you have an extra “virtual” Turbine in each power plant. Therefore, in power plants with a Nucleum present, you can use one additional Uranium. | Experiments B & C |
| 1 | (B1, D1) | Whenever you place a Railway tile, gain 1 Achievement token. | Experiments B & D |
| 2 | (A6, C6) | Immediately perform an Energize action, producing an additional 4 electricity. | Experiments A & C |
| 2 | (A4, C4) | Whenever you Energize an Urban Building, either gain 1 Worker or take an Action tile from the offer with an additional discount of 2 Thaler. | Experiments A & C |
| 2 | (B5, D4) | Whenever you place a Railway tile, gain 2 Thaler. | Experiments B & D |
| 2 | (B4) | Whenever you gain a Contract, also receive the reward of one other Contract space (regardless if that additional Contract space is empty or occupied). If the Action tile used shows ×2, it does not double this second reward. | Experiment B |
| 2 | (A5) | Immediately gain 3 Workers and 3 Thaler. | Experiment A |
| 2 | (C5, D5) | Immediately take a tile from the offer with an additional discount of 2 Thaler, then you may perform a “Place a Railway” turn using that tile. | Experiments C & D |
| 2 | (B6, D6) | Immediately gain 8 Achievement tokens. | Experiments B & D |
| 3 | (A7) | Urbanize actions have a discount of 2 Thaler, and ignore any network requirement (i.e. you can build anywhere). | Experiment A |
| 3 | (A8) | Have at least 1 Urban Building, Mine or Turbine in 5/7/9 different cities each to score 4/10/21 VP. | Experiment A |
| 3 | (B7) | Gain the 2 Special Action tiles. | Experiment B |
| 3 | (B8) | Have 1/2/3 markers on the “10 Achievement” space or higher on the Milestone track (i.e. in the red, purple, or blue tiers) to gain 4/10/21 VP. | Experiment B |
| 3 | (C7) | During Energize actions, you can transport coal, Uranium, and electricity ignoring network restrictions. Thus you can use any one power plant AND you can energize Buildings that are not connected to that power plant. That also means that you can use coal and your Uranium that are not connected to that power plant. | Experiment C |
| 3 | (C8) | Have 4/6/8 energized Urban Buildings to score 4/10/21 VP. | Experiment C |
| 3 | (D7) | Your Railway tiles are considered to be a wildcard on both sides (for all purposes, including when other players try to match with your tiles). On turns when you place a Railway tile you are allowed to fulfill a Contract (as if you were placing a tile on your player board). | Experiment D |
| 3 | (D8) | Have 6/8/10 Railway tiles to score 4/10/21 VP. | Experiment D |
TURBINE EFFECTS
Common Turbine Effects (on Player Board)
- Whenever you take an Energize action, pay one fewer Thaler in total when importing one or more Coal.
- When you take an Energize action, produce 2 additional electricity.
- Whenever you take an Energize action, produce 1 additional electricity.
Experiment Unique 2nd Turbines
- Experiment A’s 2nd Turbine: Whenever you take an Energize action, pay two fewer Thaler in total when importing one or more Coal. (This discount is additional to the discount from your topmost Turbine.)
- Experiment B’s 2nd Turbine: After you take an Energize action, gain 2 additional Achievement tokens.
- Experiment C’s 2nd Turbine: Each Uranium produces 3 electricity instead of 2.
- Experiment D’s 2nd Turbine: After you take an Energize action, gain 1 Worker.
Icon Appendix & Credits
ICON APPENDIX
- X Thaler Cost
- X Worker Cost
- X Thaler Discount
- X Worker Discount
- Receive X Thaler
- Receive X Workers
- Add Uranium to one of your Mines
- Advance Thaler income marker by X steps
- Advance Worker income marker by X steps
- Advance VP income marker by X steps
- Advance any income marker by X steps (you can split steps between different tracks)
- Get X Victory Points
- Get X Victory Points at the end of the game
- Get X Achievement tokens
- Level 1 Technology
- Level 2 Technology
- Level 3 Technology
- Action tile
- Railway tile
- Network
- Turbine
- Mine
- Residence
- Factory
- Laboratory
- Government Urban Building
- Any Urban Building
- Energized Building
- Built Mines, Turbines and Urban Buildings
- City
- Electricity Requirement
- Additional Electricity during Energize action
- Contract
- Fulfill a Contract
CREDITS
Game Design: Dávid Turczi & Simone Luciani
Solo Mode Design: Dávid Turczi
Game Development: Andrei Novac, Maciej Górkowski, Michał Cieślikowski, Kacper Frydrykiewicz
Solo Development: Gary Perrin, Chuck Case, David Digby, Mauro Gibertoni, Kacper Frydrykiewicz
Illustrations: Andreas Resch, Piotr Sokołowski
Graphic Design & DTP: Zbigniew Umgelter, Andreas Resch, Zuza Kołakowska, Paweł Niziołek
Rulebook: Dávid Turczi
Rulebook DTP: Paweł Niziołek, Zuza Kołakowska, Zbigniew Umgelter
Proofreading: Robert and Emanuela Pratt
Board&Dice would like to thank the following for their invaluable play testing, advice, and feedback: Frank de Jong, Jace Ravensburg, Tommaso Battista, Gabriele Ausielllo, Hendri Adriaens, Daniele Tascini, Noralie Lubbers, David Digby, Gary Perrin, Chuck Case, Violet Tieman, Mauro Gibertoni, Błażej Kubacki, Simone Colombo, Samantha Milani, Luke Reinsik, Daniele Radavero, Ido Traini, Claudio Ciccalè, Paolo Prioretti, Andrea Giuliani, Bijan Mehdinejad, Riccardo Fabris, Tamás Rábel, Iwona Jaworowska, Klaudyna Mikołajczyk, Przemysław Kapica, Łukasz Stadnik, Daniel “Gun3R” Sobolewski, Jakub Kisała, Paweł “Wppxis” Gajda, Dave Haenze, Anita Sokołowska, Aneta Bernaciak, Damian “Erefor” Adamczak, Yuriy Ivanov, Miłosz Murawski, Adam “Samson” Kamiński, Marta Szpaderska, Daniel Dubel, Hans Brunnström, Jesper Molin, Athina and Johan, Charles Adams, Jeff Gage, Steve Fladda, Jan Skornowicz, Ariel “Ardel” Kowalski, Michał Mazurek, Ania Oksanen, Maria Jóźwik, Paweł Jabłczyński, Patryk Olbert, Emil Pacholczyk, Jeremy Nordmoe, Krzysztof Kapelańczyk, Jakub Pańczyk, Wiktoria Matyja, Jarosław Pawełczyk, Małgosia Sztokfisz, Krzysztof Wójcikiewicz, Jan Mikołajczak, Joanna Szopińska, Konrad Nowicki, Jan Friderick Wahlin, Jacob Coon, Ed McKell.
Dávid would like to give special thanks to Noralie Lubbers, because she always has the exact idea he is looking for.
BOARD&DICE
CEO: Ireneusz Huszcza
Operations Manager: Aleksandra Menio
Head of Marketing: Aleksandra Skłodowska-Michalak
Head of Sales: Ireneusz Huszcza
Art Direction: Filip Głowacz
Head of Development: Kuba Polkowski
© 2023 Board&Dice. All rights reserved.
For more information about Nucleum please visit: www.boardanddice.com
Expansions for
Nucleum
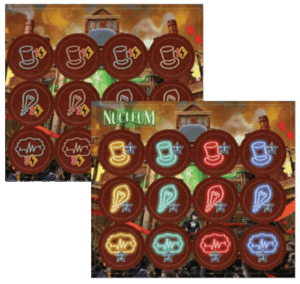
Nucleum: Neons Promo
2024
Add Neon tokens to energize actions and gain more achievement tokens.
150
minutes
View expansion
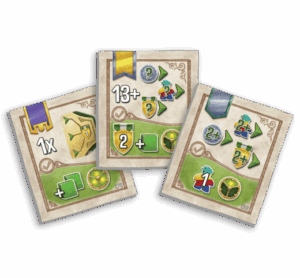
Nucleum: New Contracts Promo
2024
Add three new contracts focused on advancing the income tracks.
150
minutes
View expansion
Nucleum: Gibraltar
2026
Power a submarine project and build a new future across Gibraltar and beyond.
120
minutes
Heavy
View expansion
Nucleum: Acrylic Nucleums Promo
2023
Add acrylic markers and surprise bonus tiles to your Nucleum sessions.
150
minutes
View expansion
Nucleum: Patrons Set
2024
Give every Experiment a face, occupation, and memorable identity.
150
minutes
Medium

View expansion
Nucleum: Nucleum Half Tiles Promo
2023
Add flexible Action Fragments and Contract spaces to your Nucleum game.
150
minutes
View expansion
Nucleum: Court of Progress
2024
Enter the halls of power and shape the nuclear revolution.
150
minutes
Medium Heavy

View expansion

Nucleum: Australia
2024
Harness shipping lanes, build coal mines, and power Australia's revolution.
150
minutes
Heavy
View expansion
