
The Voyages of Marco Polo
2015
Lead your expedition from Venice to Beijing, using dice, contracts, trading posts, and special powers across five rounds.
100
minutes
2 - 4
player(s)
12+
Medium Heavy

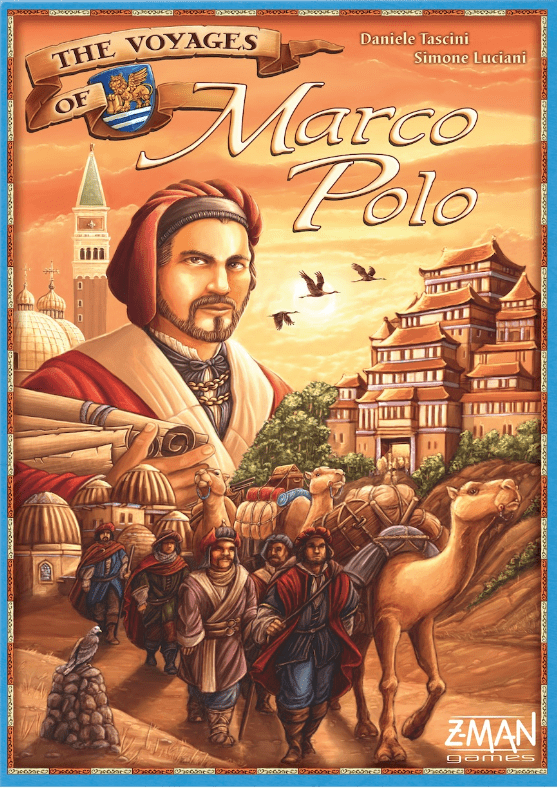
About this board game
The Voyages of Marco Polo is a board game for 2–4 players, lasting about 100 minutes, in which players recreate Marco Polo’s journey from Venice to Beijing.
Each player takes a different historical character with a special power, then rolls five personal dice at the start of every round. Over five rounds, players take turns placing their dice on the board to perform actions. The value of the dice affects the options available, while repeated use of an action can require additional payment when another player has already chosen it.
Players can collect resources or money, acquire contracts, travel across the map, or use special actions granted by cities. Every journey begins in Venice, but several routes lead eastward along the Silk Road. Reaching cities allows players to place trading posts, unlocking access to extra actions or resources for the rest of the game.
- Dice placement: Use your five personal dice to select and perform actions.
- Travel: Choose routes from Venice toward Beijing.
- Trading posts: Establish posts in cities to gain ongoing benefits.
- Contracts: Acquire and fulfill contracts during the journey.
After the fifth round, players receive additional victory points for trading posts in Beijing, fulfilling the most contracts, and occupying cities shown on their secret goal cards. With varied characters, routes, and action choices, The Voyages of Marco Polo presents a race across a famous historical journey where every die placement shapes the expedition.
Mechanics
Designers
Illustrator
/pic7182955.jpg)

Board Game Rules for
The Voyages of Marco Polo
About These Rules
Because of the complexity of the game, we are going to start by explaining the basic gameplay. We will then, step by step, explain individual options or special cases in more detail. So don’t panic if it seems like something is missing… it is coming. Even Marco’s tales didn’t fit on a single page.
Introduction
Players play as associates of Marco Polo, who traveled with him and in the surrounding areas. Each player tries to collect points by completing contracts and visiting as many lucrative cities as possible. Completed contracts provide more than just victory points, they also offer discounts and the ability to use privileges in the cities you visit. On top of that, they let you reach goals for the end of the game. At the end of the game, the winner is the player with the most victory points.
Play proceeds in clockwise order, with each player acting in turn. Players roll their dice and use them to occupy action spaces on the board. Players keep taking turns until all of the dice have been used, at which point the round ends. The game lasts a total of 5 rounds, and then ends after a short final scoring. A detailed summary of a game round has been provided at the end of the rules.
Game Components
- 1 game board
- 4 player boards
- 10 Character tiles
- 6 City Bonus markers
- 26 dice (5 each in blue, yellow, green, red, and black, along with 1 white)
- 40 coins (20×1, 10×5, 10×10)
- 44 different contracts
- 31 City cards
- 18 Goal cards
- 10 outpost bonuses
- 15 gold bars (12 small and 3 large)
- 15 silk bundles (12 small and 3 large)
- 16 pepper bags (12 small and 4 large)
- 27 camels (20 small and 7 large)
- 12 figures (3 each in blue, yellow, green, and red)
- 38 trading posts (9 each in blue, yellow, green, and red, along with 2 black)
- 4 50/100 point cards
- 1 start player marker (hourglass)
- 4 player aids
- 1 rules and 1 supplement
- 1 quick setup sheet
Board Setup
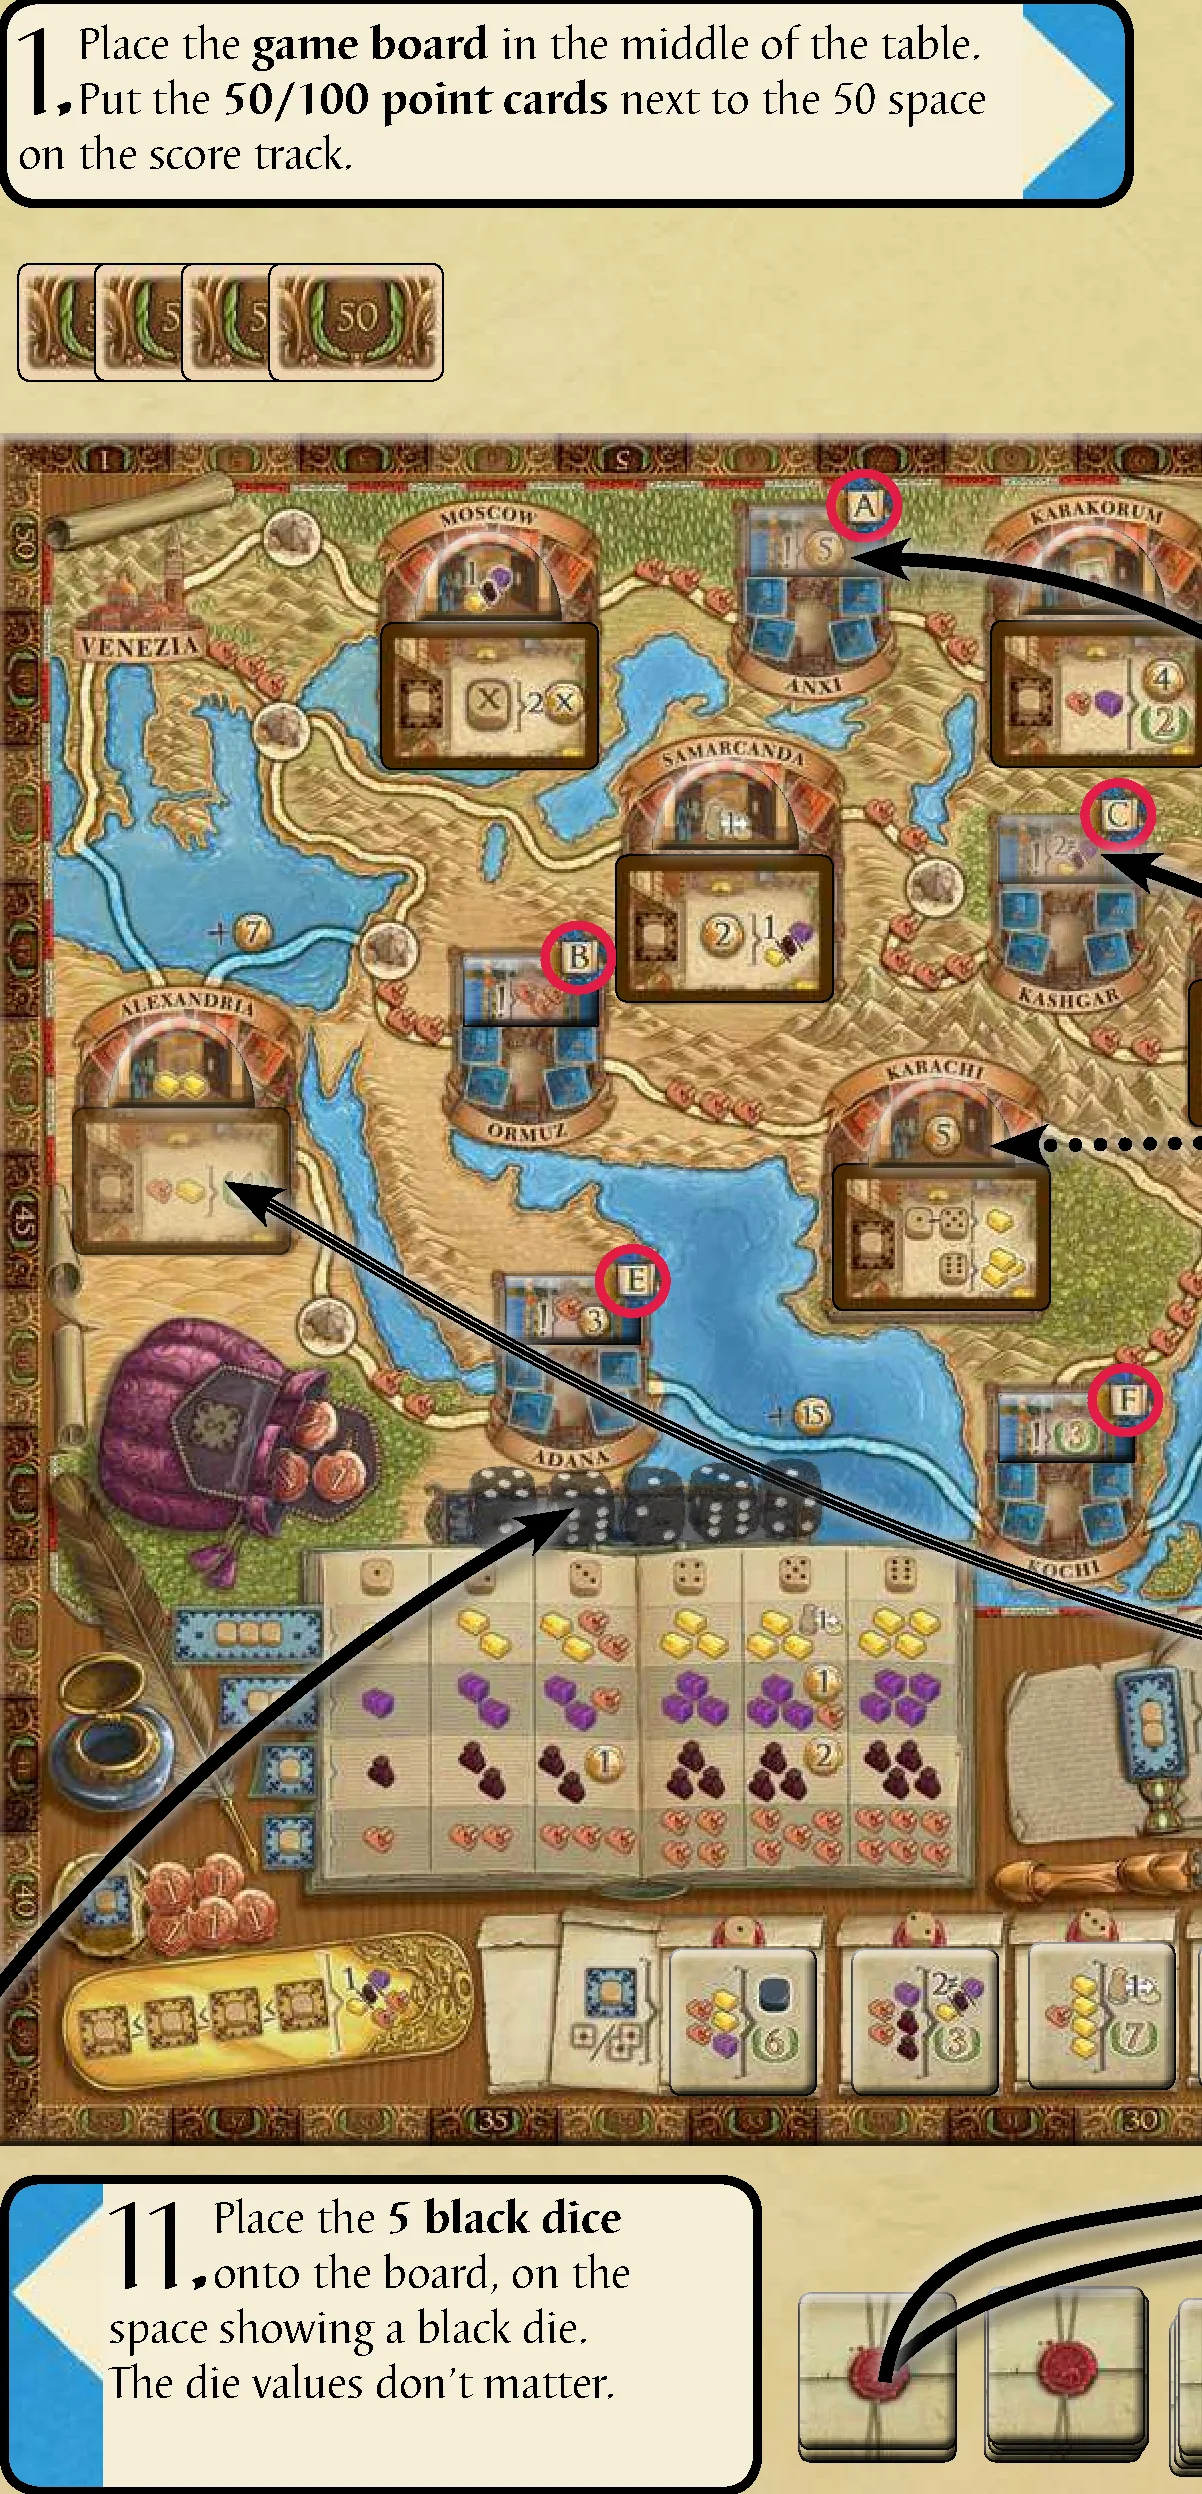
- Place the game board in the middle of the table. Put the 50/100 point cards next to the 50 space on the score track.
- Goal cards: Shuffle the 18 Goal cards and place them in a facedown pile next to the board.
- Money: Place the money (40 coins including 1s, 5s, and 10s) in a general supply next to the board.
- Goods and camels: Place the goods (gold, pepper, silk) and camels in a general supply next to the board. The larger pieces count as three of the smaller ones. The supply of goods and camels is not limited. In the rare event that the supply runs out, use something else as a substitute.
- City Bonus markers: Place the 6 City Bonus markers on the board spaces whose letters correspond to those on the tiles.
- Outpost bonuses: Shuffle the 10 outpost bonuses facedown. Place one outpost bonus, faceup, onto each large city on the board. Return the 3 unused bonuses to the game box.
- City cards: Shuffle the 31 City cards facedown. Place one card, face up, onto each of the 9 City card spaces on the board. Return the remaining city cards to the game box. They are not needed for the game.
- Contracts: Set the 6 starting contracts to the side for now (see player setup). Shuffle the remaining contracts facedown and form 5 piles, each with 6 contracts. You will have 8 left over. Take one of the piles and place one contract, faceup, onto each contract space on the board. Place the remaining 4 piles next to the board. Take the remaining 8 contracts and form a special pile. Put this pile next to the board as well, somewhat removed from the others.
- Character tiles: Place the 10 Character tiles, faceup, next to the board.
- Special character extras: Some characters have special extras: leave the 2 black trading posts, the white die, and one figure in each color in the box for now. A summary of the different characters may be found on the supplement.
- Black dice: Place the 5 black dice onto the board, on the space showing a black die. The die values don’t matter.
- Start player: The player who most recently embarked on a voyage around the world is the start player. Give that player the hourglass.
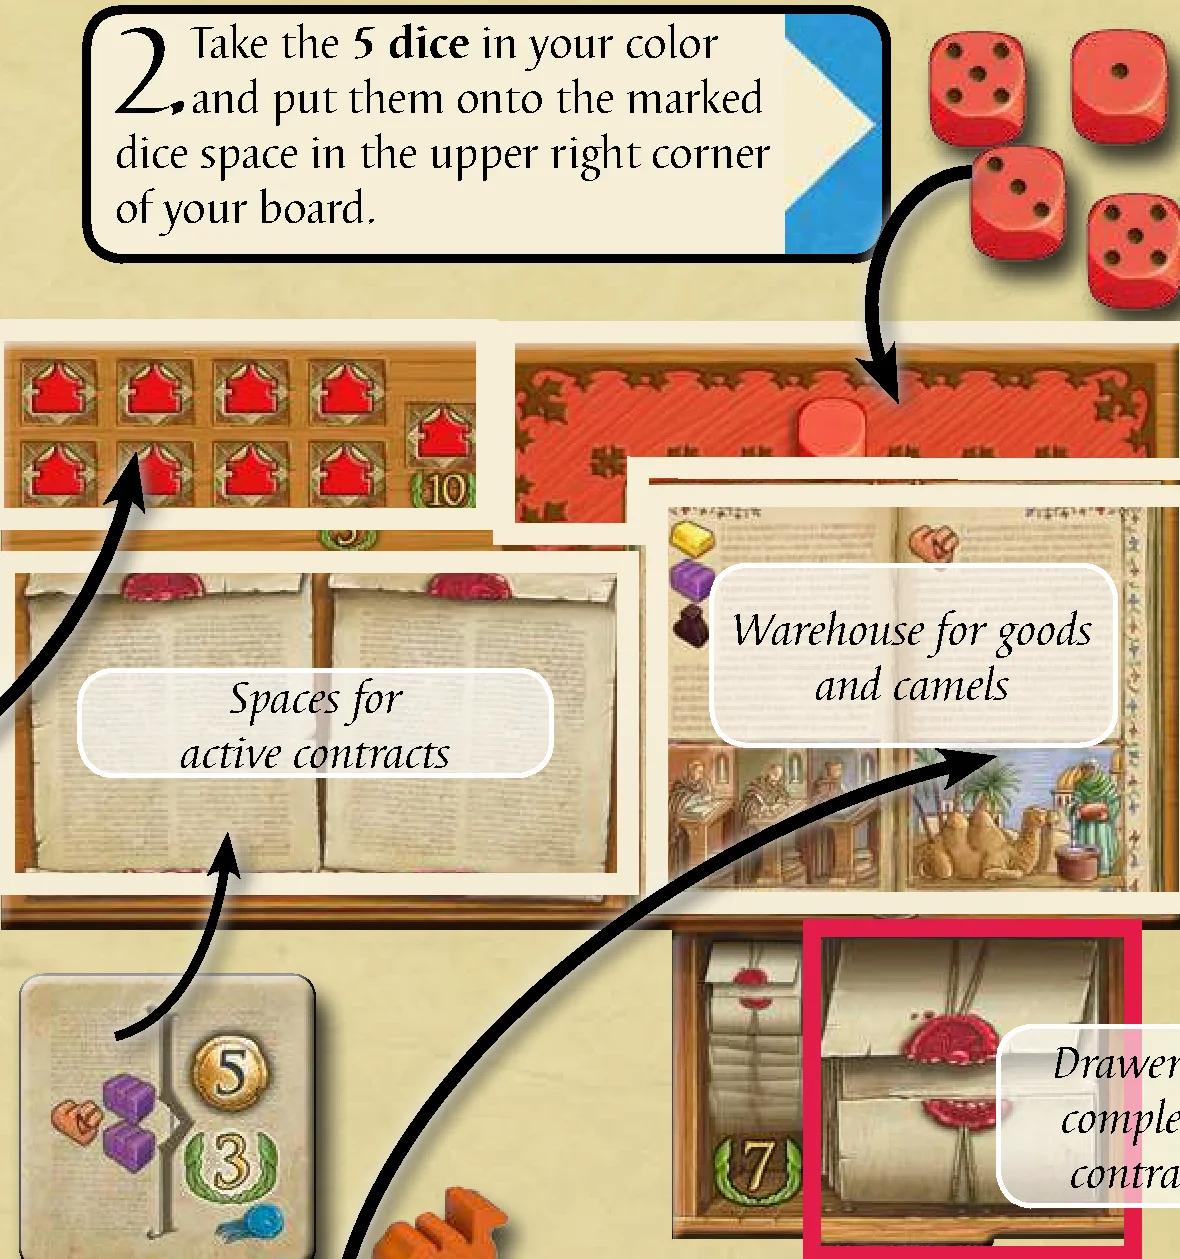
Various game components will be left over and need to be distributed to the players. What each player receives and how it should be arranged is shown below.
Player Setup
- Each player chooses a color. Take the corresponding player board and place it in front of yourself.
- Take the 5 dice in your color and put them onto the marked dice space in the upper right corner of your board.
- Take the 9 trading posts in your color and put them onto the marked spaces in the upper left corner of your board.
- Each player now receives a contract: Use the starting contracts previously set aside. Each player chooses one facedown contract, placing it faceup onto one of the two active contract spaces on their player boards.
- Give each player 2 camels, which they put into their warehouses. Give the starting player 7 coins. The next player in clockwise order gets 8 coins, the next player after that gets 9 coins, and the last player gets 10 coins. Players should keep their money on the table in front of themselves.
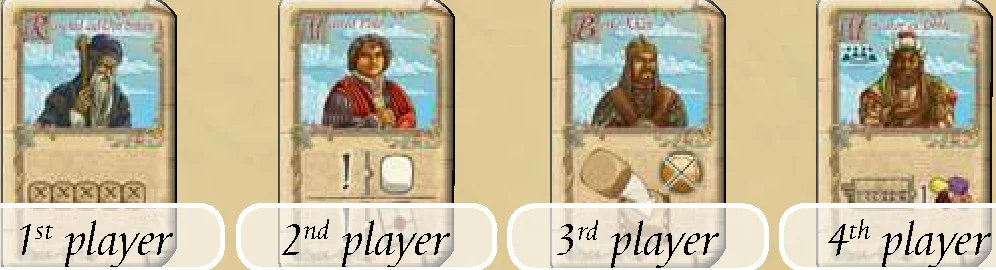
- Characters: For your first game, you will need the following 4 characters:
- Give the starting player Rashid ad-Din Sinan,
- the second player (in clockwise order) Matteo Polo,
- the third player Berke Khan,
- and the fourth player Mercator ex Tabriz.
Once you are familiar with the game you can pick your characters. The character abilities are summarized on the summary.
- Give each player 2 figures in their color. Place one onto the 50-point space of the score track, and the other onto Venezia.
- Deal each player 2 facedown cards from the Goal card pile. Players should keep their Goal cards secret. Once you are familiar with the game you can pick your Goal cards. The Goal cards are presented in the supplement.
- Finally, give each player a player aid. The game can now begin.
Overview of a Round
The game lasts a total of 5 rounds. Each round consists of three phases: Start of the Round, the Turn Phase, and End of the Round.
At the Start of a Round
What needs to be done at the start of a round?
- Choose a new start player. (Except during the first round.)
A new start player is determined at the beginning of a new round. The player who last chose the “Travel” action during the previous round is the new start player.
Hint: Stack dice on this action. This will allow you to quickly see who is the last player to have played on this action; it will be the one on top of the “Travel” action.
Exception: If nobody moved in the previous round, then the current start player remains the start player for the next round.
Exception: If the last player to move used white or black dice to do so, then players should make sure to remember which player that was. If you know you are the last player to move and you used black or white dice, then you can take the hourglass right away to avoid confusion.
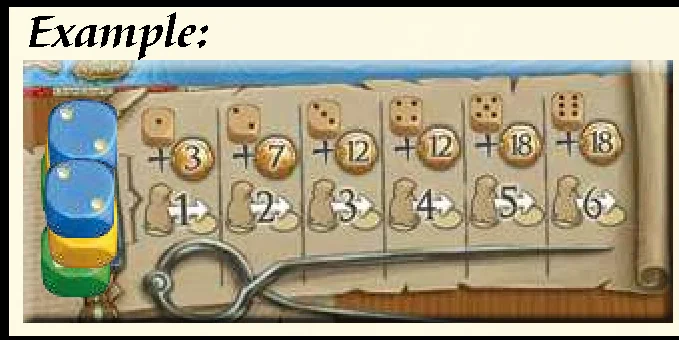
new_start_player_travel_example Example: Green moved first this round, followed by Yellow and finally Blue. Blue receives the hourglass and will be the start player in the next round.
- Award city and character bonuses.
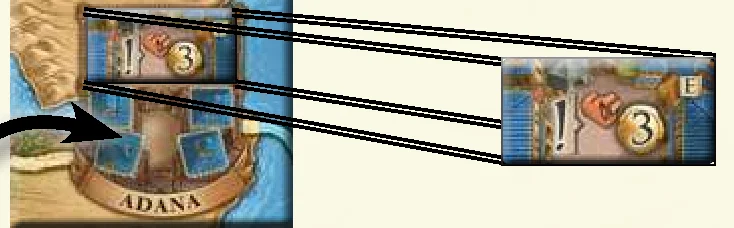
- All small cities (with a ! symbol) award bonuses. Each player receives bonuses from each small city in which he or she has a trading post, see supplement.
- All characters (with a ! symbol) award bonuses, see supplement.
- Retrieve all dice.
Retrieve all of your dice from the board, returning them to your player board. Return the black dice to their space on the board. - Roll all dice, possible compensation.
All players roll their dice simultaneously. If you rolled less than 15, you receive compensation (see Compensation for Low Die Rolls). Once all players have rolled their dice, the new round can begin.
A Game Turn
Players take turns, in clockwise direction, starting with the start player. This continues until all players are out of dice.
A turn in this game means choosing at least 1 die from your player board and placing it onto the action space of your choice. You can add your dice to an unoccupied brown or blue action space, or to an already occupied blue action space. You then immediately perform the corresponding action.
As long as you have dice left, you must choose and perform exactly 1 action. Once you are out of dice, you pass automatically. You will not have any more turns this round! Once you have taken your turn, the next player in clockwise order takes a turn. Players keep taking turns until all of their dice have been placed. This ends the round.
How does an individual turn go?
- Perform bonus actions if desired: You can choose to perform bonus actions before your main action. You can perform as many of them as you wish (provided you can pay for them). Refer to your player aid for a summary of the possible bonus actions.
- Choose and perform 1 action: Choose 1 action and place the necessary dice on the board to perform it. Pay the necessary coins, if any. Perform the action immediately.
- Perform bonus actions if desired: You can choose to perform bonus actions after your main action. You can perform as many of them as you wish (provided you can pay for them).
At the End of a Round
What needs to be done at the end of a round?
- Clear any remaining contracts: Remove any remaining contracts from the board, adding them to the bottom of the special contracts pile.
- Add new contracts to the board: Choose one of the contract piles and add 6 new contracts to the board. (Not needed at the end of the 5th round.)
The Game Board – Regions and Associated Actions

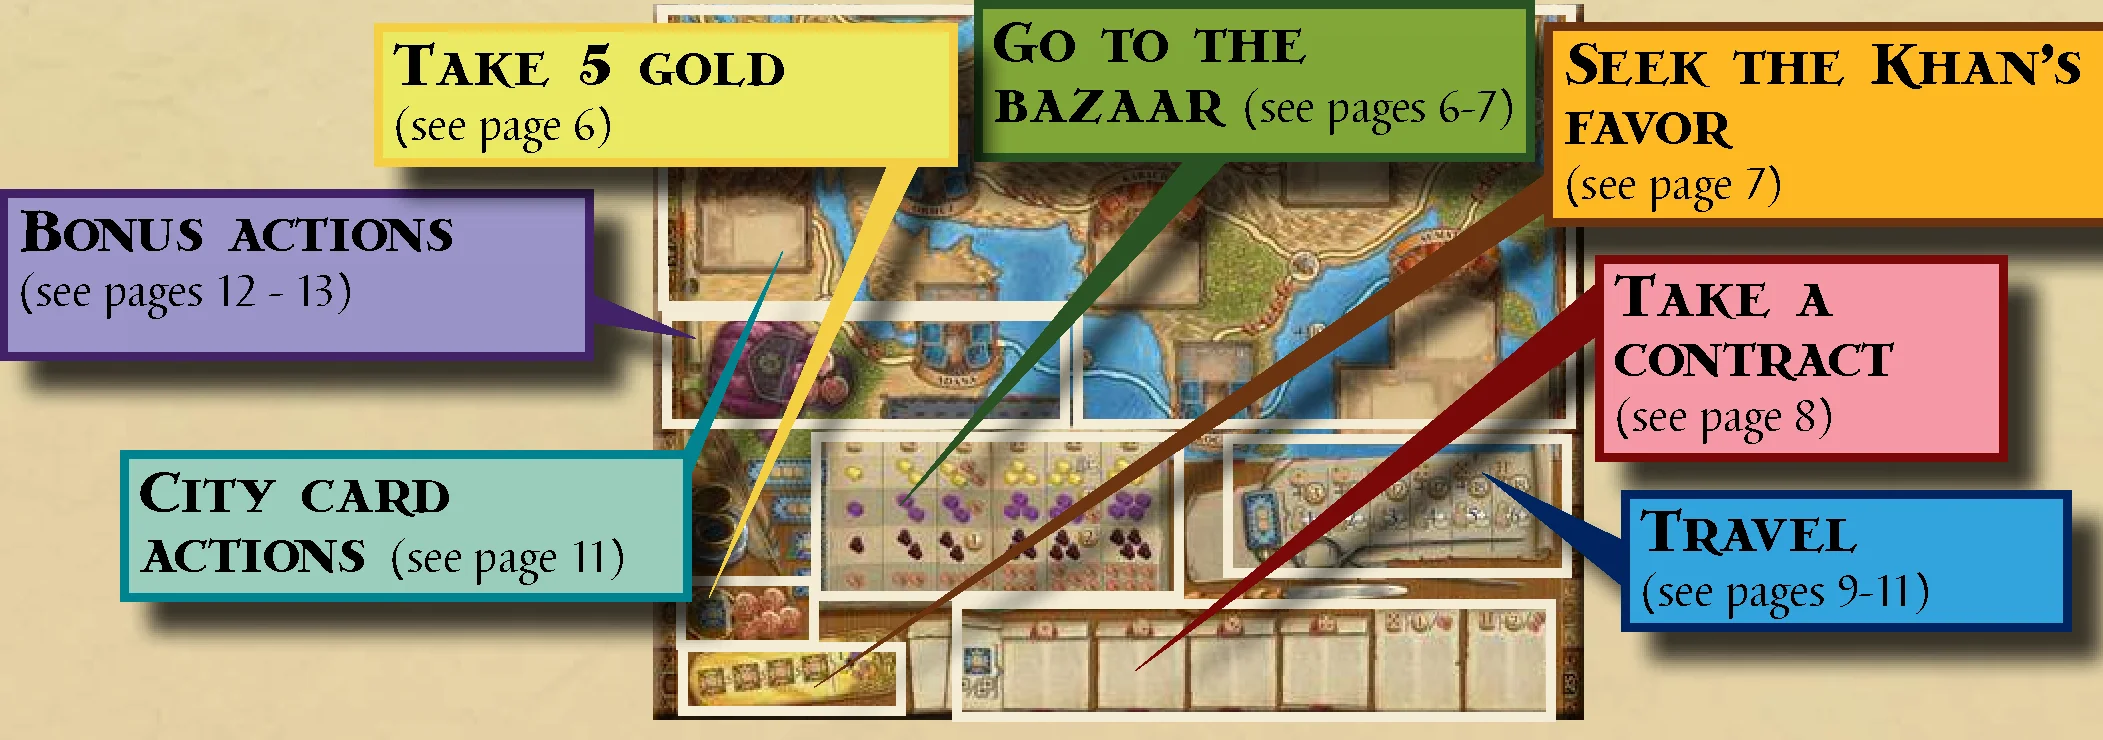
The following 6 actions are possible: Take 5 coins, go to the bazaar, seek the Khan’s favor, take a contract, travel, and City card actions.
The bonus actions are: Complete 1 contract, take 3 coins, reroll 1 die, adjust 1 die result by 1, and take 1 black die.
The Actions – General Principles
The following explains what should be kept in mind when performing an action:
- You can only use your own dice, never those of the other players.
- You must use as many dice as are shown on the action space you want to use.
- You can place your dice on unoccupied brown or blue spaces, or occupied blue spaces. For the time being, we will assume that the action space is always unoccupied.
- If you want to use an occupied blue action space, then you must pay coins. If a brown action space is already occupied, you are not allowed to use it.
- Each player color (blue, yellow, green, red) can only be used once on each action space.
- After you have placed your dice, you immediately perform the corresponding action.
- The dice themselves indicate how many times you can perform the action, or how much the action gets you (exception: Take 5 coins). Apart from a few exceptions, this is always the lowest die.
- If you are allowed to perform an action out multiple times or get more from the action, you can always choose to perform the action out fewer times or get less. You must always perform the action at least once.
Important: How exactly is an action carried out?
- Place your dice.
- Pay the necessary coins, if any.
- Perform the action.
Occupying an Action Space
Can you choose an already occupied action space?
Yes, in general action spaces can be occupied by multiple players. All players are allowed to use an action space (except for City cards). When doing so note the following:
- When you want to use an already-occupied action space, you must pay for it. You must pay as many coins as the die value of the lowest-value die you are using to perform the action.
- This is independent of any dice already present on the action space. The die values of other players’ dice do not matter. Once you have paid, then you can perform the action as usual.

Example: There are already 2 Blue dice on the “Silk” action space. Red would like to buy some silk as well this round. Red places 2 dice (4 and 5) onto the action space. Red pays 4 coins (as her lowest die value was a 4). She then takes up to 3 silk and adds them to her warehouse.
- When a player wishes to place dice on an occupied space, stack them one on top of the other. This will make it easier to see who is the last player to have chosen that action. If need be (too many dice), place them next to one another, from left to right. The one to the right will now be the last one to have chosen this action.
Exception: The Khan’s Favor only offers four action spaces. When those four spaces are occupied, it is no longer possible to choose this action for the rest of the round. - White and black dice are not considered player colors (blue, yellow, green, red). As such, a player with those types of dice could reuse an action space they have already used with their player color.
- A player may combine black and white dice with dice of their color. However, your color dice may never be more than once on the same action space (exception: Take 3 coins).
Note: There is no limit to how many white or black dice can be on an action space.

Example: Green has already taken camels this round. He cannot use his Green dice to take any more camels this round. He has a black die left, though, which he can use to take more camels if he wishes.
Compensation for Low Die Rolls
If the sum total of all of your dice at the start of a round is less than 15, then you receive compensation in the form of coins or camels. You can take 1 coin or 1 camel for each point of difference between your total and 15. You are allowed to take a combination of both should you be able to take more than 1.

Example: Green has rolled a total of 13. He has 2 points of compensation: 2 camels, 2 coins, or 1 camel and 1 coin.
Take 5 Coins – No cash, no options
To take 5 coins, you must add exactly 1 die to the “Take 5 coins” action space.
The die value you use is irrelevant and does not affect the action. You always take 5 coins. If the space is occupied, you must first pay to place your die before performing the action.
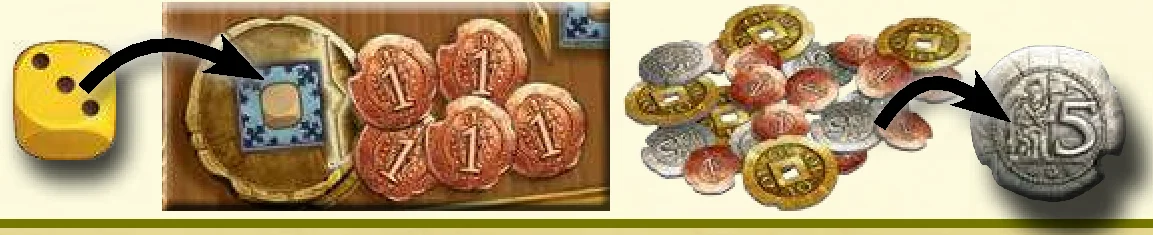
Example: Yellow places a 3-value die onto the “Take 5 coins” action space. She takes 5 coins from the general supply.
The Grand Bazaar – Goods are useful for many contracts
Above all else, you will need goods to complete contracts. Additionally, you can use certain City cards, located in the larger cities, to trade goods in for coins, camels, or points. Goods may also bring you points during final scoring.
Sequence:
- Place your dice on 1 of the 4 distinct action spaces.
- Determine how many goods you receive.
- Take the goods and add them to your player board.
1. Place your dice on 1 of the 4 distinct action spaces
You must use as many dice as indicated by the action space you are using.
2. Determine how many goods you receive
To the right of the action spaces is a table indicating how many goods a player receives. The value of the lowest numbered die used to perform the action determines how many goods you will receive.

Example: Blue places 2 dice (a 4 and a 5) onto the “silk” action space. The lowest die value Blue used is a 4, which means that he can take 3 silk from the supply.
3. Take the goods and add them to your player board
Take the goods from the general supply and place them in your player board’s warehouse.
You can also choose to use a value lower than your lowest die value. This usually only makes sense when this gives you some variety in what you receive.
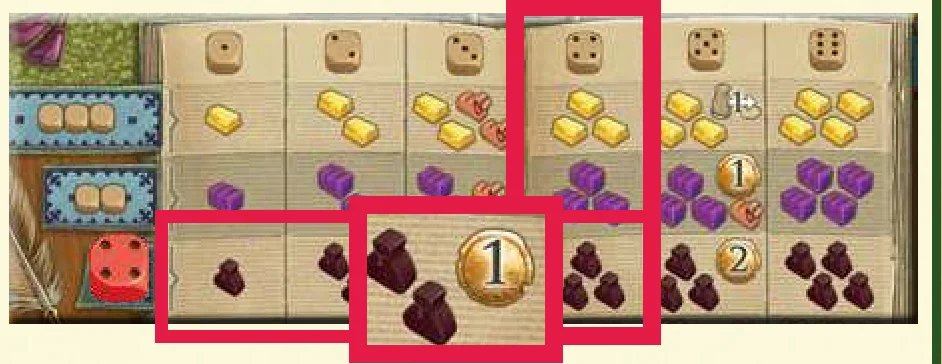
Example: Red places a single 4-value die onto the “Pepper” action space. She could take 3 pepper from the general supply. She could also, however, choose to use a lower number and take 2 pepper and a coin.
The Camels – Your constant companions
You will need camels to complete certain contracts, to be able to move along certain routes, to adjust die results, and to claim black dice. Some of the City cards in the large cities also require camels.
You receive camels in the same way as goods: Take as many camels from the general supply as indicated by your die’s value. Add the camels to your warehouse.
Note: There is not much point in using a lower value when taking camels.

Example: Green places a 6 onto the “Camels” action space. He can take up to 6 camels. Green takes the 6 camels from the general supply and adds them to his warehouse.
The Khan’s Favor – Another way to get the goods
Place exactly 1 die onto the « Khan’s Favor » action space. Then take 1 good of your choice and 2 camels from the general supply, adding them to your warehouse.
Special Rules
The first player to seek the Khan’s favor places her die onto the left-most die-space and claims her reward. The next player who wishes to use this action must place his die on the next die-space over. The next die to be used must have a value equal to or greater than the previously-placed die, or the action may not be used. These same rules are in effect for the remaining players.
Note: There are only 4 distinct spaces in this action space. When those 4 spaces are occupied, it is no longer possible to choose this action for the rest of the round. Each player color can only be used once on this action space.
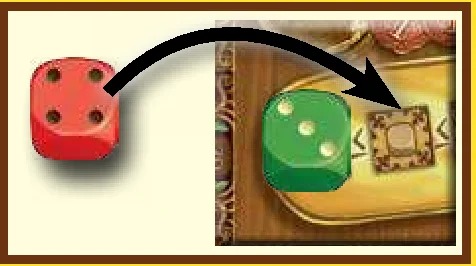
Example: Green places a 3 on the first “Khan’s Favor” action space. He takes 1 gold and 2 camels from the supply. Red places a 4 on the next “Khan’s Favor” action space. She also takes 1 gold (but could have chosen something different) and 2 camels from the supply.
The Contracts – The reason we go to the bazaar
To take contracts, you must place exactly 1 die onto the “Contracts” action space. You can then take 1 or 2 contracts from the contract spaces on the board, placing them onto the spaces for active contracts on your player board. The value of the die you use here determines the contract(s) you may choose from.
If you take the contract below the 5, you also receive an additional 1 coin or 1 camel from the general supply. If you take the contract below the 6, you receive 2 coins or 2 camels.
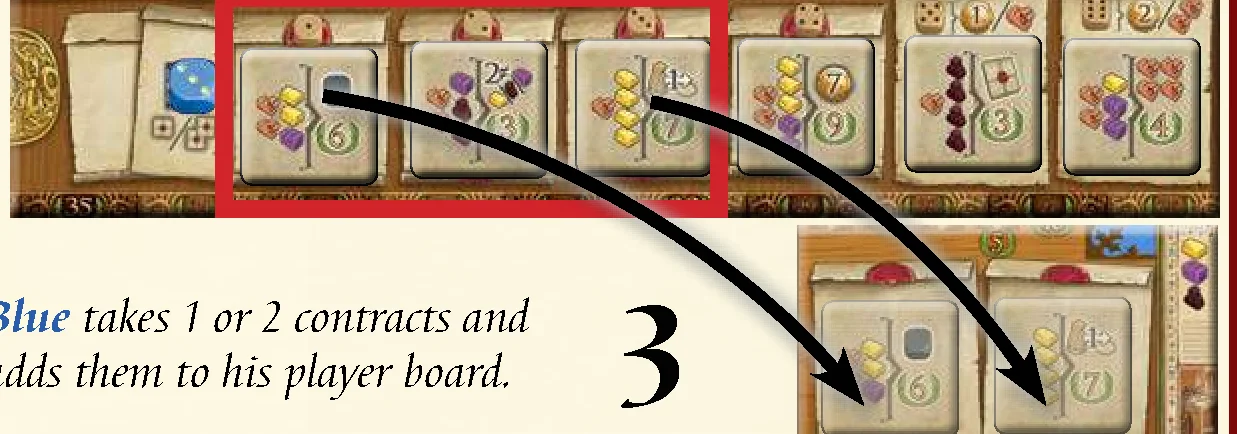
Example: Blue places one of his dice (a 3) onto the “Contracts” action space. Blue takes 1 or 2 contracts and adds them to his player board.
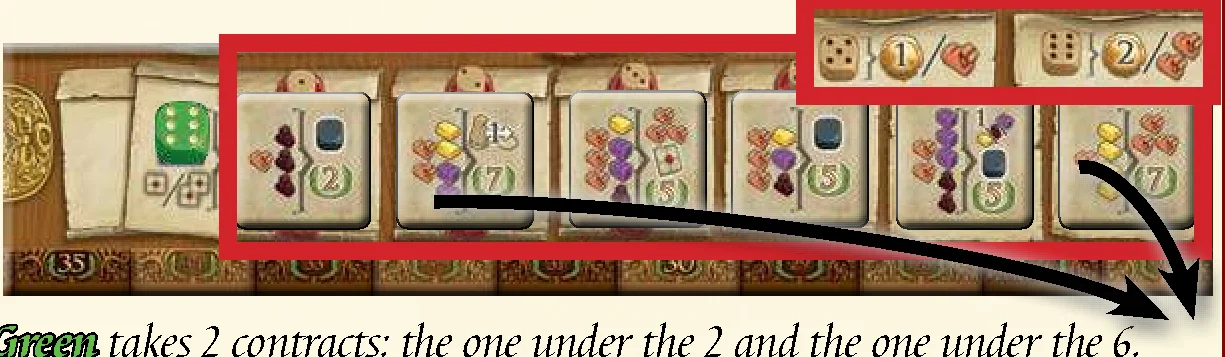
Example: Green places a 6 onto the “Contracts” action space. Green takes 2 contracts: the one under the 2 and the one under the 6. For the contract below the 6, he takes an additional 2 camels. He could have also chosen to take the two contracts below the 5 and the 6.
What else needs to be observed?
- Immediately after taking your contracts, slide the remaining ones on the board to the left, filling in any gaps left from the contracts you took. There should never be empty spaces between contracts.
- If there is only 1 contract on the contract spaces, you can only take that one during your turn.
- If all contract spaces are empty at the beginning of your turn (before you take any action), draw two contracts from the special contracts pile and place them beneath contract spaces 1 and 2.
- There is room on your player board for 2 contracts. When you take new contracts, you must also have room for them–or you will need to make some. If you do not have enough space, you must discard one or both of your ‘older’ contracts first, adding them to the bottom of the special contract pile.
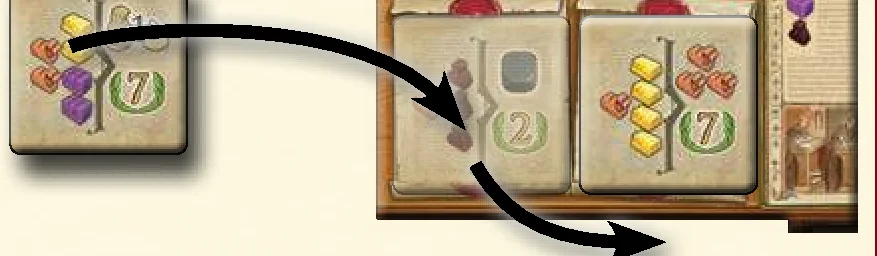
Example: Green takes 1 contract from the board. He has no empty space on his player board. He chooses to discard one of his ‘older’ contracts, adding it to the bottom of the special pile. He then places his new contract on his player board.
Special Rules
- You are not allowed to take contracts from the board and add them directly to the special pile. New contracts must always be added to your player board first.
- As long as your contracts are on your active contract spaces, they are not worth anything. You must first complete them.
Travel – Moving your figure around the map
Place exactly 2 dice onto the “Travel” action space. This allows you to move your figure around the map. The steps involved in moving your figure are outlined below.
How exactly do you move?
You need to complete the following steps:
- Place your dice.
- Pay your travel costs.
- Pay any additional costs.
- Move your figure and possibly place a trading post.
1. Place your dice
The value of the lowest numbered die used to perform the action determines how many spaces you can move.
Note: You can always choose to move fewer spaces but you must move at least 1 space.
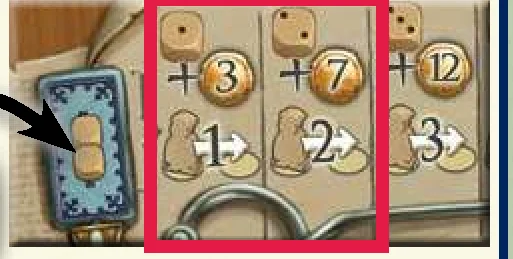
Example: Red places a 2 and a 4 onto the action space. She can therefore move up to 2 spaces on the map, as the lowest die value is a 2.
2. Pay your travel costs
Each “Travel” action spaces shows the costs for movement. This means that you must always pay for your movement. You only pay for the spaces you actually moved. Return your payment to the general supply.
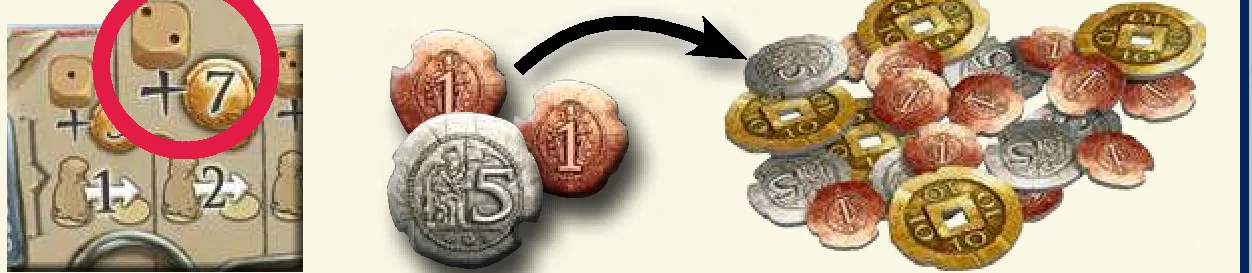
Example: Red wants to move 2 spaces on the map. This will cost her 7 coins. Red returns the necessary coins to the general supply.
3. Pay any additional costs
Many of the routes connecting two locations show additional costs, either camels or coins. In these cases, you must additionally pay those costs for your movement, returning the necessary camels or coins to the general supply.

To use this route, you must take 2 camels from your warehouse, returning them to the general supply. Or, to use this route, you must pay 7 coins, returning them to the general supply.
4. Move your figure and possibly place a trading post
Move from location to location. You will encounter oases, small cities, and large cities in your travels, and you must end your movement in one of these. You may not stop between two locations.

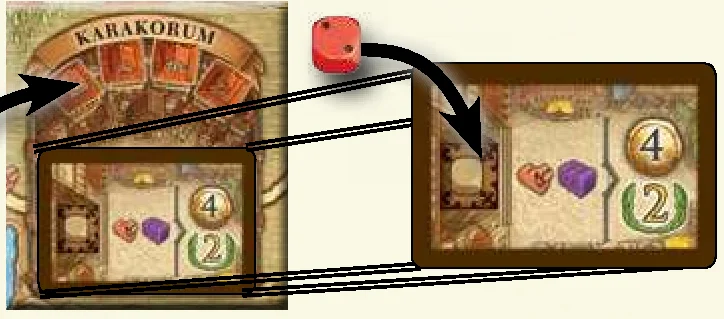
- Large city: If your “Travel” action ends in a large city, then you must place a trading post there. From your next turn on, you can use a die to activate the City card located there. The card itself remains in the city.
- Small city: If your “Travel” action ends in a small city, then you must place a trading post there. You immediately receive the indicated bonus (see supplement). The tile itself remains in the city. At the start of each subsequent round, you receive the indicated bonus again.
- Oasis: If your “Travel” ends in an oasis, nothing happens. Oases have no function other than slowing down travel.
What else needs to be observed?
- When placing trading posts, start with the one in the upper left corner of your player board and continue working your way down and to the right.
- Once you place your 8th trading post, you immediately receive 5 victory points
 , which are immediately scored on the score track. Once you place your 9th trading post, you immediately score another 10 victory points
  .
. - If you end your movement in Beijing, you place a trading post in the city as usual. Place it on the empty space showing the largest number of victory points. You will score these points at the end of the game.
- Moving back and forth is allowed. This means that you can pass through or end your movement on the same location multiple times.
Note: You may never have more than 1 trading post in any large or small city. You may not place another trading post, even when visiting a city for the second time. - The “Travel” action determines the start player for the next round.
What is the outpost bonus?
The first player to place a trading post in a large city receives the outpost bonus for that city. Take the indicated bonus from the general supply and add it your holdings. Return the outpost bonus tile to the game box, it is no longer needed for the rest of the game.
Special Rules
- At the start of the game, all players start in Venice. It can occur during play that you move your figure back to Venice. If this happens, you do not place a trading post there.
- Once you have placed all of your trading posts onto the board, the next time you must place a trading post, you must instead move an existing trading post from one location to the other.
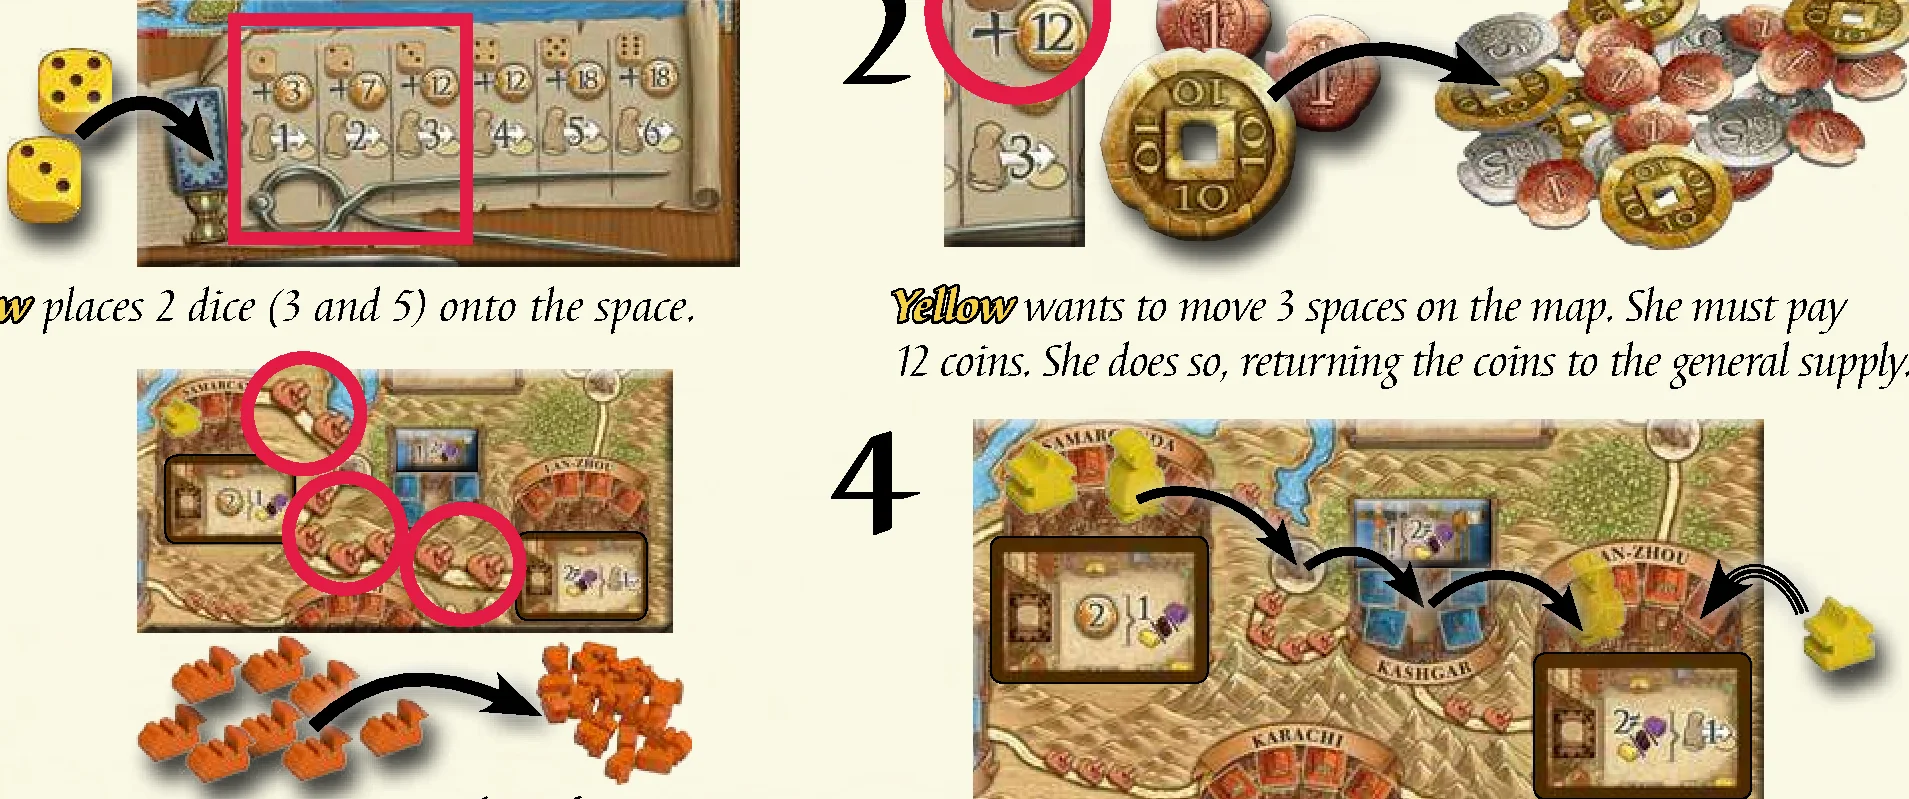
“Travel” action example:
- Yellow places 2 dice (3 and 5) onto the space.
- Yellow wants to move 3 spaces on the map. She must pay 12 coins. She does so, returning the coins to the general supply.
- Yellow wants to move to Lan-Zhou from Samarkand, passing through an oasis and Kashgar along the way. This costs another 8 camels, which she also returns to the general supply.
- Yellow moves her figure 3 spaces and places a trading post in Lan-Zhou, as her travel ended there.
The City Cards – So many possibilities
Each large city on the board has 1 City card in it. To use a City card, you must have a trading post in the corresponding city. You must then place exactly 1 die onto the City card’s action space to be able to perform the action. The individual city actions are summarized in the supplement.
Note: City cards can only be used once per round. Once a player has occupied a City card space with a die, then no one else may use the action until the start of the next round.
Note: In most cases, the value of the die you use determines the number of times you may use these actions.
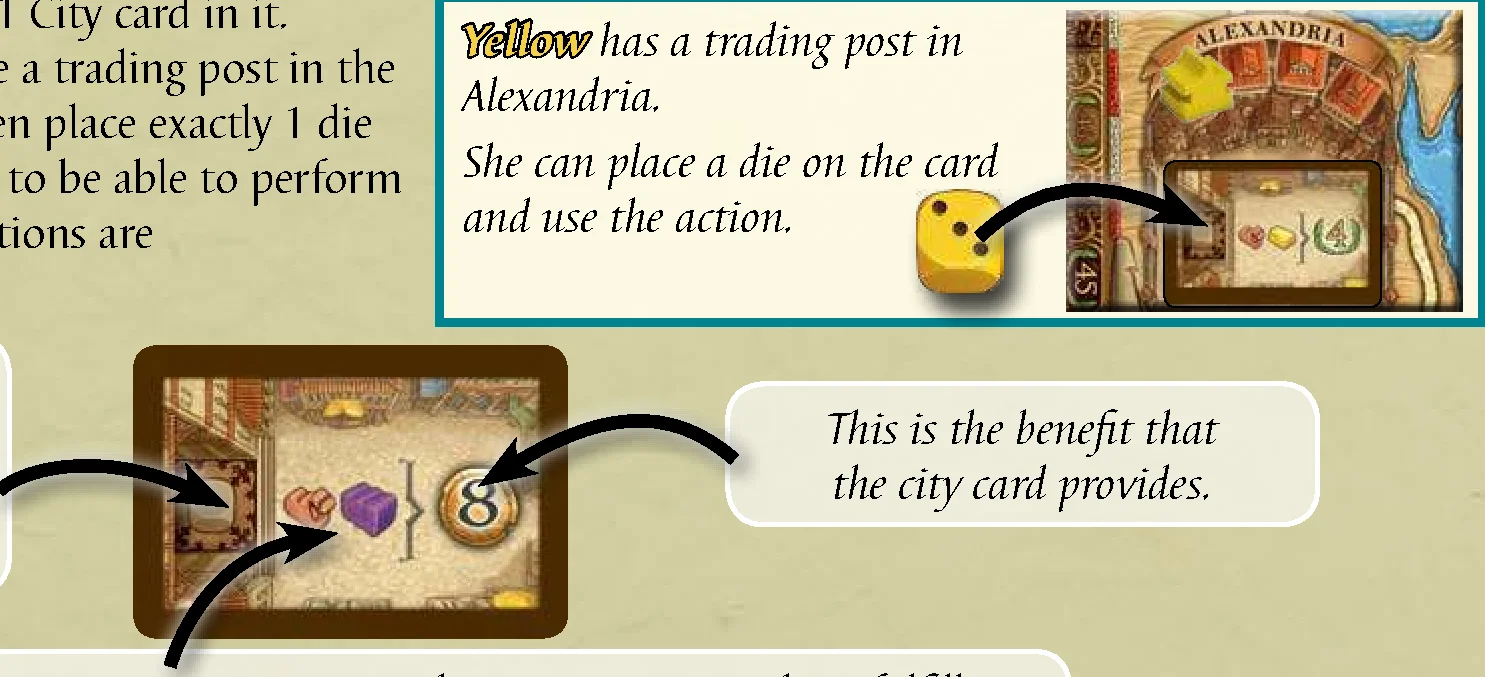
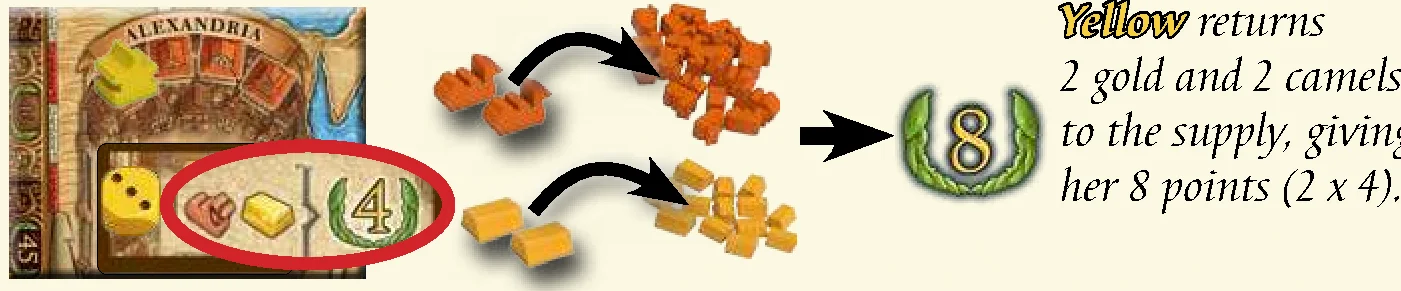
Example: Yellow places 1 die (a 3). Since she placed a 3, she can do this action three times. Yellow returns 2 gold and 2 camels to the supply, giving her 8 points (2 x 4).
Bonus Actions – Always Freely Chosen
As long as it is your turn, you can choose to perform one or more bonus actions before or after your main action.
What bonus actions are available?
- Complete 1 contract
- Take 3 coins
- Reroll 1 die
- Adjust 1 die result by 1
- Take 1 black die
1. Complete 1 contract
On the left side of each contract you will see the required camels and goods. On the right side of each contract you will see the rewards you get when you complete the contract. An explanation of the symbols can be found on the supplement.
- You can only complete contracts on the active contract spaces of your player board.
- To complete a contract, you must have the necessary goods and camels in your warehouse. Pay all of the necessary goods and camels, returning them to the general supply.
- Receive all of the rewards indicated on the right side. These rewards are always a combination of victory points and something else. The symbols are explained on the supplement.
- Finally, put the completed contract facedown into your drawer, in the bottom right corner of your player board.
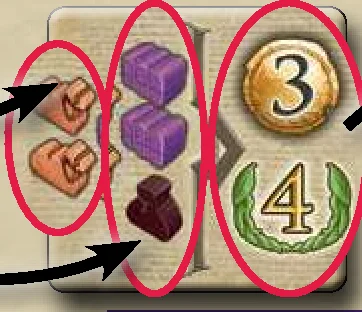
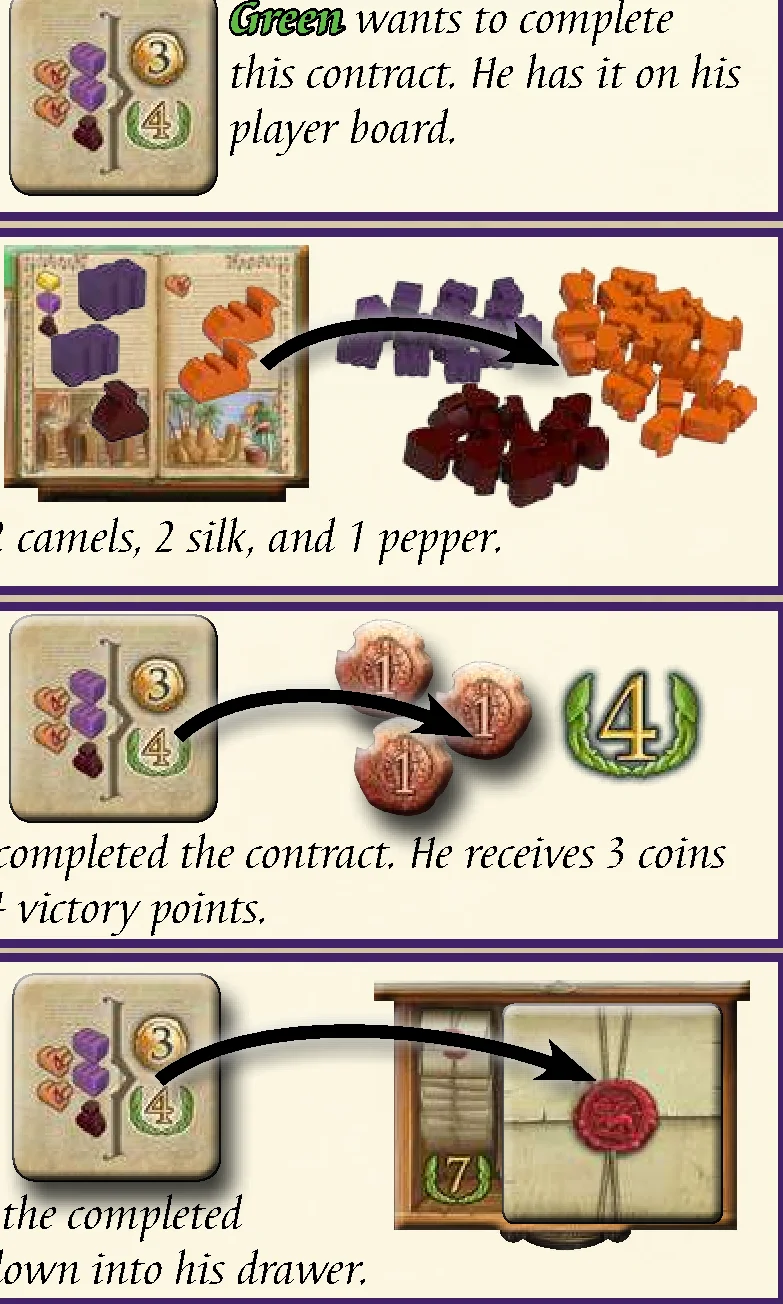
Example: Green wants to complete this contract on his player board. Green pays 2 camels, 2 silk, and 1 pepper. Green has completed the contract: he receives 3 coins and scores 4 victory points. Green places the completed contract facedown into his drawer.
2. Take 3 coins
Place exactly 1 die onto the money bag on the game board. Take 3 coins from the general supply. Furthermore:
- This space has no cost, whether it is occupied or not.
- The die value used when performing this action does not matter. Regardless of the number on the die you place there, you always take 3 coins.
- As long as you have any dice left, you can continue to choose to perform the “Take 3 coins” bonus action.
Note: It is possible to place your last die on this action space, even if this is not a main action.

Example: Green places a 3 onto the money bag. Green takes 3 coins from the general supply.
3. Reroll 1 die
You can pay 1 camel to reroll 1 of your dice once.

Example: Blue pays 1 camel to reroll one of his dice. Blue rerolls a 2. He gets a 5.
4. Adjust 1 die result by 1
You can pay 2 camels to adjust one of your die results up or down by 1.
Note: You may not adjust a 6 to a 1 or vice versa.

Example: Yellow pays 2 camels to adjust a die result up or down by 1. Yellow chooses to adjust her 2 to a 3.
5. Take 1 black die
You can pay 3 camels to take 1 black die from the general supply. Roll it immediately and add it to the remaining dice on your player board.
The black dice are limited. However, all black dice are returned to the board at the end of each round. Consequently, players will have a chance to get more black dice during the following round.
Note: Each player can only take 1 black die per turn with this bonus action.

Example: Red pays 3 camels to the supply. Red takes a black die, rolls it, and adds it to her player board.
What else needs to be observed?
- A player may realize a single bonus action multiple times during his turn (exception: take 1 black die). However, the cost must be paid each time. For example, if a player wants to adjust 1 die twice, he would have to pay 4 camels.
- You can only perform bonus actions before or after your main action.
- If a player has black and/or white dice, he may reroll and/or adjust them.
Game End
The game is over after 5 rounds. You can tell how many rounds are left by how many contract piles are left. The final round of the game happens after the last pile of contracts is added to the board. Final scoring occurs after the final round.
Final Scoring
During final scoring, players score victory points for various items:
- Each player scores the points for their 2 Goal cards. Goal cards are described in the supplement.
- Score 1 victory point for every 10 coins you have left.
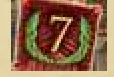
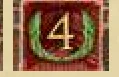
- If you have a trading post in Beijing you score the victory points indicated by the space your trading post is on (,
 ,
,  ,
, 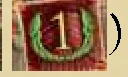 ).
). - If you have a trading post in Beijing, you score 1 victory point for every 2 goods you have left. Players without a trading post in Beijing score nothing for their remaining goods. Important: Camels are not goods!
- The player(s) with the most completed contracts score 7 victory points.
The player with the most points is the winner.
Tie Game
If there is a tie, then the winner is the tied player with the most camels. If there is still a tie, then there are multiple winners.
The Game with 2 or 3 Players
When playing with 2 or 3 players, apply the following changes:
Only use a number of black dice equal to the number of players + 1. As such, with 3 players, there will be 4 black dice, and with 2 players, 3 black dice.
3 Players
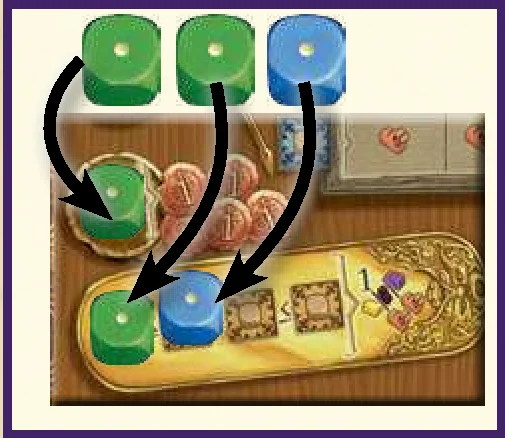
At the beginning of the game, place one die (on 1) from an unused player color on the first space of the “Khan’s Favor” action.
Important: This die will stay in place for the whole game! Do not remove it from the board.
2 Players
At the beginning of the game, place two dice (each on 1) from an unused player color on the first two spaces of the “Khan’s Favor” action. Additionally, place one die (here, the value is unimportant) on the “Take 5 coins” action space.
Important: These dice will stay in place for the whole game! Do not remove them from the board.
The Expert Variant
There are a few small changes to the game in the expert variant. All of the regular rules remain in effect. You can choose one or more of the following distribution methods. However, if you choose to include them one after the other, proceed in the order described below.
Distribution of City Bonuses
Randomly distribute the city bonuses across the small cities. Ignore the letters  –
–  while placing the bonus markers.
Distribution of Characters
During setup, randomly shuffle the 8 different characters. (There are 3 copies of the “Mercator ex Tabriz” in the game). Shuffle in the version you need, according to the number of players.
Next, reveal as many character cards as there are players taking part plus 1. The last player in turn order (the player to the right of the start player) chooses a character first, placing it in front of him or herself. The players then continue by each taking one character card in reverse turn order. Return the remaining character to the box. The individual characters are summarized on the supplement.
Distribution of Goal Cards
Deal each player 4 Goal cards, facedown, at the start of the game. Each player secretly chooses 2 of them to keep, returning the rest of them to the game box.
The game then begins as usual.
Introduction & Components
About These Rules
Because of the complexity of the game, we are going to start by explaining the basic gameplay. We will then, step by step, explain individual options or special cases in more detail. So don’t panic if it seems like something is missing… it is coming. Even Marco’s tales didn’t fit on a single page.
Introduction
Players play as associates of Marco Polo, who traveled with him and in the surrounding areas. Each player tries to collect points by completing contracts and visiting as many lucrative cities as possible. Completed contracts provide more than just victory points, they also offer discounts and the ability to use privileges in the cities you visit. On top of that, they let you reach goals for the end of the game. At the end of the game, the winner is the player with the most victory points.
Play proceeds in clockwise order, with each player acting in turn. Players roll their dice and use them to occupy action spaces on the board. Players keep taking turns until all of the dice have been used, at which point the round ends. The game lasts a total of 5 rounds, and then ends after a short final scoring. A detailed summary of a game round has been provided at the end of the rules.
Game Components
- 1 game board
- 4 player boards
- 10 Character tiles
- 6 City Bonus markers
- 26 dice (5 each in blue, yellow, green, red, and black, along with 1 white)
- 40 coins (20×1, 10×5, 10×10)
- 44 different contracts
- 31 City cards
- 18 Goal cards
- 10 outpost bonuses
- 15 gold bars (12 small and 3 large)
- 15 silk bundles (12 small and 3 large)
- 16 pepper bags (12 small and 4 large)
- 27 camels (20 small and 7 large)
- 12 figures (3 each in blue, yellow, green, and red)
- 38 trading posts (9 each in blue, yellow, green, and red, along with 2 black)
- 4 50/100 point cards
- 1 start player marker (hourglass)
- 4 player aids
- 1 rules and 1 supplement
- 1 quick setup sheet
Setup
Board Setup
- Place the game board in the middle of the table. Put the 50/100 point cards next to the 50 space on the score track.
- Goal cards: Shuffle the 18 Goal cards and place them in a facedown pile next to the board.
- Money: Place the money (40 coins including 1s, 5s, and 10s) in a general supply next to the board.
- Goods and camels: Place the goods (gold, pepper, silk) and camels in a general supply next to the board. The larger pieces count as three of the smaller ones. The supply of goods and camels is not limited. In the rare event that the supply runs out, use something else as a substitute.
- City Bonus markers: Place the 6 City Bonus markers on the board spaces whose letters correspond to those on the tiles.
- Outpost bonuses: Shuffle the 10 outpost bonuses facedown. Place one outpost bonus, faceup, onto each large city on the board. Return the 3 unused bonuses to the game box.
- City cards: Shuffle the 31 City cards facedown. Place one card, face up, onto each of the 9 City card spaces on the board. Return the remaining city cards to the game box. They are not needed for the game.
- Contracts: Set the 6 starting contracts to the side for now (see player setup). Shuffle the remaining contracts facedown and form 5 piles, each with 6 contracts. You will have 8 left over. Take one of the piles and place one contract, faceup, onto each contract space on the board. Place the remaining 4 piles next to the board. Take the remaining 8 contracts and form a special pile. Put this pile next to the board as well, somewhat removed from the others.
- Character tiles: Place the 10 Character tiles, faceup, next to the board.
- Special character extras: Some characters have special extras: leave the 2 black trading posts, the white die, and one figure in each color in the box for now. A summary of the different characters may be found on the supplement.
- Black dice: Place the 5 black dice onto the board, on the space showing a black die. The die values don’t matter.
- Start player: The player who most recently embarked on a voyage around the world is the start player. Give that player the hourglass.
Various game components will be left over and need to be distributed to the players. What each player receives and how it should be arranged is shown below.
Player Setup
- Each player chooses a color. Take the corresponding player board and place it in front of yourself.
- Take the 5 dice in your color and put them onto the marked dice space in the upper right corner of your board.
- Take the 9 trading posts in your color and put them onto the marked spaces in the upper left corner of your board.
- Each player now receives a contract: Use the starting contracts previously set aside. Each player chooses one facedown contract, placing it faceup onto one of the two active contract spaces on their player boards.
- Give each player 2 camels, which they put into their warehouses. Give the starting player 7 coins. The next player in clockwise order gets 8 coins, the next player after that gets 9 coins, and the last player gets 10 coins. Players should keep their money on the table in front of themselves.
- Characters: For your first game, you will need the following 4 characters:
- Give the starting player Rashid ad-Din Sinan,
- the second player (in clockwise order) Matteo Polo,
- the third player Berke Khan,
- and the fourth player Mercator ex Tabriz.
Once you are familiar with the game you can pick your characters. The character abilities are summarized on the summary.
- Give each player 2 figures in their color. Place one onto the 50-point space of the score track, and the other onto Venezia.
- Deal each player 2 facedown cards from the Goal card pile. Players should keep their Goal cards secret. Once you are familiar with the game you can pick your Goal cards. The Goal cards are presented in the supplement.
- Finally, give each player a player aid. The game can now begin.
Structure of Play
Overview of a Round
The game lasts a total of 5 rounds. Each round consists of three phases: Start of the Round, the Turn Phase, and End of the Round.
At the Start of a Round
What needs to be done at the start of a round?
- Choose a new start player. (Except during the first round.)
A new start player is determined at the beginning of a new round. The player who last chose the “Travel” action during the previous round is the new start player.
Hint: Stack dice on this action. This will allow you to quickly see who is the last player to have played on this action; it will be the one on top of the “Travel” action.
Exception: If nobody moved in the previous round, then the current start player remains the start player for the next round.
Exception: If the last player to move used white or black dice to do so, then players should make sure to remember which player that was. If you know you are the last player to move and you used black or white dice, then you can take the hourglass right away to avoid confusion.
new_start_player_travel_example Example: Green moved first this round, followed by Yellow and finally Blue. Blue receives the hourglass and will be the start player in the next round.
- Award city and character bonuses.
- All small cities (with a ! symbol) award bonuses. Each player receives bonuses from each small city in which he or she has a trading post, see supplement.
- All characters (with a ! symbol) award bonuses, see supplement.
- Retrieve all dice.
Retrieve all of your dice from the board, returning them to your player board. Return the black dice to their space on the board. - Roll all dice, possible compensation.
All players roll their dice simultaneously. If you rolled less than 15, you receive compensation (see Compensation for Low Die Rolls). Once all players have rolled their dice, the new round can begin.
A Game Turn
Players take turns, in clockwise direction, starting with the start player. This continues until all players are out of dice.
A turn in this game means choosing at least 1 die from your player board and placing it onto the action space of your choice. You can add your dice to an unoccupied brown or blue action space, or to an already occupied blue action space. You then immediately perform the corresponding action.
As long as you have dice left, you must choose and perform exactly 1 action. Once you are out of dice, you pass automatically. You will not have any more turns this round! Once you have taken your turn, the next player in clockwise order takes a turn. Players keep taking turns until all of their dice have been placed. This ends the round.
How does an individual turn go?
- Perform bonus actions if desired: You can choose to perform bonus actions before your main action. You can perform as many of them as you wish (provided you can pay for them). Refer to your player aid for a summary of the possible bonus actions.
- Choose and perform 1 action: Choose 1 action and place the necessary dice on the board to perform it. Pay the necessary coins, if any. Perform the action immediately.
- Perform bonus actions if desired: You can choose to perform bonus actions after your main action. You can perform as many of them as you wish (provided you can pay for them).
At the End of a Round
What needs to be done at the end of a round?
- Clear any remaining contracts: Remove any remaining contracts from the board, adding them to the bottom of the special contracts pile.
- Add new contracts to the board: Choose one of the contract piles and add 6 new contracts to the board. (Not needed at the end of the 5th round.)
General Action Rules
The Game Board – Regions and Associated Actions
The following 6 actions are possible: Take 5 coins, go to the bazaar, seek the Khan’s favor, take a contract, travel, and City card actions.
The bonus actions are: Complete 1 contract, take 3 coins, reroll 1 die, adjust 1 die result by 1, and take 1 black die.
The Actions – General Principles
The following explains what should be kept in mind when performing an action:
- You can only use your own dice, never those of the other players.
- You must use as many dice as are shown on the action space you want to use.
- You can place your dice on unoccupied brown or blue spaces, or occupied blue spaces. For the time being, we will assume that the action space is always unoccupied.
- If you want to use an occupied blue action space, then you must pay coins. If a brown action space is already occupied, you are not allowed to use it.
- Each player color (blue, yellow, green, red) can only be used once on each action space.
- After you have placed your dice, you immediately perform the corresponding action.
- The dice themselves indicate how many times you can perform the action, or how much the action gets you (exception: Take 5 coins). Apart from a few exceptions, this is always the lowest die.
- If you are allowed to perform an action out multiple times or get more from the action, you can always choose to perform the action out fewer times or get less. You must always perform the action at least once.
Important: How exactly is an action carried out?
- Place your dice.
- Pay the necessary coins, if any.
- Perform the action.
Occupying an Action Space
Can you choose an already occupied action space?
Yes, in general action spaces can be occupied by multiple players. All players are allowed to use an action space (except for City cards). When doing so note the following:
- When you want to use an already-occupied action space, you must pay for it. You must pay as many coins as the die value of the lowest-value die you are using to perform the action.
- This is independent of any dice already present on the action space. The die values of other players’ dice do not matter. Once you have paid, then you can perform the action as usual.
Example: There are already 2 Blue dice on the “Silk” action space. Red would like to buy some silk as well this round. Red places 2 dice (4 and 5) onto the action space. Red pays 4 coins (as her lowest die value was a 4). She then takes up to 3 silk and adds them to her warehouse.
- When a player wishes to place dice on an occupied space, stack them one on top of the other. This will make it easier to see who is the last player to have chosen that action. If need be (too many dice), place them next to one another, from left to right. The one to the right will now be the last one to have chosen this action.
Exception: The Khan’s Favor only offers four action spaces. When those four spaces are occupied, it is no longer possible to choose this action for the rest of the round. - White and black dice are not considered player colors (blue, yellow, green, red). As such, a player with those types of dice could reuse an action space they have already used with their player color.
- A player may combine black and white dice with dice of their color. However, your color dice may never be more than once on the same action space (exception: Take 3 coins).
Note: There is no limit to how many white or black dice can be on an action space.
Example: Green has already taken camels this round. He cannot use his Green dice to take any more camels this round. He has a black die left, though, which he can use to take more camels if he wishes.
Compensation for Low Die Rolls
If the sum total of all of your dice at the start of a round is less than 15, then you receive compensation in the form of coins or camels. You can take 1 coin or 1 camel for each point of difference between your total and 15. You are allowed to take a combination of both should you be able to take more than 1.
Example: Green has rolled a total of 13. He has 2 points of compensation: 2 camels, 2 coins, or 1 camel and 1 coin.
Main Actions
Take 5 Coins – No cash, no options
To take 5 coins, you must add exactly 1 die to the “Take 5 coins” action space.
The die value you use is irrelevant and does not affect the action. You always take 5 coins. If the space is occupied, you must first pay to place your die before performing the action.
Example: Yellow places a 3-value die onto the “Take 5 coins” action space. She takes 5 coins from the general supply.
The Grand Bazaar – Goods are useful for many contracts
Above all else, you will need goods to complete contracts. Additionally, you can use certain City cards, located in the larger cities, to trade goods in for coins, camels, or points. Goods may also bring you points during final scoring.
Sequence:
- Place your dice on 1 of the 4 distinct action spaces.
- Determine how many goods you receive.
- Take the goods and add them to your player board.
1. Place your dice on 1 of the 4 distinct action spaces
You must use as many dice as indicated by the action space you are using.
2. Determine how many goods you receive
To the right of the action spaces is a table indicating how many goods a player receives. The value of the lowest numbered die used to perform the action determines how many goods you will receive.
Example: Blue places 2 dice (a 4 and a 5) onto the “silk” action space. The lowest die value Blue used is a 4, which means that he can take 3 silk from the supply.
3. Take the goods and add them to your player board
Take the goods from the general supply and place them in your player board’s warehouse.
You can also choose to use a value lower than your lowest die value. This usually only makes sense when this gives you some variety in what you receive.
Example: Red places a single 4-value die onto the “Pepper” action space. She could take 3 pepper from the general supply. She could also, however, choose to use a lower number and take 2 pepper and a coin.
The Camels – Your constant companions
You will need camels to complete certain contracts, to be able to move along certain routes, to adjust die results, and to claim black dice. Some of the City cards in the large cities also require camels.
You receive camels in the same way as goods: Take as many camels from the general supply as indicated by your die’s value. Add the camels to your warehouse.
Note: There is not much point in using a lower value when taking camels.
Example: Green places a 6 onto the “Camels” action space. He can take up to 6 camels. Green takes the 6 camels from the general supply and adds them to his warehouse.
The Khan’s Favor – Another way to get the goods
Place exactly 1 die onto the « Khan’s Favor » action space. Then take 1 good of your choice and 2 camels from the general supply, adding them to your warehouse.
Special Rules
The first player to seek the Khan’s favor places her die onto the left-most die-space and claims her reward. The next player who wishes to use this action must place his die on the next die-space over. The next die to be used must have a value equal to or greater than the previously-placed die, or the action may not be used. These same rules are in effect for the remaining players.
Note: There are only 4 distinct spaces in this action space. When those 4 spaces are occupied, it is no longer possible to choose this action for the rest of the round. Each player color can only be used once on this action space.
Example: Green places a 3 on the first “Khan’s Favor” action space. He takes 1 gold and 2 camels from the supply. Red places a 4 on the next “Khan’s Favor” action space. She also takes 1 gold (but could have chosen something different) and 2 camels from the supply.
The Contracts – The reason we go to the bazaar
To take contracts, you must place exactly 1 die onto the “Contracts” action space. You can then take 1 or 2 contracts from the contract spaces on the board, placing them onto the spaces for active contracts on your player board. The value of the die you use here determines the contract(s) you may choose from.
If you take the contract below the 5, you also receive an additional 1 coin or 1 camel from the general supply. If you take the contract below the 6, you receive 2 coins or 2 camels.
Example: Blue places one of his dice (a 3) onto the “Contracts” action space. Blue takes 1 or 2 contracts and adds them to his player board.
Example: Green places a 6 onto the “Contracts” action space. Green takes 2 contracts: the one under the 2 and the one under the 6. For the contract below the 6, he takes an additional 2 camels. He could have also chosen to take the two contracts below the 5 and the 6.
What else needs to be observed?
- Immediately after taking your contracts, slide the remaining ones on the board to the left, filling in any gaps left from the contracts you took. There should never be empty spaces between contracts.
- If there is only 1 contract on the contract spaces, you can only take that one during your turn.
- If all contract spaces are empty at the beginning of your turn (before you take any action), draw two contracts from the special contracts pile and place them beneath contract spaces 1 and 2.
- There is room on your player board for 2 contracts. When you take new contracts, you must also have room for them–or you will need to make some. If you do not have enough space, you must discard one or both of your ‘older’ contracts first, adding them to the bottom of the special contract pile.
Example: Green takes 1 contract from the board. He has no empty space on his player board. He chooses to discard one of his ‘older’ contracts, adding it to the bottom of the special pile. He then places his new contract on his player board.
Special Rules
- You are not allowed to take contracts from the board and add them directly to the special pile. New contracts must always be added to your player board first.
- As long as your contracts are on your active contract spaces, they are not worth anything. You must first complete them.
Travel – Moving your figure around the map
Place exactly 2 dice onto the “Travel” action space. This allows you to move your figure around the map. The steps involved in moving your figure are outlined below.
How exactly do you move?
You need to complete the following steps:
- Place your dice.
- Pay your travel costs.
- Pay any additional costs.
- Move your figure and possibly place a trading post.
1. Place your dice
The value of the lowest numbered die used to perform the action determines how many spaces you can move.
Note: You can always choose to move fewer spaces but you must move at least 1 space.
Example: Red places a 2 and a 4 onto the action space. She can therefore move up to 2 spaces on the map, as the lowest die value is a 2.
2. Pay your travel costs
Each “Travel” action spaces shows the costs for movement. This means that you must always pay for your movement. You only pay for the spaces you actually moved. Return your payment to the general supply.
Example: Red wants to move 2 spaces on the map. This will cost her 7 coins. Red returns the necessary coins to the general supply.
3. Pay any additional costs
Many of the routes connecting two locations show additional costs, either camels or coins. In these cases, you must additionally pay those costs for your movement, returning the necessary camels or coins to the general supply.
To use this route, you must take 2 camels from your warehouse, returning them to the general supply. Or, to use this route, you must pay 7 coins, returning them to the general supply.
4. Move your figure and possibly place a trading post
Move from location to location. You will encounter oases, small cities, and large cities in your travels, and you must end your movement in one of these. You may not stop between two locations.
- Large city: If your “Travel” action ends in a large city, then you must place a trading post there. From your next turn on, you can use a die to activate the City card located there. The card itself remains in the city.
- Small city: If your “Travel” action ends in a small city, then you must place a trading post there. You immediately receive the indicated bonus (see supplement). The tile itself remains in the city. At the start of each subsequent round, you receive the indicated bonus again.
- Oasis: If your “Travel” ends in an oasis, nothing happens. Oases have no function other than slowing down travel.
What else needs to be observed?
- When placing trading posts, start with the one in the upper left corner of your player board and continue working your way down and to the right.
- Once you place your 8th trading post, you immediately receive 5 victory points , which are immediately scored on the score track. Once you place your 9th trading post, you immediately score another 10 victory points .
- If you end your movement in Beijing, you place a trading post in the city as usual. Place it on the empty space showing the largest number of victory points. You will score these points at the end of the game.
- Moving back and forth is allowed. This means that you can pass through or end your movement on the same location multiple times.
Note: You may never have more than 1 trading post in any large or small city. You may not place another trading post, even when visiting a city for the second time. - The “Travel” action determines the start player for the next round.
What is the outpost bonus?
The first player to place a trading post in a large city receives the outpost bonus for that city. Take the indicated bonus from the general supply and add it your holdings. Return the outpost bonus tile to the game box, it is no longer needed for the rest of the game.
Special Rules
- At the start of the game, all players start in Venice. It can occur during play that you move your figure back to Venice. If this happens, you do not place a trading post there.
- Once you have placed all of your trading posts onto the board, the next time you must place a trading post, you must instead move an existing trading post from one location to the other.
“Travel” action example:
- Yellow places 2 dice (3 and 5) onto the space.
- Yellow wants to move 3 spaces on the map. She must pay 12 coins. She does so, returning the coins to the general supply.
- Yellow wants to move to Lan-Zhou from Samarkand, passing through an oasis and Kashgar along the way. This costs another 8 camels, which she also returns to the general supply.
- Yellow moves her figure 3 spaces and places a trading post in Lan-Zhou, as her travel ended there.
The City Cards – So many possibilities
Each large city on the board has 1 City card in it. To use a City card, you must have a trading post in the corresponding city. You must then place exactly 1 die onto the City card’s action space to be able to perform the action. The individual city actions are summarized in the supplement.
Note: City cards can only be used once per round. Once a player has occupied a City card space with a die, then no one else may use the action until the start of the next round.
Note: In most cases, the value of the die you use determines the number of times you may use these actions.
Example: Yellow places 1 die (a 3). Since she placed a 3, she can do this action three times. Yellow returns 2 gold and 2 camels to the supply, giving her 8 points (2 x 4).
Bonus Actions
Bonus Actions – Always Freely Chosen
As long as it is your turn, you can choose to perform one or more bonus actions before or after your main action.
What bonus actions are available?
- Complete 1 contract
- Take 3 coins
- Reroll 1 die
- Adjust 1 die result by 1
- Take 1 black die
1. Complete 1 contract
On the left side of each contract you will see the required camels and goods. On the right side of each contract you will see the rewards you get when you complete the contract. An explanation of the symbols can be found on the supplement.
- You can only complete contracts on the active contract spaces of your player board.
- To complete a contract, you must have the necessary goods and camels in your warehouse. Pay all of the necessary goods and camels, returning them to the general supply.
- Receive all of the rewards indicated on the right side. These rewards are always a combination of victory points and something else. The symbols are explained on the supplement.
- Finally, put the completed contract facedown into your drawer, in the bottom right corner of your player board.
Example: Green wants to complete this contract on his player board. Green pays 2 camels, 2 silk, and 1 pepper. Green has completed the contract: he receives 3 coins and scores 4 victory points. Green places the completed contract facedown into his drawer.
2. Take 3 coins
Place exactly 1 die onto the money bag on the game board. Take 3 coins from the general supply. Furthermore:
- This space has no cost, whether it is occupied or not.
- The die value used when performing this action does not matter. Regardless of the number on the die you place there, you always take 3 coins.
- As long as you have any dice left, you can continue to choose to perform the “Take 3 coins” bonus action.
Note: It is possible to place your last die on this action space, even if this is not a main action.
Example: Green places a 3 onto the money bag. Green takes 3 coins from the general supply.
3. Reroll 1 die
You can pay 1 camel to reroll 1 of your dice once.
Example: Blue pays 1 camel to reroll one of his dice. Blue rerolls a 2. He gets a 5.
4. Adjust 1 die result by 1
You can pay 2 camels to adjust one of your die results up or down by 1.
Note: You may not adjust a 6 to a 1 or vice versa.
Example: Yellow pays 2 camels to adjust a die result up or down by 1. Yellow chooses to adjust her 2 to a 3.
5. Take 1 black die
You can pay 3 camels to take 1 black die from the general supply. Roll it immediately and add it to the remaining dice on your player board.
The black dice are limited. However, all black dice are returned to the board at the end of each round. Consequently, players will have a chance to get more black dice during the following round.
Note: Each player can only take 1 black die per turn with this bonus action.
Example: Red pays 3 camels to the supply. Red takes a black die, rolls it, and adds it to her player board.
What else needs to be observed?
- A player may realize a single bonus action multiple times during his turn (exception: take 1 black die). However, the cost must be paid each time. For example, if a player wants to adjust 1 die twice, he would have to pay 4 camels.
- You can only perform bonus actions before or after your main action.
- If a player has black and/or white dice, he may reroll and/or adjust them.
End of Game & Final Scoring
Game End
The game is over after 5 rounds. You can tell how many rounds are left by how many contract piles are left. The final round of the game happens after the last pile of contracts is added to the board. Final scoring occurs after the final round.
Final Scoring
During final scoring, players score victory points for various items:
- Each player scores the points for their 2 Goal cards. Goal cards are described in the supplement.
- Score 1 victory point for every 10 coins you have left.
- If you have a trading post in Beijing you score the victory points indicated by the space your trading post is on (, , , ).
- If you have a trading post in Beijing, you score 1 victory point for every 2 goods you have left. Players without a trading post in Beijing score nothing for their remaining goods. Important: Camels are not goods!
- The player(s) with the most completed contracts score 7 victory points.
The player with the most points is the winner.
Tie Game
If there is a tie, then the winner is the tied player with the most camels. If there is still a tie, then there are multiple winners.
Variants & Player Counts
The Game with 2 or 3 Players
When playing with 2 or 3 players, apply the following changes:
Only use a number of black dice equal to the number of players + 1. As such, with 3 players, there will be 4 black dice, and with 2 players, 3 black dice.
3 Players
At the beginning of the game, place one die (on 1) from an unused player color on the first space of the “Khan’s Favor” action.
Important: This die will stay in place for the whole game! Do not remove it from the board.
2 Players
At the beginning of the game, place two dice (each on 1) from an unused player color on the first two spaces of the “Khan’s Favor” action. Additionally, place one die (here, the value is unimportant) on the “Take 5 coins” action space.
Important: These dice will stay in place for the whole game! Do not remove them from the board.
The Expert Variant
There are a few small changes to the game in the expert variant. All of the regular rules remain in effect. You can choose one or more of the following distribution methods. However, if you choose to include them one after the other, proceed in the order described below.
Distribution of City Bonuses
Randomly distribute the city bonuses across the small cities. Ignore the letters – while placing the bonus markers.
Distribution of Characters
During setup, randomly shuffle the 8 different characters. (There are 3 copies of the “Mercator ex Tabriz” in the game). Shuffle in the version you need, according to the number of players.
Next, reveal as many character cards as there are players taking part plus 1. The last player in turn order (the player to the right of the start player) chooses a character first, placing it in front of him or herself. The players then continue by each taking one character card in reverse turn order. Return the remaining character to the box. The individual characters are summarized on the supplement.
Distribution of Goal Cards
Deal each player 4 Goal cards, facedown, at the start of the game. Each player secretly chooses 2 of them to keep, returning the rest of them to the game box.
The game then begins as usual.
Expansions for
The Voyages of Marco Polo

The Voyages of Marco Polo: The Secret Path of Marco Polo
2018
Unlock secret routes and bypass the costs of normal connections.
100
minutes
Medium

View expansion

The Voyages of Marco Polo: Agents of Venice
2017
Expand your Marco Polo journey with Venice, Companions, and a fifth player
Medium Heavy
View expansion

The Voyages of Marco Polo: The New Characters
2015
Add four characters, new contracts, a town bonus, and gift markers.
100
minutes
Medium Heavy
View expansion
