
Underwater Cities
2018
Develop underwater cities, manage resources, and combine cards with board actions to create the most livable area and score victory points.
150
minutes
1 - 4
player(s)
12+
Medium Heavy

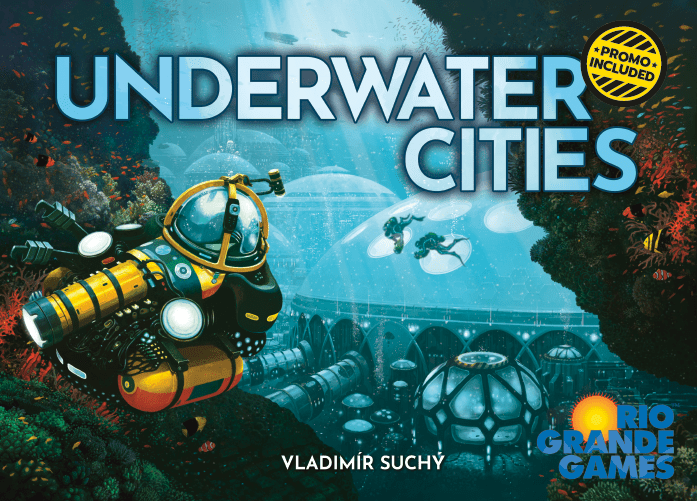
About this board game
Underwater Cities is a strategic board game for 1–4 players, with a listed play time of 150 minutes. Players take the roles of the world’s most powerful brains, working to establish the best and most livable underwater areas as Earth faces overpopulation.
The game’s central mechanism is card placement. Cards are played into colored slots around the main board, and matching a card’s color to its slot lets players gain both the board action and the card’s advantage. This creates important choices as players decide how to develop their personal underwater area.
- Collect raw materials and other useful cards.
- Build and upgrade city domes, tunnels, farms, desalination devices, and laboratories.
- Move along the initiative track to influence player order in the next turn.
- Activate personal “A-cards” for additional possibilities.
Nearly 220 cards are included, divided into five types according to how and when they can be used. Special cards and basic cards both expand players’ options, supporting different approaches to developing an underwater network.
Each player’s underwater area is double-sided, providing many opportunities to gain victory points. With careful planning, resource collection, construction, and card selection, players shape their own underwater region while competing to create the most successful and livable environment.
With its combination of colored card-and-slot decisions, personal area development, and varied card effects, Underwater Cities offers a substantial strategic challenge for players seeking a deep underwater building experience.
/pic7182955.jpg)
Board Game Rules for
Underwater Cities
THE NEXT FRONTIER
The earth is overpopulated. The colonization of Mars is always four decades away. Only one avenue is open for human expansion: the world under the sea.
Players compete to build the best underwater nation – an archipelago of undersea cities connected by a network of transportation tunnels. Kelp farms and desalination plants will provide your people with food and water. Laboratories will give you the knowledge you need to run everything more efficiently. Perhaps you will even be able to build symbiotic cities, fully integrated with the underwater ecosystem.
Beginning as a single city, you will expand your network, connecting it with the coastal metropolises. At a time when hunger has exceeded agricultural output and water shortages strain the bonds of the Federation of Nations, you will build a nation that is self-sustaining, perhaps even someday exporting your products to those who have been left ashore.
This is your task.
This is your destiny.
The world’s hopes lie in your underwater cities.
Designer: Vladimír Suchý
Players: 1–4 | Age: 14+ | Time: 40 min. / player
GAME OVERVIEW
Players work to build underwater cities, a transportation network that connects them, and various facilities that support them. In each round, players take turns choosing an action while simultaneously playing a card. If the card matches the color of the chosen action slot, the player also gains a benefit from the card.
At three times during the game, players will deal with Production, a special phase in which their underwater network produces points and resources while their people consume food. At the end of the game, additional points are awarded for various accomplishments and the player with the most points wins.
COMPONENTS
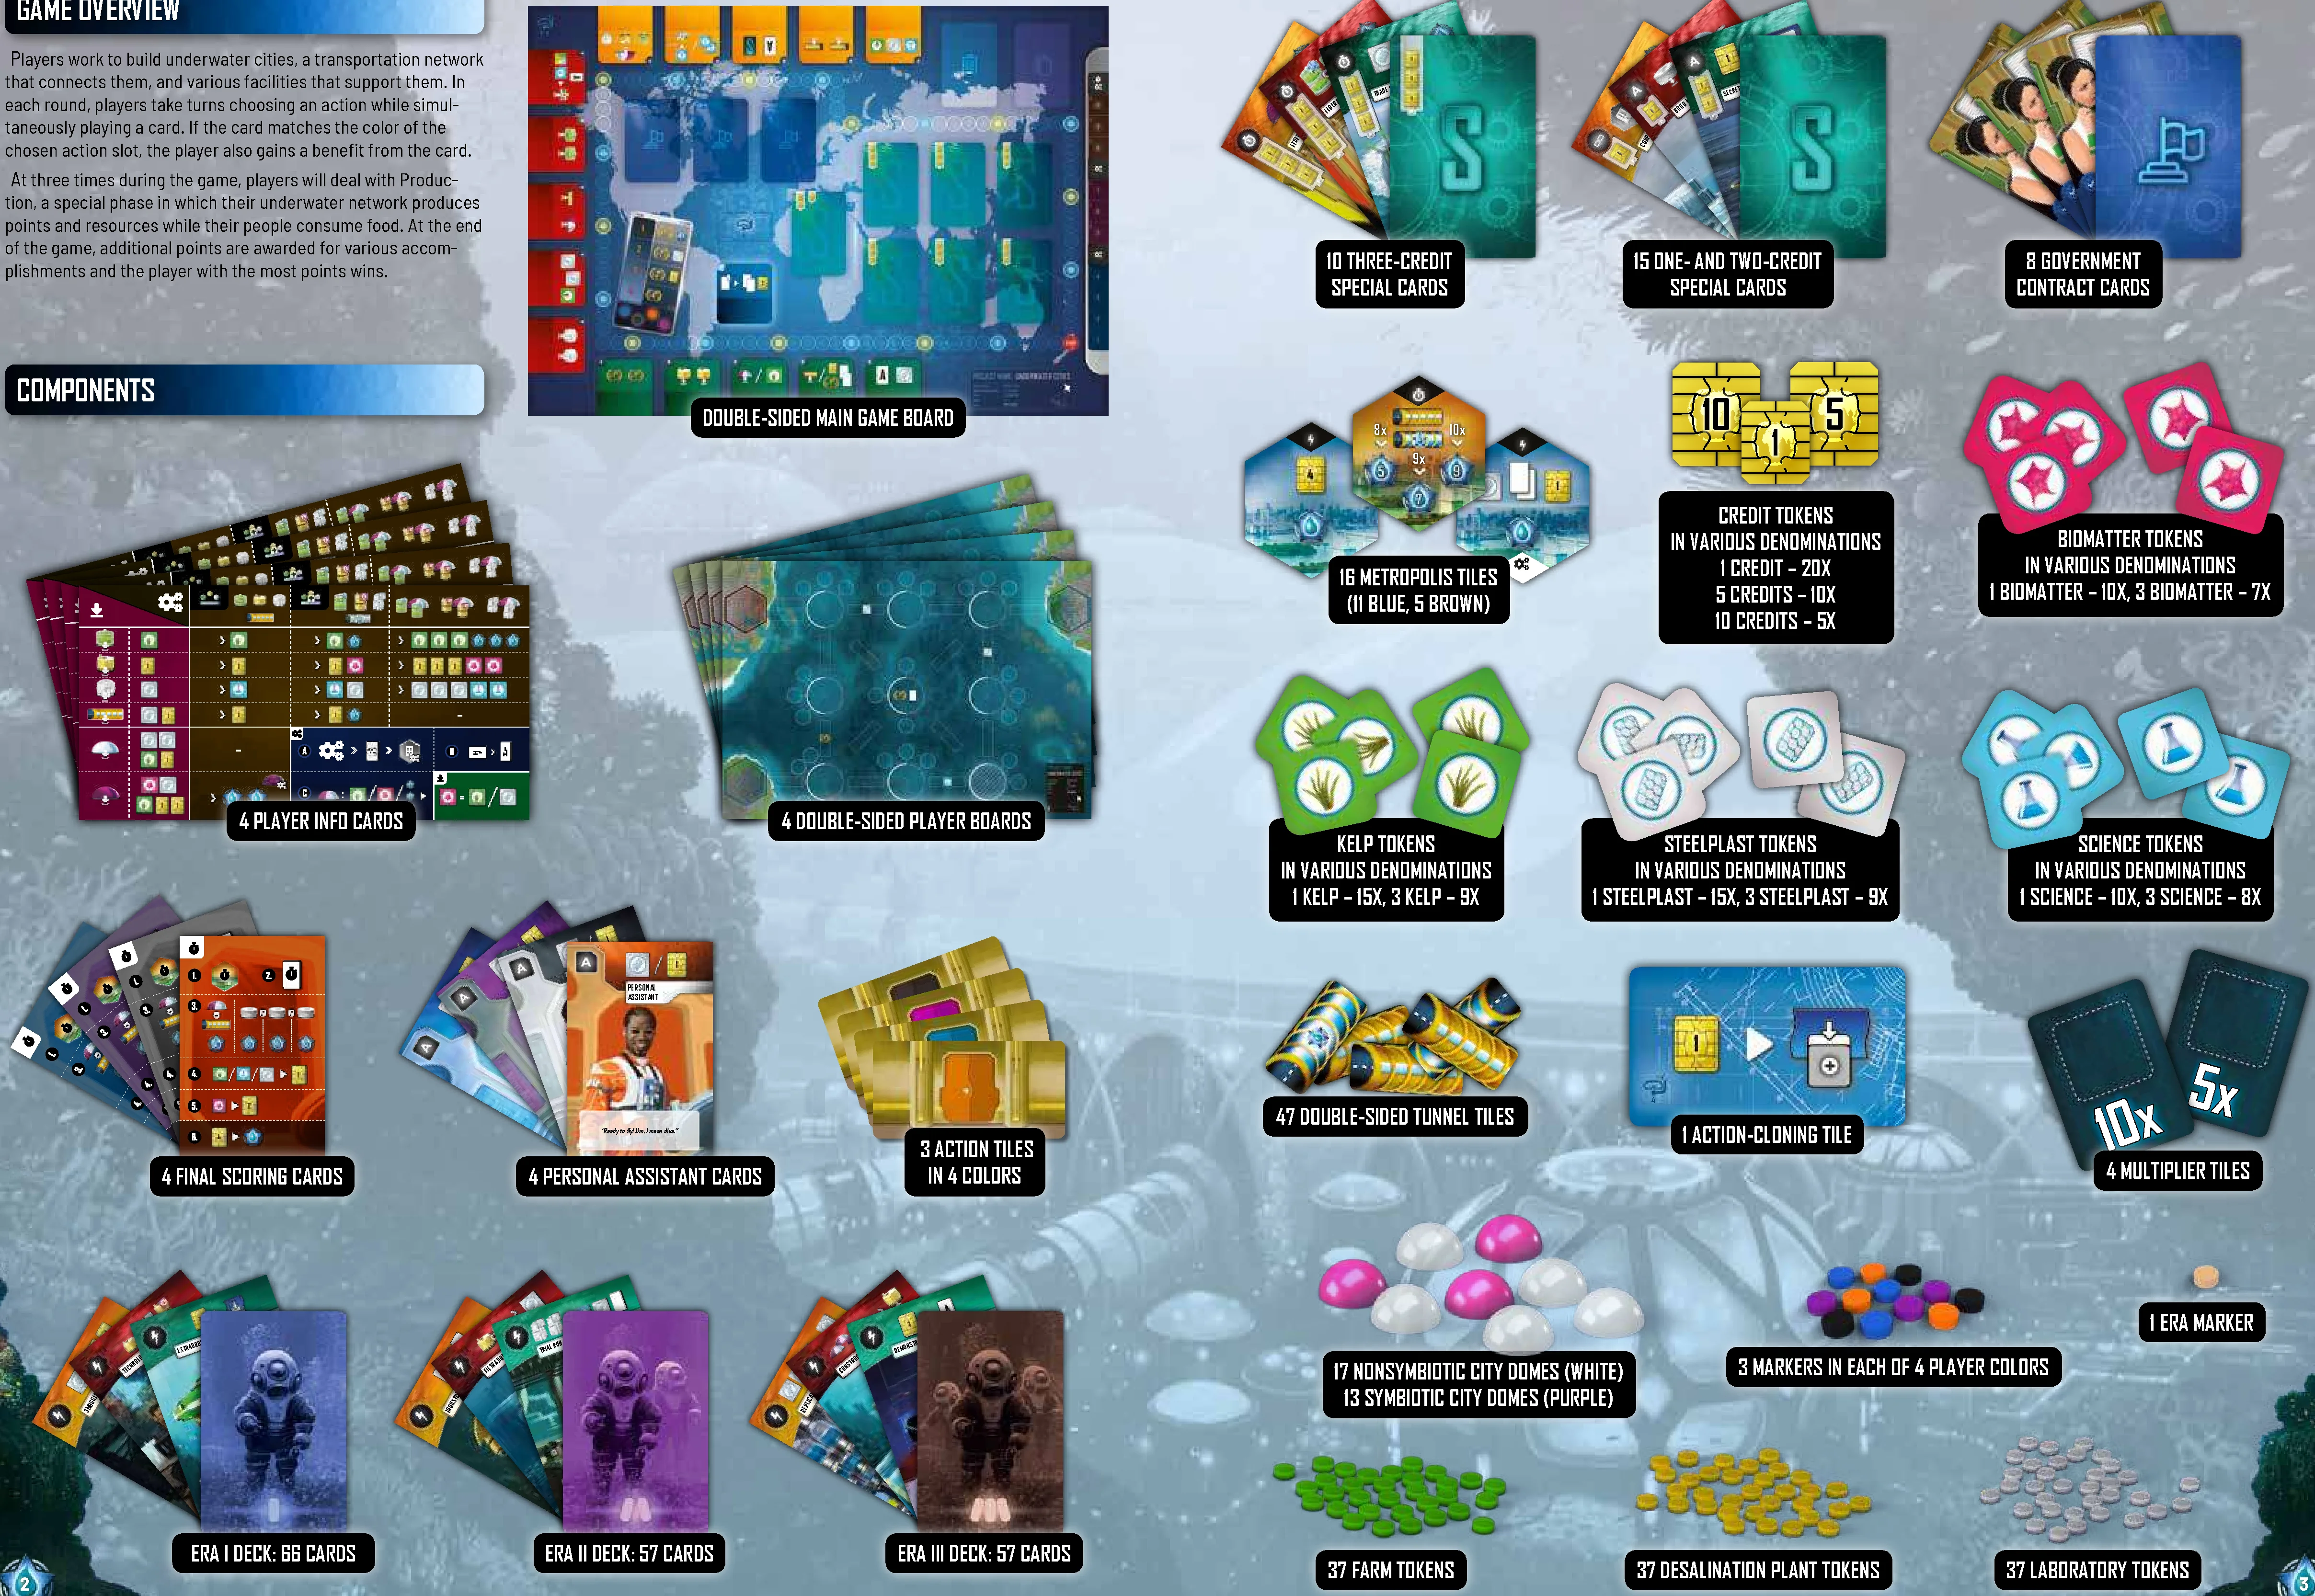
- 1 Double-sided main game board
- 4 Double-sided player boards
- 4 Player info cards
- 66 Era I cards
- 57 Era II cards
- 57 Era III cards
- 10 Three-credit Special cards
- 15 One- and two-credit Special cards
- 8 Government contract cards
- 4 Personal Assistant cards
- 4 Final scoring cards
- 3 Action tiles in each of 4 colors (12 total)
- 1 Action-cloning tile
- 16 Metropolis tiles (11 blue, 5 brown)
- 47 Double-sided tunnel tiles
- 17 Nonsymbiotic city domes (white)
- 13 Symbiotic city domes (purple)
- 37 Farm tokens
- 37 Desalination plant tokens
- 37 Laboratory tokens
- 3 Markers in each of 4 player colors (12 total)
- 1 Era marker
- 4 Multiplier tiles
- Credit tokens in various denominations:
- 1 credit – 20x
- 5 credits – 10x
- 10 credits – 5x
- Kelp tokens:
- 1 kelp – 15x
- 3 kelp – 9x
- Steelplast tokens:
- 1 steelplast – 15x
- 3 steelplast – 9x
- Science tokens:
- 1 science – 10x
- 3 science – 8x
- Biomatter tokens:
- 1 biomatter – 10x
- 3 biomatter – 7x
LIMITED AND UNLIMITED COMPONENTS
- Credits, kelp, steelplast, science, and biomatter tokens are not intended to be limited. If the supply runs low, you can use higher denominations and the multiplier tiles to represent the amount of resources you have. You can make change freely at any time.
- Building tokens are not intended to be limited. If you run out of a particular type, you can usually substitute a different colored token. For example, if players have lots of upgraded farms, the supply might run out of green tokens. You can get more in the supply by replacing the bottom tokens of some upgraded farms with a color you have lots of. The green token on top is sufficient to remind you that it is an upgraded farm.
- Tunnels and nonsymbiotic cities are limited. The supply starts with 47 tunnels. When they are gone, no one can build tunnels anymore. Similarly the game has only 17 nonsymbiotic city domes, and no more than this may be built.
- Symbiotic cities are limited. The limit depends on the number of players:
- In a two-player game, use 7 symbiotic city domes.
- In a three-player game, use 10.
- In a four-player game, use all 13.
- The era deck is not limited. If it runs out of cards, shuffle its discard pile to make a new deck.
- One- or two-credit Special cards: You should not run out of one- or two-credit Special cards. Whenever these are “discarded” they return immediately to the bottom of the deck.
- Three-credit Special cards are limited. Only six are available in the game.
GAME SETUP
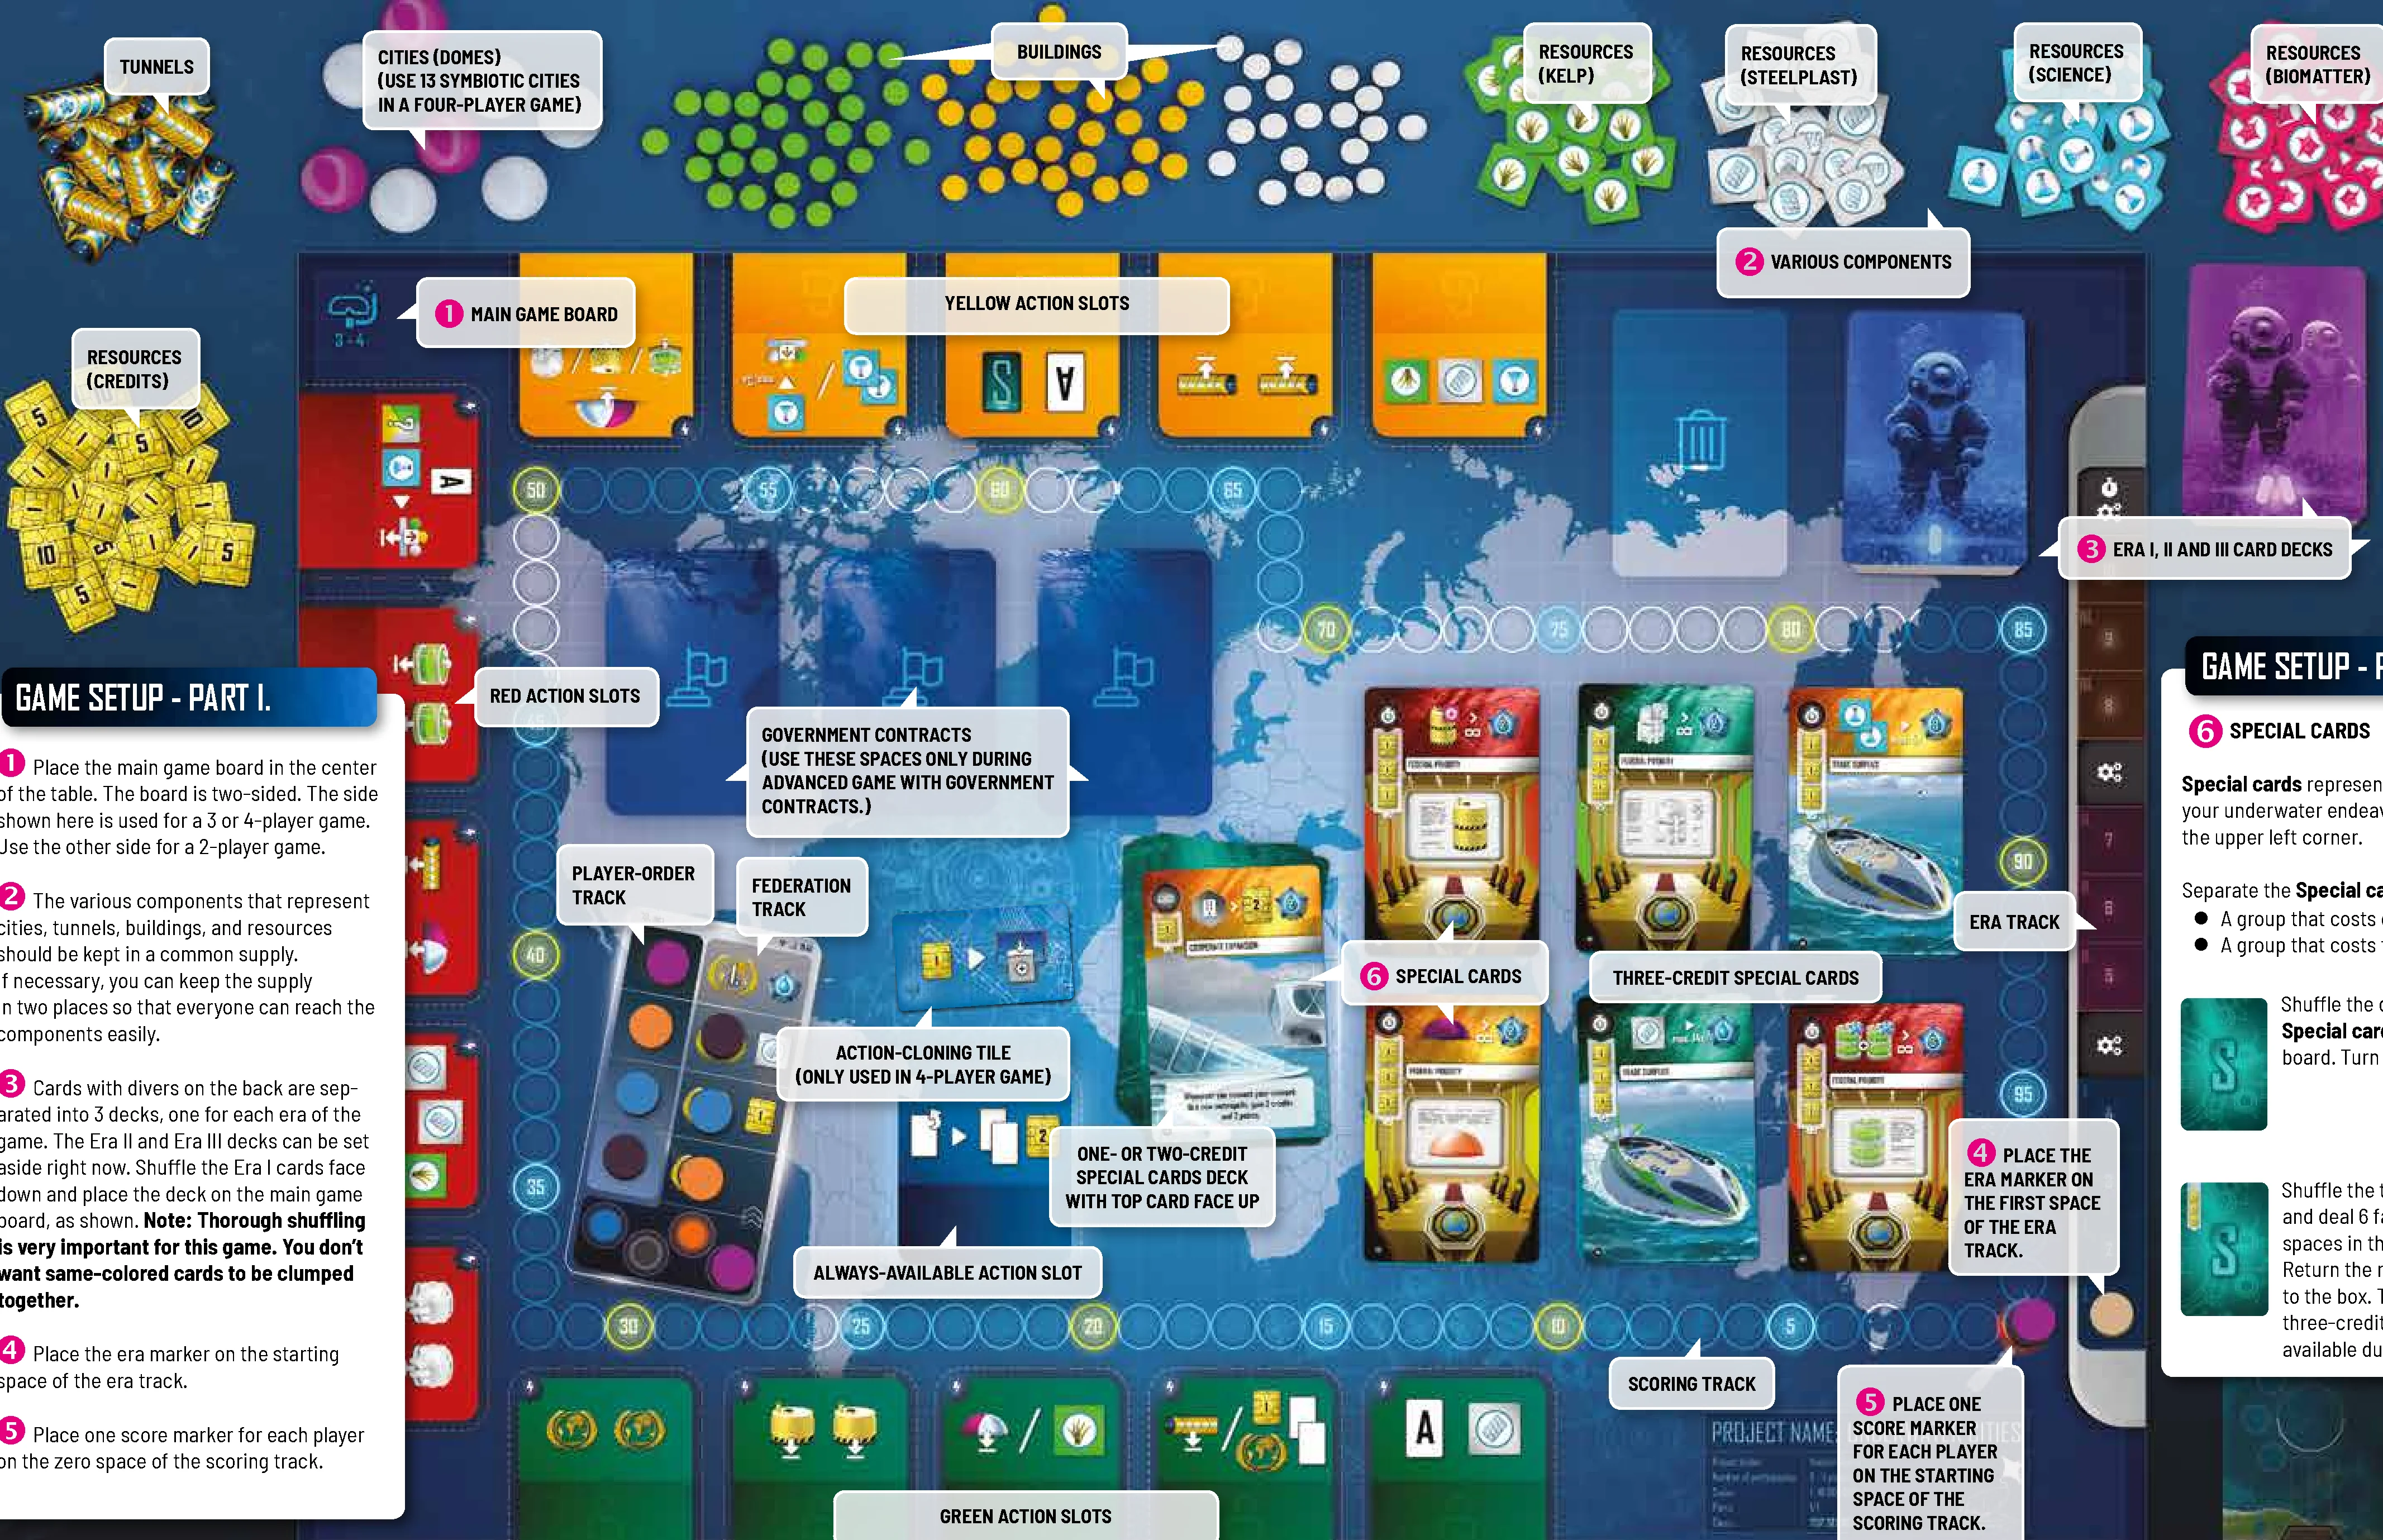
- Place the main game board in the center of the table. The board is two-sided. The side shown here is used for a 3 or 4-player game. Use the other side for a 2-player game.
- Keep components in supply: The various components that represent cities, tunnels, buildings, and resources should be kept in a common supply. If necessary, you can keep the supply in two places so that everyone can reach the components easily.
- Cards with divers on the back are separated into 3 decks, one for each era of the game. The Era II and Era III decks can be set aside right now. Shuffle the Era I cards face down and place the deck on the main game board, as shown. Note: Thorough shuffling is very important for this game. You don’t want same-colored cards to be clumped together.
- Place the era marker on the starting space of the era track.
- Place one score marker for each player on the zero space of the scoring track.
- Special cards: Special cards represent specialists you can hire for your underwater endeavors. Each has a cost near the upper left corner.
Separate the Special cards into two groups:- A group that costs one or two credits.
- A group that costs three credits.
Shuffle the deck of one-or-two-credit Special cards and place it on the main board. Turn the top card face up.
Shuffle the three-credit Special cards and deal 6 face up to the corresponding spaces in the center of the game board. Return the rest of the three-credit deck to the box. These 6 are the only three-credit Special cards that will be available during this game.
SETUP FOR 2 OR 3 PLAYERS
When setting up the game for fewer than four players, make two changes:
- Leave the action-cloning tile in the box.
- Use fewer symbiotic cities (purple domes):
- With two players, use 7 symbiotic cities.
- With three players, use 10 symbiotic cities.
A four-player game uses the action-cloning tile and all 13 symbiotic city domes.
PLAYER SETUP
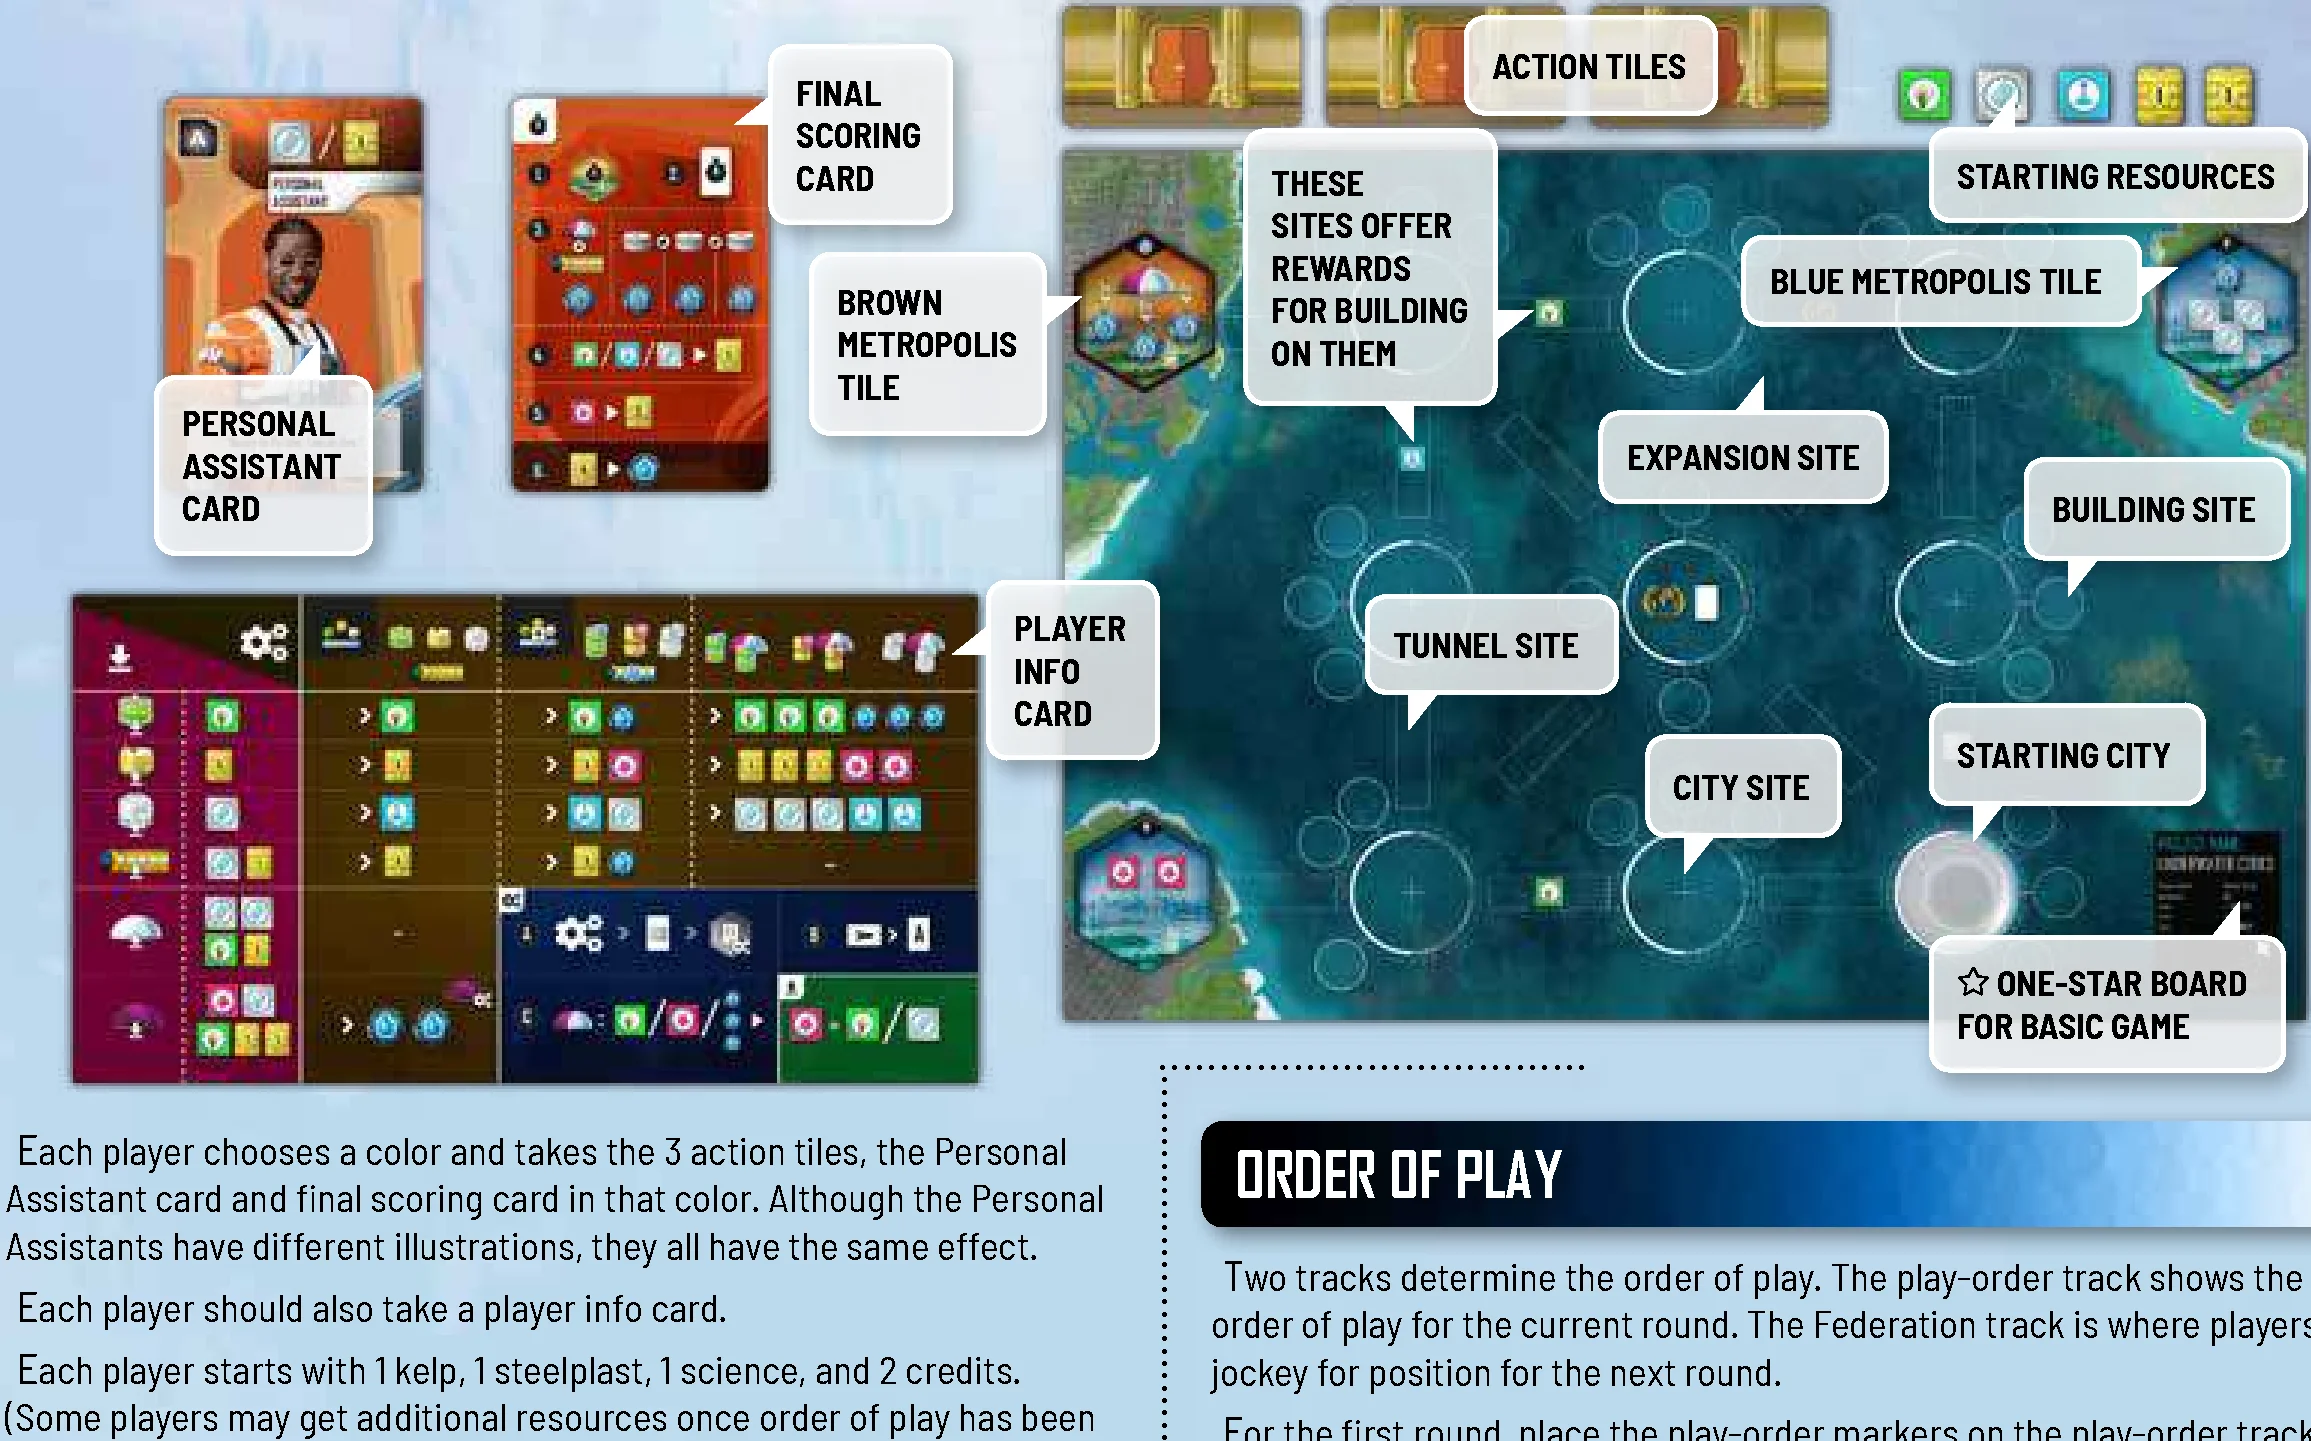
Each player chooses a color and takes:
- 3 action tiles in that color
- The Personal Assistant card and final scoring card in that color (although the Personal Assistants have different illustrations, they all have the same effect)
- 1 player info card
- Starting resources: 1 kelp, 1 steelplast, 1 science, and 2 credits. (Some players may get additional resources once order of play has been determined.)
PLAYER BOARD SETUP
Each player takes a different player board, chosen at random.
- Your nation’s infrastructure begins with a city in the lower right corner of your board. There are two types of cities – symbiotic and nonsymbiotic. Your starting city is a nonsymbiotic city represented by a white dome, as shown.
- Separate the brown hexagonal metropolis tiles from the blue ones. Mix up the brown ones and randomly give one to each player. Then mix up the blue ones and randomly give two to each player.
- Your brown metropolis goes on the hexagonal space in the upper left corner. The other two should be randomly assigned to the remaining two spaces.
- The player boards are two-sided. For your first game, use the side depicted above (# 1–4, ★). Later, for more variety, you can try the other side, which has more asymmetry (# 5–8, ★★★).
ORDER OF PLAY SETUP
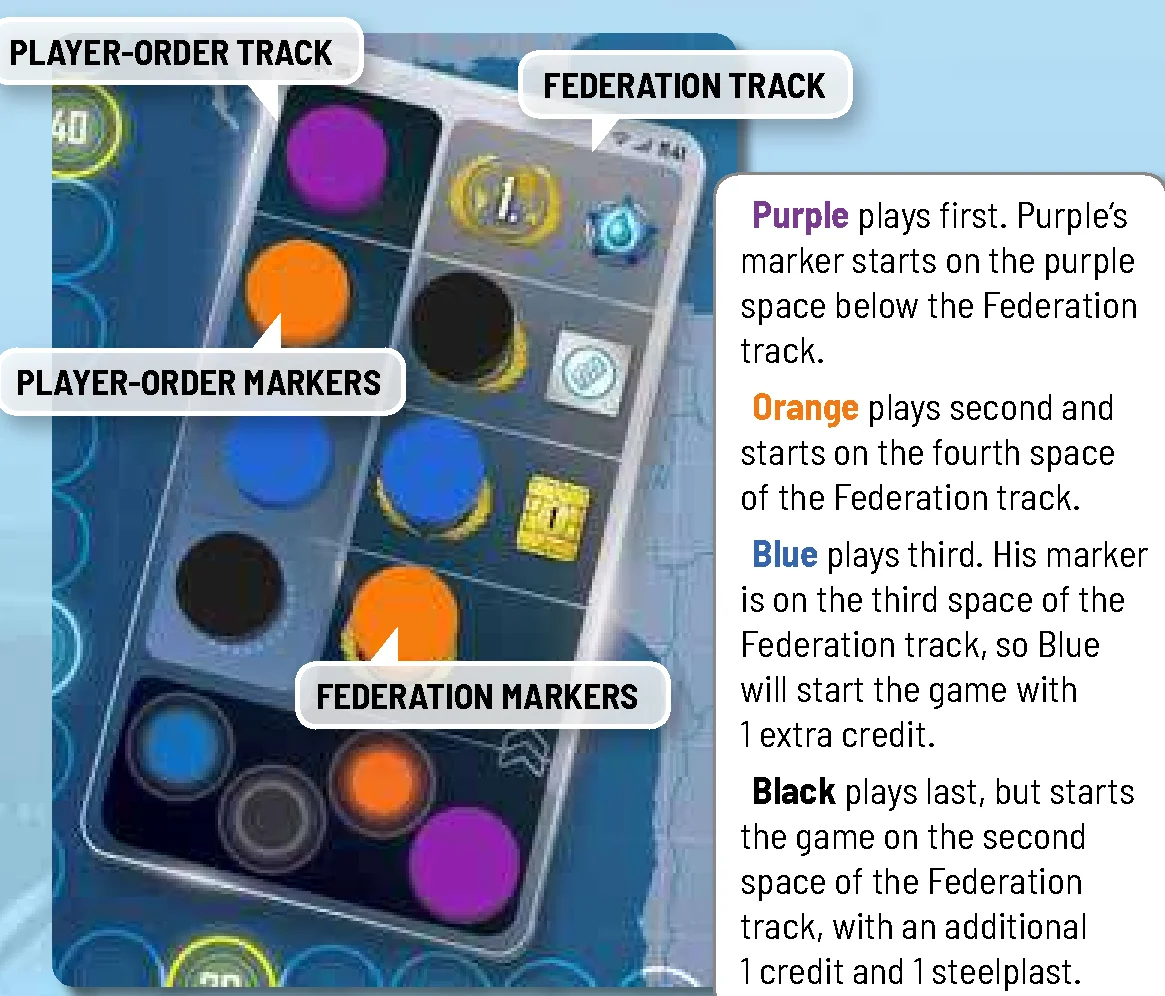
Two tracks determine the order of play. The play-order track shows the order of play for the current round. The Federation track is where players jockey for position for the next round.
For the first round, place the play-order markers on the play-order track randomly. Then, on the Federation track, the markers should be placed in the opposite order, as shown, and those who play third and fourth get additional resources. Specifically:
- The player on space 1 of the play-order track will play first in the first round. On the Federation track, his or her marker will start below the track, on the space with the matching color.
- The player on space 2 plays second. His or her other marker will start on space 4 of the Federation track.
- The player on space 3 will also start on space 3 of the Federation track and will start with one extra credit.
- The player who plays last will start on space 2 of the Federation track and will start with 1 credit and 1 steelplast in addition to the usual starting resources.
The first round is the only round that starts this way. In later rounds, play order and initial position on the Federation track will be determined differently.
CARDS FOR THE FIRST ROUND
At the start of the game, you draw 6 cards from the Era I deck. Choose 3 to keep, and discard the other 3.
If you are new to the game, try to keep one card of each color. And don’t worry about this decision too much – every card offers interesting choices, and you will be getting more cards very soon.
RESOURCES
Underwater Cities has many resources that players can gain or spend. The gaining of a resource is represented by a simple icon:
 Gain 1 steelplast.
 Gain 1 kelp.
 Gain 1 science.
 Gain 1 biomatter.
 Gain 1 credit. That is, take a 1-credit token from the supply and keep it near your player board.
 Gain 1 card. That is, draw a card from the current era’s deck. Do not take any of the Special cards from the board.
 Gain 1 point. Advance your point marker one space on the scoring track.
In general, credits, science, kelp, steelplast, and biomatter are used to pay costs. Kelp is also used for feeding your people (there are other ways to feed people, but kelp is the most efficient). Cards, of course, are useful because they give you more choices on your turn. And points are how you win the game. So anything you gain is sure to be useful to you sooner or later.
BIOMATTER AS A UNIVERSAL MATERIAL
Biomatter is a remarkable substance, somewhat more rare than the other resources. In addition to being essential for building symbiotic cities, biomatter can also be a universal building material. Only when building a tunnel, building, or city, any part of the cost that requires kelp or steelplast can be paid with biomatter instead.
EXAMPLE: A nonsymbiotic city normally costs 2 steelplast, 1 kelp, and 1 credit. But you could build it with 1 steelplast, 2 biomatter, and 1 credit.
CARD BASICS
The cards in your hand represent personnel you have at your disposal. On each turn, you will play one of these cards as you choose that turn’s action. This represents sending your personnel out to complete that assignment.
You begin each turn with exactly 3 cards. During your turn, you play exactly 1 of these, while simultaneously choosing an action slot.
If the color of the card does not match the color of the slot, then you ignore the card and just perform the action. However, if the color matches, then you get to resolve the card before or after performing the action.
The three colors have different power levels:
- Green cards are the strongest, but you get their benefits only when you play them on green action slots, which are the weakest.
- Red cards and action slots have a moderate power level.
- Yellow cards are the weakest, but the yellow action slots are the strongest.
Some cards have an instant effect. All others can be claimed for later use, as explained below. All five types of cards are described in this section.
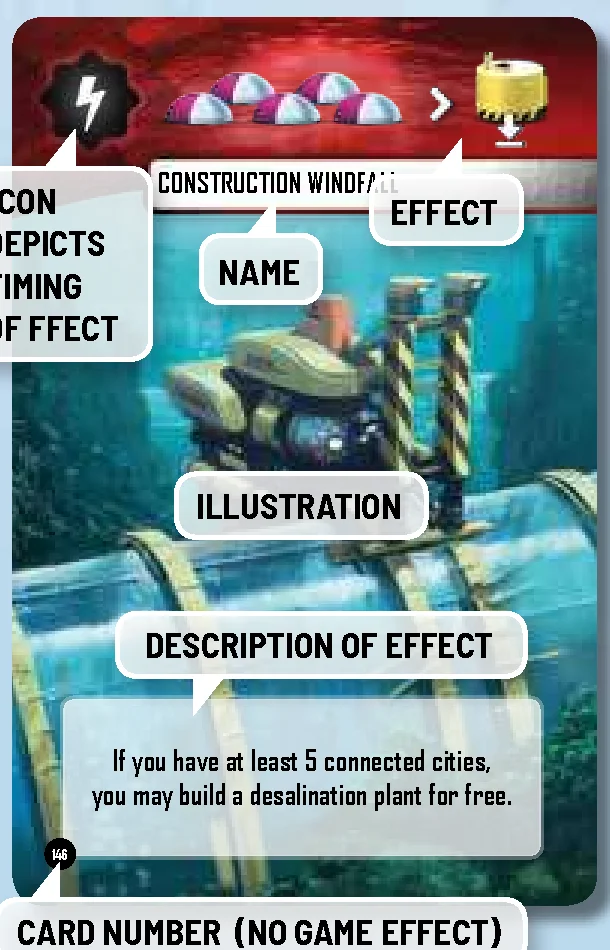
CARD TYPES
INSTANT EFFECTS
When you play a card with this symbol  , if its color matches your chosen action slot, you resolve the card’s effect immediately before or after you perform your chosen action. If the color does not match, you ignore the card’s effect.
In either case, these cards are discarded to the discard pile on the main board.
CLAIMING A CARD
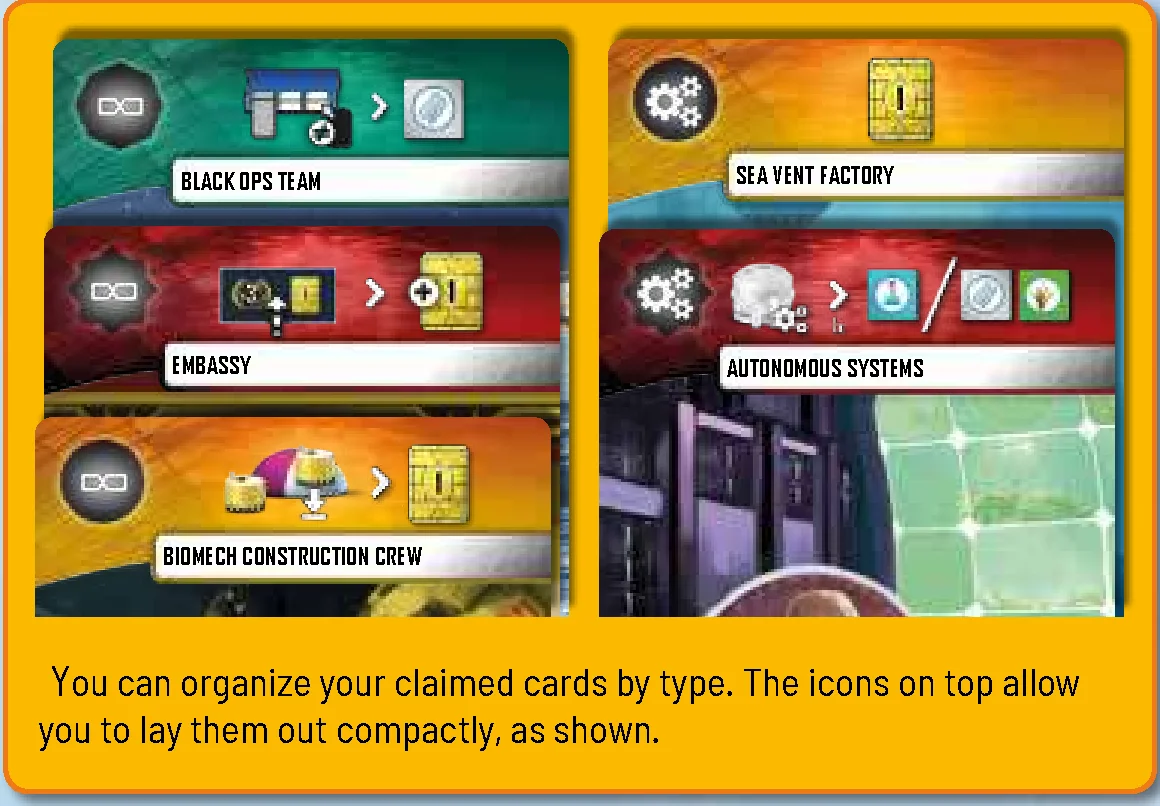
Four types of cards do not have instant effects. When you play such a card, if its color matches your chosen action slot, you claim the card by placing it near your player board. It thus becomes a permanent part of your underwater nation.
If the color of the card does not match the color of the slot, you cannot claim the card. It goes to the discard pile.
PERMANENT EFFECTS
Cards marked with this symbol  have a permanent effect. You gain the card’s benefit if you claim it, as described above. Permanent effects take various forms. Some permanent effects trigger whenever a certain event happens. Others might give you a discount in certain situations. Some offer a special ability that you can use every turn.
It is legal to use the permanent effect even on the turn in which you claim the card.
ACTION CARDS
Cards with this symbol  are action cards. Your claimed action cards offer additional actions your underwater nation can perform. To use an action card, you must use an action slot or a card effect that allows you to do so.
It is legal to use an action card even on the turn in which you claimed it.
Each action card is limited to one use per era. After use, rotate it 90 degrees to the right to show that it has been used and is no longer available. At the end of the era, after Production, all action cards are restored to the usual orientation to show that they will be available again in the new era.
Note: There are a few instant-effect cards which allow you to make an used action card available again. This can allow you to use an action card more than once in the same era.
LIMIT OF FOUR
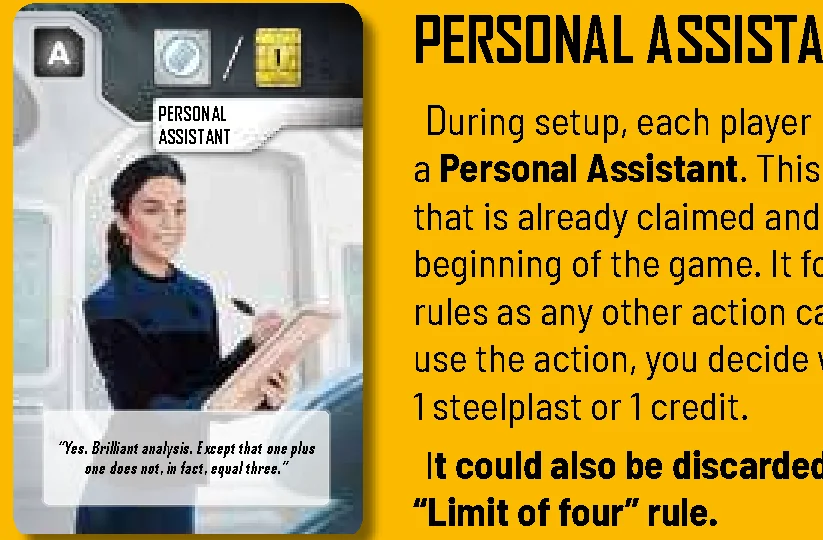
You are limited to 4 action cards (and your Personal Assistant counts as one of the 4). If you already have 4, then you must discard one before you claim a new action card. The discarded card can be one that has been used this round or one that is still available.
If you make room for a new action card by discarding one that is available, you may immediately use the discarded action. It is as though your new action card also came with an instant effect that lets you use the discarded available action card.
PRODUCTION CARDS
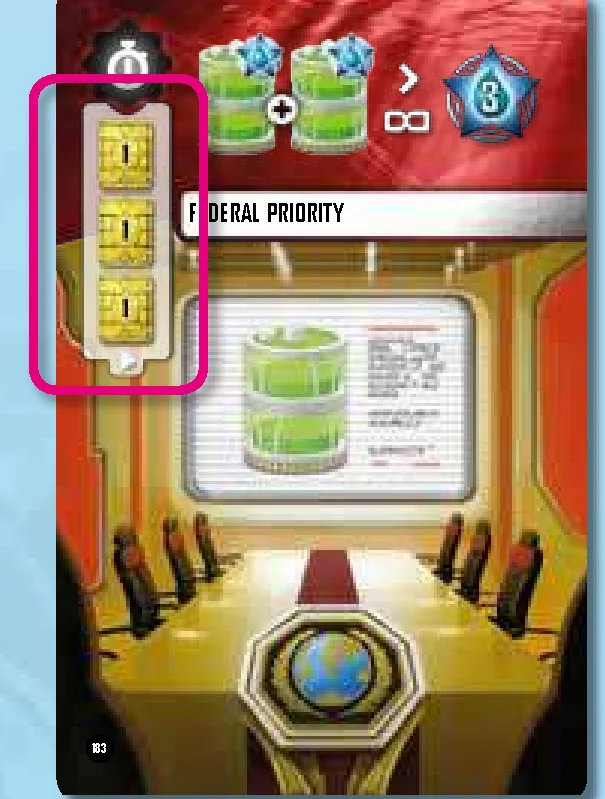
Cards with this symbol  are production cards. Your claimed production cards take effect during the Production phase, which happens three times during the game. Some produce resources directly. Others may modify your production based on what is connected to your network.
END-SCORING CARDS
Cards with this symbol  are end-scoring cards. Your claimed end-scoring cards can give you points at the end of the game. Some give you points based on some aspect of the network you have built. Others may allow you to convert certain resources to points.
SPECIAL CARDS
The cards you draw from the regular deck are unknown to you until you draw them. But some cards start the game face up for all to see. These are called Special cards.
Special cards cannot be drawn in the usual way. The only way to get one is to use the action slot marked like this .
The Special card remains in your hand. It can be played just like any other card. If it does not match your chosen action slot, then it is discarded and returned to the bottom of the Special card deck with no effect. If it matches, then it has an effect only if you pay the cost depicted near the upper left corner.
DISCARDING SPECIAL CARDS
When one- or two-credit Special cards are discarded (for example, when you are discarding down to your hand limit) they should be immediately returned to the bottom of the Special card deck.
When you play a one- or two-credit Special card:
- If the color does not match the chosen action slot, return the card to the bottom of the Special card deck.
- If you choose not to pay to play the Special card, return it to the bottom of the Special card deck.
- If the color matches and you pay to play it, then you keep it. If it has an instant effect, keep it under your player board after performing the effect to ensure that it will not re-enter play. If it is not an instant-effect card, claim it in the usual way.
Three-credit Special cards have no way to re-enter play. Generally, they are too valuable to discard, but if one is discarded, you can return it to the box.
GAMEPLAY OVERVIEW
Here is a quick summary of how the game is played:
- Play Order: Players take turns choosing actions. They play in the order depicted on the play-order track, and this order does not change during the round.
- A Turn: You always start your turn with 3 cards. On your turn, you play one card and simultaneously choose one of the available action slots.
- A Round: Players continue until each has taken 3 turns. When everyone has taken 3 turns, it is the end of the round.
- The Era Marker: At the end of each round, the era marker advances one space along the era track. When it reaches a Production space, there is a Production phase.
- Production: During Production, your underwater network will produce various resources. At the end of Production, each of your connected cities will consume 1 kelp.
- An Era: An era consists of 4 rounds in Era I and 3 in Era II and Era III. The end of each Production phase marks the end of an era. At the end of Era III, the game is done.
- Final Scoring: At the end of the game, players score various aspects of their underwater network, and the player with the most points wins.
TAKING A TURN
On your turn, you choose an action by placing one of your action tiles on an action slot. Slots that have already been chosen this round are occupied and cannot be chosen again. Slots that have not yet been chosen are available.
The two sides of the main board have different action slots. One side is designed for a two-player game. The other side is designed for three or four.
When you place your tile on an action slot, you must also play a card from your hand. The action slots and the cards come in three colors. If the color of your card matches the color of the action slot, you may resolve the card’s effect before or after you perform the slot’s action. If the colors do not match, you ignore the card and only perform the slot’s action.
It is legal to use only part of an action or card effect. For example, if an action slot allows you to build a city and a tunnel, you can choose to build only the tunnel, if you wish.
However, you are not allowed to choose an action slot without using at least part of its effect. For example, if you do not have enough resources to build 1 tunnel, you cannot choose the action slot that allows you to build 2 tunnels.
Card effects are always optional, so it is legal to play a matching card and not use its effect at all.
SUMMARY OF CHOOSING AN ACTION SLOT
- Place one of your action tiles on an unoccupied action slot or on the always-available slot.
- Play a card from your hand.
- If the color of the card does not match the color of the slot, perform the action and discard the card with no effect. The always-available slot has no color and cannot be matched.
- If the color of the card matches, then you choose one of these:
- Either perform the action, and then resolve the card’s effect.
- Or resolve the card’s effect first, and then perform the action.
TIMING
Some effects have multiple parts. The parts of an effect can be resolved in any order.
Be careful!! You must resolve all card effects and then all actions from an action slot or vice versa. Resolving these 2 sets of actions simultaneously is not allowed.
TIMING LIMITATIONS
There are two limitations with regard to resolving effects:
- If a new effect triggers, resolve it immediately, even if you haven’t finished the effect which triggered it.
- You have to resolve a card effect and the action of the chosen action slot separately and completely before resolving the other.

SPECIAL ACTIONS & SLOTS
THE ALWAYS-AVAILABLE SLOT
One action slot is always available, even if another player has already chosen it this round. It has no color, so when you choose it you ignore the effect of the card you play. The always-available slot allows you to gain 2 cards and 2 credits.
Note: Some Special card effects allow you to use the action depicted at an action slot. These effects apply only to the colored slots, not to the always-available slot.
USING ACTION CARDS
Action cards are a certain type of card you claim and keep near your player board. They have actions which can be used during the game, but only when you use an action slot or a card effect with this symbol:  You may use 1 of your action cards.
DRAWING SPECIAL CARDS
This symbol indicates that the action slot allows you to take a Special card. Many Special cards are available face up in the center of the game board.
When you take a Special card, you either:
- Take one of the three-credit Special cards (it is not replaced).
- Or take the top card from the deck (the one-or-two-credit deck) and turn the next card face up.
- Or turn the top card face down, move it to the bottom of the deck, and draw the next 3 cards. Choose one of these 3 to keep and return the other 2 to the bottom of the deck in either order. Then turn up the new top card.
Once a Special card is in your hand, it is mostly like any other card.
THE ACTION-CLONING TILE (4 PLAYERS)
In a four-player game, the important action slots become occupied quite quickly. The action-cloning tile (which is available only in a four-player game) gives players a second chance at one of these slots.
On your turn, instead of choosing an available action slot, you may do the following:
- Pay 1 credit.
- Take the action-cloning tile.
- Choose an action slot occupied by another player.
Your action tile goes on the slot you chose, on top of the other player’s tile. You also play a card, as usual, and you gain the benefits of the card if its color matches the chosen slot. Note that you cannot choose a slot that is already occupied by your tile.
Note on card effects: In a four-player game, “any slot occupied by another player” actually means “any occupied slot not occupied by you”. The idea is that if you have already placed a tile on that slot, a card that allows you to use “any slot occupied by another player” will not allow you to use that slot again. So a slot occupied by you and another player does not count as a “slot occupied by another player”.
ONE-TIME USE
Once the action-cloning tile is used, it cannot be used again for the rest of the round. The player who used the tile keeps it as a reminder that this option is no longer available. The tile is returned to its place on the main board at the end of the round.
END OF TURN
At the end of your turn you always draw 1 card. This is in addition to any cards you may have acquired during your turn. Because you played only 1 card, you now have at least 3.
If you have more than 3 cards, you must discard down to 3. However, you can think about this decision while others are playing. Officially, this decision is made at the beginning of your next turn. In practice, it is okay to discard as soon as you have made up your mind.
YOUR NETWORK
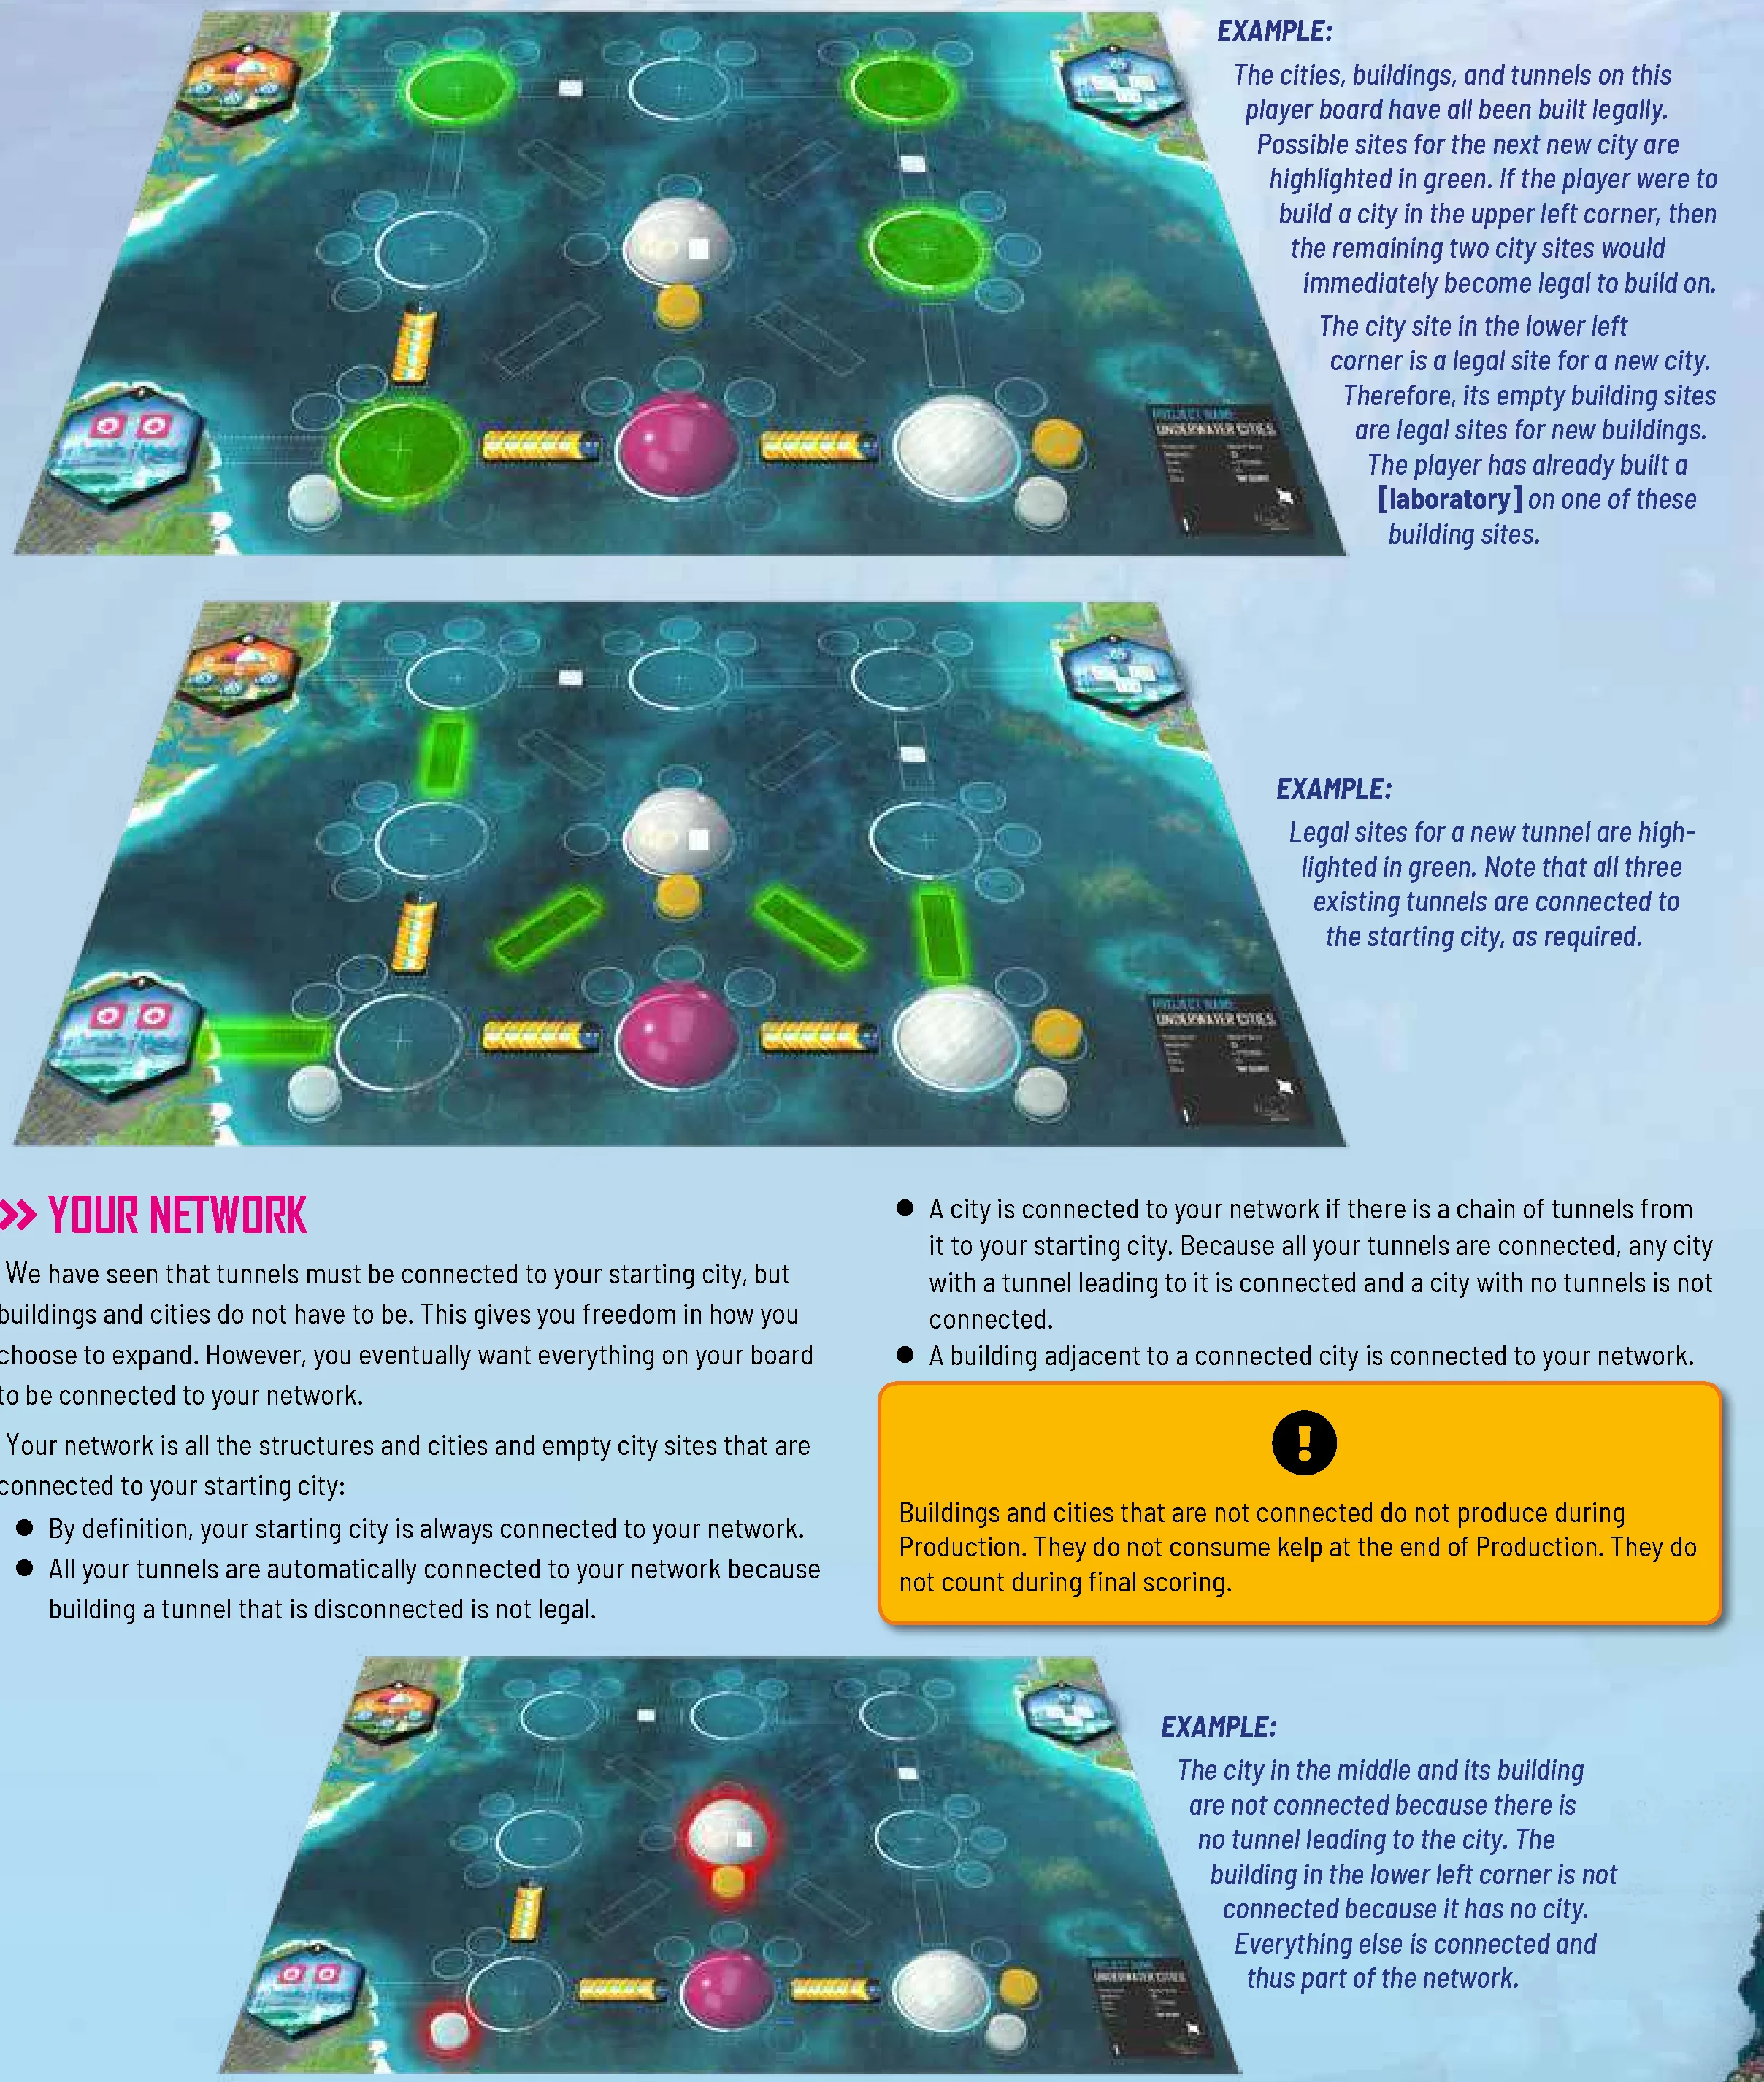
We have seen that tunnels must be connected to your starting city, but buildings and cities do not have to be. This gives you freedom in how you choose to expand. However, you eventually want everything on your board to be connected to your network.
Your network is all the structures and cities and empty city sites that are connected to your starting city:
- By definition, your starting city is always connected to your network.
- All your tunnels are automatically connected to your network because building a tunnel that is disconnected is not legal.
- A city is connected to your network if there is a chain of tunnels from it to your starting city. Because all your tunnels are connected, any city with a tunnel leading to it is connected and a city with no tunnels is not connected.
- A building adjacent to a connected city is connected to your network.
Important: Buildings and cities that are not connected do not produce during Production. They do not consume kelp at the end of Production. They do not count during final scoring.
GENERAL BUILDING RULES
STEP-BY-STEP EXPANSION
You build your tunnels, buildings, and cities one-at-a-time. For example, if you choose an action slot that allows you to build 2 tunnels, you first build one tunnel on a legal tunnel site and this could open up one or more new legal sites for the second tunnel.
COSTS
The usual cost for building a city, building, or tunnel is depicted on your player info card. This is the cost you pay when you build something by choosing an action slot. Certain card effects also allow you to build things. If the card does not specify a cost, you pay the usual cost. However, if the card specifies a cost, you pay that cost instead of the usual cost.
CITIES
Cities provide the habitat for the people of your underwater nation. At the end of the game, every city connected to your network will be worth points. There are 2 types of cities.
Build a city:
- Pay 2 steelplast, 1 kelp and 1 credit for a nonsymbiotic city (white dome);
- or pay 1 steelplast, 1 kelp, 1 biomatter and 2 credits for a symbiotic city (purple dome).
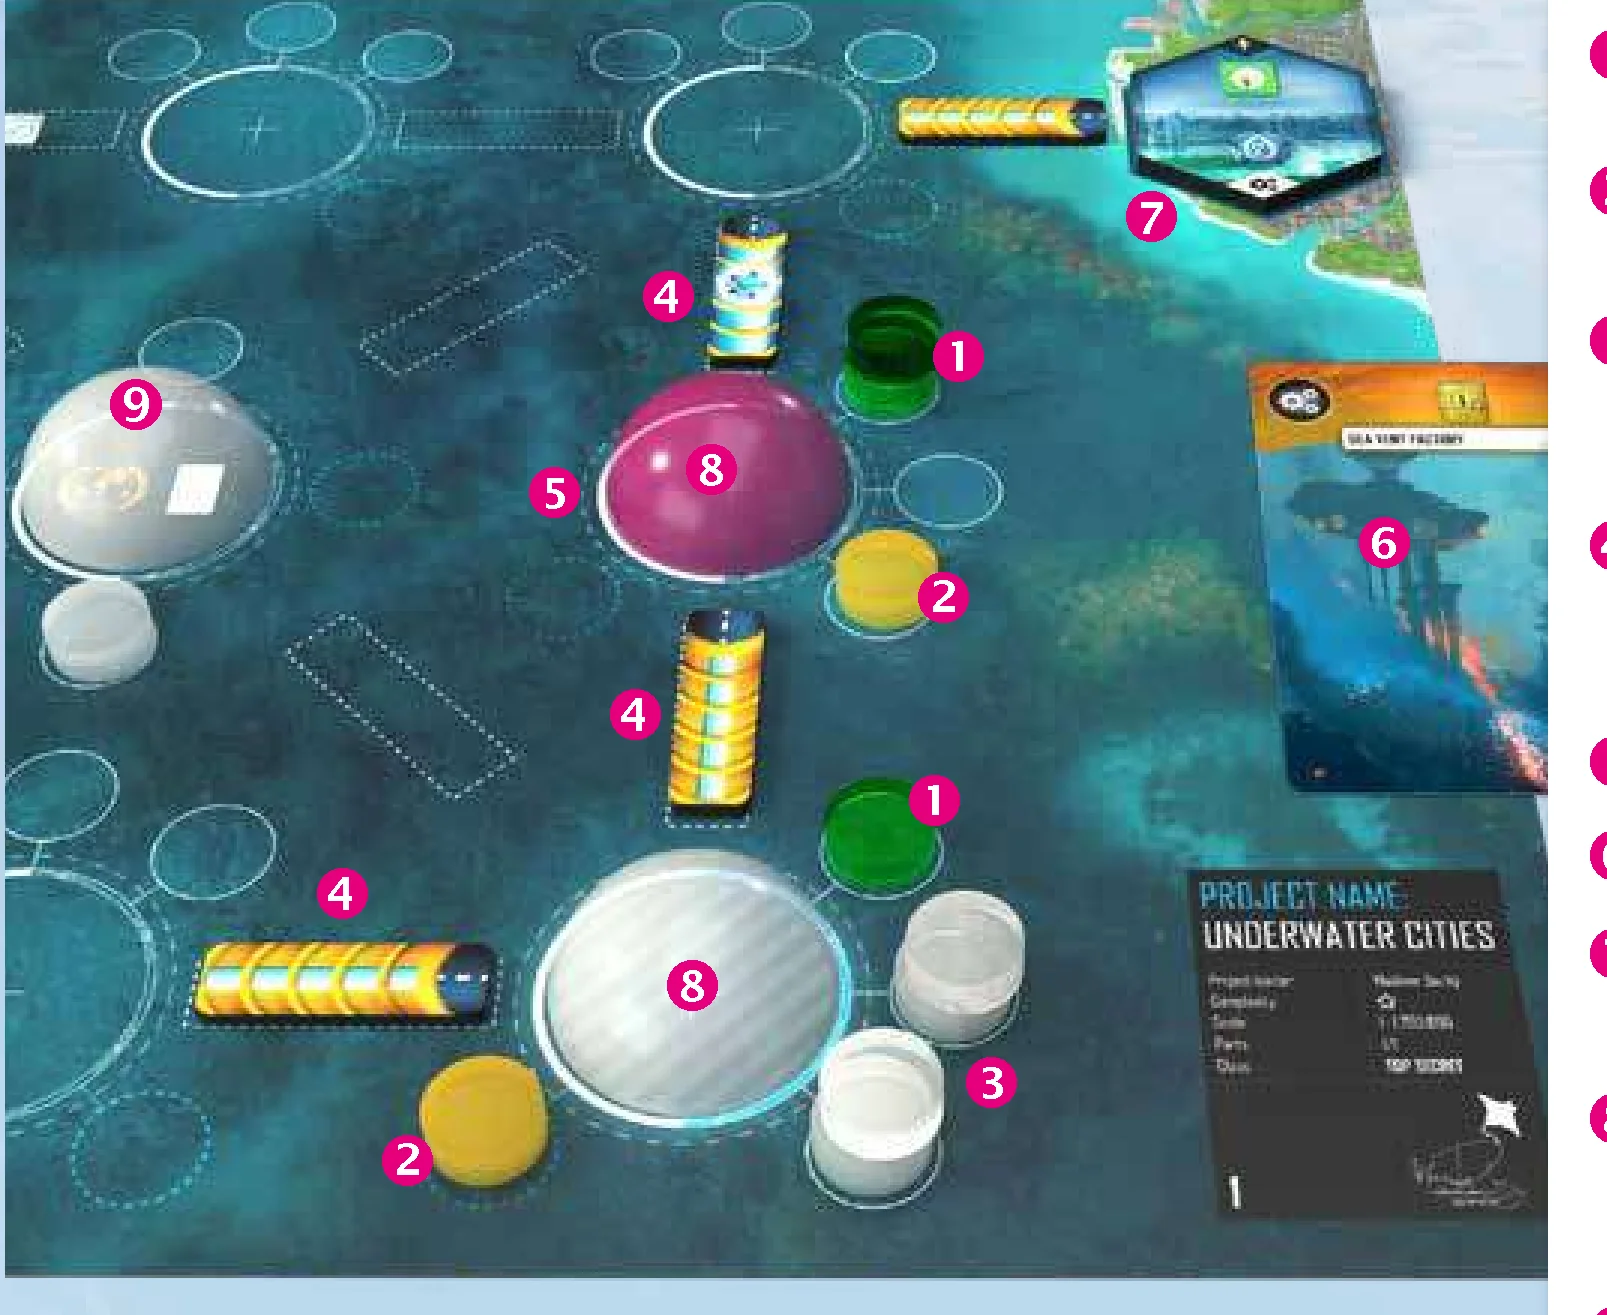
When you build a city, pay the usual cost and take the corresponding dome from the supply. Place the dome on an empty city site on your player board. The site you choose for your new city must be adjacent to an existing city. In other words, the new city must have a tunnel site that could connect it to an existing city. It is legal to build new cities before building the connecting tunnels.
Symbiotic cities are a little more expensive (biomatter is difficult to get) but they can produce points during Production. Nonsymbiotic cities are a little easier to build (if you have the steelplast) but they do not produce points. Both kinds of cities can give you points at the end of the game, and both require kelp to feed them at the end of Production. Whenever a rule or effect applies to a city, that means “a symbiotic or nonsymbiotic city.”
BUILDINGS
Buildings are special facilities that help to make your underwater nation self-sufficient. You can build 3 types of them:
- Build a farm: This costs 1 kelp.
- Build a desalination plant: This costs 1 credit.
- Build a laboratory: This costs 1 steelplast.
When you build a building, pay the cost (which is depicted on your player info card) and take a token of the corresponding color from the supply. Place the building token on an empty building site. The site you choose for your new building must be adjacent to an existing city or adjacent to a site on which you could build a new city.
The different buildings produce different things during Production. They will produce more if they are upgraded. Also, certain cards may have a conditional effect that only applies if you have certain buildings. Buildings have none of these beneficial effects until they are connected to your network. To connect them, you will need to build tunnels and cities.
EXPANSION SITES
Each city has an additional building site that is generally off limits. You can build on this site only if you play a card with an effect that specifically allows you to build on an expansion site (and only if it is adjacent to an existing city or a site on which it is legal to build a new city).
BONUSES FROM BUILDING
Your player board depicts certain bonuses you may gain from building. Every board offers different bonuses. When you build a structure or a city on a site marked with a resource, you gain the resource.
Building on a site marked with this symbol  allows you to advance 1 space on the Federation track and draw one card from current Era deck.
You gain the bonus even if the city or building you build on that site is not yet connected to your network. These bonuses are triggered effects, which are resolved immediately, even in the middle of an action.
TUNNELS
Tunnels connect your cities to your underwater network.
- Build a tunnel: This costs 1 steelplast and 1 credit.
When you build a tunnel, pay the cost and take a tunnel tile from the supply. Place it on a tunnel site with the non-upgraded side up.
The site you choose for your new tunnel must be connected to your starting city. Tunnels are connected if you can trace a path along the tunnels back to your starting city. The path can go through cities or through empty city sites, but not through empty tunnel sites.
UPGRADING STRUCTURES
Buildings and tunnels are called structures in this game. Structures are different from cities in that structures can be upgraded. There is a card that will let you turn a nonsymbiotic city into a symbiotic city, but this is an exception.
To upgrade, you need a card or action slot with a depiction like this:  Upgrade 1 structure. Pay 1 science.
Whether upgrading a tunnel, a farm, a desalination plant, or a laboratory, the usual cost is 1 science. However, the card effects offer you special cost opportunities.
When you upgrade a building, take the corresponding token from the supply and stack it atop the structure you are upgrading. To upgrade a tunnel, flip the tile over to the upgraded side.
An upgraded tunnel still counts as a tunnel, an upgraded farm still counts as a farm, etc. It is not possible to upgrade any structure that is already upgraded.
Upgraded structures produce more during Production, and certain cards may provide benefits for having upgraded structures.
METROPOLISES
You also gain benefits from expanding your network out to connect with coastal metropolises.
- To connect a 1-tunnel metropolis, you need to build a tunnel on the adjacent tunnel site.
- To connect a 2-tunnel metropolis, you need to build tunnels on both adjacent tunnel sites.
The metropolis tiles offer various benefits that apply only if the metropolis is connected. Your brown metropolis can give you points during final scoring. The blue ones either have an instant effect or an instant effect and a production effect.
THE FEDERATION TRACK
We have explained how to build your underwater nation, but you also need to build a good reputation with the world government! You do that by choosing actions or playing cards with this symbol:  Advance 1 space on the Federation track.
Before the first round, players’ markers are placed on separate spaces of the Federation track in reverse play order. At the beginning of subsequent rounds, the markers begin below space 4.
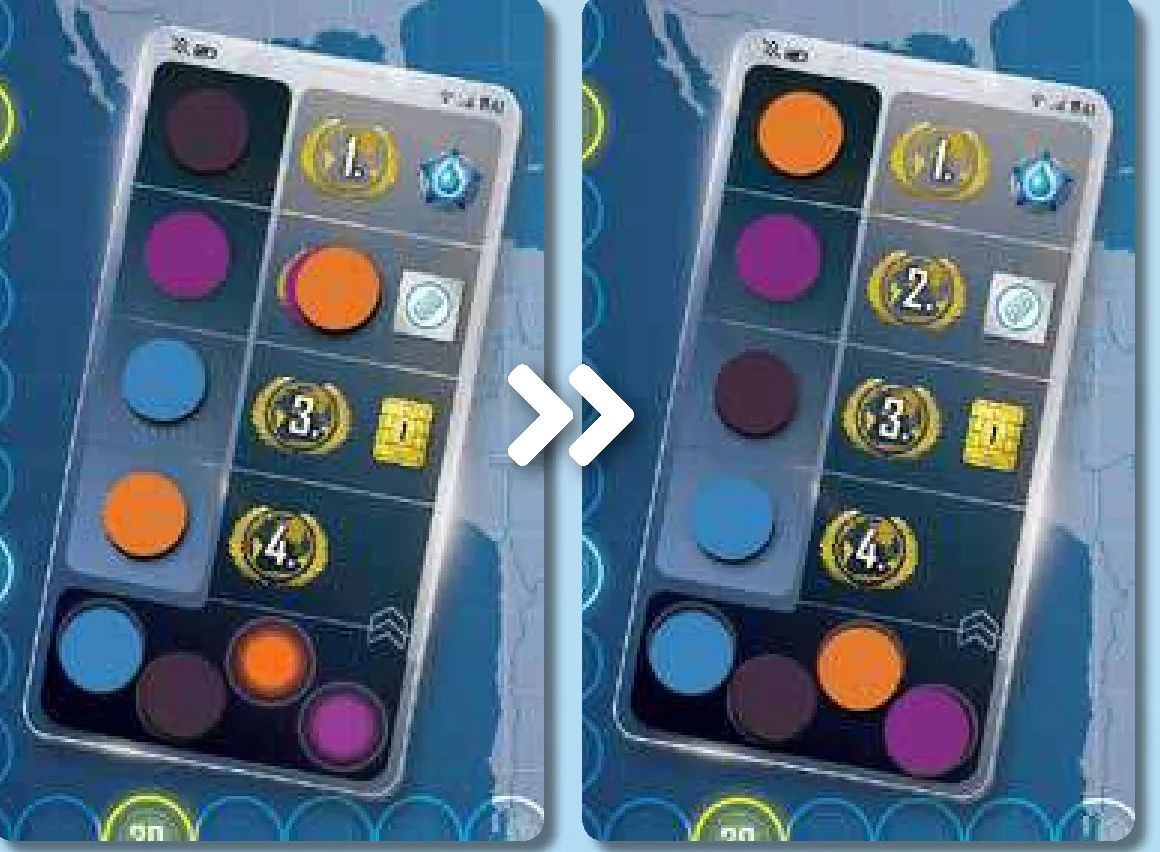
When an action slot or card effect allows you to advance 1 space on this track, move your marker 1 space ahead. If there is a bonus depicted beside that space, immediately gain the depicted resource. If you move ahead more than 1 space, gain the bonus of each of those spaces.
If your marker ends up on an occupied space, place it atop the other markers which are already there (being atop other markers means you will play ahead of them in the next round).
Even when you have advanced as far as possible, you can still gain benefits from “advancing” more. If you advance when you are already on space 1, put your marker atop any others on space 1 and score 1 point for each space you were supposed to advance.
EXAMPLE: Orange takes an action allowing her to advance 2 spaces. She moves ahead only 1 space, because that is the end of the track. However, she scores 2 points: 1 for moving onto that space and 1 for “advancing” off the track. Her marker is placed atop any other markers that are already on space 1.
END OF THE ROUND
During the course of one round, each player will get three chances to play a card while choosing an action slot. The action slots will fill up with action tiles. At the end of the round, everything needs to be reset:
- Return all action tiles to their owners. (4 players: In a four-player game, the player who took the action-cloning tile should return it to the middle of the table at this time.)
- Reorder the play-order markers according to the order of the markers on the Federation track. The player farthest ahead on the Federation track will go first next round. The next player will go next, etc. If markers are in a stack, each marker is ahead of any markers below it. Among markers below space 4, relative play order does not change.
- Place Federation markers: Once you have determined the next round’s play order, place all Federation track markers on the colored spaces below space 4.
- Advance the era marker. If this is the end of the era, there will be a Production phase before the next round.
Note: Be sure to determine the new play order even if this is the end of the final round. This final order is the tie-breaking order.
PRODUCTION
TIMING OVERVIEW
The era marker moves one space on the era track at the end of each round. After 4 rounds, it will move onto a Production space, reminding you that it is time for your first Production phase. The second Production phase happens 3 rounds later. The final Production phase happens 3 rounds after that, just before final scoring. In all, you will play 10 rounds and have 3 Production phases. Each Production phase marks the end of an era.
YOUR NETWORK’S PRODUCTION
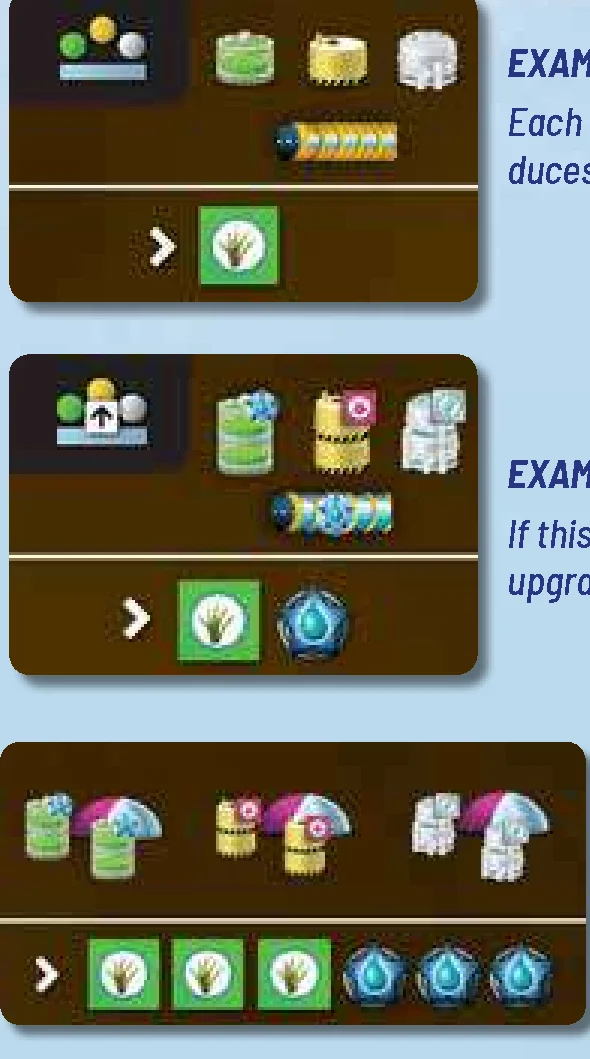
All players can handle their Production simultaneously. Every tunnel adjacent to a city and every building in your network will produce something. Upgraded structures will produce more. Symbiotic cities will produce 2 points!
Nonsymbiotic cities have no production of their own, but they are still useful because they connect buildings to your network.
You also gain a slight production bonus when you have 2 upgraded buildings of the same type at the same city.
The production of your network is depicted on your player info card.
THINGS THAT DO NOT PRODUCE
- A city will not produce if it is not connected to your network.
- A building will not produce if it is not adjacent to a connected city.
- A tunnel will not produce if it is not adjacent to a city (a tunnel connecting a metropolis with a Production effect will allow the metropolis to produce, but the metropolis does not help the tunnel produce).
PRODUCTION FROM CARDS AND METROPOLISES
If you have claimed any production cards, or if you have connected your network to any metropolises with a production effect, you apply their effects at this time. When evaluating a production effect that depends on your cities or buildings, you always ignore cities and buildings that are not attached to your network.
Some production cards have no production of their own. Instead, they can modify the production of your tunnels, buildings, and cities. Such cards are evaluated when your network produces, and they do not apply to tunnels, buildings, and cities that do not produce.
FEEDING CITIES
At the end of Production, each city in your network must be fed 1 kelp (symbiotic cities have the same requirements as nonsymbiotic cities). Return this kelp to the general supply. If you have more cities than you have kelp, you spend all your kelp to feed those you can and then feed the remaining cities according to this rule:
- For each unfed city, pay 1 biomatter.
- If any cities are still unfed, you feed them by paying points – 3 points per city at the end of each Production. If you lose all your points and still have unfed cities, just leave your scoring marker at 0.
Only cities in your network require food. Cities that are not connected do not count as cities because they do not have people in them yet.
END OF THE ERA
After everyone has resolved all production from all sources, it is time to resolve the end of the era with the following steps:
- Rotate your action cards to the usual orientation to show they can be used in the next era (this step is unnecessary at the end of the final era).
- Feed your cities (explained below).
- Remove the old era’s deck and discard pile from the game. Players keep any cards from that era that they currently have, but no more new ones will be drawn.
- Shuffle the next era’s deck and place it on the game board. This is the new draw pile. Each player draws 3 cards from the new era, adding them to any cards already in hand. From this hand of 6 or more cards, choose 3 to keep and discard the rest. (Discarded cards from the new era go to the discard pile. Discarded cards from the previous era should be returned to that era’s deck.) Skip this step at the end of the final era.
- Advance the era marker.
Once everyone has discarded down to 3 cards, you are ready to play the next era with the new deck; or if you have completed the third era, you are ready for final scoring.
HAND LIMIT SUMMARY
- You must discard down to 3 cards at the beginning of your turn and at the beginning of each era. At any other time, it is okay to have more than 3.
- If a card increases your hand limit by one, then you must discard down to 4 cards at the beginning of your turn and at the beginning of each era. It is still possible that you will start one or more turns with only 3 cards, because this effect only alters the way you discard, not the way you draw.
FINAL SCORING
Your underwater nation will score points throughout the course of the game, sometimes as the effect of certain cards, and sometimes during Production. At the end of the game, you may score points for a metropolis you have connected to or for specific cards you have claimed. And finally, you will score points for the overall composition of your network and for your resources.
The order of final scoring is depicted on your final scoring card:
- Final-Scoring Tile: The metropolis in the upper left corner of your player board will give you points if you have connected it to your network with both tunnels.
- End-Scoring Cards: Cards marked with this symbol
 can give you points at the end of the game. Some cards reward you for certain accomplishments. Others let you spend resources to buy points. You should spend as much as you can – buying points via a card is always more efficient than converting resources into points.
 - Scoring Your Network: Your points are based on the number of different buildings next to each connected city:
- 2 points for a connected city with no buildings.
- 3 points for a connected city with 1 type of building.
- 4 points for a connected city with 2 types of buildings.
- 6 points for a connected city with all 3 types of buildings.
- Scoring Your Resources: Now, many of your remaining resources can be converted to points:
- First, sell all your biomatter for 2 credits each.
- Then buy 1 point for every 4 credits, kelp, science, or steelplast you spend, in any combination. (For example, 3 kelp and 1 steelplast is 1 point; 1 science, 2 steelplast, and 1 credit is 1 point; etc.)
- Leftover resources do not count. Convert all that you can, and ignore the remainder.
WINNING THE GAME
Whoever has the most points wins. If there is a tie, break the tie according to the tie-breaking play order that was determined at the end of the final round (politics pays).
FREQUENTLY OVERLOOKED RULES
- The number of symbiotic city domes available in the game depends on the number of players – two players, 7 domes; three players, 10 domes; four players, 13 domes.
- You play in the order shown on the player-order track. This usually means you are not playing in clockwise order.
- If you claim an action card and you already have 4 action cards, then you must discard one of the old ones. If you discard an available action card in this situation, you may use its action immediately.
- When you build a structure or city, you can use biomatter as a replacement for kelp and steelplast.
- Special cards do not have a discard pile. One- or two-credit Special cards return to the bottom of the deck if they are discarded. Discarded three-credit Special cards simply leave the game.
- When you pay to play a Special card with an instant effect, it does not return to its deck. Instead, you keep it under your player board.
- During Production, tunnels produce only if they are adjacent to a city.
1) GOVERNMENT CONTRACTS
Use these cards to give your game intermediate goals that players can compete for. Shuffle the deck of contract cards and draw 3 at random. Place them on the spaces of the main board at the beginning of the game. Return the remaining cards to the box.
During play, any player may claim a government contract as soon as he or she meets all its criteria. The player keeps the card and immediately gains its benefits. Claimed contracts are not replaced.
2) THE OTHER SIDE OF THE PLAYER BOARDS
The other side of the player boards is for experienced players. The cities have variable numbers of building sites. The black-and-red sites are places where you must pay surcharges – extra resources to build. They can give you immediate bonuses or increased production. If you decide to try this other side, everyone in the game should use it.
SURCHARGES
Some sites may have surcharges for building on them (these are not on the side of the player board recommended for your first game). A surcharge is applied after any discounts or cost reductions you may have.
For example, if an effect allows you to build on a site for free, you still must pay the surcharge if you choose a site that has one.
The surcharge applies only to building on the site – it does not also apply to upgrading.
PRODUCTION MULTIPLIERS
Production multipliers indicate that the usual level of production is produced multiple times. More specifically, the two-times multiplier shown on the side means that the structure produces the usual amount one extra time. For example, two upgraded desalination plants at a connected city will normally produce 3 credits and 2 biomatter. If one of them has this multiplier, it will produce an additional 1 credit and 1 biomatter, for a total of 4 credits and 3 biomatter.
The multiplier applies to the usual production of an upgrade, but not to any additional production associated with the site.
Multipliers are not applicable outside the Production phase.
3) SOLO GAME
To play Underwater Cities by yourself, use the advanced side of a player board and the two-player side of the main board. The number of symbiotic domes is not limited in this variant. Set up the game as you would for two players, except do not use the metropolis tile with 3 points per connected metropolis.
Take three tiles in a non-player color and use them to occupy the rightmost action slot (first slot, if you move around clockwise) of each color. Next time you can occupy second, third etc. action slot of each color. You are going “first”, so your marker should start below space 4 of the Federation track. You will not need your player-order track marker.
GAMEPLAY
Play your round as usual. At the end of each round, you take back your action tiles and move all non-player action tiles one space clockwise.
If you did not advance on the Federation track, play your next round with a fourth occupied slot determined this way:
- Flip over the top card of the current era’s deck. Add its digits together to get a number.
- Starting with the first green action slot (as “1”) count around clockwise until you get to that number. Place the new action tile on that slot, if it is empty, otherwise, move the action tile clockwise to the first empty slot.
The 3 non-player tiles of the same color always move one space clockwise. The fourth tile is always placed randomly, and only if you did not advance on the Federation track during the round.
GOAL
You win if you finish with at least 7 connected cities and at least 100 points. Track your score and try to beat your previous best.
Note: It is not possible to play the solo game with the government contracts.
KEY: ACTION SLOTS
FOR 3 OR 4 PLAYERS
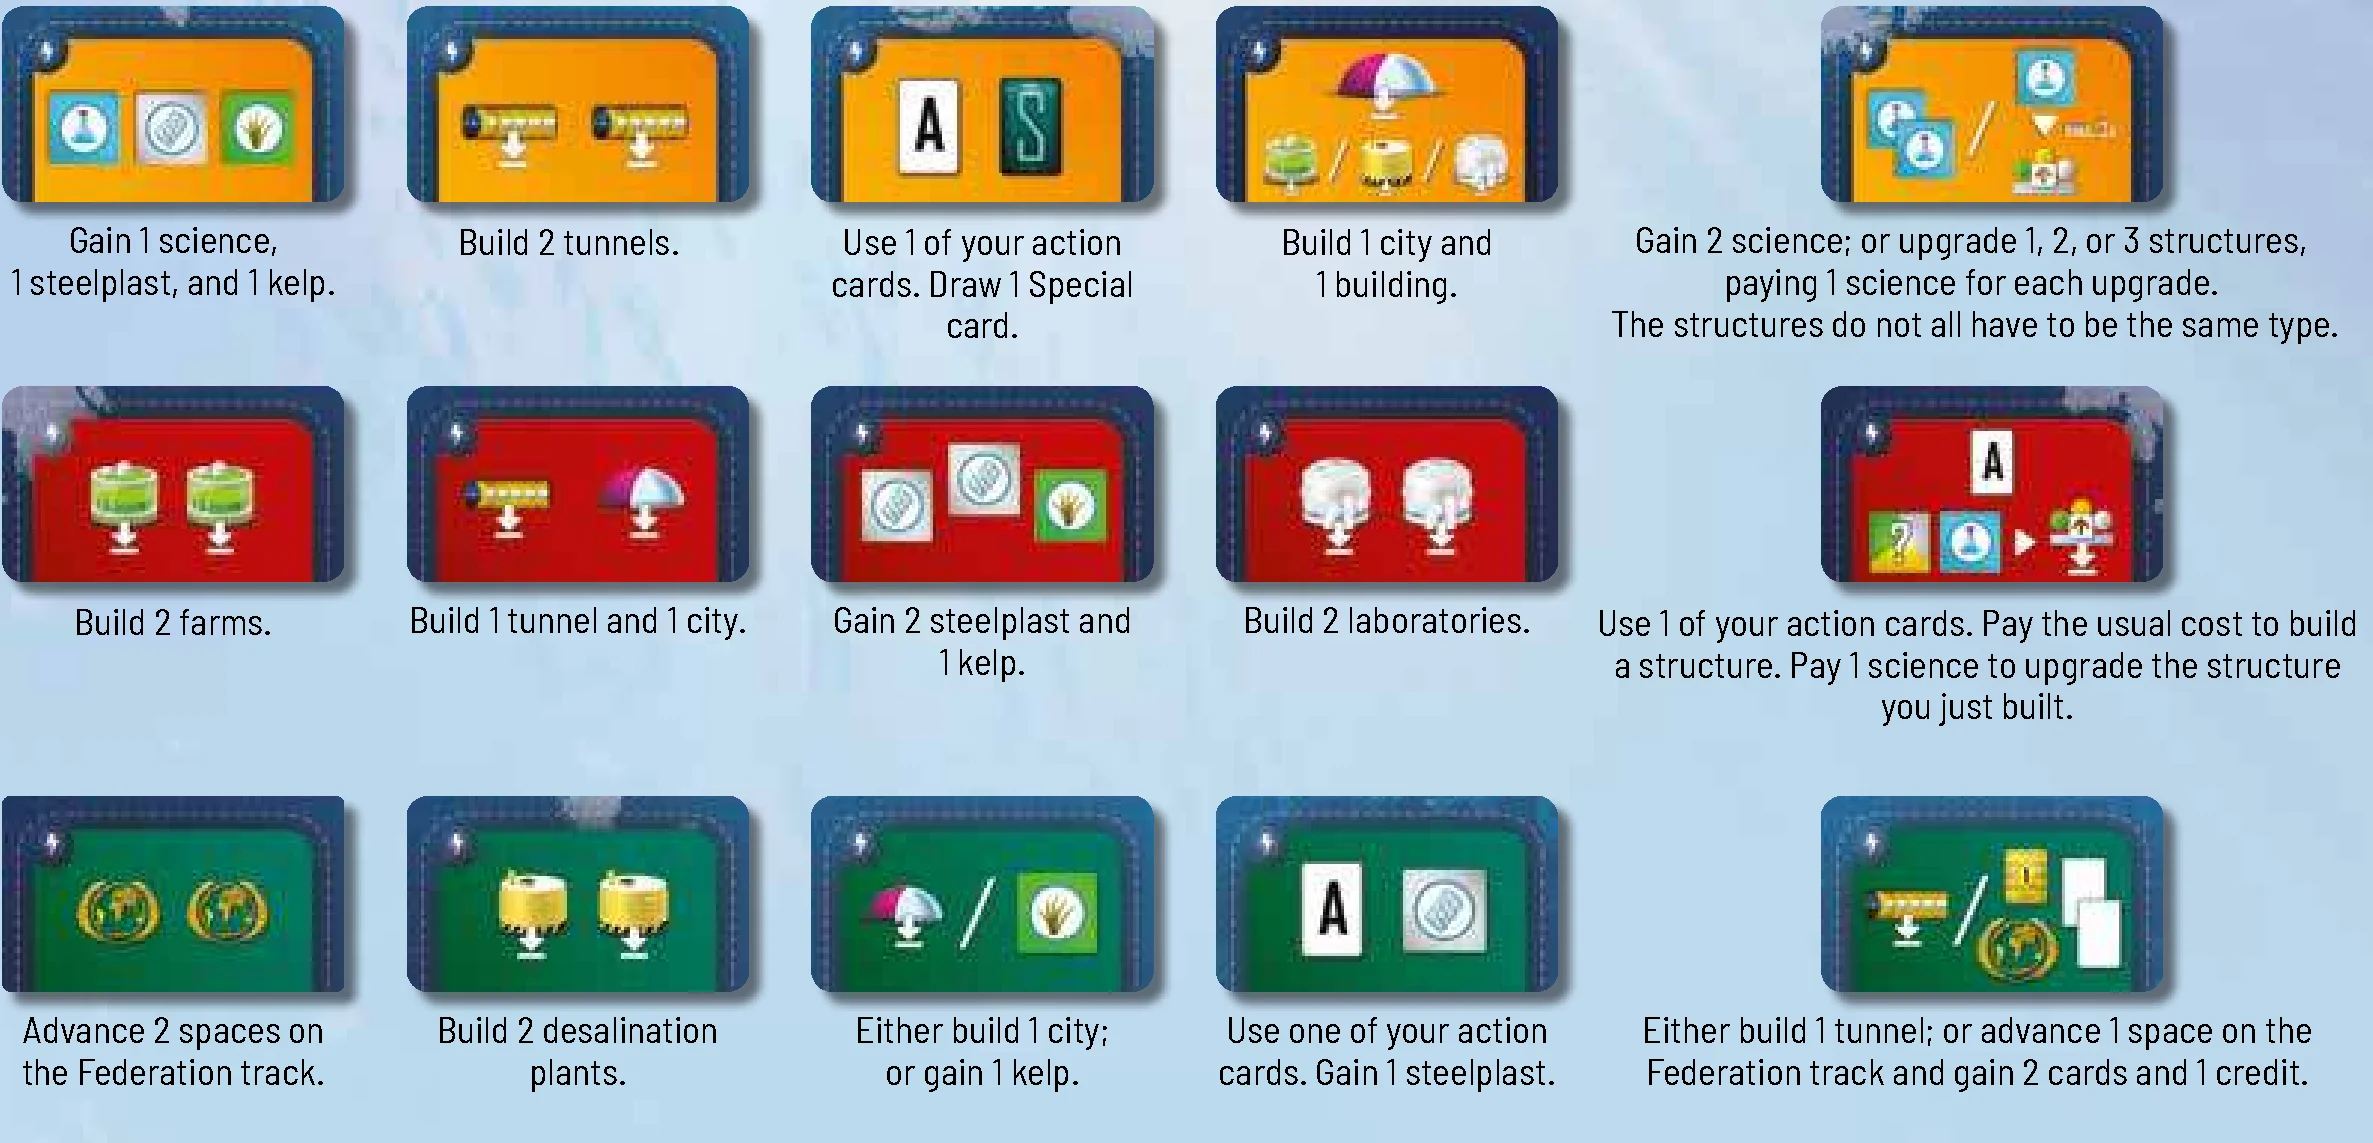
- Yellow Slots:
- Gain 1 science, 1 steelplast, and 1 kelp.
- Build 2 tunnels.
- Use 1 of your action cards. Draw 1 Special card.
- Build 1 city and 1 building.
- Gain 2 science; or upgrade 1, 2, or 3 structures, paying 1 science for each upgrade. The structures do not all have to be the same type.
- Red Slots:
- Build 2 farms.
- Build 1 tunnel and 1 city.
- Gain 2 steelplast and 1 kelp.
- Build 2 laboratories.
- Use 1 of your action cards. Pay the usual cost to build a structure. Pay 1 science to upgrade the structure you just built.
- Green Slots:
- Advance 2 spaces on the Federation track.
- Build 2 desalination plants.
- Either build 1 city; or gain 1 kelp.
- Use one of your action cards. Gain 1 steelplast.
- Either build 1 tunnel; or advance 1 space on the Federation track and gain 2 cards and 1 credit.
FOR 1 OR 2 PLAYERS
- Use one of your action cards. Gain either 2 resources (they can’t be of the same type).
- Build 2 farms; or build 2 laboratories (you cannot build 1 farm and 1 laboratory).
- Build 1 tunnel. Use one of your action cards.
- Draw 1 Special card.
- Build 1 city.
- Gain 2 cards. Upgrade 1 structure by paying 1 science or gain 1 kelp.
METROPOLISES SUMMARY
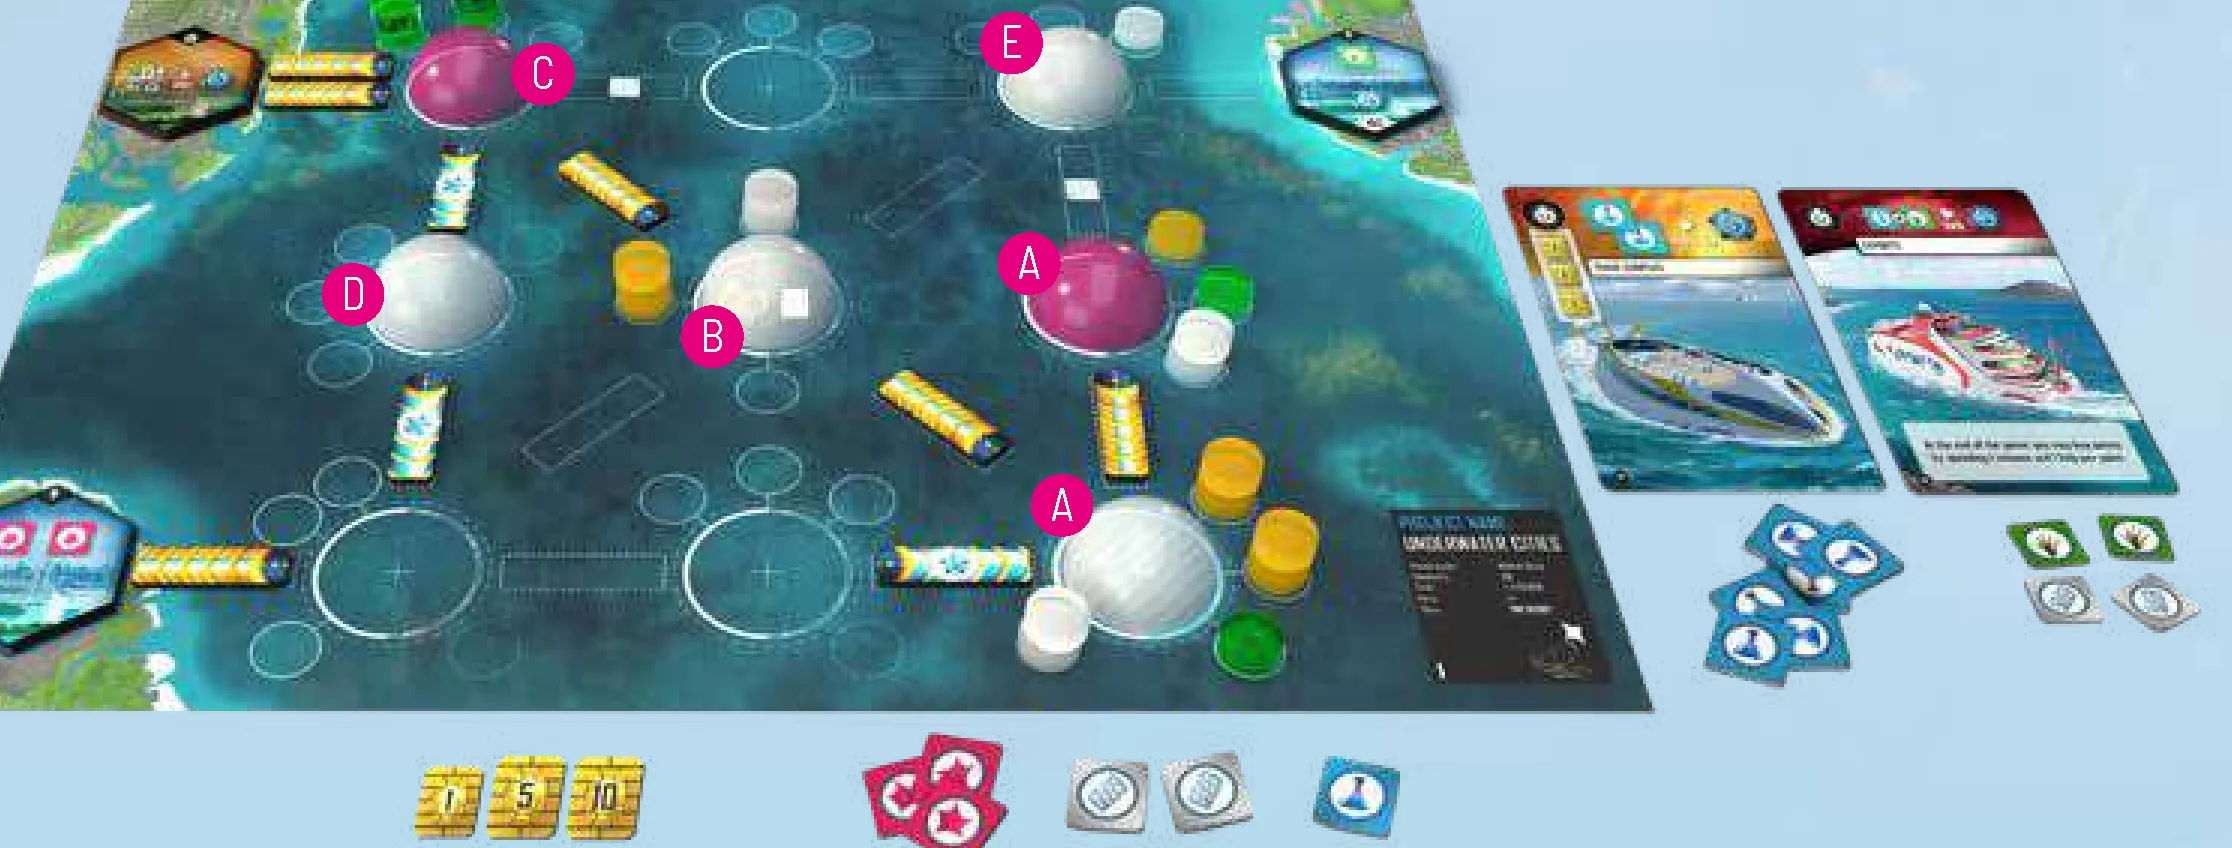
- At the end of the game, score 3 points for each metropolis connected to your network (this includes the brown and blue metropolises you started with, as well as any metropolis tile you may have gained during play).
- At the end of the game, score points for tunnels connected to cities: 5 points for eight tunnels, 7 points for nine, or 9 points for ten or more (don’t forget that upgraded tunnels also count as tunnels).
- At the end of the game, score points based on the number of connected cities you have: 4 points for five cities, 8 points for six cities, or 12 points for seven or more.
- At the end of the game, score 2 points for each Special card you played and paid for. This includes not only your claimed Special cards, but also those with instant effects. This does not include any Special action cards that you discarded.
- At the end of the game, score 4 points for each set of 4 different upgraded structures. Count only buildings that are connected and tunnels that are adjacent to a city. In other words, you count whatever you have least – upgraded tunnels adjacent to a city, connected upgraded farms, connected upgraded laboratories, or connected upgraded desalination plants – and multiply that by four.
- Blue Metropolis Examples:
- Instant effect: If you connect to this metropolis, immediately gain 1 kelp.
- Production effect: If this metropolis is connected, gain 2 points during each Production phase.
SPECIAL CARDS SUMMARY
- Player gains 2 points for every upgraded lab.
- Player submits up to 14 steelplast. For every steelplast he gains 1 point.
- Player receives 3 points for every two of submitted kelp. It could be done max. 5 times.
- Player submits directly 15 credits. He gains 13 points for it.
- Player gains 2 points for every symbiotic city he has built.
- Player receives 3 points for every two upgraded farms. Example: Player has built 7 upgraded farms – he receives 9 points.
NOTES ON CARD EFFECTS
Your cards affect your own board during your own turn. Your production cards apply only to your own production. There is nothing that can affect another player’s board. None of your cards’ effects apply during another player’s turn.
- ANY AVAILABLE SLOT: This includes the always-available slot.
- ANY SLOT OCCUPIED BY ANOTHER PLAYER: This is any occupied slot, except those occupied by your action tiles. This does not include the always-available slot, because it is never considered to be occupied. In a four-player game, a slot occupied by you and another player does not count as a slot occupied by another player (because it is occupied by you).
- AT THE END OF THE GAME, GAIN 1 POINT FOR EVERY 3 CONNECTED FARMS YOU HAVE: As above, count up all your connected farms, divide by three, and round down. That’s how many points you gain.
- BUILD: Anything you build must be built on a legal site.
- BUILDING: A building is a farm, desalination plant, or laboratory. Tunnels and cities are not buildings.
- CITY: If it is not otherwise specified, this refers to nonsymbiotic cities and symbiotic cities.
- CONNECTED: This always means “connected to your network”. For example, “If you have at least 3 connected desalination plants …” means that the effect will trigger only if the desalination plants are in your network.
- DISCOUNT: If it is not otherwise stated, the discount is subtracted from the usual cost. However, it is legal to apply several discounts and to combine them with a card that lets you pay a special cost. Discounts cannot take a cost below “free”.
- DURING PRODUCTION, 1 BIOMATTER PRODUCED: If you have nothing that produces biomatter during Production, this effect cannot be applied.
- DURING PRODUCTION, YOU PRODUCE AN ADDITIONAL 1 KELP FOR EVERY 3 CONNECTED LABORATORIES: Count up the total number of laboratories connected to your network. Divide by three. Round down. That’s how much kelp you gain.
- EXCHANGE: This is just like paying, except the effect can work either way. You cannot exchange more than the specified amount.
- EXPANSION SITE: Each city has a special building site that can only be built on if you play a Survey card. Expansion sites follow the usual rules – the chosen expansion site must be adjacent to a city or to a city site on which it is legal to build.
- FARM, DESALINATION PLANT, LABORATORY, TUNNEL: Upgraded structures still count as structures. For example, an upgraded farm counts as a farm.
- FOR FREE: If a cost is free, the card will say so. Once a cost is free, discounts have no further effect.
- GAIN THE PRODUCTION FROM 1 UPGRADED STRUCTURE ADJACENT TO A CONNECTED CITY: Pick one upgraded structure at a connected city. On your player info card, look up what one of those, by itself, produces. Gain those resources. This does not impact on its production during the Production phase.
- IF YOU ARE ON THE THIRD SPACE OF THE FEDERATION TRACK: This applies if your marker is on the space with the 3. This does not apply if your marker is on any other space.
- MAY: A card’s effect is always optional.
- ONCE PER TURN: This always refers to your turn. There are no cards that refer to other players’ turns or other players’ boards.
- PAY: Many cards allow you to pay a cost to get a benefit. If you can’t pay the cost, you do not get the benefit. If not otherwise specified, you pay the cost and gain the benefit only once.
- PERFORM THE ACTION IN A SLOT: This allows you to perform a second action. You do not play an action tile on this second slot and you do not play a second card.
- SPECIFIED COST: Some cards specify how much you pay to build a structure or city. In this case, you do not pay the usual cost; you pay the specified cost instead.
- STRUCTURE: A structure is a farm, desalination plant, laboratory, or tunnel. Cities are not structures.
- USUAL COST: The usual cost is the cost printed on your player info card. It is the cost you usually pay to build the structure or build the city.
- WHENEVER AN ACTION SLOT GIVES YOU AT LEAST 1 STEELPLAST, GAIN 1 POINT: If the slot allows you to choose between gaining steelplast and doing something else, you gain the point only if you choose to gain the steelplast. The effect is not triggered by steelplast gained from other sources.
- WHENEVER YOU BUILD A CONNECTED CITY’S SECOND LABORATORY: If it is not connected, the effect will not trigger. A third laboratory will not trigger this effect.
- WHENEVER YOU BUILD THE SECOND TUNNEL ON THE SAME TURN: This triggers on any turn on which you build at least two tunnels. It triggers immediately after you build the second tunnel.
- WHENEVER YOU COMPLETE A CONNECTED CITY’S SECOND UPGRADED FARM: The city must be connected. It must have at least two farms, but it may have more. It must already have exactly one upgraded farm. As soon as you upgrade a second farm, the effect triggers immediately.
- WHENEVER YOU USE THE DEPICTED ACTION SLOT: This effect triggers when you choose the slot as your action for the turn or when you are using the slot as the result of a card effect.
- YOU MAY UPGRADE 1 OR 2 FARMS: For each, pay 1 credit or 1 science.
ICON SUMMARY
 Pay resources / credits
 Gain / If you have, gain…
 Build
Build In one turn / In the same turn
 Once per turn
 Discount
 Exchange
 Metropolis
 End of turn
 Any available / unused slot
 Any used slot
 Or
Or
Introduction & Components
THE NEXT FRONTIER
The earth is overpopulated. The colonization of Mars is always four decades away. Only one avenue is open for human expansion: the world under the sea.
Players compete to build the best underwater nation – an archipelago of undersea cities connected by a network of transportation tunnels. Kelp farms and desalination plants will provide your people with food and water. Laboratories will give you the knowledge you need to run everything more efficiently. Perhaps you will even be able to build symbiotic cities, fully integrated with the underwater ecosystem.
Beginning as a single city, you will expand your network, connecting it with the coastal metropolises. At a time when hunger has exceeded agricultural output and water shortages strain the bonds of the Federation of Nations, you will build a nation that is self-sustaining, perhaps even someday exporting your products to those who have been left ashore.
This is your task.
This is your destiny.
The world’s hopes lie in your underwater cities.
Designer: Vladimír Suchý
Players: 1–4 | Age: 14+ | Time: 40 min. / player
GAME OVERVIEW
Players work to build underwater cities, a transportation network that connects them, and various facilities that support them. In each round, players take turns choosing an action while simultaneously playing a card. If the card matches the color of the chosen action slot, the player also gains a benefit from the card.
At three times during the game, players will deal with Production, a special phase in which their underwater network produces points and resources while their people consume food. At the end of the game, additional points are awarded for various accomplishments and the player with the most points wins.
COMPONENTS
- 1 Double-sided main game board
- 4 Double-sided player boards
- 4 Player info cards
- 66 Era I cards
- 57 Era II cards
- 57 Era III cards
- 10 Three-credit Special cards
- 15 One- and two-credit Special cards
- 8 Government contract cards
- 4 Personal Assistant cards
- 4 Final scoring cards
- 3 Action tiles in each of 4 colors (12 total)
- 1 Action-cloning tile
- 16 Metropolis tiles (11 blue, 5 brown)
- 47 Double-sided tunnel tiles
- 17 Nonsymbiotic city domes (white)
- 13 Symbiotic city domes (purple)
- 37 Farm tokens
- 37 Desalination plant tokens
- 37 Laboratory tokens
- 3 Markers in each of 4 player colors (12 total)
- 1 Era marker
- 4 Multiplier tiles
- Credit tokens in various denominations:
- 1 credit – 20x
- 5 credits – 10x
- 10 credits – 5x
- Kelp tokens:
- 1 kelp – 15x
- 3 kelp – 9x
- Steelplast tokens:
- 1 steelplast – 15x
- 3 steelplast – 9x
- Science tokens:
- 1 science – 10x
- 3 science – 8x
- Biomatter tokens:
- 1 biomatter – 10x
- 3 biomatter – 7x
LIMITED AND UNLIMITED COMPONENTS
- Credits, kelp, steelplast, science, and biomatter tokens are not intended to be limited. If the supply runs low, you can use higher denominations and the multiplier tiles to represent the amount of resources you have. You can make change freely at any time.
- Building tokens are not intended to be limited. If you run out of a particular type, you can usually substitute a different colored token. For example, if players have lots of upgraded farms, the supply might run out of green tokens. You can get more in the supply by replacing the bottom tokens of some upgraded farms with a color you have lots of. The green token on top is sufficient to remind you that it is an upgraded farm.
- Tunnels and nonsymbiotic cities are limited. The supply starts with 47 tunnels. When they are gone, no one can build tunnels anymore. Similarly the game has only 17 nonsymbiotic city domes, and no more than this may be built.
- Symbiotic cities are limited. The limit depends on the number of players:
- In a two-player game, use 7 symbiotic city domes.
- In a three-player game, use 10.
- In a four-player game, use all 13.
- The era deck is not limited. If it runs out of cards, shuffle its discard pile to make a new deck.
- One- or two-credit Special cards: You should not run out of one- or two-credit Special cards. Whenever these are “discarded” they return immediately to the bottom of the deck.
- Three-credit Special cards are limited. Only six are available in the game.
Setup
GAME SETUP
- Place the main game board in the center of the table. The board is two-sided. The side shown here is used for a 3 or 4-player game. Use the other side for a 2-player game.
- Keep components in supply: The various components that represent cities, tunnels, buildings, and resources should be kept in a common supply. If necessary, you can keep the supply in two places so that everyone can reach the components easily.
- Cards with divers on the back are separated into 3 decks, one for each era of the game. The Era II and Era III decks can be set aside right now. Shuffle the Era I cards face down and place the deck on the main game board, as shown. Note: Thorough shuffling is very important for this game. You don’t want same-colored cards to be clumped together.
- Place the era marker on the starting space of the era track.
- Place one score marker for each player on the zero space of the scoring track.
- Special cards: Special cards represent specialists you can hire for your underwater endeavors. Each has a cost near the upper left corner.
Separate the Special cards into two groups:- A group that costs one or two credits.
- A group that costs three credits.
Shuffle the deck of one-or-two-credit Special cards and place it on the main board. Turn the top card face up.
Shuffle the three-credit Special cards and deal 6 face up to the corresponding spaces in the center of the game board. Return the rest of the three-credit deck to the box. These 6 are the only three-credit Special cards that will be available during this game.
SETUP FOR 2 OR 3 PLAYERS
When setting up the game for fewer than four players, make two changes:
- Leave the action-cloning tile in the box.
- Use fewer symbiotic cities (purple domes):
- With two players, use 7 symbiotic cities.
- With three players, use 10 symbiotic cities.
A four-player game uses the action-cloning tile and all 13 symbiotic city domes.
PLAYER SETUP
Each player chooses a color and takes:
- 3 action tiles in that color
- The Personal Assistant card and final scoring card in that color (although the Personal Assistants have different illustrations, they all have the same effect)
- 1 player info card
- Starting resources: 1 kelp, 1 steelplast, 1 science, and 2 credits. (Some players may get additional resources once order of play has been determined.)
PLAYER BOARD SETUP
Each player takes a different player board, chosen at random.
- Your nation’s infrastructure begins with a city in the lower right corner of your board. There are two types of cities – symbiotic and nonsymbiotic. Your starting city is a nonsymbiotic city represented by a white dome, as shown.
- Separate the brown hexagonal metropolis tiles from the blue ones. Mix up the brown ones and randomly give one to each player. Then mix up the blue ones and randomly give two to each player.
- Your brown metropolis goes on the hexagonal space in the upper left corner. The other two should be randomly assigned to the remaining two spaces.
- The player boards are two-sided. For your first game, use the side depicted above (# 1–4, ★). Later, for more variety, you can try the other side, which has more asymmetry (# 5–8, ★★★).
ORDER OF PLAY SETUP
Two tracks determine the order of play. The play-order track shows the order of play for the current round. The Federation track is where players jockey for position for the next round.
For the first round, place the play-order markers on the play-order track randomly. Then, on the Federation track, the markers should be placed in the opposite order, as shown, and those who play third and fourth get additional resources. Specifically:
- The player on space 1 of the play-order track will play first in the first round. On the Federation track, his or her marker will start below the track, on the space with the matching color.
- The player on space 2 plays second. His or her other marker will start on space 4 of the Federation track.
- The player on space 3 will also start on space 3 of the Federation track and will start with one extra credit.
- The player who plays last will start on space 2 of the Federation track and will start with 1 credit and 1 steelplast in addition to the usual starting resources.
The first round is the only round that starts this way. In later rounds, play order and initial position on the Federation track will be determined differently.
CARDS FOR THE FIRST ROUND
At the start of the game, you draw 6 cards from the Era I deck. Choose 3 to keep, and discard the other 3.
If you are new to the game, try to keep one card of each color. And don’t worry about this decision too much – every card offers interesting choices, and you will be getting more cards very soon.
Cards & Resources
RESOURCES
Underwater Cities has many resources that players can gain or spend. The gaining of a resource is represented by a simple icon:
- Gain 1 steelplast.
- Gain 1 kelp.
- Gain 1 science.
- Gain 1 biomatter.
- Gain 1 credit. That is, take a 1-credit token from the supply and keep it near your player board.
- Gain 1 card. That is, draw a card from the current era’s deck. Do not take any of the Special cards from the board.
- Gain 1 point. Advance your point marker one space on the scoring track.
In general, credits, science, kelp, steelplast, and biomatter are used to pay costs. Kelp is also used for feeding your people (there are other ways to feed people, but kelp is the most efficient). Cards, of course, are useful because they give you more choices on your turn. And points are how you win the game. So anything you gain is sure to be useful to you sooner or later.
BIOMATTER AS A UNIVERSAL MATERIAL
Biomatter is a remarkable substance, somewhat more rare than the other resources. In addition to being essential for building symbiotic cities, biomatter can also be a universal building material. Only when building a tunnel, building, or city, any part of the cost that requires kelp or steelplast can be paid with biomatter instead.
EXAMPLE: A nonsymbiotic city normally costs 2 steelplast, 1 kelp, and 1 credit. But you could build it with 1 steelplast, 2 biomatter, and 1 credit.
CARD BASICS
The cards in your hand represent personnel you have at your disposal. On each turn, you will play one of these cards as you choose that turn’s action. This represents sending your personnel out to complete that assignment.
You begin each turn with exactly 3 cards. During your turn, you play exactly 1 of these, while simultaneously choosing an action slot.
If the color of the card does not match the color of the slot, then you ignore the card and just perform the action. However, if the color matches, then you get to resolve the card before or after performing the action.
The three colors have different power levels:
- Green cards are the strongest, but you get their benefits only when you play them on green action slots, which are the weakest.
- Red cards and action slots have a moderate power level.
- Yellow cards are the weakest, but the yellow action slots are the strongest.
Some cards have an instant effect. All others can be claimed for later use, as explained below. All five types of cards are described in this section.
CARD TYPES
INSTANT EFFECTS
When you play a card with this symbol , if its color matches your chosen action slot, you resolve the card’s effect immediately before or after you perform your chosen action. If the color does not match, you ignore the card’s effect.
In either case, these cards are discarded to the discard pile on the main board.
CLAIMING A CARD
Four types of cards do not have instant effects. When you play such a card, if its color matches your chosen action slot, you claim the card by placing it near your player board. It thus becomes a permanent part of your underwater nation.
If the color of the card does not match the color of the slot, you cannot claim the card. It goes to the discard pile.
PERMANENT EFFECTS
Cards marked with this symbol have a permanent effect. You gain the card’s benefit if you claim it, as described above. Permanent effects take various forms. Some permanent effects trigger whenever a certain event happens. Others might give you a discount in certain situations. Some offer a special ability that you can use every turn.
It is legal to use the permanent effect even on the turn in which you claim the card.
ACTION CARDS
Cards with this symbol are action cards. Your claimed action cards offer additional actions your underwater nation can perform. To use an action card, you must use an action slot or a card effect that allows you to do so.
It is legal to use an action card even on the turn in which you claimed it.
Each action card is limited to one use per era. After use, rotate it 90 degrees to the right to show that it has been used and is no longer available. At the end of the era, after Production, all action cards are restored to the usual orientation to show that they will be available again in the new era.
Note: There are a few instant-effect cards which allow you to make an used action card available again. This can allow you to use an action card more than once in the same era.
LIMIT OF FOUR
You are limited to 4 action cards (and your Personal Assistant counts as one of the 4). If you already have 4, then you must discard one before you claim a new action card. The discarded card can be one that has been used this round or one that is still available.
If you make room for a new action card by discarding one that is available, you may immediately use the discarded action. It is as though your new action card also came with an instant effect that lets you use the discarded available action card.
PRODUCTION CARDS
Cards with this symbol are production cards. Your claimed production cards take effect during the Production phase, which happens three times during the game. Some produce resources directly. Others may modify your production based on what is connected to your network.
END-SCORING CARDS
Cards with this symbol are end-scoring cards. Your claimed end-scoring cards can give you points at the end of the game. Some give you points based on some aspect of the network you have built. Others may allow you to convert certain resources to points.
SPECIAL CARDS
The cards you draw from the regular deck are unknown to you until you draw them. But some cards start the game face up for all to see. These are called Special cards.
Special cards cannot be drawn in the usual way. The only way to get one is to use the action slot marked like this .
The Special card remains in your hand. It can be played just like any other card. If it does not match your chosen action slot, then it is discarded and returned to the bottom of the Special card deck with no effect. If it matches, then it has an effect only if you pay the cost depicted near the upper left corner.
DISCARDING SPECIAL CARDS
When one- or two-credit Special cards are discarded (for example, when you are discarding down to your hand limit) they should be immediately returned to the bottom of the Special card deck.
When you play a one- or two-credit Special card:
- If the color does not match the chosen action slot, return the card to the bottom of the Special card deck.
- If you choose not to pay to play the Special card, return it to the bottom of the Special card deck.
- If the color matches and you pay to play it, then you keep it. If it has an instant effect, keep it under your player board after performing the effect to ensure that it will not re-enter play. If it is not an instant-effect card, claim it in the usual way.
Three-credit Special cards have no way to re-enter play. Generally, they are too valuable to discard, but if one is discarded, you can return it to the box.
Turn Structure & Actions
GAMEPLAY OVERVIEW
Here is a quick summary of how the game is played:
- Play Order: Players take turns choosing actions. They play in the order depicted on the play-order track, and this order does not change during the round.
- A Turn: You always start your turn with 3 cards. On your turn, you play one card and simultaneously choose one of the available action slots.
- A Round: Players continue until each has taken 3 turns. When everyone has taken 3 turns, it is the end of the round.
- The Era Marker: At the end of each round, the era marker advances one space along the era track. When it reaches a Production space, there is a Production phase.
- Production: During Production, your underwater network will produce various resources. At the end of Production, each of your connected cities will consume 1 kelp.
- An Era: An era consists of 4 rounds in Era I and 3 in Era II and Era III. The end of each Production phase marks the end of an era. At the end of Era III, the game is done.
- Final Scoring: At the end of the game, players score various aspects of their underwater network, and the player with the most points wins.
TAKING A TURN
On your turn, you choose an action by placing one of your action tiles on an action slot. Slots that have already been chosen this round are occupied and cannot be chosen again. Slots that have not yet been chosen are available.
The two sides of the main board have different action slots. One side is designed for a two-player game. The other side is designed for three or four.
When you place your tile on an action slot, you must also play a card from your hand. The action slots and the cards come in three colors. If the color of your card matches the color of the action slot, you may resolve the card’s effect before or after you perform the slot’s action. If the colors do not match, you ignore the card and only perform the slot’s action.
It is legal to use only part of an action or card effect. For example, if an action slot allows you to build a city and a tunnel, you can choose to build only the tunnel, if you wish.
However, you are not allowed to choose an action slot without using at least part of its effect. For example, if you do not have enough resources to build 1 tunnel, you cannot choose the action slot that allows you to build 2 tunnels.
Card effects are always optional, so it is legal to play a matching card and not use its effect at all.
SUMMARY OF CHOOSING AN ACTION SLOT
- Place one of your action tiles on an unoccupied action slot or on the always-available slot.
- Play a card from your hand.
- If the color of the card does not match the color of the slot, perform the action and discard the card with no effect. The always-available slot has no color and cannot be matched.
- If the color of the card matches, then you choose one of these:
- Either perform the action, and then resolve the card’s effect.
- Or resolve the card’s effect first, and then perform the action.
TIMING
Some effects have multiple parts. The parts of an effect can be resolved in any order.
Be careful!! You must resolve all card effects and then all actions from an action slot or vice versa. Resolving these 2 sets of actions simultaneously is not allowed.
TIMING LIMITATIONS
There are two limitations with regard to resolving effects:
- If a new effect triggers, resolve it immediately, even if you haven’t finished the effect which triggered it.
- You have to resolve a card effect and the action of the chosen action slot separately and completely before resolving the other.
SPECIAL ACTIONS & SLOTS
THE ALWAYS-AVAILABLE SLOT
One action slot is always available, even if another player has already chosen it this round. It has no color, so when you choose it you ignore the effect of the card you play. The always-available slot allows you to gain 2 cards and 2 credits.
Note: Some Special card effects allow you to use the action depicted at an action slot. These effects apply only to the colored slots, not to the always-available slot.
USING ACTION CARDS
Action cards are a certain type of card you claim and keep near your player board. They have actions which can be used during the game, but only when you use an action slot or a card effect with this symbol: You may use 1 of your action cards.
DRAWING SPECIAL CARDS
This symbol indicates that the action slot allows you to take a Special card. Many Special cards are available face up in the center of the game board.
When you take a Special card, you either:
- Take one of the three-credit Special cards (it is not replaced).
- Or take the top card from the deck (the one-or-two-credit deck) and turn the next card face up.
- Or turn the top card face down, move it to the bottom of the deck, and draw the next 3 cards. Choose one of these 3 to keep and return the other 2 to the bottom of the deck in either order. Then turn up the new top card.
Once a Special card is in your hand, it is mostly like any other card.
THE ACTION-CLONING TILE (4 PLAYERS)
In a four-player game, the important action slots become occupied quite quickly. The action-cloning tile (which is available only in a four-player game) gives players a second chance at one of these slots.
On your turn, instead of choosing an available action slot, you may do the following:
- Pay 1 credit.
- Take the action-cloning tile.
- Choose an action slot occupied by another player.
Your action tile goes on the slot you chose, on top of the other player’s tile. You also play a card, as usual, and you gain the benefits of the card if its color matches the chosen slot. Note that you cannot choose a slot that is already occupied by your tile.
Note on card effects: In a four-player game, “any slot occupied by another player” actually means “any occupied slot not occupied by you”. The idea is that if you have already placed a tile on that slot, a card that allows you to use “any slot occupied by another player” will not allow you to use that slot again. So a slot occupied by you and another player does not count as a “slot occupied by another player”.
ONE-TIME USE
Once the action-cloning tile is used, it cannot be used again for the rest of the round. The player who used the tile keeps it as a reminder that this option is no longer available. The tile is returned to its place on the main board at the end of the round.
END OF TURN
At the end of your turn you always draw 1 card. This is in addition to any cards you may have acquired during your turn. Because you played only 1 card, you now have at least 3.
If you have more than 3 cards, you must discard down to 3. However, you can think about this decision while others are playing. Officially, this decision is made at the beginning of your next turn. In practice, it is okay to discard as soon as you have made up your mind.
Expanding Your Network
YOUR NETWORK
We have seen that tunnels must be connected to your starting city, but buildings and cities do not have to be. This gives you freedom in how you choose to expand. However, you eventually want everything on your board to be connected to your network.
Your network is all the structures and cities and empty city sites that are connected to your starting city:
- By definition, your starting city is always connected to your network.
- All your tunnels are automatically connected to your network because building a tunnel that is disconnected is not legal.
- A city is connected to your network if there is a chain of tunnels from it to your starting city. Because all your tunnels are connected, any city with a tunnel leading to it is connected and a city with no tunnels is not connected.
- A building adjacent to a connected city is connected to your network.
Important: Buildings and cities that are not connected do not produce during Production. They do not consume kelp at the end of Production. They do not count during final scoring.
GENERAL BUILDING RULES
STEP-BY-STEP EXPANSION
You build your tunnels, buildings, and cities one-at-a-time. For example, if you choose an action slot that allows you to build 2 tunnels, you first build one tunnel on a legal tunnel site and this could open up one or more new legal sites for the second tunnel.
COSTS
The usual cost for building a city, building, or tunnel is depicted on your player info card. This is the cost you pay when you build something by choosing an action slot. Certain card effects also allow you to build things. If the card does not specify a cost, you pay the usual cost. However, if the card specifies a cost, you pay that cost instead of the usual cost.
CITIES
Cities provide the habitat for the people of your underwater nation. At the end of the game, every city connected to your network will be worth points. There are 2 types of cities.
Build a city:
- Pay 2 steelplast, 1 kelp and 1 credit for a nonsymbiotic city (white dome);
- or pay 1 steelplast, 1 kelp, 1 biomatter and 2 credits for a symbiotic city (purple dome).
When you build a city, pay the usual cost and take the corresponding dome from the supply. Place the dome on an empty city site on your player board. The site you choose for your new city must be adjacent to an existing city. In other words, the new city must have a tunnel site that could connect it to an existing city. It is legal to build new cities before building the connecting tunnels.
Symbiotic cities are a little more expensive (biomatter is difficult to get) but they can produce points during Production. Nonsymbiotic cities are a little easier to build (if you have the steelplast) but they do not produce points. Both kinds of cities can give you points at the end of the game, and both require kelp to feed them at the end of Production. Whenever a rule or effect applies to a city, that means “a symbiotic or nonsymbiotic city.”
BUILDINGS
Buildings are special facilities that help to make your underwater nation self-sufficient. You can build 3 types of them:
- Build a farm: This costs 1 kelp.
- Build a desalination plant: This costs 1 credit.
- Build a laboratory: This costs 1 steelplast.
When you build a building, pay the cost (which is depicted on your player info card) and take a token of the corresponding color from the supply. Place the building token on an empty building site. The site you choose for your new building must be adjacent to an existing city or adjacent to a site on which you could build a new city.
The different buildings produce different things during Production. They will produce more if they are upgraded. Also, certain cards may have a conditional effect that only applies if you have certain buildings. Buildings have none of these beneficial effects until they are connected to your network. To connect them, you will need to build tunnels and cities.
EXPANSION SITES
Each city has an additional building site that is generally off limits. You can build on this site only if you play a card with an effect that specifically allows you to build on an expansion site (and only if it is adjacent to an existing city or a site on which it is legal to build a new city).
BONUSES FROM BUILDING
Your player board depicts certain bonuses you may gain from building. Every board offers different bonuses. When you build a structure or a city on a site marked with a resource, you gain the resource.
Building on a site marked with this symbol allows you to advance 1 space on the Federation track and draw one card from current Era deck.
You gain the bonus even if the city or building you build on that site is not yet connected to your network. These bonuses are triggered effects, which are resolved immediately, even in the middle of an action.
TUNNELS
Tunnels connect your cities to your underwater network.
- Build a tunnel: This costs 1 steelplast and 1 credit.
When you build a tunnel, pay the cost and take a tunnel tile from the supply. Place it on a tunnel site with the non-upgraded side up.
The site you choose for your new tunnel must be connected to your starting city. Tunnels are connected if you can trace a path along the tunnels back to your starting city. The path can go through cities or through empty city sites, but not through empty tunnel sites.
UPGRADING STRUCTURES
Buildings and tunnels are called structures in this game. Structures are different from cities in that structures can be upgraded. There is a card that will let you turn a nonsymbiotic city into a symbiotic city, but this is an exception.
To upgrade, you need a card or action slot with a depiction like this: Upgrade 1 structure. Pay 1 science.
Whether upgrading a tunnel, a farm, a desalination plant, or a laboratory, the usual cost is 1 science. However, the card effects offer you special cost opportunities.
When you upgrade a building, take the corresponding token from the supply and stack it atop the structure you are upgrading. To upgrade a tunnel, flip the tile over to the upgraded side.
An upgraded tunnel still counts as a tunnel, an upgraded farm still counts as a farm, etc. It is not possible to upgrade any structure that is already upgraded.
Upgraded structures produce more during Production, and certain cards may provide benefits for having upgraded structures.
METROPOLISES
You also gain benefits from expanding your network out to connect with coastal metropolises.
- To connect a 1-tunnel metropolis, you need to build a tunnel on the adjacent tunnel site.
- To connect a 2-tunnel metropolis, you need to build tunnels on both adjacent tunnel sites.
The metropolis tiles offer various benefits that apply only if the metropolis is connected. Your brown metropolis can give you points during final scoring. The blue ones either have an instant effect or an instant effect and a production effect.
Federation Track & Round End
THE FEDERATION TRACK
We have explained how to build your underwater nation, but you also need to build a good reputation with the world government! You do that by choosing actions or playing cards with this symbol: Advance 1 space on the Federation track.
Before the first round, players’ markers are placed on separate spaces of the Federation track in reverse play order. At the beginning of subsequent rounds, the markers begin below space 4.
When an action slot or card effect allows you to advance 1 space on this track, move your marker 1 space ahead. If there is a bonus depicted beside that space, immediately gain the depicted resource. If you move ahead more than 1 space, gain the bonus of each of those spaces.
If your marker ends up on an occupied space, place it atop the other markers which are already there (being atop other markers means you will play ahead of them in the next round).
Even when you have advanced as far as possible, you can still gain benefits from “advancing” more. If you advance when you are already on space 1, put your marker atop any others on space 1 and score 1 point for each space you were supposed to advance.
EXAMPLE: Orange takes an action allowing her to advance 2 spaces. She moves ahead only 1 space, because that is the end of the track. However, she scores 2 points: 1 for moving onto that space and 1 for “advancing” off the track. Her marker is placed atop any other markers that are already on space 1.
END OF THE ROUND
During the course of one round, each player will get three chances to play a card while choosing an action slot. The action slots will fill up with action tiles. At the end of the round, everything needs to be reset:
- Return all action tiles to their owners. (4 players: In a four-player game, the player who took the action-cloning tile should return it to the middle of the table at this time.)
- Reorder the play-order markers according to the order of the markers on the Federation track. The player farthest ahead on the Federation track will go first next round. The next player will go next, etc. If markers are in a stack, each marker is ahead of any markers below it. Among markers below space 4, relative play order does not change.
- Place Federation markers: Once you have determined the next round’s play order, place all Federation track markers on the colored spaces below space 4.
- Advance the era marker. If this is the end of the era, there will be a Production phase before the next round.
Note: Be sure to determine the new play order even if this is the end of the final round. This final order is the tie-breaking order.
Production & End of Era
PRODUCTION
TIMING OVERVIEW
The era marker moves one space on the era track at the end of each round. After 4 rounds, it will move onto a Production space, reminding you that it is time for your first Production phase. The second Production phase happens 3 rounds later. The final Production phase happens 3 rounds after that, just before final scoring. In all, you will play 10 rounds and have 3 Production phases. Each Production phase marks the end of an era.
YOUR NETWORK’S PRODUCTION
All players can handle their Production simultaneously. Every tunnel adjacent to a city and every building in your network will produce something. Upgraded structures will produce more. Symbiotic cities will produce 2 points!
Nonsymbiotic cities have no production of their own, but they are still useful because they connect buildings to your network.
You also gain a slight production bonus when you have 2 upgraded buildings of the same type at the same city.
The production of your network is depicted on your player info card.
THINGS THAT DO NOT PRODUCE
- A city will not produce if it is not connected to your network.
- A building will not produce if it is not adjacent to a connected city.
- A tunnel will not produce if it is not adjacent to a city (a tunnel connecting a metropolis with a Production effect will allow the metropolis to produce, but the metropolis does not help the tunnel produce).
PRODUCTION FROM CARDS AND METROPOLISES
If you have claimed any production cards, or if you have connected your network to any metropolises with a production effect, you apply their effects at this time. When evaluating a production effect that depends on your cities or buildings, you always ignore cities and buildings that are not attached to your network.
Some production cards have no production of their own. Instead, they can modify the production of your tunnels, buildings, and cities. Such cards are evaluated when your network produces, and they do not apply to tunnels, buildings, and cities that do not produce.
FEEDING CITIES
At the end of Production, each city in your network must be fed 1 kelp (symbiotic cities have the same requirements as nonsymbiotic cities). Return this kelp to the general supply. If you have more cities than you have kelp, you spend all your kelp to feed those you can and then feed the remaining cities according to this rule:
- For each unfed city, pay 1 biomatter.
- If any cities are still unfed, you feed them by paying points – 3 points per city at the end of each Production. If you lose all your points and still have unfed cities, just leave your scoring marker at 0.
Only cities in your network require food. Cities that are not connected do not count as cities because they do not have people in them yet.
END OF THE ERA
After everyone has resolved all production from all sources, it is time to resolve the end of the era with the following steps:
- Rotate your action cards to the usual orientation to show they can be used in the next era (this step is unnecessary at the end of the final era).
- Feed your cities (explained below).
- Remove the old era’s deck and discard pile from the game. Players keep any cards from that era that they currently have, but no more new ones will be drawn.
- Shuffle the next era’s deck and place it on the game board. This is the new draw pile. Each player draws 3 cards from the new era, adding them to any cards already in hand. From this hand of 6 or more cards, choose 3 to keep and discard the rest. (Discarded cards from the new era go to the discard pile. Discarded cards from the previous era should be returned to that era’s deck.) Skip this step at the end of the final era.
- Advance the era marker.
Once everyone has discarded down to 3 cards, you are ready to play the next era with the new deck; or if you have completed the third era, you are ready for final scoring.
HAND LIMIT SUMMARY
- You must discard down to 3 cards at the beginning of your turn and at the beginning of each era. At any other time, it is okay to have more than 3.
- If a card increases your hand limit by one, then you must discard down to 4 cards at the beginning of your turn and at the beginning of each era. It is still possible that you will start one or more turns with only 3 cards, because this effect only alters the way you discard, not the way you draw.
End of Game & Scoring
FINAL SCORING
Your underwater nation will score points throughout the course of the game, sometimes as the effect of certain cards, and sometimes during Production. At the end of the game, you may score points for a metropolis you have connected to or for specific cards you have claimed. And finally, you will score points for the overall composition of your network and for your resources.
The order of final scoring is depicted on your final scoring card:
- Final-Scoring Tile: The metropolis in the upper left corner of your player board will give you points if you have connected it to your network with both tunnels.
- End-Scoring Cards: Cards marked with this symbol can give you points at the end of the game. Some cards reward you for certain accomplishments. Others let you spend resources to buy points. You should spend as much as you can – buying points via a card is always more efficient than converting resources into points.
- Scoring Your Network: Your points are based on the number of different buildings next to each connected city:
- 2 points for a connected city with no buildings.
- 3 points for a connected city with 1 type of building.
- 4 points for a connected city with 2 types of buildings.
- 6 points for a connected city with all 3 types of buildings.
- Scoring Your Resources: Now, many of your remaining resources can be converted to points:
- First, sell all your biomatter for 2 credits each.
- Then buy 1 point for every 4 credits, kelp, science, or steelplast you spend, in any combination. (For example, 3 kelp and 1 steelplast is 1 point; 1 science, 2 steelplast, and 1 credit is 1 point; etc.)
- Leftover resources do not count. Convert all that you can, and ignore the remainder.
WINNING THE GAME
Whoever has the most points wins. If there is a tie, break the tie according to the tie-breaking play order that was determined at the end of the final round (politics pays).
FREQUENTLY OVERLOOKED RULES
- The number of symbiotic city domes available in the game depends on the number of players – two players, 7 domes; three players, 10 domes; four players, 13 domes.
- You play in the order shown on the player-order track. This usually means you are not playing in clockwise order.
- If you claim an action card and you already have 4 action cards, then you must discard one of the old ones. If you discard an available action card in this situation, you may use its action immediately.
- When you build a structure or city, you can use biomatter as a replacement for kelp and steelplast.
- Special cards do not have a discard pile. One- or two-credit Special cards return to the bottom of the deck if they are discarded. Discarded three-credit Special cards simply leave the game.
- When you pay to play a Special card with an instant effect, it does not return to its deck. Instead, you keep it under your player board.
- During Production, tunnels produce only if they are adjacent to a city.
Variants
1) GOVERNMENT CONTRACTS
Use these cards to give your game intermediate goals that players can compete for. Shuffle the deck of contract cards and draw 3 at random. Place them on the spaces of the main board at the beginning of the game. Return the remaining cards to the box.
During play, any player may claim a government contract as soon as he or she meets all its criteria. The player keeps the card and immediately gains its benefits. Claimed contracts are not replaced.
2) THE OTHER SIDE OF THE PLAYER BOARDS
The other side of the player boards is for experienced players. The cities have variable numbers of building sites. The black-and-red sites are places where you must pay surcharges – extra resources to build. They can give you immediate bonuses or increased production. If you decide to try this other side, everyone in the game should use it.
SURCHARGES
Some sites may have surcharges for building on them (these are not on the side of the player board recommended for your first game). A surcharge is applied after any discounts or cost reductions you may have.
For example, if an effect allows you to build on a site for free, you still must pay the surcharge if you choose a site that has one.
The surcharge applies only to building on the site – it does not also apply to upgrading.
PRODUCTION MULTIPLIERS
Production multipliers indicate that the usual level of production is produced multiple times. More specifically, the two-times multiplier shown on the side means that the structure produces the usual amount one extra time. For example, two upgraded desalination plants at a connected city will normally produce 3 credits and 2 biomatter. If one of them has this multiplier, it will produce an additional 1 credit and 1 biomatter, for a total of 4 credits and 3 biomatter.
The multiplier applies to the usual production of an upgrade, but not to any additional production associated with the site.
Multipliers are not applicable outside the Production phase.
3) SOLO GAME
To play Underwater Cities by yourself, use the advanced side of a player board and the two-player side of the main board. The number of symbiotic domes is not limited in this variant. Set up the game as you would for two players, except do not use the metropolis tile with 3 points per connected metropolis.
Take three tiles in a non-player color and use them to occupy the rightmost action slot (first slot, if you move around clockwise) of each color. Next time you can occupy second, third etc. action slot of each color. You are going “first”, so your marker should start below space 4 of the Federation track. You will not need your player-order track marker.
GAMEPLAY
Play your round as usual. At the end of each round, you take back your action tiles and move all non-player action tiles one space clockwise.
If you did not advance on the Federation track, play your next round with a fourth occupied slot determined this way:
- Flip over the top card of the current era’s deck. Add its digits together to get a number.
- Starting with the first green action slot (as “1”) count around clockwise until you get to that number. Place the new action tile on that slot, if it is empty, otherwise, move the action tile clockwise to the first empty slot.
The 3 non-player tiles of the same color always move one space clockwise. The fourth tile is always placed randomly, and only if you did not advance on the Federation track during the round.
GOAL
You win if you finish with at least 7 connected cities and at least 100 points. Track your score and try to beat your previous best.
Note: It is not possible to play the solo game with the government contracts.
Reference & Appendices
KEY: ACTION SLOTS
FOR 3 OR 4 PLAYERS
- Yellow Slots:
- Gain 1 science, 1 steelplast, and 1 kelp.
- Build 2 tunnels.
- Use 1 of your action cards. Draw 1 Special card.
- Build 1 city and 1 building.
- Gain 2 science; or upgrade 1, 2, or 3 structures, paying 1 science for each upgrade. The structures do not all have to be the same type.
- Red Slots:
- Build 2 farms.
- Build 1 tunnel and 1 city.
- Gain 2 steelplast and 1 kelp.
- Build 2 laboratories.
- Use 1 of your action cards. Pay the usual cost to build a structure. Pay 1 science to upgrade the structure you just built.
- Green Slots:
- Advance 2 spaces on the Federation track.
- Build 2 desalination plants.
- Either build 1 city; or gain 1 kelp.
- Use one of your action cards. Gain 1 steelplast.
- Either build 1 tunnel; or advance 1 space on the Federation track and gain 2 cards and 1 credit.
FOR 1 OR 2 PLAYERS
- Use one of your action cards. Gain either 2 resources (they can’t be of the same type).
- Build 2 farms; or build 2 laboratories (you cannot build 1 farm and 1 laboratory).
- Build 1 tunnel. Use one of your action cards.
- Draw 1 Special card.
- Build 1 city.
- Gain 2 cards. Upgrade 1 structure by paying 1 science or gain 1 kelp.
METROPOLISES SUMMARY
- At the end of the game, score 3 points for each metropolis connected to your network (this includes the brown and blue metropolises you started with, as well as any metropolis tile you may have gained during play).
- At the end of the game, score points for tunnels connected to cities: 5 points for eight tunnels, 7 points for nine, or 9 points for ten or more (don’t forget that upgraded tunnels also count as tunnels).
- At the end of the game, score points based on the number of connected cities you have: 4 points for five cities, 8 points for six cities, or 12 points for seven or more.
- At the end of the game, score 2 points for each Special card you played and paid for. This includes not only your claimed Special cards, but also those with instant effects. This does not include any Special action cards that you discarded.
- At the end of the game, score 4 points for each set of 4 different upgraded structures. Count only buildings that are connected and tunnels that are adjacent to a city. In other words, you count whatever you have least – upgraded tunnels adjacent to a city, connected upgraded farms, connected upgraded laboratories, or connected upgraded desalination plants – and multiply that by four.
- Blue Metropolis Examples:
- Instant effect: If you connect to this metropolis, immediately gain 1 kelp.
- Production effect: If this metropolis is connected, gain 2 points during each Production phase.
SPECIAL CARDS SUMMARY
- Player gains 2 points for every upgraded lab.
- Player submits up to 14 steelplast. For every steelplast he gains 1 point.
- Player receives 3 points for every two of submitted kelp. It could be done max. 5 times.
- Player submits directly 15 credits. He gains 13 points for it.
- Player gains 2 points for every symbiotic city he has built.
- Player receives 3 points for every two upgraded farms. Example: Player has built 7 upgraded farms – he receives 9 points.
NOTES ON CARD EFFECTS
Your cards affect your own board during your own turn. Your production cards apply only to your own production. There is nothing that can affect another player’s board. None of your cards’ effects apply during another player’s turn.
- ANY AVAILABLE SLOT: This includes the always-available slot.
- ANY SLOT OCCUPIED BY ANOTHER PLAYER: This is any occupied slot, except those occupied by your action tiles. This does not include the always-available slot, because it is never considered to be occupied. In a four-player game, a slot occupied by you and another player does not count as a slot occupied by another player (because it is occupied by you).
- AT THE END OF THE GAME, GAIN 1 POINT FOR EVERY 3 CONNECTED FARMS YOU HAVE: As above, count up all your connected farms, divide by three, and round down. That’s how many points you gain.
- BUILD: Anything you build must be built on a legal site.
- BUILDING: A building is a farm, desalination plant, or laboratory. Tunnels and cities are not buildings.
- CITY: If it is not otherwise specified, this refers to nonsymbiotic cities and symbiotic cities.
- CONNECTED: This always means “connected to your network”. For example, “If you have at least 3 connected desalination plants …” means that the effect will trigger only if the desalination plants are in your network.
- DISCOUNT: If it is not otherwise stated, the discount is subtracted from the usual cost. However, it is legal to apply several discounts and to combine them with a card that lets you pay a special cost. Discounts cannot take a cost below “free”.
- DURING PRODUCTION, 1 BIOMATTER PRODUCED: If you have nothing that produces biomatter during Production, this effect cannot be applied.
- DURING PRODUCTION, YOU PRODUCE AN ADDITIONAL 1 KELP FOR EVERY 3 CONNECTED LABORATORIES: Count up the total number of laboratories connected to your network. Divide by three. Round down. That’s how much kelp you gain.
- EXCHANGE: This is just like paying, except the effect can work either way. You cannot exchange more than the specified amount.
- EXPANSION SITE: Each city has a special building site that can only be built on if you play a Survey card. Expansion sites follow the usual rules – the chosen expansion site must be adjacent to a city or to a city site on which it is legal to build.
- FARM, DESALINATION PLANT, LABORATORY, TUNNEL: Upgraded structures still count as structures. For example, an upgraded farm counts as a farm.
- FOR FREE: If a cost is free, the card will say so. Once a cost is free, discounts have no further effect.
- GAIN THE PRODUCTION FROM 1 UPGRADED STRUCTURE ADJACENT TO A CONNECTED CITY: Pick one upgraded structure at a connected city. On your player info card, look up what one of those, by itself, produces. Gain those resources. This does not impact on its production during the Production phase.
- IF YOU ARE ON THE THIRD SPACE OF THE FEDERATION TRACK: This applies if your marker is on the space with the 3. This does not apply if your marker is on any other space.
- MAY: A card’s effect is always optional.
- ONCE PER TURN: This always refers to your turn. There are no cards that refer to other players’ turns or other players’ boards.
- PAY: Many cards allow you to pay a cost to get a benefit. If you can’t pay the cost, you do not get the benefit. If not otherwise specified, you pay the cost and gain the benefit only once.
- PERFORM THE ACTION IN A SLOT: This allows you to perform a second action. You do not play an action tile on this second slot and you do not play a second card.
- SPECIFIED COST: Some cards specify how much you pay to build a structure or city. In this case, you do not pay the usual cost; you pay the specified cost instead.
- STRUCTURE: A structure is a farm, desalination plant, laboratory, or tunnel. Cities are not structures.
- USUAL COST: The usual cost is the cost printed on your player info card. It is the cost you usually pay to build the structure or build the city.
- WHENEVER AN ACTION SLOT GIVES YOU AT LEAST 1 STEELPLAST, GAIN 1 POINT: If the slot allows you to choose between gaining steelplast and doing something else, you gain the point only if you choose to gain the steelplast. The effect is not triggered by steelplast gained from other sources.
- WHENEVER YOU BUILD A CONNECTED CITY’S SECOND LABORATORY: If it is not connected, the effect will not trigger. A third laboratory will not trigger this effect.
- WHENEVER YOU BUILD THE SECOND TUNNEL ON THE SAME TURN: This triggers on any turn on which you build at least two tunnels. It triggers immediately after you build the second tunnel.
- WHENEVER YOU COMPLETE A CONNECTED CITY’S SECOND UPGRADED FARM: The city must be connected. It must have at least two farms, but it may have more. It must already have exactly one upgraded farm. As soon as you upgrade a second farm, the effect triggers immediately.
- WHENEVER YOU USE THE DEPICTED ACTION SLOT: This effect triggers when you choose the slot as your action for the turn or when you are using the slot as the result of a card effect.
- YOU MAY UPGRADE 1 OR 2 FARMS: For each, pay 1 credit or 1 science.
ICON SUMMARY
- Pay resources / credits
- Gain / If you have, gain…
- Build
- In one turn / In the same turn
- Once per turn
- Discount
- Exchange
- Metropolis
- End of turn
- Any available / unused slot
- Any used slot
- Or
Expansions for
Underwater Cities
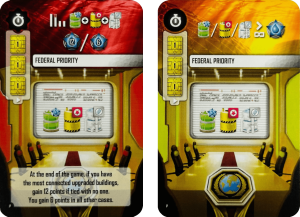
Underwater Cities: Federal Priority Promo Cards
2021
Reward the most connected upgrade buildings with Federal Priority.
150
minutes
View expansion
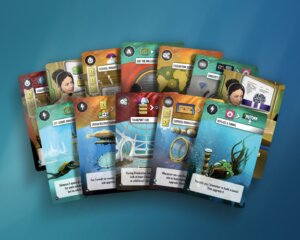
Underwater Cities: Mini-expansion
2023
Celebrate five years of Delicious Games with 12 new cards.
160
minutes
Medium Heavy
View expansion
Underwater Cities: Data Era
2025
Add data discs, data centers, and information cities to your underwater strategy.
150
minutes
Medium Heavy
View expansion
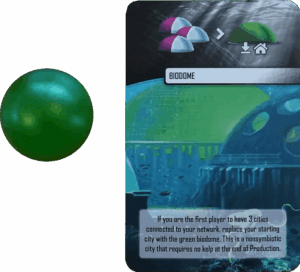
Underwater Cities: Biodome Promo
2018
Race to connect three cities and unlock a kelp-free biodome.
150
minutes
Medium

View expansion

Underwater Cities: New Discoveries
2019
Discover new strategies beneath the sea with fresh cards, assistants, and variants.
180
minutes
Medium Heavy
View expansion
