
Zombicide: Green Horde
2018
Cooperate against tougher zombie orcs, ambushes, and the growing Horde across ten challenging medieval fantasy quests.
60
minutes
1 - 6
player(s)
14+
Medium


About this board game
Zombicide: Green Horde is a cooperative medieval fantasy board game for 1–6 players, with games lasting about 60 minutes. Players take the roles of Survivors and join forces to complete quests while battling a deadly undead menace.
This sequel to Zombicide: Black Plague introduces infected orcs and goblins alongside familiar zombie types such as Walkers, Runners, Fatties, and Abominations. Zombie Orcs are stronger than classic zombies, and their tendency to gather in massive groups creates a demanding challenge even for experienced undead hunters.
The standout threat is the Horde. When zombie cards bearing the Horde symbol are drawn, an extra miniature of the matching type is set aside. These figures remain locked in place until an “Enter the Horde!” card brings the growing group onto the board, potentially ambushing Survivors in an unexpected location.
- Cooperative play for up to six players
- Ten challenging quests in a medieval fantasy setting
- Zombie orcs and goblins that intensify the danger
- New terrain, including ledges and water holes
- Weapons and spells such as Lava Burst, the Norse Sword, and the Bone Kukri
- A catapult for striking tightly gathered undead
Survivors must choose their routes carefully, gather useful medieval equipment, and decide when avoiding danger is wiser than confronting it. With the Horde always threatening to appear, staying together and planning ahead are essential to survival.
Featuring new enemies, terrain, equipment, and scenarios, Zombicide: Green Horde continues the evolving Zombicide story with a fierce battle against a rotting green menace.
/pic7182955.jpg)
Board Game Rules for
Zombicide: Green Horde
INFECTED HUNGER
This is the Western border, a land of black and green, where the sun and rain are caught in an eternal struggle to rule the skies. Here, nature grows with an unmatched vigor, and our houses have been standing for generations. We are a proud people.
We had been fighting the wild Orcs for two years when the zombie plague struck the kingdom. Our foes had grown beyond their own resources and were raiding our farms to avoid starvation. They were fighting like the hungry beasts they had become, and we answered in kind.
As Orcs are natural-born fighters and already hungry, they were harshly struck by the zombie plague. Almost all of them became infected in a short time. We were fighting the zombie plague as well, and the long feud was suspended for almost two weeks.
When the Orcs came back, they were changed. Their army had entirely turned zombie and was still determined to ravage our country. They were stronger and hungrier than ever, but craved a different kind of food. We quickly realized Orc Necromancers were directing the tide toward us, the survivors, the last obstacle between them and ultimate power.
Their infected army is no match for our untamed resolve. No matter how battered our ancestral home has become, it is ours and ours alone! Now is the time for Zombicide!
Zombicide: Green Horde is a cooperative game where 1 to 6 players face hordes of Zombies controlled by the game itself. Each player controls 1 to 6 Survivors in a fantasy world invaded by Zombies. The goal is simply to complete the Quest objectives, survive, and kill as many Zombies as possible!
Zombies are slow and predictable, but there are a lot of them. Watch out for their Abomination and Necromancer bosses, too!
Survivors use whatever they can get their hands on to kill Zombies. The better the weapon, the higher the body count, but the more Zombies will appear, attracted by the onslaught! Survivors can trade equipment, and players can share tactics. Only through cooperation can players achieve the Quest objectives and survive. Battling Zombies is fun, but players will also need to rescue other Survivors, find food and weapons, uncover the Necromancers’ secrets, and much more.
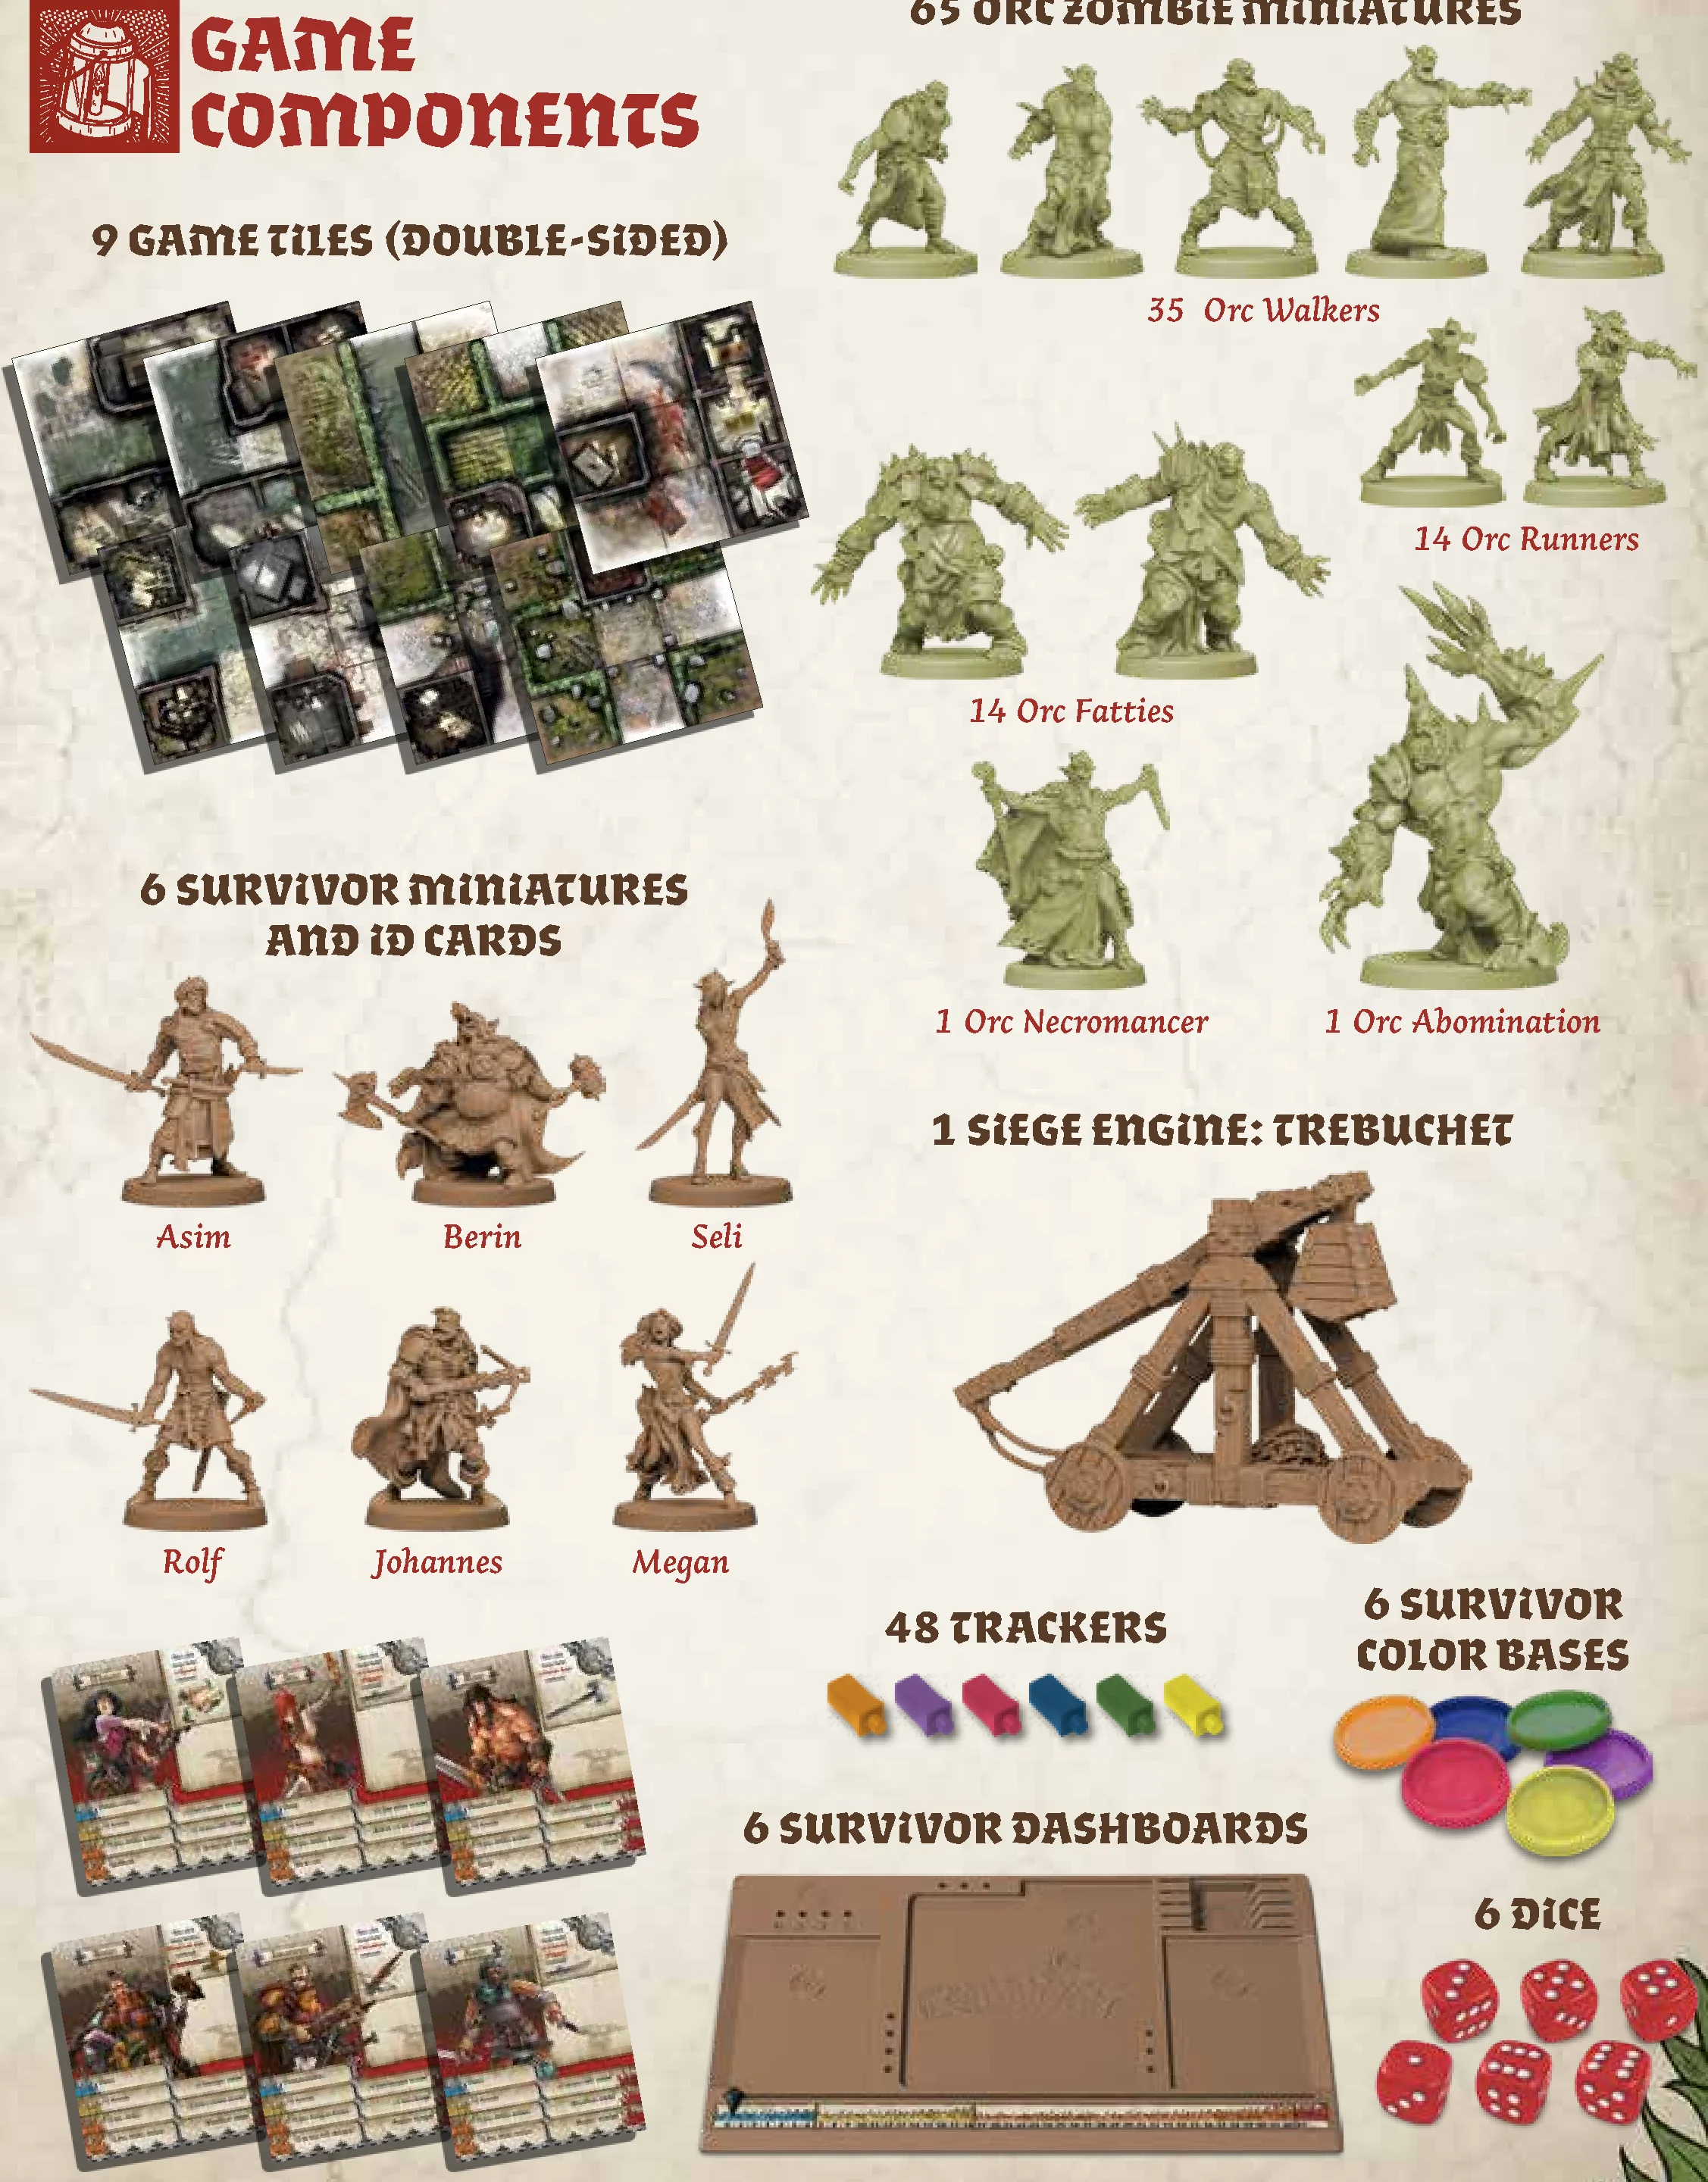
GAME COMPONENTS
- 9 Game Tiles (double-sided)
- 65 Orc Zombie Miniatures:
- 35 Orc Walkers
- 14 Orc Fatties
- 14 Orc Runners
- 1 Orc Abomination
- 1 Orc Necromancer
- 6 Survivor Miniatures and ID Cards: Asim, Berin, Seli, Rolf, Johannes, Megan
- 1 Siege Engine: Trebuchet
- 6 Survivor Dashboards
- 48 Trackers
- 6 Survivor Color Bases
- 6 Dice
- 68 Tokens:
- Doors: Blue x1, Green x1, Neutral x12
- Dragon Bile x4
- Exit Point x1
- First Player x1
- Noise x18
- Free Action x1
- Rotten x1
- Barrier/Hedge x6
- Objectives: Red/Blue x1, Red/Green x1, Red/Red x8
- Zombie Spawn: Red/Blue x1, Red/Green x1, Red/Necromancer Green x1, Red/Necromancer Brown x1, Red/Necromancer Red x1, Red/Necromancer Purple x1, Red/Necromancer Grey x1, Red/Necromancer Beige x1, Red/Red x4
- 133 Mini-Cards:
- 78 Equipment Cards: Aaahh!! Orc Walker x4, Apples x2, Axe x2, Bone Kukri (Vault Weapon) x1, Bone Sword (Vault Weapon) x1, Chainmail Armor x2, Crossbow x2, Curved Dagger x4, Death Gale x2, Dragon Bile x4, Dwarven Axe (Vault Weapon) x1, Dwarven Hammer x2, Falchion x2, Ghost Sight x1, Great Axe x2, Hand Crossbow x2, Healing x1, Lava Burst (Vault Weapon) x1, Lightning Ball x2, Longbow x2, Norse Shield x2, Norse Sword x1, Norse Sword (Starting Equipment) x1, Plate Armor x1, Plenty Of Arrows x3, Plenty Of Bolts x3, Repeating Crossbow x2, Repulse x1, Salted Meat x2, Scimitar x2, Shield x2, Short Sword x1, Short Sword (Starting Equipment) x3, Speed x1, Spiked Bow x1, Spiked Bow (Starting Equipment) x1, Steel Bow (Vault Weapon) x1, Telekinetic Blast x1, Telekinetic Blast (Starting Equipment) x1, Torch x4, Tremor x1, War Cleaver (Vault Weapon) x1, Water x2
- 54 Zombie Cards (#167 to #220)
- 1 Reference Card (Trebuchet)
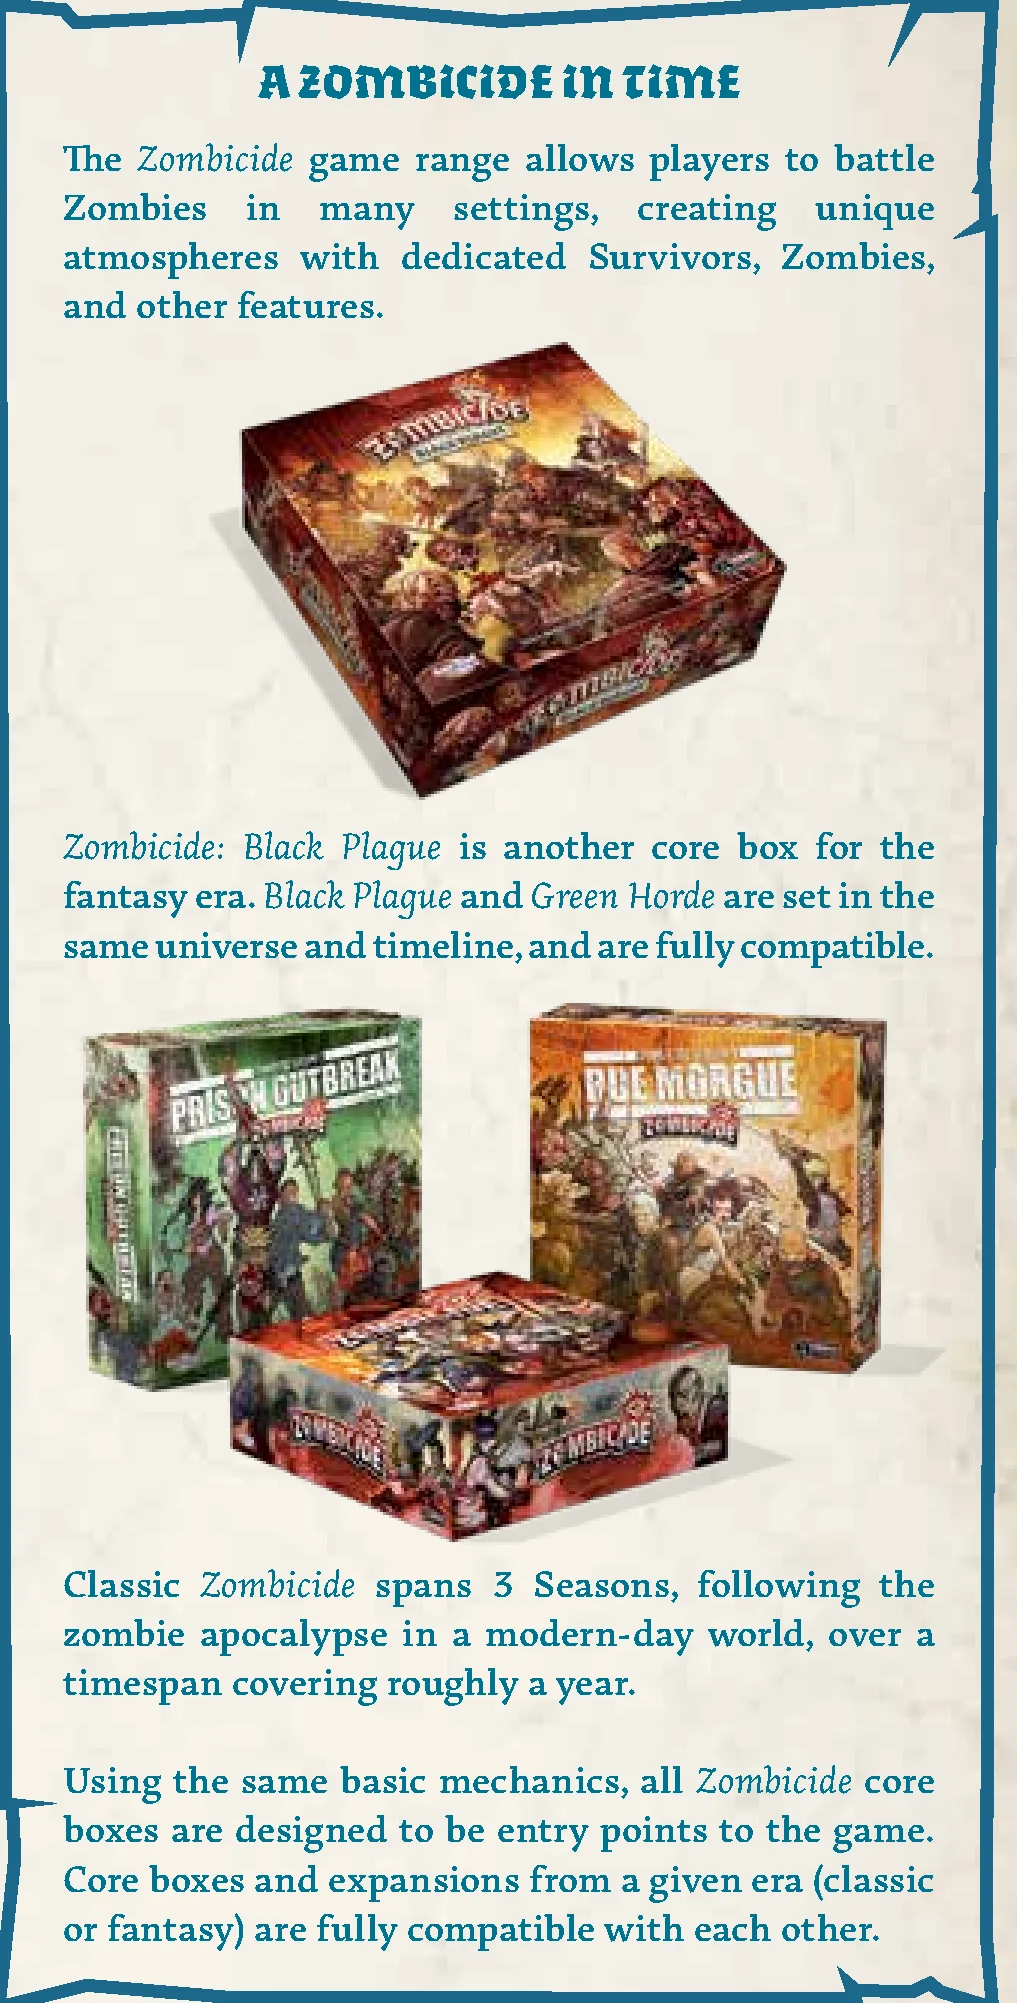
A ZOMBICIDE IN TIME
The Zombicide game range allows players to battle Zombies in many settings, creating unique atmospheres with dedicated Survivors, Zombies, and other features.
- Zombicide: Black Plague is another core box for the fantasy era. Black Plague and Green Horde are set in the same universe and timeline, and are fully compatible.
- Classic Zombicide spans 3 Seasons, following the zombie apocalypse in a modern-day world, over a timespan covering roughly a year.
- Using the same basic mechanics, all Zombicide core boxes are designed to be entry points to the game. Core boxes and expansions from a given era (classic or fantasy) are fully compatible with each other.
GAME SETUP
A Zombicide: Green Horde game usually features 6 Survivors, distributed in any way you see fit, among players. We recommend new players join the game with a single Survivor to get a quick grasp on the game mechanics. A veteran player can easily control a whole team of 6 Survivors and clear hordes of Zombie pests all on their own!
- Choose a Quest.
- Place the tiles.
- Place the doors, Objectives, and all tokens as indicated by the Quest.
- Each player gathers 1 to 6 Survivors for them to play. Players sit around the table in any order they choose. As they are cooperating against the game, all players form a single team.
- Players take 1 Dashboard for each of their Survivors, placing the Survivor’s ID card on it. They take a colored plastic base and attach it to the Survivor’s miniature to help identify it. They also take the 5 plastic trackers of the same color as their base.
- Set aside all Equipment cards with the “Starting Equipment” keyword: 1 Spiked Bow, 1 Norse Sword, 1 Telekinetic Blast, and 3 Short Swords. These cards are identified by a grey back.
Also set aside the Equipment cards with the “Vault” keyword: Bone Kukri, Bone Sword, Dwarven Axe, Lava Burst, Steel Bow, and War Cleaver. These cards are identified by a blue back. Vault artifacts are usually found as Objectives. Follow the chosen Quest’s rules to know about the way Objectives enter the game.
Place the Trebuchet’s Reference card within view of all players. This card acts as a reminder of the Trebuchet’s rules and stats, and does not belong to any single player. - Deal the starting Equipment cards as you see fit among the Survivors. Zombicide: Green Horde is a cooperative game, so decide as a team. Each Survivor starts the game with at least 1 card. If a Survivor’s starting Skill lists any starting weapons, they receive those cards now, independent of the Starting Equipment you’ve just distributed.
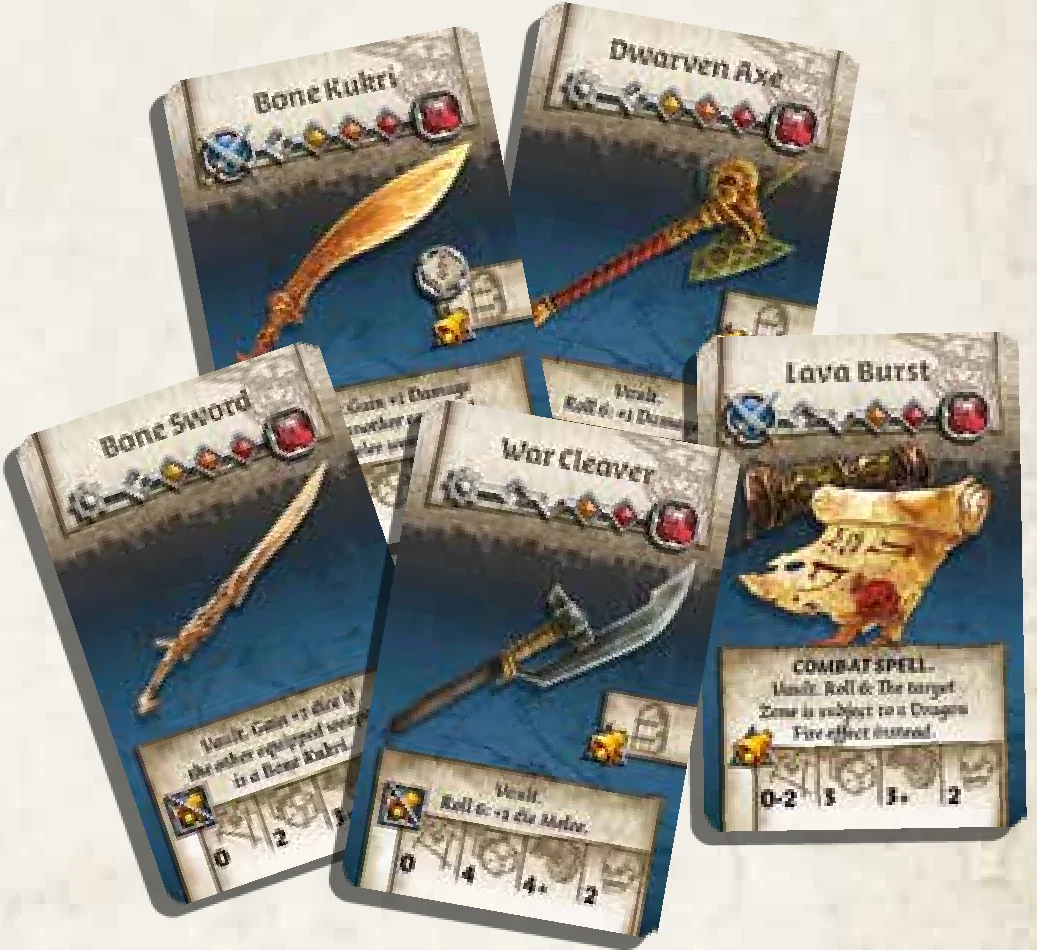
- Shuffle the Zombie cards into one deck and the Equipment cards into another. Place both decks facedown close to the board.
- Place the miniatures representing the chosen Survivors on the starting Zone(s) indicated by the Quest.
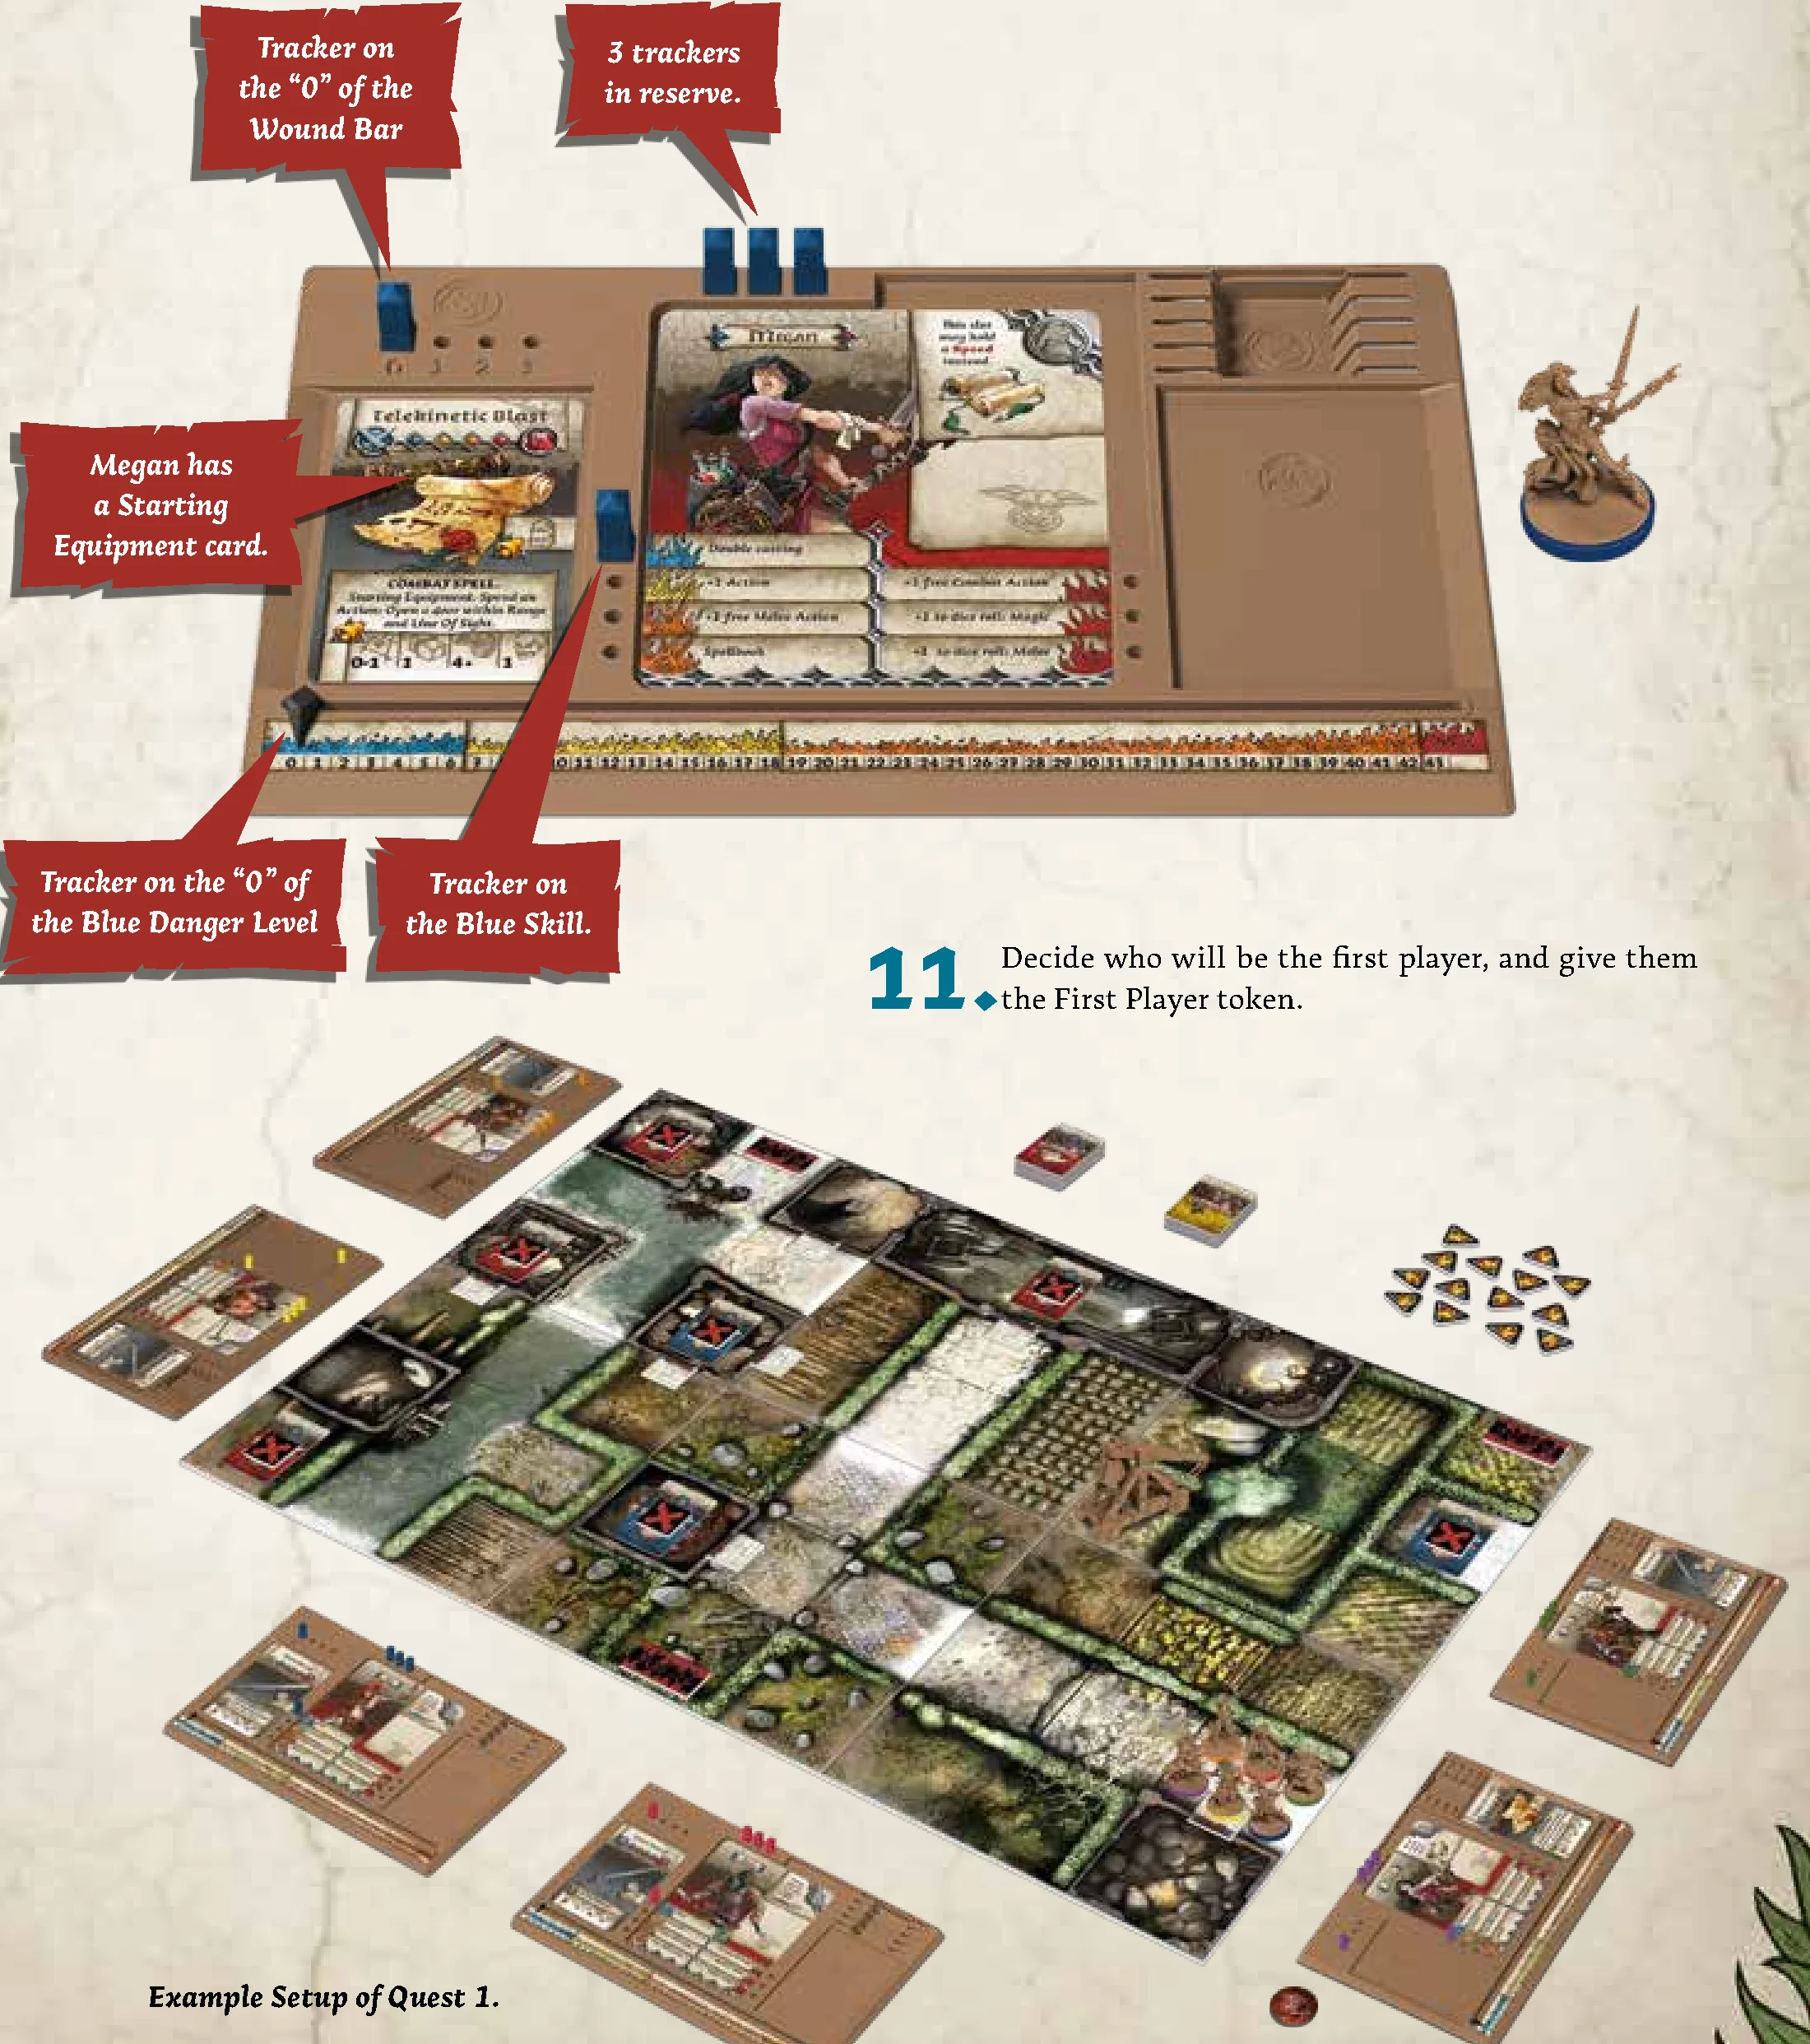
- Each player places their Survivors’ Dashboard(s) in front of them:
- Make sure the sliding arrow is on the 0 space in the blue area of the Danger Bar.
- Place a tracker in the 0 slot of the Wound Bar.
- Place another tracker in the slot for the first (blue) Skill.
- Place 3 more trackers in the reserve slots on the top of the Dashboard.
- Decide who will be the first player, and give them the First Player token.
GAME OVERVIEW
Zombicide: Green Horde is played over a series of Game Rounds, which proceed as follows:
- Players’ Phase: Each player activates their Survivors, spending Actions to move, fight, search, or interact with the map.
- Zombies’ Phase: Zombies activate to attack or move, and new Zombies spawn on the board.
- End Phase: Noise tokens are removed, and the First Player token passes to the left.
WINNING AND LOSING
- Defeat: The game is lost when all the Survivors have been eliminated, or if too many Necromancers escape. Some Quests can be lost when certain conditions are met (losing a single Survivor, for example).
- Victory: The game is won immediately when all of the Quest Objectives have been accomplished. Zombicide: Green Horde is a cooperative game, so all players win if the Quest Objectives are fulfilled.
USEFUL DEFINITIONS
- Actor: A Survivor or Zombie.
- Zone: Inside a building, a Zone is a room. On a street, a Zone is the area between 2 linear markings (or a linear marking and a tile’s edge) and the walls of buildings along the street.
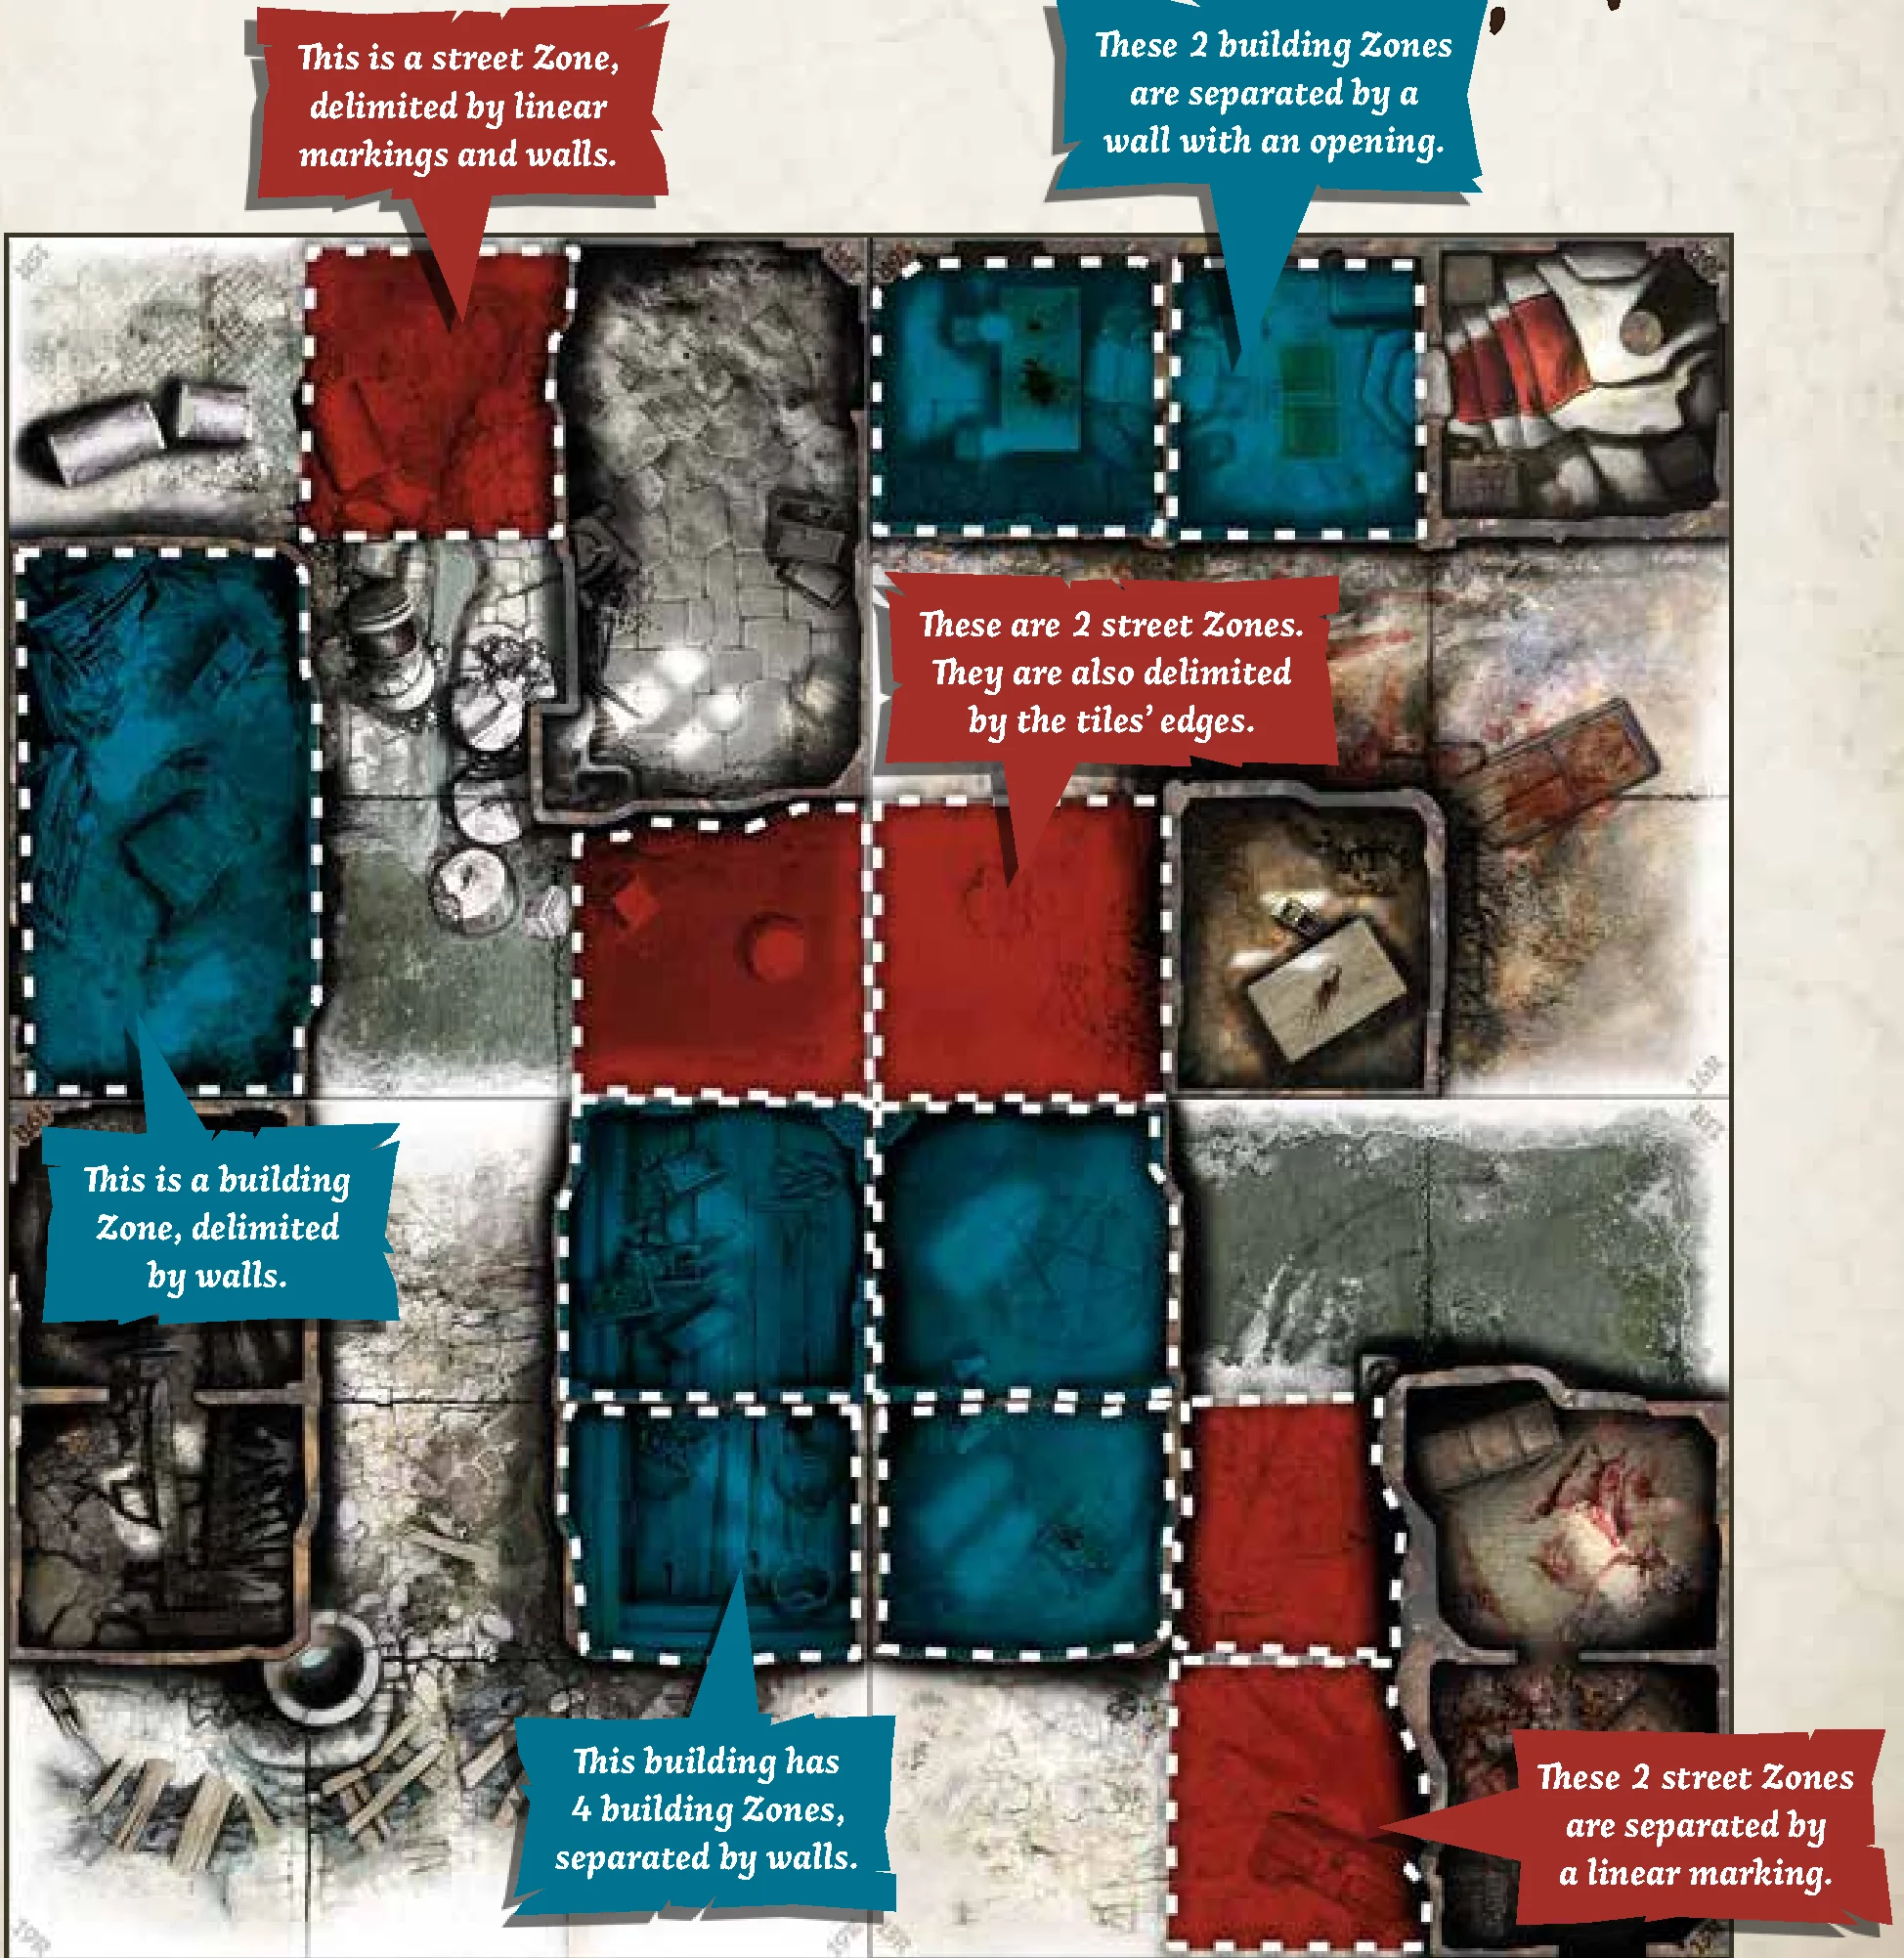
LINE OF SIGHT
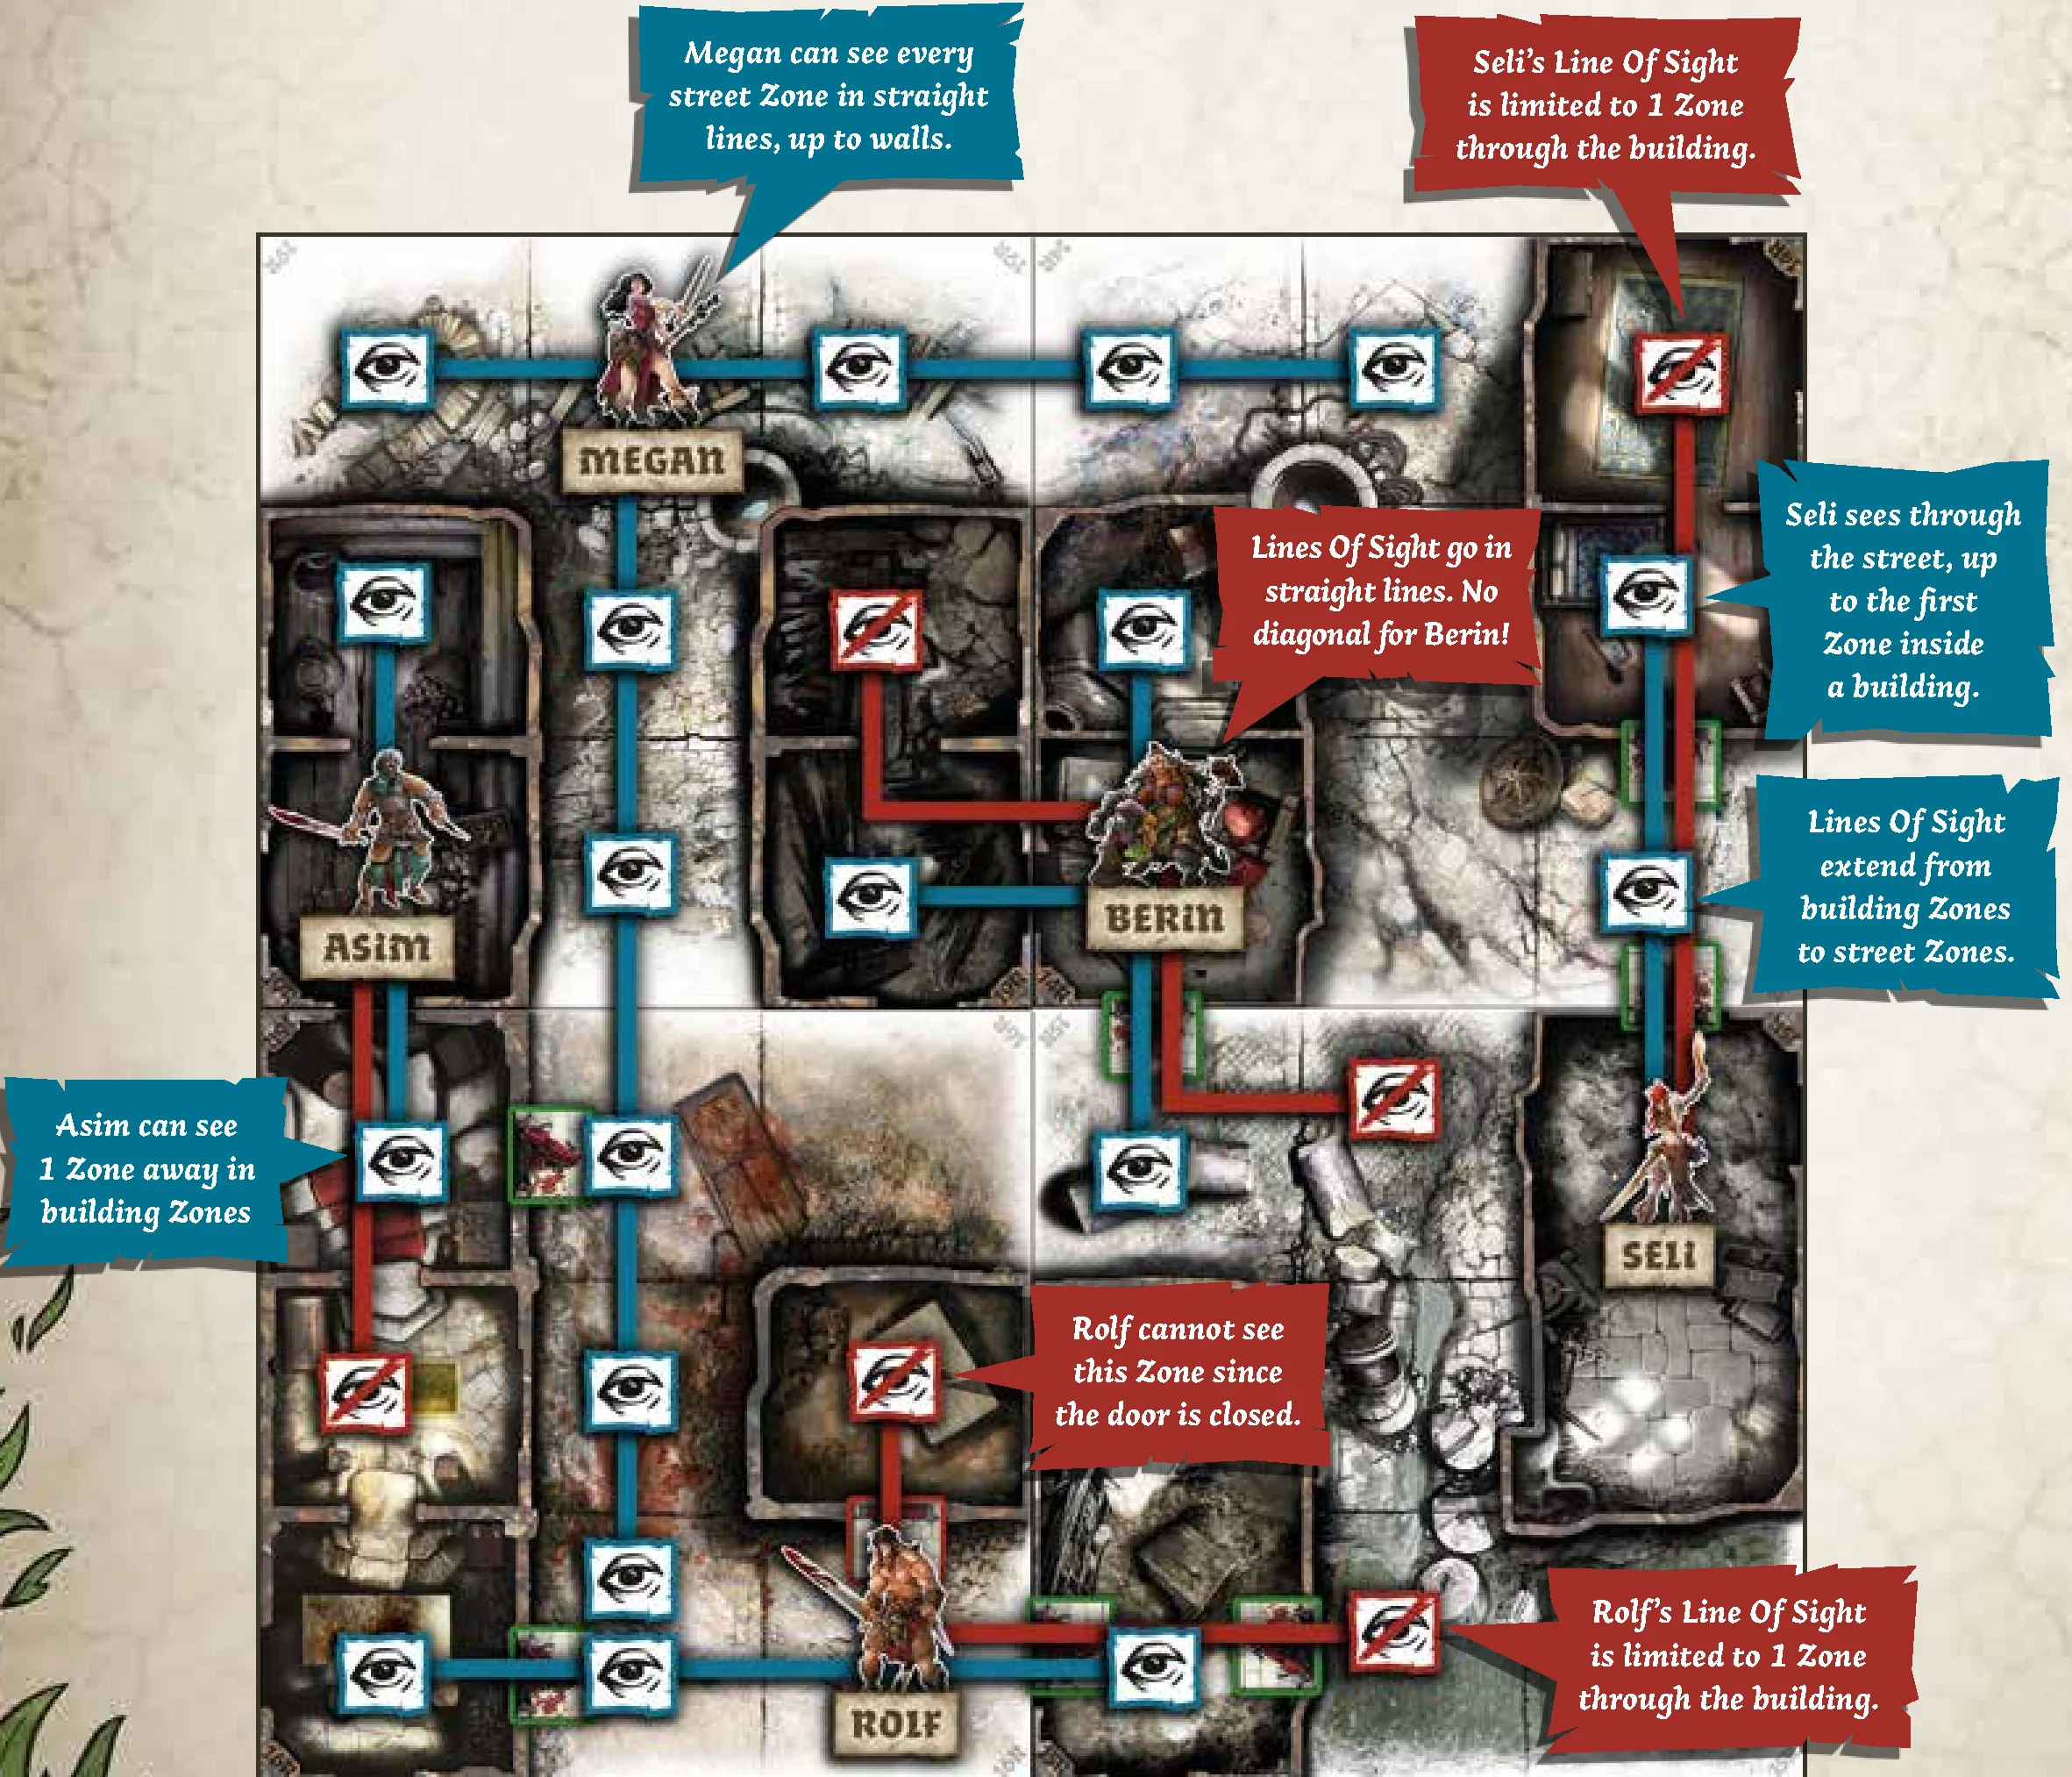
Lines of Sight define whether Actors can see each other, such as if a Survivor can see a Zombie across the street, from a room to the next in a building, etc.
- On the streets: Actors see in straight lines that run parallel to the edges of the board. Actors cannot see diagonally. Their Line of Sight covers as many Zones as the line can pass through before reaching a wall or the edge of the board.
- Inside a building: An Actor sees into all Zones that share an opening with the Zone the Actor currently occupies. If there is an opening, the walls do not block Line of Sight between 2 Zones. An Actor’s Line of Sight, however, is limited to the distance of 1 Zone.
- Looking in/out: If the Survivor is looking out into the street or from the street into a building, the Line of Sight can go through any number of street Zones in a straight line, but only 1 Zone into the building.
- NOTE: Hedges interrupt Lines of Sight.
MOVEMENT
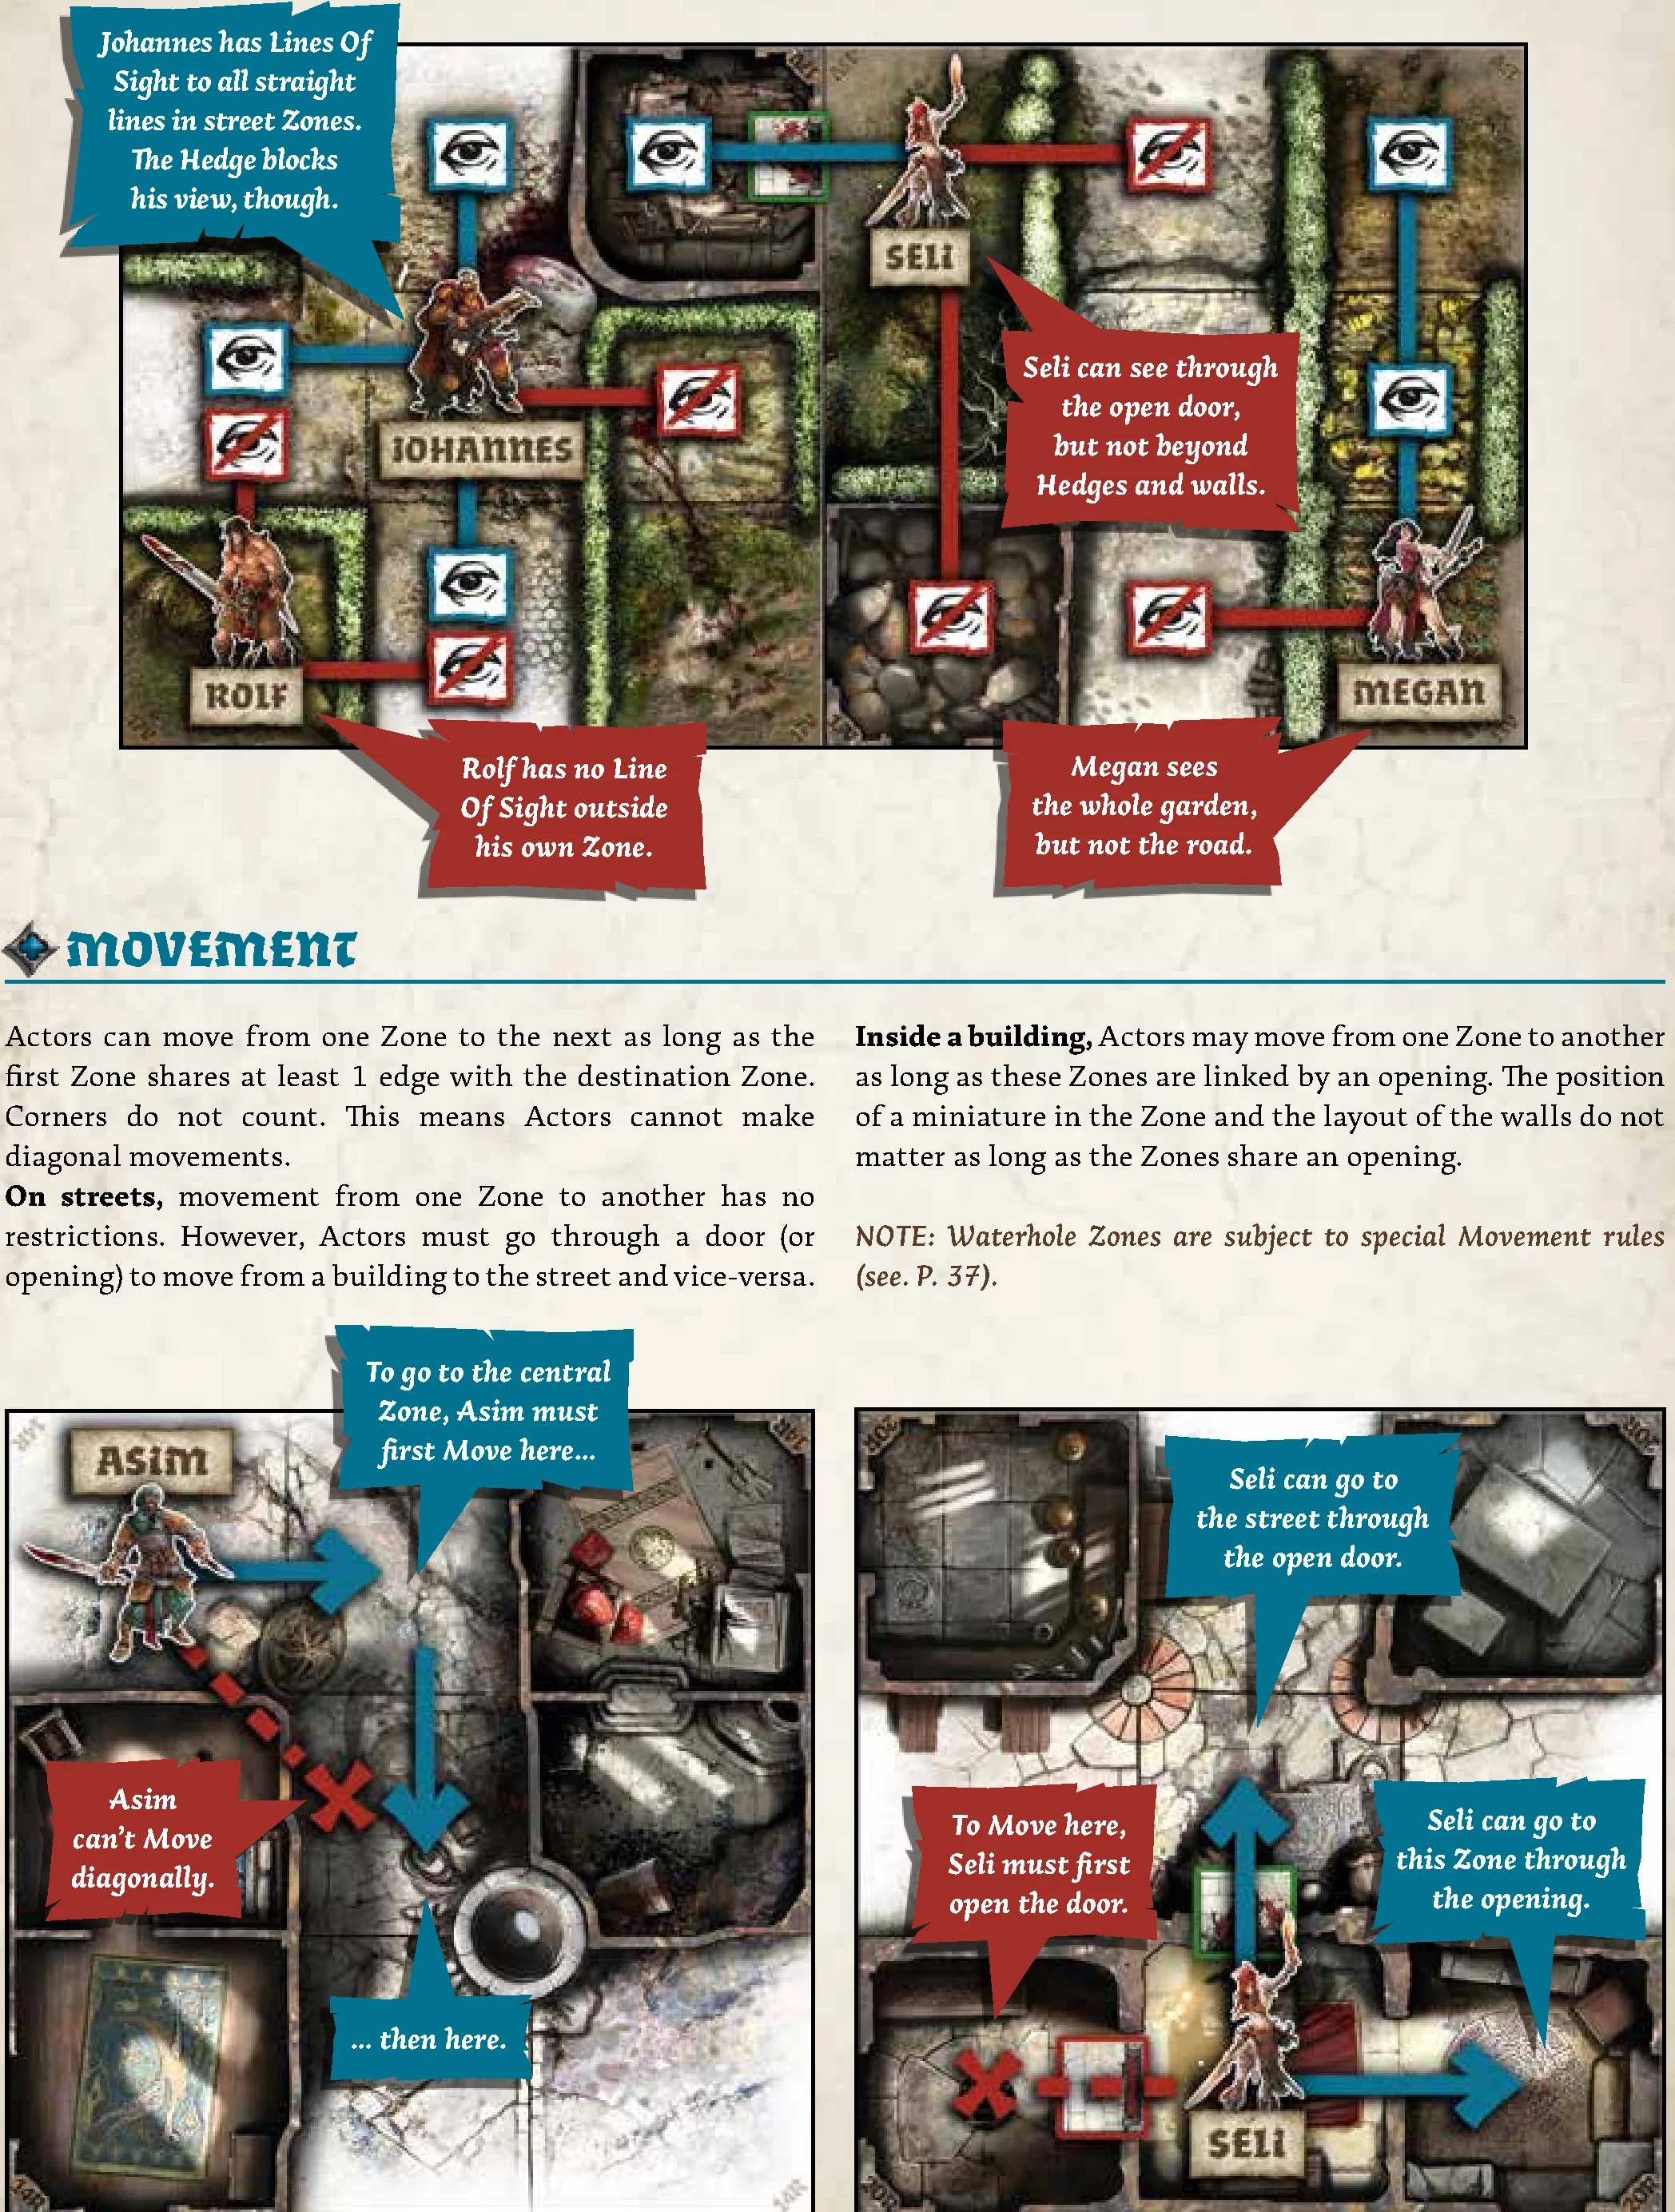
- Actors can move from one Zone to the next as long as the first Zone shares at least 1 edge with the destination Zone. Corners do not count. This means Actors cannot make diagonal movements.
- On streets: Movement from one Zone to another has no restrictions. However, Actors must go through a door (or opening) to move from a building to the street and vice-versa.
- Inside a building: Actors may move from one Zone to another as long as these Zones are linked by an opening. The position of a miniature in the Zone and the layout of the walls do not matter as long as the Zones share an opening.
- NOTE: Waterhole Zones are subject to special Movement rules.
NOISE
The zombie plague brought silence to the Orcish hordes. Huge zombie packs can slowly move around without uttering a single sound, save when they cross water pools or stumble upon some obstacle. Things may change upon hearing or seeing a survivor, though. At that point, zombie Orcs track their prey endlessly like the soulless shells they are. We often use noise to distract them or lure them to their demise.
Casting a spell or smashing through a door makes noise, and noise attracts Zombies. Each Action that opens a door with noisy Equipment or attacks with noisy Equipment produces a Noise token.
- Place this token in the Zone where the Survivor resolved the Action. It stays in the Zone where it was produced, even if the Survivor moves.
- A single Action can only produce a single Noise token, no matter how many dice are rolled, how many hits are obtained, or whether Dual weapons are used.
- Noise tokens are removed from the board in the End Phase.
- NOTE: Each Survivor miniature also counts as a Noise token. Zombies have acute hearing, and Survivors can’t stay quiet, anyway!
EXAMPLE: Berin spends an Action to open a door with an Axe. It’s a noisy way to open a door. This produces a Noise token. Then, he attacks a Zombie in his Zone, knocking it down after 2 Melee Actions. The Axe is a silent killing weapon, so these Melee Actions produce no noise. However, 2 Noises remain in this Zone: the Noise token produced by opening the door and Berin’s miniature itself.
In another Zone, Megan performs 2 Magic Actions with her Death Gale. Although she rolled 2 dice for each Magic Action, she gets only 2 Noise tokens in her Zone: 1 for each Magic Action. The Noise tokens remain in the Zone where Megan produced them. They don’t follow her when she moves.
INVENTORY
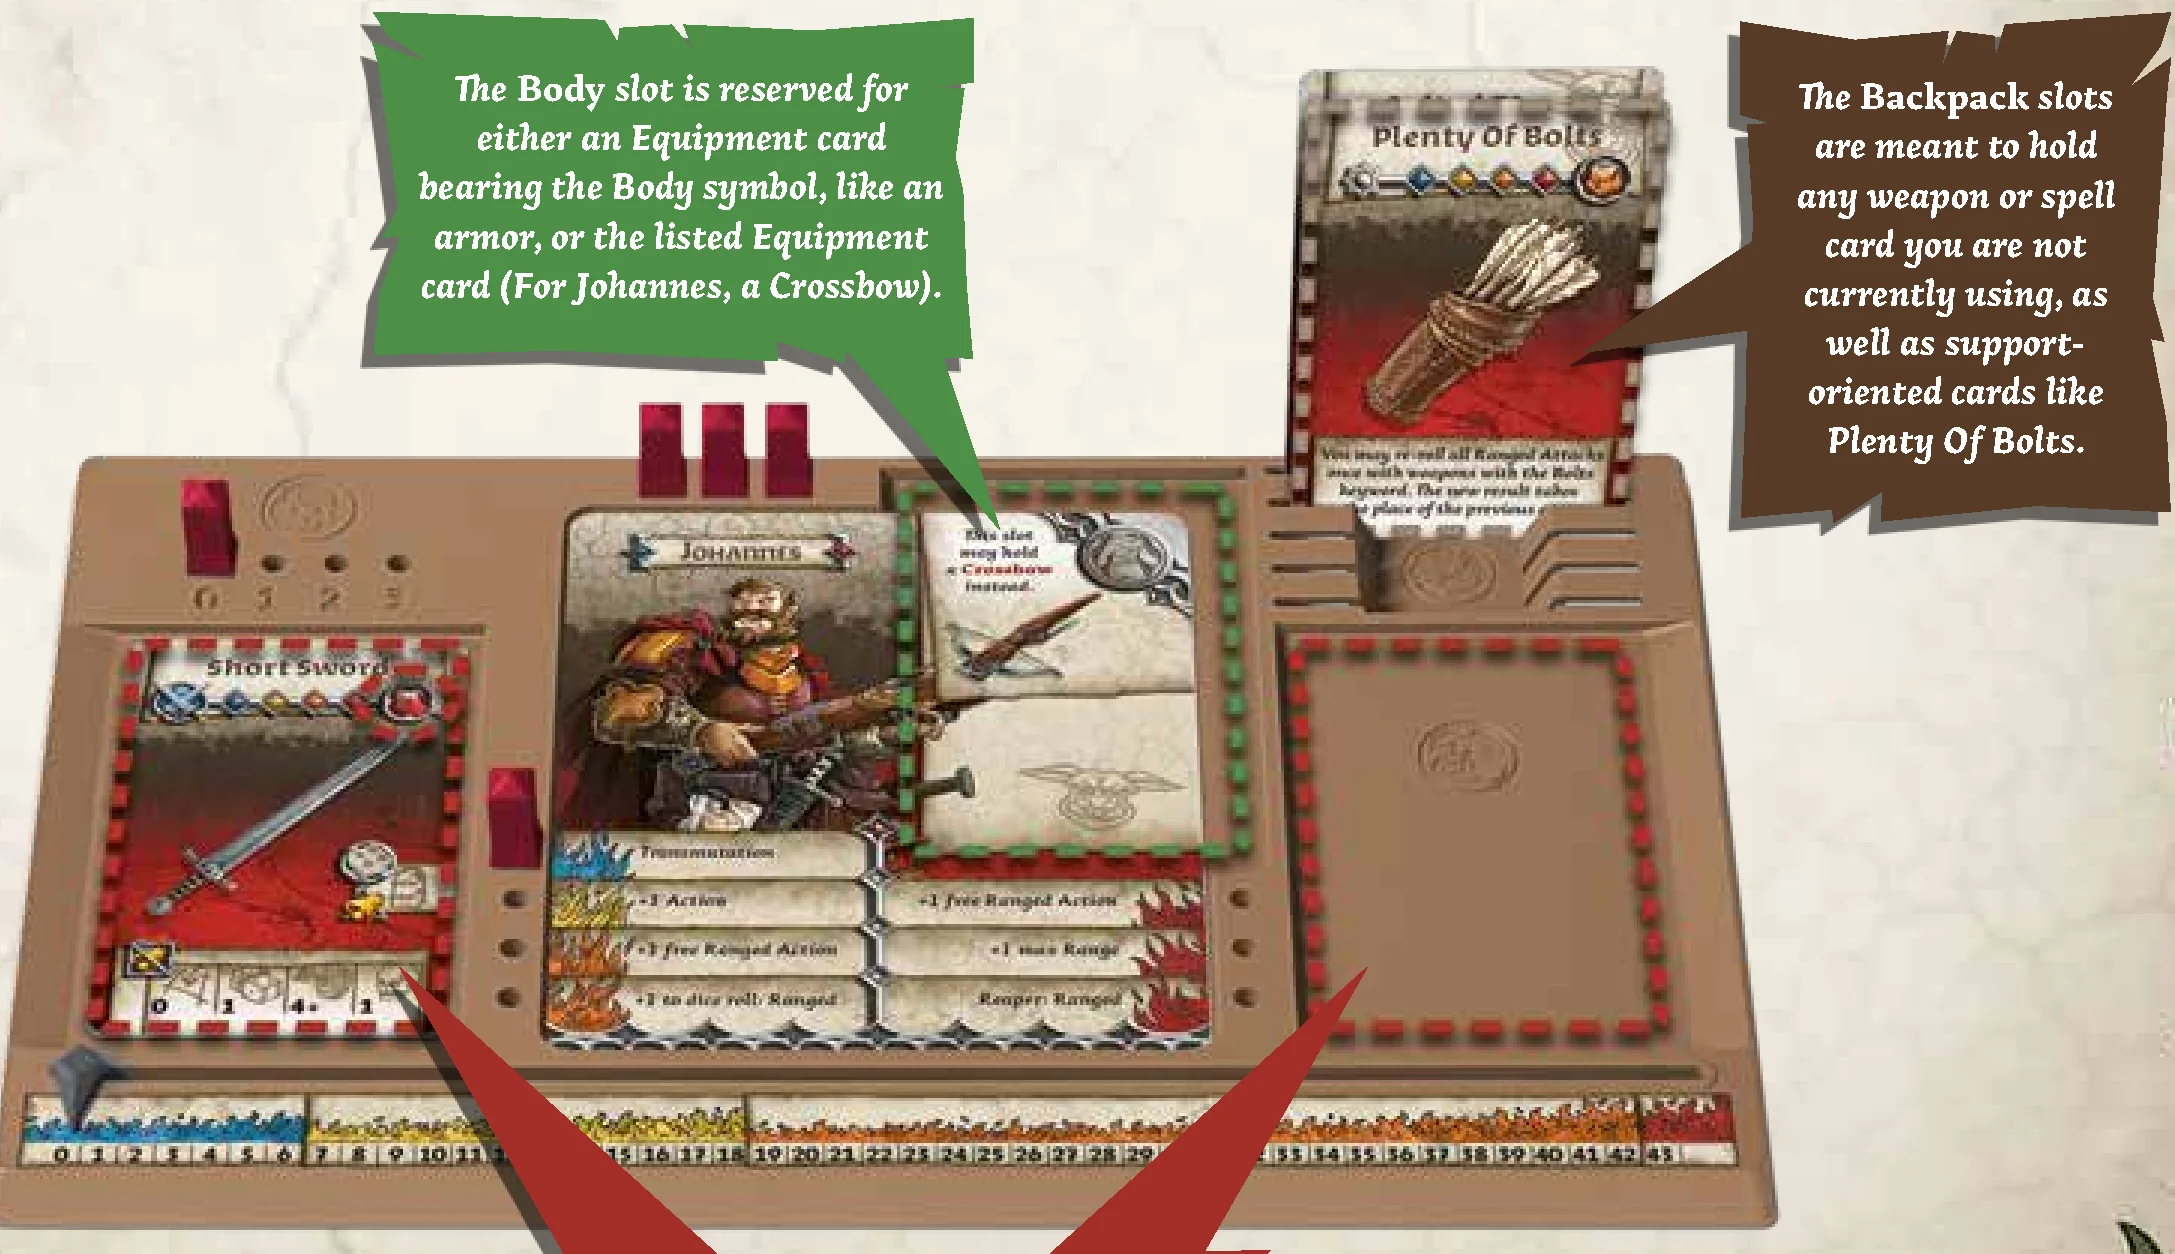
Each Survivor can carry up to 8 Equipment cards, divided into 3 types of Equipment slots on their Dashboard: 2 Hands, 1 Body, and 5 Backpack slots. You may discard cards from your inventory to make room for new cards at any time, for free (even during another player’s Turn).
 Hands: Both Hand slots are reserved exclusively for Equipment cards bearing the Hand symbol. An Equipment card bearing the Hand symbol can only be used when equipped in Hand. Both Hands are used primarily for combat (weapons and spells).
 Body: The Body slot is reserved for Equipment cards bearing the Body symbol (like armor). Alternatively, it can hold the specific Equipment card that is listed on it (e.g. for Johannes, a Crossbow); it is then considered to be equipped in Hand. An Equipment card bearing the Body symbol can only be used when put over the Body.
 Backpack: Up to 5 Equipment cards of any type can fit in the Backpack slots. Equipment cards bearing the Body or Hand symbol can be stored in the Backpack but, while there, they are not in use. Any text on them will not be in effect until they are moved to their appropriate inventory slots. An Equipment card bearing the Backpack symbol can only be stored in the Backpack and, while there, is always considered to be in use (like support-oriented cards, e.g. Plenty Of Bolts).
EXPERIENCE, DANGER LEVEL, AND SKILLS
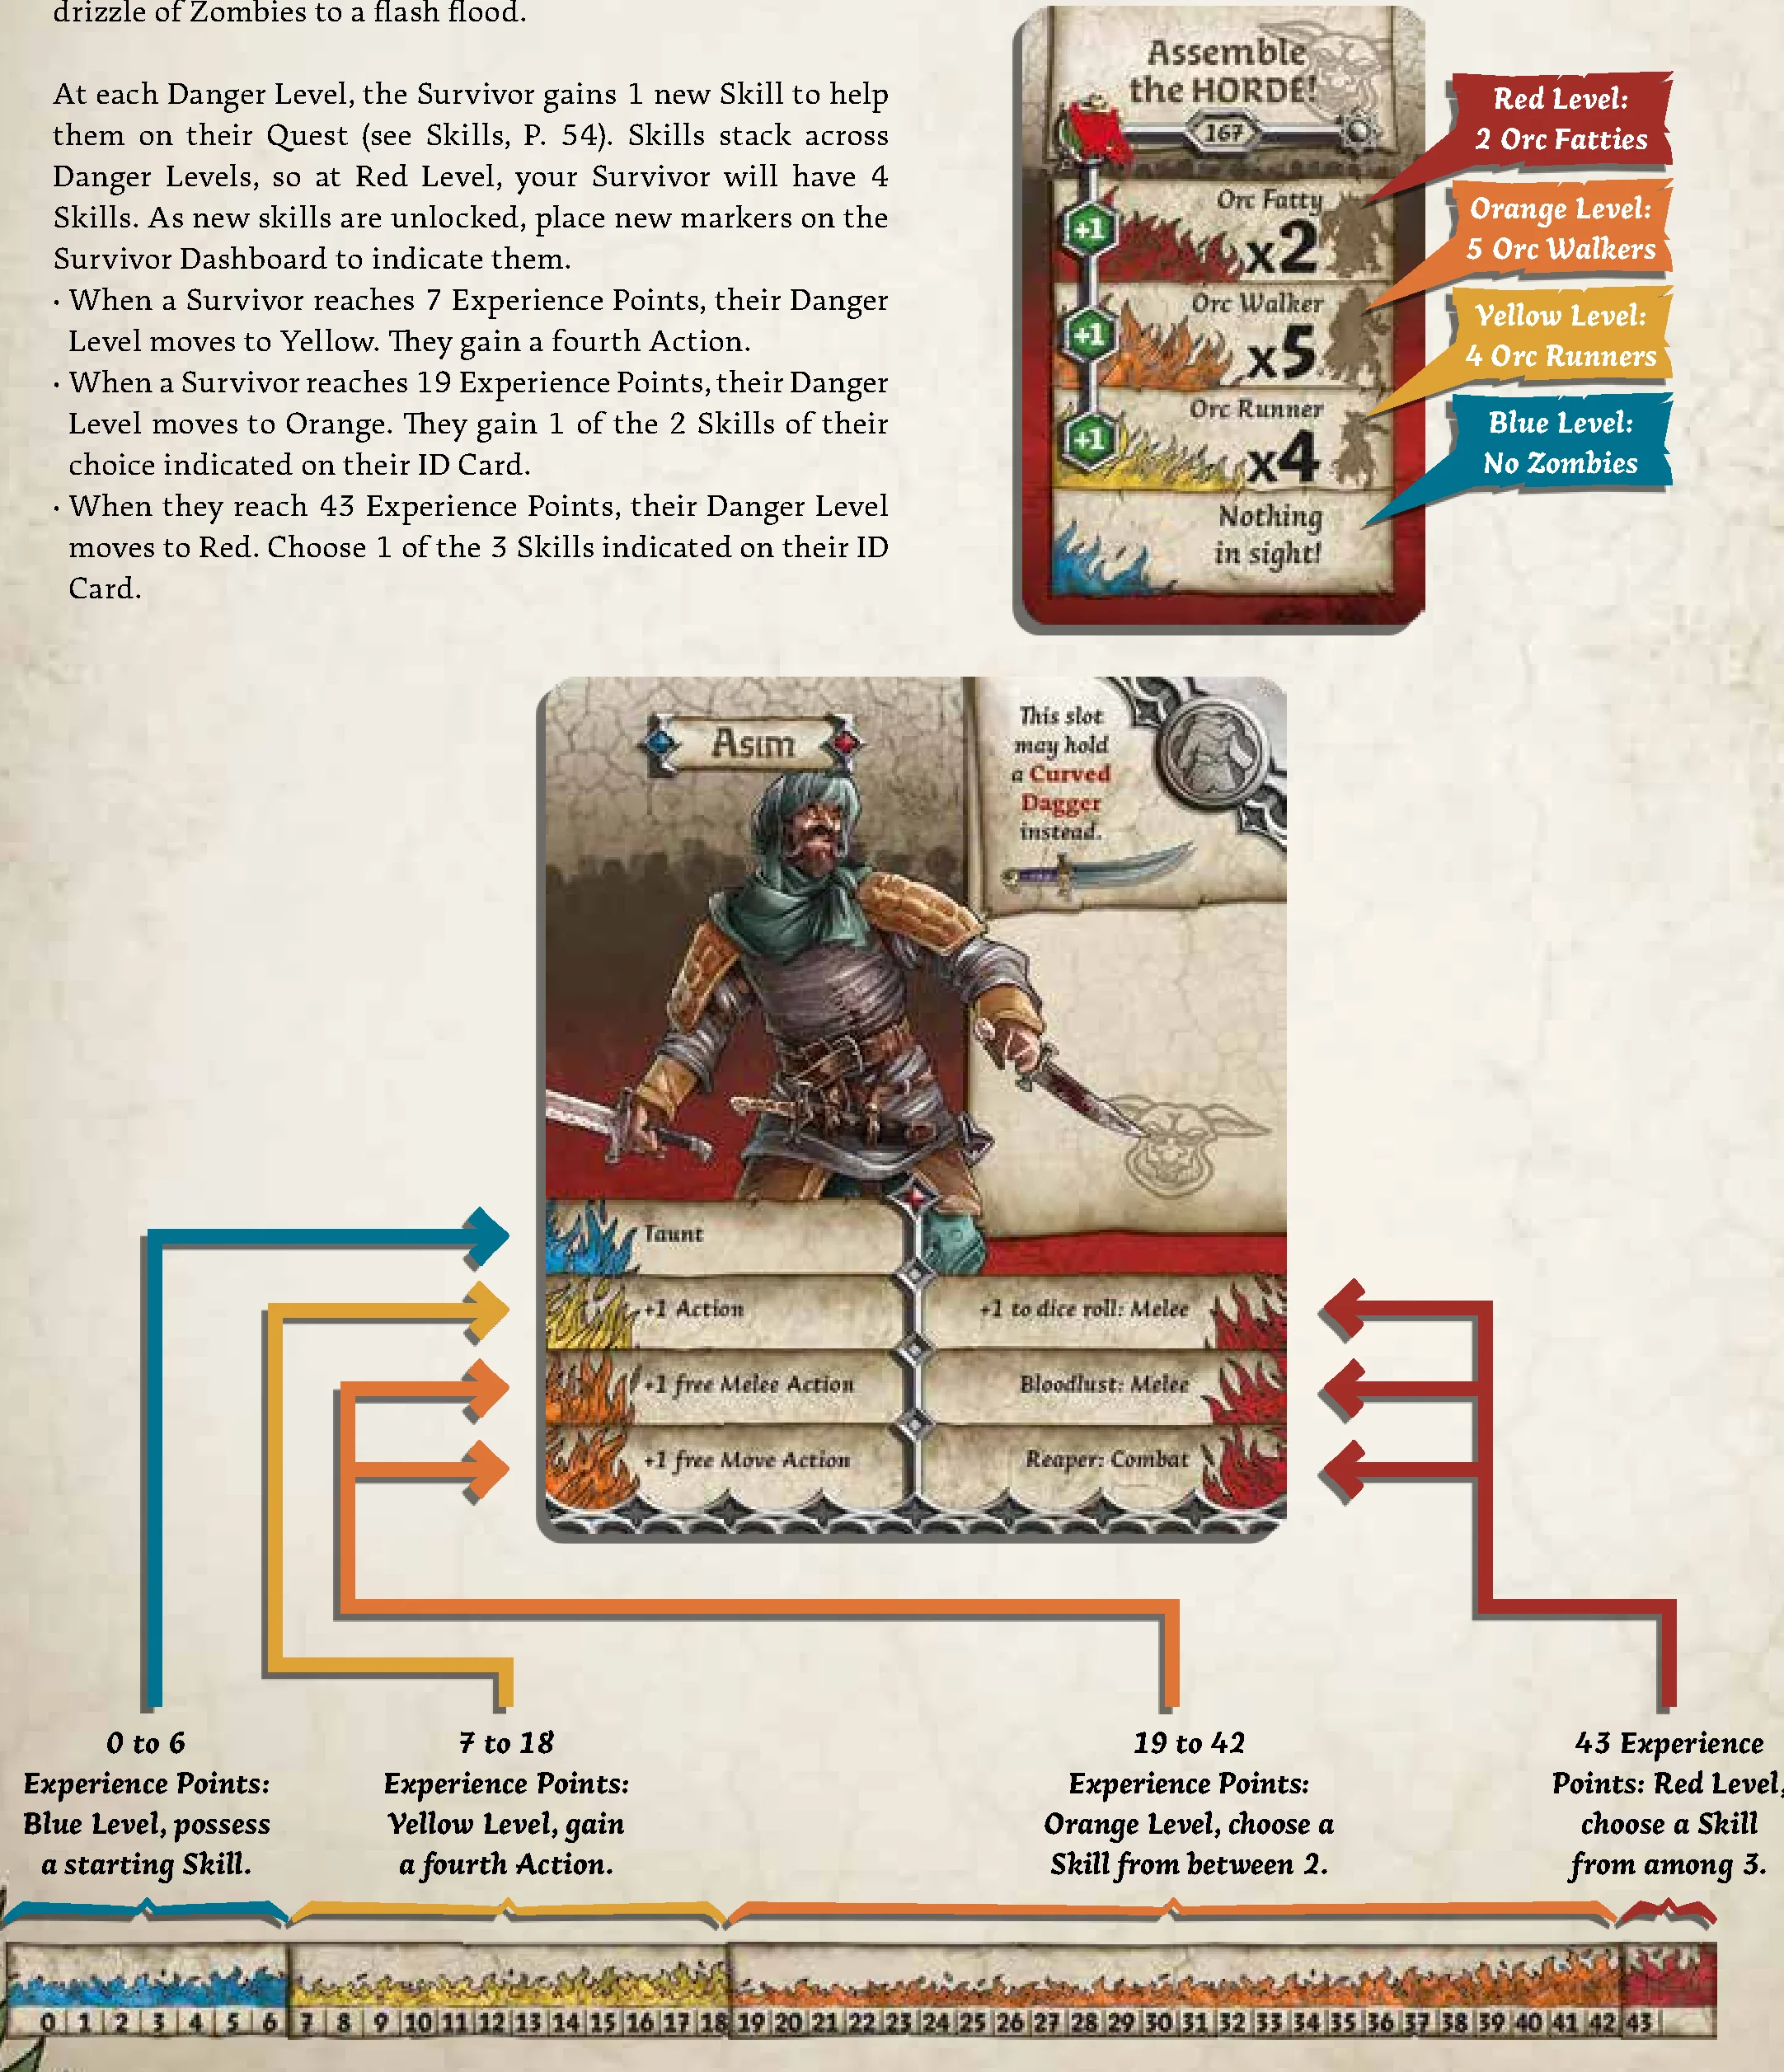
For each Zombie killed, a Survivor gains 1 Experience Point and moves up a notch on their Danger Bar. Some Quest Objectives provide more experience, as does eliminating Abominations.
There are 4 Danger Levels on the Danger Bar: Blue, Yellow, Orange, and Red. These represent everything from a light drizzle of Zombies to a flash flood.
At each Danger Level, the Survivor gains 1 new Skill to help them on their Quest. Skills stack across Danger Levels, so at Red Level, your Survivor will have 4 Skills. As new skills are unlocked, place new markers on the Survivor Dashboard to indicate them.
- Blue Level (0 to 6 Experience Points): Possess a starting Skill.
- Yellow Level (7 to 18 Experience Points): Gain a fourth Action.
- Orange Level (19 to 42 Experience Points): Choose 1 Skill from between 2 indicated on their ID Card.
- Red Level (43 Experience Points): Choose 1 Skill from among 3 indicated on their ID Card.
Spawn Side Effect: When you draw a Zombie card to spawn Zombies, read the line that corresponds to the Survivor still in play with the highest Danger Level. The stronger your Survivor is, the more Zombies appear.
PLAYERS’ PHASE OVERVIEW
Starting with whoever holds the First Player token, each player activates their Survivors one after another, in the order of their choice. Each Survivor can execute 3 Actions at the Blue Danger Level (not counting any free Action their Blue Level Skill may give them).
Once a player has activated all their Survivors, the player to their left takes their Turn, activating their Survivors in the same manner. When all the players have completed their Turns, the Players’ Phase ends.
AVAILABLE ACTIONS
The possible Actions are:
Move
The Survivor moves from one Zone to the next but cannot move through external building walls or closed doors.
- If there are Zombies in the Zone the Survivor is attempting to leave, they must spend 1 extra Action per Zombie to leave the Zone.
- Entering a Zone containing Zombies ends the Survivor’s Move Action, even if they have a Skill that allows them to move through multiple Zones per Move Action (or the Slippery Skill).
- Waterhole Zones: A Survivor must spend an additional Action to leave a Waterhole Zone with a Move Action (does not apply if leaving via a Bank, or benefiting from the Speed Enchantment).
Search
You can only Search building Zones and only if there are no Zombies in that Zone. Draw a card from the Equipment deck, place it in inventory or discard it. A Survivor can only perform a single Search Action per Turn. Reshuffle discards when the deck runs out (except Vault cards).
Open a Door
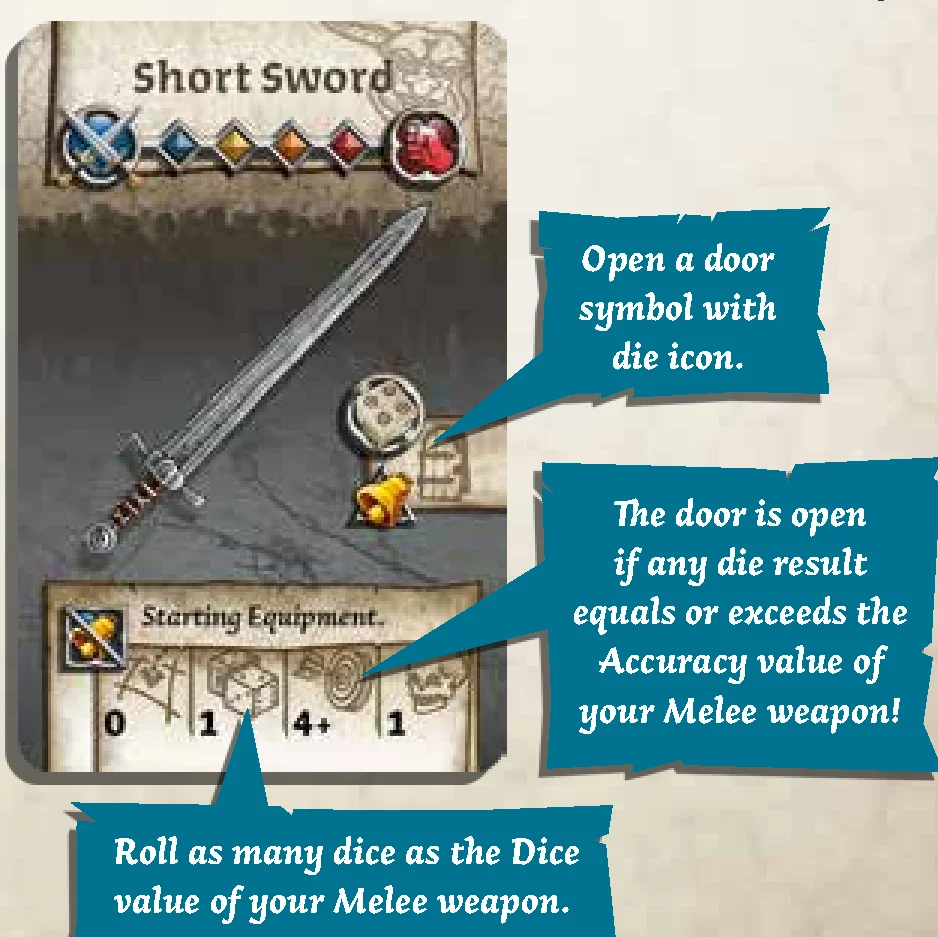
Melee weapons with the “Open a door” symbol can open an adjacent closed door:
- If the symbol has a die icon: roll as many dice as the weapon’s Dice value. The door is opened if any die result equals or exceeds the Accuracy number. Place a Noise token.
- If the symbol has no die icon: opens without a roll. Place a Noise token if the weapon is noisy.
- NOTE: Opening a door is not a Melee Action.
- Colored doors usually require specific Quest conditions (like taking the matching Objective) before they can be opened.
Spawning In Buildings
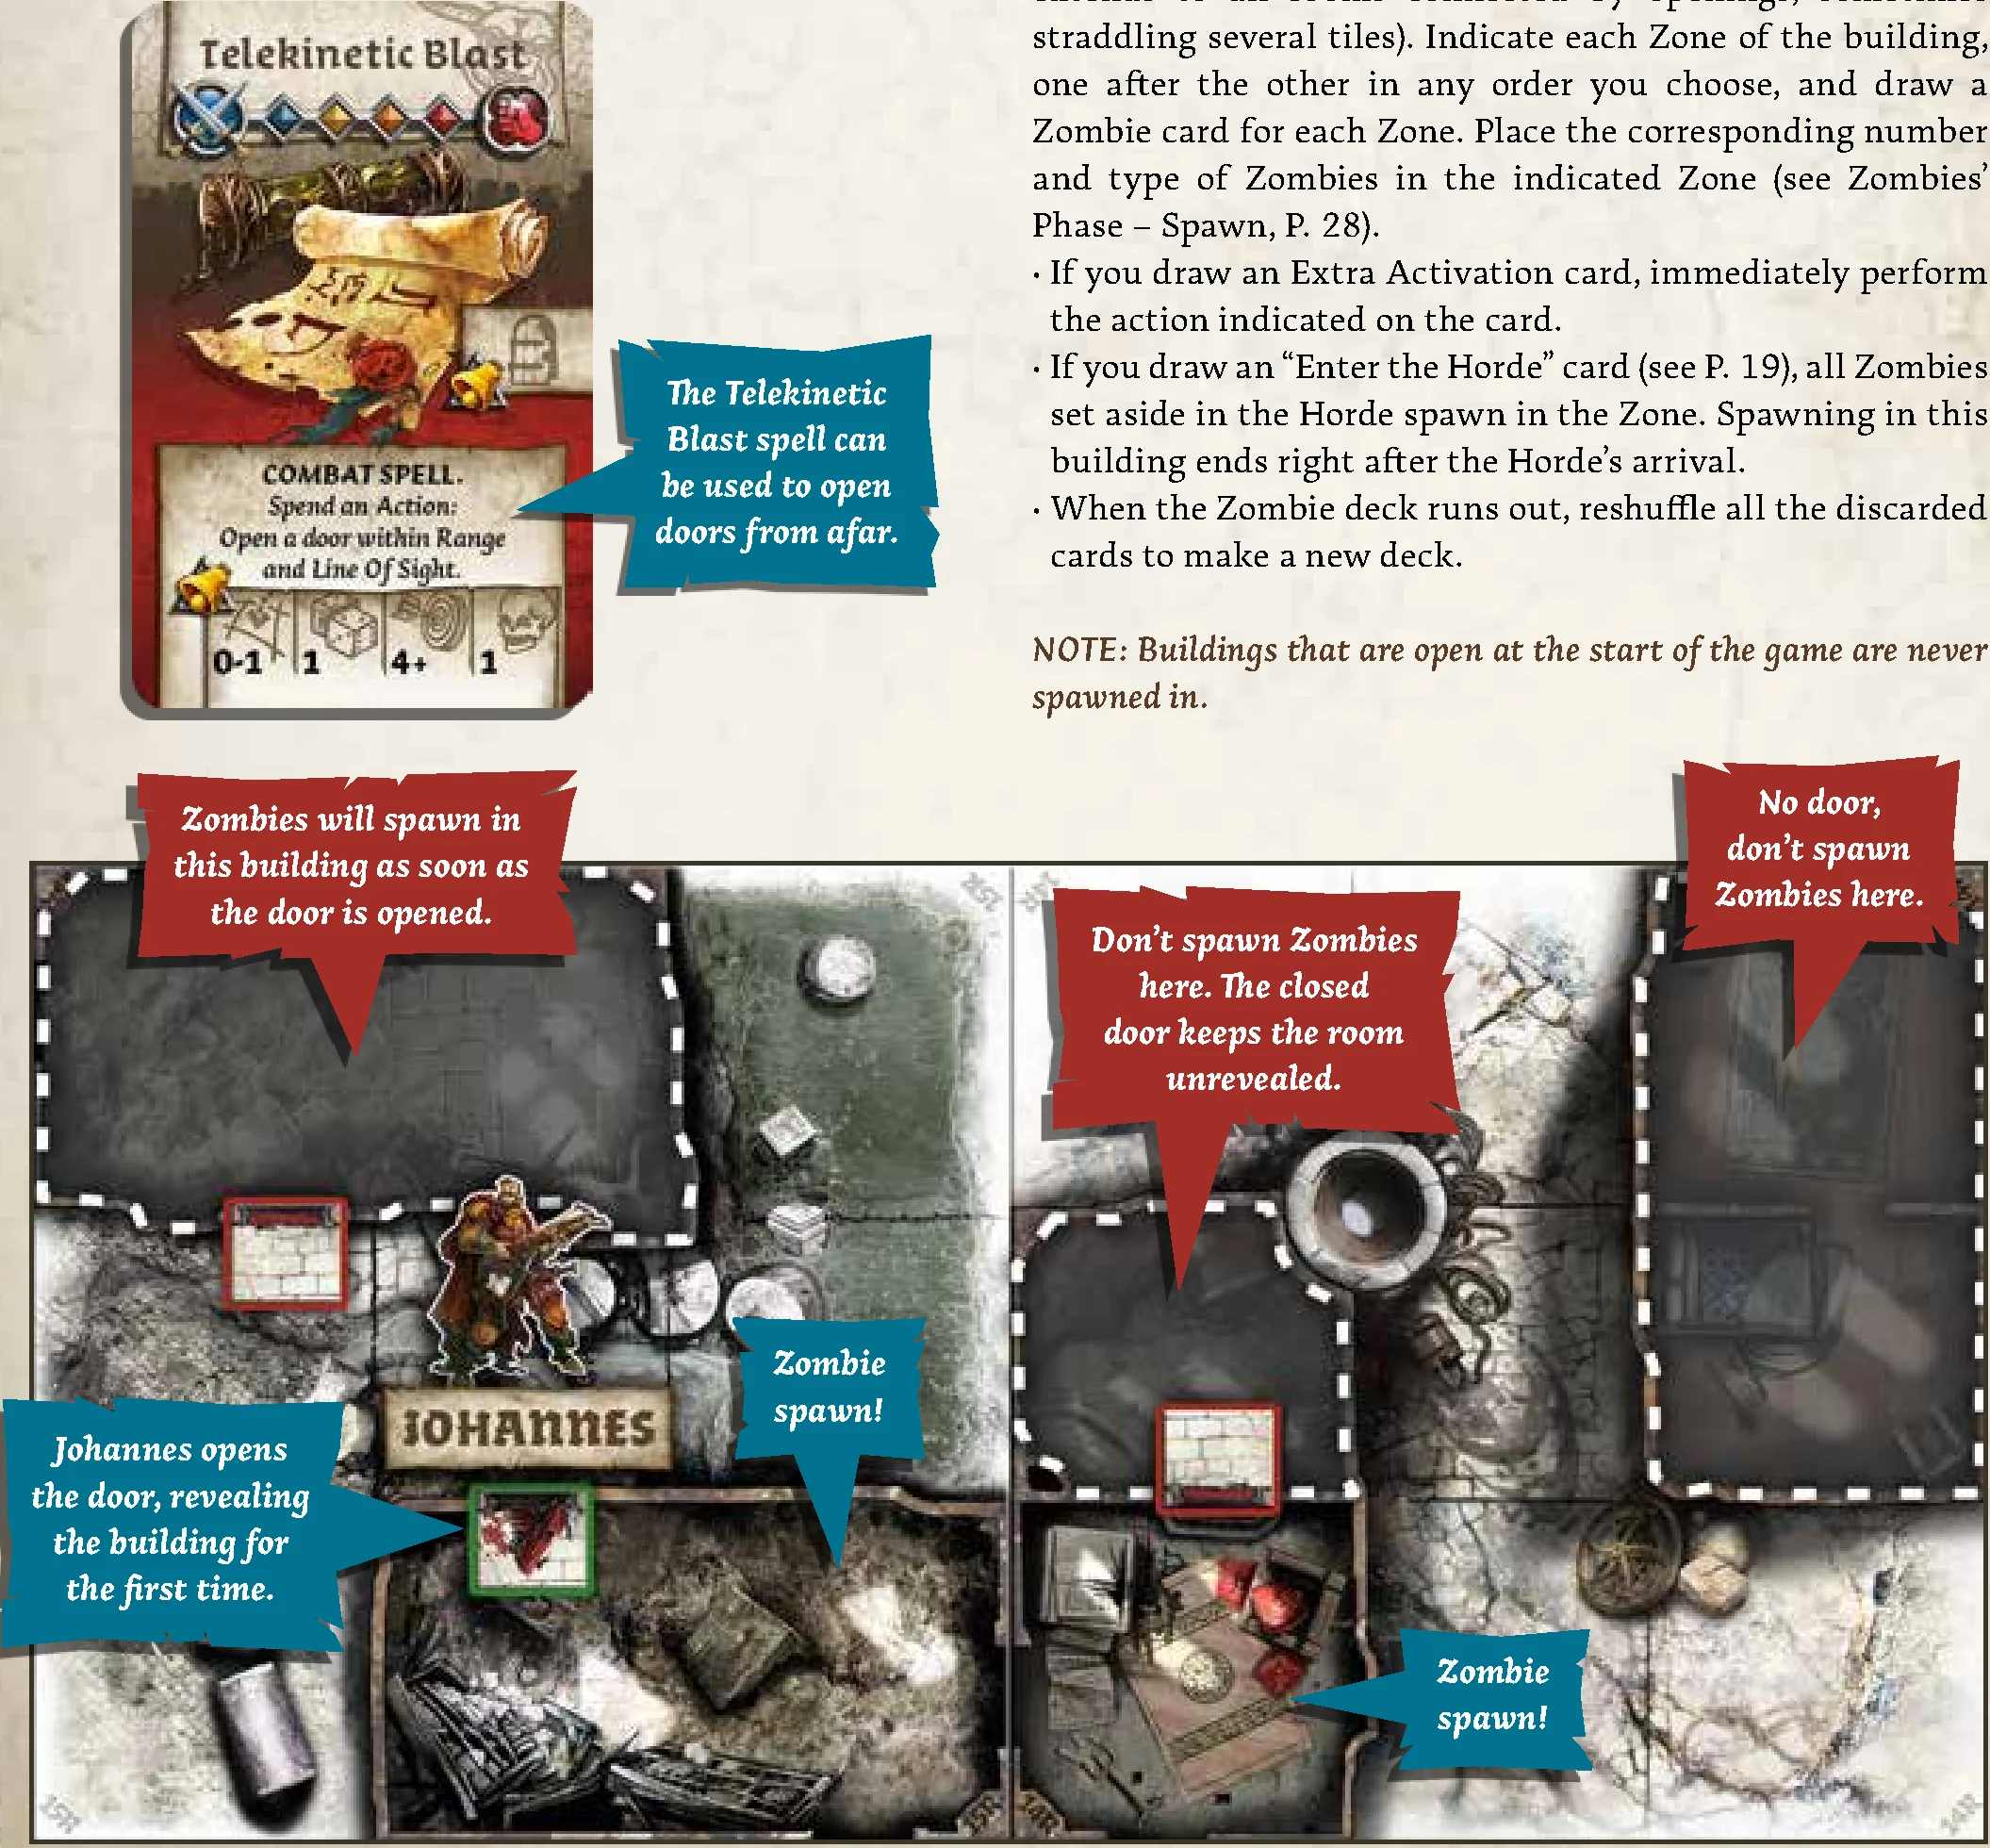
Opening a closed building for the first time reveals all the Zombies inside all rooms of the building (a single building extends to all rooms connected by openings, sometimes straddling several tiles). Indicate each Zone of the building, one after the other in any order you choose, and draw a Zombie card for each Zone. Place the corresponding number and type of Zombies in the indicated Zone.
- If you draw an Extra Activation card, immediately perform the action indicated on the card.
- If you draw an “Enter the Horde” card, all Zombies set aside in the Horde spawn in the Zone. Spawning in this building ends right after the Horde’s arrival.
- When the Zombie deck runs out, reshuffle all the discarded cards to make a new deck.
- NOTE: Buildings that are open at the start of the game are never spawned in.
Reorganize / Trade
At the cost of 1 Action, a Survivor can reorganize the cards in their inventory in any way they wish. The Survivor can simultaneously exchange any number of cards with 1 (and only 1) other Survivor currently in the same Zone. This other Survivor reorganizes their own inventory for free. A Trade Action doesn’t have to be equal. You can trade everything for nothing, if both parties agree!
Combat Actions
Combat Actions use all types of combat-oriented Equipment cards: Melee, Ranged, or Magic.
- Melee Action: The Survivor uses a Melee weapon held in Hand to attack Zombies in their own Zone.
- Ranged Action: The Survivor uses a Ranged weapon held in Hand to fire at a single Zone within the Range shown on the weapon’s card. Survivors shoot at Zones, not Actors. Using a Ranged weapon at Range 0 is still a Ranged Action.
- Magic Action: The Survivor uses a Combat spell held in Hand to attack Zombies. This attack follows the same rules as Ranged Combat.
Enchantment Action
The Survivor uses an Enchantment (a spell without Combat characteristics) held in Hand:
- Enchantments are cast at target Actors or Zones within the Survivor’s Line Of Sight.
- If the target is a Survivor, the caster may target themselves.
- Most Enchantments bear the note Once per Turn. A given Survivor can cast it only once during each of their Turns. If they own multiple copies, each copy can be cast independently.
Take or Activate an Objective
The Survivor takes an Objective or activates an Objective in the same Zone. The game effects are explained in the Quest’s description.
Siege Actions – Trebuchet
The Trebuchet is a Siege Engine. It is not an Actor. In order to perform Siege Actions, a Survivor spends a variable amount of Actions all at once:
- Moving a Trebuchet (Action Cost: 3): The Survivor and the Trebuchet both move from a Zone to the next. Uses standard Move Action rules without bonus Skills/effects. A Trebuchet is destroyed whenever it is set in a Waterhole Zone.
- Firing a Trebuchet (Action Cost: 3): The Survivor loads and fires the Trebuchet, aiming at a Zone at Range 2 or more (no Line of Sight required) or the Horde. Does not produce Noise and does not benefit from Combat Action-related bonuses.
Make Some Noise!
The Survivor makes Noise in an attempt to attract Zombies. Place 1 Noise token in their Zone.
Do Nothing
The Survivor does nothing and prematurely ends their Turn. Their remaining Actions are lost.
READING AN EQUIPMENT CARD
Zombie Orcs are invading a land which has been at war for two years. Casualties have been horrendous on both sides, but as long as one of us stands, the battle is not over. On the bright side, there are empty houses and weapons everywhere!
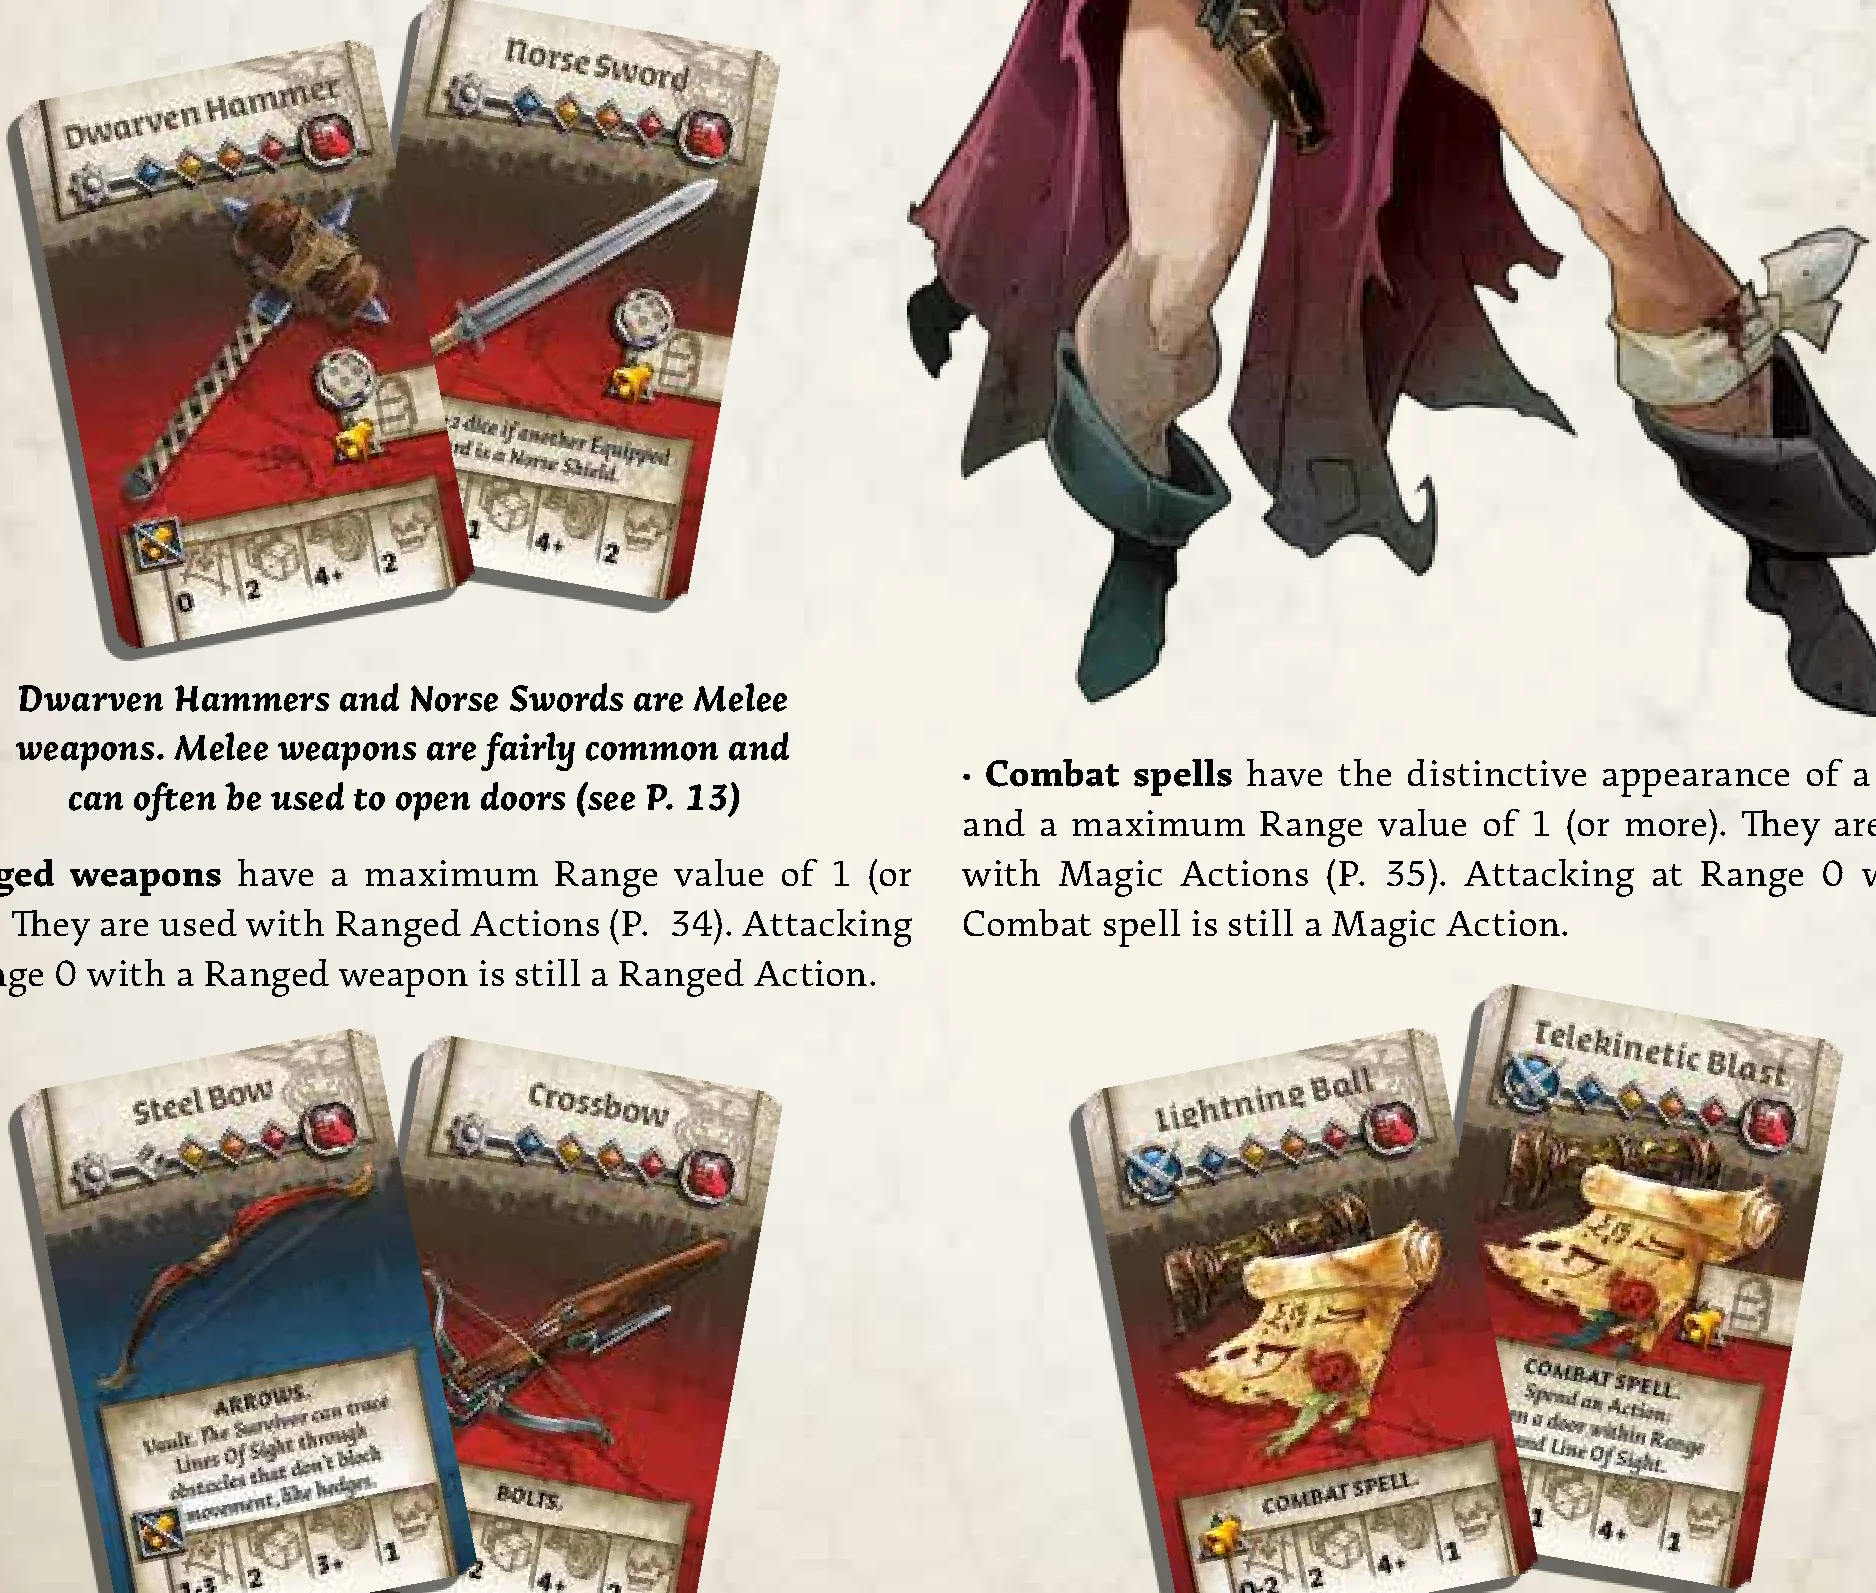
Zombicide: Green Horde features many Equipment cards. The ones your Survivors use to blast Zombies fall in 3 categories:
- Melee weapons: Display a 0 Range value and thus can only be used in the same Zone as the Survivor. They are used with Melee Actions.
- Ranged weapons: Have a maximum Range value of 1 (or more). They are used with Ranged Actions. Attacking at Range 0 with a Ranged weapon is still a Ranged Action.
- Combat spells: Have the distinctive appearance of a scroll and a maximum Range value of 1 (or more). They are used with Magic Actions. Attacking at Range 0 with a Combat spell is still a Magic Action.
- Some Equipment cards can belong to several types at once (e.g. the Spiked Bow is both a Melee and a Ranged weapon).
Door-Breaching, Zombie-Killing, And Noisy Equipment
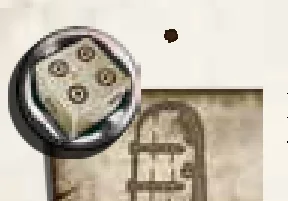 Equipment that allows you to open doors, but requires a die roll to do it: The die indicates the minimum roll needed to open the door.
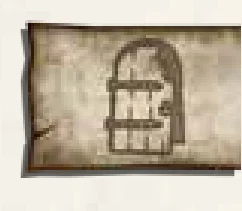 Equipment that allows you to open doors without a die roll: Opens doors without rolling dice.
- Noise symbols: Each of these symbols is accompanied by a second symbol related to noise:
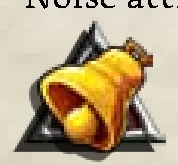 Noisy: This Action is noisy and produces a Noise token.
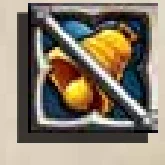 Silent: This Action isn’t noisy and does not produce a Noise token.
Magic Equipment
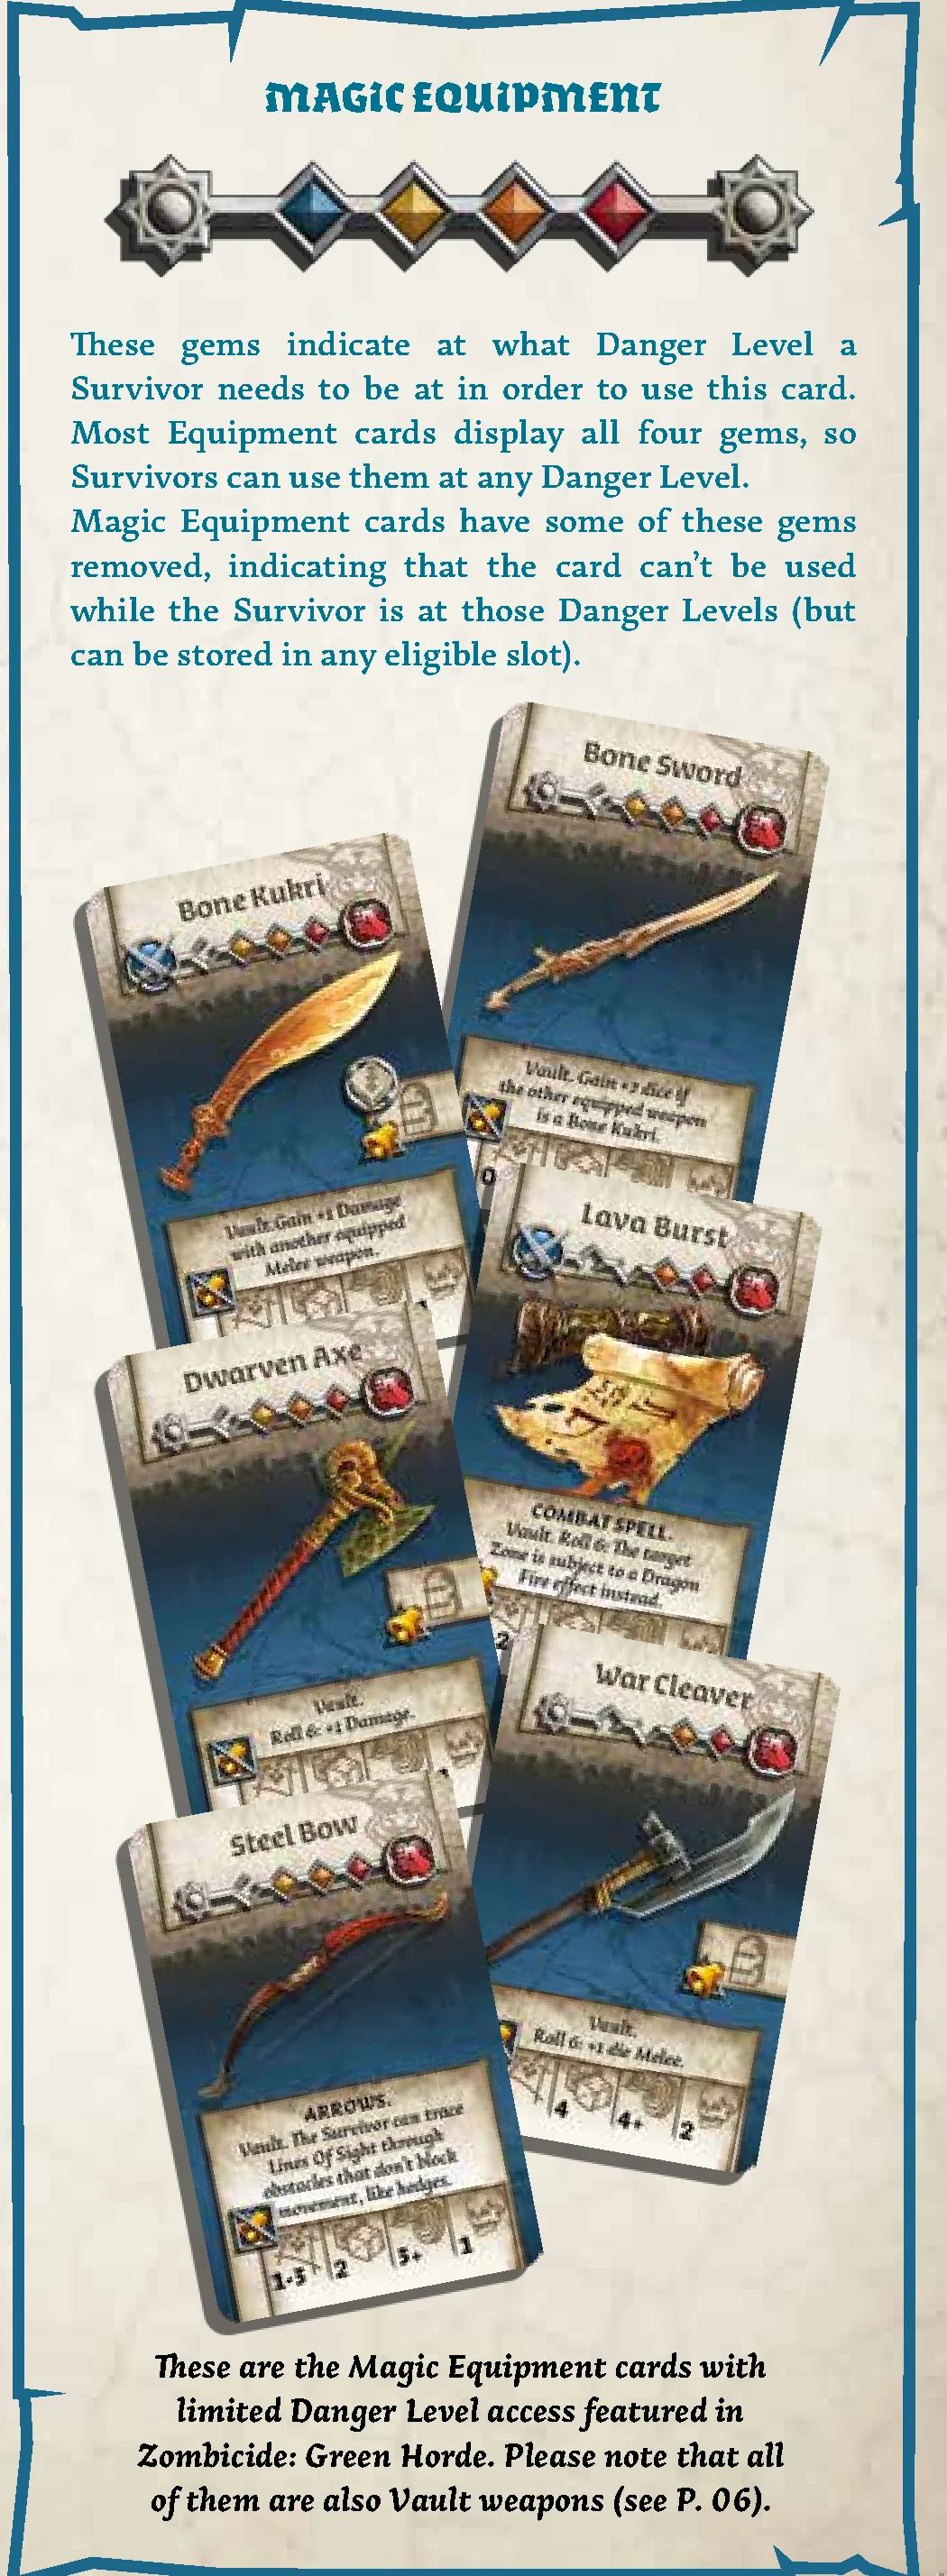
The gems on the card indicate at what Danger Level a Survivor needs to be at in order to use this card. Most Equipment cards display all four gems, so Survivors can use them at any Danger Level. Magic Equipment cards have some of these gems removed, indicating that the card can’t be used while the Survivor is at those Danger Levels (but can be stored in any eligible slot). All limited Danger Level Magic Equipment featured in Zombicide: Green Horde are also Vault weapons.
Combat Characteristics
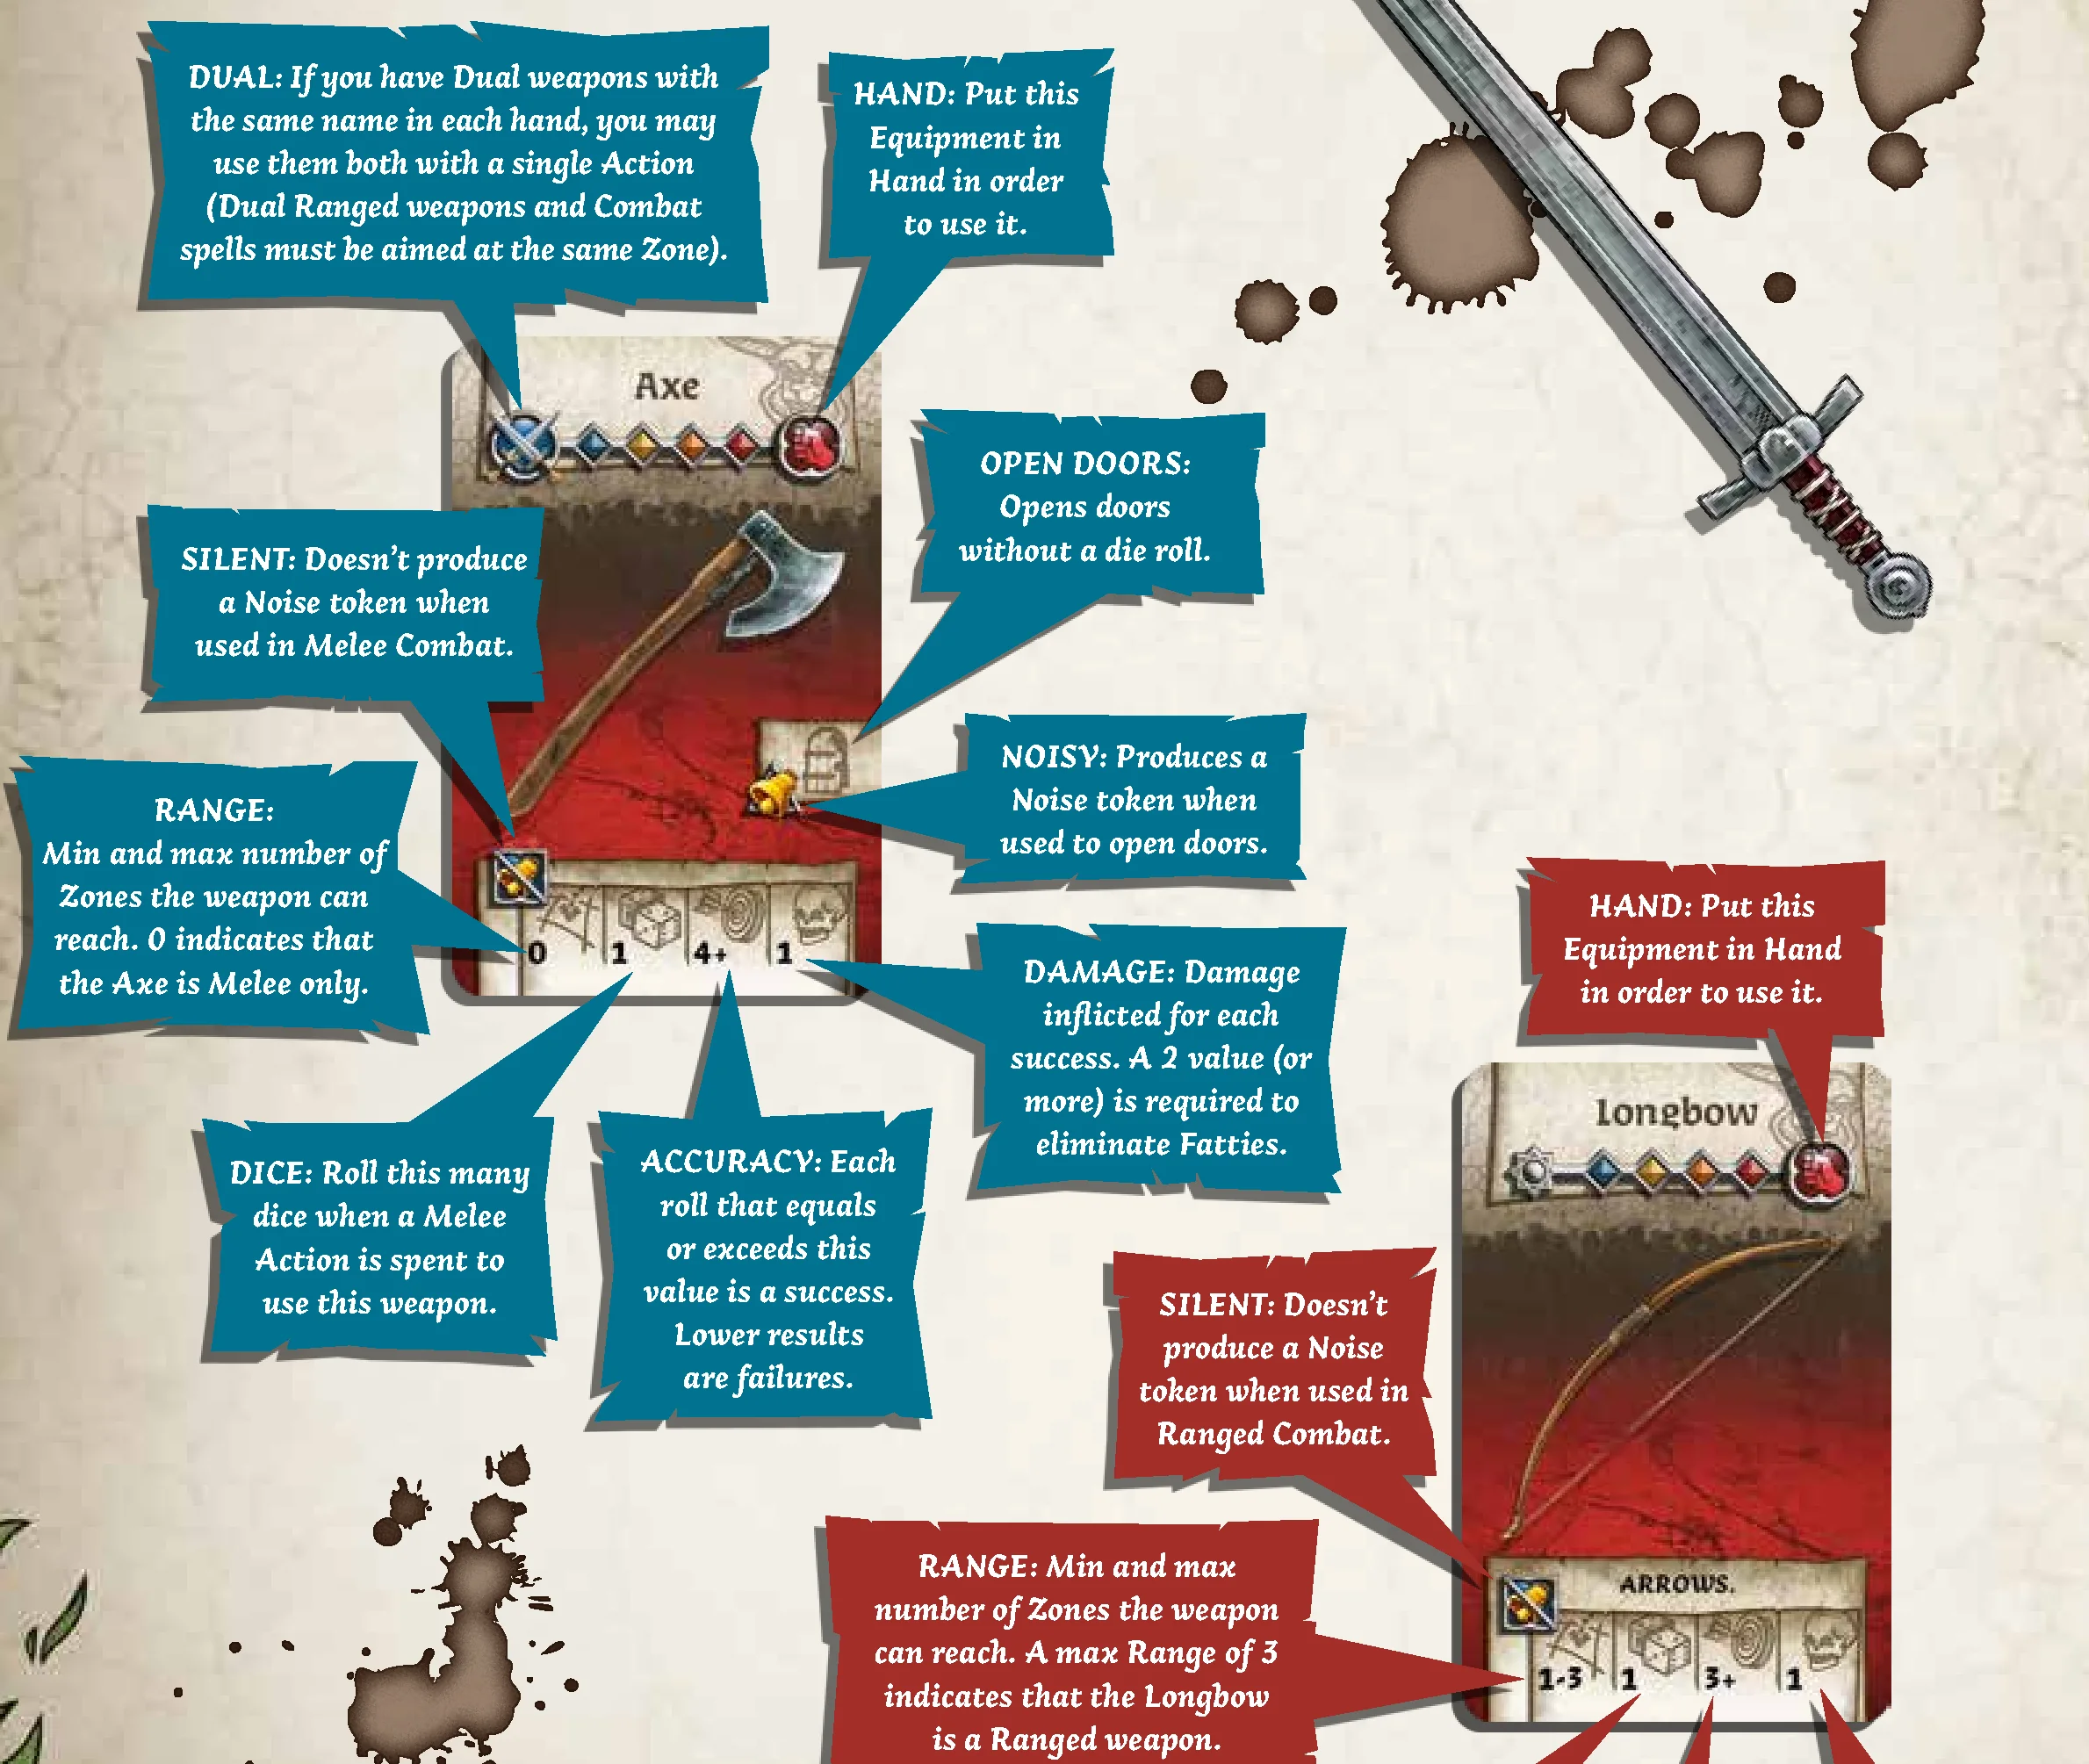
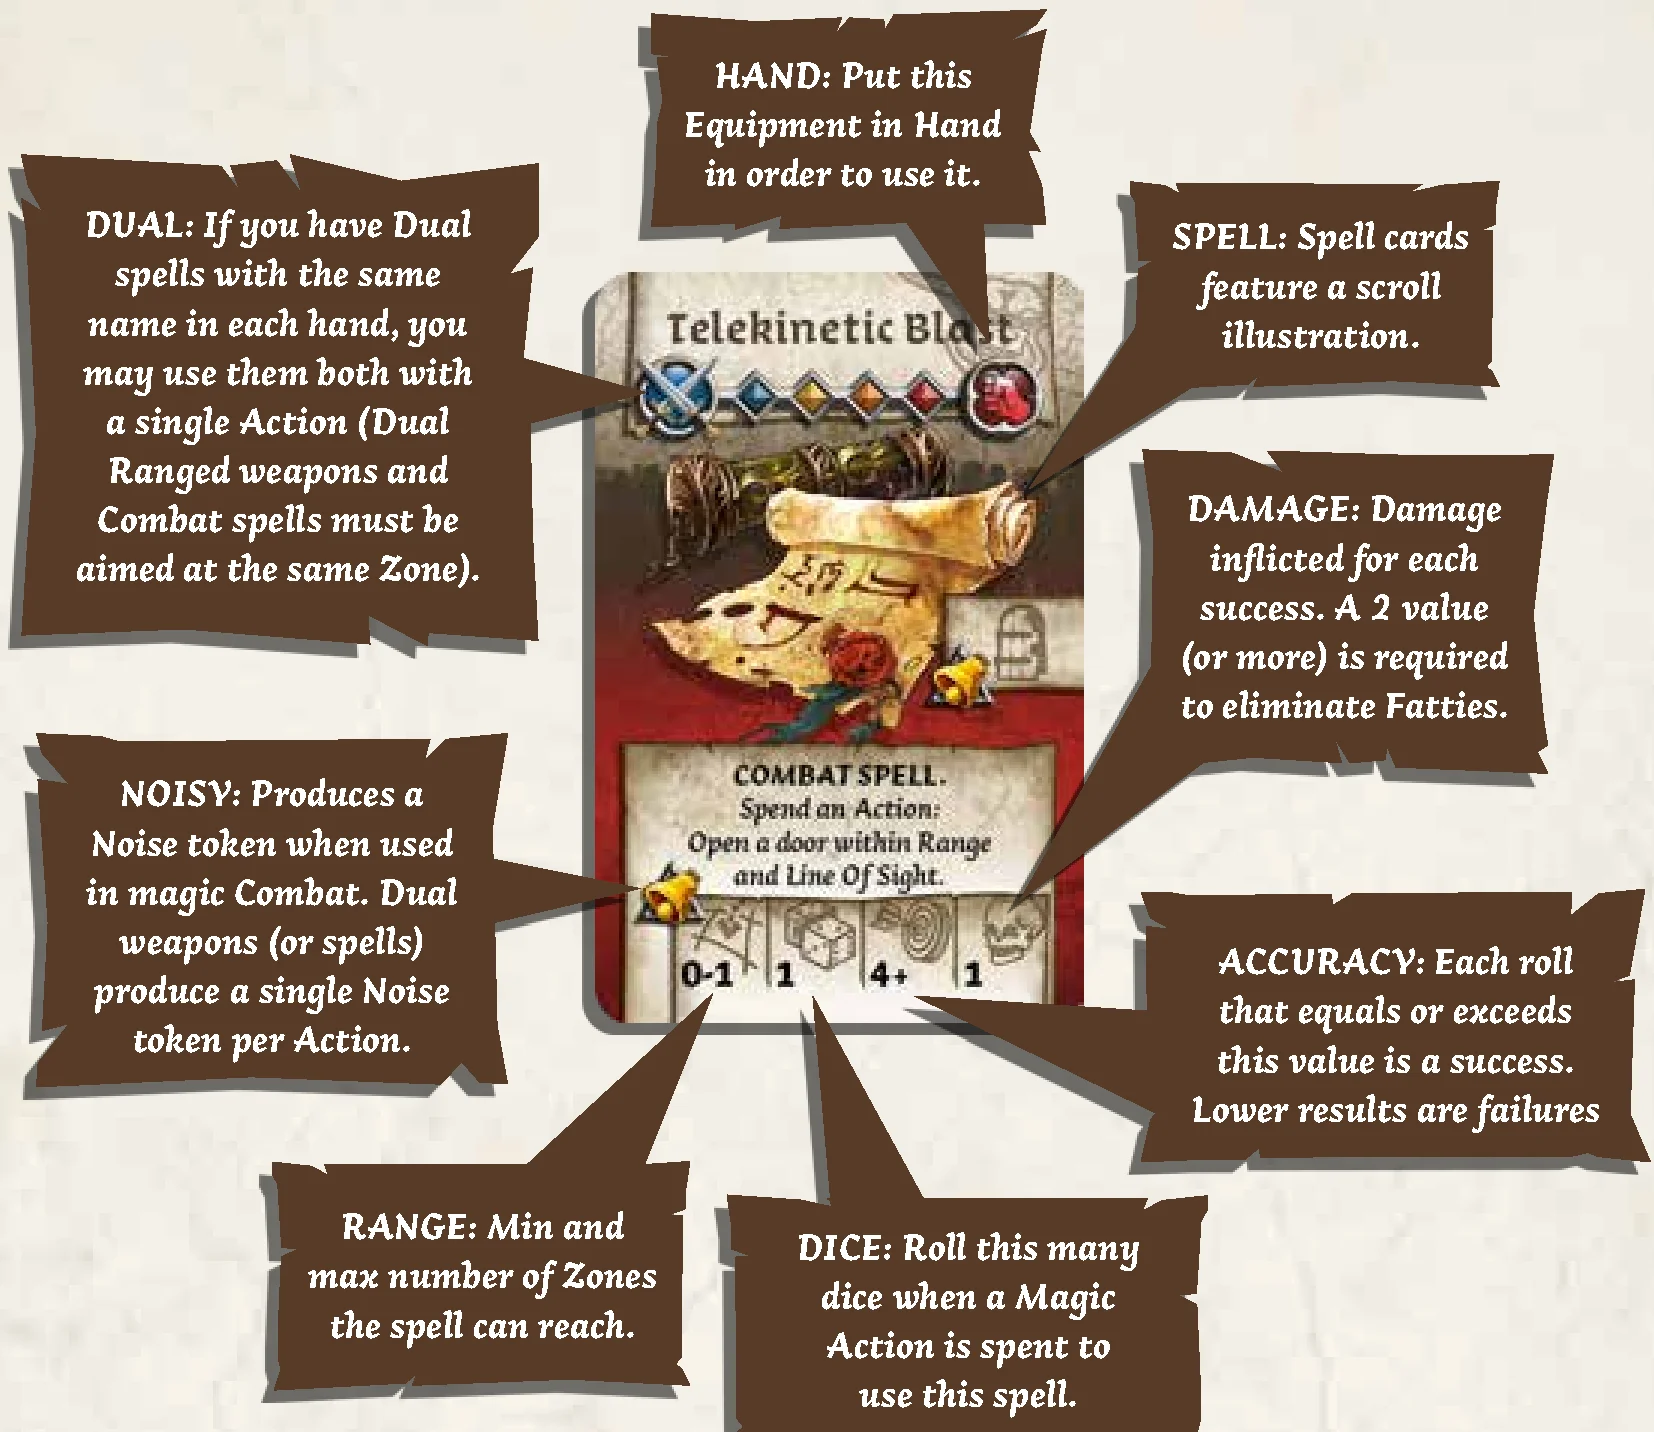
Melee weapons, Ranged weapons, and Combat spells display Combat characteristics used to maim, shoot, or disintegrate Zombies in many ways:
- HAND: Put this Equipment in Hand in order to use it.
- DUAL: If you have Dual weapons with the same name in each hand, you may use them both with a single Action (Dual Ranged weapons and Combat spells must be aimed at the same Zone).
- RANGE: Min and max number of Zones the weapon can reach. 0 indicates Melee only.
- DICE: Roll this many dice when an Action is spent to use this weapon.
- ACCURACY: Each roll that equals or exceeds this value is a success. Lower results are failures.
- DAMAGE: Damage inflicted for each success. A 2 value (or more) is required to eliminate Fatties.
- OPEN DOORS: Opens doors (with or without a die roll).
- SILENT / NOISY: Indicates whether the action produces a Noise token.
RESOLVING COMBAT
When performing a Melee, Ranged, Magic, or Siege Action, roll as many dice as the Dice number of the weapon/spell/engine being used.
- Dual Symbol: If the active Survivor has 2 identical weapons or Combat spells with the Dual symbol equipped in Hands, they can use both at the same time for a single Action. (Ranged/Magic must aim at the same Zone).
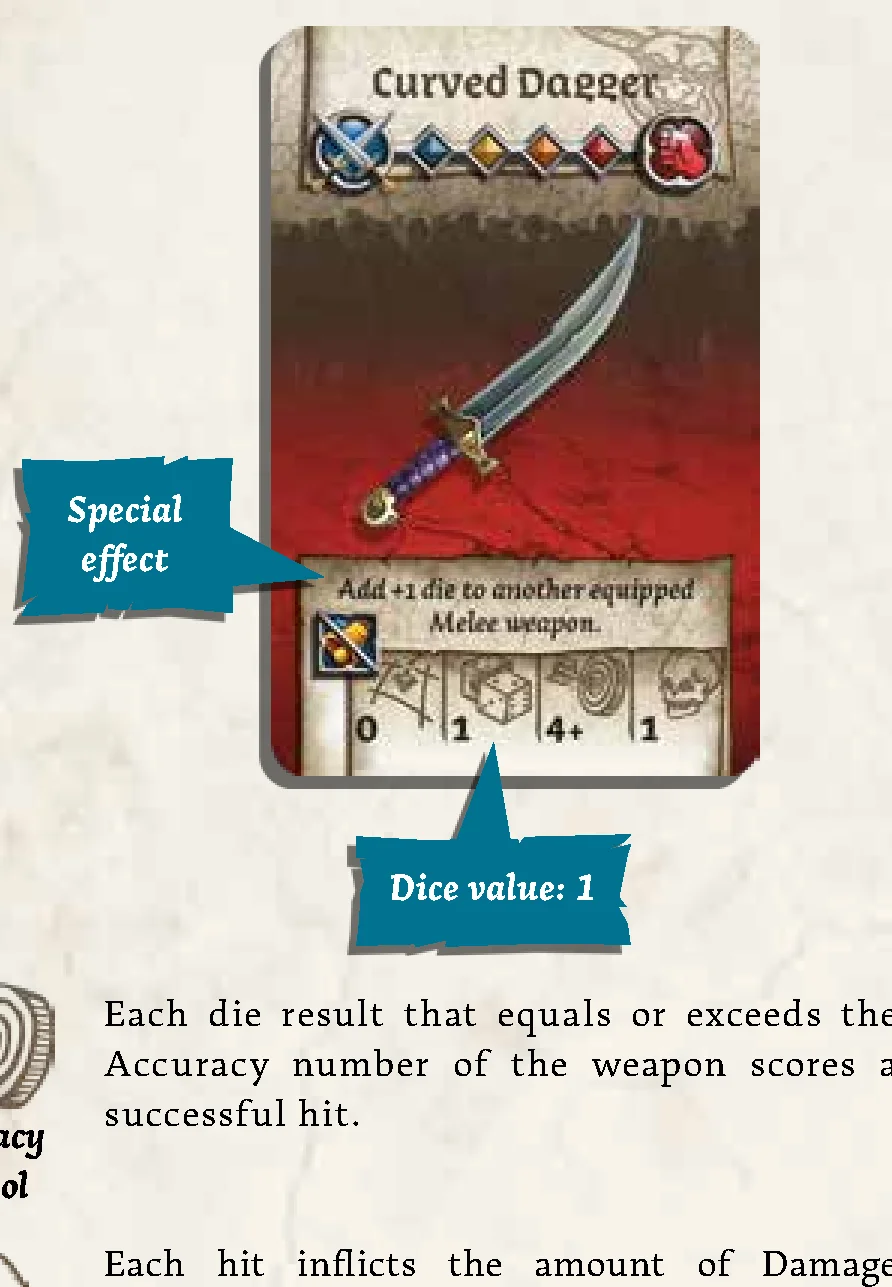
- Hits: Each die result that equals or exceeds the Accuracy number scores a hit.
- Damage: Each hit inflicts the amount of Damage specified to a single target:
- Orc Walkers, Orc Runners, Orc Necromancers require Damage 1.
- Orc Fatties require Damage 2 (Damage 1 hits are ignored, they do not stack).
- Orc Abominations require Damage 3 (Dragon Fire or Trebuchet).
- Excess Damage on a hit is overkill and wasted; each hit can only take out 1 target.
- Three Hands?: Putting a proper card in the Body space allows 3 Hand cards, but a Survivor can only use 2 of them at any given time.
Melee Action
A Survivor holding a Melee weapon (Range 0) in Hand attacks Zombies in their own Zone. Hits are divided among targets as the player chooses. Missed Melee strikes cannot cause Friendly Fire.
Ranged Action
A Survivor holding a Ranged weapon (Range 1+) in Hand shoots at a Zone within Line of Sight and Range. When shooting into a Zone, ignore Actors in intermediate Zones. A Survivor can shoot at another Zone while Orc Zombies are in their own Zone!
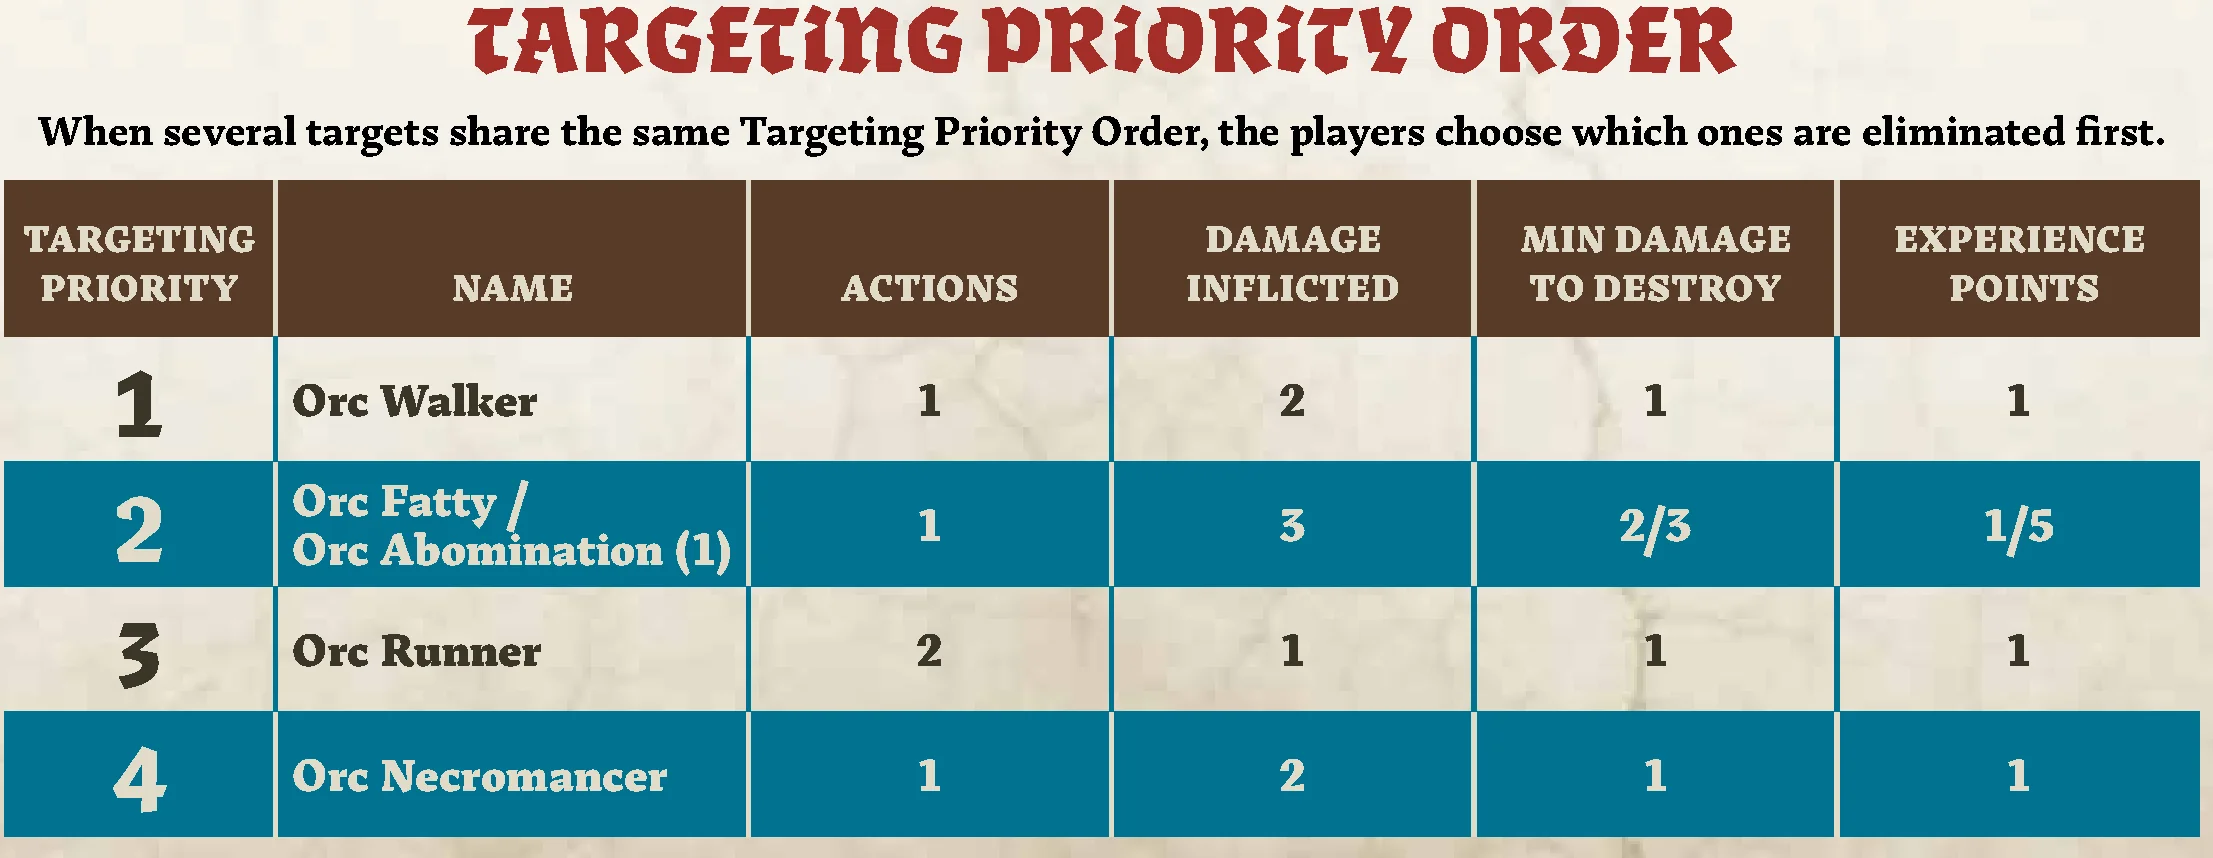
Targeting Priority Order
When using a Ranged weapon (even at Range 0), the shooting Survivor does not choose targets. Hits are assigned strictly according to this order:
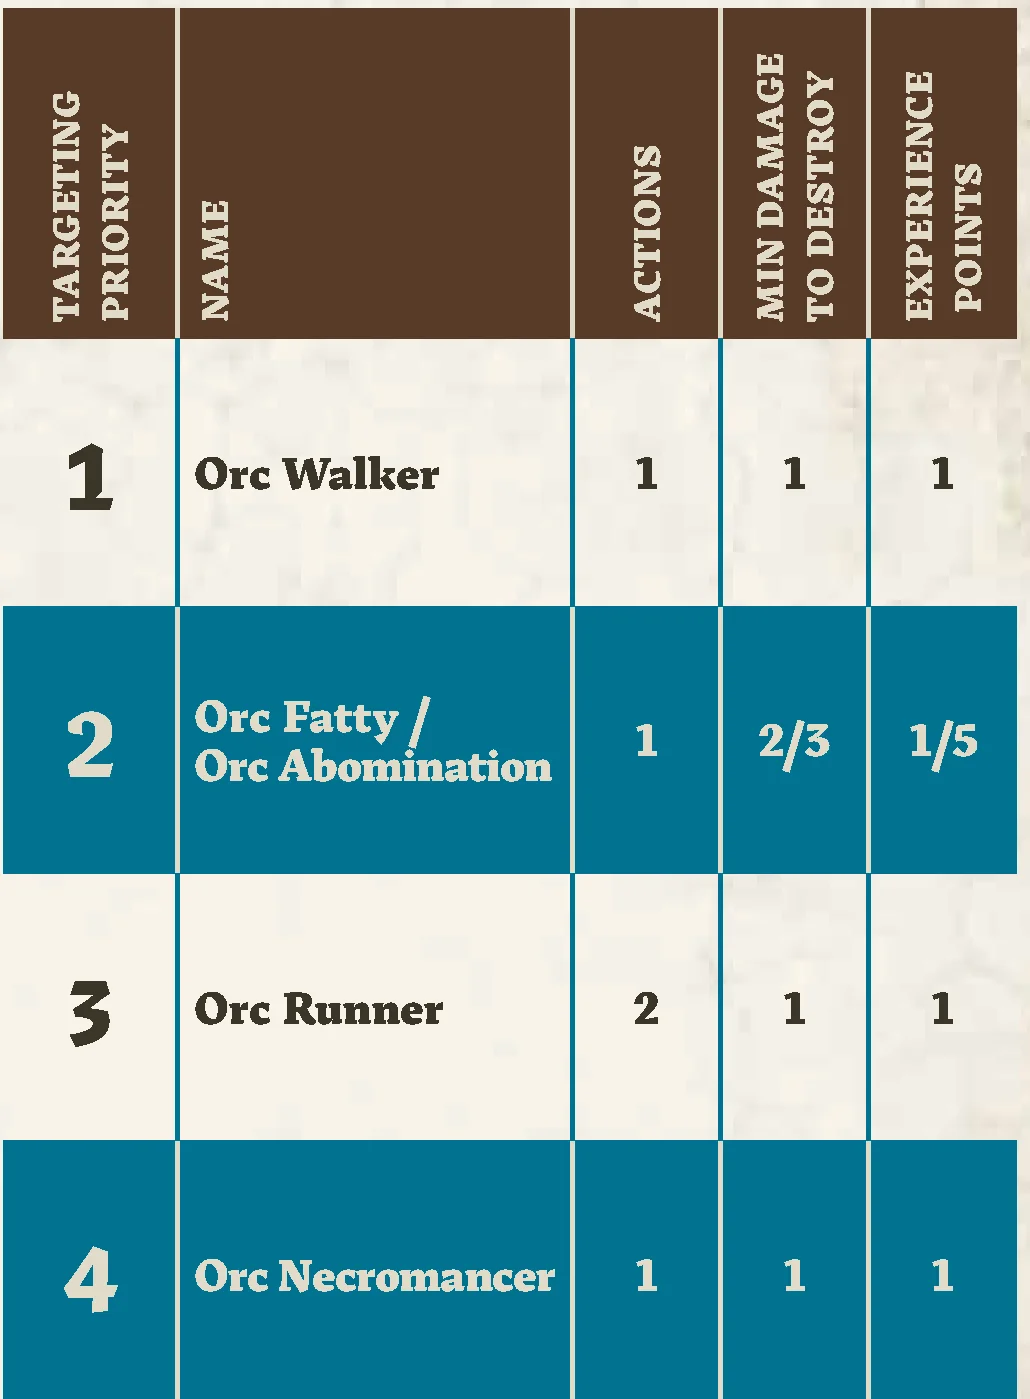
- Orc Walker (Actions: 1, Min Damage: 1, XP: 1)
- Orc Fatty / Orc Abomination (Shooter chooses) (Actions: 1, Min Damage: 2/3, XP: 1/5)
- Orc Runner (Actions: 2, Min Damage: 1, XP: 1)
- Orc Necromancer (Actions: 1, Min Damage: 1, XP: 1)
Hits must eliminate all targets of a priority before assigning hits to the next priority.
Friendly Fire
- A Survivor can’t hit themselves with their own attacks.
- Misses on attack rolls into a Zone containing teammates automatically land on Survivors standing in the target Zone.
- Assign Friendly Fire hits in any way desired among Survivors in that Zone.
- Armor rolls are allowed to cancel hits. Remaining hits inflict the weapon’s full Damage per hit.
- Friendly Fire does not apply to Melee Actions. Killing a Survivor earns no experience.
Reloadable Weapons
Weapons like the Hand Crossbow require spending an Action to reload between shots to fire multiple times in a Round. At the End Phase, all reloadable weapons are freely reloaded. A single Action reloads both Dual weapons.
Magic Action
A Survivor equipped with a Combat spell in Hand blasts a Zone within Line of Sight and Range. Follows the exact same rules as Ranged Actions (including Targeting Priority Order and Friendly Fire).
Firing a Trebuchet
For 3 Actions, load and fire a Trebuchet in the Survivor’s Zone. Does not produce Noise.
- Target any Zone at Range 2 or more (no Line of Sight required), or the Horde.
- Choose ammunition:
- Scattershot: 6 dice, Accuracy 4+, Damage 1
- Grapeshot: 3 dice, Accuracy 4+, Damage 2
- Boulder: 1 die, Accuracy 4+, Damage 3
Accuracy improves to 3+ if any Survivor has Line of Sight to the target Zone.
- Apply casualties per standard rules (Targeting Priority and Friendly Fire apply). Treating the Horde as a single target Zone with no Line of Sight.
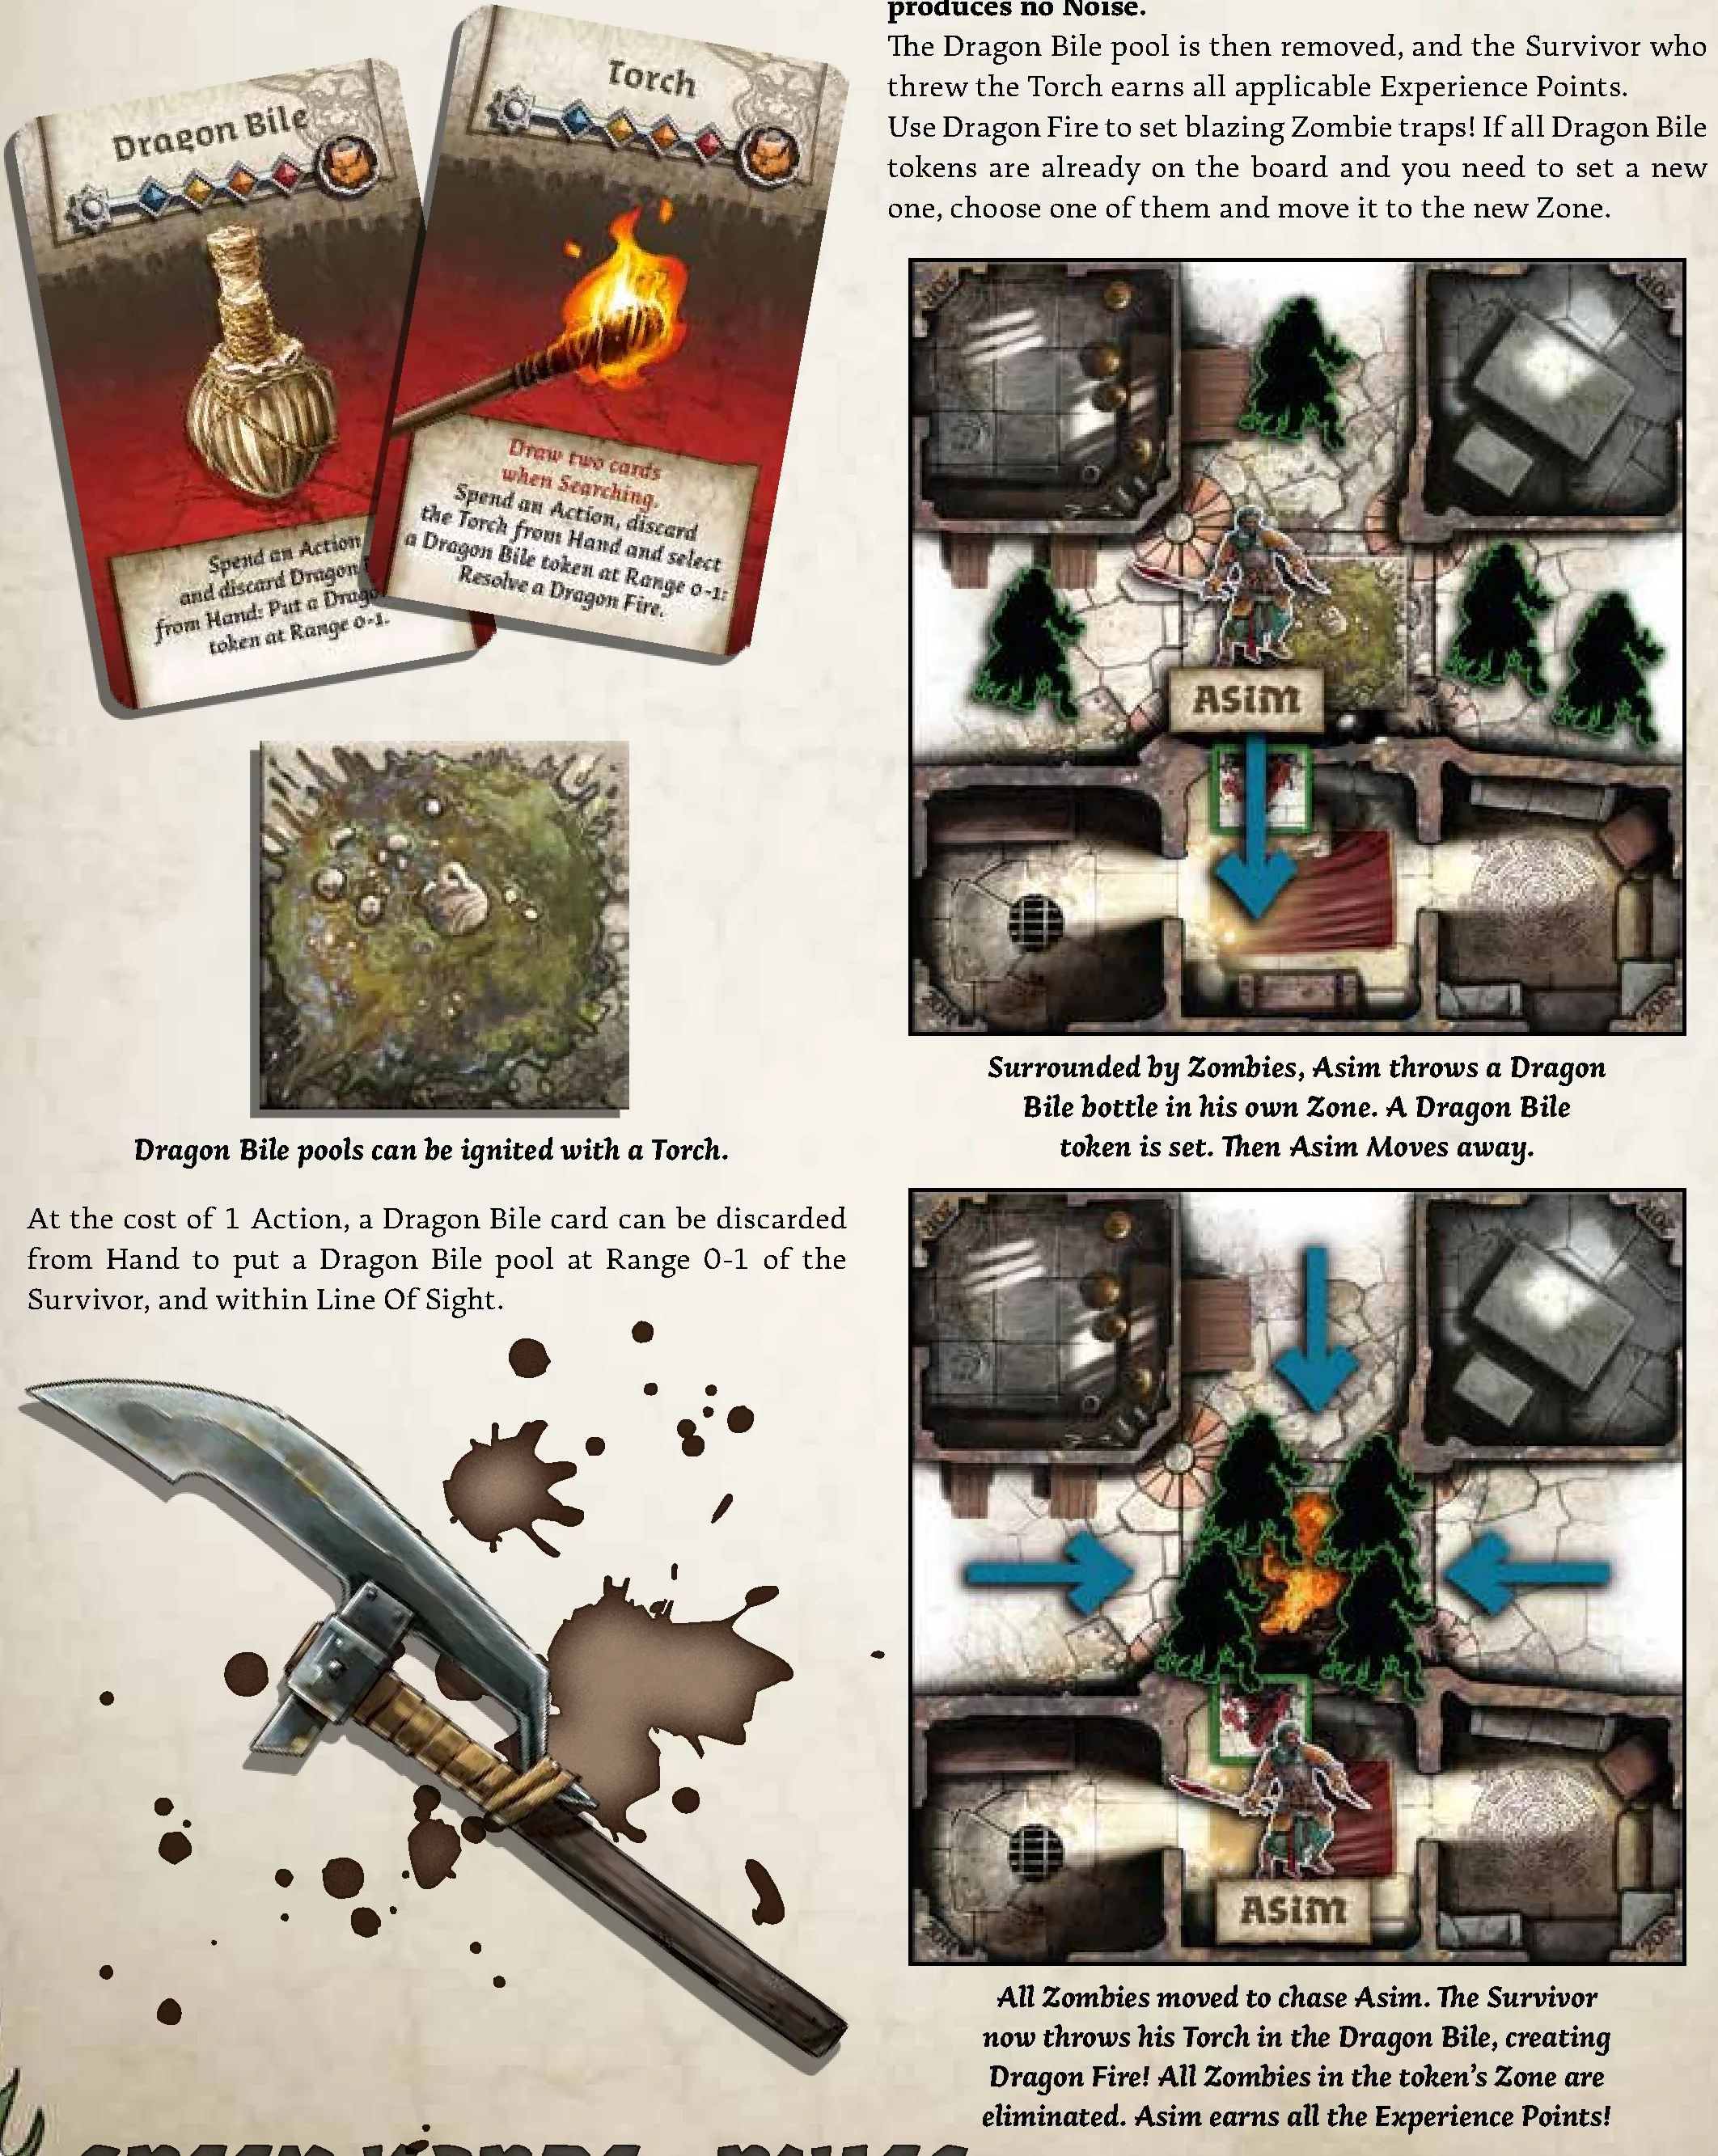
Dragon Fire
Discard Dragon Bile from Hand (1 Action) to place a Dragon Bile pool at Range 0-1 in Line of Sight. Later, discard a Torch from Hand (1 Action) to ignite it at Range 0-1, creating Dragon Fire.
- Every Actor and Siege Engine in the Zone is killed/destroyed instantly, regardless of Damage threshold, Armor, or remaining Wounds.
- Produces no Noise.
- The Survivor who threw the Torch earns all Experience Points.
- Dragon Fire has no effect in Waterhole Zones.
THE ZOMBIE TYPES
Green Horde features 5 types of Zombie Orcs. Most Zombies have a single Action to spend each time they activate (Runners have 2). A Zombie is eliminated as soon as it is successfully hit with an attack that has the minimum required Damage value. Then, its assailant immediately earns the listed Experience Points.
- Orc Walker: Rank-and-file warriors.
- Damage: 2
- Min. Damage to destroy: Damage 1
- Experience provided: 1 Point
- Orc Fatty: Leaders, shock troops, and brutes.
- Damage: 3
- Min. Damage to destroy: Damage 2
- Experience provided: 1 Point
- Orc Runner: Infected Goblins, fast and unpredictable.
- Damage: 1
- Min. Damage to destroy: Damage 1
- Experience provided: 1 Point
- Special rule: Each Orc Runner has two Actions per Activation.
- Orc Abomination: Raw power, impervious to anything but extreme damage.
- Damage: 3
- Min. Damage to destroy: Damage 3
- Experience provided: 5 Points
- Special rules: Wounds inflicted by Abominations can’t be prevented by Armor rolls. A Damage 3 weapon is required to kill an Abomination (either a Trebuchet or Dragon Fire).
- Orc Necromancer: Dark puppet-masters who flee upon being discovered.
- Damage: 2
- Min. Damage to destroy: Damage 1
- Experience provided: 1 Point
- Special rules: Detailed in the Necromancers section. Enters with a Necromancer Spawn token.
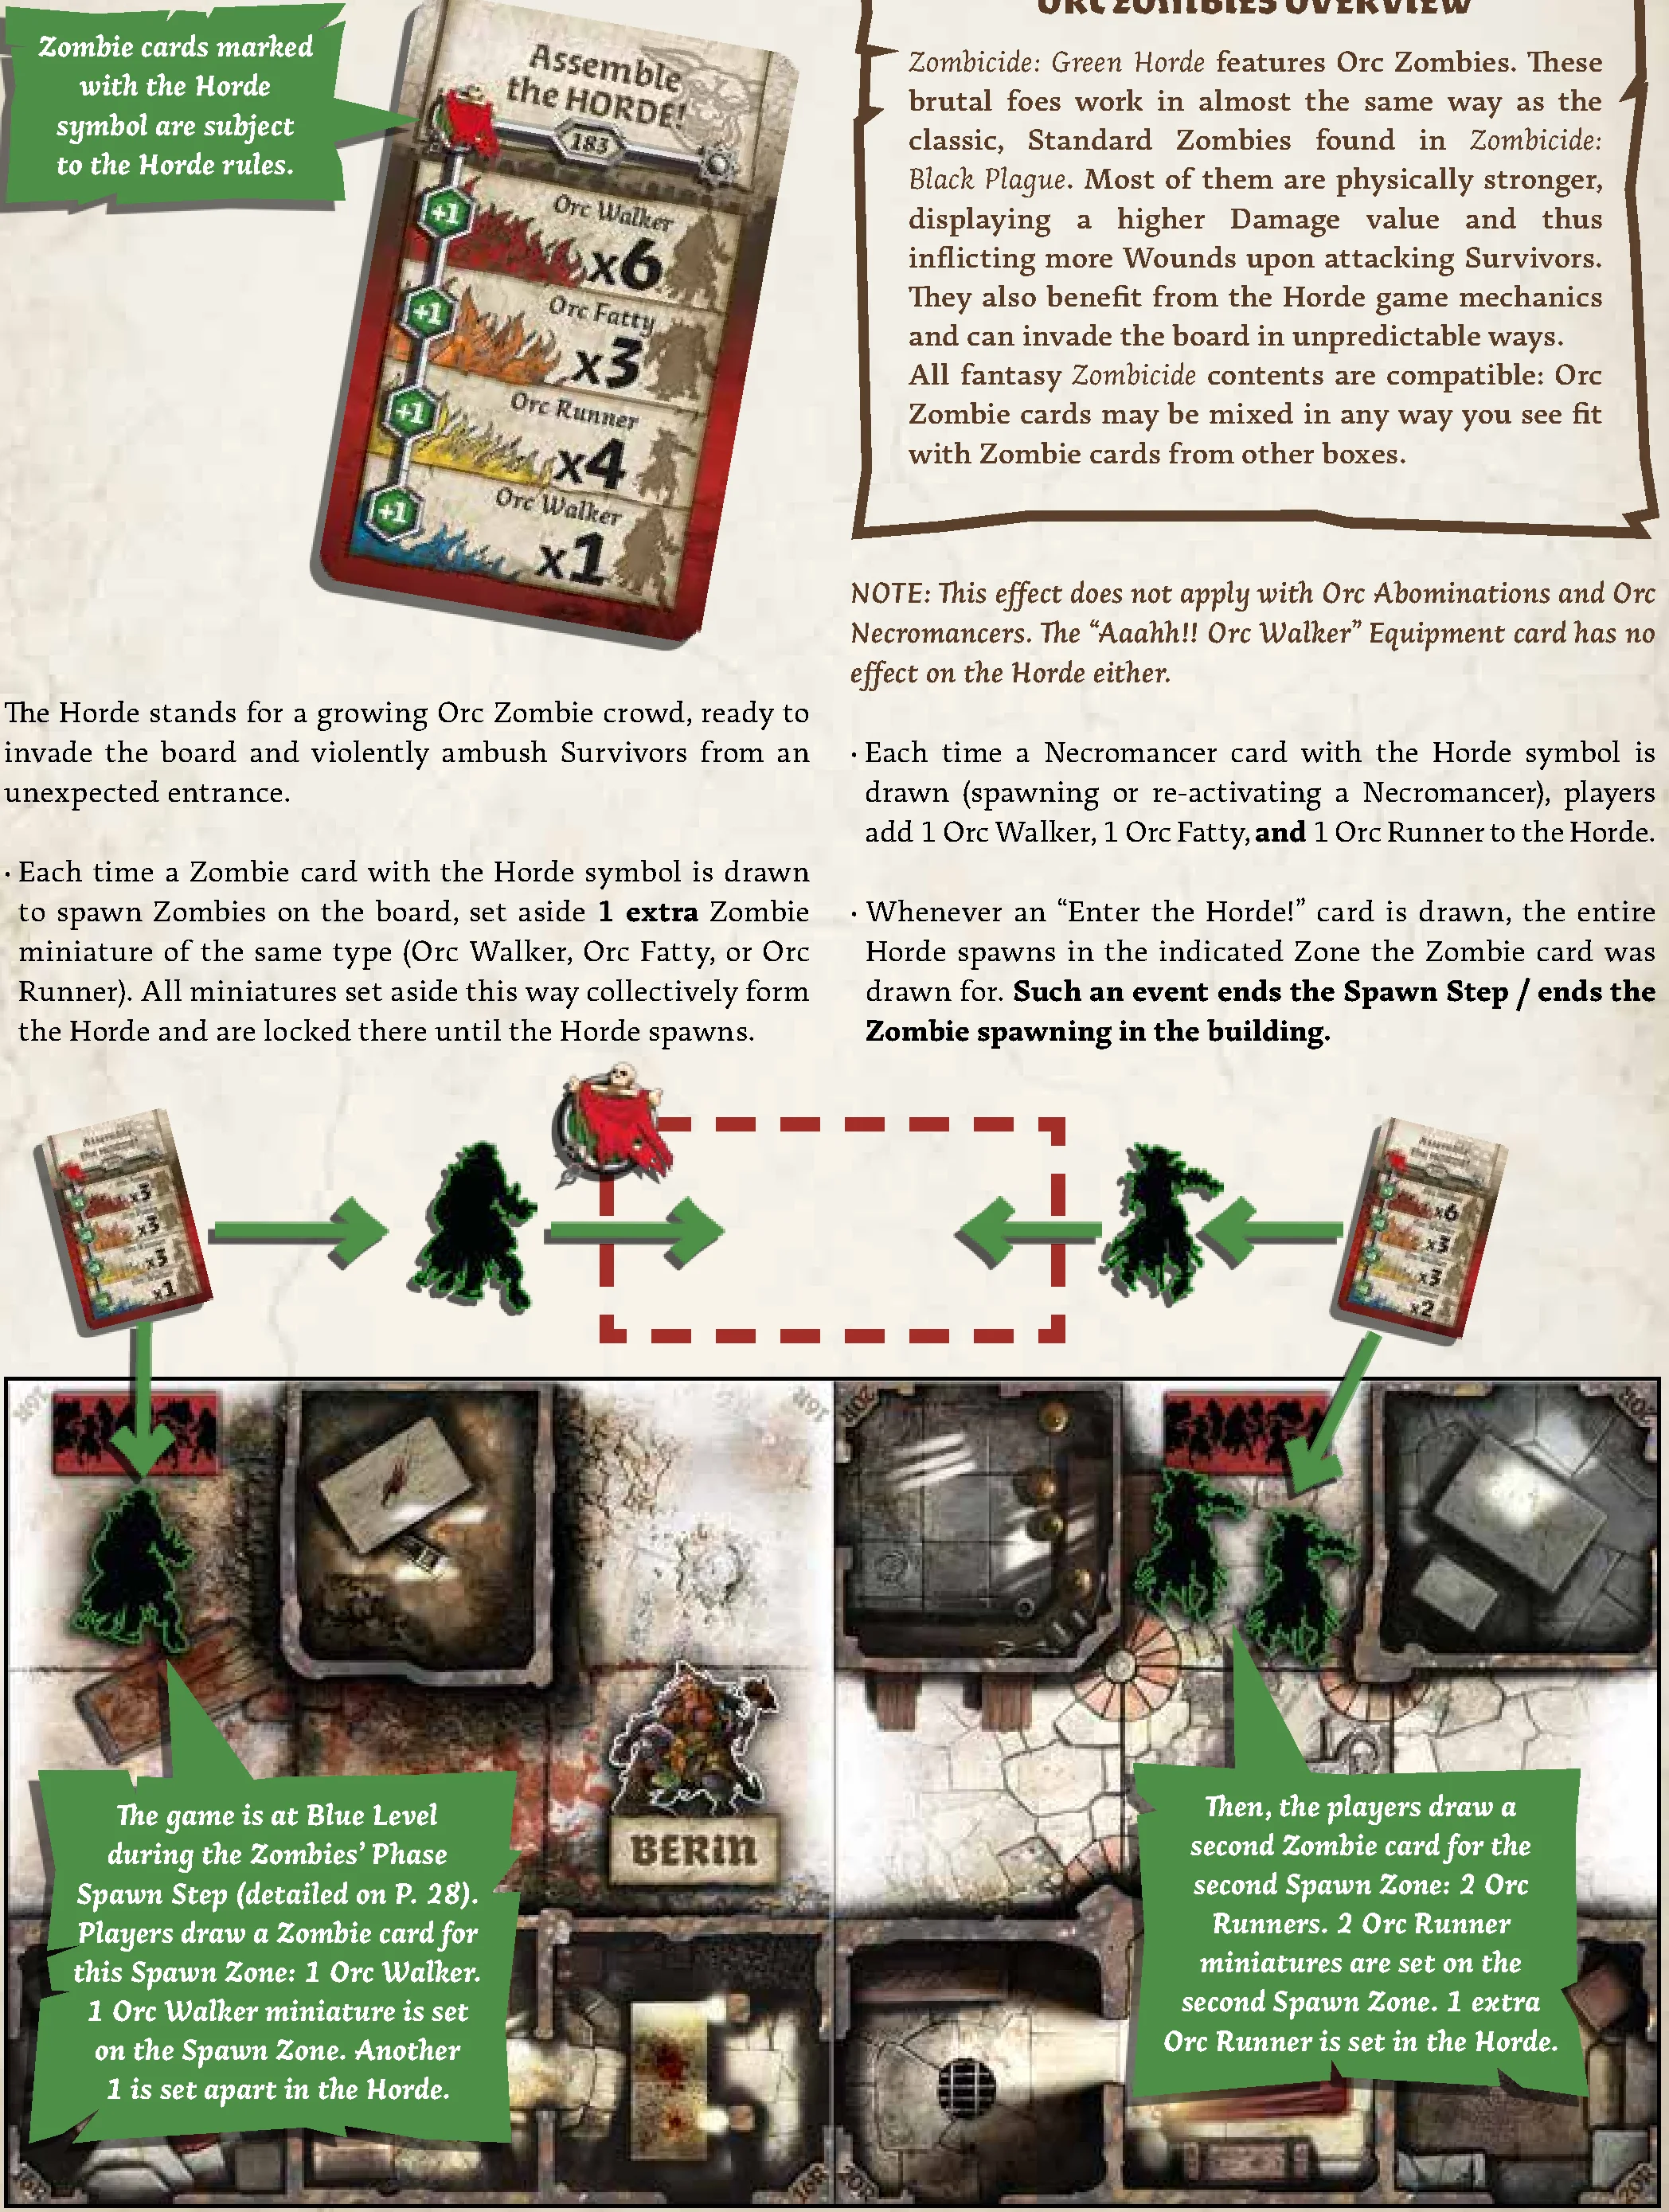
THE HORDE
The Horde stands for a growing Orc Zombie crowd, ready to invade the board and violently ambush Survivors from an unexpected entrance.
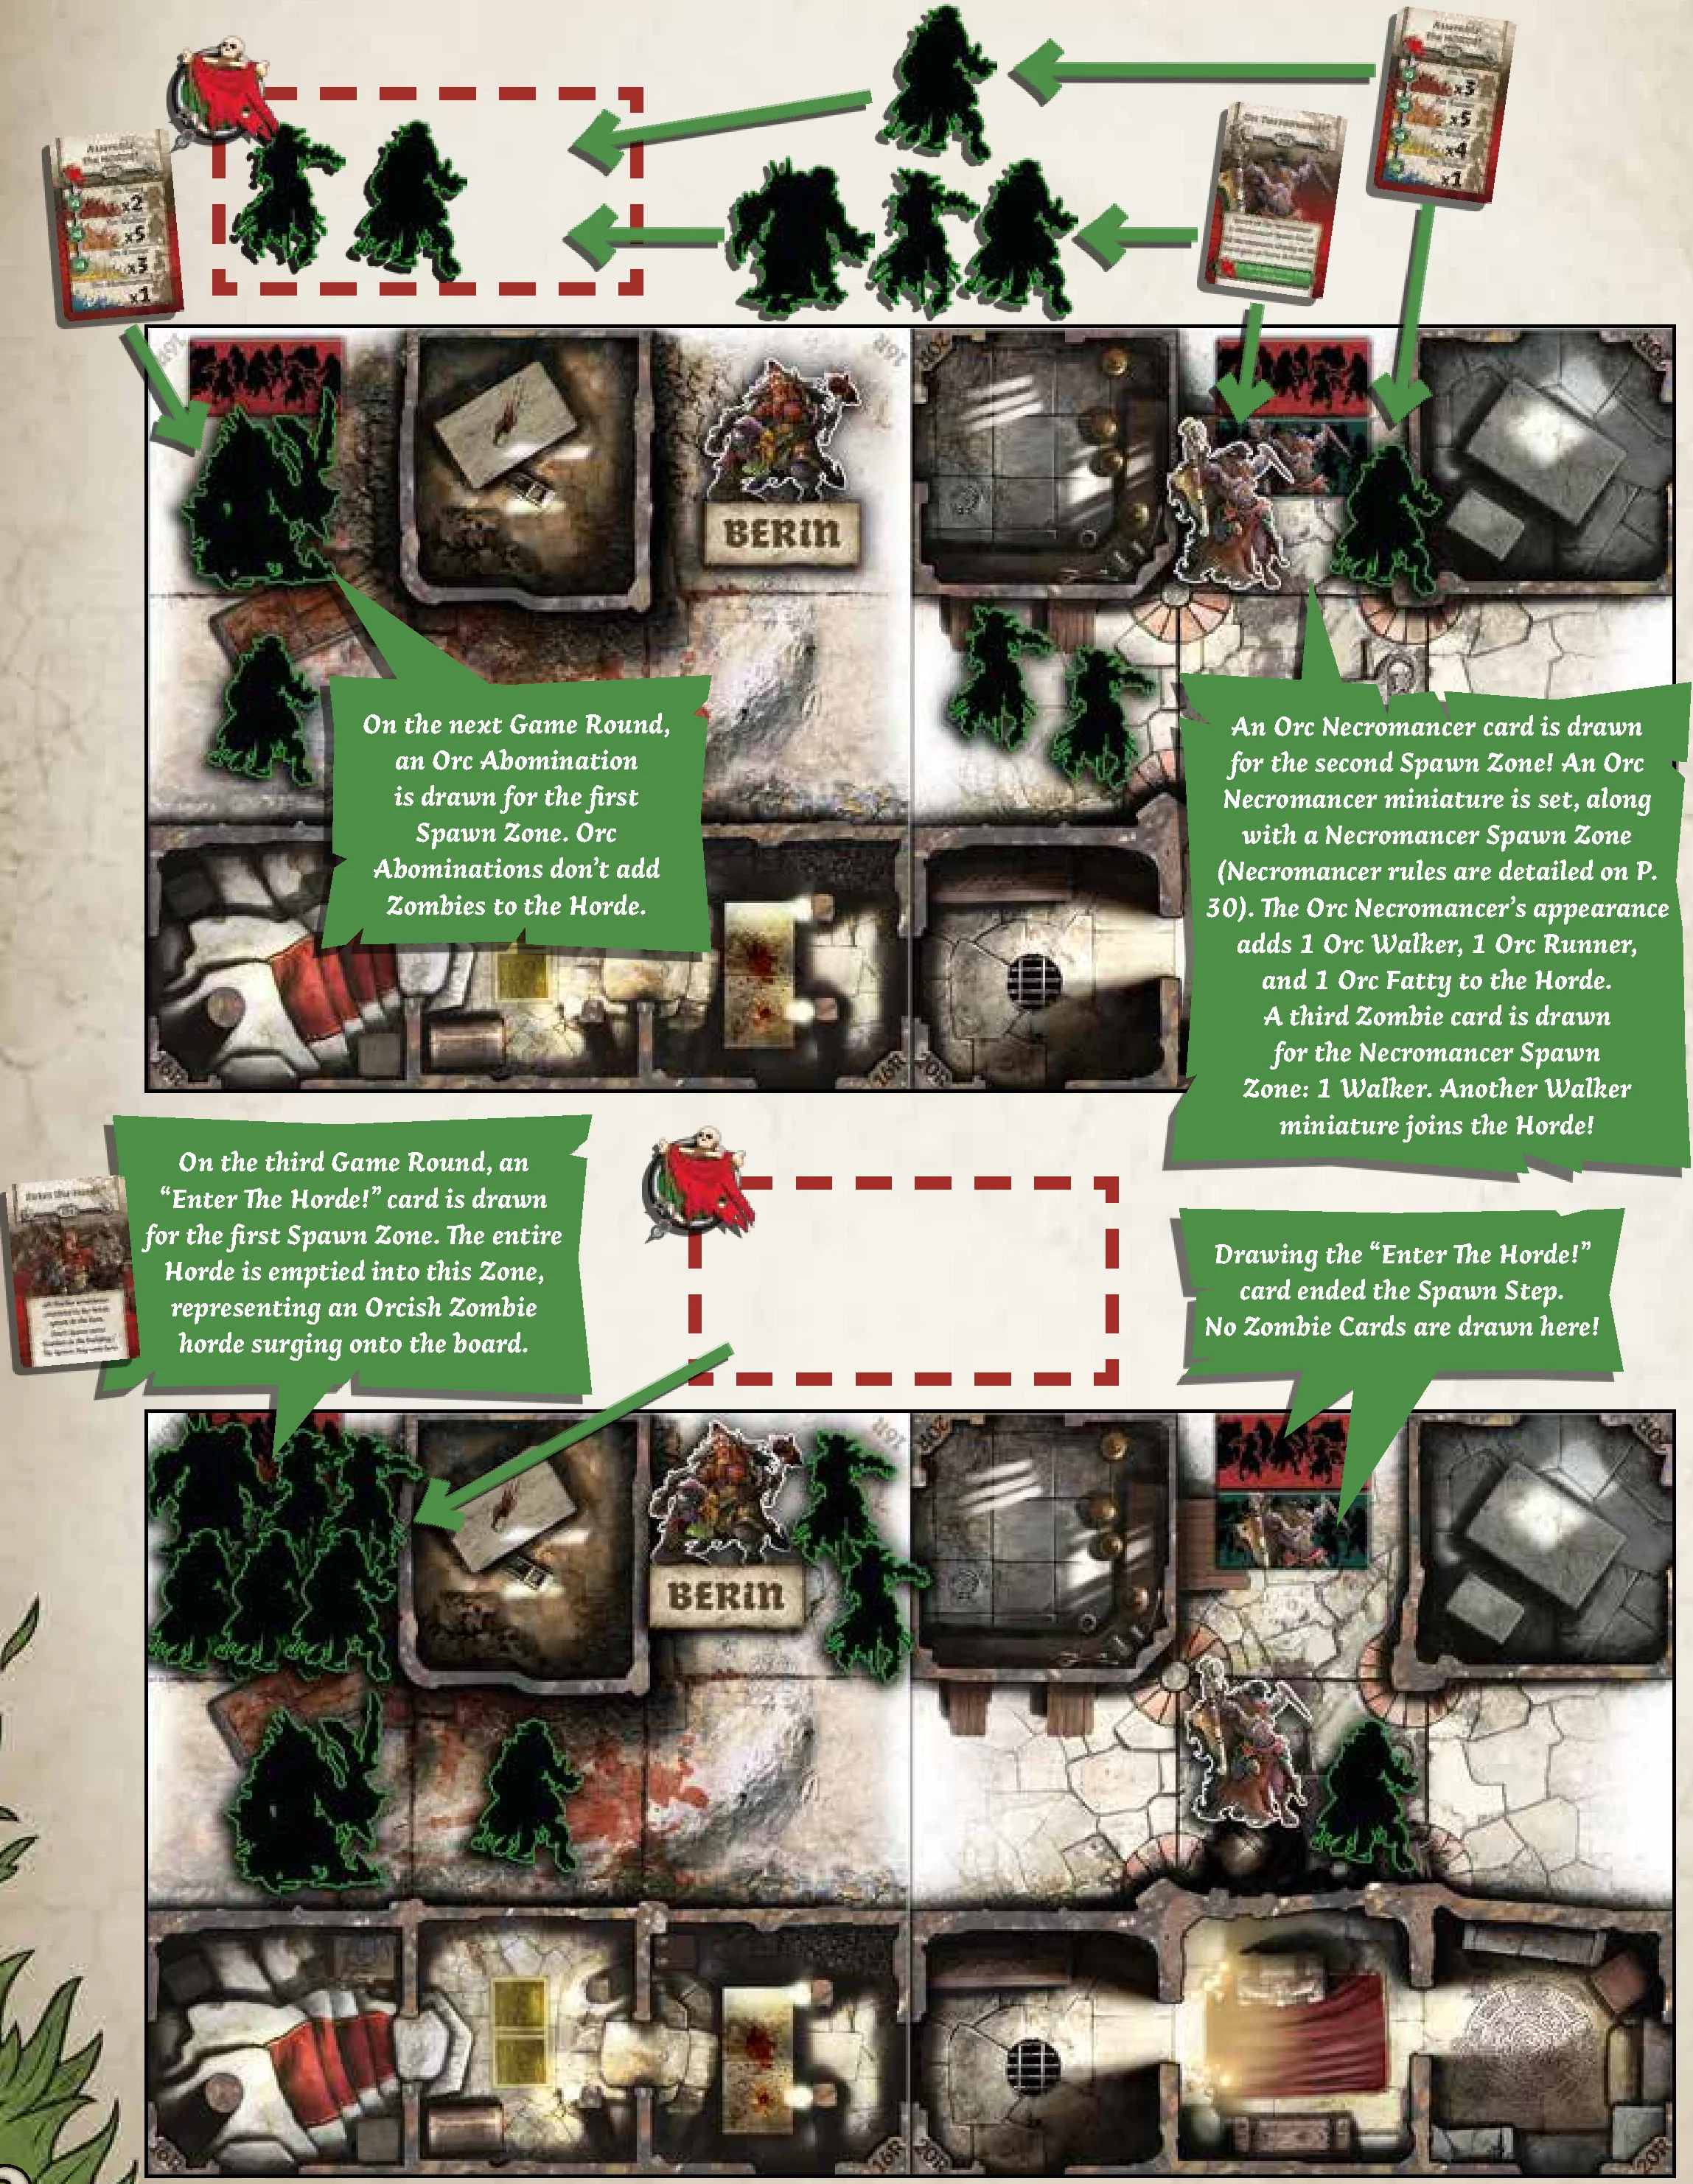
- Each time a Zombie card with the Horde symbol is drawn to spawn Zombies on the board, set aside 1 extra Zombie miniature of the same type (Orc Walker, Orc Fatty, or Orc Runner). All miniatures set aside this way collectively form the Horde and are locked there until the Horde spawns.
- NOTE: This effect does not apply with Orc Abominations and Orc Necromancers. The “Aaahh!! Orc Walker” Equipment card has no effect on the Horde either.
- Each time a Necromancer card with the Horde symbol is drawn (spawning or re-activating a Necromancer), players add 1 Orc Walker, 1 Orc Fatty, and 1 Orc Runner to the Horde.
- Whenever an “Enter the Horde!” card is drawn, the entire Horde spawns in the indicated Zone the Zombie card was drawn for. Such an event ends the Spawn Step / ends the Zombie spawning in the building.
ZOMBIES’ PHASE SEQUENCE
Once the players have activated all their Survivors, the Orc Zombies activate in the following order:
STEP 1 – ACTIVATION
Each Orc Zombie activates and spends its Action on either an Attack or a Move, depending on its situation. Resolve all the Attacks first, then all the Moves. Each Orc Zombie performs either an Attack OR a Move with a single Action.
Attack
Each Orc Zombie in the same Zone as Survivors performs an Attack. An Orc Zombie’s Attack is always successful, does not require any die rolls, and inflicts a specific amount of Wounds:
- Orc Walker: 2 Wounds
- Orc Fatty: 3 Wounds
- Orc Runner: 1 Wound
- Orc Abomination: 3 Wounds, no Armor roll
- Orc Necromancer: 2 Wounds
Survivors in the same Zones share the Orc Zombie Attacks in any way the players prefer, even if it means dealing them all to a single Survivor. After any applicable Armor rolls, the Wound Bar’s tracker is moved 1 point higher per Wound received. A Survivor is eliminated as soon as their Wound Bar reaches 3. Discard their Equipment and remove their miniature.
Feeding Frenzy! All Zombies activated in the same Zone as a Survivor join the Attack, even if overkill.
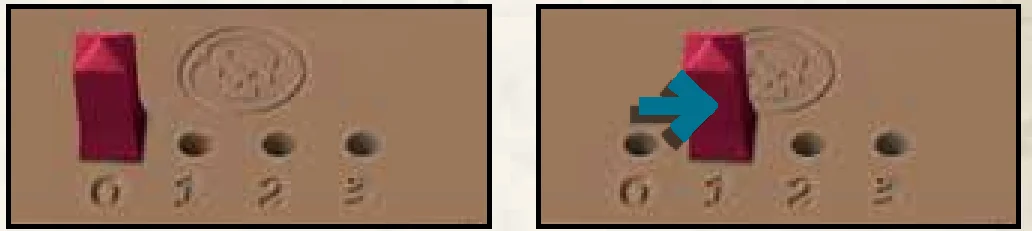
Armor Rolls
- Armor: Survivors wearing an armor Equipment card in their Body slot can perform Armor rolls to avoid Attacks. Roll as many dice as the number of Zombie Attacks the Survivor wants to avoid. Each die result that equals or exceeds the Armor number negates a Zombie Attack of your choice on a 1-for-1 basis.
- Shield: A Hand-held Shield allows Armor rolls if the Survivor isn’t wearing actual armor. If wearing armor, the Shield allows re-rolling its Armor rolls once.
- Unpreventable: Abomination Attacks, and being eliminated by a Dragon Fire, can’t be prevented by Armor rolls.
Move
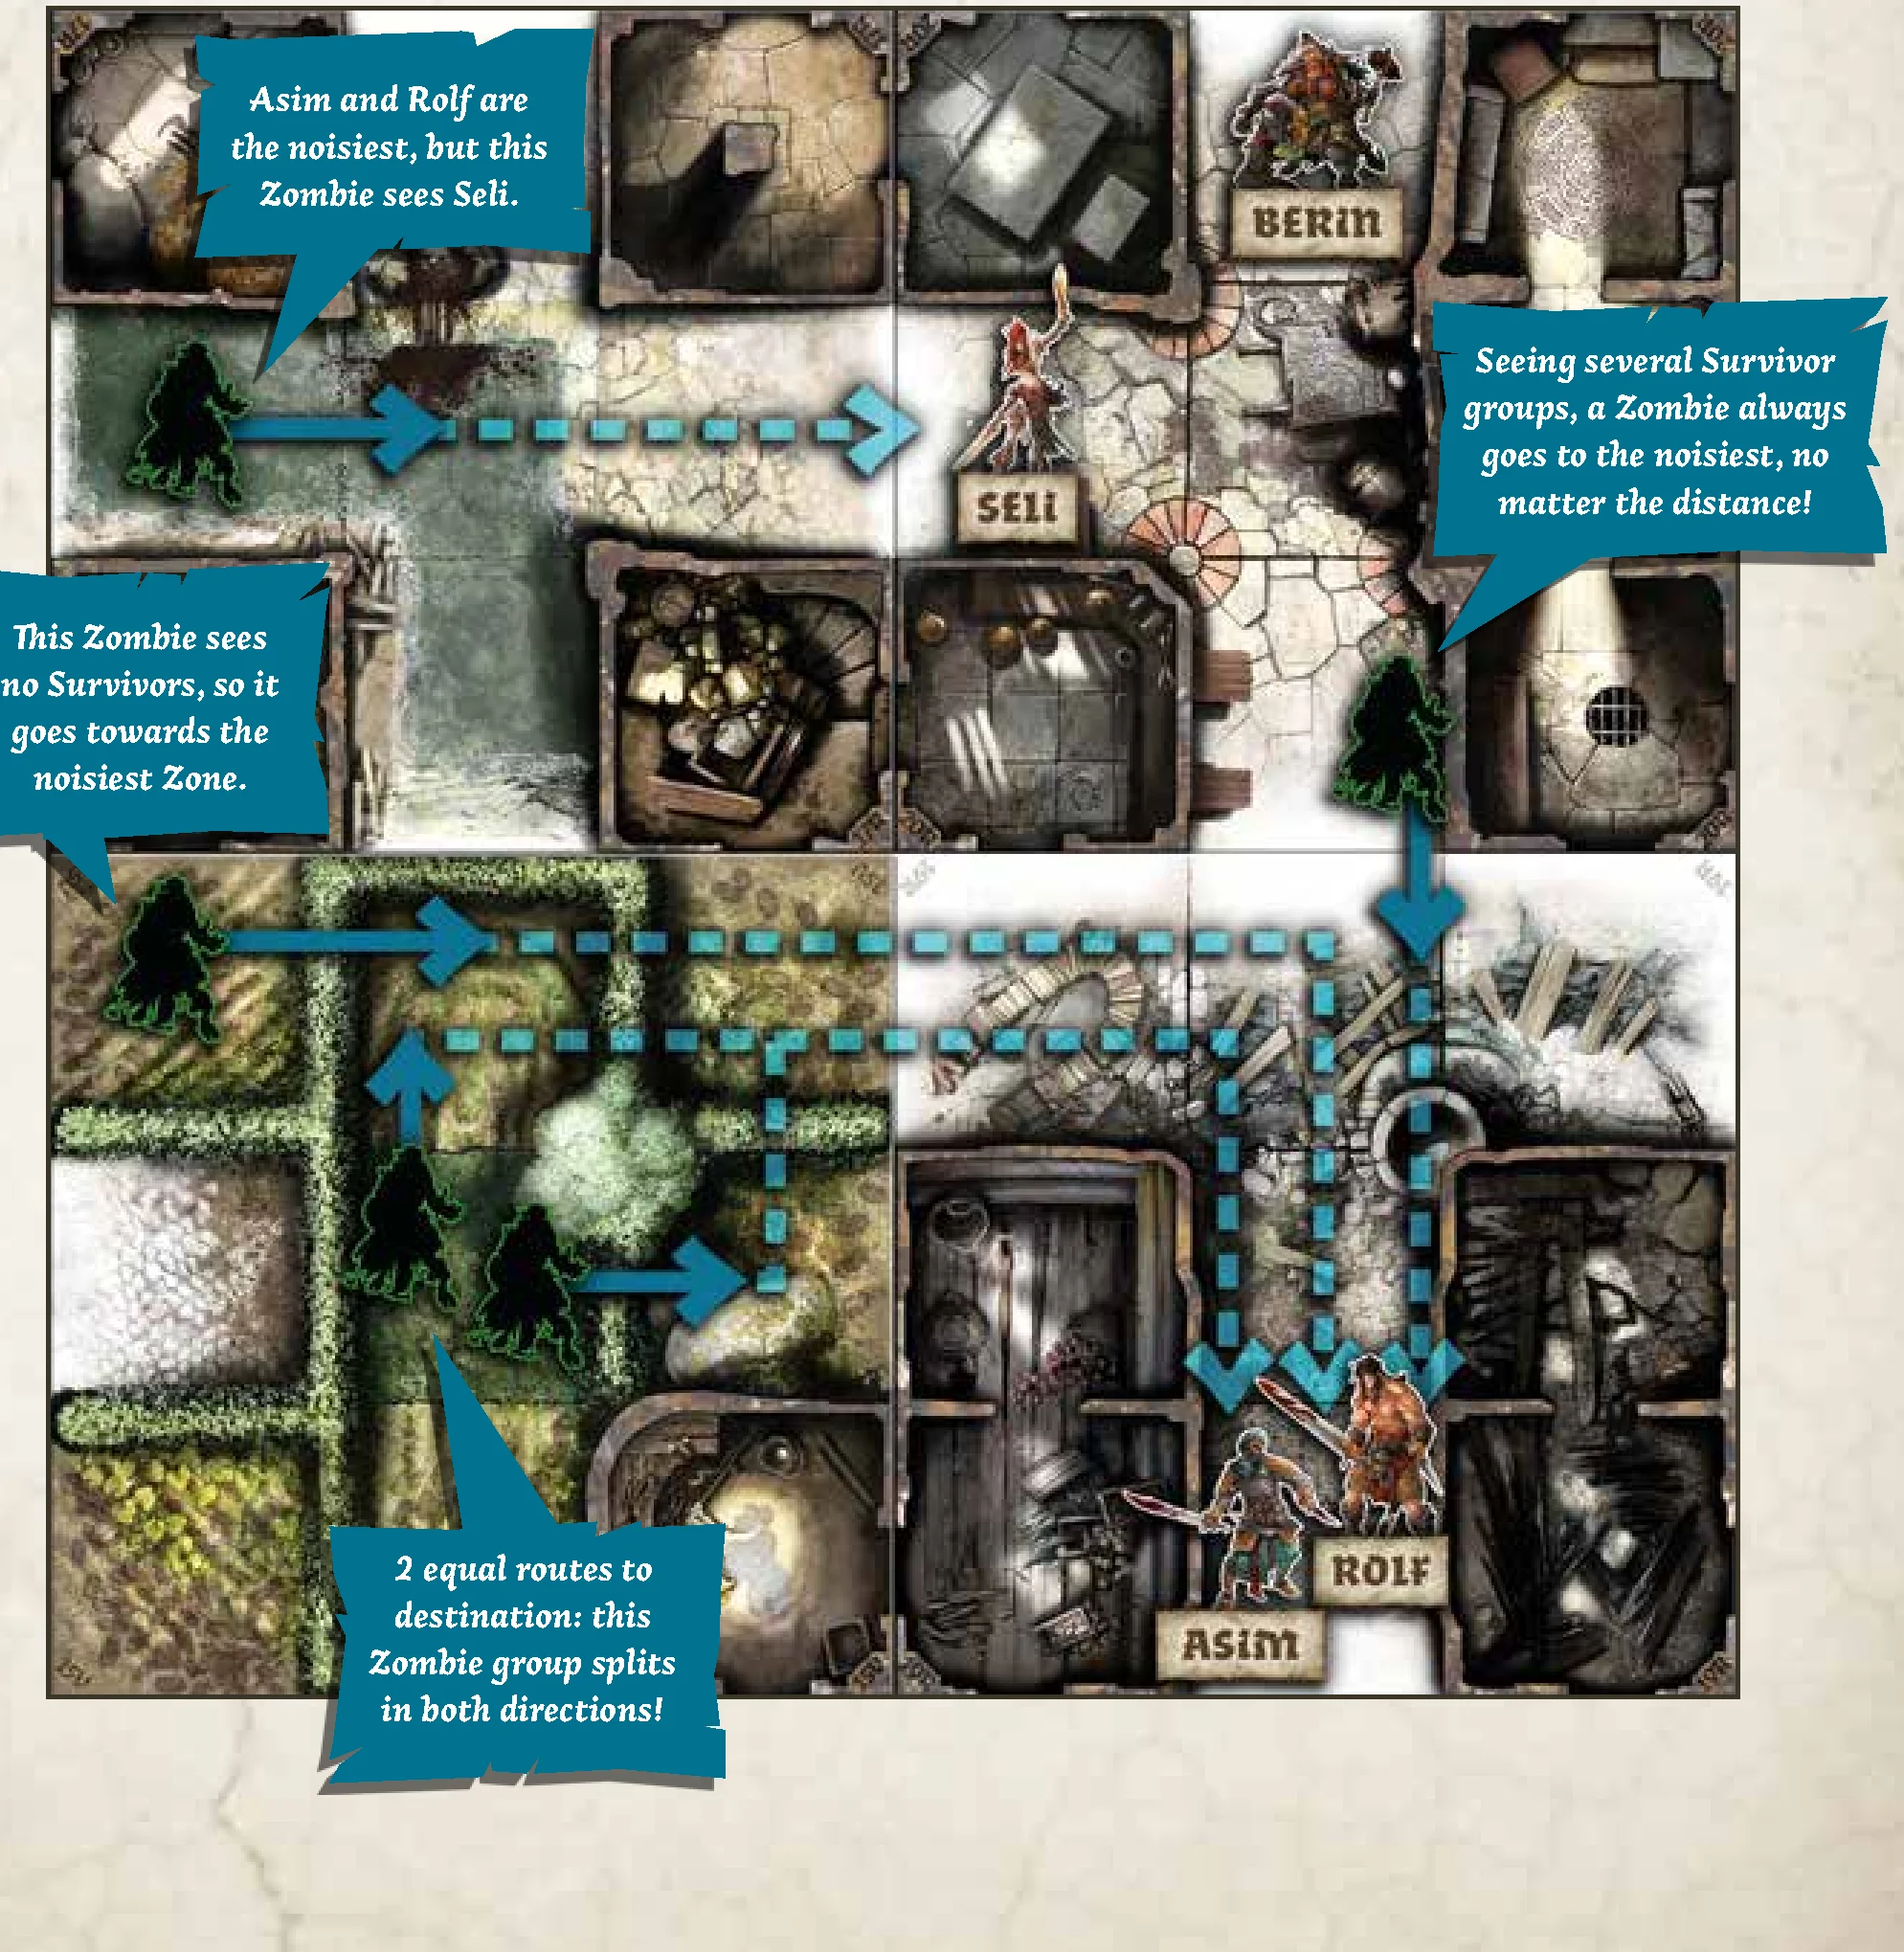
The Orc Zombies that have not attacked use their Action to Move 1 Zone toward Survivors:
- Destination Selection: First is the Zone with Survivors in Line Of Sight that has the most Noise tokens (Survivors count as Noise). If no Survivors are visible, they move toward the noisiest Zone. Distance doesn’t matter.
- Shortest Path: Orc Zombies move 1 Zone toward their destination Zone by taking the shortest available path. In case of no open paths, move toward it as if all doors were open (locked doors still stop them).
- Splitting: If there is more than one route of the same length, or multiple target Zones have equal Noise, Orc Zombies split into equal groups. If necessary, add Orc Zombies so that all new splitting groups contain the same number of each Orc Zombie type!
- Special Cases for Splitting: Orc Abominations and Orc Necromancers never split (players choose their direction). If miniatures run out during a split, decide which group gets the final reinforcement without triggering extra Activations.
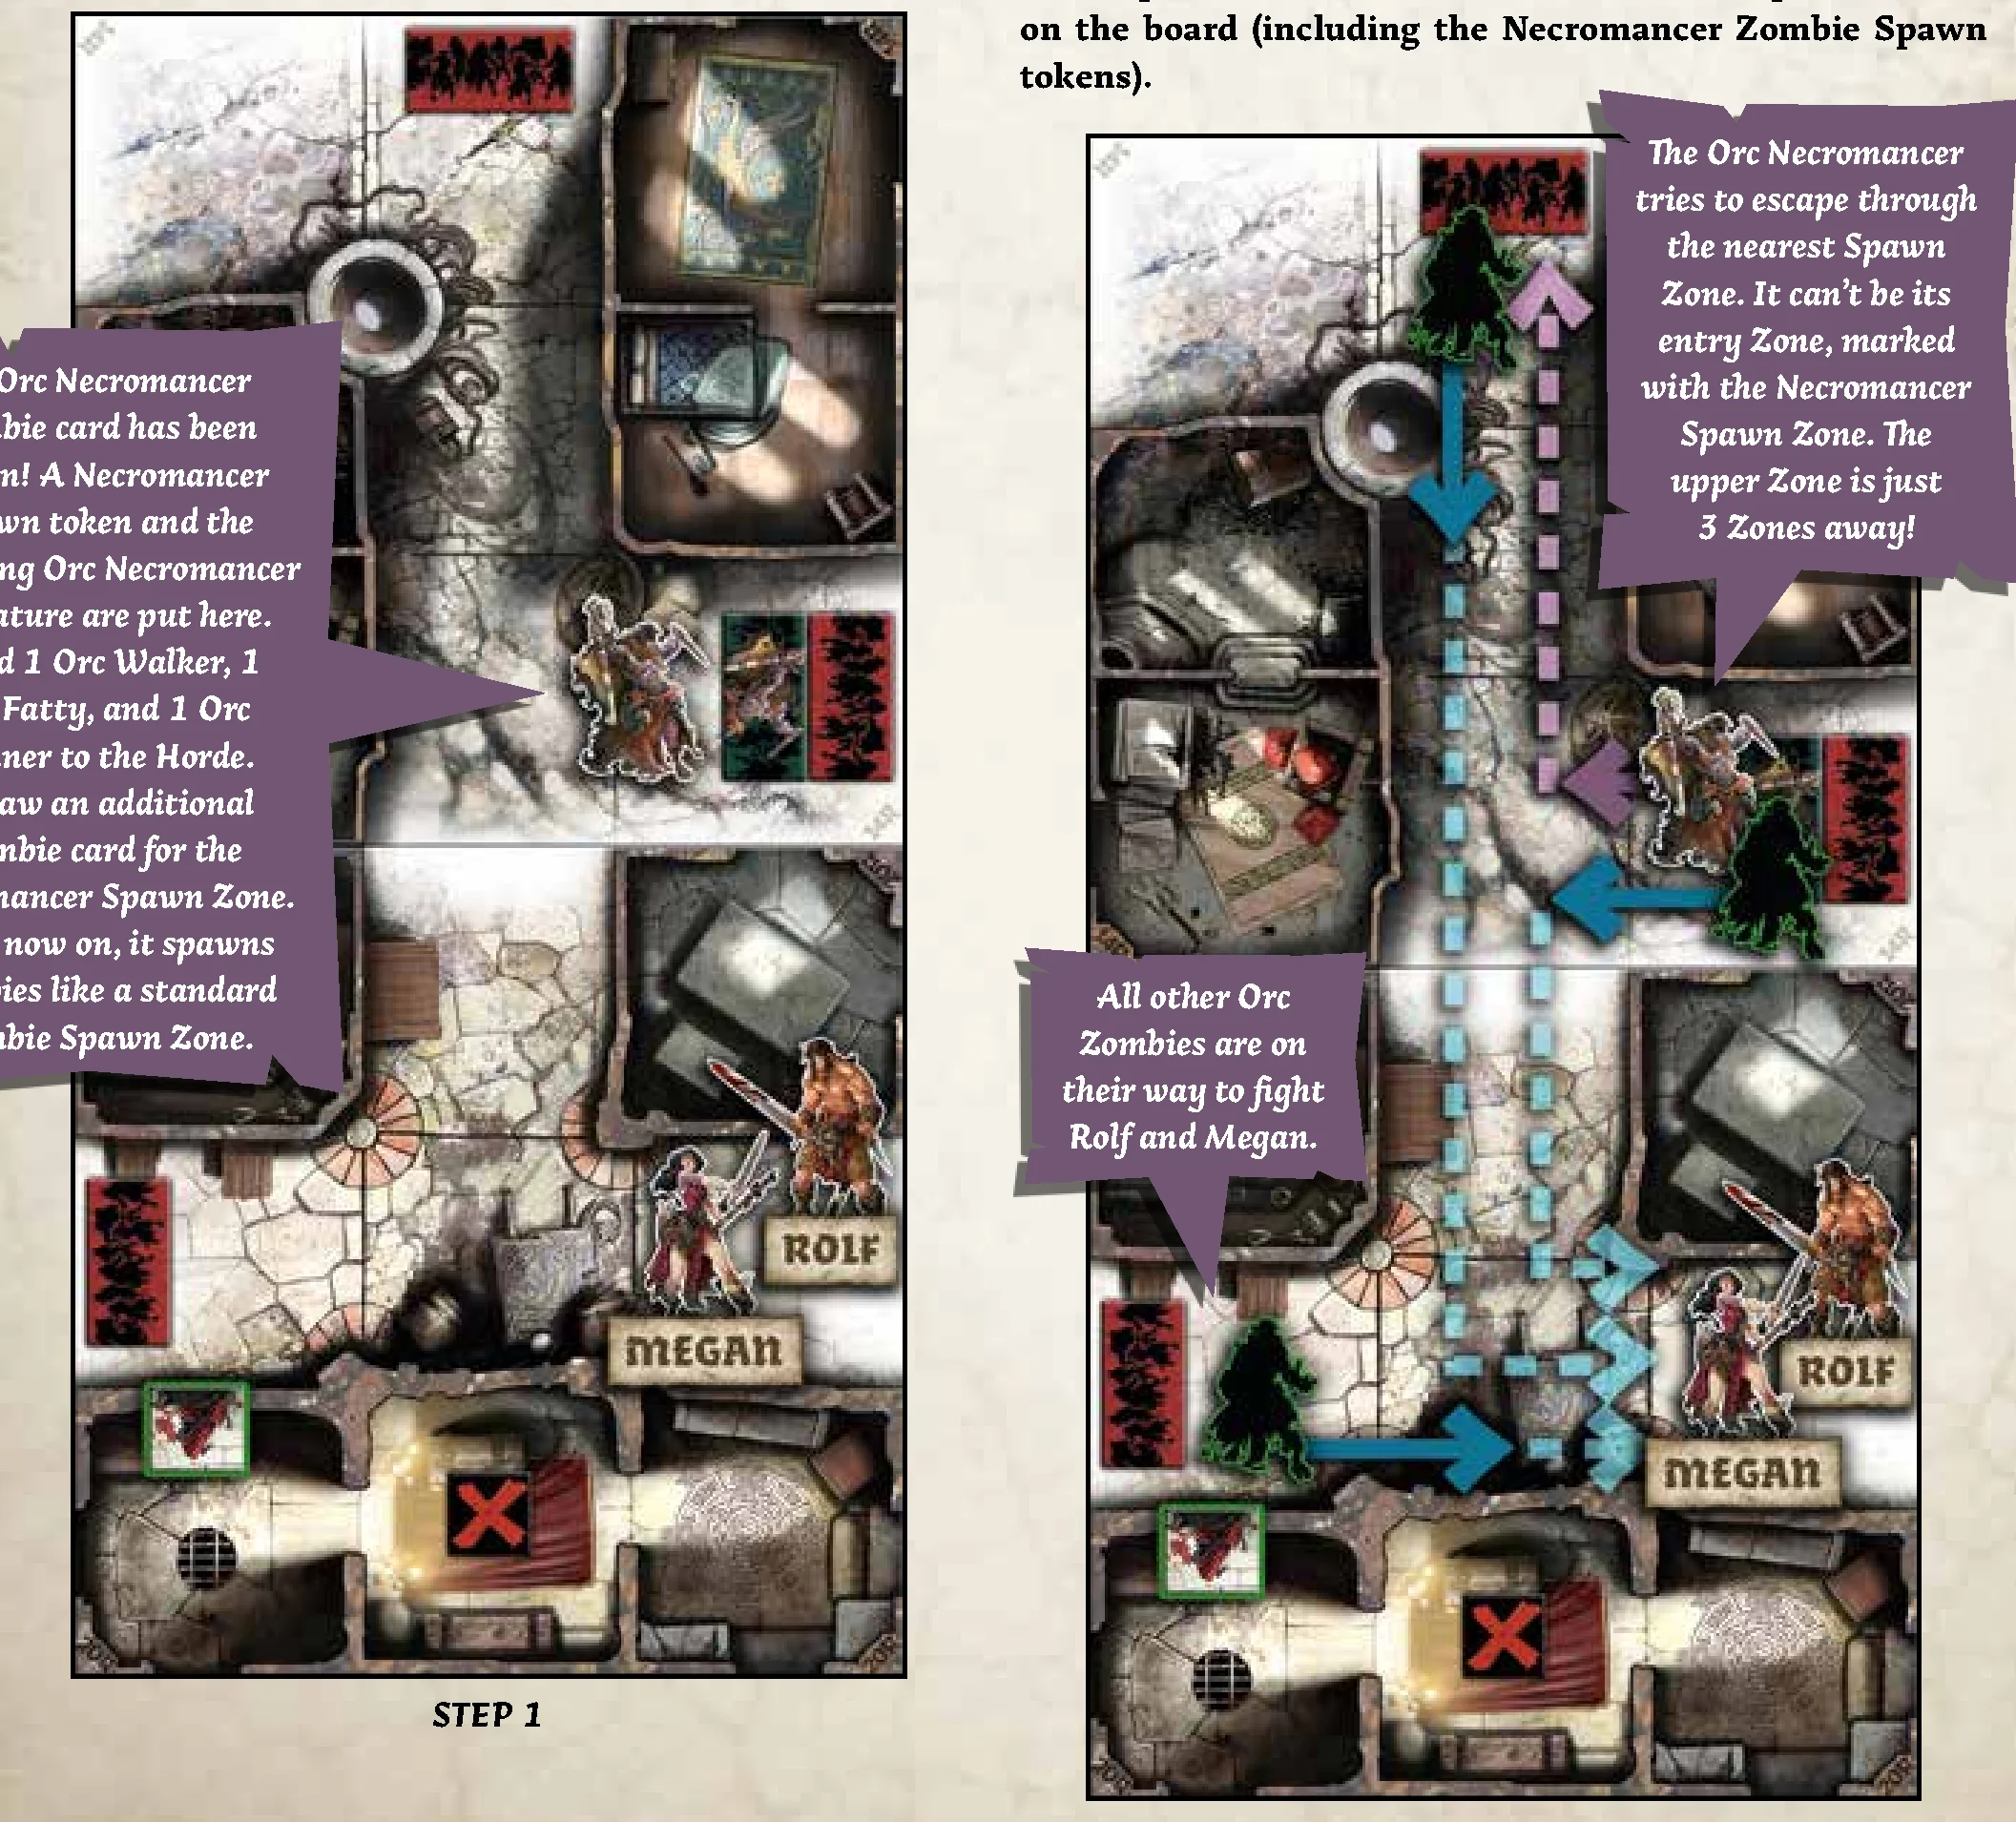
- NOTE: Orc Necromancers always Move toward the nearest non-Necromancer Spawn Zone.
Playing Orc Runners
Orc Runners have 2 Actions per Activation. After all Orc Zombies (including Orc Runners) have gone through the Activation step and resolved their first Action, Orc Runners go through the Activation step again, using their second Action to Attack a Survivor in their Zone or Move if there is nobody to attack.
STEP 2 – SPAWN
The Quest maps show where Orc Zombies appear at the end of each Zombies’ Phase (Spawn Zones):
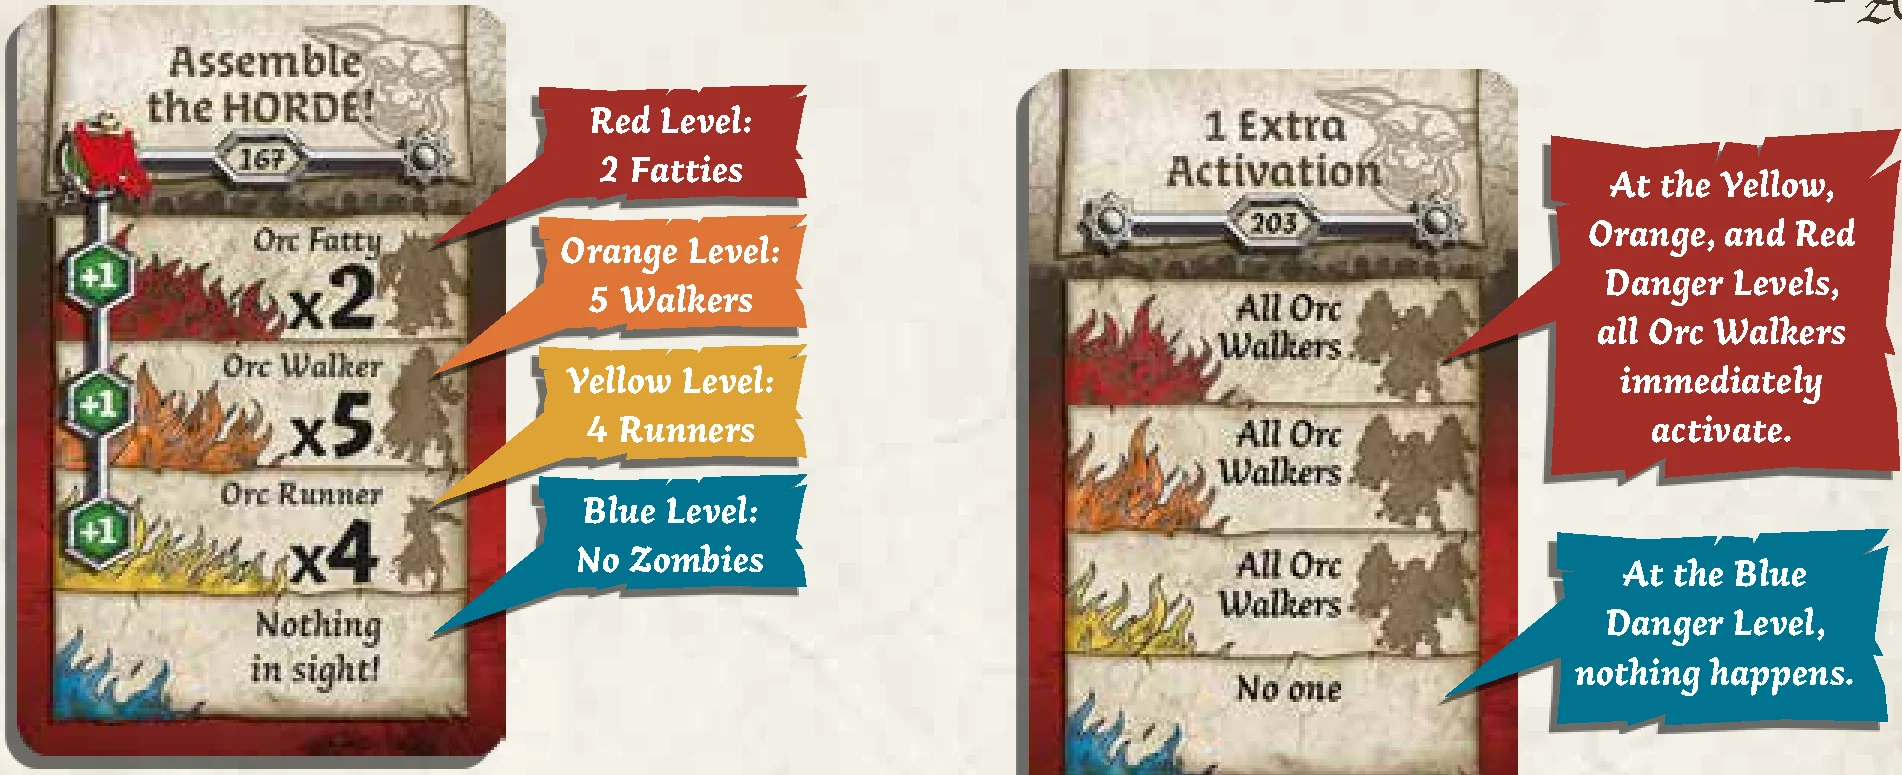
- Indicate a Spawn token and draw a Zombie card.
- Read the line on the card that corresponds to the color of the Danger Level of the most experienced Survivor still in the game (Blue, Yellow, Orange, or Red).
- Place the number and type of Orc Zombies shown.
- If the card has the Horde symbol, put an additional Orc Zombie of the same type in the Horde!
- Repeat this for each Spawn token clockwise, always starting with the same Spawn Zone.
- Colored Spawn Zones: Unless otherwise stated, Blue and Green Spawn Zones don’t spawn Zombies until activated by a specific event.
- Extra Activations Cards: No Zombies appear; all Zombies of the indicated type immediately get an extra Activation (no effect at Blue Level).
- Running Out Of Miniatures: If players run out of miniatures of the indicated type when spawning or populating a building, place whatever is left, and then all Zombies of the indicated type immediately resolve an extra Activation!
END PHASE
All Noise tokens are removed from the board, and the first player hands the First Player token to the player to their left. Another Game Round then begins.
ORC NECROMANCERS
Orc Necromancers follow these special rules:
- An Orc Necromancer is a Zombie for game purposes.
- Enters with its own army: Put an additional Zombie Spawn token (on its Necromancer side) in its entry Zone. Immediately resolve a regular Zombie Spawn for it. It remains active as a standard Spawn Zone.
- Extra Activations: Each subsequent drawing of additional Necromancer cards gives an Extra Activation to every Necromancer on the board.
- Horde addition: Each time an Orc Necromancer card is drawn, add 1 Orc Walker, 1 Orc Fatty, and 1 Orc Runner to the Horde.
- Fleeing the board: If no Survivors to Attack in its Zone, the Necromancer Moves 1 Zone toward the nearest active Spawn Zone (excluding its own entry Zone and inactive Spawn Zones).
- Defeat condition: The game is immediately lost if a Necromancer manages to escape once there’s a total of 6 Zombie Spawn tokens on the board (including Necromancer Spawn tokens).
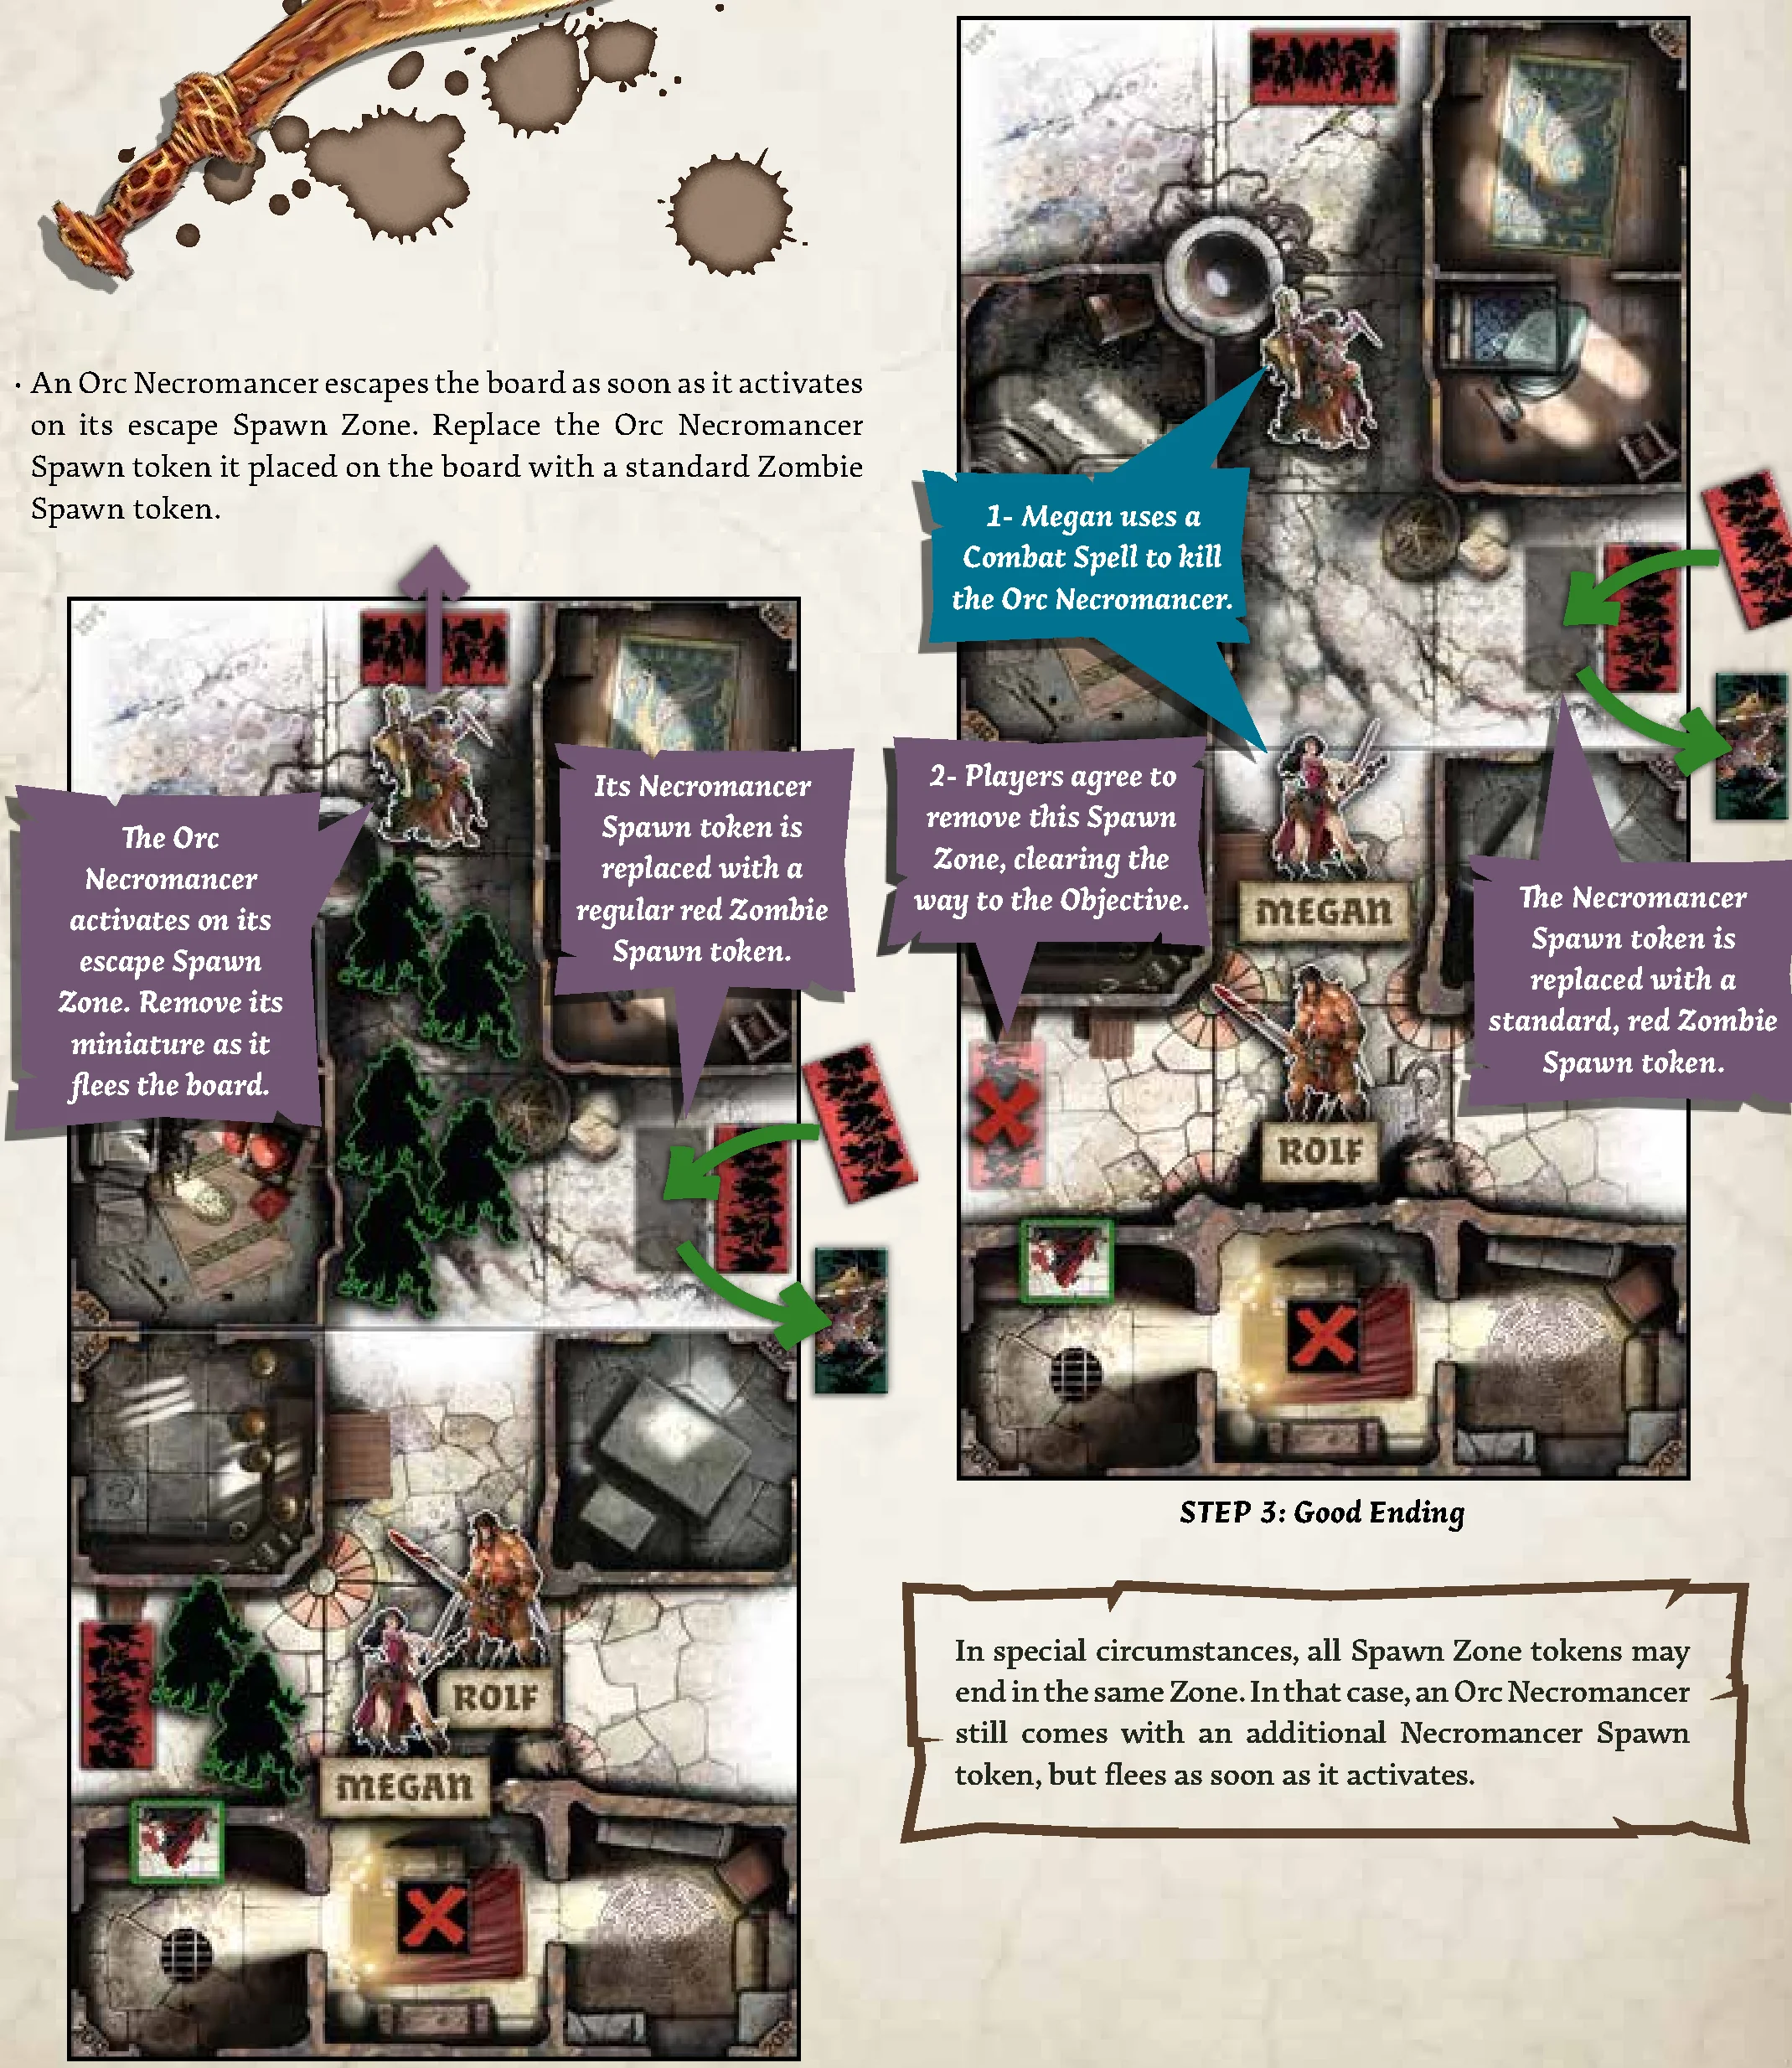
- Escaping: An Orc Necromancer escapes as soon as it activates on its escape Spawn Zone. Replace the Necromancer Spawn token it placed with a standard Zombie Spawn token, and remove the Necromancer miniature.
- Killing a Necromancer: Choose a Spawn Zone (including its own Necromancer Spawn Zone) and remove it from the board. If the Necromancer Spawn Zone is still on the board after this removal, replace it with a standard one.
NECROMANCER CABALS
Necromancer Cabals’ rules allow you to play with multiple Necromancers at once:
- Create your own Necromancer Cabal during Setup: Sort out the 6 Orc Necromancer cards and replace them in any combination with your favorite Necromancer cards, then reshuffle into the deck.
- Spawn and Move: Use the colors of the Necromancer Spawn Zones to track where each spawned and determine its escape Spawn Zone. Drawing a Necromancer card gives an extra Activation to all other Necromancers on board.
- Dark Ritual: Necromancers standing at Range 0-1 from each other at the end of a Zombies’ Phase flee the board as if they escaped through their escape Spawn Zone. Replace their Necromancer Spawn tokens with standard ones.
- Special Rules: Special rules on specific Necromancer cards are in effect until they flee or die.
BARRIERS
- Barriers prevent Move Actions between 2 Zones, but do not block Line of Sight.
- Survivors cannot Move through a Barrier (can still use Ranged/Magic or Skills like Jump through it).
- Zombies reroute around Barriers. If no other route can be taken, adjacent Zombies destroy the Barrier for free before performing their Move Step.
HEDGES
- Hedges interrupt Lines of Sight for all Actors (except standing on tower Zones).
- Roll a die whenever a Survivor crosses a Hedge without any Survivor having Line of Sight to the destination Zone. On a ‘1’, add an Orc Walker in the destination Zone.
- Hedge tokens can be placed on straight borders to customize Quests.
WATERHOLE ZONES
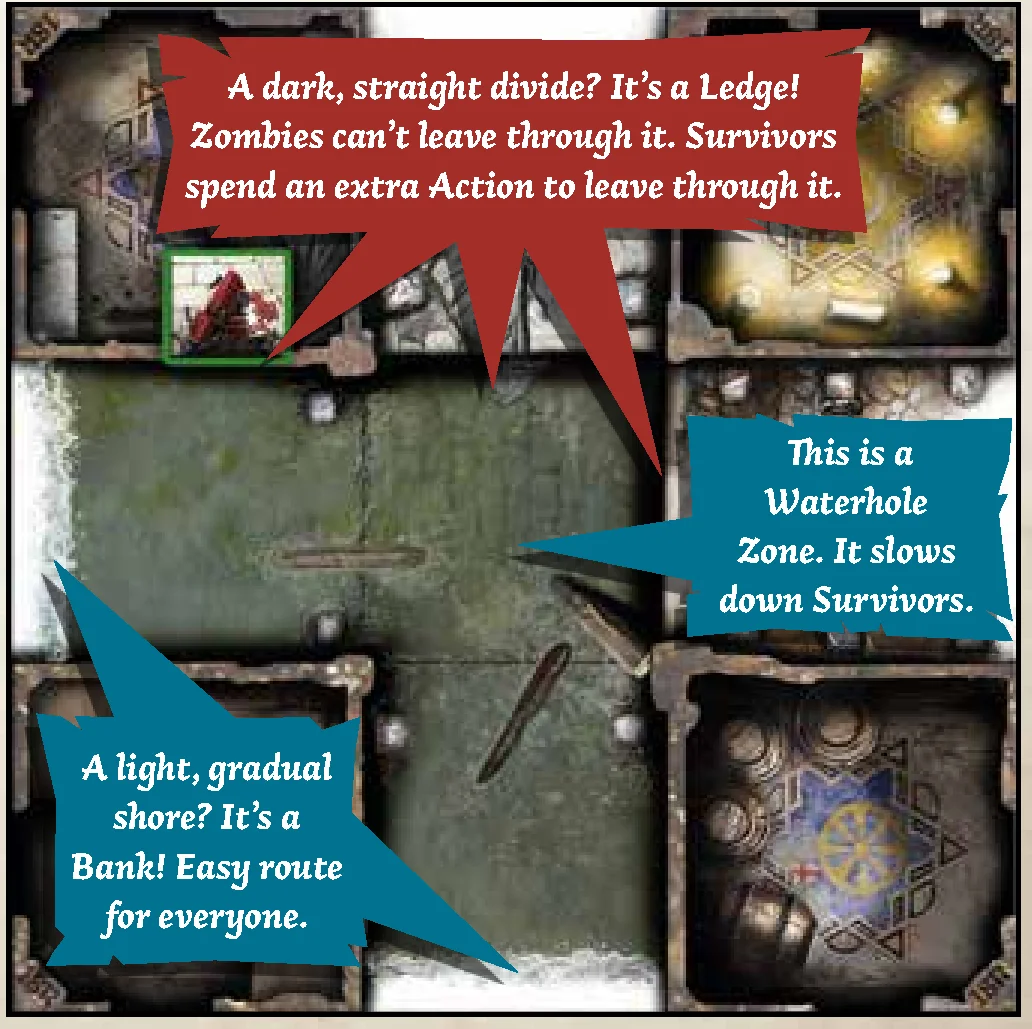
Waterhole Zones represent Street Zones waist-deep in water, connecting via Banks or Ledges:
- Bank: Smooth, irregular shore. Easy passage for everyone.
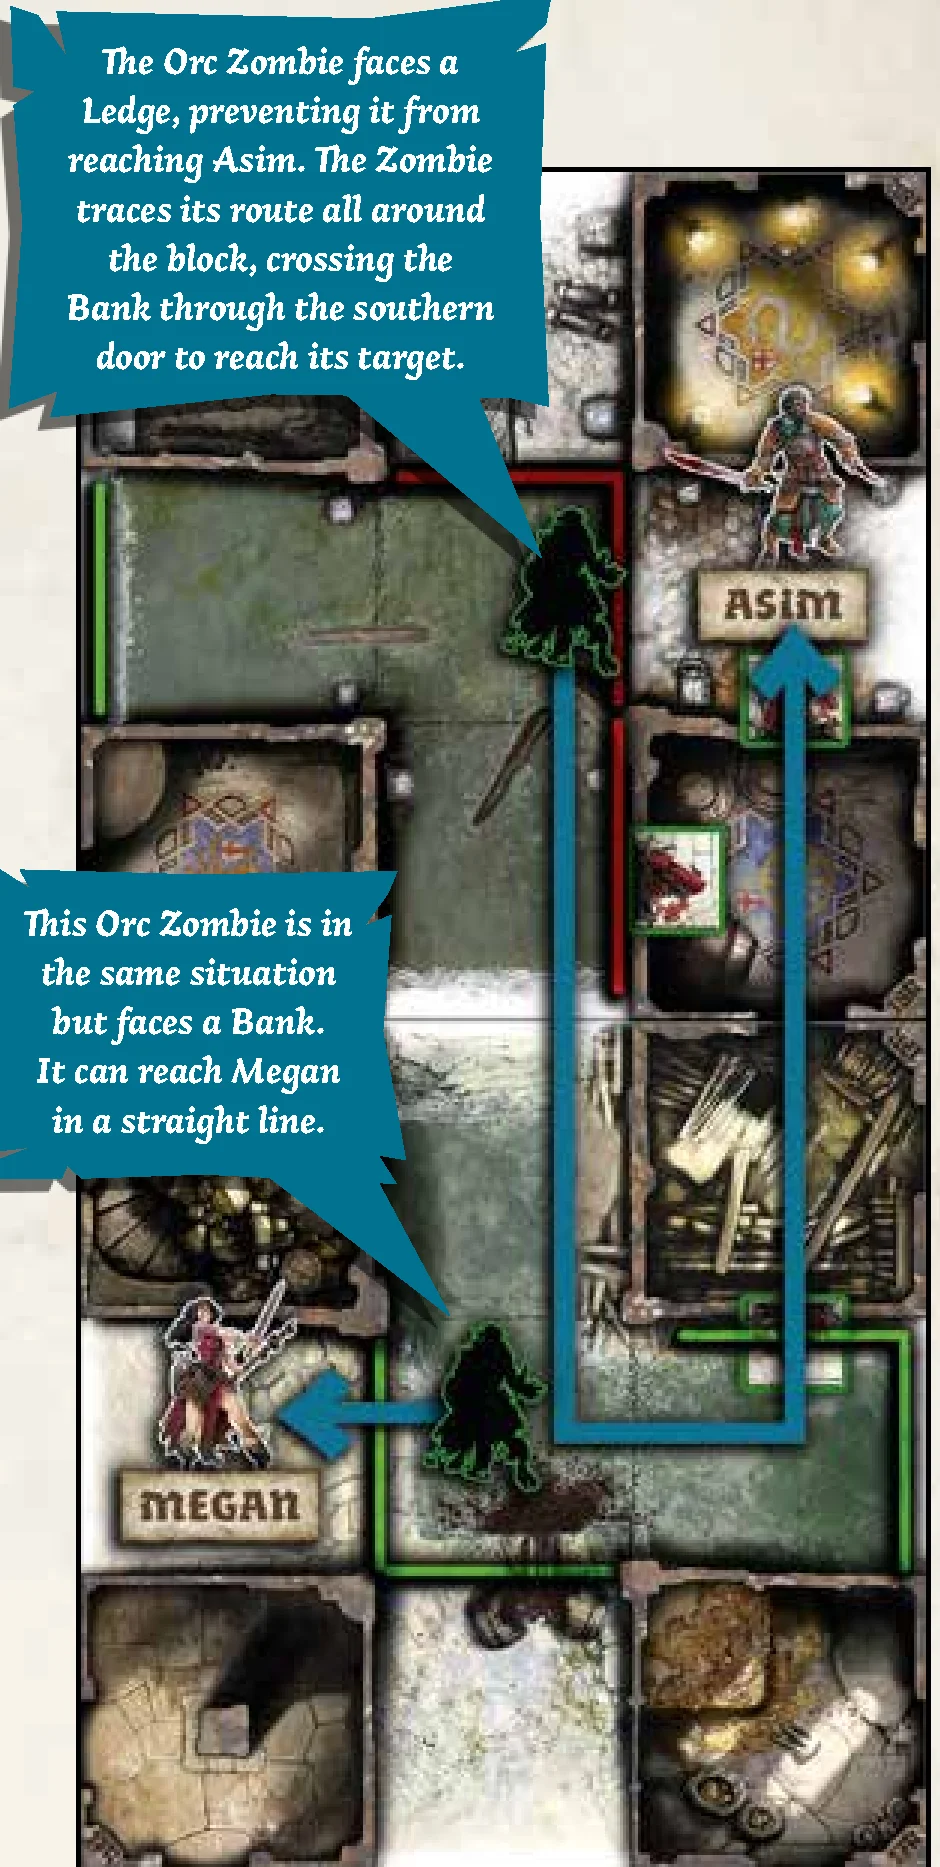
- Ledge: Steep, dark divide. Zombies cannot leave through a Ledge!
Leaving a Waterhole Zone Rules Summary
| Leaving a Waterhole Zone | To Another Waterhole Zone | Through a Bank | Through a Ledge |
|---|---|---|---|
| Survivor | Spend an additional Action | No penalty | Spend an additional Action |
| Zombie | No penalty | No penalty | Zombies can’t leave through a Ledge. Select another route. |
- Actors moving from a dry Zone to a Waterhole Zone (via Bank or Ledge) follow normal movement rules without penalty.
- Speed Enchantment ignores Waterhole movement penalties.
- Siege Engines are destroyed if set in a Waterhole Zone.
- Dragon Fire has no effect in Waterhole Zones.
ULTRARED MODE
Ultrared mode allows Survivors to gain Experience Points beyond Red Danger Level and gain extra Skills:
- When reaching Red Level (43 XP), reset the tracker to 0 and add extra points gained beyond 43. Keep all acquired Skills.
- Gain unselected Skills upon reaching Danger Levels again.
- When all of the Survivor’s printed Skills are selected, choose any Skill from the Zombicide: Green Horde Skills list (except bracketed skills like Starts with [Equipment]) upon reaching Orange and Red Levels.
PLAYING WITH 7+ SURVIVORS
- Add 1 Starting Equipment card per Survivor above 6.
- Add 1 additional Zombie Spawn token per 2 Survivors above 6 (rounded up). Stack on existing or new Spawn Zones.
- Increase the Necromancer escape token limit by 1 for every 2 Survivors above 6.
| # Survivors | Additional Spawn Tokens | Spawn Token Limit |
|---|---|---|
| Up to 6 | 0 | 6 |
| 7-8 | 1 | 7 |
| 9-10 | 2 | 8 |
| 11-12 | 3 | 9 |
QUEST 0 – TUTORIAL: THE EVIL SHRINE
EASY / 4+ SURVIVORS / 45 MINUTES
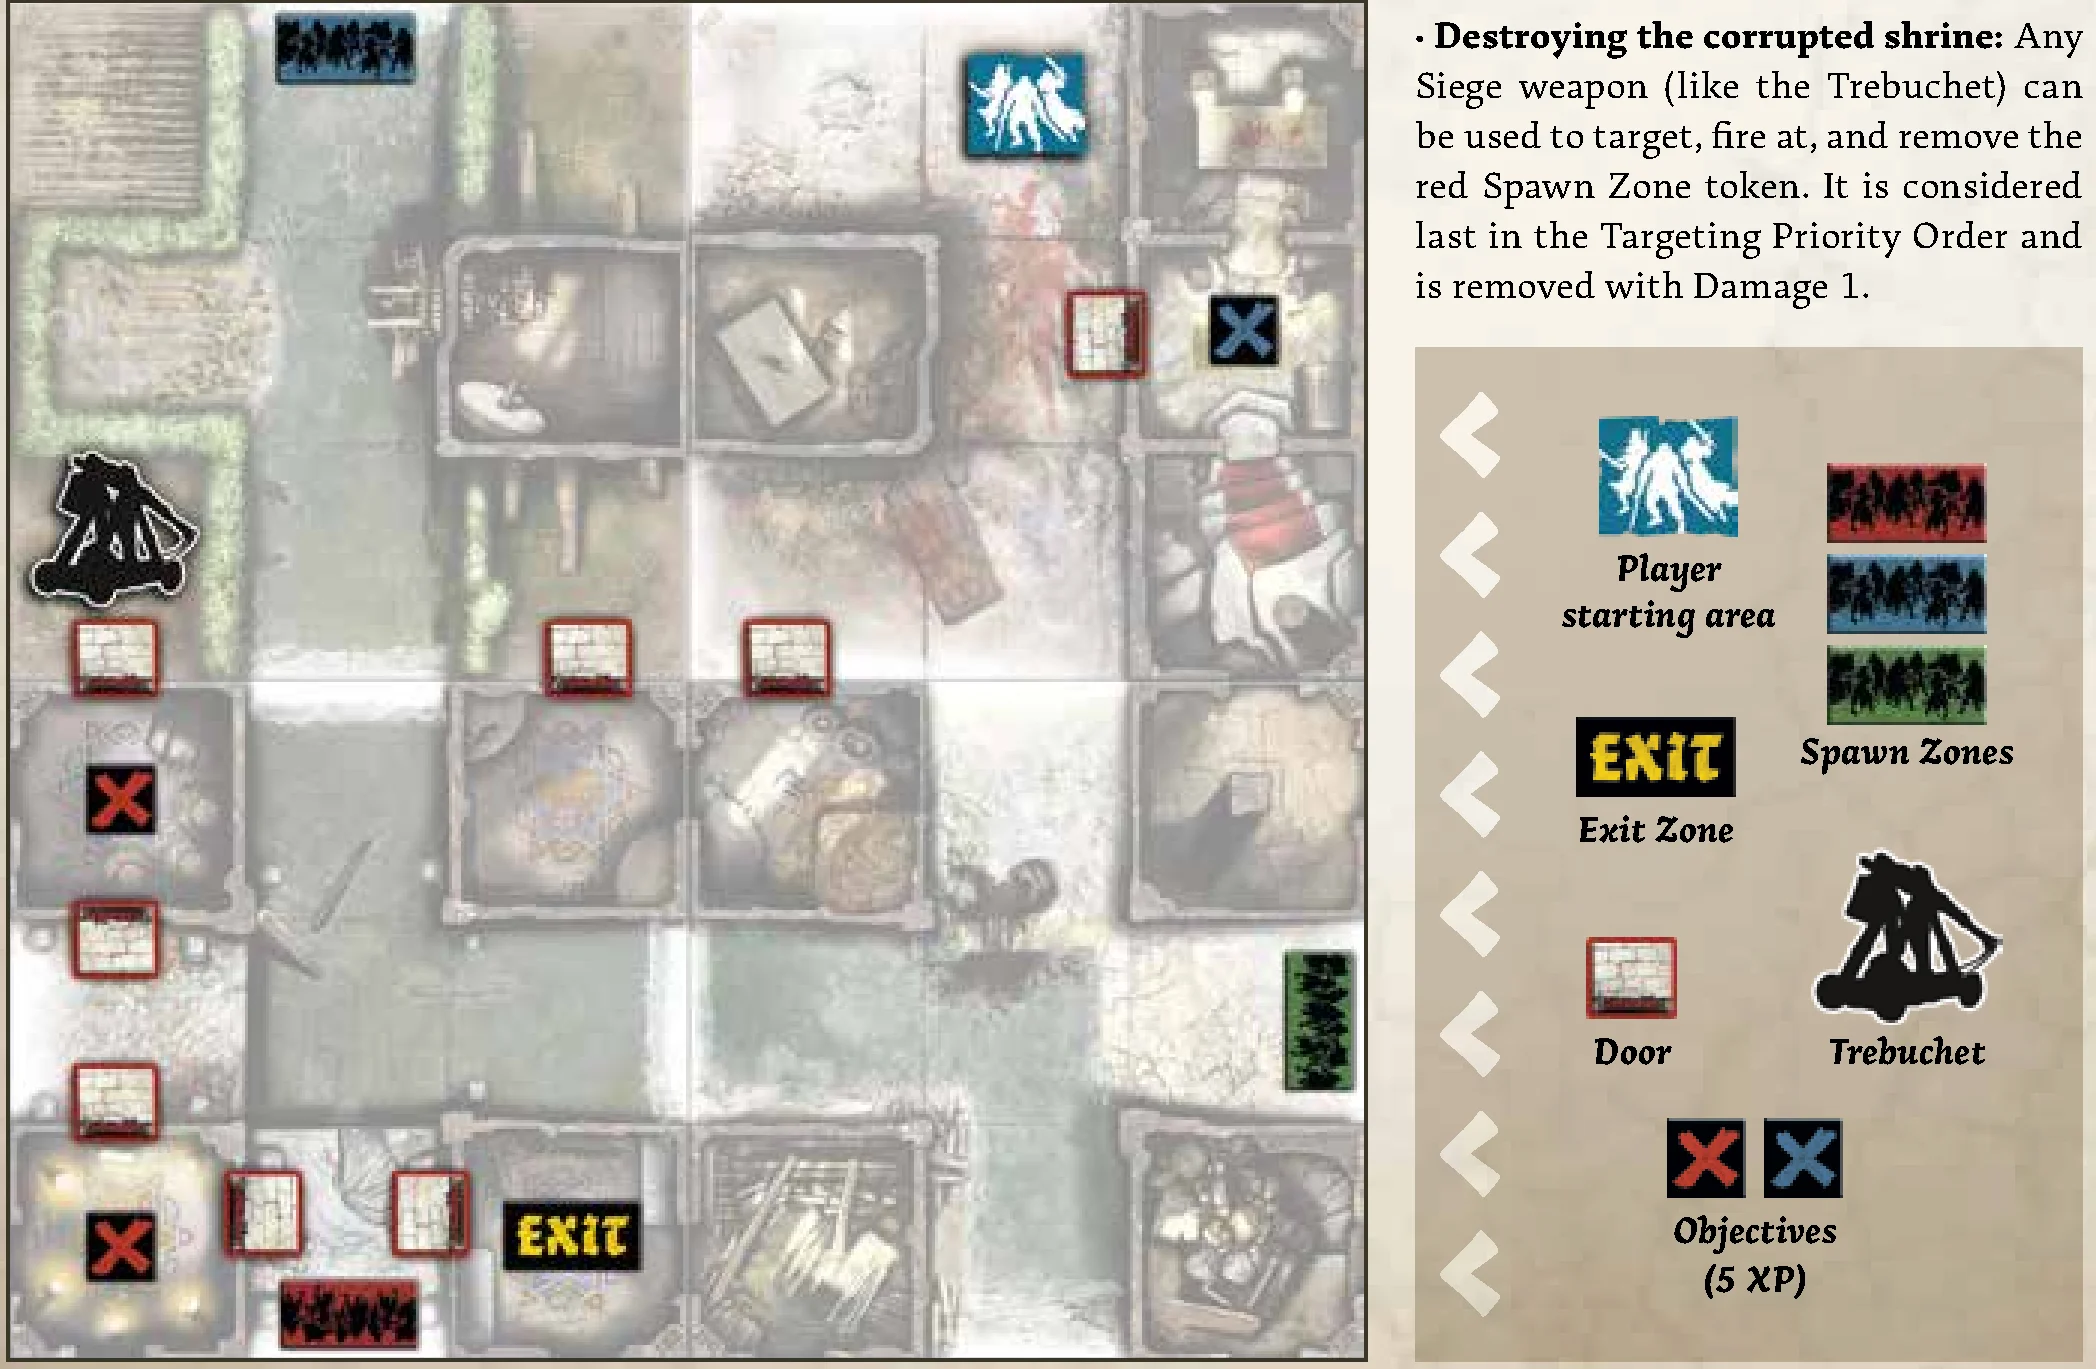
Tiles needed: 16R, 17R, 18R, & 20V.
Objectives
- Prevent the invasion: Destroy all 3 Spawn Zones (blue, green, and red).
- Reach the Exit with all Survivors.
Special Rules
- Setup: Put the green Objective randomly among the red Objectives facedown.
- Necromantic beacons: Blue and green Spawn Zones start active. Blue Spawn Zone is removed when the blue Objective is taken; green Spawn Zone is removed when green Objective is taken.
- Destroying the corrupted shrine: Any Siege weapon can target and remove the red Spawn Zone token (last in Targeting Priority, Damage 1).
QUEST 1: DRAGON BILE QUEST
MEDIUM / 6+ SURVIVORS / 90 MINUTES
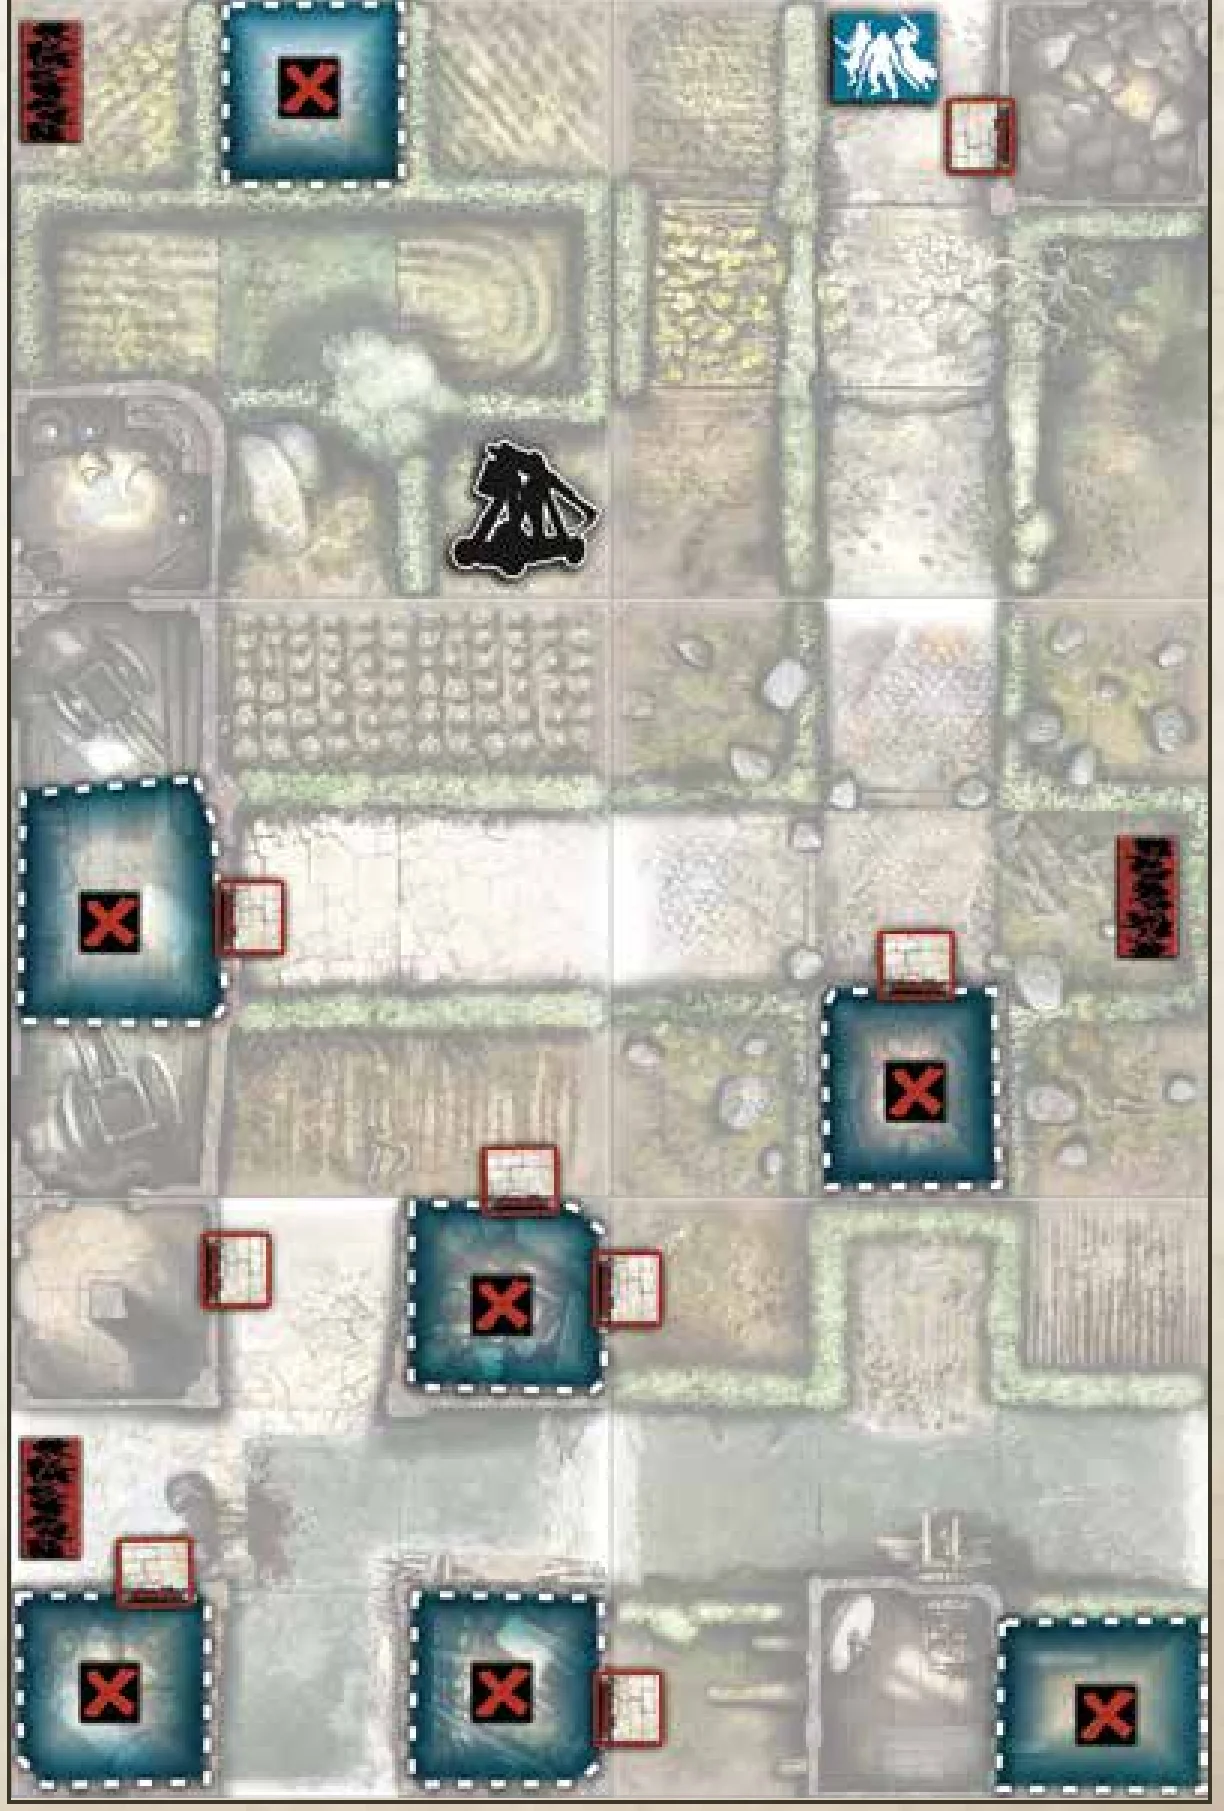
Tiles needed: 12V, 13V, 15V, 17R, 18V, & 20V.
Objectives
- Find the Dragon Bile: Collect the 4 Dragon Bile cards and all Objectives.
- Pack and leave: All Survivors must be in the same Zone, with no Zombies.
Special Rules
- Setup: Shuffle 4 Dragon Bile cards with 3 random Vault weapon cards facedown in marked Zones.
- Each Objective gives 5 XP. Spend 1 Action to take a card in their Zone.
QUEST 2: ORC NECROMANCERS?
MEDIUM / 6+ SURVIVORS / 30-90 MINUTES
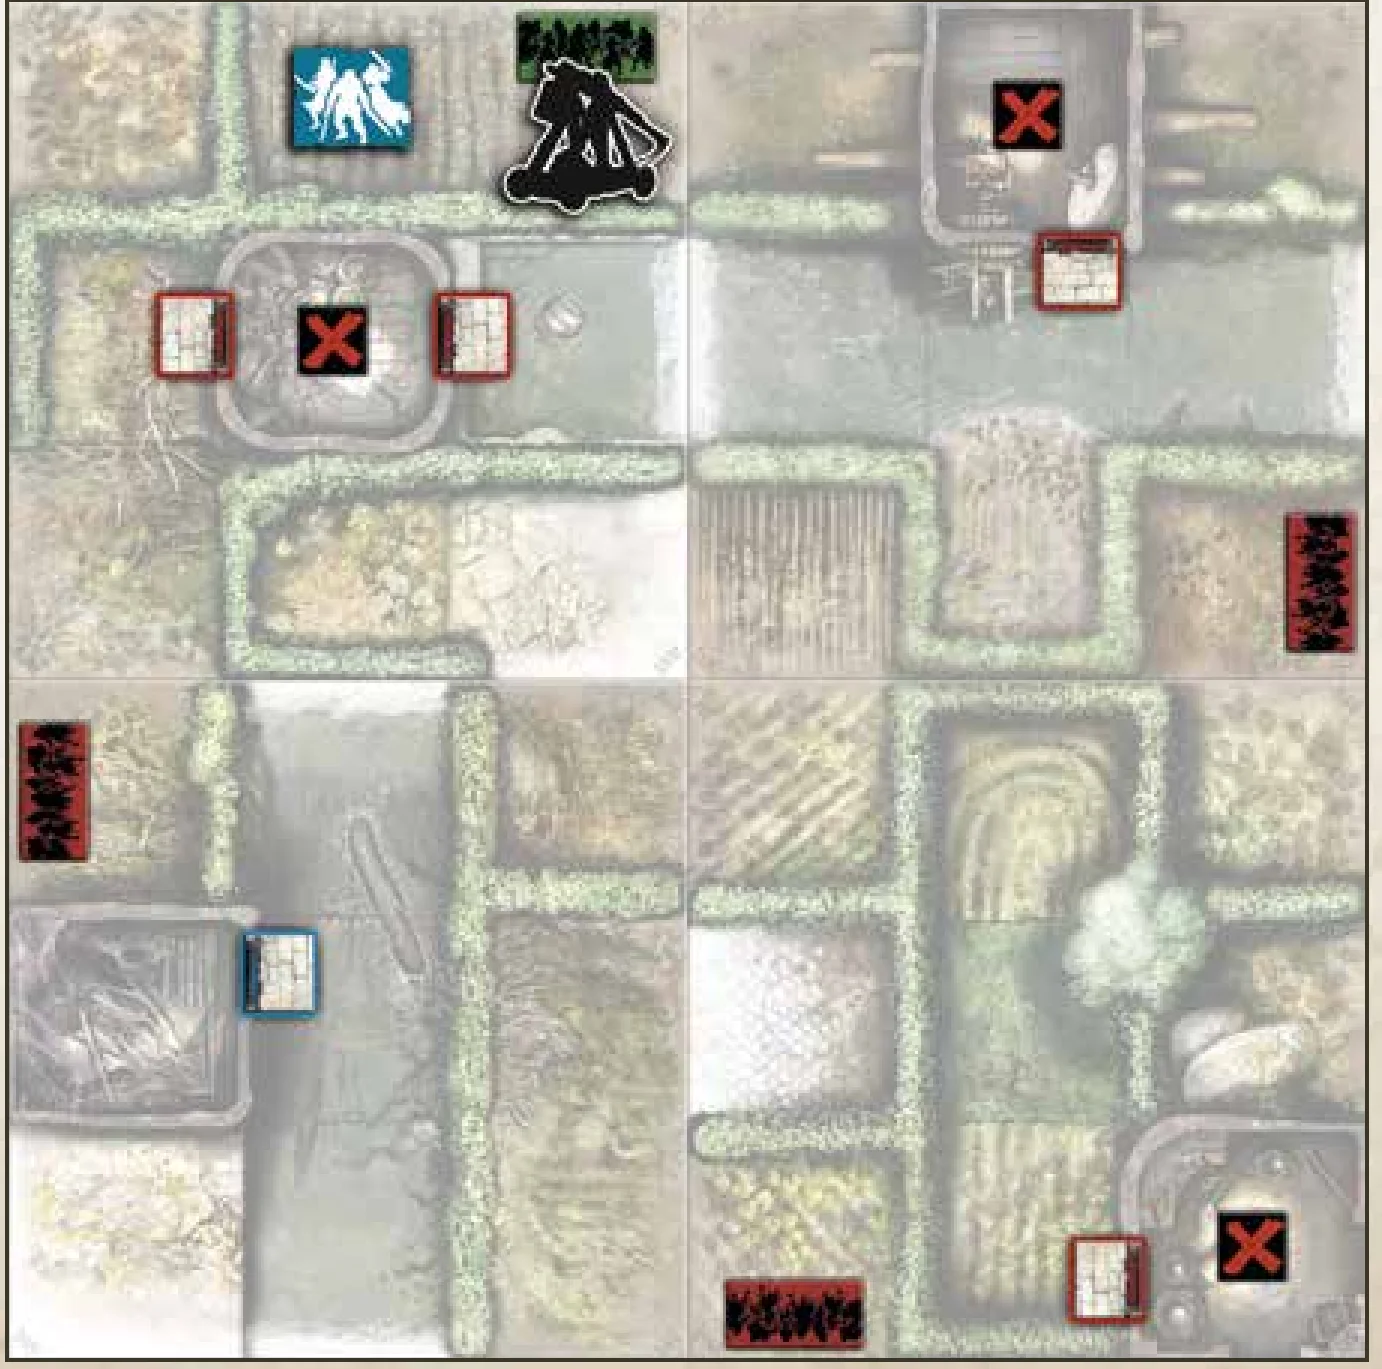
Tiles needed: 14V, 15V, 16V, & 20V.
Objectives
- Find the key: Take Objectives until finding the blue one.
- Investigate the house: Have a Survivor in the building behind the blue door with no Zombies.
Special Rules
- Setup: Shuffle blue and green Objectives with 5 red Objectives. Place 3 on board, set 4 aside.
- Each Objective gives 5 XP. Killing a Necromancer reveals an Objective from the side pile and gives 5 XP.
- Blue door opens only after the blue Objective is taken. Taking the green Objective activates the green Spawn Zone.
QUEST 3: KNOW YOUR ENEMY
MEDIUM / 6+ SURVIVORS / 90 MINUTES
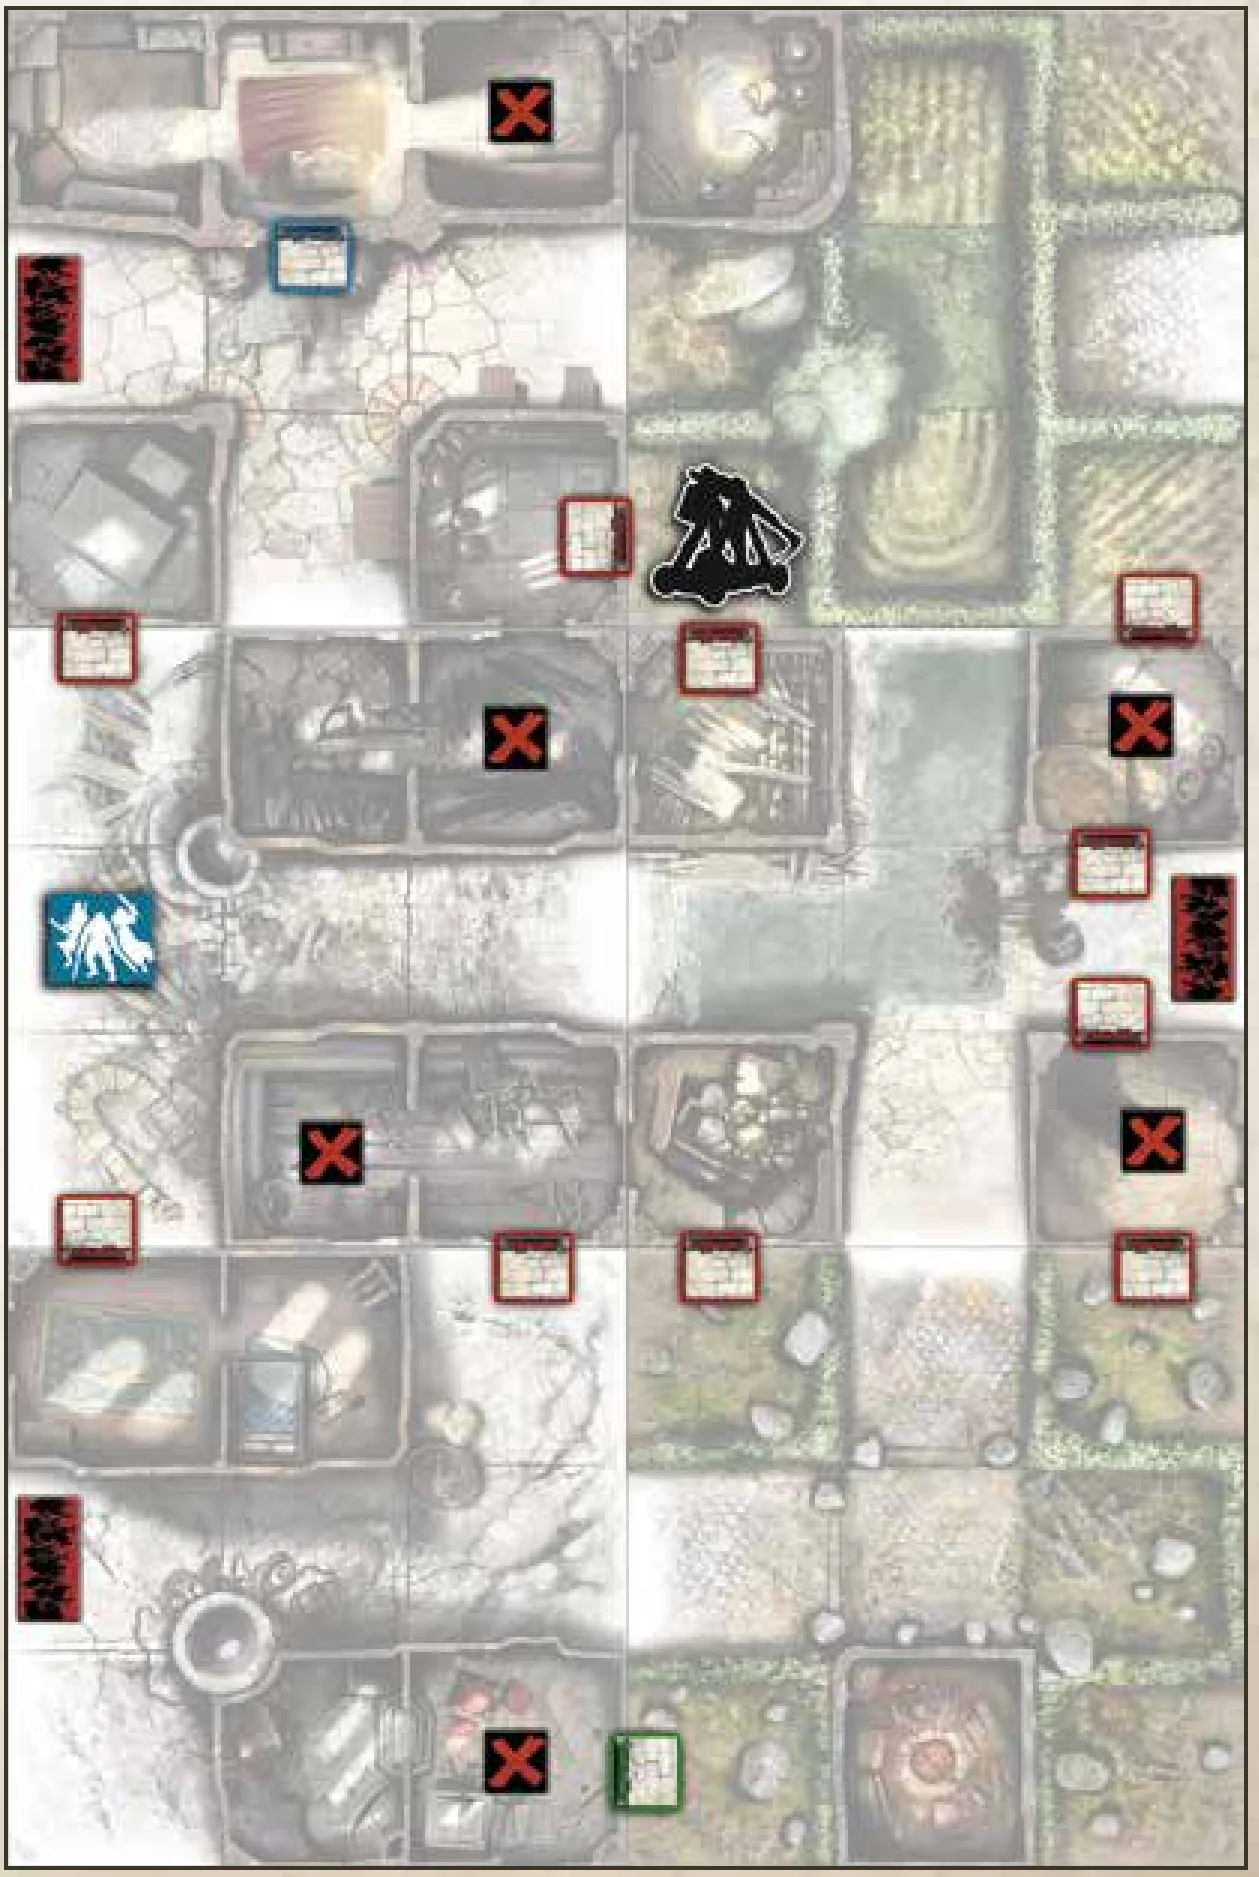
Tiles needed: 14R, 15V, 17R, 18V, 19R, & 20R.
Objectives
- Enter lairs: Find the blue and green Objectives.
- Destroy phylacteries: Take the 2 Objectives behind the blue and green doors.
Special Rules
- Each Objective gives 5 XP and a random Vault weapon. Killing a Necromancer grants an Objective from the pile.
- Blue and green doors require their matching color Objectives to be opened.
QUEST 4: THE RIVER OF THE DEAD
MEDIUM / 6+ SURVIVORS / 90 MINUTES
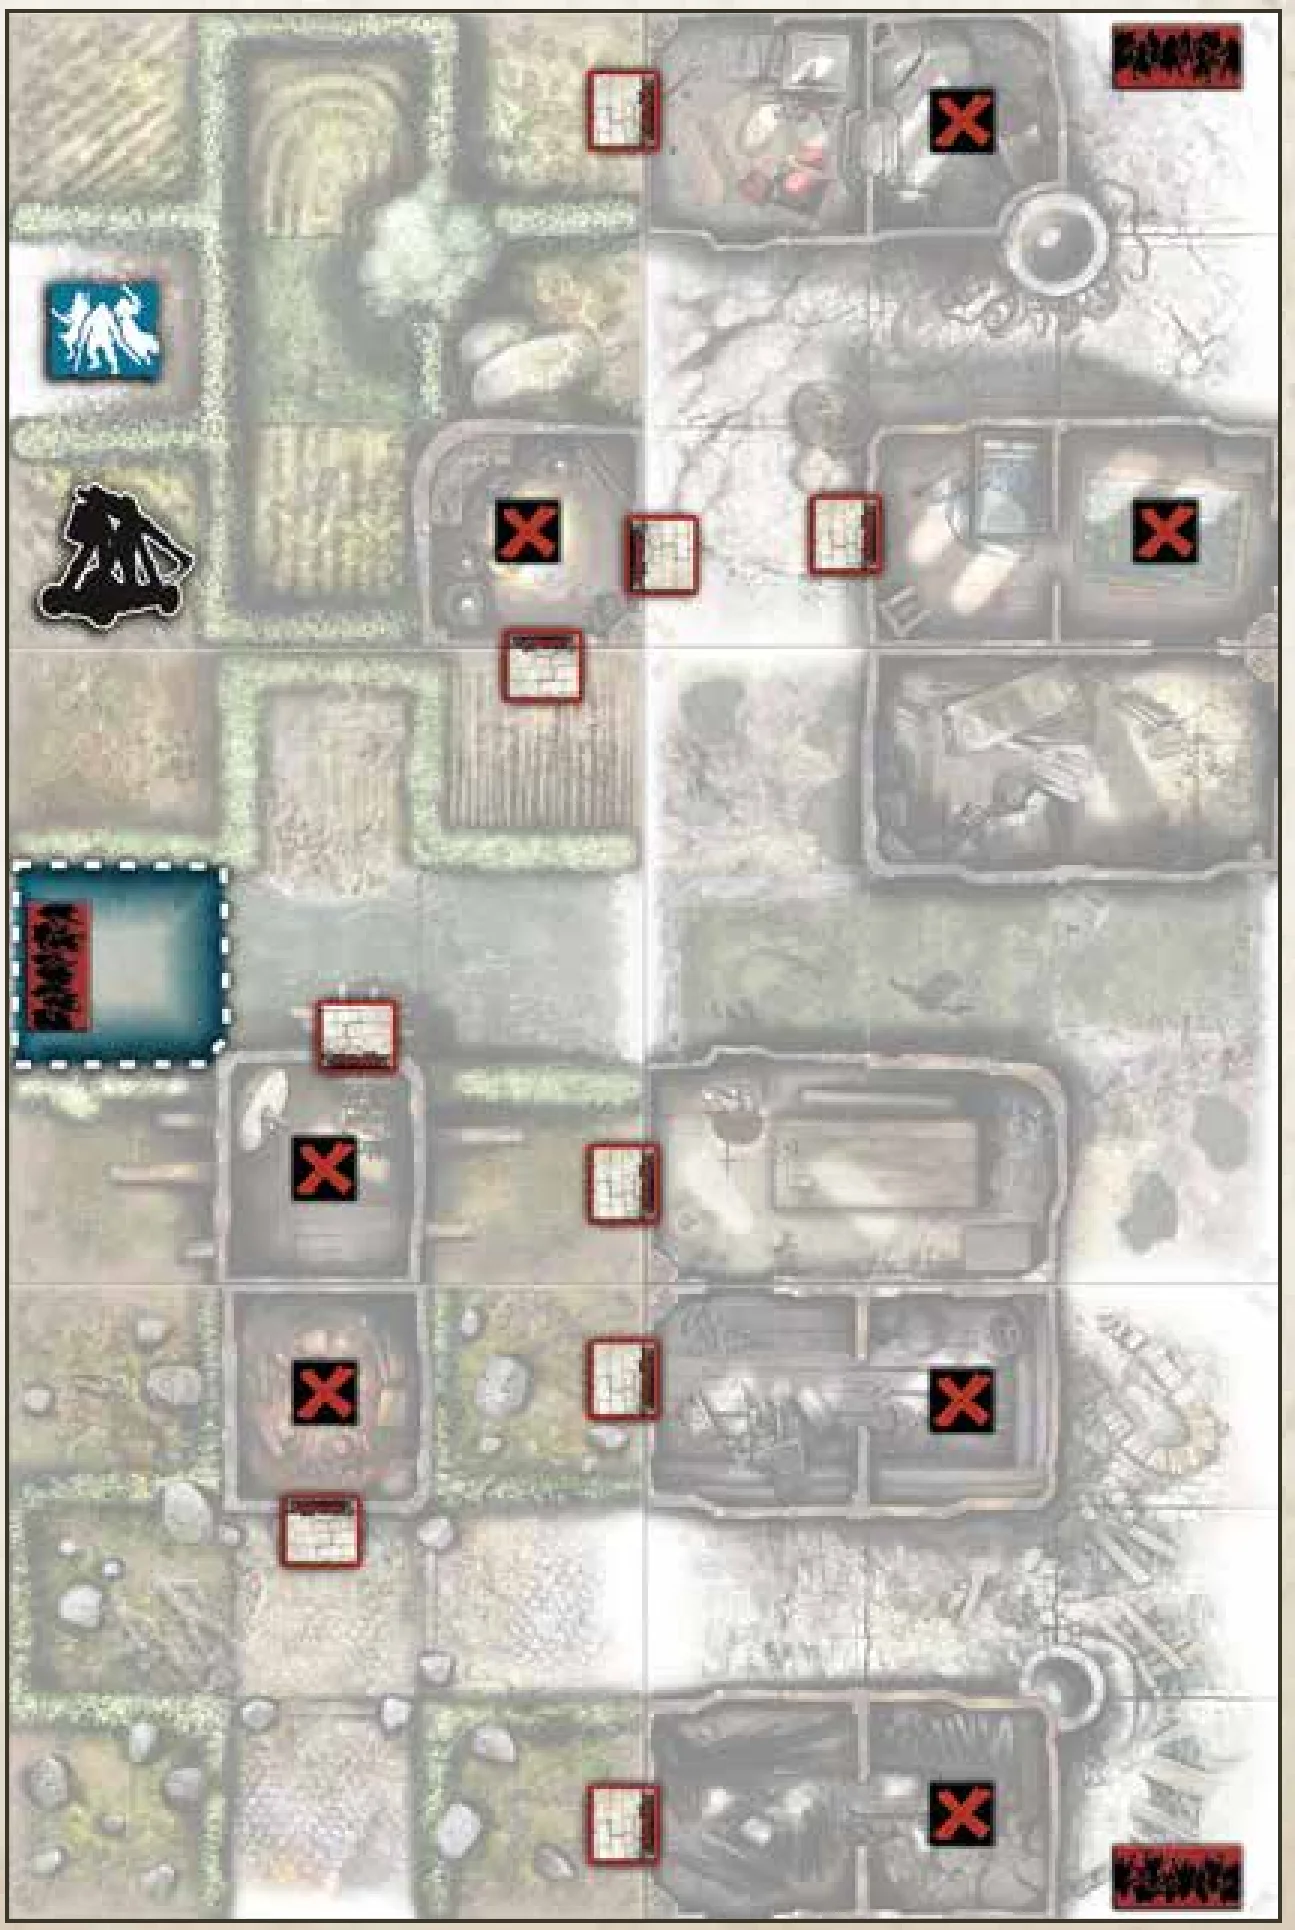
Tiles needed: 12R, 14R, 15V, 18V, 19R, & 20V.
Objectives
- Destroy the zombie baits: Take all Objectives.
- Cut reinforcement line: Gather all Zombie Spawn tokens in the River Current Zone.
Special Rules
- Each Objective gives 5 XP. Taking the blue or green Objective allows moving a Zombie Spawn token to the indicated Zone.
QUEST 5: THE CLEANSING FLOOD
MEDIUM / 6+ SURVIVORS / 90 MINUTES
Tiles needed: 13R, 14R, 15R, 16V, 19V, & 20R.
Objectives
- Access Trebuchet: Find blue and green Objectives and open doors.
- Survive flood: Use Trebuchet and reach Exit with all Survivors in the same Turn.
Special Rules
- Each Objective gives 5 XP and a random Vault weapon. Blue/green doors locked until matching Objectives taken.
- 3 Actions to fire Trebuchet to flood town. All other Survivors must already be on Exit.
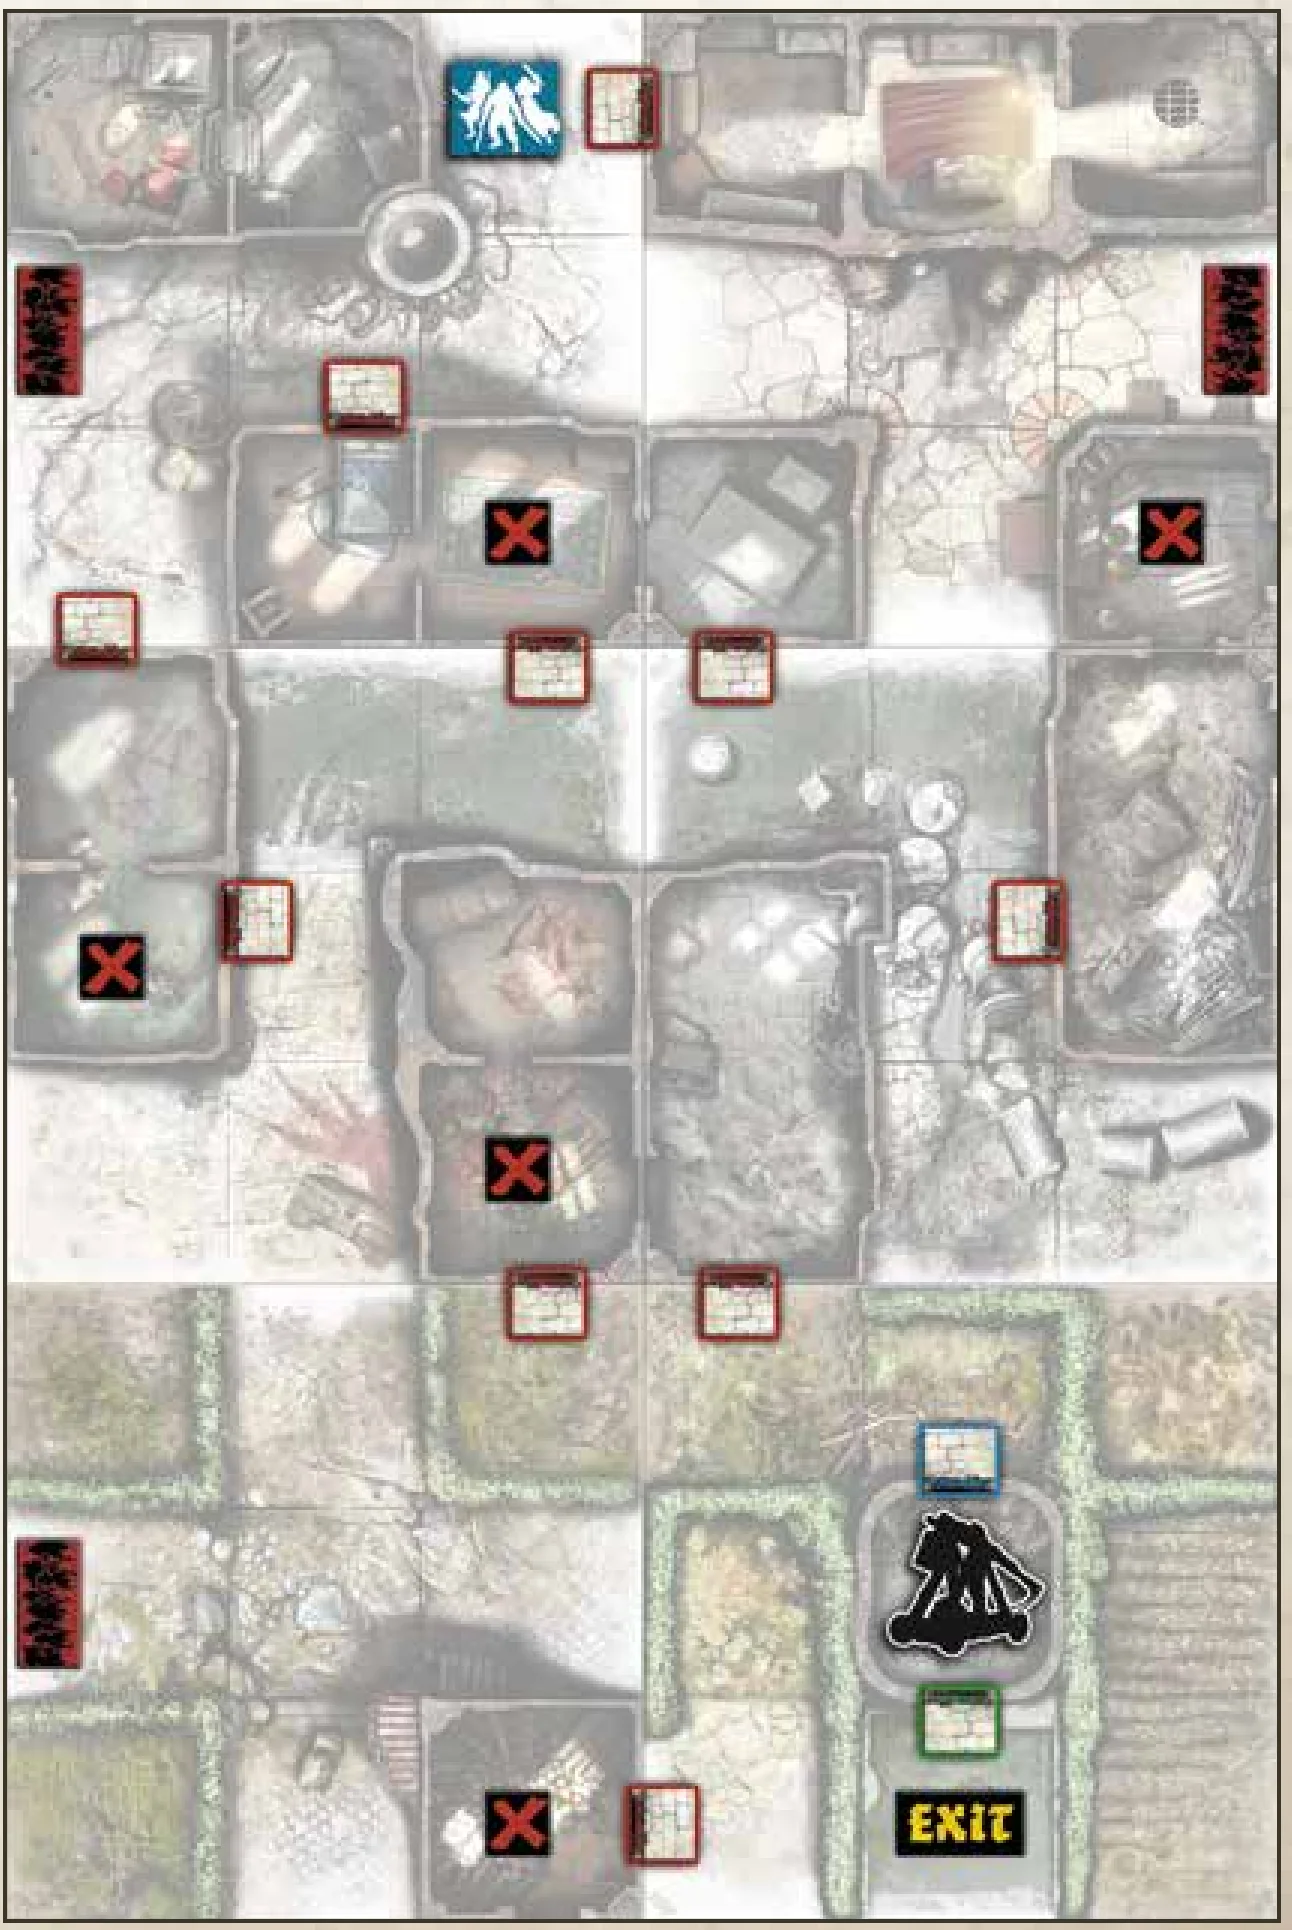
QUEST 6: SIEGE BREAKERS
MEDIUM / 6+ SURVIVORS / 90 MINUTES
Tiles needed: 12V, 14R, 15R, 17V, 19V, & 20R.
Objectives
- Find ammunition: Take all Objectives.
- Remove all Spawn Zone tokens using a Siege Weapon.
Special Rules
- Each Objective gives 5 XP. Green Spawn Zone cannot be removed by killing a Necromancer and activates when green Objective taken.
- Once all Objectives taken, Siege Engines can destroy Spawn Zones (last in priority, Damage 1).
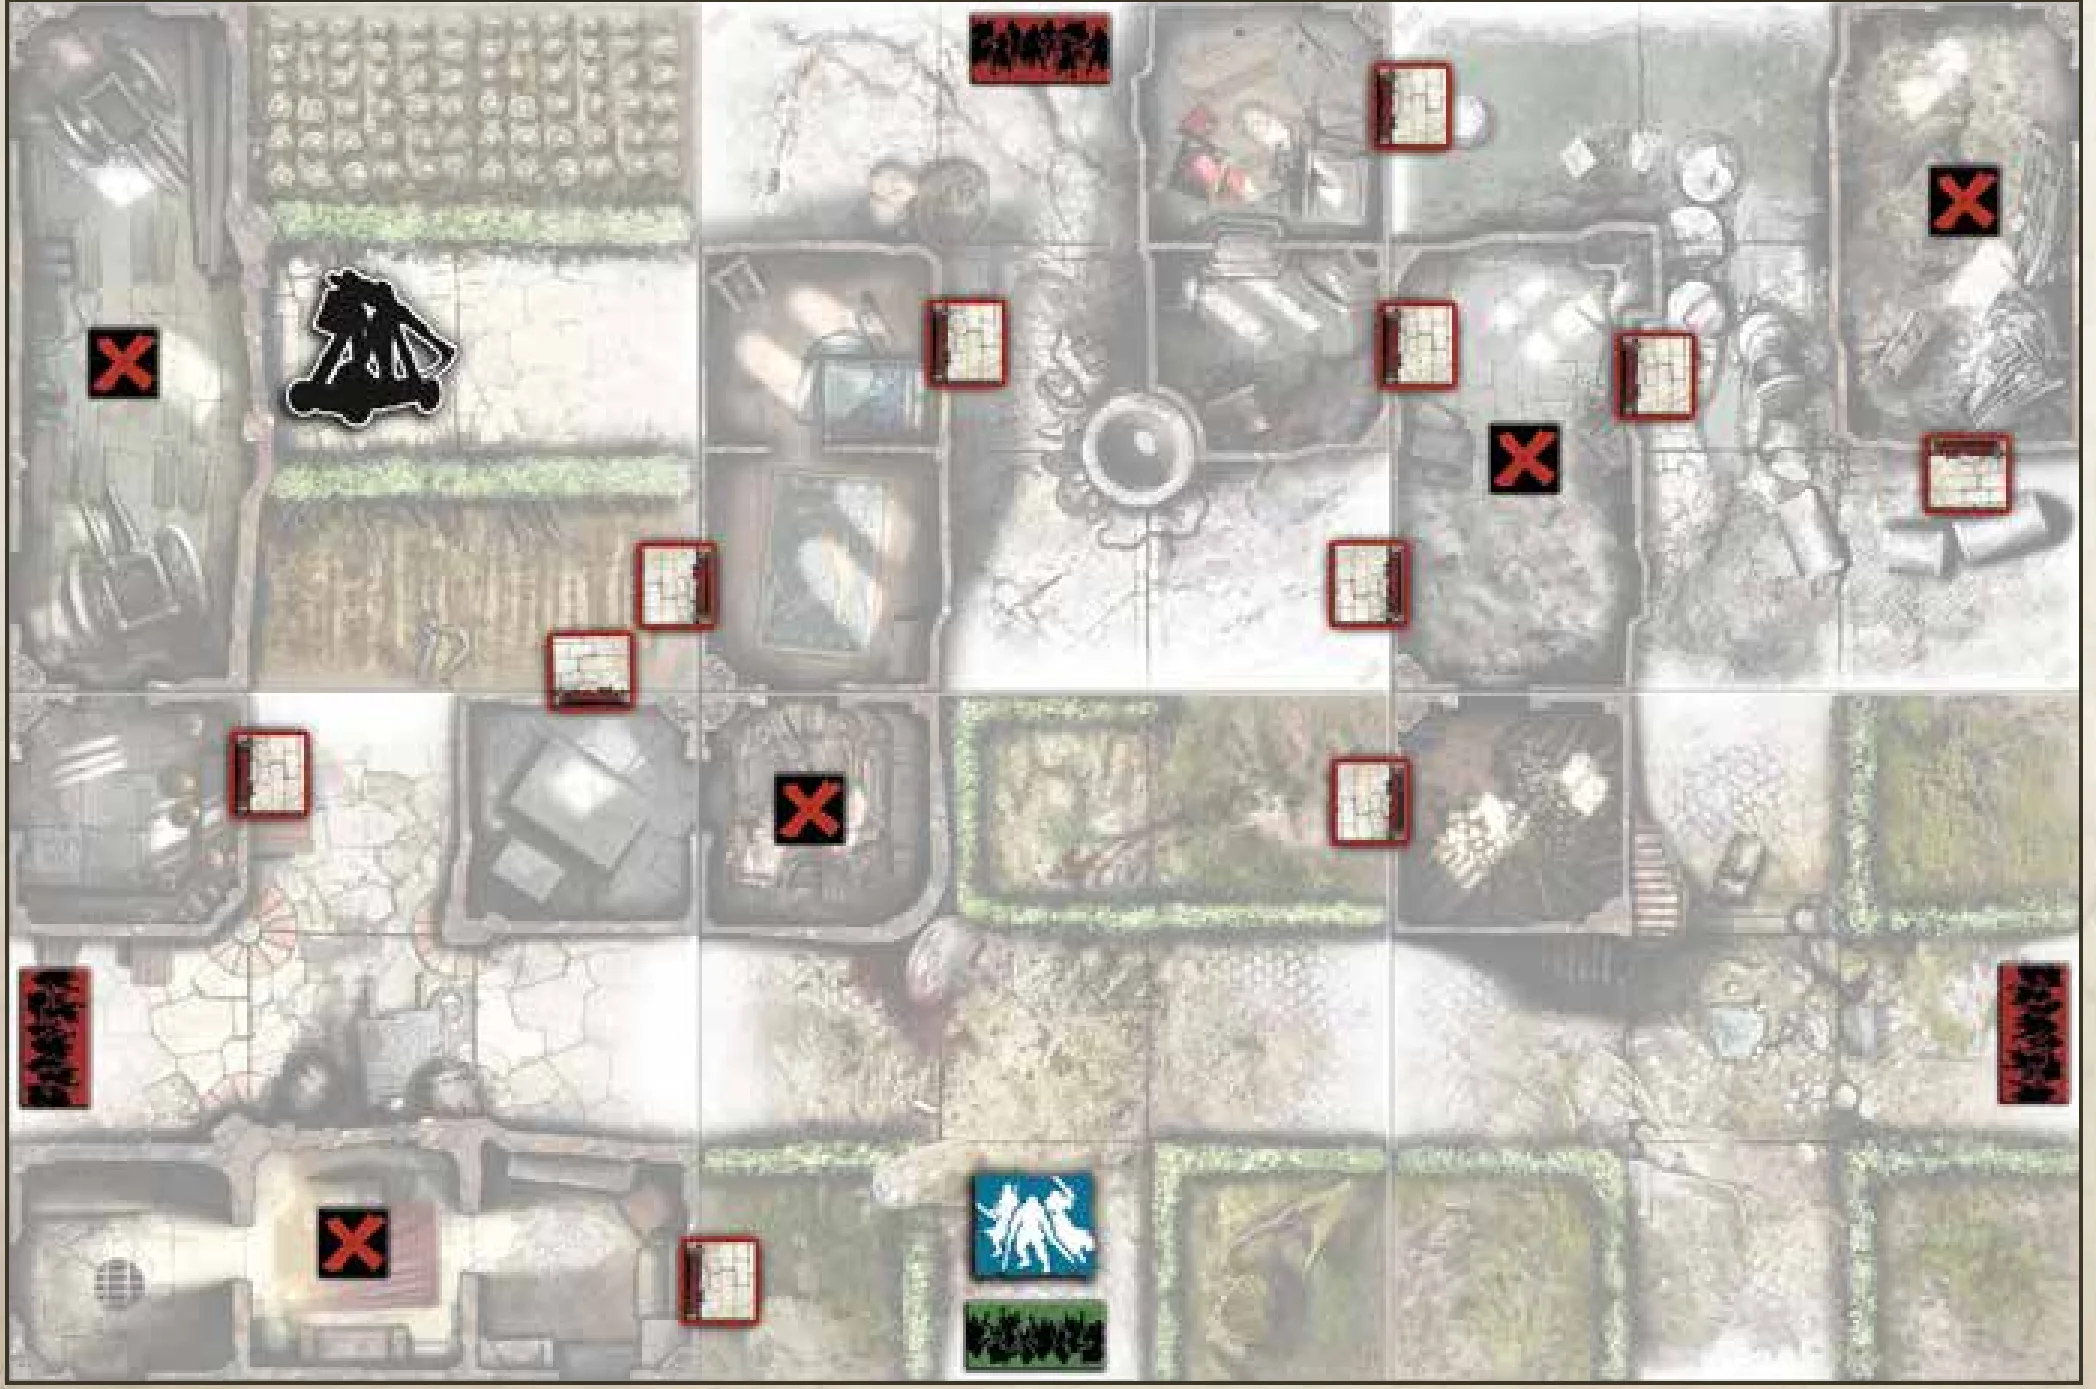
QUEST 7: FIRE IN THE HORDE!
MEDIUM / 6+ SURVIVORS / 90 MINUTES
Tiles needed: 13V, 14R, 15V, 16V, 17V, & 20V.
Objectives
- Take all double-faced red Objectives.
- Rebuild Trebuchet (1 Action in green Objective Zone).
- Quest succeeds when the Horde is completely empty (either on map or bombarded).
Special Rules
- Taking blue Objective gives 2 random Vault weapons and activates blue Spawn Zone.
- Barriers destroyed only by Zombies with extra Activations in their Zone.
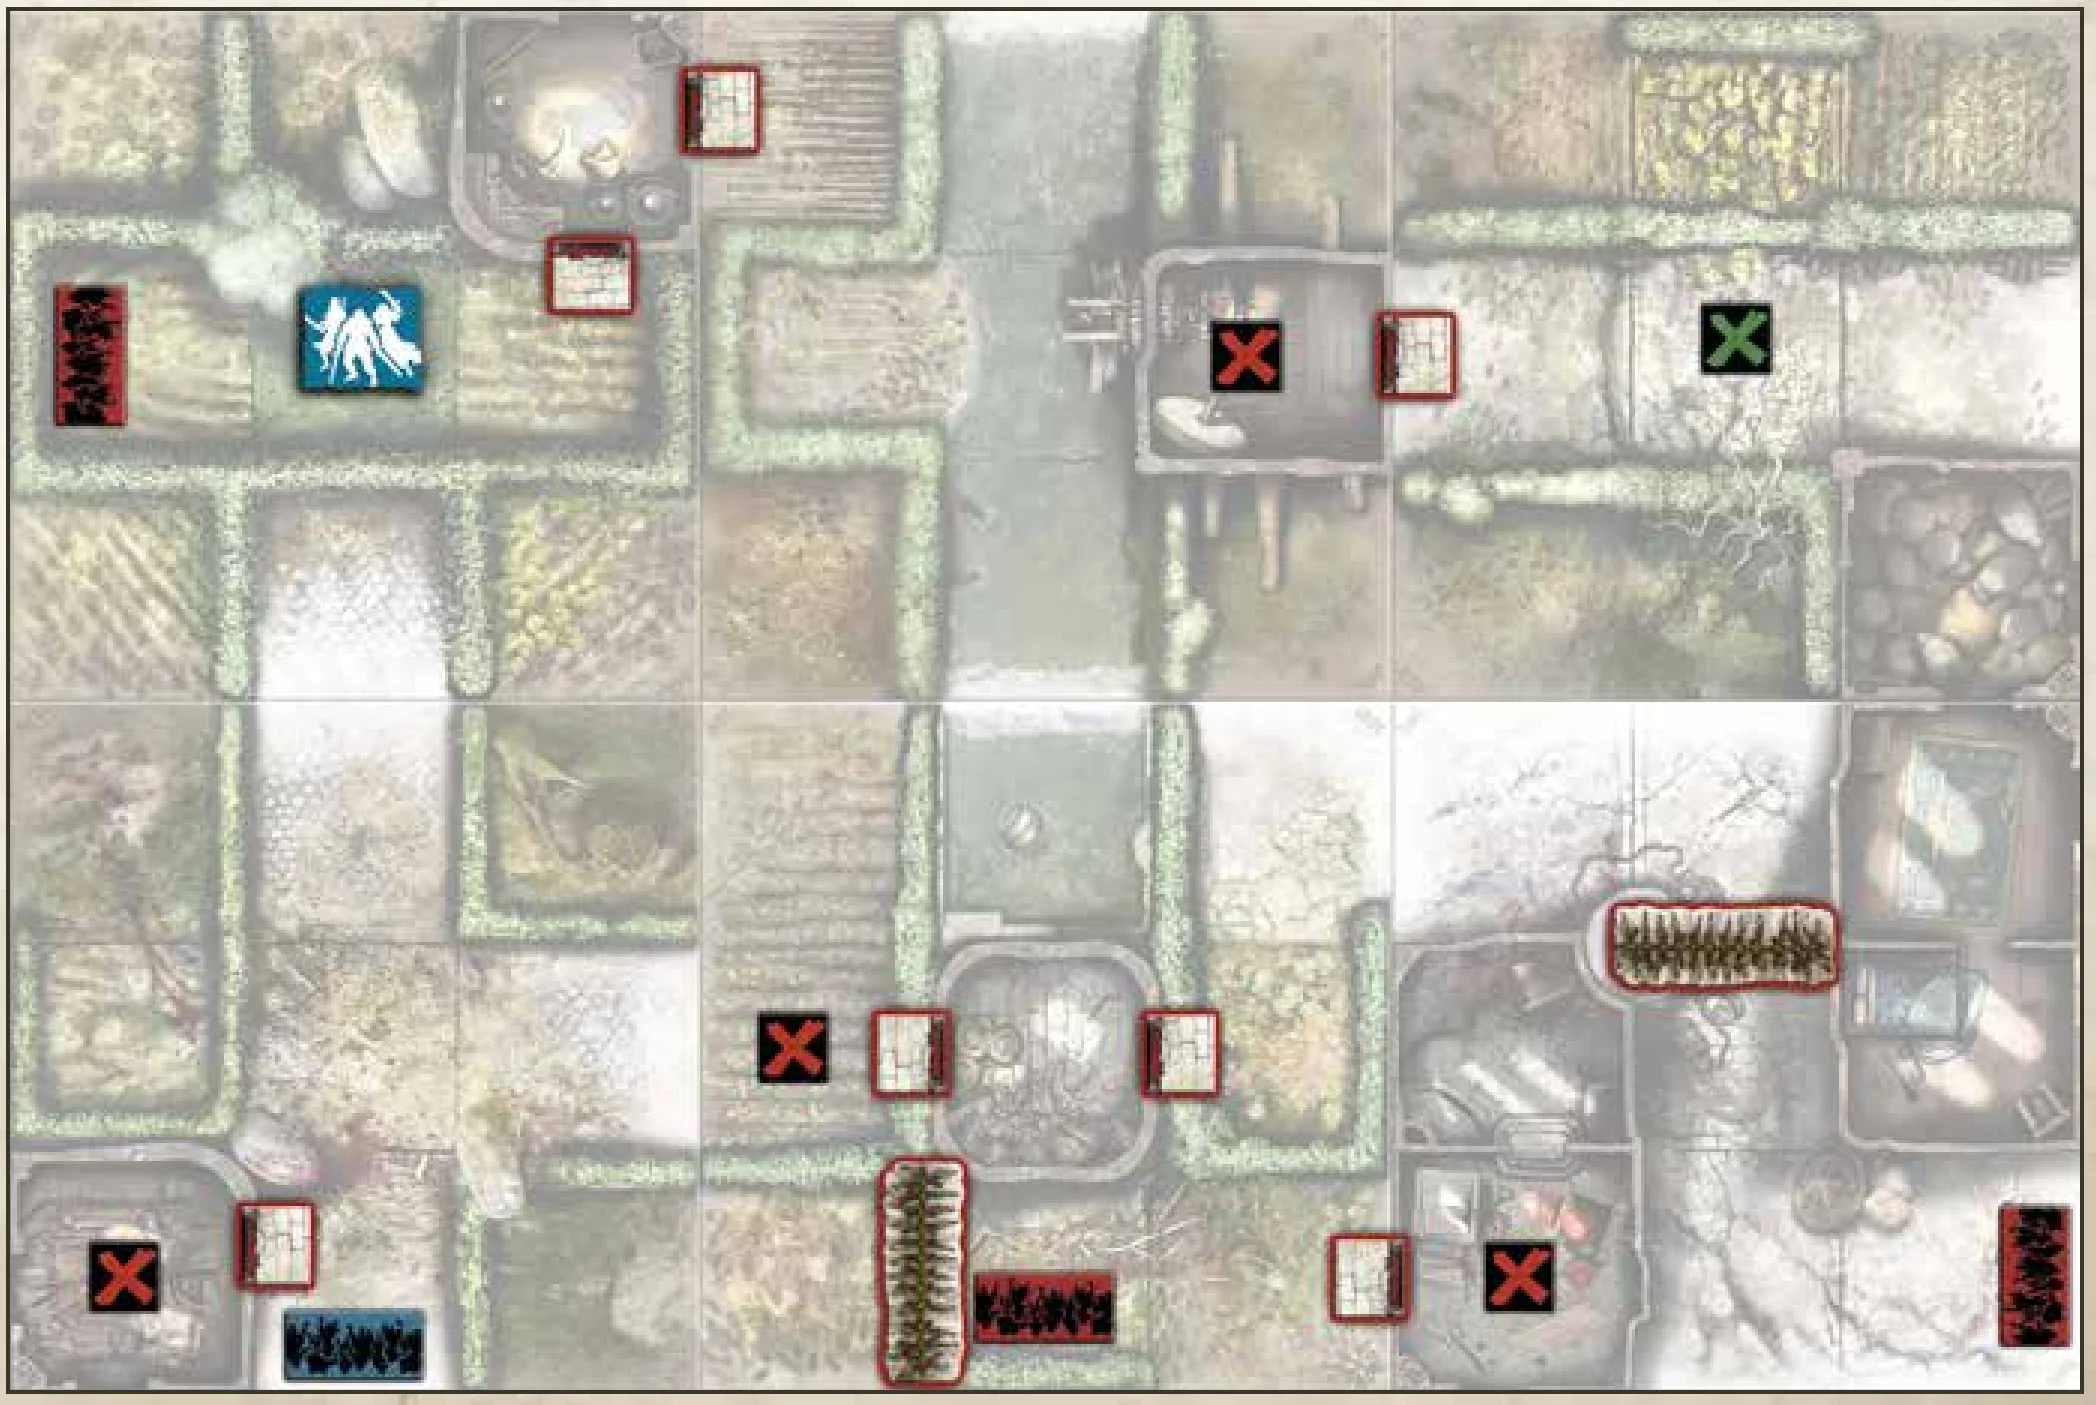
QUEST 8: CULLING THE HERD
MEDIUM / 6+ SURVIVORS / 60 MINUTES
Tiles needed: 12V, 15V, 19V, & 20R.
Objectives
- Gather Zombies: Block red Spawn Zones with Barriers.
- Free Trebuchet: All Survivors in Trebuchet Zone without Zombies.
Special Rules
- 2 Orc Fatties, 2 Runners, 4 Walkers in Trebuchet Zone are ignored until blue door opens.
- Survivors can spend 1 Action to carry a Barrier and place it freely on a border. Barriers cannot be destroyed.
- When all accesses to a Spawn Zone are blocked, move its token to the blue Spawn Zone.
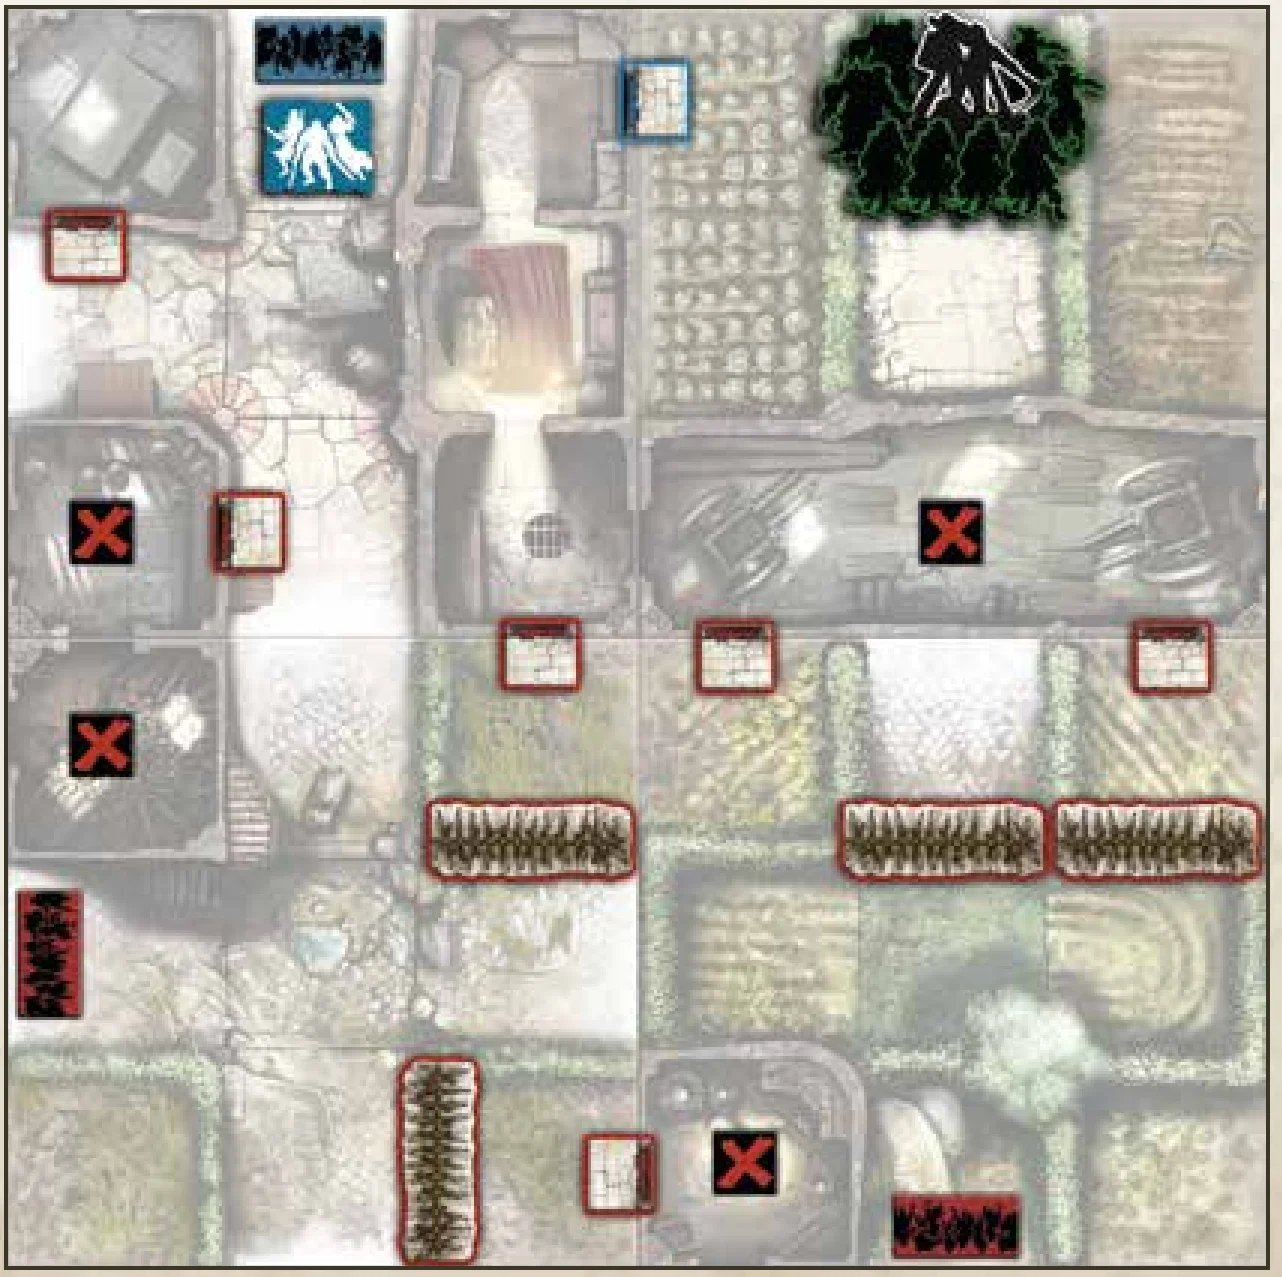
QUEST 9: FALLEN FORTRESS
MEDIUM / 6+ SURVIVORS / 90 MINUTES
Tiles needed: 12R, 13R, 15R, 16R, 17R, & 20V.
Objectives
Reach the Exit with all Survivors.
Special Rules
- 6 Vault weapon cards placed facedown on board (1 Action to pick up).
- Blue/green doors locked until matching Objectives taken. Green Spawn Zone activates when green Objective taken.
- Barriers cannot be destroyed.
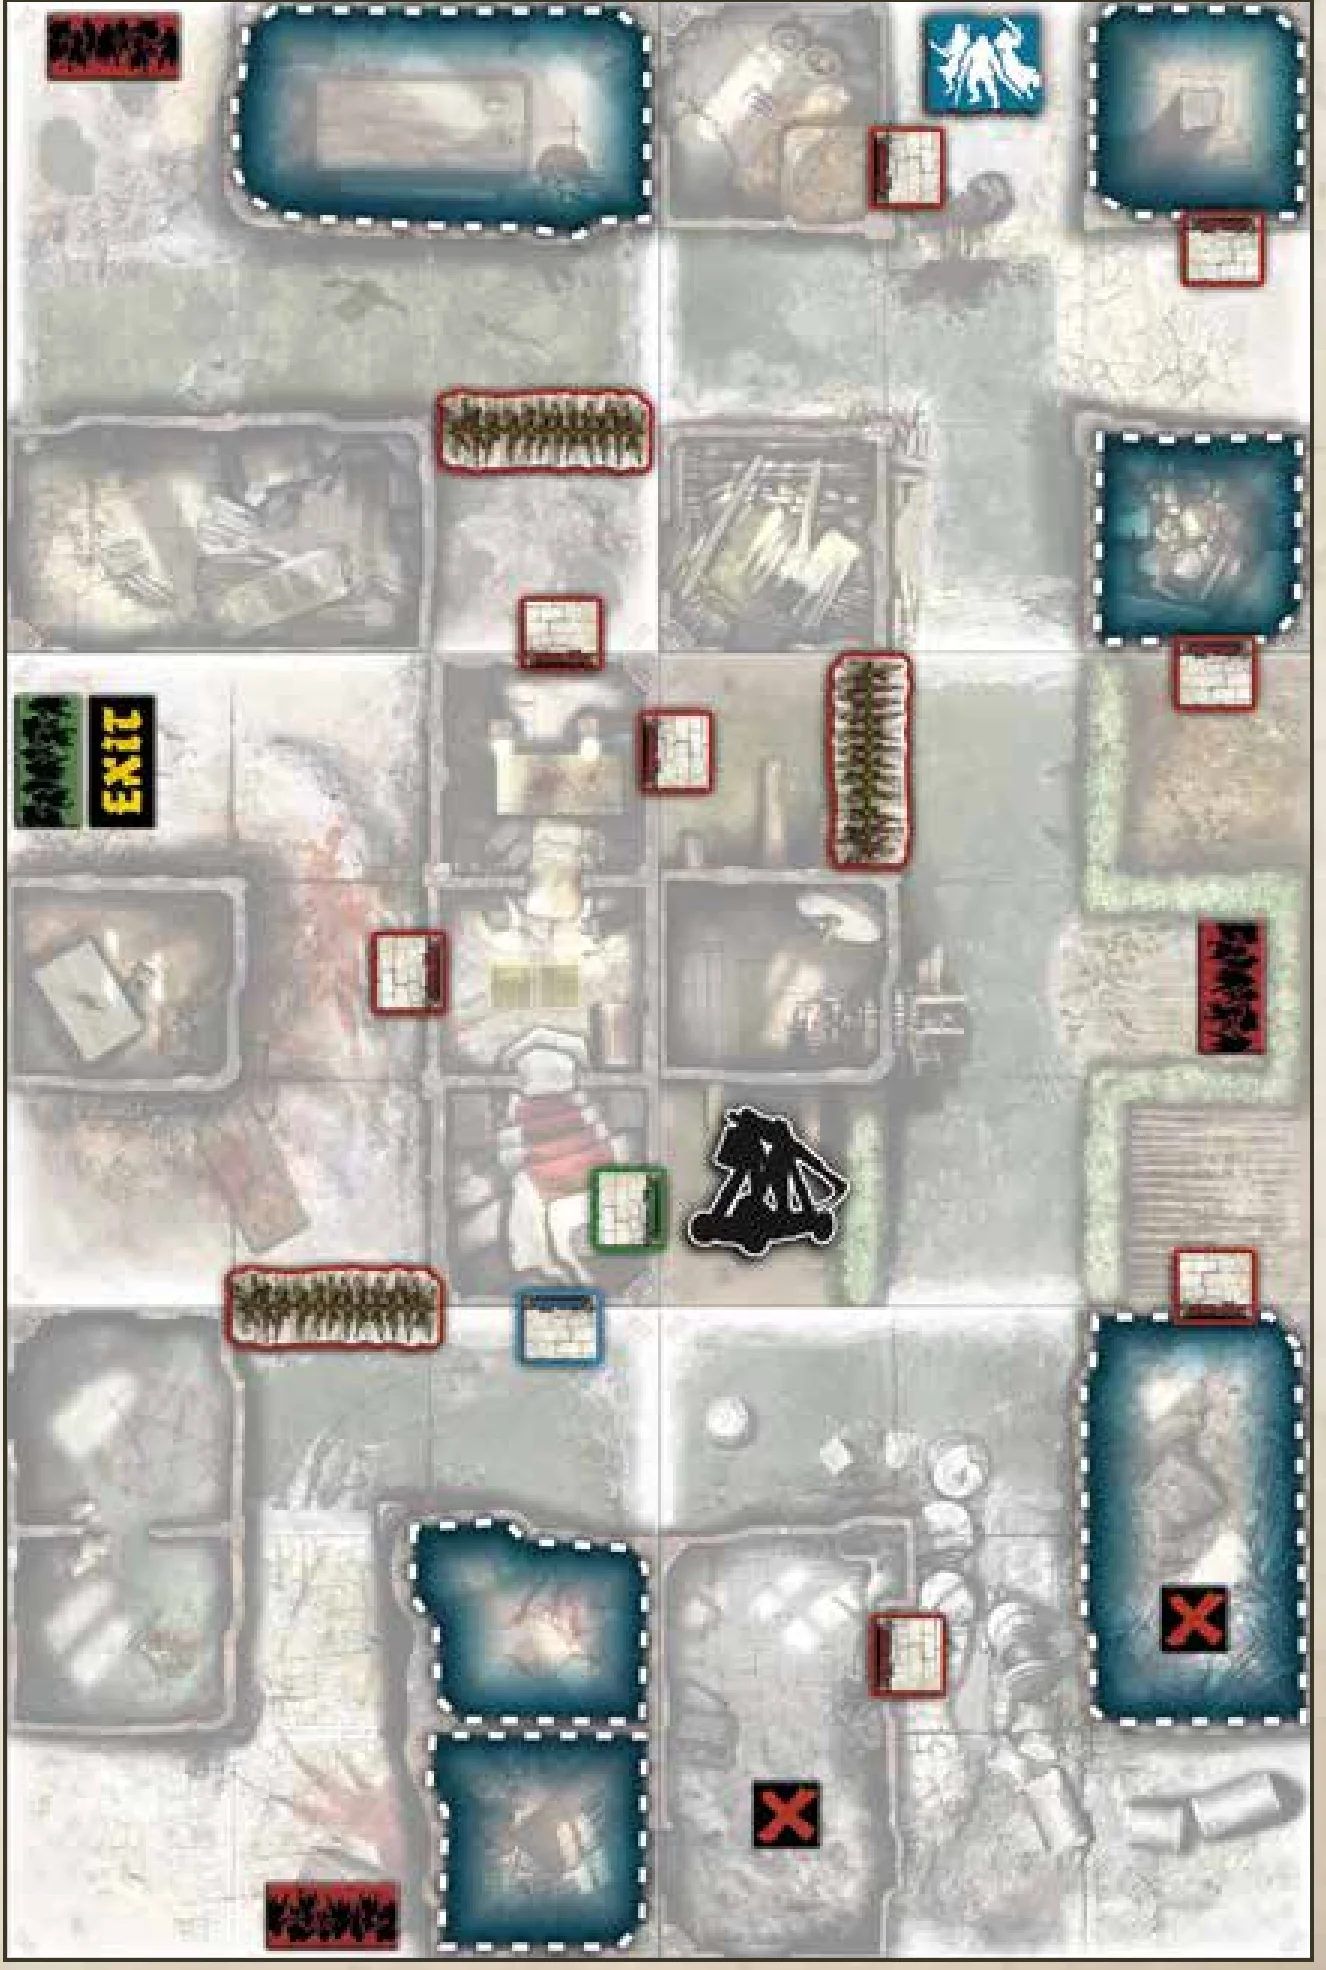
QUEST 10: A NEW HOME
MEDIUM / 6+ SURVIVORS / 90 MINUTES
Tiles needed: 14R, 15V, 16V, 17R, 19R, & 20V.
Objectives
Fortify home: No Spawn Zones on tiles 14R and 19R, and Barriers set to cut all routes to tiles 14R and 19R.
Special Rules
- Each Objective grants 5 XP, a random Vault weapon, and a mobile Barrier.
- Barriers can be carried (1 Action) and placed on straight borders. Cannot be destroyed.
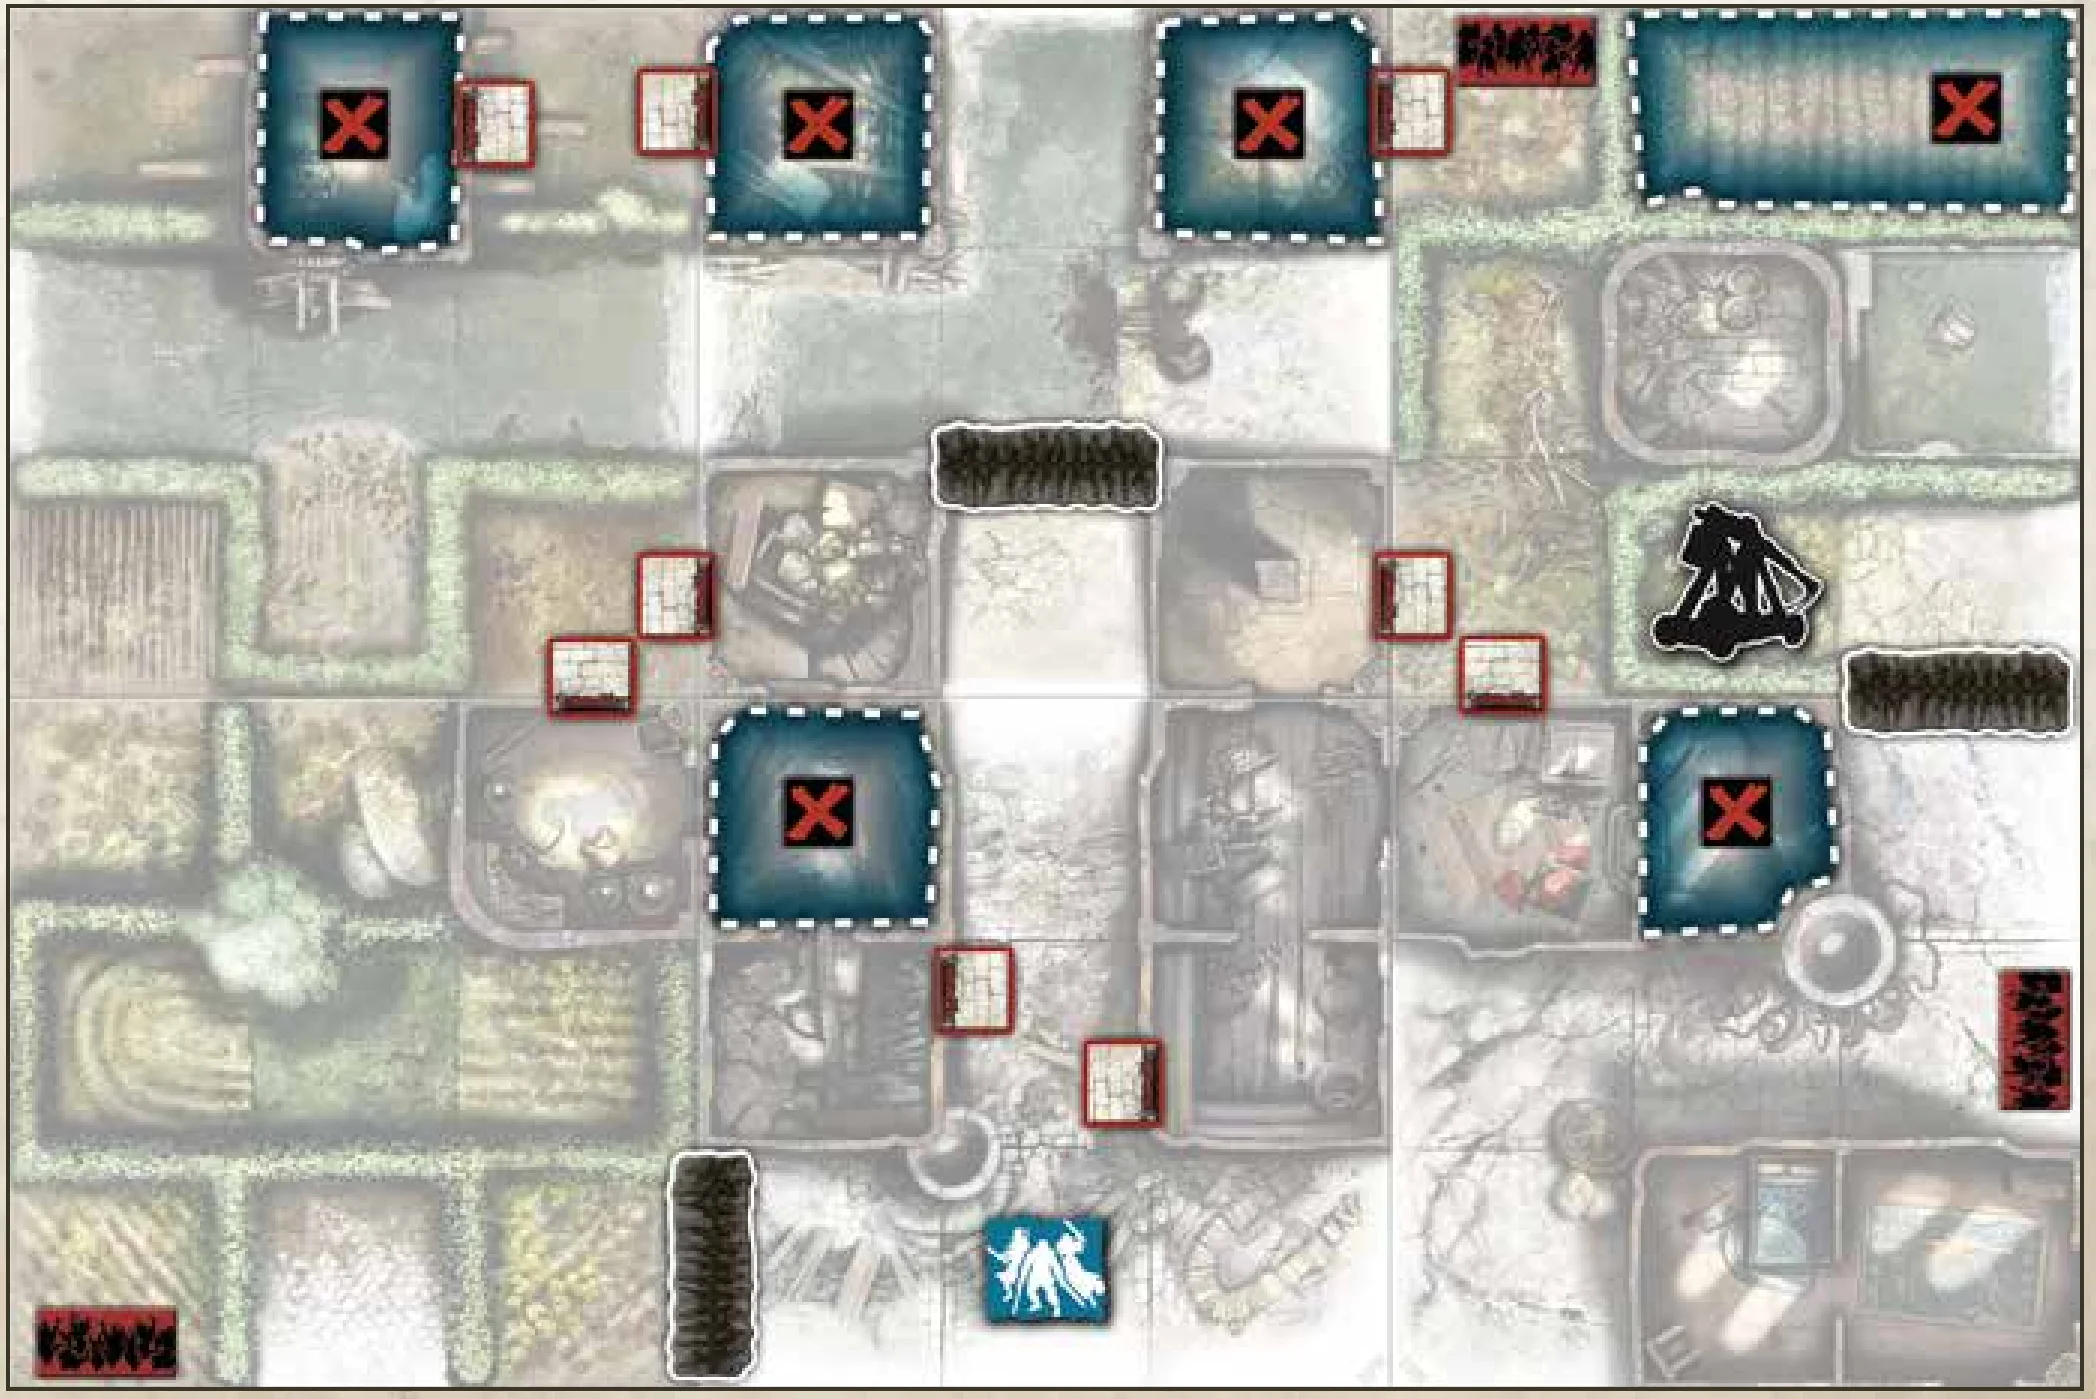
SKILLS GLOSSARY
In case of conflict with general rules, Skill rules take priority. Effects are immediate.
- +1 Action: Extra Action to use as pleased.
- +1 Damage: [Type]: +1 Damage bonus with Magic, Melee, or Ranged Actions.
- +1 Damage with [Equipment]: +1 Damage with specified Equipment.
- +1 to dice roll: [Type]: Add 1 to each die rolled (max 6).
- +1 die: [Type]: Weapons/spells roll an extra die in Combat (+2 for Dual).
- +1 free [Type] Action: 1 extra free Action of specified type per Turn.
- +1 max Range: Weapons/Combat spells max Range increased by 1.
- +1 Zone per Move / 2 Zones per Move Action: Move extra distance per Move Action.
- Ambidextrous: Treat all Combat spells, Melee, and Ranged weapons as Dual.
- Barbarian / Iron Rain / Mana Rain: Substitute Dice number of weapon/spell with number of Zombies in targeted Zone.
- Battle rage: Extra die for subsequent Melee Actions after a Melee kill.
- Blitz: Killing last Zombie in a Zone gives 1 free Move Action immediately.
- Bloodlust: [Type]: Spend 1 Action: Move up to 2 Zones to a Zombie-occupied Zone and perform a free Action.
- Born leader: Give 1 free Action to another Survivor for their next Turn.
- Break-in: Open doors silently without rolling dice or equipment; gain 1 free open-door Action.
- Brother in arms: [game effect]: All Survivors in same Zone share the effect.
- Charge: Free Move up to 2 Zones to a Zone containing Zombies.
- Collector: [Zombie type]: Double XP when killing this Zombie type.
- Destiny: Once per Turn, discard drawn Equipment card and draw another.
- Double casting: Select an extra target for the same Enchantment for free.
- Free reload: Reload reloadable weapons for free.
- Frenzy: [Type]: Weapons/spells gain +1 die per Wound suffered (+2 for Dual).
- Hit & Run: Free Move Action with Slippery after resolving a Combat kill.
- Hold Your Nose: Free Search Action if a Zombie was eliminated in the same Zone this Round.
- Ironclad: [Zombie type]: Ignore all Wounds from this Zombie type.
- Iron Hide: 5+ Armor roll without wearing armor; +1 to Armor rolls when wearing armor.
- Is That All You’ve Got?: Discard 1 Equipment card to negate 1 incoming Wound.
- Jump: 1 Action: Move 2 Zones to a Zone in Line of Sight, ignoring intervening Zone.
- Lifesaver: Drag Survivors from an adjacent Zombie-occupied Zone without penalty.
- Low Profile: Cannot be hit by friendly Magic or Ranged Actions.
- Lucky: Re-roll all dice for each Action or Armor roll once.
- Marksman: Freely choose Ranged/Magic targets; misses don’t hit Survivors.
- Matching Set!: Draw matching duplicate card when finding a Dual card while Searching.
- Point-Blank: Perform Ranged/Magic in own Zone at Range 0, choose targets freely, misses don’t hit allies.
- Reaper: [Type]: 1 hit can freely kill 1 additional identical Zombie in the same Zone.
- Regeneration: Heal all Wounds at end of Game Round if not eliminated.
- Roll 6: +1 die [Type]: Roll an extra die for each 6 rolled.
- Rotten: Gain Rotten token if no Combat/Siege/Noise performed. Ignored by Zombies.
- Scavenger: Search in any Zone free of Zombies.
- Search: +1 card: Draw 1 extra card when Searching.
- Shove: Push all Zombies in own Zone to an adjacent Zone.
- Slippery: No extra Actions spent to leave Zones containing Zombies.
- Spellbook: Backpack spells/enchantments are considered equipped in Hand.
- Spellcaster: 1 extra free Magic or Enchantment Action.
- Sprint: Spend 1 Move Action to move 2 or 3 Zones.
- Super Strength: Damage value of Melee weapons is considered 3.
- Starts with a [Equipment]: Starts game with specified card.
- Steady Hand: Ignore friendly Survivors when missing with Magic/Ranged.
- Swordmaster: Treat all Melee weapons as Dual.
- Tactician: Turn can be resolved anytime during Players’ Phase.
- Taunt: Free: Zombies in visible Zone gain extra Activation to move toward taunter.
- Tough: Ignore the first Wound received from a single Zombie each Zombies’ Phase.
- Transmutation: Spend 1 Action, discard Equipment card to draw a new one.
- Trick Shot: Aim Dual weapons/spells at different Zones with the same Action.
- Zombie Link: Take an extra Turn before Zombies when an Extra Activation card is drawn.
RULES SUMMARY
Players’ Phase
Each Survivor has 3 Actions:
- Move: Move 1 Zone (+1 Action per Zombie in starting Zone).
- Search (1x per Turn): In building Zone free of Zombies.
- Open a Door: Spawn Zombies if opening building first time.
- Reorganize/Trade: Exchange cards with Survivor in same Zone.
- Combat Action: Melee, Ranged, Magic.
- Enchantment Action.
- Take or Activate an Objective.
- Make Noise: Place Noise token.
- Siege Action: Move Trebuchet (3 Actions) or Fire Trebuchet (3 Actions).
- Do Nothing.
Zombies’ Phase
- Activation: Attack OR Move: Attack Survivors in Zone, otherwise Move 1 Zone toward visible Survivors or noise. (Runners get 2 Actions).
- Spawn: Draw Zombie card per Spawn Zone based on highest Danger Level. Add to Horde if symbol is present. Extra Activation if running out of minis.
End Phase
- Remove all Noise tokens.
- Pass First Player token clockwise.
Introduction & Components
INFECTED HUNGER
This is the Western border, a land of black and green, where the sun and rain are caught in an eternal struggle to rule the skies. Here, nature grows with an unmatched vigor, and our houses have been standing for generations. We are a proud people.
We had been fighting the wild Orcs for two years when the zombie plague struck the kingdom. Our foes had grown beyond their own resources and were raiding our farms to avoid starvation. They were fighting like the hungry beasts they had become, and we answered in kind.
As Orcs are natural-born fighters and already hungry, they were harshly struck by the zombie plague. Almost all of them became infected in a short time. We were fighting the zombie plague as well, and the long feud was suspended for almost two weeks.
When the Orcs came back, they were changed. Their army had entirely turned zombie and was still determined to ravage our country. They were stronger and hungrier than ever, but craved a different kind of food. We quickly realized Orc Necromancers were directing the tide toward us, the survivors, the last obstacle between them and ultimate power.
Their infected army is no match for our untamed resolve. No matter how battered our ancestral home has become, it is ours and ours alone! Now is the time for Zombicide!
Zombicide: Green Horde is a cooperative game where 1 to 6 players face hordes of Zombies controlled by the game itself. Each player controls 1 to 6 Survivors in a fantasy world invaded by Zombies. The goal is simply to complete the Quest objectives, survive, and kill as many Zombies as possible!
Zombies are slow and predictable, but there are a lot of them. Watch out for their Abomination and Necromancer bosses, too!
Survivors use whatever they can get their hands on to kill Zombies. The better the weapon, the higher the body count, but the more Zombies will appear, attracted by the onslaught! Survivors can trade equipment, and players can share tactics. Only through cooperation can players achieve the Quest objectives and survive. Battling Zombies is fun, but players will also need to rescue other Survivors, find food and weapons, uncover the Necromancers’ secrets, and much more.
GAME COMPONENTS
- 9 Game Tiles (double-sided)
- 65 Orc Zombie Miniatures:
- 35 Orc Walkers
- 14 Orc Fatties
- 14 Orc Runners
- 1 Orc Abomination
- 1 Orc Necromancer
- 6 Survivor Miniatures and ID Cards: Asim, Berin, Seli, Rolf, Johannes, Megan
- 1 Siege Engine: Trebuchet
- 6 Survivor Dashboards
- 48 Trackers
- 6 Survivor Color Bases
- 6 Dice
- 68 Tokens:
- Doors: Blue x1, Green x1, Neutral x12
- Dragon Bile x4
- Exit Point x1
- First Player x1
- Noise x18
- Free Action x1
- Rotten x1
- Barrier/Hedge x6
- Objectives: Red/Blue x1, Red/Green x1, Red/Red x8
- Zombie Spawn: Red/Blue x1, Red/Green x1, Red/Necromancer Green x1, Red/Necromancer Brown x1, Red/Necromancer Red x1, Red/Necromancer Purple x1, Red/Necromancer Grey x1, Red/Necromancer Beige x1, Red/Red x4
- 133 Mini-Cards:
- 78 Equipment Cards: Aaahh!! Orc Walker x4, Apples x2, Axe x2, Bone Kukri (Vault Weapon) x1, Bone Sword (Vault Weapon) x1, Chainmail Armor x2, Crossbow x2, Curved Dagger x4, Death Gale x2, Dragon Bile x4, Dwarven Axe (Vault Weapon) x1, Dwarven Hammer x2, Falchion x2, Ghost Sight x1, Great Axe x2, Hand Crossbow x2, Healing x1, Lava Burst (Vault Weapon) x1, Lightning Ball x2, Longbow x2, Norse Shield x2, Norse Sword x1, Norse Sword (Starting Equipment) x1, Plate Armor x1, Plenty Of Arrows x3, Plenty Of Bolts x3, Repeating Crossbow x2, Repulse x1, Salted Meat x2, Scimitar x2, Shield x2, Short Sword x1, Short Sword (Starting Equipment) x3, Speed x1, Spiked Bow x1, Spiked Bow (Starting Equipment) x1, Steel Bow (Vault Weapon) x1, Telekinetic Blast x1, Telekinetic Blast (Starting Equipment) x1, Torch x4, Tremor x1, War Cleaver (Vault Weapon) x1, Water x2
- 54 Zombie Cards (#167 to #220)
- 1 Reference Card (Trebuchet)
A ZOMBICIDE IN TIME
The Zombicide game range allows players to battle Zombies in many settings, creating unique atmospheres with dedicated Survivors, Zombies, and other features.
- Zombicide: Black Plague is another core box for the fantasy era. Black Plague and Green Horde are set in the same universe and timeline, and are fully compatible.
- Classic Zombicide spans 3 Seasons, following the zombie apocalypse in a modern-day world, over a timespan covering roughly a year.
- Using the same basic mechanics, all Zombicide core boxes are designed to be entry points to the game. Core boxes and expansions from a given era (classic or fantasy) are fully compatible with each other.
Setup
GAME SETUP
A Zombicide: Green Horde game usually features 6 Survivors, distributed in any way you see fit, among players. We recommend new players join the game with a single Survivor to get a quick grasp on the game mechanics. A veteran player can easily control a whole team of 6 Survivors and clear hordes of Zombie pests all on their own!
- Choose a Quest.
- Place the tiles.
- Place the doors, Objectives, and all tokens as indicated by the Quest.
- Each player gathers 1 to 6 Survivors for them to play. Players sit around the table in any order they choose. As they are cooperating against the game, all players form a single team.
- Players take 1 Dashboard for each of their Survivors, placing the Survivor’s ID card on it. They take a colored plastic base and attach it to the Survivor’s miniature to help identify it. They also take the 5 plastic trackers of the same color as their base.
- Set aside all Equipment cards with the “Starting Equipment” keyword: 1 Spiked Bow, 1 Norse Sword, 1 Telekinetic Blast, and 3 Short Swords. These cards are identified by a grey back.
Also set aside the Equipment cards with the “Vault” keyword: Bone Kukri, Bone Sword, Dwarven Axe, Lava Burst, Steel Bow, and War Cleaver. These cards are identified by a blue back. Vault artifacts are usually found as Objectives. Follow the chosen Quest’s rules to know about the way Objectives enter the game.
Place the Trebuchet’s Reference card within view of all players. This card acts as a reminder of the Trebuchet’s rules and stats, and does not belong to any single player. - Deal the starting Equipment cards as you see fit among the Survivors. Zombicide: Green Horde is a cooperative game, so decide as a team. Each Survivor starts the game with at least 1 card. If a Survivor’s starting Skill lists any starting weapons, they receive those cards now, independent of the Starting Equipment you’ve just distributed.
- Shuffle the Zombie cards into one deck and the Equipment cards into another. Place both decks facedown close to the board.
- Place the miniatures representing the chosen Survivors on the starting Zone(s) indicated by the Quest.
- Each player places their Survivors’ Dashboard(s) in front of them:
- Make sure the sliding arrow is on the 0 space in the blue area of the Danger Bar.
- Place a tracker in the 0 slot of the Wound Bar.
- Place another tracker in the slot for the first (blue) Skill.
- Place 3 more trackers in the reserve slots on the top of the Dashboard.
- Decide who will be the first player, and give them the First Player token.
Core Concepts & Game Structure
GAME OVERVIEW
Zombicide: Green Horde is played over a series of Game Rounds, which proceed as follows:
- Players’ Phase: Each player activates their Survivors, spending Actions to move, fight, search, or interact with the map.
- Zombies’ Phase: Zombies activate to attack or move, and new Zombies spawn on the board.
- End Phase: Noise tokens are removed, and the First Player token passes to the left.
WINNING AND LOSING
- Defeat: The game is lost when all the Survivors have been eliminated, or if too many Necromancers escape. Some Quests can be lost when certain conditions are met (losing a single Survivor, for example).
- Victory: The game is won immediately when all of the Quest Objectives have been accomplished. Zombicide: Green Horde is a cooperative game, so all players win if the Quest Objectives are fulfilled.
USEFUL DEFINITIONS
- Actor: A Survivor or Zombie.
- Zone: Inside a building, a Zone is a room. On a street, a Zone is the area between 2 linear markings (or a linear marking and a tile’s edge) and the walls of buildings along the street.
LINE OF SIGHT
Lines of Sight define whether Actors can see each other, such as if a Survivor can see a Zombie across the street, from a room to the next in a building, etc.
- On the streets: Actors see in straight lines that run parallel to the edges of the board. Actors cannot see diagonally. Their Line of Sight covers as many Zones as the line can pass through before reaching a wall or the edge of the board.
- Inside a building: An Actor sees into all Zones that share an opening with the Zone the Actor currently occupies. If there is an opening, the walls do not block Line of Sight between 2 Zones. An Actor’s Line of Sight, however, is limited to the distance of 1 Zone.
- Looking in/out: If the Survivor is looking out into the street or from the street into a building, the Line of Sight can go through any number of street Zones in a straight line, but only 1 Zone into the building.
- NOTE: Hedges interrupt Lines of Sight.
MOVEMENT
- Actors can move from one Zone to the next as long as the first Zone shares at least 1 edge with the destination Zone. Corners do not count. This means Actors cannot make diagonal movements.
- On streets: Movement from one Zone to another has no restrictions. However, Actors must go through a door (or opening) to move from a building to the street and vice-versa.
- Inside a building: Actors may move from one Zone to another as long as these Zones are linked by an opening. The position of a miniature in the Zone and the layout of the walls do not matter as long as the Zones share an opening.
- NOTE: Waterhole Zones are subject to special Movement rules.
NOISE
The zombie plague brought silence to the Orcish hordes. Huge zombie packs can slowly move around without uttering a single sound, save when they cross water pools or stumble upon some obstacle. Things may change upon hearing or seeing a survivor, though. At that point, zombie Orcs track their prey endlessly like the soulless shells they are. We often use noise to distract them or lure them to their demise.
Casting a spell or smashing through a door makes noise, and noise attracts Zombies. Each Action that opens a door with noisy Equipment or attacks with noisy Equipment produces a Noise token.
- Place this token in the Zone where the Survivor resolved the Action. It stays in the Zone where it was produced, even if the Survivor moves.
- A single Action can only produce a single Noise token, no matter how many dice are rolled, how many hits are obtained, or whether Dual weapons are used.
- Noise tokens are removed from the board in the End Phase.
- NOTE: Each Survivor miniature also counts as a Noise token. Zombies have acute hearing, and Survivors can’t stay quiet, anyway!
EXAMPLE: Berin spends an Action to open a door with an Axe. It’s a noisy way to open a door. This produces a Noise token. Then, he attacks a Zombie in his Zone, knocking it down after 2 Melee Actions. The Axe is a silent killing weapon, so these Melee Actions produce no noise. However, 2 Noises remain in this Zone: the Noise token produced by opening the door and Berin’s miniature itself.
In another Zone, Megan performs 2 Magic Actions with her Death Gale. Although she rolled 2 dice for each Magic Action, she gets only 2 Noise tokens in her Zone: 1 for each Magic Action. The Noise tokens remain in the Zone where Megan produced them. They don’t follow her when she moves.
Survivors: Inventory, Progression & Danger Level
INVENTORY
Each Survivor can carry up to 8 Equipment cards, divided into 3 types of Equipment slots on their Dashboard: 2 Hands, 1 Body, and 5 Backpack slots. You may discard cards from your inventory to make room for new cards at any time, for free (even during another player’s Turn).
- Hands: Both Hand slots are reserved exclusively for Equipment cards bearing the Hand symbol. An Equipment card bearing the Hand symbol can only be used when equipped in Hand. Both Hands are used primarily for combat (weapons and spells).
- Body: The Body slot is reserved for Equipment cards bearing the Body symbol (like armor). Alternatively, it can hold the specific Equipment card that is listed on it (e.g. for Johannes, a Crossbow); it is then considered to be equipped in Hand. An Equipment card bearing the Body symbol can only be used when put over the Body.
- Backpack: Up to 5 Equipment cards of any type can fit in the Backpack slots. Equipment cards bearing the Body or Hand symbol can be stored in the Backpack but, while there, they are not in use. Any text on them will not be in effect until they are moved to their appropriate inventory slots. An Equipment card bearing the Backpack symbol can only be stored in the Backpack and, while there, is always considered to be in use (like support-oriented cards, e.g. Plenty Of Bolts).
EXPERIENCE, DANGER LEVEL, AND SKILLS
For each Zombie killed, a Survivor gains 1 Experience Point and moves up a notch on their Danger Bar. Some Quest Objectives provide more experience, as does eliminating Abominations.
There are 4 Danger Levels on the Danger Bar: Blue, Yellow, Orange, and Red. These represent everything from a light drizzle of Zombies to a flash flood.
At each Danger Level, the Survivor gains 1 new Skill to help them on their Quest. Skills stack across Danger Levels, so at Red Level, your Survivor will have 4 Skills. As new skills are unlocked, place new markers on the Survivor Dashboard to indicate them.
- Blue Level (0 to 6 Experience Points): Possess a starting Skill.
- Yellow Level (7 to 18 Experience Points): Gain a fourth Action.
- Orange Level (19 to 42 Experience Points): Choose 1 Skill from between 2 indicated on their ID Card.
- Red Level (43 Experience Points): Choose 1 Skill from among 3 indicated on their ID Card.
Spawn Side Effect: When you draw a Zombie card to spawn Zombies, read the line that corresponds to the Survivor still in play with the highest Danger Level. The stronger your Survivor is, the more Zombies appear.
Players' Phase: Survivor Actions
PLAYERS’ PHASE OVERVIEW
Starting with whoever holds the First Player token, each player activates their Survivors one after another, in the order of their choice. Each Survivor can execute 3 Actions at the Blue Danger Level (not counting any free Action their Blue Level Skill may give them).
Once a player has activated all their Survivors, the player to their left takes their Turn, activating their Survivors in the same manner. When all the players have completed their Turns, the Players’ Phase ends.
AVAILABLE ACTIONS
The possible Actions are:
Move
The Survivor moves from one Zone to the next but cannot move through external building walls or closed doors.
- If there are Zombies in the Zone the Survivor is attempting to leave, they must spend 1 extra Action per Zombie to leave the Zone.
- Entering a Zone containing Zombies ends the Survivor’s Move Action, even if they have a Skill that allows them to move through multiple Zones per Move Action (or the Slippery Skill).
- Waterhole Zones: A Survivor must spend an additional Action to leave a Waterhole Zone with a Move Action (does not apply if leaving via a Bank, or benefiting from the Speed Enchantment).
Search
You can only Search building Zones and only if there are no Zombies in that Zone. Draw a card from the Equipment deck, place it in inventory or discard it. A Survivor can only perform a single Search Action per Turn. Reshuffle discards when the deck runs out (except Vault cards).
Open a Door
Melee weapons with the “Open a door” symbol can open an adjacent closed door:
- If the symbol has a die icon: roll as many dice as the weapon’s Dice value. The door is opened if any die result equals or exceeds the Accuracy number. Place a Noise token.
- If the symbol has no die icon: opens without a roll. Place a Noise token if the weapon is noisy.
- NOTE: Opening a door is not a Melee Action.
- Colored doors usually require specific Quest conditions (like taking the matching Objective) before they can be opened.
Spawning In Buildings
Opening a closed building for the first time reveals all the Zombies inside all rooms of the building (a single building extends to all rooms connected by openings, sometimes straddling several tiles). Indicate each Zone of the building, one after the other in any order you choose, and draw a Zombie card for each Zone. Place the corresponding number and type of Zombies in the indicated Zone.
- If you draw an Extra Activation card, immediately perform the action indicated on the card.
- If you draw an “Enter the Horde” card, all Zombies set aside in the Horde spawn in the Zone. Spawning in this building ends right after the Horde’s arrival.
- When the Zombie deck runs out, reshuffle all the discarded cards to make a new deck.
- NOTE: Buildings that are open at the start of the game are never spawned in.
Reorganize / Trade
At the cost of 1 Action, a Survivor can reorganize the cards in their inventory in any way they wish. The Survivor can simultaneously exchange any number of cards with 1 (and only 1) other Survivor currently in the same Zone. This other Survivor reorganizes their own inventory for free. A Trade Action doesn’t have to be equal. You can trade everything for nothing, if both parties agree!
Combat Actions
Combat Actions use all types of combat-oriented Equipment cards: Melee, Ranged, or Magic.
- Melee Action: The Survivor uses a Melee weapon held in Hand to attack Zombies in their own Zone.
- Ranged Action: The Survivor uses a Ranged weapon held in Hand to fire at a single Zone within the Range shown on the weapon’s card. Survivors shoot at Zones, not Actors. Using a Ranged weapon at Range 0 is still a Ranged Action.
- Magic Action: The Survivor uses a Combat spell held in Hand to attack Zombies. This attack follows the same rules as Ranged Combat.
Enchantment Action
The Survivor uses an Enchantment (a spell without Combat characteristics) held in Hand:
- Enchantments are cast at target Actors or Zones within the Survivor’s Line Of Sight.
- If the target is a Survivor, the caster may target themselves.
- Most Enchantments bear the note Once per Turn. A given Survivor can cast it only once during each of their Turns. If they own multiple copies, each copy can be cast independently.
Take or Activate an Objective
The Survivor takes an Objective or activates an Objective in the same Zone. The game effects are explained in the Quest’s description.
Siege Actions – Trebuchet
The Trebuchet is a Siege Engine. It is not an Actor. In order to perform Siege Actions, a Survivor spends a variable amount of Actions all at once:
- Moving a Trebuchet (Action Cost: 3): The Survivor and the Trebuchet both move from a Zone to the next. Uses standard Move Action rules without bonus Skills/effects. A Trebuchet is destroyed whenever it is set in a Waterhole Zone.
- Firing a Trebuchet (Action Cost: 3): The Survivor loads and fires the Trebuchet, aiming at a Zone at Range 2 or more (no Line of Sight required) or the Horde. Does not produce Noise and does not benefit from Combat Action-related bonuses.
Make Some Noise!
The Survivor makes Noise in an attempt to attract Zombies. Place 1 Noise token in their Zone.
Do Nothing
The Survivor does nothing and prematurely ends their Turn. Their remaining Actions are lost.
Equipment & Combat Rules
READING AN EQUIPMENT CARD
Zombie Orcs are invading a land which has been at war for two years. Casualties have been horrendous on both sides, but as long as one of us stands, the battle is not over. On the bright side, there are empty houses and weapons everywhere!
Zombicide: Green Horde features many Equipment cards. The ones your Survivors use to blast Zombies fall in 3 categories:
- Melee weapons: Display a 0 Range value and thus can only be used in the same Zone as the Survivor. They are used with Melee Actions.
- Ranged weapons: Have a maximum Range value of 1 (or more). They are used with Ranged Actions. Attacking at Range 0 with a Ranged weapon is still a Ranged Action.
- Combat spells: Have the distinctive appearance of a scroll and a maximum Range value of 1 (or more). They are used with Magic Actions. Attacking at Range 0 with a Combat spell is still a Magic Action.
- Some Equipment cards can belong to several types at once (e.g. the Spiked Bow is both a Melee and a Ranged weapon).
Door-Breaching, Zombie-Killing, And Noisy Equipment
- Equipment that allows you to open doors, but requires a die roll to do it: The die indicates the minimum roll needed to open the door.
- Equipment that allows you to open doors without a die roll: Opens doors without rolling dice.
- Noise symbols: Each of these symbols is accompanied by a second symbol related to noise:
- Noisy: This Action is noisy and produces a Noise token.
- Silent: This Action isn’t noisy and does not produce a Noise token.
Magic Equipment
The gems on the card indicate at what Danger Level a Survivor needs to be at in order to use this card. Most Equipment cards display all four gems, so Survivors can use them at any Danger Level. Magic Equipment cards have some of these gems removed, indicating that the card can’t be used while the Survivor is at those Danger Levels (but can be stored in any eligible slot). All limited Danger Level Magic Equipment featured in Zombicide: Green Horde are also Vault weapons.
Combat Characteristics
Melee weapons, Ranged weapons, and Combat spells display Combat characteristics used to maim, shoot, or disintegrate Zombies in many ways:
- HAND: Put this Equipment in Hand in order to use it.
- DUAL: If you have Dual weapons with the same name in each hand, you may use them both with a single Action (Dual Ranged weapons and Combat spells must be aimed at the same Zone).
- RANGE: Min and max number of Zones the weapon can reach. 0 indicates Melee only.
- DICE: Roll this many dice when an Action is spent to use this weapon.
- ACCURACY: Each roll that equals or exceeds this value is a success. Lower results are failures.
- DAMAGE: Damage inflicted for each success. A 2 value (or more) is required to eliminate Fatties.
- OPEN DOORS: Opens doors (with or without a die roll).
- SILENT / NOISY: Indicates whether the action produces a Noise token.
RESOLVING COMBAT
When performing a Melee, Ranged, Magic, or Siege Action, roll as many dice as the Dice number of the weapon/spell/engine being used.
- Dual Symbol: If the active Survivor has 2 identical weapons or Combat spells with the Dual symbol equipped in Hands, they can use both at the same time for a single Action. (Ranged/Magic must aim at the same Zone).
- Hits: Each die result that equals or exceeds the Accuracy number scores a hit.
- Damage: Each hit inflicts the amount of Damage specified to a single target:
- Orc Walkers, Orc Runners, Orc Necromancers require Damage 1.
- Orc Fatties require Damage 2 (Damage 1 hits are ignored, they do not stack).
- Orc Abominations require Damage 3 (Dragon Fire or Trebuchet).
- Excess Damage on a hit is overkill and wasted; each hit can only take out 1 target.
- Three Hands?: Putting a proper card in the Body space allows 3 Hand cards, but a Survivor can only use 2 of them at any given time.
Melee Action
A Survivor holding a Melee weapon (Range 0) in Hand attacks Zombies in their own Zone. Hits are divided among targets as the player chooses. Missed Melee strikes cannot cause Friendly Fire.
Ranged Action
A Survivor holding a Ranged weapon (Range 1+) in Hand shoots at a Zone within Line of Sight and Range. When shooting into a Zone, ignore Actors in intermediate Zones. A Survivor can shoot at another Zone while Orc Zombies are in their own Zone!
Targeting Priority Order
When using a Ranged weapon (even at Range 0), the shooting Survivor does not choose targets. Hits are assigned strictly according to this order:
- Orc Walker (Actions: 1, Min Damage: 1, XP: 1)
- Orc Fatty / Orc Abomination (Shooter chooses) (Actions: 1, Min Damage: 2/3, XP: 1/5)
- Orc Runner (Actions: 2, Min Damage: 1, XP: 1)
- Orc Necromancer (Actions: 1, Min Damage: 1, XP: 1)
Hits must eliminate all targets of a priority before assigning hits to the next priority.
Friendly Fire
- A Survivor can’t hit themselves with their own attacks.
- Misses on attack rolls into a Zone containing teammates automatically land on Survivors standing in the target Zone.
- Assign Friendly Fire hits in any way desired among Survivors in that Zone.
- Armor rolls are allowed to cancel hits. Remaining hits inflict the weapon’s full Damage per hit.
- Friendly Fire does not apply to Melee Actions. Killing a Survivor earns no experience.
Reloadable Weapons
Weapons like the Hand Crossbow require spending an Action to reload between shots to fire multiple times in a Round. At the End Phase, all reloadable weapons are freely reloaded. A single Action reloads both Dual weapons.
Magic Action
A Survivor equipped with a Combat spell in Hand blasts a Zone within Line of Sight and Range. Follows the exact same rules as Ranged Actions (including Targeting Priority Order and Friendly Fire).
Firing a Trebuchet
For 3 Actions, load and fire a Trebuchet in the Survivor’s Zone. Does not produce Noise.
- Target any Zone at Range 2 or more (no Line of Sight required), or the Horde.
- Choose ammunition:
- Scattershot: 6 dice, Accuracy 4+, Damage 1
- Grapeshot: 3 dice, Accuracy 4+, Damage 2
- Boulder: 1 die, Accuracy 4+, Damage 3
Accuracy improves to 3+ if any Survivor has Line of Sight to the target Zone.
- Apply casualties per standard rules (Targeting Priority and Friendly Fire apply). Treating the Horde as a single target Zone with no Line of Sight.
Dragon Fire
Discard Dragon Bile from Hand (1 Action) to place a Dragon Bile pool at Range 0-1 in Line of Sight. Later, discard a Torch from Hand (1 Action) to ignite it at Range 0-1, creating Dragon Fire.
- Every Actor and Siege Engine in the Zone is killed/destroyed instantly, regardless of Damage threshold, Armor, or remaining Wounds.
- Produces no Noise.
- The Survivor who threw the Torch earns all Experience Points.
- Dragon Fire has no effect in Waterhole Zones.
Zombies' Phase & Zombie Types
THE ZOMBIE TYPES
Green Horde features 5 types of Zombie Orcs. Most Zombies have a single Action to spend each time they activate (Runners have 2). A Zombie is eliminated as soon as it is successfully hit with an attack that has the minimum required Damage value. Then, its assailant immediately earns the listed Experience Points.
- Orc Walker: Rank-and-file warriors.
- Damage: 2
- Min. Damage to destroy: Damage 1
- Experience provided: 1 Point
- Orc Fatty: Leaders, shock troops, and brutes.
- Damage: 3
- Min. Damage to destroy: Damage 2
- Experience provided: 1 Point
- Orc Runner: Infected Goblins, fast and unpredictable.
- Damage: 1
- Min. Damage to destroy: Damage 1
- Experience provided: 1 Point
- Special rule: Each Orc Runner has two Actions per Activation.
- Orc Abomination: Raw power, impervious to anything but extreme damage.
- Damage: 3
- Min. Damage to destroy: Damage 3
- Experience provided: 5 Points
- Special rules: Wounds inflicted by Abominations can’t be prevented by Armor rolls. A Damage 3 weapon is required to kill an Abomination (either a Trebuchet or Dragon Fire).
- Orc Necromancer: Dark puppet-masters who flee upon being discovered.
- Damage: 2
- Min. Damage to destroy: Damage 1
- Experience provided: 1 Point
- Special rules: Detailed in the Necromancers section. Enters with a Necromancer Spawn token.
THE HORDE
The Horde stands for a growing Orc Zombie crowd, ready to invade the board and violently ambush Survivors from an unexpected entrance.
- Each time a Zombie card with the Horde symbol is drawn to spawn Zombies on the board, set aside 1 extra Zombie miniature of the same type (Orc Walker, Orc Fatty, or Orc Runner). All miniatures set aside this way collectively form the Horde and are locked there until the Horde spawns.
- NOTE: This effect does not apply with Orc Abominations and Orc Necromancers. The “Aaahh!! Orc Walker” Equipment card has no effect on the Horde either.
- Each time a Necromancer card with the Horde symbol is drawn (spawning or re-activating a Necromancer), players add 1 Orc Walker, 1 Orc Fatty, and 1 Orc Runner to the Horde.
- Whenever an “Enter the Horde!” card is drawn, the entire Horde spawns in the indicated Zone the Zombie card was drawn for. Such an event ends the Spawn Step / ends the Zombie spawning in the building.
ZOMBIES’ PHASE SEQUENCE
Once the players have activated all their Survivors, the Orc Zombies activate in the following order:
STEP 1 – ACTIVATION
Each Orc Zombie activates and spends its Action on either an Attack or a Move, depending on its situation. Resolve all the Attacks first, then all the Moves. Each Orc Zombie performs either an Attack OR a Move with a single Action.
Attack
Each Orc Zombie in the same Zone as Survivors performs an Attack. An Orc Zombie’s Attack is always successful, does not require any die rolls, and inflicts a specific amount of Wounds:
- Orc Walker: 2 Wounds
- Orc Fatty: 3 Wounds
- Orc Runner: 1 Wound
- Orc Abomination: 3 Wounds, no Armor roll
- Orc Necromancer: 2 Wounds
Survivors in the same Zones share the Orc Zombie Attacks in any way the players prefer, even if it means dealing them all to a single Survivor. After any applicable Armor rolls, the Wound Bar’s tracker is moved 1 point higher per Wound received. A Survivor is eliminated as soon as their Wound Bar reaches 3. Discard their Equipment and remove their miniature.
Feeding Frenzy! All Zombies activated in the same Zone as a Survivor join the Attack, even if overkill.
Armor Rolls
- Armor: Survivors wearing an armor Equipment card in their Body slot can perform Armor rolls to avoid Attacks. Roll as many dice as the number of Zombie Attacks the Survivor wants to avoid. Each die result that equals or exceeds the Armor number negates a Zombie Attack of your choice on a 1-for-1 basis.
- Shield: A Hand-held Shield allows Armor rolls if the Survivor isn’t wearing actual armor. If wearing armor, the Shield allows re-rolling its Armor rolls once.
- Unpreventable: Abomination Attacks, and being eliminated by a Dragon Fire, can’t be prevented by Armor rolls.
Move
The Orc Zombies that have not attacked use their Action to Move 1 Zone toward Survivors:
- Destination Selection: First is the Zone with Survivors in Line Of Sight that has the most Noise tokens (Survivors count as Noise). If no Survivors are visible, they move toward the noisiest Zone. Distance doesn’t matter.
- Shortest Path: Orc Zombies move 1 Zone toward their destination Zone by taking the shortest available path. In case of no open paths, move toward it as if all doors were open (locked doors still stop them).
- Splitting: If there is more than one route of the same length, or multiple target Zones have equal Noise, Orc Zombies split into equal groups. If necessary, add Orc Zombies so that all new splitting groups contain the same number of each Orc Zombie type!
- Special Cases for Splitting: Orc Abominations and Orc Necromancers never split (players choose their direction). If miniatures run out during a split, decide which group gets the final reinforcement without triggering extra Activations.
- NOTE: Orc Necromancers always Move toward the nearest non-Necromancer Spawn Zone.
Playing Orc Runners
Orc Runners have 2 Actions per Activation. After all Orc Zombies (including Orc Runners) have gone through the Activation step and resolved their first Action, Orc Runners go through the Activation step again, using their second Action to Attack a Survivor in their Zone or Move if there is nobody to attack.
STEP 2 – SPAWN
The Quest maps show where Orc Zombies appear at the end of each Zombies’ Phase (Spawn Zones):
- Indicate a Spawn token and draw a Zombie card.
- Read the line on the card that corresponds to the color of the Danger Level of the most experienced Survivor still in the game (Blue, Yellow, Orange, or Red).
- Place the number and type of Orc Zombies shown.
- If the card has the Horde symbol, put an additional Orc Zombie of the same type in the Horde!
- Repeat this for each Spawn token clockwise, always starting with the same Spawn Zone.
- Colored Spawn Zones: Unless otherwise stated, Blue and Green Spawn Zones don’t spawn Zombies until activated by a specific event.
- Extra Activations Cards: No Zombies appear; all Zombies of the indicated type immediately get an extra Activation (no effect at Blue Level).
- Running Out Of Miniatures: If players run out of miniatures of the indicated type when spawning or populating a building, place whatever is left, and then all Zombies of the indicated type immediately resolve an extra Activation!
END PHASE
All Noise tokens are removed from the board, and the first player hands the First Player token to the player to their left. Another Game Round then begins.
Orc Necromancers & Cabals
ORC NECROMANCERS
Orc Necromancers follow these special rules:
- An Orc Necromancer is a Zombie for game purposes.
- Enters with its own army: Put an additional Zombie Spawn token (on its Necromancer side) in its entry Zone. Immediately resolve a regular Zombie Spawn for it. It remains active as a standard Spawn Zone.
- Extra Activations: Each subsequent drawing of additional Necromancer cards gives an Extra Activation to every Necromancer on the board.
- Horde addition: Each time an Orc Necromancer card is drawn, add 1 Orc Walker, 1 Orc Fatty, and 1 Orc Runner to the Horde.
- Fleeing the board: If no Survivors to Attack in its Zone, the Necromancer Moves 1 Zone toward the nearest active Spawn Zone (excluding its own entry Zone and inactive Spawn Zones).
- Defeat condition: The game is immediately lost if a Necromancer manages to escape once there’s a total of 6 Zombie Spawn tokens on the board (including Necromancer Spawn tokens).
- Escaping: An Orc Necromancer escapes as soon as it activates on its escape Spawn Zone. Replace the Necromancer Spawn token it placed with a standard Zombie Spawn token, and remove the Necromancer miniature.
- Killing a Necromancer: Choose a Spawn Zone (including its own Necromancer Spawn Zone) and remove it from the board. If the Necromancer Spawn Zone is still on the board after this removal, replace it with a standard one.
NECROMANCER CABALS
Necromancer Cabals’ rules allow you to play with multiple Necromancers at once:
- Create your own Necromancer Cabal during Setup: Sort out the 6 Orc Necromancer cards and replace them in any combination with your favorite Necromancer cards, then reshuffle into the deck.
- Spawn and Move: Use the colors of the Necromancer Spawn Zones to track where each spawned and determine its escape Spawn Zone. Drawing a Necromancer card gives an extra Activation to all other Necromancers on board.
- Dark Ritual: Necromancers standing at Range 0-1 from each other at the end of a Zombies’ Phase flee the board as if they escaped through their escape Spawn Zone. Replace their Necromancer Spawn tokens with standard ones.
- Special Rules: Special rules on specific Necromancer cards are in effect until they flee or die.
Terrain & Environmental Rules
BARRIERS
- Barriers prevent Move Actions between 2 Zones, but do not block Line of Sight.
- Survivors cannot Move through a Barrier (can still use Ranged/Magic or Skills like Jump through it).
- Zombies reroute around Barriers. If no other route can be taken, adjacent Zombies destroy the Barrier for free before performing their Move Step.
HEDGES
- Hedges interrupt Lines of Sight for all Actors (except standing on tower Zones).
- Roll a die whenever a Survivor crosses a Hedge without any Survivor having Line of Sight to the destination Zone. On a ‘1’, add an Orc Walker in the destination Zone.
- Hedge tokens can be placed on straight borders to customize Quests.
WATERHOLE ZONES
Waterhole Zones represent Street Zones waist-deep in water, connecting via Banks or Ledges:
- Bank: Smooth, irregular shore. Easy passage for everyone.
- Ledge: Steep, dark divide. Zombies cannot leave through a Ledge!
Leaving a Waterhole Zone Rules Summary
| Leaving a Waterhole Zone | To Another Waterhole Zone | Through a Bank | Through a Ledge |
|---|---|---|---|
| Survivor | Spend an additional Action | No penalty | Spend an additional Action |
| Zombie | No penalty | No penalty | Zombies can’t leave through a Ledge. Select another route. |
- Actors moving from a dry Zone to a Waterhole Zone (via Bank or Ledge) follow normal movement rules without penalty.
- Speed Enchantment ignores Waterhole movement penalties.
- Siege Engines are destroyed if set in a Waterhole Zone.
- Dragon Fire has no effect in Waterhole Zones.
Variants & Alternate Modes
ULTRARED MODE
Ultrared mode allows Survivors to gain Experience Points beyond Red Danger Level and gain extra Skills:
- When reaching Red Level (43 XP), reset the tracker to 0 and add extra points gained beyond 43. Keep all acquired Skills.
- Gain unselected Skills upon reaching Danger Levels again.
- When all of the Survivor’s printed Skills are selected, choose any Skill from the Zombicide: Green Horde Skills list (except bracketed skills like Starts with [Equipment]) upon reaching Orange and Red Levels.
PLAYING WITH 7+ SURVIVORS
- Add 1 Starting Equipment card per Survivor above 6.
- Add 1 additional Zombie Spawn token per 2 Survivors above 6 (rounded up). Stack on existing or new Spawn Zones.
- Increase the Necromancer escape token limit by 1 for every 2 Survivors above 6.
| # Survivors | Additional Spawn Tokens | Spawn Token Limit |
|---|---|---|
| Up to 6 | 0 | 6 |
| 7-8 | 1 | 7 |
| 9-10 | 2 | 8 |
| 11-12 | 3 | 9 |
Quests
QUEST 0 – TUTORIAL: THE EVIL SHRINE
EASY / 4+ SURVIVORS / 45 MINUTES
Tiles needed: 16R, 17R, 18R, & 20V.
Objectives
- Prevent the invasion: Destroy all 3 Spawn Zones (blue, green, and red).
- Reach the Exit with all Survivors.
Special Rules
- Setup: Put the green Objective randomly among the red Objectives facedown.
- Necromantic beacons: Blue and green Spawn Zones start active. Blue Spawn Zone is removed when the blue Objective is taken; green Spawn Zone is removed when green Objective is taken.
- Destroying the corrupted shrine: Any Siege weapon can target and remove the red Spawn Zone token (last in Targeting Priority, Damage 1).
QUEST 1: DRAGON BILE QUEST
MEDIUM / 6+ SURVIVORS / 90 MINUTES
Tiles needed: 12V, 13V, 15V, 17R, 18V, & 20V.
Objectives
- Find the Dragon Bile: Collect the 4 Dragon Bile cards and all Objectives.
- Pack and leave: All Survivors must be in the same Zone, with no Zombies.
Special Rules
- Setup: Shuffle 4 Dragon Bile cards with 3 random Vault weapon cards facedown in marked Zones.
- Each Objective gives 5 XP. Spend 1 Action to take a card in their Zone.
QUEST 2: ORC NECROMANCERS?
MEDIUM / 6+ SURVIVORS / 30-90 MINUTES
Tiles needed: 14V, 15V, 16V, & 20V.
Objectives
- Find the key: Take Objectives until finding the blue one.
- Investigate the house: Have a Survivor in the building behind the blue door with no Zombies.
Special Rules
- Setup: Shuffle blue and green Objectives with 5 red Objectives. Place 3 on board, set 4 aside.
- Each Objective gives 5 XP. Killing a Necromancer reveals an Objective from the side pile and gives 5 XP.
- Blue door opens only after the blue Objective is taken. Taking the green Objective activates the green Spawn Zone.
QUEST 3: KNOW YOUR ENEMY
MEDIUM / 6+ SURVIVORS / 90 MINUTES
Tiles needed: 14R, 15V, 17R, 18V, 19R, & 20R.
Objectives
- Enter lairs: Find the blue and green Objectives.
- Destroy phylacteries: Take the 2 Objectives behind the blue and green doors.
Special Rules
- Each Objective gives 5 XP and a random Vault weapon. Killing a Necromancer grants an Objective from the pile.
- Blue and green doors require their matching color Objectives to be opened.
QUEST 4: THE RIVER OF THE DEAD
MEDIUM / 6+ SURVIVORS / 90 MINUTES
Tiles needed: 12R, 14R, 15V, 18V, 19R, & 20V.
Objectives
- Destroy the zombie baits: Take all Objectives.
- Cut reinforcement line: Gather all Zombie Spawn tokens in the River Current Zone.
Special Rules
- Each Objective gives 5 XP. Taking the blue or green Objective allows moving a Zombie Spawn token to the indicated Zone.
QUEST 5: THE CLEANSING FLOOD
MEDIUM / 6+ SURVIVORS / 90 MINUTES
Tiles needed: 13R, 14R, 15R, 16V, 19V, & 20R.
Objectives
- Access Trebuchet: Find blue and green Objectives and open doors.
- Survive flood: Use Trebuchet and reach Exit with all Survivors in the same Turn.
Special Rules
- Each Objective gives 5 XP and a random Vault weapon. Blue/green doors locked until matching Objectives taken.
- 3 Actions to fire Trebuchet to flood town. All other Survivors must already be on Exit.
QUEST 6: SIEGE BREAKERS
MEDIUM / 6+ SURVIVORS / 90 MINUTES
Tiles needed: 12V, 14R, 15R, 17V, 19V, & 20R.
Objectives
- Find ammunition: Take all Objectives.
- Remove all Spawn Zone tokens using a Siege Weapon.
Special Rules
- Each Objective gives 5 XP. Green Spawn Zone cannot be removed by killing a Necromancer and activates when green Objective taken.
- Once all Objectives taken, Siege Engines can destroy Spawn Zones (last in priority, Damage 1).
QUEST 7: FIRE IN THE HORDE!
MEDIUM / 6+ SURVIVORS / 90 MINUTES
Tiles needed: 13V, 14R, 15V, 16V, 17V, & 20V.
Objectives
- Take all double-faced red Objectives.
- Rebuild Trebuchet (1 Action in green Objective Zone).
- Quest succeeds when the Horde is completely empty (either on map or bombarded).
Special Rules
- Taking blue Objective gives 2 random Vault weapons and activates blue Spawn Zone.
- Barriers destroyed only by Zombies with extra Activations in their Zone.
QUEST 8: CULLING THE HERD
MEDIUM / 6+ SURVIVORS / 60 MINUTES
Tiles needed: 12V, 15V, 19V, & 20R.
Objectives
- Gather Zombies: Block red Spawn Zones with Barriers.
- Free Trebuchet: All Survivors in Trebuchet Zone without Zombies.
Special Rules
- 2 Orc Fatties, 2 Runners, 4 Walkers in Trebuchet Zone are ignored until blue door opens.
- Survivors can spend 1 Action to carry a Barrier and place it freely on a border. Barriers cannot be destroyed.
- When all accesses to a Spawn Zone are blocked, move its token to the blue Spawn Zone.
QUEST 9: FALLEN FORTRESS
MEDIUM / 6+ SURVIVORS / 90 MINUTES
Tiles needed: 12R, 13R, 15R, 16R, 17R, & 20V.
Objectives
Reach the Exit with all Survivors.
Special Rules
- 6 Vault weapon cards placed facedown on board (1 Action to pick up).
- Blue/green doors locked until matching Objectives taken. Green Spawn Zone activates when green Objective taken.
- Barriers cannot be destroyed.
QUEST 10: A NEW HOME
MEDIUM / 6+ SURVIVORS / 90 MINUTES
Tiles needed: 14R, 15V, 16V, 17R, 19R, & 20V.
Objectives
Fortify home: No Spawn Zones on tiles 14R and 19R, and Barriers set to cut all routes to tiles 14R and 19R.
Special Rules
- Each Objective grants 5 XP, a random Vault weapon, and a mobile Barrier.
- Barriers can be carried (1 Action) and placed on straight borders. Cannot be destroyed.
Skills Reference
SKILLS GLOSSARY
In case of conflict with general rules, Skill rules take priority. Effects are immediate.
- +1 Action: Extra Action to use as pleased.
- +1 Damage: [Type]: +1 Damage bonus with Magic, Melee, or Ranged Actions.
- +1 Damage with [Equipment]: +1 Damage with specified Equipment.
- +1 to dice roll: [Type]: Add 1 to each die rolled (max 6).
- +1 die: [Type]: Weapons/spells roll an extra die in Combat (+2 for Dual).
- +1 free [Type] Action: 1 extra free Action of specified type per Turn.
- +1 max Range: Weapons/Combat spells max Range increased by 1.
- +1 Zone per Move / 2 Zones per Move Action: Move extra distance per Move Action.
- Ambidextrous: Treat all Combat spells, Melee, and Ranged weapons as Dual.
- Barbarian / Iron Rain / Mana Rain: Substitute Dice number of weapon/spell with number of Zombies in targeted Zone.
- Battle rage: Extra die for subsequent Melee Actions after a Melee kill.
- Blitz: Killing last Zombie in a Zone gives 1 free Move Action immediately.
- Bloodlust: [Type]: Spend 1 Action: Move up to 2 Zones to a Zombie-occupied Zone and perform a free Action.
- Born leader: Give 1 free Action to another Survivor for their next Turn.
- Break-in: Open doors silently without rolling dice or equipment; gain 1 free open-door Action.
- Brother in arms: [game effect]: All Survivors in same Zone share the effect.
- Charge: Free Move up to 2 Zones to a Zone containing Zombies.
- Collector: [Zombie type]: Double XP when killing this Zombie type.
- Destiny: Once per Turn, discard drawn Equipment card and draw another.
- Double casting: Select an extra target for the same Enchantment for free.
- Free reload: Reload reloadable weapons for free.
- Frenzy: [Type]: Weapons/spells gain +1 die per Wound suffered (+2 for Dual).
- Hit & Run: Free Move Action with Slippery after resolving a Combat kill.
- Hold Your Nose: Free Search Action if a Zombie was eliminated in the same Zone this Round.
- Ironclad: [Zombie type]: Ignore all Wounds from this Zombie type.
- Iron Hide: 5+ Armor roll without wearing armor; +1 to Armor rolls when wearing armor.
- Is That All You’ve Got?: Discard 1 Equipment card to negate 1 incoming Wound.
- Jump: 1 Action: Move 2 Zones to a Zone in Line of Sight, ignoring intervening Zone.
- Lifesaver: Drag Survivors from an adjacent Zombie-occupied Zone without penalty.
- Low Profile: Cannot be hit by friendly Magic or Ranged Actions.
- Lucky: Re-roll all dice for each Action or Armor roll once.
- Marksman: Freely choose Ranged/Magic targets; misses don’t hit Survivors.
- Matching Set!: Draw matching duplicate card when finding a Dual card while Searching.
- Point-Blank: Perform Ranged/Magic in own Zone at Range 0, choose targets freely, misses don’t hit allies.
- Reaper: [Type]: 1 hit can freely kill 1 additional identical Zombie in the same Zone.
- Regeneration: Heal all Wounds at end of Game Round if not eliminated.
- Roll 6: +1 die [Type]: Roll an extra die for each 6 rolled.
- Rotten: Gain Rotten token if no Combat/Siege/Noise performed. Ignored by Zombies.
- Scavenger: Search in any Zone free of Zombies.
- Search: +1 card: Draw 1 extra card when Searching.
- Shove: Push all Zombies in own Zone to an adjacent Zone.
- Slippery: No extra Actions spent to leave Zones containing Zombies.
- Spellbook: Backpack spells/enchantments are considered equipped in Hand.
- Spellcaster: 1 extra free Magic or Enchantment Action.
- Sprint: Spend 1 Move Action to move 2 or 3 Zones.
- Super Strength: Damage value of Melee weapons is considered 3.
- Starts with a [Equipment]: Starts game with specified card.
- Steady Hand: Ignore friendly Survivors when missing with Magic/Ranged.
- Swordmaster: Treat all Melee weapons as Dual.
- Tactician: Turn can be resolved anytime during Players’ Phase.
- Taunt: Free: Zombies in visible Zone gain extra Activation to move toward taunter.
- Tough: Ignore the first Wound received from a single Zombie each Zombies’ Phase.
- Transmutation: Spend 1 Action, discard Equipment card to draw a new one.
- Trick Shot: Aim Dual weapons/spells at different Zones with the same Action.
- Zombie Link: Take an extra Turn before Zombies when an Extra Activation card is drawn.
Rules Summary
RULES SUMMARY
Players’ Phase
Each Survivor has 3 Actions:
- Move: Move 1 Zone (+1 Action per Zombie in starting Zone).
- Search (1x per Turn): In building Zone free of Zombies.
- Open a Door: Spawn Zombies if opening building first time.
- Reorganize/Trade: Exchange cards with Survivor in same Zone.
- Combat Action: Melee, Ranged, Magic.
- Enchantment Action.
- Take or Activate an Objective.
- Make Noise: Place Noise token.
- Siege Action: Move Trebuchet (3 Actions) or Fire Trebuchet (3 Actions).
- Do Nothing.
Zombies’ Phase
- Activation: Attack OR Move: Attack Survivors in Zone, otherwise Move 1 Zone toward visible Survivors or noise. (Runners get 2 Actions).
- Spawn: Draw Zombie card per Spawn Zone based on highest Danger Level. Add to Horde if symbol is present. Extra Activation if running out of minis.
End Phase
- Remove all Noise tokens.
- Pass First Player token clockwise.
Expansions for
Zombicide: Green Horde
Zombicide: Green Horde – Liam Survivor
2018
A Kickstarter promo survivor with a figure and ID card
60
minutes
Medium
View expansion
Zombicide: Green Horde – North the Halfling
2018
A curious halfling survivor with direction, songs, and versatile skills
60
minutes
Medium
View expansion
Zombicide: Thundercats Pack #2
2022
Battle Jackalman and Mumm-Ra's zombie hordes with four heroic Thundercats.
180
minutes
View expansion
Zombicide: Thundercats Pack #3
2022
Add ThunderCats characters, weapons, effects, and formidable enemies to Zombicide.
180
minutes
View expansion
Zombicide: Thundercats Pack #1
2022
Battle undead hordes on Third Earth with iconic Thundercats heroes and artifacts.
180
minutes
View expansion
Massive Darkness 2: Zombicide Fantasy Crossover Pack
2021
A massive card crossover between two fantasy zombie adventures
180
minutes
Medium Heavy

View expansion
Zombicide: Green Horde Special Guest Box – Adrian Smith 2
2018
Three Adrian Smith miniatures bring the Lord of Skulls and his Ogre pets to the table.
Medium
View expansion
Zombicide: Green Horde Special Guest Box – Paul Bonner 2
2018
Four Paul Bonner-designed miniatures for the Green Horde setting
Medium
View expansion
Zombicide: Black Plague – Ultimate Survivors
2018
Six upgraded survivors with new sculpts and two blue-level skills from the start.
Medium Heavy
View expansion
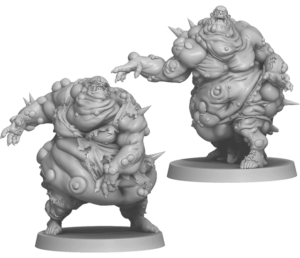
Zombicide: Green Horde – Fatty Bursters
2018
Explosive zombies that punish careless positioning and reward cunning attacks.
Medium
View expansion
Zombicide: Green Horde – Rat King & Swamp Troll
2018
A Kickstarter-exclusive box featuring a Rat King, Swamp Troll, and six Ratz Swarms.
Medium
View expansion
Zombicide: Green Horde Special Guest Box – Sean A. Murray
2018
Three survivors and a necromancer inspired by Gateway: Uprising
60
minutes
Medium
View expansion
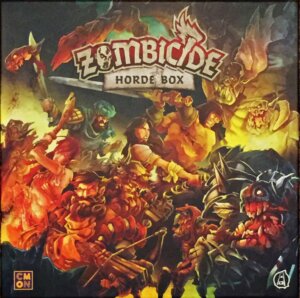
Zombicide: Green Horde – Horde Box
2018
A treasure trove of Kickstarter exclusives, survivors, monsters, and equipment
60
minutes
Medium Heavy
View expansion

Zombicide: No Rest for the Wicked
2018
Face undead swarms, spectral walkers, and a nightmare-sized necromantic dragon.
60
minutes
Medium
View expansion
Zombicide: Friends and Foes
2018
Add new Survivors, Familiars, weapons, Quests, and dangerous Tainted foes.
Medium
View expansion
