
Zombicide Season 2: Prison Outbreak
2013
Explore tortuous prison alleys, manage doors and switches, and face ranged-weapon-immune berserker zombies in a campaign for survival.
60
minutes
1 - 6
player(s)
13+
Medium


About this board game
Zombicide Season 2: Prison Outbreak is a prison-themed zombie survival game for 1–6 players, with games lasting about 60 minutes. Set indoors, it replaces open spaces with tortuous alleys, small rooms, locked doors, and vicious close-ranged fights.
The prison is filled with berserker zombies, enemies immune to ranged weapons. Players must think fast, anticipate unexpected threats, and rely on melee combat as they move through a modern dungeon of switches, security rooms, and secret areas.
Prison Outbreak includes everything needed for a new player to enter the Zombicide universe, while offering substantial new content for existing players. It contains even more material than the original 2012 core game, now known as Season 1.
- Six new Survivors, each with a Zombivor aspect
- Prison tiles featuring rooms, alleys, doors, and security areas
- New equipment including riot shields, automatic shotguns, and concrete saws
- Berserker zombies that cannot be defeated with ranged weapons
The six Survivors are designed to work as a team, with skills that complement one another. Their abilities provide valuable assets as the group confronts the prison’s many dangers and searches for a dependable refuge.
The missions in the rulebook form a connected campaign. Survivors battle to transform a zombie-filled prison into a reliable shelter, facing numerous challenges along the way. An alternate ending adds another possible conclusion to the campaign, giving Zombicide Season 2: Prison Outbreak a substantial adventure for both newcomers and returning players.
Mechanics
Useful links
/pic7182955.jpg) View board game on
View board game onBoard Game Geek
Board Game Rules for
Zombicide Season 2: Prison Outbreak
Survive and Win
Zombicide is a cooperative game where players face hordes of Zombies controlled by the game itself. Each player controls one to six Survivors of a Zombie infection. The goal is simply to complete the Mission objectives and live to see another day.
The good news: Zombies are slow, stupid, and predictable.
The bad news: there are a lot of Zombies!
Survivors use whatever they can get their hands on to kill Zombies. If they find bigger weapons, they can kill even more Zombies!
You can trade equipment, give and receive (or ignore) advice, and even sacrifice yourself to save the girl! Only through co-operation, however, can you achieve the Mission objectives and survive. Killing Zombies is fun, but you will also need to rescue other Survivors, clean out infested areas, find food and weapons, and much more.
After experiencing Zombicide, your gaming group will be the ultimate zombie killing team in town!
Prison Outbreak: A Standalone Game and an Expansion
Zombicide: Prison Outbreak is meant to be played as a standalone game. However, its components are fully compatible with the original Zombicide game, called Season 1, and the Toxic City Mall expansion. Mix them up and explore new ways to hunt zombies!
Some rules described here may differ from Season 1. Rules described here have the priority.
Game Components
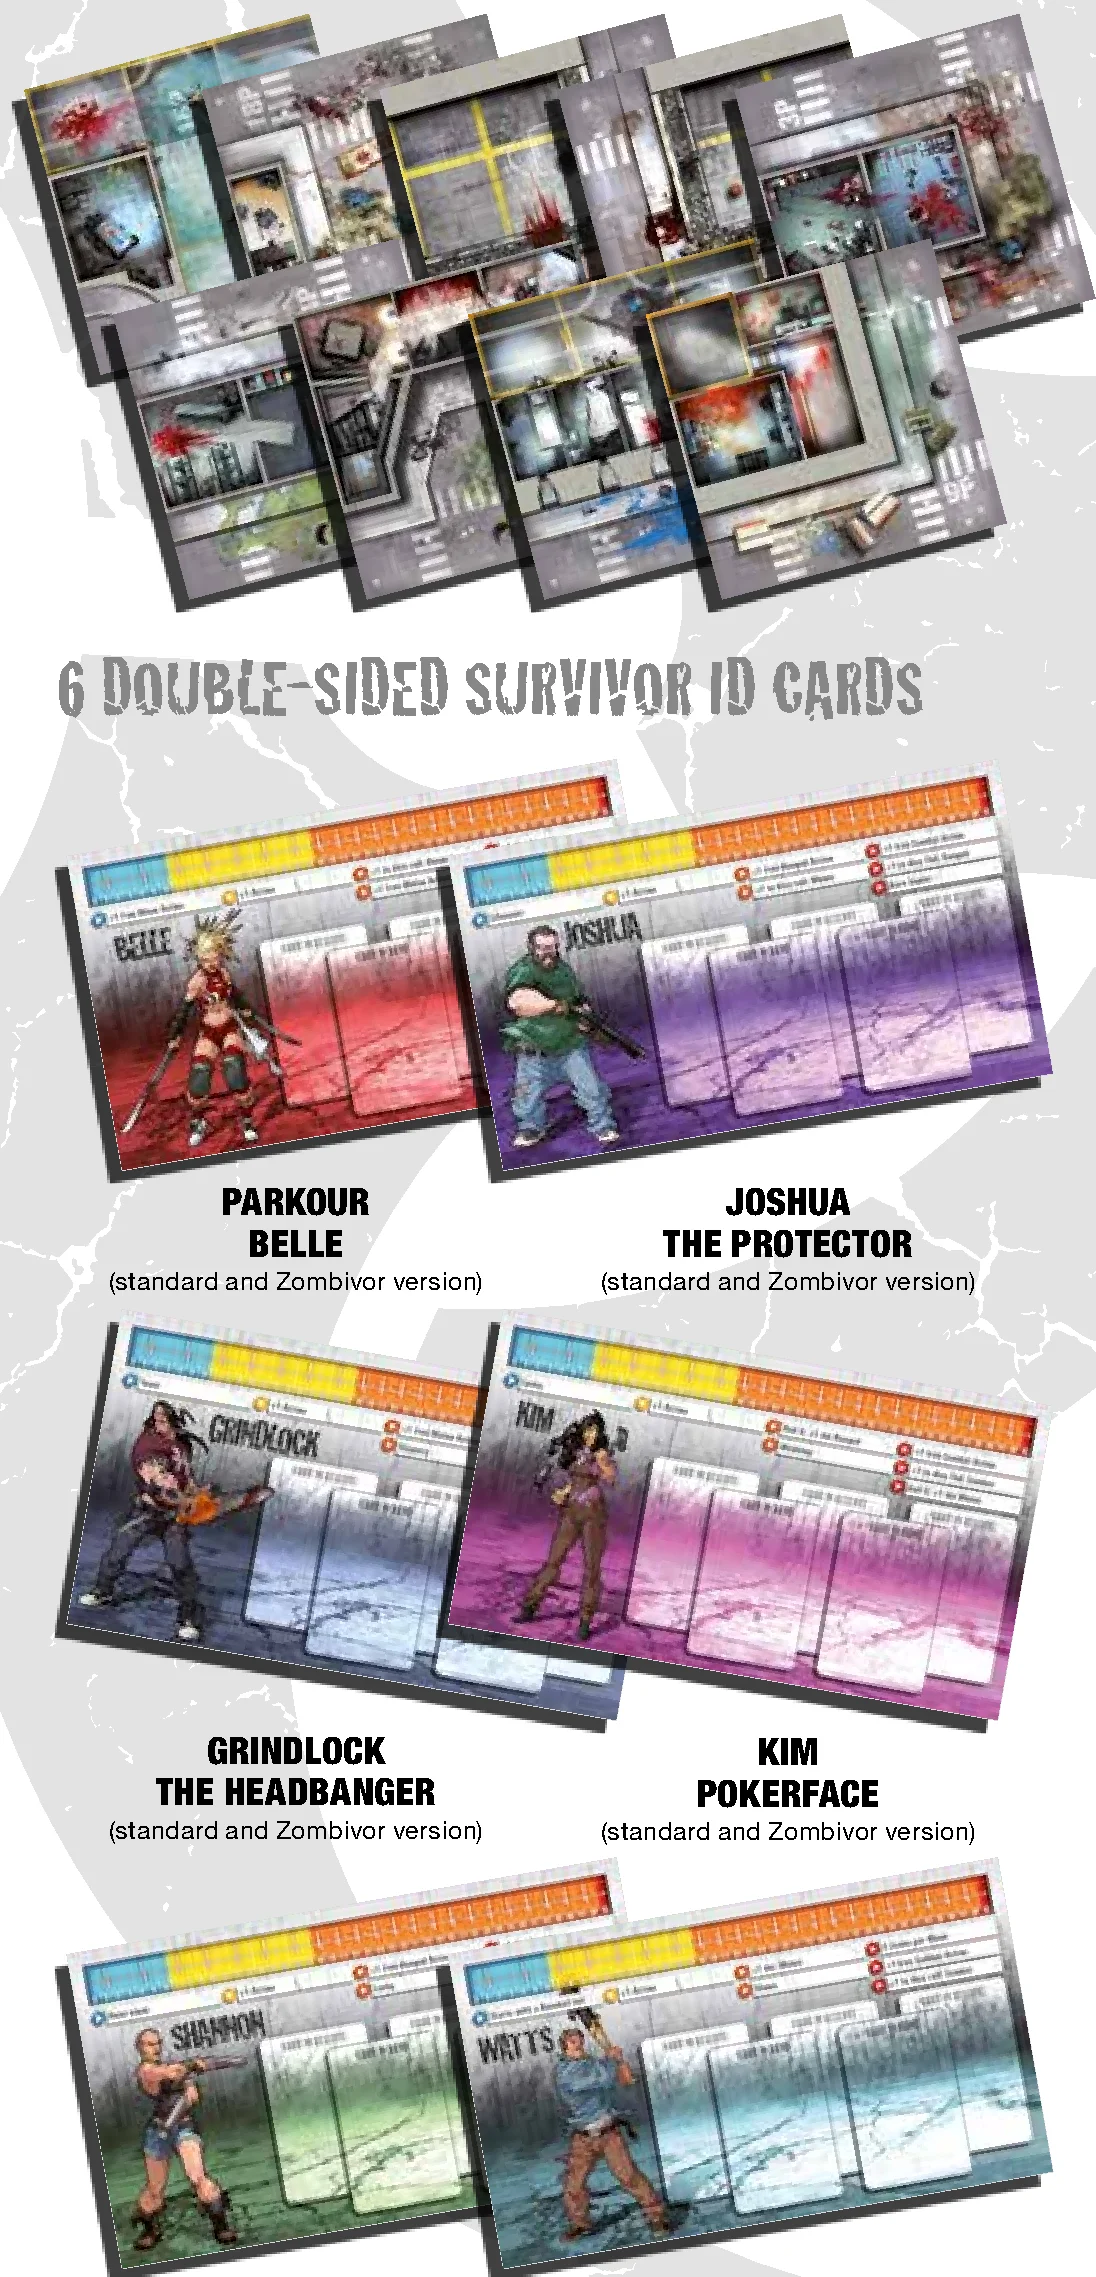
- 9 Game Tiles (double sided)
- 6 Double-Sided Survivor ID Cards
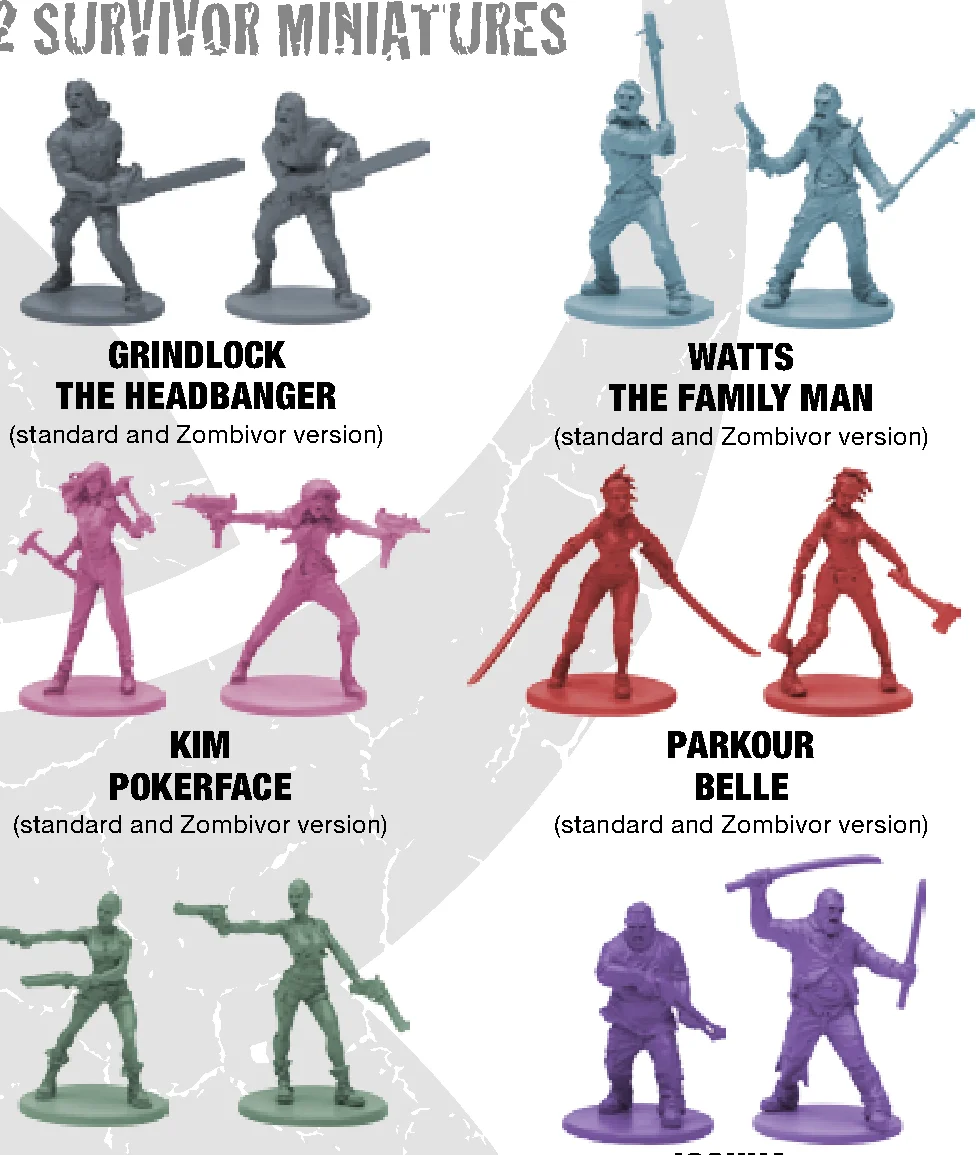
- 12 Survivor Miniatures:
- Grindlock / The Headbanger (standard and Zombivor version)
- Watts / The Family Man (standard and Zombivor version)
- Kim / Pokerface (standard and Zombivor version)
- Belle / Parkour (standard and Zombivor version)
- Shannon / The Soldier (standard and Zombivor version)
- Joshua / The Protector (standard and Zombivor version)
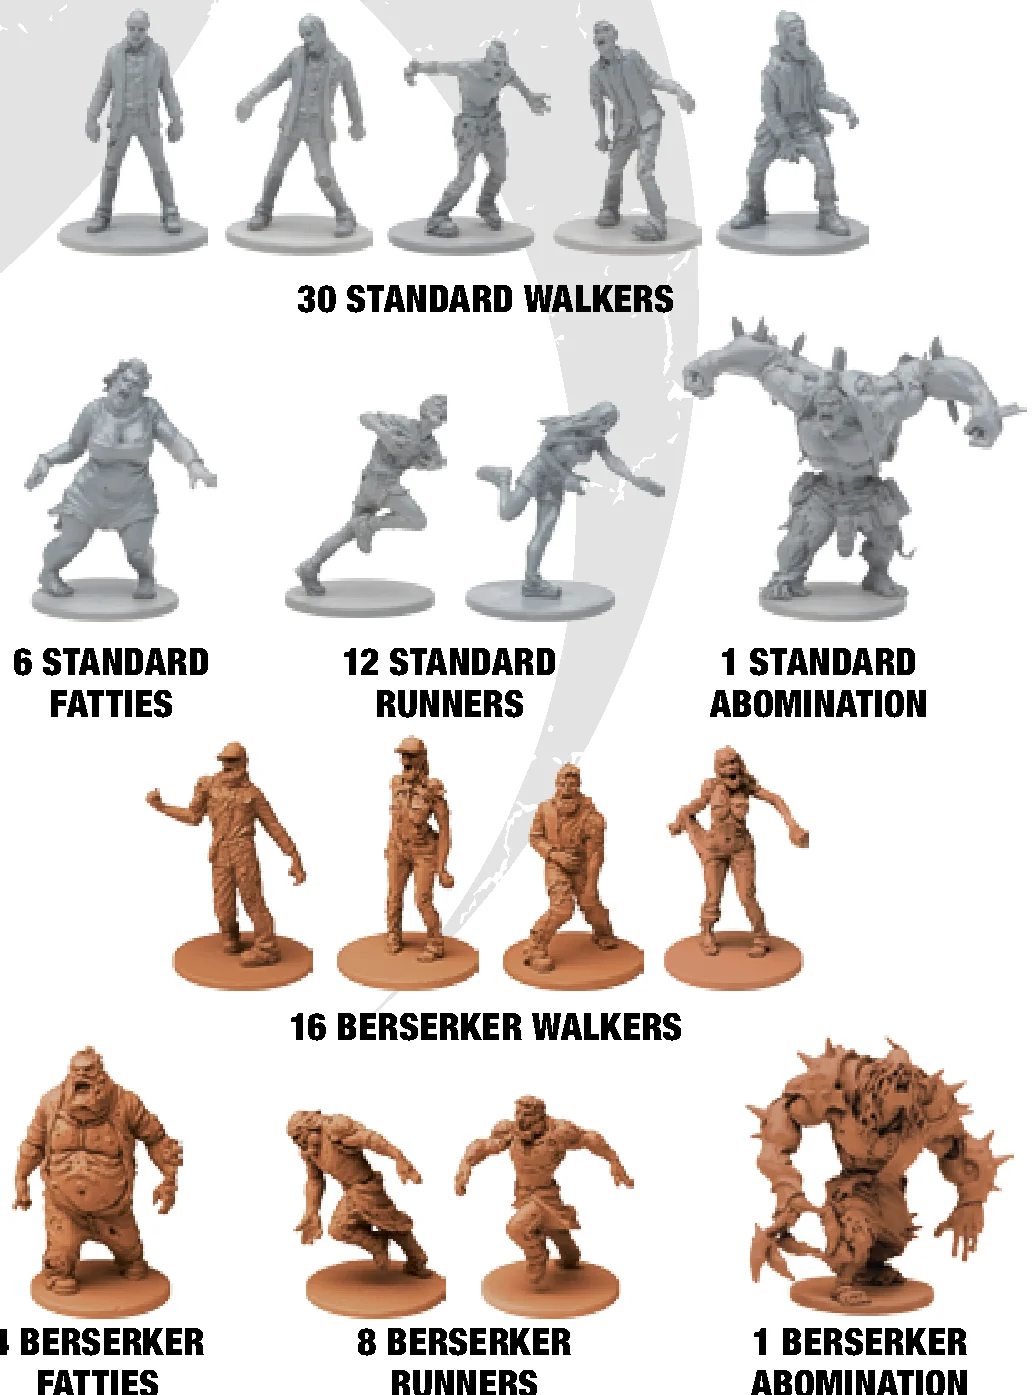
- 78 Zombies Miniatures:
- 30 Standard Walkers
- 6 Standard Fatties
- 12 Standard Runners
- 1 Standard Abomination
- 16 Berserker Walkers
- 4 Berserker Fatties
- 8 Berserker Runners
- 1 Berserker Abomination
149 Mini-Cards
- 83 Equipment Cards:
- Automatic Shotgun x2
- Aaah! x4
- Bag of Rice x3
- Baseball Bat x2
- Canned Food x3
- Chainsaw x2
- Claw Hammer x4
- Concrete Saw x1
- Fire Axe x2
- Flashlight x2
- Gasoline x2
- Glass Bottles x2
- Gunblade x2
- Hatchet x4
- Katana x2
- Kukri x4
- Meat Cleaver x2
- Molotov x2
- Nailbat x2
- Nails x2
- Nightstick x3
- Pistol x6
- Plenty of ammo (heavy) x3
- Plenty of ammo (light) x3
- Rifle x2
- Riot shield x2
- Sawed off x4
- Scope x2
- Shotgun x2
- Sub MG x2
- Wakizachi x2
- Water x3
- 42 Zombie Cards (#79 to #120)
- 24 Wounded Cards
- 6 Dice
- 6 Experience Trackers
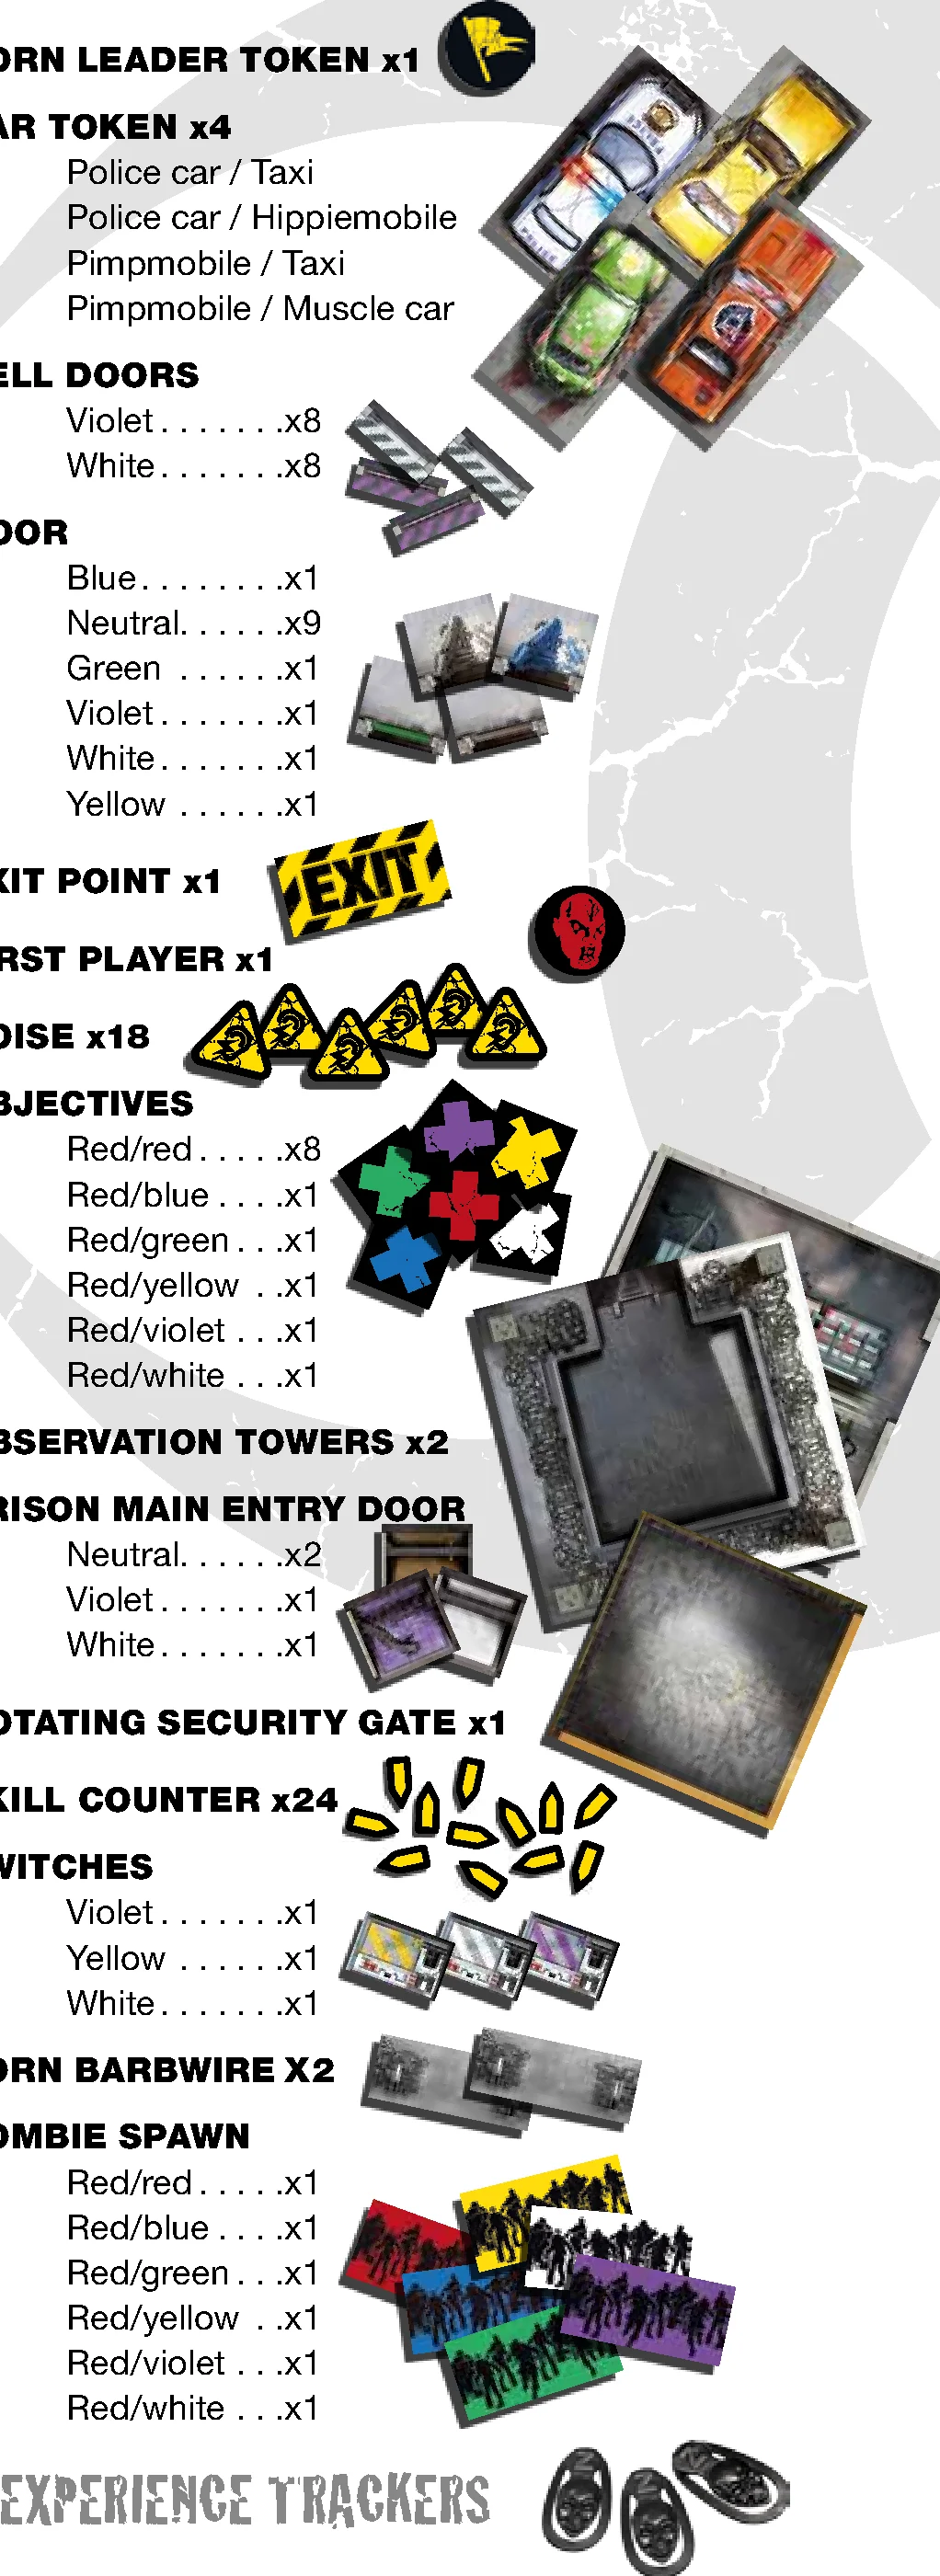
110 Tokens
- Born Leader Token x1
- Car Tokens x4:
- Police car / Taxi
- Police car / Hippiemobile
- Pimpmobile / Taxi
- Pimpmobile / Muscle car
- Cell Doors:
- Violet x8
- White x8
- Doors:
- Blue x1
- Neutral x9
- Green x1
- Violet x1
- White x1
- Yellow x1
- Exit Point x1
- First Player x1
- Noise x18
- Objectives:
- Red/red x8
- Red/blue x1
- Red/green x1
- Red/yellow x1
- Red/violet x1
- Red/white x1
- Observation Towers x2
- Prison Main Entry Door:
- Neutral x2
- Violet x1
- White x1
- Rotating Security Gate x1
- Skill Counter x24
- Switches:
- Violet x1
- Yellow x1
- White x1
- Torn Barbwire x2
- Zombie Spawn:
- Red/red x1
- Red/blue x1
- Red/green x1
- Red/yellow x1
- Red/violet x1
- Red/white x1

Game Setup
- Choose a Mission.
- Place the tiles.
- Place the doors, the cars, and Objectives.
- Put aside the pimpmobile cards (Gunblades) and all Nailbat, Nightstick, Molotov, and Wounded cards. Also keep a single Claw Hammer, Fire Axe, and Pistol card.
- Shuffle the Zombie cards into one deck and the Equipment cards into another. Place both decks face down close to the board.
- Each player chooses his Survivors based on the number of players:
- 1 player: 4 to 6 Survivors (the more, the easier).
- 2 players: 3 Survivors per player.
- 3 players: 2 Survivors per player.
- 4 to 6 players: 1 Survivor per player.
- Place the miniatures representing the chosen Survivors on the starting Zone as indicated by the Mission.
- Place your Survivor’s Identity Card in front of you, showing the “standard” version of your Survivor (the other side shows his Zombivor version and is marked with a biohazard symbol). Experienced players may begin the game with Zombivors. Place an experience tracker on the first square in the blue area of the Danger Bar, and place a Skill counter on the first corresponding Skill.
- Randomly deal the starting equipment: a Claw Hammer, Fire Axe, Pistol, and enough Nightsticks so that each Survivor gets one card. If a Survivor’s starting Skill lists any starting weapons, he receives those cards now, independent of the starting Equipment that’s just been distributed.
EXAMPLE: Watts is dealt one of the random starting Equipment cards and gets the Pistol! He then takes the weapon listed on his Identity Card from the Equipment deck: a Baseball Bat! - Decide who will be the first player, and give him or her the “first player” token. Zombicide is a cooperative game, so do not pick randomly!
Nightsticks and Pans
The Zombicide Season 1 game includes Pans as part of the starting Equipment cards. In Zombicide Season 2: Prison Outbreak, these are replaced by Nightsticks.
If you own both games, deal Nightsticks as part of the starting Equipment. If there aren’t enough starting Equipment cards, then deal Pans as well.
Useful Definitions
- Actor: A Survivor, Zombivor, or Zombie.
- Zone: Inside a building, a Zone can be either a room or, in large alleys, an area defined by floor markings. On the street, a Zone is the area between two pedestrian crossings and the walls of buildings along the street. A single Zone may extend over two tiles or even four tiles.
Line of Sight
How do I know if a Zombie sees me or if I see it?
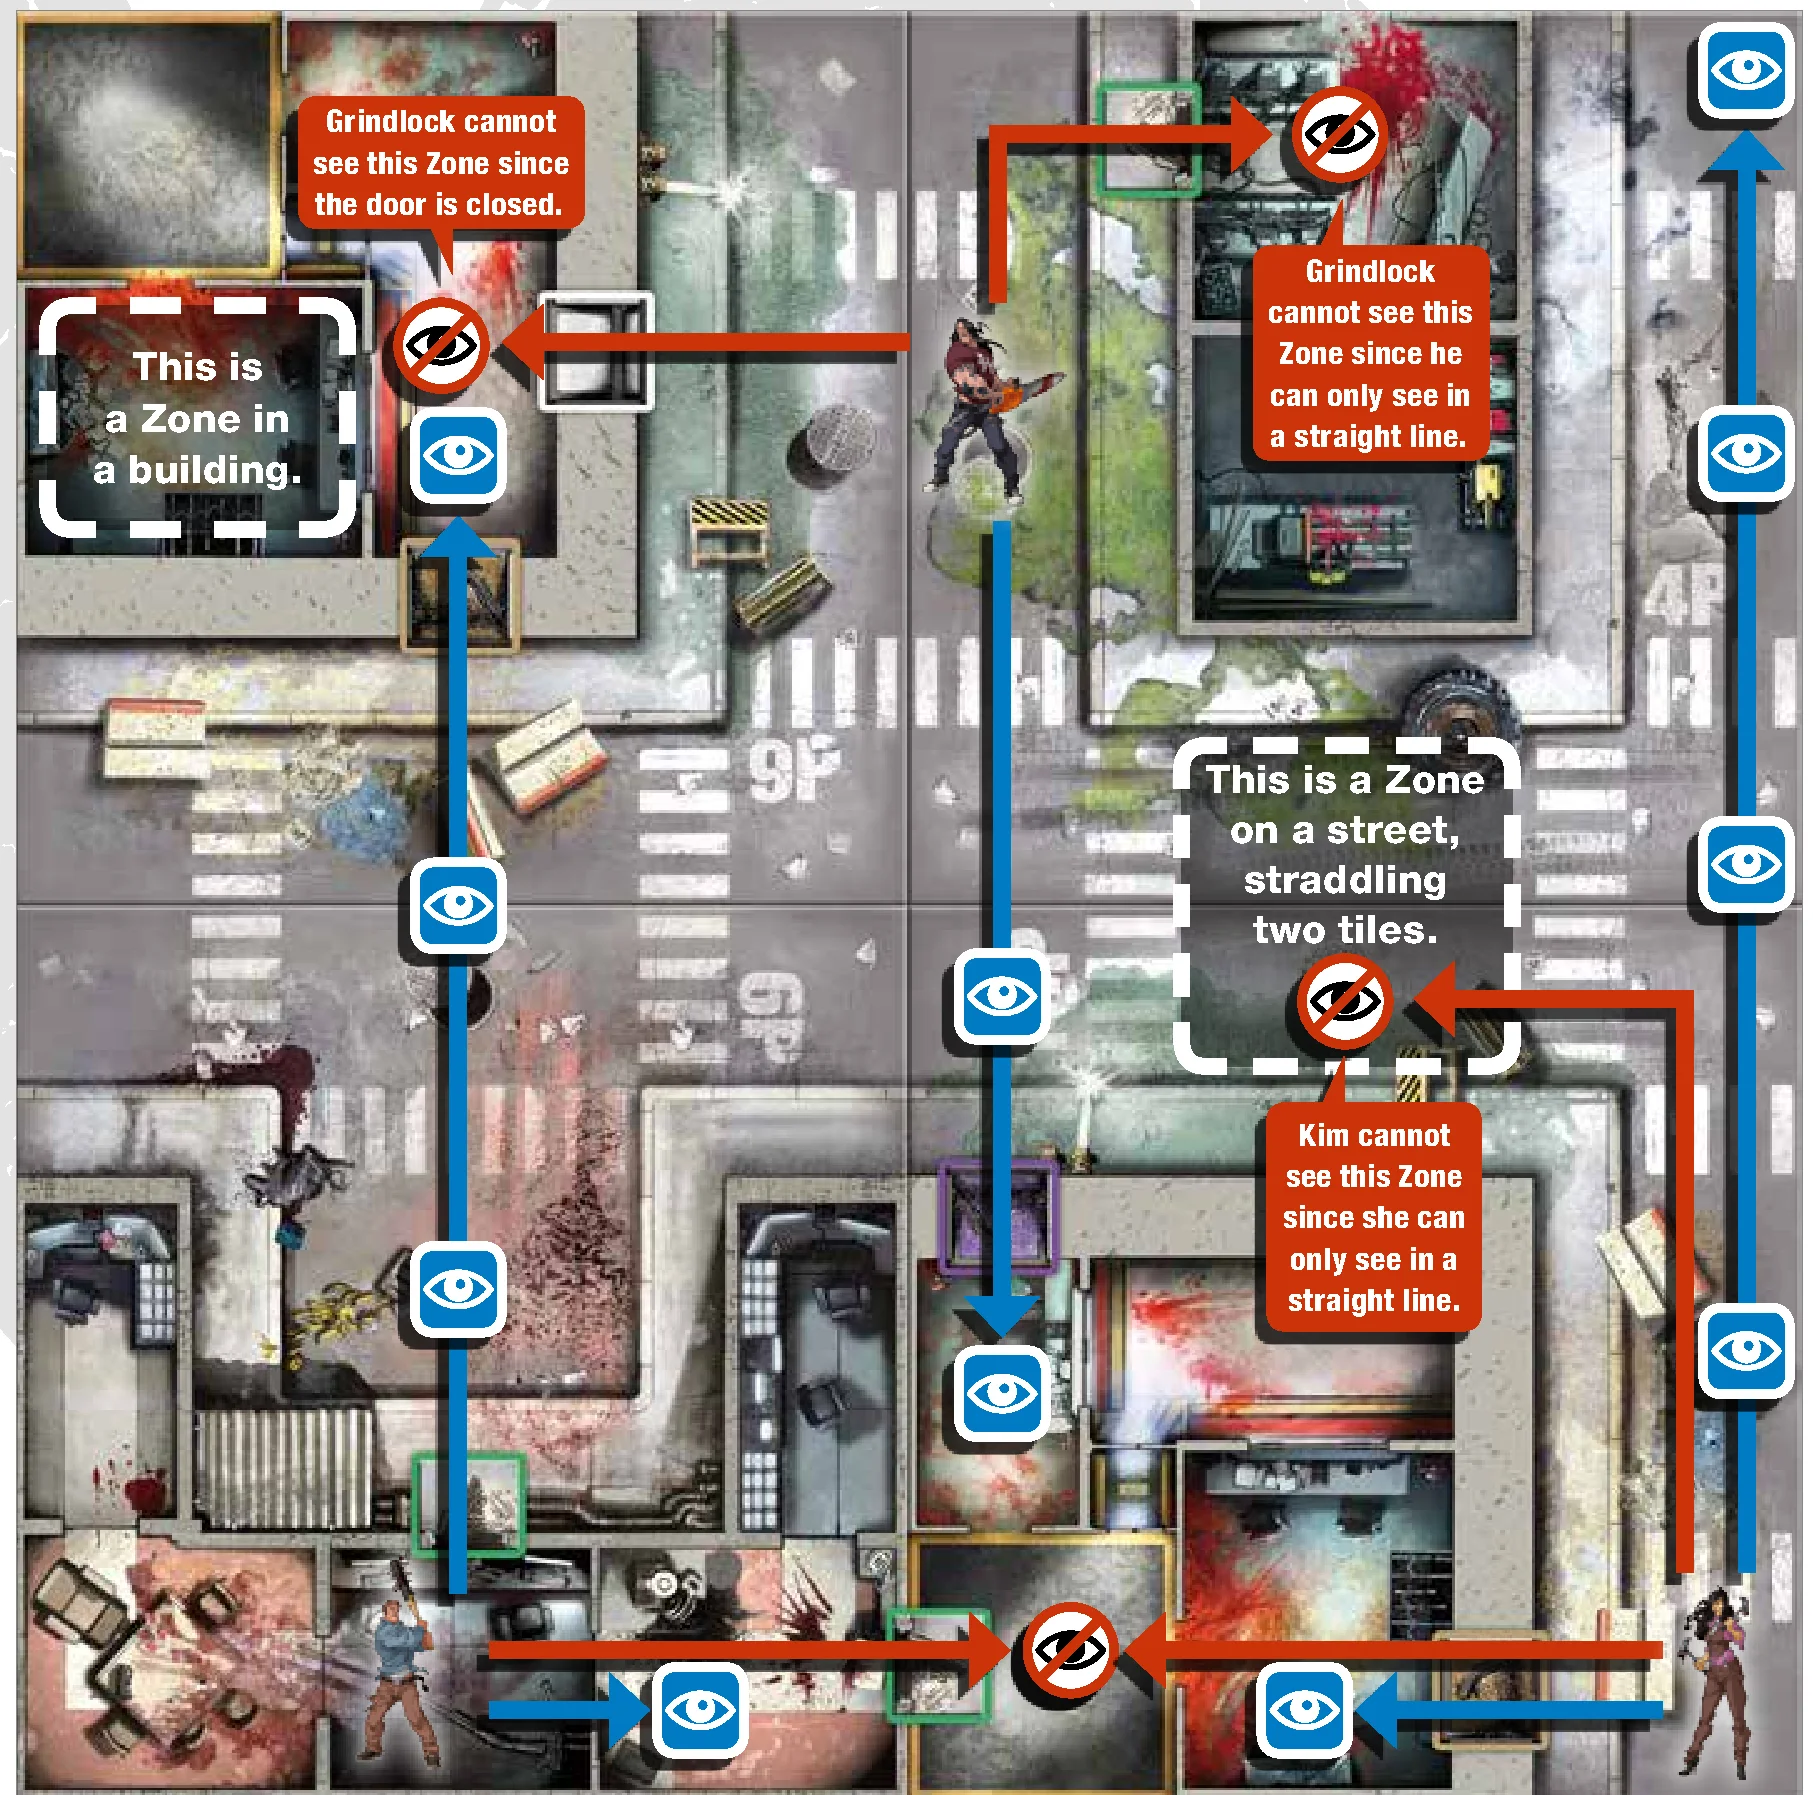
- On the streets (and indoor alleys), Actors see in straight lines that run parallel to the edges of the board. Actors cannot see diagonally. Their line of sight covers as many Zones as the line can pass through before reaching a wall or the edge of the board.
- Inside a building, an Actor sees into all Zones that share an opening with the Zone the Actor currently occupies. If there is an opening, the walls do not block line of sight between two Zones. An Actor’s line of sight, however, is limited to the distance of one Zone.
NOTE: If the Survivor is looking out into the street, or from the street into a building, the line of sight can go through any number of street Zones in a straight line, but only one Zone inside the building. Indoor alleys are considered streets for purposes of line of sight.
Movement
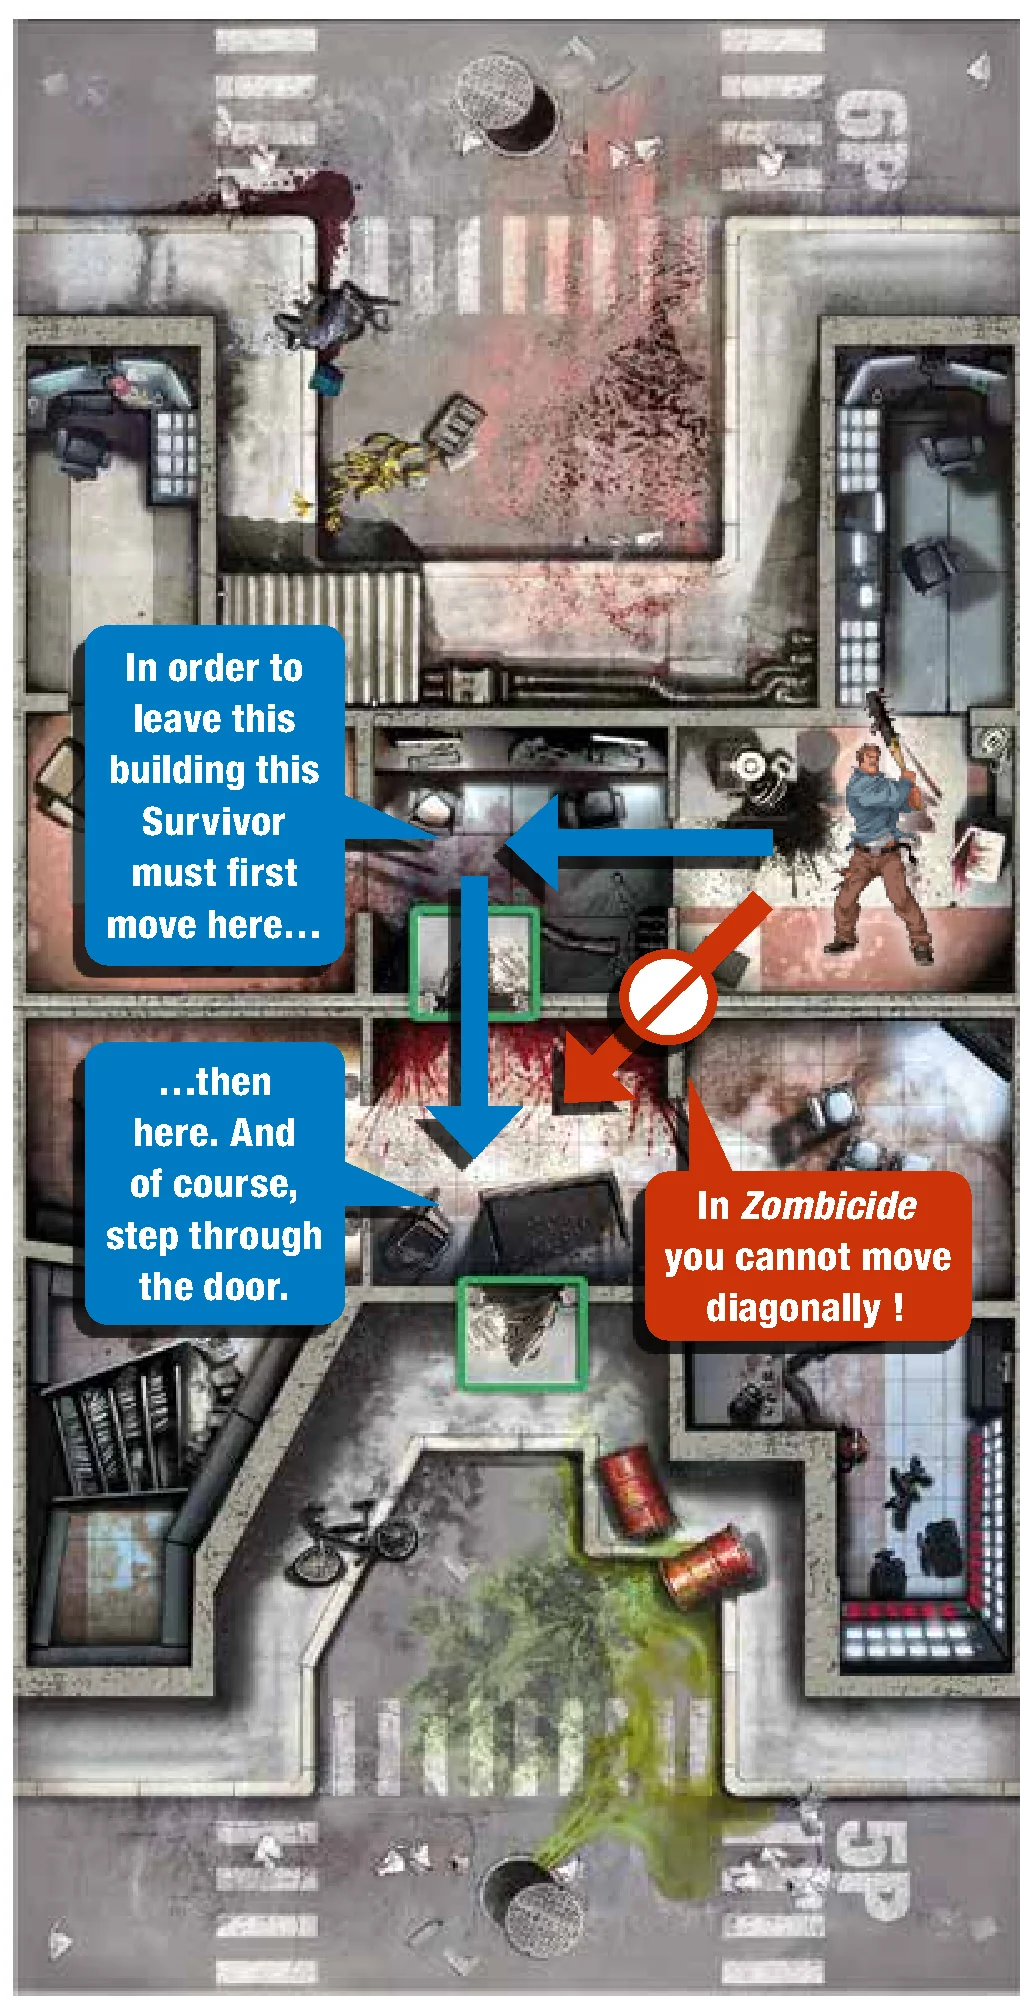
Actors can move from one Zone to the next as long as the first Zone shares at least one edge with the destination Zone. Corners do not count. This means Actors cannot make diagonal movements.
- On streets (and indoor alleys), the movement from one Zone to another has no restrictions. However, Actors must go through a door to move from a building to the street (or alley) and vice versa.
- Inside a building, Actors may move from one Zone to another as long as these Zones are linked by an opening. The position of the miniature in the Zone and the layout of the walls do not matter as long as the Zones share an opening.
Reading an Equipment Card
Door-Breaching, Zombie-Killing, and Noisy Equipment
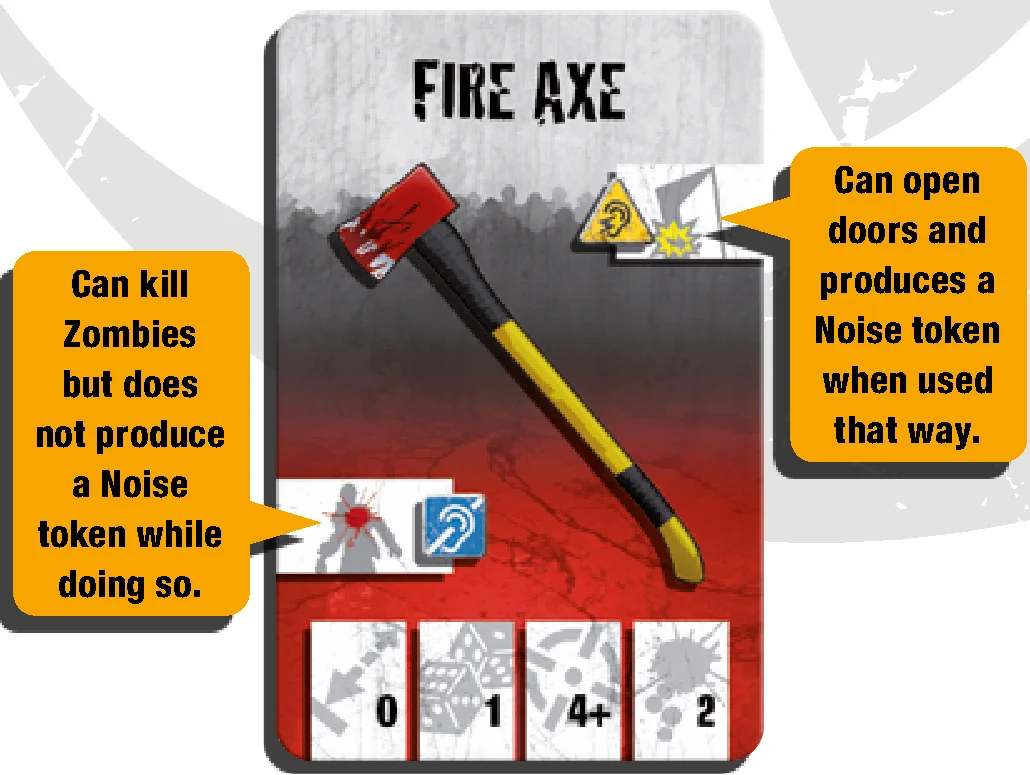
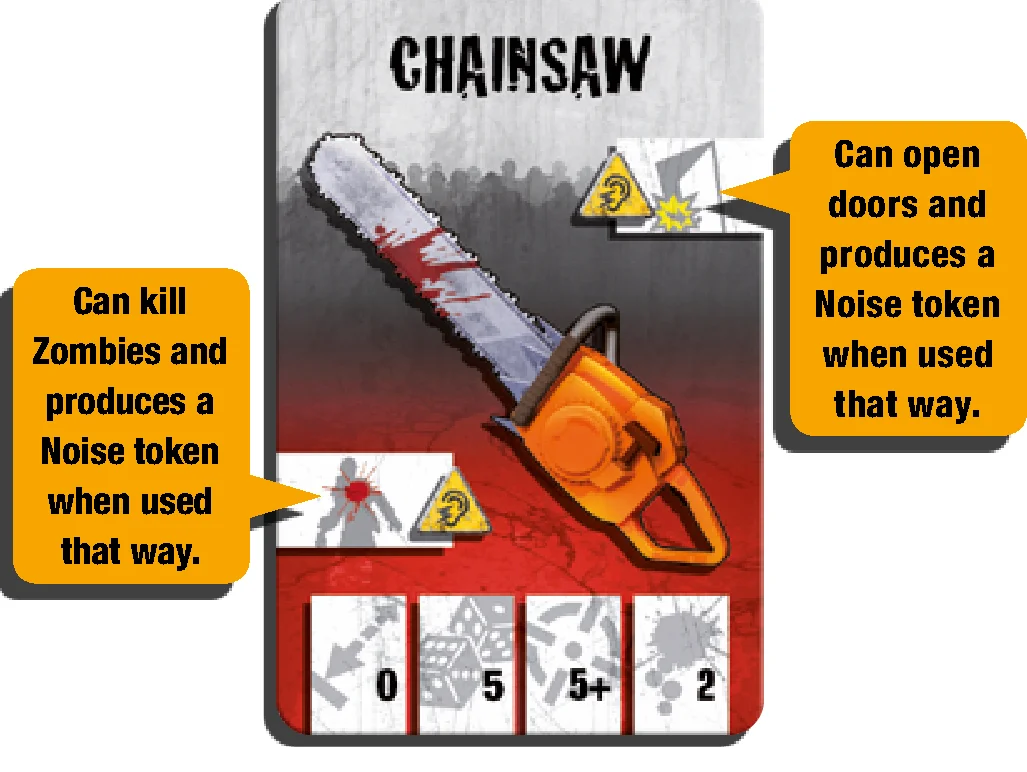
Many Equipment cards, such as the Claw Hammer, Fire Axe, and Chainsaw, allow you to open doors as well as eliminate Zombies.
- Equipment that allows you to open doors has this symbol:

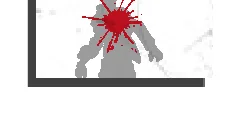
- Equipment that allows you to kill Zombies has this symbol:
 Combat characteristics are written at the bottom.
Each of these symbols is accompanied by a second symbol related to noise. It defines if the Action is noisy or not. Noise attracts Zombies!
 This Action is noisy and produces a Noise token (see Noise).
 This Action isn’t noisy and does not produce a Noise token.
Combat Characteristics
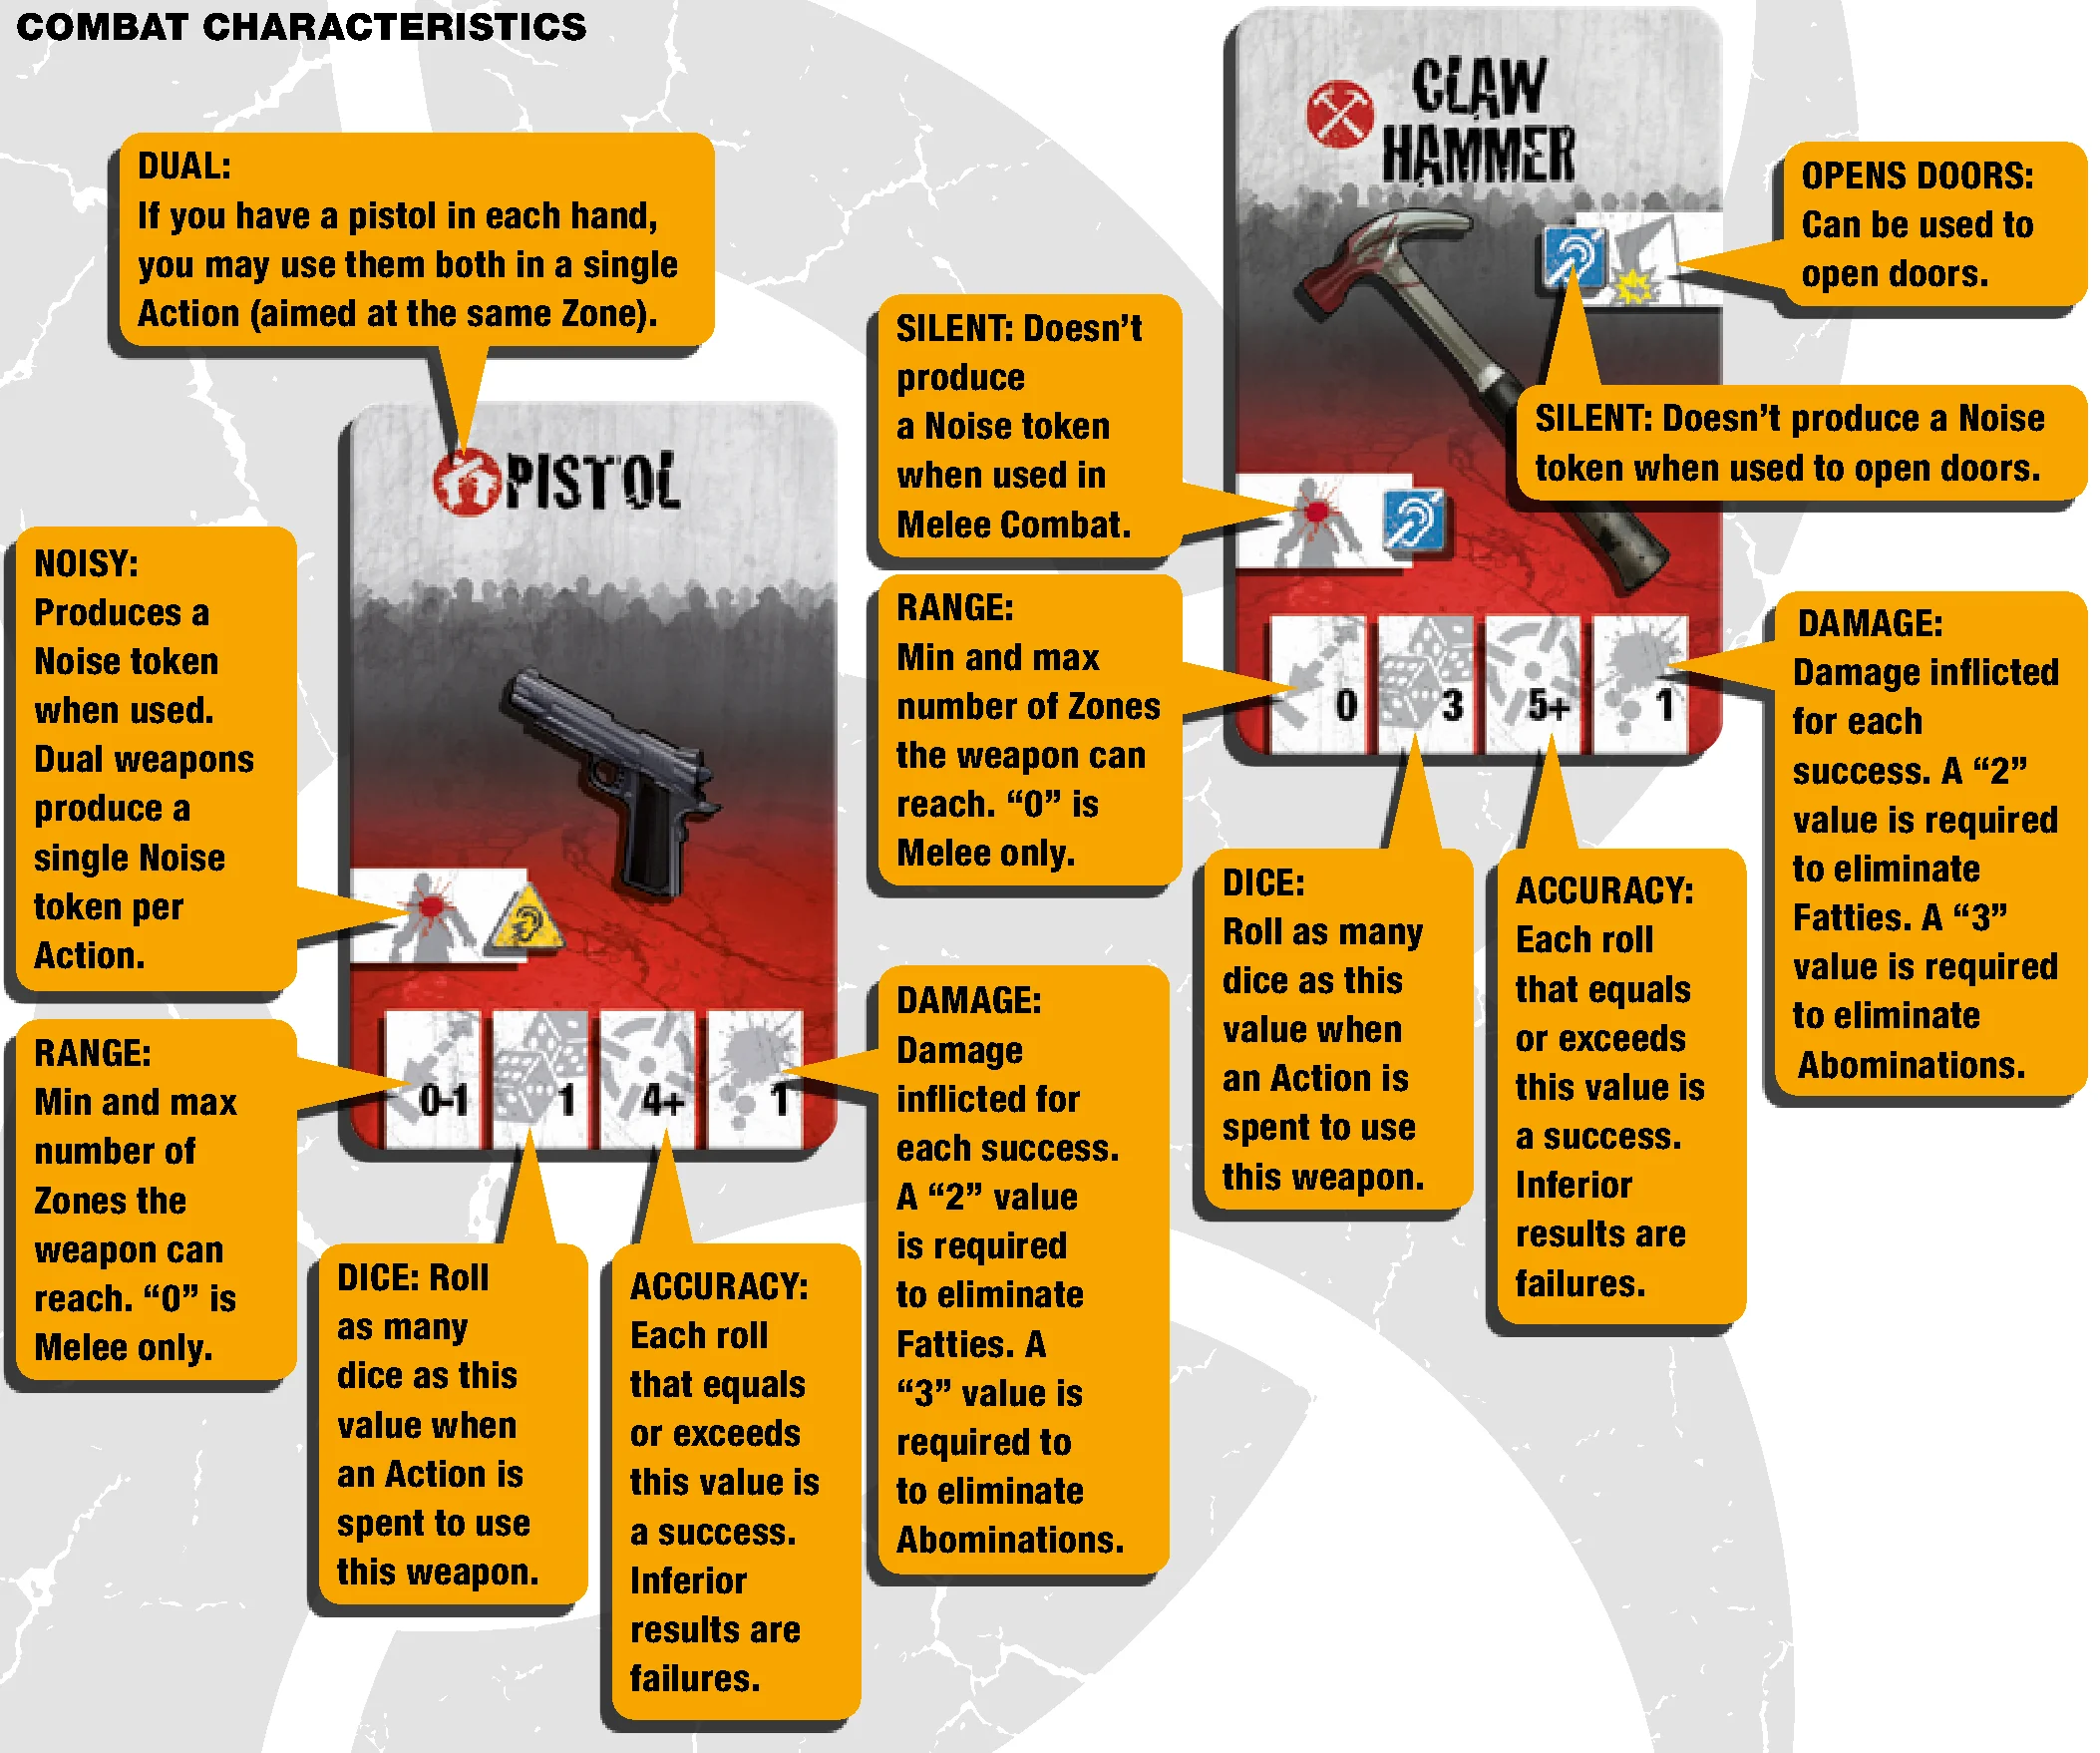
Weapons have specific characteristics displayed at the bottom of their card:
- RANGE: Min and max number of Zones the weapon can reach. “0” is Melee only.
- DICE: Roll as many dice as this value when an Action is spent to use this weapon.
- ACCURACY: Each roll that equals or exceeds this value is a success. Inferior results are failures.
- DAMAGE: Damage inflicted for each success. A “2” value is required to eliminate Fatties. A “3” value is required to eliminate Abominations.
- DUAL: If you have a weapon with this symbol in each hand, you may use them both in a single Action (aimed at the same Zone).
- SILENT: Doesn’t produce a Noise token when used.
- NOISY: Produces a Noise token when used. Dual weapons produce a single Noise token per Action.
- OPENS DOORS: Can be used to open doors.
Noise
Firing a gun or smashing through a door makes noise, and noise attracts Zombies. Each Action that opens a door with a noisy weapon or attacks with a noisy weapon produces a Noise token.
- Place this token in the Zone where the Survivor resolved the Action.
- A single Action can only produce a single Noise token no matter how many dice are rolled, how many hits are obtained, or if Dual weapons are used.
- Noise tokens are always removed from the board in the End Phase.
- NOTE: Each Survivor miniature also counts as a Noise token. Yes, they just can’t seem to stay quiet!
EXAMPLE: Grindlock opens a door with a Fire Axe. It’s a noisy way to open a door. This produces a Noise token. He then attacks a Zombie in his Zone, knocking it down after a couple of whacks. The Fire Axe is a silent killing weapon, so this action produces no noise. There remain two “noises” in this Zone, however: the token produced by opening the door and Grindlock’s miniature itself.
In another Zone, Belle executes three Ranged Combat Actions with her two Dual Sub MGs. Although she rolled six dice, she gets only three Noise tokens in her Zone, one for each Ranged Action. The tokens remain on the square where she produced them; they don’t follow Belle when she moves.
Inventory
Each Survivor can carry up to five pieces of Equipment but can only have two equipped and ready to use (one in each hand) at any given time. While all weapons must be in a hand slot in order to use them (whether to attack or to open a door), other items, such as the Flashlight and Plenty of Ammo cards, are always in effect, even while in one of the three reserve slots.
You may discard cards from your inventory to make room for new cards at any time, for free.
Experience, Danger Level, and Skills
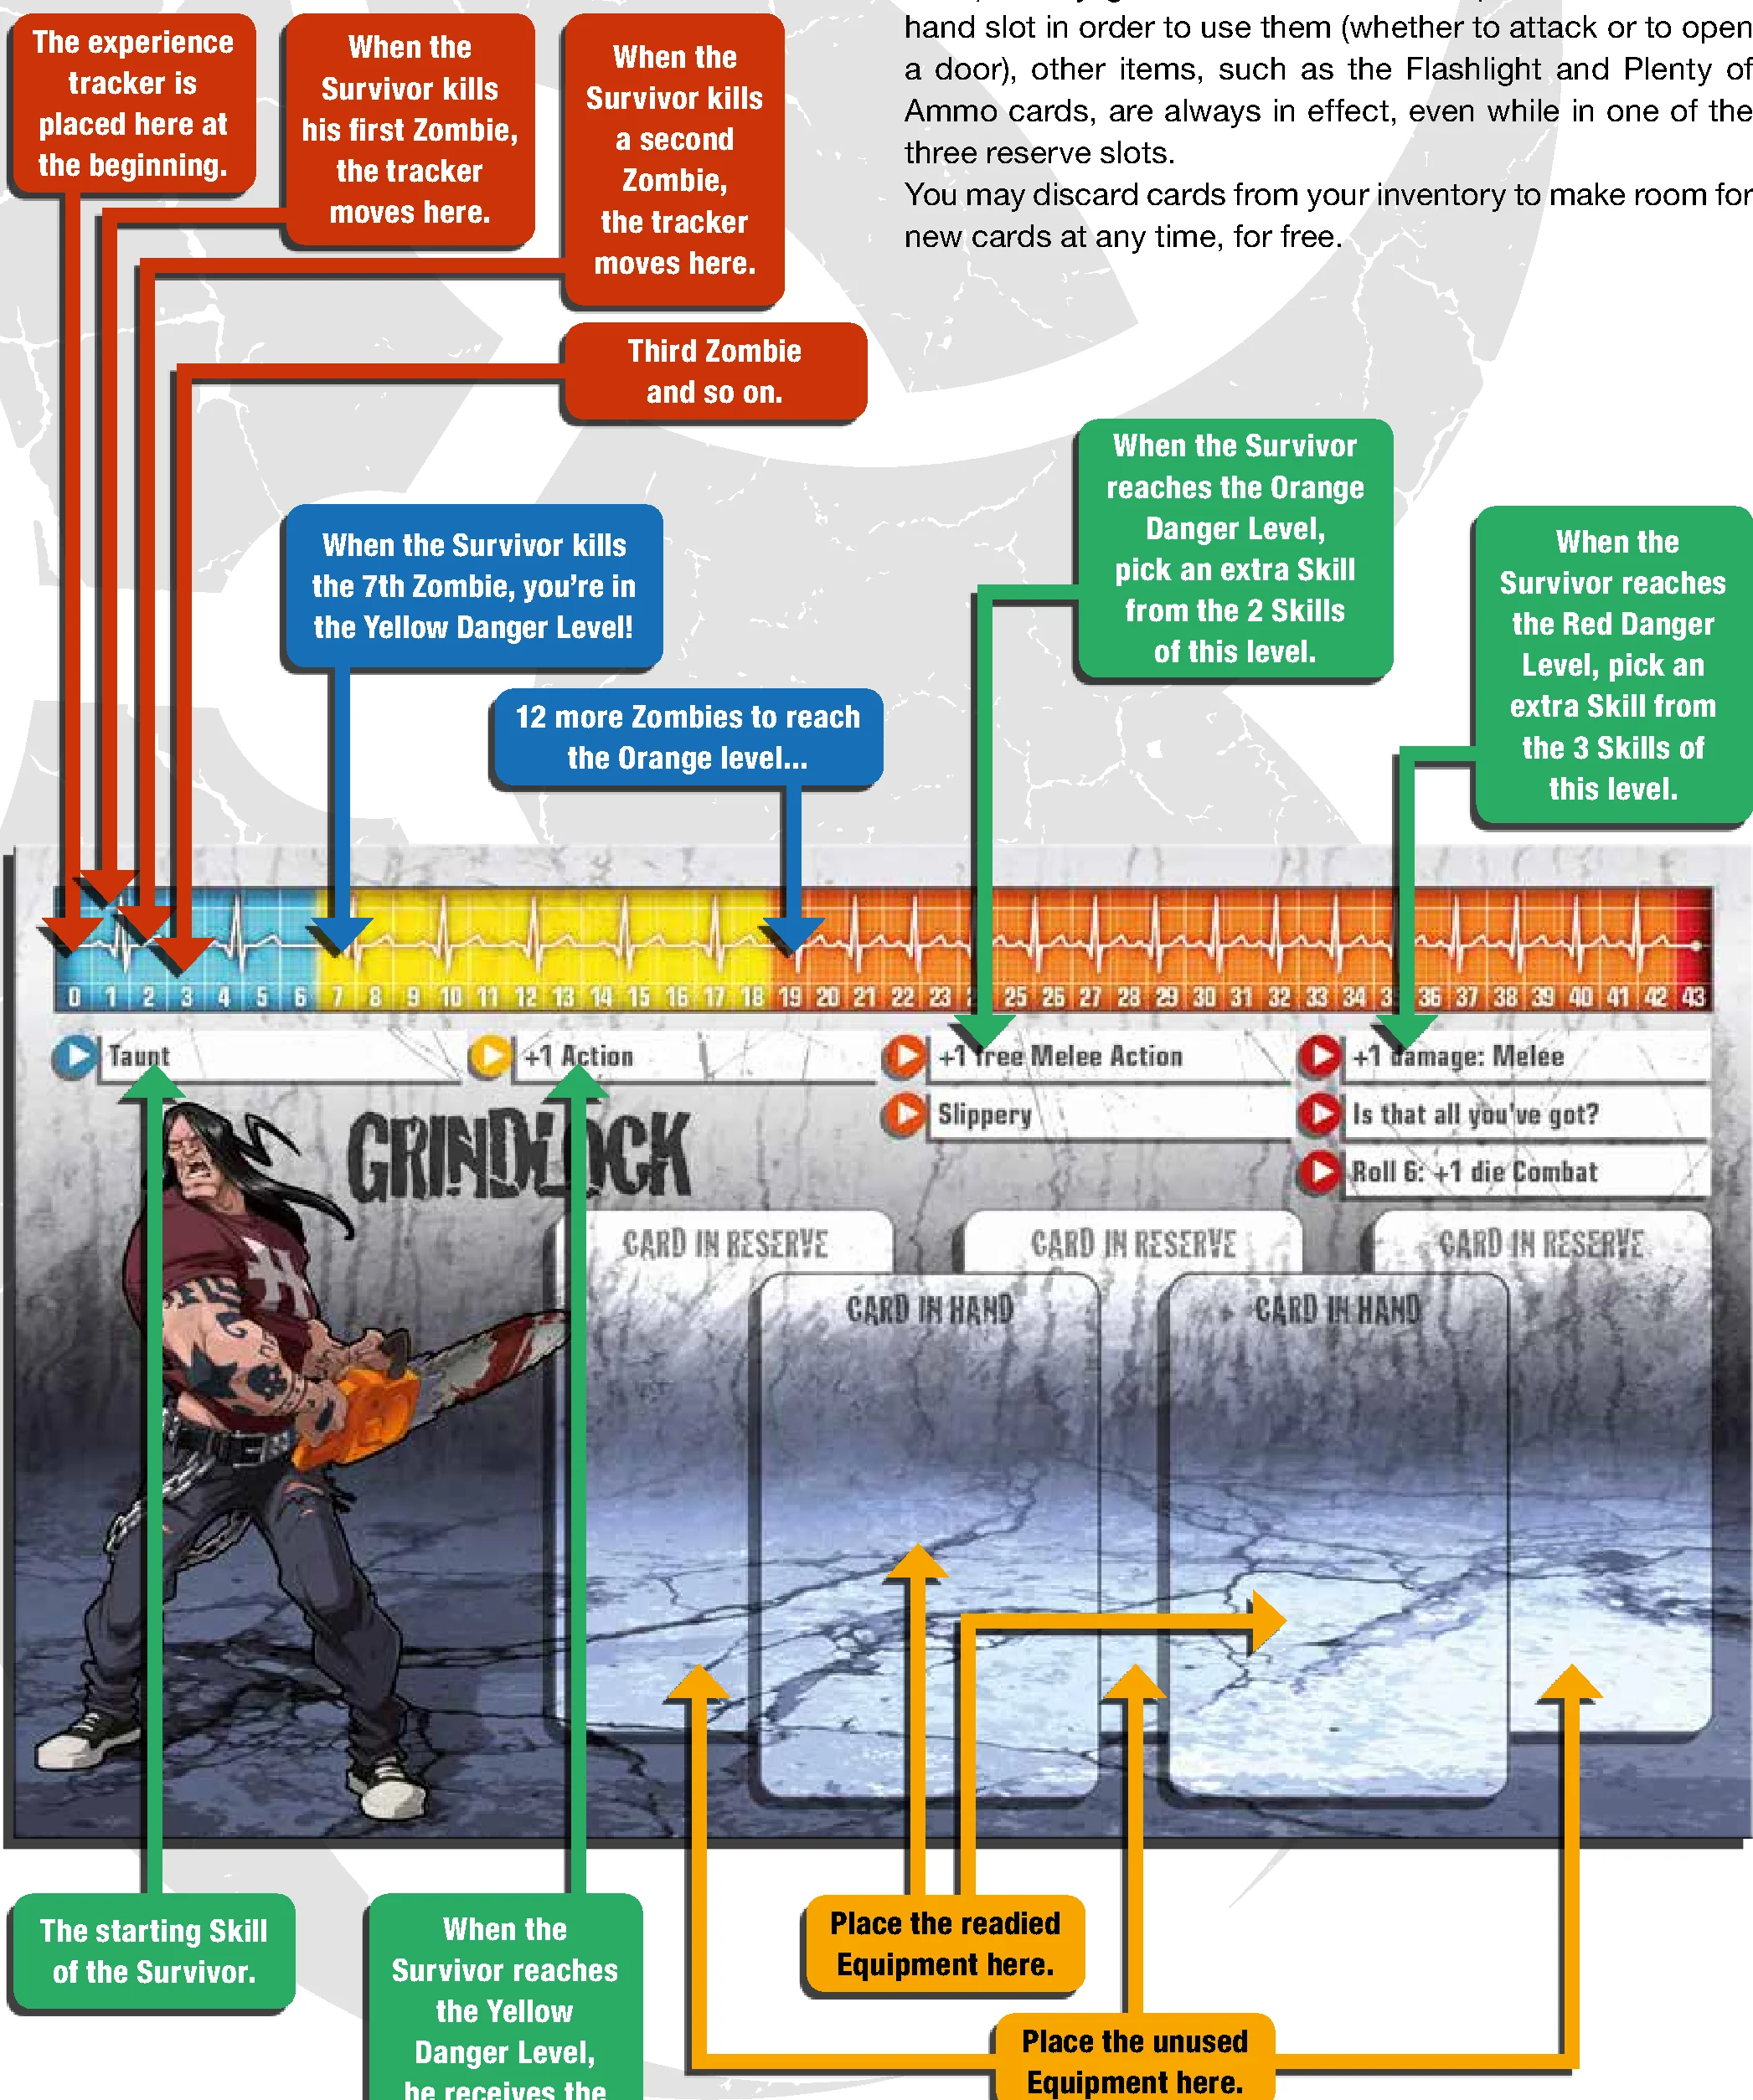
For each Zombie killed, a Survivor gains an experience point and moves up a notch on his Danger Bar. Some Mission objectives provide more experience, as does eliminating Abominations.
There are four Danger Levels: Blue, Yellow, Orange, and Red. These represent everything from a light drizzle of Zombies to a flash flood.
At each Danger Level, the Survivor gains one new Skill to help him on his Mission (see Skills, page 25). Skills add to each other across Danger Levels: at Red Level, your Survivor will have four Skills.
- Yellow Level (7 experience points): The Survivor obtains a fourth Action. He may use this Action immediately and then every turn thereafter; in other words, he now has a permanent additional Action.
- Orange Level (19 experience points): The Orange Danger Level becomes active, and the Survivor can choose one of the two Skills indicated on his Identity Card.
- Red Level (43 experience points): The Survivor reaches the Red Danger Level and obtains one Skill from among the three available at this Level.
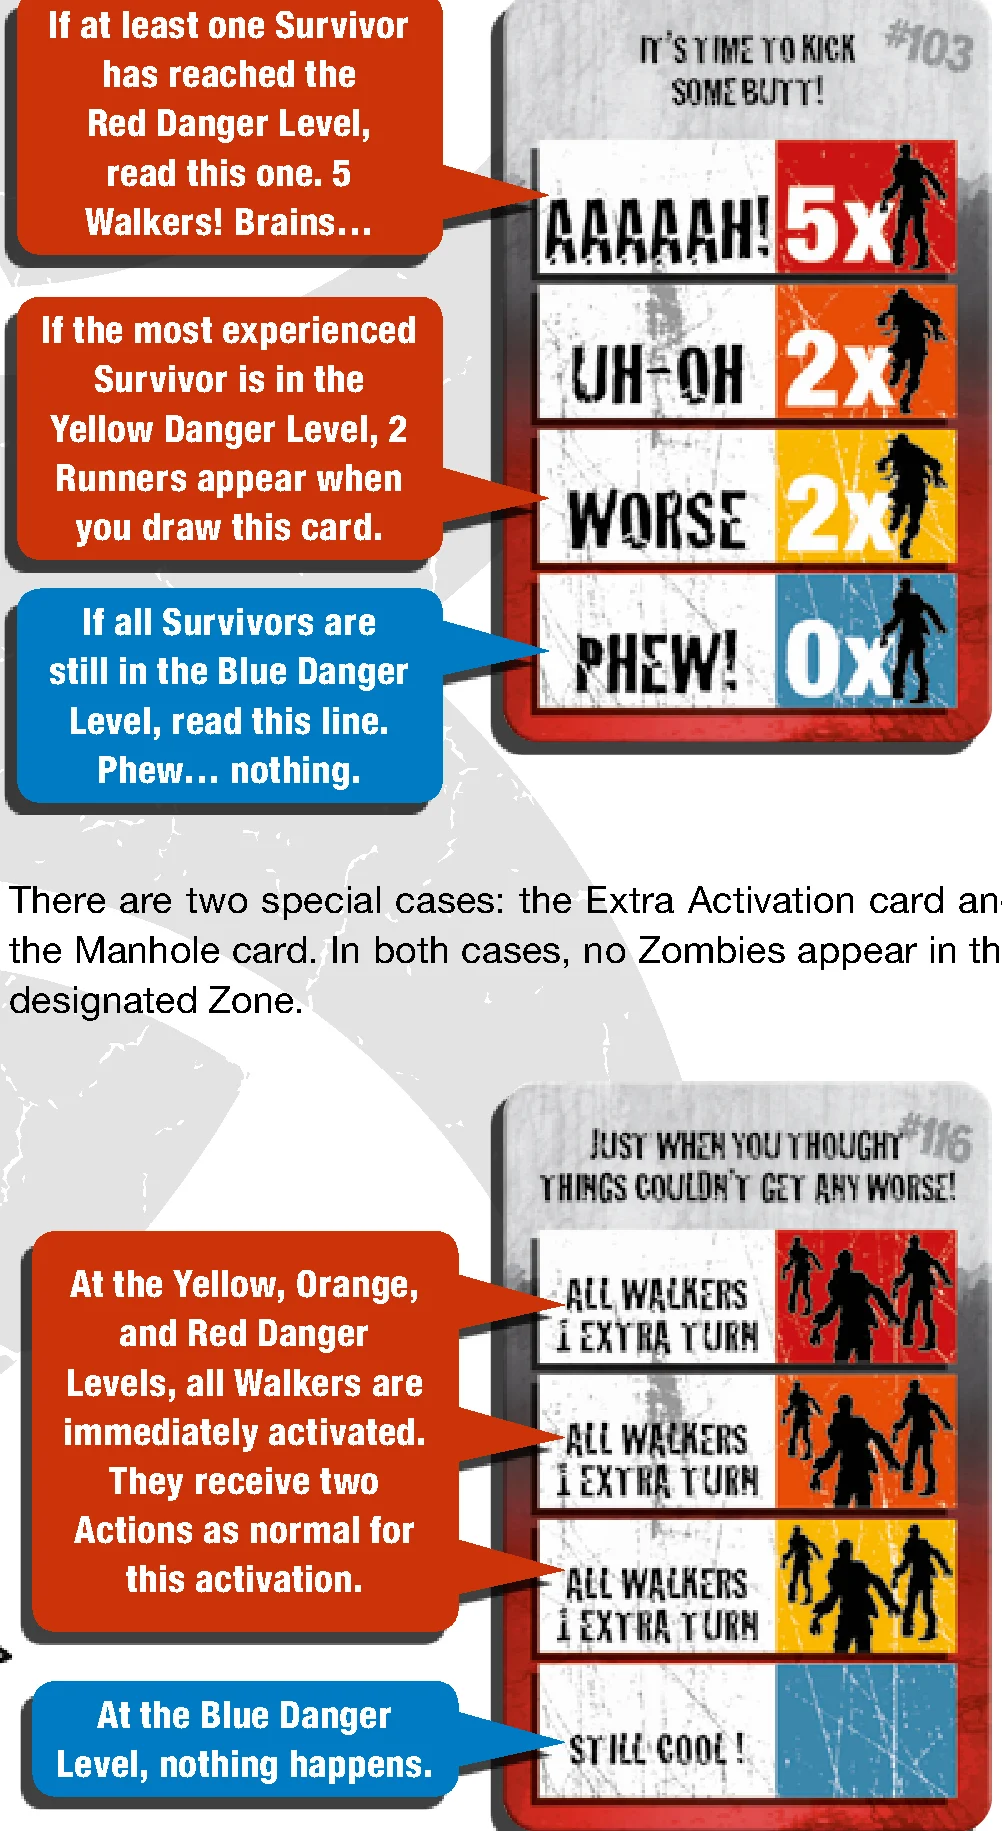
This experience has a side effect, however. When you draw a Zombie card to spawn a Zone, read the line that corresponds to the Survivor with the highest Danger Level!
Improved Weaponry: Sniper Rifle, Nailbat, and Molotov
Specific Equipment cards can be combined to build improved weaponry. Take the two appropriate cards, which the Survivor must already have in his inventory, and combine them into the new weapon. This does not cost an Action, and the new weapon occupies only a single slot in your Survivor’s inventory. When built, Survivors may immediately and freely equip improved weapons to their hands.
- Sniper Rifle: Combine a Rifle and a Scope to get a sniper rifle. Put the Scope card under the Rifle card. Now you can choose your targets when firing with this Rifle.
- Nailbat: Discard a Baseball Bat and a Nails card and give your Survivor a Nailbat card. Time to enjoy the melee-fest.
- Molotov: Discard a Glass Bottle and a Gasoline card and give your Survivor a Molotov card. The Molotov doesn’t need Dice, Accuracy, or Damage values (though it still requires a Ranged Combat Action to use). Just terminate everything in the targeted Zone. Yes, even other Survivors and Abominations. Discard the Molotov card after a single use, leaving its hand slot empty.
Overview
Starting with whoever holds the “first player” token, each player activates his Survivors one after the other, in the order of his choice. Each Survivor can execute three Actions at the Blue Danger Level. This is increased to four when the Survivor reaches the Yellow Danger Level.
Some Survivors have a free Action at the Blue Danger Level. Any free Actions do not count toward this total.
EXAMPLE: On her turn, Belle uses her free Move Action. She still has her basic three Actions of the turn remaining.
Once a player has activated all his Survivors, the player to his left takes his turn, activating his Survivors in the same manner. When all the players have completed their turns, the Players’ Phase ends.
Available Actions
Move
The Survivor moves from one Zone to the next but cannot move through external building walls or closed doors. If there are Zombies in the Zone the Survivor is attempting to leave, he must spend one extra Action per Zombie to leave the Zone. Entering a Zone containing Zombies ends the Survivor’s Move Action, even if he has a Skill that allows him to move through multiple Zones per Move Action.
- EXAMPLE 1: Shannon is in a Zone with two Walkers. To leave this Zone, she spends one Move Action, then two more Actions (one per Walker), for a total of three Actions. If there had been three Zombies in the Zone, Shannon would have needed four Actions to move.
- EXAMPLE 2: At Red Level, Watts is next to a Zone containing a Zombie when he moves. His Move Action ends in the Zone with the Zombie, even if his 2 Zones per Move Skill would normally allow him to move up to two Zones.
Search
You can only Search Zones inside a building (except for indoor alleys) and only if there are no Zombies in the Zone. The player draws a card from the Equipment deck. He may then place it in the Survivor’s inventory or immediately discard it.
A Survivor can only perform a single Search Action per turn, even if it’s an extra, free Action. After searching, the Survivor may freely reorganize his inventory. But the Survivor cannot trade with other Survivors; that requires another Action!
You may discard cards from your inventory to make room for new cards at any time, for free.
If the Equipment deck runs out, reshuffle all the discarded cards, with the exception of Wounded cards, Nightsticks, Molotov, and pimpmobile cards (Gunblades), to make a new deck.
Open a Door
A Survivor cannot open a door unless he has a Melee weapon with an “Open a door” symbol in his hand.
Remember to place a Noise token in the Zone if the Survivor uses a noisy weapon. Double doors are opened in the same way as normal doors. They simply allow a car to pass if they give way to alleys.
Opening a building for the first time reveals all the Zombies inside all rooms of the building (a single building extends to all rooms connected by openings, sometimes straddling several tiles). Indicate each Zone of the building, one after the other in any order you choose, and draw a Zombie card for each Zone. Place the corresponding number and type of Zombies on the indicated Zone. If you draw an Extra Activation or Manhole card, immediately perform the action indicated on the card, and do not add Zombies to the current Zone. When the Zombie deck runs out, reshuffle all the discarded cards to make a new deck.
Some game effects, like the Lock it down Skill, allow an open door to be locked up. If it is opened again afterward, it won’t trigger a new Zombie Spawn.
Reorganize Your Inventory and Trade with Another Survivor
At the cost of one Action, a Survivor can reorganize the cards in his inventory in any way he wishes. The Survivor can simultaneously exchange any number of cards with only one other Survivor currently in the same Zone. This other Survivor may reorganize his own inventory for free.
Ranged Combat
The Survivor uses a Ranged weapon he is holding in his hands to shoot at a single Zone within the Range shown on the weapon’s card.
Melee Combat
The Survivor uses a Melee weapon he is holding in his hands to attack the Zombies in his Zone.
Get In or Out of a Car
The Survivor gets in or out of a car in his Zone. To get in a car, the Zone must have no Zombies and either the driver’s seat or one of the three passenger’s seats must be empty for the Survivor to occupy. There are no restrictions to getting out of a car.
Change Seats in a Car
The Survivor vacates the seat he’s currently occupying and takes a different empty seat in the same car. If there are no empty seats in the car, Survivors cannot change seats.
Drive a Car
Cars can only be driven if the Mission allows it. The Survivor occupying the driver’s seat can move the car one or two street Zones per Action spent (cars cannot be driven into buildings, except for indoor alleys). This Action is not a Move and is not subject to movement modifiers, such as a free Move Action or increased movement, nor is it affected by disadvantages related to Move Actions (cars can leave a Zone with Zombies in it without the need to spend extra Actions). A car attacks all Actors in the Zones through which it moves.
Take or Activate an Objective
The Survivor takes an Objective token or activates an object in the same Zone. The game effects are explained in the Mission’s description.
Pull a Switch
The Survivor pulls a Switch in the same Zone, opening a door, rotating a security gate, etc. The game effects are explained in the Mission’s description. Switches can be used to open doors and lock them up. If the doors are re-opened thereafter, don’t spawn Zombies again.
Switches are often linked to a colored Objective of the same color standing next to them. The first Survivor to pull the Switch takes the linked Objective for free and gains the associated benefits. This is the only way to take an Objective linked to a Switch.
Make Some Noise!
The Survivor makes Noise in an attempt to attract Zombies. Place one Noise token in his Zone.
Do Nothing
The Survivor does nothing and prematurely ends his turn. His remaining Actions are lost.
Resolving Combat
When a Survivor executes a Combat Action, roll as many dice as the Dice number of the weapon being used.
If the active Survivor has two identical weapons with the Dual symbol equipped in hand, he can use both weapons at the same time at the cost of a single Combat Action. Both weapons must be aimed at the same Zone.
- EXAMPLE 1: Joshua has two Sub MGs in his hands. The Sub MG has the Dual symbol, so Joshua can shoot them both with a single Action. This allows him to roll six dice in a single roll, as the Sub MG has a Dice number of 3!
- EXAMPLE 2: Shannon is holding two Kukris. She can strike with them both at once, so she can roll two dice for every Action she uses to attack.
Each die result that equals or exceeds the Accuracy number of the weapon scores a successful hit.
Each hit inflicts the amount of Damage specified by the Damage value of the weapon to a single target.
- Walkers and Runners are killed with a 1 Damage hit (or more).
- Fatties are killed with a 2 Damage hit (or more).
- Abominations are killed with a 3 Damage hit (or a weapon killing everything in the target Zone, like a Molotov).
It does not matter how many hits you obtain with a weapon that inflicts 1 Damage, a Fatty or Abomination will absorb the hits without flinching. Also, remember Berserker Zombies can only be killed in Melee Combat!
EXAMPLE: Joshua unloads his two Sub MGs on three Walkers who are guarding a Fatty and scores five hits. The first three shots easily blow away the Walkers. However, the Fatty takes the two remaining hits with no consequence, as the Sub MG inflicts only 1 Damage. Shannon arrives to finish the job with her Kukri. She hits once, but the Kukri inflicts 2 Damage, which is enough to chop that Fatty down!
If there had been two Runners instead of a Fatty, a single hit with the Kukri would not have eliminated the two Runners. Each successful hit can only take out one target, and any remaining damage is overkill and wasted.
Melee Combat
A Survivor equipped with a Melee weapon (a weapon with a max Range of “0”) can attack a Zombie in his own Zone. Each die roll equal to or higher than the Accuracy value on the weapon’s card is a successful hit. The player divides his hits as desired among the possible targets in the Zone.
EXAMPLE: Shannon attacks a Walker, a Runner, and a Fatty with her dual Kukris. She rolls a 4 and 6, which means two hits. She decides to decapitate the Runner and to butcher the Fatty, leaving the Walker, the least dangerous of the three, for her next Action. Though Grindlock is also in the same Zone, he is safe from Shannon’s slashes.
Ranged Combat
A Survivor equipped with a Ranged weapon (a weapon with a max Range of “1” or more) can shoot at targets in a Zone he can see (see Line of Sight, page 7) and that is within the weapon’s Range.
REMEMBER: Inside a building, the Line of Sight is limited to the Zones that share an opening and just one Zone away. Indoor alleys are an exception, as they are considered as street Zones.
The Range of a weapon is shown by the Range value on its card, which represents the number of Zones it can shoot across. The first of the two values shows the minimum Range. The weapon may not shoot at Zones closer than the minimum. In most cases this is 0, meaning the Survivor can shoot at targets in the Zone he currently occupies. The second value shows the maximum Range of the weapon. A weapon cannot fire at Zones beyond the maximum Range.
- When a Zone is chosen for Ranged Combat, ignore any Actors in the Zones between the shooter and the target. This means Survivors may shoot through occupied Zones without danger to either other Survivors or Zombies.
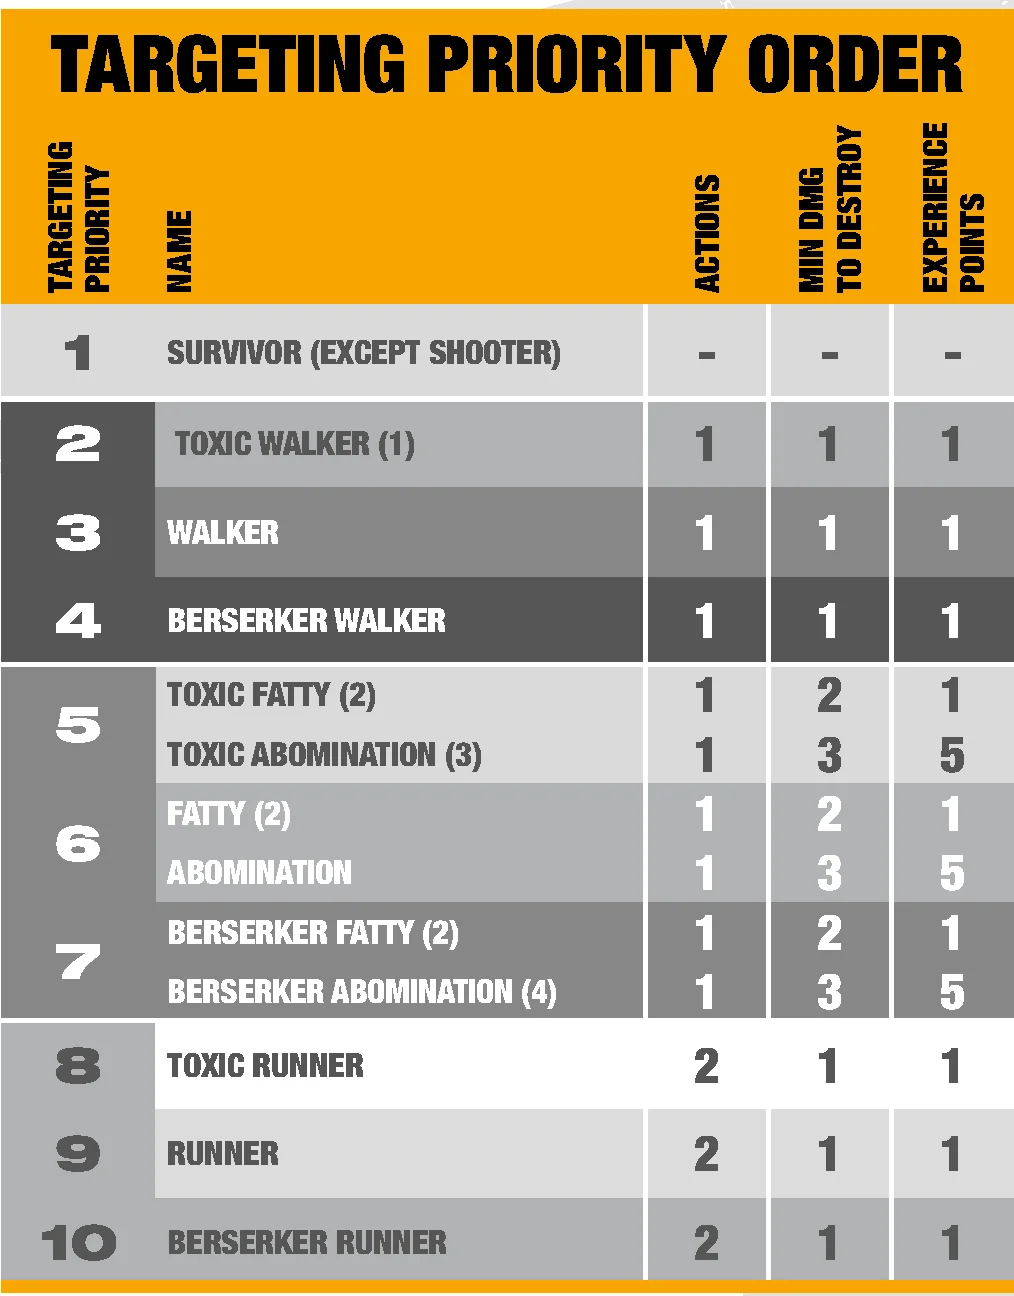
- When using a Ranged weapon, the shooting Survivor does not choose the targets hit by successful rolls. Hits are assigned to Actors in the targeted Zone following the Targeting Priority Order.
- The hits are assigned to targets at the lowest priority until they’ve all been eliminated, then to targets at the next priority until they’ve all been eliminated, and so on.
- NOTE: If a Survivor receives a hit from a 2 Damage weapon, he suffers two Wounds, killing him.
Reload!
While most weapons can be used repeatedly, a few, like the Sawed-off, require spending an Action to reload them between shots if you want to fire multiple times in the same turn. At the End Phase of the turn, all such weapons are freely reloaded, so that they always start the turn ready to fire. If such a weapon is fired and passed to another Survivor without reloading, it must still be reloaded before the new owner can use it in the same turn. When equipped with two identical Dual weapons that require reloading, a single Action reloads both.
Firing with a single Dual reloadable weapon in a Zone, then firing at another Zone with the other Dual reloadable weapon, is allowed.
Car Attack
When the Survivor in the driver’s seat spends an Action to move a car, it runs over every Actor in the Zone it starts in and each Zone it enters. The player who controls the driver rolls one die for each miniature in the Zone the car leaves, every Zone it moves through, and the Zone it reaches (except for the Survivors in any car). Each 4, 5, or 6 is a successful hit that inflicts 1 Damage (only 1; it is impossible to run down a Fatty or Abomination). Assign these hits following the Targeting Priority Order, just like a Ranged Attack: first Survivors (except for those in cars, the attacking one or any other), then Walkers, then Fatties and Abominations, and finally Runners. All targeted Survivors must be killed before hits can be assigned to any Walkers. The driver gains all the experience points from the killed Zombies.
Survivors may make Melee and Ranged attacks from the inside of a car without altering the Combat rules in any way. Cars offer no protection to their occupants from normal Zombie attacks or Survivor attacks.
Overview
Once the players have activated all their Survivors, the Zombies play. Nobody takes their role; they do it themselves, performing the following steps in order:
Step 1 – Activation
Each Zombie activates and spends its Action on either an Attack or a Move, depending on its situation. First resolve all the Attacks, then all the Moves, but each Zombie only performs one or the other with a single Action.
Attack
Each Zombie in the same Zone as a Survivor performs an Attack. A Zombie’s Attack is always successful and does not require any dice rolls. It snatches, if possible, an Equipment card the Survivor is carrying. The player who controls that Survivor chooses and discards an Equipment card. The Survivor receives a Wounded card, which replaces the lost Equipment. When he reorganizes his Survivor’s inventory, the player may move this Wounded card just like an Equipment card, but he cannot discard or trade it, and it reduces the amount of Equipment the Survivor can carry. A Survivor with two Wounded cards is eliminated and his Equipment discarded. Additional Wounds are dealt to other Survivors. If there is no Survivor left, these additional Wounds are ignored. If different Survivors are in the same Zone, the players share the Wounded cards in any way they prefer. Cooperation also means sharing the pain and suffering!
EXAMPLE: A Walker in a Zone with two Survivors inflicts one wound during its activation. The players choose which Survivor receives the Wounded card and loses Equipment. They can decide, for example, to give it to a Survivor who is holding no equipment. They can also decide to give it to a Survivor who’s already wounded and put him out of his misery!
Feeding frenzy! Zombies fight in groups. All Zombies activated in the same Zone as a Survivor join the Attack, even if there are so many that it would be overkill.
EXAMPLE: A group of seven Walkers is in the same Zone as two Survivors. The first four Walkers are enough to kill the hapless victims, but all seven spend their Action attacking. Chow time!
Move
The Zombies that have not attacked use their Action to move one Zone toward their target, according to the following parameters:
- If they can see a Survivor, they move toward him.
- If they can see Survivors in different Zones, they move toward the noisiest visible group, regardless of the distance (REMEMBER: Each Survivor counts as a Noise token).
- If they can’t see anybody, they move toward the Zone that contains the most Noise tokens.
- If they can’t see anybody and there are no open paths to the Survivors, they move toward the noisiest Zone as if all doors were open, though locked doors still stop them.
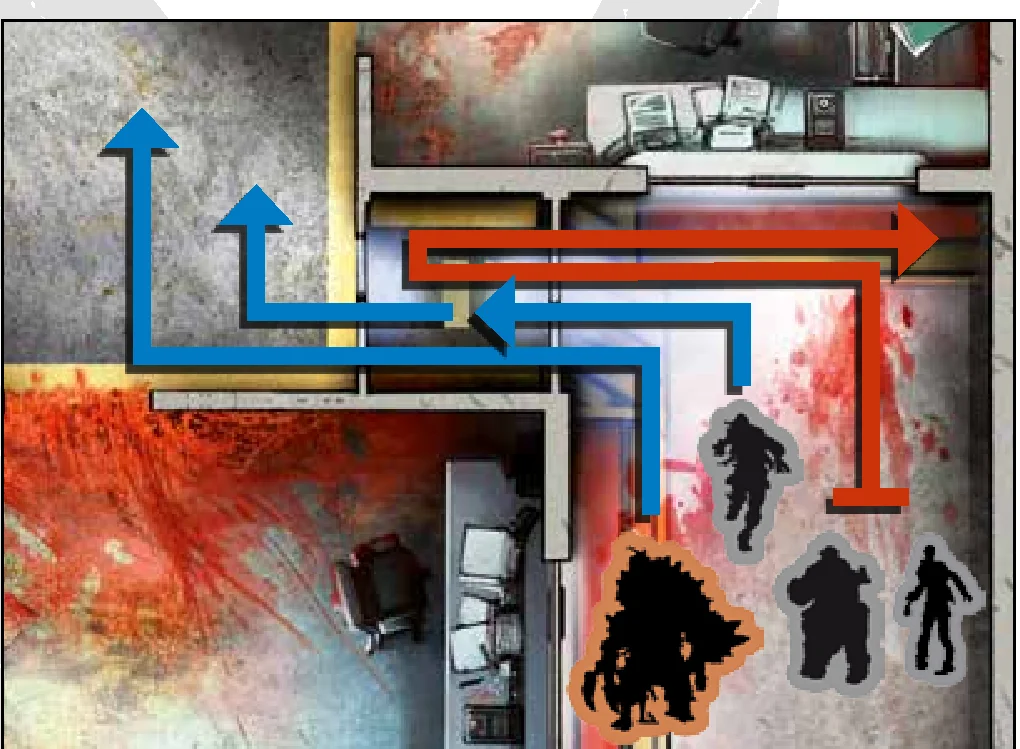
Zombies always take the shortest possible route to their target Zone. If there is more than one route of the same length, the Zombies split into groups of equal numbers to follow all possible routes. They also split up if different target Zones contain the same number of Noise tokens. If necessary, add Zombies so that all new groups resulting from a splitting group contain the same number of each Zombie type!
Splitting special cases:
- Abominations never split; the players decide which direction they go.
- If there aren’t enough Zombies for a split, each Zombie of the designated type immediately gains an extra activation.
- Fatties don’t get extra Walker escort when splitting.
EXAMPLE: A group of four Walkers, one Fatty, and three Runners move toward a group of Survivors. The Zombies can take two routes of the same length, so they split into two groups. Two Walkers go one way, the other two take the other route. The Fatty joins one group of Walkers, and a second Fatty is added to the other group (this new Fatty does not come with extra Walkers)! The three Runners also split, two joining the first group, and the other joining the second group. Another Runner is added to the latter group so that the groups remain identical. Things just got a lot harder for the Survivors…
Runners
Runners are an exception in that they have two Actions per turn. After all Zombies (including the Runners) have gone through the Activation step and resolved their first Action, the Runners go through the Activation step again, using their second Action to Attack a Survivor in their Zone or Move if there is nobody to attack.
- EXAMPLE 1: At the beginning of the Zombies’ Phase, a group of three Runners and a Fatty is one Zone away from a Survivor. For their first Action, since they have nobody they can Attack in their Zone, the Zombies Move into the Zone with the Survivor. The Runners then perform their second Action. Since they now occupy the same Zone as a Survivor, they Attack. Each of the Runners inflicts one Wound, killing the Survivor.
- EXAMPLE 2: A Runner is in the same Zone as a Survivor, and a Walker is in the adjacent Zone. The Runner Attacks the Survivor with its first Action, inflicting a Wound, and the Walker Moves into the Zone, since he sees the Survivor. Then the Runner performs its second Action. It attacks the Survivor again, killing him.
- EXAMPLE 3: A Survivor stands in the same Zone as three Walkers, two Fatties, and two Runners. All the Zombies attack and inflict seven Wounds (two Wounds are enough to kill the Survivor; the five remaining Wounds are still applied but without further consequence). None of the Zombies Move, as they all Attacked. Then the Runners resolve their second Action. They have no one to Attack, so they Move one Zone toward the noisiest Zone.
Step 2 – Spawn
The Mission maps show where Zombies appear at the end of each turn. These are the Spawn Zones. Indicate a Spawn Zone and draw a Zombie card. Read the line on the card that corresponds to the color of the Danger Level of the most experienced Survivor still in the game (Blue, Yellow, Orange, or Red). Place the number and type of Zombies shown. Repeat this for each Spawn Zone. Always begin with the same Spawn Zone and continue clockwise.
REMEMBER: Each Fatty has two Walkers as escorts when it spawns but not when you add one to balance a group of Zombies that splits.
When the Zombie deck runs out, reshuffle all the discarded cards to make a new deck.
EXAMPLE: Kim has 5 experience points, placing her in the Blue Danger Level. Watts has 12, which puts him in the Yellow. In order to determine how many Zombies spawn each turn, read the Yellow line, which corresponds to Watts, the most experienced Survivor.
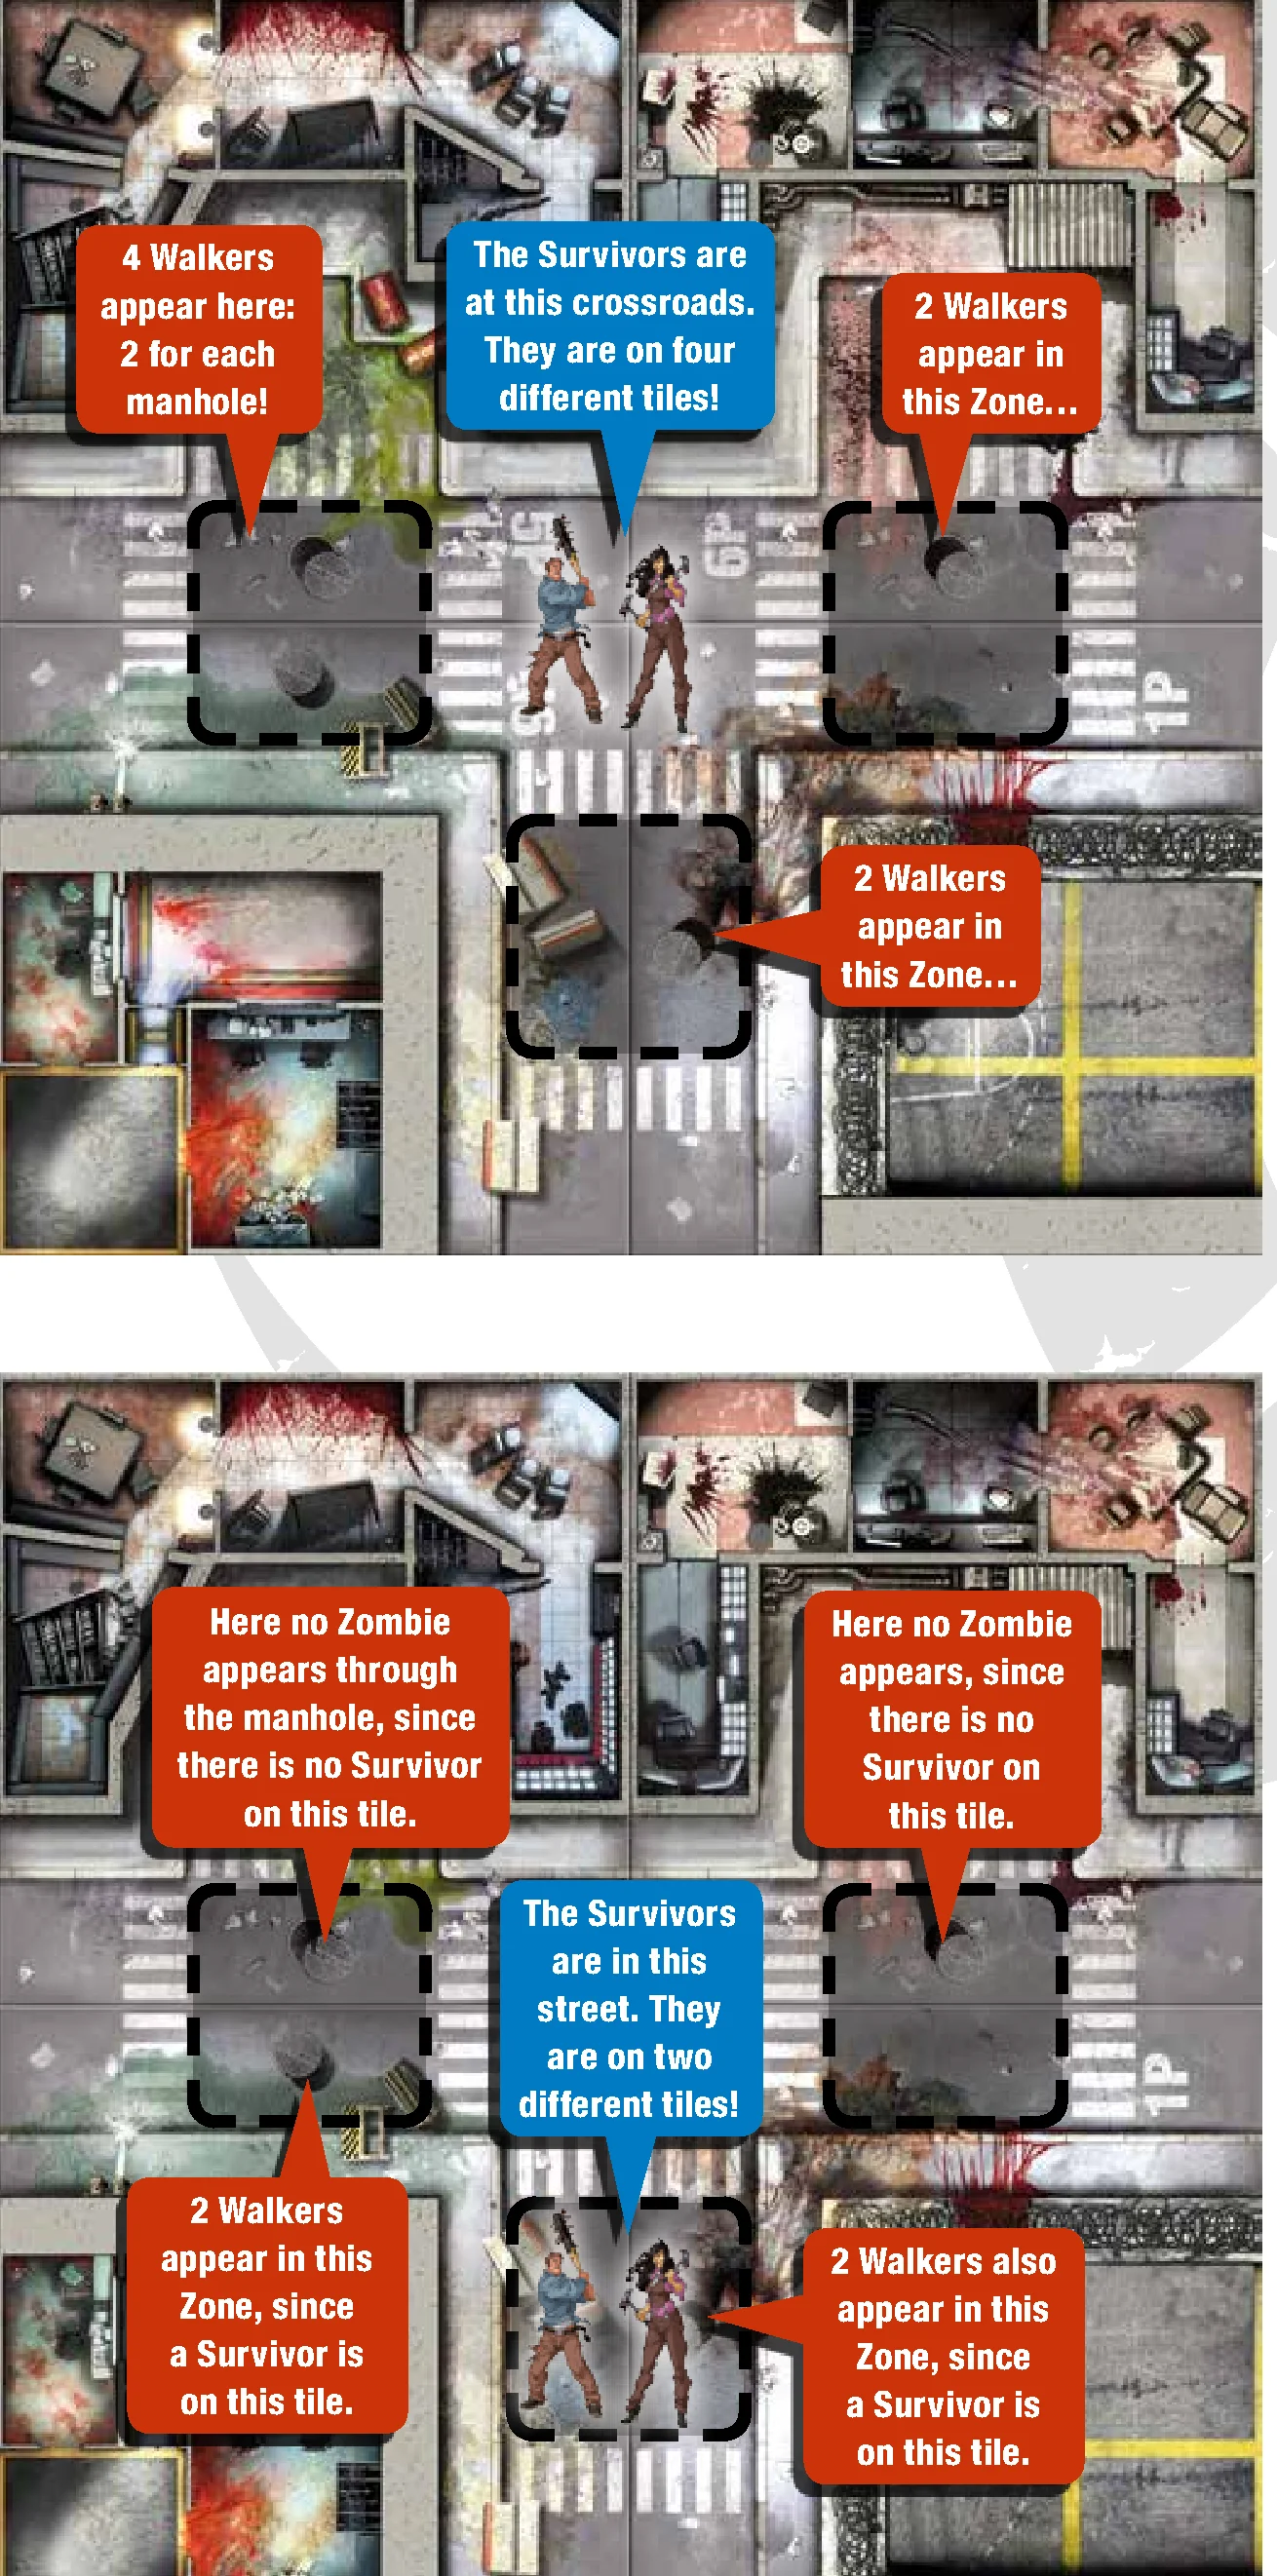
There are two special cases: the Extra Activation card and the Manhole card. In both cases, no Zombies appear in the designated Zone.
- Extra Activation card: When you reveal an Extra Activation card, no Zombies appear in the designated Zone. Instead, all Zombies of the indicated type get another turn. Notice that these cards have no effect at the Blue Danger Level!
- Manhole card: When you draw a Manhole card, no Zombie appears on the designated Zone. Instead, place the indicated number and type of Zombies in every Zone where the map shows a manhole, on every tile where at least one Survivor stands. Manhole invasions never happen on tiles devoid of Survivors.
REMEMBER: The Danger Level used for spawning Zombies is set by the Survivor with the highest Danger Level still in the game. If this Survivor is eliminated, the Danger Level drops to that of the next most experienced Survivor.
Running Out of Miniatures
The Zombicide Season 2: Prison Outbreak box contains enough Zombies to invade a city. However, players may still run out of miniatures of the indicated type when required to place a Zombie on the board (when spawning, populating a building, or due to splitting). In this case, the remaining Zombies are placed (if there are any), and then all Zombies of the requested type immediately gain an extra activation. Multiple activations may occur in a row if (bad) circumstances arise. So, always keep a wary eye on the Zombie population over the board or risk an unexpected zombie riot!
Types of Zombies
There are four types of Zombies:
- Walker: It stinks, it’s nasty, and it’s slow. Eliminating a Walker provides 1 experience point.
- Fatty: Big, bloated, and tough, these Zombies are hard to put down. Weapons dealing only 1 Damage can’t hurt them…at all. You need a 2 Damage weapon (or more) to kill them. Each Fatty spawns with two Walkers alongside it, except when its group is splitting. Killing a Fatty provides 1 experience point.
- Runner: Amped up for some reason, these guys move twice as fast as Walkers. Each Runner has two Actions per activation, while all other Zombies only have one. Eliminating a Runner provides 1 experience point.
- Abomination: Mutated beyond recognition, the Abomination is the Survivors’ worst nightmare. Only weapons dealing 3 Damage or more, like a Concrete Saw, can kill this monster. A well-aimed Molotov will also do the trick, as it kills everything in its target Zone. An Abomination spawns alone (possibly having eaten its Walker fellows). Killing an Abomination provides 5 experience points.
A game can include several Abominations if you have extra miniatures for them. If you need to spawn an Abomination but have no miniatures left, replace it with a Fatty and its two Walkers.
Zombie Species
Zombies also come in various species: Standard, Toxic, and Berserker.
- Standard Zombies have no special rules.
- Toxic Zombies are introduced in the Toxic City Mall expansion. They release Toxic Blood Sprays and have to be eliminated from a distance.
- Berserker Zombies are introduced in Zombicide Season 2: Prison Outbreak.
Berserker Zombies
- Berserker Zombies are immune to Ranged weapon Damage, except for weapons killing everything in their target Zone (such as a Molotov cocktail). Unless otherwise stated, the only way to kill a Berserker Zombie is in Melee Combat.
- Berserker Zombies exist in all types: Fatties, Runners, Walkers, etc. They have the same characteristics and get the same targeting priority as their counterparts, but in Ranged Combat and Car Attacks, a Berserker Zombie of a given type is targeted after the Standard and Toxic Zombie of the same type. Players still choose their targets in Melee Combat.
- Berserker Fatties are spawned with an escort of 2 Berserker Walkers.
- Berserker Zombies do not benefit from the extra activation cards of other Zombie types.
- Car attacks can kill Berserker Zombies.
- The Berserker Abomination has an additional game effect: it moves up to two Zones instead of one.
Berserker Zombies aren’t turned into Toxic Zombies by the Toxic Abomination (see the Toxic City Mall expansion).
EXAMPLE: Watts fires a Shotgun into a Zone where a Walker, a Berserker Walker, a Fatty, and a Runner stand. He scores two hits with his first Ranged Combat Action. The Walker is removed, but the Berserker Walker is immune. Any subsequent shot is useless, as it would be absorbed by the Berserker Walker. So, the Berserker Walker protects both the Fatty and the Runner! Watts rushes into melee with his second Action. With his third Action, he swings his Chainsaw and scores two hits. Melee Combat allows the choosing of targets and the killing of Berserkers: Watts removes the Berserker Walker and the Runner. The Fatty remains for Watts’ team to pick off.
Zombivors
Death and zombie infection can’t turn a real hero into a monster. Your favorite Survivors can make it back to the game as Zombie heroes called Zombivors! When your Survivor is eliminated by Zombies, you can turn him into a Zombivor: flip his Identity Card and savor a bloody revenge.
The Zombivors’ status is indicated with  on the Survivors’ Identity Card. All Survivor rules apply to them.
The killer feature about Zombivors is their incredible endurance: a Zombivor is only eliminated by five Wounded Cards in his Inventory (instead of two for a standard Survivor).
Zombivors are great tanks. There’s a serious drawback, though: at Yellow Level, Zombivors don’t gain the +1 Action Skill of standard Survivors. They’re tougher but somewhat slower, and thus offer a whole different gaming experience.
Resurrection Mode
Resurrection mode lets you begin the game with your favorite Survivors in their “standard” version and then switch them to their “Zombivor” version when things go awry. Experienced players may begin the game directly with Zombivors instead of standard Survivors.
- When any standard Survivor gets his second Wound, lay down his miniature. Getting killed by a team member doesn’t grant a resurrection.
- A standard Survivor can’t receive more than two Wounds. If he receives more Wounds than needed to kill him, distribute these Wounds to other Survivors, or ignore them if nobody can take them.
- Ignore the downed Survivor for all game effects until his resurrection, as if he was removed from the board.
- At the beginning of any following Players’ turn, before the first player acts, resurrect the Survivor:
- Discard all of his Wounded cards.
- Replace his downed miniature with his standing Zombivor miniature.
- Flip his Survivor Identity Card to its Zombivor version side.
- The new Zombivor immediately gains any remaining Equipment cards his standard version had (inventory reorganized for free) and as many experience points as the standard version had (choosing new Skills is allowed).
- Ongoing game effects previously applied to the standard version no longer apply. Unless for Resurrection (or stated otherwise), all rules affect Zombivors the same way they do Survivors.
Prison Locations
Alleys
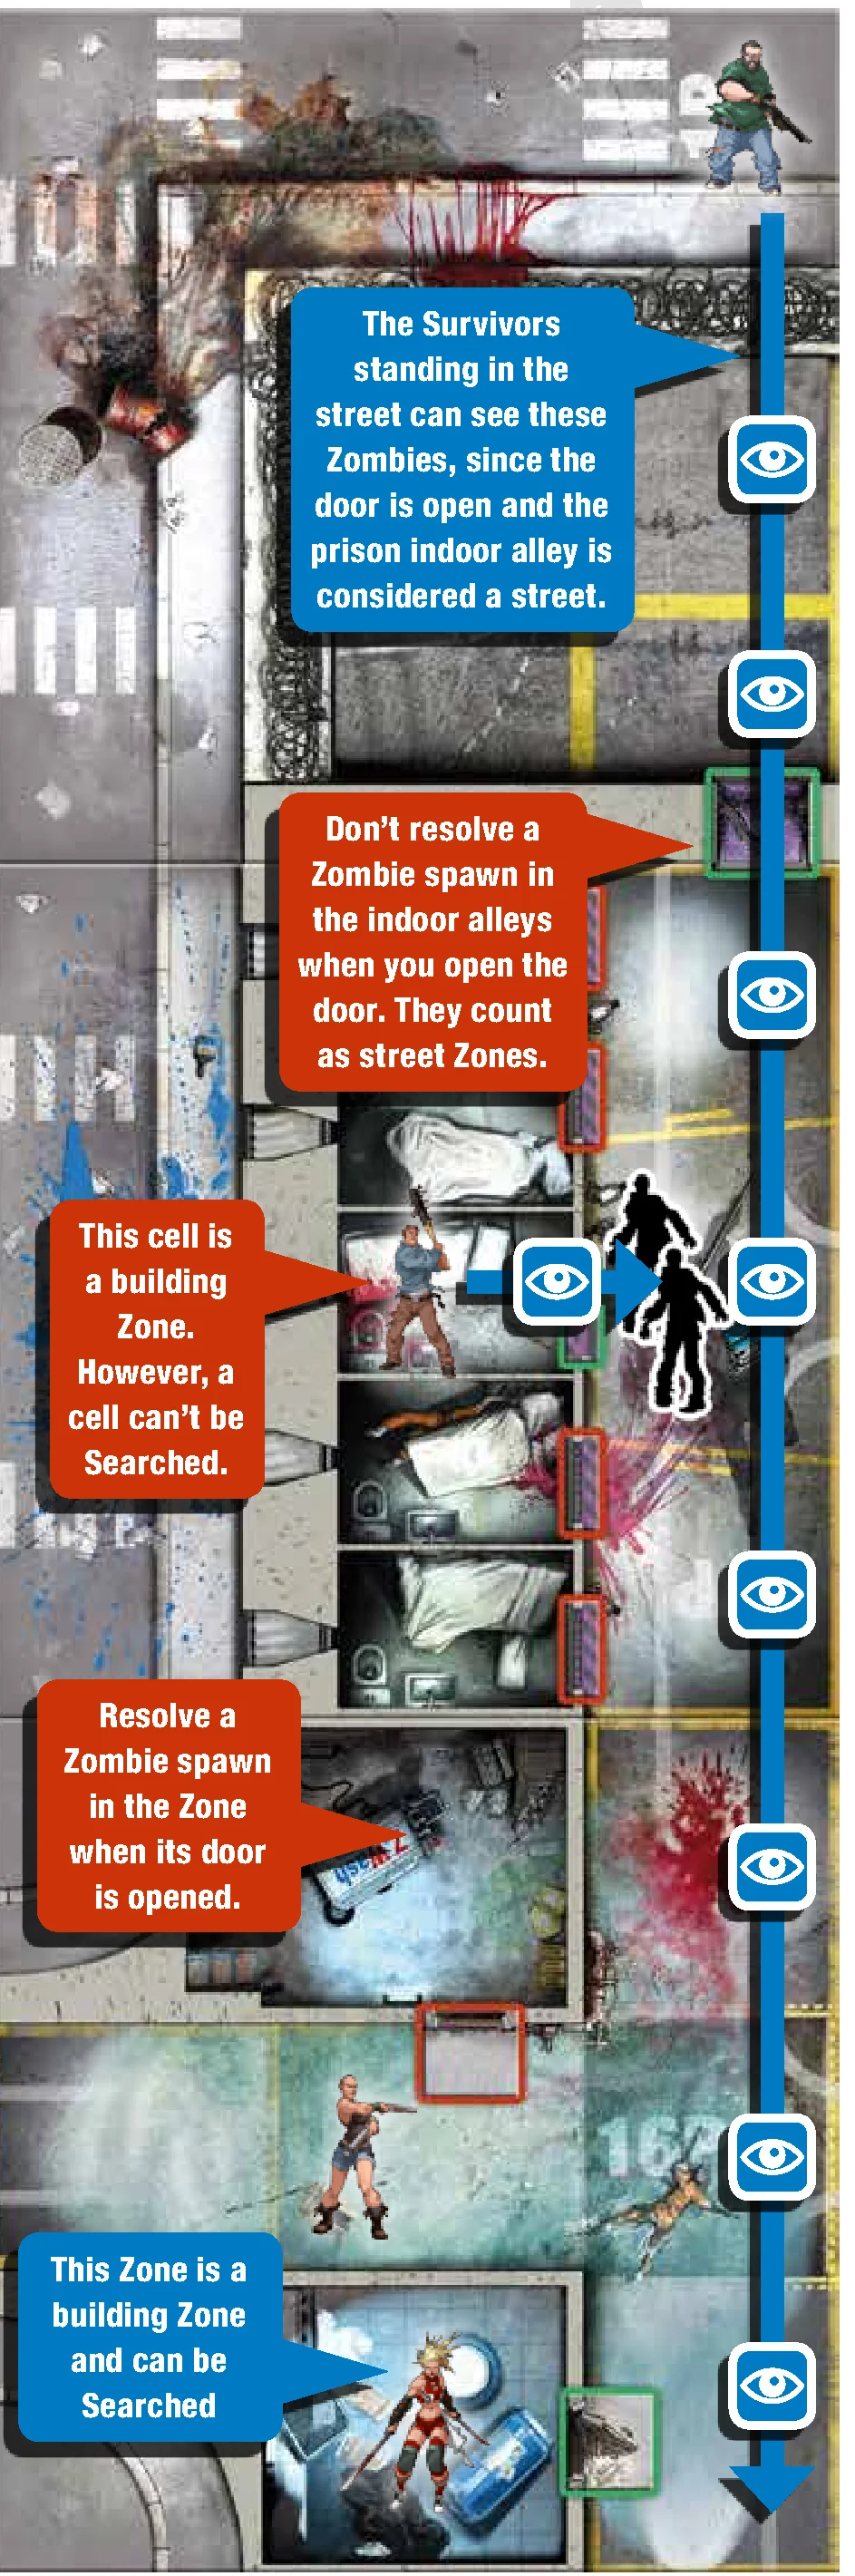
The prison tiles feature indoor alleys. Indoor alleys count as street Zones for all purposes. Cars can be driven inside the indoor alleys, as long as they got in by an opened double door. Yes, cars can get in the prison!
- 1- Lines of sight: Lines of sight cover as many Zones as the line can go through before reaching a wall or the edge of the board.
- 2- Search: You can’t Search in an indoor alley.
Cells
Cells are separated by walls. This influences:
- 1- Movement: You can only enter a cell through an opened door.
- 2- Lines of sight: Cells are building Zones.
- 3- Search: Cells can’t be Searched.
- 4- Zombie spawning: Opening a cell’s door generates a Zombie spawn in the cell. The same happens if the cell door is opened (or missing) when the route to the alley is opened. Locking down a cell then opening it again doesn’t generate a Zombie spawn.
Barbwire Fences
- 1- Barbwire fences can’t be crossed but don’t block line of sight. They can be shot through.
- 2- Barbwire fences have a special effect on Zombie movement. Zombies still follow the shortest route to the noisiest Zone or visible Survivor, as if there was no barbwire fence. They pile up at the barbwire fence until a shorter path is defined or the fence is destroyed.
- 3- Abominations are strong enough to ignore a barbwire fence and can move through it, destroying it in the process. If an Abomination has to go through a barbwire fence, first put a “torn barbwire” token to link its starting and destination Zones. Survivors and Zombies can now cross the Zones. Then proceed with moving all Zombies (as the Zombies’ route may be redefined by the fence’s destruction).
Observation Towers / Extra Zones
Observation Towers
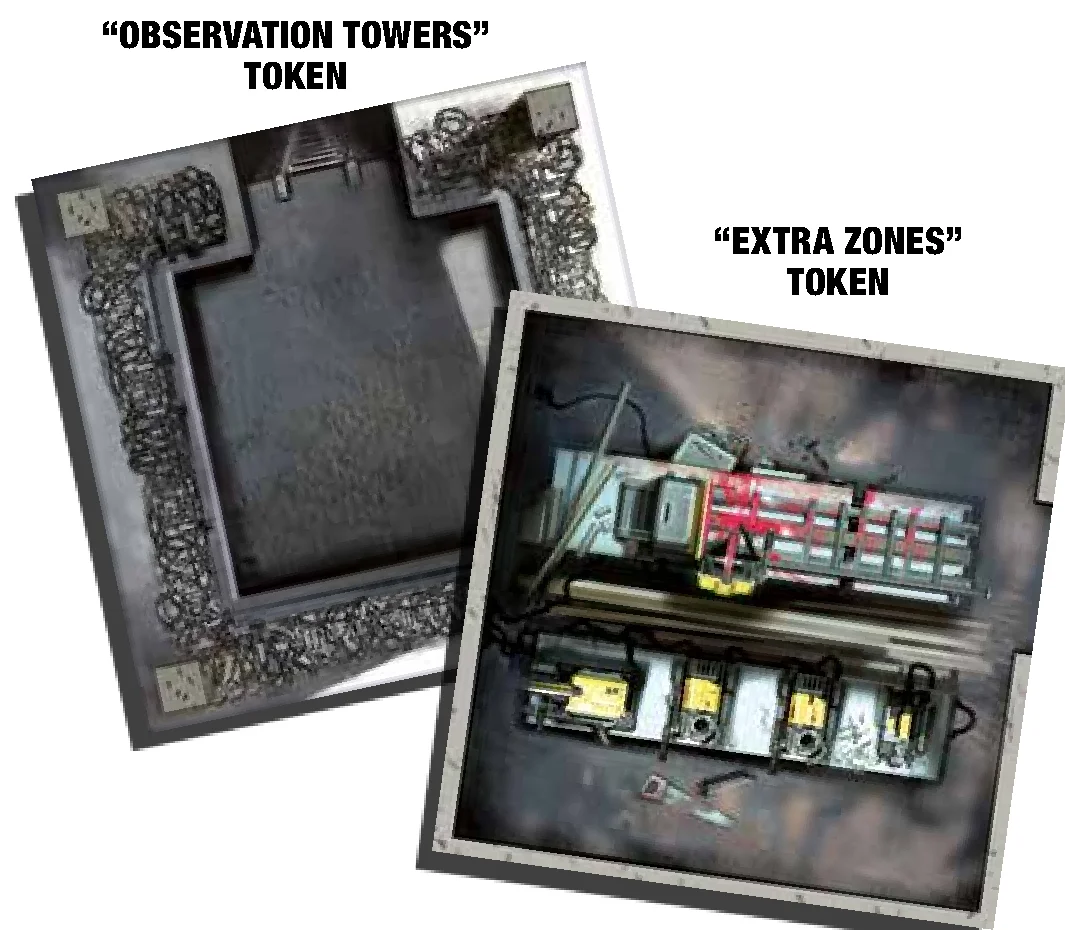
Observation tower tokens allow Survivors to climb out of reach of common Zombies and cull the infected numbers by shooting in all directions. Beware, though, not to get surrounded!
- 1- Observation towers can only be accessed by ladders. Using a ladder is done in the same way as crossing an open door. A Zombie can never get in or spawn in an observation tower.
- 2- Observation tower Zones can be shot at normally. They don’t have walls.
- 3- Survivors gain the +1 max Range Skill as long as they stand in an Observation tower.
- 4- An observation tower can’t be Searched.
Extra Zones
On the reverse, observation towers feature extra Zones to put anywhere you need: in a larger Zone, at a crossroads, in a courtyard, outside a game board, as a rooftop, or a secret Zone. They share the same rules as building Zones and offer your games greater flexibility.
Rotating Security Gate
The reversible rotating security gate tile allows you to open, change, or block the way with a simple trigger, usually a Switch. Spending an Action to pull the dedicated switch allows the player to activate the rotating security gate and turn it a quarter turn in any direction he wishes.
- Zombies don’t Spawn in a rotating security gate.
- A rotating security gate can’t be Searched.
Security Zones
- 1- Security Zones are building Zones. This has an impact especially on lines of sight.
- 2- The only Action allowed while standing on a security Zone is Moving.
- 3- Survivors and Zombies can’t finish their activation standing in a security Zone. If they do so, they are pushed back to the Zone they just left.
- 4- Zombies don’t Spawn in security Zones.
- 5- Cars can’t cross security Zones.
Car Special Rules
Searching in Cars
You can Search a car as long as the Survivor is in the same Zone and there are no Zombies in the Zone.
Car Substitution
You may want to substitute some cars for others to add flavor to your games, suit your play style, or try older missions again. Note that these substitutions work both ways:
- Police cars can be replaced by taxis.
- Pimpmobiles can be replaced by hippiemobiles or muscle cars.
Police Cars
You can Search police cars more than once per game. Draw cards until you find a weapon. Discard the other cards. The Aaahh! card triggers the appearance of a Walker as usual and interrupts the Search.
Pimpmobile
You can Search a pimpmobile only once per game. It contains a Gunblade. Unless the Mission states otherwise, feel free to add any pimpmobile weapon you might own from other Zombicide games or expansions (the Evil Twins, Ma’s Shotgun, Pa’s Pistol, etc.) and draw one of them randomly. Some Missions may contain many pimpmobiles. In this case, only the weapons that have not yet been taken can be inside them. When there are no more…there are no more.
Hippiemobile
- Hippiemobiles can be Searched in the same way as pimpmobiles.
- Ignore car attacks made by hippiemobiles. They are harmless.
Muscle Car
- Muscle cars can’t be Searched.
- Muscle cars can move up to 3 Zones instead of 2 when driven.
Taxi
You can Search taxis more than once per game. They are Searched just like a building Zone but Flashlight cards have no effect. The Aaahh! card triggers the appearance of a Walker as usual and interrupts the Search.
Survivor Skills
Each Survivor in Zombicide Season 2: Prison Outbreak has specific Skills with effects described in this section. In case of conflict with the general rules, the Skill rules have priority. Some of the following Skills are not attributed to the Survivors in this box. They will be used by other Survivors in the future.
The effects of the following Skills and/or bonuses are immediate and may be used the turn in which they are acquired. This means that if one Action causes a Survivor to level up and gain a Skill, that Skill may be used immediately if the Survivor has any Actions remaining (or the Survivor may use any extra Actions the Skill may grant).
- +1 Action: The Survivor has an extra Action he may use as he pleases.
- +1 Damage: [Type]: The Survivor gets a +1 Damage bonus with the specified type of Combat Action (Melee or Ranged).
- +1 Damage with [Equipment]: The Survivor gets a +1 Damage bonus with the specified Equipment.
- +1 to dice roll: Combat: The Survivor adds 1 to the result of each die he rolls on a Combat Action (Melee or Ranged). The maximum result is always 6.
- +1 to dice roll: Melee: The Survivor adds 1 to the result of each die he rolls in Melee Combat. The maximum result is always 6.
- +1 to dice roll: Ranged: The Survivor adds 1 to the result of each die he rolls in Ranged Combat. The maximum result is always 6.
- +1 die: Combat: The Survivor’s weapons roll an extra die in Combat (Melee or Ranged). Dual weapons gain a die each, for a total of +2 dice per Dual Combat Action.
- +1 die: Melee: The Survivor’s Melee weapons rolls an extra die in Combat. Dual Melee weapons gain a die each, for a total of +2 dice per Dual Melee Combat Action.
- +1 die: Ranged: The Survivor’s Ranged weapons roll an extra die in Combat. Dual Ranged weapons gain a die each, for a total of +2 dice per Dual Ranged Combat Action.
- +1 free Combat Action: The Survivor has one free extra Combat Action. This Action may only be used for Melee or Ranged Combat.
- +1 free Melee Action: The Survivor has one extra, free Melee Combat Action. This Action can only be used for Melee Combat.
- +1 free Move Action: The Survivor has one free extra Move Action. This Action may only be used as a Move Action.
- +1 free Ranged Action: The Survivor has one extra, free Ranged Combat Action. This Action can only be used for Ranged Combat.
- +1 free Search Action: The Survivor has one free extra Search Action. This Action may only be used to Search, and the Survivor can still only Search once per turn.
- +1 max Range: The Survivor’s Ranged weapons’ maximum Range is increased by 1.
- +1 Zone per Move: The Survivor can move through one extra Zone each time he performs a Move Action. This Skill stacks with other effects benefitting Move Actions.
- 1 re-roll per turn: Once per turn, you can re-roll all the dice related to the resolution of an Action made by the Survivor. The new result takes the place of the previous one. This Skill stacks with the effects of Equipment that allow re-rolls.
- 2 cocktails are better than 1: The Survivor gets two Molotov cards instead of one when he creates a Molotov.
- 2 Zones per Move Action: When the Survivor spends one Action to Move, he can move one or two Zones instead of one.
- Ambidextrous: The Survivor treats all Melee and Ranged weapons as if they had the Dual symbol.
- Blitz: Each time your Survivor kills the last Zombie of a Zone, he gets 1 free Move Action to use immediately.
- Bloodlust: Combat: Spend one Action with the Survivor: He moves up to two Zones to a Zone containing at least one Zombie. He then benefits of a free Combat Action.
- Bloodlust: Melee: Spend one Action with the Survivor: He moves up to two Zones to a Zone containing at least one Zombie. He then benefits of a free Melee Action.
- Bloodlust: Ranged: Spend one Action with the Survivor: He moves up to two Zones to a Zone containing at least one Zombie. He then benefits of a free Ranged Action.
- Born leader: During the Survivor’s turn, he may give one free Action to another Survivor, to use as he pleases. This Action must be used during the recipient’s next turn or it is lost.
- Break-in: The Survivor doesn’t need any Equipment to open doors. He doesn’t make Noise while using this Skill. However, other prerequisites are still mandatory (such as taking a designated Objective). Moreover, the Survivor has one extra, free Door opening Action. This Action can only be used to open doors. Please note the Break-in Skill doesn’t apply to removing barricades (see Toxic City Mall).
- Can start at [Danger Level]: The Survivor can begin the game at the indicated Danger Level (first experience point of the indicated Danger Level). All players have to agree.
- Collector: [Zombie type]: The Survivor doubles the experience gained each time he kills a Zombie of the specified type.
- Death grasp: Don’t discard an Equipment card when the Survivor receives a Wounded card. This Skill is ignored if there’s no space left in the Inventory to receive the Wounded card.
- Destiny: The Survivor can use this Skill once per turn when he reveals an Equipment card he drew. Discard that card and draw another Equipment card.
- Distributor: Using this Skill alters the Spawn step during the Zombies’ Phase. When resolving the Spawn step during the Zombies’ Phase, draw as many Zombie cards as there are Spawn Zones. Assign each of them freely to a Spawn Zone, then spawn Zombies as indicated.
- Dreadnought: [Zombie type]: The Survivor ignores all Wounds coming from Standard Zombies of the specified type.
- Frenzy: Combat: All weapons the Survivor carries gain +1 die per Wound the Survivor suffers. Dual weapons gain a die each, for a total of +2 dice per Wound and per Dual Combat Action.
- Frenzy: Melee: Melee weapons the Survivor carries gain +1 die per Wound the Survivor suffers. Dual Melee weapons gain a die each, for a total of +2 dice per Wound and per Dual Melee Combat Action.
- Frenzy: Ranged: Ranged weapons the Survivor carries gain +1 die per Wound the Survivor suffers. Dual Ranged weapons gain a die each, for a total of +2 dice per Wound and per Dual Ranged Combat Action.
- Gunslinger: The Survivor treats all Ranged weapons as if they had the Dual symbol.
- Hoard: The Survivor can carry one extra Equipment card in reserve.
- Hold your nose: This Skill can be used once per turn. The Survivor gets a free Search Action in the Zone if he has eliminated a Zombie (even outside a building) the very same turn. This Action may only be used to Search and the Survivor can still only Search once per turn.
- Is that all you’ve got?: You can use this Skill any time the Survivor is about to get Wounded cards. Discard one Equipment card in your Survivor’s inventory for each Wound he’s about to receive. Negate a Wounded card per discarded Equipment card.
- Lifesaver: The Survivor can use this Skill for free, once during each of his turns. Select a Zone containing at least one Zombie at Range 1 from your Survivor. All friendly Survivors in the selected Zone can be dragged to your Survivor’s Zone without penalty. This is not a Movement. A Survivor can decline the rescue and stay in the selected Zone if his controller wants to. Both Zones need to share a clear path: a Survivor can’t cross barricades, fences, or walls. Lifesaver can’t be used by a Survivor in a car or in an observation tower, nor can it be used to drag Survivors out of a car or an observation tower.
- Lock it down: At the cost of one Action, the Survivor can close an open door on his Zone. Opening it again later does not trigger a new Zombie Spawn.
- Loud: Once per turn, the Survivor can make a huge amount of noise! Until this Survivor’s next turn, the Zone he used this Skill in is considered to have the highest number of Noise tokens on the entire map. If different Survivors have this Skill, only the last one who used it applies the effects.
- Low profile: The Survivor can’t be targeted by allied Ranged Attacks and can’t be hit by car attacks. Ignore him when shooting in or driving through the Zone he stands in. Weapons that kill everything in the targeted Zone, like the Molotov, still kill him.
- Lucky: The Survivor can re-roll once all the dice of each Action he takes. The new result takes the place of the previous one. This Skill stacks with the effects of other Skills (“1 re-roll per turn”, for example) and Equipment that allows re-rolls.
- Matching Set!: When a Survivor performs a Search Action and draws a weapon card with the Dual symbol, he can immediately take a second card of the same type from the Equipment deck. Shuffle the deck afterward.
- Medic: Once per turn, the Survivor can freely remove one Wounded card from a Survivor in the same Zone. He may also heal himself.
- Ninja: The Survivor makes no Noise. At all. His miniature does not count as a Noise token, and his use of Equipment or weapons produces no Noise tokens either! The Survivor may choose not to use this Skill at any time, if he wishes to be noisy.
- Point-blank: When firing at Range 0, the Survivor chooses freely the targets of his Ranged Combat Actions and can kill any type of Zombies (including Berserker Zombies). His Ranged weapons still need to inflict enough Damage to kill his targets.
- Reaper: Combat: Use this Skill when assigning hits while resolving a Combat Action. One of these hits can freely kill an additional identical Zombie in the same Zone. Only a single additional Zombie can be killed per Action when using this Skill.
- Reaper: Melee: Use this Skill when assigning hits while resolving a Melee Action. One of these hits can freely kill an additional identical Zombie in the same Zone. Only a single additional Zombie can be killed per Action when using this Skill.
- Reaper: Ranged: Use this Skill when assigning hits while resolving a Ranged Action. One of these hits can freely kill an additional identical Zombie in the same Zone. Only a single additional Zombie can be killed per Action when using this Skill.
- Regeneration: At the end of each game round, discard all Wounds the Survivor received. Regeneration doesn’t work if the Survivor has been eliminated.
- Roll 6: +1 die Combat: You may roll an additional die for each “6” rolled on any attack, Melee or Ranged. Keep on rolling additional dice as long as you keep getting “6”. Game effects that allow re-rolls must be used before rolling any additional dice for this Skill.
- Roll 6: +1 die Melee: You may roll an additional die for each “6” rolled on a Melee attack. Keep on rolling additional dice as long as you keep getting “6”. Game effects that allow re-rolls must be used before rolling any additional dice for this Skill.
- Roll 6: +1 die Ranged: You may roll an additional die for each “6” rolled on a Ranged attack. Keep on rolling additional dice as long as you keep getting “6”. Game effects that allow re-rolls must be used before rolling any additional dice for this Skill.
- Rotten: At the end of his turn, if the Survivor has not taken a Combat Action, driven a car (passengers are not concerned), and has not produced a Noise token, place a Rotten token next to his base. As long as he has this token, he is totally ignored by any and all types of Zombies (except Zombivors) and is not considered a Noise token. Zombies don’t attack him and will even walk past him. The Survivor loses his Rotten token if he takes any Combat Action or makes noise. Even with the Rotten token, the Survivor still has to spend extra Actions to move out of a Zone crowded with Zombies.
- Shove: The Survivor can use this Skill for free, once during each of his turns. Select a Zone at Range 1 from your Survivor. All Zombies standing in your Survivor’s Zone are pushed to the selected Zone. This is not a Movement. Both Zones need to share a clear path: a Zombie can’t cross barricades, fences, or walls. Shove can’t be used by Survivors in a car.
- Slippery: The Survivor does not spend extra Actions when he performs a Move Action through a Zone where there are Zombies.
- Sniper: The Survivor may freely choose the targets of all his Ranged Combat Actions.
- Super strength: Consider the Damage value of Melee weapons used by the Survivor to be 3.
- Starts with a [Equipment]: The Survivor begins the game with the indicated Equipment; its card is automatically assigned to him before the beginning of the game.
- Steady hand: Allied miniatures are ignored when the Survivor uses a Ranged Attack or drives a car through a Zone. The Skill does not apply to a Ranged weapon killing everything in the targeted Zone (such as a Molotov cocktail, for example).
- Swordmaster: The Survivor treats all Melee weapons as if they had the Dual symbol.
- Tactician: The Survivor’s turn can be resolved anytime during the Players’ Phase, before or after any other Survivor’s turn.
- Taunt: The Survivor can use this Skill for free, once during each of his turns. Select a Zone your Survivor can see. All Zombies standing in the selected Zone immediately gain an extra activation: they try to reach the taunting Survivor by all means available. Taunted Zombies ignore all other Survivors: they do not attack them and cross the Zone they stand in if needed to reach the taunting Survivor.
- Tough: The Survivor ignores the first Attack he receives from a single Zombie every Zombies’ Phase.
- Toxic immunity: The Survivor is immune to Toxic Blood Spray (see Toxic City Mall).
- Trick shot: When the Survivor is equipped with Dual Ranged weapons, he can aim at targets in different Zones with each weapon in the same Action.
- Webbing: All equipment in the Survivor’s inventory is considered equipped in hand.
- Zombie link: The Survivor plays an extra turn each time an extra activation card is drawn in the Zombie pile. He plays before the extra-activated Zombies. If several Survivors benefit from this Skill at the same time, the players choose their activation order.
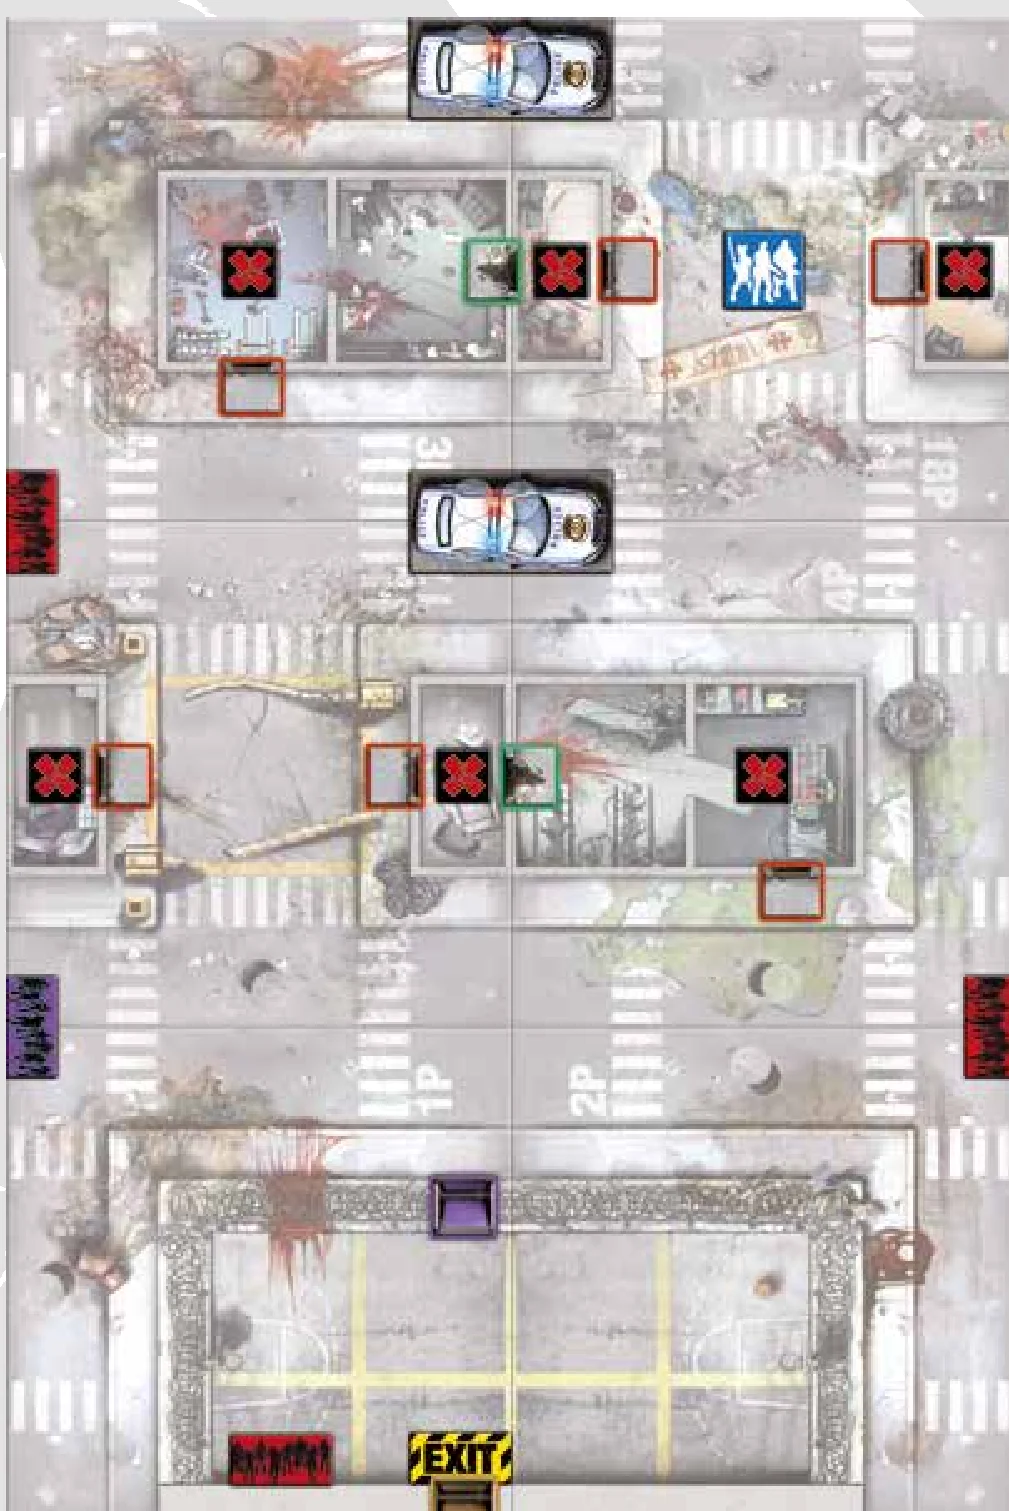
M00 Tutorial: The Break-In
Medium / 6+ Survivors / 90 Minutes
Tiles needed: 1P, 2P, 3P, 4P, 17P & 18P.
Objectives
Follow it in this order:
- Find the violet key. The violet prison main entry door only opens with the violet key, which is in one of the nearby buildings. A red “X” has been set in each room where the key could be. Take the violet Objective. Beware the green Objective, as it wakes an Abomination!
- Enter the prison. Open the neutral prison main entry door and reach the Exit with all Survivors. Any Survivor may escape through this Zone at the end of his turn, as long as there are no Zombies in it.
Special Rules
- Exploring methodically: Each Objective gives 5 experience points to the Survivor who takes it.
- I’ve found something…big: Put the green Objective randomly among the red Objectives, face down. When this Objective is taken, an Abomination immediately appears in the Zone where the token was. If the Abomination is already in the game, replace it with a Fatty and two Walkers.
- Is this the violet key?: Put the violet Objective randomly among the red Objectives, face down. When this token is taken, the violet prison main entry door can be opened.
- Do you know what a silent alarm is?: The violet spawn Zone activates when the violet Objective is taken.
- You can use cars.
- Nice, a police car!: You can Search a police car more than once. Draw cards until you find a weapon. Discard the other cards. The Aaahh! card triggers the appearance of a Walker as usual and interrupts the Search.
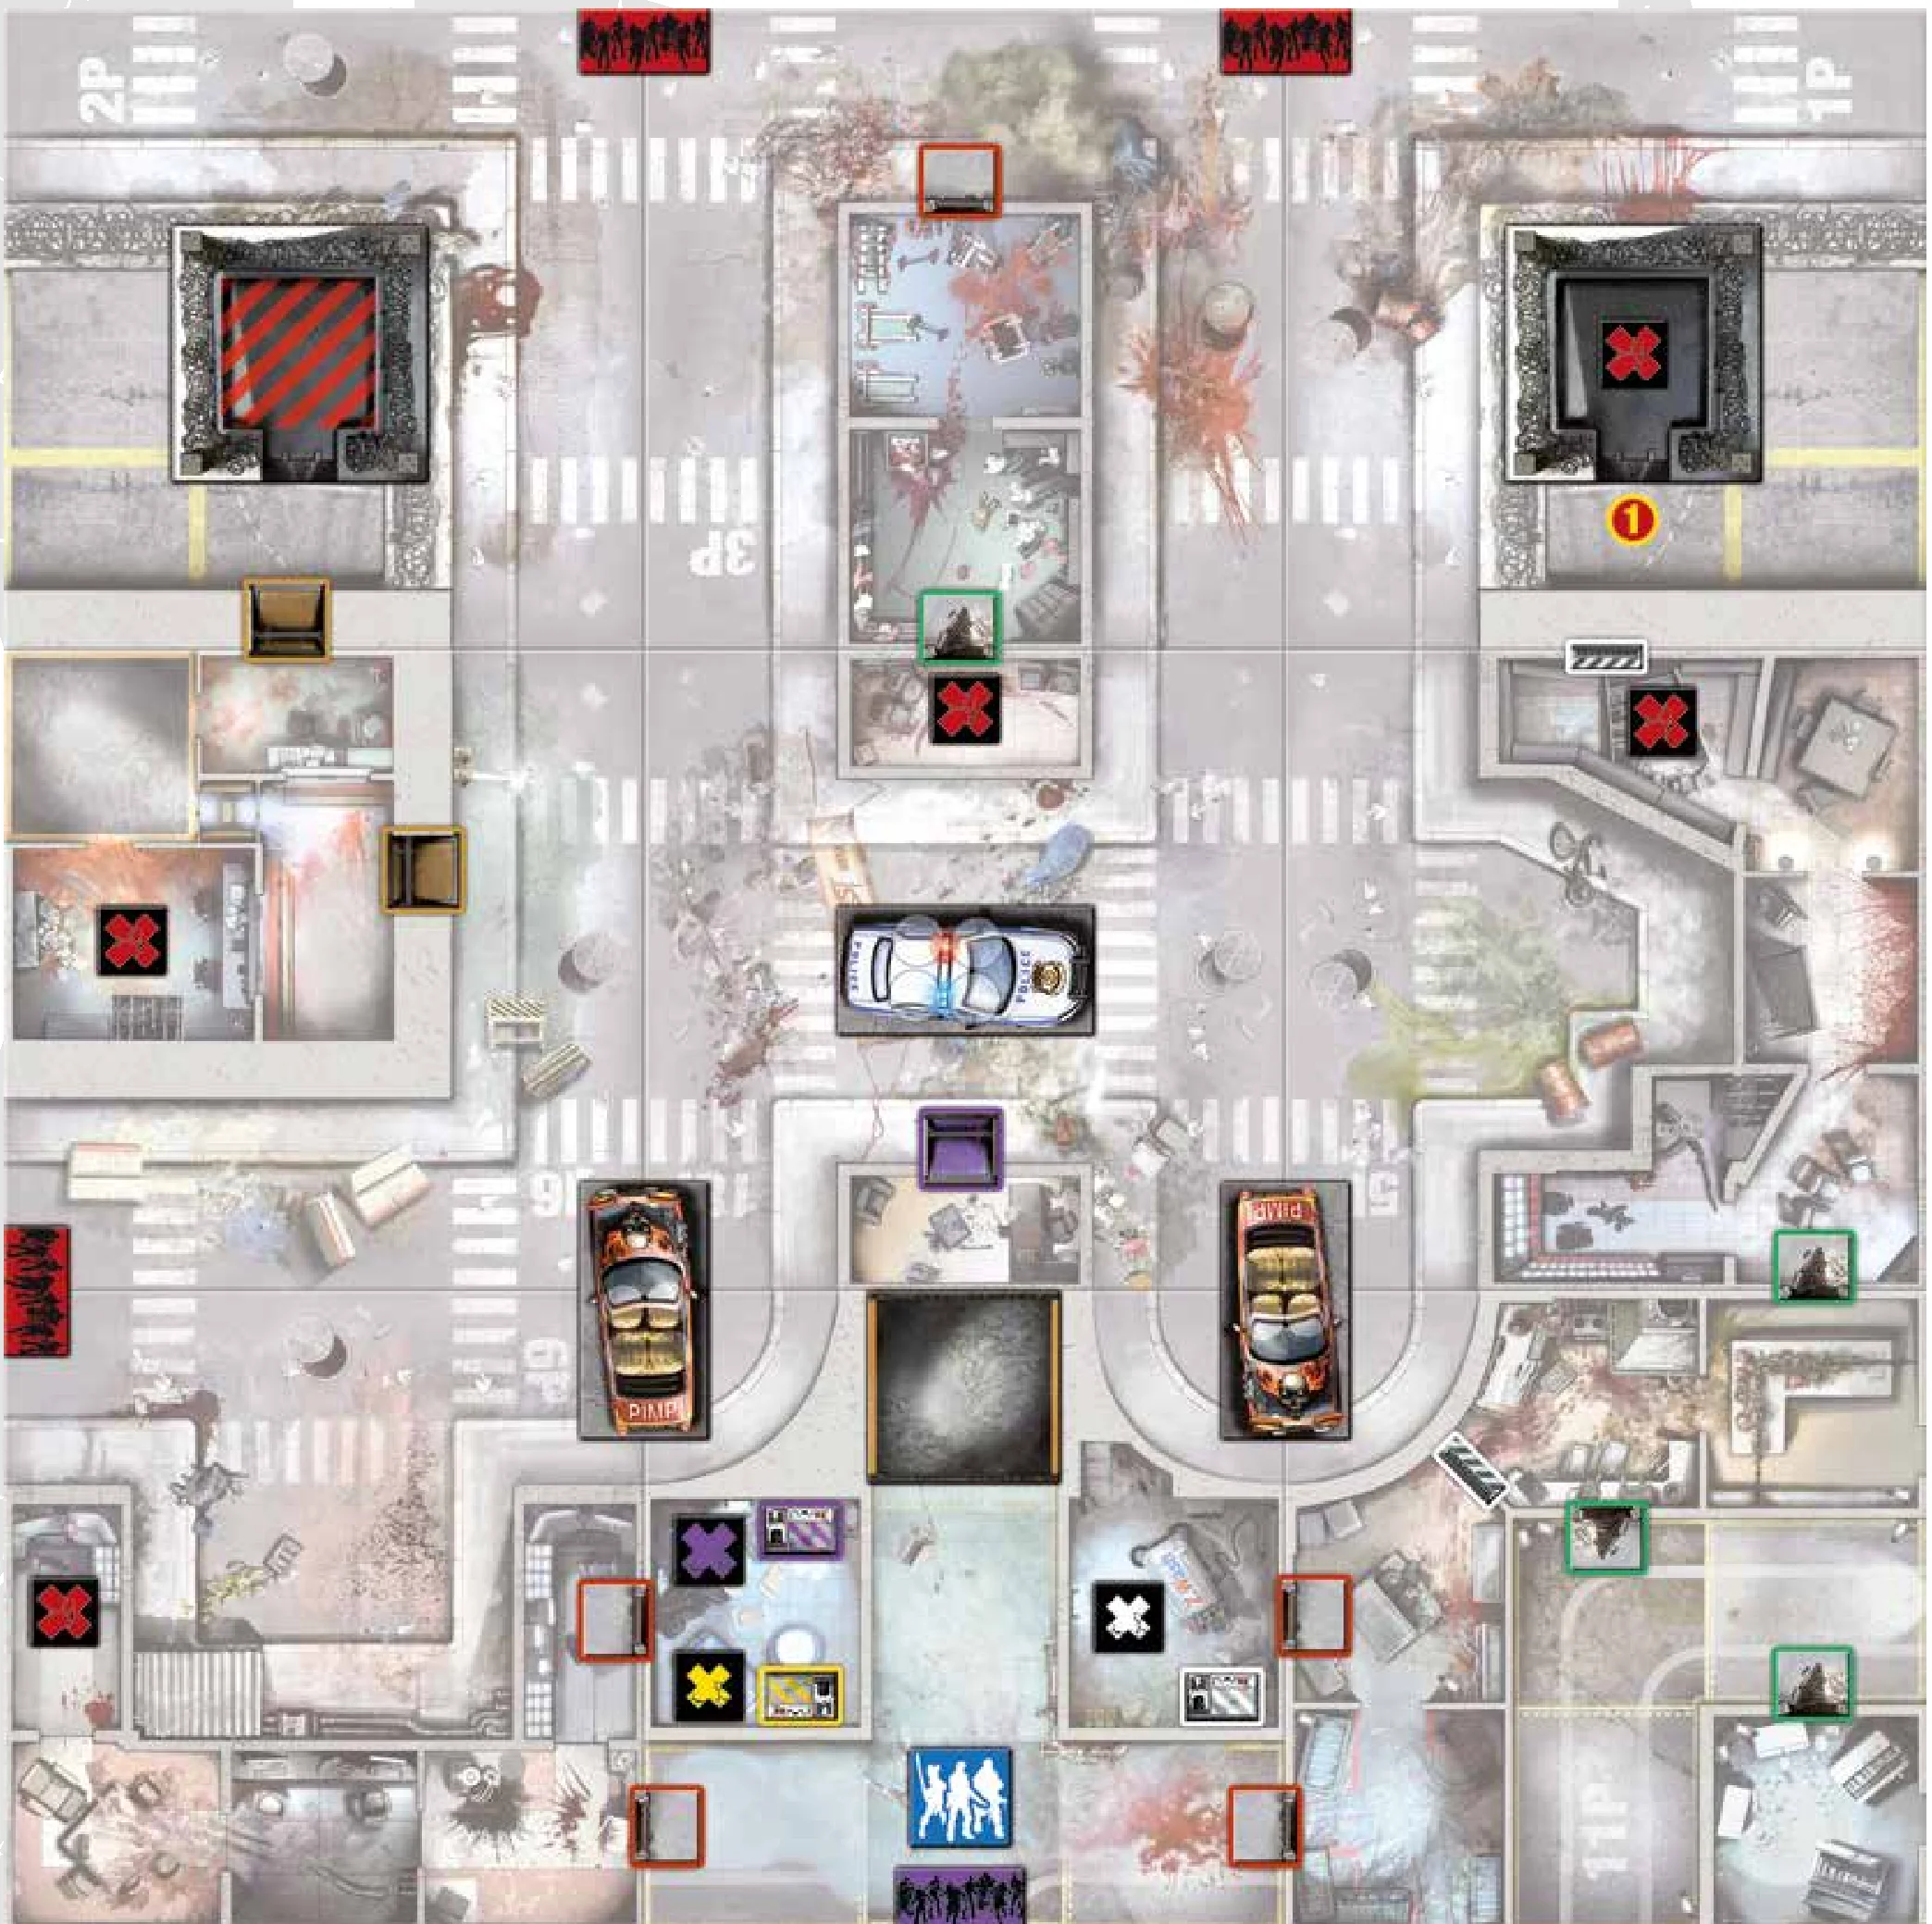
M01 The Blueprints
Hard / 6+ Survivors / 150 Minutes
Tiles needed: 1P, 2P, 3P, 5P, 6P, 9P, 11P, 16P & 18P.
Objectives
- Find the maps, blueprints, and all that can be useful: They are marked on the map with a red “X”. Take all the red Objectives.
- Fall back behind the security gates: Fall back into the prison with the remaining Survivors, then lock the violet gate and the white doors. Kill all Zombies that have entered until the remaining Zombies have no open path to reach the Survivors. At least one Survivor must be inside the prison, in this safe area.
Special Rules
- Exploring methodically: Each Objective gives 5 experience points to the Survivor who takes it.
- Observation stuff: Set one Scope card and one Rifle card in the observation tower shown on the map. A Survivor in this observation tower can use one Action to take both cards.
- The rotating security gate: When the yellow Switch is activated, the rotating security gate rotates a quarter turn to the left or to the right. The Survivor activating the yellow Switch for the first time also takes the yellow Objective and gains 5 experience points.
- The violet Switch: Activating the violet Switch opens the violet door. The Survivor activating the violet Switch for the first time also takes the violet Objective and gains 5 experience points. The violet door closes when the violet Switch is set back to its original setting.
- Uh-oh: The violet Switch also opens another door inside. The violet Spawn Zone activates when the violet Switch is activated. This Spawn Zone ceases to spawn Zombies when the violet Switch is set back to its original setting.
- The white cells have already been explored: Activating the white Switch opens all white cell doors. The Survivor who activates the white Switch for the first time also takes the white Objective and gains 5 experience points. When opened for the first time, spawn Zombies in the whole area, including the little room on the bottom right corner of the map. The white cell doors close when the white Switch is set back to its original setting.
- The berserker guardian: At the beginning of the game, place a Berserker Abomination in the Zone marked on the map.
- You can use cars.
- It’s a pimpmobile!: You can search each pimpmobile only once per game. Each contains a Gunblade.
- Police car!: Searchable more than once for weapons.
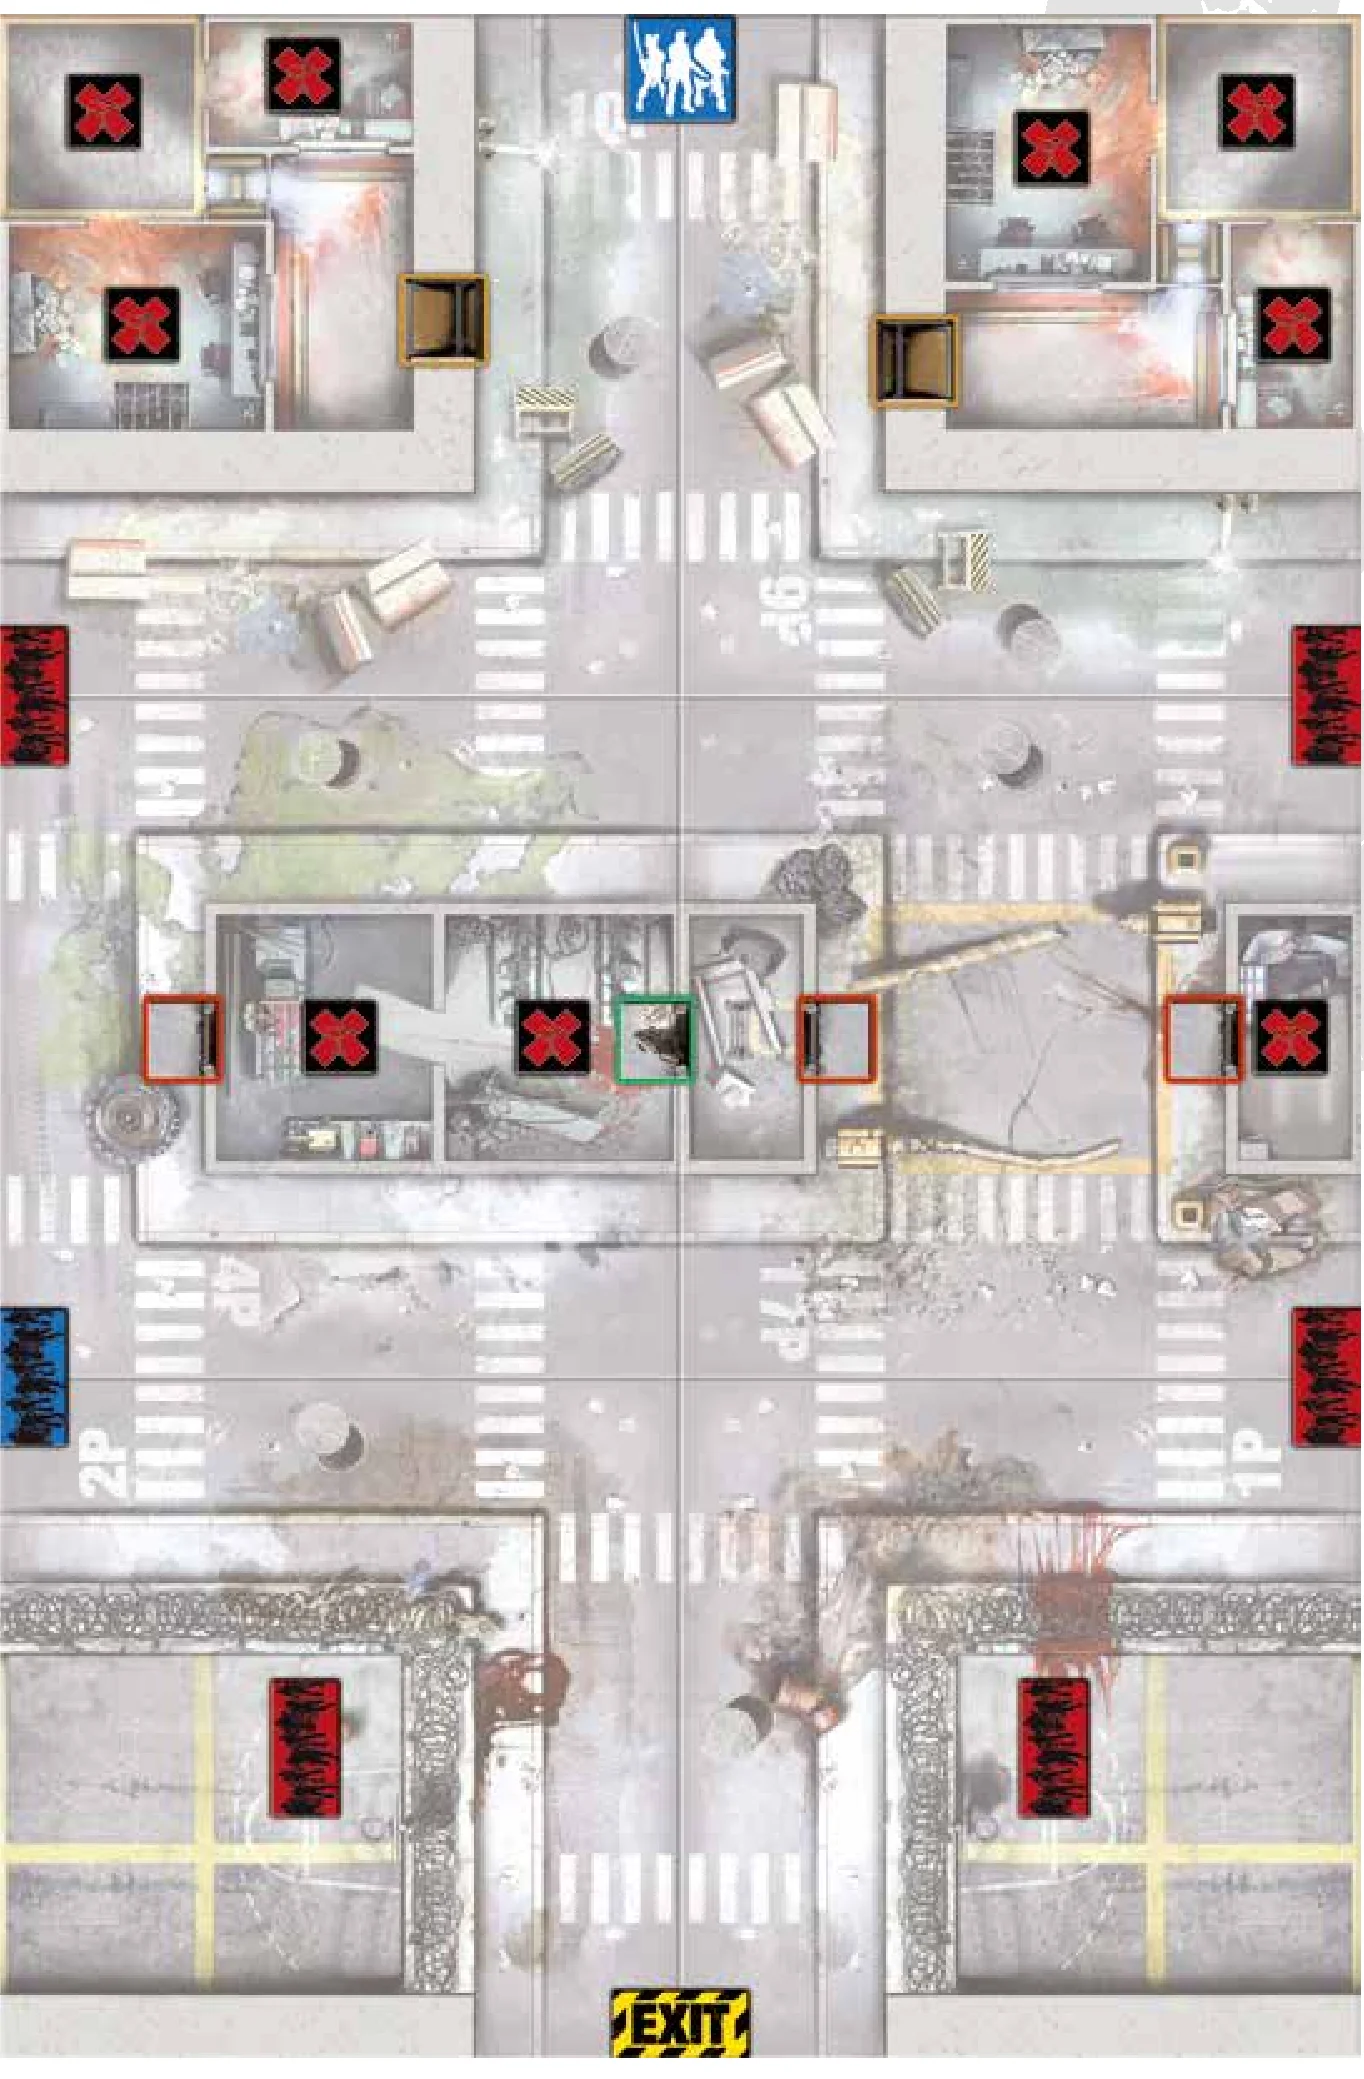
M02 Finding the Keys
Medium / 6+ Survivors / 120 Minutes
Tiles needed: 1P, 2P, 4P, 9P, 10P & 17P.
Objectives
- Find the keys: Prison keys have been stored in the administrative areas. Take all Objectives.
- Continue inside the prison: Reach the Exit Zone with all Survivors. Any Survivor may escape through this Zone at the end of his turn, as long as there are no Zombies in it.
Special Rules
- Finding the keys: Each Objective gives 5 experience points to the Survivor who takes it.
- Bad surprise: Put the green Objective randomly among the red Objectives, face down. The Survivor who takes it gains 5 experience points. When taken, an Abomination immediately appears in the Zone (replace with a Fatty and two Walkers if already in play).
- From bad to worse: Put the blue Objective randomly among the red Objectives, face down. The Survivor who takes it gains 5 experience points. When taken, a Berserker Abomination immediately appears in the Zone (replace with a Berserker Fatty and two Berserker Walkers if already in play).
- Yes it could be even worse: The Zombie blue Spawn Zone activates when the blue Objective is taken.
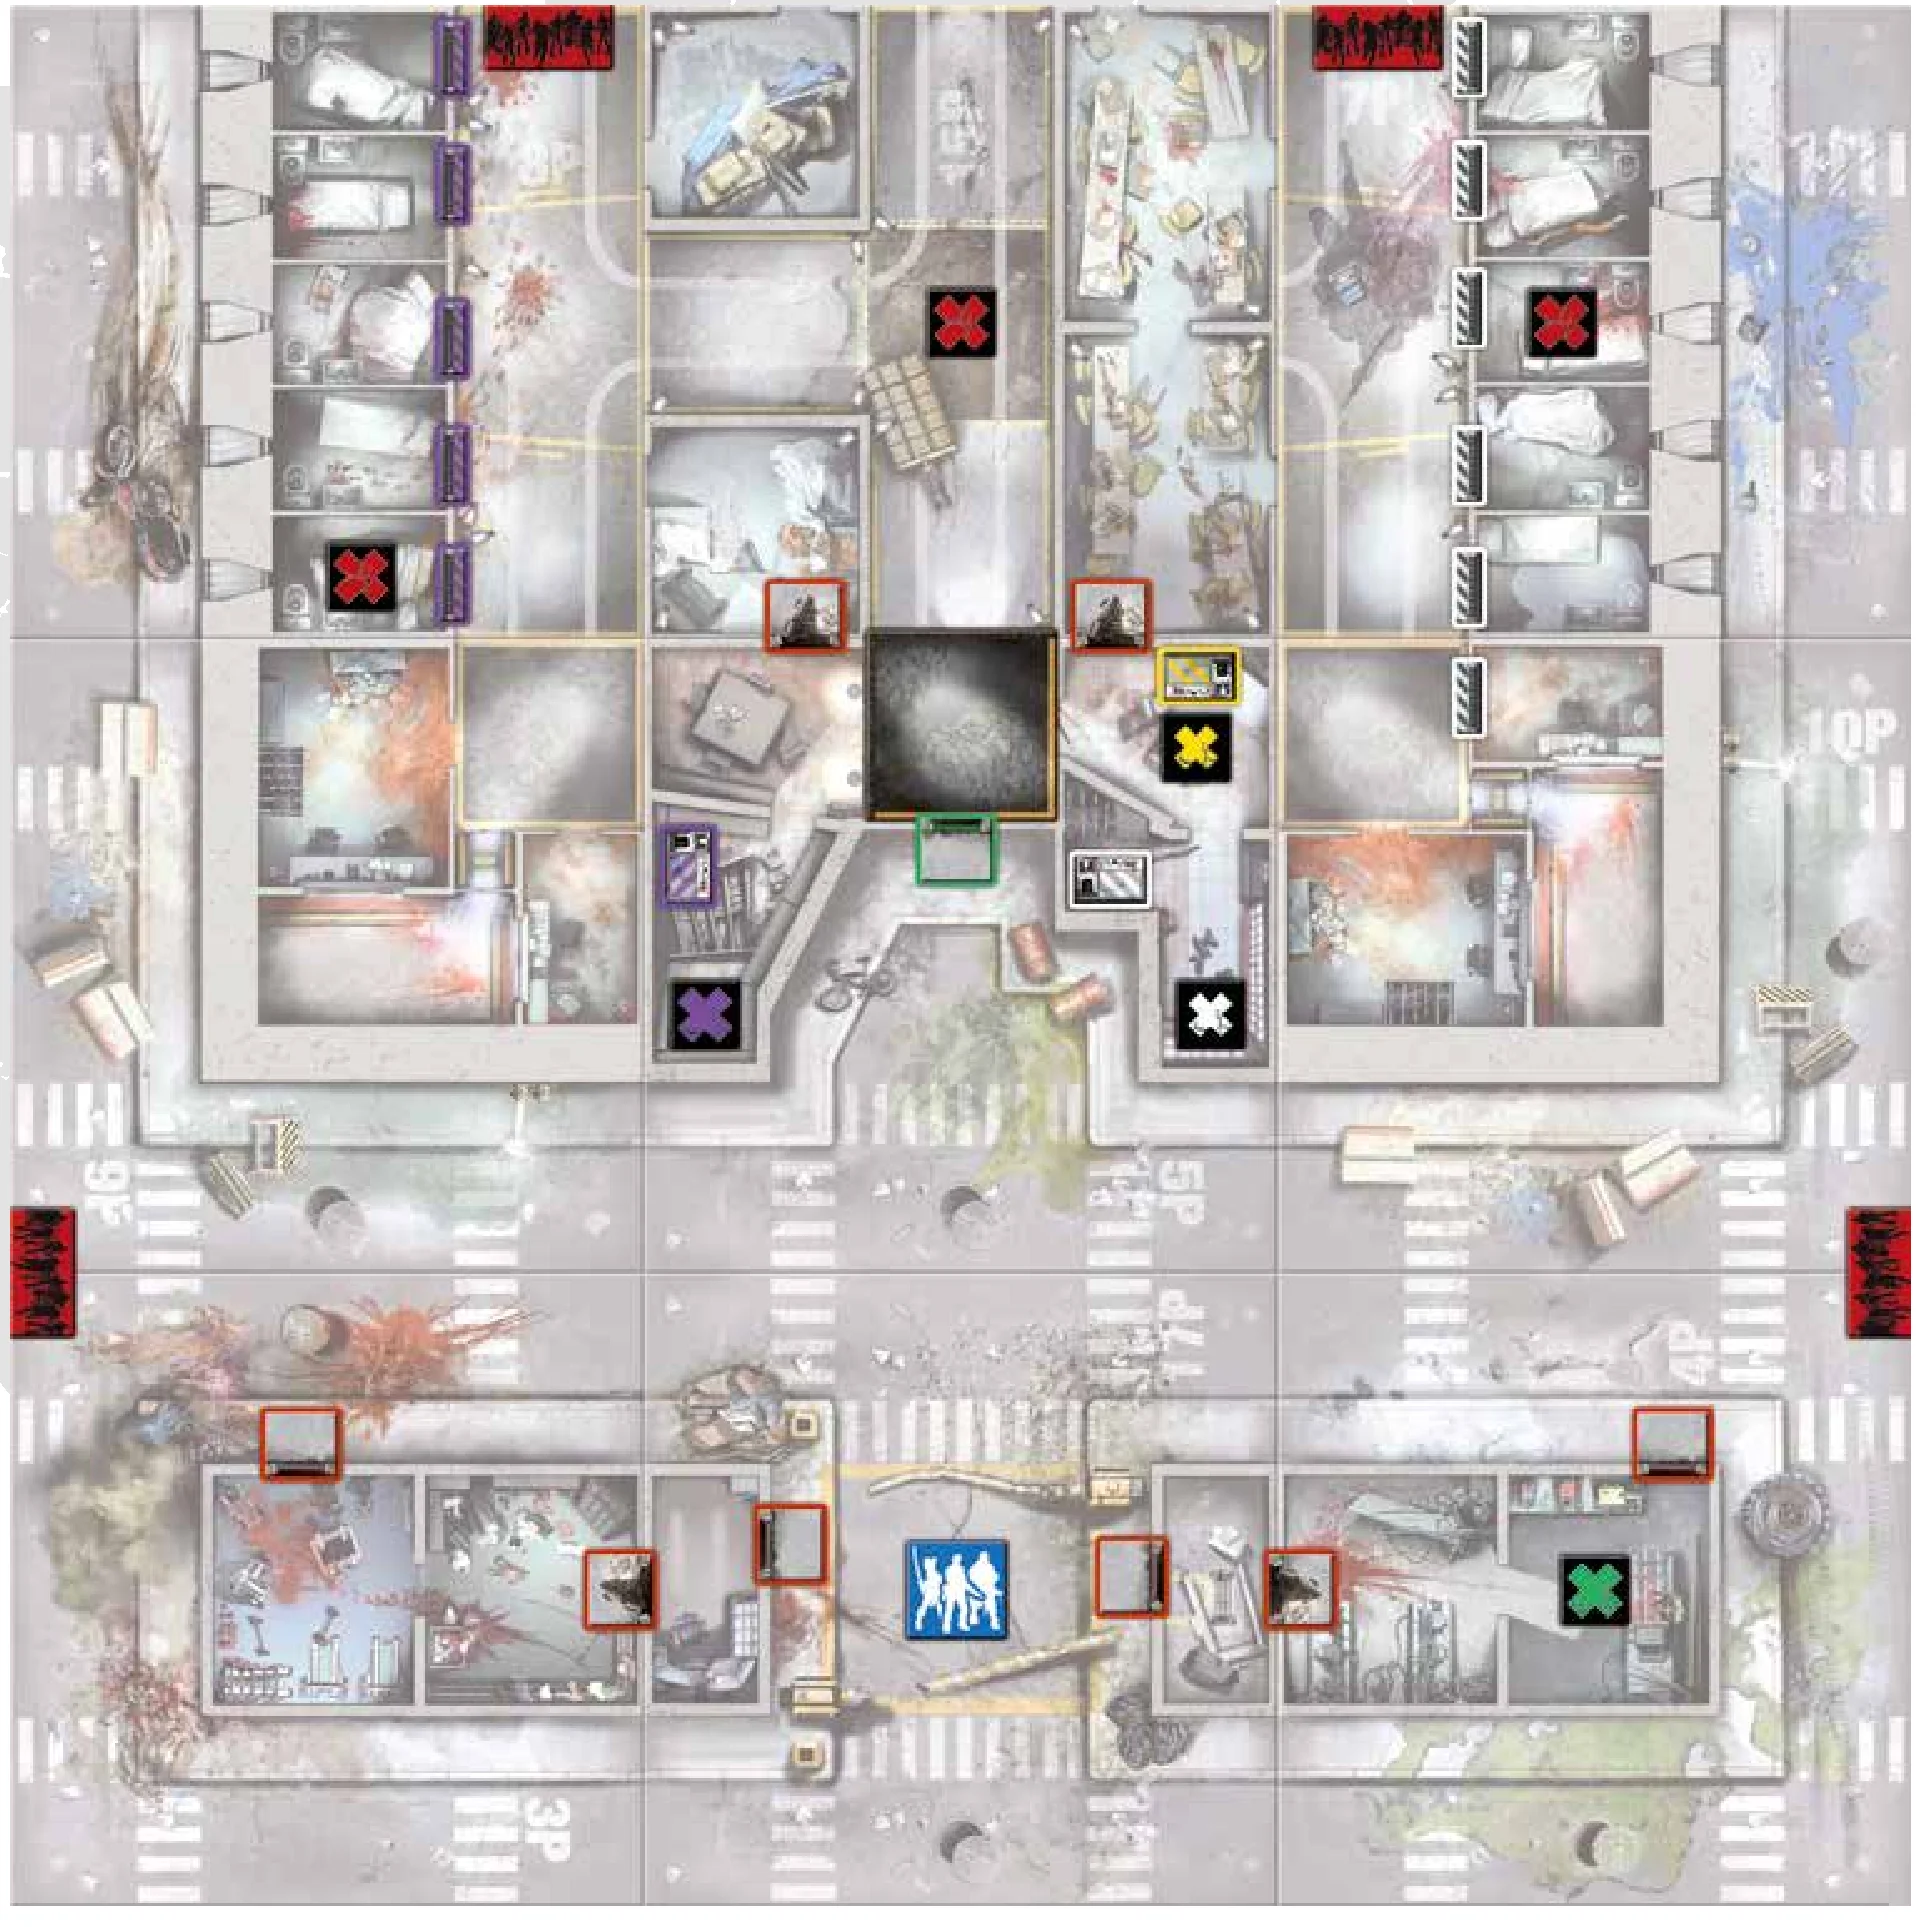
M03 Concrete Saw
Medium / 6+ Survivors / 120 Minutes
Tiles needed: 3P, 4P, 5P, 7P, 8P, 9P, 10P, 15P & 17P.
Objectives
- Get the Concrete saw: See the special rules.
- Open the green door: It can only be opened by a Concrete saw.
- Clean this prison sector: This prison area is divided into three sectors to clean: the central corridor, the white sector, and the violet sector. Take all Objectives inside the prison and clear these three areas from Zombies to win the game.
Special Rules
- Useful stuff!: Each Objective gives 5 experience points to the Survivor who takes it.
- Looking for a Concrete saw: It’s marked on the map with a green “X”. The Survivor who takes the green Objective receives 5 experience points, a Concrete saw, and his inventory can be reorganized for free.
- This door won’t be easy to open: The green door can only be opened by a Concrete saw.
- Violet sector’s cells: Activating the violet Switch opens all violet cell doors. The first Survivor to activate it takes the violet Objective and gains 5 XP. Doors close when set back.
- White sector’s cells: Activating the white Switch opens all white cell doors. The first Survivor to activate it takes the white Objective and gains 5 XP. Doors close when set back.
- The rotating security gate: Activated by the yellow Switch (rotates 90 degrees left or right). The first Survivor to activate it takes the yellow Objective and gains 5 XP.
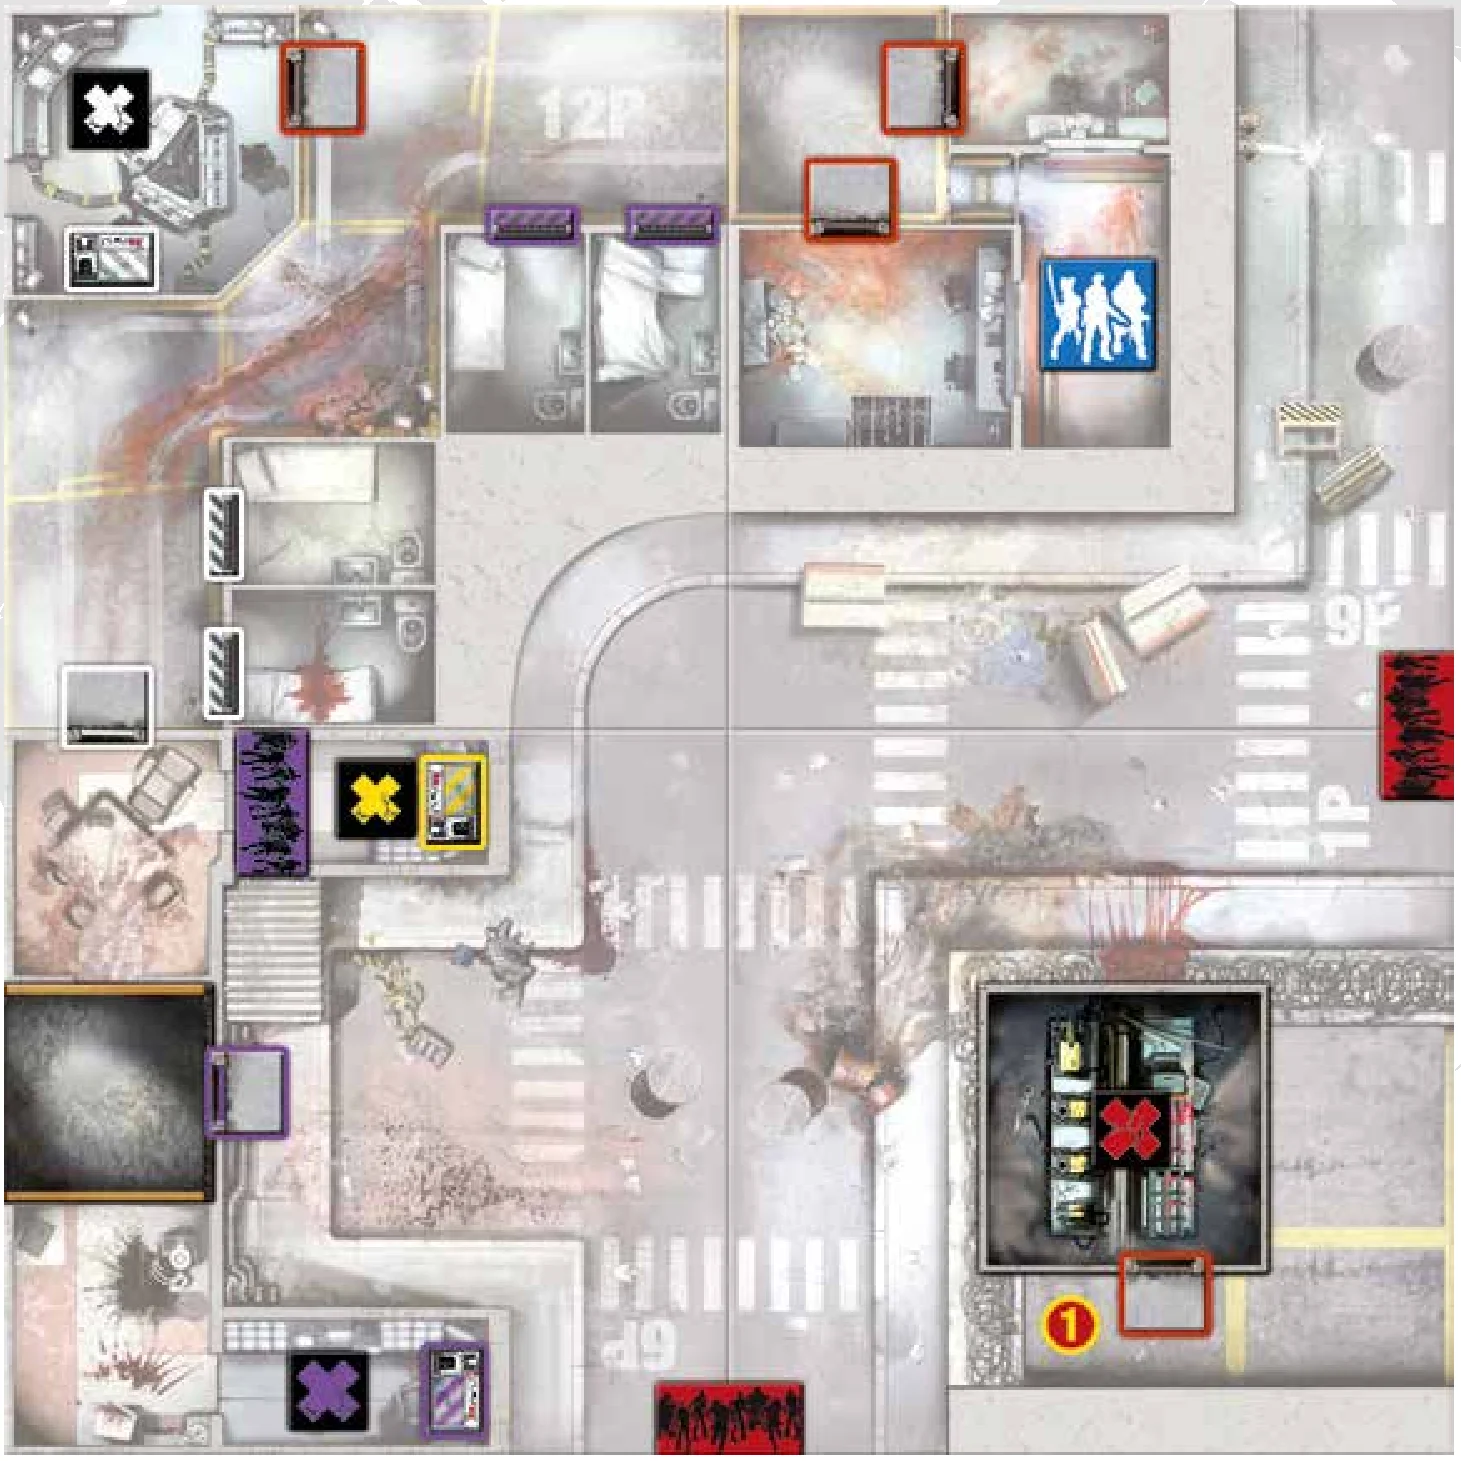
M04 The Welder
Medium / 6+ Survivors / 90 Minutes
Tiles needed: 1P, 6P, 9P & 12P.
Objectives
- Open the violet door: The first obstacle to remove is a security gate. The switch to open it is in the security room.
- Someone must operate the security gate: Someone has to activate the rotating security gate from the inside. Those who turn the yellow Switch will be left alone for some time.
- Find the welder: Take the Objective.
- Go back and close everything: Get all Survivors back into the prison. Then, lock the violet door and the rotating security gate.
Special Rules
- A precious welder: The Objective gives 5 experience points to the Survivor who takes it.
- The violet Switch: Activating opens all violet cell doors and the violet door. First activation grants the violet Objective (5 XP). Closes when set back.
- The white Switch: Activating opens all white cell doors and the white door. First activation grants the white Objective (5 XP). Closes when set back.
- Where do they come from?: The Zombie violet Spawn Zone activates when the violet Switch is activated. Setting it back shuts down this spawn zone.
- The yellow Switch for the rotating security gate: Rotates gate a quarter turn. First activation grants the yellow Objective (5 XP).
- Ex-owner of the welder: At the beginning of the game, place an Abomination in the Zone marked on the map. It will go through the barbwire and open a way to the welder.
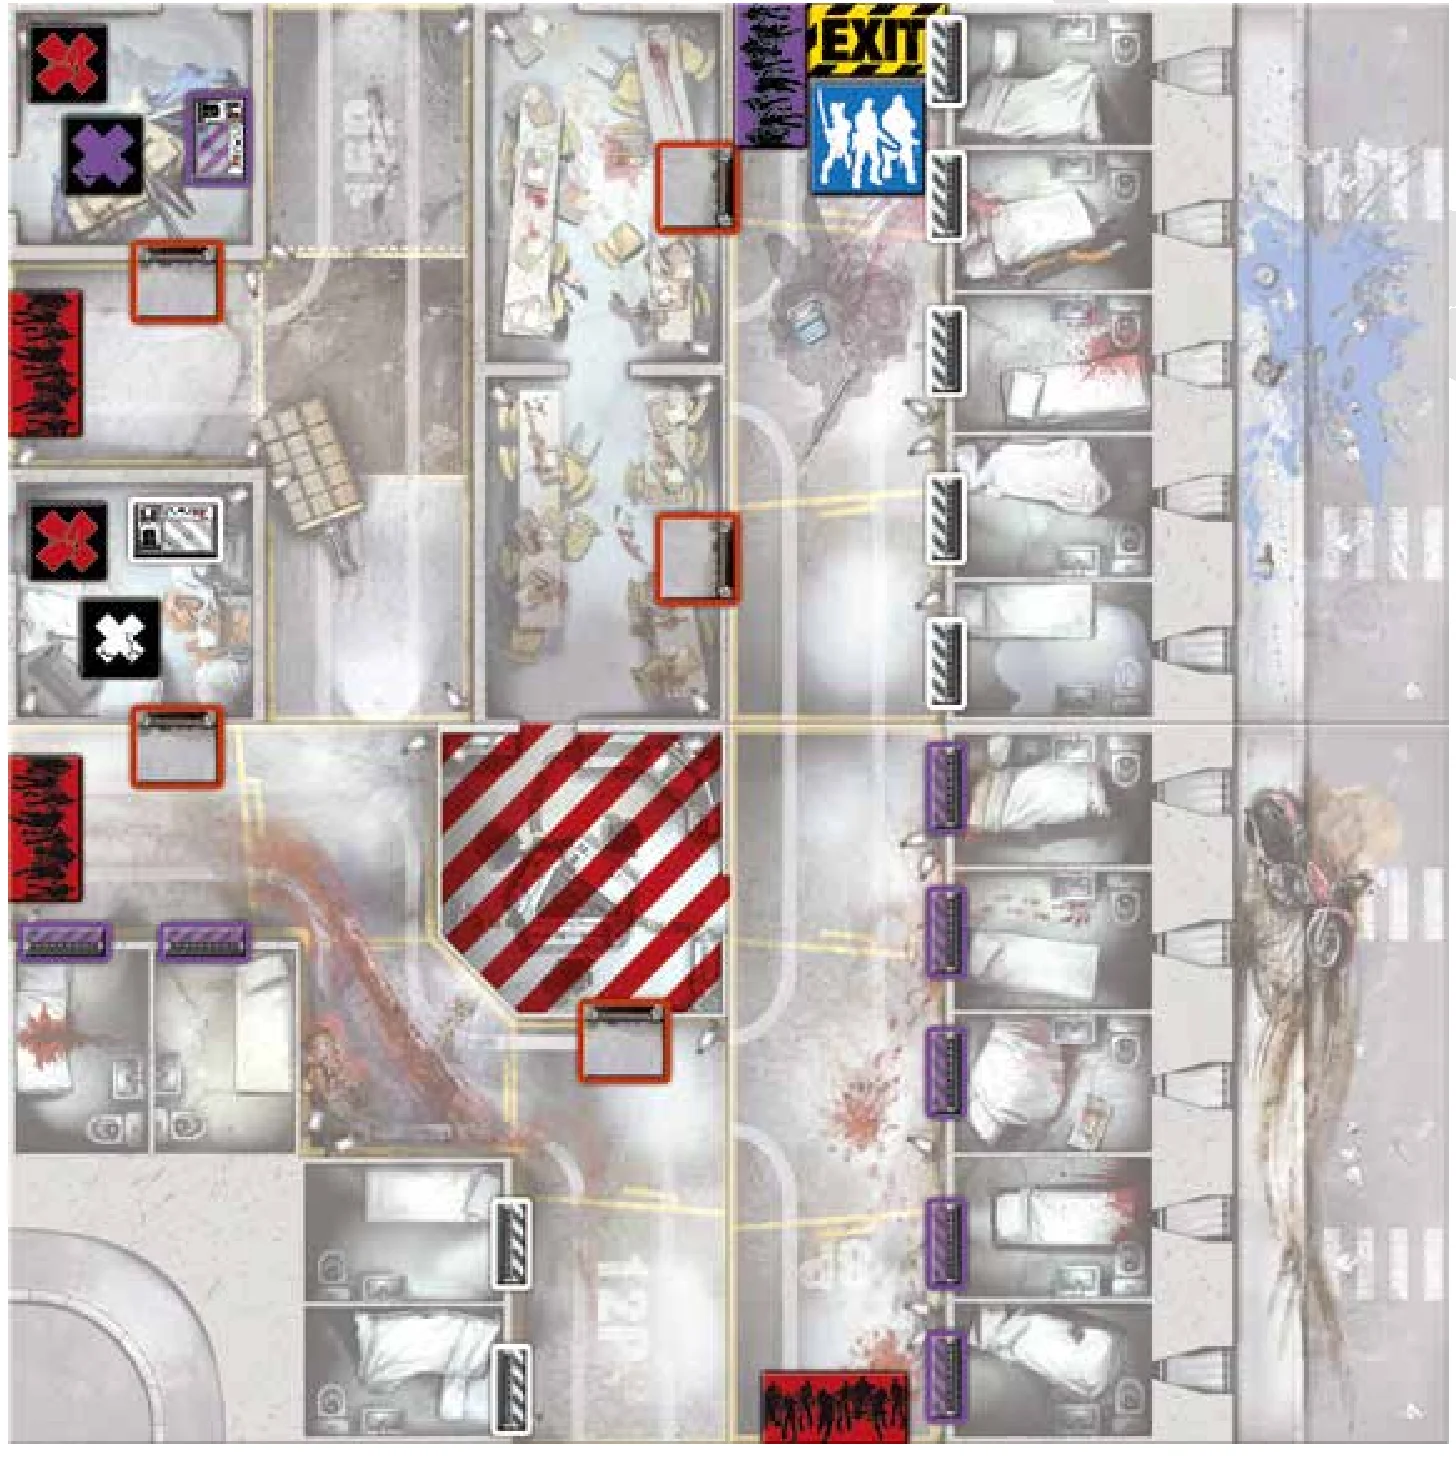
M05 An Easy Mission
Medium / 6+ Survivors / 150 Minutes
Tiles needed: 7P, 8P, 12P & 15P.
Objectives
- Open the violet and white cells: You just need to activate the violet and white Switches to open these doors.
- Come back: Reach the Exit Zone with all remaining Survivors. Any Survivor may escape through this Zone at the end of his turn, as long as there are no Zombies.
Special Rules
- Checkpoints: Each Objective gives 5 experience points to the Survivor who takes it.
- This isn’t regular guard equipment: Someone left a Gunblade and a Riot Shield in the guards’ checkroom. A Survivor can spend one Action in the same Zone to collect this equipment.
- The violet Switch: Opens all violet cell doors. The first Survivor to activate it takes the violet Objective and gains 5 XP. Can only be activated once.
- The white Switch: Opens all white cell doors. The first Survivor to activate it takes the white Objective and gains 5 XP. Can only be activated once.
- There it was: The Zombie violet Spawn Zone activates when the violet Switch is activated.
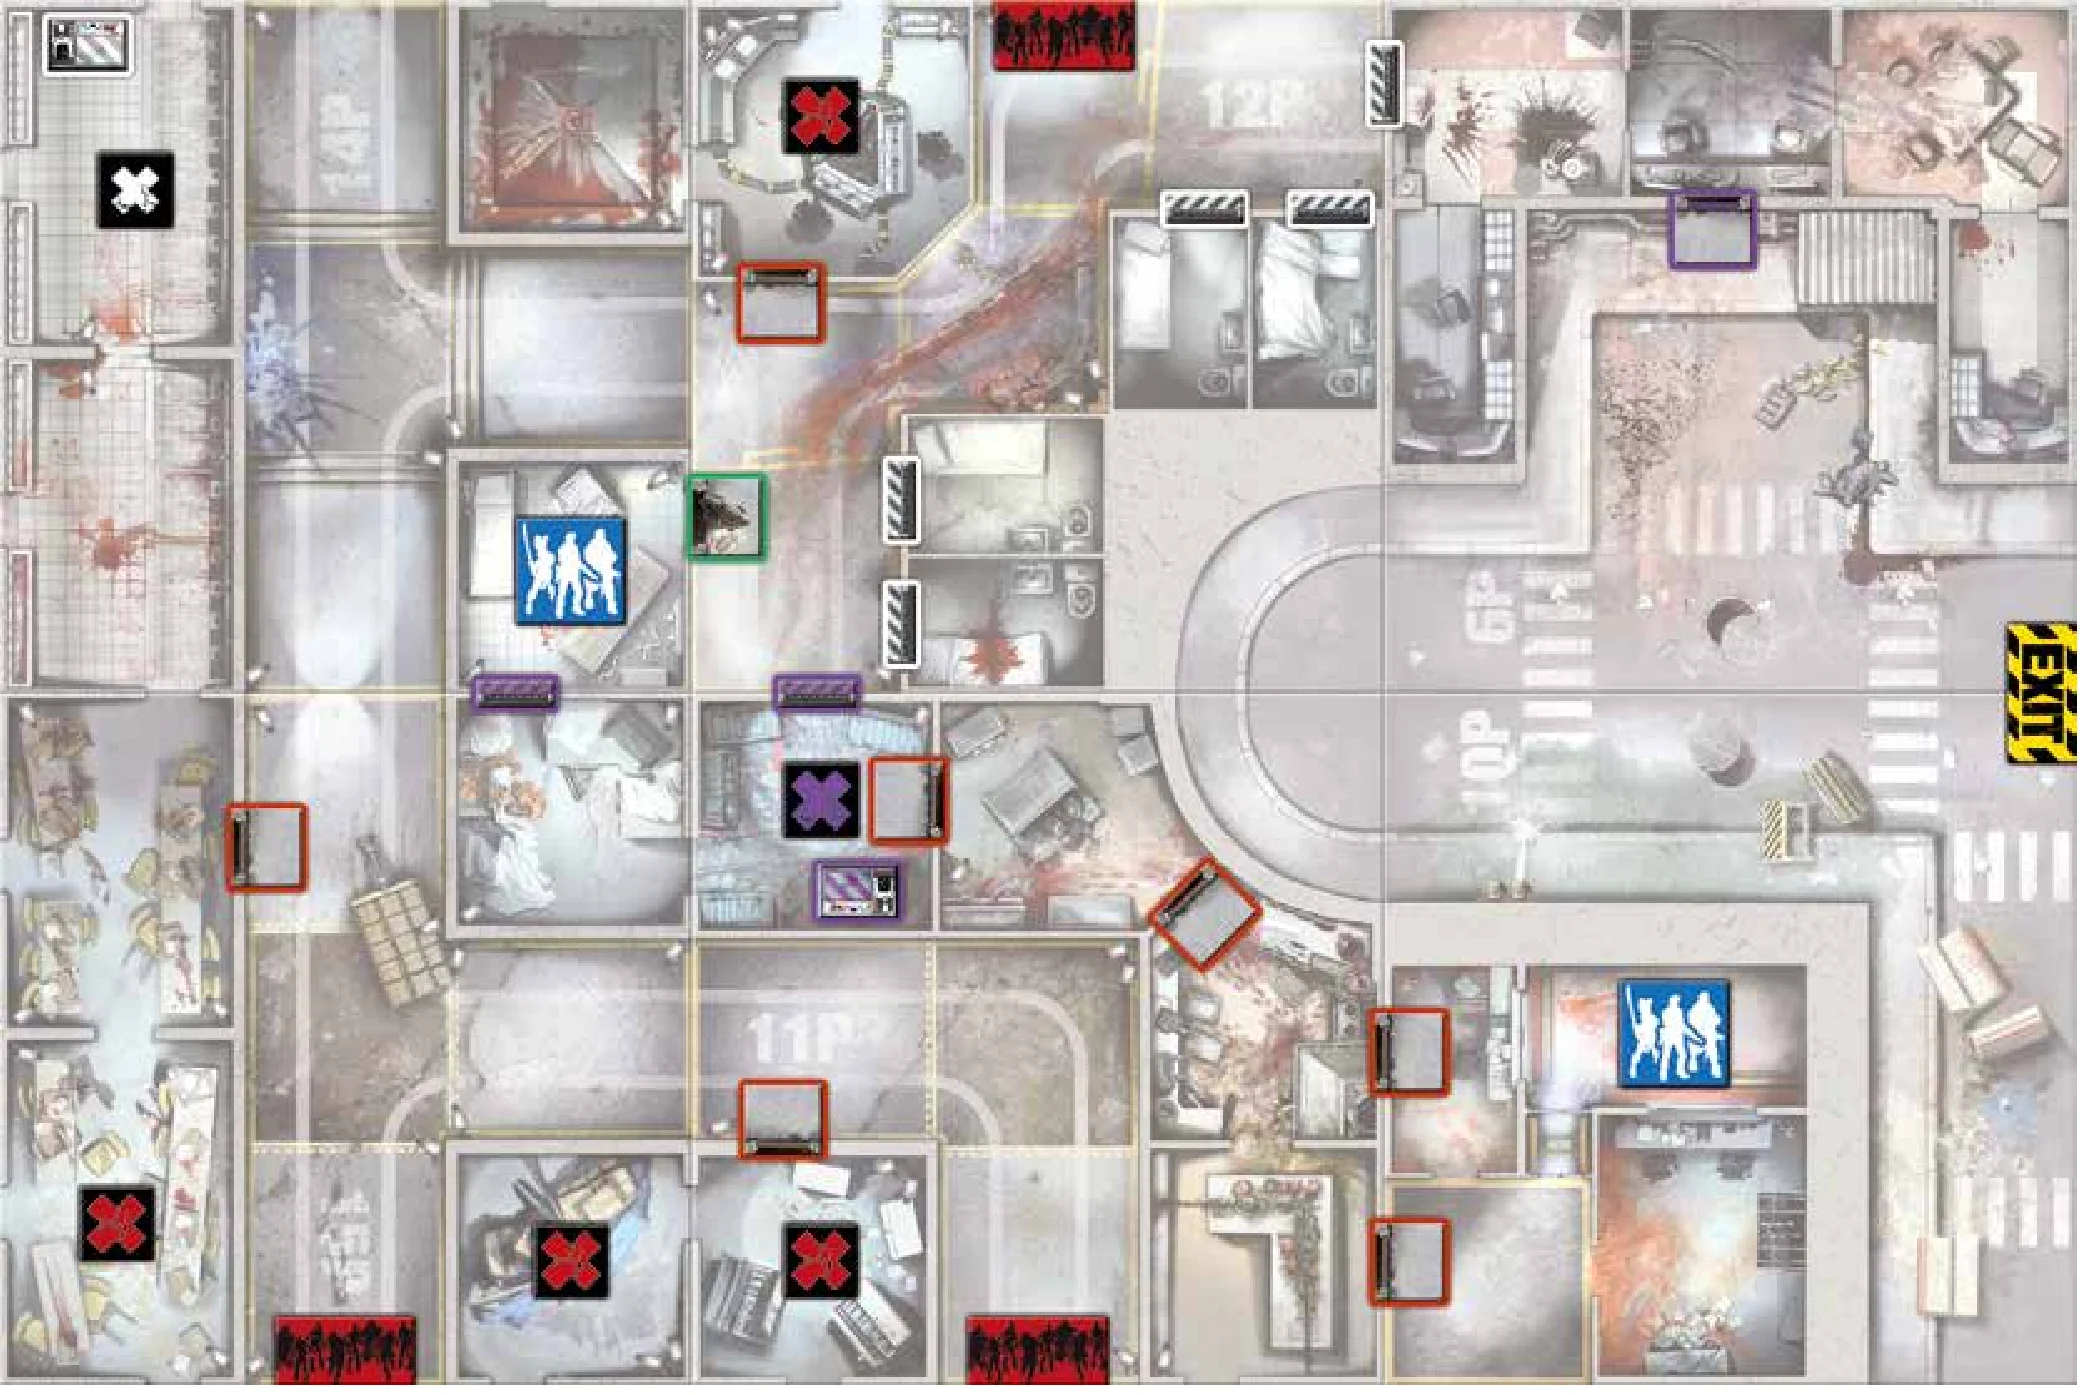
M06 Rescue Mission
Medium / 6+ Survivors / 150 Minutes
Tiles needed: 6P, 10P, 11P, 12P, 14P & 15P.
Objectives
- Open the violet doors: This way, the team will be able to unite again. Activate the violet Switch to open these doors.
- Open the white doors: The white doors are the only thing between you and the exit. Activate the white Switch to open these doors.
- No one gets left behind: Reach the Exit Zone with all Survivors. Any Survivor may escape through this Zone at the end of his turn, as long as there are no Zombies.
Special Rules
- Exploring very carefully: Each Objective gives 5 experience points to the Survivor who takes it.
- Separated team: Half of the team is trapped inside the prison. There are two starting areas. Split the team in two equal groups after distributing the starting Equipment. The first group begins on one starting area, the second group in the other.
- The violet Switch: Opens all violet cell doors and the violet door. First activation grants the violet Objective (5 XP). Can only be activated once.
- The white Switch: Opens all white cell doors. First activation grants the white Objective (5 XP). Can only be activated once.
M07 The Haven
Hard / 6+ Survivors / 120 Minutes
Tiles needed: 1P, 2P, 5P, 6P, 7P & 12P.
Objectives
- Open the violet doors: Activate the violet Switch.
- Open the white doors: Activate the white Switch.
- Body count!: The Mission succeeds if, anytime after having completed the previous two objectives, there are no Zombies left on the board.
Special Rules
- King of the yard: At the beginning of the game, place an Abomination in the Zone marked on the map.
- The violet Switch: Opens all violet cell doors and the violet door. First activation gives the violet Objective (5 XP). Closes when set back.
- A faraway door linked to the violet Switch: The Zombie violet Spawn Zone activates when the violet Switch is activated. Ceases when set back.
- The white Switch: Opens all white cell doors and the white door. First activation gives the white Objective (5 XP). Closes when set back.
- The yellow Switch for the rotating security gate: Rotates gate a quarter turn. First activation gives the yellow Objective (5 XP).
- You can use cars.
- Two police cars!: Searchable more than once for weapons.
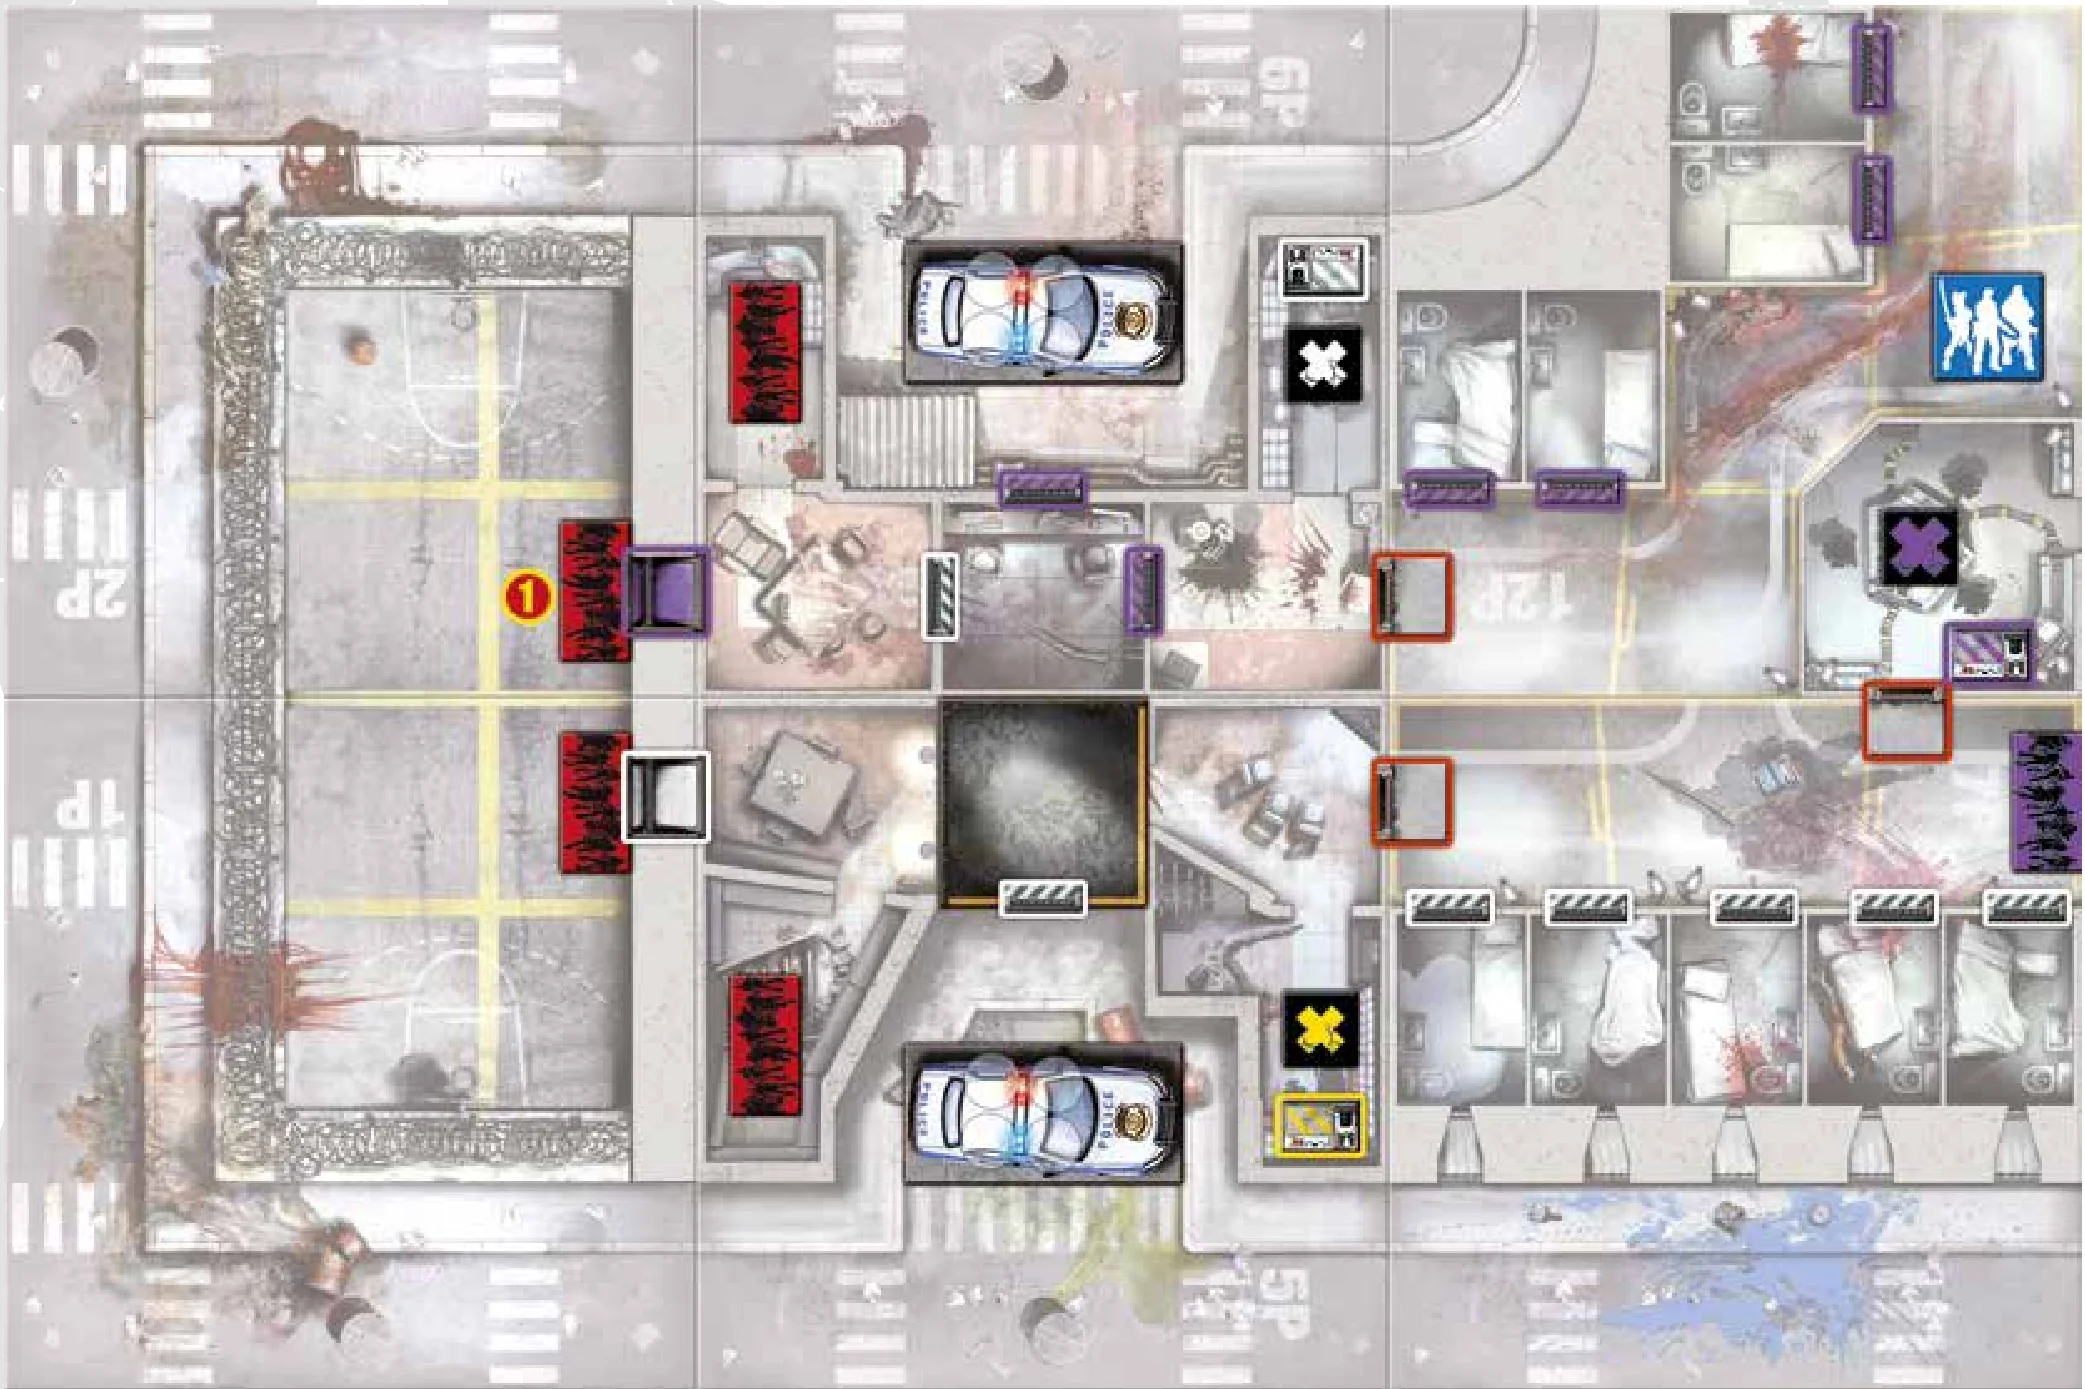
M08 Foooood!
Hard / 6+ Survivors / 180 Minutes
Tiles needed: 1P, 2P, 5P, 6P, 9P, 10P, 11P & 12P.
Objectives
- Gather food: The places where food is stored are marked with a red “X”. Take all Objectives.
- Go back to the yard: Get back to the starting area with at least eight food cards granted by the Objectives. If a Survivor is eliminated while carrying one of these cards, the game is lost.
Special Rules
- Doing what has to be done: Each Objective gives 5 experience points to the Survivor who takes it.
- Foooood!: At the beginning of the game, set apart all Canned Food, Rice, and Water cards. Each time a red Objective is taken, the Survivor who takes it receives one of these cards at random and can reorganize his inventory for free.
- What the hell did these zombies eat?: At the beginning of the game, place a Runner in each Zone marked on the map.
- The violet Switch: Opens the violet prison main entry and the violet cell doors. First activation grants the violet Objective (5 XP). Closes when set back.
- The white Switch: Opens the white cell doors. First activation grants the white Objective (5 XP). Closes when set back.
- The yellow Switch for the rotating security gate: Rotates the gate 90 degrees. First activation grants the yellow Objective (5 XP).
- You can use cars.
- Police car!: Searchable multiple times for weapons.
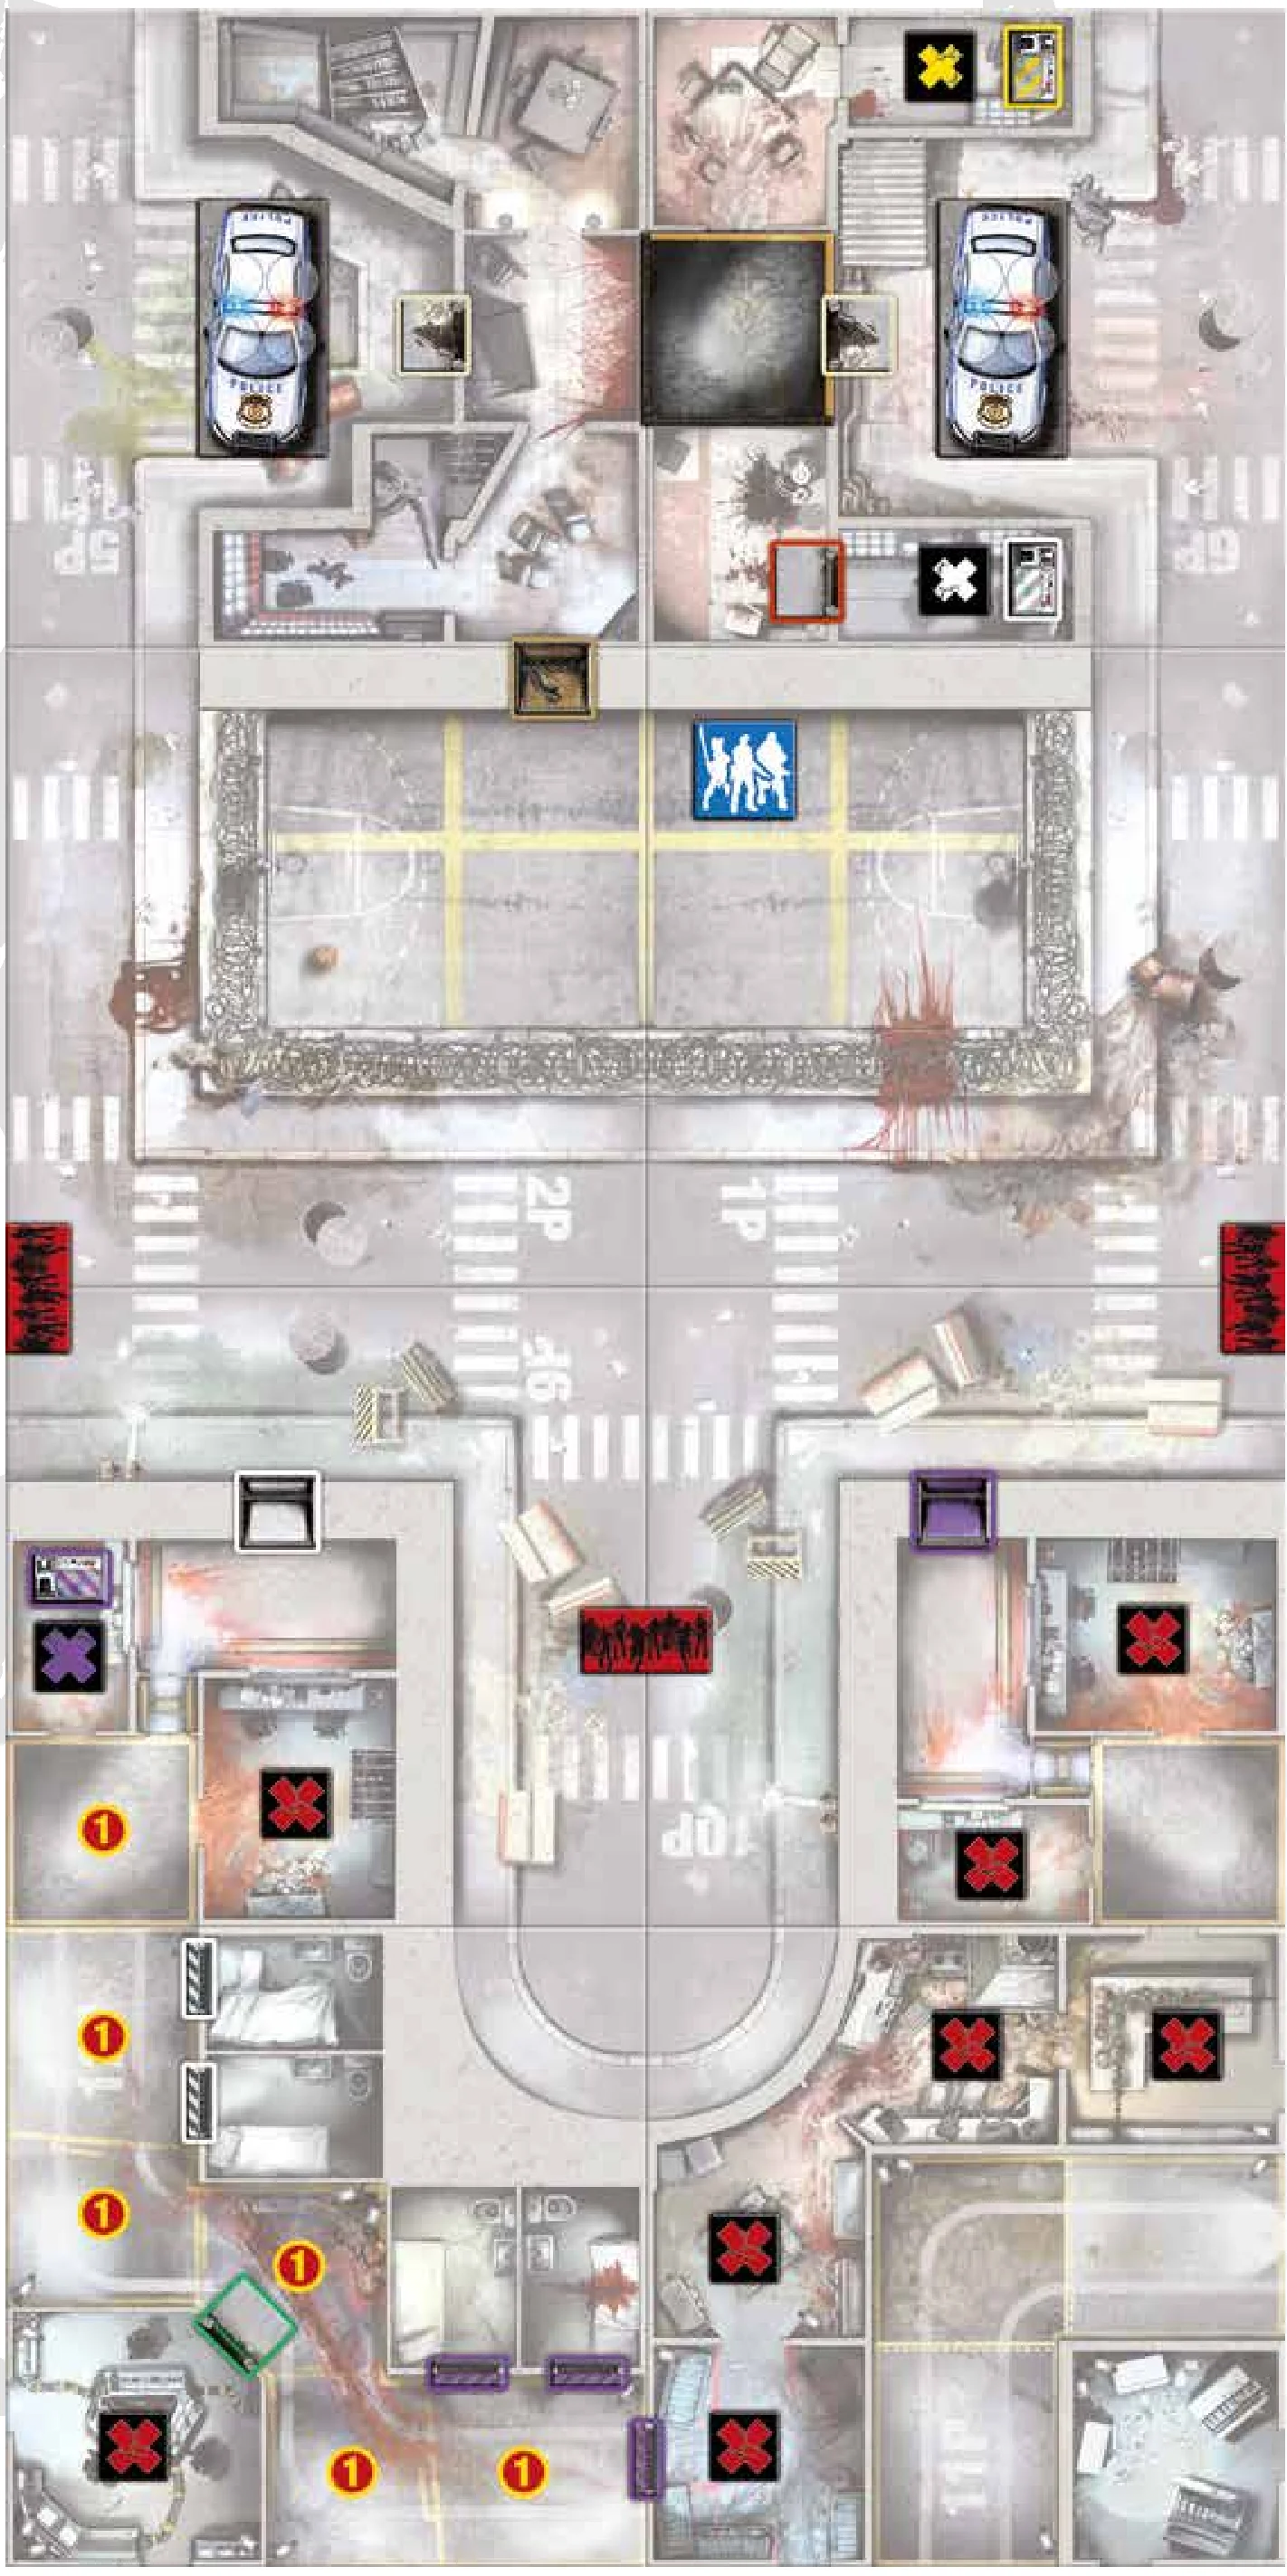
M09 Endless Cleaning (A Possible End)
Hard / 6+ Survivors / 120 Minutes
Tiles needed: 7P, 8P, 9P, 10P, 12P & 16P.
Objectives
- Find the green master key: The white Switch is behind a green door! Take Objectives until you find the green one.
- Open the white and violet cells.
- We have to leave: Reach the Exit Zone with all Survivors. Any Survivor may escape through this Zone at the end of his turn, as long as there are no Zombies.
Special Rules
- Last try, but head up!: Each Objective gives 5 experience points to the Survivor who takes it.
- The green master key!: Put the green Objective randomly among the red Objectives, face down. Once taken, the green door can be opened (5 XP).
- Silent alarm!: Put the blue Objective randomly among the red Objectives, face down. Activates the blue Spawn Zone when taken (5 XP).
- The violet Switch: Opens violet cell doors and violet prison main entrance. First activation gives violet Objective (5 XP). Closes when set back.
- The white Switch: Opens white cell doors and white prison main entrance. First activation gives white Objective (5 XP). Closes when set back.
- The yellow switch for the rotating security gate: Rotates gate a quarter turn. First activation gives yellow Objective (5 XP).
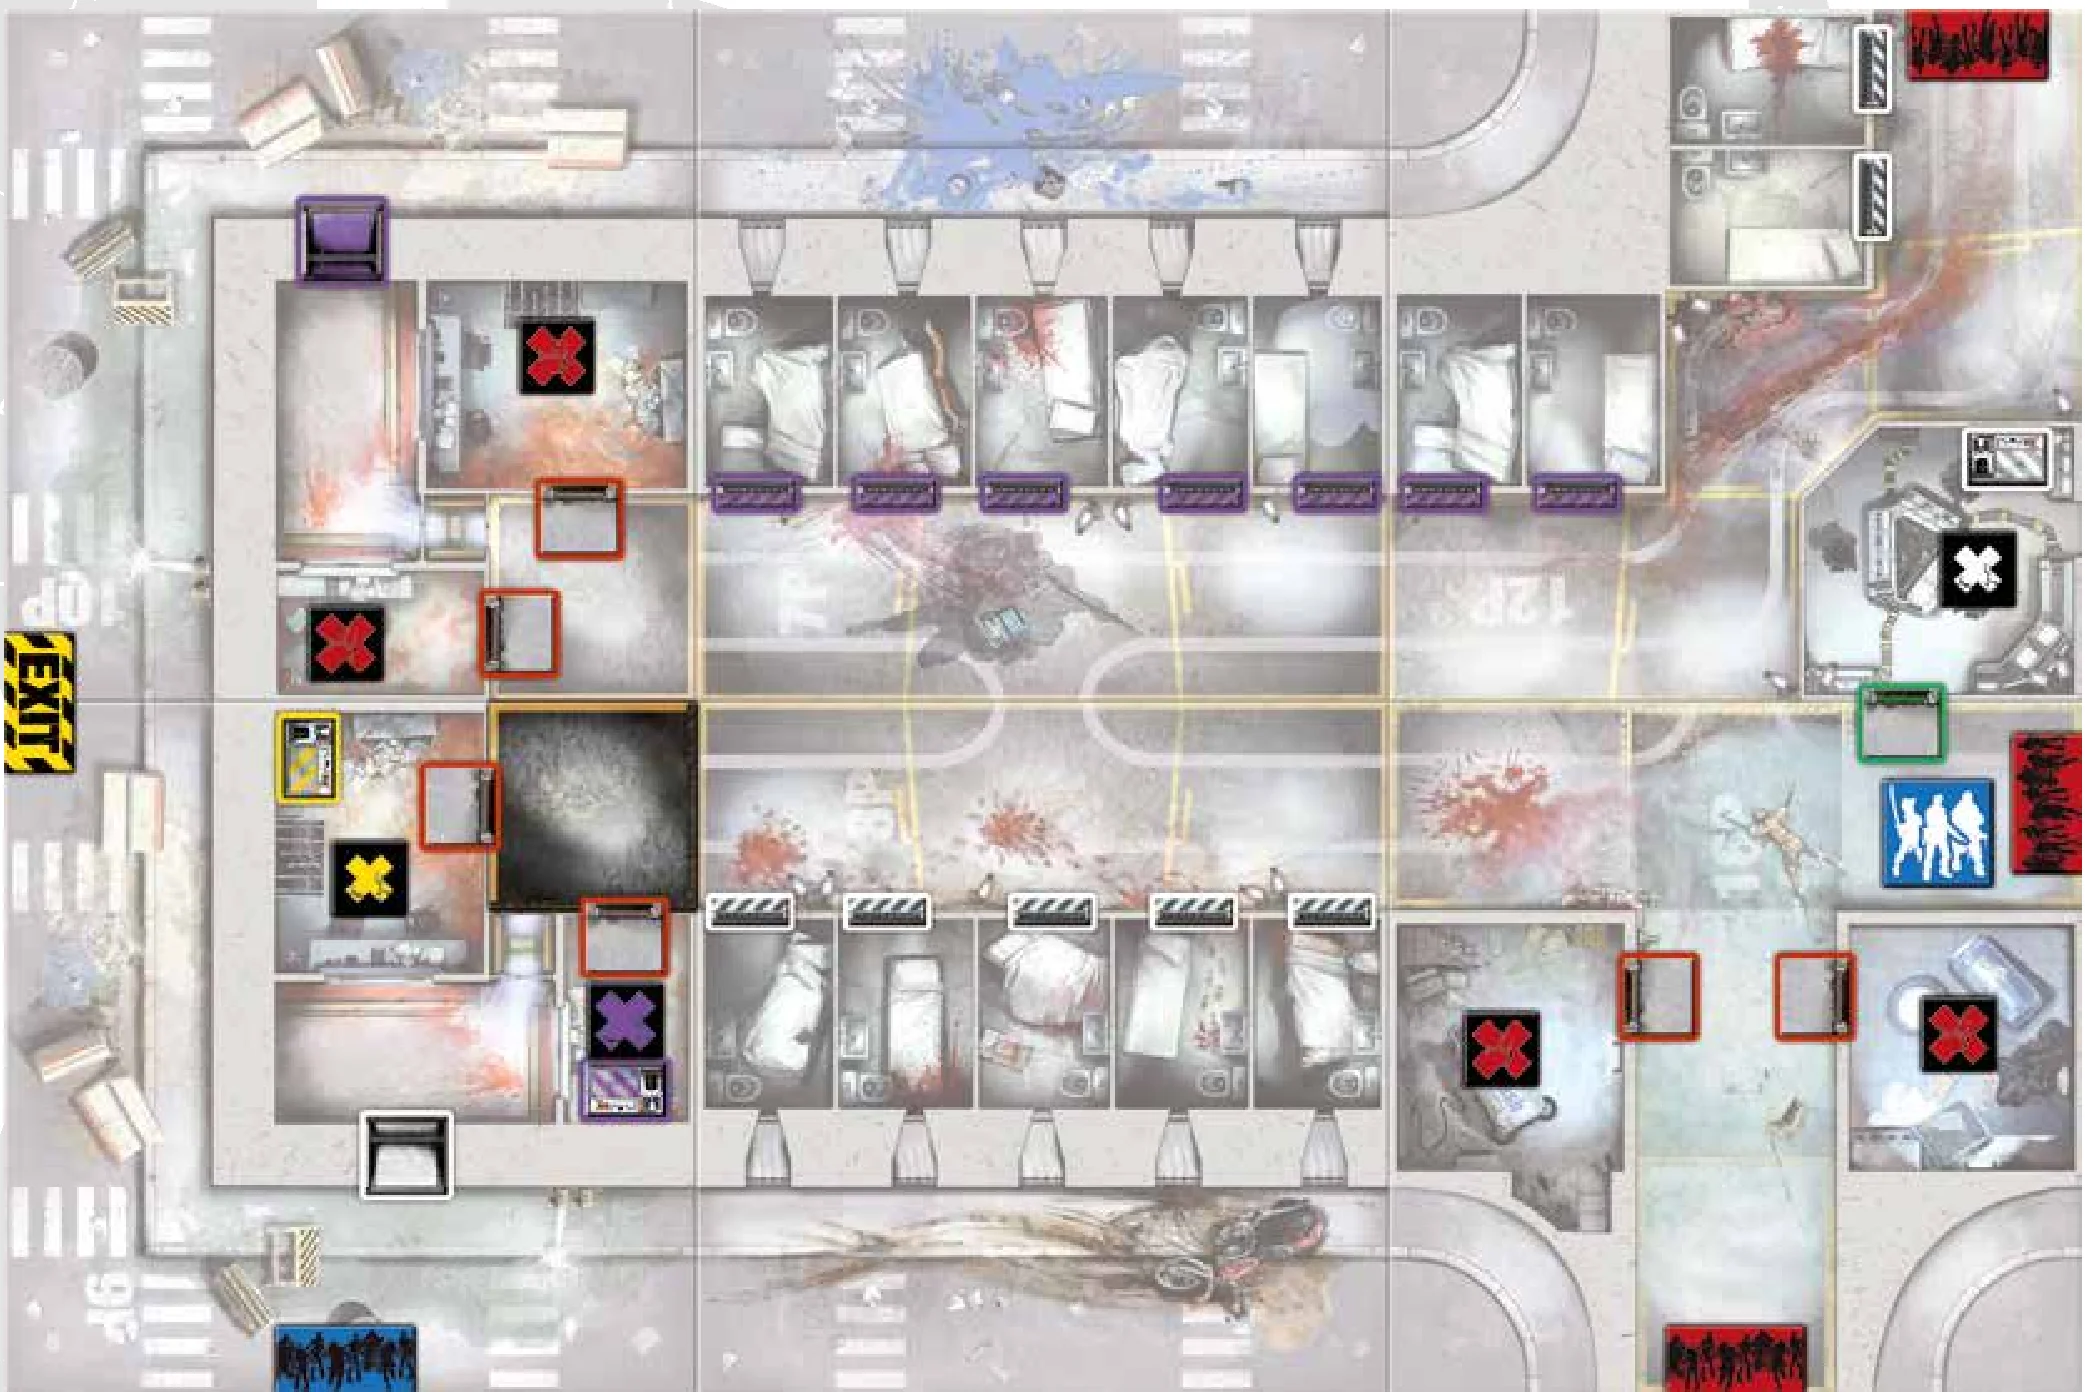
M10 Prison is Hell (An Alternative Ending)
Hard / 6+ Survivors / 120 Minutes
Tiles needed: 5P, 6P, 7P, 8P, 9P, 12P, 17P & 18P.
Objectives
- Find the blue master key: The prison main entry is locked and requires a master key to open it. Take them all and find the blue Objective among them.
- Open the violet and white cells: Once the main entry is open, jump in and kill every zombie you see.
- Explore all areas of interest: Take all the Objectives to finish the mission.
Special Rules
- Check list!: Each Objective gives 5 experience points to the Survivor who takes it.
- The blue master key!: Put the blue Objective, face down, randomly among the five red Objective tokens specially marked on the map outside of the main building. Once taken, the main entry to the prison wing can be opened.
- The violet Switch: Opens the violet cell doors. First activation gives violet Objective (5 XP). Closes when set back.
- The white Switch: Opens the white cell doors. First activation gives white Objective (5 XP). Closes when set back.
- The yellow Switch for the rotating security gate: Rotates gate a quarter turn. First activation gives yellow Objective token (5 XP).
- You can use cars.
- Pimpmobiles: Searched once each; each contains a Gunblade.
- Police car: Searchable repeatedly until a weapon is found.
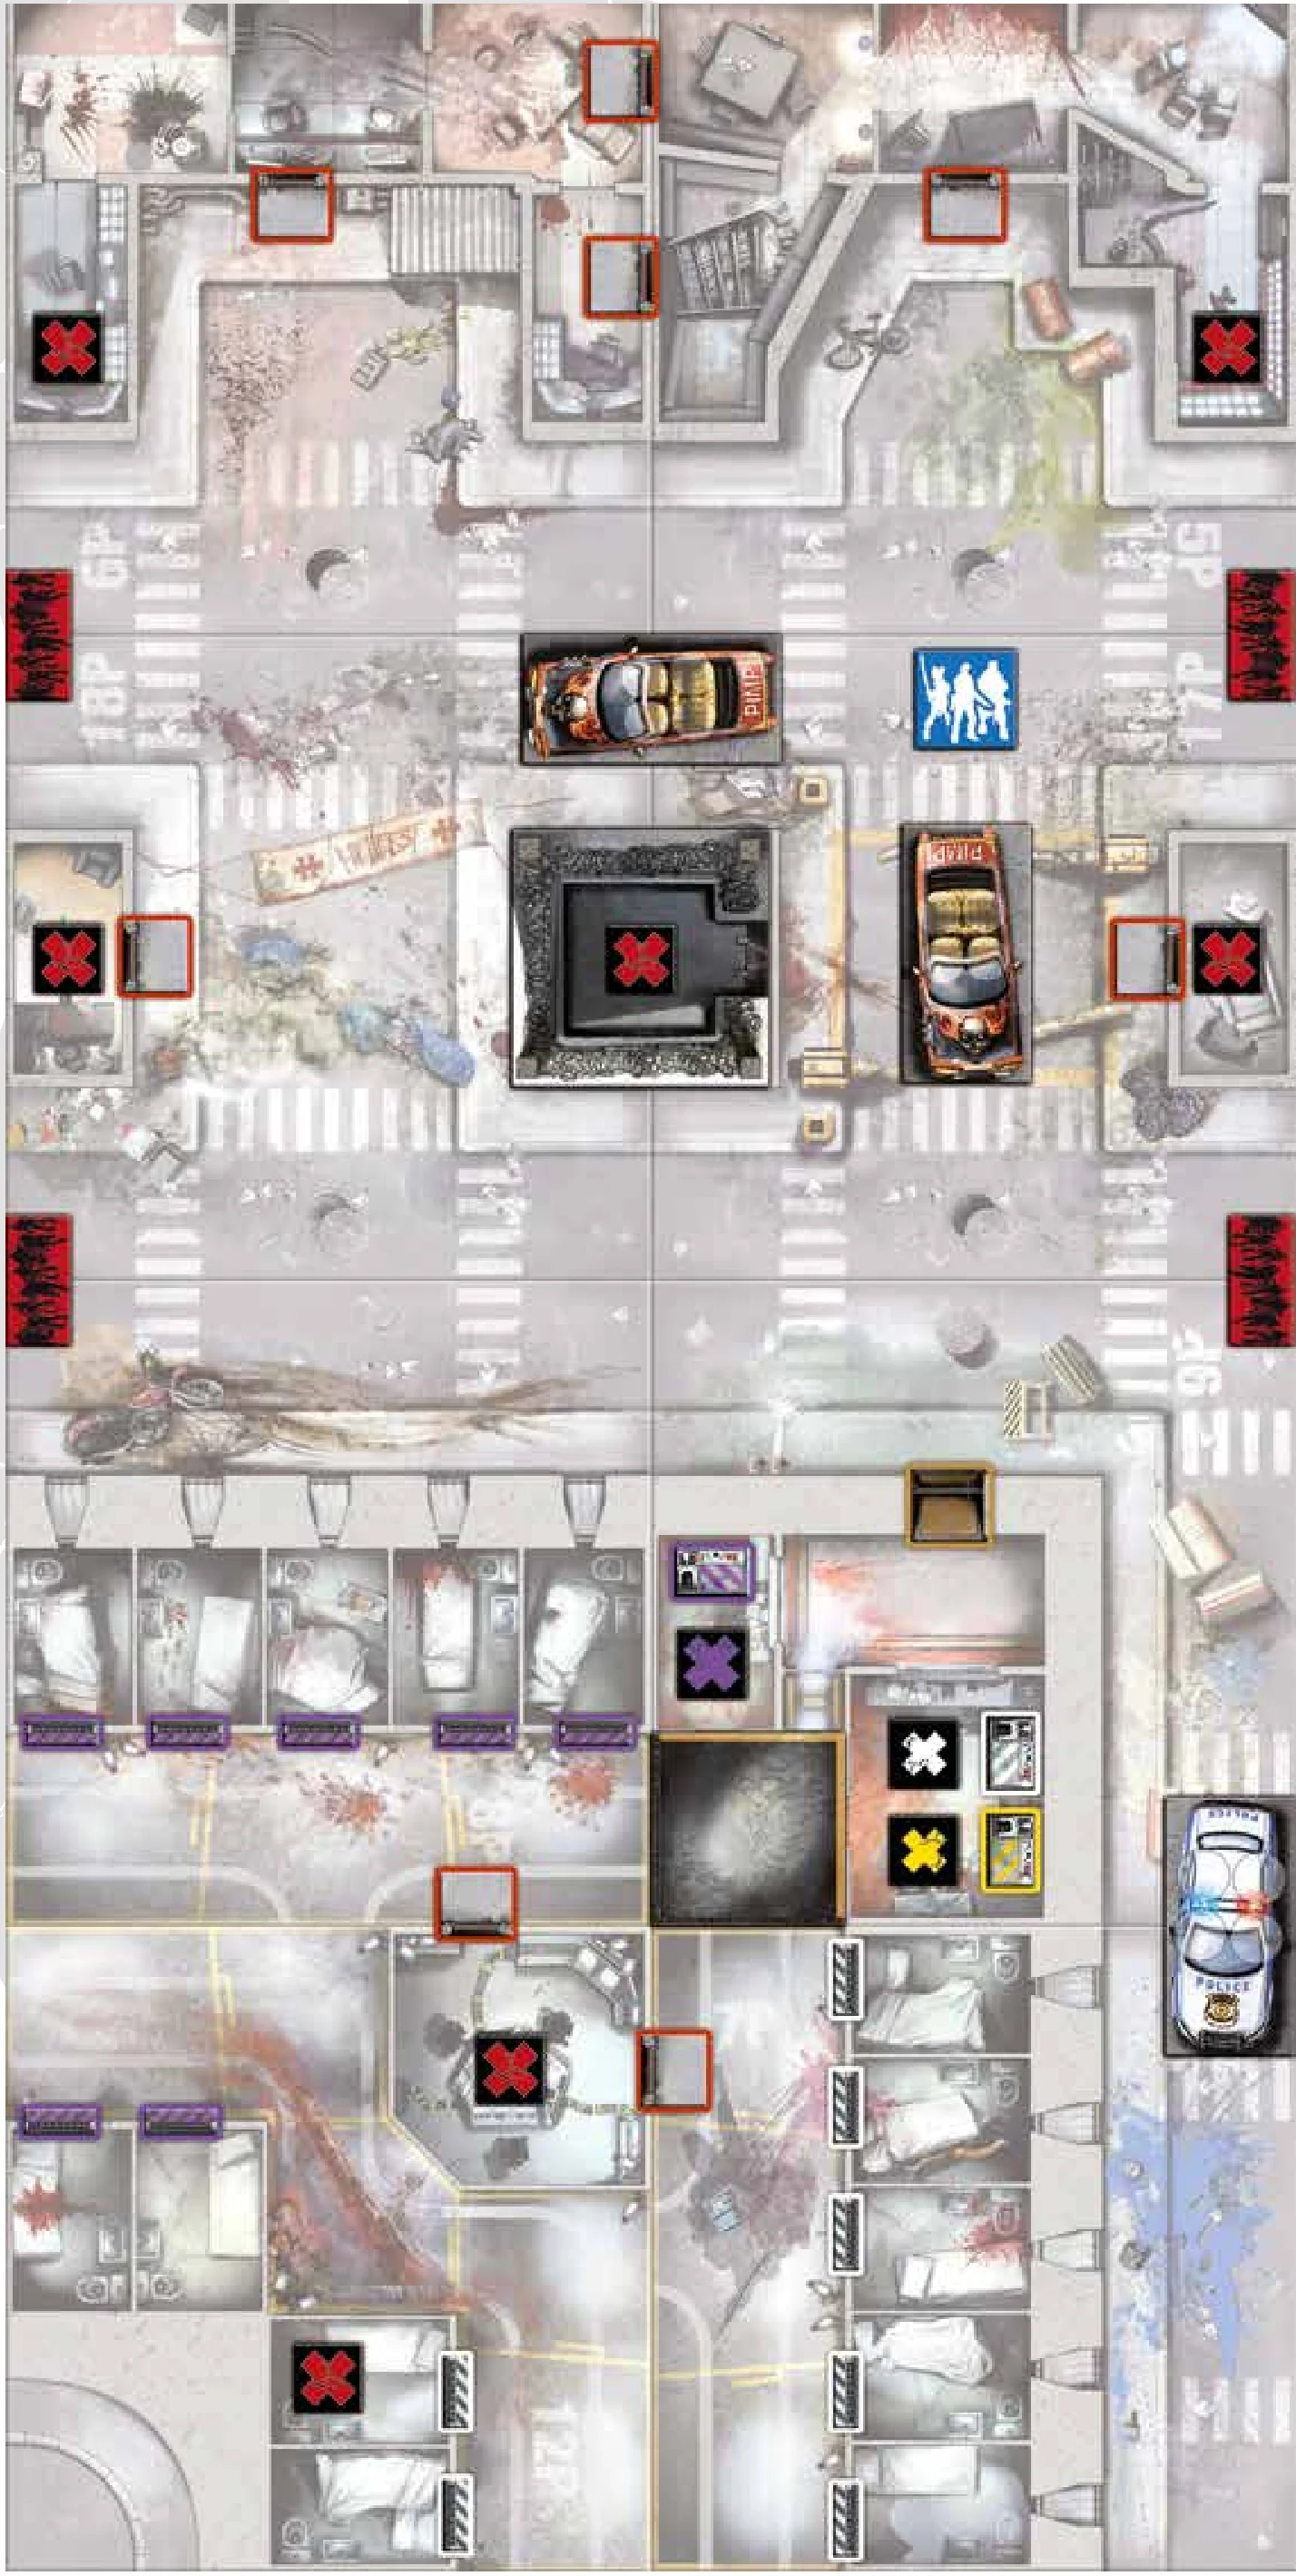
Winning and Losing
- The game is lost when all Survivors have been gruesomely killed and eliminated from the game.
- The game is won immediately when all of the Mission objectives have been accomplished. Zombicide Season 2: Prison Outbreak is a cooperative game, so all players win if the Mission objectives are fulfilled.
Turn Summary
1. First Step
Choose the first player (he receives the “first player” token).
2. Players’ Phase
The first player activates all of his or her Survivors, one after the other, in any order. When he or she’s done, the next player’s turn begins. Play clockwise. Each Survivor initially has three Actions to spend, chosen from the following list. Unless stated otherwise, each Action may be performed several times per turn.
- MOVE: Move one Zone.
- SEARCH: Indoor only. Draw a card in the Equipment deck (always only one Search per turn per Survivor).
- OPEN A DOOR: Special Equipment or Skill required. Spawn Zombies inside a building if it’s the first door.
- REORGANIZE INVENTORY: Equipment exchange with another Survivor (in the same Zone) is possible.
- RANGED COMBAT: Equipped Ranged weapon required.
- MELEE COMBAT: Equipped Melee weapon required.
- GET IN OR GET OUT OF A CAR: Can’t get in if there are Zombies.
- CHANGE SEATS IN A CAR: Move to a different empty seat.
- DRIVE A CAR: If allowed by the Mission. Must be in the driver’s seat. Attacks every Actor in the Zones travelled.
- TAKE AN OBJECTIVE TOKEN OR ACTIVATE AN OBJECT: (in the Survivor’s Zone).
- MAKE NOISE: Gotta need it to risk it.
- DO NOTHING: (and live with it).
3. Zombies’ Phase
- ACTIVATION: All Zombies spend one Action doing one of these two things:
- ATTACK: Zombies in the same Zone as a Survivor attack them.
- OR MOVE: The Zombies who didn’t Attack, Move. The others are having a brunch.
- Each Zombie favors visible Survivors, then noise.
- Choose the shortest path. If needed, split groups and add Zombies to make the groups even.
NOTE: Runners get two Actions per turn. Once all Zombies have taken their first Action, Runners go though the Activation step again to resolve their second Action.
- SPAWN:
- Always draw Zombie cards for all Spawn Zones in the same order (play clockwise).
- Danger Level used = highest Danger Level among active Survivors.
- Fatties spawn with two Walkers.
- No more minis of specified type? All Zombies of specified type get an extra activation!
4. End Phase
- Remove all Noise tokens from the board.
- The next player receives the “first player” token (play clockwise).
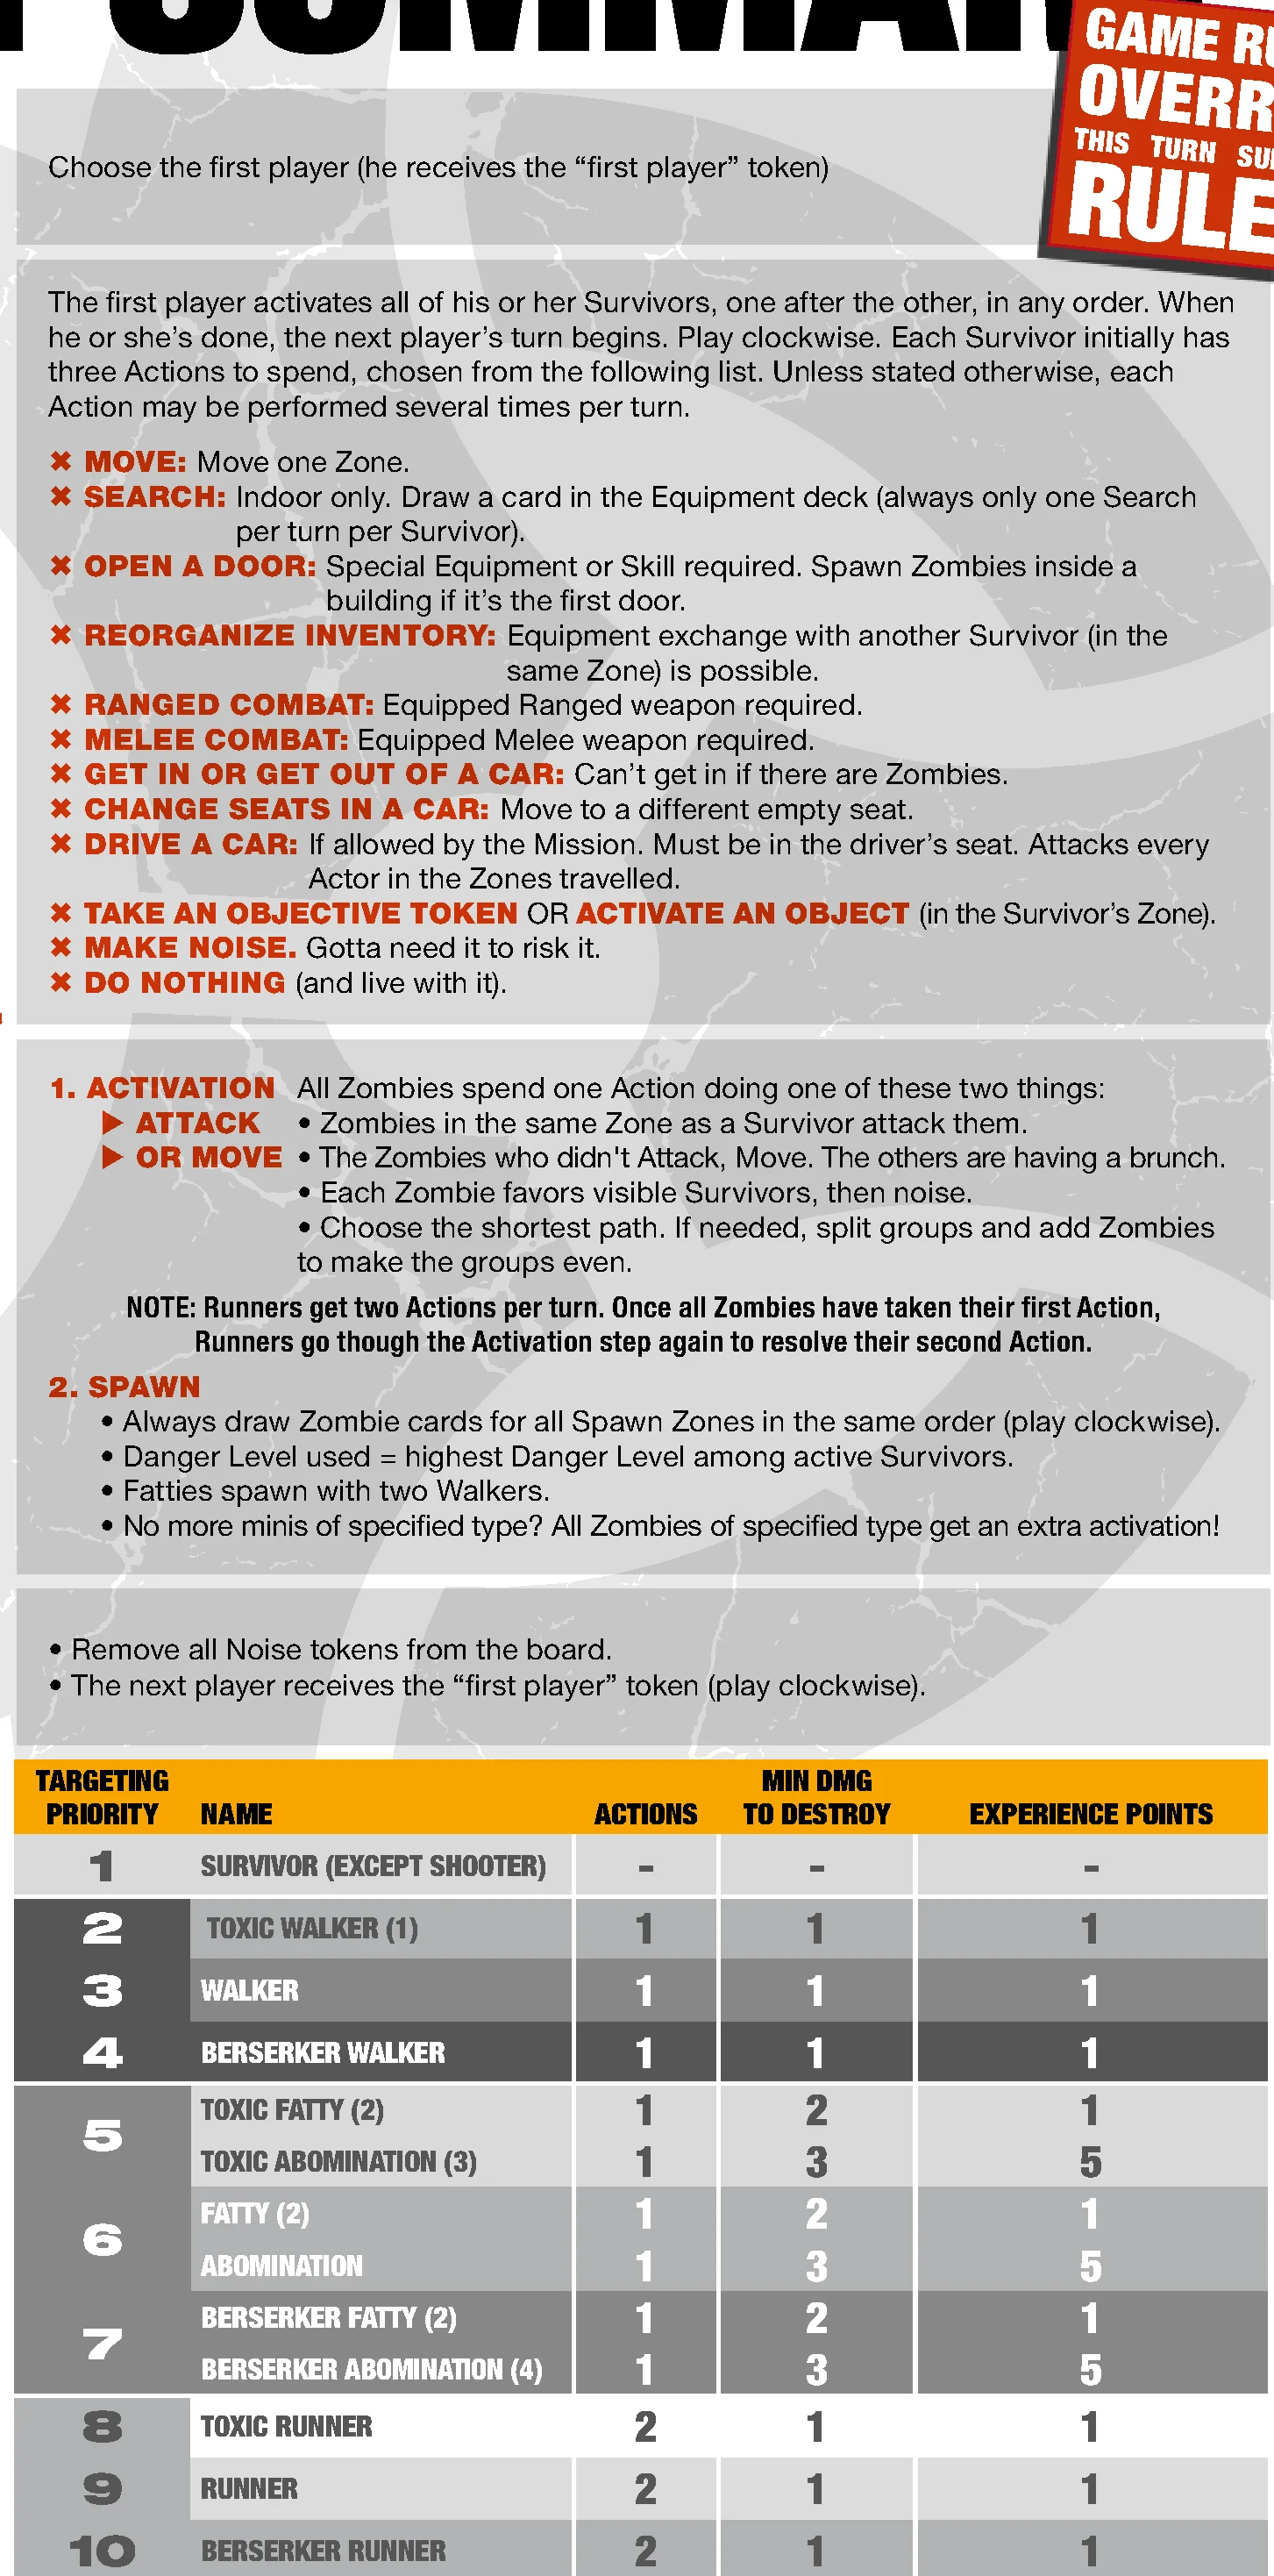
Game Components & Overview
Survive and Win
Zombicide is a cooperative game where players face hordes of Zombies controlled by the game itself. Each player controls one to six Survivors of a Zombie infection. The goal is simply to complete the Mission objectives and live to see another day.
The good news: Zombies are slow, stupid, and predictable.
The bad news: there are a lot of Zombies!
Survivors use whatever they can get their hands on to kill Zombies. If they find bigger weapons, they can kill even more Zombies!
You can trade equipment, give and receive (or ignore) advice, and even sacrifice yourself to save the girl! Only through co-operation, however, can you achieve the Mission objectives and survive. Killing Zombies is fun, but you will also need to rescue other Survivors, clean out infested areas, find food and weapons, and much more.
After experiencing Zombicide, your gaming group will be the ultimate zombie killing team in town!
Prison Outbreak: A Standalone Game and an Expansion
Zombicide: Prison Outbreak is meant to be played as a standalone game. However, its components are fully compatible with the original Zombicide game, called Season 1, and the Toxic City Mall expansion. Mix them up and explore new ways to hunt zombies!
Some rules described here may differ from Season 1. Rules described here have the priority.
Game Components
- 9 Game Tiles (double sided)
- 6 Double-Sided Survivor ID Cards
- 12 Survivor Miniatures:
- Grindlock / The Headbanger (standard and Zombivor version)
- Watts / The Family Man (standard and Zombivor version)
- Kim / Pokerface (standard and Zombivor version)
- Belle / Parkour (standard and Zombivor version)
- Shannon / The Soldier (standard and Zombivor version)
- Joshua / The Protector (standard and Zombivor version)
- 78 Zombies Miniatures:
- 30 Standard Walkers
- 6 Standard Fatties
- 12 Standard Runners
- 1 Standard Abomination
- 16 Berserker Walkers
- 4 Berserker Fatties
- 8 Berserker Runners
- 1 Berserker Abomination
149 Mini-Cards
- 83 Equipment Cards:
- Automatic Shotgun x2
- Aaah! x4
- Bag of Rice x3
- Baseball Bat x2
- Canned Food x3
- Chainsaw x2
- Claw Hammer x4
- Concrete Saw x1
- Fire Axe x2
- Flashlight x2
- Gasoline x2
- Glass Bottles x2
- Gunblade x2
- Hatchet x4
- Katana x2
- Kukri x4
- Meat Cleaver x2
- Molotov x2
- Nailbat x2
- Nails x2
- Nightstick x3
- Pistol x6
- Plenty of ammo (heavy) x3
- Plenty of ammo (light) x3
- Rifle x2
- Riot shield x2
- Sawed off x4
- Scope x2
- Shotgun x2
- Sub MG x2
- Wakizachi x2
- Water x3
- 42 Zombie Cards (#79 to #120)
- 24 Wounded Cards
- 6 Dice
- 6 Experience Trackers
110 Tokens
- Born Leader Token x1
- Car Tokens x4:
- Police car / Taxi
- Police car / Hippiemobile
- Pimpmobile / Taxi
- Pimpmobile / Muscle car
- Cell Doors:
- Violet x8
- White x8
- Doors:
- Blue x1
- Neutral x9
- Green x1
- Violet x1
- White x1
- Yellow x1
- Exit Point x1
- First Player x1
- Noise x18
- Objectives:
- Red/red x8
- Red/blue x1
- Red/green x1
- Red/yellow x1
- Red/violet x1
- Red/white x1
- Observation Towers x2
- Prison Main Entry Door:
- Neutral x2
- Violet x1
- White x1
- Rotating Security Gate x1
- Skill Counter x24
- Switches:
- Violet x1
- Yellow x1
- White x1
- Torn Barbwire x2
- Zombie Spawn:
- Red/red x1
- Red/blue x1
- Red/green x1
- Red/yellow x1
- Red/violet x1
- Red/white x1
Setup
Game Setup
- Choose a Mission.
- Place the tiles.
- Place the doors, the cars, and Objectives.
- Put aside the pimpmobile cards (Gunblades) and all Nailbat, Nightstick, Molotov, and Wounded cards. Also keep a single Claw Hammer, Fire Axe, and Pistol card.
- Shuffle the Zombie cards into one deck and the Equipment cards into another. Place both decks face down close to the board.
- Each player chooses his Survivors based on the number of players:
- 1 player: 4 to 6 Survivors (the more, the easier).
- 2 players: 3 Survivors per player.
- 3 players: 2 Survivors per player.
- 4 to 6 players: 1 Survivor per player.
- Place the miniatures representing the chosen Survivors on the starting Zone as indicated by the Mission.
- Place your Survivor’s Identity Card in front of you, showing the “standard” version of your Survivor (the other side shows his Zombivor version and is marked with a biohazard symbol). Experienced players may begin the game with Zombivors. Place an experience tracker on the first square in the blue area of the Danger Bar, and place a Skill counter on the first corresponding Skill.
- Randomly deal the starting equipment: a Claw Hammer, Fire Axe, Pistol, and enough Nightsticks so that each Survivor gets one card. If a Survivor’s starting Skill lists any starting weapons, he receives those cards now, independent of the starting Equipment that’s just been distributed.
EXAMPLE: Watts is dealt one of the random starting Equipment cards and gets the Pistol! He then takes the weapon listed on his Identity Card from the Equipment deck: a Baseball Bat! - Decide who will be the first player, and give him or her the “first player” token. Zombicide is a cooperative game, so do not pick randomly!
Nightsticks and Pans
The Zombicide Season 1 game includes Pans as part of the starting Equipment cards. In Zombicide Season 2: Prison Outbreak, these are replaced by Nightsticks.
If you own both games, deal Nightsticks as part of the starting Equipment. If there aren’t enough starting Equipment cards, then deal Pans as well.
Core Concepts & Fundamentals
Useful Definitions
- Actor: A Survivor, Zombivor, or Zombie.
- Zone: Inside a building, a Zone can be either a room or, in large alleys, an area defined by floor markings. On the street, a Zone is the area between two pedestrian crossings and the walls of buildings along the street. A single Zone may extend over two tiles or even four tiles.
Line of Sight
How do I know if a Zombie sees me or if I see it?
- On the streets (and indoor alleys), Actors see in straight lines that run parallel to the edges of the board. Actors cannot see diagonally. Their line of sight covers as many Zones as the line can pass through before reaching a wall or the edge of the board.
- Inside a building, an Actor sees into all Zones that share an opening with the Zone the Actor currently occupies. If there is an opening, the walls do not block line of sight between two Zones. An Actor’s line of sight, however, is limited to the distance of one Zone.
NOTE: If the Survivor is looking out into the street, or from the street into a building, the line of sight can go through any number of street Zones in a straight line, but only one Zone inside the building. Indoor alleys are considered streets for purposes of line of sight.
Movement
Actors can move from one Zone to the next as long as the first Zone shares at least one edge with the destination Zone. Corners do not count. This means Actors cannot make diagonal movements.
- On streets (and indoor alleys), the movement from one Zone to another has no restrictions. However, Actors must go through a door to move from a building to the street (or alley) and vice versa.
- Inside a building, Actors may move from one Zone to another as long as these Zones are linked by an opening. The position of the miniature in the Zone and the layout of the walls do not matter as long as the Zones share an opening.
Reading an Equipment Card
Door-Breaching, Zombie-Killing, and Noisy Equipment
Many Equipment cards, such as the Claw Hammer, Fire Axe, and Chainsaw, allow you to open doors as well as eliminate Zombies.
- Equipment that allows you to open doors has this symbol:
- Equipment that allows you to kill Zombies has this symbol: Combat characteristics are written at the bottom.
Each of these symbols is accompanied by a second symbol related to noise. It defines if the Action is noisy or not. Noise attracts Zombies!
- This Action is noisy and produces a Noise token (see Noise).
- This Action isn’t noisy and does not produce a Noise token.
Combat Characteristics
Weapons have specific characteristics displayed at the bottom of their card:
- RANGE: Min and max number of Zones the weapon can reach. “0” is Melee only.
- DICE: Roll as many dice as this value when an Action is spent to use this weapon.
- ACCURACY: Each roll that equals or exceeds this value is a success. Inferior results are failures.
- DAMAGE: Damage inflicted for each success. A “2” value is required to eliminate Fatties. A “3” value is required to eliminate Abominations.
- DUAL: If you have a weapon with this symbol in each hand, you may use them both in a single Action (aimed at the same Zone).
- SILENT: Doesn’t produce a Noise token when used.
- NOISY: Produces a Noise token when used. Dual weapons produce a single Noise token per Action.
- OPENS DOORS: Can be used to open doors.
Noise
Firing a gun or smashing through a door makes noise, and noise attracts Zombies. Each Action that opens a door with a noisy weapon or attacks with a noisy weapon produces a Noise token.
- Place this token in the Zone where the Survivor resolved the Action.
- A single Action can only produce a single Noise token no matter how many dice are rolled, how many hits are obtained, or if Dual weapons are used.
- Noise tokens are always removed from the board in the End Phase.
- NOTE: Each Survivor miniature also counts as a Noise token. Yes, they just can’t seem to stay quiet!
EXAMPLE: Grindlock opens a door with a Fire Axe. It’s a noisy way to open a door. This produces a Noise token. He then attacks a Zombie in his Zone, knocking it down after a couple of whacks. The Fire Axe is a silent killing weapon, so this action produces no noise. There remain two “noises” in this Zone, however: the token produced by opening the door and Grindlock’s miniature itself.
In another Zone, Belle executes three Ranged Combat Actions with her two Dual Sub MGs. Although she rolled six dice, she gets only three Noise tokens in her Zone, one for each Ranged Action. The tokens remain on the square where she produced them; they don’t follow Belle when she moves.
Inventory
Each Survivor can carry up to five pieces of Equipment but can only have two equipped and ready to use (one in each hand) at any given time. While all weapons must be in a hand slot in order to use them (whether to attack or to open a door), other items, such as the Flashlight and Plenty of Ammo cards, are always in effect, even while in one of the three reserve slots.
You may discard cards from your inventory to make room for new cards at any time, for free.
Experience, Danger Level, and Skills
For each Zombie killed, a Survivor gains an experience point and moves up a notch on his Danger Bar. Some Mission objectives provide more experience, as does eliminating Abominations.
There are four Danger Levels: Blue, Yellow, Orange, and Red. These represent everything from a light drizzle of Zombies to a flash flood.
At each Danger Level, the Survivor gains one new Skill to help him on his Mission (see Skills, page 25). Skills add to each other across Danger Levels: at Red Level, your Survivor will have four Skills.
- Yellow Level (7 experience points): The Survivor obtains a fourth Action. He may use this Action immediately and then every turn thereafter; in other words, he now has a permanent additional Action.
- Orange Level (19 experience points): The Orange Danger Level becomes active, and the Survivor can choose one of the two Skills indicated on his Identity Card.
- Red Level (43 experience points): The Survivor reaches the Red Danger Level and obtains one Skill from among the three available at this Level.
This experience has a side effect, however. When you draw a Zombie card to spawn a Zone, read the line that corresponds to the Survivor with the highest Danger Level!
Improved Weaponry: Sniper Rifle, Nailbat, and Molotov
Specific Equipment cards can be combined to build improved weaponry. Take the two appropriate cards, which the Survivor must already have in his inventory, and combine them into the new weapon. This does not cost an Action, and the new weapon occupies only a single slot in your Survivor’s inventory. When built, Survivors may immediately and freely equip improved weapons to their hands.
- Sniper Rifle: Combine a Rifle and a Scope to get a sniper rifle. Put the Scope card under the Rifle card. Now you can choose your targets when firing with this Rifle.
- Nailbat: Discard a Baseball Bat and a Nails card and give your Survivor a Nailbat card. Time to enjoy the melee-fest.
- Molotov: Discard a Glass Bottle and a Gasoline card and give your Survivor a Molotov card. The Molotov doesn’t need Dice, Accuracy, or Damage values (though it still requires a Ranged Combat Action to use). Just terminate everything in the targeted Zone. Yes, even other Survivors and Abominations. Discard the Molotov card after a single use, leaving its hand slot empty.
Players’ Phase & Actions
Overview
Starting with whoever holds the “first player” token, each player activates his Survivors one after the other, in the order of his choice. Each Survivor can execute three Actions at the Blue Danger Level. This is increased to four when the Survivor reaches the Yellow Danger Level.
Some Survivors have a free Action at the Blue Danger Level. Any free Actions do not count toward this total.
EXAMPLE: On her turn, Belle uses her free Move Action. She still has her basic three Actions of the turn remaining.
Once a player has activated all his Survivors, the player to his left takes his turn, activating his Survivors in the same manner. When all the players have completed their turns, the Players’ Phase ends.
Available Actions
Move
The Survivor moves from one Zone to the next but cannot move through external building walls or closed doors. If there are Zombies in the Zone the Survivor is attempting to leave, he must spend one extra Action per Zombie to leave the Zone. Entering a Zone containing Zombies ends the Survivor’s Move Action, even if he has a Skill that allows him to move through multiple Zones per Move Action.
- EXAMPLE 1: Shannon is in a Zone with two Walkers. To leave this Zone, she spends one Move Action, then two more Actions (one per Walker), for a total of three Actions. If there had been three Zombies in the Zone, Shannon would have needed four Actions to move.
- EXAMPLE 2: At Red Level, Watts is next to a Zone containing a Zombie when he moves. His Move Action ends in the Zone with the Zombie, even if his 2 Zones per Move Skill would normally allow him to move up to two Zones.
Search
You can only Search Zones inside a building (except for indoor alleys) and only if there are no Zombies in the Zone. The player draws a card from the Equipment deck. He may then place it in the Survivor’s inventory or immediately discard it.
A Survivor can only perform a single Search Action per turn, even if it’s an extra, free Action. After searching, the Survivor may freely reorganize his inventory. But the Survivor cannot trade with other Survivors; that requires another Action!
You may discard cards from your inventory to make room for new cards at any time, for free.
If the Equipment deck runs out, reshuffle all the discarded cards, with the exception of Wounded cards, Nightsticks, Molotov, and pimpmobile cards (Gunblades), to make a new deck.
Open a Door
A Survivor cannot open a door unless he has a Melee weapon with an “Open a door” symbol in his hand.
Remember to place a Noise token in the Zone if the Survivor uses a noisy weapon. Double doors are opened in the same way as normal doors. They simply allow a car to pass if they give way to alleys.
Opening a building for the first time reveals all the Zombies inside all rooms of the building (a single building extends to all rooms connected by openings, sometimes straddling several tiles). Indicate each Zone of the building, one after the other in any order you choose, and draw a Zombie card for each Zone. Place the corresponding number and type of Zombies on the indicated Zone. If you draw an Extra Activation or Manhole card, immediately perform the action indicated on the card, and do not add Zombies to the current Zone. When the Zombie deck runs out, reshuffle all the discarded cards to make a new deck.
Some game effects, like the Lock it down Skill, allow an open door to be locked up. If it is opened again afterward, it won’t trigger a new Zombie Spawn.
Reorganize Your Inventory and Trade with Another Survivor
At the cost of one Action, a Survivor can reorganize the cards in his inventory in any way he wishes. The Survivor can simultaneously exchange any number of cards with only one other Survivor currently in the same Zone. This other Survivor may reorganize his own inventory for free.
Ranged Combat
The Survivor uses a Ranged weapon he is holding in his hands to shoot at a single Zone within the Range shown on the weapon’s card.
Melee Combat
The Survivor uses a Melee weapon he is holding in his hands to attack the Zombies in his Zone.
Get In or Out of a Car
The Survivor gets in or out of a car in his Zone. To get in a car, the Zone must have no Zombies and either the driver’s seat or one of the three passenger’s seats must be empty for the Survivor to occupy. There are no restrictions to getting out of a car.
Change Seats in a Car
The Survivor vacates the seat he’s currently occupying and takes a different empty seat in the same car. If there are no empty seats in the car, Survivors cannot change seats.
Drive a Car
Cars can only be driven if the Mission allows it. The Survivor occupying the driver’s seat can move the car one or two street Zones per Action spent (cars cannot be driven into buildings, except for indoor alleys). This Action is not a Move and is not subject to movement modifiers, such as a free Move Action or increased movement, nor is it affected by disadvantages related to Move Actions (cars can leave a Zone with Zombies in it without the need to spend extra Actions). A car attacks all Actors in the Zones through which it moves.
Take or Activate an Objective
The Survivor takes an Objective token or activates an object in the same Zone. The game effects are explained in the Mission’s description.
Pull a Switch
The Survivor pulls a Switch in the same Zone, opening a door, rotating a security gate, etc. The game effects are explained in the Mission’s description. Switches can be used to open doors and lock them up. If the doors are re-opened thereafter, don’t spawn Zombies again.
Switches are often linked to a colored Objective of the same color standing next to them. The first Survivor to pull the Switch takes the linked Objective for free and gains the associated benefits. This is the only way to take an Objective linked to a Switch.
Make Some Noise!
The Survivor makes Noise in an attempt to attract Zombies. Place one Noise token in his Zone.
Do Nothing
The Survivor does nothing and prematurely ends his turn. His remaining Actions are lost.
Combat Rules
Resolving Combat
When a Survivor executes a Combat Action, roll as many dice as the Dice number of the weapon being used.
If the active Survivor has two identical weapons with the Dual symbol equipped in hand, he can use both weapons at the same time at the cost of a single Combat Action. Both weapons must be aimed at the same Zone.
- EXAMPLE 1: Joshua has two Sub MGs in his hands. The Sub MG has the Dual symbol, so Joshua can shoot them both with a single Action. This allows him to roll six dice in a single roll, as the Sub MG has a Dice number of 3!
- EXAMPLE 2: Shannon is holding two Kukris. She can strike with them both at once, so she can roll two dice for every Action she uses to attack.
Each die result that equals or exceeds the Accuracy number of the weapon scores a successful hit.
Each hit inflicts the amount of Damage specified by the Damage value of the weapon to a single target.
- Walkers and Runners are killed with a 1 Damage hit (or more).
- Fatties are killed with a 2 Damage hit (or more).
- Abominations are killed with a 3 Damage hit (or a weapon killing everything in the target Zone, like a Molotov).
It does not matter how many hits you obtain with a weapon that inflicts 1 Damage, a Fatty or Abomination will absorb the hits without flinching. Also, remember Berserker Zombies can only be killed in Melee Combat!
EXAMPLE: Joshua unloads his two Sub MGs on three Walkers who are guarding a Fatty and scores five hits. The first three shots easily blow away the Walkers. However, the Fatty takes the two remaining hits with no consequence, as the Sub MG inflicts only 1 Damage. Shannon arrives to finish the job with her Kukri. She hits once, but the Kukri inflicts 2 Damage, which is enough to chop that Fatty down!
If there had been two Runners instead of a Fatty, a single hit with the Kukri would not have eliminated the two Runners. Each successful hit can only take out one target, and any remaining damage is overkill and wasted.
Melee Combat
A Survivor equipped with a Melee weapon (a weapon with a max Range of “0”) can attack a Zombie in his own Zone. Each die roll equal to or higher than the Accuracy value on the weapon’s card is a successful hit. The player divides his hits as desired among the possible targets in the Zone.
EXAMPLE: Shannon attacks a Walker, a Runner, and a Fatty with her dual Kukris. She rolls a 4 and 6, which means two hits. She decides to decapitate the Runner and to butcher the Fatty, leaving the Walker, the least dangerous of the three, for her next Action. Though Grindlock is also in the same Zone, he is safe from Shannon’s slashes.
Ranged Combat
A Survivor equipped with a Ranged weapon (a weapon with a max Range of “1” or more) can shoot at targets in a Zone he can see (see Line of Sight, page 7) and that is within the weapon’s Range.
REMEMBER: Inside a building, the Line of Sight is limited to the Zones that share an opening and just one Zone away. Indoor alleys are an exception, as they are considered as street Zones.
The Range of a weapon is shown by the Range value on its card, which represents the number of Zones it can shoot across. The first of the two values shows the minimum Range. The weapon may not shoot at Zones closer than the minimum. In most cases this is 0, meaning the Survivor can shoot at targets in the Zone he currently occupies. The second value shows the maximum Range of the weapon. A weapon cannot fire at Zones beyond the maximum Range.
- When a Zone is chosen for Ranged Combat, ignore any Actors in the Zones between the shooter and the target. This means Survivors may shoot through occupied Zones without danger to either other Survivors or Zombies.
- When using a Ranged weapon, the shooting Survivor does not choose the targets hit by successful rolls. Hits are assigned to Actors in the targeted Zone following the Targeting Priority Order.
- The hits are assigned to targets at the lowest priority until they’ve all been eliminated, then to targets at the next priority until they’ve all been eliminated, and so on.
- NOTE: If a Survivor receives a hit from a 2 Damage weapon, he suffers two Wounds, killing him.
Reload!
While most weapons can be used repeatedly, a few, like the Sawed-off, require spending an Action to reload them between shots if you want to fire multiple times in the same turn. At the End Phase of the turn, all such weapons are freely reloaded, so that they always start the turn ready to fire. If such a weapon is fired and passed to another Survivor without reloading, it must still be reloaded before the new owner can use it in the same turn. When equipped with two identical Dual weapons that require reloading, a single Action reloads both.
Firing with a single Dual reloadable weapon in a Zone, then firing at another Zone with the other Dual reloadable weapon, is allowed.
Car Attack
When the Survivor in the driver’s seat spends an Action to move a car, it runs over every Actor in the Zone it starts in and each Zone it enters. The player who controls the driver rolls one die for each miniature in the Zone the car leaves, every Zone it moves through, and the Zone it reaches (except for the Survivors in any car). Each 4, 5, or 6 is a successful hit that inflicts 1 Damage (only 1; it is impossible to run down a Fatty or Abomination). Assign these hits following the Targeting Priority Order, just like a Ranged Attack: first Survivors (except for those in cars, the attacking one or any other), then Walkers, then Fatties and Abominations, and finally Runners. All targeted Survivors must be killed before hits can be assigned to any Walkers. The driver gains all the experience points from the killed Zombies.
Survivors may make Melee and Ranged attacks from the inside of a car without altering the Combat rules in any way. Cars offer no protection to their occupants from normal Zombie attacks or Survivor attacks.
Zombies’ Phase
Overview
Once the players have activated all their Survivors, the Zombies play. Nobody takes their role; they do it themselves, performing the following steps in order:
Step 1 – Activation
Each Zombie activates and spends its Action on either an Attack or a Move, depending on its situation. First resolve all the Attacks, then all the Moves, but each Zombie only performs one or the other with a single Action.
Attack
Each Zombie in the same Zone as a Survivor performs an Attack. A Zombie’s Attack is always successful and does not require any dice rolls. It snatches, if possible, an Equipment card the Survivor is carrying. The player who controls that Survivor chooses and discards an Equipment card. The Survivor receives a Wounded card, which replaces the lost Equipment. When he reorganizes his Survivor’s inventory, the player may move this Wounded card just like an Equipment card, but he cannot discard or trade it, and it reduces the amount of Equipment the Survivor can carry. A Survivor with two Wounded cards is eliminated and his Equipment discarded. Additional Wounds are dealt to other Survivors. If there is no Survivor left, these additional Wounds are ignored. If different Survivors are in the same Zone, the players share the Wounded cards in any way they prefer. Cooperation also means sharing the pain and suffering!
EXAMPLE: A Walker in a Zone with two Survivors inflicts one wound during its activation. The players choose which Survivor receives the Wounded card and loses Equipment. They can decide, for example, to give it to a Survivor who is holding no equipment. They can also decide to give it to a Survivor who’s already wounded and put him out of his misery!
Feeding frenzy! Zombies fight in groups. All Zombies activated in the same Zone as a Survivor join the Attack, even if there are so many that it would be overkill.
EXAMPLE: A group of seven Walkers is in the same Zone as two Survivors. The first four Walkers are enough to kill the hapless victims, but all seven spend their Action attacking. Chow time!
Move
The Zombies that have not attacked use their Action to move one Zone toward their target, according to the following parameters:
- If they can see a Survivor, they move toward him.
- If they can see Survivors in different Zones, they move toward the noisiest visible group, regardless of the distance (REMEMBER: Each Survivor counts as a Noise token).
- If they can’t see anybody, they move toward the Zone that contains the most Noise tokens.
- If they can’t see anybody and there are no open paths to the Survivors, they move toward the noisiest Zone as if all doors were open, though locked doors still stop them.
Zombies always take the shortest possible route to their target Zone. If there is more than one route of the same length, the Zombies split into groups of equal numbers to follow all possible routes. They also split up if different target Zones contain the same number of Noise tokens. If necessary, add Zombies so that all new groups resulting from a splitting group contain the same number of each Zombie type!
Splitting special cases:
- Abominations never split; the players decide which direction they go.
- If there aren’t enough Zombies for a split, each Zombie of the designated type immediately gains an extra activation.
- Fatties don’t get extra Walker escort when splitting.
EXAMPLE: A group of four Walkers, one Fatty, and three Runners move toward a group of Survivors. The Zombies can take two routes of the same length, so they split into two groups. Two Walkers go one way, the other two take the other route. The Fatty joins one group of Walkers, and a second Fatty is added to the other group (this new Fatty does not come with extra Walkers)! The three Runners also split, two joining the first group, and the other joining the second group. Another Runner is added to the latter group so that the groups remain identical. Things just got a lot harder for the Survivors…
Runners
Runners are an exception in that they have two Actions per turn. After all Zombies (including the Runners) have gone through the Activation step and resolved their first Action, the Runners go through the Activation step again, using their second Action to Attack a Survivor in their Zone or Move if there is nobody to attack.
- EXAMPLE 1: At the beginning of the Zombies’ Phase, a group of three Runners and a Fatty is one Zone away from a Survivor. For their first Action, since they have nobody they can Attack in their Zone, the Zombies Move into the Zone with the Survivor. The Runners then perform their second Action. Since they now occupy the same Zone as a Survivor, they Attack. Each of the Runners inflicts one Wound, killing the Survivor.
- EXAMPLE 2: A Runner is in the same Zone as a Survivor, and a Walker is in the adjacent Zone. The Runner Attacks the Survivor with its first Action, inflicting a Wound, and the Walker Moves into the Zone, since he sees the Survivor. Then the Runner performs its second Action. It attacks the Survivor again, killing him.
- EXAMPLE 3: A Survivor stands in the same Zone as three Walkers, two Fatties, and two Runners. All the Zombies attack and inflict seven Wounds (two Wounds are enough to kill the Survivor; the five remaining Wounds are still applied but without further consequence). None of the Zombies Move, as they all Attacked. Then the Runners resolve their second Action. They have no one to Attack, so they Move one Zone toward the noisiest Zone.
Step 2 – Spawn
The Mission maps show where Zombies appear at the end of each turn. These are the Spawn Zones. Indicate a Spawn Zone and draw a Zombie card. Read the line on the card that corresponds to the color of the Danger Level of the most experienced Survivor still in the game (Blue, Yellow, Orange, or Red). Place the number and type of Zombies shown. Repeat this for each Spawn Zone. Always begin with the same Spawn Zone and continue clockwise.
REMEMBER: Each Fatty has two Walkers as escorts when it spawns but not when you add one to balance a group of Zombies that splits.
When the Zombie deck runs out, reshuffle all the discarded cards to make a new deck.
EXAMPLE: Kim has 5 experience points, placing her in the Blue Danger Level. Watts has 12, which puts him in the Yellow. In order to determine how many Zombies spawn each turn, read the Yellow line, which corresponds to Watts, the most experienced Survivor.
There are two special cases: the Extra Activation card and the Manhole card. In both cases, no Zombies appear in the designated Zone.
- Extra Activation card: When you reveal an Extra Activation card, no Zombies appear in the designated Zone. Instead, all Zombies of the indicated type get another turn. Notice that these cards have no effect at the Blue Danger Level!
- Manhole card: When you draw a Manhole card, no Zombie appears on the designated Zone. Instead, place the indicated number and type of Zombies in every Zone where the map shows a manhole, on every tile where at least one Survivor stands. Manhole invasions never happen on tiles devoid of Survivors.
REMEMBER: The Danger Level used for spawning Zombies is set by the Survivor with the highest Danger Level still in the game. If this Survivor is eliminated, the Danger Level drops to that of the next most experienced Survivor.
Running Out of Miniatures
The Zombicide Season 2: Prison Outbreak box contains enough Zombies to invade a city. However, players may still run out of miniatures of the indicated type when required to place a Zombie on the board (when spawning, populating a building, or due to splitting). In this case, the remaining Zombies are placed (if there are any), and then all Zombies of the requested type immediately gain an extra activation. Multiple activations may occur in a row if (bad) circumstances arise. So, always keep a wary eye on the Zombie population over the board or risk an unexpected zombie riot!
Zombie Types & Species
Types of Zombies
There are four types of Zombies:
- Walker: It stinks, it’s nasty, and it’s slow. Eliminating a Walker provides 1 experience point.
- Fatty: Big, bloated, and tough, these Zombies are hard to put down. Weapons dealing only 1 Damage can’t hurt them…at all. You need a 2 Damage weapon (or more) to kill them. Each Fatty spawns with two Walkers alongside it, except when its group is splitting. Killing a Fatty provides 1 experience point.
- Runner: Amped up for some reason, these guys move twice as fast as Walkers. Each Runner has two Actions per activation, while all other Zombies only have one. Eliminating a Runner provides 1 experience point.
- Abomination: Mutated beyond recognition, the Abomination is the Survivors’ worst nightmare. Only weapons dealing 3 Damage or more, like a Concrete Saw, can kill this monster. A well-aimed Molotov will also do the trick, as it kills everything in its target Zone. An Abomination spawns alone (possibly having eaten its Walker fellows). Killing an Abomination provides 5 experience points.
A game can include several Abominations if you have extra miniatures for them. If you need to spawn an Abomination but have no miniatures left, replace it with a Fatty and its two Walkers.
Zombie Species
Zombies also come in various species: Standard, Toxic, and Berserker.
- Standard Zombies have no special rules.
- Toxic Zombies are introduced in the Toxic City Mall expansion. They release Toxic Blood Sprays and have to be eliminated from a distance.
- Berserker Zombies are introduced in Zombicide Season 2: Prison Outbreak.
Berserker Zombies
- Berserker Zombies are immune to Ranged weapon Damage, except for weapons killing everything in their target Zone (such as a Molotov cocktail). Unless otherwise stated, the only way to kill a Berserker Zombie is in Melee Combat.
- Berserker Zombies exist in all types: Fatties, Runners, Walkers, etc. They have the same characteristics and get the same targeting priority as their counterparts, but in Ranged Combat and Car Attacks, a Berserker Zombie of a given type is targeted after the Standard and Toxic Zombie of the same type. Players still choose their targets in Melee Combat.
- Berserker Fatties are spawned with an escort of 2 Berserker Walkers.
- Berserker Zombies do not benefit from the extra activation cards of other Zombie types.
- Car attacks can kill Berserker Zombies.
- The Berserker Abomination has an additional game effect: it moves up to two Zones instead of one.
Berserker Zombies aren’t turned into Toxic Zombies by the Toxic Abomination (see the Toxic City Mall expansion).
EXAMPLE: Watts fires a Shotgun into a Zone where a Walker, a Berserker Walker, a Fatty, and a Runner stand. He scores two hits with his first Ranged Combat Action. The Walker is removed, but the Berserker Walker is immune. Any subsequent shot is useless, as it would be absorbed by the Berserker Walker. So, the Berserker Walker protects both the Fatty and the Runner! Watts rushes into melee with his second Action. With his third Action, he swings his Chainsaw and scores two hits. Melee Combat allows the choosing of targets and the killing of Berserkers: Watts removes the Berserker Walker and the Runner. The Fatty remains for Watts’ team to pick off.
Zombivors & Resurrection Mode
Zombivors
Death and zombie infection can’t turn a real hero into a monster. Your favorite Survivors can make it back to the game as Zombie heroes called Zombivors! When your Survivor is eliminated by Zombies, you can turn him into a Zombivor: flip his Identity Card and savor a bloody revenge.
The Zombivors’ status is indicated with on the Survivors’ Identity Card. All Survivor rules apply to them.
The killer feature about Zombivors is their incredible endurance: a Zombivor is only eliminated by five Wounded Cards in his Inventory (instead of two for a standard Survivor).
Zombivors are great tanks. There’s a serious drawback, though: at Yellow Level, Zombivors don’t gain the +1 Action Skill of standard Survivors. They’re tougher but somewhat slower, and thus offer a whole different gaming experience.
Resurrection Mode
Resurrection mode lets you begin the game with your favorite Survivors in their “standard” version and then switch them to their “Zombivor” version when things go awry. Experienced players may begin the game directly with Zombivors instead of standard Survivors.
- When any standard Survivor gets his second Wound, lay down his miniature. Getting killed by a team member doesn’t grant a resurrection.
- A standard Survivor can’t receive more than two Wounds. If he receives more Wounds than needed to kill him, distribute these Wounds to other Survivors, or ignore them if nobody can take them.
- Ignore the downed Survivor for all game effects until his resurrection, as if he was removed from the board.
- At the beginning of any following Players’ turn, before the first player acts, resurrect the Survivor:
- Discard all of his Wounded cards.
- Replace his downed miniature with his standing Zombivor miniature.
- Flip his Survivor Identity Card to its Zombivor version side.
- The new Zombivor immediately gains any remaining Equipment cards his standard version had (inventory reorganized for free) and as many experience points as the standard version had (choosing new Skills is allowed).
- Ongoing game effects previously applied to the standard version no longer apply. Unless for Resurrection (or stated otherwise), all rules affect Zombivors the same way they do Survivors.
Prison Special Locations & Vehicles
Prison Locations
Alleys
The prison tiles feature indoor alleys. Indoor alleys count as street Zones for all purposes. Cars can be driven inside the indoor alleys, as long as they got in by an opened double door. Yes, cars can get in the prison!
- 1- Lines of sight: Lines of sight cover as many Zones as the line can go through before reaching a wall or the edge of the board.
- 2- Search: You can’t Search in an indoor alley.
Cells
Cells are separated by walls. This influences:
- 1- Movement: You can only enter a cell through an opened door.
- 2- Lines of sight: Cells are building Zones.
- 3- Search: Cells can’t be Searched.
- 4- Zombie spawning: Opening a cell’s door generates a Zombie spawn in the cell. The same happens if the cell door is opened (or missing) when the route to the alley is opened. Locking down a cell then opening it again doesn’t generate a Zombie spawn.
Barbwire Fences
- 1- Barbwire fences can’t be crossed but don’t block line of sight. They can be shot through.
- 2- Barbwire fences have a special effect on Zombie movement. Zombies still follow the shortest route to the noisiest Zone or visible Survivor, as if there was no barbwire fence. They pile up at the barbwire fence until a shorter path is defined or the fence is destroyed.
- 3- Abominations are strong enough to ignore a barbwire fence and can move through it, destroying it in the process. If an Abomination has to go through a barbwire fence, first put a “torn barbwire” token to link its starting and destination Zones. Survivors and Zombies can now cross the Zones. Then proceed with moving all Zombies (as the Zombies’ route may be redefined by the fence’s destruction).
Observation Towers / Extra Zones
Observation Towers
Observation tower tokens allow Survivors to climb out of reach of common Zombies and cull the infected numbers by shooting in all directions. Beware, though, not to get surrounded!
- 1- Observation towers can only be accessed by ladders. Using a ladder is done in the same way as crossing an open door. A Zombie can never get in or spawn in an observation tower.
- 2- Observation tower Zones can be shot at normally. They don’t have walls.
- 3- Survivors gain the +1 max Range Skill as long as they stand in an Observation tower.
- 4- An observation tower can’t be Searched.
Extra Zones
On the reverse, observation towers feature extra Zones to put anywhere you need: in a larger Zone, at a crossroads, in a courtyard, outside a game board, as a rooftop, or a secret Zone. They share the same rules as building Zones and offer your games greater flexibility.
Rotating Security Gate
The reversible rotating security gate tile allows you to open, change, or block the way with a simple trigger, usually a Switch. Spending an Action to pull the dedicated switch allows the player to activate the rotating security gate and turn it a quarter turn in any direction he wishes.
- Zombies don’t Spawn in a rotating security gate.
- A rotating security gate can’t be Searched.
Security Zones
- 1- Security Zones are building Zones. This has an impact especially on lines of sight.
- 2- The only Action allowed while standing on a security Zone is Moving.
- 3- Survivors and Zombies can’t finish their activation standing in a security Zone. If they do so, they are pushed back to the Zone they just left.
- 4- Zombies don’t Spawn in security Zones.
- 5- Cars can’t cross security Zones.
Car Special Rules
Searching in Cars
You can Search a car as long as the Survivor is in the same Zone and there are no Zombies in the Zone.
Car Substitution
You may want to substitute some cars for others to add flavor to your games, suit your play style, or try older missions again. Note that these substitutions work both ways:
- Police cars can be replaced by taxis.
- Pimpmobiles can be replaced by hippiemobiles or muscle cars.
Police Cars
You can Search police cars more than once per game. Draw cards until you find a weapon. Discard the other cards. The Aaahh! card triggers the appearance of a Walker as usual and interrupts the Search.
Pimpmobile
You can Search a pimpmobile only once per game. It contains a Gunblade. Unless the Mission states otherwise, feel free to add any pimpmobile weapon you might own from other Zombicide games or expansions (the Evil Twins, Ma’s Shotgun, Pa’s Pistol, etc.) and draw one of them randomly. Some Missions may contain many pimpmobiles. In this case, only the weapons that have not yet been taken can be inside them. When there are no more…there are no more.
Hippiemobile
- Hippiemobiles can be Searched in the same way as pimpmobiles.
- Ignore car attacks made by hippiemobiles. They are harmless.
Muscle Car
- Muscle cars can’t be Searched.
- Muscle cars can move up to 3 Zones instead of 2 when driven.
Taxi
You can Search taxis more than once per game. They are Searched just like a building Zone but Flashlight cards have no effect. The Aaahh! card triggers the appearance of a Walker as usual and interrupts the Search.
Skills
Survivor Skills
Each Survivor in Zombicide Season 2: Prison Outbreak has specific Skills with effects described in this section. In case of conflict with the general rules, the Skill rules have priority. Some of the following Skills are not attributed to the Survivors in this box. They will be used by other Survivors in the future.
The effects of the following Skills and/or bonuses are immediate and may be used the turn in which they are acquired. This means that if one Action causes a Survivor to level up and gain a Skill, that Skill may be used immediately if the Survivor has any Actions remaining (or the Survivor may use any extra Actions the Skill may grant).
- +1 Action: The Survivor has an extra Action he may use as he pleases.
- +1 Damage: [Type]: The Survivor gets a +1 Damage bonus with the specified type of Combat Action (Melee or Ranged).
- +1 Damage with [Equipment]: The Survivor gets a +1 Damage bonus with the specified Equipment.
- +1 to dice roll: Combat: The Survivor adds 1 to the result of each die he rolls on a Combat Action (Melee or Ranged). The maximum result is always 6.
- +1 to dice roll: Melee: The Survivor adds 1 to the result of each die he rolls in Melee Combat. The maximum result is always 6.
- +1 to dice roll: Ranged: The Survivor adds 1 to the result of each die he rolls in Ranged Combat. The maximum result is always 6.
- +1 die: Combat: The Survivor’s weapons roll an extra die in Combat (Melee or Ranged). Dual weapons gain a die each, for a total of +2 dice per Dual Combat Action.
- +1 die: Melee: The Survivor’s Melee weapons rolls an extra die in Combat. Dual Melee weapons gain a die each, for a total of +2 dice per Dual Melee Combat Action.
- +1 die: Ranged: The Survivor’s Ranged weapons roll an extra die in Combat. Dual Ranged weapons gain a die each, for a total of +2 dice per Dual Ranged Combat Action.
- +1 free Combat Action: The Survivor has one free extra Combat Action. This Action may only be used for Melee or Ranged Combat.
- +1 free Melee Action: The Survivor has one extra, free Melee Combat Action. This Action can only be used for Melee Combat.
- +1 free Move Action: The Survivor has one free extra Move Action. This Action may only be used as a Move Action.
- +1 free Ranged Action: The Survivor has one extra, free Ranged Combat Action. This Action can only be used for Ranged Combat.
- +1 free Search Action: The Survivor has one free extra Search Action. This Action may only be used to Search, and the Survivor can still only Search once per turn.
- +1 max Range: The Survivor’s Ranged weapons’ maximum Range is increased by 1.
- +1 Zone per Move: The Survivor can move through one extra Zone each time he performs a Move Action. This Skill stacks with other effects benefitting Move Actions.
- 1 re-roll per turn: Once per turn, you can re-roll all the dice related to the resolution of an Action made by the Survivor. The new result takes the place of the previous one. This Skill stacks with the effects of Equipment that allow re-rolls.
- 2 cocktails are better than 1: The Survivor gets two Molotov cards instead of one when he creates a Molotov.
- 2 Zones per Move Action: When the Survivor spends one Action to Move, he can move one or two Zones instead of one.
- Ambidextrous: The Survivor treats all Melee and Ranged weapons as if they had the Dual symbol.
- Blitz: Each time your Survivor kills the last Zombie of a Zone, he gets 1 free Move Action to use immediately.
- Bloodlust: Combat: Spend one Action with the Survivor: He moves up to two Zones to a Zone containing at least one Zombie. He then benefits of a free Combat Action.
- Bloodlust: Melee: Spend one Action with the Survivor: He moves up to two Zones to a Zone containing at least one Zombie. He then benefits of a free Melee Action.
- Bloodlust: Ranged: Spend one Action with the Survivor: He moves up to two Zones to a Zone containing at least one Zombie. He then benefits of a free Ranged Action.
- Born leader: During the Survivor’s turn, he may give one free Action to another Survivor, to use as he pleases. This Action must be used during the recipient’s next turn or it is lost.
- Break-in: The Survivor doesn’t need any Equipment to open doors. He doesn’t make Noise while using this Skill. However, other prerequisites are still mandatory (such as taking a designated Objective). Moreover, the Survivor has one extra, free Door opening Action. This Action can only be used to open doors. Please note the Break-in Skill doesn’t apply to removing barricades (see Toxic City Mall).
- Can start at [Danger Level]: The Survivor can begin the game at the indicated Danger Level (first experience point of the indicated Danger Level). All players have to agree.
- Collector: [Zombie type]: The Survivor doubles the experience gained each time he kills a Zombie of the specified type.
- Death grasp: Don’t discard an Equipment card when the Survivor receives a Wounded card. This Skill is ignored if there’s no space left in the Inventory to receive the Wounded card.
- Destiny: The Survivor can use this Skill once per turn when he reveals an Equipment card he drew. Discard that card and draw another Equipment card.
- Distributor: Using this Skill alters the Spawn step during the Zombies’ Phase. When resolving the Spawn step during the Zombies’ Phase, draw as many Zombie cards as there are Spawn Zones. Assign each of them freely to a Spawn Zone, then spawn Zombies as indicated.
- Dreadnought: [Zombie type]: The Survivor ignores all Wounds coming from Standard Zombies of the specified type.
- Frenzy: Combat: All weapons the Survivor carries gain +1 die per Wound the Survivor suffers. Dual weapons gain a die each, for a total of +2 dice per Wound and per Dual Combat Action.
- Frenzy: Melee: Melee weapons the Survivor carries gain +1 die per Wound the Survivor suffers. Dual Melee weapons gain a die each, for a total of +2 dice per Wound and per Dual Melee Combat Action.
- Frenzy: Ranged: Ranged weapons the Survivor carries gain +1 die per Wound the Survivor suffers. Dual Ranged weapons gain a die each, for a total of +2 dice per Wound and per Dual Ranged Combat Action.
- Gunslinger: The Survivor treats all Ranged weapons as if they had the Dual symbol.
- Hoard: The Survivor can carry one extra Equipment card in reserve.
- Hold your nose: This Skill can be used once per turn. The Survivor gets a free Search Action in the Zone if he has eliminated a Zombie (even outside a building) the very same turn. This Action may only be used to Search and the Survivor can still only Search once per turn.
- Is that all you’ve got?: You can use this Skill any time the Survivor is about to get Wounded cards. Discard one Equipment card in your Survivor’s inventory for each Wound he’s about to receive. Negate a Wounded card per discarded Equipment card.
- Lifesaver: The Survivor can use this Skill for free, once during each of his turns. Select a Zone containing at least one Zombie at Range 1 from your Survivor. All friendly Survivors in the selected Zone can be dragged to your Survivor’s Zone without penalty. This is not a Movement. A Survivor can decline the rescue and stay in the selected Zone if his controller wants to. Both Zones need to share a clear path: a Survivor can’t cross barricades, fences, or walls. Lifesaver can’t be used by a Survivor in a car or in an observation tower, nor can it be used to drag Survivors out of a car or an observation tower.
- Lock it down: At the cost of one Action, the Survivor can close an open door on his Zone. Opening it again later does not trigger a new Zombie Spawn.
- Loud: Once per turn, the Survivor can make a huge amount of noise! Until this Survivor’s next turn, the Zone he used this Skill in is considered to have the highest number of Noise tokens on the entire map. If different Survivors have this Skill, only the last one who used it applies the effects.
- Low profile: The Survivor can’t be targeted by allied Ranged Attacks and can’t be hit by car attacks. Ignore him when shooting in or driving through the Zone he stands in. Weapons that kill everything in the targeted Zone, like the Molotov, still kill him.
- Lucky: The Survivor can re-roll once all the dice of each Action he takes. The new result takes the place of the previous one. This Skill stacks with the effects of other Skills (“1 re-roll per turn”, for example) and Equipment that allows re-rolls.
- Matching Set!: When a Survivor performs a Search Action and draws a weapon card with the Dual symbol, he can immediately take a second card of the same type from the Equipment deck. Shuffle the deck afterward.
- Medic: Once per turn, the Survivor can freely remove one Wounded card from a Survivor in the same Zone. He may also heal himself.
- Ninja: The Survivor makes no Noise. At all. His miniature does not count as a Noise token, and his use of Equipment or weapons produces no Noise tokens either! The Survivor may choose not to use this Skill at any time, if he wishes to be noisy.
- Point-blank: When firing at Range 0, the Survivor chooses freely the targets of his Ranged Combat Actions and can kill any type of Zombies (including Berserker Zombies). His Ranged weapons still need to inflict enough Damage to kill his targets.
- Reaper: Combat: Use this Skill when assigning hits while resolving a Combat Action. One of these hits can freely kill an additional identical Zombie in the same Zone. Only a single additional Zombie can be killed per Action when using this Skill.
- Reaper: Melee: Use this Skill when assigning hits while resolving a Melee Action. One of these hits can freely kill an additional identical Zombie in the same Zone. Only a single additional Zombie can be killed per Action when using this Skill.
- Reaper: Ranged: Use this Skill when assigning hits while resolving a Ranged Action. One of these hits can freely kill an additional identical Zombie in the same Zone. Only a single additional Zombie can be killed per Action when using this Skill.
- Regeneration: At the end of each game round, discard all Wounds the Survivor received. Regeneration doesn’t work if the Survivor has been eliminated.
- Roll 6: +1 die Combat: You may roll an additional die for each “6” rolled on any attack, Melee or Ranged. Keep on rolling additional dice as long as you keep getting “6”. Game effects that allow re-rolls must be used before rolling any additional dice for this Skill.
- Roll 6: +1 die Melee: You may roll an additional die for each “6” rolled on a Melee attack. Keep on rolling additional dice as long as you keep getting “6”. Game effects that allow re-rolls must be used before rolling any additional dice for this Skill.
- Roll 6: +1 die Ranged: You may roll an additional die for each “6” rolled on a Ranged attack. Keep on rolling additional dice as long as you keep getting “6”. Game effects that allow re-rolls must be used before rolling any additional dice for this Skill.
- Rotten: At the end of his turn, if the Survivor has not taken a Combat Action, driven a car (passengers are not concerned), and has not produced a Noise token, place a Rotten token next to his base. As long as he has this token, he is totally ignored by any and all types of Zombies (except Zombivors) and is not considered a Noise token. Zombies don’t attack him and will even walk past him. The Survivor loses his Rotten token if he takes any Combat Action or makes noise. Even with the Rotten token, the Survivor still has to spend extra Actions to move out of a Zone crowded with Zombies.
- Shove: The Survivor can use this Skill for free, once during each of his turns. Select a Zone at Range 1 from your Survivor. All Zombies standing in your Survivor’s Zone are pushed to the selected Zone. This is not a Movement. Both Zones need to share a clear path: a Zombie can’t cross barricades, fences, or walls. Shove can’t be used by Survivors in a car.
- Slippery: The Survivor does not spend extra Actions when he performs a Move Action through a Zone where there are Zombies.
- Sniper: The Survivor may freely choose the targets of all his Ranged Combat Actions.
- Super strength: Consider the Damage value of Melee weapons used by the Survivor to be 3.
- Starts with a [Equipment]: The Survivor begins the game with the indicated Equipment; its card is automatically assigned to him before the beginning of the game.
- Steady hand: Allied miniatures are ignored when the Survivor uses a Ranged Attack or drives a car through a Zone. The Skill does not apply to a Ranged weapon killing everything in the targeted Zone (such as a Molotov cocktail, for example).
- Swordmaster: The Survivor treats all Melee weapons as if they had the Dual symbol.
- Tactician: The Survivor’s turn can be resolved anytime during the Players’ Phase, before or after any other Survivor’s turn.
- Taunt: The Survivor can use this Skill for free, once during each of his turns. Select a Zone your Survivor can see. All Zombies standing in the selected Zone immediately gain an extra activation: they try to reach the taunting Survivor by all means available. Taunted Zombies ignore all other Survivors: they do not attack them and cross the Zone they stand in if needed to reach the taunting Survivor.
- Tough: The Survivor ignores the first Attack he receives from a single Zombie every Zombies’ Phase.
- Toxic immunity: The Survivor is immune to Toxic Blood Spray (see Toxic City Mall).
- Trick shot: When the Survivor is equipped with Dual Ranged weapons, he can aim at targets in different Zones with each weapon in the same Action.
- Webbing: All equipment in the Survivor’s inventory is considered equipped in hand.
- Zombie link: The Survivor plays an extra turn each time an extra activation card is drawn in the Zombie pile. He plays before the extra-activated Zombies. If several Survivors benefit from this Skill at the same time, the players choose their activation order.
Missions
M00 Tutorial: The Break-In
Medium / 6+ Survivors / 90 Minutes
Tiles needed: 1P, 2P, 3P, 4P, 17P & 18P.
Objectives
Follow it in this order:
- Find the violet key. The violet prison main entry door only opens with the violet key, which is in one of the nearby buildings. A red “X” has been set in each room where the key could be. Take the violet Objective. Beware the green Objective, as it wakes an Abomination!
- Enter the prison. Open the neutral prison main entry door and reach the Exit with all Survivors. Any Survivor may escape through this Zone at the end of his turn, as long as there are no Zombies in it.
Special Rules
- Exploring methodically: Each Objective gives 5 experience points to the Survivor who takes it.
- I’ve found something…big: Put the green Objective randomly among the red Objectives, face down. When this Objective is taken, an Abomination immediately appears in the Zone where the token was. If the Abomination is already in the game, replace it with a Fatty and two Walkers.
- Is this the violet key?: Put the violet Objective randomly among the red Objectives, face down. When this token is taken, the violet prison main entry door can be opened.
- Do you know what a silent alarm is?: The violet spawn Zone activates when the violet Objective is taken.
- You can use cars.
- Nice, a police car!: You can Search a police car more than once. Draw cards until you find a weapon. Discard the other cards. The Aaahh! card triggers the appearance of a Walker as usual and interrupts the Search.
M01 The Blueprints
Hard / 6+ Survivors / 150 Minutes
Tiles needed: 1P, 2P, 3P, 5P, 6P, 9P, 11P, 16P & 18P.
Objectives
- Find the maps, blueprints, and all that can be useful: They are marked on the map with a red “X”. Take all the red Objectives.
- Fall back behind the security gates: Fall back into the prison with the remaining Survivors, then lock the violet gate and the white doors. Kill all Zombies that have entered until the remaining Zombies have no open path to reach the Survivors. At least one Survivor must be inside the prison, in this safe area.
Special Rules
- Exploring methodically: Each Objective gives 5 experience points to the Survivor who takes it.
- Observation stuff: Set one Scope card and one Rifle card in the observation tower shown on the map. A Survivor in this observation tower can use one Action to take both cards.
- The rotating security gate: When the yellow Switch is activated, the rotating security gate rotates a quarter turn to the left or to the right. The Survivor activating the yellow Switch for the first time also takes the yellow Objective and gains 5 experience points.
- The violet Switch: Activating the violet Switch opens the violet door. The Survivor activating the violet Switch for the first time also takes the violet Objective and gains 5 experience points. The violet door closes when the violet Switch is set back to its original setting.
- Uh-oh: The violet Switch also opens another door inside. The violet Spawn Zone activates when the violet Switch is activated. This Spawn Zone ceases to spawn Zombies when the violet Switch is set back to its original setting.
- The white cells have already been explored: Activating the white Switch opens all white cell doors. The Survivor who activates the white Switch for the first time also takes the white Objective and gains 5 experience points. When opened for the first time, spawn Zombies in the whole area, including the little room on the bottom right corner of the map. The white cell doors close when the white Switch is set back to its original setting.
- The berserker guardian: At the beginning of the game, place a Berserker Abomination in the Zone marked on the map.
- You can use cars.
- It’s a pimpmobile!: You can search each pimpmobile only once per game. Each contains a Gunblade.
- Police car!: Searchable more than once for weapons.
M02 Finding the Keys
Medium / 6+ Survivors / 120 Minutes
Tiles needed: 1P, 2P, 4P, 9P, 10P & 17P.
Objectives
- Find the keys: Prison keys have been stored in the administrative areas. Take all Objectives.
- Continue inside the prison: Reach the Exit Zone with all Survivors. Any Survivor may escape through this Zone at the end of his turn, as long as there are no Zombies in it.
Special Rules
- Finding the keys: Each Objective gives 5 experience points to the Survivor who takes it.
- Bad surprise: Put the green Objective randomly among the red Objectives, face down. The Survivor who takes it gains 5 experience points. When taken, an Abomination immediately appears in the Zone (replace with a Fatty and two Walkers if already in play).
- From bad to worse: Put the blue Objective randomly among the red Objectives, face down. The Survivor who takes it gains 5 experience points. When taken, a Berserker Abomination immediately appears in the Zone (replace with a Berserker Fatty and two Berserker Walkers if already in play).
- Yes it could be even worse: The Zombie blue Spawn Zone activates when the blue Objective is taken.
M03 Concrete Saw
Medium / 6+ Survivors / 120 Minutes
Tiles needed: 3P, 4P, 5P, 7P, 8P, 9P, 10P, 15P & 17P.
Objectives
- Get the Concrete saw: See the special rules.
- Open the green door: It can only be opened by a Concrete saw.
- Clean this prison sector: This prison area is divided into three sectors to clean: the central corridor, the white sector, and the violet sector. Take all Objectives inside the prison and clear these three areas from Zombies to win the game.
Special Rules
- Useful stuff!: Each Objective gives 5 experience points to the Survivor who takes it.
- Looking for a Concrete saw: It’s marked on the map with a green “X”. The Survivor who takes the green Objective receives 5 experience points, a Concrete saw, and his inventory can be reorganized for free.
- This door won’t be easy to open: The green door can only be opened by a Concrete saw.
- Violet sector’s cells: Activating the violet Switch opens all violet cell doors. The first Survivor to activate it takes the violet Objective and gains 5 XP. Doors close when set back.
- White sector’s cells: Activating the white Switch opens all white cell doors. The first Survivor to activate it takes the white Objective and gains 5 XP. Doors close when set back.
- The rotating security gate: Activated by the yellow Switch (rotates 90 degrees left or right). The first Survivor to activate it takes the yellow Objective and gains 5 XP.
M04 The Welder
Medium / 6+ Survivors / 90 Minutes
Tiles needed: 1P, 6P, 9P & 12P.
Objectives
- Open the violet door: The first obstacle to remove is a security gate. The switch to open it is in the security room.
- Someone must operate the security gate: Someone has to activate the rotating security gate from the inside. Those who turn the yellow Switch will be left alone for some time.
- Find the welder: Take the Objective.
- Go back and close everything: Get all Survivors back into the prison. Then, lock the violet door and the rotating security gate.
Special Rules
- A precious welder: The Objective gives 5 experience points to the Survivor who takes it.
- The violet Switch: Activating opens all violet cell doors and the violet door. First activation grants the violet Objective (5 XP). Closes when set back.
- The white Switch: Activating opens all white cell doors and the white door. First activation grants the white Objective (5 XP). Closes when set back.
- Where do they come from?: The Zombie violet Spawn Zone activates when the violet Switch is activated. Setting it back shuts down this spawn zone.
- The yellow Switch for the rotating security gate: Rotates gate a quarter turn. First activation grants the yellow Objective (5 XP).
- Ex-owner of the welder: At the beginning of the game, place an Abomination in the Zone marked on the map. It will go through the barbwire and open a way to the welder.
M05 An Easy Mission
Medium / 6+ Survivors / 150 Minutes
Tiles needed: 7P, 8P, 12P & 15P.
Objectives
- Open the violet and white cells: You just need to activate the violet and white Switches to open these doors.
- Come back: Reach the Exit Zone with all remaining Survivors. Any Survivor may escape through this Zone at the end of his turn, as long as there are no Zombies.
Special Rules
- Checkpoints: Each Objective gives 5 experience points to the Survivor who takes it.
- This isn’t regular guard equipment: Someone left a Gunblade and a Riot Shield in the guards’ checkroom. A Survivor can spend one Action in the same Zone to collect this equipment.
- The violet Switch: Opens all violet cell doors. The first Survivor to activate it takes the violet Objective and gains 5 XP. Can only be activated once.
- The white Switch: Opens all white cell doors. The first Survivor to activate it takes the white Objective and gains 5 XP. Can only be activated once.
- There it was: The Zombie violet Spawn Zone activates when the violet Switch is activated.
M06 Rescue Mission
Medium / 6+ Survivors / 150 Minutes
Tiles needed: 6P, 10P, 11P, 12P, 14P & 15P.
Objectives
- Open the violet doors: This way, the team will be able to unite again. Activate the violet Switch to open these doors.
- Open the white doors: The white doors are the only thing between you and the exit. Activate the white Switch to open these doors.
- No one gets left behind: Reach the Exit Zone with all Survivors. Any Survivor may escape through this Zone at the end of his turn, as long as there are no Zombies.
Special Rules
- Exploring very carefully: Each Objective gives 5 experience points to the Survivor who takes it.
- Separated team: Half of the team is trapped inside the prison. There are two starting areas. Split the team in two equal groups after distributing the starting Equipment. The first group begins on one starting area, the second group in the other.
- The violet Switch: Opens all violet cell doors and the violet door. First activation grants the violet Objective (5 XP). Can only be activated once.
- The white Switch: Opens all white cell doors. First activation grants the white Objective (5 XP). Can only be activated once.
M07 The Haven
Hard / 6+ Survivors / 120 Minutes
Tiles needed: 1P, 2P, 5P, 6P, 7P & 12P.
Objectives
- Open the violet doors: Activate the violet Switch.
- Open the white doors: Activate the white Switch.
- Body count!: The Mission succeeds if, anytime after having completed the previous two objectives, there are no Zombies left on the board.
Special Rules
- King of the yard: At the beginning of the game, place an Abomination in the Zone marked on the map.
- The violet Switch: Opens all violet cell doors and the violet door. First activation gives the violet Objective (5 XP). Closes when set back.
- A faraway door linked to the violet Switch: The Zombie violet Spawn Zone activates when the violet Switch is activated. Ceases when set back.
- The white Switch: Opens all white cell doors and the white door. First activation gives the white Objective (5 XP). Closes when set back.
- The yellow Switch for the rotating security gate: Rotates gate a quarter turn. First activation gives the yellow Objective (5 XP).
- You can use cars.
- Two police cars!: Searchable more than once for weapons.
M08 Foooood!
Hard / 6+ Survivors / 180 Minutes
Tiles needed: 1P, 2P, 5P, 6P, 9P, 10P, 11P & 12P.
Objectives
- Gather food: The places where food is stored are marked with a red “X”. Take all Objectives.
- Go back to the yard: Get back to the starting area with at least eight food cards granted by the Objectives. If a Survivor is eliminated while carrying one of these cards, the game is lost.
Special Rules
- Doing what has to be done: Each Objective gives 5 experience points to the Survivor who takes it.
- Foooood!: At the beginning of the game, set apart all Canned Food, Rice, and Water cards. Each time a red Objective is taken, the Survivor who takes it receives one of these cards at random and can reorganize his inventory for free.
- What the hell did these zombies eat?: At the beginning of the game, place a Runner in each Zone marked on the map.
- The violet Switch: Opens the violet prison main entry and the violet cell doors. First activation grants the violet Objective (5 XP). Closes when set back.
- The white Switch: Opens the white cell doors. First activation grants the white Objective (5 XP). Closes when set back.
- The yellow Switch for the rotating security gate: Rotates the gate 90 degrees. First activation grants the yellow Objective (5 XP).
- You can use cars.
- Police car!: Searchable multiple times for weapons.
M09 Endless Cleaning (A Possible End)
Hard / 6+ Survivors / 120 Minutes
Tiles needed: 7P, 8P, 9P, 10P, 12P & 16P.
Objectives
- Find the green master key: The white Switch is behind a green door! Take Objectives until you find the green one.
- Open the white and violet cells.
- We have to leave: Reach the Exit Zone with all Survivors. Any Survivor may escape through this Zone at the end of his turn, as long as there are no Zombies.
Special Rules
- Last try, but head up!: Each Objective gives 5 experience points to the Survivor who takes it.
- The green master key!: Put the green Objective randomly among the red Objectives, face down. Once taken, the green door can be opened (5 XP).
- Silent alarm!: Put the blue Objective randomly among the red Objectives, face down. Activates the blue Spawn Zone when taken (5 XP).
- The violet Switch: Opens violet cell doors and violet prison main entrance. First activation gives violet Objective (5 XP). Closes when set back.
- The white Switch: Opens white cell doors and white prison main entrance. First activation gives white Objective (5 XP). Closes when set back.
- The yellow switch for the rotating security gate: Rotates gate a quarter turn. First activation gives yellow Objective (5 XP).
M10 Prison is Hell (An Alternative Ending)
Hard / 6+ Survivors / 120 Minutes
Tiles needed: 5P, 6P, 7P, 8P, 9P, 12P, 17P & 18P.
Objectives
- Find the blue master key: The prison main entry is locked and requires a master key to open it. Take them all and find the blue Objective among them.
- Open the violet and white cells: Once the main entry is open, jump in and kill every zombie you see.
- Explore all areas of interest: Take all the Objectives to finish the mission.
Special Rules
- Check list!: Each Objective gives 5 experience points to the Survivor who takes it.
- The blue master key!: Put the blue Objective, face down, randomly among the five red Objective tokens specially marked on the map outside of the main building. Once taken, the main entry to the prison wing can be opened.
- The violet Switch: Opens the violet cell doors. First activation gives violet Objective (5 XP). Closes when set back.
- The white Switch: Opens the white cell doors. First activation gives white Objective (5 XP). Closes when set back.
- The yellow Switch for the rotating security gate: Rotates gate a quarter turn. First activation gives yellow Objective token (5 XP).
- You can use cars.
- Pimpmobiles: Searched once each; each contains a Gunblade.
- Police car: Searchable repeatedly until a weapon is found.
Turn Summary & Winning / Losing
Winning and Losing
- The game is lost when all Survivors have been gruesomely killed and eliminated from the game.
- The game is won immediately when all of the Mission objectives have been accomplished. Zombicide Season 2: Prison Outbreak is a cooperative game, so all players win if the Mission objectives are fulfilled.
Turn Summary
1. First Step
Choose the first player (he receives the “first player” token).
2. Players’ Phase
The first player activates all of his or her Survivors, one after the other, in any order. When he or she’s done, the next player’s turn begins. Play clockwise. Each Survivor initially has three Actions to spend, chosen from the following list. Unless stated otherwise, each Action may be performed several times per turn.
- MOVE: Move one Zone.
- SEARCH: Indoor only. Draw a card in the Equipment deck (always only one Search per turn per Survivor).
- OPEN A DOOR: Special Equipment or Skill required. Spawn Zombies inside a building if it’s the first door.
- REORGANIZE INVENTORY: Equipment exchange with another Survivor (in the same Zone) is possible.
- RANGED COMBAT: Equipped Ranged weapon required.
- MELEE COMBAT: Equipped Melee weapon required.
- GET IN OR GET OUT OF A CAR: Can’t get in if there are Zombies.
- CHANGE SEATS IN A CAR: Move to a different empty seat.
- DRIVE A CAR: If allowed by the Mission. Must be in the driver’s seat. Attacks every Actor in the Zones travelled.
- TAKE AN OBJECTIVE TOKEN OR ACTIVATE AN OBJECT: (in the Survivor’s Zone).
- MAKE NOISE: Gotta need it to risk it.
- DO NOTHING: (and live with it).
3. Zombies’ Phase
- ACTIVATION: All Zombies spend one Action doing one of these two things:
- ATTACK: Zombies in the same Zone as a Survivor attack them.
- OR MOVE: The Zombies who didn’t Attack, Move. The others are having a brunch.
- Each Zombie favors visible Survivors, then noise.
- Choose the shortest path. If needed, split groups and add Zombies to make the groups even.
NOTE: Runners get two Actions per turn. Once all Zombies have taken their first Action, Runners go though the Activation step again to resolve their second Action.
- SPAWN:
- Always draw Zombie cards for all Spawn Zones in the same order (play clockwise).
- Danger Level used = highest Danger Level among active Survivors.
- Fatties spawn with two Walkers.
- No more minis of specified type? All Zombies of specified type get an extra activation!
4. End Phase
- Remove all Noise tokens from the board.
- The next player receives the “first player” token (play clockwise).
Expansions for
Zombicide Season 2: Prison Outbreak
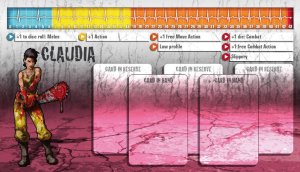
Zombicide Survivor: Claudia
2013
A gang-forged Survivor with hard-earned skills against zombies.
Medium
View expansion
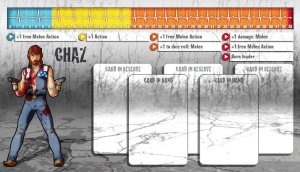
Zombicide Survivor: Chaz
2013
A heroic Survivor with gun skills, powerful fists, and a no-kill ideal.
Medium
View expansion
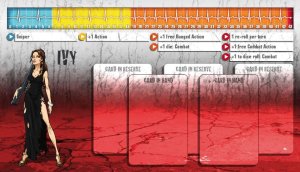
Zombicide Survivor: Ivy
2013
A former assassin returns to action when the zombie outbreak begins.
Medium
View expansion
Zombicide Survivor: Audrey
2014
A promotional Survivor tied to Guillotine Games’ map and scenario design contest.
Medium
View expansion
Zombicide Survivor: Nick
2012
A corrupt, lucky lieutenant searching for his missing wife
Medium
View expansion
Zombicide: Special Guest Box – Miguel Coimbra
2014
Add Miguel Coimbra’s survivors and Zombivor counterparts to your collection.
60
minutes
Medium
View expansion
Zombicide Set #4: Moustache Pack
2014
Add three distinctive survivors—and their zombivor counterparts—to your apocalypse.
60
minutes
Medium
View expansion
Zombicide Gaming Night #1: Cars, Food or Guns
2014
Choose your path to survival in a three-mission Zombicide gaming night.
60
minutes
Medium
View expansion
Zombicide Survivor: El Cholo
2012
A silent, machete-wielding Survivor built for close-quarters zombie action.
Medium
View expansion
Zombicide Survivor: Kyoko
2013
A promotional Survivor with a Zombivor version available
Medium
View expansion
Zombicide: Set #3 – Survivors & Zombivors
2014
Add six distinctive survivors—and their zombivor counterparts—to your crew.
60
minutes
Medium
View expansion
Zombicide: Special Guest Box – Kevin Walker
2014
Add two striking survivors and their Zombivor counterparts to your Zombicide games.
60
minutes
Medium
View expansion

Zombicide: Special Guest Box – Paolo Parente
2014
Add Paolo Parente’s survivors and Zombivor counterparts to your collection.
60
minutes
Medium
View expansion
Zombicide: Special Guest Box – Karl Kopinski
2014
Two survivors, their Zombivor counterparts, and a fierce grudge against the undead.
60
minutes
Medium
View expansion
Zombicide: Special Guest Box – Adrian Smith
2014
Add two memorable survivors—and their Zombivor counterparts—to the apocalypse.
60
minutes
Medium
View expansion
Zombicide: Box of Zombies – Set #4: Walk of the Dead 2
2013
Add 24 classic zombies and 12 new spawn cards to your Zombicide games.
60
minutes
Medium
View expansion
Zombicide: Box of Zombies – Set #3: Angry Zombies
2013
Bring 24 berserker zombies and denser spawn cards to your Zombicide games.
60
minutes
Medium
View expansion
Zombicide: Box of Zombies – Set #2: Toxic Crowd
2013
Add 24 toxic zombies and denser toxic spawns to your Zombicide game.
60
minutes
Medium
View expansion
Zombicide: Compendium 1
2014
A 92-page collection of campaigns, missions, and exclusive content
60
minutes
Medium
View expansion
Zombicide: Box of Dogs – Set #6: Dog Companions
2013
Command loyal dog companions to move, search, and attack.
60
minutes
Medium
View expansion
