
Coffee Traders
2021
Develop coffee-growing regions, build thriving Fair Trade plantations, and trade Arabica beans in a competitive 1970s global market.
150
minutes
2 - 5
player(s)
12+
Heavy


About this board game
Coffee Traders is a 2021 board game for 2–5 players that takes about 150 minutes to play, inviting you into the world of 1970s coffee production and trade.
Across Central and South America, Africa, and Asia, small coffee farmers cultivate hillside plantations and harvest delicious Arabica beans. In the game, these beans are sold in Antwerp and around the world to coffee roasters both large and small.
Work alongside your competitors to develop the regions you believe are best suited for producing exceptional coffee, while keeping a watchful eye on the market. The choices you make help shape Fair Trade coffee plantations and the wider network that connects them to buyers.
- Develop coffee regions across three major areas of the world.
- Construct buildings that help Fair Trade plantations thrive.
- Enhance trading networks for moving coffee toward the global market.
- Watch the market as Arabica beans reach roasters in Antwerp and beyond.
Fair Trade organizations in the setting help farmers establish cooperatives, improve pricing agreements, and take out loans for new plantations. These efforts support education, quality of life, families, societies, and the environment, giving the coffee trade a broader purpose than profit alone.
Will your plantations fall into ruin, or will your decisions, developments, and trading connections carry you to the top? In Coffee Traders, compete for the chance to become the world’s greatest coffee trader.
/pic7182955.jpg)
Board Game Rules for
Coffee Traders
THE COFFEE TRADING HANDBOOK
A COMPREHENSIVE GUIDE TO THE INDUSTRY
ANDRÉ SPIL & ROLF SAGEL
Edited by Travis D. Hill & Donny Behne
FIRST EDITION 1970
Coffee is always a good idea
Introduction
Coffee Traders is set in 1970s Central and South America, Africa, and Asia. Thousands of coffee farmers all over the world support their families by using small stretches of hillside land for their coffee plantations.
Farmers work day in and day out for very little, but the future of coffee farming is bright. Fair Trade organizations strive to improve living conditions for these farmers by helping them set up cooperatives. This enables them to establish better pricing agreements and take out loans for new plantations, all to help provide education and improve the quality of their lives, families, societies, and environment. In Coffee Traders, the delicious Arabica Coffee beans farmers harvest are sold in Antwerp—and all over the world—to coffee roasters large and small.
Contents
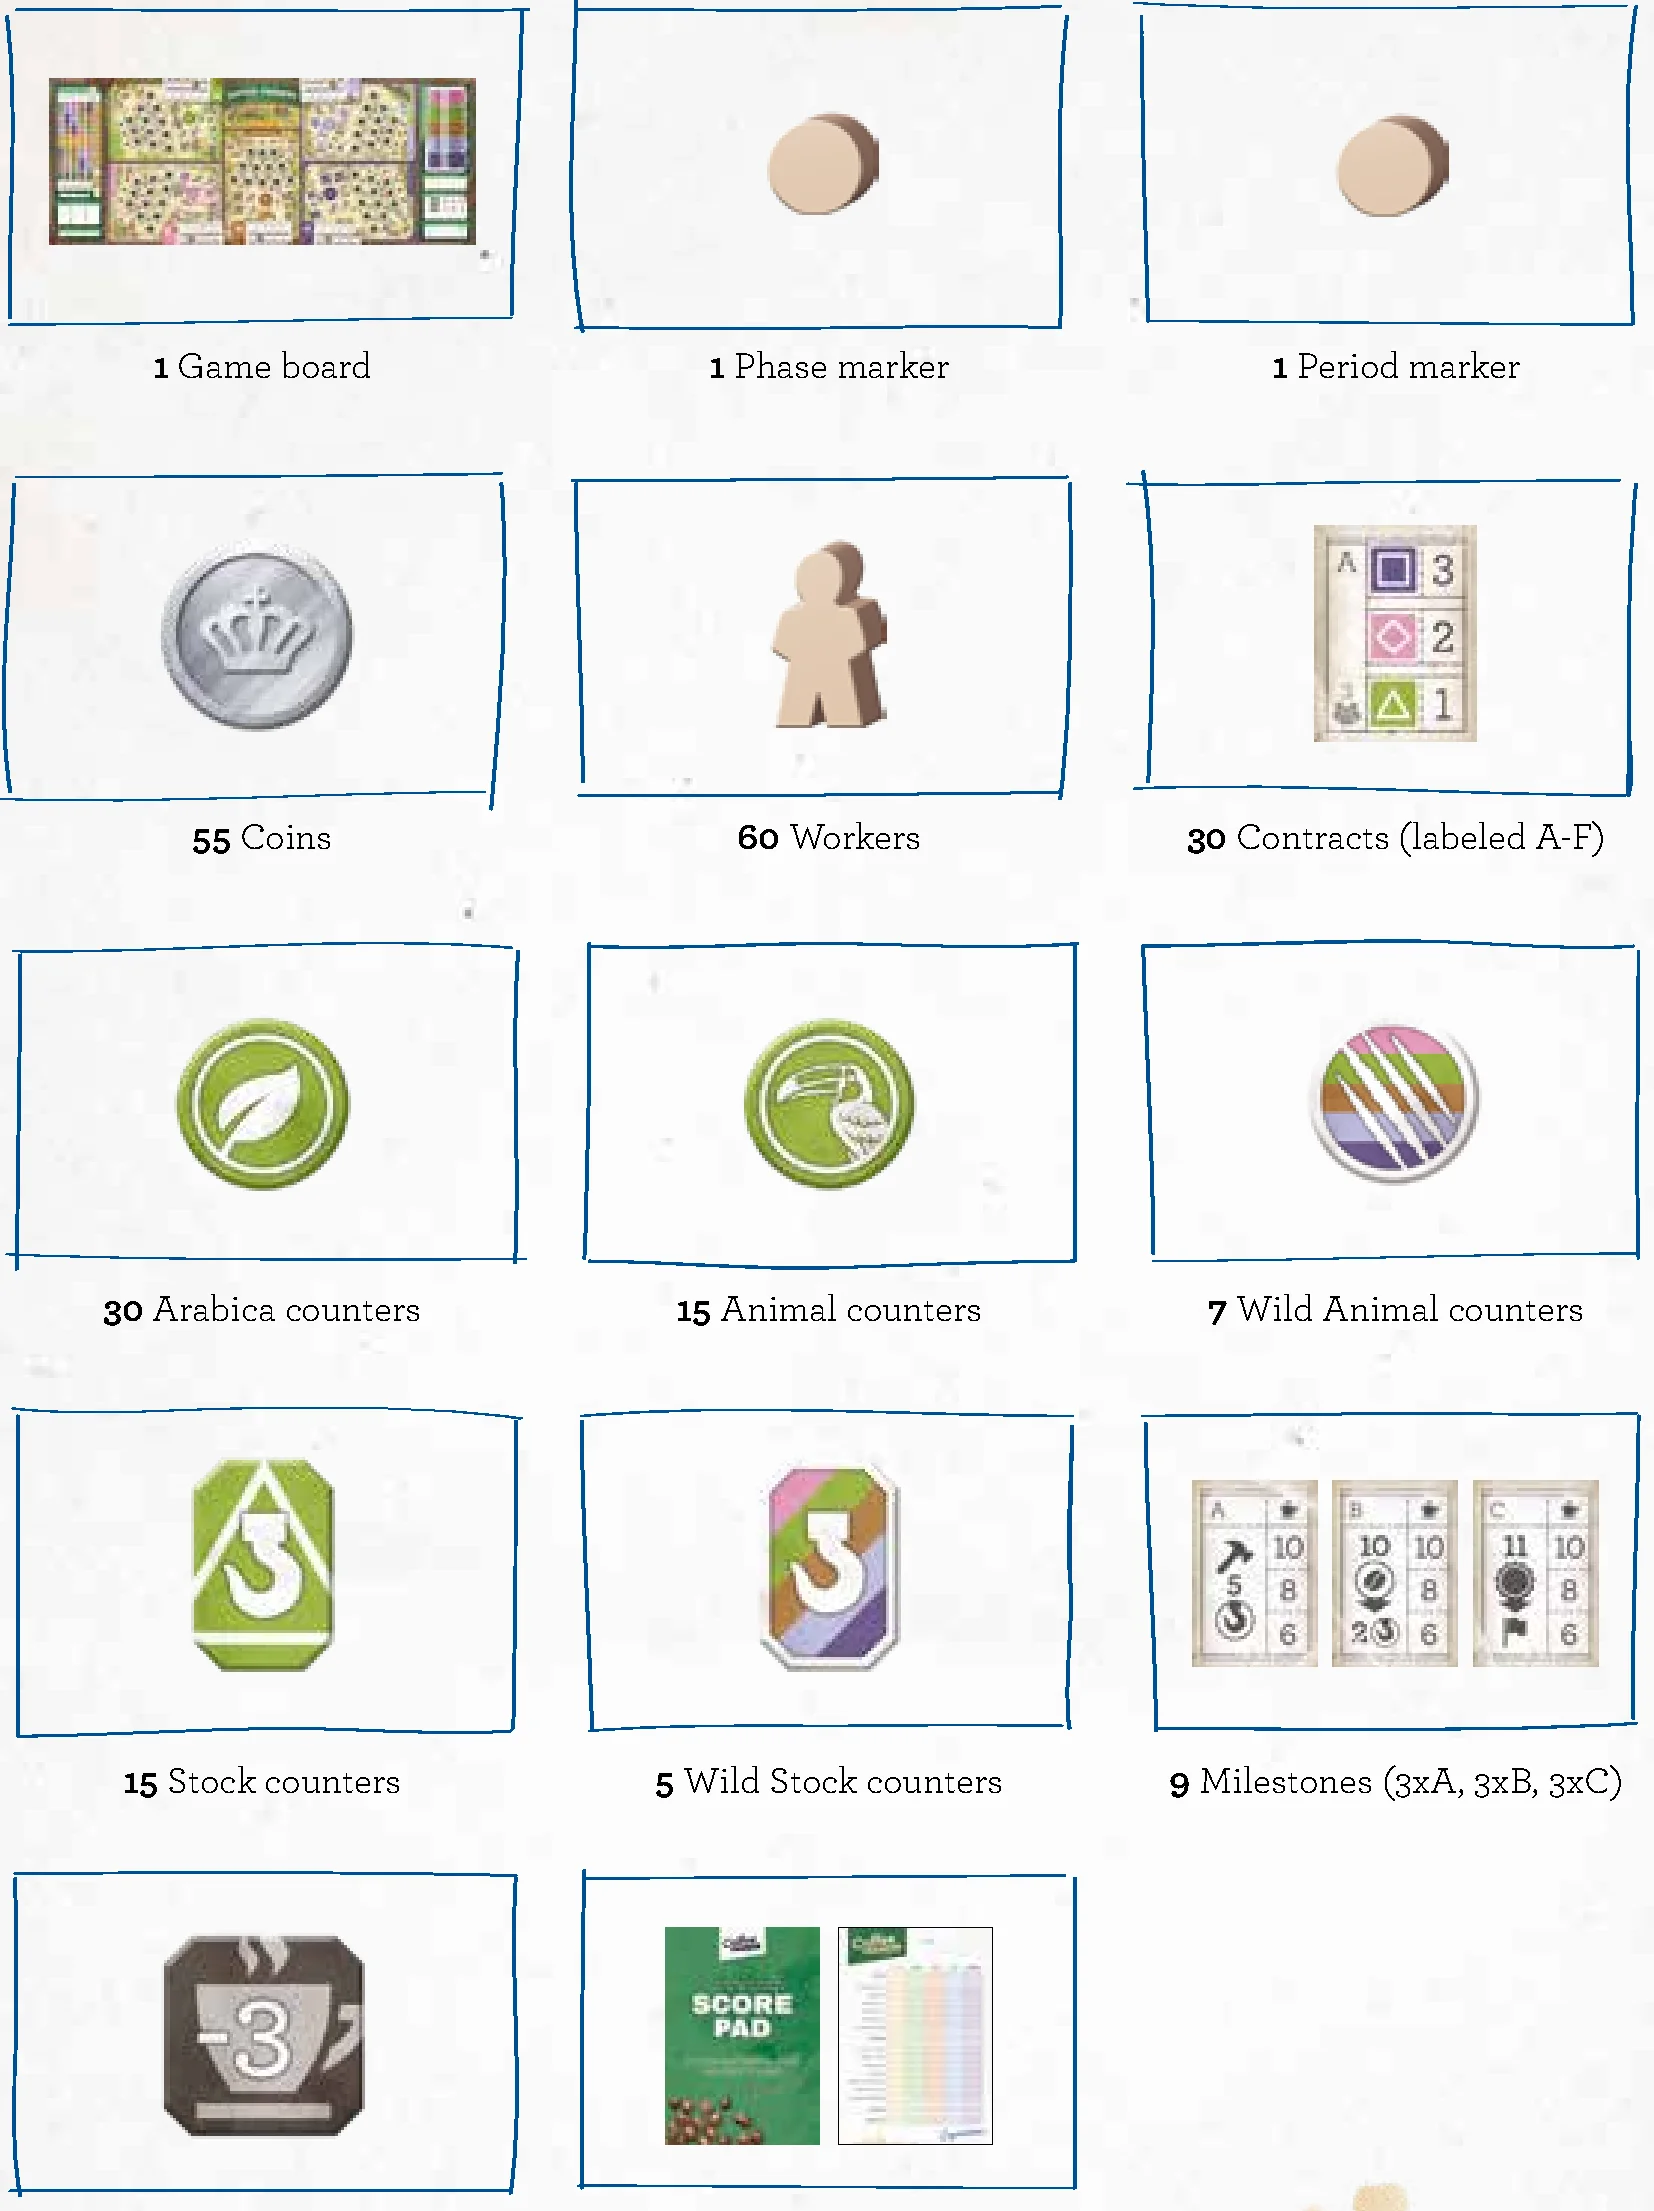
General Components
- 1 Game board
- 1 Phase marker
- 1 Period marker
- 55 Coins
- 60 Workers
- 30 Contracts (labeled A-F)
- 30 Arabica counters
- 15 Animal counters
- 7 Wild Animal counters
- 15 Stock counters
- 5 Wild Stock counters
- 9 Milestones (3xA, 3xB, 3xC)
- 6 -3VP tokens
- 1 Score pad
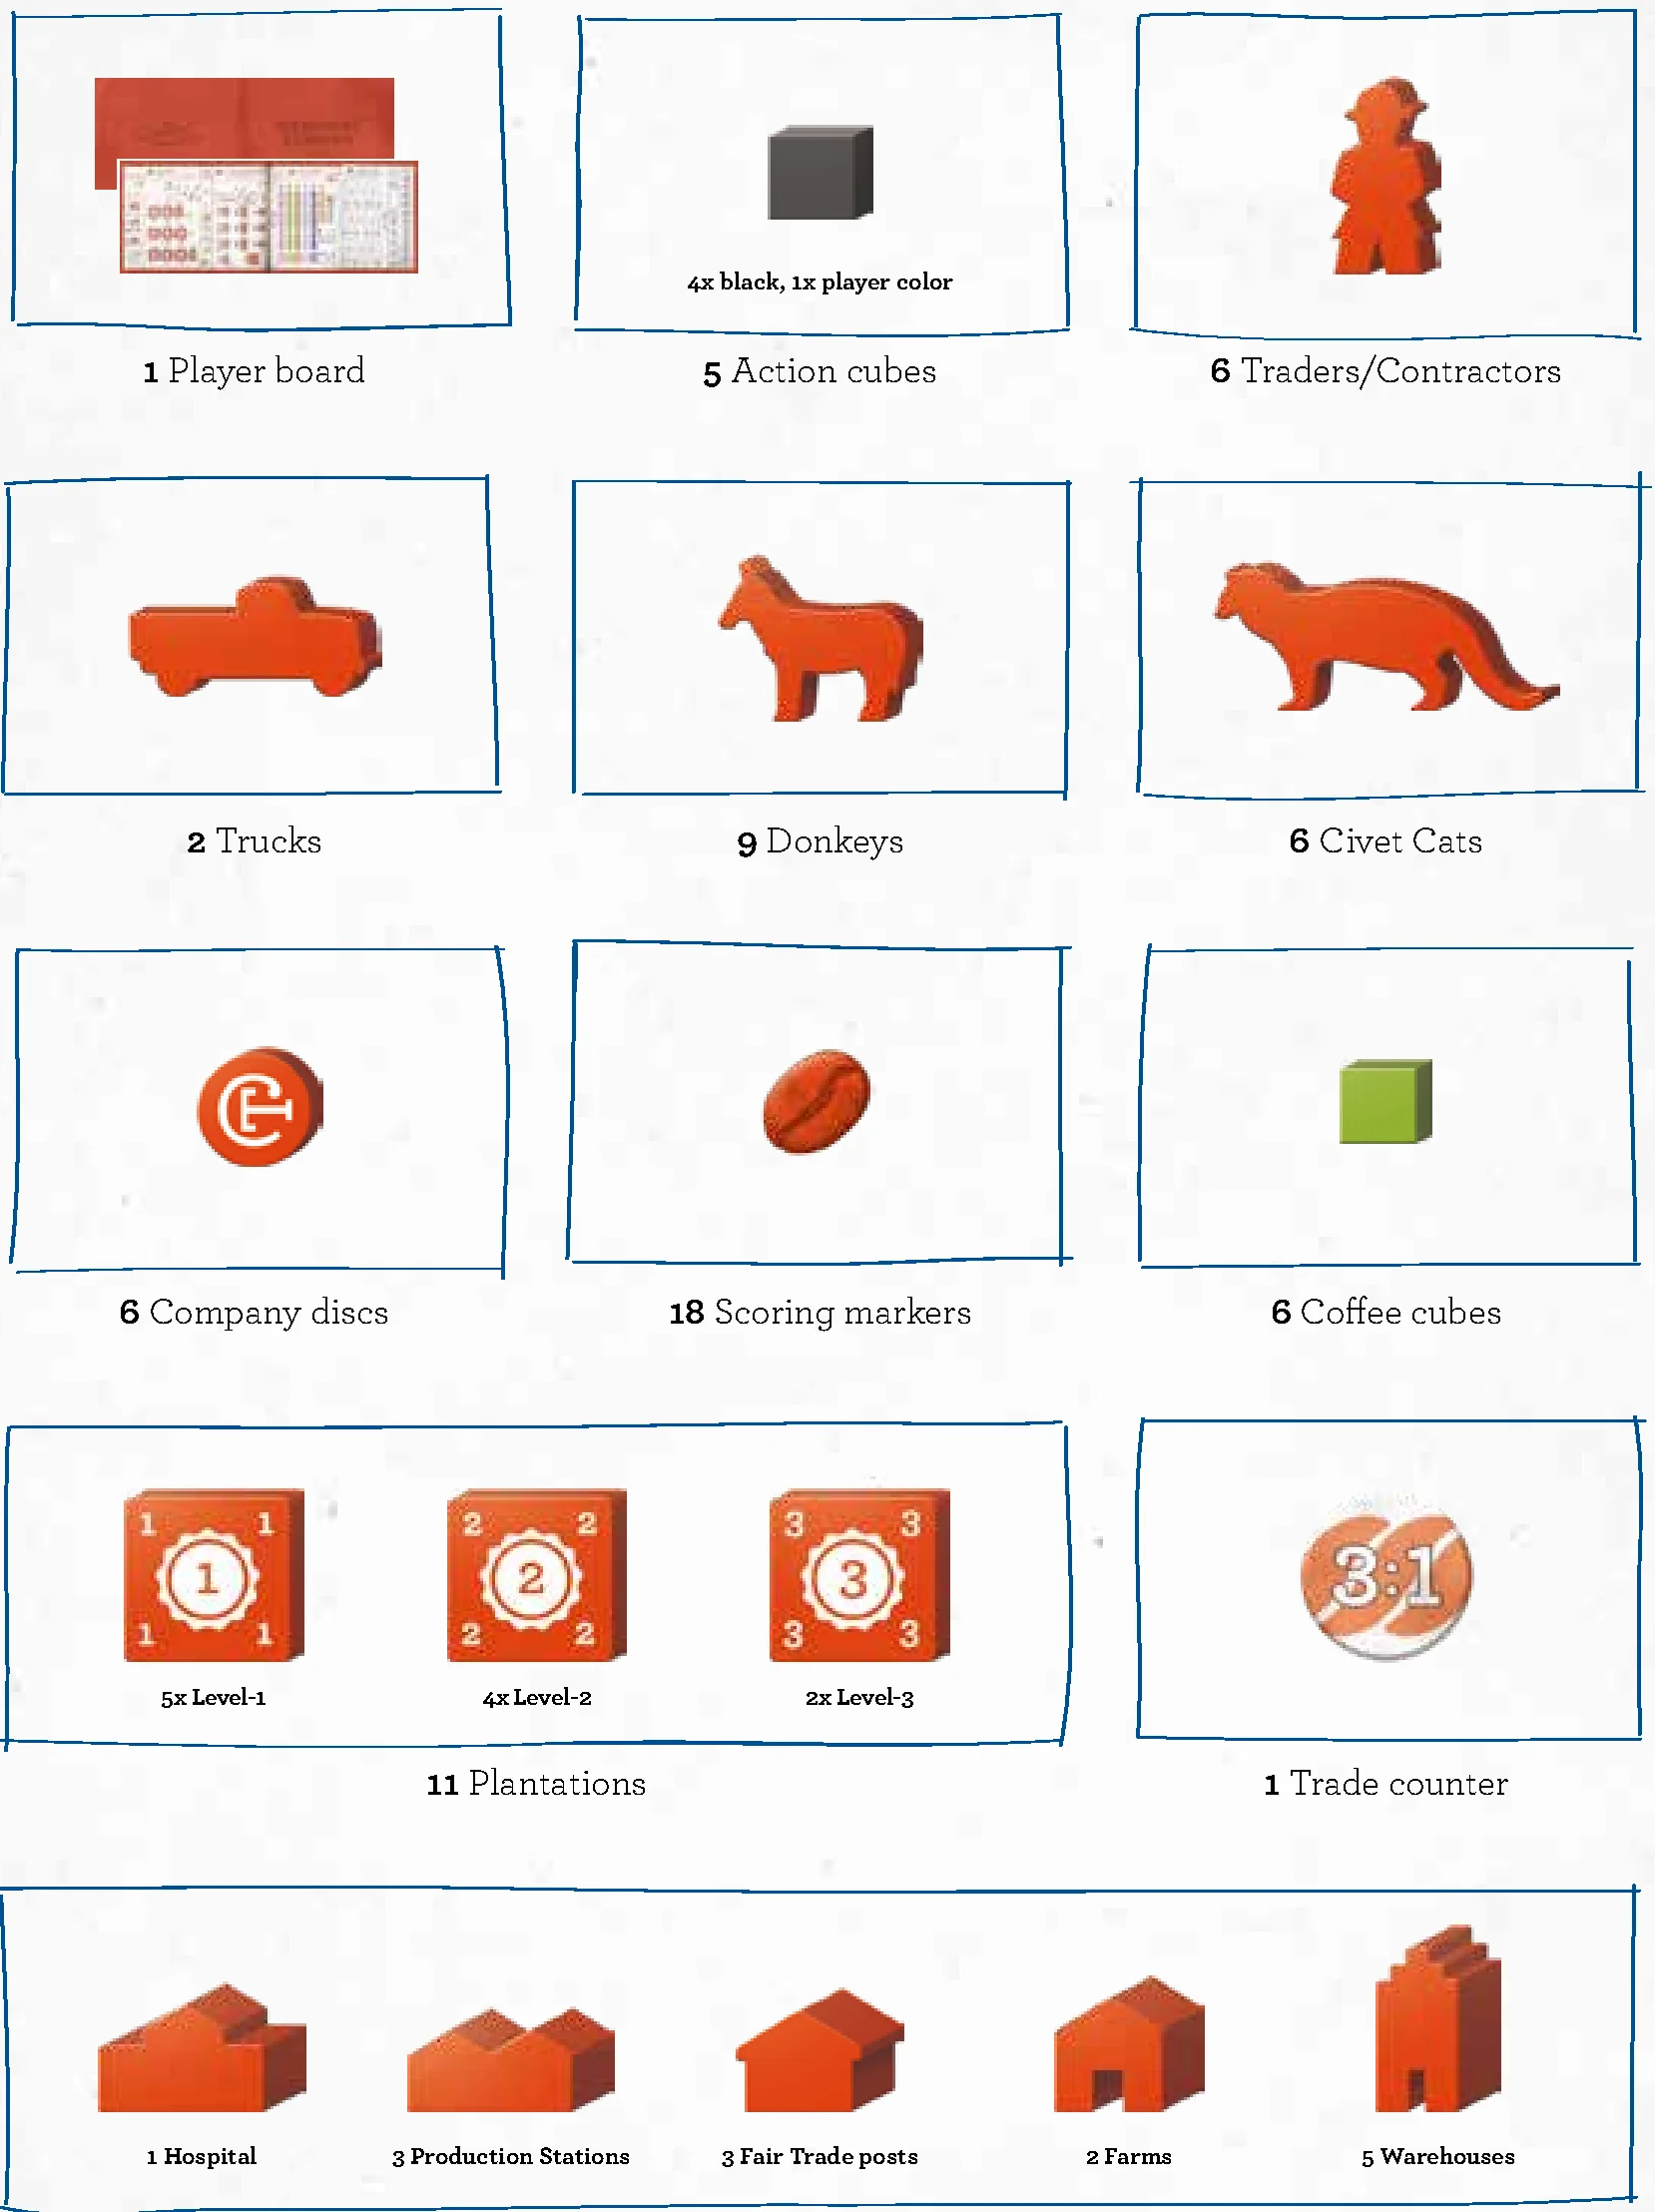
Player Components
- 1 Player board
- 5 Action cubes (4x black, 1x player color)
- 6 Traders/Contractors
- 2 Trucks
- 9 Donkeys
- 6 Civet Cats
- 6 Company discs
- 18 Scoring markers
- 6 Coffee cubes
- 11 Plantations:
- 5x Level-1
- 4x Level-2
- 2x Level-3
- 1 Trade counter
- 14 Buildings:
- 1 Hospital
- 3 Production Stations
- 3 Fair Trade posts
- 2 Farms
- 5 Warehouses
Game Board Setup
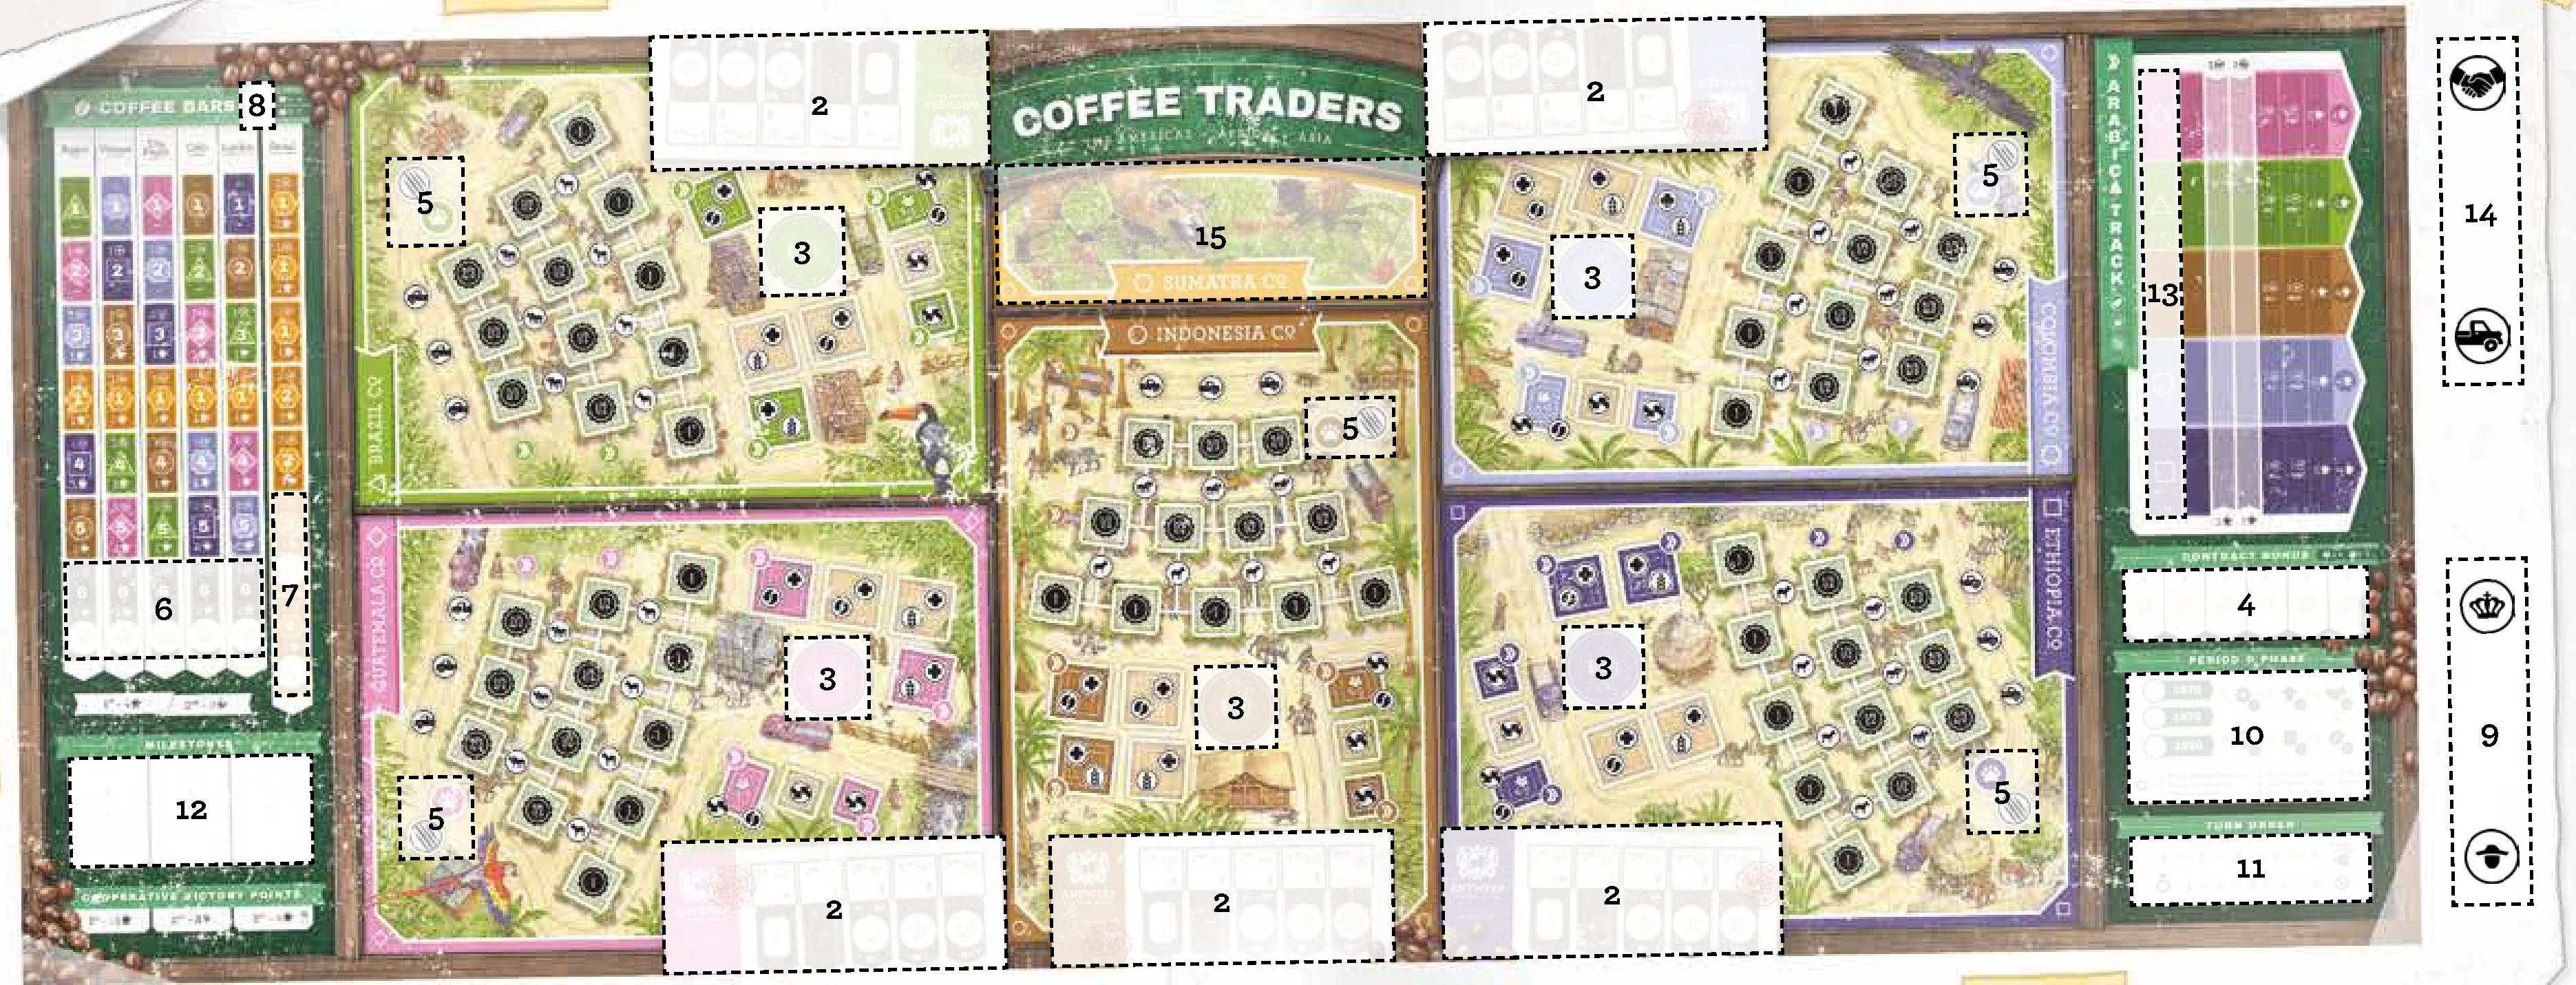
- Place the main board in the middle of the table. Players take a player board and all matching color pieces.
- In each of the 5 Trading Houses, place 1 Coin. Also, place the 3 Stock counters that correspond to their matching Trading Houses.
- In a 3-player game, place the Coin on the 3rd position.
- In a 4-player game, place the Coin on the 4th position.
- In a 5-player game, place the Coin on the 5th position.
- Place 6 Workers in each of the 5 Town Centers.
- Shuffle the Arabica counters facedown. For each Contract Bonus space, create a stack of face-up Arabica counters corresponding to the amounts stated on the board. Return any remaining Arabica counters to the box.
- In each Cooperative, place 1 Animal counter that matches the color of the Cooperative and 1 Wild Animal counter.
- Take 5 different types of Animal counters, and randomly place 1 on each “6” space by the Coffee Bars.
- Place 1 Wild Animal counter on both the 3 and 4 spaces of the Kopi Luwak bar.
- In a 4-player game, place 4 Wild Stock counters, and in a 5-player game, place 5 Wild Stock counters next to the Coffee Bars.
- Place the remaining Coins and Workers next to the board as a general supply.
- Place the Period Marker on 1970 of the Period track and the Phase marker on Phase 1.
- Shuffle 1 Company disc from each player and place them at random on the top Turn Order track.
- Sort the Milestones by letter: A, B, and C. Shuffle each stack separately and place 1 of each face up on their designated spaces on the Milestones area of the main board. Return unused Milestones to the box.
- Each player places 1 of their Company discs to the left of each line on the Arabica track.
- Each player places 1 Trader and 1 Truck next to the main board near the Arabica track.
- Each player places 1 Civet Cat in Sumatra.
Player Board Setup
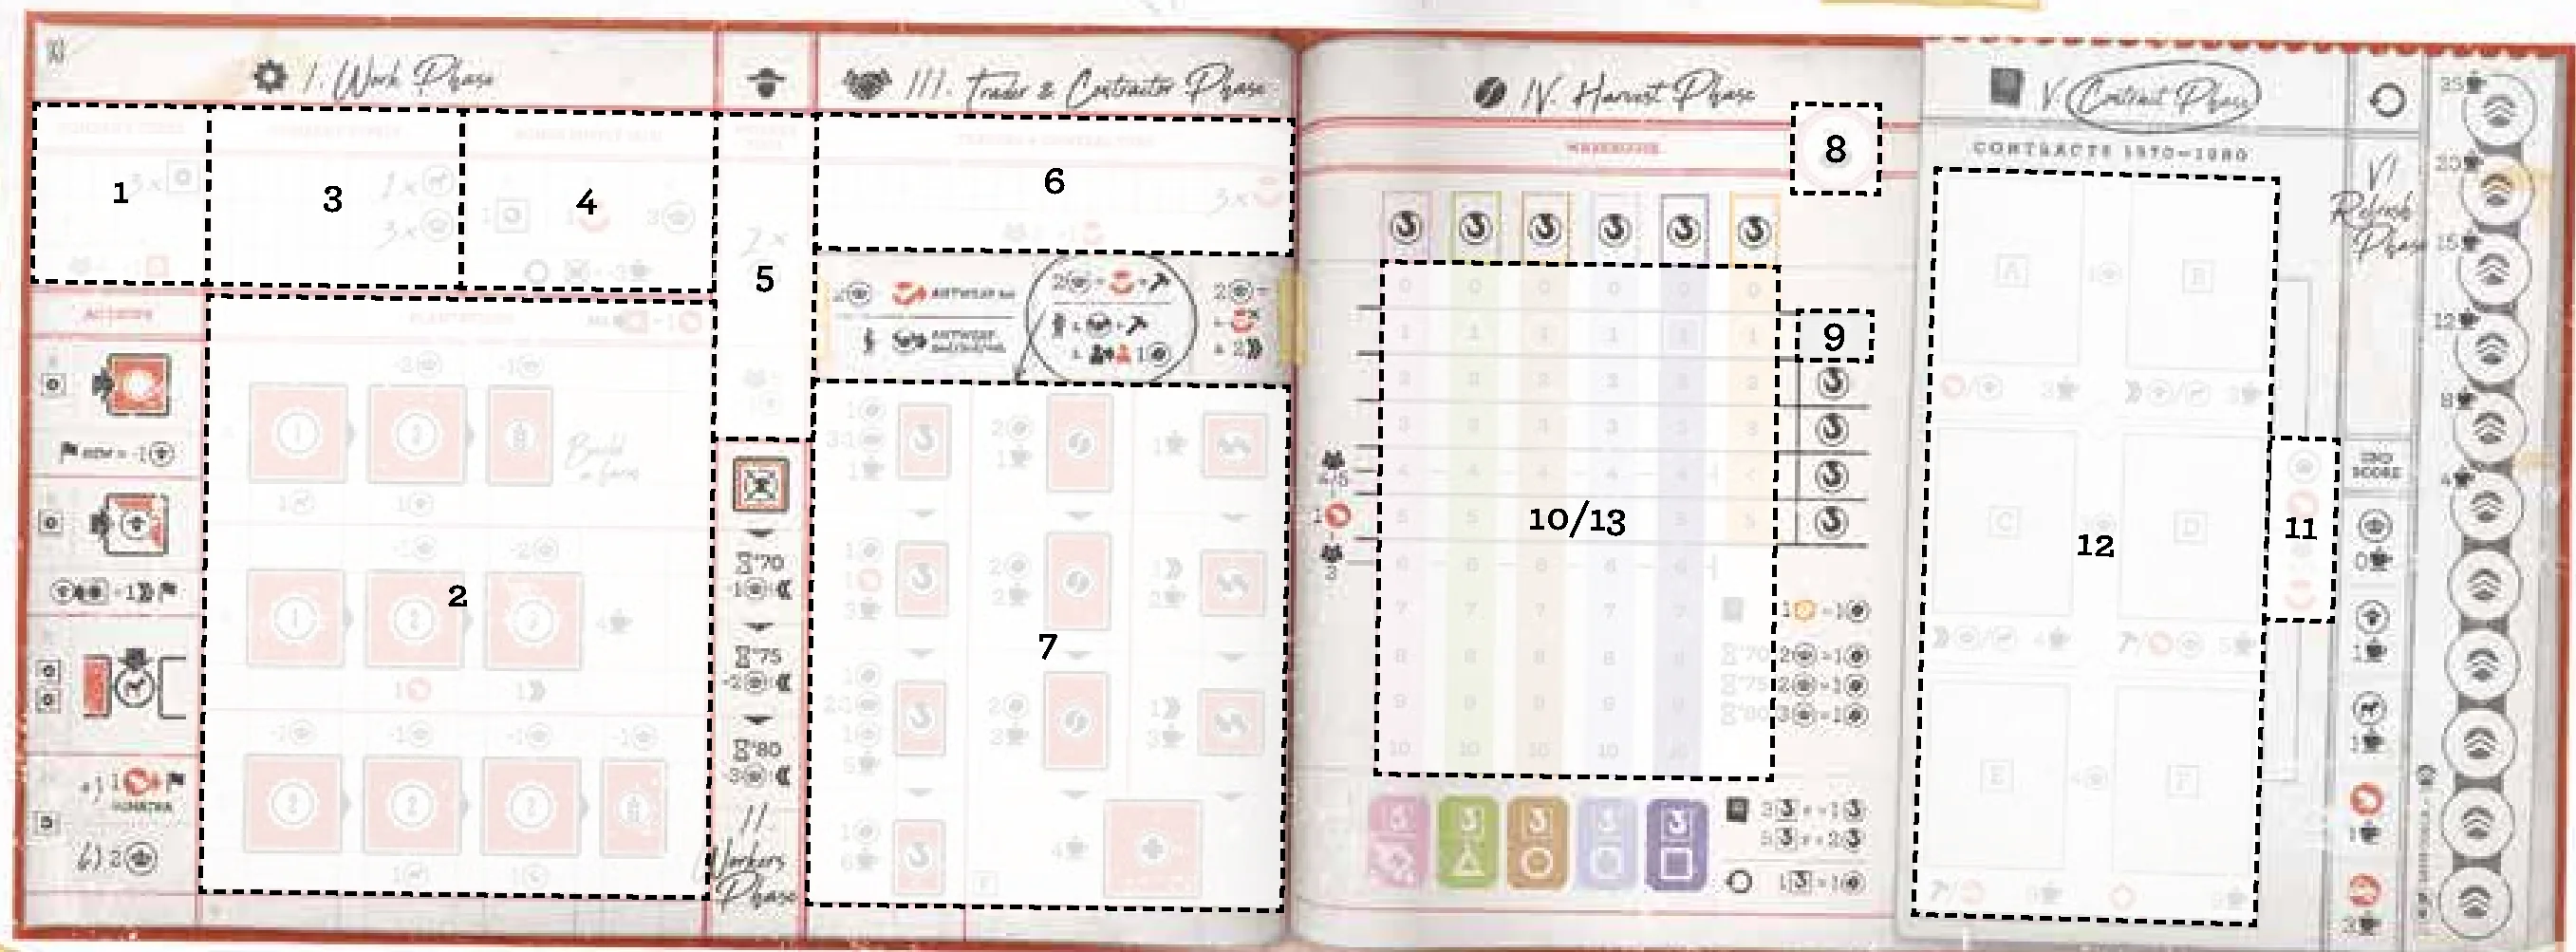
- Place 3 action cubes in the Company Cubes area. Set the fourth black action cube aside for now.
- In a 4-player game, place 1 action cube of your color in the Company Cubes area.
- Place Plantations and Farms on their designated places on the player board. Keep all additional Plantations to the side for now.
- Take 3 Coins and 1 Donkey and place them in your Company Supply.
- Take 3 Coins, the fourth black action cube, and 1 Trader, and place them in your Bonus Supply.
- Take 2 Workers and place them in your Worker Pool.
- In a 5-player game, only take 1 Worker.
- Place 3 Traders on the Traders & Contractors area.
- In a 3-player game, place 4 Traders instead.
- Place the Buildings on their corresponding spaces in the Buildings area.
- Take the Trade counter and place it with the ‘4 to 1’ side face up.
- Place the last Warehouse on the top shaded space of your Warehouse track.
- Take the 6 Coffee cubes and place them on the ‘0’ of each matching Warehouse track.
- Take 5 different Animal counters and give each player 1 at random. Place the counter next to the Contracts along with 1 Civet Cat. Return any remaining Animal counters to the box.
- In a 4- or 5-player game, also place 1 Trader.
- Sort Contracts by letter, A through E. Shuffle each stack separately and give each player 1 of each letter. Then, give each player the F-Contract that matches the number on their E-Contract. Place the Contracts in the corresponding spaces of your player board.
- The lower left corner shows which side to use in a 3-player or 4- or 5-player game.
- For their starting coffee supply, each player references their F-Contract. They should receive 2 coffees of the topmost variety and 1 each of the other 2. Advance the corresponding Coffee cubes on their respective tracks.
- In a 5-player game, each player also receives 1 step on the Arabica track of the topmost variety of their E-Contract. Advance the Company discs on their respective tracks.
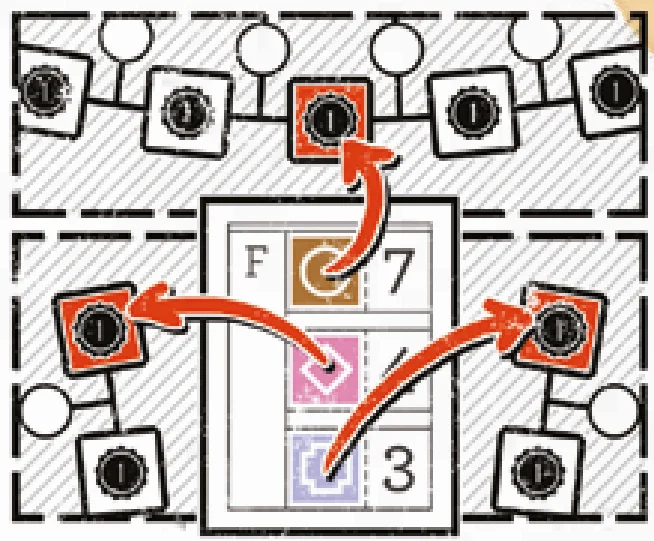
- All players will place their 3 remaining Level-1 Plantations in Cooperatives on the main board according to the Arabica Coffee varieties depicted on their F-Contract:
- In the Cooperative that matches the top variety of coffee, place a Level-1 Plantation in the center space of the 5 spaces on the “1” row.
- In the Cooperative that matches the second bean variety, place a Level-1 Plantation in the rightmost space of the 5 spaces on the “1” row.
- In the Cooperative that matches the third bean variety, place a Level-1 Plantation in the leftmost space of the 5 spaces on the “1” row.
Note: When determining leftmost or rightmost positions, it is always relative to each specific Cooperative, not to where players are positioned around the board.
- Place all remaining game pieces next to your player board; these will be used during the game.
Experienced Players
- When you have played the game a few times it is possible to place the third Plantation in a Cooperative of your own choice on a free position.
- In a 4- or 5-player game, experienced players can use Contracts for a 3-player game when playing with new players.
Game Board Areas
Arabica Track
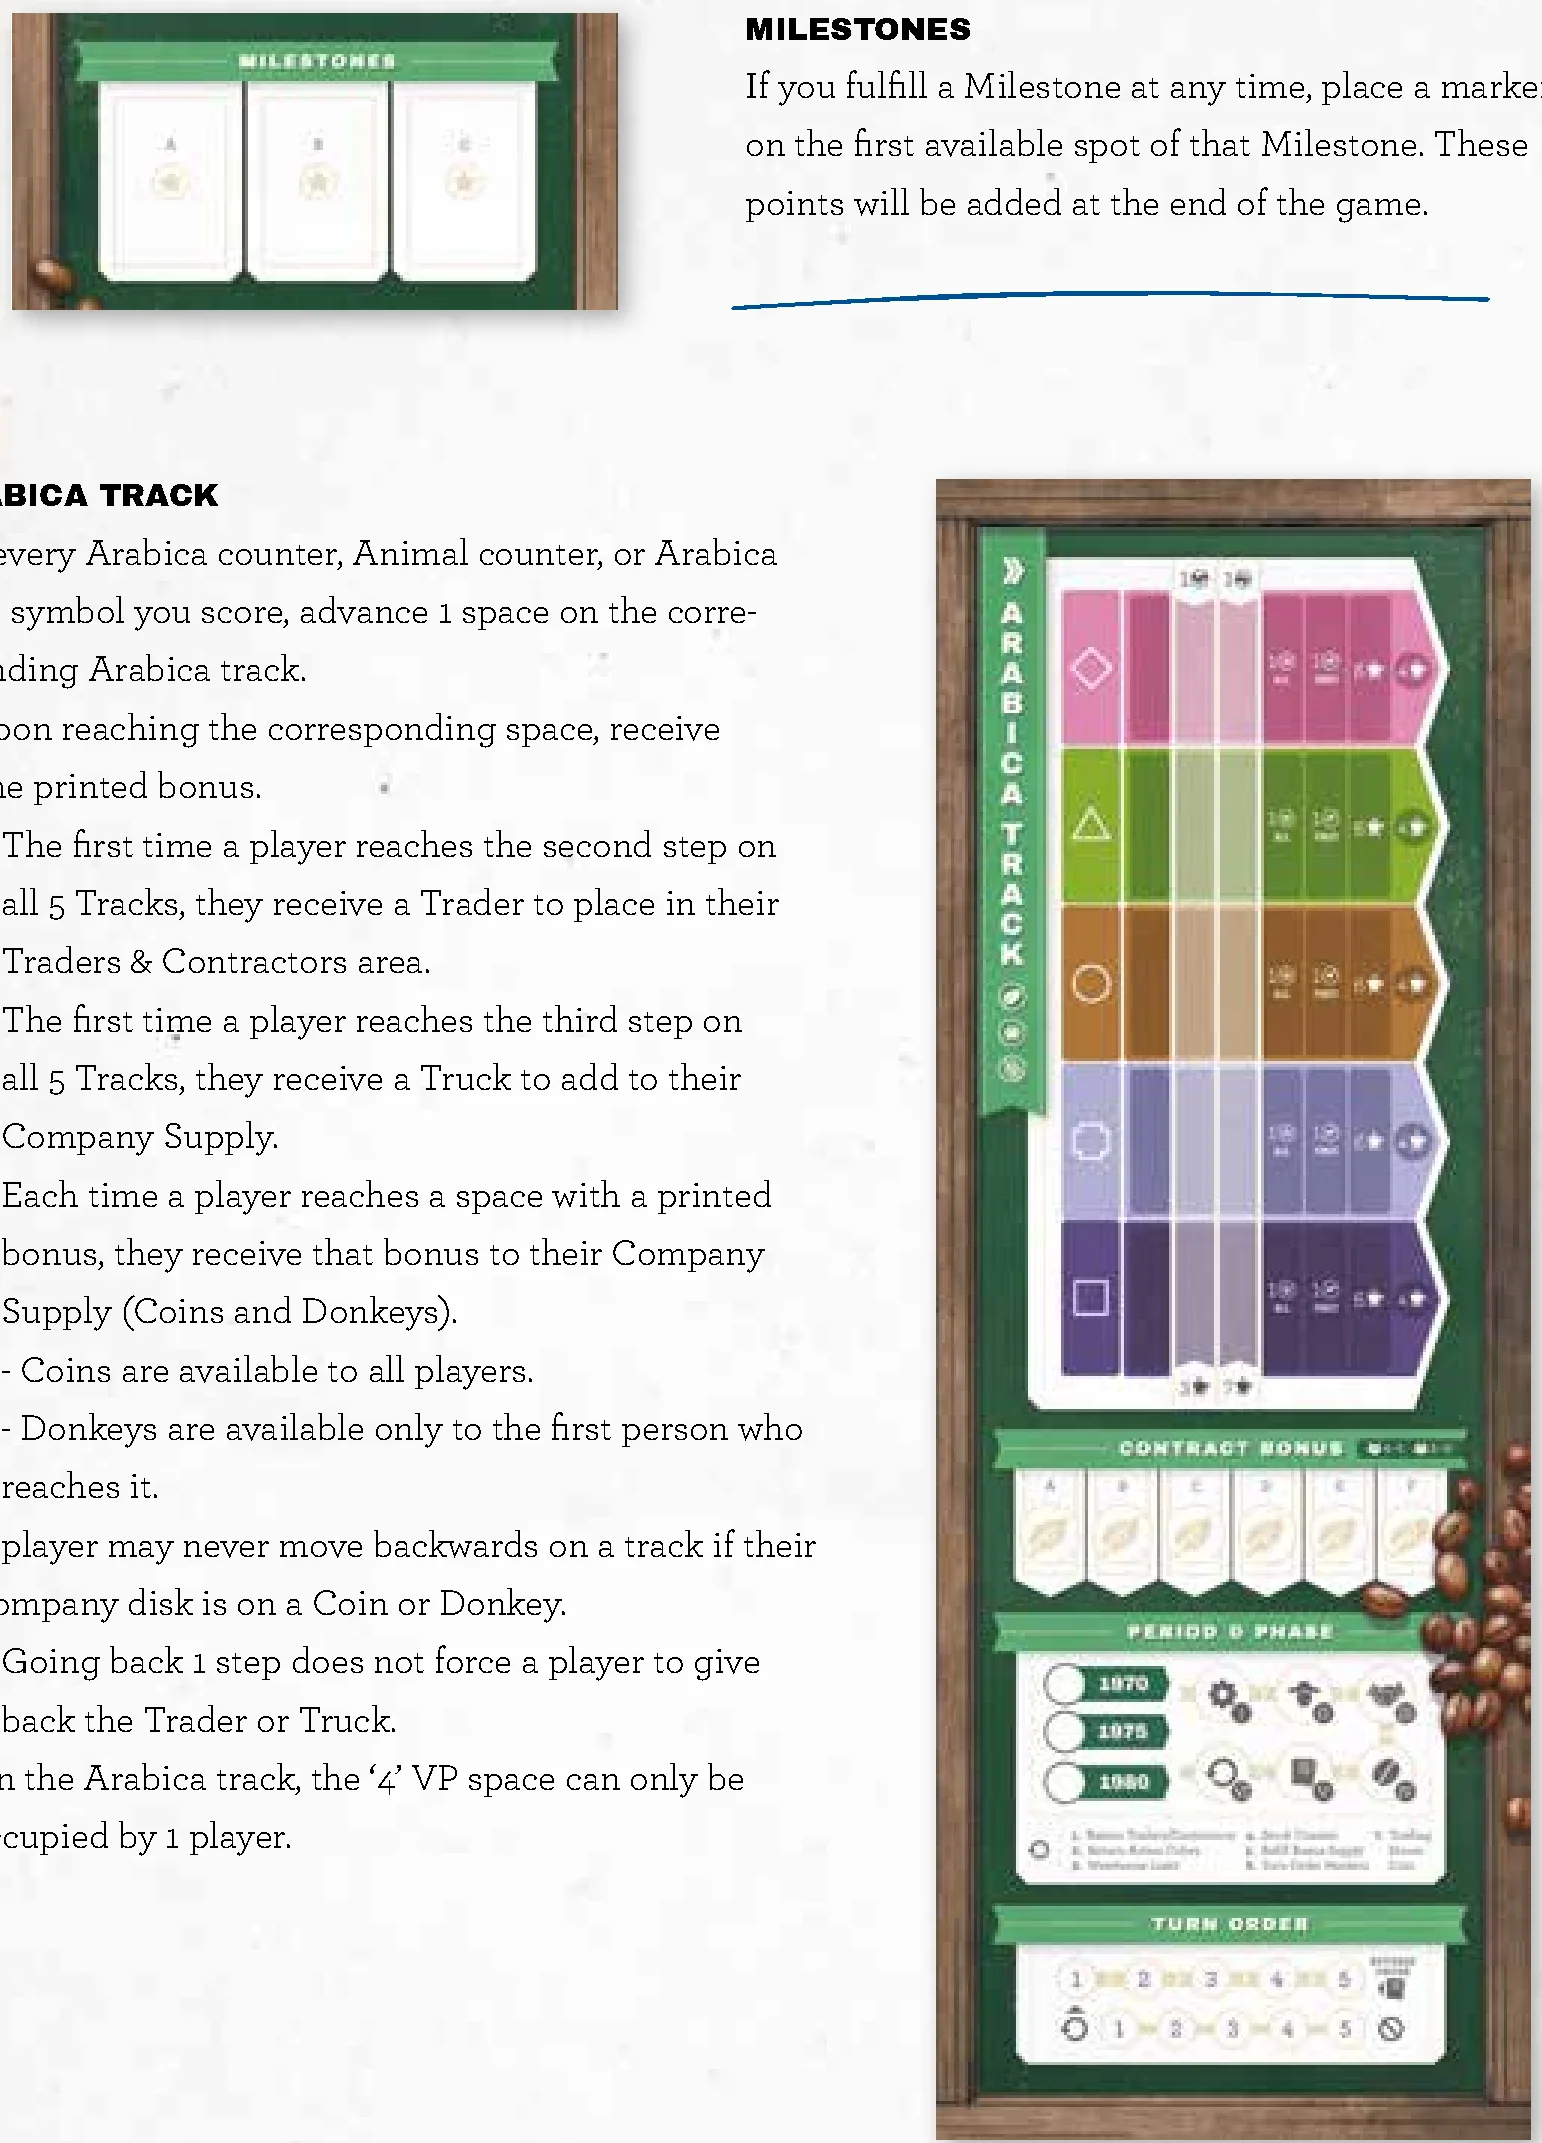
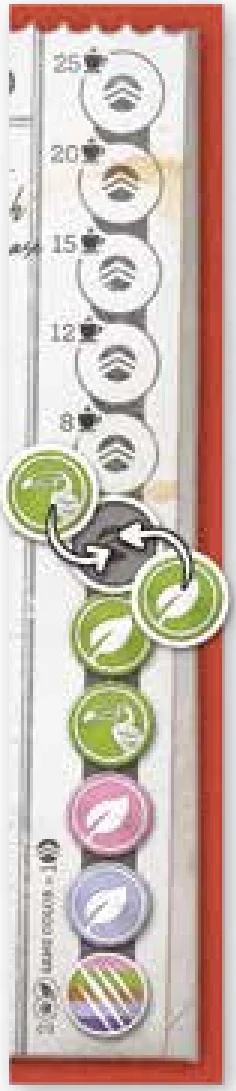
For every Arabica counter, Animal counter, or Arabica Step symbol you score, advance 1 space on the corresponding Arabica track.
- Upon reaching the corresponding space, receive the printed bonus:
- The first time a player reaches the second step on all 5 Tracks, they receive a Trader to place in their Traders & Contractors area.
- The first time a player reaches the third step on all 5 Tracks, they receive a Truck to add to their Company Supply.
- Each time a player reaches a space with a printed bonus, they receive that bonus to their Company Supply (Coins and Donkeys).
- Coins are available to all players.
- Donkeys are available only to the first person who reaches it.
- A player may never move backwards on a track if their Company disk is on a Coin or Donkey.
- Going back 1 step does not force a player to give back the Trader or Truck.
- On the Arabica track, the ‘4’ VP space can only be occupied by 1 player.
Milestones
If you fulfill a Milestone at any time, place a marker on the first available spot of that Milestone. These points will be added at the end of the game.
Player Board Areas
Bonus Supply
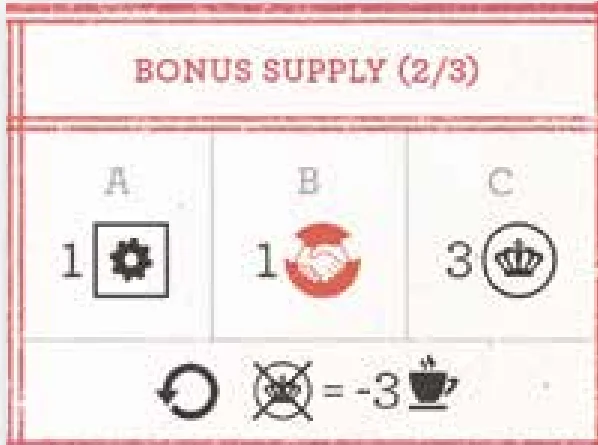
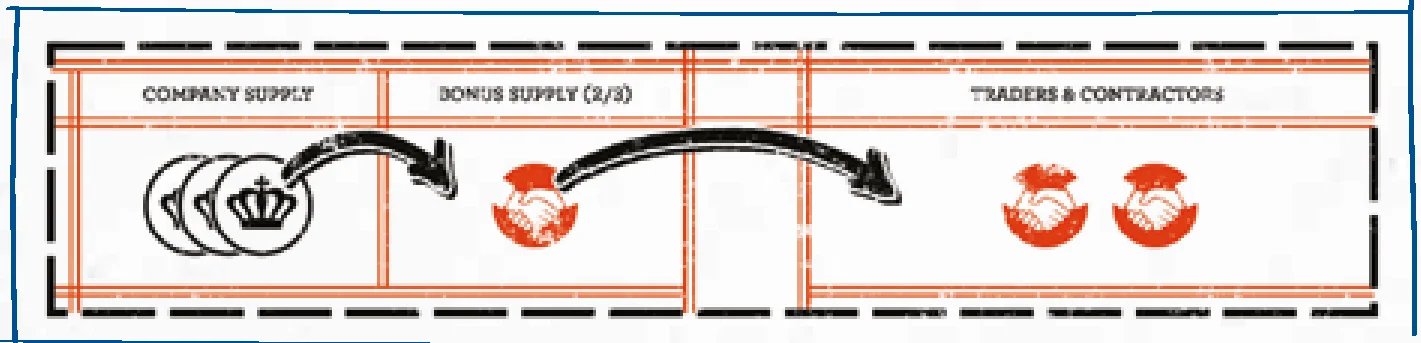
In this area on your player board there are 1 action cube, 1 Trader, and 3 Coins. Each Period, you may freely choose to use 2 of these 3 items. If during your turn, you receive a Trader or Coin, you may place it in your Bonus Supply area. If you use any Coins from your Bonus Supply, you must move over all of your Coins to your Company Supply.
Example: Red wants to add a Level 1 Plantation, which costs 1 Coin, but they have none in their Company Supply. Red chooses to use money from their Bonus Supply, so they move all 3 Coins from their Bonus Supply to their Company Supply.
Counter Track
When you collect an Arabica counter, Animal counter, or Wild Animal counter, place it on the bottom-most available space on the Counter track on the right of your player board. Matching counters of the same type and color (e.g. Indonesia Arabica counters) must be placed on top of each other. After placing the counter, immediately advance 1 step on the corresponding Arabica track. If you receive a Wild Animal counter, you may choose whichever track to advance on.
2 counters of the same color can be used to cover another space on the track. To make the match, you may take a counter that has been previously placed on a space, as long as another counter remains. Combine the 2 counters and place them both on the next available empty space on the Counter track. Any combination of counters with the same color can be used. Wild Animal counters can be combined with any counter color.
Note: Each space only holds one type of counter, with the exception of combined counters used to cover another space. Combined counters used in this way cannot be reused for additional spaces on the track.
Example: Yellow receives their 2nd Brazil Animal counter. They already have 2 Brazil Arabica counters, so they combine one of their Brazil Arabica counters with the 2nd Brazil Animal counter and place it on the next empty space on their Counter track.
Buildings Reference
When constructing, you can choose from the following Buildings:
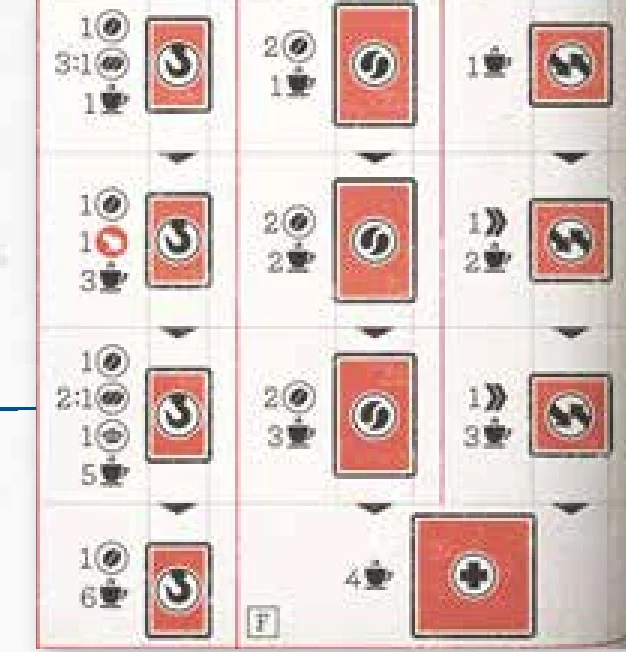
| TYPE | BONUS | VICTORY POINTS |
|---|---|---|
| 1st Warehouse | Constructed during setup | — |
| 2nd Warehouse | 1 coffee of choice, Trade counter: 3:1 | 1  |
| 3rd Warehouse | 1 coffee of choice, 1 Civet Cat | 3 |
| 4th Warehouse | 1 coffee of choice, Trade counter: 2:1, 1 Coin | 5 |
| 5th Warehouse | 1 coffee of choice | 6 |
| 1st Washing Station | 2 coffee | 1 |
| 2nd Drying Station | 2 coffee | 2 |
| 3rd Sorting Station | 2 coffee | 3 |
| Bonus coffees must match the Cooperative where the Station is constructed. | ||
| 1st Fair Trade post | 1 coffee per Harvest Phase | 1 |
| 2nd Fair Trade post | 1 coffee per Harvest Phase, 1 step on an Arabica track of choice | 2 |
| 3rd Fair Trade post | 1 coffee per Harvest Phase, 1 step on an Arabica track of choice | 3 |
| Hospital | No Bonus | 4 |
If you receive a Wild Animal counter, you may choose any Arabica track to advance on.
In Coffee Traders, each player represents a Trading Company from Antwerp, Belgium. Your Trading Company’s goal is to help Coffee Farmers from different parts of the world partner with Cooperatives, to hire Contractors all over the world to construct Buildings that will help improve their community, and to have Traders in Antwerp import as much coffee as possible to meet the demand.
Coffee Traders is divided into 3 periods. Each period consists of 6 Phases:
 Phase 1: Work – Players perform actions on their Coffee Plantations.
 Phase 2: Workers – Players send their Workers to Plantations.
 Phase 3: Trader & Contractor – Players trade with Antwerp and/or construct Buildings.
 Phase 4: Harvest – Players harvest coffee from their Plantations.
 Phase 5: Contract – Players fulfill Contracts and deliver coffee to Coffee Bars.
 Phase 6: Refresh
At the end of each Phase, move the Phase marker to the next space on the Phase track and continue playing. Do this until the Refresh Phase, signaling the end of the period. After the third period, the game ends.
Work Phase Overview
In turn order, players perform 1 of the 4 Cooperative actions on their turn. Alternatively, a player may pass, forgoing all of their actions for the remainder of this Phase. This continues until all players have passed. Players perform actions by placing action cubes on their player board. A player may choose an action multiple times.
There are 4 Cooperative Actions:
Action A: Add a Plantation to a Cooperative
There are 3 Levels of Plantations: 1, 2, and 3. These represent the qualities of the harvested coffee that may score you points at the end of the game.
To add a Plantation to a Cooperative, place 1 action cube on the matching action space.
Take an available Plantation from your player board and place it on a space in a Cooperative. The following rules apply:
- Players must take the leftmost Plantation from any of the 3 available rows on their player board.
- The Level of the Plantation must match the Level of the row where it is placed. (For example: a Level-1 Plantation can only be placed on a space in the “1” row or the “1/2” row.)
- If adding the Plantation to a Cooperative where you have no Plantations, place 1 Worker from your Worker Pool in the Town Center of that Cooperative. The first Plantation in a new Cooperative must be a Level-1 Plantation on the “1” row.
Example: Blue player takes 1 Level-1 Plantation and places it in Indonesia Co on an available place in the “1” row. Because it is their first Plantation in the Cooperative, they take 1 Worker from their Worker Pool and place it in the Town Center. For constructing the first Level-1 Plantation, they take 1 Donkey and place it into their Company Supply.
In addition to the requirements on page 15, placing a Plantation on the “1/2” and “2/3” row has additional rules:
- When placing a Level-2 Plantation, pay 1 Coin.
- When placing a Level-3 Plantation, pay 2 Coins.
Adding a Plantation to the “1/2” Row
On the “1/2” row a Level-1 or Level-2 Plantation may be built, following the rules listed below:
- Select an available building space on the “1/2” row that connects, via the pathways to 1 of your Plantations on the “1” row.
- The connected pathway cannot be occupied by a Donkey of other players.
- If the pathway is empty, you must place 1 Donkey from your Company Supply on it.
- For each of your Plantations on the “1/2” row you must have 1 Plantation on the “1” row of that Cooperative.
Adding a Plantation to the “2/3” Row
On the “2/3” row a Level-2 or Level-3 Plantation may be built. There are 2 ways to build a Plantation, following the rules listed below:
A. With a Donkey:
- Select a space on the “2/3” row that connects, via the pathways to 1 of your Plantations on the “1/2” row.
- The connected pathway cannot be occupied by a Donkey of other players.
- If the connecting space is empty, or only 1 of your Donkeys is present, you must place the requisite number of Donkeys from your Company Supply on that space.
B. With a Truck:
- Select an available building space on the “2/3” row.
- You don’t need a Plantation on the “1/2” row (because you are using a Truck instead of Donkeys).
- For each of your Plantations on the “2/3” row you must have 1 Plantation on the “1” row of that Cooperative.
- You must choose a Building space that does not have another player’s Donkeys on its connecting pathway.
- If all pathways hold a Donkey belonging to other players, you may not choose a Building space.
Take the bonus depicted underneath the Plantation on your player board and place it in your Worker Pool, Company Supply, or Sumatra Co.
- If you add a Plantation on the “1/2” or “2/3” row in a Cooperative, you immediately advance 1 step on the Arabica track corresponding to that coffee variety.
- Players adding Plantations to the third row also take 1 available Animal counter.
When all Plantations have been removed from a row on your player board, you may unlock a Farm. Unlocked Farms may immediately be placed in the Cooperative of your choice by paying 1 Coin. If you cannot, or choose not to, construct the Farm, it is removed from the game.
When you have placed all of your Plantations, take a Civet Cat from your general supply and place it in the Sumatra Co on the main board.
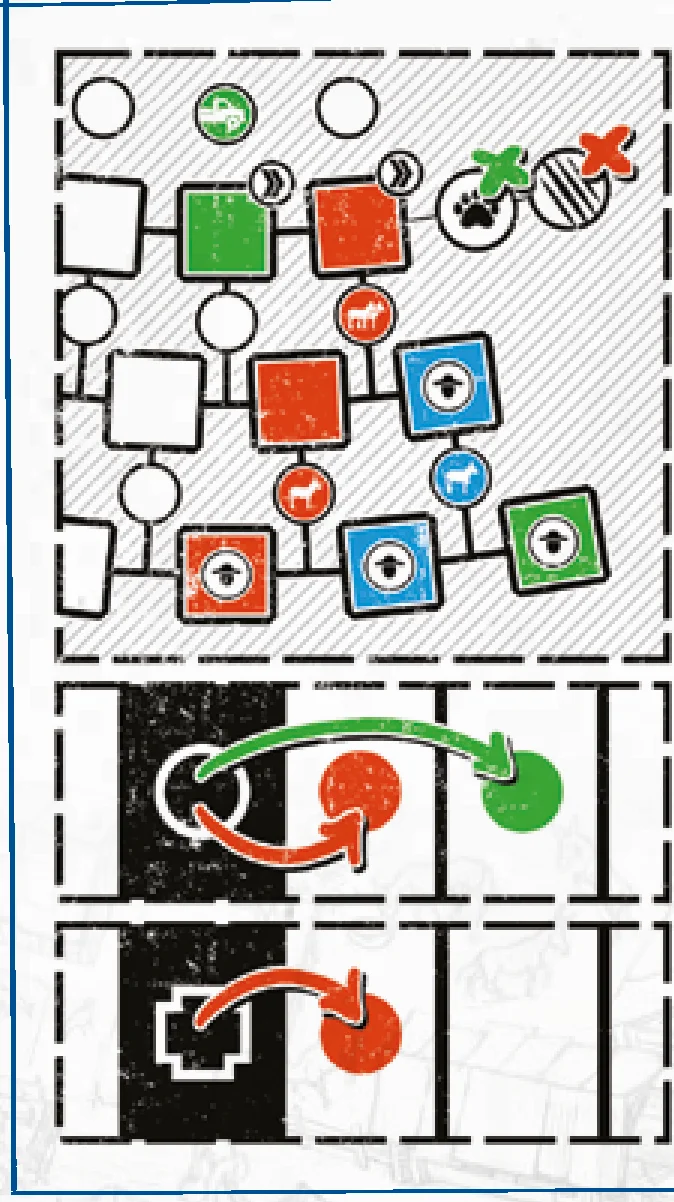
Example: Red decides to place a Level-2 Plantation in Indonesia Co on the “2/3” row. They take two Donkeys from their Company Supply, placing them on the pathway between the two rows. They advance 1 step on the Indonesia Arabica track and choose to take the Wild Animal counter. They choose to advance 1 step on the Colombia Arabica track.
Next, Green decides to place a Level-3 Plantation in Indonesia Co on the “2/3” row. They take their Truck from their Company Supply and place it on one of the available spaces on the third row. Then, they advance 1 step on the Indonesia Arabica track and take the Animal counter. They advance 1 step on the Indonesia Arabica track.
Note: Donkeys and Trucks in a player’s Company Supply may only be placed on a connecting space when performing the Add a Plantation action. Donkeys placed by performing the Breed a Donkey action are never placed in your Company Supply, they are immediately placed on the connecting space. With a Truck you can reach every location on the third row, but you can connect only 1 Plantation.
Action B: Send Workers to Harvest
With this action, you place Workers from the Town Center onto the Plantations. These Workers will harvest coffee during Phase 4.
To send Workers to harvest, place 1 action cube on the matching action space.
- The active player chooses a Cooperative.
- Place 1 Worker from the Town Center onto 1 of each player’s Plantations. Each Plantation only holds 1 Worker. If a player has multiple empty Plantations, they only receive 1 Worker on their Plantation on the lowest row. (For example: If a player has a Plantation in the “1” row and the “1/2” row, the Worker must be placed on the “1” row Plantation.)
- If there are any remaining Workers at the end of this action, they remain in the Town Center.
- If there are not enough Workers to place on each Plantation, the active player decides where to place them.
- If there are no more Workers in the Town Center when this action is complete, place 1 Worker from the general supply in the Town Center.
BONUS: If you place a Worker on 1 or more Plantations that belong to other players, you immediately advance 1 space on the Arabica track that corresponds to the Cooperative.
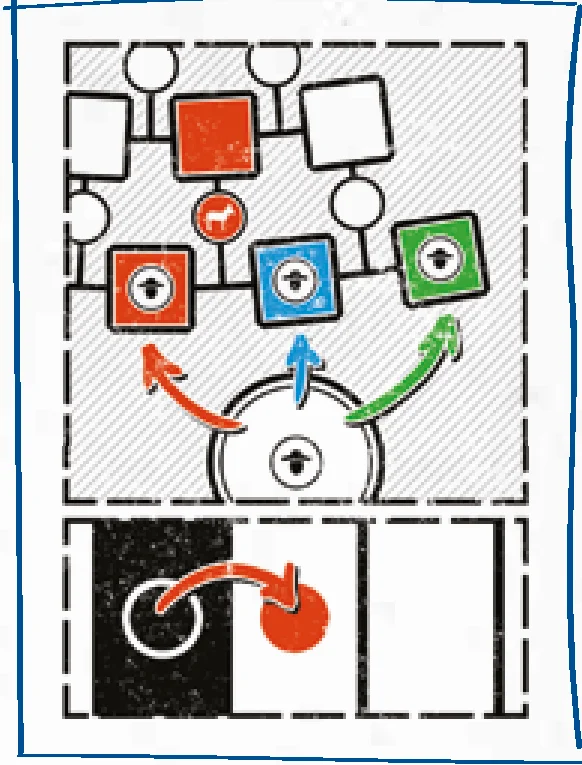
Example: Red chooses to fill the Plantations in Indonesia Co. Red, Blue, and Green all receive 1 Worker, placed on their Level-1 Plantations. Red’s Level-2 Plantation does not get a Worker. Since Red placed a Worker on both Blue’s and Green’s Plantations, Red advances 1 step on the Indonesia Arabica track.
Action C: Breed a Donkey
With this action, you can get more Donkeys to connect your Plantations.
To breed a Donkey, place 2 action cubes on the matching action space.
Take 1 Donkey from your general supply (not your Company Supply) and immediately place the Donkey on an available pathway in a Cooperative above 1 of your previously-placed Plantations.
Action D: Income
To get Income, place 1 action cube on the matching action space.
Choose 1:
- Place a Civet Cat, from your personal supply, into the Sumatra Co area of the main board.
- Take 2 Coins from the general supply and place them in your Company Supply.
Note: Use your Company Supply. Using resources from your Company Supply (like Donkeys or Trucks) cost no action. You may freely use these resources when building a Plantation.
Workers Phase
Simultaneously, all players may place Workers from their Worker Pool onto empty Plantations in any Cooperative, including other players’ Plantations. Players must place a Worker in a Plantation in the “1” row before placing Workers in any higher rows.
For each placed Plantation without a Worker, the owner of that Plantation must pay a penalty. The player may pay any combination of:
- 1 Coin
- 1 step backwards on 1 of the Arabica tracks of the player’s choice
The amount paid per Plantation is equal to the current Period: in 1975 pay 1, in 1980 pay 2, and in 1985 pay 3.
A player may never go backwards on an Arabica track once they have received a bonus (Coin or Donkey). If a player is not able to pay, they must remove the Plantation from the game. When removing a Plantation, players must remove their highest-placed Plantation first, then their next-highest, and on.
BONUS REMINDER: When placing a Worker on another player’s Plantation, you advance 1 step on the corresponding Arabica track.
Trader & Contractor Phase Overview
In turn order, players perform 1 of 3 possible Trader or Contractor actions on their turn: place a Trader in Antwerp, hire a Contractor, or remove a Trader from the game. Players may also pass, forgoing their turn. This continues until all players have passed in succession. A player who passes may still choose to perform an action on a future turn during this Phase, provided all other players have not yet passed. A player who passes may still elect to piggyback off another player’s action.
Action A: Place a Trader
Pay 2 Coins and place 1 Trader on the 1st position in a Trading House of the player’s choice. They take the Stock counter and place it at the bottom of the corresponding Warehouse track.
Piggyback in the Trading House
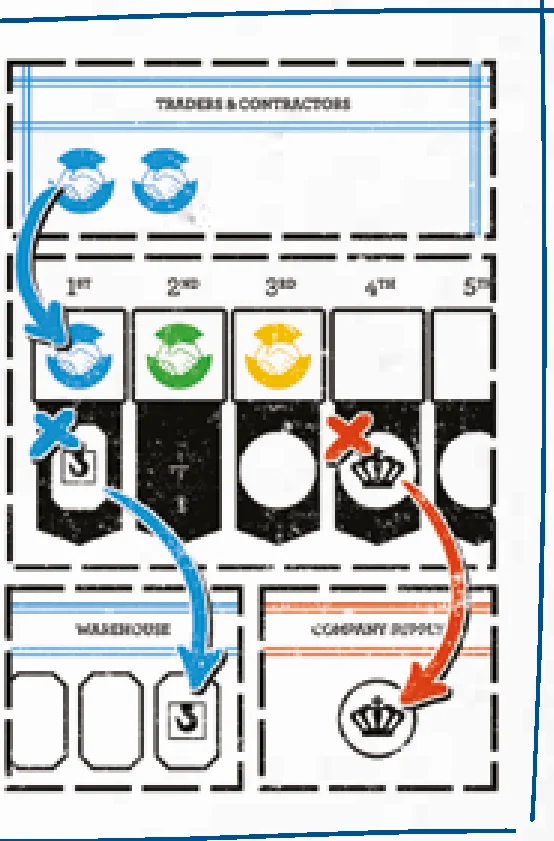
Once the active player places the 1st Trader in a Trading House, all other players may choose to follow the Trader action without paying for it. This occurs in player order. If a player decides to piggyback, they will place their Trader on the 2nd space, the subsequent player on the 3rd, 4th, etc…
In each Trading House there is 1 Coin. Give this Coin to the player who is not present in that Trading House.
- In a 3-player game, the 3rd player must make a choice: place a Trader or take the Coin.
- In a 4-player game, 3 players can place a Trader; the 4th player takes the Coin.
- In a 5-player game, 4 players can place a Trader; the 5th player takes the Coin.
Note: If there is more than 1 player without a Trader in the Trading House, no one takes the Coin.
Example: Blue pays 2 Coins and places a Trader in the Trading House for Ethiopian coffee beans. They take the Stock counter and place it on their player board. In turn order, other players may also place 1 Trader in this Trading House: Red passes, Green and then Yellow both place 1 Trader. Red receives the Coin.
Action B: Hire a Contractor
Pay 2 Coins. Choose an available Building you wish to construct. Available Buildings are the topmost Building in a column on your player board. Replace the Building with a Contractor from your Supply.
- When constructing a Warehouse, you may place it on the next available space to the right of the Warehouse tracks on your board. This increases the storage of each type by 1.
- You may also place the Warehouse at the top of one of your Warehouse tracks. This increases the storage of that coffee type to 10.
- When constructing any other Building (Hospital, Fair Trade posts, and Production Stations), place it on the main board. These must be placed in a location matching the type of Building. If that location has an Arabica Step symbol, advance 1 space on the Cooperative’s corresponding Arabica track.
Then, gain bonuses according to the Building constructed (see page 12).
Piggyback on Hiring a Contractor
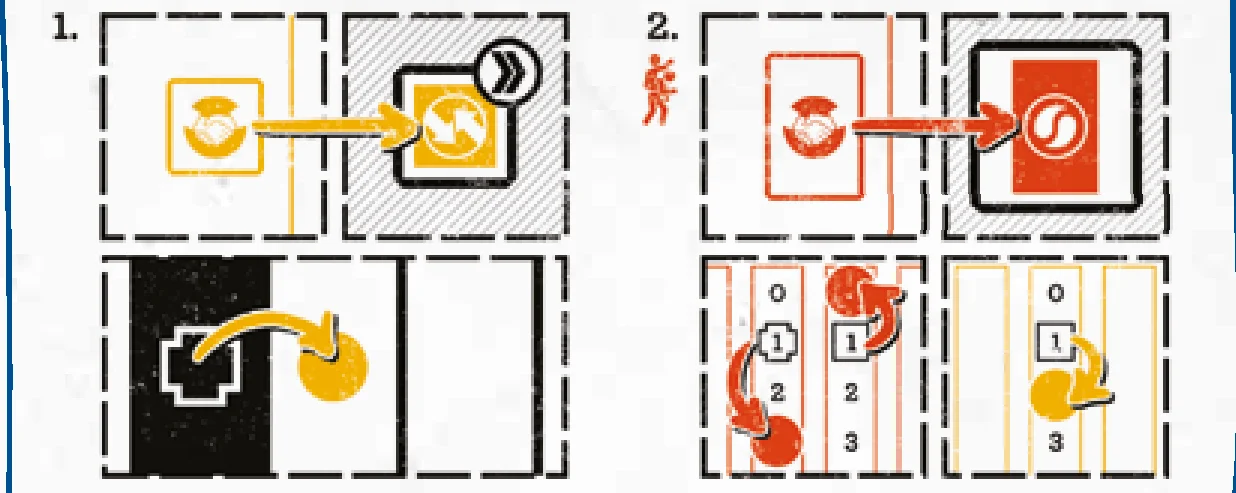
Once the active player constructs a Building, all other players may follow that action without paying for it. This occurs in player order. Players must piggyback in the same area as the active player. This means if the active player builds a Warehouse on their player board, all players who piggyback may only construct on their player board. Likewise, if the active player builds on the main board, all piggybacking players may only construct on the main board, and they must construct in the same Cooperative as the active player. However, piggybacking players may construct any available Building they wish.
Piggybacking players still replace their Building space with a Contractor.
Each piggybacking player pays 1 coffee of their choice to the active player. To pay, reduce the quantity of that coffee from the Warehouse on your player board. A player that has no coffee may not piggyback. A player may not use the coffee they just received from constructing a Warehouse or a Station to piggyback.
Example: Yellow pays 2 Coins and decides to construct 1 Fair Trade post in Colombia Co. They place a Contractor on the Building space on their player board, and then move the Fair Trade post to Colombia, placing it on a location with an Arabica Step symbol. Yellow advances 1 step on the Colombia Arabica track.
In turn order, other players may also construct 1 Building in Colombia. Only Red decides to construct. They place a Contractor on the Building space and place a Station in Colombia. They receive 2 Colombian coffee and pay Yellow 1 Ethiopian coffee.
Action C: Remove a Trader
Pay 2 Coins. Remove 1 Trader permanently from the game to advance 2 steps on the Arabica track. You may move 2 steps on 1 track or 1 step on 2 tracks.
Other players cannot piggyback the Remove a Trader action.
Harvest Phase
In this Phase, the Workers on all Plantations harvest coffee and deliver it to Fair Trade posts and Traders.
Each Plantation with a Worker harvests 2 coffees each for the corresponding Cooperative. In a 3-player game, Workers harvest 3 coffees instead. Each coffee harvested is delivered to Fair Trade posts first, then the 1st Trader, and finally to the remaining Traders. Any coffee generated in excess is lost. Players may not buy or trade coffee during this Phase.
Perform the Following Steps in Order for Each Cooperative:
- Each player who owns a Fair Trade post in the Cooperative gains 1 coffee.
- The player who placed the 1st Trader in that Cooperative’s Trading House gains 1 coffee.
- Beginning with the player who placed the 1st Trader and continuing to the 2nd, 3rd, etc… give 1 coffee to each Trader. When you reach the end of the Traders, begin again starting with the 1st Trader and continuing to the 2nd, 3rd, etc…
- Continue until there is no more coffee to distribute. Or until each Trader has received 5 coffees.
- Players adjust the storage in their Warehouses to match the coffee they received.
- Each player with at least 4 coffees in all 5 of their Warehouses (excluding Kopi Luwak coffee) immediately receives a Civet Cat and places it in Sumatra Co. (In a 3-player game, this bonus is awarded for having 6 or more coffees in all 5 Warehouses.)
- Note: Players can only get a Civet Cat during this Phase.
- Each player receives 1 Kopi Luwak coffee for each Civet Cat of their color in Sumatra Co. Then, return the Civet Cats to your general supply.
Note: The 5-coffee limit only applies to this step, not coffees received during the Fair Trade or 1st Trader steps. It is possible that a player may receive more than 5 coffees if they are the 1st Trader and/or they own Fair Trade posts.
Contract Phase Overview
Each player in REVERSE TURN ORDER may perform actions, one at a time, to fulfill a Contract or make a delivery to a Coffee Bar. A player may choose to pass, forgoing any actions this Phase. When a player passes, move their Turn Order marker to the unoccupied space closest to the “1” space of the bottom track. The Phase continues in this manner until all players pass.
During Their Turn, a Player May:
- Spend Kopi Luwak coffee as any other type of coffee.
- Trade any combination of coffee for 1 type of coffee using their current trade value (4:1, etc…).
- Players may never trade other types of coffee for Kopi Luwak coffee.
- Purchase any 1 coffee (not Kopi Luwak) for 2 Coins in the first 2 Periods or 3 Coins in the last Period.
- Each player may either spend 3 different Stock counters to construct 1 Warehouse, or 5 different Stock counters to construct 2 Warehouses.
Example: Green has 3 different Stock counters and chooses to remove them from the game. They may construct their last Warehouse and receive 1 coffee of their choice. They take 1 Ethiopian coffee.
Action A: Fulfill a Contract
Select a Contract on your player board to fulfill. Reduce the amount of coffee corresponding to that variety on the Contract.
Note: Contracts must be completed in full; partial fulfillment is not allowed.
Remove that Contract from the game and receive the bonus listed in the space under the Contract. When multiple bonuses are listed, the player may choose which one to take.
- When you get a Building bonus, you do not need to pay Coins or a Contractor. Other players may not piggyback on your construct.
- When you receive a Civet Cat, place it in Sumatra. Note: If it’s the 3rd Period, place the Civet Cat in your Company Supply.
- Any bonus Coins, Donkeys, and Trucks are placed in your Company Supply.
- Workers are placed in the Worker Pool.
- If a Wild Animal symbol is shown, advance 1 step on the Arabica track of your choice.
Whenever a horizontally-matched pair of Contracts is fulfilled (A&B, C&D, or E&F), that player receives a bonus from those available to the right of the Contracts: a Civet Cat, an Animal counter, or a Trader. Note: The Trader is not available when playing with 3 players.
- Immediately place the Trader in the Traders & Contractors area or Bonus Supply.
- Immediately place the Civet Cat in Sumatra or in your Company Supply if it’s the 3rd Period.
- Immediately place the Animal on the scoring row at the right of your player board and advance 1 step on the corresponding Arabica track.
Take the top Arabica counter from the Contract Bonus area that matches the letter of the delivered Contract (if available), and then advance 1 step on the corresponding Arabica track. Place the Arabica counter on the bottom-most available space on the Counter track.
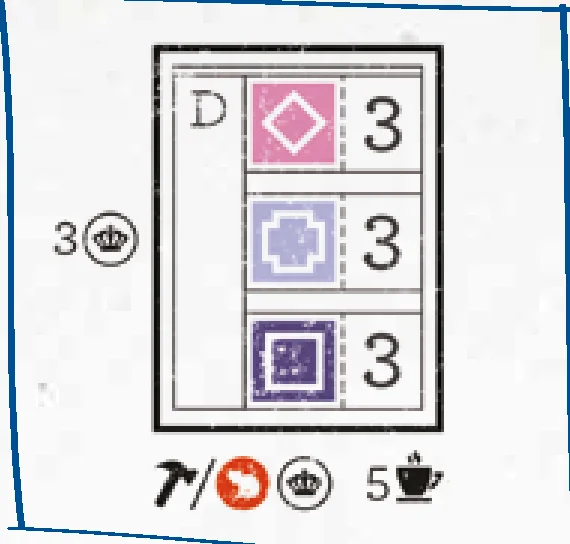
Example: Red wants to fulfill Contract-D. They pay 3 pink, 3 blue, and 3 black coffee, as per the Contract. They return the Contract to the box.
Then, Red receives 3 Coins in their Company Supply and the topmost Arabica counter. The counter advances Red 1 step on the Colombia Arabica track.
Red also chooses to construct 1 Building instead of taking 1 extra Coin and a Civet Cat in Sumatra Co. They construct a Station in Colombia, receiving 2 Colombian coffee. They place the station on a location with the Arabica Step symbol. Red advances 1 step on the Colombia Arabica track.
Action B: Deliver to Coffee Bars
Choose any empty space in one of the Coffee Bars to deliver coffee to. Adjust your storage by the amount of coffee you are delivering. Then, place a scoring marker on that position in the Coffee Bar. For example, if you place into a “Pink 3” space, reduce your Pink Coffee by 3.
Note: The final spot of each bar (except for the Kopi Luwak Coffee Bar) requires 6 of any color of coffee. All coffee delivered must be of the same color. That player takes the Animal counter and advances 1 space on the matching Arabica track.
Then, take the Coin bonus shown above the corresponding box. If you place in the final spot of each bar (final 2 in the case of Kopi Luwak coffee), take the corresponding counter.
In a 4- or 5-player game, when a player has delivered at least once to all 6 Coffee Bars they receive a Wild Stock counter.
A player may make a second delivery, performed in the same fashion as the first. If a player elects to not make a second delivery in the same turn, they must immediately pass and move their Turn Order marker.
Example: Red pays 3 Kopi Luwak coffee and places 1 scoring marker in the Kopi Luwak Coffee Bar. They receive 2 Coins and take the Arabica counter. Then, they advance 1 step on the Colombia Arabica track.
Refresh Phase
The Refresh Phase consists of the following steps:
- Return all Traders and Contractors to their area on your player board.
- Return action cubes to the Company Cubes area.
- If this is a 4-player game, and you used the action cube in your color, return it to the general supply.
- Adjust your coffee storage based on available Warehouses. Any coffee beyond what your Warehouses can store is lost.
- Each player starts the game with 1 Warehouse that can store 1 of each type of coffee.
- When constructed, a Warehouse may be added to the right of the tracks, increasing storage of each type by 1, or added above a track to increase storage of that type of coffee to 10.
- A player is free to replace their constructed Warehouses so they can store the coffee of their liking (also see page 21, Action B).
- Receive 1 coffee, on the corresponding track, for each Stock counter you have. Because you receive this after storage adjustments, this ignores capacity requirements on coffee storage.
- Refill the Bonus Supply with 3 Coins from your Company Supply. For each Coin you cannot fill up to the 3 Coins needed, take a -3VP token. Take the necessary Coins from the general supply.
- Move the Turn Order markers to the top track.
- Refill the Coin of each Trading House.
Note: A player can never get Coins from the general supply for free.
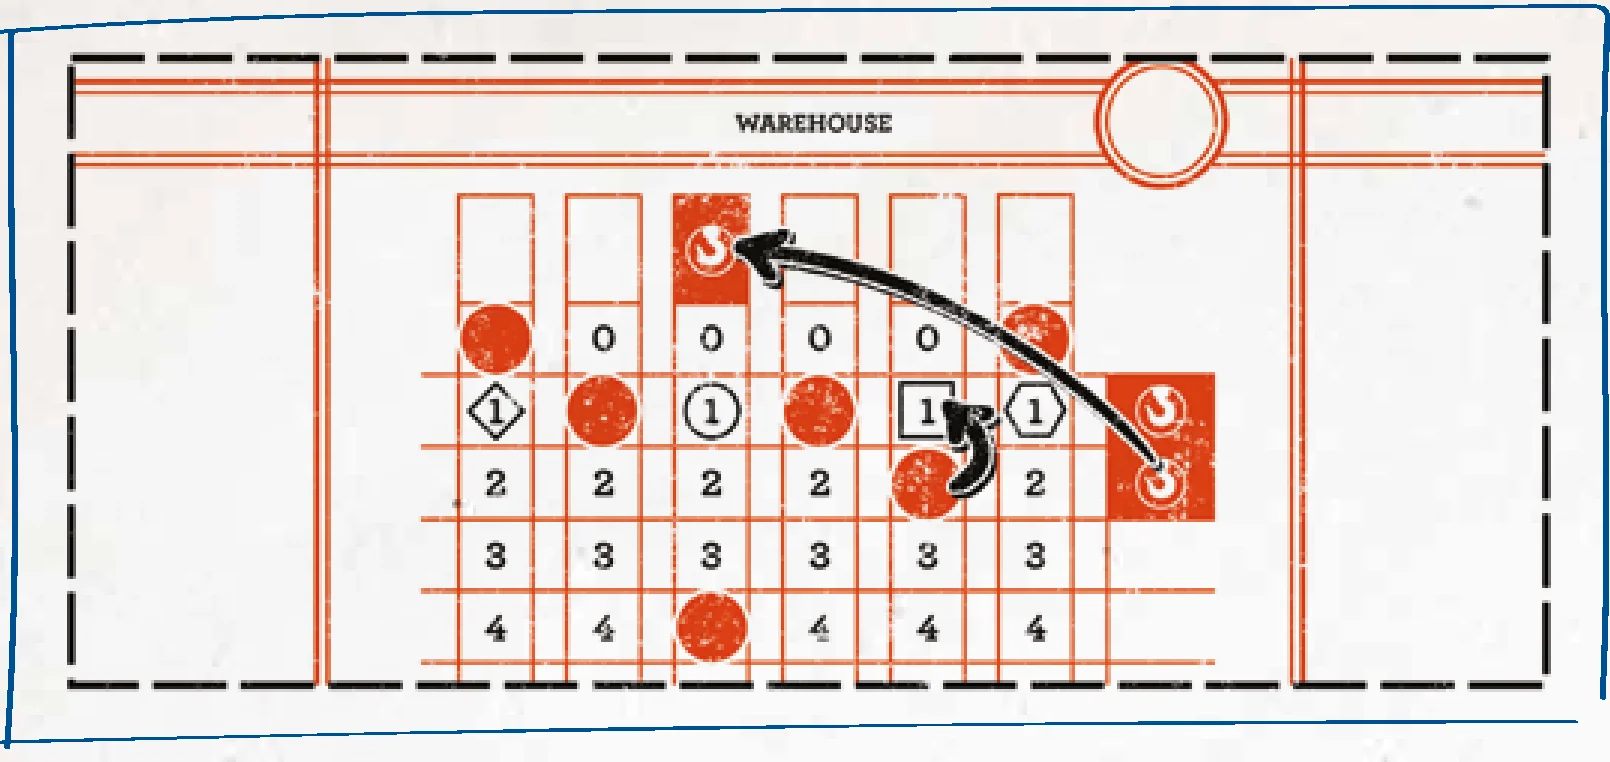
Example: Red has 2 Warehouses. They may store 2 coffees from all of the coffee types. Or, they may store 1 coffee of their choice from all the types and up to 10 from 1 type. They choose to replace their Warehouse, so they may store all 4 Indonesian coffee. They lose 1 Ethiopian coffee.
Example: Red needs to refill their Bonus Supply, but only has 2 Coins. They place both Coins in their Bonus Supply and take 1 Coin from the general supply. They also take 1 -3VP token.
It’s coffee o’clock
Example of using the Bonus Supply during Phase 3: In Phase 3, Red received their third Coin. They may move all 3 Coins into the Bonus Supply area, so they may move their Trader to the Trader & Contractor area. This way, Red doesn’t use their Coins, but piggyback on other players’ actions.
End of Game
AT THE END OF THE 3RD PERIOD, THE GAME ENDS AND PLAYERS ADD UP THEIR VICTORY POINTS (VP).
We have a winner!
- Determine the Quality Value of each player in each Cooperative:
- Each Plantation is worth its Level in Quality Value (QV): 1, 2, or 3 points.
- Each Building is worth 1 QV, except the Hospital is worth 2 QV.
Note: Players must have a Plantation in a Cooperative in order for Buildings to count towards their QV total.
Players receive VP based on their Quality Value (tied players add together the VP and split, rounding up): - Highest Quality Value: 16VP
- Second-Highest Quality Value: 8VP
- Third-Highest Quality Value: 4VP (no third place is awarded in 3-player games)
- Score points from items in your Company Supply and Worker Pool only. (This does not apply to items in personal supply or used on the board, like Donkeys, Trucks, etc…)
- Workers, Donkeys, or Civet Cats: 1VP each
- Trucks: 3VP each
- -3VP token
- Score points from your Counter track based on the topmost covered VP space.
- Score points based on advancement on the Arabica tracks (all gains are cumulative):
- If a player has reached at least the second space on all 5 Arabica tracks, they score 3 points.
- If a player has reached at least the third space on all 5 Arabica tracks, they score 7 points.
- If a player has reached the sixth space of the Arabica track, they score 6 points.
- The first player to have reached the end on each track, scores 4 bonus points.
- Score points from fulfilled Milestones.
- Score points from fulfilled Contracts:
- Each empty Contract space has a point value.
- Score points for Coffee Bar deliveries:
- For each counter inside a scoring box on a Coffee Bar track, score the corresponding number of points.
- Score points for Coffee Bar majorities:
- For each Coffee Bar track, the player with the most markers scores 4 points.
- The player with the second most markers scores 2 points.
- In the event of a tie, the tied player with the marker placed on the highest number wins.
- Score points for Plantations and Buildings constructed:
- 1 Plantation and all Buildings have a VP value if they were constructed. Refer to their space on the player board for that value.
Milestones Guide
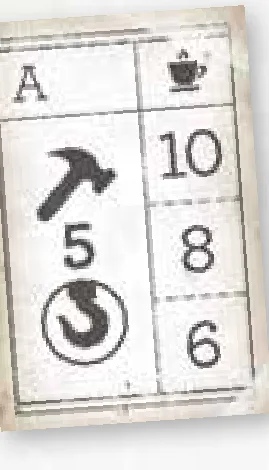
Construct all 5 Warehouses
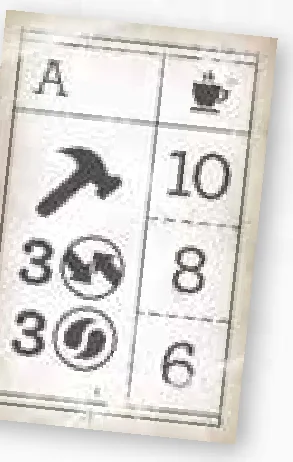
Construct all 3 Stations and Fair Trade posts
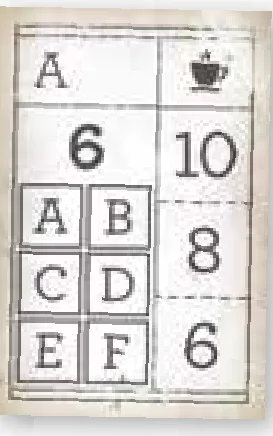
Deliver all 6 Contracts
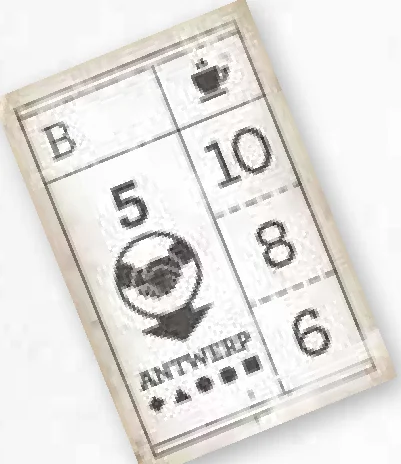
Place a Trader in all 5 Trading Houses
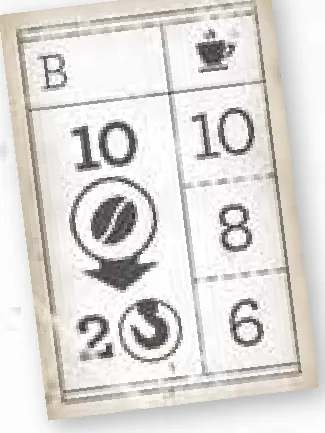
Have 10 coffees in 2 of your Warehouses
Note: Can be achieved through harvesting, trading, and/or buying.
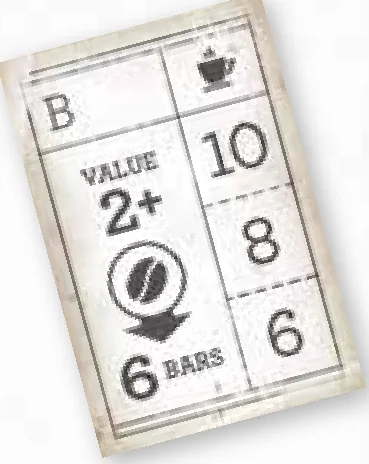
Make 1 delivery of a value 2 or more to all 6 Coffee Bars
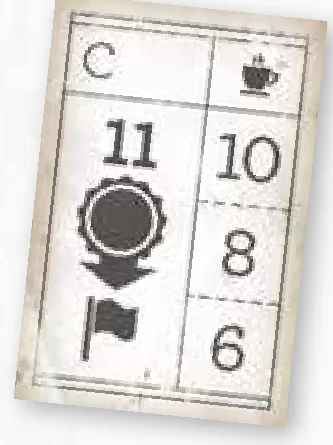
Add all 11 Plantations
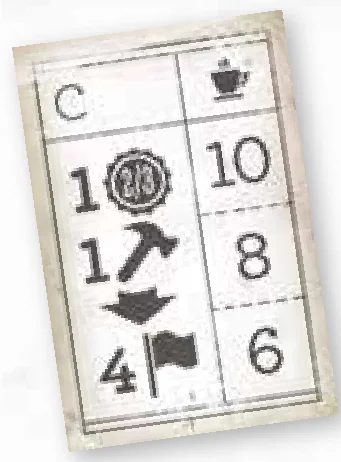
In 4 Cooperatives, have at least:
- A Plantation in level 2 or 3 and
- A Building
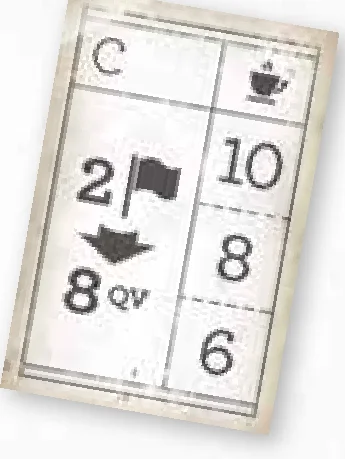
In 2 Cooperatives, have 8 or more Quality Value points (QV)
Note: See End of Game, page 28.
Game Pieces
- Worker
 Donkey
 Truck
Truck- Trader & Contractor
 Civet Cat
 Arabica counter
 Animal counter
 Wild Animal counter
 Trade counter
 Stock counter
- Action cube
 Coin
Coin Warehouse
 Production Station
 Fair Trade post
 Hospital
 Farm
Farm Milestone
- Contract
Gameplay Symbols
 Period
 Cooperative
- Coffee
 Coffee Level
 2 Donkeys
 Piggyback
 Pass
Pass- Victory points
 Advance on the Arabica track
 Advance on the Counter track
- Phase 1: Work
- Phase 2: Workers
- Phase 3: Trader & Contractor
- Phase 4: Harvest
- Phase 5: Contract
- Phase 6: Refresh
 = / / / Construction: Construct any available Building (excluding the Farm).
COFFEE TRADERS © 2020 CAPSTONE GAMES ARTWORK © 2020 DAAN VAN PARIDON & JOHN RABOU ALL RIGHTS RESERVED.
Introduction & Components
THE COFFEE TRADING HANDBOOK
A COMPREHENSIVE GUIDE TO THE INDUSTRY
ANDRÉ SPIL & ROLF SAGEL
Edited by Travis D. Hill & Donny Behne
FIRST EDITION 1970
Coffee is always a good idea
Introduction
Coffee Traders is set in 1970s Central and South America, Africa, and Asia. Thousands of coffee farmers all over the world support their families by using small stretches of hillside land for their coffee plantations.
Farmers work day in and day out for very little, but the future of coffee farming is bright. Fair Trade organizations strive to improve living conditions for these farmers by helping them set up cooperatives. This enables them to establish better pricing agreements and take out loans for new plantations, all to help provide education and improve the quality of their lives, families, societies, and environment. In Coffee Traders, the delicious Arabica Coffee beans farmers harvest are sold in Antwerp—and all over the world—to coffee roasters large and small.
Contents
General Components
- 1 Game board
- 1 Phase marker
- 1 Period marker
- 55 Coins
- 60 Workers
- 30 Contracts (labeled A-F)
- 30 Arabica counters
- 15 Animal counters
- 7 Wild Animal counters
- 15 Stock counters
- 5 Wild Stock counters
- 9 Milestones (3xA, 3xB, 3xC)
- 6 -3VP tokens
- 1 Score pad
Player Components
- 1 Player board
- 5 Action cubes (4x black, 1x player color)
- 6 Traders/Contractors
- 2 Trucks
- 9 Donkeys
- 6 Civet Cats
- 6 Company discs
- 18 Scoring markers
- 6 Coffee cubes
- 11 Plantations:
- 5x Level-1
- 4x Level-2
- 2x Level-3
- 1 Trade counter
- 14 Buildings:
- 1 Hospital
- 3 Production Stations
- 3 Fair Trade posts
- 2 Farms
- 5 Warehouses
Setup
Game Board Setup
- Place the main board in the middle of the table. Players take a player board and all matching color pieces.
- In each of the 5 Trading Houses, place 1 Coin. Also, place the 3 Stock counters that correspond to their matching Trading Houses.
- In a 3-player game, place the Coin on the 3rd position.
- In a 4-player game, place the Coin on the 4th position.
- In a 5-player game, place the Coin on the 5th position.
- Place 6 Workers in each of the 5 Town Centers.
- Shuffle the Arabica counters facedown. For each Contract Bonus space, create a stack of face-up Arabica counters corresponding to the amounts stated on the board. Return any remaining Arabica counters to the box.
- In each Cooperative, place 1 Animal counter that matches the color of the Cooperative and 1 Wild Animal counter.
- Take 5 different types of Animal counters, and randomly place 1 on each “6” space by the Coffee Bars.
- Place 1 Wild Animal counter on both the 3 and 4 spaces of the Kopi Luwak bar.
- In a 4-player game, place 4 Wild Stock counters, and in a 5-player game, place 5 Wild Stock counters next to the Coffee Bars.
- Place the remaining Coins and Workers next to the board as a general supply.
- Place the Period Marker on 1970 of the Period track and the Phase marker on Phase 1.
- Shuffle 1 Company disc from each player and place them at random on the top Turn Order track.
- Sort the Milestones by letter: A, B, and C. Shuffle each stack separately and place 1 of each face up on their designated spaces on the Milestones area of the main board. Return unused Milestones to the box.
- Each player places 1 of their Company discs to the left of each line on the Arabica track.
- Each player places 1 Trader and 1 Truck next to the main board near the Arabica track.
- Each player places 1 Civet Cat in Sumatra.
Player Board Setup
- Place 3 action cubes in the Company Cubes area. Set the fourth black action cube aside for now.
- In a 4-player game, place 1 action cube of your color in the Company Cubes area.
- Place Plantations and Farms on their designated places on the player board. Keep all additional Plantations to the side for now.
- Take 3 Coins and 1 Donkey and place them in your Company Supply.
- Take 3 Coins, the fourth black action cube, and 1 Trader, and place them in your Bonus Supply.
- Take 2 Workers and place them in your Worker Pool.
- In a 5-player game, only take 1 Worker.
- Place 3 Traders on the Traders & Contractors area.
- In a 3-player game, place 4 Traders instead.
- Place the Buildings on their corresponding spaces in the Buildings area.
- Take the Trade counter and place it with the ‘4 to 1’ side face up.
- Place the last Warehouse on the top shaded space of your Warehouse track.
- Take the 6 Coffee cubes and place them on the ‘0’ of each matching Warehouse track.
- Take 5 different Animal counters and give each player 1 at random. Place the counter next to the Contracts along with 1 Civet Cat. Return any remaining Animal counters to the box.
- In a 4- or 5-player game, also place 1 Trader.
- Sort Contracts by letter, A through E. Shuffle each stack separately and give each player 1 of each letter. Then, give each player the F-Contract that matches the number on their E-Contract. Place the Contracts in the corresponding spaces of your player board.
- The lower left corner shows which side to use in a 3-player or 4- or 5-player game.
- For their starting coffee supply, each player references their F-Contract. They should receive 2 coffees of the topmost variety and 1 each of the other 2. Advance the corresponding Coffee cubes on their respective tracks.
- In a 5-player game, each player also receives 1 step on the Arabica track of the topmost variety of their E-Contract. Advance the Company discs on their respective tracks.
- All players will place their 3 remaining Level-1 Plantations in Cooperatives on the main board according to the Arabica Coffee varieties depicted on their F-Contract:
- In the Cooperative that matches the top variety of coffee, place a Level-1 Plantation in the center space of the 5 spaces on the “1” row.
- In the Cooperative that matches the second bean variety, place a Level-1 Plantation in the rightmost space of the 5 spaces on the “1” row.
- In the Cooperative that matches the third bean variety, place a Level-1 Plantation in the leftmost space of the 5 spaces on the “1” row.
Note: When determining leftmost or rightmost positions, it is always relative to each specific Cooperative, not to where players are positioned around the board.
- Place all remaining game pieces next to your player board; these will be used during the game.
Experienced Players
- When you have played the game a few times it is possible to place the third Plantation in a Cooperative of your own choice on a free position.
- In a 4- or 5-player game, experienced players can use Contracts for a 3-player game when playing with new players.
Game Board & Player Board Breakdown
Game Board Areas
Arabica Track
For every Arabica counter, Animal counter, or Arabica Step symbol you score, advance 1 space on the corresponding Arabica track.
- Upon reaching the corresponding space, receive the printed bonus:
- The first time a player reaches the second step on all 5 Tracks, they receive a Trader to place in their Traders & Contractors area.
- The first time a player reaches the third step on all 5 Tracks, they receive a Truck to add to their Company Supply.
- Each time a player reaches a space with a printed bonus, they receive that bonus to their Company Supply (Coins and Donkeys).
- Coins are available to all players.
- Donkeys are available only to the first person who reaches it.
- A player may never move backwards on a track if their Company disk is on a Coin or Donkey.
- Going back 1 step does not force a player to give back the Trader or Truck.
- On the Arabica track, the ‘4’ VP space can only be occupied by 1 player.
Milestones
If you fulfill a Milestone at any time, place a marker on the first available spot of that Milestone. These points will be added at the end of the game.
Player Board Areas
Bonus Supply
In this area on your player board there are 1 action cube, 1 Trader, and 3 Coins. Each Period, you may freely choose to use 2 of these 3 items. If during your turn, you receive a Trader or Coin, you may place it in your Bonus Supply area. If you use any Coins from your Bonus Supply, you must move over all of your Coins to your Company Supply.
Example: Red wants to add a Level 1 Plantation, which costs 1 Coin, but they have none in their Company Supply. Red chooses to use money from their Bonus Supply, so they move all 3 Coins from their Bonus Supply to their Company Supply.
Counter Track
When you collect an Arabica counter, Animal counter, or Wild Animal counter, place it on the bottom-most available space on the Counter track on the right of your player board. Matching counters of the same type and color (e.g. Indonesia Arabica counters) must be placed on top of each other. After placing the counter, immediately advance 1 step on the corresponding Arabica track. If you receive a Wild Animal counter, you may choose whichever track to advance on.
2 counters of the same color can be used to cover another space on the track. To make the match, you may take a counter that has been previously placed on a space, as long as another counter remains. Combine the 2 counters and place them both on the next available empty space on the Counter track. Any combination of counters with the same color can be used. Wild Animal counters can be combined with any counter color.
Note: Each space only holds one type of counter, with the exception of combined counters used to cover another space. Combined counters used in this way cannot be reused for additional spaces on the track.
Example: Yellow receives their 2nd Brazil Animal counter. They already have 2 Brazil Arabica counters, so they combine one of their Brazil Arabica counters with the 2nd Brazil Animal counter and place it on the next empty space on their Counter track.
Buildings Reference
When constructing, you can choose from the following Buildings:
| TYPE | BONUS | VICTORY POINTS |
|---|---|---|
| 1st Warehouse | Constructed during setup | — |
| 2nd Warehouse | 1 coffee of choice, Trade counter: 3:1 | 1 |
| 3rd Warehouse | 1 coffee of choice, 1 Civet Cat | 3 |
| 4th Warehouse | 1 coffee of choice, Trade counter: 2:1, 1 Coin | 5 |
| 5th Warehouse | 1 coffee of choice | 6 |
| 1st Washing Station | 2 coffee | 1 |
| 2nd Drying Station | 2 coffee | 2 |
| 3rd Sorting Station | 2 coffee | 3 |
| Bonus coffees must match the Cooperative where the Station is constructed. | ||
| 1st Fair Trade post | 1 coffee per Harvest Phase | 1 |
| 2nd Fair Trade post | 1 coffee per Harvest Phase, 1 step on an Arabica track of choice | 2 |
| 3rd Fair Trade post | 1 coffee per Harvest Phase, 1 step on an Arabica track of choice | 3 |
| Hospital | No Bonus | 4 |
If you receive a Wild Animal counter, you may choose any Arabica track to advance on.
Gameplay Overview
In Coffee Traders, each player represents a Trading Company from Antwerp, Belgium. Your Trading Company’s goal is to help Coffee Farmers from different parts of the world partner with Cooperatives, to hire Contractors all over the world to construct Buildings that will help improve their community, and to have Traders in Antwerp import as much coffee as possible to meet the demand.
Coffee Traders is divided into 3 periods. Each period consists of 6 Phases:
- Phase 1: Work – Players perform actions on their Coffee Plantations.
- Phase 2: Workers – Players send their Workers to Plantations.
- Phase 3: Trader & Contractor – Players trade with Antwerp and/or construct Buildings.
- Phase 4: Harvest – Players harvest coffee from their Plantations.
- Phase 5: Contract – Players fulfill Contracts and deliver coffee to Coffee Bars.
- Phase 6: Refresh
At the end of each Phase, move the Phase marker to the next space on the Phase track and continue playing. Do this until the Refresh Phase, signaling the end of the period. After the third period, the game ends.
Phase 1: Work Phase
Work Phase Overview
In turn order, players perform 1 of the 4 Cooperative actions on their turn. Alternatively, a player may pass, forgoing all of their actions for the remainder of this Phase. This continues until all players have passed. Players perform actions by placing action cubes on their player board. A player may choose an action multiple times.
There are 4 Cooperative Actions:
Action A: Add a Plantation to a Cooperative
There are 3 Levels of Plantations: 1, 2, and 3. These represent the qualities of the harvested coffee that may score you points at the end of the game.
To add a Plantation to a Cooperative, place 1 action cube on the matching action space.
Take an available Plantation from your player board and place it on a space in a Cooperative. The following rules apply:
- Players must take the leftmost Plantation from any of the 3 available rows on their player board.
- The Level of the Plantation must match the Level of the row where it is placed. (For example: a Level-1 Plantation can only be placed on a space in the “1” row or the “1/2” row.)
- If adding the Plantation to a Cooperative where you have no Plantations, place 1 Worker from your Worker Pool in the Town Center of that Cooperative. The first Plantation in a new Cooperative must be a Level-1 Plantation on the “1” row.
Example: Blue player takes 1 Level-1 Plantation and places it in Indonesia Co on an available place in the “1” row. Because it is their first Plantation in the Cooperative, they take 1 Worker from their Worker Pool and place it in the Town Center. For constructing the first Level-1 Plantation, they take 1 Donkey and place it into their Company Supply.
In addition to the requirements on page 15, placing a Plantation on the “1/2” and “2/3” row has additional rules:
- When placing a Level-2 Plantation, pay 1 Coin.
- When placing a Level-3 Plantation, pay 2 Coins.
Adding a Plantation to the “1/2” Row
On the “1/2” row a Level-1 or Level-2 Plantation may be built, following the rules listed below:
- Select an available building space on the “1/2” row that connects, via the pathways to 1 of your Plantations on the “1” row.
- The connected pathway cannot be occupied by a Donkey of other players.
- If the pathway is empty, you must place 1 Donkey from your Company Supply on it.
- For each of your Plantations on the “1/2” row you must have 1 Plantation on the “1” row of that Cooperative.
Adding a Plantation to the “2/3” Row
On the “2/3” row a Level-2 or Level-3 Plantation may be built. There are 2 ways to build a Plantation, following the rules listed below:
A. With a Donkey:
- Select a space on the “2/3” row that connects, via the pathways to 1 of your Plantations on the “1/2” row.
- The connected pathway cannot be occupied by a Donkey of other players.
- If the connecting space is empty, or only 1 of your Donkeys is present, you must place the requisite number of Donkeys from your Company Supply on that space.
B. With a Truck:
- Select an available building space on the “2/3” row.
- You don’t need a Plantation on the “1/2” row (because you are using a Truck instead of Donkeys).
- For each of your Plantations on the “2/3” row you must have 1 Plantation on the “1” row of that Cooperative.
- You must choose a Building space that does not have another player’s Donkeys on its connecting pathway.
- If all pathways hold a Donkey belonging to other players, you may not choose a Building space.
Take the bonus depicted underneath the Plantation on your player board and place it in your Worker Pool, Company Supply, or Sumatra Co.
- If you add a Plantation on the “1/2” or “2/3” row in a Cooperative, you immediately advance 1 step on the Arabica track corresponding to that coffee variety.
- Players adding Plantations to the third row also take 1 available Animal counter.
When all Plantations have been removed from a row on your player board, you may unlock a Farm. Unlocked Farms may immediately be placed in the Cooperative of your choice by paying 1 Coin. If you cannot, or choose not to, construct the Farm, it is removed from the game.
When you have placed all of your Plantations, take a Civet Cat from your general supply and place it in the Sumatra Co on the main board.
Example: Red decides to place a Level-2 Plantation in Indonesia Co on the “2/3” row. They take two Donkeys from their Company Supply, placing them on the pathway between the two rows. They advance 1 step on the Indonesia Arabica track and choose to take the Wild Animal counter. They choose to advance 1 step on the Colombia Arabica track.
Next, Green decides to place a Level-3 Plantation in Indonesia Co on the “2/3” row. They take their Truck from their Company Supply and place it on one of the available spaces on the third row. Then, they advance 1 step on the Indonesia Arabica track and take the Animal counter. They advance 1 step on the Indonesia Arabica track.
Note: Donkeys and Trucks in a player’s Company Supply may only be placed on a connecting space when performing the Add a Plantation action. Donkeys placed by performing the Breed a Donkey action are never placed in your Company Supply, they are immediately placed on the connecting space. With a Truck you can reach every location on the third row, but you can connect only 1 Plantation.
Action B: Send Workers to Harvest
With this action, you place Workers from the Town Center onto the Plantations. These Workers will harvest coffee during Phase 4.
To send Workers to harvest, place 1 action cube on the matching action space.
- The active player chooses a Cooperative.
- Place 1 Worker from the Town Center onto 1 of each player’s Plantations. Each Plantation only holds 1 Worker. If a player has multiple empty Plantations, they only receive 1 Worker on their Plantation on the lowest row. (For example: If a player has a Plantation in the “1” row and the “1/2” row, the Worker must be placed on the “1” row Plantation.)
- If there are any remaining Workers at the end of this action, they remain in the Town Center.
- If there are not enough Workers to place on each Plantation, the active player decides where to place them.
- If there are no more Workers in the Town Center when this action is complete, place 1 Worker from the general supply in the Town Center.
BONUS: If you place a Worker on 1 or more Plantations that belong to other players, you immediately advance 1 space on the Arabica track that corresponds to the Cooperative.
Example: Red chooses to fill the Plantations in Indonesia Co. Red, Blue, and Green all receive 1 Worker, placed on their Level-1 Plantations. Red’s Level-2 Plantation does not get a Worker. Since Red placed a Worker on both Blue’s and Green’s Plantations, Red advances 1 step on the Indonesia Arabica track.
Action C: Breed a Donkey
With this action, you can get more Donkeys to connect your Plantations.
To breed a Donkey, place 2 action cubes on the matching action space.
Take 1 Donkey from your general supply (not your Company Supply) and immediately place the Donkey on an available pathway in a Cooperative above 1 of your previously-placed Plantations.
Action D: Income
To get Income, place 1 action cube on the matching action space.
Choose 1:
- Place a Civet Cat, from your personal supply, into the Sumatra Co area of the main board.
- Take 2 Coins from the general supply and place them in your Company Supply.
Note: Use your Company Supply. Using resources from your Company Supply (like Donkeys or Trucks) cost no action. You may freely use these resources when building a Plantation.
Phase 2: Workers Phase
Workers Phase
Simultaneously, all players may place Workers from their Worker Pool onto empty Plantations in any Cooperative, including other players’ Plantations. Players must place a Worker in a Plantation in the “1” row before placing Workers in any higher rows.
For each placed Plantation without a Worker, the owner of that Plantation must pay a penalty. The player may pay any combination of:
- 1 Coin
- 1 step backwards on 1 of the Arabica tracks of the player’s choice
The amount paid per Plantation is equal to the current Period: in 1975 pay 1, in 1980 pay 2, and in 1985 pay 3.
A player may never go backwards on an Arabica track once they have received a bonus (Coin or Donkey). If a player is not able to pay, they must remove the Plantation from the game. When removing a Plantation, players must remove their highest-placed Plantation first, then their next-highest, and on.
BONUS REMINDER: When placing a Worker on another player’s Plantation, you advance 1 step on the corresponding Arabica track.
Phase 3: Trader & Contractor Phase
Trader & Contractor Phase Overview
In turn order, players perform 1 of 3 possible Trader or Contractor actions on their turn: place a Trader in Antwerp, hire a Contractor, or remove a Trader from the game. Players may also pass, forgoing their turn. This continues until all players have passed in succession. A player who passes may still choose to perform an action on a future turn during this Phase, provided all other players have not yet passed. A player who passes may still elect to piggyback off another player’s action.
Action A: Place a Trader
Pay 2 Coins and place 1 Trader on the 1st position in a Trading House of the player’s choice. They take the Stock counter and place it at the bottom of the corresponding Warehouse track.
Piggyback in the Trading House
Once the active player places the 1st Trader in a Trading House, all other players may choose to follow the Trader action without paying for it. This occurs in player order. If a player decides to piggyback, they will place their Trader on the 2nd space, the subsequent player on the 3rd, 4th, etc…
In each Trading House there is 1 Coin. Give this Coin to the player who is not present in that Trading House.
- In a 3-player game, the 3rd player must make a choice: place a Trader or take the Coin.
- In a 4-player game, 3 players can place a Trader; the 4th player takes the Coin.
- In a 5-player game, 4 players can place a Trader; the 5th player takes the Coin.
Note: If there is more than 1 player without a Trader in the Trading House, no one takes the Coin.
Example: Blue pays 2 Coins and places a Trader in the Trading House for Ethiopian coffee beans. They take the Stock counter and place it on their player board. In turn order, other players may also place 1 Trader in this Trading House: Red passes, Green and then Yellow both place 1 Trader. Red receives the Coin.
Action B: Hire a Contractor
Pay 2 Coins. Choose an available Building you wish to construct. Available Buildings are the topmost Building in a column on your player board. Replace the Building with a Contractor from your Supply.
- When constructing a Warehouse, you may place it on the next available space to the right of the Warehouse tracks on your board. This increases the storage of each type by 1.
- You may also place the Warehouse at the top of one of your Warehouse tracks. This increases the storage of that coffee type to 10.
- When constructing any other Building (Hospital, Fair Trade posts, and Production Stations), place it on the main board. These must be placed in a location matching the type of Building. If that location has an Arabica Step symbol, advance 1 space on the Cooperative’s corresponding Arabica track.
Then, gain bonuses according to the Building constructed (see page 12).
Piggyback on Hiring a Contractor
Once the active player constructs a Building, all other players may follow that action without paying for it. This occurs in player order. Players must piggyback in the same area as the active player. This means if the active player builds a Warehouse on their player board, all players who piggyback may only construct on their player board. Likewise, if the active player builds on the main board, all piggybacking players may only construct on the main board, and they must construct in the same Cooperative as the active player. However, piggybacking players may construct any available Building they wish.
Piggybacking players still replace their Building space with a Contractor.
Each piggybacking player pays 1 coffee of their choice to the active player. To pay, reduce the quantity of that coffee from the Warehouse on your player board. A player that has no coffee may not piggyback. A player may not use the coffee they just received from constructing a Warehouse or a Station to piggyback.
Example: Yellow pays 2 Coins and decides to construct 1 Fair Trade post in Colombia Co. They place a Contractor on the Building space on their player board, and then move the Fair Trade post to Colombia, placing it on a location with an Arabica Step symbol. Yellow advances 1 step on the Colombia Arabica track.
In turn order, other players may also construct 1 Building in Colombia. Only Red decides to construct. They place a Contractor on the Building space and place a Station in Colombia. They receive 2 Colombian coffee and pay Yellow 1 Ethiopian coffee.
Action C: Remove a Trader
Pay 2 Coins. Remove 1 Trader permanently from the game to advance 2 steps on the Arabica track. You may move 2 steps on 1 track or 1 step on 2 tracks.
Other players cannot piggyback the Remove a Trader action.
Phase 4: Harvest Phase
Harvest Phase
In this Phase, the Workers on all Plantations harvest coffee and deliver it to Fair Trade posts and Traders.
Each Plantation with a Worker harvests 2 coffees each for the corresponding Cooperative. In a 3-player game, Workers harvest 3 coffees instead. Each coffee harvested is delivered to Fair Trade posts first, then the 1st Trader, and finally to the remaining Traders. Any coffee generated in excess is lost. Players may not buy or trade coffee during this Phase.
Perform the Following Steps in Order for Each Cooperative:
- Each player who owns a Fair Trade post in the Cooperative gains 1 coffee.
- The player who placed the 1st Trader in that Cooperative’s Trading House gains 1 coffee.
- Beginning with the player who placed the 1st Trader and continuing to the 2nd, 3rd, etc… give 1 coffee to each Trader. When you reach the end of the Traders, begin again starting with the 1st Trader and continuing to the 2nd, 3rd, etc…
- Continue until there is no more coffee to distribute. Or until each Trader has received 5 coffees.
- Players adjust the storage in their Warehouses to match the coffee they received.
- Each player with at least 4 coffees in all 5 of their Warehouses (excluding Kopi Luwak coffee) immediately receives a Civet Cat and places it in Sumatra Co. (In a 3-player game, this bonus is awarded for having 6 or more coffees in all 5 Warehouses.)
- Note: Players can only get a Civet Cat during this Phase.
- Each player receives 1 Kopi Luwak coffee for each Civet Cat of their color in Sumatra Co. Then, return the Civet Cats to your general supply.
Note: The 5-coffee limit only applies to this step, not coffees received during the Fair Trade or 1st Trader steps. It is possible that a player may receive more than 5 coffees if they are the 1st Trader and/or they own Fair Trade posts.
Phase 5: Contract Phase
Contract Phase Overview
Each player in REVERSE TURN ORDER may perform actions, one at a time, to fulfill a Contract or make a delivery to a Coffee Bar. A player may choose to pass, forgoing any actions this Phase. When a player passes, move their Turn Order marker to the unoccupied space closest to the “1” space of the bottom track. The Phase continues in this manner until all players pass.
During Their Turn, a Player May:
- Spend Kopi Luwak coffee as any other type of coffee.
- Trade any combination of coffee for 1 type of coffee using their current trade value (4:1, etc…).
- Players may never trade other types of coffee for Kopi Luwak coffee.
- Purchase any 1 coffee (not Kopi Luwak) for 2 Coins in the first 2 Periods or 3 Coins in the last Period.
- Each player may either spend 3 different Stock counters to construct 1 Warehouse, or 5 different Stock counters to construct 2 Warehouses.
Example: Green has 3 different Stock counters and chooses to remove them from the game. They may construct their last Warehouse and receive 1 coffee of their choice. They take 1 Ethiopian coffee.
Action A: Fulfill a Contract
Select a Contract on your player board to fulfill. Reduce the amount of coffee corresponding to that variety on the Contract.
Note: Contracts must be completed in full; partial fulfillment is not allowed.
Remove that Contract from the game and receive the bonus listed in the space under the Contract. When multiple bonuses are listed, the player may choose which one to take.
- When you get a Building bonus, you do not need to pay Coins or a Contractor. Other players may not piggyback on your construct.
- When you receive a Civet Cat, place it in Sumatra. Note: If it’s the 3rd Period, place the Civet Cat in your Company Supply.
- Any bonus Coins, Donkeys, and Trucks are placed in your Company Supply.
- Workers are placed in the Worker Pool.
- If a Wild Animal symbol is shown, advance 1 step on the Arabica track of your choice.
Whenever a horizontally-matched pair of Contracts is fulfilled (A&B, C&D, or E&F), that player receives a bonus from those available to the right of the Contracts: a Civet Cat, an Animal counter, or a Trader. Note: The Trader is not available when playing with 3 players.
- Immediately place the Trader in the Traders & Contractors area or Bonus Supply.
- Immediately place the Civet Cat in Sumatra or in your Company Supply if it’s the 3rd Period.
- Immediately place the Animal on the scoring row at the right of your player board and advance 1 step on the corresponding Arabica track.
Take the top Arabica counter from the Contract Bonus area that matches the letter of the delivered Contract (if available), and then advance 1 step on the corresponding Arabica track. Place the Arabica counter on the bottom-most available space on the Counter track.
Example: Red wants to fulfill Contract-D. They pay 3 pink, 3 blue, and 3 black coffee, as per the Contract. They return the Contract to the box.
Then, Red receives 3 Coins in their Company Supply and the topmost Arabica counter. The counter advances Red 1 step on the Colombia Arabica track.
Red also chooses to construct 1 Building instead of taking 1 extra Coin and a Civet Cat in Sumatra Co. They construct a Station in Colombia, receiving 2 Colombian coffee. They place the station on a location with the Arabica Step symbol. Red advances 1 step on the Colombia Arabica track.
Action B: Deliver to Coffee Bars
Choose any empty space in one of the Coffee Bars to deliver coffee to. Adjust your storage by the amount of coffee you are delivering. Then, place a scoring marker on that position in the Coffee Bar. For example, if you place into a “Pink 3” space, reduce your Pink Coffee by 3.
Note: The final spot of each bar (except for the Kopi Luwak Coffee Bar) requires 6 of any color of coffee. All coffee delivered must be of the same color. That player takes the Animal counter and advances 1 space on the matching Arabica track.
Then, take the Coin bonus shown above the corresponding box. If you place in the final spot of each bar (final 2 in the case of Kopi Luwak coffee), take the corresponding counter.
In a 4- or 5-player game, when a player has delivered at least once to all 6 Coffee Bars they receive a Wild Stock counter.
A player may make a second delivery, performed in the same fashion as the first. If a player elects to not make a second delivery in the same turn, they must immediately pass and move their Turn Order marker.
Example: Red pays 3 Kopi Luwak coffee and places 1 scoring marker in the Kopi Luwak Coffee Bar. They receive 2 Coins and take the Arabica counter. Then, they advance 1 step on the Colombia Arabica track.
Phase 6: Refresh Phase
Refresh Phase
The Refresh Phase consists of the following steps:
- Return all Traders and Contractors to their area on your player board.
- Return action cubes to the Company Cubes area.
- If this is a 4-player game, and you used the action cube in your color, return it to the general supply.
- Adjust your coffee storage based on available Warehouses. Any coffee beyond what your Warehouses can store is lost.
- Each player starts the game with 1 Warehouse that can store 1 of each type of coffee.
- When constructed, a Warehouse may be added to the right of the tracks, increasing storage of each type by 1, or added above a track to increase storage of that type of coffee to 10.
- A player is free to replace their constructed Warehouses so they can store the coffee of their liking (also see page 21, Action B).
- Receive 1 coffee, on the corresponding track, for each Stock counter you have. Because you receive this after storage adjustments, this ignores capacity requirements on coffee storage.
- Refill the Bonus Supply with 3 Coins from your Company Supply. For each Coin you cannot fill up to the 3 Coins needed, take a -3VP token. Take the necessary Coins from the general supply.
- Move the Turn Order markers to the top track.
- Refill the Coin of each Trading House.
Note: A player can never get Coins from the general supply for free.
Example: Red has 2 Warehouses. They may store 2 coffees from all of the coffee types. Or, they may store 1 coffee of their choice from all the types and up to 10 from 1 type. They choose to replace their Warehouse, so they may store all 4 Indonesian coffee. They lose 1 Ethiopian coffee.
Example: Red needs to refill their Bonus Supply, but only has 2 Coins. They place both Coins in their Bonus Supply and take 1 Coin from the general supply. They also take 1 -3VP token.
It’s coffee o’clock
Example of using the Bonus Supply during Phase 3: In Phase 3, Red received their third Coin. They may move all 3 Coins into the Bonus Supply area, so they may move their Trader to the Trader & Contractor area. This way, Red doesn’t use their Coins, but piggyback on other players’ actions.
End of Game & Scoring
End of Game
AT THE END OF THE 3RD PERIOD, THE GAME ENDS AND PLAYERS ADD UP THEIR VICTORY POINTS (VP).
We have a winner!
- Determine the Quality Value of each player in each Cooperative:
- Each Plantation is worth its Level in Quality Value (QV): 1, 2, or 3 points.
- Each Building is worth 1 QV, except the Hospital is worth 2 QV.
Note: Players must have a Plantation in a Cooperative in order for Buildings to count towards their QV total.
Players receive VP based on their Quality Value (tied players add together the VP and split, rounding up): - Highest Quality Value: 16VP
- Second-Highest Quality Value: 8VP
- Third-Highest Quality Value: 4VP (no third place is awarded in 3-player games)
- Score points from items in your Company Supply and Worker Pool only. (This does not apply to items in personal supply or used on the board, like Donkeys, Trucks, etc…)
- Workers, Donkeys, or Civet Cats: 1VP each
- Trucks: 3VP each
- -3VP token
- Score points from your Counter track based on the topmost covered VP space.
- Score points based on advancement on the Arabica tracks (all gains are cumulative):
- If a player has reached at least the second space on all 5 Arabica tracks, they score 3 points.
- If a player has reached at least the third space on all 5 Arabica tracks, they score 7 points.
- If a player has reached the sixth space of the Arabica track, they score 6 points.
- The first player to have reached the end on each track, scores 4 bonus points.
- Score points from fulfilled Milestones.
- Score points from fulfilled Contracts:
- Each empty Contract space has a point value.
- Score points for Coffee Bar deliveries:
- For each counter inside a scoring box on a Coffee Bar track, score the corresponding number of points.
- Score points for Coffee Bar majorities:
- For each Coffee Bar track, the player with the most markers scores 4 points.
- The player with the second most markers scores 2 points.
- In the event of a tie, the tied player with the marker placed on the highest number wins.
- Score points for Plantations and Buildings constructed:
- 1 Plantation and all Buildings have a VP value if they were constructed. Refer to their space on the player board for that value.
Milestones Reference
Milestones Guide
Construct all 5 Warehouses
Construct all 3 Stations and Fair Trade posts
Deliver all 6 Contracts
Place a Trader in all 5 Trading Houses
Have 10 coffees in 2 of your Warehouses
Note: Can be achieved through harvesting, trading, and/or buying.
Make 1 delivery of a value 2 or more to all 6 Coffee Bars
Add all 11 Plantations
In 4 Cooperatives, have at least:
- A Plantation in level 2 or 3 and
- A Building
In 2 Cooperatives, have 8 or more Quality Value points (QV)
Note: See End of Game, page 28.
Symbols & Icon Reference
Game Pieces
- Worker
- Donkey
- Truck
- Trader & Contractor
- Civet Cat
- Arabica counter
- Animal counter
- Wild Animal counter
- Trade counter
- Stock counter
- Action cube
- Coin
- Warehouse
- Production Station
- Fair Trade post
- Hospital
- Farm
- Milestone
- Contract
Gameplay Symbols
- Period
- Cooperative
- Coffee
- Coffee Level
- 2 Donkeys
- Piggyback
- Pass
- Victory points
- Advance on the Arabica track
- Advance on the Counter track
- Phase 1: Work
- Phase 2: Workers
- Phase 3: Trader & Contractor
- Phase 4: Harvest
- Phase 5: Contract
- Phase 6: Refresh
- = / / / Construction: Construct any available Building (excluding the Farm).
COFFEE TRADERS © 2020 CAPSTONE GAMES ARTWORK © 2020 DAAN VAN PARIDON & JOHN RABOU ALL RIGHTS RESERVED.
