
Great Western Trail: New Zealand
2023
Manage a South Island sheep station, improve your breeds, and deliver sheep to trading posts while choosing whether to focus or diversify.
150
minutes
1 - 4
player(s)
12+
Medium Heavy


About this board game
Great Western Trail: New Zealand is a board game for 1–4 players with an average play time of 150 minutes. Set towards the end of the 19th century, it places you in the role of a runholder on New Zealand’s South Island, where your family sheep station has prospered through diverse breeds and increasingly valuable wool.
The arrival of the 20th century brings new challenges. You must acquire improved and valuable sheep breeds to support your family business and the labourers who work for you. Will you rely on the strengths that brought earlier success, or diversify into new ventures?
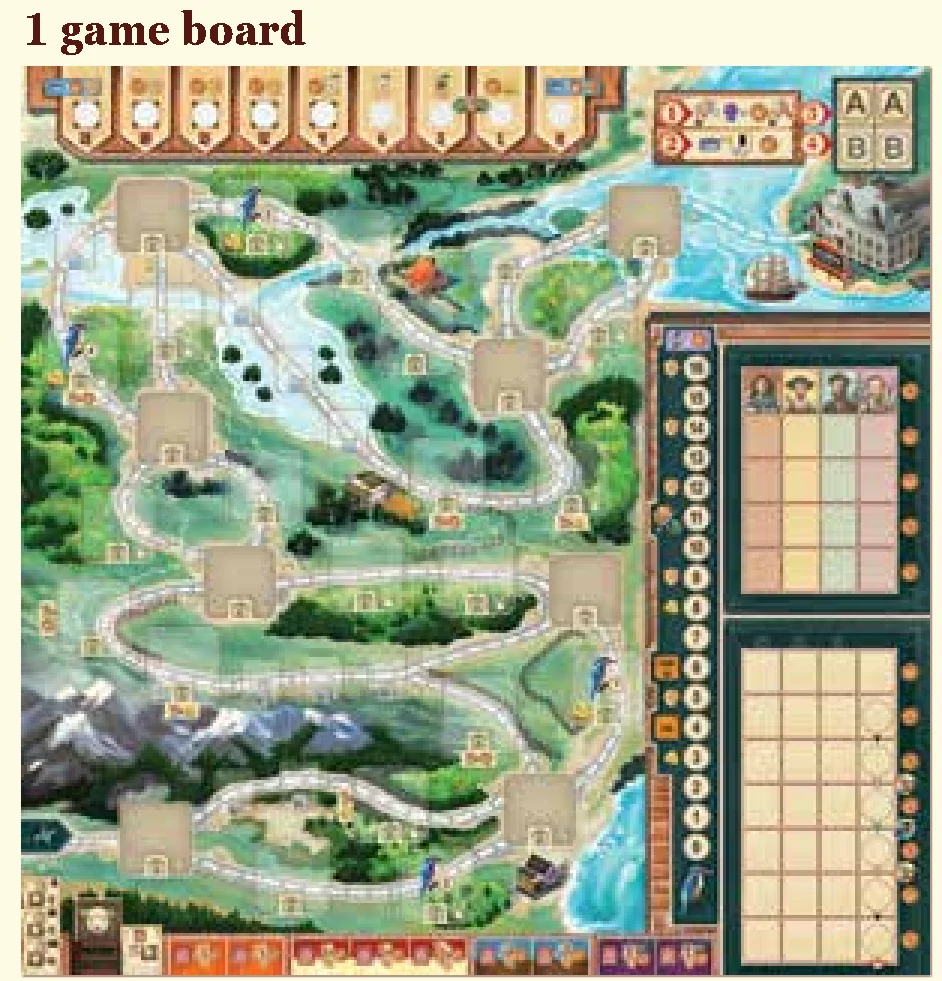
On the game board, your runholder travels along a trail that winds and forks from the lower left corner towards Wellington in the upper right. Along the way, you perform actions that offer different ways to earn victory points, shaping your approach as you progress along the route.
- Move your runholder along a winding, branching trail.
- Perform actions that provide opportunities to earn victory points.
- Acquire improved and valuable breeds of sheep.
- Deliver sheep to local or foreign trading posts when you reach Wellington.
Each time your runholder reaches Wellington, you deliver sheep to a trading post, which may also be worth victory points. Afterward, your runholder begins moving along the trail again. In an average game, this journey to Wellington happens around five or six times.
All victory points are awarded at the end of the game, and the player with the most points wins. With its South Island setting, branching trail, sheep deliveries, and choices between established strengths and new ventures, Great Western Trail: New Zealand offers a substantial journey through the changing fortunes of a family sheep station.
/pic7182955.jpg)
Board Game Rules for
Great Western Trail: New Zealand
Great Western Trail: New Zealand
Game design: Alexander Pfister
Rulebook
Kia ora, and welcome to Great Western Trail New Zealand!
Towards the end of the 19th century, you established yourself as a runholder (owner of a sheep station) on the South Island of New Zealand. Recent years have seen your family farm prosper by diversifying your breeds of sheep and increasing the value of your wool.
With the dawn of the new century, difficult challenges have arisen. You must acquire improved and valuable breeds of sheep to ensure the prosperity of your family business and the labourers who work for you. Decide whether to focus on your past strengths or to diversify into new ventures. Will the beginning of the 20th century be as rewarding as earlier years, or will the efforts of others surpass your strategy? Good luck, and kia kaha!
Components


Components List
- 1 game board
- 1 sea routes board
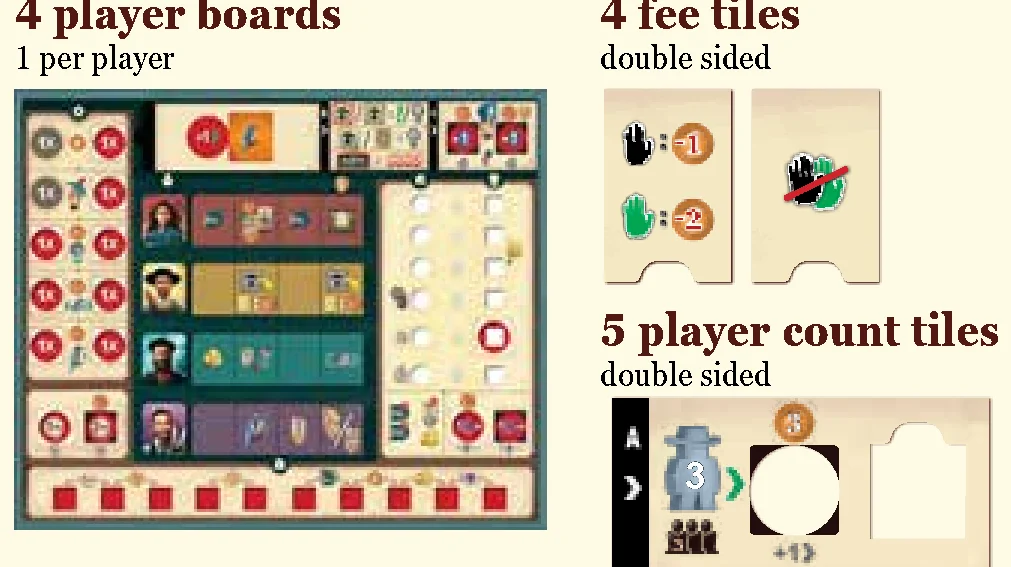
- 4 player boards (1 per player)
- 4 fee tiles (double sided)
- 5 player count tiles (double sided)
- 28 worker tiles (7 each of shepherd, craftsman, sailor, shearer; back of all worker and hazard tiles shows “A”)
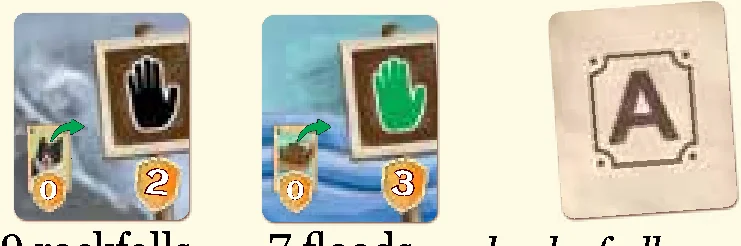
- 16 hazard tiles (9 rockfalls, 7 floods)
- 34 bonus tiles (back shows “B”)
- 2 bags (marked A and B)
- 4 step tiles (front: +1, back: +2)
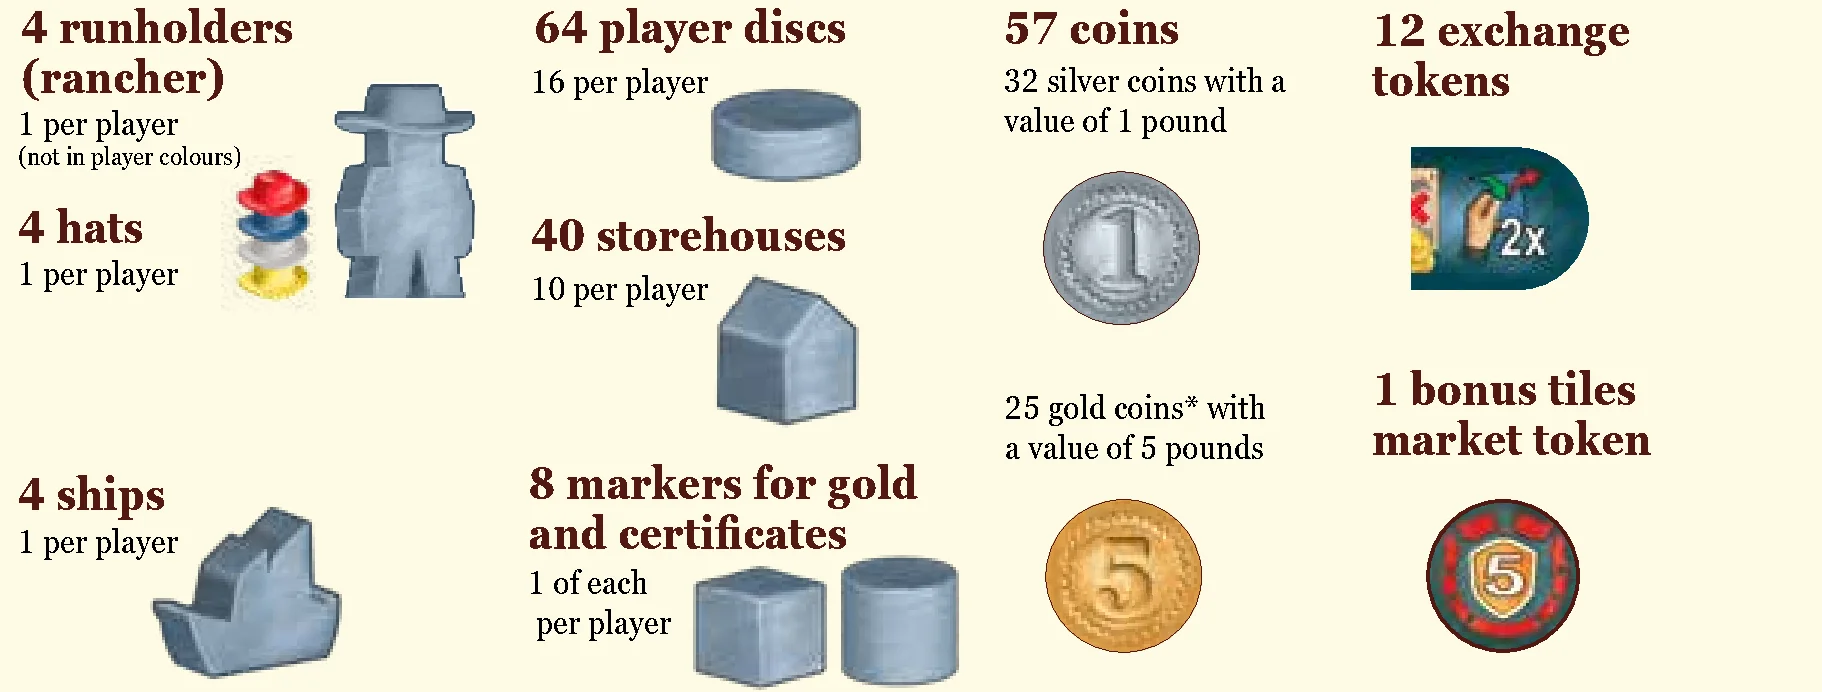
- 4 runholders (rancher, 1 per player, not in player colours)
- 4 hats (1 per player)
- 4 ships (1 per player)
- 64 player discs (16 per player)
- 40 storehouses (10 per player)
- 8 markers for gold and certificates (1 of each per player)
- 57 coins (25 gold coins with a value of 5 pounds, 32 silver coins with a value of 1 pound; *For consistency with the other GWT editions, we retained coins instead of historically correct paper bills)
- 12 exchange tokens
- 1 bonus tiles market token
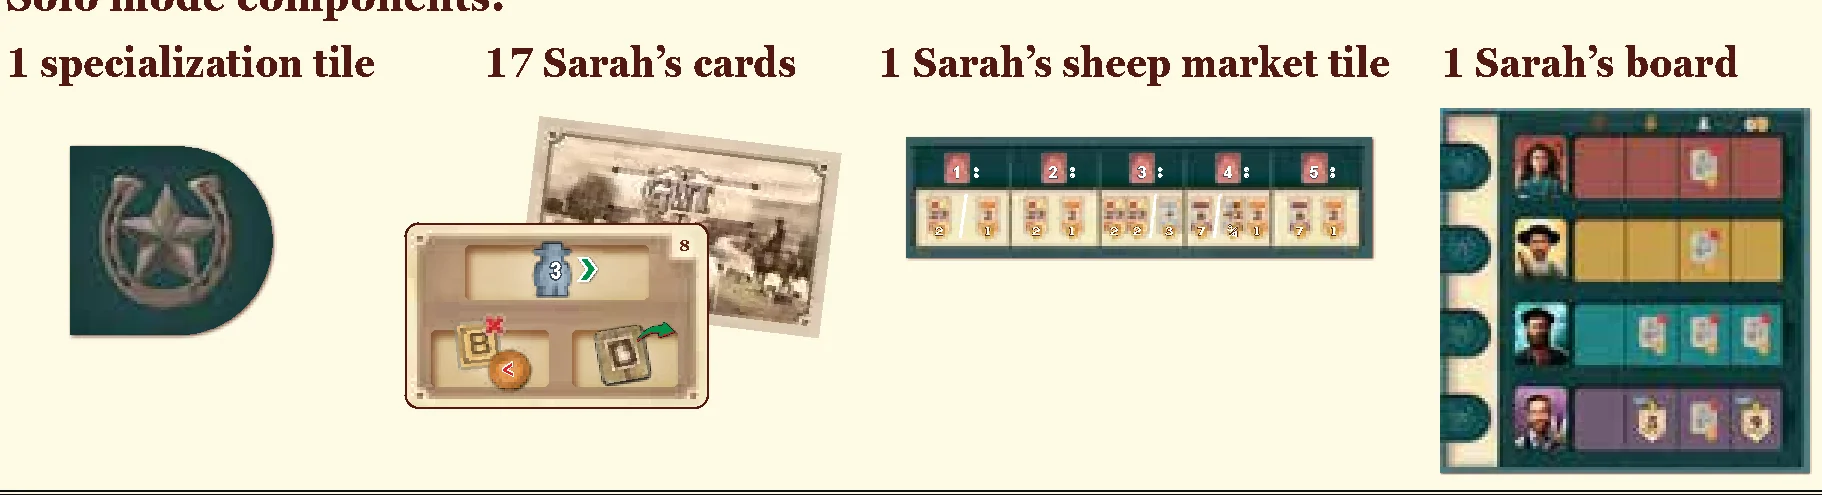
Solo mode components:
- 1 specialization tile
- 17 Sarah’s cards
- 1 Sarah’s sheep market tile
- 1 Sarah’s board
Cards and Tiles
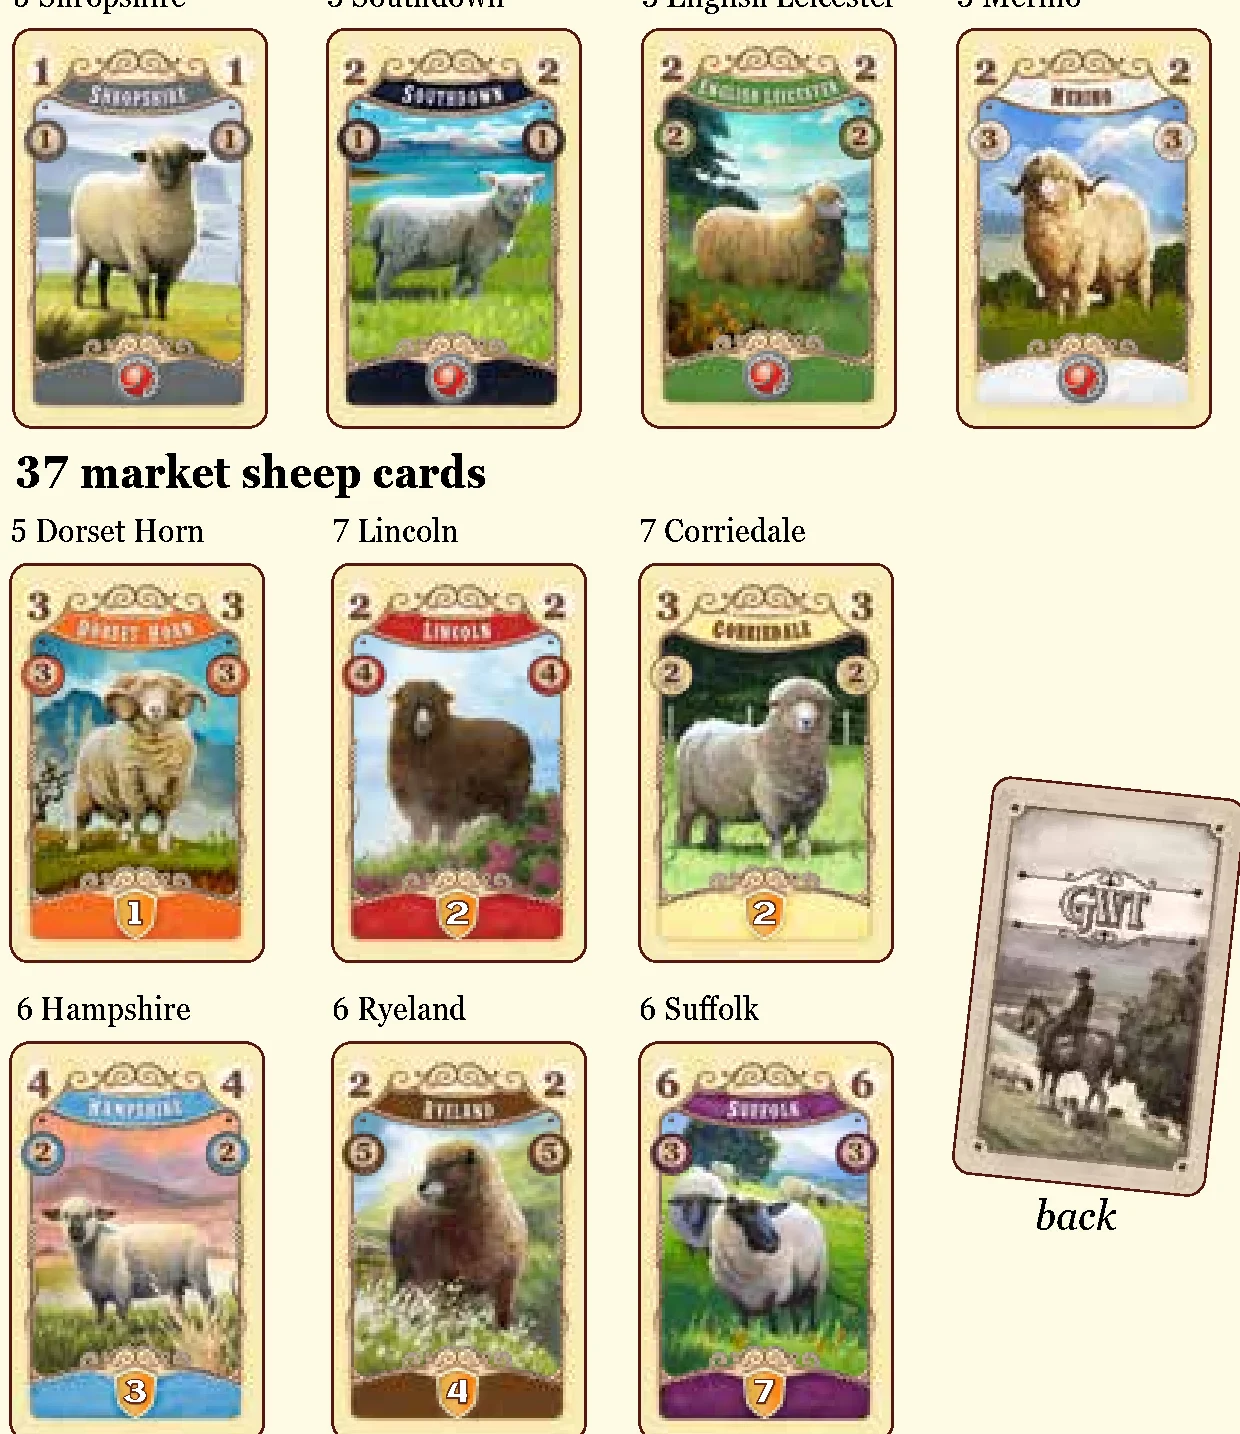
- 93 sheep cards:
- 56 player sheep cards (14 per player: 5 Shropshire, 3 Southdown, 3 English Leicester, 3 Merino)
- 37 market sheep cards (5 Dorset Horn, 7 Lincoln, 7 Corriedale, 6 Hampshire, 6 Ryeland, 6 Suffolk)
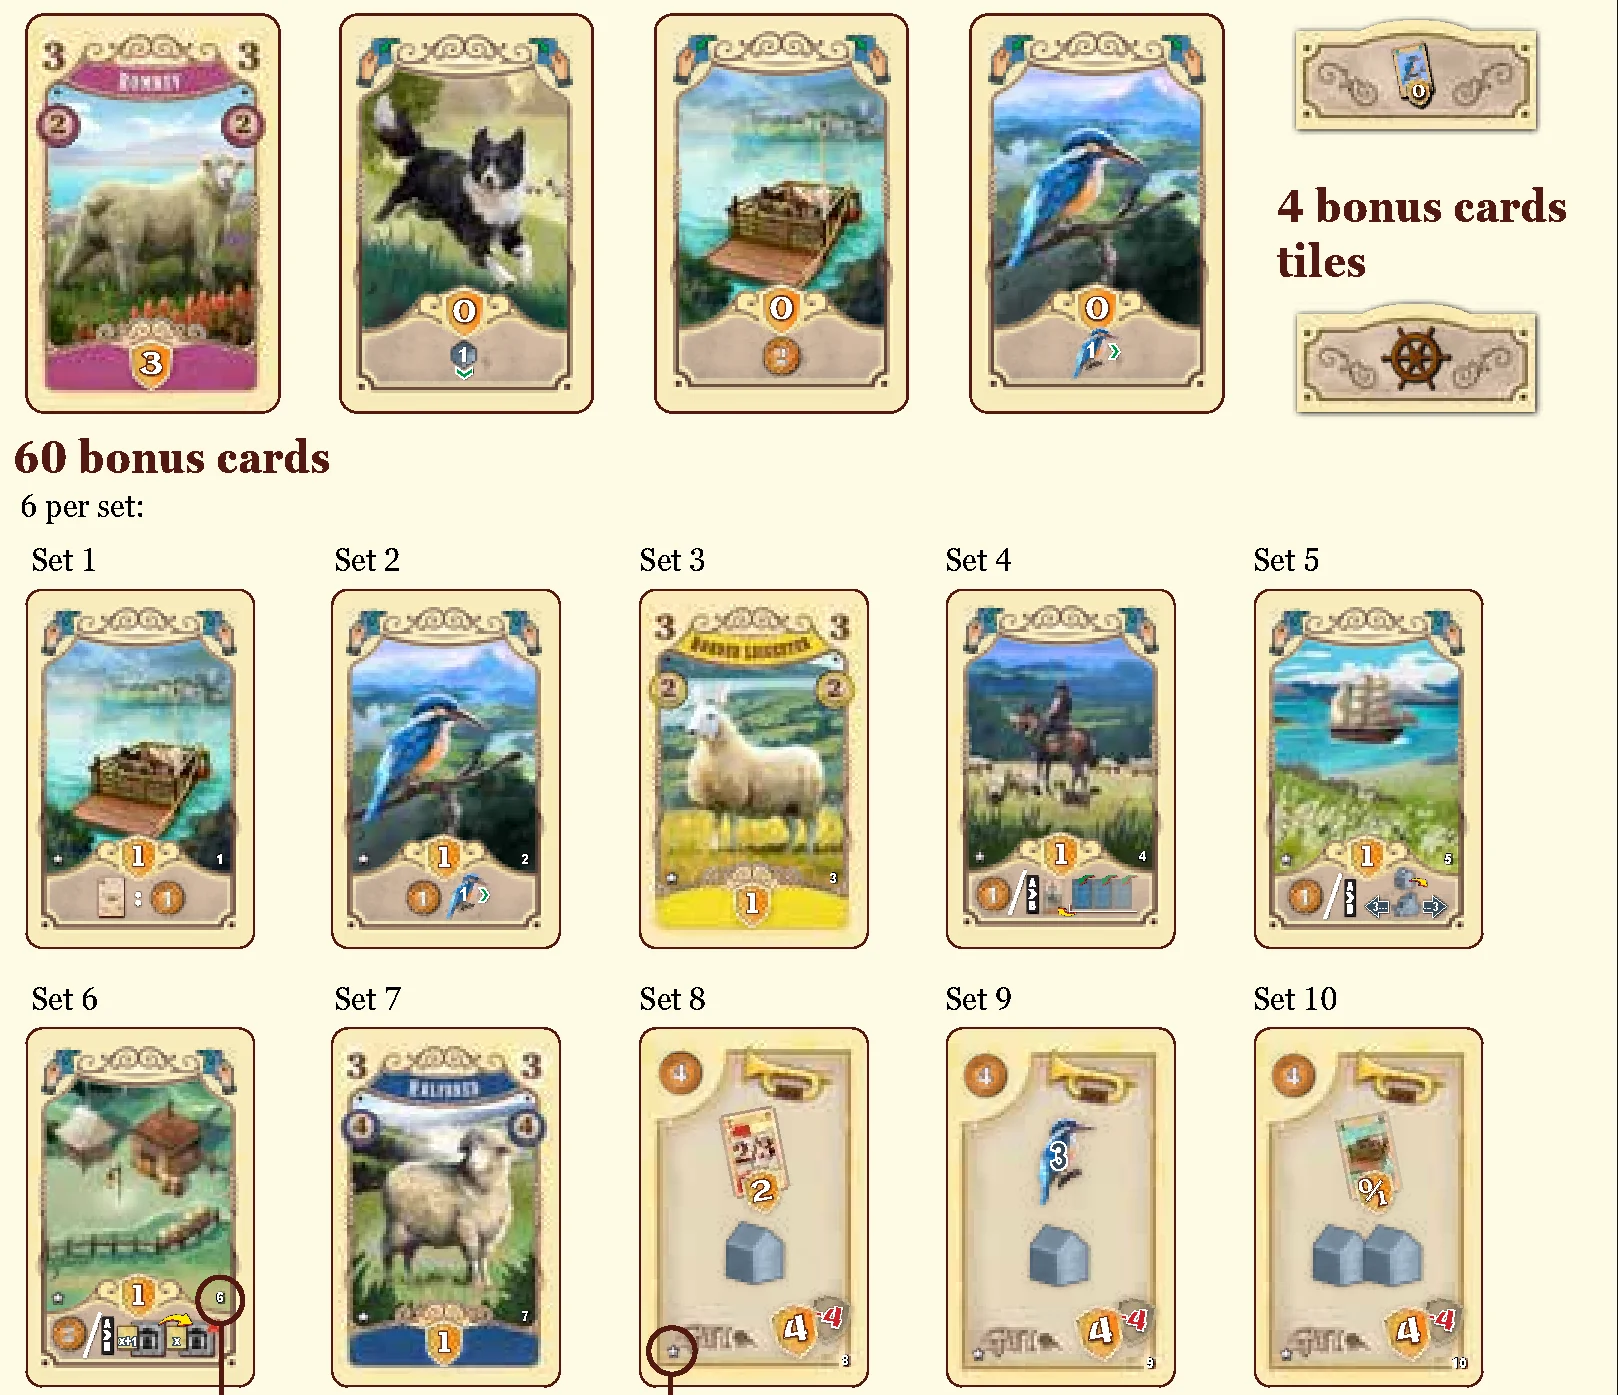
- 56 deck-building cards: 18 Romney sheep, 12 Sheepdog, 14 Ferry, 12 Kōtare bird
- 5 additional cards tiles
- 60 bonus cards (6 per set, Sets 1 to 10; one card of each set is marked with a white star; all set cards carry their respective set number)
- 4 bonus cards tiles
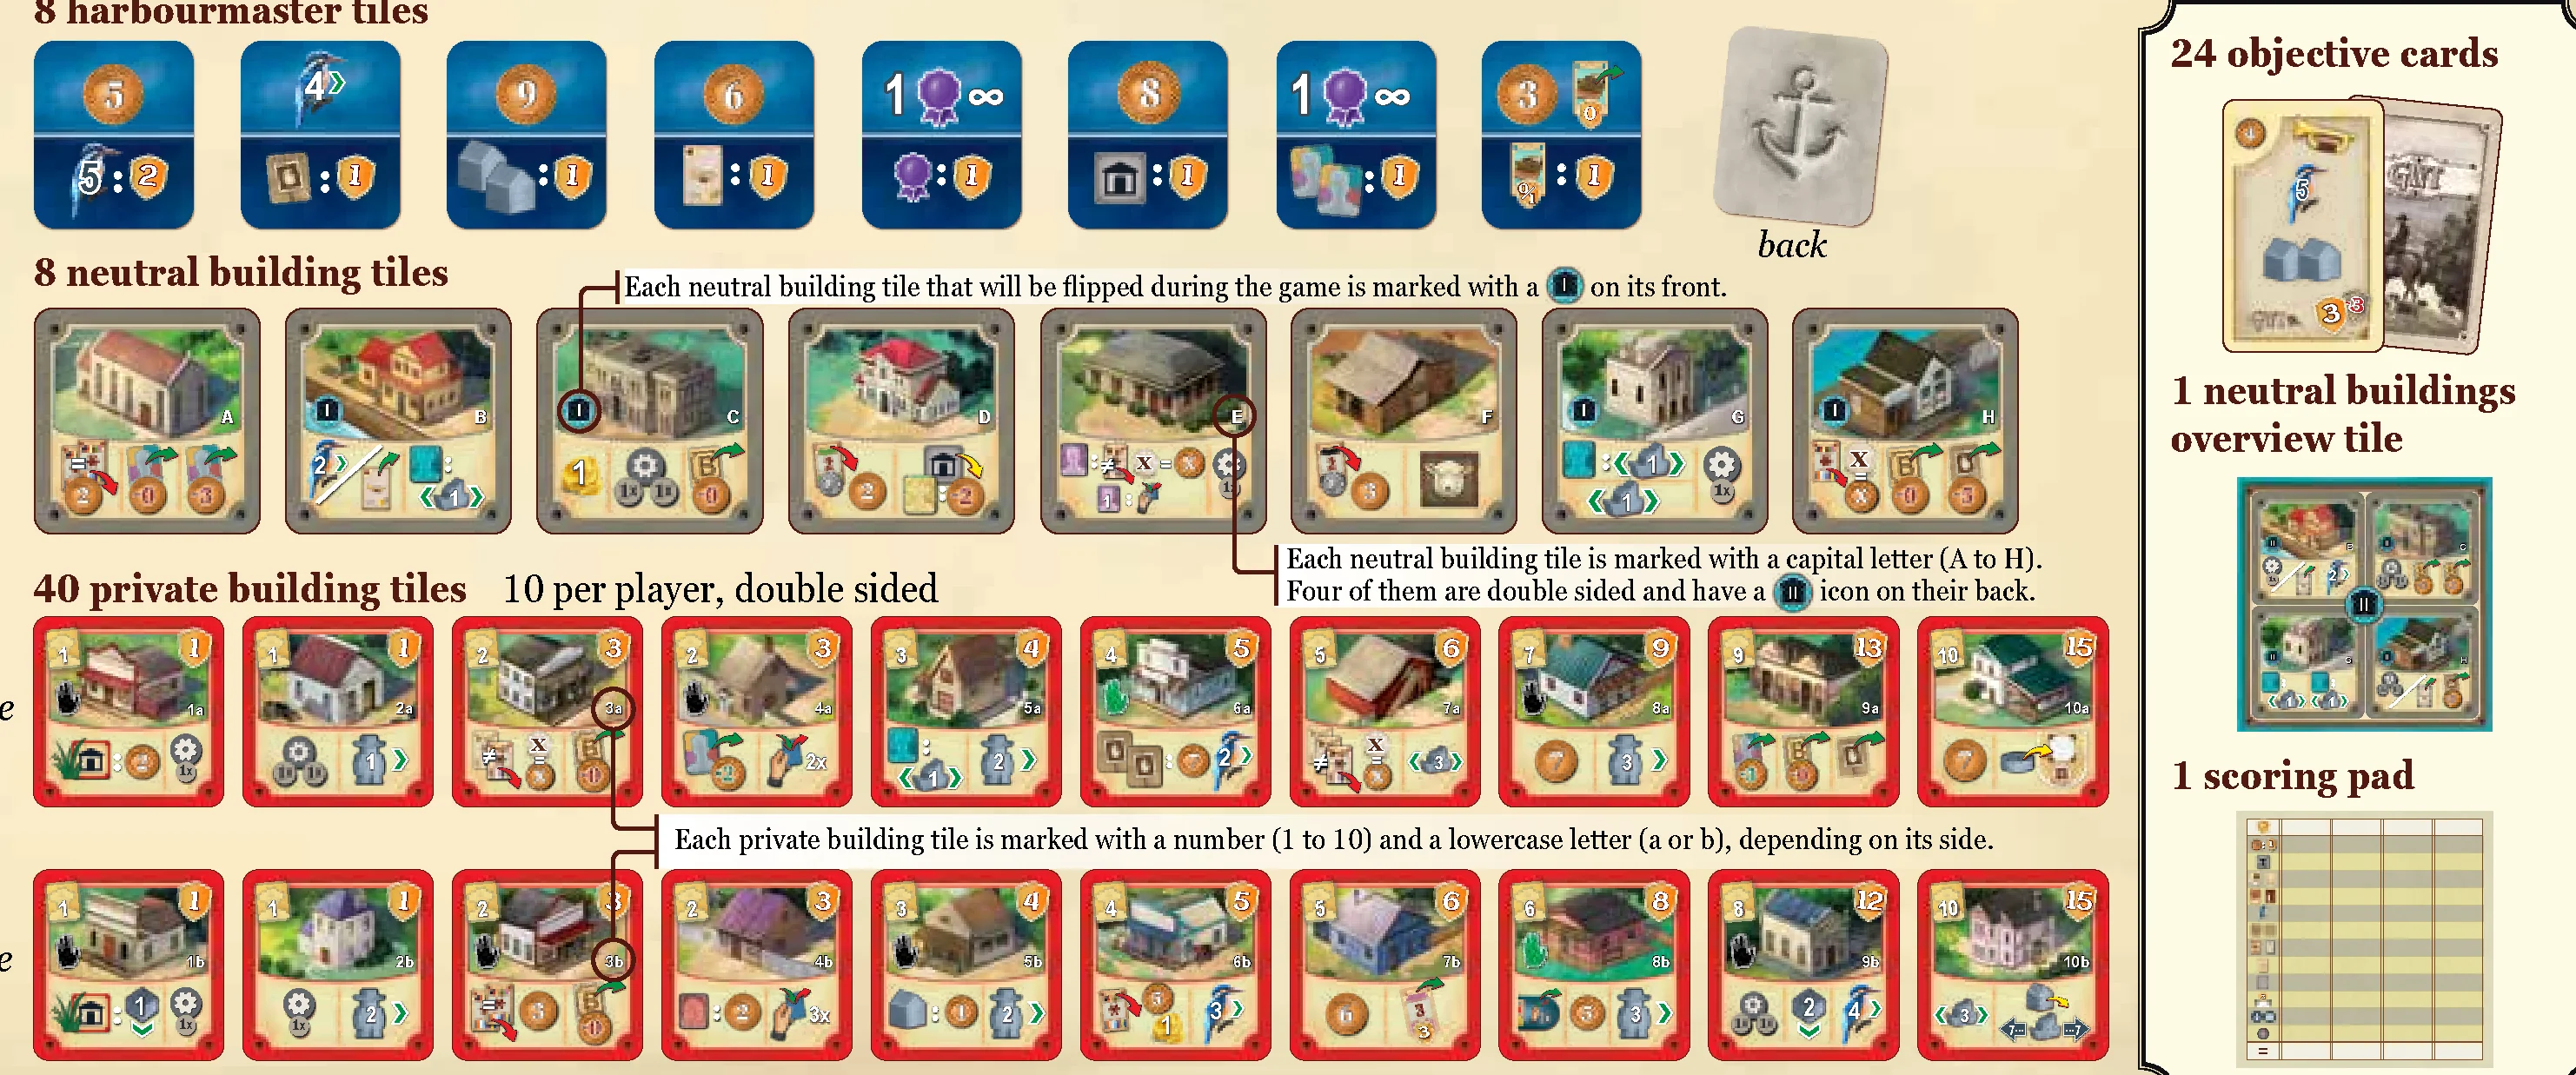
- 8 harbourmaster tiles
- 8 neutral building tiles: Each neutral building tile is marked with a capital letter (A to H). Four of them are double sided and have a
 icon on their back. Each neutral building tile that will be flipped during the game is marked with a on its front.
 - 40 private building tiles: 10 per player, double sided. Each private building tile is marked with a number (1 to 10) and a lowercase letter (a or b), depending on its side.
- 24 objective cards
- 1 neutral buildings overview tile
- 1 scoring pad
Game Board Setup
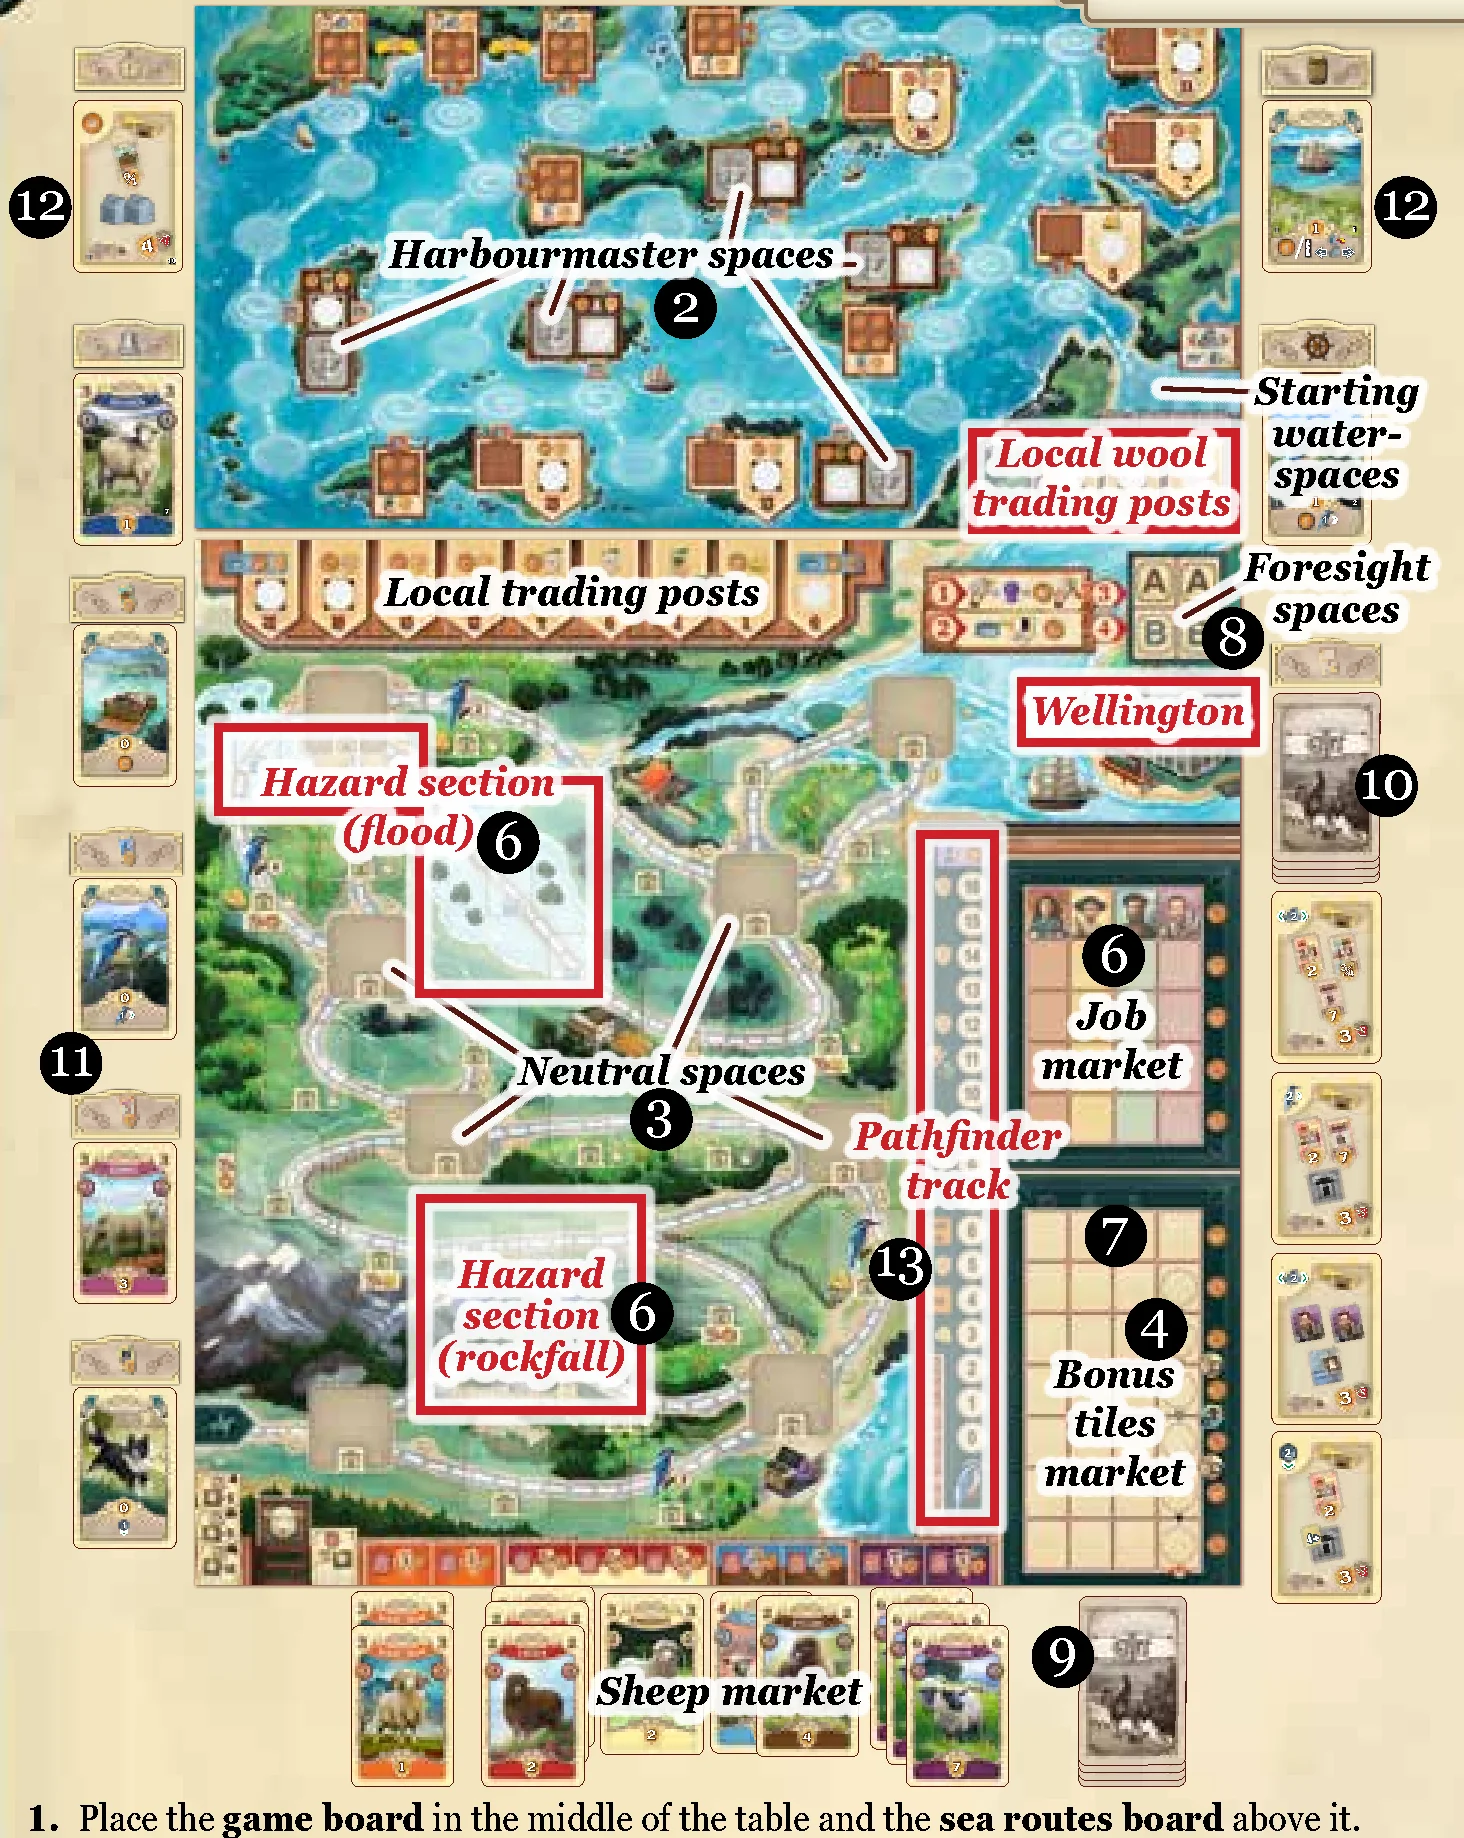
- Place boards: Place the game board in the middle of the table and the sea routes board above it.
- Harbourmaster tiles: Shuffle the 8 harbourmaster tiles and place one at random face-up onto each of the 5 harbourmaster spaces on the sea routes board. Return the remaining 3 harbourmaster tiles to the box.
- Neutral building tiles: Take the 8 neutral building tiles and place one face-up (thus the four double sided with the icon visible) onto each of the 8 neutral spaces on the game board:
- If this is your first game, place each tile onto the space marked with its matching letter (A to H).
- In subsequent games, you may shuffle the tiles and distribute them at random (still, all face-up).
- Bonus tiles market token: Place the bonus tiles market token onto the top dashed round space in the bonus tiles market.
- Wellington supply: Take the 28 worker tiles, the 16 hazard tiles and the 33 bonus tiles and turn them face-down. Sort them by the letters on their back (A and B) and put them into their corresponding bags. Place the bags next to the game board (close to Wellington). These bags are called the Wellington supply.
- Fill job market and hazards: From the Wellington supply, first pick 1 of each worker type (with an A on their back) and place these 4 worker tiles face-up onto the indicated spaces of the top row in the job market.
Then, depending on your player count, draw a number of A tiles from the Wellington supply:- In a 2-player game: Draw 12 tiles.
- In a 3-player game: Draw 13 tiles.
- In a 4-player game: Draw 14 tiles.
Where a tile is placed depends on its type:
- Hazard tile: Place it in its corresponding hazard section (flood or rockfall) onto the empty space with the lowest number (starting at space 1). If no empty space is left because all spaces in this section are already occupied, return that tile to its bag and draw a new tile.
- Worker tile: Place it onto the top most empty space of its corresponding column (which is the one in its colour with the highest cost) in the job market. If no empty space is left because all spaces in this column are already occupied, return that tile to its bag and draw a new tile.
- Bonus tiles market: Start drawing tiles with a B on their back (which include only bonus tiles) from the Wellington supply. Put these bonus tiles one after the other in the bonus tiles market as follows:
- Start at the top row and place the first drawn tile onto the space directly beneath the player count sign of your actual player count. Place the next tile onto the space to the right of that tile and continue like this rightwards.
- After you have placed a tile onto the rightmost space of the top row, continue along the second row, where you place the next tile yet again onto the space in line with your player count sign.
- Then continue like this rightwards until you place a tile onto the space to the left of the bonus tiles market token. This is the last tile. So depending on your player count, there are now 3, 5 or 7 bonus tiles in the bonus tiles market.
- Foresight spaces: Fill the 4 foresight spaces in Wellington with tiles from the Wellington supply:
- Draw 2 tiles with an A on their back and place them face-up onto the two foresight spaces marked with A.
- Draw 2 tiles with a B on their back and place them face-up onto the two foresight spaces marked with B.
- Sheep market: Shuffle the 37 market sheep cards and place them as a face-down market stack beneath the lower right of the game board. Depending on your player count, draw a number of sheep cards from this stack:
- In a 2-player game: Draw 9 cards.
- In a 3-player game: Draw 11 cards.
- In a 4-player game: Draw 14 cards.
Sort the drawn cards by colour and place them face-up beneath the game board in the sheep market, forming an overlapping row in which the left side of each card is visible. For clarity, the cards of this row should be arranged in the following order from left to right: orange, red, yellow, blue, brown, purple (not all colours may be present though).
- Objective display: Shuffle the 24 objective cards and place them as a face-down stack to the right of the game board. Then reveal 4 cards from this stack and display them face-up in a column below the stack. This display is called the general objective display.
- Deck-building supply: Place the 16 Romney sheep cards, the 12 Sheepdog cards, the 14 Ferry cards, and the 12 Kōtare bird cards on the left side of the game board. For a better overview you may optionally place the 5 additional cards tiles above their corresponding stacks of cards. This display is called deck-building supply.
- Bonus cards supply: Pick the one card marked with a white star from each of the 10 bonus cards sets. Shuffle those 10 picked cards, draw randomly a total of 4 of them and return the 6 leftover cards to the box. To each of these 4 drawn cards, add a certain number of the remaining 5 cards from their set (which is indicated by the set number on the lower right), depending on your player count:
- In a 2-player game: Add 2 cards for a total of 3 (and return the 3 leftover cards to the box).
- In a 3-player game: Add 4 cards for a total of 5 (and return the leftover card to the box).
- In a 4-player game: Add all 5 cards for a total of 6.
Then place the 4 bonus cards tiles next to the sea routes board and:
- The stack with the lowest set number (out of the 4 determined sets) below the tile with the steering wheel
 .
. - The stack with the second lowest set number below the tile with the barrel
 .
. - The stack with the second highest set number below the bell
 .
. - The stack with the highest set number below the bonus card tile with the compass
 .
.
This display is called bonus cards supply. (The back of 3 bonus card tiles shows a reminder whose use is explained in detail on page 17.)
- Step tiles: Place a number of step tiles equal to your player count onto the respective orange space next to the pathfinder track. E.g., 3 step tiles in a 3-player game next to space 4 of the pathfinder track or 4 step tiles in a 4-player game next to space 6 of the pathfinder track.
- Bank: Place the coins and exchange tokens within reach of all players as a general supply. This supply is called the bank. Also place the neutral buildings overview tile next to the game board.
Player Setup
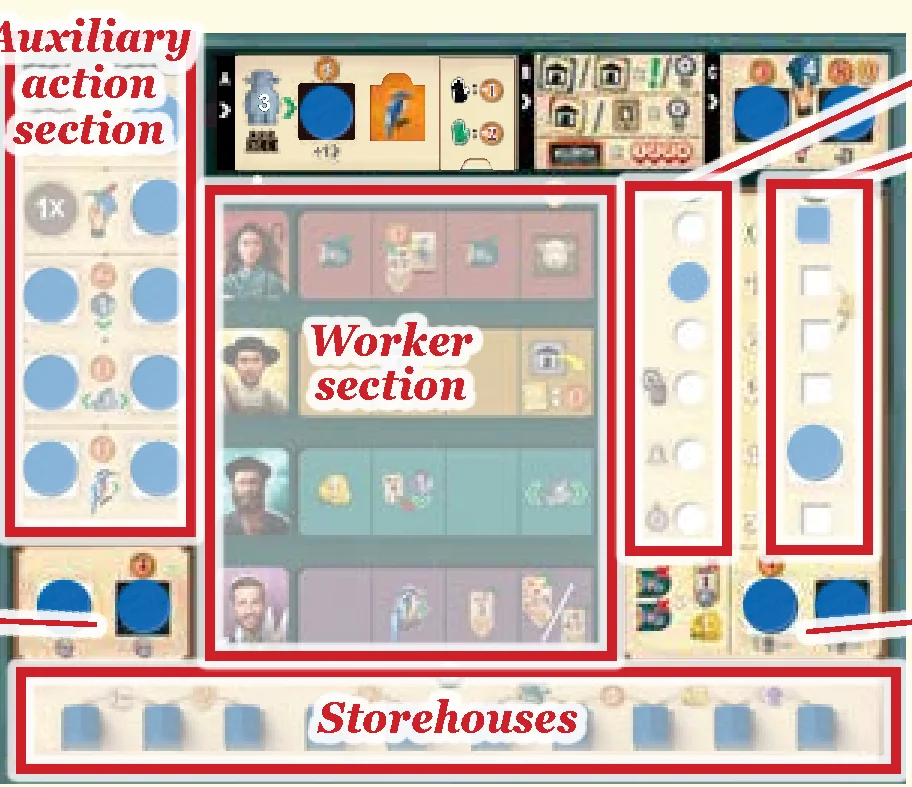
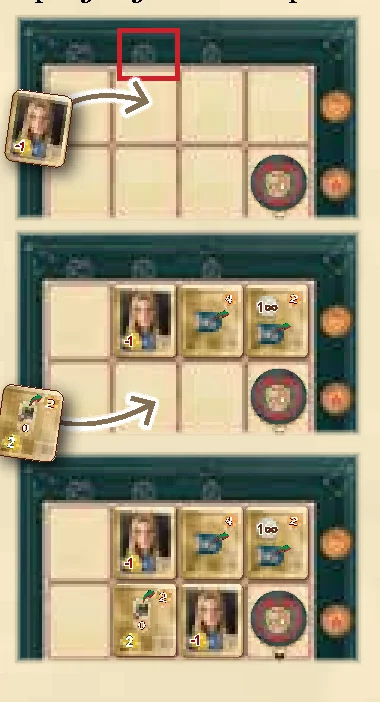
- Player board: Each player chooses a player colour. You receive the player board of that colour (identifiable by the 16 round coloured spaces) and place it in front of you. In addition, you also receive a player count tile that shows the appropriate player count and a fee tile. Place both in the Phase A box of your player board, with the fee tile on the right showing two coins with -1 and -2 on them (the side with the crossed out hands may be used later in the game).
- Private building tiles: You receive the 10 private building tiles of your colour. These building tiles are double sided and each is marked with a number (from 1 to 10) and with the lowercase letter ‘a’ on one side and the lowercase letter ‘b’ on the other.
- In your first couple of games, turn your private building tiles to the a-side and display them in an ascending order of required craftsmen above your player board.
- As you know the game better, you may try the following: Choose a player who determines the side of each of the building tiles at random (for example by tossing them in the air) and then displays them in ascending order of required craftsmen above their player board. Afterwards all other players copy the display by turning their tiles to the same sides.
Thus, for the remainder of the game, the side of each building tile is identical for all players. No one may deliberately flip a building tile to its other side.
- Player items: You also receive the following items of your colour:
- 16 discs—which you place onto your player board to cover up each of the 16 coloured disc spaces. (Only the 2 gray spaces in the upper left remain empty.)
- 10 storehouses—which you place onto your player board to cover up each of the 10 coloured square spaces.
- 1 ship—which you place onto a starting water-space on the sea routes board.
- 1 certificate marker—which you place onto the top space of your certificate track (next to the 0).
- 1 gold marker—which you place onto the second space of your gold track (next to the 1; thus you start with 1 gold).
- 1 runholder—which you place next to your player board for now.
- Flock deck: You receive the 14 player sheep cards that are marked with your colour. These 14 cards make up your flock deck. Shuffle your flock deck and place it as your face-down personal draw stack to the left of your player board.
- Starting resources: Determine a starting player, the other players will follow in clockwise order. Receive your starting capital and 1 exchange token from the bank and draw cards from your personal draw stack to add them to your hand according to this chart:
- 1st player: 7 pounds, 4 cards and 1 exchange token
- 2nd player: 8 pounds, 5 cards and 1 exchange token
- 3rd player: 9 pounds, 6 cards and 1 exchange token
- 4th player: 10 pounds, 7 cards and 1 exchange token
First Turn Rules
Important: At the beginning of your very first turn of the game, discard cards from your hand until you have only 4 remaining. Discarded cards go to your personal discard pile.
Then place one of your player discs from a disc space with white corners onto space 0 of the pathfinder track. You may chose the same disc as a previous player. (See the white box on page 9 for the rules of clearing disc spaces on your player board.)
Afterwards, place your runholder onto any neutral building tile and continue directly with phase B. You may start on the same building tile as other players.
Object of the Game
In Great Western Trail New Zealand, you move your runholder along a trail that winds and forks from the lower left corner of the game board to Wellington in the upper right. Along your path, you perform actions that provide you with various ways to earn victory points. For example: placing private building tiles, buying sheep from the sheep market, upgrading harbours and removing hazards.
Each time your runholder reaches Wellington, you deliver sheep to a local or foreign trading post, which may also be worth victory points. Afterwards, your runholder continues its movement again in the lower left corner of the game board. In an average game, your runholder will usually reach Wellington 5 or 6 times.
All victory points are awarded at the end of the game. Then, you add up the victory point icons  on the various components in front of you as well as the ones marked with your colour on the game board and the sea routes board. The player with the most victory points wins the game.
The Flock Deck
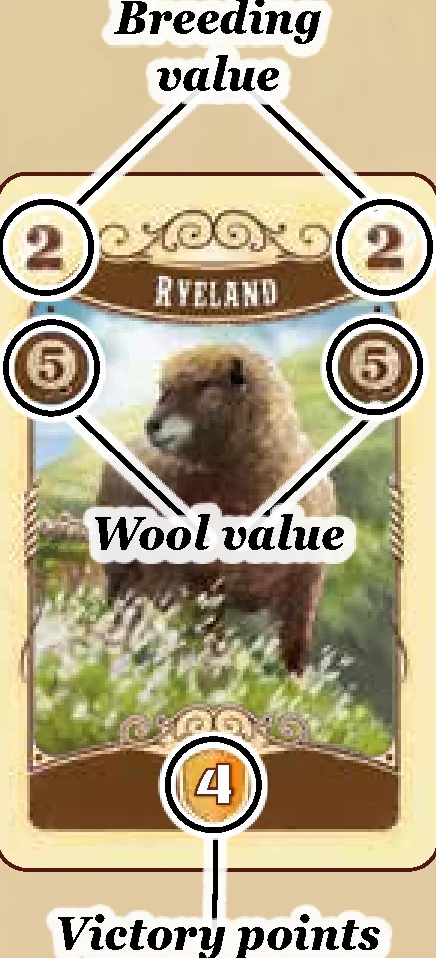
What is your flock deck?
Your flock deck represents your flock, which you lead along the trail. Each sheep card of that flock represents one animal of a specific sheep type, clearly denoted by the card’s colour as well as its breeding and wool value. Each player starts with an identical flock deck of rather low breeding and wool values. However, during the game, you can improve your flock deck by adding sheep cards with higher breeding or wool values as well as deck-building, bonus and objective cards to it.
Your flock deck is made up of the following parts:
- Your face-down personal draw stack to the left of your player board.
- Your hand cards that you draw from that draw stack according to your hand limit (you start with a hand limit of 4 cards).
- Your face-up personal discard pile, onto which you place any cards that you discard from your hand as well as any cards you acquire during the game.
What is the purpose of the sheep cards?
- On the locations of the trail, there are several actions that require specific sheep cards to be discarded from your hand in order to gain rewards.
- Also, each time you reach Wellington, you want to have many different types of sheep with high breeding values in your hand. The more varied and valuable they are, the more money and victory points are in store for you.
- Finally, each sheep card also displays the wool value of that particular breed. Selling wool is an additional way of obtaining pounds during the game.
Important: When you must draw a card from your personal draw stack but have no cards left in that stack, then (and only then) pick up your personal discard pile, shuffle it thoroughly and place it as your new face-down personal draw stack to the left of your player board. Then continue to draw cards from it as usual.
What is the purpose of the deck-building and bonus cards?
These cards are very helpful and make each deck and hence each game unique. They make your strategy stronger or turn it in a different direction – depending on your decisions.
Gameplay Overview
Beginning with the starting player (the one with a starting capital of only 7 pounds), players consecutively take turns in clockwise order. On your turn, you must carry out all of the following phases in this order:
- PHASE A: Move your runholder to another location along the trail
- PHASE B: Use the action(s) of your reached location
- PHASE C: Draw up to your hand limit
Then it is the next player’s turn.

PHASE A: Move your runholder to another location along the trail
In this phase, you must move your runholder from its current location along the trail to another location.
What is considered a location?
The main location of the trail is Wellington. Furthermore, any tile that is placed on a space of the trail is considered a location (so every building tile as well as every hazard tile). Spaces without any tile are considered an unimpeded part of the trail and are NOT locations!
For movement, bear the following rules in mind:
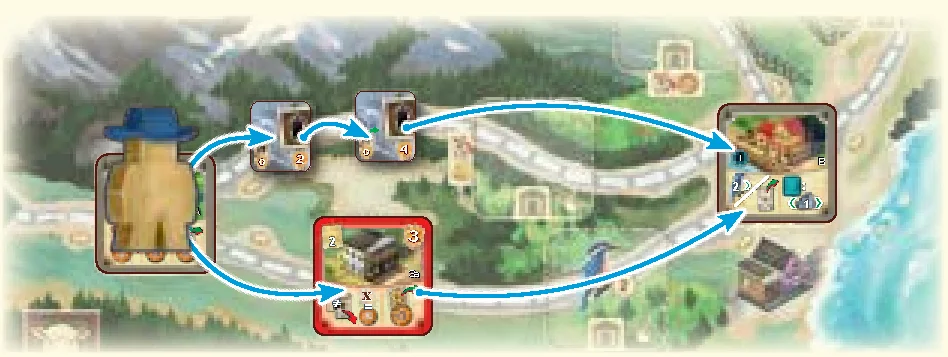
- The movement of your runholder is measured in steps. Each location along your path takes 1 step (remember, empty spaces along the trail are not considered locations).
- You must always move your runholder forward along the intended direction of the trail as indicated by the arrows. If the trail forks, choose one of the available paths to continue along. (A path is always used in one direction only.)
- You are not allowed to pass over Wellington. So when your runholder reaches Wellington, they must end their movement there.
- The runholders of the other players do not interfere in any way with your own runholder. Several runholders can be on the same location.
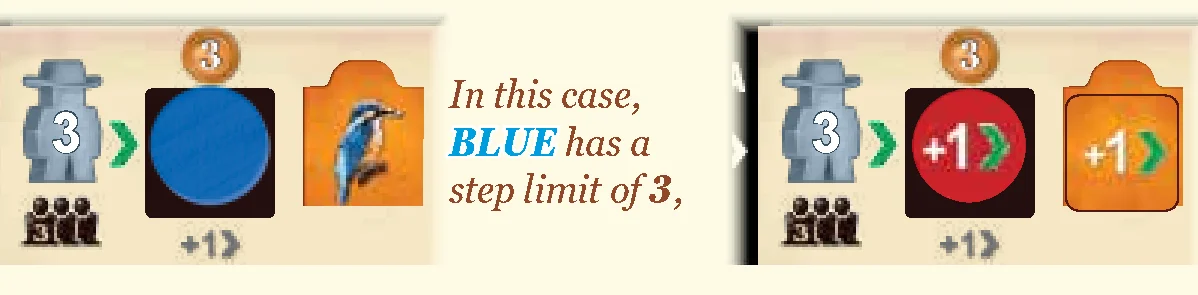
- You must move your runholder at least 1 step and are not allowed to move them more steps than the current step limit your player board indicates. (Depending on your player count, you start with a step limit of 3 or 4, which can be increased during the game.)
- The location on which your runholder ends their movement (either because you want them to or because your step limit is exhausted) is the location you use in phase B.
Hands and Fees
Several locations show a green or black hand. If your runholder moves to or passes over such a location, you must immediately pay a fee:
- Hazard tile: You must pay the fee to the bank.
- Private building tile of another player: You must pay the fee to that player.
The fee depends only on the colour of the hand (regardless of player count):
- Each black hand
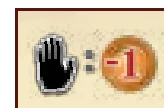 costs 1 pound
 - Each green hand
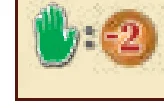 costs 2 pounds
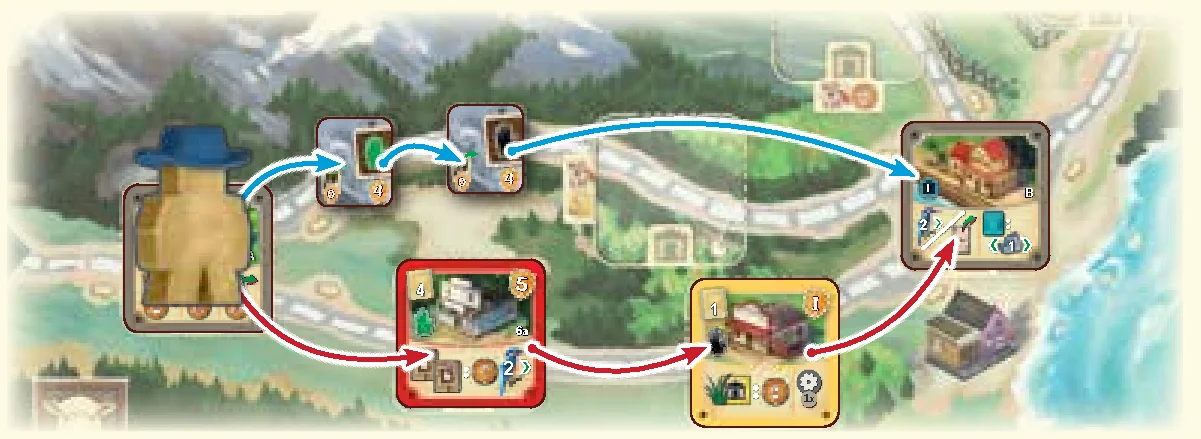
Important: If you cannot pay for some or all of the hands along your path, you are still allowed to move. This means that if your runholder moves to or passes over a location whose fee you cannot pay, pay as much as you can and continue as usual.
You never pay fees retroactively, even if you receive money while still at a location whose fee you could not pay before.
This only applies to fees levied by hands. All other costs and requirements in the game must always be paid/met in full.
PHASE B: Use the action(s) of your reached location
After moving your runholder, use the location on which they ended their movement. However, your options on the location differ depending on whether it is:
- A neutral building tile or a private building tile of your own colour
- A private building tile of another player or a hazard tile
- Wellington
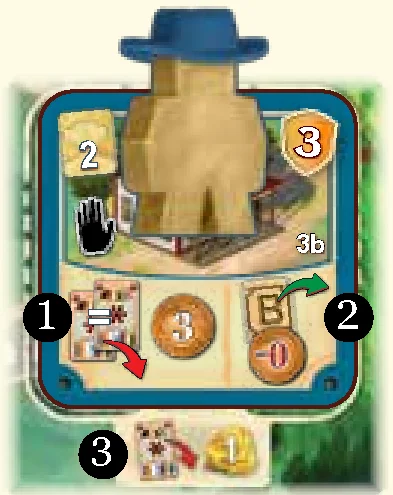
1) Neutral building tile or a private building tile of your own colour
You have two options: EITHER use the local action(s) of that tile OR use one single auxiliary action.
Use the local action(s):
Most building tiles show two different local actions on their bottom half. These actions are separated from one another by full-length dividers. (Only a few building tiles show just one or more than two local actions.)
- You may now perform each of that tile’s local actions once.
- You may perform these local actions in any order (i.e., without combining them).
- You do not have to perform all of the available local actions. But if an action shows a cost or requirement, you have to pay/meet it completely in order to gain that action’s reward.
- A few tiles show two actions (separated by a white slash) within the same local action. You are only allowed to perform one of those actions.
- Some spaces of the trail have risk actions attached. If a building tile is placed on such a space, the risk action becomes part of that tile’s local actions and thus can be performed by its owner each time that player reaches the location.
Use one single auxiliary action:
If you do not perform any of the local actions of the reached tile, then and only then may you perform one single auxiliary action instead. Your auxiliary actions can be found on the left side of your player board in the auxiliary action section.
At the beginning of the game before your first turn, only 2 of them are available. Each of the other auxiliary actions become available after you have cleared at least one of its two disc spaces.

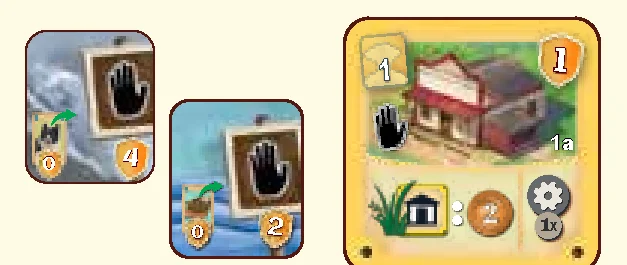
2) Private building tile of another player or a hazard tile
On a building tile of another player (meaning a different player colour than yours) or a hazard tile, you have only one option: Perform one single auxiliary action.
Note: This means that you will usually try to reach a neutral building tile or a building tile of your own colour, because only there can you perform local actions.
3) Wellington
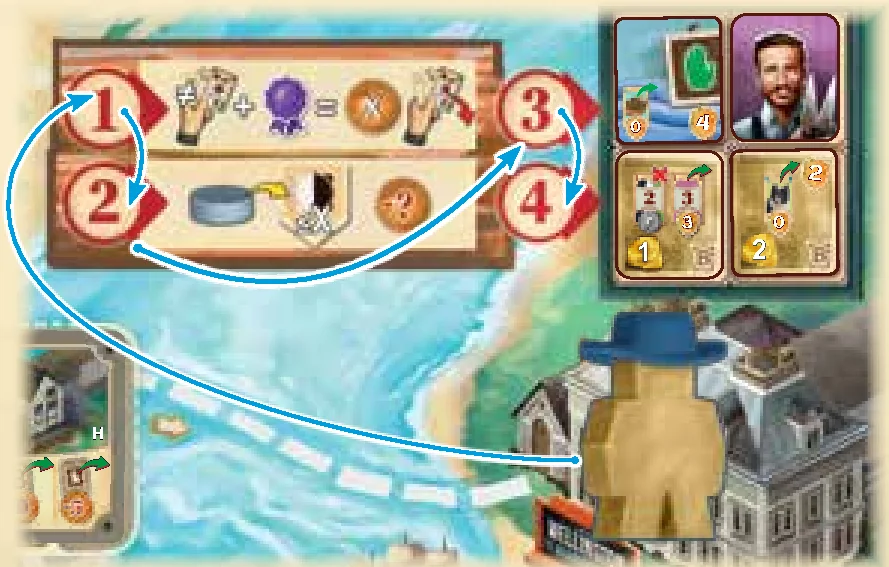
When you reach Wellington, you must carry out all of the 4 Wellington subphases in succession:
- Income
- Delivery
- Foresight A
- Foresight B
To make sure that you do not forget any subphases, you may move your runholder along the numbered spots and perform the corresponding subphase before moving on to the next spot.
Subphase 1: Income
Reveal as many sheep of different types as you like from your hand to the other players and calculate their total breeding value. To do this, sum the breeding values of each sheep that you have revealed. This means that you may reveal each type only once, no matter how many cards of that type you have in hand. (Ignore any victory points or wool values on your sheep cards.) You cannot reveal any deck-building or bonus cards at this moment that are not sheep.
Then, if possible and if you like, you can increase that total breeding value by adding certificates to it:
- Temporary certificates: Those on your certificate track. The number next to the current position of your certificate marker tells you how many temporary certificates you have available. You can use as many as you want by moving your certificate marker backwards accordingly.
- Permanent certificates: Those you cleared on your player board and any depicted on the upper half of harbourmaster tiles in front of you. Each of those increases your total breeding value by one for the rest of the game.
Once your total breeding value is set (including any certificates), take that many pounds from the bank. Place this amount a little set off from the rest of your money so that you are able to track that total breeding value in subphase 2.
Then discard all the cards you revealed to your personal discard pile. Cards you did not reveal (e.g., because they are duplicates) are kept in your hand.
Subphase 2: Delivery
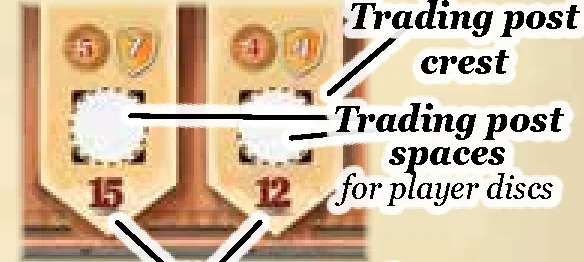
The sheep for which you just received your income must now be delivered to a trading post. The crest of each trading post shows a trading post value that corresponds to those sheep’s total breeding value: the higher the total breeding value, the better you can deliver. At the start of the game, only the local trading posts on the game board are available. During the game you can unlock foreign trading posts by placing storehouses onto the sea routes board.
To deliver, decide on a trading post whose trading post value is equal to or lower than your sheep’s total breeding value. Bear in mind, however, that you are not allowed to choose any trading post to which you have delivered before, i.e., that already has one of your discs on its trading post space. The only exceptions to this rule are:
- The first local trading post with number 0, and
- The terminal local trading post with number 21.
You may deliver to either of these local trading posts even if you already have one or more of your discs there.
Once you have decided on a trading post, place one of your player discs onto its trading post space (if other player discs are already there, put yours on top of those). Take that player disc from any of the disc spaces of your player board, respecting corner types:
- A disc from a disc space with white corners can be placed onto any trading post space.
- A disc from a disc space with dark corners can only be placed onto a trading post space that also has dark corners.
Clearing Disc Spaces on Your Player Board:
- Step limit: By clearing this space, you increase your step limit. If you take the disc from this space, immediately gain 3 pounds from the bank.
- Hand limit: By clearing either of these spaces, you increase your hand limit. However, if you take a disc from either one of these spaces, you must immediately pay 3 or 8 pounds to the bank. If you can’t, you must choose another space to clear. The 3 victory points for clearing the space on the right are awarded at the end of the game.
- Auxiliary action spaces: By clearing any of the disc spaces in the auxiliary action section, you broaden your options when performing auxiliary actions.
- Temporary certificate limit: By clearing this space, you increase your temporary certificate limit to 5 (you start with a limit of 3).
- Permanent wool: By clearing these spaces, you unlock permanent wool for “shear your sheep”. If you take the disc from the right space, you must immediately pay 4 pounds to the bank. If you can’t, you must choose another space to clear.
- Permanent certificates: By clearing these spaces, you unlock some of the available permanent certificates for you in the game. If you take the disc from the left space, you must immediately pay 4 pounds to the bank. If you can’t, you must choose another space to clear.
Delivery Rewards and Transport Costs
By placing your disc onto a trading post space, you may gain or lose victory points at the end of the game and may trigger a delivery action which you must perform immediately (e.g., gain pounds, gain a specific card, etc):
- For each disc you place on trading post 0, immediately gain 6 pounds from the bank. At the end of the game, you lose 8 victory points for each of your discs there.
- Most other delivery actions will add a specific card to your discard pile (and thus your deck):
- EITHER take the shown card from its supply and place it onto your personal discard pile
- OR if it is an objective card, immediately choose one from the general objective display, place it face up onto your personal discard pile and replenish the display if necessary.
- Green arrow victory points: The victory points in the green arrow are only applied at game end when both adjacent local trading post spaces have one of your discs on them.
- Transport costs: Finally, check whether you need to pay any transport costs for your delivery. Those in general are only applied for disc spaces with dark corners. If you can’t immediately pay the transport costs (including potential disc clearing cost) you have to choose a different combination (or trading post).
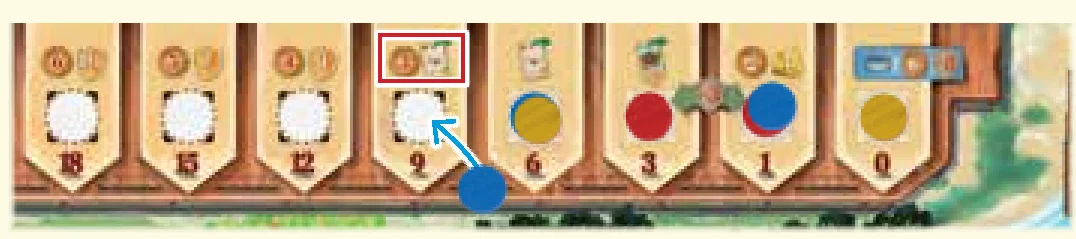
Subphases 3 & 4: Foresights (A & B)
Each of the 2 tiles that you choose in subphases 3 and 4 must immediately be moved to its corresponding section:
- Worker tile: Place it onto the most expensive (i.e., the farthest up) free space of its worker type column in the job market. If no spaces remain for workers of that type in the job market, remove this worker tile from the game by returning it to the box.
- Hazard tile: Place it in the corresponding hazard section (flood or rockfall) onto the empty space with the lowest number. If no hazard spaces of that type remain, remove this hazard tile from the game by returning it to the box.
- Bonus tile: Place it onto the next free space of the bonus tiles market:
- The tile must always be placed in the row where the bonus tiles market token is located.
- The spaces of that row must always be filled from left to right.
- In a 3-player game, each row only comprises 3 spaces (starting beneath the 3-player count sign) and the entire left column is left empty.
- In a 2-player game, each row only comprises 2 spaces (starting beneath the 2-player count sign) and both left columns are left empty.
- The last space to be filled in each row is always the one with the bonus tiles market token. And as you place a bonus tile onto this space, move that token along the arrow to the dashed round space of the next row.
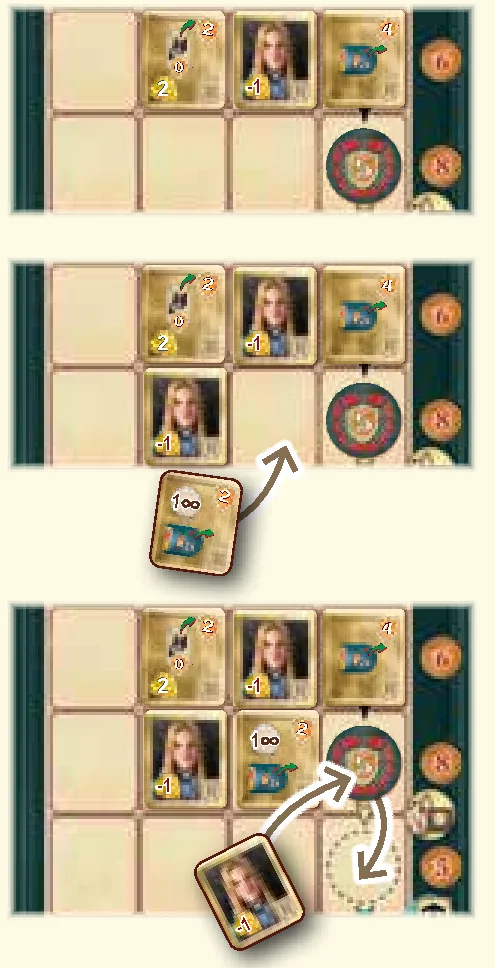
Moving the Bonus Tiles Market Token Along Arrows
When the bonus tiles market token is moved to the next row along a black arrow, nothing in particular happens. However, when that token is moved along a yellow or turquoise arrow, you must immediately either fill up the sheep market or flip the 4 neutral building tiles to their back showing the icon.
Refill Sheep Market (Yellow Arrow)
Draw from the market stack as many cards as it takes to bring the cards in the sheep market up to their initial number:
- In a 2-player game: Fill the sheep market up to its total of 9 cards.
- In a 3-player game: Fill the sheep market up to its total of 11 cards.
- In a 4-player game: Fill the sheep market up to its total of 14 cards.
Sort all sheep cards by colour and place them face up in an overlapping row from left to right: orange, red, yellow, blue, brown, purple. If the number of sheep cards in the market is already equal to (or higher than) the total for your player count, don’t add any cards. If the market sheep stack is empty, no more cards are added.
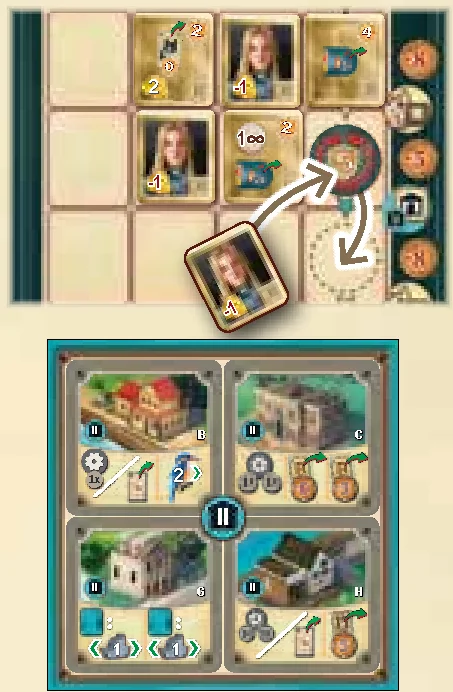
Flip the 4 Neutral Building Tiles (Turquoise Arrow)
When the bonus tiles market token is moved along the turquoise arrow, flip the 4 neutral buildings with the on their front to their back which shows a (as depicted on the neutral buildings overview tile). Runholders on any of the 4 flipped neutral buildings remain on this tile’s back and continue movement from there as usual. From now on, these 4 neutral buildings offer modified options for their actions. For the rest of the game, they remain flipped.
Finishing the 4 Wellington Subphases
After finishing the 4 Wellington subphases, carry out these two final steps:
- Move runholder: Move your runholder to the start of the trail, by placing them onto the horseman space in the lower left corner of the game board. The next time it is your turn, the movement of your runholder starts from there.
- Refill foresights: Refill each of the 2 empty foresight spaces in Wellington with tiles drawn from the Wellington supply. Make sure that onto each space you place a face-up tile whose letter on the back matches the letter of that space.
End of Game Trigger: If the bonus tiles market token is moved from the bottom row along the red arrow, the end of the game is triggered.
PHASE C: Draw up to your hand limit
Each player starts with a hand limit of 4 and can increase it up to 6. If you have fewer cards in your hand now than the current hand limit your player board indicates, bring their number up to that limit by drawing as many cards from your personal draw stack as you lack. (If necessary, shuffle your personal discard pile and use it to replace your run-out draw stack as described on page 6.)
Note: During this phase you may not play any deck-building or bonus cards.
Then it is the next player’s turn.
The Actions
The main source of actions in the game are the local actions of the neutral building tiles and of your private building tiles, though there are a few other situations in which actions might be triggered (delivery actions, single auxiliary actions, etc.). Irrespective of the situation in which actions are performed, the actions themselves are always represented by the same icons.
Attention: Quite a few actions consist of a specific requirement and a specific reward. Only if you meet the requirement are you allowed to gain the reward. Requirements are usually associated with red (red arrows or red numbers), while rewards are usually associated with green and white (green arrows and/or white numbers).
Important: You are allowed to forfeit a reward completely or in part even though you meet the requirement. However, if you receive an amount of pounds as a reward, you must take that entire amount. Also, if you receive a card due to a delivery action (of a local/foreign/wool trading post), you must take that card as well.
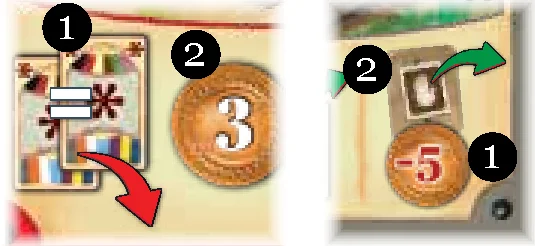
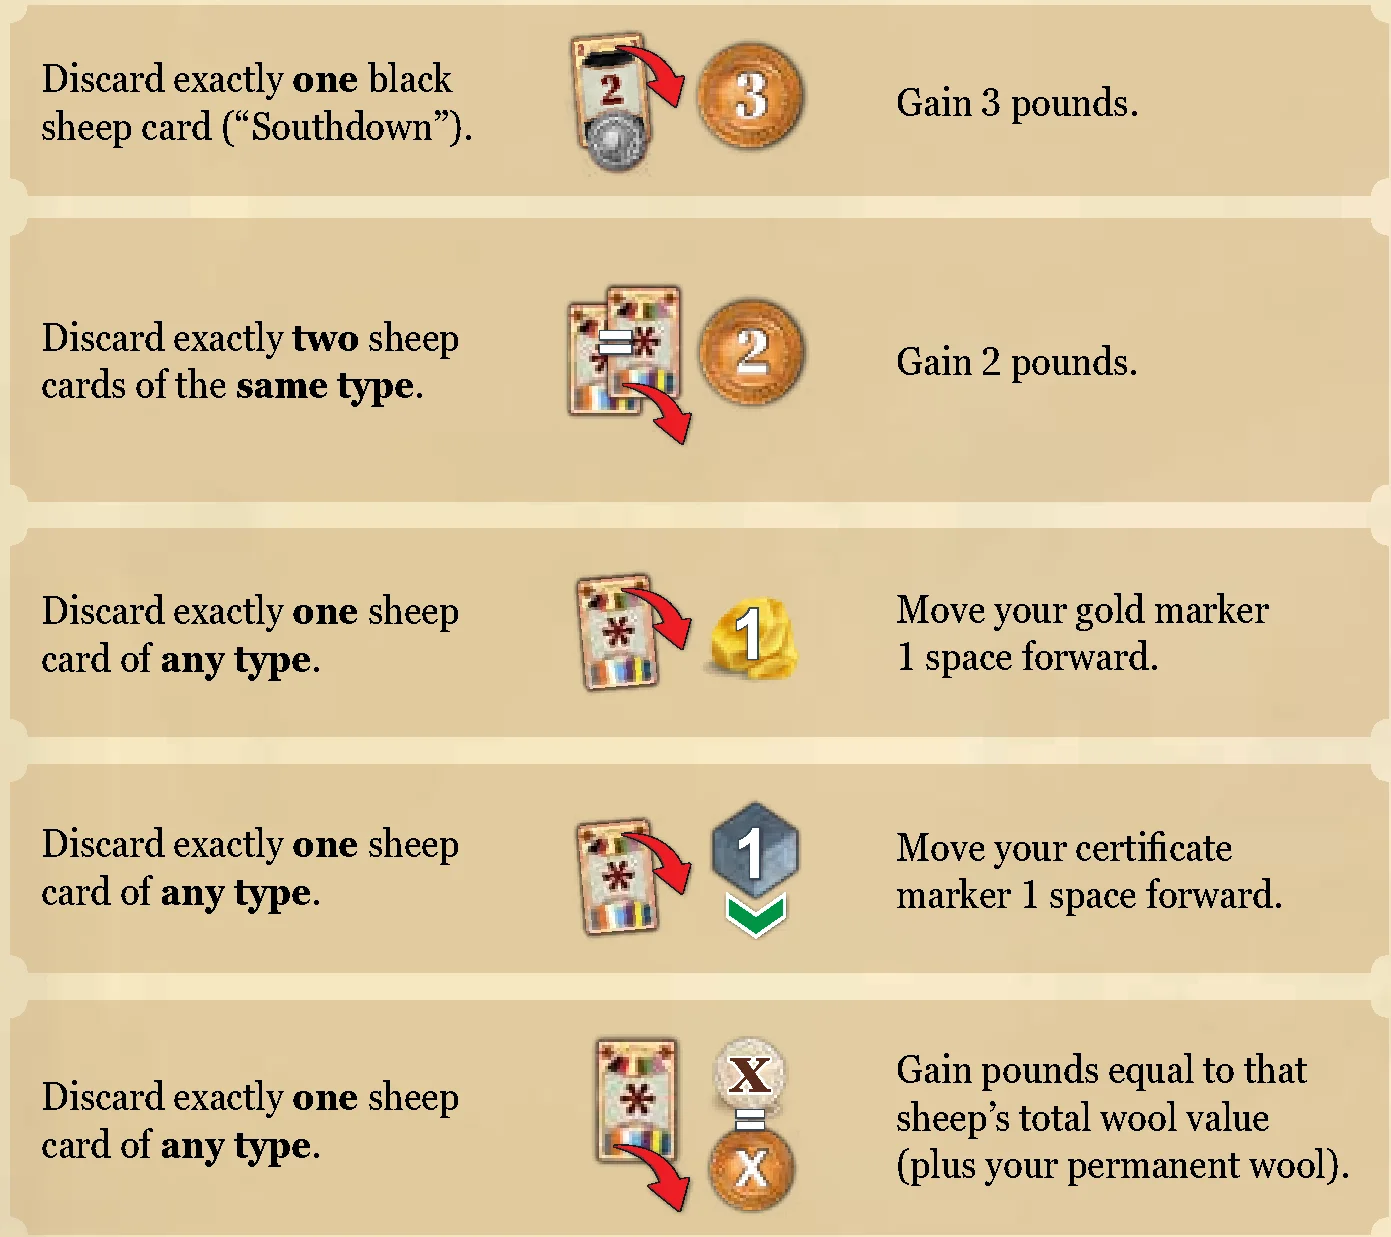
The most frequent requirement is discarding cards. Wherever an action shows one or more cards with a red arrow, you must discard the exact depicted card(s) from your hand to your face-up personal discard pile in order to gain the reward shown next to it. (You can perform the action only once, no matter how often you would be able to meet the requirement.)
Terminology
- Discarding a card: Place the card from your hand face up onto your personal discard pile.
- Gaining a specific amount of pounds: Take that exact amount from the bank.
- Paying a specific amount of pounds: Return that exact amount to the bank.
- Moving your certificate marker forward: Move your certificate marker forward on your certificate track as many spaces as indicated. You can never move beyond your temporary certificate limit (which is 3 at the beginning of the game).
Whenever you move your certificate marker on the certificate track from 0 or 1, to 2 or further, you also move your gold marker 1 space forward. - Moving your gold marker forward: Move your gold marker forward on your gold track (gold limit is always exactly 5).
- Moving your ship: Move it in any direction and/or upgrade a harbour if possible.
Action: Hire one worker
When you perform this action, choose exactly one worker tile from the job market, pay that worker’s hiring cost and place that tile in the worker section of your player board.
The hiring cost of the workers in the job market is the cost depicted on the right side of their row, modified by the value shown on the action icon itself:
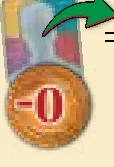 = The hiring cost is not modified.
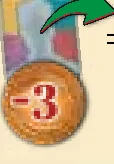 = Costs 3 pounds more.
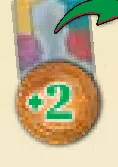 = Costs 2 pounds less.
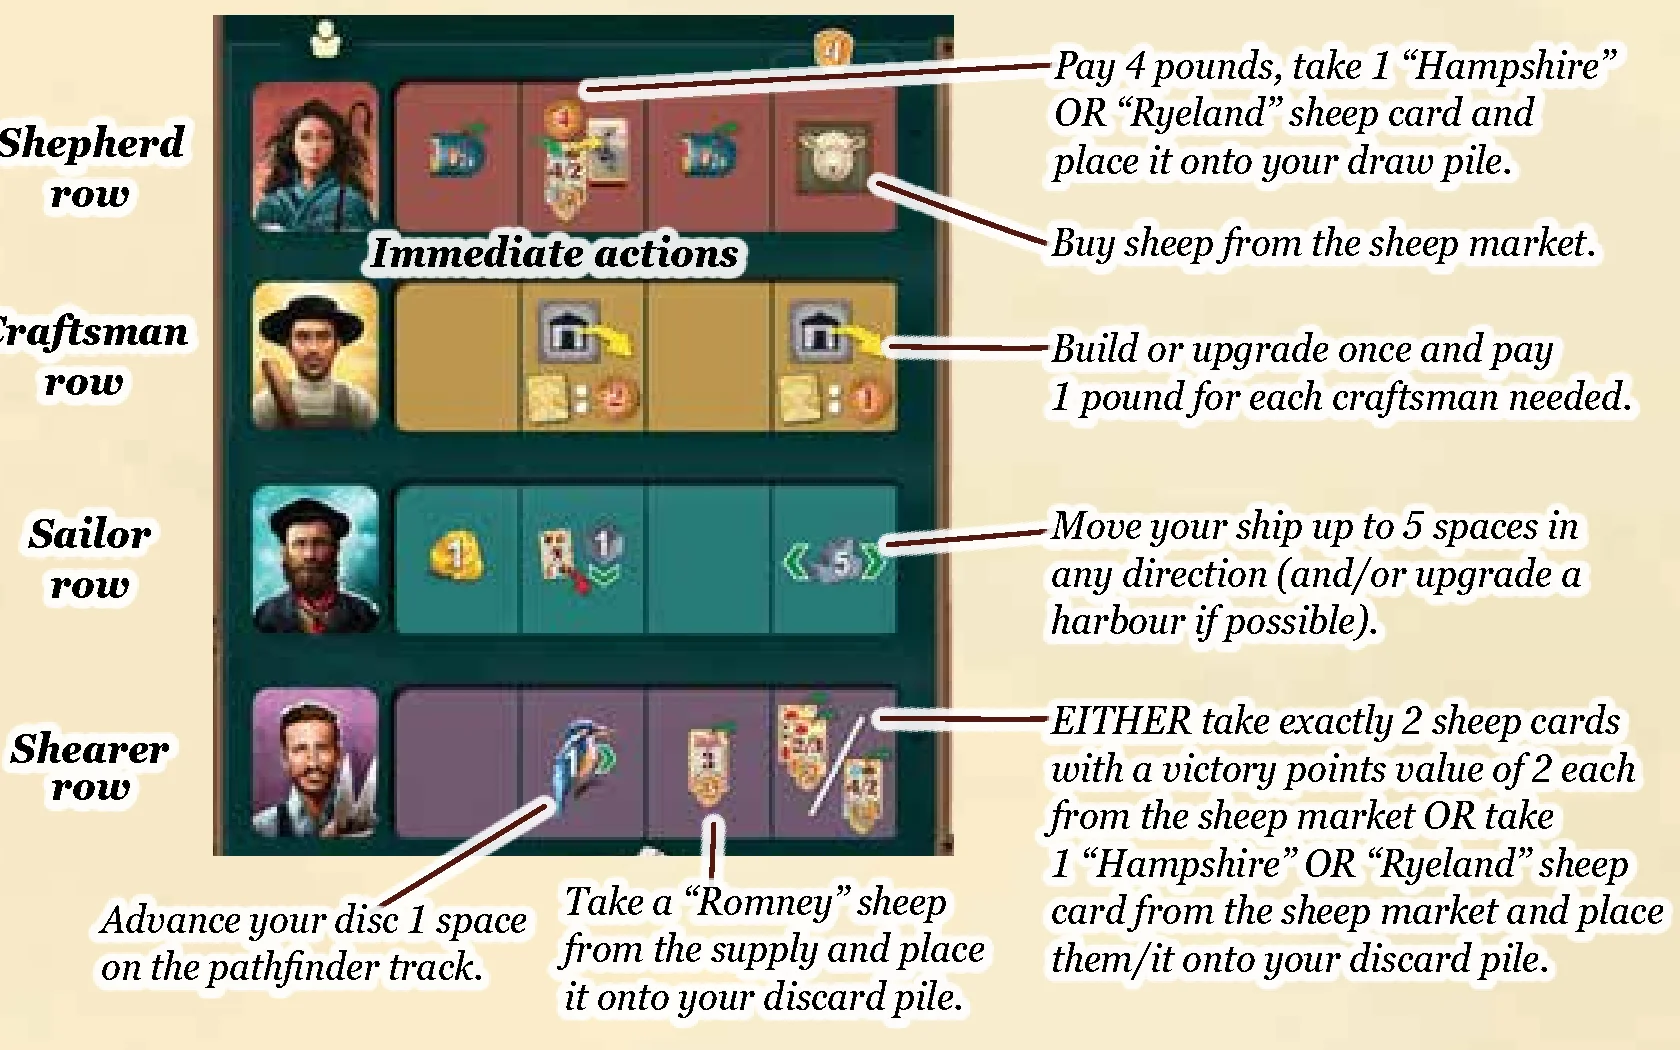
After you have paid the hiring cost, place the worker tile in your worker section, onto the leftmost free space in the row of its worker type. Each player already starts the game with one worker of each of the 4 types: shepherd, craftsman, sailor and shearer.
If the space on which you place the hired worker depicts an immediate action, you must choose to either perform that action immediately or forfeit it.
- If a row is already full, you are not allowed to hire another worker of that type.
- At the end of the game, each worker that is placed on the fifth space of any row of your player board is worth 4 victory points.
Action: Invest in a bonus tile
When you perform this action, choose exactly one bonus tile from the bonus tiles market, pay that tile’s investment cost, receive its bonus and place it next to your player board.
Bear the following rules in mind:
- You are not allowed to invest in a bonus tile from the row where the bonus tiles market token is currently located. Those bonus tiles are unavailable until the bonus tiles market token has moved.
- The investment cost of any of the other bonus tiles in the bonus tiles market is the cost depicted on the right side of their row, modified by the action icon:
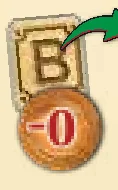 = The investment cost is not modified.
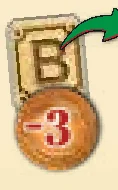 = Costs 3 pounds more.
- Important: The joker worker (who can be placed in any worker row) shows an additional cost of 1 gold which must always be paid. Also some other bonus tiles have additional costs or requirements which must always be paid/met in full.
Action: Buy sheep from the sheep market
When you perform this action, you can acquire sheep cards from the sheep market and place them face-up onto your personal discard pile. The number and types of sheep cards you may acquire depend on how many shepherds you have in your shepherd row and how much money you spend.
- 1 shepherd:
- EITHER buying 1 “Dorset Horn” sheep card for 3 pounds
- OR buying 1 “Corriedale” OR “Lincoln” sheep card for 5 pounds
- OR buying 1 “Hampshire” OR “Ryeland” sheep card for 9 pounds.
- 2 shepherds (in addition to above):
- EITHER buying 1 “Dorset Horn” sheep card for 1 pound
- OR buying 1 “Corriedale” OR “Lincoln” sheep card for 2 pounds
- OR buying 1 “Suffolk” sheep card AND 1 exchange token for 10 pounds.
- 3 shepherds: Pay 3 pounds, get exactly 2 sheep cards with a victory points value of 2 each.
- 4 shepherds: Pay 4 pounds, get exactly 1 “Suffolk” sheep card AND 1 exchange token.
Any shepherd that you do not put to use to buy sheep cards you may instead use to: Draw 2 cards from the market sheep stack and add them face-up to the sheep market. You may do this at any given moment while performing this action (so even before you buy sheep cards).
Important:
- You can only buy/choose sheep cards that are currently available in the sheep market.
- You can always choose to buy fewer sheep cards than you are allowed.
- Any sheep card that you acquire during this action must be placed face-up onto your personal discard pile.

Action: Place one of your private buildings
When you perform this action, choose one of the private building tiles above your player board: EITHER place it onto any empty building space on the trail OR use it to replace one of your private building tiles that is already placed on a building space on the trail.
Remember: The side of each building tile is identical for all players. You are not allowed to flip it to its other side.
Before choosing a building tile for this action, you must make sure:
- That you have enough craftsmen for it AND
- That you can pay that building tile’s cost.
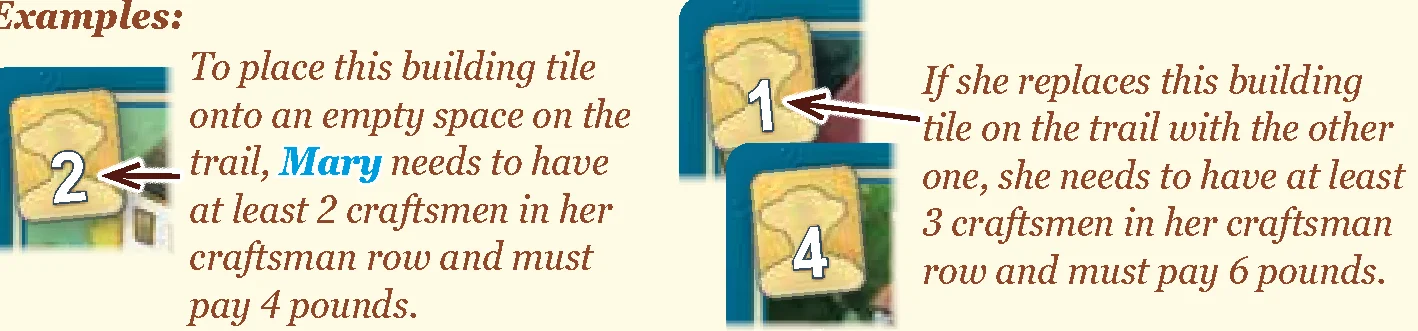
In its upper left corner, each private building tile shows how many craftsmen you need for it. If the number of craftsmen in your craftsman row equals or exceeds that number, you can place the tile onto any empty building space on the trail, provided you pay: For each craftsman needed for that building tile, you must pay 2 pounds.
Replacing a building: Alternatively, you can use this action to replace one of your private building tiles on the trail with a higher-valued private building tile from above your player board. For this, you only need to have the difference of craftsmen between the two building tiles and also only must pay the difference (2 pounds per craftsman difference). Then put the new building tile in place of the old one and remove that old building tile entirely from the game by returning it to the box. This is the only way to place building tiles that require more than 5 craftsmen.
Pathfinder requirements: There are four building spaces on the trail, which, as a condition for being allowed to build on them, must not only be empty, but also require a certain advancement (2, 4 or 7) on the pathfinder track. If you have not advanced at least the required amount of steps on the pathfinder track, you cannot build there.
Action: Move your ship
If you move your ship via this action icon, you can move it up to as many spaces in any direction on the sea routes board as you have sailors in your sailor row.
- Every space of the sea routes can accommodate any number of ships at a time.
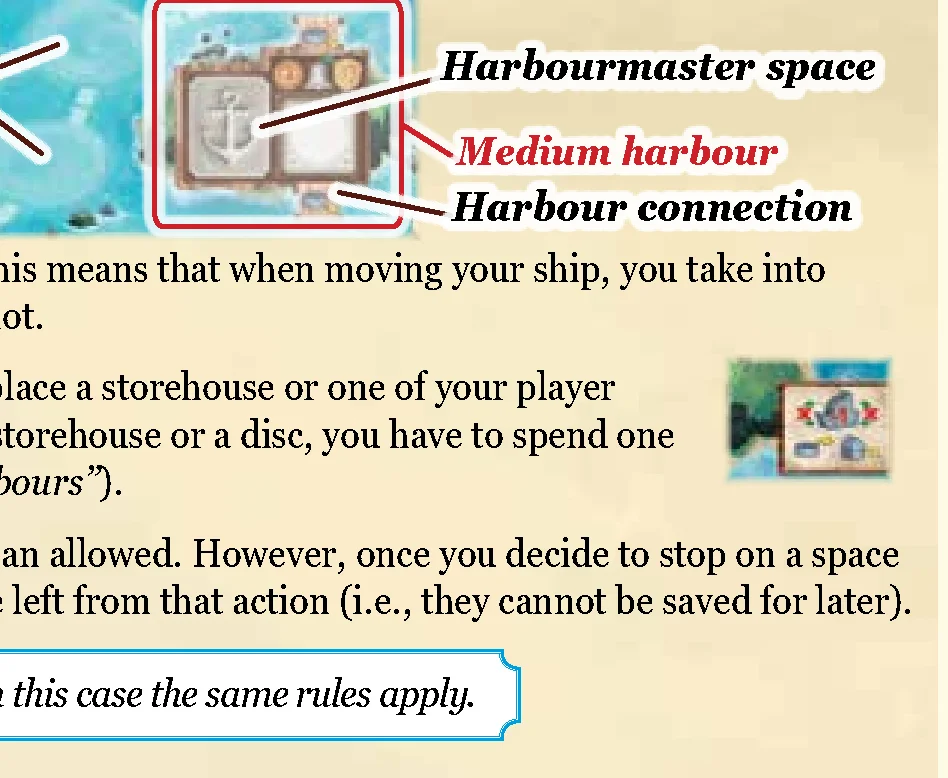
- Along the routes, there are several harbours, each of which either allows you to place a storehouse or one of your player discs if your ship is on its associated water space. Each time you want to place a storehouse or a disc, you have to spend one movement step and your move action is concluded.
- When choosing to move your ship via an action, you may move it fewer spaces than allowed. However, once you decide to stop on a space (and upgrade a harbour or not), you forfeit any excess movement you might have left from that action.
Upgrading Harbours
If your ship is already on a space with a harbour connection or you land on such a space by moving your ship and you have at least one ship movement left, you may upgrade this harbour. To do this, either place a storehouse or one of your player discs on the associated space and pay the indicated cost if applicable. When you move to a harbour to upgrade it, that ship move action is concluded.
You can only upgrade a harbour if you can pay the upgrade cost and if you have not upgraded that harbour before. It does not matter if opponents already have a storehouse or disc on the harbour.
Small Harbour:
First pay the upgrade cost depicted on one of the storehouse spaces of that harbour and then place one of your storehouses there. Take the card depicted on that small harbour and place it face-up onto your personal discard pile (if depleted, do not take a card). Check whether you unlocked a permanent or immediate bonus on your player board: Every time both storehouses linked by two brown arrows to an immediate bonus have been placed, either take this bonus immediately or forfeit it.
Medium Harbour:
First pay the upgrade cost depicted above the disc space and then place one of your player discs onto that harbour’s disc space (respecting white vs dark corners). Take the card depicted on that medium harbour.
After placing your disc, check whether there is a harbourmaster tile still next to it. If so, you may acquire that harbourmaster tile by appointing one of your hired workers (shepherd, craftsman, sailor, or shearer) as the harbourmaster: choose any hired worker currently placed on the rightmost space of its respective row, remove that worker from your player board, put it in place of the harbourmaster tile and place that harbourmaster tile face-up next to your player board. (Once placed, the worker remains there for the rest of the game. If this uncovers an immediate action, you can perform it next time you place a hired worker there.)
Large Harbour:
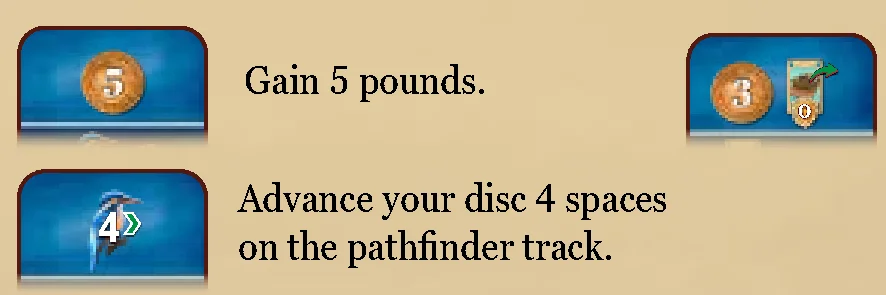
Upgrading a large harbour works similarly to upgrading a small harbour. However, you do not have to pay any upgrade cost. You just place your storehouse on one of the four storehouse spaces as usual. Then check whether you unlocked a permanent or immediate bonus on your player board. After you placed it, you enable another option for one of your future deliveries.
If you later want to place one of your discs on a large harbour, you must pay the depicted transport costs on that foreign trading post crest to the bank as always. On each of these large harbours foreign trading posts, you may place only one of your player discs as usual. In case that large harbour involves a foreign wool trading post, you can only deliver there when you shear your sheep.
Attention (End-of-route small harbours): The respective small harbour connected to the very last space of each of the three sea routes is special. You may upgrade one of these as usual (by paying the upgrade cost and placing a storehouse there). But if you do, you must reset your ship to the starting space (after you took a compass bonus card). At the end of the game, you gain the 4 victory points depicted on the yellow arrows in the upper left of the sea routes board only if both adjacent small harbours have one of your storehouses on them.
Action: Shear your sheep
When you perform this action, you may reveal up to as many different sheep cards from your hand as you have shearers in your shearer row. To determine your total wool value, sum up the wool values of each different type of sheep that you just revealed from your hand and add all permanent wool you have. (Ignore any victory points or breeding value on your sheep cards.)
Once your total wool value is set (including permanent wool unlocked on your player board or from a bonus tile), take that many pounds from the bank and place them in front of you. You can do this only once per “shear your sheep” action. You cannot reveal any deck-building or bonus cards at this moment that are not sheep. Then discard all sheep cards you revealed from your hand to your personal discard pile.
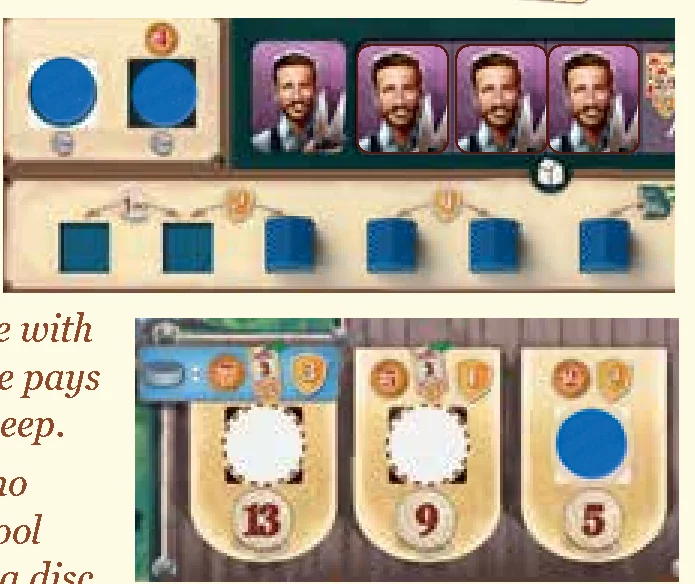
Delivering to wool trading posts: The wool value for which you just received money might allow you to also place one of your player discs from your player board onto a wool trading post on the sea routes map. There are three local wool trading posts (with values 5, 9 and 13) available from the beginning of the game and two foreign wool trading posts which you may unlock by upgrading their associated large harbour.
Check which wool trading posts are equal to or lower than your sheep’s total wool value. You are not allowed to choose any wool trading post to which you sent wool before, with the exception of the wool trading post with value 13 (you may send wool to value 13 even if you already have discs there). Respect white vs dark corners when placing your disc.
Note: Each wool trading post disc space with dark corners gives you a “Romney” sheep card, which you must take as this is a delivery action.
Alternative shearer use: Any shearer that you do not put to use to shear your sheep you may instead use to: Draw 1 card from your personal draw stack, then immediately discard 1 card. You may do this at any given moment while performing this action (so even before you shear your sheep).
Action: Gain one objective card
When you perform this action, either choose one objective card from the general objective display to the right of the game board or draw the top card of the objective stack. Place this card face-up onto your personal discard pile. If you take a card from the objective display, fill its vacant place immediately with a new face-up card drawn from the objective stack.
With this action, you may not choose a bonus objective card (Set 8, 9 or 10) from the bonus card supply. However, all rules otherwise apply also to bonus objective cards.
Playing Objective Cards:
During your own turn, if you happen to have one or more objective cards in your hand, you can play any of them, either:
- Before performing phase A
- Or before or after performing any single action in phase B.
(You cannot play them in the middle of movement/actions, nor after starting phase C.)
When you play an objective card, place it face-up in your personal objective area (beneath your player board). Then perform the immediate action depicted in the upper left corner of the card or forfeit it.
Each objective card depicts a combination of tasks to be fulfilled at the end of the game:
- If all of the tasks of an objective card are fulfilled by then, you gain the positive victory points printed on it.
- If its tasks are not fulfilled completely, you lose the negative victory point value printed on it.
- Important: Each single fulfilled task can only count towards one objective card. Tasks must be fulfilled individually.
Note: You are not compelled to play your objective cards. If kept in hand/deck at the end of the game, you may decide whether you want to score each one or not. For cards in your personal objective area, scoring them is mandatory.
Action: Advance on the pathfinder track
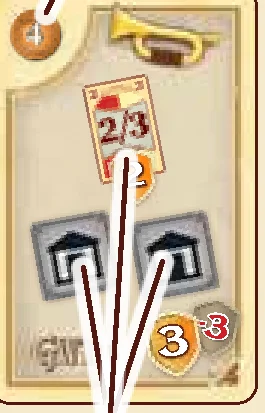
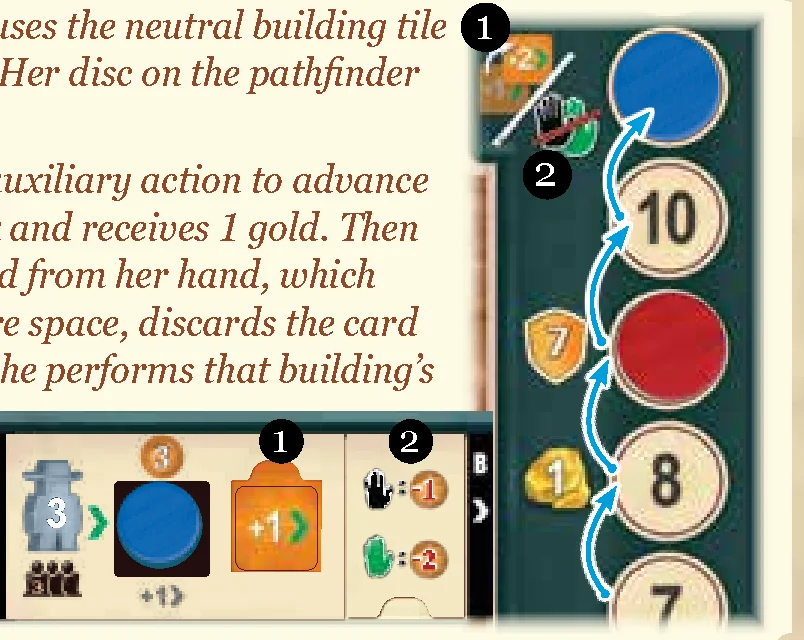
With this action you advance on the pathfinder track (also consider spaces that are occupied by other players’ discs) which provides you with rewards when you reach or exceed certain spaces:
- Spaces 3 and 8: Each lets you collect 1 gold (move your gold marker 1 space forward immediately).
- Spaces 4 or 6: (Depending on your player count) grant you an orange step tile, which increases your step limit by 1. Place the tile in the designated square on your player board.
- Spaces 2, 4 and 7: Do not provide a direct reward, but they do unlock building spaces along the trail.
- Space 11: On reaching or exceeding space 11, you must take a decision: EITHER flip the previously received step tile on its +2 side (increasing your step limit by 1), OR flip your fee tile to the side with the crossed-out hands (from now on, you do not pay any fees anymore; ignore all black/green hands).
- End of game VP: Gain the highest victory point value you have reached (maximum of 15).
- Space 16+: If you reach space 16 and earn further advancement, you receive 1 pound for each advancement instead. Your pathfinder disc never moves backwards under any circumstances.
Action: Gain an exchange token
When you perform this action, gain one exchange token from the bank and place it in front of you. Exchange tokens can be used at any point in the game—even in the middle of an action or when it is not your turn:
- To use 1 exchange token: Place it back into the bank. Then, draw up to 2 cards from your personal draw stack and immediately discard as many cards as you drew.
- To combine 2 exchange tokens: Remove 1 of your “Shropshire” sheep from your hand cards entirely from the game (and thus your deck) by returning it to the box and moving your gold marker 1 space forward.
Action: Move your runholder forward
This local action allows you to move your runholder forward to another location along the trail. If you do, you must move it at least 1 step and may not move it more steps than the white number in the icon states. On the location where you stop, you must then perform once more all of phase B. (Do not replenish your hand cards before performing phase B again; this is only done in phase C.)
Action: Remove a hazard
When you perform this action, remove one hazard tile of your choice from any hazard section, place it face up in front of you and take the associated deck-building card. If the icon shows a cost, you must immediately pay that many pounds. Each hazard tile has either 2, 3 or 4 victory points printed on it.
- Removing a rockfall hazard tile: Take one “Sheepdog” card and place it onto your personal discard pile.
- Removing a flood hazard tile: Take one “Ferry” card and place it onto your personal discard pile.
If both hazard sections are empty, you cannot get a hazard tile.
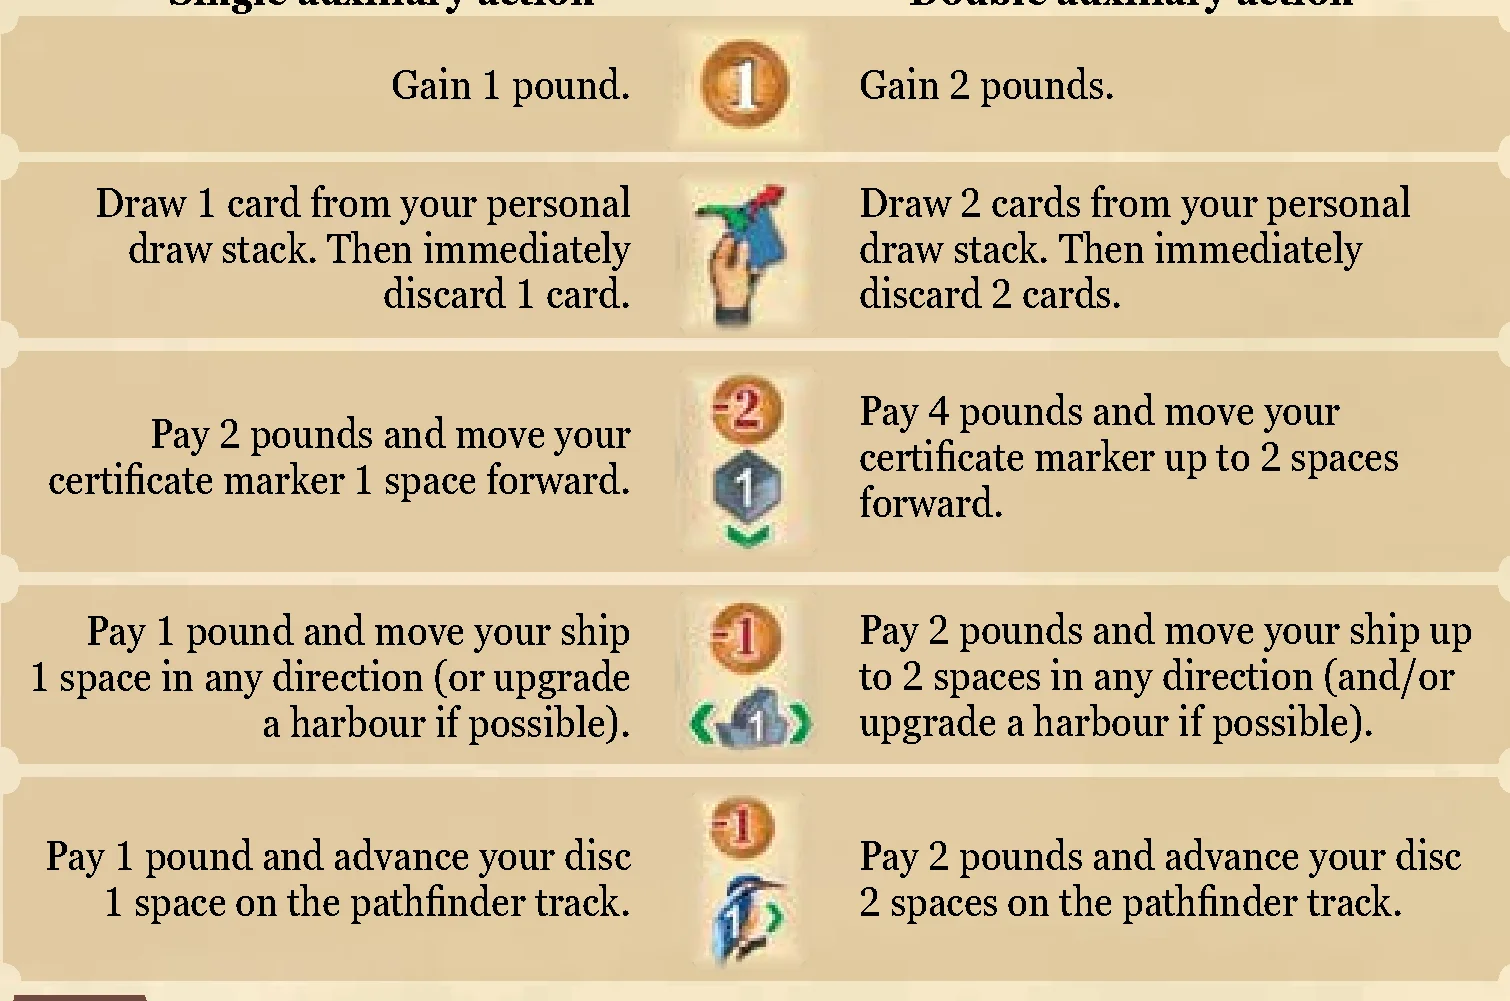
Auxiliary Actions: Single or Double
The auxiliary action section of your player board shows 5 different auxiliary actions. Each auxiliary action has 2 disc spaces next to it. Only if at least one disc space is cleared is the action unlocked:
- If only one disc space is cleared: Use the action once (single auxiliary action).
- If both disc spaces are cleared: You may use it as a double auxiliary action (requirement and reward are both doubled).
Collect Gold and Spend It
Each player starts the game with 1 gold and may collect more on different occasions (up to your gold limit of 5). You may use as much gold as you have available during phase A or B as a “free action” to buy one of the 4 different randomly determined bonus cards from the bonus cards supply:
- Bonus cards below the steering wheel and the barrel : pay 3 gold each.
- Bonus card below the bell : pay 4 gold.
- Bonus card below the compass : pay 5 gold.
End of the Game
The end of the game is triggered when you place a bonus tile onto the last space of the bonus tiles market while carrying out subphase 4 in Wellington. As this makes the bonus tiles market token move along the red arrow out of the bonus tiles market, immediately take the bonus tiles market token and place it in front of you. Afterwards, refill any empty foresight spaces at the end of your turn. This was your last turn.
Important: On your last turn, you do not carry out phase C (you do not draw up to your hand limit).
Then, each of the other players has one final turn, in which they move their runholder as usual and use the reached location. Players that move to Wellington during their final turn also carry out the 4 subphases as usual. However, if they choose a bonus tile from foresight space B when performing subphase 4, it is removed from the game. At the end of their turn (after phase B), they must refill any empty foresight spaces. When the last player has finished their final turn (without carrying out phase C), the game ends.
The Final Scoring
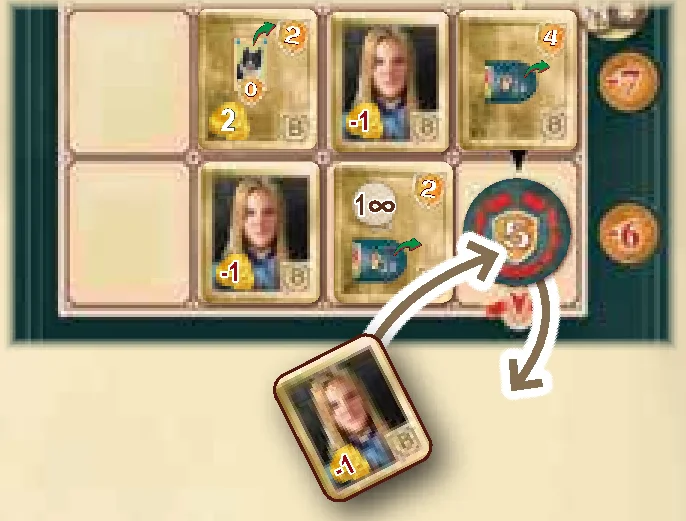
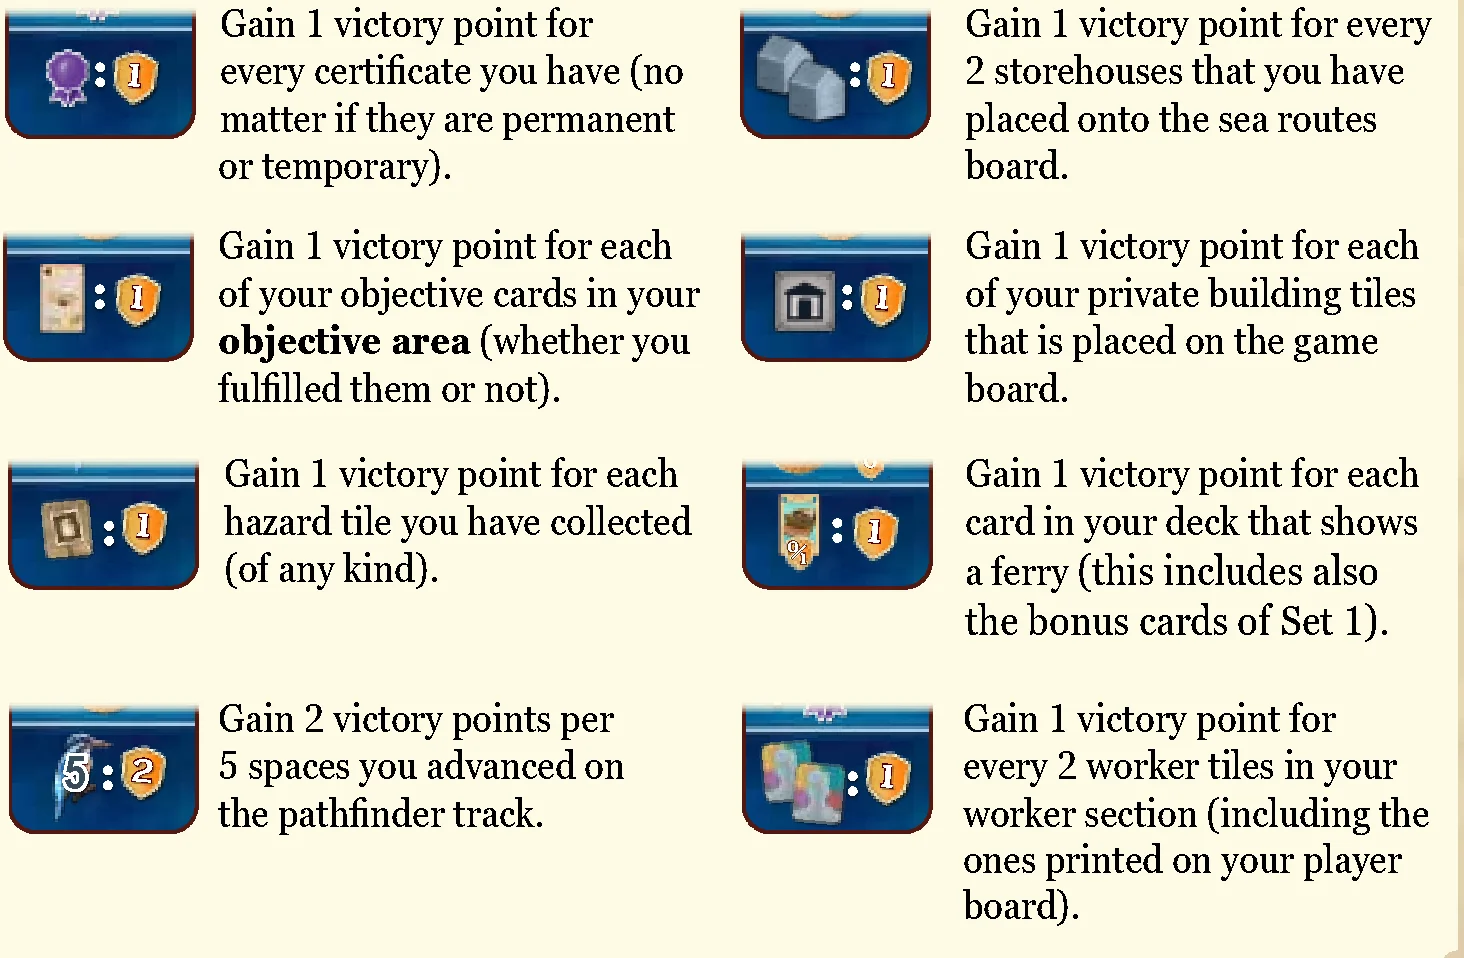
Take the scoring pad and go through its 12 categories. In each category, write down the victory points for each player as follows:
- Money: Gain 1 victory point for every 5 pounds that you own.
- Private buildings: Gain the sum of the victory points printed on each of your private building tiles that is placed on the game board.
- Trading posts: Gain the sum of the victory points that you have unlocked with your discs on all trading post crests (local, foreign and wool). Subtract any negative victory points.
- Harbours: Gain the sum of victory points unlocked with your discs and storehouses on small and medium harbours on the sea routes board.
- Pathfinder track: Gain the victory points unlocked with your disc on the pathfinder track (highest reached value, maximum 15).
- Hazards and bonus tiles: Gain the sum of the victory points printed on each of the collected hazard tiles and bonus tiles in front of you.
- Cards in deck: From your deck (draw stack, hand cards, discard pile), sum the victory points on all bonus cards (except bonus objective cards) and sheep cards.
- Objective cards: For all objective cards still in your deck, choose to remove them or add them to your personal objective area (without immediate actions). Score all cards in your personal objective area individually: gain positive points for fulfilled ones, subtract negative points for unfulfilled ones.
- Harbourmaster tiles: Gain the sum of victory points generated by the individual tasks of the harbourmaster tiles in front of you.
- Hand limit disc: Gain 3 victory points if you managed to clear the right hand limit disc space on your player board.
- Worker rows and storehouses: Gain 4 victory points for each worker on the fifth space of any row in your worker section. Additionally, gain 2 and/or 4 victory points if you cleared the corresponding pair of storehouses on your player board.
- Game end token: Gain 5 victory points if you have the bonus tiles market token in front of you.
After totaling all categories, the player with the most victory points wins the game! In case of a tie, the victory is shared.
General Notes and Special Cases
- Unlimited items: Money and exchange tokens are considered unlimited. If the bank should run out, use something else as a substitute.
- Stack depletion: If the objective stack runs out, vacant spaces in the general objective display are not refilled. If empty, no new objective cards can be gained. The same is true for all 4 stacks of deck-building cards and the bonus cards supply.
- Discard vs draw pile: You are allowed to look through the cards of your personal discard pile at any time. You are not allowed to look at the cards of your personal draw stack.
- Disc placement edge cases:
- If you must place a disc onto a space with white corners, but only have discs on dark corner spaces left, you may place a disc from a dark corner space onto a white corner space.
- If you are supposed to place a disc but have none left or cannot pay for removal, remove one of your discs from a medium harbour of your choice and place that one instead (if none is on a medium harbour, you do not place one).
- Replacing a building under your runholder: If you replace a building while your runholder is on it, you cannot immediately use the new building’s local actions if you already used an action of the replaced building.
- Hazards with runholders: If you remove a hazard tile on which there are runholders, leave those runholders on the empty space. They continue movement from there as usual.
- Snapshot rule: When you reveal cards from your hand (subphase 1 or shearing sheep), this is a “snapshot of that moment in time” at which you cannot use an exchange token or a card that lets you draw from your deck.
- Deck-building and bonus card draw: Whenever you play a deck-building or bonus card (that is not a sheep or objective card), you draw a card after performing or forfeiting its effect.
Credits
Designer: Alexander Pfister
Illustrations: Chris Quilliams
Art Direction: Sophie Gravel, Martin Bouchard
Producer: Sophie Gravel
Development: André Bierth, Anh Tú Tran
Editing: André Bierth
Graphic design: Emeline D’Aoust
3D Modelling: Emeline D’Aoust
© 2023 Plan B Games Europe GmbH. EGGERTSPIELE is a brand of Plan B Games Europe GmbH.
Introduction & Components
Great Western Trail: New Zealand
Game design: Alexander Pfister
Rulebook
Kia ora, and welcome to Great Western Trail New Zealand!
Towards the end of the 19th century, you established yourself as a runholder (owner of a sheep station) on the South Island of New Zealand. Recent years have seen your family farm prosper by diversifying your breeds of sheep and increasing the value of your wool.
With the dawn of the new century, difficult challenges have arisen. You must acquire improved and valuable breeds of sheep to ensure the prosperity of your family business and the labourers who work for you. Decide whether to focus on your past strengths or to diversify into new ventures. Will the beginning of the 20th century be as rewarding as earlier years, or will the efforts of others surpass your strategy? Good luck, and kia kaha!
Components
Components List
- 1 game board
- 1 sea routes board
- 4 player boards (1 per player)
- 4 fee tiles (double sided)
- 5 player count tiles (double sided)
- 28 worker tiles (7 each of shepherd, craftsman, sailor, shearer; back of all worker and hazard tiles shows “A”)
- 16 hazard tiles (9 rockfalls, 7 floods)
- 34 bonus tiles (back shows “B”)
- 2 bags (marked A and B)
- 4 step tiles (front: +1, back: +2)
- 4 runholders (rancher, 1 per player, not in player colours)
- 4 hats (1 per player)
- 4 ships (1 per player)
- 64 player discs (16 per player)
- 40 storehouses (10 per player)
- 8 markers for gold and certificates (1 of each per player)
- 57 coins (25 gold coins with a value of 5 pounds, 32 silver coins with a value of 1 pound; *For consistency with the other GWT editions, we retained coins instead of historically correct paper bills)
- 12 exchange tokens
- 1 bonus tiles market token
Solo mode components:
- 1 specialization tile
- 17 Sarah’s cards
- 1 Sarah’s sheep market tile
- 1 Sarah’s board
Cards and Tiles
- 93 sheep cards:
- 56 player sheep cards (14 per player: 5 Shropshire, 3 Southdown, 3 English Leicester, 3 Merino)
- 37 market sheep cards (5 Dorset Horn, 7 Lincoln, 7 Corriedale, 6 Hampshire, 6 Ryeland, 6 Suffolk)
- 56 deck-building cards: 18 Romney sheep, 12 Sheepdog, 14 Ferry, 12 Kōtare bird
- 5 additional cards tiles
- 60 bonus cards (6 per set, Sets 1 to 10; one card of each set is marked with a white star; all set cards carry their respective set number)
- 4 bonus cards tiles
- 8 harbourmaster tiles
- 8 neutral building tiles: Each neutral building tile is marked with a capital letter (A to H). Four of them are double sided and have a icon on their back. Each neutral building tile that will be flipped during the game is marked with a on its front.
- 40 private building tiles: 10 per player, double sided. Each private building tile is marked with a number (1 to 10) and a lowercase letter (a or b), depending on its side.
- 24 objective cards
- 1 neutral buildings overview tile
- 1 scoring pad
Setup
Game Board Setup
- Place boards: Place the game board in the middle of the table and the sea routes board above it.
- Harbourmaster tiles: Shuffle the 8 harbourmaster tiles and place one at random face-up onto each of the 5 harbourmaster spaces on the sea routes board. Return the remaining 3 harbourmaster tiles to the box.
- Neutral building tiles: Take the 8 neutral building tiles and place one face-up (thus the four double sided with the icon visible) onto each of the 8 neutral spaces on the game board:
- If this is your first game, place each tile onto the space marked with its matching letter (A to H).
- In subsequent games, you may shuffle the tiles and distribute them at random (still, all face-up).
- Bonus tiles market token: Place the bonus tiles market token onto the top dashed round space in the bonus tiles market.
- Wellington supply: Take the 28 worker tiles, the 16 hazard tiles and the 33 bonus tiles and turn them face-down. Sort them by the letters on their back (A and B) and put them into their corresponding bags. Place the bags next to the game board (close to Wellington). These bags are called the Wellington supply.
- Fill job market and hazards: From the Wellington supply, first pick 1 of each worker type (with an A on their back) and place these 4 worker tiles face-up onto the indicated spaces of the top row in the job market.
Then, depending on your player count, draw a number of A tiles from the Wellington supply:- In a 2-player game: Draw 12 tiles.
- In a 3-player game: Draw 13 tiles.
- In a 4-player game: Draw 14 tiles.
Where a tile is placed depends on its type:
- Hazard tile: Place it in its corresponding hazard section (flood or rockfall) onto the empty space with the lowest number (starting at space 1). If no empty space is left because all spaces in this section are already occupied, return that tile to its bag and draw a new tile.
- Worker tile: Place it onto the top most empty space of its corresponding column (which is the one in its colour with the highest cost) in the job market. If no empty space is left because all spaces in this column are already occupied, return that tile to its bag and draw a new tile.
- Bonus tiles market: Start drawing tiles with a B on their back (which include only bonus tiles) from the Wellington supply. Put these bonus tiles one after the other in the bonus tiles market as follows:
- Start at the top row and place the first drawn tile onto the space directly beneath the player count sign of your actual player count. Place the next tile onto the space to the right of that tile and continue like this rightwards.
- After you have placed a tile onto the rightmost space of the top row, continue along the second row, where you place the next tile yet again onto the space in line with your player count sign.
- Then continue like this rightwards until you place a tile onto the space to the left of the bonus tiles market token. This is the last tile. So depending on your player count, there are now 3, 5 or 7 bonus tiles in the bonus tiles market.
- Foresight spaces: Fill the 4 foresight spaces in Wellington with tiles from the Wellington supply:
- Draw 2 tiles with an A on their back and place them face-up onto the two foresight spaces marked with A.
- Draw 2 tiles with a B on their back and place them face-up onto the two foresight spaces marked with B.
- Sheep market: Shuffle the 37 market sheep cards and place them as a face-down market stack beneath the lower right of the game board. Depending on your player count, draw a number of sheep cards from this stack:
- In a 2-player game: Draw 9 cards.
- In a 3-player game: Draw 11 cards.
- In a 4-player game: Draw 14 cards.
Sort the drawn cards by colour and place them face-up beneath the game board in the sheep market, forming an overlapping row in which the left side of each card is visible. For clarity, the cards of this row should be arranged in the following order from left to right: orange, red, yellow, blue, brown, purple (not all colours may be present though).
- Objective display: Shuffle the 24 objective cards and place them as a face-down stack to the right of the game board. Then reveal 4 cards from this stack and display them face-up in a column below the stack. This display is called the general objective display.
- Deck-building supply: Place the 16 Romney sheep cards, the 12 Sheepdog cards, the 14 Ferry cards, and the 12 Kōtare bird cards on the left side of the game board. For a better overview you may optionally place the 5 additional cards tiles above their corresponding stacks of cards. This display is called deck-building supply.
- Bonus cards supply: Pick the one card marked with a white star from each of the 10 bonus cards sets. Shuffle those 10 picked cards, draw randomly a total of 4 of them and return the 6 leftover cards to the box. To each of these 4 drawn cards, add a certain number of the remaining 5 cards from their set (which is indicated by the set number on the lower right), depending on your player count:
- In a 2-player game: Add 2 cards for a total of 3 (and return the 3 leftover cards to the box).
- In a 3-player game: Add 4 cards for a total of 5 (and return the leftover card to the box).
- In a 4-player game: Add all 5 cards for a total of 6.
Then place the 4 bonus cards tiles next to the sea routes board and:
- The stack with the lowest set number (out of the 4 determined sets) below the tile with the steering wheel .
- The stack with the second lowest set number below the tile with the barrel .
- The stack with the second highest set number below the bell .
- The stack with the highest set number below the bonus card tile with the compass .
This display is called bonus cards supply. (The back of 3 bonus card tiles shows a reminder whose use is explained in detail on page 17.)
- Step tiles: Place a number of step tiles equal to your player count onto the respective orange space next to the pathfinder track. E.g., 3 step tiles in a 3-player game next to space 4 of the pathfinder track or 4 step tiles in a 4-player game next to space 6 of the pathfinder track.
- Bank: Place the coins and exchange tokens within reach of all players as a general supply. This supply is called the bank. Also place the neutral buildings overview tile next to the game board.
Player Setup
- Player board: Each player chooses a player colour. You receive the player board of that colour (identifiable by the 16 round coloured spaces) and place it in front of you. In addition, you also receive a player count tile that shows the appropriate player count and a fee tile. Place both in the Phase A box of your player board, with the fee tile on the right showing two coins with -1 and -2 on them (the side with the crossed out hands may be used later in the game).
- Private building tiles: You receive the 10 private building tiles of your colour. These building tiles are double sided and each is marked with a number (from 1 to 10) and with the lowercase letter ‘a’ on one side and the lowercase letter ‘b’ on the other.
- In your first couple of games, turn your private building tiles to the a-side and display them in an ascending order of required craftsmen above your player board.
- As you know the game better, you may try the following: Choose a player who determines the side of each of the building tiles at random (for example by tossing them in the air) and then displays them in ascending order of required craftsmen above their player board. Afterwards all other players copy the display by turning their tiles to the same sides.
Thus, for the remainder of the game, the side of each building tile is identical for all players. No one may deliberately flip a building tile to its other side.
- Player items: You also receive the following items of your colour:
- 16 discs—which you place onto your player board to cover up each of the 16 coloured disc spaces. (Only the 2 gray spaces in the upper left remain empty.)
- 10 storehouses—which you place onto your player board to cover up each of the 10 coloured square spaces.
- 1 ship—which you place onto a starting water-space on the sea routes board.
- 1 certificate marker—which you place onto the top space of your certificate track (next to the 0).
- 1 gold marker—which you place onto the second space of your gold track (next to the 1; thus you start with 1 gold).
- 1 runholder—which you place next to your player board for now.
- Flock deck: You receive the 14 player sheep cards that are marked with your colour. These 14 cards make up your flock deck. Shuffle your flock deck and place it as your face-down personal draw stack to the left of your player board.
- Starting resources: Determine a starting player, the other players will follow in clockwise order. Receive your starting capital and 1 exchange token from the bank and draw cards from your personal draw stack to add them to your hand according to this chart:
- 1st player: 7 pounds, 4 cards and 1 exchange token
- 2nd player: 8 pounds, 5 cards and 1 exchange token
- 3rd player: 9 pounds, 6 cards and 1 exchange token
- 4th player: 10 pounds, 7 cards and 1 exchange token
First Turn Rules
Important: At the beginning of your very first turn of the game, discard cards from your hand until you have only 4 remaining. Discarded cards go to your personal discard pile.
Then place one of your player discs from a disc space with white corners onto space 0 of the pathfinder track. You may chose the same disc as a previous player. (See the white box on page 9 for the rules of clearing disc spaces on your player board.)
Afterwards, place your runholder onto any neutral building tile and continue directly with phase B. You may start on the same building tile as other players.
Object of the Game & Trail Movement (Phase A)
Object of the Game
In Great Western Trail New Zealand, you move your runholder along a trail that winds and forks from the lower left corner of the game board to Wellington in the upper right. Along your path, you perform actions that provide you with various ways to earn victory points. For example: placing private building tiles, buying sheep from the sheep market, upgrading harbours and removing hazards.
Each time your runholder reaches Wellington, you deliver sheep to a local or foreign trading post, which may also be worth victory points. Afterwards, your runholder continues its movement again in the lower left corner of the game board. In an average game, your runholder will usually reach Wellington 5 or 6 times.
All victory points are awarded at the end of the game. Then, you add up the victory point icons on the various components in front of you as well as the ones marked with your colour on the game board and the sea routes board. The player with the most victory points wins the game.
The Flock Deck
What is your flock deck?
Your flock deck represents your flock, which you lead along the trail. Each sheep card of that flock represents one animal of a specific sheep type, clearly denoted by the card’s colour as well as its breeding and wool value. Each player starts with an identical flock deck of rather low breeding and wool values. However, during the game, you can improve your flock deck by adding sheep cards with higher breeding or wool values as well as deck-building, bonus and objective cards to it.
Your flock deck is made up of the following parts:
- Your face-down personal draw stack to the left of your player board.
- Your hand cards that you draw from that draw stack according to your hand limit (you start with a hand limit of 4 cards).
- Your face-up personal discard pile, onto which you place any cards that you discard from your hand as well as any cards you acquire during the game.
What is the purpose of the sheep cards?
- On the locations of the trail, there are several actions that require specific sheep cards to be discarded from your hand in order to gain rewards.
- Also, each time you reach Wellington, you want to have many different types of sheep with high breeding values in your hand. The more varied and valuable they are, the more money and victory points are in store for you.
- Finally, each sheep card also displays the wool value of that particular breed. Selling wool is an additional way of obtaining pounds during the game.
Important: When you must draw a card from your personal draw stack but have no cards left in that stack, then (and only then) pick up your personal discard pile, shuffle it thoroughly and place it as your new face-down personal draw stack to the left of your player board. Then continue to draw cards from it as usual.
What is the purpose of the deck-building and bonus cards?
These cards are very helpful and make each deck and hence each game unique. They make your strategy stronger or turn it in a different direction – depending on your decisions.
Gameplay Overview
Beginning with the starting player (the one with a starting capital of only 7 pounds), players consecutively take turns in clockwise order. On your turn, you must carry out all of the following phases in this order:
- PHASE A: Move your runholder to another location along the trail
- PHASE B: Use the action(s) of your reached location
- PHASE C: Draw up to your hand limit
Then it is the next player’s turn.
PHASE A: Move your runholder to another location along the trail
In this phase, you must move your runholder from its current location along the trail to another location.
What is considered a location?
The main location of the trail is Wellington. Furthermore, any tile that is placed on a space of the trail is considered a location (so every building tile as well as every hazard tile). Spaces without any tile are considered an unimpeded part of the trail and are NOT locations!
For movement, bear the following rules in mind:
- The movement of your runholder is measured in steps. Each location along your path takes 1 step (remember, empty spaces along the trail are not considered locations).
- You must always move your runholder forward along the intended direction of the trail as indicated by the arrows. If the trail forks, choose one of the available paths to continue along. (A path is always used in one direction only.)
- You are not allowed to pass over Wellington. So when your runholder reaches Wellington, they must end their movement there.
- The runholders of the other players do not interfere in any way with your own runholder. Several runholders can be on the same location.
- You must move your runholder at least 1 step and are not allowed to move them more steps than the current step limit your player board indicates. (Depending on your player count, you start with a step limit of 3 or 4, which can be increased during the game.)
- The location on which your runholder ends their movement (either because you want them to or because your step limit is exhausted) is the location you use in phase B.
Hands and Fees
Several locations show a green or black hand. If your runholder moves to or passes over such a location, you must immediately pay a fee:
- Hazard tile: You must pay the fee to the bank.
- Private building tile of another player: You must pay the fee to that player.
The fee depends only on the colour of the hand (regardless of player count):
- Each black hand costs 1 pound
- Each green hand costs 2 pounds
Important: If you cannot pay for some or all of the hands along your path, you are still allowed to move. This means that if your runholder moves to or passes over a location whose fee you cannot pay, pay as much as you can and continue as usual.
You never pay fees retroactively, even if you receive money while still at a location whose fee you could not pay before.
This only applies to fees levied by hands. All other costs and requirements in the game must always be paid/met in full.
Trail Locations & Wellington (Phase B & C)
PHASE B: Use the action(s) of your reached location
After moving your runholder, use the location on which they ended their movement. However, your options on the location differ depending on whether it is:
- A neutral building tile or a private building tile of your own colour
- A private building tile of another player or a hazard tile
- Wellington
1) Neutral building tile or a private building tile of your own colour
You have two options: EITHER use the local action(s) of that tile OR use one single auxiliary action.
Use the local action(s):
Most building tiles show two different local actions on their bottom half. These actions are separated from one another by full-length dividers. (Only a few building tiles show just one or more than two local actions.)
- You may now perform each of that tile’s local actions once.
- You may perform these local actions in any order (i.e., without combining them).
- You do not have to perform all of the available local actions. But if an action shows a cost or requirement, you have to pay/meet it completely in order to gain that action’s reward.
- A few tiles show two actions (separated by a white slash) within the same local action. You are only allowed to perform one of those actions.
- Some spaces of the trail have risk actions attached. If a building tile is placed on such a space, the risk action becomes part of that tile’s local actions and thus can be performed by its owner each time that player reaches the location.
Use one single auxiliary action:
If you do not perform any of the local actions of the reached tile, then and only then may you perform one single auxiliary action instead. Your auxiliary actions can be found on the left side of your player board in the auxiliary action section.
At the beginning of the game before your first turn, only 2 of them are available. Each of the other auxiliary actions become available after you have cleared at least one of its two disc spaces.
2) Private building tile of another player or a hazard tile
On a building tile of another player (meaning a different player colour than yours) or a hazard tile, you have only one option: Perform one single auxiliary action.
Note: This means that you will usually try to reach a neutral building tile or a building tile of your own colour, because only there can you perform local actions.
3) Wellington
When you reach Wellington, you must carry out all of the 4 Wellington subphases in succession:
- Income
- Delivery
- Foresight A
- Foresight B
To make sure that you do not forget any subphases, you may move your runholder along the numbered spots and perform the corresponding subphase before moving on to the next spot.
Subphase 1: Income
Reveal as many sheep of different types as you like from your hand to the other players and calculate their total breeding value. To do this, sum the breeding values of each sheep that you have revealed. This means that you may reveal each type only once, no matter how many cards of that type you have in hand. (Ignore any victory points or wool values on your sheep cards.) You cannot reveal any deck-building or bonus cards at this moment that are not sheep.
Then, if possible and if you like, you can increase that total breeding value by adding certificates to it:
- Temporary certificates: Those on your certificate track. The number next to the current position of your certificate marker tells you how many temporary certificates you have available. You can use as many as you want by moving your certificate marker backwards accordingly.
- Permanent certificates: Those you cleared on your player board and any depicted on the upper half of harbourmaster tiles in front of you. Each of those increases your total breeding value by one for the rest of the game.
Once your total breeding value is set (including any certificates), take that many pounds from the bank. Place this amount a little set off from the rest of your money so that you are able to track that total breeding value in subphase 2.
Then discard all the cards you revealed to your personal discard pile. Cards you did not reveal (e.g., because they are duplicates) are kept in your hand.
Subphase 2: Delivery
The sheep for which you just received your income must now be delivered to a trading post. The crest of each trading post shows a trading post value that corresponds to those sheep’s total breeding value: the higher the total breeding value, the better you can deliver. At the start of the game, only the local trading posts on the game board are available. During the game you can unlock foreign trading posts by placing storehouses onto the sea routes board.
To deliver, decide on a trading post whose trading post value is equal to or lower than your sheep’s total breeding value. Bear in mind, however, that you are not allowed to choose any trading post to which you have delivered before, i.e., that already has one of your discs on its trading post space. The only exceptions to this rule are:
- The first local trading post with number 0, and
- The terminal local trading post with number 21.
You may deliver to either of these local trading posts even if you already have one or more of your discs there.
Once you have decided on a trading post, place one of your player discs onto its trading post space (if other player discs are already there, put yours on top of those). Take that player disc from any of the disc spaces of your player board, respecting corner types:
- A disc from a disc space with white corners can be placed onto any trading post space.
- A disc from a disc space with dark corners can only be placed onto a trading post space that also has dark corners.
Clearing Disc Spaces on Your Player Board:
- Step limit: By clearing this space, you increase your step limit. If you take the disc from this space, immediately gain 3 pounds from the bank.
- Hand limit: By clearing either of these spaces, you increase your hand limit. However, if you take a disc from either one of these spaces, you must immediately pay 3 or 8 pounds to the bank. If you can’t, you must choose another space to clear. The 3 victory points for clearing the space on the right are awarded at the end of the game.
- Auxiliary action spaces: By clearing any of the disc spaces in the auxiliary action section, you broaden your options when performing auxiliary actions.
- Temporary certificate limit: By clearing this space, you increase your temporary certificate limit to 5 (you start with a limit of 3).
- Permanent wool: By clearing these spaces, you unlock permanent wool for “shear your sheep”. If you take the disc from the right space, you must immediately pay 4 pounds to the bank. If you can’t, you must choose another space to clear.
- Permanent certificates: By clearing these spaces, you unlock some of the available permanent certificates for you in the game. If you take the disc from the left space, you must immediately pay 4 pounds to the bank. If you can’t, you must choose another space to clear.
Delivery Rewards and Transport Costs
By placing your disc onto a trading post space, you may gain or lose victory points at the end of the game and may trigger a delivery action which you must perform immediately (e.g., gain pounds, gain a specific card, etc):
- For each disc you place on trading post 0, immediately gain 6 pounds from the bank. At the end of the game, you lose 8 victory points for each of your discs there.
- Most other delivery actions will add a specific card to your discard pile (and thus your deck):
- EITHER take the shown card from its supply and place it onto your personal discard pile
- OR if it is an objective card, immediately choose one from the general objective display, place it face up onto your personal discard pile and replenish the display if necessary.
- Green arrow victory points: The victory points in the green arrow are only applied at game end when both adjacent local trading post spaces have one of your discs on them.
- Transport costs: Finally, check whether you need to pay any transport costs for your delivery. Those in general are only applied for disc spaces with dark corners. If you can’t immediately pay the transport costs (including potential disc clearing cost) you have to choose a different combination (or trading post).
Subphases 3 & 4: Foresights (A & B)
Each of the 2 tiles that you choose in subphases 3 and 4 must immediately be moved to its corresponding section:
- Worker tile: Place it onto the most expensive (i.e., the farthest up) free space of its worker type column in the job market. If no spaces remain for workers of that type in the job market, remove this worker tile from the game by returning it to the box.
- Hazard tile: Place it in the corresponding hazard section (flood or rockfall) onto the empty space with the lowest number. If no hazard spaces of that type remain, remove this hazard tile from the game by returning it to the box.
- Bonus tile: Place it onto the next free space of the bonus tiles market:
- The tile must always be placed in the row where the bonus tiles market token is located.
- The spaces of that row must always be filled from left to right.
- In a 3-player game, each row only comprises 3 spaces (starting beneath the 3-player count sign) and the entire left column is left empty.
- In a 2-player game, each row only comprises 2 spaces (starting beneath the 2-player count sign) and both left columns are left empty.
- The last space to be filled in each row is always the one with the bonus tiles market token. And as you place a bonus tile onto this space, move that token along the arrow to the dashed round space of the next row.
Moving the Bonus Tiles Market Token Along Arrows
When the bonus tiles market token is moved to the next row along a black arrow, nothing in particular happens. However, when that token is moved along a yellow or turquoise arrow, you must immediately either fill up the sheep market or flip the 4 neutral building tiles to their back showing the icon.
Refill Sheep Market (Yellow Arrow)
Draw from the market stack as many cards as it takes to bring the cards in the sheep market up to their initial number:
- In a 2-player game: Fill the sheep market up to its total of 9 cards.
- In a 3-player game: Fill the sheep market up to its total of 11 cards.
- In a 4-player game: Fill the sheep market up to its total of 14 cards.
Sort all sheep cards by colour and place them face up in an overlapping row from left to right: orange, red, yellow, blue, brown, purple. If the number of sheep cards in the market is already equal to (or higher than) the total for your player count, don’t add any cards. If the market sheep stack is empty, no more cards are added.
Flip the 4 Neutral Building Tiles (Turquoise Arrow)
When the bonus tiles market token is moved along the turquoise arrow, flip the 4 neutral buildings with the on their front to their back which shows a (as depicted on the neutral buildings overview tile). Runholders on any of the 4 flipped neutral buildings remain on this tile’s back and continue movement from there as usual. From now on, these 4 neutral buildings offer modified options for their actions. For the rest of the game, they remain flipped.
Finishing the 4 Wellington Subphases
After finishing the 4 Wellington subphases, carry out these two final steps:
- Move runholder: Move your runholder to the start of the trail, by placing them onto the horseman space in the lower left corner of the game board. The next time it is your turn, the movement of your runholder starts from there.
- Refill foresights: Refill each of the 2 empty foresight spaces in Wellington with tiles drawn from the Wellington supply. Make sure that onto each space you place a face-up tile whose letter on the back matches the letter of that space.
End of Game Trigger: If the bonus tiles market token is moved from the bottom row along the red arrow, the end of the game is triggered.
PHASE C: Draw up to your hand limit
Each player starts with a hand limit of 4 and can increase it up to 6. If you have fewer cards in your hand now than the current hand limit your player board indicates, bring their number up to that limit by drawing as many cards from your personal draw stack as you lack. (If necessary, shuffle your personal discard pile and use it to replace your run-out draw stack as described on page 6.)
Note: During this phase you may not play any deck-building or bonus cards.
Then it is the next player’s turn.
Actions Reference
The Actions
The main source of actions in the game are the local actions of the neutral building tiles and of your private building tiles, though there are a few other situations in which actions might be triggered (delivery actions, single auxiliary actions, etc.). Irrespective of the situation in which actions are performed, the actions themselves are always represented by the same icons.
Attention: Quite a few actions consist of a specific requirement and a specific reward. Only if you meet the requirement are you allowed to gain the reward. Requirements are usually associated with red (red arrows or red numbers), while rewards are usually associated with green and white (green arrows and/or white numbers).
Important: You are allowed to forfeit a reward completely or in part even though you meet the requirement. However, if you receive an amount of pounds as a reward, you must take that entire amount. Also, if you receive a card due to a delivery action (of a local/foreign/wool trading post), you must take that card as well.
The most frequent requirement is discarding cards. Wherever an action shows one or more cards with a red arrow, you must discard the exact depicted card(s) from your hand to your face-up personal discard pile in order to gain the reward shown next to it. (You can perform the action only once, no matter how often you would be able to meet the requirement.)
Terminology
- Discarding a card: Place the card from your hand face up onto your personal discard pile.
- Gaining a specific amount of pounds: Take that exact amount from the bank.
- Paying a specific amount of pounds: Return that exact amount to the bank.
- Moving your certificate marker forward: Move your certificate marker forward on your certificate track as many spaces as indicated. You can never move beyond your temporary certificate limit (which is 3 at the beginning of the game).
Whenever you move your certificate marker on the certificate track from 0 or 1, to 2 or further, you also move your gold marker 1 space forward. - Moving your gold marker forward: Move your gold marker forward on your gold track (gold limit is always exactly 5).
- Moving your ship: Move it in any direction and/or upgrade a harbour if possible.
Action: Hire one worker
When you perform this action, choose exactly one worker tile from the job market, pay that worker’s hiring cost and place that tile in the worker section of your player board.
The hiring cost of the workers in the job market is the cost depicted on the right side of their row, modified by the value shown on the action icon itself:
- = The hiring cost is not modified.
- = Costs 3 pounds more.
- = Costs 2 pounds less.
After you have paid the hiring cost, place the worker tile in your worker section, onto the leftmost free space in the row of its worker type. Each player already starts the game with one worker of each of the 4 types: shepherd, craftsman, sailor and shearer.
If the space on which you place the hired worker depicts an immediate action, you must choose to either perform that action immediately or forfeit it.
- If a row is already full, you are not allowed to hire another worker of that type.
- At the end of the game, each worker that is placed on the fifth space of any row of your player board is worth 4 victory points.
Action: Invest in a bonus tile
When you perform this action, choose exactly one bonus tile from the bonus tiles market, pay that tile’s investment cost, receive its bonus and place it next to your player board.
Bear the following rules in mind:
- You are not allowed to invest in a bonus tile from the row where the bonus tiles market token is currently located. Those bonus tiles are unavailable until the bonus tiles market token has moved.
- The investment cost of any of the other bonus tiles in the bonus tiles market is the cost depicted on the right side of their row, modified by the action icon:
- = The investment cost is not modified.
- = Costs 3 pounds more.
- Important: The joker worker (who can be placed in any worker row) shows an additional cost of 1 gold which must always be paid. Also some other bonus tiles have additional costs or requirements which must always be paid/met in full.
Action: Buy sheep from the sheep market
When you perform this action, you can acquire sheep cards from the sheep market and place them face-up onto your personal discard pile. The number and types of sheep cards you may acquire depend on how many shepherds you have in your shepherd row and how much money you spend.
- 1 shepherd:
- EITHER buying 1 “Dorset Horn” sheep card for 3 pounds
- OR buying 1 “Corriedale” OR “Lincoln” sheep card for 5 pounds
- OR buying 1 “Hampshire” OR “Ryeland” sheep card for 9 pounds.
- 2 shepherds (in addition to above):
- EITHER buying 1 “Dorset Horn” sheep card for 1 pound
- OR buying 1 “Corriedale” OR “Lincoln” sheep card for 2 pounds
- OR buying 1 “Suffolk” sheep card AND 1 exchange token for 10 pounds.
- 3 shepherds: Pay 3 pounds, get exactly 2 sheep cards with a victory points value of 2 each.
- 4 shepherds: Pay 4 pounds, get exactly 1 “Suffolk” sheep card AND 1 exchange token.
Any shepherd that you do not put to use to buy sheep cards you may instead use to: Draw 2 cards from the market sheep stack and add them face-up to the sheep market. You may do this at any given moment while performing this action (so even before you buy sheep cards).
Important:
- You can only buy/choose sheep cards that are currently available in the sheep market.
- You can always choose to buy fewer sheep cards than you are allowed.
- Any sheep card that you acquire during this action must be placed face-up onto your personal discard pile.
Action: Place one of your private buildings
When you perform this action, choose one of the private building tiles above your player board: EITHER place it onto any empty building space on the trail OR use it to replace one of your private building tiles that is already placed on a building space on the trail.
Remember: The side of each building tile is identical for all players. You are not allowed to flip it to its other side.
Before choosing a building tile for this action, you must make sure:
- That you have enough craftsmen for it AND
- That you can pay that building tile’s cost.
In its upper left corner, each private building tile shows how many craftsmen you need for it. If the number of craftsmen in your craftsman row equals or exceeds that number, you can place the tile onto any empty building space on the trail, provided you pay: For each craftsman needed for that building tile, you must pay 2 pounds.
Replacing a building: Alternatively, you can use this action to replace one of your private building tiles on the trail with a higher-valued private building tile from above your player board. For this, you only need to have the difference of craftsmen between the two building tiles and also only must pay the difference (2 pounds per craftsman difference). Then put the new building tile in place of the old one and remove that old building tile entirely from the game by returning it to the box. This is the only way to place building tiles that require more than 5 craftsmen.
Pathfinder requirements: There are four building spaces on the trail, which, as a condition for being allowed to build on them, must not only be empty, but also require a certain advancement (2, 4 or 7) on the pathfinder track. If you have not advanced at least the required amount of steps on the pathfinder track, you cannot build there.
Action: Move your ship
If you move your ship via this action icon, you can move it up to as many spaces in any direction on the sea routes board as you have sailors in your sailor row.
- Every space of the sea routes can accommodate any number of ships at a time.
- Along the routes, there are several harbours, each of which either allows you to place a storehouse or one of your player discs if your ship is on its associated water space. Each time you want to place a storehouse or a disc, you have to spend one movement step and your move action is concluded.
- When choosing to move your ship via an action, you may move it fewer spaces than allowed. However, once you decide to stop on a space (and upgrade a harbour or not), you forfeit any excess movement you might have left from that action.
Upgrading Harbours
If your ship is already on a space with a harbour connection or you land on such a space by moving your ship and you have at least one ship movement left, you may upgrade this harbour. To do this, either place a storehouse or one of your player discs on the associated space and pay the indicated cost if applicable. When you move to a harbour to upgrade it, that ship move action is concluded.
You can only upgrade a harbour if you can pay the upgrade cost and if you have not upgraded that harbour before. It does not matter if opponents already have a storehouse or disc on the harbour.
Small Harbour:
First pay the upgrade cost depicted on one of the storehouse spaces of that harbour and then place one of your storehouses there. Take the card depicted on that small harbour and place it face-up onto your personal discard pile (if depleted, do not take a card). Check whether you unlocked a permanent or immediate bonus on your player board: Every time both storehouses linked by two brown arrows to an immediate bonus have been placed, either take this bonus immediately or forfeit it.
Medium Harbour:
First pay the upgrade cost depicted above the disc space and then place one of your player discs onto that harbour’s disc space (respecting white vs dark corners). Take the card depicted on that medium harbour.
After placing your disc, check whether there is a harbourmaster tile still next to it. If so, you may acquire that harbourmaster tile by appointing one of your hired workers (shepherd, craftsman, sailor, or shearer) as the harbourmaster: choose any hired worker currently placed on the rightmost space of its respective row, remove that worker from your player board, put it in place of the harbourmaster tile and place that harbourmaster tile face-up next to your player board. (Once placed, the worker remains there for the rest of the game. If this uncovers an immediate action, you can perform it next time you place a hired worker there.)
Large Harbour:
Upgrading a large harbour works similarly to upgrading a small harbour. However, you do not have to pay any upgrade cost. You just place your storehouse on one of the four storehouse spaces as usual. Then check whether you unlocked a permanent or immediate bonus on your player board. After you placed it, you enable another option for one of your future deliveries.
If you later want to place one of your discs on a large harbour, you must pay the depicted transport costs on that foreign trading post crest to the bank as always. On each of these large harbours foreign trading posts, you may place only one of your player discs as usual. In case that large harbour involves a foreign wool trading post, you can only deliver there when you shear your sheep.
Attention (End-of-route small harbours): The respective small harbour connected to the very last space of each of the three sea routes is special. You may upgrade one of these as usual (by paying the upgrade cost and placing a storehouse there). But if you do, you must reset your ship to the starting space (after you took a compass bonus card). At the end of the game, you gain the 4 victory points depicted on the yellow arrows in the upper left of the sea routes board only if both adjacent small harbours have one of your storehouses on them.
Action: Shear your sheep
When you perform this action, you may reveal up to as many different sheep cards from your hand as you have shearers in your shearer row. To determine your total wool value, sum up the wool values of each different type of sheep that you just revealed from your hand and add all permanent wool you have. (Ignore any victory points or breeding value on your sheep cards.)
Once your total wool value is set (including permanent wool unlocked on your player board or from a bonus tile), take that many pounds from the bank and place them in front of you. You can do this only once per “shear your sheep” action. You cannot reveal any deck-building or bonus cards at this moment that are not sheep. Then discard all sheep cards you revealed from your hand to your personal discard pile.
Delivering to wool trading posts: The wool value for which you just received money might allow you to also place one of your player discs from your player board onto a wool trading post on the sea routes map. There are three local wool trading posts (with values 5, 9 and 13) available from the beginning of the game and two foreign wool trading posts which you may unlock by upgrading their associated large harbour.
Check which wool trading posts are equal to or lower than your sheep’s total wool value. You are not allowed to choose any wool trading post to which you sent wool before, with the exception of the wool trading post with value 13 (you may send wool to value 13 even if you already have discs there). Respect white vs dark corners when placing your disc.
Note: Each wool trading post disc space with dark corners gives you a “Romney” sheep card, which you must take as this is a delivery action.
Alternative shearer use: Any shearer that you do not put to use to shear your sheep you may instead use to: Draw 1 card from your personal draw stack, then immediately discard 1 card. You may do this at any given moment while performing this action (so even before you shear your sheep).
Action: Gain one objective card
When you perform this action, either choose one objective card from the general objective display to the right of the game board or draw the top card of the objective stack. Place this card face-up onto your personal discard pile. If you take a card from the objective display, fill its vacant place immediately with a new face-up card drawn from the objective stack.
With this action, you may not choose a bonus objective card (Set 8, 9 or 10) from the bonus card supply. However, all rules otherwise apply also to bonus objective cards.
Playing Objective Cards:
During your own turn, if you happen to have one or more objective cards in your hand, you can play any of them, either:
- Before performing phase A
- Or before or after performing any single action in phase B.
(You cannot play them in the middle of movement/actions, nor after starting phase C.)
When you play an objective card, place it face-up in your personal objective area (beneath your player board). Then perform the immediate action depicted in the upper left corner of the card or forfeit it.
Each objective card depicts a combination of tasks to be fulfilled at the end of the game:
- If all of the tasks of an objective card are fulfilled by then, you gain the positive victory points printed on it.
- If its tasks are not fulfilled completely, you lose the negative victory point value printed on it.
- Important: Each single fulfilled task can only count towards one objective card. Tasks must be fulfilled individually.
Note: You are not compelled to play your objective cards. If kept in hand/deck at the end of the game, you may decide whether you want to score each one or not. For cards in your personal objective area, scoring them is mandatory.
Action: Advance on the pathfinder track
With this action you advance on the pathfinder track (also consider spaces that are occupied by other players’ discs) which provides you with rewards when you reach or exceed certain spaces:
- Spaces 3 and 8: Each lets you collect 1 gold (move your gold marker 1 space forward immediately).
- Spaces 4 or 6: (Depending on your player count) grant you an orange step tile, which increases your step limit by 1. Place the tile in the designated square on your player board.
- Spaces 2, 4 and 7: Do not provide a direct reward, but they do unlock building spaces along the trail.
- Space 11: On reaching or exceeding space 11, you must take a decision: EITHER flip the previously received step tile on its +2 side (increasing your step limit by 1), OR flip your fee tile to the side with the crossed-out hands (from now on, you do not pay any fees anymore; ignore all black/green hands).
- End of game VP: Gain the highest victory point value you have reached (maximum of 15).
- Space 16+: If you reach space 16 and earn further advancement, you receive 1 pound for each advancement instead. Your pathfinder disc never moves backwards under any circumstances.
Action: Gain an exchange token
When you perform this action, gain one exchange token from the bank and place it in front of you. Exchange tokens can be used at any point in the game—even in the middle of an action or when it is not your turn:
- To use 1 exchange token: Place it back into the bank. Then, draw up to 2 cards from your personal draw stack and immediately discard as many cards as you drew.
- To combine 2 exchange tokens: Remove 1 of your “Shropshire” sheep from your hand cards entirely from the game (and thus your deck) by returning it to the box and moving your gold marker 1 space forward.
Action: Move your runholder forward
This local action allows you to move your runholder forward to another location along the trail. If you do, you must move it at least 1 step and may not move it more steps than the white number in the icon states. On the location where you stop, you must then perform once more all of phase B. (Do not replenish your hand cards before performing phase B again; this is only done in phase C.)
Action: Remove a hazard
When you perform this action, remove one hazard tile of your choice from any hazard section, place it face up in front of you and take the associated deck-building card. If the icon shows a cost, you must immediately pay that many pounds. Each hazard tile has either 2, 3 or 4 victory points printed on it.
- Removing a rockfall hazard tile: Take one “Sheepdog” card and place it onto your personal discard pile.
- Removing a flood hazard tile: Take one “Ferry” card and place it onto your personal discard pile.
If both hazard sections are empty, you cannot get a hazard tile.
Auxiliary Actions: Single or Double
The auxiliary action section of your player board shows 5 different auxiliary actions. Each auxiliary action has 2 disc spaces next to it. Only if at least one disc space is cleared is the action unlocked:
- If only one disc space is cleared: Use the action once (single auxiliary action).
- If both disc spaces are cleared: You may use it as a double auxiliary action (requirement and reward are both doubled).
Collect Gold and Spend It
Each player starts the game with 1 gold and may collect more on different occasions (up to your gold limit of 5). You may use as much gold as you have available during phase A or B as a “free action” to buy one of the 4 different randomly determined bonus cards from the bonus cards supply:
- Bonus cards below the steering wheel and the barrel : pay 3 gold each.
- Bonus card below the bell : pay 4 gold.
- Bonus card below the compass : pay 5 gold.
End of Game & Final Scoring
End of the Game
The end of the game is triggered when you place a bonus tile onto the last space of the bonus tiles market while carrying out subphase 4 in Wellington. As this makes the bonus tiles market token move along the red arrow out of the bonus tiles market, immediately take the bonus tiles market token and place it in front of you. Afterwards, refill any empty foresight spaces at the end of your turn. This was your last turn.
Important: On your last turn, you do not carry out phase C (you do not draw up to your hand limit).
Then, each of the other players has one final turn, in which they move their runholder as usual and use the reached location. Players that move to Wellington during their final turn also carry out the 4 subphases as usual. However, if they choose a bonus tile from foresight space B when performing subphase 4, it is removed from the game. At the end of their turn (after phase B), they must refill any empty foresight spaces. When the last player has finished their final turn (without carrying out phase C), the game ends.
The Final Scoring
Take the scoring pad and go through its 12 categories. In each category, write down the victory points for each player as follows:
- Money: Gain 1 victory point for every 5 pounds that you own.
- Private buildings: Gain the sum of the victory points printed on each of your private building tiles that is placed on the game board.
- Trading posts: Gain the sum of the victory points that you have unlocked with your discs on all trading post crests (local, foreign and wool). Subtract any negative victory points.
- Harbours: Gain the sum of victory points unlocked with your discs and storehouses on small and medium harbours on the sea routes board.
- Pathfinder track: Gain the victory points unlocked with your disc on the pathfinder track (highest reached value, maximum 15).
- Hazards and bonus tiles: Gain the sum of the victory points printed on each of the collected hazard tiles and bonus tiles in front of you.
- Cards in deck: From your deck (draw stack, hand cards, discard pile), sum the victory points on all bonus cards (except bonus objective cards) and sheep cards.
- Objective cards: For all objective cards still in your deck, choose to remove them or add them to your personal objective area (without immediate actions). Score all cards in your personal objective area individually: gain positive points for fulfilled ones, subtract negative points for unfulfilled ones.
- Harbourmaster tiles: Gain the sum of victory points generated by the individual tasks of the harbourmaster tiles in front of you.
- Hand limit disc: Gain 3 victory points if you managed to clear the right hand limit disc space on your player board.
- Worker rows and storehouses: Gain 4 victory points for each worker on the fifth space of any row in your worker section. Additionally, gain 2 and/or 4 victory points if you cleared the corresponding pair of storehouses on your player board.
- Game end token: Gain 5 victory points if you have the bonus tiles market token in front of you.
After totaling all categories, the player with the most victory points wins the game! In case of a tie, the victory is shared.
Rules Clarifications & Credits
General Notes and Special Cases
- Unlimited items: Money and exchange tokens are considered unlimited. If the bank should run out, use something else as a substitute.
- Stack depletion: If the objective stack runs out, vacant spaces in the general objective display are not refilled. If empty, no new objective cards can be gained. The same is true for all 4 stacks of deck-building cards and the bonus cards supply.
- Discard vs draw pile: You are allowed to look through the cards of your personal discard pile at any time. You are not allowed to look at the cards of your personal draw stack.
- Disc placement edge cases:
- If you must place a disc onto a space with white corners, but only have discs on dark corner spaces left, you may place a disc from a dark corner space onto a white corner space.
- If you are supposed to place a disc but have none left or cannot pay for removal, remove one of your discs from a medium harbour of your choice and place that one instead (if none is on a medium harbour, you do not place one).
- Replacing a building under your runholder: If you replace a building while your runholder is on it, you cannot immediately use the new building’s local actions if you already used an action of the replaced building.
- Hazards with runholders: If you remove a hazard tile on which there are runholders, leave those runholders on the empty space. They continue movement from there as usual.
- Snapshot rule: When you reveal cards from your hand (subphase 1 or shearing sheep), this is a “snapshot of that moment in time” at which you cannot use an exchange token or a card that lets you draw from your deck.
- Deck-building and bonus card draw: Whenever you play a deck-building or bonus card (that is not a sheep or objective card), you draw a card after performing or forfeiting its effect.
Credits
Designer: Alexander Pfister
Illustrations: Chris Quilliams
Art Direction: Sophie Gravel, Martin Bouchard
Producer: Sophie Gravel
Development: André Bierth, Anh Tú Tran
Editing: André Bierth
Graphic design: Emeline D’Aoust
3D Modelling: Emeline D’Aoust
© 2023 Plan B Games Europe GmbH. EGGERTSPIELE is a brand of Plan B Games Europe GmbH.
