The Lord of the Rings: Journeys in Middle-Earth
2019
Explore Middle-earth, battle dark forces, and make courageous choices in a cooperative campaign guided by a companion app.
120
minutes
1 - 5
player(s)
14+
Medium

About this board game
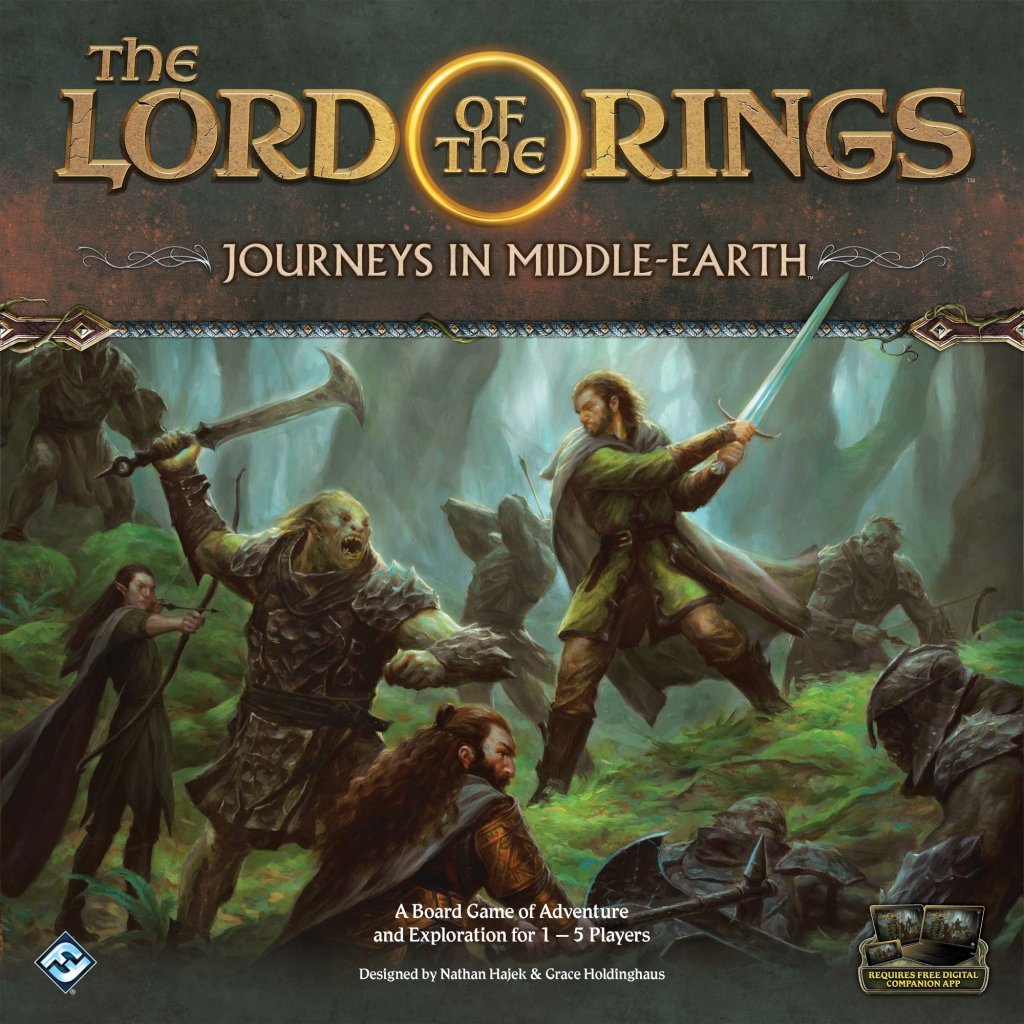
The Lord of the Rings: Journeys in Middle-Earth is a fully cooperative, app-supported adventure game for 1–5 players, with games lasting about 120 minutes. Released in 2019, it invites players to take on the roles of heroes facing the evil that threatens Middle-earth.
Each game is one adventure within a larger campaign. Across these connected quests, you will explore the vast and dynamic landscapes of Middle-earth, face perilous challenges, and make courageous choices that help shape your journey.
The companion app guides your expedition as you uncover the world around you. It reveals locations such as looming forests, quiet clearings, and ancient halls, while also controlling the enemies encountered along the way.
- Fully cooperative play: Work together with one to four other players against the threats facing the land.
- Campaign-based adventures: Experience each game as part of a larger journey through Middle-earth.
- Exploration and combat: Discover changing landscapes, use your skills, and battle villainous foes.
- App-supported storytelling: Let the companion app reveal locations and manage the enemies you encounter.
Whether you venture into the wilderness alone or gather close companions around the table, every quest offers an opportunity to survive danger and advance the campaign. The combination of exploration, battle, and meaningful decisions brings a sense of adventure to every session.
In Journeys in Middle-Earth, your heroes travel through the storied hills and dales of Tolkien’s iconic world. Face the dark forces arrayed against you, strike a blow for the land, and write your own legend in the history of Middle-earth.
Thematics
Mechanics
Designer
Illustrator
Usefull links
/pic7182955.jpg) View board game on
View board game onBoard Game Geek
The Lord of the Rings: Journeys in Middle-Earth
Board Game Rules
“But I suppose it’s often that way. The brave things in the old tales and songs, Mr. Frodo: adventures, as I used to call them. I used to think that they were things the wonderful folk of the stories went out and looked for, because they wanted them, because they were exciting and life was a bit dull, a kind of a sport, as you might say. But that’s not the way of it with the tales that really mattered, or the ones that stay in the mind. Folk seem to have been just landed in them, usually – their paths were laid that way, as you put it. But I expect they had lots of chances, like us, of turning back, only they didn’t. And if they had, we shouldn’t know, because they’d have been forgotten. We hear about those as just went on – and not all to a good end, mind you; at least not to what folk inside a story and not outside it call a good end. You know, coming home, and finding things all right, though not quite the same—like old Mr. Bilbo. But those aren’t always the best tales to hear, though they may be the best tales to get landed in!”
Game Overview
The Lord of the Rings: Journeys in Middle-earth™ is a cooperative game for one to five players. During a game, a group of heroes embarks on perilous adventures, working together to explore and survive the vast and epic fantasy world of J.R.R. Tolkien’s The Lord of the Rings™. Throughout their journeys, heroes battle powerful foes, discover lost treasures, uncover forgotten lore, and customize their skills according to their role within their Fellowship. As darkness is rising, unifying evil, shadow, and corruption, it is the time for the heroes to take a stand and begin their journey in Middle-earth.
An Epic Campaign
Each game of The Lord of the Rings: Journeys in Middle-earth is one adventure of a greater campaign. During each adventure, the heroes attempt to complete a series of objectives before they are overwhelmed by the evils of Middle-earth. No matter the outcome of a particular adventure, the heroes and the campaign progress. Eventually, after completing a series of adventures, the campaign will reach a climatic conclusion that ends in success or failure for the entire party of heroes.
The App
To play The Lord of the Rings: Journeys in Middle-earth, one player must download the free Journeys in Middle-earth app on a compatible device. The app determines the challenges and content that the heroes encounter during the game, from tile and token placement to enemy behavior. The app also allows the heroes to save their campaign, allowing them to complete it over the course of several gaming sessions. To download the app, search for Journeys in Middle-earth on the Amazon™ Appstore, Apple iOS App Store™, Google Play™, or Steam®.
Using This Document
The purpose of this document is to teach new players how to play Journeys in Middle-earth. Players must read this Learn To Play in its entirety before playing for the first time.
This game includes a Rules Reference, which is a second document that describes detailed rules and exceptions that are omitted from this Learn To Play document. As questions arise during the game, players should consult the Rules Reference instead of the Learn To Play.
The Stories Untold
Each time the players begin an adventure, the Journeys in Middle-earth app fills that adventure with content from a host of many possibilities. The same adventure can vary in many aspects: the size and layout of the map, the enemies and allies that are encountered, the events that plague the heroes, and much more. As a result, players can play the same campaign repeatedly and live a new story each time.
Component List
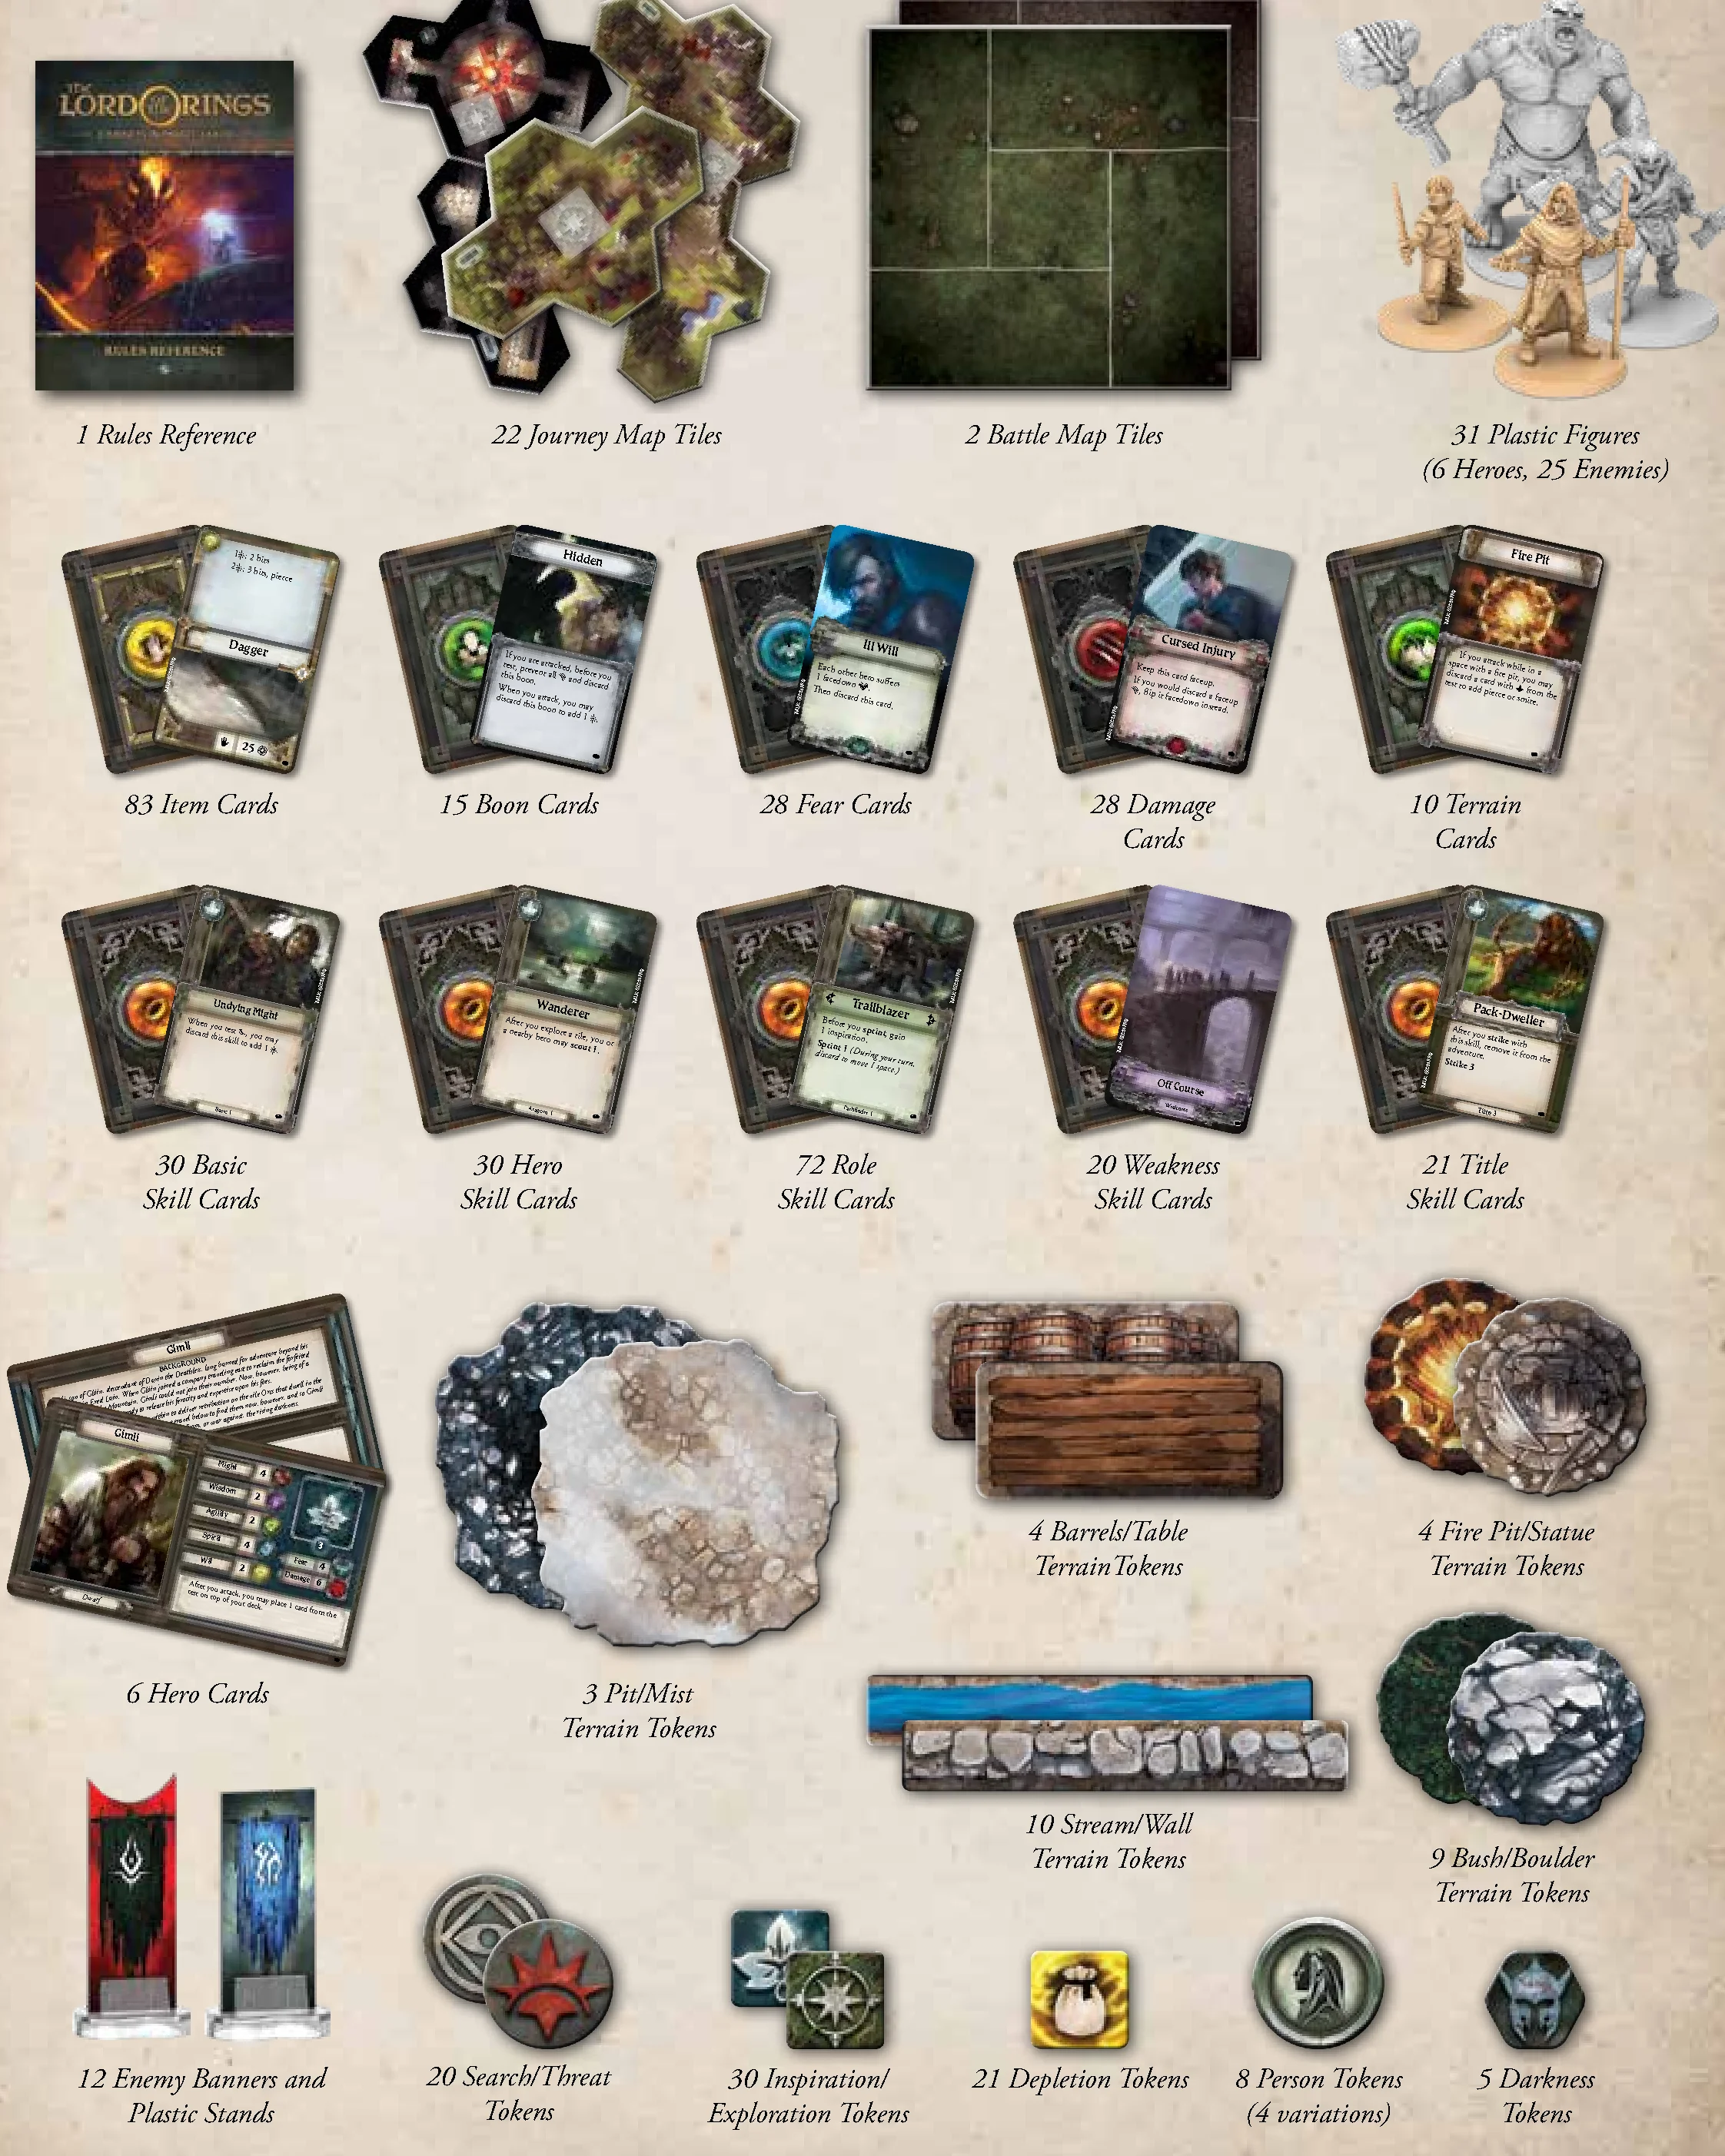
- 1 Rules Reference
- 22 Journey Map Tiles
- 2 Battle Map Tiles
- 31 Plastic Figures (6 Heroes, 25 Enemies)
- 83 Item Cards
- 15 Boon Cards
- 28 Fear Cards
- 28 Damage Cards
- 10 Terrain Cards
- 30 Basic Skill Cards
- 30 Hero Skill Cards
- 72 Role Skill Cards
- 20 Weakness Skill Cards
- 21 Title Skill Cards
- 6 Hero Cards
- 3 Pit/Mist Terrain Tokens
- 4 Barrels/Table Terrain Tokens
- 4 Fire Pit/Statue Terrain Tokens
- 10 Stream/Wall Terrain Tokens
- 9 Bush/Boulder Terrain Tokens
- 12 Enemy Banners and Plastic Stands
- 20 Search/Threat Tokens
- 30 Inspiration/Exploration Tokens
- 21 Depletion Tokens
- 8 Person Tokens (4 variations)
- 5 Darkness Tokens
First Campaign Setup
To set up their first campaign of Journeys in Middle-earth, players follow the steps presented in this section.
- Select Campaign and Difficulty: Select the “New Game” button on the app’s title screen. Then, the app will guide the players through a series of screens for selecting a campaign, a difficulty, and a save slot. It is recommended that players select the “Bones of Arnor” campaign and “Normal” difficulty.
- Create Party and Select Heroes: Each player selects a hero in the app, takes their hero’s corresponding figure and hero card, and places them in their play area. These heroes will be used for the duration of the campaign, which spans several adventures.
If playing single-player, the player chooses two heroes and controls both of them.
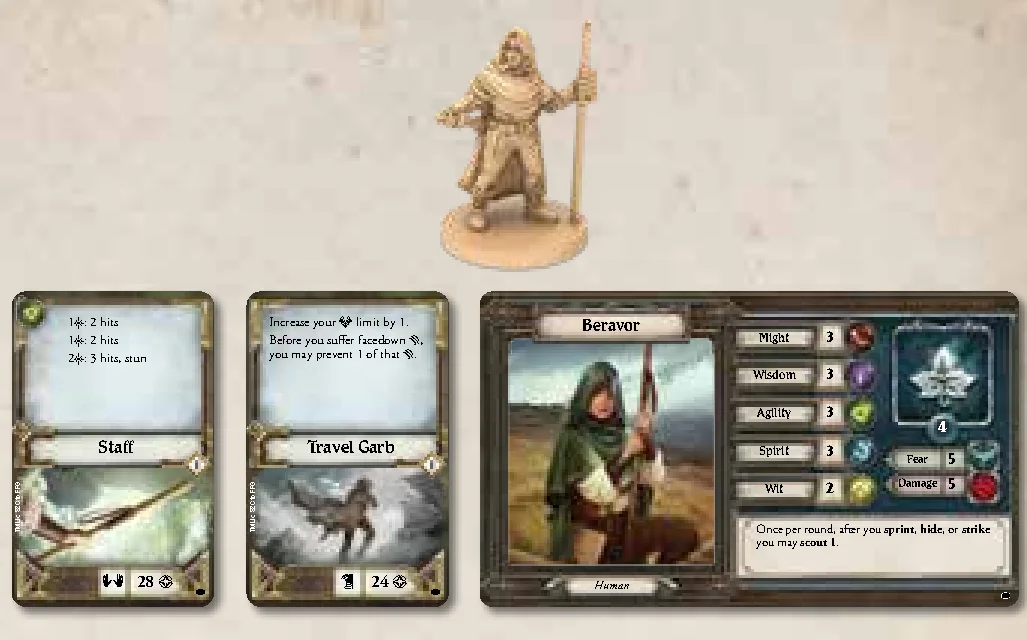
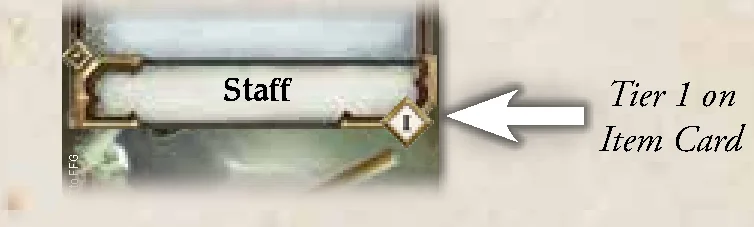
- Gather Starting Items: The app assigns starting items for each hero. Each player finds the item cards that match the name and tier displayed in the app and places them near their hero card. Players may select different starting items in the app if they wish.
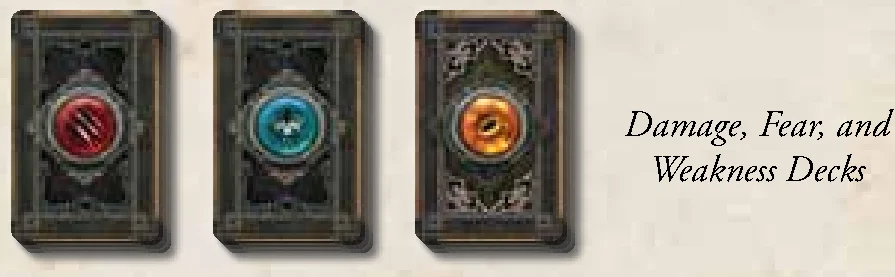
- Create Damage, Fear, and Weakness Decks: Shuffle the damage cards, fear cards, and weakness skill cards (only weakness skill cards, not other skill cards) into separate decks and place them in the center of the play area where all players can reach them.
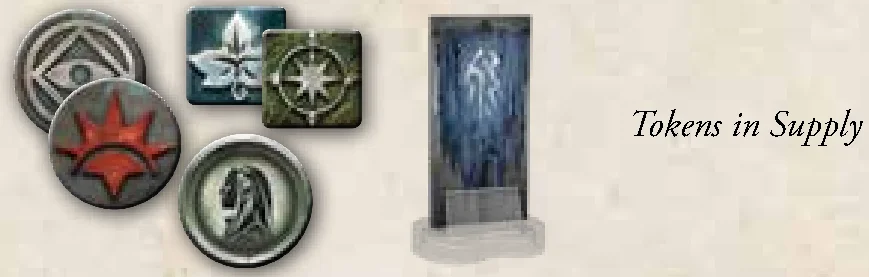
- Create Supply: Separate the exploration/inspiration, search/threat, person, and enemy banner tokens as well as the three types of boon cards into separate piles to create the supply. Set aside all map tiles and enemy figures; some of them will be used during the adventure. Return the battle map tiles and terrain tokens to the box—they are not used in the first adventure.
- Begin Campaign: The players input a group name, and then select “Begin” in the app and watch the short cutscene that introduces the story and the heroes’ quest.
- Choose Role: Each player selects a role in the app—this is the role their hero takes for the first adventure. A player can choose any role from the menu, but the recommended starting role for each hero is as follows:
- Aragorn: Captain
- Beravor: Pathfinder
- Bilbo: Burglar
- Elena: Musician
- Gimli: Guardian
- Legolas: Hunter
Roles
A hero’s role during an adventure determines some of that hero’s capabilities. Each role has a general purpose:
- Burglar: Evades enemies and is self-sufficient
- Captain: Helps the party prepare for any situation
- Guardian: Protects others and has strong defenses
- Hunter: Attacks for heavy damage
- Musician: Inspires others to succeed at their tasks
- Pathfinder: Helps the party move quickly
Role selection is not permanent—heroes can change roles between adventures.
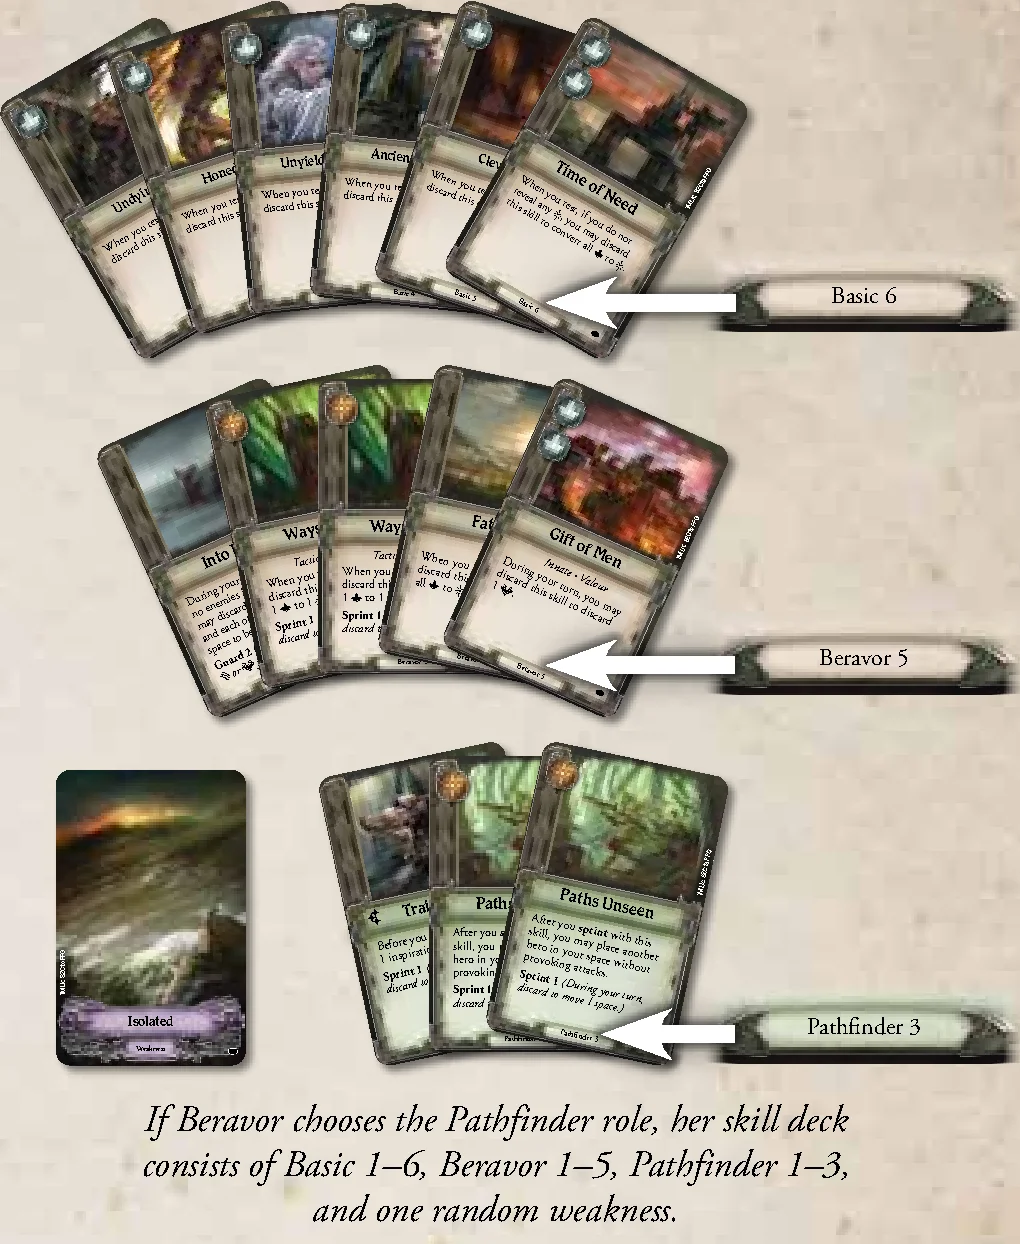
- Gather Skill Cards: Each hero gathers the following 15 skill cards:
- one copy of each skill card numbered 1–6 that has the word “Basic” on the bottom of the card
- the skill cards numbered 1–5 that have the name of their hero on the bottom of the card
- the skill cards numbered 1–3 that have their role on the bottom of the card (the text boxes on these cards are colored green to help players quickly identify them)
- one weakness card from the top of the weakness deck
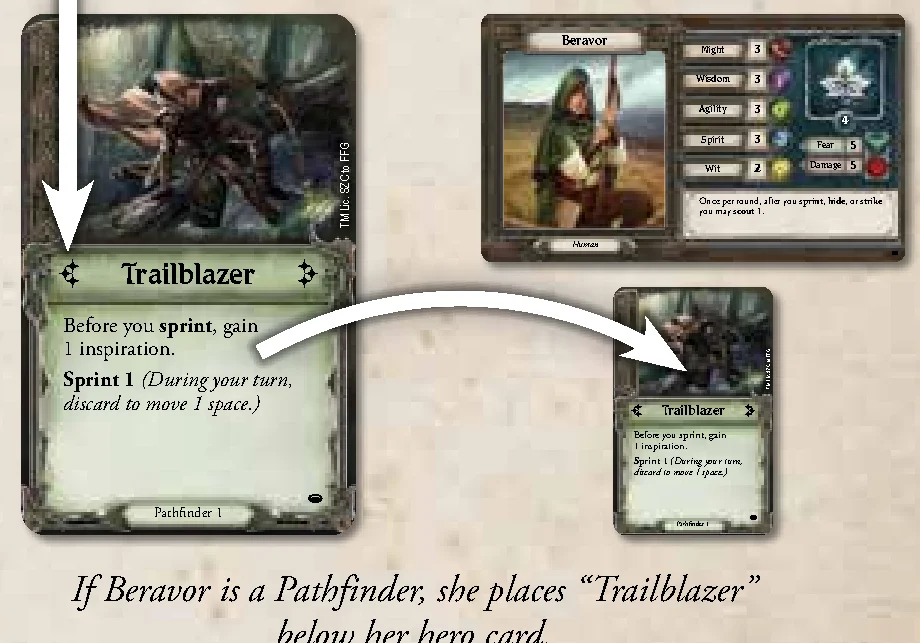
- Prepare Role Card and Create Skill Decks: Each hero finds the starting skill card for their role. Each starting skill card has the number “1” after the role name at the bottom of the card and has stars next to the card name. Each hero prepares their starting skill card by placing it faceup below their hero card. Then, each player shuffles their remaining 14 cards together to create their skill deck and places it facedown in their play area.
- Place Starting Tiles and Tokens: Select “Embark” in the app and follow the app’s instructions, placing map tiles and tokens in the play area as shown in the app to create the game map.
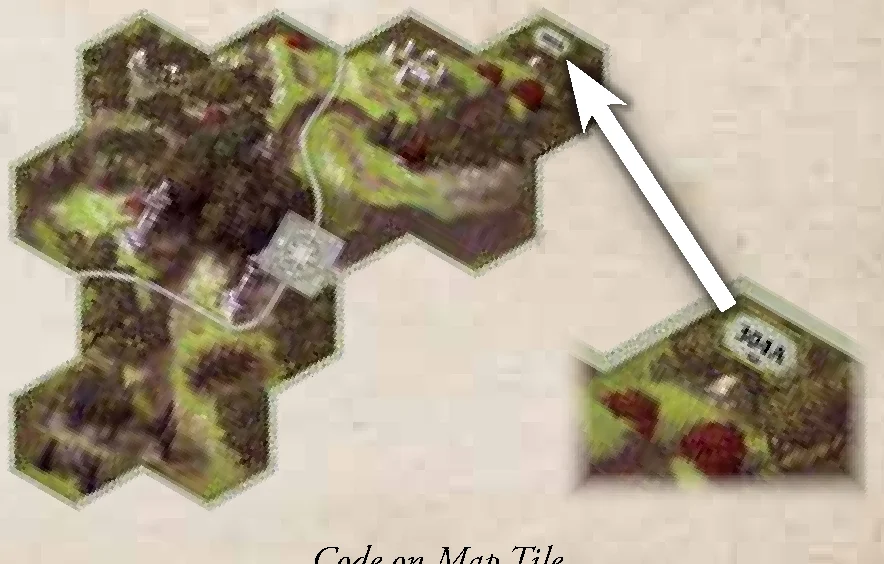
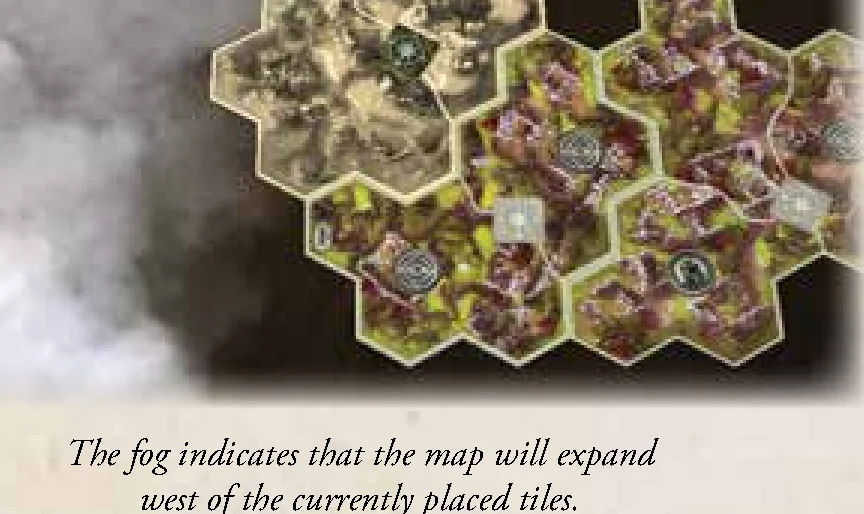
A unique alphanumeric code is printed on each map tile to make it easy both to find the tiles and to orient them when placing them. Be sure to leave extra room for additional map tiles to be placed during the game—the app displays fog next to the starting map tiles to indicate roughly where map tiles will be added later.
After following all instructions in the app, the players begin their adventure.
Round Structure
A game of Journeys in Middle-earth is played over a series of rounds. Each round has three phases that players resolve in the following order:
- Action Phase: During this phase, the heroes move around the map, interact with the world, and attack enemies.
- Shadow Phase: During this phase, the enemies move and attack heroes, and other dark threats grow stronger.
- Rally Phase: During this phase, the heroes prepare for the next round.
After resolving each phase, a new round begins with the action phase. Players continue to resolve game rounds in this manner until the adventure ends.
Action Phase
During the action phase, each hero takes a turn by performing actions to search, fight, and journey through the lands of Middle-earth. The heroes take turns in the order of their choice, and this order can change from round to round.
During a hero’s turn, they can perform two actions, which may be the same action twice. The actions are:
- Travel
- Attack
- Interact
After all heroes have taken a turn, they select the hourglass button in the lower-right corner of the app screen to proceed to the shadow phase.
Travel Action
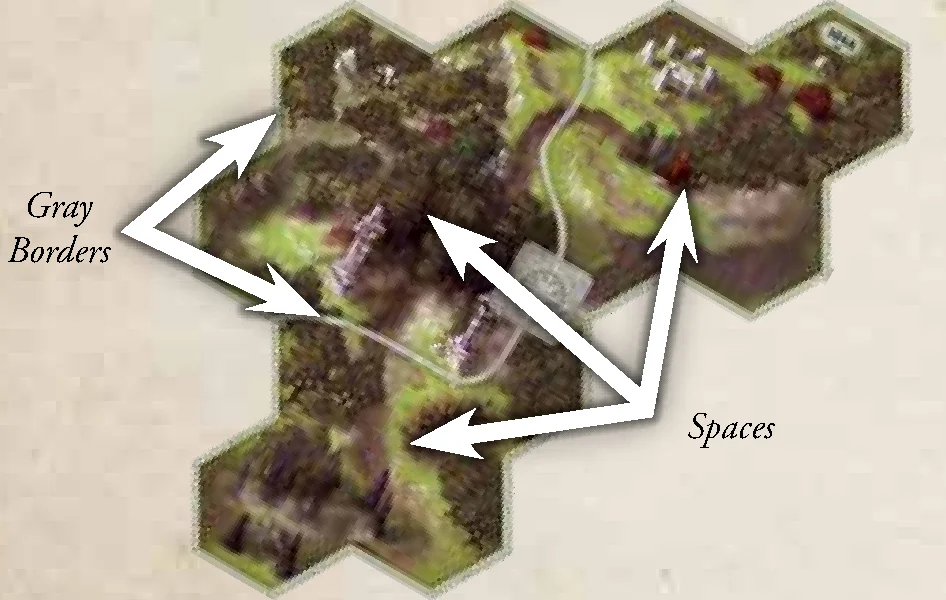
The travel action allows a hero to move around the game map. The game map is composed of map tiles, each of which is divided into one or more spaces. A space is an area of the board enclosed by gray borders. Spaces that share a gray border are adjacent to each other.
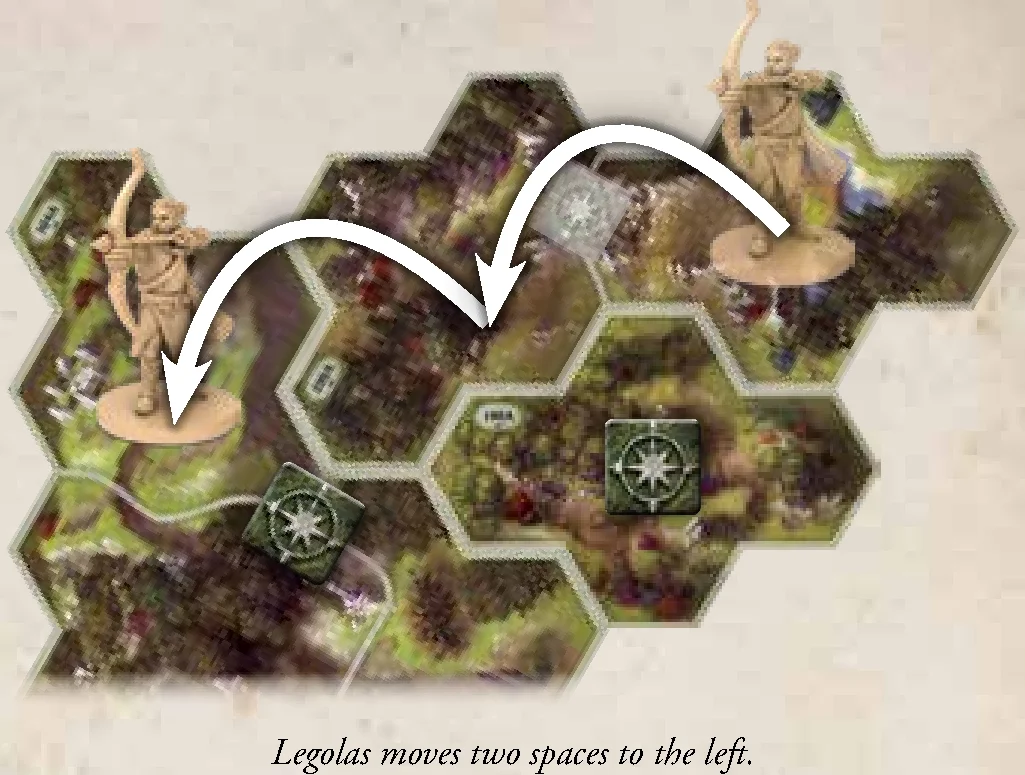
When a hero performs a travel action, they can move twice. Each time a hero moves, they move to an adjacent space.
A hero can interrupt their two moves to perform the second action of their turn. For example, a hero can move one space, perform their second action, and then move one additional space.
Exploration
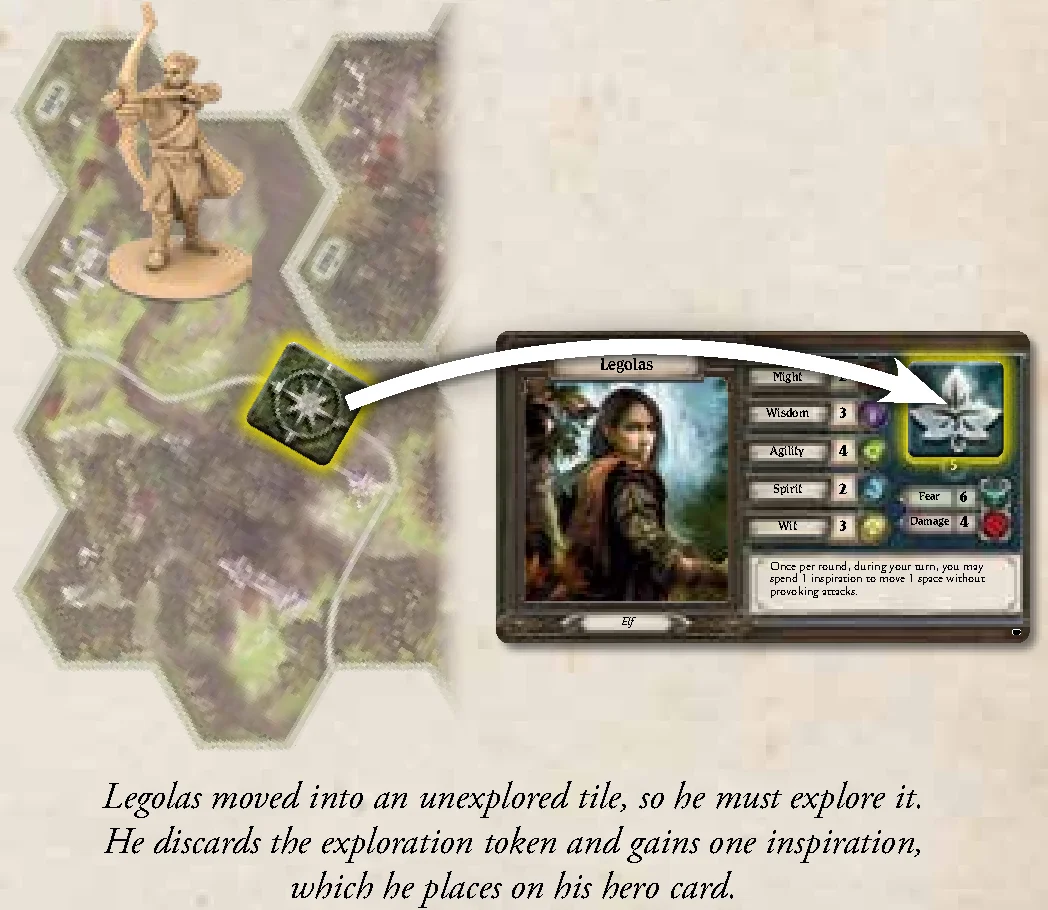
Each journey map tile has a square box where an exploration token may be placed, as indicated by the app. A map tile that has an exploration token on it is unexplored. When a hero moves into any space on an unexplored tile, they must immediately explore the tile.
To explore a tile, the hero selects the appropriate exploration token in the app and then selects the “Confirm” button. The app instructs the hero to discard the exploration token and gain one inspiration. To do this, the hero can simply flip the exploration token and place it on their hero card. Inspiration is described later.
Exploring a tile is not a separate action; it is simply the result of a hero moving onto a tile that has an exploration token.
Attack Action
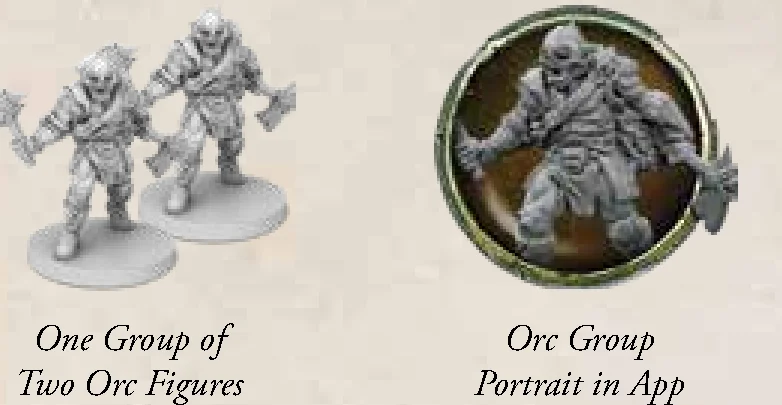
The attack action allows heroes to attack an enemy group, attempting to remove it from the map. An enemy group is one or more plastic figures of the same type that move and attack together. Each enemy group has a corresponding portrait in the app:
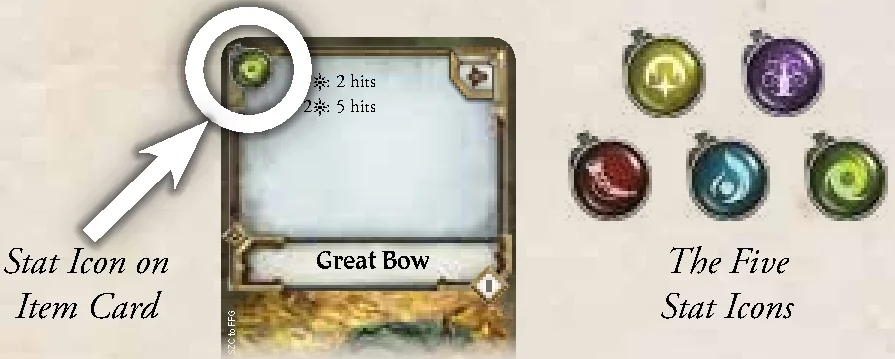
To perform an attack, the hero chooses an item to attack with. The item must have a stat icon in the upper-left corner of the card:
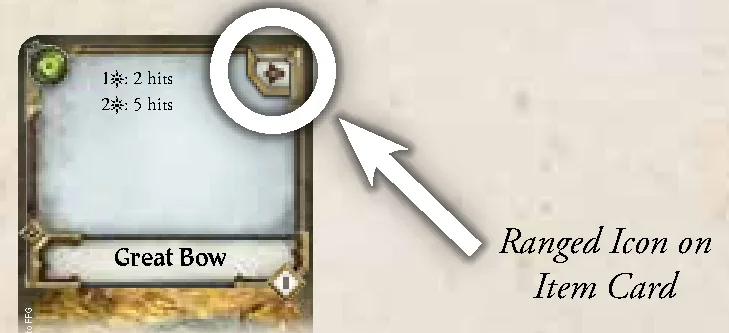
The hero also must choose one enemy group that is in range. If an enemy group is in the same space as the hero, that enemy group is in range. Enemy groups in spaces adjacent to the hero are also in range if the hero is attacking with an item card that has the ranged ( ) icon in the upper-right corner.
After the hero chooses an item and enemy group, they resolve an attack test against that enemy group. Tests are described later in “Tests”.
Dual–Wielding
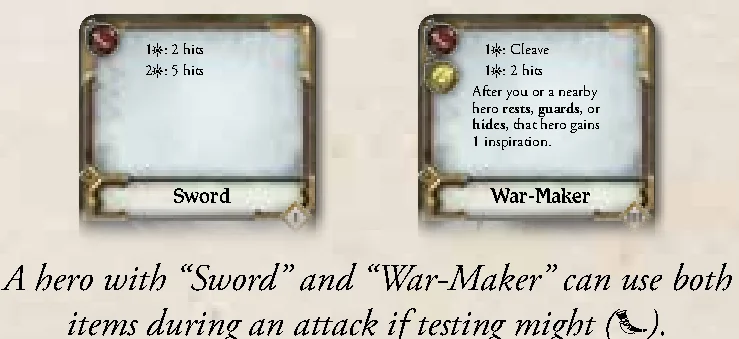
A hero can attack with more than one item if those items all share the stat that is being tested. When attacking with more than one item, the hero can spend successes ( ) to resolve abilities on any of the chosen items. If the hero is attacking an adjacent enemy group, all of the chosen items must have the ranged () icon.
Interact Action
The interact action allows heroes to encounter points of interest on the map, which are indicated by search, person, and threat tokens. Interacting with these tokens is how heroes progress the adventure, discover items, gain experience, and neutralize threats.
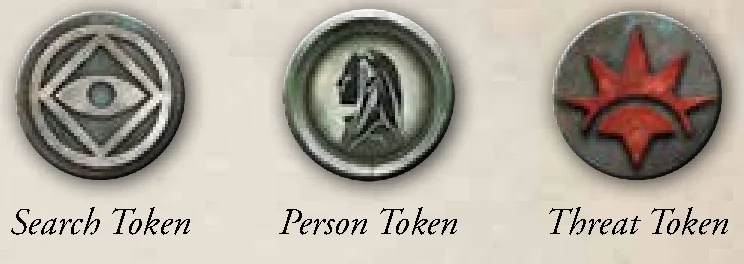
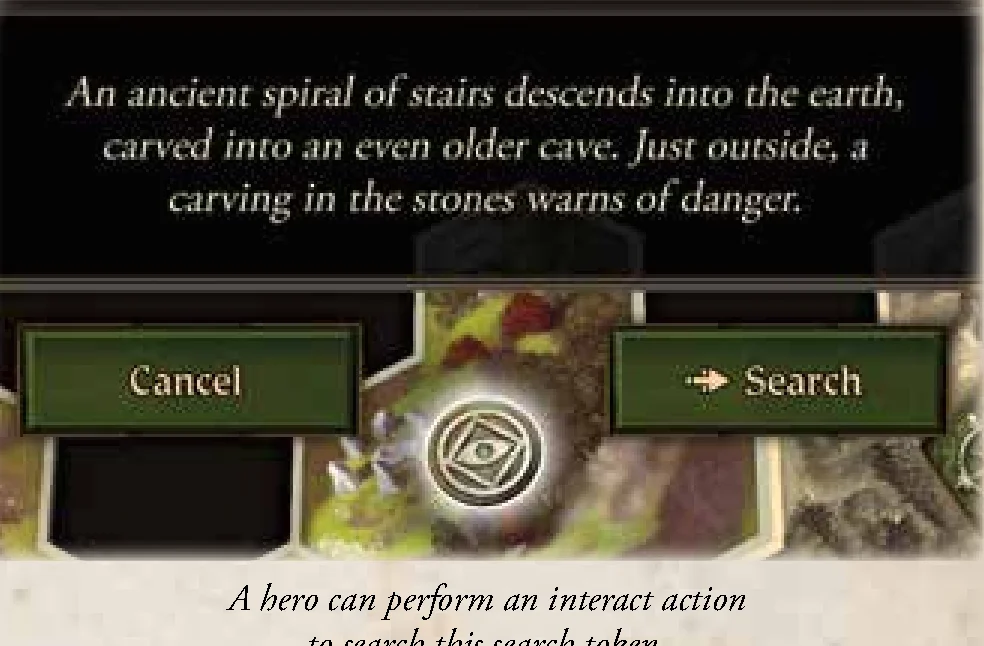
If a hero is in the same space as one of these tokens, that hero can perform an interact action by selecting the token in the app and then selecting the button with the action ( ) icon. When performing an interact action, the app provides the hero with instructions to follow. Then, the hero continues their turn.
Inspecting Tokens in the App
Players can inspect tokens in the app at any time by selecting them and reading their text, which usually describes what the token represents. Inspecting is not an action, and the player can select the “Cancel” button to close the token’s description. However, if a player selects the button preceded by the icon, they are performing an interact action and must meet the requirements for doing so. Similarly, while inspecting an exploration token, they should not select the “Confirm” button unless their hero is exploring that token.
Adding Map Tiles
The app instructs players to place new map tiles when certain conditions are met—these conditions include exploring and interacting with tokens, defeating enemies, etc. When the app instructs the players to place a tile, it highlights the alphanumeric code on that tile. The players should use this highlight to help orient the tile with the rest of the map.
Shadow Phase
The shadow phase is evil’s opportunity to strike back and hinder the heroes’ progress. To resolve the shadow phase, the app guides the heroes through the following steps: enemy activation, darkness, and threat. After the shadow phase, the heroes proceed to the rally phase.
Enemy Activation Step
During the enemy activation step, each enemy group attempts to move and attack. The app provides an enemy group with a target to move toward and attack:
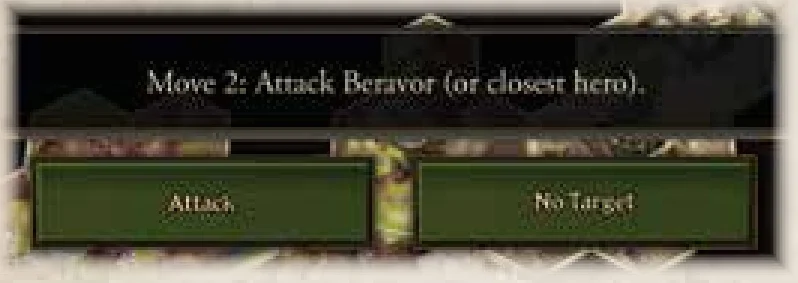
First, the enemy group moves up to the indicated number of spaces toward the targeted hero, taking the shortest path of spaces possible. The enemy group stops when it is in range of that hero. The enemy is in range if it is in the hero’s space or if it is in an adjacent space and has the ranged () icon on its enemy portrait.
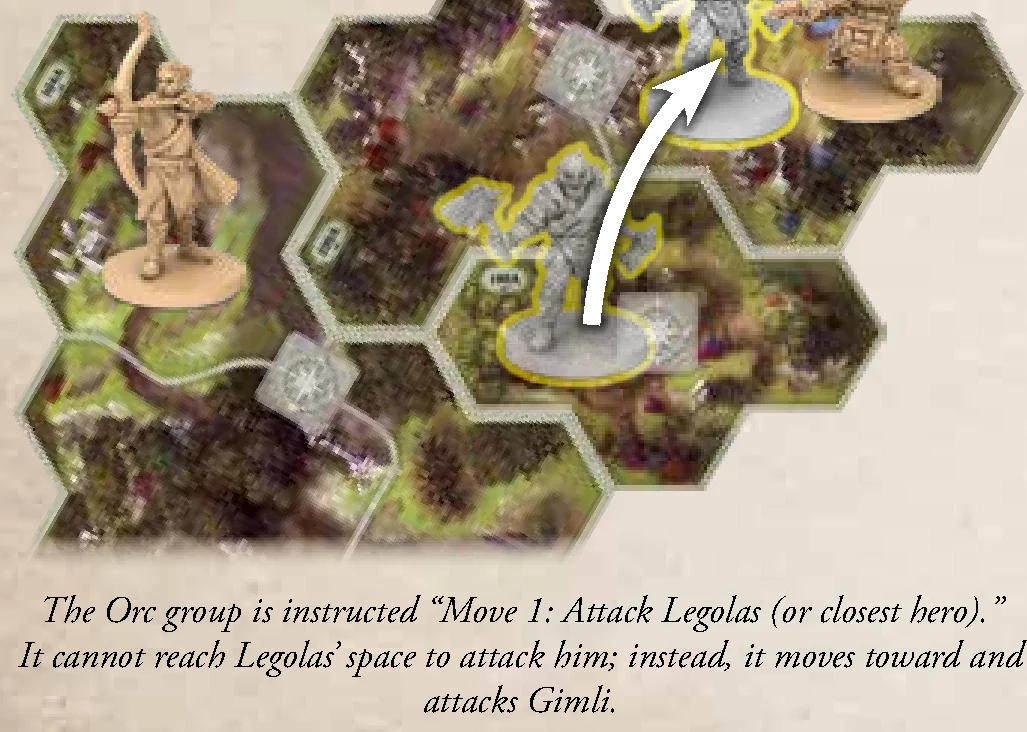
If the enemy group cannot get in range of its target but it can get in range of another hero, that closer hero becomes the new target. If multiple heroes satisfy this condition, the heroes choose which one becomes the new target.
If the enemy can get in range of a target, the “Attack” button is selected and the app displays the amount of damage ( ) and fear (
 ) that the hero might suffer. Suffering damage and fear is described later.
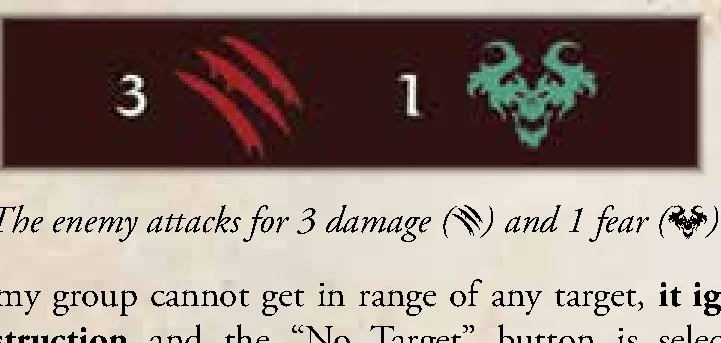
If the enemy group cannot get in range of any target, it ignores the entire instruction and the “No Target” button is selected. This provides the enemy with a new instruction, which usually moves the enemy closer to a hero.
Darkness Step
During the darkness step, darkness strikes fear into the hearts and minds of the heroes. Because darkness is not always present during an adventure, the heroes only resolve this step when the app instructs them to do so.
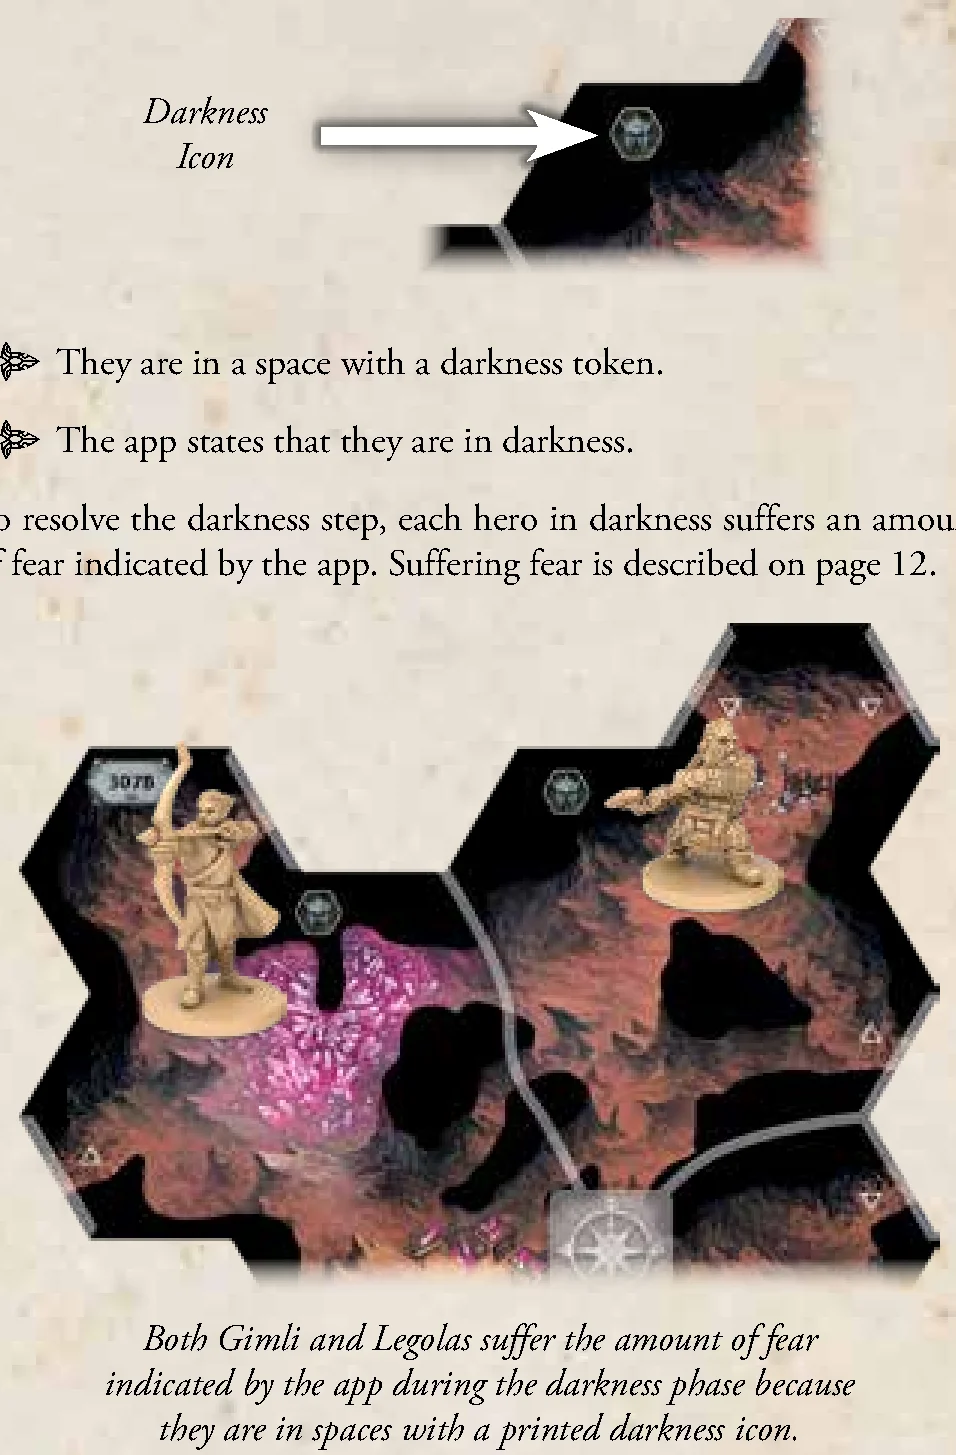
A hero is in darkness if any of the following three conditions apply:
- They are in a space with a printed darkness icon.
- They are in a space with a darkness token.
- The app states that they are in darkness.
To resolve the darkness step, each hero in darkness suffers an amount of fear indicated by the app. Suffering fear is described later.
Threat Step
As time passes for the heroes, the threats of Middle-earth draw closer and become more dangerous. During the threat step, threat increases and threat events may occur.
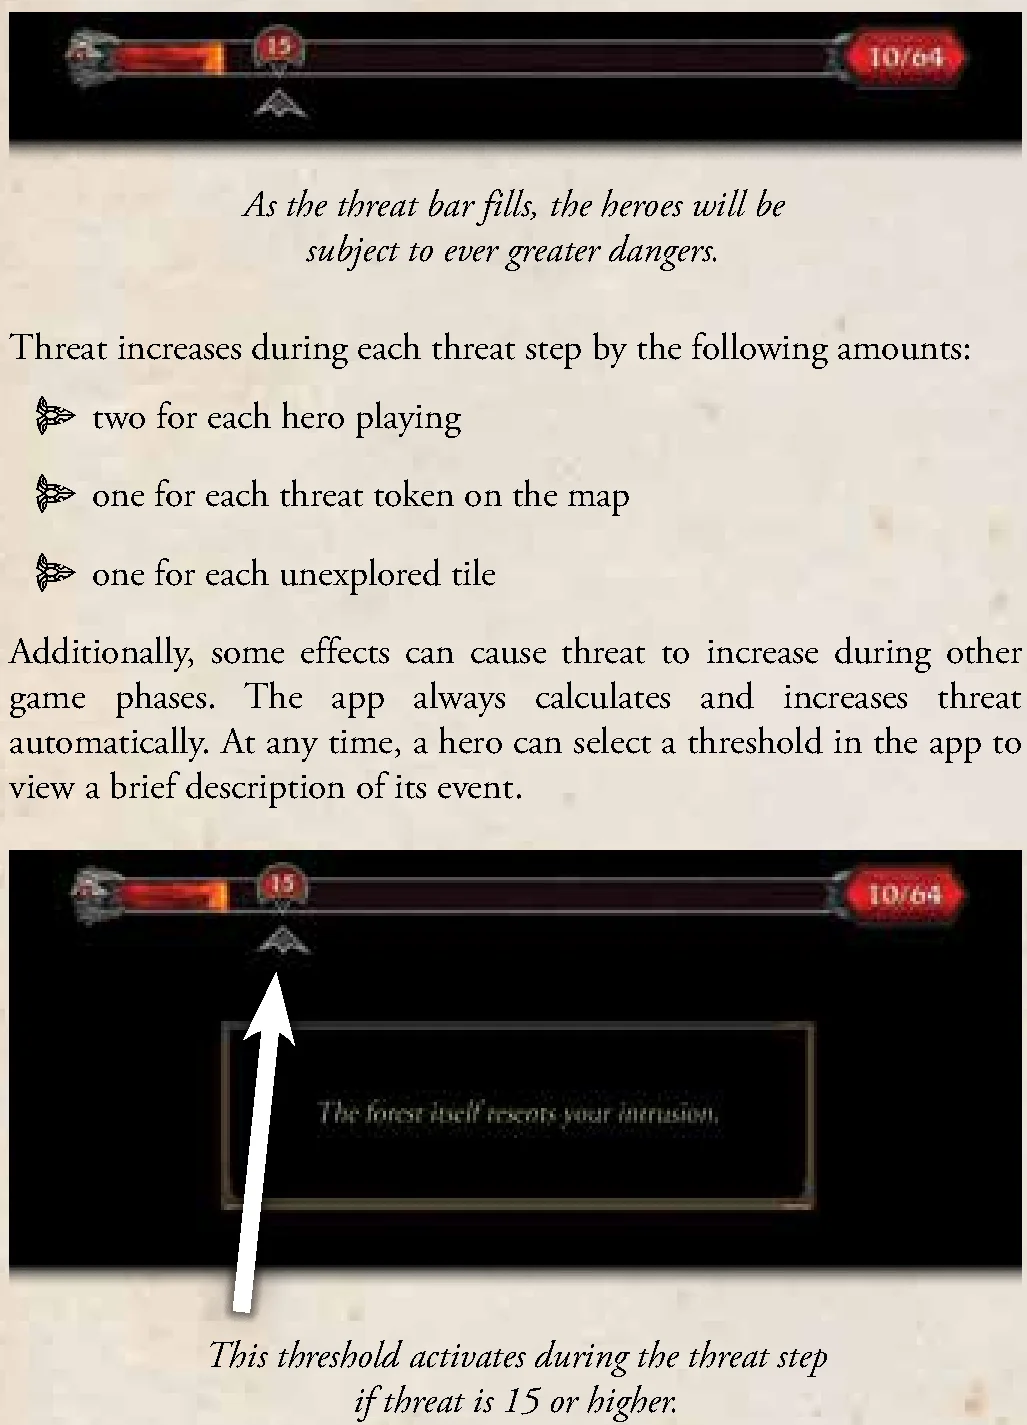
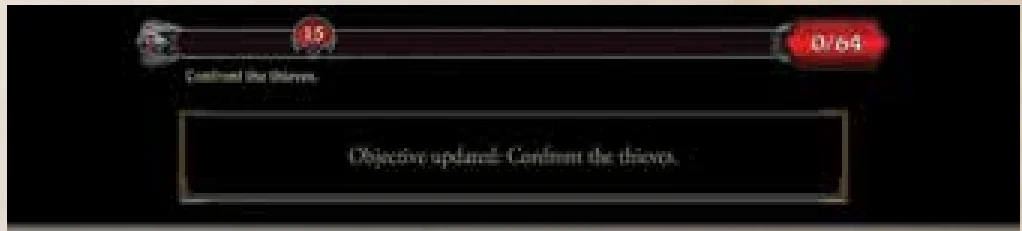
Threat is represented by a threat bar at the top of the app screen, which fills as threat increases. When threat increases to a threshold, a threat event is activated in the app and heroes resolve it by following its instructions. Each threshold has a number that indicates the amount of threat required for it to activate. If the threat bar ever fills completely, the game ends and the heroes fail the adventure.
Threat increases during each threat step by the following amounts:
- two for each hero playing
- one for each threat token on the map
- one for each unexplored tile
Additionally, some effects can cause threat to increase during other game phases. The app always calculates and increases threat automatically. At any time, a hero can select a threshold in the app to view a brief description of its event.
Rally Phase
After the shadow phase, the app instructs the heroes to plan for the next round.
- First, each hero resets their skill deck by shuffling their discard pile into their deck.
- Then, the app instructs the heroes to “Scout 2.” A hero does this by revealing the top two cards of their skill deck.
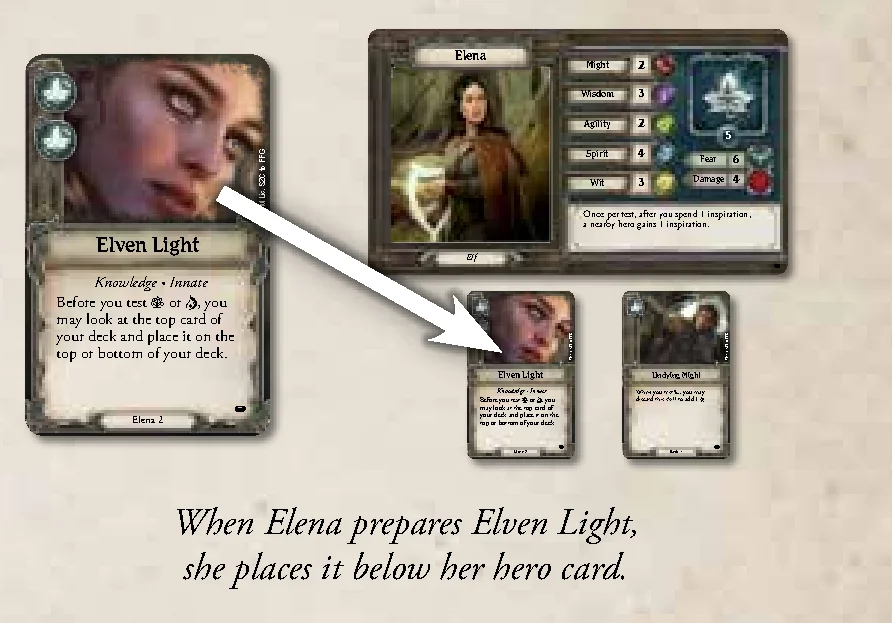
- Then, the hero may prepare one of them by placing it below their hero card. If a card is prepared, the abilities on that card are available to be used.
A hero can only have four skill cards prepared at a time, so it is important that their prepared cards are separated from any other cards they have in their play area. If a hero ever has more than four prepared cards, they must discard cards until only four prepared cards remain.
After choosing whether or not to prepare a card, each hero places their cards that were not prepared on the top or bottom of their deck in any order. By placing useless cards, like weaknesses, on the bottom of their deck and useful cards, such as cards that have the (success) icon in the upper-left corner, on the top of their deck, a hero can help ensure that their upcoming actions have positive outcomes.
After scouting, the heroes select the “Continue” button and proceed to a new round, starting with the action phase.
Tests
Tests are the primary way that heroes interact with the world and attack enemies. Heroes regularly perform tests when they are exploring, encountering threats, attacking enemies, and interacting with the people of Middle-earth.
Each test requires a hero to use one of their stats, which are listed on their hero card:
- agility (
 )
) - might (
 )
) - spirit (
 )
) - wisdom (
 )
) - wit (
 )
)
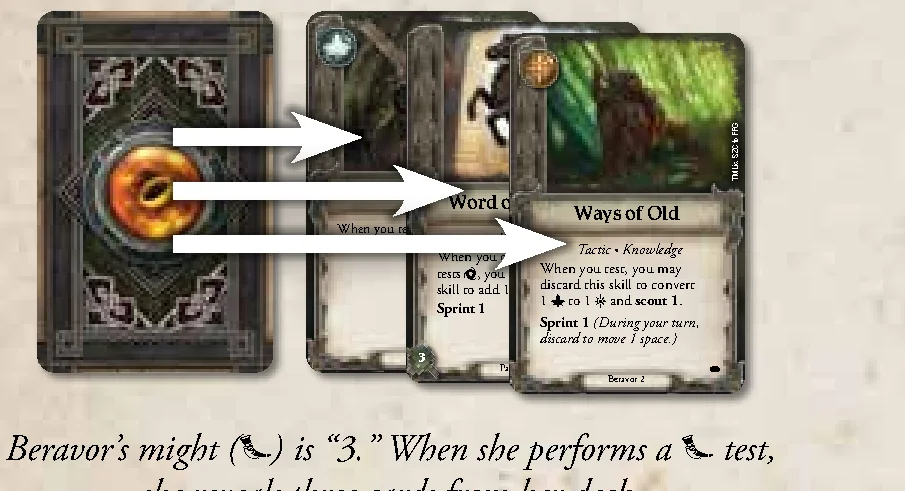
To perform a test, a hero reveals cards from the top of their skill deck. The number of cards they reveal is equal to the value of the stat being tested.
After revealing cards, the hero determines the number of successes () they have. Each success () icon on the upper-left corner of revealed cards provides one success. The text on the revealed cards is ignored—it has no effect during tests.
The hero uses successes differently depending on the test:
- Some tests require the hero to input the number of successes into the app by selecting the “+” button. Then, the app provides the outcome of the test. The successes for some of these tests are cumulative; the heroes can perform the test multiple times, and the app tracks the total number of successes.
- Some tests provide a number that indicates how many successes are required to pass (e.g., “Test ; 1”). If the hero has successes equal to or greater than the required number, they pass the test. Otherwise, they fail the test. In either situation, the app provides the hero with further instructions.
- Successes are used in different ways when attacking enemies and when negating damage and fear, both of which are described later.
After completing the test, the hero places all the cards they revealed during the test into their skill deck discard pile.
Fate and Inspiration
During a test, a hero’s revealed cards may contain fate ( ) icons. Fate icons have no inherent effect; however, the hero can spend inspiration tokens to convert fate icons to success () icons. Each inspiration spent converts a single fate icon. To spend an inspiration, the hero takes an inspiration from their hero card and returns it to the supply.
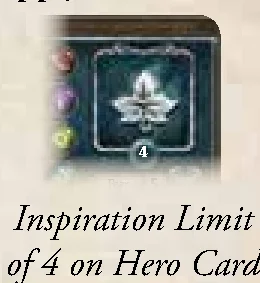
When a hero gains inspiration, they take an inspiration token from the supply and place it on their hero card. The hero cannot have more inspiration tokens than the inspiration limit indicated on their hero card.
Test Example Walkthrough
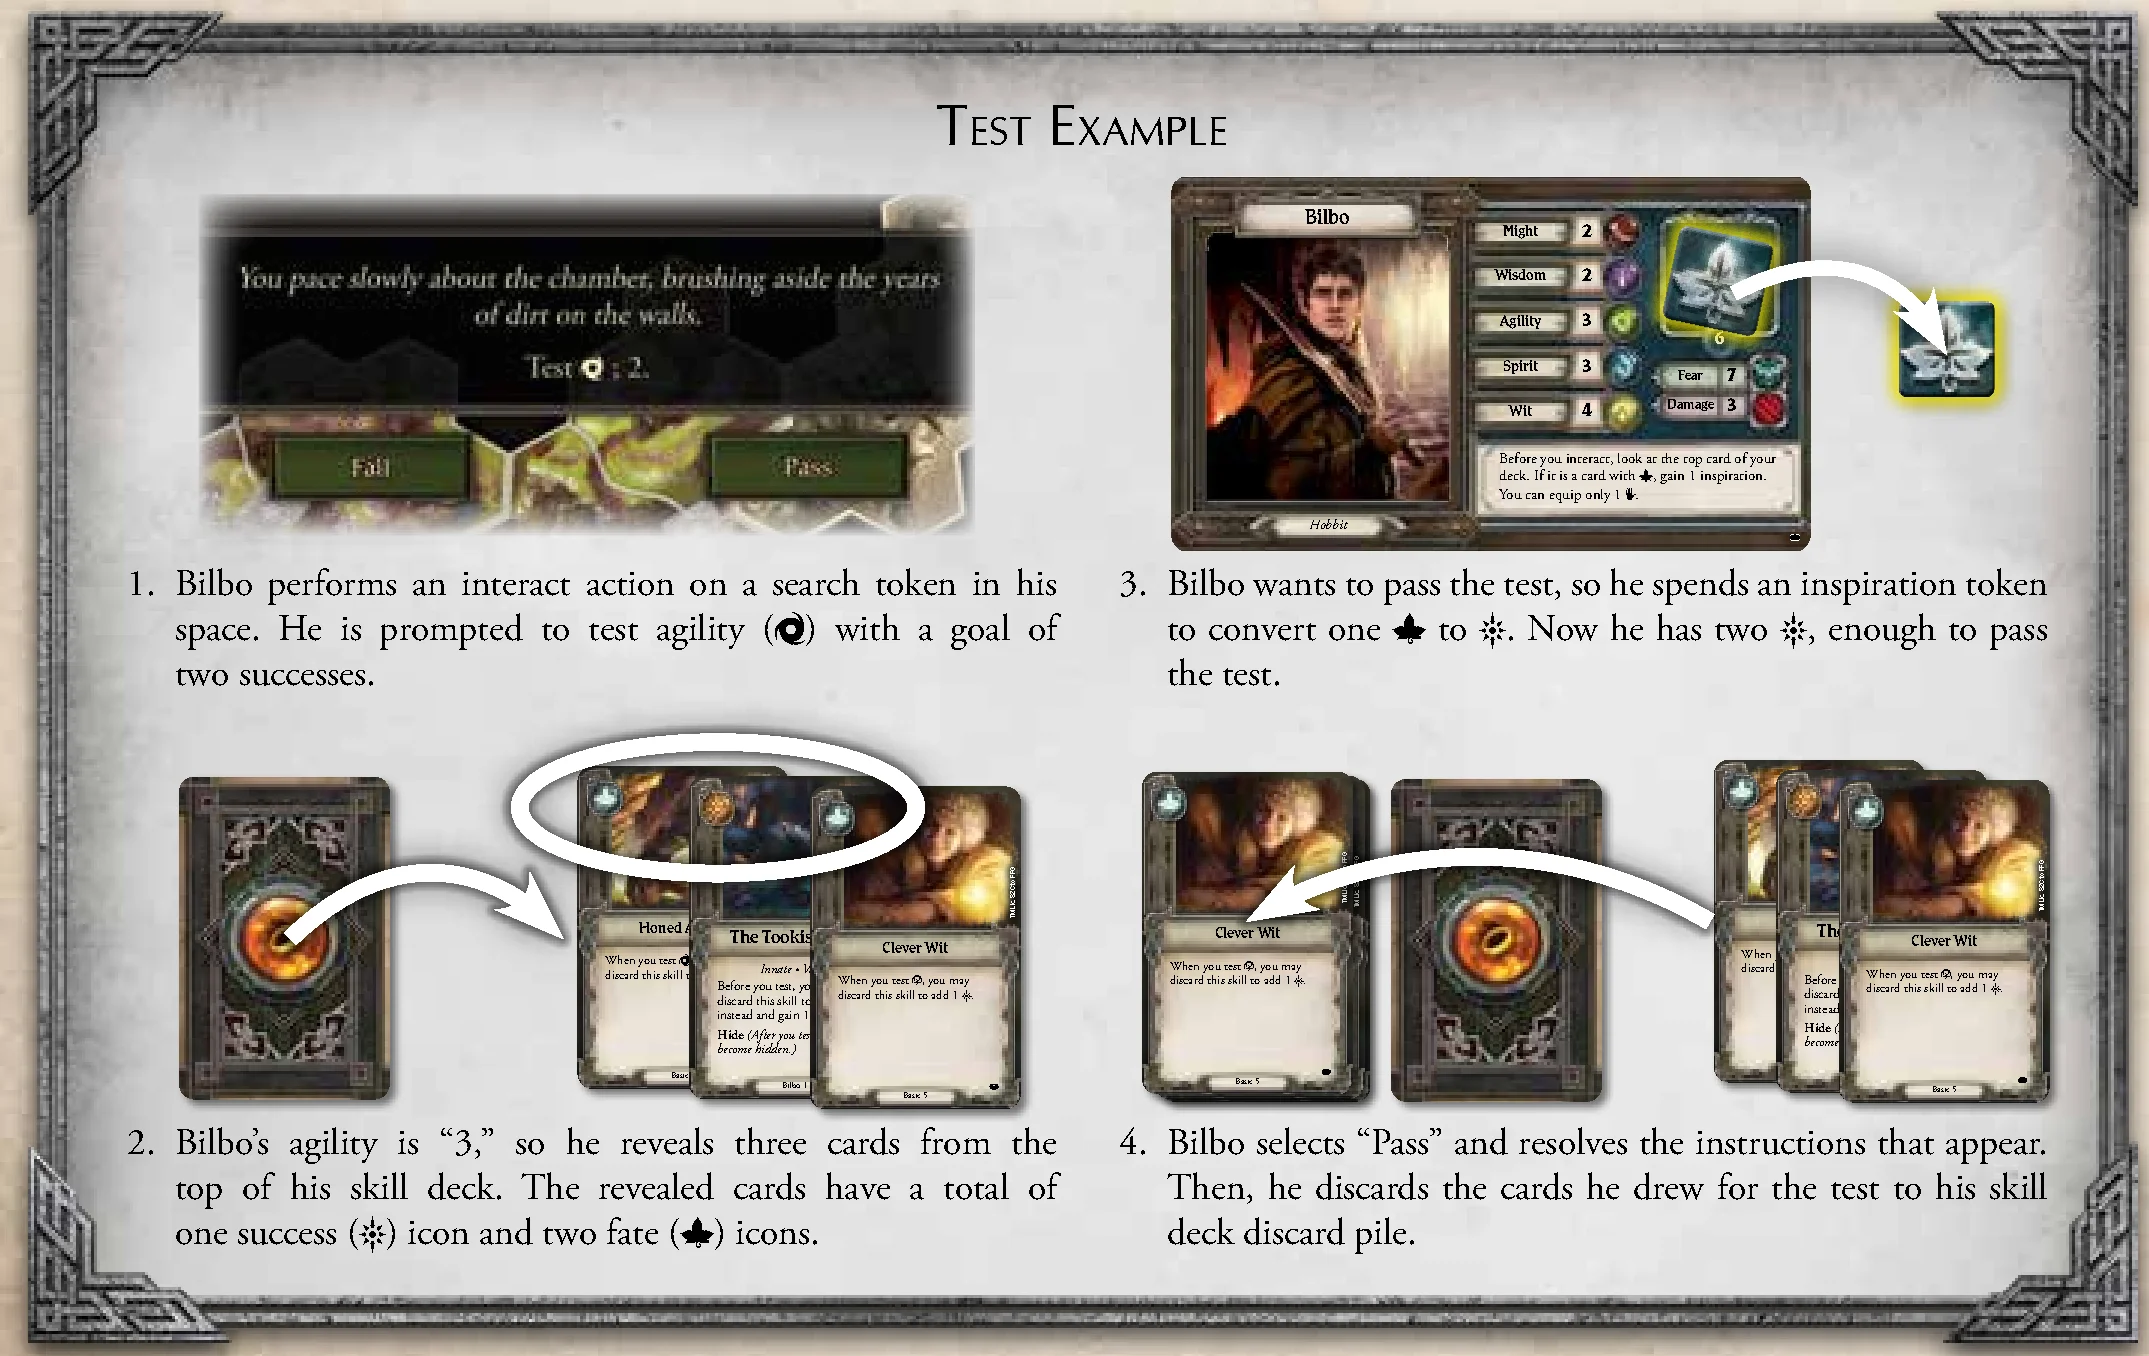
- Bilbo performs an interact action on a search token in his space. He is prompted to test agility () with a goal of two successes.
- Bilbo’s agility is “3,” so he reveals three cards from the top of his skill deck. The revealed cards have a total of one success () icon and two fate () icons.
- Bilbo wants to pass the test, so he spends an inspiration token to convert one to . Now he has two , enough to pass the test.
- Bilbo selects “Pass” and resolves the instructions that appear. Then, he discards the cards he drew for the test to his skill deck discard pile.
Attack Tests
Attack tests are performed during a hero’s attack after the hero chooses an enemy group to attack and an item to attack with. To perform an attack test, the hero chooses one of the stats listed in the upper-left corner of the item card they are attacking with and tests that stat. Then, the hero spends successes () to resolve one or more of that item’s abilities. Each ability indicates how many successes must be spent to resolve it, and each ability can be resolved only once per attack.
Most item abilities add hits to enemies. To add hits, the hero selects the enemy’s portrait to display the enemy menu and then the attack tab to display the attack pane of the menu. Then, the hero selects the “+” button in the attack pane to input each hit.
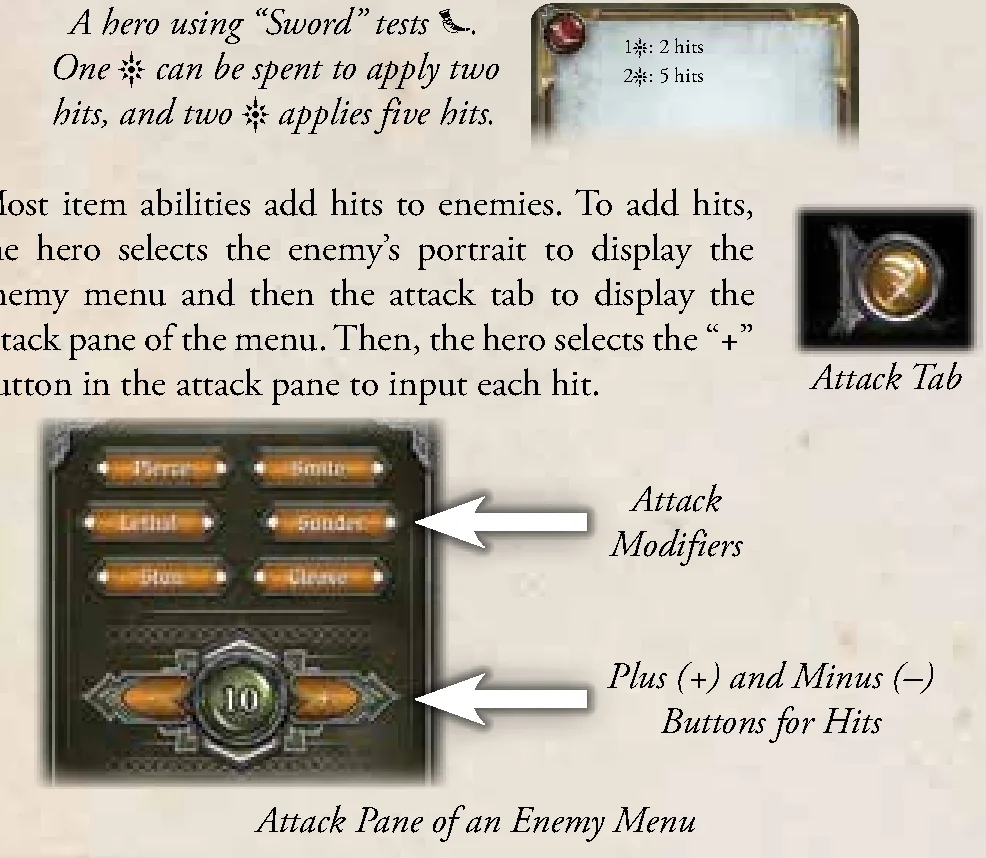
In addition to applying hits, abilities may provide heroes with attack modifiers, such as “pierce,” which allows a hero to bypass an enemy’s armor. If an ability has a modifier, the hero selects the matching modifier in the app. The app calculates the effect of each modifier automatically; each modifier is described in the Quick Reference.
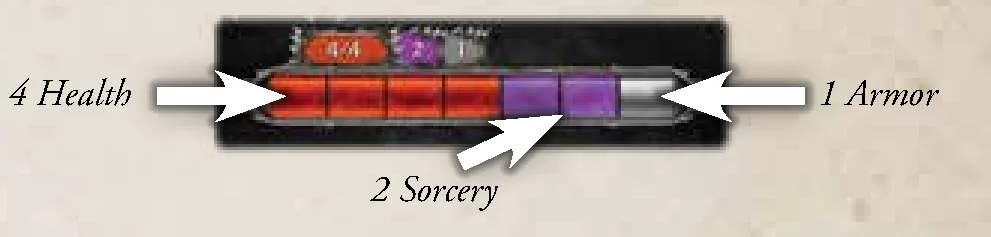
The enemy menu displays a health value for each figure in the enemy group as well as each figure’s armor or sorcery value. If an enemy has armor or sorcery, hits reduce those values first. If an enemy does not have armor or sorcery, hits reduce the enemy’s health.
After inputting all hits and modifiers, the hero selects the “Apply” button to apply the hits to the enemies (even if the hero had no hits). If an enemy’s health is reduced to zero, that enemy is defeated and the app instructs the heroes to remove the enemy’s figure from the board.
If an enemy is not defeated, it regains all of its armor and sorcery, and it may be prompted to counterattack. The enemy group can attack if it is in the hero’s space or in an adjacent space and has the ranged () icon on its portrait. If the enemy can attack, the hero selects the “Yes” button and resolves an attack as described in “Enemy Activation Step”.
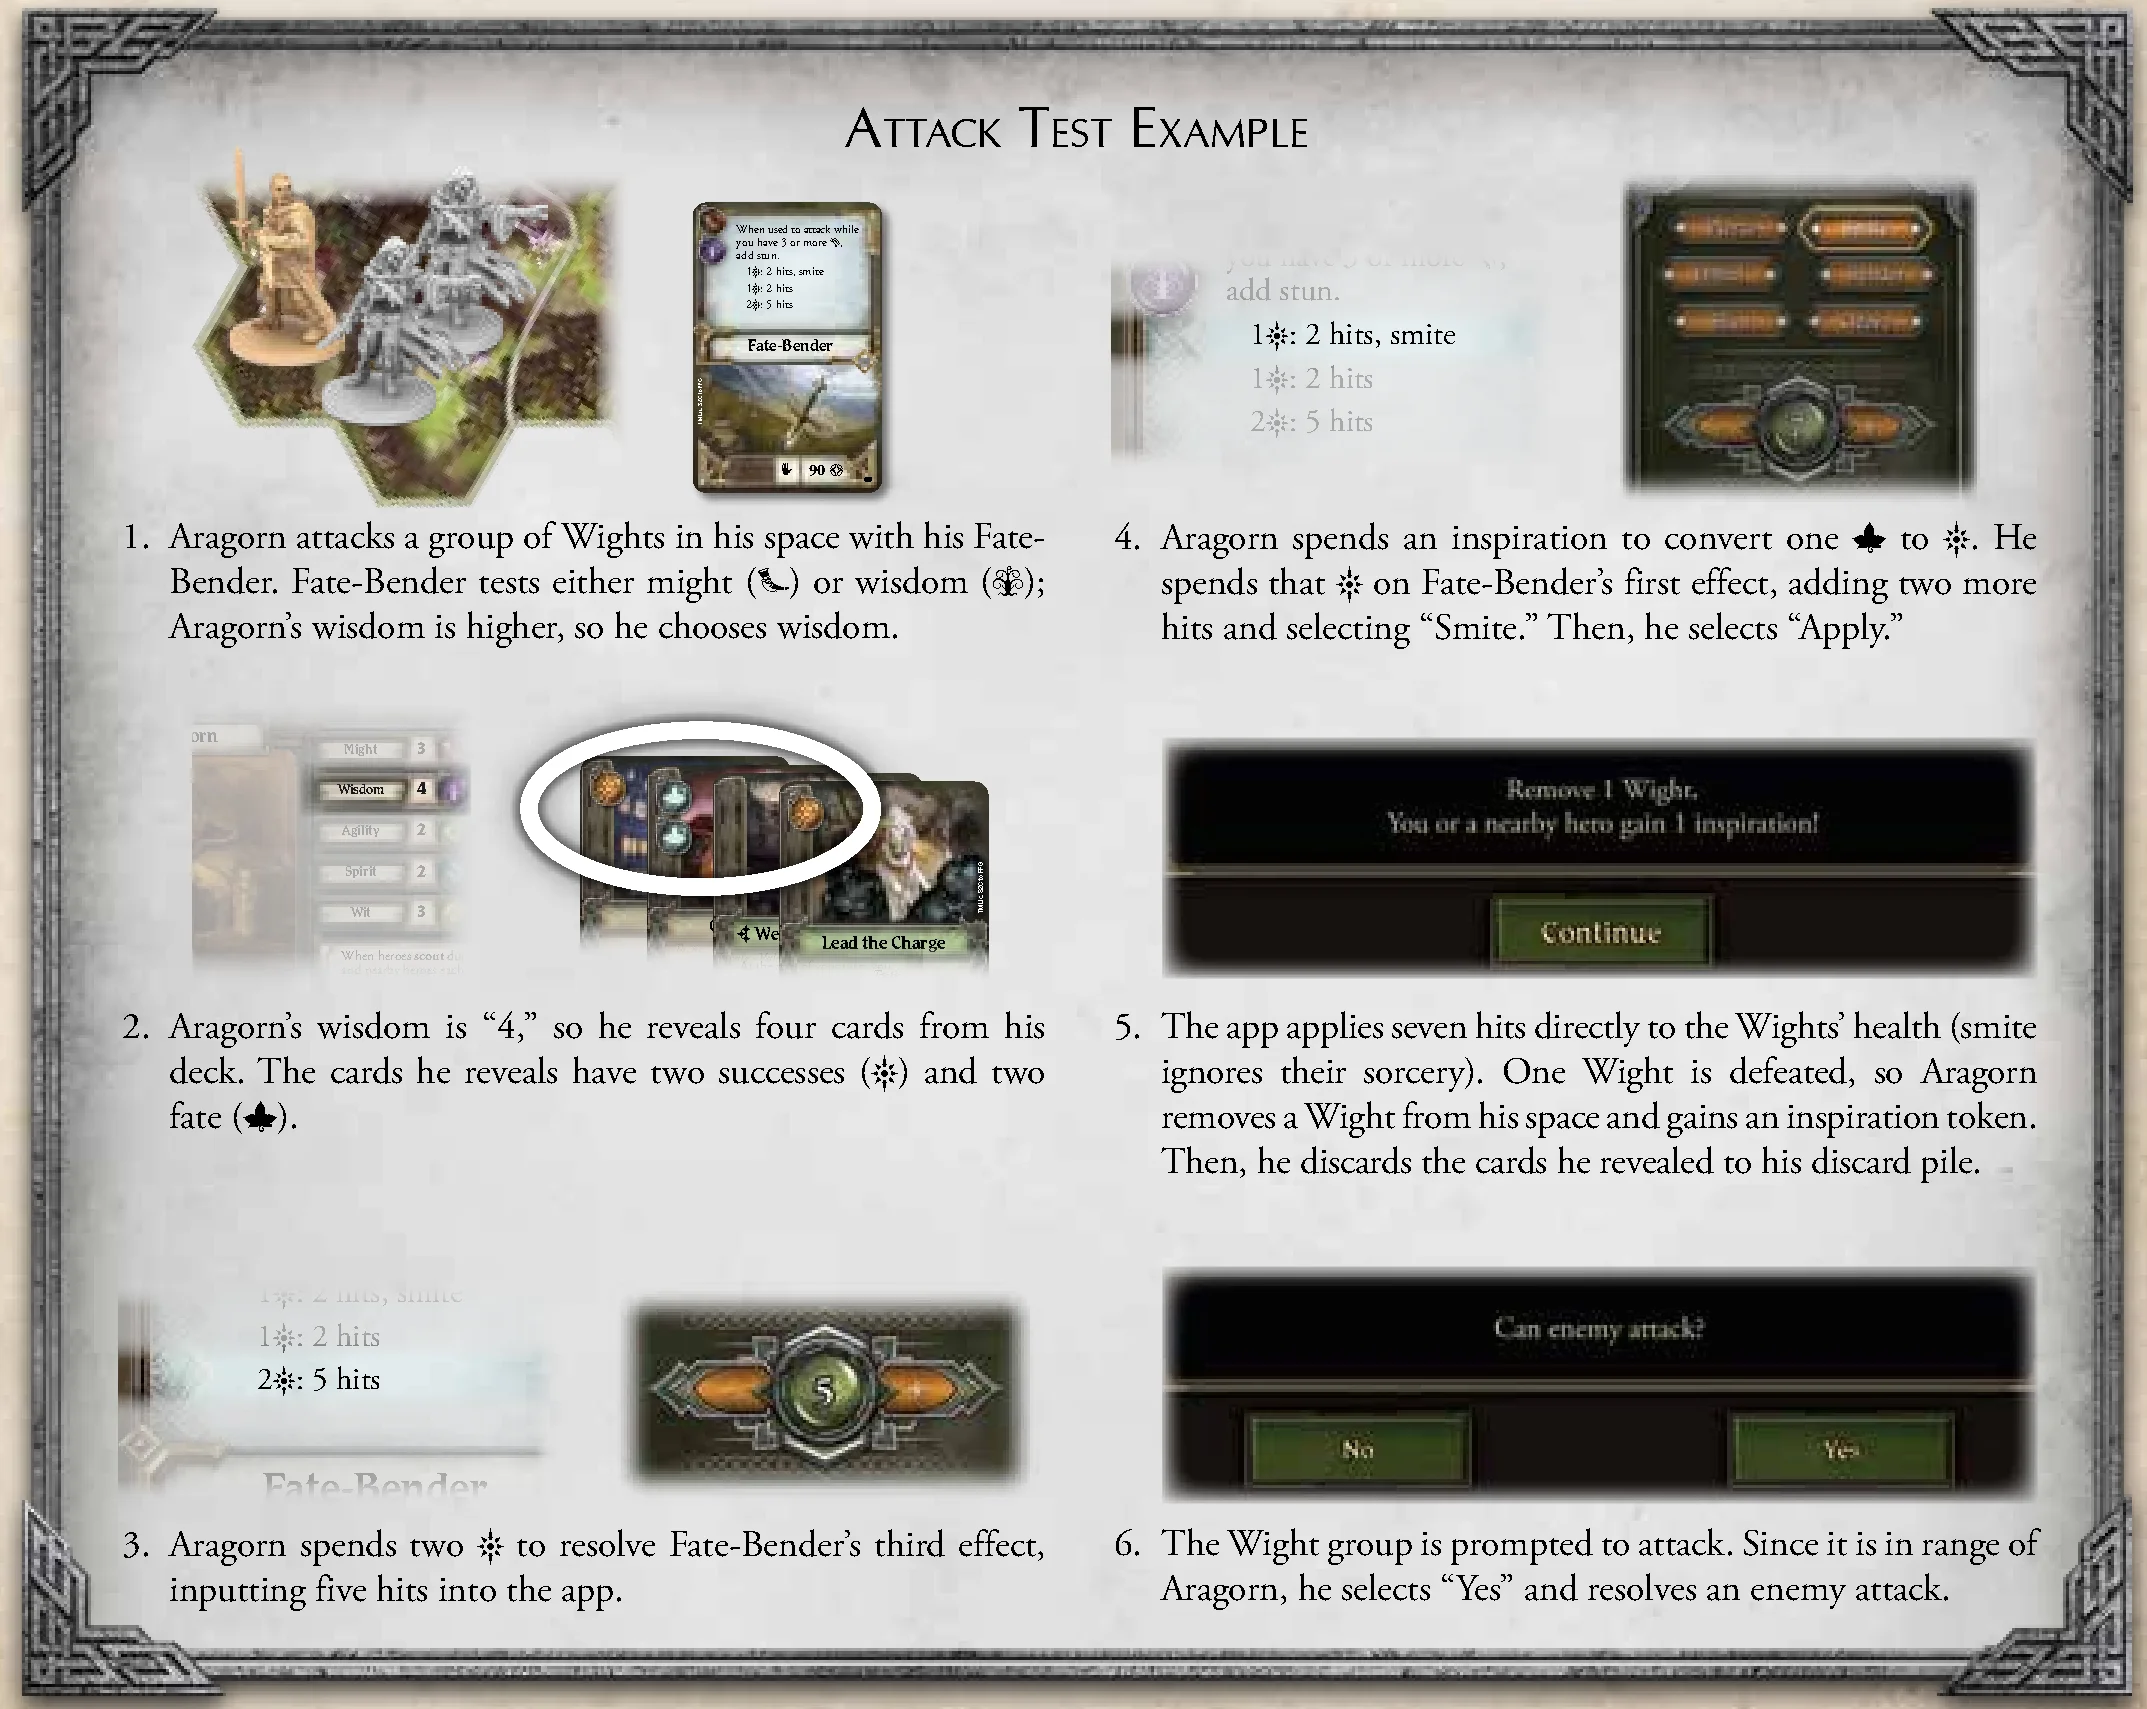
Attack Test Example Walkthrough
- Aragorn attacks a group of Wights in his space with his Fate-Bender. Fate-Bender tests either might () or wisdom (); Aragorn’s wisdom is higher, so he chooses wisdom.
- Aragorn’s wisdom is “4,” so he reveals four cards from his deck. The cards he reveals have two successes () and two fate ().
- Aragorn spends two to resolve Fate-Bender’s third effect, inputting five hits into the app.
- Aragorn spends an inspiration to convert one to . He spends that on Fate-Bender’s first effect, adding two more hits and selecting “Smite.” Then, he selects “Apply.”
- The app applies seven hits directly to the Wights’ health (smite ignores their sorcery). One Wight is defeated, so Aragorn removes a Wight from his space and gains an inspiration token. Then, he discards the cards he revealed to his discard pile.
- The Wight group is prompted to attack. Since it is in range of Aragorn, he selects “Yes” and resolves an enemy attack.
Damage and Fear
Middle-earth is rife with dangerous enemies and other threats that imperil the intrepid heroes. As a result of these threats, the heroes may suffer damage () and fear (). If a hero suffers too much damage or fear, they are on the verge of being defeated and must perform a last-stand test to determine if they succumb to the threats of Middle-earth or rally and continue their adventure.
When a hero suffers a damage or fear, they reveal a damage or fear card from the appropriate deck and place it faceup in their play area. Then, they resolve the card’s effect. Many of these cards instruct the hero to flip the card facedown or discard it. If a hero is instructed to keep the card faceup, it has a persistent effect that continues to apply to that hero. If a hero suffers multiple damage or fear at the same time, they reveal each card one at a time, resolving the card completely before revealing another card.
Occasionally, a hero is specifically instructed to suffer facedown damage or fear. When this occurs, the hero places that damage or fear facedown next to their hero card without reading the card’s text.
Negating Damage and Fear
A hero may be granted a chance to negate damage or fear before they suffer it. When this occurs, the hero is presented with a stat to test (e.g., “Each hero in darkness suffers 2 fear; negates.”). Before suffering the damage or fear, the hero may test the indicated stat, and each success () icon produced during that test prevents one damage or fear.
Last Stands
Through their trials and ordeals, the heroes may be brought to the limits of what their bodies and spirits can endure. Each hero has damage and fear limits on their hero card:
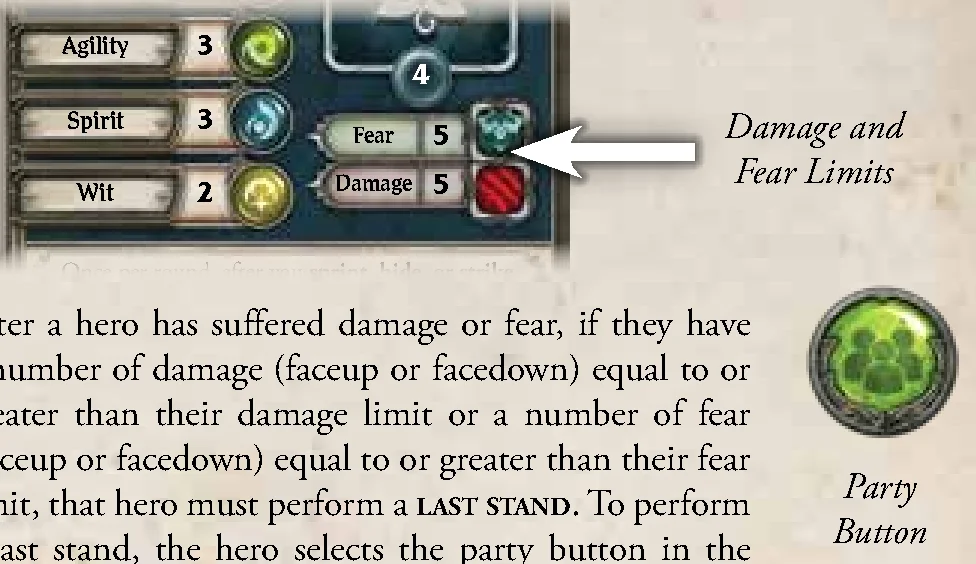
After a hero has suffered damage or fear, if they have a number of damage (faceup or facedown) equal to or greater than their damage limit or a number of fear (faceup or facedown) equal to or greater than their fear limit, that hero must perform a last stand. To perform a last stand, the hero selects the party button in the lower-left corner of the app. Then, they select the hero’s portrait and the limit (damage or fear) that was reached. Then, they follow the app’s instructions.
If a hero reaches both of their limits, they perform two last stands in the order of their choice.
A last stand includes a test—if the hero fails the test, they are defeated. The hero is removed from the board and the party loses the adventure in the next shadow phase unless they complete the final objective. If the hero passes the test, they follow the instructions provided by the app.
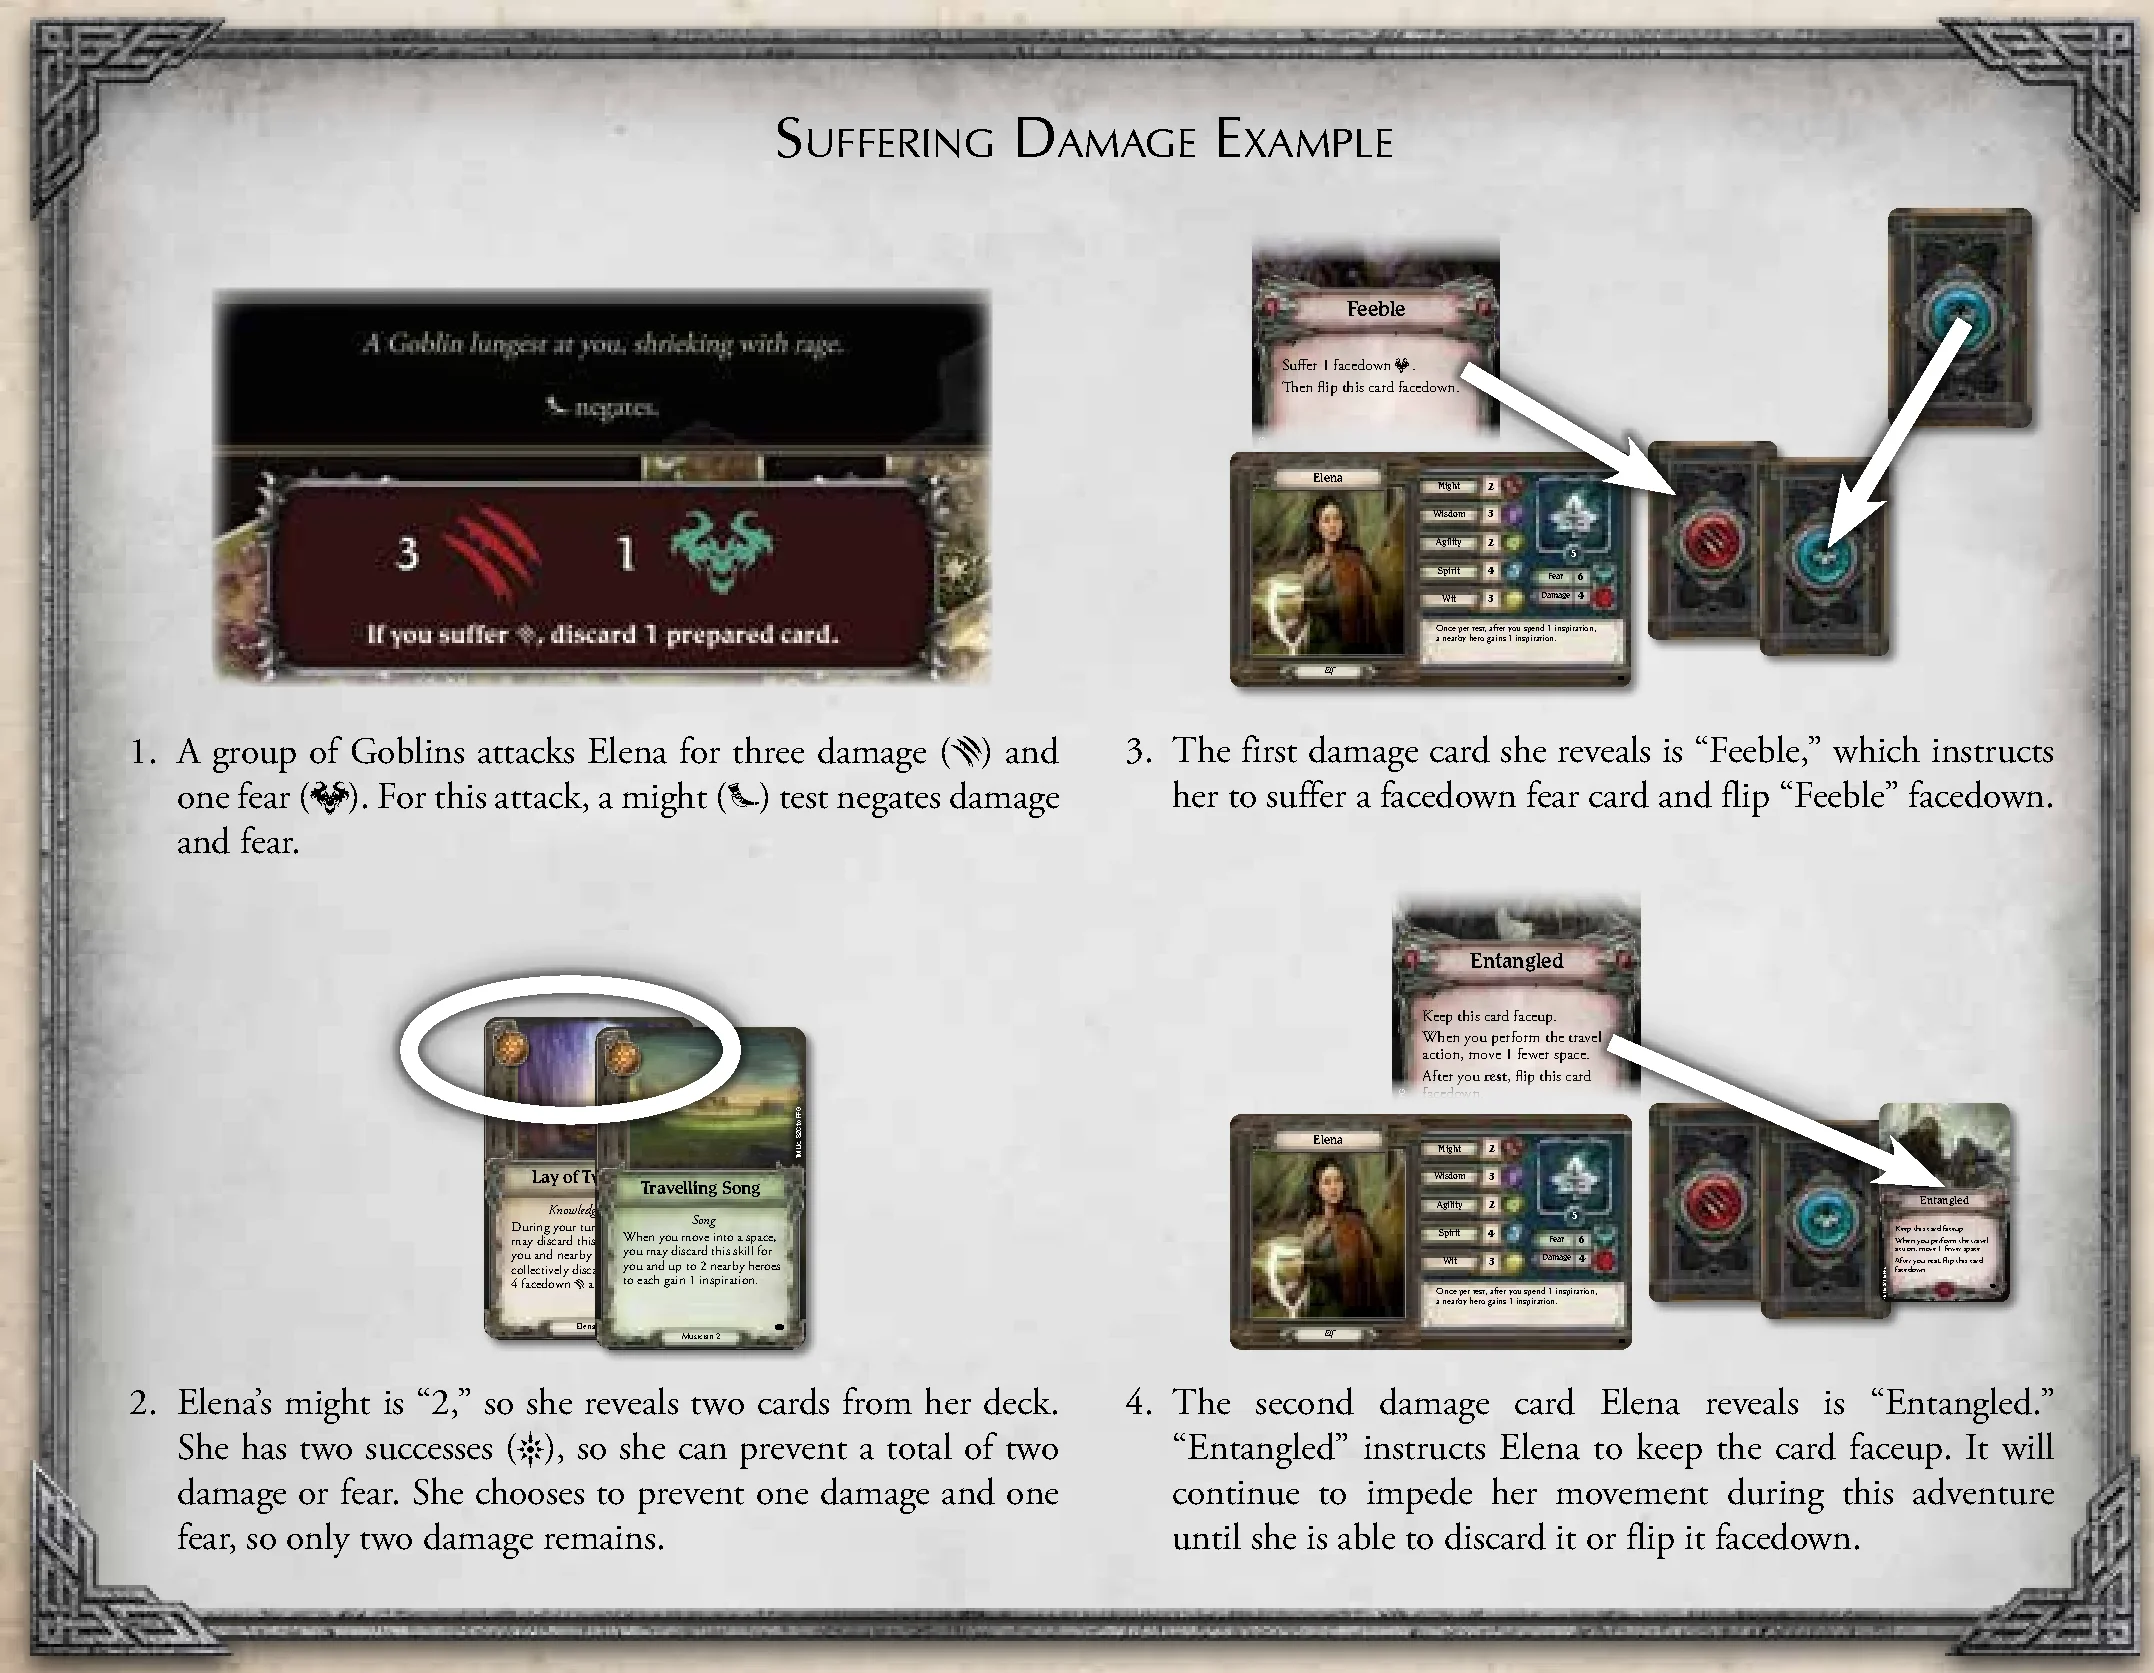
Suffering Damage Example Walkthrough
- A group of Goblins attacks Elena for three damage () and one fear (). For this attack, a might () test negates damage and fear.
- Elena’s might is “2,” so she reveals two cards from her deck. She has two successes (), so she can prevent a total of two damage or fear. She chooses to prevent one damage and one fear, so only two damage remains.
- The first damage card she reveals is “Feeble,” which instructs her to suffer a facedown fear card and flip “Feeble” facedown.
- The second damage card Elena reveals is “Entangled.” “Entangled” instructs Elena to keep the card faceup. It will continue to impede her movement during this adventure until she is able to discard it or flip it facedown.
Enemies Rules
This section explains additional details related to enemy groups.
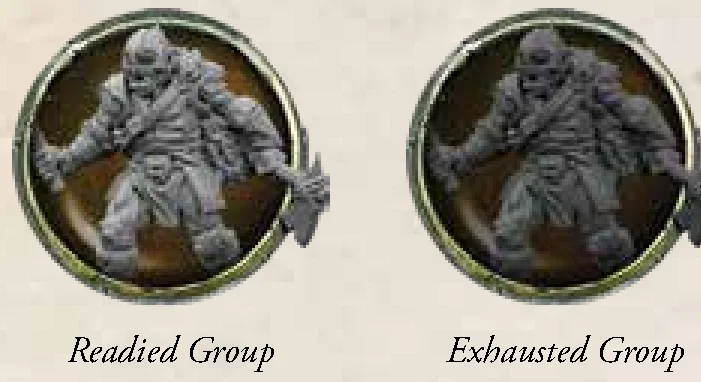
Readied and Exhausted
An enemy group is either readied or exhausted. Enemies become exhausted either after the app activates them or after they attack. When an enemy is exhausted, its portrait in the app is darkened.
Exhausted enemies cannot activate, counterattack, or be provoked. The app readies all enemy groups at the end of the shadow phase.
Provoking Enemies
While a hero is in the same space as a readied enemy group, certain actions will provoke that enemy, causing it to attack. A hero must provoke an enemy during each of the following situations:
- before a hero moves out of a space that has a readied enemy
- before a hero interacts with a token in a space that has a readied enemy
To provoke an enemy, a hero selects the provoke button to the left of the enemy portraits in the app. Then, they select the portrait of the enemy that is provoked. That enemy immediately resolves an enemy attack against the hero as instructed by the app. After the enemy attacks, the hero can move out of that enemy’s space, or perform an interact action as intended.
Unlike an enemy activation or counterattack, an enemy group is not exhausted when it is provoked.
Interrupting Enemy Activations
Some abilities, such as Elena’s “Child of the Lhûn” skill card, can interrupt an enemy’s activation to apply hits or modifiers. To resolve these abilities, the hero selects the enemy’s portrait, inputs and applies hits or modifiers indicated by the ability, then continues the enemy’s activation.
Placing Enemies
When an enemy group needs to be placed on the map, the app indicates where the group is placed and how many figures are in the group. When an enemy group is placed, the app adds that enemy group’s portrait to the enemy bar along the bottom of the screen. There should be one enemy group (containing one or more figures) on the game map for each enemy portrait shown in the app.
Elite Enemies
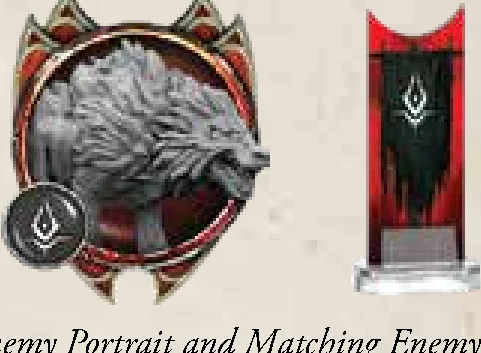
Elite enemy groups are stronger than standard enemies, and they have special bonuses. An elite enemy group’s portrait has a spiked frame and banner icon. When an elite enemy group is placed on the map, the heroes place the elite banner token (red background) that matches that enemy group’s banner icon along with the enemy figures.
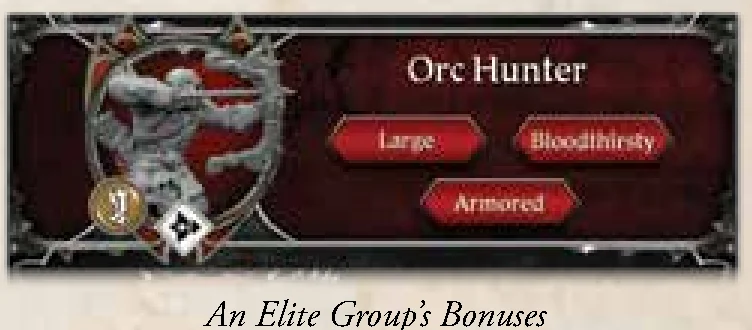
An elite enemy group’s bonuses are listed in its enemy menu. The app automatically applies all enemy bonuses, but the heroes can select bonuses in the enemy menu to view their effects. In addition to their listed bonuses, all elite enemies are able to perform counterattacks even when they are exhausted.
Duplicate Enemy Groups
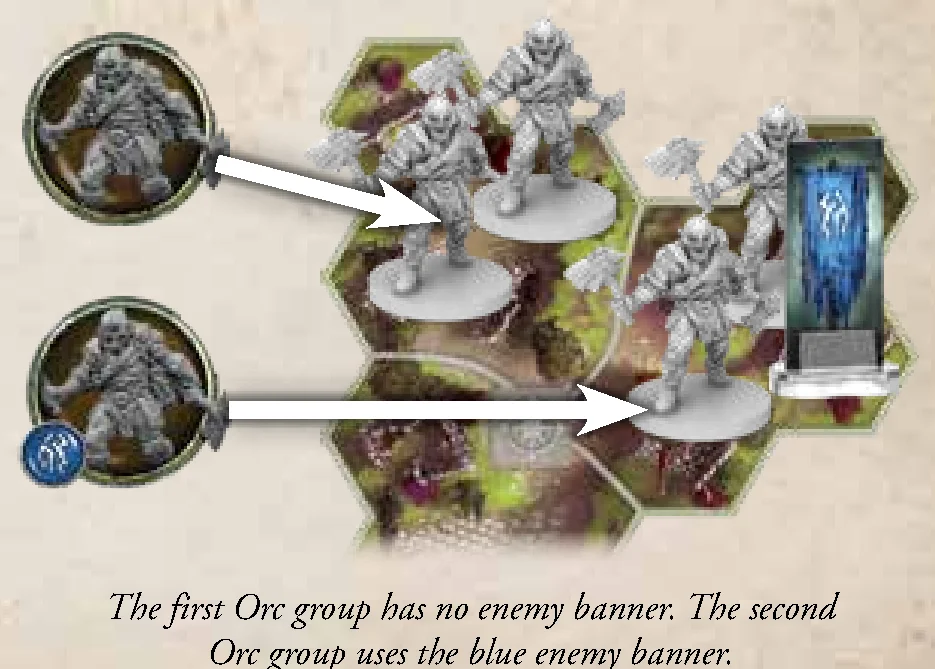
It is possible for there to be multiple enemy groups of the same type that are not elite. When this happens, each additional enemy group is automatically assigned an enemy banner, which is presented next to that enemy’s portrait in the app. When the heroes place the duplicate enemy group on the board, they place the matching enemy banner token next to that group’s figures.
Skill Cards & Rules
Prepared Skill Cards
As described in the rally phase, when a hero scouts cards, that hero can prepare one of those cards by placing it faceup below their hero card. A hero cannot have more than four prepared cards; if they would prepare a fifth card, they must discard one of their prepared cards.
Like hero and item cards, skill cards have abilities that help the heroes accomplish their goals. However, a skill card’s abilities can be used only while that card is prepared—in other words, the heroes ignore abilities on skill cards that are revealed for a test.
Each card ability describes when the ability can be used. To use an ability, the hero resolves the ability’s text. Many skill card abilities instruct the hero to discard the card from their prepared area.
Keywords
Most skill cards contain one or more bolded keywords, such as “Sprint 1.” Keywords are a shorthand for abilities that appear on cards frequently. The rules for each of the keywords can be found in the Quick Reference on the back page of this rulebook.
Traits
Some skill cards (and item cards) contain italicized traits such as “Dwarf” and “Tactic.” Traits have no inherent effects; however, other game effects may refer to cards that have traits.
Nearby
Some abilities and rules refer to nearby components or spaces. A component is nearby another component if they share the same space or are in spaces that are adjacent to each other. A nearby space refers to that space and all spaces adjacent to it. A component is not nearby itself.
Apply
Abilities that “apply” hits and modifiers to enemies are not attacks. To resolve these abilities, the hero inputs hits and modifiers in the enemy’s menu and selects “Apply,” but the hero always selects “No” if the app prompts a counterattack.
Resetting Skill Decks
A hero must reset their skill card deck at the following times:
- during the rally phase
- when there are no cards remaining in their deck
- when an effect instructs them to do so
A hero resets their deck by shuffling their discard pile with any remaining cards in their deck and placing the newly shuffled deck facedown. Prepared cards are not shuffled into the deck.
Special Skill Cards
Weakness and title cards are special types of skill cards that are part of the heroes’ skill decks.
Title Cards
Title cards reflect a hero’s memorable choices during a campaign. Title cards usually have powerful abilities that can be used only once during an adventure. When a hero gains a title card, they search the unused title skill cards for the specified card and prepare it immediately.
Weakness Cards
Each hero begins the game with one weakness card in their skill deck. Weakness cards have no inherent effect—their purpose is to be useless to heroes, cluttering skill decks and contributing no icons during tests. When a hero gains a weakness card during an adventure, they take the top card of the weakness deck and place it in their skill deck discard pile. A hero can prepare a weakness card to temporarily remove it from their skill deck even though it does not grant any abilities.
Boon & Trinket Cards
Boon Cards
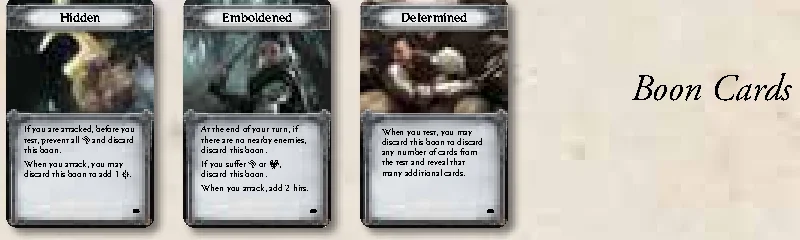
Heroes can become hidden, emboldened, or determined. These are boons that improve a hero’s chances to battle enemies and pass tests. If a hero gains a boon, they take a boon card of the appropriate type and place it in their play area. The effect of each boon is described on the card.
Trinket Item Cards
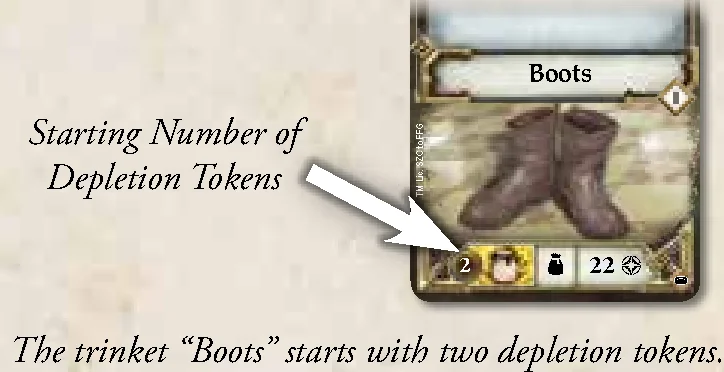
Heroes may find trinkets during their adventures. Trinkets are item cards that have the trinket ( ) icon along the bottom. When a hero gains a trinket, they search the unused item cards for the specified card and place it faceup next to their other items. Then, they place a number of depletion tokens on the trinket equal to the number in the lower-left corner of the card.
If a hero is instructed to deplete a trinket, they must spend one depletion token by removing it from that trinket’s card. After a trinket’s last depletion token is spent, the trinket is flipped facedown and cannot be used again during that adventure. Trinkets receive their starting number of depletion tokens at the beginning of each adventure.
App Elements
This section describes additional details related to the app.
Lore and Experience
During an adventure, the heroes may be rewarded with lore and experience. These resources are tracked in the app and allow the heroes to upgrade items and purchase new skills between adventures. Players can ignore lore and experience for their first adventure; they are described in more detail in the Rules Reference.
Fog
In the app, the portion of the map that is shrouded in fog indicates the locations where tiles will be placed. This informs players where the map expands so they can better set up their play area.
What Now?
Now you are ready to play your first adventure, so launch the app and carefully proceed through the setup steps on pages 4–5. You can use the Quick Reference on the back page to remind you of the phases and game terms. If you have questions during play, consult the glossary in the Rules Reference.
After you complete your first adventure, read the “Advanced Rules” and “Campaign Rules” sections of the Rules Reference. These sections explain the rules for battle map tiles, terrain tokens, and upgrading your heroes’ skills and items. Then, you will be ready to start your next adventure!
Completing an Adventure
The party of heroes wins or loses an adventure together. Winning an adventure provides the heroes with greater rewards; however, whether they win or lose, all of the heroes proceed to the next adventure of the campaign. After completing their first adventure, players should read the “Campaign Rules” section in the Rules Reference—these rules describe how heroes can upgrade their items and purchase new skills before the next adventure begins.
Objectives
Each adventure provides the heroes with a series of objectives. During an adventure, the heroes’ current objective is displayed beneath the threat bar. After the heroes complete one objective, the app provides the heroes with a new objective automatically.
If the heroes complete the final objective before the threat bar is full, they win the adventure. If a hero is defeated, the remaining heroes continue playing; however, if they do not complete the final objective by the start of the next shadow phase, they lose the adventure.
Quick Reference
Round Structure
Each game round consists of the following three phases:
- Action Phase: Each hero takes a turn by performing two actions.
- Shadow Phase: Enemies activate, darkness is resolved (if necessary), and threat increases—threat events are activated if threat reaches a threshold.
- Rally Phase: Each hero resets their skill deck and then scouts two cards.
Actions
During a hero’s turn, they can perform two actions. A hero can perform the same action twice or two different actions.
- Travel: Move up to two times. A hero can perform their second action between their first and second movement.
- Attack: Attack an enemy in your space. If you have a ranged weapon, you can attack a nearby enemy.
- Interact: Interact with a token in your space.
Resetting Skill Decks
A hero must reset their deck at the following times:
- during the rally phase
- when there are no cards remaining in their deck
- when an effect instructs them to do so
A hero resets their deck by shuffling their discard pile with any remaining cards from their deck and placing the newly shuffled deck facedown. Prepared cards are not shuffled into the deck.
Frequently Overlooked Rules
- When instructed to move and attack, if an enemy cannot get in range of any target, it ignores that entire instruction (including movement). The “No Target” button is selected and the enemy receives a new instruction.
- A readied enemy is provoked when a hero moves out of its space or when a hero interacts with a token in its space.
- A component is nearby another component if they are in the same space or adjacent spaces.
- A hero can have a maximum of four prepared cards at a time.
Attack Modifiers
There are six modifiers that can benefit heroes during an attack:
- Pierce: This attack ignores the enemy’s armor.
- Smite: This attack ignores the enemy’s sorcery.
- Sunder: This attack permanently reduces the enemy’s armor by one (before hits are applied).
- Cleave: Each enemy in the group suffers the full number of hits.
- Lethal: If this attack reduces the enemy’s current health by at least half, the enemy is defeated.
- Stun: This attack exhausts the enemy group. If the group is elite, it also cannot counterattack this attack.
Keywords
- Scout X: When an effect instructs you to “Scout X,” reveal X cards from the top of your skill deck. You may prepare one of those cards (place it faceup under your hero card). Then, place each of the remaining revealed cards on the top or bottom of your skill deck in any order.
- Strike X: During your attack test, you may discard a card that has the “Strike X” keyword to add X hits to the attack.
- Guard X: When you or a hero in your space would suffer damage or fear, you may discard a card that has the “Guard X” keyword to prevent any combination of X damage and fear.
- Sprint X: During your turn, you can discard a card that has the “Sprint X” keyword to move X additional spaces. You can perform actions between each movement.
- Rest X: At the end of your turn, you can discard a card that has the “Rest X” keyword to discard any combination of X of your facedown damage or fear cards.
- Hide: After performing a test, you can discard a card that has the “Hide” keyword to gain a “Hidden” boon card.
Icons
- Success
- Fate (Each inspiration spent during a test converts 1 to 1 )
- Damage
- Fear
- Ranged (Can attack a target in an adjacent space)
 Lore
Lore- Interact Action
Hero Stats
- Agility
- Might
- Spirit
- Wisdom
- Wit
Items
- Trinket
 Armor
Armor One-Handed Item
 Two-Handed Item
Credits
Game Design and Development: Nathan Hajek and Grace Holdinghaus
Additional Development: Kara Centell-Dunk, Daniel Lovat Clark, Brandon Perdue, Colin Phelps, and Yu-Chi Wang
Technical Writing: Adam Baker
Producer: Molly Glover
Editing: Justin Hoeger
Board Game Manager: Andrew Fischer
Graphic Design: Edge Studios and Toujer Moua with Monica Helland, Duane Nichols, and WiL Springer
Graphic Design Manager: Christopher Hosch
Cover Art: Chris Rahn
Map Tile Art: Yoann Boissonnet
Interior Art: Nate Abell, Even Amundsen, Igor Artyokmenko, Cristi Balanescu, Ryan Barger, Juan Carlos Barquet, Tiziano Baracchi, Arden Beckwith, Sara Betsy, Sara Biddle, Dimitri Bielak, Gabriela Birchal, Grzegorz Bobrowski, Yoann Boissonnet, Marius Bota, Eric Braddock, Noah Bradley, Jake Bullock, Joshua Cairos, Caravan Studio, Sidharth Chaturvedi, Jason Cheeseman, Carmen Cianelli, Carlos Palma Cruchaga, Alexandre Dainche, Christina Davis, David Demaret, Tristan Denecke, Sara Diesel, Lino Drieghe, Guillaume Ducos, Carolina Eade, Alexandr Elichev, Emrah Elmasil, Alvaro Calvo Escudero, Tony Foti, Mariusz Gandzel, Tom Garden, Marica George-Bogdan, Sebastian Giacobino, Sergey Glushakov, Michael Anthony Gonzales, Nicholas Gregory, Katy Grierson, Nikolas Hagialas, Ilich Henriquez, David Hollowell, Rafal Hrynkiewicz, Aurelien Hubert, Amelie Hutt, Taylor Ingvarsson, Lukasz Jaskolski, Toni Justamante, Aleksander Karcz, Romana Kendelic, Igor Kieryluk, Drazenka Kimpel, Alexander Kozachenko, Adam Lane, Diego Gisbert Llorens, Henning Ludvigsen, Titus Lunter, Stephen M. Mabee, Melanie Maier, Javier Charro Martinez, Ken McCuen, Nacho Molina, Brendan C. Murphy, Jacob Murray, Mike Nash, Winona Nelson, Will O’Brien, Anthony Palumbo, Borja Pindado, Gabrielle Portal, Claudio Pozas, Rick Price, Dmitry Prosvirnin, Chris Rahn, Jose Manuel Rey, Silver Saaremel, Amanda Sartor, Adam Schumpert, Lucas Staniec, Anna Steinbauer, Florian Stitz, Tropa Entertainment, Andreia Ugrai, Charles Urbach, Brian Valenzuela, Jose Vega, Cristina Vela, Gabriel Verdon, Magali Villeneuve, Piya Wannachaiwong, Jason Ward, Kara Williams, Darek Zabrocki, and Ben Zweifel
Art Direction: Tim Flanders
Managing Art Director: Melissa Shetler
Sculpting: Bhushan Arekar, Robert Brantseg, Brian Dugas, Rowena Frenzel, Ben Lodge, Adam Martin, Derek Miller, Niklas Norman, Luigi Terzi, and Dave Whitaker
Sculpting Lead: Cory DeVore
Sculpting Manager: Derrick Fuchs
Software Development: Mark Jones, Nathan Karpinski, Paul Klecker, and Xavier Marleau
Digital Artist: Gary Storkamp
Software Executive Producer: Keith Hurley
Quality Assurance: Andrew Janeba and Zach Tewalthomas
Licensing Coordinators: Sherry Anisi and Long Moua
Licensing Manager: Simone Elliott
Production Management: Jason Glawe and Dylan Tierney
Visual Creative Director: Brian Schomburg
Senior Project Manager: John Franz-Wichlacz
Senior Manager of Product Development: Chris Gerber
Executive Game Designer: Corey Konieczka
Publisher: Andrew Navaro
Overview & Components
“But I suppose it’s often that way. The brave things in the old tales and songs, Mr. Frodo: adventures, as I used to call them. I used to think that they were things the wonderful folk of the stories went out and looked for, because they wanted them, because they were exciting and life was a bit dull, a kind of a sport, as you might say. But that’s not the way of it with the tales that really mattered, or the ones that stay in the mind. Folk seem to have been just landed in them, usually – their paths were laid that way, as you put it. But I expect they had lots of chances, like us, of turning back, only they didn’t. And if they had, we shouldn’t know, because they’d have been forgotten. We hear about those as just went on – and not all to a good end, mind you; at least not to what folk inside a story and not outside it call a good end. You know, coming home, and finding things all right, though not quite the same—like old Mr. Bilbo. But those aren’t always the best tales to hear, though they may be the best tales to get landed in!”
Game Overview
The Lord of the Rings: Journeys in Middle-earth™ is a cooperative game for one to five players. During a game, a group of heroes embarks on perilous adventures, working together to explore and survive the vast and epic fantasy world of J.R.R. Tolkien’s The Lord of the Rings™. Throughout their journeys, heroes battle powerful foes, discover lost treasures, uncover forgotten lore, and customize their skills according to their role within their Fellowship. As darkness is rising, unifying evil, shadow, and corruption, it is the time for the heroes to take a stand and begin their journey in Middle-earth.
An Epic Campaign
Each game of The Lord of the Rings: Journeys in Middle-earth is one adventure of a greater campaign. During each adventure, the heroes attempt to complete a series of objectives before they are overwhelmed by the evils of Middle-earth. No matter the outcome of a particular adventure, the heroes and the campaign progress. Eventually, after completing a series of adventures, the campaign will reach a climatic conclusion that ends in success or failure for the entire party of heroes.
The App
To play The Lord of the Rings: Journeys in Middle-earth, one player must download the free Journeys in Middle-earth app on a compatible device. The app determines the challenges and content that the heroes encounter during the game, from tile and token placement to enemy behavior. The app also allows the heroes to save their campaign, allowing them to complete it over the course of several gaming sessions. To download the app, search for Journeys in Middle-earth on the Amazon™ Appstore, Apple iOS App Store™, Google Play™, or Steam®.
Using This Document
The purpose of this document is to teach new players how to play Journeys in Middle-earth. Players must read this Learn To Play in its entirety before playing for the first time.
This game includes a Rules Reference, which is a second document that describes detailed rules and exceptions that are omitted from this Learn To Play document. As questions arise during the game, players should consult the Rules Reference instead of the Learn To Play.
The Stories Untold
Each time the players begin an adventure, the Journeys in Middle-earth app fills that adventure with content from a host of many possibilities. The same adventure can vary in many aspects: the size and layout of the map, the enemies and allies that are encountered, the events that plague the heroes, and much more. As a result, players can play the same campaign repeatedly and live a new story each time.
Component List
- 1 Rules Reference
- 22 Journey Map Tiles
- 2 Battle Map Tiles
- 31 Plastic Figures (6 Heroes, 25 Enemies)
- 83 Item Cards
- 15 Boon Cards
- 28 Fear Cards
- 28 Damage Cards
- 10 Terrain Cards
- 30 Basic Skill Cards
- 30 Hero Skill Cards
- 72 Role Skill Cards
- 20 Weakness Skill Cards
- 21 Title Skill Cards
- 6 Hero Cards
- 3 Pit/Mist Terrain Tokens
- 4 Barrels/Table Terrain Tokens
- 4 Fire Pit/Statue Terrain Tokens
- 10 Stream/Wall Terrain Tokens
- 9 Bush/Boulder Terrain Tokens
- 12 Enemy Banners and Plastic Stands
- 20 Search/Threat Tokens
- 30 Inspiration/Exploration Tokens
- 21 Depletion Tokens
- 8 Person Tokens (4 variations)
- 5 Darkness Tokens
Setup
First Campaign Setup
To set up their first campaign of Journeys in Middle-earth, players follow the steps presented in this section.
- Select Campaign and Difficulty: Select the “New Game” button on the app’s title screen. Then, the app will guide the players through a series of screens for selecting a campaign, a difficulty, and a save slot. It is recommended that players select the “Bones of Arnor” campaign and “Normal” difficulty.
- Create Party and Select Heroes: Each player selects a hero in the app, takes their hero’s corresponding figure and hero card, and places them in their play area. These heroes will be used for the duration of the campaign, which spans several adventures.
If playing single-player, the player chooses two heroes and controls both of them.
- Gather Starting Items: The app assigns starting items for each hero. Each player finds the item cards that match the name and tier displayed in the app and places them near their hero card. Players may select different starting items in the app if they wish.
- Create Damage, Fear, and Weakness Decks: Shuffle the damage cards, fear cards, and weakness skill cards (only weakness skill cards, not other skill cards) into separate decks and place them in the center of the play area where all players can reach them.
- Create Supply: Separate the exploration/inspiration, search/threat, person, and enemy banner tokens as well as the three types of boon cards into separate piles to create the supply. Set aside all map tiles and enemy figures; some of them will be used during the adventure. Return the battle map tiles and terrain tokens to the box—they are not used in the first adventure.
- Begin Campaign: The players input a group name, and then select “Begin” in the app and watch the short cutscene that introduces the story and the heroes’ quest.
- Choose Role: Each player selects a role in the app—this is the role their hero takes for the first adventure. A player can choose any role from the menu, but the recommended starting role for each hero is as follows:
- Aragorn: Captain
- Beravor: Pathfinder
- Bilbo: Burglar
- Elena: Musician
- Gimli: Guardian
- Legolas: Hunter
Roles
A hero’s role during an adventure determines some of that hero’s capabilities. Each role has a general purpose:
- Burglar: Evades enemies and is self-sufficient
- Captain: Helps the party prepare for any situation
- Guardian: Protects others and has strong defenses
- Hunter: Attacks for heavy damage
- Musician: Inspires others to succeed at their tasks
- Pathfinder: Helps the party move quickly
Role selection is not permanent—heroes can change roles between adventures.
- Gather Skill Cards: Each hero gathers the following 15 skill cards:
- one copy of each skill card numbered 1–6 that has the word “Basic” on the bottom of the card
- the skill cards numbered 1–5 that have the name of their hero on the bottom of the card
- the skill cards numbered 1–3 that have their role on the bottom of the card (the text boxes on these cards are colored green to help players quickly identify them)
- one weakness card from the top of the weakness deck
- Prepare Role Card and Create Skill Decks: Each hero finds the starting skill card for their role. Each starting skill card has the number “1” after the role name at the bottom of the card and has stars next to the card name. Each hero prepares their starting skill card by placing it faceup below their hero card. Then, each player shuffles their remaining 14 cards together to create their skill deck and places it facedown in their play area.
- Place Starting Tiles and Tokens: Select “Embark” in the app and follow the app’s instructions, placing map tiles and tokens in the play area as shown in the app to create the game map.
A unique alphanumeric code is printed on each map tile to make it easy both to find the tiles and to orient them when placing them. Be sure to leave extra room for additional map tiles to be placed during the game—the app displays fog next to the starting map tiles to indicate roughly where map tiles will be added later.
After following all instructions in the app, the players begin their adventure.
How to Play: Round Structure & Action Phase
Round Structure
A game of Journeys in Middle-earth is played over a series of rounds. Each round has three phases that players resolve in the following order:
- Action Phase: During this phase, the heroes move around the map, interact with the world, and attack enemies.
- Shadow Phase: During this phase, the enemies move and attack heroes, and other dark threats grow stronger.
- Rally Phase: During this phase, the heroes prepare for the next round.
After resolving each phase, a new round begins with the action phase. Players continue to resolve game rounds in this manner until the adventure ends.
Action Phase
During the action phase, each hero takes a turn by performing actions to search, fight, and journey through the lands of Middle-earth. The heroes take turns in the order of their choice, and this order can change from round to round.
During a hero’s turn, they can perform two actions, which may be the same action twice. The actions are:
- Travel
- Attack
- Interact
After all heroes have taken a turn, they select the hourglass button in the lower-right corner of the app screen to proceed to the shadow phase.
Travel Action
The travel action allows a hero to move around the game map. The game map is composed of map tiles, each of which is divided into one or more spaces. A space is an area of the board enclosed by gray borders. Spaces that share a gray border are adjacent to each other.
When a hero performs a travel action, they can move twice. Each time a hero moves, they move to an adjacent space.
A hero can interrupt their two moves to perform the second action of their turn. For example, a hero can move one space, perform their second action, and then move one additional space.
Exploration
Each journey map tile has a square box where an exploration token may be placed, as indicated by the app. A map tile that has an exploration token on it is unexplored. When a hero moves into any space on an unexplored tile, they must immediately explore the tile.
To explore a tile, the hero selects the appropriate exploration token in the app and then selects the “Confirm” button. The app instructs the hero to discard the exploration token and gain one inspiration. To do this, the hero can simply flip the exploration token and place it on their hero card. Inspiration is described later.
Exploring a tile is not a separate action; it is simply the result of a hero moving onto a tile that has an exploration token.
Attack Action
The attack action allows heroes to attack an enemy group, attempting to remove it from the map. An enemy group is one or more plastic figures of the same type that move and attack together. Each enemy group has a corresponding portrait in the app:
To perform an attack, the hero chooses an item to attack with. The item must have a stat icon in the upper-left corner of the card:
The hero also must choose one enemy group that is in range. If an enemy group is in the same space as the hero, that enemy group is in range. Enemy groups in spaces adjacent to the hero are also in range if the hero is attacking with an item card that has the ranged () icon in the upper-right corner.
After the hero chooses an item and enemy group, they resolve an attack test against that enemy group. Tests are described later in “Tests”.
Dual–Wielding
A hero can attack with more than one item if those items all share the stat that is being tested. When attacking with more than one item, the hero can spend successes () to resolve abilities on any of the chosen items. If the hero is attacking an adjacent enemy group, all of the chosen items must have the ranged () icon.
Interact Action
The interact action allows heroes to encounter points of interest on the map, which are indicated by search, person, and threat tokens. Interacting with these tokens is how heroes progress the adventure, discover items, gain experience, and neutralize threats.
If a hero is in the same space as one of these tokens, that hero can perform an interact action by selecting the token in the app and then selecting the button with the action () icon. When performing an interact action, the app provides the hero with instructions to follow. Then, the hero continues their turn.
Inspecting Tokens in the App
Players can inspect tokens in the app at any time by selecting them and reading their text, which usually describes what the token represents. Inspecting is not an action, and the player can select the “Cancel” button to close the token’s description. However, if a player selects the button preceded by the icon, they are performing an interact action and must meet the requirements for doing so. Similarly, while inspecting an exploration token, they should not select the “Confirm” button unless their hero is exploring that token.
Adding Map Tiles
The app instructs players to place new map tiles when certain conditions are met—these conditions include exploring and interacting with tokens, defeating enemies, etc. When the app instructs the players to place a tile, it highlights the alphanumeric code on that tile. The players should use this highlight to help orient the tile with the rest of the map.
Shadow Phase & Rally Phase
Shadow Phase
The shadow phase is evil’s opportunity to strike back and hinder the heroes’ progress. To resolve the shadow phase, the app guides the heroes through the following steps: enemy activation, darkness, and threat. After the shadow phase, the heroes proceed to the rally phase.
Enemy Activation Step
During the enemy activation step, each enemy group attempts to move and attack. The app provides an enemy group with a target to move toward and attack:
First, the enemy group moves up to the indicated number of spaces toward the targeted hero, taking the shortest path of spaces possible. The enemy group stops when it is in range of that hero. The enemy is in range if it is in the hero’s space or if it is in an adjacent space and has the ranged () icon on its enemy portrait.
If the enemy group cannot get in range of its target but it can get in range of another hero, that closer hero becomes the new target. If multiple heroes satisfy this condition, the heroes choose which one becomes the new target.
If the enemy can get in range of a target, the “Attack” button is selected and the app displays the amount of damage () and fear () that the hero might suffer. Suffering damage and fear is described later.
If the enemy group cannot get in range of any target, it ignores the entire instruction and the “No Target” button is selected. This provides the enemy with a new instruction, which usually moves the enemy closer to a hero.
Darkness Step
During the darkness step, darkness strikes fear into the hearts and minds of the heroes. Because darkness is not always present during an adventure, the heroes only resolve this step when the app instructs them to do so.
A hero is in darkness if any of the following three conditions apply:
- They are in a space with a printed darkness icon.
- They are in a space with a darkness token.
- The app states that they are in darkness.
To resolve the darkness step, each hero in darkness suffers an amount of fear indicated by the app. Suffering fear is described later.
Threat Step
As time passes for the heroes, the threats of Middle-earth draw closer and become more dangerous. During the threat step, threat increases and threat events may occur.
Threat is represented by a threat bar at the top of the app screen, which fills as threat increases. When threat increases to a threshold, a threat event is activated in the app and heroes resolve it by following its instructions. Each threshold has a number that indicates the amount of threat required for it to activate. If the threat bar ever fills completely, the game ends and the heroes fail the adventure.
Threat increases during each threat step by the following amounts:
- two for each hero playing
- one for each threat token on the map
- one for each unexplored tile
Additionally, some effects can cause threat to increase during other game phases. The app always calculates and increases threat automatically. At any time, a hero can select a threshold in the app to view a brief description of its event.
Rally Phase
After the shadow phase, the app instructs the heroes to plan for the next round.
- First, each hero resets their skill deck by shuffling their discard pile into their deck.
- Then, the app instructs the heroes to “Scout 2.” A hero does this by revealing the top two cards of their skill deck.
- Then, the hero may prepare one of them by placing it below their hero card. If a card is prepared, the abilities on that card are available to be used.
A hero can only have four skill cards prepared at a time, so it is important that their prepared cards are separated from any other cards they have in their play area. If a hero ever has more than four prepared cards, they must discard cards until only four prepared cards remain.
After choosing whether or not to prepare a card, each hero places their cards that were not prepared on the top or bottom of their deck in any order. By placing useless cards, like weaknesses, on the bottom of their deck and useful cards, such as cards that have the (success) icon in the upper-left corner, on the top of their deck, a hero can help ensure that their upcoming actions have positive outcomes.
After scouting, the heroes select the “Continue” button and proceed to a new round, starting with the action phase.
Tests & Combat
Tests
Tests are the primary way that heroes interact with the world and attack enemies. Heroes regularly perform tests when they are exploring, encountering threats, attacking enemies, and interacting with the people of Middle-earth.
Each test requires a hero to use one of their stats, which are listed on their hero card:
- agility ()
- might ()
- spirit ()
- wisdom ()
- wit ()
To perform a test, a hero reveals cards from the top of their skill deck. The number of cards they reveal is equal to the value of the stat being tested.
After revealing cards, the hero determines the number of successes () they have. Each success () icon on the upper-left corner of revealed cards provides one success. The text on the revealed cards is ignored—it has no effect during tests.
The hero uses successes differently depending on the test:
- Some tests require the hero to input the number of successes into the app by selecting the “+” button. Then, the app provides the outcome of the test. The successes for some of these tests are cumulative; the heroes can perform the test multiple times, and the app tracks the total number of successes.
- Some tests provide a number that indicates how many successes are required to pass (e.g., “Test ; 1”). If the hero has successes equal to or greater than the required number, they pass the test. Otherwise, they fail the test. In either situation, the app provides the hero with further instructions.
- Successes are used in different ways when attacking enemies and when negating damage and fear, both of which are described later.
After completing the test, the hero places all the cards they revealed during the test into their skill deck discard pile.
Fate and Inspiration
During a test, a hero’s revealed cards may contain fate () icons. Fate icons have no inherent effect; however, the hero can spend inspiration tokens to convert fate icons to success () icons. Each inspiration spent converts a single fate icon. To spend an inspiration, the hero takes an inspiration from their hero card and returns it to the supply.
When a hero gains inspiration, they take an inspiration token from the supply and place it on their hero card. The hero cannot have more inspiration tokens than the inspiration limit indicated on their hero card.
Test Example Walkthrough
- Bilbo performs an interact action on a search token in his space. He is prompted to test agility () with a goal of two successes.
- Bilbo’s agility is “3,” so he reveals three cards from the top of his skill deck. The revealed cards have a total of one success () icon and two fate () icons.
- Bilbo wants to pass the test, so he spends an inspiration token to convert one to . Now he has two , enough to pass the test.
- Bilbo selects “Pass” and resolves the instructions that appear. Then, he discards the cards he drew for the test to his skill deck discard pile.
Attack Tests
Attack tests are performed during a hero’s attack after the hero chooses an enemy group to attack and an item to attack with. To perform an attack test, the hero chooses one of the stats listed in the upper-left corner of the item card they are attacking with and tests that stat. Then, the hero spends successes () to resolve one or more of that item’s abilities. Each ability indicates how many successes must be spent to resolve it, and each ability can be resolved only once per attack.
Most item abilities add hits to enemies. To add hits, the hero selects the enemy’s portrait to display the enemy menu and then the attack tab to display the attack pane of the menu. Then, the hero selects the “+” button in the attack pane to input each hit.
In addition to applying hits, abilities may provide heroes with attack modifiers, such as “pierce,” which allows a hero to bypass an enemy’s armor. If an ability has a modifier, the hero selects the matching modifier in the app. The app calculates the effect of each modifier automatically; each modifier is described in the Quick Reference.
The enemy menu displays a health value for each figure in the enemy group as well as each figure’s armor or sorcery value. If an enemy has armor or sorcery, hits reduce those values first. If an enemy does not have armor or sorcery, hits reduce the enemy’s health.
After inputting all hits and modifiers, the hero selects the “Apply” button to apply the hits to the enemies (even if the hero had no hits). If an enemy’s health is reduced to zero, that enemy is defeated and the app instructs the heroes to remove the enemy’s figure from the board.
If an enemy is not defeated, it regains all of its armor and sorcery, and it may be prompted to counterattack. The enemy group can attack if it is in the hero’s space or in an adjacent space and has the ranged () icon on its portrait. If the enemy can attack, the hero selects the “Yes” button and resolves an attack as described in “Enemy Activation Step”.
Attack Test Example Walkthrough
- Aragorn attacks a group of Wights in his space with his Fate-Bender. Fate-Bender tests either might () or wisdom (); Aragorn’s wisdom is higher, so he chooses wisdom.
- Aragorn’s wisdom is “4,” so he reveals four cards from his deck. The cards he reveals have two successes () and two fate ().
- Aragorn spends two to resolve Fate-Bender’s third effect, inputting five hits into the app.
- Aragorn spends an inspiration to convert one to . He spends that on Fate-Bender’s first effect, adding two more hits and selecting “Smite.” Then, he selects “Apply.”
- The app applies seven hits directly to the Wights’ health (smite ignores their sorcery). One Wight is defeated, so Aragorn removes a Wight from his space and gains an inspiration token. Then, he discards the cards he revealed to his discard pile.
- The Wight group is prompted to attack. Since it is in range of Aragorn, he selects “Yes” and resolves an enemy attack.
Damage, Fear & Last Stands
Damage and Fear
Middle-earth is rife with dangerous enemies and other threats that imperil the intrepid heroes. As a result of these threats, the heroes may suffer damage () and fear (). If a hero suffers too much damage or fear, they are on the verge of being defeated and must perform a last-stand test to determine if they succumb to the threats of Middle-earth or rally and continue their adventure.
When a hero suffers a damage or fear, they reveal a damage or fear card from the appropriate deck and place it faceup in their play area. Then, they resolve the card’s effect. Many of these cards instruct the hero to flip the card facedown or discard it. If a hero is instructed to keep the card faceup, it has a persistent effect that continues to apply to that hero. If a hero suffers multiple damage or fear at the same time, they reveal each card one at a time, resolving the card completely before revealing another card.
Occasionally, a hero is specifically instructed to suffer facedown damage or fear. When this occurs, the hero places that damage or fear facedown next to their hero card without reading the card’s text.
Negating Damage and Fear
A hero may be granted a chance to negate damage or fear before they suffer it. When this occurs, the hero is presented with a stat to test (e.g., “Each hero in darkness suffers 2 fear; negates.”). Before suffering the damage or fear, the hero may test the indicated stat, and each success () icon produced during that test prevents one damage or fear.
Last Stands
Through their trials and ordeals, the heroes may be brought to the limits of what their bodies and spirits can endure. Each hero has damage and fear limits on their hero card:
After a hero has suffered damage or fear, if they have a number of damage (faceup or facedown) equal to or greater than their damage limit or a number of fear (faceup or facedown) equal to or greater than their fear limit, that hero must perform a last stand. To perform a last stand, the hero selects the party button in the lower-left corner of the app. Then, they select the hero’s portrait and the limit (damage or fear) that was reached. Then, they follow the app’s instructions.
If a hero reaches both of their limits, they perform two last stands in the order of their choice.
A last stand includes a test—if the hero fails the test, they are defeated. The hero is removed from the board and the party loses the adventure in the next shadow phase unless they complete the final objective. If the hero passes the test, they follow the instructions provided by the app.
Suffering Damage Example Walkthrough
- A group of Goblins attacks Elena for three damage () and one fear (). For this attack, a might () test negates damage and fear.
- Elena’s might is “2,” so she reveals two cards from her deck. She has two successes (), so she can prevent a total of two damage or fear. She chooses to prevent one damage and one fear, so only two damage remains.
- The first damage card she reveals is “Feeble,” which instructs her to suffer a facedown fear card and flip “Feeble” facedown.
- The second damage card Elena reveals is “Entangled.” “Entangled” instructs Elena to keep the card faceup. It will continue to impede her movement during this adventure until she is able to discard it or flip it facedown.
Additional Rules & Card Types
Enemies Rules
This section explains additional details related to enemy groups.
Readied and Exhausted
An enemy group is either readied or exhausted. Enemies become exhausted either after the app activates them or after they attack. When an enemy is exhausted, its portrait in the app is darkened.
Exhausted enemies cannot activate, counterattack, or be provoked. The app readies all enemy groups at the end of the shadow phase.
Provoking Enemies
While a hero is in the same space as a readied enemy group, certain actions will provoke that enemy, causing it to attack. A hero must provoke an enemy during each of the following situations:
- before a hero moves out of a space that has a readied enemy
- before a hero interacts with a token in a space that has a readied enemy
To provoke an enemy, a hero selects the provoke button to the left of the enemy portraits in the app. Then, they select the portrait of the enemy that is provoked. That enemy immediately resolves an enemy attack against the hero as instructed by the app. After the enemy attacks, the hero can move out of that enemy’s space, or perform an interact action as intended.
Unlike an enemy activation or counterattack, an enemy group is not exhausted when it is provoked.
Interrupting Enemy Activations
Some abilities, such as Elena’s “Child of the Lhûn” skill card, can interrupt an enemy’s activation to apply hits or modifiers. To resolve these abilities, the hero selects the enemy’s portrait, inputs and applies hits or modifiers indicated by the ability, then continues the enemy’s activation.
Placing Enemies
When an enemy group needs to be placed on the map, the app indicates where the group is placed and how many figures are in the group. When an enemy group is placed, the app adds that enemy group’s portrait to the enemy bar along the bottom of the screen. There should be one enemy group (containing one or more figures) on the game map for each enemy portrait shown in the app.
Elite Enemies
Elite enemy groups are stronger than standard enemies, and they have special bonuses. An elite enemy group’s portrait has a spiked frame and banner icon. When an elite enemy group is placed on the map, the heroes place the elite banner token (red background) that matches that enemy group’s banner icon along with the enemy figures.
An elite enemy group’s bonuses are listed in its enemy menu. The app automatically applies all enemy bonuses, but the heroes can select bonuses in the enemy menu to view their effects. In addition to their listed bonuses, all elite enemies are able to perform counterattacks even when they are exhausted.
Duplicate Enemy Groups
It is possible for there to be multiple enemy groups of the same type that are not elite. When this happens, each additional enemy group is automatically assigned an enemy banner, which is presented next to that enemy’s portrait in the app. When the heroes place the duplicate enemy group on the board, they place the matching enemy banner token next to that group’s figures.
Skill Cards & Rules
Prepared Skill Cards
As described in the rally phase, when a hero scouts cards, that hero can prepare one of those cards by placing it faceup below their hero card. A hero cannot have more than four prepared cards; if they would prepare a fifth card, they must discard one of their prepared cards.
Like hero and item cards, skill cards have abilities that help the heroes accomplish their goals. However, a skill card’s abilities can be used only while that card is prepared—in other words, the heroes ignore abilities on skill cards that are revealed for a test.
Each card ability describes when the ability can be used. To use an ability, the hero resolves the ability’s text. Many skill card abilities instruct the hero to discard the card from their prepared area.
Keywords
Most skill cards contain one or more bolded keywords, such as “Sprint 1.” Keywords are a shorthand for abilities that appear on cards frequently. The rules for each of the keywords can be found in the Quick Reference on the back page of this rulebook.
Traits
Some skill cards (and item cards) contain italicized traits such as “Dwarf” and “Tactic.” Traits have no inherent effects; however, other game effects may refer to cards that have traits.
Nearby
Some abilities and rules refer to nearby components or spaces. A component is nearby another component if they share the same space or are in spaces that are adjacent to each other. A nearby space refers to that space and all spaces adjacent to it. A component is not nearby itself.
Apply
Abilities that “apply” hits and modifiers to enemies are not attacks. To resolve these abilities, the hero inputs hits and modifiers in the enemy’s menu and selects “Apply,” but the hero always selects “No” if the app prompts a counterattack.
Resetting Skill Decks
A hero must reset their skill card deck at the following times:
- during the rally phase
- when there are no cards remaining in their deck
- when an effect instructs them to do so
A hero resets their deck by shuffling their discard pile with any remaining cards in their deck and placing the newly shuffled deck facedown. Prepared cards are not shuffled into the deck.
Special Skill Cards
Weakness and title cards are special types of skill cards that are part of the heroes’ skill decks.
Title Cards
Title cards reflect a hero’s memorable choices during a campaign. Title cards usually have powerful abilities that can be used only once during an adventure. When a hero gains a title card, they search the unused title skill cards for the specified card and prepare it immediately.
Weakness Cards
Each hero begins the game with one weakness card in their skill deck. Weakness cards have no inherent effect—their purpose is to be useless to heroes, cluttering skill decks and contributing no icons during tests. When a hero gains a weakness card during an adventure, they take the top card of the weakness deck and place it in their skill deck discard pile. A hero can prepare a weakness card to temporarily remove it from their skill deck even though it does not grant any abilities.
Boon & Trinket Cards
Boon Cards
Heroes can become hidden, emboldened, or determined. These are boons that improve a hero’s chances to battle enemies and pass tests. If a hero gains a boon, they take a boon card of the appropriate type and place it in their play area. The effect of each boon is described on the card.
Trinket Item Cards
Heroes may find trinkets during their adventures. Trinkets are item cards that have the trinket () icon along the bottom. When a hero gains a trinket, they search the unused item cards for the specified card and place it faceup next to their other items. Then, they place a number of depletion tokens on the trinket equal to the number in the lower-left corner of the card.
If a hero is instructed to deplete a trinket, they must spend one depletion token by removing it from that trinket’s card. After a trinket’s last depletion token is spent, the trinket is flipped facedown and cannot be used again during that adventure. Trinkets receive their starting number of depletion tokens at the beginning of each adventure.
App Elements
This section describes additional details related to the app.
Lore and Experience
During an adventure, the heroes may be rewarded with lore and experience. These resources are tracked in the app and allow the heroes to upgrade items and purchase new skills between adventures. Players can ignore lore and experience for their first adventure; they are described in more detail in the Rules Reference.
Fog
In the app, the portion of the map that is shrouded in fog indicates the locations where tiles will be placed. This informs players where the map expands so they can better set up their play area.
What Now?
Now you are ready to play your first adventure, so launch the app and carefully proceed through the setup steps on pages 4–5. You can use the Quick Reference on the back page to remind you of the phases and game terms. If you have questions during play, consult the glossary in the Rules Reference.
After you complete your first adventure, read the “Advanced Rules” and “Campaign Rules” sections of the Rules Reference. These sections explain the rules for battle map tiles, terrain tokens, and upgrading your heroes’ skills and items. Then, you will be ready to start your next adventure!
Objectives & Completing an Adventure
Completing an Adventure
The party of heroes wins or loses an adventure together. Winning an adventure provides the heroes with greater rewards; however, whether they win or lose, all of the heroes proceed to the next adventure of the campaign. After completing their first adventure, players should read the “Campaign Rules” section in the Rules Reference—these rules describe how heroes can upgrade their items and purchase new skills before the next adventure begins.
Objectives
Each adventure provides the heroes with a series of objectives. During an adventure, the heroes’ current objective is displayed beneath the threat bar. After the heroes complete one objective, the app provides the heroes with a new objective automatically.
If the heroes complete the final objective before the threat bar is full, they win the adventure. If a hero is defeated, the remaining heroes continue playing; however, if they do not complete the final objective by the start of the next shadow phase, they lose the adventure.
Reference & Credits
Quick Reference
Round Structure
Each game round consists of the following three phases:
- Action Phase: Each hero takes a turn by performing two actions.
- Shadow Phase: Enemies activate, darkness is resolved (if necessary), and threat increases—threat events are activated if threat reaches a threshold.
- Rally Phase: Each hero resets their skill deck and then scouts two cards.
Actions
During a hero’s turn, they can perform two actions. A hero can perform the same action twice or two different actions.
- Travel: Move up to two times. A hero can perform their second action between their first and second movement.
- Attack: Attack an enemy in your space. If you have a ranged weapon, you can attack a nearby enemy.
- Interact: Interact with a token in your space.
Resetting Skill Decks
A hero must reset their deck at the following times:
- during the rally phase
- when there are no cards remaining in their deck
- when an effect instructs them to do so
A hero resets their deck by shuffling their discard pile with any remaining cards from their deck and placing the newly shuffled deck facedown. Prepared cards are not shuffled into the deck.
Frequently Overlooked Rules
- When instructed to move and attack, if an enemy cannot get in range of any target, it ignores that entire instruction (including movement). The “No Target” button is selected and the enemy receives a new instruction.
- A readied enemy is provoked when a hero moves out of its space or when a hero interacts with a token in its space.
- A component is nearby another component if they are in the same space or adjacent spaces.
- A hero can have a maximum of four prepared cards at a time.
Attack Modifiers
There are six modifiers that can benefit heroes during an attack:
- Pierce: This attack ignores the enemy’s armor.
- Smite: This attack ignores the enemy’s sorcery.
- Sunder: This attack permanently reduces the enemy’s armor by one (before hits are applied).
- Cleave: Each enemy in the group suffers the full number of hits.
- Lethal: If this attack reduces the enemy’s current health by at least half, the enemy is defeated.
- Stun: This attack exhausts the enemy group. If the group is elite, it also cannot counterattack this attack.
Keywords
- Scout X: When an effect instructs you to “Scout X,” reveal X cards from the top of your skill deck. You may prepare one of those cards (place it faceup under your hero card). Then, place each of the remaining revealed cards on the top or bottom of your skill deck in any order.
- Strike X: During your attack test, you may discard a card that has the “Strike X” keyword to add X hits to the attack.
- Guard X: When you or a hero in your space would suffer damage or fear, you may discard a card that has the “Guard X” keyword to prevent any combination of X damage and fear.
- Sprint X: During your turn, you can discard a card that has the “Sprint X” keyword to move X additional spaces. You can perform actions between each movement.
- Rest X: At the end of your turn, you can discard a card that has the “Rest X” keyword to discard any combination of X of your facedown damage or fear cards.
- Hide: After performing a test, you can discard a card that has the “Hide” keyword to gain a “Hidden” boon card.
Icons
- Success
- Fate (Each inspiration spent during a test converts 1 to 1 )
- Damage
- Fear
- Ranged (Can attack a target in an adjacent space)
- Lore
- Interact Action
Hero Stats
- Agility
- Might
- Spirit
- Wisdom
- Wit
Items
- Trinket
- Armor
- One-Handed Item
- Two-Handed Item
Credits
Game Design and Development: Nathan Hajek and Grace Holdinghaus
Additional Development: Kara Centell-Dunk, Daniel Lovat Clark, Brandon Perdue, Colin Phelps, and Yu-Chi Wang
Technical Writing: Adam Baker
Producer: Molly Glover
Editing: Justin Hoeger
Board Game Manager: Andrew Fischer
Graphic Design: Edge Studios and Toujer Moua with Monica Helland, Duane Nichols, and WiL Springer
Graphic Design Manager: Christopher Hosch
Cover Art: Chris Rahn
Map Tile Art: Yoann Boissonnet
Interior Art: Nate Abell, Even Amundsen, Igor Artyokmenko, Cristi Balanescu, Ryan Barger, Juan Carlos Barquet, Tiziano Baracchi, Arden Beckwith, Sara Betsy, Sara Biddle, Dimitri Bielak, Gabriela Birchal, Grzegorz Bobrowski, Yoann Boissonnet, Marius Bota, Eric Braddock, Noah Bradley, Jake Bullock, Joshua Cairos, Caravan Studio, Sidharth Chaturvedi, Jason Cheeseman, Carmen Cianelli, Carlos Palma Cruchaga, Alexandre Dainche, Christina Davis, David Demaret, Tristan Denecke, Sara Diesel, Lino Drieghe, Guillaume Ducos, Carolina Eade, Alexandr Elichev, Emrah Elmasil, Alvaro Calvo Escudero, Tony Foti, Mariusz Gandzel, Tom Garden, Marica George-Bogdan, Sebastian Giacobino, Sergey Glushakov, Michael Anthony Gonzales, Nicholas Gregory, Katy Grierson, Nikolas Hagialas, Ilich Henriquez, David Hollowell, Rafal Hrynkiewicz, Aurelien Hubert, Amelie Hutt, Taylor Ingvarsson, Lukasz Jaskolski, Toni Justamante, Aleksander Karcz, Romana Kendelic, Igor Kieryluk, Drazenka Kimpel, Alexander Kozachenko, Adam Lane, Diego Gisbert Llorens, Henning Ludvigsen, Titus Lunter, Stephen M. Mabee, Melanie Maier, Javier Charro Martinez, Ken McCuen, Nacho Molina, Brendan C. Murphy, Jacob Murray, Mike Nash, Winona Nelson, Will O’Brien, Anthony Palumbo, Borja Pindado, Gabrielle Portal, Claudio Pozas, Rick Price, Dmitry Prosvirnin, Chris Rahn, Jose Manuel Rey, Silver Saaremel, Amanda Sartor, Adam Schumpert, Lucas Staniec, Anna Steinbauer, Florian Stitz, Tropa Entertainment, Andreia Ugrai, Charles Urbach, Brian Valenzuela, Jose Vega, Cristina Vela, Gabriel Verdon, Magali Villeneuve, Piya Wannachaiwong, Jason Ward, Kara Williams, Darek Zabrocki, and Ben Zweifel
Art Direction: Tim Flanders
Managing Art Director: Melissa Shetler
Sculpting: Bhushan Arekar, Robert Brantseg, Brian Dugas, Rowena Frenzel, Ben Lodge, Adam Martin, Derek Miller, Niklas Norman, Luigi Terzi, and Dave Whitaker
Sculpting Lead: Cory DeVore
Sculpting Manager: Derrick Fuchs
Software Development: Mark Jones, Nathan Karpinski, Paul Klecker, and Xavier Marleau
Digital Artist: Gary Storkamp
Software Executive Producer: Keith Hurley
Quality Assurance: Andrew Janeba and Zach Tewalthomas
Licensing Coordinators: Sherry Anisi and Long Moua
Licensing Manager: Simone Elliott
Production Management: Jason Glawe and Dylan Tierney
Visual Creative Director: Brian Schomburg
Senior Project Manager: John Franz-Wichlacz
Senior Manager of Product Development: Chris Gerber
Executive Game Designer: Corey Konieczka
Publisher: Andrew Navaro
Board game expansions

The Lord of the Rings: Journeys in Middle-earth – The Haunting of Dale
2020
Investigate a deadly shade through branching adventures in Dale.
120
minutes
Medium
View game

The Lord of the Rings: Journeys in Middle-Earth – Hunt for the Ember Crown
2019
Secure the Shire as Wargs roam and dark secrets unsettle Bree-land.
120
minutes
Medium
View game

The Lord of the Rings: Journeys in Middle-Earth – Spreading War Expansion
2021
Defend Gondor and Rohan across fifteen perilous Middle-earth scenarios.
120
minutes
Medium
View game

The Lord of the Rings: Journeys in Middle-earth – Villains of Eriador Figure Pack
2019
Bring Eriador’s villains to life with figures, trinkets, and titles.
120
minutes
Medium
View game

The Lord of the Rings: Journeys in Middle-earth – Shadowed Paths Expansion
2020
Explore Mirkwood and Moria in a thirteen-scenario Middle-earth campaign.
120
minutes
Medium
View game
