
Viticulture Essential Edition
2015
Plant vines, build your vineyard, fill wine orders, and welcome helpful visitors in a competitive Tuscan winery strategy game.
90
minutes
1 - 6
player(s)
13+
Medium

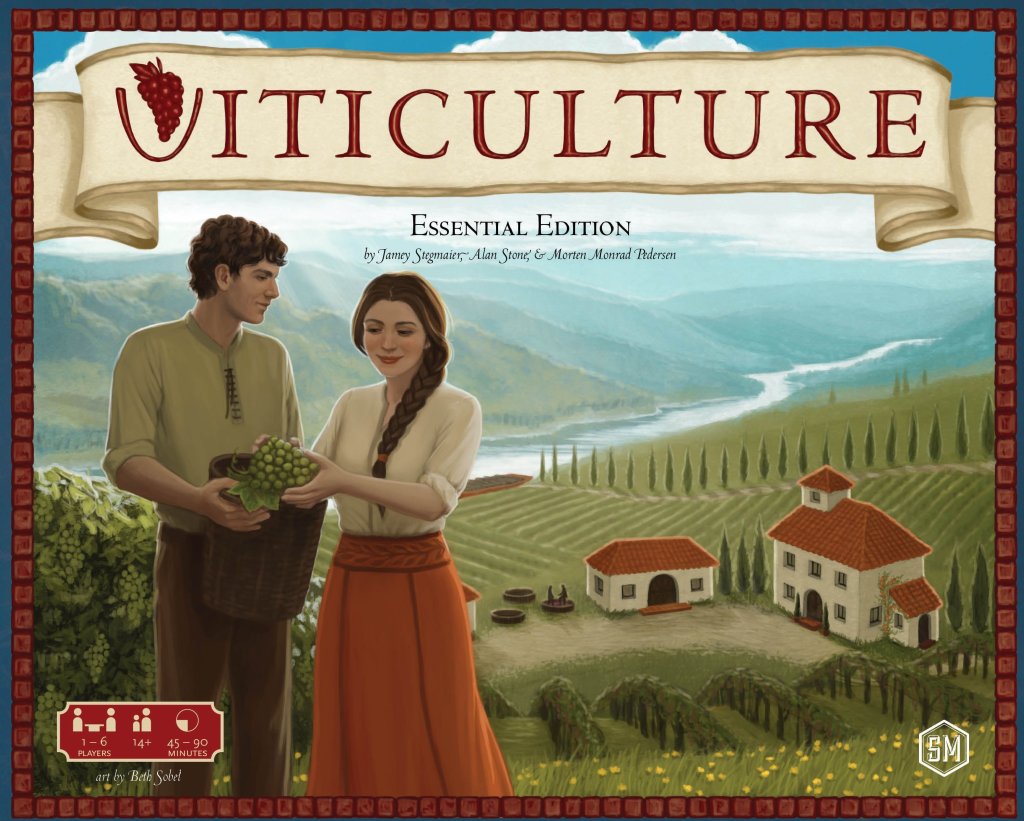
About this board game
Viticulture Essential Edition is a strategic vineyard game for 1–6 players, with play time of about 90 minutes, in which you develop a winery in pre-modern Tuscany.
Each player begins with a modest vineyard, a few plots of land, an old crush pad, a tiny cellar, and three workers. Your goal is to turn these limited resources into a successful winery by deciding how to allocate your workers throughout the year.
Summer and winter bring different tasks to the vineyard, creating competition over available spaces. In many cases, the first worker to take a task gains an advantage, making timing an important part of your plans. You can expand your vineyard by building structures, planting vines, and filling wine orders.
- Seasonal worker placement: Assign workers to different summer and winter tasks.
- Vineyard development: Build structures and plant vines to expand your operation.
- Wine orders: Work toward winery success by fulfilling orders.
- Visitor cards: Invite helpful visitors who can assist around the vineyard when assigned a worker.
- Solo play: Use Automa cards for a single-player variant.
Visitors offer brief but useful assistance, adding new possibilities as you manage the changing needs of your vineyard. Balancing seasonal opportunities, limited workers, construction, planting, and orders forms the heart of the experience.
Viticulture Essential Edition includes the base game along with selected modules from the original Tuscany expansion: Mamas & Papas, expanded and revised Visitors, Fields, and Automa cards, plus several minor rule changes. Released in 2015, it brings these additions together for a focused winery-building experience.
Thematics
Mechanics
Designers
Illustrators
/pic7182955.jpg)

Board Game Rules for
Viticulture Essential Edition
Designed by: Jamey Stegmaier, Alan Stone, & Morten Monrad Pedersen
Illustrated by: Beth Sobel
Published by: Stonemaier Games
Old-world Tuscany awaits your winemaking skill and strategic cunning. You’ll plant vines, harvest grapes, age wines, and fill merchant orders to create the greatest winery in Italy!
1 – 6 PLAYERS | AGES 13 & UP | 45 – 90 MINUTES
Viticulture is a worker-placement strategy game. The Essential Edition includes the second edition of Viticulture along with several elements from the original Tuscany expansion pack, hand-picked by famed designer Uwe Rosenberg.
Object of the Game
Players allocate workers and play visitors to complete various tasks throughout the seasons (each worker is placed on one action each year):
- In the spring: Players decide the schedule their workers will follow. An early rise gives the player the chance to act first; however, offering workers a later wake-up time gives you more valuable bonuses.
- In the summer: Players place workers on action spaces to plant vines and build structures that help advance that player’s vineyard.
- In the fall: Players invite visitors to help their workers.
- In the winter: Players place workers on action spaces to harvest grapes, make wine, and fill orders.
Components
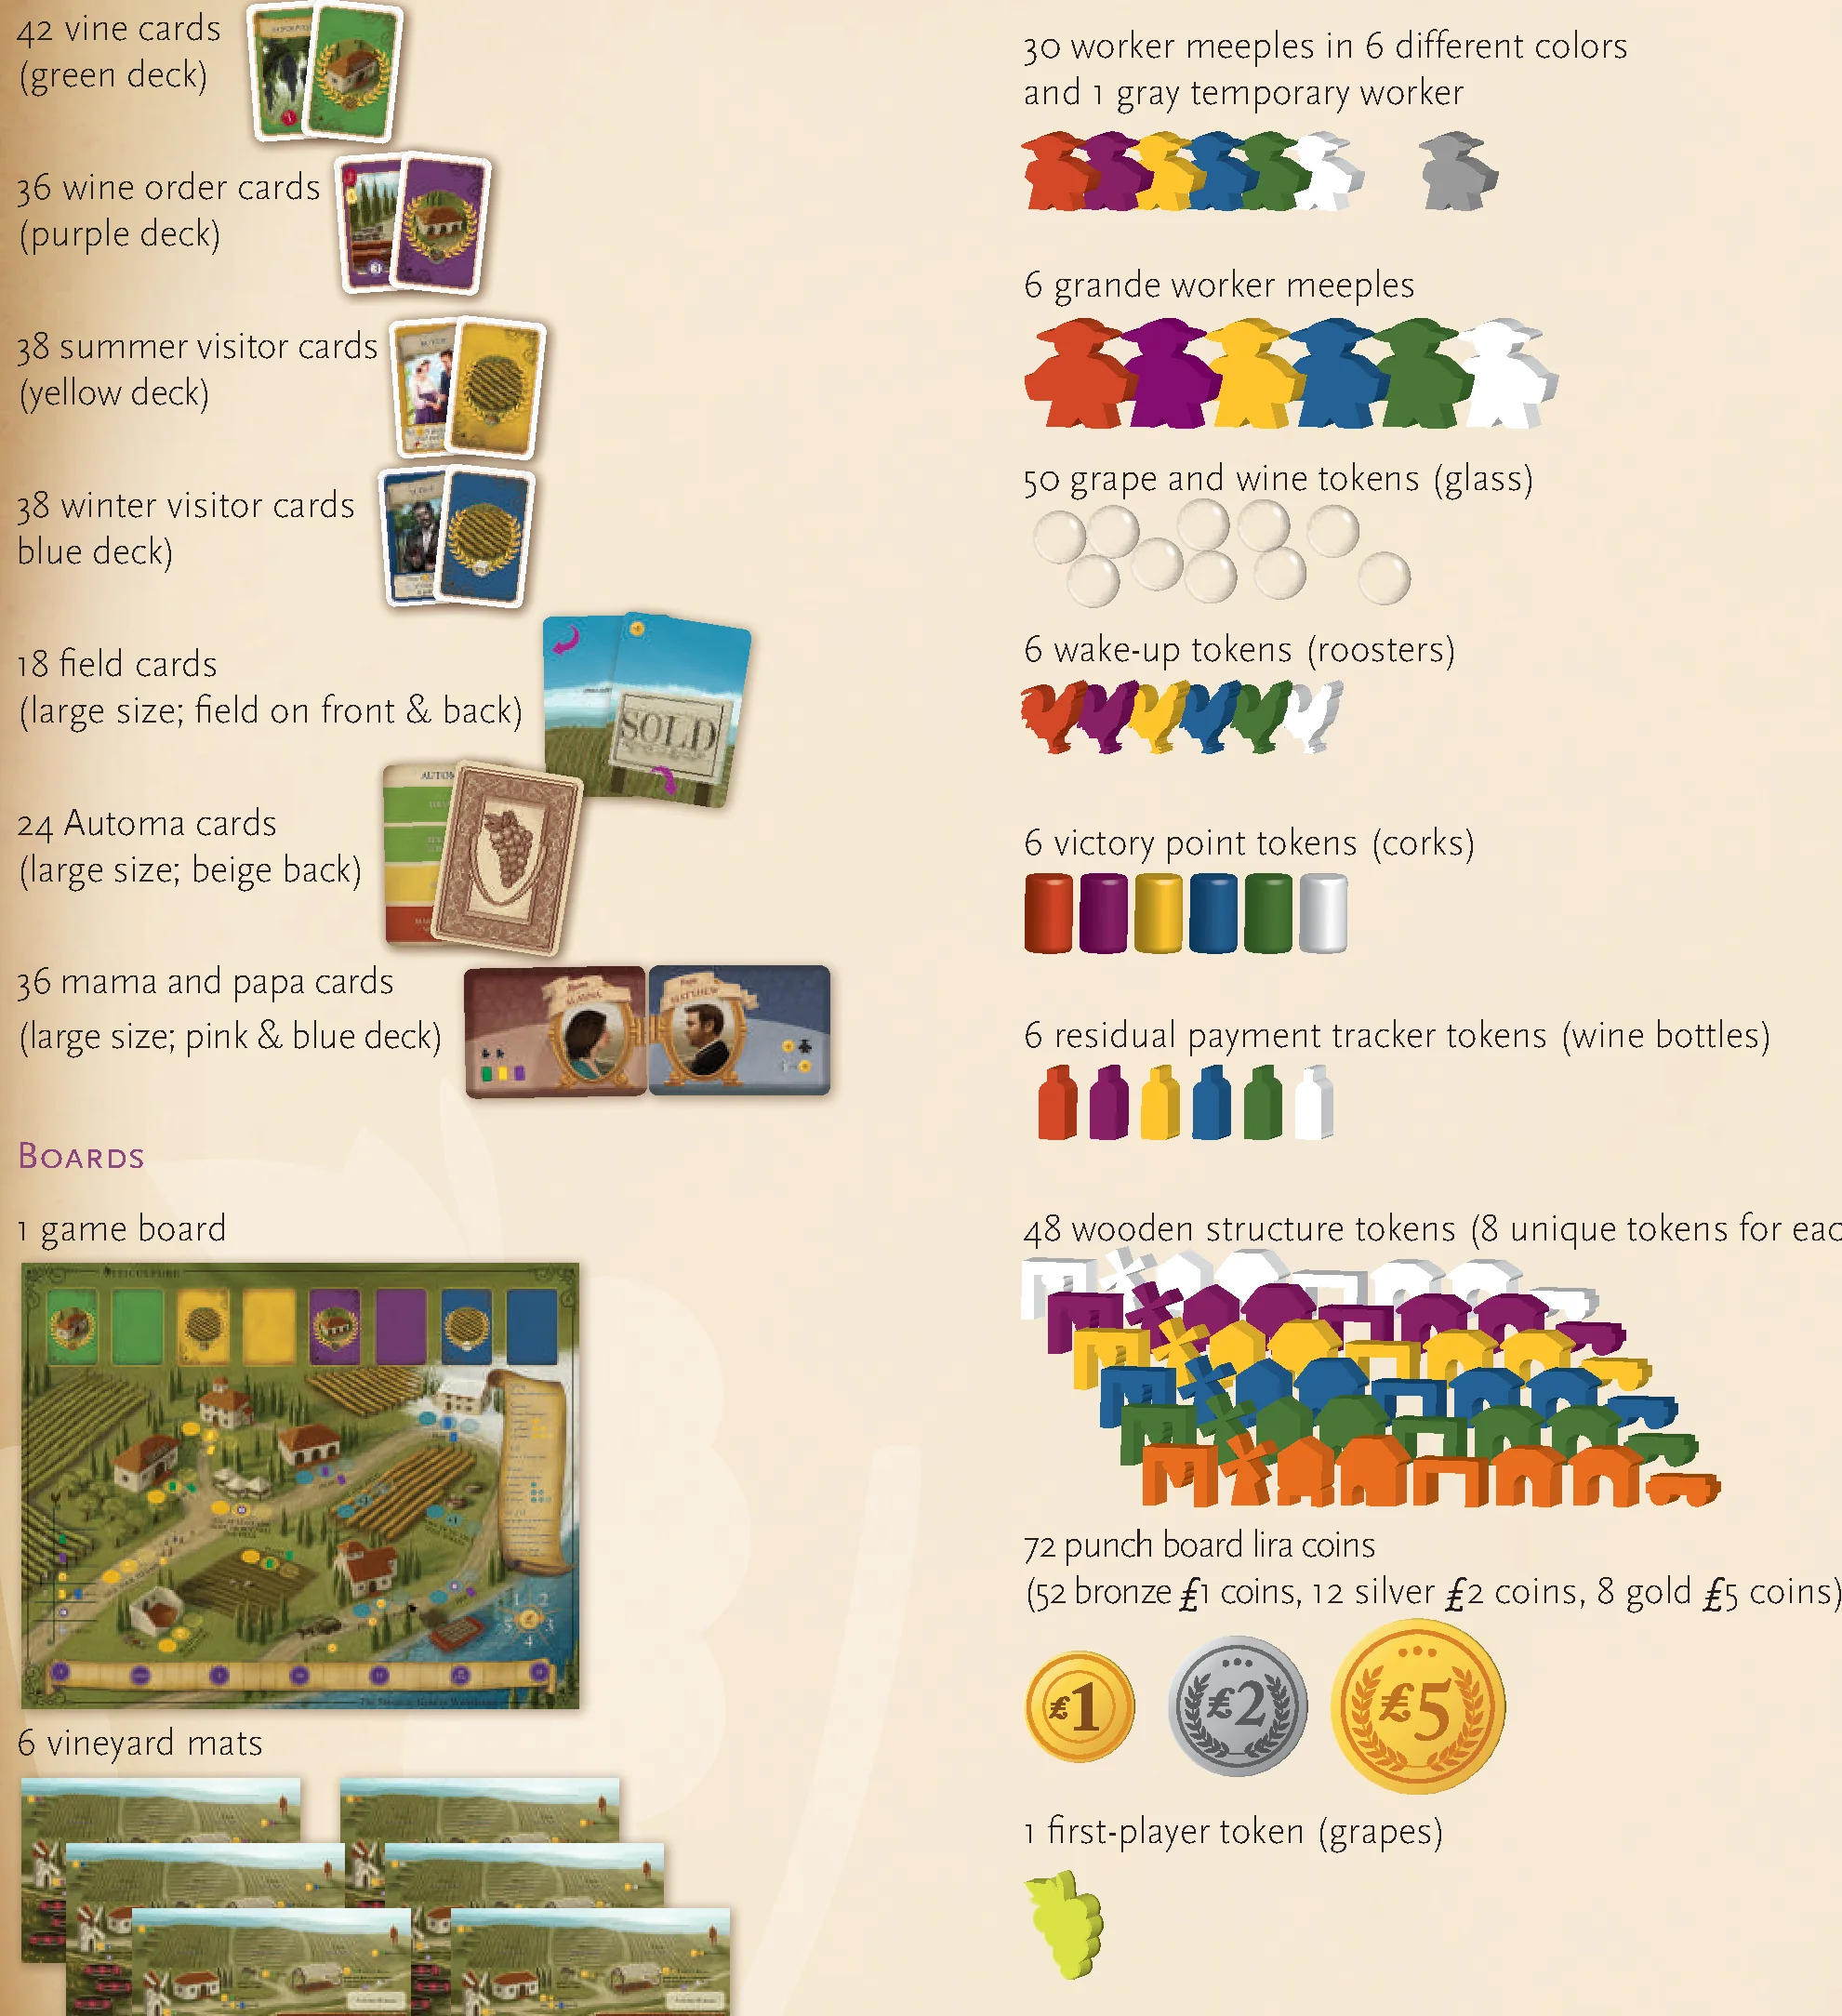
Cards (232 Total)
- 42 vine cards (green deck)
- 36 wine order cards (purple deck)
- 38 summer visitor cards (yellow deck)
- 38 winter visitor cards (blue deck)
- 18 field cards (large size; field on front & back)
- 24 Automa cards (large size; beige back)
- 36 mama and papa cards (large size; pink & blue deck)
Boards
- 1 game board
- 6 vineyard mats
Pieces
- 30 worker meeples in 6 different colors and 1 gray temporary worker
- 6 grande worker meeples
- 50 grape and wine tokens (glass)
- 6 wake-up tokens (roosters)
- 6 victory point tokens (corks)
- 6 residual payment tracker tokens (wine bottles)
- 48 wooden structure tokens (8 unique tokens for each color)
- 72 punch board lira coins (52 bronze 1 coins, 12 silver 2 coins, 8 gold 5 coins)
- 1 first-player token (grapes)
Rule Book & Quick-Reference Guide
Have a question while playing? Tweet it to @stonemaiergames with the hashtag #viticulture and we’ll help. Replacement parts are available for free upon request at stonemaiergames.com/replacement-parts.
Game Board Setup
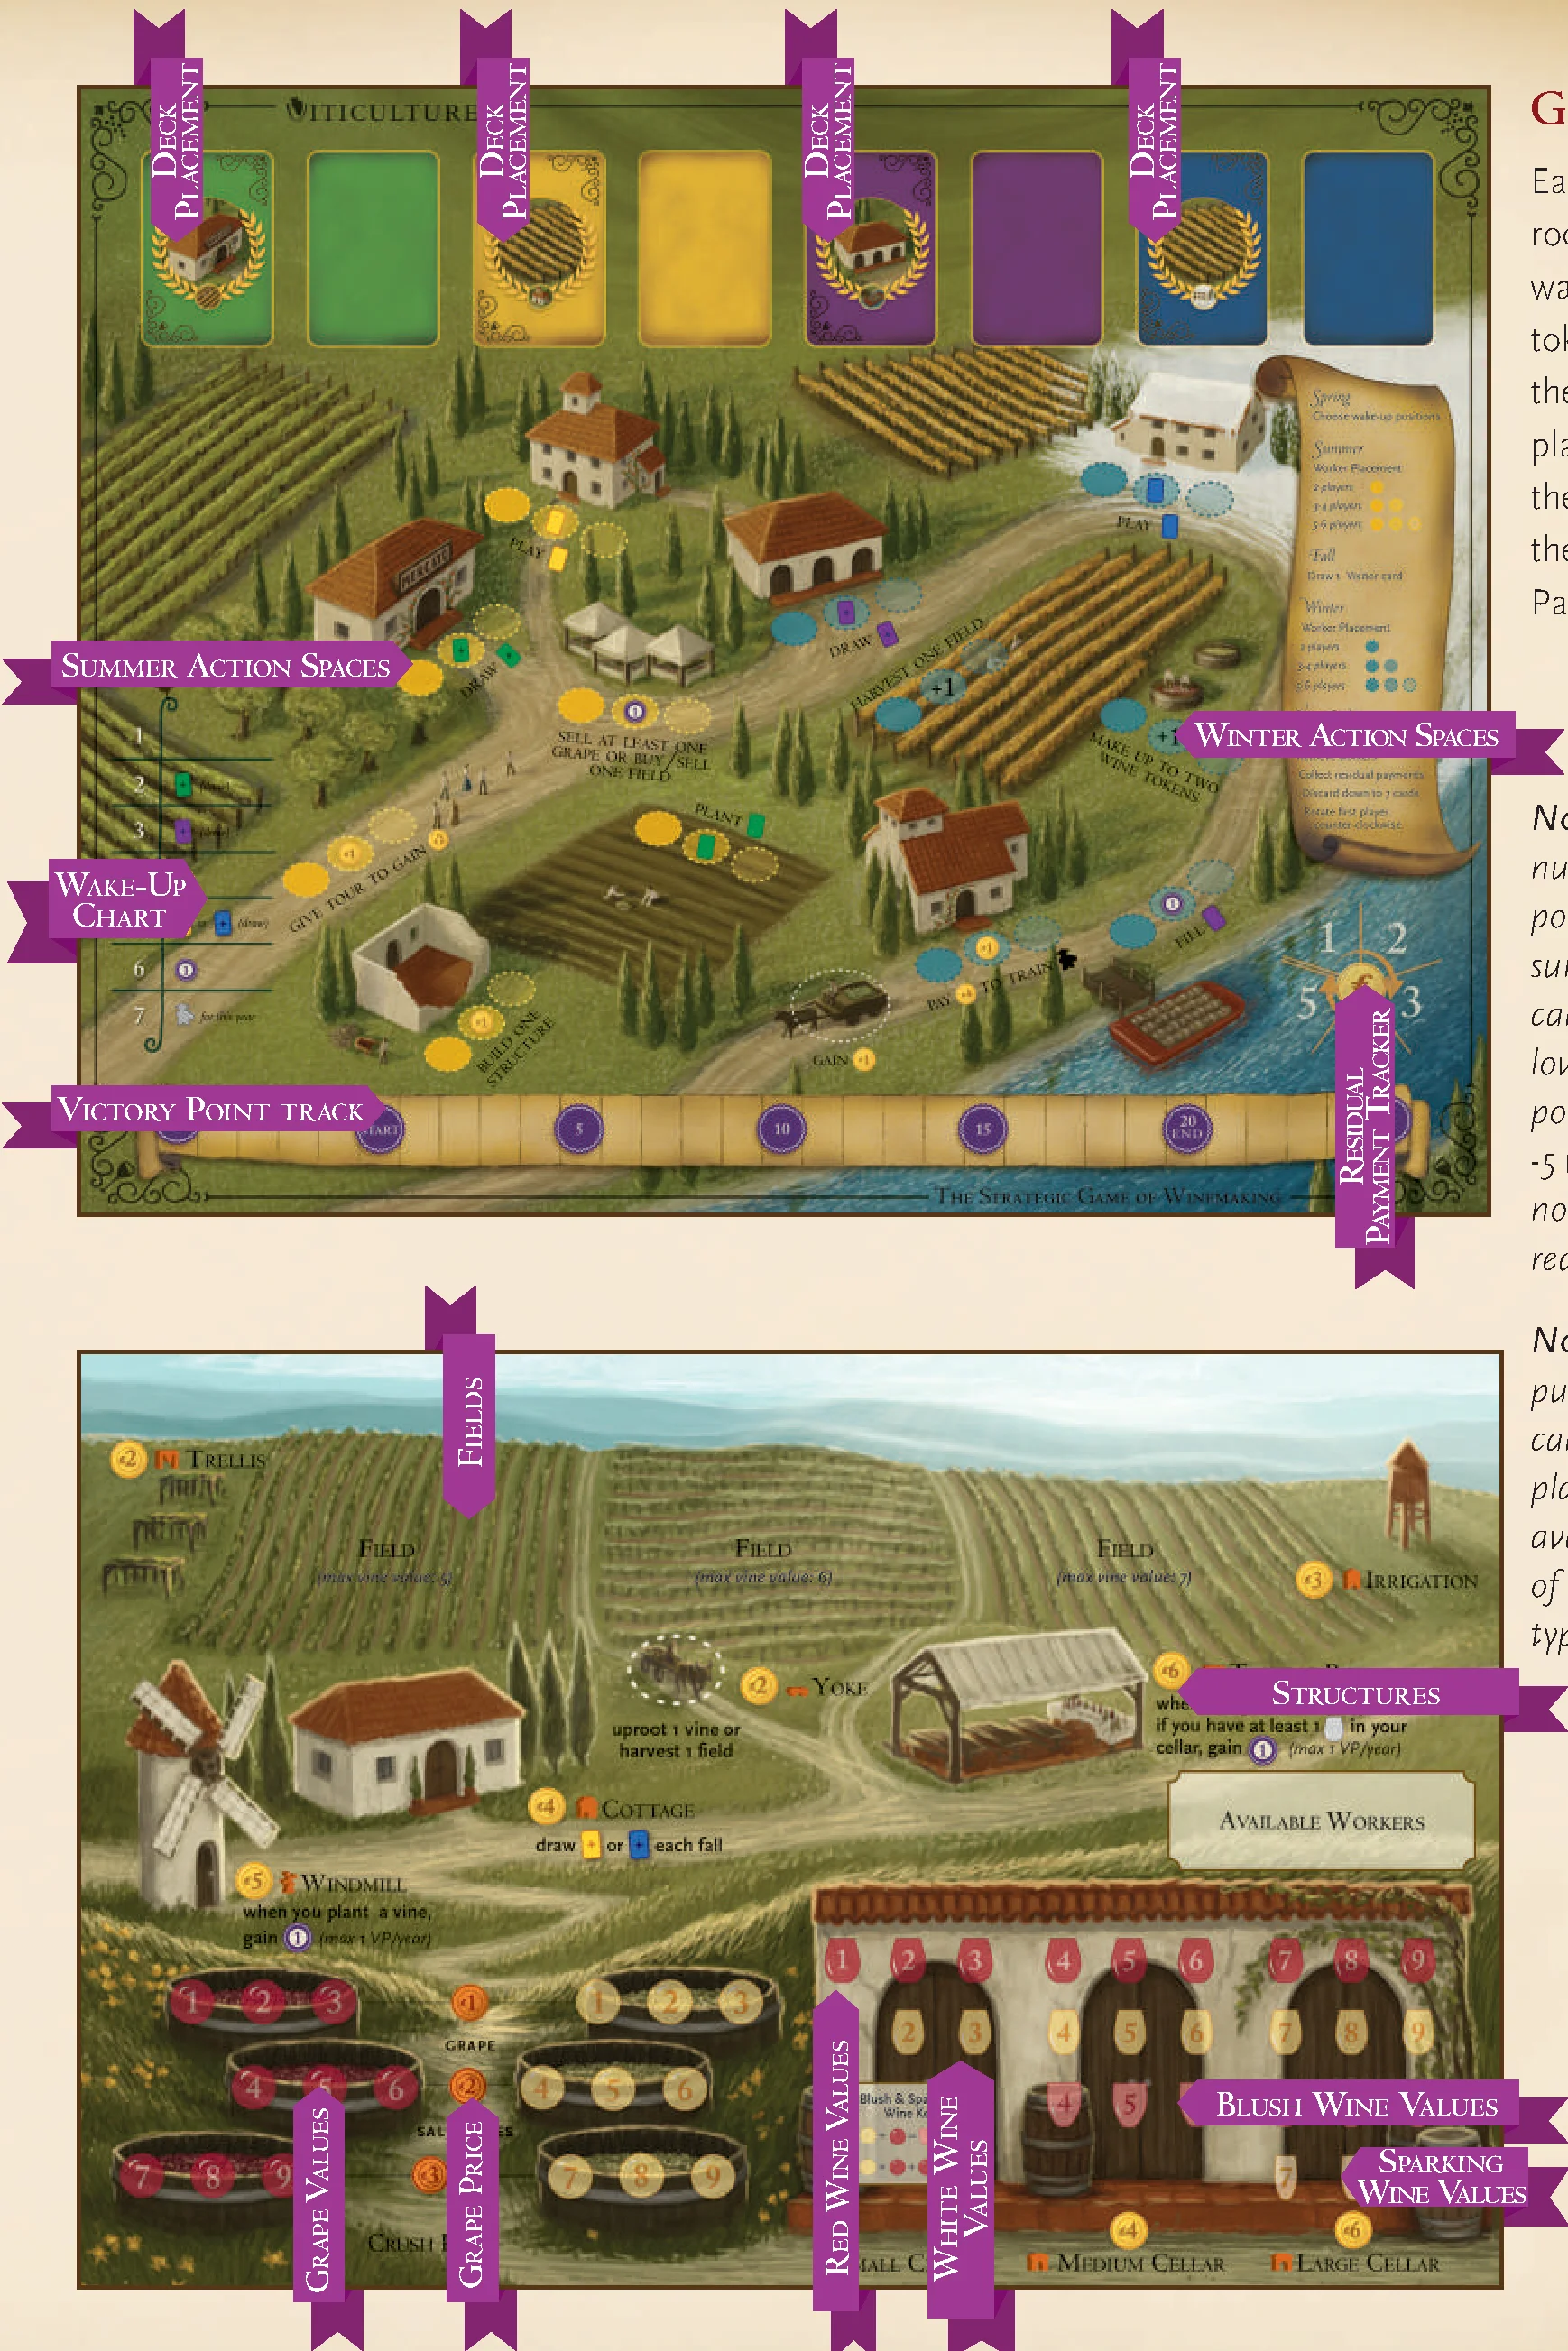
Each player places their rooster token above the wake-up chart and their cork token on the start space on the victory point track. Each player should also place their wine bottle token on the middle of the Residual Payment Tracker.
Note 1: There are negative numbers on the victory point track for a few of the summer and winter visitor cards. A player may not go lower than -5 on the victory point track. If a player has -5 victory points, he may not use a visitor card that requires losing more points.
Note 2: The following is public information and cannot be concealed: a player’s vineyard mat, available workers, amount of lira, and number and type of cards.
Vineyard & Resource Setup
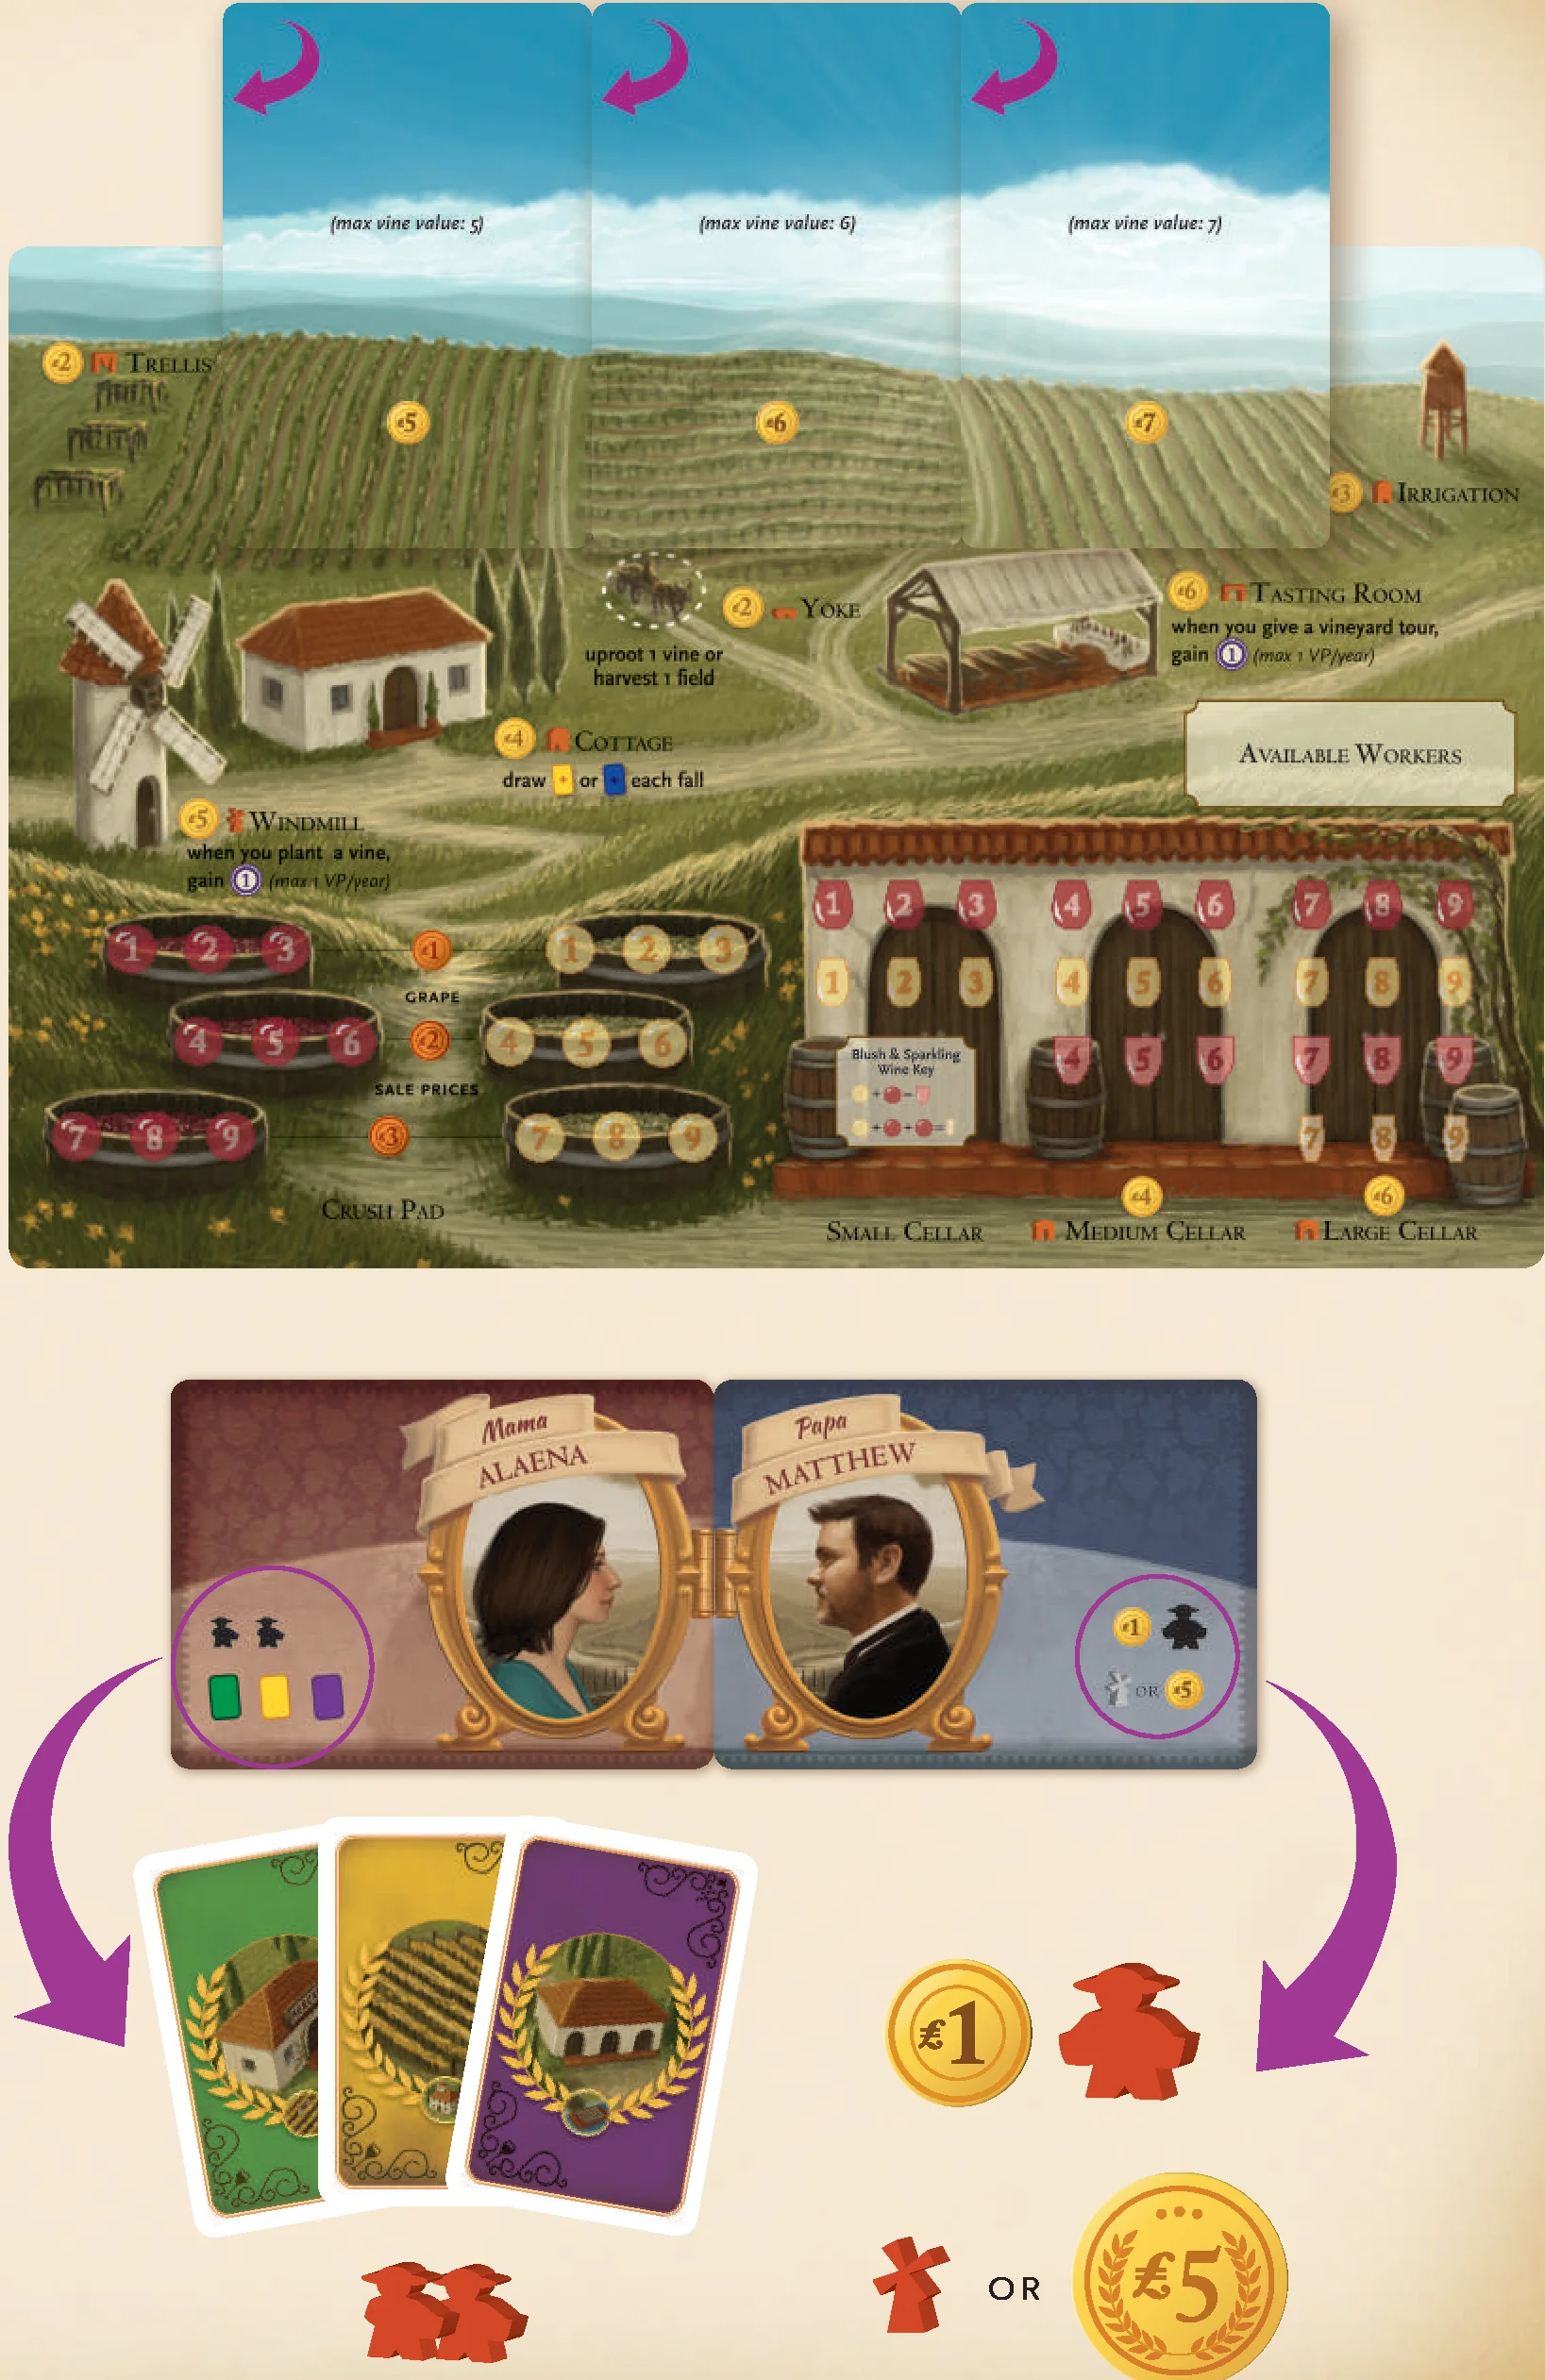
- Vineyard Mat: Each player receives a vineyard mat and 3 different field cards: 5, 6, and 7. Place them side by side (field side up) on the vineyard mat. Shuffle the 4 decks of small cards (green, yellow, purple, and blue) and place them on the board.
- Deck Maintenance: If any of the four decks are exhausted during play, immediately shuffle the discard pile and replace the deck. If the deck has been exhausted but no cards have been discarded, that deck is unavailable until more cards are discarded.
- First Player: Take all of the rooster tokens that have been claimed by players, shake them up in your hand, and randomly pick one. The player with that color is the first player and gets the first player token (grapes).
- Mamas and Papas: After randomly selecting the first player, shuffle the mama and papa cards and deal one face-up to each player. Each player’s starting resources are determined by their mama and papa cards.
- Advanced Variant: Some groups might prefer to let each player draw 2 mamas and 2 papas, then choose 1 of each.
- Every mama comes with 2 regular workers. Draw cards as indicated on your mama card to form your opening hand. Do this before gaining resources from your papa card.
- Every papa card comes with 1 grande worker, and most come with a certain amount of lira. Papa cards also give you a choice: start with a specific structure or gain a few extra lira. Players make this choice in clockwise order starting with the first player. Several papas offer an extra regular worker or a victory point instead of a structure.
- After all starting resources are accounted for, discard the mama and papa cards. They are only used while setting up the game.
Terminology
Throughout this rulebook, you will notice the terms value and price:
- Value refers to a grape’s worth when being turned into wine and the worth of a wine when filling an order.
- Price refers to the amount of money a grape will bring when sold. In Viticulture, grapes can be sold for immediate payments, while wine is “sold” via wine orders in exchange for victory points and residual payments.
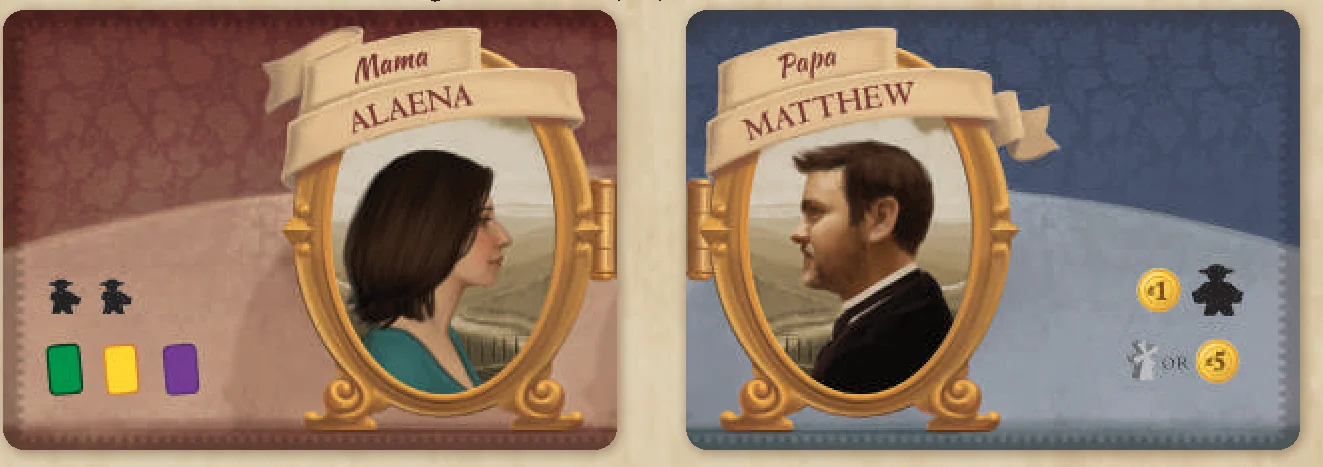
Example: You are dealt the following mama & papa cards: Mama Alaena and Papa Matthew. Thus you will begin the game with 2 regular workers, 1 vine card, 1 summer visitor card, 1 wine order card, 1 lira, 1 grande worker, and either a windmill or an additional 5 lira.
Seasons Overview
- Spring: Starting with the player who has the first player token and proceeding clockwise, each player will place their rooster on an open row of the wake-up chart to determine player order for the rest of the year.
- Summer: Starting with the top player on the wake-up chart and proceeding down the chart, each player will either place 1 worker on any available action space in the summer (yellow action spaces) and then immediately take that action, or that player may choose to save their remaining workers for the winter by passing. This cycle of turns continues until all players have passed.
- Fall: Starting with the top player on the wake-up chart and proceeding down the chart, each player will draw either a summer or winter visitor card.
- Winter: Starting with the top player on the wake-up chart and proceeding down the chart, each player will place 1 worker on any available action space in the winter (blue action spaces) and then immediately take that action. This cycle of turns continues until all players have played all of their workers.
- Year End: Players age their grape and wine tokens, return workers to their vineyard mats, collect residual payments, remove rooster tokens from the wake-up chart, and rotate the first-player token counter-clockwise. When any player reaches or exceeds 20 victory points, the game will finish at the end of the current year.
Worker Placement Rules
- A player may use each worker only once a year. Thus a worker placed in the summer cannot be used in the winter.
- A player may place 1 worker per turn.
- In a 3–6 player game, multiple spaces are available for each action. The worker you place may go on any unoccupied space, even if there are other workers (yours or opponents) on other spaces on the same action.
- Workers may only be placed on the current season’s action spaces.
- If a player passes, he may place no more workers that season.
- A player must take the action when placing a worker. For example, if a player chooses the “Plant vine” action, that player must plant a vine.
Scaling the Game Based on Number of Players
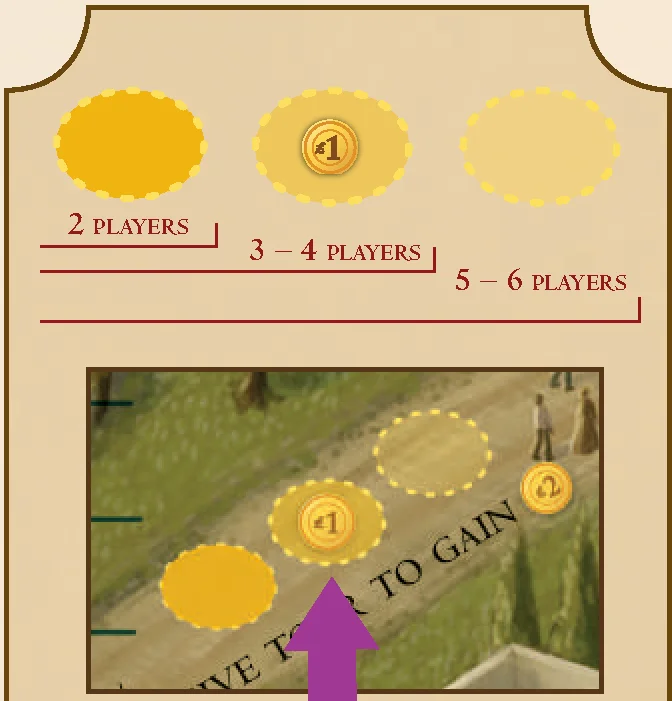
- In the 2-player game, only the left action space is available.
- For the 3–4 player game, the left and middle action spaces are available.
- For the 5–6 player game, all three action spaces are available.
These action spaces may be claimed in any order. Each action space can be occupied by only one worker.
Bonuses: Most actions have one action space with a special bonus. A player may take the bonus when placing a worker on an action space with an icon—1 lira, 1 card, +1, etc.—on it. A player may take the action and the bonus in any order. The action is mandatory and the bonus is optional. For example, a player cannot place a worker on the “Fill 1 wine order” bonus space to gain 1 VP without also filling a wine order.
Grande Worker Placement
The grande worker follows the rules for regular workers but also has a special ability: The grande worker may be placed on a fully occupied action on the board to perform that action.
- Multiple players may place their grande workers in this way.
- A grande worker placed on a bonus action space will give you the bonus (just like a regular worker); otherwise it does not give you a bonus.
Example: You are playing a 2-player game and the other player chooses to give a tour with regular worker to gain 2 lira. If you really need to give a tour, you may then place your grande worker on that action (on the art for that action, not an action space) to gain 2 lira as well.
Spring Actions
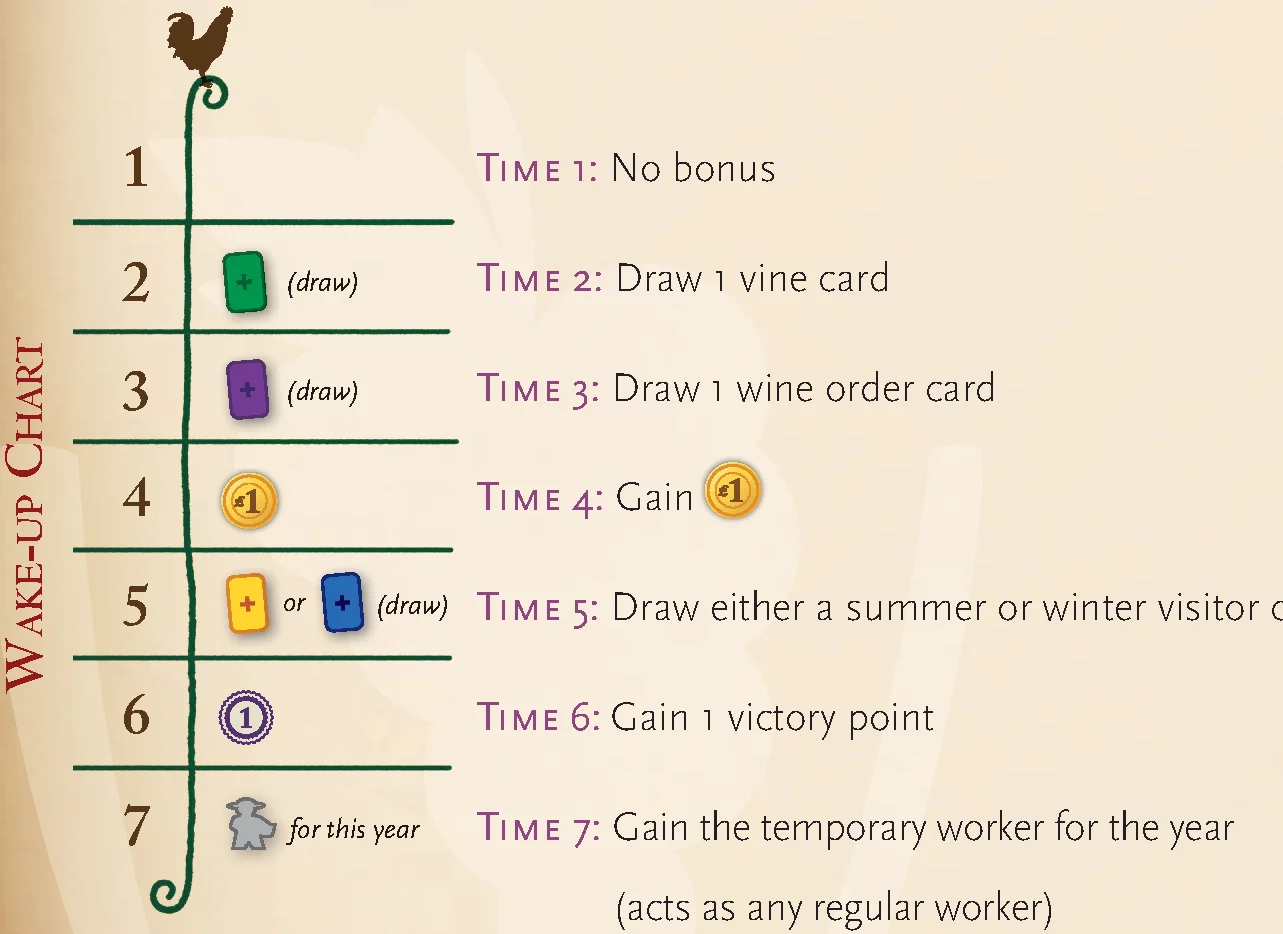
Wake-Up Chart: Starting with the player holding the first-player token and moving clockwise, each player places his/her rooster on an unoccupied wake-up row. The number represents how early that player wants his/her workers to wake up in the coming year. 1 is the earliest time and 7 is the latest. For workers, the later the better; for the vineyard owner, perhaps not.
- Time 1: No bonus
- Time 2: Draw 1 vine card
- Time 3: Draw 1 wine order card
- Time 4: Gain 1 lira
- Time 5: Draw either a summer or winter visitor card
- Time 6: Gain 1 victory point
- Time 7: Gain the temporary worker for the year (acts as any regular worker)
Helpful Tip: When a player passes during the summer, he will slide his rooster from the left to the right on the wake-up chart for a clear visual of the players that remain active. Then as players pass during the winter, they will slide their roosters back to the left. This will help players see who has yet to pass in the summer and winter.
Note: The first player to act in the summer, fall, and winter reverts back to the wake-up chart order from the spring of that year. Thus, in the example below, even if Player 2 (row 4 on the wake-up chart) is the last player to act in the summer, he will be the first player to act in the fall, and then again in the winter.
Example: Player 1, the player with the first-player token, chooses the 6 slot and gains a point on the victory point track. Player 2 chooses the 4 row and gains 1 lira. So, even though Player 1 has the first-player token, for the rest of the year Player 2 will go first and Player 1 will go second based on where each player placed their rooster on the wake-up chart.
Summer Actions
Summertime in the game is the time to build your vineyard, go to market, plant vines, put your summer visitors to work, show off your vineyard, and sell grapes.
- Gain 1 Lira: In the summer or winter, a player may place a worker on the cart at the bottom of the board to gain 1 lira. Placing 1 worker here counts as a player’s turn. Any number of workers may be placed on this action over the course of the year by any number of players.
- Uproot: Some visitor cards and the Yoke action give players the option to uproot a vine card. To do so, a player selects a planted vine card from their field and returns it to their hand. This action is rarely used; it’s there as a backup in case a player needs to reconfigure their fields.
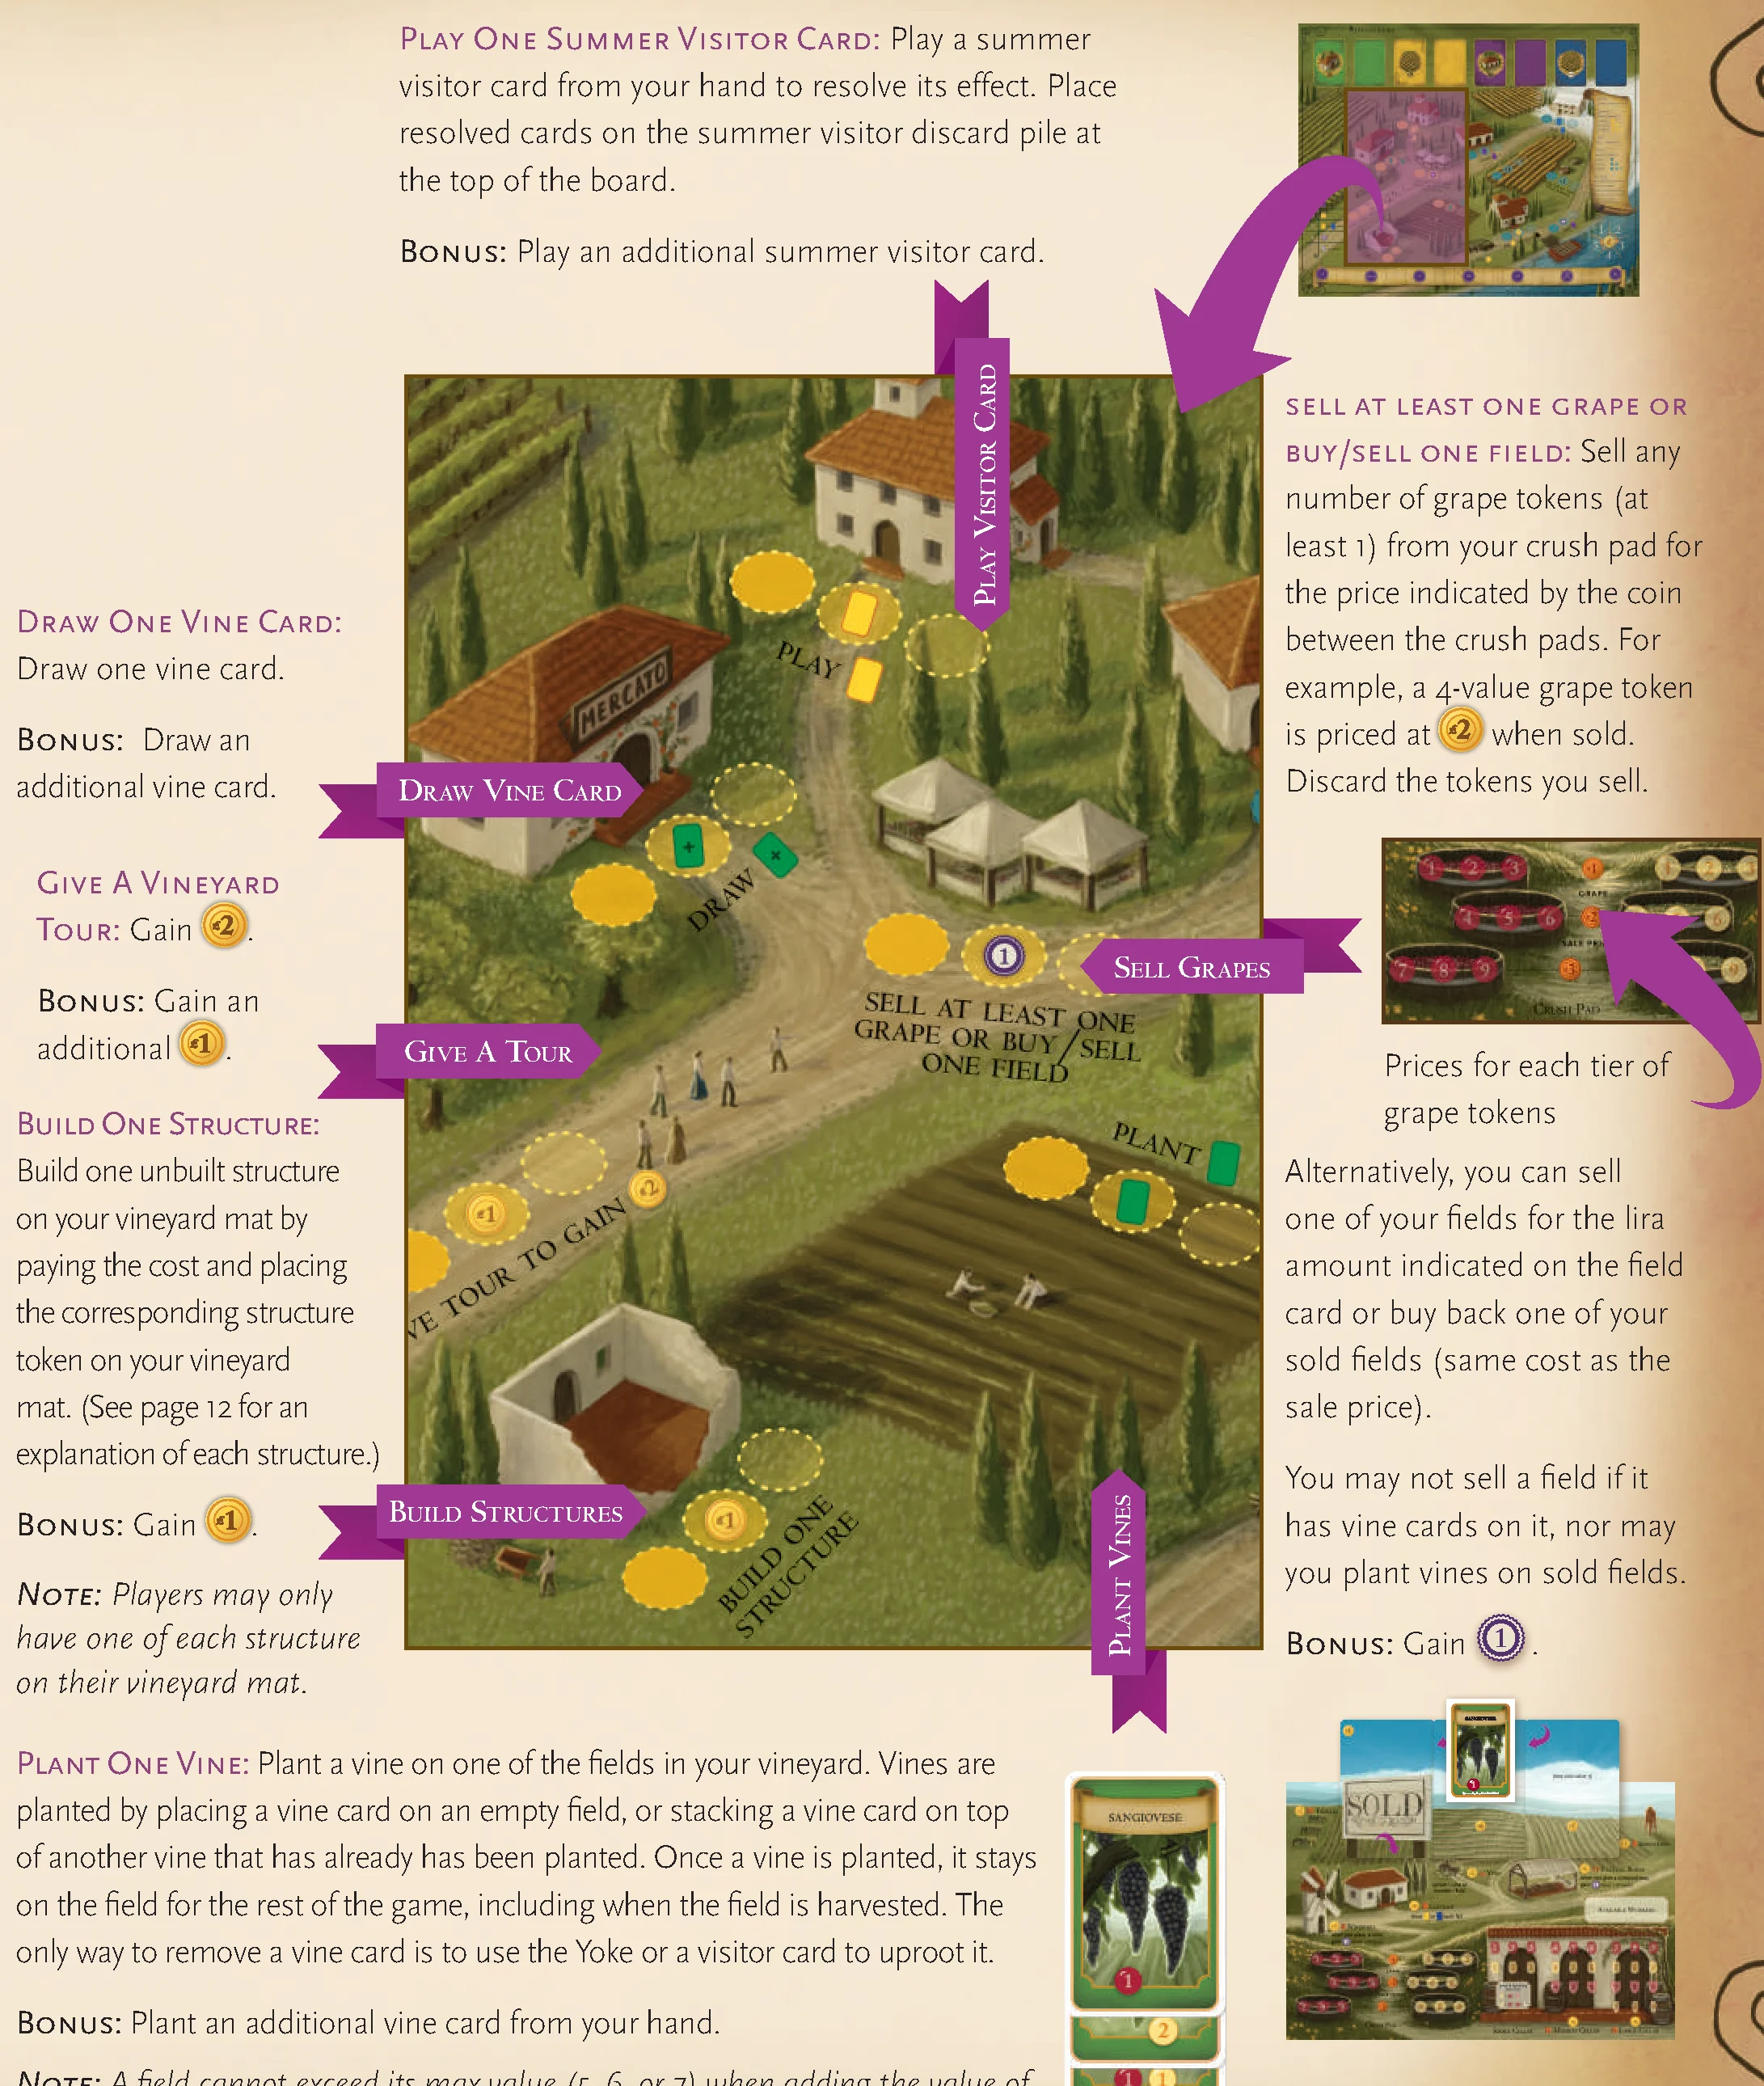
- Play One Summer Visitor Card: Play a summer visitor card from your hand to resolve its effect. Place resolved cards on the summer visitor discard pile at the top of the board.
Bonus: Play an additional summer visitor card. - Draw One Vine Card: Draw one vine card.
Bonus: Draw an additional vine card. - Give A Vineyard Tour: Gain 2 lira.
Bonus: Gain an additional 1 lira. - Build One Structure: Build one unbuilt structure on your vineyard mat by paying the cost and placing the corresponding structure token on your vineyard mat. (See Structures for an explanation of each structure.)
Bonus: Gain 1 lira.
Note: Players may only have one of each structure on their vineyard mat. - Plant One Vine: Plant a vine on one of the fields in your vineyard. Vines are planted by placing a vine card on an empty field, or stacking a vine card on top of another vine that has already has been planted. Once a vine is planted, it stays on the field for the rest of the game, including when the field is harvested. The only way to remove a vine card is to use the Yoke or a visitor card to uproot it.
Bonus: Plant an additional vine card from your hand.
Note: A field cannot exceed its max value (5, 6, or 7) when adding the value of the cards on the field together. - Sell At Least One Grape or Buy/Sell One Field: Sell any number of grape tokens (at least 1) from your crush pad for the price indicated by the coin between the crush pads. For example, a 4-value grape token is priced at 2 lira when sold. Discard the tokens you sell.
Alternatively, you can sell one of your fields for the lira amount indicated on the field card or buy back one of your sold fields (same cost as the sale price). You may not sell a field if it has vine cards on it, nor may you plant vines on sold fields.
Bonus: Gain 1 victory point.
Vine Deck Varieties and Values
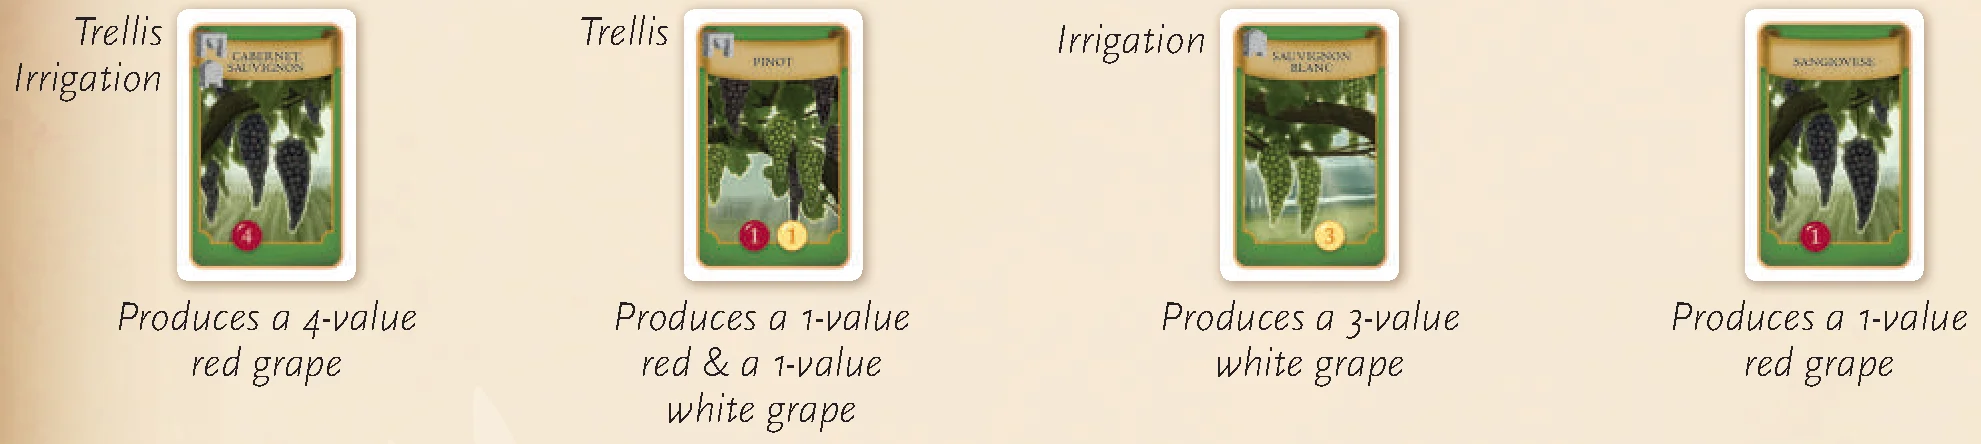
Each vine card has a circle with a number representing the value of grape the vine will yield. Some cards have structures in the upper-left corner (irrigation, trellis, or both). The depicted structures must be built before the vine can be planted.
| Variety | Color | Value | Total Cards | Prerequisite |
|---|---|---|---|---|
| Sangiovese | Red | 1 | 4 | None |
| Malvasia | White | 1 | 4 | None |
| Pinot | Red & White | 1 each | 6 | Trellis |
| Syrah | Red | 2 | 5 | Trellis |
| Trebbiano | White | 2 | 5 | Trellis |
| Merlot | Red | 3 | 5 | Irrigation |
| Sauvignon Blanc | White | 3 | 5 | Irrigation |
| Cabernet Sauvignon | Red | 4 | 4 | Trellis & Irrigation |
| Chardonnay | White | 4 | 4 | Trellis & Irrigation |
Fall Actions
Fall is a time to invite helpful visitors to your vineyard. These visitors will arrive in the summer or the winter to provide a helpful hand on your vineyard.
In wake-up order, without placing a worker, each player draws a summer or winter visitor card. Do not play this card (you may only play visitor cards on the corresponding actions in the summer and winter).
Any player with a cottage may draw a summer or winter visitor card in addition to the first visitor card they drew in the fall.
Winter Actions
Winter is the time to reap what you have sown, turn grapes into wine, find out which wines are in demand, train new workers, put winter visitors to work, and fill wine orders.
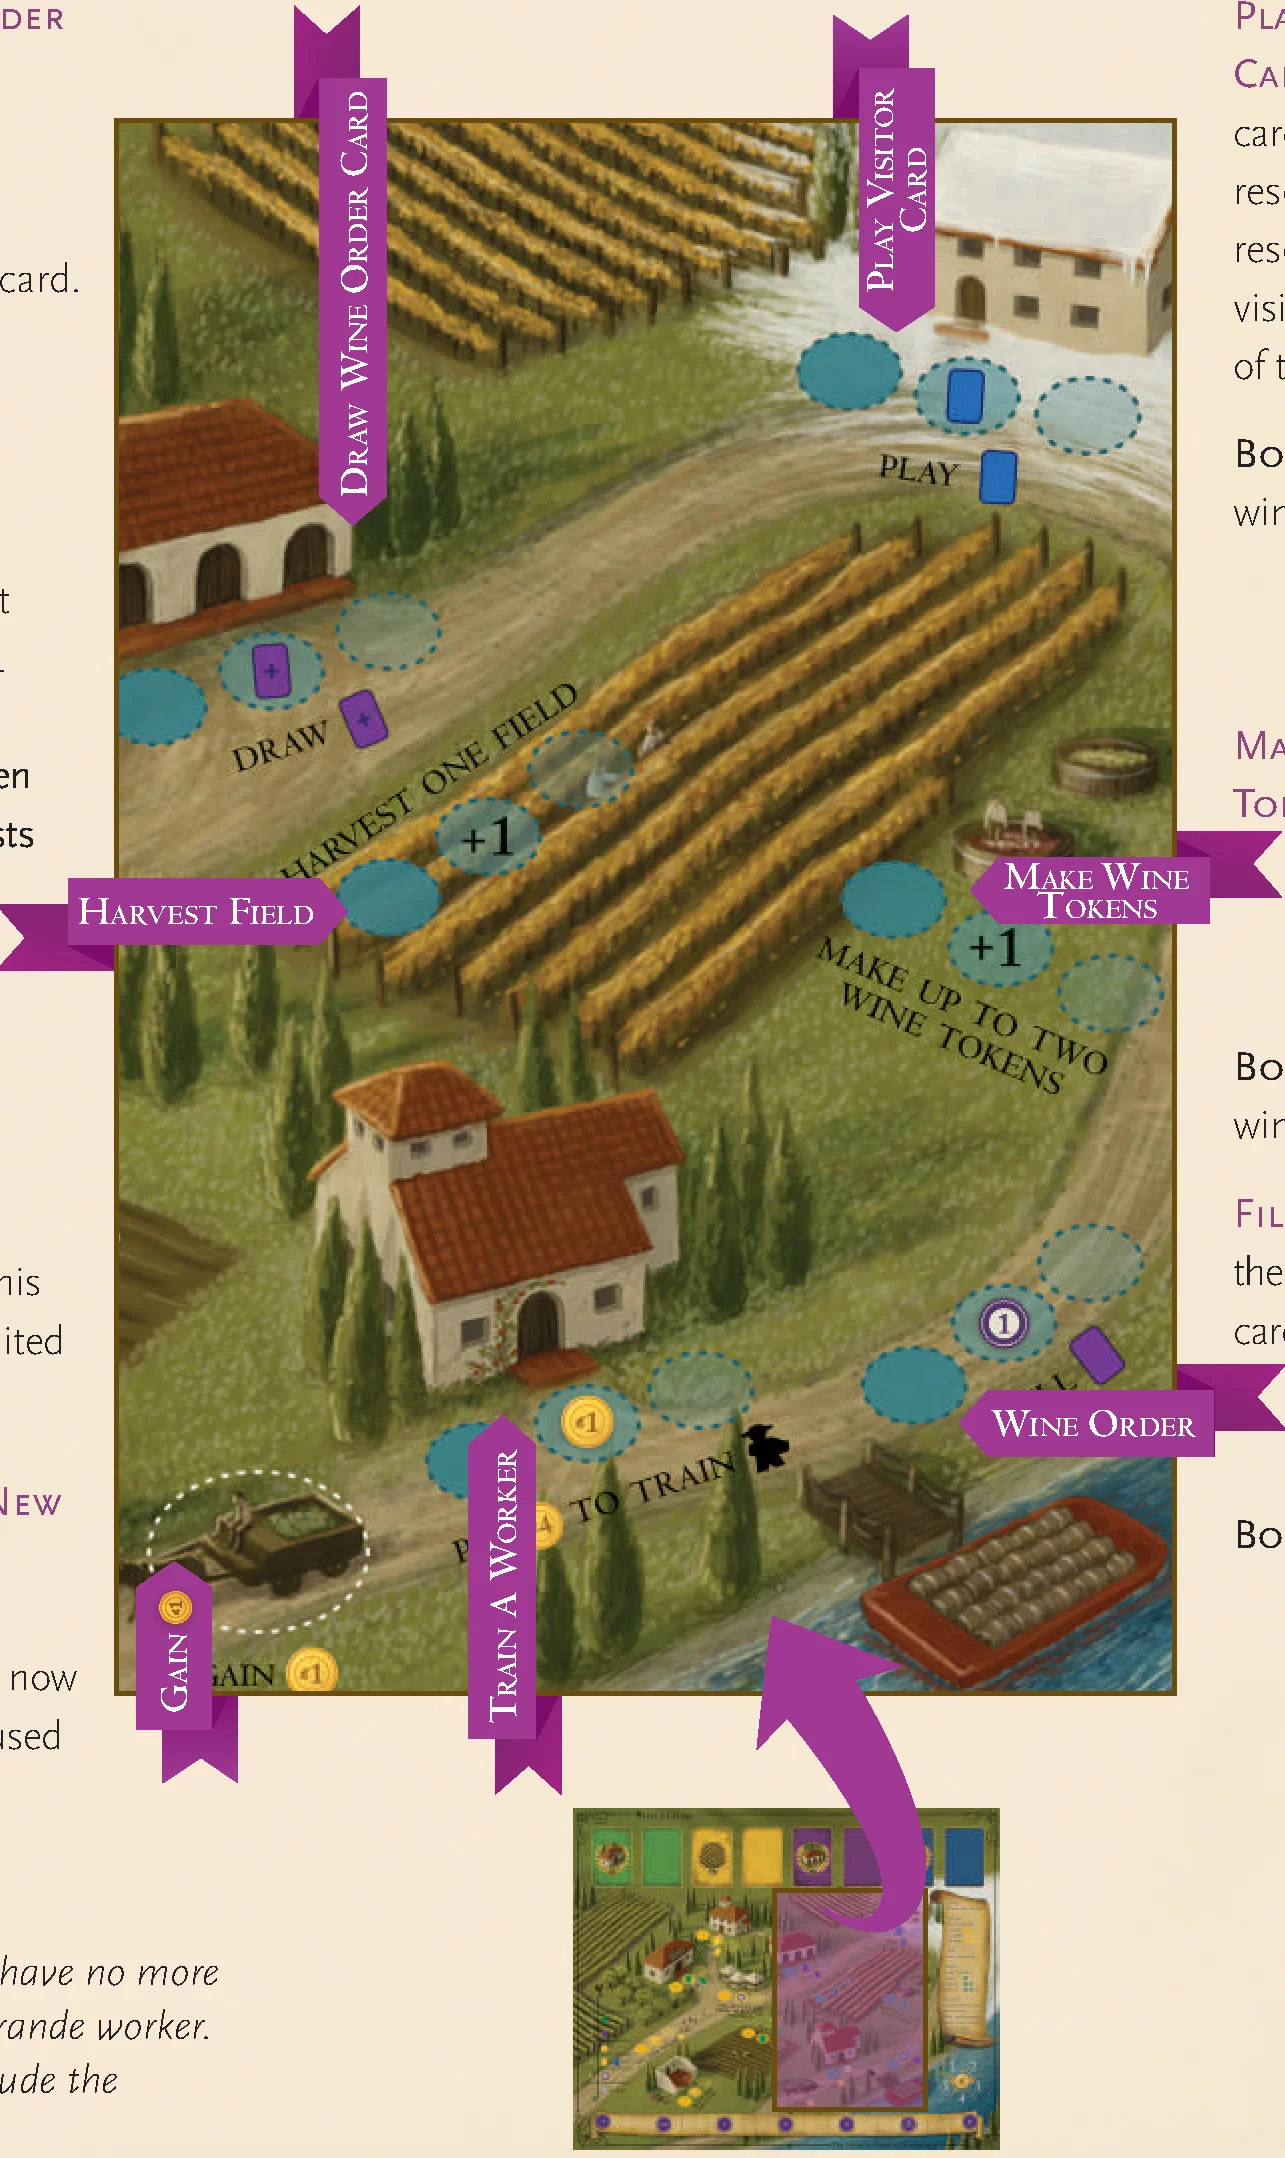
- Draw One Wine Order Card: Draw one wine order card.
Bonus: Draw an additional wine order card. - Harvest One Field: Choose one field and add grape tokens to the crush pad based on that field’s yield (see Harvesting Fields for details). Vine cards remain on the field when harvesting—viticulturists do not remove vines from the ground when they pick grapes.
Bonus: Harvest an additional field. - Gain 1 Lira: Gain 1 lira. This action space is not limited to 1 worker.
- Pay 4 Lira to Train a New Worker: Place a new worker near this action space to show that it is now trained but cannot be used until the following year.
Bonus: Gain 1 lira.
Note: A player may have no more than 5 workers and 1 grande worker. This limit does not include the temporary worker. - Play One Winter Visitor Card: Play a winter visitor card from your hand to resolve its effect. Place resolved cards on the winter visitor discard pile at the top of the board.
Bonus: Play an additional winter visitor card. - Make Up to Two Wine Tokens: Turn grapes on the crush pad into wine (see Making Wine for more details).
Bonus: Make 1 extra wine token. - Fill One Wine Order: Fulfill the criteria on a wine order card in your hand and then discard it (see Filling Wine Orders for details).
Bonus: Gain 1 victory point.
Harvesting Fields
When a player harvests a field, they collect grape tokens from the vine cards on that field.
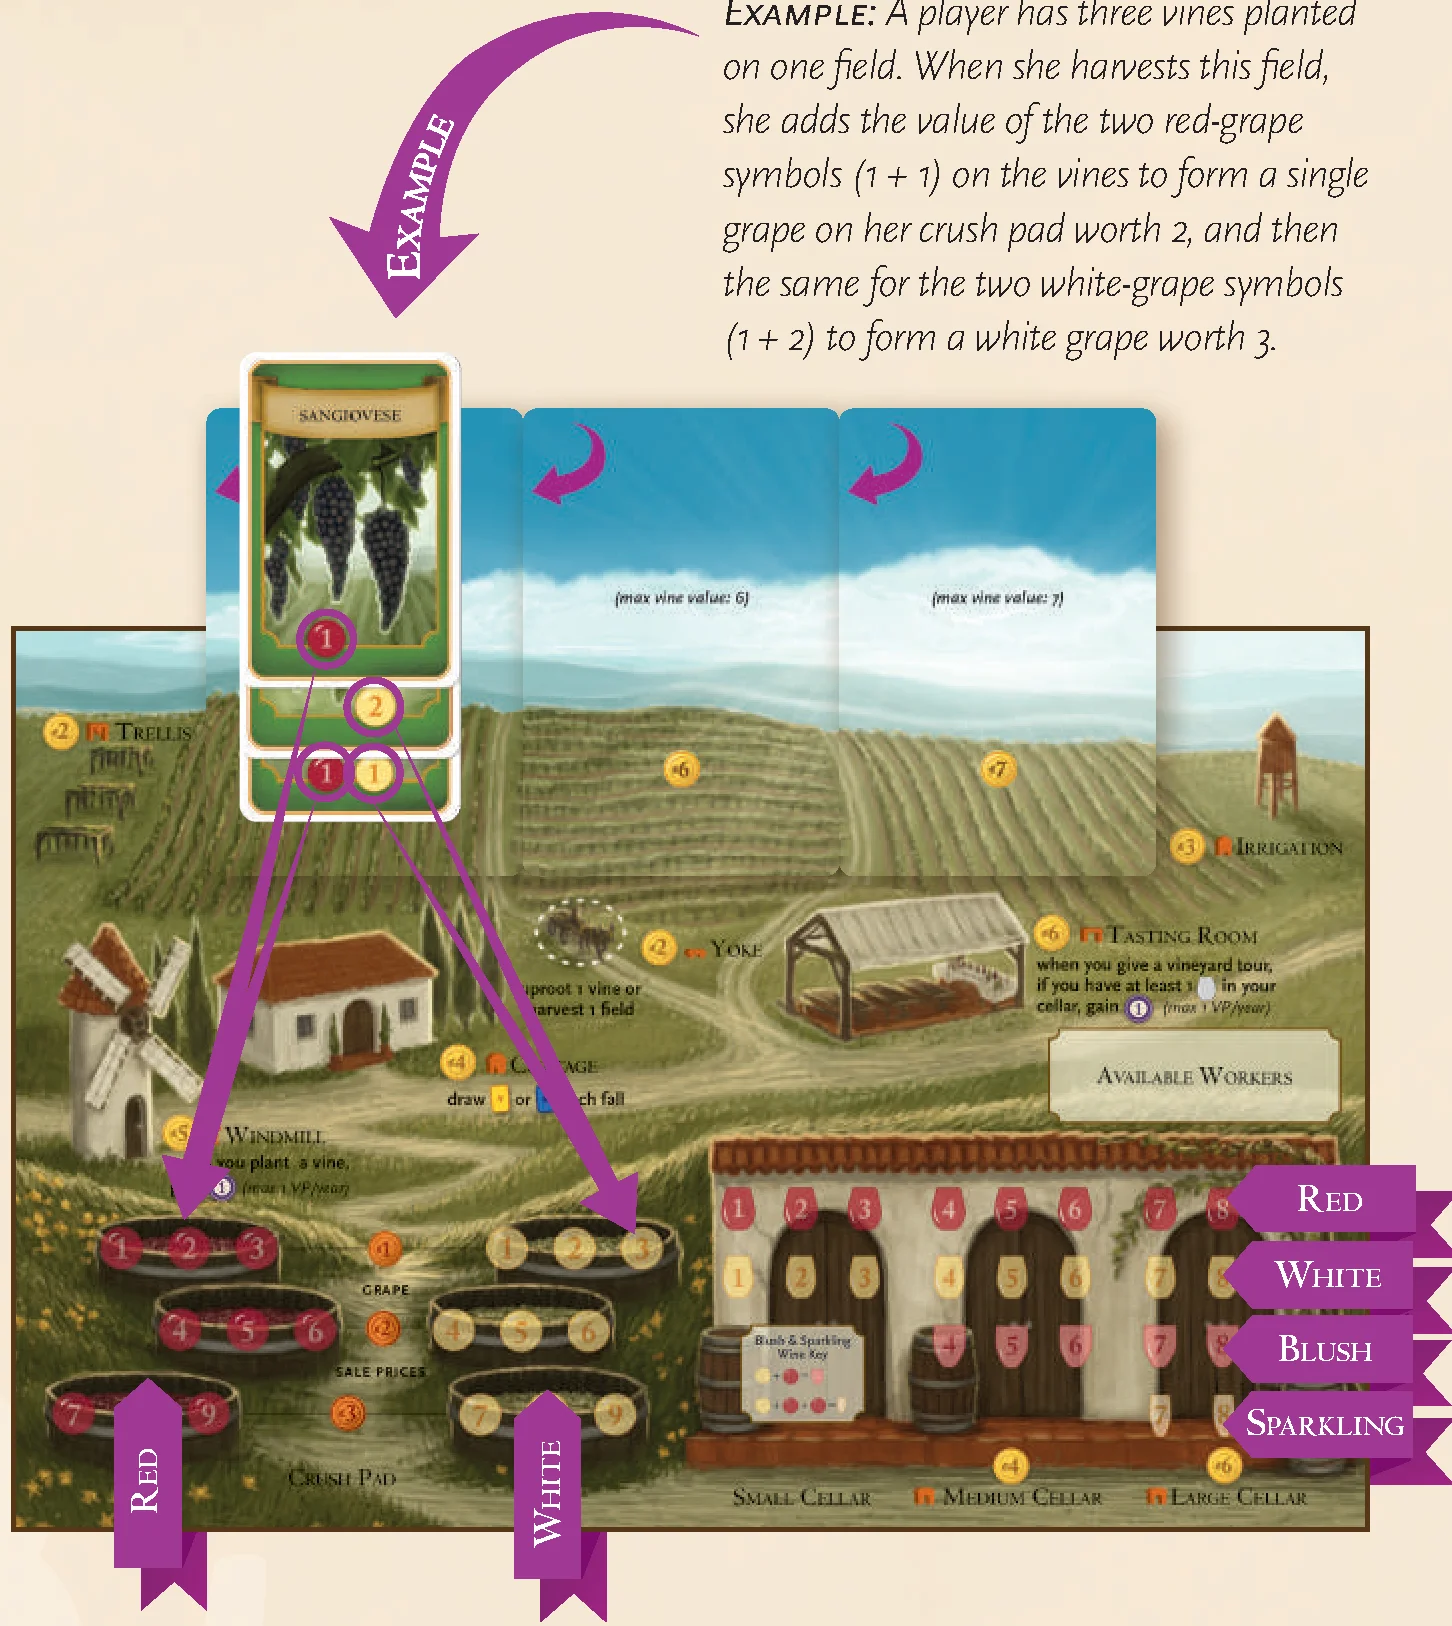
To harvest a field, add the total value of all red grape icons on the vine to create 1 red grape token and then add the total value of all white grape icons on the vine to create 1 white grape token on your crush pad. The vine cards remain on the field.
- Note 1: Each field can only be harvested once per year.
- Note 2: Each grape icon on the crush pad can fit exactly 1 grape token. If the grape icon already has a token on it when you harvest a grape at that value, you must devalue the grape token to the next available lowest icon. Thus if the 4-value white grape icon on your crush pad already has a token on it when you harvest a field yielding a 4-value white grape, the new token would instead go on the 3-value white icon on the crush pad (if it’s empty; otherwise to the 2-value icon, etc).
Example: A player has three vines planted on one field. When she harvests this field, she adds the value of the two red-grape symbols (1 + 1) on the vines to form a single grape on her crush pad worth 2, and then the same for the two white-grape symbols (1 + 2) to form a white grape worth 3.
Making Wine
Make Up to 2 Wine Tokens: Players make wine by converting grapes on their crush pads into wine tokens. Low-value red and white wine tokens can be created when a player owns only a small cellar, but the cellar must be upgraded to create blush wine, sparkling wine, and higher-value red and white wine.
When a player makes more than 1 wine token, the wine he makes may be the same type of wine or different types.
- Red Wine: Move 1 red grape token to the corresponding space on the cellar. For example, a 3-value red grape becomes a 3-value red wine.
- White Wine: Move 1 white grape token to the corresponding space on the cellar.
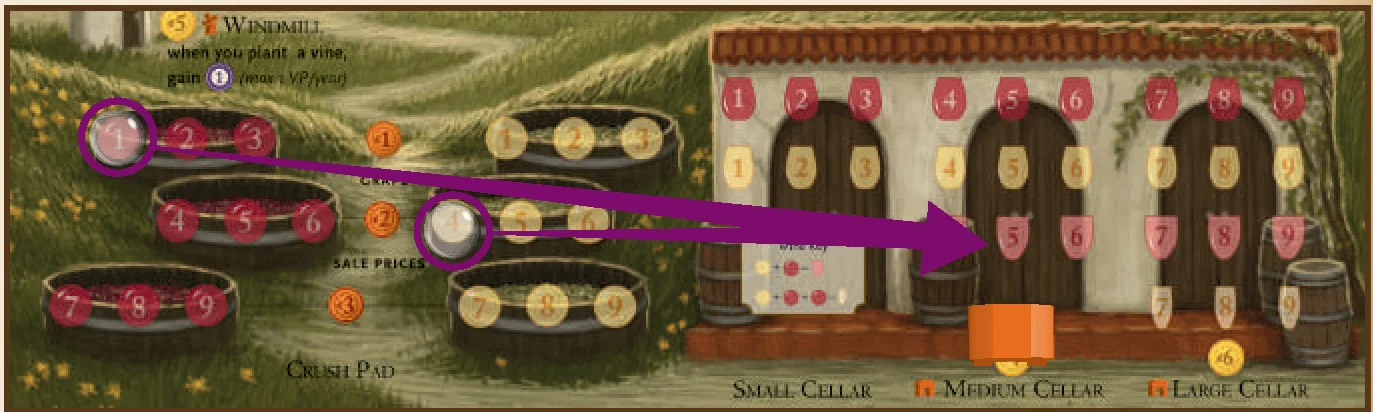
- Blush: Combine 1 red grape token and 1 white grape token to make 1 blush wine token equal to the combined values of the grapes. For example, a 1-value white grape plus a 4-value red grape creates a 5-value blush wine.
- Sparkling: Combine 2 red grape tokens and 1 white grape token to make 1 sparkling wine token equal to the grape value.
- Note 1: Discard excess tokens used to create blush or sparkling wine.
- Note 2: Players must build the appropriate cellar to house any wines, blushes, or sparkling wines above a value of 3 and 6.
- Note 3: Each wine icon on the cellar can fit exactly 1 wine token. This follows the same rules as explained in Note 2 above (devaluation to the next lowest available slot).
- Note 4: Once in the cellar, wine tokens may never be combined.
- Note 5: A savvy player will make wine strategically based on the cellars he owns and the wine orders in his hand. Grapes in Viticulture age just like wine!
Example 1: A player decides to make 2 red wine tokens, but he doesn’t have the medium cellar yet. The 1-value red grape becomes a 1-value red wine, and the 4-value red grape is devalued to become a 3-value red wine.
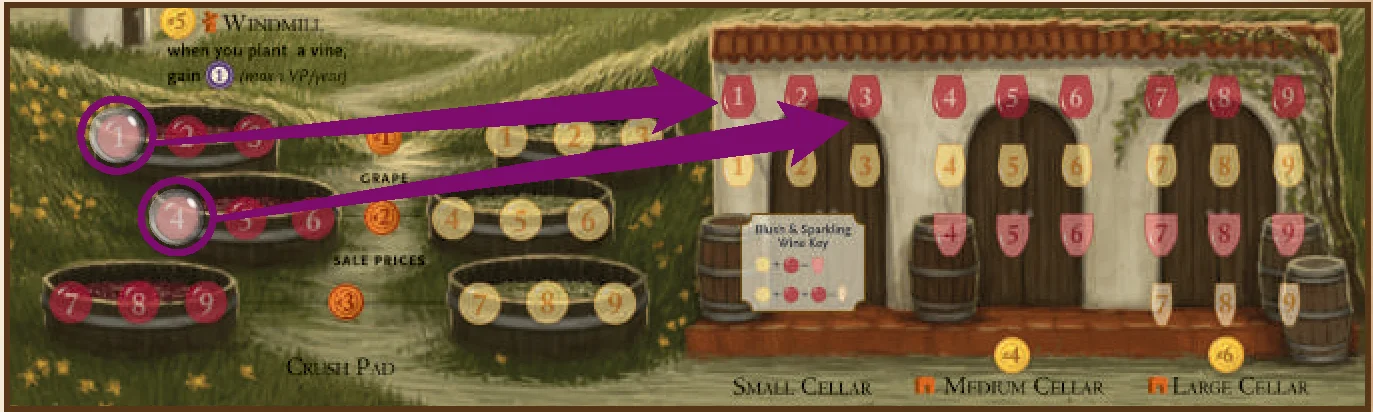
Example 2: The player decides to make a blush wine token, so he combines a red and a white grape to form a single blush wine token equal to their cumulative value. He can only do this because he owns a medium cellar.
Filling Wine Orders
To fill a wine order, place a worker on the “fill one wine order” action. There are also some visitor cards that enable you to fill a wine order.
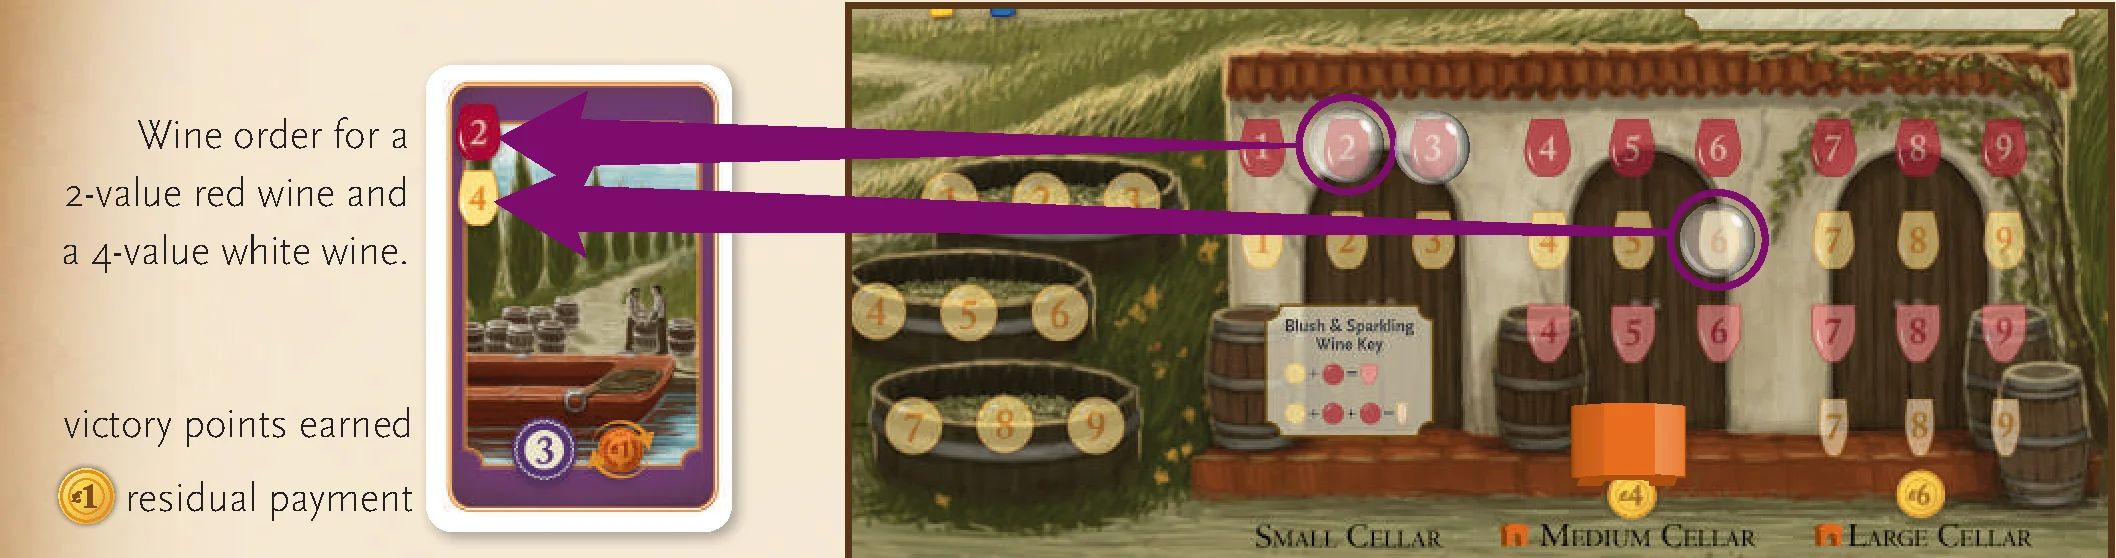
- Select and reveal a wine order card from your hand. The card shows one or more wine token icons with numbers in them. These are the minimum values of the wine tokens you must discard from your cellar to fill this wine order.
- After removing those wine tokens from your vineyard mat, gain victory points and a residual lira benefit as indicated at the bottom of the card (move your token on the residual payment tracker).
- Discard the wine order card.
Example: This wine order card requires a red wine token worth at least 2 and a white wine worth at least 4. To fill this order, the player reveals the wine order card, removes exactly one red wine token worth at least 2 and exactly one white wine token worth at least 4 from his cellar, gains 3 points on the victory point track, and moves up 1 on the residual payment tracker. The player then discards the wine order card.
Residual Payments
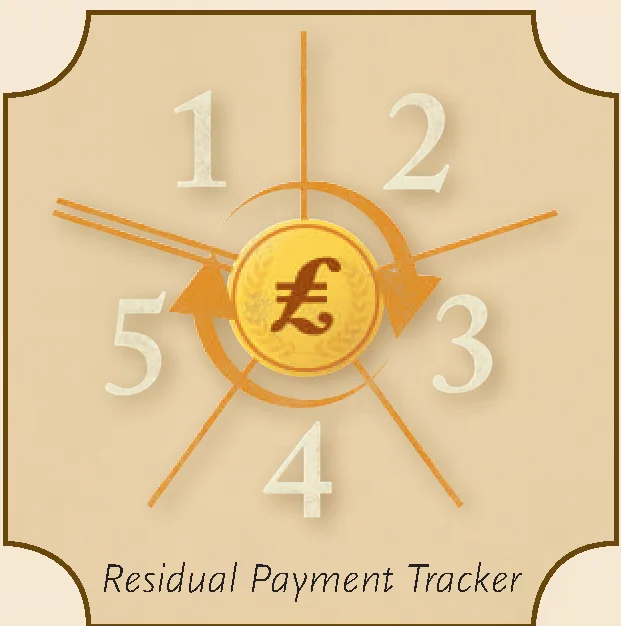
Players keep track of residual payments from wine orders on the residual payment tracker. All players begin the game with their wine bottle tokens on the lira symbol in the middle of the residual payment tracker.
- When a player fills a wine order, that player moves his residual token up on the track based on the lira amount on the wine order card. It remains in that position—do not reset it.
- At the end of each year, each player gains lira equal to their position on the residual payment tracker (1 = 1 lira).
- The highest residual payment a player can receive is 5 lira. If they fill additional wine orders, the residual token remains on 5.
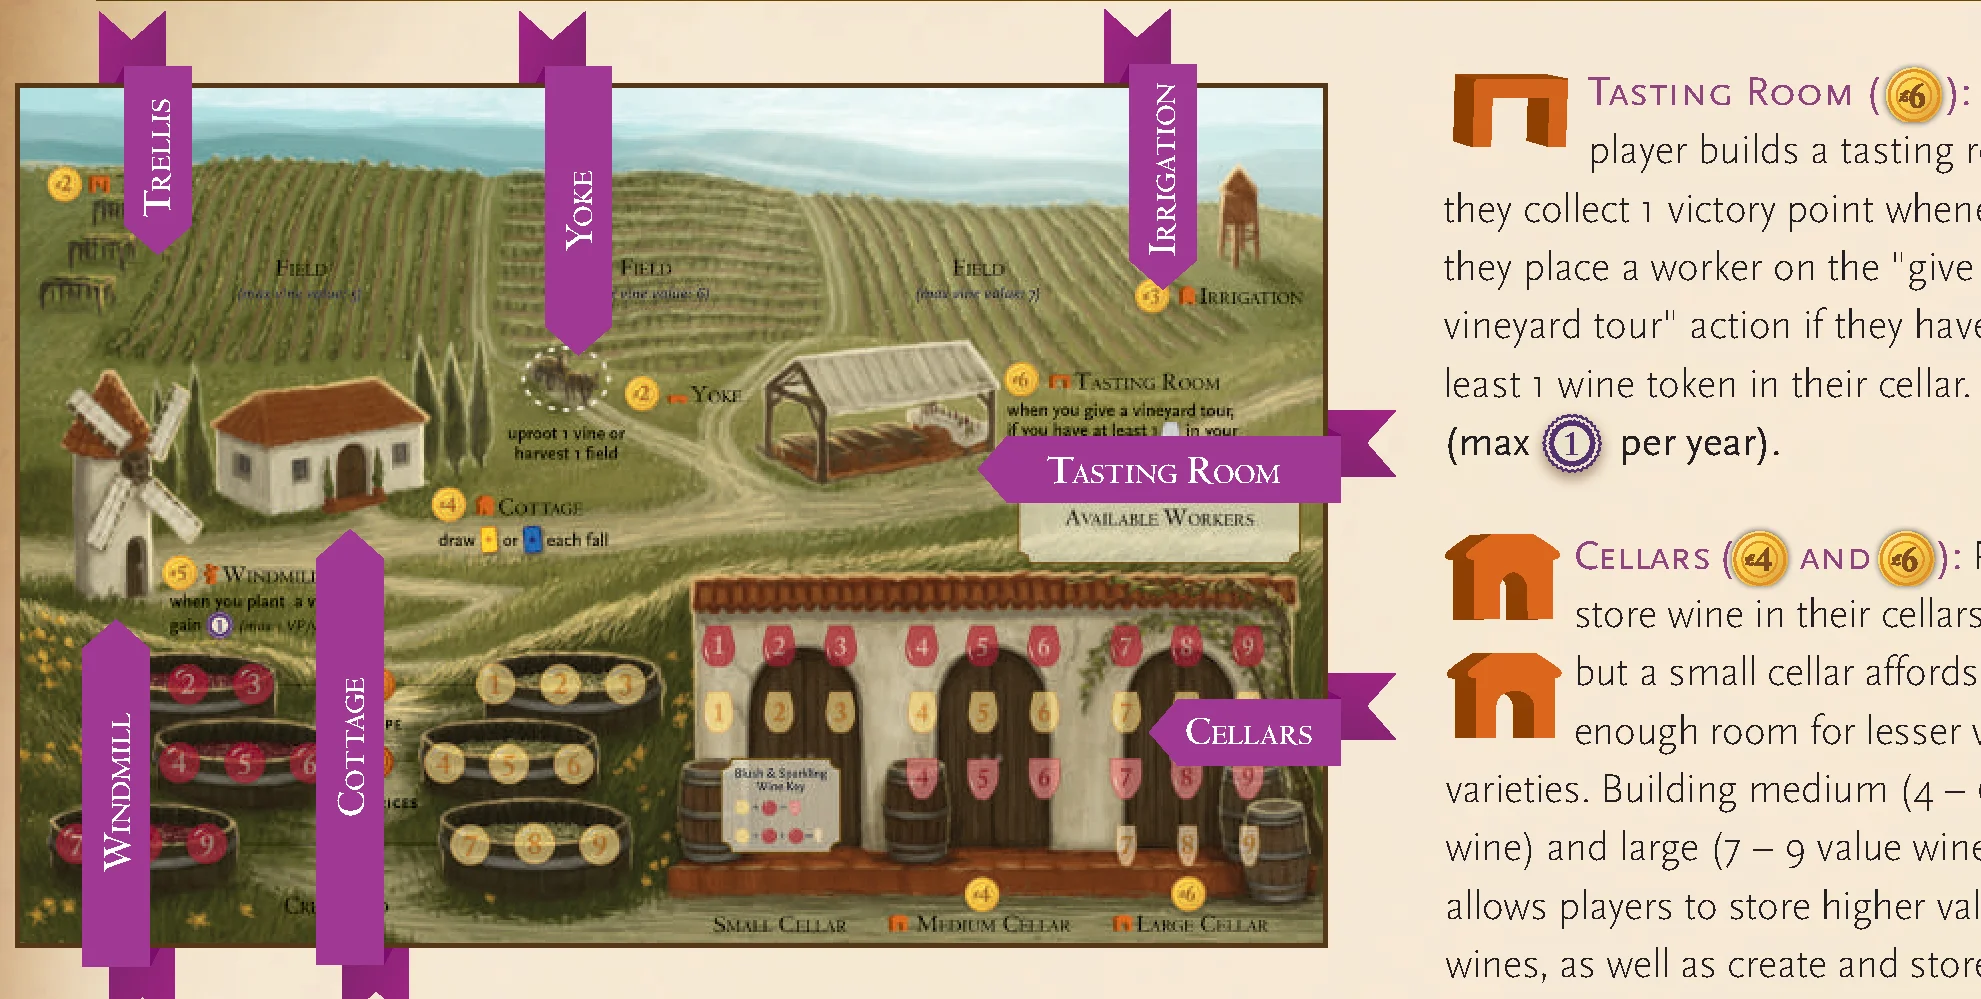
Structures allow you to plant higher quality vines, make better wine, and gain special bonuses in the summer and fall. Each structure has a cost indicated by a coin on the player mat:
- Trellis (2 Lira): A trellis is required to plant certain types of vines.
- Windmill (5 Lira): After a player builds a windmill, he collects 1 victory point whenever he plants a vine (max 1 VP per year).
- Irrigation (3 Lira): Irrigation is required to plant certain types of vines.
- Yoke (2 Lira): Owning a yoke gives a player an action space that they can use once per year in any season (summer or winter). On their turn, a player may place a regular worker (or a grande worker acting as a regular worker) on their yoke to uproot 1 vine card (return a vine card from their field to their hand) or harvest 1 field (even in the summer, though the field may only be harvested once per year. More details about harvesting are in the Harvesting Fields section).
- Cellars (Medium: 4 Lira; Large: 6 Lira): Players store wine in their cellars, but a small cellar affords only enough room for lesser value varieties. Building medium (4 – 6 value wine) and large (7 – 9 value wine) allows players to store higher value wines, as well as create and store blush wines in the medium and large cellars and sparkling wines in the large cellar.
Note: The medium cellar must be built before a player builds the large cellar. - Cottage (4 Lira): If a player has a cottage, they will draw a visitor card of their choice at the beginning of the fall season (in addition to the visitor card drawn by default in the fall). The two cards drawn may be of the same type or different types of visitor cards.
- Tasting Room (6 Lira): After a player builds a tasting room, they collect 1 victory point whenever they place a worker on the “give a vineyard tour” action if they have at least 1 wine token in their cellar (max 1 VP per year).
Playing Visitor Cards
When a player plays a summer or winter visitor card, the action described on the card is taken immediately and the card is discarded, ending any bonuses granted by that card.
Visitor cards are played by placing a worker on the play summer/winter visitor card action spaces. No additional worker is required to take the action described on the card.
You may only play a visitor card if you are able to fully resolve the effect on the card. For example, if a card says that you must give all opponents each 2 lira to gain a benefit, you can only play that card if you have enough lira to pay 2 lira to all other players. Multiple actions on visitor cards may be taken in any order.
- Upgrading the Cellar: Several cards let you “upgrade your cellar to the next level.” That means you may build either a medium or large cellar, depending on what you already have (you may not build a large cellar if you don’t have a medium cellar).
- One Way Conversions (➔): Some cards allow you to trade lira for victory points (or vice versa) at a specific ratio. For example, 3 lira ➔ 1 VP means that you can gain victory points at a rate of 1 VP for every 3 lira you spend.
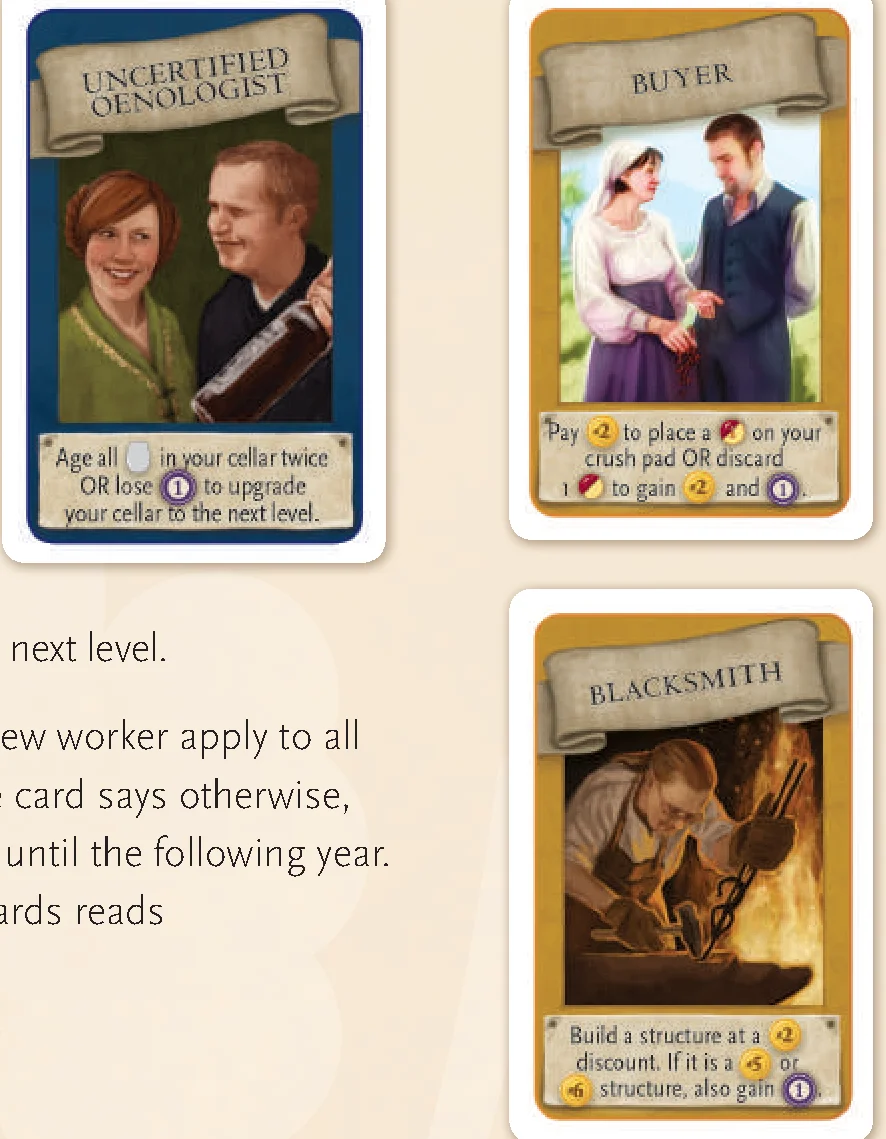
- Structure Cost Bonuses: Several visitors refer to a bonus you get for structures of specific costs. The bonus only applies to structures with that exact cost. For example, the Blacksmith gives you 1 VP for building a windmill, tasting room, or large cellar.
- Buying Grapes via Visitors: Several visitors let you pay to place a 1-value grape on your crush pad. This is not a grape harvested from your vines—rather, it is as if you are buying grapes directly from a market. A 1-value grape slot on your crush pad must be open to use this ability.
- Training Workers: The rules for training a new worker apply to all visitor cards—unless the card says otherwise, you can’t use the worker until the following year. The worker meeple icon on visitor cards reads “any worker.”
Example: Many visitors have two separate clauses delineated by the all-caps word “OR”. These are two completely independent clauses. In the example above (Uncertified Oenologist), you choose to either (1) age all wine in your cellar twice OR (2) lose 1 VP to upgrade your cellar to the next level.
Examples & Clarifications (Specific Cards)
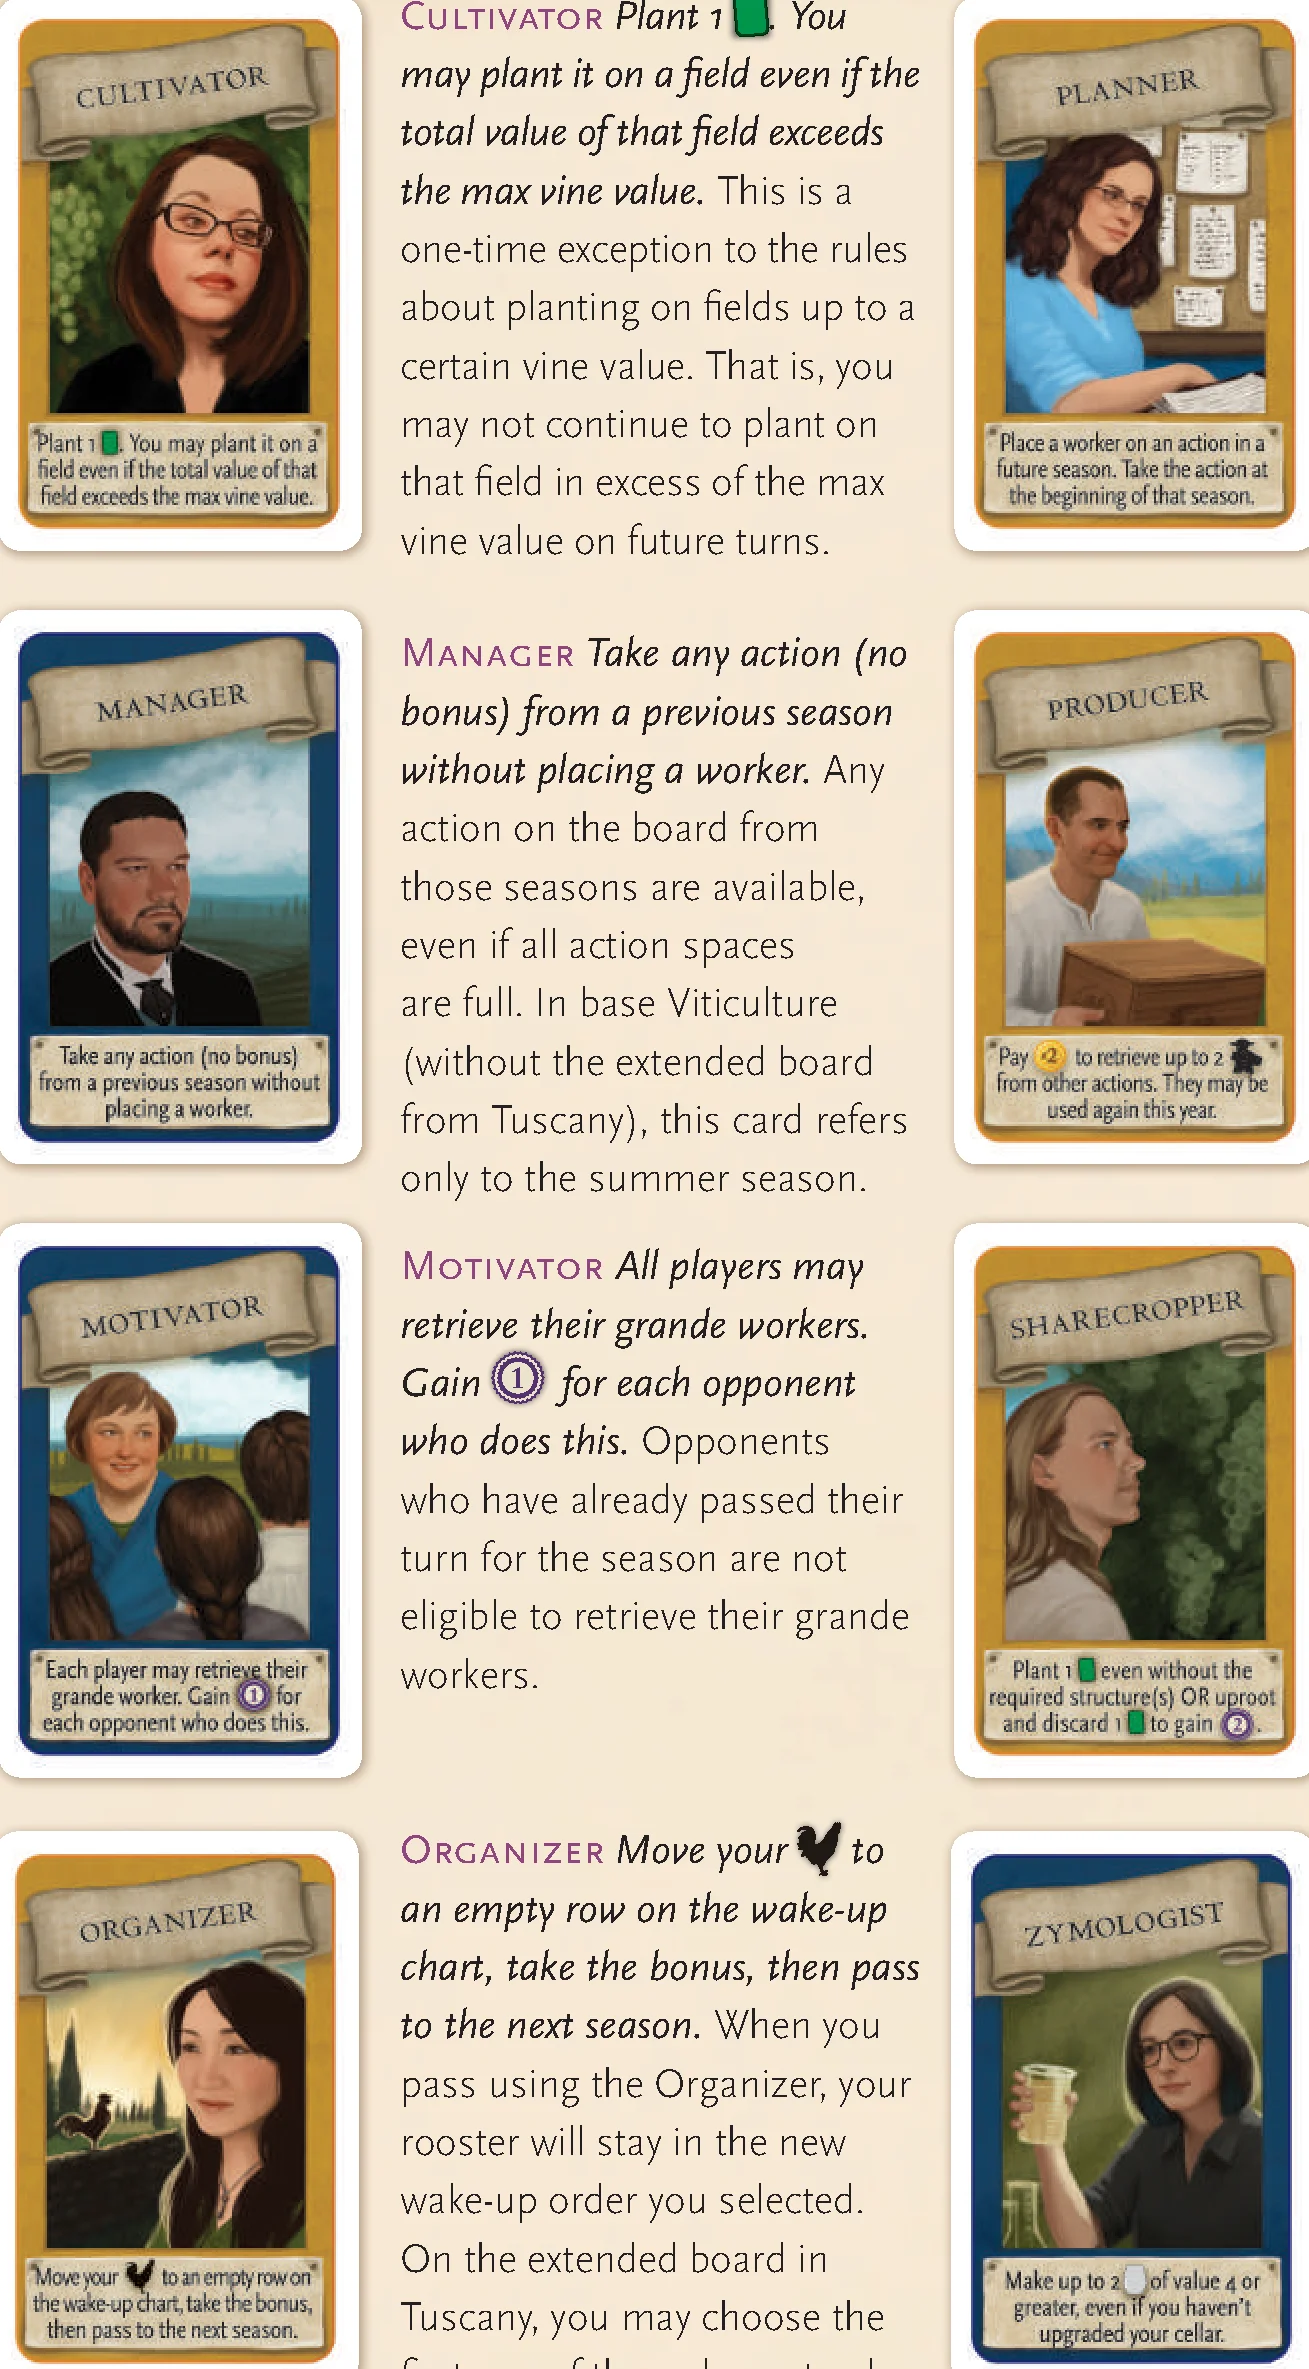
- Cultivator: Plant 1 vine. You may plant it on a field even if the total value of that field exceeds the max vine value. This is a one-time exception to the rules about planting on fields up to a certain vine value. That is, you may not continue to plant on that field in excess of the max vine value on future turns.
- Manager: Take any action (no bonus) from a previous season without placing a worker. Any action on the board from those seasons are available, even if all action spaces are full. In base Viticulture (without the extended board from Tuscany), this card refers only to the summer season.
- Motivator: All players may retrieve their grande workers. Gain 1 VP for each opponent who does this. Opponents who have already passed their turn for the season are not eligible to retrieve their grande workers.
- Organizer: Move your rooster to an empty row on the wake-up chart, take the bonus, then pass to the next season. When you pass using the Organizer, your rooster will stay in the new wake-up order you selected. On the extended board in Tuscany, you may choose the first row of the wake-up track (if it’s unoccupied).
- Planner: Place a worker on an action in a future season. Take the action at the beginning of that season. Thus, if you place a worker on the “fill 1 wine order” action, you take that action before players take winter actions as normal in wake-up order. For example, if you are first in wake-up order, you would take the Planner action and then take your turn. This card only applies to action spaces on the board. In base Viticulture (without the extended board from Tuscany), this card refers only to the winter season.
- Producer: Pay 2 lira to retrieve up to 2 workers from other actions. They may be used again this year. “Other actions” refers to any action other than the “play 1 summer visitor action” where you played the Producer. Retrieving those workers may open up action spaces in the summer for you and other players to use.
- Sharecropper: Plant 1 vine even without the required structure(s) OR uproot and discard 1 vine to gain 2 VP. This card lets you bypass the normal “cost” for planting vine cards—you don’t need a trellis or irrigation to plant with the Sharecropper’s first ability. You may discard any 1 vine card from hand—it’s not restricted to the vine card you uprooted.
- Zymologist: Make up to 2 wine of value 4 or greater, even if you haven’t upgraded your cellar. Thus, if you use this card to make a 5-value red token, you may place it on the 5-value space even if you don’t have the medium cellar. For that token to age past the 6-value, you need to build both a medium cellar and a large cellar. (You cannot build a large cellar without a medium cellar.)
Year End
At the end of each year, players complete the following steps:
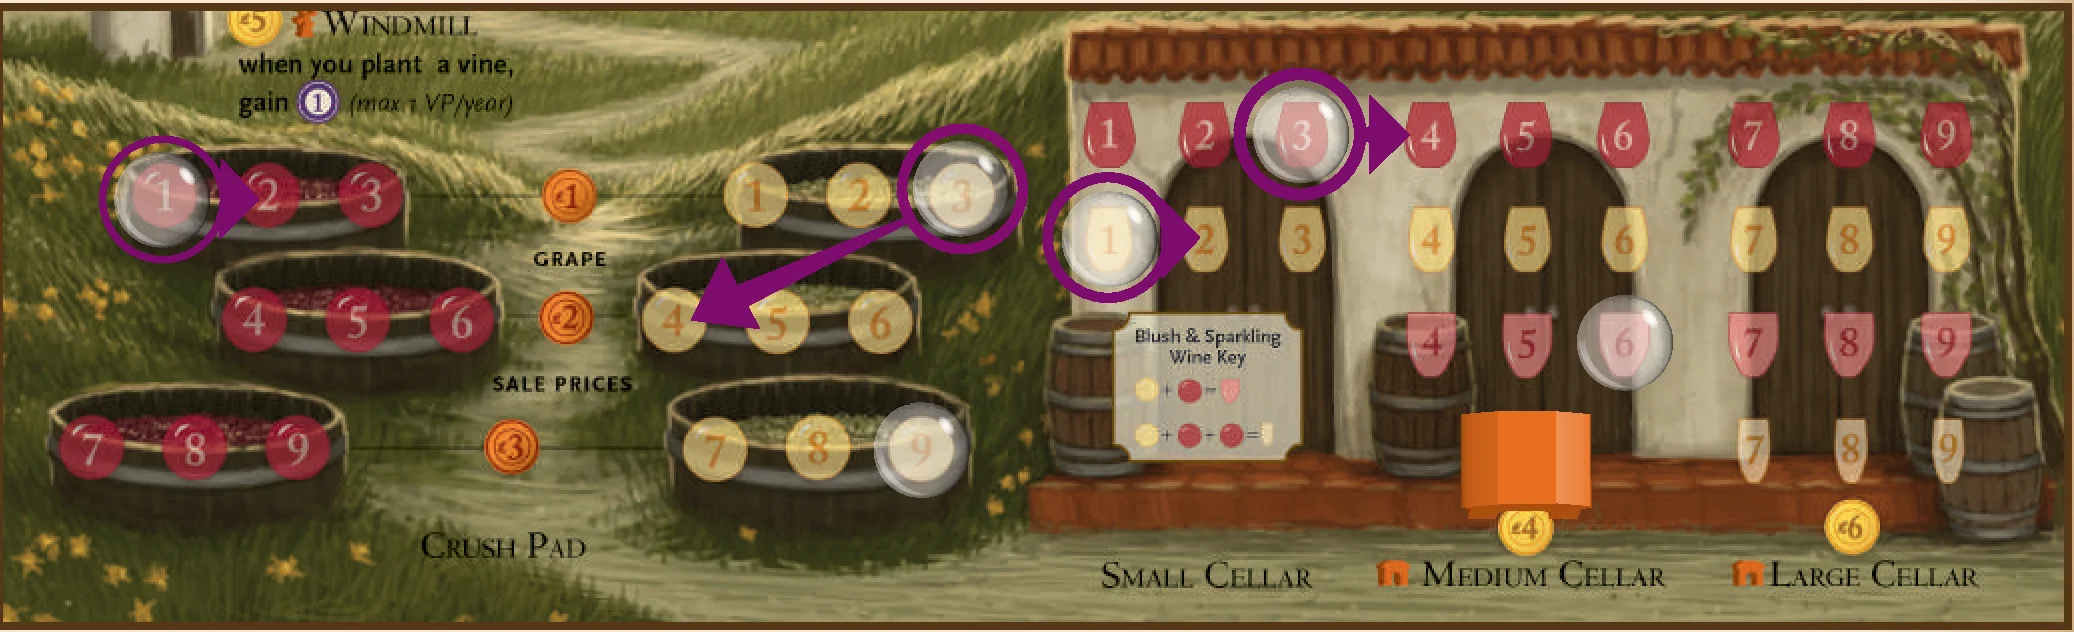
- Age Grape and Wine Tokens: Increase the value of all grape and wine tokens on your crush pad and in your cellar by 1 (i.e., a grape or wine token valued at 2 would move to 3 and a 3 would move to a 4). Wine and grape tokens may not have a value higher than 9.
- Note 1: Wine tokens can only be aged past the value of 3 if the medium cellar has been built and past 6 if the large cellar has been built.
- Note 2: Players do not lose wine or grape tokens if they cannot age them. For example, if a player owns a medium and a large cellar and has red wine tokens valued at 8 and 9, when it comes time to age those tokens, they remain in the same position.
- Return Workers: Return all workers to their respective players, and return the temporary worker to the wake-up chart.
- Collect Residual Payments for All Orders Filled: Players collect lira based on their position on the Residual Payment Tracker (max 5 lira per year).
- Discard Down to 7 Cards: At the end of each year, players must discard their hands down to 7 cards of their choice.
- Rotate First-Player Token: Rotate the first player counter-clockwise and remove all rooster tokens from the wake-up chart.
Note: The new “first player” is merely the first player to select his worker placement order on the wake-up chart in the spring.
Goal, Game End & Tiebreakers
The goal is to reach 20 victory points, with victory points representing your reputation as a vineyard owner. When any player reaches or exceeds 20 victory points, the current year will be played through the year end (after year-end steps), and the player with the most points wins. Players may exceed the 20-point goal and there is no point limit.
In the case of a tie, tiebreakers are (in order):
- Most lira
- Total value of wine in the cellar
- Total value of grapes on the crush pad
Friendly Variant
An optional rule for a more casual game of Viticulture is that a player may only choose a bonus action space if he completes that bonus (i.e., play a second summer visitor card) or if there is no other available space on that action. Thus players may not place workers on bonus action spaces to block other players as they can do in the standard rules for 3-6 players.
Designed by: Morten Monrad Pedersen
Introduction
Sometimes getting your gaming group together is hard, but that doesn’t mean that you can’t play Viticulture. This rulesheet provides rules for playing Viticulture solitaire against an artificial opponent called the “Automa”.
Goal
Have more victory points (VPs) than the Automa at the end of the game, which consists of 7 years.
Setup
Set up your own vineyard as usual.
- Choose a player color for the Automa and place that VP marker on the End space on the victory point track.
- Place 1 glass token on each row of the wake-up chart.
- Shuffle the Automa deck and place it next to the wake-up chart.
- Remove any visitor cards that only give you a benefit if another player takes an action. Alternatively you can keep them in the deck and just redraw when you draw one of them.
Wake-Up Chart
Place your rooster token as usual except that you can only place it on a space where there is a glass token. Remove the glass token and place it to the side of your player mat. This becomes a bonus action token.
Note: The “Organizer” summer visitor card action can not move your rooster to row 7.
Gameplay
The game plays out season by season using the 2-player action spaces (the far-left space on each action).
Automa Cards
At the beginning of each season where you are to place workers, first draw 1 Automa card from the deck. Then place either 0, 1, 2, or 3 Automa workers on action spaces on the board in the current season as indicated on the Automa card. To maintain compatibility with the extended board from the Tuscany expansion, Automa cards have the four seasonal colors. In Viticulture, yellow and green correspond to summer and red and blue correspond to winter. Additionally, some actions are specific to expansions from Tuscany. These are marked with a “T” on the Automa card and they should be ignored if you’re not using the corresponding expansion.
Automa workers do not actually take any actions, nor do they gain bonuses. They simply block action spaces to simulate an opponent.
Bonus Action Tokens
Whenever you choose your wake-up slot at the beginning of the year, remove the glass token from the slot and place it to the side of your vineyard mat. You may accumulate these Bonus Action Tokens from year to year. You may spend 1 of those tokens per turn when you place 1 of your workers on the board. Discard a Bonus Action Token and in addition to taking the action, also gain the bonus action of that action. If you do, you may take the action and the bonus in any order.
Year End
In addition to the usual end-of-year upkeep, retrieve all Automa workers from the board.
Game End & Winning/Losing
The game ends at the end of the 7th year. You win if your VP marker is ahead of the Automa VP marker. If they’re on the same space, the game is a draw, and if the Automa is ahead, you lose.
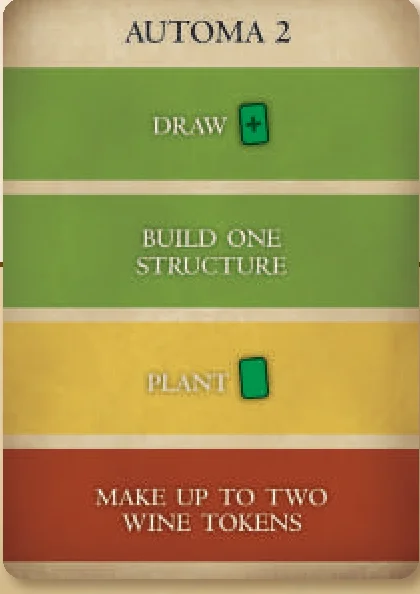
Example: If you draw this card during summer place Automa workers on the “Draw vine card”, “Build one structure”, and “Plant vine” actions in that order (the order only matters at the hard and very hard difficulties). If you drew it during winter place one on the “Make up to two wine tokens”.
Adjusting the Difficulty
- Very Easy: Add an eighth year. In this eighth year you can choose any wake-up chart row and you get a bonus action token.
- Easy: Start at 3 victory points.
- Normal: As described in the rules above.
- Hard: Keep drawing Automa cards and place workers until the Automa has placed at least 2 workers in the current season. Place workers on all the spots listed on the extra cards, but don’t place on actions where there’s already a worker. If the Automa places its sixth worker, it doesn’t place any more. If you run out of Automa cards, then reshuffle the deck.
- Very Hard: Same as the hard difficulty level, but the Automa starts at 23 victory points.
Aggressive Variant
If you want to add tenseness to the game you can let the Automa score victory points each year, and if you’re not ahead of it at the end of a year, you lose immediately. This “aggressive variant” can be played at easy, normal, and hard difficulty levels. At the beginning of each year place the Automa VP marker at the position on the VP track listed in the table below, and make sure that you end the year ahead of this number:
| Year | 1 | 2 | 3 | 4 | 5 | 6 | 7 |
|---|---|---|---|---|---|---|---|
| VP | -1 | 0 | 1 | 4 | 8 | 13 | 20 |
Campaign Play
You can play the game in campaign mode to add variation and challenge. The campaign mode consists of eight challenges, you must beat the Automa in each one to complete the campaign. Each time you lose, restart with the same challenge and begin with a number of bonus action tokens in hand equal to the number of consecutive times you’ve lost.
Your score is the number of games you played to complete the campaign (lower is better). Each campaign challenge plays like normal except for a small tweak to the rules. Play these 8 challenges in this order:
- You don’t get a Mama card, instead select any 3 vine cards and plant them as part of the setup. You can ignore the structure requirements of these 3 vine cards. Reshuffle the deck after you’ve made your choice.
- You can’t have more than 2 regular workers (not counting grande or temporary). Use the middle action spaces instead of the leftmost action spaces, except when you’re placing the grande on an already occupied action. You can’t use bonus action tokens.
- You must have 6 workers by the end of year 3 or you lose the game.
- Start at 5 victory points. When you use the harvest action, you can harvest up to three fields.
- You can’t use bonus action tokens. Play 8 years, where each year you can choose any wake-up chart row you want.
- You don’t score VP during the game. Instead at the end of the game you get 2 VP for each wine in your large cellar and 1 VP for each wine in you medium cellar. If you play the aggressive variant you should skip this part of the campaign.
- Start at 3 victory points and 3 lira.
- You can’t fill wine orders (this includes filling orders via visitors). Wine can be used to gain VP in all other ways, though. Mama cards that give you wine order cards can be redrawn.
- Action Space
- A dashed oval where a single worker can be placed. Workers can only be placed in the current season, and each worker can only be placed once a year. Some action spaces are private—they are on your player mats or on structures you’ve built. Only you can place workers on your private action spaces.
- Age Grapes & Wine
- Increase the value of all grape tokens on your crush pad and wine tokens in your cellar. Wine tokens cannot advance into cellars that you haven’t built.
- Bonus
- An extra benefit indicated inside an action space. You may place a worker on a bonus even if you don’t use it (you must take the action, but the bonus is optional). Take the bonus and the action in any order.
- Grande Worker
- The grande worker acts as a regular worker, but it can be placed on an action even if all action spaces are full (this ability can only be used on the board). The only way for a grande worker to gain a bonus is to place it on a bonus action space.
- Harvest
- Choose a field on your vineyard mat that you have not already harvested this year (each field may only be harvested once per year). Add up the total value of all red vines on that field and place a grape token on the space with the corresponding value on your red crush pad. Then do the same for white vines. The vine cards remain planted on the fields (you’re simply plucking grapes from those vines).
- Make Wine
- Using the grapes on your crush pad, make 2 wine tokens (the type of wine may be different for each token). You cannot combine 2 same-color grapes to make a wine of the same color—1 red grape token becomes 1 red wine token of the same value (devalue it if you don’t have the cellar space). To make 1 blush wine token, combine 1 red grape token and 1 white grape token—add the values of the 2 grape tokens to determine the value of the blush wine token (must be at least 4). To make 1 sparkling wine token, combine 2 red grape tokens and 1 white grape token—add the values of the 3 grape tokens to determine the value of the sparkling wine token (must be at least 7).
- Place Grape Tokens on Crush Pad or Wine Tokens in Cellar
- Some visitor cards, trade actions, or special workers enable you to “place” a specific type of token onto your vineyard mat. This is distinctly different than harvesting vines (to gain grape tokens) or making wine tokens (moving grape tokens to your cellar to become wine tokens). When you “place” a grape or wine token, it is as if you are buying a grape or wine from a source outside of your vineyard. So you will take a glass token and place it directly on your crush pad (grape) or cellar (wine).
- Play 1 Visitor Card
- Choose a visitor card in your hand, pay the cost if necessary, gain the benefit (you must be able to fully pay the cost and fully gain the benefit), and place it face-up on its discard pile.
- Temporary Worker
- The player who selects the last row of the wake-up chart gets the grey temporary worker to use that year. The temporary worker is considered to be that player’s worker in all regards for the remainder of the current year, including any reference to “your workers” or “your regular workers.” When you retrieve workers at the end of the year, retrieve the temporary worker token and place it back on the wake-up chart.
- Trading
- There is no trading between players in Viticulture.
- Uproot
- This is an action you can take by using the Yoke or some visitor cards. Choose a planted vine card on your vineyard mat and return it to your hand.
- Wake-Up Chart
- The player at the top of the wake-up chart takes the first turn (i.e., place 1 worker or pass) each season, followed by each other player in wake-up order. Your wake-up order stays the same throughout the year. Use wake-up order when players must make any sequential decision (e.g., drawing cards in the fall or making a decision based on an interactive visitor card).
Overview & Components
Designed by: Jamey Stegmaier, Alan Stone, & Morten Monrad Pedersen
Illustrated by: Beth Sobel
Published by: Stonemaier Games
Old-world Tuscany awaits your winemaking skill and strategic cunning. You’ll plant vines, harvest grapes, age wines, and fill merchant orders to create the greatest winery in Italy!
1 – 6 PLAYERS | AGES 13 & UP | 45 – 90 MINUTES
Viticulture is a worker-placement strategy game. The Essential Edition includes the second edition of Viticulture along with several elements from the original Tuscany expansion pack, hand-picked by famed designer Uwe Rosenberg.
Object of the Game
Players allocate workers and play visitors to complete various tasks throughout the seasons (each worker is placed on one action each year):
- In the spring: Players decide the schedule their workers will follow. An early rise gives the player the chance to act first; however, offering workers a later wake-up time gives you more valuable bonuses.
- In the summer: Players place workers on action spaces to plant vines and build structures that help advance that player’s vineyard.
- In the fall: Players invite visitors to help their workers.
- In the winter: Players place workers on action spaces to harvest grapes, make wine, and fill orders.
Components
Cards (232 Total)
- 42 vine cards (green deck)
- 36 wine order cards (purple deck)
- 38 summer visitor cards (yellow deck)
- 38 winter visitor cards (blue deck)
- 18 field cards (large size; field on front & back)
- 24 Automa cards (large size; beige back)
- 36 mama and papa cards (large size; pink & blue deck)
Boards
- 1 game board
- 6 vineyard mats
Pieces
- 30 worker meeples in 6 different colors and 1 gray temporary worker
- 6 grande worker meeples
- 50 grape and wine tokens (glass)
- 6 wake-up tokens (roosters)
- 6 victory point tokens (corks)
- 6 residual payment tracker tokens (wine bottles)
- 48 wooden structure tokens (8 unique tokens for each color)
- 72 punch board lira coins (52 bronze 1 coins, 12 silver 2 coins, 8 gold 5 coins)
- 1 first-player token (grapes)
Rule Book & Quick-Reference Guide
Have a question while playing? Tweet it to @stonemaiergames with the hashtag #viticulture and we’ll help. Replacement parts are available for free upon request at stonemaiergames.com/replacement-parts.
Setup
Game Board Setup
Each player places their rooster token above the wake-up chart and their cork token on the start space on the victory point track. Each player should also place their wine bottle token on the middle of the Residual Payment Tracker.
Note 1: There are negative numbers on the victory point track for a few of the summer and winter visitor cards. A player may not go lower than -5 on the victory point track. If a player has -5 victory points, he may not use a visitor card that requires losing more points.
Note 2: The following is public information and cannot be concealed: a player’s vineyard mat, available workers, amount of lira, and number and type of cards.
Vineyard & Resource Setup
- Vineyard Mat: Each player receives a vineyard mat and 3 different field cards: 5, 6, and 7. Place them side by side (field side up) on the vineyard mat. Shuffle the 4 decks of small cards (green, yellow, purple, and blue) and place them on the board.
- Deck Maintenance: If any of the four decks are exhausted during play, immediately shuffle the discard pile and replace the deck. If the deck has been exhausted but no cards have been discarded, that deck is unavailable until more cards are discarded.
- First Player: Take all of the rooster tokens that have been claimed by players, shake them up in your hand, and randomly pick one. The player with that color is the first player and gets the first player token (grapes).
- Mamas and Papas: After randomly selecting the first player, shuffle the mama and papa cards and deal one face-up to each player. Each player’s starting resources are determined by their mama and papa cards.
- Advanced Variant: Some groups might prefer to let each player draw 2 mamas and 2 papas, then choose 1 of each.
- Every mama comes with 2 regular workers. Draw cards as indicated on your mama card to form your opening hand. Do this before gaining resources from your papa card.
- Every papa card comes with 1 grande worker, and most come with a certain amount of lira. Papa cards also give you a choice: start with a specific structure or gain a few extra lira. Players make this choice in clockwise order starting with the first player. Several papas offer an extra regular worker or a victory point instead of a structure.
- After all starting resources are accounted for, discard the mama and papa cards. They are only used while setting up the game.
Terminology
Throughout this rulebook, you will notice the terms value and price:
- Value refers to a grape’s worth when being turned into wine and the worth of a wine when filling an order.
- Price refers to the amount of money a grape will bring when sold. In Viticulture, grapes can be sold for immediate payments, while wine is “sold” via wine orders in exchange for victory points and residual payments.
Example: You are dealt the following mama & papa cards: Mama Alaena and Papa Matthew. Thus you will begin the game with 2 regular workers, 1 vine card, 1 summer visitor card, 1 wine order card, 1 lira, 1 grande worker, and either a windmill or an additional 5 lira.
Core Rules & Worker Placement
Seasons Overview
- Spring: Starting with the player who has the first player token and proceeding clockwise, each player will place their rooster on an open row of the wake-up chart to determine player order for the rest of the year.
- Summer: Starting with the top player on the wake-up chart and proceeding down the chart, each player will either place 1 worker on any available action space in the summer (yellow action spaces) and then immediately take that action, or that player may choose to save their remaining workers for the winter by passing. This cycle of turns continues until all players have passed.
- Fall: Starting with the top player on the wake-up chart and proceeding down the chart, each player will draw either a summer or winter visitor card.
- Winter: Starting with the top player on the wake-up chart and proceeding down the chart, each player will place 1 worker on any available action space in the winter (blue action spaces) and then immediately take that action. This cycle of turns continues until all players have played all of their workers.
- Year End: Players age their grape and wine tokens, return workers to their vineyard mats, collect residual payments, remove rooster tokens from the wake-up chart, and rotate the first-player token counter-clockwise. When any player reaches or exceeds 20 victory points, the game will finish at the end of the current year.
Worker Placement Rules
- A player may use each worker only once a year. Thus a worker placed in the summer cannot be used in the winter.
- A player may place 1 worker per turn.
- In a 3–6 player game, multiple spaces are available for each action. The worker you place may go on any unoccupied space, even if there are other workers (yours or opponents) on other spaces on the same action.
- Workers may only be placed on the current season’s action spaces.
- If a player passes, he may place no more workers that season.
- A player must take the action when placing a worker. For example, if a player chooses the “Plant vine” action, that player must plant a vine.
Scaling the Game Based on Number of Players
- In the 2-player game, only the left action space is available.
- For the 3–4 player game, the left and middle action spaces are available.
- For the 5–6 player game, all three action spaces are available.
These action spaces may be claimed in any order. Each action space can be occupied by only one worker.
Bonuses: Most actions have one action space with a special bonus. A player may take the bonus when placing a worker on an action space with an icon—1 lira, 1 card, +1, etc.—on it. A player may take the action and the bonus in any order. The action is mandatory and the bonus is optional. For example, a player cannot place a worker on the “Fill 1 wine order” bonus space to gain 1 VP without also filling a wine order.
Grande Worker Placement
The grande worker follows the rules for regular workers but also has a special ability: The grande worker may be placed on a fully occupied action on the board to perform that action.
- Multiple players may place their grande workers in this way.
- A grande worker placed on a bonus action space will give you the bonus (just like a regular worker); otherwise it does not give you a bonus.
Example: You are playing a 2-player game and the other player chooses to give a tour with regular worker to gain 2 lira. If you really need to give a tour, you may then place your grande worker on that action (on the art for that action, not an action space) to gain 2 lira as well.
The Four Seasons
Spring Actions
Wake-Up Chart: Starting with the player holding the first-player token and moving clockwise, each player places his/her rooster on an unoccupied wake-up row. The number represents how early that player wants his/her workers to wake up in the coming year. 1 is the earliest time and 7 is the latest. For workers, the later the better; for the vineyard owner, perhaps not.
- Time 1: No bonus
- Time 2: Draw 1 vine card
- Time 3: Draw 1 wine order card
- Time 4: Gain 1 lira
- Time 5: Draw either a summer or winter visitor card
- Time 6: Gain 1 victory point
- Time 7: Gain the temporary worker for the year (acts as any regular worker)
Helpful Tip: When a player passes during the summer, he will slide his rooster from the left to the right on the wake-up chart for a clear visual of the players that remain active. Then as players pass during the winter, they will slide their roosters back to the left. This will help players see who has yet to pass in the summer and winter.
Note: The first player to act in the summer, fall, and winter reverts back to the wake-up chart order from the spring of that year. Thus, in the example below, even if Player 2 (row 4 on the wake-up chart) is the last player to act in the summer, he will be the first player to act in the fall, and then again in the winter.
Example: Player 1, the player with the first-player token, chooses the 6 slot and gains a point on the victory point track. Player 2 chooses the 4 row and gains 1 lira. So, even though Player 1 has the first-player token, for the rest of the year Player 2 will go first and Player 1 will go second based on where each player placed their rooster on the wake-up chart.
Summer Actions
Summertime in the game is the time to build your vineyard, go to market, plant vines, put your summer visitors to work, show off your vineyard, and sell grapes.
- Gain 1 Lira: In the summer or winter, a player may place a worker on the cart at the bottom of the board to gain 1 lira. Placing 1 worker here counts as a player’s turn. Any number of workers may be placed on this action over the course of the year by any number of players.
- Uproot: Some visitor cards and the Yoke action give players the option to uproot a vine card. To do so, a player selects a planted vine card from their field and returns it to their hand. This action is rarely used; it’s there as a backup in case a player needs to reconfigure their fields.
- Play One Summer Visitor Card: Play a summer visitor card from your hand to resolve its effect. Place resolved cards on the summer visitor discard pile at the top of the board.
Bonus: Play an additional summer visitor card. - Draw One Vine Card: Draw one vine card.
Bonus: Draw an additional vine card. - Give A Vineyard Tour: Gain 2 lira.
Bonus: Gain an additional 1 lira. - Build One Structure: Build one unbuilt structure on your vineyard mat by paying the cost and placing the corresponding structure token on your vineyard mat. (See Structures for an explanation of each structure.)
Bonus: Gain 1 lira.
Note: Players may only have one of each structure on their vineyard mat. - Plant One Vine: Plant a vine on one of the fields in your vineyard. Vines are planted by placing a vine card on an empty field, or stacking a vine card on top of another vine that has already has been planted. Once a vine is planted, it stays on the field for the rest of the game, including when the field is harvested. The only way to remove a vine card is to use the Yoke or a visitor card to uproot it.
Bonus: Plant an additional vine card from your hand.
Note: A field cannot exceed its max value (5, 6, or 7) when adding the value of the cards on the field together. - Sell At Least One Grape or Buy/Sell One Field: Sell any number of grape tokens (at least 1) from your crush pad for the price indicated by the coin between the crush pads. For example, a 4-value grape token is priced at 2 lira when sold. Discard the tokens you sell.
Alternatively, you can sell one of your fields for the lira amount indicated on the field card or buy back one of your sold fields (same cost as the sale price). You may not sell a field if it has vine cards on it, nor may you plant vines on sold fields.
Bonus: Gain 1 victory point.
Vine Deck Varieties and Values
Each vine card has a circle with a number representing the value of grape the vine will yield. Some cards have structures in the upper-left corner (irrigation, trellis, or both). The depicted structures must be built before the vine can be planted.
| Variety | Color | Value | Total Cards | Prerequisite |
|---|---|---|---|---|
| Sangiovese | Red | 1 | 4 | None |
| Malvasia | White | 1 | 4 | None |
| Pinot | Red & White | 1 each | 6 | Trellis |
| Syrah | Red | 2 | 5 | Trellis |
| Trebbiano | White | 2 | 5 | Trellis |
| Merlot | Red | 3 | 5 | Irrigation |
| Sauvignon Blanc | White | 3 | 5 | Irrigation |
| Cabernet Sauvignon | Red | 4 | 4 | Trellis & Irrigation |
| Chardonnay | White | 4 | 4 | Trellis & Irrigation |
Fall Actions
Fall is a time to invite helpful visitors to your vineyard. These visitors will arrive in the summer or the winter to provide a helpful hand on your vineyard.
In wake-up order, without placing a worker, each player draws a summer or winter visitor card. Do not play this card (you may only play visitor cards on the corresponding actions in the summer and winter).
Any player with a cottage may draw a summer or winter visitor card in addition to the first visitor card they drew in the fall.
Winter Actions
Winter is the time to reap what you have sown, turn grapes into wine, find out which wines are in demand, train new workers, put winter visitors to work, and fill wine orders.
- Draw One Wine Order Card: Draw one wine order card.
Bonus: Draw an additional wine order card. - Harvest One Field: Choose one field and add grape tokens to the crush pad based on that field’s yield (see Harvesting Fields for details). Vine cards remain on the field when harvesting—viticulturists do not remove vines from the ground when they pick grapes.
Bonus: Harvest an additional field. - Gain 1 Lira: Gain 1 lira. This action space is not limited to 1 worker.
- Pay 4 Lira to Train a New Worker: Place a new worker near this action space to show that it is now trained but cannot be used until the following year.
Bonus: Gain 1 lira.
Note: A player may have no more than 5 workers and 1 grande worker. This limit does not include the temporary worker. - Play One Winter Visitor Card: Play a winter visitor card from your hand to resolve its effect. Place resolved cards on the winter visitor discard pile at the top of the board.
Bonus: Play an additional winter visitor card. - Make Up to Two Wine Tokens: Turn grapes on the crush pad into wine (see Making Wine for more details).
Bonus: Make 1 extra wine token. - Fill One Wine Order: Fulfill the criteria on a wine order card in your hand and then discard it (see Filling Wine Orders for details).
Bonus: Gain 1 victory point.
Viticulture Operations: Harvest, Wine & Orders
Harvesting Fields
When a player harvests a field, they collect grape tokens from the vine cards on that field.
To harvest a field, add the total value of all red grape icons on the vine to create 1 red grape token and then add the total value of all white grape icons on the vine to create 1 white grape token on your crush pad. The vine cards remain on the field.
- Note 1: Each field can only be harvested once per year.
- Note 2: Each grape icon on the crush pad can fit exactly 1 grape token. If the grape icon already has a token on it when you harvest a grape at that value, you must devalue the grape token to the next available lowest icon. Thus if the 4-value white grape icon on your crush pad already has a token on it when you harvest a field yielding a 4-value white grape, the new token would instead go on the 3-value white icon on the crush pad (if it’s empty; otherwise to the 2-value icon, etc).
Example: A player has three vines planted on one field. When she harvests this field, she adds the value of the two red-grape symbols (1 + 1) on the vines to form a single grape on her crush pad worth 2, and then the same for the two white-grape symbols (1 + 2) to form a white grape worth 3.
Making Wine
Make Up to 2 Wine Tokens: Players make wine by converting grapes on their crush pads into wine tokens. Low-value red and white wine tokens can be created when a player owns only a small cellar, but the cellar must be upgraded to create blush wine, sparkling wine, and higher-value red and white wine.
When a player makes more than 1 wine token, the wine he makes may be the same type of wine or different types.
- Red Wine: Move 1 red grape token to the corresponding space on the cellar. For example, a 3-value red grape becomes a 3-value red wine.
- White Wine: Move 1 white grape token to the corresponding space on the cellar.
- Blush: Combine 1 red grape token and 1 white grape token to make 1 blush wine token equal to the combined values of the grapes. For example, a 1-value white grape plus a 4-value red grape creates a 5-value blush wine.
- Sparkling: Combine 2 red grape tokens and 1 white grape token to make 1 sparkling wine token equal to the grape value.
- Note 1: Discard excess tokens used to create blush or sparkling wine.
- Note 2: Players must build the appropriate cellar to house any wines, blushes, or sparkling wines above a value of 3 and 6.
- Note 3: Each wine icon on the cellar can fit exactly 1 wine token. This follows the same rules as explained in Note 2 above (devaluation to the next lowest available slot).
- Note 4: Once in the cellar, wine tokens may never be combined.
- Note 5: A savvy player will make wine strategically based on the cellars he owns and the wine orders in his hand. Grapes in Viticulture age just like wine!
Example 1: A player decides to make 2 red wine tokens, but he doesn’t have the medium cellar yet. The 1-value red grape becomes a 1-value red wine, and the 4-value red grape is devalued to become a 3-value red wine.
Example 2: The player decides to make a blush wine token, so he combines a red and a white grape to form a single blush wine token equal to their cumulative value. He can only do this because he owns a medium cellar.
Filling Wine Orders
To fill a wine order, place a worker on the “fill one wine order” action. There are also some visitor cards that enable you to fill a wine order.
- Select and reveal a wine order card from your hand. The card shows one or more wine token icons with numbers in them. These are the minimum values of the wine tokens you must discard from your cellar to fill this wine order.
- After removing those wine tokens from your vineyard mat, gain victory points and a residual lira benefit as indicated at the bottom of the card (move your token on the residual payment tracker).
- Discard the wine order card.
Example: This wine order card requires a red wine token worth at least 2 and a white wine worth at least 4. To fill this order, the player reveals the wine order card, removes exactly one red wine token worth at least 2 and exactly one white wine token worth at least 4 from his cellar, gains 3 points on the victory point track, and moves up 1 on the residual payment tracker. The player then discards the wine order card.
Residual Payments
Players keep track of residual payments from wine orders on the residual payment tracker. All players begin the game with their wine bottle tokens on the lira symbol in the middle of the residual payment tracker.
- When a player fills a wine order, that player moves his residual token up on the track based on the lira amount on the wine order card. It remains in that position—do not reset it.
- At the end of each year, each player gains lira equal to their position on the residual payment tracker (1 = 1 lira).
- The highest residual payment a player can receive is 5 lira. If they fill additional wine orders, the residual token remains on 5.
Structures
Structures allow you to plant higher quality vines, make better wine, and gain special bonuses in the summer and fall. Each structure has a cost indicated by a coin on the player mat:
- Trellis (2 Lira): A trellis is required to plant certain types of vines.
- Windmill (5 Lira): After a player builds a windmill, he collects 1 victory point whenever he plants a vine (max 1 VP per year).
- Irrigation (3 Lira): Irrigation is required to plant certain types of vines.
- Yoke (2 Lira): Owning a yoke gives a player an action space that they can use once per year in any season (summer or winter). On their turn, a player may place a regular worker (or a grande worker acting as a regular worker) on their yoke to uproot 1 vine card (return a vine card from their field to their hand) or harvest 1 field (even in the summer, though the field may only be harvested once per year. More details about harvesting are in the Harvesting Fields section).
- Cellars (Medium: 4 Lira; Large: 6 Lira): Players store wine in their cellars, but a small cellar affords only enough room for lesser value varieties. Building medium (4 – 6 value wine) and large (7 – 9 value wine) allows players to store higher value wines, as well as create and store blush wines in the medium and large cellars and sparkling wines in the large cellar.
Note: The medium cellar must be built before a player builds the large cellar. - Cottage (4 Lira): If a player has a cottage, they will draw a visitor card of their choice at the beginning of the fall season (in addition to the visitor card drawn by default in the fall). The two cards drawn may be of the same type or different types of visitor cards.
- Tasting Room (6 Lira): After a player builds a tasting room, they collect 1 victory point whenever they place a worker on the “give a vineyard tour” action if they have at least 1 wine token in their cellar (max 1 VP per year).
Visitor Cards Reference & Clarifications
Playing Visitor Cards
When a player plays a summer or winter visitor card, the action described on the card is taken immediately and the card is discarded, ending any bonuses granted by that card.
Visitor cards are played by placing a worker on the play summer/winter visitor card action spaces. No additional worker is required to take the action described on the card.
You may only play a visitor card if you are able to fully resolve the effect on the card. For example, if a card says that you must give all opponents each 2 lira to gain a benefit, you can only play that card if you have enough lira to pay 2 lira to all other players. Multiple actions on visitor cards may be taken in any order.
- Upgrading the Cellar: Several cards let you “upgrade your cellar to the next level.” That means you may build either a medium or large cellar, depending on what you already have (you may not build a large cellar if you don’t have a medium cellar).
- One Way Conversions (➔): Some cards allow you to trade lira for victory points (or vice versa) at a specific ratio. For example, 3 lira ➔ 1 VP means that you can gain victory points at a rate of 1 VP for every 3 lira you spend.
- Structure Cost Bonuses: Several visitors refer to a bonus you get for structures of specific costs. The bonus only applies to structures with that exact cost. For example, the Blacksmith gives you 1 VP for building a windmill, tasting room, or large cellar.
- Buying Grapes via Visitors: Several visitors let you pay to place a 1-value grape on your crush pad. This is not a grape harvested from your vines—rather, it is as if you are buying grapes directly from a market. A 1-value grape slot on your crush pad must be open to use this ability.
- Training Workers: The rules for training a new worker apply to all visitor cards—unless the card says otherwise, you can’t use the worker until the following year. The worker meeple icon on visitor cards reads “any worker.”
Example: Many visitors have two separate clauses delineated by the all-caps word “OR”. These are two completely independent clauses. In the example above (Uncertified Oenologist), you choose to either (1) age all wine in your cellar twice OR (2) lose 1 VP to upgrade your cellar to the next level.
Examples & Clarifications (Specific Cards)
- Cultivator: Plant 1 vine. You may plant it on a field even if the total value of that field exceeds the max vine value. This is a one-time exception to the rules about planting on fields up to a certain vine value. That is, you may not continue to plant on that field in excess of the max vine value on future turns.
- Manager: Take any action (no bonus) from a previous season without placing a worker. Any action on the board from those seasons are available, even if all action spaces are full. In base Viticulture (without the extended board from Tuscany), this card refers only to the summer season.
- Motivator: All players may retrieve their grande workers. Gain 1 VP for each opponent who does this. Opponents who have already passed their turn for the season are not eligible to retrieve their grande workers.
- Organizer: Move your rooster to an empty row on the wake-up chart, take the bonus, then pass to the next season. When you pass using the Organizer, your rooster will stay in the new wake-up order you selected. On the extended board in Tuscany, you may choose the first row of the wake-up track (if it’s unoccupied).
- Planner: Place a worker on an action in a future season. Take the action at the beginning of that season. Thus, if you place a worker on the “fill 1 wine order” action, you take that action before players take winter actions as normal in wake-up order. For example, if you are first in wake-up order, you would take the Planner action and then take your turn. This card only applies to action spaces on the board. In base Viticulture (without the extended board from Tuscany), this card refers only to the winter season.
- Producer: Pay 2 lira to retrieve up to 2 workers from other actions. They may be used again this year. “Other actions” refers to any action other than the “play 1 summer visitor action” where you played the Producer. Retrieving those workers may open up action spaces in the summer for you and other players to use.
- Sharecropper: Plant 1 vine even without the required structure(s) OR uproot and discard 1 vine to gain 2 VP. This card lets you bypass the normal “cost” for planting vine cards—you don’t need a trellis or irrigation to plant with the Sharecropper’s first ability. You may discard any 1 vine card from hand—it’s not restricted to the vine card you uprooted.
- Zymologist: Make up to 2 wine of value 4 or greater, even if you haven’t upgraded your cellar. Thus, if you use this card to make a 5-value red token, you may place it on the 5-value space even if you don’t have the medium cellar. For that token to age past the 6-value, you need to build both a medium cellar and a large cellar. (You cannot build a large cellar without a medium cellar.)
Year End, Game End & Variants
Year End
At the end of each year, players complete the following steps:
- Age Grape and Wine Tokens: Increase the value of all grape and wine tokens on your crush pad and in your cellar by 1 (i.e., a grape or wine token valued at 2 would move to 3 and a 3 would move to a 4). Wine and grape tokens may not have a value higher than 9.
- Note 1: Wine tokens can only be aged past the value of 3 if the medium cellar has been built and past 6 if the large cellar has been built.
- Note 2: Players do not lose wine or grape tokens if they cannot age them. For example, if a player owns a medium and a large cellar and has red wine tokens valued at 8 and 9, when it comes time to age those tokens, they remain in the same position.
- Return Workers: Return all workers to their respective players, and return the temporary worker to the wake-up chart.
- Collect Residual Payments for All Orders Filled: Players collect lira based on their position on the Residual Payment Tracker (max 5 lira per year).
- Discard Down to 7 Cards: At the end of each year, players must discard their hands down to 7 cards of their choice.
- Rotate First-Player Token: Rotate the first player counter-clockwise and remove all rooster tokens from the wake-up chart.
Note: The new “first player” is merely the first player to select his worker placement order on the wake-up chart in the spring.
Goal, Game End & Tiebreakers
The goal is to reach 20 victory points, with victory points representing your reputation as a vineyard owner. When any player reaches or exceeds 20 victory points, the current year will be played through the year end (after year-end steps), and the player with the most points wins. Players may exceed the 20-point goal and there is no point limit.
In the case of a tie, tiebreakers are (in order):
- Most lira
- Total value of wine in the cellar
- Total value of grapes on the crush pad
Friendly Variant
An optional rule for a more casual game of Viticulture is that a player may only choose a bonus action space if he completes that bonus (i.e., play a second summer visitor card) or if there is no other available space on that action. Thus players may not place workers on bonus action spaces to block other players as they can do in the standard rules for 3-6 players.
Viticulture Automa (Official Solo Version)
Designed by: Morten Monrad Pedersen
Introduction
Sometimes getting your gaming group together is hard, but that doesn’t mean that you can’t play Viticulture. This rulesheet provides rules for playing Viticulture solitaire against an artificial opponent called the “Automa”.
Goal
Have more victory points (VPs) than the Automa at the end of the game, which consists of 7 years.
Setup
Set up your own vineyard as usual.
- Choose a player color for the Automa and place that VP marker on the End space on the victory point track.
- Place 1 glass token on each row of the wake-up chart.
- Shuffle the Automa deck and place it next to the wake-up chart.
- Remove any visitor cards that only give you a benefit if another player takes an action. Alternatively you can keep them in the deck and just redraw when you draw one of them.
Wake-Up Chart
Place your rooster token as usual except that you can only place it on a space where there is a glass token. Remove the glass token and place it to the side of your player mat. This becomes a bonus action token.
Note: The “Organizer” summer visitor card action can not move your rooster to row 7.
Gameplay
The game plays out season by season using the 2-player action spaces (the far-left space on each action).
Automa Cards
At the beginning of each season where you are to place workers, first draw 1 Automa card from the deck. Then place either 0, 1, 2, or 3 Automa workers on action spaces on the board in the current season as indicated on the Automa card. To maintain compatibility with the extended board from the Tuscany expansion, Automa cards have the four seasonal colors. In Viticulture, yellow and green correspond to summer and red and blue correspond to winter. Additionally, some actions are specific to expansions from Tuscany. These are marked with a “T” on the Automa card and they should be ignored if you’re not using the corresponding expansion.
Automa workers do not actually take any actions, nor do they gain bonuses. They simply block action spaces to simulate an opponent.
Bonus Action Tokens
Whenever you choose your wake-up slot at the beginning of the year, remove the glass token from the slot and place it to the side of your vineyard mat. You may accumulate these Bonus Action Tokens from year to year. You may spend 1 of those tokens per turn when you place 1 of your workers on the board. Discard a Bonus Action Token and in addition to taking the action, also gain the bonus action of that action. If you do, you may take the action and the bonus in any order.
Year End
In addition to the usual end-of-year upkeep, retrieve all Automa workers from the board.
Game End & Winning/Losing
The game ends at the end of the 7th year. You win if your VP marker is ahead of the Automa VP marker. If they’re on the same space, the game is a draw, and if the Automa is ahead, you lose.
Example: If you draw this card during summer place Automa workers on the “Draw vine card”, “Build one structure”, and “Plant vine” actions in that order (the order only matters at the hard and very hard difficulties). If you drew it during winter place one on the “Make up to two wine tokens”.
Adjusting the Difficulty
- Very Easy: Add an eighth year. In this eighth year you can choose any wake-up chart row and you get a bonus action token.
- Easy: Start at 3 victory points.
- Normal: As described in the rules above.
- Hard: Keep drawing Automa cards and place workers until the Automa has placed at least 2 workers in the current season. Place workers on all the spots listed on the extra cards, but don’t place on actions where there’s already a worker. If the Automa places its sixth worker, it doesn’t place any more. If you run out of Automa cards, then reshuffle the deck.
- Very Hard: Same as the hard difficulty level, but the Automa starts at 23 victory points.
Aggressive Variant
If you want to add tenseness to the game you can let the Automa score victory points each year, and if you’re not ahead of it at the end of a year, you lose immediately. This “aggressive variant” can be played at easy, normal, and hard difficulty levels. At the beginning of each year place the Automa VP marker at the position on the VP track listed in the table below, and make sure that you end the year ahead of this number:
| Year | 1 | 2 | 3 | 4 | 5 | 6 | 7 |
|---|---|---|---|---|---|---|---|
| VP | -1 | 0 | 1 | 4 | 8 | 13 | 20 |
Campaign Play
You can play the game in campaign mode to add variation and challenge. The campaign mode consists of eight challenges, you must beat the Automa in each one to complete the campaign. Each time you lose, restart with the same challenge and begin with a number of bonus action tokens in hand equal to the number of consecutive times you’ve lost.
Your score is the number of games you played to complete the campaign (lower is better). Each campaign challenge plays like normal except for a small tweak to the rules. Play these 8 challenges in this order:
- You don’t get a Mama card, instead select any 3 vine cards and plant them as part of the setup. You can ignore the structure requirements of these 3 vine cards. Reshuffle the deck after you’ve made your choice.
- You can’t have more than 2 regular workers (not counting grande or temporary). Use the middle action spaces instead of the leftmost action spaces, except when you’re placing the grande on an already occupied action. You can’t use bonus action tokens.
- You must have 6 workers by the end of year 3 or you lose the game.
- Start at 5 victory points. When you use the harvest action, you can harvest up to three fields.
- You can’t use bonus action tokens. Play 8 years, where each year you can choose any wake-up chart row you want.
- You don’t score VP during the game. Instead at the end of the game you get 2 VP for each wine in your large cellar and 1 VP for each wine in you medium cellar. If you play the aggressive variant you should skip this part of the campaign.
- Start at 3 victory points and 3 lira.
- You can’t fill wine orders (this includes filling orders via visitors). Wine can be used to gain VP in all other ways, though. Mama cards that give you wine order cards can be redrawn.
Glossary
- Action Space
- A dashed oval where a single worker can be placed. Workers can only be placed in the current season, and each worker can only be placed once a year. Some action spaces are private—they are on your player mats or on structures you’ve built. Only you can place workers on your private action spaces.
- Age Grapes & Wine
- Increase the value of all grape tokens on your crush pad and wine tokens in your cellar. Wine tokens cannot advance into cellars that you haven’t built.
- Bonus
- An extra benefit indicated inside an action space. You may place a worker on a bonus even if you don’t use it (you must take the action, but the bonus is optional). Take the bonus and the action in any order.
- Grande Worker
- The grande worker acts as a regular worker, but it can be placed on an action even if all action spaces are full (this ability can only be used on the board). The only way for a grande worker to gain a bonus is to place it on a bonus action space.
- Harvest
- Choose a field on your vineyard mat that you have not already harvested this year (each field may only be harvested once per year). Add up the total value of all red vines on that field and place a grape token on the space with the corresponding value on your red crush pad. Then do the same for white vines. The vine cards remain planted on the fields (you’re simply plucking grapes from those vines).
- Make Wine
- Using the grapes on your crush pad, make 2 wine tokens (the type of wine may be different for each token). You cannot combine 2 same-color grapes to make a wine of the same color—1 red grape token becomes 1 red wine token of the same value (devalue it if you don’t have the cellar space). To make 1 blush wine token, combine 1 red grape token and 1 white grape token—add the values of the 2 grape tokens to determine the value of the blush wine token (must be at least 4). To make 1 sparkling wine token, combine 2 red grape tokens and 1 white grape token—add the values of the 3 grape tokens to determine the value of the sparkling wine token (must be at least 7).
- Place Grape Tokens on Crush Pad or Wine Tokens in Cellar
- Some visitor cards, trade actions, or special workers enable you to “place” a specific type of token onto your vineyard mat. This is distinctly different than harvesting vines (to gain grape tokens) or making wine tokens (moving grape tokens to your cellar to become wine tokens). When you “place” a grape or wine token, it is as if you are buying a grape or wine from a source outside of your vineyard. So you will take a glass token and place it directly on your crush pad (grape) or cellar (wine).
- Play 1 Visitor Card
- Choose a visitor card in your hand, pay the cost if necessary, gain the benefit (you must be able to fully pay the cost and fully gain the benefit), and place it face-up on its discard pile.
- Temporary Worker
- The player who selects the last row of the wake-up chart gets the grey temporary worker to use that year. The temporary worker is considered to be that player’s worker in all regards for the remainder of the current year, including any reference to “your workers” or “your regular workers.” When you retrieve workers at the end of the year, retrieve the temporary worker token and place it back on the wake-up chart.
- Trading
- There is no trading between players in Viticulture.
- Uproot
- This is an action you can take by using the Yoke or some visitor cards. Choose a planted vine card on your vineyard mat and return it to your hand.
- Wake-Up Chart
- The player at the top of the wake-up chart takes the first turn (i.e., place 1 worker or pass) each season, followed by each other player in wake-up order. Your wake-up order stays the same throughout the year. Use wake-up order when players must make any sequential decision (e.g., drawing cards in the fall or making a decision based on an interactive visitor card).


