
War of the Ring: Second Edition
2011
Lead the Free Peoples or Shadow Armies in a strategic battle where military conquest and the secret journey to Mount Doom decide Middle-earth’s fate.
240
minutes
2 - 4
player(s)
13+
Heavy


About this board game
War of the Ring: Second Edition is a strategic game for 2–4 players that plays in about 240 minutes, recreating the struggle between the Free Peoples and the Shadow Armies.
One player controls the Free Peoples while the other commands the Shadow. The Free People nations are initially reluctant to fight, so they must be attacked or persuaded by Gandalf and other Companions before they can join the war in earnest. Their readiness is tracked on the Political Track.
Military victory is possible for either side: Sauron can win by conquering enough Free People cities and strongholds, while the Free Peoples can achieve victory through their own military success. Yet the Free Peoples’ greatest hope lies in a more perilous mission.
As armies clash across Middle-earth, the Fellowship of the Ring attempts to travel secretly to Mount Doom and destroy the One Ring. Sauron does not know the enemy’s true intention, but searches for the Ring while the Fellowship faces dangers governed by the Hunt for the Ring rules.
- Action Dice: Each turn revolves around rolled dice that determine available actions, including moving armies or characters, recruiting troops, and advancing a Political Track.
- Event Cards: These represent specific story events or possible alternate developments, adding special actions and unexpected changes to battles.
- Strategic balance: The Free People player must protect the Ring-bearer while building a defense strong enough to prevent the Shadow from overrunning Middle-earth.
With competing paths to victory and decisions shaped by dice and Event Cards, War of the Ring: Second Edition combines a broad military conflict with a hidden, dangerous quest.
/pic7182955.jpg)
Board Game Rules for
War of the Ring: Second Edition
Everywhere he looked he saw the signs of war. The Misty Mountains were crawling like anthills: Orcs were issuing out of a thousand holes. Under the boughs of Mirkwood there was deadly strife of Elves and Men and fell beasts. The land of the Beornings was aflame; a cloud was over Moria; smoke rose on the borders of Lórien. Horsemen were galloping on the grass of Rohan; wolves poured from Isengard. From the havens of Harad ships of war put out to sea; and out of the East Men were moving endlessly: swordsmen, spearmen, bowmen upon horses, chariots of chieftains and laden wains. All the power of the Dark Lord was in motion.
— The Fellowship of the Ring by J.R.R. Tolkien, Book II, Chapter 10.
GAME OVERVIEW
Welcome to the War of the Ring strategy board game.
War of the Ring is a game for two to four players, based on J.R.R. Tolkien’s The Lord of the Rings™.
The players take part in the struggle of the armies of the Free Peoples and the heroic Companions of the Fellowship of the Ring against the dark host of the Shadow and the powerful Minions of the Dark Lord.
In a two-player game, each opponent will lead either the Free Peoples or the armies of the Shadow, while in a three- or four-player game, the players will be organized in two teams, each team controlling either faction.
In each game of War of the Ring, the player controlling the Shadow attempts to use his superior military power to conquer Middle-earth.
At his command gather Sauron’s legions of Orcs and Trolls, the forces of the wizard Saruman, and the hosts of the Southrons and Easterlings, set to bring darkness over the West.
Against this onslaught, the Free Peoples player leads an allegiance of Elves, Dwarves, the riders of Rohan, men of Gondor, and men from the North—a fragile union trying to defend the last free realms of Middle-earth, and to gain precious time to allow the success of the Quest of the Ring-bearers.
While armies clash, the nine Companions of the Fellowship of the Ring travel towards the very heart of the domains of the Dark Lord—Mount Doom—to destroy the One Ring in the Mountain of Fire.
Controlled by the Free Peoples player, the Fellowship is his true chance of winning, as the military forces of the Shadow will be vanquished together with their master if the Ring is undone. But the Quest is fraught with ever greater perils, as the Darkness falls over Middle-earth…
In the end, one side will emerge victorious:
- If the Shadow conquers enough of its enemies’ cities and strongholds, or if the Ring-bearers fail and are corrupted, Darkness will triumph.
- If the Fellowship succeeds in destroying the Ring before this happens, or the armies of the Free Peoples succeed in turning the tide and conquering the enemy’s strongholds themselves, the fall of the Dark Lord is at hand…
NUMBER OF PLAYERS
War of the Ring is a game for 2 to 4 players. The forces involved in the conflict are divided into two sides: the Free Peoples and the Shadow.
- When playing with three players, one player controls the Free Peoples and the remaining two control the Shadow, sharing tasks.
- When playing with four players, all participants evenly share the forces of the two sides.
Please note that these rules refer to games played with only two players. To play games with more than two players, see Multiplayer Rules.
NOTES ON THE SECOND EDITION
This new edition of the game introduces a few subtle but important changes. For this reason, we recommend a careful reading of the rules, even to experienced players. The main changes are summarized here for the benefit of players already familiar with the previous edition:
- Character Abilities: Gandalf the Grey, Gollum, Meriadoc Brandybuck, Peregrin Took and the Witch-king now have modified special abilities (see their Character Cards). The changes to Gandalf the Grey (Guide ability) and the Witch-king (mustering pre-requisites, “Sorcerer” ability) are especially important to take notice of.
- Event Cards: Many Event Cards have been revised to improve their effectiveness, or simplify their use. The “Ents of Fangorn”, “Paths of the Woses” and “The Last Battle” cards have modified effects.
- Army Setup: The setup for the Dwarves has been modified.
- Action dice: The Shadow player must allocate a minimum of 1 Action Die to the Hunt if the Free Peoples player placed at least one Action Die in the Hunt Box in the previous turn.
- Use of Combat Cards: Combat Cards are now chosen and played using a modified sequence.
- The Hunt: There is a new sequence for the Hunt resolution, to streamline the application of Event Cards and Special Abilities.
- Entering Mordor: To enter Mordor, it is now sufficient that the Ring-bearers are located in Minas Morgul or Morannon, without the requirement of declaring the Fellowship. As a consequence, the Fellowship can enter Mordor even if it is not Hidden.
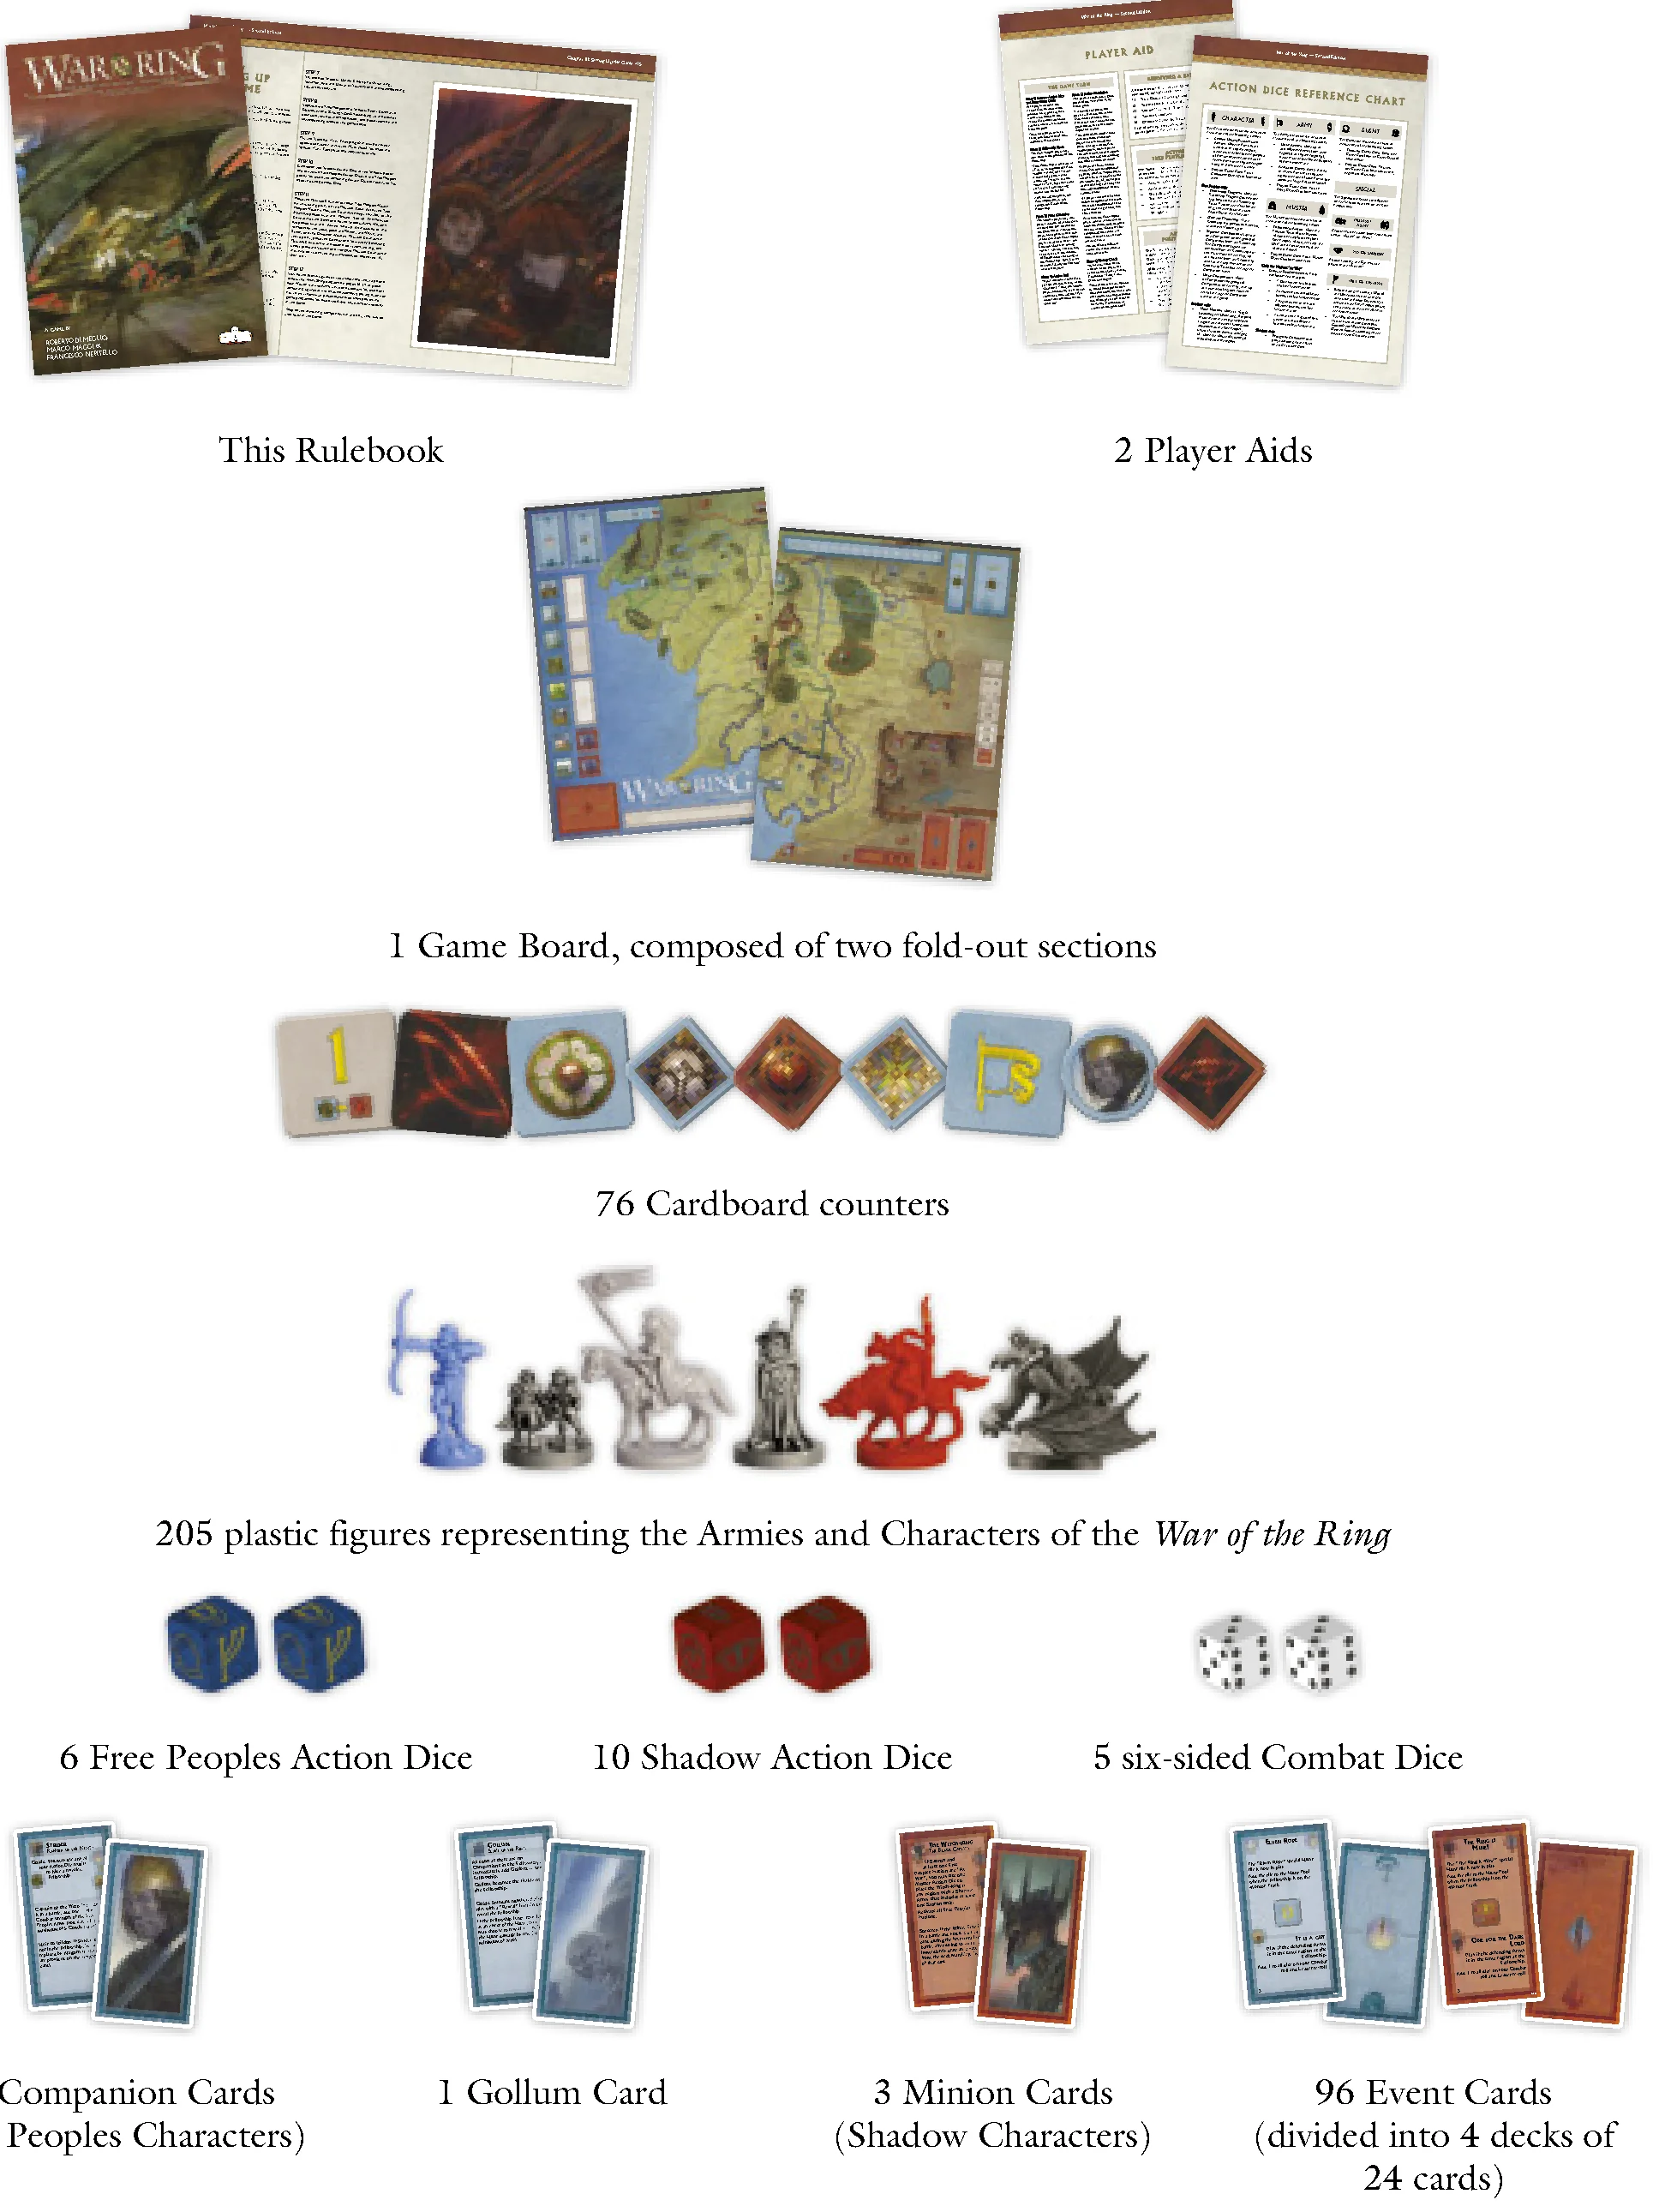
COMPONENTS LIST
Inside your War of the Ring box you will find an extensive set of components, listed here:
- This Rulebook
- 2 Player Aids
- 1 Game Board, composed of two fold-out sections
- 6 Free Peoples Action Dice
- 10 Shadow Action Dice
- 5 six-sided Combat Dice
- 10 Companion Cards (Free Peoples Characters)
- 1 Gollum Card
- 3 Minion Cards (Shadow Characters)
- 96 Event Cards (divided into 4 decks of 24 cards each)
- 205 plastic figures representing the Armies and Characters of the War of the Ring, including:
- 90 red figures representing Shadow Army units
- 75 blue figures representing Free Peoples Army units
- 20 gray figures representing Free Peoples Leaders and 8 figures representing the Nazgûl
- 8 silver figures representing the Ring-bearers (Frodo and Sam) and their Companions
- 3 silver figures representing the Minions of the Shadow
- 1 silver figure representing Gollum
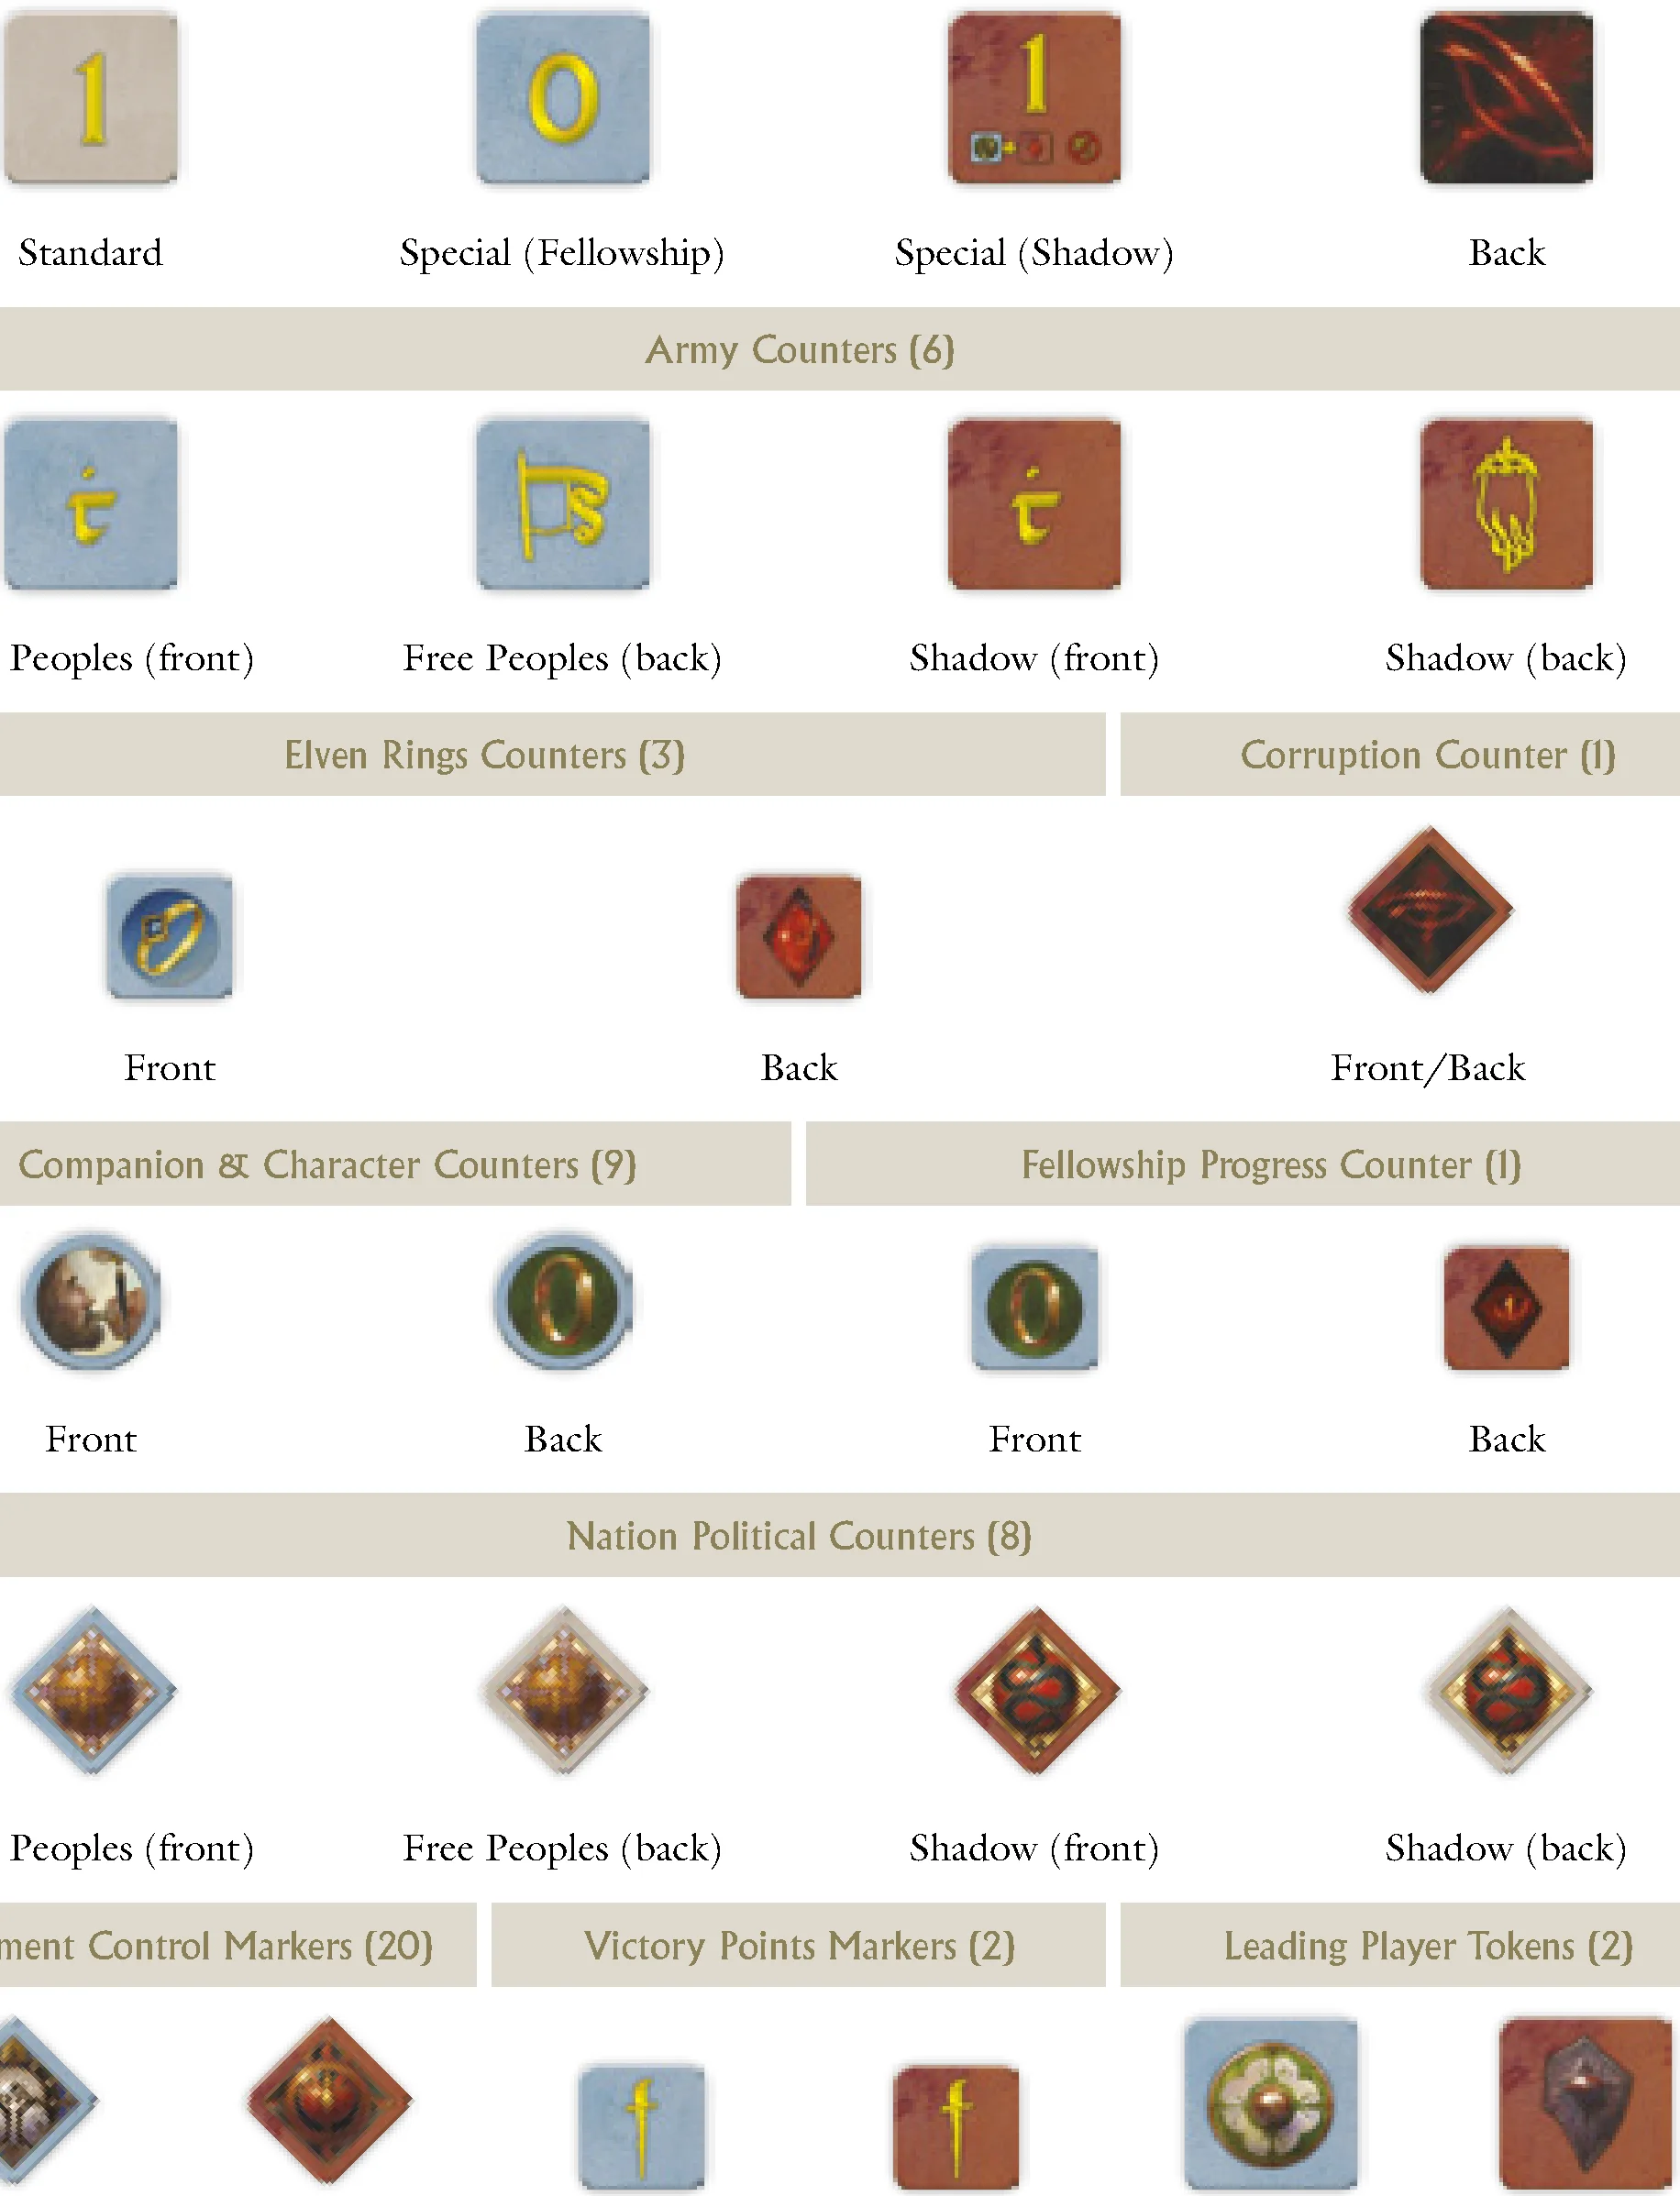
- 76 cardboard counters and markers, including:
- 24 Hunt Tiles (16 Standard Hunt Tiles and 8 Special Hunt Tiles)
- 6 Army counters
- 3 Elven Rings counters
- 1 Corruption counter
- 7 Companion counters
- 1 Aragorn – Heir to Isildur marker
- 1 Gandalf the White marker
- 1 Fellowship Progress counter
- 8 Nation Political counters
- 20 Settlement Control markers
- 2 Victory Points markers
- 2 Leading Player tokens (used in the three- and four-player games)
GAME PIECES
PLASTIC FIGURES
The Armies fighting for Middle-earth and the heroes and monsters that lead them are represented in the game by plastic figures.
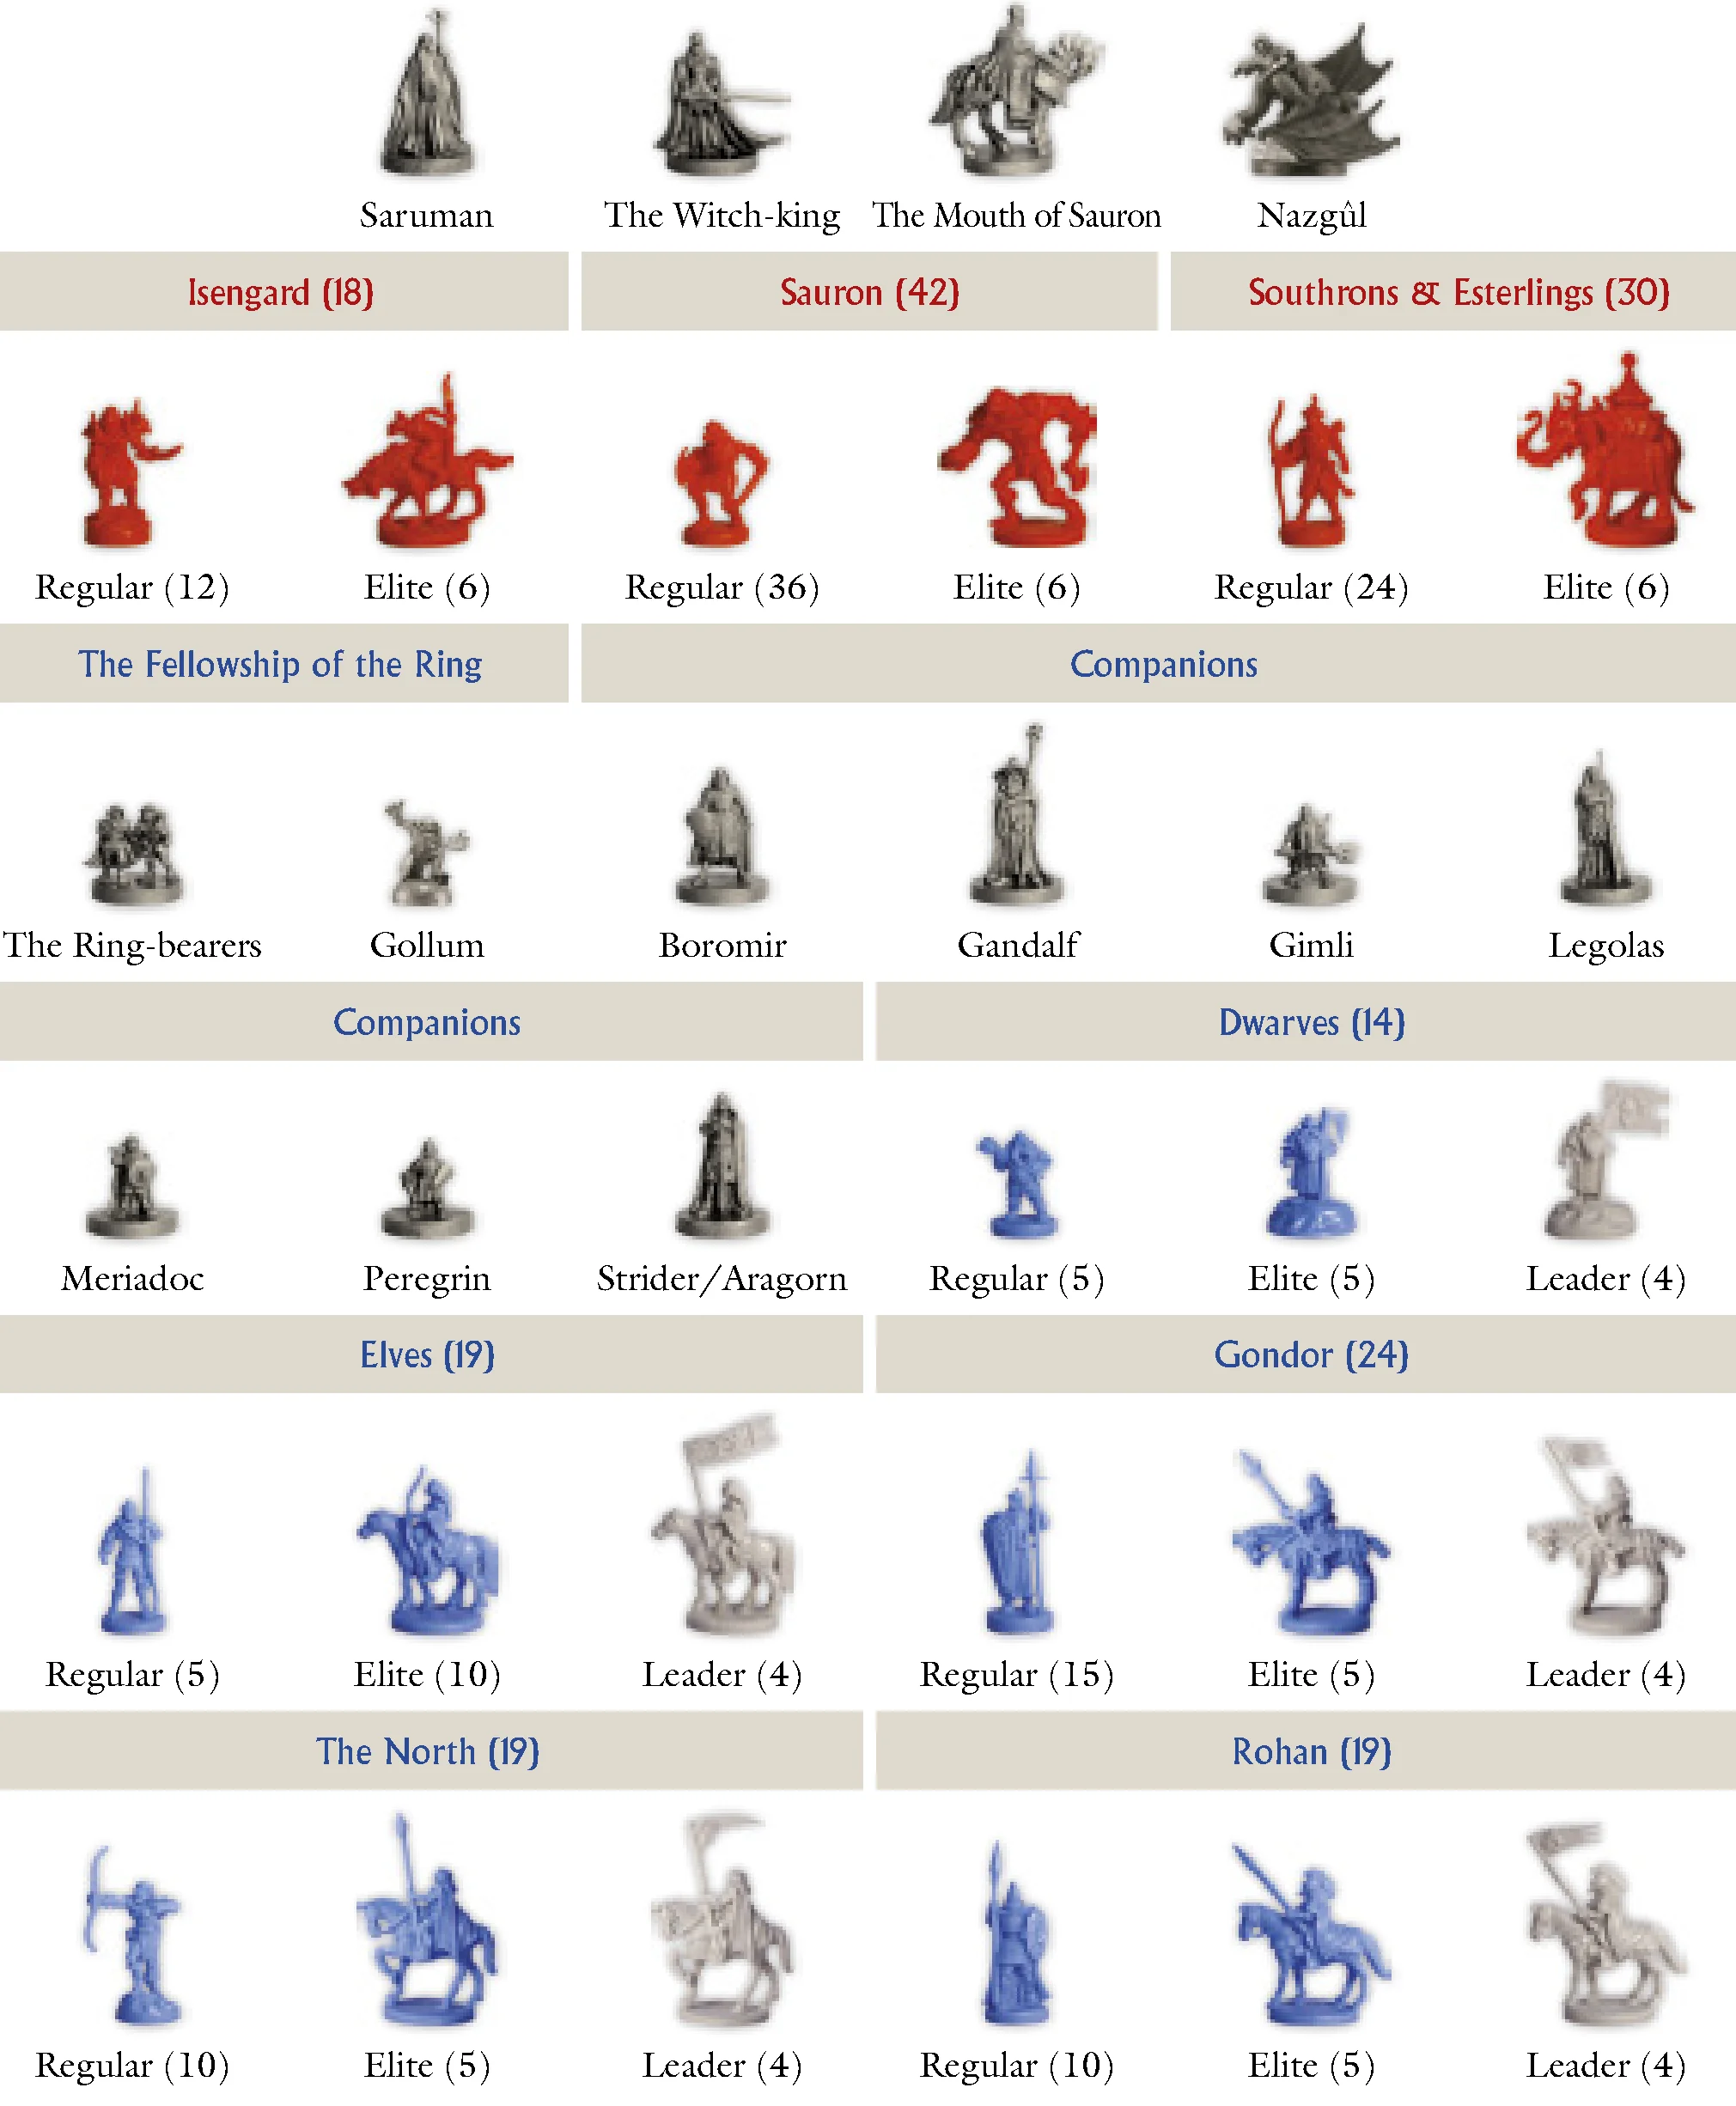
Armies
The bulk of the armed forces of a Nation are represented by Army units.
The Army units of a Nation are further divided into either Regular or Elite units, where the first category represents a fighting force of average warriors and the second a host of chosen fighters or powerful monsters.
A single Army unit corresponds to a variable number of warriors, from a few hundred expert fighters to thousands of Orcs. In game terms, all units of a kind (Regular or Elite) have the same fighting capabilities as any other of the same kind, regardless of the Nation they belong to.
All Army units inside a single region and controlled by the same player are considered a single group and are collectively called an Army.
An Army can be composed of a maximum of ten units, or five units if the Army is inside a Stronghold under siege.
Free Peoples Leaders
The captains and chieftains leading the Armies of the Free Peoples are represented by Leader figures.
Leaders are unable to move on their own and must always be part of a friendly Army. If at any time a Leader is on the map without an Army, he is immediately removed.
The presence of a Leader in an Army provides an advantage in combat and a superior movement capability. There is no limit to the number of Leaders who can be in the same Army. Free Peoples Leaders, regardless of nationality, can lead Armies composed of units from any Free Peoples Nation.
A Leader is not considered an Army unit and cannot be taken as a casualty, nor does the presence of a Leader add to the Combat Strength of an Army.
Nazgûl
The Nazgûl, also called Ringwraiths, act as Leaders for the Shadow Armies and each is represented by the distinctive Ringwraith figure mounted on a winged beast.
The rules pertaining to the Free Peoples Leaders also apply to the Nazgûl, with the following exceptions:
- The Nazgûl are not obliged to be part of a friendly Army and can move on their own, flying to any region (even regions containing Free Peoples units) on the game board with a single movement. Exception: a Nazgûl moving without an Army cannot be placed alone in an enemy-controlled Stronghold.
- The Nazgûl are unaffected by the presence of an enemy Army in the same region.
Characters
The main heroes of the story and their main antagonists are represented by the Character figures.
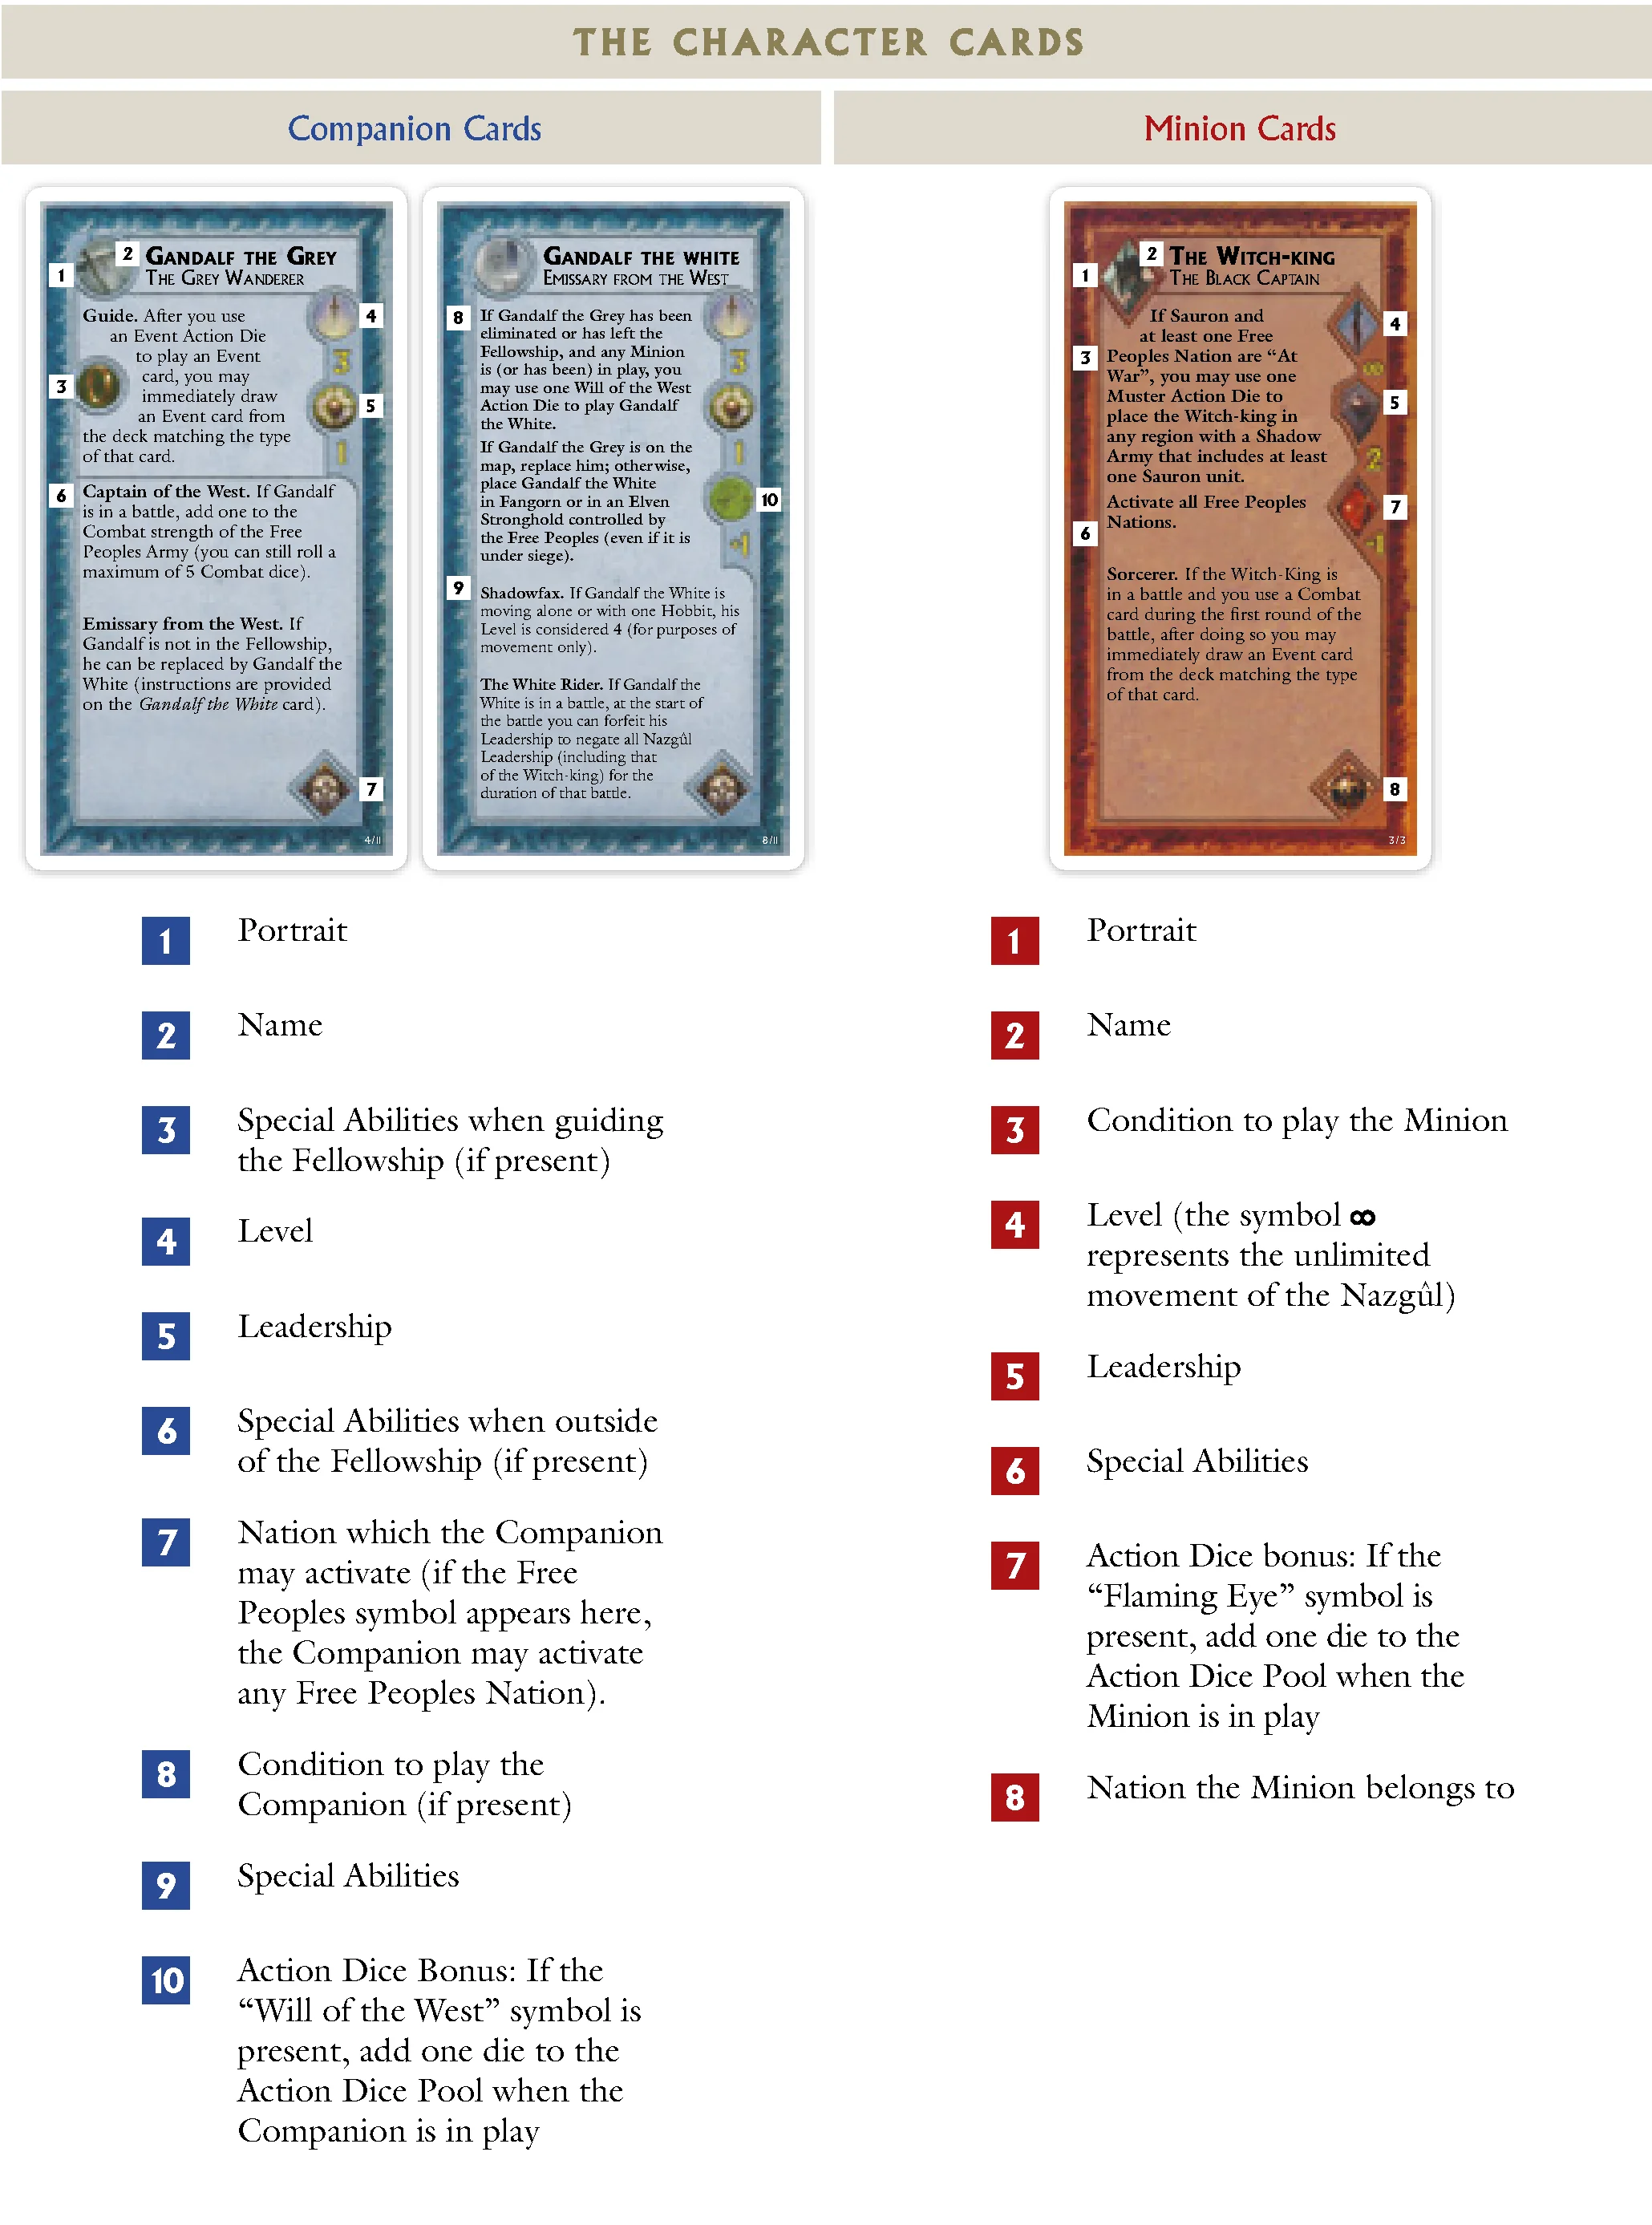
Characters are personalities with abilities superior to those of simple Leaders. Characters belonging to the Free Peoples are called Companions, while the Characters of the Shadow are called Minions.
Each Character is represented by a unique figure and a Character Card detailing his special skills. Players should carefully read all of the Character Cards before playing the game.
In game terms, Characters act much the same as Leaders, but they do not suffer the same restrictions and can move on the game board on their own, ignoring the presence of enemy Armies.
- Companions: Legolas, Gimli, Boromir, Aragorn (as Strider), Meriadoc, Peregrin, and Gandalf the Grey start the game as the Companions of Frodo and Sam (the Ring-bearers) and members of the Fellowship of the Ring. As the game progresses, they can leave the Fellowship to help rouse the Free Peoples Nations to war and to act as Leaders for the Free Peoples Armies. Under certain conditions (as described on their Character Cards), Strider and Gandalf the Grey can be replaced by their more powerful incarnations: Aragorn – Heir to Isildur and Gandalf the White. When this happens, put the appropriate marker under the plastic figure of the Character to remember his new status.
- Minions: The more prominent servants of the Dark Lord—Saruman, the Witch-king, and the Mouth of Sauron—do not start in play at the beginning of the game. They will enter play later, under the conditions specified on their Character Cards.
- Gollum: Gollum is a very unusual Character. Gollum is always assumed to be following the Fellowship of the Ring, and he becomes the Guide of the Fellowship if the Ring-bearers are alone. When this happens, you may place the Gollum figure together with the Ring-bearers figure as a reminder of his presence. The effects of Gollum’s actions are represented in the game by the Gollum Character Card and certain Event Cards.
THE GAME BOARD
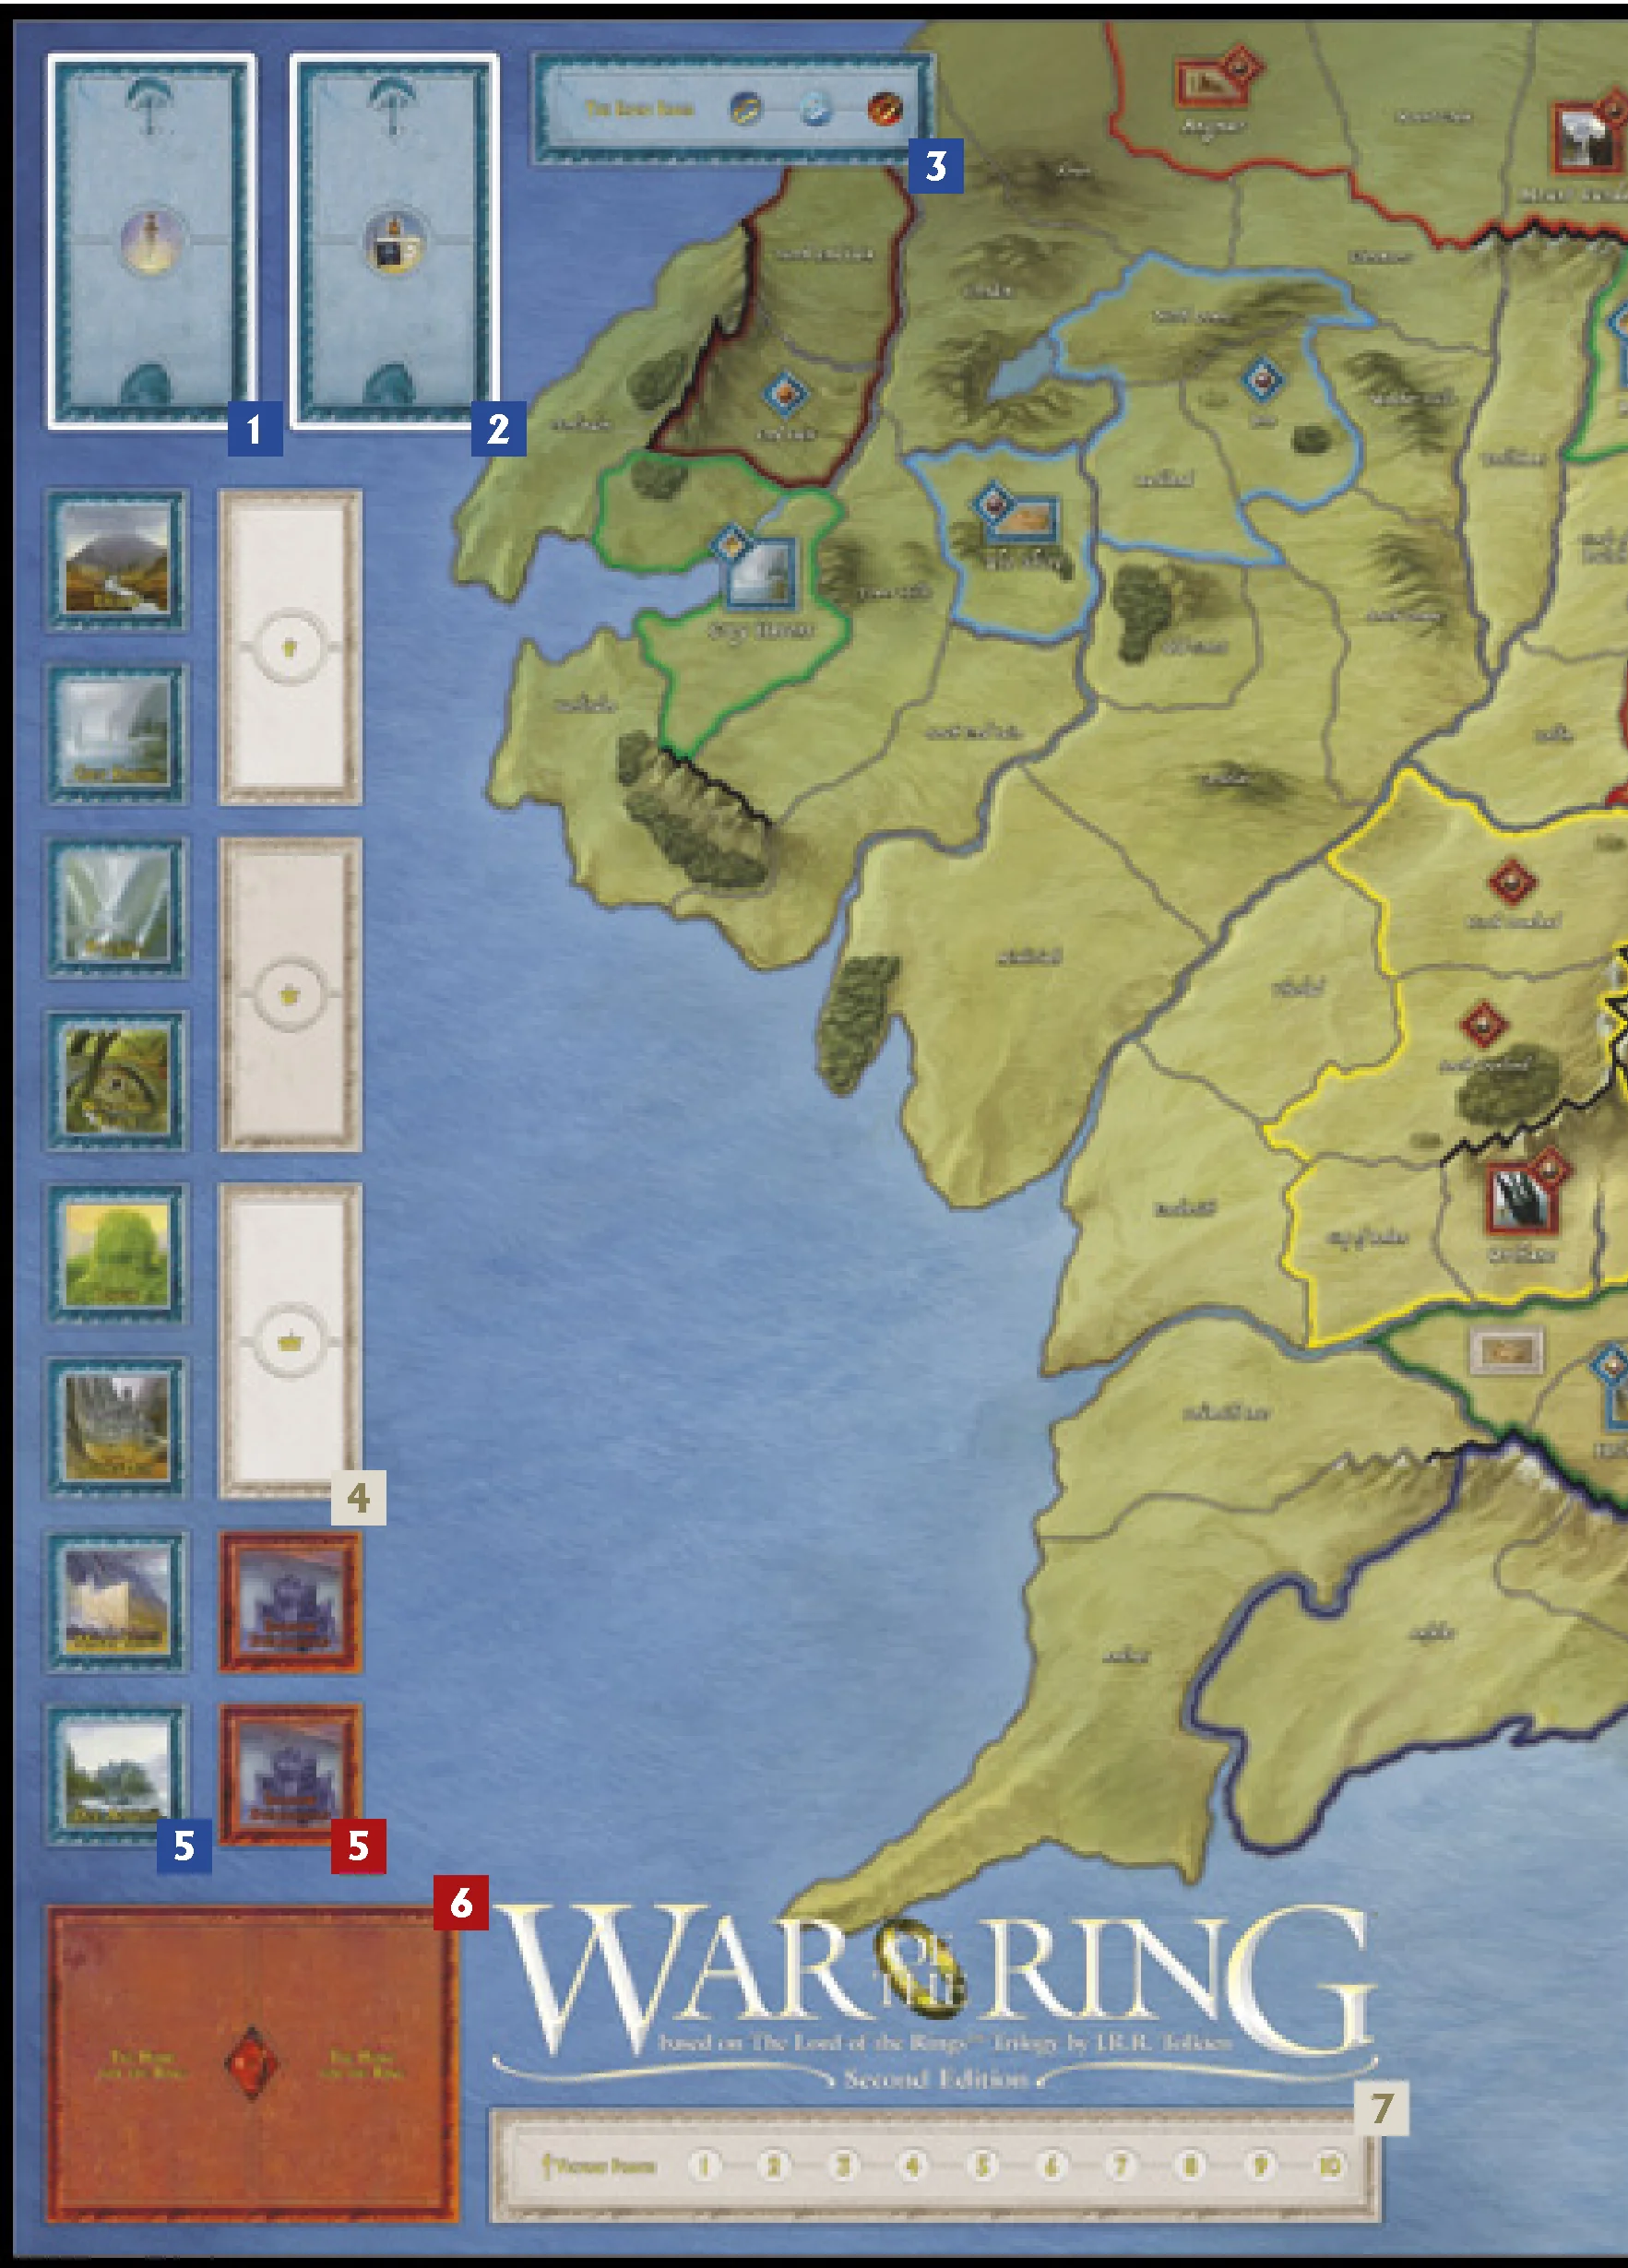
The game board is a view of western Middle-earth at the end of the Third Age. In addition to the playing area proper, the game board also includes several spaces and tracks used to help the players keep track of various elements and components of the game.
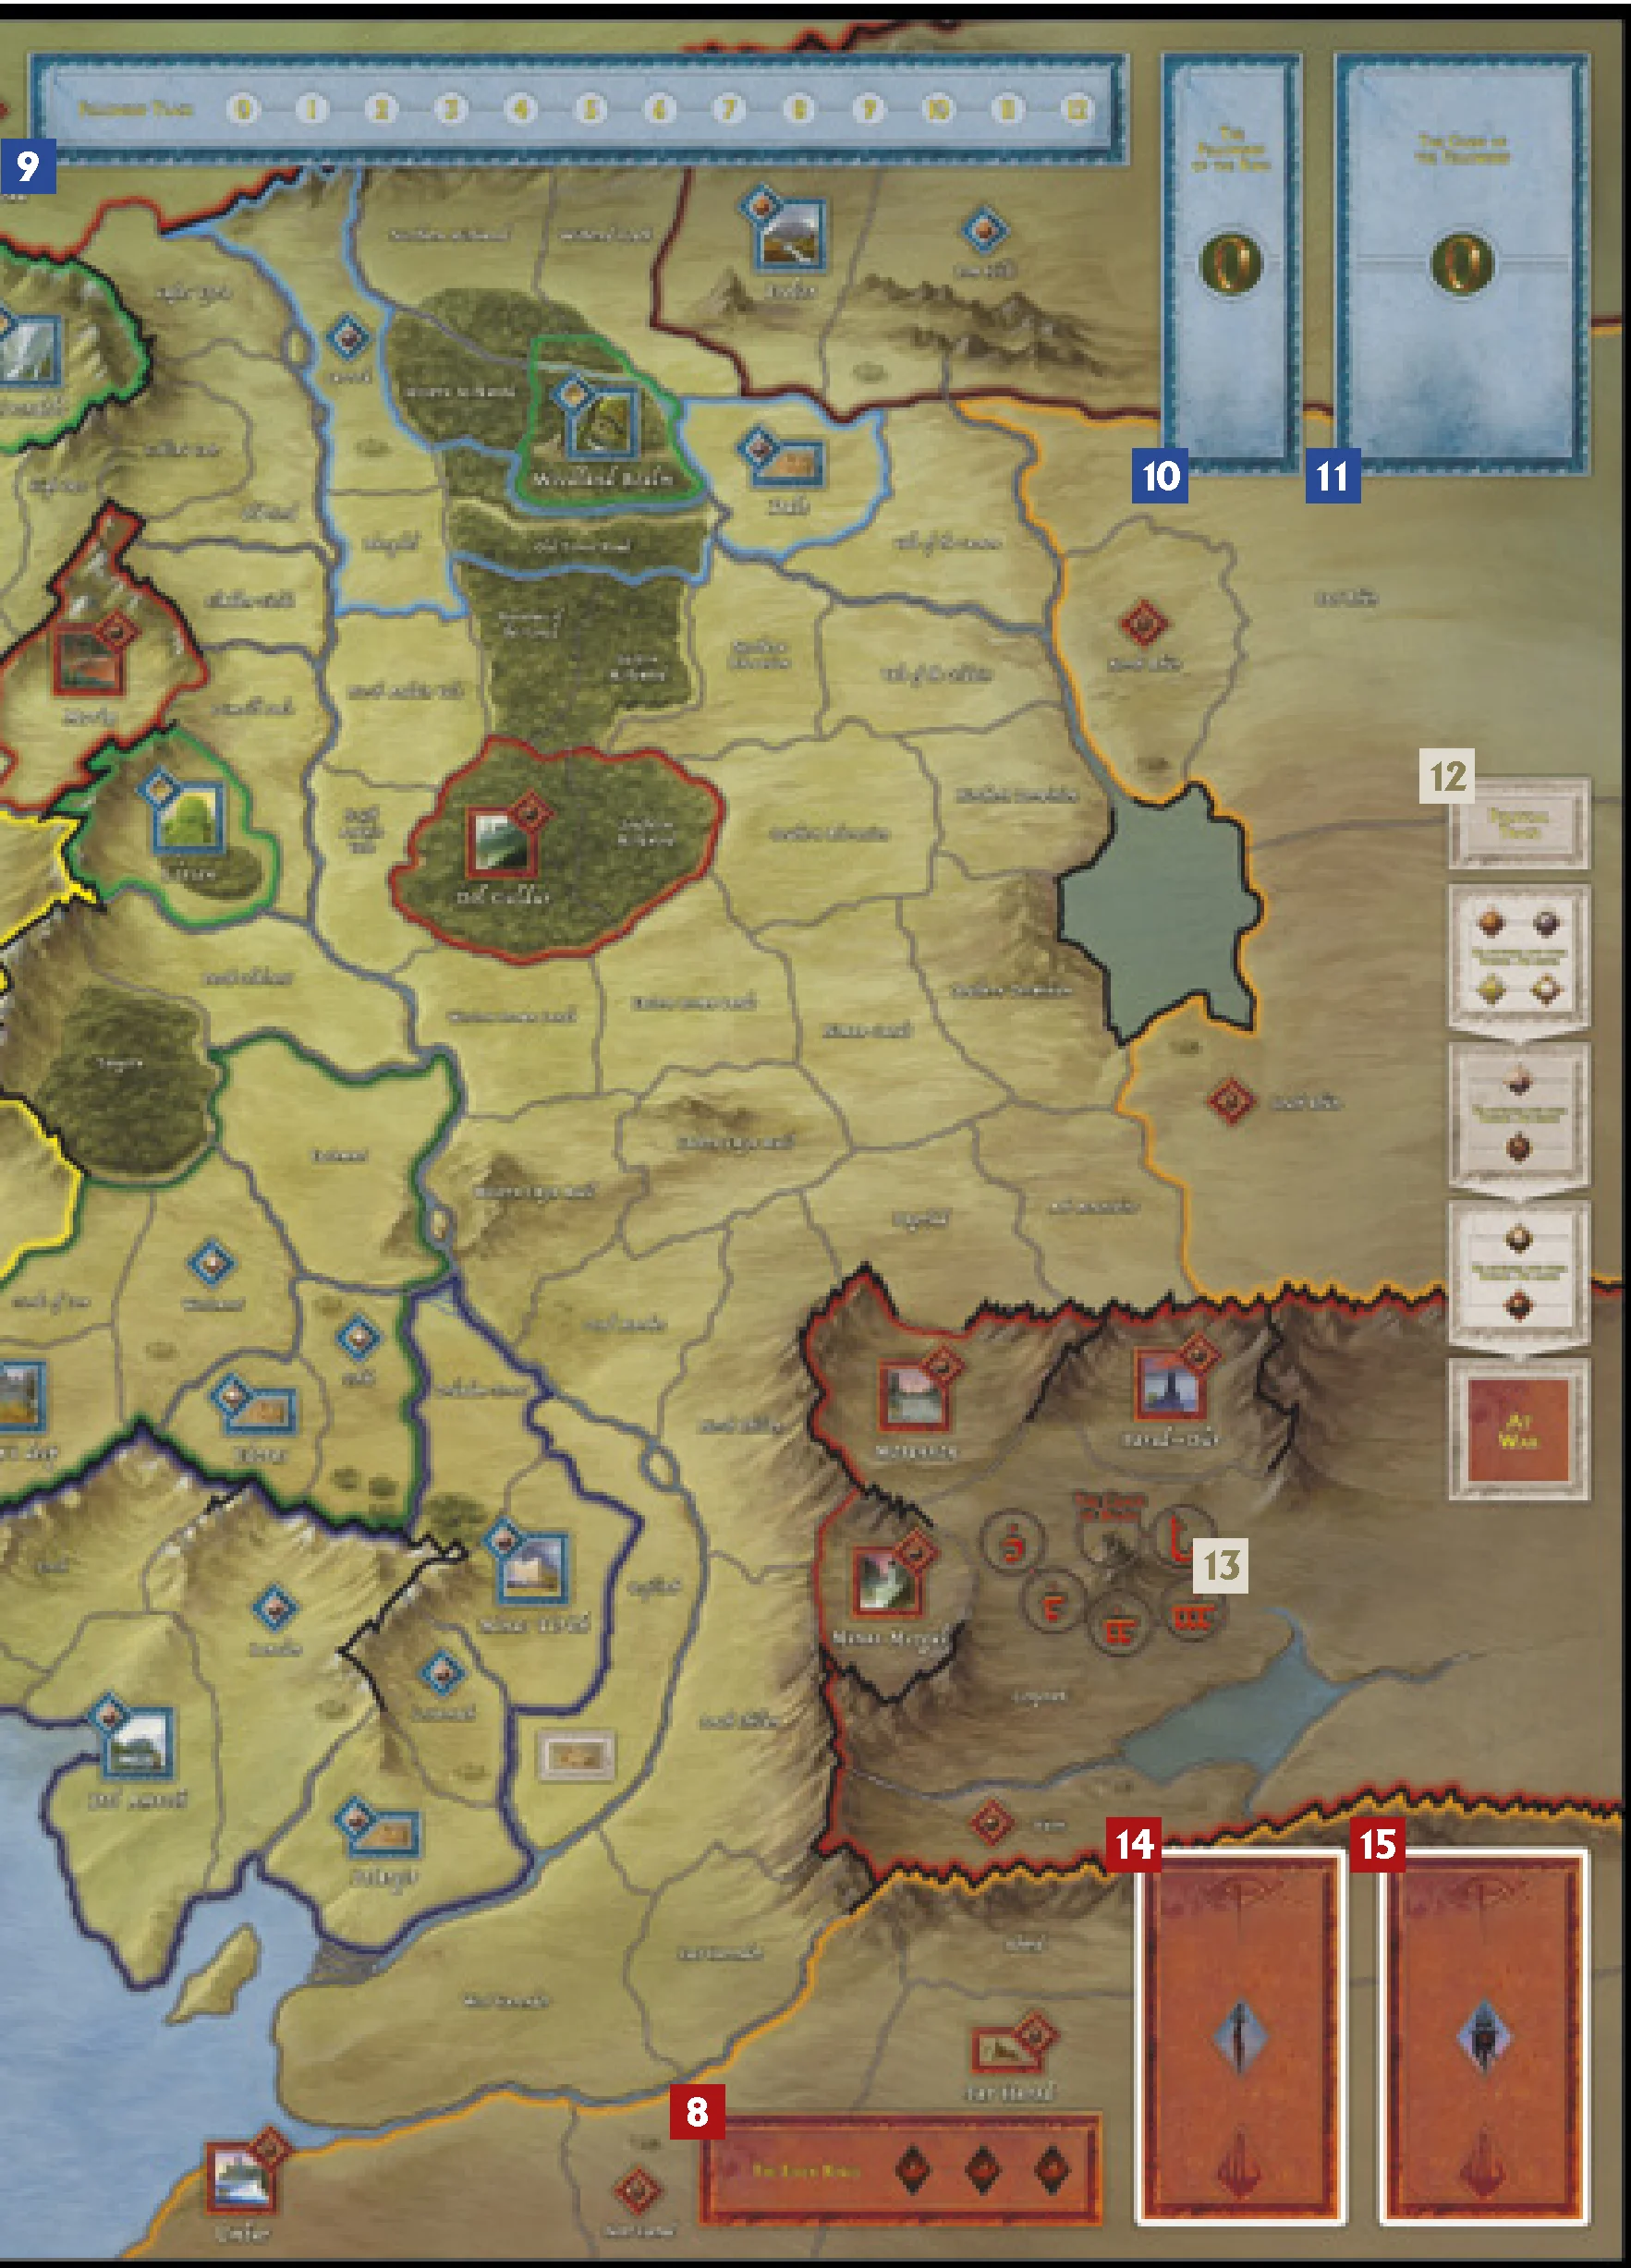
The diagram of the game board identifies its various parts and shows the spaces where many of the components needed at the start of the game are placed during setup.
NATIONS
The Nations are identified by their colored borders:
- Dwarves: brown
- Elves: light green
- Gondor: dark blue
- The North: light blue
- Rohan: dark green
- Isengard: yellow
- Sauron: red
- Southrons & Easterlings: orange
REGIONS
The main portion of the game board shows a view of western Middle-earth at the end of the Third Age. The map is divided into territories called regions. Each region is identified by a name, which usually refers to a site of note or to an entire geographical area (such as Minas Tirith or Cardolan). Regions are used to regulate movement, combat, and the placement of all plastic figures.
- Regions are normally separated by a white line or by a river between two white lines.
- A thick black border denotes impassable terrain which cannot be crossed, usually a high mountain range. If the border between two regions is completely divided by such a line, those regions are not considered adjacent for any purpose.
- Some areas of the board are completely blue, either surrounded by a black line or bordered by a white line. These areas are seas or lakes. A sea or lake area is not a region and can never be crossed or moved into. Regions bordering the large sea area on the left side of the board are called coastal regions.
- Larger letters in the name of a region show that the region includes a City or Stronghold.
Free Regions
The rules and Event Cards often refer to a free region. A region is free for a player when it doesn’t contain an enemy Army and/or an enemy-controlled Settlement. A region containing a Stronghold controlled by the enemy is also free for a player when the Stronghold is besieged by an Army of that player.
FORTIFICATIONS AND SETTLEMENTS
A region can be empty, or contain either a Fortification or one of three types of Settlements (Town, City, or Stronghold).
Fortifications
A Fortification in a region offers easily defendable positions, such as a ruin, a fort, or a ford crossing a river. There are two Fortifications on the map: in the regions of Osgiliath and the Fords of Isen.
Settlements
Settlements represent locations that are vital to the economy and defense of a Nation. A region containing a Settlement gives several advantages to the player controlling it.
- Towns: Represent populated areas that allow the recruitment of troops of a specific Nation. The presence of a Town is shown on the board by the symbol of the appropriate Nation.
- Cities: Represent major urban centers and can also be used to recruit troops. They also provide an advantage in combat to defending troops. Control of an enemy City is worth 1 Victory Point to the opponent.
- Strongholds: Represent fortresses, Elven homes, and the greatest capitals of Middle-earth. Troops may be recruited in Strongholds, and defenders receive a very strong advantage in battle. Control of an enemy Stronghold is worth 2 Victory Points to the opponent. Each Stronghold on the board is matched by a Stronghold Box with the same drawing (or with a generic drawing in the case of Shadow Strongholds).
In both Cities and Strongholds, the color of the frame shows which player initially controls it (red for the Shadow, blue for the Free Peoples). The icon in the upper corner shows which Nation the City or Stronghold belongs to.
TRACKS AND BOXES
In addition to the regions of Middle-earth, the game board also contains various boxes and tracks used during the game to keep track of different activities. These areas include:
- Free Peoples Character Event Cards Box: holds the Free Peoples Character Event deck.
- Free Peoples Strategy Event Cards Box: holds the Free Peoples Strategy Event deck.
- Elven Rings Box (controlled by the Free Peoples player): displays the Elven Rings counters controlled by the Free Peoples player.
- Army Boxes: hold figures when there is not enough space in a region.
- Stronghold Boxes: display those Army units involved in a Siege Battle.
- Hunt for the Ring Box (Hunt Box): displays the dice that the Shadow player allocates to hunt the Fellowship and keeps track of the number of times that the Fellowship moves during a turn.
- Victory Points Track: keeps count of the conquests of each player.
- Elven Rings Box (controlled by the Shadow player): displays the Elven Rings counters after being used by the Free Peoples and transferred to the Shadow.
- Fellowship Track: keeps track of the progress of the Fellowship and the Corruption of the Ring-bearers.
- Fellowship of the Ring Box (Fellowship Box): displays the figures and counters of the Companions composing the Fellowship.
- Guide of the Fellowship Box: displays the Character Card of the Character who is guiding the Fellowship.
- Political Track: keeps track of which Nations of Middle-earth are “at War”.
- Mordor Track: the final part of the quest to destroy the One Ring.
- Shadow Character Event Cards Box: holds the Shadow Character Event deck.
- Shadow Strategy Event Cards Box: holds the Shadow Strategy Event deck.
SETUP STEPS
Before you start playing, you should decide who will play the Free Peoples and who will play the Shadow. Then, get the game ready to play by following these steps:
- Step 1: Place the game board on a suitable surface, possibly large enough to leave some room along the sides of the board (to place discarded cards and eliminated pieces and to roll dice).
- Step 2: Place the Ring-bearers figure on Rivendell, its starting point.
- Step 3: Place the Fellowship Progress Counter on Step 0 of the Fellowship Track, with the “Hidden” side up. The Corruption Counter is also placed on Step 0 of the same track.
- Step 4: Place all Companion Cards in the Guide of the Fellowship Box, with the Gandalf the Grey Character Card on top, as he is the starting Guide of the Fellowship. Set aside the cards for Aragorn – Heir to Isildur, Gandalf the White, and Gollum for later use.
- Step 5: Place all the Companion figures and their counters in the Fellowship of the Ring Box. Set aside the Gollum figure for later use.
- Step 6: Place the three Elven Ring counters in the Free Peoples’ Elven Rings Box of the game board with the “Ring” side up.
- Step 7: Set aside all Shadow Minion Cards (the Witch-king, Saruman, and the Mouth of Sauron) and the corresponding figures for later use.
- Step 8: Separate the Free Peoples and Shadow Event Cards into Character and Strategy Decks according to the back of each card, shuffle them separately, and place them on the corresponding areas of the game board.
- Step 9: Put the Standard Hunt Tiles (beige) in a cup or other opaque container: this is the Hunt Pool. Set aside the Special Hunt Tiles (blue and red) for later use.
- Step 10: Give seven red Shadow Action Dice to the Shadow player and four blue Free Peoples Action Dice to the Free Peoples player. Set aside the remaining Action Dice for later use. Set aside the five Combat Dice.
- Step 11: Place the Political Counter for each Free Peoples Nation on its starting point on the Political Track:
- All of the Free Peoples Nations’ Political Counters except for that of the Elves are placed with the “Passive” side up. The Political Counters of the Elves and all the Shadow Army Nations are placed with the “Active” side up.
- As indicated by the symbols on the track, place the Rohan, the North, the Elven, and the Dwarven Nations’ Political Counters in the top box.
- Place the Gondor and Southron/Easterling Political Counters in the second box from the top.
- Finally, place the Sauron and Isengard Political Counters in the third box from the top—immediately above the “At War” box.
- Step 12: Sort all the plastic figures by their color and their type and follow the Army Setup diagram to place each Nation’s initial Army units and Leaders. Set aside any remaining figures to use as reinforcements, paying attention not to mix them with pieces eliminated from play as the game progresses. Set aside the Army counters for use later in the game.
Keep all the remaining components in the box; they will be used later in the game.
ARMY SETUP
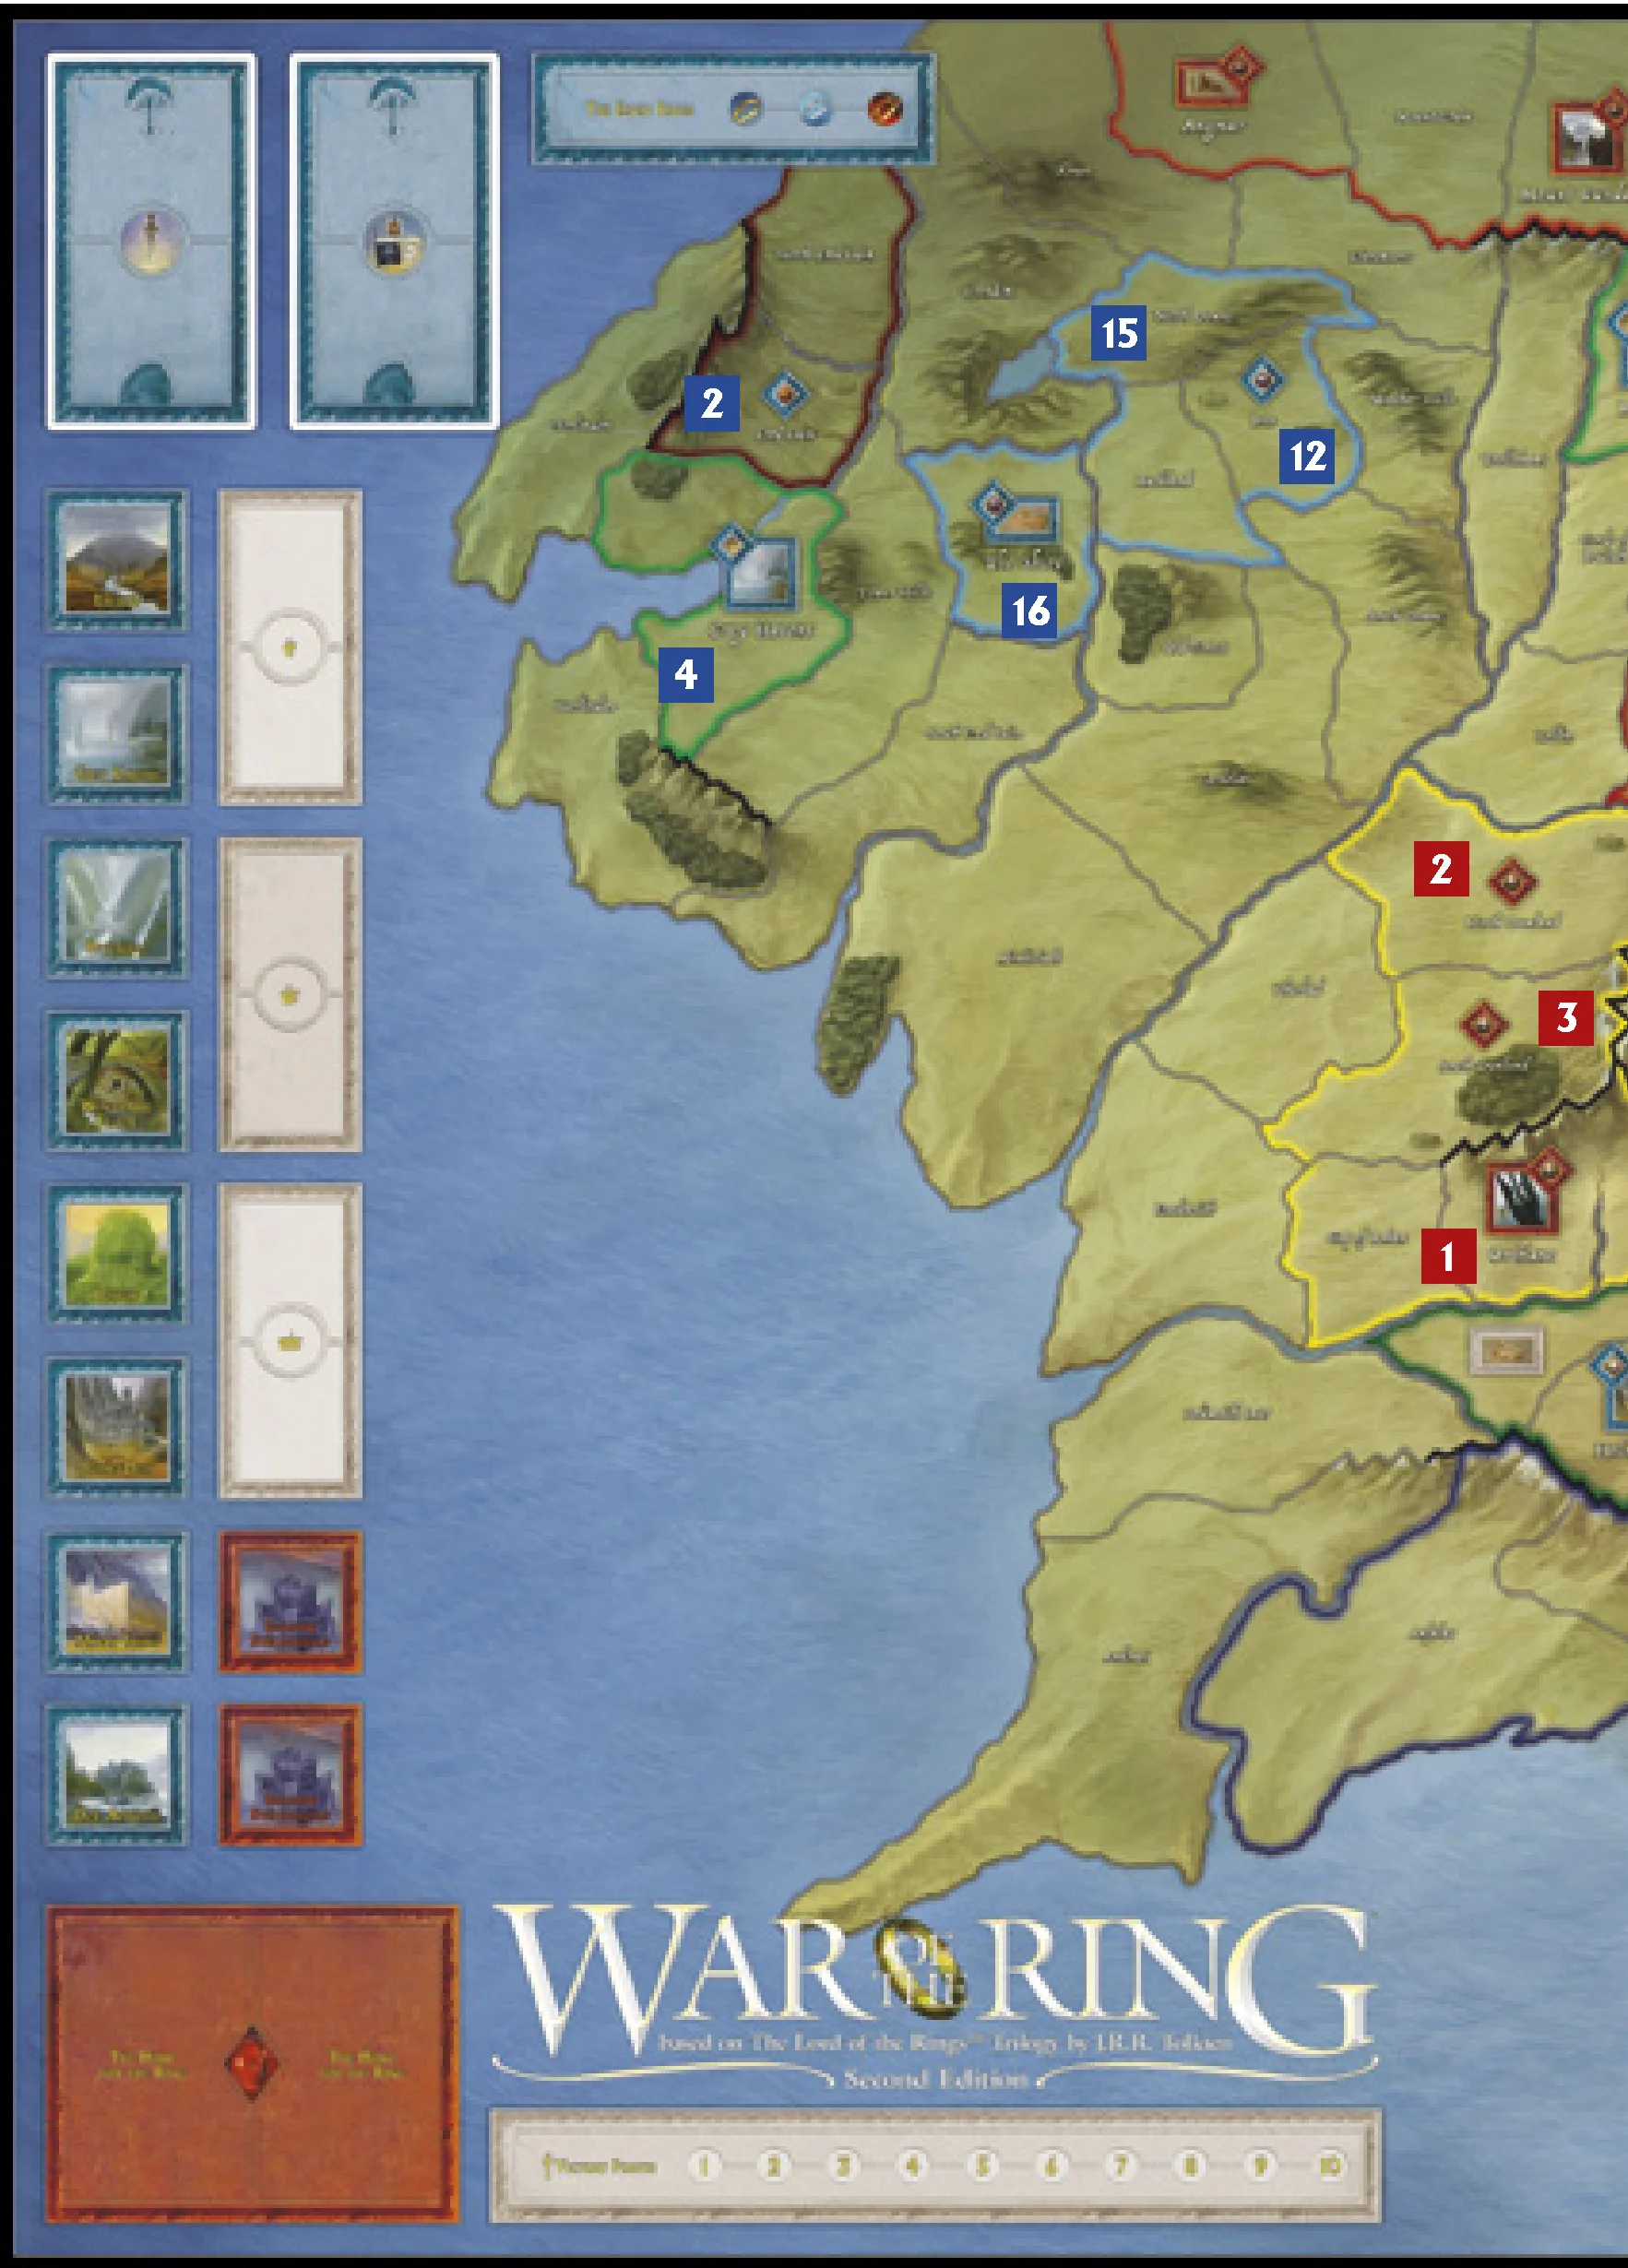
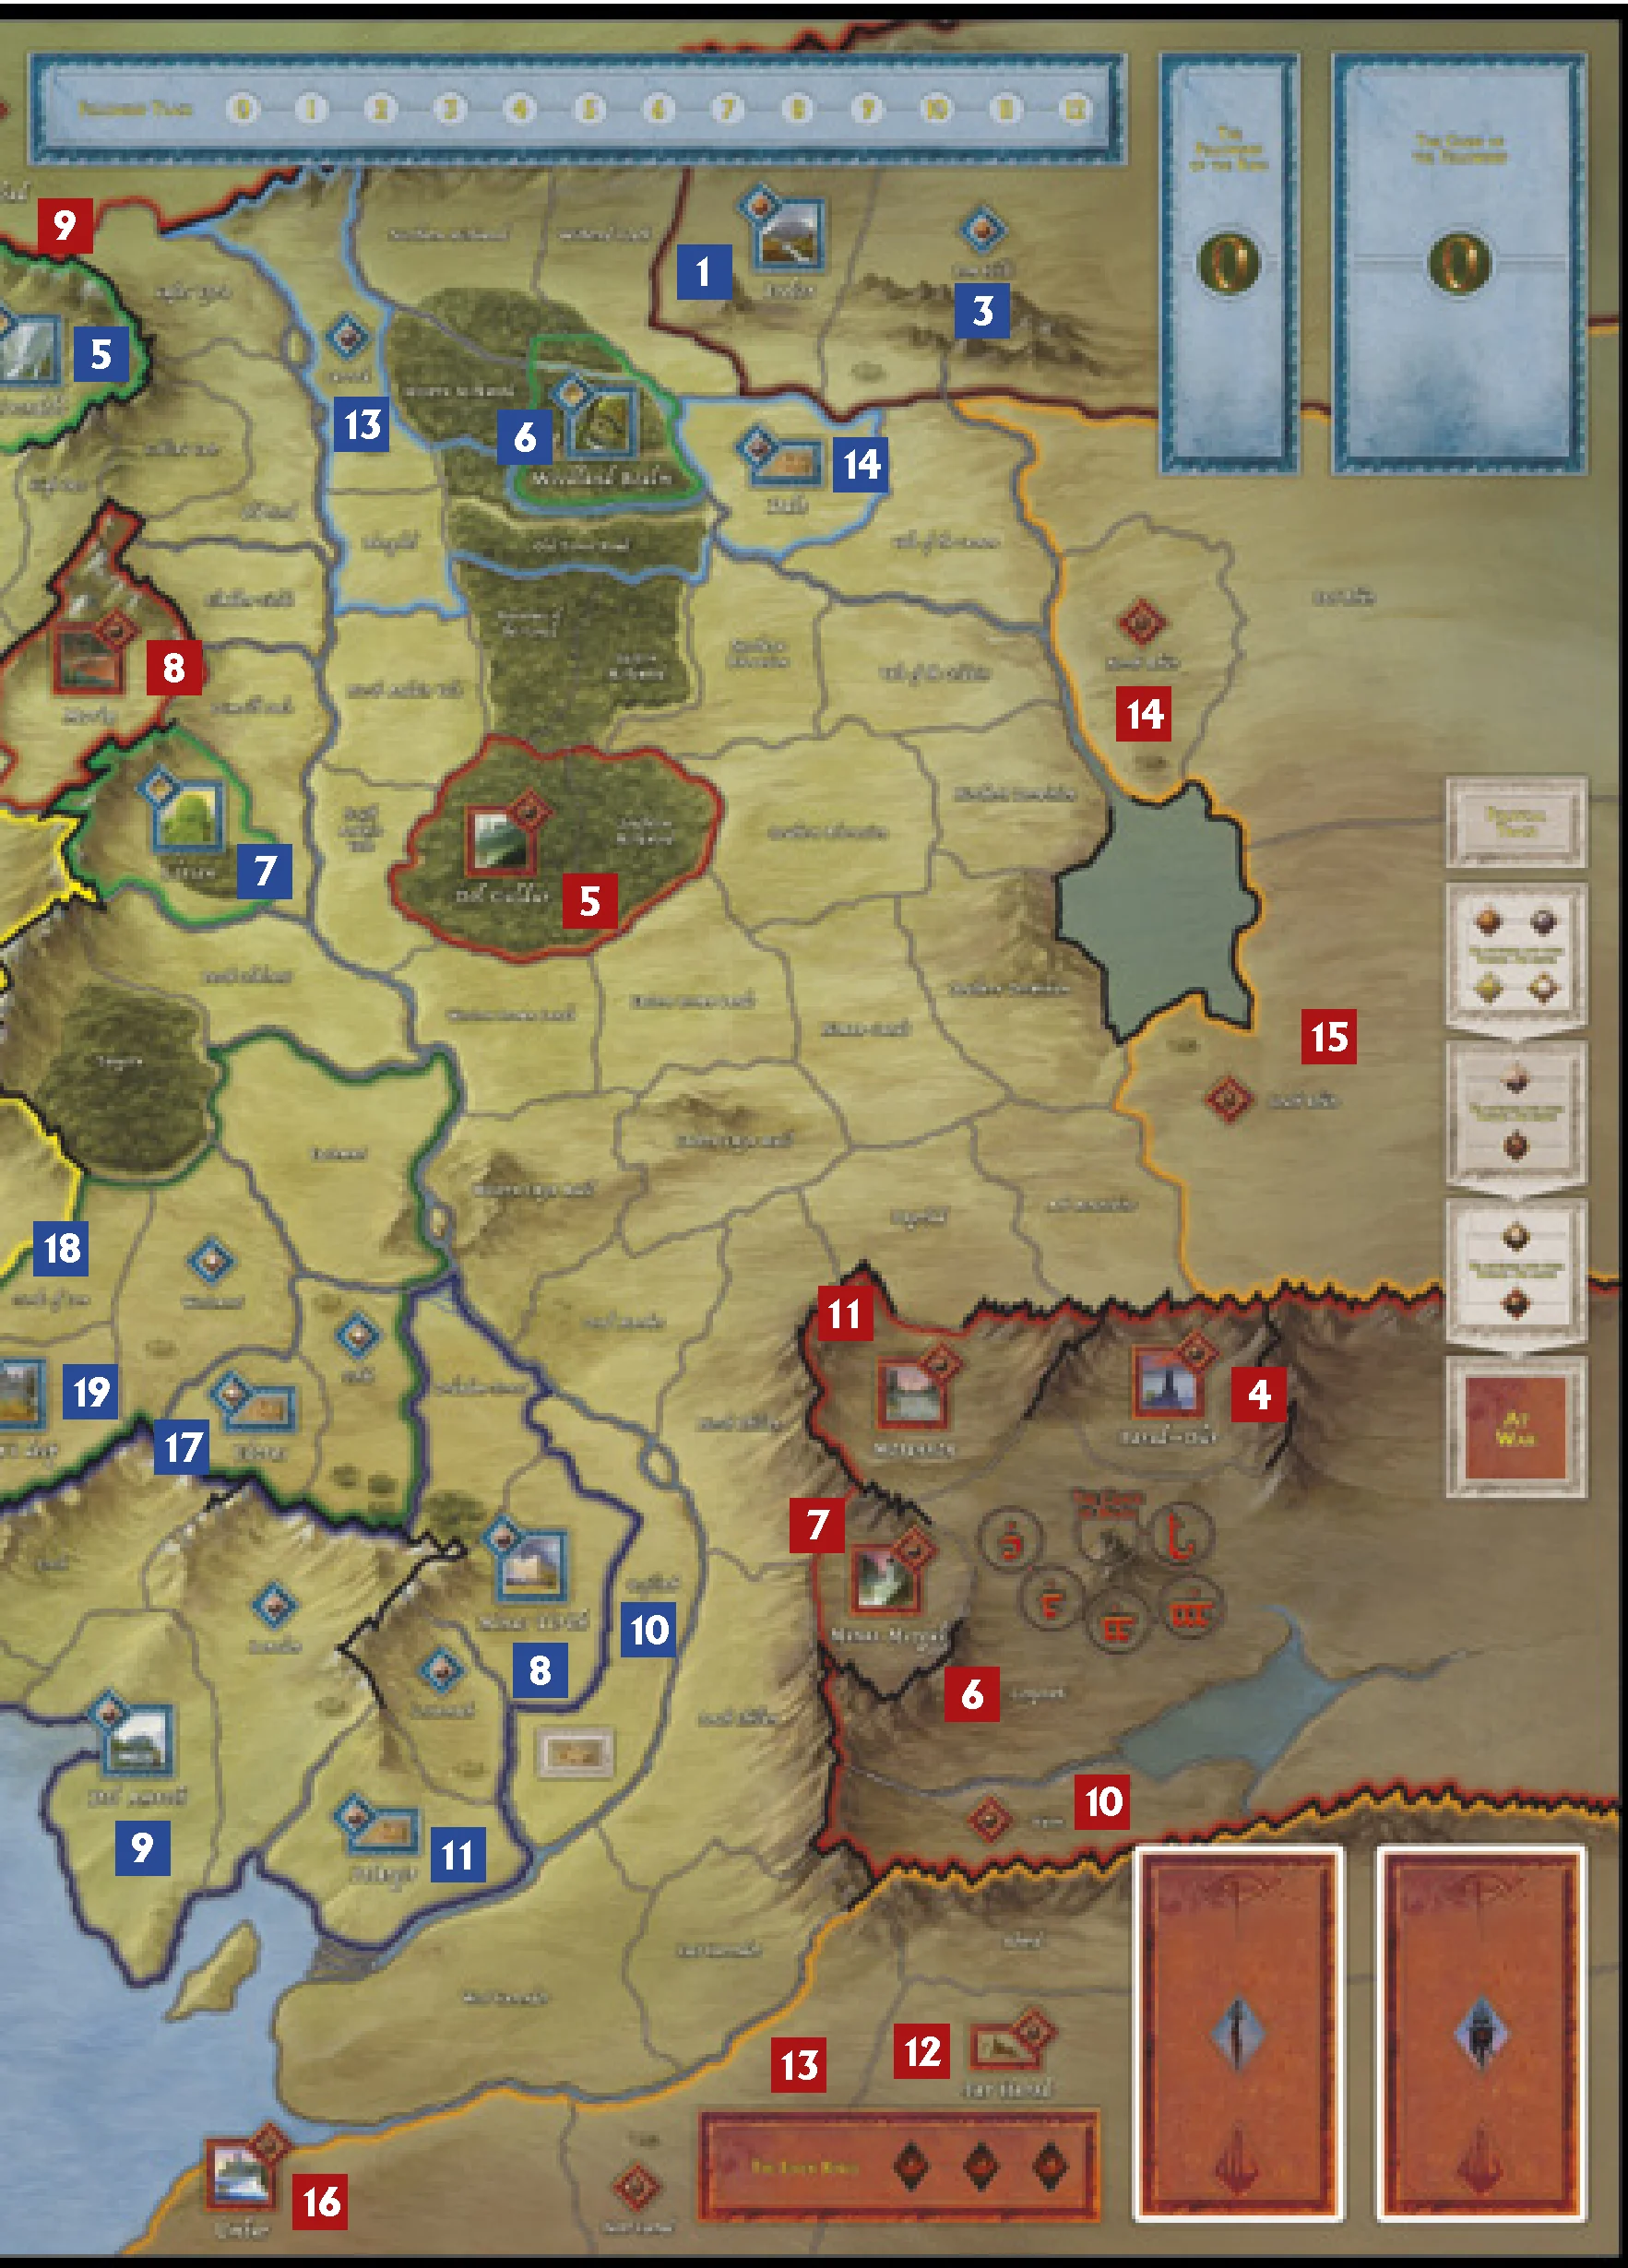
Free Peoples Setup
- Dwarves:
- Erebor (1): 1 Regular, 2 Elite, 1 Leader.
- Ered Luin (2): 1 Regular.
- Iron Hills (3): 1 Regular.
- Reinforcements: 2 Regular, 3 Elite, 3 Leader.
- Elves:
- Grey Havens (4): 1 Regular, 1 Elite, 1 Leader.
- Rivendell (5): 2 Elite, 1 Leader.
- Woodland Realm (6): 1 Regular, 1 Elite, 1 Leader.
- Lórien (7): 1 Regular, 2 Elite, 1 Leader.
- Reinforcements: 2 Regular, 4 Elite.
- Gondor:
- Minas Tirith (8): 3 Regular, 1 Elite, 1 Leader.
- Dol Amroth (9): 3 Regular.
- Osgiliath (10): 2 Regular.
- Pelargir (11): 1 Regular.
- Reinforcements: 6 Regular, 4 Elite, 3 Leader.
- The North:
- Bree (12): 1 Regular.
- Carrock (13): 1 Regular.
- Dale (14): 1 Regular, 1 Leader.
- North Downs (15): 1 Elite.
- The Shire (16): 1 Regular.
- Reinforcements: 6 Regular, 4 Elite, 3 Leader.
- Rohan:
- Edoras (17): 1 Regular, 1 Elite.
- Fords of Isen (18): 2 Regular, 1 Leader.
- Helm’s Deep (19): 1 Regular.
- Reinforcements: 6 Regular, 4 Elite, 3 Leader.
Shadow Setup
- Isengard:
- Orthanc (1): 4 Regular, 1 Elite.
- North Dunland (2): 1 Regular.
- South Dunland (3): 1 Regular.
- Reinforcements: 6 Regular, 5 Elite.
- Sauron:
- Barad-Dûr (4): 4 Regular, 1 Elite, 1 Nazgûl.
- Dol Guldur (5): 5 Regular, 1 Elite, 1 Nazgûl.
- Gorgoroth (6): 3 Regular.
- Minas Morgul (7): 5 Regular, 1 Nazgûl.
- Moria (8): 2 Regular.
- Mount Gundabad (9): 2 Regular.
- Nurn (10): 2 Regular.
- Morannon (11): 5 Regular, 1 Nazgûl.
- Reinforcements: 8 Regular, 4 Elite, 4 Nazgûl.
- Southrons & Easterlings:
- Far Harad (12): 3 Regular, 1 Elite.
- Near Harad (13): 3 Regular, 1 Elite.
- North Rhûn (14): 2 Regular.
- South Rhûn (15): 3 Regular, 1 Elite.
- Umbar (16): 3 Regular.
- Reinforcements: 10 Regular, 3 Elite.
SUMMARY OF THE TURN
War of the Ring is played over a series of turns, until either player wins the game. Each turn is divided into six phases.
- Phase 1) Recover Action Dice and Draw Event Cards: Each player recovers the Action Dice he used in the previous turn, plus any dice which were added to the Action Dice Pool and minus any dice which were removed from the pool. Then, each player draws 2 cards, one from each of their respective Event Decks.
- Phase 2) Fellowship Phase: The Free Peoples player may now declare the position of the Fellowship. If the Fellowship is declared in a City or Stronghold of a Free Peoples Nation, that Nation is activated (if the Nation is showing “Passive” on the Political Track, flip the Nation to “Active”) and the Ring-bearers may be healed. Also, during this phase, the Free Peoples player may change the Guide of the Fellowship.
- Phase 3) Hunt Allocation: The Shadow player may now place a number of Action Dice in the Hunt Box located on the game board. The Shadow player must place at least one Action Die if the Free Peoples player retrieved at least 1 die from the Hunt Box during Phase 1. He may allocate only as many dice as the number of Companions remaining in the Fellowship. These dice are not rolled during the following Action Roll phase.
- Phase 4) Action Roll: Players roll their Action Dice (except the dice already in the Hunt Box). Then, the Shadow player immediately takes all the rolled dice showing the “Eye” result and adds them to the Hunt Box.
- Phase 5) Action Resolution: This phase is the primary game phase of the War of the Ring board game. It is during this phase that players will utilize the Action Dice results to move their Characters and Armies on the game board, or to take other important actions. The results of the rolled Action Dice dictate the actions the players can take during this phase. Starting with the Free Peoples player, the two players alternate actions, each taking one action by selecting and removing one of his available die results. (See also Using Action Dice.) Each time the Free Peoples player uses an Action Die to move the Fellowship, he places that die in the Hunt Box after completing the action. All other used dice are set aside until next turn.
- Phase 6) Victory Check: Players now check to see whether either player has achieved the Military Victory Conditions. If not, a new game turn begins.
When all the activities required by the different phases have been concluded, the turn is over and another turn begins (unless one of the players has achieved his Victory Conditions, in which case the game ends).
THE ACTION DICE
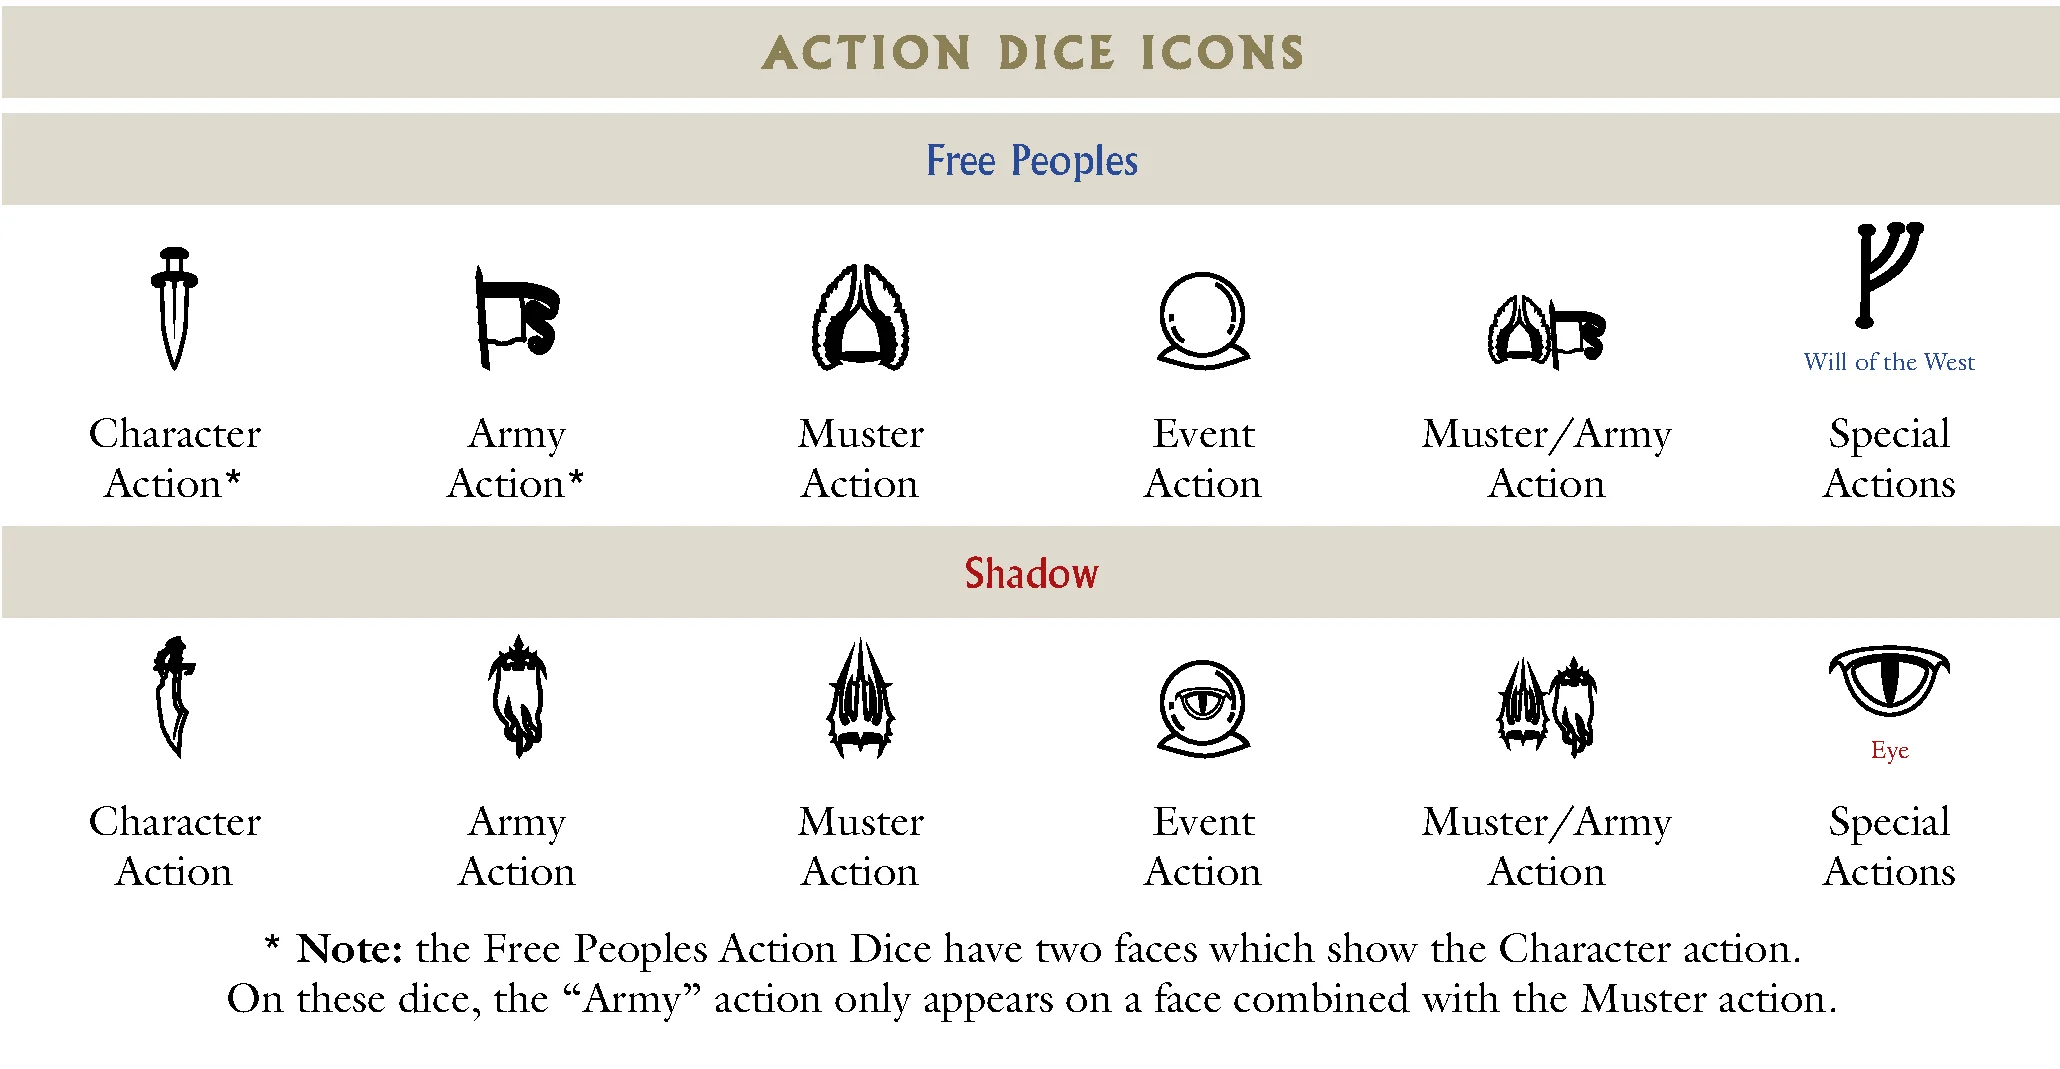
The Action Dice play a fundamental role in the game, as they dictate the options available to each player during a turn. These dice have special icons on their faces, each icon representing a different group of action from which the players may choose. The different numbers and types of icons appearing on the Free Peoples Action Dice and Shadow Action Dice reflect the different attitudes of the two sides fighting the War of the Ring.
Note: The Free Peoples Action Dice have two faces which show the “Character” action, and on these dice the “Army” action only appears on a face combined with the “Muster” action.
ACTION DICE POOL
The total number of Action Dice rolled by a player in a turn is called his dice pool.
- The Shadow player: starts the game with seven dice in his pool, but may gain additional dice later in the game, up to a maximum of ten. These additional Action Dice enter play when the Shadow player brings his Minions into the game (one die for Saruman, one for the Witch-king, one for the Mouth of Sauron).
- The Free Peoples player: starts with four dice in his pool. Like the Shadow, he can also gain additional dice later in the game. The Free Peoples player adds one die to his dice pool when Aragorn – Heir to Isildur enters play and another one when Gandalf the White appears.
Both the Shadow and the Free Peoples player lose the additional die if the corresponding Character is eliminated.
When a player gains or loses an Action Die, the gain or loss becomes effective in the next turn: the die is added to, or removed from, the dice pool during the Recover Action Dice and Draw Event Cards phase of the following turn.
HUNT ALLOCATION AND ACTION ROLL
The Shadow player, during the Hunt Allocation Phase, places the number of Action Dice into the Hunt Box that he wants to devote to the Hunt for the Ring.
- If one or more Fellowship Action Dice were in the Hunt Box at the end of the previous turn, he must place a minimum of 1 die in the Hunt Box.
- The maximum number of dice he can place in the Hunt Box is equal to the number of Companions currently in the Fellowship (note that the Ring-bearers are not considered to be a Companion and do not add to this maximum).
- However, the Shadow player may always place at least one die in the Hunt Box, even if all the Companions have left the Fellowship.
The dice placed in the Hunt Box are not rolled, but the Shadow player rolls the remaining dice in his dice pool, and all dice showing an “Eye” result are immediately added to the Hunt Box as well.
The Free Peoples player simply rolls his entire Action Dice pool.
USING ACTION DICE
Starting with the Free Peoples, players alternate actions selecting one of their Action Dice and immediately taking the action made available by the specific die result.
When an action has been completed, the corresponding die is considered “used” and is set aside until needed again for the next turn.
The only exception to this rule is that each time the Free Peoples player uses an Action Die to move the Fellowship, he places that die in the Hunt Box after completing the action rather than setting it aside (note that the die is returned to the Free Peoples player during the Recover Action Dice and Draw Event Cards phase of the next turn).
If a player has fewer unused Action Dice than his opponent (typically the Free Peoples player will have fewer Action Dice than the Shadow player), he can pass instead of taking an action, thus allowing the opponent to take another action.
A player may also choose to skip an action and discard one of his Action Dice without effect, instead of using that die to take an action.
If a player runs out of actions before his opponent has done the same, the opponent executes his remaining actions one after the other.
ACTION DICE REFERENCE CHART
CHARACTER
The Character die result can be used to execute one of the following actions:
- Leader Moves/Attacks with Armies: Move an Army with a Leader to an adjacent region, which must be free for the purposes of Army movement; or attack an enemy Army in an adjacent region using an Army with a Leader.
- Play an Event Card: Play a Character Event Card from your hand.
Free Peoples only:
- Fellowship Progress: Move the Fellowship Progress Counter one step forward on the Fellowship Track. Resolve the Hunt for the ring, and then place the used Action Die in the Hunt Box.
- Hide the Fellowship: If the Fellowship was previously Revealed, it becomes Hidden again.
- Separate Companions: Separate one Companion or one group of Companions from the Fellowship. The Companion figures are removed from the Fellowship Box and must move on the map, up to a distance from the Fellowship equal to the step number on the Fellowship Track plus the highest Companion Level.
- Move Companions: Move all Companions or groups of Companions on the map, each up to a number of regions equal to that of the highest Companion Level in the group.
Shadow only:
- Move Minions: Move all Nazgûl (including the Witch-king, if in play) anywhere on the map (except into a region that contains a Stronghold controlled by the Free Peoples, unless a Shadow Army is besieging it). Move the Mouth of Sauron (if in play) up to three regions.
ARMY
The Army die result can be used to execute one of the following actions:
- Move Armies: Move up to two different Armies from their region(s) to adjacent region(s), which must be free for the purposes of Army movement.
- Attack an Enemy Army: Attack an enemy Army in an adjacent region with one of your Armies (or conduct a Siege Attack or Sortie).
- Play an Event Card: Play an Army Event Card from your hand.
MUSTER
The Muster die result can be used to execute one of the following actions:
- Diplomatic Action: Move the Political Track of one friendly Nation one step forward (for a Free Peoples Nation, the step “At War” can be reached only if the Nation is Active).
- Play an Event Card: Play a Muster Event Card from your hand.
- Recruit Reinforcements (Only for Nations “At War”): Place reinforcements into play:
- 1 Elite unit in any friendly and free Settlement, or
- 2 Leaders in any two different friendly and free Settlements, or
- 2 Regular units in any two different friendly and free Settlements, or
- 1 Leader and 1 Regular Army unit in any two different friendly and free Settlements.
- Bring Character into play (Shadow only): Bring one Character into play according to the rules on his Character Card.
EVENT
The Event die result can be used to execute one of the following actions:
- Draw an Event Card: Draw one Event Card from an Event Deck of your choice.
- Play an Event Card: Play any one Event Card from your hand, regardless of its type.
MUSTER / ARMY
Choose any one action from those listed under “Muster” or “Army”.
SPECIAL
The Special die results are different on the Shadow dice and on the Free Peoples dice:
- Eye of Sauron (Shadow): All dice showing the Eye must be placed in the Hunt Box.
- Will of the West (Free Peoples):
- Before taking an action, a Will of the West result can be changed to any other Action Die result, as chosen by the Free Peoples player, and be used to the same effect as the chosen result.
- The Will of the West result can also be used to bring into play Gandalf the White or Aragorn – Heir to Isildur according to the rules on their Character cards.
THE ELVEN RINGS
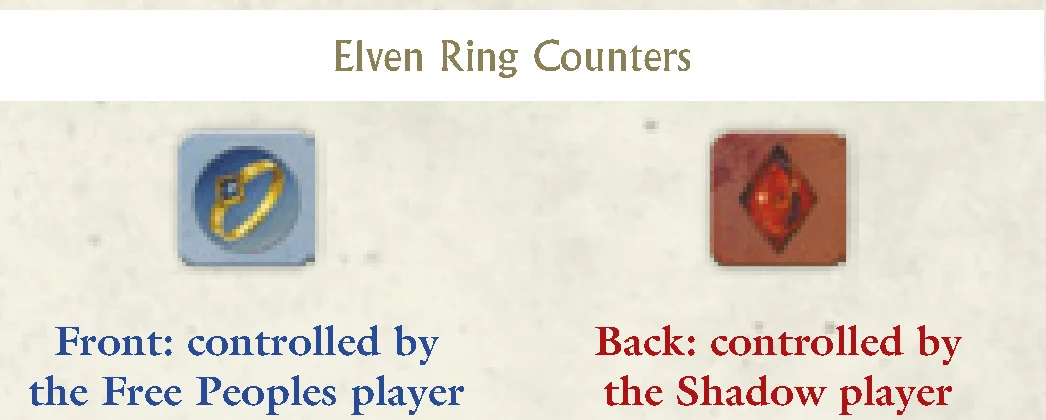
At the beginning of the game, the Free Peoples player receives three counters, representing the Elven Rings of Power.
He keeps each counter in the Elven Rings Box on the game board, with the Ring side face up, until he decides to use it.
When the Free Peoples player uses an Elven Ring, he flips over the counter to show its “Flaming Eye” side and gives it to the Shadow player.
After the Shadow player uses the counter, it is discarded from play.
Each Elven Ring/Eye counter can thus be used once by its owner in the following way:
- When a player is about to take an action during the Action Resolution phase, he may use an Elven Ring to change the result shown on one of his unused Action Dice to another Action Die result of his choice.
- A player that just used an Elven Ring to change a die result then proceeds to take a regular action, choosing any one Action Die result (not necessarily the one he has just changed with the Elven Ring).
The use of an Elven Ring is subject to the following limitations:
- Only one Elven Ring may be used by the same player during the course of a single turn.
- The Free Peoples player may not use an Elven Ring to change an action die to a “Will of the West” result.
- The Shadow player can use an Elven Ring to change a die result into an “Eye” result (that die is immediately moved to the Hunt Box). This does not count as an action, so he may then take an action normally. However, he cannot do the opposite and use an Elven Ring to change the result of an action die already showing an “Eye” result.
EVENT CARDS OVERVIEW
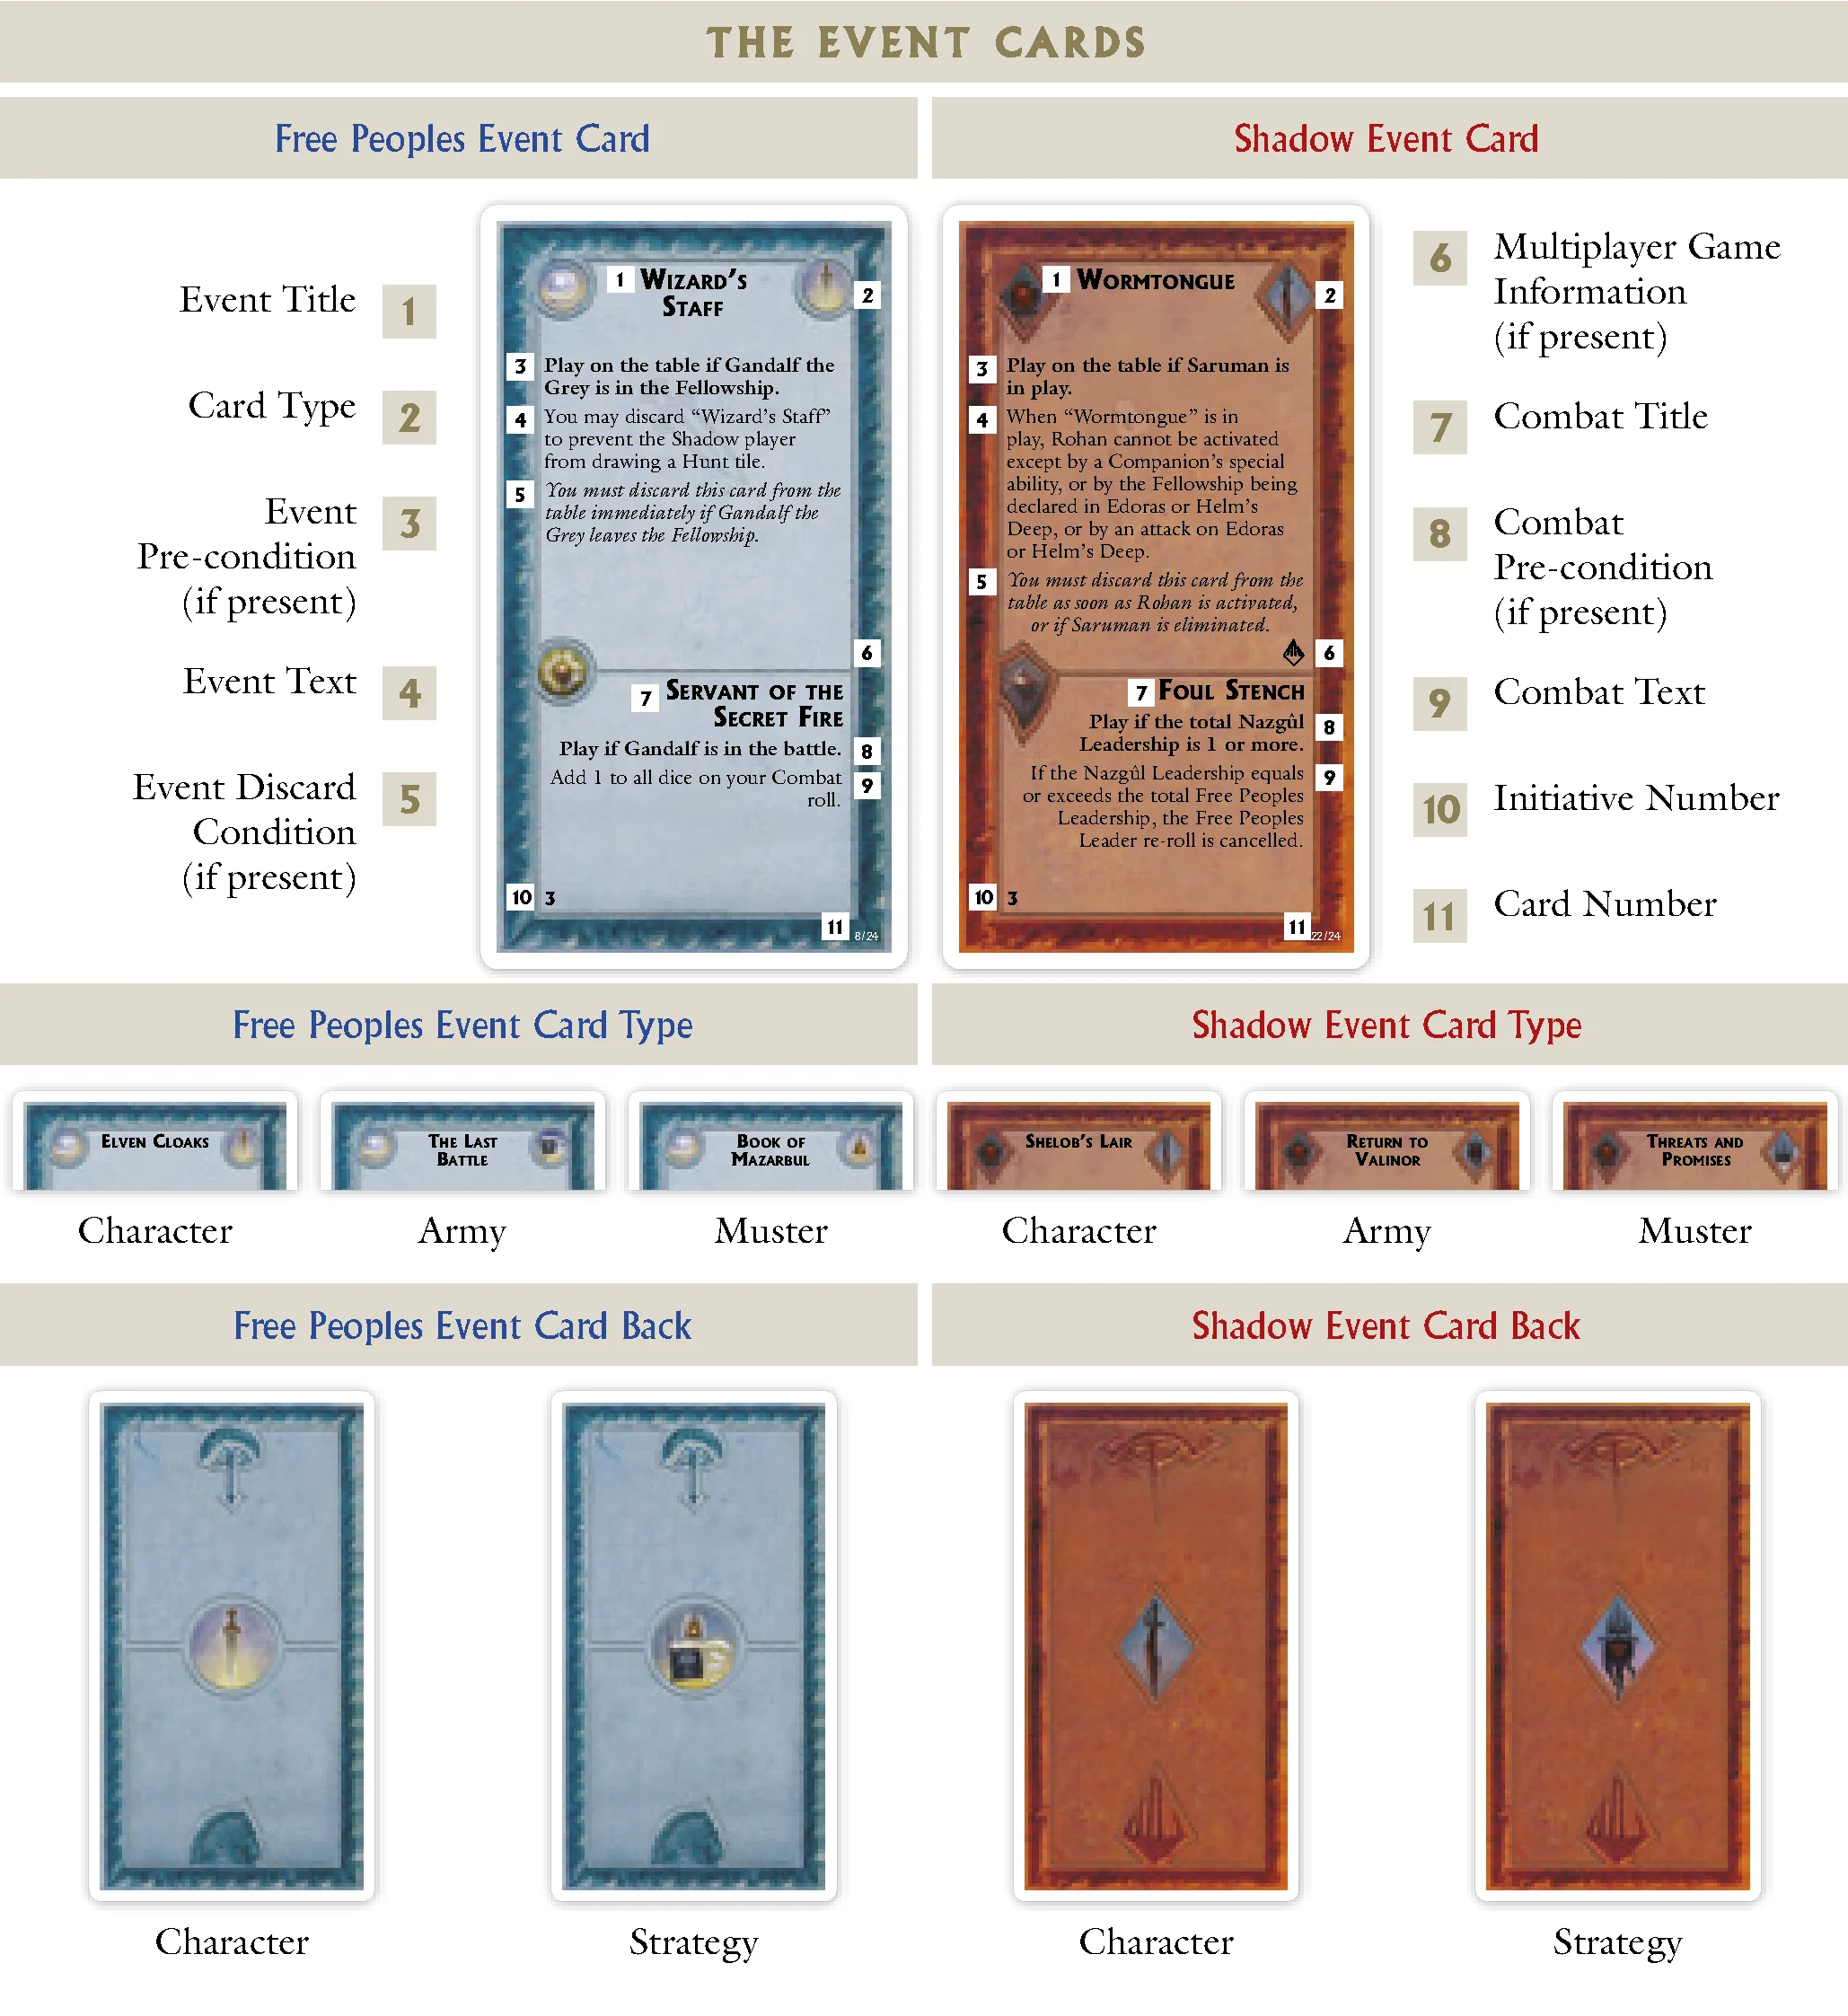
The Event Cards represent many of the fortunate (or unfortunate) episodes in The Lord of the Rings, as well as special items, unexpected occurrences, and “what if’s”.
Moreover, each Event Card can alternatively be used for a special combat effect to be employed in battle. When an Event Card is used for its combat ability, we refer to the card as a Combat Card.
EVENT DECKS
Each player receives two decks of Event Cards: his Strategy Deck (represented graphically by an army banner) and his Character Deck (represented graphically by a sword).
- Cards in the Strategy Deck usually offer military and political options to the player.
- Cards in the Character Deck are often related to the Fellowship and to the actions of Companions and Minions on the map.
DRAWING EVENT CARDS
During the first phase of each game turn (including the first turn) both players must draw one card from each of their decks.
It is also possible for players to draw cards from either deck by using an Action Die result during the Action Resolution phase.
Players may hold a maximum of six cards in their hand at any time and must immediately discard those in excess as soon as the maximum number is exceeded. Cards are discarded face down.
If a deck is depleted during the game, the discarded cards are not reshuffled. It is now no longer possible for the player to draw cards out of that deck (and thus he may only draw one card from the other deck during the Recover Action Dice and Draw Event Cards phase).
PLAYING EVENT CARDS
Event Cards can be played during the Action Resolution phase in two ways:
- by using an Event Action Die result (the Palantir symbol), or
- by using an Action Die result whose icon matches the symbol on the upper right corner of the card.
Example: For the Free Peoples player to play the Strategy Card “Paths of the Woses” he must either use an Action Dice that shows the Palantir symbol (the Event result), or an Action Dice that shows the Banner symbol (an Army result).
Generally, Event Cards are discarded as soon as their effects are resolved. The effects of an Event Card are explained in its text.
Often, some kind of requirement must be met for the effects of the card to apply; if a requirement is not fully satisfied, the card cannot be played.
Usually, a card allows a player to take an action that violates the standard rules; this is intentional, but any rule that is not expressly replaced by the card text still applies normally. Some exceptions to the general rules use the following terminology:
- If a card reads “Play on the table”, it means that the card is not discarded after it is played, and its effects last until a particular condition or requirement is met after which the card is discarded. If discarding a card requires the use of an Action Die, discarding the card counts as an action. Note that if the condition required to play such a card ceases to be met, the card is immediately discarded. (Example: “Denethor’s Folly” is discarded if Minas Tirith is no longer under siege.)
- If a card text directs you to “recruit” units or Leaders, these units or Leaders are taken from your available reinforcements. See also Using an Event Card to Recruit Troops for the specific workings of Event Cards who allow recruitments.
The actions indicated by an Event Card are mandatory. However, it can happen that the effects of an Event Card cannot be fully applied. In this case, the card can still be played, and its effects are applied to the maximum extent possible.
Example: The “Knights of Dol Amroth” card allows the Free Peoples player to recruit one Leader and one Elite (or Regular) unit in Dol Amroth. If no Leader is available in the Free Peoples reinforcements, only the Elite or Regular unit is recruited.
Event Cards Provoking Casualties
Several cards describe effects that may cause a player to remove some figures from play. If all the Army units in an Army are eliminated by the effect of such a card, all Free Peoples Leaders with the Army are immediately removed, while any Nazgûl, Companions, or Minions are left in the region, unless specified differently in the card text.
COMBAT CARDS
In addition to their standard Event Text, all Event Cards contain additional text (located at the bottom of the cards) representing their use as Combat Cards.
Unlike playing an Event Card for its main use, playing it as a Combat Card does not require taking an action. Combat Cards are played during a battle (see Resolving a Battle for further details).
Just like with Event Card effects, Combat Card effects modify the normal rules of the game, and the text of the card always has precedence over the normal rules. Event Cards used as Combat Cards are always discarded immediately after use.
THE POLITICAL TRACK
The end of the Third Age was a dark time for Middle-earth. While the basic allegiances of the Free Peoples were clearly defined, their individual opinions towards the threat of Sauron differed widely. The diplomatic stance of the various Nations is represented in War of the Ring by a Nation’s position on the Political Track found on the game board.
The initial starting position of a Nation on the Political Track represents its diplomatic attitude at the beginning of the war. The farther its Political Counter is from the “At War” step of the track, the less inclined that Nation is to take part in the conflict.
For a Nation to be considered completely mobilized and ready to fight, its Political Counter must be in the last step in the track, marked “At War”.
All the Free Peoples Nations except the Elves start the game in a passive state (represented by the gray side of a Nation’s Political Counter facing up). As long as a Nation remains passive, it can never be moved to the last step of the track (“At War”) and thus be fully mobilized.
ACTIVATING FREE PEOPLES NATIONS
The Political Counter of a Free Peoples Nation is turned to the active side (light blue side face up) when any of the following events occur:
- A region of that Nation is entered by an enemy Army.
- An Army containing units of that Nation is attacked.
- The Fellowship of the Ring is declared in a City or Stronghold of that Nation.
- When a Companion (capable of activating that Nation) ends his movement in one of its Cities or Strongholds.
Each Companion Card has a symbol in its lower right-hand corner indicating which Free Peoples Nation the Companion is capable of activating. Note that Gandalf, Aragorn, Meriadoc Brandybuck, and Peregrin Took show the “Free Peoples” symbol: they are capable of activating any Free Peoples Nation upon ending their movement in one of its Cities or Strongholds.
ADVANCING A POLITICAL POSITION
The Political Counter of a Nation is advanced (moving it down a step toward the “At War” step) by:
- Using a Muster Action Die result, or
- Playing certain Event Cards, or
- Automatically advancing one step every time an Army containing units of that Nation is attacked, or
- Automatically advancing one step every time a Nation’s Settlement (Town, City, or Stronghold) is captured by the opponent.
Event Cards Affecting the Political Track
All cards that initiate an attack by an Army will trigger a political reaction (activation and/or advancement). The three “Ent” Event Cards and the “Dead Men of Dunharrow” card also trigger a political reaction (considered battles in which the enemy Army cannot fight back).
ENTERING WAR
A Nation that is not “At War” is considered to be non-belligerent. Army units and Leaders of a non-belligerent Nation suffer the following restrictions:
- They can move outside their National borders but can never move across the borders of other Nations (including friendly ones).
- They cannot attack enemy Armies (but can defend if attacked).
- They can never be recruited by using Muster Action Die results.
All these restrictions apply even if units of a non-belligerent Nation are stacked with units of a Nation “At War”.
Exception: Non-belligerent units are allowed to cross another Nation’s border when retreating from a battle. If they do so, the next time they move, they must move out of that Nation, unless they became “At War” in the meantime.
When a Nation’s Political Counter moves into the last step of the Political Track, that Nation is now “At War”. Its Armies may freely move across all National borders and attack enemy Armies, and its troops can be recruited using Muster Action Die results. (Remember that a passive Free Peoples Nation must be activated first before entering the “At War” step.)
CHARACTERS AT WAR
Companions, Minions, and Nazgûl can freely move and be involved in battles regardless of the political position of the Nation they belong to. In essence, they should be considered already “At War”.
CHARACTERS
PLAYING FREE PEOPLES CHARACTERS
Free Peoples Characters are brought into play in two ways:
- Companions enter play when they are separated from the Fellowship (see Separating Companions from the Fellowship);
- Gandalf the White and Aragorn – Heir to Isildur, are brought into play using a Will of the West die. Use the rules specified by their Character Card.
PLAYING SHADOW CHARACTERS
Shadow Characters (Minions) are brought into play using a Muster die. This use of a Muster die does not follow the normal rules for recruitment — use the rules specified by the Character Card.
MOVING CHARACTERS
Characters are moved on the game board during the Action Resolution phase by using a Character Action Die result (the Sword icon), or by playing an Event Card that allows the movement of Characters.
A Character Action Die result can be used:
- To move all Companions who are not in the Fellowship (Free Peoples player only).
- To move all Nazgûl and Minions (Shadow player only).
Note: If a Character’s Level is 0, he cannot move, even when attached to an Army.
Moving Companions
When the Free Peoples player uses a Character Action Die result to move his Characters, all Companions on the map may be moved a number of regions equal to or less than their Level.
However, a group of Companions in the same region can be moved to a common destination at a distance equal to or less than the highest Level in the group.
The Free Peoples player can create more than one group from the Companions in the same region, which may then move independently to different destinations.
When Companions move, they are subject to the following rules:
- They are unaffected by any enemy Army. When moving alone or with other Companions, they can enter or leave a region that contains Shadow units, but must stop upon entering a region containing a Stronghold controlled by the Shadow player.
- They can never leave or enter a region containing a friendly Stronghold besieged by an enemy Army (except as a result of certain Event Card effects).
- They cannot cross impassable terrain (black borders).
Moving Nazgûl and Minions
When the Shadow player uses a Character Action Die result to move his Characters, each Nazgûl (including the Witch-king) can be moved to any region on the game board with a single move. One, some, or all Nazgûl can be moved this way using a single Character Action Die result.
The only restriction is that the Nazgûl can never move this way into a region that contains a Stronghold controlled by the Free Peoples player, unless that Stronghold is besieged by a Shadow Army.
Note that in War of the Ring, for the purposes of rules clarity, the Witch-king is considered to be a Nazgûl (including with respect to all references to “Nazgûl” on Event Cards, unless differentiated in the card text by the use of his name or the “Minion” title).
The Mouth of Sauron and Saruman do not possess the unlimited movement ability of the Nazgûl; they are subject to the following rules:
- Saruman can never leave the Orthanc region.
- The Mouth of Sauron can move up to three regions if moving alone. Like Companions, he cannot cross impassable terrain, he ignores any enemy Army when moving alone and cannot leave or enter a region that contains a friendly Stronghold besieged by an enemy Army.
- Like the Nazgûl, any Minion moving without an Army cannot be moved into a Stronghold controlled by the Free Peoples unless it is besieged by a Shadow Army.
ARMIES AND STACKING
ARMY COMPOSITION
All friendly Army units, Leaders and Characters inside a single region form an Army.
An Army can be composed of units belonging to different Nations fighting on the same side.
If a moving Army enters a region occupied by another friendly Army, the two Armies are merged into a single Army at the end of the action.
Likewise, an Army can be divided by simply moving part of its units into an adjacent region and leaving the rest behind.
STACKING LIMIT
A single region can contain a maximum of 10 Army units.
If, at the end of any action (for example, after moving or mustering troops), more than 10 units are in the same region, the excess units must be removed from the game by the controlling player.
Units removed in this way can re-enter the game later as reinforcements.
ARMY BOXES
Along the left side of the board can be found three numbered Army Boxes.
If the size and number of plastic figures happen to be troublesome to physically fit in a single region, the controlling player may move some or all his figures from a region to a free Army Box, placing the corresponding numbered Army counter in the region for identification purposes. Figures can be moved back to the board from the Army Box at any time.
Players must be careful not to exceed the stacking limit when making use of an Army Box. For all game purposes, the figures in the box are considered to be in the region containing the Army counter.
RECRUITING TROOPS
RECRUITING NEW UNITS AND LEADERS
Additional Army units and Leaders are brought into the game during the Action Resolution phase by using a Muster Action Die result (a Helmet icon) as an action, or by playing an Event Card that recruits new units.
To bring reinforcements onto the board when using a Muster Action Die result, the new units must belong to a Nation “At War”.
Using a single Muster Action Die result, a player can bring the following figures into play:
- two Regular units, or
- two Leaders/Nazgûl, or
- one Regular unit and one Leader/Nazgûl, or
- one Elite unit.
All newly recruited units and Leaders are taken from the player’s available reinforcements and can only be placed in a City, Town, or Stronghold of the Nation to which the unit belongs.
When two regular units or Leaders, or a combination of the two, are brought into play using a Muster Action Die result, they can belong to different Nations, as long as both Nations concerned are “At War” and each figure is placed in a City, Town, or Stronghold of the Nation to which the unit belongs.
Nazgûl are always recruited in the Strongholds of the Sauron Nation.
RECRUITING RESTRICTIONS
- When mustering two figures (units and/or Leaders) using a Muster Action Die result, the two figures must always be placed in separate Settlements.
- You cannot muster or recruit troops in a Settlement captured by the enemy (i.e., currently occupied by enemy units or containing an enemy Control marker).
- You cannot muster troops in a Stronghold besieged by the enemy, unless you are recruiting with an Event Card.
- Reinforcements are limited to the available figures. Thus, if all units of a type are in play, no additional units of that type can be recruited.
- Shadow units and Nazgûl removed as casualties are placed back among the available reinforcements (thus allowing for an almost limitless mustering).
- All Characters (including Shadow Minions) and Free Peoples units, Leaders, are permanently out of the game if eliminated; they should be placed in an area designated for casualties (such as back in the box) and are no longer eligible for recruitment.
USING AN EVENT CARD TO RECRUIT TROOPS
When using Event Cards whose effects allow a player to recruit units, all regular recruiting restrictions must be respected, with the following exceptions:
- If a card instructs a player to recruit troops of a Nation and that Nation hasn’t yet reached the “At War” step, the player is allowed to recruit nonetheless.
- If a card instructs a player to recruit troops into a Stronghold region, the units can be placed even if the Stronghold is under siege. Except for this case, an Event Card that allows to recruit units in a specific region (or regions), is subject to the normal restriction that a recruitment cannot be made if the region is not free.
ARMY MOVEMENT
MOVING AN ARMY
Armies are moved on the game board during the Action Resolution phase by using either an Army Action Die result or a Character Action Die result (if the moving Army contains a Leader or Character), or an Event Card that allows the movement of Armies.
- A player using an Army Action Die result can move two different Armies, but cannot move the same Army twice.
- A player using a Character Action Die result can move a single Army containing at least one Leader or Character.
An Army is moved by simply moving its units to an adjacent region.
Splitting an Army
It is not mandatory that you move all units in an Army. An Army can split itself into two different Armies by moving only a portion of its units to an adjacent region.
Free Peoples Leaders can never be in a region without combat units, so if a moving Army completely vacates a region, all such Leaders must follow the Army. If the Army splits, Leaders may choose to either move or stay behind. When a player uses a Character Action Die result to move an Army and the Army splits, at least one Leader or Character must join the moving units.
Note that, unless used as the subject to move an Army with a Character Action Die result, Characters (Companions and Minions) and Nazgûl are not obliged to move with an Army, as they can remain in a region on their own.
Movement Restrictions
- The moving units, as well as Leaders and Characters, can be chosen freely, as long as no figure is moved twice using the same action (this includes movement effectuated by Event Cards, unless the card explicitly has different instructions). Thus, during the same action, it is never possible to move an Army into a region containing another friendly Army (joining the two Armies into one), and then move the new combined Army with the second movement allowance.
- Any region entered by a moving Army must be either a free region or an enemy-controlled Settlement that is free of enemy Army units (“regions that are free for the purpose of Army movement”).
- If a region is occupied by enemy units, it cannot be entered but must be attacked.
- After moving an Army into a region, you cannot exceed the stacking limit of 10 units.
- If a moving Army includes any units from a Nation which is not yet “At War” on the Political Track, it cannot enter a region that is inside the borders of another Nation (even if friendly).
- An Army can never move into a region that is separated from the region the Army is currently in by a black line (impassable terrain).
USING AN EVENT CARD TO MOVE ARMIES
When using Event Cards whose effects allow a player to move Armies, all regular movement restrictions must be respected. Some Event Cards allow a player to move one or more Armies through more than one region, and the following additional rules apply:
- Each Army to be moved is defined at the beginning of its movement (it is possible to split the Army before moving). The Army cannot pick up or drop figures along the way.
- If an Army moves through an enemy-controlled Settlement, it captures that Settlement.
- If an Army moves through regions containing other friendly Armies, stacking limits are checked only after all the multiple movements have been completed.
BATTLE RESOLUTION
ATTACKING WITH ARMIES
An Army is allowed to attack an enemy Army during the Action Resolution phase by using an Army or a Character Action Die result, or by playing an Event Card that allows an Army to attack.
Only Armies belonging to a Nation “At War” on the Political Track can start a Battle.
A player can use an Army Action Die result, or a Character Action Die result (if the Army contains at least one Leader or Character), for the following purposes:
- To attack an enemy Army in an adjacent region.
- To initiate a Siege or a Sortie against an enemy Army in the same region.
Note that, unlike when used merely for movement, an Army Action Die result can only activate a single Army for the purpose of attacking.
Note: When a battle is initiated, attacking units do not actually move into the region they are attacking, but instead stay in their present region for the duration of the attack. Only if the battle is over and won, the attacker may move his attacking units into the embattled region.
Splitting an Attacking Army
It is not mandatory for all figures composing an Army chosen to attack to participate in the battle.
When a player is about to attack, he can split the Army into two, dividing the figures contained in the region into an attacking Army and into a second Army, called the rearguard, that will not take part in the upcoming battle.
Each of the two newly-created Armies must contain at least one Army unit, while Leaders, Companions, or Minions can be distributed among the two Armies as the player sees fit.
Note: If the player is using a Character Action Die result to attack, the newly-created attacking Army must contain at least one Leader or one Character.
The Army chosen as the rearguard does not affect the battle in any way, it cannot be targeted by Combat Card effects, its figures cannot be chosen as casualties, and it cannot advance into the contested region if the battle is won.
If the attacking Army includes one or more figures belonging to Nations not “At War”, then it is mandatory to split the Army (leaving with the rearguard any figure which is not “At War”).
Note that all defending units, including Leaders and Characters, are always considered to be part of the battle.
Combat Strength and Leadership
Attacking and defending Army units, Leaders, and Characters all participate in determining the Combat Strength and Leadership of the Armies involved in battle:
- Combat Strength: The Combat Strength of an Army is equal to the total number of its Army units (Regular and Elite units). Combat Strength determines the number of dice rolled in the Combat Roll, up to a maximum of five dice. This means that units in excess of five do not add to the number of dice rolled by an Army, but an Army with more than five units is usually able to retain its full Combat Strength for a longer period.
- Leadership: The Leadership of an Army is equal to the number of Leaders (or Nazgûl), plus the Leadership ratings of all participating Characters (as shown on each Character Card). Leadership determines the maximum number of dice that may be rolled in the Leader Re-roll, up to a maximum of five dice.
Often, Combat Cards and Character special abilities modify the Combat Strength and Leadership rating of an Army involved in battle. In either case, the maximum of five dice can never be exceeded, regardless of modifiers.
RESOLVING A BATTLE
A battle is resolved in a series of Combat Rounds. During each round, both players follow the steps below simultaneously:
- Step 1: Play a Combat Card (optional)
- First, the attacker declares whether he wants to use a Combat Card and chooses the card.
- Then, the defender declares if he wants to use a Combat Card and chooses the card. The defender may play a Combat Card even if the attacker chooses not to.
- Cards are chosen secretly, then revealed simultaneously. However, the back of the chosen card is always visible to the opponent.
- Unless otherwise specified, the effects of a card only apply for the current Combat Round. Combat Cards are always discarded as soon as the Combat Round is over.
- Timing: In the case of any uncertainty as to timing, the initiative number in the bottom left corner of the card indicates which card must be applied first: the card with the lower number is applied first. If the two cards have the same initiative, the effects of the defender’s card are always applied first.
- Requirements: Some Combat Cards have specific requirements (indicated in boldface under the Combat Title) that must be met. Many cards require a player to “forfeit” Leadership, meaning the selected figure does not count as a Leader for that Combat Round.
- Attack Rolls of Combat Cards: Some cards grant an additional attack before Step 2 or after Step 4. Unless specified otherwise, these attacks use the same base hit number as the Combat Roll, but a Leader Re-roll is never applicable, opponent modifiers do not apply, and casualties are removed immediately.
- Step 2: Roll the Dice for the Combat Roll
- Each player rolls a number of Combat Dice equal to the Combat Strength of their respective Armies (up to a maximum of five dice).
- Each die rolled scores a hit on a result of “5” or “6”. Modifiers from cards, Strongholds, Cities, and Fortifications may alter this. Note: A roll of a “1” is always a miss, and a roll of a “6” is always a hit, regardless of modifiers.
- Step 3: Roll the Dice for the Leader Re-roll
- After the Combat Roll, both players can re-roll a number of failed die rolls equal to their Leadership (up to a maximum of five dice).
- The result required to score a hit remains the same as for the Combat Roll (unless modified by a card).
- Step 4: Remove Casualties
- The attacker decides first how to remove his units.
- For each hit scored by the opponent: remove one Regular unit, or replace one Elite unit with one Regular unit.
- For every two hits: remove two Regular units, replace two Elite units with two Regular units, or simply remove one Elite unit.
- When replacing an Elite unit, the Regular unit can be taken from previous casualties or reinforcements. If none are available, the Elite unit is eliminated outright.
- Casualties: Free Peoples units and Leaders removed as casualties are placed permanently out of the game. Shadow casualties and Nazgûl may return as reinforcements.
- Elimination of Leaders and Characters: If all Army units in a battle are eliminated, all accompanying Leaders and Characters are immediately removed from play. Characters in a region without friendly Army units are never drawn into battle.
- Step 5: Choose to Cease the Attack, or Retreat
- At the end of each Combat Round, the attacking player has the option to cease the attack.
- If the attacker chooses to continue, the defender has the option to retreat. If the defender declines to retreat, another Combat Round begins.
- If the attacking Army ceases its attack, surviving units remain where they were.
- If the defending player retreats, his Army must immediately retreat to an adjacent free region. If no such region is available, the defender cannot retreat.
- Special Exceptions: An Army defending a region containing a friendly Stronghold may retreat into the Stronghold itself at the beginning of any Combat Round by Retreating into a Siege. A besieged Army cannot retreat. If the retreating Army contains a Character of Level 0, that Character is left behind.
End of Battle
A battle ends when the attacker ceases to fight, the defender retreats, or when one or both Armies are completely eliminated.
If the defending Army is eliminated or retreats, the attacker may immediately move all or part of the units participating in the attack into the embattled region.
If an embattled region invaded by a successful attacker contains an enemy Stronghold, and that Stronghold contains enemy units, the Stronghold becomes besieged.
FORTIFICATIONS, CITIES, STRONGHOLDS, AND SIEGES
ATTACKING A CITY OR FORTIFICATION
During an attack against an enemy defending a region containing a City or Fortification, during the first round of combat only the attacker hits on a result of “6” or higher (instead of “5” or higher). After the first Combat Round is resolved, normal rules apply.
ATTACKING A STRONGHOLD
When attacking an enemy defending a region containing a Stronghold, before every battle round, the defender must choose to either Fight a Field Battle or Retreat into a Siege.
- Fighting a Field Battle: A Field Battle is resolved normally as described before.
- Retreating into a Siege: As soon as the defender Retreats into a Siege, the region around the Stronghold is left open to the enemy, who may immediately advance into the region. If the attacking Army chooses to advance, the Stronghold is now considered under siege and the battle is over.
The defending units are placed in the appropriate Stronghold Box found on the game board.
A Stronghold under siege can contain a maximum of five Army units (and any number of Leaders). Any unit in excess of five is removed immediately when a Stronghold comes under siege (these units can re-enter later as reinforcements).
A siege ends if the attacking Army leaves the region, or if at any time either Army is completely eliminated. During the siege, the region surrounding the Stronghold is considered free for the besieging player, while the Stronghold itself remains controlled by the player under siege.
CONDUCTING A SIEGE
When a Stronghold is under siege, the troops within can only be attacked by an Army in the same region using an Action Die for battle during the Action Resolution phase. Any battle starting against a besieged Army is considered a Siege Battle.
- During a Siege Battle, the attacker hits only on a result of “6” or higher, while the defender hits on a result of “5” or higher as normal.
- A Siege Battle only lasts for one Combat Round, unless the attacker decides to voluntarily reduce one of his participating Elite units to a Regular unit. If so, the Siege Battle lasts for an additional round (this can be repeated as long as the attacker has Elite units to reduce).
- A defending Army under siege may never choose to retreat to an adjacent region.
- An Army besieging a Stronghold is free to move away from the region. If no Army units are left behind, the Stronghold is no longer under siege.
SORTIE
An Army inside a Stronghold under siege may attack the besieging Army by using an Action Die for battle. This is called a Sortie.
- In a Sortie, the besieged Army fights a Field Battle for at least one round, forfeiting the advantages of defending the Stronghold.
- A rearguard may be formed and left behind in the Stronghold.
- Combat is resolved normally (both score hits on a “5” or higher). If the attacker wants to cease the battle, the attacking Army moves back into the Stronghold.
- The besieging defending Army may retreat to a free adjacent region as usual. If the attacking Army wins the Sortie, it cannot advance outside of the region.
RELIEVING A SIEGE
An Army in an adjacent region can attack an enemy Army besieging a friendly Stronghold using normal rules. The Army inside the Stronghold does not participate in the battle. The attacking Army cannot advance into the region containing the Stronghold unless the besieging Army is destroyed or retreats.
REINFORCING A SIEGE
While a Stronghold is under siege, the besieging player can move new troops into the region (because it is a free region). This is considered a movement, not an attack.
CAPTURING A SETTLEMENT
A settlement is considered captured when:
- An enemy Army enters a region containing a City, or Town, or unoccupied Stronghold, or
- All the units defending a Stronghold are eliminated and the besieging Army still has at least one unit remaining in the region.
The capturing player places a Settlement Control Marker on the region. A captured Settlement cannot be used for mustering troops or advancing the Political Track.
Captured Settlements award Victory Points:
- Captured City: 1 Victory Point
- Captured Stronghold: 2 Victory Points
If the original owner recaptures it, the Settlement Control Marker is removed and the Victory Points are lost.
FELLOWSHIP OVERVIEW
In War of the Ring, Frodo and Sam are inseparable and are represented collectively as the Ring-bearers. As told in The Lord of the Rings, the two Hobbits are accompanied by a number of Companions, chosen from among the Free Peoples of Middle-earth.
These Characters together form the Fellowship of the Ring. While Frodo and Sam are bent on reaching Mount Doom to complete their quest, the other Companions have a choice: they can stay and protect the Fellowship, or, in time, leave the Fellowship in order to help the Free Peoples of the West in their struggle against the Shadow.
FELLOWSHIP FIGURES AND COUNTERS
- The Ring-bearers figure (Frodo & Sam): Indicates the last known position of the Fellowship. It is placed in the region where the Fellowship was last declared or revealed. At the start of the game, it is placed in Rivendell. Whenever rules or Event Cards refer to the current location of the Fellowship, it is determined by the position of this figure, regardless of the position of the Fellowship Progress Counter. Frodo and Sam can never be separated from one another or leave the Fellowship.
- The Fellowship Progress Counter: Shows how far the Fellowship has traveled from its last known position and indicates whether the Fellowship is Hidden or Revealed. Placed on the Fellowship Track and moved forward each time the Fellowship advances.
- The Companion figures and counters: Seven individual Characters (Legolas, Gimli, Boromir, Strider, Meriadoc, Peregrin, Gandalf the Grey) representing the heroes of the Free Peoples, placed in the Fellowship of the Ring Box until they separate.
CORRUPTION
The growing burden of carrying the One Ring to its destruction is represented by the Corruption of the Ring-bearers, a numerical score that starts at zero points and can increase to 12.
Upon reaching 12 Corruption points, the Ring-bearers immediately succumb to the One Ring, and the game is won by the Shadow. The Free Peoples player tracks Corruption with the Corruption Counter on the Fellowship Track.
COMPANION CHARACTER CARDS
Each Companion Card contains: Level, Nation icon, Guide Special Ability, outside of Fellowship Special Ability, and Leadership Rating.
At the beginning, all Companion cards are stacked together in the Guide of the Fellowship Box to form the Fellowship Deck. When a Companion leaves, his card is removed from the deck.
THE GUIDE OF THE FELLOWSHIP
One Companion is the Guide of the group. At the start, this is Gandalf the Grey. The Guide must always be the remaining Companion who has the highest Level (in case of a tie, the Free Peoples player chooses). A new Guide can be nominated at the end of each Fellowship Phase or when the composition of the Fellowship changes.
When acting as Guide, only the special ability marked “Guide:” can be used.
Gollum as a Guide: If all Companions have left the Fellowship, the Ring-bearers are alone and Gollum becomes the Guide of the Fellowship.
THE FELLOWSHIP TRACK
The Ring-bearers figure marks the last known position, while the Fellowship Progress Counter advances along the Fellowship Track each time the Fellowship moves.
MOVING THE FELLOWSHIP
During the Action Resolution phase, the Free Peoples player may advance the Fellowship Progress Counter by using a Character result on an Action Die, or by using certain Event Cards.
Every time the Fellowship moves, the Fellowship Progress Counter advances one step (keeping it Hidden). After each movement, the Shadow player gets a chance to Hunt for the Fellowship.
If the Fellowship moves more than once in a turn, every Character Action Die used to move it is added to the Hunt Box after the Hunt is completed, providing a +1 bonus to subsequent Hunt Rolls that turn (Event Cards used to move do not add dice to the Hunt Box). These dice are returned at the start of the next turn.
LOCATING THE FELLOWSHIP
The actual position of the Fellowship is determined only if the Free Peoples player declares the Fellowship, or a Hunt reveals the Fellowship. Both circumstances cause the Ring-bearers figure to move up to the distance indicated on the Fellowship Track, and the Fellowship Progress Counter is reset to “0”. The Ring-bearers figure cannot cross impassable black borders.
Fellowship Declares Its Own Position
During the Fellowship Phase, if the Fellowship is Hidden, the Free Peoples player may declare its position. The Ring-bearers figure is moved up to the distance indicated by the Progress Counter, which is then reset to 0 (remaining Hidden).
- If declared in a Free Peoples City or Stronghold, that Nation is activated and one point of Corruption can be healed.
- The Fellowship may enter or leave a besieged Stronghold freely.
Fellowship is Revealed by a Hunt for the Ring
When revealed by a Hunt or Event Card, turn the Progress Counter to Revealed and move the Ring-bearers figure up to that distance. Restriction: This movement can never end in a region containing a City or Stronghold controlled by the Free Peoples.
IMPORTANT: Once revealed, the Fellowship cannot be moved using a Character Action Die until it is Hidden again.
The Fellowship in Shadow Strongholds
When the Fellowship is revealed, if its path from its last known position moves through, moves from, moves into, or remains stationary in a Shadow Stronghold still controlled by the Shadow player, an additional Hunt Tile is immediately drawn.
HIDING THE FELLOWSHIP
The Free Peoples player can use a Character Action Die result during the Action Resolution phase to flip a Revealed Progress Counter back to Hidden. This does not move the Fellowship.
HEALING THE RING-BEARER
If during the Fellowship Phase the Fellowship is declared in a region containing an uncaptured Free Peoples City or Stronghold, one point of Corruption is immediately removed (to a minimum of zero). This can be repeated each turn the Fellowship remains declared there.
ENTERING MORDOR
If the Fellowship is in Minas Morgul or Morannon during a Fellowship Phase, the Free Peoples player may decide to enter Mordor. (See The Hunt for the Ring & Mordor for full details.)
SEPARATING COMPANIONS FROM THE FELLOWSHIP
During the Action Resolution phase, the Free Peoples player can use a Character Action Die result to separate one Companion or a group of Companions from the Fellowship (prohibited on the Mordor Track).
- The separated Companion(s) move from the Fellowship’s last known position up to a number of regions equal to the current step on the Fellowship Track plus the highest Companion Level in the group.
- Separated Companions cannot later rejoin the Fellowship.
- If the Guide separates, a new Guide is selected (or Gollum becomes Guide).
THE HUNT POOL
While the Fellowship covertly seeks to reach Mount Doom, Sauron is searching tirelessly for the Ring-bearers and their Companions.
The Hunt Pool is a set of cardboard tiles placed in an opaque container. When all tiles are used, return all Standard Tiles (beige) to the pool, but do not return Special Tiles (blue/red) or permanently removed tiles.
- Standard Hunt Tiles (beige): Show numerical values from 0 to 3 (Hunt Damage). Some feature an Eye icon (variable damage) or a Reveal icon.
- Special Hunt Tiles (blue for Fellowship, red for Shadow): Enter play only via Event Cards and are added to the Hunt Pool when the Fellowship enters Mordor (or immediately if already in Mordor). Some have negative damage (-1, -2) which heal Corruption, or a Die icon. All Shadow Special Tiles show a Stop icon.
HUNTING THE FELLOWSHIP
THE HUNT ROLL
Every time the Free Peoples player moves the Fellowship, the Shadow player rolls a number of Combat Dice equal to the Hunt Level (number of Shadow Action Dice in the Hunt Box, up to a maximum of 5 dice). Each result of “6” is a success.
- Modifiers: +1 to each Hunt Roll die result for every Free Peoples Action Die currently in the Hunt Box. A roll of “1” is always a failure.
- Hunt Re-rolls: The Shadow player can re-roll one failed die for each of the following conditions present in the region containing the Fellowship figure:
- A Stronghold controlled by the Shadow player
- One or more Shadow Army units
- One or more Nazgûl
DETERMINING HUNT DAMAGE
If at least one success is rolled, the Shadow player draws one tile from the Hunt Pool:
- Numbered Tile: Hunt Damage equals the number.
- Eye Tile: Hunt Damage equals the number of successes rolled in the Hunt Roll (value is 0 if drawn due to a Stronghold or Event Card).
- Reveal Icon: The Fellowship is revealed after resolving damage.
EFFECTS OF THE HUNT
Resolve damage in this exact order:
- Event Cards: Free Peoples player may use one relevant “Play on the Table” Event Card to cancel or reduce damage.
- Guide Ability: Use the Guide’s special ability if applicable.
- Taking Casualties: Free Peoples player may reduce Hunt Damage by eliminating one Companion (either the Guide, or a randomly drawn Companion). If the damage exceeds the Companion’s Level, the excess must be taken as Corruption.
- Using the Ring: Any remaining Hunt Damage advances the Corruption Counter on the Fellowship Track by that amount.
- Reveal: If the tile has a Reveal icon, the Fellowship becomes revealed.
THE FELLOWSHIP IN MORDOR
To enter Mordor, the Fellowship must be in Minas Morgul or Morannon during the Fellowship Phase. When entering Mordor:
- Place the Ring-bearers figure on the “0” step of the Mordor Track. The Progress Counter is no longer advanced on the Fellowship Track, but still tracks Hidden/Revealed status.
- Create a new Hunt Pool by returning all drawn Eye tiles to the pool, along with any played Special Hunt Tiles.
Special Rules on the Mordor Track
- Companions can never be separated; any effect separating them removes them from the game instead.
- When moving the Fellowship, do not roll Hunt Dice: automatically draw a tile from the Hunt Pool! An Eye tile deals damage equal to the total number of dice in the Hunt Box.
- If a tile shows a Stop icon, the Fellowship does not advance on the Mordor Track.
- If the Free Peoples player does not attempt to move or hide the Fellowship during a turn, one Corruption is automatically added at the end of the Action Resolution phase.
- When the Fellowship completes all 5 steps on the Mordor Track and enters the Crack of Doom with fewer than 12 Corruption, the Free Peoples win!
VICTORY CONDITIONS
There are four ways to win the game. Two Victory Conditions can be triggered at any moment during a turn, while the other two apply only during Phase 6 (Victory Check). If two or more conditions are met on the same turn, lower-numbered conditions take precedence.
RING-BASED VICTORY CONDITIONS (Checked Immediately)
- 1) Corruption of the Ring-bearers: If the Ring-bearers reach 12 or more Corruption Points, the Shadow player wins immediately.
- 2) Destroying the Ring: If the Ring-bearers reach the “Crack of Doom” step on the Mordor Track with fewer than 12 Corruption points, the Free Peoples player wins immediately.
MILITARY VICTORY CONDITIONS (Checked in Phase 6)
- 3) The Shadow Conquers Middle-earth: If the Shadow player controls Free Peoples Settlements worth 10 or more Victory Points, the Shadow player wins.
- 4) Sauron is Banished from Middle-earth: If the Free Peoples player controls Shadow Settlements worth 4 or more Victory Points, the Free Peoples player wins.
Victory Points are awarded for captured enemy Settlements: each enemy City is worth 1 VP, and each enemy Stronghold is worth 2 VP.
FOUR-PLAYER GAME
In a four-player game, player roles and faction responsibilities are divided as follows:
- Free Peoples:
- Player 1: Gondor (also controls Elves)
- Player 2: Rohan (also controls the North and Dwarves)
- Shadow:
- Player 1: The Witch-king (Sauron Nation)
- Player 2: Saruman and Sauron Allies (Isengard and Southron & Easterling Nations)
Turn Sequence & Mechanics Adjustments
- Leading Player Tokens: Gondor and The Witch-king start as Leading Players. The token passes to teammates at the start of each subsequent turn.
- Event Draw: On Turn 1, draw 1 card from each deck. On later turns, draw 1 card from either deck. Teammates may secretly agree to swap one card each turn. Hand limit is 4 cards.
- Fellowship Phase: Decided by the Free Peoples Leading Player.
- Hunt Allocation: Decided by the Shadow Leading Player.
- Action Resolution: Turn order alternates: non-Leading Free Peoples, non-Leading Shadow, Leading Free Peoples, Leading Shadow.
- Limits on Actions: Players can only move/recruit/fight with Nations they control, unless using Character abilities. Both players may interact with the Fellowship.
- Mixed Armies: When units from different players share a region, they form a mixed Army if attacked or by mutual agreement. Control goes to the player with the most units (tiebreakers: most Elite units, then Leading Player).
- Southron & Easterling Elite Units: When Saruman is in play, each Southron & Easterling Elite unit (and Isengard Elite unit) counts as both an Army unit and a Leader.
THREE-PLAYER GAME
Follows four-player rules, with one player controlling all Free Peoples as in a two-player game, subject to one restriction: the Free Peoples player cannot use two consecutive actions on the same Nation.
MULTIPLAYER VICTORY CONDITIONS
Teams win together. To determine the individual winner within the winning team:
- Shadow Team: The player with the highest net Victory Points (points gained from captured enemy Settlements minus points lost from their own captured Settlements) wins.
- Free Peoples Team: The player who lost fewer Victory Points from conquered Settlements wins.
Introduction & Overview
Everywhere he looked he saw the signs of war. The Misty Mountains were crawling like anthills: Orcs were issuing out of a thousand holes. Under the boughs of Mirkwood there was deadly strife of Elves and Men and fell beasts. The land of the Beornings was aflame; a cloud was over Moria; smoke rose on the borders of Lórien. Horsemen were galloping on the grass of Rohan; wolves poured from Isengard. From the havens of Harad ships of war put out to sea; and out of the East Men were moving endlessly: swordsmen, spearmen, bowmen upon horses, chariots of chieftains and laden wains. All the power of the Dark Lord was in motion.
— The Fellowship of the Ring by J.R.R. Tolkien, Book II, Chapter 10.
GAME OVERVIEW
Welcome to the War of the Ring strategy board game.
War of the Ring is a game for two to four players, based on J.R.R. Tolkien’s The Lord of the Rings™.
The players take part in the struggle of the armies of the Free Peoples and the heroic Companions of the Fellowship of the Ring against the dark host of the Shadow and the powerful Minions of the Dark Lord.
In a two-player game, each opponent will lead either the Free Peoples or the armies of the Shadow, while in a three- or four-player game, the players will be organized in two teams, each team controlling either faction.
In each game of War of the Ring, the player controlling the Shadow attempts to use his superior military power to conquer Middle-earth.
At his command gather Sauron’s legions of Orcs and Trolls, the forces of the wizard Saruman, and the hosts of the Southrons and Easterlings, set to bring darkness over the West.
Against this onslaught, the Free Peoples player leads an allegiance of Elves, Dwarves, the riders of Rohan, men of Gondor, and men from the North—a fragile union trying to defend the last free realms of Middle-earth, and to gain precious time to allow the success of the Quest of the Ring-bearers.
While armies clash, the nine Companions of the Fellowship of the Ring travel towards the very heart of the domains of the Dark Lord—Mount Doom—to destroy the One Ring in the Mountain of Fire.
Controlled by the Free Peoples player, the Fellowship is his true chance of winning, as the military forces of the Shadow will be vanquished together with their master if the Ring is undone. But the Quest is fraught with ever greater perils, as the Darkness falls over Middle-earth…
In the end, one side will emerge victorious:
- If the Shadow conquers enough of its enemies’ cities and strongholds, or if the Ring-bearers fail and are corrupted, Darkness will triumph.
- If the Fellowship succeeds in destroying the Ring before this happens, or the armies of the Free Peoples succeed in turning the tide and conquering the enemy’s strongholds themselves, the fall of the Dark Lord is at hand…
NUMBER OF PLAYERS
War of the Ring is a game for 2 to 4 players. The forces involved in the conflict are divided into two sides: the Free Peoples and the Shadow.
- When playing with three players, one player controls the Free Peoples and the remaining two control the Shadow, sharing tasks.
- When playing with four players, all participants evenly share the forces of the two sides.
Please note that these rules refer to games played with only two players. To play games with more than two players, see Multiplayer Rules.
NOTES ON THE SECOND EDITION
This new edition of the game introduces a few subtle but important changes. For this reason, we recommend a careful reading of the rules, even to experienced players. The main changes are summarized here for the benefit of players already familiar with the previous edition:
- Character Abilities: Gandalf the Grey, Gollum, Meriadoc Brandybuck, Peregrin Took and the Witch-king now have modified special abilities (see their Character Cards). The changes to Gandalf the Grey (Guide ability) and the Witch-king (mustering pre-requisites, “Sorcerer” ability) are especially important to take notice of.
- Event Cards: Many Event Cards have been revised to improve their effectiveness, or simplify their use. The “Ents of Fangorn”, “Paths of the Woses” and “The Last Battle” cards have modified effects.
- Army Setup: The setup for the Dwarves has been modified.
- Action dice: The Shadow player must allocate a minimum of 1 Action Die to the Hunt if the Free Peoples player placed at least one Action Die in the Hunt Box in the previous turn.
- Use of Combat Cards: Combat Cards are now chosen and played using a modified sequence.
- The Hunt: There is a new sequence for the Hunt resolution, to streamline the application of Event Cards and Special Abilities.
- Entering Mordor: To enter Mordor, it is now sufficient that the Ring-bearers are located in Minas Morgul or Morannon, without the requirement of declaring the Fellowship. As a consequence, the Fellowship can enter Mordor even if it is not Hidden.
Game Components & Board
COMPONENTS LIST
Inside your War of the Ring box you will find an extensive set of components, listed here:
- This Rulebook
- 2 Player Aids
- 1 Game Board, composed of two fold-out sections
- 6 Free Peoples Action Dice
- 10 Shadow Action Dice
- 5 six-sided Combat Dice
- 10 Companion Cards (Free Peoples Characters)
- 1 Gollum Card
- 3 Minion Cards (Shadow Characters)
- 96 Event Cards (divided into 4 decks of 24 cards each)
- 205 plastic figures representing the Armies and Characters of the War of the Ring, including:
- 90 red figures representing Shadow Army units
- 75 blue figures representing Free Peoples Army units
- 20 gray figures representing Free Peoples Leaders and 8 figures representing the Nazgûl
- 8 silver figures representing the Ring-bearers (Frodo and Sam) and their Companions
- 3 silver figures representing the Minions of the Shadow
- 1 silver figure representing Gollum
- 76 cardboard counters and markers, including:
- 24 Hunt Tiles (16 Standard Hunt Tiles and 8 Special Hunt Tiles)
- 6 Army counters
- 3 Elven Rings counters
- 1 Corruption counter
- 7 Companion counters
- 1 Aragorn – Heir to Isildur marker
- 1 Gandalf the White marker
- 1 Fellowship Progress counter
- 8 Nation Political counters
- 20 Settlement Control markers
- 2 Victory Points markers
- 2 Leading Player tokens (used in the three- and four-player games)
GAME PIECES
PLASTIC FIGURES
The Armies fighting for Middle-earth and the heroes and monsters that lead them are represented in the game by plastic figures.
Armies
The bulk of the armed forces of a Nation are represented by Army units.
The Army units of a Nation are further divided into either Regular or Elite units, where the first category represents a fighting force of average warriors and the second a host of chosen fighters or powerful monsters.
A single Army unit corresponds to a variable number of warriors, from a few hundred expert fighters to thousands of Orcs. In game terms, all units of a kind (Regular or Elite) have the same fighting capabilities as any other of the same kind, regardless of the Nation they belong to.
All Army units inside a single region and controlled by the same player are considered a single group and are collectively called an Army.
An Army can be composed of a maximum of ten units, or five units if the Army is inside a Stronghold under siege.
Free Peoples Leaders
The captains and chieftains leading the Armies of the Free Peoples are represented by Leader figures.
Leaders are unable to move on their own and must always be part of a friendly Army. If at any time a Leader is on the map without an Army, he is immediately removed.
The presence of a Leader in an Army provides an advantage in combat and a superior movement capability. There is no limit to the number of Leaders who can be in the same Army. Free Peoples Leaders, regardless of nationality, can lead Armies composed of units from any Free Peoples Nation.
A Leader is not considered an Army unit and cannot be taken as a casualty, nor does the presence of a Leader add to the Combat Strength of an Army.
Nazgûl
The Nazgûl, also called Ringwraiths, act as Leaders for the Shadow Armies and each is represented by the distinctive Ringwraith figure mounted on a winged beast.
The rules pertaining to the Free Peoples Leaders also apply to the Nazgûl, with the following exceptions:
- The Nazgûl are not obliged to be part of a friendly Army and can move on their own, flying to any region (even regions containing Free Peoples units) on the game board with a single movement. Exception: a Nazgûl moving without an Army cannot be placed alone in an enemy-controlled Stronghold.
- The Nazgûl are unaffected by the presence of an enemy Army in the same region.
Characters
The main heroes of the story and their main antagonists are represented by the Character figures.
Characters are personalities with abilities superior to those of simple Leaders. Characters belonging to the Free Peoples are called Companions, while the Characters of the Shadow are called Minions.
Each Character is represented by a unique figure and a Character Card detailing his special skills. Players should carefully read all of the Character Cards before playing the game.
In game terms, Characters act much the same as Leaders, but they do not suffer the same restrictions and can move on the game board on their own, ignoring the presence of enemy Armies.
- Companions: Legolas, Gimli, Boromir, Aragorn (as Strider), Meriadoc, Peregrin, and Gandalf the Grey start the game as the Companions of Frodo and Sam (the Ring-bearers) and members of the Fellowship of the Ring. As the game progresses, they can leave the Fellowship to help rouse the Free Peoples Nations to war and to act as Leaders for the Free Peoples Armies. Under certain conditions (as described on their Character Cards), Strider and Gandalf the Grey can be replaced by their more powerful incarnations: Aragorn – Heir to Isildur and Gandalf the White. When this happens, put the appropriate marker under the plastic figure of the Character to remember his new status.
- Minions: The more prominent servants of the Dark Lord—Saruman, the Witch-king, and the Mouth of Sauron—do not start in play at the beginning of the game. They will enter play later, under the conditions specified on their Character Cards.
- Gollum: Gollum is a very unusual Character. Gollum is always assumed to be following the Fellowship of the Ring, and he becomes the Guide of the Fellowship if the Ring-bearers are alone. When this happens, you may place the Gollum figure together with the Ring-bearers figure as a reminder of his presence. The effects of Gollum’s actions are represented in the game by the Gollum Character Card and certain Event Cards.
THE GAME BOARD
The game board is a view of western Middle-earth at the end of the Third Age. In addition to the playing area proper, the game board also includes several spaces and tracks used to help the players keep track of various elements and components of the game.
The diagram of the game board identifies its various parts and shows the spaces where many of the components needed at the start of the game are placed during setup.
NATIONS
The Nations are identified by their colored borders:
- Dwarves: brown
- Elves: light green
- Gondor: dark blue
- The North: light blue
- Rohan: dark green
- Isengard: yellow
- Sauron: red
- Southrons & Easterlings: orange
REGIONS
The main portion of the game board shows a view of western Middle-earth at the end of the Third Age. The map is divided into territories called regions. Each region is identified by a name, which usually refers to a site of note or to an entire geographical area (such as Minas Tirith or Cardolan). Regions are used to regulate movement, combat, and the placement of all plastic figures.
- Regions are normally separated by a white line or by a river between two white lines.
- A thick black border denotes impassable terrain which cannot be crossed, usually a high mountain range. If the border between two regions is completely divided by such a line, those regions are not considered adjacent for any purpose.
- Some areas of the board are completely blue, either surrounded by a black line or bordered by a white line. These areas are seas or lakes. A sea or lake area is not a region and can never be crossed or moved into. Regions bordering the large sea area on the left side of the board are called coastal regions.
- Larger letters in the name of a region show that the region includes a City or Stronghold.
Free Regions
The rules and Event Cards often refer to a free region. A region is free for a player when it doesn’t contain an enemy Army and/or an enemy-controlled Settlement. A region containing a Stronghold controlled by the enemy is also free for a player when the Stronghold is besieged by an Army of that player.
FORTIFICATIONS AND SETTLEMENTS
A region can be empty, or contain either a Fortification or one of three types of Settlements (Town, City, or Stronghold).
Fortifications
A Fortification in a region offers easily defendable positions, such as a ruin, a fort, or a ford crossing a river. There are two Fortifications on the map: in the regions of Osgiliath and the Fords of Isen.
Settlements
Settlements represent locations that are vital to the economy and defense of a Nation. A region containing a Settlement gives several advantages to the player controlling it.
- Towns: Represent populated areas that allow the recruitment of troops of a specific Nation. The presence of a Town is shown on the board by the symbol of the appropriate Nation.
- Cities: Represent major urban centers and can also be used to recruit troops. They also provide an advantage in combat to defending troops. Control of an enemy City is worth 1 Victory Point to the opponent.
- Strongholds: Represent fortresses, Elven homes, and the greatest capitals of Middle-earth. Troops may be recruited in Strongholds, and defenders receive a very strong advantage in battle. Control of an enemy Stronghold is worth 2 Victory Points to the opponent. Each Stronghold on the board is matched by a Stronghold Box with the same drawing (or with a generic drawing in the case of Shadow Strongholds).
In both Cities and Strongholds, the color of the frame shows which player initially controls it (red for the Shadow, blue for the Free Peoples). The icon in the upper corner shows which Nation the City or Stronghold belongs to.
TRACKS AND BOXES
In addition to the regions of Middle-earth, the game board also contains various boxes and tracks used during the game to keep track of different activities. These areas include:
- Free Peoples Character Event Cards Box: holds the Free Peoples Character Event deck.
- Free Peoples Strategy Event Cards Box: holds the Free Peoples Strategy Event deck.
- Elven Rings Box (controlled by the Free Peoples player): displays the Elven Rings counters controlled by the Free Peoples player.
- Army Boxes: hold figures when there is not enough space in a region.
- Stronghold Boxes: display those Army units involved in a Siege Battle.
- Hunt for the Ring Box (Hunt Box): displays the dice that the Shadow player allocates to hunt the Fellowship and keeps track of the number of times that the Fellowship moves during a turn.
- Victory Points Track: keeps count of the conquests of each player.
- Elven Rings Box (controlled by the Shadow player): displays the Elven Rings counters after being used by the Free Peoples and transferred to the Shadow.
- Fellowship Track: keeps track of the progress of the Fellowship and the Corruption of the Ring-bearers.
- Fellowship of the Ring Box (Fellowship Box): displays the figures and counters of the Companions composing the Fellowship.
- Guide of the Fellowship Box: displays the Character Card of the Character who is guiding the Fellowship.
- Political Track: keeps track of which Nations of Middle-earth are “at War”.
- Mordor Track: the final part of the quest to destroy the One Ring.
- Shadow Character Event Cards Box: holds the Shadow Character Event deck.
- Shadow Strategy Event Cards Box: holds the Shadow Strategy Event deck.
Setup & Initial Armies
SETUP STEPS
Before you start playing, you should decide who will play the Free Peoples and who will play the Shadow. Then, get the game ready to play by following these steps:
- Step 1: Place the game board on a suitable surface, possibly large enough to leave some room along the sides of the board (to place discarded cards and eliminated pieces and to roll dice).
- Step 2: Place the Ring-bearers figure on Rivendell, its starting point.
- Step 3: Place the Fellowship Progress Counter on Step 0 of the Fellowship Track, with the “Hidden” side up. The Corruption Counter is also placed on Step 0 of the same track.
- Step 4: Place all Companion Cards in the Guide of the Fellowship Box, with the Gandalf the Grey Character Card on top, as he is the starting Guide of the Fellowship. Set aside the cards for Aragorn – Heir to Isildur, Gandalf the White, and Gollum for later use.
- Step 5: Place all the Companion figures and their counters in the Fellowship of the Ring Box. Set aside the Gollum figure for later use.
- Step 6: Place the three Elven Ring counters in the Free Peoples’ Elven Rings Box of the game board with the “Ring” side up.
- Step 7: Set aside all Shadow Minion Cards (the Witch-king, Saruman, and the Mouth of Sauron) and the corresponding figures for later use.
- Step 8: Separate the Free Peoples and Shadow Event Cards into Character and Strategy Decks according to the back of each card, shuffle them separately, and place them on the corresponding areas of the game board.
- Step 9: Put the Standard Hunt Tiles (beige) in a cup or other opaque container: this is the Hunt Pool. Set aside the Special Hunt Tiles (blue and red) for later use.
- Step 10: Give seven red Shadow Action Dice to the Shadow player and four blue Free Peoples Action Dice to the Free Peoples player. Set aside the remaining Action Dice for later use. Set aside the five Combat Dice.
- Step 11: Place the Political Counter for each Free Peoples Nation on its starting point on the Political Track:
- All of the Free Peoples Nations’ Political Counters except for that of the Elves are placed with the “Passive” side up. The Political Counters of the Elves and all the Shadow Army Nations are placed with the “Active” side up.
- As indicated by the symbols on the track, place the Rohan, the North, the Elven, and the Dwarven Nations’ Political Counters in the top box.
- Place the Gondor and Southron/Easterling Political Counters in the second box from the top.
- Finally, place the Sauron and Isengard Political Counters in the third box from the top—immediately above the “At War” box.
- Step 12: Sort all the plastic figures by their color and their type and follow the Army Setup diagram to place each Nation’s initial Army units and Leaders. Set aside any remaining figures to use as reinforcements, paying attention not to mix them with pieces eliminated from play as the game progresses. Set aside the Army counters for use later in the game.
Keep all the remaining components in the box; they will be used later in the game.
ARMY SETUP
Free Peoples Setup
- Dwarves:
- Erebor (1): 1 Regular, 2 Elite, 1 Leader.
- Ered Luin (2): 1 Regular.
- Iron Hills (3): 1 Regular.
- Reinforcements: 2 Regular, 3 Elite, 3 Leader.
- Elves:
- Grey Havens (4): 1 Regular, 1 Elite, 1 Leader.
- Rivendell (5): 2 Elite, 1 Leader.
- Woodland Realm (6): 1 Regular, 1 Elite, 1 Leader.
- Lórien (7): 1 Regular, 2 Elite, 1 Leader.
- Reinforcements: 2 Regular, 4 Elite.
- Gondor:
- Minas Tirith (8): 3 Regular, 1 Elite, 1 Leader.
- Dol Amroth (9): 3 Regular.
- Osgiliath (10): 2 Regular.
- Pelargir (11): 1 Regular.
- Reinforcements: 6 Regular, 4 Elite, 3 Leader.
- The North:
- Bree (12): 1 Regular.
- Carrock (13): 1 Regular.
- Dale (14): 1 Regular, 1 Leader.
- North Downs (15): 1 Elite.
- The Shire (16): 1 Regular.
- Reinforcements: 6 Regular, 4 Elite, 3 Leader.
- Rohan:
- Edoras (17): 1 Regular, 1 Elite.
- Fords of Isen (18): 2 Regular, 1 Leader.
- Helm’s Deep (19): 1 Regular.
- Reinforcements: 6 Regular, 4 Elite, 3 Leader.
Shadow Setup
- Isengard:
- Orthanc (1): 4 Regular, 1 Elite.
- North Dunland (2): 1 Regular.
- South Dunland (3): 1 Regular.
- Reinforcements: 6 Regular, 5 Elite.
- Sauron:
- Barad-Dûr (4): 4 Regular, 1 Elite, 1 Nazgûl.
- Dol Guldur (5): 5 Regular, 1 Elite, 1 Nazgûl.
- Gorgoroth (6): 3 Regular.
- Minas Morgul (7): 5 Regular, 1 Nazgûl.
- Moria (8): 2 Regular.
- Mount Gundabad (9): 2 Regular.
- Nurn (10): 2 Regular.
- Morannon (11): 5 Regular, 1 Nazgûl.
- Reinforcements: 8 Regular, 4 Elite, 4 Nazgûl.
- Southrons & Easterlings:
- Far Harad (12): 3 Regular, 1 Elite.
- Near Harad (13): 3 Regular, 1 Elite.
- North Rhûn (14): 2 Regular.
- South Rhûn (15): 3 Regular, 1 Elite.
- Umbar (16): 3 Regular.
- Reinforcements: 10 Regular, 3 Elite.
Turn Structure & Action Dice
SUMMARY OF THE TURN
War of the Ring is played over a series of turns, until either player wins the game. Each turn is divided into six phases.
- Phase 1) Recover Action Dice and Draw Event Cards: Each player recovers the Action Dice he used in the previous turn, plus any dice which were added to the Action Dice Pool and minus any dice which were removed from the pool. Then, each player draws 2 cards, one from each of their respective Event Decks.
- Phase 2) Fellowship Phase: The Free Peoples player may now declare the position of the Fellowship. If the Fellowship is declared in a City or Stronghold of a Free Peoples Nation, that Nation is activated (if the Nation is showing “Passive” on the Political Track, flip the Nation to “Active”) and the Ring-bearers may be healed. Also, during this phase, the Free Peoples player may change the Guide of the Fellowship.
- Phase 3) Hunt Allocation: The Shadow player may now place a number of Action Dice in the Hunt Box located on the game board. The Shadow player must place at least one Action Die if the Free Peoples player retrieved at least 1 die from the Hunt Box during Phase 1. He may allocate only as many dice as the number of Companions remaining in the Fellowship. These dice are not rolled during the following Action Roll phase.
- Phase 4) Action Roll: Players roll their Action Dice (except the dice already in the Hunt Box). Then, the Shadow player immediately takes all the rolled dice showing the “Eye” result and adds them to the Hunt Box.
- Phase 5) Action Resolution: This phase is the primary game phase of the War of the Ring board game. It is during this phase that players will utilize the Action Dice results to move their Characters and Armies on the game board, or to take other important actions. The results of the rolled Action Dice dictate the actions the players can take during this phase. Starting with the Free Peoples player, the two players alternate actions, each taking one action by selecting and removing one of his available die results. (See also Using Action Dice.) Each time the Free Peoples player uses an Action Die to move the Fellowship, he places that die in the Hunt Box after completing the action. All other used dice are set aside until next turn.
- Phase 6) Victory Check: Players now check to see whether either player has achieved the Military Victory Conditions. If not, a new game turn begins.
When all the activities required by the different phases have been concluded, the turn is over and another turn begins (unless one of the players has achieved his Victory Conditions, in which case the game ends).
THE ACTION DICE
The Action Dice play a fundamental role in the game, as they dictate the options available to each player during a turn. These dice have special icons on their faces, each icon representing a different group of action from which the players may choose. The different numbers and types of icons appearing on the Free Peoples Action Dice and Shadow Action Dice reflect the different attitudes of the two sides fighting the War of the Ring.
Note: The Free Peoples Action Dice have two faces which show the “Character” action, and on these dice the “Army” action only appears on a face combined with the “Muster” action.
ACTION DICE POOL
The total number of Action Dice rolled by a player in a turn is called his dice pool.
- The Shadow player: starts the game with seven dice in his pool, but may gain additional dice later in the game, up to a maximum of ten. These additional Action Dice enter play when the Shadow player brings his Minions into the game (one die for Saruman, one for the Witch-king, one for the Mouth of Sauron).
- The Free Peoples player: starts with four dice in his pool. Like the Shadow, he can also gain additional dice later in the game. The Free Peoples player adds one die to his dice pool when Aragorn – Heir to Isildur enters play and another one when Gandalf the White appears.
Both the Shadow and the Free Peoples player lose the additional die if the corresponding Character is eliminated.
When a player gains or loses an Action Die, the gain or loss becomes effective in the next turn: the die is added to, or removed from, the dice pool during the Recover Action Dice and Draw Event Cards phase of the following turn.
HUNT ALLOCATION AND ACTION ROLL
The Shadow player, during the Hunt Allocation Phase, places the number of Action Dice into the Hunt Box that he wants to devote to the Hunt for the Ring.
- If one or more Fellowship Action Dice were in the Hunt Box at the end of the previous turn, he must place a minimum of 1 die in the Hunt Box.
- The maximum number of dice he can place in the Hunt Box is equal to the number of Companions currently in the Fellowship (note that the Ring-bearers are not considered to be a Companion and do not add to this maximum).
- However, the Shadow player may always place at least one die in the Hunt Box, even if all the Companions have left the Fellowship.
The dice placed in the Hunt Box are not rolled, but the Shadow player rolls the remaining dice in his dice pool, and all dice showing an “Eye” result are immediately added to the Hunt Box as well.
The Free Peoples player simply rolls his entire Action Dice pool.
USING ACTION DICE
Starting with the Free Peoples, players alternate actions selecting one of their Action Dice and immediately taking the action made available by the specific die result.
When an action has been completed, the corresponding die is considered “used” and is set aside until needed again for the next turn.
The only exception to this rule is that each time the Free Peoples player uses an Action Die to move the Fellowship, he places that die in the Hunt Box after completing the action rather than setting it aside (note that the die is returned to the Free Peoples player during the Recover Action Dice and Draw Event Cards phase of the next turn).
If a player has fewer unused Action Dice than his opponent (typically the Free Peoples player will have fewer Action Dice than the Shadow player), he can pass instead of taking an action, thus allowing the opponent to take another action.
A player may also choose to skip an action and discard one of his Action Dice without effect, instead of using that die to take an action.
If a player runs out of actions before his opponent has done the same, the opponent executes his remaining actions one after the other.
ACTION DICE REFERENCE CHART
CHARACTER
The Character die result can be used to execute one of the following actions:
- Leader Moves/Attacks with Armies: Move an Army with a Leader to an adjacent region, which must be free for the purposes of Army movement; or attack an enemy Army in an adjacent region using an Army with a Leader.
- Play an Event Card: Play a Character Event Card from your hand.
Free Peoples only:
- Fellowship Progress: Move the Fellowship Progress Counter one step forward on the Fellowship Track. Resolve the Hunt for the ring, and then place the used Action Die in the Hunt Box.
- Hide the Fellowship: If the Fellowship was previously Revealed, it becomes Hidden again.
- Separate Companions: Separate one Companion or one group of Companions from the Fellowship. The Companion figures are removed from the Fellowship Box and must move on the map, up to a distance from the Fellowship equal to the step number on the Fellowship Track plus the highest Companion Level.
- Move Companions: Move all Companions or groups of Companions on the map, each up to a number of regions equal to that of the highest Companion Level in the group.
Shadow only:
- Move Minions: Move all Nazgûl (including the Witch-king, if in play) anywhere on the map (except into a region that contains a Stronghold controlled by the Free Peoples, unless a Shadow Army is besieging it). Move the Mouth of Sauron (if in play) up to three regions.
ARMY
The Army die result can be used to execute one of the following actions:
- Move Armies: Move up to two different Armies from their region(s) to adjacent region(s), which must be free for the purposes of Army movement.
- Attack an Enemy Army: Attack an enemy Army in an adjacent region with one of your Armies (or conduct a Siege Attack or Sortie).
- Play an Event Card: Play an Army Event Card from your hand.
MUSTER
The Muster die result can be used to execute one of the following actions:
- Diplomatic Action: Move the Political Track of one friendly Nation one step forward (for a Free Peoples Nation, the step “At War” can be reached only if the Nation is Active).
- Play an Event Card: Play a Muster Event Card from your hand.
- Recruit Reinforcements (Only for Nations “At War”): Place reinforcements into play:
- 1 Elite unit in any friendly and free Settlement, or
- 2 Leaders in any two different friendly and free Settlements, or
- 2 Regular units in any two different friendly and free Settlements, or
- 1 Leader and 1 Regular Army unit in any two different friendly and free Settlements.
- Bring Character into play (Shadow only): Bring one Character into play according to the rules on his Character Card.
EVENT
The Event die result can be used to execute one of the following actions:
- Draw an Event Card: Draw one Event Card from an Event Deck of your choice.
- Play an Event Card: Play any one Event Card from your hand, regardless of its type.
MUSTER / ARMY
Choose any one action from those listed under “Muster” or “Army”.
SPECIAL
The Special die results are different on the Shadow dice and on the Free Peoples dice:
- Eye of Sauron (Shadow): All dice showing the Eye must be placed in the Hunt Box.
- Will of the West (Free Peoples):
- Before taking an action, a Will of the West result can be changed to any other Action Die result, as chosen by the Free Peoples player, and be used to the same effect as the chosen result.
- The Will of the West result can also be used to bring into play Gandalf the White or Aragorn – Heir to Isildur according to the rules on their Character cards.
THE ELVEN RINGS
At the beginning of the game, the Free Peoples player receives three counters, representing the Elven Rings of Power.
He keeps each counter in the Elven Rings Box on the game board, with the Ring side face up, until he decides to use it.
When the Free Peoples player uses an Elven Ring, he flips over the counter to show its “Flaming Eye” side and gives it to the Shadow player.
After the Shadow player uses the counter, it is discarded from play.
Each Elven Ring/Eye counter can thus be used once by its owner in the following way:
- When a player is about to take an action during the Action Resolution phase, he may use an Elven Ring to change the result shown on one of his unused Action Dice to another Action Die result of his choice.
- A player that just used an Elven Ring to change a die result then proceeds to take a regular action, choosing any one Action Die result (not necessarily the one he has just changed with the Elven Ring).
The use of an Elven Ring is subject to the following limitations:
- Only one Elven Ring may be used by the same player during the course of a single turn.
- The Free Peoples player may not use an Elven Ring to change an action die to a “Will of the West” result.
- The Shadow player can use an Elven Ring to change a die result into an “Eye” result (that die is immediately moved to the Hunt Box). This does not count as an action, so he may then take an action normally. However, he cannot do the opposite and use an Elven Ring to change the result of an action die already showing an “Eye” result.
Event & Combat Cards
EVENT CARDS OVERVIEW
The Event Cards represent many of the fortunate (or unfortunate) episodes in The Lord of the Rings, as well as special items, unexpected occurrences, and “what if’s”.
Moreover, each Event Card can alternatively be used for a special combat effect to be employed in battle. When an Event Card is used for its combat ability, we refer to the card as a Combat Card.
EVENT DECKS
Each player receives two decks of Event Cards: his Strategy Deck (represented graphically by an army banner) and his Character Deck (represented graphically by a sword).
- Cards in the Strategy Deck usually offer military and political options to the player.
- Cards in the Character Deck are often related to the Fellowship and to the actions of Companions and Minions on the map.
DRAWING EVENT CARDS
During the first phase of each game turn (including the first turn) both players must draw one card from each of their decks.
It is also possible for players to draw cards from either deck by using an Action Die result during the Action Resolution phase.
Players may hold a maximum of six cards in their hand at any time and must immediately discard those in excess as soon as the maximum number is exceeded. Cards are discarded face down.
If a deck is depleted during the game, the discarded cards are not reshuffled. It is now no longer possible for the player to draw cards out of that deck (and thus he may only draw one card from the other deck during the Recover Action Dice and Draw Event Cards phase).
PLAYING EVENT CARDS
Event Cards can be played during the Action Resolution phase in two ways:
- by using an Event Action Die result (the Palantir symbol), or
- by using an Action Die result whose icon matches the symbol on the upper right corner of the card.
Example: For the Free Peoples player to play the Strategy Card “Paths of the Woses” he must either use an Action Dice that shows the Palantir symbol (the Event result), or an Action Dice that shows the Banner symbol (an Army result).
Generally, Event Cards are discarded as soon as their effects are resolved. The effects of an Event Card are explained in its text.
Often, some kind of requirement must be met for the effects of the card to apply; if a requirement is not fully satisfied, the card cannot be played.
Usually, a card allows a player to take an action that violates the standard rules; this is intentional, but any rule that is not expressly replaced by the card text still applies normally. Some exceptions to the general rules use the following terminology:
- If a card reads “Play on the table”, it means that the card is not discarded after it is played, and its effects last until a particular condition or requirement is met after which the card is discarded. If discarding a card requires the use of an Action Die, discarding the card counts as an action. Note that if the condition required to play such a card ceases to be met, the card is immediately discarded. (Example: “Denethor’s Folly” is discarded if Minas Tirith is no longer under siege.)
- If a card text directs you to “recruit” units or Leaders, these units or Leaders are taken from your available reinforcements. See also Using an Event Card to Recruit Troops for the specific workings of Event Cards who allow recruitments.
The actions indicated by an Event Card are mandatory. However, it can happen that the effects of an Event Card cannot be fully applied. In this case, the card can still be played, and its effects are applied to the maximum extent possible.
Example: The “Knights of Dol Amroth” card allows the Free Peoples player to recruit one Leader and one Elite (or Regular) unit in Dol Amroth. If no Leader is available in the Free Peoples reinforcements, only the Elite or Regular unit is recruited.
Event Cards Provoking Casualties
Several cards describe effects that may cause a player to remove some figures from play. If all the Army units in an Army are eliminated by the effect of such a card, all Free Peoples Leaders with the Army are immediately removed, while any Nazgûl, Companions, or Minions are left in the region, unless specified differently in the card text.
COMBAT CARDS
In addition to their standard Event Text, all Event Cards contain additional text (located at the bottom of the cards) representing their use as Combat Cards.
Unlike playing an Event Card for its main use, playing it as a Combat Card does not require taking an action. Combat Cards are played during a battle (see Resolving a Battle for further details).
Just like with Event Card effects, Combat Card effects modify the normal rules of the game, and the text of the card always has precedence over the normal rules. Event Cards used as Combat Cards are always discarded immediately after use.
The Politics of Middle-earth
THE POLITICAL TRACK
The end of the Third Age was a dark time for Middle-earth. While the basic allegiances of the Free Peoples were clearly defined, their individual opinions towards the threat of Sauron differed widely. The diplomatic stance of the various Nations is represented in War of the Ring by a Nation’s position on the Political Track found on the game board.
The initial starting position of a Nation on the Political Track represents its diplomatic attitude at the beginning of the war. The farther its Political Counter is from the “At War” step of the track, the less inclined that Nation is to take part in the conflict.
For a Nation to be considered completely mobilized and ready to fight, its Political Counter must be in the last step in the track, marked “At War”.
All the Free Peoples Nations except the Elves start the game in a passive state (represented by the gray side of a Nation’s Political Counter facing up). As long as a Nation remains passive, it can never be moved to the last step of the track (“At War”) and thus be fully mobilized.
ACTIVATING FREE PEOPLES NATIONS
The Political Counter of a Free Peoples Nation is turned to the active side (light blue side face up) when any of the following events occur:
- A region of that Nation is entered by an enemy Army.
- An Army containing units of that Nation is attacked.
- The Fellowship of the Ring is declared in a City or Stronghold of that Nation.
- When a Companion (capable of activating that Nation) ends his movement in one of its Cities or Strongholds.
Each Companion Card has a symbol in its lower right-hand corner indicating which Free Peoples Nation the Companion is capable of activating. Note that Gandalf, Aragorn, Meriadoc Brandybuck, and Peregrin Took show the “Free Peoples” symbol: they are capable of activating any Free Peoples Nation upon ending their movement in one of its Cities or Strongholds.
ADVANCING A POLITICAL POSITION
The Political Counter of a Nation is advanced (moving it down a step toward the “At War” step) by:
- Using a Muster Action Die result, or
- Playing certain Event Cards, or
- Automatically advancing one step every time an Army containing units of that Nation is attacked, or
- Automatically advancing one step every time a Nation’s Settlement (Town, City, or Stronghold) is captured by the opponent.
Event Cards Affecting the Political Track
All cards that initiate an attack by an Army will trigger a political reaction (activation and/or advancement). The three “Ent” Event Cards and the “Dead Men of Dunharrow” card also trigger a political reaction (considered battles in which the enemy Army cannot fight back).
ENTERING WAR
A Nation that is not “At War” is considered to be non-belligerent. Army units and Leaders of a non-belligerent Nation suffer the following restrictions:
- They can move outside their National borders but can never move across the borders of other Nations (including friendly ones).
- They cannot attack enemy Armies (but can defend if attacked).
- They can never be recruited by using Muster Action Die results.
All these restrictions apply even if units of a non-belligerent Nation are stacked with units of a Nation “At War”.
Exception: Non-belligerent units are allowed to cross another Nation’s border when retreating from a battle. If they do so, the next time they move, they must move out of that Nation, unless they became “At War” in the meantime.
When a Nation’s Political Counter moves into the last step of the Political Track, that Nation is now “At War”. Its Armies may freely move across all National borders and attack enemy Armies, and its troops can be recruited using Muster Action Die results. (Remember that a passive Free Peoples Nation must be activated first before entering the “At War” step.)
CHARACTERS AT WAR
Companions, Minions, and Nazgûl can freely move and be involved in battles regardless of the political position of the Nation they belong to. In essence, they should be considered already “At War”.
Armies, Movement & Battles
CHARACTERS
PLAYING FREE PEOPLES CHARACTERS
Free Peoples Characters are brought into play in two ways:
- Companions enter play when they are separated from the Fellowship (see Separating Companions from the Fellowship);
- Gandalf the White and Aragorn – Heir to Isildur, are brought into play using a Will of the West die. Use the rules specified by their Character Card.
PLAYING SHADOW CHARACTERS
Shadow Characters (Minions) are brought into play using a Muster die. This use of a Muster die does not follow the normal rules for recruitment — use the rules specified by the Character Card.
MOVING CHARACTERS
Characters are moved on the game board during the Action Resolution phase by using a Character Action Die result (the Sword icon), or by playing an Event Card that allows the movement of Characters.
A Character Action Die result can be used:
- To move all Companions who are not in the Fellowship (Free Peoples player only).
- To move all Nazgûl and Minions (Shadow player only).
Note: If a Character’s Level is 0, he cannot move, even when attached to an Army.
Moving Companions
When the Free Peoples player uses a Character Action Die result to move his Characters, all Companions on the map may be moved a number of regions equal to or less than their Level.
However, a group of Companions in the same region can be moved to a common destination at a distance equal to or less than the highest Level in the group.
The Free Peoples player can create more than one group from the Companions in the same region, which may then move independently to different destinations.
When Companions move, they are subject to the following rules:
- They are unaffected by any enemy Army. When moving alone or with other Companions, they can enter or leave a region that contains Shadow units, but must stop upon entering a region containing a Stronghold controlled by the Shadow player.
- They can never leave or enter a region containing a friendly Stronghold besieged by an enemy Army (except as a result of certain Event Card effects).
- They cannot cross impassable terrain (black borders).
Moving Nazgûl and Minions
When the Shadow player uses a Character Action Die result to move his Characters, each Nazgûl (including the Witch-king) can be moved to any region on the game board with a single move. One, some, or all Nazgûl can be moved this way using a single Character Action Die result.
The only restriction is that the Nazgûl can never move this way into a region that contains a Stronghold controlled by the Free Peoples player, unless that Stronghold is besieged by a Shadow Army.
Note that in War of the Ring, for the purposes of rules clarity, the Witch-king is considered to be a Nazgûl (including with respect to all references to “Nazgûl” on Event Cards, unless differentiated in the card text by the use of his name or the “Minion” title).
The Mouth of Sauron and Saruman do not possess the unlimited movement ability of the Nazgûl; they are subject to the following rules:
- Saruman can never leave the Orthanc region.
- The Mouth of Sauron can move up to three regions if moving alone. Like Companions, he cannot cross impassable terrain, he ignores any enemy Army when moving alone and cannot leave or enter a region that contains a friendly Stronghold besieged by an enemy Army.
- Like the Nazgûl, any Minion moving without an Army cannot be moved into a Stronghold controlled by the Free Peoples unless it is besieged by a Shadow Army.
ARMIES AND STACKING
ARMY COMPOSITION
All friendly Army units, Leaders and Characters inside a single region form an Army.
An Army can be composed of units belonging to different Nations fighting on the same side.
If a moving Army enters a region occupied by another friendly Army, the two Armies are merged into a single Army at the end of the action.
Likewise, an Army can be divided by simply moving part of its units into an adjacent region and leaving the rest behind.
STACKING LIMIT
A single region can contain a maximum of 10 Army units.
If, at the end of any action (for example, after moving or mustering troops), more than 10 units are in the same region, the excess units must be removed from the game by the controlling player.
Units removed in this way can re-enter the game later as reinforcements.
ARMY BOXES
Along the left side of the board can be found three numbered Army Boxes.
If the size and number of plastic figures happen to be troublesome to physically fit in a single region, the controlling player may move some or all his figures from a region to a free Army Box, placing the corresponding numbered Army counter in the region for identification purposes. Figures can be moved back to the board from the Army Box at any time.
Players must be careful not to exceed the stacking limit when making use of an Army Box. For all game purposes, the figures in the box are considered to be in the region containing the Army counter.
RECRUITING TROOPS
RECRUITING NEW UNITS AND LEADERS
Additional Army units and Leaders are brought into the game during the Action Resolution phase by using a Muster Action Die result (a Helmet icon) as an action, or by playing an Event Card that recruits new units.
To bring reinforcements onto the board when using a Muster Action Die result, the new units must belong to a Nation “At War”.
Using a single Muster Action Die result, a player can bring the following figures into play:
- two Regular units, or
- two Leaders/Nazgûl, or
- one Regular unit and one Leader/Nazgûl, or
- one Elite unit.
All newly recruited units and Leaders are taken from the player’s available reinforcements and can only be placed in a City, Town, or Stronghold of the Nation to which the unit belongs.
When two regular units or Leaders, or a combination of the two, are brought into play using a Muster Action Die result, they can belong to different Nations, as long as both Nations concerned are “At War” and each figure is placed in a City, Town, or Stronghold of the Nation to which the unit belongs.
Nazgûl are always recruited in the Strongholds of the Sauron Nation.
RECRUITING RESTRICTIONS
- When mustering two figures (units and/or Leaders) using a Muster Action Die result, the two figures must always be placed in separate Settlements.
- You cannot muster or recruit troops in a Settlement captured by the enemy (i.e., currently occupied by enemy units or containing an enemy Control marker).
- You cannot muster troops in a Stronghold besieged by the enemy, unless you are recruiting with an Event Card.
- Reinforcements are limited to the available figures. Thus, if all units of a type are in play, no additional units of that type can be recruited.
- Shadow units and Nazgûl removed as casualties are placed back among the available reinforcements (thus allowing for an almost limitless mustering).
- All Characters (including Shadow Minions) and Free Peoples units, Leaders, are permanently out of the game if eliminated; they should be placed in an area designated for casualties (such as back in the box) and are no longer eligible for recruitment.
USING AN EVENT CARD TO RECRUIT TROOPS
When using Event Cards whose effects allow a player to recruit units, all regular recruiting restrictions must be respected, with the following exceptions:
- If a card instructs a player to recruit troops of a Nation and that Nation hasn’t yet reached the “At War” step, the player is allowed to recruit nonetheless.
- If a card instructs a player to recruit troops into a Stronghold region, the units can be placed even if the Stronghold is under siege. Except for this case, an Event Card that allows to recruit units in a specific region (or regions), is subject to the normal restriction that a recruitment cannot be made if the region is not free.
ARMY MOVEMENT
MOVING AN ARMY
Armies are moved on the game board during the Action Resolution phase by using either an Army Action Die result or a Character Action Die result (if the moving Army contains a Leader or Character), or an Event Card that allows the movement of Armies.
- A player using an Army Action Die result can move two different Armies, but cannot move the same Army twice.
- A player using a Character Action Die result can move a single Army containing at least one Leader or Character.
An Army is moved by simply moving its units to an adjacent region.
Splitting an Army
It is not mandatory that you move all units in an Army. An Army can split itself into two different Armies by moving only a portion of its units to an adjacent region.
Free Peoples Leaders can never be in a region without combat units, so if a moving Army completely vacates a region, all such Leaders must follow the Army. If the Army splits, Leaders may choose to either move or stay behind. When a player uses a Character Action Die result to move an Army and the Army splits, at least one Leader or Character must join the moving units.
Note that, unless used as the subject to move an Army with a Character Action Die result, Characters (Companions and Minions) and Nazgûl are not obliged to move with an Army, as they can remain in a region on their own.
Movement Restrictions
- The moving units, as well as Leaders and Characters, can be chosen freely, as long as no figure is moved twice using the same action (this includes movement effectuated by Event Cards, unless the card explicitly has different instructions). Thus, during the same action, it is never possible to move an Army into a region containing another friendly Army (joining the two Armies into one), and then move the new combined Army with the second movement allowance.
- Any region entered by a moving Army must be either a free region or an enemy-controlled Settlement that is free of enemy Army units (“regions that are free for the purpose of Army movement”).
- If a region is occupied by enemy units, it cannot be entered but must be attacked.
- After moving an Army into a region, you cannot exceed the stacking limit of 10 units.
- If a moving Army includes any units from a Nation which is not yet “At War” on the Political Track, it cannot enter a region that is inside the borders of another Nation (even if friendly).
- An Army can never move into a region that is separated from the region the Army is currently in by a black line (impassable terrain).
USING AN EVENT CARD TO MOVE ARMIES
When using Event Cards whose effects allow a player to move Armies, all regular movement restrictions must be respected. Some Event Cards allow a player to move one or more Armies through more than one region, and the following additional rules apply:
- Each Army to be moved is defined at the beginning of its movement (it is possible to split the Army before moving). The Army cannot pick up or drop figures along the way.
- If an Army moves through an enemy-controlled Settlement, it captures that Settlement.
- If an Army moves through regions containing other friendly Armies, stacking limits are checked only after all the multiple movements have been completed.
BATTLE RESOLUTION
ATTACKING WITH ARMIES
An Army is allowed to attack an enemy Army during the Action Resolution phase by using an Army or a Character Action Die result, or by playing an Event Card that allows an Army to attack.
Only Armies belonging to a Nation “At War” on the Political Track can start a Battle.
A player can use an Army Action Die result, or a Character Action Die result (if the Army contains at least one Leader or Character), for the following purposes:
- To attack an enemy Army in an adjacent region.
- To initiate a Siege or a Sortie against an enemy Army in the same region.
Note that, unlike when used merely for movement, an Army Action Die result can only activate a single Army for the purpose of attacking.
Note: When a battle is initiated, attacking units do not actually move into the region they are attacking, but instead stay in their present region for the duration of the attack. Only if the battle is over and won, the attacker may move his attacking units into the embattled region.
Splitting an Attacking Army
It is not mandatory for all figures composing an Army chosen to attack to participate in the battle.
When a player is about to attack, he can split the Army into two, dividing the figures contained in the region into an attacking Army and into a second Army, called the rearguard, that will not take part in the upcoming battle.
Each of the two newly-created Armies must contain at least one Army unit, while Leaders, Companions, or Minions can be distributed among the two Armies as the player sees fit.
Note: If the player is using a Character Action Die result to attack, the newly-created attacking Army must contain at least one Leader or one Character.
The Army chosen as the rearguard does not affect the battle in any way, it cannot be targeted by Combat Card effects, its figures cannot be chosen as casualties, and it cannot advance into the contested region if the battle is won.
If the attacking Army includes one or more figures belonging to Nations not “At War”, then it is mandatory to split the Army (leaving with the rearguard any figure which is not “At War”).
Note that all defending units, including Leaders and Characters, are always considered to be part of the battle.
Combat Strength and Leadership
Attacking and defending Army units, Leaders, and Characters all participate in determining the Combat Strength and Leadership of the Armies involved in battle:
- Combat Strength: The Combat Strength of an Army is equal to the total number of its Army units (Regular and Elite units). Combat Strength determines the number of dice rolled in the Combat Roll, up to a maximum of five dice. This means that units in excess of five do not add to the number of dice rolled by an Army, but an Army with more than five units is usually able to retain its full Combat Strength for a longer period.
- Leadership: The Leadership of an Army is equal to the number of Leaders (or Nazgûl), plus the Leadership ratings of all participating Characters (as shown on each Character Card). Leadership determines the maximum number of dice that may be rolled in the Leader Re-roll, up to a maximum of five dice.
Often, Combat Cards and Character special abilities modify the Combat Strength and Leadership rating of an Army involved in battle. In either case, the maximum of five dice can never be exceeded, regardless of modifiers.
RESOLVING A BATTLE
A battle is resolved in a series of Combat Rounds. During each round, both players follow the steps below simultaneously:
- Step 1: Play a Combat Card (optional)
- First, the attacker declares whether he wants to use a Combat Card and chooses the card.
- Then, the defender declares if he wants to use a Combat Card and chooses the card. The defender may play a Combat Card even if the attacker chooses not to.
- Cards are chosen secretly, then revealed simultaneously. However, the back of the chosen card is always visible to the opponent.
- Unless otherwise specified, the effects of a card only apply for the current Combat Round. Combat Cards are always discarded as soon as the Combat Round is over.
- Timing: In the case of any uncertainty as to timing, the initiative number in the bottom left corner of the card indicates which card must be applied first: the card with the lower number is applied first. If the two cards have the same initiative, the effects of the defender’s card are always applied first.
- Requirements: Some Combat Cards have specific requirements (indicated in boldface under the Combat Title) that must be met. Many cards require a player to “forfeit” Leadership, meaning the selected figure does not count as a Leader for that Combat Round.
- Attack Rolls of Combat Cards: Some cards grant an additional attack before Step 2 or after Step 4. Unless specified otherwise, these attacks use the same base hit number as the Combat Roll, but a Leader Re-roll is never applicable, opponent modifiers do not apply, and casualties are removed immediately.
- Step 2: Roll the Dice for the Combat Roll
- Each player rolls a number of Combat Dice equal to the Combat Strength of their respective Armies (up to a maximum of five dice).
- Each die rolled scores a hit on a result of “5” or “6”. Modifiers from cards, Strongholds, Cities, and Fortifications may alter this. Note: A roll of a “1” is always a miss, and a roll of a “6” is always a hit, regardless of modifiers.
- Step 3: Roll the Dice for the Leader Re-roll
- After the Combat Roll, both players can re-roll a number of failed die rolls equal to their Leadership (up to a maximum of five dice).
- The result required to score a hit remains the same as for the Combat Roll (unless modified by a card).
- Step 4: Remove Casualties
- The attacker decides first how to remove his units.
- For each hit scored by the opponent: remove one Regular unit, or replace one Elite unit with one Regular unit.
- For every two hits: remove two Regular units, replace two Elite units with two Regular units, or simply remove one Elite unit.
- When replacing an Elite unit, the Regular unit can be taken from previous casualties or reinforcements. If none are available, the Elite unit is eliminated outright.
- Casualties: Free Peoples units and Leaders removed as casualties are placed permanently out of the game. Shadow casualties and Nazgûl may return as reinforcements.
- Elimination of Leaders and Characters: If all Army units in a battle are eliminated, all accompanying Leaders and Characters are immediately removed from play. Characters in a region without friendly Army units are never drawn into battle.
- Step 5: Choose to Cease the Attack, or Retreat
- At the end of each Combat Round, the attacking player has the option to cease the attack.
- If the attacker chooses to continue, the defender has the option to retreat. If the defender declines to retreat, another Combat Round begins.
- If the attacking Army ceases its attack, surviving units remain where they were.
- If the defending player retreats, his Army must immediately retreat to an adjacent free region. If no such region is available, the defender cannot retreat.
- Special Exceptions: An Army defending a region containing a friendly Stronghold may retreat into the Stronghold itself at the beginning of any Combat Round by Retreating into a Siege. A besieged Army cannot retreat. If the retreating Army contains a Character of Level 0, that Character is left behind.
End of Battle
A battle ends when the attacker ceases to fight, the defender retreats, or when one or both Armies are completely eliminated.
If the defending Army is eliminated or retreats, the attacker may immediately move all or part of the units participating in the attack into the embattled region.
If an embattled region invaded by a successful attacker contains an enemy Stronghold, and that Stronghold contains enemy units, the Stronghold becomes besieged.
FORTIFICATIONS, CITIES, STRONGHOLDS, AND SIEGES
ATTACKING A CITY OR FORTIFICATION
During an attack against an enemy defending a region containing a City or Fortification, during the first round of combat only the attacker hits on a result of “6” or higher (instead of “5” or higher). After the first Combat Round is resolved, normal rules apply.
ATTACKING A STRONGHOLD
When attacking an enemy defending a region containing a Stronghold, before every battle round, the defender must choose to either Fight a Field Battle or Retreat into a Siege.
- Fighting a Field Battle: A Field Battle is resolved normally as described before.
- Retreating into a Siege: As soon as the defender Retreats into a Siege, the region around the Stronghold is left open to the enemy, who may immediately advance into the region. If the attacking Army chooses to advance, the Stronghold is now considered under siege and the battle is over.
The defending units are placed in the appropriate Stronghold Box found on the game board.
A Stronghold under siege can contain a maximum of five Army units (and any number of Leaders). Any unit in excess of five is removed immediately when a Stronghold comes under siege (these units can re-enter later as reinforcements).
A siege ends if the attacking Army leaves the region, or if at any time either Army is completely eliminated. During the siege, the region surrounding the Stronghold is considered free for the besieging player, while the Stronghold itself remains controlled by the player under siege.
CONDUCTING A SIEGE
When a Stronghold is under siege, the troops within can only be attacked by an Army in the same region using an Action Die for battle during the Action Resolution phase. Any battle starting against a besieged Army is considered a Siege Battle.
- During a Siege Battle, the attacker hits only on a result of “6” or higher, while the defender hits on a result of “5” or higher as normal.
- A Siege Battle only lasts for one Combat Round, unless the attacker decides to voluntarily reduce one of his participating Elite units to a Regular unit. If so, the Siege Battle lasts for an additional round (this can be repeated as long as the attacker has Elite units to reduce).
- A defending Army under siege may never choose to retreat to an adjacent region.
- An Army besieging a Stronghold is free to move away from the region. If no Army units are left behind, the Stronghold is no longer under siege.
SORTIE
An Army inside a Stronghold under siege may attack the besieging Army by using an Action Die for battle. This is called a Sortie.
- In a Sortie, the besieged Army fights a Field Battle for at least one round, forfeiting the advantages of defending the Stronghold.
- A rearguard may be formed and left behind in the Stronghold.
- Combat is resolved normally (both score hits on a “5” or higher). If the attacker wants to cease the battle, the attacking Army moves back into the Stronghold.
- The besieging defending Army may retreat to a free adjacent region as usual. If the attacking Army wins the Sortie, it cannot advance outside of the region.
RELIEVING A SIEGE
An Army in an adjacent region can attack an enemy Army besieging a friendly Stronghold using normal rules. The Army inside the Stronghold does not participate in the battle. The attacking Army cannot advance into the region containing the Stronghold unless the besieging Army is destroyed or retreats.
REINFORCING A SIEGE
While a Stronghold is under siege, the besieging player can move new troops into the region (because it is a free region). This is considered a movement, not an attack.
CAPTURING A SETTLEMENT
A settlement is considered captured when:
- An enemy Army enters a region containing a City, or Town, or unoccupied Stronghold, or
- All the units defending a Stronghold are eliminated and the besieging Army still has at least one unit remaining in the region.
The capturing player places a Settlement Control Marker on the region. A captured Settlement cannot be used for mustering troops or advancing the Political Track.
Captured Settlements award Victory Points:
- Captured City: 1 Victory Point
- Captured Stronghold: 2 Victory Points
If the original owner recaptures it, the Settlement Control Marker is removed and the Victory Points are lost.
The Fellowship of the Ring
FELLOWSHIP OVERVIEW
In War of the Ring, Frodo and Sam are inseparable and are represented collectively as the Ring-bearers. As told in The Lord of the Rings, the two Hobbits are accompanied by a number of Companions, chosen from among the Free Peoples of Middle-earth.
These Characters together form the Fellowship of the Ring. While Frodo and Sam are bent on reaching Mount Doom to complete their quest, the other Companions have a choice: they can stay and protect the Fellowship, or, in time, leave the Fellowship in order to help the Free Peoples of the West in their struggle against the Shadow.
FELLOWSHIP FIGURES AND COUNTERS
- The Ring-bearers figure (Frodo & Sam): Indicates the last known position of the Fellowship. It is placed in the region where the Fellowship was last declared or revealed. At the start of the game, it is placed in Rivendell. Whenever rules or Event Cards refer to the current location of the Fellowship, it is determined by the position of this figure, regardless of the position of the Fellowship Progress Counter. Frodo and Sam can never be separated from one another or leave the Fellowship.
- The Fellowship Progress Counter: Shows how far the Fellowship has traveled from its last known position and indicates whether the Fellowship is Hidden or Revealed. Placed on the Fellowship Track and moved forward each time the Fellowship advances.
- The Companion figures and counters: Seven individual Characters (Legolas, Gimli, Boromir, Strider, Meriadoc, Peregrin, Gandalf the Grey) representing the heroes of the Free Peoples, placed in the Fellowship of the Ring Box until they separate.
CORRUPTION
The growing burden of carrying the One Ring to its destruction is represented by the Corruption of the Ring-bearers, a numerical score that starts at zero points and can increase to 12.
Upon reaching 12 Corruption points, the Ring-bearers immediately succumb to the One Ring, and the game is won by the Shadow. The Free Peoples player tracks Corruption with the Corruption Counter on the Fellowship Track.
COMPANION CHARACTER CARDS
Each Companion Card contains: Level, Nation icon, Guide Special Ability, outside of Fellowship Special Ability, and Leadership Rating.
At the beginning, all Companion cards are stacked together in the Guide of the Fellowship Box to form the Fellowship Deck. When a Companion leaves, his card is removed from the deck.
THE GUIDE OF THE FELLOWSHIP
One Companion is the Guide of the group. At the start, this is Gandalf the Grey. The Guide must always be the remaining Companion who has the highest Level (in case of a tie, the Free Peoples player chooses). A new Guide can be nominated at the end of each Fellowship Phase or when the composition of the Fellowship changes.
When acting as Guide, only the special ability marked “Guide:” can be used.
Gollum as a Guide: If all Companions have left the Fellowship, the Ring-bearers are alone and Gollum becomes the Guide of the Fellowship.
THE FELLOWSHIP TRACK
The Ring-bearers figure marks the last known position, while the Fellowship Progress Counter advances along the Fellowship Track each time the Fellowship moves.
MOVING THE FELLOWSHIP
During the Action Resolution phase, the Free Peoples player may advance the Fellowship Progress Counter by using a Character result on an Action Die, or by using certain Event Cards.
Every time the Fellowship moves, the Fellowship Progress Counter advances one step (keeping it Hidden). After each movement, the Shadow player gets a chance to Hunt for the Fellowship.
If the Fellowship moves more than once in a turn, every Character Action Die used to move it is added to the Hunt Box after the Hunt is completed, providing a +1 bonus to subsequent Hunt Rolls that turn (Event Cards used to move do not add dice to the Hunt Box). These dice are returned at the start of the next turn.
LOCATING THE FELLOWSHIP
The actual position of the Fellowship is determined only if the Free Peoples player declares the Fellowship, or a Hunt reveals the Fellowship. Both circumstances cause the Ring-bearers figure to move up to the distance indicated on the Fellowship Track, and the Fellowship Progress Counter is reset to “0”. The Ring-bearers figure cannot cross impassable black borders.
Fellowship Declares Its Own Position
During the Fellowship Phase, if the Fellowship is Hidden, the Free Peoples player may declare its position. The Ring-bearers figure is moved up to the distance indicated by the Progress Counter, which is then reset to 0 (remaining Hidden).
- If declared in a Free Peoples City or Stronghold, that Nation is activated and one point of Corruption can be healed.
- The Fellowship may enter or leave a besieged Stronghold freely.
Fellowship is Revealed by a Hunt for the Ring
When revealed by a Hunt or Event Card, turn the Progress Counter to Revealed and move the Ring-bearers figure up to that distance. Restriction: This movement can never end in a region containing a City or Stronghold controlled by the Free Peoples.
IMPORTANT: Once revealed, the Fellowship cannot be moved using a Character Action Die until it is Hidden again.
The Fellowship in Shadow Strongholds
When the Fellowship is revealed, if its path from its last known position moves through, moves from, moves into, or remains stationary in a Shadow Stronghold still controlled by the Shadow player, an additional Hunt Tile is immediately drawn.
HIDING THE FELLOWSHIP
The Free Peoples player can use a Character Action Die result during the Action Resolution phase to flip a Revealed Progress Counter back to Hidden. This does not move the Fellowship.
HEALING THE RING-BEARER
If during the Fellowship Phase the Fellowship is declared in a region containing an uncaptured Free Peoples City or Stronghold, one point of Corruption is immediately removed (to a minimum of zero). This can be repeated each turn the Fellowship remains declared there.
ENTERING MORDOR
If the Fellowship is in Minas Morgul or Morannon during a Fellowship Phase, the Free Peoples player may decide to enter Mordor. (See The Hunt for the Ring & Mordor for full details.)
SEPARATING COMPANIONS FROM THE FELLOWSHIP
During the Action Resolution phase, the Free Peoples player can use a Character Action Die result to separate one Companion or a group of Companions from the Fellowship (prohibited on the Mordor Track).
- The separated Companion(s) move from the Fellowship’s last known position up to a number of regions equal to the current step on the Fellowship Track plus the highest Companion Level in the group.
- Separated Companions cannot later rejoin the Fellowship.
- If the Guide separates, a new Guide is selected (or Gollum becomes Guide).
The Hunt for the Ring & Mordor
THE HUNT POOL
While the Fellowship covertly seeks to reach Mount Doom, Sauron is searching tirelessly for the Ring-bearers and their Companions.
The Hunt Pool is a set of cardboard tiles placed in an opaque container. When all tiles are used, return all Standard Tiles (beige) to the pool, but do not return Special Tiles (blue/red) or permanently removed tiles.
- Standard Hunt Tiles (beige): Show numerical values from 0 to 3 (Hunt Damage). Some feature an Eye icon (variable damage) or a Reveal icon.
- Special Hunt Tiles (blue for Fellowship, red for Shadow): Enter play only via Event Cards and are added to the Hunt Pool when the Fellowship enters Mordor (or immediately if already in Mordor). Some have negative damage (-1, -2) which heal Corruption, or a Die icon. All Shadow Special Tiles show a Stop icon.
HUNTING THE FELLOWSHIP
THE HUNT ROLL
Every time the Free Peoples player moves the Fellowship, the Shadow player rolls a number of Combat Dice equal to the Hunt Level (number of Shadow Action Dice in the Hunt Box, up to a maximum of 5 dice). Each result of “6” is a success.
- Modifiers: +1 to each Hunt Roll die result for every Free Peoples Action Die currently in the Hunt Box. A roll of “1” is always a failure.
- Hunt Re-rolls: The Shadow player can re-roll one failed die for each of the following conditions present in the region containing the Fellowship figure:
- A Stronghold controlled by the Shadow player
- One or more Shadow Army units
- One or more Nazgûl
DETERMINING HUNT DAMAGE
If at least one success is rolled, the Shadow player draws one tile from the Hunt Pool:
- Numbered Tile: Hunt Damage equals the number.
- Eye Tile: Hunt Damage equals the number of successes rolled in the Hunt Roll (value is 0 if drawn due to a Stronghold or Event Card).
- Reveal Icon: The Fellowship is revealed after resolving damage.
EFFECTS OF THE HUNT
Resolve damage in this exact order:
- Event Cards: Free Peoples player may use one relevant “Play on the Table” Event Card to cancel or reduce damage.
- Guide Ability: Use the Guide’s special ability if applicable.
- Taking Casualties: Free Peoples player may reduce Hunt Damage by eliminating one Companion (either the Guide, or a randomly drawn Companion). If the damage exceeds the Companion’s Level, the excess must be taken as Corruption.
- Using the Ring: Any remaining Hunt Damage advances the Corruption Counter on the Fellowship Track by that amount.
- Reveal: If the tile has a Reveal icon, the Fellowship becomes revealed.
THE FELLOWSHIP IN MORDOR
To enter Mordor, the Fellowship must be in Minas Morgul or Morannon during the Fellowship Phase. When entering Mordor:
- Place the Ring-bearers figure on the “0” step of the Mordor Track. The Progress Counter is no longer advanced on the Fellowship Track, but still tracks Hidden/Revealed status.
- Create a new Hunt Pool by returning all drawn Eye tiles to the pool, along with any played Special Hunt Tiles.
Special Rules on the Mordor Track
- Companions can never be separated; any effect separating them removes them from the game instead.
- When moving the Fellowship, do not roll Hunt Dice: automatically draw a tile from the Hunt Pool! An Eye tile deals damage equal to the total number of dice in the Hunt Box.
- If a tile shows a Stop icon, the Fellowship does not advance on the Mordor Track.
- If the Free Peoples player does not attempt to move or hide the Fellowship during a turn, one Corruption is automatically added at the end of the Action Resolution phase.
- When the Fellowship completes all 5 steps on the Mordor Track and enters the Crack of Doom with fewer than 12 Corruption, the Free Peoples win!
End of Game & Victory Conditions
VICTORY CONDITIONS
There are four ways to win the game. Two Victory Conditions can be triggered at any moment during a turn, while the other two apply only during Phase 6 (Victory Check). If two or more conditions are met on the same turn, lower-numbered conditions take precedence.
RING-BASED VICTORY CONDITIONS (Checked Immediately)
- 1) Corruption of the Ring-bearers: If the Ring-bearers reach 12 or more Corruption Points, the Shadow player wins immediately.
- 2) Destroying the Ring: If the Ring-bearers reach the “Crack of Doom” step on the Mordor Track with fewer than 12 Corruption points, the Free Peoples player wins immediately.
MILITARY VICTORY CONDITIONS (Checked in Phase 6)
- 3) The Shadow Conquers Middle-earth: If the Shadow player controls Free Peoples Settlements worth 10 or more Victory Points, the Shadow player wins.
- 4) Sauron is Banished from Middle-earth: If the Free Peoples player controls Shadow Settlements worth 4 or more Victory Points, the Free Peoples player wins.
Victory Points are awarded for captured enemy Settlements: each enemy City is worth 1 VP, and each enemy Stronghold is worth 2 VP.
Multiplayer Rules
FOUR-PLAYER GAME
In a four-player game, player roles and faction responsibilities are divided as follows:
- Free Peoples:
- Player 1: Gondor (also controls Elves)
- Player 2: Rohan (also controls the North and Dwarves)
- Shadow:
- Player 1: The Witch-king (Sauron Nation)
- Player 2: Saruman and Sauron Allies (Isengard and Southron & Easterling Nations)
Turn Sequence & Mechanics Adjustments
- Leading Player Tokens: Gondor and The Witch-king start as Leading Players. The token passes to teammates at the start of each subsequent turn.
- Event Draw: On Turn 1, draw 1 card from each deck. On later turns, draw 1 card from either deck. Teammates may secretly agree to swap one card each turn. Hand limit is 4 cards.
- Fellowship Phase: Decided by the Free Peoples Leading Player.
- Hunt Allocation: Decided by the Shadow Leading Player.
- Action Resolution: Turn order alternates: non-Leading Free Peoples, non-Leading Shadow, Leading Free Peoples, Leading Shadow.
- Limits on Actions: Players can only move/recruit/fight with Nations they control, unless using Character abilities. Both players may interact with the Fellowship.
- Mixed Armies: When units from different players share a region, they form a mixed Army if attacked or by mutual agreement. Control goes to the player with the most units (tiebreakers: most Elite units, then Leading Player).
- Southron & Easterling Elite Units: When Saruman is in play, each Southron & Easterling Elite unit (and Isengard Elite unit) counts as both an Army unit and a Leader.
THREE-PLAYER GAME
Follows four-player rules, with one player controlling all Free Peoples as in a two-player game, subject to one restriction: the Free Peoples player cannot use two consecutive actions on the same Nation.
MULTIPLAYER VICTORY CONDITIONS
Teams win together. To determine the individual winner within the winning team:
- Shadow Team: The player with the highest net Victory Points (points gained from captured enemy Settlements minus points lost from their own captured Settlements) wins.
- Free Peoples Team: The player who lost fewer Victory Points from conquered Settlements wins.
Expansions for
War of the Ring: Second Edition
War of the Ring: Kings and Lords of Middle-Earth – Limited Edition
2024
Deluxe Middle-earth expansions with painted figures, new characters, and fresh strategies
120
minutes
View expansion
War of the Ring: Scenario – The Breaking of the Fellowship
2012
Begin at Rauros with the Fellowship scattered and Shadow armies advancing.
180
minutes
Medium

View expansion

War of the Ring: The Fate of Erebor
2022
An alternate War of the Ring setup shaped by a Shadow victory
180
minutes
Medium Heavy

View expansion
War of the Ring: Kings of Middle-earth
2023
Explore the rulers, weaknesses, and dark forces shaping Middle-earth’s war
150
minutes
Medium Heavy
View expansion

War of the Ring: Lords of Middle-earth – Treebeard Mini-Expansion
2012
Bring Treebeard to Fangorn when Gandalf the White and a Companion are in play.
180
minutes
Medium Heavy
View expansion

War of the Ring: Warriors of Middle-earth
2016
Bring Middle-earth’s legendary warriors and creatures into the battle.
180
minutes
Heavy
View expansion

War of the Ring: Lords of Middle-earth
2012
Rewrite Middle-earth’s fate with new characters, dice, and dramatic possibilities.
180
minutes
Medium Heavy
View expansion
