
Zombicide: Black Plague
2015
Lead paladins, dwarves, knights, and magicians through dangerous missions to reclaim a realm overrun by zombies and dark magic.
180
minutes
1 - 6
player(s)
14+
Medium

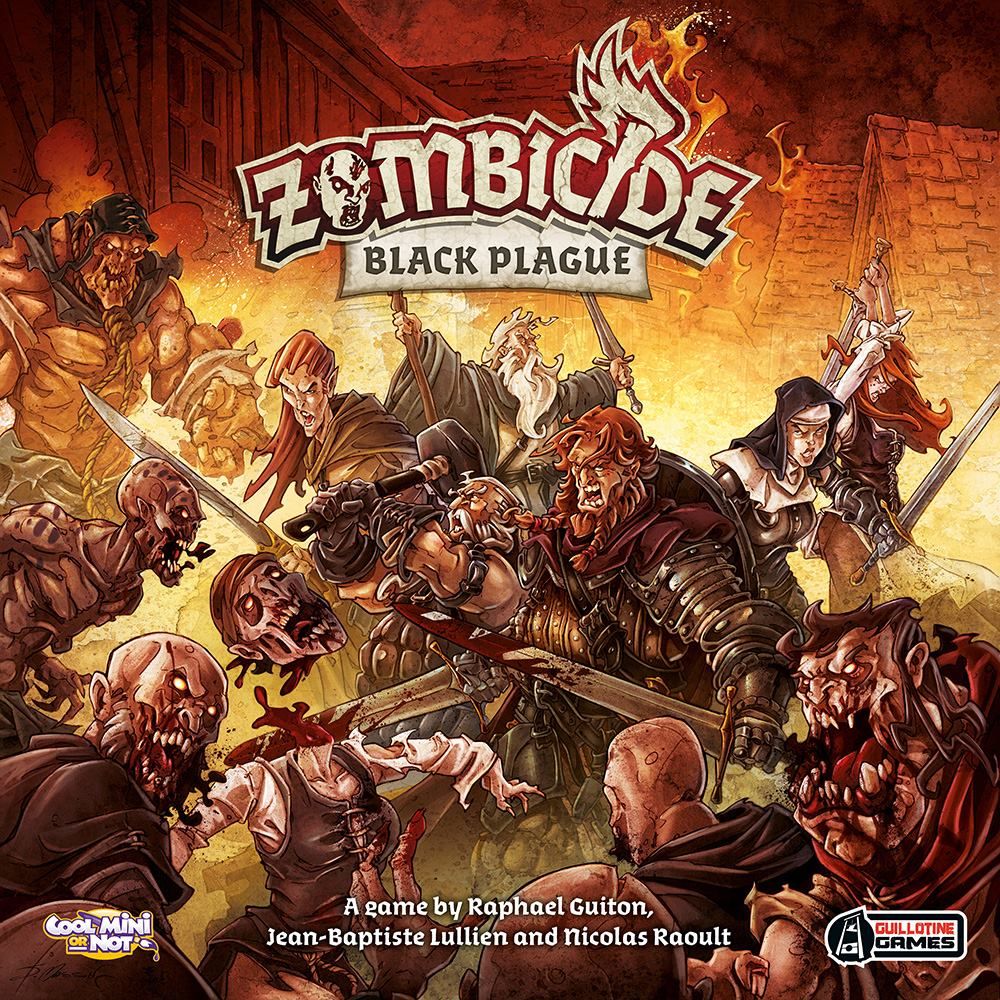
About this board game
Zombicide: Black Plague is a fantasy zombie survival game for 1–6 players, with sessions lasting about 180 minutes. Set in a medieval realm of swords and sorcery, it challenges a group of survivors to endure an undead invasion and punish the Necromancers responsible.
Take control of paladins, dwarves, knights, and magicians as they fight through the apocalypse. Wield powerful swords, crossbows, and magic spells, while searching for equipment that can improve your chances against the zombie hordes.
The classic Zombicide rules have been revamped for this medieval setting while retaining the series’ nonstop action, tense atmosphere, and easy-to-learn rules. Survivors can find useful gear and powerful artifacts during a series of dangerous missions.
- Defend survivors with chainmail armor and shields.
- Use spell books to perform fantastic enchantments.
- Light pools of dragon bile to create all-consuming dragon fire.
- Chase elusive Necromancers before they multiply the zombie masses.
Scenarios lead your group from medieval streets into secret vaults hidden within the citadel. These vaults create quick passages through the stronghold and may hold special artifacts, offering both opportunities and danger as you push deeper into the crisis.
Each mission brings your survivors closer to becoming the heroes of the land—or becoming the latest victims of the zombie massacre. With its mix of exploration, equipment, spellcasting, and relentless undead enemies, Zombicide: Black Plague delivers a dramatic battle for survival in a world consumed by dark magic.
/pic7182955.jpg)
Board Game Rules for
Zombicide: Black Plague
Get Medieval!
Death, injustice, plague, and war are common things these days, but nothing prepared us for… Zombies!
They emerged from the deep forests, through the mists, themselves pawns for the necromancers who pointed their fingers at villages and farmholds, designating their prey. The zombies swarmed all around us, biting, ripping, tearing the people to pieces. And then we could do little but watch, horrified, as our dead friends rose as yet more zombies.
The invasion could have worked, spreading chaos and death, until they had enough to menace the great cities. With enough zombies, even mighty walls could be torn down. But the necromancers didn’t take us into account. The rabble. The peasantry.
The necromancers fell victim to the same hubris that our ‘mighty lords’ often do. They forgot that we’re tough. We’re hardy. And we know how to fight. The necromancers thought us a ready supply of fresh corpses.
They were wrong.
Now is the time to take arms, to make our stand for our lives and freedom! Now is the time for Zombicide!
Zombicide: Black Plague is a cooperative game where one to six players face hordes of Zombies controlled by the game itself.
Each player controls one to six Survivors in a fantasy world invaded by Zombies. The goal is simply to complete the Quest objectives, survive, and kill as many Zombies as possible!
Zombies are slow and predictable, but there are a lot of them. Watch out for their Abomination and Necromancer bosses, too!
Survivors use whatever they can get their hands on to kill Zombies. The better the weapon, the higher the body count, and the more Zombies appear, attracted by the onslaught!
Survivors can trade equipment, and players can share tactics. Only through cooperation can you achieve the Quest objectives and survive. Battling Zombies is fun, but you will also need to rescue other Survivors, find food and weapons, uncover the Necromancers’ secrets, and much more.
After experiencing Zombicide: Black Plague, your gaming group will be the ultimate monster hunters!
What About the Modern-Era Zombicide?
Zombicide: Black Plague uses some core mechanics borne from its original, modern-era Zombicide brother. You could even mix some material among them to create your own setting (boomstick, anyone?). There are many rules twists, however, giving Zombicide: Black Plague a unique flavor!
Winning and Losing
The game is lost when all Survivors have been eliminated or if too many Necromancers escape. Some Missions can be lost when certain conditions are met (losing a single Survivor, for example).
The game is won immediately when all of the Quest objectives have been accomplished. Zombicide: Black Plague is a cooperative game, so all players win if the Quest objectives are fulfilled.
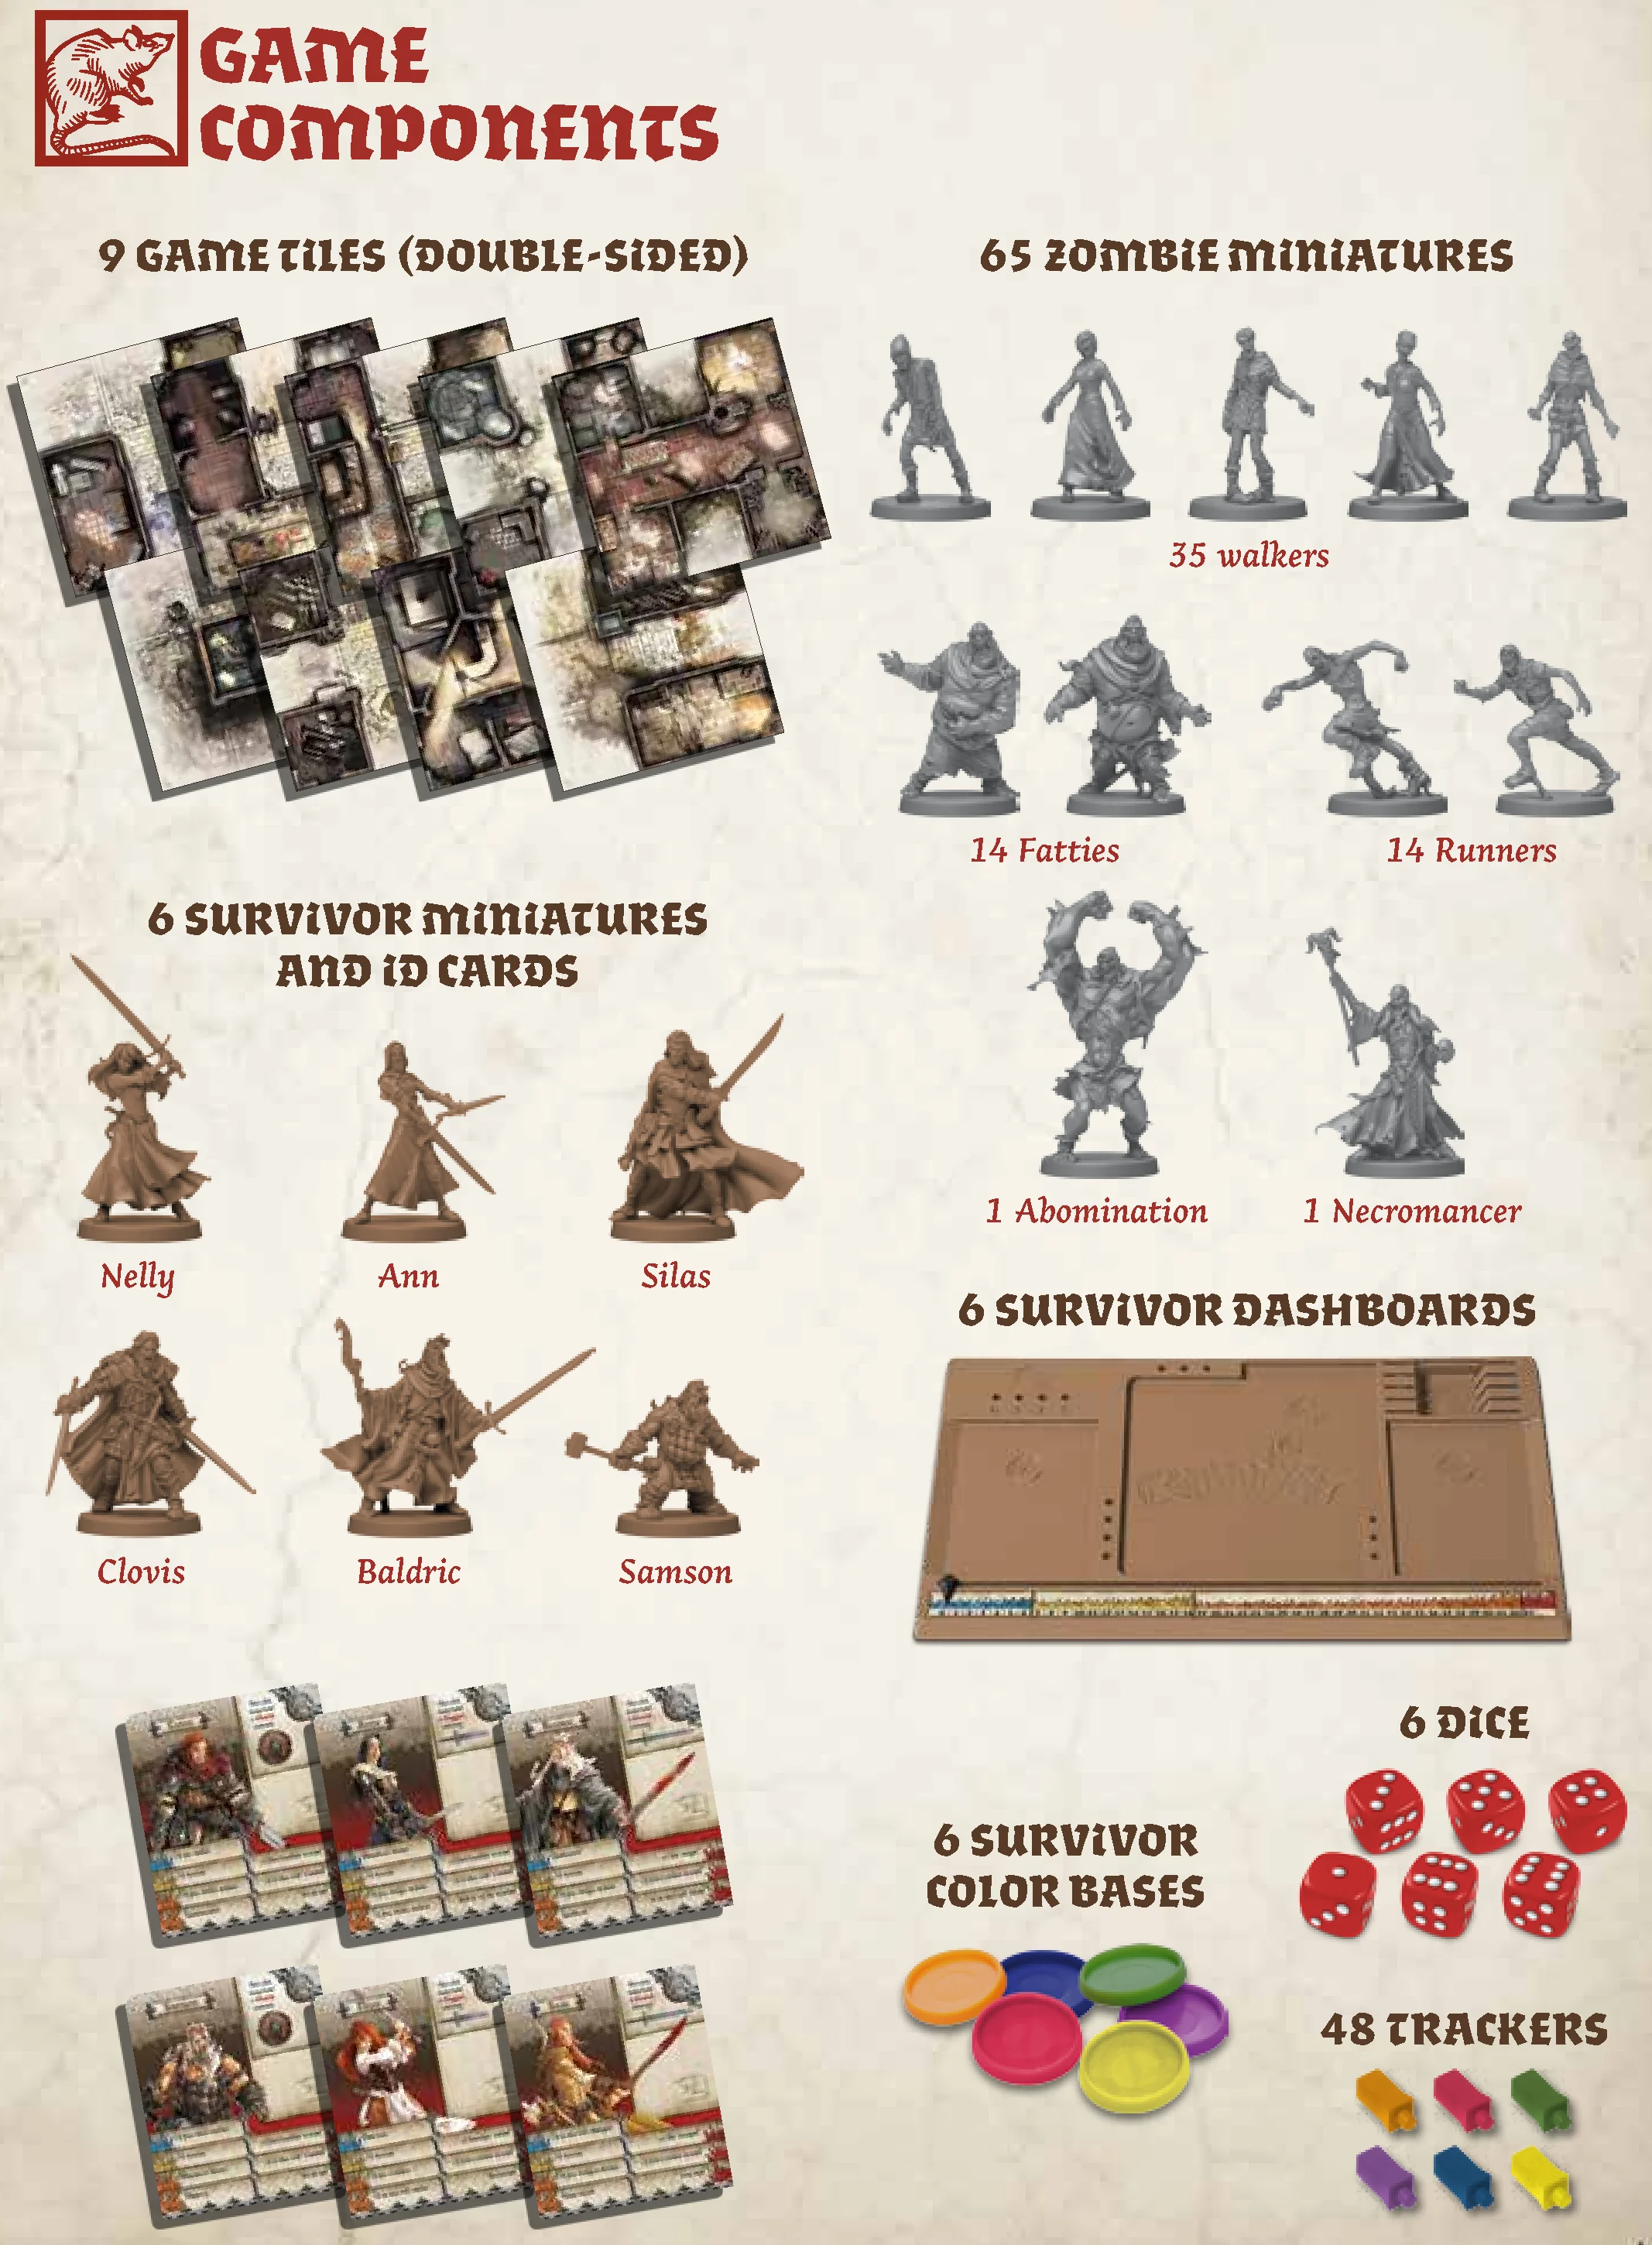
Game Components
- 9 Game tiles (double-sided)
- 65 Zombie miniatures:
- 35 Walkers
- 14 Fatties
- 14 Runners
- 1 Abomination
- 1 Necromancer
- 6 Survivor miniatures and ID cards: Nelly, Ann, Silas, Clovis, Baldric, Samson
- 6 Survivor dashboards
- 6 Survivor color bases
- 48 Trackers
- 6 Dice
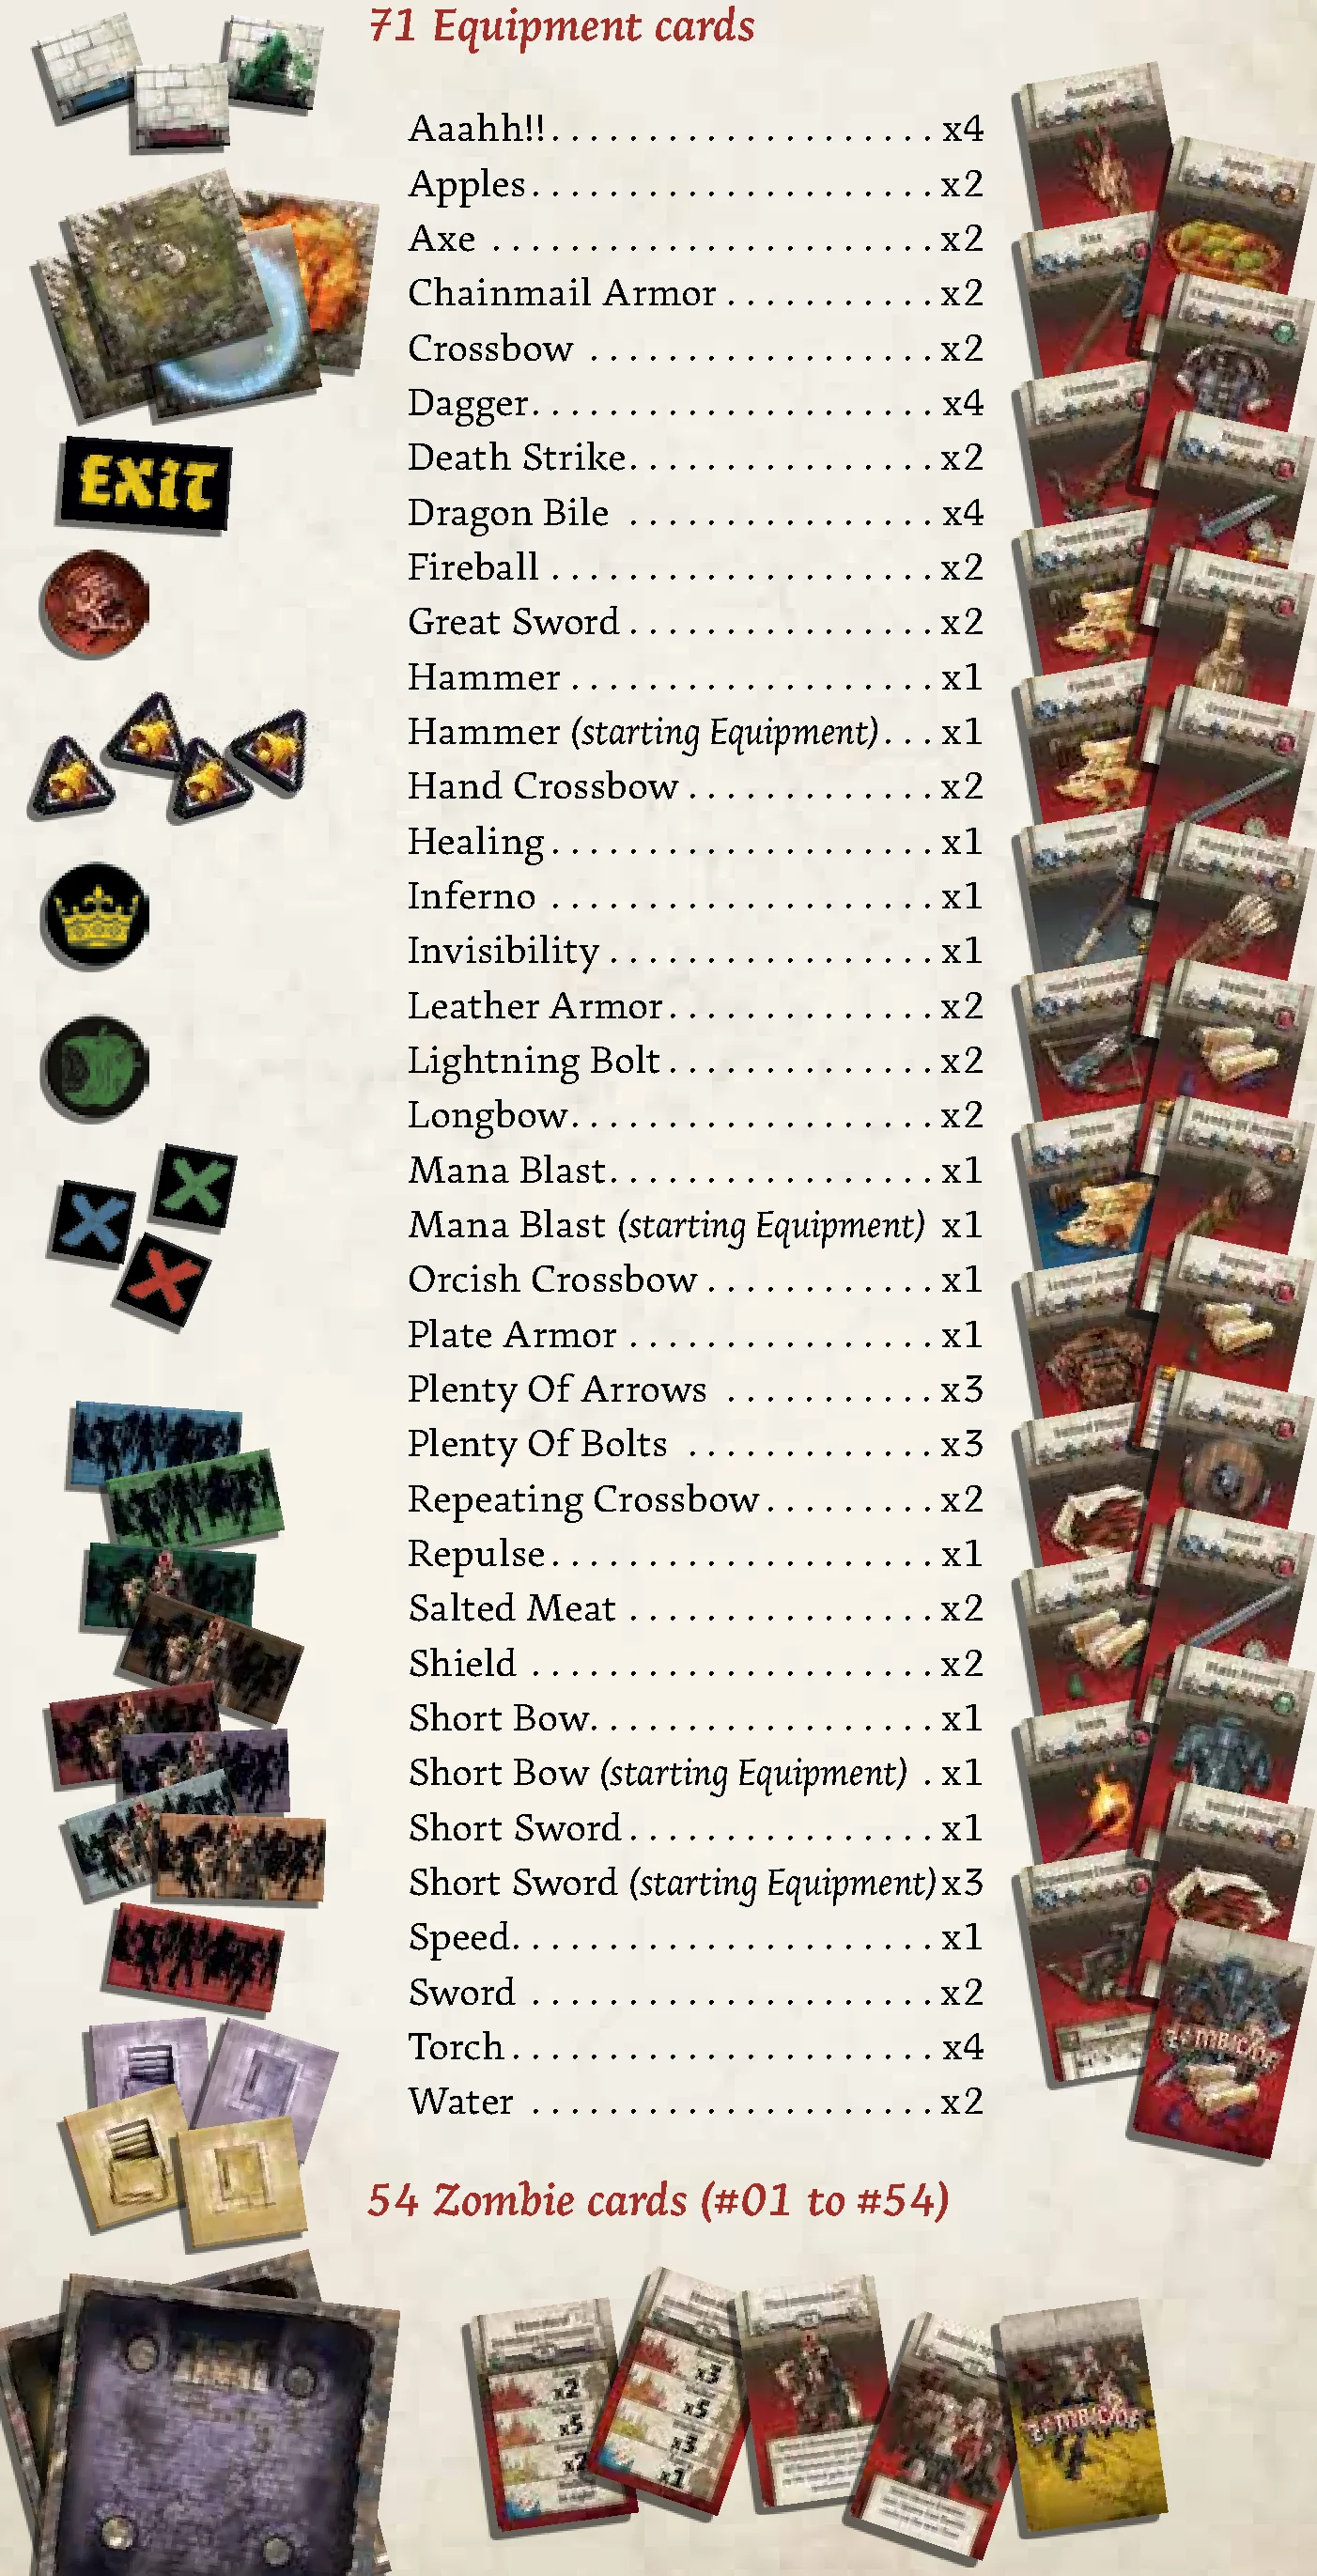
68 Tokens
- Doors:
- Blue: x1
- Green: x1
- Neutral: x12
- Dragon Bile: x4
- Exit point: x1
- First player: x1
- Noise: x18
- Free Action: x1
- Rotten: x1
- Objectives:
- Red/Blue: x1
- Red/Green: x1
- Red/Red: x8
- Zombie Spawn:
- Red/Blue: x1
- Red/Green: x1
- Red/Necromancer Green: x1
- Red/Necromancer Brown: x1
- Red/Necromancer Red: x1
- Red/Necromancer Purple: x1
- Red/Necromancer Grey: x1
- Red/Necromancer Beige: x1
- Red/Red: x4
- Vault doors:
- Violet: x2
- Yellow: x2
- Vault Zone:
- Violet: x1
- Yellow: x1
125 Mini-Cards
71 Equipment Cards
- Aaahh!!: x4
- Apples: x2
- Axe: x2
- Chainmail Armor: x2
- Crossbow: x2
- Dagger: x4
- Death Strike: x2
- Dragon Bile: x4
- Fireball: x2
- Great Sword: x2
- Hammer: x1
- Hammer (starting Equipment): x1
- Hand Crossbow: x2
- Healing: x1
- Inferno: x1
- Invisibility: x1
- Leather Armor: x2
- Lightning Bolt: x2
- Longbow: x2
- Mana Blast: x1
- Mana Blast (starting Equipment): x1
- Orcish Crossbow: x1
- Plate Armor: x1
- Plenty Of Arrows: x3
- Plenty Of Bolts: x3
- Repeating Crossbow: x2
- Repulse: x1
- Salted Meat: x2
- Shield: x2
- Short Bow: x1
- Short Bow (starting Equipment): x1
- Short Sword: x1
- Short Sword (starting Equipment): x3
- Speed: x1
- Sword: x2
- Torch: x4
- Water: x2
54 Zombie Cards
(#01 to #54)
Game Setup Steps
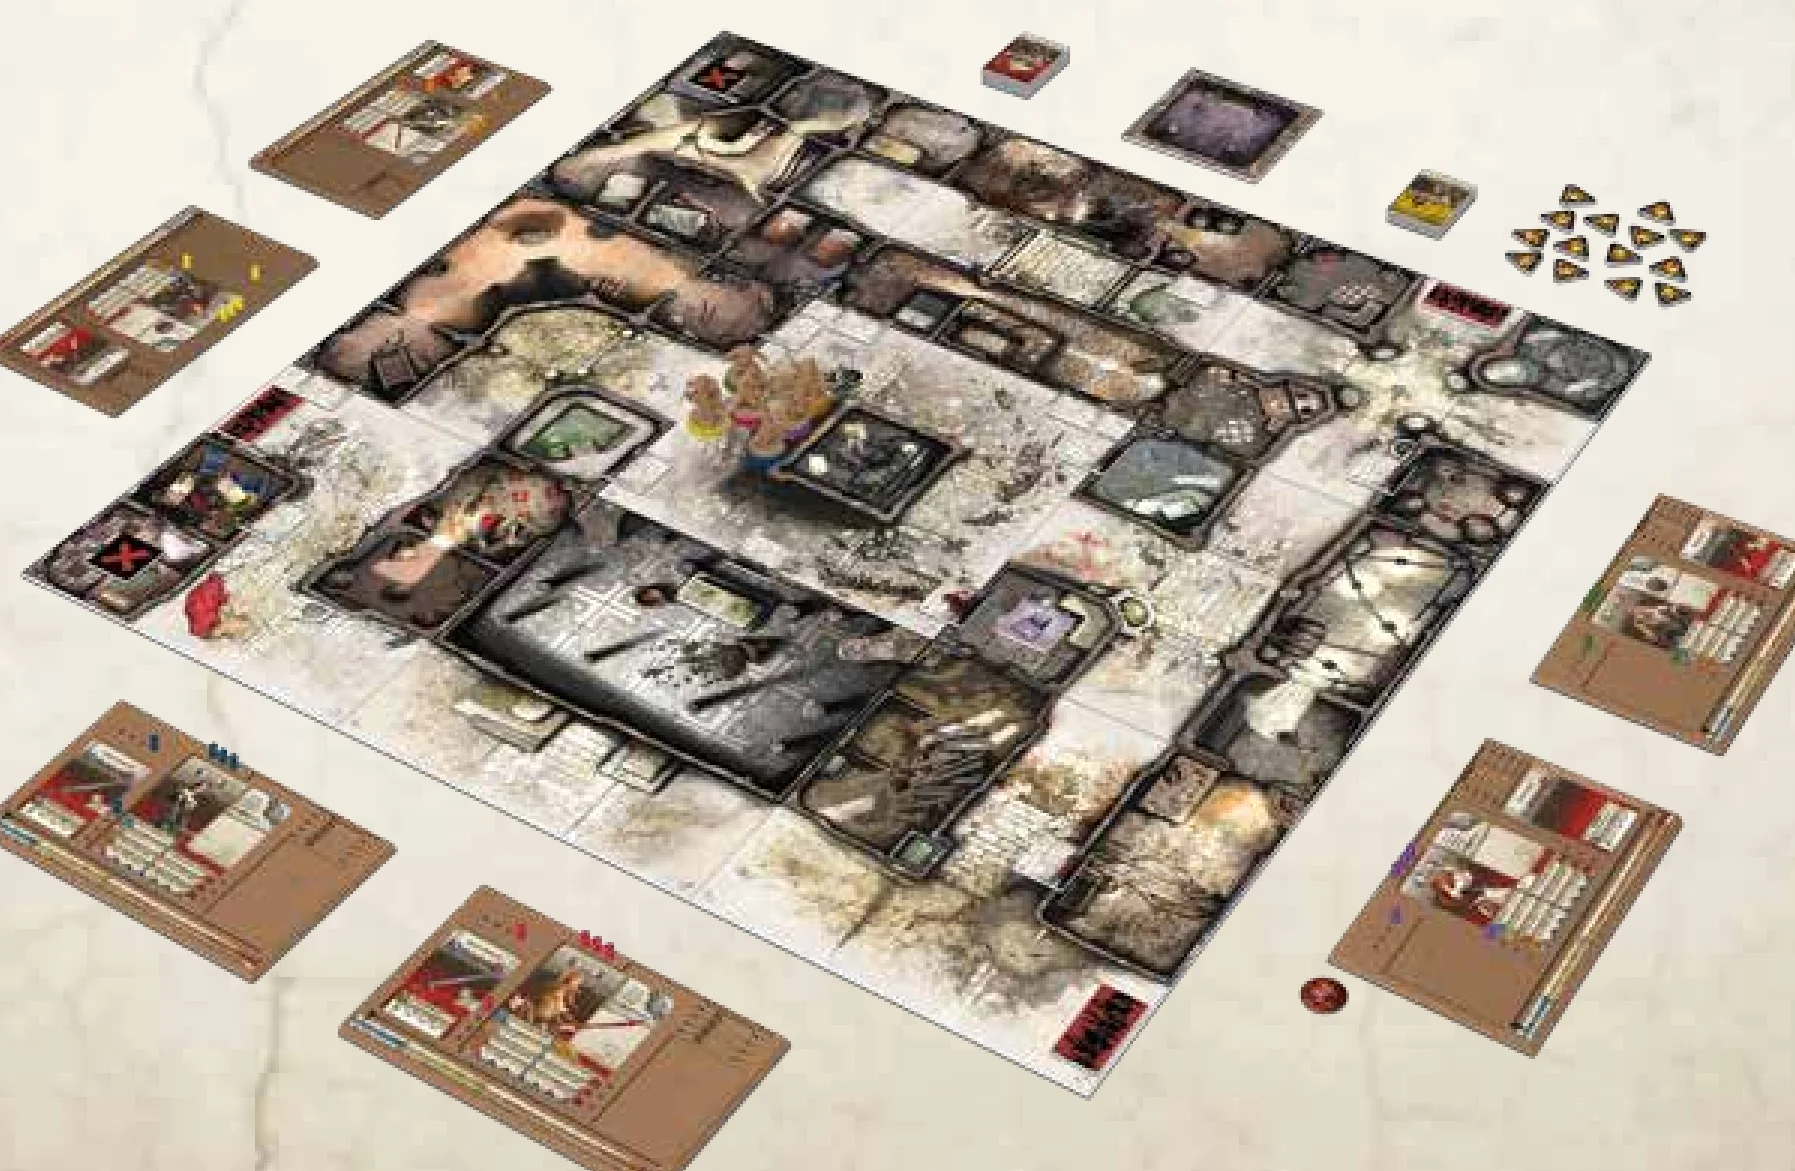
- Choose a Quest.
- Place the tiles.
- Place the doors, Objectives, and all tokens as indicated by the Quest.
- Each player gathers 1 to 6 Survivors for him to play. Players sit around the table in any order they choose. As they cooperate against the game, all players form a single team. A Zombicide: Black Plague game usually features 6 Survivors, distributed in any way you see fit among players. We recommend new players to join the game with a single Survivor, to get a quick grasp on the game mechanics. A veteran player can easily control a whole team of 6 Survivors and clean Zombie pests on his own!
- Players take one Dashboard for each of their Survivors, placing the Survivor’s ID Card on it. They take a colored plastic base and attach it to the Survivor’s miniature to help identify it. They also take the 5 plastic trackers in the same color.
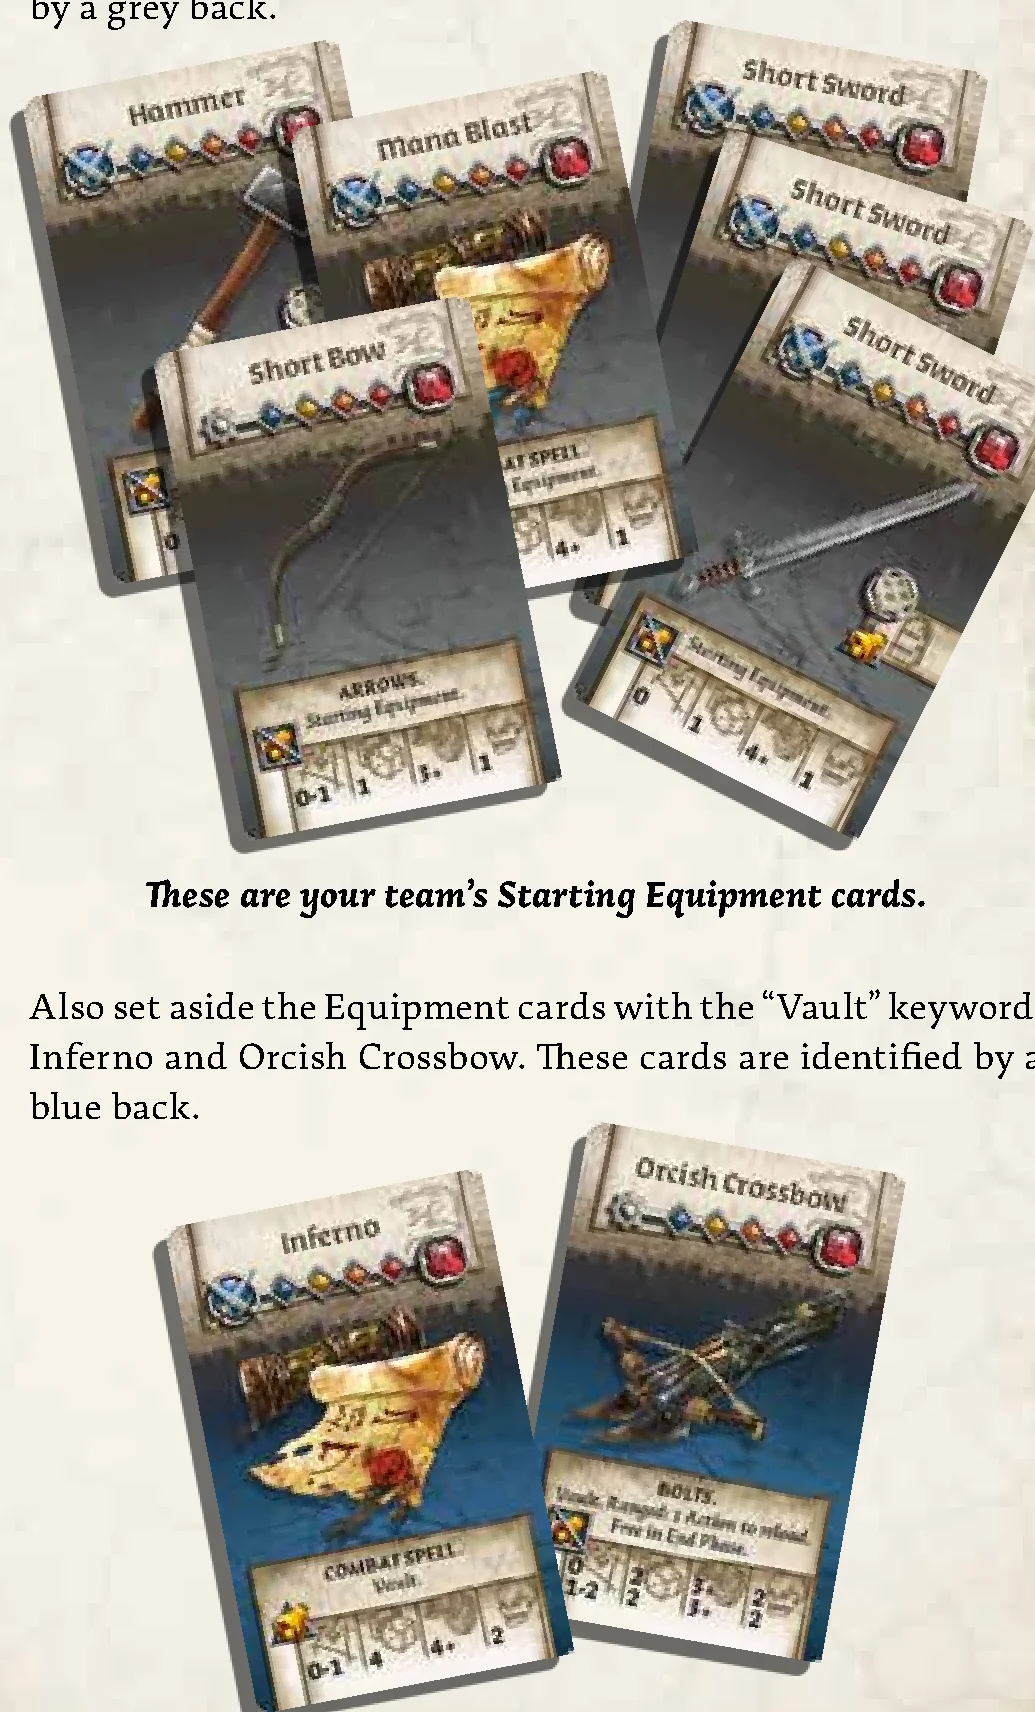
- Put aside all Equipment cards with the “Starting Equipment” keyword: a Hammer, a Mana Blast, a Short Bow and three Short Swords. These cards are identified by a grey back. Also set aside the Equipment cards with the “Vault” keyword: Inferno and Orcish Crossbow. These cards are identified by a blue back.
- Deal the Starting Equipment as you see fit amongst Survivors. Zombicide: Black Plague is a cooperative game, so decide as a team. Each Survivor starts the game with at least one card. If a Survivor’s starting Skill lists any starting weapons, he receives those cards now, independent of the starting Equipment you’ve just distributed.
- Shuffle the Zombie cards into one deck and the Equipment cards into another. Place both decks face down close to the board.
- Place the miniatures representing the chosen Survivors on the starting Zone(s) indicated by the Quest.
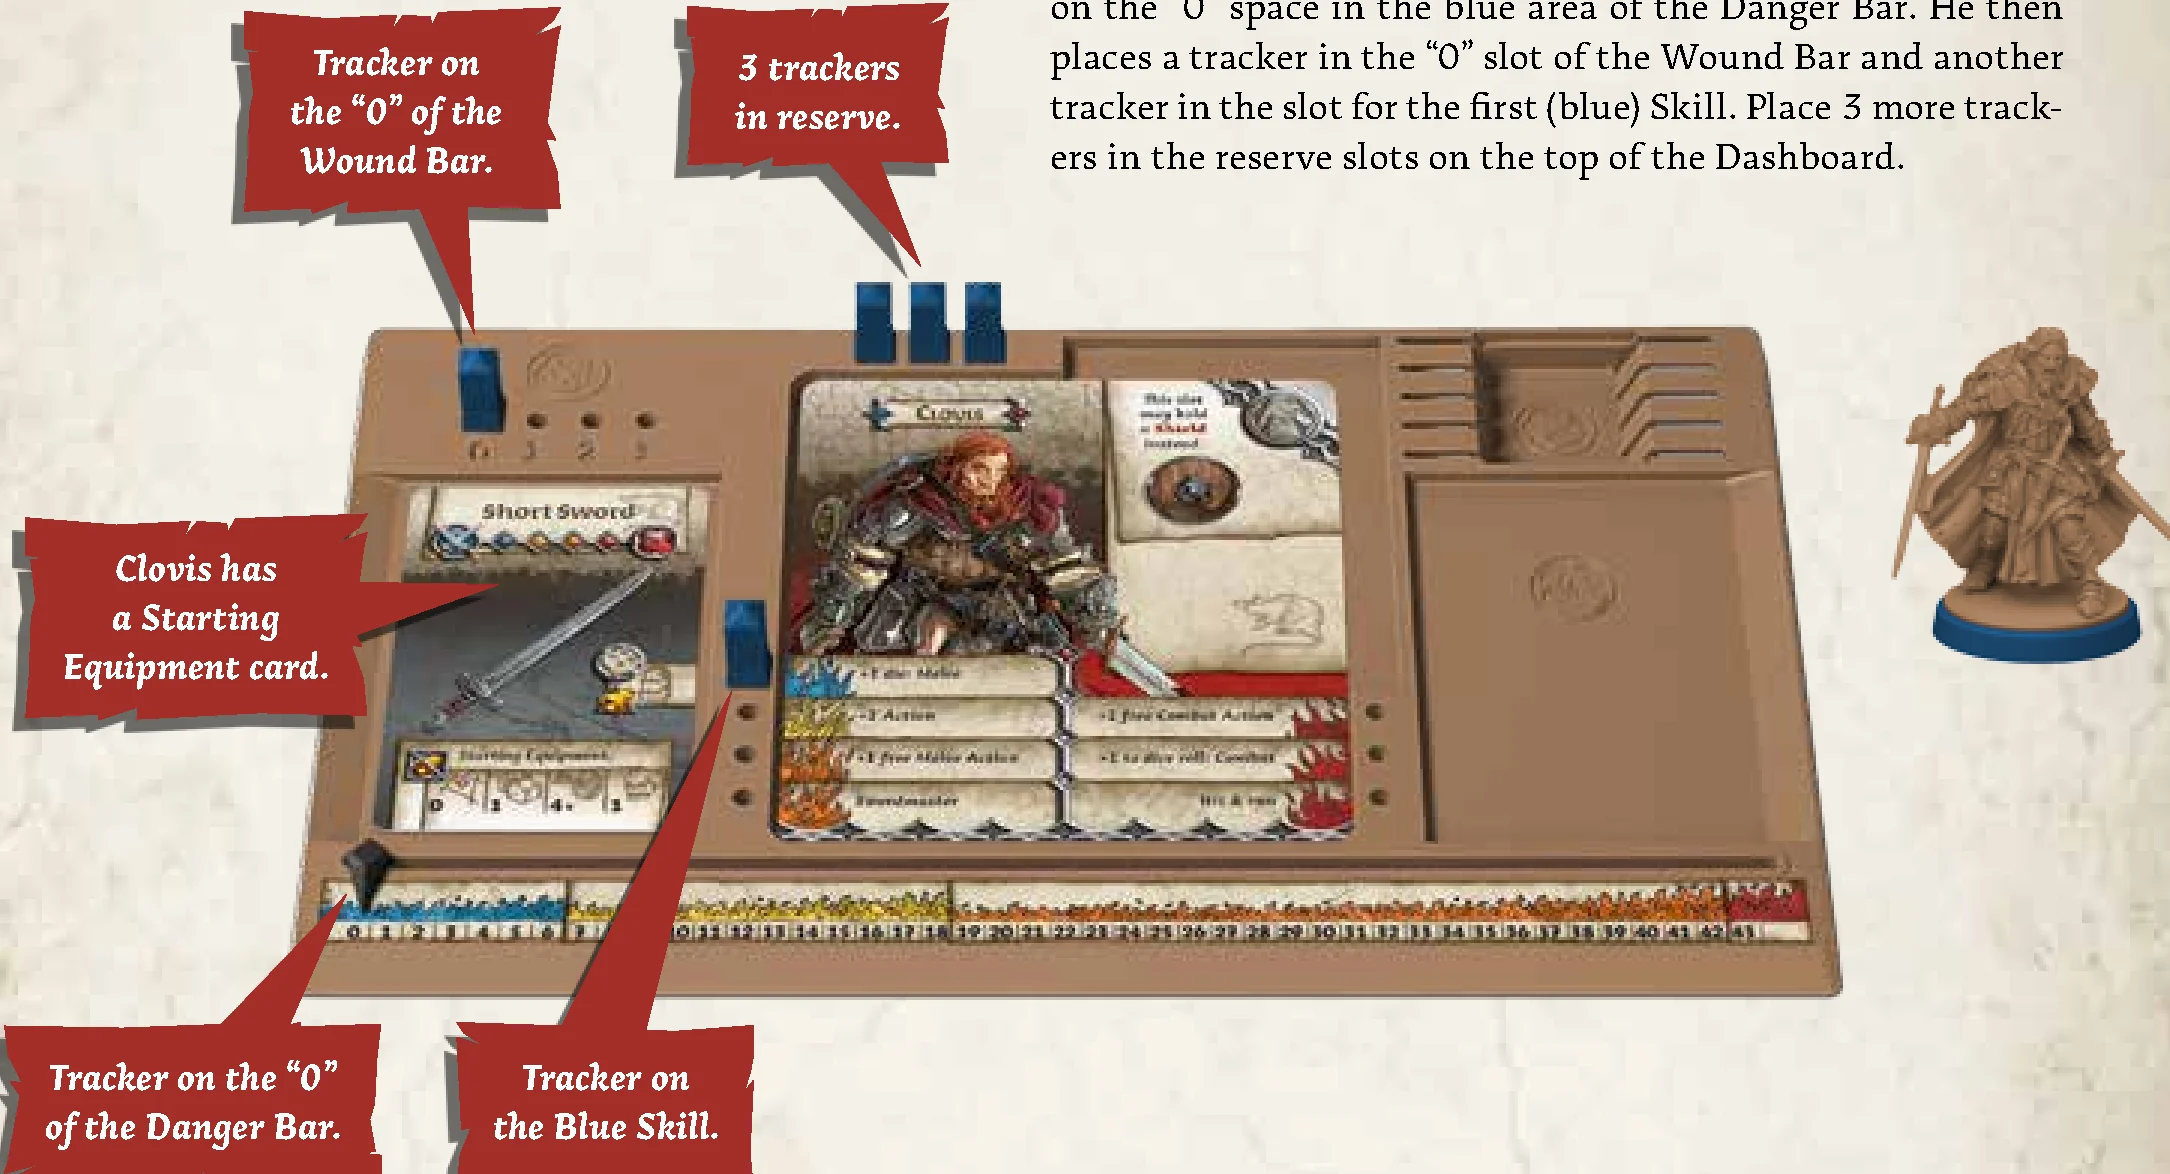
- Each player places his Survivors’ Dashboard(s) in front of him. He makes sure the sliding arrow is on the “0” space in the blue area of the Danger Bar. He then places a tracker in the “0” slot of the Wound Bar and another tracker in the slot for the first (blue) Skill. Place 3 more trackers in the reserve slots on the top of the Dashboard.
- Decide who will be the first player, and give him the first player token.
Useful Definitions
- Actor: A Survivor or Zombie.
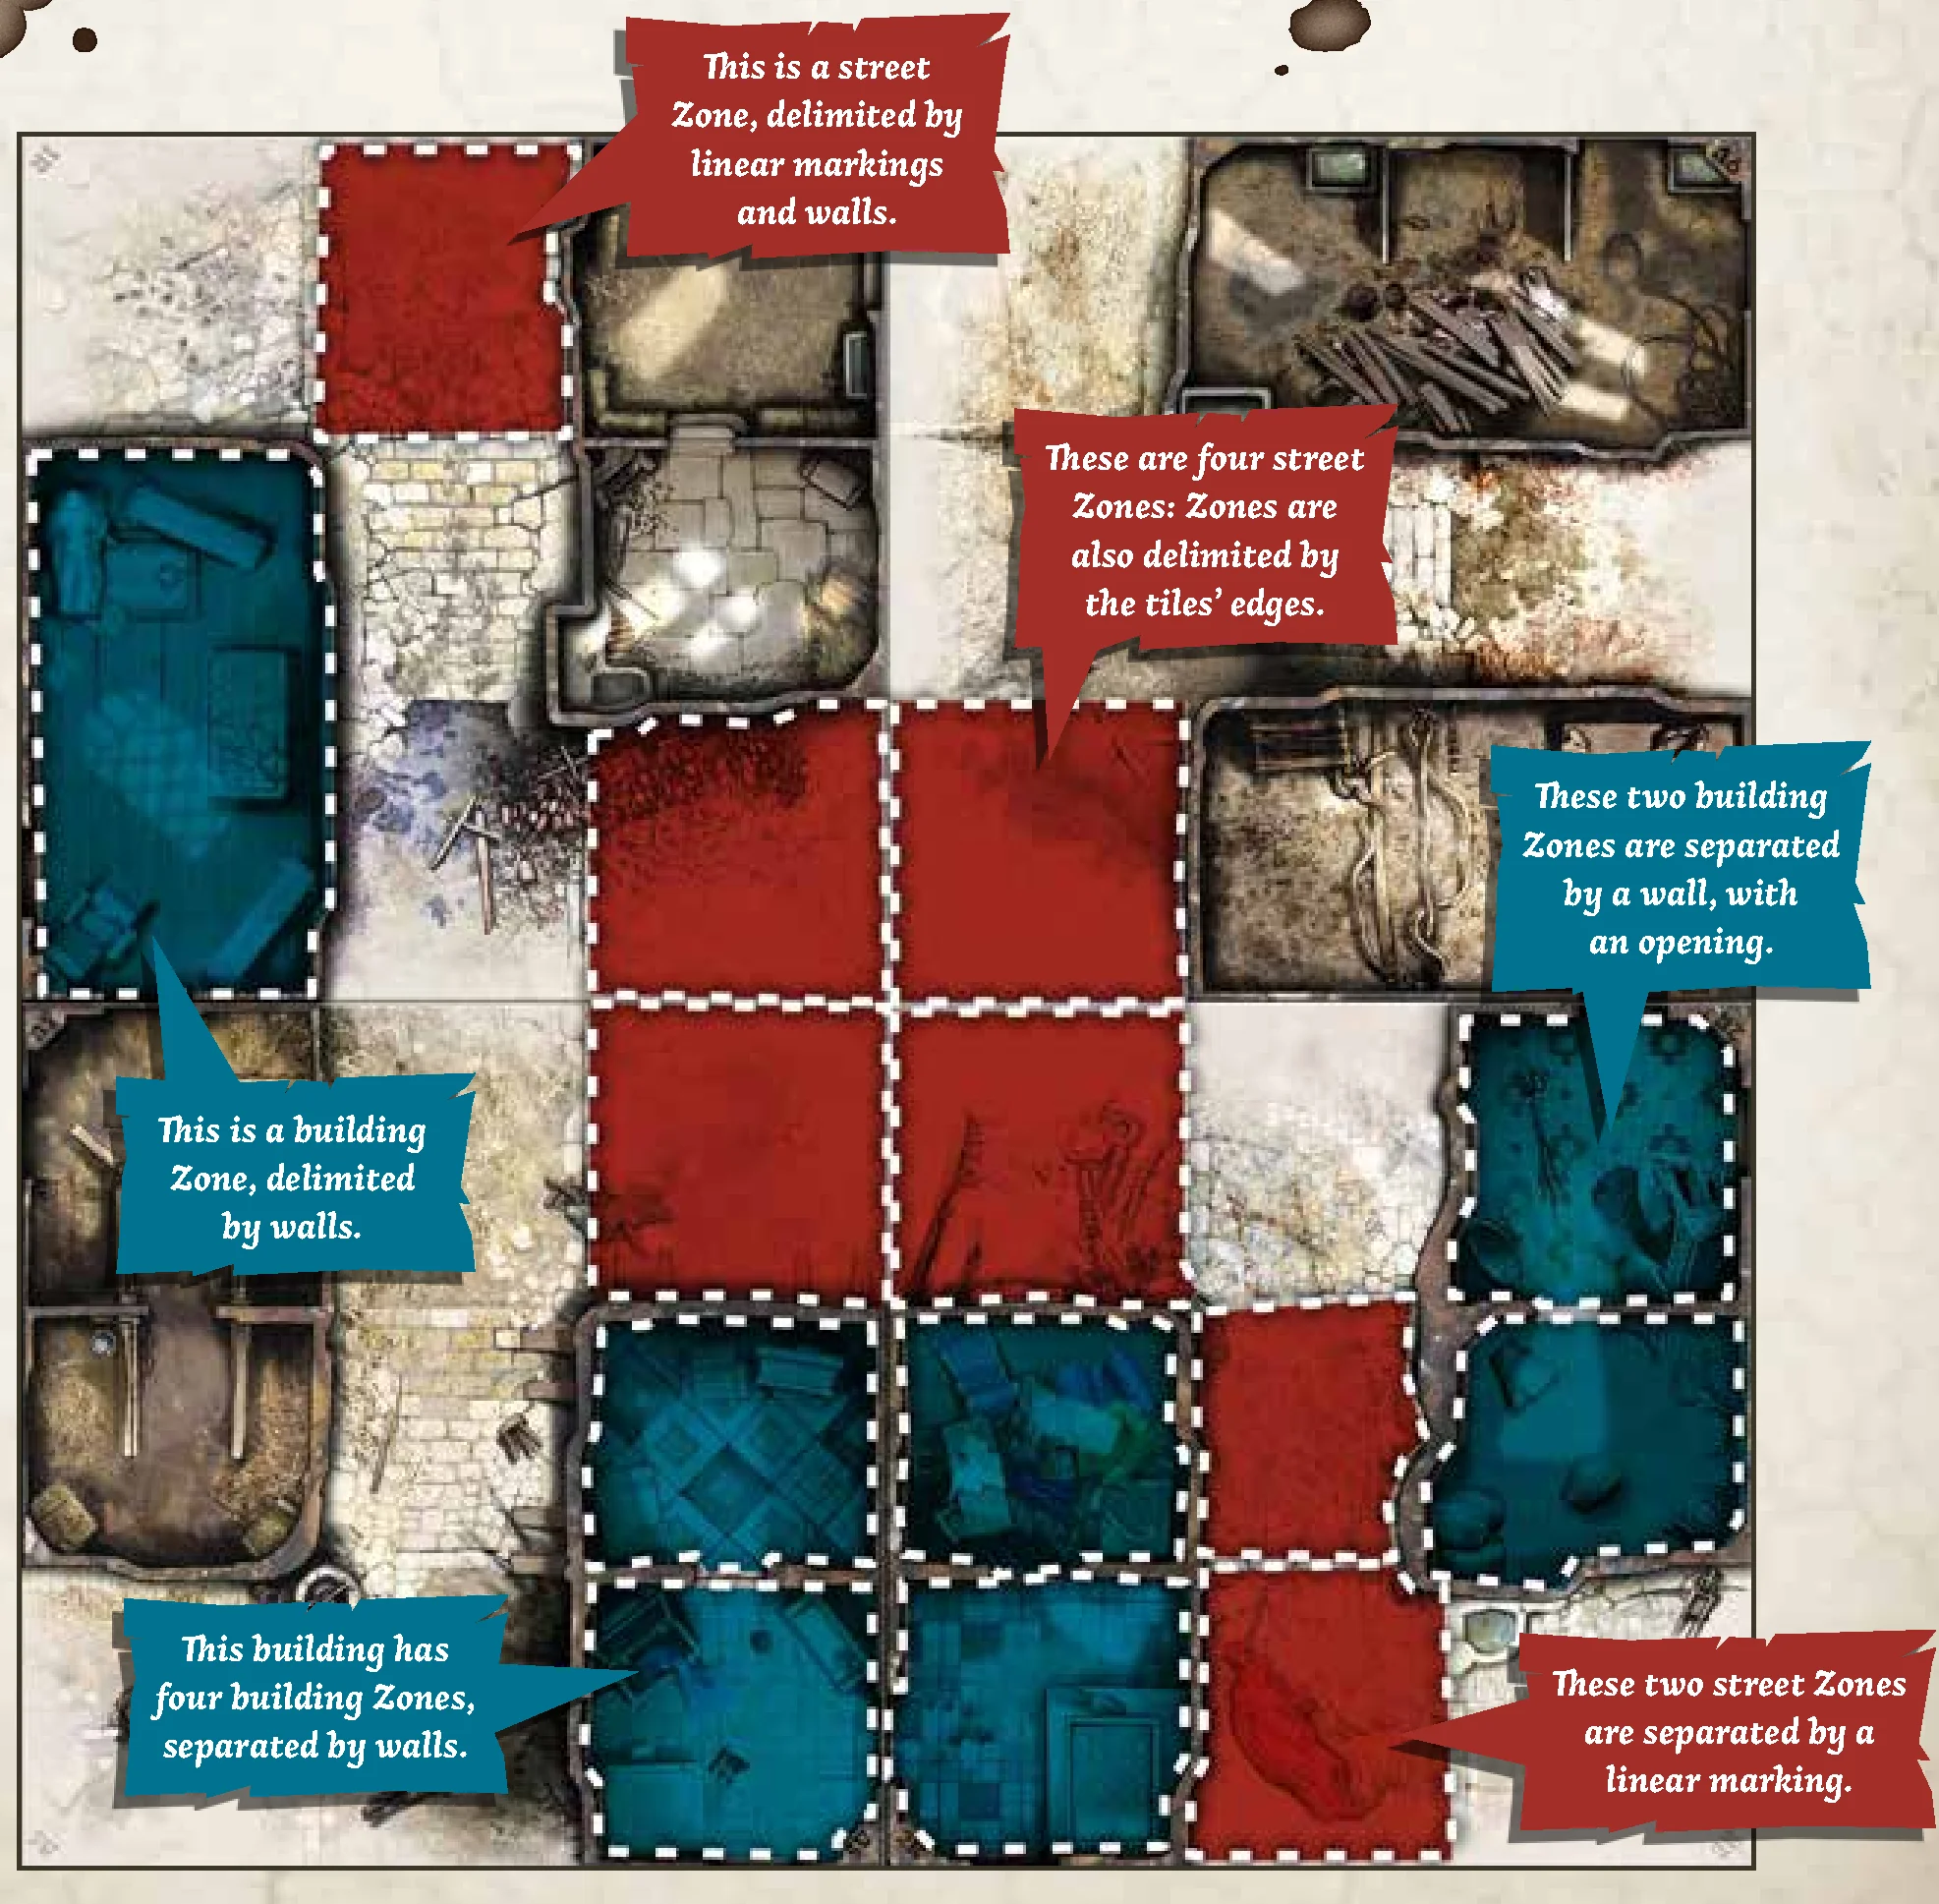
- Zone: Inside a building, a Zone is a room. On a street, a Zone is the area between two linear markings (or a linear marking and a tile’s edge) and the walls of buildings along the street.
Line of Sight
How do I know if a Zombie sees me or if I see it?
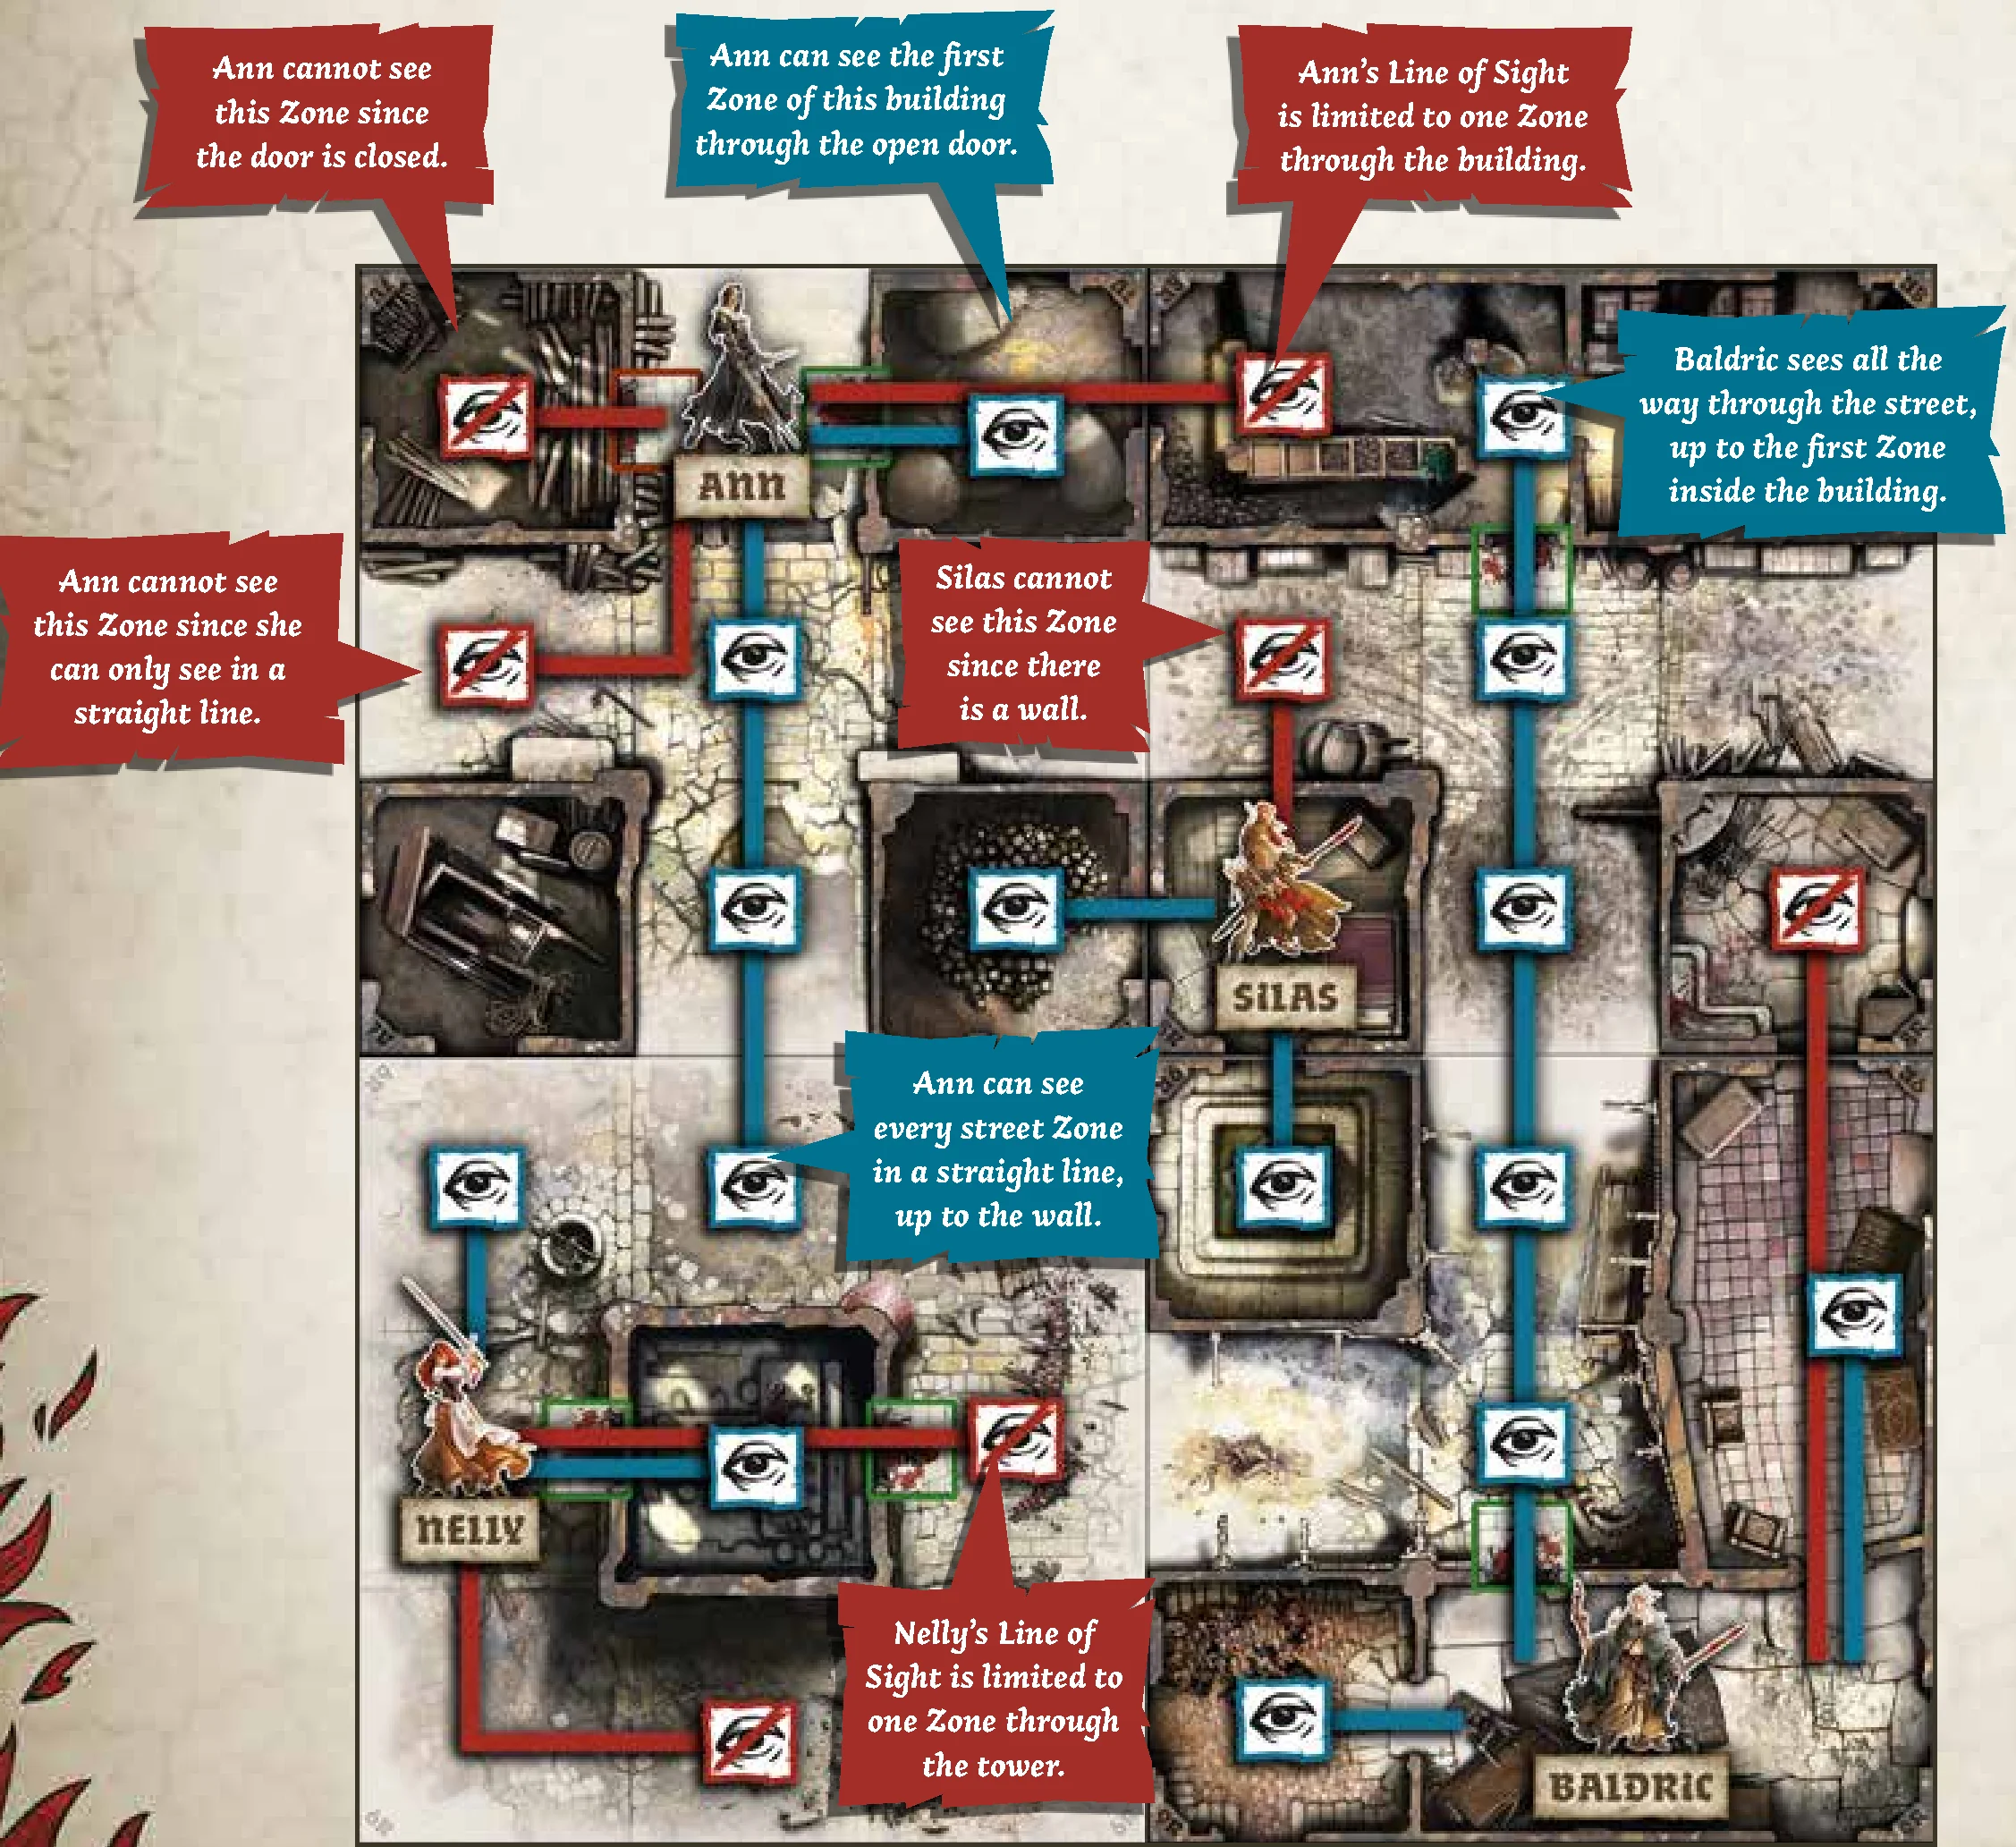
- On the streets, Actors see in straight lines that run parallel to the edges of the board. Actors cannot see diagonally. Their Line of Sight covers as many Zones as the line can pass through before reaching a wall or the edge of the board.
- Inside a building, an Actor sees into all Zones that share an opening with the Zone the Actor currently occupies. If there is an opening, the walls do not block Line of Sight between two Zones. An Actor’s Line of Sight, however, is limited to the distance of one Zone.
NOTE: If the Survivor is looking out into the street, or from the street into a building, the Line of Sight can go through any number of street Zones in a straight line, but only one Zone into the building.
Movement
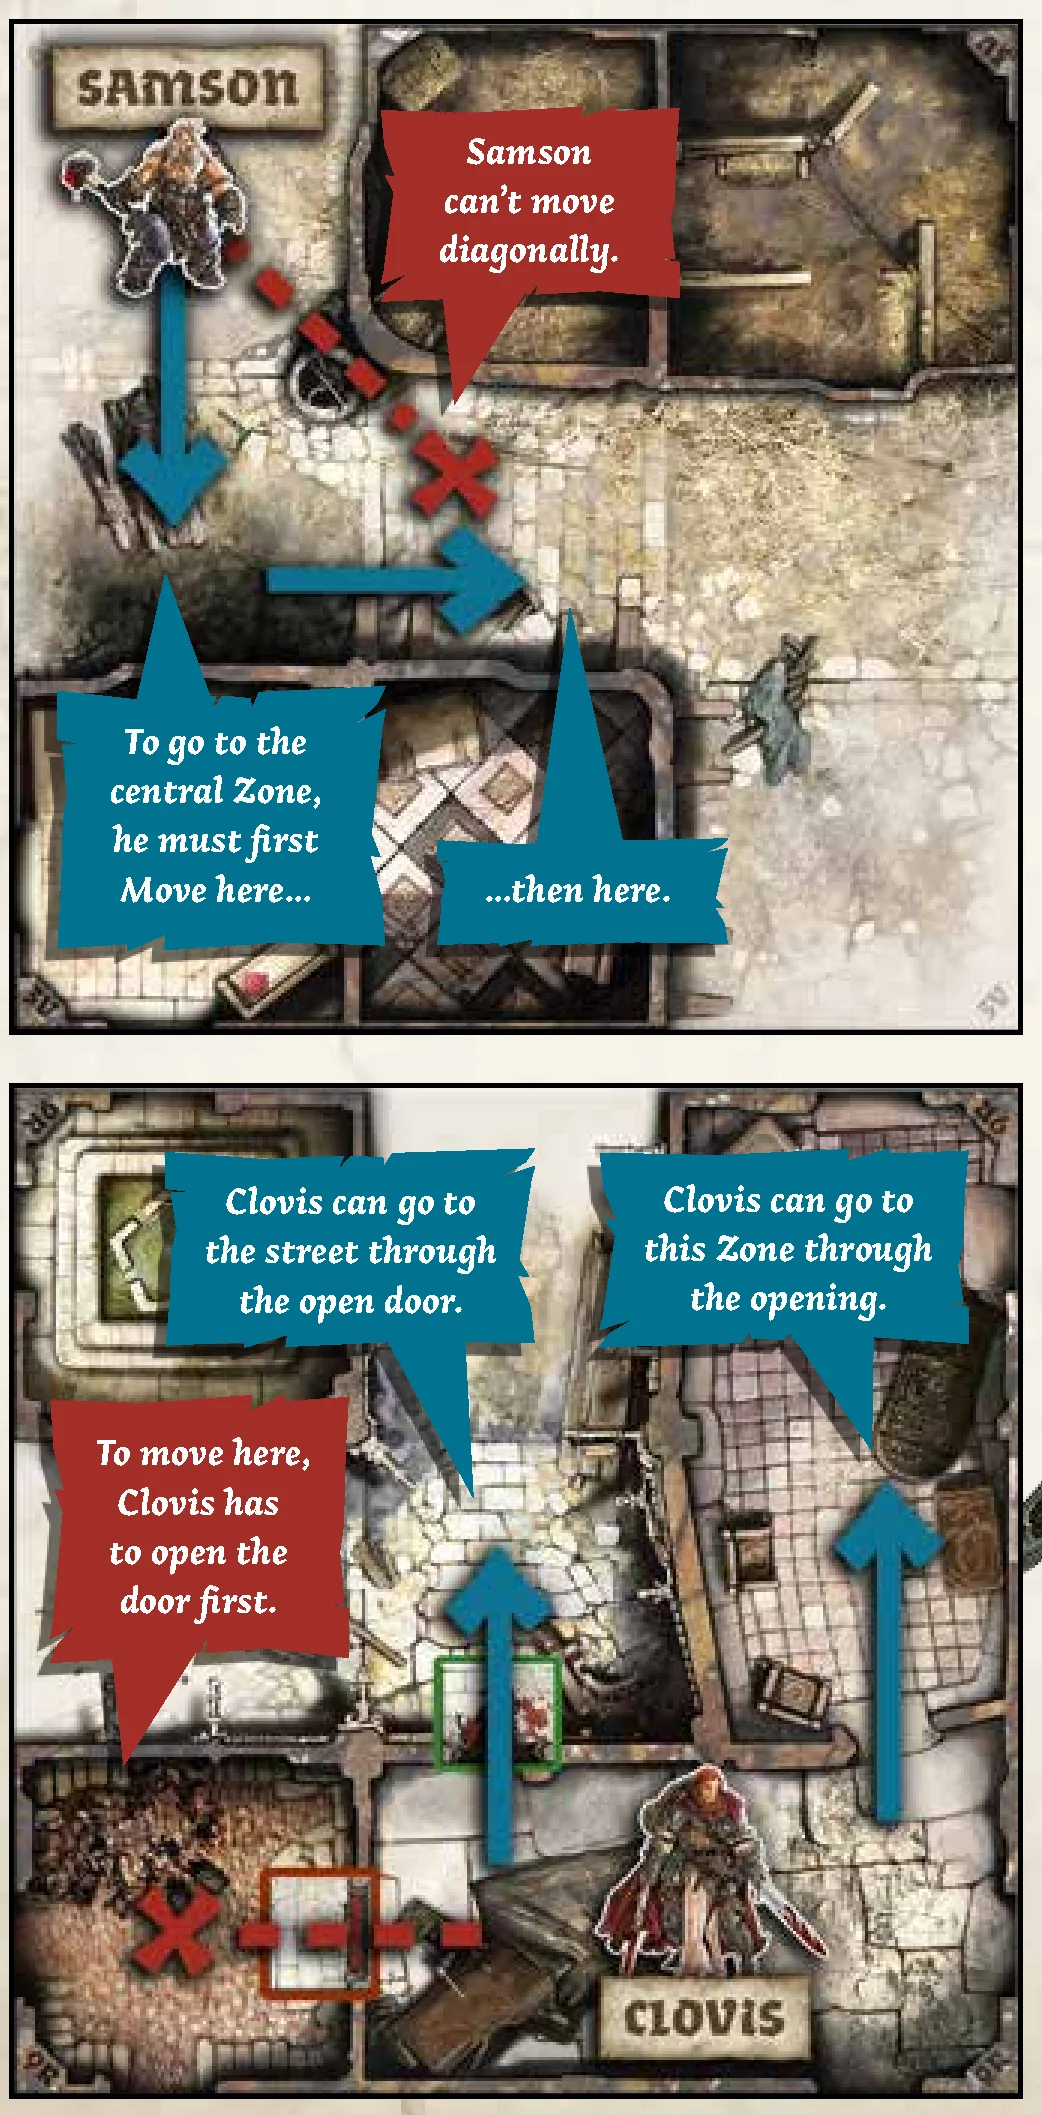
Actors can move from one Zone to the next as long as the first Zone shares at least one edge with the destination Zone. Corners do not count. This means Actors cannot make diagonal movements.
- On streets: The movement from one Zone to another has no restrictions. However, Actors must go through a door (or opening) to move from a building to the street and vice-versa.
- Inside a building: Actors may move from one Zone to another as long as these Zones are linked by an opening. The position of a miniature in the Zone and the layout of the walls do not matter as long as the Zones share an opening.
Noise
The shufflers hunt by sight and sound. If they see you, you’ll hear ‘em gasping and moaning for your flesh. But when it’s quiet, they’re quiet. Any noise, anything at all, and they’ll come poking around. You wouldn’t believe how quiet a dead man can be. … Well, ‘course you would, but a walking dead man can be just as quiet as a resting corpse. No battle cries. No shouts. Some folks take to gagging themselves voluntarily, just so they can’t cry out in surprise (or horror).
Casting a spell or smashing through a door makes noise, and noise attracts Zombies. Each Action that opens a door with a noisy Equipment or attacks with a noisy Equipment produces a Noise token.
- Place this token in the Zone where the Survivor resolved the Action. It stays in the Zone where it was produced, even if the Survivor moves.
- A single Action can only produce a single Noise token, no matter how many dice are rolled, how many hits are obtained, or if Dual weapons are used.
- Noise tokens are removed from the board in the End Phase (see page 8).
NOTE: Each Survivor miniature also counts as a Noise token. Zombies have acute hearing, and Survivors can’t stay quiet anyway!
EXAMPLE: Clovis spends an Action to open a door with an Axe. It’s a noisy way to open a door. This produces a Noise token. He then attacks a Zombie in his Zone, knocking it down after two Melee Actions. The Axe is a silent killing weapon, so these Melee Actions produce no noise. Two “noises” remain in this Zone: the Noise token produced by opening the door and Clovis’ miniature itself.
In another Zone, Baldric executes two Magic Actions with his Fireball. Although he rolled three dice for each Magic Action, he gets only two Noise tokens in his Zone, one for each Magic Action. The Noise tokens remain on the Zone where Baldric produced them; they don’t follow him when he moves.
Experience, Danger Level, and Skills
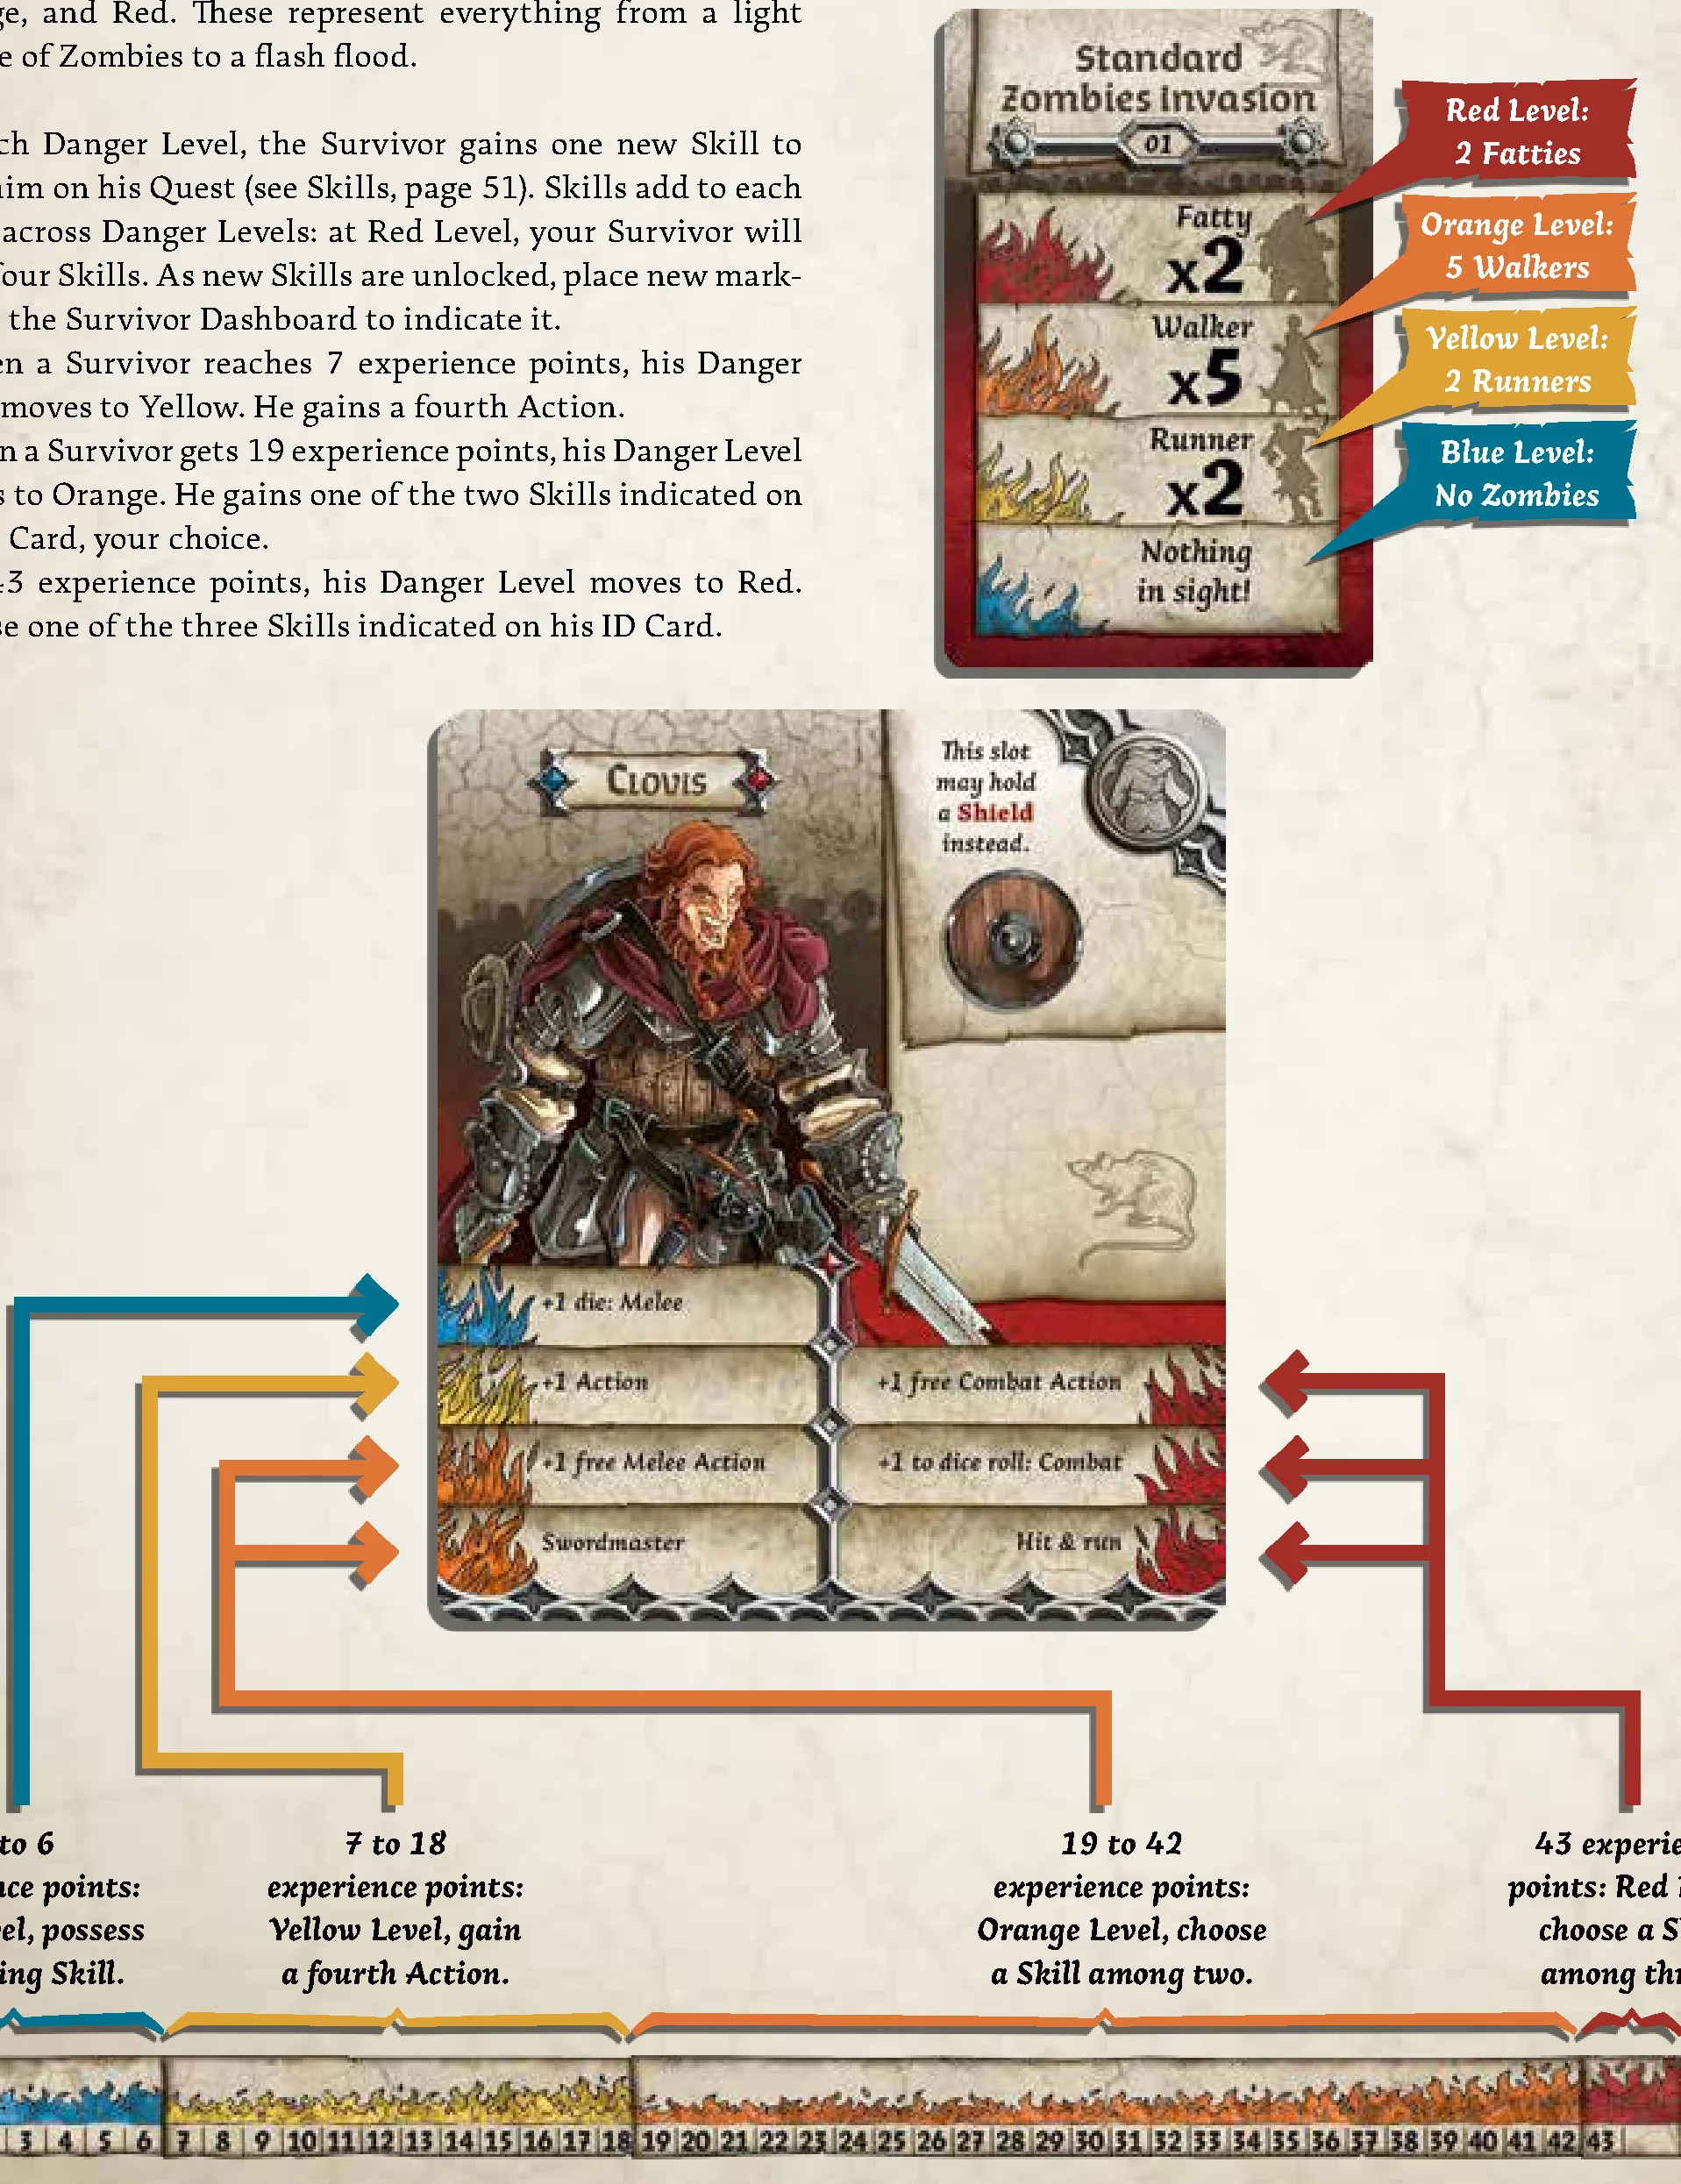
For each Zombie killed, a Survivor gains one experience point and moves up a notch on his Danger Bar. Some Quest objectives provide more experience, as does eliminating Abominations.
There are four Danger Levels on the Danger Bar: Blue, Yellow, Orange, and Red. These represent everything from a light drizzle of Zombies to a flash flood.
At each Danger Level, the Survivor gains one new Skill to help him on his Quest (see Skills, page 51). Skills add to each other across Danger Levels: at Red Level, your Survivor will have four Skills. As new Skills are unlocked, place new markers on the Survivor Dashboard to indicate it.
- 0 to 6 experience points (Blue Level): Possess a starting Skill.
- 7 to 18 experience points (Yellow Level): Reaching 7 experience points moves Danger Level to Yellow. Gains a fourth Action.
- 19 to 42 experience points (Orange Level): Reaching 19 experience points moves Danger Level to Orange. Choose one of the two Skills indicated on his ID Card.
- 43 experience points (Red Level): Choose one of the three Skills indicated on his ID Card.
This experience has a side effect, however. When you draw a Zombie card to spawn Zombies, read the line that corresponds to the Survivor still in play with the highest Danger Level (see Zombie Spawn, page 25). The stronger your Survivor is, the more Zombies appear.
Inventory
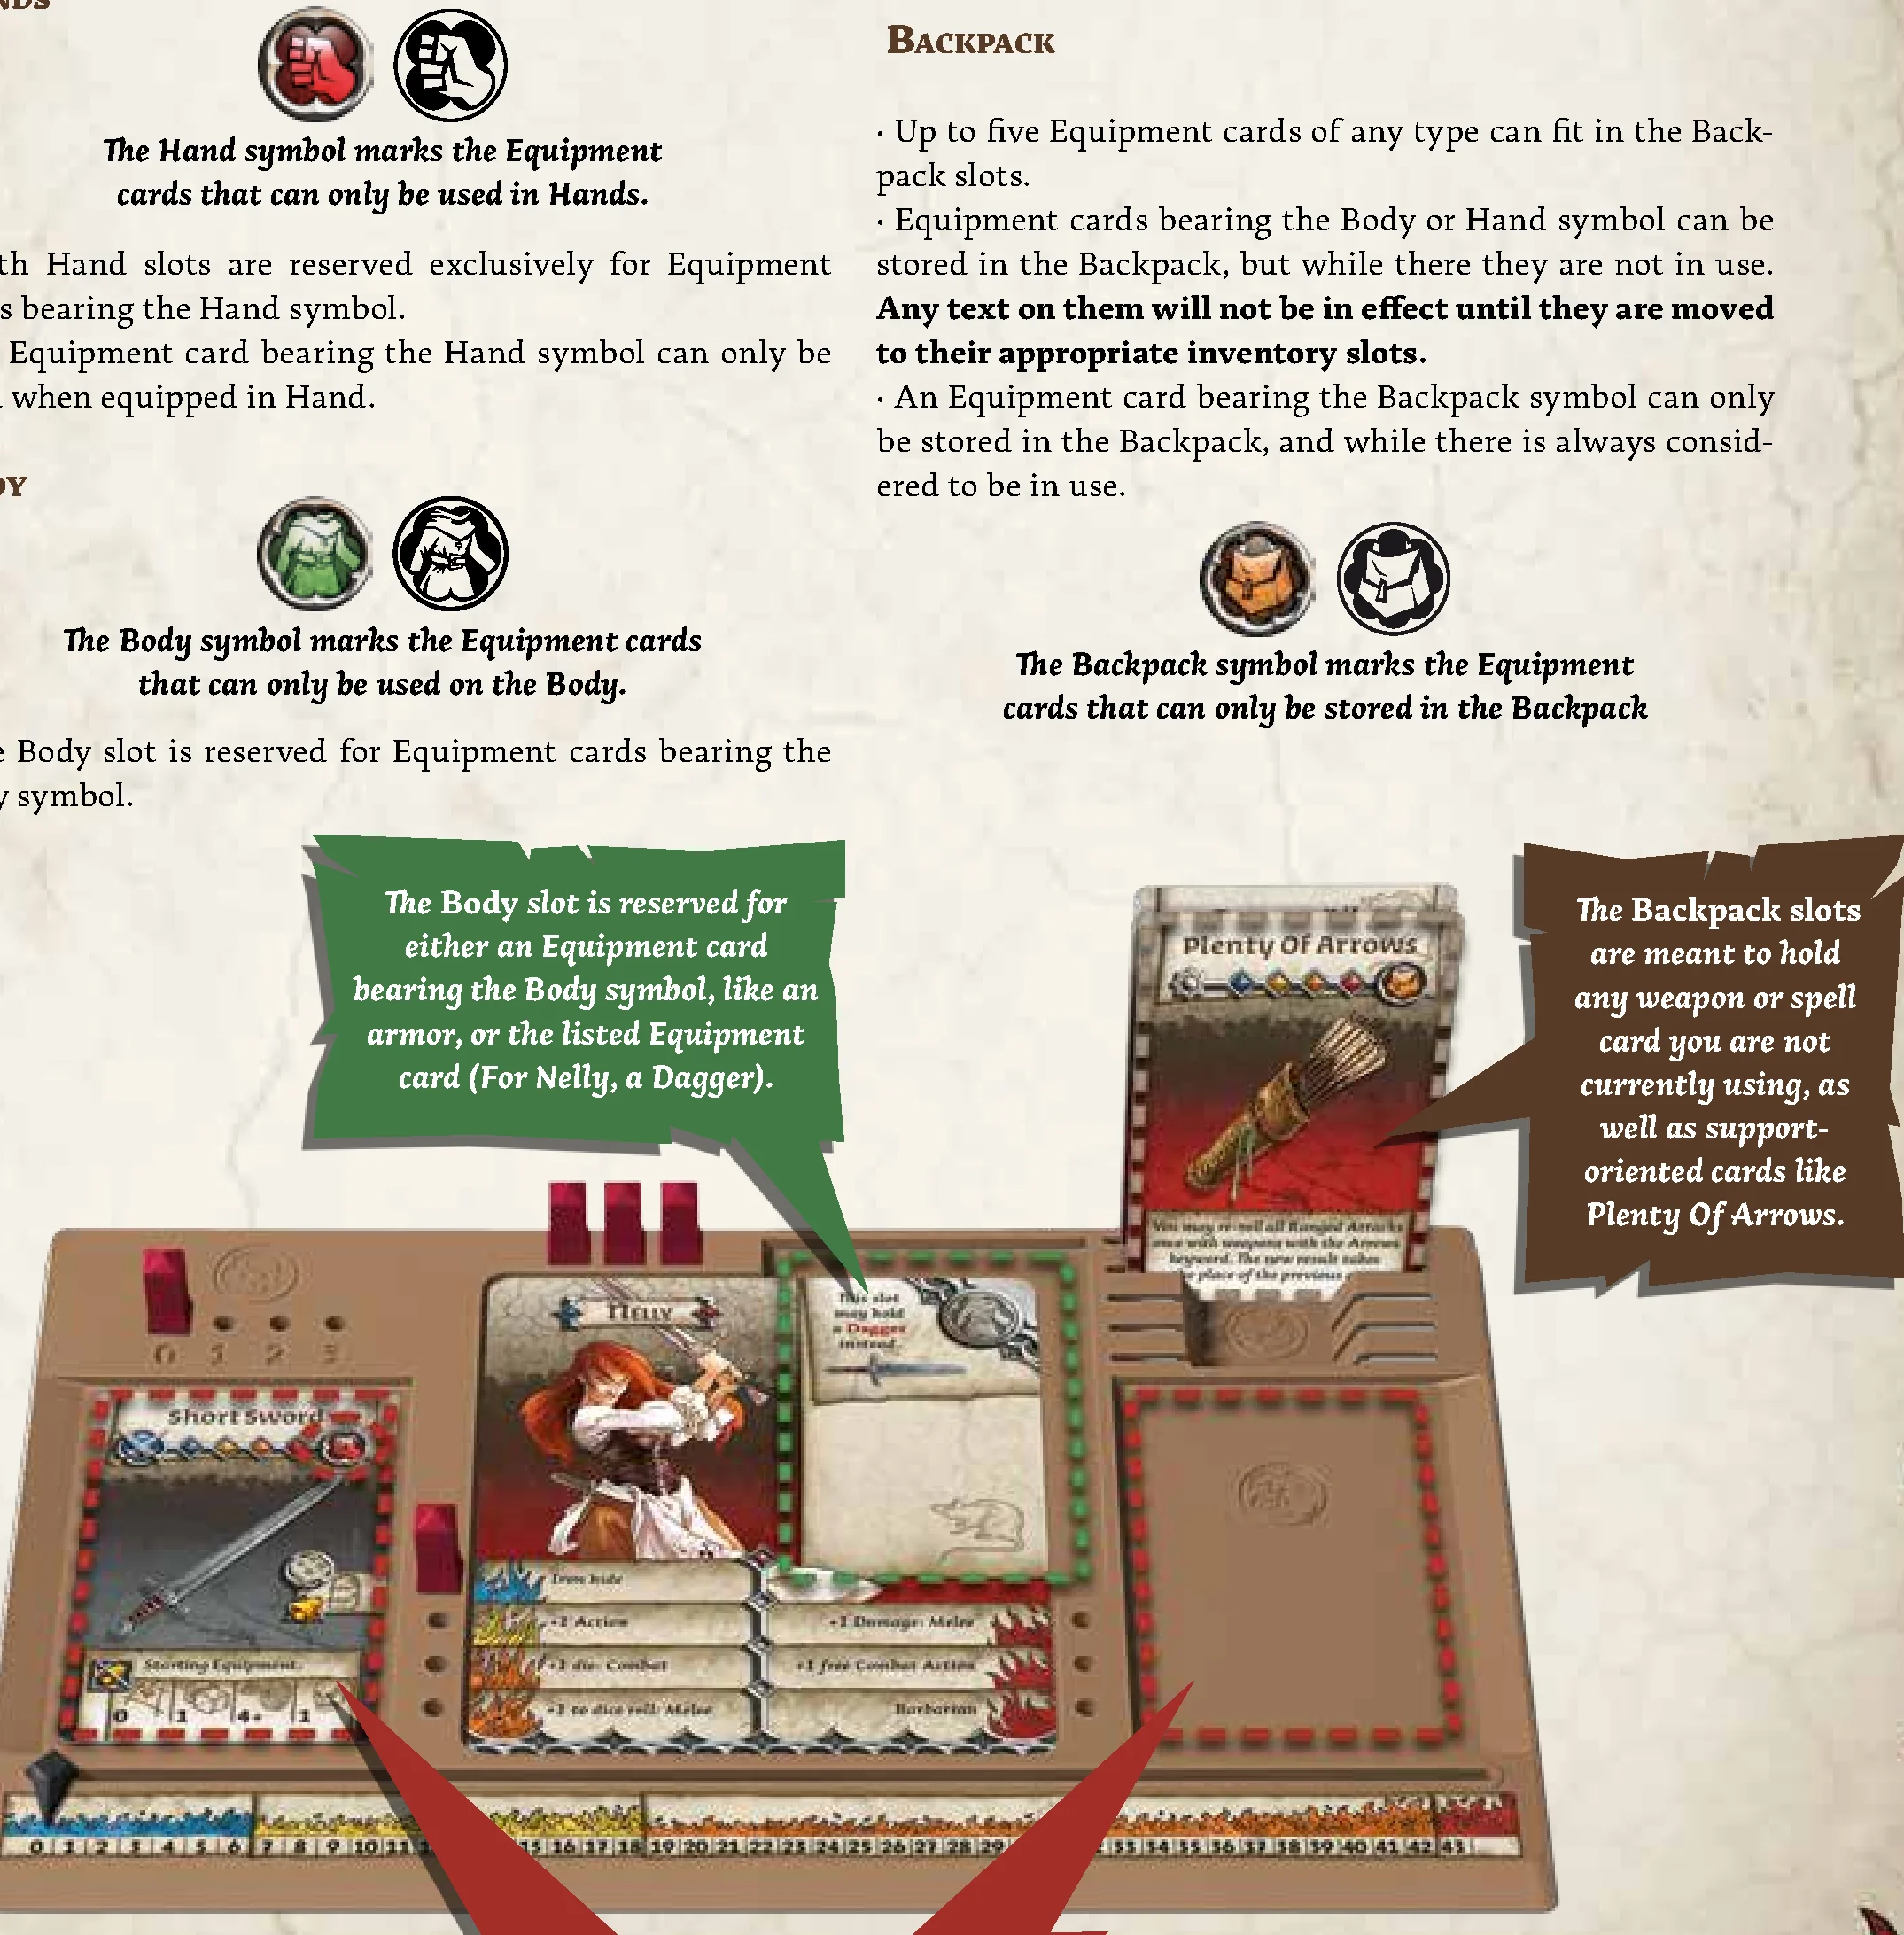
Each Survivor can carry up to eight Equipment cards, divided into three types of Equipment slots on his Dashboard: Two Hands, a Body and five Backpack slots. You may discard cards from your inventory to make room for new cards at any time, for free (even during another player’s Turn).
Hands
- Both Hand slots are reserved exclusively for Equipment cards bearing the Hand symbol.
- An Equipment card bearing the Hand symbol can only be used when equipped in Hand.
Body
- The Body slot is reserved for Equipment cards bearing the Body symbol.
- Alternatively, it can hold the specific Equipment card that is listed on it. It is then considered to be equipped in Hand, representing a special piece of Equipment that this Survivor can draw and use in the blink of an eye.
- An Equipment card bearing the Body symbol can only be used when put over the Body.
Backpack
- Up to five Equipment cards of any type can fit in the Backpack slots.
- Equipment cards bearing the Body or Hand symbol can be stored in the Backpack, but while there they are not in use. Any text on them will not be in effect until they are moved to their appropriate inventory slots.
- An Equipment card bearing the Backpack symbol can only be stored in the Backpack, and while there is always considered to be in use.
Weapons and Combat Spells
We went to the king’s country estate. It was nearby, and though we weren’t allowed on his lands, we figured the situation warranted some leeway from His Majesty. We found the castle shattered. Wrecked. The few survivors had holed up in the cellars. Imagine their surprise when they opened the doors to human voices, and found a peasant army armed with pitchforks and torches. The king’s forces had proved no match for the ravening horde. But now, at least, we had a few wizards and men-at-arms on our side. And weapons. Lots of weapons. There were plenty left over after the slaughter. Zombies don’t use swords.
Zombicide: Black Plague features many Equipment cards. The ones your Survivors use to blast Zombies fall in three categories:
- Melee weapons: Display a “0” Range value and thus can only be used in the same Zone as the Survivor. They are used with Melee Actions (see P. 33).
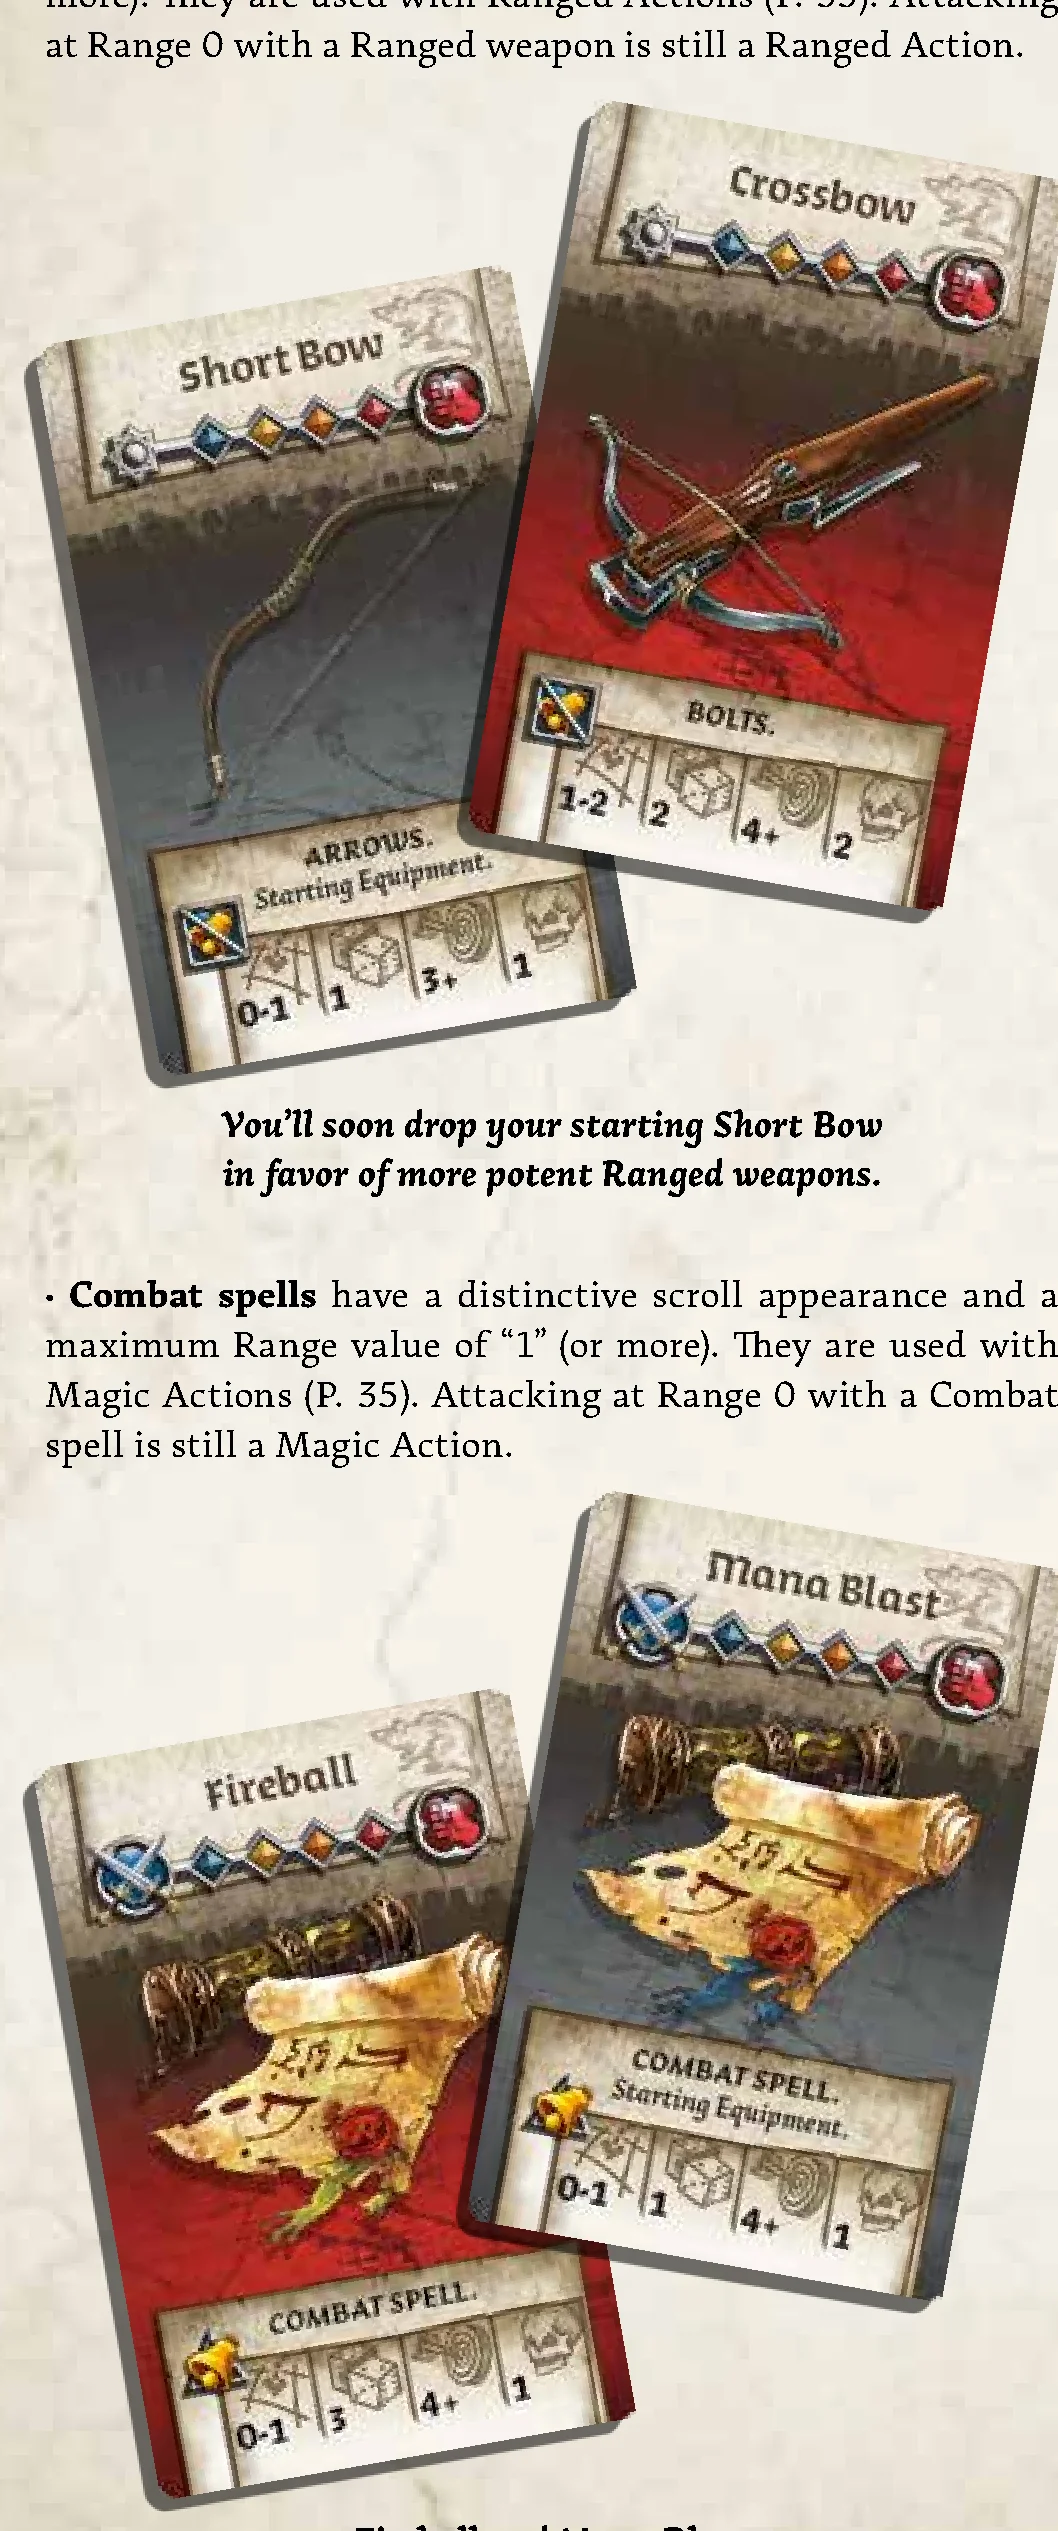
- Ranged weapons: Have a maximum Range value of “1” (or more). They are used with Ranged Actions (P. 33). Attacking at Range 0 with a Ranged weapon is still a Ranged Action.
- Combat spells: Have a distinctive scroll appearance and a maximum Range value of “1” (or more). They are used with Magic Actions (P. 35). Attacking at Range 0 with a Combat spell is still a Magic Action.
Some Equipment cards can belong to several types at once (e.g., Orcish Crossbow is both a Melee and a Ranged weapon).
Door-Breaching, Zombie-Killing, and Noisy Equipment
- Equipment that allows you to open doors but requires a dice roll to do it has this symbol. The die indicates the minimum roll needed to open the door.
- Equipment that allows you to open doors without any dice roll has this symbol.
- Equipment that allows you to kill Zombies has Combat characteristics displayed at the bottom: Range, Dice, Accuracy, Damage.
- Each of these symbols is accompanied by a second symbol related to noise:
- Noisy: This Action is noisy and produces a Noise token (see Noise, page 15).
- Silent: This Action isn’t noisy and does not produce a Noise token.
Combat Characteristics
Melee weapons, Ranged weapons and Combat spells display Combat characteristics used to maim, shoot or disintegrate Zombies in many ways.
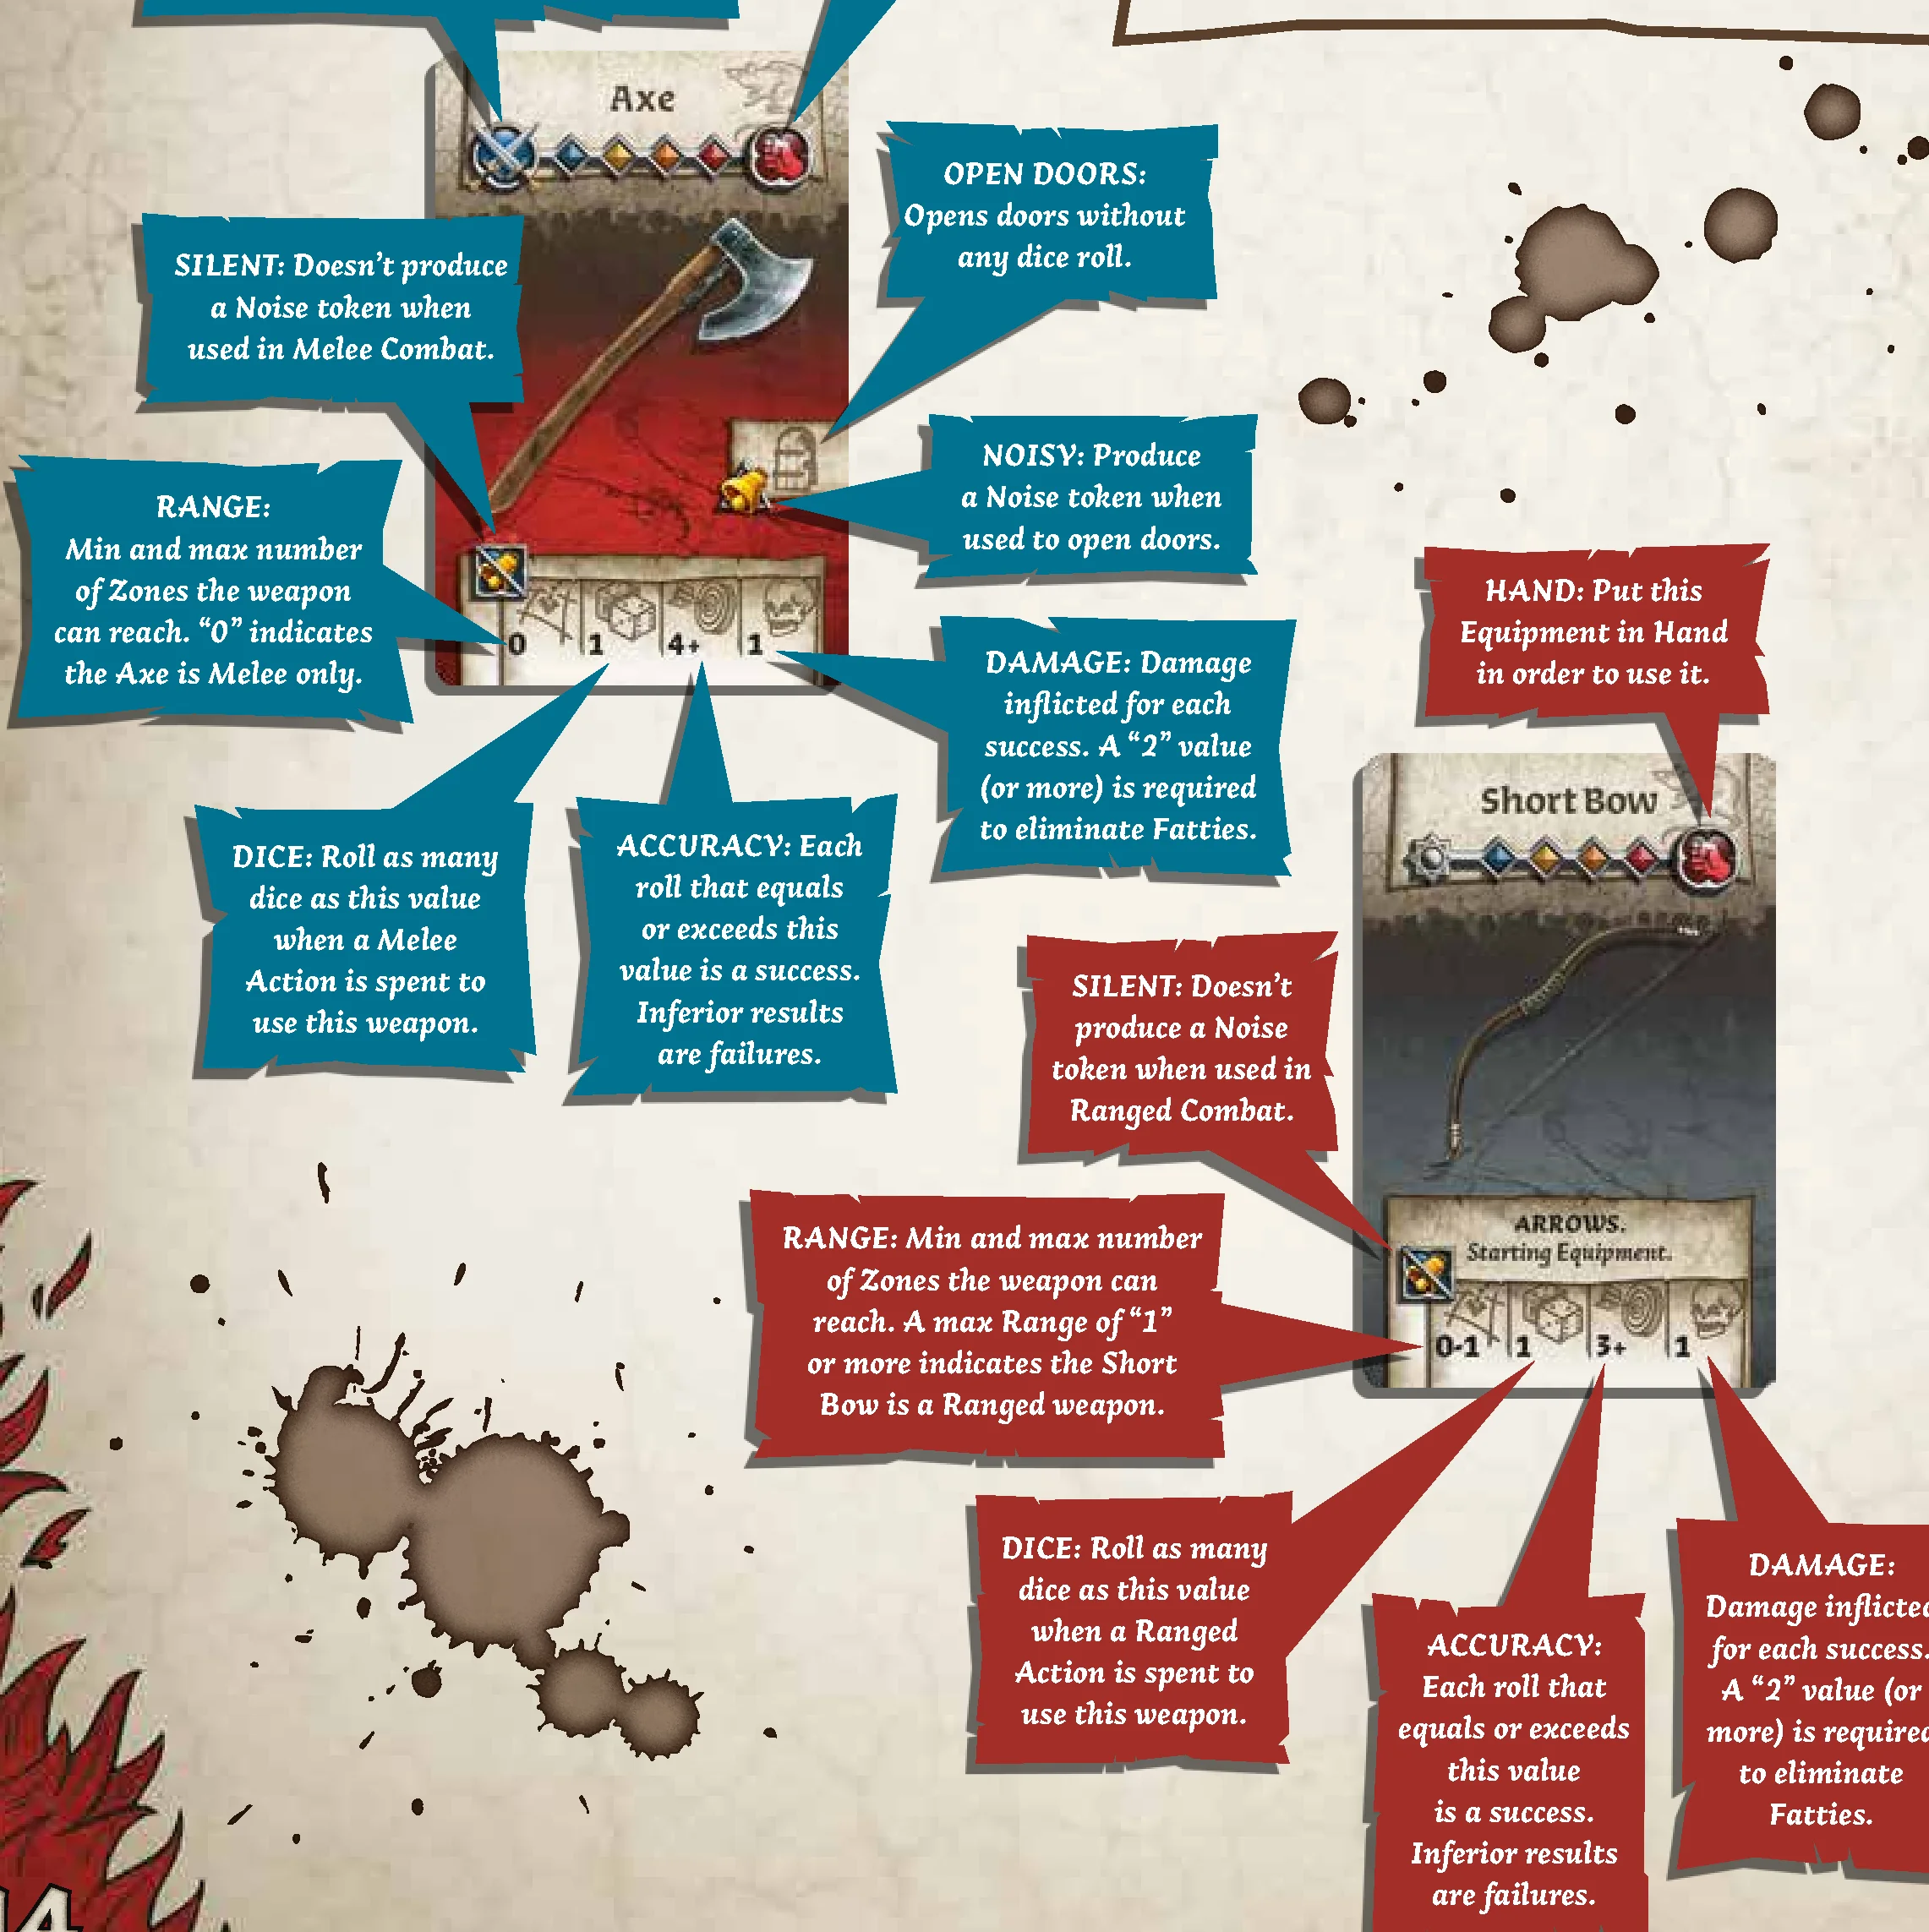
- Danger Level Gems: These gems indicate at what Danger Level a Survivor needs to be to be able to use this card. All cards in this box display all four gems, so Survivors can use them at any level. Expansions will contain cards with some of these gems removed, indicating the card can’t be used while the Survivor is at those Danger Levels (but can be stored in any eligible slot).
- HAND: Put this Equipment in Hand in order to use it.
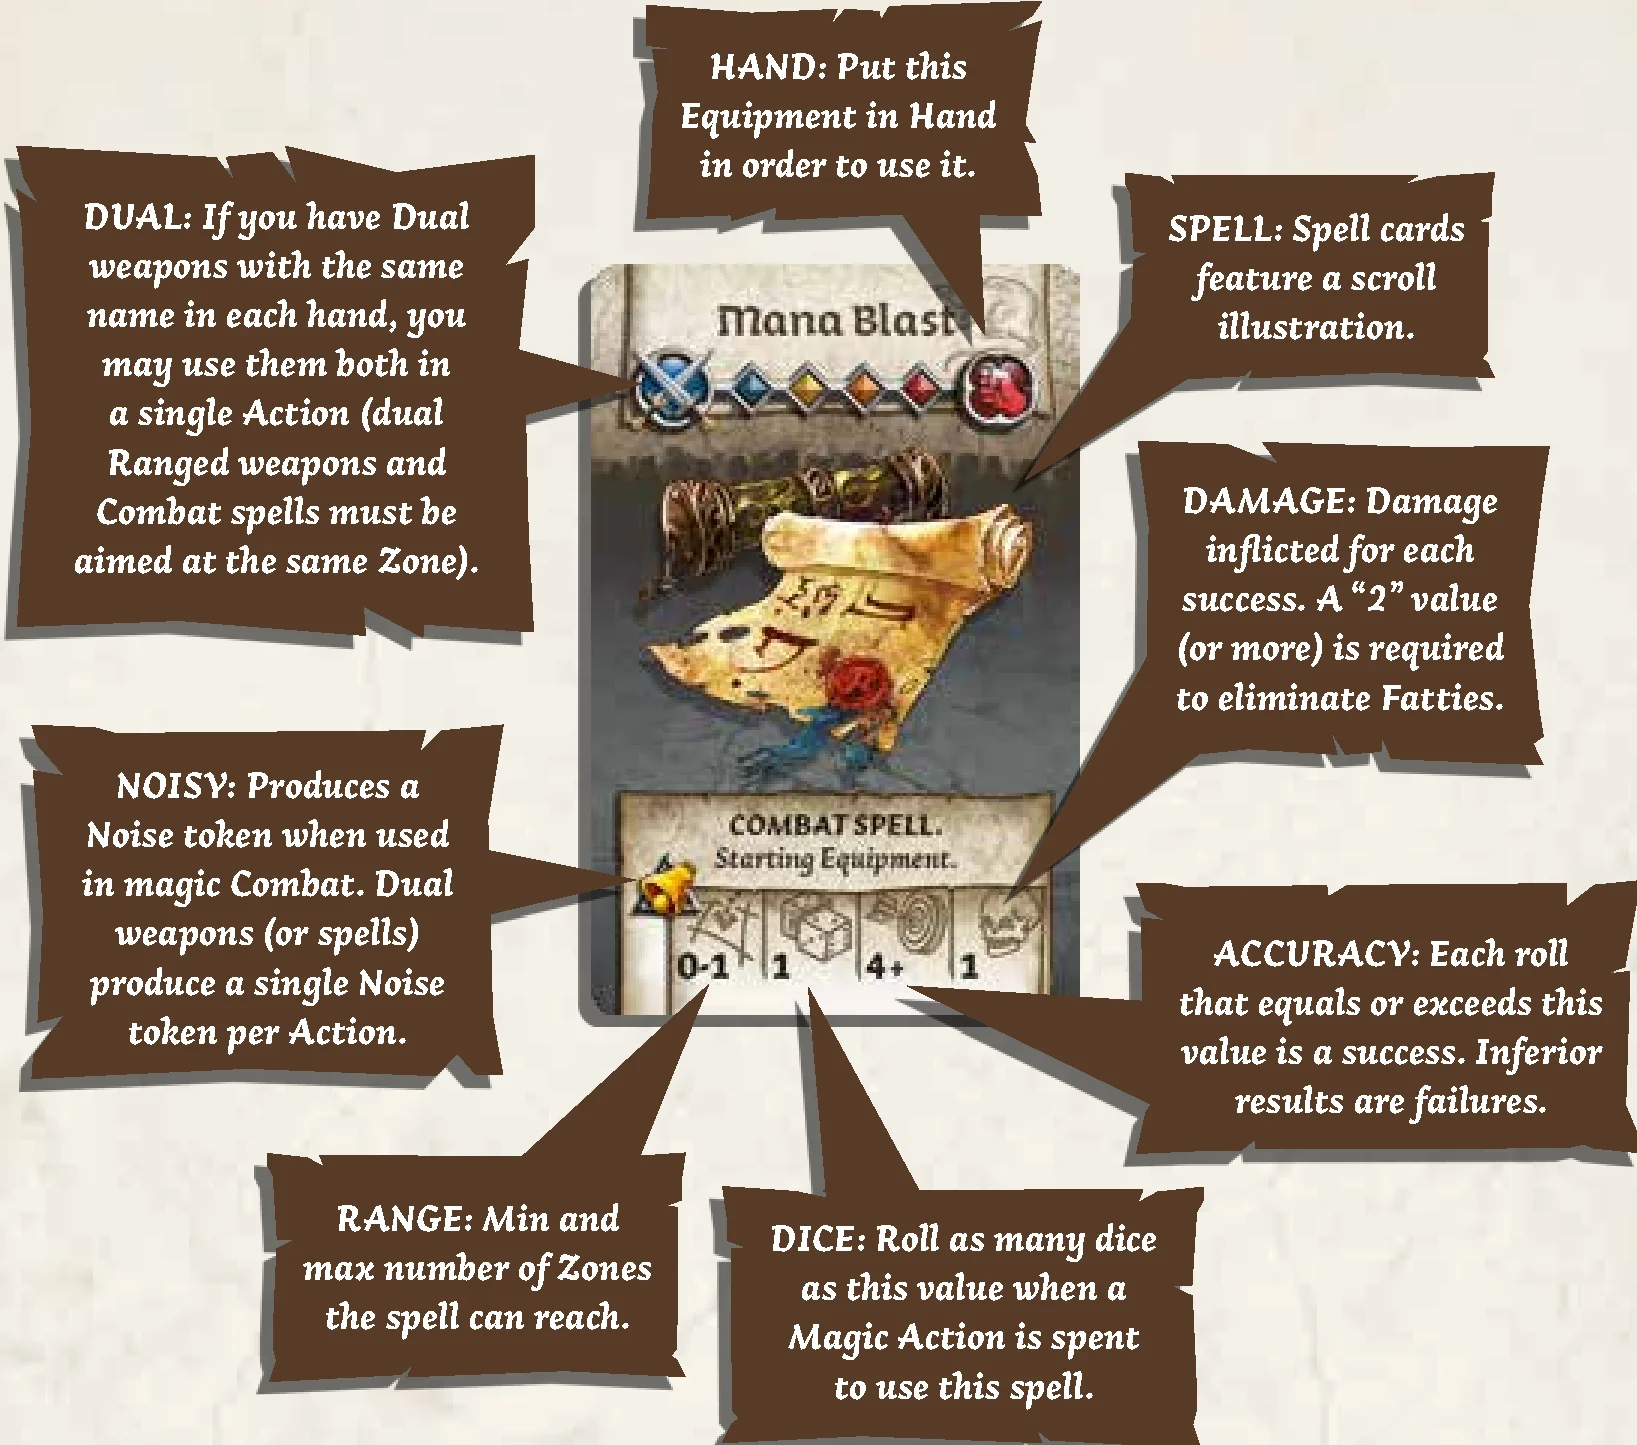
- DUAL: If you have Dual weapons with the same name in each hand, you may use them both in a single Action (dual Ranged weapons and Combat spells must be aimed at the same Zone).
- RANGE: Min and max number of Zones the weapon can reach. “0” indicates Melee only; a max Range of “1” or more indicates a Ranged weapon or Combat spell.
- DICE: Roll as many dice as this value when an Action is spent to use this weapon.
- ACCURACY: Each roll that equals or exceeds this value is a success. Inferior results are failures.
- DAMAGE: Damage inflicted for each success. A “2” value (or more) is required to eliminate Fatties.
- OPEN DOORS: Opens doors without any dice roll (or rolling a die if a value is shown).
- SILENT: Doesn’t produce a Noise token when used.
- NOISY: Produces a Noise token when used.
Turn Overview
Zombicide: Black Plague is played over a series of Game Rounds. During the Players’ Phase, the player with the first player token takes his Turn, activating his Survivors one at a time, in the order of his choice.
Each Survivor can initially perform three Actions per Turn, though Skills may allow him to perform extra Actions as the game progresses. The Survivor uses his Actions to kill Zombies, move around the board, and performs other tasks to accomplish the various Quest objectives. Some Actions make noise, and noise attracts Zombies!
Once a player has activated all his Survivors, the player to his left takes his Turn, activating his Survivors in the same manner.
When all the players have completed their Turns, the Players’ Phase ends.
Available Survivor Actions
Starting with whoever holds the first player token, each player activates his Survivors one after another, in the order of his choice. Each Survivor can execute three Actions at the Blue Danger Level (not counting any free Action his Blue Level Skill may give him). The possible Actions are:
Move
The Survivor moves from one Zone to the next but cannot move through external building walls or closed doors. If there are Zombies in the Zone the Survivor is attempting to leave, he must spend one extra Action per Zombie to leave the Zone. Entering a Zone containing Zombies ends the Survivor’s Move Action, even if he has a Skill that allows him to move through multiple Zones per Move Action (or the Slippery Skill, see page 54).
EXAMPLE: Silas is in a Zone with two Walkers. To leave this Zone, he spends one Move Action, then two more Actions (one per Walker), for a total of three Actions. If there had been three Zombies in the Zone, Silas would have needed four Actions to move.
Search
You can only Search building Zones and only if there are no Zombies in the Zone. The player draws a card from the Equipment deck. He may then place it in the Survivor’s inventory or immediately discard it. A Survivor can only perform a single Search Action per Turn (even if it’s an extra, free Action). After searching, the Survivor may freely reorganize his inventory.
Remember, you may discard cards from your inventory to make room for new cards at any time, for free.
When the Equipment deck runs out, reshuffle all the discarded Equipment cards (with the exception of Vault cards like Inferno and Orcish Crossbow, but including starting Equipment cards) to make a new deck.
Open a Door
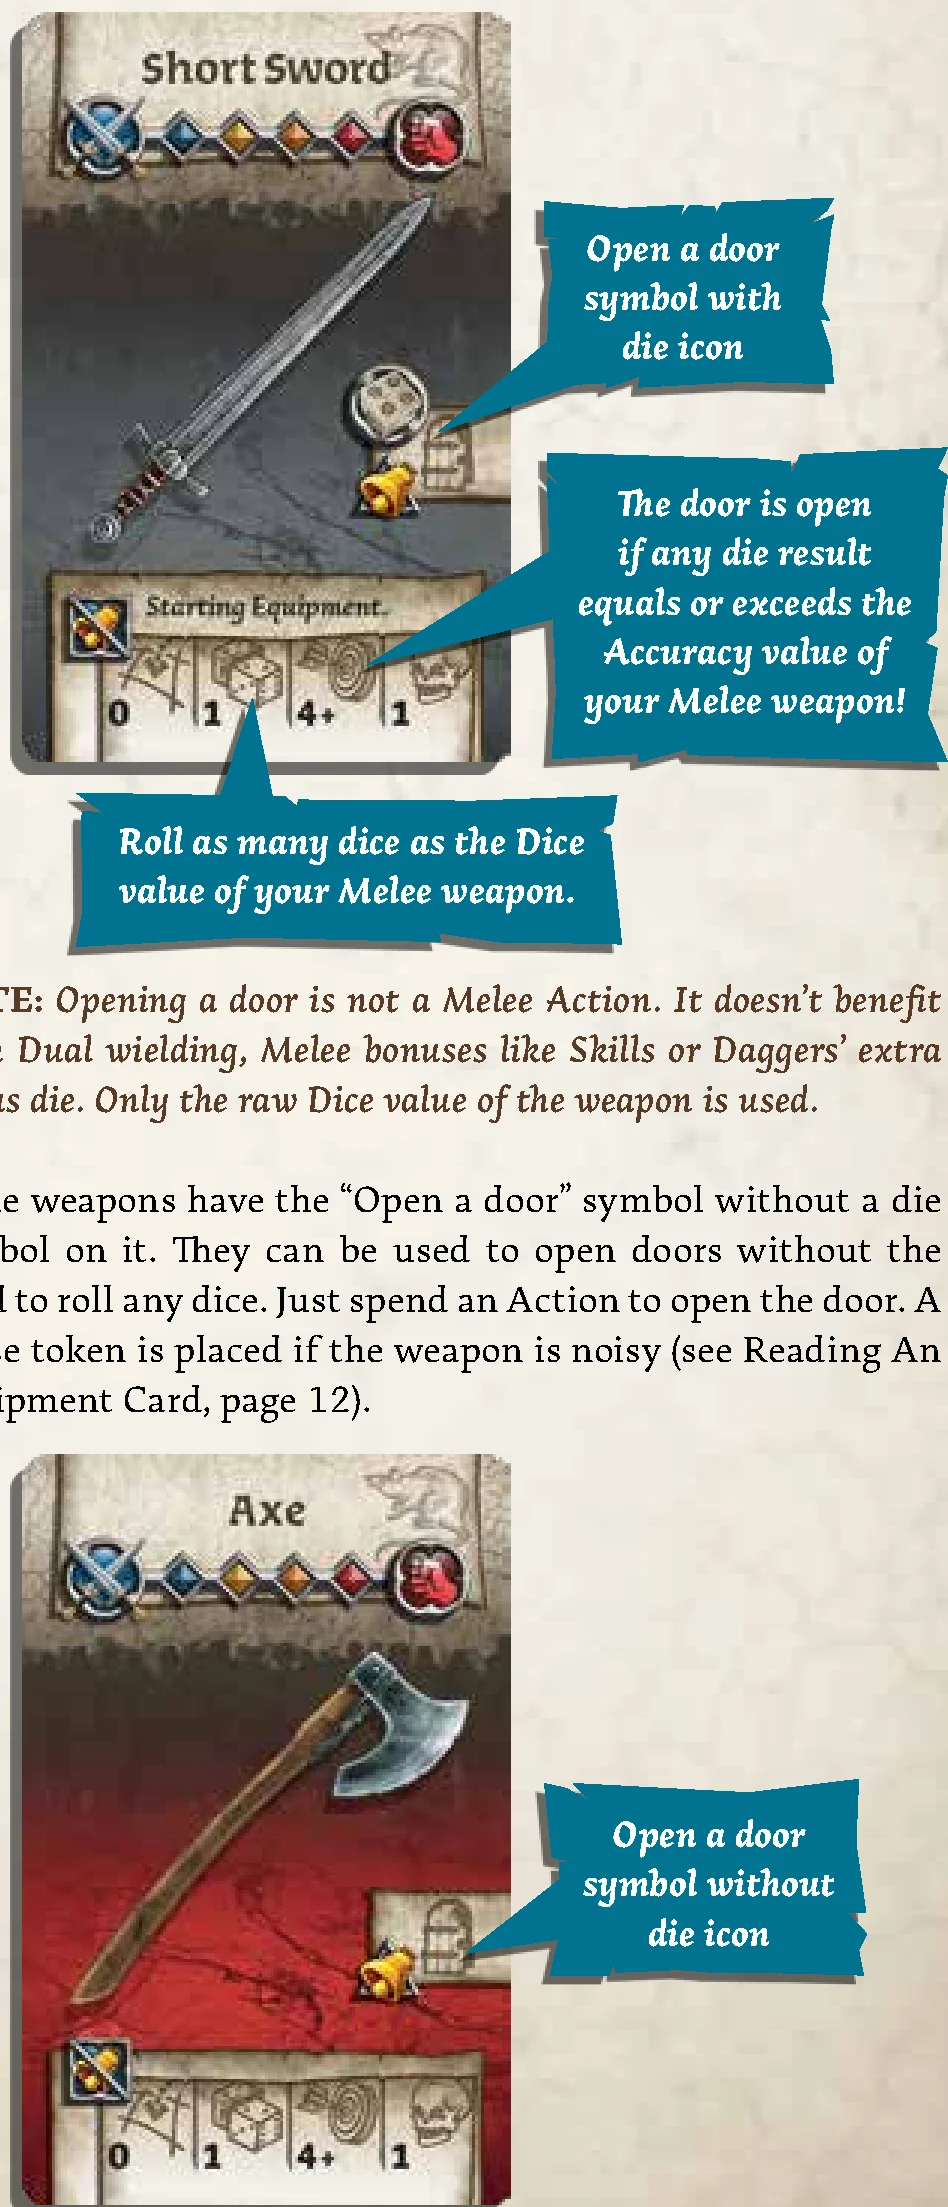
Melee weapons with the “Open a door” symbol can be used to open a door next to the Survivor:
- Weapons with a die icon: Spend an Action and roll as many dice as the weapon’s Dice value: the door is opened if any die result equals or exceeds the Accuracy number of the weapon. Place a Noise token in the Zone. Opening a door is not a Melee Action. It doesn’t benefit from Dual wielding, Melee bonuses like Skills or Daggers’ extra bonus die. Only the raw Dice value of the weapon is used.
- Weapons without a die icon: Spend an Action to open the door without rolling any dice. A Noise token is placed if the weapon is noisy.
Spawning In Buildings
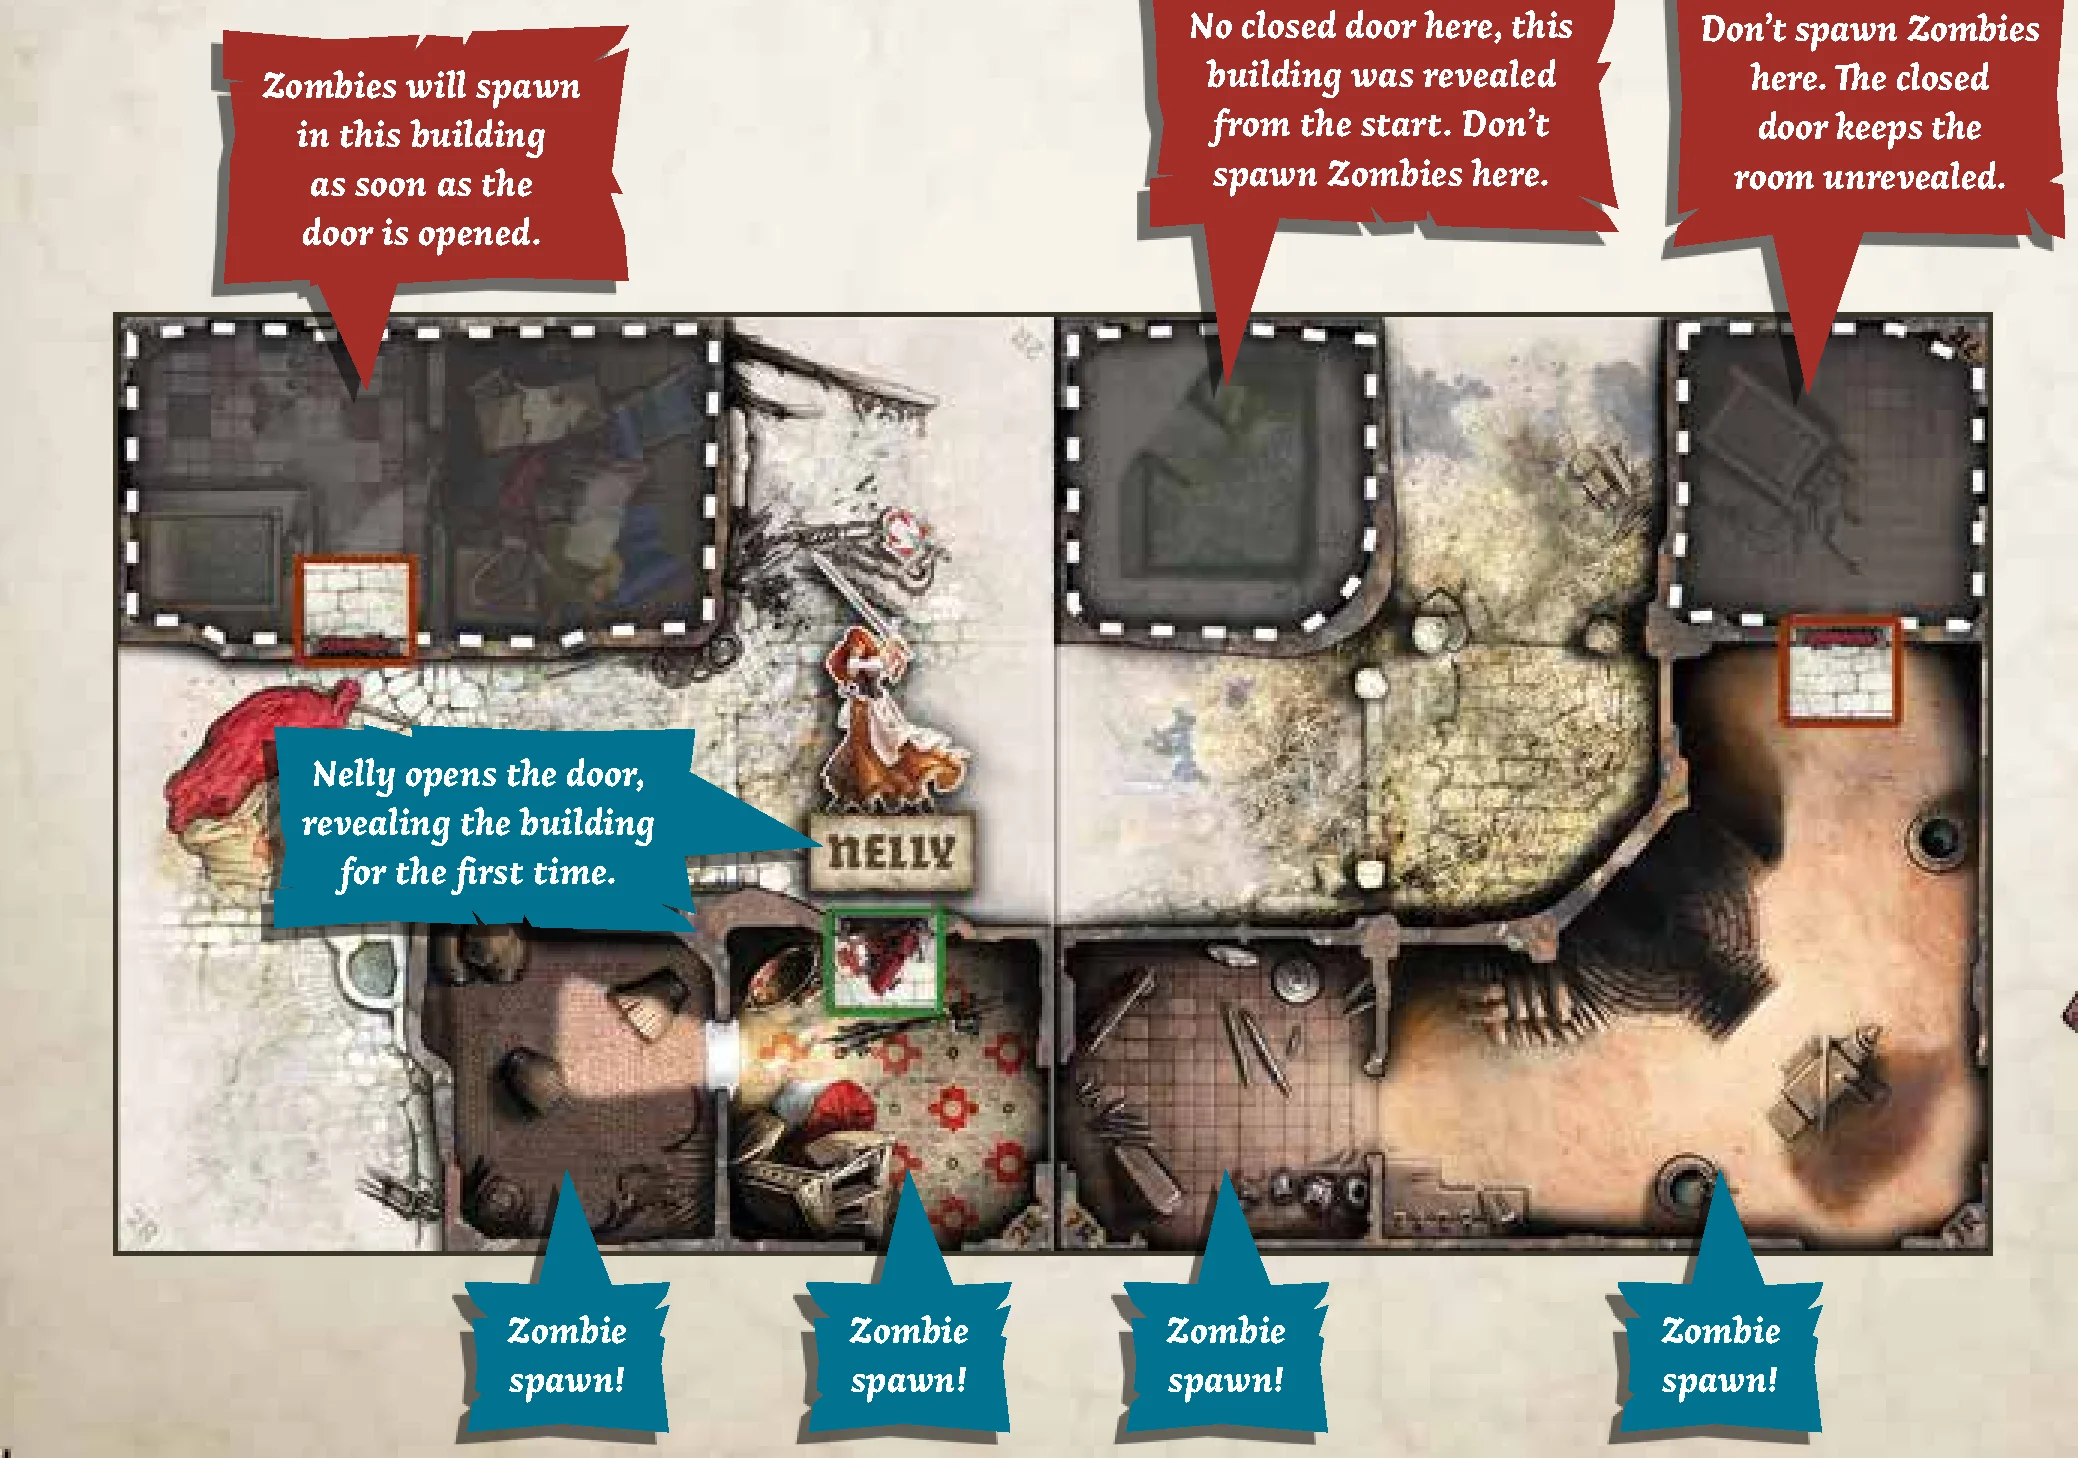
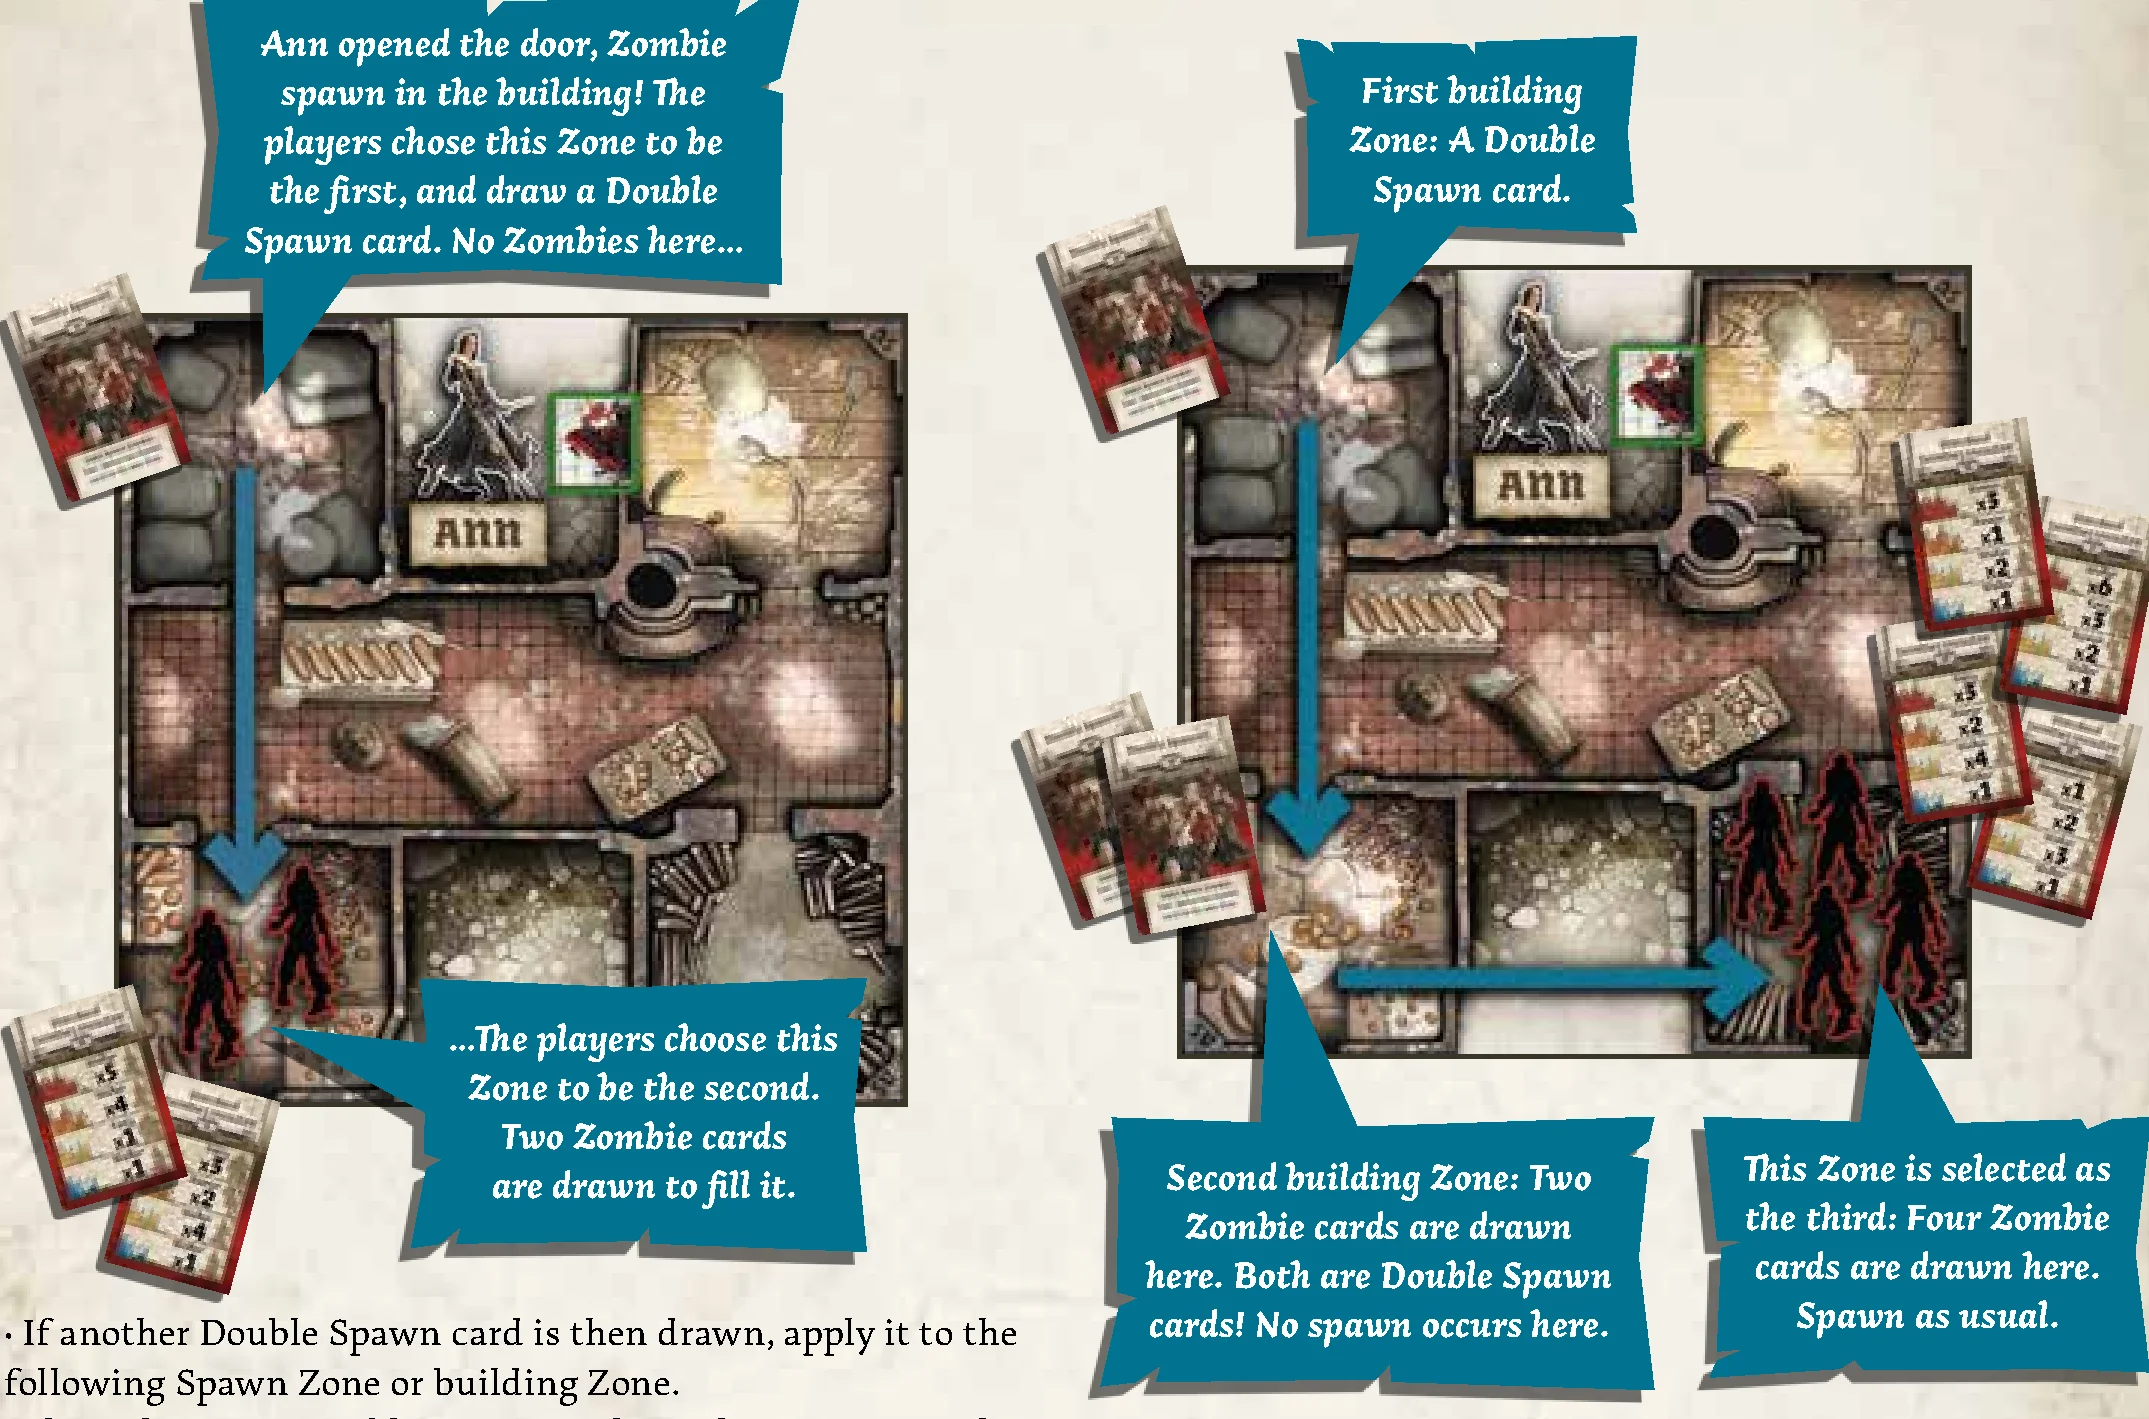
Opening a closed building for the first time reveals all the Zombies inside all rooms of the building (a single building extends to all rooms connected by openings, sometimes straddling several tiles). Indicate each Zone of the building, one after the other in any order you choose, and draw a Zombie card for each Zone. Place the corresponding number and type of Zombies on the indicated Zone (see Zombies’ Phase – Spawn, page 25).
- If you draw an Extra Activation, immediately perform the action indicated on the card.
- If you draw a Double Spawn card (see page 26), don’t spawn Zombies in this Zone, and spawn two cards’ worth of Zombies on the next.
- Some game effects allow an open door to be locked up. If it is opened again afterward, it won’t trigger a new Zombie Spawn.
- When the Zombie deck runs out, reshuffle all the discarded cards to make a new deck.
- Buildings that are open at the start of the game are never spawned in.
- Many Quests feature colored doors. Usually, these cannot be opened until some conditions are met, like finding an Objective of the matching color. Read the Quest description to know more.
Reorganize/Trade
At the cost of one Action, a Survivor can reorganize the cards in his inventory in any way he wishes. The Survivor can simultaneously exchange any number of cards with one (and only one) other Survivor currently in the same Zone. This other Survivor reorganizes his own inventory for free.
A Trade Action doesn’t have to be fair; you can trade everything for nothing, if both parties agree!
Combat Actions
Combat Actions use all types of combat-oriented Equipment cards: Melee, Ranged or Magic.
- Melee Action: The Survivor uses a Melee weapon he is holding in Hand to attack Zombies in his Zone (see Combat, page 32).
- Ranged Action: The Survivor uses a Ranged weapon he is holding in Hand to fire at a single Zone within the Range shown on the weapon’s card (see Combat, page 32). In Zombicide: Black Plague, people shoot at Zones, not Actors. This is especially important for Targeting Priority Order (see page 34). Remember, using a Ranged weapon at Range 0 is still a Ranged Action.
- Magic Action: The Survivor uses a Combat spell (a spell with combat characteristics) he is holding in Hand to attack Zombies. This attack follows the same rules as Ranged Actions.
Enchantment Action
The Survivor uses an Enchantment (a spell without combat characteristics) he is holding in Hand. Resolve the game effect(s) described on the card.
- Enchantments are cast at target Actors or Zones (check the card description) within the Survivor’s Line Of Sight.
- If the target is a Survivor, the caster may target himself.
- Most Enchantments bear the note “Once per Turn”: a given Survivor can cast it only once during each of his Turns. If he owns multiple copies of the same Enchantment, each copy can be cast independently. The same Enchantment can be cast several times in a Game Round, if Survivors exchange it and cast it as their Turns go by.
Take or Activate an Objective
The Survivor takes an Objective or activates an Objective in the same Zone. The game effects are explained in the Quest’s description.
Make Some Noise!
The Survivor makes Noise in an attempt to attract Zombies. Place one Noise token in his Zone.
Do Nothing
The Survivor does nothing and prematurely ends his Turn. His remaining Actions are lost.
Combat Mechanics
When a Survivor executes a Melee, Ranged or Magic Action to attack Zombies, roll as many dice as the Dice number of the weapon (or Combat spell) being used.
- Dual Wielding: If the active Survivor has two identical weapons or Combat spells with the Dual symbol equipped in Hands, he can use both weapons at the same time at the cost of a single Action. For Ranged and Magic Actions, both weapons/spells must be aimed at the same Zone.
- Success: Each die result that equals or exceeds the Accuracy number of the weapon scores a successful hit.
- Damage: Each hit inflicts the amount of Damage specified by the Damage value of the weapon to a single target:
- Walkers, Runners and Necromancers are killed with a 1 Damage hit (or more).
- Fatties are killed with a 2 Damage hit (or more). It does not matter how many hits you obtain with a weapon that inflicts 1 Damage. A Fatty will absorb the hits without flinching.
- Abominations are killed with a 3 Damage hit (or more). As no weapon naturally has Damage 3 in Zombicide: Black Plague, you have to destroy the monster with Dragon Fire (see page 35) or with Samson using a Damage 2 Melee weapon in conjunction with his +1 Damage: Melee Skill.
- Each successful hit can only take out one target, and any remaining Damage is overkill and wasted.
THREE HANDS? Putting the proper Equipment card in his Body space, a Survivor could effectively be considered as having three cards equipped in Hand. For obvious reasons, he can only use two of them at any given time. Choose any combination of two among these three before resolving Actions or rolls involving the Survivor.
Melee Action
A Survivor holding a Melee weapon (a weapon with a max Range of “0”) in Hand can attack a Zombie in his own Zone. Each die roll equal or higher than the Accuracy value on the weapon’s card is a successful hit. The player divides his hits as he wishes among the possible targets in the Zone.
Missed melee strikes cannot cause Friendly Fire.
Ranged Action
A Survivor holding a Ranged weapon (a weapon with a max Range of “1” or more) in Hand can shoot at a Zone he can see (see Line of Sight, page 10) and that is within the weapon’s Range.
- Inside a building, the Line of Sight is limited to the Zones that share an opening and just one Zone away.
- Missed shots can cause Friendly Fire (see Page 34), so aim carefully!
- The Range of a weapon, indicated by the Range value on its card, is the number of Zones it can shoot across:
- The first value shows the minimum Range. The weapon may not shoot at Zones closer than the minimum. In some cases this is 0, meaning the Survivor can shoot at targets in the Zone he currently occupies (it is still a Ranged Action).
- The second value shows the maximum Range of the weapon. A weapon cannot fire at Zones beyond the maximum Range.
- When a Zone is chosen for a Ranged Action, ignore any Actors in the Zones between the shooter and the target. This means Survivors may shoot through occupied Zones without danger to either fellow Survivors or Zombies. A Survivor can even shoot at another Zone while Zombies stand on his own!
Targeting Priority Order
When using a Ranged weapon (even at Range 0), the shooting Survivor does not choose the targets hit by successful rolls. Hits are assigned to Actors in the targeted Zone according to this targeting priority order:
| Targeting Priority | Name | Actions | Min Damage to Destroy | Experience Points |
|---|---|---|---|---|
| 1 | Walker | 1 | 1 | 1 |
| 2 | Fatty / Abomination (1) | 1 | 2 / 3 | 1 / 5 |
| 3 | Runner | 2 | 1 | 1 |
| 4 | Necromancer | 1 | 1 | 1 |
(1) Abomination: Ignore Armor rolls.
The hits are assigned to targets of the lowest priority number until they’ve all been eliminated, then to targets of the next priority until they’ve all been eliminated, and so on. If several targets share the same Targeting Priority Order, players choose the targets hit among them.
Friendly Fire
A Survivor can’t hit himself with his own attacks. However, emergency situations can call for a Ranged or Magic Action aimed at a Zone where a teammate is stuck. In that case, misses on the attack roll automatically land on Survivors standing in the target Zone. Assign these Friendly Fire hits in any way you want.
- Armor rolls are allowed, successes cancelling Friendly Fire hits on a one-to-one basis.
- Each remaining Friendly Fire hit on the Survivor inflicts as many Wounds as the Damage value of the weapon (or Combat spell) used.
- Friendly Fire doesn’t apply to Melee Actions.
- Killing a Survivor earns no experience.
Reloadable Weapons
While most weapons can be used repeatedly, a few, like the Hand Crossbow and Orcish Crossbow (when used for Ranged Actions), require spending an Action to reload them between shots if you want to fire multiple times in the same Game Round. You can turn the card upside down to remember the weapon is empty and needs a reload to fire again. At the End Phase of the Game Round, all such weapons are freely reloaded, so that they always start the Round ready to fire.
- If such a weapon is fired and passed to another Survivor without reloading, it must still be reloaded before the new owner can use it in the same Game Round.
- When equipped with two identical Dual weapons that require reloading, a single Action reloads both.
- Survivors may fire a single Dual reloadable weapon at a Zone and then execute another Ranged Action to fire at another Zone with the other Dual reloadable weapon.
Magic Action
A Survivor equipped with a Combat spell (a spell with combat characteristics) in Hand can blast a Zone he can see (and within the spell’s Range). Magic Actions share the same rules as Ranged Actions.
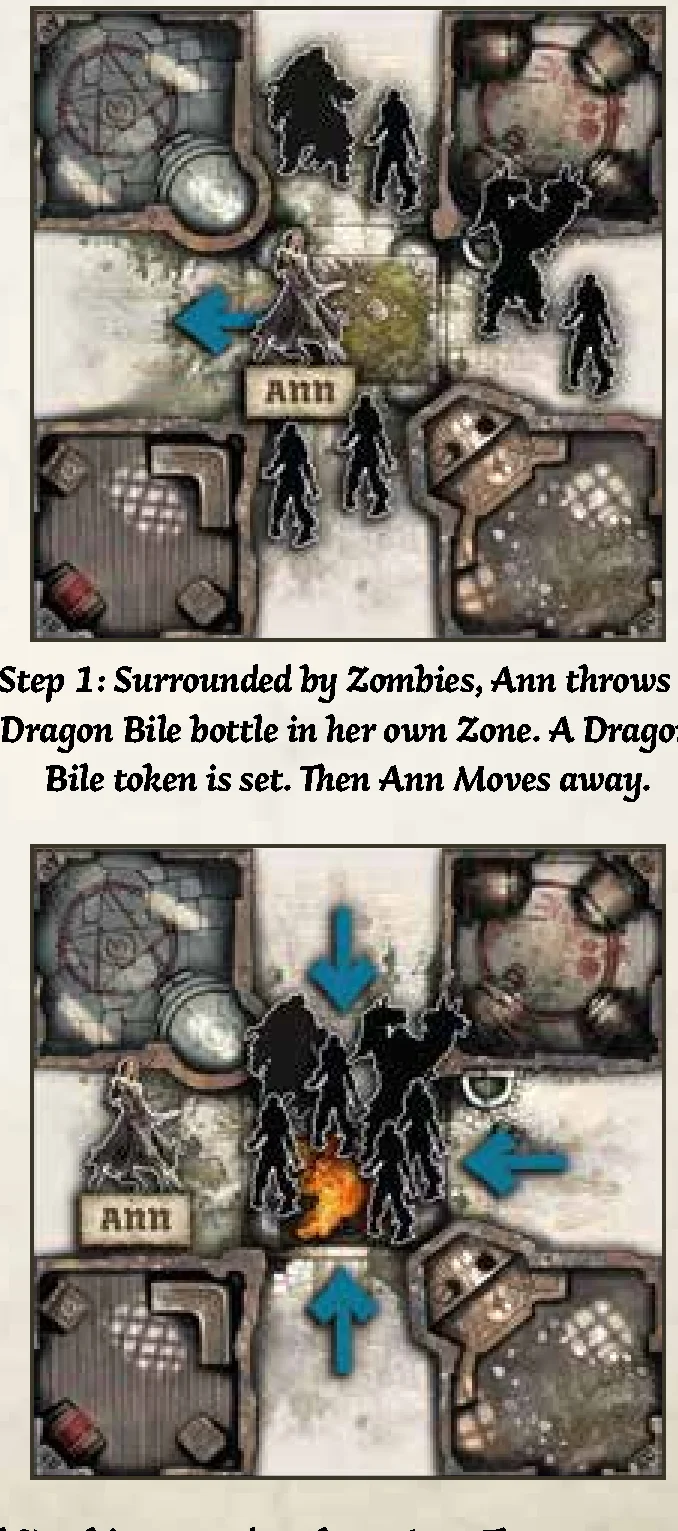
Dragon Fire
Most problems may be solved by torching them. – Ann
- A Dragon Bile card can be discarded from Hand to put a Dragon Bile pool at Range 0-1 of the Survivor.
- Later, a Torch card can be discarded from Hand to ignite a Dragon Bile pool at Range 0-1 and create a Dragon Fire: every Actor in the token’s Zone is killed, no matter its Damage threshold, Armor values or remaining Wounds. A Dragon Fire produces no Noise.
- The Dragon Bile pool is then removed, and the Survivor who threw the Torch earns all experience points.
Use Dragon Fire to set blazing Zombie traps! If all Dragon Bile tokens are already on the board and you need to set a new one, choose one of them and move it to the new Zone.
The Zombies
Zombicide: Black Plague features five types of Zombies. A good Survivor quickly learns their strengths and weaknesses!
Most Zombies have a single Action to spend each time they activate (Runners have two). A Zombie is eliminated as soon as it is successfully hit with an attack that has the minimum required Damage value. Its assailant then immediately earns the listed experience points.
Walker
Once peasants, craftsmen, merchants, or townsfolk, these poor unfortunates were taken unawares… dumbest and most numerous of the lot.
- Min. Damage to destroy: Damage 1
- Experience provided: 1 point
Fatty
Fatties are what we call the… well, fat ones… They ignore pain, just like most dead men. You need a strong arm to finish these.
- Min. Damage to destroy: Damage 2
- Experience provided: 1 point
Runner
Runners are fast. Faster than anything on two legs should be…
- Min. Damage to destroy: Damage 1
- Experience provided: 1 point
- Special rule: Each Runner has two Actions per Activation (see Playing Runners, page 25).
Abomination
Weapons don’t work. Armor don’t work. Fire is what you need. A good hot fire. It’s the only thing that works.
- Min. Damage to destroy: Damage 3
- Experience provided: 5 points
- Special rules:
- Wounds inflicted by Abominations can’t be prevented by Armor rolls (see page 23).
- A Damage 3 weapon is required to kill an Abomination. There is no such weapon in Zombicide: Black Plague’s core box. To slay the monster, your team needs to throw Dragon Bile in its Zone and ignite it with a Torch, creating a Dragon Fire (see page 35). Samson can also achieve this at Red Level, using a Damage 2 Melee weapon in conjunction with his +1 Damage: Melee Skill (see page 51).
Necromancer
Everyone’s heard the children’s stories, of the necromancers that live in the woods… They’re immune to the plague somehow, but that figures since they control the hordes. Kill them on sight, and burn the corpses.
- Min. Damage to destroy: Damage 1
- Experience provided: 1 point
- Special rules: Necromancers’ special rules are explained in depth on Page 29.
Zombies’ Phase Sequence
All Zombies on the board activate and spend one Action either attacking a Survivor next to them or, if they have nobody to attack, moving toward the Survivors or noisy Zones. Some Zombies, called Runners, get two Actions, so they can attack twice, attack and move, move and attack, or move twice.
Once all Zombies have performed their Actions, new Zombies appear in all active Spawn Zones on the board.
Once the players have activated all their Survivors, the Zombies play. Nobody takes their role; they do it themselves, performing the following steps in order:
Step 1 – Activation
Each Zombie activates and spends its Action on either an Attack or a Move, depending on its situation. Resolve all the Attacks first, then all the Moves. Each Zombie performs either an Attack OR a Move with a single Action.
Attack
Each Zombie in the same Zone as Survivors performs an Attack. A Zombie’s Attack is always successful, does not require any dice rolls, and inflicts one Wound. Survivors in the Zone share the Wounds in any way the players prefer, even if it means inflicting them all on a single Survivor.
After any applicable Armor roll, the Wound Bar’s tracker is moved one point higher per Wound received. A Survivor is eliminated as soon as his Wound Bar reaches 3. Remove his miniature and discard his Equipment.
Feeding Frenzy! Zombies fight in groups. All Zombies activated in the same Zone as a Survivor joins the Attack, even if there are so many that it would be overkill.
Armor Rolls
- Armor: Survivors wearing an armor Equipment card on the Body slot can execute Armor rolls to avoid Wounds. Roll as many dice as the number of Wounds the Survivor is about to receive. Each die result that equals or exceeds the Armor number of the armor card negates a Wound. A lucky Survivor could even choose to endure all Wounds for his team and get out without a scratch!
- Shield: A Hand-held Shield allows Armor rolls if the Survivor isn’t wearing actual armor. If he is wearing armor, the Shield allows re-rolling its Armor rolls once. Re-roll all the dice, and the new result takes the place of the previous one. In some cases (with a 5+ Leather Armor, for example), the Shield could offer a better Armor value than the armor itself: the Survivor may choose to use the Shield’s Armor value instead, but then he won’t be allowed a re-roll.
- Exceptions: Wounds inflicted by Abominations, as well as being eliminated by a Dragon Fire, can’t be prevented by Armor rolls.
Move
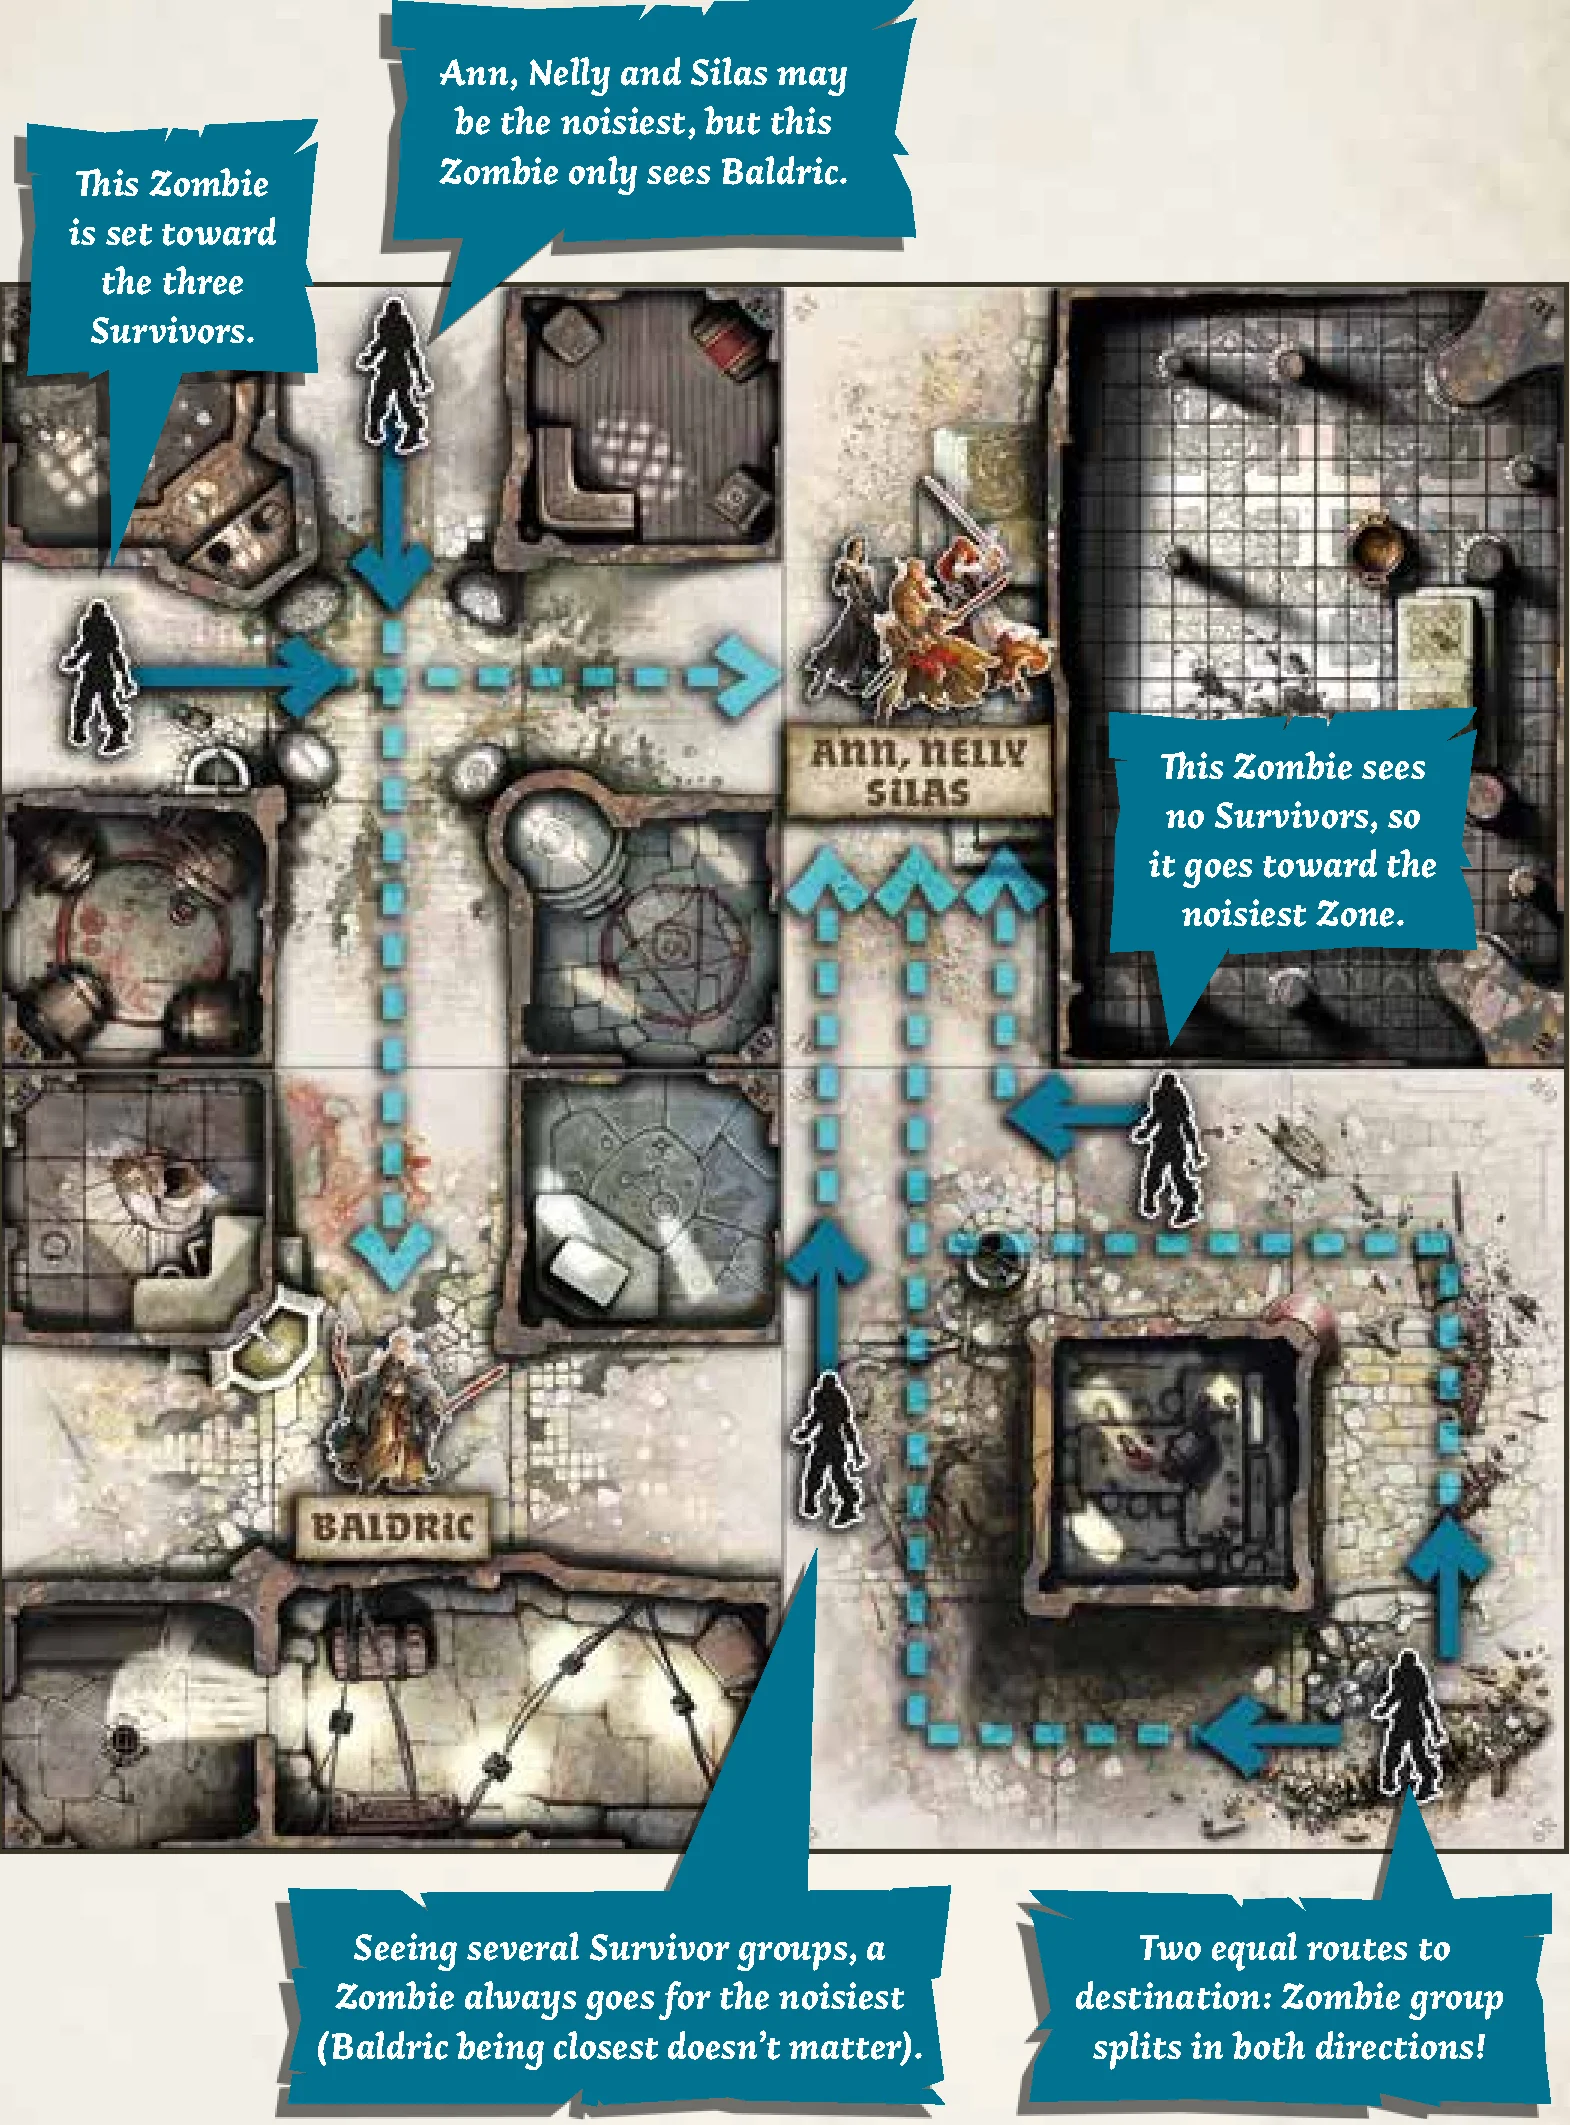
The Zombies that have not attacked use their Action to Move one Zone toward Survivors:
- Zombies select their destination Zone:
- First is the Zone with Survivors in Line Of Sight that has the most Noise tokens. Remember, each Survivor counts as a Noise token.
- If no Survivor is visible, they move toward the noisiest Zone.
- In both cases, distance doesn’t matter. A Zombie always goes for the noisiest meal he can see or hear.
- Zombies move 1 Zone toward their destination Zone by taking the shortest available path. In case there are no open paths to the noisiest Zone, Zombies move toward it as if all doors were open, though locked doors still stop them.
If there is more than one route of the same length, the Zombies split into groups of equal numbers to follow all possible routes. They also split up if different target Zones contain the same number of Noise tokens. If necessary, add Zombies so that all new groups resulting from a splitting group contain the same number of each Zombie type!
Splitting special cases:
- Abominations and Necromancers never split; decide which direction they go.
- If there aren’t enough Zombie miniatures to add for an even split, decide which Zombie group gets the final reinforcement, and which direction the uneven split groups go. It doesn’t generate extra Activations (see P. 26).
IMPORTANT: Necromancers use their own Movement rules. They always Move toward the nearest non-Necromancer Spawn Zone (see P. 29).
Playing Runners
Runners have two Actions per Activation. After all Zombies (including the Runners) have gone through the Activation step and resolved their first Action, the Runners go through the Activation step again, using their second Action to Attack a Survivor in their Zone or Move if there is nobody to attack.
Step 2 – Spawn
The Quest maps show where Zombies appear at the end of each Zombies’ Phase. These are the Spawn Zones.
- Indicate a Spawn Zone and draw a Zombie card.
- Read the line on the card that corresponds to the color of the Danger Level of the most experienced Survivor still in the game (Blue, Yellow, Orange, or Red). Place the number and type of Zombies shown.
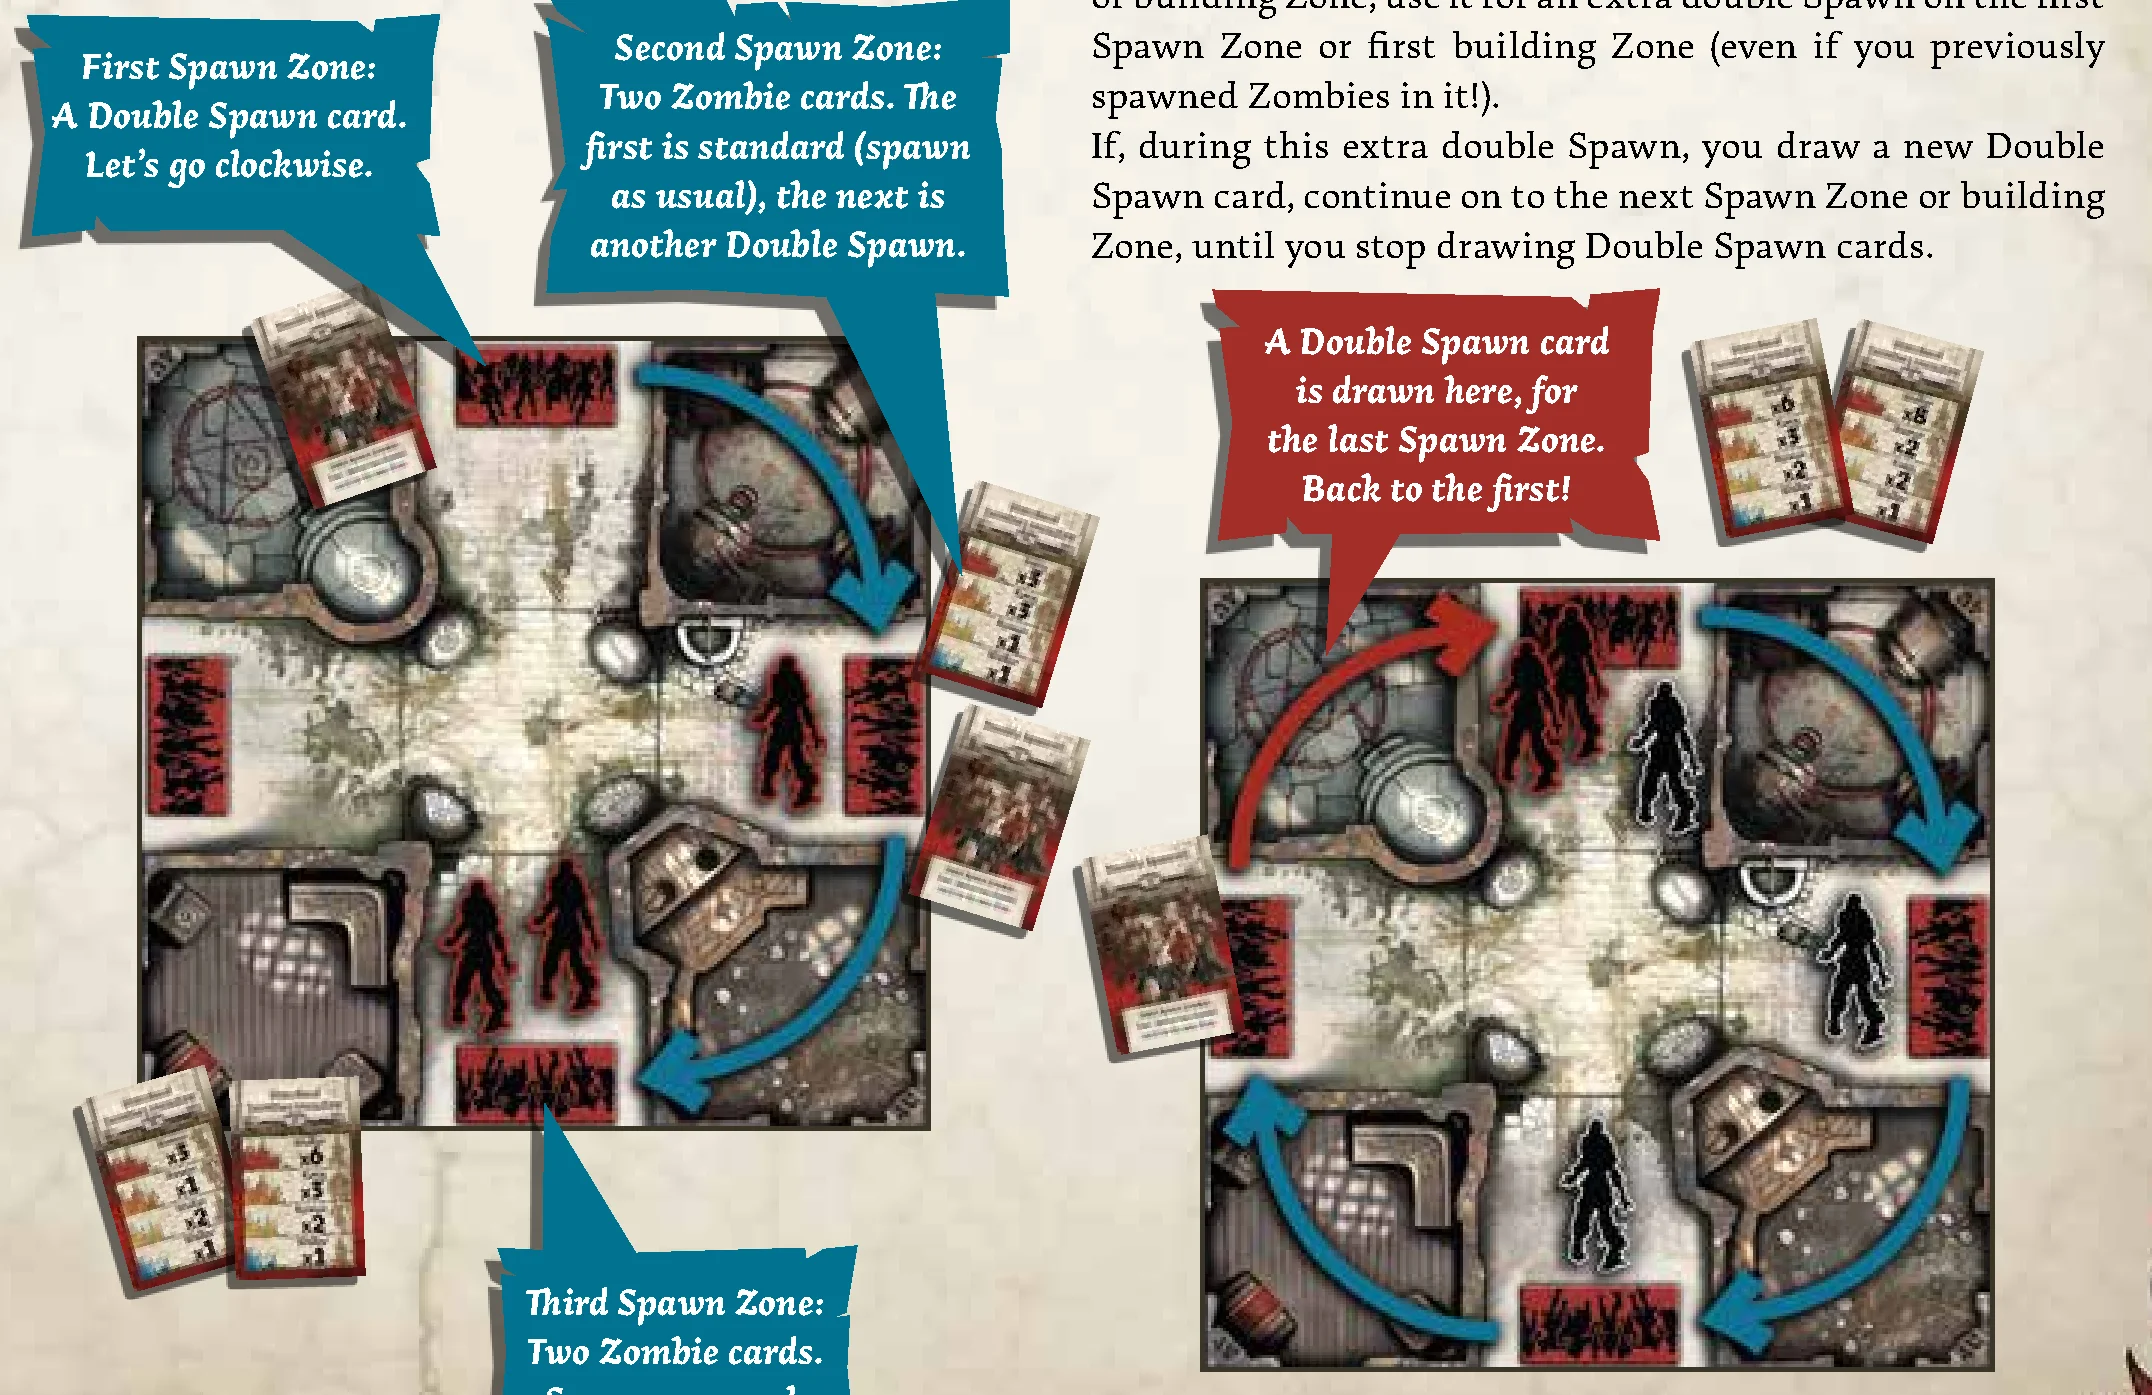
- Repeat this for each Spawn Zone. Always begin with the same Spawn Zone and continue clockwise.
- When the Zombie deck runs out, reshuffle all the discarded Zombie cards to make a new deck.
Colored Spawn Zones
Some Quests feature blue and/or green colored Spawn Zone tokens. Unless otherwise stated, their Zone doesn’t spawn Zombies until a specific event (like taking an Objective of the matching color) happens and activates them.
Extra Activations Cards
When you reveal an Extra Activation card, no Zombies appear in the designated Zone. Instead, all Zombies of the indicated type immediately get an extra Activation (see Activation step, page 23). Notice that these cards have no effect at the Blue Danger Level!
Double Spawn Cards
- When you draw a Double Spawn card, no Zombies appear in the designated Zone. The next Zombie Spawn is resolved by drawing two Zombie cards instead of one for the next Spawn Zone (if drawn during Spawn Step) or building Zone (if drawn when spawning in a building).
- These Zombie cards are drawn together and resolved in drawing order. If one of them is another Double Spawn card, resolve the standard Spawn card first, then the Double Spawn card.
- If another Double Spawn card is then drawn, apply it to the following Spawn Zone or building Zone.
- If you draw two Double Spawn cards on the same Zone, the next Zone receives four cards’ worth of Zombies!
- If the Double Spawn card is drawn for the last Spawn Zone or building Zone, use it for an extra double Spawn on the first Spawn Zone or first building Zone (even if you previously spawned Zombies in it!).
- If, during this extra double Spawn, you draw a new Double Spawn card, continue on to the next Spawn Zone or building Zone, until you stop drawing Double Spawn cards.
Running Out Of Miniatures
The Zombicide: Black Plague box contains enough Zombies to invade a village. However, players may still run out of miniatures of the indicated type when required to place a Zombie on the board through spawning or populating a building. In this case, the remaining Zombie miniatures are placed (if there are any), and then all Zombies of the indicated type immediately resolve an extra Activation.
Multiple Activations may occur in a row. This rule is especially important to Abominations and Necromancers, as there is a single miniature of each in the Zombicide: Black Plague core box. Under some circumstances, an Abomination or Necromancer may get several extra Activations in a single Game Round.
Several Abominations and Necromancers can roam the board if you own miniatures of them.
End Phase
All Noise tokens are removed from the board, and the first player hands the first player token to the player to his left. Another Game Round then begins.
Necromancers
Being the most evil of all opponents, Necromancers do their best to spread havoc and seize power. They don’t have time to battle Survivors on their own, and try to flee as soon as they are discovered. Necromancers follow these special rules:
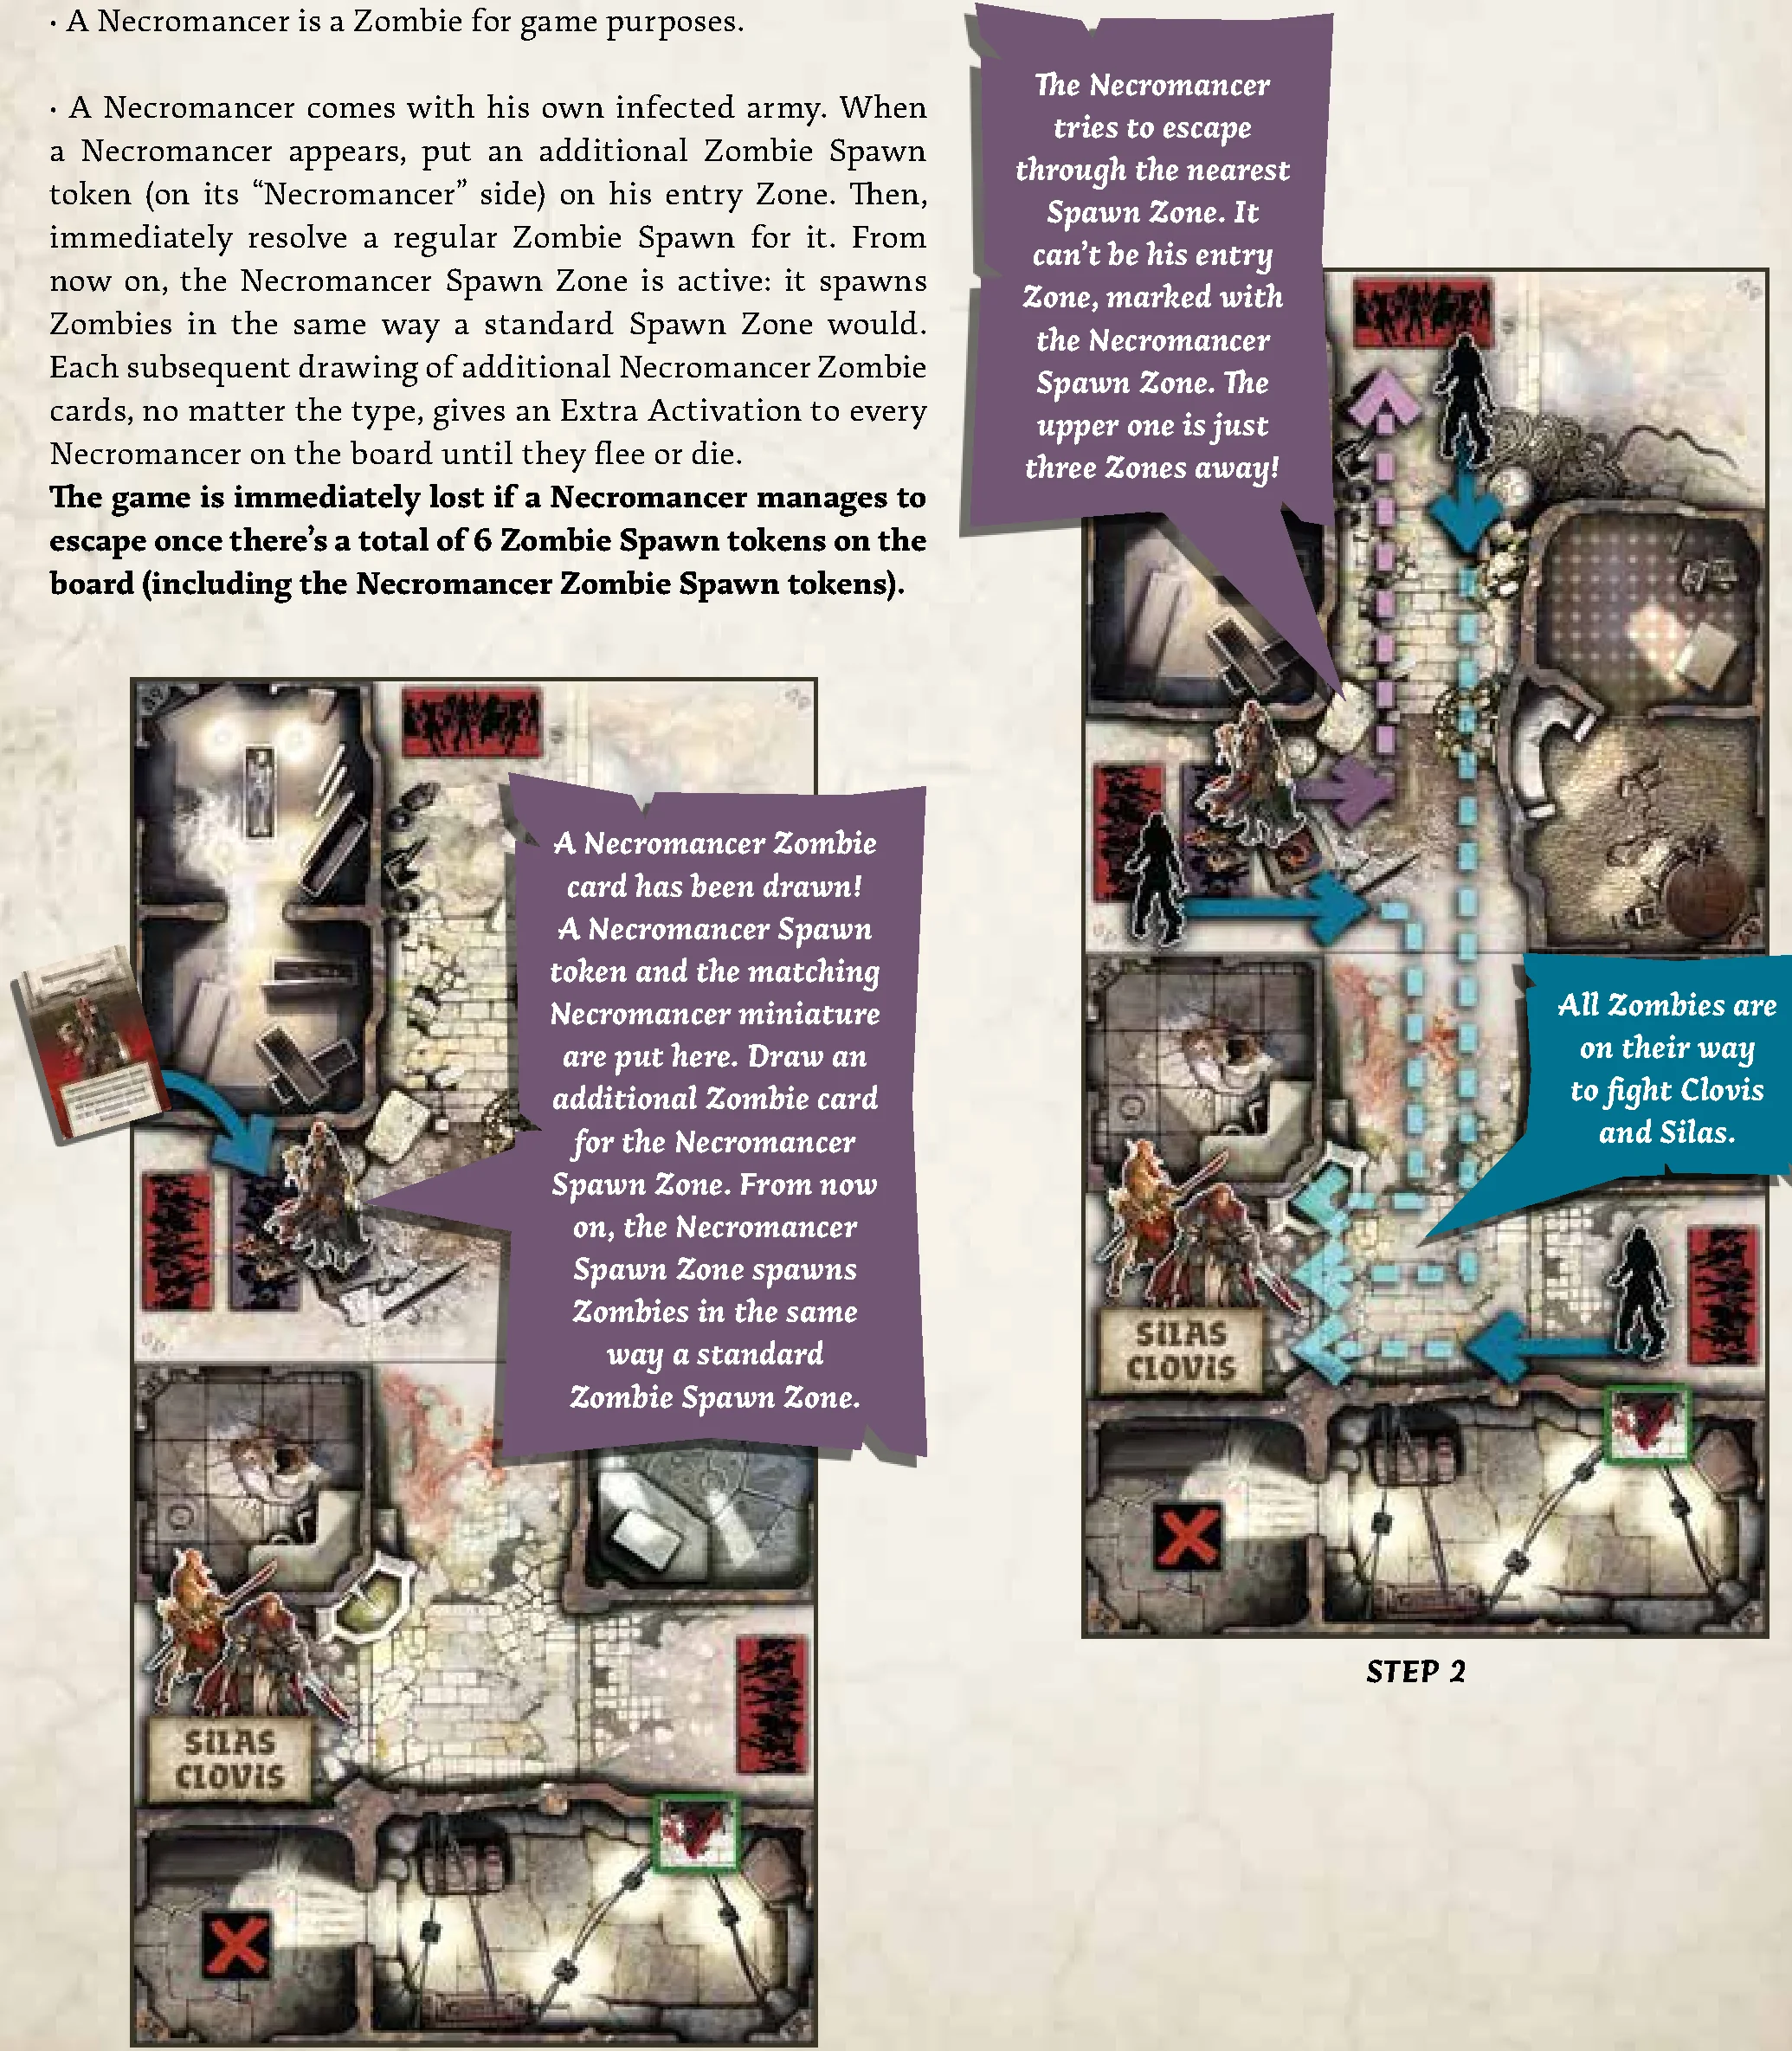
- A Necromancer is a Zombie for game purposes.
- A Necromancer comes with his own infected army. When a Necromancer appears, put an additional Zombie Spawn token (on its “Necromancer” side) on his entry Zone. Then, immediately resolve a regular Zombie Spawn for it. From now on, the Necromancer Spawn Zone is active: it spawns Zombies in the same way a standard Spawn Zone would.
- Each subsequent drawing of additional Necromancer Zombie cards, no matter the type, gives an Extra Activation to every Necromancer on the board until they flee or die.
- The game is immediately lost if a Necromancer manages to escape once there’s a total of 6 Zombie Spawn tokens on the board (including the Necromancer Zombie Spawn tokens).
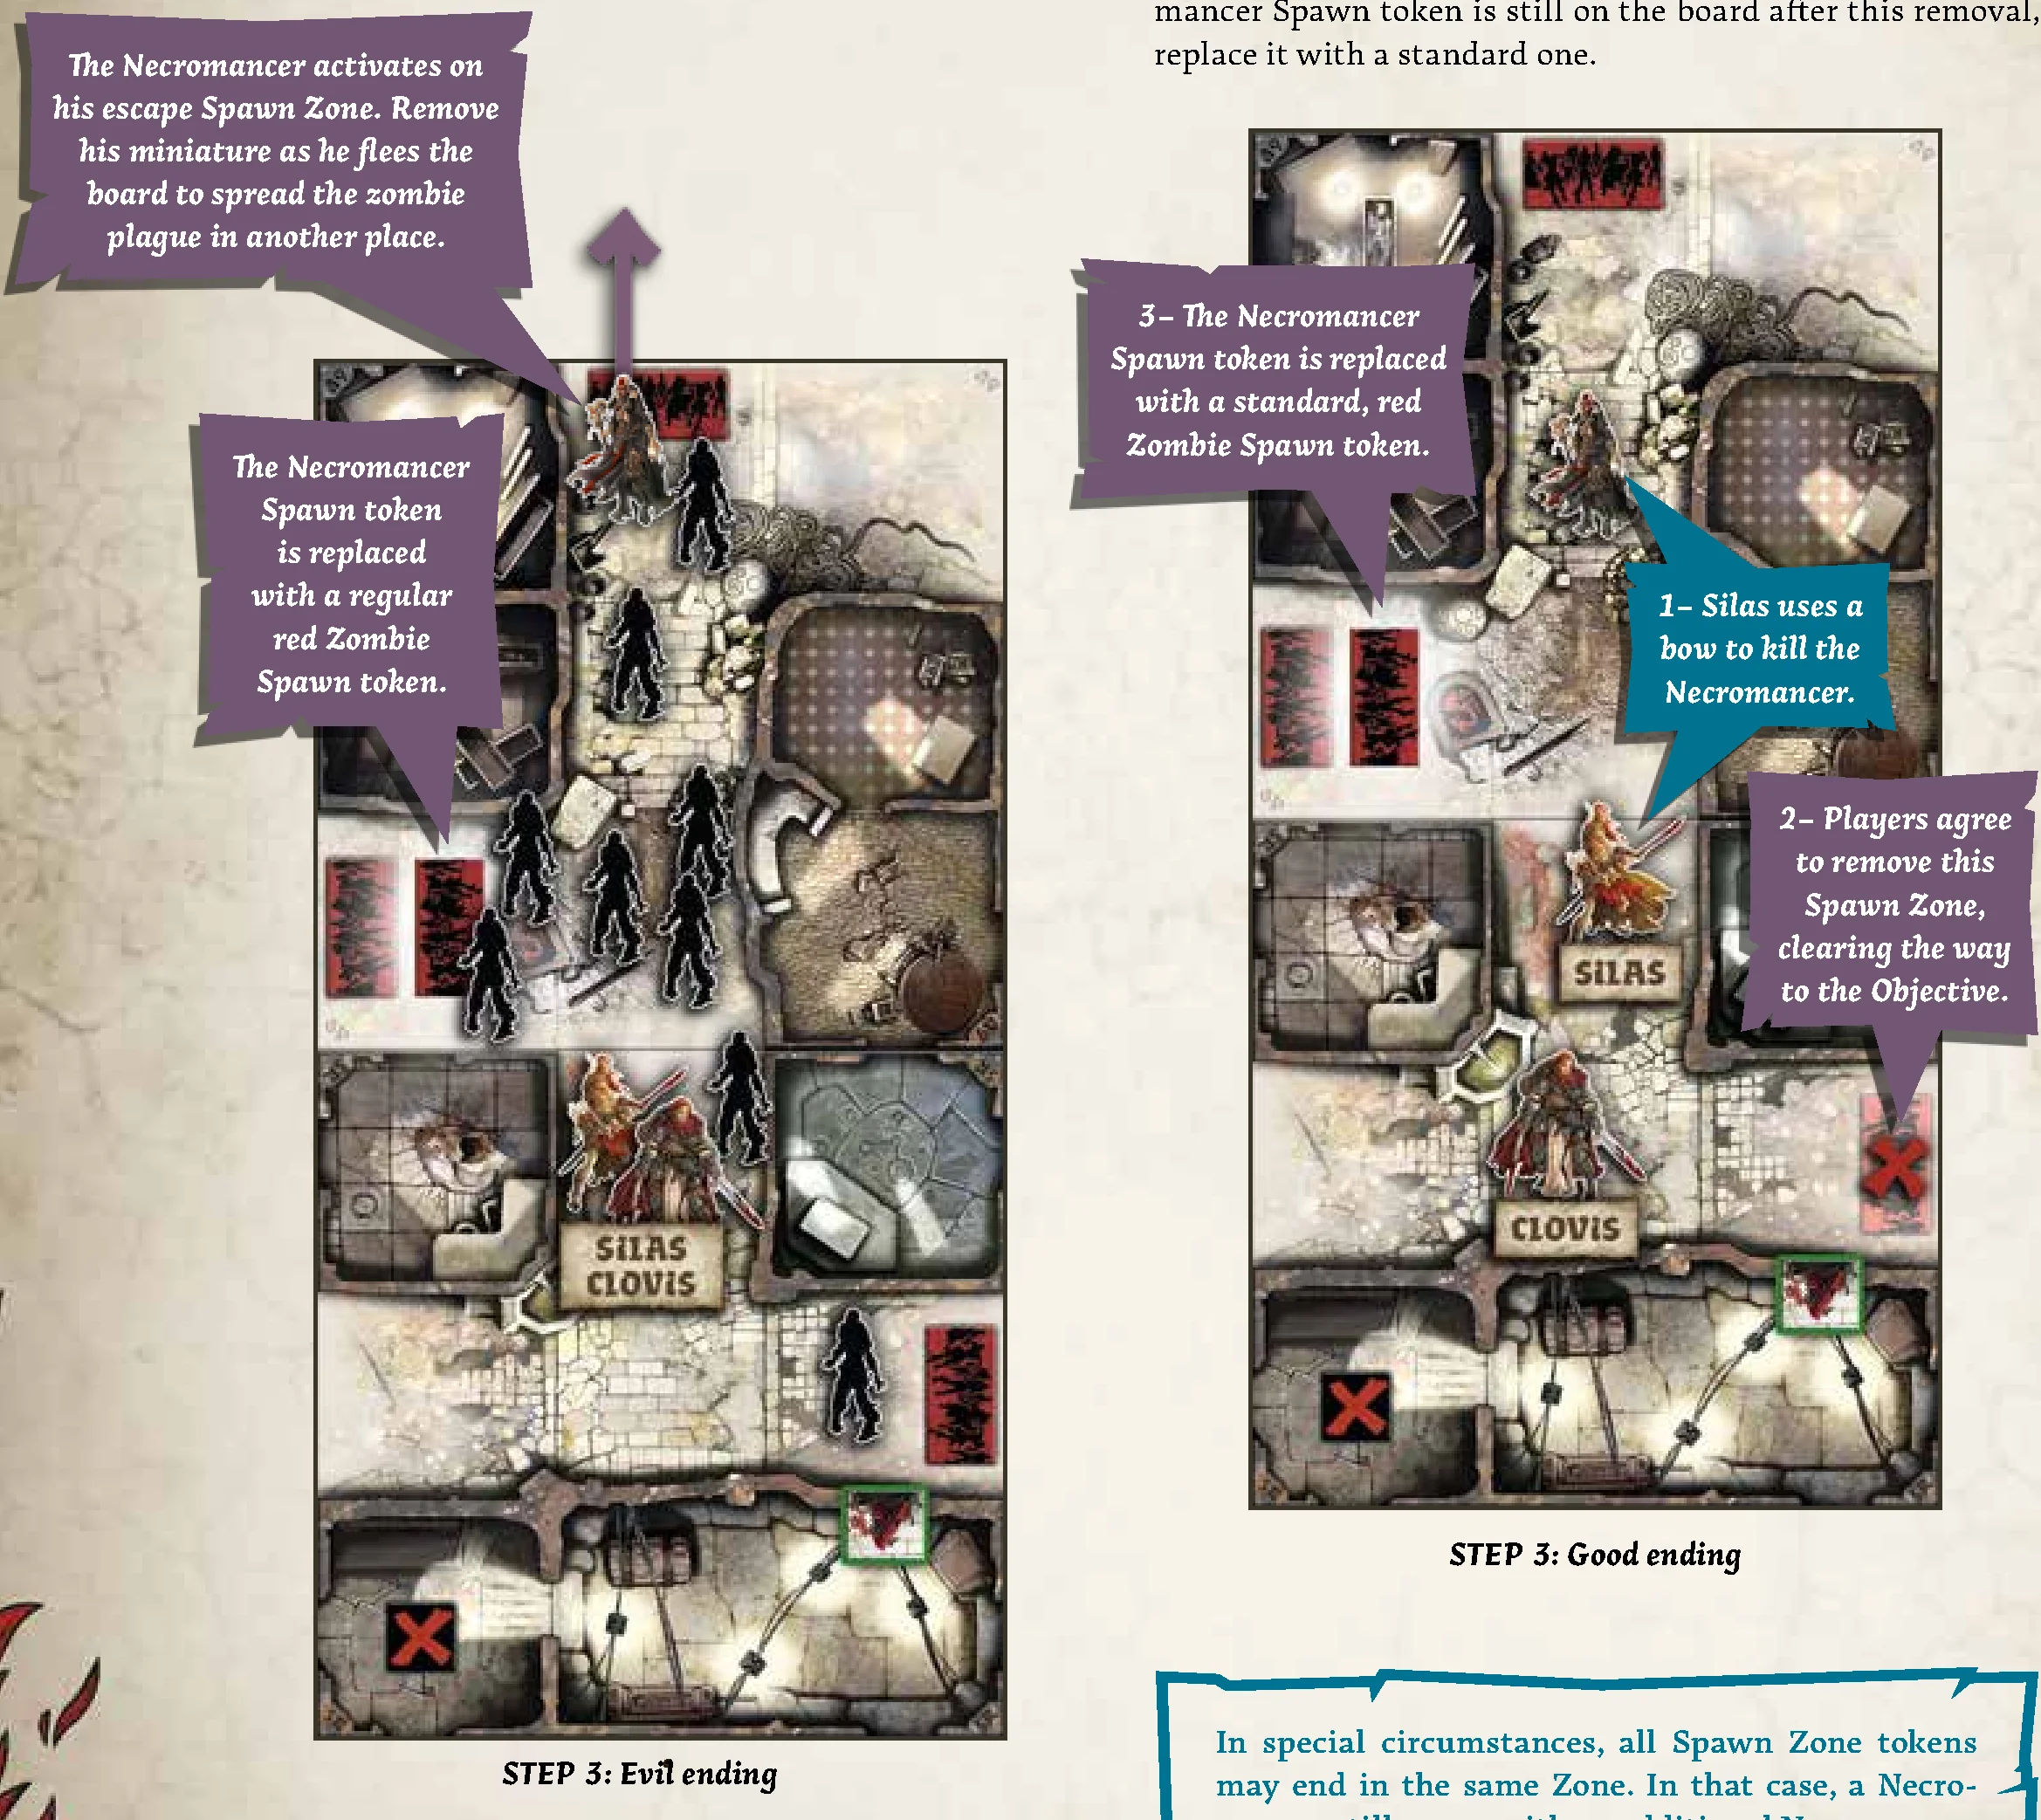
- A Necromancer tries to flee the board. If there are no Survivors in his Zone for him to Attack during his Activation (see Zombies’ Phase, page 23), he Moves 1 Zone toward the nearest Spawn Zone (NOT his entry Zone), ignoring any Survivors he might see. If several escape Spawn Zones are at the same distance, choose one.
- A Necromancer escapes the board as soon as he activates on his escape Spawn Zone. Remove his miniature as he flees. Replace the Necromancer Spawn token it introduced on the board with a standard Zombie Spawn token.
- Killing a Necromancer slows the invasion. If you manage to kill it, choose a Spawn Zone (including its own Necromancer Spawn Zone) and remove it from the board. If the Necromancer Spawn token is still on the board after this removal, replace it with a standard one.
- In special circumstances, all Spawn Zone tokens may end in the same Zone. In that case, a Necromancer still comes with an additional Necromancer Spawn token, but flees as soon as he activates.
Necromancer Cabals
Necromancer Cabals’ rules allow you to play multiple necromancers at once during your Zombicide: Black Plague games. To use these rules you will require extra special Necromancers, such as the ones included in the Special Guest Boxes by Carl Critchlow, Naiade, and Stefan Kopinski (sold separately).
- Create your own Necromancer Cabal at game Setup: Choose the Necromancers you want your Survivor team to face (the more, the deadlier!). Sort out the six standard Necromancer cards from the Zombie pile, and replace them in any combination you see fit with your favorite Necromancer cards. Replace these six tailored cards in the Zombie pile, and shuffle. You’re ready to go against the Cabal!
- Use the classic Necromancer rules to spawn and move Necromancers. Use the colors of the Necromancer Spawn Zones to track where each of them spawned, and determine its escape Spawn Zone. Remember: drawing a Necromancer Zombie card also gives an extra Activation to others Necromancer on the board until they flee or die.
- Beware the dark ritual! Necromancers standing at Range 0-1 from each other at the end of a Zombies’ Phase flee the board as if they escaped through their escape Spawn Zone. Replace the Necromancer Spawn tokens they introduced on the board with standard Zombie Spawn tokens.
- Each of the special Necromancers has special rules written on their Zombie cards. These rules are in effect from the moment they enter the board, until they flee or die.
Vaults
Vault Zones and Doors
Vaults, secret rooms and underground lairs are fairly common in Zombicide: Black Plague. They can be great shortcuts for Survivors… and Zombies!
Whenever the Quest map shows one (or more) Vault doors, set Vault Zone tokens of the matching colors near the board.
- Vault doors can be opened like standard doors (unless otherwise stated in the Quest’s description).
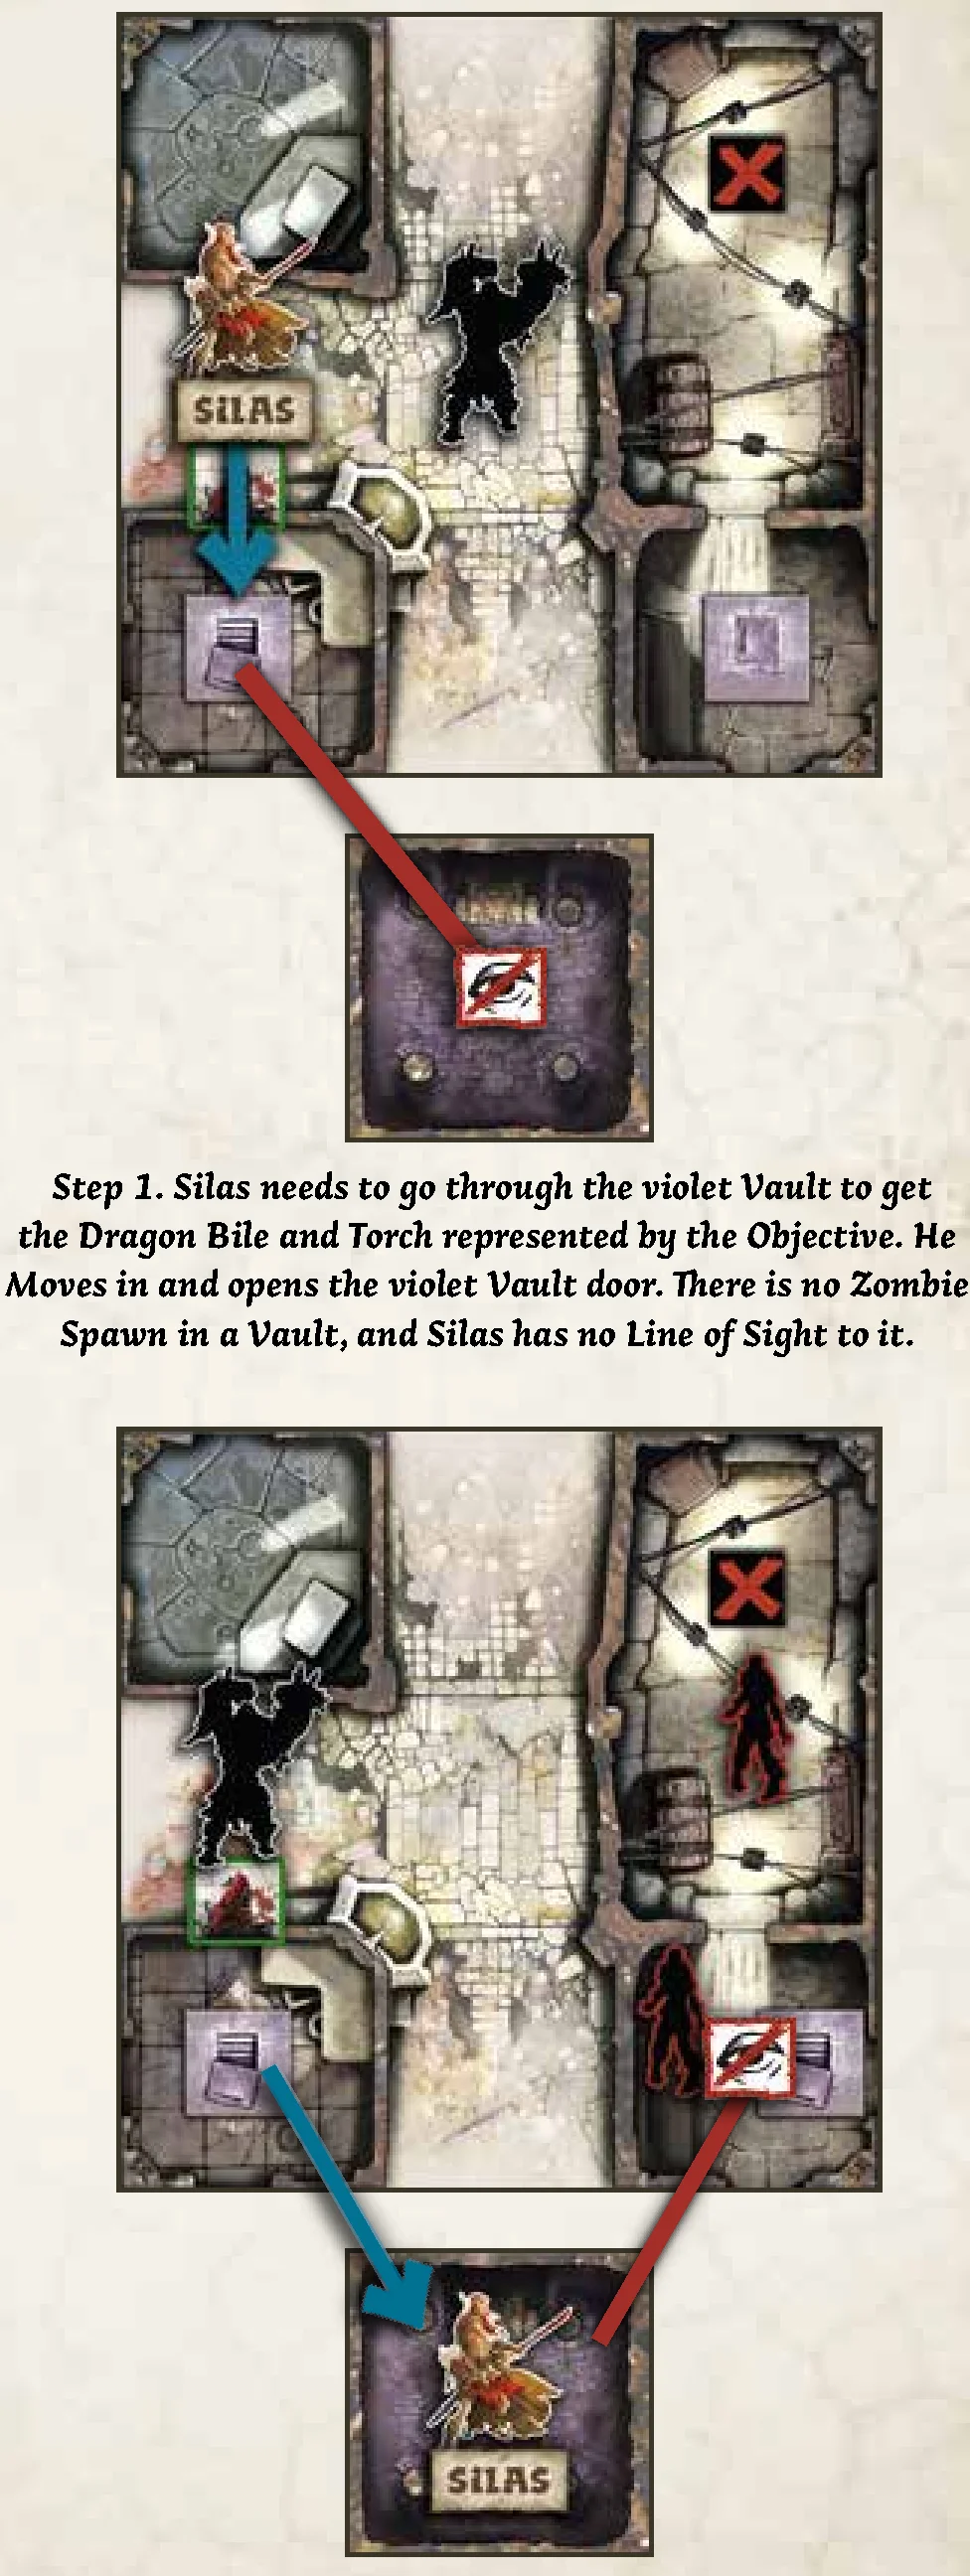
- Open Vault doors give access to the Vault of the matching color, as if they were connected. However, there is no Line Of Sight between the Vault and the Zone it connects to.
- Vaults are building Zones. They can’t be Searched. Don’t Spawn Zombies in Vaults when they are revealed.
- A Vault door can be opened from inside its Vault Zone.
NOTE: Quests featuring Vaults can have special rules detailing the way they’re played. They have priority over the rules listed here.
Vault Artifacts
Powerful weapons and spells are set aside during Setup (see page 6) to be found in Vaults. These are called Vault artifacts, and bear the keyword “Vault” on their card.
A Survivor can spend an Action to take a Vault artifact stored in a Vault. It is not a Search Action and thus can be done multiple times if the Vault holds several artifacts.
The Quest description may hold additional special rules for them. Check them out!
Playing with 7+ Survivors
Playing with an increased number of Survivors (or players!) is quite easy. Follow these guidelines, and adjust them to fit your challenge level:
- For each Survivor above the sixth, add 1 additional Starting Equipment card from the expansion to the pool of cards that will be distributed among Survivors during Setup.
- Add 1 additional Zombie Spawn token per 2 Survivors above the sixth (rounded up). Stack these additional Spawn tokens in the same Zones as existing ones. Yes, that means some Zones will double or even triple their spawn rate!
- On a 6-Survivors game, once there are 6 Zombie Spawn tokens on the board, the game is over if a Necromancer escapes. This Spawn token limit is increased by 1 for every 2 Survivors above the sixth (rounded up).
| # Survivors | Additional Spawn Tokens | Spawn Tokens Limit |
|---|---|---|
| Up to 6 | 0 | 6 |
| 7-8 | 1 | 7 |
| 9-10 | 2 | 8 |
| 11-12 | 3 | 9 |
Quest 0: Tutorial: Danse Macabre
Easy / 4+ Survivors / 45 Minutes
Tiles needed: 4V & 9R.
Objectives
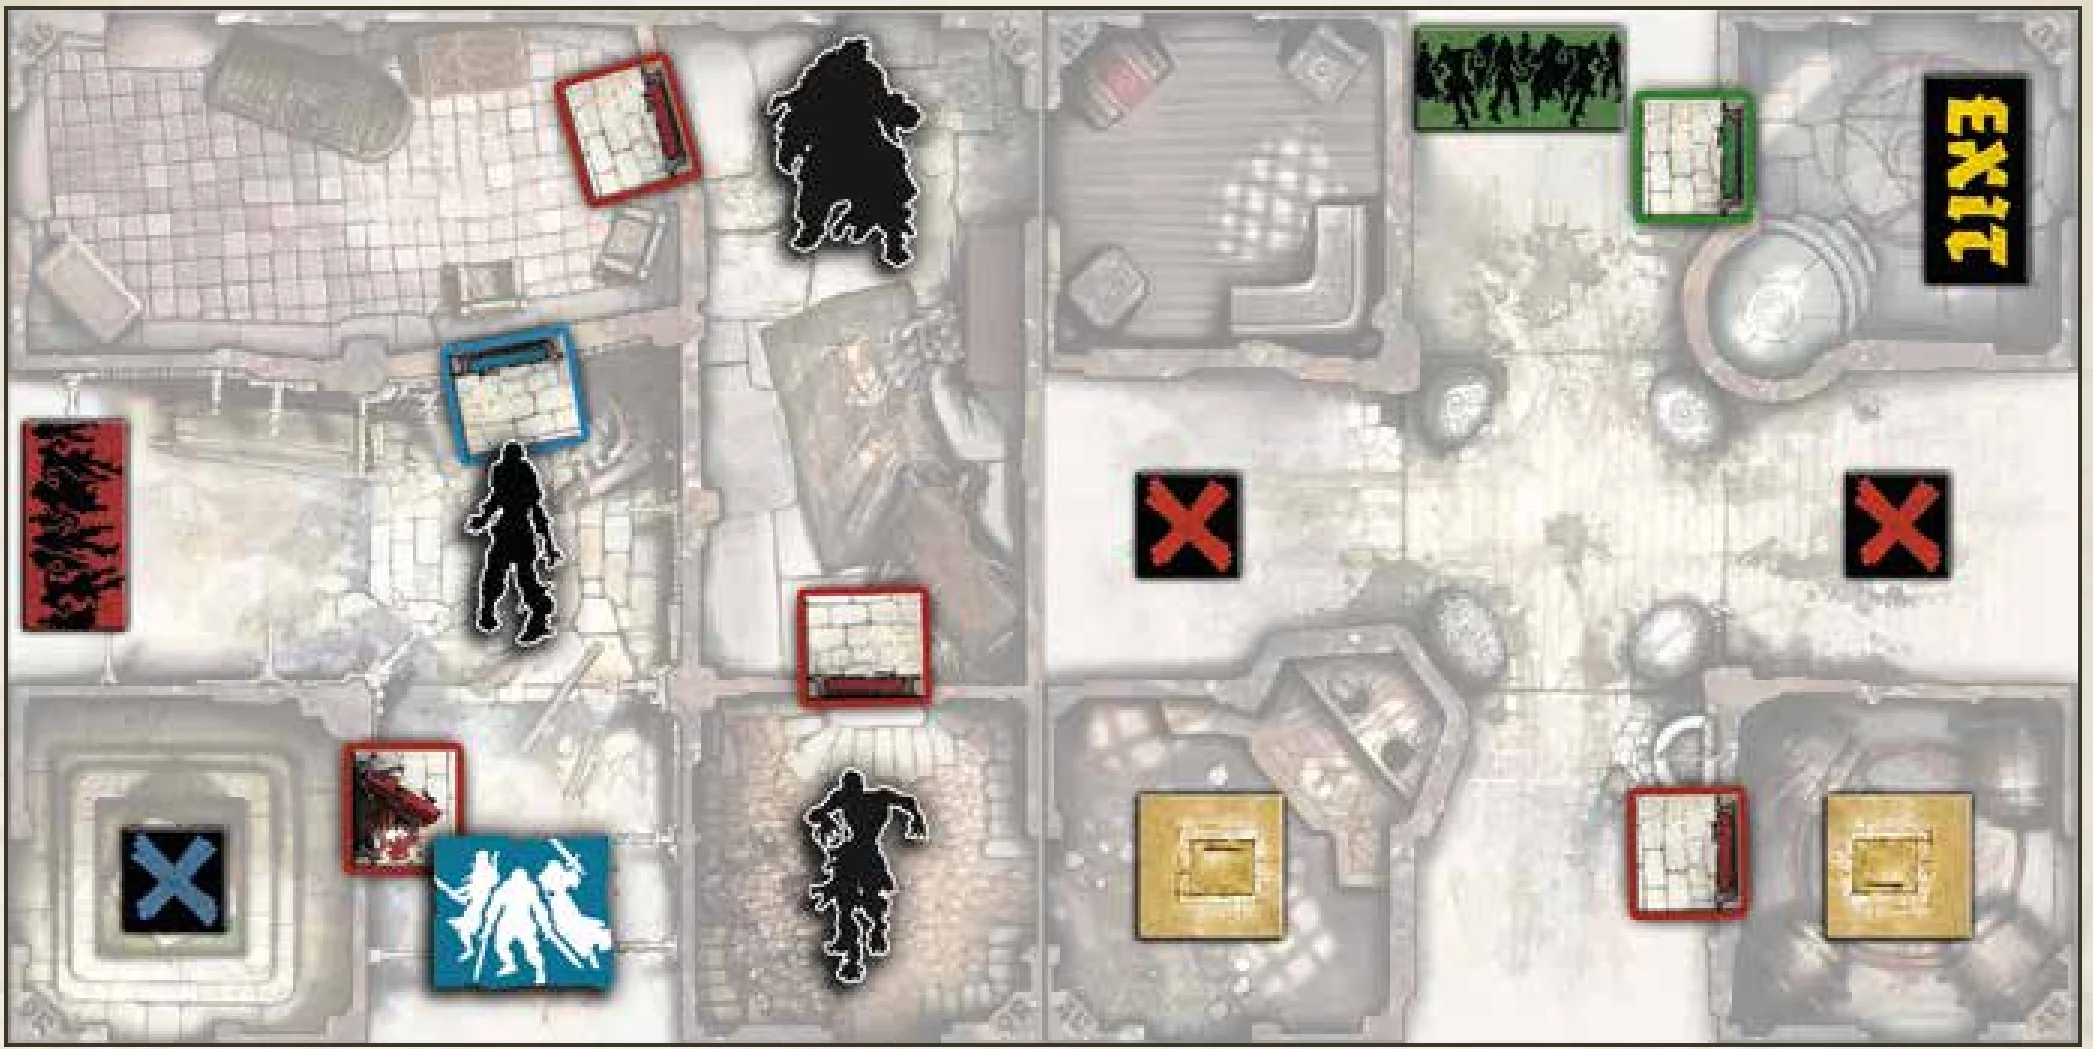
Use the magic circle to teleport to safety. Reach the Exit Zone with all Survivors. Any Survivor may escape through this Zone at the end of his turn, as long as there are no Zombies in it.
Special Rules
- Setup:
- Put aside the Necromancer Zombie cards.
- Put the green Objective randomly among the red Objectives, face down.
- Put a Walker, a Fatty and a Runner in the marked Zones.
- I don’t think so: Abominations are considered as Fatties when reading Zombie cards.
- What’s this? Each Objective gives 5 experience points to the Survivor who takes it.
- Doors and keys: The blue door cannot be opened until the blue Objective has been taken. The green door cannot be opened until the green Objective has been taken.
- We shall pass: The green Spawn Zone is inactive until the green Objective is taken.
Quest 1: Big Game Hunting
Easy / 6+ Survivors / 60 Minutes
Tiles needed: 1V, 2R, 8V & 9V.
Objectives
Reach these objectives in any order to win the game:
- Slay the beast and its master: Kill at least one Abomination and one Necromancer.
- Raid the laboratory: Take all Objectives.
Special Rules
- Setup:
- Put the blue Objective randomly among the red Objectives, face down.
- Put a Vault artifact randomly in each Vault.
- Looking for the laboratory: Each Objective gives 5 experience points to the Survivor who takes it.
- Torch’em! Finding the blue Objective marks the laboratory’s location! Immediately spawn a Necromancer in the Zone. If a Necromancer is already on the board, spawn an Abomination instead. If both are already on the board, nothing happens (but you still get the experience).
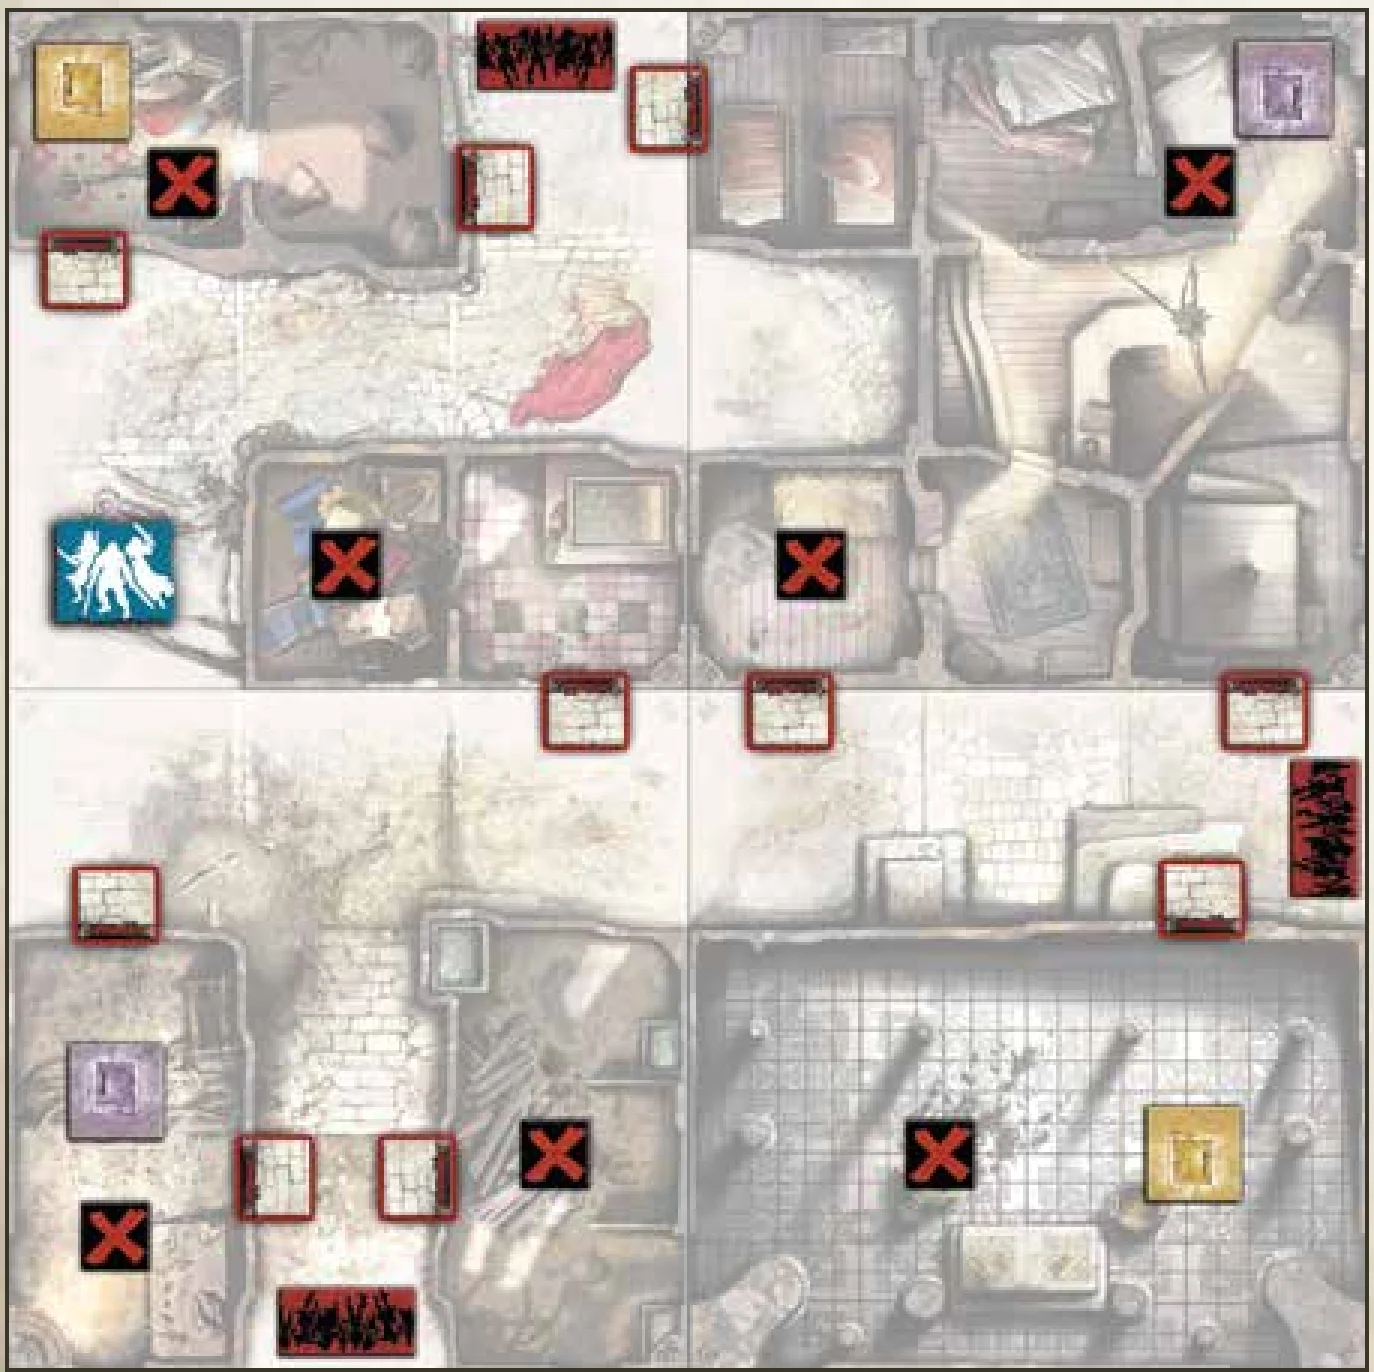
Quest 2: The Black Book
Easy / 6+ Survivors / 60 Minutes
Tiles needed: 4V, 5R, 7V & 8R.
Objectives
Reach these objectives in any order to win the game:
- Steal the Black Book: Take the Objective in the central building (tile 8R).
- Claim the artifacts: Take both Vault artifacts.
- Feel the power: Get to the Red Danger Level with at least a Survivor.
Special Rules
- Setup:
- Put the blue and the green Objectives randomly among the red Objectives, face down.
- Put a Vault artifact randomly in each Vault.
- Lost keys opening forbidden doors: Each Objective gives 5 experience points to the Survivor who takes it.
- What the…? Magic trap! The green Spawn Zone is inactive until the green Objective is taken.
- Doors and keys: The blue door cannot be opened until the blue Objective has been taken. The green door cannot be opened until the green Objective has been taken.
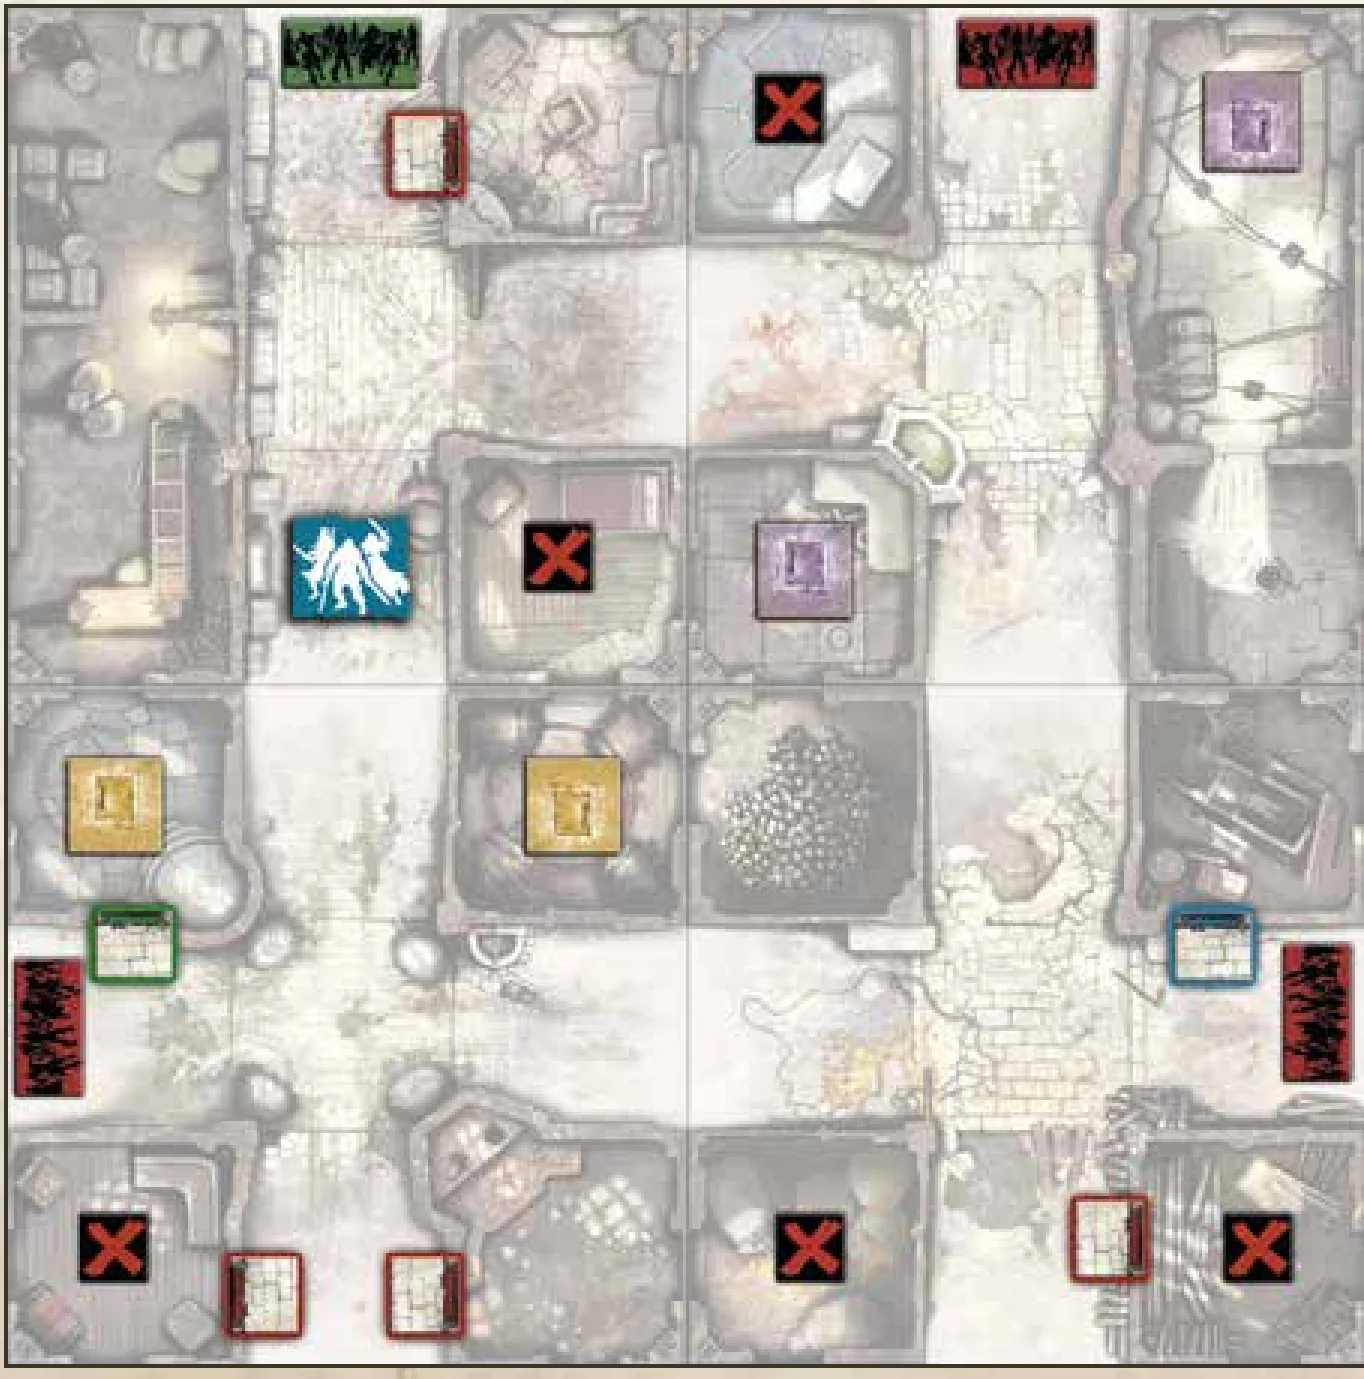
Quest 3: The Shepherds
Medium / 6+ Survivors / 90 Minutes
Tiles needed: 1R, 2R, 3V, 4V, 5R & 9V.
Objectives
Rescue the townsfolks: Keep an eye on them, some may be infected. You win the game when all Objectives are taken.
Special Rules
- Setup:
- Put the blue and the green Objectives randomly among the red Objectives, face down.
- Put a Vault artifact randomly in each Vault.
- Hidden folks: Each Objective gives 5 experience points to the Survivor who takes it.
- These are infected! The blue and the green Objectives mark infected people turning zombies! Earn the experience, then resolve immediately a Zombie spawn in the Objective’s Zone.
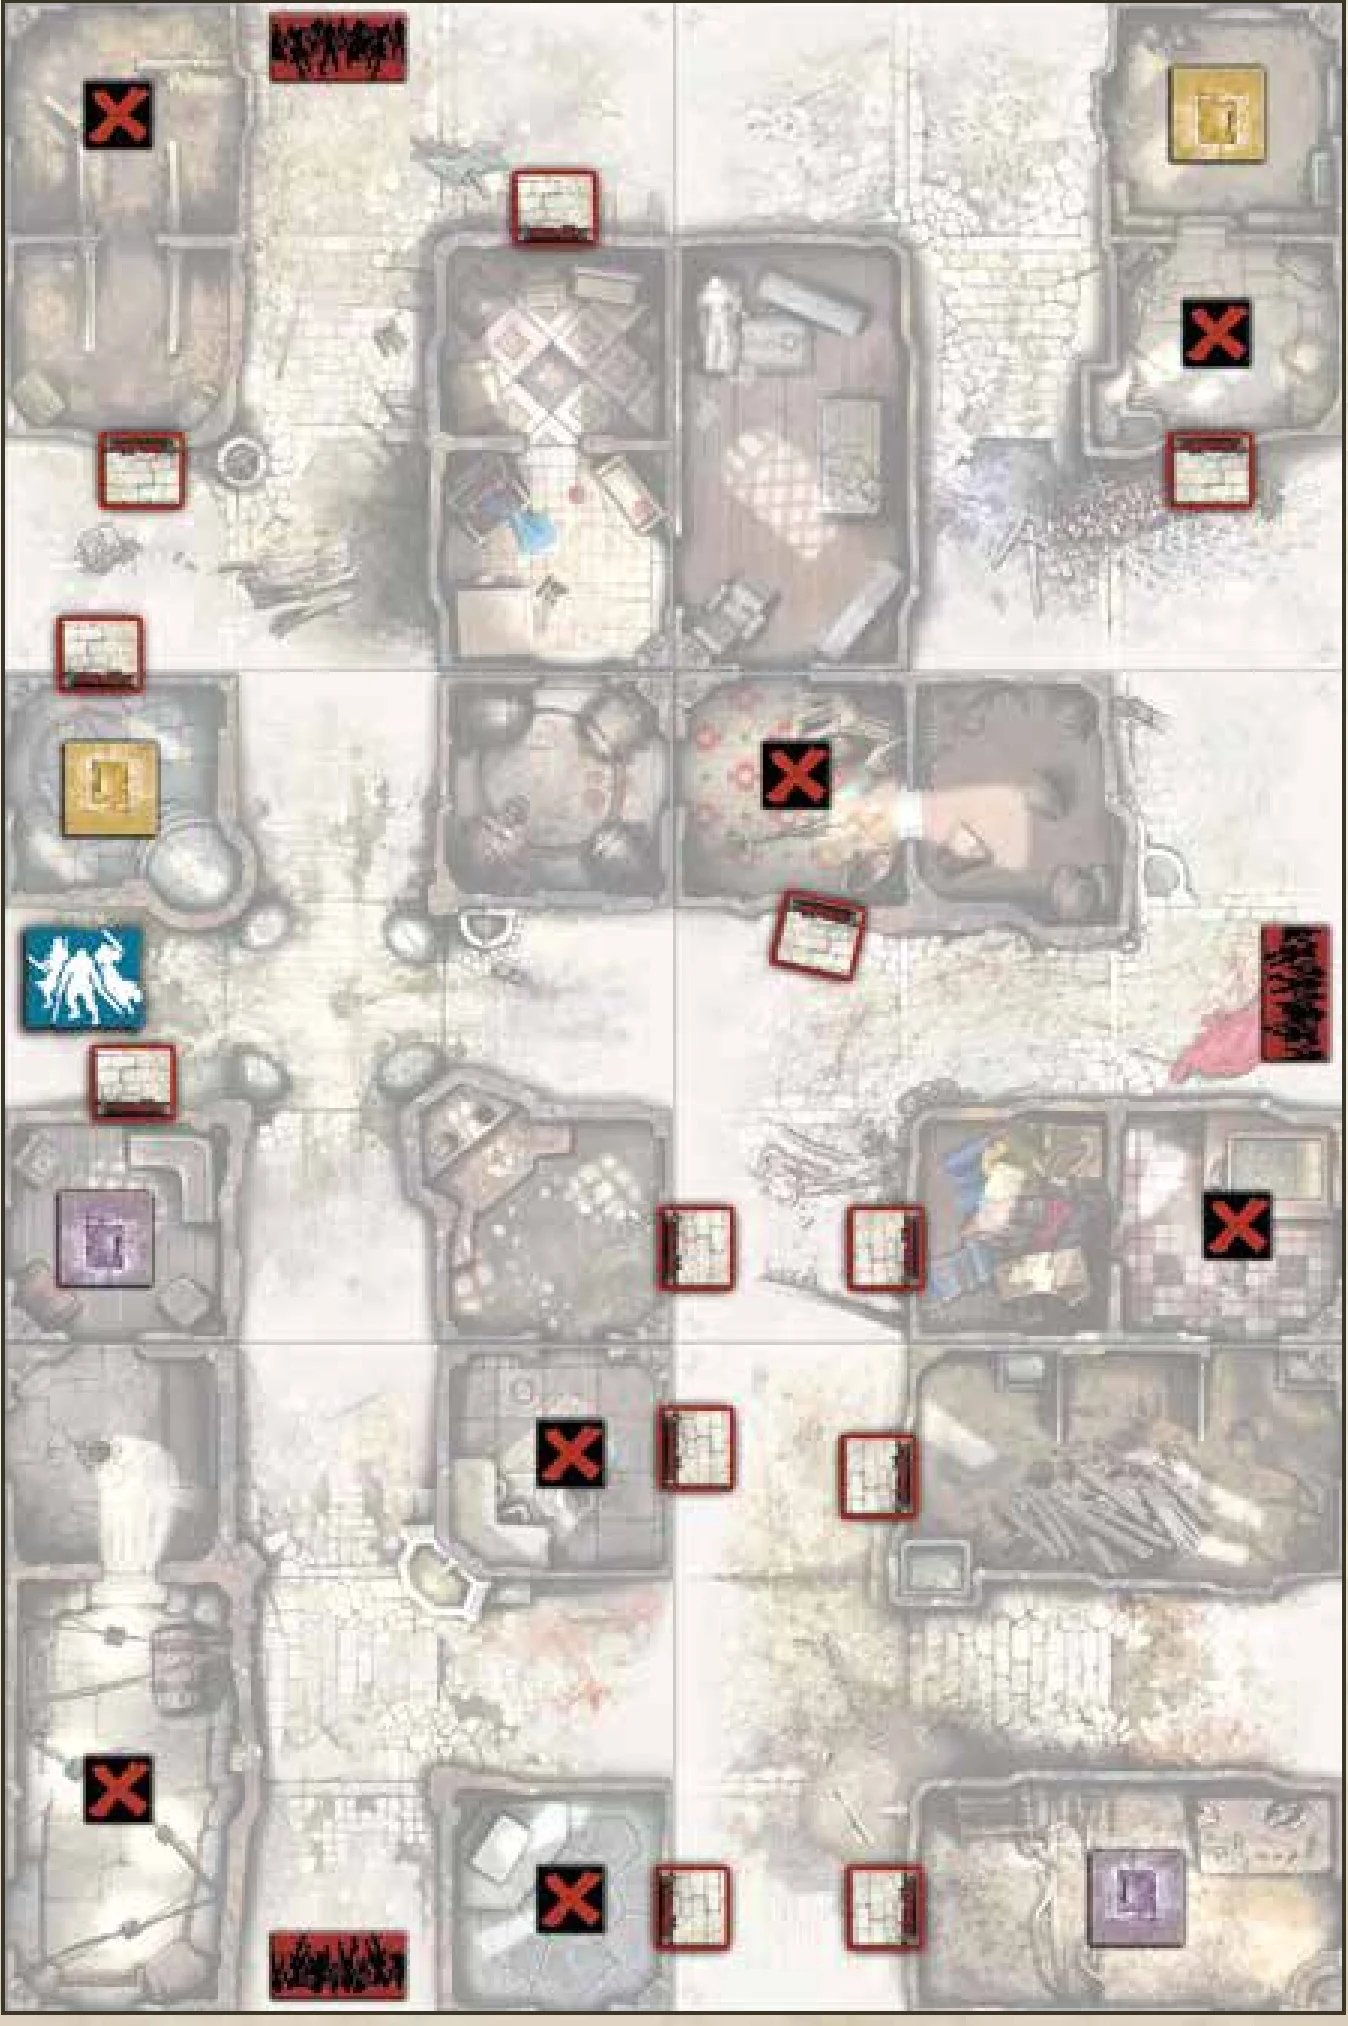
Quest 4: Famine
Medium / 6 Survivors / Variable
Tiles needed: 1R, 2R, 3R, 5R, 6R & 8R.
Objectives
Reach the objectives in this order to win the game:
- Find enough food: Gather the following 6 food cards in your team’s inventories:
- Apples x2
- Salted Meat x2
- Water x2
- Lock yourself in the Vault: You win the game when all starting Survivors are in the yellow Vault during an End Phase, without any Zombies with them.
Special Rules
- Setup:
- Put the blue Objective randomly among the red Objectives, face down.
- Put a random Vault artifact in the Vault.
- Candles, clothes, iron tools… Each Objective gives 5 experience points to the Survivor who takes it.
- …keys! Both yellow Vault doors cannot be opened until the blue Objective has been taken.
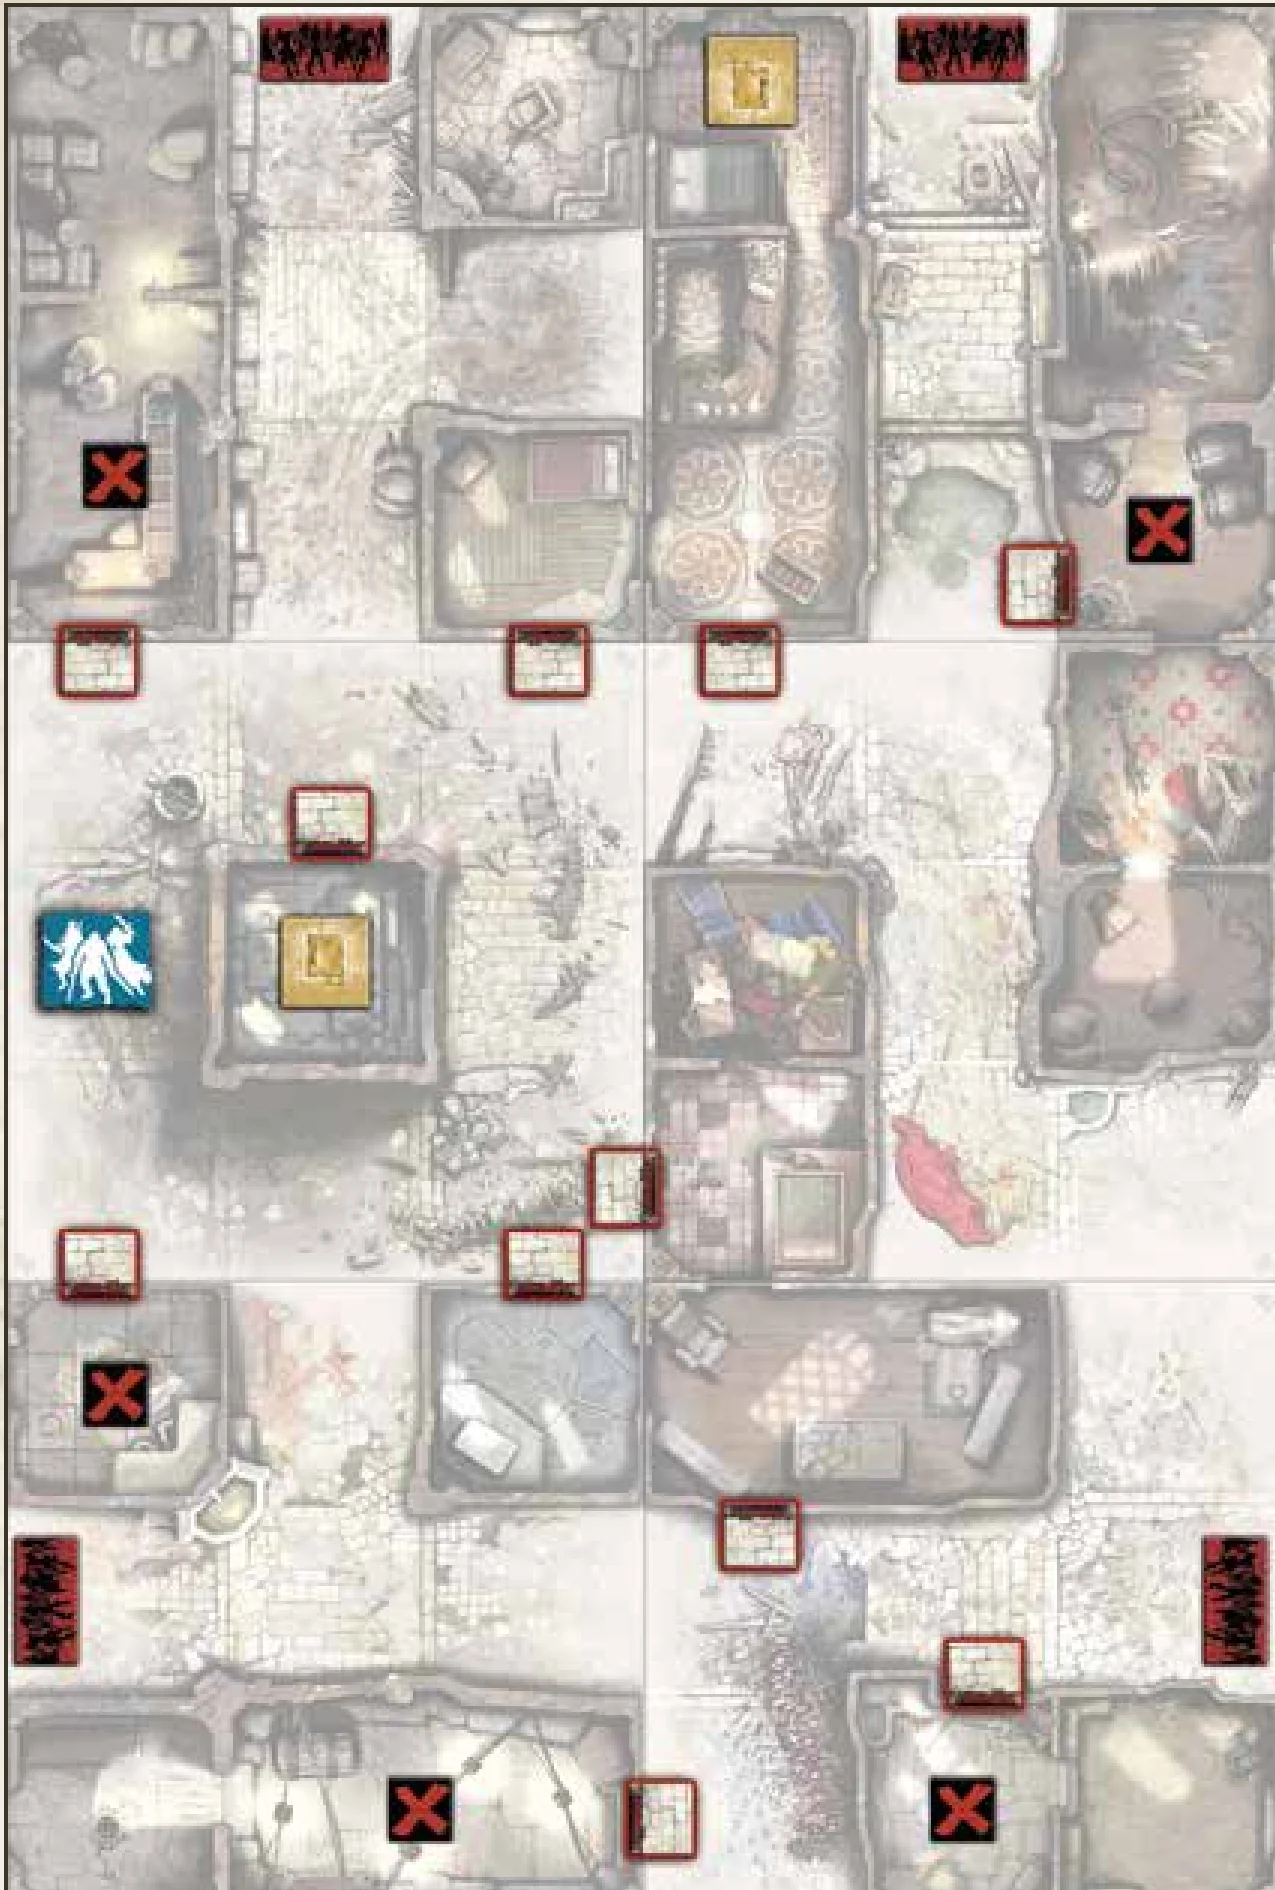
Quest 5: The Commandry
Medium / 6+ Survivors / 120 Minutes
Tiles needed: 4R, 5R, 6R, 7R, 8R & 9R.
Objectives
Use the underpass to escape: Reach the Exit Zone with all Survivors. Any Survivor may escape through this Zone at the end of his turn, as long as there are no Zombies in it.
Special Rules
- Setup:
- Put the blue and the green Objectives randomly among the red Objectives, face down.
- Put a Vault artifact randomly in each Vault.
- Hidden clues: Each Objective gives 5 experience points to the Survivor who takes it.
- Reinforced doors: The blue door cannot be opened until the blue Objective has been taken. The green door cannot be opened until the green Objective has been taken.
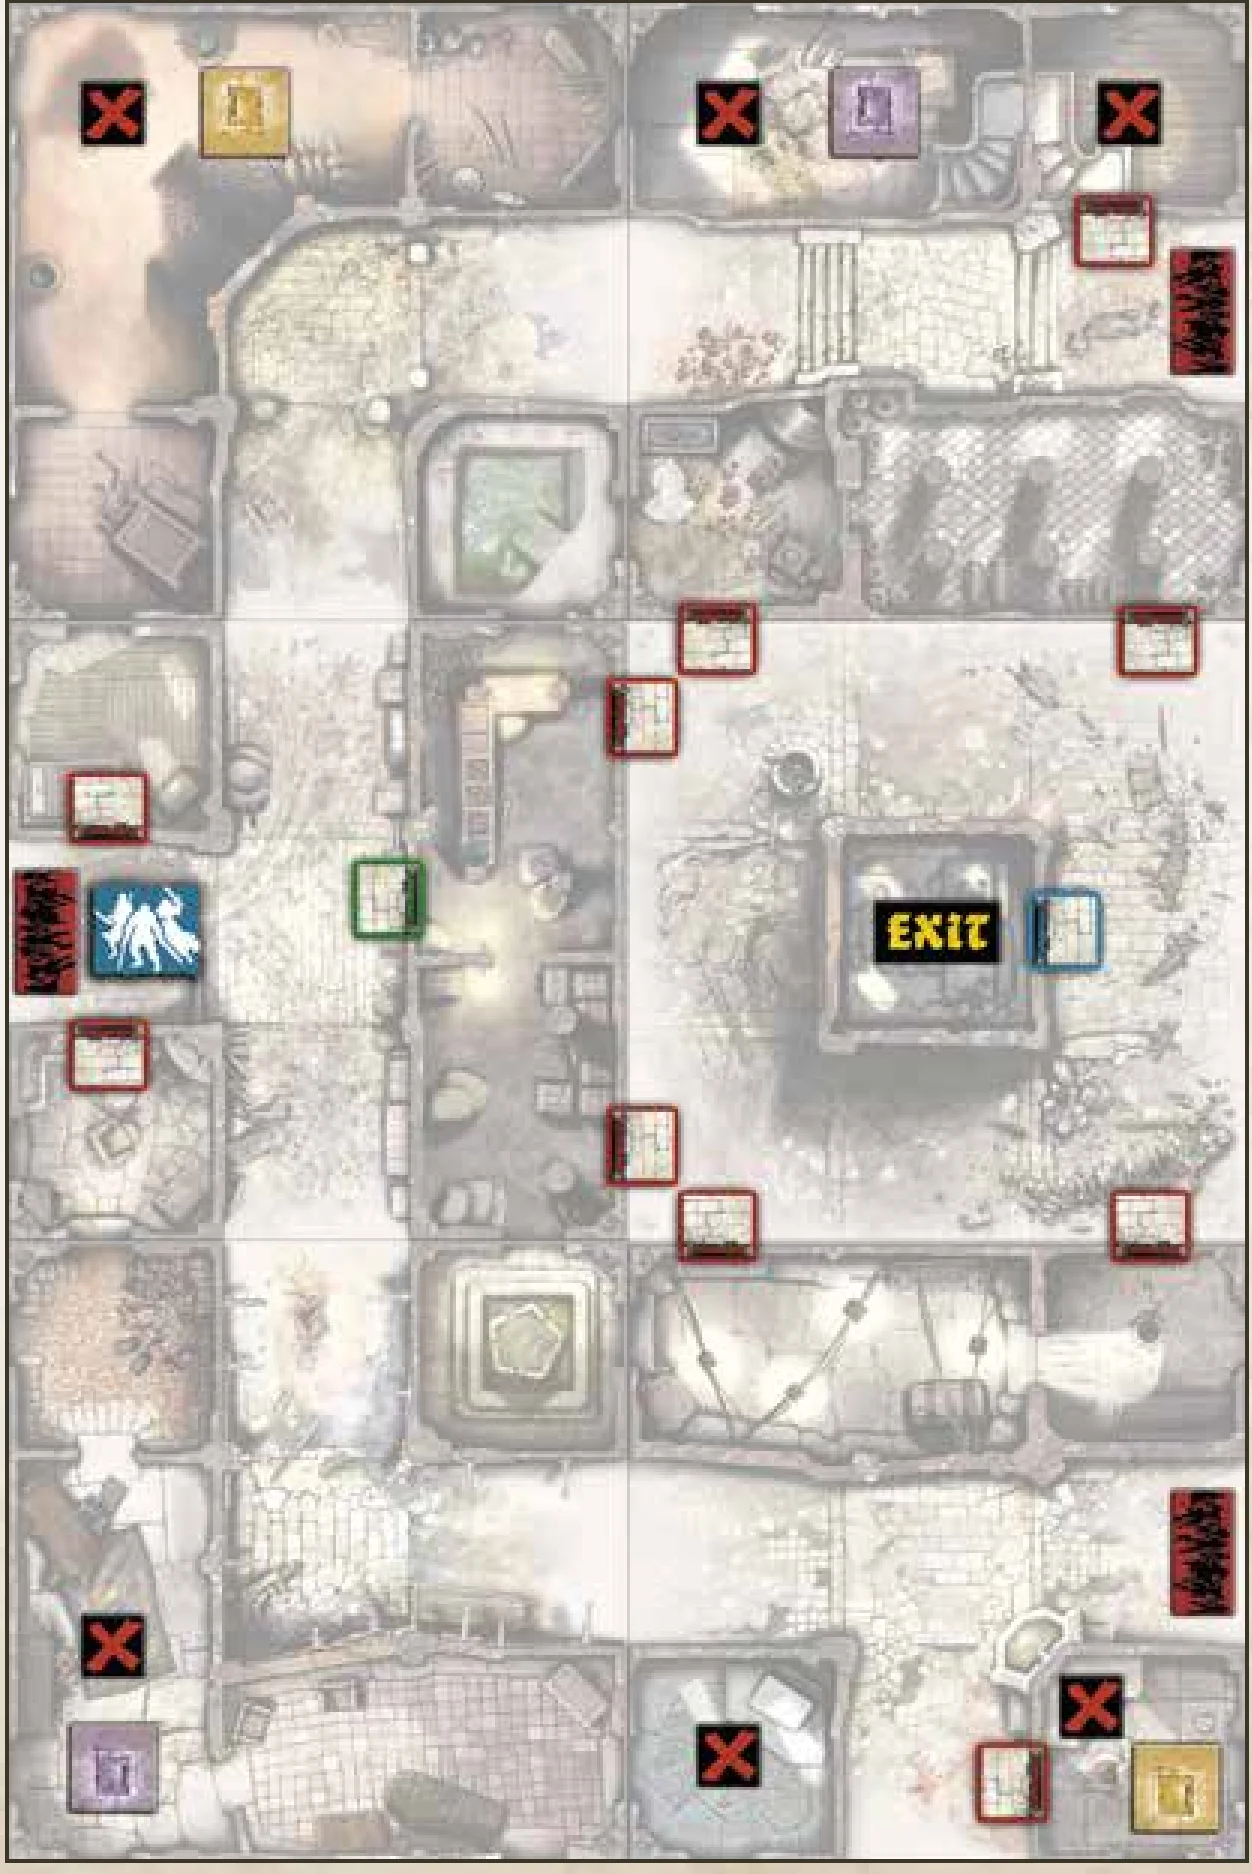
Quest 6: In Caligine Abditus
Medium / 6+ Survivors / 120 Minutes
Tiles needed: 2R, 3R, 5R, 6R, 8R & 9V.
Objectives
It means “hidden in the darkness”: Reach the Exit Zone with all Survivors. Any Survivor may escape through this Zone at the end of his turn, as long as there are no Zombies in it.
Special Rules
- Necromancers set the scene: What a promise!
- Put the blue and the green Objectives randomly among the red Objectives, face down.
- Put two random Vault artifacts in the yellow Vault.
- Latin writings: Each Objective gives 5 experience points to the Survivor who takes it.
- Doors to darkness and death: The blue door cannot be opened until the blue Objective has been taken. The green door cannot be opened until the green Objective has been taken.
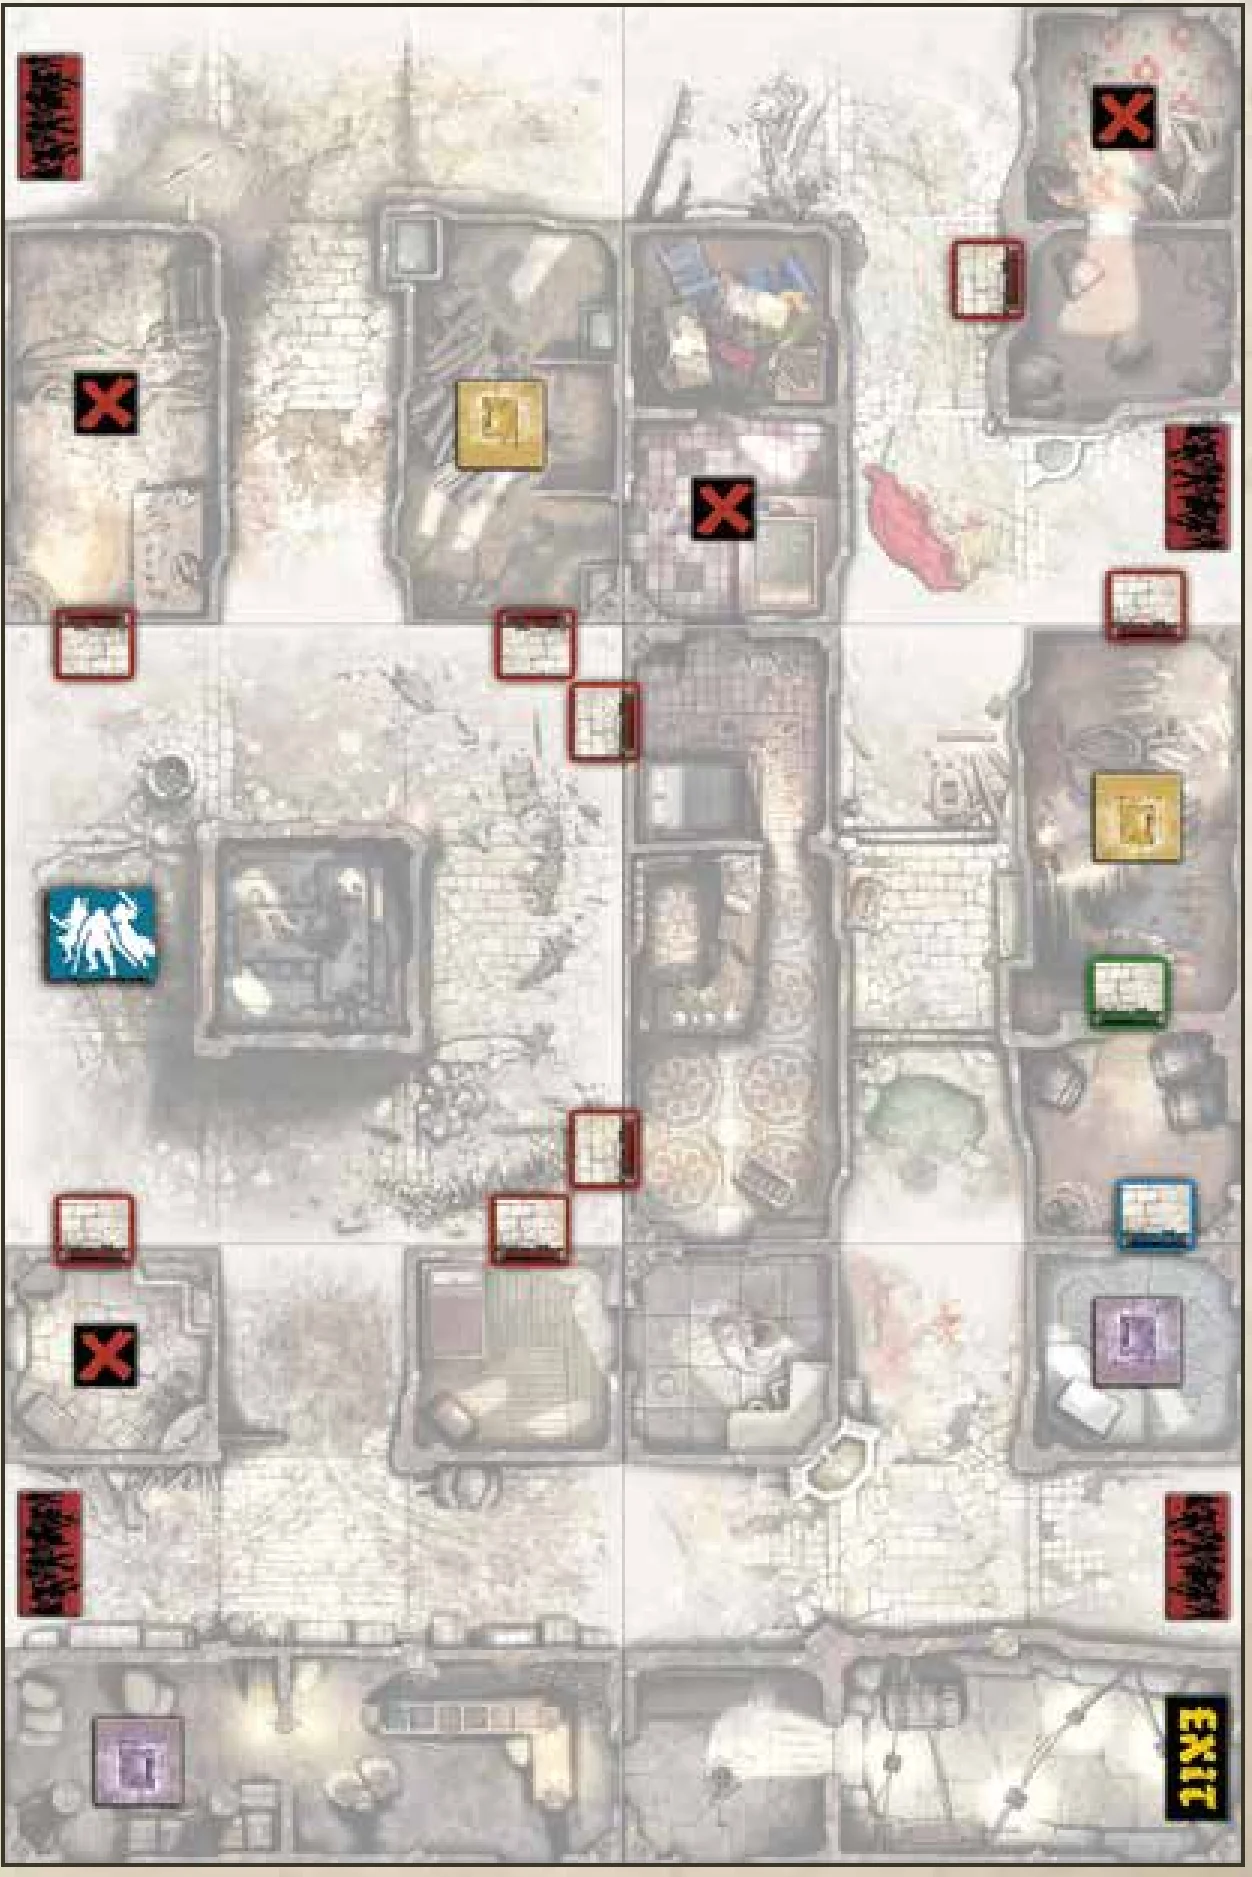
Quest 7: Dead Trail
Medium / 6+ Survivors / 150 Minutes
Tiles needed: 1R, 2R, 3V, 4R, 5V & 6V.
Objectives
Hinder the ritual: Achieve the first two objectives in any order:
- Ruin the ritual: Destroy the impious scriptures by taking all Objectives.
- Get the artifacts: Get both Vault artifacts.
Then, Reach the Exit Zone with all Survivors. Any Survivor may escape through this Zone at the end of his turn, as long as there are no Zombies in it.
Special Rules
- Setup:
- Put the blue and the green Objectives randomly among the red Objectives, face down.
- Put a Vault artifact randomly in each Vault.
- Wicked writings: Each Objective gives 5 experience points to the Survivor who takes it.
- Heavy doors: Both violet Vault doors cannot be opened until the blue Objective has been taken. The single yellow Vault door cannot be opened until the green Objective has been taken.
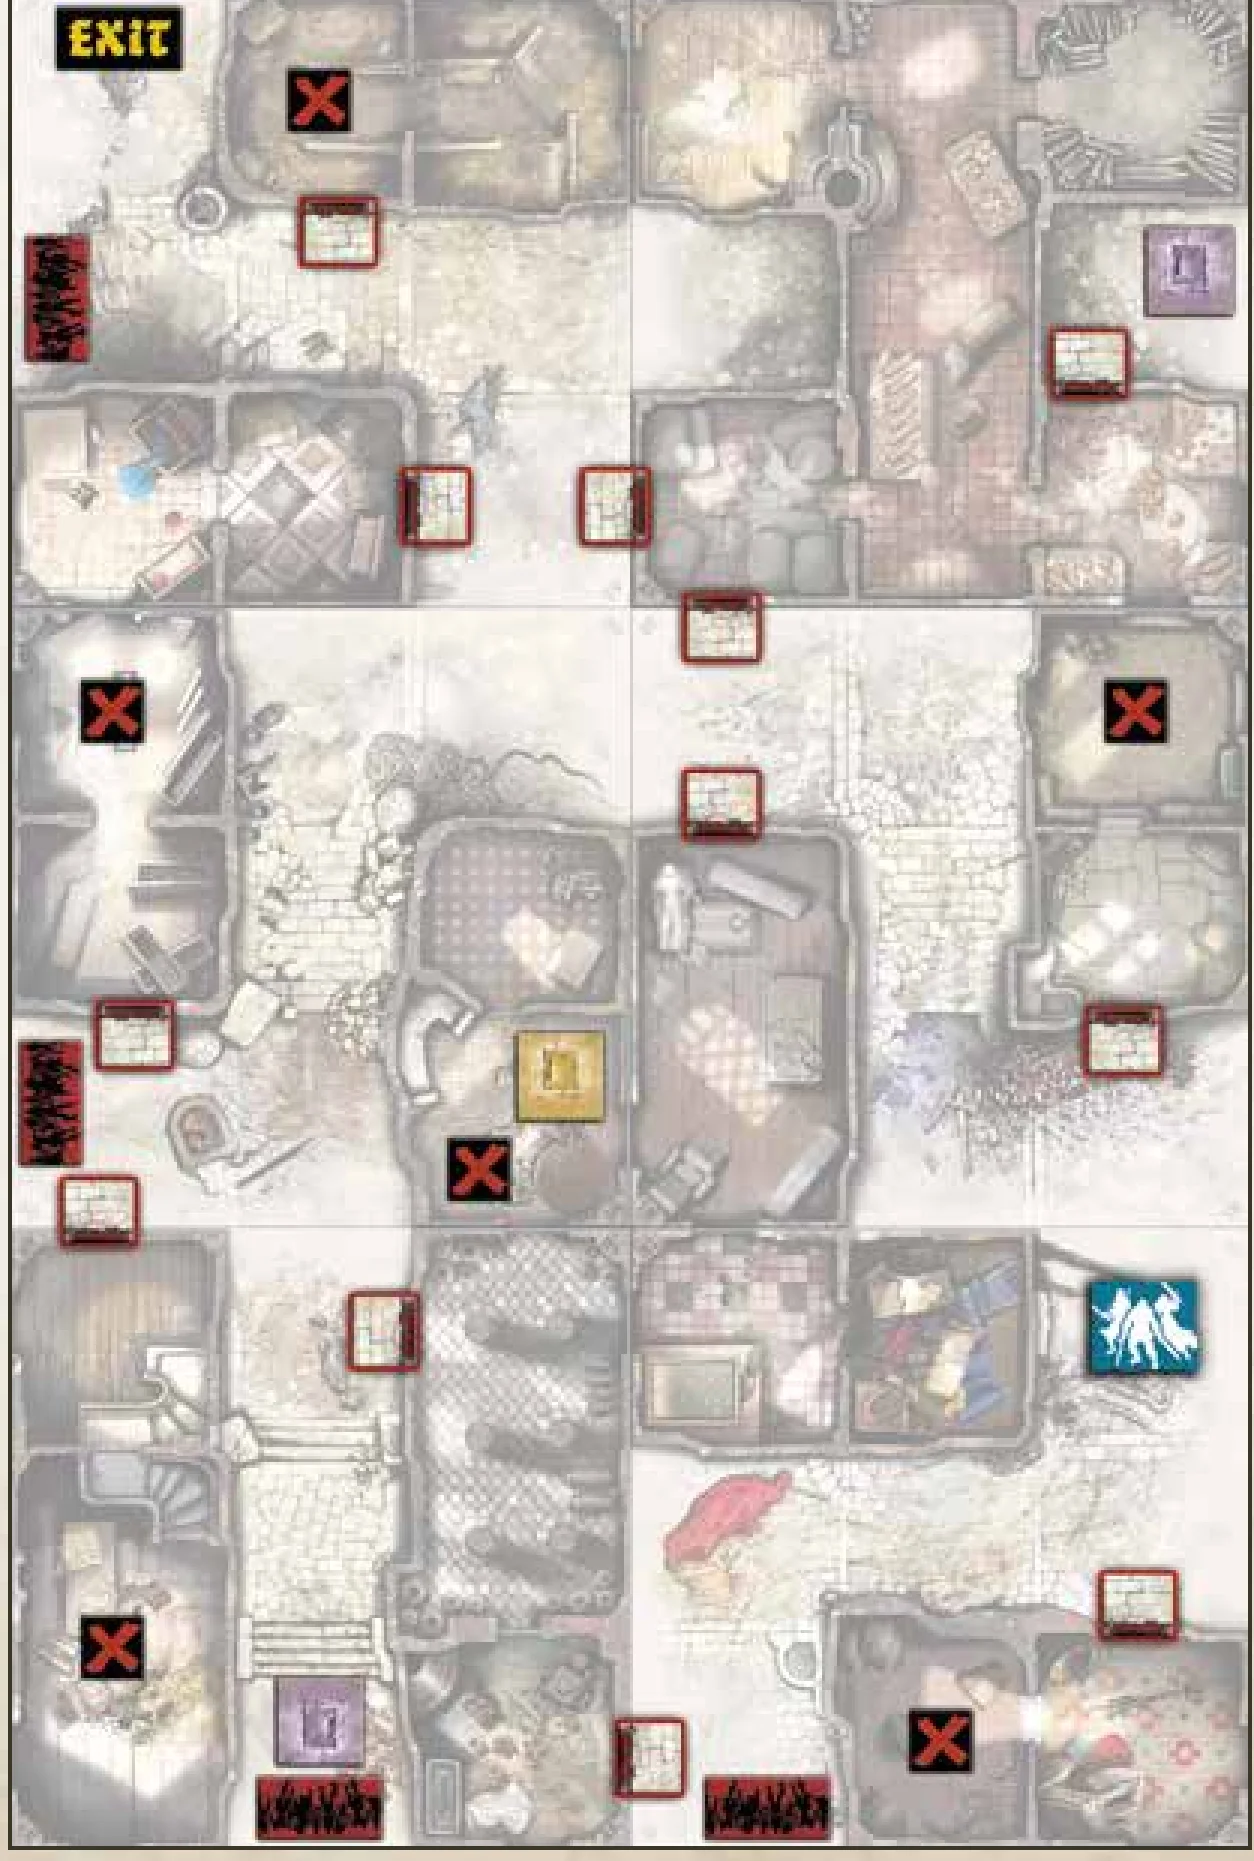
Quest 8: The Evil Temple
Hard / 6+ Survivors / 120 Minutes
Tiles needed: 1V, 2R, 4R, 5R, 8R & 9V.
Objectives
Exorcism, survivors’ style: Zombicide! Take both Vault weapons and kill the Abomination to win the game.
Special Rules
- Setup:
- Put the blue and the green Objectives randomly among the red Objectives, face down.
- Put aside the Dragon Bile and Torch cards. Set one Dragon Bile card and one Torch card in the yellow Vault.
- Put two random Vault artifacts in the violet Vault.
- Destroying the cursed idols: Each Objective gives 5 experience points to the Survivor who takes it.
- Caches: The violet Vault door cannot be opened until the blue Objective has been taken. The yellow Vault door cannot be opened until the green Objective has been taken.
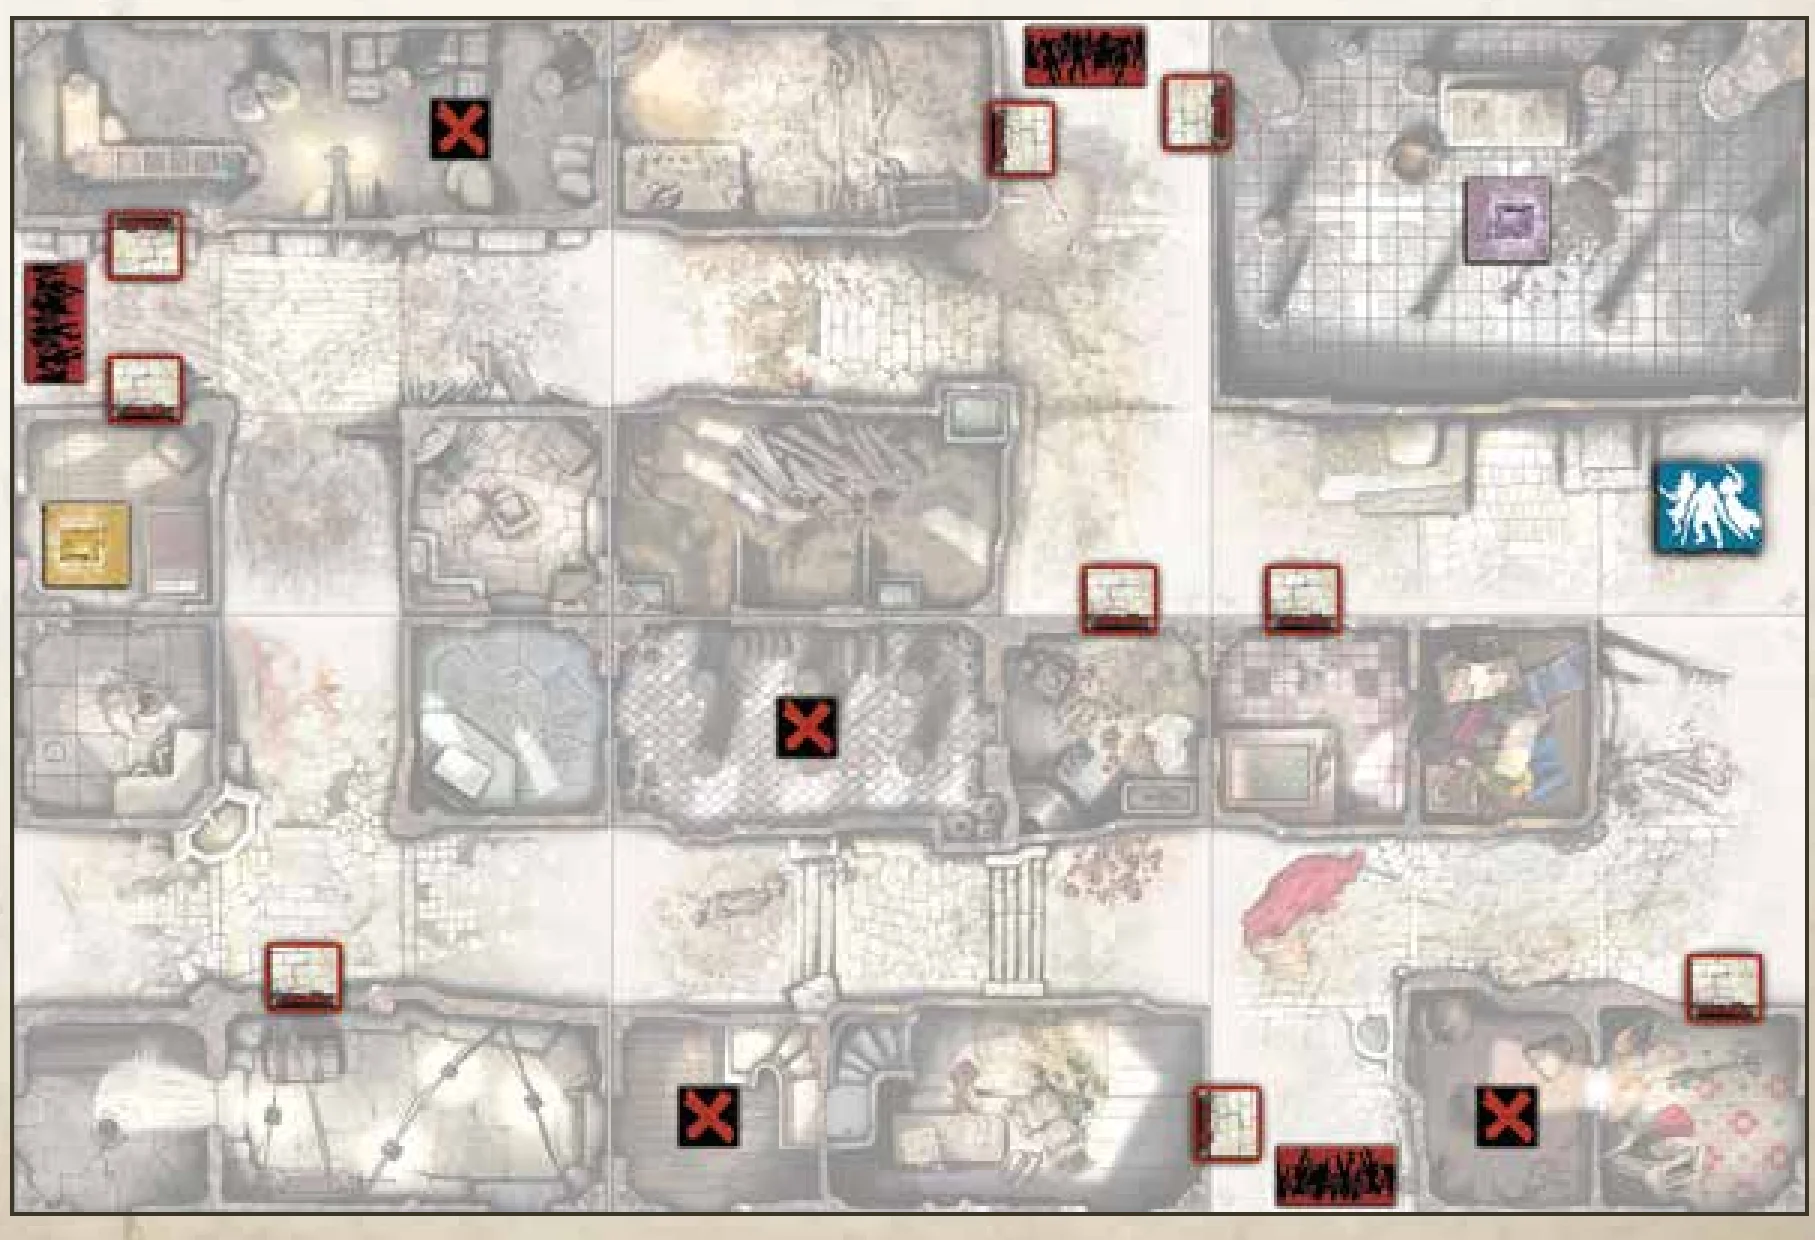
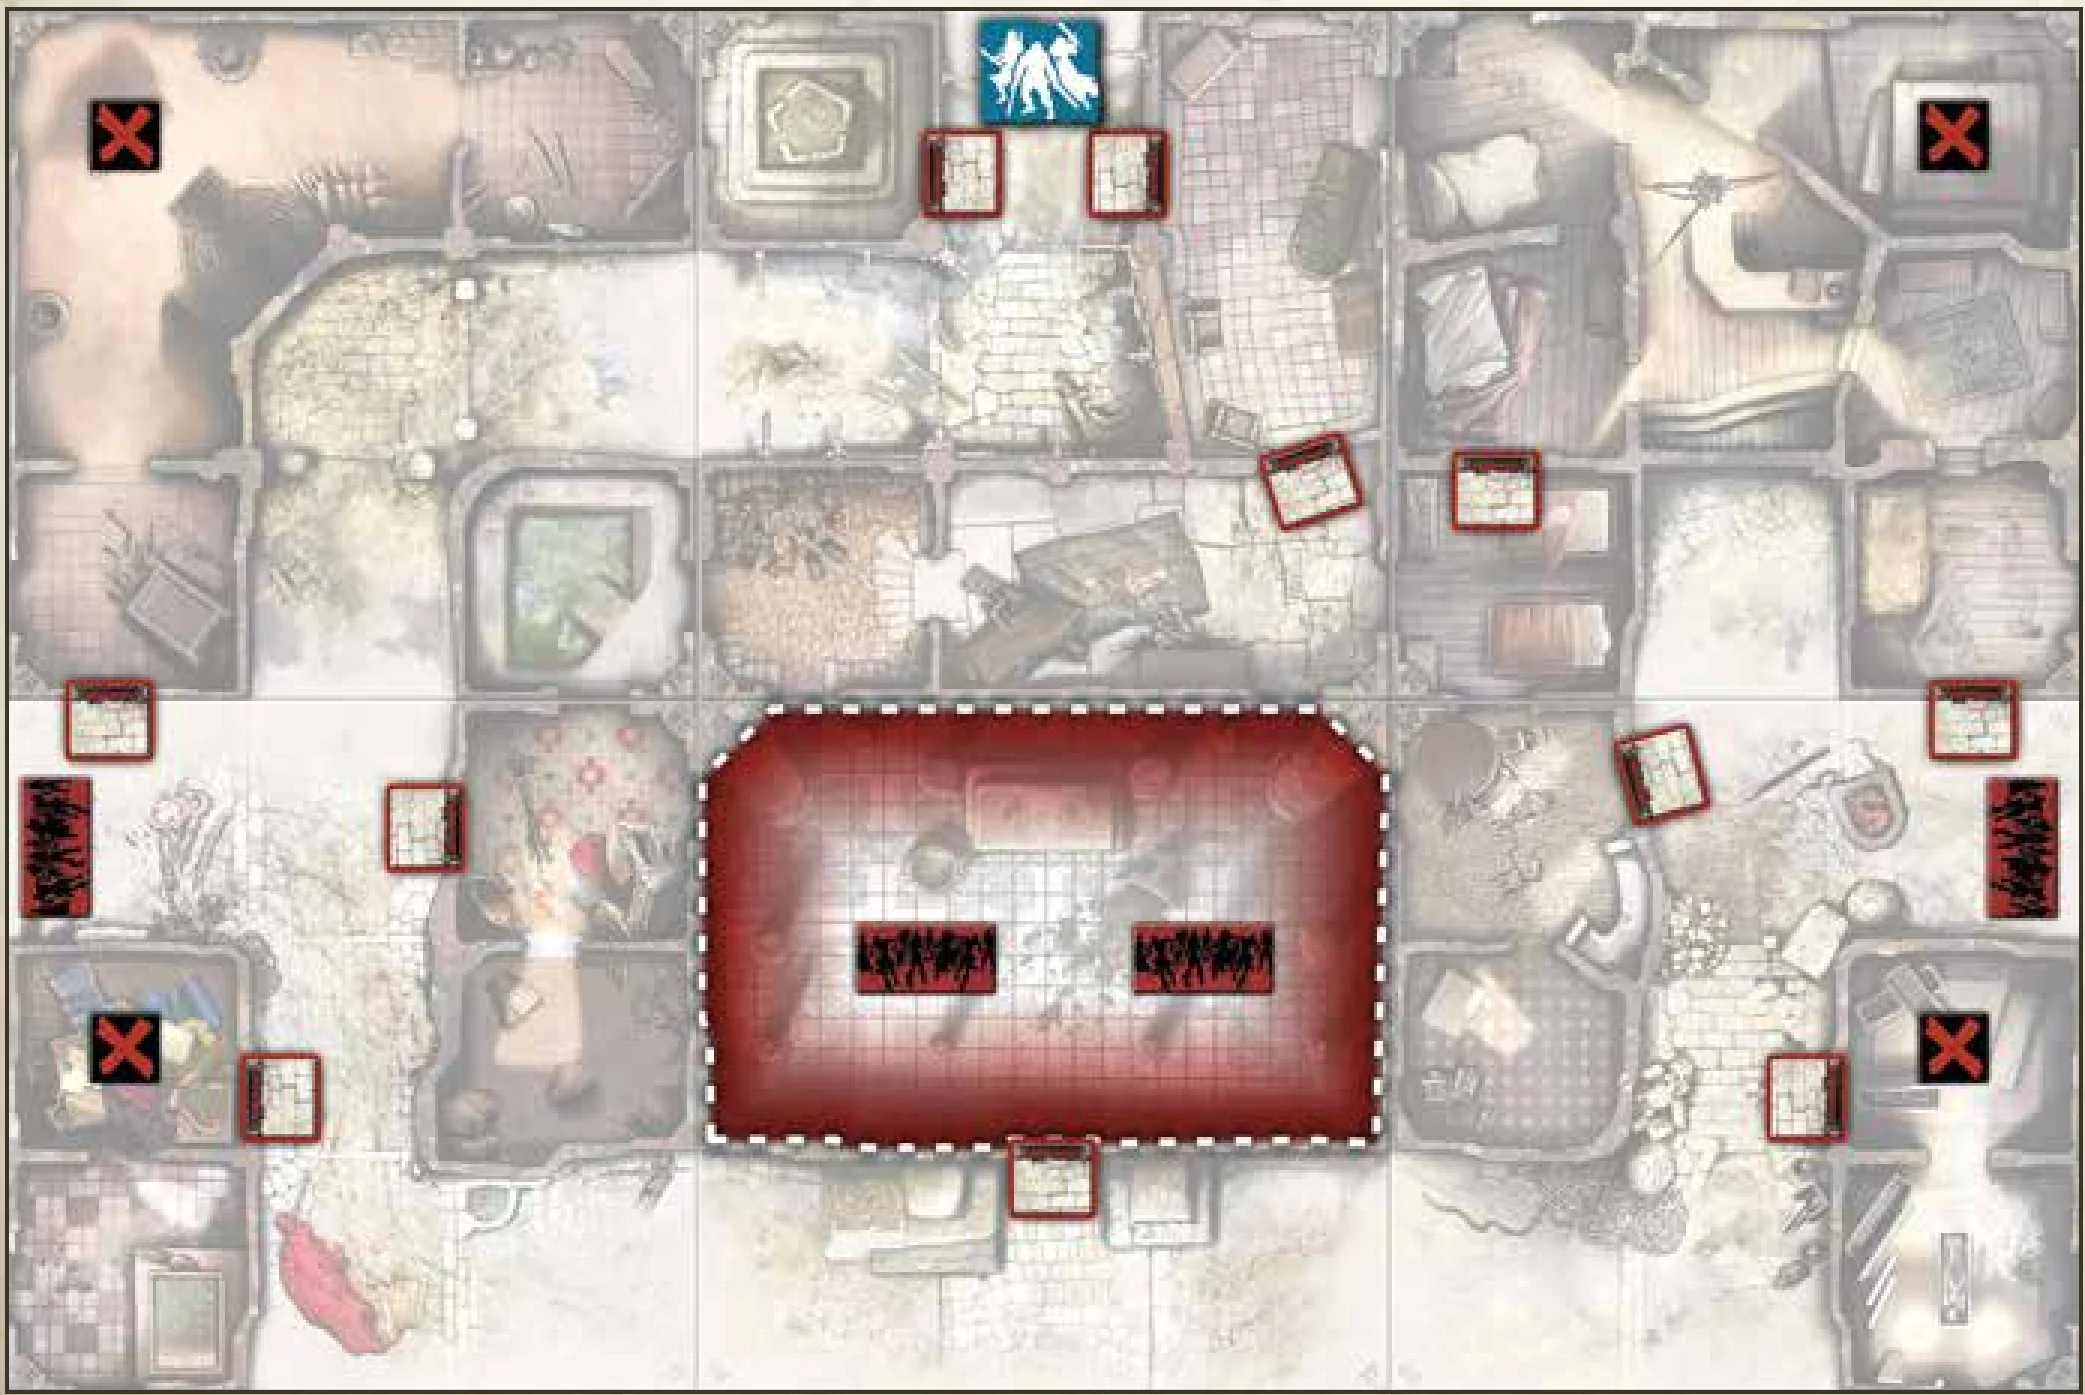
Quest 9: The Hellhole
Hard / 6+ Survivors / 150 Minutes
Tiles needed: 1V, 2R, 6V, 7R, 8V & 9R.
Objectives
Reach the objectives in this order to win the game:
- Gather them all in one place… Get all Spawn Zones on the board in the Hellhole, the marked Zone of tile 1V. Check the Necromancer rules P.29.
- …and call upon a dragon: Create a Dragon Fire in the Hellhole.
Special Rules
- That’s the way we do alchemy: Each Objective gives 5 experience points to the Survivor who takes it. It also allows the player to look for a Dragon Bile card in the Equipment deck and give it to the Survivor for free. If there are no Dragon Bile cards in the Equipment deck, look in the discard pile. Shuffle the Equipment deck afterward.
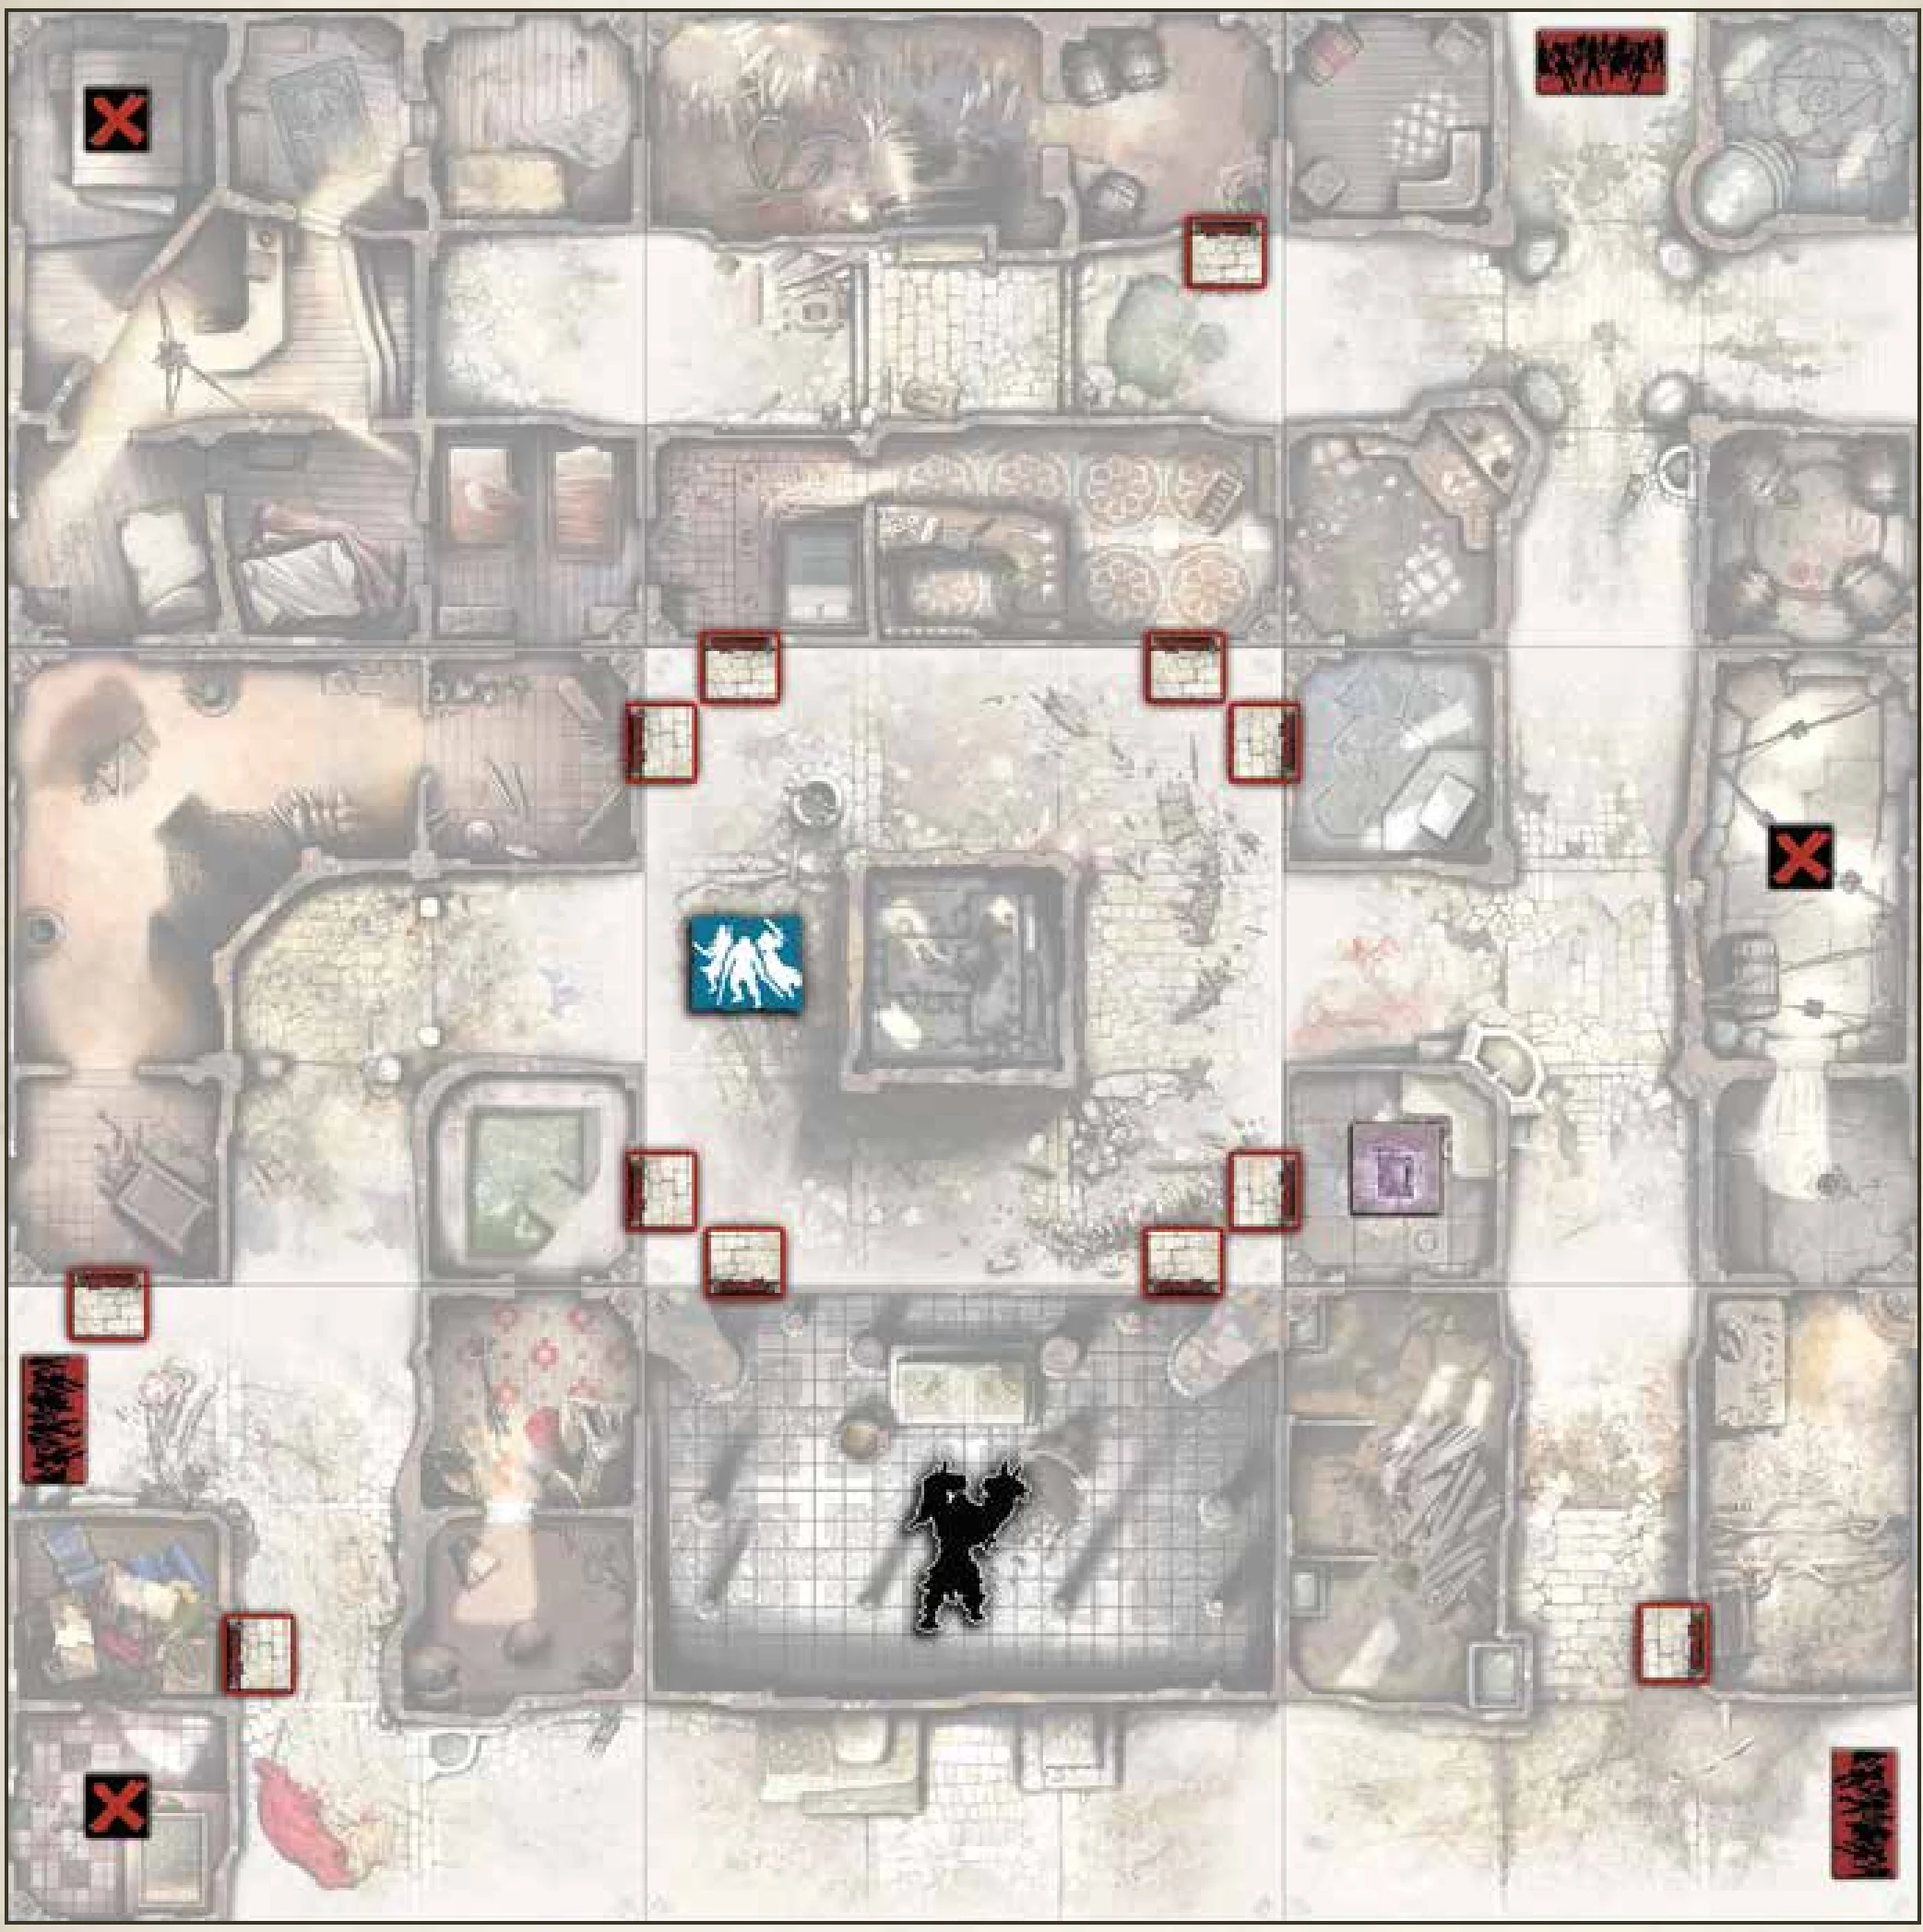
Quest 10: Trial by Fire
Hard / 6+ Survivors / 180 Minutes
Tiles needed: 1V, 2R, 3R, 4V, 5R, 6R, 7R, 8V & 9V.
Objectives
Slay the monster: Kill the Abomination set on tile 1V.
Special Rules
- Setup:
- Put the blue Objective randomly among the red Objectives, face down.
- Put aside all Dragon Bile cards. Set them in the violet Vault.
- Set an Abomination in the marked Zone.
- The north-eastern building Zone has no door on purpose.
- Three seals: Each Objective gives 5 experience points to the Survivor who takes it.
- A hero died here: The blue Objective gives a random Vault artifact to the Survivor who takes it.
- Sealed gate: The violet Vault door cannot be opened until all Objectives have been taken.
Survivor Skills
Each Survivor in Zombicide: Black Plague has specific Skills with effects described in this section. In case of conflict with the general rules, the Skill rules have priority.
The effects of the following Skills and/or bonuses are immediate and may be used the Turn in which they are acquired. This means that if one Action causes a Survivor to level up and gain a Skill, that Skill may be used immediately if the Survivor has any Actions remaining (or the Survivor may use any extra Actions the Skill grants).
- +1 Action: The Survivor has an extra Action he may use as he pleases.
- +1 Damage: [Type]: The Survivor gets a +1 Damage bonus with the specified type of Combat Action (Magic, Melee or Ranged).
- +1 Damage with [Equipment]: The Survivor gets a +1 Damage bonus with the specified Equipment.
- +1 to dice roll: Combat: The Survivor adds 1 to the result of each die he rolls on a Combat Action (Melee, Ranged or Magic). The maximum result is always 6.
- +1 to dice roll: Magic: The Survivor adds 1 to the result of each die he rolls on a Magic Action. The maximum result is always 6.
- +1 to dice roll: Melee: The Survivor adds 1 to the result of each die he rolls in Melee Actions. The maximum result is always 6.
- +1 to dice roll: Ranged: The Survivor adds 1 to the result of each die he rolls in Ranged Actions. The maximum result is always 6.
- +1 die: Combat: The Survivor’s weapons and Combat spells roll an extra die in Combat (Melee, Ranged or Magic). Dual weapons and spells gain a die each, for a total of +2 dice per Dual Combat Action.
- +1 die: Magic: The Survivor’s Combat spells roll an extra die for Magic Actions. Dual Combat spells gain a die each, for a total of +2 dice per Dual Magic Action.
- +1 die: Melee: The Survivor’s Melee weapons roll an extra die for Melee Actions. Dual Melee weapons gain a die each, for a total of +2 dice per Dual Melee Action.
- +1 die: Ranged: The Survivor’s Ranged weapons roll an extra die for Ranged Actions. Dual Ranged weapons gain a die each, for a total of +2 dice per Dual Ranged Action.
- +1 free Combat Action: The Survivor has one extra free Combat Action. This Action may only be used for Melee, Ranged or Magic Actions.
- +1 free Enchantment Action: The Survivor has one extra free Enchantment Action. This Action may only be used for Enchantment Actions.
- +1 free Magic Action: The Survivor has one extra free Magic Action. This Action may only be used for Magic Actions.
- +1 free Melee Action: The Survivor has one extra free Melee Action. This Action may only be used for a Melee Action.
- +1 free Move Action: The Survivor has one extra free Move Action. This Action may only be used as a Move Action.
- +1 free Ranged Action: The Survivor has one extra free Ranged Action. This Action may only be used as a Ranged Action.
- +1 free Search Action: The Survivor has one extra free Search Action. This Action may only be used to Search, and the Survivor can still only Search once per Turn.
- +1 max Range: The Survivor’s Ranged weapons and Combat spells’ maximum Range is increased by 1.
- +1 Zone per Move: The Survivor can move through one extra Zone each time he performs a Move Action. This Skill stacks with other effects benefiting Move Actions. Entering a Zone containing Zombies ends the Survivor’s Move Action.
- 2 Zones per Move Action: When the Survivor spends one Action to Move, he can move one or two Zones instead of one. Entering a Zone containing Zombies ends the Survivor’s Move Action.
- Ambidextrous: The Survivor treats all Combat spells, Melee and Ranged weapons as if they had the Dual symbol.
- Barbarian: When resolving a Melee Action, the Survivor may substitute the Dice number of the Melee weapon(s) he uses with the number of Zombies standing in the targeted Zone. Skills affecting the dice value, like +1 die: Melee, still apply.
- Blitz: Each time the Survivor kills the last Zombie in a Zone, he gets 1 free Move Action to use immediately.
- Bloodlust: Combat: Spend one Action with the Survivor: He Moves up to two Zones to a Zone containing at least one Zombie. He then gains one free Combat Action (Melee, Ranged or Magic).
- Bloodlust: Magic: Spend one Action with the Survivor: He Moves up to two Zones to a Zone containing at least one Zombie. He then gains one free Magic Action, to use immediately.
- Bloodlust: Melee: Spend one Action with the Survivor: He Moves up to two Zones to a Zone containing at least one Zombie. He then gains one free Melee Action, to use immediately.
- Bloodlust: Ranged: Spend one Action with the Survivor: He Moves up to two Zones to a Zone containing at least one Zombie. He then gains one free Ranged Action, to use immediately.
- Born leader: During the Survivor’s Turn, he may give one free Action to another Survivor to use as he pleases. This Action must be used during the recipient’s next Turn or it is lost.
- Break-in: In order to open doors, the Survivor rolls no dice, and needs no equipment (but still spends an Action to do so). He doesn’t make Noise while using this Skill. However, other prerequisites still apply (such as taking a designated Objective before a door can be opened). Moreover, the Survivor gains one extra free Action that can only be used to open doors.
- Charge: The Survivor can use this Skill for free, as often as he pleases, during each of his Turns: He moves up to two Zones to a Zone containing at least one Zombie. Normal Movement rules still apply. Entering a Zone containing Zombies ends the Survivor’s Move Action.
- Collector: [Zombie type]: The Survivor gains double the experience each time he kills a Zombie of the specified type.
- Destiny: The Survivor can use this Skill once per Turn when he reveals an Equipment card he drew. You can ignore and discard that card, then draw another Equipment card.
- Free reload: The Survivor reloads reloadable weapons (Hand Crossbows, Orcish Crossbow, etc.) for free.
- Frenzy: Combat: All weapons and Combat spells the Survivor carries gain +1 die per Wound the Survivor suffers. Dual weapons gain a die each, for a total of +2 dice per Wound and per Dual Combat Action (Melee, Ranged or Magic).
- Frenzy: Magic: Combat spells the Survivor carries gain +1 die per Wound the Survivor suffers. Dual Combat spells gain a die each, for a total of +2 dice per Dual Magic Action.
- Frenzy: Melee: Melee weapons the Survivor carries gain +1 die per Wound the Survivor suffers. Dual Melee weapons gain a die each, for a total of +2 dice per Wound and per Dual Melee Action.
- Frenzy: Ranged: Ranged weapons the Survivor carries gain +1 die per Wound the Survivor suffers. Dual Ranged weapons gain a die each, for a total of +2 dice per Wound and per Dual Ranged Action.
- Hit & run: The Survivor can use this Skill for free, just after he resolved a Magic, Melee or Ranged Action resulting in at least a Zombie kill. He can then resolve a free Move Action. The Survivor does not spend extra Actions to perform this free Move Action if Zombies are standing in his Zone.
- Hold your nose: This Skill can be used once per Turn. The Survivor gets a free Search Action in the Zone if he has eliminated a Zombie (even in a Vault or a street Zone) the same Game Round. This Action may only be used to Search, and the Survivor can still only Search once per Turn.
- Ironclad: [Zombie type]: The Survivor ignores all Wounds coming from Zombies of the specified type (such as “Walker”, “Runner”, etc.).
- Iron hide: The Survivor can make Armor rolls with a 5+ Armor value, even when he does not wear an armor on his Body slot. Wearing an armor, the Survivor adds 1 to the result of each die he rolls for Armor rolls. The maximum result is always 6.
- Iron rain: When resolving a Ranged Action, the Survivor may substitute the Dice number of the Ranged weapon(s) he uses with the number of Zombies standing in the targeted Zone. Skills affecting the dice value, like +1 die: Ranged, still apply.
- Is that all you’ve got?: You can use this Skill any time the Survivor is about to get Wounds. Discard one Equipment card in your Survivor’s inventory for each Wound he’s about to receive. Negate a Wound per discarded Equipment card.
- Jump: The Survivor can use this Skill once during each Activation. The Survivor spends one Action: He moves two Zones into a Zone to which he has Line of Sight. Movement related Skills (like +1 Zone per Move Action or Slippery) are ignored, but Movement penalties (like having Zombies in the starting Zone) apply. Ignore everything in the intervening Zone.
- Lifesaver: The Survivor can use this Skill, for free, once during each of his Turns. Select a Zone containing at least one Zombie at Range 1 from your Survivor. Choose Survivors in the selected Zone to be dragged to your Survivor’s Zone without penalty. This is not a Move Action. A Survivor can decline the rescue and stay in the selected Zone if his controller chooses. Both Zones need to share a clear path. A Survivor can’t cross closed doors or walls, and can’t be extracted into or out of a Vault.
- Lock it down: At the cost of one Action, the Survivor can close an open door in his Zone. Opening or destroying it again later does not trigger a new Zombie Spawn.
- Loud: Once during each of his Turns, the Survivor can make a huge amount of noise! Until this Survivor’s next Turn, the Zone he used this Skill in is considered to have the highest number of Noise tokens on the entire board. If different Survivors have this Skill, only the last one who used it applies the effects.
- Low profile: The Survivor can’t get hit by Survivors’ Magic and Ranged Actions. Ignore him when casting a Combat spell or shooting in the Zone he stands in. Game effects that kill everything in the targeted Zone, like Dragon Fire, still kill him, though.
- Lucky: The Survivor can re-roll once all the dice for each Action (or Armor roll) he takes. The new result takes the place of the previous one. This Skill stacks with the effects of other Skills and Equipment that allows re-rolls.
- Mana rain: When resolving a Magic Action, the Survivor may substitute the Dice number of the Combat spell(s) he uses with the number of Zombies standing in the targeted Zone. Skills affecting the dice value, like +1 die: Magic, still apply.
- Marksman: The Survivor may freely choose the targets of all his Magic and Ranged Actions. Misses don’t hit Survivors.
- Matching set!: When a Survivor performs a Search Action and draws an Equipment card with the Dual symbol, he can immediately take a second card of the same type from the Equipment deck. Shuffle the deck afterward.
- Point-blank: The Survivor can resolve Ranged and Magic Actions in his own Zone, no matter the minimum Range. When resolving a Magic or Ranged Action at Range 0, the Survivor freely chooses the targets and can kill any type of Zombies. His Combat spells and Ranged weapons still need to inflict enough Damage to kill his targets. Misses don’t hit Survivors.
- Reaper: Combat: Use this Skill when assigning hits while resolving a Combat Action (Melee, Ranged or Magic). One of these hits can freely kill an additional identical Zombie in the same Zone. Only a single additional Zombie can be killed per Action when using this Skill. The Survivor gains the experience for the additional Zombie.
- Reaper: Magic: Use this Skill when assigning hits while resolving a Magic Action. One of these hits can freely kill an additional identical Zombie in the same Zone. Only a single additional Zombie can be killed per Action when using this Skill. The Survivor gains the experience for the additional Zombie.
- Reaper: Melee: Use this Skill when assigning hits while resolving a Melee Action. One of these hits can freely kill an additional identical Zombie in the same Zone. Only a single additional Zombie can be killed per Action when using this Skill. The Survivor gains the experience for the additional Zombie.
- Reaper: Ranged: Use this Skill when assigning hits while resolving a Ranged Action. One of these hits can freely kill an additional identical Zombie in the same Zone. Only a single additional Zombie can be killed per Action when using this Skill. The Survivor gains the experience for the additional Zombie.
- Regeneration: At the end of each Game Round, remove all Wounds the Survivor received. Regeneration doesn’t work if the Survivor has been eliminated.
- Roll 6: +1 die Combat: You may roll an additional die for each “6” rolled on any Combat Action (Melee, Ranged or Magic). Keep on rolling additional dice as long as you keep getting “6”. Game effects that allow re-rolls (the Plenty Of Arrows Equipment card, for example) must be used before rolling any additional dice for this Skill.
- Roll 6: +1 die Magic: You may roll an additional die for each “6” rolled on a Magic Action. Keep on rolling additional dice as long as you keep getting “6”. Game effects that allow re-rolls must be used before rolling any additional dice for this Skill.
- Roll 6: +1 die Melee: You may roll an additional die for each “6” rolled on a Melee Action. Keep on rolling additional dice as long as you keep getting “6”. Game effects that allow re-rolls must be used before rolling any additional dice for this Skill.
- Roll 6: +1 die Ranged: You may roll an additional die for each “6” rolled on a Ranged Action. Keep on rolling additional dice as long as you keep getting “6”. Game effects that allow re-rolls (the Plenty Of Arrows Equipment card, for example) must be used before rolling any additional dice for this Skill.
- Rotten: At the end of his Turn, if the Survivor has not resolved a Combat Action (Melee, Ranged or Magic) and not produced a Noise token, place a Rotten token next to his base. As long as he has this token, he is totally ignored by all Zombies and is not considered a Noise token. Zombies don’t attack him and will even walk past him. The Survivor loses his Rotten token if he resolves any kind of Combat Action (Melee, Ranged or Magic) or makes noise. Even with the Rotten token, the Survivor still has to spend extra Actions to move out of a Zone crowded with Zombies.
- Scavenger: The Survivor can Search in any Zone. This includes street Zones, Vault Zones, etc.
- Search: +1 card: Draw an extra card when Searching with the Survivor.
- Shove: The Survivor can use this Skill, for free, once during each of his Turns. Select a Zone at Range 1 from your Survivor. All Zombies standing in your Survivor’s Zone are pushed to the selected Zone. This is not a Movement. Both Zones need to share a clear path. A Zombie can’t cross closed doors, ramparts (see the Wulfsburg expansion) or walls, but can be shoved in or out of a Vault.
- Slippery: The Survivor does not spend extra Actions when he performs a Move Action out of a Zone containing Zombies. Entering a Zone containing Zombies ends the Survivor’s Move Action.
- Spellbook: All Combat spells and Enchantments in the Survivor’s Inventory are considered equipped in Hand. With this Skill, a Survivor could effectively be considered as having several Combat spells and Enchantments cards equipped in Hand. For obvious reasons, he can only use two identical dual Combat Spells at any given time. Choose any combination of two before resolving Actions or rolls involving the Survivor.
- Spellcaster: The Survivor has one extra free Action. This Action may only be used for a Magic Action or an Enchantment Action.
- Sprint: The Survivor can use this Skill once during each of his Turns. Spend one Move Action with the Survivor: He may move two or three Zones instead of one. Entering a Zone containing Zombies ends the Survivor’s Move Action.
- Super strength: Consider the Damage value of Melee weapons used by the Survivor to be 3.
- Starts with a [Equipment]: The Survivor begins the game with the indicated Equipment; its card is automatically assigned to him during Setup.
- Steady hand: The Survivor can ignore other Survivors of his choosing when missing with a Magic or Ranged Action. The Skill does not apply to game effects killing everything in the targeted Zone (such as a Dragon Fire, for example).
- Swordmaster: The Survivor treats all Melee weapons as if they had the Dual symbol.
- Tactician: The Survivor’s Turn can be resolved anytime during the Players’ Phase, before or after any other Survivor’s Turn. If several Survivors benefit from this Skill at the same time, choose their Turn order.
- Taunt: The Survivor can use this Skill, for free, once during each of his Turns. Select a Zone your Survivor can see. All Zombies standing in the selected Zone immediately gain an extra Activation: They try to reach the taunting Survivor by any means available. Taunted Zombies ignore all other Survivors. They do not attack them and cross the Zone they stand in if needed to reach the taunting Survivor.
- Tough: The Survivor ignores the first Wound he receives from a single Zombie every Zombies’ Phase.
- Trick shot: When the Survivor is equipped with Dual Combat spells or Ranged weapons, he can aim at different Zones with each spell/weapon in the same Action.
- Zombie link: The Survivor plays an extra Turn each time an Extra Activation card is drawn from the Zombie pile. He plays before the extra-activated Zombies. If several Survivors benefit from this Skill at the same time, choose their Turn order.
Game Round Summary
1. First Step
Choose the first player at the beginning of the game. He receives the “first player” token.
2. Players’ Phase
The first player activates all of his or her Survivors, one after the other, in any order. When he or she’s done, the next player’s Turn begins. Play clockwise. Each Survivor has three Actions to spend, chosen from the following list. Unless stated otherwise, each Action may be performed several times per Activation:
- Move: Move one Zone.
- Search (1x/Activation and per Survivor): Building Zone only. Draw a card in the Equipment deck.
- Open a door: Melee weapon required. Spawn Zombies inside a building if it’s the first door.
- Reorganize/Trade: Equipment exchange with another Survivor standing in the same Zone is possible. You can trade everything for nothing.
- Combat Action:
- Magic Action: Equipped Combat spell required.
- Melee Action: Equipped Melee weapon required.
- Ranged Action: Equipped Ranged weapon required.
- Enchantment Action: Equipped Enchantment required.
- Take or activate an Objective in the Survivor’s Zone.
- Make Noise: Put a Noise token in the Survivor’s Zone.
- Do Nothing: All remaining Actions are lost.
3. Zombies’ Phase
Step 1 – Activation: Attack OR Move
All Zombies spend one Action doing one of these two things:
- Zombies in the same Zone as at least one Survivor attack them.
- The Zombies which didn’t Attack, Move. Each Zombie favors visible Survivors, then noise. Necromancers follow special rules (see page 29). Choose the shortest path. If several paths share the same length, split the Zombies in equal groups.
NOTE: Runners get two Actions per Activation. Once all Zombies have taken their first Action, Runners go through the Activation step again to resolve their second Action.
Step 2 – Spawn
- Always draw Zombie cards for all Spawn Zones in the same order (play clockwise).
- Danger Level used: highest Danger Level among active Survivors.
- No more minis of specified type? All Zombies of specified type get an extra Activation!
End Phase
- Remove all Noise tokens from the board.
- The next player receives the “first player” token (play clockwise).
Targeting Priority Order
When several targets share the same Targeting Priority Order, the players choose which ones are eliminated first.
| Targeting Priority | Name | Actions | Min Damage to Destroy | Experience Points |
|---|---|---|---|---|
| 1 | Walker | 1 | 1 | 1 |
| 2 | Fatty / Abomination (1) | 1 | 2 / 3 | 1 / 5 |
| 3 | Runner | 2 | 1 | 1 |
| 4 | Necromancer | 1 | 1 | 1 |
(1) Abomination: Ignore Armor rolls.
Credits
- Game Designers: Raphaël Guiton, Jean-Baptiste Lullien and Nicolas Raoult
- Executive Producer: Percy de Montblanc and Thiago Aranha
- Art: Jérémy Masson, Nicolas Fructus and Louise Combal
- Graphic Design: Mathieu Harlaut and Louise Combal
- Sculptors: Gael Goumon, Jason Hendricks, Bobby Jackson, Patrick Masson, Juan Navarro Perez, Elfried Perochon, Steve Saunders, Jody Siegel, Remy Tremblay, and Rafal Zelazo
- Editing: Thiago Aranha and Eric Kelley
- Publisher: David Preti
Introduction & Components
Get Medieval!
Death, injustice, plague, and war are common things these days, but nothing prepared us for… Zombies!
They emerged from the deep forests, through the mists, themselves pawns for the necromancers who pointed their fingers at villages and farmholds, designating their prey. The zombies swarmed all around us, biting, ripping, tearing the people to pieces. And then we could do little but watch, horrified, as our dead friends rose as yet more zombies.
The invasion could have worked, spreading chaos and death, until they had enough to menace the great cities. With enough zombies, even mighty walls could be torn down. But the necromancers didn’t take us into account. The rabble. The peasantry.
The necromancers fell victim to the same hubris that our ‘mighty lords’ often do. They forgot that we’re tough. We’re hardy. And we know how to fight. The necromancers thought us a ready supply of fresh corpses.
They were wrong.
Now is the time to take arms, to make our stand for our lives and freedom! Now is the time for Zombicide!
Zombicide: Black Plague is a cooperative game where one to six players face hordes of Zombies controlled by the game itself.
Each player controls one to six Survivors in a fantasy world invaded by Zombies. The goal is simply to complete the Quest objectives, survive, and kill as many Zombies as possible!
Zombies are slow and predictable, but there are a lot of them. Watch out for their Abomination and Necromancer bosses, too!
Survivors use whatever they can get their hands on to kill Zombies. The better the weapon, the higher the body count, and the more Zombies appear, attracted by the onslaught!
Survivors can trade equipment, and players can share tactics. Only through cooperation can you achieve the Quest objectives and survive. Battling Zombies is fun, but you will also need to rescue other Survivors, find food and weapons, uncover the Necromancers’ secrets, and much more.
After experiencing Zombicide: Black Plague, your gaming group will be the ultimate monster hunters!
What About the Modern-Era Zombicide?
Zombicide: Black Plague uses some core mechanics borne from its original, modern-era Zombicide brother. You could even mix some material among them to create your own setting (boomstick, anyone?). There are many rules twists, however, giving Zombicide: Black Plague a unique flavor!
Winning and Losing
The game is lost when all Survivors have been eliminated or if too many Necromancers escape. Some Missions can be lost when certain conditions are met (losing a single Survivor, for example).
The game is won immediately when all of the Quest objectives have been accomplished. Zombicide: Black Plague is a cooperative game, so all players win if the Quest objectives are fulfilled.
Game Components
- 9 Game tiles (double-sided)
- 65 Zombie miniatures:
- 35 Walkers
- 14 Fatties
- 14 Runners
- 1 Abomination
- 1 Necromancer
- 6 Survivor miniatures and ID cards: Nelly, Ann, Silas, Clovis, Baldric, Samson
- 6 Survivor dashboards
- 6 Survivor color bases
- 48 Trackers
- 6 Dice
68 Tokens
- Doors:
- Blue: x1
- Green: x1
- Neutral: x12
- Dragon Bile: x4
- Exit point: x1
- First player: x1
- Noise: x18
- Free Action: x1
- Rotten: x1
- Objectives:
- Red/Blue: x1
- Red/Green: x1
- Red/Red: x8
- Zombie Spawn:
- Red/Blue: x1
- Red/Green: x1
- Red/Necromancer Green: x1
- Red/Necromancer Brown: x1
- Red/Necromancer Red: x1
- Red/Necromancer Purple: x1
- Red/Necromancer Grey: x1
- Red/Necromancer Beige: x1
- Red/Red: x4
- Vault doors:
- Violet: x2
- Yellow: x2
- Vault Zone:
- Violet: x1
- Yellow: x1
125 Mini-Cards
71 Equipment Cards
- Aaahh!!: x4
- Apples: x2
- Axe: x2
- Chainmail Armor: x2
- Crossbow: x2
- Dagger: x4
- Death Strike: x2
- Dragon Bile: x4
- Fireball: x2
- Great Sword: x2
- Hammer: x1
- Hammer (starting Equipment): x1
- Hand Crossbow: x2
- Healing: x1
- Inferno: x1
- Invisibility: x1
- Leather Armor: x2
- Lightning Bolt: x2
- Longbow: x2
- Mana Blast: x1
- Mana Blast (starting Equipment): x1
- Orcish Crossbow: x1
- Plate Armor: x1
- Plenty Of Arrows: x3
- Plenty Of Bolts: x3
- Repeating Crossbow: x2
- Repulse: x1
- Salted Meat: x2
- Shield: x2
- Short Bow: x1
- Short Bow (starting Equipment): x1
- Short Sword: x1
- Short Sword (starting Equipment): x3
- Speed: x1
- Sword: x2
- Torch: x4
- Water: x2
54 Zombie Cards
(#01 to #54)
Setup
Game Setup Steps
- Choose a Quest.
- Place the tiles.
- Place the doors, Objectives, and all tokens as indicated by the Quest.
- Each player gathers 1 to 6 Survivors for him to play. Players sit around the table in any order they choose. As they cooperate against the game, all players form a single team. A Zombicide: Black Plague game usually features 6 Survivors, distributed in any way you see fit among players. We recommend new players to join the game with a single Survivor, to get a quick grasp on the game mechanics. A veteran player can easily control a whole team of 6 Survivors and clean Zombie pests on his own!
- Players take one Dashboard for each of their Survivors, placing the Survivor’s ID Card on it. They take a colored plastic base and attach it to the Survivor’s miniature to help identify it. They also take the 5 plastic trackers in the same color.
- Put aside all Equipment cards with the “Starting Equipment” keyword: a Hammer, a Mana Blast, a Short Bow and three Short Swords. These cards are identified by a grey back. Also set aside the Equipment cards with the “Vault” keyword: Inferno and Orcish Crossbow. These cards are identified by a blue back.
- Deal the Starting Equipment as you see fit amongst Survivors. Zombicide: Black Plague is a cooperative game, so decide as a team. Each Survivor starts the game with at least one card. If a Survivor’s starting Skill lists any starting weapons, he receives those cards now, independent of the starting Equipment you’ve just distributed.
- Shuffle the Zombie cards into one deck and the Equipment cards into another. Place both decks face down close to the board.
- Place the miniatures representing the chosen Survivors on the starting Zone(s) indicated by the Quest.
- Each player places his Survivors’ Dashboard(s) in front of him. He makes sure the sliding arrow is on the “0” space in the blue area of the Danger Bar. He then places a tracker in the “0” slot of the Wound Bar and another tracker in the slot for the first (blue) Skill. Place 3 more trackers in the reserve slots on the top of the Dashboard.
- Decide who will be the first player, and give him the first player token.
Core Concepts & Survivor Progression
Useful Definitions
- Actor: A Survivor or Zombie.
- Zone: Inside a building, a Zone is a room. On a street, a Zone is the area between two linear markings (or a linear marking and a tile’s edge) and the walls of buildings along the street.
Line of Sight
How do I know if a Zombie sees me or if I see it?
- On the streets, Actors see in straight lines that run parallel to the edges of the board. Actors cannot see diagonally. Their Line of Sight covers as many Zones as the line can pass through before reaching a wall or the edge of the board.
- Inside a building, an Actor sees into all Zones that share an opening with the Zone the Actor currently occupies. If there is an opening, the walls do not block Line of Sight between two Zones. An Actor’s Line of Sight, however, is limited to the distance of one Zone.
NOTE: If the Survivor is looking out into the street, or from the street into a building, the Line of Sight can go through any number of street Zones in a straight line, but only one Zone into the building.
Movement
Actors can move from one Zone to the next as long as the first Zone shares at least one edge with the destination Zone. Corners do not count. This means Actors cannot make diagonal movements.
- On streets: The movement from one Zone to another has no restrictions. However, Actors must go through a door (or opening) to move from a building to the street and vice-versa.
- Inside a building: Actors may move from one Zone to another as long as these Zones are linked by an opening. The position of a miniature in the Zone and the layout of the walls do not matter as long as the Zones share an opening.
Noise
The shufflers hunt by sight and sound. If they see you, you’ll hear ‘em gasping and moaning for your flesh. But when it’s quiet, they’re quiet. Any noise, anything at all, and they’ll come poking around. You wouldn’t believe how quiet a dead man can be. … Well, ‘course you would, but a walking dead man can be just as quiet as a resting corpse. No battle cries. No shouts. Some folks take to gagging themselves voluntarily, just so they can’t cry out in surprise (or horror).
Casting a spell or smashing through a door makes noise, and noise attracts Zombies. Each Action that opens a door with a noisy Equipment or attacks with a noisy Equipment produces a Noise token.
- Place this token in the Zone where the Survivor resolved the Action. It stays in the Zone where it was produced, even if the Survivor moves.
- A single Action can only produce a single Noise token, no matter how many dice are rolled, how many hits are obtained, or if Dual weapons are used.
- Noise tokens are removed from the board in the End Phase (see page 8).
NOTE: Each Survivor miniature also counts as a Noise token. Zombies have acute hearing, and Survivors can’t stay quiet anyway!
EXAMPLE: Clovis spends an Action to open a door with an Axe. It’s a noisy way to open a door. This produces a Noise token. He then attacks a Zombie in his Zone, knocking it down after two Melee Actions. The Axe is a silent killing weapon, so these Melee Actions produce no noise. Two “noises” remain in this Zone: the Noise token produced by opening the door and Clovis’ miniature itself.
In another Zone, Baldric executes two Magic Actions with his Fireball. Although he rolled three dice for each Magic Action, he gets only two Noise tokens in his Zone, one for each Magic Action. The Noise tokens remain on the Zone where Baldric produced them; they don’t follow him when he moves.
Experience, Danger Level, and Skills
For each Zombie killed, a Survivor gains one experience point and moves up a notch on his Danger Bar. Some Quest objectives provide more experience, as does eliminating Abominations.
There are four Danger Levels on the Danger Bar: Blue, Yellow, Orange, and Red. These represent everything from a light drizzle of Zombies to a flash flood.
At each Danger Level, the Survivor gains one new Skill to help him on his Quest (see Skills, page 51). Skills add to each other across Danger Levels: at Red Level, your Survivor will have four Skills. As new Skills are unlocked, place new markers on the Survivor Dashboard to indicate it.
- 0 to 6 experience points (Blue Level): Possess a starting Skill.
- 7 to 18 experience points (Yellow Level): Reaching 7 experience points moves Danger Level to Yellow. Gains a fourth Action.
- 19 to 42 experience points (Orange Level): Reaching 19 experience points moves Danger Level to Orange. Choose one of the two Skills indicated on his ID Card.
- 43 experience points (Red Level): Choose one of the three Skills indicated on his ID Card.
This experience has a side effect, however. When you draw a Zombie card to spawn Zombies, read the line that corresponds to the Survivor still in play with the highest Danger Level (see Zombie Spawn, page 25). The stronger your Survivor is, the more Zombies appear.
Inventory
Each Survivor can carry up to eight Equipment cards, divided into three types of Equipment slots on his Dashboard: Two Hands, a Body and five Backpack slots. You may discard cards from your inventory to make room for new cards at any time, for free (even during another player’s Turn).
Hands
- Both Hand slots are reserved exclusively for Equipment cards bearing the Hand symbol.
- An Equipment card bearing the Hand symbol can only be used when equipped in Hand.
Body
- The Body slot is reserved for Equipment cards bearing the Body symbol.
- Alternatively, it can hold the specific Equipment card that is listed on it. It is then considered to be equipped in Hand, representing a special piece of Equipment that this Survivor can draw and use in the blink of an eye.
- An Equipment card bearing the Body symbol can only be used when put over the Body.
Backpack
- Up to five Equipment cards of any type can fit in the Backpack slots.
- Equipment cards bearing the Body or Hand symbol can be stored in the Backpack, but while there they are not in use. Any text on them will not be in effect until they are moved to their appropriate inventory slots.
- An Equipment card bearing the Backpack symbol can only be stored in the Backpack, and while there is always considered to be in use.
Equipment & Weapon Cards
Weapons and Combat Spells
We went to the king’s country estate. It was nearby, and though we weren’t allowed on his lands, we figured the situation warranted some leeway from His Majesty. We found the castle shattered. Wrecked. The few survivors had holed up in the cellars. Imagine their surprise when they opened the doors to human voices, and found a peasant army armed with pitchforks and torches. The king’s forces had proved no match for the ravening horde. But now, at least, we had a few wizards and men-at-arms on our side. And weapons. Lots of weapons. There were plenty left over after the slaughter. Zombies don’t use swords.
Zombicide: Black Plague features many Equipment cards. The ones your Survivors use to blast Zombies fall in three categories:
- Melee weapons: Display a “0” Range value and thus can only be used in the same Zone as the Survivor. They are used with Melee Actions (see P. 33).
- Ranged weapons: Have a maximum Range value of “1” (or more). They are used with Ranged Actions (P. 33). Attacking at Range 0 with a Ranged weapon is still a Ranged Action.
- Combat spells: Have a distinctive scroll appearance and a maximum Range value of “1” (or more). They are used with Magic Actions (P. 35). Attacking at Range 0 with a Combat spell is still a Magic Action.
Some Equipment cards can belong to several types at once (e.g., Orcish Crossbow is both a Melee and a Ranged weapon).
Door-Breaching, Zombie-Killing, and Noisy Equipment
- Equipment that allows you to open doors but requires a dice roll to do it has this symbol. The die indicates the minimum roll needed to open the door.
- Equipment that allows you to open doors without any dice roll has this symbol.
- Equipment that allows you to kill Zombies has Combat characteristics displayed at the bottom: Range, Dice, Accuracy, Damage.
- Each of these symbols is accompanied by a second symbol related to noise:
- Noisy: This Action is noisy and produces a Noise token (see Noise, page 15).
- Silent: This Action isn’t noisy and does not produce a Noise token.
Combat Characteristics
Melee weapons, Ranged weapons and Combat spells display Combat characteristics used to maim, shoot or disintegrate Zombies in many ways.
- Danger Level Gems: These gems indicate at what Danger Level a Survivor needs to be to be able to use this card. All cards in this box display all four gems, so Survivors can use them at any level. Expansions will contain cards with some of these gems removed, indicating the card can’t be used while the Survivor is at those Danger Levels (but can be stored in any eligible slot).
- HAND: Put this Equipment in Hand in order to use it.
- DUAL: If you have Dual weapons with the same name in each hand, you may use them both in a single Action (dual Ranged weapons and Combat spells must be aimed at the same Zone).
- RANGE: Min and max number of Zones the weapon can reach. “0” indicates Melee only; a max Range of “1” or more indicates a Ranged weapon or Combat spell.
- DICE: Roll as many dice as this value when an Action is spent to use this weapon.
- ACCURACY: Each roll that equals or exceeds this value is a success. Inferior results are failures.
- DAMAGE: Damage inflicted for each success. A “2” value (or more) is required to eliminate Fatties.
- OPEN DOORS: Opens doors without any dice roll (or rolling a die if a value is shown).
- SILENT: Doesn’t produce a Noise token when used.
- NOISY: Produces a Noise token when used.
Players' Phase & Actions
Turn Overview
Zombicide: Black Plague is played over a series of Game Rounds. During the Players’ Phase, the player with the first player token takes his Turn, activating his Survivors one at a time, in the order of his choice.
Each Survivor can initially perform three Actions per Turn, though Skills may allow him to perform extra Actions as the game progresses. The Survivor uses his Actions to kill Zombies, move around the board, and performs other tasks to accomplish the various Quest objectives. Some Actions make noise, and noise attracts Zombies!
Once a player has activated all his Survivors, the player to his left takes his Turn, activating his Survivors in the same manner.
When all the players have completed their Turns, the Players’ Phase ends.
Available Survivor Actions
Starting with whoever holds the first player token, each player activates his Survivors one after another, in the order of his choice. Each Survivor can execute three Actions at the Blue Danger Level (not counting any free Action his Blue Level Skill may give him). The possible Actions are:
Move
The Survivor moves from one Zone to the next but cannot move through external building walls or closed doors. If there are Zombies in the Zone the Survivor is attempting to leave, he must spend one extra Action per Zombie to leave the Zone. Entering a Zone containing Zombies ends the Survivor’s Move Action, even if he has a Skill that allows him to move through multiple Zones per Move Action (or the Slippery Skill, see page 54).
EXAMPLE: Silas is in a Zone with two Walkers. To leave this Zone, he spends one Move Action, then two more Actions (one per Walker), for a total of three Actions. If there had been three Zombies in the Zone, Silas would have needed four Actions to move.
Search
You can only Search building Zones and only if there are no Zombies in the Zone. The player draws a card from the Equipment deck. He may then place it in the Survivor’s inventory or immediately discard it. A Survivor can only perform a single Search Action per Turn (even if it’s an extra, free Action). After searching, the Survivor may freely reorganize his inventory.
Remember, you may discard cards from your inventory to make room for new cards at any time, for free.
When the Equipment deck runs out, reshuffle all the discarded Equipment cards (with the exception of Vault cards like Inferno and Orcish Crossbow, but including starting Equipment cards) to make a new deck.
Open a Door
Melee weapons with the “Open a door” symbol can be used to open a door next to the Survivor:
- Weapons with a die icon: Spend an Action and roll as many dice as the weapon’s Dice value: the door is opened if any die result equals or exceeds the Accuracy number of the weapon. Place a Noise token in the Zone. Opening a door is not a Melee Action. It doesn’t benefit from Dual wielding, Melee bonuses like Skills or Daggers’ extra bonus die. Only the raw Dice value of the weapon is used.
- Weapons without a die icon: Spend an Action to open the door without rolling any dice. A Noise token is placed if the weapon is noisy.
Spawning In Buildings
Opening a closed building for the first time reveals all the Zombies inside all rooms of the building (a single building extends to all rooms connected by openings, sometimes straddling several tiles). Indicate each Zone of the building, one after the other in any order you choose, and draw a Zombie card for each Zone. Place the corresponding number and type of Zombies on the indicated Zone (see Zombies’ Phase – Spawn, page 25).
- If you draw an Extra Activation, immediately perform the action indicated on the card.
- If you draw a Double Spawn card (see page 26), don’t spawn Zombies in this Zone, and spawn two cards’ worth of Zombies on the next.
- Some game effects allow an open door to be locked up. If it is opened again afterward, it won’t trigger a new Zombie Spawn.
- When the Zombie deck runs out, reshuffle all the discarded cards to make a new deck.
- Buildings that are open at the start of the game are never spawned in.
- Many Quests feature colored doors. Usually, these cannot be opened until some conditions are met, like finding an Objective of the matching color. Read the Quest description to know more.
Reorganize/Trade
At the cost of one Action, a Survivor can reorganize the cards in his inventory in any way he wishes. The Survivor can simultaneously exchange any number of cards with one (and only one) other Survivor currently in the same Zone. This other Survivor reorganizes his own inventory for free.
A Trade Action doesn’t have to be fair; you can trade everything for nothing, if both parties agree!
Combat Actions
Combat Actions use all types of combat-oriented Equipment cards: Melee, Ranged or Magic.
- Melee Action: The Survivor uses a Melee weapon he is holding in Hand to attack Zombies in his Zone (see Combat, page 32).
- Ranged Action: The Survivor uses a Ranged weapon he is holding in Hand to fire at a single Zone within the Range shown on the weapon’s card (see Combat, page 32). In Zombicide: Black Plague, people shoot at Zones, not Actors. This is especially important for Targeting Priority Order (see page 34). Remember, using a Ranged weapon at Range 0 is still a Ranged Action.
- Magic Action: The Survivor uses a Combat spell (a spell with combat characteristics) he is holding in Hand to attack Zombies. This attack follows the same rules as Ranged Actions.
Enchantment Action
The Survivor uses an Enchantment (a spell without combat characteristics) he is holding in Hand. Resolve the game effect(s) described on the card.
- Enchantments are cast at target Actors or Zones (check the card description) within the Survivor’s Line Of Sight.
- If the target is a Survivor, the caster may target himself.
- Most Enchantments bear the note “Once per Turn”: a given Survivor can cast it only once during each of his Turns. If he owns multiple copies of the same Enchantment, each copy can be cast independently. The same Enchantment can be cast several times in a Game Round, if Survivors exchange it and cast it as their Turns go by.
Take or Activate an Objective
The Survivor takes an Objective or activates an Objective in the same Zone. The game effects are explained in the Quest’s description.
Make Some Noise!
The Survivor makes Noise in an attempt to attract Zombies. Place one Noise token in his Zone.
Do Nothing
The Survivor does nothing and prematurely ends his Turn. His remaining Actions are lost.
Combat
Combat Mechanics
When a Survivor executes a Melee, Ranged or Magic Action to attack Zombies, roll as many dice as the Dice number of the weapon (or Combat spell) being used.
- Dual Wielding: If the active Survivor has two identical weapons or Combat spells with the Dual symbol equipped in Hands, he can use both weapons at the same time at the cost of a single Action. For Ranged and Magic Actions, both weapons/spells must be aimed at the same Zone.
- Success: Each die result that equals or exceeds the Accuracy number of the weapon scores a successful hit.
- Damage: Each hit inflicts the amount of Damage specified by the Damage value of the weapon to a single target:
- Walkers, Runners and Necromancers are killed with a 1 Damage hit (or more).
- Fatties are killed with a 2 Damage hit (or more). It does not matter how many hits you obtain with a weapon that inflicts 1 Damage. A Fatty will absorb the hits without flinching.
- Abominations are killed with a 3 Damage hit (or more). As no weapon naturally has Damage 3 in Zombicide: Black Plague, you have to destroy the monster with Dragon Fire (see page 35) or with Samson using a Damage 2 Melee weapon in conjunction with his +1 Damage: Melee Skill.
- Each successful hit can only take out one target, and any remaining Damage is overkill and wasted.
THREE HANDS? Putting the proper Equipment card in his Body space, a Survivor could effectively be considered as having three cards equipped in Hand. For obvious reasons, he can only use two of them at any given time. Choose any combination of two among these three before resolving Actions or rolls involving the Survivor.
Melee Action
A Survivor holding a Melee weapon (a weapon with a max Range of “0”) in Hand can attack a Zombie in his own Zone. Each die roll equal or higher than the Accuracy value on the weapon’s card is a successful hit. The player divides his hits as he wishes among the possible targets in the Zone.
Missed melee strikes cannot cause Friendly Fire.
Ranged Action
A Survivor holding a Ranged weapon (a weapon with a max Range of “1” or more) in Hand can shoot at a Zone he can see (see Line of Sight, page 10) and that is within the weapon’s Range.
- Inside a building, the Line of Sight is limited to the Zones that share an opening and just one Zone away.
- Missed shots can cause Friendly Fire (see Page 34), so aim carefully!
- The Range of a weapon, indicated by the Range value on its card, is the number of Zones it can shoot across:
- The first value shows the minimum Range. The weapon may not shoot at Zones closer than the minimum. In some cases this is 0, meaning the Survivor can shoot at targets in the Zone he currently occupies (it is still a Ranged Action).
- The second value shows the maximum Range of the weapon. A weapon cannot fire at Zones beyond the maximum Range.
- When a Zone is chosen for a Ranged Action, ignore any Actors in the Zones between the shooter and the target. This means Survivors may shoot through occupied Zones without danger to either fellow Survivors or Zombies. A Survivor can even shoot at another Zone while Zombies stand on his own!
Targeting Priority Order
When using a Ranged weapon (even at Range 0), the shooting Survivor does not choose the targets hit by successful rolls. Hits are assigned to Actors in the targeted Zone according to this targeting priority order:
| Targeting Priority | Name | Actions | Min Damage to Destroy | Experience Points |
|---|---|---|---|---|
| 1 | Walker | 1 | 1 | 1 |
| 2 | Fatty / Abomination (1) | 1 | 2 / 3 | 1 / 5 |
| 3 | Runner | 2 | 1 | 1 |
| 4 | Necromancer | 1 | 1 | 1 |
(1) Abomination: Ignore Armor rolls.
The hits are assigned to targets of the lowest priority number until they’ve all been eliminated, then to targets of the next priority until they’ve all been eliminated, and so on. If several targets share the same Targeting Priority Order, players choose the targets hit among them.
Friendly Fire
A Survivor can’t hit himself with his own attacks. However, emergency situations can call for a Ranged or Magic Action aimed at a Zone where a teammate is stuck. In that case, misses on the attack roll automatically land on Survivors standing in the target Zone. Assign these Friendly Fire hits in any way you want.
- Armor rolls are allowed, successes cancelling Friendly Fire hits on a one-to-one basis.
- Each remaining Friendly Fire hit on the Survivor inflicts as many Wounds as the Damage value of the weapon (or Combat spell) used.
- Friendly Fire doesn’t apply to Melee Actions.
- Killing a Survivor earns no experience.
Reloadable Weapons
While most weapons can be used repeatedly, a few, like the Hand Crossbow and Orcish Crossbow (when used for Ranged Actions), require spending an Action to reload them between shots if you want to fire multiple times in the same Game Round. You can turn the card upside down to remember the weapon is empty and needs a reload to fire again. At the End Phase of the Game Round, all such weapons are freely reloaded, so that they always start the Round ready to fire.
- If such a weapon is fired and passed to another Survivor without reloading, it must still be reloaded before the new owner can use it in the same Game Round.
- When equipped with two identical Dual weapons that require reloading, a single Action reloads both.
- Survivors may fire a single Dual reloadable weapon at a Zone and then execute another Ranged Action to fire at another Zone with the other Dual reloadable weapon.
Magic Action
A Survivor equipped with a Combat spell (a spell with combat characteristics) in Hand can blast a Zone he can see (and within the spell’s Range). Magic Actions share the same rules as Ranged Actions.
Dragon Fire
Most problems may be solved by torching them. – Ann
- A Dragon Bile card can be discarded from Hand to put a Dragon Bile pool at Range 0-1 of the Survivor.
- Later, a Torch card can be discarded from Hand to ignite a Dragon Bile pool at Range 0-1 and create a Dragon Fire: every Actor in the token’s Zone is killed, no matter its Damage threshold, Armor values or remaining Wounds. A Dragon Fire produces no Noise.
- The Dragon Bile pool is then removed, and the Survivor who threw the Torch earns all experience points.
Use Dragon Fire to set blazing Zombie traps! If all Dragon Bile tokens are already on the board and you need to set a new one, choose one of them and move it to the new Zone.
Zombies' Phase & Zombie Types
The Zombies
Zombicide: Black Plague features five types of Zombies. A good Survivor quickly learns their strengths and weaknesses!
Most Zombies have a single Action to spend each time they activate (Runners have two). A Zombie is eliminated as soon as it is successfully hit with an attack that has the minimum required Damage value. Its assailant then immediately earns the listed experience points.
Walker
Once peasants, craftsmen, merchants, or townsfolk, these poor unfortunates were taken unawares… dumbest and most numerous of the lot.
- Min. Damage to destroy: Damage 1
- Experience provided: 1 point
Fatty
Fatties are what we call the… well, fat ones… They ignore pain, just like most dead men. You need a strong arm to finish these.
- Min. Damage to destroy: Damage 2
- Experience provided: 1 point
Runner
Runners are fast. Faster than anything on two legs should be…
- Min. Damage to destroy: Damage 1
- Experience provided: 1 point
- Special rule: Each Runner has two Actions per Activation (see Playing Runners, page 25).
Abomination
Weapons don’t work. Armor don’t work. Fire is what you need. A good hot fire. It’s the only thing that works.
- Min. Damage to destroy: Damage 3
- Experience provided: 5 points
- Special rules:
- Wounds inflicted by Abominations can’t be prevented by Armor rolls (see page 23).
- A Damage 3 weapon is required to kill an Abomination. There is no such weapon in Zombicide: Black Plague’s core box. To slay the monster, your team needs to throw Dragon Bile in its Zone and ignite it with a Torch, creating a Dragon Fire (see page 35). Samson can also achieve this at Red Level, using a Damage 2 Melee weapon in conjunction with his +1 Damage: Melee Skill (see page 51).
Necromancer
Everyone’s heard the children’s stories, of the necromancers that live in the woods… They’re immune to the plague somehow, but that figures since they control the hordes. Kill them on sight, and burn the corpses.
- Min. Damage to destroy: Damage 1
- Experience provided: 1 point
- Special rules: Necromancers’ special rules are explained in depth on Page 29.
Zombies’ Phase Sequence
All Zombies on the board activate and spend one Action either attacking a Survivor next to them or, if they have nobody to attack, moving toward the Survivors or noisy Zones. Some Zombies, called Runners, get two Actions, so they can attack twice, attack and move, move and attack, or move twice.
Once all Zombies have performed their Actions, new Zombies appear in all active Spawn Zones on the board.
Once the players have activated all their Survivors, the Zombies play. Nobody takes their role; they do it themselves, performing the following steps in order:
Step 1 – Activation
Each Zombie activates and spends its Action on either an Attack or a Move, depending on its situation. Resolve all the Attacks first, then all the Moves. Each Zombie performs either an Attack OR a Move with a single Action.
Attack
Each Zombie in the same Zone as Survivors performs an Attack. A Zombie’s Attack is always successful, does not require any dice rolls, and inflicts one Wound. Survivors in the Zone share the Wounds in any way the players prefer, even if it means inflicting them all on a single Survivor.
After any applicable Armor roll, the Wound Bar’s tracker is moved one point higher per Wound received. A Survivor is eliminated as soon as his Wound Bar reaches 3. Remove his miniature and discard his Equipment.
Feeding Frenzy! Zombies fight in groups. All Zombies activated in the same Zone as a Survivor joins the Attack, even if there are so many that it would be overkill.
Armor Rolls
- Armor: Survivors wearing an armor Equipment card on the Body slot can execute Armor rolls to avoid Wounds. Roll as many dice as the number of Wounds the Survivor is about to receive. Each die result that equals or exceeds the Armor number of the armor card negates a Wound. A lucky Survivor could even choose to endure all Wounds for his team and get out without a scratch!
- Shield: A Hand-held Shield allows Armor rolls if the Survivor isn’t wearing actual armor. If he is wearing armor, the Shield allows re-rolling its Armor rolls once. Re-roll all the dice, and the new result takes the place of the previous one. In some cases (with a 5+ Leather Armor, for example), the Shield could offer a better Armor value than the armor itself: the Survivor may choose to use the Shield’s Armor value instead, but then he won’t be allowed a re-roll.
- Exceptions: Wounds inflicted by Abominations, as well as being eliminated by a Dragon Fire, can’t be prevented by Armor rolls.
Move
The Zombies that have not attacked use their Action to Move one Zone toward Survivors:
- Zombies select their destination Zone:
- First is the Zone with Survivors in Line Of Sight that has the most Noise tokens. Remember, each Survivor counts as a Noise token.
- If no Survivor is visible, they move toward the noisiest Zone.
- In both cases, distance doesn’t matter. A Zombie always goes for the noisiest meal he can see or hear.
- Zombies move 1 Zone toward their destination Zone by taking the shortest available path. In case there are no open paths to the noisiest Zone, Zombies move toward it as if all doors were open, though locked doors still stop them.
If there is more than one route of the same length, the Zombies split into groups of equal numbers to follow all possible routes. They also split up if different target Zones contain the same number of Noise tokens. If necessary, add Zombies so that all new groups resulting from a splitting group contain the same number of each Zombie type!
Splitting special cases:
- Abominations and Necromancers never split; decide which direction they go.
- If there aren’t enough Zombie miniatures to add for an even split, decide which Zombie group gets the final reinforcement, and which direction the uneven split groups go. It doesn’t generate extra Activations (see P. 26).
IMPORTANT: Necromancers use their own Movement rules. They always Move toward the nearest non-Necromancer Spawn Zone (see P. 29).
Playing Runners
Runners have two Actions per Activation. After all Zombies (including the Runners) have gone through the Activation step and resolved their first Action, the Runners go through the Activation step again, using their second Action to Attack a Survivor in their Zone or Move if there is nobody to attack.
Step 2 – Spawn
The Quest maps show where Zombies appear at the end of each Zombies’ Phase. These are the Spawn Zones.
- Indicate a Spawn Zone and draw a Zombie card.
- Read the line on the card that corresponds to the color of the Danger Level of the most experienced Survivor still in the game (Blue, Yellow, Orange, or Red). Place the number and type of Zombies shown.
- Repeat this for each Spawn Zone. Always begin with the same Spawn Zone and continue clockwise.
- When the Zombie deck runs out, reshuffle all the discarded Zombie cards to make a new deck.
Colored Spawn Zones
Some Quests feature blue and/or green colored Spawn Zone tokens. Unless otherwise stated, their Zone doesn’t spawn Zombies until a specific event (like taking an Objective of the matching color) happens and activates them.
Extra Activations Cards
When you reveal an Extra Activation card, no Zombies appear in the designated Zone. Instead, all Zombies of the indicated type immediately get an extra Activation (see Activation step, page 23). Notice that these cards have no effect at the Blue Danger Level!
Double Spawn Cards
- When you draw a Double Spawn card, no Zombies appear in the designated Zone. The next Zombie Spawn is resolved by drawing two Zombie cards instead of one for the next Spawn Zone (if drawn during Spawn Step) or building Zone (if drawn when spawning in a building).
- These Zombie cards are drawn together and resolved in drawing order. If one of them is another Double Spawn card, resolve the standard Spawn card first, then the Double Spawn card.
- If another Double Spawn card is then drawn, apply it to the following Spawn Zone or building Zone.
- If you draw two Double Spawn cards on the same Zone, the next Zone receives four cards’ worth of Zombies!
- If the Double Spawn card is drawn for the last Spawn Zone or building Zone, use it for an extra double Spawn on the first Spawn Zone or first building Zone (even if you previously spawned Zombies in it!).
- If, during this extra double Spawn, you draw a new Double Spawn card, continue on to the next Spawn Zone or building Zone, until you stop drawing Double Spawn cards.
Running Out Of Miniatures
The Zombicide: Black Plague box contains enough Zombies to invade a village. However, players may still run out of miniatures of the indicated type when required to place a Zombie on the board through spawning or populating a building. In this case, the remaining Zombie miniatures are placed (if there are any), and then all Zombies of the indicated type immediately resolve an extra Activation.
Multiple Activations may occur in a row. This rule is especially important to Abominations and Necromancers, as there is a single miniature of each in the Zombicide: Black Plague core box. Under some circumstances, an Abomination or Necromancer may get several extra Activations in a single Game Round.
Several Abominations and Necromancers can roam the board if you own miniatures of them.
End Phase
All Noise tokens are removed from the board, and the first player hands the first player token to the player to his left. Another Game Round then begins.
Necromancers, Vaults & Additional Rules
Necromancers
Being the most evil of all opponents, Necromancers do their best to spread havoc and seize power. They don’t have time to battle Survivors on their own, and try to flee as soon as they are discovered. Necromancers follow these special rules:
- A Necromancer is a Zombie for game purposes.
- A Necromancer comes with his own infected army. When a Necromancer appears, put an additional Zombie Spawn token (on its “Necromancer” side) on his entry Zone. Then, immediately resolve a regular Zombie Spawn for it. From now on, the Necromancer Spawn Zone is active: it spawns Zombies in the same way a standard Spawn Zone would.
- Each subsequent drawing of additional Necromancer Zombie cards, no matter the type, gives an Extra Activation to every Necromancer on the board until they flee or die.
- The game is immediately lost if a Necromancer manages to escape once there’s a total of 6 Zombie Spawn tokens on the board (including the Necromancer Zombie Spawn tokens).
- A Necromancer tries to flee the board. If there are no Survivors in his Zone for him to Attack during his Activation (see Zombies’ Phase, page 23), he Moves 1 Zone toward the nearest Spawn Zone (NOT his entry Zone), ignoring any Survivors he might see. If several escape Spawn Zones are at the same distance, choose one.
- A Necromancer escapes the board as soon as he activates on his escape Spawn Zone. Remove his miniature as he flees. Replace the Necromancer Spawn token it introduced on the board with a standard Zombie Spawn token.
- Killing a Necromancer slows the invasion. If you manage to kill it, choose a Spawn Zone (including its own Necromancer Spawn Zone) and remove it from the board. If the Necromancer Spawn token is still on the board after this removal, replace it with a standard one.
- In special circumstances, all Spawn Zone tokens may end in the same Zone. In that case, a Necromancer still comes with an additional Necromancer Spawn token, but flees as soon as he activates.
Necromancer Cabals
Necromancer Cabals’ rules allow you to play multiple necromancers at once during your Zombicide: Black Plague games. To use these rules you will require extra special Necromancers, such as the ones included in the Special Guest Boxes by Carl Critchlow, Naiade, and Stefan Kopinski (sold separately).
- Create your own Necromancer Cabal at game Setup: Choose the Necromancers you want your Survivor team to face (the more, the deadlier!). Sort out the six standard Necromancer cards from the Zombie pile, and replace them in any combination you see fit with your favorite Necromancer cards. Replace these six tailored cards in the Zombie pile, and shuffle. You’re ready to go against the Cabal!
- Use the classic Necromancer rules to spawn and move Necromancers. Use the colors of the Necromancer Spawn Zones to track where each of them spawned, and determine its escape Spawn Zone. Remember: drawing a Necromancer Zombie card also gives an extra Activation to others Necromancer on the board until they flee or die.
- Beware the dark ritual! Necromancers standing at Range 0-1 from each other at the end of a Zombies’ Phase flee the board as if they escaped through their escape Spawn Zone. Replace the Necromancer Spawn tokens they introduced on the board with standard Zombie Spawn tokens.
- Each of the special Necromancers has special rules written on their Zombie cards. These rules are in effect from the moment they enter the board, until they flee or die.
Vaults
Vault Zones and Doors
Vaults, secret rooms and underground lairs are fairly common in Zombicide: Black Plague. They can be great shortcuts for Survivors… and Zombies!
Whenever the Quest map shows one (or more) Vault doors, set Vault Zone tokens of the matching colors near the board.
- Vault doors can be opened like standard doors (unless otherwise stated in the Quest’s description).
- Open Vault doors give access to the Vault of the matching color, as if they were connected. However, there is no Line Of Sight between the Vault and the Zone it connects to.
- Vaults are building Zones. They can’t be Searched. Don’t Spawn Zombies in Vaults when they are revealed.
- A Vault door can be opened from inside its Vault Zone.
NOTE: Quests featuring Vaults can have special rules detailing the way they’re played. They have priority over the rules listed here.
Vault Artifacts
Powerful weapons and spells are set aside during Setup (see page 6) to be found in Vaults. These are called Vault artifacts, and bear the keyword “Vault” on their card.
A Survivor can spend an Action to take a Vault artifact stored in a Vault. It is not a Search Action and thus can be done multiple times if the Vault holds several artifacts.
The Quest description may hold additional special rules for them. Check them out!
Playing with 7+ Survivors
Playing with an increased number of Survivors (or players!) is quite easy. Follow these guidelines, and adjust them to fit your challenge level:
- For each Survivor above the sixth, add 1 additional Starting Equipment card from the expansion to the pool of cards that will be distributed among Survivors during Setup.
- Add 1 additional Zombie Spawn token per 2 Survivors above the sixth (rounded up). Stack these additional Spawn tokens in the same Zones as existing ones. Yes, that means some Zones will double or even triple their spawn rate!
- On a 6-Survivors game, once there are 6 Zombie Spawn tokens on the board, the game is over if a Necromancer escapes. This Spawn token limit is increased by 1 for every 2 Survivors above the sixth (rounded up).
| # Survivors | Additional Spawn Tokens | Spawn Tokens Limit |
|---|---|---|
| Up to 6 | 0 | 6 |
| 7-8 | 1 | 7 |
| 9-10 | 2 | 8 |
| 11-12 | 3 | 9 |
Quests
Quest 0: Tutorial: Danse Macabre
Easy / 4+ Survivors / 45 Minutes
Tiles needed: 4V & 9R.
Objectives
Use the magic circle to teleport to safety. Reach the Exit Zone with all Survivors. Any Survivor may escape through this Zone at the end of his turn, as long as there are no Zombies in it.
Special Rules
- Setup:
- Put aside the Necromancer Zombie cards.
- Put the green Objective randomly among the red Objectives, face down.
- Put a Walker, a Fatty and a Runner in the marked Zones.
- I don’t think so: Abominations are considered as Fatties when reading Zombie cards.
- What’s this? Each Objective gives 5 experience points to the Survivor who takes it.
- Doors and keys: The blue door cannot be opened until the blue Objective has been taken. The green door cannot be opened until the green Objective has been taken.
- We shall pass: The green Spawn Zone is inactive until the green Objective is taken.
Quest 1: Big Game Hunting
Easy / 6+ Survivors / 60 Minutes
Tiles needed: 1V, 2R, 8V & 9V.
Objectives
Reach these objectives in any order to win the game:
- Slay the beast and its master: Kill at least one Abomination and one Necromancer.
- Raid the laboratory: Take all Objectives.
Special Rules
- Setup:
- Put the blue Objective randomly among the red Objectives, face down.
- Put a Vault artifact randomly in each Vault.
- Looking for the laboratory: Each Objective gives 5 experience points to the Survivor who takes it.
- Torch’em! Finding the blue Objective marks the laboratory’s location! Immediately spawn a Necromancer in the Zone. If a Necromancer is already on the board, spawn an Abomination instead. If both are already on the board, nothing happens (but you still get the experience).
Quest 2: The Black Book
Easy / 6+ Survivors / 60 Minutes
Tiles needed: 4V, 5R, 7V & 8R.
Objectives
Reach these objectives in any order to win the game:
- Steal the Black Book: Take the Objective in the central building (tile 8R).
- Claim the artifacts: Take both Vault artifacts.
- Feel the power: Get to the Red Danger Level with at least a Survivor.
Special Rules
- Setup:
- Put the blue and the green Objectives randomly among the red Objectives, face down.
- Put a Vault artifact randomly in each Vault.
- Lost keys opening forbidden doors: Each Objective gives 5 experience points to the Survivor who takes it.
- What the…? Magic trap! The green Spawn Zone is inactive until the green Objective is taken.
- Doors and keys: The blue door cannot be opened until the blue Objective has been taken. The green door cannot be opened until the green Objective has been taken.
Quest 3: The Shepherds
Medium / 6+ Survivors / 90 Minutes
Tiles needed: 1R, 2R, 3V, 4V, 5R & 9V.
Objectives
Rescue the townsfolks: Keep an eye on them, some may be infected. You win the game when all Objectives are taken.
Special Rules
- Setup:
- Put the blue and the green Objectives randomly among the red Objectives, face down.
- Put a Vault artifact randomly in each Vault.
- Hidden folks: Each Objective gives 5 experience points to the Survivor who takes it.
- These are infected! The blue and the green Objectives mark infected people turning zombies! Earn the experience, then resolve immediately a Zombie spawn in the Objective’s Zone.
Quest 4: Famine
Medium / 6 Survivors / Variable
Tiles needed: 1R, 2R, 3R, 5R, 6R & 8R.
Objectives
Reach the objectives in this order to win the game:
- Find enough food: Gather the following 6 food cards in your team’s inventories:
- Apples x2
- Salted Meat x2
- Water x2
- Lock yourself in the Vault: You win the game when all starting Survivors are in the yellow Vault during an End Phase, without any Zombies with them.
Special Rules
- Setup:
- Put the blue Objective randomly among the red Objectives, face down.
- Put a random Vault artifact in the Vault.
- Candles, clothes, iron tools… Each Objective gives 5 experience points to the Survivor who takes it.
- …keys! Both yellow Vault doors cannot be opened until the blue Objective has been taken.
Quest 5: The Commandry
Medium / 6+ Survivors / 120 Minutes
Tiles needed: 4R, 5R, 6R, 7R, 8R & 9R.
Objectives
Use the underpass to escape: Reach the Exit Zone with all Survivors. Any Survivor may escape through this Zone at the end of his turn, as long as there are no Zombies in it.
Special Rules
- Setup:
- Put the blue and the green Objectives randomly among the red Objectives, face down.
- Put a Vault artifact randomly in each Vault.
- Hidden clues: Each Objective gives 5 experience points to the Survivor who takes it.
- Reinforced doors: The blue door cannot be opened until the blue Objective has been taken. The green door cannot be opened until the green Objective has been taken.
Quest 6: In Caligine Abditus
Medium / 6+ Survivors / 120 Minutes
Tiles needed: 2R, 3R, 5R, 6R, 8R & 9V.
Objectives
It means “hidden in the darkness”: Reach the Exit Zone with all Survivors. Any Survivor may escape through this Zone at the end of his turn, as long as there are no Zombies in it.
Special Rules
- Necromancers set the scene: What a promise!
- Put the blue and the green Objectives randomly among the red Objectives, face down.
- Put two random Vault artifacts in the yellow Vault.
- Latin writings: Each Objective gives 5 experience points to the Survivor who takes it.
- Doors to darkness and death: The blue door cannot be opened until the blue Objective has been taken. The green door cannot be opened until the green Objective has been taken.
Quest 7: Dead Trail
Medium / 6+ Survivors / 150 Minutes
Tiles needed: 1R, 2R, 3V, 4R, 5V & 6V.
Objectives
Hinder the ritual: Achieve the first two objectives in any order:
- Ruin the ritual: Destroy the impious scriptures by taking all Objectives.
- Get the artifacts: Get both Vault artifacts.
Then, Reach the Exit Zone with all Survivors. Any Survivor may escape through this Zone at the end of his turn, as long as there are no Zombies in it.
Special Rules
- Setup:
- Put the blue and the green Objectives randomly among the red Objectives, face down.
- Put a Vault artifact randomly in each Vault.
- Wicked writings: Each Objective gives 5 experience points to the Survivor who takes it.
- Heavy doors: Both violet Vault doors cannot be opened until the blue Objective has been taken. The single yellow Vault door cannot be opened until the green Objective has been taken.
Quest 8: The Evil Temple
Hard / 6+ Survivors / 120 Minutes
Tiles needed: 1V, 2R, 4R, 5R, 8R & 9V.
Objectives
Exorcism, survivors’ style: Zombicide! Take both Vault weapons and kill the Abomination to win the game.
Special Rules
- Setup:
- Put the blue and the green Objectives randomly among the red Objectives, face down.
- Put aside the Dragon Bile and Torch cards. Set one Dragon Bile card and one Torch card in the yellow Vault.
- Put two random Vault artifacts in the violet Vault.
- Destroying the cursed idols: Each Objective gives 5 experience points to the Survivor who takes it.
- Caches: The violet Vault door cannot be opened until the blue Objective has been taken. The yellow Vault door cannot be opened until the green Objective has been taken.
Quest 9: The Hellhole
Hard / 6+ Survivors / 150 Minutes
Tiles needed: 1V, 2R, 6V, 7R, 8V & 9R.
Objectives
Reach the objectives in this order to win the game:
- Gather them all in one place… Get all Spawn Zones on the board in the Hellhole, the marked Zone of tile 1V. Check the Necromancer rules P.29.
- …and call upon a dragon: Create a Dragon Fire in the Hellhole.
Special Rules
- That’s the way we do alchemy: Each Objective gives 5 experience points to the Survivor who takes it. It also allows the player to look for a Dragon Bile card in the Equipment deck and give it to the Survivor for free. If there are no Dragon Bile cards in the Equipment deck, look in the discard pile. Shuffle the Equipment deck afterward.
Quest 10: Trial by Fire
Hard / 6+ Survivors / 180 Minutes
Tiles needed: 1V, 2R, 3R, 4V, 5R, 6R, 7R, 8V & 9V.
Objectives
Slay the monster: Kill the Abomination set on tile 1V.
Special Rules
- Setup:
- Put the blue Objective randomly among the red Objectives, face down.
- Put aside all Dragon Bile cards. Set them in the violet Vault.
- Set an Abomination in the marked Zone.
- The north-eastern building Zone has no door on purpose.
- Three seals: Each Objective gives 5 experience points to the Survivor who takes it.
- A hero died here: The blue Objective gives a random Vault artifact to the Survivor who takes it.
- Sealed gate: The violet Vault door cannot be opened until all Objectives have been taken.
Skills Glossary
Survivor Skills
Each Survivor in Zombicide: Black Plague has specific Skills with effects described in this section. In case of conflict with the general rules, the Skill rules have priority.
The effects of the following Skills and/or bonuses are immediate and may be used the Turn in which they are acquired. This means that if one Action causes a Survivor to level up and gain a Skill, that Skill may be used immediately if the Survivor has any Actions remaining (or the Survivor may use any extra Actions the Skill grants).
- +1 Action: The Survivor has an extra Action he may use as he pleases.
- +1 Damage: [Type]: The Survivor gets a +1 Damage bonus with the specified type of Combat Action (Magic, Melee or Ranged).
- +1 Damage with [Equipment]: The Survivor gets a +1 Damage bonus with the specified Equipment.
- +1 to dice roll: Combat: The Survivor adds 1 to the result of each die he rolls on a Combat Action (Melee, Ranged or Magic). The maximum result is always 6.
- +1 to dice roll: Magic: The Survivor adds 1 to the result of each die he rolls on a Magic Action. The maximum result is always 6.
- +1 to dice roll: Melee: The Survivor adds 1 to the result of each die he rolls in Melee Actions. The maximum result is always 6.
- +1 to dice roll: Ranged: The Survivor adds 1 to the result of each die he rolls in Ranged Actions. The maximum result is always 6.
- +1 die: Combat: The Survivor’s weapons and Combat spells roll an extra die in Combat (Melee, Ranged or Magic). Dual weapons and spells gain a die each, for a total of +2 dice per Dual Combat Action.
- +1 die: Magic: The Survivor’s Combat spells roll an extra die for Magic Actions. Dual Combat spells gain a die each, for a total of +2 dice per Dual Magic Action.
- +1 die: Melee: The Survivor’s Melee weapons roll an extra die for Melee Actions. Dual Melee weapons gain a die each, for a total of +2 dice per Dual Melee Action.
- +1 die: Ranged: The Survivor’s Ranged weapons roll an extra die for Ranged Actions. Dual Ranged weapons gain a die each, for a total of +2 dice per Dual Ranged Action.
- +1 free Combat Action: The Survivor has one extra free Combat Action. This Action may only be used for Melee, Ranged or Magic Actions.
- +1 free Enchantment Action: The Survivor has one extra free Enchantment Action. This Action may only be used for Enchantment Actions.
- +1 free Magic Action: The Survivor has one extra free Magic Action. This Action may only be used for Magic Actions.
- +1 free Melee Action: The Survivor has one extra free Melee Action. This Action may only be used for a Melee Action.
- +1 free Move Action: The Survivor has one extra free Move Action. This Action may only be used as a Move Action.
- +1 free Ranged Action: The Survivor has one extra free Ranged Action. This Action may only be used as a Ranged Action.
- +1 free Search Action: The Survivor has one extra free Search Action. This Action may only be used to Search, and the Survivor can still only Search once per Turn.
- +1 max Range: The Survivor’s Ranged weapons and Combat spells’ maximum Range is increased by 1.
- +1 Zone per Move: The Survivor can move through one extra Zone each time he performs a Move Action. This Skill stacks with other effects benefiting Move Actions. Entering a Zone containing Zombies ends the Survivor’s Move Action.
- 2 Zones per Move Action: When the Survivor spends one Action to Move, he can move one or two Zones instead of one. Entering a Zone containing Zombies ends the Survivor’s Move Action.
- Ambidextrous: The Survivor treats all Combat spells, Melee and Ranged weapons as if they had the Dual symbol.
- Barbarian: When resolving a Melee Action, the Survivor may substitute the Dice number of the Melee weapon(s) he uses with the number of Zombies standing in the targeted Zone. Skills affecting the dice value, like +1 die: Melee, still apply.
- Blitz: Each time the Survivor kills the last Zombie in a Zone, he gets 1 free Move Action to use immediately.
- Bloodlust: Combat: Spend one Action with the Survivor: He Moves up to two Zones to a Zone containing at least one Zombie. He then gains one free Combat Action (Melee, Ranged or Magic).
- Bloodlust: Magic: Spend one Action with the Survivor: He Moves up to two Zones to a Zone containing at least one Zombie. He then gains one free Magic Action, to use immediately.
- Bloodlust: Melee: Spend one Action with the Survivor: He Moves up to two Zones to a Zone containing at least one Zombie. He then gains one free Melee Action, to use immediately.
- Bloodlust: Ranged: Spend one Action with the Survivor: He Moves up to two Zones to a Zone containing at least one Zombie. He then gains one free Ranged Action, to use immediately.
- Born leader: During the Survivor’s Turn, he may give one free Action to another Survivor to use as he pleases. This Action must be used during the recipient’s next Turn or it is lost.
- Break-in: In order to open doors, the Survivor rolls no dice, and needs no equipment (but still spends an Action to do so). He doesn’t make Noise while using this Skill. However, other prerequisites still apply (such as taking a designated Objective before a door can be opened). Moreover, the Survivor gains one extra free Action that can only be used to open doors.
- Charge: The Survivor can use this Skill for free, as often as he pleases, during each of his Turns: He moves up to two Zones to a Zone containing at least one Zombie. Normal Movement rules still apply. Entering a Zone containing Zombies ends the Survivor’s Move Action.
- Collector: [Zombie type]: The Survivor gains double the experience each time he kills a Zombie of the specified type.
- Destiny: The Survivor can use this Skill once per Turn when he reveals an Equipment card he drew. You can ignore and discard that card, then draw another Equipment card.
- Free reload: The Survivor reloads reloadable weapons (Hand Crossbows, Orcish Crossbow, etc.) for free.
- Frenzy: Combat: All weapons and Combat spells the Survivor carries gain +1 die per Wound the Survivor suffers. Dual weapons gain a die each, for a total of +2 dice per Wound and per Dual Combat Action (Melee, Ranged or Magic).
- Frenzy: Magic: Combat spells the Survivor carries gain +1 die per Wound the Survivor suffers. Dual Combat spells gain a die each, for a total of +2 dice per Dual Magic Action.
- Frenzy: Melee: Melee weapons the Survivor carries gain +1 die per Wound the Survivor suffers. Dual Melee weapons gain a die each, for a total of +2 dice per Wound and per Dual Melee Action.
- Frenzy: Ranged: Ranged weapons the Survivor carries gain +1 die per Wound the Survivor suffers. Dual Ranged weapons gain a die each, for a total of +2 dice per Wound and per Dual Ranged Action.
- Hit & run: The Survivor can use this Skill for free, just after he resolved a Magic, Melee or Ranged Action resulting in at least a Zombie kill. He can then resolve a free Move Action. The Survivor does not spend extra Actions to perform this free Move Action if Zombies are standing in his Zone.
- Hold your nose: This Skill can be used once per Turn. The Survivor gets a free Search Action in the Zone if he has eliminated a Zombie (even in a Vault or a street Zone) the same Game Round. This Action may only be used to Search, and the Survivor can still only Search once per Turn.
- Ironclad: [Zombie type]: The Survivor ignores all Wounds coming from Zombies of the specified type (such as “Walker”, “Runner”, etc.).
- Iron hide: The Survivor can make Armor rolls with a 5+ Armor value, even when he does not wear an armor on his Body slot. Wearing an armor, the Survivor adds 1 to the result of each die he rolls for Armor rolls. The maximum result is always 6.
- Iron rain: When resolving a Ranged Action, the Survivor may substitute the Dice number of the Ranged weapon(s) he uses with the number of Zombies standing in the targeted Zone. Skills affecting the dice value, like +1 die: Ranged, still apply.
- Is that all you’ve got?: You can use this Skill any time the Survivor is about to get Wounds. Discard one Equipment card in your Survivor’s inventory for each Wound he’s about to receive. Negate a Wound per discarded Equipment card.
- Jump: The Survivor can use this Skill once during each Activation. The Survivor spends one Action: He moves two Zones into a Zone to which he has Line of Sight. Movement related Skills (like +1 Zone per Move Action or Slippery) are ignored, but Movement penalties (like having Zombies in the starting Zone) apply. Ignore everything in the intervening Zone.
- Lifesaver: The Survivor can use this Skill, for free, once during each of his Turns. Select a Zone containing at least one Zombie at Range 1 from your Survivor. Choose Survivors in the selected Zone to be dragged to your Survivor’s Zone without penalty. This is not a Move Action. A Survivor can decline the rescue and stay in the selected Zone if his controller chooses. Both Zones need to share a clear path. A Survivor can’t cross closed doors or walls, and can’t be extracted into or out of a Vault.
- Lock it down: At the cost of one Action, the Survivor can close an open door in his Zone. Opening or destroying it again later does not trigger a new Zombie Spawn.
- Loud: Once during each of his Turns, the Survivor can make a huge amount of noise! Until this Survivor’s next Turn, the Zone he used this Skill in is considered to have the highest number of Noise tokens on the entire board. If different Survivors have this Skill, only the last one who used it applies the effects.
- Low profile: The Survivor can’t get hit by Survivors’ Magic and Ranged Actions. Ignore him when casting a Combat spell or shooting in the Zone he stands in. Game effects that kill everything in the targeted Zone, like Dragon Fire, still kill him, though.
- Lucky: The Survivor can re-roll once all the dice for each Action (or Armor roll) he takes. The new result takes the place of the previous one. This Skill stacks with the effects of other Skills and Equipment that allows re-rolls.
- Mana rain: When resolving a Magic Action, the Survivor may substitute the Dice number of the Combat spell(s) he uses with the number of Zombies standing in the targeted Zone. Skills affecting the dice value, like +1 die: Magic, still apply.
- Marksman: The Survivor may freely choose the targets of all his Magic and Ranged Actions. Misses don’t hit Survivors.
- Matching set!: When a Survivor performs a Search Action and draws an Equipment card with the Dual symbol, he can immediately take a second card of the same type from the Equipment deck. Shuffle the deck afterward.
- Point-blank: The Survivor can resolve Ranged and Magic Actions in his own Zone, no matter the minimum Range. When resolving a Magic or Ranged Action at Range 0, the Survivor freely chooses the targets and can kill any type of Zombies. His Combat spells and Ranged weapons still need to inflict enough Damage to kill his targets. Misses don’t hit Survivors.
- Reaper: Combat: Use this Skill when assigning hits while resolving a Combat Action (Melee, Ranged or Magic). One of these hits can freely kill an additional identical Zombie in the same Zone. Only a single additional Zombie can be killed per Action when using this Skill. The Survivor gains the experience for the additional Zombie.
- Reaper: Magic: Use this Skill when assigning hits while resolving a Magic Action. One of these hits can freely kill an additional identical Zombie in the same Zone. Only a single additional Zombie can be killed per Action when using this Skill. The Survivor gains the experience for the additional Zombie.
- Reaper: Melee: Use this Skill when assigning hits while resolving a Melee Action. One of these hits can freely kill an additional identical Zombie in the same Zone. Only a single additional Zombie can be killed per Action when using this Skill. The Survivor gains the experience for the additional Zombie.
- Reaper: Ranged: Use this Skill when assigning hits while resolving a Ranged Action. One of these hits can freely kill an additional identical Zombie in the same Zone. Only a single additional Zombie can be killed per Action when using this Skill. The Survivor gains the experience for the additional Zombie.
- Regeneration: At the end of each Game Round, remove all Wounds the Survivor received. Regeneration doesn’t work if the Survivor has been eliminated.
- Roll 6: +1 die Combat: You may roll an additional die for each “6” rolled on any Combat Action (Melee, Ranged or Magic). Keep on rolling additional dice as long as you keep getting “6”. Game effects that allow re-rolls (the Plenty Of Arrows Equipment card, for example) must be used before rolling any additional dice for this Skill.
- Roll 6: +1 die Magic: You may roll an additional die for each “6” rolled on a Magic Action. Keep on rolling additional dice as long as you keep getting “6”. Game effects that allow re-rolls must be used before rolling any additional dice for this Skill.
- Roll 6: +1 die Melee: You may roll an additional die for each “6” rolled on a Melee Action. Keep on rolling additional dice as long as you keep getting “6”. Game effects that allow re-rolls must be used before rolling any additional dice for this Skill.
- Roll 6: +1 die Ranged: You may roll an additional die for each “6” rolled on a Ranged Action. Keep on rolling additional dice as long as you keep getting “6”. Game effects that allow re-rolls (the Plenty Of Arrows Equipment card, for example) must be used before rolling any additional dice for this Skill.
- Rotten: At the end of his Turn, if the Survivor has not resolved a Combat Action (Melee, Ranged or Magic) and not produced a Noise token, place a Rotten token next to his base. As long as he has this token, he is totally ignored by all Zombies and is not considered a Noise token. Zombies don’t attack him and will even walk past him. The Survivor loses his Rotten token if he resolves any kind of Combat Action (Melee, Ranged or Magic) or makes noise. Even with the Rotten token, the Survivor still has to spend extra Actions to move out of a Zone crowded with Zombies.
- Scavenger: The Survivor can Search in any Zone. This includes street Zones, Vault Zones, etc.
- Search: +1 card: Draw an extra card when Searching with the Survivor.
- Shove: The Survivor can use this Skill, for free, once during each of his Turns. Select a Zone at Range 1 from your Survivor. All Zombies standing in your Survivor’s Zone are pushed to the selected Zone. This is not a Movement. Both Zones need to share a clear path. A Zombie can’t cross closed doors, ramparts (see the Wulfsburg expansion) or walls, but can be shoved in or out of a Vault.
- Slippery: The Survivor does not spend extra Actions when he performs a Move Action out of a Zone containing Zombies. Entering a Zone containing Zombies ends the Survivor’s Move Action.
- Spellbook: All Combat spells and Enchantments in the Survivor’s Inventory are considered equipped in Hand. With this Skill, a Survivor could effectively be considered as having several Combat spells and Enchantments cards equipped in Hand. For obvious reasons, he can only use two identical dual Combat Spells at any given time. Choose any combination of two before resolving Actions or rolls involving the Survivor.
- Spellcaster: The Survivor has one extra free Action. This Action may only be used for a Magic Action or an Enchantment Action.
- Sprint: The Survivor can use this Skill once during each of his Turns. Spend one Move Action with the Survivor: He may move two or three Zones instead of one. Entering a Zone containing Zombies ends the Survivor’s Move Action.
- Super strength: Consider the Damage value of Melee weapons used by the Survivor to be 3.
- Starts with a [Equipment]: The Survivor begins the game with the indicated Equipment; its card is automatically assigned to him during Setup.
- Steady hand: The Survivor can ignore other Survivors of his choosing when missing with a Magic or Ranged Action. The Skill does not apply to game effects killing everything in the targeted Zone (such as a Dragon Fire, for example).
- Swordmaster: The Survivor treats all Melee weapons as if they had the Dual symbol.
- Tactician: The Survivor’s Turn can be resolved anytime during the Players’ Phase, before or after any other Survivor’s Turn. If several Survivors benefit from this Skill at the same time, choose their Turn order.
- Taunt: The Survivor can use this Skill, for free, once during each of his Turns. Select a Zone your Survivor can see. All Zombies standing in the selected Zone immediately gain an extra Activation: They try to reach the taunting Survivor by any means available. Taunted Zombies ignore all other Survivors. They do not attack them and cross the Zone they stand in if needed to reach the taunting Survivor.
- Tough: The Survivor ignores the first Wound he receives from a single Zombie every Zombies’ Phase.
- Trick shot: When the Survivor is equipped with Dual Combat spells or Ranged weapons, he can aim at different Zones with each spell/weapon in the same Action.
- Zombie link: The Survivor plays an extra Turn each time an Extra Activation card is drawn from the Zombie pile. He plays before the extra-activated Zombies. If several Survivors benefit from this Skill at the same time, choose their Turn order.
Round Summary & Credits
Game Round Summary
1. First Step
Choose the first player at the beginning of the game. He receives the “first player” token.
2. Players’ Phase
The first player activates all of his or her Survivors, one after the other, in any order. When he or she’s done, the next player’s Turn begins. Play clockwise. Each Survivor has three Actions to spend, chosen from the following list. Unless stated otherwise, each Action may be performed several times per Activation:
- Move: Move one Zone.
- Search (1x/Activation and per Survivor): Building Zone only. Draw a card in the Equipment deck.
- Open a door: Melee weapon required. Spawn Zombies inside a building if it’s the first door.
- Reorganize/Trade: Equipment exchange with another Survivor standing in the same Zone is possible. You can trade everything for nothing.
- Combat Action:
- Magic Action: Equipped Combat spell required.
- Melee Action: Equipped Melee weapon required.
- Ranged Action: Equipped Ranged weapon required.
- Enchantment Action: Equipped Enchantment required.
- Take or activate an Objective in the Survivor’s Zone.
- Make Noise: Put a Noise token in the Survivor’s Zone.
- Do Nothing: All remaining Actions are lost.
3. Zombies’ Phase
Step 1 – Activation: Attack OR Move
All Zombies spend one Action doing one of these two things:
- Zombies in the same Zone as at least one Survivor attack them.
- The Zombies which didn’t Attack, Move. Each Zombie favors visible Survivors, then noise. Necromancers follow special rules (see page 29). Choose the shortest path. If several paths share the same length, split the Zombies in equal groups.
NOTE: Runners get two Actions per Activation. Once all Zombies have taken their first Action, Runners go through the Activation step again to resolve their second Action.
Step 2 – Spawn
- Always draw Zombie cards for all Spawn Zones in the same order (play clockwise).
- Danger Level used: highest Danger Level among active Survivors.
- No more minis of specified type? All Zombies of specified type get an extra Activation!
End Phase
- Remove all Noise tokens from the board.
- The next player receives the “first player” token (play clockwise).
Targeting Priority Order
When several targets share the same Targeting Priority Order, the players choose which ones are eliminated first.
| Targeting Priority | Name | Actions | Min Damage to Destroy | Experience Points |
|---|---|---|---|---|
| 1 | Walker | 1 | 1 | 1 |
| 2 | Fatty / Abomination (1) | 1 | 2 / 3 | 1 / 5 |
| 3 | Runner | 2 | 1 | 1 |
| 4 | Necromancer | 1 | 1 | 1 |
(1) Abomination: Ignore Armor rolls.
Credits
- Game Designers: Raphaël Guiton, Jean-Baptiste Lullien and Nicolas Raoult
- Executive Producer: Percy de Montblanc and Thiago Aranha
- Art: Jérémy Masson, Nicolas Fructus and Louise Combal
- Graphic Design: Mathieu Harlaut and Louise Combal
- Sculptors: Gael Goumon, Jason Hendricks, Bobby Jackson, Patrick Masson, Juan Navarro Perez, Elfried Perochon, Steve Saunders, Jody Siegel, Remy Tremblay, and Rafal Zelazo
- Editing: Thiago Aranha and Eric Kelley
- Publisher: David Preti
Expansions for
Zombicide: Black Plague
Zombicide: Black Plague – Troy and Evil Troy
2015
Two contrasting survivors bring heroism and ruthless evil to the plague.
Medium
View expansion
Zombicide: Black Plague – Benson
2016
Add one new Survivor to your Zombicide: Black Plague games.
60
minutes
Medium
View expansion
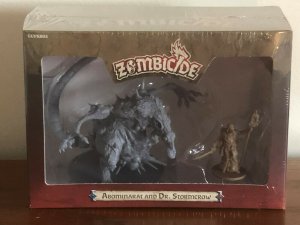
Zombicide: Black Plague – Abominarat and Dr. Stormcrow
2016
Confront giant infected rats while Dr. Stormcrow investigates the plague.
Medium
View expansion
Zombicide: Black Plague – Homer
2016
Add Homer, a new Survivor with a miniature and ID cards.
Medium
View expansion
Zombicide: Black Plague Special Guest Box – Neal Adams
2015
Four Neal Adams-designed survivors join the Black Plague setting.
60
minutes
Medium
View expansion
Zombicide: Black Plague Special Guest Box – Edouard Guiton
2015
Four Edouard Guiton-designed survivors for your Zombicide collection.
60
minutes
Medium
View expansion
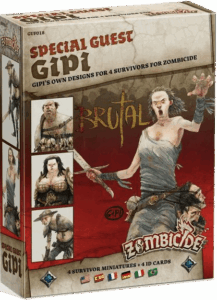
Zombicide: Black Plague Special Guest Box – Gipi
2015
Meet four distinctive survivors from Gipi’s card game Bruti.
60
minutes
Medium
View expansion
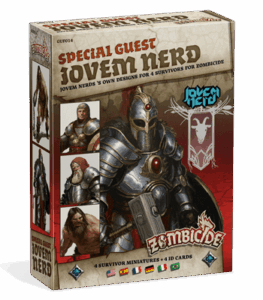
Zombicide: Black Plague Special Guest Box – Jovem Nerd
2015
Four Jovem Nerd survivors join the world of Black Plague.
60
minutes
Medium
View expansion
Zombicide: Black Plague – Grom and Thalia
2015
Add two new Survivors, complete with miniatures and ID cards.
60
minutes
View expansion
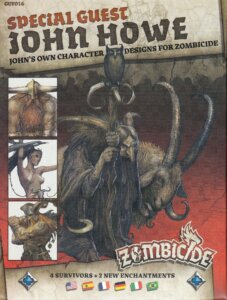
Zombicide: Black Plague Special Guest Box – John Howe
2015
Four John Howe-designed survivors and unique spell equipment cards.
60
minutes
Medium
View expansion
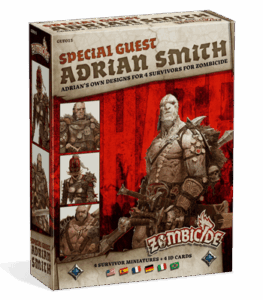
Zombicide: Black Plague Special Guest Box – Adrian Smith
2015
Four striking survivors from Adrian Smith's acclaimed Chronicles of HATE
60
minutes
Medium
View expansion
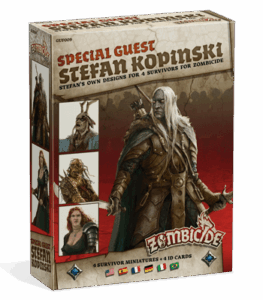
Zombicide: Black Plague Special Guest Box – Stefan Kopinski
2015
Four Stefan Kopinski-designed survivors for Zombicide: Black Plague
60
minutes
Medium
View expansion
Zombicide: Black Plague Special Guest Box – Paolo Parente
2015
Four legendary Anastyr survivors join the fight in Black Plague
60
minutes
Medium
View expansion
Zombicide: Black Plague Special Guest Box – Karl Kopinski
2015
Four Karl Kopinski-designed survivors join your Black Plague collection.
60
minutes
Medium
View expansion
Zombicide: Black Plague Special Guest Box – Carl Critchlow
2015
Four memorable characters bring Carl Critchlow’s distinctive fantasy art to the table.
60
minutes
Medium
View expansion
Zombicide: Black Plague – NPC-2: Notorious Plagued Characters
2016
Collect notorious undead foes and trade five types for a powerful vault weapon.
60
minutes
Medium
View expansion

Zombicide: Black Plague – Knight Pack
2016
Six survivors, one necromancer, and two abominations from the Knight-level stretch goals.
60
minutes
Medium
View expansion
Zombicide: Black Plague Special Guest Box – Marc Simonetti
2015
Add four Marc Simonetti-designed survivors to your Black Plague collection.
60
minutes
Medium
View expansion

Zombicide: Black Plague – Murder of Crowz
2015
Fast-moving flying vermin that ignore walls, doors, and other obstacles
60
minutes
Medium
View expansion

Zombicide: Black Plague – Huntsman Pack
2016
A trove of exclusive survivors, enemies, dice, cards, and gaming accessories.
60
minutes
Medium
View expansion
Zombicide: Black Plague Special Guest Box – Naïade
2015
Four Naïade-designed survivors, plus a special Necromancer option.
60
minutes
Medium
View expansion
Zombicide: Black Plague Special Guest Box – Paul Bonner
2015
Four new Survivors designed by acclaimed illustrator Paul Bonner.
60
minutes
Medium
View expansion

Zombicide: Black Plague – NPC-1: Notorious Plagued Characters
2016
Claim notorious zombies and trade five unique figures for vault weapons.
60
minutes
Medium
View expansion

Zombicide: Black Plague – Hero Box 1
2016
Five new Survivors and two dashboards expand your zombie-killing party.
60
minutes
Medium
View expansion
