
Andromeda’s Edge
2024
Launch starships, gather resources, build developments, and compete across five progress tracks in an uncharted region of space.
160
minutes
2 - 4
player(s)
14+
Medium Heavy

About this board game
Andromeda’s Edge is a 2024 space board game for 2–4 players, with a play time of approximately 160 minutes. Each player leads a desperate faction seeking to build a new civilization in an uncharted region on the edge of the Andromeda Galaxy.
The Edge is filled with modular debris from a precursor civilization, dense nebulae, and malicious extragalactic raiders. With only a space station, a few ships, and a handful of resources, your faction must establish a future beyond the oppressive reach of the Lords of Unity.
On your turn, choose whether to launch a starship or return your ships to your station. Launching sends a ship to a region of Andromeda to collect resources from planetary systems or take actions at Alliance Bases. Occupied regions can lead to dice battles against opponents or fearsome raiders, with Supremacy at stake and strategic manipulation offering a way to turn a loss into a reward.
Returning to your station activates your engine. Use the modules you have acquired to generate energy, gain resources, and carry out actions. As your faction develops, you can claim moons, populate planets, build developments, and expand your station with new modules.
- Build Observatories, Factories, Spaceports, Cities, and Obelisks.
- Advance on the Science, Industry, Commerce, Civilization, and Supremacy tracks.
- Compete for rewards during mid-game events and at the conclusion of the game.
In Andromeda’s Edge, progress across these tracks is central to victory. Carefully place your ships, manage your engine, and shape a unique faction while competing to establish civilization at the frontier.
/pic7182955.jpg)
Board Game Rules for
Andromeda’s Edge
You lead a desperate faction seeking to build a new civilization on Andromeda’s Edge. You begin with only a space station, a few ships, and a handful of resources. By carefully placing your ships, you will gather resources, claim moons, acquire station modules, and build planetary developments. You will battle opponents and compete with others in science, industry, commerce, civilization, and supremacy!
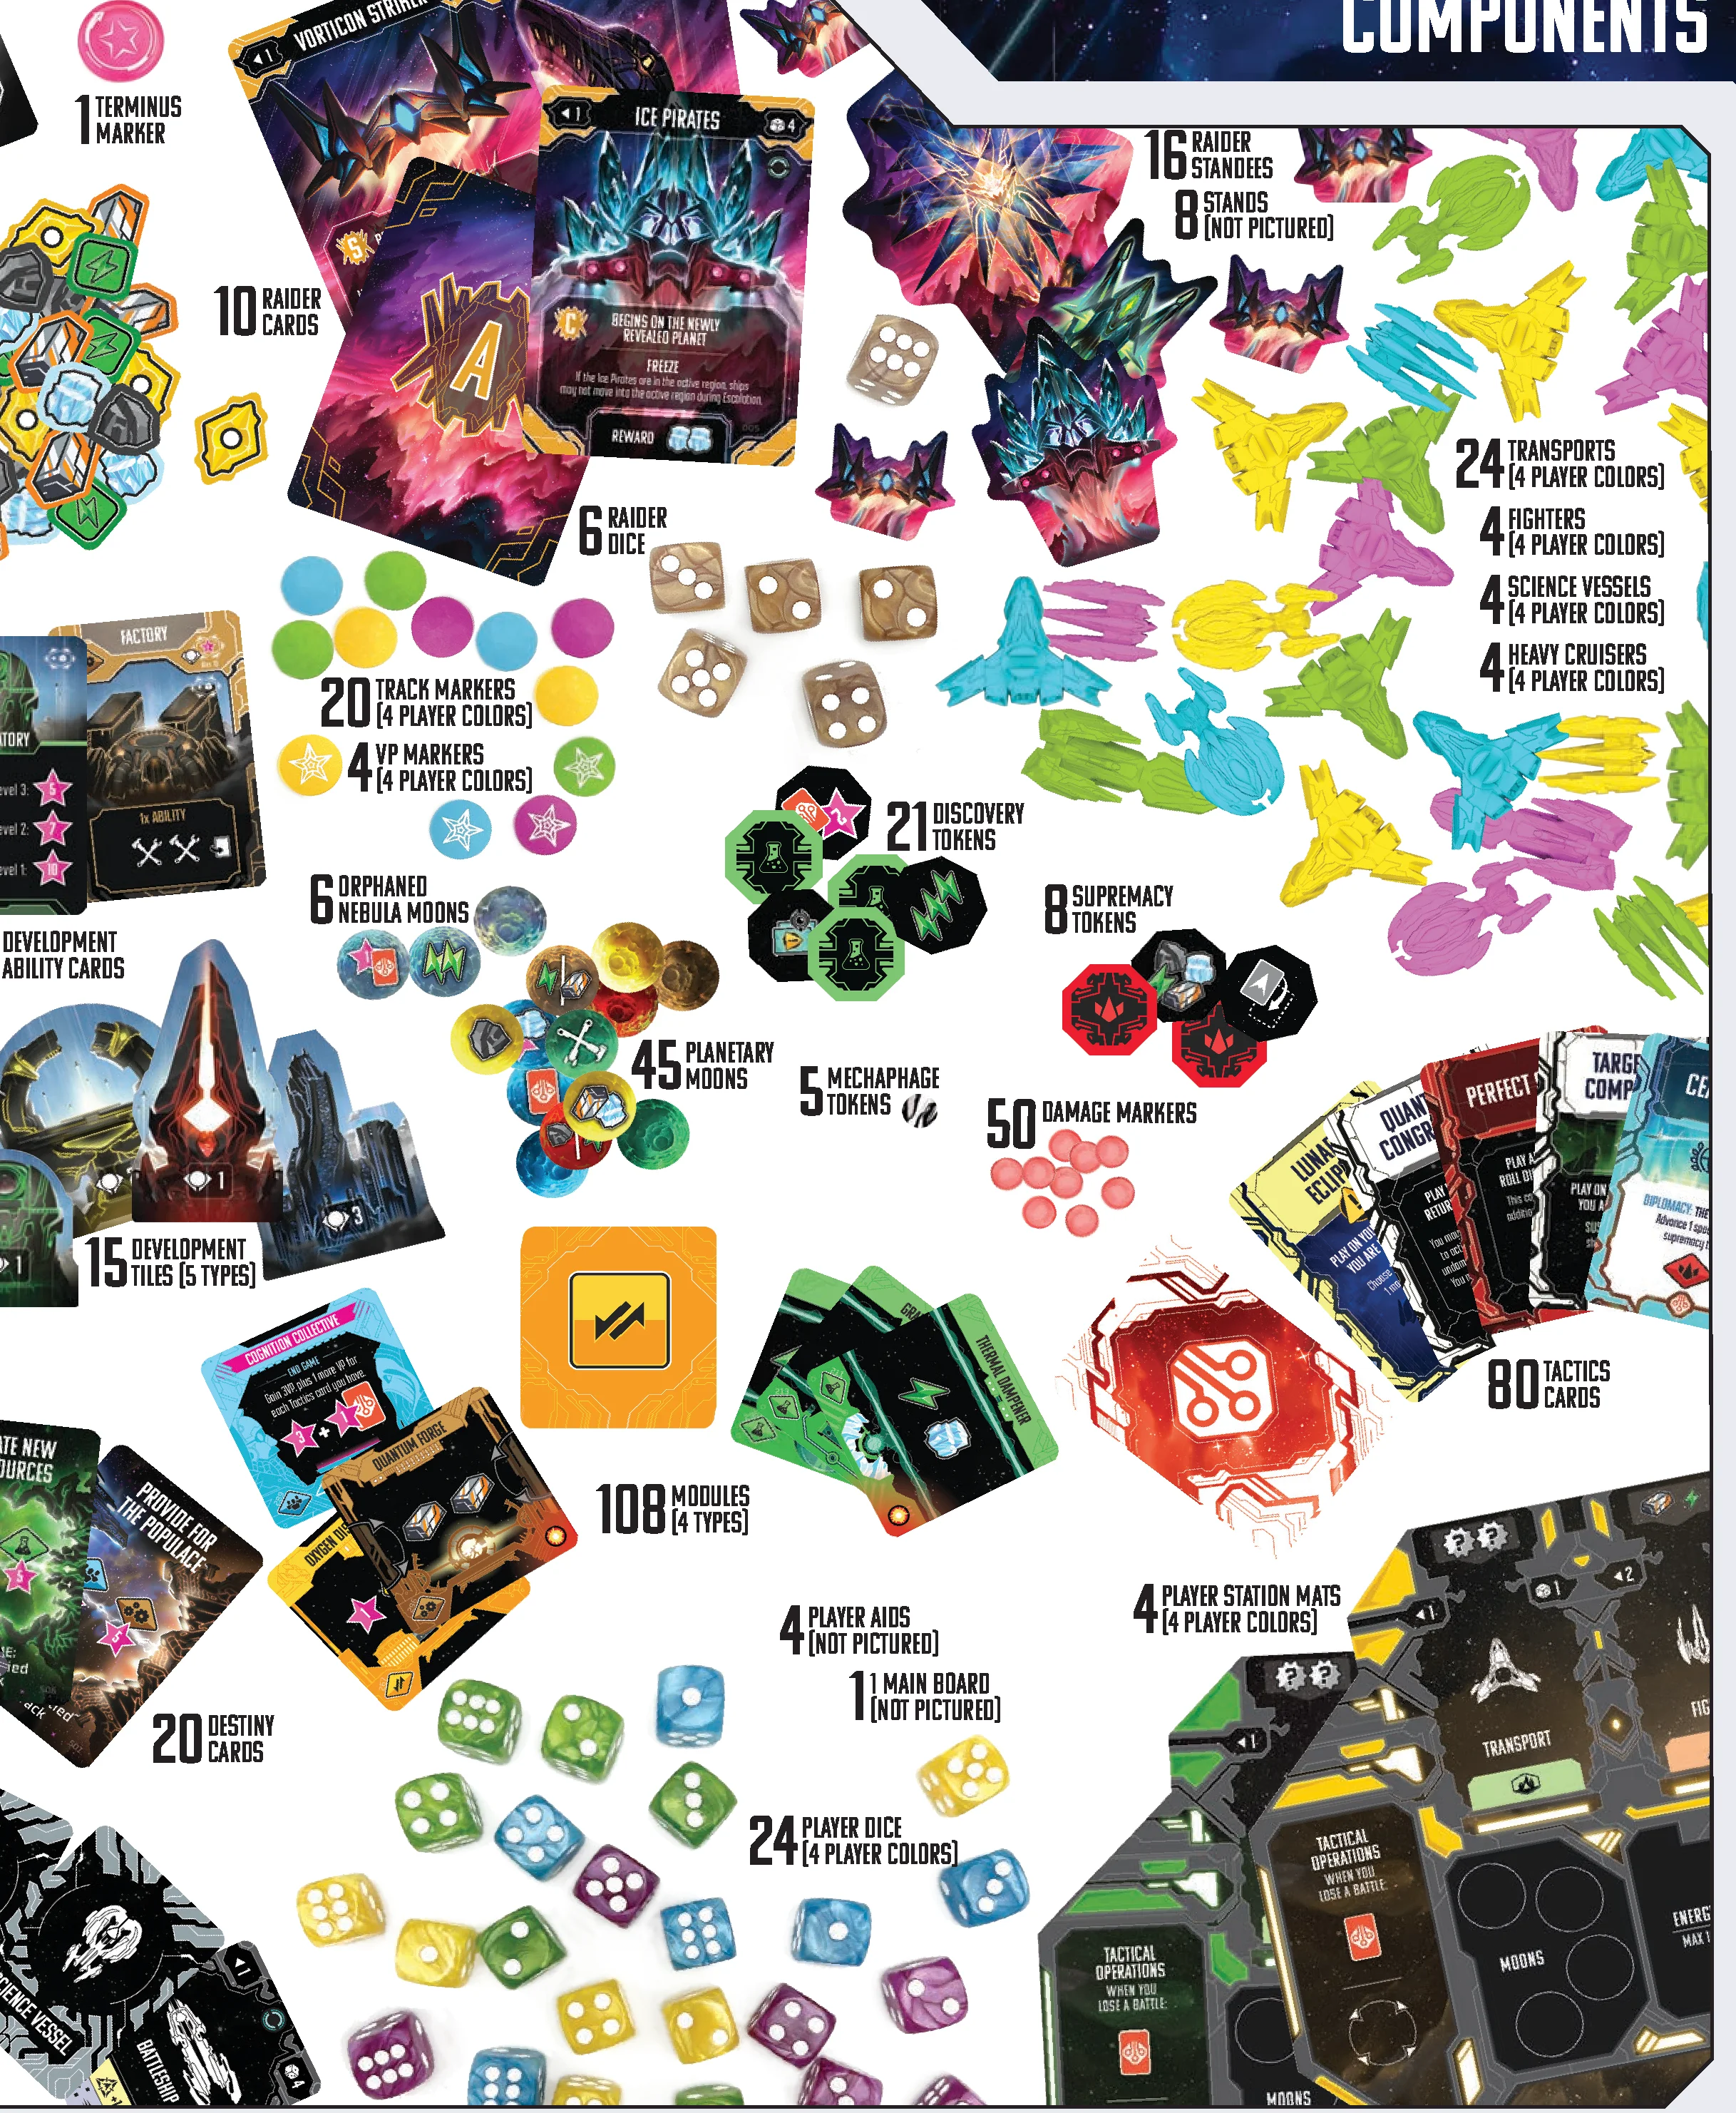
Components
- 1 Main Board (not pictured)
- 1 Event Board
- 1 Event Marker
- 1 Scrapyard Board
- 1 Terminus Marker
- 4 Player Station Mats (4 player colors)
- 4 Player Aids (not pictured)
- 15 Planet Region Tiles
- 6 Alliance Base Region Tiles
- 4 Special Region Tiles (not pictured)
- 12 Faction Cards
- 36 Leaders (4 player colors)
- 24 Player Dice (4 player colors)
- 24 Transports (4 player colors)
- 4 Fighters (4 player colors)
- 4 Science Vessels (4 player colors)
- 4 Heavy Cruisers (4 player colors)
- 20 Track Markers (4 player colors)
- 4 VP Markers (4 player colors)
- 16 Neutral Ship Upgrade Tiles
- 12 Faction Ship Upgrade Tiles
- 108 Modules (4 types)
- 45 Planetary Moons
- 6 Orphaned Nebula Moons
- 15 Development Tiles (5 types)
- 15 Development Ability Cards
- 20 Event Cards
- 20 Destiny Cards
- 80 Tactics Cards
- 10 Raider Cards
- 16 Raider Standees & 8 Stands (not pictured)
- 6 Raider Dice
- 5 Mechaphage Tokens
- 21 Discovery Tokens
- 8 Supremacy Tokens
- 50 Damage Markers
- Resources:
- 50 Energy
- 25 Credits
- 25 Ice
- 25 Nanocarbon
- 25 Titanium
Game Setup
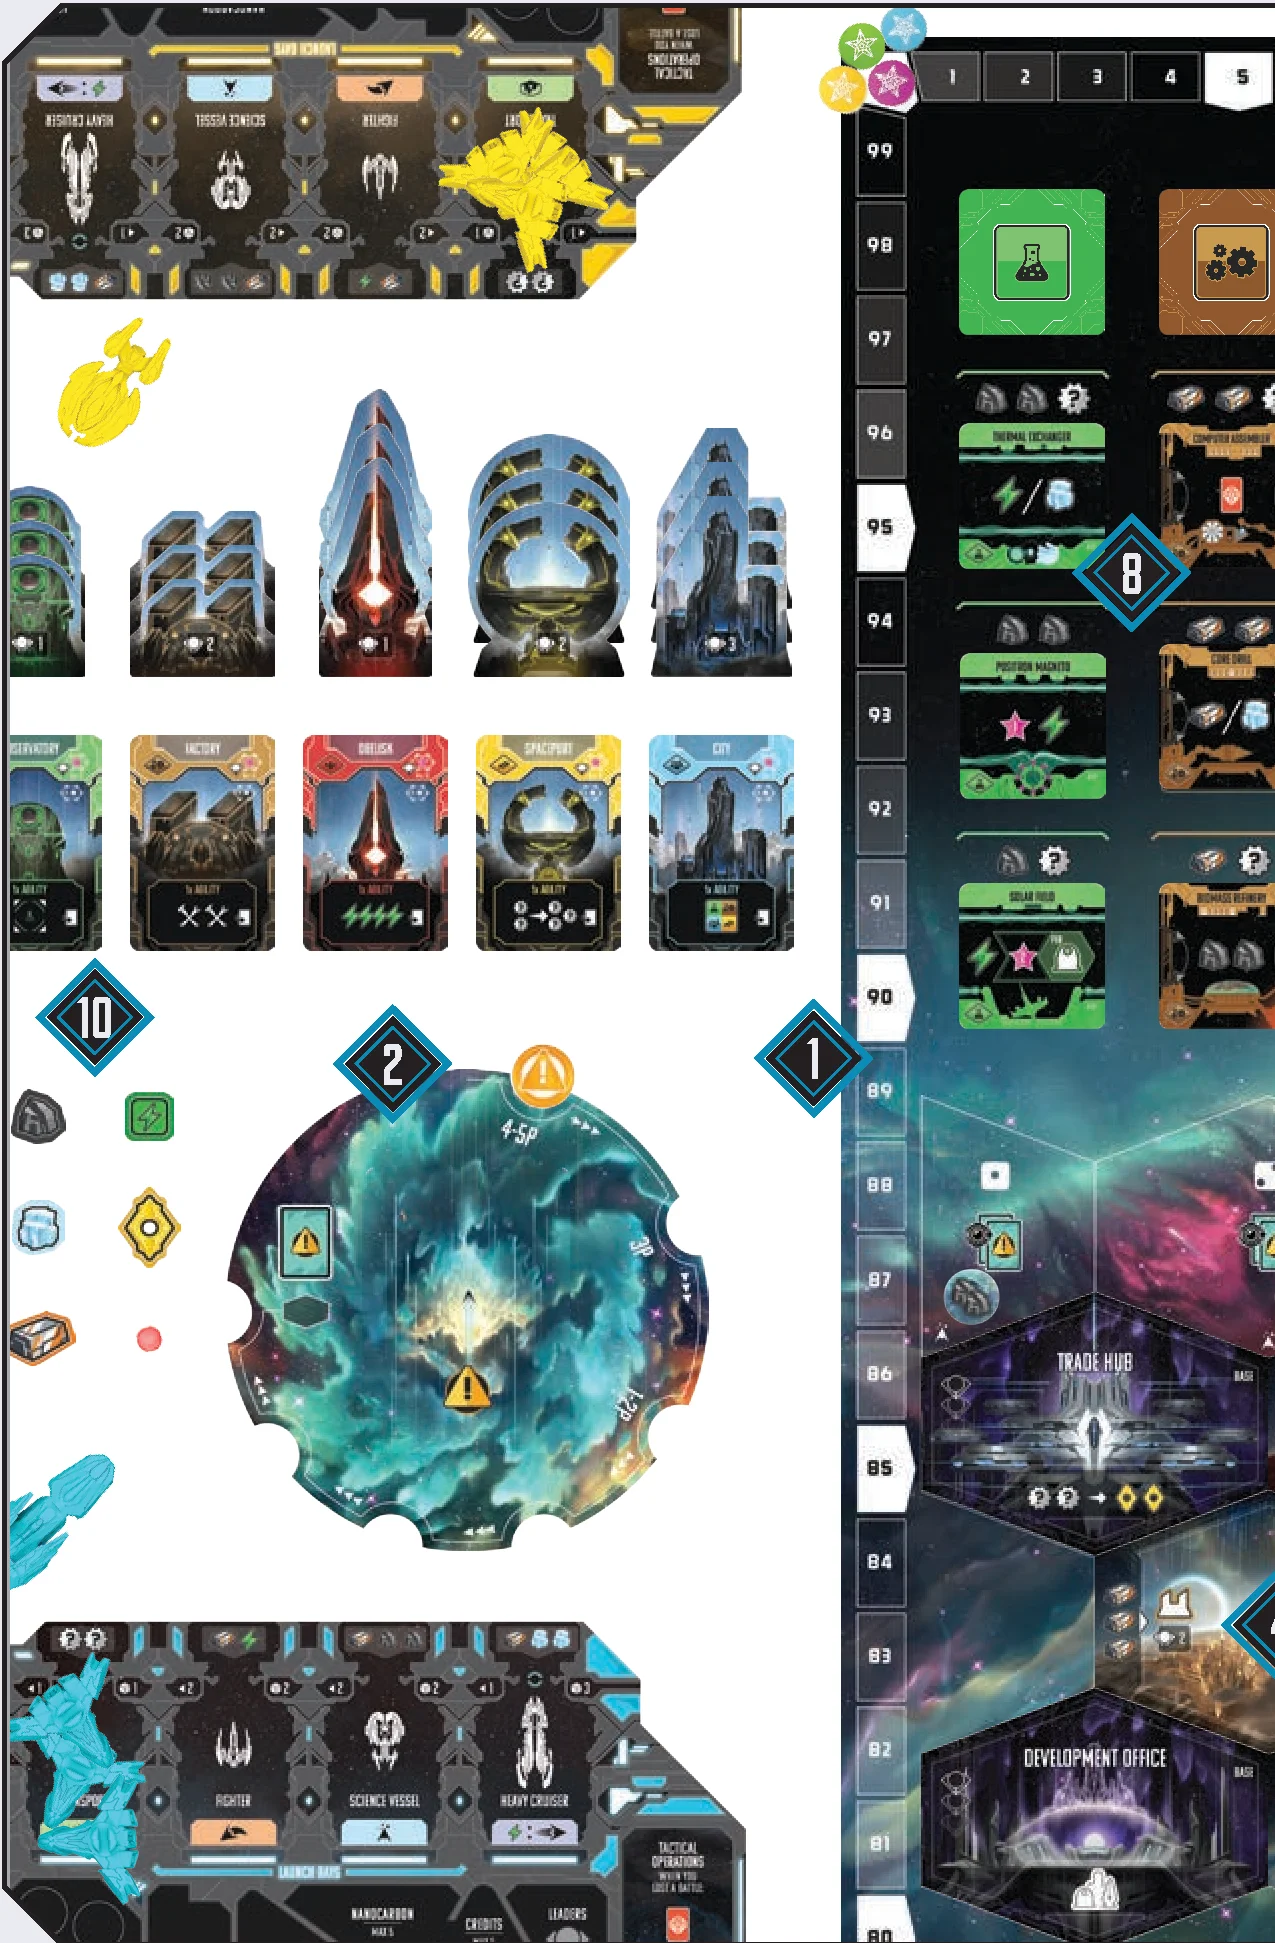
- Main Board: Place the main board in the center of the table.
- Event Board: Place the event board next to the main board and place the event marker on the start space for your player count.
Choose an event deck for this game. We recommend Galactic Dawn for your first foray into the Edge. Shuffle the chosen deck and place it face down on the event board. - Scrapyard: Place the Scrapyard board next to the main board.
- Starting Regions: Separate out the 15 planet tiles (not Alliance Base tiles), shuffle them, and stack them face down at the bottom of the main board. Then draw a number of planets based on your player count:
- 2 players: 4 planets
- 3 players: 6 planets
- 4 players: 8 planets
Shuffle the planets you drew together with the 6 Alliance Base tiles. These are your starting tiles. Lay them out face up on the board, one at a time, beginning in the top left and proceeding left to right, top to bottom.
- Moon Tokens: Shuffle the 6 orphaned nebula moons and place 1 face up on each nebula.
Separately shuffle each of the 5 colors of planetary moon tokens. On each planet, stack 3 moons of the matching color face down, then flip the stack face up so the top moon is visible. Place the remaining moons face down near the main board, in stacks of 3. - Starting Raiders: Choose an S-Class raider card for this game. We recommend the Vorticon Strikers for your first foes. Build the matching S-Class standees. Place the card face up next to the board along with the standees for the S-Class raider near the main board.
Roll 2 dice and place 1 S-Class raider standee on nebulae matching the numbers rolled (they may be in the same nebula).
Select 1 A-Class, 1 B-Class, 1 C-Class, and 1 D-Class raider for this game, using any method you choose. Build the A, B, C, and D raider standees. Place the raider cards face down next to the board with the standees nearby.
Return all unused raider cards and standees to the game box. They will not be used during game. - Game Length: Decide whether you will play a short, medium, or long game and place the terminus marker on the appropriate space on the VP track:
- Short: 50 VP
- Medium: 60 VP
- Long: 70 VP
- Modules: Shuffle each of the 4 module decks and place them in the marked spaces at the top of the main board. Reveal 3 modules from each deck to fill the spaces in the columns below.
- Progress Tracks: Shuffle the discovery tokens and stack 5 tokens face down on each of the 2 marked spaces on the science track.
Stack another 5 discovery tokens face down on the observatory discoveries space at the top of the science track. Return the remaining tokens to the game box.
Shuffle the supremacy tokens and place 1 face up on each of the 3 marked spaces on the supremacy track. Return the remaining tokens to the game box. - General Supply: Create a supply area as follows:
- Shuffle the tactics cards deck and place it face down.
- Pile the development cards by type, with the matching development tiles nearby.
- Pile the damage markers and resources.
Player Setup
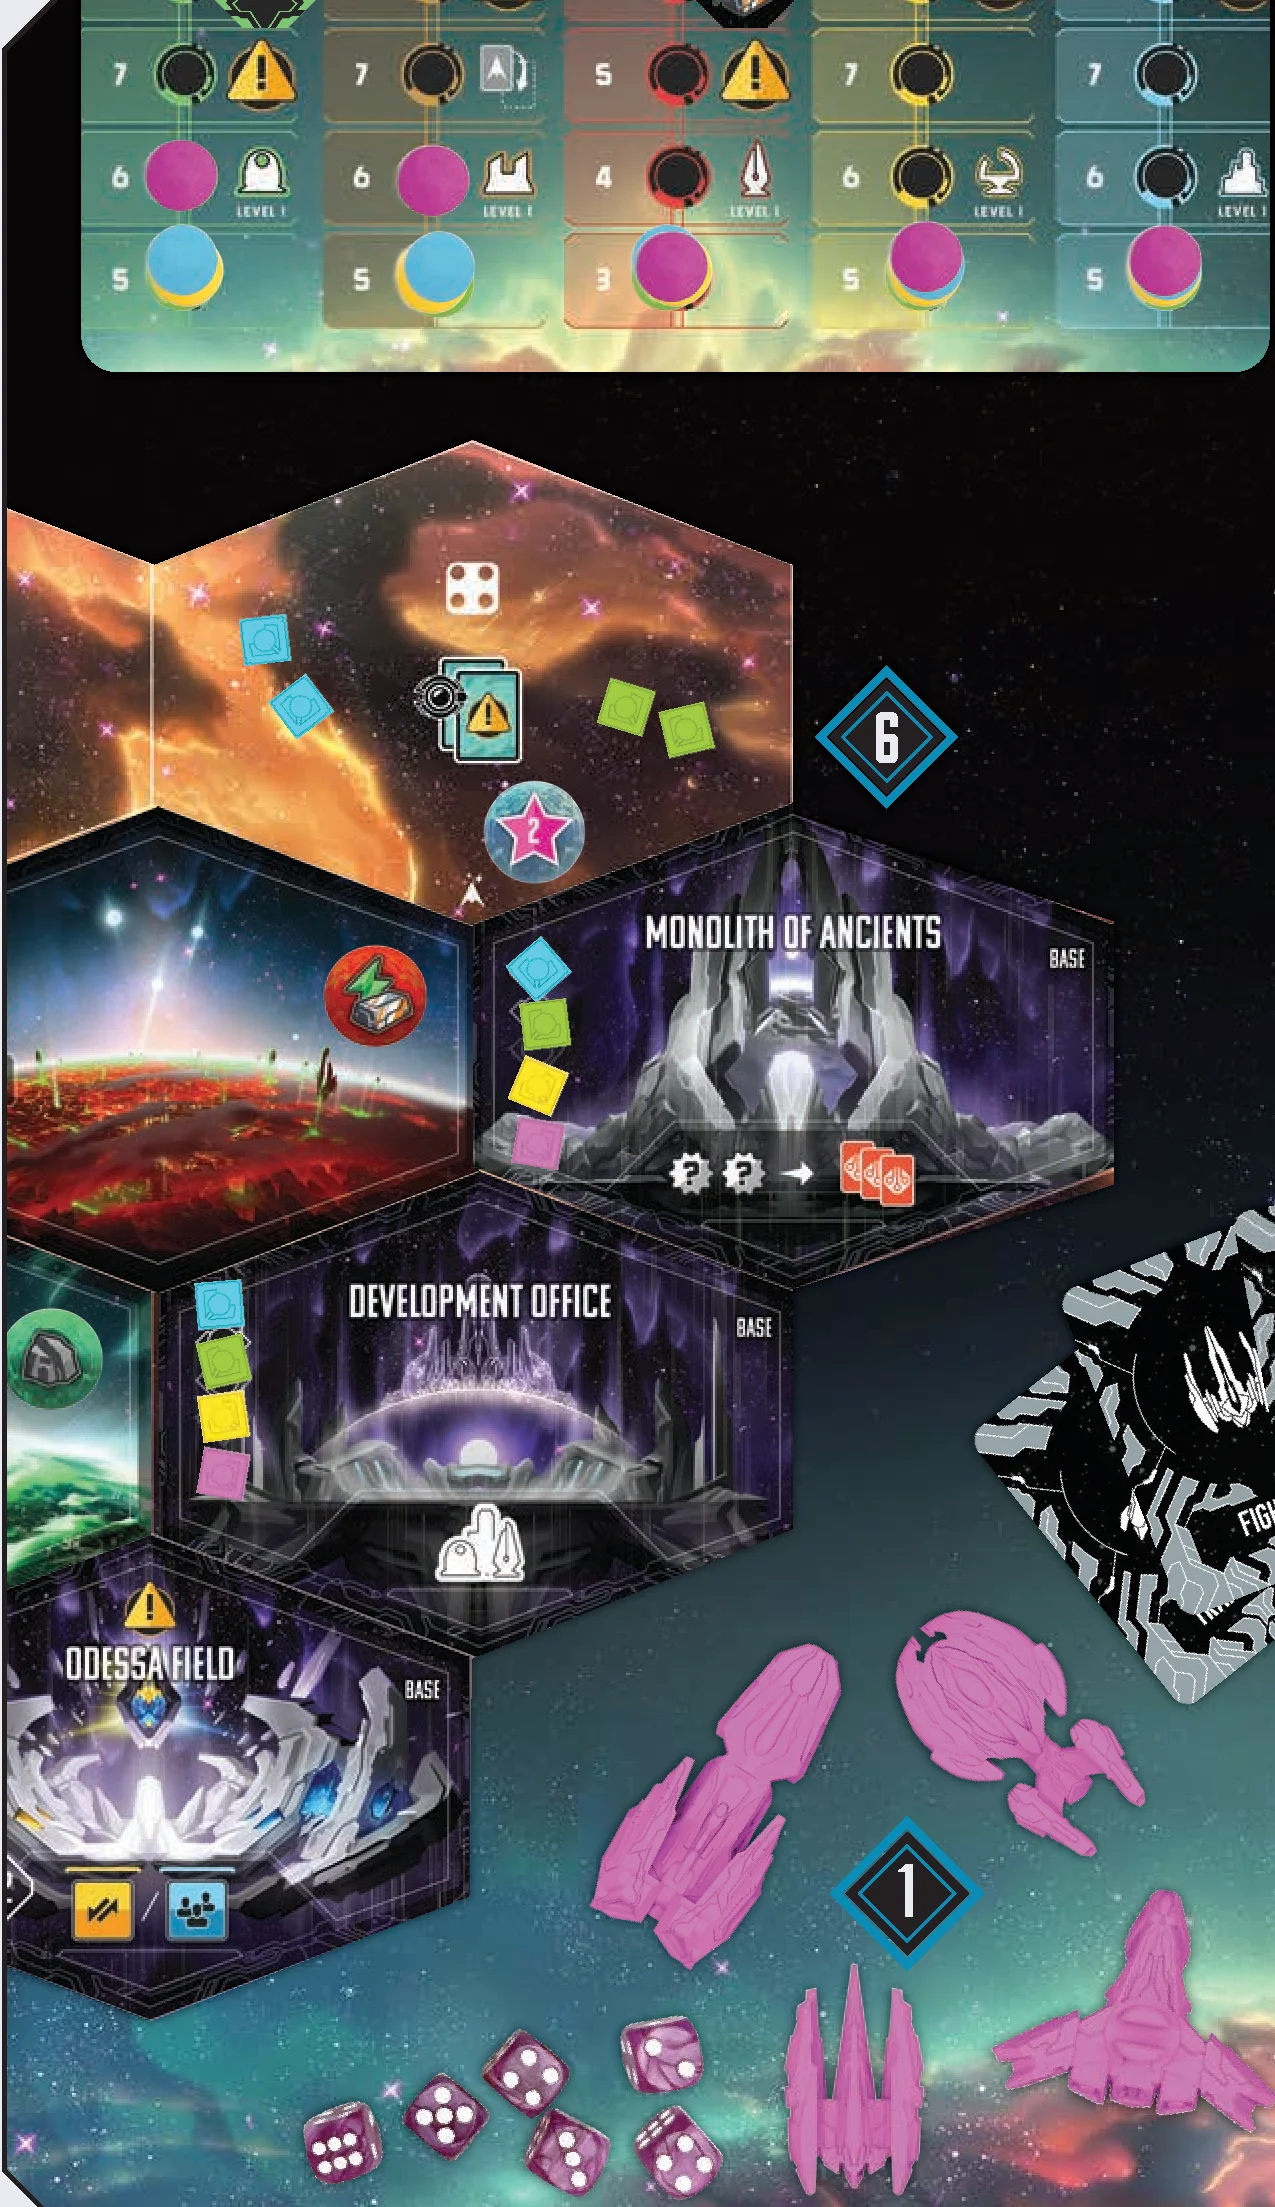
- Player Materials: Each player takes the following materials in their chosen color:
- 1 station mat
- 1 player aid
- 6 transports
- 1 fighter
- 1 science vessel
- 1 heavy cruiser
- 9 leaders
- 6 dice
- 5 track markers
- 1 VP marker
- Station Mat: Station mats are double-sided for flexibility. Note the orientation of the four colorful modules on one side – players will need room to build out from this side of their station. Each player places their station in front of themselves and places 3 transports in the Launch Bay area. They place all other ships in a personal supply beside their mat. They are available to build later.
- Factions: Shuffle the faction cards and deal 3 to each player. Each player chooses 1 to keep. Return all unused faction cards to the game box. Each player gains the starting resources listed on the back of their faction card, placing them in the storage areas of their station, then places their faction card face up in the faction area on their mat.
- Ship Upgrades: Each player takes their faction’s unique ship upgrade tile. Separately shuffle the 4 neutral ship upgrade types (transports, fighters, science vessels, and heavy cruisers) and deal 1 tile from each stack to each player. Return all unused ship upgrades to the game box. Each player places their 5 ship upgrade tiles in a personal supply with their unbuilt ships. They are available to acquire later.
- Progress Tracks: Each player places 1 track marker on the bottom space of each of the 5 progress tracks. Then each player advances 1 space on each of the progress tracks marked in the top left of their faction card.
- Leaders: Each player places 1 leader on each Alliance Base on the board. Each player rolls a die and places 2 leaders on the nebula matching the die rolled (more than 1 player can have leaders in the same nebula). Each player places their remaining 1 leader in the leaders area of their station.
- Start Player: Choose a start player by simulating a battle: each player rolls their 6 dice, and the player with the highest single die is the start player. If there is a tie, the tied players compare their next highest die, and so on until there is a winner. The start player places their VP marker on the 1 space of the VP track. Going clockwise, each other player places their marker on the next empty space on the track.
Game Overview
Andromeda’s Edge consists of a series of turns (there are not traditional rounds in this galaxy…). Players take turns in clockwise order, beginning with the start player and continuing until the game ends. On your turn, you either send out a ship or return all your ships to your station. This simple decision leads to all the wonders of the universe.
The game end is triggered when a player’s victory point marker reaches the terminus on the VP track. Each player then gets 1 more turn, including the active player. Once final scores are tallied, the player with the most VP wins.
ACTIVE PLAYER: The player who is taking a turn is the active player. When indicated, some decisions are made by the active player, and many events throughout the game are carried out in turn order beginning with the active player. If game effects occur simultaneously, when order is not indicated, such as those triggered by the end or beginning of a turn, the active player determines the order in which they occur.
Regions of the Edge
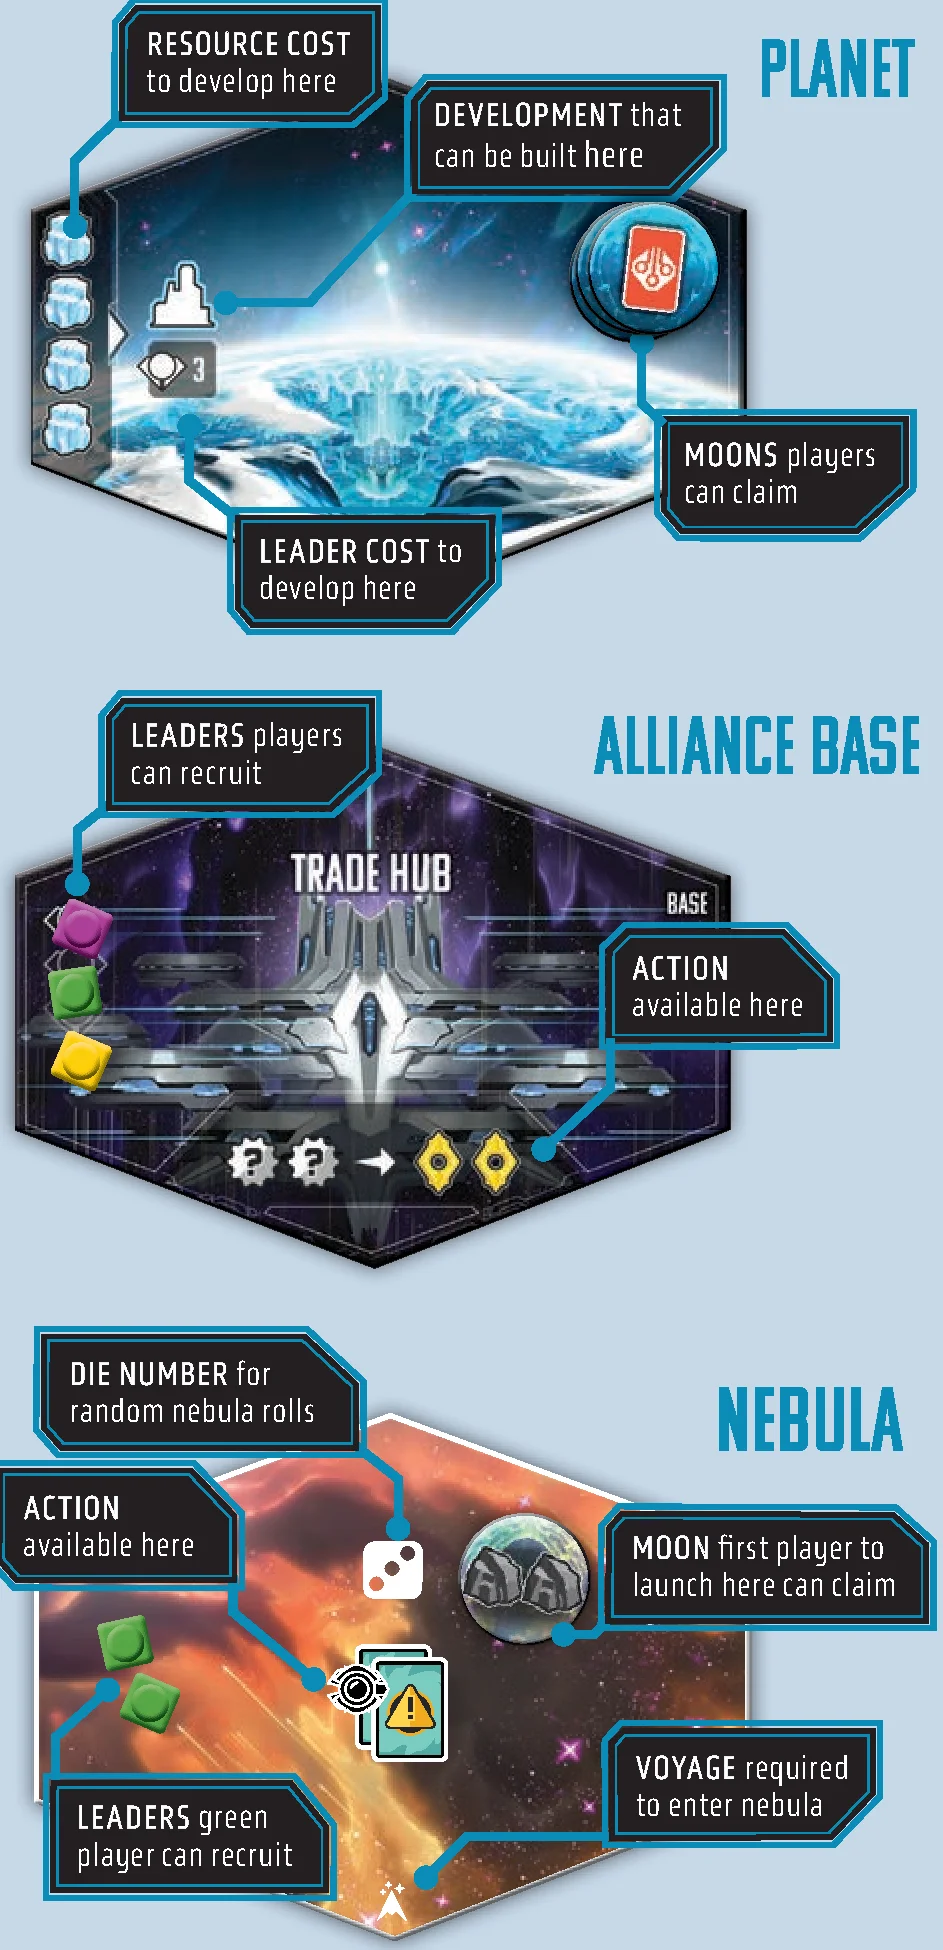
The board map is made up of regions of different types. During the game, you will Launch ships to different regions to gain resources and take actions. There are 3 main types of regions, described below. Optionally, special regions (see p26) may be added as well.
- Planets: The Edge is filled with an abundance of planets. Planets have moon tokens you can claim to gain resources, and you can build developments on planets to advance on the progress tracks and earn special rewards. New planets to explore will be revealed as key events trigger in Andromeda’s Edge.
- Alliance Bases: A frontier Alliance arrived before the latest wave of explorers and scattered their outposts across the Edge. Players can visit Alliance Bases to trade resources, salvage precursor technology, build ships, and take other important actions.
- Nebulae: The Edge is bordered by mysterious, unexplored nebulae where raiders lurk. Ships may only enter a nebula region if they have Voyage. However, those brave enough to do so can earn powerful rewards.
Resources & Storage
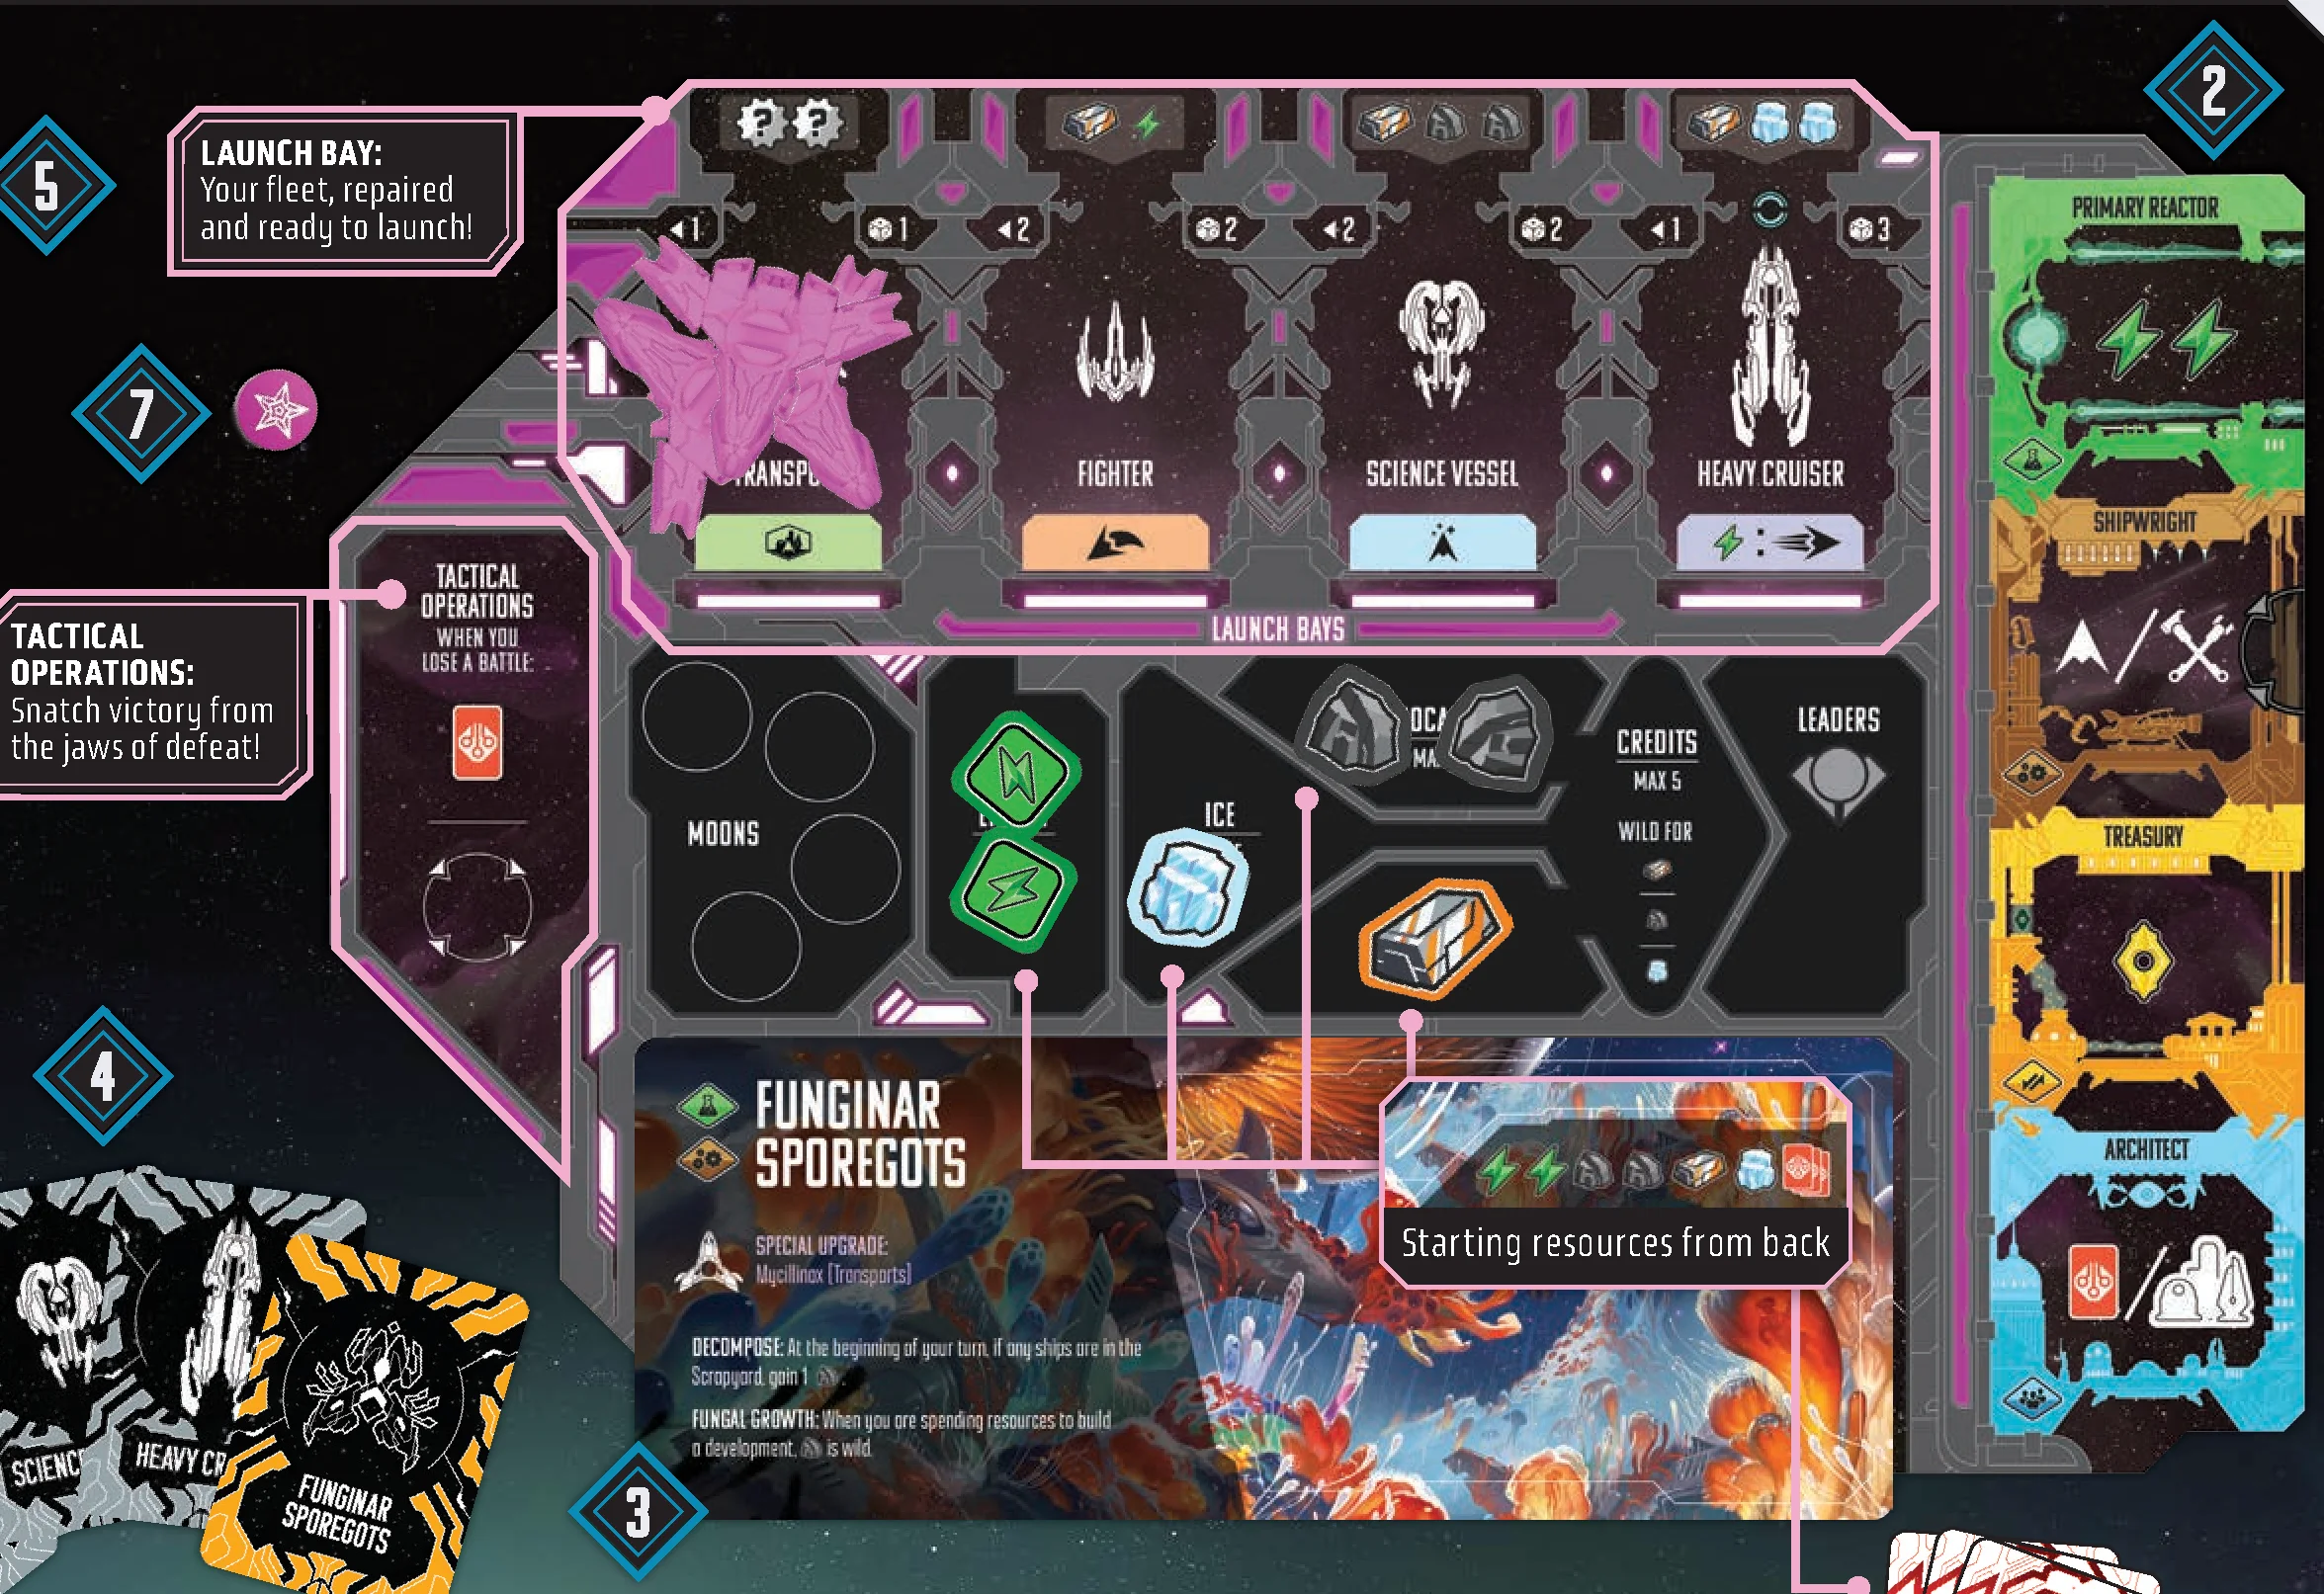
Over the course of the game, you will gain and spend resources of 6 different types. Resources are scarce in Andromeda. Use these to start building your future!
- Energy (Store Max 10): Station modules, weapons, jumps.
- Titanium (Store Max 5): Factories, industry modules, building ships.
- Ice (Store Max 5): Cities, civilization modules.
- Nanocarbon (Store Max 5): Observatories, science modules.
- Credits (Store Max 5): Wild for titanium, ice, nanocarbon.
- Tactics Cards: 5 types, used in a variety of ways.
Taking Your Turn
On your turn, you must either LAUNCH a ship onto the board or bring back all your ships in a RETURN TO STATION. You can also use any number of free actions during your turn. Launch and Return to Station turns, as well as free actions, are covered in detail over the following sections. At the end of your turn, discard any resources in excess of your limits.
Launching Overview
During a Launch turn, you send a ship from your station to a region, then activate that region to take its specific action. The region to which the ship Launches is the active region for this turn (even if the ship you Launch moves to a different region during your turn).
Launch Steps:
- Launch Ship
- Activate Region
- Raider Strike
- Battle
Step 1: Launch Ship
First, choose a ship in your Launch Bay and place it in a region of your choice on the board. The rules for selecting a region differ depending on whether you are making a first Launch or a subsequent Launch.
First Launch
If you have no ships on the board when you Launch, it is considered a first Launch. During a first Launch:
- You may Launch to any unoccupied region. A region is considered to be occupied if it contains a raider or at least 1 ship belonging to a player. In addition, all additional Launch requirements must be met.
Subsequent Launches
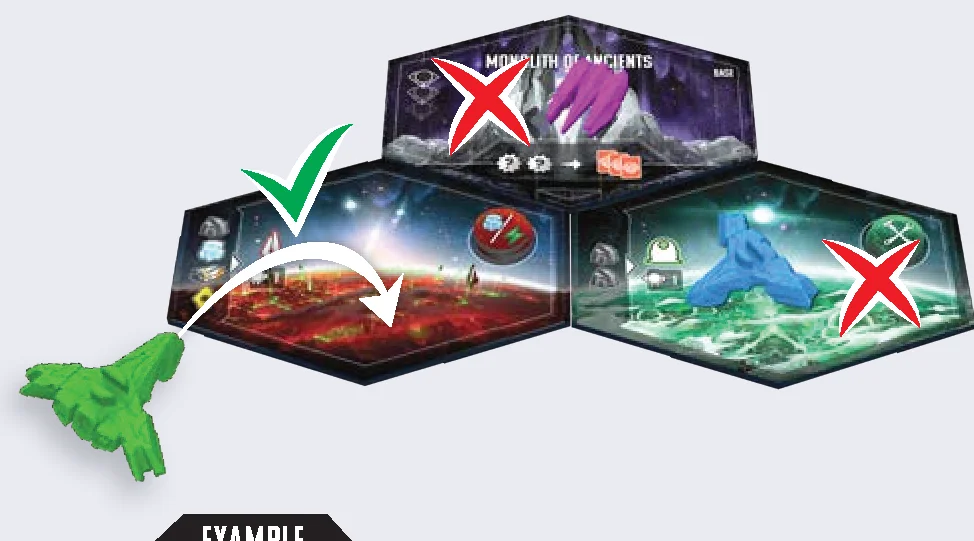
If you have 1 or more ships on the board when you Launch, it is considered a subsequent Launch. During this type of Launch:
- You must Launch to a region that is within range of at least 1 of your other ships on the board, using the launching ship’s range value.
- You may not Launch to a region where you already have 1 or more ships. You may Launch to an occupied region with opposing ships. Doing so may result in battle.
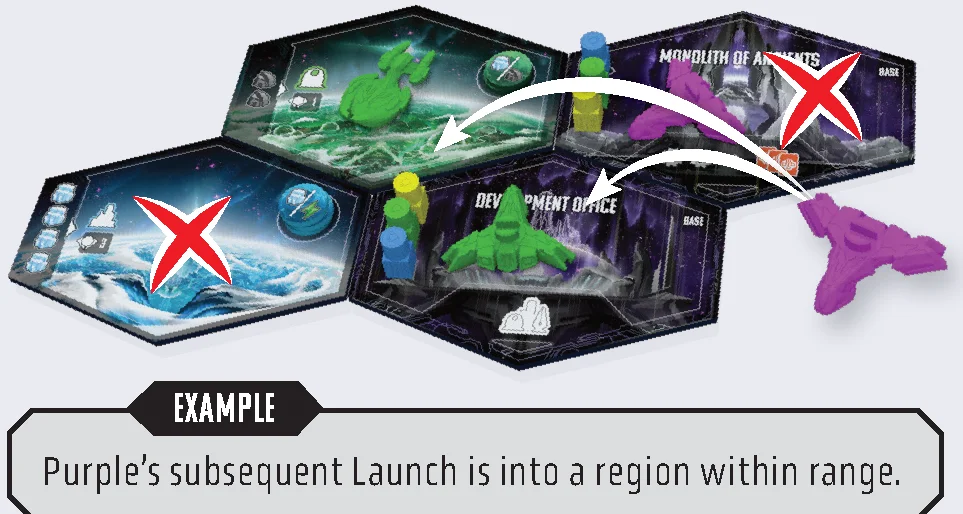
Additional Launch Requirements
You must follow these rules when making any Launch:
- You may only Launch to an Alliance Base if you are able to activate it and do so.
- Only ships with Voyage may Launch to a nebula.
Step 2: Activate Region
Once you have launched to a region, you must activate it. What happens when you activate a region depends on its type:
- Activating a Planet: Claim the top moon token from the stack and place it on your station. If the active planet has no unclaimed moons left, instead gain the resource printed where the moons were stacked.
- Activating a Nebula: Claim the moon token (if there is one) and place it on your station. Then secretly look at the top 2 cards of the event deck. Choose 1 to return to the top of the deck and 1 to place on the bottom.
- Activating an Alliance Base: Perform the Alliance Base’s action. A brief description of each is listed below.
Claiming Moons
One of the primary ways to gain resources is to claim moons that orbit planets and drift through the nebulae.
Whenever you claim a moon, place it in the claimed moons area of your station mat.
You can have no more than 4 moons in your claimed moons area. You can use the free action Abandon Moon on your turn to discard a moon and gain the depicted benefits, or you can slot a moon token elsewhere on your station during any player’s turn to free up space.
If you gain a moon on any other player’s turn, you may discard a moon in your claimed moons area to make room for the new moon, but you do not gain depicted benefit.
Alliance Base Actions
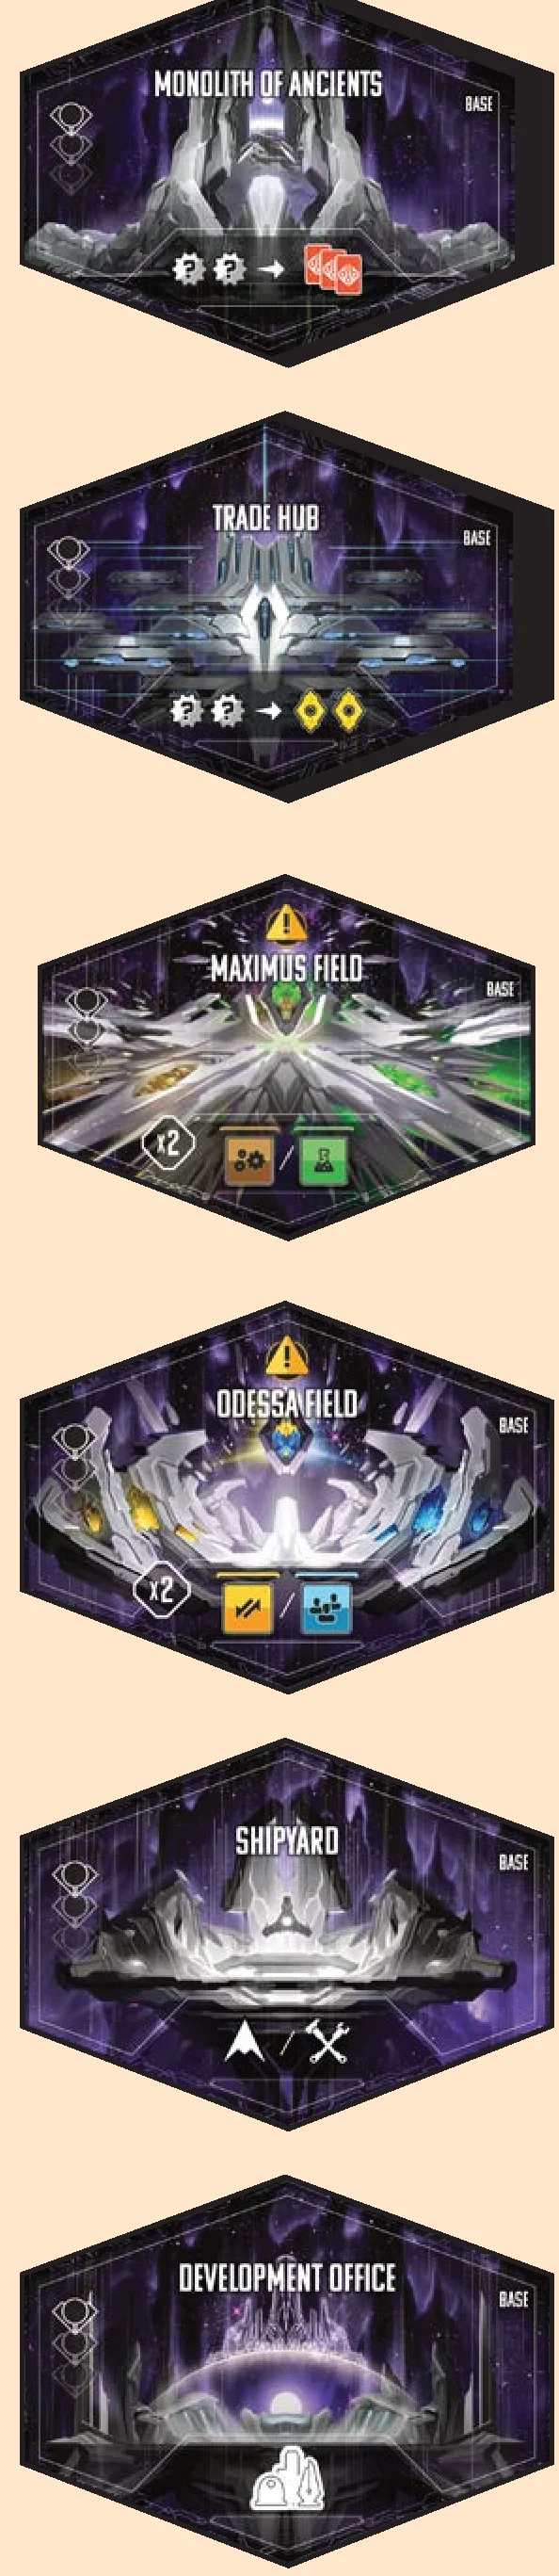
- Monolith of Ancients: Spend any 2 resources to draw 3 tactics cards.
- Trade Hub: Spend any 2 resources to gain 2 credits.
- Maximus Field: Advance the event marker 1 space, then buy 1 or 2 science or industry modules from the main board.
- Odessa Field: Advance the event marker 1 space, then buy 1 or 2 commerce or civilization modules from the main board.
- Shipyard: Either pay the resource cost to build 1 new ship, placing it in your Launch Bay, or perform 1 repair action.
- Development Office: Pay the resource and leader costs to build a development on an undeveloped planet where you have a transport.
Step 3: Raider Strike
After you activate a region, check for Raider Strike:
- A RAIDER IS ALREADY IN ACTIVE REGION: If there is already a raider in the active region, a Raider Strike does not occur, and no further raiders may enter the region. (An exception is S-Class raiders, see below).
- S-CLASS RAIDERS: If there is an S-Class raider already in the active region, check to see if there other S-Class raiders within range of the active region that may perform a Raider Strike. Unlike other raiders, multiple S-Class raiders can occupy a region together with Swarm.
- NO RAIDERS IN ACTIVE REGION: If there is not a raider in the active region, check to see if there are any raiders within range of the active region, using the range value on each raider’s card. If any raiders are in range, the active player must choose 1 of them to perform a Raider Strike and move into the active region. (If an S-Class raider is chosen, all within range will move into the region).
All raiders have the Voyage ability, so they can always perform a Raider Strike into nebulae.
Raiders Overview & Placement
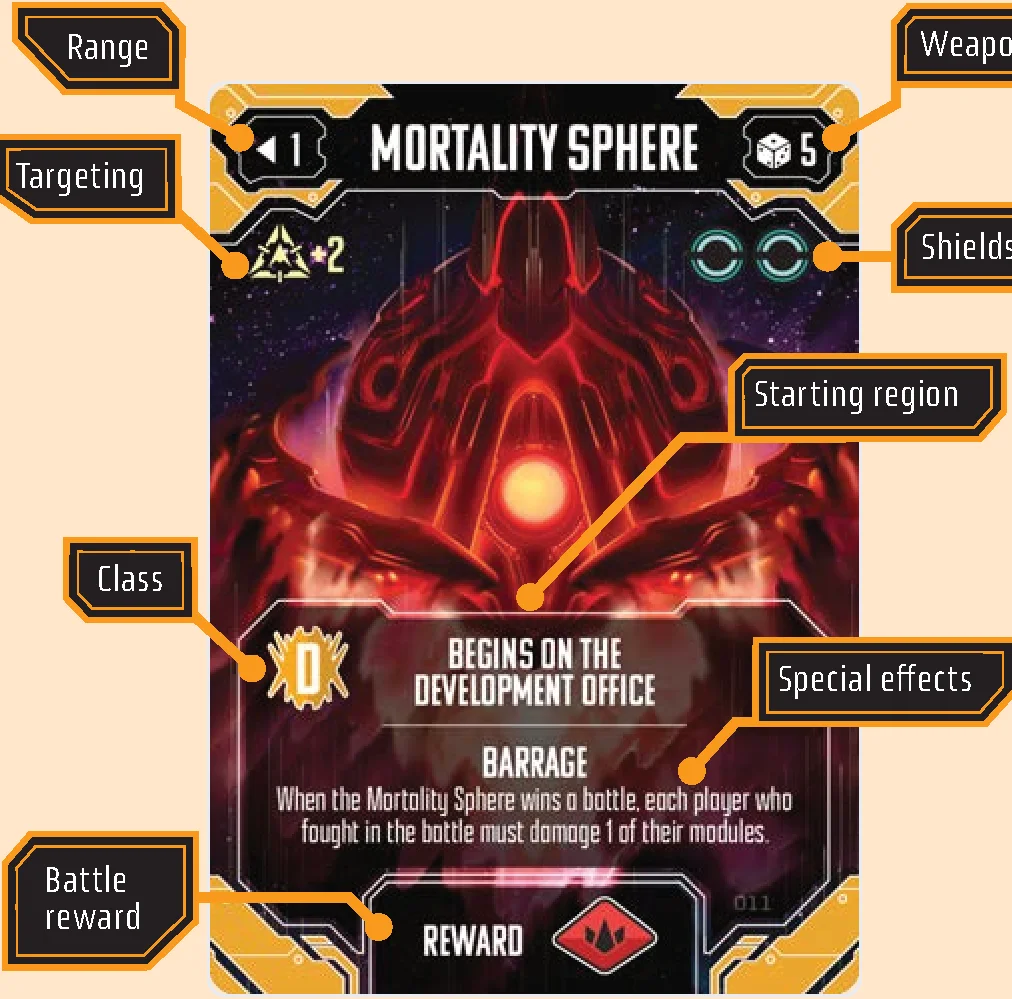
Over the course of the game, menacing raiders will emerge from the nebulae to threaten your operations and prey on your starships. Each class of raider has a raider card that determines its values and abilities.
Only 1 class of raider can occupy a region at a time. A raider can never be placed or moved into any region where a raider of another class is present.
Raiders of different classes are placed on the board when event cards are resolved. Each raider’s card indicates which region it is placed in.
- When a raider card says it starts in a random nebula, roll a die and place the new raider in the nebula matching the number.
- When a new raider would be placed in a region occupied by a raider, instead place it in a random nebula that is not occupied by a raider. S-Class raiders are the exception, they may be placed in a region already occupied by S-Class raiders.
- If the raider of the indicated class is already on the board, instead place 2 S-Class raiders in the region indicated on their card. If there are fewer than 2 left in the supply, place as many as possible.
- A raider that has been returned to its card might return to the board later in the game. If an event is resolved that depicts the raider’s class, it is placed on the board again, following the same rules as above.
Step 4: Battle
After the raiders have had a chance to strike, if 2 or more opposing players and/or raiders have ships in the active region, a battle must be resolved. Battle can only occur in the active region. The steps of battle resolution are covered on pg. 21.
Battle can occur even if the active player no longer has any ships in the active region.
Return to Station Overview
During a Return to Station turn, you return all your ships one-by-one from the board and Scrapyard to your station. The ships you return from the board and the Repair Barge area of the Scrapyard may be used to activate modules on your station.
If you have no ships left in your Launch Bay at the start of your turn, you must Return to Station.
Return Steps:
- Activate Modules
- Return All Ships
- Discard Energy
Step 1: Activate Modules
During this step, you may activate any number of modules on your station, in any order, to gain their printed benefit. To activate a module, either take 1 ship from anywhere on the board (or the Repair Barge area of the Scrapyard) and place it on the module, or take 1 energy from your storage area and place it on the module.
In addition, you must follow these rules:
- You may not activate a module that already has a ship or energy on it.
- You may only activate a module using energy if you have already activated a module in the same row using a ship.
- You may not activate modules with any damage markers on them.
- Ships in the top area of the Scrapyard can’t be used to activate modules. However, ships that have been moved to the Repair Barge area at the bottom of the Scrapyard board can be used to activate modules. This includes ships moved to the Repair Barge during the current turn.
- Science Modules: Unlike other modules, science modules can’t be activated individually when you Return to Station. Instead, you can activate them by activating your Primary Reactor module. This must be done with a ship.
- Moon Inputs: If a module has a moon slot on the input side of an action, you may only activate it once you have slotted a moon into it.
Core Modules
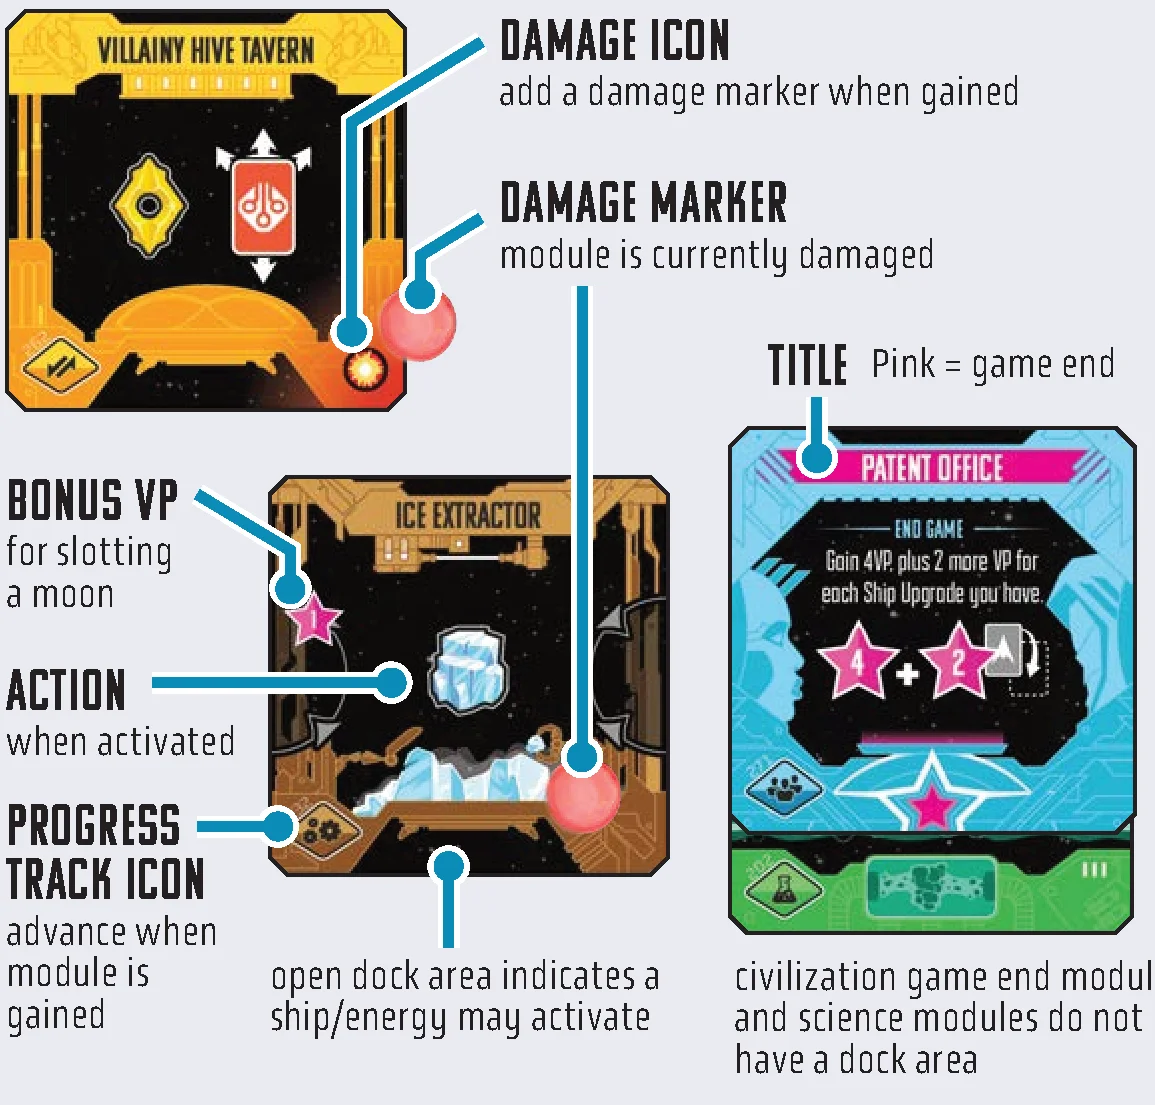
- Primary Reactor: Gain 2 energy and activate any number of your other science modules.
- Shipwright: Either pay the resource cost to build 1 new ship in your Launch Bay or perform a repair action.
- Treasury: Gain 1 credit.
- Architect: Either draw 1 tactics card or pay the resource and leader costs to build a development on an undeveloped planet where you have a transport.
Step 2: Return All Ships
After you have finished activating modules, return all your ships from modules, the Scrapyard, and the board to the Launch Bay on your station. Remove all damage markers from any ships with shields.
You may not choose to leave ships behind on the board or in the Scrapyard, unless a game effect says otherwise.
Step 3: Discard Energy
After ships are returned to the Launch Bay, return all energy you spent to activate modules to the supply.
If you have played any tactics cards with sustain abilities, these are also discarded at this time.
Free Actions
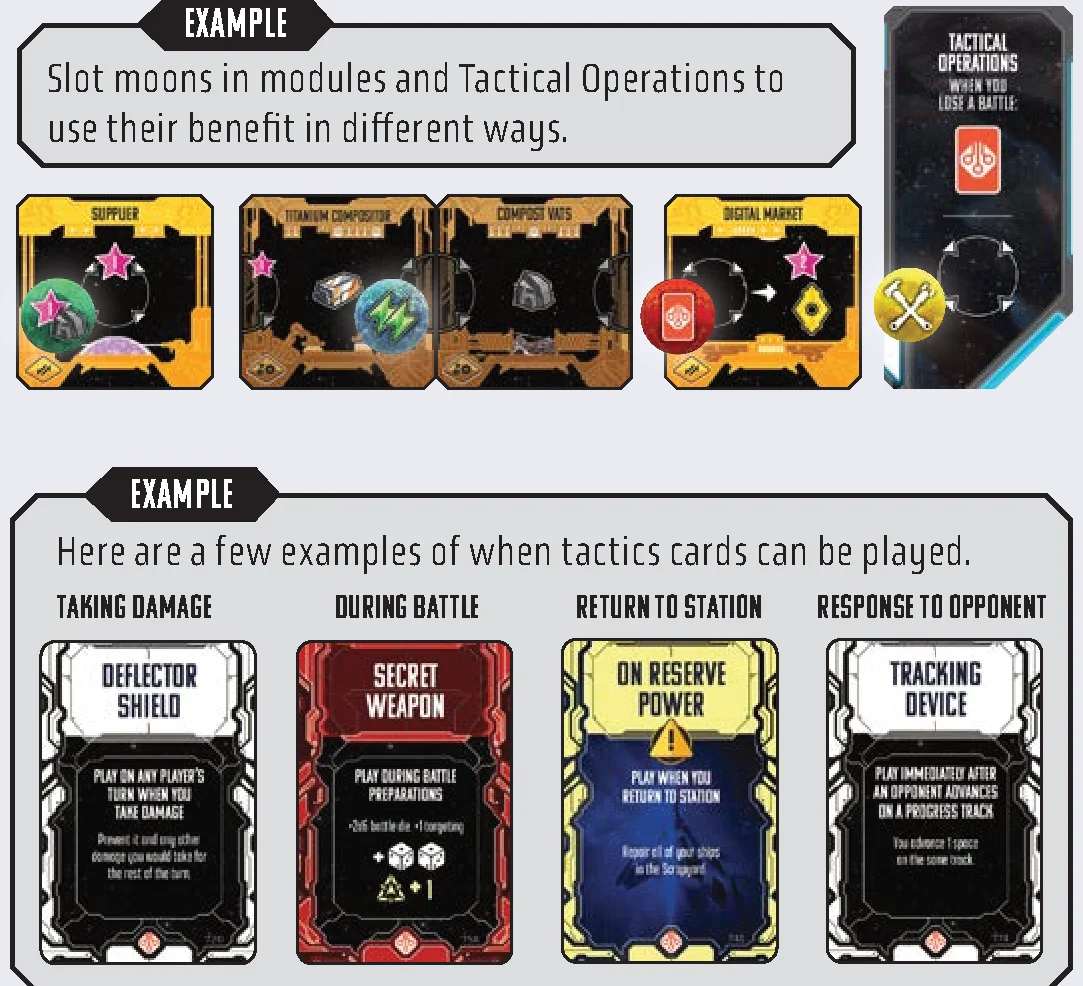
You may take any number of free actions during your turn, regardless of whether you are taking a Launch or Return to Station turn. Free actions may be used at any time on your turn, including immediately before or after other actions.
On Any Turn:
- Slot a Moon Token
- Play Tactics Cards
On Your Turn:
- Use Development Card
- Discard a Discovery / Supremacy Token
- Recruit Leaders
- Abandon a Moon
- Collect Bonus Resources
- Use Faction Abilities
Slot a Moon Token
At any time, you may slot a moon from your claimed moons area into a moon slot on a module or the Tactical Operations area on your station.
Once you have slotted a moon, you may no longer discard it to gain its benefit. If you replace a moon that is already in a slot, you must discard it without gaining its benefit.
Play Tactics Cards
Tactics cards are resources you can gain during the game and play to take special actions. Each tactics card indicates when it can be played.
After you play and fully resolve a tactics card, place it in a face up discard pile next to the deck. If the deck is ever empty, shuffle the discard pile to make a new deck.
Tactics Cards Types
- Action: May be played at the indicated time. Some may be played on other players’ turns. Can’t be played during battle.
- Event: May be played at the indicated time on your turn. When played, immediately advance the event marker 1 space.
- Sustain: May be played at the indicated time on your turn. Keep this card in play until you Return to Station. (Sustain cards are discarded with energy in the final step of Return to Station).
- Diplomacy: May only be played during the Diplomacy step of a battle you are participating in. You may only play 1 Diplomacy card per battle.
- Battle: May be played at the indicated time during battle. The majority may only be played if you have ships in the battle. You may play any number of battle cards during a single battle.
Tactics Card Limit
At the start of the game, you have a hand limit of 5 tactics cards. You must discard down to this limit at the end of your turn. You can increase this limit by advancing on the civilization track.
Other Free Actions
- Use a Development Card: If you have an unused development card, you may flip it face down at any time on your turn to take the 1x ability on it.
- Discard a Discovery or Supremacy Token: If you have an unused discovery or supremacy token, you may discard it at any time on your turn to gain the benefit on it.
- Recruit Leaders: At any time on your turn, you may recruit any number of leaders of your color from any region or regions where you have ships. Place each of them in the leaders area of your station.
- Abandon a Moon Token: At any time on your turn, you may discard a moon you’ve claimed to gain the resources and/or VP printed on it. If you discard a moon with a repair icon on it, you may repair 1 damaged ship or module.
You may discard a moon as part of paying a resource cost. Place each moon you discard in a face up pile next to the board (separate from the face down moons that have not yet been placed). - Collect Bonus Resources: Event cards or other effects may place bonus resources on certain regions on the board. At any time on your turn, you may gain any number of bonus resources from any region or regions where you have ships.
- Use Faction Abilities: Many faction abilities describe when they take effect, but unless otherwise specified, a player may use their faction abilities as free actions on their turn.
Starships
Each player uses their fleet of ships to explore Andromeda’s Edge. During the game, you will build ships of different types, then Launch them out onto the board to gain resources, develop planets, and do battle with opponents.
When your ships Return to Station, you use them to activate modules on your station for extra resources and actions.
Building Your Fleet
At the start of the game, you have 3 transports ready to Launch. Ships you have built are kept in your Launch Bay until you Launch them onto the board.
You can spend resources to build additional ships when you visit the Shipyard (Alliance Base) or activate the Shipwright module on your station.
Ship Types
There are 4 types of ships you can build – you have 3 additional transports, a fighter, a science vessel and a heavy cruiser. Each type of ship has a range and weapons value, and unique abilities, which are displayed in your Launch Bay:
- Transport: Range 1, Weapons 1, Populate.
- Fighter: Range 2, Weapons 2, Attack.
- Science Vessel: Range 2, Weapons 2, Voyage.
- Heavy Cruiser: Range 1, Weapons 3, Jump, Shields.
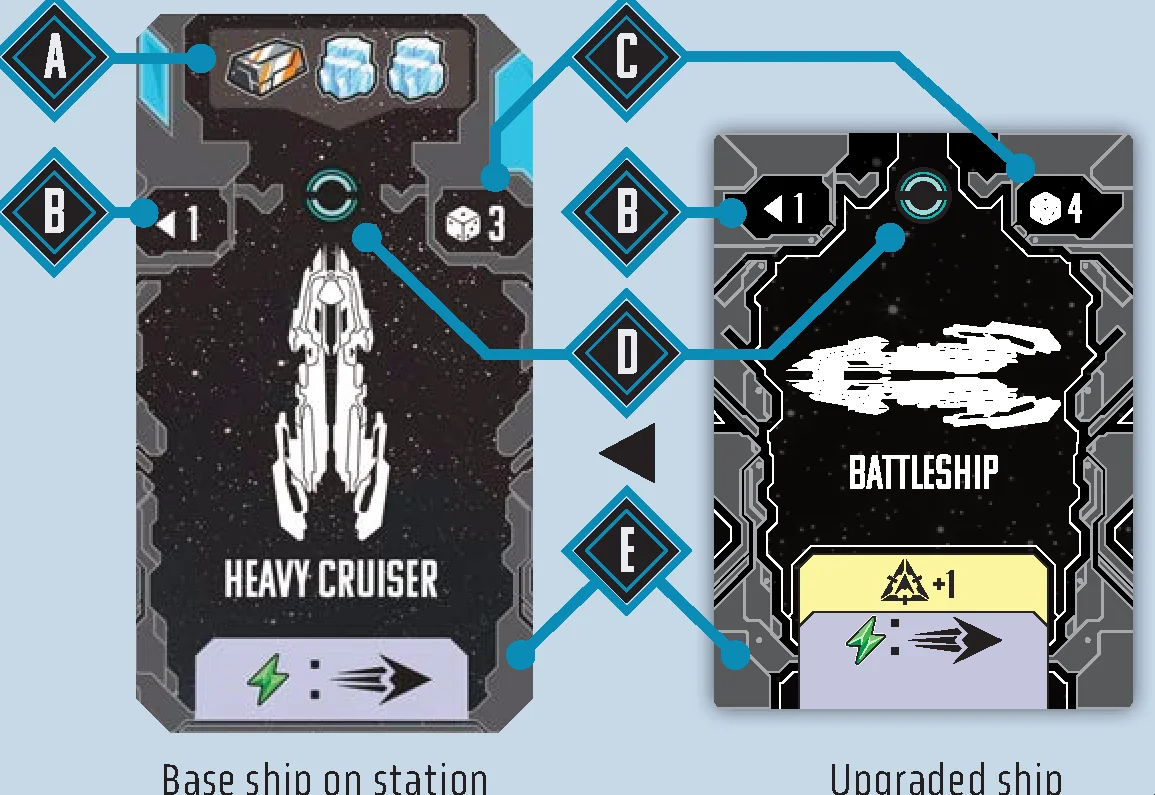
Ship Specs
- A – Resource Cost: The cost to build 1 ship of this type.
- B – Range Value: The maximum distance (in number of regions) from your other ships that you may place this ship when you Launch it from your station. It is also the distance this ship can move to join a battle.
- C – Weapons Value: The number of dice this ship rolls in battle.
- D – Shield Icons: Shields prevent a ship from being sent to the Scrapyard as a result of losing a battle or other game effects.
- E – Abilities: Special abilities this ship has.
Ship Abilities
- Targeting: Increases minimum roll in battle, affecting all ship dice (max 5).
- Voyage: When this ship Launches or moves, it may enter a nebula.
- Attack: During a first Launch, this ship may Launch to an occupied region.
- Jump: When this ship Launches or moves, you may spend 1 energy to give it infinite range.
- Populate: Allows developments on a planet. This ability is only on transports.
- Custom Ability: A unique ability for this ship. See appendix for clarifications.
Ship Upgrades
At the start of the game, each player receives 5 ship upgrade tiles – 1 for each of the ship types, and 1 faction specific upgrade. When you see the upgrade symbol  , you may place 1 of these tiles over that ship space of your Launch Bay. This replaces the base specifications, and may grant all ships of that type new abilities. In addition – if you have an available ship of that type when you upgrade, you immediately build that ship for no cost!
You primarily upgrade ships by means of the industry progress track, but there are other ways.
Each ship type may be upgraded once. When all 4 ships have been upgraded, further upgrades have no effect.
Station Modules
The remnants of the precursor civilization are littered across the Edge. You may acquire this technology in the form of modules you can add to your station. Each module you gain enhances your capabilities when you Return to Station.
Station modules come in 4 types, corresponding to 4 of the 5 progress tracks (science, industry, commerce, and civilization). Whenever you gain a new module, place it in the row of the matching type on your station mat. Then, advance 1 space on the corresponding progress track. Modules on your station may be rearranged at any time.
Buying or Acquiring Modules
- Choose modules from the indicated column or columns. If there is a cost above the module, the gain is not free. Pay the resource costs depicted on the board for any module you gain this way.
- Add each module to the appropriate row on your station. If any module has 1 or more damage icons in the bottom right corner, place 1 damage marker on it per icon.
- For each module gained throughout the game, you will always advance 1 space on the corresponding progress track.
- When acquiring modules via the Maximus or Odessa Field regions, if you can’t or don’t want to buy 2 modules, you must discard 1 module from the indicated column for the second module. You must buy 1 module before you discard any. The discarded module is placed on the bottom of its deck.
- At the end of any action or free action where modules are gained, refresh the module columns by sliding modules down to fill any empty spaces and revealing new ones from the decks. This refresh is done per unique module gain action.
Slotting Moons into Modules
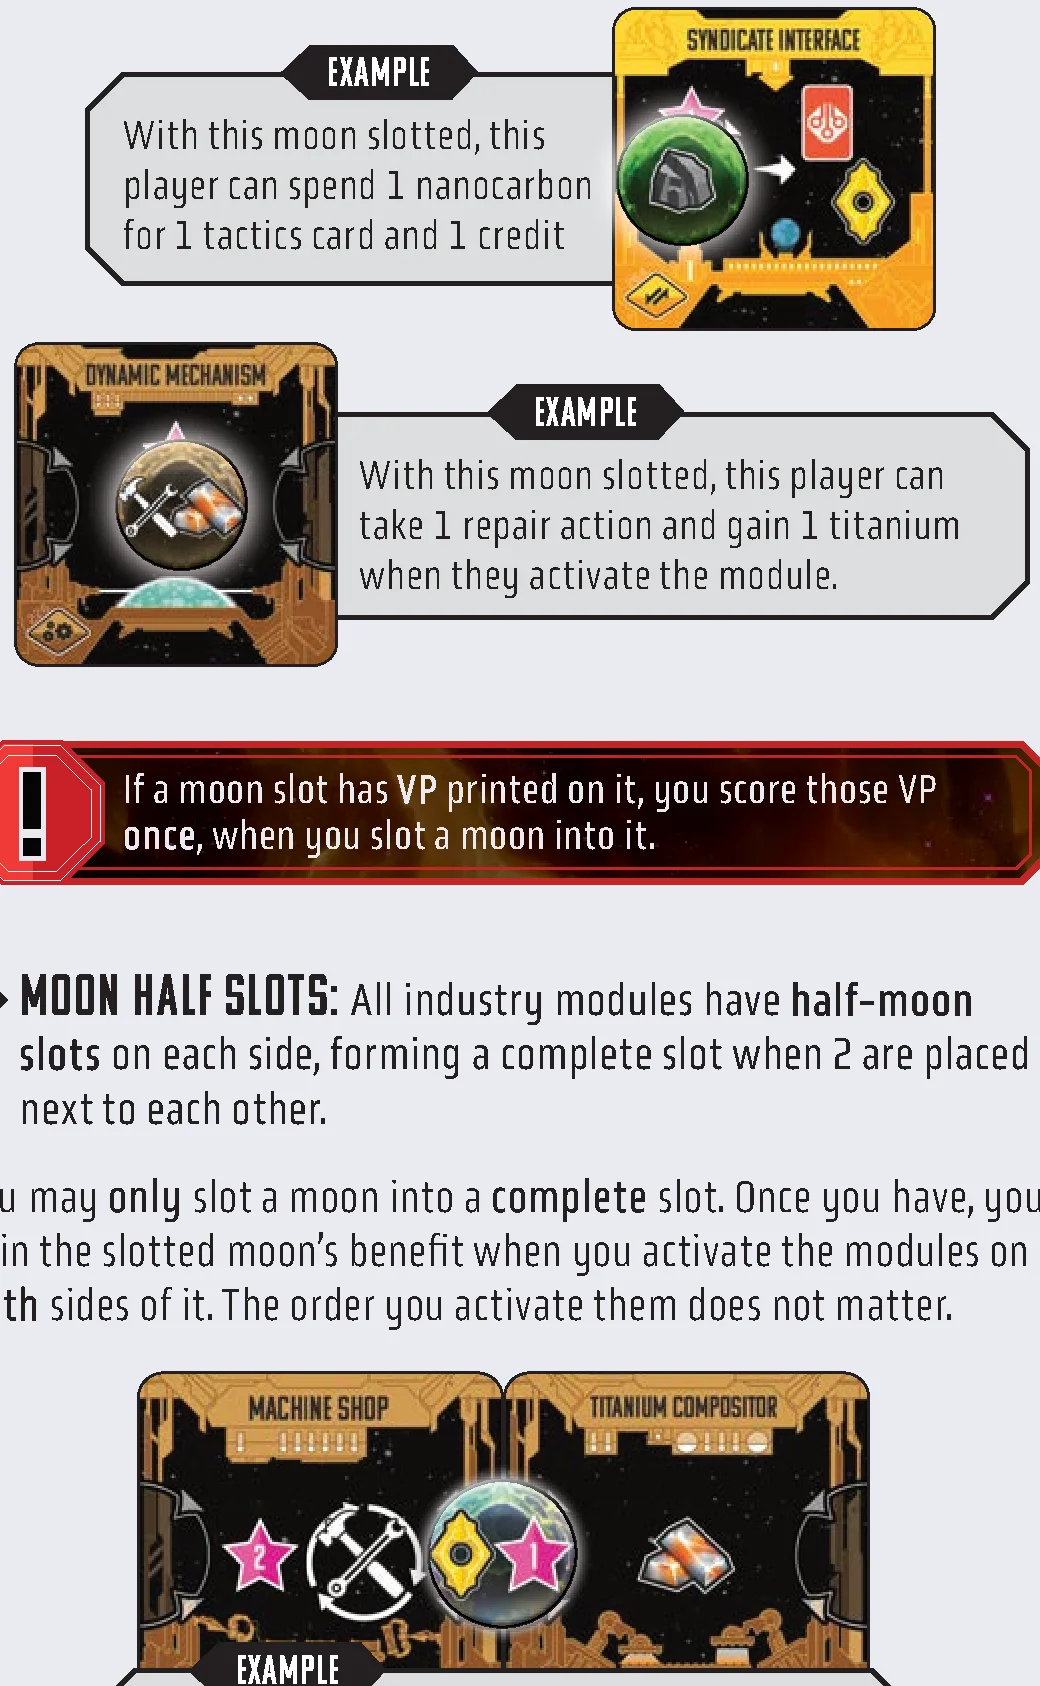
Some modules have moon token slots where you can slot moons you have claimed.
- Moon Input: If a moon slot is on the cost side (left of arrow) of an action, then the slotted moon’s resources become the cost to activate the module. A module with an empty input slot can’t be activated until a moon is slotted there. A moon with a repair icon can’t be slotted as an input.
- Moon Output: If a moon slot is not on the cost side of an action, then you gain the slotted moon’s resources whenever you activate the module.
- If a moon slot has VP printed on it, you score those VP once, when you slot a moon into it.
Moon Half Slots
All industry modules have half-moon slots on each side, forming a complete slot when 2 are placed next to each other.
You may only slot a moon into a complete slot. Once you have, you gain the slotted moon’s benefit when you activate the modules on both sides of it. The order you activate them does not matter.
If you rearrange your industry row such that you separate 2 industry modules with a moon slotted between them, you must discard the moon (without gaining its resources).
You may still activate the main action of an industry module that has incomplete or unfilled half-moon slots.
Planetary Developments
The many planets of the Edge are fertile ground for bustling metropolises, humming factories, and monoliths to your supremacy – but you will have to get to them before other factions do.
There are 5 types of developments you can build, each corresponding to 1 of the progress tracks. Each planet can only have 1 development of a specific type (indicated on the left of the planet’s tile). Once someone has built a development on a planet, no one may build another there.
There are 3 planets of each type in the game, meaning a maximum of 3 developments of each type can be built.
Building a Development
When taking a development action, you must have:
- A transport on an undeveloped planet
- At least enough recruited leaders in your station, depending on the development type (noted on planet’s tile).
- At least enough resources to pay the development cost printed on the left side of the planet’s tile.
Whenever you build a development, follow these steps:
- Pay the planet’s resource cost. Discard the leaders you spend from your station out of the game.
- Claim a development tile of the appropriate type and slot it on top of your transport on the planet.
- Claim a development card of the appropriate type and place it face up near your station and gain the benefits listed below in Development Card Benefits.
When you build a development, you can build it on any planet where you have a transport (not just the active region, if there is one).
Assigning Leaders to Developments
Building a development also requires skilled leaders to oversee its operations. Each development type requires a certain number of leaders (which is the same on all planets that support that development).
Leaders you assign to build developments permanently become part of the development and can’t be returned to your station or recruited again later. Although the leader pieces are removed from your station, each development tile displays the number of leaders that are assigned to it, which is important for scoring developments.
Populating Developments
When you build a development, you must use a transport to Populate it. This transport permanently becomes part of the development. It can’t return to your station or your supply, and you can’t build it again later.
You must always have at least 1 ship, which means you cannot use your last ship to create a development, leaving you with no ships.
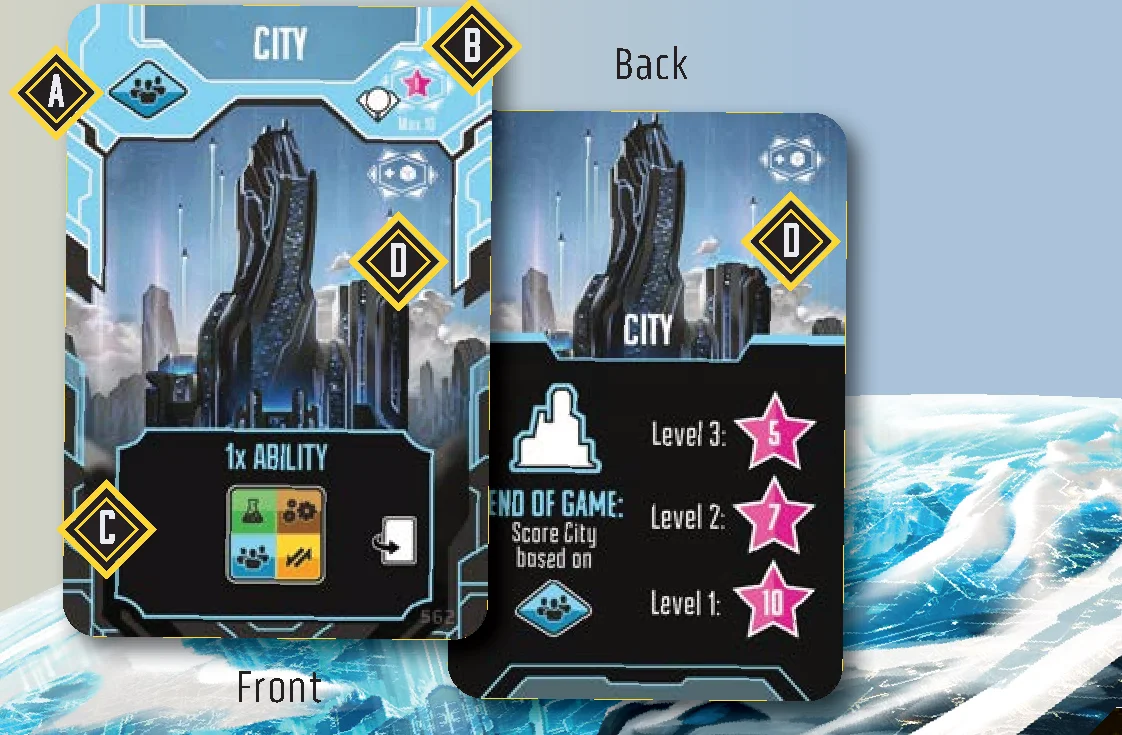
Development Card Benefits
- A – Progress Track: Advance 1 space on the corresponding progress track.
- B – VP Scoring: Score VP based on the number of leaders on the developed planet and in adjacent regions.
- C – Ability: A one-time development card ability that can be used immediately or on future turns. Flip the development card over after using ability.
- D – Bonus Battle Die: Gain +1 die when engaging in a battle in a region adjacent to this development.
Development Abilities
Each development card you gain gives you access to a once-per-game free action. If you build multiple developments of the same type, you may claim multiple copies of the same card, and use each of them once:
- Observatory (Science): Flip this card to secretly look through the stack of discovery tokens on the observatory discoveries space and choose 1 to claim.
- Factory (Industry): Flip this card to take 2 repair actions.
- Spaceport (Commerce): Flip this card and spend any 2 resources to gain any 3 resources.
- City (Civilization): Flip this card to choose any 1 available module and add it to your station at no cost.
- Obelisk (Supremacy): Flip this card to gain 4 energy.
Developments on the Board
Building a development on a planet does not prevent other players from launching their ships to that planet or activating it. Developments do not count as occupying planets (only ships do). This is important for determining where you can place ships during subsequent Launch turns.
Development Scoring
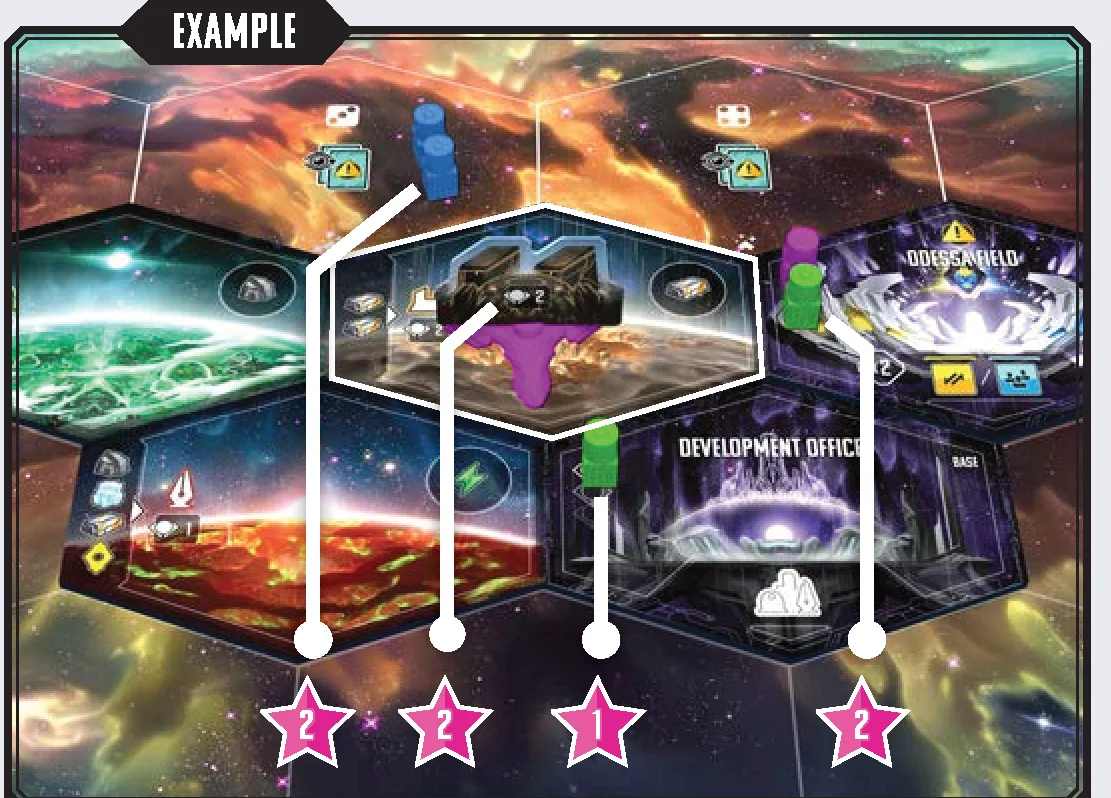
When you build a development, you score VP equal to the total number of leaders on the developed planet and in all adjacent regions up to a maximum of 10 VP. Count leaders that belong to all players, including unrecruited leaders, the number of assigned leaders printed on the new development you built, and the number of assigned leaders printed on any adjacent developments already constructed.
At the end of the game, each of your developments will also score VP based on your development level on the corresponding progress track.
Progress Tracks
The 5 progress tracks provide various rewards during the game and are a significant source of VP at the end of the game. You can advance on the progress tracks by building developments, buying modules, discarding tokens and (in the case of supremacy) winning battles or playing key tactics cards.
All 5 tracks contain development and event spaces:
- Development Spaces: Each progress track has 3 levels depicting a development. At the end of the game, each of your developments scores VP based on the highest level you have reached on the corresponding track.
- Event Spaces: When any player reaches a progress track space with an event icon, immediately advance the event marker 1 space.
Track Specific Spaces
- Science Track: When you reach a discovery token space, secretly look through the stack of tokens there, claim any 1 token, and keep it near your station. You may keep it face down until you use it. You may use it as a free action on your turn.
- Industry Track: When you reach a ship upgrade space, choose any 1 ship upgrade tile from your supply and place it on the appropriate slot in your Launch Bay. Remember: whenever you gain a new ship upgrade, you may immediately build a ship of that type for no cost! All ships of the corresponding type gain the new values and abilities on the upgrade tile.
- Supremacy Track: If you are the first to reach a supremacy token space, claim the token there and keep it near your station. You may use it as a free action on your turn. If you reach a supremacy space and the token is gone, instead score 2 VP.
- Commerce Track: Unspent resources at the Edge are usually worth nothing! If you reach or pass the 1 or 2 vault spaces on the track, each unspent resource you have at the end of the game is worth VP equal to the highest vault bonus space you have reached.
- Civilization Track: When you reach a tactics card limit space, the number of tactics cards you can keep at the end of your turn is increased. You may then immediately draw tactics cards until you have reached your new maximum hand size.
The Event Track
Throughout the game, certain actions like buying modules or advancing on progress tracks will advance the marker on the event track. When the marker reaches the end of the track, a new planet is revealed immediately and an event card must be resolved at the end of the current turn.
During setup, an event deck was chosen:
- Galactic Dawn: Galactic Dawn includes 10 event cards that generally benefit the players when an event is triggered. That is, except for the raiders emerging from the nebula…
- Cosmic Twilight: Cosmic Twilight includes 10 event cards that impose greater challenges on players. Cosmic Twilight is recommended for advanced players seeking a more difficult mode of play.
Triggering an Event
If the event marker reaches the end of the track on your turn, you must do the following:
- Immediately reveal the top planet tile from the stack and place it in the next empty space on the board (in left-to-right, top-to-bottom order).
- Stack 3 moon tokens matching the planet’s color on the planet and flip them face up so the top one is visible.
- Place the event marker on your station to remind you to resolve an event card at the end of your turn.
Resolve Event Card
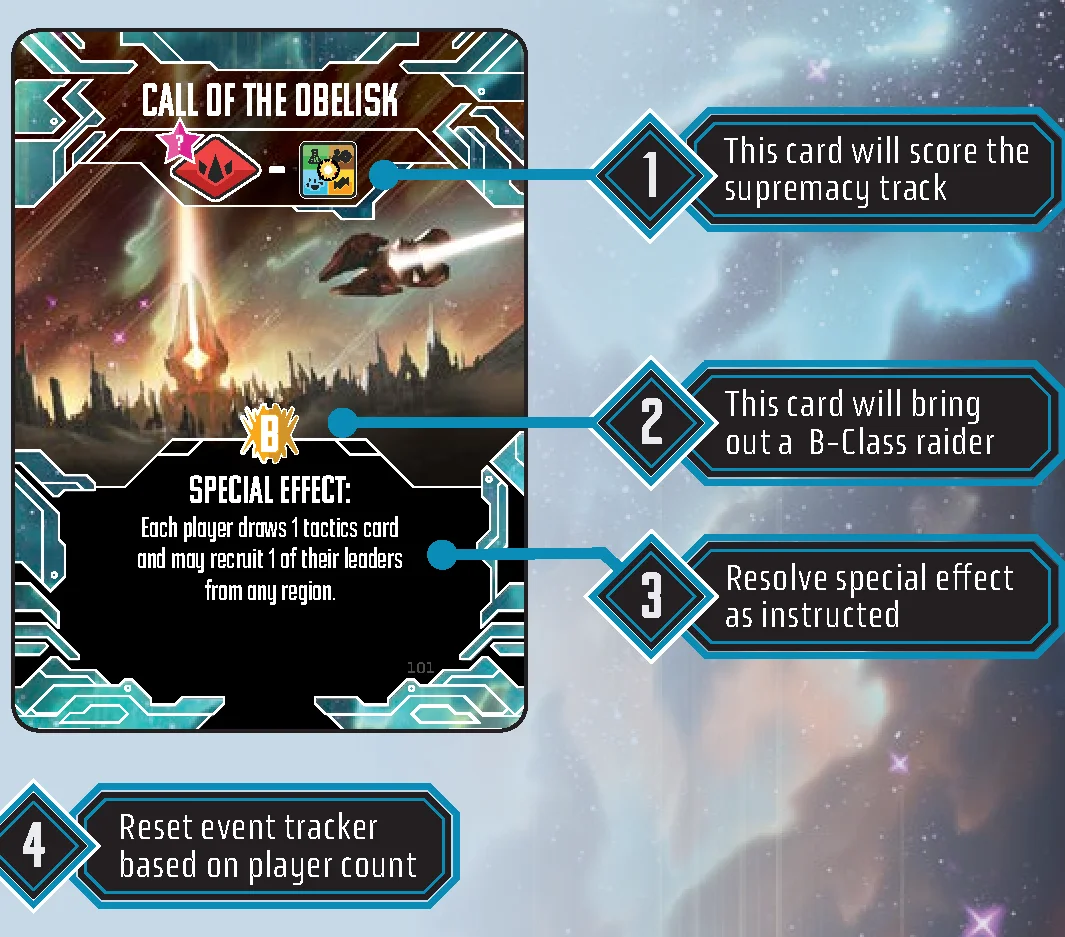
If the event marker is on your station at the end of your turn, you must reveal an event card from the deck, then resolve each of the following effects in order:
- Score VP: Each player scores the number of VP printed next to their marker on the indicated progress track, minus 1 VP per damaged module on their station (to a minimum of 0 VP).
- Place New Raider: Find the raider card of the indicated letter class and place it face up near the board. Then place its standee in the region listed on its raider card.
- Special Effect: Resolve the special effect as instructed.
- Reset Event Track: Return the event marker to the starting space on the track and discard the event card face up next to the event board.
During an event, no actions may be taken and no cards may be played, unless specifically stated (exceptions can be granted by tactics cards).
Battle Rules
During the final step of a Launch turn, if the active region is occupied by 2 or more players or by 1 or more players and the raiders, a battle must be resolved. Battle can occur even if the active player does not have any ships in the active region.
Everyone with ships in the active region must participate in the battle (including raiders – have someone roll the raider dice!). Players who have ships within range of the battle may also choose to participate by moving their ships into the battle during the Escalation step.
A battle can only happen during a Launch turn, and then only in the active region. If a player’s or raider’s ships share a region with opposing ships at any other time or in any non-active region, no battle is resolved. If during a battle, only 1 faction (or no factions) remain, battle ends.
Battle Steps:
- Escalation
- Diplomacy
- Battle Preparations
- Roll Dice
- Outcome
- Damage Ships
Step 1: Escalation
Beginning with the active player and proceeding in turn order, each player with ships in range of the active region may move any number of those ships to the region to join the battle. (This includes players who are not currently part of the battle.) Each player only gets 1 chance to make this decision.
If the active region is a nebula, only ships with Voyage may join a battle there.
Step 2: Diplomacy
Diplomacy can sometimes end conflicts immediately, or change the rules of battle!
Beginning with the active player and proceeding in turn order, each participating player may play 1 (and only 1) diplomacy tactics card from their hand and immediately resolve its effects. Each player only gets 1 chance to play a diplomacy card.
Step 3: Battle Preparations
Each participating player counts how many dice they will roll and determines the targeting value they will use for rerolls. If raiders are participating, also count their dice and determine their targeting value.
Then, beginning with the active player and proceeding in turn order, each player may spend any amount of energy to gain +1 die per energy spent. Each player only gets 1 chance to spend energy. Spending energy does not increase targeting value.
- Ship Weapons: Each ship adds a number of dice equal to its weapons value.
- Developments: Each player adds +1 die for each of their developments in or adjacent to the active region.
- Energy: Each player adds +1 die per energy they spend.
- Dice Limit: No participant may roll more than 6 total dice.
- Targeting Value: Each participant’s targeting value is the number of ships they have in the active region, plus any targeting bonuses, to a maximum of 5.
Step 4: Roll Dice
All participants (including raiders) simultaneously roll their dice. Each participant then rerolls all dice results that are less than their targeting value until each of their dice results are equal to or greater than their targeting value.
Targeting Value Rules
Each battle participant has a targeting value which is the minimum result they can roll on each of their dice during that battle. Whenever a participant rolls a die and gets a result below their targeting value, they must reroll the die until it is equal to or greater than their targeting value.
Each participant’s targeting value is the number of ships they have in the active region, plus modifiers from ship upgrades, tactics cards, and other game effects, up to a maximum of 5. If a modifier would increase a participant’s targeting above 5, they still only reroll results of 4 or less.
S-Class raiders have a targeting value equal to the number of their ships in the active region. Other raider types have a targeting value of 1 (plus bonuses).
Step 5: Outcome
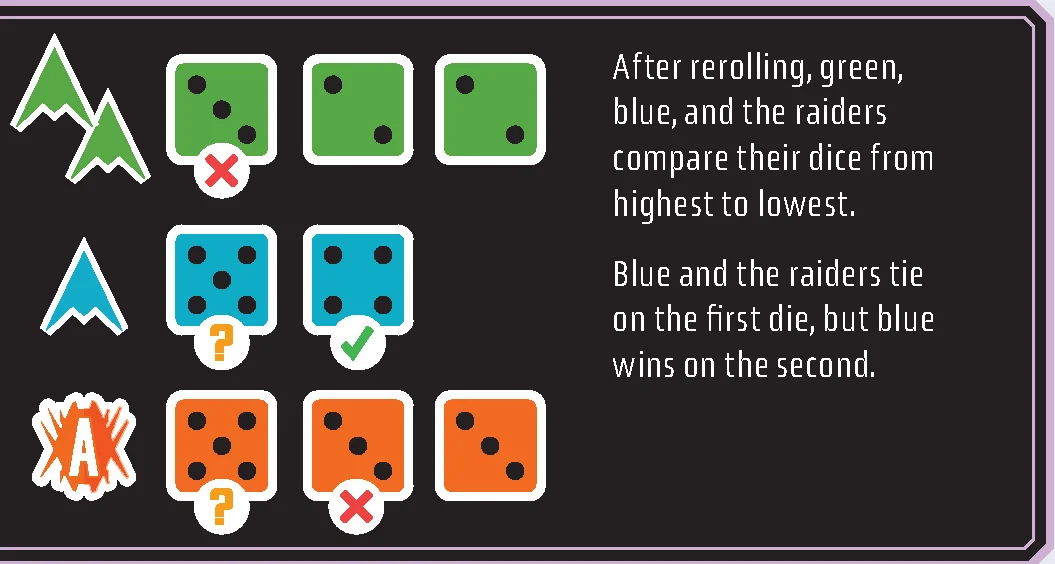
To determine the winner, each participant (including the raiders) compares their highest single die result. If there is a tie, the tied players compare their next highest die result. (If a tied player has a die left to compare but their opponents do not, they win the tie.) This continues until there is no longer a tie.
If a tie has not been broken after all dice have been compared, there is no winner and everyone loses.
Once a winner is determined, resolve the following outcomes:
- Winning Player: If a player won, they advance 1 space on the supremacy track. If any raiders were defeated, the winner also claims the reward on their card (just once for S-Class raiders together).
- Defeated Players: Each defeated player may take the Tactical Operations action on their station.
Tactical Operations
Whenever you lose a battle, you may use the Tactical Operations action on your station. This allows you to either draw 1 tactics card or gain the resources on a moon token you have slotted there.
Remember you can slot a moon at any time, including when you are about to use tactical operations.
Step 6: Damage Ships
- Defeated Players: All defeated ships take damage. If a ship does not have shields, or their shields have been depleted, that ship is sent to the Scrapyard. Whenever a player’s ship is sent to the Scrapyard, it is placed in the top area of the Scrapyard.
- Defeated Raiders: If any raiders were defeated, a single raider in the active region takes damage and is returned to its raider card, unless it has undamaged shields. Raiders are never placed in the Scrapyard.
Shields
Some ship types have a shield icon(s) printed in their Launch Bay area or raider card. When a ship with shield icons takes damage, place 1 damage marker on 1 of its shield icons and it will stay in the region.
Once a shield icon is covered with a damage marker, it is depleted. If all of a ship’s shields are depleted, the next time it would receive a damage marker it is sent to the Scrapyard. All of the damage markers remain (until the last step of Return to Station). Depleted shields can be recharged using the repair action, removing the damage marker.
Whenever a player ship suffers damage in battle or from another game effect and does not have shields, it is sent to the Scrapyard and removed from the board.
All is not lost! Your ships in the Scrapyard will return to your Launch Bay the next time you Return to Station, and can be launched again on future turns.
Damage & Repair
Ships and modules become damaged and are repaired throughout the game. Managing damage is important, because having too many damaged ships interferes with your ability to use your modules, and module damage will reduce your score when resolving event cards and tallying final scores.
Some modules come into play already damaged. Note that acquiring 1 of these damaged modules is not “taking damage”. Losing battles, events and tactics card effects can cause damage to ships and modules.
When a game effect such as an event or tactics card damages a module on your station, place 1 damage marker on an undamaged module of your choice, if possible. (You may damage a core module.)
Repair Actions
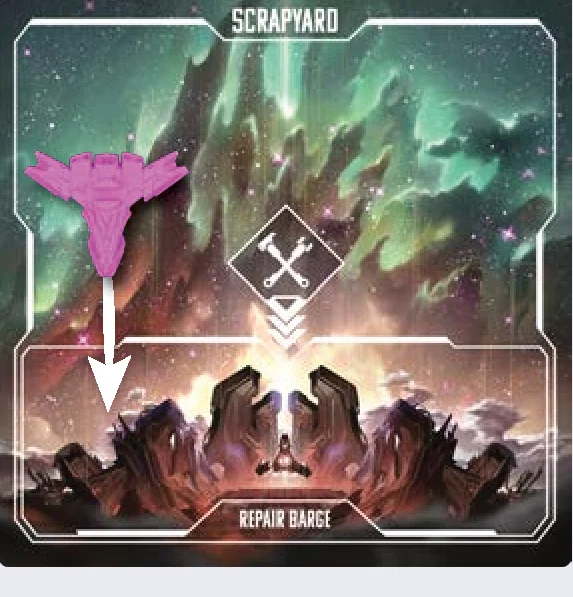
Whenever you take a repair action (for example by visiting the Shipyard or discarding a moon token with a repair icon), choose 1 of the following options. If you repair multiple times with a single action, you may choose the same option or a different one each time:
- Repair a Ship in the Scrapyard: Move 1 of your ships from the top area of the Scrapyard to the Repair Barge area at the bottom. Ships on the Repair Barge can’t be launched back onto the board until they Return to Station, but they can be used to activate modules when they return.
- Recharge Shields: Remove 1 damage marker from 1 of your ships’ shield icons in your Launch Bay.
- Repair a Station Module: Remove 1 damage marker from 1 module on your station.
- Nothing to Repair: If you have no ships or modules you can repair, gain 1 VP.
Battle Example
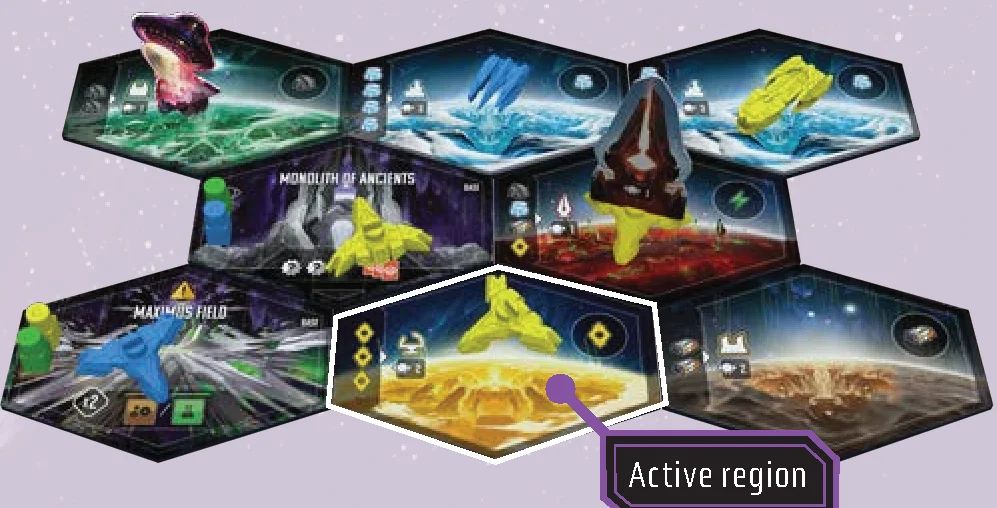
The yellow player launches a transport to a yellow commerce planet and claims a moon. The Saucerian Abductor has range 2, and moves into the active region during Raider Strike. Battle must be resolved because the active region is occupied by 2 or more opponents and/or raiders.
- Escalation: The yellow player escalates first, joining the battle with a transport from within range 1, and paying 1 energy to Jump their heavy cruiser into the active region from 2 spaces away. The blue player decides next, joining with 1 transport from within range 1, and their fighter from within range 2.
- Diplomacy: The yellow player chooses to not play a diplomacy card, and passes. The blue player plays “Hailing Frequencies” and gains 1 VP for each opponents’ ship in the active region. They gain 4 VP. The card also allows any player to end the battle. Neither player chooses to do so.
- Battle Preparations: The yellow player will already be rolling 6 weapons dice in this battle, 1 for each transport, 3 for their heavy cruiser, and 1 more for their adjacent Obelisk. They take no actions during Battle Preparations. The blue player needs more firepower, so they spend 2 energy to gain 2 additional weapons dice for a total of 5.
- Roll Dice: All dice, including the raider dice, are rolled simultaneously. Targeting: The blue player has 2 ships in the battle, so their targeting value is 2. They reroll any results of 1. The yellow player has 3 ships, leading to a targeting value of 3. They reroll any results of 1 or 2.
- Outcome: Comparing each opponent’s single highest die, yellow and blue are tied, but the raider is defeated. Comparing the second highest die, the blue player has a higher value. The blue player wins the battle.
Winning player: The blue player advances 1 space on the Supremacy track. The blue player also gains the reward for defeating the raider. - Damage: The Saucerian Abductor takes damage and is returned to its card. The yellow player’s ships become damaged. They send their 2 transports to the Scrapyard, and they put a damage token on their heavy cruiser shield icon. The heavy cruiser remains in the active region. The yellow player performs the Tactical Operations action on their station. In this case, they may choose to draw 1 tactics card, or gain 1 credit because of their slotted moon.
Game End
When any player’s VP marker reaches or surpasses the terminus marker on the VP track, this triggers the end of the game.
When game end is triggered, immediately remove the event marker from the event track. Event cards can’t be triggered during the final turns of the game.
The active player finishes their current turn, and each player takes 1 more turn, including the player who triggered the end of the game. Players then proceed to final scoring. After final scoring, the player with the most VP is the winner.
Final Scoring
- Progress Tracks: Each player scores the VP printed next to their marker on each of the 5 progress tracks.
- Developments: Each player scores VP for each of their developments based on the highest development level they have reached on the corresponding progress track:
- Level 1: 5 VP
- Level 2: 7 VP
- Level 3: 10 VP
- Damaged Modules: Each player loses 2 VP for each damaged module on their station. (No VP loss for damaged ships.)
- Vault Bonus: Each player scores VP for each unspent resource they have (including tactics cards) based on the highest vault bonus they have reached on the commerce track.
- Civilization Modules: Each player earns any game end VP on undamaged civilization modules on their station.
- Leaders: Each player scores 1 VP per leader left on their station.
- Other: Faction abilities may score additional VP.
Resolving Ties
- If there is a tie, the tied player with the most modules wins.
- If there is still a tie, the tied player with the most resources wins.
- If there is still a tie, victory is shared at the Edge.
Scoring Example
The game ends, and the yellow player has 62 VP.
- Progress Tracks: The yellow player scores 9 VP for science, 20 VP for industry, 10 VP for supremacy, 12 VP for commerce, and 8 VP for civilization. Their score is now 121. Since they passed the 0 space on the score track, they also flip their VP marker to the other side.
- Developments: The yellow player has built 1 factory and 2 spaceports. Their factory is level 3 due to their position at the top of the industry track, so it scores 10 VP. The spaceports are each level 2, so they each score 7 VP. Their score is now 145.
- Damaged Modules: The yellow player has 4 damaged modules on their station, so they lose 8 VP. Their score is now 137.
- Vault Bonus: The yellow player reached the first vault bonus space on the commerce track, so they will receive 1 VP per resource in their possession. They ended the game with 2 titanium, 0 nanocarbon, 0 ice, 1 credit, 4 energy, and 3 tactics cards for a total of 10 resources. They receive 10 VP. Their score is now 147.
- Civilization Modules: The yellow player ended the game with 2 undamaged civilization game end scoring modules. The Land Ministry rewards them 10 VP; 4 VP + 2 VP for each of their 3 developments. The Cognition Collective awards them 6 VP; 3 VP + 1 VP for each of their 3 tactics cards. Their score increases by 16 to 163.
- Leaders: They have 2 leaders on their station, earning them 2 VP. Their final score is 165.
Special Regions
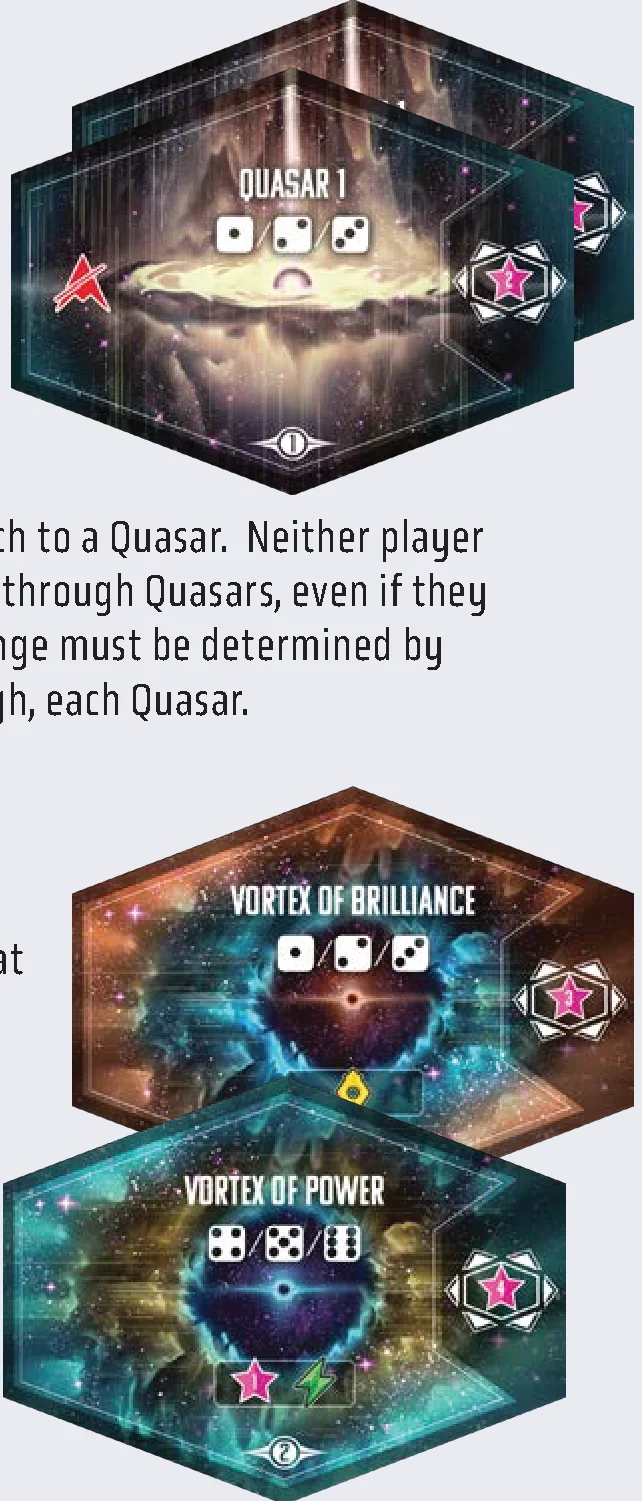
Special regions add unique effects and scoring bonuses to the game. You may choose either the 2 Quasar tiles or the 2 Vortex tiles to include in your game.
Setup
Before you place any other starting tiles on the board, place the selected special region tiles on the board in the spaces marked with special region icons. Then place all other starting tiles normally, skipping over the special regions. Place the same number of planets and Alliance Bases you would normally.
None of the special region tiles in the base game use the 5-player icon. It can be ignored when playing the base game.
Scoring
At the end of the game, after development scoring, each player then gains the indicated VP for each development they have adjacent to each Quasar or Vortex. A development can be adjacent to both special regions and receive both bonuses.
Placing Raiders
When using either the Quasars or the Vortexes, raiders that start on a random nebula space will now be placed on these special regions. When rolling a die to place the raiders note the die numbers on the Quasars or Vortexes in play.
Quasars
No ships can reach them, but the incredible glow they emit casts good fortune on nearby planets.
NO ACTION IN A QUASAR: Players ships may not Launch to a Quasar. Neither player ships nor raiders may move through Quasars, even if they have the Voyage ability. Range must be determined by counting around, not through, each Quasar.
Vortexes
Patient vessels can harvest great riches from these continuous streams of matter and energy.
USING A VORTEX:
- When you Launch a ship to a Vortex you gain the depicted benefit.
- At the beginning of your turn, you gain the depicted benefit on a Vortex if you have 1 or more ships on it. Additional ships on the Vortex do not increase this benefit.
- A player with ships on more than 1 Vortex gains the benefit from each Vortex they occupy.
Destiny Cards
Will you unite the edge? Cultivate new food sources? Or perhaps find the cure? Your destiny awaits in Andromeda’s Edge! This optional set of cards can give a direction for newer players as well provide a strategic edge to seasoned veterans.
Setup
At the beginning of the game, deal each player 2 destiny cards. Each player chooses 1 to keep and returns the other to the box without revealing it.
Final Scoring
At the end of the game add a step for scoring destiny cards after scoring leaders. Each player reveals and boldly announces their destiny (it’s fun this way), scoring a bonus for their achievements.
Each destiny card depicts 2 progress track goals. To achieve a goal and gain the depicted VP bonus, your marker must be the highest or tied for highest on the track. You may achieve both goals.
2v2 Mode
Setup
Players form teams of 2. Each player sits next to their teammate. Each player chooses and controls their own faction, as in a normal 4-player game.
To choose a start player, each player rolls their 6 dice as normal, but each team combines their rolls and compares their new team roll with the roll of the opposing team. The leftmost player on the winning team is the start player. Player order then proceeds clockwise.
Battle
When checking if a battle occurs, if the active region only contains ships belonging to the same team, no battle is resolved.
When 2 teammates participate in a battle together, they combine forces. Each teammate independently counts their dice (up to 6 maximum), determines their targeting value, and spends resources. After everyone is finished rolling, each team combines their rolls (up to a total of 12 dice per team) and compares it to the other team and the raiders.
When 2 teammates win a battle they both participated in, they both advance 1 space on the supremacy track, and they both gain the raider reward (if there is one). If 2 teammates reach a supremacy token space at the same time, the active player decides which of them takes it. If they reach an event space at the same time, the event marker advances 2 spaces.
Collaboration
Teammates may collaborate in the following ways:
- Opponents: Teammates are not considered opponents. However, they are considered “other players.”
- Hidden Information: Teammates may share hidden information with each other, including tactics cards, event cards, and face down tokens.
- Transfer a Resource/Token: Once per turn, as a free action, the active player may transfer any 1 of the following to or from their teammate:
- 1 resource (including 1 tactics card)
- 1 claimed but unslotted moon
- 1 supremacy token
- 1 discovery token
Both teammates must be in agreement on any transfer.
- Transfer Module: The first time the active player acquires a module on their turn, they may have their teammate gain it instead. Their teammate advances on the progress track corresponding to the row the module is placed in on their station (instead of the active player).
Final Scoring
At the end of the game, each team creates a single team score by summing the scores of the 2 teammates. The team with the highest score wins.
Icon Glossary
 OR example: 1 nanocarbon or 1 ice
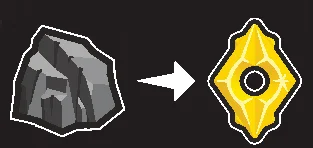 Input output example: spend 1 nanocarbon to gain 1 credit
 “All players” example: each player gains 1 titanium
 Damage
 Any resource (including tactics cards)
 Range of a ship or raider
 Shield
 Gain a science module by paying board cost
 Gain a science module
 Advance on the science track
 Advance on any progress track
 Advance the event marker
 Event card
 Look at the top 2 event cards, put 1 on top and 1 on bottom of event deck
 Pay the appropriate cost to build 1 ship
 Perform 1 repair (if no repairs, may gain 1 VP)
 Pay the appropriate cost to build a development
 Ships may not enter this region
 Supremacy token
 Discovery token
 Discovery token space (white corners: observatory discovery space)
 Gain 1 upgrade (gain that ship too)
 Advance 1 space on the victory point track
 Vault bonus (star number indicates VP per resource at end of game)
 Hand size increases to new limit; draw tactics cards until full
 Flip development card face up
 Flip development card face down
 Claimed moon token space on player station (4 claimed moons max)
 Slot for moon token
 Gain 1 VP when you slot a moon here
 Half of a moon slot: may not slot until a full slot is created by 2 modules
 Moon token
 Die result of 1: nebula/special regions: numbers represent where randomly rolled raiders may be placed
 Leader
 Seen on development cards: this region and adjacent: provides 1 weapons die in battle
 Seen on Quasars/Vortexes: gain 1 VP per development adjacent at game end
Credits
- Design: Luke Laurie, Maximus Laurie
- Art: Sergio Chaves
- Development: Peter Vaughan
- Production: Brad Brooks, Peter Vaughan, Lauren Ino, Chris Strain
- Graphic Design: Duane Nichols
- Additional Graphic Design: Snow Conrad, Layne Huber, Matt Paquette, Chris Strain, Stevo Torres, Andrew Wall
- Logo Design: Matt Paquette
- 3D Modeling: Erick Tosco
- Tray Design, Storage (Deluxe Edition): Noah Adelman, Game Trayz
- Renders: Victor Almeida Ferreira
- Communications: Rozie Powell
- Customer Service: Judy Neff
- Additional Art: Sandara Tang
- Campaign Page: Peter Vaughan, Lauren Ino, Oniro, Andrew Wall, Layne Huber
- Prototyping: LongPack, Print & Play, Mike DePasquale (3D resin miniatures)
- Rulebook Editing: Jason Harris
- Rulebook Editing (Additional): Jeff Fraser, Peter Vaughan, Luke & Maximus Laurie
- Special Thanks: Lucky Duck Games, Gamefound, Daniel Tosco, Alexei Menardo, Mike Vander Veen, Rich Malena, The Full 42, Not Board Gaming, Hungry Gamer, Tim Chuon, Quackalope
Introduction & Components
You lead a desperate faction seeking to build a new civilization on Andromeda’s Edge. You begin with only a space station, a few ships, and a handful of resources. By carefully placing your ships, you will gather resources, claim moons, acquire station modules, and build planetary developments. You will battle opponents and compete with others in science, industry, commerce, civilization, and supremacy!
Components
- 1 Main Board (not pictured)
- 1 Event Board
- 1 Event Marker
- 1 Scrapyard Board
- 1 Terminus Marker
- 4 Player Station Mats (4 player colors)
- 4 Player Aids (not pictured)
- 15 Planet Region Tiles
- 6 Alliance Base Region Tiles
- 4 Special Region Tiles (not pictured)
- 12 Faction Cards
- 36 Leaders (4 player colors)
- 24 Player Dice (4 player colors)
- 24 Transports (4 player colors)
- 4 Fighters (4 player colors)
- 4 Science Vessels (4 player colors)
- 4 Heavy Cruisers (4 player colors)
- 20 Track Markers (4 player colors)
- 4 VP Markers (4 player colors)
- 16 Neutral Ship Upgrade Tiles
- 12 Faction Ship Upgrade Tiles
- 108 Modules (4 types)
- 45 Planetary Moons
- 6 Orphaned Nebula Moons
- 15 Development Tiles (5 types)
- 15 Development Ability Cards
- 20 Event Cards
- 20 Destiny Cards
- 80 Tactics Cards
- 10 Raider Cards
- 16 Raider Standees & 8 Stands (not pictured)
- 6 Raider Dice
- 5 Mechaphage Tokens
- 21 Discovery Tokens
- 8 Supremacy Tokens
- 50 Damage Markers
- Resources:
- 50 Energy
- 25 Credits
- 25 Ice
- 25 Nanocarbon
- 25 Titanium
Setup
Game Setup
- Main Board: Place the main board in the center of the table.
- Event Board: Place the event board next to the main board and place the event marker on the start space for your player count.
Choose an event deck for this game. We recommend Galactic Dawn for your first foray into the Edge. Shuffle the chosen deck and place it face down on the event board. - Scrapyard: Place the Scrapyard board next to the main board.
- Starting Regions: Separate out the 15 planet tiles (not Alliance Base tiles), shuffle them, and stack them face down at the bottom of the main board. Then draw a number of planets based on your player count:
- 2 players: 4 planets
- 3 players: 6 planets
- 4 players: 8 planets
Shuffle the planets you drew together with the 6 Alliance Base tiles. These are your starting tiles. Lay them out face up on the board, one at a time, beginning in the top left and proceeding left to right, top to bottom.
- Moon Tokens: Shuffle the 6 orphaned nebula moons and place 1 face up on each nebula.
Separately shuffle each of the 5 colors of planetary moon tokens. On each planet, stack 3 moons of the matching color face down, then flip the stack face up so the top moon is visible. Place the remaining moons face down near the main board, in stacks of 3. - Starting Raiders: Choose an S-Class raider card for this game. We recommend the Vorticon Strikers for your first foes. Build the matching S-Class standees. Place the card face up next to the board along with the standees for the S-Class raider near the main board.
Roll 2 dice and place 1 S-Class raider standee on nebulae matching the numbers rolled (they may be in the same nebula).
Select 1 A-Class, 1 B-Class, 1 C-Class, and 1 D-Class raider for this game, using any method you choose. Build the A, B, C, and D raider standees. Place the raider cards face down next to the board with the standees nearby.
Return all unused raider cards and standees to the game box. They will not be used during game. - Game Length: Decide whether you will play a short, medium, or long game and place the terminus marker on the appropriate space on the VP track:
- Short: 50 VP
- Medium: 60 VP
- Long: 70 VP
- Modules: Shuffle each of the 4 module decks and place them in the marked spaces at the top of the main board. Reveal 3 modules from each deck to fill the spaces in the columns below.
- Progress Tracks: Shuffle the discovery tokens and stack 5 tokens face down on each of the 2 marked spaces on the science track.
Stack another 5 discovery tokens face down on the observatory discoveries space at the top of the science track. Return the remaining tokens to the game box.
Shuffle the supremacy tokens and place 1 face up on each of the 3 marked spaces on the supremacy track. Return the remaining tokens to the game box. - General Supply: Create a supply area as follows:
- Shuffle the tactics cards deck and place it face down.
- Pile the development cards by type, with the matching development tiles nearby.
- Pile the damage markers and resources.
Player Setup
- Player Materials: Each player takes the following materials in their chosen color:
- 1 station mat
- 1 player aid
- 6 transports
- 1 fighter
- 1 science vessel
- 1 heavy cruiser
- 9 leaders
- 6 dice
- 5 track markers
- 1 VP marker
- Station Mat: Station mats are double-sided for flexibility. Note the orientation of the four colorful modules on one side – players will need room to build out from this side of their station. Each player places their station in front of themselves and places 3 transports in the Launch Bay area. They place all other ships in a personal supply beside their mat. They are available to build later.
- Factions: Shuffle the faction cards and deal 3 to each player. Each player chooses 1 to keep. Return all unused faction cards to the game box. Each player gains the starting resources listed on the back of their faction card, placing them in the storage areas of their station, then places their faction card face up in the faction area on their mat.
- Ship Upgrades: Each player takes their faction’s unique ship upgrade tile. Separately shuffle the 4 neutral ship upgrade types (transports, fighters, science vessels, and heavy cruisers) and deal 1 tile from each stack to each player. Return all unused ship upgrades to the game box. Each player places their 5 ship upgrade tiles in a personal supply with their unbuilt ships. They are available to acquire later.
- Progress Tracks: Each player places 1 track marker on the bottom space of each of the 5 progress tracks. Then each player advances 1 space on each of the progress tracks marked in the top left of their faction card.
- Leaders: Each player places 1 leader on each Alliance Base on the board. Each player rolls a die and places 2 leaders on the nebula matching the die rolled (more than 1 player can have leaders in the same nebula). Each player places their remaining 1 leader in the leaders area of their station.
- Start Player: Choose a start player by simulating a battle: each player rolls their 6 dice, and the player with the highest single die is the start player. If there is a tie, the tied players compare their next highest die, and so on until there is a winner. The start player places their VP marker on the 1 space of the VP track. Going clockwise, each other player places their marker on the next empty space on the track.
Core Concepts & Board Anatomy
Game Overview
Andromeda’s Edge consists of a series of turns (there are not traditional rounds in this galaxy…). Players take turns in clockwise order, beginning with the start player and continuing until the game ends. On your turn, you either send out a ship or return all your ships to your station. This simple decision leads to all the wonders of the universe.
The game end is triggered when a player’s victory point marker reaches the terminus on the VP track. Each player then gets 1 more turn, including the active player. Once final scores are tallied, the player with the most VP wins.
ACTIVE PLAYER: The player who is taking a turn is the active player. When indicated, some decisions are made by the active player, and many events throughout the game are carried out in turn order beginning with the active player. If game effects occur simultaneously, when order is not indicated, such as those triggered by the end or beginning of a turn, the active player determines the order in which they occur.
Regions of the Edge
The board map is made up of regions of different types. During the game, you will Launch ships to different regions to gain resources and take actions. There are 3 main types of regions, described below. Optionally, special regions (see p26) may be added as well.
- Planets: The Edge is filled with an abundance of planets. Planets have moon tokens you can claim to gain resources, and you can build developments on planets to advance on the progress tracks and earn special rewards. New planets to explore will be revealed as key events trigger in Andromeda’s Edge.
- Alliance Bases: A frontier Alliance arrived before the latest wave of explorers and scattered their outposts across the Edge. Players can visit Alliance Bases to trade resources, salvage precursor technology, build ships, and take other important actions.
- Nebulae: The Edge is bordered by mysterious, unexplored nebulae where raiders lurk. Ships may only enter a nebula region if they have Voyage. However, those brave enough to do so can earn powerful rewards.
Resources & Storage
Over the course of the game, you will gain and spend resources of 6 different types. Resources are scarce in Andromeda. Use these to start building your future!
- Energy (Store Max 10): Station modules, weapons, jumps.
- Titanium (Store Max 5): Factories, industry modules, building ships.
- Ice (Store Max 5): Cities, civilization modules.
- Nanocarbon (Store Max 5): Observatories, science modules.
- Credits (Store Max 5): Wild for titanium, ice, nanocarbon.
- Tactics Cards: 5 types, used in a variety of ways.
Turn Action: Launching
Taking Your Turn
On your turn, you must either LAUNCH a ship onto the board or bring back all your ships in a RETURN TO STATION. You can also use any number of free actions during your turn. Launch and Return to Station turns, as well as free actions, are covered in detail over the following sections. At the end of your turn, discard any resources in excess of your limits.
Launching Overview
During a Launch turn, you send a ship from your station to a region, then activate that region to take its specific action. The region to which the ship Launches is the active region for this turn (even if the ship you Launch moves to a different region during your turn).
Launch Steps:
- Launch Ship
- Activate Region
- Raider Strike
- Battle
Step 1: Launch Ship
First, choose a ship in your Launch Bay and place it in a region of your choice on the board. The rules for selecting a region differ depending on whether you are making a first Launch or a subsequent Launch.
First Launch
If you have no ships on the board when you Launch, it is considered a first Launch. During a first Launch:
- You may Launch to any unoccupied region. A region is considered to be occupied if it contains a raider or at least 1 ship belonging to a player. In addition, all additional Launch requirements must be met.
Subsequent Launches
If you have 1 or more ships on the board when you Launch, it is considered a subsequent Launch. During this type of Launch:
- You must Launch to a region that is within range of at least 1 of your other ships on the board, using the launching ship’s range value.
- You may not Launch to a region where you already have 1 or more ships. You may Launch to an occupied region with opposing ships. Doing so may result in battle.
Additional Launch Requirements
You must follow these rules when making any Launch:
- You may only Launch to an Alliance Base if you are able to activate it and do so.
- Only ships with Voyage may Launch to a nebula.
Step 2: Activate Region
Once you have launched to a region, you must activate it. What happens when you activate a region depends on its type:
- Activating a Planet: Claim the top moon token from the stack and place it on your station. If the active planet has no unclaimed moons left, instead gain the resource printed where the moons were stacked.
- Activating a Nebula: Claim the moon token (if there is one) and place it on your station. Then secretly look at the top 2 cards of the event deck. Choose 1 to return to the top of the deck and 1 to place on the bottom.
- Activating an Alliance Base: Perform the Alliance Base’s action. A brief description of each is listed below.
Claiming Moons
One of the primary ways to gain resources is to claim moons that orbit planets and drift through the nebulae.
Whenever you claim a moon, place it in the claimed moons area of your station mat.
You can have no more than 4 moons in your claimed moons area. You can use the free action Abandon Moon on your turn to discard a moon and gain the depicted benefits, or you can slot a moon token elsewhere on your station during any player’s turn to free up space.
If you gain a moon on any other player’s turn, you may discard a moon in your claimed moons area to make room for the new moon, but you do not gain depicted benefit.
Alliance Base Actions
- Monolith of Ancients: Spend any 2 resources to draw 3 tactics cards.
- Trade Hub: Spend any 2 resources to gain 2 credits.
- Maximus Field: Advance the event marker 1 space, then buy 1 or 2 science or industry modules from the main board.
- Odessa Field: Advance the event marker 1 space, then buy 1 or 2 commerce or civilization modules from the main board.
- Shipyard: Either pay the resource cost to build 1 new ship, placing it in your Launch Bay, or perform 1 repair action.
- Development Office: Pay the resource and leader costs to build a development on an undeveloped planet where you have a transport.
Step 3: Raider Strike
After you activate a region, check for Raider Strike:
- A RAIDER IS ALREADY IN ACTIVE REGION: If there is already a raider in the active region, a Raider Strike does not occur, and no further raiders may enter the region. (An exception is S-Class raiders, see below).
- S-CLASS RAIDERS: If there is an S-Class raider already in the active region, check to see if there other S-Class raiders within range of the active region that may perform a Raider Strike. Unlike other raiders, multiple S-Class raiders can occupy a region together with Swarm.
- NO RAIDERS IN ACTIVE REGION: If there is not a raider in the active region, check to see if there are any raiders within range of the active region, using the range value on each raider’s card. If any raiders are in range, the active player must choose 1 of them to perform a Raider Strike and move into the active region. (If an S-Class raider is chosen, all within range will move into the region).
All raiders have the Voyage ability, so they can always perform a Raider Strike into nebulae.
Raiders Overview & Placement
Over the course of the game, menacing raiders will emerge from the nebulae to threaten your operations and prey on your starships. Each class of raider has a raider card that determines its values and abilities.
Only 1 class of raider can occupy a region at a time. A raider can never be placed or moved into any region where a raider of another class is present.
Raiders of different classes are placed on the board when event cards are resolved. Each raider’s card indicates which region it is placed in.
- When a raider card says it starts in a random nebula, roll a die and place the new raider in the nebula matching the number.
- When a new raider would be placed in a region occupied by a raider, instead place it in a random nebula that is not occupied by a raider. S-Class raiders are the exception, they may be placed in a region already occupied by S-Class raiders.
- If the raider of the indicated class is already on the board, instead place 2 S-Class raiders in the region indicated on their card. If there are fewer than 2 left in the supply, place as many as possible.
- A raider that has been returned to its card might return to the board later in the game. If an event is resolved that depicts the raider’s class, it is placed on the board again, following the same rules as above.
Step 4: Battle
After the raiders have had a chance to strike, if 2 or more opposing players and/or raiders have ships in the active region, a battle must be resolved. Battle can only occur in the active region. The steps of battle resolution are covered on pg. 21.
Battle can occur even if the active player no longer has any ships in the active region.
Turn Action: Return to Station & Free Actions
Return to Station Overview
During a Return to Station turn, you return all your ships one-by-one from the board and Scrapyard to your station. The ships you return from the board and the Repair Barge area of the Scrapyard may be used to activate modules on your station.
If you have no ships left in your Launch Bay at the start of your turn, you must Return to Station.
Return Steps:
- Activate Modules
- Return All Ships
- Discard Energy
Step 1: Activate Modules
During this step, you may activate any number of modules on your station, in any order, to gain their printed benefit. To activate a module, either take 1 ship from anywhere on the board (or the Repair Barge area of the Scrapyard) and place it on the module, or take 1 energy from your storage area and place it on the module.
In addition, you must follow these rules:
- You may not activate a module that already has a ship or energy on it.
- You may only activate a module using energy if you have already activated a module in the same row using a ship.
- You may not activate modules with any damage markers on them.
- Ships in the top area of the Scrapyard can’t be used to activate modules. However, ships that have been moved to the Repair Barge area at the bottom of the Scrapyard board can be used to activate modules. This includes ships moved to the Repair Barge during the current turn.
- Science Modules: Unlike other modules, science modules can’t be activated individually when you Return to Station. Instead, you can activate them by activating your Primary Reactor module. This must be done with a ship.
- Moon Inputs: If a module has a moon slot on the input side of an action, you may only activate it once you have slotted a moon into it.
Core Modules
- Primary Reactor: Gain 2 energy and activate any number of your other science modules.
- Shipwright: Either pay the resource cost to build 1 new ship in your Launch Bay or perform a repair action.
- Treasury: Gain 1 credit.
- Architect: Either draw 1 tactics card or pay the resource and leader costs to build a development on an undeveloped planet where you have a transport.
Step 2: Return All Ships
After you have finished activating modules, return all your ships from modules, the Scrapyard, and the board to the Launch Bay on your station. Remove all damage markers from any ships with shields.
You may not choose to leave ships behind on the board or in the Scrapyard, unless a game effect says otherwise.
Step 3: Discard Energy
After ships are returned to the Launch Bay, return all energy you spent to activate modules to the supply.
If you have played any tactics cards with sustain abilities, these are also discarded at this time.
Free Actions
You may take any number of free actions during your turn, regardless of whether you are taking a Launch or Return to Station turn. Free actions may be used at any time on your turn, including immediately before or after other actions.
On Any Turn:
- Slot a Moon Token
- Play Tactics Cards
On Your Turn:
- Use Development Card
- Discard a Discovery / Supremacy Token
- Recruit Leaders
- Abandon a Moon
- Collect Bonus Resources
- Use Faction Abilities
Slot a Moon Token
At any time, you may slot a moon from your claimed moons area into a moon slot on a module or the Tactical Operations area on your station.
Once you have slotted a moon, you may no longer discard it to gain its benefit. If you replace a moon that is already in a slot, you must discard it without gaining its benefit.
Play Tactics Cards
Tactics cards are resources you can gain during the game and play to take special actions. Each tactics card indicates when it can be played.
After you play and fully resolve a tactics card, place it in a face up discard pile next to the deck. If the deck is ever empty, shuffle the discard pile to make a new deck.
Tactics Cards Types
- Action: May be played at the indicated time. Some may be played on other players’ turns. Can’t be played during battle.
- Event: May be played at the indicated time on your turn. When played, immediately advance the event marker 1 space.
- Sustain: May be played at the indicated time on your turn. Keep this card in play until you Return to Station. (Sustain cards are discarded with energy in the final step of Return to Station).
- Diplomacy: May only be played during the Diplomacy step of a battle you are participating in. You may only play 1 Diplomacy card per battle.
- Battle: May be played at the indicated time during battle. The majority may only be played if you have ships in the battle. You may play any number of battle cards during a single battle.
Tactics Card Limit
At the start of the game, you have a hand limit of 5 tactics cards. You must discard down to this limit at the end of your turn. You can increase this limit by advancing on the civilization track.
Other Free Actions
- Use a Development Card: If you have an unused development card, you may flip it face down at any time on your turn to take the 1x ability on it.
- Discard a Discovery or Supremacy Token: If you have an unused discovery or supremacy token, you may discard it at any time on your turn to gain the benefit on it.
- Recruit Leaders: At any time on your turn, you may recruit any number of leaders of your color from any region or regions where you have ships. Place each of them in the leaders area of your station.
- Abandon a Moon Token: At any time on your turn, you may discard a moon you’ve claimed to gain the resources and/or VP printed on it. If you discard a moon with a repair icon on it, you may repair 1 damaged ship or module.
You may discard a moon as part of paying a resource cost. Place each moon you discard in a face up pile next to the board (separate from the face down moons that have not yet been placed). - Collect Bonus Resources: Event cards or other effects may place bonus resources on certain regions on the board. At any time on your turn, you may gain any number of bonus resources from any region or regions where you have ships.
- Use Faction Abilities: Many faction abilities describe when they take effect, but unless otherwise specified, a player may use their faction abilities as free actions on their turn.
Fleet, Modules & Developments
Starships
Each player uses their fleet of ships to explore Andromeda’s Edge. During the game, you will build ships of different types, then Launch them out onto the board to gain resources, develop planets, and do battle with opponents.
When your ships Return to Station, you use them to activate modules on your station for extra resources and actions.
Building Your Fleet
At the start of the game, you have 3 transports ready to Launch. Ships you have built are kept in your Launch Bay until you Launch them onto the board.
You can spend resources to build additional ships when you visit the Shipyard (Alliance Base) or activate the Shipwright module on your station.
Ship Types
There are 4 types of ships you can build – you have 3 additional transports, a fighter, a science vessel and a heavy cruiser. Each type of ship has a range and weapons value, and unique abilities, which are displayed in your Launch Bay:
- Transport: Range 1, Weapons 1, Populate.
- Fighter: Range 2, Weapons 2, Attack.
- Science Vessel: Range 2, Weapons 2, Voyage.
- Heavy Cruiser: Range 1, Weapons 3, Jump, Shields.
Ship Specs
- A – Resource Cost: The cost to build 1 ship of this type.
- B – Range Value: The maximum distance (in number of regions) from your other ships that you may place this ship when you Launch it from your station. It is also the distance this ship can move to join a battle.
- C – Weapons Value: The number of dice this ship rolls in battle.
- D – Shield Icons: Shields prevent a ship from being sent to the Scrapyard as a result of losing a battle or other game effects.
- E – Abilities: Special abilities this ship has.
Ship Abilities
- Targeting: Increases minimum roll in battle, affecting all ship dice (max 5).
- Voyage: When this ship Launches or moves, it may enter a nebula.
- Attack: During a first Launch, this ship may Launch to an occupied region.
- Jump: When this ship Launches or moves, you may spend 1 energy to give it infinite range.
- Populate: Allows developments on a planet. This ability is only on transports.
- Custom Ability: A unique ability for this ship. See appendix for clarifications.
Ship Upgrades
At the start of the game, each player receives 5 ship upgrade tiles – 1 for each of the ship types, and 1 faction specific upgrade. When you see the upgrade symbol , you may place 1 of these tiles over that ship space of your Launch Bay. This replaces the base specifications, and may grant all ships of that type new abilities. In addition – if you have an available ship of that type when you upgrade, you immediately build that ship for no cost!
You primarily upgrade ships by means of the industry progress track, but there are other ways.
Each ship type may be upgraded once. When all 4 ships have been upgraded, further upgrades have no effect.
Station Modules
The remnants of the precursor civilization are littered across the Edge. You may acquire this technology in the form of modules you can add to your station. Each module you gain enhances your capabilities when you Return to Station.
Station modules come in 4 types, corresponding to 4 of the 5 progress tracks (science, industry, commerce, and civilization). Whenever you gain a new module, place it in the row of the matching type on your station mat. Then, advance 1 space on the corresponding progress track. Modules on your station may be rearranged at any time.
Buying or Acquiring Modules
- Choose modules from the indicated column or columns. If there is a cost above the module, the gain is not free. Pay the resource costs depicted on the board for any module you gain this way.
- Add each module to the appropriate row on your station. If any module has 1 or more damage icons in the bottom right corner, place 1 damage marker on it per icon.
- For each module gained throughout the game, you will always advance 1 space on the corresponding progress track.
- When acquiring modules via the Maximus or Odessa Field regions, if you can’t or don’t want to buy 2 modules, you must discard 1 module from the indicated column for the second module. You must buy 1 module before you discard any. The discarded module is placed on the bottom of its deck.
- At the end of any action or free action where modules are gained, refresh the module columns by sliding modules down to fill any empty spaces and revealing new ones from the decks. This refresh is done per unique module gain action.
Slotting Moons into Modules
Some modules have moon token slots where you can slot moons you have claimed.
- Moon Input: If a moon slot is on the cost side (left of arrow) of an action, then the slotted moon’s resources become the cost to activate the module. A module with an empty input slot can’t be activated until a moon is slotted there. A moon with a repair icon can’t be slotted as an input.
- Moon Output: If a moon slot is not on the cost side of an action, then you gain the slotted moon’s resources whenever you activate the module.
- If a moon slot has VP printed on it, you score those VP once, when you slot a moon into it.
Moon Half Slots
All industry modules have half-moon slots on each side, forming a complete slot when 2 are placed next to each other.
You may only slot a moon into a complete slot. Once you have, you gain the slotted moon’s benefit when you activate the modules on both sides of it. The order you activate them does not matter.
If you rearrange your industry row such that you separate 2 industry modules with a moon slotted between them, you must discard the moon (without gaining its resources).
You may still activate the main action of an industry module that has incomplete or unfilled half-moon slots.
Planetary Developments
The many planets of the Edge are fertile ground for bustling metropolises, humming factories, and monoliths to your supremacy – but you will have to get to them before other factions do.
There are 5 types of developments you can build, each corresponding to 1 of the progress tracks. Each planet can only have 1 development of a specific type (indicated on the left of the planet’s tile). Once someone has built a development on a planet, no one may build another there.
There are 3 planets of each type in the game, meaning a maximum of 3 developments of each type can be built.
Building a Development
When taking a development action, you must have:
- A transport on an undeveloped planet
- At least enough recruited leaders in your station, depending on the development type (noted on planet’s tile).
- At least enough resources to pay the development cost printed on the left side of the planet’s tile.
Whenever you build a development, follow these steps:
- Pay the planet’s resource cost. Discard the leaders you spend from your station out of the game.
- Claim a development tile of the appropriate type and slot it on top of your transport on the planet.
- Claim a development card of the appropriate type and place it face up near your station and gain the benefits listed below in Development Card Benefits.
When you build a development, you can build it on any planet where you have a transport (not just the active region, if there is one).
Assigning Leaders to Developments
Building a development also requires skilled leaders to oversee its operations. Each development type requires a certain number of leaders (which is the same on all planets that support that development).
Leaders you assign to build developments permanently become part of the development and can’t be returned to your station or recruited again later. Although the leader pieces are removed from your station, each development tile displays the number of leaders that are assigned to it, which is important for scoring developments.
Populating Developments
When you build a development, you must use a transport to Populate it. This transport permanently becomes part of the development. It can’t return to your station or your supply, and you can’t build it again later.
You must always have at least 1 ship, which means you cannot use your last ship to create a development, leaving you with no ships.
Development Card Benefits
- A – Progress Track: Advance 1 space on the corresponding progress track.
- B – VP Scoring: Score VP based on the number of leaders on the developed planet and in adjacent regions.
- C – Ability: A one-time development card ability that can be used immediately or on future turns. Flip the development card over after using ability.
- D – Bonus Battle Die: Gain +1 die when engaging in a battle in a region adjacent to this development.
Development Abilities
Each development card you gain gives you access to a once-per-game free action. If you build multiple developments of the same type, you may claim multiple copies of the same card, and use each of them once:
- Observatory (Science): Flip this card to secretly look through the stack of discovery tokens on the observatory discoveries space and choose 1 to claim.
- Factory (Industry): Flip this card to take 2 repair actions.
- Spaceport (Commerce): Flip this card and spend any 2 resources to gain any 3 resources.
- City (Civilization): Flip this card to choose any 1 available module and add it to your station at no cost.
- Obelisk (Supremacy): Flip this card to gain 4 energy.
Developments on the Board
Building a development on a planet does not prevent other players from launching their ships to that planet or activating it. Developments do not count as occupying planets (only ships do). This is important for determining where you can place ships during subsequent Launch turns.
Development Scoring
When you build a development, you score VP equal to the total number of leaders on the developed planet and in all adjacent regions up to a maximum of 10 VP. Count leaders that belong to all players, including unrecruited leaders, the number of assigned leaders printed on the new development you built, and the number of assigned leaders printed on any adjacent developments already constructed.
At the end of the game, each of your developments will also score VP based on your development level on the corresponding progress track.
Progress Tracks & The Event Track
Progress Tracks
The 5 progress tracks provide various rewards during the game and are a significant source of VP at the end of the game. You can advance on the progress tracks by building developments, buying modules, discarding tokens and (in the case of supremacy) winning battles or playing key tactics cards.
All 5 tracks contain development and event spaces:
- Development Spaces: Each progress track has 3 levels depicting a development. At the end of the game, each of your developments scores VP based on the highest level you have reached on the corresponding track.
- Event Spaces: When any player reaches a progress track space with an event icon, immediately advance the event marker 1 space.
Track Specific Spaces
- Science Track: When you reach a discovery token space, secretly look through the stack of tokens there, claim any 1 token, and keep it near your station. You may keep it face down until you use it. You may use it as a free action on your turn.
- Industry Track: When you reach a ship upgrade space, choose any 1 ship upgrade tile from your supply and place it on the appropriate slot in your Launch Bay. Remember: whenever you gain a new ship upgrade, you may immediately build a ship of that type for no cost! All ships of the corresponding type gain the new values and abilities on the upgrade tile.
- Supremacy Track: If you are the first to reach a supremacy token space, claim the token there and keep it near your station. You may use it as a free action on your turn. If you reach a supremacy space and the token is gone, instead score 2 VP.
- Commerce Track: Unspent resources at the Edge are usually worth nothing! If you reach or pass the 1 or 2 vault spaces on the track, each unspent resource you have at the end of the game is worth VP equal to the highest vault bonus space you have reached.
- Civilization Track: When you reach a tactics card limit space, the number of tactics cards you can keep at the end of your turn is increased. You may then immediately draw tactics cards until you have reached your new maximum hand size.
The Event Track
Throughout the game, certain actions like buying modules or advancing on progress tracks will advance the marker on the event track. When the marker reaches the end of the track, a new planet is revealed immediately and an event card must be resolved at the end of the current turn.
During setup, an event deck was chosen:
- Galactic Dawn: Galactic Dawn includes 10 event cards that generally benefit the players when an event is triggered. That is, except for the raiders emerging from the nebula…
- Cosmic Twilight: Cosmic Twilight includes 10 event cards that impose greater challenges on players. Cosmic Twilight is recommended for advanced players seeking a more difficult mode of play.
Triggering an Event
If the event marker reaches the end of the track on your turn, you must do the following:
- Immediately reveal the top planet tile from the stack and place it in the next empty space on the board (in left-to-right, top-to-bottom order).
- Stack 3 moon tokens matching the planet’s color on the planet and flip them face up so the top one is visible.
- Place the event marker on your station to remind you to resolve an event card at the end of your turn.
Resolve Event Card
If the event marker is on your station at the end of your turn, you must reveal an event card from the deck, then resolve each of the following effects in order:
- Score VP: Each player scores the number of VP printed next to their marker on the indicated progress track, minus 1 VP per damaged module on their station (to a minimum of 0 VP).
- Place New Raider: Find the raider card of the indicated letter class and place it face up near the board. Then place its standee in the region listed on its raider card.
- Special Effect: Resolve the special effect as instructed.
- Reset Event Track: Return the event marker to the starting space on the track and discard the event card face up next to the event board.
During an event, no actions may be taken and no cards may be played, unless specifically stated (exceptions can be granted by tactics cards).
Combat, Damage & Repair
Battle Rules
During the final step of a Launch turn, if the active region is occupied by 2 or more players or by 1 or more players and the raiders, a battle must be resolved. Battle can occur even if the active player does not have any ships in the active region.
Everyone with ships in the active region must participate in the battle (including raiders – have someone roll the raider dice!). Players who have ships within range of the battle may also choose to participate by moving their ships into the battle during the Escalation step.
A battle can only happen during a Launch turn, and then only in the active region. If a player’s or raider’s ships share a region with opposing ships at any other time or in any non-active region, no battle is resolved. If during a battle, only 1 faction (or no factions) remain, battle ends.
Battle Steps:
- Escalation
- Diplomacy
- Battle Preparations
- Roll Dice
- Outcome
- Damage Ships
Step 1: Escalation
Beginning with the active player and proceeding in turn order, each player with ships in range of the active region may move any number of those ships to the region to join the battle. (This includes players who are not currently part of the battle.) Each player only gets 1 chance to make this decision.
If the active region is a nebula, only ships with Voyage may join a battle there.
Step 2: Diplomacy
Diplomacy can sometimes end conflicts immediately, or change the rules of battle!
Beginning with the active player and proceeding in turn order, each participating player may play 1 (and only 1) diplomacy tactics card from their hand and immediately resolve its effects. Each player only gets 1 chance to play a diplomacy card.
Step 3: Battle Preparations
Each participating player counts how many dice they will roll and determines the targeting value they will use for rerolls. If raiders are participating, also count their dice and determine their targeting value.
Then, beginning with the active player and proceeding in turn order, each player may spend any amount of energy to gain +1 die per energy spent. Each player only gets 1 chance to spend energy. Spending energy does not increase targeting value.
- Ship Weapons: Each ship adds a number of dice equal to its weapons value.
- Developments: Each player adds +1 die for each of their developments in or adjacent to the active region.
- Energy: Each player adds +1 die per energy they spend.
- Dice Limit: No participant may roll more than 6 total dice.
- Targeting Value: Each participant’s targeting value is the number of ships they have in the active region, plus any targeting bonuses, to a maximum of 5.
Step 4: Roll Dice
All participants (including raiders) simultaneously roll their dice. Each participant then rerolls all dice results that are less than their targeting value until each of their dice results are equal to or greater than their targeting value.
Targeting Value Rules
Each battle participant has a targeting value which is the minimum result they can roll on each of their dice during that battle. Whenever a participant rolls a die and gets a result below their targeting value, they must reroll the die until it is equal to or greater than their targeting value.
Each participant’s targeting value is the number of ships they have in the active region, plus modifiers from ship upgrades, tactics cards, and other game effects, up to a maximum of 5. If a modifier would increase a participant’s targeting above 5, they still only reroll results of 4 or less.
S-Class raiders have a targeting value equal to the number of their ships in the active region. Other raider types have a targeting value of 1 (plus bonuses).
Step 5: Outcome
To determine the winner, each participant (including the raiders) compares their highest single die result. If there is a tie, the tied players compare their next highest die result. (If a tied player has a die left to compare but their opponents do not, they win the tie.) This continues until there is no longer a tie.
If a tie has not been broken after all dice have been compared, there is no winner and everyone loses.
Once a winner is determined, resolve the following outcomes:
- Winning Player: If a player won, they advance 1 space on the supremacy track. If any raiders were defeated, the winner also claims the reward on their card (just once for S-Class raiders together).
- Defeated Players: Each defeated player may take the Tactical Operations action on their station.
Tactical Operations
Whenever you lose a battle, you may use the Tactical Operations action on your station. This allows you to either draw 1 tactics card or gain the resources on a moon token you have slotted there.
Remember you can slot a moon at any time, including when you are about to use tactical operations.
Step 6: Damage Ships
- Defeated Players: All defeated ships take damage. If a ship does not have shields, or their shields have been depleted, that ship is sent to the Scrapyard. Whenever a player’s ship is sent to the Scrapyard, it is placed in the top area of the Scrapyard.
- Defeated Raiders: If any raiders were defeated, a single raider in the active region takes damage and is returned to its raider card, unless it has undamaged shields. Raiders are never placed in the Scrapyard.
Shields
Some ship types have a shield icon(s) printed in their Launch Bay area or raider card. When a ship with shield icons takes damage, place 1 damage marker on 1 of its shield icons and it will stay in the region.
Once a shield icon is covered with a damage marker, it is depleted. If all of a ship’s shields are depleted, the next time it would receive a damage marker it is sent to the Scrapyard. All of the damage markers remain (until the last step of Return to Station). Depleted shields can be recharged using the repair action, removing the damage marker.
Whenever a player ship suffers damage in battle or from another game effect and does not have shields, it is sent to the Scrapyard and removed from the board.
All is not lost! Your ships in the Scrapyard will return to your Launch Bay the next time you Return to Station, and can be launched again on future turns.
Damage & Repair
Ships and modules become damaged and are repaired throughout the game. Managing damage is important, because having too many damaged ships interferes with your ability to use your modules, and module damage will reduce your score when resolving event cards and tallying final scores.
Some modules come into play already damaged. Note that acquiring 1 of these damaged modules is not “taking damage”. Losing battles, events and tactics card effects can cause damage to ships and modules.
When a game effect such as an event or tactics card damages a module on your station, place 1 damage marker on an undamaged module of your choice, if possible. (You may damage a core module.)
Repair Actions
Whenever you take a repair action (for example by visiting the Shipyard or discarding a moon token with a repair icon), choose 1 of the following options. If you repair multiple times with a single action, you may choose the same option or a different one each time:
- Repair a Ship in the Scrapyard: Move 1 of your ships from the top area of the Scrapyard to the Repair Barge area at the bottom. Ships on the Repair Barge can’t be launched back onto the board until they Return to Station, but they can be used to activate modules when they return.
- Recharge Shields: Remove 1 damage marker from 1 of your ships’ shield icons in your Launch Bay.
- Repair a Station Module: Remove 1 damage marker from 1 module on your station.
- Nothing to Repair: If you have no ships or modules you can repair, gain 1 VP.
Battle Example
The yellow player launches a transport to a yellow commerce planet and claims a moon. The Saucerian Abductor has range 2, and moves into the active region during Raider Strike. Battle must be resolved because the active region is occupied by 2 or more opponents and/or raiders.
- Escalation: The yellow player escalates first, joining the battle with a transport from within range 1, and paying 1 energy to Jump their heavy cruiser into the active region from 2 spaces away. The blue player decides next, joining with 1 transport from within range 1, and their fighter from within range 2.
- Diplomacy: The yellow player chooses to not play a diplomacy card, and passes. The blue player plays “Hailing Frequencies” and gains 1 VP for each opponents’ ship in the active region. They gain 4 VP. The card also allows any player to end the battle. Neither player chooses to do so.
- Battle Preparations: The yellow player will already be rolling 6 weapons dice in this battle, 1 for each transport, 3 for their heavy cruiser, and 1 more for their adjacent Obelisk. They take no actions during Battle Preparations. The blue player needs more firepower, so they spend 2 energy to gain 2 additional weapons dice for a total of 5.
- Roll Dice: All dice, including the raider dice, are rolled simultaneously. Targeting: The blue player has 2 ships in the battle, so their targeting value is 2. They reroll any results of 1. The yellow player has 3 ships, leading to a targeting value of 3. They reroll any results of 1 or 2.
- Outcome: Comparing each opponent’s single highest die, yellow and blue are tied, but the raider is defeated. Comparing the second highest die, the blue player has a higher value. The blue player wins the battle.
Winning player: The blue player advances 1 space on the Supremacy track. The blue player also gains the reward for defeating the raider. - Damage: The Saucerian Abductor takes damage and is returned to its card. The yellow player’s ships become damaged. They send their 2 transports to the Scrapyard, and they put a damage token on their heavy cruiser shield icon. The heavy cruiser remains in the active region. The yellow player performs the Tactical Operations action on their station. In this case, they may choose to draw 1 tactics card, or gain 1 credit because of their slotted moon.
Game End & Final Scoring
Game End
When any player’s VP marker reaches or surpasses the terminus marker on the VP track, this triggers the end of the game.
When game end is triggered, immediately remove the event marker from the event track. Event cards can’t be triggered during the final turns of the game.
The active player finishes their current turn, and each player takes 1 more turn, including the player who triggered the end of the game. Players then proceed to final scoring. After final scoring, the player with the most VP is the winner.
Final Scoring
- Progress Tracks: Each player scores the VP printed next to their marker on each of the 5 progress tracks.
- Developments: Each player scores VP for each of their developments based on the highest development level they have reached on the corresponding progress track:
- Level 1: 5 VP
- Level 2: 7 VP
- Level 3: 10 VP
- Damaged Modules: Each player loses 2 VP for each damaged module on their station. (No VP loss for damaged ships.)
- Vault Bonus: Each player scores VP for each unspent resource they have (including tactics cards) based on the highest vault bonus they have reached on the commerce track.
- Civilization Modules: Each player earns any game end VP on undamaged civilization modules on their station.
- Leaders: Each player scores 1 VP per leader left on their station.
- Other: Faction abilities may score additional VP.
Resolving Ties
- If there is a tie, the tied player with the most modules wins.
- If there is still a tie, the tied player with the most resources wins.
- If there is still a tie, victory is shared at the Edge.
Scoring Example
The game ends, and the yellow player has 62 VP.
- Progress Tracks: The yellow player scores 9 VP for science, 20 VP for industry, 10 VP for supremacy, 12 VP for commerce, and 8 VP for civilization. Their score is now 121. Since they passed the 0 space on the score track, they also flip their VP marker to the other side.
- Developments: The yellow player has built 1 factory and 2 spaceports. Their factory is level 3 due to their position at the top of the industry track, so it scores 10 VP. The spaceports are each level 2, so they each score 7 VP. Their score is now 145.
- Damaged Modules: The yellow player has 4 damaged modules on their station, so they lose 8 VP. Their score is now 137.
- Vault Bonus: The yellow player reached the first vault bonus space on the commerce track, so they will receive 1 VP per resource in their possession. They ended the game with 2 titanium, 0 nanocarbon, 0 ice, 1 credit, 4 energy, and 3 tactics cards for a total of 10 resources. They receive 10 VP. Their score is now 147.
- Civilization Modules: The yellow player ended the game with 2 undamaged civilization game end scoring modules. The Land Ministry rewards them 10 VP; 4 VP + 2 VP for each of their 3 developments. The Cognition Collective awards them 6 VP; 3 VP + 1 VP for each of their 3 tactics cards. Their score increases by 16 to 163.
- Leaders: They have 2 leaders on their station, earning them 2 VP. Their final score is 165.
Optional Rules & Game Modes
Special Regions
Special regions add unique effects and scoring bonuses to the game. You may choose either the 2 Quasar tiles or the 2 Vortex tiles to include in your game.
Setup
Before you place any other starting tiles on the board, place the selected special region tiles on the board in the spaces marked with special region icons. Then place all other starting tiles normally, skipping over the special regions. Place the same number of planets and Alliance Bases you would normally.
None of the special region tiles in the base game use the 5-player icon. It can be ignored when playing the base game.
Scoring
At the end of the game, after development scoring, each player then gains the indicated VP for each development they have adjacent to each Quasar or Vortex. A development can be adjacent to both special regions and receive both bonuses.
Placing Raiders
When using either the Quasars or the Vortexes, raiders that start on a random nebula space will now be placed on these special regions. When rolling a die to place the raiders note the die numbers on the Quasars or Vortexes in play.
Quasars
No ships can reach them, but the incredible glow they emit casts good fortune on nearby planets.
NO ACTION IN A QUASAR: Players ships may not Launch to a Quasar. Neither player ships nor raiders may move through Quasars, even if they have the Voyage ability. Range must be determined by counting around, not through, each Quasar.
Vortexes
Patient vessels can harvest great riches from these continuous streams of matter and energy.
USING A VORTEX:
- When you Launch a ship to a Vortex you gain the depicted benefit.
- At the beginning of your turn, you gain the depicted benefit on a Vortex if you have 1 or more ships on it. Additional ships on the Vortex do not increase this benefit.
- A player with ships on more than 1 Vortex gains the benefit from each Vortex they occupy.
Destiny Cards
Will you unite the edge? Cultivate new food sources? Or perhaps find the cure? Your destiny awaits in Andromeda’s Edge! This optional set of cards can give a direction for newer players as well provide a strategic edge to seasoned veterans.
Setup
At the beginning of the game, deal each player 2 destiny cards. Each player chooses 1 to keep and returns the other to the box without revealing it.
Final Scoring
At the end of the game add a step for scoring destiny cards after scoring leaders. Each player reveals and boldly announces their destiny (it’s fun this way), scoring a bonus for their achievements.
Each destiny card depicts 2 progress track goals. To achieve a goal and gain the depicted VP bonus, your marker must be the highest or tied for highest on the track. You may achieve both goals.
2v2 Mode
Setup
Players form teams of 2. Each player sits next to their teammate. Each player chooses and controls their own faction, as in a normal 4-player game.
To choose a start player, each player rolls their 6 dice as normal, but each team combines their rolls and compares their new team roll with the roll of the opposing team. The leftmost player on the winning team is the start player. Player order then proceeds clockwise.
Battle
When checking if a battle occurs, if the active region only contains ships belonging to the same team, no battle is resolved.
When 2 teammates participate in a battle together, they combine forces. Each teammate independently counts their dice (up to 6 maximum), determines their targeting value, and spends resources. After everyone is finished rolling, each team combines their rolls (up to a total of 12 dice per team) and compares it to the other team and the raiders.
When 2 teammates win a battle they both participated in, they both advance 1 space on the supremacy track, and they both gain the raider reward (if there is one). If 2 teammates reach a supremacy token space at the same time, the active player decides which of them takes it. If they reach an event space at the same time, the event marker advances 2 spaces.
Collaboration
Teammates may collaborate in the following ways:
- Opponents: Teammates are not considered opponents. However, they are considered “other players.”
- Hidden Information: Teammates may share hidden information with each other, including tactics cards, event cards, and face down tokens.
- Transfer a Resource/Token: Once per turn, as a free action, the active player may transfer any 1 of the following to or from their teammate:
- 1 resource (including 1 tactics card)
- 1 claimed but unslotted moon
- 1 supremacy token
- 1 discovery token
Both teammates must be in agreement on any transfer.
- Transfer Module: The first time the active player acquires a module on their turn, they may have their teammate gain it instead. Their teammate advances on the progress track corresponding to the row the module is placed in on their station (instead of the active player).
Final Scoring
At the end of the game, each team creates a single team score by summing the scores of the 2 teammates. The team with the highest score wins.
Icon Glossary & Credits
Icon Glossary
- OR example: 1 nanocarbon or 1 ice
- Input output example: spend 1 nanocarbon to gain 1 credit
- “All players” example: each player gains 1 titanium
- Damage
- Any resource (including tactics cards)
- Range of a ship or raider
- Shield
- Gain a science module by paying board cost
- Gain a science module
- Advance on the science track
- Advance on any progress track
- Advance the event marker
- Event card
- Look at the top 2 event cards, put 1 on top and 1 on bottom of event deck
- Pay the appropriate cost to build 1 ship
- Perform 1 repair (if no repairs, may gain 1 VP)
- Pay the appropriate cost to build a development
- Ships may not enter this region
- Supremacy token
- Discovery token
- Discovery token space (white corners: observatory discovery space)
- Gain 1 upgrade (gain that ship too)
- Advance 1 space on the victory point track
- Vault bonus (star number indicates VP per resource at end of game)
- Hand size increases to new limit; draw tactics cards until full
- Flip development card face up
- Flip development card face down
- Claimed moon token space on player station (4 claimed moons max)
- Slot for moon token
- Gain 1 VP when you slot a moon here
- Half of a moon slot: may not slot until a full slot is created by 2 modules
- Moon token
- Die result of 1: nebula/special regions: numbers represent where randomly rolled raiders may be placed
- Leader
- Seen on development cards: this region and adjacent: provides 1 weapons die in battle
- Seen on Quasars/Vortexes: gain 1 VP per development adjacent at game end
Credits
- Design: Luke Laurie, Maximus Laurie
- Art: Sergio Chaves
- Development: Peter Vaughan
- Production: Brad Brooks, Peter Vaughan, Lauren Ino, Chris Strain
- Graphic Design: Duane Nichols
- Additional Graphic Design: Snow Conrad, Layne Huber, Matt Paquette, Chris Strain, Stevo Torres, Andrew Wall
- Logo Design: Matt Paquette
- 3D Modeling: Erick Tosco
- Tray Design, Storage (Deluxe Edition): Noah Adelman, Game Trayz
- Renders: Victor Almeida Ferreira
- Communications: Rozie Powell
- Customer Service: Judy Neff
- Additional Art: Sandara Tang
- Campaign Page: Peter Vaughan, Lauren Ino, Oniro, Andrew Wall, Layne Huber
- Prototyping: LongPack, Print & Play, Mike DePasquale (3D resin miniatures)
- Rulebook Editing: Jason Harris
- Rulebook Editing (Additional): Jeff Fraser, Peter Vaughan, Luke & Maximus Laurie
- Special Thanks: Lucky Duck Games, Gamefound, Daniel Tosco, Alexei Menardo, Mike Vander Veen, Rich Malena, The Full 42, Not Board Gaming, Hungry Gamer, Tim Chuon, Quackalope
Expansions for
Andromeda’s Edge

Andromeda’s Edge: Exotic Matter Promo Kit
2024
Expand your frontier with new factions, raiders, and exotic modules.
200
minutes
Medium Heavy
View expansion

Andromeda’s Edge: Escalation
2024
Face Unity, explore the Nethervoid, and expand your Andromeda’s Edge experience.
200
minutes
Medium Heavy
View expansion
