
Imhotep
2016
Guide wooden stones by boat to five monuments, balancing your plans against rival builders across six rounds.
40
minutes
2 - 4
player(s)
10+
Medium


About this board game
Imhotep is a board game for 2–4 players, played over approximately 40 minutes, in which builders in Egypt strive to emulate the renowned architect Imhotep.
Across six rounds, players move wooden stones by boat to create five seminal monuments. Each turn offers a choice of four actions, but the other builders are always carrying out plans of their own and can thwart carefully prepared construction efforts.
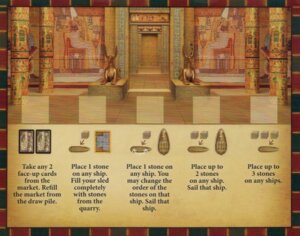
- Procure new stones.
- Load stones onto a boat.
- Bring a boat to a monument.
- Play an action card.
The central challenge is deciding when to gather materials, when to load a boat, and when to send it toward a monument. A move that supports your own building plans may also affect the timing of everyone else’s plans, making each action an important choice.
Success depends on having the stones needed to support your ambitions and choosing the right moment to act. Players who manage their resources and timing most effectively can prove themselves Egypt’s best builder.
With its focus on boat movement, monument construction, and changing plans among the builders, Imhotep presents a compact contest of timing over six rounds. Released in 2016, it challenges 2–4 players to turn wooden stones into the foundations of five important monuments.
Mechanics
Designer
Illustrators


Board Game Rules for
Imhotep
Phil Walker-Harding
For 2-4 Players, Ages 10 Years and Up
Game Story
Imhotep was the first and most famous master builder of ancient Egypt. He is considered one of the earliest polymaths in the history of humanity. For example, he is said to have been responsible for building the very first pyramid in Egypt — the Pyramid of Djoser in Saqqara. Can you match his accomplishments in creating monuments for the ages? You will need ships to transport blocks of stone to various building sites. But you will not be the only one making decisions about where to send the ships and their cargoes. Your opponents will have their own plans and will try to prevent your success. A fierce competition will unfold over the most valuable stone shipments. It will take clever tactics and a little luck to achieve success.
Game Objective
Each player assumes the role of an Egyptian master builder. You will have 6 rounds to transport your stones to the various sites and to erect monuments in such a way that you earn the most points. Whenever your turn comes up, you will select one of the following 4 action options:
- Get new stones
- Place 1 stone on the ship
- Sail 1 ship to a site
- Play 1 blue market card
Delivering the stones gets you various points in various ways — sometimes more points, sometimes fewer; sometimes right away, sometimes at the end of a round, and sometimes at the end of the game. Whoever has the most points after 6 rounds is the winner.
Game Materials
- 120 Wooden blocks (called “stones”) (30 in each of the 4 game colors: black, white, brown, and gray)
- 5 Site boards
- 1 Scoring track board
- 8 Ship tokens
- 4 Supply sled tokens (1 in each of the 4 game colors: black, white, brown, and gray)
- 21 Round cards
- 34 Market cards


Setup
- Place the 5 site boards in the center of the table as shown in the illustration. All site boards have an A side and a B side. In your first few games, use the A side. You can use the B sides in later games as a variant to the standard game play. So be sure that the A sides of the boards are showing in your first game.
- Place the scoring track board to the right of the site boards. Use this to keep track of all players’ points.
- Have the 8 ship tokens ready above the boards.
- Separate the cards: Separate the 21 round cards from the 34 market cards.
- Market cards draw pile: Shuffle the 34 market cards and place them face down as a draw pile to the right of the “A) Market” board.
- Prepare the round cards: There are 7 round cards for two, three, and four players:
- Use the 7 round cards with 2 heads on them in a two-person game.
- Use the 7 round cards with 3 heads on them in a three-person game.
- Use the 7 round cards with 4 heads on them in a four-person game.
Pull out the 7 round cards corresponding to your number of players. You will not need the other 14 round cards. Place them back in the box. Since you will only be playing for 6 rounds, you must now pick one of your 7 round cards at random (without looking at it) and place it back in the box as well. Shuffle the remaining 6 round cards and place them face down in a single stack next to the 8 ship tokens.
- Choose a color: Each player chooses a color (black, white, brown, or gray) and gets a supply sled token in that color. With fewer than 4 players, the unused supply sled token(s) and stones of the unused color(s) go back in the box.
- Stone quarry: All of the stones go in a pile to the right of the site boards, forming the stone quarry.
- Scoring track marker: Each player places 1 stone in his or her color on the “0/40” space of the scoring track.
- Starting stones: Decide who will be the player to start.
- The starting player gets 2 stones in his or her color from the stone quarry and places them on his or her supply sled token.
- The second player (player to the left of the starting player) gets 3 stones for his or her supply sled token.
- The third player (player to the left of the second player) gets 4 stones.
- The fourth player gets 5 stones, each in their color.


The game is played over 6 rounds.
Course of a Round
Each round proceeds as follows:
- Reveal round card and place ships: At the start of the round, turn over the top round card. It will indicate which 4 ship tokens are available in this round. Arrange these tokens spaced not too closely together to the left of the site boards.
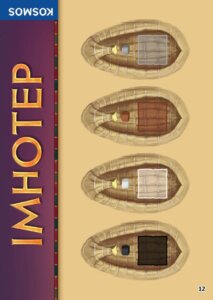
There are ships with various amounts of space for stones: Two boats have space for 4 stones, three have space for 3 stones, two have space for 2 stones, and one boat has space for 1 stone. - Turn over market cards: Turn over the top four market cards from the draw pile and place them face up on the market board. If the draw pile is empty, shuffle the discard pile and create a new draw pile.
- Take turns: All the players take their actions in turns, beginning with the starting player.


Turn Actions
The player whose turn it is must carry out exactly one of the following 4 actions:
Action 1: Get new stones
Take 3 stones of your color from the stone quarry and place them on your supply sled token.
Note: Your supply sled token has enough space for a maximum of 5 stones! For example, if you only have space for 2 stones and you choose this action, you can only take 2 stones from the quarry. If you already have 5 stones on your supply sled or there are no more stones of your color in the quarry, then you cannot take any more stones.

OR
Action 2: Place 1 stone on a ship
Take 1 stone from your supply sled token and place it on any empty space on a ship that has not yet sailed to a site.
If you do not have any stones on your supply sled or there is no free space on any ship, then you cannot take this action.

OR
Action 3: Sail 1 ship to a site
Slide 1 ship to a site board. You must observe 2 conditions, however:
- Minimum required stones: The ship must already be loaded with at least the minimum required number of stones. The gray stone symbols at the bow of the ship indicate the minimum number for that ship. This number varies from ship to ship.
- Open dock: The site to which the ship is sailing must still have an open dock. In other words, no other ship can have sailed to it in this round.
The ship’s stones are then unloaded by their owners (indicated by color) in order from front to back and delivered to the site — beginning with the stone placed closest to the front. Ignore any empty spaces on the ship.
If no ship is loaded with the minimum required number of stones, then you cannot take this action.

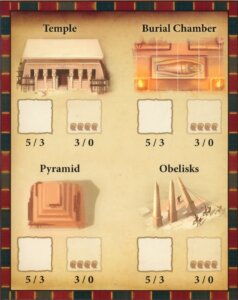
At each of the 5 sites, there are different rules for what the stone’s owner will receive for each stone delivered, and when they will receive it:
- The market and the pyramid are assessed immediately.
- The temple is assessed at the end of each round.
- The burial chamber and the obelisks are not assessed until the end of the game.
Important: You are also permitted to sail a ship when you do not have a stone of your own on it. The only requirement is that both of the above conditions must be met.
After a site has been sailed to, the now-empty ship remains at the site’s mooring area until the end of the round. This way, you can see that no more ships can sail to that site during that same round. No more than one ship can sail to any given site per round.

OR
Action 4: Play 1 blue market card
If you have one of these cards, you can play it and make use of its benefit. The played card is then placed on the discard pile. You can only play 1 blue market card per turn.

Each player takes action in turns and always performs exactly one action per turn. Each player’s turn will come up several times per round. The round does not end until all 4 ships have been sailed to the various sites.
Important: Since there are only 4 ships available per round, there will always be 1 of the 5 site boards that will not be sailed to in each round!
A) Market
For each stone delivered here, the owner of the stone can immediately take any 1 face-up market card.
- Important: The delivered stones must be returned to the quarry after taking the card.
- Drawn cards must be placed face up in front of you.
- The red cards must be played immediately. These are then placed in the discard pile.
- The blue market cards can be played exactly once as an action in a later turn of the player who draws it.
- The purple statue cards and the green decoration cards will earn you points at the end of the game.

A) Pyramids
For each stone delivered here, the owner of the stone earns points immediately. Place the stone on the next free space in the pyramid.
- Stones are placed column by column. Placement begins at the top left until the column is full. Continue to the center column, starting again at the top.
- When the first level (3×3 stones) is full, continue building in the second level. In the second level, start once again at the top left (it only includes 2×2 stones).
- When the second level is full, continue building in the third level, which only consists of one single stone.
- Each stone that you place yields the number of points indicated on the space. The values of the spaces in the second and third levels are indicated on the right side of the board.
- Once the pyramid is completely built, each additional stone delivered to the pyramid yields 1 point. Place these stones at the right edge of the pyramid board.

A) Temple
For each stone delivered here, the owner of the stone earns points at the end of the round if the stone is visible from above.
- Place the stone on the next free space in the temple. Placement of the stones begins from the left, until the first level is full.
- With 3 and 4 players, all 5 spaces of the temple are covered. With 2 players, just the first 4 spaces are covered.
- When the first level is full, continue to the second level, beginning again from the left. The stones on the first level are covered over in the process, and so on with additional levels. There is no height limit.

A) Burial Chamber
For each stone delivered here, the owner of the stone earns points at the end of the game.
- Stones are placed column by column. Placement begins at the top left until the column is full. Then continue to the next column, starting again from the top, and so on.
- The burial chamber is unrestricted in the rightward direction. In other words, there can be as many columns as you like, even if you have to go to the end of the board.
- At the end of the game, points are earned as follows: Each area consisting of one stone or more than one connected stones of a single color yields a certain number of points depending on the number of stones.
- Connected stones must be touching along at least one side. Stones touching only diagonally at corners are not connected.
| Number of stones: | 1x | 2x | 3x | 4x | 5x | … |
|---|---|---|---|---|---|---|
| Points: | 1 | 3 | 6 | 10 | 15 | +2 |
In areas with more than 5 connected stones, each additional connected stone yields an additional 2 points.
Important: Each player can get points for more than one “field” of connected stones. So don’t just add up points for the largest field for one player!


A) Obelisks
For the stones delivered here, the players earn points at the end of the game. Place each stone delivered here on the space matching your color. In that way, you will create a stacked tower of your stones. Each player will be building his or her own obelisk. Add up the points at the end of the game — with the tallest obelisk getting the most points, of course.
Two-person game:
- Tallest obelisk: 10 points
- Second-tallest obelisk: 1 point
Three-person game:
- Tallest obelisk: 12 points
- Second-tallest obelisk: 6 points
- Third-tallest obelisk: 1 point
Four-person game:
- Tallest obelisk: 15 points
- Second-tallest obelisk: 10 points
- Third-tallest obelisk: 5 points
- Fourth-tallest obelisk: 1 point
Important:
- You must have delivered at least 1 stone to the obelisks to participate in this point assessment.
- In case of a tie, divide the total points among the number of players who tied. Every player involved in the tie shares in the divided-up point total rounded down to the nearest whole number.


End of Round
When all 4 ships have been sailed to the sites, the round ends immediately.
Temple assessment: Now the temple is assessed. Each stone visible from above yields 1 point. In other words, stones covered by other stones no longer yield any points.

Prepare for the Next Round
- Return the 4 ships to the pile of other ships.
- Gather up any market cards still remaining on the market board and place them on the discard pile.
- All stones already placed on site boards and supply sled tokens stay in place.
The next round begins:
- Turn over the next round card from the pile, get the 4 ships indicated on the card, and place them to the left of the site boards.
- Turn over 4 new market cards from the pile and place them on the market board.
- The starting player for the new round is the player to the left of the player who sailed the fourth ship in the previous round.
End of Game
The game ends after 6 rounds. Then the final point assessment, or scoring, takes place.
Final Point Assessment (Scoring)
- Burial chamber: Start by assessing the stones in the burial chamber (explained under the “A) Burial chamber” heading).
- Obelisks: Assess the obelisks (explained under the “A) Obelisks” heading).
- Decoration and statue cards: Yield points in accordance with what is printed on them (explained on page 12).
- Unused blue cards: Unused blue market cards yield an additional value of 1 point each.
Winner
The player with the most points is the winner. In case of a tie: The player with the greater number of stones on his or her supply sled token is the winner. If this is also a tie, the tied players share first place.
In this section, you will find an overview of all of the market cards and a more detailed description of the way they work. Wait to read these explanations until a given market card comes into play.
Red Market Cards
Entrance, Sarcophagus, and Paved Path (2 of each)
When you get a market card like this, immediately place 1 of your stones from the quarry on the corresponding site. The stone is placed on the next available space, following the normal rules of building on that site. The card is then placed on the discard pile.

Green Market Cards
Pyramid Decoration, Temple Decoration, Burial Chamber Decoration, and Obelisk Decoration (2 of each)
When you get a market card like this, it remains face up in front of you until the end of the game.
At the end of the game, you earn 1 point for every 3 stones (your own stones plus others’ stones added together) found at the corresponding site.
Example: In the burial chamber, there are 13 stones at the end of the game. That means that there would be 4 points granted for the burial chamber decoration card.


Purple Market Cards
Statue (10x)
When you get a market card like this, it remains face up in front of you until the end of the game. At the end of the game, you count up the number of statue cards you have and receive points in accordance with the following table. Additional cards past 5 are worth 2 points each.
| Number of statues: | 1x | 2x | 3x | 4x | 5x | … |
|---|---|---|---|---|---|---|
| Points: | 1 | 3 | 6 | 10 | 15 | +2 |
Example: One player has 3 statue cards at the end of the game. For those, she gets 6 points.

Blue Market Cards
You can only use exactly 1 blue market card per turn. The use of a blue market card is not in addition to, but instead of, the use of one of the three other action possibilities: “Get new stones,” “Place 1 stone on a ship,” or “Sail 1 ship to a site.” There are four different types of blue market cards:
Lever (2x)
When you get this market card, it remains face up in front of you until you use it. In a later turn, you can perform the following action a single time:
- Sail 1 ship to a site. Decide for yourself what sequence to follow when unloading the stones.
As always, of course, both conditions for sailing a ship must have been met. After play, the card is placed on the discard pile. If you have not used the card by the end of the game, you will get 1 point for it.

Hammer (2x)
When you get the market card, it remains face up in front of you until you use it. In a later turn, you can perform the following action a single time:
- Take 3 stones from the quarry and place them on your supply sled token. Then, place 1 stone from your supply sled token on 1 ship.
After play, the card is placed on the discard pile. If you have not used the card by the end of the game, you will get 1 point for it.

Sail (3x)
When you get this market card, it remains face up in front of you until you use it. In a later turn, you can perform the following action a single time:
- Place 1 stone on 1 ship and sail this ship to a site.
As always, of course, both conditions for sailing a ship must have been met. After play, the card is placed on the discard pile. If you have not used the card by the end of the game, you will get 1 point for it.

Chisel (3x)
When you get this market card, it remains face up in front of you until you use it. In a later turn, you can perform the following action a single time:
- Place 2 stones on 1 ship or 1 stone on each of 2 ships.
After play, the card is placed on the discard pile. If you have not used the card by the end of the game, you will get 1 point for it.

The B Sides of the Sites
All site boards have an A side and a B side. You should always start playing with just the A sides. Later on, you can try the B sides. You can also play with a mix of A and B sides. Why not try various combinations?
B) Market
The B side works just like the A side, except for the following difference:
- At the start of the round, place 2 cards face down on the card space at bottom right (instead of 1 face-up card).
- For a stone delivered to the market, you can pick up both cards and look at them. Then, select 1 card to keep. Place the other card face up on the discard pile.


B) Pyramids
The B side works just like the A side, except for the following differences:
- For a stone delivered to the pyramids, the owner of the stone gets to decide which of the 3 pyramids the stone is to be delivered to.
- Some of the pyramids yield special bonuses:
 You get 1 point and can take the top market card from the draw pile.
 You get 1 point and can immediately take 3 stones from the quarry and place them on the supply sled token.
 You get 1 point and can place 1 stone from your supply sled token on any empty space of a ship that has not yet sailed to a site.
- Each pyramid is started from the top left. Stones are placed column by column.
- Each stone in the second level of a pyramid is worth 4 points.
- Once the pyramids are completed, each additional stone delivered to the pyramids yields 1 point. Place these stones at the right edge of the pyramid board.

B) Temple
The B side works just like the A side, except for the following difference:
At the end of each round, there are various bonuses for each stone visible from above — depending on the temple space on which the stone is placed:
 You get 1 point or, if you prefer, you can take 2 stones from the quarry and place them on your supply sled token.
 You get 2 points.
 You get the top market card from the draw pile.

B) Burial Chamber
The B side works just like the A side, except for the following differences:
At the end of the game, the players earn points for having the greatest number of stones in the 3 rows of the burial chamber. Each row is assessed individually.
Important:
- You must have at least 1 stone in a row in order to be involved in the point assessment for that row.
- The stones of any one color do not have to be adjacent.
- In case of a tie, add up the placement points and divide them among the number of tied players. Every player involved in the tie shares in the divided-up point total rounded down to the nearest whole number.


B) Obelisks
The B side works just like the A side, except for the following differences:
- Each stone delivered here is first placed on a space with the corresponding color.
- When the third stone of any given color is delivered, these stones immediately have their value assessed. The 3 stones are stacked in a single tower on the free space with the highest point value. The owner of the stones immediately receives these points.
- Individual stones that do not make it into an obelisk earn 1 point each at the end of the game.


Variant: Wrath of the Pharaoh
If you want to play with somewhat “harsher” rules, you can try the following rule variation:
You are punished if you fail to participate in the building of all four monuments.
Any player who has not delivered at least 1 stone to each of the four building sites — pyramid, temple, burial chamber, and obelisks — by the end of the game must have 5 points deducted from his or her score.

Publisher’s Information
Author: Phil Walker-Harding
Since childhood, Phil Walker-Harding has loved playing and inventing board games. He particularly likes games that bring together people of different ages and personality types. Phil is also interested in theology, classic Hollywood films, and the myths of ancient Egypt. He lives with his wife Meredith in Sydney, Australia.
The prototype edition of “Imhotep,” under the name “Builders of Egypt,” won second place in the Premio Archimede board game designers’ competition in 2010.
Illustration: Miguel Coimbra
Graphics: Michaela Kienle
Editor, Original German Edition: Ralph Querfurth
English Translation: David Gamon
English Text Editing: Ted McGuire
Phil Walker-Harding and KOSMOS thank all the test players and rule reviewers.
Special thanks go to Meredith Walker-Harding, Leo Colovini, Chris Morphew, Nick Barnett, Kerryn and Andrew Young, Josh and Naomi Pryde, Marion Engelke, Maria Fischer-Witzmann, Arnd Fischer, Thomas Wessels and Markus Potthast.
© 2016 Franckh-Kosmos Verlags-GmbH & Co. KG
© 2016 Thames & Kosmos, LLC


Introduction & Components
Phil Walker-Harding
For 2-4 Players, Ages 10 Years and Up
Game Story
Imhotep was the first and most famous master builder of ancient Egypt. He is considered one of the earliest polymaths in the history of humanity. For example, he is said to have been responsible for building the very first pyramid in Egypt — the Pyramid of Djoser in Saqqara. Can you match his accomplishments in creating monuments for the ages? You will need ships to transport blocks of stone to various building sites. But you will not be the only one making decisions about where to send the ships and their cargoes. Your opponents will have their own plans and will try to prevent your success. A fierce competition will unfold over the most valuable stone shipments. It will take clever tactics and a little luck to achieve success.
Game Objective
Each player assumes the role of an Egyptian master builder. You will have 6 rounds to transport your stones to the various sites and to erect monuments in such a way that you earn the most points. Whenever your turn comes up, you will select one of the following 4 action options:
- Get new stones
- Place 1 stone on the ship
- Sail 1 ship to a site
- Play 1 blue market card
Delivering the stones gets you various points in various ways — sometimes more points, sometimes fewer; sometimes right away, sometimes at the end of a round, and sometimes at the end of the game. Whoever has the most points after 6 rounds is the winner.
Game Materials
- 120 Wooden blocks (called “stones”) (30 in each of the 4 game colors: black, white, brown, and gray)
- 5 Site boards
- 1 Scoring track board
- 8 Ship tokens
- 4 Supply sled tokens (1 in each of the 4 game colors: black, white, brown, and gray)
- 21 Round cards
- 34 Market cards
Game Preparation
Setup
- Place the 5 site boards in the center of the table as shown in the illustration. All site boards have an A side and a B side. In your first few games, use the A side. You can use the B sides in later games as a variant to the standard game play. So be sure that the A sides of the boards are showing in your first game.
- Place the scoring track board to the right of the site boards. Use this to keep track of all players’ points.
- Have the 8 ship tokens ready above the boards.
- Separate the cards: Separate the 21 round cards from the 34 market cards.
- Market cards draw pile: Shuffle the 34 market cards and place them face down as a draw pile to the right of the “A) Market” board.
- Prepare the round cards: There are 7 round cards for two, three, and four players:
- Use the 7 round cards with 2 heads on them in a two-person game.
- Use the 7 round cards with 3 heads on them in a three-person game.
- Use the 7 round cards with 4 heads on them in a four-person game.
Pull out the 7 round cards corresponding to your number of players. You will not need the other 14 round cards. Place them back in the box. Since you will only be playing for 6 rounds, you must now pick one of your 7 round cards at random (without looking at it) and place it back in the box as well. Shuffle the remaining 6 round cards and place them face down in a single stack next to the 8 ship tokens.
- Choose a color: Each player chooses a color (black, white, brown, or gray) and gets a supply sled token in that color. With fewer than 4 players, the unused supply sled token(s) and stones of the unused color(s) go back in the box.
- Stone quarry: All of the stones go in a pile to the right of the site boards, forming the stone quarry.
- Scoring track marker: Each player places 1 stone in his or her color on the “0/40” space of the scoring track.
- Starting stones: Decide who will be the player to start.
- The starting player gets 2 stones in his or her color from the stone quarry and places them on his or her supply sled token.
- The second player (player to the left of the starting player) gets 3 stones for his or her supply sled token.
- The third player (player to the left of the second player) gets 4 stones.
- The fourth player gets 5 stones, each in their color.
How to Play
The game is played over 6 rounds.
Course of a Round
Each round proceeds as follows:
- Reveal round card and place ships: At the start of the round, turn over the top round card. It will indicate which 4 ship tokens are available in this round. Arrange these tokens spaced not too closely together to the left of the site boards.
There are ships with various amounts of space for stones: Two boats have space for 4 stones, three have space for 3 stones, two have space for 2 stones, and one boat has space for 1 stone. - Turn over market cards: Turn over the top four market cards from the draw pile and place them face up on the market board. If the draw pile is empty, shuffle the discard pile and create a new draw pile.
- Take turns: All the players take their actions in turns, beginning with the starting player.
Turn Actions
The player whose turn it is must carry out exactly one of the following 4 actions:
Action 1: Get new stones
Take 3 stones of your color from the stone quarry and place them on your supply sled token.
Note: Your supply sled token has enough space for a maximum of 5 stones! For example, if you only have space for 2 stones and you choose this action, you can only take 2 stones from the quarry. If you already have 5 stones on your supply sled or there are no more stones of your color in the quarry, then you cannot take any more stones.
OR
Action 2: Place 1 stone on a ship
Take 1 stone from your supply sled token and place it on any empty space on a ship that has not yet sailed to a site.
If you do not have any stones on your supply sled or there is no free space on any ship, then you cannot take this action.
OR
Action 3: Sail 1 ship to a site
Slide 1 ship to a site board. You must observe 2 conditions, however:
- Minimum required stones: The ship must already be loaded with at least the minimum required number of stones. The gray stone symbols at the bow of the ship indicate the minimum number for that ship. This number varies from ship to ship.
- Open dock: The site to which the ship is sailing must still have an open dock. In other words, no other ship can have sailed to it in this round.
The ship’s stones are then unloaded by their owners (indicated by color) in order from front to back and delivered to the site — beginning with the stone placed closest to the front. Ignore any empty spaces on the ship.
If no ship is loaded with the minimum required number of stones, then you cannot take this action.
At each of the 5 sites, there are different rules for what the stone’s owner will receive for each stone delivered, and when they will receive it:
- The market and the pyramid are assessed immediately.
- The temple is assessed at the end of each round.
- The burial chamber and the obelisks are not assessed until the end of the game.
Important: You are also permitted to sail a ship when you do not have a stone of your own on it. The only requirement is that both of the above conditions must be met.
After a site has been sailed to, the now-empty ship remains at the site’s mooring area until the end of the round. This way, you can see that no more ships can sail to that site during that same round. No more than one ship can sail to any given site per round.
OR
Action 4: Play 1 blue market card
If you have one of these cards, you can play it and make use of its benefit. The played card is then placed on the discard pile. You can only play 1 blue market card per turn.
Each player takes action in turns and always performs exactly one action per turn. Each player’s turn will come up several times per round. The round does not end until all 4 ships have been sailed to the various sites.
Important: Since there are only 4 ships available per round, there will always be 1 of the 5 site boards that will not be sailed to in each round!
Site Boards (Side A)
A) Market
For each stone delivered here, the owner of the stone can immediately take any 1 face-up market card.
- Important: The delivered stones must be returned to the quarry after taking the card.
- Drawn cards must be placed face up in front of you.
- The red cards must be played immediately. These are then placed in the discard pile.
- The blue market cards can be played exactly once as an action in a later turn of the player who draws it.
- The purple statue cards and the green decoration cards will earn you points at the end of the game.
A) Pyramids
For each stone delivered here, the owner of the stone earns points immediately. Place the stone on the next free space in the pyramid.
- Stones are placed column by column. Placement begins at the top left until the column is full. Continue to the center column, starting again at the top.
- When the first level (3×3 stones) is full, continue building in the second level. In the second level, start once again at the top left (it only includes 2×2 stones).
- When the second level is full, continue building in the third level, which only consists of one single stone.
- Each stone that you place yields the number of points indicated on the space. The values of the spaces in the second and third levels are indicated on the right side of the board.
- Once the pyramid is completely built, each additional stone delivered to the pyramid yields 1 point. Place these stones at the right edge of the pyramid board.
A) Temple
For each stone delivered here, the owner of the stone earns points at the end of the round if the stone is visible from above.
- Place the stone on the next free space in the temple. Placement of the stones begins from the left, until the first level is full.
- With 3 and 4 players, all 5 spaces of the temple are covered. With 2 players, just the first 4 spaces are covered.
- When the first level is full, continue to the second level, beginning again from the left. The stones on the first level are covered over in the process, and so on with additional levels. There is no height limit.
A) Burial Chamber
For each stone delivered here, the owner of the stone earns points at the end of the game.
- Stones are placed column by column. Placement begins at the top left until the column is full. Then continue to the next column, starting again from the top, and so on.
- The burial chamber is unrestricted in the rightward direction. In other words, there can be as many columns as you like, even if you have to go to the end of the board.
- At the end of the game, points are earned as follows: Each area consisting of one stone or more than one connected stones of a single color yields a certain number of points depending on the number of stones.
- Connected stones must be touching along at least one side. Stones touching only diagonally at corners are not connected.
| Number of stones: | 1x | 2x | 3x | 4x | 5x | … |
|---|---|---|---|---|---|---|
| Points: | 1 | 3 | 6 | 10 | 15 | +2 |
In areas with more than 5 connected stones, each additional connected stone yields an additional 2 points.
Important: Each player can get points for more than one “field” of connected stones. So don’t just add up points for the largest field for one player!
A) Obelisks
For the stones delivered here, the players earn points at the end of the game. Place each stone delivered here on the space matching your color. In that way, you will create a stacked tower of your stones. Each player will be building his or her own obelisk. Add up the points at the end of the game — with the tallest obelisk getting the most points, of course.
Two-person game:
- Tallest obelisk: 10 points
- Second-tallest obelisk: 1 point
Three-person game:
- Tallest obelisk: 12 points
- Second-tallest obelisk: 6 points
- Third-tallest obelisk: 1 point
Four-person game:
- Tallest obelisk: 15 points
- Second-tallest obelisk: 10 points
- Third-tallest obelisk: 5 points
- Fourth-tallest obelisk: 1 point
Important:
- You must have delivered at least 1 stone to the obelisks to participate in this point assessment.
- In case of a tie, divide the total points among the number of players who tied. Every player involved in the tie shares in the divided-up point total rounded down to the nearest whole number.
End of Round & Game End
End of Round
When all 4 ships have been sailed to the sites, the round ends immediately.
Temple assessment: Now the temple is assessed. Each stone visible from above yields 1 point. In other words, stones covered by other stones no longer yield any points.
Prepare for the Next Round
- Return the 4 ships to the pile of other ships.
- Gather up any market cards still remaining on the market board and place them on the discard pile.
- All stones already placed on site boards and supply sled tokens stay in place.
The next round begins:
- Turn over the next round card from the pile, get the 4 ships indicated on the card, and place them to the left of the site boards.
- Turn over 4 new market cards from the pile and place them on the market board.
- The starting player for the new round is the player to the left of the player who sailed the fourth ship in the previous round.
End of Game
The game ends after 6 rounds. Then the final point assessment, or scoring, takes place.
Final Point Assessment (Scoring)
- Burial chamber: Start by assessing the stones in the burial chamber (explained under the “A) Burial chamber” heading).
- Obelisks: Assess the obelisks (explained under the “A) Obelisks” heading).
- Decoration and statue cards: Yield points in accordance with what is printed on them (explained on page 12).
- Unused blue cards: Unused blue market cards yield an additional value of 1 point each.
Winner
The player with the most points is the winner. In case of a tie: The player with the greater number of stones on his or her supply sled token is the winner. If this is also a tie, the tied players share first place.
Market Cards Reference
In this section, you will find an overview of all of the market cards and a more detailed description of the way they work. Wait to read these explanations until a given market card comes into play.
Red Market Cards
Entrance, Sarcophagus, and Paved Path (2 of each)
When you get a market card like this, immediately place 1 of your stones from the quarry on the corresponding site. The stone is placed on the next available space, following the normal rules of building on that site. The card is then placed on the discard pile.
Green Market Cards
Pyramid Decoration, Temple Decoration, Burial Chamber Decoration, and Obelisk Decoration (2 of each)
When you get a market card like this, it remains face up in front of you until the end of the game.
At the end of the game, you earn 1 point for every 3 stones (your own stones plus others’ stones added together) found at the corresponding site.
Example: In the burial chamber, there are 13 stones at the end of the game. That means that there would be 4 points granted for the burial chamber decoration card.
Purple Market Cards
Statue (10x)
When you get a market card like this, it remains face up in front of you until the end of the game. At the end of the game, you count up the number of statue cards you have and receive points in accordance with the following table. Additional cards past 5 are worth 2 points each.
| Number of statues: | 1x | 2x | 3x | 4x | 5x | … |
|---|---|---|---|---|---|---|
| Points: | 1 | 3 | 6 | 10 | 15 | +2 |
Example: One player has 3 statue cards at the end of the game. For those, she gets 6 points.
Blue Market Cards
You can only use exactly 1 blue market card per turn. The use of a blue market card is not in addition to, but instead of, the use of one of the three other action possibilities: “Get new stones,” “Place 1 stone on a ship,” or “Sail 1 ship to a site.” There are four different types of blue market cards:
Lever (2x)
When you get this market card, it remains face up in front of you until you use it. In a later turn, you can perform the following action a single time:
- Sail 1 ship to a site. Decide for yourself what sequence to follow when unloading the stones.
As always, of course, both conditions for sailing a ship must have been met. After play, the card is placed on the discard pile. If you have not used the card by the end of the game, you will get 1 point for it.
Hammer (2x)
When you get the market card, it remains face up in front of you until you use it. In a later turn, you can perform the following action a single time:
- Take 3 stones from the quarry and place them on your supply sled token. Then, place 1 stone from your supply sled token on 1 ship.
After play, the card is placed on the discard pile. If you have not used the card by the end of the game, you will get 1 point for it.
Sail (3x)
When you get this market card, it remains face up in front of you until you use it. In a later turn, you can perform the following action a single time:
- Place 1 stone on 1 ship and sail this ship to a site.
As always, of course, both conditions for sailing a ship must have been met. After play, the card is placed on the discard pile. If you have not used the card by the end of the game, you will get 1 point for it.
Chisel (3x)
When you get this market card, it remains face up in front of you until you use it. In a later turn, you can perform the following action a single time:
- Place 2 stones on 1 ship or 1 stone on each of 2 ships.
After play, the card is placed on the discard pile. If you have not used the card by the end of the game, you will get 1 point for it.
Variants
The B Sides of the Sites
All site boards have an A side and a B side. You should always start playing with just the A sides. Later on, you can try the B sides. You can also play with a mix of A and B sides. Why not try various combinations?
B) Market
The B side works just like the A side, except for the following difference:
- At the start of the round, place 2 cards face down on the card space at bottom right (instead of 1 face-up card).
- For a stone delivered to the market, you can pick up both cards and look at them. Then, select 1 card to keep. Place the other card face up on the discard pile.
B) Pyramids
The B side works just like the A side, except for the following differences:
- For a stone delivered to the pyramids, the owner of the stone gets to decide which of the 3 pyramids the stone is to be delivered to.
- Some of the pyramids yield special bonuses:
- You get 1 point and can take the top market card from the draw pile.
- You get 1 point and can immediately take 3 stones from the quarry and place them on the supply sled token.
- You get 1 point and can place 1 stone from your supply sled token on any empty space of a ship that has not yet sailed to a site.
- Each pyramid is started from the top left. Stones are placed column by column.
- Each stone in the second level of a pyramid is worth 4 points.
- Once the pyramids are completed, each additional stone delivered to the pyramids yields 1 point. Place these stones at the right edge of the pyramid board.
B) Temple
The B side works just like the A side, except for the following difference:
At the end of each round, there are various bonuses for each stone visible from above — depending on the temple space on which the stone is placed:
- You get 1 point or, if you prefer, you can take 2 stones from the quarry and place them on your supply sled token.
- You get 2 points.
- You get the top market card from the draw pile.
B) Burial Chamber
The B side works just like the A side, except for the following differences:
At the end of the game, the players earn points for having the greatest number of stones in the 3 rows of the burial chamber. Each row is assessed individually.
Important:
- You must have at least 1 stone in a row in order to be involved in the point assessment for that row.
- The stones of any one color do not have to be adjacent.
- In case of a tie, add up the placement points and divide them among the number of tied players. Every player involved in the tie shares in the divided-up point total rounded down to the nearest whole number.
B) Obelisks
The B side works just like the A side, except for the following differences:
- Each stone delivered here is first placed on a space with the corresponding color.
- When the third stone of any given color is delivered, these stones immediately have their value assessed. The 3 stones are stacked in a single tower on the free space with the highest point value. The owner of the stones immediately receives these points.
- Individual stones that do not make it into an obelisk earn 1 point each at the end of the game.
Variant: Wrath of the Pharaoh
If you want to play with somewhat “harsher” rules, you can try the following rule variation:
You are punished if you fail to participate in the building of all four monuments.
Any player who has not delivered at least 1 stone to each of the four building sites — pyramid, temple, burial chamber, and obelisks — by the end of the game must have 5 points deducted from his or her score.
Credits & Publisher Information
Publisher’s Information
Author: Phil Walker-Harding
Since childhood, Phil Walker-Harding has loved playing and inventing board games. He particularly likes games that bring together people of different ages and personality types. Phil is also interested in theology, classic Hollywood films, and the myths of ancient Egypt. He lives with his wife Meredith in Sydney, Australia.
The prototype edition of “Imhotep,” under the name “Builders of Egypt,” won second place in the Premio Archimede board game designers’ competition in 2010.
Illustration: Miguel Coimbra
Graphics: Michaela Kienle
Editor, Original German Edition: Ralph Querfurth
English Translation: David Gamon
English Text Editing: Ted McGuire
Phil Walker-Harding and KOSMOS thank all the test players and rule reviewers.
Special thanks go to Meredith Walker-Harding, Leo Colovini, Chris Morphew, Nick Barnett, Kerryn and Andrew Young, Josh and Naomi Pryde, Marion Engelke, Maria Fischer-Witzmann, Arnd Fischer, Thomas Wessels and Markus Potthast.
© 2016 Franckh-Kosmos Verlags-GmbH & Co. KG
© 2016 Thames & Kosmos, LLC
Expansions for
Imhotep

Imhotep: The Sun Ship Tiles – Mini Expansion
2019
Add surprise actions to every Sun Ship delivery
40
minutes
Medium
View expansion
Imhotep: The Pharaoh’s Favors – Mini Expansion
2017
Unlock one-use favors to reshape your plans across the quarry, market, and ships.
Medium
View expansion
Imhotep: The Stonemason’s Wager – Mini Expansion
2016
Bet on the grandest monument and earn bonus points for your prediction.
40
minutes
Medium Light

View expansion
Imhotep: The Private Ships – Mini Expansion
2016
Add a one-use private ship for surprise deliveries and market timing
Medium Light
View expansion

Imhotep: A New Dynasty
2017
Expand the ancient-building experience with new places, gods, tiles, and more.
50
minutes
Medium
View expansion
